Administration and Configuration Guide
for JBoss Enterprise Application Platform 5
Edition 5.2.0
Abstract
Part I. Overview
Chapter 1. Scope of Book
Chapter 2. Introduction
- JBoss HTTP Connector for load balancing
- PicketLink framework for identity management
- RESTEasy framework for RESTful web services
- Seam framework for development
2.1. Integrated Projects
- JBoss EJB
- JBoss EJB3 provides the implementation of the Enterprise Java Beans (EJB) specification. EJB 3.0 is a deep overhaul and simplification of the EJB specification.
- JBoss Transactions
- JBoss Transactions is the default transaction manager compliant with JTA, JTS and Web Services standards.
- JBoss Web
- JBoss Web is the Web container component based on Apache Tomcat that includes the Apache Portable Runtime (APR) and Tomcat native technologies.
- JBoss Messaging (JMS)
- JBoss Messaging is the default messaging provider. It is also the backbone of the JBoss enterprise service bus (ESB) infrastructure. JBoss Messaging substitutes JBossMQ, which is the default JMS provider for JBoss Enterprise Application Platform 4.2.
- JBoss Cache
- JBoss Cache provides two types of transactional cache: a traditional tree-structured node-based cache; and a PojoCache, an in-memory, transactional, and replicated cache system that allows users to operate on simple POJOs transparently without active user management of either replication or persistency aspects.
Important
JBoss Cache is deprecated and substituted by Infinispan in the next major JBoss Enterprise Application Platform release. - JBossWS 3.x
- JBossWS 3.x is the web service stack that provides Java EE compatible web services.
2.2. Architecture
- JBoss HTTP Connector for load balancing
- Picketlink framework for identity management
- RESTEasy framework for RESTful web services
- Seam framework for development of web application

Figure 2.1. Components
- JBoss Microcontainer kernel
- is the execution core of JBoss Enterprise Application Platform. It loads the bootstrap beans so as to connect to the deployed services. JBoss Microcontainer substitutes JMX (Java Management Extension). However, MCBeans and legacy MBean deployments are still included so as to support legacy services.
- Component Deployers
- cover the loading of the deployed resources.
- Enterprise Services
- include all services of the JBoss Enterprise Application Platform.
2.3. Directory Structure
mod_cluster directory), Picketlink (in the picketlink directory) , and RESTeasy (in the resteasy directory).
common directory, which has been added to accommodate the libraries common for all server profiles and prevent the library duplication in the directory structure.
jboss-as— JBoss Enterprise Application Server home directorybin— start and shutdown scripts, other useful scriptsclient— client JAR filescommon— static JAR files shared by all server profilesThis directory has been added to prevent duplicated copying of common libraries into individual server profile directories.docs— schemas/dtds, exampleslib— core bootstrap JAR filesendorsed— directory on the server JVM java.endorsed.dirs path
server— server profile directories
mod_cluster— JBoss HTTP Connectorpicketlink— the PicketLink projectresteasy— RESTEasy implementation (JSR-311, JAX-RS)seam— JBoss Seam application framework home directoryNote that JBoss Enterprise Application Platform 4.3 contained two seam directories:seam1andseam2. Theseam1directory contained Seam 1.2.1 that was delivered originally with JBoss Enterprise Application Platform 4. It contained thedrools,embedded-ejb, andhibernatedirectories with libraries. Now, these are in thelibdirectory. Also, the mail resource adapter has been moved for themaildirectory toextrasandbuni-meldware, external mail and groupware server intended for presentation purposes, has been removed.Theseam2directory contained the 2.0.2FP version of the Seam delivered with JBoss Enterprise Application Platform Feature Pack and the structure has not undergone any significant changes.bootstrap— JBoss Embedded configuration for the Seam integration testsuite (refer to the Slib— library directoryseam-gen— command-line utility for generating simple skeletal Seam project to allow a quick project startbuild— configuration and resources for buildingexamples— examples demonstrating uses of Seam's featuresextras— mail resource adapter; JsUnit testingui— sources for the Seam UI module
2.4. JBoss Enterprise Application Platform Use Cases
- Most web applications involving a database
- Web applications likely to be clustered
- Simple web applications with JSPs/Servlets upgrades to JBoss Enterprise Application Platform with Tomcat Embedded
- Intermediate web applications with JSPs/Servlets using a web framework such as Struts, Java Server Faces, Cocoon, Tapestry, Spring, Expresso, Avalon, Turbine
- Complex web applications with JSPs/Servlets, Seam, Enterprise Java Beans (EJB), Java Messaging (JMS), caching etc.
- Cross-application middleware (JMS, Corba, JMX, etc.)
Note
$EAP_HOME/seam/examples/booking/. The application is a Java EE 5 application that makes use of the following technologies:
- EJB3
- Stateful Session Beans
- Stateless Session Beans
- JPA (w/ Hibernate validation)
- JSF
- Facelets
- Ajax4JSF
- Seam
2.5. Bootstrap
org.jboss.Main entry point loads an org.jboss.system.server.Server implementation. In JBoss Enterprise Application Platform 4 this was a JMX-based microkernel. In JBoss Enterprise Application Platform 5, this is a JBoss Microcontainer.
org.jboss.system.server.Server implementation is org.jboss.bootstrap.microcontainer.ServerImpl. This implementation is an extension of the kernel basic bootstrap that boots the MC from the bootstrap beans declared in {jboss.server.config.url}/bootstrap.xml descriptors using a BasicXMLDeployer. In addition, the ServerImpl registers install callbacks for any beans that implement the org.jboss.bootstrap.spi.Bootstrap interface. The bootstrap/profile*.xml configurations include a ProfileServiceBootstrap bean that implements the Bootstrap interface.
org.jboss.system.server.profileservice.ProfileServiceBootstrap is an implementation of the org.jboss.bootstrap.spi.Bootstrap interface that loads the deployments associated with the current server profile. The <PROFILE> is the name of the server profile being loaded and corresponds to the server -c command line argument. The default <PROFILE> is default.
2.6. Hot Deployment
Profile implementations associated with the ProfileService. The HDScanner bean deployed via the deploy/hdscanner-jboss-beans.xml MC deployment, queries the profile service for changes in application directory contents and redeploys updated content, undeploys removed content, and adds new deployment content to the current server profile via the ProfileService.
- Remove the
hdscanner-jboss-beans.xmlfile from deployment; - Edit the
hdscanner-jboss-beans.xmlfile, add thescanEnabledattribute (if it's not already present)and set its value tofalse.
hdscanner-jboss-beans.xml file in which hot deployment has been disabled.
<?xml version="1.0" encoding="UTF-8"?>
<!--
   Hot deployment scanning

   $Id: hdscanner-jboss-beans.xml 98983 2010-01-04 13:35:41Z emuckenhuber $
-->
<deployment xmlns="urn:jboss:bean-deployer:2.0">

   <!-- Hotdeployment of applications -->
   <bean name="HDScanner" class="org.jboss.system.server.profileservice.hotdeploy.HDScanner">
       <property name="deployer"><inject bean="ProfileServiceDeployer"/></property>
       <property name="profileService"><inject bean="ProfileService"/></property>
       <property name="scanPeriod">5000</property>
       <property name="scanThreadName">HDScanner</property>
       <property name="scanEnabled">false</property>
   </bean>

   ...(snip)...

</deployment>
2.6.1. Adding a Custom Deploy Folder
<JBOSS_HOME>/jboss-as/server/<PROFILE>/deploy folder. However you can configure the server to even include your custom folder for scanning deployments. This can be done by configuring the BootstrapProfileFactory MC bean in <JBOSS_HOME>/jboss-as/server/<PROFILE>/conf/bootstrap/profile.xml file. The applicationURIs property of the BootstrapProfileFactory accepts a list of URLs which will be scanned for applications. You can add your custom deploy folder to this list. For example, if you want /home/me/myapps to be scanned for deployments, then you can add the following:
<bean name="BootstrapProfileFactory" class="org.jboss.system.server.profileservice.repository.
StaticProfileFactory">
   ...
   <property name="applicationURIs">
      <list elementClass="java.net.URI">
         <value>${jboss.server.home.url}deploy</value>
         <value>file:///home/me/myapps</value>
      </list>
   ...
Important
<JBOSS_HOME>/jboss-as/server/<PROFILE>/conf/bootstrap/profile.xml requires a server restart, for the changes to take effect.
BootstrapProfileFactory also requires the same URL to be added to the VFSCache MC bean configuration in <JBOSS_HOME>/jboss-as/server/<PROFILE>/conf/bootstrap/vfs.xml. For example:
<bean name="VFSCache">
   ...
   <property name="permanentRoots">
      <map keyClass="java.net.URL" valueClass="org.jboss.virtual.spi.ExceptionHandler">
         ...
         <entry>
            <key>file:///home/me/myapps</key>
            <value><inject bean="VfsNamesExceptionHandler"/></value>
         </entry>
      </map>
   </property>
   ...
Important
VFSCache might result in growing disk space usage by the server, over a period of time.
Part II. JBoss Enterprise Application Platform Configuration
Chapter 3. Network
3.1. IPv6 Support
Chapter 4. JBoss Web
4.1. System Properties
General Properties
catalina.useNaming- override for the useNaming element of the Context elementSet to
falseto override theuseNamingattribute of all Context elements. catalina.config- URL of the
catalina.propertiesconfiguration file jvmRoute- used if an
Engineelement does not define itsjvmRouteattribute org.apache.catalina.loader.WebappClassLoader.ENABLE_CLEAR_REFERENCES- activation or deactivation of clearing static or final fields from loaded classes (set to
trueby default)Set totrueto null out static or final fields from the loaded classes when a web application is stopped. This setting provides a workaround for garbage collection bugs and application coding errors. org.apache.tomcat.util.buf.StringCache.byte.enabled- enabling the String cache for ByteChunk (set to
falseby default)Set totrueto enable the String cache forByteChunk. org.apache.tomcat.util.buf.StringCache.char.enabled- enabling the String cache for
CharChunk(set tofalseby default)Set totrueto enable the String cache forCharChunk. org.apache.tomcat.util.buf.StringCache.trainThreshold- call limit for the String cache activation (set to
2000by default)The limit defines the number of times thetoString()method must be called before the String cache is activated. org.apache.tomcat.util.buf.StringCache.cacheSize- size of the String cache (set to
200entries by default) org.apache.tomcat.util.buf.StringCache.maxStringSize- maximum length of a cached String (set to
128characters by default) org.apache.tomcat.util.http.FastHttpDateFormat.CACHE_SIZE- size of the cache used for parsing and formatting of date values (
2000entries by default) org.apache.catalina.core.StandardService.DELAY_CONNECTOR_STARTUP- disabling automatic connector start-up (To prevent the connector from starting up automatically, set to
true.) org.apache.catalina.connector.Request.SESSION_ID_CHECK- enabling session verification (If enabled, that is set to
true, the Servlet container verifies if a session with the specified session ID exists in a context before creating a session with that ID.) org.apache.coyote.USE_CUSTOM_STATUS_MSG_IN_HEADER- enabling custom HTTP status messages in HTTP headers (If enabled, that is set to
true, custom HTTP status messages are allowed in HTTP headers.)Important
Ensure that any such message uses only the ISO-8859-1 characters to prevent a possible XSS vulnerability. The property is set tofalseby default. org.apache.tomcat.util.http.ServerCookie.VERSION_SWITCH- activates automatic usage of v1 cookies (set to
trueby default)The v1 cookies are used automatically if the servlet container is using v0 cookies and cookie values which have to be quoted to be valid. org.apache.el.parser.COERCE_TO_ZERO- sets if "" and null numbers become 0This is the desired behavior defined in the specification and therefore the property is set to
trueby default.
JSP Configuration Properties
- org.apache.jasper.compiler.Generator.VAR_EXPRESSIONFACTORY
- the variable used as the expression language expression factory (if unspecified the
_el_expressionfactoryis used) - org.apache.jasper.compiler.Generator.VAR_INSTANCEMANAGER
- The name of the variable to use for the instance manager factory. If not specified, the default value of _jsp_instancemanager will be used.
- org.apache.jasper.compiler.Parser.STRICT_QUOTE_ESCAPING
- If false the requirements for escaping quotes in JSP attributes will be relaxed so that a missing required quote will not cause an error. If not specified, the specification compliant default of true will be used.
- org.apache.jasper.runtime.JspFactoryImpl.USE_POOL
- If true, a ThreadLocal PageContext pool will be used. If not specified, the default value of true will be used.
- org.apache.jasper.runtime.JspFactoryImpl.POOL_SIZE
- The size of the ThreadLocal PageContext. If not specified, the default value of 8 will be used.
- org.apache.jasper.Constants.JSP_SERVLET_BASE
- The base class of the Servlets generated from the JSPs. If not specified, the default value of org.apache.jasper.runtime.HttpJspBase will be used.
- org.apache.jasper.Constants.SERVICE_METHOD_NAME
- The name of the service method called by the base class. If not specified, the default value of _jspService will be used.
- org.apache.jasper.Constants.SERVLET_CLASSPATH
- The name of the ServletContext attribute that provides the classpath for the JSP. If not specified, the default value of org.apache.catalina.jsp_classpath will be used.
- org.apache.jasper.Constants.JSP_FILE
- The name of the request attribute for <jsp-file> element of a servlet definition. If present on a request, this overrides the value returned by request.getServletPath() to select the JSP page to be executed. If not specified, the default value of org.apache.catalina.jsp_file will be used.
- org.apache.jasper.Constants.PRECOMPILE
- The name of the query parameter that causes the JSP engine to just pre-generate the servlet but not invoke it. If not specified, the default value of org.apache.catalina.jsp_precompile will be used.
- org.apache.jasper.Constants.JSP_PACKAGE_NAME
- The default package name for compiled jsp pages. If not specified, the default value of org.apache.jsp will be used.
- org.apache.jasper.Constants.TAG_FILE_PACKAGE_NAME
- The default package name for tag handlers generated from tag files. If not specified, the default value of org.apache.jsp.tag will be used.
- org.apache.jasper.Constants.ALT_DD_ATTR
- The servlet context attribute under which the alternate deployment descriptor for this web application is stored. If not specified, the default value of org.apache.catalina.deploy.alt_dd will be used.
- org.apache.jasper.Constants.TEMP_VARIABLE_NAME_PREFIX
- Prefix to use for generated temporary variable names. If not specified, the default value of _jspx_temp will be used.
- org.apache.jasper.Constants.USE_INSTANCE_MANAGER_FOR_TAGS
- If true, the instance manager is used to obtain tag handler instances. If not specified, false will be used.
- org.apache.jasper.Constants.USE_INSTANCE_MANAGER_FOR_TAGS
- If true, annotations specified in tags will be processed and injected. This can have a performance impact when using simple tags, or if tag pooling is disabled. If not specified, true will be used.
Security Configuration Properties
- org.apache.catalina.connector.RECYCLE_FACADES
- If this is true or if a security manager is in use a new facade object will be created for each request. If not specified, the default value of false will be used.
- org.apache.catalina.connector.CoyoteAdapter.ALLOW_BACKSLASH
- If this is true the '\' character will be permitted as a path delimiter. If not specified, the default value of false will be used.
- org.apache.tomcat.util.buf.UDecoder.ALLOW_ENCODED_SLASH
- If this is true '%2F' and '%5C' will be permitted as path delimiters. If not specified, the default value of false will be used.
Properties Required by Specification
- org.apache.catalina.STRICT_SERVLET_COMPLIANCE
- If set to
true, then the following applies:- any wrapped request or response object passed to an application dispatcher is checked to ensure that it has wrapped the original request or response. (SRV.8.2 / SRV.14.2.5.1)
- a call to Response.getWriter() if no character encoding has been specified will result in subsequent calls to Response.getCharacterEncoding() returning ISO-8859-1 and the Content-Type response header will include a charset=ISO-8859-1 component. (SRV.15.2.22.1)
- every request that is associated with a session will cause the session's last accessed time to be updated regardless of whether or not the request explicitly accesses the session. (SRV.7.6)
- org.apache.catalina.core.StandardWrapperValve.SERVLET_STATS
- If true or if org.apache.catalina.STRICT_SERVLET_COMPLIANCE is true, the wrapper will collect the JSR-77 statistics for individual servlets. If not specified, the default value of false will be used.
- org.apache.catalina.session.StandardSession.ACTIVITY_CHECK
- If this is true or if org.apache.catalina.STRICT_SERVLET_COMPLIANCE is true Tomcat will track the number of active requests for each session. When determining if a session is valid, any session with at least one active request will always be considered valid. If not specified, the default value of false will be used.
4.1.1. Modifying System Properties
JBOSS_HOME/bin/run.conf or in the form of a -D option on server start-up (refer to the Getting Started Guide).
4.2. Configuring the JBoss Web Container
server.xml- The
server.xmlis the main JBoss Web server configuration file (for further details refer to Section 4.3, “The Main Config File”) web.xml- The
web.xmlfile is a deployment descriptor defining URL mappings to servlets (defines how web applications are executed)Important
There are two types ofweb.xml: the globalweb.xmlvalid for the entire server and the localweb.xmlvalid for a web application. The local file overrides the globalserver.xmlfile for the given web application.The globalweb.xmlfile is located in$JBOSS_SERVER_HOME/deployers/jbossweb.deployer/WEB-INF/directory of the web application.
4.3. The Main Config File
server.xml file located in the $JBOSS_SERVER_HOME/PROFILE/deploy/jbossweb.sar/ directory. The file defines the JBoss Web server configuration with a set of XML configuration elements and their attributes.
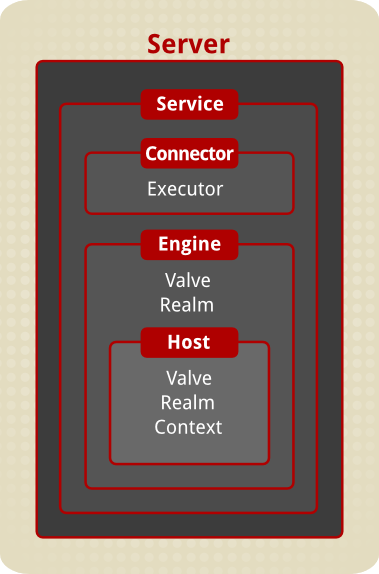
Figure 4.1. The server.xml file schema
- top-level elements: contain any other elements (
<Server>and<Service>); - connectors: represent interface between clients and the service that receives the clients' requests;
- containers: represent components, which process incoming requests (
<Engine>,<Host>, and<Context>); - nested components: represent entities that provide further functionalities to their parent elements or intercept the request processing;
4.4. Top-Level Elements
server.xml file contains the <Server> top-element, which contains the <Service> elements. Any other elements are nested in these two elements.
4.4.1. Server
Server is a container element that represents the entire servlet container and is the only parent of any other element, that is, it is the only top-level element.
Service, GlobalNamingResources and Listener elements.
Note
Server element in the JBoss Web's server.xml file contains multiple Listener elements. Amongst others, the org.apache.catalina.core.AprLifecycleListener and the org.apache.catalina.core.JasperListener. If the mod_ cluster load balancer is enabled for the profile, also the org.jboss.web.tomcat.service.deployers.MicrocontainerIntegrationLifecycleListener is required.
AprLifecycleListener and the JasperListener are used to start up and shut down APR and initialize Jasper. Removing the Listener elements is therefore discouraged just as removing the MicrocontainerIntegrationLifecycleListener.
| Attribute | Description |
|---|---|
| className |
class implementing the Server
The defined class must implement the org.apache.catalina.Server interface. If no class is specified, the standard implementation is used, that is,
org.apache.catalina.core.StandardServer.
|
| port |
TCP/IP port number on which the server expects the shutdown command
The connection must be initiated from the server computer that runs the JBoss Web server instance.
|
| shutdown |
string that the server must receive on the port specified in the port property to shutdown
|
4.4.2. Service
Service element serves as a container for Connectors that share a single Engine component. There can be multiple Service components in one Server element and the Service component can contain multiple Connector elements followed by exactly one Engine element.
| Attribute | Description |
|---|---|
| className |
class implementing the Service
The class must implement the org.apache.catalina.Service interface. If no className is specified, the standard
org.apache.catalina.core.StandardService implementation is used.
|
| name | Service name unique within the Server element (the name is used for log purposes) |
4.5. Connector
Connector element represents an interface between clients and the Service; the element defines how client requests are transported.
Note
4.5.1. Executor
Executor represents a thread pool that can be shared among components (primarily among connectors).
org.apache.catalina.Executor interface.
| Attribute | Description |
|---|---|
| className |
class implementing the Executor
The class must implement the org.apache.catalina.Executor interface. If no className is specified, the standard
org.apache.catalina.core.StandardThreadExecutor implementation is used.
|
| name |
Executor name (the name must be unique within the
Server element)
|
| Attribute | Description |
|---|---|
| threadPriority | thread priority for threads in the executor (Thread.NORM_PRIORITY by default) |
| daemon | enabling/disabling daemon threads (true by default) |
| namePrefix | name prefix for each thread created by the executor (the thread name takes the form namePrefix+threadNumber) |
| maxThreads | maximum number of active threads in the thread pool (200 by default) |
| minSpareThreads | minimum number of threads kept alive (25 by default) |
| maxIdleTime |
number of milliseconds before the idle thread is shut down (applied only if the number of active threads is higher that the minSpareThreads value;
60.000 by default)
|
Defining Executor for Multiple Components
Important
server.xml file. Such Executor definitions are now ignored.
- Open the
$JBOSS_SERVER_HOME/PROFILE/deploy/jbossweb.sar/META-INF/jboss-beans.xmlfile. - Add the
Executorbean definition to the file (see Example 4.1, “Executor bean definition”).Example 4.1. Executor bean definition
<bean name="Executor"
class="org.apache.catalina.core.StandardThreadExecutor">
<property name="maxThreads">300</property>
<property name="minSpareThreads">25</property>
</bean>
- Set the executor property for the
TomcatServicebean.<bean name="WebServer" class="org.jboss.web.tomcat.service.deployers.TomcatService"> <annotation>@org.jboss.aop.microcontainer.aspects.jmx.JMX(name="jboss.web:service=WebServer", exposedInterface=org.jboss.web.tomcat.service.deployers.TomcatServiceMBean.class,registerDirectly=true)</annotation> ⋮ <!--This is the executor property you need to add.--> <property name="executor"><inject bean="Executor"/></property> </bean>
4.6. Containers
<Engine>, <Host>, and <Context>).
4.6.1. Engine
Host elements inside the Engine element; each Host element represents one virtual host. You need to define at least one Host element and one of the Hosts must have a name that matches the defaultHost value defined in the parent Engine element.
Engine element can contain at most one Realm element. The Realm element represents a database of users and their roles: the user information defined in the respective resource is shared across all Hosts and Contexts nested inside the Engine. Realm setting in the Engine element can be overridden by another Realm element defined in a lower-level element; that is, a Host or Context element.
| Attribute | Description |
|---|---|
| backgroundProcessorDelay |
delay between the invocation of the
backgroundProcess method on the engine and the invocation of the backgroundProcess method on the child containers of the Engine (Engine's Hosts and Contexts; 10 by default, that is 10 seconds)
If set to a positive value, the engine produces a thread. The thread waits for the specified amount of time and then invokes the
backgroundProcess method on the engine and all its child containers.
Host and Context containers can also define the backgroundProcessorDelay attribute. If the delay of a child container is not negative, the child container is using its own processing thread.
|
| className |
class implementing the Engine
The class must implement the org.apache.catalina.Engine interface. If not specified, the standard value
org.apache.catalina.core.StandardEngine is used.
|
| defaultHost |
name of the default host name
The default Host processes requests directed to host names on the server that are not configured in the
server.xml configuration file. The defaultHost must match the name attribute of a Host element nested immediately inside the Engine element.
|
| jvmRoute |
identifier used in load balancing scenarios to enable session affinity (so-called "sticky sessions")
The identifier must be unique across all JBoss Web servers which participate in the cluster. It is appended to the generated session identifier so that a front-end proxy can always forward a particular session to the same JBoss Web instance.
|
| name |
logical name of the Engine used in log and error messages
When using multiple Service elements in the same Server, each Engine must be assigned a unique name.
|
Note
Engine element are ignored.
4.6.2. Host
Host element represents a virtual host on the Engine. It allows you to associate a network name with the server, that is, to change the domains or the hostname of the Server.
Note
Engine can contain multiple virtual hosts, that is the Engine element can have several Host elements nested. The Host element can contain Context elements for individual web applications associated with the virtual host. Exactly one of the Hosts in every Engine must have a name matching the defaultHost attribute of the Engine.
Host element can contain multiple Alias elements to allow the virtual host to use multiple hostnames (refer to Section 4.6.2.1, “Defining Host Name Aliases”).
Host element can contain at most one Realm element. A Realm element in a Host represents a database of users and their roles used by the virtual host. If the Realm element is nested in the Host element, the user information is shared across all Contexts nested inside the Host unless overridden by another Realm element defined for a child Context element.
| Attribute | Description |
|---|---|
| appBase |
Application Base directory for the virtual host
The Application Base directory is the pathname of a directory that contains web applications to be deployed on the virtual host. The property value can be defined as an absolute path to the directory or a path relative to the $JBOSS_SERVER_HOME directory.
|
| autoDeploy |
automatic deployment of web applications dropped in the Application Base directory while the JBoss Web server is running (
true by default)
Note
Note that the default deployment directory is |
| backgroundProcessorDelay |
delay between the invocation of the
backgroundProcess method on the host and the invocation of the backgroundProcess method on the child containers of the Host (such as Contexts; set to -1 by default, that is the Host uses the background processing thread of its Engine)
If set to a positive value, the Host produces a thread. The thread waits for the specified amount of time and then invokes the
backgroundProcess method on the virtual host and all its child containers.
Context containers can also define the backgroundProcessorDelay attribute. If the delay of a child Context is not negative, the Context uses its own processing thread.
|
| className |
class implementing the Host
The defined class must implement the org.apache.catalina.Host interface. If no class is specified, the standard implementation is used, that is,
org.apache.catalina.core.StandardHost.
|
| deployOnStartup |
automatic deployment of web applications from the Host (
true by default)
|
| name |
network name of the virtual host as registered in your Domain Name Service server
One of the Hosts nested in the Engine must have a name that matches the defaultHost setting for the parent Engine.
|
| Attribute | Description |
|---|---|
| deployXML |
applying the
context.xml file located inside the web application (that is, /META-INF/context.xml; true by default)
If set to
false to parsing of the context.xml file is disabled. In security conscious environments, set to false to prevent applications from interacting with the container's configuration and provide an external context configuration file to the $JBOSS_SERVER_HOME/conf/enginename/hostname/ directory.
|
| errorReportValveClass |
class implementing the error reporting valve used by the Host
The defined class must implement the org.apache.catalina.Valve interface. If no class is specified, the
org.apache.catalina.valves.ErrorReportValve implementation is used.
The valve defines the output error reports. This property allows you to customize the look of the error pages generated by JBoss Web.
|
| unpackWARs |
automatic unpacking of deployer WAR files (
false by default)
If set to
true, web applications that are placed in the appBase directory in the form of a web application archive (WAR) file are unpacked into a corresponding disk directory structure. If set to false, such a web application is run from the WAR file.
|
| workDir |
pathname to a scratch directory used by applications on the Host (if not specified, a suitable directory under
$JBOSS_SERVER_HOME/work/ is used)
Each application has its own sub-directory with temporary read-write use. The directory can be made visible for servlets in the web application using the javax.servlet.context.tempdir servlet context attribute of type
java.io.File as described in the Servlet Specification.
If a child Context defines the workDir property, the Host's workDir is overridden.
|
4.6.2.1. Defining Host Name Aliases
Alias element to define such network name resolution.
<Host name="www.company.com" ...>
     ...
     <Alias>company.com</Alias>
     ...
</Host>4.6.3. Context
Context element represents a web application, which runs within a particular virtual host.
/WEB-INF/web.xml in the web application directory hierarchy).
4.6.3.1. Defining Context
Context element in some of the following locations depending on the desired behavior:
$JBOSS_SERVER_HOME/conf/context.xml: the Context element is loaded by all web applications on the server.$JBOSS_SERVER_HOME/conf/enginename/hostname/context.xmlfile: the Context element is loaded by all web applications on the host.$JBOSS_SERVER_HOME/conf/enginename/hostname/directory as individual files with thexmlextension: The name of thexmlfile is used as the context path. To define a multi-level context path, separate the domains with the hash sign (that is,#); for example, thefoo#bar.xmlfile will be resolved as the context path/foo/bar. Define the default web application file as theROOT.xmlfile./META-INF/context.xmlin the web application: this context definition is applied only if there is no context file for the application in the$JBOSS_SERVER_HOME/conf/enginename/hostname/directory.If the web application is deployed as a WAR archive, its/META-INF/context.xmlfile is copied to$JBOSS_SERVER_HOME/conf/enginename/hostname/directory and renamed to match the application's context path. Mind that the file will not be replaced if a new WAR with a newer/META-INF/context.xmlfile is placed in the host's appBase.- In a
Hostelement in the mainserver.xmlfile.
Important
<Context> element in the server.xml file. Such context definitions require more invasive approach when modifying the Context configuration since the main $JBOSS_SERVER_HOME/conf/server.xml file cannot be reloaded without restarting the JBoss Web server.
| Attribute | Description |
|---|---|
| backgroundProcessorDelay |
Delay between the invocation of the
backgroundProcess method on the context and the invocation of the backgroundProcess method on the child containers of the context (-1 by default and the context relies therefore on the background processing of its parent host)
If set to a positive value, the context produces a thread. The thread waits for the specified amount of time and then invokes the
backgroundProcess method on the context and all its child containers.
If the delay of a child container is not negative, the child container is using its own processing thread.
A context uses background processing to perform session expiration and class monitoring for reloading.
|
| className |
Class implementing the Context
This class must implement the org.apache.catalina.Context interface. If not specified, the
org.apache.catalina.core.StandardContext standard value is used.
|
| cookies |
Use cookies for session identifier communication if supported by the client (
true by default)
Set to
false if you want to disable the feature. The server relies then only on URL rewriting performed by the application.
|
| crossContext |
Returning of the context to other web applications (defines the response sent to the
ServletContext.getContext() call; set to false by default and the request dispatcher is filled with the NULL value)
If set to
true, the context returns the request dispatcher with the ServletContext value to the requesting web application. The requesting web application must run on the same virtual host.
|
| docBase |
Document Base, that is the Context Root directory, of the web application or the pathname to the web application archive file
You can define the docBase value as an absolute pathname to the directory or WAR file, or as a pathname relative to the appBase directory of the parent Host.
|
| override |
Overriding of explicit settings in the Context element by the corresponding settings in the global or host default contexts (set to use the default context setting)
Set to
true to activate the overriding.
If the
docBase value is defined as a symbolic link, changes to the symbolic link take effect only after the JBoss Web server is restarted or after the context is undeployed and then re-deployed: context reload is not sufficient.
|
| privileged |
Enabling/disabling the context to use container servlets, such as the manager servlet
The
privileged attribute changes the context's parent class loader to the Server class loader rather than the Shared class loader (the Common class loader is used for the Server and the Shared class loaders by default).
Set to
true to allow the context to use container servlets.
|
| path |
Context path of the web application.
The path is matched against the beginning of each request URI to select the appropriate web application for the request processing. Therefore all context paths within a particular host must be unique.
To use the context as the default web application for the host, specify the context path as an empty string (
""). The default web application processes any requests, which could not be assigned to any other Context.
Do not set the value of this field unless you want to define the context statically in
server.xml as its value is inferred from the file names used for the xml context file or the docBase property.
|
| reloadable |
Enabling/disabling the monitoring of class changes in
/WEB-INF/classes/ and /WEB-INF/lib and automatic reloading of the web application if a change is detected (false by default).
Note that this feature requires significant runtime overhead and is not recommended for production applications (to reload deployed applications, use the Manager web application).
|
| WrapperClass |
Class implementing the org.apache.catalina.Wrapper interface used for servlets in this context
If no value is specified, the standard default value is used.
|
| Attribute | Description |
|---|---|
| allowLinking |
Enabling/disabling the usage of symlinks inside the web application if the symlinks point to resources outside of the web application Base directory (set to
false by default)
Set to
true to allow such symlinks in the web application.
This property must not be set to
true on Windows platforms or any other operating systems with case-insensitive file systems as this can result in various security problem, such as disabling of case sensitivity checks and possible disclosure of JSP source code.
|
| antiJARLocking |
Enabling/disabling extra measures for keeping JAR files unlocked even if being accessed through URLs (
false by default)
Enabling this feature prolongs the start time of applications.
|
| antiResourceLocking |
Enabling/disabling file locking by JBoss Web (
false by default)
Enabling this features allows full hot deploy and undeploy on platforms or configurations where file locking can occur. However, enabling this feature significantly impacts the start time of applications along with other side effects, such as disabling of JSP reloading in a running server and application deletion on JBoss Web shutdown if the application is outside of the appBase for the Host (in the
webapps directory by default).
|
| cacheMaxSize |
Defines the maximum size of the static resource cache in kilobytes (set to
10240, that is 10 megabytes by default)
|
| cacheTTL |
Defines the amount of time in milliseconds between cache entries revalidation (set to
5000, that is 5 seconds, by default)
|
| cachingAllowed |
Enabling the usage of the cache for static resources (set to
true by default)
|
| caseSensitive |
Enabling case sensitivity checks (set to
false by default)
Set to
false to disable all case sensitivity checks.
Do not set the property
false on Windows platforms or any operating systems that do not have a case sensitive file system as this might result in various security issues including JSP source code disclosure.
|
| processTlds |
Enabling processing of tag library descriptors (TLD) on context start up (set to
true by default)
Set to
false if TLDs are not part of the web application.
|
| swallowOutput |
Enabling redirection of System.out and System.err output to the web application logger (
false by default)
Set to
true to redirect the output to the web application logger.
|
| tldNamespaceAware |
Enabling the TLD files XML validation to be namespace-aware (
false by default)
The feature is usually enabled along with tldValidation.
|
| tldValidation |
Enabling the TLD files XML validation on context start up (
false by default)
|
| unloadDelay |
Amount of time (in ms) the container waits for servlets to unload (
2000 ms by default)
|
| unpackWAR |
Enabling unpacking of compressed web applications before they are run (
true by default)
|
| useNaming |
Enabling a JNDI InitialContext that is compatible with Java Enterprise Edition (JEE) conventions (
true by default)
|
| workDir |
Path to a directory provided by this Context for temporary read-write use to the servlets in the associated web application
The directory is visible for servlets in the web application through the javax.servlet.context.tempdir servlet context attribute (of type java.io.File) named as described in the Servlet Specification. If not specified, a suitable directory under
$JBOSS_SERVER_HOME/work/ is provided.
|
Context FAQs
- Q: What is context.xml?
- Q: Why is context.xml placed in WEB-INF in JBoss deployments but META-INF in Tomcat?
- Q: What is the difference between jboss-web.xml and context.xml?
- Q: Why is context.xml needed at all?
- Q: Why is not context.xml usage better documented?
- Q: How do I remove the jsessionid from URLs?
Context FAQs
context.xml?
context.xml is a Tomcat configuration file that is used to configure many webapp settings on a per-webapp basis.
context.xml file in the WEB-INF directory of your WAR archive.
context.xml files. They can be found at <JBOSS_HOME>/server/<PROFILE>/deploy/management/console-mgr.sar/web-console.war/WEB-INF/context.xml and <JBOSS_HOME>/server/<PROFILE>/deploy/jbossweb.sar/context.xml.
context.xml placed in WEB-INF in JBoss deployments but META-INF in Tomcat?
META-INF directory however a WEB-INF directory is required.
jboss-web.xml and context.xml?
jboss-web.xml and context.xml, there is some confusion over how and when context.xml should be used.
jboss-web.xml then the context.xml equivalent is ignored.
context.xml needed at all?
context.xml is that there are some things that are used to configure Tomcat as opposed to the JBoss wrapper around Tomcat. Some examples of ways you would use context.xml are found here:
context.xml usage better documented?
context.xml has no DTD. There is no exhaustive list of possible elements and overlaps with jboss-web.xml.
path attribute is the most commonly cited overlap jboss-web.xml. You should set the context-root in jboss-web.xml.
- Create the following JsessionIdRemoveFilter.java in your code base:
import java.io.IOException; import javax.servlet.Filter; import javax.servlet.FilterChain; import javax.servlet.FilterConfig; import javax.servlet.ServletException; import javax.servlet.ServletRequest; import javax.servlet.ServletResponse; import javax.servlet.http.HttpServletRequest; import javax.servlet.http.HttpServletResponse; import javax.servlet.http.HttpServletResponseWrapper; public class JsessionIdRemoveFilter implements Filter { public void doFilter(ServletRequest req, ServletResponse res, FilterChain chain) throws IOException, ServletException { if (!(req instanceof HttpServletRequest)) { chain.doFilter(req, res); return; } HttpServletRequest request = (HttpServletRequest) req; HttpServletResponse response = (HttpServletResponse) res; // Redirect requests with JSESSIONID in URL to clean version (old links bookmarked/stored by bots) // This is ONLY triggered if the request did not also contain a JSESSIONID cookie! Which should be fine for bots... if (request.isRequestedSessionIdFromURL()) { String url = request.getRequestURL() .append(request.getQueryString() != null ? "?"+request.getQueryString() : "") .toString(); response.setHeader("Location", url); response.sendError(HttpServletResponse.SC_MOVED_PERMANENTLY); return; } // Prevent rendering of JSESSIONID in URLs for all outgoing links HttpServletResponseWrapper wrappedResponse = new HttpServletResponseWrapper(response) { @Override public String encodeRedirectUrl(String url) { return url; } @Override public String encodeRedirectURL(String url) { return url; } @Override public String encodeUrl(String url) { return url; } @Override public String encodeURL(String url) { return url; } }; chain.doFilter(req, wrappedResponse); } public void destroy() { } public void init(FilterConfig arg0) throws ServletException { } } - Add the following to the
web.xmlfile to have the filter deployed:<filter> <filter-name>JsessionIdRemoveFilter</filter-name> <filter-class>com.example.JsessionIdRemoveFilter</filter-class> </filter> <filter-mapping> <filter-name>JsessionIdRemoveFilter</filter-name> <url-pattern>/*</url-pattern> </filter-mapping>
4.7. Nested Components
Realm, Valve, Resources, Manager, Loader, and GlobalNamingResources.
4.7.1. Realm
Realm element can be defined either in the Engine element or in the Host element. It defines the security applied to the received requests and thus integrates the JBoss Web server into JBoss SX.
Realm element supports the following attributes: TBD
4.7.2. Valve
Valve element "catches" requests before they are received by the respective container and executes the code defined. The element is nested in the element, which represents the container to catch the requests from; that is Engine, Host, or Context container.
4.7.3. GlobalNamingResources
GlobalNamingResources element defines the global JNDI resources for the Server.
Environment element nested in the GlobalNamingResources element.
<GlobalNamingResources ...>
...
<Environment name="maxExemptions" value="10"
     type="java.lang.Integer" override="false"/>
...
</GlobalNamingResources>Environment element supports the following attributes:
- description: optional human-readable description of the element
- name: name of the environment entry to be created relative to the
java:comp/envcontext - override: Set this to false if you do not want an ___env-entry___ for the same environment entry name, found in the web application deployment descriptor, to override the value specified here. By default, overrides are allowed.
- type: The fully qualified Java class name expected by the web application for this environment entry. Must be one of the legal values for ___env-entry-type____ in the web application deployment descriptor: java.lang.Boolean, java.lang.Byte, java.lang.Character, java.lang.Double, java.lang.Float, java.lang.Integer, java.lang.Long, java.lang.Short, or java.lang.String.
- value: The parameter value that will be presented to the application when requested from the JNDI context. This value must be convertible to the Java type defined by the type attribute.
Chapter 5. Enterprise Applications with EJB3 Services
5.1. Session Beans
@Local
public interface MyBeanInt {
  public String doSomething (String para1, int para2);
}

@Stateless
public class MyBean implements MyBeanInt {

  public String doSomething (String para1, int para2) {
    ... implement the logic ...
  }

}
- If the bean is deployed in a standalone JAR file in the
<JBOSS_HOME>/default/deploydirectory, the bean is accessible via local JNDI nameMyBean/local, whereMyBeanis the implementation class name of the bean as we showed earlier. The "local" JNDI in JBoss Enterprise Application Platform means that the JNDI name is relative tojava:comp/env/. - If the JAR file containing the bean is packaged in an EAR file, the local JNDI name for the bean is
myapp/MyBean/local, wheremyappis the root name of the EAR archive file (e.g.,myapp.ear, see later for the EAR packaging of EJB3 beans).
local to remote if the bean interface is annotated with @Remote and the bean is accessed from outside of the server it is deployed on. Below is the code snippet to get a reference of the MyBean bean in a web application (e.g., in a servlet or a JSF backing bean) packaged in myapp.ear, and then invoke a managed method.
try {
  InitialContext ctx = new InitialContext();
  MyBeanInt bean = (MyBeanInt) ctx.lookup("myapp/MyBean/local");
} catch (Exception e) {
  e.printStackTrace ();
}

... ...

String result = bean.doSomething("have fun", 1);

... ...
@LocalBinding annotation on the bean implementation class. The JNDI binding is always "local" under the java:comp/env/ space. For instance, the following bean class definition results in the bean instances available under JNDI name java:comp/env/MyService/MyOwnName.
@Stateless
@LocalBinding (jndiBinding="MyService/MyOwnName")
public class MyBean implements MyBeanInt {

  public String doSomething (String para1, int para2) {
    ... implement the logic ...
  }

}
Note
5.2. Entity Beans (a.k.a. Java Persistence API)
@Entity
public class Customer {

  String name;

  public String getName () {
    return name;
  }

  public void setName (String name) {
    this.name = name;
  }

  int age;

  public int getAge () {
    return age;
  }

  public void setAge (int age) {
    this.age = age;
  }

  Date signupdate;

  public Date getSignupdate () {
    return signupdate;
  }

  public void setSignupdate (Date signupdate) {
    this.signupdate = signupdate;
  }
}
@Entity
public class Customer {

  ... ...

  Account account;

  @OneToOne
  public Account getAccount () {
    return account;
  }

  public void setAccount (Accout account) {
    this.account = account;
  }

  Employee salesRep;

  @ManyToOne
  public Employee getSalesRep () {
    return salesRep;
  }

  public void setSalesRep (Employee salesRep) {
    this.salesRep = salesRep;
  }

  Vector <Order> orders;

  @OneToMany
  public Vector <Order> getOrders () {
    return orders;
  }

  public void setOrders (Vector <Order> orders) {
    this.orders = orders;
  }
@PersistenceContext
EntityManager em;

Customer customer = new Customer ();
// populate data in customer

// Save the newly created customer object to DB
em.persist (customer);

// Increase age by 1 and auto save to database
customer.setAge (customer.getAge() + 1);

// delete the customer and its related objects from the DB
em.remove (customer);

// Get all customer records with age > 30 from the DB
List <Customer> customers = em.query (
     "select c from Customer as c where c.age > 30");
5.2.1. The persistence.xml file
<persistence>
   <persistence-unit name="myapp">
      <provider>org.hibernate.ejb.HibernatePersistence</provider>
      <jta-data-source>java:/DefaultDS</jta-data-source>
      <properties>
         ... ...
      </properties>
   </persistence-unit>
</persistence>
Note
<persistence>
   <persistence-unit name="myapp">
      <provider>org.hibernate.ejb.HibernatePersistence</provider>
      <jta-data-source>java:/DefaultDS</jta-data-source>
      <properties>
         property name="hibernate.dialect"
                  value="org.hibernate.dialect.HSQLDialect"/>
         <property name="hibernate.hbm2ddl.auto" value="create-drop"/>
      </properties>
   </persistence-unit>
</persistence>
5.2.2. Use Alternative Databases
<JBOSS_HOME>/docs/examples/jca directory in the server.
- Oracle 9i and 10g: org.hibernate.dialect.Oracle9Dialect
- Microsoft SQL Server 2005: org.hibernate.dialect.SQLServerDialect
- PostgresSQL 8.1: org.hibernate.dialect.PostgreSQLDialect
- MySQL 5.0: org.hibernate.dialect.MySQL5Dialect
- DB2 8.0: org.hibernate.dialect.DB2Dialect
- Sybase ASE 12.5: org.hibernate.dialect.SybaseDialect
5.2.3. Default Hibernate Options
persistence.xml file. The default Hibernate property values are specified in the PersistenceUnitDeployer bean definition in the JBOSS_HOME/server/PROFILE/deployers/ejb3.deployer/META-INF/jpa-deployers-jboss-beans.xml file. Below is the code of the bean used in JBoss Enterprise Application Platform 5. Notice the options that are commented out. These are the properties available in the persistence.xml file.
<bean name="PersistenceUnitDeployer" class="org.jboss.jpa.deployers.PersistenceUnitDeployer">
   <property name="defaultPersistenceProperties">
	  <map keyClass="java.lang.String" valueClass="java.lang.String">
		 <entry>
			<key>hibernate.transaction.manager_lookup_class</key>
<value>org.hibernate.transaction.JBossTransactionManagerLookup</value>
		 </entry>
		 <!--entry>
			<key>hibernate.connection.release_mode</key>
			<value>after_statement</value>
		 </entry-->
		 <!--entry>
			<key>hibernate.transaction.flush_before_completion</key>
			<value>false</value>
		 </entry-->
		 <!--entry>
			<key>hibernate.transaction.auto_close_session</key>
			<value>false</value>
		 </entry-->
		 <!--entry>
			<key>hibernate.query.factory_class</key>
			<value>org.hibernate.hql.ast.ASTQueryTranslatorFactory</value>
		 </entry-->
		 <!--entry>
			<key>hibernate.hbm2ddl.auto</key>
			<value>create-drop</value>
		 </entry-->
		 <entry>
			<key>hibernate.cache.provider_class</key>
			<value>org.hibernate.cache.HashtableCacheProvider</value>
		 </entry>
		 <!-- Clustered cache with JBoss Cache -->
		 <!--entry>
			<key>hibernate.cache.region.factory_class</key>
<value>org.hibernate.cache.jbc2.JndiMultiplexedJBossCacheRegionFactory</value>
		 </entry>
		 <entry>
			<key>hibernate.cache.region.jbc2.cachefactory</key>
			<value>java:CacheManager</value>
		 </entry>
		 <entry>
			<key>hibernate.cache.region.jbc2.cfg.entity</key>
			<value>pessimistic-entity</value>
		 </entry>
		 <entry>
			<key>hibernate.cache.region.jbc2.cfg.query</key>
			<value>local-query</value>
		 </entry-->
		 <!--entry>
			<key>hibernate.dialect</key>
			<value>org.hibernate.dialect.HSQLDialect</value>
		 </entry-->
		 <entry>
			<key>hibernate.jndi.java.naming.factory.initial</key>
			<value>org.jnp.interfaces.NamingContextFactory</value>
		 </entry>
		 <entry>
			<key>hibernate.jndi.java.naming.factory.url.pkgs</key>
			<value>org.jboss.naming:org.jnp.interfaces</value>
		 </entry>
		 <entry>
			<key>hibernate.bytecode.use_reflection_optimizer</key>
			<value>false</value>
		 </entry>
		 <entry>
			<key>hibernate.bytecode.provider</key>
			<value>javassist</value>
		 </entry>
	  </map>
   </property>
</bean>
5.3. Message Driven Beans
onMessage() method, and passes in the message itself for processing. The bean class specifies the JMS queue it listens to in the @MessageDriven annotation. The queue is registered under the local JNDI java:comp/env/ name space.
@MessageDriven(activationConfig =
{
  @ActivationConfigProperty(propertyName="destinationType",
    propertyValue="javax.jms.Queue"),
  @ActivationConfigProperty(propertyName="destination",
    propertyValue="queue/MyQueue")
})
public class MyJmsBean implements MessageListener {

  public void onMessage (Message msg) {
    // ... do something with the msg ...
  }

  // ... ...
}
try {
    InitialContext ctx = new InitialContext();
    queue = (Queue) ctx.lookup("queue/MyQueue");
    QueueConnectionFactory factory =
        (QueueConnectionFactory) ctx.lookup("ConnectionFactory");
    cnn = factory.createQueueConnection();
    sess = cnn.createQueueSession(false,
            QueueSession.AUTO_ACKNOWLEDGE);

} catch (Exception e) {
    e.printStackTrace ();
}

TextMessage msg = sess.createTextMessage(...);

sender = sess.createSender(queue);
sender.send(msg);
5.4. Package and Deploy EJB3 Services
5.4.1. Deploy the EJB3 JAR
<JBOSS_HOME>/server/<JBOSS_HOME>/deploy/ directory, it will be automatically picked up and processed by the server. All the EJB3 beans defined in the JAR file will then be available to other applications deployed inside or outside of the server via JNDI names like MyBean/local, where MyBean is the implementation class name for the session bean. The deployment is done via the JBoss EJB3 deployer in <JBOSS_HOME>/server/<PROFILE>/ejb3.deployer/. The META-INF/persistence.properties file we discussed earlier to configure the default behavior of EJB3 entity manager is located in the EJB3 deployer.
<JBOSS_HOME>/server/<JBOSS_HOME>/deployers/ejb3.deployer/META-INF/ejb3-deployers-jboss-beans.xml file, you can tell the EJB3 deployer to ignore JARs you know do not contain EJB3 beans. The non-EJB3 JAR files shipped with the JBoss Enterprise Application Platform are already listed in the jboss.ejb3:service=JarsIgnoredForScanning MBean service:
  ... ...
  <mbean code="org.jboss.ejb3.JarsIgnoredForScanning"
         name="jboss.ejb3:service=JarsIgnoredForScanning">
      <attribute name="IgnoredJars">
         snmp-adaptor.jar,
         otherimages.jar,
         applet.jar,
         jcommon.jar,
         console-mgr-classes.jar,
         jfreechart.jar,
         juddi-service.jar,
         wsdl4j.jar,
         ... ...
         servlets-webdav.jar
      </attribute>
   </mbean>
  ... ...
5.4.2. Deploy EAR with EJB3 JAR
application.xml and jboss-app.xml. Below is the basic structure of a typical EAR application.
myapp.ear
├── META-INF/
│   ├── application.xml
│   └── jboss-app.xml
├── myapp.war/
│   ├── web pages and JSP /JSF pages
│   └── WEB-INF
│       ├── web.xml
│       ├── jboss-web.xml
│       ├── faces-config.xml
│       ├── ...
│       ├── lib/
│       │   └── tag library JARs
│       └── classes/
│           └── servlets and other classes used by web pages
├── myapp.jar/
│   ├── EJB3 bean classes
│   └── META-INF/
│       ├── ejb-jar.xml
│       └── persistence.xml
└── lib/
    └──Library JARs for the EAR
<application>
  <display-name>My Application</display-name>

  <module>
    <web>
      <web-uri>myapp.war</web-uri>
      <context-root>/myapp</context-root>
    </web>
  </module>

  <module>
    <ejb>myapp.jar</ejb>
  </module>

  <library-directory>lib</library-directory>

</application>
<jboss-app>
      <loader-repository>
      myapp:archive=myapp.ear
      </loader-repository>
</jboss-app>
<JBOSS_HOME>/server/<PROFILE>/deploy/ear-deploy.xml file. This file contains three attributes as follows.
<server>
   <mbean code="org.jboss.deployment.EARDeployer"
          name="jboss.j2ee:service=EARDeployer">
      <!--
          A flag indicating if ear deployments should
           have their own scoped class loader to isolate
           their classes from other deployments.
      -->
      <attribute name="Isolated">false</attribute>

      <!--
          A flag indicating if the ear components should
          have in VM call optimization disabled.
      -->
      <attribute name="CallByValue">false</attribute>

      <!--
          A flag the enables the default behavior of
          the ee5 library-directory. If true, the lib
          contents of an ear are assumed to be the default
          value for library-directory in the absence of
          an explicit library-directory. If false, there
          must be an explicit library-directory.
      -->
      <attribute name="EnablelibDirectoryByDefault">true</attribute>
   </mbean>
</server>
Chapter 6. Logging
6.1. Logging Defaults
<JBOSS_HOME>/server/<PROFILE>/conf/jboss-log4j.xml deployment descriptor. log4j uses appenders to control its logging behavior. An appender is a directive for where to log information, and how to do it. The jboss-log4j.xml file contains many sample appenders, including FILE, CONSOLE, and SMTP.
| Configuration Option | Description |
|---|---|
appender
|
The main appender. Gives the name and the implementing class.
|
errorHandler
|
Delegates an external class to handle exceptions passed to the logger, especially if the appender cannot write the log for some reason.
|
param
|
Options specific to the type of appender. In this instance, the <param> is the name of the file that stores the logs for the FILE appender.
|
layout |
Controls the logging format. Tweak this to work with your log-parsing software of choice.
|
Example 6.1. Sample Appender
<appender name="FILE" class="org.jboss.logging.appender.DailyRollingFileAppender">
  <errorHandler class="org.jboss.logging.util.OnlyOnceErrorHandler"/>
  <param name="File" value="${jboss.server.log.dir}/server.log"/>
  <param name="Append" value="true"/>
  <!-- In AS 5.0.x the server log threshold was set by a system property.
		 In 5.1 and later, the system property sets the priority on the root
		 logger (see <root/> below)
		 <param name="Threshold" value="${jboss.server.log.threshold}"/> -->

  <!-- Rollover at midnight each day -->
  <param name="DatePattern" value="'.'yyyy-MM-dd"/>
  <layout class="org.apache.log4j.PatternLayout">
	 <!-- The default pattern: Date Priority [Category] (Thread) Message\n -->
	 <param name="ConversionPattern" value="%d %-5p [%c] (%t) %m%n"/>
  </layout>
</appender>6.2. Component-Specific Logging
6.2.1. SQL Logging with Hibernate
SessionFactory sf = new Configuration()
	 .setProperty("hibernate.show_sql", "true")
	 // ...
.buildSessionFactory();log4j.logger.org.hibernate.SQL=DEBUG, SQL_APPENDER log4j.additivity.org.hibernate.SQL=false
additivity option controls whether these log messages are propagated upward to parent handlers, and is a matter of preference.
6.2.2. Transaction Service Logging
jbossjta-properties.xml file, forcing use of the log4j_releveler logger. All INFO level messages in the transaction code behave as DEBUG messages. Therefore, these messages are only present in log files if the filter level is DEBUG. All other log messages behave as normal.
Chapter 7. Deployment
<JBOSS_HOME>/server/<PROFILE>/deploy directory. Replace default with different server profiles such as all or minimal (server profiles are covered later in this guide). The JBoss Enterprise Application Platform constantly scans the deploy directory to pick up new applications or any changes to existing applications. This enables hot deployment of applications on the fly, while JBoss Enterprise Application Platform is still running.
7.1. Deployable Application Types
- WAR
- The WAR application archive (e.g., myapp.war) packages Java EE web applications in a JAR file. It contains servlet classes, view pages, libraries, and deployment descriptors in WEB-INF such as
web.xml,faces-config.xml, andjboss-web.xmletc.. - EAR
- The EAR application archive (e.g., myapp.ear) packages a Java EE enterprise application in a JAR file. It typically contains a WAR file for the web module, JAR files for EJB modules, as well as META-INF deployment descriptors such as application.xml and jboss-app.xml etc.
Note
According to EJB3 specification, deployment of a persistence unit into an EAR should fail when the unit is outside of the EAR file and the bean attempting to inject the persistence unit is within the EAR. To follow the specification, you need to deploy the persistence unit packaged within the EAR file.However, JBoss Enterprise Application Platform persistence units can exist outside of their EARs. To allow this behavior, modify the bean class of thePersistenceUnitDependencyResolverbean in the filedeployers/ejb3.deployer/META-INF/jpa-deployer-jboss-beans.xmlunder the respective JBoss Enterprise Application Platform server profile:<!-- Can be DefaultPersistenceUnitDependencyResolver for spec compliant resolving, InterApplicationPersistenceUnitDependencyResolver for resolving beyond EARs, or DynamicPersistencePersistenceUnitDependencyResolver which allows configuration via JMX. --> <bean name="PersistenceUnitDependencyResolver" class="org.jboss.jpa.resolvers.DynamicPersistenceUnitDependencyResolver"/>
The bean default value isDynamicPersistenceUnitDependencyResolver. This resolver allows you to specify the specification-compliant behavior, which can be additionally monitored through an MBean in the JMX Console. To use the spec-noncompliant JBoss variant, set the bean toInterApplicationPersistenceUnitDependencyResolver. - JBoss Microcontainer
- The JBoss Microcontainer (MC) beans archive (typical suffixes include, .beans, .deployer) packages a POJO deployment in a JAR file with a
META-INF/jboss-beans.xmldescriptor. This format is commonly used by the JBoss Enterprise Application Platform component deployers.You can deploy*-jboss-beans.xmlfiles with MC beans definitions. If you have the appropriate JAR files available in the deploy or lib directories, the MC beans can be deployed using such a standalone XML file. - SAR
- The SAR application archive (e.g., myservice.sar) packages a JBoss service in a JAR file. It is mostly used by JBoss Enterprise Application Platform internal services that have not been updated to support MC beans style deployments.You can deploy
*-service.xmlfiles with MBean service definitions. If you have the appropriate JAR files available in the deploy or lib directories, the MBeans specified in the XML files will be started. This is the way you deploy many JBoss Enterprise Application Platform internal services that have not been updated to support POJO style deployment, such as the JMS queues. - DataSource
- The
*-ds.xmlfile defines connections to external databases. The data source can then be reused by all applications and services in JBoss Enterprise Application Platform via the internal JNDI. - HAR
- The HAR file defines Hibernate objects for an application. It resembles a SAR file but it contains the Hibernate class and mapping files, and a *-hibernate.xml deployment descriptor in its META-INF directory.
Note
The*-hibernate.xmltakes the same form asjboss-service.xml.Example 7.1. A Hibernate deployment descriptor (*-hibernate.xml)
<hibernate-configuration xmlns="urn:jboss:hibernate-deployer:1.0"> <session-factory name="java:/hibernate/SessionFactory" bean="jboss.test.har:service=Hibernate,testcase=TimersUnitTestCase"> <property name="datasourceName">OracleDS</property> <property name="dialect">org.hibernate.dialect.OracleDialect</property> <depends>jboss:service=Naming</depends> <depends>jboss:service=TransactionManager</depends> </session-factory> </hibernate-configuration> - *AR
- You can also deploy JAR files containing EJBs or other service objects directly in JBoss Enterprise Application Platform. The list of suffixes that are recognized as JAR files is specified in the
conf/bootstrap/deployers.xmlJARStructure bean constructor set.
7.1.1. Exploded Deployment
touch the deployment descriptors (that is the WEB-INF/web.xml in a WAR and the META-INF/application.xml in an EAR) to update their timestamps.
7.2. Standard Server Profiles
<JBOSS_HOME>/server/<PROFILE>/. You can look into each server profile's directory to see the services, applications, and libraries included in the server profile.
Note
<JBOSS_HOME>/server/<PROFILE> directory depends on the server profile service implementation and is subject to change as the management layer and embedded server evolve.
- all
- The
allprofile provides clustering support and other enterprise extensions. - production
- The production server profile is based on the
allserver profile and provides configuration optimized for production environments. - minimal
- Starts the core server container without any of the enterprise services. Use the
minimalserver profile as a base to build a customized version of JBoss Enterprise Application Platform that only contains the services you need. - default
- The
defaultserver profile is mostly used by application developers. It supports the standard Java EE 5.0 programming APIs (e.g., Annotations, JPA, and EJB3).Note
Thedefaultserver profile is used if a profile is not specified via the command-line or in a configuration file. - standard
- The standard server profile is the server profile that has been tested for Java EE compliance. The major differences with the existing server profiles is that call-by-value and deployment isolation are enabled by default, along with support for
rmiiiopandjuddi(taken from the all config). - web
- The web server profile is an experimental, lightweight configuration created around JBoss Web that will follow the developments of the Java EE 6 web server profile. Except for the
servlet/jspcontainer, it provides support for JTA/JCA and JPA. It also limits itself to allowing access to the server only through the http port. Please note that this server profile is not Java EE certified and will most likely change in the following releases.
7.2.1. Changing Profile
run.sh -c profile. For example, run.sh -c all on Red Hat Enterprise Linux or run.bat -c all command on Microsoft Windows starts the server in the all server profile.
Important
Server Started message shown at the console when the server is started using the production profile. This message can be found in the server.log file located in the <JBOSS_HOME>/jboss-as/server/production/logs/log subdirectory.
7.2.2. Creating Your Own Profile
Example 7.2. Example: Create a New Server Profile
messaging service:
Procedure 7.1.
- Copy a suitable profile directory (
production, for instance). - Rename the copied directory as desired (myconfig, for example).
- Remove the
messagingsubdirectory from thedeployfolder. - Start JBoss with the new profile using the command:
run -c myconfig
Note
7.3. Context Root
application.war archive, which contains JSP pages in a hello directory, the JSPs in the hello directory will be available under /application/hello/.
Procedure 7.2. Rewriting the Default Context Root
- To define a new context root, add the context-root element with the new value to the deployment descriptor of the application:
- To change the context root of a web application, add the context-root element to the
jboss-web.xmlfile.Example 7.3. Example jboss-web.xml with a context root defined
<?xml version="1.0"?>
<jboss-web>
   <context-root>/application-root</context-root>
</jboss-web>
The URL address for the application on localhost ishttp://localhost:8080/application-root
- To change the context root of a servlet, change the url-pattern element in the
web.xmlfile.Example 7.4. Example web.xml with a context root defined
<?xml version="1.0"?>
<servlet-mapping>
  <servlet-name>MapRenderer</servlet-name>
  <url-pattern>/servlet-root</url-pattern>
</servlet-mapping>
The URL address for the servlet on localhost ishttp://localhost:8080/application-root/servlet-root
- To start the server with the REWRITE_CONTEXT_CHECK variable set to
false, run the following command:run.sh -Dorg.apache.catalina.connector.Response.REWRITE_CONTEXT_CHECK=false
Chapter 8. Microcontainer
Note
Chapter 9. The JNDI Naming Service
queue/IncomingOrders and need not worry about any of the queue's configuration details.
ProductCatalog session bean from the cluster without needing to know which machine it resides on. Whether it is a large clustered service, a local resource or an application component that is needed, the JNDI naming service provides the glue that lets code find the objects in the system by name.
9.1. An Overview of JNDI
javax.naming package. It contains five interfaces, 10 classes, and several exceptions. There is one key class, InitialContext, and two key interfaces, Context and Name
9.1.1. Names
/"). The file's path is ordered from left to right. The pathname /usr/jboss/readme.txt, for example, names a file readme.txt in the directory jboss, under the directory usr, located in the root of the file system. JBoss Enterprise Application Platform naming uses a Unix-style namespace as its naming convention.
javax.naming.Name interface represents a generic name as an ordered sequence of components. It can be a composite name (one that spans multiple namespaces), or a compound name (one that is used within a single hierarchical naming system). The components of a name are numbered. The indexes of a name with N components range from 0 up to, but not including, N. The most significant component is at index 0. An empty name has no components.
scp. For example, the following command copies localfile.txt to the file remotefile.txt in the tmp directory on host ahost.someorg.org:
scp localfile.txt ahost.someorg.org:/tmp/remotefile.txt
ahost.someorg.org:/tmp/remotefile.txt is a composite name that spans the DNS and Unix file system namespaces. The components of the composite name are ahost.someorg.org and /tmp/remotefile.txt. A component is a string name from the namespace of a naming system. If the component comes from a hierarchical namespace, that component can be further parsed into its atomic parts by using the javax.naming.CompoundName class. The JNDI API provides the javax.naming.CompositeName class as the implementation of the Name interface for composite names.
9.1.2. Contexts
javax.naming.Context interface is the primary interface for interacting with a naming service. The Context interface represents a set of name-to-object bindings. Every context has an associated naming convention that determines how the context parses string names into javax.naming.Name instances. To create a name-to-object binding you invoke the bind method of a Context and specify a name and an object as arguments. The object can later be retrieved using its name using the Context lookup method. A Context will typically provide operations for binding a name to an object, unbinding a name, and obtaining a listing of all name-to-object bindings. The object you bind into a Context can itself be of type Context. The Context object that is bound is referred to as a subcontext of the Context on which the bind method was invoked.
/usr, which is a context in the Unix file system. A file directory named relative to another file directory is a subcontext (commonly referred to as a subdirectory). A file directory with a pathname /usr/jboss names a jboss context that is a subcontext of usr. In another example, a DNS domain, such as org, is a context. A DNS domain named relative to another DNS domain is another example of a subcontext. In the DNS domain jboss.org, the DNS domain jboss is a subcontext of org because DNS names are parsed right to left.
9.1.2.1. Obtaining a Context using InitialContext
Context interface. Therefore, you need a way to obtain a Context for the naming service you are interested in using. The javax.naming.IntialContext class implements the Context interface, and provides the starting point for interacting with a naming service.
InitialContext, it is initialized with properties from the environment. JNDI determines each property's value by merging the values from the following two sources, in order.
- The first occurrence of the property from the constructor's environment parameter and (for appropriate properties) the applet parameters and system properties.
- All
jndi.propertiesresource files found on the classpath.
jndi.properties file, which allows your code to externalize the JNDI provider specific information so that changing JNDI providers will not require changes to your code or recompilation.
Context implementation used internally by the InitialContext class is determined at runtime. The default policy uses the environment property java.naming.factory.initial, which contains the class name of the javax.naming.spi.InitialContextFactory implementation. You obtain the name of the InitialContextFactory class from the naming service provider you are using.
jndi.properties file a client application would use to connect to a JBossNS service running on the local host at port 1099. The client application would need to have the jndi.properties file available on the application classpath. These are the properties that the JBossNS JNDI implementation requires. Other JNDI providers will have different properties and values.
Example 9.1. A sample jndi.properties file
### JBossNS properties
java.naming.factory.initial=org.jnp.interfaces.NamingContextFactory
java.naming.provider.url=jnp://localhost:1099
java.naming.factory.url.pkgs=org.jboss.naming:org.jnp.interfaces
9.2. The JBoss Naming Service Architecture
javax.naming.Context interface. It is a client/server implementation that can be accessed remotely. The implementation is optimized so that access from within the same VM in which the JBossNS server is running does not involve sockets. Same VM access occurs through an object reference available as a global singleton. Figure 9.1, “Key components in the JBoss Naming Service architecture.” illustrates some of the key classes in the JBossNS implementation and their relationships.
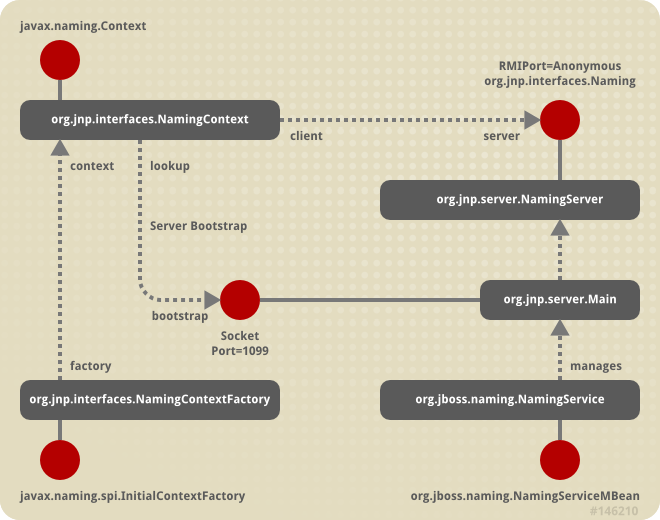
Figure 9.1. Key components in the JBoss Naming Service architecture.
NamingService MBean. The NamingService MBean provides the JNDI naming service. This is a key service used pervasively by the J2EE technology components. The configurable attributes for the NamingService are as follows.
- Port: The jnp protocol listening port for the
NamingService. If not specified default is 1099, the same as the RMI registry default port. - RmiPort: The RMI port on which the RMI Naming implementation will be exported. If not specified the default is 0 which means use any available port.
- BindAddress: The specific address the
NamingServicelistens on. This can be used on a multi-homed host for ajava.net.ServerSocketthat will only accept connect requests on one of its addresses. - RmiBindAddress: The specific address the RMI server portion of the
NamingServicelistens on. This can be used on a multi-homed host for ajava.net.ServerSocketthat will only accept connect requests on one of its addresses. If this is not specified and theBindAddressis, theRmiBindAddressdefaults to theBindAddressvalue. - Backlog: The maximum queue length for incoming connection indications (a request to connect) is set to the
backlogparameter. If a connection indication arrives when the queue is full, the connection is refused. - ClientSocketFactory: An optional custom
java.rmi.server.RMIClientSocketFactoryimplementation class name. If not specified the defaultRMIClientSocketFactoryis used. - ServerSocketFactory: An optional custom
java.rmi.server.RMIServerSocketFactoryimplementation class name. If not specified the defaultRMIServerSocketFactoryis used. - JNPServerSocketFactory: An optional custom
javax.net.ServerSocketFactoryimplementation class name. This is the factory for theServerSocketused to bootstrap the download of the JBoss Naming ServiceNaminginterface. If not specified thejavax.net.ServerSocketFactory.getDefault()method value is used.
NamingService also creates the java:comp context such that access to this context is isolated based on the context class loader of the thread that accesses the java:comp context. This provides the application component private ENC that is required by the J2EE specs. This segregation is accomplished by binding a javax.naming.Reference to a context that uses the org.jboss.naming.ENCFactory as its javax.naming.ObjectFactory. When a client performs a lookup of java:comp, or any subcontext, the ENCFactory checks the thread context ClassLoader, and performs a lookup into a map using the ClassLoader as the key.
ENCFactory map. Thus, correct isolation of an application component's ENC relies on each component receiving a unique ClassLoader that is associated with the component threads of execution.
NamingService delegates its functionality to an org.jnp.server.Main MBean. The reason for the duplicate MBeans is because JBoss Naming Service started out as a stand-alone JNDI implementation, and can still be run as such. The NamingService MBean embeds the Main instance into the server so that usage of JNDI with the same VM as the server does not incur any socket overhead. The configurable attributes of the NamingService are really the configurable attributes of the JBoss Naming Service Main MBean. The setting of any attributes on the NamingService MBean simply set the corresponding attributes on the Main MBean the NamingService contains. When the NamingService is started, it starts the contained Main MBean to activate the JNDI naming service.
NamingService exposes the Naming interface operations through a JMX detyped invoke operation. This allows the naming service to be accessed via JMX adaptors for arbitrary protocols. We will look at an example of how HTTP can be used to access the naming service using the invoke operation later in this chapter.
Main MBean is started, it performs the following tasks:
- Instantiates an
org.jnp.naming.NamingServiceinstance and sets this as the local VM server instance. This is used by anyorg.jnp.interfaces.NamingContextinstances that are created within the server VM to avoid RMI calls over TCP/IP. - Exports the
NamingServerinstance'sorg.jnp.naming.interfaces.NamingRMI interface using the configuredRmiPort,ClientSocketFactory,ServerSocketFactoryattributes. - Creates a socket that listens on the interface given by the
BindAddressandPortattributes. - Spawns a thread to accept connections on the socket.
9.3. The Naming InitialContext Factories
InitialContext factory implementations.
9.3.1. The standard naming context factory
org.jnp.interfaces.NamingContextFactory implementation. Its properties include:
- java.naming.factory.initial: The name of the environment property for specifying the initial context factory to use. The value of the property should be the fully qualified class name of the factory class that will create an initial context. If it is not specified, a
javax.naming.NoInitialContextExceptionwill be thrown when anInitialContextobject is created. - java.naming.provider.url: The name of the environment property for specifying the location of the JBoss JNDI service provider the client will use. The
NamingContextFactoryclass uses this information to know which JBossNS server to connect to. The value of the property should be a URL string. For JBossNS the URL format isjnp://host:port/[jndi_path]. Thejnp:portion of the URL is the protocol and refers to the socket/RMI based protocol used by JBoss. Thejndi_pathportion of the URL is an optional JNDI name relative to the root context, for example,appsorapps/tmp. Everything but the host component is optional. The following examples are equivalent because the default port value is 1099.jnp://www.jboss.org:1099/www.jboss.org:1099www.jboss.org
- java.naming.factory.url.pkgs: The name of the environment property for specifying the list of package prefixes to use when loading in URL context factories. The value of the property should be a colon-separated list of package prefixes for the class name of the factory class that will create a URL context factory. For the JBoss JNDI provider this must be
org.jboss.naming:org.jnp.interfaces. This property is essential for locating thejnp:andjava:URL context factories of the JBoss JNDI provider. - jnp.socketFactory: The fully qualified class name of the
javax.net.SocketFactoryimplementation to use to create the bootstrap socket. The default value isorg.jnp.interfaces.TimedSocketFactory. TheTimedSocketFactoryis a simpleSocketFactoryimplementation that supports the specification of a connection and read timeout. These two properties are specified by: - jnp.timeout: The connection timeout in milliseconds. The default value is 0 which means the connection will block until the VM TCP/IP layer times out.
- jnp.sotimeout: The connected socket read timeout in milliseconds. The default value is 0 which means reads will block. This is the value passed to the
Socket.setSoTimeouton the newly connected socket.
InitialContext with these JBossNS properties available, the org.jnp.interfaces.NamingContextFactory object is used to create the Context instance that will be used in subsequent operations. The NamingContextFactory is the JBossNS implementation of the javax.naming.spi.InitialContextFactory interface. When the NamingContextFactory class is asked to create a Context, it creates an org.jnp.interfaces.NamingContext instance with the InitialContext environment and name of the context in the global JNDI namespace. It is the NamingContext instance that actually performs the task of connecting to the JBossNS server, and implements the Context interface. The Context.PROVIDER_URL information from the environment indicates from which server to obtain a NamingServer RMI reference.
NamingContext instance to a NamingServer instance is done in a lazy fashion on the first Context operation that is performed. When a Context operation is performed and the NamingContext has no NamingServer associated with it, it looks to see if its environment properties define a Context.PROVIDER_URL. A Context.PROVIDER_URL defines the host and port of the JBossNS server the Context is to use. If there is a provider URL, the NamingContext first checks to see if a Naming instance keyed by the host and port pair has already been created by checking a NamingContext class static map. It simply uses the existing Naming instance if one for the host port pair has already been obtained. If no Naming instance has been created for the given host and port, the NamingContext connects to the host and port using a java.net.Socket, and retrieves a Naming RMI stub from the server by reading a java.rmi.MarshalledObject from the socket and invoking its get method. The newly obtained Naming instance is cached in the NamingContext server map under the host and port pair. If no provider URL was specified in the JNDI environment associated with the context, the NamingContext simply uses the in VM Naming instance set by the Main MBean.
NamingContext implementation of the Context interface delegates all operations to the Naming instance associated with the NamingContext. The NamingServer class that implements the Naming interface uses a java.util.Hashtable as the Context store. There is one unique NamingServer instance for each distinct JNDI Name for a given JBossNS server. There are zero or more transient NamingContext instances active at any given moment that refers to a NamingServer instance. The purpose of the NamingContext is to act as a Context to the Naming interface adaptor that manages translation of the JNDI names passed to the NamingContext. Because a JNDI name can be relative or a URL, it needs to be converted into an absolute name in the context of the JBossNS server to which it refers. This translation is a key function of the NamingContext.
9.3.2. The org.jboss.naming.NamingContextFactory
InitialContextFactory implementation is a simple extension of the jnp version which differs from the jnp version in that it stores the last configuration passed to its InitialContextFactory.getInitialContext(Hashtable env) method in a public thread local variable. This is used by EJB handles and other JNDI sensitive objects like the UserTransaction factory to keep track of the JNDI context that was in effect when they were created. If you want this environment to be bound to the object even after its serialized across vm boundaries, then you should the org.jboss.naming.NamingContextFactory. If you want the environment that is defined in the current VM jndi.properties or system properties, then you should use the org.jnp.interfaces.NamingContextFactory version.
9.3.3. Naming Discovery in Clustered Environments
Context.PROVIDER_URL value and let the client query the network for available naming services. This only works with servers running with the all server profile, or an equivalent server profile that has org.jboss.ha.framework.server.ClusterPartition and org.jboss.ha.jndi.HANamingService services deployed. The discovery process consists of sending a multicast request packet to the discovery address/port and waiting for any node to respond. The response is a HA-RMI version of the Naming interface. The following InitialContext properties affect the discovery configuration:
- jnp.partitionName: The cluster partition name discovery should be restricted to. If you are running in an environment with multiple clusters, you may want to restrict the naming discovery to a particular cluster. There is no default value, meaning that any cluster response will be accepted.
- jnp.discoveryGroup: The multicast IP/address to which the discovery query is sent. The default is 230.0.0.4.
- jnp.discoveryPort: The port to which the discovery query is sent. The default is 1102.
- jnp.discoveryTimeout: The time in milliseconds to wait for a discovery query response. The default value is 5000 (5 seconds).
- jnp.disableDiscovery: A flag indicating if the discovery process should be avoided. Discovery occurs when either no
Context.PROVIDER_URLis specified, or no valid naming service could be located among the URLs specified. If thejnp.disableDiscoveryflag is true, then discovery will not be attempted.
9.3.4. The HTTP InitialContext Factory Implementation
Context interface. Operations through the Context interface are translated into HTTP posts to a servlet that passes the request to the NamingService using its JMX invoke operation. Advantages of using HTTP as the access protocol include better access through firewalls and proxies setup to allow HTTP, as well as the ability to secure access to the JNDI service using standard servlet role based security.
org.jboss.naming.HttpNamingContextFactory as the factory implementation. The complete set of support InitialContext environment properties for this factory are:
- java.naming.factory.initial: The name of the environment property for specifying the initial context factory, which must be
org.jboss.naming.HttpNamingContextFactory. - java.naming.provider.url (or
Context.PROVIDER_URL): This must be set to the HTTP URL of the JNDI factory. The full HTTP URL would be the public URL of the JBoss servlet container plus/invoker/JNDIFactory. Examples include:http://www.jboss.org:8080/invoker/JNDIFactoryhttp://www.jboss.org/invoker/JNDIFactoryhttps://www.jboss.org/invoker/JNDIFactory
The first example accesses the servlet using the port 8080. The second uses the standard HTTP port 80, and the third uses an SSL encrypted connection to the standard HTTPS port 443. - java.naming.factory.url.pkgs: For all JBoss JNDI provider this must be
org.jboss.naming:org.jnp.interfaces. This property is essential for locating thejnp:andjava:URL context factories of the JBoss JNDI provider.
Context implementation returned by the HttpNamingContextFactory is a proxy that delegates invocations made on it to a bridge servlet which forwards the invocation to the NamingService through the JMX bus and marshals the reply back over HTTP. The proxy needs to know what the URL of the bridge servlet is in order to operate. This value may have been bound on the server side if the JBoss web server has a well known public interface. If the JBoss web server is sitting behind one or more firewalls or proxies, the proxy cannot know what URL is required. In this case, the proxy will be associated with a system property value that must be set in the client VM. For more information on the operation of JNDI over HTTP see Section 9.4.1, “Accessing JNDI over HTTP”.
Note
9.3.5. The Login InitialContext Factory Implementation
InitialContext. JAAS is still used under the covers, but there is no manifest use of the JAAS interfaces in the client application.
org.jboss.security.jndi.LoginInitialContextFactory. The complete set of support InitialContext environment properties for this factory are:
- java.naming.factory.initial: The name of the environment property for specifying the initial context factory, which must be
org.jboss.security.jndi.LoginInitialContextFactory. - java.naming.provider.url: This must be set to a
NamingContextFactoryprovider URL. TheLoginIntialContextis really just a wrapper around theNamingContextFactorythat adds a JAAS login to the existingNamingContextFactorybehavior. - java.naming.factory.url.pkgs: For all JBoss JNDI provider this must be
org.jboss.naming:org.jnp.interfaces. This property is essential for locating thejnp:andjava:URL context factories of the JBoss JNDI provider. - java.naming.security.principal (or
Context.SECURITY_PRINCIPAL): The principal to authenticate. This may be either ajava.security.Principalimplementation or a string representing the name of a principal. - java.naming.security.credentials (or
Context.SECURITY_CREDENTIALS), The credentials that should be used to authenticate the principal, e.g., password, session key, etc. - java.naming.security.protocol: (
Context.SECURITY_PROTOCOL) This gives the name of the JAAS login module to use for the authentication of the principal and credentials.
9.3.6. The ORBInitialContextFactory
deploy/iiop-service.xml?. It is necessary to set the global context factory to org.jboss.iiop.naming.ORBInitialContextFactory, which sets the ORB to JBoss's ORB. This is done in the conf/jndi.properties file:
# DO NOT EDIT THIS FILE UNLESS YOU KNOW WHAT YOU ARE DOING
#
java.naming.factory.initial=org.jboss.iiop.naming.ORBInitialContextFactory
java.naming.factory.url.pkgs=org.jboss.naming:org.jnp.interfaces
ORBInitialContextFactory when using CosNaming in an application client.
9.4. JNDI over HTTP
9.4.1. Accessing JNDI over HTTP
http-invoker.sar. The structure of the http-invoker.sar is:
http-invoker.sar
├── invoker.war
│   └── WEB-INF
│       ├── classes
│       │   └── org
│       │       └── jboss
│       │           └── invocation
│       │               └── http
│       │                   └── servlet
│       │                       ├── InvokerServlet.class
│       │                       ├── InvokerServlet$GetCredentialAction.class
│       │                       ├── InvokerServlet$GetPrincipalAction.class
│       │                       ├── NamingFactoryServlet.class
│       │                       └── ReadOnlyAccessFilter.class
│       ├── jboss-web.xml
│       └── web.xml
└── META-INF
    └── jboss-service.xml
jboss-service.xml descriptor defines the HttpInvoker and HttpInvokerHA MBeans. These services handle the routing of methods invocations that are sent via HTTP to the appropriate target MBean on the JMX bus.
http-invoker.war web application contains servlets that handle the details of the HTTP transport. The NamingFactoryServlet handles creation requests for the JBoss JNDI naming service javax.naming.Context implementation. The InvokerServlet handles invocations made by RMI/HTTP clients. The ReadOnlyAccessFilter allows one to secure the JNDI naming service while making a single JNDI context available for read-only access by unauthenticated clients.
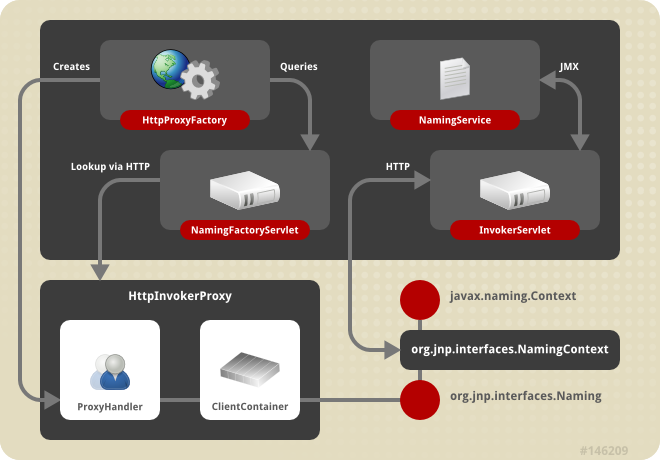
Figure 9.2. The HTTP invoker proxy/server structure for a JNDI Context
http-invoker services. Figure 9.2, “The HTTP invoker proxy/server structure for a JNDI Context” shows a logical view of the structure of a JBoss JNDI proxy and its relationship to the server side components of the http-invoker. The proxy is obtained from the NamingFactoryServlet using an InitialContext with the Context.INITIAL_CONTEXT_FACTORY property set to org.jboss.naming.HttpNamingContextFactory, and the Context.PROVIDER_URL property set to the HTTP URL of the NamingFactoryServlet. The resulting proxy is embedded in an org.jnp.interfaces.NamingContext instance that provides the Context interface implementation.
org.jboss.invocation.http.interfaces.HttpInvokerProxy, and implements the org.jnp.interfaces.Naming interface. Internally the HttpInvokerProxy contains an invoker that marshals the Naming interface method invocations to the InvokerServlet via HTTP posts. The InvokerServlet translates these posts into JMX invocations to the NamingService, and returns the invocation response back to the proxy in the HTTP post response.

Figure 9.3. The relationship between configuration files and JNDI/HTTP component
http-invoker.sar/META-INF/jboss-service.xml descriptor defines the HttpProxyFactory that creates the HttpInvokerProxy for the NamingService. The attributes that need to be configured for the HttpProxyFactory include:
- InvokerName: The JMX
ObjectNameof theNamingServicedefined in theconf/jboss-service.xmldescriptor. The standard setting used in the JBoss distributions isjboss:service=Naming. - InvokerURL or InvokerURLPrefix + InvokerURLSuffix + UseHostName. You can specify the full HTTP URL to the
InvokerServletusing theInvokerURLattribute, or you can specify the hostname independent parts of the URL and have theHttpProxyFactoryfill them in. An exampleInvokerURLvalue would behttp://jbosshost1.dot.com:8080/invoker/JMXInvokerServlet. This can be broken down into:- InvokerURLPrefix: the URL prefix prior to the hostname. Typically this will be
http://orhttps://if SSL is to be used. - InvokerURLSuffix: the URL suffix after the hostname. This will include the port number of the web server as well as the deployed path to the
InvokerServlet. For the exampleInvokerURLvalue theInvokerURLSuffixwould be:8080/invoker/JMXInvokerServletwithout the quotes. The port number is determined by the web container service settings. The path to theInvokerServletis specified in thehttp-invoker.sar/invoker.war/WEB-INF/web.xmldescriptor. - UseHostName: a flag indicating if the hostname should be used in place of the host IP address when building the hostname portion of the full
InvokerURL. If true,InetAddress.getLocalHost().getHostNamemethod will be used. Otherwise, theInetAddress.getLocalHost().getHostAddress()method is used.
- ExportedInterface: The
org.jnp.interfaces.Naminginterface the proxy will expose to clients. The actual client of this proxy is the JBoss JNDI implementationNamingContextclass, which JNDI client obtain fromInitialContextlookups when using the JBoss JNDI provider. - JndiName: The name in JNDI under which the proxy is bound. This needs to be set to a blank/empty string to indicate the interface should not be bound into JNDI. We can not use the JNDI to bootstrap itself. This is the role of the
NamingFactoryServlet.
http-invoker.sar/invoker.war/WEB-INF/web.xml descriptor defines the mappings of the NamingFactoryServlet and InvokerServlet along with their initialization parameters. The configuration of the NamingFactoryServlet relevant to JNDI/HTTP is the JNDIFactory entry which defines:
- A
namingProxyMBeaninitialization parameter that maps to theHttpProxyFactoryMBean name. This is used by theNamingFactoryServletto obtain theNamingproxy which it will return in response to HTTP posts. For the defaulthttp-invoker.sar/META-INF/jboss-service.xmlsettings the namejboss:service=invoker,type=http,target=Naming. - A proxy initialization parameter that defines the name of the
namingProxyMBeanattribute to query for the Naming proxy value. This defaults to an attribute name ofProxy. - The servlet mapping for the
JNDIFactoryconfiguration. The default setting for the unsecured mapping is/JNDIFactory/*. This is relative to the context root of thehttp-invoker.sar/invoker.war, which by default is the WAR name minus the.warsuffix.
InvokerServlet relevant to JNDI/HTTP is the JMXInvokerServlet which defines:
- The servlet mapping of the
InvokerServlet. The default setting for the unsecured mapping is/JMXInvokerServlet/*. This is relative to the context root of thehttp-invoker.sar/invoker.war, which by default is the WAR name minus the.warsuffix.
9.4.2. Accessing JNDI over HTTPS
HttpProxyFactory setup to use an HTTPS URL. The following example shows the section of the http-invoker.sarjboss-service.xml descriptor that the example installs to provide this configuration. All that has changed relative to the standard HTTP configuration are the InvokerURLPrefix and InvokerURLSuffix attributes, which setup an HTTPS URL using the 8443 port.
<!-- Expose the Naming service interface via HTTPS -->
<mbean code="org.jboss.invocation.http.server.HttpProxyFactory"
       name="jboss:service=invoker,type=https,target=Naming">
    <!-- The Naming service we are proxying -->
    <attribute name="InvokerName">jboss:service=Naming</attribute>
    <!-- Compose the invoker URL from the cluster node address -->
    <attribute name="InvokerURLPrefix">https://</attribute>
    <attribute name="InvokerURLSuffix">:8443/invoker/JMXInvokerServlet
</attribute>
    <attribute name="UseHostName">true</attribute>
    <attribute name="ExportedInterface">org.jnp.interfaces.Naming
</attribute>
    <attribute name="JndiName"/>
    <attribute name="ClientInterceptors">
        <interceptors>
            <interceptor>org.jboss.proxy.ClientMethodInterceptor
</interceptor>
            <interceptor>org.jboss.proxy.SecurityInterceptor
</interceptor>
            <interceptor>org.jboss.naming.interceptors.ExceptionInterceptor
</interceptor>
            <interceptor>org.jboss.invocation.InvokerInterceptor
</interceptor>
        </interceptors>
    </attribute>
</mbean>
- A protocol handler for HTTPS URLs must be made available to Java. The JSSE release includes an HTTPS handler in the
com.sun.net.ssl.internal.www.protocolpackage. To enable the use of HTTPS URLs you include this package in the standard URL protocol handler search property,java.protocol.handler.pkgs. We set thejava.protocol.handler.pkgsproperty in the Ant script. - The JSSE security provider must be installed in order for SSL to work. This can be done either by installing the JSSE jars as an extension package, or programatically. We use the programmatic approach in the example since this is less intrusive. Line 18 of the
ExClientcode demonstrates how this is done. - The JNDI provider URL must use HTTPS as the protocol. Lines 24-25 of the
ExClientcode specify an HTTP/SSL connection to the localhost on port 8443. The hostname and port are defined by the web container SSL connector. - The validation of the HTTPS URL hostname against the server certificate must be disabled. By default, the JSSE HTTPS protocol handler employs a strict validation of the hostname portion of the HTTPS URL against the common name of the server certificate. This is the same check done by web browsers when you connect to secured web site. We are using a self-signed server certificate that uses a common name of "
Chapter 8 SSL Example" rather than a particular hostname, and this is likely to be common in development environments or intranets. The JBossHttpInvokerProxywill override the default hostname checking if aorg.jboss.security.ignoreHttpsHostsystem property exists and has a value of true. We set theorg.jboss.security.ignoreHttpsHostproperty to true in the Ant script.
Example 9.2. A JNDI client that uses HTTPS as the transport
package org.jboss.chap3.ex1;

import java.security.Security;
import java.util.Properties;
import javax.naming.Context;
import javax.naming.InitialContext;

public class ExClient
{
    public static void main(String args[]) throws Exception
    {
        Properties env = new Properties();
        env.setProperty(Context.INITIAL_CONTEXT_FACTORY,
                        "org.jboss.naming.HttpNamingContextFactory");
        env.setProperty(Context.PROVIDER_URL,
                        "https://localhost:8443/invoker/JNDIFactorySSL");

        Context ctx = new InitialContext(env);
        System.out.println("Created InitialContext, env=" + env);

        Object data = ctx.lookup("jmx/invoker/RMIAdaptor");
        System.out.println("lookup(jmx/invoker/RMIAdaptor): " + data);
    }
}
chap3 configuration fileset.
[examples]$ ant -Dchap=naming config
naming configuration fileset:
[bin]$ sh run.sh -c naming
ExClient using:
[examples]$ ant -Dchap=naming -Dex=1 run-example
...
run-example1:

[java] Created InitialContext, env={java.naming. \
provider.url=https://localhost:8443/invoker/JNDIFactorySSL, java.naming. \
factory.initial=org.jboss.naming.HttpNamingContextFactory}
     [java] lookup(jmx/invoker/RMIAdaptor): org.jboss.invocation.jrmp. \
     interfaces.JRMPInvokerP
roxy@cac3fa
9.4.3. Securing Access to JNDI over HTTP
InitialContext factory as well as the naming operations using standard web declarative security. This is possible because the server side handling of the JNDI/HTTP transport is implemented with two servlets. These servlets are included in the http-invoker.sar/invoker.war directory found in the default and all server profile deploy directories as shown previously. To enable secured access to JNDI you need to edit the invoker.war/WEB-INF/web.xml descriptor and remove all unsecured servlet mappings. For example, the web.xml descriptor shown in Example 9.3, “An example web.xml descriptor for secured access to the JNDI servlets” only allows access to the invoker.war servlets if the user has been authenticated and has a role of HttpInvoker.
Example 9.3. An example web.xml descriptor for secured access to the JNDI servlets
<?xml version="1.0" encoding="UTF-8"?>
<!DOCTYPE web-app PUBLIC
          "-//Sun Microsystems, Inc.//DTD Web Application 2.3//EN"
          "http://java.sun.com/dtd/web-app_2_3.dtd">
<web-app>
    <!-- ### Servlets -->
    <servlet>
        <servlet-name>JMXInvokerServlet</servlet-name>
        <servlet-class>
            org.jboss.invocation.http.servlet.InvokerServlet
        </servlet-class>
        <load-on-startup>1</load-on-startup>
    </servlet>   <servlet>
        <servlet-name>JNDIFactory</servlet-name>
        <servlet-class>
            org.jboss.invocation.http.servlet.NamingFactoryServlet
        </servlet-class>
        <init-param>
            <param-name>namingProxyMBean</param-name>
            <param-value>jboss:service=invoker,type=http,target=Naming</param-value>
        </init-param>
        <init-param>
            <param-name>proxyAttribute</param-name>
            <param-value>Proxy</param-value>
        </init-param>
        <load-on-startup>2</load-on-startup>
    </servlet>
    <!-- ### Servlet Mappings -->
    <servlet-mapping>
        <servlet-name>JNDIFactory</servlet-name>
        <url-pattern>/restricted/JNDIFactory/*</url-pattern>
    </servlet-mapping>
    <servlet-mapping>
        <servlet-name>JMXInvokerServlet</servlet-name>
        <url-pattern>/restricted/JMXInvokerServlet/*</url-pattern>
    </servlet-mapping>   <security-constraint>
        <web-resource-collection>
            <web-resource-name>HttpInvokers</web-resource-name>
            <description>An example security config that only allows users with
                the role HttpInvoker to access the HTTP invoker servlets </description>
            <url-pattern>/restricted/*</url-pattern>
            <http-method>GET</http-method>
            <http-method>POST</http-method>
        </web-resource-collection>
        <auth-constraint>
            <role-name>HttpInvoker</role-name>
        </auth-constraint>
    </security-constraint>
    <login-config>
        <auth-method>BASIC</auth-method>
        <realm-name>JBoss HTTP Invoker</realm-name>
    </login-config>   <security-role>
        <role-name>HttpInvoker</role-name>
    </security-role>
</web-app>
web.xml descriptor only defines which servlets are secured, and which roles are allowed to access the secured servlets. You must additionally define the security domain that will handle the authentication and authorization for the war. This is done through the jboss-web.xml descriptor, and an example that uses the http-invoker security domain is given below.
<jboss-web>
    <security-domain>java:/jaas/http-invoker</security-domain>
</jboss-web>
security-domain element defines the name of the security domain that will be used for the JAAS login module configuration used for authentication and authorization.
9.4.4. Securing Access to JNDI with a Read-Only Unsecured Context
SRPLoginModule needs to lookup the SRP server interface used to perform authentication. The rest of this section explains how read-only works in JBoss Enterprise Application Platform.
ReadOnlyJNDIFactory is declared in invoker.sar/WEB-INF/web.xml. It will be mapped to /invoker/ReadOnlyJNDIFactory.
<servlet>
    <servlet-name>ReadOnlyJNDIFactory</servlet-name>
    <description>A servlet that exposes the JBoss JNDI Naming service stub
          through http, but only for a single read-only context. The return content
          is serialized MarshalledValue containing the org.jnp.interfaces.Naming
          stub.
    </description>
    <servlet-class>org.jboss.invocation.http.servlet.NamingFactoryServlet</servlet-class>
    <init-param>
        <param-name>namingProxyMBean</param-name>
        <param-value>jboss:service=invoker,type=http,target=Naming,readonly=true</param-value>
    </init-param>
    <init-param>
        <param-name>proxyAttribute</param-name>
        <param-value>Proxy</param-value>
    </init-param>
    <load-on-startup>2</load-on-startup>
</servlet>

<!-- ... -->

<servlet-mapping>
    <servlet-name>ReadOnlyJNDIFactory</servlet-name>
    <url-pattern>/ReadOnlyJNDIFactory/*</url-pattern>
</servlet-mapping>
jboss:service=invoker,type=http,target=Naming,readonly=true. This invoker is declared in the http-invoker.sar/META-INF/jboss-service.xml file.
   <mbean code="org.jboss.invocation.http.server.HttpProxyFactory"
      name="jboss:service=invoker,type=http,target=Naming,readonly=true">
      <attribute name="InvokerName">jboss:service=Naming</attribute>
      <attribute name="InvokerURLPrefix">http://</attribute>
      <attribute name="InvokerURLSuffix">:8080/invoker/readonly/JMXInvokerServlet</attribute>
      <attribute name="UseHostName">true</attribute>
      <attribute name="ExportedInterface">org.jnp.interfaces.Naming</attribute>
      <attribute name="JndiName"></attribute>
      <attribute name="ClientInterceptors">
          <interceptors>
             <interceptor>org.jboss.proxy.ClientMethodInterceptor</interceptor>
             <interceptor>org.jboss.proxy.SecurityInterceptor</interceptor>
             <interceptor>org.jboss.naming.interceptors.ExceptionInterceptor</interceptor>
             <interceptor>org.jboss.invocation.InvokerInterceptor</interceptor>
          </interceptors>
      </attribute>
   </mbean>
/invoker/readonly/JMXInvokerServlet. This is actually the standard JMXInvokerServlet with a read-only filter attached.
  <filter>
     <filter-name>ReadOnlyAccessFilter</filter-name>
     <filter-class>org.jboss.invocation.http.servlet.ReadOnlyAccessFilter</filter-class>
     <init-param>
         <param-name>readOnlyContext</param-name>
         <param-value>readonly</param-value>
         <description>The top level JNDI context the filter will enforce
             read-only access on. If specified only Context.lookup operations
             will be allowed on this context. Another other operations or
             lookups on any other context will fail. Do not associate this
             filter with the JMXInvokerServlets if you want unrestricted
             access. </description>
     </init-param>
     <init-param>
         <param-name>invokerName</param-name>
         <param-value>jboss:service=Naming</param-value>
         <description>The JMX ObjectName of the naming service mbean </description>
     </init-param>
 </filter>

 <filter-mapping>
     <filter-name>ReadOnlyAccessFilter</filter-name>
     <url-pattern>/readonly/*</url-pattern>
 </filter-mapping>

 <!-- ... -->
 <!-- A mapping for the JMXInvokerServlet that only allows invocations
         of lookups under a read-only context. This is enforced by the
         ReadOnlyAccessFilter
         -->
 <servlet-mapping>
     <servlet-name>JMXInvokerServlet</servlet-name>
     <url-pattern>/readonly/JMXInvokerServlet/*</url-pattern>
 </servlet-mapping>
readOnlyContext parameter is set to readonly which means that when you access JBoss through the ReadOnlyJNDIFactory, you will only be able to access data in the readonly context. Here is a code fragment that illustrates the usage:
Properties env = new Properties();
env.setProperty(Context.INITIAL_CONTEXT_FACTORY,
                "org.jboss.naming.HttpNamingContextFactory");
env.setProperty(Context.PROVIDER_URL,
                "http://localhost:8080/invoker/ReadOnlyJNDIFactory");

Context ctx2 = new InitialContext(env);
Object data = ctx2.lookup("readonly/data");
readonly context, so the readonly context will not be bound usable unless you create it.
9.5. Additional Naming MBeans
NamingService MBean that configures an embedded JBossNS server within JBoss, there are several additional MBean services related to naming that ship with JBoss. They are JndiBindingServiceMgr, NamingAlias, ExternalContext, and JNDIView.
9.5.1. JNDI Binding Manager
org.jboss.naming.JNDIBindingServiceMgr. It has a single attribute, BindingsConfig, which accepts an XML document that conforms to the jndi-binding-service_1_0.xsd schema. The content of the BindingsConfig attribute is unmarshaled using the JBossXB framework. The following is an MBean definition that shows the most basic form usage of the JNDI binding manager service.
<mbean code="org.jboss.naming.JNDIBindingServiceMgr"
       name="jboss.tests:name=example1">
    <attribute name="BindingsConfig" serialDataType="jbxb">
        <jndi:bindings xmlns:xs="http://www.w3.org/2001/XMLSchema-instance"
                       xmlns:jndi="urn:jboss:jndi-binding-service:1.0"
                       xs:schemaLocation="urn:jboss:jndi-binding-service  \
         resource:jndi-binding-service_1_0.xsd">
            <jndi:binding name="bindexample/message">
                <jndi:value trim="true">
                    Hello, JNDI!
                </jndi:value>
            </jndi:binding>
        </jndi:bindings>
    </attribute>
</mbean>
Hello, JNDI!" under the JNDI name bindexample/message. An application would look up the value just as it would for any other JNDI value. The trim attribute specifies that leading and trailing whitespace should be ignored. The use of the attribute here is purely for illustrative purposes as the default value is true.
InitialContext ctx  = new InitialContext();
String         text = (String) ctx.lookup("bindexample/message");
type attribute
<jndi:binding name="urls/jboss-home">
    <jndi:value type="java.net.URL">http://www.jboss.org</jndi:value>
</jndi:binding>
editor attribute can be used to specify a particular property editor to use.
<jndi:binding name="hosts/localhost">
    <jndi:value editor="org.jboss.util.propertyeditor.InetAddressEditor">
        127.0.0.1
    </jndi:value>
</jndi:binding>
java.util.Properties object would be mapped.
<jndi:binding name="maps/testProps">
    <java:properties xmlns:java="urn:jboss:java-properties"
                     xmlns:xs="http://www.w3.org/2001/XMLSchema-instance"
                     xs:schemaLocation="urn:jboss:java-properties \
       resource:java-properties_1_0.xsd">
        <java:property>
            <java:key>key1</java:key>
            <java:value>value1</java:value>
        </java:property>
        <java:property>
            <java:key>key2</java:key>
            <java:value>value2</java:value>
        </java:property>
    </java:properties>
</jndi:binding>
9.5.2. The org.jboss.naming.NamingAlias MBean
NamingAlias MBean is a simple utility service that allows you to create an alias in the form of a JNDI javax.naming.LinkRef from one JNDI name to another. This is similar to a symbolic link in the Unix file system. To an alias you add a configuration of the NamingAlias MBean to the jboss-service.xml configuration file. The configurable attributes of the NamingAlias service are as follows:
- FromName: The location where the
LinkRefis bound under JNDI. - ToName: The to name of the alias. This is the target name to which the
LinkRefrefers. The name is a URL, or a name to be resolved relative to theInitialContext, or if the first character of the name is a dot (.), the name is relative to the context in which the link is bound.
QueueConnectionFactory to the name ConnectionFactory.
<mbean code="org.jboss.naming.NamingAlias"
       name="jboss.mq:service=NamingAlias,fromName=QueueConnectionFactory">
    <attribute name="ToName">ConnectionFactory</attribute>
    <attribute name="FromName">QueueConnectionFactory</attribute>
</mbean>
9.5.3. org.jboss.naming.ExternalContext MBean
ExternalContext MBean allows you to federate external JNDI contexts into the server JNDI namespace. The term external refers to any naming service external to the JBossNS naming service running inside of the server VM. You can incorporate LDAP servers, file systems, DNS servers, and so on, even if the JNDI provider root context is not serializable. The federation can be made available to remote clients if the naming service supports remote access.
ExternalContext MBean service to the jboss-service.xml configuration file. The configurable attributes of the ExternalContext service are as follows:
- JndiName: The JNDI name under which the external context is to be bound.
- RemoteAccess: A boolean flag indicating if the external
InitialContextshould be bound using aSerializableform that allows a remote client to create the externalInitialContext. When a remote client looks up the external context via the JBoss JNDIInitialContext, they effectively create an instance of the externalInitialContextusing the same env properties passed to theExternalContextMBean. This will only work if the client can do anew InitialContext(env)remotely. This requires that theContext.PROVIDER_URLvalue of env is resolvable in the remote VM that is accessing the context. This should work for the LDAP example. For the file system example this most likely will not work unless the file system path refers to a common network path. If this property is not given it defaults to false. - CacheContext: The
cacheContextflag. When set to true, the externalContextis only created when the MBean is started and then stored as an in memory object until the MBean is stopped. If cacheContext is set to false, the externalContextis created on each lookup using the MBean properties and InitialContext class. When the uncachedContextis looked up by a client, the client should invokeclose()on the Context to prevent resource leaks. - InitialContext: The fully qualified class name of the
InitialContextimplementation to use. Must be one of:javax.naming.InitialContext,javax.naming.directory.InitialDirContextorjavax.naming.ldap.InitialLdapContext. In the case of theInitialLdapContexta nullControlsarray is used. The default isjavax.naming.InitialContex. - Properties: The
Propertiesattribute contains the JNDI properties for the externalInitialContext. The input should be the text equivalent to what would go into ajndi.propertiesfile. - PropertiesURL: This set the
jndi.propertiesinformation for the externalInitialContextfrom an external properties file. This is either a URL, string or a classpath resource name. Examples are as follows:- file:///config/myldap.properties
- http://config.mycompany.com/myldap.properties
- /conf/myldap.properties
- myldap.properties
external/ldap/jboss.
<!-- Bind a remote LDAP server -->
<mbean code="org.jboss.naming.ExternalContext"
       name="jboss.jndi:service=ExternalContext,jndiName=external/ldap/jboss">
    <attribute name="JndiName">external/ldap/jboss</attribute>
    <attribute name="Properties">
        java.naming.factory.initial=com.sun.jndi.ldap.LdapCtxFactory
        java.naming.provider.url=ldap://ldaphost.jboss.org:389/o=jboss.org
        java.naming.security.principal=cn=Directory Manager
        java.naming.security.authentication=simple
        java.naming.security.credentials=secret
    </attribute>
    <attribute name="InitialContext"> javax.naming.ldap.InitialLdapContext </attribute>
    <attribute name="RemoteAccess">true</attribute>
</mbean>
ldap://ldaphost.jboss.org:389/o=jboss.org from within the JBoss VM using the following code fragment:
InitialContext iniCtx = new InitialContext();
LdapContext ldapCtx = iniCtx.lookup("external/ldap/jboss");
RemoteAccess property was set to true. If it were set to false, it would not work because the remote client would receive a Reference object with an ObjectFactory that would not be able to recreate the external InitialContext.
<!-- Bind the /usr/local file system directory  -->
<mbean code="org.jboss.naming.ExternalContext"
       name="jboss.jndi:service=ExternalContext,jndiName=external/fs/usr/local">
    <attribute name="JndiName">external/fs/usr/local</attribute>
    <attribute name="Properties">
        java.naming.factory.initial=com.sun.jndi.fscontext.RefFSContextFactory
        java.naming.provider.url=file:///usr/local
    </attribute>
    <attribute name="InitialContext">javax.naming.IntialContext</attribute>
</mbean>
/usr/local into the JBoss JNDI namespace under the name external/fs/usr/local.
file:///usr/local from within the JBoss VM using the following code fragment:
InitialContext iniCtx = new InitialContext();
                Context ldapCtx = iniCtx.lookup("external/fs/usr/local");
9.5.4. The org.jboss.naming.JNDIView MBean
http://localhost:8080/jmx-console/. On this page you will see a section that lists the registered MBeans sorted by domain. It should look something like that shown in Figure 9.4, “The JMX Console view of the configured JBoss MBeans”.

Figure 9.4. The JMX Console view of the configured JBoss MBeans
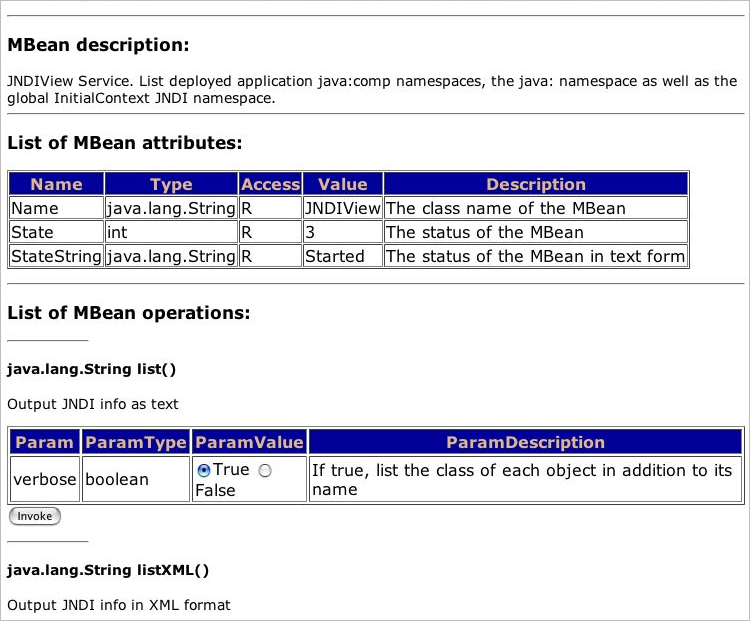
Figure 9.5. The JMX Console view of the JNDIView MBean
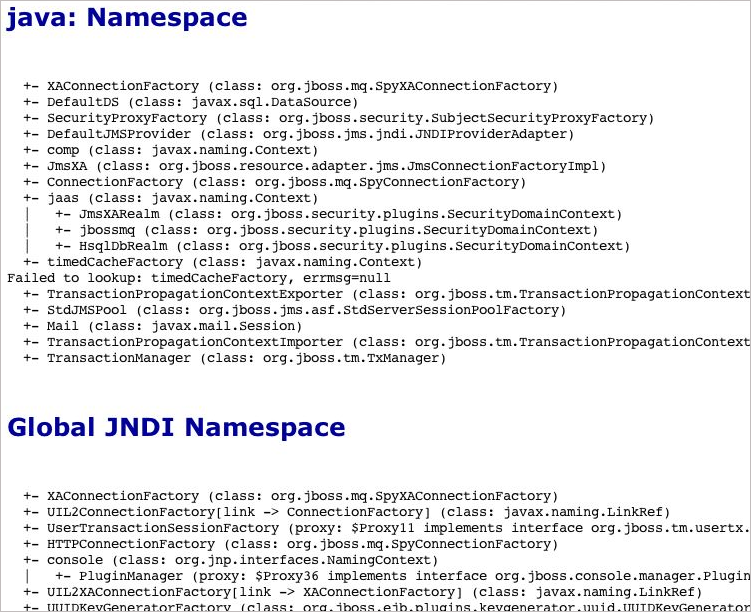
Figure 9.6. The JMX Console view of the JNDIView list operation output
9.6. J2EE and JNDI - The Application Component Environment
- Application component business logic should be coded to access information from its ENC. The component provider uses the standard deployment descriptor for the component to specify the required ENC entries. The entries are declarations of the information and resources the component requires at runtime.
- The container provides tools that allow a deployer of a component to map the ENC references made by the component developer to the deployment environment entity that satisfies the reference.
- The component deployer utilizes the container tools to ready a component for final deployment.
- The component container uses the deployment package information to build the complete component ENC at runtime
javax.naming.InitialContext object by using the no argument constructor and then looks up the naming environment under the name java:comp/env. The application component's environment entries are stored directly in the ENC, or in its subcontexts. Example 9.4, “ENC access sample code” illustrates the prototypical lines of code a component uses to access its ENC.
Example 9.4. ENC access sample code
// Obtain the application component's ENC
Context iniCtx = new InitialContext();
Context compEnv = (Context) iniCtx.lookup("java:comp/env");
Bean1 cannot access the ENC elements of EJB Bean2, and vice versa. Similarly, Web application Web1 cannot access the ENC elements of Web application Web2 or Bean1 or Bean2 for that matter. Also, arbitrary client code, whether it is executing inside of the application server VM or externally cannot access a component's java:comp JNDI context. The purpose of the ENC is to provide an isolated, read-only namespace that the application component can rely on regardless of the type of environment in which the component is deployed. The ENC must be isolated from other components because each component defines its own ENC content. Components A and B, for example, may define the same name to refer to different objects. For example, EJB Bean1 may define an environment entry java:comp/env/red to refer to the hexadecimal value for the RGB color for red, while Web application Web1 may bind the same name to the deployment environment language locale representation of red.
java:comp, names under java:, and any other name. As discussed, the java:comp context and its subcontexts are only available to the application component associated with that particular context. Subcontexts and object bindings directly under java: are only visible within the server virtual machine and not to remote clients. Any other context or object binding is available to remote clients, provided the context or object supports serialization. You'll see how the isolation of these naming scopes is achieved in the Section 9.2, “The JBoss Naming Service Architecture”.
java: context is useful would be a javax.sql.DataSource connection factory that can only be used inside of the server where the associated database pool resides. On the other hand, an EJB home interface would be bound to a globally visible name that should accessible by remote client.
9.6.1. ENC Usage Conventions
ejb-jar.xml deployment descriptor for EJB components, and the standard web.xml deployment descriptor for Web components. Several different types of information may be stored in and retrieved from JNDI including:
- Environment entries as declared by the
env-entryelements - EJB references as declared by
ejb-refandejb-local-refelements. - Resource manager connection factory references as declared by the
resource-refelements - Resource environment references as declared by the
resource-env-refelements
9.6.1.1. Environment Entries
env-entry element in the standard deployment descriptors. The env-entry element contains the following child elements:
- An optional description element that provides a description of the entry
- An env-entry-name element giving the name of the entry relative to
java:comp/env - An env-entry-type element giving the Java type of the entry value that must be one of:
java.lang.Bytejava.lang.Booleanjava.lang.Characterjava.lang.Doublejava.lang.Floatjava.lang.Integerjava.lang.Longjava.lang.Shortjava.lang.String
- An env-entry-value element giving the value of entry as a string
env-entry fragment from an ejb-jar.xml deployment descriptor is given in Example 9.5, “An example ejb-jar.xml env-entry fragment”. There is no JBoss specific deployment descriptor element because an env-entry is a complete name and value specification. Example 9.6, “ENC env-entry access code fragment” shows a sample code fragment for accessing the maxExemptions and taxRate and env-entry values declared in the deployment descriptor.
Example 9.5. An example ejb-jar.xml env-entry fragment
<!-- ... -->
<session>
    <ejb-name>ASessionBean</ejb-name>
    <!-- ... -->
    <env-entry>
        <description>The maximum number of tax exemptions allowed </description>
        <env-entry-name>maxExemptions</env-entry-name>
        <env-entry-type>java.lang.Integer</env-entry-type>
        <env-entry-value>15</env-entry-value>
    </env-entry>
    <env-entry>
        <description>The tax rate </description>
        <env-entry-name>taxRate</env-entry-name>
        <env-entry-type>java.lang.Float</env-entry-type>
        <env-entry-value>0.23</env-entry-value>
    </env-entry>
</session>
<!-- ... -->
Example 9.6. ENC env-entry access code fragment
InitialContext iniCtx = new InitialContext();
Context envCtx = (Context) iniCtx.lookup("java:comp/env");
Integer maxExemptions = (Integer) envCtx.lookup("maxExemptions");
Float taxRate = (Float) envCtx.lookup("taxRate");
9.6.1.2. EJB References
java:comp/env/ejb context of the application component's environment.
ejb-ref element in the deployment descriptor. Each ejb-ref element describes the interface requirements that the referencing application component has for the referenced enterprise bean. The ejb-ref element contains the following child elements:
- An optional description element that provides the purpose of the reference.
- An ejb-ref-name element that specifies the name of the reference relative to the
java:comp/envcontext. To place the reference under the recommendedjava:comp/env/ejbcontext, use anejb/link-nameform for theejb-ref-namevalue. - An ejb-ref-type element that specifies the type of the EJB. This must be either
EntityorSession. - A home element that gives the fully qualified class name of the EJB home interface.
- A remote element that gives the fully qualified class name of the EJB remote interface.
- An optional ejb-link element that links the reference to another enterprise bean in the same EJB JAR or in the same J2EE application unit. The
ejb-linkvalue is theejb-nameof the referenced bean. If there are multiple enterprise beans with the sameejb-name, the value uses the path name specifying the location of theejb-jarfile that contains the referenced component. The path name is relative to the referencingejb-jarfile. The Application Assembler appends theejb-nameof the referenced bean to the path name separated by#. This allows multiple beans with the same name to be uniquely identified.
ejb-ref element. This means that the EJB reference is not accessible from other application components at runtime, and that other application components may define ejb-ref elements with the same ejb-ref-name without causing a name conflict. Example 9.7, “An example ejb-jar.xml ejb-ref descriptor fragment” provides an ejb-jar.xml fragment that illustrates the use of the ejb-ref element. A code sample that illustrates accessing the ShoppingCartHome reference declared in Example 9.7, “An example ejb-jar.xml ejb-ref descriptor fragment” is given in Example 9.8, “ENC ejb-ref access code fragment”.
Example 9.7. An example ejb-jar.xml ejb-ref descriptor fragment
<!-- ... -->
<session>
    <ejb-name>ShoppingCartBean</ejb-name>
    <!-- ...-->
</session>

<session>
    <ejb-name>ProductBeanUser</ejb-name>
    <!--...-->
    <ejb-ref>
        <description>This is a reference to the store products entity </description>
        <ejb-ref-name>ejb/ProductHome</ejb-ref-name>
        <ejb-ref-type>Entity</ejb-ref-type>
        <home>org.jboss.store.ejb.ProductHome</home>
        <remote> org.jboss.store.ejb.Product</remote>
    </ejb-ref>

</session>

<session>
    <ejb-ref>
        <ejb-name>ShoppingCartUser</ejb-name>
        <!--...-->
        <ejb-ref-name>ejb/ShoppingCartHome</ejb-ref-name>
        <ejb-ref-type>Session</ejb-ref-type>
        <home>org.jboss.store.ejb.ShoppingCartHome</home>
        <remote> org.jboss.store.ejb.ShoppingCart</remote>
        <ejb-link>ShoppingCartBean</ejb-link>
    </ejb-ref>
</session>

<entity>
    <description>The Product entity bean </description>
    <ejb-name>ProductBean</ejb-name>
    <!--...-->
</entity>

<!--...-->
Example 9.8. ENC ejb-ref access code fragment
InitialContext iniCtx = new InitialContext();
Context ejbCtx = (Context) iniCtx.lookup("java:comp/env/ejb");
ShoppingCartHome home = (ShoppingCartHome) ejbCtx.lookup("ShoppingCartHome");
9.6.1.3. EJB References with jboss.xml and jboss-web.xml
jboss.xml EJB deployment descriptor affects EJB references in two ways. First, the jndi-name child element of the session and entity elements allows the user to specify the deployment JNDI name for the EJB home interface. In the absence of a jboss.xml specification of the jndi-name for an EJB, the home interface is bound under the ejb-jar.xmlejb-name value. For example, the session EJB with the ejb-name of ShoppingCartBean in Example 9.7, “An example ejb-jar.xml ejb-ref descriptor fragment” would have its home interface bound under the JNDI name ShoppingCartBean in the absence of a jboss.xmljndi-name specification.
jboss.xml descriptor with respect to ejb-refs is the setting of the destination to which a component's ENC ejb-ref refers. The ejb-link element cannot be used to refer to EJBs in another enterprise application. If your ejb-ref needs to access an external EJB, you can specify the JNDI name of the deployed EJB home using the jboss.xmlejb-ref/jndi-name element.
jboss-web.xml descriptor is used only to set the destination to which a Web application ENC ejb-ref refers. The content model for the JBoss ejb-ref is as follows:
- An ejb-ref-name element that corresponds to the ejb-ref-name element in the ejb-jar.xml or web.xml standard descriptor
- A
jndi-nameelement that specifies the JNDI name of the EJB home interface in the deployment environment
jboss.xml descriptor fragment that illustrates the following usage points:
- The
ProductBeanUserejb-reflink destination is set to the deployment name ofjboss/store/ProductHome - The deployment JNDI name of the
ProductBeanis set tojboss/store/ProductHome
Example 9.9. An example jboss.xml ejb-ref fragment
<!-- ... -->
<session>
    <ejb-name>ProductBeanUser</ejb-name>
    <ejb-ref>
        <ejb-ref-name>ejb/ProductHome</ejb-ref-name>
        <jndi-name>jboss/store/ProductHome</jndi-name>
    </ejb-ref>
</session>

<entity>
    <ejb-name>ProductBean</ejb-name>
    <jndi-name>jboss/store/ProductHome</jndi-name>
     <!-- ... -->
</entity>
<!-- ... -->
9.6.1.4. EJB Local References
java:comp/env/ejb context of the application component's environment.
ejb-local-ref element in the deployment descriptor. Each ejb-local-ref element describes the interface requirements that the referencing application component has for the referenced enterprise bean. The ejb-local-ref element contains the following child elements:
- An optional description element that provides the purpose of the reference.
- An ejb-ref-name element that specifies the name of the reference relative to the
java:comp/envcontext. To place the reference under the recommendedjava:comp/env/ejbcontext, use anejb/link-nameform for theejb-ref-namevalue. - An ejb-ref-type element that specifies the type of the EJB. This must be either
EntityorSession. - A local-home element that gives the fully qualified class name of the EJB local home interface.
- A local element that gives the fully qualified class name of the EJB local interface.
- An ejb-link element that links the reference to another enterprise bean in the
ejb-jarfile or in the same J2EE application unit. Theejb-linkvalue is theejb-nameof the referenced bean. If there are multiple enterprise beans with the sameejb-name, the value uses the path name specifying the location of theejb-jarfile that contains the referenced component. The path name is relative to the referencingejb-jarfile. The Application Assembler appends theejb-nameof the referenced bean to the path name separated by#. This allows multiple beans with the same name to be uniquely identified. Anejb-linkelement must be specified in JBoss to match the local reference to the corresponding EJB.
ejb-local-ref element. This means that the EJB local reference is not accessible from other application components at runtime, and that other application components may define ejb-local-ref elements with the same ejb-ref-name without causing a name conflict. Example 9.10, “An example ejb-jar.xml ejb-local-ref descriptor fragment” provides an ejb-jar.xml fragment that illustrates the use of the ejb-local-ref element. A code sample that illustrates accessing the ProbeLocalHome reference declared in Example 9.10, “An example ejb-jar.xml ejb-local-ref descriptor fragment” is given in Example 9.11, “ENC ejb-local-ref access code fragment”.
Example 9.10. An example ejb-jar.xml ejb-local-ref descriptor fragment
 <!-- ... -->
 <session>
     <ejb-name>Probe</ejb-name>
     <home>org.jboss.test.perf.interfaces.ProbeHome</home>
     <remote>org.jboss.test.perf.interfaces.Probe</remote>
     <local-home>org.jboss.test.perf.interfaces.ProbeLocalHome</local-home>
     <local>org.jboss.test.perf.interfaces.ProbeLocal</local>
     <ejb-class>org.jboss.test.perf.ejb.ProbeBean</ejb-class>
     <session-type>Stateless</session-type>
     <transaction-type>Bean</transaction-type>
 </session>
 <session>
     <ejb-name>PerfTestSession</ejb-name>
     <home>org.jboss.test.perf.interfaces.PerfTestSessionHome</home>
     <remote>org.jboss.test.perf.interfaces.PerfTestSession</remote>
     <ejb-class>org.jboss.test.perf.ejb.PerfTestSessionBean</ejb-class>
     <session-type>Stateless</session-type>
     <transaction-type>Container</transaction-type>
     <ejb-ref>
         <ejb-ref-name>ejb/ProbeHome</ejb-ref-name>
         <ejb-ref-type>Session</ejb-ref-type>
         <home>org.jboss.test.perf.interfaces.SessionHome</home>
         <remote>org.jboss.test.perf.interfaces.Session</remote>
         <ejb-link>Probe</ejb-link>
     </ejb-ref>
     <ejb-local-ref>
         <ejb-ref-name>ejb/ProbeLocalHome</ejb-ref-name>
         <ejb-ref-type>Session</ejb-ref-type>
         <local-home>org.jboss.test.perf.interfaces.ProbeLocalHome</local-home>
         <local>org.jboss.test.perf.interfaces.ProbeLocal</local>
         <ejb-link>Probe</ejb-link>
     </ejb-local-ref>
 </session>
 <!-- ... -->
Example 9.11. ENC ejb-local-ref access code fragment
InitialContext iniCtx = new InitialContext();
Context ejbCtx = (Context) iniCtx.lookup("java:comp/env/ejb");
ProbeLocalHome home = (ProbeLocalHome) ejbCtx.lookup("ProbeLocalHome");
9.6.1.5. Resource Manager Connection Factory References
resource-ref elements in the standard deployment descriptors. The Deployer binds the resource manager connection factory references to the actual resource manager connection factories that exist in the target operational environment using the jboss.xml and jboss-web.xml descriptors.
resource-ref element describes a single resource manager connection factory reference. The resource-ref element consists of the following child elements:
- An optional description element that provides the purpose of the reference.
- A res-ref-name element that specifies the name of the reference relative to the
java:comp/envcontext. The resource type based naming convention for which subcontext to place theres-ref-nameinto is discussed in the next paragraph. - A res-type element that specifies the fully qualified class name of the resource manager connection factory.
- A res-auth element that indicates whether the application component code performs resource sign on programmatically, or whether the container signs on to the resource based on the principal mapping information supplied by the Deployer. It must be one of
ApplicationorContainer. - An optional res-sharing-scope element. This currently is not supported by JBoss.
- JDBC
DataSourcereferences should be declared in thejava:comp/env/jdbcsubcontext. - JMS connection factories should be declared in the
java:comp/env/jmssubcontext. - JavaMail connection factories should be declared in the
java:comp/env/mailsubcontext. - URL connection factories should be declared in the
java:comp/env/urlsubcontext.
web.xml descriptor fragment that illustrates the resource-ref element usage. Example 9.13, “ENC resource-ref access sample code fragment” provides a code fragment that an application component would use to access the DefaultMail resource declared by the resource-ref.
Example 9.12. A web.xml resource-ref descriptor fragment
<web>
    <!-- ... -->
    <servlet>
        <servlet-name>AServlet</servlet-name>
        <!-- ... -->
    </servlet>
    <!-- ... -->
    <!-- JDBC DataSources (java:comp/env/jdbc) -->
    <resource-ref>
        <description>The default DS</description>
        <res-ref-name>jdbc/DefaultDS</res-ref-name>
        <res-type>javax.sql.DataSource</res-type>
        <res-auth>Container</res-auth>
    </resource-ref>
    <!-- JavaMail Connection Factories (java:comp/env/mail) -->
    <resource-ref>
        <description>Default Mail</description>
        <res-ref-name>mail/DefaultMail</res-ref-name>
        <res-type>javax.mail.Session</res-type>
        <res-auth>Container</res-auth>
    </resource-ref>
    <!-- JMS Connection Factories (java:comp/env/jms) -->
    <resource-ref>
        <description>Default QueueFactory</description>
        <res-ref-name>jms/QueueFactory</res-ref-name>
        <res-type>javax.jms.QueueConnectionFactory</res-type>
        <res-auth>Container</res-auth>
    </resource-ref>
<web>
Example 9.13. ENC resource-ref access sample code fragment
Context initCtx = new InitialContext();
javax.mail.Session s = (javax.mail.Session)
initCtx.lookup("java:comp/env/mail/DefaultMail");
9.6.1.6. Resource Manager Connection Factory References with jboss.xml and jboss-web.xml
jboss.xml EJB deployment descriptor and jboss-web.xml Web application deployment descriptor is to provide the link from the logical name defined by the res-ref-name element to the JNDI name of the resource factory as deployed in JBoss. This is accomplished by providing a resource-ref element in the jboss.xml or jboss-web.xml descriptor. The JBoss resource-ref element consists of the following child elements:
- A res-ref-name element that must match the
res-ref-nameof a correspondingresource-refelement from theejb-jar.xmlorweb.xmlstandard descriptors - An optional res-type element that specifies the fully qualified class name of the resource manager connection factory
- A jndi-name element that specifies the JNDI name of the resource factory as deployed in JBoss
- A res-url element that specifies the URL string in the case of a
resource-refof typejava.net.URL
jboss-web.xml descriptor fragment that shows sample mappings of the resource-ref elements given in Example 9.12, “A web.xml resource-ref descriptor fragment”.
Example 9.14. A sample jboss-web.xml resource-ref descriptor fragment
<jboss-web>
    <!-- ... -->
    <resource-ref>
        <res-ref-name>jdbc/DefaultDS</res-ref-name>
        <res-type>javax.sql.DataSource</res-type>
        <jndi-name>java:/DefaultDS</jndi-name>
    </resource-ref>
    <resource-ref>
        <res-ref-name>mail/DefaultMail</res-ref-name>
        <res-type>javax.mail.Session</res-type>
        <jndi-name>java:/Mail</jndi-name>
    </resource-ref>
    <resource-ref>
        <res-ref-name>jms/QueueFactory</res-ref-name>
        <res-type>javax.jms.QueueConnectionFactory</res-type>
        <jndi-name>QueueConnectionFactory</jndi-name>
    </resource-ref>
    <!-- ... -->
</jboss-web>
9.6.1.7. Resource Environment References
resource-env-ref elements in the standard deployment descriptors. The Deployer binds the resource environment references to the actual administered objects location in the target operational environment using the jboss.xml and jboss-web.xml descriptors.
resource-env-ref element describes the requirements that the referencing application component has for the referenced administered object. The resource-env-ref element consists of the following child elements:
- An optional description element that provides the purpose of the reference.
- A resource-env-ref-name element that specifies the name of the reference relative to the
java:comp/envcontext. Convention places the name in a subcontext that corresponds to the associated resource factory type. For example, a JMS queue reference namedMyQueueshould have aresource-env-ref-nameofjms/MyQueue. - A resource-env-ref-type element that specifies the fully qualified class name of the referenced object. For example, in the case of a JMS queue, the value would be
javax.jms.Queue.
resource-ref-env element declaration by a session bean. Example 9.16, “ENC resource-env-ref access code fragment” gives a code fragment that illustrates how to look up the StockInfo queue declared by the resource-env-ref.
Example 9.15. An example ejb-jar.xml resource-env-ref fragment
<session>
    <ejb-name>MyBean</ejb-name>
    <!-- ... -->
    <resource-env-ref>
        <description>This is a reference to a JMS queue used in the
            processing of Stock info
        </description>
        <resource-env-ref-name>jms/StockInfo</resource-env-ref-name>
        <resource-env-ref-type>javax.jms.Queue</resource-env-ref-type>
    </resource-env-ref>
    <!-- ... -->
</session>
Example 9.16. ENC resource-env-ref access code fragment
InitialContext iniCtx = new InitialContext();
javax.jms.Queue q = (javax.jms.Queue)
envCtx.lookup("java:comp/env/jms/StockInfo");
9.6.1.8. Resource Environment References and jboss.xml, jboss-web.xml
jboss.xml EJB deployment descriptor and jboss-web.xml Web application deployment descriptor is to provide the link from the logical name defined by the resource-env-ref-name element to the JNDI name of the administered object deployed in JBoss. This is accomplished by providing a resource-env-ref element in the jboss.xml or jboss-web.xml descriptor. The JBoss resource-env-ref element consists of the following child elements:
- A
resource-env-ref-nameelement that must match theresource-env-ref-nameof a correspondingresource-env-refelement from theejb-jar.xmlorweb.xmlstandard descriptors - A
jndi-nameelement that specifies the JNDI name of the resource as deployed in JBoss
jboss.xml descriptor fragment that shows a sample mapping for the StockInforesource-env-ref.
Example 9.17. A sample jboss.xml resource-env-ref descriptor fragment
<session>
    <ejb-name>MyBean</ejb-name>
    <!-- ... -->
    <resource-env-ref>
        <resource-env-ref-name>jms/StockInfo</resource-env-ref-name>
        <jndi-name>queue/StockInfoQueue</jndi-name>
    </resource-env-ref>
    <!-- ... -->
</session>
Chapter 10. Web Services
Warning
10.1. The need for web services
10.2. What web services are not
10.3. Document/Literal
<binding name='EndpointInterfaceBinding' type='tns:EndpointInterface'>
   <soap:binding style='document' transport='http://schemas.xmlsoap.org/soap/http'/>
   <operation name='concat'>
      <soap:operation soapAction=''/>
      <input>
         <soap:body use='literal'/>
      </input>
      <output>
         <soap:body use='literal'/>
      </output>
   </operation>
</binding>
<complexType name='concatType'>
   <sequence>
      <element name='String_1' nillable='true' type='string'/>
      <element name='long_1' type='long'/>
   </sequence>
</complexType>
<element name='concat' type='tns:concatType'/><message name='EndpointInterface_concat'> <part name='parameters' element='tns:concat'/> </message>
<message name='EndpointInterface_concat'>
   <part name='parameters' type='tns:concatType'/>
</message>
10.4. Document/Literal (Bare)
@WebService
@SOAPBinding(parameterStyle = SOAPBinding.ParameterStyle.BARE)
public class DocBareServiceImpl
{
   @WebMethod
   public SubmitBareResponse submitPO(SubmitBareRequest poRequest)
   {
      ...
   }
}@XmlAccessorType(XmlAccessType.FIELD)
@XmlType(name = "SubmitBareRequest", namespace="http://soapbinding.samples.jaxws.ws.test.jboss.org/", propOrder = { "product" })
@XmlRootElement(namespace="http://soapbinding.samples.jaxws.ws.test.jboss.org/", name = "SubmitPO")
public class SubmitBareRequest
{
@XmlElement(namespace="http://soapbinding.samples.jaxws.ws.test.jboss.org/", required = true)
private String product;
...
}10.5. Document/Literal (Wrapped)
@WebService
public class DocWrappedServiceImpl
{
   @WebMethod
   @RequestWrapper (className="org.somepackage.SubmitPO")
   @ResponseWrapper (className="org.somepackage.SubmitPOResponse")
   public String submitPO(String product, int quantity)
   {
   ...
   }
}
Note
10.6. RPC/Literal
- The port type operation name defines the endpoint method name
- Message parts are endpoint method parameters
<binding name='EndpointInterfaceBinding' type='tns:EndpointInterface'>
   <soap:binding style='rpc' transport='http://schemas.xmlsoap.org/soap/http'/>
   <operation name='echo'>
      <soap:operation soapAction=''/>
      <input>
         <soap:body namespace='http://org.jboss.ws/samples/jsr181pojo' use='literal'/>
      </input>
      <output>
         <soap:body namespace='http://org.jboss.ws/samples/jsr181pojo' use='literal'/>
      </output>
   </operation>
</binding><portType name='EndpointInterface'>
<operation name='echo' parameterOrder='String_1'>
<input message='tns:EndpointInterface_echo'/>
<output message='tns:EndpointInterface_echoResponse'/>
</operation>
</portType><message name='EndpointInterface_echo'> <part name='String_1' type='xsd:string'/> </message> <message name='EndpointInterface_echoResponse'> <part name='result' type='xsd:string'/> </message>
Note
@WebService
@SOAPBinding(style = SOAPBinding.Style.RPC)
public class JSEBean01
{
   @WebMethod
   @WebResult(name="result")
   public String echo(@WebParam(name="String_1") String input)
   {
   ...
   }
}10.7. RPC/Encoded
- element references
- soap arrays as bean properties
Note
10.8. Web Service Endpoints
10.9. Plain old Java Object (POJO)
@WebService
@SOAPBinding(style = SOAPBinding.Style.RPC)
public class JSEBean01
{
   @WebMethod
   public String echo(String input)
   {
    ...
   }
}
10.10. The endpoint as a web application
<web-app ...>
   <servlet>
      <servlet-name>TestService</servlet-name>
      <servlet-class>org.jboss.test.ws.jaxws.samples.jsr181pojo.JSEBean01</servlet-class>
   </servlet>
   <servlet-mapping>
      <servlet-name>TestService</servlet-name>
      <url-pattern>/*</url-pattern>
   </servlet-mapping>
</web-app>
10.11. Packaging the endpoint
*.war file.
<war warfile="${build.dir}/libs/jbossws-samples-jsr181pojo.war" webxml="${build.resources.dir}/samples/jsr181pojo/WEB-INF/web.xml">
   <classes dir="${build.dir}/classes">
      <include name="org/jboss/test/ws/samples/jsr181pojo/JSEBean01.class"/>
   </classes>
</war>
Note
web.xml file are required.
10.12. Accessing the generated WSDL
http://yourhost:8080/jbossws/services
10.13. EJB3 Stateless Session Bean (SLSB)
@Stateless
@Remote(EJB3RemoteInterface.class)
@RemoteBinding(jndiBinding = "/ejb3/EJB3EndpointInterface")

@WebService
@SOAPBinding(style = SOAPBinding.Style.RPC)
public class EJB3Bean01 implements EJB3RemoteInterface
{
   @WebMethod
   public String echo(String input)
   {
   ...
   }
}A JSR-181 EJB service endpoint is packaged as an ordinary ejb deployment.
<jar jarfile="${build.dir}/libs/jbossws-samples-jsr181ejb.jar">
   <fileset dir="${build.dir}/classes">
      <include name="org/jboss/test/ws/samples/jsr181ejb/EJB3Bean01.class"/>
      <include name="org/jboss/test/ws/samples/jsr181ejb/EJB3RemoteInterface.class"/>
   </fileset>
</jar>A successfully deployed service endpoint will show up in the service endpoint manager. This is also where you will find the links to the generated WSDL.
http://yourhost:8080/jbossws/services
10.14. Endpoint Provider
@WebServiceProvider
@ServiceMode(value = Service.Mode.PAYLOAD)
public class ProviderBeanPayload implements Provider<Source>
{
   public Source invoke(Source req)
   {
      // Access the entire request PAYLOAD and return the response PAYLOAD
   }
}10.15. WebServiceContext
WebServiceContext is treated as an injectable resource that can be set at the time an endpoint is initialized. The WebServiceContext object will then use thread-local information to return the correct information regardless of how many threads are concurrently being used to serve requests addressed to the same endpoint object.
@WebService
public class EndpointJSE
{
   @Resource
   WebServiceContext wsCtx;

   @WebMethod
   public String testGetMessageContext()
   {
      SOAPMessageContext jaxwsContext = (SOAPMessageContext)wsCtx.getMessageContext();
      return jaxwsContext != null ? "pass" : "fail";
   }
   ...
   @WebMethod
   public String testGetUserPrincipal()
   {
      Principal principal = wsCtx.getUserPrincipal();
      return principal.getName();
   }

   @WebMethod
   public boolean testIsUserInRole(String role)
   {
      return wsCtx.isUserInRole(role);
   }
}
10.16. Web Service Clients
10.16.1. Service
Service is an abstraction that represents a WSDL service. A WSDL service is a collection of related ports, each of which consists of a port type bound to a particular protocol and available at a particular endpoint address.
10.16.1.1. Service Usage
Most clients will start with a WSDL file, and generate some stubs using jbossws tools like wsconsume. This usually gives a mass of files, one of which is the top of the tree. This is the service implementation class.
// Generated Service Class

@WebServiceClient(name="StockQuoteService", targetNamespace="http://example.com/stocks", wsdlLocation="http://example.com/stocks.wsdl")
public class StockQuoteService extends javax.xml.ws.Service
{

   public StockQuoteService()
   {
      super(new URL("http://example.com/stocks.wsdl"), new QName("http://example.com/stocks", "StockQuoteService"));
   }

   public StockQuoteService(String wsdlLocation, QName serviceName)
   {
      super(wsdlLocation, serviceName);
   }

   ...
}
In the dynamic case, when nothing is generated, a web service client uses Service.create to create Service instances, the following code illustrates this process.
URL wsdlLocation = new URL("http://example.org/my.wsdl");
QName serviceName = new QName("http://example.org/sample", "MyService");
Service service = Service.create(wsdlLocation, serviceName);10.16.1.2. Handler Resolver
Service instance provides access to a HandlerResolver via a pair of getHandlerResolver and setHandlerResolver methods that may be used to configure a set of handlers on a per-service, per-port or per-protocol binding basis.
Service instance is used to create a proxy or a Dispatch instance then the handler resolver currently registered with the service is used to create the required handler chain. Subsequent changes to the handler resolver configured for a Service instance do not affect the handlers on previously created proxies, or Dispatch instances.
10.16.1.3. Executor
Service instances can be configured with a java.util.concurrent.Executor. The executor will then be used to invoke any asynchronous callbacks requested by the application. The setExecutor and getExecutor methods of Service can be used to modify and retrieve the executor configured for a service.
10.16.2. Dynamic Proxy
getPort methods on the Service.
/**
 * The getPort method returns a proxy. A service client
 * uses this proxy to invoke operations on the target
 * service endpoint. The <code>serviceEndpointInterface</code>
 * specifies the service endpoint interface that is supported by
 * the created dynamic proxy instance.
 */
public <T> T getPort(QName portName, Class<T> serviceEndpointInterface)
{
...
}

/**
 * The getPort method returns a proxy. The parameter
 * <code>serviceEndpointInterface</code> specifies the service
 * endpoint interface that is supported by the returned proxy.
 * In the implementation of this method, the JAX-WS
 * runtime system takes the responsibility of selecting a protocol
 * binding (and a port) and configuring the proxy accordingly.
 * The returned proxy should not be reconfigured by the client.
 *
 */
public <T> T getPort(Class<T> serviceEndpointInterface)
{
...
}Service usually also offers typed methods to get ports. These methods also return dynamic proxies that implement the SEI.
@WebServiceClient(name = "TestEndpointService", targetNamespace = "http://org.jboss.ws/wsref",
  wsdlLocation = "http://localhost.localdomain:8080/jaxws-samples-webserviceref?wsdl")
public class TestEndpointService extends Service
{
   ...

   public TestEndpointService(URL wsdlLocation, QName serviceName) {
      super(wsdlLocation, serviceName);
   }

   @WebEndpoint(name = "TestEndpointPort")
   public TestEndpoint getTestEndpointPort()
   {
      return (TestEndpoint)super.getPort(TESTENDPOINTPORT, TestEndpoint.class);
   }
}
10.16.3. WebServiceRef
WebServiceRef annotation is used to declare a reference to a Web service. It follows the resource pattern exemplified by the javax.annotation.Resource annotation in JSR-250
WebServiceRef annotation:
- To define a reference whose type is a generated service class. In this case, the type and value element will both refer to the generated service class type. Moreover, if the reference type can be inferred by the field or method declaration then the annotation is applied to the type, and value elements may have the default value (
Object.class, that is). If the type cannot be inferred, then at least the type element must be present with a non-default value. - To define a reference whose type is a SEI. In this case, the type element may be present with its default value if the type of the reference can be inferred from the annotated field and method declaration, but the value element must always be present and refer to a generated service class type (a subtype of
javax.xml.ws.Service). The wsdlLocation element, if present, overrides theWSDL location information specified in theWebServiceannotation of the referenced generated service class.
public class EJB3Client implements EJB3Remote
{
   @WebServiceRef
   public TestEndpointService service4;

   @WebServiceRef
   public TestEndpoint port3;
}
In JBoss Enterprise Application Platform 5.0 we offer a number of overrides and extensions to the WebServiceRef annotation. These include:
- define the port that should be used to resolve a container-managed port
- define default Stub property settings for Stub objects
- define the URL of a final WSDL document to be used
<service-ref>
   <service-ref-name>OrganizationService</service-ref-name>
   <wsdl-override>file:/wsdlRepository/organization-service.wsdl</wsdl-override>
</service-ref>
..
<service-ref>
   <service-ref-name>OrganizationService</service-ref-name>
   <config-name>Secure Client Config</config-name>
   <config-file>META-INF/jbossws-client-config.xml</config-file>
   <handler-chain>META-INF/jbossws-client-handlers.xml</handler-chain>
</service-ref>

<service-ref>
   <service-ref-name>SecureService</service-ref-name>
   <service-class-name>org.jboss.tests.ws.jaxws.webserviceref.SecureEndpointService</service-class-name>
   <service-qname>{http://org.jboss.ws/wsref}SecureEndpointService</service-qname>
   <port-info>
      <service-endpoint-interface>org.jboss.tests.ws.jaxws.webserviceref.SecureEndpoint</service-endpoint-interface>
      <port-qname>{http://org.jboss.ws/wsref}SecureEndpointPort</port-qname>
      <stub-property>
         <name>javax.xml.ws.security.auth.username</name>
         <value>kermit</value>
      </stub-property>
      <stub-property>
         <name>javax.xml.ws.security.auth.password</name>
         <value>thefrog</value>
      </stub-property>
   </port-info>
</service-ref>
10.16.4. Dispatch
In this mode, client applications work directly with protocol-specific message structures. For example, when used with a SOAP protocol binding, a client application would work directly with a SOAP message.
In this mode, client applications work with the payload of messages rather than the messages themselves. For example, when used with a SOAP protocol binding, a client application would work with the contents of the SOAP Body rather than the SOAP message as a whole.
Service service = Service.create(wsdlURL, serviceName);
Dispatch dispatch = service.createDispatch(portName, StreamSource.class, Mode.PAYLOAD);

String payload = "<ns1:ping xmlns:ns1='http://oneway.samples.jaxws.ws.test.jboss.org/'/>";
dispatch.invokeOneWay(new StreamSource(new StringReader(payload)));

payload = "<ns1:feedback xmlns:ns1='http://oneway.samples.jaxws.ws.test.jboss.org/'/>";
Source retObj = (Source)dispatch.invoke(new StreamSource(new StringReader(payload)));
10.16.5. Asynchronous Invocations
BindingProvider interface represents a component that provides a protocol binding for use by clients, it is implemented by proxies and is extended by the Dispatch interface.
BindingProvider instances may provide asynchronous operation capabilities. When used, asynchronous operation invocations are decoupled from the BindingProvider instance at invocation time such that the response context is not updated when the operation completes. Instead a separate response context is made available using the Response interface.
public void testInvokeAsync() throws Exception
{
   URL wsdlURL = new URL("http://" + getServerHost() + ":8080/jaxws-samples-asynchronous?wsdl");
   QName serviceName = new QName(targetNS, "TestEndpointService");
   Service service = Service.create(wsdlURL, serviceName);
   TestEndpoint port = service.getPort(TestEndpoint.class);

   Response response = port.echoAsync("Async");

   // access future
   String retStr = (String) response.get();
   assertEquals("Async", retStr);
}
10.16.6. Oneway Invocations
@WebService (name="PingEndpoint")
@SOAPBinding(style = SOAPBinding.Style.RPC)
public class PingEndpointImpl
{
   private static String feedback;
   ...
   @WebMethod
   @Oneway
   public void ping()
   {
      log.info("ping");
      feedback = "ok";
   }
   ...
   @WebMethod
   public String feedback()
   {
   log.info("feedback");
   return feedback;
   }
}
10.17. Common API
10.17.1. Handler Framework
10.17.1.1. Logical Handler
javax.xml.ws.handler.LogicalHandler.
10.17.1.2. Protocol Handler
javax.xml.ws.handler.Handler except javax.xml.ws.handler.LogicalHandler.
10.17.1.3. Service endpoint handlers
@WebService
@HandlerChain(file = "jaxws-server-source-handlers.xml")
public class SOAPEndpointSourceImpl
{
...
}10.17.1.4. Service client handlers
Service service = Service.create(wsdlURL, serviceName);
Endpoint port = (Endpoint)service.getPort(Endpoint.class);

BindingProvider bindingProvider = (BindingProvider)port;
List<Handler> handlerChain = new ArrayList<Handler>();
handlerChain.add(new LogHandler());
handlerChain.add(new AuthorizationHandler());
handlerChain.add(new RoutingHandler());
bindingProvider.getBinding().setHandlerChain(handlerChain); // important!
10.17.2. Message Context
10.17.2.1. Accessing the message context
@WebServiceContext annotation.
10.17.2.2. Logical Message Context
Logical Handlers at invocation time. LogicalMessageContext extends MessageContext with methods to obtain and modify the message payload, it does not provide access to the protocol specific aspects of a message. A protocol binding defines what component of a message are available via a logical message context. The SOAP binding defines that a logical handler deployed in a SOAP binding can access the contents of the SOAP body but not the SOAP headers whereas the XML/HTTP binding defines that a logical handler can access the entire XML payload of a message.
10.17.2.3. SOAP Message Context
SOAP handlers at invocation time. SOAPMessageContext extends MessageContext with methods to obtain and modify the SOAP message payload.
10.17.3. Fault Handling
public void throwSoapFaultException()
{
   SOAPFactory factory = SOAPFactory.newInstance();
   SOAPFault fault = factory.createFault("this is a fault string!", new QName("http://foo", "FooCode"));
   fault.setFaultActor("mr.actor");
   fault.addDetail().addChildElement("test");
   throw new SOAPFaultException(fault);
}
public void throwApplicationException() throws UserException
{
   throw new UserException("validation", 123, "Some validation error");
}
Note
10.18. DataBinding
10.18.1. Using JAXB with non annotated classes
10.19. Attachments
10.19.1. MTOM/XOP
10.19.1.1. Supported MTOM parameter types
|
image/jpeg
|
java.awt.Image
|
|
text/xml
|
javax.xml.transform.Source
|
|
application/xml
|
javax.xml.transform.Source
|
|
application/octet-stream
|
javax.activation.DataHandler
|
Note
10.19.1.2. Enabling MTOM per endpoint
@BindingType annotation. JBossWS does handle SOAP1.1 and SOAP1.2. Both come with or without MTOM flavors:
package org.jboss.test.ws.jaxws.samples.xop.doclit;

import javax.ejb.Remote;
import javax.jws.WebService;
import javax.jws.soap.SOAPBinding;
import javax.xml.ws.BindingType;

@Remote
@WebService(targetNamespace = "http://org.jboss.ws/xop/doclit")
@SOAPBinding(style = SOAPBinding.Style.DOCUMENT, parameterStyle = SOAPBinding.ParameterStyle.BARE)
@BindingType(value="http://schemas.xmlsoap.org/wsdl/soap/http?mtom=true")                         (1)
public interface MTOMEndpoint
{
...
}- The MTOM enabled SOAP 1.1 binding ID
Binding API to enable MTOM (Excerpt taken from the org.jboss.test.ws.jaxws.samples.xop.doclit.XOPTestCase):
...
Service service = Service.create(wsdlURL, serviceName);
port = service.getPort(MTOMEndpoint.class);

// enable MTOM
binding = (SOAPBinding)((BindingProvider)port).getBinding();
binding.setMTOMEnabled(true);
Note
10.19.2. SwaRef
10.19.2.1. Using SwaRef with JAX-WS endpoints
DataHandler types is to annotate a payload bean with the @XmlAttachmentRef annotation as shown below:
/**
 * Payload bean that will use SwaRef encoding
 */
@XmlRootElement
public class DocumentPayload
{
   private DataHandler data;

   public DocumentPayload()
   {
   }

   public DocumentPayload(DataHandler data)
   {
      this.data = data;
   }

   @XmlElement
   @XmlAttachmentRef
   public DataHandler getData()
   {
      return data;
   }

   public void setData(DataHandler data)
   {
      this.data = data;
   }
}@XmlAttachmentRef annotation on the service endpoint interface:
@WebService
public interface DocWrappedEndpoint
{
   @WebMethod
   DocumentPayload beanAnnotation(DocumentPayload dhw, String test);

   @WebMethod
   @XmlAttachmentRef
   DataHandler parameterAnnotation(@XmlAttachmentRef DataHandler data, String test);

}<env:Envelope xmlns:env='http://schemas.xmlsoap.org/soap/envelope/'>
<env:Header/>
<env:Body>
<ns2:parameterAnnotation xmlns:ns2='http://swaref.samples.jaxws.ws.test.jboss.org/'>
<arg0>cid:0-1180017772935-32455963@ws.jboss.org</arg0>
<arg1>Wrapped test</arg1>
</ns2:parameterAnnotation>
</env:Body>
</env:Envelope>
10.19.2.2. Starting from WSDL
<element name="data" type="wsi:swaRef"
xmlns:wsi="http://ws-i.org/profiles/basic/1.1/xsd"/>
10.20. Tools
- Exposing an already existing EJB3 bean as a Web Service
- Providing a new service, and you want the contract to be generated for you
- Replacing the implementation of an existing Web Service without breaking compatibility with older clients
- Exposing a service that conforms to a contract specified by a third party (e.g. a vendor that calls you back using an already defined protocol).
- Creating a service that adheres to the XML Schema and WSDL you developed by hand up front
|
Command
|
Description
|
|---|---|
|
Generates JAX-WS portable artifacts, and provides the abstract contract. Used for bottom-up development.
| |
|
Consumes the abstract contract (WSDL and Schema files), and produces artifacts for both a server and client. Used for top-down and client development
| |
|
Executes a Java client (that has a main method) using the JBossWS classpath.
|
10.20.1. Bottom-Up (Using wsprovide)
package echo;

@javax.jws.WebService
public class Echo
{
   public String echo(String input)
   {
      return input;
   }
}
$ javac -d . -classpath jboss-jaxws.jar Echo.java
$ wsprovide -w echo.Echo
Generating WSDL:
EchoService.wsdl
Writing Classes:
echo/jaxws/Echo.class
echo/jaxws/EchoResponse.class
<service name='EchoService'>
   <port binding='tns:EchoBinding' name='EchoPort'>
      <soap:address location='REPLACE_WITH_ACTUAL_URL'/>
   </port>
</service><portType name='Echo'>
<operation name='echo' parameterOrder='echo'>
<input message='tns:Echo_echo'/>
<output message='tns:Echo_echoResponse'/>
</operation>
</portType>Note
web.xml needs to be created:
<web-app xmlns="http://java.sun.com/xml/ns/j2ee"
xmlns:xsi="http://www.w3.org/2001/XMLSchema-instance"
xsi:schemaLocation="http://java.sun.com/xml/ns/j2ee http://java.sun.com/xml/ns/j2ee/web-app_2_4.xsd"
version="2.4">

   <servlet>
      <servlet-name>Echo</servlet-name>
      <servlet-class>echo.Echo</servlet-class>
   </servlet>

   <servlet-mapping>
      <servlet-name>Echo</servlet-name>
      <url-pattern>/Echo</url-pattern>
   </servlet-mapping>
</web-app>
web.xml and the single class can now be used to create a WAR:
$ mkdir -p WEB-INF/classes
$ cp -rp echo WEB-INF/classes/
$ cp web.xml WEB-INF
$ jar cvf echo.war WEB-INF
added manifest
adding: WEB-INF/(in = 0) (out= 0)(stored 0%)
adding: WEB-INF/classes/(in = 0) (out= 0)(stored 0%)
adding: WEB-INF/classes/echo/(in = 0) (out= 0)(stored 0%)
adding: WEB-INF/classes/echo/Echo.class(in = 340) (out= 247)(deflated 27%)
adding: WEB-INF/web.xml(in = 576) (out= 271)(deflated 52%)
cp echo.war <JBOSS_HOME>/server/default/deploy
10.20.2. Top-Down (Using wsconsume)
Note
$ wsconsume -k EchoService.wsdl
echo/Echo.java
echo/EchoResponse.java
echo/EchoService.java
echo/Echo_Type.java
echo/ObjectFactory.java
echo/package-info.java
echo/Echo.java
echo/EchoResponse.java
echo/EchoService.java
echo/Echo_Type.java
echo/ObjectFactory.java
echo/package-info.java
|
File
|
Purpose
|
|
Echo.java
|
Service Endpoint Interface
|
|
Echo_Type.java
|
Wrapper bean for request message
|
|
EchoResponse.java
|
Wrapper bean for response message
|
|
ObjectFactory.java
|
JAXB XML Registry
|
|
package-info.java
|
Holder for JAXB package annotations
|
|
EchoService.java
|
Used only by JAX-WS clients
|
@WebService(name = "Echo", targetNamespace = "http://echo/")
public interface Echo
{
   @WebMethod
   @WebResult(targetNamespace = "")
   @RequestWrapper(localName = "echo", targetNamespace = "http://echo/", className = "echo.Echo_Type")
   @ResponseWrapper(localName = "echoResponse", targetNamespace = "http://echo/", className = "echo.EchoResponse")
   public String echo(@WebParam(name = "arg0", targetNamespace = "") String arg0);
}package echo;
@javax.jws.WebService(endpointInterface="echo.Echo")
public class EchoImpl implements Echo
{
public String echo(String arg0)
{
return arg0;
}
}
10.20.3. Client Side
<service name='EchoService'>
   <port binding='tns:EchoBinding' name='EchoPort'>
      <soap:address location='REPLACE_WITH_ACTUAL_URL'/>
   </port>
</service><service name="EchoService">
<port binding="tns:EchoBinding" name="EchoPort">
<soap:address location="http://localhost.localdomain:8080/echo/Echo"/>
</port>
</service>$ wsconsume -k http://localhost:8080/echo/Echo?wsdl echo/Echo.java echo/EchoResponse.java echo/EchoService.java echo/Echo_Type.java echo/ObjectFactory.java echo/package-info.java echo/Echo.java echo/EchoResponse.java echo/EchoService.java echo/Echo_Type.java echo/ObjectFactory.java echo/package-info.java
EchoService.java. Notice how it stores the location the WSDL was obtained from.
@WebServiceClient(name = "EchoService", targetNamespace = "http://echo/", wsdlLocation = "http://localhost:8080/echo/Echo?wsdl")
public class EchoService extends Service
{
   private final static URL ECHOSERVICE_WSDL_LOCATION;

   static
   {
      URL url = null;
      try
      {
         url = new URL("http://localhost:8080/echo/Echo?wsdl");
      }
      catch (MalformedURLException e)
      {
         e.printStackTrace();
      }
      ECHOSERVICE_WSDL_LOCATION = url;
   }

   public EchoService(URL wsdlLocation, QName serviceName)
   {
      super(wsdlLocation, serviceName);
   }

   public EchoService()
   {
      super(ECHOSERVICE_WSDL_LOCATION, new QName("http://echo/", "EchoService"));
   }

   @WebEndpoint(name = "EchoPort")
   public Echo getEchoPort()
   {
      return (Echo)super.getPort(new QName("http://echo/", "EchoPort"), Echo.class);
   }
}javax.xml.ws.Service. While you can use Service directly, this is far simpler since it provides the configuration info for you. The only method we really care about is the getEchoPort() method, which returns an instance of our Service Endpoint Interface. Any Web Services operation can then be called by just invoking a method on the returned interface.
Note
Note
import echo.*;
..
public class EchoClient
{
   public static void main(String args[])
   {
      if (args.length != 1)
      {
         System.err.println("usage: EchoClient <message>");
         System.exit(1);
      }

      EchoService service = new EchoService();
      Echo echo = service.getEchoPort();
      System.out.println("Server said: " + echo.echo(args[0]));
   }
}$ wsrunclient EchoClient 'Hello World!' Server said: Hello World!
...
EchoService service = new EchoService();
Echo echo = service.getEchoPort();

/* Set NEW Endpoint Location */
String endpointURL = "http://NEW_ENDPOINT_URL";
BindingProvider bp = (BindingProvider)echo;
bp.getRequestContext().put(BindingProvider.ENDPOINT_ADDRESS_PROPERTY, endpointURL);

System.out.println("Server said: " + echo.echo(args[0]));
...
10.20.4. Command-line & Ant Task Reference
10.20.5. JAX-WS binding customization
10.21. Web Service Extensions
10.21.1. WS-Addressing
10.21.1.1. Specifications
10.21.1.2. Addressing Endpoint
Note
@WebService(name = "StatefulEndpoint", targetNamespace = "http://org.jboss.ws/samples/wsaddressing", serviceName = "TestService")
@Addressing(enabled=true, required=true)
@SOAPBinding(style = SOAPBinding.Style.RPC)
public class StatefulEndpointImpl implements StatefulEndpoint, ServiceLifecycle
{
   @WebMethod
   public void addItem(String item)
   { ... }

   @WebMethod
   public void checkout()
   { ... }

   @WebMethod
   public String getItems()
   { ... }
}javax.xml.ws.soap.Addressing annotation to enable the server side addressing handler.
10.21.1.3. Addressing Client
javax.xml.ws.soap.AddressingFeature feature from JAX-WS 2.1 API to enable the WS-Addressing.
Service service = Service.create(wsdlURL, serviceName);
port1 = (StatefulEndpoint)service.getPort(StatefulEndpoint.class,  new AddressingFeature());
public class AddressingStatefulTestCase extends JBossWSTest
{
   ...
   public void testAddItem() throws Exception
   {
      port1.addItem("Ice Cream");
      port1.addItem("Ferrari");

      port2.addItem("Mars Bar");
      port2.addItem("Porsche");
   }

   public void testGetItems() throws Exception
   {
      String items1 = port1.getItems();
      assertEquals("[Ice Cream, Ferrari]", items1);

      String items2 = port2.getItems();
      assertEquals("[Mars Bar, Porsche]", items2);
   }
}<env:Envelope xmlns:env='http://schemas.xmlsoap.org/soap/envelope/'> <env:Header xmlns:wsa='http://schemas.xmlsoap.org/ws/2004/08/addressing'> <wsa:To>uri:jbossws-samples-wsaddr/TestService</wsa:To> <wsa:Action>http://org.jboss.ws/addressing/stateful/action</wsa:Action> <wsa:ReferenceParameters> <ns1:clientid xmlns:ns1='http://somens'>clientid-1</ns1:clientid> </wsa:ReferenceParameters> </env:Header> <env:Body> <ns1:addItem xmlns:ns1='http://org.jboss.ws/samples/wsaddr'> <String_1>Ice Cream</String_1> </ns1:addItem> </env:Body> </env:Envelope> <env:Envelope xmlns:env='http://schemas.xmlsoap.org/soap/envelope/'> <env:Header xmlns:wsa='http://schemas.xmlsoap.org/ws/2004/08/addressing'> <wsa:To>http://www.w3.org/2005/08/addressing/anonymous</wsa:To> <wsa:Action>http://org.jboss.ws/addressing/stateful/actionReply</wsa:Action> <ns1:clientid xmlns:ns1='http://somens'>clientid-1</ns1:clientid> </env:Header> <env:Body> <ns1:addItemResponse xmlns:ns1='http://org.jboss.ws/samples/wsaddr'/> </env:Body> </env:Envelope> ... <env:Envelope xmlns:env='http://schemas.xmlsoap.org/soap/envelope/'> <env:Header xmlns:wsa='http://schemas.xmlsoap.org/ws/2004/08/addressing'> <wsa:To>uri:jbossws-samples-wsaddr/TestService</wsa:To> <wsa:Action>http://org.jboss.ws/addressing/stateful/action</wsa:Action> <wsa:ReferenceParameters> <ns1:clientid xmlns:ns1='http://somens'>clientid-1</ns1:clientid> </wsa:ReferenceParameters> </env:Header> <env:Body> <ns1:getItems xmlns:ns1='http://org.jboss.ws/samples/wsaddr'/> </env:Body> </env:Envelope> <env:Envelope xmlns:env='http://schemas.xmlsoap.org/soap/envelope/'> <env:Header xmlns:wsa='http://schemas.xmlsoap.org/ws/2004/08/addressing'> <wsa:To>http://www.w3.org/2005/08/addressing/anonymous</wsa:To> <wsa:Action>http://org.jboss.ws/addressing/stateful/actionReply</wsa:Action> <ns1:clientid xmlns:ns1='http://somens'>clientid-1</ns1:clientid> </env:Header> <env:Body> <ns1:getItemsResponse xmlns:ns1='http://org.jboss.ws/samples/wsaddr'> <result>[Ice Cream, Ferrari]</result> </ns1:getItemsResponse> </env:Body> </env:Envelope>
10.21.2. WS-Security
10.21.2.1. Endpoint configuration
Note
10.21.2.2. Server side WSSE declaration (jboss-wsse-server.xml)
<jboss-ws-security xmlns="http://www.jboss.com/ws-security/config" xmlns:xsi="http://www.w3.org/2001/XMLSchema-instance" xsi:schemaLocation="http://www.jboss.com/ws-security/config http://www.jboss.com/ws-security/schema/jboss-ws-security_1_0.xsd"> <key-store-file>WEB-INF/wsse.keystore</key-store-file><key-store-password>jbossws</key-store-password>
<trust-store-file>WEB-INF/wsse.truststore</trust-store-file>
<trust-store-password>jbossws</trust-store-password>
<config>
<sign type="x509v3" alias="wsse"/>
<requires>
<signature/>
</requires> </config> </jboss-ws-security>
|
This specifies that the key store we wish to use is WEB-INF/wsse.keystore, which is located in our war file.
|
|
This specifies that the store password is "jbossws". Password can be encypted using the {EXT} and {CLASS} commands. Please see samples for their usage.
|
|
This specifies that the trust store we wish to use is WEB-INF/wsse.truststore, which is located in our war file.
|
|
This specifies that the trust store password is also "jbossws". Password can be encrypted using the {EXT} and {CLASS} commands. Please see samples for their usage.
|
|
Here we start our root config block. The root config block is the default configuration for all services in this war file.
|
|
This means that the server must sign the message body of all responses. Type means that we are using X.509v3 certificate (a standard certificate). The alias option says that the certificate and key pair to use for signing is in the key store under the "wsse" alias
|
|
Here we start our optional requires block. This block specifies all security requirements that must be met when the server receives a message.
|
|
This means that all web services in this war file require the message body to be signed.
|
@EndpointConfig annotation to set the config name. See JAX-WS_Endpoint_Configuration for the list of available config names.
@WebService
@EndpointConfig(configName = "Standard WSSecurity Endpoint")
public class HelloJavaBean
{
...
}
10.21.2.3. Client side WSSE declaration (jboss-wsse-client.xml)
<jboss-ws-security xmlns="http://www.jboss.com/ws-security/config"
xmlns:xsi="http://www.w3.org/2001/XMLSchema-instance"
xsi:schemaLocation="http://www.jboss.com/ws-security/config
http://www.jboss.com/ws-security/schema/jboss-ws-security_1_0.xsd">
     <config>
        <sign type="x509v3" alias="wsse"/>
        <requires>
           <signature/>
        </requires>
     </config>
</jboss-ws-security>
|
Here we start our root config block. The root config block is the default configuration for all web service clients (Call, Proxy objects).
|
|
This means that the client must sign the message body of all requests it sends. Type means that we are to use a X.509v3 certificate (a standard certificate). The alias option says that the certificate/key pair to use for signing is in the key store under the "wsse" alias
|
|
Here we start our optional requires block. This block specifies all security requirements that must be met when the client receives a response.
|
|
This means that all web service clients must receive signed response messages.
|
10.21.2.3.1. Client side key store configuration
<sysproperty key="org.jboss.ws.wsse.keyStore"
value="${tests.output.dir}/resources/jaxrpc/samples/wssecurity/wsse.keystore"/>
<sysproperty key="org.jboss.ws.wsse.trustStore"
value="${tests.output.dir}/resources/jaxrpc/samples/wssecurity/wsse.truststore"/>
<sysproperty key="org.jboss.ws.wsse.keyStorePassword" value="jbossws"/>
<sysproperty key="org.jboss.ws.wsse.trustStorePassword" value="jbossws"/>
<sysproperty key="org.jboss.ws.wsse.keyStoreType" value="jks"/>
<sysproperty key="org.jboss.ws.wsse.trustStoreType" value="jks"/>
<env:Envelope xmlns:env="http://schemas.xmlsoap.org/soap/envelope/">
<env:Header>
<wsse:Security env:mustUnderstand="1" ...>
<wsu:Timestamp wsu:Id="timestamp">...</wsu:Timestamp>
<wsse:BinarySecurityToken ...>
...
</wsse:BinarySecurityToken>
<ds:Signature xmlns:ds="http://www.w3.org/2000/09/xmldsig#">
...
</ds:Signature>
</wsse:Security>
</env:Header>
<env:Body wsu:Id="element-1-1140197309843-12388840" ...>
<ns1:echoUserType xmlns:ns1="http://org.jboss.ws/samples/wssecurity">
<UserType_1 xmlns:xsi="http://www.w3.org/2001/XMLSchema-instance">
<msg>Kermit</msg>
</UserType_1>
</ns1:echoUserType>
</env:Body>
</env:Envelope>
10.21.2.4. Installing the BouncyCastle JCE provider
java.security properties file (found in $JAVA_HOME/jre/lib/security/java.security, where $JAVA_HOME is the location of your JDK and JRE distribution). You will find detailed instructions in the file but basically it comes down to adding a line:
security.provider.<n>=org.bouncycastle.jce.provider.BouncyCastleProvider
<n> is the preference you want the provider at.
Note
10.21.2.5. Username Token Authentication
Example 10.1. Basic Username Token Configuration
jboss-wsse-client.xml that contains the following information.
<jboss-ws-security xmlns="http://www.jboss.com/ws-security/config"
    xmlns:xsi="http://www.w3.org/2001/XMLSchema-instance"
    xsi:schemaLocation="http://www.jboss.com/ws-security/config
    http://www.jboss.com/ws-security/schema/jboss-ws-security_1_0.xsd">
     <config>
       <username/>
       <timestamp ttl="300"/>
     </config>
</jboss-ws-security>
|
This line specifies that a <timestamp> element must be present in the message and that the message can not be older than 300 seconds. The seconds limitation is used to prevent replay attacks.
|
seconds attribute in the jboss-wsse-server.xml file so both headers match. You must also specify the <requires/> element to enforce this condition.
<jboss-ws-security xmlns="http://www.jboss.com/ws-security/config"
          xmlns:xsi="http://www.w3.org/2001/XMLSchema-instance"
          xsi:schemaLocation="http://www.jboss.com/ws-security/config
          http://www.jboss.com/ws-security/schema/jboss-ws-security_1_0.xsd">
     <config>
          <timestamp ttl="300"/>
          <requires/>
     </config>
</jboss-ws-security>
Warning
Example 10.1, “Basic Username Token Configuration” results in the client password being sent as plain text. You can use a combination of digested passwords, nonces, and timestamps to provide further protection from replay attacks.
Example 10.2. Enable Password Digesting
<jboss-ws-security xmlns="http://www.jboss.com/ws-security/config"
    xmlns:xsi="http://www.w3.org/2001/XMLSchema-instance"
    xsi:schemaLocation="http://www.jboss.com/ws-security/config
    http://www.jboss.com/ws-security/schema/jboss-ws-security_1_0.xsd">
  <config>
     <username digestPassword="true" useNonce="true" useCreated="true"/>
       <timestamp ttl="300"/>
  </config>
</jboss-ws-security>
|
The <username> element of the jboss-wsse-client.xml file enables the digestPassword, nonces and timestamps attributes.
|
login-config.xml file, you must also implement the UsernameTokenCallback module option.
Example 10.3. UsernameTokenCallback Module
<application-policy name="JBossWSDigest">
  <authentication>
    <login-module code="org.jboss.security.auth.spi.UsersRolesLoginModule" flag="required">
      <module-option name="usersProperties">META-INF/jbossws-users.properties</module-option>
      <module-option name="rolesProperties">META-INF/jbossws-roles.properties</module-option>
      <module-option name="hashAlgorithm">SHA</module-option>
      <module-option name="hashEncoding">BASE64</module-option>
      <module-option name="hashUserPassword">false</module-option>
      <module-option name="hashStorePassword">true</module-option>
      <module-option name="storeDigestCallback">org.jboss.ws.extensions.security.auth.callback.UsernameTokenCallback</module-option>
      <module-option name="unauthenticatedIdentity">anonymous</module-option>
    </login-module>
  </authentication>
</application-policy>- plug the
UsernameTokenCallbackcallback into your login module - extend the
org.jboss.security.auth.spi.UsernamePasswordLoginModule - set the hash attributes (
hashAlgorithm,hashEncoding,hashUserPassword,hashStorePassword) as shown in Example 10.3, “UsernameTokenCallback Module”.
The way nonces are created, and subsequently checked and stored on the server side, influences overall security against replay attacks. Currently JBossWS ships with a basic implementation of a nonce store that does not cache the received tokens on the server side.
NonceFactory and NonceStore interfaces. You can find these interfaces in the org.jboss.ws.extensions.security.nonce package.
jboss-wsse-server.xml file.
If a Timestamp is present in the wsse:Security header, header verification does not allow for any tolerance whatsoever in the time comparisons. If the message appears to have been created even slightly in the future or if the message has just expired it will be rejected. A new element called <timestamp-verification> is available for the wsse configuration. Example 10.4, “<timestamp-verification> Configuration” describes the required attributes for the <timestamp-verification> element.
Example 10.4. <timestamp-verification> Configuration
<jboss-ws-security xmlns='http://www.jboss.com/ws-security/config'
                   xmlns:xsi='http://www.w3.org/2001/XMLSchema-instance'
                   xsi:schemaLocation='http://www.jboss.com/ws-security/config
                   http://www.jboss.com/ws-security/schema/jboss-ws-security_1_0.xsd'>
  <timestamp-verification createdTolerance="5" warnCreated="false" expiresTolerance="10" warnExpires="false" />
</jboss-ws-security>-
createdTolerance - Number of seconds in the future a message will be accepted. The default value is
0 -
expiresTolerance - Number of seconds a message is rejected after being classed as expired. The default value is
0. -
warnCreated - Specifies whether to log a warning message if a message is accepted with a 'Created' value in the future. The default value is
true. -
warnExpires - Specifies whether to log a warning message if a message is accepted with an 'Expired' value in the past. The default value is
true.
Note
warnCreated and warnExpires attributes can be used to identify accepted messages that would normally be rejected. You can use this data to identify clients that are out of sync with the server time, without rejecting the client messages.
10.21.2.5.1. Secure Transport
10.21.2.6. X509 Certificate Token
To configure encryption, you must specify the items in Example 10.5, “X509 Encryption Configuration”. The configuration is the same for clients and servers.
Example 10.5. X509 Encryption Configuration
<jboss-ws-security xmlns="http://www.jboss.com/ws-security/config"
       xmlns:xsi="http://www.w3.org/2001/XMLSchema-instance"
       xsi:schemaLocation="http://www.jboss.com/ws-security/config
       http://www.jboss.com/ws-security/schema/jboss-ws-security_1_0.xsd">
    <key-store-file>WEB-INF/bob-sign_enc.jks</key-store-file>
    <key-store-password>password</key-store-password>
    <key-store-type>jks</key-store-type>
    <trust-store-file>WEB-INF/wsse10.truststore</trust-store-file>
    <trust-store-password>password</trust-store-password>

    <config>
     <timestamp ttl="300"/>
      <sign type="x509v3" alias="1" includeTimestamp="true"/>
      <encrypt type="x509v3"
              alias="alice"
              algorithm="aes-256"
              keyWrapAlgorithm="rsa_oaep"
              tokenReference="keyIdentifier" />
            <requires>
              <signature/>
              <encryption/>
            </requires>
    </config>
</jboss-ws-security>
|
Keystore and Truststore information: location of each store, the password, and type of store.
|
|
Signature configuration: you must provide the certificate and key pair aliases to use. includeTimestamp specifies whether the timestamp is signed to prevent tampering.
|
|
Encryption configuration: you must provide the certificate and key pair aliases to use. Refer to Algorithms for more information.
|
|
Optional security requirements: incoming messages must be both signed, and encrypted.
|
When replying to multiple clients, a service provider must encrypt a message according to its destination using the correct public key. The JBossWS native implementation of WS-Security obtains the correct key to use from the signature received (and verified) in the incoming message.
Example 10.6. Dynamic Encryption Configuration
<jboss-ws-security xmlns="http://www.jboss.com/ws-security/config"
       xmlns:xsi="http://www.w3.org/2001/XMLSchema-instance"
       xsi:schemaLocation="http://www.jboss.com/ws-security/config
       http://www.jboss.com/ws-security/schema/jboss-ws-security_1_0.xsd">
    <key-store-file>WEB-INF/bob-sign_enc.jks</key-store-file>
    <key-store-password>password</key-store-password>
    <key-store-type>jks</key-store-type>
    <trust-store-file>WEB-INF/wsse10.truststore</trust-store-file>
    <trust-store-password>password</trust-store-password>

    <config>
     <timestamp ttl="300"/>
        <sign type="x509v3" alias="1" includeTimestamp="true"/>
      <encrypt type="x509v3"
              algorithm="aes-256"
              keyWrapAlgorithm="rsa_oaep"
               tokenReference="keyIdentifier" />
            <requires>
              <signature/>
              <encryption/>
           </requires>
    </config>
</jboss-ws-security>
|
Do not specify any encryption alias on the server side.
|
|
Declare that a signature is required.
|
Asymmetric and symmetric encryption is performed whenever the <encrypt> element is declared. Message data are encrypted using a generated symmetric secured key. This key is written in the SOAP header after being encrypted (wrapped) with the receiver public key. You can set both the encryption and key wrap algorithms.
- AES 128 (aes-128) (default)
- AES 192 (aes-192)
- AES 256 (aes-256)
- Triple DES (triple-des)
- RSA v1.5 (rsa_15) (default)
- RSA OAEP (rsa_oaep)
Note
For interoperability reasons, you may need to configure the type of reference to encryption token to be used. For example, Microsoft Indigo does not support direct reference to local binary security tokens which are the default reference type used by JBossWS.
tokenReference attribute in the <encrypt> element. The values for the tokenReference attribute are:
directReference(default)keyIdentifier- specifies the token data by means of an X509 SubjectKeyIdentifier reference.x509IssuerSerial- uniquely identifies an end entity certificate by its X509 Issuer and Serial Number
Note
JBossWS gives you precise control over elements that must be signed or encrypted. This allows you to encrypt important data only (such as credit card numbers) instead of other, security-trivial, information exchanged by the same service (email addresses, for example). To configure this, you must specify the Qualified Name (qname) of the SOAP elements to encrypt. The default behavior is to encrypt the whole SOAP body.
<encrypt type="x509v3" alias="alice">
  <targets>
    <target type="qname">{http://www.my-company.com/cc}CardNumber</target>
    <target type="qname">{http://www.my-company.com/cc}CardExpiration</target>
    <target type="qname" contentOnly="true">{http://www.my-company.com/cc}CustomerData</target>
  </targets>
</encrypt>
Signature verification errors can occur in signed message payloads that contain carriage returns (\r) due to the way the special character is parsed by XML parsers. To prevent this issue, you can choose to implement custom encoding before sending the payload. Users can either encrypt the message, or force JBossWS to perform canonical normalization of messages.
true in the MessageContext. The property must be set just before the invocation on the client side and in the endpoint implementation.
10.21.2.7. JAAS Integration
Username Token Profile provides a mean of specifying the caller's username and password. The wsse server configuration file can be used to have those information used when performing authentication and authorization through configured login module.
<jboss-ws-security xmlns="http://www.jboss.com/ws-security/config"
  xmlns:xsi="http://www.w3.org/2001/XMLSchema-instance"
  xsi:schemaLocation="http://www.jboss.com/ws-security/config
                      http://www.jboss.com/ws-security/schema/jboss-ws-security_1_0.xsd">
  <config>
    <username/>
    <authenticate>
      <usernameAuth/>
    </authenticate>
  </config>
</jboss-ws-security>In previous versions of JBossWS, the username token was always used to set the principal and credential of the caller whenever specified. This behavior is retained for backward compatibility reasons where no <authenticate> element is specified and the username token is used.
<jboss-ws-security xmlns="http://www.jboss.com/ws-security/config"
  xmlns:xsi="http://www.w3.org/2001/XMLSchema-instance"
  xsi:schemaLocation="http://www.jboss.com/ws-security/config
                      http://www.jboss.com/ws-security/schema/jboss-ws-security_1_0.xsd">
  <key-store-file>META-INF/bob-sign.jks</key-store-file>
  <key-store-password>password</key-store-password>
  <key-store-type>jks</key-store-type>
  <trust-store-file>META-INF/wsse10.truststore</trust-store-file>
  <trust-store-password>password</trust-store-password>
  <config>
    <sign type="x509v3" alias="1" includeTimestamp="false"/>
    <requires>
      <signature/>
    </requires>
    <authenticate>
      <signatureCertAuth certificatePrincipal="org.jboss.security.auth.certs.SubjectCNMapping"/>
    </authenticate>
  </config>
</jboss-ws-security>
|
The optional certificatePrincipal attribute specifies the class used to retrieve the principal from the X.509 certificate's attributes. The selected class must extend CertificatePrincipal. The default class used when no attribute is specified is org.jboss.security.auth.certs.SubjectDNMapping.
|
Example 10.7. BaseCertLoginModule Security Domain
CertRolesLoginModule that also enables authorization (using the specified jbossws-roles.properties file).
<application-policy name="JBossWSCert">
  <authentication>
    <login-module code="org.jboss.security.auth.spi.CertRolesLoginModule" flag="required">
      <module-option name="rolesProperties">jbossws-roles.properties</module-option>
      <module-option name="unauthenticatedIdentity">anonymous</module-option>
      <module-option name="securityDomain">java:/jaas/JBossWSCert</module-option>
    </login-module>
  </authentication>
</application-policy>org.jboss.security.plugins.JaasSecurityDomain MBean as shown in Example 10.8, “BaseCertLoginModule Keystore”.
Example 10.8. BaseCertLoginModule Keystore
<mbean code="org.jboss.security.plugins.JaasSecurityDomain"
       name="jboss.security:service=SecurityDomain">
  <constructor>
    <arg type="java.lang.String" value="JBossWSCert"/>
  </constructor>
  <attribute name="KeyStoreURL">resource:META-INF/keystore.jks</attribute>
  <attribute name="KeyStorePass">password</attribute>
  <depends>jboss.security:service=JaasSecurityManager</depends>
</mbean>CertificatePrincipal mapping class accesses the keystore using the principal obtained from the associated wsse header. If a certificate is found and is the same as the one specified in the wsse header, the user is successfully authenticated.
10.21.2.8. POJO Endpoint Authentication and Authorization
Important
Procedure 10.1. Enabling POJO Authentication and Authorization
Define Security Domain in Web Archive
You must define a security domain in the WAR containing the POJO.Specify a <security-domain> in the jboss-web deployment descriptor within the/WEB-INFfolder.<jboss-web> <security-domain>java:/jaas/JBossWS</security-domain> </jboss-web>
Configure the jboss-wsse-server.xml <authorize> element
Specify an <authorize> element within the <config> element.The <config> element can be defined globally, be port-specific, or operation-specific.The <authorize> element must contain either the <unchecked/> element or one or more <role> elements. Each <role> element must contain the name of a valid RoleName.You can choose to implement two types of authentication: unchecked, and role-based authentication.Unchecked AuthenticationThe authentication step is performed to validate the user's username and password, but no further role checking takes place. If the user's username and password are invalid, the request is rejected.
Example 10.9. Unchecked Authentication
<jboss-ws-security>

  <config>
    <authorize>
      <unchecked/>
    </authorize>
  </config>

</jboss-ws-security>
Role-based AuthenticationThe user is authenticated using their username and password as per Unchecked Authentication. Once the user's username and password is verified, user credentials are checked again to ensure at least of the roles specified in the <role> element is assigned to the user.
Note
Authentication and authorization proceeds even if no username and password, or certificate was provided in the request message. In this scenario, authentication may proceed if the security domain's login module has been configured with an anonymous identity.Example 10.10. Role-based Authentication
<jboss-ws-security>

  <config>
    <authorize>
      <role>friend</role>
      <role>family</role>
    </authorize>
  </config>

</jboss-ws-security>
10.21.3. XML Registries
10.21.3.1. Apache jUDDI Configuration
juddi-service.sar archive in the all server profile. The configuration of this service can be done in the jboss-service.xml of the META-INF directory in the juddi-service.sar
<!-- Datasource to Database -->
<attribute name="DataSourceUrl">java:/DefaultDS</attribute>
<!-- Should all tables be created on Start-->
<attribute name="CreateOnStart">false</attribute>
<!-- Should all tables be dropped on Stop-->
<attribute name="DropOnStop">true</attribute>
<!-- Should all tables be dropped on Start-->
<attribute name="DropOnStart">false</attribute>
<!-- Should I bind a Context to which JaxrConnectionFactory bound-->
<attribute name="ShouldBindJaxr">true</attribute>

<!-- Context to which JaxrConnectionFactory to bind to. If you have remote clients, please bind it to the global namespace(default behavior).
To just cater to clients running on the same VM as JBoss, change to java:/JAXR -->
<attribute name="BindJaxr">JAXR</attribute>
Look at the script META-INF/ddl/juddi_data.ddl for more details. Example for a user 'jboss'

INSERT INTO PUBLISHER (PUBLISHER_ID,PUBLISHER_NAME,
EMAIL_ADDRESS,IS_ENABLED,IS_ADMIN)
VALUES ('jboss','JBoss User','jboss@xxx','true','true');
10.21.3.2. JBoss JAXR Configuration
javax.xml.registry.ConnectionFactoryClass=org.apache.ws.scout.registry.
ConnectionFactoryImpl
jaxr.query.url=http://localhost:8080/juddi/inquiry
jaxr.publish.url=http://localhost:8080/juddi/publish
scout.proxy.transportClass=org.jboss.jaxr.scout.transport.SaajTransport
- When the client code is running inside JBoss (maybe a servlet or an EJB). Then you will need to pass the System properties in the
run.shorrun.batscripts to the java process via the"-D"option. - When the client code is running in an external JVM. Then you can pass the properties either as "-D" options to the java process or explicitly set them in the client code(not recommended).
System.setProperty(propertyname, propertyvalue);
10.21.3.3. JAXR Sample Code
- javax.xml.registry.RegistryService From J2EE 5.0 JavaDoc: "This is the principal interface implemented by a JAXR provider. A registry client can get this interface from a Connection to a registry. It provides the methods that are used by the client to discover various capability specific interfaces implemented by the JAXR provider."
- javax.xml.registry.BusinessLifeCycleManager From J2EE 5.0 JavaDoc: "The
BusinessLifeCycleManagerinterface, which is exposed by the Registry Service, implements the life cycle management functionality of the Registry as part of a business level API. There is no authentication information provided, because the Connection interface keeps that state and context on behalf of the client." - javax.xml.registry.BusinessQueryManager From J2EE 5.0 JavaDoc: "The
BusinessQueryManagerinterface, which is exposed by the Registry Service, implements the business style query interface. It is also referred to as the focused query interface."
String queryurl = System.getProperty("jaxr.query.url", "http://localhost:8080/juddi/inquiry");
String puburl = System.getProperty("jaxr.publish.url", "http://localhost:8080/juddi/publish");
..
Properties props = new Properties();
props.setProperty("javax.xml.registry.queryManagerURL", queryurl);
props.setProperty("javax.xml.registry.lifeCycleManagerURL", puburl);

String transportClass = System.getProperty("scout.proxy.transportClass", "org.jboss.jaxr.scout.transport.SaajTransport");
System.setProperty("scout.proxy.transportClass", transportClass);

// Create the connection, passing it the configuration properties
factory = ConnectionFactory.newInstance();
factory.setProperties(props);
connection = factory.createConnection();
/**
 * Does authentication with the uddi registry
 */
protected void login() throws JAXRException
{
   PasswordAuthentication passwdAuth = new PasswordAuthentication(userid, passwd.toCharArray());
   Set creds = new HashSet();
   creds.add(passwdAuth);

   connection.setCredentials(creds);
}
/**
 * Creates a Jaxr Organization with 1 or more services
 */
protected Organization createOrganization(String orgname) throws JAXRException
{
   Organization org = blm.createOrganization(getIString(orgname));
   org.setDescription(getIString("JBoss Inc"));
   Service service = blm.createService(getIString("JBOSS JAXR Service"));
   service.setDescription(getIString("Services of XML Registry"));
   //Create serviceBinding
   ServiceBinding serviceBinding = blm.createServiceBinding();
   serviceBinding.setDescription(blm.createInternationalString("Test Service Binding"));

   //Turn validation of URI off
   serviceBinding.setValidateURI(false);
   serviceBinding.setAccessURI("http://testjboss.org");
   ...
   // Add the serviceBinding to the service
   service.addServiceBinding(serviceBinding);

   User user = blm.createUser();
   org.setPrimaryContact(user);
   PersonName personName = blm.createPersonName("Anil S");
   TelephoneNumber telephoneNumber = blm.createTelephoneNumber();
   telephoneNumber.setNumber("111-111-7777");
   telephoneNumber.setType(null);
   PostalAddress address = blm.createPostalAddress("111", "My Drive", "BuckHead", "GA", "USA", "1111-111", "");
   Collection postalAddresses = new ArrayList();
   postalAddresses.add(address);
   Collection emailAddresses = new ArrayList();
   EmailAddress emailAddress = blm.createEmailAddress("anil@apache.org");
   emailAddresses.add(emailAddress);

   Collection numbers = new ArrayList();
   numbers.add(telephoneNumber);
   user.setPersonName(personName);
   user.setPostalAddresses(postalAddresses);
   user.setEmailAddresses(emailAddresses);
   user.setTelephoneNumbers(numbers);

   ClassificationScheme cScheme = getClassificationScheme("ntis-gov:naics", "");
   Key cKey = blm.createKey("uuid:C0B9FE13-324F-413D-5A5B-2004DB8E5CC2");
   cScheme.setKey(cKey);
   Classification classification = blm.createClassification(cScheme, "Computer Systems Design and Related Services", "5415");
   org.addClassification(classification);
   ClassificationScheme cScheme1 = getClassificationScheme("D-U-N-S", "");
   Key cKey1 = blm.createKey("uuid:3367C81E-FF1F-4D5A-B202-3EB13AD02423");
   cScheme1.setKey(cKey1);
   ExternalIdentifier ei = blm.createExternalIdentifier(cScheme1, "D-U-N-S number", "08-146-6849");
   org.addExternalIdentifier(ei);
   org.addService(service);

   return org;
}
/**
 * Locale aware Search a business in the registry
 */
public void searchBusiness(String bizname) throws JAXRException
{
   try
   {
      // Get registry service and business query manager
      this.getJAXREssentials();

      // Define find qualifiers and name patterns
      Collection findQualifiers = new ArrayList();
      findQualifiers.add(FindQualifier.SORT_BY_NAME_ASC);
      Collection namePatterns = new ArrayList();
      String pattern = "%" + bizname + "%";
      LocalizedString ls = blm.createLocalizedString(Locale.getDefault(), pattern);
      namePatterns.add(ls);

      // Find based upon qualifier type and values
      BulkResponse response = bqm.findOrganizations(findQualifiers, namePatterns, null, null, null, null);

      // check how many organization we have matched
      Collection orgs = response.getCollection();
      if (orgs == null)
      {
         log.debug(" -- Matched 0 orgs");
      }
      else
      {
         log.debug(" -- Matched " + orgs.size() + " organizations -- ");

         // then step through them
         for (Iterator orgIter = orgs.iterator(); orgIter.hasNext();)
         {
            Organization org = (Organization)orgIter.next();
            log.debug("Org name: " + getName(org));
            log.debug("Org description: " + getDescription(org));
            log.debug("Org key id: " + getKey(org));
            checkUser(org);
            checkServices(org);
         }
      }
   }
   finally
   {
      connection.close();
   }
}
10.21.3.4. Troubleshooting
- I cannot connect to the registry from JAXR. Please check the inquiry and publish url passed to the JAXR ConnectionFactory.
- I cannot connect to the jUDDI registry. Please check the jUDDI configuration and see if there are any errors in the server.log. And also remember that the jUDDI registry is available only in the "all" configuration.
- I cannot authenticate to the jUDDI registry. Have you added an authorized user to the jUDDI database, as described earlier in the chapter?
- I would like to view the SOAP messages in transit between the client and the UDDI Registry. Please use the tcpmon tool to view the messages in transit. TCPMon
10.21.3.5. Resources
10.22. JBossWS Extensions
10.22.1. Proprietary Annotations
10.22.1.1. EndpointConfig
/**
 * Defines an endpoint or client configuration.
 * This annotation is valid on an endpoint implementaion bean or a SEI.
 */
@Retention(value = RetentionPolicy.RUNTIME)
@Target(value = { ElementType.TYPE })
public @interface EndpointConfig
{
   ...
   /**
    * The optional config-name element gives the configuration name that must be present in
    * the configuration given by element config-file.
    *
    * Server side default: Standard Endpoint
    * Client side default: Standard Client
    */
   String configName() default "";
   ...
   /**
    * The optional config-file element is a URL or resource name for the configuration.
    *
    * Server side default: standard-jaxws-endpoint-config.xml
    * Client side default: standard-jaxws-client-config.xml
    */
   String configFile() default "";
}
10.22.1.2. WebContext
/**
 * Provides web context specific meta data to EJB based web service endpoints.
 *
 * @author thomas.diesler@jboss.org
 * @since 26-Apr-2005
 */
@Retention(value = RetentionPolicy.RUNTIME)
@Target(value = { ElementType.TYPE })
public @interface WebContext
{
   ...
   /**
    * The contextRoot element specifies the context root that the web service endpoint is deployed to.
    * If it is not specified it will be derived from the deployment short name.
    *
    * Applies to server side port components only.
    */
   String contextRoot() default "";
   ...
   /**
    * The virtual hosts that the web service endpoint is deployed to.
    *
    * Applies to server side port components only.
    */
   String[] virtualHosts() default {};

   /**
    * Relative path that is appended to the contextRoot to form fully qualified
    * endpoint address for the web service endpoint.
    *
    * Applies to server side port components only.
    */
   String urlPattern() default "";

   /**
    * The authMethod is used to configure the authentication mechanism for the web service.
    * As a prerequisite to gaining access to any web service which are protected by an authorization
    * constraint, a user must have authenticated using the configured mechanism.
    *
    * Legal values for this element are "BASIC", or "CLIENT-CERT".
    */
   String authMethod() default "";

   /**
    * The transportGuarantee specifies that the communication
    * between client and server should be NONE, INTEGRAL, or
    * CONFIDENTIAL. NONE means that the application does not require any
    * transport guarantees. A value of INTEGRAL means that the application
    * requires that the data sent between the client and server be sent in
    * such a way that it can not be changed in transit. CONFIDENTIAL means
    * that the application requires that the data be transmitted in a
    * fashion that prevents other entities from observing the contents of
    * the transmission. In most cases, the presence of the INTEGRAL or
    * CONFIDENTIAL flag will indicate that the use of SSL is required.
    */
   String transportGuarantee() default "";

   /**
    * A secure endpoint does not by default publish it's wsdl on an unsecure transport.
    * You can override this behavior by explicitly setting the secureWSDLAccess flag to false.
    *
    * Protect access to WSDL. See http://jira.jboss.org/jira/browse/JBWS-723
    */
   boolean secureWSDLAccess() default true;
}
10.22.1.3. SecurityDomain
/**
 * Annotation for specifying the JBoss security domain for an EJB
 */
@Target(ElementType.TYPE) @Retention(RetentionPolicy.RUNTIME)
public @interface SecurityDomain
{
   /**
    * The required name for the security domain.
    *
    * Do not use the JNDI name
    *
    *    Good: "MyDomain"
    *    Bad:  "java:/jaas/MyDomain"
    */
   String value();

   /**
    * The name for the unauthenticated pricipal
    */
   String unauthenticatedPrincipal() default "";
}
10.23. Web Services Appendix
Note
Chapter 11. Additional Services
11.1. Exposing MBean Events via SNMP
snmp-adaptor.sar. This service is only available in the all configuration, so you will need to copy the .sar file to your configuration if you want to use the service from another profile.
snmp-adaptor.sar directory, there are two configuration files that control the SNMP service.
- managers.xml
- This file configures where to send traps. The content model for this file is shown in Figure 11.1, “The schema for the SNMP managers file”.
- notifications.xml
- This file specifies the exact mapping of each notification type to a corresponding SNMP trap. The content model for this file is shown in Figure 11.2, “The schema for the notification to trap mapping file”.
SNMPAgentService MBean is configured in snmp-adaptor.sar/META-INF/jboss-service.xml.
| Parameter | Description |
|---|---|
| HeartBeatPeriod | The period in seconds at which heartbeat notifications are generated. |
| ManagersResName | Specifies the resource name of the managers.xml file. |
| NotificationMapResName | Specifies the resource name of the notifications.xml file. |
| TrapFactoryClassName | The org.jboss.jmx.adaptor.snmp.agent.TrapFactory implementation class that takes care of translation of JMX Notifications into SNMP V1 and V2 traps. |
| TimerName | Specifies the JMX ObjectName of the JMX timer service to use for heartbeat notifications. |
| SubscriptionList | Specifies which MBeans and notifications to listen for. |
Figure 11.1. The schema for the SNMP managers file

Figure 11.2. The schema for the notification to trap mapping file
TrapdService is a simple MBean that acts as an SNMP Manager. It listens to a configurable port for incoming traps and logs them as DEBUG messages using the system logger. You can modify the log4j configuration to redirect the log output to a file. SnmpAgentService and TrapdService are not dependent on each other.
Chapter 12. JBoss AOP
12.1. Some key terms
A joinpoint is any point in your Java program. The call of a method, the execution of a constructor, the access of a field; all these are joinpoints. You could also think of a joinpoint as a particular Java event, where an event is a method call, constructor call, field access, etc.
An invocation is a JBoss AOP class that encapsulates what a joinpoint is at runtime. It could contain information like which method is being called, the arguments of the method, etc.
An advice is a method that is called when a particular joinpoint is executed, such as the behavior that is triggered when a method is called. It could also be thought of as the code that performs the interception. Another analogy is that an advice is an "event handler".
Pointcuts are AOP's expression language. Just as a regular expression matches strings, a pointcut expression matches a particular joinpoint.
An introduction modifies the type and structure of a Java class. It can be used to force an existing class to implement an interface or to add an annotation to anything.
An aspect is a plain Java class that encapsulates any number of advices, pointcut definitions, mixins, or any other JBoss AOP construct.
An interceptor is an aspect with only one advice, named invoke. It is a specific interface that you can implement if you want your code to be checked by forcing your class to implement an interface. It also will be portable and can be reused in other JBoss environments like EJBs and JMX MBeans.
public class BankAccountDAO
{
 public void withdraw(double amount)
 {
  long startTime = System.currentTimeMillis();
  try
  {
   // Actual method body...
  }
  finally
  {
   long endTime = System.currentTimeMillis() - startTime;
   System.out.println("withdraw took: " + endTime);
  }
 }
}- It's extremely difficult to turn metrics on and off, as you have to manually add the code in the
try/finallyblocks to each and every method or constructor you want to benchmark. - Profiling code should not be combined with your application code. It makes your code more verbose and difficult to read, since the timings must be enclosed within the
try/finallyblocks. - If you wanted to expand this functionality to include a method or failure count, or even to register these statistics to a more sophisticated reporting mechanism, you'd have to modify a lot of different files (again).
BankAccountDAO to go through a metrics aspect before executing the actual body of that code.
12.2. Creating Aspects in JBoss AOP
try/finally block in our first code example's BankAccountDAO.withdraw() method into Metrics, an implementation of a JBoss AOP Interceptor class.
01. public class Metrics implements org.jboss.aop.advice.Interceptor
02. {
03.   public Object invoke(Invocation invocation) throws Throwable
04.   {
05.     long startTime = System.currentTimeMillis();
06.     try
07.     {
08.       return invocation.invokeNext();
09.     }
10.     finally
11.     {
12.       long endTime = System.currentTimeMillis() - startTime;
13.       java.lang.reflect.Method m = ((MethodInvocation)invocation).method;
14.       System.out.println("method " + m.toString() + " time: " + endTime + "ms");
15.     }
16.   }
17. }withdraw(): when calling code invokes withdraw(), the AOP framework breaks the method call into its parts and encapsulates those parts into an Invocation object. The framework then calls any aspects that sit between the calling code and the actual method body.
Metrics's invoke method at line 3. Line 8 wraps and delegates to the actual method and uses an enclosing try/finally block to perform the timings. Line 13 obtains contextual information about the method call from the Invocation object, while line 14 displays the method name and the calculated metrics.
Metrics code within its own object allows us to easily expand and capture additional measurements later on. Now that metrics are encapsulated into an aspect, let us see how to apply it.
12.3. Applying Aspects in JBoss AOP
executeQuery(), call the aspect that verifies SQL syntax."
<interceptor name="SimpleInterceptor" class="com.mc.Metrics"/>
|
Defines the mapping of the interceptor name to the interceptor class.
|
|
Lines 2-4 define a pointcut that applies the metrics aspect to the specific method BankAccountDAO.withdraw().
|
|
Lines 5-7 define a general pointcut that applies the metrics aspect to all methods in all classes in the com.mc.billing package. There is also an optional annotation mapping if you prefer to avoid XML.
|
BankAccountDAO class does not detect that it is being profiled. Profiling is part of what aspect-oriented programmers deem orthogonal concerns. In the object-oriented programming code snippet at the beginning of this chapter, profiling was part of the application code. AOP allows you to remove that code. A modern promise of middleware is transparency, and AOP clearly delivers.
12.4. Packaging AOP Applications
deploy/ directory with the signature *-aop.xml along with your package (this is how the base-aop.xml, included in the jboss-aop.deployer file works) or you can include it in the JAR file containing your classes. If you include your XML file in your JAR, it must have the file extension .aop and a jboss-aop.xml file must be contained in a META-INF directory, for instance: META-INF/jboss-aop.xml.
xmlns="urn:jboss:aop-beans:1:0 attribute to the root aop element, as shown here:
<aop xmlns="urn:jboss:aop-beans:1.0">
</aop>
.aop JAR files, you can make any top-level deployment contain an AOP file containing the XML binding configuration. For instance you can have an AOP file in an EAR file, or an AOP file in a WAR file. The bindings specified in the META-INF/jboss-aop.xml file contained in the AOP file will affect all the classes in the whole WAR file.
.ear/META-INF/application.xml as a Java module, as follows:
<?xml version='1.0'  encoding='UTF-8'?>
<!DOCTYPE application PUBLIC '-//Sun Microsystems, Inc.//DTD J2EE Application 1.2//EN''http://java.sun.com/j2ee/dtds/application_1_2.dtd'>

<application>
    <display-name>AOP in JBoss example</display-name>
    <module>
        <java>example.aop</java>
    </module>
    <module>
        <ejb>aopexampleejb.jar</ejb>
    </module>
    <module>
        <web>
            <web-uri>aopexample.war</web-uri>
            <context-root>/aopexample</context-root>
        </web>
    </module>
</application>
Important
.ear file are deployed in the order they are listed in the application.xml. When using loadtime weaving the bindings listed in the example.aop file must be deployed before the classes being advised are deployed, so that the bindings exist in the system before (for example) the ejb and servlet classes are loaded. This is achieved by listing the AOP file at the start of the application.xml. Other types of archives are deployed before anything else and so do not require special consideration, such as .sar and .war files.
12.5. The JBoss AspectManager Service
AspectManager Service can be managed at runtime using the JMX console, which is found at http://localhost:8080/jmx-console. It is registered under the ObjectName jboss.aop:service=AspectManager. If you want to configure it on start up you need to edit some configuration files.
AspectManager Service is configured using a JBoss Microcontainer bean. The configuration file is jboss-as/server/PROFILE/conf/bootstrap/aop.xml. The AspectManager Service is deployed with the following XML:
    <bean name="AspectManager" class="org.jboss.aop.deployers.AspectManagerJDK5">

    <property name="jbossIntegration"><inject bean="AOPJBossIntegration"/></property>

    <property name="enableLoadtimeWeaving">false</property>
    <!-- only relevant when EnableLoadtimeWeaving is true.
    When transformer is on, every loaded class gets transformed.
    If AOP can not find the class, then it throws an exception.
    Sometimes, classes may not have all the classes they reference.
    So, the Suppressing is needed.  (For instance, JBoss cache in the default configuration) -->

    <property name="suppressTransformationErrors">true</property>

    <property name="prune">true</property>

    <property name="include">org.jboss.test., org.jboss.injbossaop.</property>

    <property name="exclude">org.jboss.</property>
    <!-- This avoids instrumentation of hibernate cglib enhanced proxies

    <property name="ignore">*$$EnhancerByCGLIB$$*</property> -->

    <property name="optimized">true</property>

    <property name="verbose">false</property>
    <!-- Available choices for this attribute are: org.jboss.aop.instrument.ClassicInstrumentor (default)
    org.jboss.aop.instrument.GeneratedAdvisorInstrumentor -->

    <!-- <property name="instrumentor">org.jboss.aop.instrument.ClassicInstrumentor</property>-->

    <!-- By default the deployment of the aspects contained in
    ../deployers/jboss-aop-jboss5.deployer/base-aspects.xml
    are not deployed. To turn on deployment uncomment this property
    <property name="useBaseXml">true</property>-->
</bean>
AspectManager Service. To do this, replace the contents of the class attribute of the bean element.
12.6. Loadtime transformation in the JBoss Enterprise Application Platform Using Sun JDK
- Set the
enableLoadtimeWeavingattribute/property totrue. By default, JBoss Enterprise Application Platform will not do load-time bytecode manipulation of AOP files unless this is set. IfsuppressTransformationErrorsistrue, failed bytecode transformation will only give an error warning. This flag is needed because sometimes a JBoss deployment will not include all of the classes referenced. - Copy the
pluggable-instrumentor.jarfrom thelib/directory of your JBoss AOP distribution to thebin/directory of your JBoss Enterprise Application Platform. - Next edit
run.shorrun.bat(depending on what OS you are on) and add the following to theJAVA_OPTSenvironment variable:set JAVA_OPTS=%JAVA_OPTS% -Dprogram.name=%PROGNAME% -javaagent:pluggable-instrumentor.jar
Important
org.jboss.aop.deployers.AspectManagerJDK5 or org.jboss.aop.deployment.AspectManagerServiceJDK5 as these are what work with the -javaagent option.
12.7. JRockit
-javaagent switch mentioned in Section 12.6, “Loadtime transformation in the JBoss Enterprise Application Platform Using Sun JDK”. If you wish to use that, then the steps in Section 12.6, “Loadtime transformation in the JBoss Enterprise Application Platform Using Sun JDK” are sufficient. However, JRockit also comes with its own framework for intercepting when classes are loaded, which might be faster than the -javaagent switch. If you want to do load-time transformations using the special JRockit hooks, these are the steps you must take.
- Set the
enableLoadtimeWeavingattribute/property to true. By default, JBoss Enterprise Application Platform will not do load-time bytecode manipulation of AOP files unless this is set. IfsuppressTransformationErrorsistrue, failed bytecode transformation will only give an error warning. This flag is needed because sometimes a JBoss deployment will not include all the classes referenced. - Copy the
jrockit-pluggable-instrumentor.jarfrom thelib/directory of your JBoss AOP distribution to thebin/directory of your the JBoss Enterprise Application Platform installation. - Next edit
run.shorrun.bat(depending on what OS you are on) and add the following to theJAVA_OPTSandJBOSS_CLASSPATHenvironment variables:# Setup JBoss specific properties JAVA_OPTS="$JAVA_OPTS -Dprogram.name=$PROGNAME \ -Xmanagement:class=org.jboss.aop.hook.JRockitPluggableClassPreProcessor" JBOSS_CLASSPATH="$JBOSS_CLASSPATH:jrockit-pluggable-instrumentor.jar"
- Set the class of the
AspectManagerService toorg.jboss.aop.deployers.AspectManagerJRockiton JBoss Enterprise Application Platform 5, ororg.jboss.aop.deployment.AspectManagerServiceas these are what work with special hooks in JRockit.
12.8. Improving Loadtime Performance in the JBoss Enterprise Application Platform Environment
jboss-5.x.x.GA/server/xxx/conf/aop.xml file talked about earlier in this chapter.
12.9. Scoping the AOP to the classloader
12.9.1. Deploying as part of a scoped classloader
.aop/META-INF/jboss-aop.xml file will only apply to the classes within the scoped archive and not to anything else in the application server. Another alternative is to deploy -aop.xml files as part of a service archive (SAR). Again, if the SAR is scoped, the bindings contained in the -aop.xml files will only apply to the contents of the SAR file. It is not currently possible to deploy a standalone -aop.xml file and have that attach to a scoped deployment. Standalone -aop.xml files will apply to classes in the whole application server.
12.9.2. Attaching to a scoped deployment
jboss-app.xml file, with the scoped loader repository jboss.test:service=scoped:
<jboss-app>
    <loader-repository>
        jboss.test:service=scoped
    </loader-repository>
</jboss-app>
loader-repository tag in the AOP file's META-INF/jboss-aop.xml file.
<?xml version="1.0" encoding="UTF-8"?>
<aop>
    <loader-repository>jboss.test:service=scoped</loader-repository>

    <!-- Aspects and bindings -->
</aop>
Chapter 13. Transaction Management
13.1. Overview
- JBoss Transaction Service JTS
- A Transaction Manager capable of distributing transaction context on remote IIOP method calls, creating a single distributed transaction which spans multiple Java Virtual Machines. This is useful for large-scale applications that span multiple servers, or for standards based interoperability with transactional business logic running in CORBA based systems. The functionality of this module can be accessed through the standard JTA API. In this way, it is a drop-in replacement and does not require changes to transactional business logic. To enable it, refer to Section 13.8, “Using the JTS Module” for more information.
- JBoss Transaction Service XTS
- A Transaction Manager, based on XML, which implements the WS-AtomicTransaction (WS-AT) and WS-BusinessActivity (WS-BA) specifications. This additional module uses core transaction support provided by the JTA or JTS managers, along with web services functionality provided by JBossWS Native. It is deployed into the server as an application. Applications may use WS-AT to provide standards based, distributed ACID transactions in a manner similar to JTS but using a Web Services transport, instead of CORBA. The WS-BA implementation compliments this by providing an alternative, compensation-based transaction model, well suited to coordinating long-running, loosely coupled business processes. XTS also implements a WS-Coordination (WS-C) service which is usually accessed internally by the local WS-AT and WS-BA implementations. However, this WS-C service can also be used to provide remote coordination for WS-AT and WS-BA transactions created in other server instances or non-JBoss containers. Refer to the JBoss Transactions Web Services Programmer's Guide for more details. To enable XTS, refer to Section 13.9, “Using the XTS Module”.
13.2. Configuration Essentials
<JBOSS_HOME>/server/<PROFILE>/conf/jbossts-properties.xml. It contains defaults for the most commonly used properties. Many more are detailed in the accompanying JBoss Transaction Service Administration Guide. Each setting has a hard-coded default, but the system may not function properly if a configuration file does not exist. Additional configuration is also possible as part of the Microcontainer beans configuration found in the <JBOSS_HOME>/server/<PROFILE>/deploy/transaction-jboss-beans.xml file. This ties the transaction manager into the overall server profile, overriding the transaction configuration file settings with values specific to the application server where appropriate. In particular, it uses the Service Binding Manager to set port binding information, as well as overriding selected other properties. Configuration properties are read by the Transaction Service at server initialization, and the server must be restarted to incorporate any changes made to the configuration files.
|
Property Name
|
Default Value
|
Description
|
|---|---|---|
|
transactionTimeout
|
300 seconds
|
the default time, in seconds, after which a transaction will time out and be rolled back by. Adjust this to suit your environment and workload.
It may come as a surprise that transactions are processed asynchronously. This was a design decision, and needs to be accounted for by your code.
|
|
objectStoreDir
| |
The directory where transaction data is logged. The transaction log is required to complete transactions in the case of system failure, and needs to be on reliable storage. Normally one file is generated per transaction, and each file is a few kilobytes in size. These are distributed over a directory tree for optimal performance. If a RAID controller is used, it should be configured for write through cache, in much the same manner as database storage devices. Writing of the transaction log is automatically skipped in the case of transactions that are rolling back or contain only a single resource.
|
|
max-pool-size
| |
The Java EE Connector Architecture container keeps a dedicated physical connection open against the EIS where recovery is performed. Therefore, set the
max-pool-size to the maximum number of connection possible minus 1.
|
|
Property Name
|
Default Value
|
Description
|
|---|---|---|
|
com.arjuna.common.util.logging.DebugLevel
| 0x00000000, which equates to no logging
|
determines the internal log threshold for the transaction manager codebase. It is independent of the overall server's log4j logging configuration, and acts to suppress extraneous log entries from being printed. When the default value is active, INFO and WARN messages are still printed, and this setting provides optimal performance.
0xffffffff enables full debug logging. This setting results in large log files.
Log messages that pass the internal
DebugLevel check are passed to the server's logging system for further processing. In theory, full debugging may be left on and log4j can be used to turn logging on or off, but in reality this has a performance impact.
|
|
com.arjuna.ats.arjuna.coordinator.commitOnePhase
| YES
|
Determines whether the transaction manager automatically applies the one-phase commit optimization to the transaction completion protocol, when only a single resource is registered with the transaction. Enabled by default to prevent writing transaction logs needlessly.
|
|
com.arjuna.ats.arjuna.objectstore.transactionSync
| ON
|
Controls the flushing of transaction logs to disk during transaction termination. The default value results in a
FileDescriptor.sync call for each committing transaction. This behavior is required to provide recovery and ACID properties. If these features are unimportant to the application in question, you can achieve better performance by disabling this property. This is discouraged, since it is usually better to write such applications in a way that avoids using transactions at all.
|
|
com.arjuna.ats.arjuna.xa.nodeIdentifier
com.arjuna.ats.jta.xaRecoveryNode
| |
These properties determine the behavior of the transaction recovery system. They must be configured correctly to ensure that transactions are resolved correctly so that recovery can happen if the server crashes. Please refer to the Recovery chapter of the JBoss Transactions Administration Guide for more details.
|
|
com.arjuna.ats.arjuna.coordinator.enableStatistics
| NO
|
Enables gathering of transaction statistics. The statistics can be viewed using methods on the
TransactionManagerService bean or its corresponding JMX MBean. Disabled by default.
|
13.3. Transactional Resources
XAResource implementations, which are provided by the various resource managers. Resource managers may include databases, message queues or third-party JCA resource adapters. The list of databases and JDBC drivers which have been certified on JBoss Enterprise Application Platform is located at http://www.jboss.com/products/platforms/application/supportedconfigurations/. Most standards-compliant JDBC drivers should function correctly, but you should perform extensive testing when using an uncertified configuration, since interpretations of the XA specifications different from one vendor to another.
-ds.xml. Datasources which use the <xa-datasource> property automatically interact with the transaction manager. Connections obtained by looking up such datasource in JNDI and calling getConnection automatically participate in ongoing transactions. This is the preferred use case when transactional guarantees for data access are required.
13.4. Last Resource Commit Optimization (LRCO)
prepare phase of the transaction, at which time an attempt is made to commit it. If the attempt is successful, the transaction log is written and the remaining resources go through the phase-two commit. If the last resource fails to commit, the transaction is rolled back. Although this protocol allows most transactions to complete normally, some errors can cause an inconsistent transaction outcome. For this reason, use LRCO as a last resort. When a single <local-tx-datasource> is used in a transaction, the LRCO is automatically applied to it. In other situations, you can designate a last resource by using a special marker interface. Refer to the JBoss Transactions Programmer's Guide for more details.
13.5. Transaction Timeout Handling
TransactionReaper. The reaper rolls back transactions without interrupting any threads that may be operating within their scope. This prevents instability that results from interrupting threads executing arbitrary code. Furthermore, it allows for timely abort of transactions where the business logic thread may be executing non-interruptible operations such as network I/O operations. This approach may, cause unexpected behavior in code that is not designed to handle multithreaded transactions. Warning or error messages may be printed from transaction-aware components as a result of the unexpected change in transaction status. The transaction outcome should usually be unaffected. Any problems can be minimized by tuning the transaction timeout values. See Chapter 17, Datasource Configuration for more information.
13.6. Recovery Configuration
13.7. Transaction Service FAQ
- Q: I turned on debug logging, but nothing is logged.
- Q: Why do server logs show WARN Adding multiple last resources is disallowed., and why are my transactions are aborted?
- Q: My server terminated unexpectedly. It is running again, but my logs are filling with messages like WARN [com.arjuna.ats.jta.logging.loggerI18N] [com.arjuna.ats.internal.jta.resources.arjunacore.norecoveryxa] Could not find new XAResource to use for recovering non-serializable XAResource.
- Q: My transactions take a long time and sometimes strange things happen. The server log contains WARN [arjLoggerI18N] [BasicAction_58] - Abort of action id ... invoked while multiple threads active within it.
- Logs go through JBoss Transaction Service's own logging abstraction layer.
- Logs go through JBoss Enterprise Application Platform's
log4jlogging system.
WARN Adding multiple last resources is disallowed., and why are my transactions are aborted?
WARN [com.arjuna.ats.jta.logging.loggerI18N] [com.arjuna.ats.internal.jta.resources.arjunacore.norecoveryxa] Could not find new XAResource to use for recovering non-serializable XAResource.
WARN [arjLoggerI18N] [BasicAction_58] - Abort of action id ... invoked while multiple threads active within it.
13.8. Using the JTS Module
jbossts-properties.xml file to move between the JTA and JTS modules.
jbossts-properties.xml file is located in the <JBOSS_HOME>/docs/examples/transactions/ directory. Consult the README.txt file in the same directory for more information about changes that need to be made to other files, including the transactions-jboss-beans.xml file. An ANT script is provided to perform all of the steps automatically, but it is recommended to consult the README.txt carefully before running the script, as well as backing up your existing configuration.
INFO [TransactionManagerService] JBossTS Transaction Service (JTA version - ...)
INFO [TransactionManagerService] JBossTS Transaction Service (JTS version - ...)
13.9. Using the XTS Module
<JBOSS_HOME>/docs/examples/transactions/.
Procedure 13.1. Installing the XTS Module
- Create a subdirectory in the
<JBOSS_HOME>/server/[name]/deploy/directory, calledjbossxts.sar/. - Unpack the .sar, which is a ZIP archive, into this new directory.
- Restart JBoss Enterprise Application Platform for the module to be active.
Note
jbossxts-api.jar file included in the XTS Service Archive, but should avoid packaging it with their applications, to avoid classloading problems. All other JAR files contain internal implementation classes and should not be used directly.
<JBOSS_HOME>/docs/examples/transactions/README.txt for more configuration information. The JBoss Web Services Transactions User Guide contains information about using XTS in your applications.
13.10. Transaction Management Console
<JBOSS_HOME>/docs/example/transactions/. It is provided as an unsupported, experimental prototype. Consult the README.txt file for its capabilities and information about its use.
13.11. Experimental Components
Warning
- txbridge
- Sometimes you may need the ability to invoke traditional transaction components, such as EJBs, within the scope of a Web Services transaction. Conversely, some traditional transactional applications may need to invoke transactional web services. The Transaction Bridge (txbridge) provides mechanisms for linking these two types of transactional services together.
- BA Framework
- The XTS API operates at a very low level, requiring the developer to undertake much of the transaction infrastructure work involved in WS-BA. The BA Framework provides high-level annotations that enable JBoss Transaction Service to handle this infrastructure. The developer can then focus more on business logic instead.
13.12. Source Code and Upgrading
INFO [TransactionManagerService] JBossTS Transaction Service (JTA version - tag:JBOSSTS_4_6_1_GA_CP02) - JBoss Inc.
tag element corresponds to a tree under /tags/ in the Subversion repository. Note that the version refers to the version of the JBoss Transaction Service component used in the Enterprise Application Platform, not the version of EAP itself. If you build Enterprise Application Platform from source, you can also find the version by searching for the string version.jboss.jbossts in the component-matrix/pom.xml file.
Warning
Chapter 14. Remoting
14.1. Background
socket://bluemonkeydiamond.com:8888/?timeout=10000&serialization=jboss
14.2. JBoss Remoting Configuration
14.2.1. MBeans
    <mbean code="org.jboss.remoting.transport.Connector"
            name="jboss.messaging:service=Connector,transport=bisocket"
            display-name="Bisocket Transport Connector">
      <attribute name="Configuration">
        <config>
          <invoker transport="bisocket">
            <attribute name="marshaller" isParam="true">org.jboss.jms.wireformat.JMSWireFormat</attribute>
            <attribute name="unmarshaller" isParam="true">org.jboss.jms.wireformat.JMSWireFormat</attribute>
            <attribute name="serverBindAddress">${jboss.bind.address}</attribute>
            <attribute name="serverBindPort">4457</attribute>
            <attribute name="callbackTimeout">10000</attribute>
                 ...
          </invoker>
              ...
        </config>
      </attribute>
    </mbean>
- This server uses the bisocket transport;
- it runs on port 4457 of host ${jboss.bind.address}; and
- JBoss Messaging uses its own marshaling algorithm.
      bisocket://bluemonkeydiamond.com:4457/?marshaller=
      org.jboss.jms.wireformat.JMSWireFormat&
      unmarshaller=org.jboss.jms.wireformat.JMSWireFormat
14.2.2. POJOs
org.jboss.remoting.ServerConfiguration POJO:
     <bean name="JBMConnector" class="org.jboss.remoting.transport.Connector">
       <annotation>@org.jboss.aop.microcontainer.aspects.jmx.JMX
        (name="jboss.messaging:service=Connector,transport=bisocket",
        exposedInterface=org.jboss.remoting.transport.ConnectorMBean.class,
        registerDirectly=true)</annotation>
       <property name="serverConfiguration"><inject bean="JBMConfiguration"/></property>
     </bean>

     <!-- Remoting server configuration -->
     <bean name="JBMConfiguration" class="org.jboss.remoting.ServerConfiguration">
       <constructor>
         <parameter>bisocket</parameter>
       </constructor>

        <!-- Parameters visible to both client and server -->
       <property name="invokerLocatorParameters">
         <map keyClass="java.lang.String" valueClass="java.lang.String">
           <entry>
             <key>serverBindAddress</key>
             <value>
               <value-factory bean="ServiceBindingManager" method="getStringBinding">
                 <parameter>JBMConnector</parameter>
                 <parameter>${host}</parameter>
               </value-factory>
             </value>
           </entry>
           <entry>
             <key>serverBindPort</key>
             <value>
               <value-factory bean="ServiceBindingManager" method="getStringBinding">
                 <parameter>JBMConnector</parameter>
                 <parameter>${port}</parameter>
               </value-factory>
             </value>
           </entry>
              ...
           <entry><key>marshaller</key> <value>org.jboss.jms.wireformat.JMSWireFormat</value></entry>
           <entry><key>unmarshaller</key> <value>org.jboss.jms.wireformat.JMSWireFormat</value></entry>
         </map
       </property>

       <!-- Parameters visible only to server -->
       <property name="serverParameters">
         <map keyClass="java.lang.String" valueClass="java.lang.String">
           <entry><key>callbackTimeout</key> <value>10000</value></entry>
         </map>
       </property>

        ...
     </bean>
ServerConfiguration POJO, which is then injected into the JBMConnector org.jboss.remoting.transport.Connector POJO. The syntax is that of the Microcontainer, which is beyond the scope of this chapter. See Chapter 8, Microcontainer for details. One variation from the MBean version is the use of the ServiceBindingManager, which is also beyond the scope of this chapter. Note that the @org.jboss.aop.microcontainer.aspects.jmx.JMX annotation causes the JBMConnector to be visible as an MBean named "jboss.messaging:service=Connector,transport=bisocket".
14.3. Multihomed servers
   <!-- Beans homes1 and homes2 are used to construct a multihome Remoting server. -->
   <bean name="homes1" class="java.lang.StringBuffer">
      <constructor>
         <parameter class="java.lang.String">
            <value-factory bean="ServiceBindingManager" method="getStringBinding">
               <parameter>JBMConnector:bindingHome1</parameter>
               <parameter>${host}:${port}</parameter>
            </value-factory>
         </parameter>
      </constructor>
   </bean>

   <bean name="homes2" class="java.lang.StringBuffer">
      <constructor factoryMethod="append">
         <factory bean="homes1"/>
         <parameter>
            <value-factory bean="ServiceBindingManager" method="getStringBinding">
               <parameter>JBMConnector:bindingHome2</parameter>
               <parameter>!${host}:${port}</parameter>
            </value-factory>
         </parameter>
      </constructor>
   </bean>
    <entry>
      <key>homes</key>
      <value><value-factory bean="homes2" method="toString"/></value>
    </entry>
    bisocket://multihome/?homes=external.acme.com:5555!internal.acme.com:
    4444&marshaller=org.jboss.jms.wireformat.JMSWireFormat&
    unmarshaller=org.jboss.jms.wireformat.JMSWireFormat
14.4. Address translation
14.5. Where are they now?
<JBOSS_HOME>/server/<PROFILE>/deploy/remoting-jboss-beans.xml
<JBOSS_HOME>/server/<PROFILE>/deploy/ejb3-connectors-jboss-beans.xml
<JBOSS_HOME>/server/<PROFILE>/deploy/messaging/remoting-bisocket-service.xml
14.6. Further information.
Chapter 15. Messaging
15.1. Default JMS messaging providers
- JBoss Messaging - detailed information can be found in JBoss Messaging User Guide.
- HornetQ - detailed information can be found in HornetQ User Guide.
15.2. IBM WebSphere MQ Integration
15.2.1. Configuring WebSphere MQ Integration
The following is required before you get started configuring your instance of JBoss Enterprise Application Platform for integration with WebSphere MQ.
- A running instance of WebSphere MQ version
7.5. - A WebSphere MQ JMS resource adapter. It is supplied with your distribution of WebSphere MQ as a Resource Archive (RAR) file called
wmq.jmsra.rar. You can find it in theMQ.HOME/java/lib/jcadirectory. - To configure the connection properly, you also need to know the values listed below. The names shown in capital letters are used in the code samples further in this chapter. When reusing the code, make sure that you replace these names with the actual values relevant for your WebSphere MQ instance.
- MQ.HOST.NAME
- The host name of the machine where the WebSphere MQ instance is running. It is also possible to specify the machine's IP address instead of the hostname.
- MQ.PORT
- The port used to connect to the WebSphere MQ queue manager. The default value is
1414. - MQ.CHANNEL.NAME
- The server channel used to connect to the WebSphere MQ queue manager. The default value is
SYSTEM.DEF.SVRCONN. - MQ.TRANSPORT.TYPE
- The transport type used for the connection to WebSphere MQ. The default value is
CLIENT. - MQ.HOME
- The path to the WebSphere MQ instance's base directory. The default is
/opt/mqm/on Linux or Unix,/usr/mqm/on AIX andC:\ProgramFiles\IBM\WebSphere MQon Windows. - MQ.USER
- The user name of a user account with permissions to connect to the WebSphere MQ server by the broker.
- MQ.PASSWORD
- The password of the MQ.USER user account.
- Within the WebSphere MQ instance, you need to have objects like queue managers, queues, topics and channels defined according to the needs of your specific system. The list below contains WebSphere MQ objects that are used to demonstrate the configuration in the code samples further in this chapter. Similarly as above, when reusing the code samples, make sure that you replace the capitalized names with the names of the actual objects defined in your WebSphere MQ instance.
- MQ.QUEUE.MANAGER
- The name of the WebSphere MQ queue manager with which the connection will be established.
- MQ.QUEUE.REQUESTS
- The name of the destination message queue in WebSphere MQ to which request messages will be sent.
- MQ.QUEUE.RESPONSES
- The name of the source message queue in WebSphere MQ from which response messages will be received.
- MQ.TOPIC1
- The name of a topic defined in WebSphere MQ.
- MQ.TOPIC2
- The name of another topic defined in WebSphere MQ.
Procedure 15.1. Deploying the WebSphere MQ Resource Adapter
- Copy the
wmq.jmsra.rarfile to theJBOSS_HOME/server/PROFILE/deploy/directory.cp MQ.HOME/java/lib/jca/wmq.jmsra.rar JBOSS_HOME/server/PROFILE/deploy/
- Create a file named
jboss_jmsra_ds.xmlin theJBOSS_HOME/server/PROFILE/deploy/directory.Below, you can find a code sample showing the expected content of the file. The first part of the XML file defines a connection factory used to establish the connection with the WebSphere MQ instance. The second part of the file defines JNDI bindings of objects defined in WebSphere MQ to JMS administered objects.<?xml version="1.0" encoding="UTF-8"?> <connection-factories> <!-- connection factory definition --> <tx-connection-factory> <jndi-name>jms/CF</jndi-name> <xa-transaction /> <rar-name>wmq.jmsra.rar</rar-name> <connection-definition>javax.jms.ConnectionFactory</connection-definition> <config-property name="channel" type="java.lang.String">MQ.CHANNEL.NAME</config-property> <config-property name="hostName" type="java.lang.String">MQ.HOST.NAME</config-property> <config-property name="port" type="java.lang.String">MQ.PORT</config-property> <config-property name="username" type="java.lang.String">MQ.USER</config-property> <config-property name="password" type="java.lang.String">MQ.PASSWORD</config-property> <config-property name="queueManager" type="java.lang.String">MQ.QUEUE.MANAGER</config-property> <config-property name="transportType" type="java.lang.String">MQ.TRANSPORT.TYPE</config-property> <security-domain-and-application>JmsXARealm</security-domain-and-application> </tx-connection-factory> <!-- admin object definitions --> <mbean code="org.jboss.resource.deployment.AdminObject" name="jca.wmq:name=queue1"> <attribute name="JNDIName"> jms/queue/MQ.QUEUE.REQUESTS </attribute> <depends optional-attribute-name="RARName"> jboss.jca:service=RARDeployment,name='wmq.jmsra.rar' </depends> <attribute name="Type">javax.jms.Queue</attribute> <attribute name="Properties"> baseQueueManagerName=MQ.QUEUE.MANAGER baseQueueName=MQ.QUEUE.REQUESTS </attribute> </mbean> <mbean code="org.jboss.resource.deployment.AdminObject" name="jca.wmq:name=topic1"> <attribute name="JNDIName"> jms/topic/MQ.TOPIC1 </attribute> <depends optional-attribute-name="RARName"> jboss.jca:service=RARDeployment,name='wmq.jmsra.rar' </depends> <attribute name="Type">javax.jms.Topic</attribute> <attribute name="Properties"> brokerPubQueueManager=MQ.QUEUE.MANAGER baseTopicName=MQ.TOPIC1 </attribute> </mbean> <mbean code="org.jboss.resource.deployment.AdminObject" name="jca.wmq:name=queue2"> <attribute name="JNDIName"> jms/queue/MQ.QUEUE.RESPONSES </attribute> <depends optional-attribute-name="RARName"> jboss.jca:service=RARDeployment,name='wmq.jmsra.rar' </depends> <attribute name="Type">javax.jms.Queue</attribute> <attribute name="Properties"> baseQueueManagerName=MQ.QUEUE.MANAGER baseQueueName=MQ.QUEUE.RESPONSES </attribute> </mbean> <mbean code="org.jboss.resource.deployment.AdminObject" name="jca.wmq:name=topic2"> <attribute name="JNDIName"> jms/topic/MQ.TOPIC2 </attribute> <depends optional-attribute-name="RARName"> jboss.jca:service=RARDeployment,name='wmq.jmsra.rar' </depends> <attribute name="Type">javax.jms.Topic</attribute> <attribute name="Properties"> brokerPubQueueManager=MQ.QUEUE.MANAGER baseTopicName=MQ.TOPIC2 </attribute> </mbean> </connection-factories>
15.2.1.1. Using the WebSphere MQ resource adapter in an MDB
ActivationConfigProperty and ResourceAdapter annotations as in the following code sample:
@MessageDriven(name="WebSphereMQMDB".
 activationConfig =
   {
   @ActivationConfigProperty(propertyName = "destinationType",propertyValue = "javax.jms.Queue"),
   @ActivationConfigProperty(propertyName = "useJNDI", propertyValue = "false"),
   @ActivationConfigProperty(propertyName = "hostName", propertyValue = "MQ.HOST.NAME"),
   @ActivationConfigProperty(propertyName = "port", propertyValue = "MQ.PORT"),
   @ActivationConfigProperty(propertyName = "channel", propertyValue = "MQ.CHANNEL.NAME"),
   @ActivationConfigProperty(propertyName = "queueManager", propertyValue = "MQ.QUEUE.MANAGER"),
   @ActivationConfigProperty(propertyName = "destination", propertyValue = "MQ.QUEUE.REQUESTS"),
   @ActivationConfigProperty(propertyName = "transportType", propertyValue = "MQ.TRANSPORT.TYPE"),
   @ActivationConfigProperty(propertyName = "username", propertyValue = "MQ.USER"),
   @ActivationConfigProperty(propertyName = "password", propertyValue = "MQ.PASSWORD")
   })
@ResourceAdapter(value = "wmq.jmsra.rar")
public class WebSphereMQMDB implements MessageListener {
}
15.2.1.2. Configuration for XA Transaction Recovery
Before you begin the configuration for XA transaction recovery, you need:
- JBoss Enterprise Application Platform and WebSphere MQ configured as described previously in this chapter.
- The
mqcontext.jarlibrary. It is available as part of IBM Support Pac: ME01, which can be downloaded from the IBM website. Installation of the pack adds the library to theMQ.HOME/java/lib/directory. - An additional message queue created in WebSphere MQ for transaction recovery purposes. In the following code samples, it is referred to as
MQ.RECOVERY.QUEUE.
Procedure 15.2. Configuring WebSphere MQ Integration for XA Transaction Recovery
- In a directory of your choice on the WebSphere MQ server, create a
JMSAdmin.configfile with the following content:INITIAL_CONTEXT_FACTORY=com.ibm.mq.jms.context.WMQInitialContextFactory PROVIDER_URL=MQ.HOST.NAME:MQ.PORT/MQ.CHANNEL.NAME
- In the same directory, create a file called
xaqcf_def.scp. In the file, define an XA queue connection factory as follows:def xaqcf(WNPMQMXACF) qmgr(MQ.QUEUE.MANAGER) tran(MQ.TRANSPORT.TYPE) chan(MQ.CHANNEL.NAME) host(MQ.HOST.NAME) port(MQ.PORT)
- Still in the same directory, create a
JMSAdmin.shscript as follows:CLASSPATH=$CLASSPATH:/opt/mqm/java/lib/jms.jar CLASSPATH=$CLASSPATH:/opt/mqm/java/lib/com.ibm.mq.jar CLASSPATH=$CLASSPATH:/opt/mqm/java/lib/com.ibm.mqjms.jar CLASSPATH=$CLASSPATH:/opt/mqm/java/lib/jta.jar CLASSPATH=$CLASSPATH:/opt/mqm/java/lib/connector.jar CLASSPATH=$CLASSPATH:/opt/mqm/java/lib/jndi.jar CLASSPATH=$CLASSPATH:/opt/mqm/java/lib/providerutil.jar CLASSPATH=$CLASSPATH:/opt/mqm/java/lib/fscontext.jar CLASSPATH=$CLASSPATH:/opt/mqm/java/lib/com.ibm.mqjms.jar CLASSPATH=$CLASSPATH:/opt/mqm/java/lib/mqcontext.jar export CLASSPATH /opt/mqm/java/bin/JMSAdmin -v -cfg $PWD/JMSAdmin.config < xaqcf_def.scp
All libraries necessary for JMSAdmin tools are linked from the default WebSphere MQ installation directory, which is/opt/mqm. Please modify the paths in the script accordingly if your WebSphere MQ installation is located elsewhere. - Launch the script created in the previous step. The script will append the required paths to the CLASSPATH variable and create the XA queue connection factory.
- Copy the following libraries from
MQ.HOME/java/lib/to theJBOSS_HOME/server/PROFILE/lib/directory:- dhbcore.jar
- mqcontext.jar
- com.ibm.mq.jar
- com.ibm.mqjms.jar
- com.ibm.mq.pcf.jar
- com.ibm.mq.jmqi.jar
- com.ibm.mq.headers.jar
- com.ibm.mq.commonservices.jar
- Create an external JNDI context by adding the following code to the
JBOSS_HOME/server/PROFILE/conf/jboss-service.xmlfile:<mbean code="org.jboss.naming.ExternalContext" name="jboss.jndi:service=ExternalContext,jndiName=IBMMQInitialContext"> <attribute name="JndiName">IBMMQInitialContext</attribute> <attribute name="InitialContext">javax.naming.InitialContext</attribute> <attribute name="Properties"> java.naming.factory.initial=com.ibm.mq.jms.context.WMQInitialContextFactory java.naming.factory.url.pkgs=com.ibm.mq.jms.naming java.naming.provider.url=MQ.HOST.NAME:MQ.PORT/MQ.CHANNEL.NAME </attribute> </mbean>Alternatively, it is possible to define the external JNDI context as a remote one by adding theRemoteAccessattribute to the MBean definition. In this case, theIBMMQInitialContext/WNPMQMXACFJNDI name used in the following step points to a remote connection factory in the WebSphere MQ broker.<mbean code="org.jboss.naming.ExternalContext" name="jboss.jndi:service=ExternalContext,jndiName=IBMMQIntialContext"> <attribute name="JndiName">IBMMQIntialContext</attribute> <attribute name="InitialContext">javax.naming.InitialContext</attribute> <!-- Indicates that the external context is remote --> <attribute name="RemoteAccess">true</attribute> <attribute name="Properties"> java.naming.factory.initial=com.ibm.mq.jms.context.WMQInitialContextFactory java.naming.factory.url.pkgs=com.ibm.mq.jms.naming java.naming.provider.url=MQ.HOST.NAME:MQ.PORT/MQ.CHANNEL.NAME </attribute> </mbean> - Create a file called
wsmq-jmsprovider-ds.xmlin theJBOSS_HOME/server/PROFILE/conf/directory.Below, you can find a code sample showing the expected content of the file. The first part of the XML file defines a connection factory that supports XA transactions. The second part of the file defines JNDI bindings of the recovery queue defined in WebSphere MQ and of the XA connection factory. See the comments inside the code sample for more information.<?xml version="1.0" encoding="UTF-8"?> <connection-factories> <!-- connection factory definition --> <tx-connection-factory> <!-- Bind this ConnectionFactory with the JNDI --> <jndi-name>IbmMQJMSXA</jndi-name> <!-- Indicate that the connection factory supports XA transactions --> <xa-transaction/> <!-- rar-name is the actual RAR file name, in this case wmq.jmsra.rar --> <rar-name>wmq.jmsra.rar</rar-name> <!-- Do not prefix the JNDI name of the connection factory with the java: context and thus allow it to be looked up externally --> <use-java-context>true</use-java-context> <!-- connection-definition is the ConnectionFactory interface defined in the jboss_jmsra_ds.xml file --> <connection-definition> javax.jms.ConnectionFactory </connection-definition> <config-property name="hostName" type="java.lang.String">MQ.HOST.NAME:</config-property> <config-property name="username" type="java.lang.String">MQ.USER</config-property> <config-property name="password" type="java.lang.String">MQ.PASSWORD</config-property> <config-property name="port" type="java.lang.String">MQ.PORT</config-property> <config-property name="queueManager" type="java.lang.String">MQ.QUEUE.MANAGER</config-property> <config-property name="channel" type="java.lang.String">MQ.CHANNEL.NAME</config-property> <config-property name="transportType" type="java.lang.String">MQ.TRANSPORT.TYPE</config-property> <!-- define the security domain --> <security-domain-and-application>JmsXARealm</security-domain-and-application> </tx-connection-factory> <!-- admin object definitions --> <!-- Binding of the crash recovery queue in WebSphere MQ --> <mbean code="org.jboss.resource.deployment.AdminObject" name="jca.wmq:name=crashRecovery"> <attribute name="JNDIName"> queue/crashRecoveryQueue </attribute> <depends optional-attribute-name="RARName"> jboss.jca:service=RARDeployment,name='wmq.jmsra.rar' </depends> <attribute name="Type">javax.jms.Queue</attribute> <attribute name="Properties"> baseQueueManagerName=MQ.QUEUE.MANAGER baseQueueName=MQ.RECOVERY.QUEUE </attribute> </mbean> <!-- Binding of the XA Connection factory to the JMSProvider that is used by the transaction module --> <!-- The properties must match the Websphere MQ JNDI entry and the FactoryRef must match the xaqcf name --> <mbean code="org.jboss.jms.jndi.JMSProviderLoader" name="jboss.jms:service=JMSProviderLoader,name=WSMQJmsWNPMQMProvider"> <!-- this will be bound to java:/... and you will need to use it in conf/jbossts-properties.xml --> <attribute name="ProviderName">WSMQJmsWNPMQMProvider</attribute> <attribute name="ProviderAdapterClass">org.jboss.jms.jndi.JNDIProviderAdapter</attribute> <attribute name="FactoryRef">IBMMQInitialContext/WNPMQMXACF</attribute> <attribute name="QueueFactoryRef">IBMMQInitialContext/WNPMQMXACF</attribute> <attribute name="TopicFactoryRef">IBMMQInitialContext/WNPMQMXACF</attribute> <!-- external context defined in conf/jboss-service.xml --> <depends>jboss.jndi:service=ExternalContext,jndiName=IBMMQInitialContext</depends> </mbean> </connection-factories> - Add the the
JMSProviderLoaderreference to the<properties depends="arjuna" name="jta">section of theJBOSS_HOME/server/PROFILE/conf/jbossts-properties.xmlfile. TheWSMQJmsWNPMQMProvidervalue must match the name in the JMSProviderLoader definition in thewsmq-jmsprovider-ds.xmlfile.<!-- the value has to correspond with property com.arjuna.ats.arjuna.xa.nodeIdentifier --> <property name="com.arjuna.ats.jta.xaRecoveryNode" value="1" /> <!-- IBM MQ settings --> <!-- the WSMQJmsWNPMQMProvider must match the name in the JMSProviderLoader definition in the *-ds.xml file. --> <property name="com.arjuna.ats.jta.recovery.XAResourceRecovery.WSMQWNPMQM" value="org.jboss.jms.server.recovery.MessagingXAResourceRecovery;java:/WSMQJmsWNPMQMProvider"/>
- Restart the JBoss Enterprise Application Server instance. After the restart, the connection will be established. The connection factory will be available under the
IbmMQJMSXAJNDI name (bound by JCA). The XA connection factory will be available under theIBMMQInitialContext/WNPMQMXACFJNDI name (bound as external context).If the connection is not established successfully, the following WARN message will be periodically logged:2011-06-10 10:44:08,707 WARN [loggerI18N] [com.arjuna.ats.internal.jta.recovery.xarecovery1] Local XARecoveryModule.xaRecovery got XA exception javax.transaction.xa.XAException: Error trying to connect to provider java:/WSMQJmsWNPMQMProvider, XAException.XAER_RMERR
Chapter 16. Using Production Databases with JBoss Enterprise Application Platform
16.1. How to Use Production Databases
16.2. Installing JDBC Drivers
<JBOSS_HOME>/server/<PROFILE>/lib directory. Replace <PROFILE> with the server profile you are using.
JBDC Driver Download Locations
- MySQL
- Download from http://www.mysql.com/products/connector/.
- PostgreSQL
- Download from http://jdbc.postgresql.org/.
- Oracle
- IBM
- Download from http://www-306.ibm.com/software/data/db2/java/.
- Sybase
- Download from the Sybase jConnect product page http://www.sybase.com/products/allproductsa-z/softwaredeveloperkit/jconnect.
Note
When using Sybase database with this driver, theMaxParamsattribute cannot be set higher than481due to a limitation in the driver'sPreparedStatementclass. - Microsoft
- Download from the MSDN web site http://msdn.microsoft.com/data/jdbc/.
16.2.1. Special Notes on Sybase
sp_dboption db_name, "allow nulls by default", true
@@textsize global variable. The default setting for this variable depends on the software used to access Adaptive Server. For the JDBC driver, the default value is 32 kilobytes.
16.2.1.1. Enable JAVA services
sp_configure "enable java",1
com.sybase.jdbc2.jdbc.SybSQLException: Cannot run this command because Java services are not
        enabled. A user with System Administrator (SA) role must reconfigure the system to enable Java
16.2.1.2. CMP Configuration
sysxtypes contains one row for each extended Java-SQL datatype. This table is only used for Adaptive Servers enabled for Java. Install Java classes using the installjava program.
installjava -f <jar-file-name> -S<sybase-server> -U<super-user> -P<super-pass> -D<db-name>
16.2.1.3. Installing Java Classes
- You have to be a super-user with required privileges to install Java classes.
- The JAR file you are trying to install should be created without compression.
- Java classes that you install and use in the server must be compiled with JDK 1.2.2. If you compile a class with a later JDK, you will be able to install it in the server using the installjava utility, but you will get a java.lang.ClassFormatError exception when you attempt to use the class. This is because Sybase Adaptive Server uses an older JVM internally, and requires the Java classes to be compiled with the same.
16.2.1.4. Increase @@textsize Default for Sybase v15.0.3
@@textsize value from 32768 (bytes) to 2147483647 (bytes).
sybase-ds.xml file inside a <connection-url> directive. An example sybase-ds.xml file is located in <JBOSS_HOME>/jboss-as/docs/examples/jca/ Important
<connection-url>jdbc:sybase:[domain]:[port]/db_name?SQLINITSTRING=set TextSize 2147483647</connection-url>
16.2.2. Configuring JDBC DataSources
<JBOSS_HOME>/server/<PROFILE>/deploy directory, alongside other deployable applications and resources. The files use a standard naming scheme of DBNAME-ds.xml.
<JBOSS_HOME>/docs/examples/jca directory. Edit the datasource that corresponds to your database, and copy it to the deploy/ directory before restarting the application server.
connection-url , user-name , and password to correspond to your database of choice.
16.3. Switching to a Production Database
JBOSS_HOME/jboss-as/tools/schema/ directory.
Prerequisites
- Apache Ant must be installed.
- The database that you wish to use must already exist.
- A user with permission to make changes to that database must already exist.
- The JDBC driver JAR file for the database must be in the server configuration's
lib/directory.
Warning
Back Up Your Server Profile
Make a copy of the server profile for which you plan to configure your database as the Database Configuration Tool modifies the configuration settings.cp -R JBOSS_HOME/jboss-as/server/Profile /path/to/backup/folder.Run the Database Configuration Tool
Change to the directory containing the Database Configuration Tool script:cd JBOSS_HOME/jboss-as/tools/schemaRun Apache Ant
Run theantcommand to launch the script.Enter Data
Following the prompts, enter the following information as it is requested:- the type of database being used,
- the name of the database,
- the host name or IP Address of the database,
- the TCP port being used for the database,
- the user name needed to access the database, and
- the password for the user account.
Note
You could also add these values directly to thebuild.propertiesfile (found in the same directory) before running the script. The Database Configuration Tool will not prompt you for these properties if it finds you have already added them to the file.
The Database Configuration Tool updates the relevant configuration files and exits. JBoss Enterprise Application Platform is then reconfigured for use with the production database.
16.4. Common Database-Related Tasks
16.4.1. Security and Pooling
ResourceAdapter has <reauthentication-support>, using multiple security identities will create subpools for each identity.
Note
16.4.2. Change Database for the JMS Services
<JBOSS_HOME>/server/<PROFILE>/deploy/messaging/$DATABASE-persistence-service.xml with the $DATABASE-persistence-service.xml filename depending on your external database.
- MySQL:
mysql-persistence-service.xml - PostgreSQL:
postgresql-persistence-service.xml - Oracle:
oracle-persistence-service.xml - DB2:
db2-persistence-service.xml - Sybase:
sybase-persistence-service.xml - MS SQL Server:
mssql-persistence-service.xml
16.4.3. Support Foreign Keys in CMP Services
<JBOSS_HOME>/server/<PROFILE>/conf/standardjbosscmp-jdbc.xml file so that the fk-constraint property is true. That is needed for all external databases we support on the JBoss Enterprise Application Platform. This file configures the database connection settings for the EJB2 CMP beans deployed in the JBoss Enterprise Application Platform.
<fk-constraint>true</fk-constraint>
16.4.4. Specify Database Dialect for Java Persistence API
<JBOSS_HOME>/server/<PROFILE>/deployers/ejb3.deployer/META-INF/jpa-deployers-jboss-beans.xml file. To configure this file you need to uncomment the set of tags related to the map entry hibernate.dialect and change the values to the following based on the database you setup.
- Oracle 10g:
org.hibernate.dialect.Oracle10gDialect - Oracle 11g:
org.hibernate.dialect.Oracle10gDialect - Microsoft SQL Server 2008:
org.hibernate.dialect.SQLServerDialect - PostgresSQL 8.2.3:
org.hibernate.dialect.PostgreSQLDialect - PostgresSQL 8.3.7:
org.hibernate.dialect.PostgreSQLDialect - MySQL 5.0:
org.hibernate.dialect.MySQL5InnoDBDialect - MySQL 5.1:
org.hibernate.dialect.MySQL5InnoDBDialect - DB2 9.1:
org.hibernate.dialect.DB2Dialect - Sybase ASE 15:
org.hibernate.dialect.SybaseASE15Dialect
16.4.5. Change Other JBoss Enterprise Application Platform Services to use the External Database
16.4.5.1. The Easy Way
DefaultDS. Most JBoss services are hard-wired to use the DefaultDS by default. So, by changing the DataSource name, we do not need to change the configuration for each service individually.
*-ds.xml file for your external database, and change the value of the jndi-name property to DefaultDS. For instance, in mysql-ds.xml, you would change MySqlDS to DefaultDS and so on. You will need to remove the <JBOSS_HOME>/server/<PROFILE>/deploy/hsqldb-ds.xml file after you are done to avoid duplicated DefaultDS definition.
messaging/$DATABASE-persistence-service.xml file, you should also change the datasource name in the depends tag for the PersistenceManagers MBean to DefaultDS. For instance, for mysql-persistence-service.xml file, we change the MySqlDS to DefaultDS.
<mbean
            code="org.jboss.messaging.core.jmx.JDBCPersistenceManagerService"
            name="jboss.messaging:service=PersistenceManager"
            xmbean-dd="xmdesc/JDBCPersistenceManager-xmbean.xml">

            <depends>jboss.jca:service=DataSourceBinding,name=DefaultDS</depends>
16.4.5.2. The More Flexible Way
DefaultDS is convenient. But if you have applications that assume the DefaultDS always points to the factory-default HSQL DB, that approach could break your application. Also, changing DefaultDS destination forces all JBoss services to use the external database. What if you want to use the external database only on some services?
DefaultDS in all standard JBoss services to the DataSource JNDI name defined in your *-ds.xml file (for example, the MySqlDS in mysql-ds.xml, etc.). Below is a complete list of files that contain DefaultDS. You can update them all to use the external database on all JBoss services or update some of them to use different combination of DataSources for different services.
<JBOSS_HOME>/server/<PROFILE>/conf/login-config.xml: This file is used in Java EE container managed security services.JBOSS_HOME/server/<PROFILE>/conf/standardjbosscmp-jdbc.xml: This file configures the CMP beans in the EJB container.<JBOSS_HOME>/server/<PROFILE>/deploy/ejb2-timer-service.xml: This file configures the EJB timer services.<JBOSS_HOME>/server/<PROFILE>/deploy/juddi-service.sar/META-INF/jboss-service.xml: This file configures the UUDI service.<JBOSS_HOME>/server/<PROFILE>/deploy/juddi-service.sar/juddi.war/WEB-INF/jboss-web.xml: This file configures the UUDI service.<JBOSS_HOME>/server/<PROFILE>/deploy/juddi-service.sar/juddi.war/WEB-INF/juddi.properties: This file configures the UUDI service.<JBOSS_HOME>/server/<PROFILE>/deploy/uuid-key-generator.sar/META-INF/jboss-service.xml: This file configures the UUDI service.<JBOSS_HOME>/server/<PROFILE>/deploy/messaging/messaging-jboss-beans.xmland<JBOSS_HOME>/server/<PROFILE>/deploy/messaging/persistence-service.xml: Those files configure the JMS persistence service as we discussed earlier.
16.4.6. A Special Note About Oracle Databases
schemaname.tablename. The TIMERS and HILOSEQUENCES tables needed by JBoss Enterprise Application Platform would not be created on a schema if the table already existed on a different schema. To work around this issue, you need to edit the <JBOSS_HOME>/server/<PROFILE>/deploy/ejb2-timer-service.xml file to change the table name from TIMERS to something like schemaname2.tablename.
          <mbean code="org.jboss.ejb.txtimer.DatabasePersistencePolicy"
          name="jboss.ejb:service=EJBTimerService,persistencePolicy=database">
          <!-- DataSourceBinding ObjectName -->
          <depends optional-attribute-name="DataSource">
          jboss.jca:service=DataSourceBinding,name=DefaultDS
          </depends>
          <!-- The plugin that handles database persistence -->
          <attribute name="DatabasePersistencePlugin">
          org.jboss.ejb.txtimer.GeneralPurposeDatabasePersistencePlugin
          </attribute>
          <!-- The timers table name -->
          <attribute name="TimersTable">TIMERS</attribute>
          </mbean>
<JBOSS_HOME>/server/<PROFILE>/deploy/uuid-key-generator.sar/META-INF/jboss-service.xml file to change the table name from HILOSEQUENCES to something like schemaname2.tablename as well.
 <!-- HiLoKeyGeneratorFactory --> <mbean
          code="org.jboss.ejb.plugins.keygenerator.hilo.HiLoKeyGeneratorFactory"
          name="jboss:service=KeyGeneratorFactory,type=HiLo">

          <depends>jboss:service=TransactionManager</depends>

          <!-- Attributes common to HiLo factory instances -->

          <!-- DataSource JNDI name -->
          <depends optional-attribute-name="DataSource">jboss.jca:service=DataSourceBinding,name=DefaultDS</depends>

          <!-- table name -->
          <attribute name="TableName">HILOSEQUENCES</attribute>
Important
SQLException ("Bigger type length than Maximum") on Oracle 11g R1.
Chapter 17. Datasource Configuration
Warning
- no transaction isolation;
- thread and socket leaks (
connection.close()does not tidy up resources); - persistence quality (logs commonly become corrupted after a failure, preventing automatic recovery);
- database corruption;
- stability under load (database processes cease when dealing with too much data);
- and not viable in clustered environments.
Important
17.1. Types of Datasources
Datasource Definitions
<no-tx-datasource>- Does not take part in JTA transactions. The
java.sql.Driveris used. <local-tx-datasource>- Does not support two phase commit. The
java.sql.Driveris used. Suitable for a single database or a non-XA-aware resource. <xa-datasource>- Supports two phase commit. The
javax.sql.XADataSourcedriver is used.
17.2. Datasource Parameters
Common Datasource Parameters
<mbean>- A standard JBoss MBean deployment.
<depends>- The
ObjectNameof an MBean service thisConnectionFactoryorDataSourcedeployment depends upon. The connection manager service will not be started until the dependent services have been started. <jndi-name>- The JNDI name under which the Datasource should be bound.
<use-java-context>- Boolean value indicating whether the jndi-name should be prefixed with java:. This prefix causes the Datasource to only be accessible from within the JBoss Enterprise Application Platform virtual machine. Defaults to
TRUE. <user-name>- The user name used to create the connection to the datasource.
Note
Not used when security is configured. <password>- The password used to create the connection to the datasource.
Note
Not used when security is configured. <transaction-isolation>- The default transaction isolation of the connection. If not specified, the database-provided default is used.
Possible values for <transaction-isolation>
TRANSACTION_READ_UNCOMMITTEDTRANSACTION_READ_COMMITTEDTRANSACTION_REPEATABLE_READTRANSACTION_SERIALIZABLETRANSACTION_NONE
<new-connection-sql>- An SQL statement that is executed against each new connection. This can be used to set up the connection schema, for instance.
<check-valid-connection-sql>- An SQL statement that is executed before the connection is checked out from the pool to make sure it is still valid. If the SQL statement fails, the connection is closed and a new one is created.
<valid-connection-checker-class-name>- A class that checks whether a connection is valid using a vendor-specific mechanism.
<exception-sorter-class-name>- A class that parses vendor-specific messages to determine whether SQL errors are fatal, and destroys the connection if so. If empty, no errors are treated as fatal.
<track-statements>- Whether to monitor for un-closed Statements and ResultSets and issue warnings when they have not been closed. The default value is
NOWARN. <prepared-statement-cache-size>- The number of prepared statements per connection to be kept open and reused in subsequent requests. They are stored in a Least Recently Used (LRU) cache. The default value is
0, meaning that no cache is kept. <share-prepared-statements>- When the
<prepared-statement-cache-size>is non-zero, determines whether two requests in the same transaction should return the same statement. Defaults toFALSE.Example 17.1. Using
<share-prepared-statements>The goal is to work around questionable driver behavior, where the driver applies auto-commit semantics to local transactions.Connection c = dataSource.getConnection(); // auto-commit == false PreparedStatement ps1 = c.prepareStatement(...); ResultSet rs1 = ps1.executeQuery(); PreparedStatement ps2 = c.prepareStatement(...); ResultSet rs2 = ps2.executeQuery();This assumes that the prepared statements are the same. For some drivers,ps2.executeQuery()automatically closesrs1, so you actually need two real prepared statements behind the scenes. This only applies to the auto-commit semantic, where re-running the query starts a new transaction automatically. For drivers that follow the specification, you can set it toTRUEto share the same real prepared statement. <set-tx-query-timeout>- Whether to enable query timeout based on the length of time remaining until the transaction times out. Defaults to
FALSE. <query-timeout>- The maximum time, in seconds, before a query times out. You can override this value by setting
<set-tx-query-timeout>toTRUE. <type-mapping>- A pointer to the type mapping in
conf/standardjbosscmp.xml. This element is a child element of<metadata>. A legacy from JBoss4. <validate-on-match>- Whether to validate the connection when the JCA layer matches a managed connection, such as when the connection is checked out of the pool. With the addition of
<background-validation>this is not required. It is usually not necessary to specifyTRUEfor<validate-on-match>in conjunction with specifyingTRUEfor<background-validation>. Defaults toTRUE. <prefill>- Whether to attempt to prefill the connection pool to the minimum number of connections. Only supporting pools (OnePool) support this feature. A warning is logged if the pool does not support prefilling. Defaults to
TRUE. <background-validation>- Background connection validation reduces the overall load on the RDBMS system when validating a connection. When using this feature, EAP checks whether the current connection in the pool a separate thread (ConnectionValidator).
<background-validation-minutes>depends on this value also being set toTRUE. Defaults toFALSE.Warning
The <background-validation> parameter has been deprecated and is no longer supported: set the <background-validation-millis> parameter to a value greater than 0 and background validation will be enabled automatically. <background-validation-millis>- Background connection validation reduces the overall load on the RDBMS system when validating a connection. Setting this parameter means that JBoss will attempt to validate the current connections in the pool as a separate thread (
ConnectionValidator). This parameter's value defines the interval for which theConnectionValidatorruns. The value should differ from the <idle-timeout-minutes > value). The default value of the property is0. If <background-validation-millis> is set to a value greater than 0, the background validation is enabled.This value should not be the same as your<idle-timeout-minutes>value.Note
You should set this to a smaller value than<idle-timeout-minutes>, unless you have specified<min-pool-size>a minimum pool size set. <idle-timeout-minutes>- The maximum time, in minutes, before an idle connection is closed. A value of
0disables timeout. Defaults to15minutes. <track-connection-by-tx>- Whether the connection should be locked to the transaction, instead of returning it to the pool at the end of the transaction. In previous releases, this was
truefor local connection factories andfalsefor XA connection factories. The default is nowtruefor both local and XA connection factories, and the element has been deprecated. <interleaving>- Enables interleaving for XA connection factories.
<background-validation-minutes>- How often, in minutes, the ConnectionValidator runs. Default to 0 mills.
Warning
The <background-validation-minutes> parameter has been deprecated and is no longer supported: use the <background-validation-millis> parameter instead.Note
You should set this to a smaller value than <idle-timeout-minutes>, unless you have specified <min-pool-size> a minimum pool size set. <url-delimiter>, <url-property>, <url-selector-strategy-class-name>- Parameters dealing with database failover. As of JBoss Enterprise Application Platform 5.1, these are configured as part of the main datasource configuration. In previous versions,
<url-delimiter>appeared as<url-delimiter>. <stale-connection-checker-class-name>- An implementation of
org.jboss.resource.adapter.jdbc.StateConnectionCheckerthat decides whetherSQLExceptions that notify of bad connections throw theorg.jboss.resource.adapter.jdbc.StateConnectionExceptionexception. <max-pool-size>- The maximum number of connections allowed in the pool. If undefined, the size defaults to
10. The value in the example datasource definition (<JBOSS_HOME>/server/<PROFILE>/deploy/hsqldb-ds.xml) is set to 20. <min-pool-size>- The minimum number of connections maintained in the pool. Unless
<prefill>isTRUE, the pool remains empty until the first use, at which point the pool is filled to the<min-pool-size>. When the pool size drops below the<min-pool-size>due to idle timeouts, the pool is refilled to the<min-pool-size>. Defaults to0. <blocking-timeout-millis>- The length of time, in milliseconds, to wait for a connection to become available when all the connections are checked out. Defaults to
30000, which is 30 seconds. <use-fast-fail>- Whether to continue trying to acquire a connection from the pool even if the previous attempt has failed, or begin failover. This is to address performance issues where validation SQL takes significant time and resources to execute. Defaults to
FALSE.
Parameters for javax.sql.XADataSource Usage
<connection-url>- The JDBC driver connection URL string
<driver-class>- The JDBC driver class implementing the
java.sql.Driver <connection-property>- Used to configure the connections retrieved from the
java.sql.Driver.Example 17.2. Example
<connection-property><connection-property name="char.encoding">UTF-8</connection-property>
Parameters for javax.sql.XADataSource Usage
<xa-datasource-class>- The class implementing the
XADataSource <xa-datasource-property>- Properties used to configure the
XADataSource.Example 17.3. Example
<xa-datasource-property> Declarations<xa-datasource-property name="IfxWAITTIME">10</xa-datasource-property> <xa-datasource-property name="IfxIFXHOST">myhost.mydomain.com</xa-datasource-property> <xa-datasource-property name="PortNumber">1557</xa-datasource-property> <xa-datasource-property name="DatabaseName">mydb</xa-datasource-property> <xa-datasource-property name="ServerName">myserver</xa-datasource-property>
<xa-resource-timeout>- The number of seconds passed to
XAResource.setTransactionTimeout()when not zero. <isSameRM-override-value>- When set to
FALSE, fixes some problems with Oracle databases. <no-tx-separate-pools>- Pool transactional and non-transactional connections separately
Warning
Using this option will cause your total pool size to be twicemax-pool-size, because two actual pools will be created.Used to fix problems with Oracle.
Security Parameters
-
<application-managed-security> - Uses the username and password passed on the
getConnectionorcreateConnectionrequest by the application. -
<security-domain> - Uses the identified login module configured in
conf/login-module.xml. -
<security-domain-and-application> - Uses the identified login module configured in
conf/login-module.xmland other connection request information supplied by the application, for example JMS Queues and Topics.
Parameters for XA Recovery in the JCA Layer
<recover-user-name>- The user with credentials to perform a recovery operation.
<recover-password>- Password of the user with credentials to perform a recovery operation.
<recover-security-domain>- Security domain for recovery.
<no-recover>- Excludes a datasource from recovery.
<user-name>, < password> and <security-domain>.
17.3. Datasource Examples
17.3.1. Generic Datasource Example
Example 17.4. Generic Datasource Example
          <datasources>
  <local-tx-datasource>
    <jndi-name>GenericDS</jndi-name>
    <connection-url>[jdbc: url for use with Driver class]</connection-url>
    <driver-class>[fully qualified class name of java.sql.Driver implementation]</driver-class>
    <user-name>x</user-name>
    <password>y</password>
    <!-- you can include connection properties that will get passed in
	 the DriverManager.getConnection(props) call-->
    <!-- look at your Driver docs to see what these might be -->
    <connection-property name="char.encoding">UTF-8</connection-property>
    <transaction-isolation>TRANSACTION_SERIALIZABLE</transaction-isolation>

    <!--pooling parameters-->
    <min-pool-size>5</min-pool-size>
    <max-pool-size>100</max-pool-size>
    <blocking-timeout-millis>5000</blocking-timeout-millis>
    <idle-timeout-minutes>15</idle-timeout-minutes>
    <!-- sql to call when connection is created
	 <new-connection-sql>some arbitrary sql</new-connection-sql>
    -->

    <!-- sql to call on an existing pooled connection when it is obtained from pool
	 <check-valid-connection-sql>some arbitrary sql</check-valid-connection-sql>
    -->

    <set-tx-query-timeout></set-tx-query-timeout>
    <query-timeout>300</query-timeout> <!-- maximum of 5 minutes for queries -->

    <!-- pooling criteria.  USE AT MOST ONE-->
    <!--  If you do not use JAAS login modules or explicit login
	 getConnection(usr,pw) but rely on user/pw specified above,
	 do not specify anything here -->

    <!-- If you supply the usr/pw from a JAAS login module -->
    <security-domain>MyRealm</security-domain>

    <!-- if your app supplies the usr/pw explicitly getConnection(usr, pw) -->
    <application-managed-security></application-managed-security>

    <!--Anonymous depends elements are copied verbatim into the ConnectionManager mbean config-->
    <depends>myapp.service:service=DoSomethingService</depends>

  </local-tx-datasource>

  <!-- you can include regular mbean configurations like this one -->
  <mbean code="org.jboss.tm.XidFactory"
	 name="jboss:service=XidFactory">
    <attribute name="Pad">true</attribute>
  </mbean>


  <!-- Here's an xa example -->
  <xa-datasource>
    <jndi-name>GenericXADS</jndi-name>
    <xa-datasource-class>[fully qualified name of class implementing javax.sql.XADataSource goes here]</xa-datasource-class>
    <xa-datasource-property name="SomeProperty">SomePropertyValue</xa-datasource-property>
    <xa-datasource-property name="SomeOtherProperty">SomeOtherValue</xa-datasource-property>

    <user-name>x</user-name>
    <password>y</password>
    <transaction-isolation>TRANSACTION_SERIALIZABLE</transaction-isolation>


    <!--pooling parameters-->
    <min-pool-size>5</min-pool-size>
    <max-pool-size>100</max-pool-size>
    <blocking-timeout-millis>5000</blocking-timeout-millis>
    <idle-timeout-minutes>15</idle-timeout-minutes>
    <!-- sql to call when connection is created
	 <new-connection-sql>some arbitrary sql</new-connection-sql>
    -->

    <!-- sql to call on an existing pooled connection when it is obtained from pool
	 <check-valid-connection-sql>some arbitrary sql</check-valid-connection-sql>
    -->


    <!-- pooling criteria.  USE AT MOST ONE-->
    <!--  If you do not use JAAS login modules or explicit login
	 getConnection(usr,pw) but rely on user/pw specified above,
	 do not specify anything here -->

    <!-- If you supply the usr/pw from a JAAS login module -->
    <security-domain></security-domain>

    <!-- if your app supplies the usr/pw explicitly getConnection(usr, pw) -->
    <application-managed-security></application-managed-security>

  </xa-datasource>

</datasources>
17.3.2. Configuring a DataSource for Remote Usage
use-java-context=false.
Example 17.5. Configuring a Datasource for Remote Usage
   <datasources>
     <local-tx-datasource>
       <jndi-name>GenericDS</jndi-name>
       <use-java-context>false</use-java-context>
       <connection-url>...</connection-url>
       ...
GenericDS instead of the default of java:/GenericDS, which restricts the lookup to the same Virtual Machine as the EAP server.
Note
<use-java-context> setting is not recommended in a production environment. It requires accessing a connection pool remotely and this can cause unexpected problems, since connections are not serializable. Also, transaction propagation is not supported, since it can lead to connection leaks if unreliability is present, such as in a system crash or network failure. A remote session bean facade is the preferred way to access a datasource remotely.
17.3.3. Configuring a Datasource to Use Login Modules
Procedure 17.1. Configuring a Datasource to Use Login Modules
Add the
<security-domain-parameter>to the XML file for the datasource.<datasources> <local-tx-datasource> ... <security-domain>MyDomain</security-domain> ... </local-tx-datasource> </datasources>Add an application policy to the
login-config.xmlfile.The authentication section needs to include the configuration for your login-module. For example, to encrypt the database password, use theSecureIdentityLoginModulelogin module.<application-policy name="MyDomain"> <authentication> <login-module code="org.jboss.resource.security.SecureIdentityLoginModule" flag="required"> <module-option name="username">scott</module-option> <module-option name="password">-170dd0fbd8c13748</module-option> <module-option name="managedConnectionFactoryName">jboss.jca:service=LocalTxCM,name=OracleDSJAAS</module-option> </login-module> </authentication> </application-policy>- If you plan to fetch the data source connection from a web application, authentication must be enabled for the web application, so that the
Subjectis populated. - If users need the ability to connect anonymously, add an additional login module to the application-policy, to populate the security credentials.
- Add the
UsersRolesLoginModulemodule to the beginning of the chain. TheusersPropertiesandrolesPropertiesparameters can be directed to dummy files.<login-module code="org.jboss.security.auth.spi.UsersRolesLoginModule" flag="required"> <module-option name="unauthenticatedIdentity">nobody</module-option> <module-option name="usersProperties">props/users.properties</module-option> <module-option name="rolesProperties">props/roles.properties</module-option> </login-module>
Chapter 18. Pooling
18.1. Strategy
ManagedConnectionPool to perform the pooling. The ManagedConnectionPool is made up of subpools depending upon the strategy chosen and other pooling parameters.
|
XML
|
mbean
|
Internal Name
|
Description
|
|---|---|---|---|
| |
ByNothing
|
OnePool
|
A single pool of equivalent connections
|
|
<application-managed-security/>
|
ByApplication
|
PoolByCRI
|
Use the connection properties from allocateConnection()
|
|
<security-domain/>
|
ByContainer
|
PoolBySubject
|
A pool per Subject, e.g. preconfigured or EJB/Web log in subjects
|
|
<security-domain-and-application/>
|
ByContainerAndApplicaton
|
PoolBySubjectAndCri
|
A per Subject and connection property combination
|
Subject always overrides any user/password from createConnection(user, password) in the CRI:
(
ConnectionRequestInfo
)
18.2. Workaround for Oracle's JDK
18.3. Pool Access
No Managed Connections Available exception. More information about this exception can be found at http://www.jboss.org/community/wiki/WhatDoesTheMessageNoManagedConnectionsAvailableMean.
<allocation-retry/> and <allocation-retry-wait-millis/> elements to have the pool retry to obtain a connection before throwing the exception.
18.4. Pool Filling
- <min-pool-size/> - When the number of connections falls below this size, new connections are created
- <max-pool-size/> - No more than this number of connections are created
- <prefill/> - Feature Request has been implemented for 4.0.5.
Important
min-pool-size only on their first usage.
18.5. Idle Connections
idle-timeout-minutes parameter.
idle-timeout-minutes) are purged regularly. The check is performed at an interval that is half of the idle-timeout-minutes value.
min-pool-size value, new connections are created.
Note
18.6. Dead connections
connectionErrorOccured() event when a connection is broken. To support dead/broken connection checking there are a number of plug-ins.
18.6.1. Valid connection checking
<check-valid-connection-sql>select 1 from dual</check-valid-connection-sql>
pingDatabase() tool:
<valid-connection-checker-class-name/>
18.6.2. Errors during SQL queries
SQLException for FATAL errors rather than normal SQLExceptions. These codes or messages can be vendor specific, such as:
<exception-sorter-class-name>org.jboss.resource.adapter.jdbc.vendor.OracleExceptionSorter</exception-sorter-class-name>
FATAL errors, the connection will be closed.
18.6.3. Changing, Closing or Flushing the pool
Procedure 18.1. Changing or Flushing the pool
- Use JMX to change the attributes on the connection pool
jboss.jca:service=JBossManagedConnectionPool,name=<jndi-name>. - Use JMX to invoke
flush()to reset the pools.
flush() is invoked;
- All idle connections are immediately closed;
- Any in use connections are closed when the application finishes with them;
- New connections are created.
18.6.4. Using Third Party Pools
Part III. Clustering Guide
Chapter 19. Introduction and Quick Start
production server profile. The production server profile includes support for the following:
- A scalable, fault-tolerant JNDI implementation (HA-JNDI).
- Web tier clustering, including:
- High availability for web session state via state replication.
- Ability to integrate with hardware and software load balancers, including special integration with mod_jk and other JK-based software load balancers.
- Single Sign-on support across a cluster.
- EJB session bean clustering, for both stateful and stateless beans, and for both EJB3 and EJB2.
- A distributed cache for JPA/Hibernate entities.
- A framework for keeping local EJB2 entity caches consistent across a cluster by invalidating cache entries across the cluster when a bean is changed on any node.
- Distributed JMS queues and topics via JBoss Messaging.
- Deploying a service or application on multiple nodes in the cluster but having it active on only one (but at least one) node is called a HA Singleton.
- Keeping deployed content in sync on all nodes in the cluster via the
Farmservice.
19.1. Quick Start Guide
19.1.1. Initial Preparation
- Install JBoss Enterprise Application Platform on all your servers. In its simplest form, this is just a matter of unzipping the JBoss download onto the file system on each server.If you want to run multiple JBoss Enterprise Application Platform instances on a single server, you can either install the full JBoss distribution onto multiple locations on your file system, or you can simply make copies of the
productionserver profile. For example, assuming the root of the JBoss distribution was unzipped to/var/jboss, you would:$ cd /var/jboss/server $ cp -r production node1 $ cp -r production node2
- For each node, determine the address to bind sockets to. When you start JBoss, whether clustered or not, you need to tell JBoss on what address its sockets should listen for traffic. (The default is
localhostwhich is secure but is not very useful, particularly in a cluster.) So, you need to decide what those addresses will be. - Ensure multicast is working. By default JBoss Enterprise Application Platform uses UDP multicast for most intra-cluster communications. Make sure each server's networking configuration supports multicast and that multicast support is enabled for any switches or routers between your servers. If you are planning to run more than one node on a server, make sure the server's routing table includes a multicast route. See the JGroups documentation at http://www.jgroups.org for more on this general area, including information on how to use JGroups' diagnostic tools to confirm that multicast is working.
Note
JBoss Enterprise Application Platform clustering does not require the use of UDP multicast; the Enterprise Application Platform can also be reconfigured to use TCP unicast for intra-cluster communication. - Determine a unique integer "ServerPeerID" for each node. This is needed for JBoss Messaging clustering, and can be skipped if you will not be running JBoss Messaging (that is, you will remove JBM from the server profile's
deploydirectory). JBM requires that each node in a cluster has a unique integer ID, known as a "ServerPeerID", that should remain consistent across server restarts.Important
A simple 1, 2, 3, ..., x naming scheme is acceptable, however the value must be between the range0to1023. Values outside this range will result in a java.lang.IllegalArgumentException with the ServerPeer start Service.We will cover how to use the ServerPeerID in Section 19.1.2, “Launching a JBoss Enterprise Application Platform Cluster”.
- Pick a unique name for your cluster. The default name for a JBoss Enterprise Application Platform cluster is "DefaultPartition". Come up with a different name for each cluster in your environment, e.g. "QAPartition" or "BobsDevPartition". The use of "Partition" is not required; it's just a semi-convention. As a small aid to performance try to keep the name short, as it gets included in every message sent around the cluster. We will cover how to use the name you pick in the next section.
- Pick a unique multicast address for your cluster. By default JBoss Enterprise Application Platform uses UDP multicast for most intra-cluster communication. Pick a different multicast address for each cluster you run. Generally a good multicast address is of the form
239.255.x.y. We will cover how to use the address you pick in the next section.
19.1.2. Launching a JBoss Enterprise Application Platform Cluster
-c production command line option for each instance. Those server instances will detect each other and automatically form a cluster.
1 and for the second node is 2. We've decided to call our cluster "DocsPartition" and to use 239.255.100.100 as our multicast address. These scenarios are meant to be illustrative; the use of a two node cluster should not be taken to mean that is the best size for a cluster; it's just that's the simplest way to do the examples.
- Scenario 1: Nodes on Separate MachinesThis is the most common production scenario. Assume the machines are named "node1" and "node2", while node1 has an IP address of
192.168.0.101and node2 has an address of192.168.0.102. Assume the "ServerPeerID" for node1 is1and for node2 it's2. Assume on each machine JBoss is installed in/var/jboss.On node1, to launch JBoss:$ cd /var/jboss/bin $ ./run.sh -c production -g DocsPartition -u 239.255.100.100 \ -b 192.168.0.101 -Djboss.messaging.ServerPeerID=1On node2, it's the same except for a different-bvalue and ServerPeerID:$ cd /var/jboss/bin $ ./run.sh -c production -g DocsPartition -u 239.255.100.100 \ -b 192.168.0.102 -Djboss.messaging.ServerPeerID=2The-cswitch says to use theproductionconfig, which includes clustering support. The-gswitch sets the cluster name. The-uswitch sets the multicast address that will be used for intra-cluster communication. The-bswitch sets the address on which sockets will be bound. The-Dswitch sets system propertyjboss.messaging.ServerPeerID, from which JBoss Messaging gets its unique id. - Scenario 2: Two Nodes on a Single, Multihomed, ServerRunning multiple nodes on the same machine is a common scenario in a development environment, and is also used in production in combination with Scenario 1. (Running all the nodes in a production cluster on a single machine is generally not recommended, since the machine itself becomes a single point of failure.) In this version of the scenario, the machine is multihomed, i.e. has more than one IP address. This allows the binding of each JBoss instance to a different address, preventing port conflicts when the nodes open sockets.Assume the single machine has the
192.168.0.101and192.168.0.102addresses assigned, and that the two JBoss instances use the same addresses and ServerPeerIDs as in Scenario 1. The difference from Scenario 1 is we need to be sure each Enterprise Application Platform instance has its own work area. So, instead of using theproductionconfig, we are going to use thenode1andnode2configs we copied fromproductionearlier in the previous section.To launch the first instance, open a console window and:$ cd /var/jboss/bin $ ./run.sh -c node1 -g DocsPartition -u 239.255.100.100 \ -b 192.168.0.101 -Djboss.messaging.ServerPeerID=1For the second instance, it's the same except for different -b and -c values and a different ServerPeerID:$ cd /var/jboss/bin $ ./run.sh -c node2 -g DocsPartition -u 239.255.100.100 \ -b 192.168.0.102 -Djboss.messaging.ServerPeerID=2 - Scenario 3: Two Nodes on a Single, Non-Multihomed, ServerThis is similar to Scenario 2, but here the machine only has one IP address available. Two processes can not bind sockets to the same address and port, so we will have to tell JBoss to use different ports for the two instances. This can be done by configuring the ServiceBindingManager service by setting the
jboss.service.binding.setsystem property.To launch the first instance, open a console window and:$ cd /var/jboss/bin $ ./run.sh -c node1 -g DocsPartition -u 239.255.100.100 \ -b 192.168.0.101 -Djboss.messaging.ServerPeerID=1 \ -Djboss.service.binding.set=ports-defaultFor the second instance:$ cd /var/jboss/bin $ ./run.sh -c node2 -g DocsPartition -u 239.255.100.100 \ -b 192.168.0.101 -Djboss.messaging.ServerPeerID=2 \ -Djboss.service.binding.set=ports-01This tells the ServiceBindingManager on the first node to use the standard set of ports (e.g. JNDI on 1099). The second node uses the "ports-01" binding set, which by default for each port has an offset of 100 from the standard port number (e.g. JNDI on 1199). See theconf/bindingservice.beans/META-INF/bindings-jboss-beans.xmlfile for the full ServiceBindingManager configuration.Note that this setup is not advised for production use, due to the increased management complexity that comes with using different ports. But it is a fairly common scenario in development environments where developers want to use clustering but cannot multihome their workstations.Note
Including-Djboss.service.binding.set=ports-defaulton the command line for node1 is not technically necessary, sinceports-defaultis the default value. But using a consistent set of command line arguments across all servers is helpful to people less familiar with all the details.
19.1.3. Web Application Clustering Quick Start
HttpSession state is stored on one or more nodes in the cluster. In case the primary node handling the session fails or is shut down, any other node in the cluster can handle subsequent requests for the session by accessing the backup copy. Web tier clustering is discussed in detail in the HTTP Connectors Load Balancing Guide.
- Configuring an External Load Balancer. Web applications require an external load balancer to balance HTTP requests across the cluster of JBoss Enterprise Application Platform instances (see Section 20.2.2, “External Load Balancer Architecture” for more on why that is). JBoss Enterprise Application Platform itself does not act as an HTTP load balancer. So, you will need to set up a hardware or software load balancer. There are many possible load balancer choices, so how to configure one is really beyond the scope of a Quick Start. Refer to the HTTP Connectors Load Balancing Guide for details on how to set up the popular mod_jk software load balancer.
- Configuring Your Web Application for Clustering. This aspect involves telling JBoss you want clustering behavior for a particular web app, and it could not be simpler. Just add an empty
distributableelement to your application'sweb.xmlfile:<?xml version="1.0"?> <web-app xmlns="http://java.sun.com/xml/ns/javaee" xmlns:xsi="http://www.w3.org/2001/XMLSchema-instance" xsi:schemaLocation="http://java.sun.com/xml/ns/javaee http://java.sun.com/xml/ns/javaee/web-app_2_5.xsd" version="2.5"> <distributable/> </web-app>Simply doing that is enough to get the default JBoss Enterprise Application Platform web session clustering behavior, which is appropriate for most applications. Refer to the HTTP Connectors Load Balancing Guide for more advanced configuration options.
19.1.4. EJB Session Bean Clustering Quick Start
org.jboss.ejb3.annotation.Clustered annotation to the bean class for your stateful or stateless bean:
@javax.ejb.Stateless
@org.jboss.ejb3.annotation.Clustered
public class MyBean implements MySessionInt {
public void test() {
// Do something cool
}
}clustered element to the bean's section in the JBoss-specific deployment descriptor, jboss.xml:
<jboss>
<enterprise-beans>
<session>
<ejb-name>example.StatelessSession</ejb-name>
<jndi-name>example.StatelessSession</jndi-name>
<clustered>true</clustered>
</session>
</enterprise-beans>
</jboss>19.1.5. Entity Clustering Quick Start
persistence.xml as follows:
<?xml version="1.0" encoding="UTF-8"?>
<persistence xmlns="http://java.sun.com/xml/ns/persistence"
xmlns:xsi="http://www.w3.org/2001/XMLSchema-instance"
xsi:schemaLocation="http://java.sun.com/xml/ns/persistence
http://java.sun.com/xml/ns/persistence/persistence_1_0.xsd"
version="1.0">
<persistence-unit name="somename" transaction-type="JTA">
<jta-data-source>java:/SomeDS</jta-data-source>
<properties>
<property name="hibernate.cache.use_second_level_cache" value="true"/>
<property name="hibernate.cache.region.factory_class"
value="org.hibernate.cache.jbc2.JndiMultiplexedJBossCacheRegionFactory"/>
<property name="hibernate.cache.region.jbc2.cachefactory" value="java:CacheManager"/>
<!-- Other configuration options ... -->
</properties>
</persistence-unit>
</persistence>org.hibernate.annotations.Cache annotation to your entity class:
package org.example.entities;
import java.io.Serializable;
import javax.persistence.Entity;
import org.hibernate.annotations.Cache;
import org.hibernate.annotations.CacheConcurrencyStrategy;
@Entity
@Cache(usage=CacheConcurrencyStrategy.TRANSACTIONAL)
public class Account implements Serializable {Note
Chapter 20. Clustering Concepts
20.1. Cluster Definition
Channel providing the core functionality of tracking who is in the cluster and reliably exchanging messages between the cluster members. JGroups channels with the same configuration and name have the ability to dynamically discover each other and form a group. This is why simply executing “run -c production” on two Enterprise Application Platform instances on the same network is enough for them to form a cluster – each Enterprise Application Platform starts a Channel (actually, several) with the same default configuration, so they dynamically discover each other and form a cluster. Nodes can be dynamically added to or removed from clusters at any time, simply by starting or stopping a Channel with a configuration and name that matches the other cluster members.
Channel. In a standard start of the Enterprise Application Platform 5 production server profile, two different services create a total of four different channels – JBoss Messaging creates two and a core general purpose clustering service known as HAPartition creates two more. If you deploy clustered web applications, clustered EJB3 SFSBs or a clustered JPA/Hibernate entity cache, additional channels will be created. The channels the Enterprise Application Platform connects can be divided into three broad categories: a general purpose channel used by the HAPartition service, channels created by JBoss Cache for special purpose caching and cluster wide state replication, and two channels used by JBoss Messaging.
run -c production, the channels will discover each other and you'll have a conceptual cluster. It's easy to think of this as a two node cluster, but it's important to understand that you really have multiple channels, and hence multiple two node clusters.
-g (partition name) and -u (multicast address) start up switches. For each set of servers, different values should be chosen. The sections on “JGroups Configuration” and “Isolating JGroups Channels” cover in detail how to configure the Enterprise Application Platform such that desired peers find each other and unwanted peers do not.
Figure 20.1. Clusters and server nodes
20.2. Service Architectures
20.2.1. Client-side interceptor architecture

|
Client communicates with proxy
|
|
Proxy sends request to Node 1
|
|
Node 1 goes offline
|
|
Proxy switches to Node 2
|
|
Proxy sends request to Node 2
|
|
Proxy downloads class dynamically from Node 2
|
20.2.2. External Load Balancer Architecture

|
Browser sends a request.
|
|
Load Balancer forwards request to Node 1.
|
|
Node 1 goes offline.
|
|
Load Balancer switches to using Node 2.
|
|
Load Balancer forwards to Node 2.
|
20.3. Load Balancing Policies
20.3.1. Client-side interceptor architecture
- Round-Robin: each call is dispatched to a new node, proceeding sequentially through the list of nodes. The first target node is randomly selected from the list. Implemented by
org.jboss.ha.framework.interfaces.RoundRobin(legacy) andorg.jboss.ha.client.loadbalance.RoundRobin(EJB3). - Random-Robin: for each call the target node is randomly selected from the list. Implemented by
org.jboss.ha.framework.interfaces.RandomRobin(legacy) andorg.jboss.ha.client.loadbalance.RandomRobin(EJB3). - First Available: one of the available target nodes is elected as the main target and is thereafter used for every call; this elected member is randomly chosen from the list of members in the cluster. When the list of target nodes changes (because a node starts or dies), the policy will choose a new target node unless the currently elected node is still available. Each client-side proxy elects its own target node independently of the other proxies, so if a particular client downloads two proxies for the same target service (for example, an EJB), each proxy will independently pick its target. This is an example of a policy that provides “session affinity” or “sticky sessions”, since the target node does not change once established. Implemented by
org.jboss.ha.framework.interfaces.FirstAvailable(legacy) andorg.jboss.ha.client.loadbalance.aop.FirstAvailable(EJB3). - First Available Identical All Proxies: has the same behavior as the "First Available" policy but the elected target node is shared by all proxies in the same client-side VM that are associated with the same target service. So if a particular client downloads two proxies for the same target service (e.g. an EJB), each proxy will use the same target. Implemented by
org.jboss.ha.framework.interfaces.FirstAvailableIdenticalAllProxies(legacy) andorg.jboss.ha.client.loadbalance.aop.FirstAvailableIdenticalAllProxies(EJB3).
org.jboss.ha.framework.interfaces.LoadBalancePolicy interface; users are free to write their own implementation of this simple interface if they need some special behavior. In later sections we will see how to configure the load balance policies used by different services.
20.3.2. External load balancer architecture
- Transaction-Sticky Round-Robin: Transaction-sticky variant of Round-Robin. Implemented by
org.jboss.ha.framework.interfaces.TransactionStickyRoundRobin. - Transaction-Sticky Random-Robin: Transaction-sticky variant of Random-Robin. Implemented by
org.jboss.ha.framework.interfaces.TransactionStickyRandomRobin. - Transaction-Sticky First Available: Transaction-sticky variant of First Available. Implemented by
org.jboss.ha.framework.interfaces.TransactionStickyFirstAvailable. - Transaction-Sticky First Available Identical All Proxies: Transaction-sticky variant of First Available Identical All Proxies. Implemented by
org.jboss.ha.framework.interfaces.TransactionStickyFirstAvailableIdenticalAllProxies.
Chapter 21. Clustering Building Blocks
Figure 21.1. The JBoss Enterprise Application Platform clustering architecture
21.1. Group Communication with JGroups
Channel and use it to communicate. The Channel handles such tasks as managing which nodes are members of the group, detecting node failures, ensuring lossless, first-in-first-out delivery of messages to all group members, and providing flow control to ensure fast message senders cannot overwhelm slow message receivers.
Channel are determined by the set of protocols that compose it. Each protocol handles a single aspect of the overall group communication task; for example the UDP protocol handles the details of sending and receiving UDP datagrams. A Channel that uses the UDP protocol is capable of communicating with UDP unicast and multicast; alternatively one that uses the TCP protocol uses TCP unicast for all messages. JGroups supports a wide variety of different protocols (see Section 28.1, “Configuring a JGroups Channel's Protocol Stack” for details), but the Enterprise Application Platform ships with a default set of channel configurations that should meet most needs.
<JBOSS_HOME>/bin/ create run.conf. Open the file and add the following: JAVA_OPTS="$JAVA_OPTS -Djboss.default.jgroups.stack=<METHOD>".
21.1.1. The Channel Factory Service
ChannelFactory service is used as a registry for named channel configurations and as a factory for Channel instances. A service that needs a channel requests the channel from the ChannelFactory, passing in the name of the desired configuration.
server/production/deploy/cluster/jgroups-channelfactory.sar. On start up the ChannelFactory service parses the server/production/deploy/cluster/jgroups-channelfactory.sar/META-INF/jgroups-channelfactory-stacks.xml file, which includes various standard JGroups configurations identified by name (for example, UDP or TCP). Services needing a channel access the channel factory and ask for a channel with a particular named configuration.
Note
cluster_name argument to the Channel.connect(String cluster_name) method. The Channel uses that cluster_name as one of the factors that determine whether a particular message received over the network is intended for it.
21.1.1.1. Standard Protocol Stack Configurations
udp, jbm-control and jbm-data, with all clustering services other than JBoss Messaging using udp.
stack element to the server/production/deploy/cluster/jgroups-channelfactory.sar/META-INF/jgroups-channelfactory-stacks.xml file. You can alter the behavior of an existing configuration by editing this file. Before doing this though, have a look at the other standard configurations the Enterprise Application Platform ships; perhaps one of those meets your needs. Also, please note that before editing a configuration you should understand what services are using that configuration; make sure the change you are making is appropriate for all affected services. If the change is not appropriate for a particular service, create a new configuration and change some services to use that new configuration.
- udpUDP multicast based stack meant to be shared between different channels. Message bundling is disabled, as it can add latency to synchronous group RPCs. Services that only make asynchronous RPCs (for example, JBoss Cache configured for REPL_ASYNC) and do so in high volume may be able to improve performance by configuring their cache to use the
udp-asyncstack below. Services that only make synchronous RPCs (for example JBoss Cache configured for REPL_SYNC or INVALIDATION_SYNC) may be able to improve performance by using theudp-syncstack below, which does not include flow control. - udp-asyncSame as the default
udpstack above, except message bundling is enabled in the transport protocol (enable_bundling=true). Useful for services that make high-volume asynchronous RPCs (e.g. high volume JBoss Cache instances configured for REPL_ASYNC) where message bundling may improve performance. - udp-syncUDP multicast based stack, without flow control and without message bundling. This can be used instead of
udpif (1) synchronous calls are used and (2) the message volume (rate and size) is not that large. Do not use this configuration if you send messages at a high sustained rate, or you might run out of memory. - tcpTCP based stack, with flow control and message bundling. TCP stacks are usually used when IP multicasting cannot be used in a network (e.g. routers discard multicast).
- tcp-syncTCP based stack, without flow control and without message bundling. TCP stacks are usually used when IP multicasting cannot be used in a network (e.g.routers discard multicast). This configuration should be used instead of
tcpabove when (1) synchronous calls are used and (2) the message volume (rate and size) is not that large. Do not use this configuration if you send messages at a high sustained rate, or you might run out of memory. - jbm-controlStack optimized for the JBoss Messaging Control Channel. By default uses the same UDP transport protocol configuration as is used for the default
udpstack defined above. This allows the JBoss Messaging Control Channel to use the same sockets, network buffers and thread pools as are used by the other standard JBoss Enterprise Application Platform clustered services (see Section 21.1.2, “The JGroups Shared Transport”) - jbm-dataTCP-based stack optimized for the JBoss Messaging Data Channel.
21.1.1.2. Changing the Protocol Stack Configuration
udp protocol stack configuration. If you want to use a TCP-based configuration, set the system property jboss.default.jgroups.stack to the tcp value (-Djboss.default.jgroups.stack=tcp). This change configures most of the services that use a JGroups channel to use the TCP-based configuration. To make tcp the default protocol stack, add the system property to the JAVA_OPTS environment variable in the <JBOSS_HOME>/bin/run.conf file on Linux platforms or <JBOSS_HOME>/bin/run.conf.bat on Windows platforms.
tcp stack uses UDP multicast (via the MPING layer) for peer discovery. This allows the stack to avoid environment-specific configuration of hosts and work out of the box. If you cannot use UDP multicast, you need to change to a non-UDP-based peer-discovery layer (the TCPPING layer) and configure the addresses/ports of the possible cluster nodes. You can change the protocol stack configuration in jgroups-channelfactory-stacks.xml. The file contains definitions for both peer-discovery layers: by default, the definition of MPING layer is uncommented and the TCPPING layer is commented. To switch to non-UDP based peer-discovery, comment out the MPING layer, and uncomment and configure the TCPPING layer. For more information on MPING and TCPPING, refer to Section 28.1.3, “Discovery Protocols”.
21.1.1.3. Changing the Protocol Stack Configuration of JBoss Messaging
jbm-control and jbm-data protocol stack configurations by default. The jbm-control protocol stack is fully UDP-based and jbm-data uses the MPING discovery protocol, which uses UDP multicast. Therefore, if you want JBoss Messaging to use only TCP-based configurations, you need to configure the JBoss Messaging control channel to use the tcp protocol stack instead of the jbm-control stack and modify the jbm-data protocol stack to use TCPPING layer instead of the MPING layer.
tcp protocol stack, open the deploy/messaging/RDMS-persistence-service.xml file (the RDMS value depends on the relational database management system you are using for message persistence) and change the ControlChannelName attribute value of the org.jboss.messaging.core.jmx.MessagingPostOfficeService mbean to tcp:
<!--<attribute name="ControlChannelName">jbm-control</attribute>--> <attribute name="ControlChannelName">tcp</attribute>
/server/PROFILE/deploy/cluster/jgroups-channelfactory.sar/META-INF/jgroups-channelfactory-stacks.xml and replace the MPING layer with an equivalent TCPPING layer as shown in Example 21.1, “Definition of the jbm-data protocol stack with TCPPING definition”.
Example 21.1. Definition of the jbm-data protocol stack with TCPPING definition
<!--
<MPING timeout="3000"
num_initial_members="3"
mcast_addr="${jboss.jgroups.tcp.mping_mcast_addr:230.11.11.11}"
mcast_port="${jgroups.tcp.mping_mcast_port:45700}"
ip_ttl="${jgroups.udp.ip_ttl:2}"/>
-->
<TCPPING timeout="5000"
initial_hosts="${jbm.data.tcpping.initial_hosts:localhost[7900],localhost[7901]}"
port_range="1"
num_initial_members="3"/>
21.1.2. The JGroups Shared Transport
singleton_name="someName" attribute to the protocol's configuration. All channels whose transport protocol configuration uses the same singleton_name value will share their transport. All other protocols in the stack will not be shared. Figure 21.2, “Services using a Shared Transport” illustrates 4 services running in a VM, each with its own channel. Three of the services are sharing a transport; the fourth is using its own transport.
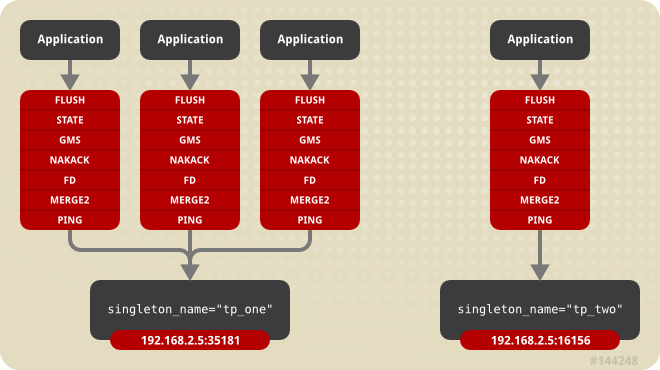
Figure 21.2. Services using a Shared Transport
singleton_name configured. In fact, if you add a stack to the ChannelFactory that does not include a singleton_name, before creating any channels for that stack, the ChannelFactory will synthetically create a singleton_name by concatenating the stack name to the string "unnamed_", e.g. unnamed_customStack.
21.2. Distributed Caching with JBoss Cache
Important
- replication of clustered webapp sessions
- replication of clustered EJB3 Stateful Session beans
- clustered caching of JPA and Hibernate entities
- clustered Single Sign-On
- the HA-JNDI replicated tree
- DistributedStateService
21.2.1. The JBoss Enterprise Application Platform CacheManager Service
deploy/ directory, which had a number of disadvantages:
- Caches that end user applications did not need were deployed anyway, with each creating an expensive JGroups channel. For example, even if there were no clustered EJB3 SFSBs, a cache to store them was started.
- Caches are internal details of the services that use them. They should not be first-class deployments.
- Services would find their cache via JMX look ups. Using JMX for purposes other than exposing management interfaces is just not the JBoss Enterprise Application Platform 5 way.
<JBOSS_HOME>/server/<PROFILE>/deploy/cluster/jboss-cache-manager.sar. The CacheManager is a factory and registry for JBoss Cache instances. It is configured with a set of named JBoss Cache configurations. Services that need a cache ask the cache manager for the cache by name; the cache manager creates the cache (if not already created) and returns it. The cache manager keeps a reference to each cache it has created, so all services that request the same cache configuration name will share the same cache. When a service is done with the cache, it releases it to the cache manager. The cache manager keeps track of how many services are using each cache, and will stop and destroy the cache when all services have released it.
21.2.1.1. Standard Cache Configurations
deploy/cluster/jboss-cache-manager.sar/META-INF/jboss-cache-manager-jboss-beans.xml file (see Section 29.2.1, “Deployment Via the CacheManager Service” for details). Note however that these configurations are specifically optimized for their intended use, and except as specifically noted in the documentation chapters for each service in this guide, it is not advisable to change them.
- standard-session-cacheStandard cache used for web sessions.
- field-granularity-session-cacheStandard cache used for FIELD granularity web sessions.
- sfsb-cacheStandard cache used for EJB3 SFSB caching.
- ha-partitionUsed by web tier Clustered Single Sign-On, HA-JNDI, Distributed State.
- mvcc-entityA configuration appropriate for JPA/Hibernate entity/collection caching that uses JBoss Cache's MVCC locking (see notes below).
- optimistic-entityA configuration appropriate for JPA/Hibernate entity/collection caching that uses JBoss Cache's optimistic locking (see notes below).
- pessimistic-entityA configuration appropriate for JPA/Hibernate entity/collection caching that uses JBoss Cache's pessimistic locking (see notes below).
- mvcc-entity-repeatableSame as "mvcc-entity" but uses JBoss Cache's REPEATABLE_READ isolation level instead of READ_COMMITTED (see notes below).
- pessimistic-entity-repeatableSame as "pessimistic-entity" but uses JBoss Cache's REPEATABLE_READ isolation level instead of READ_COMMITTED (see notes below).
- local-queryA configuration appropriate for JPA/Hibernate query result caching. Does not replicate query results. DO NOT store the timestamp data Hibernate uses to verify validity of query results in this cache.
- replicated-queryA configuration appropriate for JPA/Hibernate query result caching. Replicates query results. DO NOT store the timestamp data Hibernate uses to verify validity of query result in this cache.
- timestamps-cacheA configuration appropriate for the timestamp data cached as part of JPA/Hibernate query result caching. A replicated timestamp cache is required if query result caching is used, even if the query results themselves use a non-replicating cache like
local-query. - mvcc-sharedA configuration appropriate for a cache that's shared for JPA/Hibernate entity, collection, query result and timestamp caching. Not an advised configuration, since it requires cache mode REPL_SYNC, which is the least efficient mode. Also requires a full state transfer at start up, which can be expensive. Maintained for backwards compatibility reasons, as a shared cache was the only option in JBoss 4. Uses JBoss Cache's MVCC locking.
- optimistic-sharedA configuration appropriate for a cache that's shared for JPA/Hibernate entity, collection, query result and timestamp caching. Not an advised configuration, since it requires cache mode REPL_SYNC, which is the least efficient mode. Also requires a full state transfer at start up, which can be expensive. Maintained for backwards compatibility reasons, as a shared cache was the only option in JBoss 4. Uses JBoss Cache's optimistic locking.
- pessimistic-sharedA configuration appropriate for a cache that's shared for JPA/Hibernate entity, collection, query result and timestamp caching. Not an advised configuration, since it requires cache mode REPL_SYNC, which is the least efficient mode. Also requires a full state transfer at start up, which can be expensive. Maintained for backwards compatibility reasons, as a shared cache was the only option in JBoss 4. Uses JBoss Cache's pessimistic locking.
- mvcc-shared-repeatableSame as "mvcc-shared" but uses JBoss Cache's REPEATABLE_READ isolation level instead of READ_COMMITTED (see notes below).
- pessimistic-shared-repeatableSame as "pessimistic-shared" but uses JBoss Cache's REPEATABLE_READ isolation level instead of READ_COMMITTED. (see notes below).
Note
Note
21.2.1.2. Cache Configuration Aliases
jboss-cache-manager-jboss-beans.xml file. The following redacted configuration shows the standard aliases in Enterprise Application Platform 5:
<bean name="CacheManager" class="org.jboss.ha.cachemanager.CacheManager">
. . .
<!-- Aliases for cache names. Allows caches to be shared across
services that may expect different cache configuration names. -->
<property name="configAliases">
<map keyClass="java.lang.String" valueClass="java.lang.String">
<!-- Use the HAPartition cache for ClusteredSSO caching -->
<entry>
<key>clustered-sso</key>
<value>ha-partition</value>
</entry>
<!-- Handle the legacy name for the EJB3 SFSB cache -->
<entry>
<key>jboss.cache:service=EJB3SFSBClusteredCache</key>
<value>sfsb-cache</value>
</entry>
<!-- Handle the legacy name for the EJB3 Entity cache -->
<entry>
<key>jboss.cache:service=EJB3EntityTreeCache</key>
<value>mvcc-shared</value>
</entry>
</map>
</property>
. . .
</bean>21.3. The HAPartition Service
Channel that provides support for making/receiving RPC invocations on/from one or more cluster members. HAPartition allows services that use it to share a single Channel and multiplex RPC invocations over it, eliminating the configuration complexity and runtime overhead of having each service create its own Channel. HAPartition also supports a distributed registry of which clustering services are running on which cluster members. It provides notifications to interested listeners when the cluster membership changes or the clustered service registry changes. HAPartition forms the core of many of the clustering services we will be discussing in the rest of this guide, including smart client-side clustered proxies, EJB 2 SFSB replication and entity cache management, farming, HA-JNDI and HA singletons. Custom services can also make use of HAPartition.
HAPartition service definition packaged with the standard JBoss Enterprise Application Platform distribution. This configuration can be found in the server/production/deploy/cluster/hapartition-jboss-beans.xml file.
<bean name="HAPartitionCacheHandler" class="org.jboss.ha.framework.server.HAPartitionCacheHandlerImpl">
<property name="cacheManager"><inject bean="CacheManager"/></property>
<property name="cacheConfigName">ha-partition</property>
</bean>
<bean name="HAPartition" class="org.jboss.ha.framework.server.ClusterPartition">
<depends>jboss:service=Naming</depends>
<annotation>@org.jboss.aop.microcontainer.aspects.jmx.JMX
(name="jboss:service=HAPartition,partition=${jboss.partition.name:DefaultPartition}", exposedInterface=org.jboss.ha.framework.server.ClusterPartitionMBean.class, registerDirectly=true)</annotation>
<!-- ClusterPartition requires a Cache for state management -->
<property name="cacheHandler"><inject bean="HAPartitionCacheHandler"/></property>
<!-- Name of the partition being built -->
<property name="partitionName">${jboss.partition.name:DefaultPartition}</property>
<!-- The address used to determine the node name -->
<property name="nodeAddress">${jboss.bind.address}</property>
<!-- Max time (in ms) to wait for state transfer to complete. Increase for large states -->
<property name="stateTransferTimeout">30000</property>
<!-- Max time (in ms) to wait for RPC calls to complete. -->
<property name="methodCallTimeout">60000</property>
<!-- Optionally provide a thread source to allow async connect of our channel -->
<property name="threadPool"><inject bean="jboss.system:service=ThreadPool"/></property>
<property name="distributedStateImpl">
<bean name="DistributedState" class="org.jboss.ha.framework.server.DistributedStateImpl">
<annotation>@org.jboss.aop.microcontainer.aspects.jmx.JMX
(name="jboss:service=DistributedState,partitionName=${jboss.partition.name:DefaultPartition}", exposedInterface=org.jboss.ha.framework.server.DistributedStateImplMBean.class, registerDirectly=true)</annotation>
<property name="cacheHandler"><inject bean="HAPartitionCacheHandler"/></property>
</bean>
</property>
</bean>HAPartitionCacheHandler and the HAPartition itself.
HAPartition bean itself exposes the following configuration properties:
- partitionName is an optional attribute to specify the name of the cluster. Its default value is
DefaultPartition. Use the-g(a.k.a. --partition) command line switch to set this value at server start up.Note
If you use the partitionName property on the MCBean:ServerConfig Profile Service component, the system returns a null value for the property. Use the PartionName from the MCBean:HAPartition managed component to obtain the correct value. - nodeAddress is unused and can be ignored.
- stateTransferTimeout specifies the timeout (in milliseconds) for initial application state transfer. State transfer refers to the process of obtaining a serialized copy of initial application state from other already-running cluster members at service start up. Its default value is
30000. - methodCallTimeout specifies the timeout (in milliseconds) for obtaining responses to group RPCs from the other cluster members. Its default value is
60000.
HAPartitionCacheHandler is a small utility service that helps the HAPartition integrate with JBoss Cache (see Section 21.2.1, “The JBoss Enterprise Application Platform CacheManager Service”). HAPartition exposes a child service called DistributedState (see Section 21.3.2, “DistributedState Service”) that uses JBoss Cache; the HAPartitionCacheHandler helps ensure consistent configuration between the JGroups Channel used by Distributed State's cache and the one used directly by HAPartition.
- cacheConfigName the name of the JBoss Cache configuration to use for the HAPartition-related cache. Indirectly, this also specifies the name of the JGroups protocol stack configuration HAPartition should use. See Section 29.1.5, “JGroups Integration” for more on how the JGroups protocol stack is configured.
partitionName and the HAPartitionCacheHandler's cacheConfigName must specify an identical JBoss Cache configuration. Changes in either element on some but not all nodes would prevent proper clustering behavior.
http://hostname:8080/jmx-console/) and then clicking on the jboss:service=HAPartition,partition=DefaultPartition MBean (change the MBean name to reflect your partitioner name if you use the -g switch). A list of IP addresses for the current cluster members is shown in the CurrentView field.
Note
21.3.1. DistributedReplicantManager Service
DistributedReplicantManager (DRM) service is a component of the HAPartition service made available to HAPartition users via the HAPartition.getDistributedReplicantManager() method. Generally speaking, JBoss Enterprise Application Platform users will not directly make use of the DRM; we discuss it here as an aid to those who want a deeper understanding of how Enterprise Application Platform clustering internals work.
- Clustered Smart ProxiesHere the keys are the names of the various services that need a clustered smart proxy (see Section 20.2.1, “Client-side interceptor architecture”, e.g. the name of a clustered EJB. The value object each node stores in the DRM is known as a "target". It's something a smart proxy's transport layer can use to contact the node (e.g. an RMI stub, an HTTP URL or a JBoss Remoting
InvokerLocator). The factory that builds clustered smart proxies accesses the DRM to get the set of "targets" that should be injected into the proxy to allow it to communicate with all the nodes in a cluster. - HASingletonHere the keys are the names of the various services that need to function as High Availability Singletons (see the HASingleton chapter). The value object each node stores in the DRM is simply a String that acts as a token to indicate that the node has the service deployed, and thus is a candidate to become the "master" node for the HA singleton service.
21.3.2. DistributedState Service
DistributedState service is a legacy component of the HAPartition service made available to HAPartition users via the HAPartition.getDistributedState() method. This service provides coordinated management of arbitrary application state around the cluster. It is supported for backwards compatibility reasons, but new applications should not use it; they should use the much more sophisticated JBoss Cache instead.
DistributedState service actually delegates to an underlying JBoss Cache instance.
21.3.3. Custom Use of HAPartition
org.jboss.ha.framework.server.HAServiceImpl base class, or the org.jboss.ha.jxm.HAServiceMBeanSupport class if JMX registration and notification support are desired.
Chapter 22. Clustered JNDI Services
- Transparent failover of naming operations. If an HA-JNDI naming Context is connected to the HA-JNDI service on a particular JBoss Enterprise Application Platform instance, and that service fails or is shut down, the HA-JNDI client can transparently fail over to another Enterprise Application Platform instance.
- Load balancing of naming operations. A HA-JNDI naming Context will automatically load balance its requests across all the HA-JNDI servers in the cluster.
- Automatic client discovery of HA-JNDI servers (using multicast).
- Unified view of JNDI trees cluster-wide. A client can connect to the HA-JNDI service running on any node in the cluster and find objects bound in JNDI on any other node. This is accomplished via two mechanisms:
- Cross-cluster lookups. A client can perform a lookup and the server side HA-JNDI service has the ability to find things bound in regular JNDI on any node in the cluster.
- A replicated cluster-wide context tree. An object bound into the HA-JNDI service will be replicated around the cluster, and a copy of that object will be available in-VM on each node in the cluster.
- If an EJB is not configured as clustered, looking up the EJB via HA-JNDI does not somehow result in the addition of clustering capabilities (load balancing of EJB calls, transparent failover, state replication) to the EJB.
- If an EJB is configured as clustered, looking up the EJB via regular JNDI instead of HA-JNDI does not somehow result in the removal of the bean proxy's clustering capabilities.
22.1. How it works
InitialContext object) and invokes JNDI lookup services on the remote server through the proxy. The client specifies that it wants an HA-JNDI proxy by configuring the naming properties used by the InitialContext object. This is covered in detail in Section 22.2, “Client configuration”. Other than the need to ensure the appropriate naming properties are provided to the InitialContext, the fact that the naming Context is using HA-JNDI is completely transparent to the client.
- It avoids migration issues with applications that assume that their JNDI implementation is local. This allows clustering to work out-of-the-box with just a few tweaks of configuration files.
- In a homogeneous cluster, this configuration actually cuts down on the amount of network traffic. A homogeneous cluster is one where the same types of objects are bound under the same names on each node.
- Designing it in this way makes the HA-JNDI service an optional service since all underlying cluster code uses a straight new
InitialContextto lookup or create bindings.
new InitialContext() will be bound to the local-only, non-cluster-wide JNDI Context. So, all EJB homes and such will not be bound to the cluster-wide JNDI Context, but rather, each home will be bound into the local JNDI.
- If the binding is available in the cluster-wide JNDI tree, return it.
- If the binding is not in the cluster-wide tree, delegate the lookup query to the local JNDI service and return the received answer if available.
- If not available, the HA-JNDI service asks all other nodes in the cluster if their local JNDI service owns such a binding and returns the answer from the set it receives.
- If no local JNDI service owns such a binding, a
NameNotFoundExceptionis finally raised.
Note
Note
Note
ExternalContext MBean to bind non-JBoss JNDI trees into the JBoss JNDI namespace. Furthermore, nothing prevents you using one centralized JNDI server for your whole cluster and scrapping HA-JNDI and JNP.
22.2. Client configuration
InitialContext is created. How this is done varies depending on whether the client is running inside JBoss Enterprise Application Platform itself or is in another VM.
22.2.1. For clients running inside the Enterprise Application Platform
InitialContext by passing in JNDI properties to the constructor. The following code shows how to create a naming Context bound to HA-JNDI:
Properties p = new Properties();
p.put(Context.INITIAL_CONTEXT_FACTORY, "org.jnp.interfaces.NamingContextFactory");
p.put(Context.URL_PKG_PREFIXES, "jboss.naming:org.jnp.interfaces");
// HA-JNDI is listening on the address passed to JBoss via -b
String bindAddress = System.getProperty("jboss.bind.address", "localhost");
p.put(Context.PROVIDER_URL, bindAddress + ":1100"); // HA-JNDI address and port.
return new InitialContext(p);deploy/cluster/hajndi-jboss-beans.xml file (see Section 22.3, “JBoss configuration”). By default this service listens on the interface named via the jboss.bind.address system property, which itself is set to whatever value you assign to the -b command line option when you start JBoss Enterprise Application Platform (or localhost if not specified). The above code shows an example of accessing this property.
InitialContext to statically find the in-VM HA-JNDI by specifying the jnp.partitionName property:
Properties p = new Properties();
p.put(Context.INITIAL_CONTEXT_FACTORY, "org.jnp.interfaces.NamingContextFactory");
p.put(Context.URL_PKG_PREFIXES, "jboss.naming:org.jnp.interfaces");
// HA-JNDI is registered under the partition name passed to JBoss via -g
String partitionName = System.getProperty("jboss.partition.name", "DefaultPartition");
p.put("jnp.partitionName", partitionName);
return new InitialContext(p);jboss.partition.name system property to identify the partition with which the HA-JNDI service works. This system property is set to whatever value you assign to the -g command line option when you start JBoss Enterprise Application Platform (or DefaultPartition if not specified).
jndi.properties file in your deployment or by editing the Enterprise Application Platform's conf/jndi.properties file. Doing either will almost certainly break things for your application and quite possibly across the server. If you want to externalize your client configuration, one approach is to deploy a properties file not named jndi.properties, and then programatically create a Properties object that loads that file's contents.
22.2.1.1. Accessing HA-JNDI Resources from EJBs and WARs -- Environment Naming Context
<resource-ref> <res-ref-name>jms/ConnectionFactory</res-ref-name> <res-type>javax.jms.QueueConnectionFactory</res-type> <res-auth>Container</res-auth> </resource-ref> <resource-ref> <res-ref-name>jms/Queue</res-ref-name> <res-type>javax.jms.Queue</res-type> <res-auth>Container</res-auth> </resource-ref>
<resource-ref>
<res-ref-name>jms/ConnectionFactory</res-ref-name>
<jndi-name>jnp://${jboss.bind.address}:1100/ConnectionFactory</jndi-name>
</resource-ref>
<resource-ref>
<res-ref-name>jms/Queue</res-ref-name>
<jndi-name>jnp://${jboss.bind.address}:1100/queue/A</jndi-name>
</resource-ref>${jboss.bind.address} syntax used above tells JBoss to use the value of the jboss.bind.address system property when determining the URL. That system property is itself set to whatever value you assign to the -b command line option when you start JBoss Enterprise Application Platform.
22.2.1.2. Why do this programmatically and not just put this in a jndi.properties file?
conf/jndi.properties file, which should not be edited.
22.2.1.3. How can I tell if things are being bound into HA-JNDI that should not be?
list operation on the jboss:service=JNDIView mbean. Towards the bottom of the results, the contents of the "HA-JNDI Namespace" are listed. Typically this will be empty; if any of your own deployments are shown there and you did not explicitly bind them there, there's probably an improper jndi.properties file on the classpath. Please visit the following link for an example: Problem with removing a Node from Cluster.
22.2.2. For clients running outside the Enterprise Application Platform
java.naming.provider.url JNDI setting in the jndi.properties file. Each server node is identified by its IP address and the JNDI port number. The server nodes are separated by commas (see Section 22.3, “JBoss configuration” for how to configure the servers and ports).
java.naming.provider.url=server1:1100,server2:1100,server3:1100,server4:1100
Note
java.naming.provider.url is empty or if all servers it mentions are not reachable, the JNP client will try to discover a HA-JNDI server through a multicast call on the network (auto-discovery). See Section 22.3, “JBoss configuration” for how to configure auto-discovery on the JNDI server nodes. Through auto-discovery, the client might be able to get a valid HA-JNDI server node without any configuration. Of course, for auto-discovery to work, the network segment(s) between the client and the server cluster must be configured to propagate such multicast datagrams.
Note
java.naming.provider.url property, you can specify a set of other properties. The following list shows all clustering-related client side properties you can specify when creating a new InitialContext. (All of the standard, non-clustering-related environment properties used with regular JNDI are also available.)
java.naming.provider.url: Provides a list of IP addresses and port numbers for HA-JNDI provider nodes in the cluster. The client tries those providers one by one and uses the first one that responds.jnp.disableDiscovery: When set totrue, this property disables the automatic discovery feature. Default isfalse.jnp.partitionName: In an environment where multiple HA-JNDI services bound to distinct clusters (a.k.a. partitions), are running, this property allows you to ensure that your client only accepts automatic-discovery responses from servers in the desired partition. If you do not use the automatic discovery feature (i.e. jnp.disableDiscovery is true), this property is not used. By default, this property is not set and the automatic discovery selects the first HA-JNDI server that responds, regardless of the cluster partition name.jnp.discoveryTimeout: Determines how many milliseconds the context will wait for a response to its automatic discovery packet. Default is 5000 ms.jnp.discoveryGroup: Determines which multicast group address is used for the automatic discovery. Default is 230.0.0.4. Must match the value of the AutoDiscoveryAddress configured on the server side HA-JNDI service. Note that the server side HA-JNDI service by default listens on the address specified via the-uswitch, so if-uis used on the server side (as is recommended), jnp.discoveryGroup will need to be configured on the client side.jnp.discoveryPort: Determines which multicast port is used for the automatic discovery. Default is 1102. Must match the value of the AutoDiscoveryPort configured on the server side HA-JNDI service.jnp.discoveryTTL: specifies the TTL (time-to-live) for autodiscovery IP multicast packets. This value represents the number of network hops a multicast packet can be allowed to propagate before networking equipment should drop the packet. Despite its name, it does not represent a unit of time.
22.3. JBoss configuration
hajndi-jboss-beans.xml file in the <JBOSS_HOME>/server/production/deploy/cluster directory includes the following bean to enable HA-JNDI services.
<bean name="HAJNDI" class="org.jboss.ha.jndi.HANamingService">
<annotation>@org.jboss.aop.microcontainer.aspects.jmx.JMX
(name="jboss:service=HAJNDI",
exposedInterface=org.jboss.ha.jndi.HANamingServiceMBean.class)</annotation>
<!-- The partition used for group RPCs to find locally bound objects on other nodes -->
<property name="HAPartition"><inject bean="HAPartition"/></property>
<!-- Handler for the replicated tree -->
<property name="distributedTreeManager">
<bean class="org.jboss.ha.jndi.impl.jbc.JBossCacheDistributedTreeManager">
<property name="cacheHandler"><inject bean="HAPartitionCacheHandler"/></property>
</bean>
</property>
<property name="localNamingInstance">
<inject bean="jboss:service=NamingBeanImpl" property="namingInstance"/>
</property>
<!-- The thread pool used to control the bootstrap and auto discovery lookups -->
<property name="lookupPool"><inject bean="jboss.system:service=ThreadPool"/></property>
<!-- Bind address of bootstrap endpoint -->
<property name="bindAddress">${jboss.bind.address}</property>
<!-- Port on which the HA-JNDI stub is made available -->
<property name="port">
<!-- Get the port from the ServiceBindingManager -->
<value-factory bean="ServiceBindingManager" method="getIntBinding">
<parameter>jboss:service=HAJNDI</parameter>
<parameter>Port</parameter>
</value-factory>
</property>
<!-- Bind address of the HA-JNDI RMI endpoint -->
<property name="rmiBindAddress">${jboss.bind.address}</property>
<!-- RmiPort to be used by the HA-JNDI service once bound. 0 = ephemeral. -->
<property name="rmiPort">
<!-- Get the port from the ServiceBindingManager -->
<value-factory bean="ServiceBindingManager" method="getIntBinding">
<parameter>jboss:service=HAJNDI</parameter>
<parameter>RmiPort</parameter>
</value-factory>
</property>
<!-- Accept backlog of the bootstrap socket -->
<property name="backlog">50</property>
<!-- A flag to disable the auto discovery via multicast -->
<property name="discoveryDisabled">false</property>
<!-- Set the auto-discovery bootstrap multicast bind address. If not
specified and a BindAddress is specified, the BindAddress will be used. -->
<property name="autoDiscoveryBindAddress">${jboss.bind.address}</property>
<!-- Multicast Address and group port used for auto-discovery -->
<property name="autoDiscoveryAddress">${jboss.partition.udpGroup:230.0.0.4}</property>
<property name="autoDiscoveryGroup">1102</property>
<!-- The TTL (time-to-live) for autodiscovery IP multicast packets -->
<property name="autoDiscoveryTTL">16</property>
<!-- The load balancing policy for HA-JNDI -->
<property name="loadBalancePolicy">org.jboss.ha.framework.interfaces.RoundRobin</property>
<!-- Client socket factory to be used for client-server
RMI invocations during JNDI queries
<property name="clientSocketFactory">custom</property>
-->
<!-- Server socket factory to be used for client-server
RMI invocations during JNDI queries
<property name="serverSocketFactory">custom</property>
-->
</bean>- HAPartition accepts the core clustering service used manage HA-JNDI's clustered proxies and to make the group RPCs that find locally bound objects on other nodes. See Section 21.3, “The HAPartition Service” for more.
- distributedTreeManager accepts a handler for the replicated tree. The standard handler uses JBoss Cache to manage the replicated tree. The JBoss Cache instance is retrieved using the injected
HAPartitionCacheHandlerbean. See Section 21.3, “The HAPartition Service” for more details. - localNamingInstance accepts the reference to the local JNDI service.
- lookupPool accepts the thread pool used to provide threads to handle the bootstrap and auto discovery lookups.
- bindAddress specifies the address to which the HA-JNDI server will bind to listen for naming proxy download requests from JNP clients. The default value is the value of the
jboss.bind.addresssystem property, orlocalhostif that property is not set. Thejboss.bind.addresssystem property is set if the-bcommand line switch is used when JBoss is started. - port specifies the port to which the HA-JNDI server will bind to listen for naming proxy download requests from JNP clients. The value is obtained from the ServiceBindingManager bean configured in
conf/bootstrap/bindings.xml. The default value is1100. - backlog specifies the maximum queue length for incoming connection indications for the TCP server socket on which the service listens for naming proxy download requests from JNP clients. The default value is
50. - rmiBindAddress specifies the address to which the HA-JNDI server will bind to listen for RMI requests (e.g. for JNDI lookups) from naming proxies. The default value is the value of the
jboss.bind.addresssystem property, orlocalhostif that property is not set. Thejboss.bind.addresssystem property is set if the-bcommand line switch is used when JBoss is started. - rmiPort specifies the port to which the server will bind to communicate with the downloaded stub. The value is obtained from the ServiceBindingManager bean configured in
conf/bootstrap/bindings.xml. The default value is1101. If no value is set, the operating system automatically assigns a port. - discoveryDisabled is a boolean flag that disables configuration of the auto discovery multicast listener. The default is
false. - autoDiscoveryAddress specifies the multicast address to listen to for JNDI automatic discovery. The default value is the value of the
jboss.partition.udpGroupsystem property, or 230.0.0.4 if that is not set. Thejboss.partition.udpGroupsystem property is set if the-ucommand line switch is used when JBoss is started. - autoDiscoveryGroup specifies the port to listen on for multicast JNDI automatic discovery packets. The default value is
1102. - autoDiscoveryBindAddress sets the interface on which HA-JNDI should listen for auto-discovery request packets. If this attribute is not specified and a
bindAddressis specified, thebindAddresswill be used. - autoDiscoveryTTL specifies the TTL (time-to-live) for autodiscovery IP multicast packets. This value represents the number of network hops a multicast packet can be allowed to propagate before networking equipment should drop the packet. Despite its name, it does not represent a unit of time.
- loadBalancePolicy specifies the class name of the LoadBalancePolicy implementation that should be included in the client proxy. See Chapter 19, Introduction and Quick Start the Introduction and Quick Start chapter for details.
- clientSocketFactory is an optional attribute that specifies the fully qualified classname of the
java.rmi.server.RMIClientSocketFactorythat should be used to create client sockets. The default isnull. - serverSocketFactory is an optional attribute that specifies the fully qualified classname of the
java.rmi.server.RMIServerSocketFactorythat should be used to create server sockets. The default isnull.
22.3.1. Adding a Second HA-JNDI Service
<-- Cache Handler for secondary HAPartition -->
<bean name="SecondaryHAPartitionCacheHandler"
class="org.jboss.ha.framework.server.HAPartitionCacheHandlerImpl">
<property name="cacheManager"><inject bean="CacheManager"/></property>
<property name="cacheConfigName">secondary-ha-partition</property>
</bean>
<-- The secondary HAPartition -->
<bean name="SecondaryHAPartition" class="org.jboss.ha.framework.server.ClusterPartition">
<depends>jboss:service=Naming</depends>
<annotation>@org.jboss.aop.microcontainer.aspects.jmx.JMX
(name="jboss:service=HAPartition,partition=SecondaryPartition",
exposedInterface=org.jboss.ha.framework.server.ClusterPartitionMBean.class, registerDirectly=true)</annotation>
<property name="cacheHandler"><inject bean="SecondaryHAPartitionCacheHandler"/></property>
<property name="partitionName">SecondaryPartition</property>
....
</bean>
<bean name="MySpecialPartitionHAJNDI" class="org.jboss.ha.jndi.HANamingService">
<annotation>@org.jboss.aop.microcontainer.aspects.jmx.JMX
(name="jboss:service=HAJNDI,partitionName=SecondaryPartition",
exposedInterface=org.jboss.ha.jndi.HANamingServiceMBean.class)</annotation>
<property name="HAPartition"><inject bean="SecondaryHAPartition"/></property>
<property name="distributedTreeManager">
<bean class="org.jboss.ha.jndi.impl.jbc.JBossCacheDistributedTreeManager">
<property name="cacheHandler"><inject bean="SecondaryHAPartitionPartitionCacheHandler"/></property>
</bean>
</property>
<property name="port">56789</property>
<property name="rmiPort">56790</property>
<property name="autoDiscoveryGroup">56791</property>
.....
</bean>Chapter 23. Clustered Session EJBs
23.1. Stateless Session Bean in EJB 3.0
@Clustered annotation. This annotation contains optional parameters for overriding both the load balance policy and partition to use.
public @interface Clustered
{
String partition() default "${jboss.partition.name:DefaultPartition}";
String loadBalancePolicy() default "LoadBalancePolicy";
}
- partition specifies the name of the cluster the bean participates in. While the
@Clusteredannotation lets you override the default partition,DefaultPartition, for an individual bean, you can override this for all beans using thejboss.partition.namesystem property. - loadBalancePolicy defines the name of a class implementing
org.jboss.ha.client.loadbalance.LoadBalancePolicy, indicating how the bean stub should balance calls made on the nodes of the cluster. The default value,LoadBalancePolicyis a special token indicating the default policy for the session bean type. For stateless session beans, the default policy isorg.jboss.ha.client.loadbalance.RoundRobin. You can override the default value using your own implementation, or choose one from the list of available policies:-
org.jboss.ha.client.loadbalance.RoundRobin - Starting with a random target, always favors the next available target in the list, ensuring maximum load balancing always occurs.
-
org.jboss.ha.client.loadbalance.RandomRobin - Randomly selects its target without any consideration to previously selected targets.
-
org.jboss.ha.client.loadbalance.aop.FirstAvailable - Once a target is chosen, always favors that same target; i.e. no further load balancing occurs. Useful in cases where "sticky session" behavior is desired, e.g. stateful session beans.
-
org.jboss.ha.client.loadbalance.aop.FirstAvailableIdenticalAllProxies - Similar to
FirstAvailable, except that the favored target is shared across all proxies.
-
@Stateless
@Clustered
public class MyBean implements MySessionInt
{
public void test()
{
// Do something cool
}
}
@Clustered annotation, you can also enable clustering for a session bean in jboss.xml:
<jboss>
<enterprise-beans>
<session>
<ejb-name>NonAnnotationStateful</ejb-name>
<clustered>true</clustered>
<cluster-config>
<partition-name>FooPartition</partition-name>
<load-balance-policy>org.jboss.ha.framework.interfaces.RandomRobin</load-balance-policy>
</cluster-config>
</session>
</enterprise-beans>
</jboss>
Note
<clustered>true</clustered> element is really just an alias for the <container-name>Clustered Stateless SessionBean</container-name> element in the conf/standardjboss.xml file.
@Clustered annotation.
23.2. Stateful Session Beans in EJB 3.0
23.2.1. The EJB application configuration
@Clustered annotation, just as we did with the EJB 3.0 stateless session bean earlier. In contrast to stateless session beans, stateful session bean method invocations are load balanced using org.jboss.ha.client.loadbalance.aop.FirstAvailable policy, by default. Using this policy, methods invocations will stick to a randomly chosen node.
@org.jboss.ejb3.annotation.CacheConfig annotation can also be applied to the bean to override the default caching behavior. Below is the definition of the @CacheConfig annotation:
public @interface CacheConfig
{
String name() default "";
int maxSize() default 10000;
long idleTimeoutSeconds() default 300;
boolean replicationIsPassivation() default true;
long removalTimeoutSeconds() default 0;
}
namespecifies the name of a cache configuration registered with theCacheManagerservice discussed in Section 23.2.3, “CacheManager service configuration”. By default, thesfsb-cacheconfiguration will be used.maxSizespecifies the maximum number of beans that can cached before the cache should start passivating beans, using an LRU algorithm.idleTimeoutSecondsspecifies the max period of time a bean can go unused before the cache should passivate it (regardless of whether maxSize beans are cached.)removalTimeoutSecondsspecifies the max period of time a bean can go unused before the cache should remove it altogether.replicationIsPassivationspecifies whether the cache should consider a replication as being equivalent to a passivation, and invoke any @PrePassivate and @PostActivate callbacks on the bean. By default true, since replication involves serializing the bean, and preparing for and recovering from serialization is a common reason for implementing the callback methods.
@Stateful
@Clustered
@CacheConfig(maxSize=5000, removalTimeoutSeconds=18000)
public class MyBean implements MySessionInt
{
private int state = 0;
public void increment()
{
System.out.println("counter: " + (state++));
}
}
<jboss>
<enterprise-beans>
<session>
<ejb-name>NonAnnotationStateful</ejb-name>
<clustered>true</clustered>
<cache-config>
<cache-max-size>5000</cache-max-size>
<remove-timeout-seconds>18000</remove-timeout-seconds>
</cache-config>
</session>
</enterprise-beans>
</jboss>
23.2.2. Optimize state replication
public interface Optimized
{
boolean isModified();
}
Optimized interface. If this is the case, the container calls the isModified() method and will only replicate the bean when the method returns true. If the bean has not been modified (or not enough to require replication, depending on your own preferences), you can return false and the replication would not occur.
23.2.3. CacheManager service configuration
CacheManager service, described in Section 21.2.1, “The JBoss Enterprise Application Platform CacheManager Service” is both a factory and registry of JBoss Cache instances. By default, stateful session beans use the sfsb-cache configuration from the CacheManager, defined as follows:
<bean name="StandardSFSBCacheConfig" class="org.jboss.cache.config.Configuration">
<!-- No transaction manager lookup -->
<!-- Name of cluster. Needs to be the same for all members -->
<property name="clusterName">${jboss.partition.name:DefaultPartition}-SFSBCache</property>
<!--
Use a UDP (multicast) based stack. Need JGroups flow control (FC)
because we are using asynchronous replication.
-->
<property name="multiplexerStack">${jboss.default.jgroups.stack:udp}</property>
<property name="fetchInMemoryState">true</property>
<property name="nodeLockingScheme">PESSIMISTIC</property>
<property name="isolationLevel">REPEATABLE_READ</property>
<property name="useLockStriping">false</property>
<property name="cacheMode">REPL_ASYNC</property>
<!--
Number of milliseconds to wait until all responses for a
synchronous call have been received. Make this longer
than lockAcquisitionTimeout.
-->
<property name="syncReplTimeout">17500</property>
<!-- Max number of milliseconds to wait for a lock acquisition -->
<property name="lockAcquisitionTimeout">15000</property>
<!-- The max amount of time (in milliseconds) we wait until the
state (ie. the contents of the cache) are retrieved from
existing members at startup. -->
<property name="stateRetrievalTimeout">60000</property>
<!--
SFSBs use region-based marshalling to provide for partial state
transfer during deployment/undeployment.
-->
<property name="useRegionBasedMarshalling">false</property>
<!-- Must match the value of "useRegionBasedMarshalling" -->
<property name="inactiveOnStartup">false</property>
<!-- Disable asynchronous RPC marshalling/sending -->
<property name="serializationExecutorPoolSize">0</property>
<!-- We have no asynchronous notification listeners -->
<property name="listenerAsyncPoolSize">0</property>
<property name="exposeManagementStatistics">true</property>
<property name="buddyReplicationConfig">
<bean class="org.jboss.cache.config.BuddyReplicationConfig">
<!-- Just set to true to turn on buddy replication -->
<property name="enabled">false</property>
<!--
A way to specify a preferred replication group. We try
and pick a buddy who shares the same pool name (falling
back to other buddies if not available).
-->
<property name="buddyPoolName">default</property>
<property name="buddyCommunicationTimeout">17500</property>
<!-- Do not change these -->
<property name="autoDataGravitation">false</property>
<property name="dataGravitationRemoveOnFind">true</property>
<property name="dataGravitationSearchBackupTrees">true</property>
<property name="buddyLocatorConfig">
<bean class="org.jboss.cache.buddyreplication.NextMemberBuddyLocatorConfig">
<!-- The number of backup nodes we maintain -->
<property name="numBuddies">1</property>
<!-- Means that each node will *try* to select a buddy on
a different physical host. If not able to do so
though, it will fall back to colocated nodes. -->
<property name="ignoreColocatedBuddies">true</property>
</bean>
</property>
</bean>
</property>
<property name="cacheLoaderConfig">
<bean class="org.jboss.cache.config.CacheLoaderConfig">
<!-- Do not change these -->
<property name="passivation">true</property>
<property name="shared">false</property>
<property name="individualCacheLoaderConfigs">
<list>
<bean class="org.jboss.cache.loader.FileCacheLoaderConfig">
<!-- Where passivated sessions are stored -->
<property name="location">${jboss.server.data.dir}${/}sfsb</property>
<!-- Do not change these -->
<property name="async">false</property>
<property name="fetchPersistentState">true</property>
<property name="purgeOnStartup">true</property>
<property name="ignoreModifications">false</property>
<property name="checkCharacterPortability">false</property>
</bean>
</list>
</property>
</bean>
</property>
<!-- EJBs use JBoss Cache eviction -->
<property name="evictionConfig">
<bean class="org.jboss.cache.config.EvictionConfig">
<property name="wakeupInterval">5000</property>
<!-- Overall default -->
<property name="defaultEvictionRegionConfig">
<bean class="org.jboss.cache.config.EvictionRegionConfig">
<property name="regionName">/</property>
<property name="evictionAlgorithmConfig">
<bean class="org.jboss.cache.eviction.NullEvictionAlgorithmConfig"/>
</property>
</bean>
</property>
<!-- EJB3 integration code will programatically create other regions as beans are deployed -->
</bean>
</property>
</bean>
The default SFSB cache is configured to support eviction. The EJB3 SFSB container uses the JBoss Cache eviction mechanism to manage SFSB passivation. When beans are deployed, the EJB container will programatically add eviction regions to the cache, one region per bean type.
A JBoss Cache CacheLoader is also configured; again to support SFSB passivation. When beans are evicted from the cache, the cache loader passivates them to a persistent store; in this case to the file system in the <JBOSS_HOME>/server/production/data/sfsb directory. JBoss Cache supports a variety of different CacheLoader implementations that know how to store data to different persistent store types; see the JBoss Cache documentation for details. However, if you change the CacheLoaderConfiguration, be sure that you do not use a shared store, e.g. a single schema in a shared database. Each node in the cluster must have its own persistent store, otherwise as nodes independently passivate and activate clustered beans, they will corrupt each other's data.
Using buddy replication, state is replicated to a configurable number of backup servers in the cluster (a.k.a. buddies), rather than to all servers in the cluster. To enable buddy replication, adjust the following properties in the buddyReplicationConfig property bean:
- Set
enabledtotrue. - Use the
buddyPoolNameto form logical subgroups of nodes within the cluster. If possible, buddies will be chosen from nodes in the same buddy pool. - Adjust the
buddyLocatorConfig.numBuddiesproperty to reflect the number of backup nodes to which each node should replicate its state.
23.3. Stateless Session Bean in EJB 2.x
jboss.xml descriptor to contain a <clustered> tag.
<jboss>
<enterprise-beans>
<session>
<ejb-name>nextgen.StatelessSession</ejb-name>
<jndi-name>nextgen.StatelessSession</jndi-name>
<clustered>true</clustered>
<cluster-config>
<partition-name>DefaultPartition</partition-name>
<home-load-balance-policy>org.jboss.ha.framework.interfaces.RoundRobin</home-load-balance-policy>
<bean-load-balance-policy>org.jboss.ha.framework.interfaces.RoundRobin</bean-load-balance-policy>
</cluster-config>
</session>
</enterprise-beans>
</jboss>
- partition-name specifies the name of the cluster the bean participates in. The default value is
DefaultPartition. The default partition name can also be set system-wide using thejboss.partition.namesystem property. - home-load-balance-policy indicates the class to be used by the home stub to balance calls made on the nodes of the cluster. By default, the proxy will load-balance calls in a
RoundRobinfashion. - bean-load-balance-policy Indicates the class to be used by the bean stub to balance calls made on the nodes of the cluster. By default, the proxy will load-balance calls in a
RoundRobinfashion.
23.4. Stateful Session Bean in EJB 2.x
HASessionStateService bean to manage distributed session states for clustered EJB 2.x stateful session beans. In this section, we cover both the session bean configuration and the HASessionStateService bean configuration.
23.4.1. The EJB application configuration
jboss.xml descriptor file for each stateful session bean and add the <clustered> tag.
<jboss>
<enterprise-beans>
<session>
<ejb-name>nextgen.StatefulSession</ejb-name>
<jndi-name>nextgen.StatefulSession</jndi-name>
<clustered>True</clustered>
<cluster-config>
<partition-name>DefaultPartition</partition-name>
<home-load-balance-policy>org.jboss.ha.framework.interfaces.RoundRobin</home-load-balance-policy>
<bean-load-balance-policy>org.jboss.ha.framework.interfaces.FirstAvailable</bean-load-balance-policy>
<session-state-manager-jndi-name>/HASessionState/Default</session-state-manager-jndi-name>
</cluster-config>
</session>
</enterprise-beans>
</jboss>
<clustered> tag is mandatory to indicate that the bean works in a cluster. The <cluster-config> element is optional and its default attribute values are indicated in the sample configuration above.
<session-state-manager-jndi-name> tag is used to give the JNDI name of the HASessionStateService to be used by this bean.
23.4.2. Optimize state replication
public boolean isModified();
isModified() method and it only replicates the bean when the method returns true. If the bean has not been modified (or not enough to require replication, depending on your own preferences), you can return false and the replication would not occur.
23.4.3. The HASessionStateService configuration
HASessionStateService bean is defined in the <JBOSS_HOME>/server/<PROFILE>/deploy/cluster/ha-legacy-jboss-beans.xml file.
<bean name="HASessionStateService"
class="org.jboss.ha.hasessionstate.server.HASessionStateService">
<annotation>@org.jboss.aop.microcontainer.aspects.jmx.JMX
(name="jboss:service=HASessionState",
exposedInterface=org.jboss.ha.hasessionstate.server.
HASessionStateServiceMBean.class,
registerDirectly=true)</annotation>
<!-- Partition used for group RPCs -->
<property name="HAPartition"><inject bean="HAPartition"/></property>
<!-- JNDI name under which the service is bound -->
<property name="jndiName">/HASessionState/Default</property>
<!-- Max delay before cleaning unreclaimed state.
Defaults to 30*60*1000 => 30 minutes -->
<property name="beanCleaningDelay">0</property>
</bean>
HASessionStateService bean are listed below.
- HAPartition is a required attribute to inject the HAPartition service that HA-JNDI uses for intra-cluster communication.
- jndiName is an optional attribute to specify the JNDI name under which this
HASessionStateServicebean is bound. The default value is/HAPartition/Default. - beanCleaningDelay is an optional attribute to specify the number of milliseconds after which the
HASessionStateServicecan clean a state that has not been modified. If a node, owning a bean, crashes, its brother node will take ownership of this bean. Nevertheless, the container cache of the brother node will not know about it (because it has never seen it before) and will never delete according to the cleaning settings of the bean. That is why theHASessionStateServiceneeds to do this cleanup sometimes. The default value is30*60*1000milliseconds (i.e., 30 minutes).
23.4.4. Handling Cluster Restart
<jboss>
<session>
<ejb-name>nextgen_RetryInterceptorStatelessSession</ejb-name>
<invoker-bindings>
<invoker>
<invoker-proxy-binding-name>clustered-retry-stateless-rmi-invoker</invoker-proxy-binding-name>
<jndi-name>nextgen_RetryInterceptorStatelessSession</jndi-name>
</invoker>
</invoker-bindings>
<clustered>true</clustered>
</session>
<invoker-proxy-binding>
<name>clustered-retry-stateless-rmi-invoker</name>
<invoker-mbean>jboss:service=invoker,type=jrmpha</invoker-mbean>
<proxy-factory>org.jboss.proxy.ejb.ProxyFactoryHA</proxy-factory>
<proxy-factory-config>
<client-interceptors>
<home>
<interceptor>org.jboss.proxy.ejb.HomeInterceptor</interceptor>
<interceptor>org.jboss.proxy.SecurityInterceptor</interceptor>
<interceptor>org.jboss.proxy.TransactionInterceptor</interceptor>
<interceptor>org.jboss.proxy.ejb.RetryInterceptor</interceptor>
<interceptor>org.jboss.invocation.InvokerInterceptor</interceptor>
</home>
<bean>
<interceptor>org.jboss.proxy.ejb.StatelessSessionInterceptor</interceptor>
<interceptor>org.jboss.proxy.SecurityInterceptor</interceptor>
<interceptor>org.jboss.proxy.TransactionInterceptor</interceptor>
<interceptor>org.jboss.proxy.ejb.RetryInterceptor</interceptor>
<interceptor>org.jboss.invocation.InvokerInterceptor</interceptor>
</bean>
</client-interceptors>
</proxy-factory-config>
</invoker-proxy-binding>
</jboss>
23.4.5. JNDI Lookup Process
- It will check its own static retryEnv field. This field can be set by client code via a call to RetryInterceptor.setRetryEnv(Properties). This approach to configuration has two downsides: first, it reduces portability by introducing JBoss-specific calls to the client code; and second, since a static field is used only a single configuration per VM is possible.
- If the retryEnv field is null, it will check for any environment properties bound to a ThreadLocal by the org.jboss.naming.NamingContextFactory class. To use this class as your naming context factory, in your jndi.properties set property java.naming.factory.initial=org.jboss.naming.NamingContextFactory. The advantage of this approach is use of org.jboss.naming.NamingContextFactory is simply a configuration option in your jndi.properties file, and thus your java code is unaffected. The downside is the naming properties are stored in a ThreadLocal and thus are only visible to the thread that originally created an InitialContext.
- If neither of the above approaches yield a set of naming environment properties, a default InitialContext is used. If the attempt to contact a naming server is unsuccessful, by default the InitialContext will attempt to fall back on multicast discovery to find an HA-JNDI naming server. See Chapter 22, Clustered JNDI Services for more on multicast discovery of HA-JNDI.
23.4.6. SingleRetryInterceptor
Chapter 24. Clustered Entity EJBs
24.1. Entity Bean in EJB 3.0
24.1.1. Configure the distributed cache
- If you persist a cache-enabled entity bean instance to the database via the entity manager, the entity will be inserted into the cache.
- If you update an entity bean instance, and save the changes to the database via the entity manager, the entity will be updated in the cache.
- If you remove an entity bean instance from the database via the entity manager, the entity will be removed from the cache.
- If loading a cached entity from the database via the entity manager, and that entity does not exist in the database, it will be inserted into the cache.
persistence.xml, like so:
<?xml version="1.0" encoding="UTF-8"?>
<persistence xmlns:xsi="http://www.w3.org/2001/XMLSchema-instance" xmlns="http://java.sun.com/xml/ns/persistence"
xsi:schemaLocation="http://java.sun.com/xml/ns/persistence http://java.sun.com/xml/ns/persistence/persistence_1_0.xsd">
<persistence-unit name="tempdb" transaction-type="JTA">
<jta-data-source>java:/DefaultDS</jta-data-source>
<properties>
<property name="hibernate.cache.use_second_level_cache" value="true"/>
<property name="hibernate.cache.use_query_cache" value="true"/>
<property name="hibernate.cache.region.factory_class" value="org.hibernate.cache.jbc2.JndiMultiplexedJBossCacheRegionFactory"/>
<!-- region factory specific properties -->
<property name="hibernate.cache.region.jbc2.cachefactory" value="java:CacheManager"/>
<property name="hibernate.cache.region.jbc2.cfg.entity" value="mvcc-entity"/>
<property name="hibernate.cache.region.jbc2.cfg.collection" value="mvcc-entity"/>
</properties>
</persistence-unit>
</persistence>
- hibernate.cache.use_second_level_cache
- Enables second-level caching of entities and collections.
- hibernate.cache.use_query_cache
- Enables second-level caching of queries.
- hibernate.cache.region.factory_class
- Defines the
RegionFactoryimplementation that dictates region-specific caching behavior. Hibernate ships with 2 types of JBoss Cache-based second-level caches: shared and multiplexed.A shared region factory uses the same Cache for all cache regions - much like the legacy CacheProvider implementation in older Hibernate versions.Hibernate ships with 2 shared region factory implementations:- org.hibernate.cache.jbc2.SharedJBossCacheRegionFactory
- Uses a single JBoss Cache configuration, from a newly instantiated CacheManager, for all cache regions.
Table 24.1. Additional properties for SharedJBossCacheRegionFactory Property Default Description hibernate.cache.region.jbc2.cfg.shared treecache.xml The classpath or file system resource containing the JBoss Cache configuration settings. hibernate.cache.region.jbc2.cfg.jgroups.stacks org/hibernate/cache/jbc2/builder/jgroups-stacks.xml The classpath or file system resource containing the JGroups protocol stack configurations. - org.hibernate.cache.jbc2.JndiSharedJBossCacheRegionFactory
- Uses a single JBoss Cache configuration, from an existing CacheManager bound to JNDI, for all cache regions.
Table 24.2. Additional properties for JndiSharedJBossCacheRegionFactory Property Default Description hibernate.cache.region.jbc2.cfg.shared Required JNDI name to which the shared Cacheinstance is bound.
A multiplexed region factory uses separate Cache instances, using optimized configurations for each cache region.Table 24.3. Common properties for multiplexed region factory implementations Property Default Description hibernate.cache.region.jbc2.cfg.entity optimistic-entity The JBoss Cache configuration used for the entity cache region. Alternative configurations: mvcc-entity, pessimistic-entity, mvcc-entity-repeatable, optimistic-entity-repeatable, pessimistic-entity-repeatable hibernate.cache.region.jbc2.cfg.collection optimistic-entity The JBoss Cache configuration used for the collection cache region. The collection cache region typically uses the same configuration as the entity cache region. hibernate.cache.region.jbc2.cfg.query local-query The JBoss Cache configuration used for the query cache region. By default, cached query results are not replicated. Alternative configurations: replicated-query hibernate.cache.region.jbc2.cfg.ts timestamps-cache The JBoss Cache configuration used for the timestamp cache region. If query caching is used, the corresponding timestamp cache must be replicating, even if the query cache is non-replicating. The timestamp cache region must never share the same cache as the query cache. Hibernate ships with 2 shared region factory implementations:- org.hibernate.cache.jbc2.MultiplexedJBossCacheRegionFactory
- Uses separate JBoss Cache configurations, from a newly instantiated CacheManager, per cache region.
Table 24.4. Additional properties for MultiplexedJBossCacheRegionFactory Property Default Description hibernate.cache.region.jbc2.configs org/hibernate/cache/jbc2/builder/jbc2-configs.xml The classpath or file system resource containing the JBoss Cache configuration settings. hibernate.cache.region.jbc2.cfg.jgroups.stacks org/hibernate/cache/jbc2/builder/jgroups-stacks.xml The classpath or file system resource containing the JGroups protocol stack configurations. - org.hibernate.cache.jbc2.JndiMultiplexedJBossCacheRegionFactory
- Uses separate JBoss Cache configurations, from a JNDI-bound CacheManager, see Section 21.2.1, “The JBoss Enterprise Application Platform CacheManager Service”, per cache region.
Table 24.5. Additional properties for JndiMultiplexedJBossCacheRegionFactory Property Default Description hibernate.cache.region.jbc2.cachefactory Required JNDI name to which the CacheManagerinstance is bound.
24.1.2. Configure the entity beans for cache
@org.hibernate.annotations.Cache annotation to tag entity beans that needs to be cached.
@Entity
@Cache(usage = CacheConcurrencyStrategy.TRANSACTIONAL)
public class Account implements Serializable
{
// ... ...
}
jboss-cache-manager-jboss-beans.xml. For instance, you can specify the size of the cache. If there are too many objects in the cache, the cache can evict the oldest or least used objects, depending on configuration, to make room for new objects. Assuming the region_prefix specified in persistence.xml was myprefix, the default name of the cache region for the com.mycompany.entities.Account entity bean would be /myprefix/com/mycompany/entities/Account.
<bean name="..." class="org.jboss.cache.config.Configuration">
... ...
<property name="evictionConfig">
<bean class="org.jboss.cache.config.EvictionConfig">
<property name="wakeupInterval">5000</property>
<!-- Overall default -->
<property name="defaultEvictionRegionConfig">
<bean class="org.jboss.cache.config.EvictionRegionConfig">
<property name="regionName">/</property>
<property name="evictionAlgorithmConfig">
<bean class="org.jboss.cache.eviction.LRUAlgorithmConfig">
<!-- Evict LRU node once we have more than this number of nodes -->
<property name="maxNodes">10000</property>
<!-- And, evict any node that has not been accessed in this many seconds -->
<property name="timeToLiveSeconds">1000</property>
<!-- Do not evict a node that's been accessed within this many seconds.
Set this to a value greater than your max expected transaction length. -->
<property name="minTimeToLiveSeconds">120</property>
</bean>
</property>
</bean>
</property>
<property name="evictionRegionConfigs">
<list>
<bean class="org.jboss.cache.config.EvictionRegionConfig">
<property name="regionName">/myprefix/com/mycompany/entities/Account</property>
<property name="evictionAlgorithmConfig">
<bean class="org.jboss.cache.eviction.LRUAlgorithmConfig">
<property name="maxNodes">10000</property>
<property name="timeToLiveSeconds">5000</property>
<property name="minTimeToLiveSeconds">120</property>
</bean>
</property>
</bean>
... ...
</list>
</property>
</bean>
</property>
</bean>
defaultEvictionRegionConfig as defined above. The @Cache annotation exposes an optional attribute "region" that lets you specify the cache region where an entity is to be stored, rather than having it be automatically created from the fully-qualified class name of the entity class.
@Entity
@Cache(usage = CacheConcurrencyStrategy.TRANSACTIONAL, region = "Account")
public class Account implements Serializable
{
// ... ...
}
<bean name="..." class="org.jboss.cache.config.Configuration">
... ...
<property name="evictionConfig">
<bean class="org.jboss.cache.config.EvictionConfig">
<property name="wakeupInterval">5000</property>
<!-- Overall default -->
<property name="defaultEvictionRegionConfig">
<bean class="org.jboss.cache.config.EvictionRegionConfig">
<property name="regionName">/</property>
<property name="evictionAlgorithmConfig">
<bean class="org.jboss.cache.eviction.LRUAlgorithmConfig">
<property name="maxNodes">5000</property>
<property name="timeToLiveSeconds">1000</property>
<property name="minTimeToLiveSeconds">120</property>
</bean>
</property>
</bean>
</property>
<property name="evictionRegionConfigs">
<list>
<bean class="org.jboss.cache.config.EvictionRegionConfig">
<property name="regionName">/myprefix/Account</property>
<property name="evictionAlgorithmConfig">
<bean class="org.jboss.cache.eviction.LRUAlgorithmConfig">
<property name="maxNodes">10000</property>
<property name="timeToLiveSeconds">5000</property>
<property name="minTimeToLiveSeconds">120</property>
</bean>
</property>
</bean>
... ...
</list>
</property>
</bean>
</property>
</bean>
24.1.3. Query result caching
<property name="hibernate.cache.use_query_cache" value="true"/>
@Entity
@Cache(usage = CacheConcurrencyStrategy.TRANSACTIONAL, region = "Account")
@NamedQueries(
{
@NamedQuery(
name = "account.bybranch",
query = "select acct from Account as acct where acct.branch = ?1",
hints = { @QueryHint(name = "org.hibernate.cacheable", value = "true") }
)
})
public class Account implements Serializable
{
// ... ...
}
persistence.xml, you could, for example, create this sort of eviction handling:
<bean name="..." class="org.jboss.cache.config.Configuration">
... ...
<property name="evictionConfig">
<bean class="org.jboss.cache.config.EvictionConfig">
<property name="wakeupInterval">5000</property>
<!-- Overall default -->
<property name="defaultEvictionRegionConfig">
<bean class="org.jboss.cache.config.EvictionRegionConfig">
<property name="regionName">/</property>
<property name="evictionAlgorithmConfig">
<bean class="org.jboss.cache.eviction.LRUAlgorithmConfig">
<property name="maxNodes">5000</property>
<property name="timeToLiveSeconds">1000</property>
<property name="minTimeToLiveSeconds">120</property>
</bean>
</property>
</bean>
</property>
<property name="evictionRegionConfigs">
<list>
<bean class="org.jboss.cache.config.EvictionRegionConfig">
<property name="regionName">/myprefix/Account</property>
<property name="evictionAlgorithmConfig">
<bean class="org.jboss.cache.eviction.LRUAlgorithmConfig">
<property name="maxNodes">10000</property>
<property name="timeToLiveSeconds">5000</property>
<property name="minTimeToLiveSeconds">120</property>
</bean>
</property>
</bean>
<bean class="org.jboss.cache.config.EvictionRegionConfig">
<property name="regionName">/myprefix/org/hibernate/cache/StandardQueryCache</property>
<property name="evictionAlgorithmConfig">
<bean class="org.jboss.cache.eviction.LRUAlgorithmConfig">
<property name="maxNodes">100</property>
<property name="timeToLiveSeconds">600</property>
<property name="minTimeToLiveSeconds">120</property>
</bean>
</property>
</bean>
</list>
</property>
</bean>
</property>
</bean>
@Entity
@Cache(usage = CacheConcurrencyStrategy.TRANSACTIONAL, region = "Account")
@NamedQueries(
{
@NamedQuery(
name = "account.bybranch",
query = "select acct from Account as acct where acct.branch = ?1",
hints =
{
@QueryHint(name = "org.hibernate.cacheable", value = "true"),
@QueryHint(name = "org.hibernate.cacheRegion", value = "Queries")
}
)
})
public class Account implements Serializable
{
// ... ...
}
<bean name="..." class="org.jboss.cache.config.Configuration">
... ...
<property name="evictionConfig">
<bean class="org.jboss.cache.config.EvictionConfig">
<property name="wakeupInterval">5000</property>
<!-- Overall default -->
<property name="defaultEvictionRegionConfig">
<bean class="org.jboss.cache.config.EvictionRegionConfig">
<property name="regionName">/</property>
<property name="evictionAlgorithmConfig">
<bean class="org.jboss.cache.eviction.LRUAlgorithmConfig">
<property name="maxNodes">5000</property>
<property name="timeToLiveSeconds">1000</property>
<property name="minTimeToLiveSeconds">120</property>
</bean>
</property>
</bean>
</property>
<property name="evictionRegionConfigs">
<list>
<bean class="org.jboss.cache.config.EvictionRegionConfig">
<property name="regionName">/myprefix/Account</property>
<property name="evictionAlgorithmConfig">
<bean class="org.jboss.cache.eviction.LRUAlgorithmConfig">
<property name="maxNodes">10000</property>
<property name="timeToLiveSeconds">5000</property>
<property name="minTimeToLiveSeconds">120</property>
</bean>
</property>
</bean>
<bean class="org.jboss.cache.config.EvictionRegionConfig">
<property name="regionName">/myprefix/Queries</property>
<property name="evictionAlgorithmConfig">
<bean class="org.jboss.cache.eviction.LRUAlgorithmConfig">
<property name="maxNodes">100</property>
<property name="timeToLiveSeconds">600</property>
<property name="minTimeToLiveSeconds">120</property>
</bean>
</property>
</bean>
... ...
</list>
</property>
</bean>
</property>
</bean>
24.2. Entity Beans in EJB 2.x
Important
<clustered> element to the application's jboss.xml descriptor file. Below is a typical jboss.xml file.
<jboss>
<enterprise-beans>
<entity>
<ejb-name>nextgen.EnterpriseEntity</ejb-name>
<jndi-name>nextgen.EnterpriseEntity</jndi-name>
<clustered>True</clustered>
<cluster-config>
<partition-name>DefaultPartition</partition-name>
<home-load-balance-policy>org.jboss.ha.framework.interfaces.RoundRobin</home-load-balance-policy>
<bean-load-balance-policy>org.jboss.ha.framework.interfaces.FirstAvailable</bean-load-balance-policy>
</cluster-config>
</entity>
</enterprise-beans>
</jboss>
<row-lock> in the CMP specification) or by setting the Transaction Isolation Level of your JDBC driver to be TRANSACTION_SERIALIZABLE. Because there is no supported distributed locking mechanism or distributed cache Entity Beans use Commit Option "B" by default (see standardjboss.xml and the container configurations Clustered CMP 2.x EntityBean, Clustered CMP EntityBean, or Clustered BMP EntityBean). It is not recommended that you use Commit Option "A" unless your Entity Bean is read-only.
Note
Chapter 25. HTTP Services
Chapter 26. JBoss Messaging Clustering Notes
Chapter 27. Clustered Deployment Options
27.1. Clustered Singleton Services
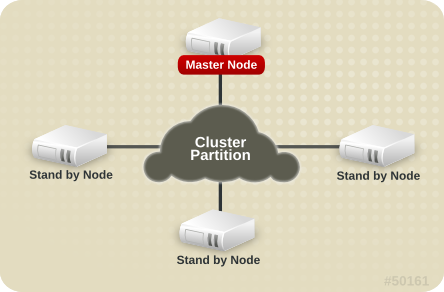
Figure 27.1. Topology before the Master Node fails
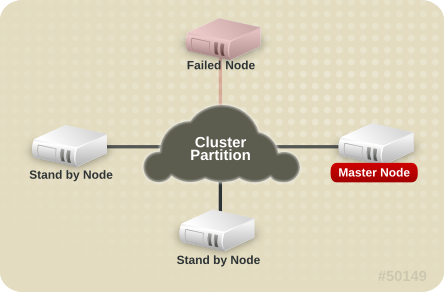
Figure 27.2. Topology after the Master Node fails
27.1.1. HASingleton Deployment Options
HAPartition to provide notifications when different nodes in the cluster start and stop; based on those notifications each node in the cluster can independently (but consistently) determine if it is now the master node and needs to begin providing a service.
27.1.1.1. HASingletonDeployer service
<JBOSS_HOME>/server/<PROFILE>/deploy-hasingleton directory instead of in deploy. The deploy-hasingleton directory does not lie under deploy nor farm directories, so its contents are not automatically deployed when an Enterprise Application Platform instance starts. Instead, deploying the contents of this directory is the responsibility of a special service, the HASingletonDeployer bean (which itself is deployed via the deploy/deploy-hasingleton-jboss-beans.xml file). The HASingletonDeployer service is itself an HA Singleton, one whose provided service, when it becomes master, is to deploy the contents of deploy-hasingleton; and whose service, when it stops being the master (typically at server shutdown), is to undeploy the contents of deploy-hasingleton.
deploy-hasingleton you know that they will be deployed only on the master node in the cluster. If the master node cleanly shuts down, they will be cleanly undeployed as part of shutdown. If the master node fails or is shut down, they will be deployed on whatever node takes over as master.
- There is no hot-deployment feature for services in
deploy-hasingleton. Redeploying a service that has been deployed todeploy-hasingletonrequires a server restart. - If the master node fails and another node takes over as master, your singleton service needs to go through the entire deployment process before it will be providing services. Depending on the complexity of your service's deployment, and the extent of start up activity in which it engages, this could take a while, during which time the service is not being provided.
27.1.1.2. POJO deployments using HASingletonController
public interface HASingletonExampleMBean
{
boolean isMasterNode();
}public class HASingletonExample implements HASingletonExampleMBean
{
private boolean isMasterNode = false;
public boolean isMasterNode()
{
return isMasterNode;
}
public void startSingleton()
{
isMasterNode = true;
}
public void stopSingleton()
{
isMasterNode = false;
}
}
startSingleton and stopSingleton in the above example, but you could name the methods anything.
META-INF/jboss-beans.xml:
<deployment xmlns="urn:jboss:bean-deployer:2.0">
<!-- This bean is an example of a clustered singleton -->
<bean name="HASingletonExample" class="org.jboss.ha.examples.HASingletonExample">
<annotation>@org.jboss.aop.microcontainer.aspects.jmx.JMX (name="jboss:service=HASingletonExample", exposedInterface=org.jboss.ha.examples.HASingletonExampleMBean.class)</annotation>
</bean>
<bean name="ExampleHASingletonController" class="org.jboss.ha.singleton.HASingletonController">
<annotation>@org.jboss.aop.microcontainer.aspects.jmx.JMX(name="jboss:service=ExampleHASingletonController",
exposedInterface=org.jboss.ha.singleton.HASingletonControllerMBean.class, registerDirectly=true)</annotation>
<property name="HAPartition"><inject bean="HAPartition"/></property>
<property name="target"><inject bean="HASingletonExample"/></property>
<property name="targetStartMethod">startSingleton</property>
<property name="targetStopMethod">stopSingleton</property>
</bean>
</deployment>
|
While the <annotation> line in the code sample above has been broken across multiple lines for formatting, ensure it is on a single line if you copy it into a configuration file. The configuration will not work if this line is broken.
|
deploy or farm and thus can be hot deployed and farmed deployed. Also, if our example service had complex, time-consuming start up requirements, those could potentially be implemented in create() or start() methods. JBoss will invoke create() and start() as soon as the service is deployed; it does not wait until the node becomes the master node. So, the service could be primed and ready to go, just waiting for the controller to implement startSingleton() at which point it can immediately provide service.
HASingletonController can support an optional argument for either or both of the target start and stop methods. These are specified using the targetStartMethodArgument and TargetStopMethodArgument properties, respectively. Currently, only string values are supported.
27.1.1.3. HASingleton deployments using a Barrier
<depends>jboss.ha:service=HASingletonDeployer,type=Barrier</depends>
Note
BarrierController is itself destroyed/undeployed. Thus using the Barrier to control services that need to be "destroyed" as part of their normal “undeploy” operation (like, for example, an EJBContainer) will not have the desired effect.
27.1.2. Determining the master node
jboss:service=DefaultPartition mbean. Every member of the cluster will have the same view, with the members in the same order.
HASingletonController) named Foo that's deployed around the cluster, except, for whatever reason, on B. The HAPartition service maintains across the cluster a registry of what services are deployed where, in view order. So, on every node in the cluster, the HAPartition service knows that the view with respect to the Foo service is {A, C, D} (no B).
HAPartition service invokes a callback on Foo notifying it of the new topology. So, for example, when Foo started on D, the Foo service running on A, C and D all got callbacks telling them the new view for Foo was {A, C, D}. That callback gives each node enough information to independently decide if it is now the master. The Foo service on each node uses the HAPartition's HASingletonElectionPolicy to determine if they are the master, as explained in the Section 27.1.2.1, “HA singleton election policy”.
27.1.2.1. HA singleton election policy
HASingletonElectionPolicy object is responsible for electing a master node from a list of available nodes, on behalf of an HA singleton, following a change in cluster topology.
public interface HASingletonElectionPolicy
{
ClusterNode elect(List<ClusterNode> nodes);
}
-
HASingletonElectionPolicySimple - This policy selects a master node based relative age. The desired age is configured via the
positionproperty, which corresponds to the index in the list of available nodes.position = 0, the default, refers to the oldest node;position = 1, refers to the 2nd oldest; etc.positioncan also be negative to indicate youngness; imagine the list of available nodes as a circular linked list.position = -1, refers to the youngest node;position = -2, refers to the 2nd youngest node; etc.<bean class="org.jboss.ha.singleton.HASingletonElectionPolicySimple"> <property name="position">-1</property> </bean>
-
PreferredMasterElectionPolicy - This policy extends
HASingletonElectionPolicySimple, allowing the configuration of a preferred node. ThepreferredMasterproperty, specified as host:port or address:port, identifies a specific node that should become master, if available. If the preferred node is not available, the election policy will behave as described above.<bean class="org.jboss.ha.singleton.PreferredMasterElectionPolicy"> <property name="preferredMaster">server1:12345</property> </bean>
27.2. Farming Deployment
all/farm/ directory of any cluster member and the application will be automatically duplicate across all nodes in the same cluster. If a node joins the cluster later, it will pull in all farm deployed applications in the cluster and deploy them locally at start-up time. If you delete the application from a running clustered server node's farm/ directory, the application will be undeployed locally and then removed from all other clustered server nodes' farm/ directories (triggering undeployment).
all configuration in JBoss Enterprise Application Platform and thus requires no manual setup. The required farm-deployment-jboss-beans.xml and timestamps-jboss-beans.xml configuration files are located in the deploy/cluster directory. If you want to enable farming in a custom configuration, simply copy these files to the corresponding JBoss deploy directory <JBOSS_HOME>/server/<PROFILE>/deploy/cluster. Make sure that your custom configuration has clustering enabled.
FarmProfileRepositoryClusteringHandler bean, whose properties and default values are listed below:
<bean name="FarmProfileRepositoryClusteringHandler"
class="org.jboss.profileservice.cluster.repository.
DefaultRepositoryClusteringHandler">
<property name="partition"><inject bean="HAPartition"/></property>
<property name="profileDomain">default</property>
<property name="profileServer">default</property>
<property name="profileName">farm</property>
<property name="immutable">false</property>
<property name="lockTimeout">60000</property><!-- 1 minute -->
<property name="methodCallTimeout">60000</property><!-- 1 minute -->
<property name="synchronizationPolicy"><inject bean="FarmProfileSynchronizationPolicy"/></property>
</bean>
- partition is a required attribute to inject the HAPartition service that the farm service uses for intra-cluster communication.
- profile[Domain|Server|Name] are all used to identify the server profile for which this handler is intended.
- immutable indicates whether or not this handler allows a node to push content changes to the cluster. A value of
trueis equivalent to settingsynchronizationPolicytoorg.jboss.system.server.profileservice.repository.clustered.sync.ImmutableSynchronizationPolicy. - lockTimeout defines the number of milliseconds to wait for cluster-wide lock acquisition.
- methodCallTimeout defines the number of milliseconds to wait for invocations on remote cluster nodes.
- synchronizationPolicy decides how to handle content additions, reincarnations, updates, or removals from nodes attempting to join the cluster or from cluster merges. The policy is consulted on the "authoritative" node, i.e. the master node for the service on the cluster. Reincarnation refers to the phenomenon where a newly started node may contain an application in its
farm/directory that was previously removed by the farming service but might still exist on the starting node if it was not running when the removal took place. The default synchronization policy is defined as follows:<bean name="FarmProfileSynchronizationPolicy" class="org.jboss.profileservice.cluster.repository. DefaultSynchronizationPolicy"> <property name="allowJoinAdditions"><null/></property> <property name="allowJoinReincarnations"><null/></property> <property name="allowJoinUpdates"><null/></property> <property name="allowJoinRemovals"><null/></property> <property name="allowMergeAdditions"><null/></property> <property name="allowMergeReincarnations"><null/></property> <property name="allowMergeUpdates"><null/></property> <property name="allowMergeRemovals"><null/></property> <property name="developerMode">false</property> <property name="removalTrackingTime">2592000000</property><!-- 30 days --> <property name="timestampService"><inject bean="TimestampDiscrepancyService"/></property> </bean>- allow[Join|Merge][Additions|Reincarnations|Updates|Removals] define fixed responses to requests to allow additions, reincarnations, updates, or removals from joined or merged nodes.
- developerMode enables a lenient synchronization policy that allows all changes. Enabling developer mode is equivalent to setting each of the above properties to
trueand is intended for development environments. - removalTrackingTime defines the number of milliseconds for which this policy should remembered removed items, for use in detecting reincarnations.
- timestampService estimates and tracks discrepancies in system clocks for current and past members of the cluster. Default implementation is defined in
timestamps-jboss-beans.xml.
Chapter 28. JGroups Services
- The JGroups project documentation at http://jgroups.org/ug.html
- The JGroups wiki pages at jboss.org, rooted at https://www.jboss.org/community/wiki/JGroups
28.1. Configuring a JGroups Channel's Protocol Stack
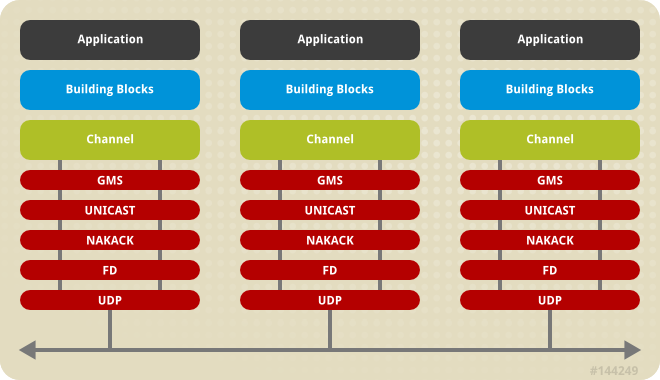
Figure 28.1. Protocol stack in JGroups
<JBOSS_HOME>/server/<PROFILE>/deploy/cluster/jgroups-channelfactory.sar/META-INF/jgroups-channelfactory-stacks.xml file. This file is parsed by the ChannelFactory service, which uses the contents to provide correctly configured channels to the clustered services that require them. See Section 21.1.1, “The Channel Factory Service” for more on the ChannelFactory service.
jgroups-channelfactory-stacks.xml:
<stack name="udp-async"
description="Same as the default 'udp' stack above, except message bundling
is enabled in the transport protocol (enable_bundling=true).
Useful for services that make high-volume asynchronous
RPCs (e.g. high volume JBoss Cache instances configured
for REPL_ASYNC) where message bundling may improve performance.">
<config>
<UDP
singleton_name="udp-async"
mcast_port="${jboss.jgroups.udp_async.mcast_port:45689}"
mcast_addr="${jboss.partition.udpGroup:228.11.11.11}"
tos="8"
ucast_recv_buf_size="20000000"
ucast_send_buf_size="640000"
mcast_recv_buf_size="25000000"
mcast_send_buf_size="640000"
loopback="true"
discard_incompatible_packets="true"
enable_bundling="true"
max_bundle_size="64000"
max_bundle_timeout="30"
ip_ttl="${jgroups.udp.ip_ttl:2}"
thread_naming_pattern="cl"
timer.num_threads="12"
enable_diagnostics="${jboss.jgroups.enable_diagnostics:true}"
diagnostics_addr="${jboss.jgroups.diagnostics_addr:224.0.0.75}"
diagnostics_port="${jboss.jgroups.diagnostics_port:7500}"
thread_pool.enabled="true"
thread_pool.min_threads="8"
thread_pool.max_threads="200"
thread_pool.keep_alive_time="5000"
thread_pool.queue_enabled="true"
thread_pool.queue_max_size="1000"
thread_pool.rejection_policy="discard"
oob_thread_pool.enabled="true"
oob_thread_pool.min_threads="8"
oob_thread_pool.max_threads="200"
oob_thread_pool.keep_alive_time="1000"
oob_thread_pool.queue_enabled="false"
oob_thread_pool.rejection_policy="discard"/>
<PING timeout="2000" num_initial_members="3"/>
<MERGE2 max_interval="100000" min_interval="20000"/>
<FD_SOCK/>
<FD timeout="6000" max_tries="5" shun="true"/>
<VERIFY_SUSPECT timeout="1500"/>
<BARRIER/>
<pbcast.NAKACK use_mcast_xmit="true" gc_lag="0"
retransmit_timeout="300,600,1200,2400,4800"
discard_delivered_msgs="true"/>
<UNICAST timeout="300,600,1200,2400,3600"/>
<pbcast.STABLE stability_delay="1000" desired_avg_gossip="50000"
max_bytes="400000"/>
<VIEW_SYNC avg_send_interval="10000"/>
<pbcast.GMS print_local_addr="true" join_timeout="3000"
shun="true"
view_bundling="true"
view_ack_collection_timeout="5000"
resume_task_timeout="7500"/>
<FC max_credits="2000000" min_threshold="0.10"
ignore_synchronous_response="true"/>
<FRAG2 frag_size="60000"/>
<!-- pbcast.STREAMING_STATE_TRANSFER/ -->
<pbcast.STATE_TRANSFER/>
<pbcast.FLUSH timeout="0" start_flush_timeout="10000"/>
</config>
</stack><config> element contains all the configuration data for JGroups. This information is used to configure a JGroups channel, which is conceptually similar to a socket, and manages communication between peers in a cluster. Each element within the <config> element defines a particular JGroups protocol. Each protocol performs one function. The combination of these functions defines the characteristics of the channel as a whole. The next few sections describe common protocols and explain the options available to each.
28.1.1. Common Configuration Properties
stats- indicates whether the protocol should gather runtime statistics on its operations. These statistics can be exposed via tools like the JMX Console or the JGroups Probe utility. What, if any, statistics are gathered depends on the protocol. Default istrue.
Note
down_thread and up_thread attributes. The JGroups version included in JBoss Enterprise Application Platform 5 and later no longer uses those attributes, and a WARN message will be written to the server log if they are configured for any protocol.
28.1.2. Transport Protocols
UDP, TCP and TUNNEL as transport protocols.
Note
UDP, TCP, and TUNNEL protocols are mutually exclusive. You can only have one transport protocol in each JGroups Config element
28.1.2.1. UDP configuration
UDP sub-element in the JGroups config element. Here is an example.
<UDP
singleton_name="udp-async"
mcast_port="${jboss.jgroups.udp_async.mcast_port:45689}"
mcast_addr="${jboss.partition.udpGroup:228.11.11.11}"
tos="8"
ucast_recv_buf_size="20000000"
ucast_send_buf_size="640000"
mcast_recv_buf_size="25000000"
mcast_send_buf_size="640000"
loopback="true"
discard_incompatible_packets="true"
enable_bundling="true"
max_bundle_size="64000"
max_bundle_timeout="30"
ip_ttl="${jgroups.udp.ip_ttl:2}"
thread_naming_pattern="cl"
timer.num_threads="12"
enable_diagnostics="${jboss.jgroups.enable_diagnostics:true}"
diagnostics_addr="${jboss.jgroups.diagnostics_addr:224.0.0.75}"
diagnostics_port="${jboss.jgroups.diagnostics_port:7500}"
thread_pool.enabled="true"
thread_pool.min_threads="8"
thread_pool.max_threads="200"
thread_pool.keep_alive_time="5000"
thread_pool.queue_enabled="true"
thread_pool.queue_max_size="1000"
thread_pool.rejection_policy="discard"
oob_thread_pool.enabled="true"
oob_thread_pool.min_threads="8"
oob_thread_pool.max_threads="200"
oob_thread_pool.keep_alive_time="1000"
oob_thread_pool.queue_enabled="false"
oob_thread_pool.rejection_policy="discard"/>UDP protocol, followed by the attributes that are also used by the TCP and TUNNEL transport protocols.
UDP protocol are:
- ip_mcast specifies whether or not to use IP multicasting. The default is
true. If set tofalse, multiple unicast packets will be sent instead of one multicast packet. Any packet sent viaUDPprotocol are UDP datagrams. - mcast_addr specifies the multicast address (class D) for communicating with the group (i.e., the cluster). The standard protocol stack configurations in JBoss Enterprise Application Platform use the value of system property
jboss.partition.udpGroup, if set, as the value for this attribute. Using the-ucommand line switch when starting JBoss Enterprise Application Platform sets that value. See Section 28.6.2, “Isolating JGroups Channels” for information about using this configuration attribute to ensure that JGroups channels are properly isolated from one another. If this attribute is omitted, the default value is228.11.11.11. - mcast_port specifies the port to use for multicast communication with the group. See Section 28.6.2, “Isolating JGroups Channels” for how to use this configuration attribute to ensure JGroups channels are properly isolated from one another. If this attribute is omitted, the default is
45688. mcast_send_buf_size,mcast_recv_buf_size,ucast_send_buf_sizeanducast_recv_buf_sizedefine the socket send and receive buffer sizes that JGroups will request from the operating system. A large buffer size helps to ensure that packets are not dropped due to buffer overflow. However, socket buffer sizes are limited at the operating system level, so obtaining the desired buffer may require configuration at the operating system level. See Section 28.6.2.3, “Improving UDP Performance by Configuring OS UDP Buffer Limits” for further details.- bind_port specifies the port to which the unicast receive socket should be bound. The default is
0; i.e. use an ephemeral port. - port_range specifies the number of ports to try if the port identified by
bind_portis not available. The default is1, which specifies that onlybind_portwill be tried. - ip_ttl specifies time-to-live (TTL) for IP Multicast packets. TTL is the commonly used term in multicast networking, but is actually something of a misnomer, since the value here refers to how many network hops a packet will be allowed to travel before networking equipment will drop it.
- tos specifies the traffic class for sending unicast and multicast datagrams.
TCP or TUNNEL, are:
- singleton_name provides a unique name for this transport protocol configuration. Used by the application server's
ChannelFactoryto support sharing of a transport protocol instance by different channels that use the same transport protocol configuration. See Section 21.1.2, “The JGroups Shared Transport”. - bind_addr specifies the interface on which to receive and send messages. By default, JGroups uses the value of system property
jgroups.bind_addr. This can also be set with the-bcommand line switch. See Section 28.6, “Other Configuration Issues” for more on binding JGroups sockets. - receive_on_all_interfaces specifies whether this node should listen on all interfaces for multicasts. The default is
false. It overrides thebind_addrproperty for receiving multicasts. However,bind_addr(if set) is still used to send multicasts. - send_on_all_interfaces specifies whether this node sends UDP packets via all available network interface controllers, if your machine has multiple network interface controllers available. This means that the same multicast message is sent N times, so use with care.
- receive_interfaces specifies a list of interfaces on which to receive multicasts. The multicast receive socket will listen on all of these interfaces. This is a comma-separated list of IP addresses or interface names, for example,
192.168.5.1,eth1,127.0.0.1. - send_interfaces specifies a list of interfaces via which to send multicasts. The multicast sender socket will send on all of these interfaces. This is a comma-separated list of IP addresses or interface names, for example,
192.168.5.1,eth1,127.0.0.1.This means that the same multicast message is sent N times, so use with care. - enable_bundling specifies whether to enable message bundling. If
true, the transport protocol queues outgoing messages untilmax_bundle_sizebytes have accumulated, ormax_bundle_timemilliseconds have elapsed, whichever occurs first. Then the transport protocol bundles queued messages into one large message and sends it. The messages are un-bundled at the receiver. The default isfalse.Message bundling can have significant performance benefits for channels that are used for high volume sending of messages where the sender does not block waiting for a response from recipients (for example, a JBoss Cache instance configured forREPL_ASYNC.) It can add considerable latency to applications where senders need to block waiting for responses, so it is not recommended for certain situations, such as where a JBoss Cache instance is configured forREPL_SYNC. - loopback specifies whether the thread sending a message to the group should itself carry the message back up the stack for delivery. (Messages sent to the group are always delivered to the sending node as well.) If
false, the sending thread does not carry the message; the transport protocol waits to read the message off the network and uses one of the message delivery pool threads for delivery. The default isfalse, buttrueis recommended to ensure that the channel receives its own messages, in case the network interface goes down. - discard_incompatible_packets specifies whether to discard packets sent by peers that use a different version of JGroups. Each message in the cluster is tagged with a JGroups version. If
discard_incompatible_packetsis set totrue, messages received from different versions of JGroups will be silently discarded. Otherwise, a warning will be logged. In no case will the message be delivered. The default value isfalse. - enable_diagnostics specifies that the transport should open a multicast socket on address
diagnostics_addrand portdiagnostics_portto listen for diagnostic requests sent by the JGroups Probe utility. - The various thread_pool attributes configure the behavior of the pool of threads JGroups uses to carry ordinary incoming messages up the stack. The various attributes provide the constructor arguments for an instance of
java.util.concurrent.ThreadPoolExecutorService. In the example above, the pool will have a minimum or core size of 8 threads, and a maximum size of 200. If more than 8 pool threads have been created, a thread returning from carrying a message will wait for up to 5000 milliseconds to be assigned a new message to carry, after which it will terminate. If no threads are available to carry a message, the (separate) thread reading messages off the socket will place messages in a queue; the queue will hold up to 1000 messages. If the queue is full, the thread reading messages off the socket will discard the message. - The various oob_thread_pool attributes are similar to the thread_pool attributes in that they configure a
java.util.concurrent.ThreadPoolExecutorServiceused to carry incoming messages up the protocol stack. In this case, the pool is used to carry a special type of message known as an Out-Of-Band (OOB) message. OOB messages are exempt from the ordered-delivery requirements of protocols like NAKACK and UNICAST and thus can be delivered up the stack even if NAKACK or UNICAST are queuing up messages from a particular sender. OOB messages are often used internally by JGroups protocols and can be used by applications as well. For example, when JBoss Cache is inREPL_SYNCmode, it uses OOB messages for the second phase of its two-phase-commit protocol.
28.1.2.2. TCP configuration
TCP element in the JGroups config element. Here is an example of the TCP element.
<TCP singleton_name="tcp"
start_port="7800" end_port="7800"/>
TCP element:
start_portandend_portdefine the range of TCP ports to which the server should bind. The server socket is bound to the first available port beginning withstart_port. If no available port is found (for example, because the ports are in use by other sockets) before theend_port, the server throws an exception. If noend_portis provided, orend_portis lower thanstart_port, no upper limit is applied to the port range. Ifstart_portis equal toend_port, JGroups is forced to use the specified port, sincestart_portfails if the specified port in not available. The default value is7800. If set to0, the operating system will select a port. (This will only work forMPINGorTCPGOSSIPdiscovery protocols.TCCPINGrequires that nodes and their required ports are listed.)- bind_port in TCP acts as an alias for
start_port. If configured internally, it setsstart_port. - recv_buf_size, send_buf_size define receive and send buffer sizes. It is good to have a large receiver buffer size, so packets are less likely to get dropped due to buffer overflow.
- conn_expire_time specifies the time (in milliseconds) after which a connection can be closed by the reaper if no traffic has been received.
- reaper_interval specifies interval (in milliseconds) to run the reaper. If both values are 0, no reaping will be done. If either value is > 0, reaping will be enabled. By default, reaper_interval is 0, which means no reaper.
- sock_conn_timeout specifies max time in milliseconds for a socket creation. When doing the initial discovery, and a peer hangs, do not wait forever but go on after the timeout to ping other members. Reduces chances of *not* finding any members at all. The default is 2000.
- use_send_queues specifies whether to use separate send queues for each connection. This prevents blocking on write if the peer hangs. The default is true.
- external_addr specifies external IP address to broadcast to other group members (if different to local address). This is useful when you have use (Network Address Translation) NAT, e.g. a node on a private network, behind a firewall, but you can only route to it via an externally visible address, which is different from the local address it is bound to. Therefore, the node can be configured to broadcast its external address, while still able to bind to the local one. This avoids having to use the TUNNEL protocol, (and hence a requirement for a central gossip router) because nodes outside the firewall can still route to the node inside the firewall, but only on its external address. Without setting the external_addr, the node behind the firewall will broadcast its private address to the other nodes which will not be able to route to it.
- skip_suspected_members specifies whether unicast messages should not be sent to suspected members. The default is true.
- tcp_nodelay specifies TCP_NODELAY. TCP by default nagles messages, that is, conceptually, smaller messages are bundled into larger ones. If we want to invoke synchronous cluster method calls, then we need to disable nagling in addition to disabling message bundling (by setting
enable_bundlingto false). Nagling is disabled by settingtcp_nodelayto true. The default is false.
Note
28.1.2.3. TUNNEL configuration
TUNNEL protocol uses an external router process to send messages. The external router is a Java process that runs the org.jgroups.stack.GossipRouter main class. Each node has to register with the router. All messages are sent to the router and forwarded on to their destinations. The TUNNEL approach can be used to set up communication with nodes behind firewalls. A node can establish a TCP connection to the GossipRouter through the firewall (you can use port 80). This connection is also used by the router to send messages to nodes behind the firewall, as most firewalls do not permit outside hosts to initiate a TCP connection to a host inside the firewall. The TUNNEL configuration is defined in the TUNNEL element within the JGroups <config> element, like so:
<TUNNEL singleton_name="tunnel"
router_port="12001"
router_host="192.168.5.1"/>
TUNNEL element are listed below.
- router_host specifies the host on which the GossipRouter is running.
- router_port specifies the port on which the GossipRouter is listening.
- reconnect_interval specifies the interval of time (in milliseconds) for which
TUNNELwill attempt to connect to theGossipRouterif the connection is not established. The default value is5000.
Note
TUNNEL.
28.1.3. Discovery Protocols
<config> element.
28.1.3.1. PING
<PING timeout="2000"
num_initial_members="3"/>
<PING gossip_host="localhost"
gossip_port="1234"
timeout="2000"
num_initial_members="3"/>PING element are listed below.
- timeout specifies the maximum number of milliseconds to wait for num_initial_members responses. The default is 3000.
- num_initial_members specifies the minimum number of responses to wait for unless timeout has expired. The default is 2.
- gossip_host specifies the host on which the GossipRouter is running.
- gossip_port specifies the port on which the GossipRouter is listening on.
- gossip_refresh specifies the interval (in milliseconds) for the lease from the GossipRouter. The default is 20000.
- initial_hosts is a comma-separated list of addresses or ports (for example,
host1[12345],host2[23456]) which are pinged for discovery. Default isnull, meaning multicast discovery should be used. Ifinitial_hostsis specified, you must list all possible cluster members, not just a few well-known hosts, orMERGE2cluster split discovery will not work reliably.
gossip_host and gossip_port are defined, the cluster uses the GossipRouter for the initial discovery. If the initial_hosts is specified, the cluster pings that static list of addresses for discovery. Otherwise, the cluster uses IP multicasting for discovery.
Note
timeout ms have elapsed or the num_initial_members responses have been received.
28.1.3.2. TCPGOSSIP
gossip_host and gossip_port attributes. It works on top of both UDP and TCP transport protocols. Here is an example.
<TCPGOSSIP timeout="2000"
num_initial_members="3"
initial_hosts="192.168.5.1[12000],192.168.0.2[12000]"/>TCPGOSSIP element are listed below.
- timeout specifies the maximum number of milliseconds to wait for num_initial_members responses. The default is 3000.
- num_initial_members specifies the minimum number of responses to wait for unless timeout has expired. The default is 2.
- initial_hosts is a comma-separated list of addresses/ports (for example,
host1[12345],host2[23456]) ofGossipRouters to register
28.1.3.3. TCPPING
TCPPING configuration element in the JGroups config element.
<TCPPING timeout="2000"
num_initial_members="3"/
initial_hosts="hosta[2300],hostb[3400],hostc[4500]"
max_dynamic_hosts="3"
port_range="3">
TCPPING element are listed below.
- timeout specifies the maximum number of milliseconds to wait for num_initial_members responses. The default is 3000.
- num_initial_members specifies the minimum number of responses to wait for unless timeout has expired. The default is 2.
- initial_hosts is a comma-separated list of addresses (for example,
host1[12345],host2[23456]) for pinging. - max_dynamic_hosts specifies the maximum number of hosts that can be dynamically added to the cluster (defaults to
0).If dynamic adding of hosts is not allowed, make sure you list all cluster members in the <initial_hosts> attribute on all cluster members before adding the new node to the cluster, so that the nodes can be added on server start. - port_range specifies the number of consecutive ports to be probed when getting the initial membership, starting with the port specified in the
initial_hostsparameter. Given the current values ofport_rangeandinitial_hostsabove, theTCPPINGlayer will try to connect tohosta[2300],hosta[2301],hosta[2302],hostb[3400],hostb[3401],hostb[3402],hostc[4500],hostc[4501], andhostc[4502]. This configuration option allows for multiple possible ports on the same host to be pinged without having to spell out all possible combinations. If in your TCP protocol configuration yourend_portis greater than yourstart_port, we recommend using a TCPPINGport_rangeequal to the difference, to ensure a node is pinged no matter which port it is bound to within the allowed range.
28.1.3.4. MPING
MPING uses IP multicast to discover the initial membership. Unlike the other discovery protocols, which delegate the sending and receiving of discovery messages on the network to the transport protocol, MPING opens its own sockets to send and receive multicast discovery messages. As a result it can be used with all transports, but it is most often used with TCP. TCP usually requires TCPPING, which must explicitly list all possible group members. MPING does not have this requirement, and is typically used where TCP is required for regular message transport, and UDP multicasting is allowed for discovery.
<MPING timeout="2000"
num_initial_members="3"
bind_to_all_interfaces="true"
mcast_addr="228.8.8.8"
mcast_port="7500"
ip_ttl="8"/>
MPING element are listed below.
- timeout specifies the maximum number of milliseconds to wait for any responses. The default is 3000.
- num_initial_members specifies the maximum number of responses to wait for unless timeout has expired. The default is 2..
- bind_addr specifies the interface on which to send and receive multicast packets. By default JGroups uses the value of the system property
jgroups.bind_addr, which can be set with the-bcommand line switch. See Section 28.6, “Other Configuration Issues” for more on binding JGroups sockets. - bind_to_all_interfaces overrides the
bind_addrand uses all interfaces in multihome nodes. - mcast_addr, mcast_port, ip_ttl attributes are the same as related attributes in the UDP protocol configuration.
28.1.4. Failure Detection Protocols
<config> element.
28.1.4.1. FD
FD is a failure detection protocol based on 'heartbeat' messages. This protocol requires that each node periodically ping its neighbor. If the neighbor fails to respond, the calling node sends a SUSPECT message to the cluster. The current group coordinator can optionally verify that the suspected node is dead (VERIFY_SUSPECT). If the node is still considered dead after this verification step, the coordinator updates the cluster's membership view. The following is an example of FD configuration:
<FD timeout="6000"
max_tries="5"
shun="true"/>
FD element are listed below.
- timeout specifies the maximum number of milliseconds to wait for the responses to the are-you-alive messages. The default is 3000.
- max_tries specifies the number of missed are-you-alive messages from a node before the node is suspected. The default is 2.
- shun specifies whether a failed node will be forbidden from sending messages to the group without formally rejoining. A shunned node would need to rejoin the cluster via the discovery process. JGroups allows applications to configure a channel such that, when a channel is shunned, the process of rejoining the cluster and transferring state takes place automatically. This is the default behavior of JBoss Enterprise Application Platform.
Note
28.1.4.2. FD_SOCK
FD_SOCK is a failure detection protocol based on a ring of TCP sockets created between group members. Each member in a group connects to its neighbor, with the final member connecting to the first, forming a ring. Node B becomes suspected when its neighbor, Node A, detects an abnormally closed TCP socket, presumably due to a crash in Node B. (When nodes intend to leave the group, they inform their neighbors so that they do not become suspected.)
FD_SOCK configuration does not take any attribute. You can declare an empty FD_SOCK element in the JGroups <config> element.
<FD_SOCK/>
FD_SOCK element are listed below.
- bind_addr specifies the interface to which the server socket should be bound. By default, JGroups uses the value of the system property
jgroups.bind_addr. This system property can be set with the-bcommand line switch. For more information about binding JGroups sockets, see Section 28.6, “Other Configuration Issues”.
28.1.4.3. VERIFY_SUSPECT
<VERIFY_SUSPECT timeout="1500"/>
VERIFY_SUSPECT element are listed below.
- timeout specifies how long to wait for a response from the suspected member before considering it dead.
28.1.4.4. FD versus FD_SOCK
- FD
- An overloaded machine might be slow in sending are-you-alive responses.
- A member will be suspected when suspended in a debugger/profiler.
- Low timeouts lead to higher probability of false suspicions and higher network traffic.
- High timeouts will not detect and remove crashed members for some time.
- FD_SOCK:
- Suspended in a debugger is no problem because the TCP connection is still open.
- High load no problem either for the same reason.
- Members will only be suspected when TCP connection breaks, so hung members will not be detected.
- Also, a crashed switch will not be detected until the connection runs into the TCP timeout (between 2-20 minutes, depending on TCP/IP stack implementation).
- By default, JGroups configures the FD_SOCK socket with KEEP_ALIVE, which means that TCP sends a heartbeat on socket on which no traffic has been received in 2 hours. If a host crashed (or an intermediate switch or router crashed) without closing the TCP connection properly, we would detect this after 2 hours (plus a few minutes). This is of course better than never closing the connection (if KEEP_ALIVE is off), but may not be of much help. So, the first solution would be to lower the timeout value for KEEP_ALIVE. This can only be done for the entire kernel in most operating systems, so if this is lowered to 15 minutes, this will affect all TCP sockets.
- The second solution is to combine FD_SOCK and FD; the timeout in FD can be set such that it is much lower than the TCP timeout, and this can be configured individually per process. FD_SOCK will already generate a suspect message if the socket was closed abnormally. However, in the case of a crashed switch or host, FD will make sure the socket is eventually closed and the suspect message generated. Example:
<FD_SOCK/> <FD timeout="6000" max_tries="5" shun="true"/> <VERIFY_SUSPECT timeout="1500"/>
FD will suspect the neighbor after sixty seconds (6000 milliseconds). Note that if this example system were stopped in a breakpoint in the debugger, the node being debugged will be suspected once the timeout has elapsed.
FD and FD_SOCK provides a solid failure detection layer, which is why this technique is used across the JGroups configurations included with JBoss Enterprise Application Platform.
28.1.5. Reliable Delivery Protocols
ACK mode, the sender resends the message until acknowledgment is received from the receiver. In NAK mode, the receiver requests re-transmission when it discovers a gap.
28.1.5.1. UNICAST
UNICAST protocol is used for unicast messages. It uses positive acknowledgements (ACK). It is configured as a sub-element under the JGroups config element. If the JGroups stack is configured with the TCP transport protocol, UNICAST is not necessary because TCP itself guarantees FIFO delivery of unicast messages. Here is an example configuration for the UNICAST protocol:
<UNICAST timeout="300,600,1200,2400,3600"/>
UNICAST element.
- timeout specifies the re-transmission timeout (in milliseconds). For instance, if the timeout is
100,200,400,800, the sender resends the message if it has not received anACKafter 100 milliseconds the first time, and the second time it waits for 200 milliseconds before re-sending, and so on. A low value for the first timeout allows for prompt re-transmission of dropped messages, but means that messages may be transmitted more than once if they have not actually been lost (that is, the message has been sent, but theACKhas not been received before the timeout). High values (1000,2000,3000) can improve performance if the network is tuned such that UDP datagram loss is infrequent. High values on networks with frequent losses will be harmful to performance, since later messages will not be delivered until lost messages have been re-transmitted.
28.1.5.2. NAKACK
NAKACK protocol is used for multicast messages. It uses negative acknowledgements (NAK). Under this protocol, each message is tagged with a sequence number. The receiver keeps track of the received sequence numbers and delivers the messages in order. When a gap in the series of received sequence numbers is detected, the receiver schedules a task to periodically ask the sender to re-transmit the missing message. The task is canceled if the missing message is received. NAKACK protocol is configured as the pbcast.NAKACK sub-element under the JGroups <config> element. Here is an example configuration:
<pbcast.NAKACK max_xmit_size="60000" use_mcast_xmit="false" retransmit_timeout="300,600,1200,2400,4800" gc_lag="0" discard_delivered_msgs="true"/>
pbcast.NAKACK element are as follows.
- re-transmit_timeout specifies the series of timeouts (in milliseconds) after which re-transmission is requested if a missing message has not yet been received.
- use_mcast_xmit determines whether the sender should send the re-transmission to the entire cluster rather than just to the node requesting it. This is useful when the sender's network layer tends to drop packets, avoiding the need to individually re-transmit to each node.
- max_xmit_size specifies the maximum size (in bytes) for a bundled re-transmission, if multiple messages are reported missing.
- discard_delivered_msgs specifies whether to discard delivered messages on the receiver nodes. By default, nodes save delivered messages so any node can re-transmit a lost message in case the original sender has crashed or left the group. However, if we only ask the sender to resend its messages, we can enable this option and discard delivered messages.
- gc_lag specifies the number of messages to keep in memory for re-transmission, even after the periodic cleanup protocol (see Section 28.4, “Distributed Garbage Collection (STABLE)”) indicates all peers have received the message. The default value is
20.
28.1.6. Group Membership (GMS)
pbcast.GMS sub-element under the JGroups config element. Here is an example configuration.
<pbcast.GMS print_local_addr="true"
join_timeout="3000"
join_retry_timeout="2000"
shun="true"
view_bundling="true"/>
pbcast.GMS element are as follows.
- join_timeout specifies the maximum number of milliseconds to wait for a new node JOIN request to succeed. Retry afterwards.
- join_retry_timeout specifies the number of milliseconds to wait after a failed JOIN before trying again.
- print_local_addr specifies whether to dump the node's own address to the standard output when started.
- shun specifies whether a node should shun (that is, disconnect) itself if it receives a cluster view in which it is not a member node.
- disable_initial_coord specifies whether to prevent this node from becoming the cluster coordinator during the initial connection of the channel. This flag does not prevent a node becoming the coordinator after the initial channel connection, if the current coordinator leaves the group.
- view_bundling specifies whether multiple JOIN or LEAVE requests arriving at the same time are bundled and handled together at the same time, resulting in only one new view that incorporates all changes. This is more efficient than handling each request separately.
28.1.7. Flow Control (FC)
FC sub-element under the JGroups config element. Here is an example configuration.
<FC max_credits="2000000"
min_threshold="0.10"
ignore_synchronous_response="true"/>
FC element are as follows.
- max_credits specifies the maximum number of credits (in bytes). This value should be smaller than the JVM heap size.
- min_credits specifies the minimum number of bytes that must be received before the receiver will send more credits to the sender.
- min_threshold specifies the percentage of the
max_creditsthat should be used to calculatemin_credits. Setting this overrides themin_creditsattribute. - ignore_synchronous_response specifies whether threads that have carried messages up to the application should be allowed to carry outgoing messages back down through FC without blocking for credits. Synchronous response refers to the fact that these messages are generally responses to incoming RPC-type messages. Forbidding JGroups threads to carry messages up to block in FC can help prevent certain deadlock scenarios, so we recommend setting this to
true.
Note
NAKACK is required, even though TCP handles its own re-transmission.)
STABLE protocol. For more information, see Section 28.4, “Distributed Garbage Collection (STABLE)”.)
Note
28.2. Fragmentation (FRAG2)
FRAG2 sub-element in the JGroups config element. Here is an example configuration:
<FRAG2 frag_size="60000"/>- frag_size specifies the maximum message size (in bytes) before fragmentation occurs. Messages larger than this size are fragmented. For stacks that use the UDP transport, this value must be lower than 64 kilobytes (the maximum UDP datagram size). For TCP-based stacks, it must be lower than the value of
max_creditsin the FC protocol.
Note
FC.max_credits, the FC protocol will block forever. So, frag_size within FRAG2 must always be set to a value lower than that of FC.max_credits.
28.3. State Transfer
pbcast.STATE_TRANSFER sub-element under the JGroups Config element. It does not have any configurable attribute. Here is an example configuration.
<pbcast.STATE_TRANSFER/>
28.4. Distributed Garbage Collection (STABLE)
pbcast.STABLE sub-element under the JGroups config element. Here is an example configuration.
<pbcast.STABLE stability_delay="1000"
desired_avg_gossip="5000"
max_bytes="400000"/>
pbcast.STABLE element are as follows.
- desired_avg_gossip specifies intervals (in milliseconds) of garbage collection runs. Set this to
0to disable interval-based garbage collection. - max_bytes specifies the maximum number of bytes received before the cluster triggers a garbage collection run. Set to
0to disable garbage collection based on the bytes received. - stability_delay specifies the maximum time period (in milliseconds) of a random delay introduced before a node sends its
STABILITYmessage at the end of a garbage collection run. The delay gives other nodes concurrently running aSTABLEtask a chance to send first. If used together withmax_bytes, this attribute should be set to a small number.
Note
max_bytes attribute when you have a high traffic cluster.
28.5. Merging (MERGE2)
MERGE2 sub-element under the JGroups Config element. Here is an example configuration.
<MERGE2 max_interval="10000"
min_interval="2000"/>
MERGE2 element are as follows.
- max_interval specifies the maximum number of milliseconds to wait before sending a MERGE message.
- min_interval specifies the minimum number of milliseconds to wait before sending a MERGE message.
min_interval and max_interval to periodically send the MERGE message.
Note
Note
MERGE2 is used in conjunction with TCPPING, the initial_hosts attribute must contain all the nodes that could potentially be merged back, in order for the merge process to work properly. Otherwise, the merge process may not detect all sub-groups, and may miss those comprised solely of unlisted members.
28.6. Other Configuration Issues
28.6.1. Binding JGroups Channels to a Particular Interface
bind_addr element in an XML configuration file will be ignored by JGroups if it finds that the system property jgroups.bind_addr (or a deprecated earlier name for the same thing, bind.address) has been set. The system property has a higher priority level than the XML property. If JBoss Enterprise Application Platform is started with the -b (or --host) switch, the application server will set jgroups.bind_addr to the specified value. If -b is not set, the application server will bind most services to localhost by default.
- Binding JGroups to the same interface as other services. Simple, just use
-b:./run.sh -b 192.168.1.100 -c production
- Binding services (e.g., JBoss Web) to one interface, but use a different one for JGroups:
./run.sh -b 10.0.0.100 -Djgroups.bind_addr=192.168.1.100 -c production
Specifically setting the system property overrides the-bvalue. This is a common usage pattern; put client traffic on one network, with intra-cluster traffic on another. - Binding services (e.g., JBoss Web) to all interfaces. This can be done like this:
./run.sh -b 0.0.0.0 -c production
However, doing this will not cause JGroups to bind to all interfaces! Instead, JGroups will bind to the machine's default interface. See the Transport Protocols section for how to tell JGroups to receive or send on all interfaces, if that is what you really want. - Binding services (e.g., JBoss Web) to all interfaces, but specify the JGroups interface:
./run.sh -b 0.0.0.0 -Djgroups.bind_addr=192.168.1.100 -c production
Again, specifically setting the system property overrides the-bvalue. - Using different interfaces for different channels:
./run.sh -b 10.0.0.100 -Djgroups.ignore.bind_addr=true -c production
jgroups.bind_addr system property, and instead use whatever is specified in XML. You would need to edit the various XML configuration files to set the various bind_addr attributes to the desired interfaces.
28.6.2. Isolating JGroups Channels
HttpSession replication, EJB3 stateful session bean replication and EJB3 entity replication), two JBoss Messaging channels, and HAPartition, the general purpose clustering service that underlies most other JBossHA services.
28.6.2.1. Isolating Sets of JBoss Enterprise Application Platform Instances from Each Other
- Make sure the channels in the various clusters use different group names. This can be controlled with the command line arguments used to start JBoss Enterprise Application Platform; see Section 28.6.2.2.1, “Changing the Group Name” for more information.
- Make sure the channels in the various clusters use different multicast addresses. This is also easy to control with the command line arguments used to start JBoss.
- If you are not running on Linux, Windows, Solaris or HP-UX, you may also need to ensure that the channels in each cluster use different multicast ports. This is more difficult than using different group names, although it can still be controlled from the command line. See Section 28.6.2.2.3, “Changing the Multicast Port”. Note that using different ports should not be necessary if your servers are running on Linux, Windows, Solaris or HP-UX.
28.6.2.2. Isolating Channels for Different Services on the Same Set of JBoss Enterprise Application Platform Instances
clusterName configuration property.
28.6.2.2.1. Changing the Group Name
-g (or --partition) switch when starting JBoss:
./run.sh -g QAPartition -b 192.168.1.100 -c production
jboss.partition.name system property, which is used as a component in the configuration of the group name in all the standard clustering configuration files. For example,
<property name="clusterName">${jboss.partition.name:DefaultPartition}-SFSBCache</property>
28.6.2.2.2. Changing the multicast address and port
-u (or --udp) command line switch may be used to control the multicast address used by the JGroups channels opened by all standard JBoss Enterprise Application Platform services.
/run.sh -u 230.1.2.3 -g QAPartition -b 192.168.1.100 -c productionThis switch sets the
jboss.partition.udpGroup system property, which is referenced in all of the standard protocol stack configurations in JBoss Enterprise Application Platform:
<UDP mcast_addr="${jboss.partition.udpGroup:228.1.2.3}" ....Note
28.6.2.2.3. Changing the Multicast Port
-g and -u values is not sufficient to isolate clusters; the channels running in the different clusters must also use different multicast ports. Unfortunately, setting the multicast ports is not as simple as -g and -u. By default, a JBoss Enterprise Application Platform instance running the production configuration will use up to two different instances of the JGroups UDP transport protocol, and will therefore open two multicast sockets. You can control the ports those sockets use by using system properties on the command line. For example,
/run.sh -u 230.1.2.3 -g QAPartition -b 192.168.1.100 -c production \\
-Djboss.jgroups.udp.mcast_port=12345 -Djboss.messaging.datachanneludpport=23456
jboss.messaging.datachanneludpport property controls the multicast port used by the MPING protocol in JBoss Messaging's DATA channel. The jboss.jgroups.udp.mcast_port property controls the multicast port used by the UDP transport protocol shared by all other clustered services.
<JBOSS_HOME>/server/production/deploy/cluster/jgroups-channelfactory.sar/META-INF/jgroups-channelfactory-stacks.xml file includes a number of other example protocol stack configurations that the standard JBoss Enterprise Application Platform distribution does not actually use. Those configurations also use system properties to set any multicast ports. So, if you reconfigure a JBoss Enterprise Application Platform service to use one of those protocol stack configurations, use the appropriate system property to control the port from the command line.
Note
java.net.MulticastSocket class provides different overloaded constructors. On some operating systems, if you use one constructor variant, packets addressed to a particular multicast port are delivered to all listeners on that port, regardless of the multicast address on which they are listening. We refer to this as the promiscuous traffic problem. On most operating systems that exhibit the promiscuous traffic problem (Linux, Solaris and HP-UX) JGroups can use a different constructor variant that avoids the problem. However, on some operating systems with the promiscuous traffic problem (Mac OS X), multicast does not work properly if the other constructor variant is used. So, on these operating systems the recommendation is to configure different multicast ports for different clusters.
28.6.2.3. Improving UDP Performance by Configuring OS UDP Buffer Limits
mcast_recv_buf_size and ucast_recv_buf_size configuration attributes are used to specify the amount of receive buffer JGroups requests from the operating system, but the actual size of the buffer the operating system provides is limited by operating system-level maximums. These maximums are often very low:
| Operating System | Default Max UDP Buffer (in bytes) |
|---|---|
| Linux | 131071 |
| Windows | No known limit |
| Solaris | 262144 |
| FreeBSD, Darwin | 262144 |
| AIX | 1048576 |
| Operating System | Command |
|---|---|
| Linux | sysctl -w net.core.rmem_max=26214400 |
| Solaris | ndd -set /dev/udp udp_max_buf 26214400 |
| FreeBSD, Darwin | sysctl -w kern.ipc.maxsockbuf=26214400 |
| AIX | no -o sb_max=8388608 (AIX will only allow 1 megabyte, 4 megabytes or 8 megabytes). |
28.6.3. JGroups Troubleshooting
28.6.3.1. Nodes do not form a cluster
<JBOSS_HOME>/server/production/lib directory and start McastReceiverTest, for example:
[lib]$ java -cp jgroups.jar org.jgroups.tests.McastReceiverTest -mcast_addr 224.10.10.10 -port 5555
McastSenderTest:
[lib]$ java -cp jgroups.jar org.jgroups.tests.McastSenderTest -mcast_addr 224.10.10.10 -port 5555
-bind_addr 192.168.0.2, where 192.168.0.2 is the IP address of the NIC to which you want to bind. Use this parameter in both the sender and the receiver.
McastSenderTest window and see the output in the McastReceiverTest window. If not, try to use -ttl 32 in the sender. If this still fails, consult a system administrator to help you setup IP multicast correctly, and ask the admin to make sure that multicast will work on the interface you have chosen or, if the machines have multiple interfaces, ask to be told the correct interface. Once you know multicast is working properly on each machine in your cluster, you can repeat the above test to test the network, putting the sender on one machine and the receiver on another.
28.6.3.2. Causes of missing heartbeats in FD
- B or C are running at 100% CPU for more than T seconds. So even if C sends a heartbeat ack to B, B may not be able to process it because it is at 100%
- B or C are garbage collecting, same as above.
- A combination of the 2 cases above
- The network loses packets. This usually happens when there is a lot of traffic on the network, and the switch starts dropping packets (usually broadcasts first, then IP multicasts, TCP packets last).
- B or C are processing a callback. Let us say C received a remote method call over its channel and takes T+1 seconds to process it. During this time, C will not process any other messages, including heartbeats, and therefore B will not receive the heartbeat ack and will suspect C.
Chapter 29. JBoss Cache Configuration and Deployment
29.1. Key JBoss Cache Configuration Options
org.jboss.cache.config.Configuration object graph from XML. JBoss Cache has its own custom XML schema, but the standard JBoss Enterprise Application Platform CacheManager service uses the JBoss Microcontainer schema to be consistent with most other internal Enterprise Application Platform services.
29.1.1. Editing the CacheManager Configuration
Note
<JBOSS_HOME>/server/<PROFILE>/deploy/cluster/jboss-cache-manager.sar/META-INF/jboss-cache-manager-jboss-beans.xml file. The element most likely to be edited is the "CacheConfigurationRegistry" bean, which maintains a registry of all the named JBC configurations the CacheManager knows about. Most edits to this file would involve adding a new JBoss Cache configuration or changing a property of an existing one.
<bean name="CacheConfigurationRegistry"
class="org.jboss.ha.cachemanager.DependencyInjectedConfigurationRegistry">
<!-- If users wish to add configs using a more familiar JBC config format
they can add them to a cache-configs.xml file specified by this property.
However, use of the microcontainer format used below is recommended.
<property name="configResource">META-INF/jboss-cache-configs.xml</property>
-->
<!-- The configurations. A Map<String name, Configuration config> -->
<property name="newConfigurations">
<map keyClass="java.lang.String" valueClass="org.jboss.cache.config.Configuration">
<!-- The standard configurations follow. You can add your own and/or edit these. -->
<!-- Standard cache used for web sessions -->
<entry><key>standard-session-cache</key>
<value>
<bean name="StandardSessionCacheConfig" class="org.jboss.cache.config.Configuration">
<!-- Provides batching functionality for caches that do not want to
interact with regular JTA Transactions -->
<property name="transactionManagerLookupClass">
org.jboss.cache.transaction.BatchModeTransactionManagerLookup
</property>
<!-- Name of cluster. Needs to be the same for all members -->
<property name="clusterName">${jboss.partition.name:DefaultPartition}-SessionCache</property>
<!-- Use a UDP (multicast) based stack. Need JGroups flow control (FC)
because we are using asynchronous replication. -->
<property name="multiplexerStack">${jboss.default.jgroups.stack:udp}</property>
<property name="fetchInMemoryState">true</property>
<property name="nodeLockingScheme">PESSIMISTIC</property>
<property name="isolationLevel">REPEATABLE_READ</property>
<property name="cacheMode">REPL_ASYNC</property>
.... more details of the standard-session-cache configuration
</bean>
</value>
</entry>
<!-- Appropriate for web sessions with FIELD granularity -->
<entry><key>field-granularity-session-cache</key>
<value>
<bean name="FieldSessionCacheConfig" class="org.jboss.cache.config.Configuration">
.... details of the field-granularity-standard-session-cache configuration
</bean>
</value>
</entry>
... entry elements for the other configurations
</map>
</property>
</bean>org.jboss.cache.config.Configuration with a tree of child Java Beans for some of the more complex sub-configurations (i.e. cache loading, eviction, buddy replication). Rather than delegating this task of XML parsing/Java Bean creation to JBC, we let the Enterprise Application Platform's microcontainer do it directly. This has the advantage of making the microcontainer aware of the configuration beans, which in later Enterprise Application Platform 5.x releases will be helpful in allowing external management tools to manage the JBC configurations.
<bean name="StandardSFSBCacheConfig" class="org.jboss.cache.config.Configuration">
<!-- No transaction manager lookup -->
<!-- Name of cluster. Needs to be the same for all members -->
<property name="clusterName">${jboss.partition.name:DefaultPartition}-SFSBCache</property>
<!-- Use a UDP (multicast) based stack. Need JGroups flow control (FC)
because we are using asynchronous replication. -->
<property name="multiplexerStack">${jboss.default.jgroups.stack:udp}</property>
<property name="fetchInMemoryState">true</property>
<property name="nodeLockingScheme">PESSIMISTIC</property>
<property name="isolationLevel">REPEATABLE_READ</property>
<property name="cacheMode">REPL_ASYNC</property>
<property name="useLockStriping">false</property>
<!-- Number of milliseconds to wait until all responses for a
synchronous call have been received. Make this longer
than lockAcquisitionTimeout.-->
<property name="syncReplTimeout">17500</property>
<!-- Max number of milliseconds to wait for a lock acquisition -->
<property name="lockAcquisitionTimeout">15000</property>
<!-- The max amount of time (in milliseconds) we wait until the
state (ie. the contents of the cache) are retrieved from
existing members at startup. -->
<property name="stateRetrievalTimeout">60000</property>
<!--
SFSBs use region-based marshalling to provide for partial state
transfer during deployment/undeployment.
-->
<property name="useRegionBasedMarshalling">false</property>
<!-- Must match the value of "useRegionBasedMarshalling" -->
<property name="inactiveOnStartup">false</property>
<!-- Disable asynchronous RPC marshalling/sending -->
<property name="serializationExecutorPoolSize">0</property>
<!-- We have no asynchronous notification listeners -->
<property name="listenerAsyncPoolSize">0</property>
<property name="exposeManagementStatistics">true</property>
<property name="buddyReplicationConfig">
<bean class="org.jboss.cache.config.BuddyReplicationConfig">
<!-- Just set to true to turn on buddy replication -->
<property name="enabled">false</property>
<!-- A way to specify a preferred replication group. We try
and pick a buddy who shares the same pool name (falling
back to other buddies if not available). -->
<property name="buddyPoolName">default</property>
<property name="buddyCommunicationTimeout">17500</property>
<!-- Do not change these -->
<property name="autoDataGravitation">false</property>
<property name="dataGravitationRemoveOnFind">true</property>
<property name="dataGravitationSearchBackupTrees">true</property>
<property name="buddyLocatorConfig">
<bean class="org.jboss.cache.buddyreplication.NextMemberBuddyLocatorConfig">
<!-- The number of backup nodes we maintain -->
<property name="numBuddies">1</property>
<!-- Means that each node will *try* to select a buddy on
a different physical host. If not able to do so
though, it will fall back to colocated nodes. -->
<property name="ignoreColocatedBuddies">true</property>
</bean>
</property>
</bean>
</property>
<property name="cacheLoaderConfig">
<bean class="org.jboss.cache.config.CacheLoaderConfig">
<!-- Do not change these -->
<property name="passivation">true</property>
<property name="shared">false</property>
<property name="individualCacheLoaderConfigs">
<list>
<bean class="org.jboss.cache.loader.FileCacheLoaderConfig">
<!-- Where passivated sessions are stored -->
<property name="location">${jboss.server.data.dir}${/}sfsb</property>
<!-- Do not change these -->
<property name="async">false</property>
<property name="fetchPersistentState">true</property>
<property name="purgeOnStartup">true</property>
<property name="ignoreModifications">false</property>
<property name="checkCharacterPortability">false</property>
</bean>
</list>
</property>
</bean>
</property>
<!-- EJBs use JBoss Cache eviction -->
<property name="evictionConfig">
<bean class="org.jboss.cache.config.EvictionConfig">
<property name="wakeupInterval">5000</property>
<!-- Overall default -->
<property name="defaultEvictionRegionConfig">
<bean class="org.jboss.cache.config.EvictionRegionConfig">
<property name="regionName">/</property>
<property name="evictionAlgorithmConfig">
<bean class="org.jboss.cache.eviction.NullEvictionAlgorithmConfig"/>
</property>
</bean>
</property>
<!-- EJB3 integration code will programatically create
other regions as beans are deployed -->
</bean>
</property>
</bean>org.jboss.cache.config.Configuration java bean and the setting of a number of properties on that bean. Most of the properties are of simple types, but some, such as buddyReplicationConfig and cacheLoaderConfig take various types java beans as their values.
29.1.2. Cache Mode
cacheMode configuration attribute combines into a single property two related aspects:
- Synchronous means the cache instance sends a message to its peers notifying them of the change(s) and before returning waits for them to acknowledge that they have applied the same changes. If the changes are made as part of a JTA transaction, this is done as part of a two-phase commit process during transaction commit. Any locks are held until this acknowledgment is received. Waiting for acknowledgement from all nodes adds delays, but it ensures consistency around the cluster. Synchronous mode is needed when all the nodes in the cluster may access the cached data resulting in a high need for consistency.
- Asynchronous means the cache instance sends a message to its peers notifying them of the change(s) and then immediately returns, without any acknowledgement that they have applied the same changes. It does not mean sending the message is handled by some other thread besides the one that changed the cache content; the thread that makes the change still spends some time dealing with sending messages to the cluster, just not as much as with synchronous communication. Asynchronous mode is most useful for cases like session replication, where the cache doing the sending expects to be the only one that accesses the data and the cluster messages are used to provide backup copies in case of failure of the sending node. Asynchronous messaging adds a small risk that a later user request that fails over to another node may see out-of-date state, but for many session-type applications this risk is acceptable given the major performance benefits asynchronous mode has over synchronous mode.
- Local means the cache instance does not send a message at all. A JGroups channel is not even used by the cache. JBoss Cache has many useful features besides its clustering capabilities and is a very useful caching library even when not used in a cluster. Also, even in a cluster, some cached data does not need to be kept consistent around the cluster, in which case Local mode will improve performance. Caching of JPA/Hibernate query result sets is an example of this; Hibernate's second level caching logic uses a separate mechanism to invalidate stale query result sets from the second level cache, so JBoss Cache does not need to send messages around the cluster for a query result set cache.
- Replication means the other nodes should update their state to reflect the new state on the sending node. This means the sending node needs to include the changed state, increasing the cost of the message. Replication is necessary if the other nodes have no other way to obtain the state.
- Invalidation means the other nodes should remove the changed state from their local state. Invalidation reduces the cost of the cluster update messages, since only the cache key of the changed state needs to be transmitted, not the state itself. However, it is only an option if the removed state can be retrieved from another source. It is an excellent option for a clustered JPA/Hibernate entity cache, since the cached state can be re-read from the database.
cacheMode configuration attribute:
- LOCAL means no cluster messages are needed.
- REPL_SYNC means synchronous replication messages are sent.
- REPL_ASYNC means asynchronous replication messages are sent.
- INVALIDATION_SYNC means synchronous invalidation messages are sent.
- INVALIDATION_ASYNC means asynchronous invalidation messages are sent.
29.1.3. Transaction Handling
transactionManagerLookupClass configuration attribute; this specifies the fully qualified class name of a class JBoss Cache can use to find the local transaction manager. Inside JBoss Enterprise Application Platform, this attribute would have one of two values:
- org.jboss.cache.transaction.JBossTransactionManagerLookupThis finds the standard transaction manager running in the application server. Use this for any custom caches you deploy where you want caching to participate in any JTA transactions.
- org.jboss.cache.transaction.BatchModeTransactionManagerLookupThis is used in the cache configurations used for web session and EJB SFSB caching. It specifies a simple mock
TransactionManagerthat ships with JBoss Cache called theBatchModeTransactionManager. This transaction manager is not a true JTA transaction manager and should not be used for anything other than JBoss Cache. Its usage in JBoss Enterprise Application Platform is to get most of the benefits of JBoss Cache's transactional behavior for the session replication use cases, but without getting tangled up with end user transactions that may run during a request.
29.1.4. Concurrent Access
nodeLockingScheme and isolationLevel configuration attributes.
nodeLockingScheme:
- MVCC or multi-version concurrency control, is a locking scheme commonly used by modern database implementations to control fast, safe concurrent access to shared data. JBoss Cache 3.x uses an innovative implementation of MVCC as the default locking scheme. MVCC is designed to provide the following features for concurrent access:It achieves this by using data versioning and copying for concurrent writers. The theory is that readers continue reading shared state, while writers copy the shared state, increment a version id, and write that shared state back after verifying that the version is still valid (i.e., another concurrent writer has not changed this state first).
- Readers that do not block writers
- Writers that fail fast
MVCC is the recommended choice for JPA/Hibernate entity caching. - PESSIMISTIC locking involves threads/transactions acquiring either exclusive or non-exclusive locks on nodes before reading or writing. Which is acquired depends on the
isolationLevel(see below) but in most cases a non-exclusive lock is acquired for a read and an exclusive lock is acquired for a write. Pessimistic locking requires considerably more overhead than MVCC and allows lesser concurrency, since reader threads must block until a write has completed and released its exclusive lock (potentially a long time if the write is part of a transaction). A write will also be delayed due to ongoing reads.Generally MVCC is a better choice than PESSIMISTIC, which is deprecated as of JBoss Cache 3.0. But, for the session caching usage in JBoss Enterprise Application Platform 5.0.0, PESSIMISTIC is still the default. This is largely because for the session use case there are generally not concurrent threads accessing the same cache location, so the benefits of MVCC are not as great. - OPTIMISTIC locking seeks to improve upon the concurrency available with PESSIMISTIC by creating a "workspace" for each request/transaction that accesses the cache. Data accessed by the request/transaction (even reads) is copied into the workspace, which is adds overhead. All data is versioned; on completion of non-transactional requests or commits of transactions the version of data in the workspace is compared to the main cache, and an exception is raised if there are inconsistencies. Otherwise changes to the workspace are applied to the main cache.OPTIMISTIC locking is deprecated but is still provided to support backward compatibility. Users are encouraged to use MVCC instead, which provides the same benefits at lower cost.
isolationLevel attribute has two possible values READ_COMMITTED and REPEATABLE_READ which correspond in semantic to database-style isolation levels. Previous versions of JBoss Cache supported all 5 database isolation levels, and if an unsupported isolation level is configured, it is either upgraded or downgraded to the closest supported level.
29.1.5. JGroups Integration
Channel to handle group communications. Inside JBoss Enterprise Application Platform, we strongly recommend that you use the Enterprise Application Platform's JGroups Channel Factory service as the source for your cache's Channel. In this section we discuss how to configure your cache to get it's channel from the Channel Factory; if you wish to configure the channel in some other way see the JBoss Cache documentation.
jboss-cache-manager-jboss-beans.xml file (see Section 29.2.1, “Deployment Via the CacheManager Service”), add the following to your cache configuration, where the value is the name of the protocol stack configuration.:
<property name="multiplexerStack">udp</property>
-jboss-beans.xml File
-jboss-beans.xml file (see Section 29.2.3, “Deployment Via a -jboss-beans.xml File”), you need inject a reference to the Channel Factory service as well as specifying the protocol stack configuration:
<property name="runtimeConfig">
<bean class="org.jboss.cache.config.RuntimeConfig">
<property name="muxChannelFactory"><inject bean="JChannelFactory"/></property>
</bean>
</property>
<property name="multiplexerStack">udp</property>-service.xml File
-service.xml file (see Section 29.2.2, “Deployment Via a -service.xml File”), CacheJmxWrapper is the class of your MBean; that class exposes a MuxChannelFactory MBean attribute. You dependency inject the Channel Factory service into this attribute, and set the protocol stack name via the MultiplexerStack attribute:
<attribute name="MuxChannelFactory"><inject bean="JChannelFactory"/></attribute> <attribute name="MultiplexerStack">udp</attribute>
29.1.6. Eviction
sfsb-cache configuration (see Section 21.2.1, “The JBoss Enterprise Application Platform CacheManager Service”). The EJB container will configure eviction itself using the values included in each bean's configuration.
29.1.7. Cache Loaders
passivation flag in the JBoss Cache cache loader configuration section. A true value means the persistent store acts as an overflow area written to when data is evicted from the in-memory cache.
29.1.7.1. CacheLoader Configuration for Web Session and SFSB Caches
standard-session-cache config serves as a good example:
<property name="cacheLoaderConfig">
<bean class="org.jboss.cache.config.CacheLoaderConfig">
<!-- Do not change these -->
<property name="passivation">true</property>
<property name="shared">false</property>
<property name="individualCacheLoaderConfigs">
<list>
<bean class="org.jboss.cache.loader.FileCacheLoaderConfig">
<!-- Where passivated sessions are stored -->
<property name="location">${jboss.server.data.dir}${/}session</property>
<!-- Do not change these -->
<property name="async">false</property>
<property name="fetchPersistentState">true</property>
<property name="purgeOnStartup">true</property>
<property name="ignoreModifications">false</property>
<property name="checkCharacterPortability">false</property>
</bean>
</list>
</property>
</bean>
</property>- passivation property MUST be
true - shared property MUST be
false. Do not passivate sessions to a shared persistent store, otherwise if another node activates the session, it will be gone from the persistent store and also gone from memory on other nodes that have passivated it. Backup copies will be lost. - individualCacheLoaderConfigs property accepts a list of Cache Loader configurations. JBC allows you to chain cache loaders; see the JBoss Cache docs. For the session passivation use case a single cache loader is sufficient.
- class attribute on a cache loader config bean must refer to the configuration class for a cache loader implementation (e.g.
org.jboss.cache.loader.FileCacheLoaderConfigororg.jboss.cache.loader.JDBCCacheLoaderConfig). See the JBoss Cache documentation for more on the available CacheLoader implementations. If you wish to use JDBCCacheLoader (to persist to a database rather than the file system used by FileCacheLoader) note the comment above about thesharedproperty. Do not use a shared database, or at least not a shared table in the database. Each node in the cluster must have its own storage location. - location property for FileCacheLoaderConfig defines the root node of the file system tree where passivated sessions should be stored. The default is to store them in your JBoss Enterprise Application Platform configuration's
datadirectory. - async MUST be
falseto ensure passivated sessions are promptly written to the persistent store. - fetchPersistentState property MUST be
trueto ensure passivated sessions are included in the set of session backup copies transferred over from other nodes when the cache starts. - purgeOnStartup should be
trueto ensure out-of-date session data left over from a previous shutdown of a server does not pollute the current data set. - ignoreModifications should be
false - checkCharacterPortability should be
falseas a minor performance optimization.
29.1.8. Buddy Replication
standard-session-cache config:
<property name="buddyReplicationConfig">
<bean class="org.jboss.cache.config.BuddyReplicationConfig">
<!-- Just set to true to turn on buddy replication -->
<property name="enabled">true</property>
<!-- A way to specify a preferred replication group. We try
and pick a buddy who shares the same pool name (falling
back to other buddies if not available). -->
<property name="buddyPoolName">default</property>
<property name="buddyCommunicationTimeout">17500</property>
<!-- Do not change these -->
<property name="autoDataGravitation">false</property>
<property name="dataGravitationRemoveOnFind">true</property>
<property name="dataGravitationSearchBackupTrees">true</property>
<property name="buddyLocatorConfig">
<bean class="org.jboss.cache.buddyreplication.NextMemberBuddyLocatorConfig">
<!-- The number of backup copies we maintain -->
<property name="numBuddies">1</property>
<!-- Means that each node will *try* to select a buddy on
a different physical host. If not able to do so
though, it will fall back to colocated nodes. -->
<property name="ignoreColocatedBuddies">true</property>
</bean>
</property>
</bean>
</property>- buddyReplicationEnabled —
trueif you want buddy replication;falseif data should be replicated to all nodes in the cluster, in which case none of the other buddy replication configurations matter. - numBuddies — to how many backup nodes should each node replicate its state.
- buddyPoolName — allows logical subgrouping of nodes within the cluster; if possible, buddies will be chosen from nodes in the same buddy pool.
ignoreColocatedBuddies switch means that when the cache is trying to find a buddy, it will if possible not choose a buddy on the same physical host as itself. If the only server it can find is running on its own machine, it will use that server as a buddy.
autoDataGravitation, dataGravitationRemoveOnFind and dataGravitationSearchBackupTrees. Session replication will not work properly if these are changed.
29.2. Deploying Your Own JBoss Cache Instance
29.2.1. Deployment Via the CacheManager Service
newConfigurations <map>:
<bean name="CacheConfigurationRegistry"
class="org.jboss.ha.cachemanager.DependencyInjectedConfigurationRegistry">
.....
<property name="newConfigurations">
<map keyClass="java.lang.String" valueClass="org.jboss.cache.config.Configuration">
<entry><key>my-custom-cache</key>
<value>
<bean name="MyCustomCacheConfig" class="org.jboss.cache.config.Configuration">
.... details of the my-custom-cache configuration
</bean>
</value>
</entry>
.....
29.2.1.1. Accessing the CacheManager
- Dependency InjectionIf your application uses the JBoss Microcontainer for configuration, the simplest mechanism is to have it inject the CacheManager into your service.
<bean name="MyService" class="com.example.MyService"> <property name="cacheManager"><inject bean="CacheManager"/></property> </bean>
- JNDI LookupAlternatively, you can find look up the CacheManger is JNDI. It is bound under
java:CacheManager.import org.jboss.ha.cachemanager.CacheManager; public class MyService { private CacheManager cacheManager; public void start() throws Exception { Context ctx = new InitialContext(); cacheManager = (CacheManager) ctx.lookup("java:CacheManager"); } } - CacheManagerLocatorJBoss Enterprise Application Platform also provides a service locator object that can be used to access the CacheManager.
import org.jboss.ha.cachemanager.CacheManager; import org.jboss.ha.framework.server.CacheManagerLocator; public class MyService { private CacheManager cacheManager; public void start() throws Exception { CacheManagerLocator locator = CacheManagerLocator.getCacheManagerLocator(); // Locator accepts as param a set of JNDI properties to help in lookup; // this is not necessary inside the Enterprise Application Platform cacheManager = locator.getCacheManager(null); } }
import org.jboss.cache.Cache;
import org.jboss.ha.cachemanager.CacheManager;
import org.jboss.ha.framework.server.CacheManagerLocator;
public class MyService {
private CacheManager cacheManager;
private Cache cache;
public void start() throws Exception {
Context ctx = new InitialContext();
cacheManager = (CacheManager) ctx.lookup("java:CacheManager");
// "true" param tells the manager to instantiate the cache if
// it does not exist yet
cache = cacheManager.getCache("my-cache-config", true);
cache.start();
}
public void stop() throws Exception {
cacheManager.releaseCache("my-cache-config");
}
}import org.jboss.cache.pojo.PojoCache;
import org.jboss.ha.cachemanager.CacheManager;
import org.jboss.ha.framework.server.CacheManagerLocator;
public class MyService {
private CacheManager cacheManager;
private PojoCache pojoCache;
public void start() throws Exception {
Context ctx = new InitialContext();
cacheManager = (CacheManager) ctx.lookup("java:CacheManager");
// "true" param tells the manager to instantiate the cache if
// it does not exist yet
pojoCache = cacheManager.getPojoCache("my-cache-config", true);
pojoCache.start();
}
public void stop() throws Exception {
cacheManager.releaseCache("my-cache-config");
}
}29.2.2. Deployment Via a -service.xml File
-service.xml file. The primary difference from JBoss Enterprise Application Platform 4.x is the value of the code attribute in the mbean element. In JBoss Enterprise Application Platform 4.x, this was org.jboss.cache.TreeCache; in JBoss Enterprise Application Platform 5.x it is org.jboss.cache.jmx.CacheJmxWrapper. Here's an example:
<?xml version="1.0" encoding="UTF-8"?>
<server>
<mbean code="org.jboss.cache.jmx.CacheJmxWrapper"
name="foo:service=ExampleCacheJmxWrapper">
<attribute name="TransactionManagerLookupClass">
org.jboss.cache.transaction.JBossTransactionManagerLookup
</attribute>
<attribute name="MuxChannelFactory"><inject bean="JChannelFactory"/></attribute>
<attribute name="MultiplexerStack">udp</attribute>
<attribute name="ClusterName">Example-EntityCache</attribute>
<attribute name="IsolationLevel">REPEATABLE_READ</attribute>
<attribute name="CacheMode">REPL_SYNC</attribute>
<attribute name="InitialStateRetrievalTimeout">15000</attribute>
<attribute name="SyncReplTimeout">20000</attribute>
<attribute name="LockAcquisitionTimeout">15000</attribute>
<attribute name="ExposeManagementStatistics">true</attribute>
</mbean>
</server>CacheJmxWrapper is not the cache itself (i.e. you can not store stuff in it). Rather, as it's name implies, it's a wrapper around an org.jboss.cache.Cache that handles integration with JMX. CacheJmxWrapper exposes the org.jboss.cache.Cache via its CacheJmxWrapperMBean MBean interfaces Cache attribute; services that need the cache can obtain a reference to it via that attribute.
29.2.3. Deployment Via a -jboss-beans.xml File
-service.xml, JBoss Enterprise Application Platform 5 can also deploy services that consist of Plain Old Java Objects (POJOs) if the POJOs are described using the JBoss Microcontainer schema in a -jboss-beans.xml file. You create such a file and deploy it, either directly in the deploy dir, or packaged in an ear or sar. Following is an example:
<?xml version="1.0" encoding="UTF-8"?>
<deployment xmlns="urn:jboss:bean-deployer:2.0">
<!-- First we create a Configuration object for the cache -->
<bean name="ExampleCacheConfig"
class="org.jboss.cache.config.Configuration">
<!-- Externally injected services -->
<property name="runtimeConfig">
<bean name="ExampleCacheRuntimeConfig" class="org.jboss.cache.config.RuntimeConfig">
<property name="transactionManager">
<inject bean="jboss:service=TransactionManager"
property="TransactionManager"/>
</property>
<property name="muxChannelFactory"><inject bean="JChannelFactory"/></property>
</bean>
</property>
<property name="multiplexerStack">udp</property>
<property name="clusterName">Example-EntityCache</property>
<property name="isolationLevel">REPEATABLE_READ</property>
<property name="cacheMode">REPL_SYNC</property>
<property name="initialStateRetrievalTimeout">15000</property>
<property name="syncReplTimeout">20000</property>
<property name="lockAcquisitionTimeout">15000</property>
<property name="exposeManagementStatistics">true</property>
</bean>
<!-- Factory to build the Cache. -->
<bean name="DefaultCacheFactory" class="org.jboss.cache.DefaultCacheFactory">
<constructor factoryClass="org.jboss.cache.DefaultCacheFactory" />
</bean>
<!-- The cache itself -->
<bean name="ExampleCache" class="org.jboss.cache.Cache">
<constructor factoryMethod="createCache">
<factory bean="DefaultCacheFactory"/>
<parameter class="org.jboss.cache.config.Configuration"><inject bean="ExampleCacheConfig"/></parameter>
<parameter class="boolean">false</false>
</constructor>
</bean>
<bean name="ExampleService" class="org.foo.ExampleService">
<property name="cache"><inject bean="ExampleCache"/></property>
</bean>
</deployment>Configuration object; this is the same as what we saw in the configuration of the CacheManager service (see Section 29.1.1, “Editing the CacheManager Configuration”). In this case we are not using the CacheManager service as a cache factory, so instead we create our own factory bean and then use it to create the cache (the "ExampleCache" bean). The "ExampleCache" is then injected into a (fictitious) service that needs it.
RuntimeConfig object. External resources like a TransactionManager and a JGroups ChannelFactory that are visible to the microcontainer are dependency injected into the RuntimeConfig. The assumption here is that in some other deployment descriptor in the Enterprise Application Platform, the referenced beans have already been described.
<?xml version="1.0" encoding="UTF-8"?>
<deployment xmlns="urn:jboss:bean-deployer:2.0">
<!-- First we create a Configuration object for the cache -->
<bean name="ExampleCacheConfig"
class="org.jboss.cache.config.Configuration">
.... same as above
</bean>
<bean name="ExampleCacheJmxWrapper" class="org.jboss.cache.jmx.CacheJmxWrapper">
<annotation>@org.jboss.aop.microcontainer.aspects.jmx.JMX
(name="foo:service=ExampleCacheJmxWrapper",
exposedInterface=org.jboss.cache.jmx.CacheJmxWrapperMBean.class,
registerDirectly=true)
</annotation>
<property name="configuration"><inject bean="ExampleCacheConfig"/></property>
</bean>
<bean name="ExampleService" class="org.foo.ExampleService">
<property name="cache"><inject bean="ExampleCacheJmxWrapper" property="cache"/></property>
</bean>
</deployment>CacheJmxWrapper is a JBoss Cache class that provides an MBean interface for a cache. Adding an <annotation> element binds the JBoss Microcontainer @JMX annotation to the bean; that in turn results in JBoss Enterprise Application Platform registering the bean in JXM as part of the deployment process.
org.jboss.cache.Cache instance is available from the CacheJmxWrapper via its cache property; the example shows how this can be used to inject the cache into the "ExampleService".
Part IV. Legacy EJB Support
Chapter 30. EJBs on JBoss
The EJB Container Configuration and Architecture
META-INF/jboss.xml descriptor and the default server-wide equivalent standardjboss.xml descriptor. We will look at various configuration capabilities throughout this chapter as we explore the container architecture.
30.1. The EJB Client Side View
javax.ejb.EJBHome and javax.ejb.EJBObject for an EJB implementation. A client never references an EJB bean instance directly, but rather references the EJBHome which implements the bean home interface, and the EJBObject which implements the bean remote interface. Figure 30.1, “The composition of an EJBHome proxy in JBoss.” shows the composition of an EJB home proxy and its relation to the EJB deployment.
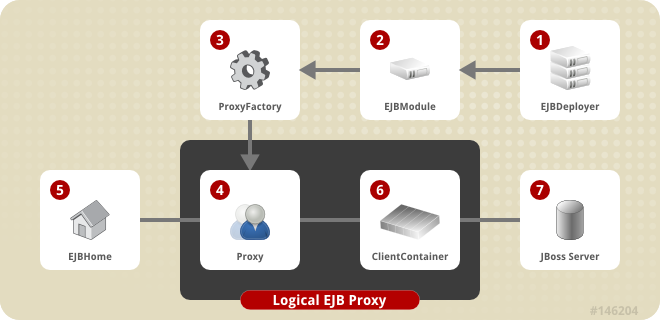
Figure 30.1. The composition of an EJBHome proxy in JBoss.
- The EJBDeployer (
org.jboss.ejb.EJBDeployer) is invoked to deploy an EJB JAR. AnEJBModule(org.jboss.ejb.EJBModule) is created to encapsulate the deployment metadata. - The create phase of the
EJBModulelife cycle creates anEJBProxyFactory(org.jboss.ejb.EJBProxyFactory) that manages the creation of EJB home and remote interface proxies based on theEJBModuleinvoker-proxy-bindingsmetadata. There can be multiple proxy factories associated with an EJB and we will look at how this is defined shortly. - The
ProxyFactoryconstructs the logical proxies and binds the homes into JNDI. A logical proxy is composed of a dynamicProxy(java.lang.reflect.Proxy), the home interfaces of the EJB that the proxy exposes, theProxyHandler(java.lang.reflect.InvocationHandler) implementation in the form of theClientContainer(org.jboss.proxy.ClientContainer), and the client side interceptors. - The proxy created by the
EJBProxyFactoryis a standard dynamic proxy. It is a serializable object that proxies the EJB home and remote interfaces as defined in theEJBModulemetadata. The proxy translates requests made through the strongly typed EJB interfaces into a detyped invocation using theClientContainerhandler associated with the proxy. It is the dynamic proxy instance that is bound into JNDI as the EJB home interface that clients lookup. When a client does a lookup of an EJB home, the home proxy is transported into the client VM along with theClientContainerand its interceptors. The use of dynamic proxies avoids the EJB specific compilation step required by many other EJB containers. - The EJB home interface is declared in the ejb-jar.xml descriptor and available from the EJBModule metadata. A key property of dynamic proxies is that they are seen to implement the interfaces they expose. This is true in the sense of Java's strong type system. A proxy can be cast to any of the home interfaces and reflection on the proxy provides the full details of the interfaces it proxies.
- The proxy delegates calls made through any of its interfaces to the
ClientContainerhandler. The single method required of the handler is:public Object invoke(Object proxy, Method m, Object[] args) throws Throwable. TheEJBProxyFactorycreates aClientContainerand assigns this as theProxyHandler. TheClientContainer's state consists of anInvocationContext(org.jboss.invocation.InvocationContext) and a chain of interceptors (org.jboss.proxy.Interceptor). TheInvocationContextcontains:- the JMX
ObjectNameof the EJB container MBean theProxyis associated with - the
javax.ejb.EJBMetaDatafor the EJB - the JNDI name of the EJB home interface
- the transport specific invoker (
org.jboss.invocation.Invoker)
The interceptor chain consists of the functional units that make up the EJB home or remote interface behavior. This is a configurable aspect of an EJB as we will see when we discuss thejboss.xmldescriptor, and the interceptor makeup is contained in theEJBModulemetadata. Interceptors (org.jboss.proxy.Interceptor) handle the different EJB types, security, transactions and transport. You can add your own interceptors as well. - The transport specific invoker associated with the proxy has an association to the server side detached invoker that handles the transport details of the EJB method invocation. The detached invoker is a server side component.
jboss.xmlclient-interceptors element. When the ClientContainer invoke method is called it creates an un-typed Invocation (org.jboss.invocation.Invocation) to encapsulate request. This is then passed through the interceptor chain. The last interceptor in the chain will be the transport handler that knows how to send the request to the server and obtain the reply, taking care of the transport specific details.
server/production/standardjboss.xml descriptor. Example 30.1, “The client-interceptors from the Standard Stateless SessionBean configuration.” shows the stateless-rmi-invoker client interceptors configuration referenced by the Standard Stateless SessionBean.
Example 30.1. The client-interceptors from the Standard Stateless SessionBean configuration.
<invoker-proxy-binding>
<name>stateless-rmi-invoker</name>
<invoker-mbean>jboss:service=invoker,type=jrmp</invoker-mbean>
<proxy-factory>org.jboss.proxy.ejb.ProxyFactory</proxy-factory>
<proxy-factory-config>
<client-interceptors>
<home>
<interceptor>org.jboss.proxy.ejb.HomeInterceptor</interceptor>
<interceptor>org.jboss.proxy.SecurityInterceptor</interceptor>
<interceptor>org.jboss.proxy.TransactionInterceptor</interceptor>
<interceptor call-by-value="false">
org.jboss.invocation.InvokerInterceptor
</interceptor>
<interceptor call-by-value="true">
org.jboss.invocation.MarshallingInvokerInterceptor
</interceptor>
</home>
<bean>
<interceptor>org.jboss.proxy.ejb.StatelessSessionInterceptor</interceptor>
<interceptor>org.jboss.proxy.SecurityInterceptor</interceptor>
<interceptor>org.jboss.proxy.TransactionInterceptor</interceptor>
<interceptor call-by-value="false">
org.jboss.invocation.InvokerInterceptor
</interceptor>
<interceptor call-by-value="true">
org.jboss.invocation.MarshallingInvokerInterceptor
</interceptor>
</bean>
</client-interceptors>
</proxy-factory-config>
</invoker-proxy-binding>
<container-configuration>
<container-name>Standard Stateless SessionBean</container-name>
<call-logging>false</call-logging>
<invoker-proxy-binding-name>stateless-rmi-invoker</invoker-proxy-binding-name>
<!-- ... -->
</container-configuration>
META-INF/jboss.xml configuration that overrides these settings. The functionality provided by each client interceptor is:
- org.jboss.proxy.ejb.HomeInterceptor: handles the
getHomeHandle,getEJBMetaData, and remove methods of theEJBHomeinterface locally in the client VM. Any other methods are propagated to the next interceptor. - org.jboss.proxy.ejb.StatelessSessionInterceptor: handles the
toString,equals,hashCode,getHandle,getEJBHomeandisIdenticalmethods of theEJBObjectinterface locally in the client VM. Any other methods are propagated to the next interceptor. - org.jboss.proxy.SecurityInterceptor: associates the current security context with the method invocation for use by other interceptors or the server.
- org.jboss.proxy.TransactionInterceptor: associates any active transaction with the invocation method invocation for use by other interceptors.
- org.jboss.invocation.InvokerInterceptor: encapsulates the dispatch of the method invocation to the transport specific invoker. It knows if the client is executing in the same VM as the server and will optimally route the invocation to a by reference invoker in this situation. When the client is external to the server VM, this interceptor delegates the invocation to the transport invoker associated with the invocation context. In the case of the Example 30.1, “The client-interceptors from the Standard Stateless SessionBean configuration.” configuration, this would be the invoker stub associated with the
jboss:service=invoker,type=jrmp, theJRMPInvokerservice.org.jboss.invocation.MarshallingInvokerInterceptor: extends theInvokerInterceptorto not optimize in-VM invocations. This is used to forcecall-by-valuesemantics for method calls.
30.1.1. Specifying the EJB Proxy Configuration
invoker-proxy-binding in either the EJB JAR META-INF/jboss.xml descriptor, or the server standardjboss.xml descriptor. There are several default invoker-proxy-bindings defined in the standardjboss.xml descriptor for the various default EJB container configurations and the standard RMI/JRMP and RMI/IIOP transport protocols. The current default proxy configurations are:
- entity-rmi-invoker: a RMI/JRMP configuration for entity beans
- clustered-entity-rmi-invoker: a RMI/JRMP configuration for clustered entity beans
- stateless-rmi-invoker: a RMI/JRMP configuration for stateless session beans
- clustered-stateless-rmi-invoker: a RMI/JRMP configuration for clustered stateless session beans
- stateful-rmi-invoker: a RMI/JRMP configuration for clustered stateful session beans
- clustered-stateful-rmi-invoker: a RMI/JRMP configuration for clustered stateful session beans
- message-driven-bean: a JMS invoker for message driven beans
- singleton-message-driven-bean: a JMS invoker for singleton message driven beans
- message-inflow-driven-bean: a JMS invoker for message inflow driven beans
- jms-message-inflow-driven-bean: a JMS inflow invoker for standard message driven beans
- iiop: a RMI/IIOP for use with session and entity beans.
invoker-proxy-binding. The full invoker-proxy-binding DTD fragment for the specification of the proxy configuration is given in Figure 30.2, “The invoker-proxy-binding schema”.
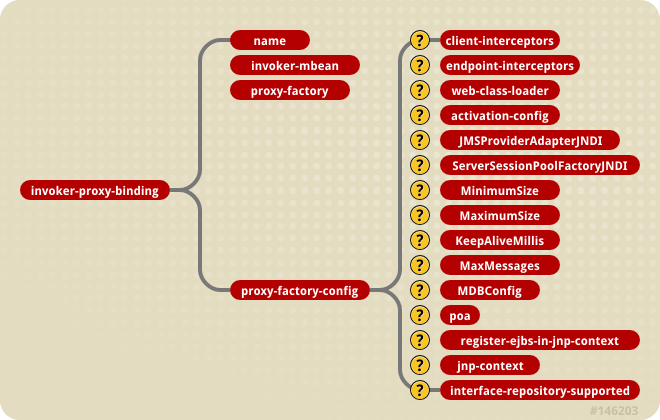
Figure 30.2. The invoker-proxy-binding schema
invoker-proxy-binding child elements are:
- name: The
nameelement gives a unique name for theinvoker-proxy-binding. The name is used to reference the binding from the EJB container configuration when setting the default proxy binding as well as the EJB deployment level to specify addition proxy bindings. You will see how this is done when we look at thejboss.xmlelements that control the server side EJB container configuration. - invoker-mbean: The
invoker-mbeanelement gives the JMXObjectNamestring of the detached invoker MBean service the proxy invoker will be associated with. - proxy-factory: The
proxy-factoryelement specifies the fully qualified class name of the proxy factory, which must implement theorg.jboss.ejb.EJBProxyFactoryinterface. TheEJBProxyFactoryhandles the configuration of the proxy and the association of the protocol specific invoker and context. The current JBoss implementations of theEJBProxyFactoryinterface include:- org.jboss.proxy.ejb.ProxyFactory: The RMI/JRMP specific factory.
- org.jboss.proxy.ejb.ProxyFactoryHA: The cluster RMI/JRMP specific factory.
- org.jboss.ejb.plugins.jms.JMSContainerInvoker: The JMS specific factory.
- org.jboss.proxy.ejb.IORFactory: The RMI/IIOP specific factory.
- proxy-factory-config: The
proxy-factory-configelement specifies additional information for theproxy-factoryimplementation. Unfortunately, its currently an unstructured collection of elements. Only a few of the elements apply to each type of proxy factory. The child elements break down into the three invocation protocols: RMI/RJMP, RMI/IIOP and JMS.
org.jboss.proxy.ejb.ProxyFactory and org.jboss.proxy.ejb.ProxyFactoryHA the following elements apply:
- client-interceptors: The
client-interceptorsdefine the home, remote and optionally the multi-valued proxy interceptor stacks. - web-class-loader: The web class loader defines the instance of the
org.jboss.web.WebClassLoaderthat should be associated with the proxy for dynamic class loading.
proxy-factory-config is for an entity bean accessed over RMI.
<proxy-factory-config>
<client-interceptors>
<home>
<interceptor>org.jboss.proxy.ejb.HomeInterceptor</interceptor>
<interceptor>org.jboss.proxy.SecurityInterceptor</interceptor>
<interceptor>org.jboss.proxy.TransactionInterceptor</interceptor>
<interceptor call-by-value="false">
org.jboss.invocation.InvokerInterceptor
</interceptor>
<interceptor call-by-value="true">
org.jboss.invocation.MarshallingInvokerInterceptor
</interceptor>
</home>
<bean>
<interceptor>org.jboss.proxy.ejb.EntityInterceptor</interceptor>
<interceptor>org.jboss.proxy.SecurityInterceptor</interceptor>
<interceptor>org.jboss.proxy.TransactionInterceptor</interceptor>
<interceptor call-by-value="false">
org.jboss.invocation.InvokerInterceptor
</interceptor>
<interceptor call-by-value="true">
org.jboss.invocation.MarshallingInvokerInterceptor
</interceptor>
</bean>
<list-entity>
<interceptor>org.jboss.proxy.ejb.ListEntityInterceptor</interceptor>
<interceptor>org.jboss.proxy.SecurityInterceptor</interceptor>
<interceptor>org.jboss.proxy.TransactionInterceptor</interceptor>
<interceptor call-by-value="false">
org.jboss.invocation.InvokerInterceptor
</interceptor>
<interceptor call-by-value="true">
org.jboss.invocation.MarshallingInvokerInterceptor
</interceptor>
</list-entity>
</client-interceptors>
</proxy-factory-config>
org.jboss.proxy.ejb.IORFactory, the following elements apply:
- web-class-loader: The web class loader defines the instance of the
org.jboss.web.WebClassLoaderthat should be associated with the proxy for dynamic class loading. - poa: The portable object adapter usage. Valid values are
per-servantandshared. - register-ejbs-in-jnp-context: A flag indicating if the EJBs should be register in JNDI.
- jnp-context: The JNDI context in which to register EJBs.
- interface-repository-supported: This indicates whether or not a deployed EJB has its own CORBA interface repository.
proxy-factory-config for EJBs accessed over IIOP.
<proxy-factory-config>
<web-class-loader>org.jboss.iiop.WebCL</web-class-loader>
<poa>per-servant</poa>
<register-ejbs-in-jnp-context>true</register-ejbs-in-jnp-context>
<jnp-context>iiop</jnp-context>
</proxy-factory-config>
org.jboss.ejb.plugins.jms.JMSContainerInvoker, the following elements apply:
- MinimumSize: This specifies the minimum pool size for MDBs processing. This defaults to 1.
- MaximumSize: This specifies the upper limit to the number of concurrent MDBs that will be allowed for the JMS destination. This defaults to 15.
- MaxMessages: This specifies the
maxMessagesparameter value for thecreateConnectionConsumermethod ofjavax.jms.QueueConnectionandjavax.jms.TopicConnectioninterfaces, as well as themaxMessagesparameter value for thecreateDurableConnectionConsumermethod ofjavax.jms.TopicConnection. It is the maximum number of messages that can be assigned to a server session at one time. This defaults to 1. This value should not be modified from the default unless your JMS provider indicates this is supported. - KeepAliveMillis: This specifies the keep alive time interval in milliseconds for sessions in the session pool. The default is 30000 (30 seconds).
- MDBConfig: Configuration for the MDB JMS connection behavior. Among the elements supported are:
- ReconnectIntervalSec: The time to wait (in seconds) before trying to recover the connection to the JMS server.
- DeliveryActive: Whether or not the MDB is active at start up. The default is true.
- DLQConfig: Configuration for an MDB's dead letter queue, used when messages are redelivered too many times.
- JMSProviderAdapterJNDI: The JNDI name of the JMS provider adapter in the
java:/namespace. This is mandatory for an MDB and must implementorg.jboss.jms.jndi.JMSProviderAdapter. - ServerSessionPoolFactoryJNDI: The JNDI name of the session pool in the
java:/namespace of the JMS provider's session pool factory. This is mandatory for an MDB and must implementorg.jboss.jms.asf.ServerSessionPoolFactory.
proxy-factory-config fragment taken from the standardjboss.xml descriptor.
Example 30.2. A sample JMSContainerInvoker proxy-factory-config
<proxy-factory-config>
<JMSProviderAdapterJNDI>DefaultJMSProvider</JMSProviderAdapterJNDI>
<ServerSessionPoolFactoryJNDI>StdJMSPool</ServerSessionPoolFactoryJNDI>
<MinimumSize>1</MinimumSize>
<MaximumSize>15</MaximumSize>
<KeepAliveMillis>30000</KeepAliveMillis>
<MaxMessages>1</MaxMessages>
<MDBConfig>
<ReconnectIntervalSec>10</ReconnectIntervalSec>
<DLQConfig>
<DestinationQueue>queue/DLQ</DestinationQueue>
<MaxTimesRedelivered>10</MaxTimesRedelivered>
<TimeToLive>0</TimeToLive>
</DLQConfig>
</MDBConfig>
</proxy-factory-config>
30.2. The EJB Server Side View
30.2.1. Detached Invokers - The Transport Middlemen
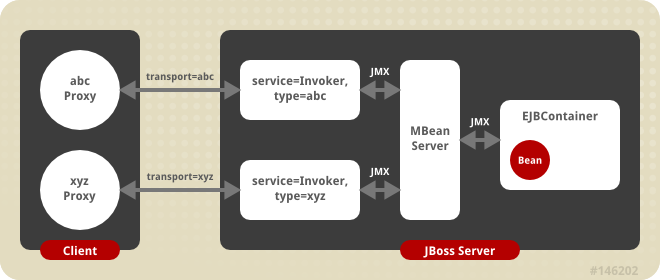
Figure 30.3. The transport invoker server side architecture
jboss.xml file, an invoker-proxy-binding-name maps to an invoker-proxy-binding/name element. At the container-configuration level this specifies the default invoker that will be used for EJBs deployed to the container. At the bean level, the invoker-bindings specify one or more invokers to use with the EJB container MBean.
invoker/jndi-name element value. Another issue when multiple invokers exist for an EJB is how to handle remote homes or interfaces obtained when the EJB calls other beans. Any such interfaces need to use the same invoker used to call the outer EJB in order for the resulting remote homes and interfaces to be compatible with the proxy the client has initiated the call through. The invoker/ejb-ref elements allow one to map from a protocol independent ENC ejb-ref to the home proxy binding for ejb-ref target EJB home that matches the referencing invoker type.
JRMPInvoker MBean that enables compressed sockets for session beans can be found in the org.jboss.test.jrmp package of the testsuite. The following example illustrates the custom JRMPInvoker configuration and its mapping to a stateless session bean.
<server>
<mbean code="org.jboss.invocation.jrmp.server.JRMPInvoker"
name="jboss:service=invoker,type=jrmp,socketType=CompressionSocketFactory">
<attribute name="RMIObjectPort">4445</attribute>
<attribute name="RMIClientSocketFactory">
org.jboss.test.jrmp.ejb.CompressionClientSocketFactory
</attribute>
<attribute name="RMIServerSocketFactory">
org.jboss.test.jrmp.ejb.CompressionServerSocketFactory
</attribute>
</mbean>
</server>
JRMPInvoker has been customized to bind to port 4445 and to use custom socket factories that enable compression at the transport level.
<?xml version="1.0"?>
<!DOCTYPE jboss PUBLIC
"-//JBoss//DTD JBOSS 3.2//EN"
"http://www.jboss.org/j2ee/dtd/jboss_3_2.dtd">
<!-- The jboss.xml descriptor for the jrmp-comp.jar ejb unit -->
<jboss>
<enterprise-beans>
<session>
<ejb-name>StatelessSession</ejb-name>
<configuration-name>Standard Stateless SessionBean</configuration-name>
<invoker-bindings>
<invoker>
<invoker-proxy-binding-name>
stateless-compression-invoker
</invoker-proxy-binding-name>
<jndi-name>jrmp-compressed/StatelessSession</jndi-name>
</invoker>
</invoker-bindings>
</session>
</enterprise-beans>
<invoker-proxy-bindings>
<invoker-proxy-binding>
<name>stateless-compression-invoker</name>
<invoker-mbean>
jboss:service=invoker,type=jrmp,socketType=CompressionSocketFactory
</invoker-mbean>
<proxy-factory>org.jboss.proxy.ejb.ProxyFactory</proxy-factory>
<proxy-factory-config>
<client-interceptors>
<home>
<interceptor>org.jboss.proxy.ejb.HomeInterceptor</interceptor>
<interceptor>org.jboss.proxy.SecurityInterceptor</interceptor>
<interceptor>org.jboss.proxy.TransactionInterceptor</interceptor>
<interceptor>org.jboss.invocation.InvokerInterceptor</interceptor>
</home>
<bean>
<interceptor>
org.jboss.proxy.ejb.StatelessSessionInterceptor
</interceptor>
<interceptor>org.jboss.proxy.SecurityInterceptor</interceptor>
<interceptor>org.jboss.proxy.TransactionInterceptor</interceptor>
<interceptor>org.jboss.invocation.InvokerInterceptor</interceptor>
</bean>
</client-interceptors>
</proxy-factory-config>
</invoker-proxy-binding>
</invoker-proxy-bindings>
</jboss>
StatelessSession EJB invoker-bindings settings specify that the stateless-compression-invoker will be used with the home interface bound under the JNDI name jrmp-compressed/StatelessSession. The stateless-compression-invoker is linked to the custom JRMP invoker we just declared.
org.jboss.test.hello testsuite package, is an example of using the HttpInvoker to configure a stateless session bean to use the RMI/HTTP protocol.
<?xml version="1.0" encoding="UTF-8"?>
<!DOCTYPE jboss PUBLIC
"-//JBoss//DTD JBOSS 3.2//EN"
"http://www.jboss.org/j2ee/dtd/jboss_3_2.dtd">
<jboss>
<enterprise-beans>
<session>
<ejb-name>HelloWorldViaHTTP</ejb-name>
<jndi-name>helloworld/HelloHTTP</jndi-name>
<invoker-bindings>
<invoker>
<invoker-proxy-binding-name>
stateless-http-invoker
</invoker-proxy-binding-name>
</invoker>
</invoker-bindings>
</session>
</enterprise-beans>
<invoker-proxy-bindings>
<!-- A custom invoker for RMI/HTTP -->
<invoker-proxy-binding>
<name>stateless-http-invoker</name>
<invoker-mbean>jboss:service=invoker,type=http</invoker-mbean>
<proxy-factory>org.jboss.proxy.ejb.ProxyFactory</proxy-factory>
<proxy-factory-config>
<client-interceptors>
<home>
<interceptor>org.jboss.proxy.ejb.HomeInterceptor</interceptor>
<interceptor>org.jboss.proxy.SecurityInterceptor</interceptor>
<interceptor>org.jboss.proxy.TransactionInterceptor</interceptor>
<interceptor>org.jboss.invocation.InvokerInterceptor</interceptor>
</home>
<bean>
<interceptor>
org.jboss.proxy.ejb.StatelessSessionInterceptor
</interceptor>
<interceptor>org.jboss.proxy.SecurityInterceptor</interceptor>
<interceptor>org.jboss.proxy.TransactionInterceptor</interceptor>
<interceptor>org.jboss.invocation.InvokerInterceptor</interceptor>
</bean>
</client-interceptors>
</proxy-factory-config>
</invoker-proxy-binding>
</invoker-proxy-bindings>
</jboss>
stateless-http-invoker is defined. It uses the HttpInvoker MBean as the detached invoker. The jboss:service=invoker,type=http name is the default name of the HttpInvoker MBean as found in the http-invoker.sar/META-INF/jboss-service.xml descriptor, and its service descriptor fragment is show here:
<!-- The HTTP invoker service configuration -->
<mbean code="org.jboss.invocation.http.server.HttpInvoker"
name="jboss:service=invoker,type=http">
<!-- Use a URL of the form http://<hostname>:8080/invoker/EJBInvokerServlet
where <hostname> is InetAddress.getHostname value on which the server
is running. -->
<attribute name="InvokerURLPrefix">http://</attribute>
<attribute name="InvokerURLSuffix">:8080/invoker/EJBInvokerServlet</attribute>
<attribute name="UseHostName">true</attribute>
</mbean>
EJBInvokerServlet URL specified in the HttpInvoker service configuration.
30.2.2. The HA JRMPInvoker - Clustered RMI/JRMP Transport
org.jboss.invocation.jrmp.server.JRMPInvokerHA service is an extension of the JRMPInvoker that is a cluster aware invoker. The JRMPInvokerHA fully supports all of the attributes of the JRMPInvoker. This means that customized bindings of the port, interface and socket transport are available to clustered RMI/JRMP as well. For additional information on the clustering architecture and the implementation of the HA RMI proxies see the JBoss Clustering docs.
30.2.3. The HA HttpInvoker - Clustered RMI/HTTP Transport
jboss.xml descriptor, or the standardjboss.xml descriptor. Example 30.3, “A jboss.xml stateless session configuration for HA-RMI/HTTP” shows is an example of a stateless session configuration taken from the org.jboss.test.hello testsuite package.
Example 30.3. A jboss.xml stateless session configuration for HA-RMI/HTTP
<jboss>
<enterprise-beans>
<session>
<ejb-name>HelloWorldViaClusteredHTTP</ejb-name>
<jndi-name>helloworld/HelloHA-HTTP</jndi-name>
<invoker-bindings>
<invoker>
<invoker-proxy-binding-name>
stateless-httpHA-invoker
</invoker-proxy-binding-name>
</invoker>
</invoker-bindings>
<clustered>true</clustered>
</session>
</enterprise-beans>
<invoker-proxy-bindings>
<invoker-proxy-binding>
<name>stateless-httpHA-invoker</name>
<invoker-mbean>jboss:service=invoker,type=httpHA</invoker-mbean>
<proxy-factory>org.jboss.proxy.ejb.ProxyFactoryHA</proxy-factory>
<proxy-factory-config>
<client-interceptors>
<home>
<interceptor>org.jboss.proxy.ejb.HomeInterceptor</interceptor>
<interceptor>org.jboss.proxy.SecurityInterceptor</interceptor>
<interceptor>org.jboss.proxy.TransactionInterceptor</interceptor>
<interceptor>org.jboss.invocation.InvokerInterceptor</interceptor>
</home>
<bean>
<interceptor>
org.jboss.proxy.ejb.StatelessSessionInterceptor
</interceptor>
<interceptor>org.jboss.proxy.SecurityInterceptor</interceptor>
<interceptor>org.jboss.proxy.TransactionInterceptor</interceptor>
<interceptor>org.jboss.invocation.InvokerInterceptor</interceptor>
</bean>
</client-interceptors>
</proxy-factory-config>
</invoker-proxy-binding>
</invoker-proxy-bindings>
</jboss>
stateless-httpHA-invoker invoker-proxy-binding references the jboss:service=invoker,type=httpHA invoker service. This service would be configured as shown below.
<mbean code="org.jboss.invocation.http.server.HttpInvokerHA"
name="jboss:service=invoker,type=httpHA">
<!-- Use a URL of the form
http://<hostname>:8080/invoker/EJBInvokerHAServlet
where <hostname> is InetAddress.getHostname value on which the server
is running.
-->
<attribute name="InvokerURLPrefix">http://</attribute>
<attribute name="InvokerURLSuffix">:8080/invoker/EJBInvokerHAServlet</attribute>
<attribute name="UseHostName">true</attribute>
</mbean>
EJBInvokerHAServlet mapping as deployed on the cluster node. The HttpInvokerHA instances across the cluster form a collection of candidate http URLs that are made available to the client side proxy for failover and/or load balancing.
30.3. The EJB Container
org.jboss.ejb.Container created for each unique configuration of an EJB that is deployed. The actual object that is instantiated is a subclass of Container and the creation of the container instance is managed by the EJBDeployer MBean.
30.3.1. EJBDeployer MBean
org.jboss.ejb.EJBDeployer MBean is responsible for the creation of EJB containers. Given an EJB JAR that is ready for deployment, the EJBDeployer will create and initialize the necessary EJB containers, one for each type of EJB. The configurable attributes of the EJBDeployer are:
- VerifyDeployments: a boolean flag indicating if the EJB verifier should be run. This validates that the EJBs in a deployment unit conform to the EJB 2.1 specification. Setting this to true is useful for ensuring your deployments are valid.
- VerifierVerbose: A boolean that controls the verbosity of any verification failures/warnings that result from the verification process.
- StrictVerifier: A boolean that enables/disables strict verification. When strict verification is enable an EJB will deploy only if verifier reports no errors.
- CallByValue: a boolean flag that indicates call by value semantics should be used by default.
- ValidateDTDs: a boolean flag that indicates if the
ejb-jar.xmlandjboss.xmldescriptors should be validated against their declared DTDs. Setting this to true is useful for ensuring your deployment descriptors are valid. - MetricsEnabled: a boolean flag that controls whether container interceptors marked with an
metricsEnabled=trueattribute should be included in the configuration. This allows one to define a container interceptor configuration that includes metrics type interceptors that can be toggled on and off. - WebServiceName: The JMX ObjectName string of the web service MBean that provides support for the dynamic class loading of EJB classes.
- TransactionManagerServiceName: The JMX ObjectName string of the JTA transaction manager service. This must have an attribute named
TransactionManagerthat returns thatjavax.transaction.TransactionManagerinstance.
EJBDeployer and its associated classes perform three main functions, verify the EJBs, create a container for each unique EJB, initialize the container with the deployment configuration information. We will talk about each function in the following sections.
30.3.1.1. Verifying EJB deployments
VerifyDeployments attribute of the EJBDeployer is true, the deployer performs a verification of EJBs in the deployment. The verification checks that an EJB meets EJB specification compliance. This entails validating that the EJB deployment unit contains the required home and remote, local home and local interfaces. It will also check that the objects appearing in these interfaces are of the proper types and that the required methods are present in the implementation class. This is a useful behavior that is enabled by default since there are a number of steps that an EJB developer and deployer must perform correctly to construct a proper EJB JAR, and it is easy to make a mistake. The verification stage attempts to catch any errors and fail the deployment with an error that indicates what needs to be corrected.
30.3.1.2. Deploying EJBs Into Containers
EJBDeployer is the creation of an EJB container and the deployment of the EJB into the container. The deployment phase consists of iterating over EJBs in an EJB JAR, and extracting the bean classes and their metadata as described by the ejb-jar.xml and jboss.xml deployment descriptors. For each EJB in the EJB JAR, the following steps are performed:
- Create subclass of
org.jboss.ejb.Containerdepending on the type of the EJB: stateless, stateful, BMP entity, CMP entity, or message driven. The container is assigned a uniqueClassLoaderfrom which it can load local resources. The uniqueness of theClassLoaderis also used to isolate the standardjava:compJNDI namespace from other J2EE components. - Set all container configurable attributes from a merge of the
jboss.xmlandstandardjboss.xmldescriptors. - Create and add the container interceptors as configured for the container.
- Associate the container with an application object. This application object represents a J2EE enterprise application and may contain multiple EJBs and web contexts.
30.3.1.3. Container configuration information
jboss_4_0.dtd. The section DTD that relates to container configuration information is shown in Figure 30.4, “The jboss_4_0 DTD elements related to container configuration.”.
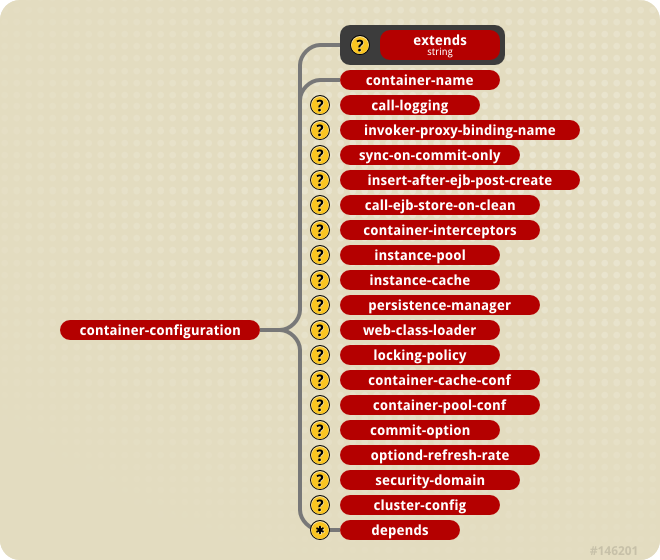
Figure 30.4. The jboss_4_0 DTD elements related to container configuration.
container-configuration element and its subelements specify container configuration settings for a type of container as given by the container-name element. Each configuration specifies information such as the default invoker type, the container interceptor makeup, instance caches/pools and their sizes, persistence manager, security, and so on. Because this is a large amount of information that requires a detailed understanding of the JBoss container architecture, JBoss ships with a standard configuration for the four types of EJBs. This configuration file is called standardjboss.xml and it is located in the conf directory of any configuration file set that uses EJBs. The following is a sample of container-configuration from standardjboss.xml.
<container-configuration>
<container-name>Standard CMP 2.x EntityBean</container-name>
<call-logging>false</call-logging>
<invoker-proxy-binding-name>entity-rmi-invoker</invoker-proxy-binding-name>
<sync-on-commit-only>false</sync-on-commit-only>
<insert-after-ejb-post-create>false</insert-after-ejb-post-create>
<call-ejb-store-on-clean>true</call-ejb-store-on-clean>
<container-interceptors>
<interceptor>org.jboss.ejb.plugins.ProxyFactoryFinderInterceptor</interceptor>
<interceptor>org.jboss.ejb.plugins.LogInterceptor</interceptor>
<interceptor>org.jboss.ejb.plugins.SecurityInterceptor</interceptor>
<interceptor>org.jboss.ejb.plugins.TxInterceptorCMT</interceptor>
<interceptor>org.jboss.ejb.plugins.CallValidationInterceptor</interceptor>
<interceptor metricsEnabled="true">
org.jboss.ejb.plugins.MetricsInterceptor
</interceptor>
<interceptor>org.jboss.ejb.plugins.EntityCreationInterceptor</interceptor>
<interceptor>org.jboss.ejb.plugins.EntityLockInterceptor</interceptor>
<interceptor>org.jboss.ejb.plugins.EntityInstanceInterceptor</interceptor>
<interceptor>org.jboss.ejb.plugins.EntityReentranceInterceptor</interceptor>
<interceptor>
org.jboss.resource.connectionmanager.CachedConnectionInterceptor
</interceptor>
<interceptor>org.jboss.ejb.plugins.EntitySynchronizationInterceptor</interceptor>
<interceptor>org.jboss.ejb.plugins.cmp.jdbc.JDBCRelationInterceptor</interceptor>
</container-interceptors>
<instance-pool>org.jboss.ejb.plugins.EntityInstancePool</instance-pool>
<instance-cache>org.jboss.ejb.plugins.InvalidableEntityInstanceCache</instance-cache>
<persistence-manager>org.jboss.ejb.plugins.cmp.jdbc.JDBCStoreManager</persistence-manager>
<locking-policy>org.jboss.ejb.plugins.lock.QueuedPessimisticEJBLock</locking-policy>
<container-cache-conf>
<cache-policy>org.jboss.ejb.plugins.LRUEnterpriseContextCachePolicy</cache-policy>
<cache-policy-conf>
<min-capacity>50</min-capacity>
<max-capacity>1000000</max-capacity>
<overager-period>300</overager-period>
<max-bean-age>600</max-bean-age>
<resizer-period>400</resizer-period>
<max-cache-miss-period>60</max-cache-miss-period>
<min-cache-miss-period>1</min-cache-miss-period>
<cache-load-factor>0.75</cache-load-factor>
</cache-policy-conf>
</container-cache-conf>
<container-pool-conf>
<MaximumSize>100</MaximumSize>
</container-pool-conf>
<commit-option>B</commit-option>
</container-configuration>
standardjboss.xml file contained in the configuration file set directory. The second is at the EJB JAR level. By placing a jboss.xml file in the EJB JAR META-INF directory, you can specify either overrides for container configurations in the standardjboss.xml file, or entirely new named container configurations. This provides great flexibility in the configuration of containers. As you have seen, all container configuration attributes have been externalized and as such are easily modifiable. Knowledgeable developers can even implement specialized container components, such as instance pools or caches, and easily integrate them with the standard container configurations to optimize behavior for a particular application or environment.
jboss/enterprise-beans/<type>/configuration-name element. The configuration-name element is a link to a container-configurations/container-configuration element. It specifies which container configuration to use for the referring EJB. The link is from a configuration-name element to a container-name element.
container-configuration element in the EJB definition. Typically one does not define completely new container configurations, although this is supported. The typical usage of a jboss.xml level container-configuration is to override one or more aspects of a container-configuration coming from the standardjboss.xml descriptor. This is done by specifying container-configuration that references the name of an existing standardjboss.xmlcontainer-configuration/container-name as the value for the container-configuration/extends attribute. The following example shows an example of defining a new Secured Stateless SessionBean configuration that is an extension of the Standard Stateless SessionBean configuration.
<?xml version="1.0"?>
<jboss>
<enterprise-beans>
<session>
<ejb-name>EchoBean</ejb-name>
<configuration-name>Secured Stateless SessionBean</configuration-name>
<!-- ... -->
</session>
</enterprise-beans>
<container-configurations>
<container-configuration extends="Standard Stateless SessionBean">
<container-name>Secured Stateless SessionBean</container-name>
<!-- Override the container security domain -->
<security-domain>java:/jaas/my-security-domain</security-domain>
</container-configuration>
</container-configurations>
</jboss>
standardjboss.xml descriptor based on the type of the EJB. So, in reality there is an implicit configuration-name element for every type of EJB, and the mappings from the EJB type to default container configuration name are as follows:
- container-managed persistence entity version 2.0 = Standard CMP 2.x EntityBean
- container-managed persistence entity version 1.1 = Standard CMP EntityBean
- bean-managed persistence entity = Standard BMP EntityBean
- stateless session = Standard Stateless SessionBean
- stateful session = Standard Stateful SessionBean
- message driven = Standard Message Driven Bean
configuration-name element, but this is purely a matter of style.
container-configuration child elements in the following sections. A number of the elements specify interface class implementations whose configuration is affected by other elements, so before starting in on the configuration elements you need to understand the org.jboss.metadata.XmlLoadable interface.
XmlLoadable interface is a simple interface that consists of a single method. The interface definition is:
import org.w3c.dom.Element;
public interface XmlLoadable
{
public void importXml(Element element) throws Exception;
}
importXml method. You will see a few examples of this as the container configuration elements are described in the following sections.
30.3.1.3.1. The container-name element
container-name element specifies a unique name for a given configuration. EJBs link to a particular container configuration by setting their configuration-name element to the value of the container-name for the container configuration.
30.3.1.3.2. The call-logging element
call-logging element expects a boolean (true or false) as its value to indicate whether or not the LogInterceptor should log method calls to a container. This is somewhat obsolete with the change to log4j, which provides a fine-grained logging API.
30.3.1.3.3. The invoker-proxy-binding-name element
invoker-proxy-binding-name element specifies the name of the default invoker to use. In the absence of a bean level invoker-bindings specification, the invoker-proxy-binding whose name matches the invoker-proxy-binding-name element value will be used to create home and remote proxies.
30.3.1.3.4. The sync-on-commit-only element
30.3.1.3.5. insert-after-ejb-post-create
ejbPostCreate method is called. This allows normal CMP fields as well as CMR fields to be set in a single insert, instead of the default insert followed by an update, which allows removes the requirement for relation ship fields to allow null values.
30.3.1.3.6. call-ejb-store-on-clean
ejbStore method on an entity bean instance when transaction commits even if the instance was not modified in the transaction. Setting this to false will cause JBoss to only call ejbStore for dirty objects.
30.3.1.3.7. The container-interceptors Element
container-interceptors element specifies one or more interceptor elements that are to be configured as the method interceptor chain for the container. The value of the interceptor element is a fully qualified class name of an org.jboss.ejb.Interceptor interface implementation. The container interceptors form a linked-list structure through which EJB method invocations pass. The first interceptor in the chain is invoked when the MBeanServer passes a method invocation to the container. The last interceptor invokes the business method on the bean. We will discuss the Interceptor interface latter in this chapter when we talk about the container plug-in framework. Generally, care must be taken when changing an existing standard EJB interceptor configuration as the EJB contract regarding security, transactions, persistence, and thread safety derive from the interceptors.
30.3.1.3.8. The instance-pool element
instance-pool element specifies the fully qualified class name of an org.jboss.ejb.InstancePool interface implementation to use as the container InstancePool. We will discuss the InstancePool interface in detail latter in this chapter when we talk about the container plug-in framework.
30.3.1.3.9. The container-pool-conf element
container-pool-conf is passed to the InstancePool implementation class given by the instance-pool element if it implements the XmlLoadable interface. All current JBoss InstancePool implementations derive from the org.jboss.ejb.plugins.AbstractInstancePool class which provides support for elements shown in Figure 30.5, “The container-pool-conf element DTD”.

Figure 30.5. The container-pool-conf element DTD
- MinimumSize: The
MinimumSizeelement gives the minimum number of instances to keep in the pool, although JBoss does not currently seed anInstancePoolto theMinimumSizevalue. - MaximumSize: The
MaximumSizespecifies the maximum number of pool instances that are allowed. The default use ofMaximumSizemay not be what you expect. The poolMaximumSizeis the maximum number of EJB instances that are kept available, but additional instances can be created if the number of concurrent requests exceeds theMaximumSizevalue. - strictMaximumSize: If you want to limit the maximum concurrency of an EJB to the pool
MaximumSize, you need to set thestrictMaximumSizeelement to true. WhenstrictMaximumSizeis true, onlyMaximumSizeEJB instances may be active. When there areMaximumSizeactive instances, any subsequent requests will be blocked until an instance is freed back to the pool. The default value forstrictMaximumSizeis false. - strictTimeout: How long a request blocks waiting for an instance pool object is controlled by the
strictTimeoutelement. ThestrictTimeoutdefines the time in milliseconds to wait for an instance to be returned to the pool when there areMaximumSizeactive instances. A value less than or equal to 0 will mean not to wait at all. When a request times out waiting for an instance ajava.rmi.ServerExceptionis generated and the call aborted. This is parsed as aLongso the maximum possible wait time is 9,223,372,036,854,775,807 or about 292,471,208 years, and this is the default value.
30.3.1.3.10. The instance-cache element
instance-cache element specifies the fully qualified class name of the org.jboss.ejb.InstanceCache interface implementation. This element is only meaningful for entity and stateful session beans as these are the only EJB types that have an associated identity. We will discuss the InstanceCache interface in detail latter in this chapter when we talk about the container plug-in framework.
30.3.1.3.11. The container-cache-conf element
container-cache-conf element is passed to the InstanceCache implementation if it supports the XmlLoadable interface. All current JBoss InstanceCache implementations derive from the org.jboss.ejb.plugins.AbstractInstanceCache class which provides support for the XmlLoadable interface and uses the cache-policy child element as the fully qualified class name of an org.jboss.util.CachePolicy implementation that is used as the instance cache store. The cache-policy-conf child element is passed to the CachePolicy implementation if it supports the XmlLoadable interface. If it does not, the cache-policy-conf will silently be ignored.
standardjboss.xml configuration that support the current array of cache-policy-conf child elements. The classes are org.jboss.ejb.plugins.LRUEnterpriseContextCachePolicy and org.jboss.ejb.plugins.LRUStatefulContextCachePolicy. The LRUEnterpriseContextCachePolicy is used by entity bean containers while the LRUStatefulContextCachePolicy is used by stateful session bean containers. Both cache policies support the following cache-policy-conf child elements, shown in Figure 30.6, “The container-cache-conf element DTD”.
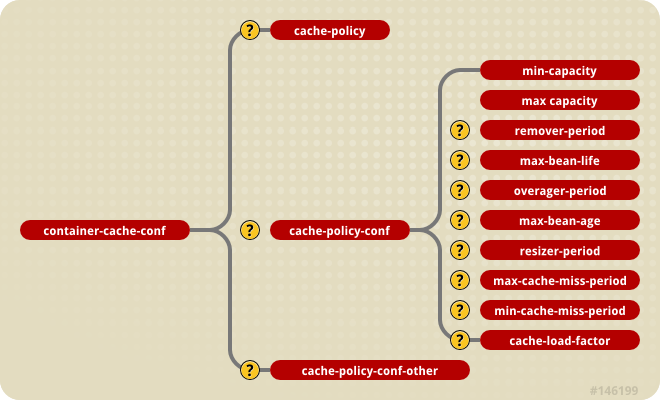
Figure 30.6. The container-cache-conf element DTD
- min-capacity: specifies the minimum capacity of this cache
- max-capacity: specifies the maximum capacity of the cache, which cannot be less than
min-capacity. - overager-period: specifies the period in seconds between runs of the overager task. The purpose of the overager task is to see if the cache contains beans with an age greater than the
max-bean-ageelement value. Any beans meeting this criterion will be passivated. - max-bean-age: specifies the maximum period of inactivity in seconds a bean can have before it will be passivated by the overager process.
- resizer-period: specifies the period in seconds between runs of the resizer task. The purpose of the resizer task is to contract or expand the cache capacity based on the remaining three element values in the following way. When the resizer task executes it checks the current period between cache misses, and if the period is less than the
min-cache-miss-periodvalue the cache is expanded up to themax-capacityvalue using thecache-load-factor. If instead the period between cache misses is greater than themax-cache-miss-periodvalue the cache is contracted using thecache-load-factor. - max-cache-miss-period: specifies the time period in seconds in which a cache miss should signal that the cache capacity be contracted. It is equivalent to the minimum miss rate that will be tolerated before the cache is contracted.
- min-cache-miss-period: specifies the time period in seconds in which a cache miss should signal that the cache capacity be expanded. It is equivalent to the maximum miss rate that will be tolerated before the cache is expanded.
- cache-load-factor: specifies the factor by which the cache capacity is contracted and expanded. The factor should be less than 1. When the cache is contracted the capacity is reduced so that the current ratio of beans to cache capacity is equal to the cache-load-factor value. When the cache is expanded the new capacity is determined as
current-capacity * 1/cache-load-factor. The actual expansion factor may be as high as 2 based on an internal algorithm based on the number of cache misses. The higher the cache miss rate the closer the true expansion factor will be to 2.
LRUStatefulContextCachePolicy also supports the remaining child elements:
- remover-period: specifies the period in seconds between runs of the remover task. The remover task removes passivated beans that have not been accessed in more than
max-bean-lifeseconds. This task prevents stateful session beans that were not removed by users from filling up the passivation store. - max-bean-life: specifies the maximum period in seconds that a bean can exist inactive. After this period, as a result, the bean will be removed from the passivation store.
org.jboss.ejb.plugins.NoPassivationCachePolicy class, which simply never passivates instances. It uses an in-memory HashMap implementation that never discards instances unless they are explicitly removed. This class does not support any of the cache-policy-conf configuration elements.
30.3.1.3.12. The persistence-manager element
persistence-manager element value specifies the fully qualified class name of the persistence manager implementation. The type of the implementation depends on the type of EJB. For stateful session beans it must be an implementation of the org.jboss.ejb.StatefulSessionPersistenceManager interface. For BMP entity beans it must be an implementation of the org.jboss.ejb.EntityPersistenceManager interface, while for CMP entity beans it must be an implementation of the org.jboss.ejb.EntityPersistenceStore interface.
30.3.1.3.13. The web-class-loader Element
web-class-loader element specifies a subclass of org.jboss.web.WebClassLoader that is used in conjunction with the WebService MBean to allow dynamic loading of resources and classes from deployed ears, EJB JARs and WARs. A WebClassLoader is associated with a Container and must have an org.jboss.mx.loading.UnifiedClassLoader as its parent. It overrides the getURLs() method to return a different set of URLs for remote loading than what is used for local loading.
WebClassLoader has two methods meant to be overridden by subclasses: getKey() and getBytes(). The latter is a no-op in this implementation and should be overridden by subclasses with bytecode generation ability, such as the classloader used by the iiop module.
WebClassLoader subclasses must have a constructor with the same signature as the WebClassLoader(ObjectName containerName, UnifiedClassLoader parent) constructor.
30.3.1.3.14. The locking-policy element
locking-policy element gives the fully qualified class name of the EJB lock implementation to use. This class must implement the org.jboss.ejb.BeanLock interface. The current JBoss versions include:
- org.jboss.ejb.plugins.lock.QueuedPessimisticEJBLock: an implementation that holds threads awaiting the transactional lock to be freed in a fair FIFO queue. Non-transactional threads are also put into this wait queue as well. This class pops the next waiting transaction from the queue and notifies only those threads waiting associated with that transaction. The
QueuedPessimisticEJBLockis the current default used by the standard configurations. - org.jboss.ejb.plugins.lock.QueuedPessimisticEJBLockNoADE: This behaves the same as the
QueuedPessimisticEJBLockexcept that deadlock detection is disabled. - org.jboss.ejb.plugins.lock.SimpleReadWriteEJBLock: This lock allows multiple read locks concurrently. Once a writer has requested the lock, future read-lock requests whose transactions do not already have the read lock will block until all writers are done; then all the waiting readers will concurrently go (depending on the reentrant setting / methodLock). A reader who promotes gets first crack at the write lock, ahead of other waiting writers. If there is already a reader that is promoting, we throw an inconsistent read exception. Of course, writers have to wait for all read-locks to release before taking the write lock.
- org.jboss.ejb.plugins.lock.NoLock: an anti-locking policy used with the instance per transaction container configurations.
30.3.1.3.15. The commit-option and optiond-refresh-rate elements
A, B, C or D.
- A: the container caches the beans state between transactions. This option assumes that the container is the only user accessing the persistent store. This assumption allows the container to synchronize the in-memory state from the persistent storage only when absolutely necessary. This occurs before the first business method executes on a found bean or after the bean is passivated and reactivated to serve another business method. This behavior is independent of whether the business method executes inside a transaction context.
- B: the container caches the bean state between transactions. However, unlike option
Athe container does not assume exclusive access to the persistent store. Therefore, the container will synchronize the in-memory state at the beginning of each transaction. Thus, business methods executing in a transaction context do not see much benefit from the container caching the bean, whereas business methods executing outside a transaction context (transaction attributes Never, NotSupported or Supports) access the cached (and potentially invalid) state of the bean. - C: the container does not cache bean instances. The in-memory state must be synchronized on every transaction start. For business methods executing outside a transaction the synchronization is still performed, but the
ejbLoadexecutes in the same transaction context as that of the caller. - D: is a JBoss-specific commit option which is not described in the EJB specification. It is a lazy read scheme where bean state is cached between transactions as with option
A, but the state is periodically re-synchronized with that of the persistent store. The default time between reloads is 30 seconds, but may configured using theoptiond-refresh-rateelement.
30.3.1.3.16. The security-domain element
security-domain element specifies the JNDI name of the object that implements the org.jboss.security.AuthenticationManager and org.jboss.security.RealmMapping interfaces. It is more typical to specify the security-domain under the jboss root element so that all EJBs in a given deployment are secured in the same manner. However, it is possible to configure the security domain for each bean configuration.
30.3.1.3.17. cluster-config
cluster-config element allows to specify cluster specific settings for all EJBs that use the container configuration. Specification of the cluster configuration may be done at the container configuration level or at the individual EJB deployment level.

Figure 30.7. The cluster-config and related elements
- partition-name: The
partition-nameelement indicates where to find theorg.jboss.ha.framework.interfaces.HAPartitioninterface to be used by the container to exchange clustering information. This is not the full JNDI name under whichHAPartitionis bound. Rather, it should correspond to thePartitionNameattribute of theClusterPartitionMBeanservice that is managing the desired cluster. The actual JNDI name of theHAPartitionbinding will be formed by appending/HASessionState/to the partition-name value. The default value isDefaultPartition. - home-load-balance-policy: The
home-load-balance-policyelement indicates the Java class name to be used to load balance calls made on the home proxy. The class must implement theorg.jboss.ha.framework.interface.LoadBalancePolicyinterface. The default policy isorg.jboss.ha.framework.interfaces.RoundRobin. - bean-load-balance-policy: The
bean-load-balance-policyelement indicates the java class name to be used to load balance calls in the bean proxy. The class must implement theorg.jboss.ha.framework.interface.LoadBalancePolicyinterface. For entity beans and stateful session beans, the default isorg.jboss.ha.framework.interfaces.FirstAvailavble. For stateless session beans,org.jboss.ha.framework.interfaces.RoundRobin. - session-state-manager-jndi-name: The
session-state-manager-jndi-nameelement indicates the name of theorg.jboss.ha.framework.interfaces.HASessionStateto be used by the container as a backend for state session management in the cluster. Unlike the partition-name element, this is a JNDI name under which theHASessionStateimplementation is bound. The default location used is/HASessionState/Default.
30.3.1.3.18. The depends element
depends element gives a JMX ObjectName of a service on which the container or EJB depends. Specification of explicit dependencies on other services avoids having to rely on the deployment order being after the required services are started.
30.3.2. Container Plug-in Framework
org.jboss.ejb.Container class, each one implementing a particular bean type:
- org.jboss.ejb.EntityContainer: handles
javax.ejb.EntityBeantypes - org.jboss.ejb.StatelessSessionContainer: handles Stateless
javax.ejb.SessionBeantypes - org.jboss.ejb.StatefulSessionContainer: handles Stateful
javax.ejb.SessionBeantypes - org.jboss.ejb.MessageDrivenContainer handles
javax.ejb.MessageDrivenBeantypes
- org.jboss.ejb.ContainerPlugin
- org.jboss.ejb.ContainerInvoker
- org.jboss.ejb.Interceptor
- org.jboss.ejb.InstancePool
- org.jboss.ejb.InstanceCache
- org.jboss.ejb.EntityPersistanceManager
- org.jboss.ejb.EntityPersistanceStore
- org.jboss.ejb.StatefulSessionPersistenceManager
30.3.2.1. org.jboss.ejb.ContainerPlugin
ContainerPlugin interface is the parent interface of all container plug-in interfaces. It provides a callback that allows a container to provide each of its plug-ins a pointer to the container the plug-in is working on behalf of. The ContainerPlugin interface is given below.
Example 30.4. The org.jboss.ejb.ContainerPlugin interface
public interface ContainerPlugin
extends Service, AllowedOperationsFlags
{
/** co
* This callback is set by the container so that the plugin
* may access its container
*
* @param con the container which owns the plugin
*/
public void setContainer(Container con);
}
30.3.2.2. org.jboss.ejb.Interceptor
Interceptor interface enables one to build a chain of method interceptors through which each EJB method invocation must pass. The Interceptor interface is given below.
Example 30.5. The org.jboss.ejb.Interceptor interface
import org.jboss.invocation.Invocation;
public interface Interceptor
extends ContainerPlugin
{
public void setNext(Interceptor interceptor);
public Interceptor getNext();
public Object invokeHome(Invocation mi) throws Exception;
public Object invoke(Invocation mi) throws Exception;
}
EJBDeployer. The last interceptor is not added by the deployer but rather by the container itself because this is the interceptor that interacts with the EJB bean implementation.
EnterpriseContext instance are positioned before interceptors that interact with caches and pools.
Interceptor interface form a linked-list like structure through which the Invocation object is passed. The first interceptor in the chain is invoked when an invoker passes a Invocation to the container via the JMX bus. The last interceptor invokes the business method on the bean. There are usually on the order of five interceptors in a chain depending on the bean type and container configuration. Interceptor semantic complexity ranges from simple to complex. An example of a simple interceptor would be LoggingInterceptor, while a complex example is EntitySynchronizationInterceptor.
TXInterceptor and SecurityInterceptor respectively.
SecurityInterceptor before any transactions are started or instances caches are updated.
30.3.2.3. org.jboss.ejb.InstancePool
InstancePool is used to manage the EJB instances that are not associated with any identity. The pools actually manage subclasses of the org.jboss.ejb.EnterpriseContext objects that aggregate un-associated bean instances and related data.
Example 30.6. The org.jboss.ejb.InstancePool interface
public interface InstancePool
extends ContainerPlugin
{
/**
* Get an instance without identity. Can be used
* by finders and create-methods, or stateless beans
*
* @return Context /w instance
* @exception RemoteException
*/
public EnterpriseContext get() throws Exception;
/** Return an anonymous instance after invocation.
*
* @param ctx
*/
public void free(EnterpriseContext ctx);
/**
* Discard an anonymous instance after invocation.
* This is called if the instance should not be reused,
* perhaps due to some exception being thrown from it.
*
* @param ctx
*/
public void discard(EnterpriseContext ctx);
/**
* Return the size of the pool.
*
* @return the size of the pool.
*/
public int getCurrentSize();
/**
* Get the maximum size of the pool.
*
* @return the size of the pool.
*/
public int getMaxSize();
}
InstanceCache implementation to acquire free instances for activation, and it is used by interceptors to acquire instances to be used for Home interface methods (create and finder calls).
30.3.2.4. org.jboss.ebj.InstanceCache
InstanceCache implementation handles all EJB-instances that are in an active state, meaning bean instances that have an identity attached to them. Only entity and stateful session beans are cached, as these are the only bean types that have state between method invocations. The cache key of an entity bean is the bean primary key. The cache key for a stateful session bean is the session id.
Example 30.7. The org.jboss.ejb.InstanceCache interface
public interface InstanceCache
extends ContainerPlugin
{
/**
* Gets a bean instance from this cache given the identity.
* This method may involve activation if the instance is not
* in the cache.
* Implementation should have O(1) complexity.
* This method is never called for stateless session beans.
*
* @param id the primary key of the bean
* @return the EnterpriseContext related to the given id
* @exception RemoteException in case of illegal calls
* (concurrent / reentrant), NoSuchObjectException if
* the bean cannot be found.
* @see #release
*/
public EnterpriseContext get(Object id)
throws RemoteException, NoSuchObjectException;
/**
* Inserts an active bean instance after creation or activation.
* Implementation should guarantee proper locking and O(1) complexity.
*
* @param ctx the EnterpriseContext to insert in the cache
* @see #remove
*/
public void insert(EnterpriseContext ctx);
/**
* Releases the given bean instance from this cache.
* This method may passivate the bean to get it out of the cache.
* Implementation should return almost immediately leaving the
* passivation to be executed by another thread.
*
* @param ctx the EnterpriseContext to release
* @see #get
*/
public void release(EnterpriseContext ctx);
/**
* Removes a bean instance from this cache given the identity.
* Implementation should have O(1) complexity and guarantee
* proper locking.
*
* @param id the primary key of the bean
* @see #insert
*/
public void remove(Object id);
/**
* Checks whether an instance corresponding to a particular
* id is active
*
* @param id the primary key of the bean
* @see #insert
*/
public boolean isActive(Object id);
}
InstanceCache is also responsible for activating and passivating instances. If an instance with a given identity is requested, and it is not currently active, the InstanceCache must use the InstancePool to acquire a free instance, followed by the persistence manager to activate the instance. Similarly, if the InstanceCache decides to passivate an active instance, it must call the persistence manager to passivate it and release the instance to the InstancePool.
30.3.2.5. org.jboss.ejb.EntityPersistenceManager
EntityPersistenceManager is responsible for the persistence of EntityBeans. This includes the following:
- Creating an EJB instance in a storage
- Loading the state of a given primary key into an EJB instance
- Storing the state of a given EJB instance
- Removing an EJB instance from storage
- Activating the state of an EJB instance
- Passivating the state of an EJB instance
Example 30.8. The org.jboss.ejb.EntityPersistenceManager interface
public interface EntityPersistenceManager
extends ContainerPlugin
{
/**
* Returns a new instance of the bean class or a subclass of the
* bean class.
*
* @return the new instance
*/
Object createBeanClassInstance() throws Exception;
/**
* This method is called whenever an entity is to be created. The
* persistence manager is responsible for calling the ejbCreate method
* on the instance and to handle the results properly wrt the persistent
* store.
*
* @param m the create method in the home interface that was
* called
* @param args any create parameters
* @param instance the instance being used for this create call
*/
void createEntity(Method m,
Object[] args,
EntityEnterpriseContext instance)
throws Exception;
/**
* This method is called whenever an entity is to be created. The
* persistence manager is responsible for calling the ejbPostCreate method
* on the instance and to handle the results properly wrt the persistent
* store.
*
* @param m the create method in the home interface that was
* called
* @param args any create parameters
* @param instance the instance being used for this create call
*/
void postCreateEntity(Method m,
Object[] args,
EntityEnterpriseContext instance)
throws Exception;
/**
* This method is called when single entities are to be found. The
* persistence manager must find out whether the wanted instance is
* available in the persistence store, and if so it shall use the
* ContainerInvoker plugin to create an EJBObject to the instance, which
* is to be returned as result.
*
* @param finderMethod the find method in the home interface that was
* called
* @param args any finder parameters
* @param instance the instance to use for the finder call
* @return an EJBObject representing the found entity
*/
Object findEntity(Method finderMethod,
Object[] args,
EntityEnterpriseContext instance)
throws Exception;
/**
* This method is called when collections of entities are to be
* found. The persistence manager must find out whether the wanted
* instances are available in the persistence store, and if so it
* shall use the ContainerInvoker plugin to create EJBObjects to
* the instances, which are to be returned as result.
*
* @param finderMethod the find method in the home interface that was
* called
* @param args any finder parameters
* @param instance the instance to use for the finder call
* @return an EJBObject collection representing the found
* entities
*/
Collection findEntities(Method finderMethod,
Object[] args,
EntityEnterpriseContext instance)
throws Exception;
/**
* This method is called when an entity shall be activated. The
* persistence manager must call the ejbActivate method on the
* instance.
*
* @param instance the instance to use for the activation
*
* @throws RemoteException thrown if some system exception occurs
*/
void activateEntity(EntityEnterpriseContext instance)
throws RemoteException;
/**
* This method is called whenever an entity shall be load from the
* underlying storage. The persistence manager must load the state
* from the underlying storage and then call ejbLoad on the
* supplied instance.
*
* @param instance the instance to synchronize
*
* @throws RemoteException thrown if some system exception occurs
*/
void loadEntity(EntityEnterpriseContext instance)
throws RemoteException;
/**
* This method is used to determine if an entity should be stored.
*
* @param instance the instance to check
* @return true, if the entity has been modified
* @throws Exception thrown if some system exception occurs
*/
boolean isModified(EntityEnterpriseContext instance) throws Exception;
/**
* This method is called whenever an entity shall be stored to the
* underlying storage. The persistence manager must call ejbStore
* on the supplied instance and then store the state to the
* underlying storage.
*
* @param instance the instance to synchronize
*
* @throws RemoteException thrown if some system exception occurs
*/
void storeEntity(EntityEnterpriseContext instance)
throws RemoteException;
/**
* This method is called when an entity shall be passivate. The
* persistence manager must call the ejbPassivate method on the
* instance.
*
* @param instance the instance to passivate
*
* @throws RemoteException thrown if some system exception occurs
*/
void passivateEntity(EntityEnterpriseContext instance)
throws RemoteException;
/**
* This method is called when an entity shall be removed from the
* underlying storage. The persistence manager must call ejbRemove
* on the instance and then remove its state from the underlying
* storage.
*
* @param instance the instance to remove
*
* @throws RemoteException thrown if some system exception occurs
* @throws RemoveException thrown if the instance could not be removed
*/
void removeEntity(EntityEnterpriseContext instance)
throws RemoteException, RemoveException;
}
30.3.2.6. The org.jboss.ejb.EntityPersistenceStore interface
org.jboss.ejb.EntityPersistanceStore interface. By default this is the org.jboss.ejb.plugins.cmp.jdbc.JDBCStoreManager which is the entry point for the CMP2 persistence engine. The EntityPersistanceStore interface is shown below.
Example 30.9. The org.jboss.ejb.EntityPersistanceStore interface
public interface EntityPersistenceStore
extends ContainerPlugin
{
/**
* Returns a new instance of the bean class or a subclass of the
* bean class.
*
* @return the new instance
*
* @throws Exception
*/
Object createBeanClassInstance()
throws Exception;
/**
* Initializes the instance context.
*
* <p>This method is called before createEntity, and should
* reset the value of all cmpFields to 0 or null.
*
* @param ctx
*
* @throws RemoteException
*/
void initEntity(EntityEnterpriseContext ctx);
/**
* This method is called whenever an entity is to be created. The
* persistence manager is responsible for handling the results
* properly wrt the persistent store.
*
* @param m the create method in the home interface that was
* called
* @param args any create parameters
* @param instance the instance being used for this create call
* @return The primary key computed by CMP PM or null for BMP
*
* @throws Exception
*/
Object createEntity(Method m,
Object[] args,
EntityEnterpriseContext instance)
throws Exception;
/**
* This method is called when single entities are to be found. The
* persistence manager must find out whether the wanted instance
* is available in the persistence store, if so it returns the
* primary key of the object.
*
* @param finderMethod the find method in the home interface that was
* called
* @param args any finder parameters
* @param instance the instance to use for the finder call
* @return a primary key representing the found entity
*
* @throws RemoteException thrown if some system exception occurs
* @throws FinderException thrown if some heuristic problem occurs
*/
Object findEntity(Method finderMethod,
Object[] args,
EntityEnterpriseContext instance)
throws Exception;
/**
* This method is called when collections of entities are to be
* found. The persistence manager must find out whether the wanted
* instances are available in the persistence store, and if so it
* must return a collection of primaryKeys.
*
* @param finderMethod the find method in the home interface that was
* called
* @param args any finder parameters
* @param instance the instance to use for the finder call
* @return an primary key collection representing the found
* entities
*
* @throws RemoteException thrown if some system exception occurs
* @throws FinderException thrown if some heuristic problem occurs
*/
Collection findEntities(Method finderMethod,
Object[] args,
EntityEnterpriseContext instance)
throws Exception;
/**
* This method is called when an entity shall be activated.
*
* <p>With the PersistenceManager factorization most EJB
* calls should not exists However this calls permits us to
* introduce optimizations in the persistence store. Particularly
* the context has a "PersistenceContext" that a PersistenceStore
* can use (JAWS does for smart updates) and this is as good a
* callback as any other to set it up.
* @param instance the instance to use for the activation
*
* @throws RemoteException thrown if some system exception occurs
*/
void activateEntity(EntityEnterpriseContext instance)
throws RemoteException;
/**
* This method is called whenever an entity shall be load from the
* underlying storage. The persistence manager must load the state
* from the underlying storage and then call ejbLoad on the
* supplied instance.
*
* @param instance the instance to synchronize
*
* @throws RemoteException thrown if some system exception occurs
*/
void loadEntity(EntityEnterpriseContext instance)
throws RemoteException;
/**
* This method is used to determine if an entity should be stored.
*
* @param instance the instance to check
* @return true, if the entity has been modified
* @throws Exception thrown if some system exception occurs
*/
boolean isModified(EntityEnterpriseContext instance)
throws Exception;
/**
* This method is called whenever an entity shall be stored to the
* underlying storage. The persistence manager must call ejbStore
* on the supplied instance and then store the state to the
* underlying storage.
*
* @param instance the instance to synchronize
*
* @throws RemoteException thrown if some system exception occurs
*/
void storeEntity(EntityEnterpriseContext instance)
throws RemoteException;
/**
* This method is called when an entity shall be passivate. The
* persistence manager must call the ejbPassivate method on the
* instance.
*
* <p>See the activate discussion for the reason for
* exposing EJB callback * calls to the store.
*
* @param instance the instance to passivate
*
* @throws RemoteException thrown if some system exception occurs
*/
void passivateEntity(EntityEnterpriseContext instance)
throws RemoteException;
/**
* This method is called when an entity shall be removed from the
* underlying storage. The persistence manager must call ejbRemove
* on the instance and then remove its state from the underlying
* storage.
*
* @param instance the instance to remove
*
* @throws RemoteException thrown if some system exception occurs
* @throws RemoveException thrown if the instance could not be removed
*/
void removeEntity(EntityEnterpriseContext instance)
throws RemoteException, RemoveException;
}
EntityPersistenceManager interface is org.jboss.ejb.plugins.BMPPersistenceManager. The BMP persistence manager is fairly simple since all persistence logic is in the entity bean itself. The only duty of the persistence manager is to perform container callbacks.
30.3.2.7. org.jboss.ejb.StatefulSessionPersistenceManager
StatefulSessionPersistenceManager is responsible for the persistence of stateful SessionBeans. This includes the following:
- Creating stateful sessions in a storage
- Activating stateful sessions from a storage
- Passivating stateful sessions to a storage
- Removing stateful sessions from a storage
StatefulSessionPersistenceManager interface is shown below.
Example 30.10. The org.jboss.ejb.StatefulSessionPersistenceManager interface
public interface StatefulSessionPersistenceManager
extends ContainerPlugin
{
public void createSession(Method m, Object[] args,
StatefulSessionEnterpriseContext ctx)
throws Exception;
public void activateSession(StatefulSessionEnterpriseContext ctx)
throws RemoteException;
public void passivateSession(StatefulSessionEnterpriseContext ctx)
throws RemoteException;
public void removeSession(StatefulSessionEnterpriseContext ctx)
throws RemoteException, RemoveException;
public void removePassivated(Object key);
}
StatefulSessionPersistenceManager interface is org.jboss.ejb.plugins.StatefulSessionFilePersistenceManager. As its name implies, StatefulSessionFilePersistenceManager utilizes the file system to persist stateful session beans. More specifically, the persistence manager serializes beans in a flat file whose name is composed of the bean name and session id with a .ser extension. The persistence manager restores a bean's state during activation and respectively stores its state during passivation from the bean's .ser file.
30.4. Entity Bean Locking and Deadlock Detection
30.4.1. Why JBoss Needs Locking
30.4.2. Entity Bean Lifecycle
commit-option. The lifecycle for this instance is different for every commit-option though.
- For commit option A, this instance is cached and used between transactions.
- For commit option B, this instance is cached and used between transactions, but is marked as dirty at the end of a transaction. This means that at the start of a new transaction
ejbLoadmust be called. - For commit option C, this instance is marked as dirty, released from the cache, and marked for passivation at the end of a transaction.
- For commit option D, a background refresh thread periodically calls
ejbLoadon stale beans within the cache. Otherwise, this option works in the same way as A.
30.4.3. Default Locking Behavior
- Method Lock: The method lock ensures that only one thread of execution at a time can invoke on a given Entity Bean. This is required by the EJB spec.
- Transaction Lock: A transaction lock ensures that only one transaction at a time has access to a give Entity Bean. This ensures the ACID properties of transactions at the application server level. Since, by default, there is only one active instance of any given Entity Bean at one time, JBoss must protect this instance from dirty reads and dirty writes. So, the default entity bean locking behavior will lock an entity bean within a transaction until it completes. This means that if any method at all is invoked on an entity bean within a transaction, no other transaction can have access to this bean until the holding transaction commits or is rolled back.
30.4.4. Pluggable Interceptors and Locking Policy
standardjboss.xml descriptor. Let us look at the container-interceptors definition for the Standard CMP 2.x EntityBean configuration.
<container-interceptors>
<interceptor>org.jboss.ejb.plugins.ProxyFactoryFinderInterceptor</interceptor>
<interceptor>org.jboss.ejb.plugins.LogInterceptor</interceptor>
<interceptor>org.jboss.ejb.plugins.SecurityInterceptor</interceptor>
<interceptor>org.jboss.ejb.plugins.TxInterceptorCMT</interceptor>
<interceptor>org.jboss.ejb.plugins.CallValidationInterceptor</interceptor>
<interceptor metricsEnabled="true">org.jboss.ejb.plugins.MetricsInterceptor</interceptor>
<interceptor>org.jboss.ejb.plugins.EntityCreationInterceptor</interceptor>
<interceptor>org.jboss.ejb.plugins.EntityLockInterceptor</interceptor>
<interceptor>org.jboss.ejb.plugins.EntityInstanceInterceptor</interceptor>
<interceptor>org.jboss.ejb.plugins.EntityReentranceInterceptor</interceptor>
<interceptor>org.jboss.resource.connectionmanager.CachedConnectionInterceptor</interceptor>
<interceptor>org.jboss.ejb.plugins.EntitySynchronizationInterceptor</interceptor>
<interceptor>org.jboss.ejb.plugins.cmp.jdbc.JDBCRelationInterceptor</interceptor>
</container-interceptors>
- EntityLockInterceptor: This interceptor's role is to schedule any locks that must be acquired before the invocation is allowed to proceed. This interceptor is very lightweight and delegates all locking behavior to a pluggable locking policy.
- EntityInstanceInterceptor: The job of this interceptor is to find the entity bean within the cache or create a new one. This interceptor also ensures that there is only one active instance of a bean in memory at one time.
- EntitySynchronizationInterceptor: The role of this interceptor is to synchronize the state of the cache with the underlying storage. It does this with the
ejbLoadandejbStoresemantics of the EJB specification. In the presence of a transaction this is triggered by transaction demarcation. It registers a callback with the underlying transaction monitor through the JTA interfaces. If there is no transaction the policy is to store state upon returning from invocation. The synchronization polices A, B and C of the specification are taken care of here as well as the JBoss specific commit-option D.
30.4.5. Deadlock
Thread 1 has the lock for Bean A, and Thread 2 has the lock for Bean B. At a later time, Thread 1 tries to lock Bean B and blocks because Thread 2 has it. Likewise, as Thread 2 tries to lock A it also blocks because Thread 1 has the lock. At this point both threads are deadlocked waiting for access to the resource already locked by the other thread.
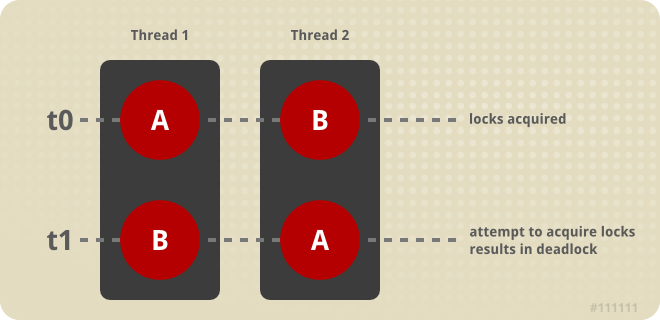
Figure 30.8. Deadlock definition example
30.4.5.1. Deadlock Detection
| Blocking TX | Tx that holds needed lock |
|---|---|
| Tx1 | Tx2 |
| Tx3 | Tx4 |
| Tx4 | Tx1 |
ApplicationDeadlockException. This exception will cause a transaction rollback which will cause all locks that transaction holds to be released.
30.4.5.2. Catching ApplicationDeadlockException
ApplicationDeadlockException. Unfortunately, this exception can be deeply embedded within a RemoteException, so you have to search for it in your catch block. For example:
try {
// ...
} catch (RemoteException ex) {
Throwable cause = null;
RemoteException rex = ex;
while (rex.detail != null) {
cause = rex.detail;
if (cause instanceof ApplicationDeadlockException) {
// ... We have deadlock, force a retry of the transaction.
break;
}
if (cause instanceof RemoteException) {
rex = (RemoteException)cause;
}
}
}
30.4.5.3. Viewing Lock Information
EntityLockMonitor MBean service allows one to view basic locking statistics as well as printing out the state of the transaction locking table. To enable this monitor uncomment its configuration in the conf/jboss-service.xml:
<mbean code="org.jboss.monitor.EntityLockMonitor"
name="jboss.monitor:name=EntityLockMonitor"/>
EntityLockMonitor has no configurable attributes. It does have the following read-only attributes:
- MedianWaitTime: The median value of all times threads had to wait to acquire a lock.
- AverageContenders: The ratio of the total number of contentions to the sum of all threads that had to wait for a lock.
- TotalContentions: The total number of threads that had to wait to acquire the transaction lock. This happens when a thread attempts to acquire a lock that is associated with another transaction
- MaxContenders: The maximum number of threads that were waiting to acquire the transaction lock.
- clearMonitor: This operation resets the lock monitor state by zeroing all counters.
- printLockMonitor: This operation prints out a table of all EJB locks that lists the
ejbNameof the bean, the total time spent waiting for the lock, the count of times the lock was waited on and the number of transactions that timed out waiting for the lock.
30.4.6. Advanced Configurations and Optimizations
30.4.6.1. Short-lived Transactions
30.4.6.2. Ordered Access
30.4.6.3. Read-Only Beans
read-only flag in the jboss.xml deployment descriptor.
Example 30.11. Marking an entity bean read-only using jboss.xml
<jboss>
<enterprise-beans>
<entity>
<ejb-name>MyEntityBean</ejb-name>
<jndi-name>MyEntityHomeRemote</jndi-name>
<read-only>True</read-only>
</entity>
</enterprise-beans>
</jboss>
30.4.6.4. Explicitly Defining Read-Only Methods
jboss.xml deployment descriptor. Wildcards are allowed for method names. The following is an example of declaring all getter methods and the anotherReadOnlyMethod as read-only.
Example 30.12. Defining entity bean methods as read only
<jboss>
<enterprise-beans>
<entity>
<ejb-name>nextgen.EnterpriseEntity</ejb-name>
<jndi-name>nextgen.EnterpriseEntity</jndi-name>
<method-attributes>
<method>
<method-name>get*</method-name>
<read-only>true</read-only>
</method>
<method>
<method-name>anotherReadOnlyMethod</method-name>
<read-only>true</read-only>
</method>
</method-attributes>
</entity>
</enterprise-beans>
</jboss>
30.4.6.5. Instance Per Transaction Policy
READ_COMMITTED. This can create repeatable reads when they are not desired. In other words, a transaction could have a copy of a stale bean. Second, this configuration option currently requires commit-option B or C which can be a performance drain since an ejbLoad must happen at the beginning of the transaction. But, if your application currently requires commit-option B or C anyways, then this is the way to go. The JBoss developers are currently exploring ways to allow commit-option A as well (which would allow the use of caching for this option).
Instance Per Transaction CMP 2.x EntityBean and Instance Per Transaction BMP EntityBean defined in the standardjboss.xml that implement this locking policy. To use this configuration, you just have to reference the name of the container configuration to use with your bean in the jboss.xml deployment descriptor as show below.
Example 30.13. An example of using the Instance Per Transaction policy.
<jboss>
<enterprise-beans>
<entity>
<ejb-name>MyCMP2Bean</ejb-name>
<jndi-name>MyCMP2</jndi-name>
<configuration-name>
Instance Per Transaction CMP 2.x EntityBean
</configuration-name>
</entity>
<entity>
<ejb-name>MyBMPBean</ejb-name>
<jndi-name>MyBMP</jndi-name>
<configuration-name>
Instance Per Transaction BMP EntityBean
</configuration-name>
</entity>
</enterprise-beans>
</jboss>
30.4.7. Running Within a Cluster
select for update when the bean is loaded from the database. With commit-option B or C, this implements a transactional lock that can be used across the cluster. For BMP, you must explicitly implement the select for update invocation within the BMP's ejbLoad method.
30.4.8. Troubleshooting
30.4.8.1. Locking Behavior Not Working
- If you have custom
container-configurations, make sure you have updated these configurations. - Make absolutely sure that you have implemented
equalsandhashCodecorrectly from custom/complex primary key classes. - Make absolutely sure that your custom/complex primary key classes serialize correctly. One common mistake is assuming that member variable initializations will be executed when a primary key is unmarshaled.
30.4.8.2. IllegalStateException
equals and/or hashCode correctly for your custom/complex primary key class, or that your primary key class is not implemented correctly for serialization.
30.4.8.3. Hangs and Transaction Timeouts
30.5. EJB Timer Configuration
ejb-deployer.xml file. The primary MBean is the EJBTimerService MBean.
<mbean code="org.jboss.ejb.txtimer.EJBTimerServiceImpl" name="jboss.ejb:service=EJBTimerService">
<attribute name="RetryPolicy">jboss.ejb:service=EJBTimerService,retryPolicy=fixedDelay</attribute>
<attribute name="PersistencePolicy">jboss.ejb:service=EJBTimerService,persistencePolicy=database</attribute>
<attribute name="TimerIdGeneratorClassName">org.jboss.ejb.txtimer.BigIntegerTimerIdGenerator</attribute>
<attribute name="TimedObjectInvokerClassName">org.jboss.ejb.txtimer.TimedObjectInvokerImpl</attribute>
</mbean>
EJBTimerService has the following configurable attributes:
- RetryPolicy: This is name of the MBean that implements the retry policy. The MBean must support the
org.jboss.ejb.txtimer.RetryPolicy interface. JBoss provides one implementation,FixedDelayRetryPolicy, which will be described later. - PersistencePolicy: This is the name of the MBean that implements the persistence strategy for saving timer events. The MBean must support the
org.jboss.ejb.txtimer.PersistencePolicyinterface. JBoss provides two implementations, NoopPersistencePolicy and DatabasePersistencePolicy, which will be described later. - TimerIdGeneratorClassName: This is the name of a class that provides the timer ID generator strategy. This class must implement the
org.jboss.ejb.txtimer.TimerIdGeneratorinterface. JBoss provides theorg.jboss.ejb.txtimer.BigIntegerTimerIdGeneratorimplementation. - TimedObjectInvokerClassname: This is the name of a class that provides the timer method invocation strategy. This class must implement the
org.jboss.ejb.txtimer.TimedObjectInvokerinterface. JBoss provides theorg.jboss.ejb.txtimer.TimedObjectInvokerImplimplementation.
<mbean code="org.jboss.ejb.txtimer.FixedDelayRetryPolicy"
name="jboss.ejb:service=EJBTimerService,retryPolicy=fixedDelay">
<attribute name="Delay">100</attribute>
</mbean>
- Delay: This is the delay (ms) before retrying a failed timer execution. The default delay is 100ms.
NoopPersistence policy can be used. This MBean is commented out by default, but when enabled will look like this:
<mbean code="org.jboss.ejb.txtimer.NoopPersistencePolicy"
name="jboss.ejb:service=EJBTimerService,persistencePolicy=noop"/>
DatabasePersitencePolicy MBean should be used.
<mbean code="org.jboss.ejb.txtimer.DatabasePersistencePolicy"
name="jboss.ejb:service=EJBTimerService,persistencePolicy=database">
<!-- DataSource JNDI name -->
<depends optional-attribute-name="DataSource">jboss.jca:service=DataSourceBinding,name=DefaultDS</depends>
<!-- The plugin that handles database persistence -->
<attribute name="DatabasePersistencePlugin">org.jboss.ejb.txtimer.GeneralPurposeDatabasePersistencePlugin</attribute>
</mbean>
- DataSource: This is the MBean for the DataSource that timer data will be written to.
- DatabasePersistencePlugin: This is the name of the class the implements the persistence strategy. This should be
org.jboss.ejb.txtimer.GeneralPurposeDatabasePersistencePlugin.
Chapter 31. The CMP Engine
31.1. Example Code
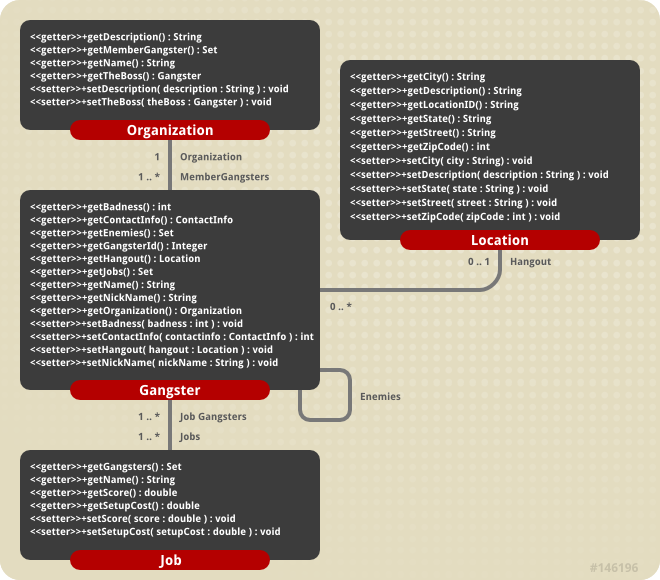
Figure 31.1. The crime portal example classes
src/main/org/jboss/cmp2 directory of the example code. To build the example code, run Ant as shown below
[examples]$ ant -Dchap=cmp2 config
15:46:36,704 INFO [OrganizationBean$Proxy] Creating organization Yakuza, Japanese Gangsters 15:46:36,790 INFO [OrganizationBean$Proxy] Creating organization Mafia, Italian Bad Guys 15:46:36,797 INFO [OrganizationBean$Proxy] Creating organization Triads, Kung Fu Movie Extras 15:46:36,877 INFO [GangsterBean$Proxy] Creating Gangster 0 'Bodyguard' Yojimbo 15:46:37,003 INFO [GangsterBean$Proxy] Creating Gangster 1 'Master' Takeshi 15:46:37,021 INFO [GangsterBean$Proxy] Creating Gangster 2 'Four finger' Yuriko 15:46:37,040 INFO [GangsterBean$Proxy] Creating Gangster 3 'Killer' Chow 15:46:37,106 INFO [GangsterBean$Proxy] Creating Gangster 4 'Lightning' Shogi 15:46:37,118 INFO [GangsterBean$Proxy] Creating Gangster 5 'Pizza-Face' Valentino 15:46:37,133 INFO [GangsterBean$Proxy] Creating Gangster 6 'Toohless' Toni 15:46:37,208 INFO [GangsterBean$Proxy] Creating Gangster 7 'Godfather' Corleone 15:46:37,238 INFO [JobBean$Proxy] Creating Job 10th Street Jeweler Heist 15:46:37,247 INFO [JobBean$Proxy] Creating Job The Greate Train Robbery 15:46:37,257 INFO [JobBean$Proxy] Creating Job Cheap Liquor Snatch and Grab
31.1.1. Enabling CMP Debug Logging
log4j.xml file:
<category name="org.jboss.ejb.plugins.cmp">
<priority value="DEBUG"/>
</category>
CONSOLE appender to allow debug level messages to be logged to the console. The following changes also need to be applied to the log4j.xml file.
<appender name="CONSOLE" class="org.apache.log4j.ConsoleAppender">
<errorHandler class="org.jboss.logging.util.OnlyOnceErrorHandler"/>
<param name="Target" value="System.out"/>
<param name="Threshold" value="DEBUG" />
<layout class="org.apache.log4j.PatternLayout">
<!-- The default pattern: Date Priority [Category] Message\n -->
<param name="ConversionPattern" value="%d{ABSOLUTE} %-5p [%c{1}] %m%n"/>
</layout>
</appender>
TRACE level priority on the org.jboss.ejb.plugins.cmp category as shown here:
<category name="org.jboss.ejb.plugins.cmp">
<priority value="TRACE" class="org.jboss.logging.XLevel"/>
</category>
31.1.2. Running the examples
[examples]$ ant -Dchap=cmp2 -Dex=test run-example
22:30:09,862 DEBUG [OrganizationEJB#findByPrimaryKey] Executing SQL: SELECT t0_OrganizationEJ B.name FROM ORGANIZATION t0_OrganizationEJB WHERE t0_OrganizationEJB.name=? 22:30:09,927 DEBUG [OrganizationEJB] Executing SQL: SELECT desc, the_boss FROM ORGANIZATION W HERE (name=?) 22:30:09,931 DEBUG [OrganizationEJB] load relation SQL: SELECT id FROM GANGSTER WHERE (organi zation=?) 22:30:09,947 DEBUG [StatelessSessionContainer] Useless invocation of remove() for stateless s ession bean 22:30:10,086 DEBUG [GangsterEJB#findBadDudes_ejbql] Executing SQL: SELECT t0_g.id FROM GANGST ER t0_g WHERE (t0_g.badness > ?) 22:30:10,097 DEBUG [GangsterEJB#findByPrimaryKey] Executing SQL: SELECT t0_GangsterEJB.id FRO M GANGSTER t0_GangsterEJB WHERE t0_GangsterEJB.id=? 22:30:10,102 DEBUG [GangsterEJB#findByPrimaryKey] Executing SQL: SELECT t0_GangsterEJB.id FRO M GANGSTER t0_GangsterEJB WHERE t0_GangsterEJB.id=?
[examples]$ ant -Dchap=cmp2 -Dex=readahead run-example
22:44:31,570 INFO [ReadAheadTest] ######################################################## ### read-ahead none ### 22:44:31,582 DEBUG [GangsterEJB#findAll_none] Executing SQL: SELECT t0_g.id FROM GANGSTER t0_ g ORDER BY t0_g.id ASC 22:44:31,604 DEBUG [GangsterEJB] Executing SQL: SELECT name, nick_name, badness, organization , hangout FROM GANGSTER WHERE (id=?) 22:44:31,615 DEBUG [GangsterEJB] Executing SQL: SELECT name, nick_name, badness, organization , hangout FROM GANGSTER WHERE (id=?) 22:44:31,622 DEBUG [GangsterEJB] Executing SQL: SELECT name, nick_name, badness, organization , hangout FROM GANGSTER WHERE (id=?) 22:44:31,628 DEBUG [GangsterEJB] Executing SQL: SELECT name, nick_name, badness, organization , hangout FROM GANGSTER WHERE (id=?) 22:44:31,635 DEBUG [GangsterEJB] Executing SQL: SELECT name, nick_name, badness, organization , hangout FROM GANGSTER WHERE (id=?) 22:44:31,644 DEBUG [GangsterEJB] Executing SQL: SELECT name, nick_name, badness, organization , hangout FROM GANGSTER WHERE (id=?) 22:44:31,649 DEBUG [GangsterEJB] Executing SQL: SELECT name, nick_name, badness, organization , hangout FROM GANGSTER WHERE (id=?) 22:44:31,658 DEBUG [GangsterEJB] Executing SQL: SELECT name, nick_name, badness, organization , hangout FROM GANGSTER WHERE (id=?) 22:44:31,670 INFO [ReadAheadTest] ### ######################################################## ...
31.2. The jbosscmp-jdbc Structure
jbosscmp-jdbc.xml descriptor is used to control the behavior of the JBoss engine. This can be done globally through the conf/standardjbosscmp-jdbc.xml descriptor found in the server configuration file set, or per EJB JAR deployment via a META-INF/jbosscmp-jdbc.xml descriptor.
jbosscmp-jdbc.xml descriptor can be found in <JBOSS_HOME>/docs/dtd/jbosscmp-jdbc_4_0.dtd. The public doctype for this DTD is:
<!DOCTYPE jbosscmp-jdbc PUBLIC
"-//JBoss//DTD JBOSSCMP-JDBC 4.0//EN"
"http://www.jboss.org/j2ee/dtd/jbosscmp-jdbc_4_0.dtd">
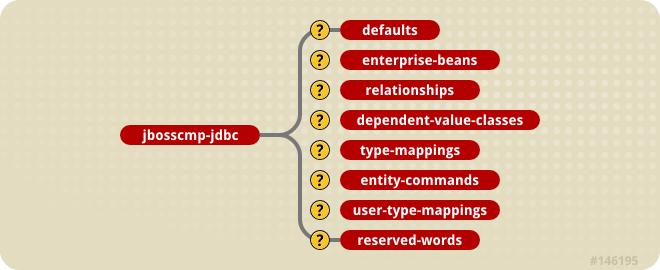
Figure 31.2. The jbosscmp-jdbc content model.
- defaults: The defaults section allows for the specification of default behavior/settings for behavior that controls entity beans. Use of this section simplifies the amount of information needed for the common behaviors found in the entity beans section. See Section 31.12, “Defaults” for the details of the defaults content.
- enterprise-beans: The
enterprise-beanselement allows for customization of entity beans defined in theejb-jar.xmlenterprise-beansdescriptor. This is described in detail in Section 31.3, “Entity Beans”. - relationships: The
relationshipselement allows for the customization of tables and the loading behavior of entity relationships. This is described in detail in Section 31.5, “Container Managed Relationships”. - dependent-value-classes: The
dependent-value-classeselement allows for the customization of the mapping of dependent value classes to tables. Dependent value classes are described in detail in Section 31.4.5, “Dependent Value Classes (DVCs)” (DVCs). - type-mappings: The
type-mappingselement defines the Java to SQL type mappings for a database, along with SQL templates, and function mappings. This is described in detail in Section 31.13, “Datasource Customization”. - entity-commands: The
entity-commandselement allows for the definition of the entity creation command instances that know how to create an entity instance in a persistent store. This is described in detail in Section 31.11, “Entity Commands and Primary Key Generation”. - user-type-mappings: The
user-type-mappingselements defines a mapping of a user types to a column using a mapper class. A mapper is like a mediator. When storing, it takes an instance of the user type and translates it to a column value. When loading, it takes a column value and translates it to an instance of the user type. Details of the user type mappings are described in Section 31.13.4, “User Type Mappings”. - reserved-words: The
reserved-wordselement defines one or more reserved words that should be escaped when generating tables. Each reserved word is specified as the content of awordelement.
31.3. Entity Beans
// Gangster Local Home Interface
public interface GangsterHome
extends EJBLocalHome
{
Gangster create(Integer id, String name, String nickName)
throws CreateException;
Gangster findByPrimaryKey(Integer id)
throws FinderException;
}
// Gangster Local Interface
public interface Gangster
extends EJBLocalObject
{
Integer getGangsterId();
String getName();
String getNickName();
void setNickName(String nickName);
int getBadness();
void setBadness(int badness);
}
// Gangster Implementation Class
public abstract class GangsterBean
implements EntityBean
{
private EntityContext ctx;
private Category log = Category.getInstance(getClass());
public Integer ejbCreate(Integer id, String name, String nickName)
throws CreateException
{
log.info("Creating Gangster " + id + " '" + nickName + "' "+ name);
setGangsterId(id);
setName(name);
setNickName(nickName);
return null;
}
public void ejbPostCreate(Integer id, String name, String nickName) {
}
// CMP field accessors ---------------------------------------------
public abstract Integer getGangsterId();
public abstract void setGangsterId(Integer gangsterId);
public abstract String getName();
public abstract void setName(String name);
public abstract String getNickName();
public abstract void setNickName(String nickName);
public abstract int getBadness();
public abstract void setBadness(int badness);
public abstract ContactInfo getContactInfo();
public abstract void setContactInfo(ContactInfo contactInfo);
//...
// EJB callbacks ---------------------------------------------------
public void setEntityContext(EntityContext context) { ctx = context; }
public void unsetEntityContext() { ctx = null; }
public void ejbActivate() { }
public void ejbPassivate() { }
public void ejbRemove() { log.info("Removing " + getName()); }
public void ejbStore() { }
public void ejbLoad() { }
}
ejb-jar.xml deployment descriptor. Although the actual bean class is named GangsterBean, we've called the entity GangsterEJB.
<?xml version="1.0" encoding="UTF-8"?>
<ejb-jar xmlns="http://java.sun.com/xml/ns/"Whats_new_in_JBoss_4-J2EE_Certification_and_Standards_Compliance" version="2.1"
xmlns:xsi="http://www.w3.org/2001/XMLSchema-instance"
xsi:schemaLocation="http://java.sun.com/xml/ns/j2ee
http://java.sun.com/xml/ns/j2ee/ejb-jar_\2_1.xsd">
<display-name>Crime Portal</display-name>
<enterprise-beans>
<entity>
<display-name>Gangster Entity Bean</display-name>
<ejb-name>GangsterEJB</ejb-name>
<local-home>org.jboss.cmp2.crimeportal.GangsterHome</local-home>
<local>org.jboss.cmp2.crimeportal.Gangster</local>
<ejb-class>org.jboss.cmp2.crimeportal.GangsterBean</ejb-class>
<persistence-type>Container</persistence-type>
<prim-key-class>java.lang.Integer</prim-key-class>
<reentrant>False</reentrant>
<cmp-version>2.x</cmp-version>
<abstract-schema-name>gangster</abstract-schema-name>
<cmp-field>
<field-name>gangsterId</field-name>
</cmp-field>
<cmp-field>
<field-name>name</field-name>
</cmp-field>
<cmp-field>
<field-name>nickName</field-name>
</cmp-field>
<cmp-field>
<field-name>badness</field-name>
</cmp-field>
<cmp-field>
<field-name>contactInfo</field-name>
</cmp-field>
<primkey-field>gangsterId</primkey-field>
<!-- ... -->
</entity>
</enterprise-beans>
</ejb-jar>
2.x to indicate that this is EJB 2.x CMP entity bean. The abstract schema name was set to gangster. That will be important when we look at EJB-QL queries in Section 31.6, “Queries”.
31.3.1. Entity Mapping
entity element in the jbosscmp-jdbc.xml file. This file is located in the META-INF directory of the EJB JAR and contains all of the optional configuration information for configuring the CMP mapping. The entity elements for each entity bean are grouped together in the enterprise-beans element under the top level jbosscmp-jdbc element. A stubbed out entity configuration is shown below.
<?xml version="1.0" encoding="UTF-8"?>
<!DOCTYPE jbosscmp-jdbc PUBLIC
"-//JBoss//DTD JBOSSCMP-JDBC 3.2//EN"
"http://www.jboss.org/j2ee/dtd/jbosscmp-jdbc_3_2.dtd">
<jbosscmp-jdbc>
<defaults>
<!-- application-wide CMP defaults -->
</defaults>
<enterprise-beans>
<entity>
<ejb-name>GangsterEJB</ejb-name>
<!-- overrides to defaults section -->
<table-name>gangster</table-name>
<!-- CMP Fields (see CMP-Fields) -->
<!-- Load Groups (see Load Groups)-->
<!-- Queries (see Queries) -->
</entity>
</enterprise-beans>
</jbosscmp-jdbc>
ejb-name element is required to match the entity specification here with the one in the ejb-jar.xml file. The remainder of the elements specify either overrides the global or application-wide CMP defaults and CMP mapping details specific to the bean. The application defaults come from the defaults section of the jbosscmp-jdbc.xml file and the global defaults come from the defaults section of the standardjbosscmp-jdbc.xml file in the conf directory for the current server configuration file set. The defaults section is discussed in Section 31.12, “Defaults”. Figure 31.3, “The entity element content model” shows the full entity content model.
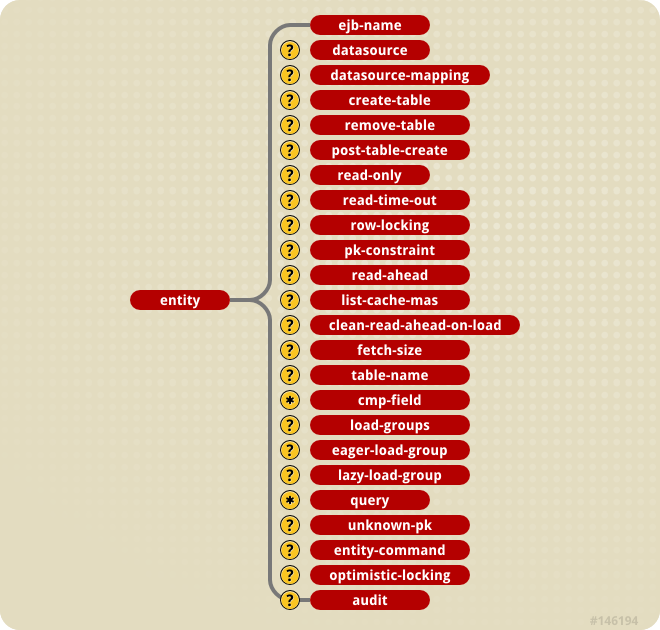
Figure 31.3. The entity element content model
- ejb-name: This required element is the name of the EJB to which this configuration applies. This element must match an
ejb-nameof an entity in theejb-jar.xmlfile. - datasource: This optional element is the
jndi-nameused to look up the datasource. All database connections used by an entity or relation-table are obtained from the datasource. Having different datasources for entities is not recommended, as it vastly constrains the domain over which finders and ejbSelects can query. The default isjava:/DefaultDSunless overridden in the defaults section. - datasource-mapping: This optional element specifies the name of the
type-mapping, which determines how Java types are mapped to SQL types, and how EJB-QL functions are mapped to database specific functions. Type mappings are discussed in Section 31.13.3, “Mapping”. The default isHypersonic SQLunless overridden in the defaults section. - create-table: This optional element when true, specifies that JBoss should attempt to create a table for the entity. When the application is deployed, JBoss checks if a table already exists before creating the table. If a table is found, it is logged, and the table is not created. This option is very useful during the early stages of development when the table structure changes often. The default is false unless overridden in the defaults section.
- alter-table: If
create-tableis used to automatically create the schema,alter-tablecan be used to keep the schema current with changes to the entity bean. Alter table will perform the following specific tasks:- new fields will be created
- fields which are no longer used will be removed
- string fields which are shorter than the declared length will have their length increased to the declared length. (not supported by all databases)
- remove-table: This optional element when true, JBoss will attempt to drop the table for each entity and each relation table mapped relationship. When the application is undeployed, JBoss will attempt to drop the table. This option is very useful during the early stages of development when the table structure changes often. The default is false unless overridden in the defaults section.
- post-table-create: This optional element specifies an arbitrary SQL statement that should be executed immediately after the database table is created. This command is only executed if
create-tableis true and the table did not previously exist. - read-only: This optional element when true specifies that the bean provider will not be allowed to change the value of any fields. A field that is read-only will not be stored in, or inserted into, the database. If a primary key field is read-only, the create method will throw a
CreateException. If a set accessor is called on a read-only field, it throws anEJBException. Read-only fields are useful for fields that are filled in by database triggers, such as last update. Theread-onlyoption can be overridden on a percmp-fieldbasis, and is discussed in Section 31.4.3, “Read-only Fields”. The default is false unless overridden in thedefaultssection. - read-time-out: This optional element is the amount of time in milliseconds that a read on a read-only field is valid. A value of 0 means that the value is always reloaded at the start of a transaction, and a value of -1 means that the value never times out. This option can also be overridden on a per
cmp-fieldbasis. Ifread-onlyis false, this value is ignored. The default is -1 unless overridden in thedefaultssection. - row-locking: This optional element if true specifies that JBoss will lock all rows loaded in a transaction. Most databases implement this by using the
SELECT FOR UPDATEsyntax when loading the entity, but the actual syntax is determined by therow-locking-templatein the datasource-mapping used by this entity. The default is false unless overridden in thedefaultssection. - pk-constraint: This optional element if true specifies that JBoss will add a primary key constraint when creating tables. The default is true unless overridden in the defaults section.
- read-ahead: This optional element controls caching of query results and
cmr-fieldsfor the entity. This option is discussed in Section 31.7.3, “Read-ahead”. - fetch-size: This optional element specifies the number of entities to read in one round-trip to the underlying datastore. The default is 0 unless overridden in the defaults section.
- list-cache-max: This optional element specifies the number of read-lists that can be tracked by this entity. This option is discussed in
on-load. The default is 1000 unless overridden in the defaults section. - clean-read-ahead-on-load: When an entity is loaded from the read ahead cache, JBoss can remove the data used from the read ahead cache. The default is
false. - table-name: This optional element is the name of the table that will hold data for this entity. Each entity instance will be stored in one row of this table. The default is the
ejb-name. - cmp-field: The optional element allows one to define how the
ejb-jar.xmlcmp-fieldis mapped onto the persistence store. This is discussed in Section 31.4, “CMP Fields”. - load-groups: This optional element specifies one or more groupings of CMP fields to declare load groupings of fields. This is discussed in Section 31.7.2, “Load Groups”.
- eager-load-groups: This optional element defines one or more load grouping as eager load groups. This is discussed in Section 31.8.2, “Eager-loading Process”.
- lazy-load-groups: This optional element defines one or more load grouping as lazy load groups. This is discussed in Section 31.8.3, “Lazy loading Process”.
- query: This optional element specifies the definition of finders and selectors. This is discussed in Section 31.6, “Queries”.
- unknown-pk: This optional element allows one to define how an unknown primary key type of
java.lang.Objectmaps to the persistent store. - entity-command: This optional element allows one to define the entity creation command instance. Typically this is used to define a custom command instance to allow for primary key generation. This is described in detail in Section 31.11, “Entity Commands and Primary Key Generation”.
- optimistic-locking: This optional element defines the strategy to use for optimistic locking. This is described in detail in Section 31.10, “Optimistic Locking”.
- audit: This optional element defines the CMP fields that will be audited. This is described in detail in Section 31.4.4, “Auditing Entity Access”.
31.4. CMP Fields
getName() and a setName() method for accessing the name CMP field. In this section we will look at how the configure these declared CMP fields and control the persistence and behavior.
31.4.1. CMP Field Declaration
ejb-jar.xml file. On the gangster bean, for example, the gangsterId, name, nickName and badness would be declared in the ejb-jar.xml file as follows:
<ejb-jar>
<enterprise-beans>
<entity>
<ejb-name>GangsterEJB</ejb-name>
<cmp-field><field-name>gangsterId</field-name></cmp-field>
<cmp-field><field-name>name</field-name></cmp-field>
<cmp-field><field-name>nickName</field-name></cmp-field>
<cmp-field><field-name>badness</field-name></cmp-field>
</entity>
</enterprise-beans>
</ejb-jar>
31.4.2. CMP Field Column Mapping
jbosscmp-jdbc.xml file. The structure is similar to the ejb-jar.xml with an entity element that has cmp-field elements under it with the additional configuration details.
<jbosscmp-jdbc>
<enterprise-beans>
<entity>
<ejb-name>GangsterEJB</ejb-name>
<table-name>gangster</table-name>
<cmp-field>
<field-name>gangsterId</field-name>
<column-name>id</column-name>
</cmp-field>
<cmp-field>
<field-name>name</field-name>
<column-name>name</column-name>
<not-null/>
</cmp-field>
<cmp-field>
<field-name>nickName</field-name>
<column-name>nick_name</column-name>
<jdbc-type>VARCHAR</jdbc-type>
<sql-type>VARCHAR(64)</sql-type>
</cmp-field>
<cmp-field>
<field-name>badness</field-name>
<column-name>badness</column-name>
</cmp-field>
</entity>
</enterprise-beans>
</jbosscmp-jdbc>
cmp-field element of the jbosscmp-jdbc.xml is shown below.

Figure 31.4. The JBoss entity element content model
- field-name: This required element is the name of the
cmp-fieldthat is being configured. It must match thefield-nameelement of acmp-fielddeclared for this entity in theejb-jar.xmlfile. - read-only: This declares that field in question is read-only. This field will not be written to the database by JBoss. Read-only fields are discussed in Section 31.4.3, “Read-only Fields”.
- read-only-timeout: This is the time in milliseconds that a read-only field value will be considered valid.
- column-name: This optional element is the name of the column to which the
cmp-fieldis mapped. The default is to use thefield-namevalue. - not-null: This optional element indicates that JBoss should add a NOT NULL to the end of the column declaration when automatically creating the table for this entity. The default for primary key fields and primitives is not null.
- jdbc-type: This is the JDBC type that is used when setting parameters in a JDBC prepared statement or loading data from a JDBC result set. The valid types are defined in
java.sql.Types. This is only required ifsql-typeis specified. The default JDBC type will be based on the database type in thedatasourcemapping. - sql-type: This is the SQL type that is used in create table statements for this field. Valid SQL types are only limited by your database vendor. This is only required if
jdbc-typeis specified. The default SQL type will be base on the database type in thedatasourcemapping - property: This optional element allows one to define how the properties of a dependent value class CMP field should be mapped to the persistent store. This is discussed further in Section 31.4.5, “Dependent Value Classes (DVCs)”.
- auto-increment: The presence of this optional field indicates that it is automatically incremented by the database layer. This is used to map a field to a generated column as well as to an externally manipulated column.
- dbindex: The presence of this optional field indicates that the server should create an index on the corresponding column in the database. The index name will be fieldname_index.
- check-dirty-after-get: This value defaults to false for primitive types and the basic java.lang immutable wrappers (
Integer,String, etc...). For potentially mutable objects, JBoss will mark they field as potentially dirty after a get operation. If the dirty check on an object is too expensive, you can optimize it away by settingcheck-dirty-after-getto false. - state-factory: This specifies class name of a state factory object which can perform dirty checking for this field. State factory classes must implement the
CMPFieldStateFactoryinterface.
31.4.3. Read-only Fields
read-only and read-time-out elements in the cmp-field declaration. These elements work the same way as they do at the entity level. If a field is read-only, it will never be used in an INSERT or UPDATE statement. If a primary key field is read-only, the create method will throw a CreateException. If a set accessor is called for a read-only field, it throws an EJBException. Read-only fields are useful for fields that are filled in by database triggers, such as last update. A read-only CMP field declaration example follows:
<jbosscmp-jdbc>
<enterprise-beans>
<entity>
<ejb-name>GangsterEJB</ejb-name>
<cmp-field>
<field-name>lastUpdated</field-name>
<read-only>true</read-only>
<read-time-out>1000</read-time-out>
</cmp-field>
</entity>
</enterprise-beans>
</jbosscmp-jdbc>
31.4.4. Auditing Entity Access
audit element of the entity section allows one to specify how access to and entity bean is audited. This is only allowed when an entity bean is accessed under a security domain so that this is a caller identity established. The content model of the audit element is given Figure 31.5, “The jbosscmp-jdbc.xml audit element content model”.

Figure 31.5. The jbosscmp-jdbc.xml audit element content model
- created-by: This optional element indicates that the caller who created the entity should be saved to either the indicated
column-nameor cmpfield-name. - created-time: This optional element indicates that the time of entity creation should be saved to either the indicated
column-nameor cmpfield-name. - updated-by: This optional element indicates that the caller who last modified the entity should be saved to either the indicated
column-nameor CMPfield-name. - updated-time: This optional element indicates that the last time of entity modification should be saved to either the indicated
column-nameor CMPfield-name.
field-name is given, the corresponding audit information should be stored in the specified CMP field of the entity bean being accessed. Note that there does not have to be an corresponding CMP field declared on the entity. In case there are matching field names, you will be able to access audit fields in the application using the corresponding CMP field abstract getters and setters. Otherwise, the audit fields will be created and added to the entity internally. You will be able to access audit information in EJB-QL queries using the audit field names, but not directly through the entity accessors.
column-name is specified, the corresponding audit information should be stored in the indicated column of the entity table. If JBoss is creating the table the jdbc-type and sql-type element can then be used to define the storage type.
<jbosscmp-jdbc>
<enterprise-beans>
<entity>
<ejb-name>AuditChangedNamesEJB</ejb-name>
<table-name>cmp2_audit_changednames</table-name>
<audit>
<created-by>
<column-name>createdby</column-name>
</created-by>
<created-time>
<column-name>createdtime</column-name>
</created-time>
<updated-by>
<column-name>updatedby</column-name></updated-by>
<updated-time>
<column-name>updatedtime</column-name>
</updated-time>
</audit>
</entity>
</enterprise-beans>
</jbosscmp-jdbc>
31.4.5. Dependent Value Classes (DVCs)
cmp-field other than the automatically recognized types core types such as strings and number values. By default, a DVC is serialized, and the serialized form is stored in a single database column. Although not discussed here, there are several known issues with the long-term storage of classes in serialized form.
PURCHASE_ORDER table with the fields SHIP_LINE1, SHIP_LINE2, SHIP_CITY, etc. and an additional set of fields for the billing address). Other common database structures include telephone numbers with separate fields for area code, exchange, and extension, or a person's name spread across several fields. With a DVC, multiple columns can be mapped to one logical field.
dependent-value-class element within the dependent-value-classes element.

Figure 31.6. The jbosscmp-jdbc dependent-value-class element model.
ContactInfo DVC class.
public class ContactInfo
implements Serializable
{
/** The cell phone number. */
private PhoneNumber cell;
/** The pager number. */
private PhoneNumber pager;
/** The email address */
private String email;
/**
* Creates empty contact info.
*/
public ContactInfo() {
}
public PhoneNumber getCell() {
return cell;
}
public void setCell(PhoneNumber cell) {
this.cell = cell;
}
public PhoneNumber getPager() {
return pager;
}
public void setPager(PhoneNumber pager) {
this.pager = pager;
}
public String getEmail() {
return email;
}
public void setEmail(String email) {
this.email = email.toLowerCase();
}
// ... equals, hashCode, toString
}
public class PhoneNumber
implements Serializable
{
/** The first three digits of the phone number. */
private short areaCode;
/** The middle three digits of the phone number. */
private short exchange;
/** The last four digits of the phone number. */
private short extension;
// ... getters and setters
// ... equals, hashCode, toString
}
<dependent-value-classes>
<dependent-value-class>
<description>A phone number</description>
<class>org.jboss.cmp2.crimeportal.PhoneNumber</class>
<property>
<property-name>areaCode</property-name>
<column-name>area_code</column-name>
</property>
<property>
<property-name>exchange</property-name>
<column-name>exchange</column-name>
</property>
<property>
<property-name>extension</property-name>
<column-name>extension</column-name>
</property>
</dependent-value-class>
<dependent-value-class>
<description>General contact info</description>
<class>org.jboss.cmp2.crimeportal.ContactInfo</class>
<property>
<property-name>cell</property-name>
<column-name>cell</column-name>
</property>
<property>
<property-name>pager</property-name>
<column-name>pager</column-name>
</property>
<property>
<property-name>email</property-name>
<column-name>email</column-name>
<jdbc-type>VARCHAR</jdbc-type>
<sql-type>VARCHAR(128)</sql-type>
</property>
</dependent-value-class>
</dependent-value-classes>
dependent-value-class element. A DVC is identified by the Java class type declared in the class element. Each property to be persisted is declared with a property element. This specification is based on the cmp-field element, so it should be self-explanatory. This restriction will also be removed in a future release. The current proposal involves storing the primary key fields in the case of a local entity and the entity handle in the case of a remote entity.
dependent-value-classes section defines the internal structure and default mapping of the classes. When JBoss encounters a field that has an unknown type, it searches the list of registered DVCs, and if a DVC is found, it persists this field into a set of columns, otherwise the field is stored in serialized form in a single column. JBoss does not support inheritance of DVCs; therefore, this search is only based on the declared type of the field. A DVC can be constructed from other DVCs, so when JBoss runs into a DVC, it flattens the DVC tree structure into a set of columns. If JBoss finds a DVC circuit during start up, it will throw an EJBException. The default column name of a property is the column name of the base cmp-field followed by an underscore and then the column name of the property. If the property is a DVC, the process is repeated. For example, a cmp-field named info that uses the ContactInfo DVC would have the following columns:
info_cell_area_code info_cell_exchange info_cell_extension info_pager_area_code info_pager_exchange info_pager_extension info_email
<jbosscmp-jdbc>
<enterprise-beans>
<entity>
<ejb-name>GangsterEJB</ejb-name>
<cmp-field>
<field-name>contactInfo</field-name>
<property>
<property-name>cell.areaCode</property-name>
<column-name>cell_area</column-name>
</property>
<property>
<property-name>cell.exchange</property-name>
<column-name>cell_exch</column-name>
</property>
<property>
<property-name>cell.extension</property-name>
<column-name>cell_ext</column-name>
</property>
<property>
<property-name>pager.areaCode</property-name>
<column-name>page_area</column-name>
</property>
<property>
<property-name>pager.exchange</property-name>
<column-name>page_exch</column-name>
</property>
<property>
<property-name>pager.extension</property-name>
<column-name>page_ext</column-name>
</property>
<property>
<property-name>email</property-name>
<column-name>email</column-name>
<jdbc-type>VARCHAR</jdbc-type>
<sql-type>VARCHAR(128)</sql-type>
</property>
</cmp-field>
</entity>
</enterprise-beans>
</jbosscmp-jdbc>
cell.areaCode.
31.5. Container Managed Relationships
cmr-field abstract accessors and declare the relationship in the ejb-jar.xml file. The following two sections describe these steps.
31.5.1. CMR-Field Abstract Accessors
cmp-fields, except that single-valued relationships must return the local interface of the related entity, and multi-valued relationships can only return a java.util.Collection (or java.util.Set) object. For example, to declare a one-to-many relationship between organization and gangster, we declare the relationship from organization to gangster in the OrganizationBean class:
public abstract class OrganizationBean
implements EntityBean
{
public abstract Set getMemberGangsters();
public abstract void setMemberGangsters(Set gangsters);
}
GangsterBean class:
public abstract class GangsterBean
implements EntityBean
{
public abstract Organization getOrganization();
public abstract void setOrganization(Organization org);
}
31.5.2. Relationship Declaration
ejb-jar.xml file is complicated and error prone. Although we recommend using a tool like XDoclet to manage the deployment descriptors for CMR fields, it's still important to understand how the descriptor works. The following illustrates the declaration of the organization/gangster relationship:
<ejb-jar>
<relationships>
<ejb-relation>
<ejb-relation-name>Organization-Gangster</ejb-relation-name>
<ejb-relationship-role>
<ejb-relationship-role-name>org-has-gangsters </ejb-relationship-role-name>
<multiplicity>One</multiplicity>
<relationship-role-source>
<ejb-name>OrganizationEJB</ejb-name>
</relationship-role-source>
<cmr-field>
<cmr-field-name>memberGangsters</cmr-field-name>
<cmr-field-type>java.util.Set</cmr-field-type>
</cmr-field>
</ejb-relationship-role>
<ejb-relationship-role>
<ejb-relationship-role-name>
gangster-belongs-to-org
</ejb-relationship-role-name>
<multiplicity>Many</multiplicity>
<cascade-delete/>
<relationship-role-source>
<ejb-name>GangsterEJB</ejb-name>
</relationship-role-source>
<cmr-field>
<cmr-field-name>organization</cmr-field-name>
</cmr-field>
</ejb-relationship-role>
</ejb-relation>
</relationships>
</ejb-jar>
ejb-relation element within the top level relationships element. The relation is given a name in the ejb-relation-name element. This is important because we will need to refer to the role by name in the jbosscmp-jdbc.xml file. Each ejb-relation contains two ejb-relationship-role elements (one for each side of the relationship). The ejb-relationship-role tags are as follows:
- ejb-relationshiprole-name: This optional element is used to identify the role and match the database mapping the
jbosscmp-jdbc.xmlfile. The relationship role names for each side of a relationship must be different. - multiplicity: This indicates the multiplicity of this side of the relationship. The valid values are
OneorMany. In this example, the multiplicity of the organization isOneand the multiplicity of the gangster isManybecause the relationship is from one organization to many gangsters. Note, as with all XML elements, this element is case sensitive. - cascade-delete: When this optional element is present, JBoss will delete the child entity when the parent entity is deleted. Cascade deletion is only allowed for a role where the other side of the relationship has a multiplicity of one. The default is to not cascade delete.
- relationship-role-source
- ejb-name: This required element gives the name of the entity that has the role.
- cmr-field
- cmr-field-name: This is the name of the CMR field of the entity has one, if it has one.
- cmr-field-type: This is the type of the CMR field, if the field is a collection type. It must be
java.util.Collectionorjava.util.Set.
31.5.3. Relationship Mapping
relationships section of the jbosscmp-jdbc.xml descriptor via ejb-relation elements. Relationships are identified by the ejb-relation-name from the ejb-jar.xml file. The jbosscmp-jdbc.xmlejb-relation element content model is shown in Figure 31.7, “The jbosscmp-jdbc.xml ejb-relation element content model”.
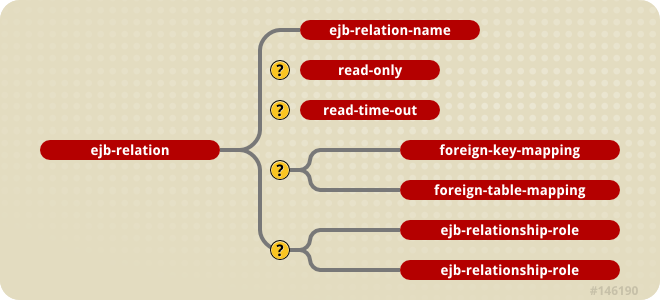
Figure 31.7. The jbosscmp-jdbc.xml ejb-relation element content model
Organization-Gangster relationship follows:
<jbosscmp-jdbc>
<relationships>
<ejb-relation>
<ejb-relation-name>Organization-Gangster</ejb-relation-name>
<foreign-key-mapping/>
<ejb-relationship-role>
<ejb-relationship-role-name>org-has-gangsters</ejb-relationship-role-name>
<key-fields>
<key-field>
<field-name>name</field-name>
<column-name>organization</column-name>
</key-field>
</key-fields>
</ejb-relationship-role>
<ejb-relationship-role>
<ejb-relationship-role-name>gangster-belongs-to-org</ejb-relationship-role-name>
<key-fields/>
</ejb-relationship-role>
</ejb-relation>
</relationships>
</jbosscmp-jdbc>
ejb-relation-name of the relationship being mapped is declared, the relationship can be declared as read only using the read-only and read-time-out elements. They have the same semantics as their counterparts in the entity element.
ejb-relation element must contain either a foreign-key-mapping element or a relation-table-mapping element, which are described in Section 31.5.3.2, “Foreign Key Mapping” and Section 31.5.3.3, “Relation table Mapping”. This element may also contain a pair of ejb-relationship-role elements as described in the following section.
31.5.3.1. Relationship Role Mapping
ejb-relationship-role elements contains mapping information specific to an entity in the relationship. The content model of the ejb-relationship-role element is shown in Figure 31.8, “The jbosscmp-jdbc ejb-relationship-role element content model”.
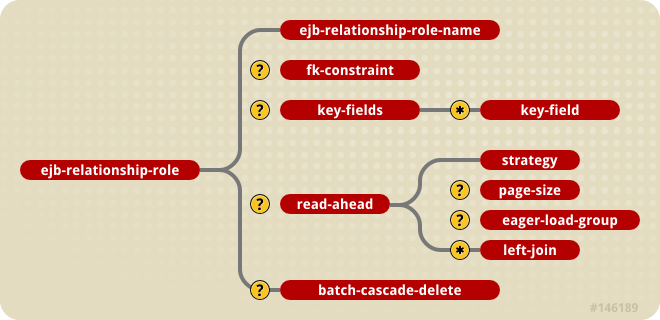
Figure 31.8. The jbosscmp-jdbc ejb-relationship-role element content model
- ejb-relationship-role-name: This required element gives the name of the role to which this configuration applies. It must match the name of one of the roles declared for this relationship in the
ejb-jar.xmlfile. - fk-constraint: This optional element is a true/false value that indicates whether JBoss should add a foreign key constraint to the tables for this side of the relationship. JBoss will only add generate the constraint if both the primary table and the related table were created by JBoss during deployment.
- key-fields: This optional element specifies the mapping of the primary key fields of the current entity, whether it is mapped in the relation table or in the related object. The
key-fieldselement must contain akey-fieldelement for each primary key field of the current entity. Thekey-fieldselement can be empty if no foreign key mapping is needed for this side of the relation. An example of this would be the many side of a one-to-many relationship. The details of this element are described below. - read-ahead: This optional element controls the caching of this relationship. This option is discussed in Section 31.8.3.1, “Relationships”.
- batch-cascade-delete: This indicates that a cascade delete on this relationship should be performed with a single SQL statement. This requires that the relationship be marked as
batch-deletein theejb-jar.xml.
key-fields element contains a key-field for each primary key field of the current entity. The key-field element uses the same syntax as the cmp-field element of the entity, except that key-field does not support the not-null option. Key fields of a relation-table are automatically not null, because they are the primary key of the table. On the other hand, foreign key fields must be nullable by default. This is because the CMP specification requires an insert into the database after the ejbCreate method and an update to it after to pick up CMR changes made in ejbPostCreate. Since the EJB specification does not allow a relationship to be modified until ejbPostCreate, a foreign key will be initially set to null. There is a similar problem with removal. You can change this insert behavior using the jboss.xmlinsert-after-ejb-post-create container configuration flag. The following example illustrates the creation of a new bean configuration that uses insert-after-ejb-post-create by default.
<jboss>
<!-- ... -->
<container-configurations>
<container-configuration extends="Standard CMP 2.x EntityBean">
<container-name>INSERT after ejbPostCreate Container</container-name>
<insert-after-ejb-post-create>true</insert-after-ejb-post-create>
</container-configuration>
</container-configurations>
</jboss>
ejbCreate using the associated CMP field setters.

Figure 31.9. The jbosscmp-jdbc key-fields element content model
key-field element follows:
- field-name: This required element identifies the field to which this mapping applies. This name must match a primary key field of the current entity.
- column-name: Use this element to specify the column name in which this primary key field will be stored. If this is relationship uses
foreign-key-mapping, this column will be added to the table for the related entity. If this relationship usesrelation-table-mapping, this column is added to therelation-table. This element is not allowed for mapped dependent value class; instead use the property element. - jdbc-type: This is the JDBC type that is used when setting parameters in a JDBC
PreparedStatementor loading data from a JDBC ResultSet. The valid types are defined injava.sql.Types. - sql-type: This is the SQL type that is used in create table statements for this field. Valid types are only limited by your database vendor.
- property: Use this element for to specify the mapping of a primary key field which is a dependent value class.
- dbindex: The presence of this optional field indicates that the server should create an index on the corresponding column in the database, and the index name will be
fieldname_index.
31.5.3.2. Foreign Key Mapping
key-mapping element to the ejb-relation element.
key-fields declared in the ejb-relationship-role are added to the table of the related entity. If the key-fields element is empty, a foreign key will not be created for the entity. In a one-to-many relationship, the many side (Gangster in the example) must have an empty key-fields element, and the one side (Organization in the example) must have a key-fields mapping. In one-to-one relationships, one or both roles can have foreign keys.
Organization-Gangster relationship is shown below with the foreign key elements:
<jbosscmp-jdbc>
<relationships>
<ejb-relation>
<ejb-relation-name>Organization-Gangster</ejb-relation-name>
<foreign-key-mapping/>
<ejb-relationship-role>
<ejb-relationship-role-name>org-has-gangsters</ejb-relationship-role-name>
<key-fields> <key-field> <field-name>name</field-name> <column-name>organization</column-name> </key-field> </key-fields>
</ejb-relationship-role>
<ejb-relationship-role>
<ejb-relationship-role-name>gangster-belongs-to-org</ejb-relationship-role-name>
<key-fields/>
</ejb-relationship-role>
</ejb-relation>
</relationships>
</jbosscmp-jdbc>
31.5.3.3. Relation table Mapping
relation-table-mapping element, the content model of which is shown below.
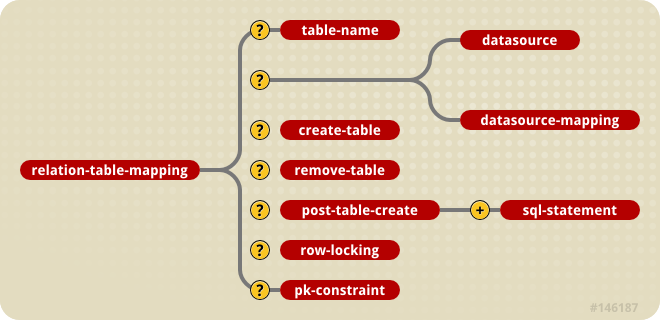
Figure 31.10. The jbosscmp-jdbc relation-table-mapping element content model
Gangster-Job relationship is shown in with table mapping elements:
Example 31.1. The jbosscmp-jdbc.xml Relation-table Mapping
<jbosscmp-jdbc>
<relationships>
<ejb-relation>
<ejb-relation-name>Gangster-Jobs</ejb-relation-name>
<relation-table-mapping>
<table-name>gangster_job</table-name>
</relation-table-mapping>
<ejb-relationship-role>
<ejb-relationship-role-name>gangster-has-jobs</ejb-relationship-role-name>
<key-fields>
<key-field>
<field-name>gangsterId</field-name>
<column-name>gangster</column-name>
</key-field>
</key-fields>
</ejb-relationship-role>
<ejb-relationship-role>
<ejb-relationship-role-name>job-has-gangsters</ejb-relationship-role-name>
<key-fields>
<key-field>
<field-name>name</field-name>
<column-name>job</column-name>
</key-field>
</key-fields>
</ejb-relationship-role>
</ejb-relation>
</relationships>
</jbosscmp-jdbc>
relation-table-mapping element contains a subset of the options available in the entity element. A detailed description of these elements is reproduced here for convenience:
- table-name: This optional element gives the name of the table that will hold data for this relationship. The default table name is based on the entity and
cmr-fieldnames. - datasource: This optional element gives the
jndi-nameused to look up the datasource. All database connections are obtained from the datasource. Having different datasources for entities is not recommended, as it vastly constrains the domain over which finders andejbSelects can query. - datasourcemapping: This optional element allows one to specify the name of the
type-mappingto use. - create-table: This optional element if true indicates JBoss should attempt to create a table for the relationship. When the application is deployed, JBoss checks if a table already exists before creating the table. If a table is found, it is logged, and the table is not created. This option is very useful during the early stages of development when the table structure changes often.
- post-table-create: This optional element specifies an arbitrary SQL statement that should be executed immediately after the database table is created. This command is only executed if
create-tableis true and the table did not previously exist. - remove-table: This optional element if true indicates JBoss should attempt to drop the
relation-tablewhen the application is undeployed. This option is very useful during the early stages of development when the table structure changes often. - row-locking: This optional element if true indicates JBoss should lock all rows loaded in a transaction. Most databases implement this by using the
SELECT FOR UPDATEsyntax when loading the entity, but the actual syntax is determined by therow-locking-templatein thedatasource-mappingused by this entity. - pk-constraint: This optional element if true indicates JBoss should add a primary key constraint when creating tables.
31.6. Queries
31.6.1. Finder and select Declaration
findBadDudes_ejbql finder on the GangsterHome interface. The ejbql suffix here is not required. It is simply a naming convention used here to differentiate the different types of query specifications we will be looking at.
public interface GangsterHome
extends EJBLocalHome
{
Collection findBadDudes_ejbql(int badness) throws FinderException;
}
FinderException. The following code declares an select method:
public abstract class GangsterBean
implements EntityBean
{
public abstract Set ejbSelectBoss_ejbql(String name)
throws FinderException;
}
31.6.2. EJB-QL Declaration
findByPrimaryKey) must have an EJB-QL query defined in the ejb-jar.xml file. The EJB-QL query is declared in a query element, which is contained in the entity element. The following are the declarations for findBadDudes_ejbql and ejbSelectBoss_ejbql queries:
<ejb-jar>
<enterprise-beans>
<entity>
<ejb-name>GangsterEJB</ejb-name>
<!-- ... -->
<query>
<query-method>
<method-name>findBadDudes_ejbql</method-name>
<method-params>
<method-param>int</method-param>
</method-params>
</query-method>
<ejb-ql>
SELECT OBJECT(g) FROM gangster g WHERE g.badness > ?1
</ejb-ql>
</query>
<query>
<query-method>
<method-name>ejbSelectBoss_ejbql</method-name>
<method-params>
<method-param>java.lang.String</method-param>
</method-params>
</query-method>
<ejb-ql>
SELECT DISTINCT underling.organization.theBoss FROM gangster underling WHERE underling.name = ?1 OR underling.nickName = ?1
</ejb-ql>
</query>
</entity>
</enterprise-beans>
</ejb-jar>
- EJB-QL is a typed language, meaning that it only allows comparison of like types (i.e., strings can only be compared with strings).
- In an equals comparison a variable (single valued path) must be on the left hand side. Some examples follow:
g.hangout.state = 'CA' Legal 'CA' = g.shippingAddress.state NOT Legal 'CA' = 'CA' NOT Legal (r.amountPaid * .01) > 300 NOT Legal r.amountPaid > (300 / .01) Legal
- Parameters use a base 1 index like java.sql.PreparedStatement.
- Parameters are only allowed on the right hand side of a comparison. For example:
gangster.hangout.state = ?1 Legal ?1 = gangster.hangout.state NOT Legal
31.6.3. Overriding the EJB-QL to SQL Mapping
jbosscmp-jdbc.xml file. The finder or select is still required to have an EJB-QL declaration, but the ejb-ql element can be left empty. Currently the SQL can be overridden with JBossQL, DynamicQL, DeclaredSQL or a BMP style custom ejbFind method. All EJB-QL overrides are non-standard extensions to the EJB specification, so use of these extensions will limit portability of your application. All of the EJB-QL overrides, except for BMP custom finders, are declared using a query element in the jbosscmp-jdbc.xml file. The content model is shown in Figure 31.11, “The jbosscmp-jdbc query element content model”.

Figure 31.11. The jbosscmp-jdbc query element content model
- description: An optional description for the query.
- query-method: This required element specifies the query method that being configured. This must match a
query-methoddeclared for this entity in theejb-jar.xmlfile. - jboss-ql: This is a JBossQL query to use in place of the EJB-QL query. JBossQL is discussed in Section 31.6.4, “JBossQL”.
- dynamic-ql: This indicated that the method is a dynamic query method and not an EJB-QL query. Dynamic queries are discussed in Section 31.6.5, “DynamicQL”.
- declared-sql: This query uses declared SQL in place of the EJB-QL query. Declared SQL is discussed in Section 31.6.6, “DeclaredSQL”.
- read-ahead: This optional element allows one to optimize the loading of additional fields for use with the entities referenced by the query. This is discussed in detail in Section 31.7, “Optimized Loading”.
31.6.4. JBossQL
ORDER BY, OFFSET and LIMIT clauses, parameters in the IN and LIKE operators, the COUNT, MAX, MIN, AVG, SUM, UCASE and LCASE functions. Queries can also include functions in the SELECT clause for select methods.
jbosscmp-jdbc.xml file with a jboss-ql element containing the JBossQL query. The following example provides an example JBossQL declaration.
<jbosscmp-jdbc>
<enterprise-beans>
<entity>
<ejb-name>GangsterEJB</ejb-name>
<query>
<query-method>
<method-name>findBadDudes_jbossql</method-name>
<method-params>
<method-param>int</method-param>
</method-params>
</query-method>
<jboss-ql>SELECT OBJECT(g) FROM gangster g WHERE g.badness > ?1 ORDER BY g.badness DESC</jboss-ql>
</query>
</entity>
</enterprise-beans>
</jbosscmp-jdbc>
SELECT t0_g.id
FROM gangster t0_g
WHERE t0_g.badness > ?
ORDER BY t0_g.badness DESC
LIMIT and OFFSET functions. For example, to iterate through the large number of jobs performed, the following findManyJobs_jbossql finder may be defined.
<jbosscmp-jdbc>
<enterprise-beans>
<entity>
<ejb-name>GangsterEJB</ejb-name>
<query>
<query-method>
<method-name>findManyJobs_jbossql</method-name>
<method-params>
<method-param>int</method-param>
</method-params>
<method-params>
<method-param>int</method-param>
</method-params>
</query-method>
<jboss-ql>SELECT OBJECT(j) FROM jobs j OFFSET ?1 LIMIT ?2</jboss-ql>
</query>
</entity>
</enterprise-beans>
</jbosscmp-jdbc>
31.6.5. DynamicQL
public abstract class GangsterBean
implements EntityBean
{
public Set ejbHomeSelectInStates(Set states)
throws FinderException
{
// generate JBossQL query
StringBuffer jbossQl = new StringBuffer();
jbossQl.append("SELECT OBJECT(g) ");
jbossQl.append("FROM gangster g ");
jbossQl.append("WHERE g.hangout.state IN (");
for (int i = 0; i < states.size(); i++) {
if (i > 0) {
jbossQl.append(", ");
}
jbossQl.append("?").append(i+1);
}
jbossQl.append(") ORDER BY g.name");
// pack arguments into an Object[]
Object[] args = states.toArray(new Object[states.size()]);
// call dynamic-ql query
return ejbSelectGeneric(jbossQl.toString(), args);
}
}
jbosscmp-jdbc.xml file with an empty dynamic-ql element. The following is the declaration for ejbSelectGeneric.
<jbosscmp-jdbc>
<enterprise-beans>
<entity>
<ejb-name>GangsterEJB</ejb-name>
<query>
<query-method>
<method-name>ejbSelectGeneric</method-name>
<method-params>
<method-param>java.lang.String</method-param>
<method-param>java.lang.Object[]</method-param>
</method-params>
</query-method>
<dynamic-ql/>
</query>
</entity>
</enterprise-beans>
</jbosscmp-jdbc>
31.6.6. DeclaredSQL
WHERE clause that cannot be represented in q EJB-QL or JBossQL. The content model for the declared-sql element is given in Figure 31.12, “The jbosscmp-jdbc declared-sql element content model.>”.
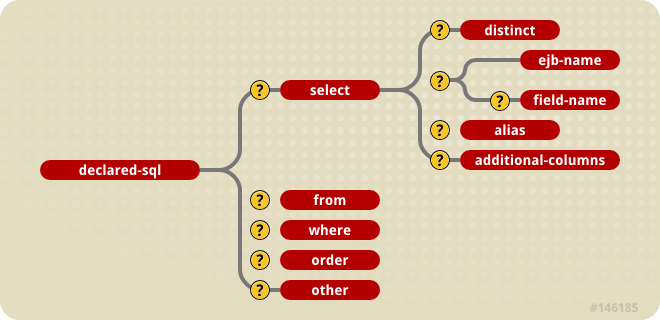
Figure 31.12. The jbosscmp-jdbc declared-sql element content model.>
- select: The
selectelement specifies what is to be selected and consists of the following elements:- distinct: If this empty element is present, JBoss will add the
DISTINCTkeyword to the generatedSELECTclause. The default is to useDISTINCTif method returns ajava.util.Set - ejb-name: This is the
ejb-nameof the entity that will be selected. This is only required if the query is for a select method. - field-name: This is the name of the CMP field that will be selected from the specified entity. The default is to select entire entity.
- alias: This specifies the alias that will be used for the main select table. The default is to use the
ejb-name. - additional-columns: Declares other columns to be selected to satisfy ordering by arbitrary columns with finders or to facilitate aggregate functions in selects.
- from: The
fromelement declares additional SQL to append to the generatedFROMclause. - where: The
whereelement declares theWHEREclause for the query. - order: The
orderelement declares theORDERclause for the query. - other: The
otherelement declares additional SQL that is appended to the end of the query.
<jbosscmp-jdbc>
<enterprise-beans>
<entity>
<ejb-name>GangsterEJB</ejb-name>
<query>
<query-method>
<method-name>findBadDudes_declaredsql</method-name>
<method-params>
<method-param>int</method-param>
</method-params>
</query-method>
<declared-sql>
<where><![CDATA[ badness > {0} ]]></where>
<order><![CDATA[ badness DESC ]]></order>
</declared-sql>
</query>
</entity>
</enterprise-beans>
</jbosscmp-jdbc>
SELECT id FROM gangster WHERE badness > ? ORDER BY badness DESC
SELECT and FROM clauses necessary to select the primary key for this entity. If desired an additional FROM clause can be specified that is appended to the end of the automatically generated FROM clause. The following is example DeclaredSQL declaration with an additional FROM clause.
<jbosscmp-jdbc>
<enterprise-beans>
<entity>
<ejb-name>GangsterEJB</ejb-name>
<query>
<query-method>
<method-name>ejbSelectBoss_declaredsql</method-name>
<method-params>
<method-param>java.lang.String</method-param>
</method-params>
</query-method>
<declared-sql>
<select>
<distinct/>
<ejb-name>GangsterEJB</ejb-name>
<alias>boss</alias>
</select>
<from><![CDATA[, gangster g, organization o]]></from>
<where><![CDATA[
(LCASE(g.name) = {0} OR LCASE(g.nick_name) = {0}) AND
g.organization = o.name AND o.the_boss = boss.id
]]></where>
</declared-sql>
</query>
</entity>
</enterprise-beans>
</jbosscmp-jdbc>
SELECT DISTINCT boss.id
FROM gangster boss, gangster g, organization o
WHERE (LCASE(g.name) = ? OR LCASE(g.nick_name) = ?) AND
g.organization = o.name AND o.the_boss = boss.id
FROM clause starts with a comma. This is because the container appends the declared FROM clause to the end of the generated FROM clause. It is also possible for the FROM clause to start with a SQL JOIN statement. Since this is a select method, it must have a select element to declare the entity that will be selected. Note that an alias is also declared for the query. If an alias is not declared, the table-name is used as the alias, resulting in a SELECT clause with the table_name.field_name style column declarations. Not all database vendors support the that syntax, so the declaration of an alias is preferred. The optional empty distinct element causes the SELECT clause to use the SELECT DISTINCT declaration. The DeclaredSQL declaration can also be used in select methods to select a CMP field.
Organization operates in.
<jbosscmp-jdbc>
<enterprise-beans>
<entity>
<ejb-name>OrganizationEJB</ejb-name>
<query>
<query-method>
<method-name>ejbSelectOperatingZipCodes_declaredsql</method-name>
<method-params>
<method-param>java.lang.String</method-param>
</method-params>
</query-method>
<declared-sql> <select> <distinct/> <ejb-name>LocationEJB</ejb-name> <field-name>zipCode</field-name> <alias>hangout</alias> </select> <from><![CDATA[ , organization o, gangster g ]]></from> <where><![CDATA[ LCASE(o.name) = {0} AND o.name = g.organization AND g.hangout = hangout.id ]]></where> <order><![CDATA[ hangout.zip ]]></order> </declared-sql>
</query>
</entity>
</enterprise-beans>
</jbosscmp-jdbc>
SELECT DISTINCT hangout.zip
FROM location hangout, organization o, gangster g
WHERE LCASE(o.name) = ? AND o.name = g.organization AND g.hangout = hangout.id
ORDER BY hangout.zip
31.6.6.1. Parameters
- simple: A simple parameter can be of any type except for a known (mapped) DVC or an entity. A simple parameter only contains the argument number, such as
{0}. When a simple parameter is set, the JDBC type used to set the parameter is determined by thedatasourcemappingfor the entity. An unknown DVC is serialized and then set as a parameter. Note that most databases do not support the use of a BLOB value in a WHERE clause. - DVC: A DVC parameter can be any known (mapped) DVC. A DVC parameter must be dereferenced down to a simple property (one that is not another DVC). For example, if we had a CVS property of type
ContactInfo, valid parameter declarations would be{0.email}and{0.cell.areaCode}but not{0.cell}. The JDBC type used to set a parameter is based on the class type of the property and thedatasourcemappingof the entity. The JDBC type used to set the parameter is the JDBC type that is declared for that property in thedependent-value-classelement. - entity: An entity parameter can be any entity in the application. An entity parameter must be dereferenced down to a simple primary key field or simple property of a DVC primary key field. For example, if we had a parameter of type
Gangster, a valid parameter declaration would be{0.gangsterId}. If we had some entity with a primary key field named info of typeContactInfo, avalid parameterdeclaration would be{0.info.cell.areaCode}. Only fields that are members of the primary key of the entity can be dereferenced (this restriction may be removed in later versions). The JDBC type used to set the parameter is the JDBC type that is declared for that field in the entity declaration.
31.6.7. EJBQL 2.1 and SQL92 queries
standardjbosscmp-jdbc.xml.
<defaults>
...
<ql-compiler>org.jboss.ejb.plugins.cmp.jdbc.JDBCEJBQLCompiler</ql-compiler>
...
</defaults>
ql-compiler element.
<defaults>
...
<ql-compiler>org.jboss.ejb.plugins.cmp.jdbc.EJBQLToSQL92Compiler</ql-compiler>
...
</defaults>
jbosscmp-jdbc.xml. Here is an example using one of our earlier queries.
<query>
<query-method>
<method-name>findBadDudes_ejbql</method-name>
<method-params>
lt;method-param>int</method-param>
</method-params>
</query-method>
<ejb-ql><![CDATA[
SELECT OBJECT(g)
FROM gangster g
WHERE g.badness > ?1]]>
</ejb-ql>
<ql-compiler>org.jboss.ejb.plugins.cmp.jdbc.EJBQLToSQL92Compiler</ql-compiler>
</query>
read-ahead strategy in use. For example, if a query is configured with the on-loadread-ahead strategy, the first query will include all the fields, not just primary key fields but only the primary key fields will be read from the ResultSet. Then, on load, other fields will be actually loaded into the read-ahead cache. The on-findread-ahead with the default load group * works as expected.
31.6.8. BMP Custom Finders
ejb-jar.xml or jbosscmp-jdbc.xml files. The following simple example finds the entities by a collection of primary keys:
public abstract class GangsterBean
implements EntityBean
{
public Collection ejbFindByPrimaryKeys(Collection keys)
{
return keys;
}
}
31.7. Optimized Loading
31.7.1. Loading Scenario
public String createGangsterHtmlTable_none()
throws FinderException
{
StringBuffer table = new StringBuffer();
table.append("<table>");
Collection gangsters = gangsterHome.findAll_none();
for (Iterator iter = gangsters.iterator(); iter.hasNext();) {
Gangster gangster = (Gangster) iter.next();
table.append("<tr>");
table.append("<td>").append(gangster.getName());
table.append("</td>");
table.append("<td>").append(gangster.getNickName());
table.append("</td>");
table.append("<td>").append(gangster.getBadness());
table.append("</td>");
table.append("</tr>");
}
return table.toString();
}
findAll_none call, JBoss will execute the following query:
SELECT t0_g.id
FROM gangster t0_g
ORDER BY t0_g.id ASC
SELECT name, nick_name, badness, hangout, organization FROM gangster WHERE (id=0) SELECT name, nick_name, badness, hangout, organization FROM gangster WHERE (id=1) SELECT name, nick_name, badness, hangout, organization FROM gangster WHERE (id=2) SELECT name, nick_name, badness, hangout, organization FROM gangster WHERE (id=3) SELECT name, nick_name, badness, hangout, organization FROM gangster WHERE (id=4) SELECT name, nick_name, badness, hangout, organization FROM gangster WHERE (id=5) SELECT name, nick_name, badness, hangout, organization FROM gangster WHERE (id=6) SELECT name, nick_name, badness, hangout, organization FROM gangster WHERE (id=7)
findAll and one query to access each element found. The reason for this behavior has to do with the handling of query results inside the JBoss container. Although it appears that the actual entity beans selected are returned when a query is executed, JBoss really only returns the primary keys of the matching entities, and does not load the entity until a method is invoked on it. This is known as the n+1 problem and is addressed with the read-ahead strategies described in the following sections.
hangout and organization fields, which are never accessed. (we have disabled the complex contactInfo field for the sake of clarity)
| id | name | nick_name | badness | hangout | organization |
|---|---|---|---|---|---|
| 0 | Yojimbo | Bodyguard | 7 | 0 | Yakuza |
| 1 | Takeshi | Master | 10 | 1 | Yakuza |
| 2 | Yuriko | Four finger | 4 | 2 | Yakuza |
| 3 | Chow | Killer | 9 | 3 | Triads |
| 4 | Shogi | Lightning | 8 | 4 | Triads |
| 5 | Valentino | Pizza-Face | 4 | 5 | Mafia |
| 6 | Toni | Toothless | 2 | 6 | Mafia |
| 7 | Corleone | Godfather | 6 | 7 | Mafia |
31.7.2. Load Groups
Gangster in the Organization-Gangster example) that will be loaded in a single operation. An example configuration is shown below:
<jbosscmp-jdbc>
<enterprise-beans>
<entity>
<ejb-name>GangsterEJB</ejb-name>
<!-- ... -->
<load-groups>
<load-group>
<load-group-name>basic</load-group-name>
<field-name>name</field-name>
<field-name>nickName</field-name>
<field-name>badness</field-name>
</load-group>
<load-group>
<load-group-name>contact info</load-group-name>
<field-name>nickName</field-name>
<field-name>contactInfo</field-name>
<field-name>hangout</field-name>
</load-group>
</load-groups>
</entity>
</enterprise-beans>
</jbosscmp-jdbc>
basic and contact info. Note that the load groups do not need to be mutually exclusive. For example, both of the load groups contain the nickName field. In addition to the declared load groups, JBoss automatically adds a group named * (the star group) that contains every CMP field and CMR field with a foreign key in the entity.
31.7.3. Read-ahead
on-find and on-load) to optimize the loading problem identified in the previous section. The extra data loaded during read-ahead is not immediately associated with an entity object in memory, as entities are not materialized in JBoss until actually accessed. Instead, it is stored in the preload cache where it remains until it is loaded into an entity or the end of the transaction occurs. The following sections describe the read-ahead strategies.
31.7.3.1. on-find
on-find strategy reads additional columns when the query is invoked. If the query is on-find optimized, JBoss will execute the following query when the query is executed.
SELECT t0_g.id, t0_g.name, t0_g.nick_name, t0_g.badness
FROM gangster t0_g
ORDER BY t0_g.id ASC
| id | name | nick_name | badness | hangout | organization |
|---|---|---|---|---|---|
| 0 | Yojimbo | Bodyguard | 7 | 0 | Yakuza |
| 1 | Takeshi | Master | 10 | 1 | Yakuza |
| 2 | Yuriko | Four finger | 4 | 2 | Yakuza |
| 3 | Chow | Killer | 9 | 3 | Triads |
| 4 | Shogi | Lightning | 8 | 4 | Triads |
| 5 | Valentino | Pizza-Face | 4 | 5 | Mafia |
| 6 | Toni | Toothless | 2 | 6 | Mafia |
| 7 | Corleone | Godfather | 6 | 7 | Mafia |
read-ahead strategy and load-group for a query is defined in the query element. If a read-ahead strategy is not declared in the query element, the strategy declared in the entity element or defaults element is used. The on-find configuration follows:
<jbosscmp-jdbc>
<enterprise-beans>
<entity>
<ejb-name>GangsterEJB</ejb-name>
<!--...-->
<query>
<query-method>
<method-name>findAll_onfind</method-name>
<method-params/>
</query-method>
<jboss-ql><![CDATA[
SELECT OBJECT(g)
FROM gangster g
ORDER BY g.gangsterId
]]></jboss-ql>
<read-ahead>
<strategy>on-find</strategy>
<page-size>4</page-size>
<eager-load-group>basic</eager-load-group>
</read-ahead>
</query>
</entity>
</enterprise-beans>
</jbosscmp-jdbc>
on-find strategy is that it must load additional data for every entity selected. Commonly in web applications only a fixed number of results are rendered on a page. Since the preloaded data is only valid for the length of the transaction, and a transaction is limited to a single web HTTP hit, most of the preloaded data is not used. The on-load strategy discussed in the next section does not suffer from this problem.
31.7.3.1.1. Left join read ahead
on-findread-ahead strategy. It allows you to preload in one SQL query not only fields from the base instance but also related instances which can be reached from the base instance by CMR navigation. There are no limitation for the depth of CMR navigations. There are also no limitations for cardinality of CMR fields used in navigation and relationship type mapping, i.e. both foreign key and relation-table mapping styles are supported. Let us look at some examples. Entity and relationship declarations can be found below.
31.7.3.1.2. D#findByPrimaryKey
D. A typical SQL query generated for the findByPrimaryKey would look like this:
SELECT t0_D.id, t0_D.name FROM D t0_D WHERE t0_D.id=?
findByPrimaryKey we also want to preload two collection-valued CMR fields bs and cs.
<query>
<query-method>
<method-name>findByPrimaryKey</method-name>
<method-params>
<method-param>java.lang.Long</method-param>
</method-params>
</query-method>
<jboss-ql><![CDATA[SELECT OBJECT(o) FROM D AS o WHERE o.id = ?1]]></jboss-ql>
<read-ahead>
<strategy>on-find</strategy>
<page-size>4</page-size>
<eager-load-group>basic</eager-load-group>
<left-join cmr-field="bs" eager-load-group="basic"/>
<left-join cmr-field="cs" eager-load-group="basic"/>
</read-ahead>
</query>
left-join declares the relations to be eager loaded. The generated SQL would look like this:
SELECT t0_D.id, t0_D.name,
t1_D_bs.id, t1_D_bs.name,
t2_D_cs.id, t2_D_cs.name
FROM D t0_D
LEFT OUTER JOIN B t1_D_bs ON t0_D.id=t1_D_bs.D_FK
LEFT OUTER JOIN C t2_D_cs ON t0_D.id=t2_D_cs.D_FK
WHERE t0_D.id=?
D with the specific id we preload all its related B's and C's and can access those instance loading them from the read ahead cache, not from the database.
31.7.3.1.3. D#findAll
findAll method on D selects all the D's. A normal findAll query would look like this:
SELECT DISTINCT t0_o.id, t0_o.name FROM D t0_o ORDER BY t0_o.id DESC
left-join elements to the query.
<query>
<query-method>
<method-name>findAll</method-name>
</query-method>
<jboss-ql><![CDATA[SELECT DISTINCT OBJECT(o) FROM D AS o ORDER BY o.id DESC]]></jboss-ql>
<read-ahead>
<strategy>on-find</strategy>
<page-size>4</page-size>
<eager-load-group>basic</eager-load-group>
<left-join cmr-field="bs" eager-load-group="basic"/>
<left-join cmr-field="cs" eager-load-group="basic"/>
</read-ahead>
</query>
SELECT DISTINCT t0_o.id, t0_o.name,
t1_o_bs.id, t1_o_bs.name,
t2_o_cs.id, t2_o_cs.name
FROM D t0_o
LEFT OUTER JOIN B t1_o_bs ON t0_o.id=t1_o_bs.D_FK
LEFT OUTER JOIN C t2_o_cs ON t0_o.id=t2_o_cs.D_FK
ORDER BY t0_o.id DESC
findAll query now preloads the related B and C objects for each D object.
31.7.3.1.4. A#findAll
A along with several relations.
- its parent (self-relation) reached from
Awith CMR fieldparent - the
Breached fromAwith CMR fieldb, and the relatedCreached fromBwith CMR fieldc Breached fromAbut this time with CMR fieldb2and related to itCreached from B with CMR field c.
SELECT t0_o.id, t0_o.name FROM A t0_o ORDER BY t0_o.id DESC FOR UPDATE
<query>
<query-method>
<method-name>findAll</method-name>
</query-method>
<jboss-ql><![CDATA[SELECT OBJECT(o) FROM A AS o ORDER BY o.id DESC]]></jboss-ql>
<read-ahead>
<strategy>on-find</strategy>
<page-size>4</page-size>
<eager-load-group>basic</eager-load-group>
<left-join cmr-field="parent" eager-load-group="basic"/>
<left-join cmr-field="b" eager-load-group="basic">
<left-join cmr-field="c" eager-load-group="basic"/>
</left-join>
<left-join cmr-field="b2" eager-load-group="basic">
<left-join cmr-field="c" eager-load-group="basic"/>
</left-join>
</read-ahead>
</query>
SELECT t0_o.id, t0_o.name,
t1_o_parent.id, t1_o_parent.name,
t2_o_b.id, t2_o_b.name,
t3_o_b_c.id, t3_o_b_c.name,
t4_o_b2.id, t4_o_b2.name,
t5_o_b2_c.id, t5_o_b2_c.name
FROM A t0_o
LEFT OUTER JOIN A t1_o_parent ON t0_o.PARENT=t1_o_parent.id
LEFT OUTER JOIN B t2_o_b ON t0_o.B_FK=t2_o_b.id
LEFT OUTER JOIN C t3_o_b_c ON t2_o_b.C_FK=t3_o_b_c.id
LEFT OUTER JOIN B t4_o_b2 ON t0_o.B2_FK=t4_o_b2.id
LEFT OUTER JOIN C t5_o_b2_c ON t4_o_b2.C_FK=t5_o_b2_c.id
ORDER BY t0_o.id DESC FOR UPDATE
A without an additional database load.
31.7.3.1.5. A#findMeParentGrandParent
left-join declaration.
<query>
<query-method>
<method-name>findMeParentGrandParent</method-name>
<method-params>
<method-param>java.lang.Long</method-param>
</method-params>
</query-method>
<jboss-ql><![CDATA[SELECT OBJECT(o) FROM A AS o WHERE o.id = ?1]]></jboss-ql>
<read-ahead>
<strategy>on-find</strategy>
<page-size>4</page-size>
<eager-load-group>*</eager-load-group>
<left-join cmr-field="parent" eager-load-group="basic">
<left-join cmr-field="parent" eager-load-group="basic">
<left-join cmr-field="parent" eager-load-group="basic"/>
</left-join>
</left-join>
</read-ahead>
</query>
SELECT t0_o.id, t0_o.name, t0_o.secondName, t0_o.B_FK, t0_o.B2_FK, t0_o.PARENT,
t1_o_parent.id, t1_o_parent.name,
t2_o_parent_parent.id, t2_o_parent_parent.name,
t3_o_parent_parent_parent.id, t3_o_parent_parent_parent.name
FROM A t0_o
LEFT OUTER JOIN A t1_o_parent ON t0_o.PARENT=t1_o_parent.id
LEFT OUTER JOIN A t2_o_parent_parent ON t1_o_parent.PARENT=t2_o_parent_parent.id
LEFT OUTER JOIN A t3_o_parent_parent_parent
ON t2_o_parent_parent.PARENT=t3_o_parent_parent_parent.id
WHERE (t0_o.id = ?) FOR UPDATE
left-join metadata we will have only
SELECT t0_o.id, t0_o.name, t0_o.secondName, t0_o.B2_FK, t0_o.PARENT FOR UPDATE
31.7.3.2. on-load
on-load strategy block-loads additional data for several entities when an entity is loaded, starting with the requested entity and the next several entities in the order they were selected. This strategy is based on theory that the results of a find or select will be accessed in forward order. When a query is executed, JBoss stores the order of the entities found in the list cache. Later, when one of the entities is loaded, JBoss uses this list to determine the block of entities to load. The number of lists stored in the cache is specified with the list-cachemax element of the entity. This strategy is also used when faulting in data not loaded in the on-find strategy.
on-find strategy, on-load is declared in the read-ahead element. The on-load configuration for this example is shown below.
<jbosscmp-jdbc>
<enterprise-beans>
<entity>
<ejb-name>GangsterEJB</ejb-name>
<!-- ... -->
<query>
<query-method>
<method-name>findAll_onload</method-name>
<method-params/>
</query-method>
<jboss-ql><![CDATA[
SELECT OBJECT(g)
FROM gangster g
ORDER BY g.gangsterId
]]></jboss-ql>
<read-ahead>
<strategy>on-load</strategy>
<page-size>4</page-size>
<eager-load-group>basic</eager-load-group>
</read-ahead>
</query>
</entity>
</enterprise-beans>
</jbosscmp-jdbc>
SELECT t0_g.id
FROM gangster t0_g
ORDER BY t0_g.id ASC
name, nickName and badness fields for the entities:
SELECT id, name, nick_name, badness
FROM gangster
WHERE (id=0) OR (id=1) OR (id=2) OR (id=3)
SELECT id, name, nick_name, badness
FROM gangster
WHERE (id=4) OR (id=5) OR (id=6) OR (id=7)
| id | name | nick_name | badness | hangout | organization |
|---|---|---|---|---|---|
| 0 | Yojimbo | Bodyguard | 7 | 0 | Yakuza |
| 1 | Takeshi | Master | 10 | 1 | Yakuza |
| 2 | Yuriko | Four finger | 4 | 2 | Yakuza |
| 3 | Chow | Killer | 9 | 3 | Triads |
| 4 | Shogi | Lightning | 8 | 4 | Triads |
| 5 | Valentino | Pizza-Face | 4 | 5 | Mafia |
| 6 | Toni | Toothless | 2 | 6 | Mafia |
| 7 | Corleone | Godfather | 6 | 7 | Mafia |
31.7.3.3. none
none strategy is really an anti-strategy. This strategy causes the system to fall back to the default lazy-load code, and specifically does not read-ahead any data or remember the order of the found entities. This results in the queries and performance shown at the beginning of this chapter. The none strategy is declared with a read-ahead element. If the read-ahead element contains a page-size element or eager-load-group, it is ignored. The none strategy is declared the following example.
<jbosscmp-jdbc>
<enterprise-beans>
<entity>
<ejb-name>GangsterEJB</ejb-name>
<!-- ... -->
<query>
<query-method>
<method-name>findAll_none</method-name>
<method-params/>
</query-method>
<jboss-ql><![CDATA[
SELECT OBJECT(g)
FROM gangster g
ORDER BY g.gangsterId
]]></jboss-ql>
<read-ahead>
<strategy>none</strategy>
</read-ahead>
</query>
</entity>
</enterprise-beans>
</jbosscmp-jdbc>
31.8. Loading Process
31.8.1. Commit Options
A, B, C and D. The first three are described in the Enterprise JavaBeans Specification, but the last one is specific to JBoss. A detailed description of each commit option follows:
- A: JBoss assumes it is the sole user of the database; therefore, JBoss can cache the current value of an entity between transactions, which can result is substantial performance gains. As a result of this assumption, no data managed by JBoss can be changed outside of JBoss. For example, changing data in another program or with the use of direct JDBC (even within JBoss) will result in an inconsistent database state.
- B: JBoss assumes that there is more than one user of the database but keeps the context information about entities between transactions. This context information is used for optimizing loading of the entity. This is the default commit option.
- C: JBoss discards all entity context information at the end of the transaction.
- D: This is a JBoss specific commit option. This option is similar to commit option
A, except that the data only remains valid for a specified amount of time.
jboss.xml file. For a detailed description of this file see Chapter 30, EJBs on JBoss. The following example changes the commit option to A for all entity beans in the application:
Example 31.2. The jboss.xml Commit Option Declaration
<jboss>
<container-configurations>
<container-configuration>
<container-name>Standard CMP 2.x EntityBean</container-name>
<commit-option>A</commit-option>
</container-configuration>
</container-configurations>
</jboss>
31.8.2. Eager-loading Process
eager-load-group of the last query that selected this entity. If the entity has not been selected in a query, or the last query used the none read-ahead strategy, JBoss will use the default eager-load-group declared for the entity. In the following example configuration, the basic load group is set as the default eager-load-group for the gangster entity bean:
<jbosscmp-jdbc>
<enterprise-beans>
<entity>
<ejb-name>GangsterEJB</ejb-name>
<!-- ... -->
<load-groups>
<load-group>
<load-group-name>most</load-group-name>
<field-name>name</field-name>
<field-name>nickName</field-name>
<field-name>badness</field-name>
<field-name>hangout</field-name>
<field-name>organization</field-name>
</load-group>
</load-groups>
<eager-load-group>most</eager-load-group>
</entity>
</enterprise-beans>
</jbosscmp-jdbc>
- If the entity context is still valid, no loading is necessary, and therefore the loading process is done. The entity context will be valid when using commit option
A, or when using commit optionD, and the data has not timed out. - Any residual data in the entity context is flushed. This assures that old data does not bleed into the new load.
- The primary key value is injected back into the primary key fields. The primary key object is actually independent of the fields and needs to be reloaded after the flush in step 2.
- All data in the preload cache for this entity is loaded into the fields.
- JBoss determines the additional fields that still need to be loaded. Normally the fields to load are determined by the eager-load group of the entity, but can be overridden if the entity was located using a query or CMR field with an
on-findoron-loadread ahead strategy. If all of the fields have already been loaded, the load process skips to step 7. - A query is executed to select the necessary column. If this entity is using the
on-loadstrategy, a page of data is loaded as described in Section 31.7.3.2, “on-load”. The data for the current entity is stored in the context and the data for the other entities is stored in the preload cache. - The
ejbLoadmethod of the entity is called.
31.8.3. Lazy loading Process
lazy-load-group the field belong to. JBoss performs a set join and then removes any field that is already loaded. An example configuration is shown below.
<jbosscmp-jdbc>
<enterprise-beans>
<entity>
<ejb-name>GangsterEJB</ejb-name>
<!-- ... -->
<load-groups>
<load-group>
<load-group-name>basic</load-group-name>
<field-name>name</field-name>
<field-name>nickName</field-name>
<field-name>badness</field-name>
</load-group>
<load-group>
<load-group-name>contact info</load-group-name>
<field-name>nickName</field-name>
<field-name>contactInfo</field-name>
<field-name>hangout</field-name>
</load-group>
</load-groups>
<!-- ... -->
<lazy-load-groups>
<load-group-name>basic</load-group-name>
<load-group-name>contact info</load-group-name>
</lazy-load-groups>
</entity>
</enterprise-beans>
</jbosscmp-jdbc>
getName() with this configuration, JBoss loads name, nickName and badness, assuming they are not already loaded. When the bean provider calls getNickName(), the name, nickName, badness, contactInfo, and hangout are loaded. A detailed description of the lazy loading process follows:
- All data in the preload cache for this entity is loaded into the fields.
- If the field value was loaded by the preload cache the lazy load process is finished.
- JBoss finds all of the lazy load groups that contain this field, performs a set join on the groups, and removes any field that has already been loaded.
- A query is executed to select the necessary columns. As in the basic load process, JBoss may load a block of entities. The data for the current entity is stored in the context and the data for the other entities is stored in the preload cache.
31.8.3.1. Relationships
on-load block loaded, meaning the value of the currently sought entity and the values of the CMR field for the next several entities are loaded. As a query, the field values of the related entity can be preloaded using on-find.
Example 31.3. Relationship Lazy Loading Example Code
public String createGangsterHangoutHtmlTable()
throws FinderException
{
StringBuffer table = new StringBuffer();
table.append("<table>");
Collection gangsters = gangsterHome.findAll_onfind();
for (Iterator iter = gangsters.iterator(); iter.hasNext(); ) {
Gangster gangster = (Gangster)iter.next();
Location hangout = gangster.getHangout();
table.append("<tr>");
table.append("<td>").append(gangster.getName());
table.append("</td>");
table.append("<td>").append(gangster.getNickName());
table.append("</td>");
table.append("<td>").append(gangster.getBadness());
table.append("</td>");
table.append("<td>").append(hangout.getCity());
table.append("</td>");
table.append("<td>").append(hangout.getState());
table.append("</td>");
table.append("<td>").append(hangout.getZipCode());
table.append("</td>");
table.append("</tr>");
}
table.append("</table>");return table.toString();
}
findAll_onfind query is unchanged from the on-find section. The configuration of the Location entity and Gangster-Hangout relationship follows:
Example 31.4. The jbosscmp-jdbc.xml Relationship Lazy Loading Configuration
<jbosscmp-jdbc>
<enterprise-beans>
<entity>
<ejb-name>LocationEJB</ejb-name>
<load-groups>
<load-group>
<load-group-name>quick info</load-group-name>
<field-name>city</field-name>
<field-name>state</field-name>
<field-name>zipCode</field-name>
</load-group>
</load-groups>
<eager-load-group/>
</entity>
</enterprise-beans>
<relationships>
<ejb-relation>
<ejb-relation-name>Gangster-Hangout</ejb-relation-name>
<foreign-key-mapping/>
<ejb-relationship-role>
<ejb-relationship-role-name>
gangster-has-a-hangout
</ejb-relationship-role-name>
<key-fields/>
<read-ahead>
<strategy>on-find</strategy>
<page-size>4</page-size>
<eager-load-group>quick info</eager-load-group>
</read-ahead>
</ejb-relationship-role>
<ejb-relationship-role>
<ejb-relationship-role-name>
hangout-for-a-gangster
</ejb-relationship-role-name>
<key-fields>
<key-field>
<field-name>locationID</field-name>
<column-name>hangout</column-name>
</key-field>
</key-fields>
</ejb-relationship-role>
</ejb-relation>
</relationships>
</jbosscmp-jdbc>
SELECT t0_g.id, t0_g.name, t0_g.nick_name, t0_g.badness
FROM gangster t0_g
ORDER BY t0_g.id ASC
city, state, and zip fields of the hangout:
SELECT gangster.id, gangster.hangout,
location.city, location.st, location.zip
FROM gangster, location
WHERE (gangster.hangout=location.id) AND
((gangster.id=0) OR (gangster.id=1) OR
(gangster.id=2) OR (gangster.id=3))
SELECT gangster.id, gangster.hangout,
location.city, location.st, location.zip
FROM gangster, location
WHERE (gangster.hangout=location.id) AND
((gangster.id=4) OR (gangster.id=5) OR
(gangster.id=6) OR (gangster.id=7))
| id | name | nick_name | badness | hangout | id | city | st | zip |
|---|---|---|---|---|---|---|---|---|
| 0 | Yojimbo | Bodyguard | 7 | 0 | 0 | San Fran | CA | 94108 |
| 1 | Takeshi | Master | 10 | 1 | 1 | San Fran | CA | 94133 |
| 2 | Yuriko | Four finger | 4 | 2 | 2 | San Fran | CA | 94133 |
| 3 | Chow | Killer | 9 | 3 | 3 | San Fran | CA | 94133 |
| 4 | Shogi | Lightning | 8 | 4 | 4 | San Fran | CA | 94133 |
| 5 | Valentino | Pizza-Face | 4 | 5 | 5 | New York | NY | 10017 |
| 6 | Toni | Toothless | 2 | 6 | 6 | Chicago | IL | 60661 |
| 7 | Corleone | Godfather | 6 | 7 | 7 | Las Vegas | NV | 89109 |
31.8.4. Lazy loading result sets
EJBLocalObject or CMP field values which it can then iterate through. For big result sets this approach is not efficient. In some cases it is better to delay reading the next row in the result set until the client tries to read the corresponding value from the collection. You can get this behavior for a query using the lazy-resultset-loading element.
<query>
<query-method>
<method-name>findAll</method-name>
</query-method>
<jboss-ql><![CDATA[select object(o) from A o]]></jboss-ql>
<lazy-resultset-loading>true</lazy-resultset-loading>
</query>
Collection associated with a lazily loaded result set. The first call to iterator() returns a special Iterator that reads from the ResultSet. Until this Iterator has been exhausted, subsequent calls to iterator() or calls to the add() method will result in an exception. The remove() and size() methods work as would be expected.
31.9. Transactions
on-find optimized query that selects the first four gangsters (to keep the result set small), and it is executed without a wrapper transaction. The example code follows:
public String createGangsterHtmlTable_no_tx() throws FinderException
{
StringBuffer table = new StringBuffer();
table.append("<table>");
Collection gangsters = gangsterHome.findFour();
for(Iterator iter = gangsters.iterator(); iter.hasNext(); ) {
Gangster gangster = (Gangster)iter.next();
table.append("<tr>");
table.append("<td>").append(gangster.getName());
table.append("</td>");
table.append("<td>").append(gangster.getNickName());
table.append("</td>");
table.append("<td>").append(gangster.getBadness());
table.append("</td>");
table.append("</tr>");
}
table.append("</table>");
return table.toString();
}
SELECT t0_g.id, t0_g.name, t0_g.nick_name, t0_g.badness FROM gangster t0_g WHERE t0_g.id < 4 ORDER BY t0_g.id ASC
SELECT id, name, nick_name, badness FROM gangster WHERE (id=0) OR (id=1) OR (id=2) OR (id=3) SELECT id, name, nick_name, badness FROM gangster WHERE (id=1) OR (id=2) OR (id=3) SELECT id, name, nick_name, badness FROM gangster WHERE (id=2) OR (id=3) SELECT name, nick_name, badness FROM gangster WHERE (id=3)
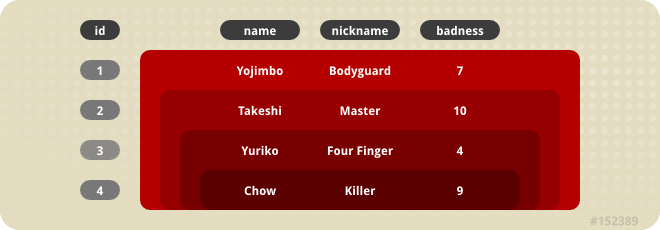
Figure 31.13. No Transaction on-find optimized query execution
Example 31.5.
Required or RequiresNewtrans-attribute in the assembly-descriptor. If the code is not running in an EJB, a user transaction is necessary. The following code wraps a call to the declared method with a user transaction:
public String createGangsterHtmlTable_with_tx()
throws FinderException
{
UserTransaction tx = null;
try {
InitialContext ctx = new InitialContext();
tx = (UserTransaction) ctx.lookup("UserTransaction");
tx.begin();
String table = createGangsterHtmlTable_no_tx();
if (tx.getStatus() == Status.STATUS_ACTIVE) {
tx.commit();
}
return table;
} catch (Exception e) {
try {
if (tx != null) tx.rollback();
} catch (SystemException unused) {
// eat the exception we are exceptioning out anyway
}
if (e instanceof FinderException) {
throw (FinderException) e;
}
if (e instanceof RuntimeException) {
throw (RuntimeException) e;
}
throw new EJBException(e);
}
}
31.10. Optimistic Locking
select for UPDATE WHERE ... statement that contains the value assertions.
optimistic-locking element in the jbosscmp-jdbc.xml descriptor. The content model of the optimistic-locking element is shown below and the description of the elements follows.
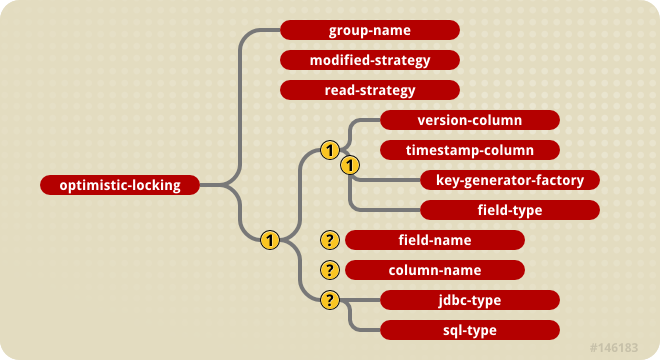
Figure 31.14. The jbosscmp-jdbc optimistic-locking element content model
- group-name: This element specifies that optimistic locking is based on the fields of a
load-group. This value of this element must match one of the entity'sload-group-name. The fields in this group will be used for optimistic locking. - modified-strategy: This element specifies that optimistic locking is based on the modified fields. This strategy implies that the fields that were modified during transaction will be used for optimistic locking.
- read-strategy: This element specifies that optimistic locking is based on the fields read. This strategy implies that the fields that were read/changed in the transaction will be used for optimistic locking.
- version-column: This element specifies that optimistic locking is based on a version column strategy. Specifying this element will add an additional version field of type
java.lang.Longto the entity bean for optimistic locking. Each update of the entity will increase the value of this field. Thefield-nameelement allows for the specification of the name of the CMP field while thecolumn-nameelement allows for the specification of the corresponding table column. - timestamp-column: This element specifies that optimistic locking is based on a timestamp column strategy. Specifying this element will add an additional version field of type
java.util.Dateto the entity bean for optimistic locking. Each update of the entity will set the value of this field to the current time. Thefield-nameelement allows for the specification of the name of the CMP field while thecolumn-nameelement allows for the specification of the corresponding table column. - key-generator-factory: This element specifies that optimistic locking is based on key generation. The value of the element is the JNDI name of a
org.jboss.ejb.plugins.keygenerator.KeyGeneratorFactoryimplementation. Specifying this element will add an additional version field to the entity bean for optimistic locking. The type of the field must be specified via thefield-typeelement. Each update of the entity will update the key field by obtaining a new value from the key generator. Thefield-nameelement allows for the specification of the name of the CMP field while thecolumn-nameelement allows for the specification of the corresponding table column.
jbosscmp-jdbc.xml descriptor illustrating all of the optimistic locking strategies is given below.
<!DOCTYPE jbosscmp-jdbc PUBLIC
"-//JBoss//DTD JBOSSCMP-JDBC 3.2//EN"
"http://www.jboss.org/j2ee/dtd/jbosscmp-jdbc_3_2.dtd">
<jbosscmp-jdbc>
<defaults>
<datasource>java:/DefaultDS</datasource>
<datasource-mapping>Hypersonic SQL</datasource-mapping>
</defaults>
<enterprise-beans>
<entity>
<ejb-name>EntityGroupLocking</ejb-name>
<create-table>true</create-table>
<remove-table>true</remove-table>
<table-name>entitygrouplocking</table-name>
<cmp-field>
<field-name>dateField</field-name>
</cmp-field>
<cmp-field>
<field-name>integerField</field-name>
</cmp-field>
<cmp-field>
<field-name>stringField</field-name>
</cmp-field>
<load-groups>
<load-group>
<load-group-name>string</load-group-name>
<field-name>stringField</field-name>
</load-group>
<load-group>
<load-group-name>all</load-group-name>
<field-name>stringField</field-name>
<field-name>dateField</field-name>
</load-group>
</load-groups>
<optimistic-locking>
<group-name>string</group-name>
</optimistic-locking>
</entity>
<entity>
<ejb-name>EntityModifiedLocking</ejb-name>
<create-table>true</create-table>
<remove-table>true</remove-table>
<table-name>entitymodifiedlocking</table-name>
<cmp-field>
<field-name>dateField</field-name>
</cmp-field>
<cmp-field>
<field-name>integerField</field-name>
</cmp-field>
<cmp-field>
<field-name>stringField</field-name>
</cmp-field>
<optimistic-locking>
<modified-strategy/>
</optimistic-locking>
</entity>
<entity>
<ejb-name>EntityReadLocking</ejb-name>
<create-table>true</create-table>
<remove-table>true</remove-table>
<table-name>entityreadlocking</table-name>
<cmp-field>
<field-name>dateField</field-name>
</cmp-field>
<cmp-field>
<field-name>integerField</field-name>
</cmp-field>
<cmp-field>
<field-name>stringField</field-name>
</cmp-field>
<optimistic-locking>
<read-strategy/>
</optimistic-locking>
</entity>
<entity>
<ejb-name>EntityVersionLocking</ejb-name>
<create-table>true</create-table>
<remove-table>true</remove-table>
<table-name>entityversionlocking</table-name>
<cmp-field>
<field-name>dateField</field-name>
</cmp-field>
<cmp-field>
<field-name>integerField</field-name>
</cmp-field>
<cmp-field>
<field-name>stringField</field-name>
</cmp-field>
<optimistic-locking>
<version-column/>
<field-name>versionField</field-name>
<column-name>ol_version</column-name>
<jdbc-type>INTEGER</jdbc-type>
<sql-type>INTEGER(5)</sql-type>
</optimistic-locking>
</entity>
<entity>
<ejb-name>EntityTimestampLocking</ejb-name>
<create-table>true</create-table>
<remove-table>true</remove-table>
<table-name>entitytimestamplocking</table-name>
<cmp-field>
<field-name>dateField</field-name>
</cmp-field>
<cmp-field>
<field-name>integerField</field-name>
</cmp-field>
<cmp-field>
<field-name>stringField</field-name>
</cmp-field>
<optimistic-locking>
<timestamp-column/>
<field-name>versionField</field-name>
<column-name>ol_timestamp</column-name>
<jdbc-type>TIMESTAMP</jdbc-type>
<sql-type>DATETIME</sql-type>
</optimistic-locking>
</entity>
<entity>
<ejb-name>EntityKeyGeneratorLocking</ejb-name>
<create-table>true</create-table>
<remove-table>true</remove-table>
<table-name>entitykeygenlocking</table-name>
<cmp-field>
<field-name>dateField</field-name>
</cmp-field>
<cmp-field>
<field-name>integerField</field-name>
</cmp-field>
<cmp-field>
<field-name>stringField</field-name>
</cmp-field>
<optimistic-locking>
<key-generator-factory>UUIDKeyGeneratorFactory</key-generator-factory>
<field-type>java.lang.String</field-type>
<field-name>uuidField</field-name>
<column-name>ol_uuid</column-name>
<jdbc-type>VARCHAR</jdbc-type>
<sql-type>VARCHAR(32)</sql-type>
</optimistic-locking>
</entity>
</enterprise-beans>
</jbosscmp-jdbc>
31.11. Entity Commands and Primary Key Generation
jbosscmp-jdbc.xml descriptor. The default entity-command may be specified in the jbosscmp-jdbc.xml in defaults element. Each entity element can override the entity-command in defaults by specifying its own entity-command. The content model of the entity-commands and child elements is given below.

Figure 31.15. The jbosscmp-jdbc.xml entity-commands element model
entity-command element specifies an entity generation implementation. The name attribute specifies a name that allows the command defined in an entity-commands section to be referenced in the defaults and entity elements. The class attribute specifies the implementation of the org.jboss.ejb.plugins.cmp.jdbc. JDBCCreateEntityCommand that supports the key generation. Database vendor specific commands typically subclass the org.jboss.ejb.plugins.cmp.jdbc. JDBCIdentityColumnCreateCommand if the database generates the primary key as a side effect of doing an insert, or the org.jboss.ejb.plugins.cmp.jdbc.JDBCInsertPKCreateCommand if the command must insert the generated key.
attribute element(s) allows for the specification of arbitrary name/value property pairs that will be available to the entity command implementation class. The attribute element has a required name attribute that specifies the name property, and the attribute element content is the value of the property. The attribute values are accessible through the org.jboss.ejb.plugins.cmp.jdbc.metadata.JDBCEntityCommandMetaData.getAttribute(String) method.
31.11.1. Existing Entity Commands
entity-command definitions found in the standardjbosscmp-jdbc.xml descriptor:
- default: (
org.jboss.ejb.plugins.cmp.jdbc.JDBCCreateEntityCommand) TheJDBCCreateEntityCommandis the default entity creation as it is theentity-commandreferenced in thestandardjbosscmp-jdbc.xmldefaults element. This entity-command executes anINSERT INTOquery using the assigned primary key value. - no-select-before-insert: (
org.jboss.ejb.plugins.cmp.jdbc.JDBCCreateEntityCommand) This is a variation ondefaultthat skips select before insert by specifying an attributename="SQLExceptionProcessor"that points to thejboss.jdbc:service=SQLExceptionProcessorservice. TheSQLExceptionProcessorservice provides aboolean isDuplicateKey(SQLException e)operation that allows a for determination of any unique constraint violation. - pk-sql (
org.jboss.ejb.plugins.cmp.jdbc.keygen.JDBCPkSqlCreateCommand) TheJDBCPkSqlCreateCommandexecutes anINSERT INTOquery statement provided by thepk-sqlattribute to obtain the next primary key value. Its primary target usage are databases with sequence support. - mysql-get-generated-keys: (
org.jboss.ejb.plugins.cmp.jdbc.keygen.JDBCMySQLCreateCommand) TheJDBCMySQLCreateCommandexecutes anINSERT INTOquery using thegetGeneratedKeysmethod from MySQL nativejava.sql.Statementinterface implementation to fetch the generated key. - oracle-sequence: (
org.jboss.ejb.plugins.cmp.jdbc.keygen.JDBCOracleCreateCommand) TheJDBCOracleCreateCommandis a create command for use with Oracle that uses a sequence in conjunction with aRETURNINGclause to generate keys in a single statement. It has a requiredsequenceelement that specifies the name of the sequence column. - hsqldb-fetch-key: (
org.jboss.ejb.plugins.cmp.jdbc.keygen.JDBCHsqldbCreateCommand) TheJDBCHsqldbCreateCommandexecutes anINSERT INTOquery after executing aCALL IDENTITY()statement to fetch the generated key. - sybase-fetch-key: (
org.jboss.ejb.plugins.cmp.jdbc.keygen.JDBCSybaseCreateCommand) TheJDBCSybaseCreateCommandexecutes anINSERTINTO query after executing aSELECT @@IDENTITYstatement to fetch the generated key. - mssql-fetch-key: (
org.jboss.ejb.plugins.cmp.jdbc.keygen.JDBCSQLServerCreateCommand) TheJDBCSQLServerCreateCommandfor Microsoft SQL Server that uses the value from anIDENTITYcolumns. By default usesSELECT SCOPE_IDENTITY()to reduce the impact of triggers; can be overridden withpk-sqlattribute e.g. for V7. - informix-serial: (
org.jboss.ejb.plugins.cmp.jdbc.keygen.JDBCInformixCreateCommand) TheJDBCInformixCreateCommandexecutes anINSERTINTO query after using thegetSerialmethod from Informix nativejava.sql.Statementinterface implementation to fetch the generated key. - postgresql-fetch-seq: (
org.jboss.ejb.plugins.cmp.jdbc.keygen.JDBCPostgreSQLCreateCommand) TheJDBCPostgreSQLCreateCommandfor PostgreSQL that fetches the current value of the sequence. The optionalsequenceattribute can be used to change the name of the sequence, with the default beingtable_pkColumn_seq. - key-generator: (
org.jboss.ejb.plugins.cmp.jdbc.keygen.JDBCKeyGeneratorCreateCommand) TheJDBCKeyGeneratorCreateCommandexecutes anINSERT INTOquery after obtaining a value for the primary key from the key generator referenced by thekey-generator-factory. Thekey-generator-factoryattribute must provide the name of a JNDI binding of theorg.jboss.ejb.plugins.keygenerator.KeyGeneratorFactoryimplementation. - get-generated-keys: (org.jboss.ejb.plugins.cmp.jdbc.jdbc3.JDBCGetGeneratedKeysCreateCommand) The
JDBCGetGeneratedKeysCreateCommandexecutes anINSERT INTOquery using a statement built using the JDBC3prepareStatement(String, Statement.RETURN_GENERATED_KEYS)that has the capability to retrieve the auto-generated key. The generated key is obtained by calling thePreparedStatement.getGeneratedKeysmethod. Since this requires JDBC3 support it is only available in JDK1.4.1+ with a supporting JDBC driver.
hsqldb-fetch-keyentity-command with the generated key mapped to a known primary key cmp-field is shown below.
<jbosscmp-jdbc>
<enterprise-beans>
<entity>
<ejb-name>LocationEJB</ejb-name>
<pk-constraint>false</pk-constraint>
<table-name>location</table-name>
<cmp-field>
<field-name>locationID</field-name>
<column-name>id</column-name>
<auto-increment/>
</cmp-field>
<!-- ... -->
<entity-command name="hsqldb-fetch-key"/>
</entity>
</enterprise-beans>
</jbosscmp-jdbc>
cmp-field is shown below.
<jbosscmp-jdbc>
<enterprise-beans>
<entity>
<ejb-name>LocationEJB</ejb-name>
<pk-constraint>false</pk-constraint>
<table-name>location</table-name>
<unknown-pk>
<unknown-pk-class>java.lang.Integer</unknown-pk-class>
<field-name>locationID</field-name>
<column-name>id</column-name>
<jdbc-type>INTEGER</jdbc-type>
<sql-type>INTEGER</sql-type>
<auto-increment/>
</unknown-pk>
<!--...-->
<entity-command name="hsqldb-fetch-key"/>
</entity>
</enterprise-beans>
</jbosscmp-jdbc>
31.12. Defaults
standardjbosscmp-jdbc.xml file of the server/<server-name>/conf/ directory. Each application can override the global defaults in the jbosscmp-jdbc.xml file. The default options are contained in a defaults element of the configuration file, and the content model is shown below.
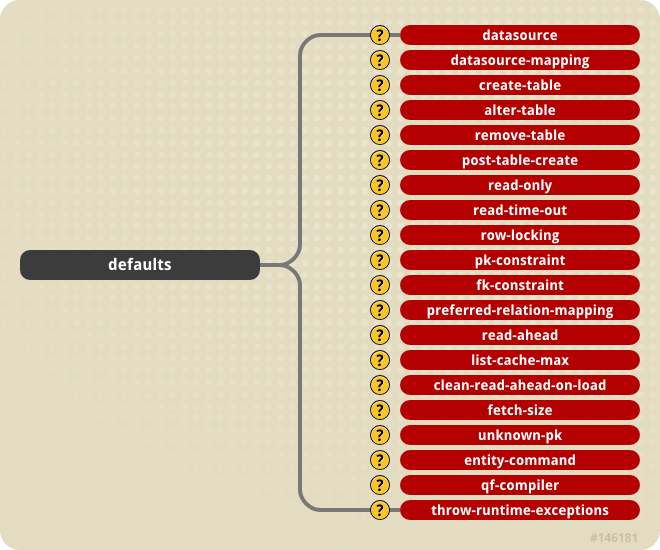
Figure 31.16. The jbosscmp-jdbc.xml defaults content model
<jbosscmp-jdbc>
<defaults>
<datasource>java:/DefaultDS</datasource>
<datasource-mapping>Hypersonic SQL</datasource-mapping>
<create-table>true</create-table>
<remove-table>false</remove-table>
<read-only>false</read-only>
<read-time-out>300000</read-time-out>
<pk-constraint>true</pk-constraint>
<fk-constraint>false</fk-constraint>
<row-locking>false</row-locking>
<preferred-relation-mapping>foreign-key</preferred-relation-mapping>
<read-ahead>
<strategy>on-load</strategy>
<page-size>1000</page-size>
<eager-load-group>*</eager-load-group>
</read-ahead>
<list-cache-max>1000</list-cache-max>
</defaults>
</jbosscmp-jdbc>
31.12.1. A sample jbosscmp-jdbc.xml defaults declaration
- datasource: This optional element is the
jndi-nameused to look up the datasource. All database connections used by an entity orrelation-tableare obtained from the datasource. Having different datasources for entities is not recommended, as it vastly constrains the domain over which finders and ejbSelects can query. - datasource-mapping: This optional element specifies the name of the
type-mapping, which determines how Java types are mapped to SQL types, and how EJB-QL functions are mapped to database specific functions. Type mappings are discussed in Section 31.13.3, “Mapping”. - create-table: This optional element when true, specifies that JBoss should attempt to create a table for the entity. When the application is deployed, JBoss checks if a table already exists before creating the table. If a table is found, it is logged, and the table is not created. This option is very useful during the early stages of development when the table structure changes often. The default is false.
- alter-table: If
create-tableis used to automatically create the schema,alter-tablecan be used to keep the schema current with changes to the entity bean. Alter table will perform the following specific tasks:- new fields will be created
- fields which are no longer used will be removed
- string fields which are shorter than the declared length will have their length increased to the declared length. (not supported by all databases)
- remove-table: This optional element when true, JBoss will attempt to drop the table for each entity and each relation table mapped relationship. When the application is undeployed, JBoss will attempt to drop the table. This option is very useful during the early stages of development when the table structure changes often. The default is false.
- read-only: This optional element when true specifies that the bean provider will not be allowed to change the value of any fields. A field that is read-only will not be stored in, or inserted into, the database. If a primary key field is read-only, the create method will throw a
CreateException. If a set accessor is called on aread-onlyfield, it throws anEJBException. Read only fields are useful for fields that are filled in by database triggers, such as last update. Theread-onlyoption can be overridden on a per field basis. The default is false. - read-time-out: This optional element is the amount of time in milliseconds that a read on a read only field is valid. A value of 0 means that the value is always reloaded at the start of a transaction, and a value of -1 means that the value never times out. This option can also be overridden on a per CMP field basis. If
read-onlyis false, this value is ignored. The default is -1. - row-locking: This optional element if true specifies that JBoss will lock all rows loaded in a transaction. Most databases implement this by using the
SELECT FOR UPDATEsyntax when loading the entity, but the actual syntax is determined by therow-locking-templatein thedatasource-mappingused by this entity. The default is false. - pk-constraint: This optional element if true specifies that JBoss will add a primary key constraint when creating tables. The default is true.
- preferred-relation-mapping: This optional element specifies the preferred mapping style for relationships. The
preferred-relation-mappingelement must be eitherforeign-keyorrelation-table. - read-ahead: This optional element controls caching of query results and CMR fields for the entity. This option is discussed in Section 31.7.3, “Read-ahead”.
- list-cache-max: This optional element specifies the number of
read-liststhat can be tracked by this entity. This option is discussed in Section 31.7.3.2, “on-load”. The default is 1000. - clean-read-ahead-on-load: When an entity is loaded from the read ahead cache, JBoss can remove the data used from the read ahead cache. The default is
false. - fetch-size: This optional element specifies the number of entities to read in one round-trip to the underlying datastore. The default is 0.
- unknown-pk: This optional element allows one to define the default mapping of an unknown primary key type of
java.lang.Objectmaps to the persistent store. - entity-command: This optional element allows one to define the default command for entity creation. This is described in detail in Section 31.11, “Entity Commands and Primary Key Generation”.
- ql-compiler: This optional elements allows a replacement query compiler to be specified. Alternate query compilers were discussed in Section 31.6.7, “EJBQL 2.1 and SQL92 queries”.
- throw-runtime-exceptions: This attribute, if set to true, indicates that an error in connecting to the database should be seen in the application as runtime
EJBExceptionrather than as a checked exception.
31.13. Datasource Customization
31.13.1. Type Mapping
type-mapping section of the jbosscmp-jdbc.xml descriptor. The content model for the type-mapping element is given in Figure 31.17, “The jbosscmp-jdbc type-mapping element content model.”.
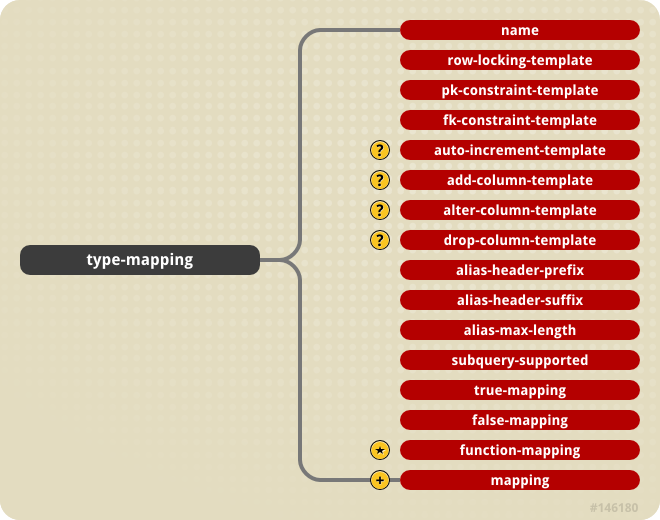
Figure 31.17. The jbosscmp-jdbc type-mapping element content model.
- name: This required element provides the name identifying the database customization. It is used to refer to the mapping by the
datasource-mappingelements found in defaults and entity. - row-locking-template: This required element gives the
PreparedStatementtemplate used to create a row lock on the selected rows. The template must support three arguments:- the select clause
- the from clause. The order of the tables is currently not guaranteed
- the where clause
If row locking is not supported in select statement this element should be empty. The most common form of row locking is select for update as in:SELECT ?1 FROM ?2 WHERE ?3 FOR UPDATE. - pk-constraint-template: This required element gives the
PreparedStatementtemplate used to create a primary key constraint in the create table statement. The template must support two arguments- Primary key constraint name; which is always
pk_{table-name} - Comma separated list of primary key column names
If a primary key constraint clause is not supported in a create table statement this element should be empty. The most common form of a primary key constraint is:CONSTRAINT ?1 PRIMARY KEY (?2) - fk-constraint-template: This is the template used to create a foreign key constraint in separate statement. The template must support five arguments:
- Table name
- Foreign key constraint name; which is always
fk_{table-name}_{cmr-field-name} - Comma separated list of foreign key column names
- References table name
- Comma separated list of the referenced primary key column names
If the datasource does not support foreign key constraints this element should be empty. The most common form of a foreign key constraint is:ALTER TABLE ?1 ADD CONSTRAINT ?2 FOREIGN KEY (?3) REFERENCES ?4 (?5). - auto-increment-template: This declares the SQL template for specifying auto increment columns.
- add-column-template: When
alter-tableis true, this SQL template specifies the syntax for adding a column to an existing table. The default value isALTER TABLE ?1 ADD ?2 ?3. The parameters are:- the table name
- the column name
- the column type
- alter-column-template: When
alter-tableis true, this SQL template specifies the syntax for dropping a column to from an existing table. The default value isALTER TABLE ?1 ALTER ?2 TYPE ?3. The parameters are:- the table name
- the column name
- the column type
- drop-column-template: When
alter-tableis true, this SQL template specifies the syntax for dropping a column to from an existing table. The default value isALTER TABLE ?1 DROP ?2. The parameters are:- the table name
- the column name
- alias-header-prefix: This required element gives the prefix used in creating the alias header. An alias header is prepended to a generated table alias by the EJB-QL compiler to prevent name collisions. The alias header is constructed as follows: alias-header-prefix + int_counter + alias-header-suffix. An example alias header would be
t0_for an alias-header-prefix of "t" and an alias-header-suffix of "_". - alias-header-suffix: This required element gives the suffix portion of the generated alias header.
- alias-max-length: This required element gives the maximum allowed length for the generated alias header.
- subquery-supported: This required element specifies if this
type-mappingsubqueries as either true or false. Some EJB-QL operators are mapped to exists subqueries. Ifsubquery-supportedis false, the EJB-QL compiler will use a left join and is null. - true-mapping: This required element defines true identity in EJB-QL queries. Examples include
TRUE,1, and(1=1). - false-mapping: This required element defines false identity in EJB-QL queries. Examples include
FALSE,0, and(1=0). - function-mapping: This optional element specifies one or more the mappings from an EJB-QL function to an SQL implementation. See Section 31.13.2, “Function Mapping” for the details.
- mapping: This required element specifies the mappings from a Java type to the corresponding JDBC and SQL type. See Section 31.13.3, “Mapping” for the details.
31.13.2. Function Mapping
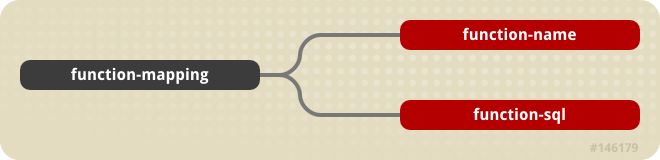
Figure 31.18. The jbosscmp-jdbc function-mapping element content model
- function-name: This required element gives the EJB-QL function name, e.g.,
concat,substring. - function-sql: This required element gives the SQL for the function as appropriate for the underlying database. Examples for a
concatfunction include:(?1 || ?2),concat(?1, ?2),(?1 + ?2).
31.13.3. Mapping
type-mapping is simply a set of mappings between Java class types and database types. A set of type mappings is defined by a set of mapping elements, the content model for which is shown in Figure 31.19, “The jbosscmp-jdbc mapping element content model.”.
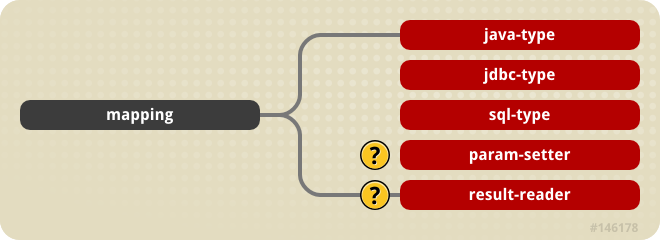
Figure 31.19. The jbosscmp-jdbc mapping element content model.
java.lang.Object mapping. The following describes the three child elements of the mapping element:
- java-type: This required element gives the fully qualified name of the Java class to be mapped. If the class is a primitive wrapper class such as
java.lang.Short, the mapping also applies to the primitive type. - jdbc-type: This required element gives the JDBC type that is used when setting parameters in a JDBC
PreparedStatementor loading data from a JDBCResultSet. The valid types are defined injava.sql.Types. - sql-type: This required element gives the SQL type that is used in create table statements. Valid types are only limited by your database vendor.
- param-setter: This optional element specifies the fully qualified name of the
JDBCParameterSetterimplementation for this mapping. - result-reader: This option element specifies the fully qualified name of the
JDBCResultSetReaderimplementation for this mapping.
<jbosscmp-jdbc>
<type-mappings>
<type-mapping>
<name>Oracle9i</name>
<!--...-->
<mapping>
<java-type>java.lang.Short</java-type>
<jdbc-type>NUMERIC</jdbc-type>
<sql-type>NUMBER(5)</sql-type>
</mapping>
</type-mapping>
</type-mappings>
</jbosscmp-jdbc>
31.13.4. User Type Mappings
org.jboss.ejb.plugins.cmp.jdbc.Mapper interface, the definition of which is shown below.
public interface Mapper
{
/**
* This method is called when CMP field is stored.
* @param fieldValue - CMP field value
* @return column value.
*/
Object toColumnValue(Object fieldValue);
/**
* This method is called when CMP field is loaded.
* @param columnValue - loaded column value.
* @return CMP field value.
*/
Object toFieldValue(Object columnValue);
}
user-type-mappings element consists of one or more user-type-mapping elements, the content model of which is shown in Figure 31.20, “The user-type-mapping content model >”.

Figure 31.20. The user-type-mapping content model >
- java-type: the fully qualified name of the CMP field type in the mapping.
- mapped-type: the fully qualified name of the database type in the mapping.
- mapper: the fully qualified name of the
Mapperinterface implementation that handles the conversion between thejava-typeandmapped-type.
Part V. Appendices
Appendix A. Server Directory Structure
jboss-eap-<version>.
<$JBOSS_HOME> directory.
| Directory | Description | Important Notes |
|---|---|---|
| bin | Contains start up, shut down and other system-specific scripts. Basically all the entry point JARs and start scripts included with the JBoss distribution are located in the bin directory. It also contains the configuration scripts which can be used to configure the JVM parameters. | |
| client | Stores configuration files and JAR files that may be used by a Java client application (running outside JBoss) or an external web container. You can select archives as required or use jbossall-client.jar. |
Unlike early versions of the JBoss Enterprise Application Platform, the
jbossall-client.jar is now a MANIFEST only JAR file.
So if the client application copies over the
jbossall-client.jar to its classpath, then it also has to copy over all the other jar files listed in the META-INF/MANIFEST.MF file of jbossall-client.jar.
Furthermore, all these JARs, including the
jbossall-client.jar, must be placed in the same folder in the client classpath.
|
| common |
The
lib sub-directory within this common directory, contains all the JAR files which are common to the server configuration sets.
Keeping all common JAR files in one place (rather than in the
lib folder of each of the server configuration) reduces the size of the server. It also helps with maintenance as there are fewer files to maintain.
| Like some of the other configuration paths, the common and the common/lib directories are available as the system properties jboss.common.base.url (This holds the URL to <JBOSS_HOME>/jboss-as/common directory) and jboss.common.lib.url (This holds the URL to <JBOSS_HOME>/jboss-as/common/lib directory). |
| docs |
Contains the XML DTDs, schemas used in JBoss for reference (these are also a useful source of documentation on JBoss configuration specifics).
This directory also contains example JCA (Java Connector Architecture) configuration files for setting up datasources for different databases (such as MySQL, Oracle, Postgres).
| |
| lib | Contains start up JARs used by JBoss. This directory contains an endorsed sub-directory which is used as one of the Java Endorsed directories. Refer to the Java Endorsed Standards for more details. Do not place your own JAR files in these directories. | |
| server | Contains the server profile sets discussed above. Each of the subdirectories is a different server profile. JBoss ships with minimal, default, production, standard, web and all profile sets. The subdirectories and key configuration files contained in the default profile set are discussed in more detail in subsequent sections. |
Important
common directory location. You may add your own JAR files in the common/lib directory if those JAR files are meant to be used by all the server profile sets.
production profile), then the best location to place these JARs is the <JBOSS_HOME>/server/<PROFILE>/lib directory.
A.1. Server Profile Directory Structure
<JBOSS_HOME>/server/<PROFILE>) and their functions.
| Directory | Description |
|---|---|
conf |
The
conf directory contains the jboss-service.xml, bootstrap.xml bootstrap descriptor file for a given server profile.
The
bootstrap.xml in turn points to various other configuration files which comprise the server bootstrap. This defines the core microcontainer beans that are fixed for the lifetime of the server.
|
deploy |
The
deploy directory contains the hot-deployable services (those which can be added to or removed from the running server). It also contains applications for the current server profile.
You deploy your application code by placing application packages (JAR, WAR and EAR files) in the
deploy directory.
The directory is constantly scanned for updates, and any modified components will be re-deployed automatically.
The directory monitored may be configured with the applicationURIs property of the
BootstrapProfileFactory bean configuration in the <JBOSS_HOME>/jboss-as/server/<PROFILE>/conf/bootstrap/profile.xml file.
|
deployers | In Enterprise Application Platform 5, unlike earlier versions, the deployers (which are responsible for parsing and deploying applications) are located separately in the <JBOSS_HOME>/jboss-as/server/<PROFILE>/deployers folder. This folder contains various deployer JAR files and their configurations in *-jboss-beans.xml files. |
lib |
This directory contains JAR files (Java libraries that should not be hot deployed) needed by this server profile. You can add required library files for JDBC drivers and other requirements to this directory.
All JARs in this directory are loaded into the shared classpath at start up. Note that this directory only contains those jars unique to the server profile. Jars common across the server profiles are now located in
<JBOSS_HOME>/common/lib.
|
Important
<PROFILE>/conf/bindingservice.beans/META-INF folder. The name of the file is bindings-jboss-beans.xml. See the port configuration section for more details on how to use this file.
A.1.1. The default Server Profile File Set
default server profile file set is located in the <JBOSS_HOME>/server/default directory.
default profile are found in other pre-configured profile. The sections below will discuss some of these files, their location and their use.
A.1.1.1. Contents of conf directory
conf directory are explained in the following table.
| File | Description |
|---|---|
bindingservice.beans/* | This directory contains the configurations for various ports used by the server. |
bootstrap.xml | This is the bootstrap.xml file that defines which additional microcontainer deployments will be loaded as part of the bootstrap phase. |
bootstrap/* | This directory contains the microcontainer bootstrap descriptors that are referenced from the bootstrap.xml file. |
jboss-service.xml | jboss-service.xml legacy core mbeans that have yet to be ported to either bootstrap deployments, or deploy services. This file will likely be deprecated in the near future. |
jboss-log4j.xml | This file configures the Apache log4j framework category priorities and appenders used by the server code. |
jbossts-properties.xml | This file provides the default configuration for the transaction manager. |
login-config.xml | This file contains sample server side authentication configurations that are applicable when using JAAS based security. |
props/* | The props directory contains the users and roles property files for the jmx-console. |
standardjboss.xml | This file provides the default container configurations. |
standardjbosscmp-jdbc.xml | This file provides a default configuration file for the JBoss CMP engine. |
xmdesc/*-mbean.xml | The xmdesc directory contains XMBean descriptors for several services configured in the jboss-service.xml file. |
java.policy | |
jax-ws-catalog.xml | |
jndi.properties | |
standardjbosscmp-jdbc.xml |
A.1.1.2. Contents of deployers directory
deployers directory are explained in the following table.
| File | Description |
|---|---|
alias-deployers-jboss-beans.xml | This file contains deployers that treat aliases in deployment as true controller context. Which means they will only get active/installed when their original is installed. |
bsh.deployer | This file configures the bean shell deployer, which deploys bean shell scripts as JBoss mbean services. |
clustering-deployer-jboss-beans.xml | Clustering-related deployers which add dependencies on needed clustering services to clustered EJB3, EJB2 beans and to distributable web applications. |
dependency-deployers-jboss-beans.xml | Deployers for aliases.txt and jboss-dependency.xml. jboss-depedency.xml adds generic dependency and aliases.txt adds human-readable names for deployments. For instance, vfszip://home/something/.../jboss-5.0.0.GA/server/default/deploy/some-long-name.ear aliased to ales-app.ear. |
directory-deployer-jboss-beans.xml | Adds legacy behavior for directories, handling its children as possible deployments. For example, .sar's lib directory to treat the .jar files as deployments. |
ear-deployer-jboss-beans.xml | JavaEE 5 enterprise application related deployers. |
ejb-deployer-jboss-beans.xml | Legacy JavaEE 1.4 ejb jar related deployers. |
ejb3.deployer | This is a deployer that supports JavaEE 5 ejb3, JPA, and application client deployments. |
hibernate-deployer-jboss-beans.xml | Deployers for Hibernate -hibernate.xml descriptors, which are similar to Hibernate's .cfg.xml files. |
jboss-aop-jboss5.deployer | JBossAspectLibrary and base aspects. |
jboss-ejb3-endpoint-deployer.jar | |
jboss-ejb3-metrics-deployer.jar | |
jboss-jca.deployer | jboss-jca.deployer description |
jboss-threads.deployer | |
jbossweb.deployer | The JavaEE 5 servlet, JSF, JSP deployers. |
jbossws.deployer | The JavaEE 5 web services endpoint deployers. |
jsr77-deployers-jboss-beans.xml | Deployers for creating the JSR77 MBeans from the JavaEE components. |
logbridge-jboss-beans.xml | |
messaging-definitions-jboss-beans.xml | |
metadata-deployer-jboss-beans.xml | Deployers for processing the JavaEE metadata from xml, annotations. |
seam.deployer | Deployer providing integration support for JBoss Seam applications. |
security-deployer-jboss-beans.xml | Deployers for configuration the security layers of the JavaEE components. |
xnio.deployer |
A.1.1.3. Contents of deploy directory
deploy directory are explained in the following table.
| File | Description |
|---|---|
ROOT.war | ROOT.war establishes the '/' root web application. |
admin-console.war | This is the admin-console application which provides a web interface for JBoss Enterprise Application Platform administrators. By default the admin-console is available at http://localhost:8080/admin-console. |
cache-invalidation-service.xml | This is a service that allows for custom invalidation of the EJB caches via JMS notifications. It is disabled by default. |
ejb2-container-jboss-beans.xml | ejb2-container-jboss-beans.xml UserTransaction integration bean for the EJB2 containers. |
ejb2-timer-service.xml | ejb2-timer-service.xml contains the ejb timer service beans. |
ejb3-connectors-jboss-beans.xml | ejb3-connectors-jboss-beans.xml EJB3 remoting transport beans. |
ejb3-container-jboss-beans.xml | ejb3-container-jboss-beans.xml UserTransaction integration bean for the EJB3 containers. |
ejb3-interceptors-aop.xml | ejb3-interceptors-aop.xml defines the EJB3 container aspects. |
ejb3-timerservice-jboss-beans.xml | ejb3-timerservice-jboss-beans.xml configures the EJB3 TimerService |
hdscanner-jboss-beans.xml | hdscanner-jboss-beans.xml the deploy directory hot deployment scanning bean |
hsqldb-ds.xml | Configures the Hypersonic embedded database service configuration file. It sets up the embedded database and related connection factories. |
http-invoker.sar | Contains the detached invoker that supports RMI over HTTP. It also contains the proxy bindings for accessing JNDI over HTTP. |
jboss-local-jdbc.rar | Is a JCA resource adaptor that implements the JCA ManagedConnectionFactory interface for JDBC drivers that support the DataSource interface but not JCA. |
jboss-xa-jdbc.rar | JCA resource adaptors for XA DataSources. |
jbossweb.sar | An mbean service supporting TomcatDeployer with web application deployment service management. |
jbossws.sar | Provides JEE web services support. |
jca-jboss-beans.xml | The jca-jboss-beans.xml file is the application server implementation of the JCA specification. It provides the connection management facilities for integrating resource adaptors into the server. |
jms-ra.rar | jms-ra.rar JBoss JMS Resource Adapter. |
jmx-console.war | This is the jmx-console application which provides a simple web interface for managing the MBean server. By default, the jmx-console is available at http://localhost:8080/jmx-console |
jmx-invoker-service.xml | jmx-invoker-service.xml is an MBean service archive that exposes a subset of the JMX MBeanServer interface methods as an RMI interface to enable remote access to the JMX core functionality. |
jsr-88-service.xml | jsr-88-service.xml provides the JSR 88 remote deployment service. |
legacy-invokers-service.xml | legacy-invokers-service.xml the legacy detached jmx invoker remoting services. |
management/console-mgr.sar | Provides the Web Console. It is a web application/applet that provides a richer view of the JMX server management data than the JMX console. You may view the console using the URL http://localhost:8080/web-console/. |
messaging/destinations-service.xml | Configures the default Dead Letter queue and the Expiry queue. |
messaging/hsqldb-persistence-service.xml | Provides JMS state management using Hypersonic. |
messaging/messaging-service.xml | The messaging-service.xml file configures the core JBoss Messaging service. |
mail-ra.rar | mail-ra.rar is a resource adaptor that provides a JavaMail connector. |
mail-service.xml | The mail-service.xml file is an MBean service descriptor that provides JavaMail sessions for use inside the server. |
profileservice-jboss-beans.xml | profileservice-jboss-beans.xml configures the ProfileService, which is a generalization of the server configuration. |
properties-service.xml | The properties-service.xml file is an MBean service descriptor that allows for customization of the JavaBeans PropertyEditors as well as the definition of system properties. |
quartz-ra.rar | quartz-ra.rar is a resource adaptor for inflow of Quartz events |
remoting-jboss-beans.xml | remoting-jboss-beans.xml contains the unified invokers based on JBoss Remoting. |
scheduler-service.xml | The scheduler-service.xml and schedule-manager-service.xml files are MBean service descriptors that provide a scheduling type of service. |
security/security-jboss-beans.xml | security-jboss-beans.xml security domain related beans. |
security/security-policies-jboss-beans.xml | security-policies-jboss-beans.xml security authorization related beans for ejb and web authorization. |
schedule-manager-service.xml | The schedule-manager-service.xml contains sample scheduler configurations. It is disabled by default. |
sqlexception-service.xml | The sqlexception-service.xml file is an MBean service descriptor for the handling of vendor specific SQLExceptions. |
transaction-jboss-beans.xml | transaction-jboss-beans.xml JTA transaction manager related beans. |
transaction-service.xml | transaction-service.xml contains ClientUserTransaction proxy service configuration. |
uuid-key-generator.sar | The uuid-key-generator.sar service provides a UUID-based key generation facility. |
vfs-jboss-beans.xml | The vfs-jboss-beans.xml configures the Microcontainer bean exposing the JBoss VFS cache statistics. |
xnio-provider.jar | XNIO is a centralized management point for network services. |
A.1.2. The all Server Profile File Set
all server profile is located in the <JBOSS_HOME>/server/all directory. In addition to the services in the "default" profile, the all configuration contains several other services in the deploy/ directory as shown below.
| File | Description |
|---|---|
cluster/deploy-hasingleton-service.xml | This provides the HA singleton service, allowing JBoss to manage services that must be active on only one node of a cluster. |
cluster/farm-deployment-jboss-beans.xml | This provides the farm service, which allows for cluster-wide deployment and undeployment of services. |
httpha-invoker.sar | This service provides HTTP tunneling support for clustered environments. |
http-invoker.sar | |
iiop-service.xml | This provides IIOP invocation support. |
juddi-service.sar | This service provides UDDI lookup services. |
snmp-adaptor.sar | This is a JMX to SNMP adaptor. It allows for the mapping of JMX notifications onto SNMP traps. |
A.1.3. EJB3 Services
| File | Description |
|---|---|
ejb3-interceptors-aop.xml | This service provides the AOP interceptor stack configurations for EJB3 bean types. |
ejb3.deployer | This service deploys EJB3 applications into JBoss. |
jbossws.sar | This provides Java EE 5 web services support. |
Appendix B. Vendor-Specific Datasource Definitions
B.1. Deployer Location and Naming
<JBOSS_HOME>/server/<PROFILE>/deploy/ directory on the server. Each deployer file needs to end with the suffix -ds.xml. For instance, an Oracle datasource deployer might be named oracle-ds.xml. If files are not named properly, the are not found by the server.
B.2. DB2
Example B.1. DB2 Local-XA
$db2_install_dir/java/db2jcc.jar and $db2_install_dir/java/db2jcc_license_cu.jar files into the $jboss_install_dir/server/default/lib directory. The db2java.zip file, which is part of the legacy CLI driver, is normally not required when using the DB2 Universal JDBC driver included in DB2 v8.1 and later.
<datasources>
<local-tx-datasource>
<jndi-name>DB2DS</jndi-name>
<!-- Use the syntax 'jdbc:db2:yourdatabase' for jdbc type 2 connection -->
<!-- Use the syntax 'jdbc:db2://serveraddress:port/yourdatabase' for jdbc type 4 connection -->
<connection-url>jdbc:db2://serveraddress:port/yourdatabase</connection-url>
<driver-class>com.ibm.db2.jcc.DB2Driver</driver-class>
<user-name>x</user-name>
<password>y</password>
<min-pool-size>0</min-pool-size>
<!-- sql to call when connection is created
<new-connection-sql>some arbitrary sql</new-connection-sql>
-->
<!-- sql to call on an existing pooled connection when it is obtained from pool
<check-valid-connection-sql>some arbitrary sql</check-valid-connection-sql>
-->
<!-- corresponding type-mapping in the standardjbosscmp-jdbc.xml (optional) -->
<metadata>
<type-mapping>DB2</type-mapping>
</metadata>
</local-tx-datasource>
</datasources>Example B.2. DB2 XA
$db2_install_dir/java/db2jcc.jar and $db2_install_dir/java/db2jcc_license_cu.jar files into the $jboss_install_dir/server/default/lib directory.
db2java.zip file is required when using the DB2 Universal JDBC driver (type 4) for XA on DB2 v8.1 fixpak 14 (and the corresponding DB2 v8.2 fixpak 7).
<datasources>
<!--
XADatasource for DB2 v8.x (app driver)
-->
<xa-datasource>
<jndi-name>DB2XADS</jndi-name>
<xa-datasource-class>com.ibm.db2.jcc.DB2XADataSource</xa-datasource-class>
<xa-datasource-property name="ServerName">your_server_address</xa-datasource-property>
<xa-datasource-property name="PortNumber">your_server_port</xa-datasource-property>
<xa-datasource-property name="DatabaseName">your_database_name</xa-datasource-property>
<!-- DriverType can be either 2 or 4, but you most likely want to use the JDBC type 4 as it does not require a DB" client -->
<xa-datasource-property name="DriverType">4</xa-datasource-property>
<!-- If driverType 4 is used, the following two tags are needed -->
<track-connection-by-tx></track-connection-by-tx>
<isSameRM-override-value>false</isSameRM-override-value>
<xa-datasource-property name="User">your_user</xa-datasource-property>
<xa-datasource-property name="Password">your_password</xa-datasource-property>
<!-- corresponding type-mapping in the standardjbosscmp-jdbc.xml (optional) -->
<metadata>
<type-mapping>DB2</type-mapping>
</metadata>
</xa-datasource>
</datasources>Example B.3. DB2 on AS/400
<?xml version="1.0" encoding="UTF-8"?>
<!-- ===================================================================== -->
<!-- -->
<!-- JBoss Server Configuration -->
<!-- -->
<!-- ===================================================================== -->
<!-- $Id: db2-400-ds.xml,v 1.1.4.2 2004/10/27 18:44:10 pilhuhn Exp $ -->
<!-- You need the jt400.jar that is delivered with IBM iSeries Access or the
OpenSource Project jtopen.
[systemname] Hostame of the iSeries
[schema] Default schema is needed so jboss could use metadat to test if the tables exists
-->
<datasources>
<local-tx-datasource>
<jndi-name>DB2-400</jndi-name>
<connection-url>jdbc:as400://[systemname]/[schema];extended dynamic=true;package=jbpkg;package cache=true;package library=jboss;errors=full</connection-url>
<driver-class>com.ibm.as400.access.AS400JDBCDriver</driver-class>
<user-name>[username]</user-name>
<password>[password]</password>
<min-pool-size>0</min-pool-size>
<!-- sql to call when connection is created
<new-connection-sql>some arbitrary sql</new-connection-sql>
-->
<!-- sql to call on an existing pooled connection when it is obtained from pool
<check-valid-connection-sql>some arbitrary sql</check-valid-connection-sql>
-->
<!-- corresponding type-mapping in the standardjbosscmp-jdbc.xml (optional) -->
<metadata>
<type-mapping>DB2/400</type-mapping>
</metadata>
</local-tx-datasource>
</datasources>Example B.4. DB2 on AS/400 "native"
com.ibm.db2.jdbc.app.DB2Driver. The URL subprotocol is db2. Refer to the JDBC FAQs at http://www-03.ibm.com/systems/i/software/toolbox/faqjdbc.html#faqA1 for more information.
<?xml version="1.0" encoding="UTF-8"?>
<!-- ===================================================================== -->
<!-- -->
<!-- JBoss Server Configuration -->
<!-- -->
<!-- ===================================================================== -->
<!-- $Id: db2-400-ds.xml,v 1.1.4.2 2004/10/27 18:44:10 pilhuhn Exp $ -->
<!-- You need the jt400.jar that is delivered with IBM iSeries Access or the
OpenSource Project jtopen.
[systemname] Hostame of the iSeries
[schema] Default schema is needed so jboss could use metadat to test if the tables exists -->
<datasources>
<local-tx-datasource>
<jndi-name>DB2-400</jndi-name>
<connection-url>jdbc:db2://[systemname]/[schema];extended dynamic=true;package=jbpkg;package cache=true;package library=jboss;errors=full</connection-url>
<driver-class>com.ibm.db2.jdbc.app.DB2Driver</driver-class>
<user-name>[username]</user-name>
<password>[password]</password>
<min-pool-size>0</min-pool-size>
<!-- sql to call when connection is created
<new-connection-sql>some arbitrary sql</new-connection-sql> -->
<!-- sql to call on an existing pooled connection when it is obtained from pool
<check-valid-connection-sql>some arbitrary sql</check-valid-connection-sql> -->
<!-- corresponding type-mapping in the standardjbosscmp-jdbc.xml (optional) -->
<metadata>
<type-mapping>DB2/400</type-mapping>
</metadata>
</local-tx-datasource>
</datasources>Tips
- This driver is sensitive to the job’s CCSID, but works fine with
CCSID=37. [systemname]must be defined as entryWRKRDBDIRElike*local.
B.3. Oracle
Example B.5. Oracle Local-TX Datasource
<?xml version="1.0" encoding="UTF-8"?>
<!-- ===================================================================== -->
<!-- -->
<!-- JBoss Server Configuration -->
<!-- -->
<!-- ===================================================================== -->
<!-- $Id: oracle-ds.xml,v 1.6 2004/09/15 14:37:40 loubyansky Exp $ -->
<!-- ==================================================================== -->
<!-- Datasource config for Oracle originally from Steven Coy -->
<!-- ==================================================================== -->
<datasources>
<local-tx-datasource>
<jndi-name>OracleDS</jndi-name>
<connection-url>jdbc:oracle:thin:@youroraclehost:1521:yoursid</connection-url>
<!--
See on WIKI page below how to use Oracle's thin JDBC driver to connect with enterprise RAC.
-->
<!--
Here are a couple of the possible OCI configurations.
For more information, see http://otn.oracle.com/docs/products/oracle9i/doc_library/release2/java.920/a96654/toc.htm
<connection-url>jdbc:oracle:oci:@youroracle-tns-name</connection-url>
or
<connection-url>jdbc:oracle:oci:@(description=(address=(host=youroraclehost)(protocol=tcp)(port=1521))(connect_data=(SERVICE_NAME=yourservicename)))</connection-url>
Clearly, its better to have TNS set up properly.
-->
<driver-class>oracle.jdbc.driver.OracleDriver</driver-class>
<user-name>x</user-name>
<password>y</password>
<min-pool-size>5</min-pool-size>
<max-pool-size>100</max-pool-size>
<!-- Uses the pingDatabase method to check a connection is still valid before handing it out from the pool -->
<!--valid-connection-checker-class-name>org.jboss.resource.adapter.jdbc.vendor.OracleValidConnectionChecker</valid-connection-checker-class-name-->
<!-- Checks the Oracle error codes and messages for fatal errors -->
<exception-sorter-class-name>org.jboss.resource.adapter.jdbc.vendor.OracleExceptionSorter</exception-sorter-class-name>
<!-- sql to call when connection is created
<new-connection-sql>some arbitrary sql</new-connection-sql>
-->
<!-- sql to call on an existing pooled connection when it is obtained from pool - the OracleValidConnectionChecker is prefered
<check-valid-connection-sql>some arbitrary sql</check-valid-connection-sql>
-->
<!-- corresponding type-mapping in the standardjbosscmp-jdbc.xml (optional) -->
<metadata>
<type-mapping>Oracle9i</type-mapping>
</metadata>
</local-tx-datasource>
</datasources>Example B.6. Oracle XA Datasource
<?xml version="1.0" encoding="UTF-8"?>
<!-- ===================================================================== -->
<!-- -->
<!-- JBoss Server Configuration -->
<!-- -->
<!-- ===================================================================== -->
<!-- $Id: oracle-xa-ds.xml,v 1.13 2004/09/15 14:37:40 loubyansky Exp $ -->
<!-- ===================================================================== -->
<!-- ATTENTION: DO NOT FORGET TO SET Pad=true IN transaction-service.xml -->
<!-- ===================================================================== -->
<datasources>
<xa-datasource>
<jndi-name>XAOracleDS</jndi-name>
<track-connection-by-tx></track-connection-by-tx>
<isSameRM-override-value>false</isSameRM-override-value>
<xa-datasource-class>oracle.jdbc.xa.client.OracleXADataSource</xa-datasource-class>
<xa-datasource-property name="URL">jdbc:oracle:oci8:@tc</xa-datasource-property>
<xa-datasource-property name="User">scott</xa-datasource-property>
<xa-datasource-property name="Password">tiger</xa-datasource-property>
<!-- Uses the pingDatabase method to check a connection is still valid before handing it out from the pool -->
<!--valid-connection-checker-class-name>org.jboss.resource.adapter.jdbc.vendor.OracleValidConnectionChecker</valid-connection-checker-class-name-->
<!-- Checks the Oracle error codes and messages for fatal errors -->
<exception-sorter-class-name>org.jboss.resource.adapter.jdbc.vendor.OracleExceptionSorter</exception-sorter-class-name>
<!-- Oracles XA datasource cannot reuse a connection outside a transaction once enlisted in a global transaction and vice-versa -->
<no-tx-separate-pools></no-tx-separate-pools>
<!-- corresponding type-mapping in the standardjbosscmp-jdbc.xml (optional) -->
<metadata>
<type-mapping>Oracle9i</type-mapping>
</metadata>
</xa-datasource>
<mbean code="org.jboss.resource.adapter.jdbc.vendor.OracleXAExceptionFormatter"
name="jboss.jca:service=OracleXAExceptionFormatter">
<depends optional-attribute-name="TransactionManagerService">jboss:service=TransactionManager</depends>
</mbean>
</datasources>Example B.7. Oracle's Thin JDBC Driver with Enterprise RAC
... <connection-url>jdbc:oracle:thin:@(description=(address_list=(load_balance=on)(failover=on)(address=(protocol=tcp)(host=xxxxhost1)(port=1521))(address=(protocol=tcp)(host=xxxxhost2)(port=1521)))(connect_data=(service_name=xxxxsid)(failover_mode=(type=select)(method=basic))))</connection-url> ...
Note
B.3.1. Changes in Oracle 10g JDBC Driver
Pad option in your jboss-service.xml file. Further, you no longer need the <no-tx-separate-pool/>.
B.3.2. Type Mapping for Oracle 10g
Example B.8. Oracle9i Type Mapping
.... <metadata> <type-mapping>Oracle9i</type-mapping> </metadata> ....
B.3.3. Retrieving the Underlying Oracle Connection Object
Example B.9. Oracle Connection Object
Connection conn = myJBossDatasource.getConnection(); WrappedConnection wrappedConn = (WrappedConnection)conn; Connection underlyingConn = wrappedConn.getUnderlyingConnection(); OracleConnection oracleConn = (OracleConnection)underlyingConn;
B.3.4. Limitations of Oracle 11g
B.4. Sybase
Example B.10. Sybase Datasource
<?xml version="1.0" encoding="UTF-8"?>
<datasources>
<local-tx-datasource>
<jndi-name>jdbc/SybaseDB</jndi-name>
<!-- Sybase jConnect URL for the database.
NOTE: The hostname and port are made up values. The optional
database name is provided, as well as some additinal Driver
parameters.
-->
<connection-url>jdbc:sybase:Tds:host.at.some.domain:5000/db_name?JCONNECT_VERSION=6</connection-url>
<driver-class>com.sybase.jdbc2.jdbc.SybDataSource</driver-class>
<user-name>x</user-name>
<password>y</password>
<exception-sorter-class-name>org.jboss.resource.adapter.jdbc.vendor.SybaseExceptionSorter</exception-sorter-class-name>
<!-- sql to call when connection is created
<new-connection-sql>some arbitrary sql</new-connection-sql>
-->
<!-- sql to call on an existing pooled connection when it is obtained from pool
<check-valid-connection-sql>some arbitrary sql</check-valid-connection-sql>
-->
<!-- corresponding type-mapping in the standardjbosscmp-jdbc.xml (optional) -->
<metadata>
<type-mapping>Sybase</type-mapping>
</metadata>
</local-tx-datasource>
</datasources>B.4.1. Sybase Limitations
- DDL statements in transactions
- Hibernate, which is an integral part of the Enterprise Platform, allows the SQL Dialect to decide whether or not the database supports DDL statements within a transaction. Sybase does not override this. the default is to query the JDBC metadata to see whether DDL is allowed within transactions. However, Sybase does not correct report whether it is set up to use this option.Sybase recommends against using DDL statements in transactions, because of locking issues. Review the Sybase documentation for how to enable or disable the
ddl in tranoption. - Sybase does not throw an exception if a value overflows the constraints of the underlying column.
- Sybase ASE does not throw an exception when Parameterized Sql is in use.
jconn3.jaruses Parameterized Sql for insertion by default, so no exception is thrown if a value overflows the constraints of the underlying column. Since no exception is thrown, Hibernate cannot tell that the insert failed. By using Dynamic Prepare instead of Parameterized SQL, ASE throws an exception. Hibernate can catch this exception and act accordingly.For that reason, set theDynamic prepareparameter totruein Hibernate's configuration file.<property name="connection.url">jdbc:sybase:Tds:aurum:1503/masterDb?DYNAMIC_PREPARE=true</property>
jconn4.jaruses Dynamic Prepare by default. - SchemaExport cannot create stored procedures in chained transaction mode
- On Sybase, SchemaExport cannot be used to create stored procedures while in while in chained transaction mode. The workaround for this case is to add the following code immediately after the definition of the new stored procedure:
<database-object> <create> sp_procxmode paramHandling, 'chained' </create> <drop/> </database-object>
B.5. Microsoft SQL Server
pubs database shipped with Microsoft SQL Server.
/deploy, start the server, and navigate your web browser to http://localhost:8080/test/test.jsp.
Example B.11. Local-TX Datasource Using DataDirect Driver
<datasources>
<local-tx-datasource>
<jndi-name>MerliaDS</jndi-name>
<connection-url>jdbc:datadirect:sqlserver://localhost:1433;DatabaseName=jboss</connection-url>
<driver-class>com.ddtek.jdbc.sqlserver.SQLServerDriver</driver-class>
<user-name>sa</user-name>
<password>sa</password>
<!-- corresponding type-mapping in the standardjbosscmp-jdbc.xml (optional) -->
<metadata>
<type-mapping>MS SQLSERVER2000</type-mapping>
</metadata>
</local-tx-datasource>
</datasources>Example B.12. Local-TX Datasource Using Merlia Driver
<datasources>
<local-tx-datasource>
<jndi-name>MerliaDS</jndi-name>
<connection-url>jdbc:inetdae7:localhost:1433?database=pubs</connection-url>
<driver-class>com.inet.tds.TdsDataSource</driver-class>
<user-name>sa</user-name>
<password>sa</password>
<!-- corresponding type-mapping in the standardjbosscmp-jdbc.xml (optional) -->
<metadata>
<type-mapping>MS SQLSERVER2000</type-mapping>
</metadata>
</local-tx-datasource>
</datasources>Example B.13. XA Datasource Using Merlia Driver
<datasources>
<xa-datasource>
<jndi-name>MerliaXADS</jndi-name>
<track-connection-by-tx></track-connection-by-tx>
<isSameRM-override-value>false</isSameRM-override-value>
<xa-datasource-class>com.inet.tds.DTCDataSource</xa-datasource-class>
<xa-datasource-property name="ServerName">localhost</xa-datasource-property>
<xa-datasource-property name="DatabaseName">pubs</xa-datasource-property>
<user-name>sa</user-name>
<password>sa</password>
<!-- corresponding type-mapping in the standardjbosscmp-jdbc.xml (optional) -->
<metadata>
<type-mapping>MS SQLSERVER2000</type-mapping>
</metadata>
</xa-datasource>
</datasources>B.5.1. Microsoft JDBC Drivers
release.txt file included in the driver distribution for more information.
Example B.14. Microsoft SQL Server 2008 Local-TX Datasource
<?xml version="1.0" encoding="UTF-8"?>
<datasources>
<local-tx-datasource>
<jndi-name>MSSQL2008DS</jndi-name>
<connection-url>jdbc:sqlserver://localhost:1433;DatabaseName=pubs</connection-url>
<driver-class>com.microsoft.sqlserver.jdbc.SQLServerDriver</driver-class>
<user-name>sa</user-name>
<password>jboss</password>
<!-- corresponding type-mapping in the standardjbosscmp-jdbc.xml (optional) -->
<metadata>
<type-mapping>MS SQLSERVER2000</type-mapping>
</metadata>
</local-tx-datasource>
</datasources>
Example B.15. Microsoft SQL Server 2008 XA Datasource
<?xml version="1.0" encoding="UTF-8"?>
<datasources>
<xa-datasource>
<jndi-name>MSSQL2008XADS</jndi-name>
<track-connection-by-tx></track-connection-by-tx>
<isSameRM-override-value>false</isSameRM-override-value>
<xa-datasource-class>com.microsoft.sqlserver.jdbc.SQLServerXADataSource</xa-datasource-class>
<xa-datasource-property name="ServerName">localhost</xa-datasource-property>
<xa-datasource-property name="DatabaseName">pubs</xa-datasource-property>
<xa-datasource-property name="SelectMethod">cursor</xa-datasource-property>
<xa-datasource-property name="User">sa</xa-datasource-property>
<xa-datasource-property name="Password">jboss</xa-datasource-property>
<!-- corresponding type-mapping in the standardjbosscmp-jdbc.xml (optional) -->
<metadata>
<type-mapping>MS SQLSERVER2000</type-mapping>
</metadata>
</xa-datasource>
</datasources>
B.5.2. JSQL Drivers
Example B.16. JSQL Driver
<?xml version="1.0" encoding="UTF-8"?>
<datasources>
<local-tx-datasource>
<jndi-name>JSQLDS</jndi-name>
<connection-url>jdbc:JSQLConnect://localhost:1433/databaseName=testdb</connection-url>
<driver-class>com.jnetdirect.jsql.JSQLDriver</driver-class>
<user-name>x</user-name>
<password>y</password>
<!-- sql to call when connection is created
<new-connection-sql>some arbitrary sql</new-connection-sql>
-->
<!-- sql to call on an existing pooled connection when it is obtained from pool
<check-valid-connection-sql>some arbitrary sql</check-valid-connection-sql>
-->
</local-tx-datasource>
</datasources>B.5.3. jTDS JDBC Driver
DatabaseMetaData and ResultSetMetaData methods.
Example B.17. jTDS Local-TX Datasource
<?xml version="1.0" encoding="UTF-8"?>
<datasources>
<local-tx-datasource>
<jndi-name>jtdsDS</jndi-name>
<connection-url>jdbc:jtds:sqlserver://localhost:1433;databaseName=pubs</connection-url>
<driver-class>net.sourceforge.jtds.jdbc.Driver</driver-class>
<user-name>sa</user-name>
<password>jboss</password>
<!-- optional parameters -->
<transaction-isolation>TRANSACTION_READ_COMMITTED</transaction-isolation>
<min-pool-size>10</min-pool-size>
<max-pool-size>30</max-pool-size>
<idle-timeout-minutes>15</idle-timeout-minutes>
<blocking-timeout-millis>5000</blocking-timeout-millis>
<new-connection-sql>select 1</new-connection-sql>
<check-valid-connection-sql>select 1</check-valid-connection-sql>
<set-tx-query-timeout></set-tx-query-timeout>
<metadata>
<type-mapping>MS SQLSERVER2000</type-mapping>
</metadata>
</local-tx-datasource>
</datasources>Example B.18. jTDS XA Datasource
<?xml version="1.0" encoding="UTF-8"?>
<datasources>
<xa-datasource>
<jndi-name>jtdsXADS</jndi-name>
<xa-datasource-class>net.sourceforge.jtds.jdbcx.JtdsDataSource</xa-datasource-class>
<xa-datasource-property name="ServerName">localhost</xa-datasource-property>
<xa-datasource-property name="DatabaseName">pubs</xa-datasource-property>
<xa-datasource-property name="User">sa</xa-datasource-property>
<xa-datasource-property name="Password">jboss</xa-datasource-property>
<!--
When set to true, emulate XA distributed transaction support. Set to false to use experimental
true distributed transaction support. True distributed transaction support is only available for
SQL Server 2000 and requires the installation of an external stored procedure in the target server
(see the README.XA file in the distribution for details).
-->
<xa-datasource-property name="XaEmulation">true</xa-datasource-property>
<track-connection-by-tx></track-connection-by-tx>
<!-- optional parameters -->
<transaction-isolation>TRANSACTION_READ_COMMITTED</transaction-isolation>
<min-pool-size>10</min-pool-size>
<max-pool-size>30</max-pool-size>
<idle-timeout-minutes>15</idle-timeout-minutes>
<blocking-timeout-millis>5000</blocking-timeout-millis>
<new-connection-sql>select 1</new-connection-sql>
<check-valid-connection-sql>select 1</check-valid-connection-sql>
<set-tx-query-timeout></set-tx-query-timeout>
<metadata>
<type-mapping>MS SQLSERVER2000</type-mapping>
</metadata>
</xa-datasource>
</datasources>B.5.4. "Invalid object name 'JMS_SUBSCRIPTIONS' Exception
SelectMethod in the connection URL, as shown in Example B.20, “Specifying a SelectMethod”.
Example B.19. JMS_SUBSCRIPTIONS Exception
17:17:57,167 WARN [ServiceController] Problem starting service jboss.mq.destination:name=testTopic,service=Topic
org.jboss.mq.SpyJMSException: Error getting durable subscriptions for topic TOPIC.testTopic; - nested throwable: (java.sql.SQLException: [Microsoft][SQLServer 2000 Driver for JDBC][SQLServer]Invalid object name 'JMS_SUBSCRIPTIONS'.)
at org.jboss.mq.sm.jdbc.JDBCStateManager.getDurableSubscriptionIdsForTopic(JDBCStateManager.java:290)
at org.jboss.mq.server.JMSDestinationManager.addDestination(JMSDestinationManager.java:656)
Example B.20. Specifying a SelectMethod
<connection-url>jdbc:microsoft:sqlserver://localhost:1433;SelectMethod=cursor;DatabaseName=jboss</connection-url>
B.6. MySQL Datasource
B.6.1. Installing the Driver
Procedure B.1. Installing the Driver
- Download the driver from http://www.mysql.com/products/connector/j/. Make sure to choose the driver based on your version of MySQL.
- Expand the driver ZIP or TAR file, and locate the
.jarfile. - Move the
.jarfile into<JBOSS_HOME>/server/<PROFILE>/lib. - Copy the
<JBOSS_HOME>docs/examples/jca/mysql-ds.xmlexample datasource deployer file to<JBOSS_HOME>/server/<PROFILE>/deploy/, for use as a template.
MySQL limitations
- Millisecond and microsecond measurements
- MySQL does not currently support millisecond and microsecond measurements when returning database values such as
TIMEandTIMESTAMP. Tests which rely on these measurements will fail.
B.6.2. MySQL Local-TX Datasource
Example B.21. MySQL Local-TX Datasource
localhost, on port 3306, with autoReconnect enabled. This is not a recommended configuration, unless you do not need any Transactions support.
<datasources>
<local-tx-datasource>
<jndi-name>MySqlDS</jndi-name>
<connection-url>jdbc:mysql://localhost:3306/database</connection-url>
<driver-class>com.mysql.jdbc.Driver</driver-class>
<user-name>username</user-name>
<password>secret</password>
<connection-property name="autoReconnect">true</connection-property>
<!-- Typemapping for JBoss 4.0 -->
<metadata>
<type-mapping>mySQL</type-mapping>
</metadata>
</local-tx-datasource>
</datasources> B.6.3. MySQL Using a Named Pipe
Example B.22. MySQL Using a Named Pipe
<datasources>
<local-tx-datasource>
<jndi-name>MySQLDS</jndi-name>
<connection-url>jdbc:mysql://./database</connection-url>
<driver-class>com.mysql.jdbc.Driver</driver-class>
<user-name>username</user-name>
<password>secret</password>
<connection-property name="socketFactory">com.mysql.jdbc.NamedPipeSocketFactory</connection-property>
<metadata>
<type-mapping>mySQL</type-mapping>
</metadata>
</local-tx-datasource>
</datasources> B.7. PostgreSQL
Example B.23. PostgreSQL Local-TX Datasource
<?xml version="1.0" encoding="UTF-8"?>
<datasources>
<local-tx-datasource>
<jndi-name>PostgresDS</jndi-name>
<connection-url>jdbc:postgresql://[servername]:[port]/[database name]</connection-url>
<driver-class>org.postgresql.Driver</driver-class>
<user-name>x</user-name>
<password>y</password>
<!-- sql to call when connection is created
<new-connection-sql>some arbitrary sql</new-connection-sql>
-->
<!-- sql to call on an existing pooled connection when it is obtained from pool
<check-valid-connection-sql>some arbitrary sql</check-valid-connection-sql>
-->
<!-- corresponding type-mapping in the standardjbosscmp-jdbc.xml (optional) -->
<metadata>
<type-mapping>PostgreSQL 8.0</type-mapping>
</metadata>
</local-tx-datasource>
</datasources>
Important
max_prepared_transactions uses the default value (0) in PostgreSQL v8.4 and v8.2.
max_prepared_transactions value to meet or exceed the value of max_connections so every session can have a prepared transaction pending.
Example B.24. PostgreSQL XA Datasource
<?xml version="1.0" encoding="UTF-8"?>
<datasources>
<xa-datasource>
<jndi-name>PostgresDS</jndi-name>
<xa-datasource-class>org.postgresql.xa.PGXADataSource</xa-datasource-class>
<xa-datasource-property name="ServerName">[servername]</xa-datasource-property>
<xa-datasource-property name="PortNumber">5432</xa-datasource-property>
<xa-datasource-property name="DatabaseName">[database name]</xa-datasource-property>
<xa-datasource-property name="User">[username]</xa-datasource-property>
<xa-datasource-property name="Password">[password]</xa-datasource-property>
<track-connection-by-tx></track-connection-by-tx>
</xa-datasource>
</datasources>B.8. Ingres
Example B.25. Ingres Datasource
<?xml version="1.0" encoding="UTF-8"?>
<datasources>
<local-tx-datasource>
<jndi-name>IngresDS</jndi-name>
<use-java-context>false</use-java-context>
<driver-class>com.ingres.jdbc.IngresDriver</driver-class>
<connection-url>jdbc:ingres://localhost:II7/testdb</connection-url>
<datasource-class>com.ingres.jdbc.IngresDataSource</datasource-class>
<datasource-property name="ServerName">localhost</datasource-property>
<datasource-property name="PortName">II7</datasource-property>
<datasource-property name="DatabaseName">testdb</datasource-property>
<datasource-property name="User">testuser</datasource-property>
<datasource-property name="Password">testpassword</datasource-property>
<new-connection-sql>select count(*) from iitables</new-connection-sql>
<check-valid-connection-sql>select count(*) from iitables</check-valid-connection-sql>
<metadata>
<type-mapping>Ingres</type-mapping>
</metadata>
</local-tx-datasource>
</datasources>Appendix C. Logging Information and Recipes
C.1. Log Level Descriptions
| log4j Level | JDK Level | Description |
|---|---|---|
| FATAL |
The Application Service is likely to crash.
| |
| ERROR | SEVERE |
A definite problem exists.
|
| WARN | WARNING |
Likely to be a problem, but may be recoverable.
|
| INFO | INFO |
Low-volume detailed logging. Something of interest, but not a problem.
|
| DEBUG | FINE |
Low-volume detailed logging. Information that is probably not of interest.
|
| FINER |
Medium-volume detailed logging.
| |
| TRACE | FINEST |
High-volume detailed logging.
|
Note
Example C.1. Restricting Logged Information to a Specific Log Level
<!-- Show the evolution of the DataSource pool in the logs [inUse/Available/Max]--> <category name="org.jboss.resource.connectionmanager.JBossManagedConnectionPool"> <priority value="TRACE" class="org.jboss.logging.XLevel"></priority> </category>
C.2. Separate Log Files Per Application
conf/log4j.xml deployment descriptor.
Example C.2. Filtering App1 Log Output to a Separate File
<appender name="App1Log" class="org.apache.log4j.FileAppender">
<errorHandler class="org.jboss.logging.util.OnlyOnceErrorHandler"></errorHandler>
<param name="Append" value="false"/>
<param name="File" value="${jboss.server.home.dir}/log/app1.log"/>
<layout class="org.apache.log4j.PatternLayout">
<param name="ConversionPattern" value="%d{ABSOLUTE} %-5p [%c{1}] %m%n"/>
</layout>
</appender>
...
<category name="com.app1">
<appender-ref ref="App1Log"></appender-ref>
</category>
<category name="com.util">
<appender-ref ref="App1Log"></appender-ref>
</category>
Example C.3. Using TCLMCFilter
jboss.logging.filter.TCLMCFilter, which allows you to filter based on the deployment URL.
<appender name="App1Log" class="org.apache.log4j.FileAppender">
<errorHandler class="org.jboss.logging.util.OnlyOnceErrorHandler"></errorHandler>
<param name="Append" value="false"/>
<param name="File" value="${jboss.server.home.dir}/log/app1.log"/>
<layout class="org.apache.log4j.PatternLayout">
<param name="ConversionPattern" value="%d{ABSOLUTE} %-5p [%c{1}] %m%n"/>
</layout>
<filter class="org.jboss.logging.filter.TCLMCFilter">
<param name="AcceptOnMatch" value="true"/>
<param name="DeployURL" value="app1.ear"/>
</filter>
<!-- end the filter chain here -->
<filter class="org.apache.log4j.varia.DenyAllFilter"></filter>
</appender>
C.3. Redirecting Category Output
appender-ref to the category.
Example C.4. Adding an appender-ref
<appender name="JSR77" class="org.apache.log4j.FileAppender">
<param name="File" value="${jboss.server.home.dir}/log/jsr77.log"/>
...
</appender>
<!-- Limit the JSR77 categories -->
<category name="org.jboss.management" additivity="false">
<priority value="DEBUG"></priority>
<appender-ref ref="JSR77"></appender-ref>
</category>
org.jboss.management output goes to the jsr77.log file. The additivity attribute controls whether output continues to go to the root category appender. If false, output only goes to the appenders referred to by the category.
Appendix D. Revision History
| Revision History | |||||||
|---|---|---|---|---|---|---|---|
| Revision 5.2.0-100.400 | 2013-10-30 | ||||||
| |||||||
| Revision 5.2.0-100 | Wed 23 Jan 2013 | ||||||
| |||||||
| Revision 5.1.2-103 | Wed May 9 2012 | ||||||
| |||||||
| Revision 5.1.2-102 | Wed May 9 2012 | ||||||
| |||||||
| Revision 5.1.2-101 | Wed May 9 2012 | ||||||
| |||||||
| Revision 5.1.2-100 | Thu Dec 8 2011 | ||||||
| |||||||
| Revision 5.1.1-100 | Mon Jul 18 2011 | ||||||
| |||||||
| Revision 5.1.0-100 | Thu Sep 23 2010 | ||||||
| |||||||