此内容没有您所选择的语言版本。
Getting Started with CodeReady Studio Tools
Introduction to Using Red Hat CodeReady Studio Tools
Abstract
Chapter 1. Setting Up and Managing a Repository for Your Projects
1.1. Using Git with CodeReady Studio
The IDE includes the Git Perspective to allow developers to create, add, and manage their Git repositories quickly and easily with a graphical interface. This article introduces the basic workflow of a Git project and how to accomplish the most common Git-related tasks via the Git perspective.
1.1.1. Setting Up the Git Perspective
To locate the Git Perspective in the IDE:
- In the IDE, click Window > Perspective > Open Perspective > Other.
- In the Open Perspective window, click Git and click Open. The Git Repositories view appears.
1.1.2. Setting up a Repository in the Git Perspective
The first step to using the Git Perspective in the IDE is to set up a Git repository.
1.1.2.1. Creating a New Git Repository
If a repository is not already created and available, use the following steps to create a new repository:
Click the Create a new Git Repository and add it to this view icon.
Figure 1.1. Click the Create a New Git Repository Button

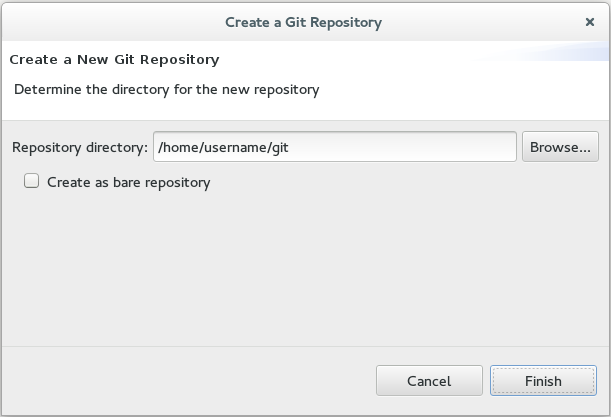
In the Create a Git Repository window:
- Ensure that the automatically populated default value for the Repository directory field is correct.
Optionally, click the Create a bare repository checkbox to create a new bare repository. For details about bare repositories and how they differ from a normal repository, see the Additional Resources section.
Figure 1.2. Create a New Git Repository
A new git repository is created on your local machine and is listed in the Git Repositories view.
1.1.2.2. Cloning an Existing Git Repository
If your repository already exists online (for example, in GitHub), use the following steps to create a local clone:
- Ensure that you have forked the repository online. This option is available in the repository host’s website.
Click the Clone a Git Repository and add the clone to this view icon.
Figure 1.3. Click the Clone a Git Repository Icon

- Click the Clone a Git Repository icon.
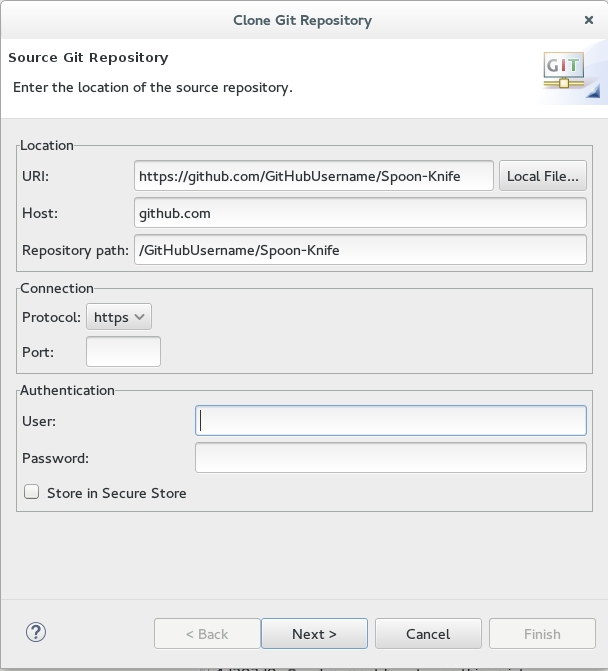
Enter the details of the source repository as follows:
- Add the URI for the repository’s online source. This automatically populates the Host and Repository path fields.
- In the Authentication pane, add your username and password for the source repository.
Click Next to continue.
Figure 1.4. Enter the Source Repository Details
- In the Clone Git Repository window, select the branches that you want to clone and click Next.
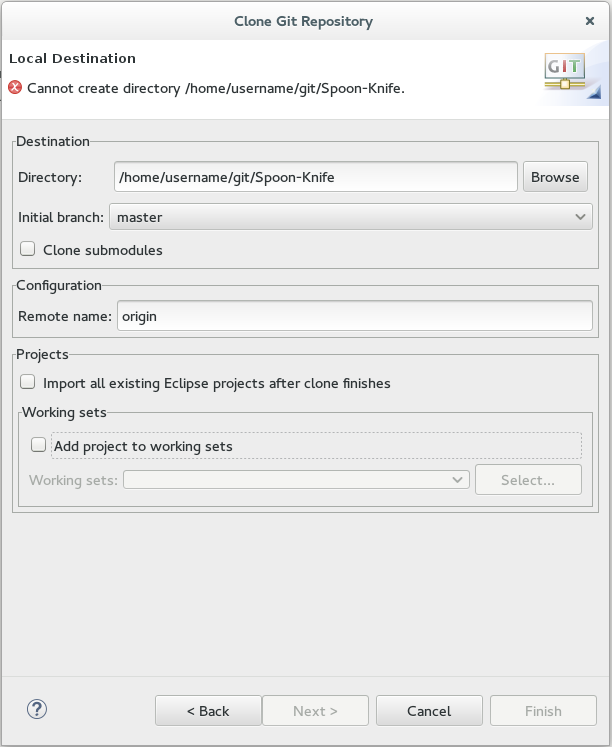
Customize the local version of your Git repository as follows:
- Confirm that the automatically populated information for the destination Directory and Initial Branch are correctly populated.
- Optionally, set a non-default name for the Remote name field.
Optionally, select the Add project to working sets check box and use the drop down menu and the Select button to select the appropriate working sets for this repository.
Figure 1.5. Customize the Local Version of the Git Repository
- Click Finish to conclude cloning an existing Git repository. The new cloned repository is listed in the Git Repositories view.
1.1.2.3. Adding an Existing Local Git Repository
If you have already cloned a Git repository locally, the following instructions are necessary to add your Git repository to the IDE. If you have not yet cloned your repository, follow the instructions in the following prerequisites section.
Prerequisites
- Ensure that you have forked the repository online.
On the command line on your local system, navigate to the location where you want to store the local copy of the repository and enter the following command to clone the repository:
$ git clone _<repository URL>_
Use the following instructions to add your existing local Git Repository to CodeReady Studio’s Git Perspective:
Click the Add an existing local Git Repository to this view icon.
Figure 1.6. Click the Add an Existing Local Git Repository Icon

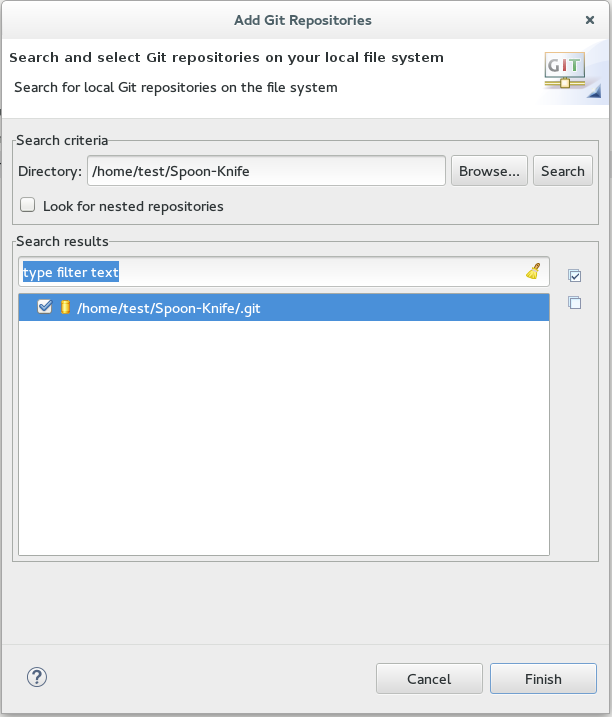
Select the local Git Repository as follows:
- Click Browse to navigate to the local directory that contains the Git repository.
- Optionally, select the Look for nested repositories checkbox to search for nested repositories.
In the Search results pane, ensure that the appropriate .git file is selected and click Finish.
Figure 1.7. Find and Add Local Repository
The local repository now appears in the Git Repositories view.
1.1.3. Adding a Remote for the Repository
After setting up your repository for the first time, set up a remote for repository. This is a one-time set up step for newly created or added repository.
To set up the remote for your repository:
- In the Git Repositories view, expand the target repository.
- From the expanded options, right-click Remotes and then Create Remote.
In the New Remote dialog box:
- Add a name in the Remote name field.
- Ensure that Configure push is selected.
- Click OK to continue.
In the Configure Push dialog box:
- Click Change to view the Select a URI dialog box.
- In the URI field, add the URI to your repository . This automatically populates the Host and Repository path fields.
- In the Authentication pane, add your repository username and password and click Finish to continue.
- Click Save to save your push configuration settings. Expand the Remotes folder in the repository view to see the newly added remote.
1.1.4. Creating and Working With a New Branch
This section provides instructions for creating a new branch and common tasks that you can perfrom with the new branch.
1.1.4.1. Creating a New Branch
If your repository is already set up in the IDE, create a new branch to make changes to the files.
To create a new branch:
In the Git Repositories view:
- Expand the name of your Git Repository.
- Click Branches to expand the branch view.
- Click Remote Tracking to view all remote branches for the repository.
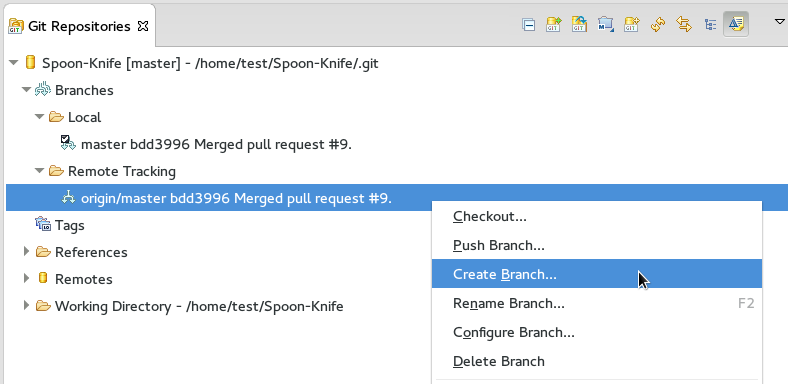
A branch displays with a name that begins with origin/master. Right-click this branch and click Create Branch.
Figure 1.8. Create a Branch from Origin/Master
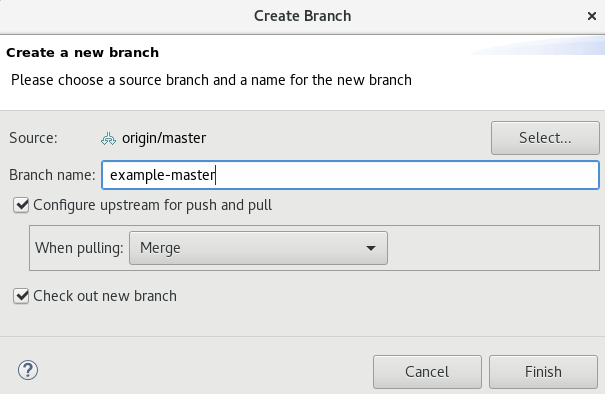
Add the required details about the new branch:
- In the Branch name field, add the desired new branch name.
- Ensure that the Configure upstream for push and pull checkbox is selected.
- In the When pulling options, select the option that suits your requirement.
Ensure that the Checkout new branch check box is selected and click Finish.
Figure 1.9. Add Details for a New Branch
The new branch appears under {Repository_Name} > Branches > Local.
1.1.4.2. Working in the New Branch
After creating a new branch, you can implement changes in the new branch as follows:
- Expand {Repository_Name} > Branches > Local and find the new branch where changes are to be implemented.
Confirm that the target branch is checked out. The currently checked-out branch displays a small check mark.
Figure 1.10. An Example of a Checked-out Branch

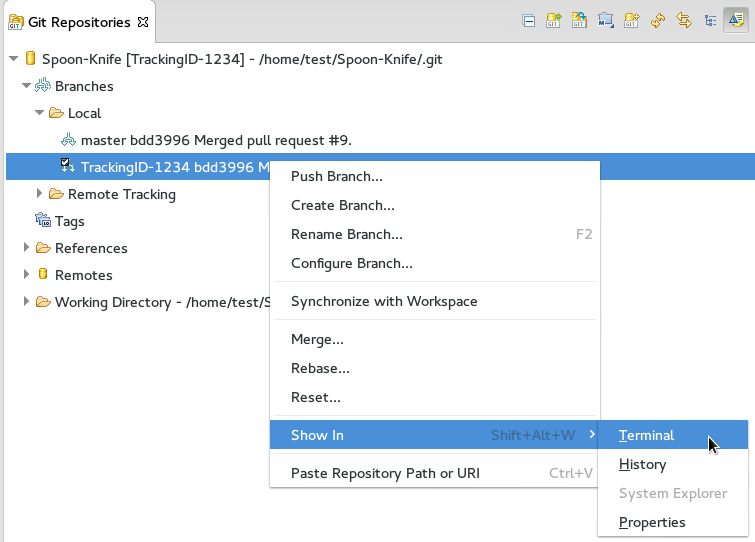
Right-click on the checked-out branch name and click Show In > Terminal.
Figure 1.11. The Show Branch in Terminal Option
Next to the Terminal tab that has just opened, click the Open a Terminal icon to view the command line prompt in this view.
Figure 1.12. The Open a Terminal Icon

In the Launch Terminal dialog box:
- In the Choose a Terminal list, ensure that Local Terminal is selected.
- In the Encoding list, click Default (ISO-8859-1). Click OK. Note that as a default, the terminal window is at the /home/YourCurrentUser/ directory.
The Terminal tab now displays a command line terminal. Use the terminal view to make the required changes to your checked-out files.
1.1.4.3. Updating the Branch Before Implementing the Changes
When working locally on a branch, it is better to ensure the local branch is up to date before creating a pull request (PR). As an example, if someone else has checked out the same repository and created a new branch, made changes, and merged the changes, use the following procedure to update your repository and branch before committing your own changes.
In the example below, a new branch called TrackingID-1234 is created using the IDE. Assuming that someone else is working on the same repository and has created a new branch called NEWBRANCH, made changes to it, and then merged the changes back into the repository. The local branch (TrackingID-1234) is now out of date because it does not include the changes from NEWBRANCH. Use the following instructions to update the branch:
- Right-click the name of the repository to update and click Pull. A status menu appears that displays the progress of the pull request. When the pull is complete, the Pull Result for {Repository_Name} window appears showing the results of the fetch and update operations.
- Click Close to conclude the operation. The repository now contains the most updated version of the contents.
1.1.5. Committing and Merging the Changes
After all the required changes are complete, commit the changes and then create a PR. PRs are then evaluated by the repository owner and either merged into the repository or rejected.
To commit and merge the changes:
- Expand {Repository_Name} > Branches > Local. Ensure that the check mark that indicates the current branch appears at the correct working branch.
- Right-click the name of the repository and click Commit.
In the Git Staging view:
- In the Commit message field, add a commit message describing the changes.
Confirm that the automatically populated Author and Committer fields display the correct name and email address.
Figure 1.13. Add details in the Commit Changes Field
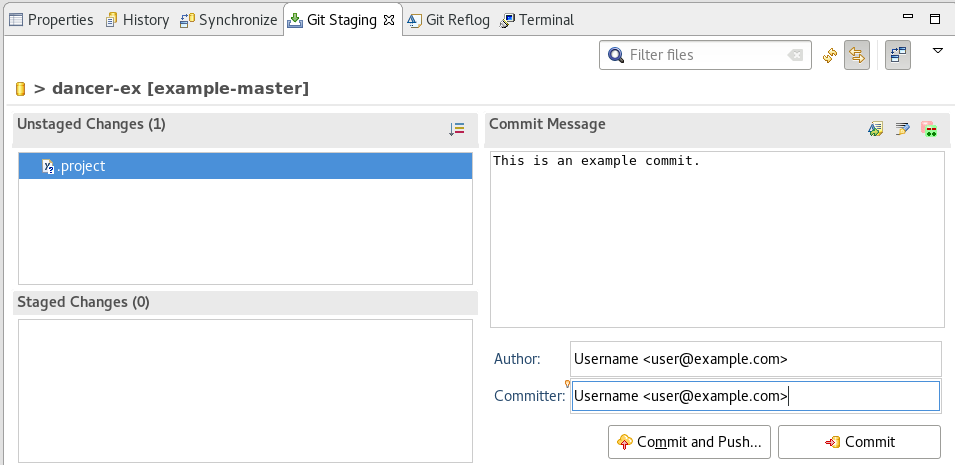
- Click Commit to create a new commit (without creating a Pull Request) or click Commit and Push to commit the changes and create a Pull Request at the same time.
1.1.5.1. Committing and Pushing the Changes
If you selected Commit and Push in Section 1.1.5, “Committing and Merging the Changes”, use the following instructions:
- In the Login dialog box, enter your repository access username and password and click OK.
When the operation completes, the repository is now ahead by one commit. This is represented with an arrow and the number one:
Figure 1.14. Git Repository Status

- After the Pull Request is evaluated and merged, right-click the repository and click Pull to manually update the repository. A Pull Request is generating and ready for the repository owner to review.
1.1.5.2. Committing Without Pushing the Changes
If you selected Commit in Section 1.1.5, “Committing and Merging the Changes” to commit changes but not push them, use the following instructions:
When the operation completes, the repository is now ahead by one commit. This is represented with an arrow and the number one.
Figure 1.15. Git Repository Status

- When you are ready to create a Pull Request, right click the current branch name and click Push Branch {branch_name}.
- An automatically populated `Push Branch {Branch_Name}* dialog box appears. Confirm that the settings are correct. The settings selected when creating this branch are used for this step. Click Next to continue.
- In the Login dialog box, enter your repository access username and password and click OK.
- In the Push Confirmation dialog box, click Finish to create the Pull Request. If requested, supply the username and password for the repository once again.
- When the operation completes, a Push summary dialog box appears. Click OK to dismiss this dialog box. The included changes are now committed and a Pull Request is generated for the repository owner to review.
Additional Resources
-
Bare repositories are recommended for central repositories, but not for development environments. Bare repositories differ from normal repositories because they do not contain a working or checked out copy of any source files. This prevents editing files and committing changes in the repository. Additionally, they store the git revision history for your repository in the repository’s root folder instead of in a
.gitsub-folder. - If you need to add a change ID to each commit message, in the Comming Changes dialog box, click the rightmost icon at the top right corner to add a change ID to the commit message.
Chapter 2. Configuring Maven Basics
In the context of application development, Maven provides a standardized build system for projects. One of the main benefits of using Maven with your project is that it facilitates fetching dependencies from one or more repositories. This article serves as an introduction to using Maven with the IDE.
Root Maven projects can serve as aggregators for multiple Maven modules, also known as sub-projects. For each module that is part of a maven project, a <module> entry is added to the project’s pom.xml file. A pom.xml that contains <module> entries is often referred to as an aggregator pom.
When modules are included into a project it is possible to execute Maven goals across all of the modules by a single command issued from the parent project directory.
The provided instructions pertain to the creation of a parent+module project structure. If you prefer to create a simple project, simply start with an archetype or don’t use the pom packaging in step 2.i of the Section 2.1, “Creating a New Maven Project” section.
2.1. Creating a New Maven Project
Use the following instructions to create the parent project of a multi-module Maven project. The instructions provided ensure that the packaging option is set to pom, which is a requirement for multi-module Maven projects. Alternately, to create a standalone Maven project instead, set the packaging option to an option other than pom.
To create a new Maven project:
- In the workspace, click File > New > Other.
- In the Filter field, type maven and then click Maven Project from the search results.
- Click Next to continue.
Enter the initial project details:
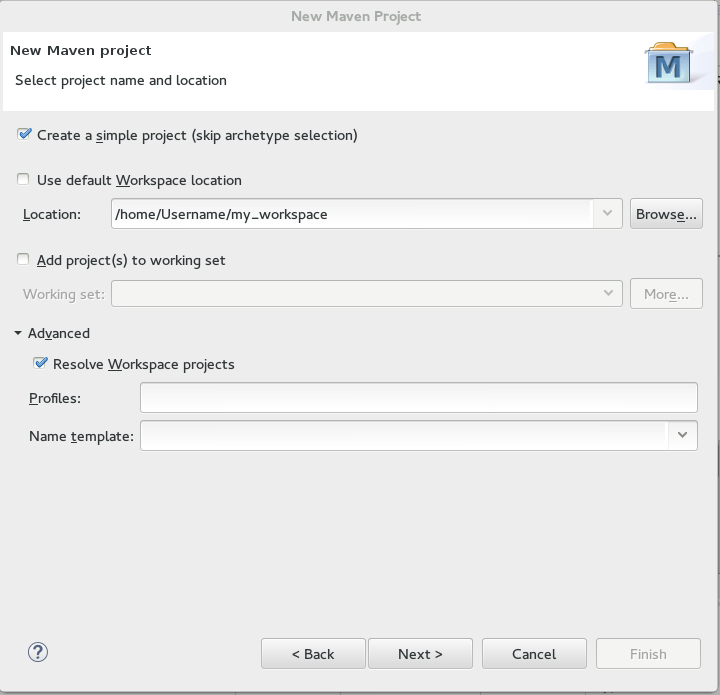
- Click the Create a simple project (skip archetype selection) check box. If this check box is selected, the Select an Archetype step of the wizard is skipped and the project type is set to pom, which is required to create a Maven Module based on this Maven project. Alternately, to create a standalone project, clear the Create a simple project (skip archetype selection) check box and follow the instructions in the wizard.
- Ensure that the Use default Workspace location check box is clear and specify a non-default location for your workspace files using the Browse button. Using a non-default workspace location is recommended because this allows other tools to access the workspace location easily.
- Optional, click the Add project(s) to working set check box to add the newly created projects to a working set.
Optional, click Advanced to view additional optional advanced configuration for the new Maven project, such as:
- Resolve Workspace projects: Dependencies opened as workspace projects will be resolved without having to install them to your local Maven repository first. This way, any changes made to one of these dependencies will have an immediate effect on other projects consuming it (compilation, refactoring, etc.). When Resolve Workspace projects is disabled, dependencies existing in the workspace must be installed to your local Maven repository after any change (by running mvn install), in order to see effects in projects consuming them.
-
Profiles: Select a set of Maven profiles to activate or deactivate in the workspace. Profiles are defined in the project
pom.xml, or inherited from a parentpom.xml, or defined in the relevantsettings.xml. Name templates: Allows you to disambiguate project names in the workspace by prepending or appending the group ID or SCM branch names to the default artifact ID.
Figure 2.1. Create a New Maven Project
- When the configuration is complete, click Next to continue.
To configure the project details:
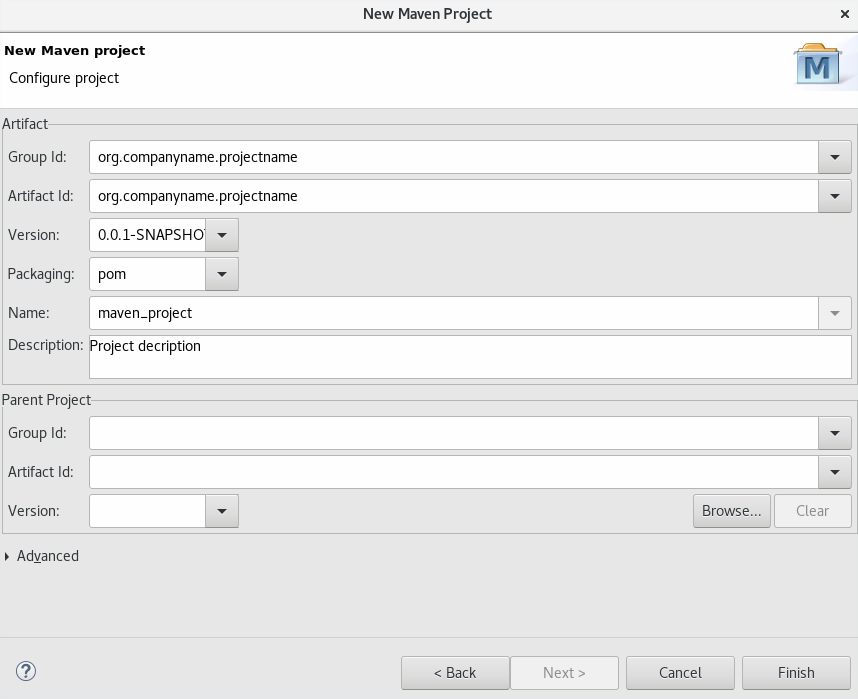
- In the Group Id field, enter the desired group ID, which is similar to an organization namespace (for example, com.company.businessunit.project).
- In the Artifact Id field, enter the desired artifact ID value, which is the name for your project. This value must not include any spaces and the only special characters allowed are periods ('.'), underscores ('_'), and dashes ('-').
- In the Version list, click 0.0.1-SNAPSHOT or a similar value. For details about the appropriate version build numbers, see Project Versions
- In the Packaging list, click pom.
- Optionally, in the Name field, add a name for your project.
Optionally, in the Description field, add a description for your project.
Figure 2.2. Configure Project Details
- Click Finish to conclude the new Maven project creation. Your new Maven project is created and appears in the Project Explorer view.
2.2. Creating a New Maven Module
Each Maven project with a packaging pom can include multiple Maven modules. Follow the instructions here to create your first Maven module.
Prerequisites
- You must have an existing Maven project available with the packaging type pom. See Section 2.1, “Creating a New Maven Project” for instructions to create a new Maven project.
To create a new Maven module:
- In the Project Explorer view, right-click the recently created pom project and click New > Project.
- In the New Project wizard, expand Maven and click Maven Module.
- Click Next to continue.
To enter the initial module details:
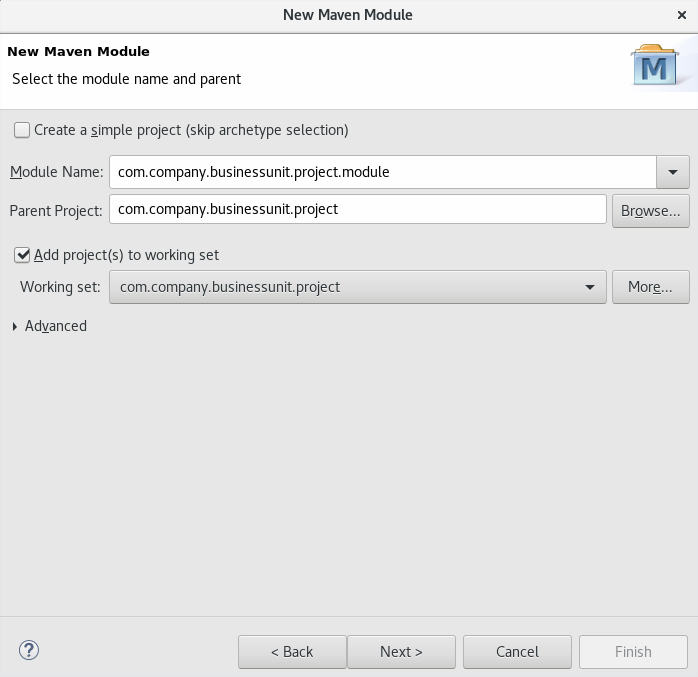
- Ensure that the Create a simple project (skip archetype selection) check box is clear. If this check box is clicked, the Select an Archetype step of the wizard is skipped.
- In the Module Name field, enter the desired module name. This value corresponds to the Maven project’s Project ID.
- Use the Browse button to locate the desired parent project and select it.
- Optionally, clikc the Add project(s) to working set check box to add the newly created projects to a working set.
Optionally, click Advanced to view additional optional advanced configuration for the new Maven project, such as:
-
Resolve Workspace projects: Dependencies opened as workspace projects will be resolved without having to install them to your local Maven repository first. This way, any changes made to one of these dependencies will have an immediate effect on other projects consuming it (compilation, refactoring, etc.). When Resolve Workspace projects is disabled, dependencies existing in the workspace must be installed to your local Maven repository after any change (by running
mvn install), in order to see effects in projects consuming them. -
Profiles: Select a set of Maven profiles to activate or deactivate in the workspace. Profiles are defined in the project
pom.xml, or inherited from a parentpom.xml, or defined in the relevantsettings.xml. Name templates: Allows you to disambiguate projects names in the workspace by prepending or appending the group ID or SCM branch names to the default artifact ID.
Figure 2.3. Set the Module Name and Parent
-
Resolve Workspace projects: Dependencies opened as workspace projects will be resolved without having to install them to your local Maven repository first. This way, any changes made to one of these dependencies will have an immediate effect on other projects consuming it (compilation, refactoring, etc.). When Resolve Workspace projects is disabled, dependencies existing in the workspace must be installed to your local Maven repository after any change (by running
- When the configuration is complete, click Next to continue.
To enter the module archetype information:
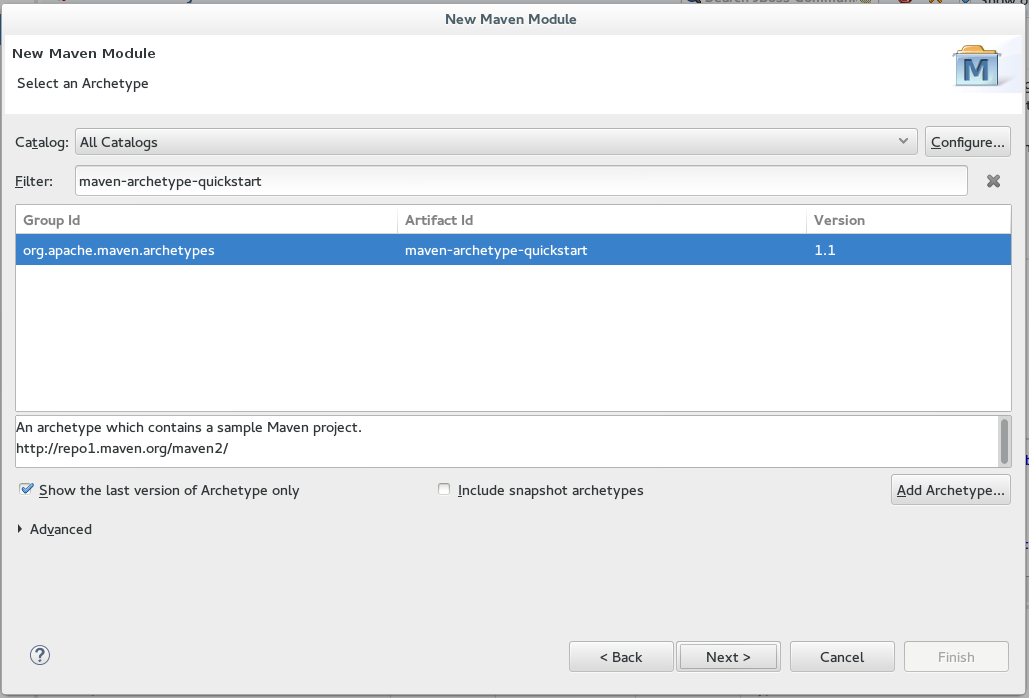
- Ensure that the Show the last version of Archetype only check box is clicked. This ensures that only the latest version of each archetype displays.
Select an archetype based on the purpose of the project you are creating. Use the keyword maven-archetype-quickstart in the Filter field to locate a sample Maven project archetype.
Figure 2.4. Select a Module Archetype
- Click Next to continue.
To enter the module details:
- In the Group Id field, add the same group ID value that was used for the Maven project.
- In the Version field, add the desired version number. For details about the appropriate version build numbers, see Project Versions
The Artefact Id and Package fields are automatically populated based on the parent project details. Click Finish to conclude setting up the Maven module.
Figure 2.5. Configure the Module Archetype Parameters

Optionally, to change the settings for the created Maven module, expand the module name in the Project Explorer view and double click pom.xml from the expanded list. An Overview tab appears for you to chnage the settings if you wish to.
Figure 2.6. Change the Module Settings from the Overview View
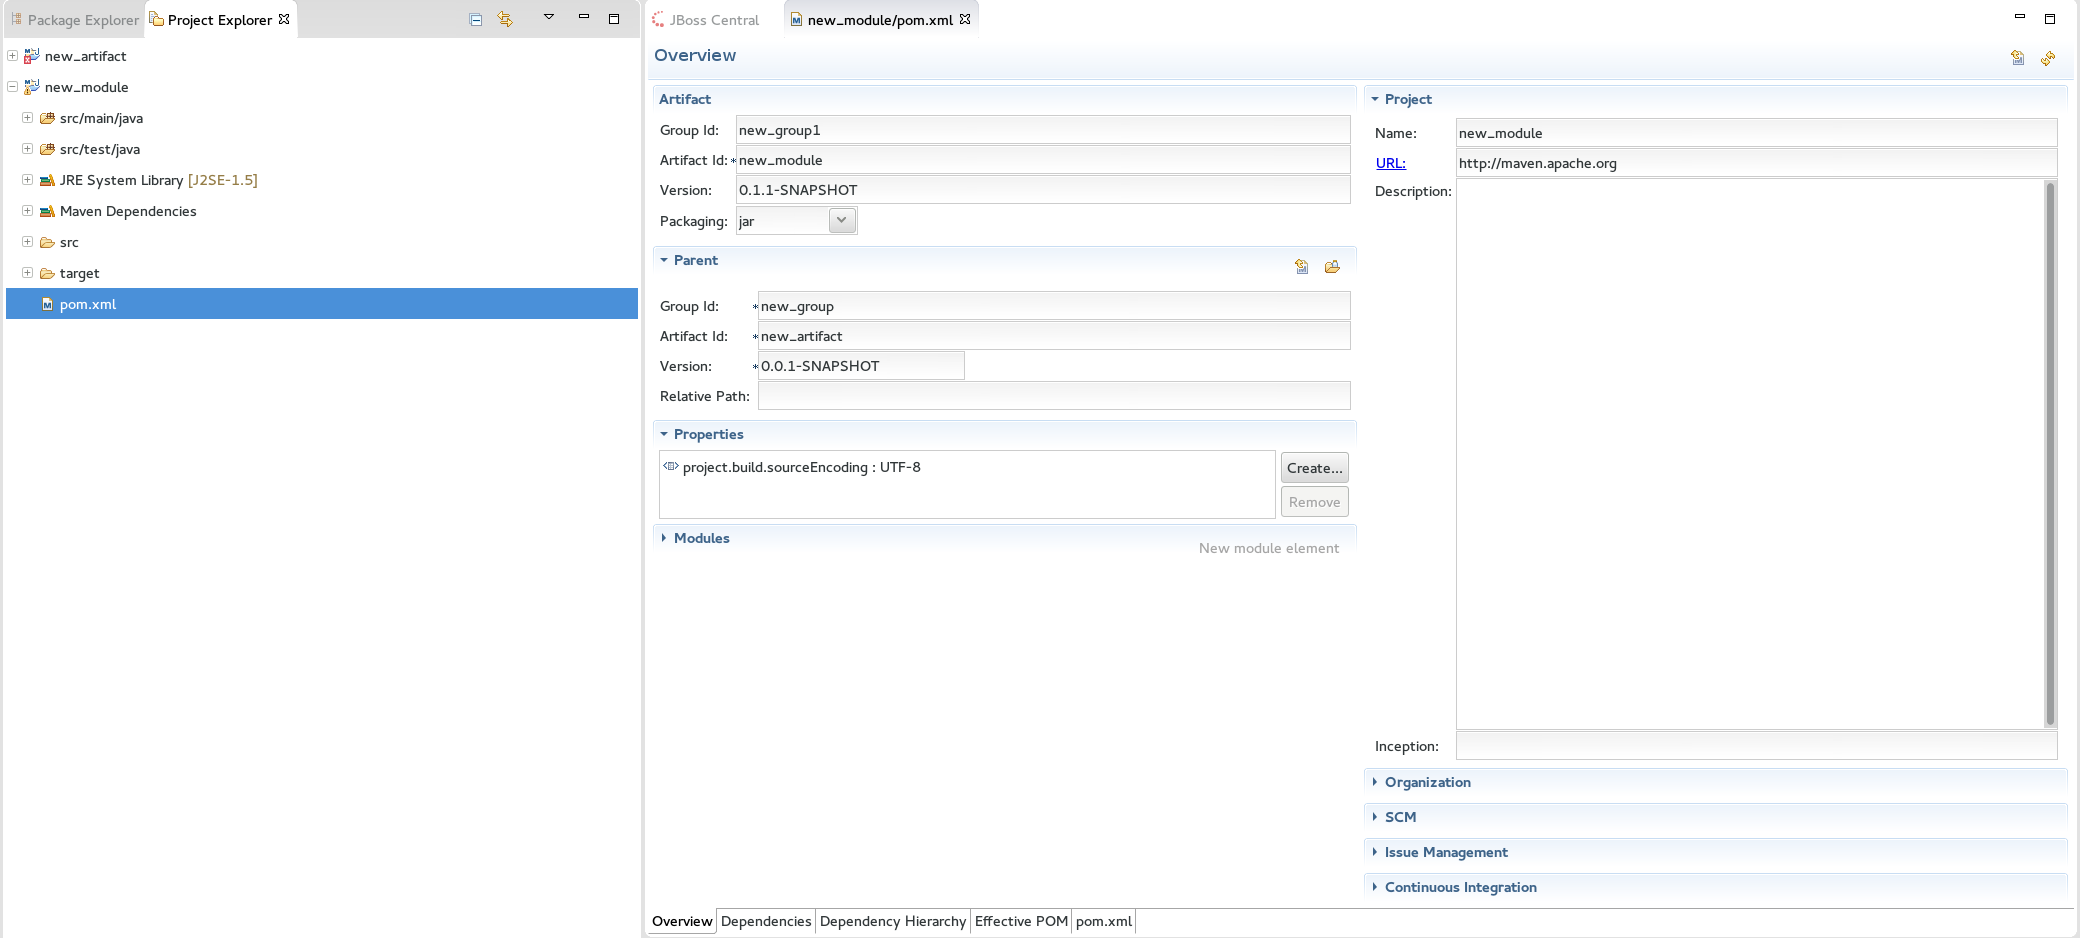
Your new Maven module is created and appears in the Project Explorer view. Additionally, a hierarchical view of the nested projects is now available in the Project Explorer view as well (see Nested/Hierarchical view of projects).
2.3. Adding Maven Support to an Existing Non-Maven Project
For an existing application that was not created with Maven support, use the following instructions to add Maven support to the non-Maven project:
- In the Project Explorer view, right-click the project name and click Configure > Convert to Maven Project.
To configure details for the new
pomfile:-
The basic fields for the new
pomfile are prepopulated based on the project details. If required, edit the existing values: - Optionally, in the Name field, add a name for the new project.
Optionally, in the Description field, add a brief description for the project.
Figure 2.7. Create a New Pom Descriptor
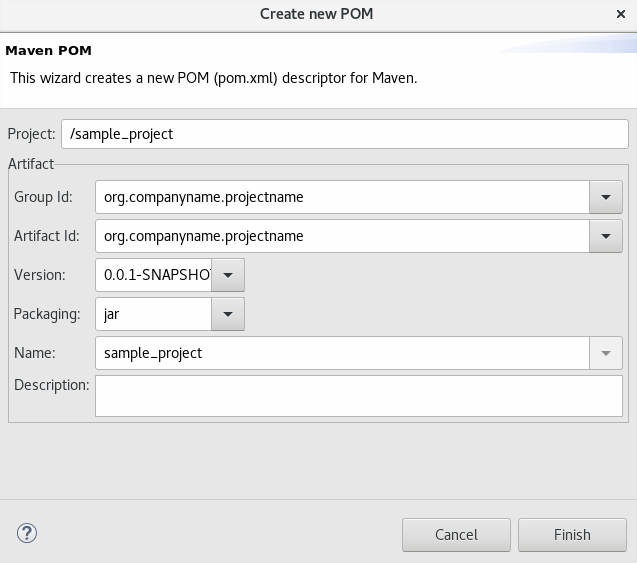
- Click Finish to finalize the pom information.
-
The basic fields for the new
- If the project references java dependencies, a wizard appears displaying all these dependencies and a green check mark when each dependency is identified. Learn more about dependency identification in the Troubleshooting section.
Check the Delete original references from project check box to avoid retaining duplicate or stale dependencies in your project.
Figure 2.8. Identify Maven Dependencies
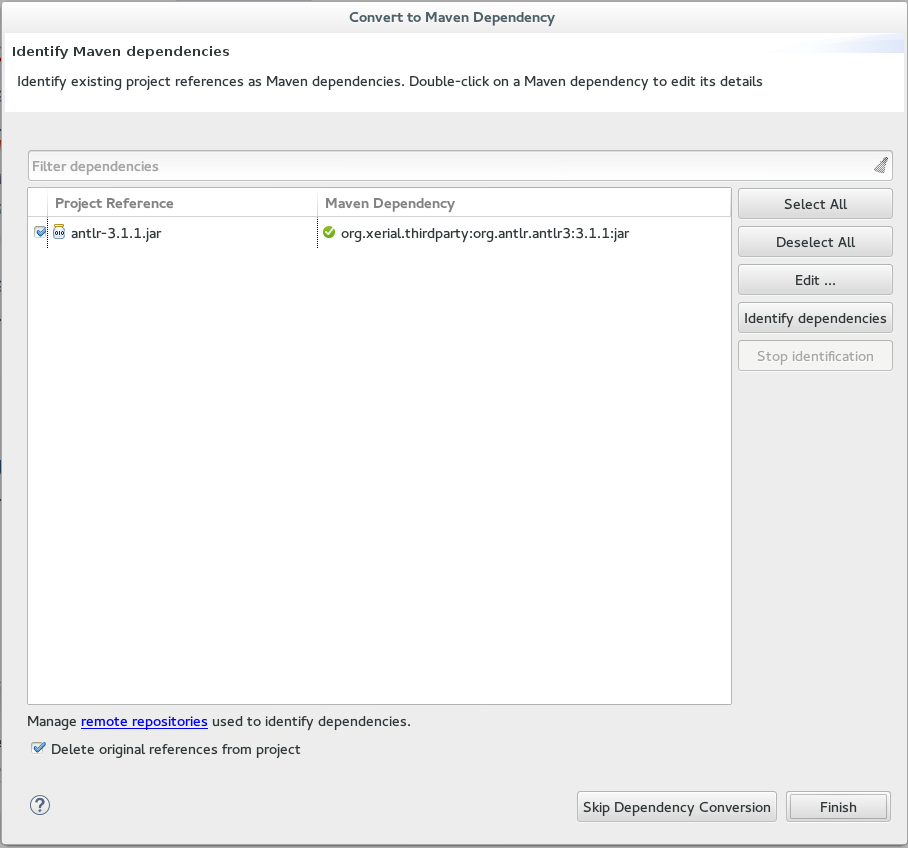
- Click Finish when all dependencies are converted. The existing project is now configured for Maven support.
2.4. Troubleshooting
2.4.1. Unidentifiable Dependency
Figure 2.9. Unidentifiable Dependency
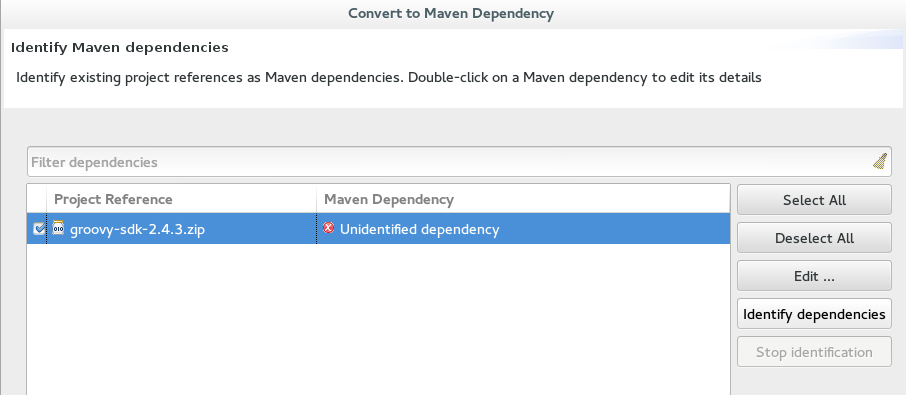
Issue:
Either:
- The jar file is corrupted/invalid.
- The jar file is valid but does not contain any metadata used for identification.
Resolution:
- Ensure that jar exists as a Maven artifact. If needed, you can install it to your local repository and then click .
- Double-click the dependency, or click and set the expected maven coordinates.
2.4.2. Some selected dependencies can not be resolved. Click here to configure repositories in your settings.xml.
Figure 2.10. Dependencies Can Not Be Resolved Error

Issue: This error displays when a dependency can be identified (that is, whether it contains the pom properties or other metadata) but the dependency is not available in any repository defined in your settings.xml file.
Resolution: Click the here link in the error message and compare the old and new settings for the dependency and add a new and correct repository. Users may choose to use one of the predefined repositories from Red Hat.
Additional Resources
The wizard used to convert a non-Maven project to a Maven project attempts to identify all the project’s classpath entries and their equivalent Maven dependencies. From the list of identified dependencies, users can select which ones will be added to the generated Maven
pom.xmlfile. When identifying dependencies, one of several strategies may be used:- Checking if the jar contains the relevant maven metadata.
- Identify the dependency using the Nexus indexer.
- Identify the dependency using the JBoss Nexus instance REST API (if we are online) via a SHA1 search.
-
Identify the dependency using the
search.maven.orgREST API (if we are online) via a SHA1 search.
-
All unchecked dependencies will be ignored and are not added to the generated
pom.xml. However, some of these can be added as transitive dependencies to your project. For instance, if you addjsp-apibut removeservlet-api, the latter appears in the project classpath, as it is a dependency ofjsp-api. -
You can double-click on a dependency from a list (or click the
Editbutton) to edit its Maven coordinates or scope. Selecting several dependencies (ctrl+click) and clicking theEditbutton allows batch editing of their scope.
Chapter 3. Developing First Applications with CodeReady Studio Tools
3.1. Configuring CodeReady Studio for use with JBoss EAP and JBoss Web Framework Kit
This article provides details for new and existing users who need to configure a fresh install of the IDE or upgrade the versions of Red Hat JBoss Enterprise Application Platform or JBoss Web Framework Kit in use.
The IDE supports application development and deployment with JBoss EAP and JBoss Web Framework Kit only after you configure the IDE for use with JBoss EAP and JBoss Web Framework Kit. This configuration is essential for using the enterprise versions of the example Maven projects provided in Red Hat Central. These projects are intended for deployment to JBoss EAP and necessitate IDE access to the JBoss EAP and JBoss Web Framework Kit Maven repositories.
3.1.1. Setting up JBoss EAP
To set up JBoss EAP for use in the IDE, you must direct the IDE to the local or remote runtime servers. This establishes a communication channel between the IDE and the JBoss EAP server for efficient deployment and server management workflows.
3.1.1.1. Downloading, Installing, and Setting Up JBoss EAP from within the IDE
If you have the IDE already installed but not JBoss EAP, you can download, install, and set up JBoss EAP from within the IDE. With this option, you can choose from a range of supported JBoss EAP versions; for details of supported JBoss EAP versions, see https://access.redhat.com/documentation/en-us/red_hat_codeready_studio/12.11/html/supported_configurations_and_components/.
To download, install, and set up JBoss EAP from within the IDE:
- Start the IDE.
-
Click
Window>Preferences, expandJBoss Tools, and then clickJBoss Runtime Detection. -
In the
Pathspane, clickDownload. In the
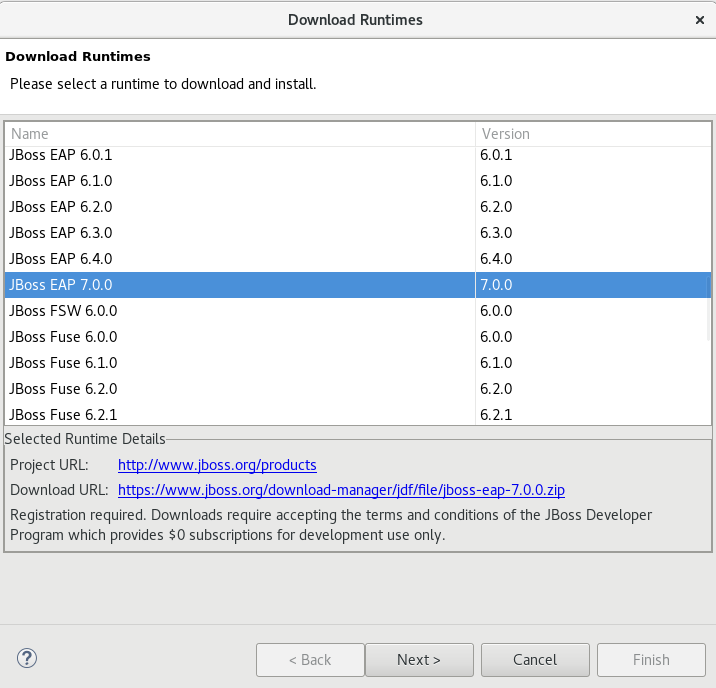
Download Runtimeswindow, from theDownload Runtimestable select the JBoss EAP version that you want to download and clickNext.NoteFor JBoss EAP 6.1.x and later, continue to follow the steps given here. For JBoss EAP 6.0.x and earlier, follow the on-screen instructions for downloading JBoss EAP from the Red Hat Customer Portal and after JBoss EAP is installed continue to Section 3.1.1.2, “Using Runtime Detection to Set Up JBoss EAP from within the IDE”.
Figure 3.1. Download Runtimes Window Listing Available JBoss EAP Versions
-
In the
JBoss.org Credentialswindow, enter your credentials and clickNext. -
In the
Runtime JBoss EAP_versionwindow, read the terms and conditions, and then clickI accept the terms of the license agreementand then clickNext. Note that if you have previously accepted the terms and conditions in the IDE or through the jboss.org website, this window is skipped. -
In the
Download Runtimewindow, in theInstall Folderfield, clickBrowseand choose a location in which to install JBoss EAP and clickFinish. TheDownload 'JBoss EAP 1window shows the progress of the downlaod. -
Click
Apply and Closeto close thePreferenceswindow. The server is listed in theServersview in stopped mode.
3.1.1.2. Using Runtime Detection to Set Up JBoss EAP from within the IDE
If the IDE and JBoss EAP are already installed, you can use runtime detection to set up JBoss EAP from within the IDE. The runtime detection feature automatically identifies the JBoss EAP instance installed on your local system and generates a corresponding default server setup for use in the IDE. This feature makes getting started with a default JBoss EAP server very quick.
Specific JBoss EAP versions are supported by each IDE release; for details of supported JBoss EAP versions, see https://access.redhat.com/documentation/en-us/red_hat_codeready_studio/12.11/html/supported_configurations_and_components/.
To use runtime detection to set up JBoss EAP for use in the IDE:
- Start the IDE.
-
Click
Window→Preferences, expandJBoss Tools, and then selectJBoss Runtime Detection. -
Click
Add. -
Navigate to
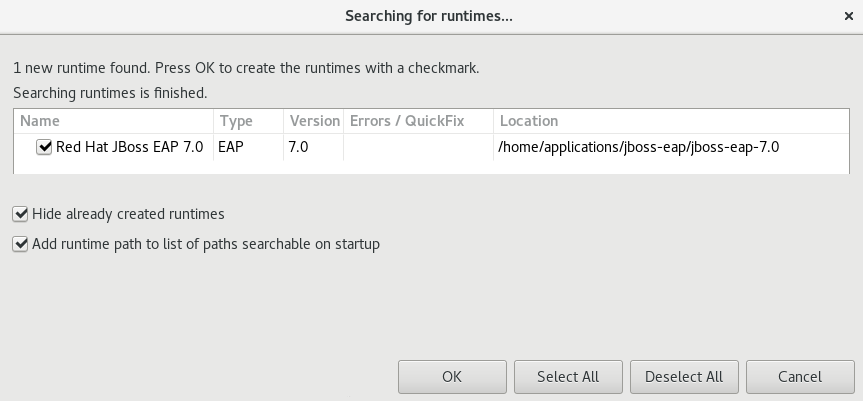
path/to/jboss-eapand clickOK. JBoss Server Tools recursively scans the path searching for installed servers and displays a list of those it finds. Ensure the
jboss-eap-versioncheck box is selected, where version denotes the JBoss EAP version, and clickOK.Figure 3.2. Selecting a Runtime
-
Click
Apply and Closeto close thePreferenceswindow. The server is listed in theServersview in stopped mode.
3.1.2. Configuring Maven for JBoss EAP and JBoss Web Framework Kit Maven Repositories
To configure Maven to use the JBoss EAP and JBoss Web Framework Kit Maven repositories when working inside the IDE, you must ensure that the IDE knows the location of your Maven configuration settings.xml file and that the necessary profiles for the JBoss EAP and JBoss Web Framework Kit Maven repositories are contained in that file. This ensures that Maven knows where to search for project dependencies when it is called to build Maven projects from within the IDE.
3.1.2.1. Specifying Maven settings.xml File Location
If you have multiple Maven settings.xml files or you are using a shared settings.xml file, then this file may not be in the default location expected by the IDE. In this case, you must inform the IDE of the file location.
To specify the Maven settings.xml file location:
- Start the IDE.
-
Click
Window→Preferences, expandMaven, and then clickUser Settings. -
For the
User Settingsfield, clickBrowseand locate thesettings.xmlfile. -
Click
Update Settings. -
Click
Applyand then clickOK.
3.1.3. Using JBoss EAP and JBoss Web Framework Kit Maven Repositories
You can either download the JBoss EAP and JBoss Web Framework Kit Maven repositories from the Red Hat Customer Portal or use the online Maven repository located at https://maven.repository.redhat.com/ga.
3.1.3.1. Using the Offline Maven Repositories
If you have not previously used these versions of JBoss EAP and JBoss Web Framework Kit, you must configure your Maven settings.xml file to use the associated product Maven repositories. You can manually edit your settings.xml file in a text editor or use the CodeReady Studio Maven integration feature to automatically detect the JBoss repositories and appropriately edit your settings.xml file.
The JBoss EAP and JBoss Web Framework Kit Maven repositories must be already obtained from the Red Hat Customer Portal and located on a system that you can access.
To specify the JBoss EAP and JBoss Web Framework Kit Maven repositories locations using the IDE:
- Start the IDE.
-
Click
Window→Preferences, expandJBoss Tools, and then clickJBoss Maven Integration. -
Click
Configure Maven Repositories. -
Click
Add Repository. -
Click
Recognize JBoss Maven Enterprise Repositories. -
Navigate to
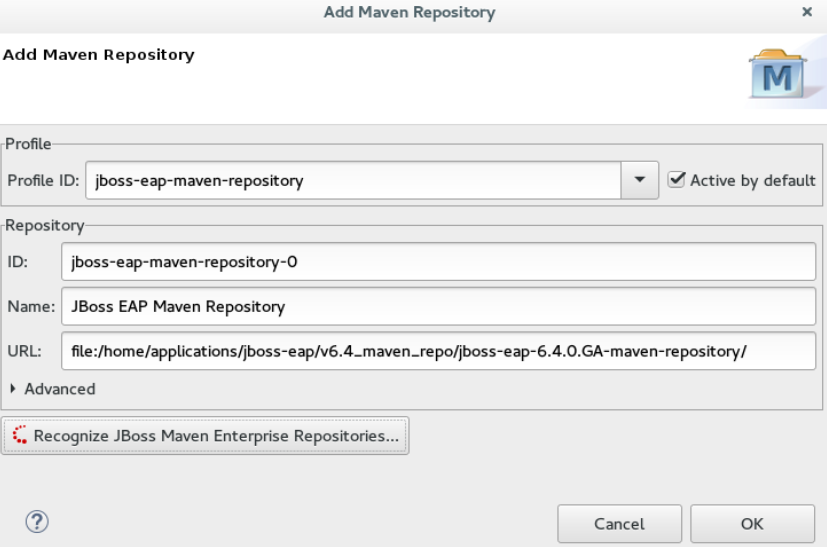
path/to/jboss-eap-maven-repositoryand clickOK. JBoss Maven Tools recursively scans the path searching for a Maven repository. Modify the information in the
IDandNamefields as desired, ensure theActive by defaultcheck box is selected, and then clickOK.Figure 3.3. Details of the Selected Maven Repository
-
Click
Add Repository. -
Click
Recognize JBoss Maven Enterprise Repositories. -
Navigate to
path/to/jboss-wfk-maven-repositoryand clickOK. JBoss Maven Tools recursively scans the path searching for a Maven repository. -
Modify the information in the
IDandNamefields as desired, ensure theActive by defaultcheck box is selected, and then clickOK. -
Click
Finishand at the prompt asking if you are sure you want to update the Maven configuration file clickYes. If the specified configuration file does not exist, JBoss Maven Tools creates it. -
Click
Applyand clickOKto close thePreferenceswindow.
3.1.3.2. Using the Online Maven Repositories
Adding the online repository to the IDE, adds https://maven.repository.redhat.com/ga to your settings.xml , which takes care of all the dependencies.
To use the online Maven repositories:
- Start the IDE.
-
Click
Window→Preferences, expandJBoss Tools, and then clickJBoss Maven Integration. -
Click
Configure Maven Repositories. -
Click
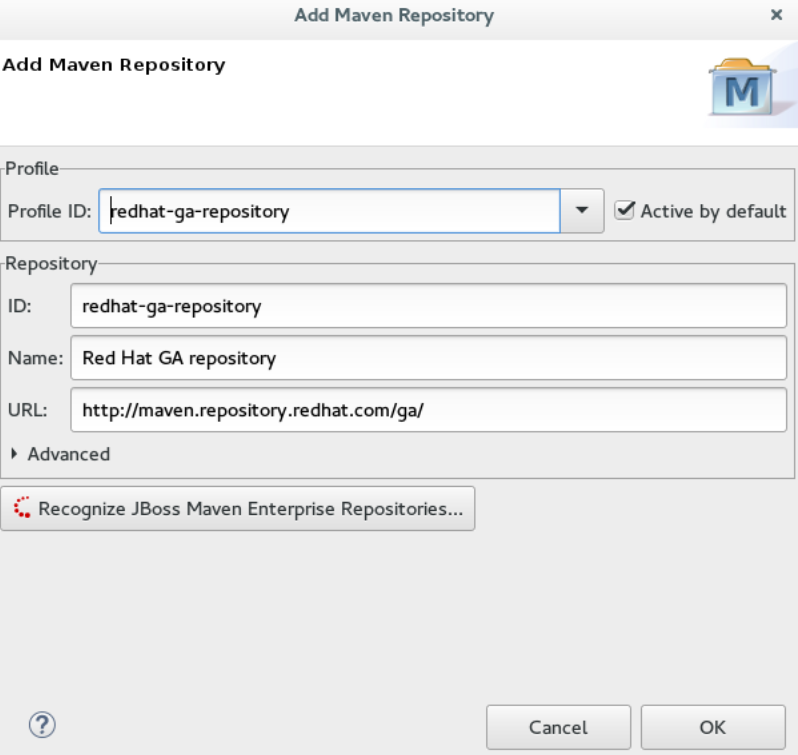
Add Repository. In the
Profile IDdrop-down list, selectredhat-ga-repository.Figure 3.4. Add a Maven Repository
-
Click
OK. -
In the
Configure Maven Repositorieswindow, clickFinish. -
Click
Applyand then clickOKto close thePreferenceswindow.
3.2. Creating and Importing Node.js Applications
Node.js is an event-based, asynchronous I/O framework and is used to develop applications that run JavaScript on the client and server side. This allows the application to re-use parts of the code and to avoid switching contexts. Node.js is commonly used to create applications such as static file servers, messaging middleware, HTML5 game servers, web application framework, and others.
CodeReady Studio supports node.js application development using the npm package installer and offers a built-in debugging tool to identify and fix issues with applications.
Prerequisites
Ensure that the following prerequisites are met to start developing node.js applications in CodeReady Studio:
-
Install npm. On Red Hat Enterprise Linux and Fedora, use the
sudo dnf install npmcommand. See the npm documentation (https://docs.npmjs.com/getting-started/installing-node) for installation information about other operating systems. - Install CodeReady Studio. You are now ready to start developing Node.js applications with CodeReady Studio.
3.2.1. Creating a new JavaScript Application
To create a new JavaScript project and application in CodeReady Studio:
To create a new JavaScript project:
- Click → → and type JavaScript in the search text box.
- Select JavaScript Project and click Next.
- In the Project Name field, add a name for your new project.
- Ensure that the rest of the fields, which are set to the default settings, are as required, and then click Finish to create the new project.
-
If asked to view the JavaScript perspective, click Yes. Your new project is listed in the
Project Explorerview.
To interactively create a
package.jsonfile:-
Click → → and then type
npmin the search box. - From the search results, click npm Init.
- Set the Base directory to your JavaScript project folder in your CodeReady Studio workspace.
-
Optionally, clear the
Use default configurationcheck box to supply non-default values for these fields. Click Finish to continue with the default values for the
package.jsonfile or to continue after changing the default values.Figure 3.5. Generate a New package.json File
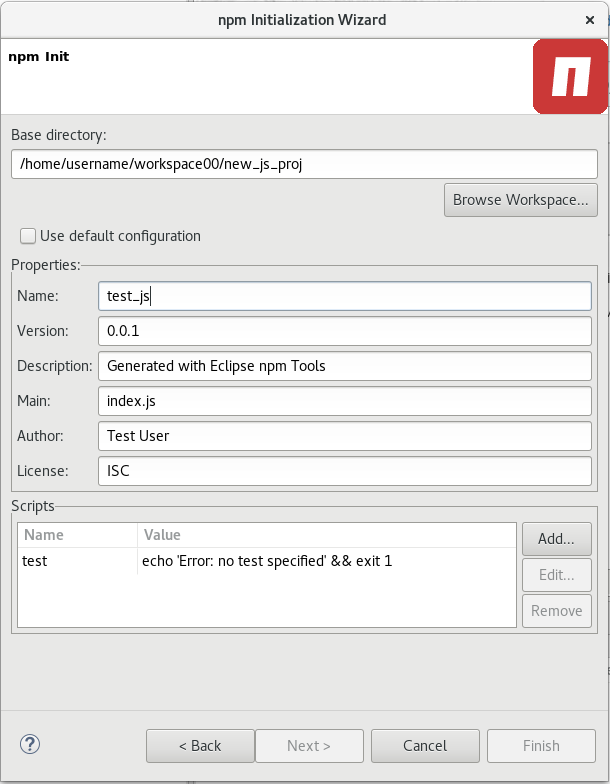
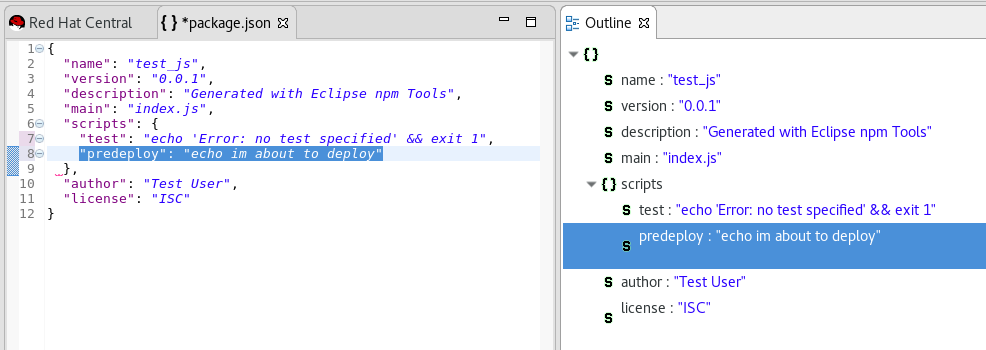
The new
package.jsonfile is generated and displayed for editing. If required, manually edit the file in the displayed pane and save the changes.Figure 3.6. Manually Edit the Generated package.json File
-
Click → → and then type
Manually edit the
package.jsonfile to add dependencies. Dependencies are modules which provide extended functionality, such as libraries and frameworks. See the following screen capture for an example of the required format for dependencies and developer dependencies.Figure 3.7. Adding Dependencies to the package.json File
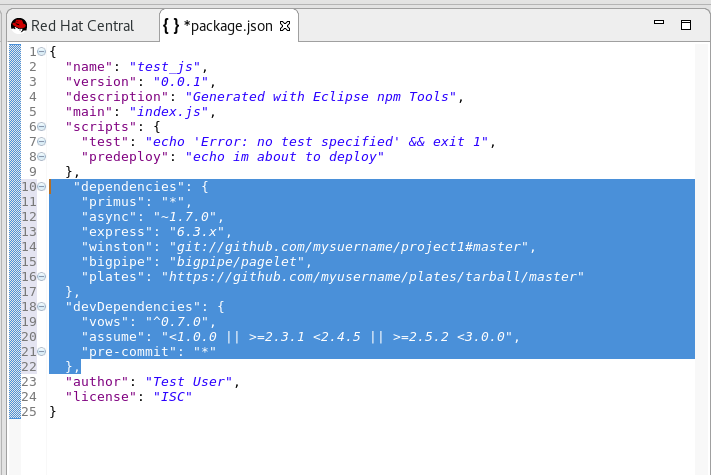
For further details about dependencies, see the NPM documentation: https://docs.npmjs.com/files/package.json#dependencies
Create a new JavaScript file with the required business logic:
-
In the
Project Explorerview, right-click the name of your project, and select → . -
In the dialog box, add a name for the new file, for example
index.js, and click Finish to create the new file. - The new file displays for editing in a new tab. Add the required business logic to the your JavaScript files and save the changes.
-
In the
-
Run the project files by right-clicking the
index.jsfile in your project and select → . TheConsoleview appears and displays details about the application as it runs, or errors if it is unable to run the application. You have created a new JavaScript project and application.
3.2.2. Importing an Existing JavaScript Project
You can import an existing JavaScript project directly into CodeReady Studio and then make changes and run the project as follows:
- Click → .
-
In the
Importdialog box, expand the General option. - Click Existing Projects into Workspace and then click Next.
In the
Import Projectsdialog box:-
Click either the
Select root directoryorSelect archive fileoptions based on your project format. - Click Browse to add the path to the project root directory or archive file.
-
In the
Projectsbox, select one or more projects to import into the workspace. -
If required, click the
Search for nested projectsoption to locate nested projects in the root directory or archive file. -
Click the
Copy projects into workspaceoption to save a copy of the imported project in the workspace directory specified for CodeReady Studio. -
If required, select the
Add project to working setscheckbox and add the details for a new or existing working set. -
Click Finish to add the project to the workspace. The
Project Explorerview now contains your imported project.
-
Click either the
-
If required, expand the project in the
Project Explorerview and either double-click the project files to edit them, or right-click and select → to add a new JavaScript file for your project. -
Run the project files by right-clicking the
index.jsfile in your project and click → . TheConsoleview appears and displays details about the application as it runs, or errors if it is unable to run the application. You have imported an existing JavaScript project into CodeReady Studio.
3.2.3. Debugging a Node.js Application
After either creating a new Node.js project or importing an existing one and then running the project, some errors may appear. CodeReady Studio includes a debugger to help identify and resolve these issues.
To use the debugging feature:
Start the debugger for your project:
-
In the
Project Explorerview, expand your project. -
Right-click the
index.jsfile for your project and click → . -
Select the
Remember my decisioncheck box in the dialog box to apply your selection to subsequent perspective shifts and then click Yes or No to continue.
-
In the
Review the elements of your project’s JavaScript files to locate errors in one of two ways:
-
Expand any variable listed in the
Variablestab to view additional objects and edit the details for each item. -
Hover the mouse cursor over any variables in the
index.jstab to view and edit its property details.
-
Expand any variable listed in the
Make changes to the files to address the errors:
-
Edit the
index.jsfile in the appropriate view. -
Save the changes. The
Consoleview runs the updated file and displays changes.
-
Edit the
After debugging the errors, use the Resume, Suspend, and Terminate buttons (
 ) as follows to test your changes:
- The Resume button (green triangle) continues running the project files.
- The Suspend button (two yellow rectangles) temporarily stops running the project files to allow users to make changes.
- The Terminate button (red square) ends the running of the project files.
- Repeat steps 4 through 6 as necessary to locate and fix errors found by the debugger.
-
When debugging is concluded, click → → and select
Project Explorerfrom the options. This displays the list of projects again. You have debugged your application and returned to theProject Explorerview.
3.3. Developing Applications Using the Forge Tool
CodeReady Studio offers Forge Tools for developing Java EE applications and to extend the IDE functionality in Eclipse. Start developing Java EE applications using either the Forge context menu or the command line from the IDE.
3.3.1. Creating a Forge Project
After you have created a Forge project you can set up persistence, add entities and fields, and create scaffold for the project.
To create a new project:
- Press Ctrl+4 to start Forge and open the JBoss Forge context menu.
- Click Project:New to open the Create a new project window.
In the Create a new project window:
- In the Project name field, type a project name.
- In the Top level package field, type {com.example} as the top package.
- In the Project location field, enter a target location for the Forge project.
- In the Stack list, click Java EE 7.
- Click Finish.
Figure 3.8. Create a New Forge Project
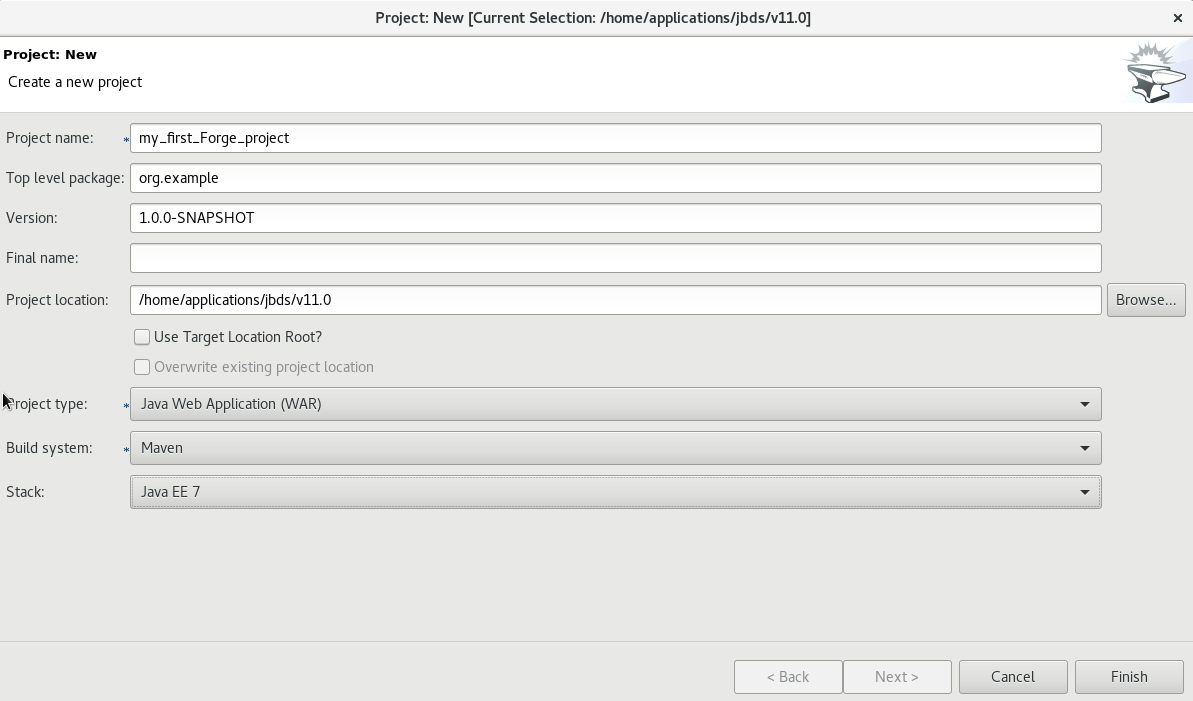
The project is listed in the Project Explorer view.
3.3.2. Setting up Persistence
Setting up the JPA prerequisites, creates the persistence.xml file in the project and adds the required dependencies to the pom.xml file.
While creating the JPA entity, the Forge console automatically detects any prerequisites that must be set up and prompts you to create those at runtime.
To set up persistence:
- Press Ctrl+4 to open the JBoss Forge context menu.
- Click JPA: New Entity. The window is populated with default values.
- Click Next to continue using the default values or edit the fields to change the values.
- In the Configure your connection settings window, ensure that the fields display the appropriate values and then click Next.
In the Create a new JPA entity window:
- The Package Name field shows the system defined name of the package, example: {your_Forge_project_name}.model. Edit the package name if desired.
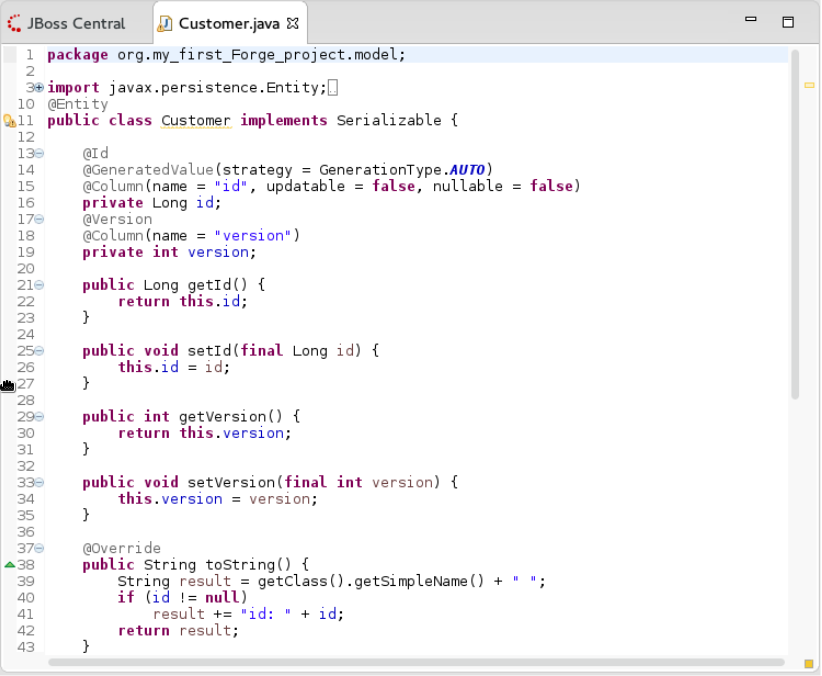
- In the Type Name field, type a name for the new entity. Example: Customer.
- Click Finish. The new entity appears in the editor and is also listed in the Project Explorer view with the name: .java.
Figure 3.9. .java Displayed in the Editor
3.3.3. Adding Fields to the Entity
To add fields to the entity:
- Press Ctrl+4 to open the JBoss Forge context menu.
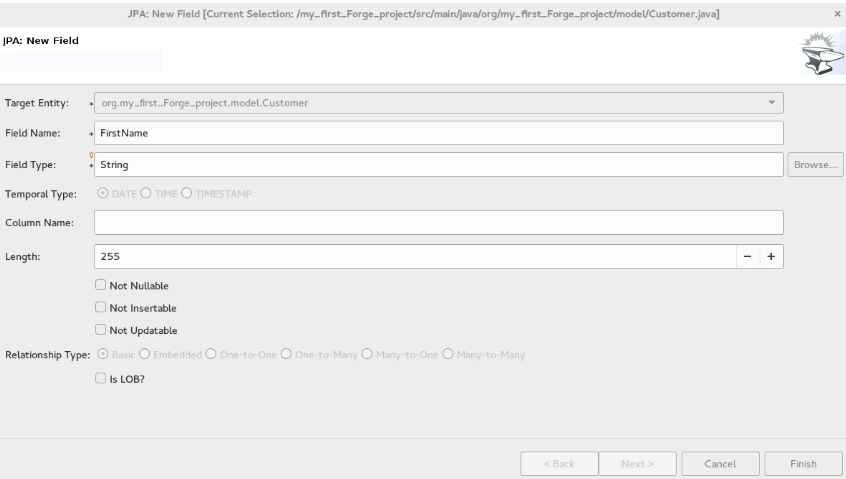
- Click JPA: New Field.
In the Create a new field window:
- In the Target Entity field, select {package_name.model.entity}.
- In the Field Name field, type FirstName.
Click Finish.
Figure 3.10. Add Field to the Entity
- Repeat steps 1 through 4 to add more fields to the entity.
The fields are added to the Customer.java file.
3.3.4. Creating a Scaffold
Scaffolding is automatic code generation by a program, using available information, usually a database to generate a basic CRUD (create, read, update, delete) admin interface. The Scaffold Generate command is used to create the scaffold.
To create the scaffold:
- Press Ctrl+4 to open the JBoss Forge context menu.
- Click Scaffold Generate.
- In the Scaffold Type list, click Angular JS and then click Next.
- If your project is not configured to use all the technologies that you want to use, Forge prompts you to set up the dependencies. Click Next.
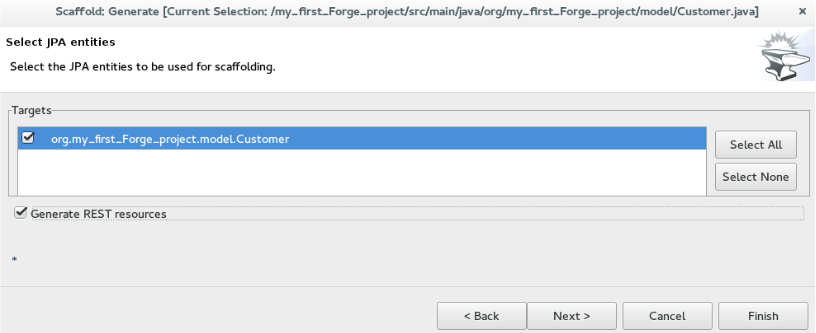
In the Select JPA entities window:
- Click the check box in the Targets field.
- Click the Generate REST resources check box.
- Click Finish.
Figure 3.11. Select JPA Entities to Create the Scaffold
The entities are created and listed in the Project Explorer view.
3.3.5. Running and Testing the Application
In this example we use the JBoss EAP server to run the application.
To run the application:
- In the Project Explorer view, right-click the application and click Run As > Run on Server. Alternatively, drag and drop the application from the Project Explorer view to the JBoss EAP 1 server in the Servers view. The application opens in the default browser.
- Click Customers and then click Create to create a new customer.
- In the FirstName and the LastName fields, enter the first and last names and click Save. The customer is added to the application.
- Optionally, use the Search for Customers section to search for customers by their first and/or last names.
3.3.6. Creating Extensions or Add-ons
The add-ons/extensions run inside the IDE. After adding commands and features to the add-on, no further changes are required for the extensions or add-ons to run in another IDE.
Prerequisites
- Sentence or a bulleted list of pre-requisites that must be in place or done before the user starts this task.
- Delete section title and bullets if the task has no required pre-requisites.
- Text can be a link to a pre-requisite task that the user must do before starting this task.
To create an add-on:
- Press Ctrl+4 to open the JBoss Forge context menu.
- Click Project:New.
In the Create a new project window:
- In the Project name field, type a name for the add-on (example_addon, in this case).
- In the Project type list, click Forge Addon (JAR).
- Click Next.
- In the Furnace Addon Setup window, Depend on these addons section, Forge automatically selects the prerequisites. Review the dependencies and click Finish. The setting up of these dependencies may take some time to complete. The add-on is listed in the Project Explorer view.
- Press Ctrl+4 to open the Forge context menu.
- Select Java: New Class to open the Java: New Class window.
-
In the Type Name field, type CustomCommand and click Finish. The
CustomCommand.javafile opens in the editor. To change this Java class into a Forge command:
- Press Ctrl+4 to open the Forge context menu.
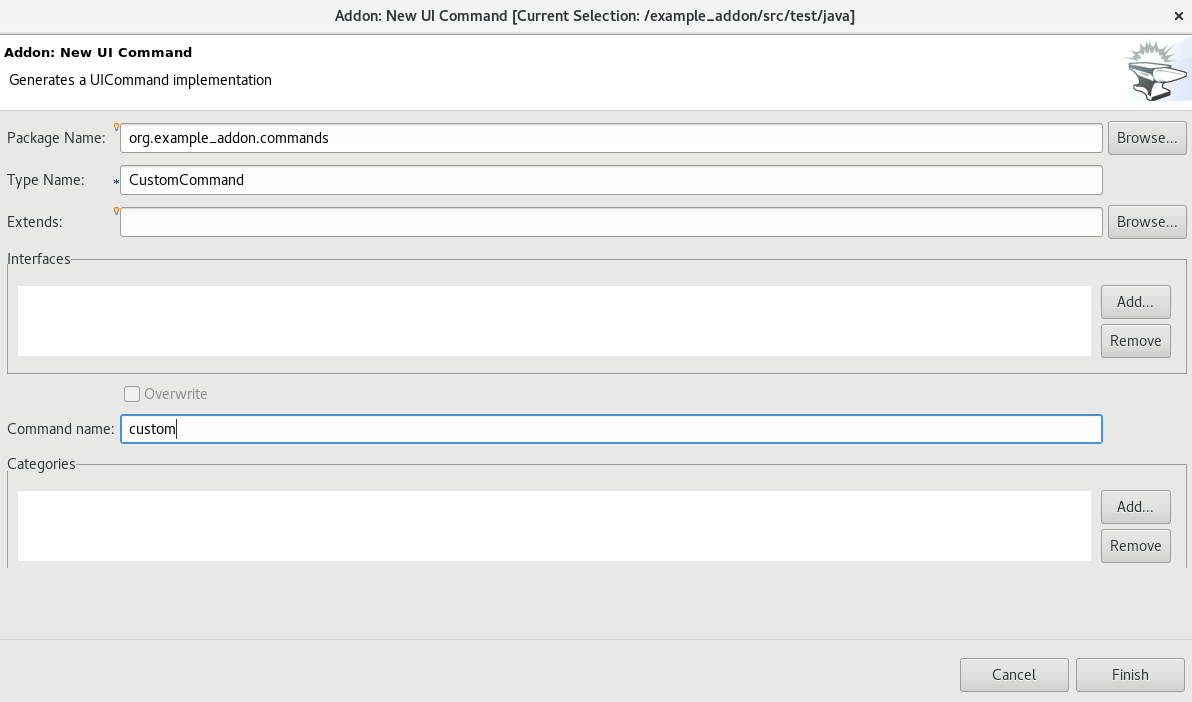
- Select Addon: New UI Command to open the Generates a UICommand implementation window.
In the Generates a UICommand implementation window:
- In the Type Name field, type CustomCommand.
- In the Command name field, type custom.
Click Finish.
Figure 3.12. Add a Command
The command is listed in the
CustomerCommand.javafile.
-
In the Project Explorer view, click the
CustomerCommand.javafile to select the file. - Press Ctrl+4 to open the Forge context menu.
- Select Build and Install an Addon to open the Build and install a Forge addon window. The Project directory field, by deafult, shows the path to the addon.
- Click Finish to install the add-on into the IDE.
To execute the installed command:
- Press Ctrl+4 to open the Forge context menu.
- Select custom.
Add parameters to the method in order to add user input to the command. Copy and paste the following command in the
CustomCommand.javafile and save the file.package org.example_addon.commands; import org.jboss.forge.addon.configuration.Configuration; import org.jboss.forge.addon.resource.URLResource; import org.jboss.forge.addon.ui.command.AbstractUICommand; import org.jboss.forge.addon.ui.context.UIBuilder; import org.jboss.forge.addon.ui.context.UIContext; import org.jboss.forge.addon.ui.context.UIExecutionContext; import org.jboss.forge.addon.ui.input.UIInput; import org.jboss.forge.addon.ui.metadata.UICommandMetadata; import org.jboss.forge.addon.ui.metadata.WithAttributes; import org.jboss.forge.addon.ui.util.Metadata; import org.jboss.forge.addon.ui.util.Categories; import org.jboss.forge.addon.ui.result.Result; import org.jboss.forge.addon.ui.result.Results; import java.lang.Override; import java.lang.Exception; import javax.inject.Inject; public class CustomCommand extends AbstractUICommand { @Inject @WithAttributes(label = "JIRA URL", required = true) private UIInput<URLResource> url; @Inject private Configuration config; @Override public UICommandMetadata getMetadata(UIContext context) { return Metadata.forCommand(getClass()) .name("JIRA: Setup") .description("Setup the JIRA Addon") .category(Categories.create("JIRA", "Setup")); } @Override public void initializeUI(UIBuilder builder) throws Exception { builder.add(url); } @Override public Result execute(UIExecutionContext context) { String targetUrl = url.getValue().getFullyQualifiedName(); Configuration subset = config.subset("jira"); subset.setProperty("url", targetUrl); return Results.success("JIRA URL set to: "+targetUrl); } }
To rebuild and install:
- In the Project Explorer view, click the created add-on (example_addon, in this case).
- Press Ctrl+4 to open the Forge context menu.
- Select Build and Install an Addon. The Project directory field, by deafult, shows the path to the addon.
- Click Finish to install the add-on into the IDE.
- Press Ctrl+4 to open the Forge context menu.
- Click JIRA: Setup.
Figure 3.13. Add-on Listed in the Forge Context Menu

The add-on is created and listed in the Forge context menu.
Additional Resources
- You can launch the Forge Console by clicking Window > Show view > Forge Console. The Forge Console view opens in an inactive state.
-
You can start JBoss Forge by clicking the Start {JBoss Forge_version} button
 ).
).
-
To link the Forge Console output with the open editor, click the Link with Editor button (
 ).
).
3.4. Developing Applications Using the Hibernate Tools
Hibernate Tools is a collection of tools for projects related to Hibernate version 5 and earlier. The tools provide Eclipse plugins for reverse engineering, code generation, visualization and interaction with Hibernate.
Prerequisites
Connect to the sakila-h2 databass:
- Download the sakila-h2 database from the h2 version of the Sakila database.
-
On the terminal, navigate to the directory where you have saved the
sakila-h2.jarfile and run the following command to start the database:$ ./runh2.sh.
3.4.1. Creating a JPA Project
To create a JPA project and connect to the database:
- In the workspace, click File > New > Other and then search for JPA Project and double-click it to open the New JPA Project wizard.
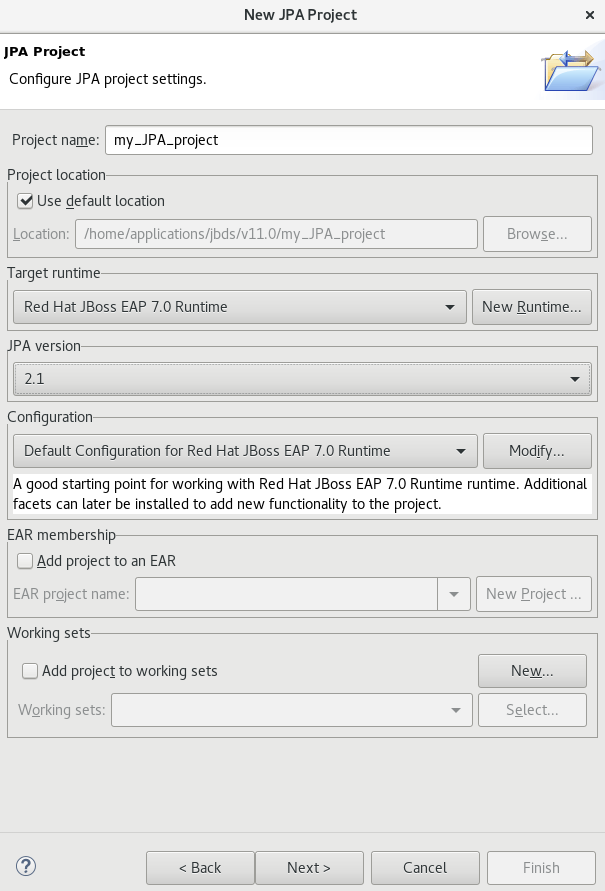
In the New JPA Project wizard:
- In the Project name field, type a name for the project.
- In the Target runtime field, click a runtime server that you wish to use.
- In the JPA version list, click 2.1.
Click Next.
Figure 3.14. Create a New JPA Project
- In the New JPA Project - Java window, select the source folder on the build path and click Next.
- In the JPA Facet window, click Add connection.
In the New Connection Profile window:
- Click Generic JDBC.
- In the Name field, type sakila.
- Click Next.
In the New Connection Profile window:
-
Click the New Driver Definition icon (
 ) located next to the Drivers field to open the New Driver Definition window.
-
Click the New Driver Definition icon (
- In the Name/Type tab, click Generic JBDC Driver and then click the JAR list tab.
Click Add JAR/Zip and then select the previously downloaded
.jarfile in the sakila-h2-master folder.Figure 3.15. Select the JAR File

Click the Properties tab and enter the following details in the Properties table:
- Click Connection URL and type jdbc:h2:tcp://localhost/sakila.
-
Click Driver Class, and then click the ellipsis icon
 .
.
- In the Available Classes from Jar List window, click Browse for class. Click OK when the required driver is found (org.h2.Driver, in this case).
- Click User ID, type sa.
- In the New Driver Definition window, click OK.
- In the New Connection Profile window, click Finish to return to the JPA Facet window.
- In the Platform list, click Hibernate (JPA 2.1).
- In the JPA implementation pane, Type list, either click User Library and to add the libraries in the Preferences (Filtered) window see, the Additional Resources, Adding Libraries section for detailed steps, OR click Disable Library Configuration.
- Click Finish.
- If you see the Open Associated Perspective window asking if you want to open the JPA perspective, click Open Perspective. The project is created and is listed in the Project Explorer view.
3.4.2. Generating DDL and Entities
DDL, Data Definition Language, is a syntax to define data structures. Generate DDL and entities to enable Hibernate runtime support in an Eclipse JPA project.
To generate DDL and Entities:
- In the Project Explorer view, right-click the .
- Click JPA Tools > Generate Tables from Entities or Generate Entities from Tables. The Generate Entities window (or the Generate Tables from Entities window) appears.
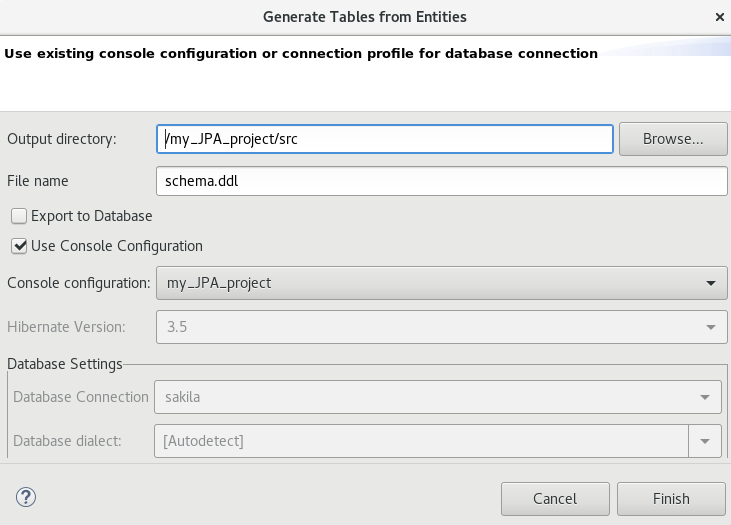
In the Generate Entities window:
- In the Output directory field, change the default directory, if required.
- Ensure that the Use Console Configuration check box is clicked.
- In the Console Configuration list, ensure that the relevant configuration is shown.
Click Finish.
Figure 3.16. Generate Entities
3.4.3. Creating a Hibernate Mapping File
Hibernate mapping files specify how your objects relate to the database tables.
To create basic mappings for properties and associations, meaning, to generate the`.hbm.xml` files:
Create a new Hibernate Mapping file:
- Click File > New > Other.
- In the New wizard, locate Hibernate and expand it. Click Hibernate XML Mapping file (hbm.xml).
- Click Next.
In the New Hibernate XML Mapping files (hbm.xml) window:
-
Click Add Class to add classes or click Add Packages to add packages. You can create an empty
.hbmfile by not selecting any packages or classes. An empty .hbm file is created in the specified location. - Click the depth control check box to define the dependency depth used when choosing classes.
- Click Next.
- Select the parent folder location.
-
In the File name field, type a name for the file (example: hibernate.hbm.xml) and click Finish. The
hibernate.hbm.xmlfile opens in the default editor.
-
Click Add Class to add classes or click Add Packages to add packages. You can create an empty
3.4.4. Creating a Hibernate Configuration File
For reverse engineering, prototype queries, or to simply use Hibernate Core, a hibernate.properties or a hibernate.cfg.xml file is needed. Hibernate Tools provides a wizard to generate the hibernate.cfg.xml file if required.
To create a Hibernate Configuration file:
Create a new
cfg.xmlfile:- Click File > New > Other.
- In the New wizard, locate Hibernate and then click Hibernate Configuration File (cfg.xml).
- Click Next.
- In the Create Hibernate Configuration File (cfg.xml) window, select the target folder for the file and then click Next.
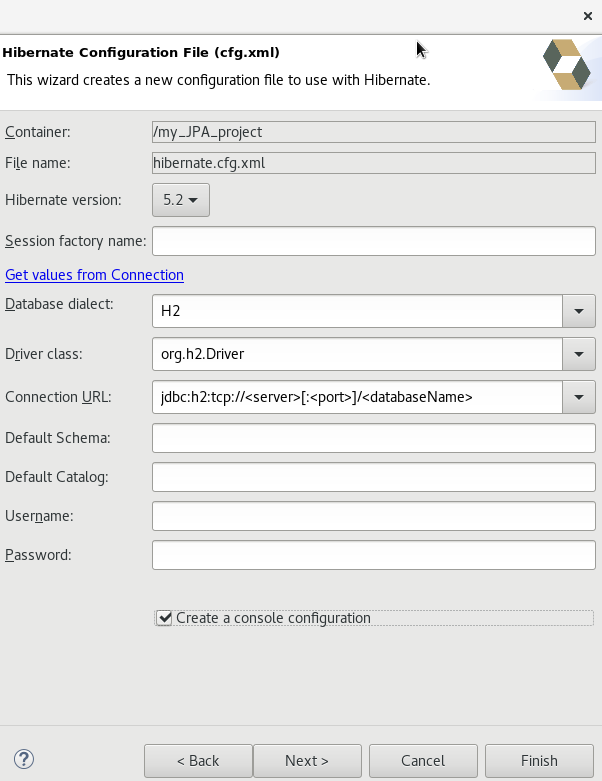
In the Hibernate Configuration File (cfg.xml) window:
- The Container field, by default, shows the container folder.
- The File name field, by default, shows the configuration file name (hibernate.cfg.xml, in this case).
- In the Database dialect list, click the relevant database (H2, in this case).
- In the Driver class list, click the driver class depending on the database dialect that you just selected (org.h2.Driver, in this case).
- In the Connection URL list, click the relevant URL (jdbc:h2:tcp://<server>[:<port>]/<databaseName>, in this case).
-
Click the Create a console configuration check box to use the
hibernate.cfg.xmlfile as the basis of the console configuration.
Click Finish.
Figure 3.17. Create a New cfg.xml File
The new hibernate.cfg.xml file opens in the default editor.
3.4.5. Creating a Hibernate Console Configuration File
A Console configuration file describes how the Hibernate plugin configures Hibernate. It also describes the configuration files and classpaths needed to load the POJOs, JDBC drivers, etc. It is required to make use of query prototyping, reverse engineering and code generation. You can have multiple console configurations per project, but for most requirements, one configuration is sufficient.
To create a Hibernate console configuration file:
Create a
cfg.xmlfile:- Click File > New > Other.
- In the New wizard, locate Hibernate and then click Hibernate Console Configuration.
- Click Next.
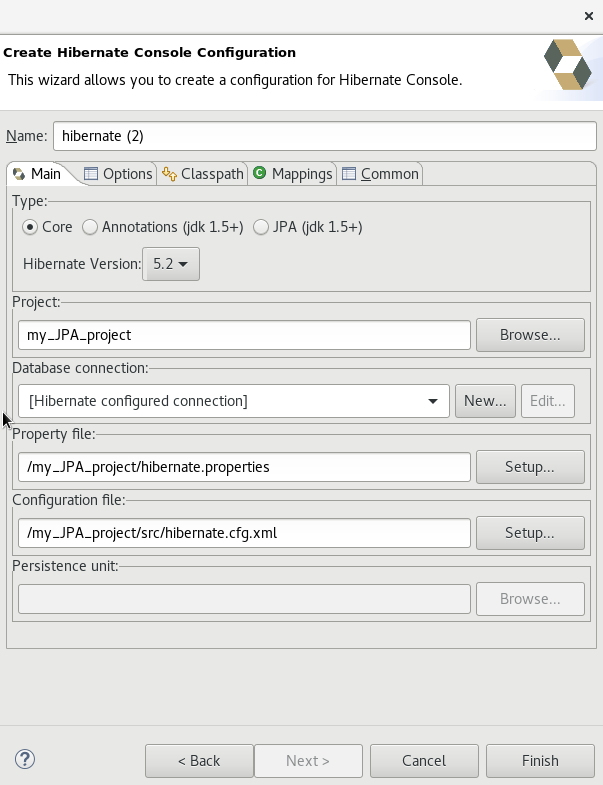
In the Main tab:
- In the Name field, if required, edit the generated name provided by default.
- In the Type pane, click Core.
- In the Hibernate Version list, select the relevant version.
- In the Project field, type a project name or click Browse to locate an existing project (my_JPA_project, in this case).
- In the Database connection list, click New to configure a new database connection or leave as is to use the default connection.
-
In the Property file field, click Setup to set the path to the first
hibernate.propertiesfile found in the selected project (see, the Additional Resources, Setting up the Property File section for detailed steps). Once created the path of the.propertiesfile displays in the Property file field. -
In the Configuration file field, click Setup to set the path to the first
hibernate.cfg.xmlfile found in the selected project (see, the Additional Resources, Setting up the Configuration File section for detailed steps). Once created, the path of thehibernate.cfg.xmlfile displays in the Configuration file field.
- Click Finish.
Figure 3.18. Create Hibernate Console
3.4.6. Modifying the Hibernate Configurations
You can edit the Hibernate Configurations from the Hibernate Configurations view.
To modify the Hibernate Configurations:
- Click Window > Show View > Other. Click Hibernate Configurations and then click Open.
- In the Hibernate Configurations view, right-click the and click Edit Configuration.
- The Edit Configuration window displays. Edit the fields. Click Apply and then click OK.
3.4.7. Generating Code and Reverse Engineering
Hibernate tools’ reverse engineering and code generation features allow you to generate a range of artifacts based on a database or an existing Hibernate configuration, like mapping files or annotated classes. Among others, these generated artifacts can be POJO Java source files, hibernate.hbm.xml files, hibernate.cfg.xml generation and schema documentation.
To generate code:
Configure Hibernate:
- Click Window > Perspective > Open Perspective > Other.
- Search for Hibernate and double-click it. The Hibernate Configurations view appears.
View the Hibernate Code Generation Configurations:
- In the toolbar, next to the Run icon, click the down arrow.
- Click Hibernate Code Generation Configurations.
- Expand Hibernate Code Generation and then click New_configuration.
- In the Create, manage, and run configurations window, in the Name field, type a logical name for the code generation launcher. If you do not specify a name, the default name, New_Generation, is used.
In the Main tab, enter the following details:
NoteThe At least one exporter option must be selected warning indicates that for the launcher to work you must select an exporter on the Exporter tab. The warning disappears after you select an exporter.
- In the Console Configuration list, click the name of the console configuration to be used when generating code.
- In the Output directory field, click Browse and select an output directory. This is the default location where all output will be written. You can enter absolute directory paths, for example: d:/temp. Note that existing files will be overwritten/ if the correct directory is not specified.
- To reverse engineer the database defined in the connection information, click the Reverse engineering from JDBC connection check box. CodeReady Studio generates code based on the database schema when this option is used.If this option is not enabled, the code generation is based on the existing mappings specified in the Hibernate Console configuration.
- In the Package field, add a default package name for any entities found when reverse engineering.
In the reveng.xml field, click Setup to select an existing
reveng.xmlfile, or create a new one. This file controls certain aspects of the reverse engineering process, such as:- how JDBC types are mapped to Hibernate types
- which tables are included or excluded from the process
In the reveng. strategy field, click Browse and provide an implementation of a ReverseEngineeringStrategy. this must be done if the
reveng.xmlfile does not provide enough customization; the class must be in the classpath of the Console Configuration because if not, you will get a class not found exception.NoteRefer to the Additional Resources, Creating, Managing, and Running Configurations Window, Main tab, Check Boxes section for details of the selected check boxes.
- The Exporter tab specifies the type of code that is generated. Each selection represents an Exporter that generates the code. In the Exporter tab:
Click the Use Java 5 syntax check box to use a Java 5 syntax for the Exporter
- Click the Generate EJB3 annotations check box to generate EJB 3 annotations
Select the Exporters from the Exporters table. Refer to the Additional Resources, Exporter section for details about the exporters.
Each Exporter selected in the preceding step uses certain properties that can be set up in the Properties section. In the Properties section, you can add and remove predefined or custom properties for each of the exporters.
- Click Add next to the Properties table to add a property to the chosen Exporter. In the resulting dialog box, select the property from the proposed list and the appropriate value for it. For an explanation of the property and its value, refer to the Additional Resources, Exporter Property and its Values section.
Click the Refresh tab and enter the following:
Click the Refresh resources upon completion check box to refresh the resources and click one of the following:
- The entire workspace: To refresh the entire workspace.
- The selected resource: To only refresh the selected resource
- The project containing the selected resource: To refresh the project containing the selected resource
- The folder containing the selected resource: To refresh the folder containing the selected resource
- Specific resources: To refresh specific resources; then click Specify Resources to open the Edit Working Set window and select the working set.
- Click the Recursively include sub-folders check box to refresh the sub-folders.
Click the Common tab and enter the following:
- In the Save as pane, click Local file to save the configuration as a local file, OR click Shared file and then select a shared file location.
- In the Display in favourites menu pane, click the menu to display the configuration.
- In the Encoding pane, click the format that you want the configuration to be encoded to.
- In the Standard Input and Output pane, click the Allocate console check box and optionally click the Input File and Output File check boxes and select the relevant options.
- Click the Launch in background check box to show the configuration launch progress in the background.
- Click Apply and then click Run.
3.4.8. Troubleshooting
3.4.8.1. Problems While Loading Database Driverclass
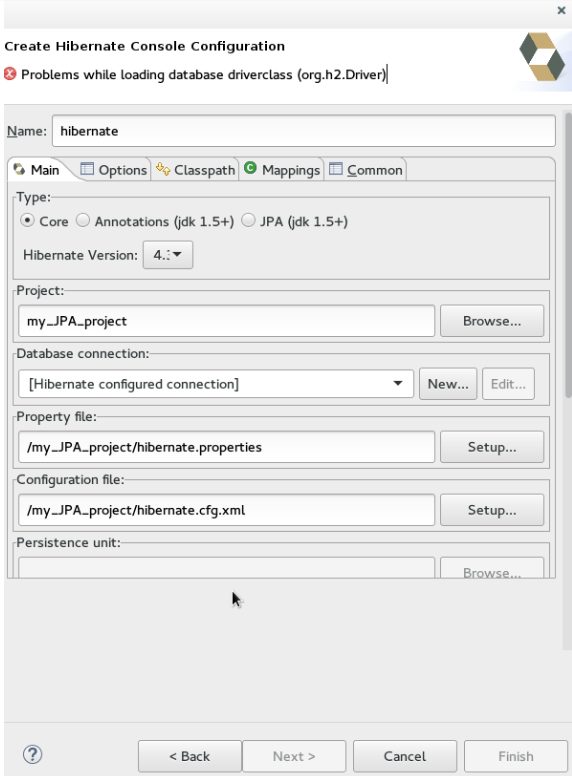
Error message: Problems while loading database driverclass (org.h2.Driver)
Resolution: To avoid this error, you must select a predefined DTP connection profile in the Database Connection dropdown. Also, the jar can be added on the Classpath page of the Console Configuration wizard if you don’t want to have it on the project classpath.
- Right-click {project_name} → Properties → Java Build Path.
- Click the Libraries tab and then click Add External JARs.
- Navigate to the downloaded database JAR file and click OK.
- In the Properties for {project_name} window, click Apply and then click OK.
Additional Resources
Adding Libraries
To add libraries:
- Download Hibernate ORM from http://hibernate.org/orm/.
-
Extract the file to locate the libraries in the
lib/requiredfolder. - In the JPA Facet window, Platform list, click * User Library*.
-
Click the Manage libraries icon (
 ).
).
- In the Preferences (Filtered) window, click New.
- In the New User Library window, User library name field, type a name for the user library and click OK (user_library, in this case).
- Click the System library (added to the boot class path) check box and click OK.
-
In the Preferences (Filtered), click Add External JARs and locate the extracted
hibernate-release-1/lib/requiredfolder. - Click the first library and click OK. Repeat the above step to add all the libraries from the hibernate-release-1/lib/required` folder.
- In the Preferences (Filtered), click Apply and Close.
Setting up the Property File
To set up the property file:
- In the Create Hibernate Configuration window, Main tab, click Setup.
- In the Setup property file window, click Create new to create a new property file (or click Use existing to choose an existing file as a property file).
- In the Create Hibernate Properties file (.properties) window, click the parent folder name and then click Finish.
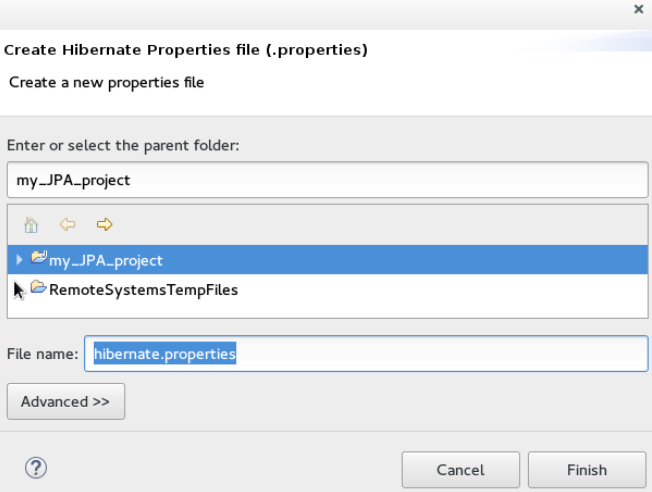
Setting up the Configuration File
To set up the configuration file:
- In the Create Hibernate Configuration window, Main tab, click Setup.
- In the Setup configuration file window, click Use existing to choose an existing file as a property file (or click Create new to create a new property file).
- In the Select hibernate.cfg.xml file window, expand the parent folder, choose the file to use as the hibernate.cfg.xml file, and then click OK.

Creating, Managing, and Running the Configurations Window, Main tab, Check Boxes
The following check boxes are selected by default in the Create, manage, and run configurations window, in the Main tab:
- Generate basic typed composite ids: When a table has a multi-column primary key, a <composite-id> mapping will always be created. If this option is enabled and there are matching foreign-keys, each key column is still considered a 'basic' scalar (string, long, etc.) instead of a reference to an entity. If you disable this option a <key-many-to-one> property is created instead. Note that a <many-to-one> property is still created, but is simply marked as non-updatable and non-insertable.
- Detect optimistic lock columns: Automatically detects optimistic lock columns. Controllable via reveng. strategy; the current default is to use columns named VERSION or TIMESTAMP.
- Detect many-to-many tables: Automatically detects many-to-many tables. Controllable via reveng. Strategy.
- Detect one-to-one associations: Reverse engineering detects one-to-one associations via primary key and both the hbm.xml file and annotation generation generates the proper code for it. The detection is enabled by default (except for Seam 1.2 and Seam 2.0) reverse engineering. For Hibernate Tools generation there is a check box to disable this feature if it is not required.
Exporter Property and Values
- jdj5: Generates Java 5 syntax
- ejb3: Generates EJB 3 annotations
- for_each: Specifies for which type of model elements the exporter should create a file and run through the templates. Possible values are: entity, component, configuration.
- template_path: Creates a custom template directory for this specific exporter. You can use Eclipse variables.
- template_name: Name for template relative to the template path.
- outputdir: Custom output directory for the specific exporter. You can use Eclipse variables.
- file_pattern: Pattern to use for the generated files, with a path relative to the output dir. Example: /.java.
- Dot.executable: Executable to run GraphViz (only relevant, but optional for Schema documentation).
- Drop: Output will contain drop statements for the tables, indices, and constraints.
- delimiter: Is used in the output file.
- create: Output will contain create statements for the tables, indices, and constraints.
- scriptToConsole: The script will be output to Console.
- exportToDatabase: Executes the generated statements against the database.
- outputFileName: If specified the statements will be dumped to this file.
- haltOnError: Halts the build process if an error occurs.
- Format: Applies basic formatting to the statements.
- schemaUpdate: Updates a schema.
- query: HQL Query template
Exporter
- Domain code (.java): Generates POJOs for all the persistent classes and components found in the given Hibernate configuration.
- Hibernate XML Mappings (.hbm.xml): Generate mapping (hbm.xml) files for each entity.
- DAO code (.java): Generates a set of DAOs for each entity found.
- Generic Exporter (<hbmtemplate>): Generates a fully customizable exporter that can be used to perform custom generation.
- Hibernate XML Configuration (.cfg.xml): Generates a hibernate.cfg.xml file; used to keep the hibernate.cfg.xml file updated with any newly discovered mapping files.
- Schema Documentation (.html): Generates a set of HTML pages that document the database schema and some of the mappings.
- Schema Export (.ddl): Generates the appropriate SQL DDL and allows you to store the result in a file or export it directly to the database.
- HQL Query Execution Exporter: Generates HQL Query according to given properties.
3.5. Creating a Mobile Web Application
Mobile Web Tools provides an HTML5 Project wizard that enables you to create web applications optimized for mobile devices. The HTML5 Project wizard is a useful starting point for creating all new HTML5 web applications in the IDE. The wizard generates a sample ready-to-deploy HTML5 mobile application with REST resources from a Maven archetype.
You can customize the application using the JBoss Tools HTML Editor, deploy and view the application with the mobile browser simulator BrowserSim, and use LiveReload to refresh BrowserSim as the application source code is modified and saved in the IDE.
Prerequisites
Configuring the IDE for an Available Server
For information on configuring a local runtime server and deploying applications to it, see Deploying Applications to a Local Server.
The IDE must be configured for any servers to which you want to deploy applications, including the location and type of application server and any custom configuration or management settings. This article assumes you completed the configuration in advance, but that step can be completed at deployment.
3.5.1. Creating an HTML5 Project
The HTML5 Project wizard generates a sample project based on a Maven archetype and the project and application identifiers provided by you. The Maven archetype version is indicated in the Description field in the first page of the wizard and you can change the version, and therefore the project look and dependencies, by selecting either an enterprise or non-enterprise target runtime within the wizard.
To create an HTML5 project:
- In Red Hat Central, in the Getting Started tab, click HTML5 Project.
- In the Target Runtime list, click an IDE-ready server and click Next.
In the New Project Example window, complete the fields about the HTML5 project as follows:
- In the Project name field, type a name for the project.
- In the Package field, type an alpha-numeric package for the project.
- Click Finish.
- When prompted with 'HTML5 Project' Project is now ready, click Finish. The project is generated and listed in the Project Explorer view.
3.5.2. Building and Deploying the Application
After the HTML5 project is generated, it can be built and deployed to an application server.
To build and deploy the application:
- In the Project Explorer view, right-click {project name} and click Run As > Run on Server.
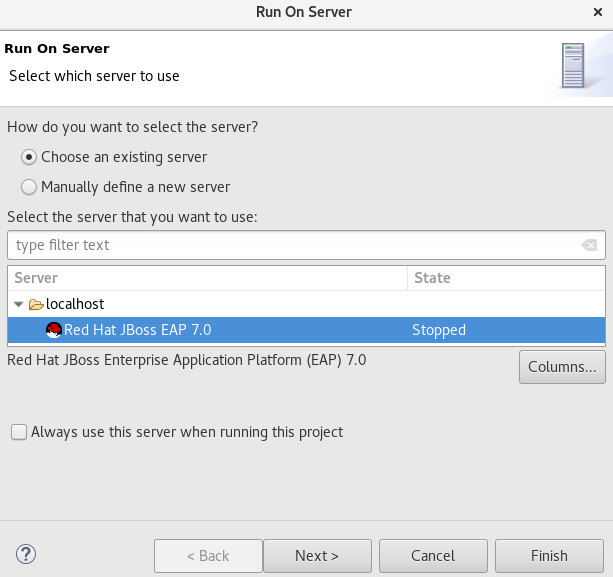
- In the Run On Server window, ensure that Choose an existing server is selected.
From the table of servers, expand localhost, select the server on which to deploy the application, and click Finish.
Figure 3.19. Selecting the Server to Run the Application
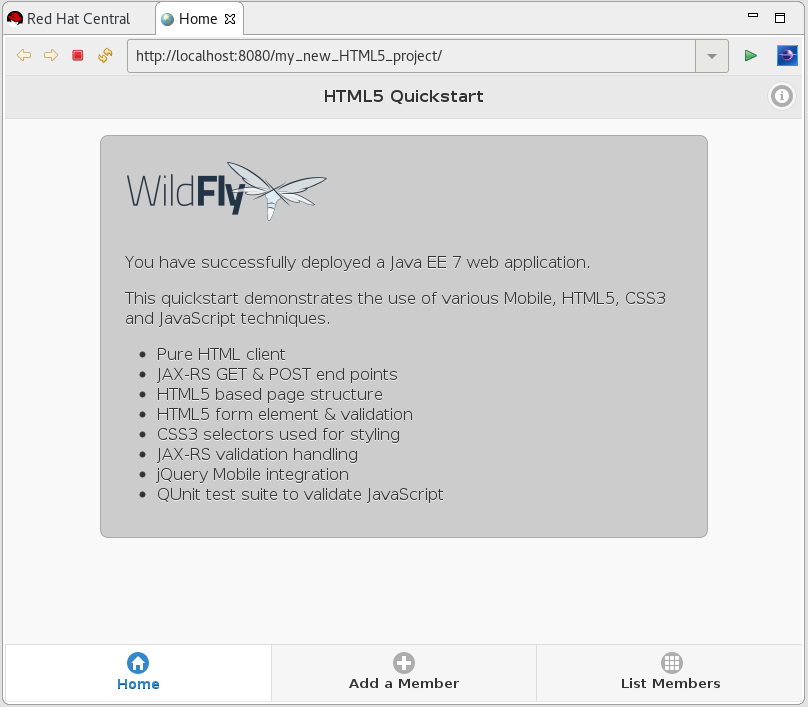
The Console view shows output from the server starting and deploying the application. When deployment is complete, an IDE default web browser opens and shows the deployed web application.
Figure 3.20. Enterprise HTML5 web application Viewed in Browser
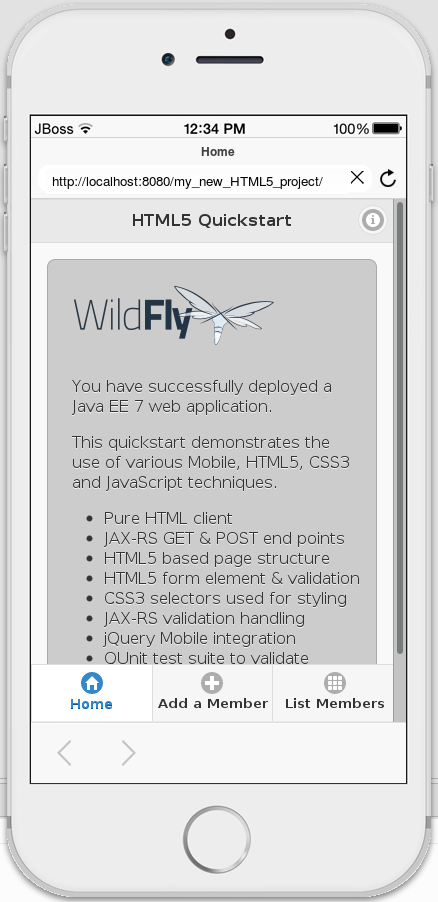
3.5.3. Viewing the Application with BrowserSim
The HTML5 web application has an interface optimized for mobile devices. You can view and test such web pages as they would be on mobile devices using BrowserSim. This mobile device web browser simulator provides skins for different mobile devices, making it easy to test and debug web applications for mobile devices.
To view the application with BrowserSim:
- Ensure JBoss is the perspective in use. To open the JBoss perspective, click Window > Perspective > Open Perspective > Other and double-click JBoss (default).
- In the Servers view, expand the server adapter to list the application.
-
Right-click
{application name}and click Show In > BrowserSim.
Figure 3.21. HTML5 Web Application Viewed with BrowserSim
3.5.4. Enabling LiveReload for BrowserSim
Mobile Web Tools supports the LiveReload protocol for automatic reloading of web pages in enabled browsers as the application source is modified and saved. LiveReload can be enabled for your system browsers and, as demonstrated here, BrowserSim. This provides an interactive web development experience.
To enable LiveReload for BrowserSim, complete the following steps:
- Close any open BrowserSim simulated devices.
- In the Servers view, right-click an existing server to display the context menu and click New > Server.
- From the list, expand Basic, click LiveReload Server and click Finish.
- In the Servers view, right-click LiveReload Server and click Start.
- In the Servers view, right-click {application name} and click Show In > BrowserSim.
LiveReload is automatically enabled for this BrowserSim simulated device and all subsequent devices opened while the LiveReload server is running.
3.5.5. Editing the Application
With LiveReload enabled for BrowserSim, you can make changes to your application source code and BrowserSim automatically reloads the application when changes are saved. This is demonstrated here by making a simple change to the project index.html file, specifically changing the text in the application title banner.
To change your application:
- In the Project Explorer view, expand {project name} > src > main > webapp.
-
Double-click
index.htmlto open it for editing with the JBoss Tools HTML Editor. Locate the following line of code inside the <body> tags:
<title>HTML5 Quickstart</title>
and replace it with
<title>My Quickstart</title>
- Save the file by pressing Ctrl+S (or Cmd+S).
This code change modifies the heading displayed on the main application page. Notice that BrowserSim automatically reloads the web page when you save the changed file and the application modifications are immediately visible.
Additional Resources
- You can launch the HTML5 Project wizard from the JBoss perspective by clicking File > New > HTML5 Project.
-
You can test an undeployed
.htmlfile with BrowserSim by right-clicking the.htmlfile in the Project Explorer view and clicking Open With > BrowserSim. - To set BrowserSim as the IDE default web browser, in the JBoss perspective click Window > Web Browser > BrowserSim or click Window > Preferences > General > Web Browser and from the External web browsers list select BrowserSim.
- You can also enable LiveReload for already opened BrowserSim simulated devices. After starting the LiveReload server, right-click the BrowserSim simulated device frame and click Enable LiveReload.
3.6. Generating an HTML5 Web Application Using the Mobile Web Palette
The IDE provides the Mobile Web palette that allows the user to make interactive web applications. This palette offers a wide range of features including drag-and-drop widgets for adding common web interface framework features such as HTML5, jQuery Mobile, and Ionic tags to html files. It also contains widgets like Panels, Pages, Lists, Buttons to make the applications more user friendly and efficient.
3.6.1. Adding a New HTML5 jQuery Mobile File to a Project
The HTML5 jQuery Mobile file template consists of JavaScript and CSS library references that are inserted in the file’s HTML header. The template also inserts a skeleton of the jQuery Mobile page and listview widgets in the file’s HTML body. The following procedure details the steps to insert the template into your project.
To create a new HTML5 jQuery Mobile file in an existing project:
- In the Project Explorer view, expand [project name] > src > main.
- Right-click webapp and click New > HTML File.
Complete the fields about the html file as follows:
- Ensure the parent folder field shows [project name]/src/main/webapp.
- In the File name field, type a name for the HTML5 file.
- Click Next.
- From the Templates table, select HTML5 jQuery Mobile Page (1.4) and click Finish.
Figure 3.22. Selecting the HTML5 jQuery Mobile Page (1.4) Option
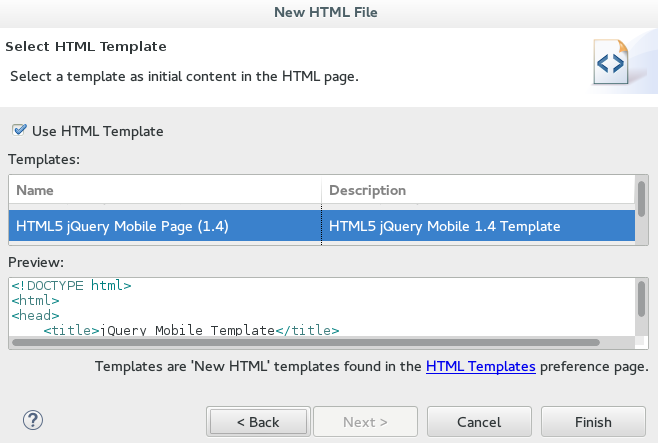
The new file is listed in the Project Explorer view under the project webapp directory and the file opens in the editor.
3.6.2. Adding New Pages to the Web Application
Use the jQuery Mobile Page widget to add pages to your mobile web application:
- In the Project Explorer view, expand [project name] > src > main > webapp.
- Right-click the new html file and click Open With > JBoss Tools HTML Editor.
- In the Palette view, click the jQuery Mobile tab to view the available widgets and click Page.
Complete the fields about the page as follows:
- In the Header field, type a name for the page header.
- In the Footer field, type a name for the page footer.
Click Finish.
Figure 3.23. Adding a New Page
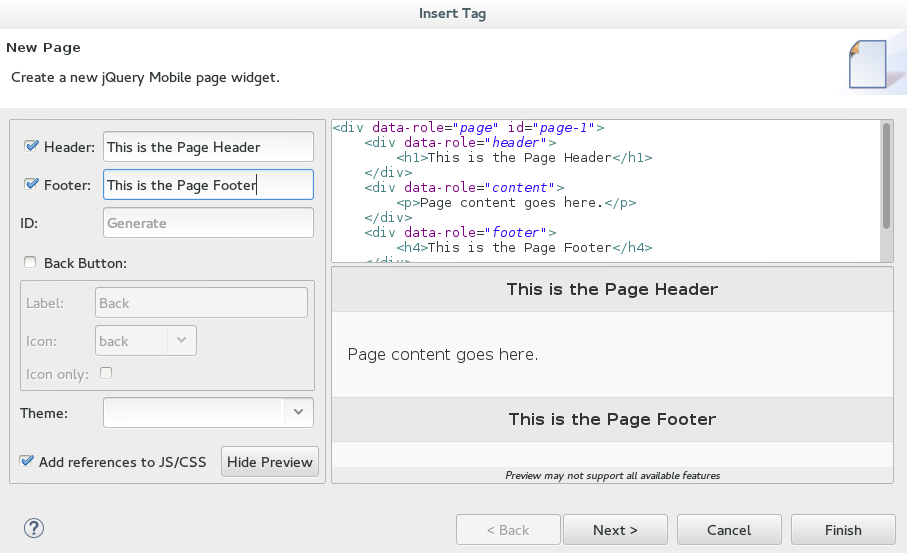
- Save the changes to the file by clicking the Save icon.
A page is added to the html file. JS and CSS references are also automatically added to the file by the Page widget wizard.
Figure 3.24. New Page Added to the HTML File
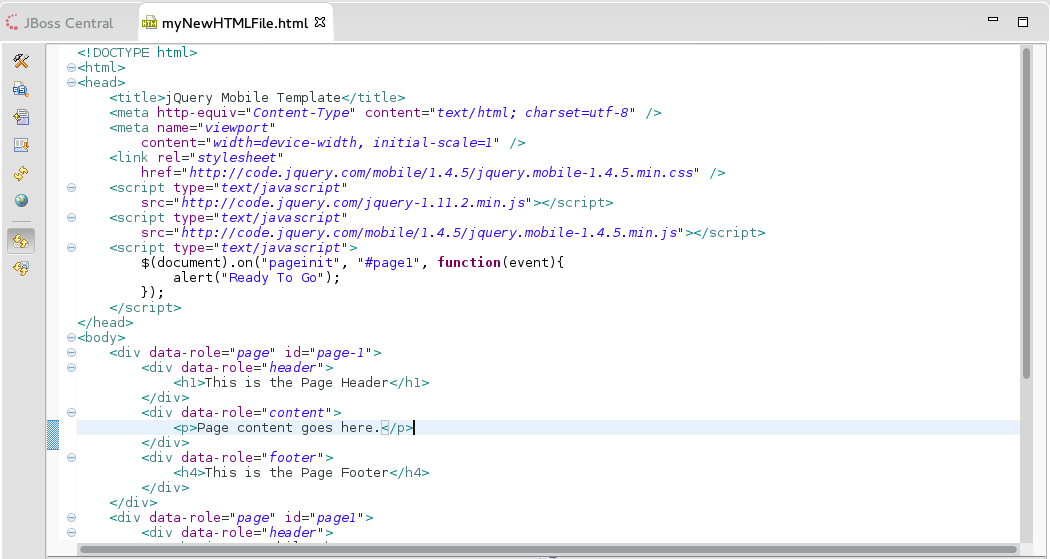
3.6.3. Customizing the Home Page of the Web Application
Use the widgets in the jQuery Mobile palette to customize the page. Use the instructions to add a menu to the page. This menu links to three other pages: Home, Search, and the Add Contacts page.
3.6.3.1. Adding a Panel to the Page
To add a panel:
-
In the
htmlfile, place the cursor where you want the panel. - In the Palette view, in the jQuery Mobile tab, click Panel.
Complete the fields about the Panel as follows:
- In the ID field, type my panel ID.
- Clear the Add Menu check box.
- Click Finish.
-
Save the
htmlfile.
Figure 3.25. Adding a New Panel
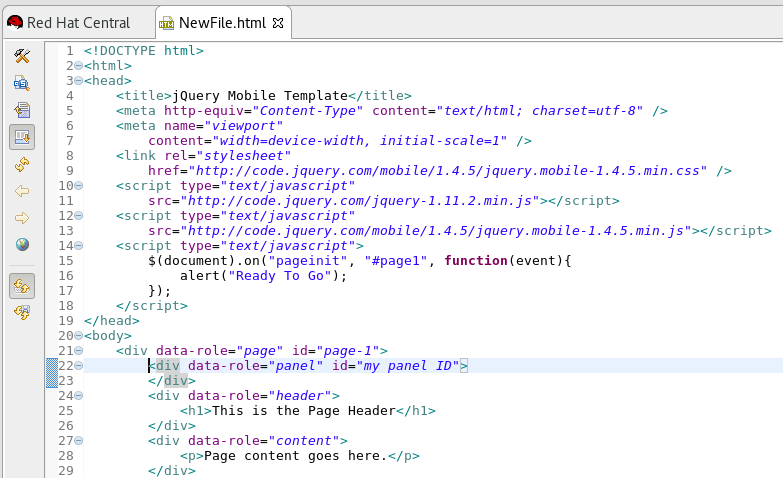
A corresponding code snippet, for the newly added panel, is added to the html file where you had placed the cursor.
3.6.3.2. Adding a List to the Panel
To add a list:
- Within the panel’s code snippet, place your cursor at the desired location for the new list.
- In the Palette view, in the jQuery Mobile tab, click ListView.
Complete the fields about the ListView as follows:
- In the Items section, 1 tab, in the Label field, type the name for the first list item on the page.
In the URL (href) field, type a URL identifier for the label.
Figure 3.26. New Listitem Added to the Panel
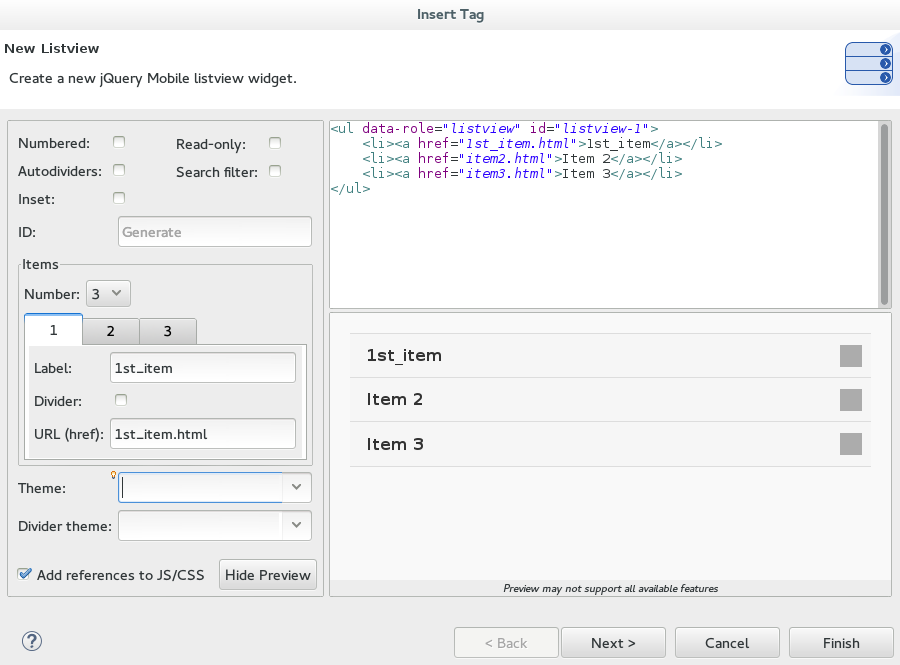
- Click Finish.
- Save the html file.
The new list item name appears in the code snippet.
Figure 3.27. Code for the New Listitem in the Panel Added

3.6.3.3. Adding a Button in the Header of the Page to Display the List
To add a button:
- Place the cursor within the header at the desired location for the new button.
- In the Palette view, in the jQuery Mobile tab, click Button.
Complete the fields about the button as follows:
- In the Label field, type Menu.
- In the URL (href) field, type # followed by the panel ID (#my panel ID, in this case).
- In the Icon list, select an icon.
- In the Icon position list, select a desired value.
- Click the Icon only check-box.
- Click Finish.
- Save the html file.
Figure 3.28. Adding a Button
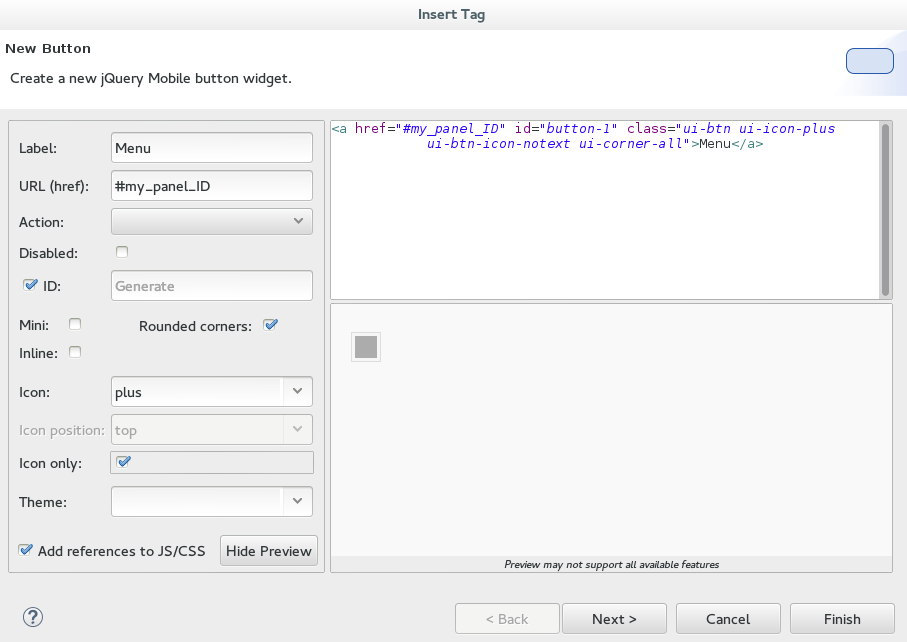
The following code is added to the body of the html file.
<div data-role="page" id="page-1">
    <div data-role="panel" id="my_panel_ID">
        <ul data-role="listview" id="listview-1">
            <li><a href="1st_item.html">1st_item</a></li>
            <li><a href="item2.html">Item 2</a></li>
            <li><a href="item3.html">Item 3</a></li>
        </ul>
    </div>

    <div data-role="header">
        <h1>This is the Page Header</h1>
        <a href="#my_panel_ID" id="button-1" class="ui-btn ui-icon-plus ui-btn-icon-notext ui-corner-all">Menu</a>
    </div>

    <div data-role="content">
        <p>Page content goes here.</p>
    </div>

    <div data-role="footer">
        <h4>This is the Page Footer</h4>
    </div>
</div>
3.6.4. Running and Testing the HTML5 Mobile Application Using BrowserSim
Test the newly added elements to the application by navigating to the interface on BrowserSim as follows:
- In the Project Explore view, expand [project name] > src > main > webapp.
- Right-click the changed html file and click Open With > BrowserSim.
A simulated device appears and displays the application.
Figure 3.29. The Changes Made to the HTML File Displayed on BrowserSim
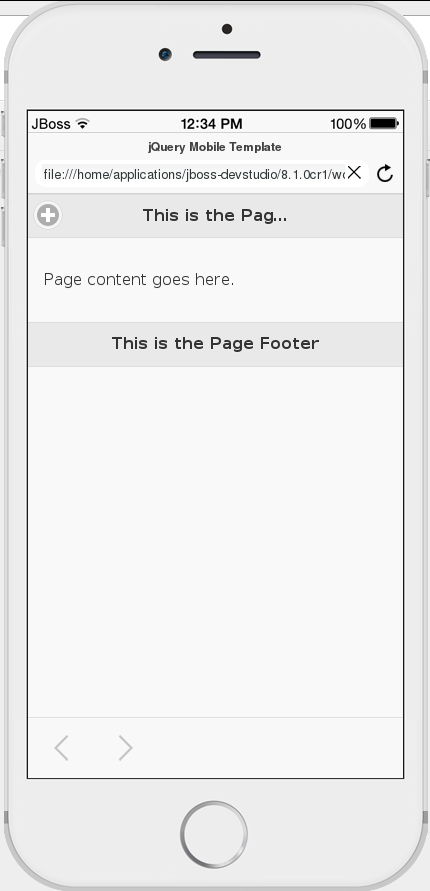
Additional Resources
- To access the jQuery Mobile palette when the Palette view is not visible, click Window > Show View > Other, expand General and select Palette.
- To add BrowserSim in the toolbar by clicking Window > Customize Perspective and select BrowserSim under Command Groups Availability. It appears as a Phone icon in the toolbar.
- Use the Panel widget to create menus, collapsible columns, drawers, and more. The List View widget is an unordered list containing links to list items. jQuery Mobile applies the necessary styles to make the listview mobile friendly.
- Add contacts to the Add Contacts page by following the above listed procedure. You can add Name, Email, Phone Number fields to the Add Contacts page by using the Text Input icon in the Mobile Web palette.
3.7. Importing Projects in CodeReady Studio Using Git Import
The CodeReady Studio Git Import feature allows you to easily configure most of the settings required to make a project workable immediately after it is imported in the IDE.
Procedure
3.7.1. Importing Projects from Git with Smart Import
Use the Project from Git (with smart import) option, if you are unaware of the type of the project that you want to import.
We recommend using the Projects from Git (with smart import) option because it is the easiest and most efficient way to import projects into the IDE with minimal effort.
The Import wizard will automatically detect the type of project being imported and will configure the project so that you have to put in minimal effort to make the project workable.
The Git Import feature detects the various modules of a project that is a set of other individual projects. It detects markers such as pom.xml, MANIFEST.MF, etc. to determine the type of project that you are importing.
To import projects from Git with smart import:
- Click File > Import.
- In the Import window, click Projects from Git (with smart import) and click Next.
- In the Select Repository Source window, click Existing local repository or Clone URI.
- Step through the wizard and click Finish for the wizard to analyze the content of the project folder to find projects for import and import them in the IDE. The imported project is listed in the Project Explorer view.
3.7.2. Importing Projects from Git
Use the Projects from Git option when you are aware of the type of project that you want to import into the IDE. Use the Existing local repository option, if you have, at some point in time, cloned the remote Git repository and the repository is present on your local system.
Procedure
3.7.2.1. Importing Existing Eclipse Projects
Use the Existing local repositories option to import Eclipse projects in the IDE. These projects essentially have a .project file. This .project file contains the project description and settings needed to configure and build project in Eclipse.
To import projects as existing Eclipse projects:
- Click File > Import.
In the Import wizard:
- Expand Git and then click Projects from Git. Click Next.
- Click Existing local repository and then click Next.
- Click Git to choose one of the recently used repositories from the list or click Add to browse to any local repository. Click Next. In the Wizard for project import section, click Import existing Eclipse project. Click Next.
- In the Import Projects window, select all the projects that you want to import.
- Ensure that the Select nested projects check box is clicked to import the nested projects under the parent project that you are importing.
- Click Finish.
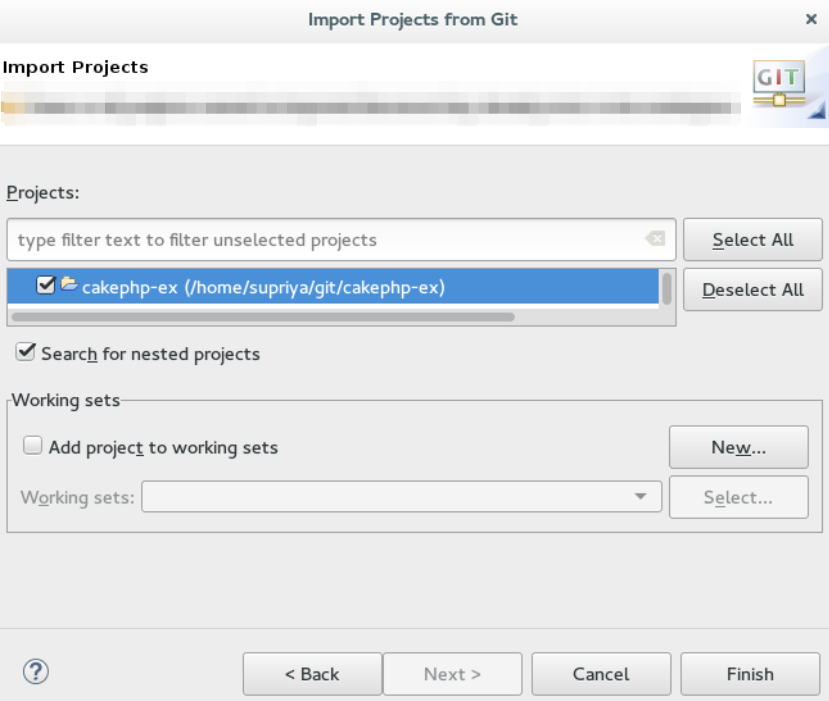
The imported project is listed in the Project Explorer view.
3.7.2.2. Importing Using the New Project Wizard
Use the Import using the New Project wizard option, if your repository is empty and you want to start developing a new project from scratch and then push the code to the remote repository.
To import projects using the New Project wizard:
- Click File > Import.
In the Import wizard:
- Click Git > Projects from Git. Click Next.
- Click Existing local repository and then click Next.
- Click Git and then click Next.
- In the Wizard for project import section, click Import using the New Project wizard. Click Finish.
In the New Project wizard, expand the category, and then click the project type that you want to create and import. Click Next.
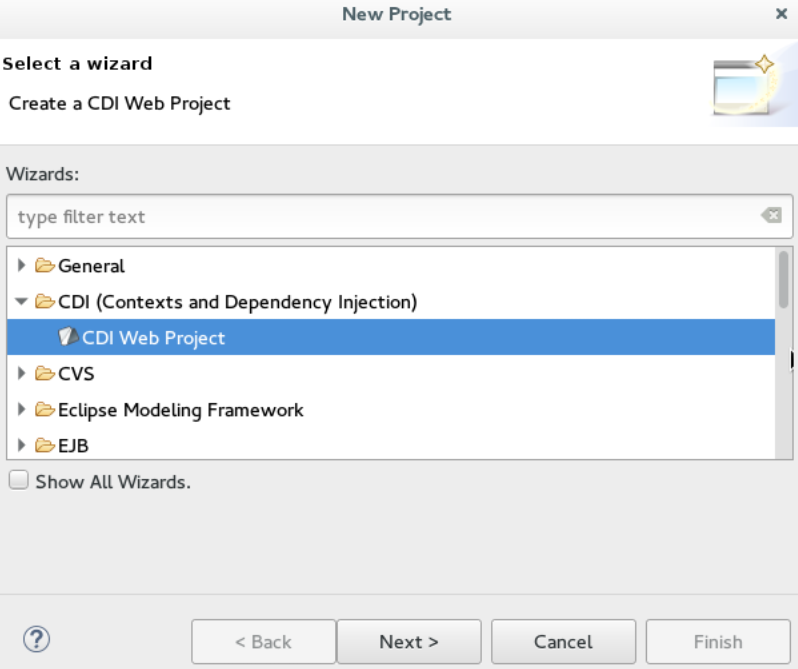
- In the New <type_of_project> window, fill in the information for the new project and click Next or Finish to create the new project. The imported project is listed in the Project Explorer view.
3.7.2.3. Importing as a General Project
Use the Import as general project option if the project being imported does not have a .project file, meaning it is not an Eclipse project. In this case Eclipse will create a clean .project file with default settings.
To import a project as a general project:
- Click File > Import.
In the Import wizard:
- Click Git > Projects from Git. Click Next.
- Click Existing local repository and then click Next.
- Click Git and then click Next.
- In the Wizard for project import section, click Import as general project.
- Select the project and click Next.
- In the Import Projects from Git window, confirm or edit the default parameters and click Finish.
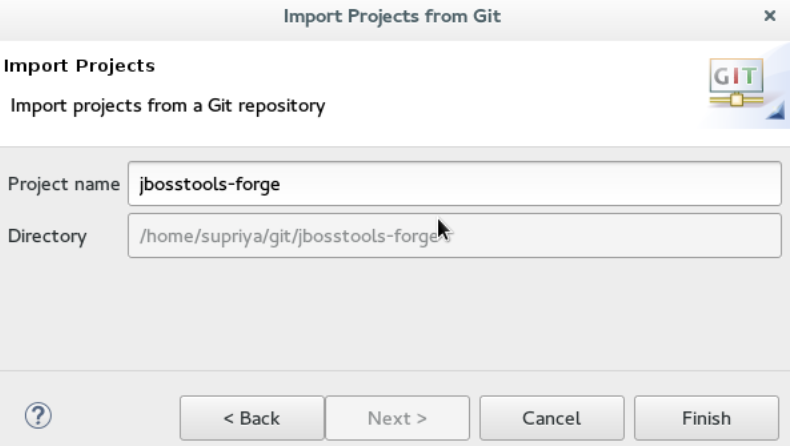
The imported project is listed in the Project Explorer view.
3.7.3. Importing Projects from the Remote Git Repository
Use the Clone URI option to clone the repository on your system if you have never cloned the Git repository; meaning, the repository does not exist on your local system.
The three options, importing existing eclipse projects, importing using the New Project wizard, and importing as a general project, are available under the Clone URI method, too. For detailed steps, see the preceding sections: Section 3.7.2.1, “Importing Existing Eclipse Projects”, Section 3.7.2.2, “Importing Using the New Project Wizard”, and Section 3.7.2.3, “Importing as a General Project”.
To import projects in the Cloned URI:
- Click File > Import.
In the Import wizard:
- Click Git > Projects from Git and then click Next.
- Click Clone URI and click Next.
In the Source Git Repository window, in the URI field, enter an existing Git repository URL, either local or remote and click Next.
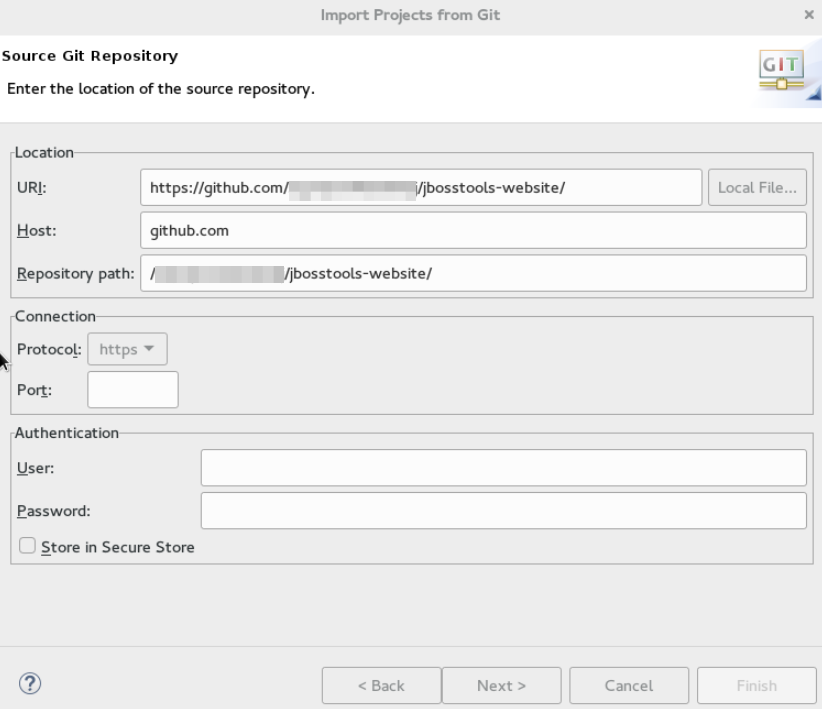
In the Branch Selection window, click all the branches that you want to clone from the remote repository and click Next.
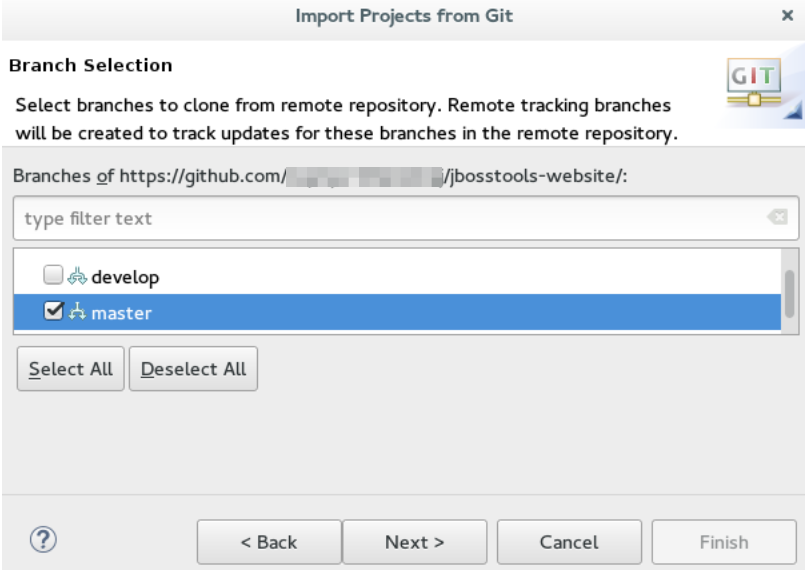
In the Local Destination window, ensure that the directory that you want to set as the local storage location for the repository is selected in the Directory field. Or, click Browse to select the location.
The Cloning from <GitHub_repository> window shows the progress of the cloning process.
- In the Select a wizard to use for importing projects window, Import as general project is selected by default. Click Next.
- In the Import Projects window, ensure that the Directory field shows the path to the directory where you want to import the projects and click Finish. The imported project is listed in the Project Explorer view. The cloned repository of the remote Git repository is now located in the local file system.
3.8. Getting Started with JavaScript Development for Neon 3
This article walks you through JavaScript Development for Neon 3. Neon 3 uses the new Esprima parser that supports ECMAScript 2015 (JavaScript 6). The intuitive Esprima parser assists in the following tasks:
- Syntax coloration
- Validation
- Content assist
- Templates for keywords
- Class definition
- Template literals
- Integration with Outline View
Prerequisites
3.8.1. Installing node.js
To install node.js:
- On Windows, macOS, and Linux, see https://nodejs.org/en/.
- On RHEL, see https://www.softwarecollections.org/en/ .
3.8.2. Installing the Package Managers (Bower and npm)
You may choose to work with either npm or with Bower. However, if you are using npm you must use the file package.json and if using Bower, use the file bower.json.
If installing both npm and bower, ensure that you install npm before you install Bower.
- To install npm: When you install node.js, npm will be available for use because npm is distributed with node.js.
-
To install Bower: Run the command
npm install -g boweras the root user.
Procedure
3.8.3. Using the Package Managers
Bower and npm are Package Managers that allow you to install, in a single click, all the dependencies required for the plugins to work. In this section, we list steps for enabling Bower Init and npm Init. You may choose to work with any one of these Package Managers and follow the respective procedure. However, if you are using npm you must use the file package.json and if using Bower, use the file bower.json.
Procedure
3.8.3.1. Creating a New Project
In this section, you create a new project so that you can later enable the dependencies and see how the Neon 3 features work with CodeReady Studio.
Procedure
To create a project:
- Click File > Project.
- In the New Project wizard, click General > Project. Click Next.
- In the Project name field, type the name of the project (Neon3_features, in this example).
- Edit the other fields if required and then click Finish. The new project is listed in the Project Explorer view.
3.8.3.2. Enabling Bower Init
After you have enabled Bower Init the result will be a bower.json file listed under the project in the Project Explorer view.
Procedure
To enable Bower Init:
- In the Project Explorer view, right-click Neon3_features and then click New > Other.
- In the New wizard, type filter text field, type bower. After Bower Init is selected, click Next.
Optionally, in the Bower Initialization Wizard:
- Clear the Use default configuration check box.
- In the Version field, type 0.0.1.
- In the License field, type MIT.
-
Click Finish. The
bower.jsonfile opens in the default editor.
Figure 3.30. Contents of the bower.json File
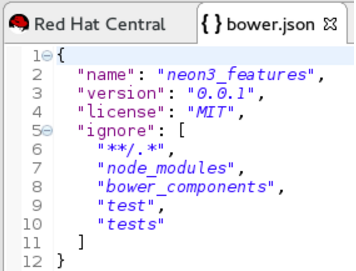
3.8.3.3. Enabling npm Init
Procedure
To enable npm Init:
- In the Project Explorer view, right-click Neon3_features and then click New > Other.
- In the New wizard, type filter text field, type npm. After npm Init is selected, click Next.
Optionally, in the npm Initialization Wizard:
- Clear the Use default configuration check box.
- In the Version field, type 0.0.1.
- In the License field, type MIT.
-
Click Finish. The
package.jsonfile opens in the default editor.
3.8.3.4. Creating a New index.html File
In this section, you create an index.html file so that you can use it in Section 3.8.3.5, “Using the Bower Tool”.
Procedure
To create an index.html file:
- In the Project Explorer view, right-click Neon3_features and click New > File.
In the New File wizard:
- Ensure that Neon3_features is selected as the parent folder.
- In the File name field, type index.html.
-
Click Finish. The empty
index.htmlfile opens in the default editor. Copy the following code snippet and paste it in the
index.htmlfile.<!DOCTYPE html> <html> <head> <title>npm / bower / JSON editor</title> <script type="text/javascript" src="bower_components/jquery/dist/jquery.min.js"></script> <script type="text/javascript" src="bower_components/bootstrap/dist/js/bootstrap.min.js"></script> <link rel="stylesheet" href="bower_components/bootstrap/dist/css/bootstrap.min.css"> <link rel="stylesheet" href="bower_components/bootstrap/dist/css/bootstrap-theme.min.css"> </head> <body> <div class="container"> <div class="jumbotron"> <h1>My First Bootstrap Page</h1> <p>Resize this responsive page to see the effect!</p> </div> <div class="row"> <div class="col-sm-4"> <h3>Column 1</h3> </div> <div class="col-sm-4"> <h3>Column 2</h3> </div> <div class="col-sm-4"> <h3>Column 3</h3> </div> </div> </div> </body> </html>
- Save the file.
3.8.3.5. Using the Bower Tool
Procedure
To use the Bower tool:
-
In the Project Explorer view, expand Neon3_features to view
bower.jsonandindex.html. -
Double-click
index.htmlto open it in the default editor, if not already open. The editor shows the bootstrap template. Right-click index.html and click Open With > Web Browser. Notice that the page does not show any bootstrap theme or style applied to it.
Figure 3.31. index.html Page without Theme and Style Applied to it

To be able to view the themes and styles applied to the page, you must edit the
bower.jsonfile that contains the dependencies.To edit the
bower.jsonfile:In the Project Explorer view, double-click bower.json to open it in the default text editor. The json editor Outline support:
- Allows you to navigate through the json file
- Allows you to validate syntax errors
To define the jquery and bootstrap dependencies:
- After the closing square bracket ], add a comma (,).
On the next line type:
       "dependencies" : {
          "jquery" : "*",
          "bootstrap" : "~3.3.6"
          }
Save the file. The contents of the file are as displayed in the following image.
Figure 3.32. bower.json File Edited
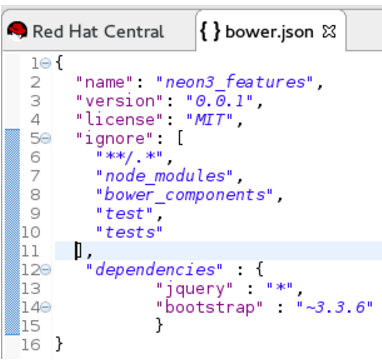
- Right-click bower.json and then click Run As > Bower Install. You can see the progress of installation of the dependencies in the Console view.
- Expand the bower_components folder to ensure that it contains bootstrap and jquery.
- Refresh the index.html web page. The page shows the bootstrap template with a responsive design.
Figure 3.33. index.html Page with Responsive Design
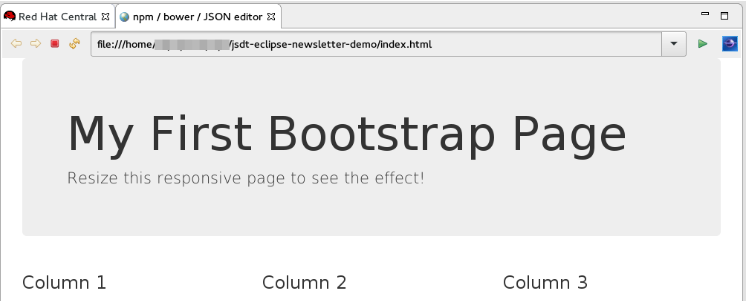
3.8.4. Using the Build Systems
In this section, you will use the npm Package Manager and hence the package.json file.
You can either use the Grunt or the Gulp build systems to run your tasks directly from the IDE instead of switching to the CLI every time you want to run a task.
Prerequisites
Ensure that Gulp or Grunt plugins are installed on your system by running the following command:
-
For Gulp plugin, run the command:
gulp -v -
For the Grunt plugin, run the command:
grunt -v
-
For Gulp plugin, run the command:
If not installed, use the following commands to install them:
-
To install the Gulp plugin, run the command
npm install --global gulp-clias the root user. -
To install the Grunt plugin, run the command
npm install --global grunt-clias the root user.
This section describes the workflow for Gulp. However, Grunt and Gulp are both supported and they both have similar workflows.
Procedure
3.8.4.1. Adding Dependencies to the package.json File
This section is applicable only if you are using the package.json file. Skip this section if you are using the bower.json file.
You must add the dependencies to the package.json file to be able to use it in Section 3.8.4.2, “Enabling the Gulp Plugin”.
Procedure
To add the dependencies:
- In the Project Explorer view, expand neon3_features and double-click package.json to open the file in the default editor.
- After "license": "ISC", add a comma (,).
On the next line add the following code snippet:
"devDependencies" : { "jquery" : "*", "angular" : "*", "bootstrap" : "~3.3.6" }-
Save the file. The contents of the
package.jsonfile are as displayed in the following image.
Figure 3.34. package.json File as Edited
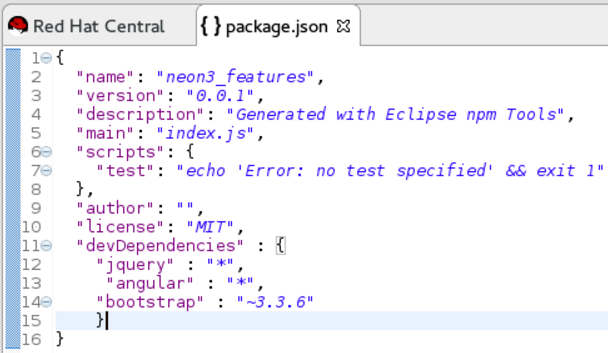
3.8.4.2. Enabling the Gulp Plugin
To be able to use the task runners Grunt or Gulp, you must first define the following dependencies required for these plugins:
-
In the
bower.jsonfile, under dependencies you must have “gulp”:”” or “grunt”:”*”. -
In the
package.jsonfile, under dependencies you must have “gulp”:”” or “grunt”:””.
In this section, we elaborate steps to enable the Gulp plugin. Use the same steps to enable the Grunt plugin.
Procedure
To enable the Gulp plugin:
- In the Project Explorer view, expand neon3_features and double-click package.json to open it in the default editor.
-
In the
package.jsonfile, under devDependencies, after the last dependency defined in the file, type a comma (,). - On the next line, type "gulp": "*".
On the next line type "gulp-rename": "*" and save the file. The contents of the
package.jsonfile are as displayed in the following image.Figure 3.35. package.json File with Gulp Enabled

-
In the
package.jsonfile, click Run As > npm Install. The Console view shows the progress of the task. Overlook any warnings at this point of time. The node_modules folder displays under the project in the Project Explorer view.
3.8.4.3. Creating the gulpfile.js File
In this section, you create the gulpfile.js file to be used in Section 3.8.4.4, “Using the Gulp Plugin”.
Procedure
To create the gulpfile.js:
- Right-click neon3_features and then click New > Other.
- In the New wizard, search field, type JavaScript.
Click JavaScript Source File and then click Next. In the New JavaScript file window:
- Cick neon3_features.
- In the File name field, type gulpfile.js.
- Click Finish. The empty file opens in the default editor.
Copy the following content and paste it in the
gulpfile.jsfile:var gulp = require('gulp') , rename = require('gulp-rename'); // task gulp.task('default', function () { gulp.src('./index.html') //path to file to be renamed .pipe(rename('renamed.html')) // rename index.html to renamed.html .pipe(gulp.dest('renamed-html')); // destination folder });-
Save the file. The contents of the
gulpfile.jsfile are as displayed in the following image.
Figure 3.36. gulpfile.js File

3.8.4.4. Using the Gulp Plugin
Procedure
To use the Gulp plugin:
- In the Project Explorer view, expand neon3_features and double-click gulpfile.js to open the file in the editor. The file has several Gulp tasks defined.
- Right-click gulpfile.js and click Run As > Gulp Task. The Console view shows the progress of the task.
-
You may also choose to expand gulpfile.js in the Project Explorer view and view all the tasks. Right-click each task and click Run As > Gulp Task to view the task. A new directory named renamed-html is created under neon3_features. Expand the renamed-html directory to see the
renamed.htmlfile.
3.8.5. Working with the Node.js Application
In this section, you will use the project at: https://github.com/ibuziuk/jsdt-node-test-project.
Prerequisites
- Ensure npm and node.js are installed. For details to install, see the Additional Resources section.
Procedure
3.8.5.1. Importing the jsdt-node-test-project
Procedure
To import the jsdt-node-test-project:
-
Run the command
git clone https://github.com/ibuziuk/jsdt-node-test-projectto clone the project on your local system: . - In the IDE, click File > Open Projects from File System.
- In the Open Projects from File System or Archive window, click Directory next to the Open Source field.
- Locate the jsdt-node-test-project and click OK.
- In the Open Projects from File System or Archive window, click Finish. The jsdt-node-test-project is listed in the Project Explorer view.
3.8.5.2. Running the index.js File
Procedure
To work with the node.js application:
- In the Project Explorer view, expand jsdt-node-test-project.
- Right-click package.json and click Run As > npm Install. The Console view shows the progress of the task.
- Right-click index.js and click Run As > Node.js Application. The Console view shows the Listening on port 3000 message. Open localhost:3000 to see the output on a web page.
Figure 3.37. Output of the index.js File

3.8.5.3. Debugging the Node.js Application
Procedure
To debug the node.js application:
- In the Project Explorer view, expand jsdt-node-test-project and double-click index.js to open it in the default editor.
- To add a breakpoint, right-click on the line number where you want the execution of the code to stop, and then click Toggle Breakpoint. Save the file.
- Right-click index.js, click Debug As > Node.js Application. The Console view shows the debugger listening on port <port_number> message.
Figure 3.38. Debugging the Node.js Application

Additional Resources
Use the following features to carry out different tasks:
- Inspecting Variables: All the variables are listed in the Variables view. Use this view to search for specific variables and inspect them.
-
Inspecting the main
node.jsfile: The mainnode.jsfile opens in the default editor (index.js, in this case). You can hover the mouse over the variables to see the functions. -
Editing the main
node.jsfile: You can edit the mainnode.jsfile and save it to see the changes automatically propagated to VM.
Chapter 4. Deploying Your Applications
4.1. Deploying Applications to a Local Server
In order to deploy applications to a server from within the IDE, you must configure the IDE with information about the server. For a local server this information includes the following:
- A server runtime environment with details about the server location, runtime JRE, and configuration files
- A server adapter with management settings for the server runtime environment, including access parameters, launch arguments, and publishing options
JBoss Server Tools enables you to efficiently configure a local server ready for use with the IDE using Runtime Detection. As demonstrated here, this feature is useful for quickly configuring a server for deploying and testing an application.
Procedure
4.1.1. Configuring the IDE for a Local Runtime Server
Runtime Detection searches a given local system path to locate certain types of runtime servers. For any servers found, Runtime Detection automatically generates both a default server runtime environment and a default server adapter. These items can be used as they are for immediate application deployment or customized to meet your requirements.
Procedure
To configure the IDE for a local runtime server:
- Click Window > Preferences.
- In the Preferences window, locate and click JBoss Tools > JBoss Runtime Detection.
- Click Add.
- Locate the directory containing the runtime server and click OK.
- In the table of located runtimes, ensure the runtime is selected and click OK.
- Click Apply and Close to close the Preferences window. A default runtime environment and server adapter are generated for the server, with the server adapter listed in the Servers view.
4.1.2. Deploying an Application
When you have configured the IDE for the server, you can deploy applications to the server from the IDE using the server adapter. The server adapter enables runtime communication between the server and IDE for easy deployment of applications and server management.
Procedure
To deploy an application to the server:
- In the Project Explorer view, right-click {project name} and click Run As > Run on Server.
- Ensure Choose an existing server is selected.
- From the table of servers, expand localhost, select the server on which to deploy the application and click Finish. The Console view shows output from the server starting and deploying the application. When deployment is complete, an IDE default web browser opens and shows the deployed web application.
4.1.3. Changing and Republishing the Application
By default, the server adapter configures the server for automatic publishing when changed resources are saved. This automatic publishing action applies to application resources that can be interchanged in the dedicated deployment location of the server without requiring the application to stop and restart, such as .html files. For other changed resources, such as .java files, you need to republish the application such that it forces a rebuild of the application.
Procedure
To republish the application to the server after changes that cannot be automatically published:
- In the Servers view, expand the server adapter to list the applications allocated to the server.
- Right-click {application name} and click Full Publish. The Console view shows the output from the server replacing the deploying application. Unless LiveReload is enabled in the web browser, you must manually reload the web browser to see the changed application.
Additional Resources
- You can also configure servers by right-clicking the Servers view and selecting New > Server or by clicking Manually define a new server in the Run on Server wizard.
- Paths previously searched by Runtime Detection can be automatically searched on every workspace start. Click Window > Preferences > JBoss Tools > JBoss Runtime Detection and from the Paths table select the check boxes of the appropriate paths. Click Apply and click OK to close the Preferences window.
- You can customize the server adapter and server runtime environment with the Server Editor. In the Servers view, double-click the server adapter to open the Server Editor.
- You can initiate download and installation of runtime servers from the IDE. Click Window > Preferences > JBoss Tools > JBoss Runtime Detection. Click Download and from the table of runtime servers select the one to install and click Next. Follow the on-screen instructions to complete the download and installation process.
4.2. Configuring a Remote Server
Remote servers allow developers to access and deploy to a JBoss instance that is not a local machine. Developers can use remote servers to set up multiple environments for development and testing purposes and share them with other developers. Another reason to use a remote server with Red Hat CodeReady Studio is to allow developers to share and deploy automated tests to run in a non-local environment.
Procedure
4.2.1. Setting up a Remote Server
Procedure
The following instructions are used to set up a remote server for JBoss Enterprise Middleware application servers. A complete server definition requires a server adapter (or server) that allows the IDE to communicate with and manage the remote server.
- Click the Servers view. If the Servers view is not visible, click Window > Show View > Server.
Use the appropriate instructions depending on the number of existing servers listed in the Servers tab:
- If there are no existing servers, click No servers are available. Click this link to create a new server.
- If there are one or more existing servers, right-click an existing server and click New > Server.
In the New Server wizard:
- From the Select the server type list, select a JBoss Enterprise Middleware application server.
- The Server’s host name and Server name fields are completed by default. In the Server name field, you can type a custom name to later identify the server in the Servers view.
Click Next to continue.
Figure 4.1. Defining a New Remote Server
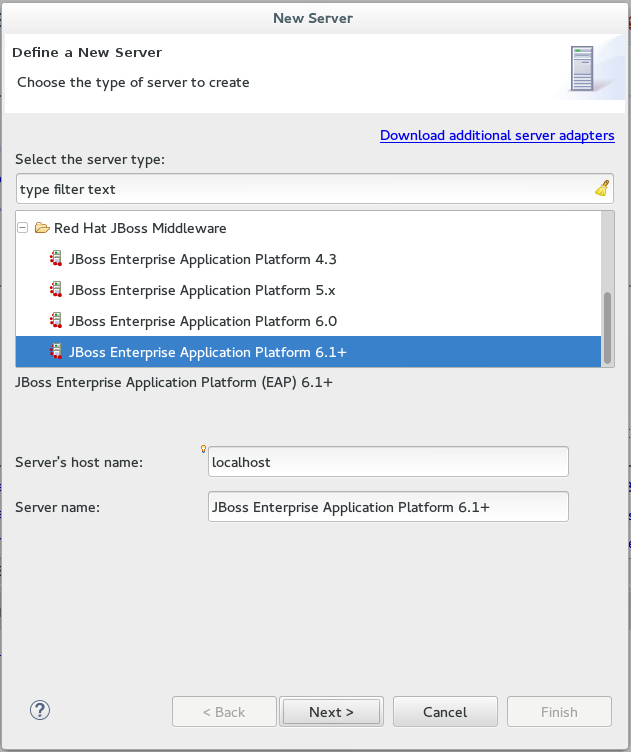
Configure the required Server Adapter details:
- In The server is list, click Remote.
In the Controlled by list, click either Filesystem and shell operations or Management Operations depending on your requirement.
NoteIf you select Management Operations in the Controlled by list, you must set up an administrator user on the server by using the $SERVER_HOME/bin/add-users.sh script for Linux, or the $SERVER_HOME\bin\add-users.bat file for Windows, and enter the same credentials in the server editor or during the server start.
- Click the Server lifecycle is externally managed. check box to deploy the server but to not expect the IDE to stop or start the server.
Clear the Assign a runtime to this server check box to create a remote server without assigning a runtime to it.
NoteCreating a Remote Server without a runtime results in limitations. For example, the JMX connection does not work because it requires libraries from the runtime to connect via JMX. Additionally, automatic port detection occurs using the
standalone.xmlfile, which is not available if a runtime is not specified. These and other minor issues related to hard-coded minor fixes in maintenance releases may occur if no runtime is specified for the Remote Server.
From the drop-down list, click the relevant runtime server and click Next.
Figure 4.2. Creating a New Server Adapter
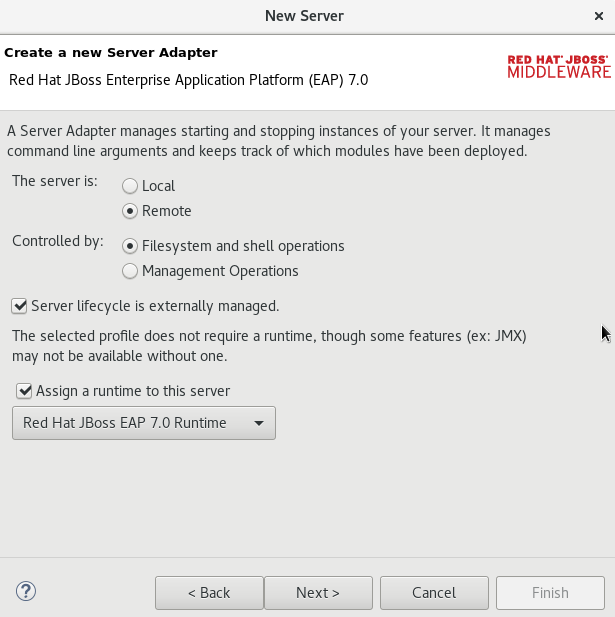
Add the remote system integration details as follows:
- In the Host field, the default host is Local. If required, click New Host to create a new host, which may be remote or local. Supported connection types for remote hosts are FTP Only or SSH Only.
- In the Remote Server Home field, specify a path to the directory that contains the remote server.
- In the Remote Server Base Directory field, specify the remote server’s base directory (the default value for this is the standalone directory within the server home directory).
-
In the Remote Server Configuration File field, specify the file to use for the remote server’s configuration (the default value for this is the standalone.xml file). This location is within the Remote Server Home directory (specifically in the
$SERVER_HOME/$BASE_DIRECTORY/configuration/directory). Either click Next to continue to the (optional) next step to add or remove server resources or click Finish to conclude the new remote server configuration.
Figure 4.3. Connect to a Remote System
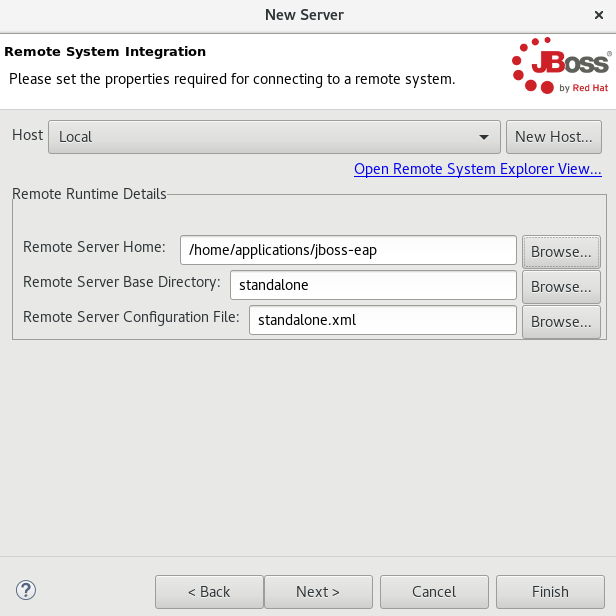
Optional: Add or remove resources configured on the server as follows:
- To add a resource, select the appropriate resource in the Available pane and click Add. To add all available resources, click Add All.
- To remove a resource, select the appropriate resource in the Configured pane and click Remove. To remove all configured resources, click Remove All.
Click Finish to complete the server configuration.
Figure 4.4. Add and Remove Server Resources
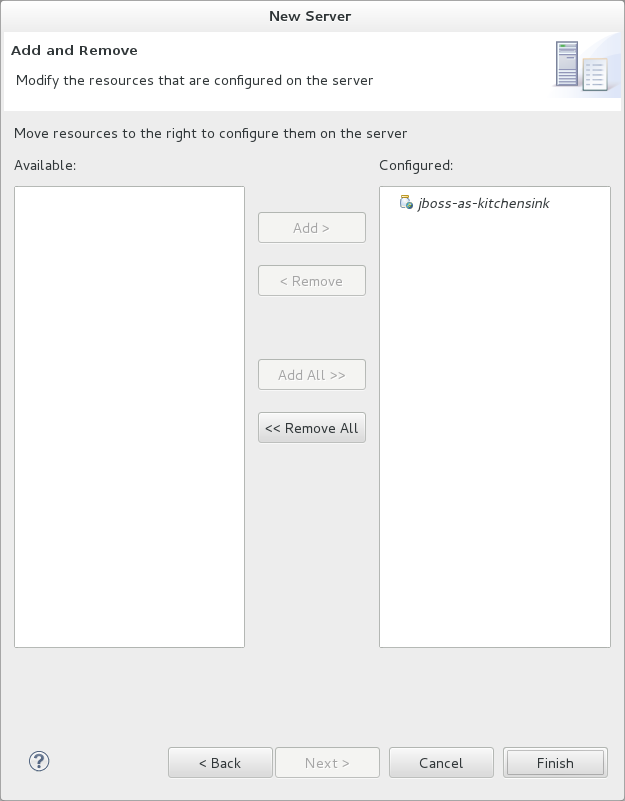
Result: You have successfully configured a remote server. The new server is listed in the Servers view. Right-click the server to view operations, including Start to start the server.
If the Server lifecycle is externally managed. check box was selected in the steps above, clicking Start does not start the server. Instead, it marks the server to indicate that it has started and the web poller checks whether the server is running.