Chapter 2. Ceph network configuration
As a storage administrator, you must understand the network environment that the Red Hat Ceph Storage cluster will operate in, and configure the Red Hat Ceph Storage accordingly. Understanding and configuring the Ceph network options will ensure optimal performance and reliability of the overall storage cluster.
2.1. Prerequisites
- Network connectivity.
- Installation of the Red Hat Ceph Storage software.
2.2. Network configuration for Ceph
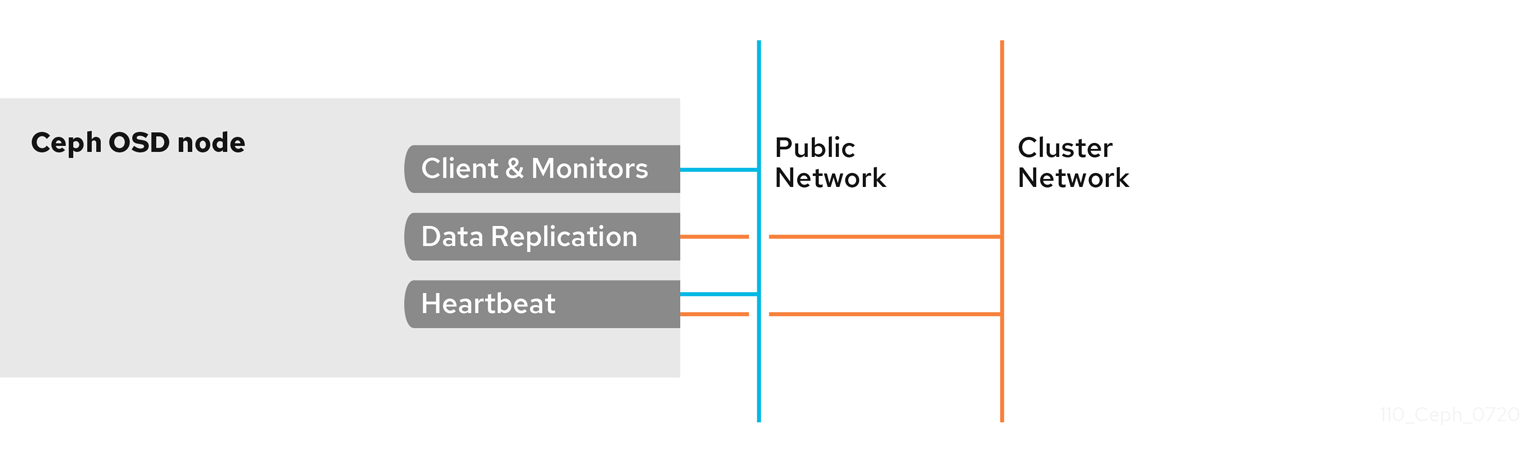
Network configuration is critical for building a high performance Red Hat Ceph Storage cluster. The Ceph storage cluster does not perform request routing or dispatching on behalf of the Ceph client. Instead, Ceph clients make requests directly to Ceph OSD daemons. Ceph OSDs perform data replication on behalf of Ceph clients, which means replication and other factors impose additional loads on the networks of Ceph storage clusters.
All Ceph clusters must use a public network. However, unless you specify an internal cluster network, Ceph assumes a single public network. Ceph can function with a public network only, but for large storage clusters you will see significant performance improvement with a second private network for carrying only cluster-related traffic.
Red Hat recommends running a Ceph storage cluster with two networks. One public network and one private network.
To support two networks, each Ceph Node will need to have more than one network interface card (NIC).

There are several reasons to consider operating two separate networks:
- Performance: Ceph OSDs handle data replication for the Ceph clients. When Ceph OSDs replicate data more than once, the network load between Ceph OSDs easily dwarfs the network load between Ceph clients and the Ceph storage cluster. This can introduce latency and create a performance problem. Recovery and rebalancing can also introduce significant latency on the public network.
-
Security: While most people are generally civil, some actors will engage in what is known as a Denial of Service (DoS) attack. When traffic between Ceph OSDs gets disrupted, peering may fail and placement groups may no longer reflect an
active + cleanstate, which may prevent users from reading and writing data. A great way to defeat this type of attack is to maintain a completely separate cluster network that does not connect directly to the internet.
Network configuration settings are not required. Ceph can function with a public network only, assuming a public network is configured on all hosts running a Ceph daemon. However, Ceph allows you to establish much more specific criteria, including multiple IP networks and subnet masks for your public network. You can also establish a separate cluster network to handle OSD heartbeat, object replication, and recovery traffic.
Do not confuse the IP addresses you set in the configuration with the public-facing IP addresses network clients might use to access your service. Typical internal IP networks are often 192.168.0.0 or 10.0.0.0.
Ceph uses CIDR notation for subnets, for example, 10.0.0.0/24.
If you specify more than one IP address and subnet mask for either the public or the private network, the subnets within the network must be capable of routing to each other. Additionally, make sure you include each IP address and subnet in your IP tables and open ports for them as necessary.
When you configured the networks, you can restart the cluster or restart each daemon. Ceph daemons bind dynamically, so you do not have to restart the entire cluster at once if you change the network configuration.
2.3. Configuration requirements for Ceph daemons
Ceph has one network configuration requirement that applies to all daemons. The Ceph configuration file must specify the host for each daemon.
Some deployment utilities might create a configuration file for you. Do not set these values if the deployment utility does it for you.
The host option is the short name of the node, not its FQDN. It is not an IP address.
You can set the host names and the IP addresses for where the daemon resides by specifying the host name.
Example
[mon.a]
    host = host01
    mon_addr = 10.0.0.101:6789, 10.0.0.101:3300

[osd.0]
    host = host02
You do not have to set the node IP address for a daemon, it is optional. If you have a static IP configuration and both public and private networks running, the Ceph configuration file might specify the IP address of the node for each daemon. Setting a static IP address for a daemon must appear in the daemon instance sections of the Ceph configuration file.
Example
[osd.0]
    public_addr = 10.74.250.101/21
    cluster_addr = 10.74.250.101/21
You can deploy an OSD host with a single NIC in a cluster with two networks by forcing the OSD host. You can force the OSD host to operate on the public network by adding a public addr entry to the [osd.n] section of the Ceph configuration file, where n refers to the number of the OSD with one NIC. Additionally, the public network and cluster network must be able to route traffic to each other, which Red Hat does not recommend for security reasons.
Red Hat does not recommend deploying an OSD node with a single NIC with two networks for security reasons.
Additional Resources
- See the host options in Red Hat Ceph Storage Configuration Guide, Appendix B for specific option descriptions and usage.
- See the common options in Red Hat Ceph Storage Configuration Guide, Appendix B for specific option descriptions and usage.
2.4. Ceph network messenger
Messenger is the Ceph network layer implementation. Red Hat supports two messenger types:
-
simple -
async
In Red Hat Ceph Storage 3 and higher, async is the default messenger type. To change the messenger type, specify the ms_type configuration setting in the [global] section of the Ceph configuration file.
For the async messenger, Red Hat supports the posix transport type, but does not currently support rdma or dpdk. By default, the ms_type setting in Red Hat Ceph Storage 3 or higher reflects async+posix, where async is the messenger type and posix is the transport type.
SimpleMessenger
The SimpleMessenger implementation uses TCP sockets with two threads per socket. Ceph associates each logical session with a connection. A pipe handles the connection, including the input and output of each message. While SimpleMessenger is effective for the posix transport type, it is not effective for other transport types such as rdma or dpdk.
AsyncMessenger
Consequently, AsyncMessenger is the default messenger type for Red Hat Ceph Storage 3 or higher. For Red Hat Ceph Storage 3 or higher, the AsyncMessenger implementation uses TCP sockets with a fixed-size thread pool for connections, which should be equal to the highest number of replicas or erasure-code chunks. The thread count can be set to a lower value if performance degrades due to a low CPU count or a high number of OSDs per server.
Red Hat does not support other transport types such as rdma or dpdk at this time.
Additional Resources
- See the AsyncMessenger options in Red Hat Ceph Storage Configuration Guide, Appendix B for specific option descriptions and usage.
- See the Red Hat Ceph Storage Architecture Guide for details about using on-wire encryption with the Ceph messenger version 2 protocol.
2.5. Configuring a public network
The public network configuration allows you specifically define IP addresses and subnets for the public network. You may specifically assign static IP addresses or override public network settings using the public addr setting for a specific daemon.
Prerequisites
- Installation of the Red Hat Ceph Storage software.
Procedure
-
Add the following option to the
[global]section of the Ceph configuration file:
[global]
    ...
    public_network = PUBLIC-NET/NETMASK
Additional Resources
- See the common options in Red Hat Ceph Storage Configuration Guide, Appendix B for specific option descriptions and usage.
2.6. Configuring a private network
If you declare a cluster network, OSDs will route heartbeat, object replication, and recovery traffic over the cluster network. This can improve performance compared to using a single network.
It is preferable, that the cluster network is not reachable from the public network or the Internet for added security.
The cluster network configuration allows you to declare a cluster network, and specifically define IP addresses and subnets for the cluster network. You can specifically assign static IP addresses or override cluster network settings using the cluster addr setting for specific OSD daemons.
Prerequisites
- A running Red Hat Ceph Storage cluster.
- Access to the Ceph software repository.
Procedure
-
Add the following option to the
[global]section of the Ceph configuration file:
[global]
    ...
    cluster_network = CLUSTER-NET/NETMASK
2.7. Verify the firewall settings
By default, daemons bind to ports within the 6800:7100 range. You can configure this range at your discretion. Before configuring the firewall, check the default firewall configuration.
Prerequisites
- A running Red Hat Ceph Storage cluster.
- Access to the Ceph software repository.
- Root-level access to the Ceph Monitor node.
Procedure
You can configure this range at your discretion:
[root@mon ~]# sudo iptables -L
For the
firewallddaemon, execute the following command:[root@mon ~]# firewall-cmd --list-all-zones
Some Linux distributions include rules that reject all inbound requests except SSH from all network interfaces.
Example
REJECT all -- anywhere anywhere reject-with icmp-host-prohibited
2.8. Firewall settings for Ceph Monitor node
Ceph monitors listen on port 3300 and 6789 by default. Additionally, Ceph monitors always operate on the public network.
Prerequisites
- A running Red Hat Ceph Storage cluster.
- Access to the Ceph software repository.
- Root-level access to the Ceph Monitor node.
Procedure
Add rules using the following example:
[root@mon ~]# sudo iptables -A INPUT -i IFACE -p tcp -s IP-ADDRESS/NETMASK --dport 6789 -j ACCEPT
[root@mon ~]# sudo iptables -A INPUT -i IFACE -p tcp -s IP-ADDRESS/NETMASK --dport 3300 -j ACCEPT
-
Replace
IFACEwith the public network interface. For example,eth0,eth1, and so on. -
Replace
IP-ADDRESSwith the IP address of the public network andNETMASKwith the netmask for the public network.
-
Replace
For the
firewallddaemon, execute the following commands:[root@mon ~]# firewall-cmd --zone=public --add-port=6789/tcp [root@mon ~]# firewall-cmd --zone=public --add-port=6789/tcp --permanent [root@mon ~]# firewall-cmd --zone=public --add-port=3300/tcp [root@mon ~]# firewall-cmd --zone=public --add-port=3300/tcp --permanent
2.9. Firewall settings for Ceph OSDs
By default, Ceph OSDs bind to the first available ports on a Ceph node beginning at port 6800. Ensure to open at least four ports beginning at port 6800 for each OSD that runs on the node:
- One for talking to clients and monitors on the public network.
- One for sending data to other OSDs on the cluster network.
- Two for sending heartbeat packets on the cluster network.
Ports are node-specific. However, you might need to open more ports than the number of ports needed by Ceph daemons running on that Ceph node in the event that processes get restarted and the bound ports do not get released. Consider to open a few additional ports in case a daemon fails and restarts without releasing the port such that the restarted daemon binds to a new port. Also, consider opening the port range of 6800:7300 on each OSD node.
If you set separate public and cluster networks, you must add rules for both the public network and the cluster network, because clients will connect using the public network and other Ceph OSD Daemons will connect using the cluster network.
Prerequisites
- A running Red Hat Ceph Storage cluster.
- Access to the Ceph software repository.
- Root-level access to the Ceph OSD nodes.
Procedure
Add rules using the following example:
[root@mon ~]# sudo iptables -A INPUT -i IFACE -m multiport -p tcp -s IP-ADDRESS/NETMASK --dports 6800:6810 -j ACCEPT
-
Replace
IFACEwith the public network interface (for example,eth0,eth1, and so on). -
Replace
IP-ADDRESSwith the IP address of the public network andNETMASKwith the netmask for the public network.
-
Replace
For the
firewallddaemon, execute the following:[root@mon ~] # firewall-cmd --zone=public --add-port=6800-6810/tcp [root@mon ~] # firewall-cmd --zone=public --add-port=6800-6810/tcp --permanent
If you put the cluster network into another zone, open the ports within that zone as appropriate.
2.10. Verifying and configuring the MTU value
The maximum transmission unit (MTU) value is the size, in bytes, of the largest packet sent on the link layer. The default MTU value is 1500 bytes. Red Hat recommends using jumbo frames, a MTU value of 9000 bytes, for a Red Hat Ceph Storage cluster.
Red Hat Ceph Storage requires the same MTU value throughout all networking devices in the communication path, end-to-end for both public and cluster networks. Verify that the MTU value is the same on all nodes and networking equipment in the environment before using a Red Hat Ceph Storage cluster in production.
When bonding network interfaces together, the MTU value only needs to be set on the bonded interface. The new MTU value propagates from the bonding device to the underlying network devices.
Prerequisites
- Root-level access to the node.
Procedure
Verify the current MTU value:
Example
[root@mon ~]# ip link list
1: lo: <LOOPBACK,UP,LOWER_UP> mtu 65536 qdisc noqueue state UNKNOWN mode DEFAULT group default qlen 1000
    link/loopback 00:00:00:00:00:00 brd 00:00:00:00:00:00
2: enp22s0f0: <BROADCAST,MULTICAST,UP,LOWER_UP> mtu 1500 qdisc mq state UP mode DEFAULT group default qlen 1000
    link/ether 40:f2:e9:b8:a0:48 brd ff:ff:ff:ff:ff:ff
For this example, the network interface is
enp22s0f0and it has a MTU value of1500.To temporarily change the MTU value online:
Syntax
ip link set dev NET_INTERFACE mtu NEW_MTU_VALUE
Example
[root@mon ~]# ip link set dev enp22s0f0 mtu 9000
To permanently change the MTU value.
Open for editing the network configuration file for that particular network interface:
Syntax
vim /etc/sysconfig/network-scripts/ifcfg-NET_INTERFACEExample
[root@mon ~]# vim /etc/sysconfig/network-scripts/ifcfg-enp22s0f0
On a new line, add the
MTU=9000option:Example
NAME="enp22s0f0"
DEVICE="enp22s0f0"
MTU=9000 1
ONBOOT=yes
NETBOOT=yes
UUID="a8c1f1e5-bd62-48ef-9f29-416a102581b2"
IPV6INIT=yes
BOOTPROTO=dhcp
TYPE=Ethernet
Restart the network service:
Example
[root@mon ~]# systemctl restart network
Additional Resources
- For more details, see the Configuring and Managing Networking guide for Red Hat Enterprise Linux 8.
- For more details, see the Networking Guide for Red Hat Enterprise Linux 7.
2.11. Additional Resources
- See the Red Hat Ceph Storage network configuration options in Appendix B for specific option descriptions and usage.
- See the Red Hat Ceph Storage Architecture Guide for details about using on-wire encryption with the Ceph messenger version 2 protocol.