File System Guide
Configuring and Mounting Ceph File Systems
Abstract
Chapter 1. Introduction to the Ceph File System
As a storage administrator, you can gain an understanding of the features, system components, and limitations to manage a Ceph File System (CephFS) environment.
1.1. Ceph File System features and enhancements
The Ceph File System (CephFS) is a file system compatible with POSIX standards that is built on top of Ceph’s distributed object store, called RADOS (Reliable Autonomic Distributed Object Storage). CephFS provides file access to a Red Hat Ceph Storage cluster, and uses the POSIX semantics wherever possible. For example, in contrast to many other common network file systems like NFS, CephFS maintains strong cache coherency across clients. The goal is for processes using the file system to behave the same when they are on different hosts as when they are on the same host. However, in some cases, CephFS diverges from the strict POSIX semantics.
The Ceph File System has the following features and enhancements:
- Scalability
- The Ceph File System is highly scalable due to horizontal scaling of metadata servers and direct client reads and writes with individual OSD nodes.
- Shared File System
- The Ceph File System is a shared file system so multiple clients can work on the same file system at once.
- High Availability
- The Ceph File System provides a cluster of Ceph Metadata Servers (MDS). One is active and others are in standby mode. If the active MDS terminates unexpectedly, one of the standby MDS becomes active. As a result, client mounts continue working through a server failure. This behavior makes the Ceph File System highly available. In addition, you can configure multiple active metadata servers.
- Configurable File and Directory Layouts
- The Ceph File System allows users to configure file and directory layouts to use multiple pools, pool namespaces, and file striping modes across objects.
- POSIX Access Control Lists (ACL)
-
The Ceph File System supports the POSIX Access Control Lists (ACL). ACL are enabled by default with the Ceph File Systems mounted as kernel clients with kernel version
kernel-3.10.0-327.18.2.el7or newer. To use an ACL with the Ceph File Systems mounted as FUSE clients, you must enable them. - Client Quotas
- The Ceph File System supports setting quotas on any directory in a system. The quota can restrict the number of bytes or the number of files stored beneath that point in the directory hierarchy. CephFS client quotas are enabled by default.
- Resizing
- The Ceph File System size is only bound by the capacity of the OSDs servicing its data pool. To increase the capacity, add more OSDs to the CephFS data pool. To decrease the capacity, use either client quotas or pool quotas.
- Snapshots
- The Ceph File System supports read-only snapshots but not writable clones.
- POSIX file system operations
The Ceph File System supports standard and consistent POSIX file system operations including the following access patterns:
- Buffered write operations via the Linux page cache.
- Cached read operations via the Linux page cache.
- Direct I/O asynchronous or synchronous read/write operations, bypassing the page cache.
- Memory mapped I/O.
Additional Resources
- See the Installing Metadata servers section in the Installation Guide to install Ceph Metadata servers.
- See the Deploying Ceph File Systems section in the File System Guide to create Ceph File Systems.
1.2. Ceph File System components
The Ceph File System has two primary components:
- Clients
-
The CephFS clients perform I/O operations on behalf of applications using CephFS, such as,
ceph-fusefor FUSE clients andkcephfsfor kernel clients. CephFS clients send metadata requests to an active Metadata Server. In return, the CephFS client learns of the file metadata, and can begin safely caching both metadata and file data. - Metadata Servers (MDS)
The MDS does the following:
- Provides metadata to CephFS clients.
- Manages metadata related to files stored on the Ceph File System.
- Coordinates access to the shared Red Hat Ceph Storage cluster.
- Caches hot metadata to reduce requests to the backing metadata pool store.
- Manages the CephFS clients' caches to maintain cache coherence.
- Replicates hot metadata between active MDS.
- Coalesces metadata mutations to a compact journal with regular flushes to the backing metadata pool.
-
CephFS requires at least one Metadata Server daemon (
ceph-mds) to run.
The diagram below shows the component layers of the Ceph File System.
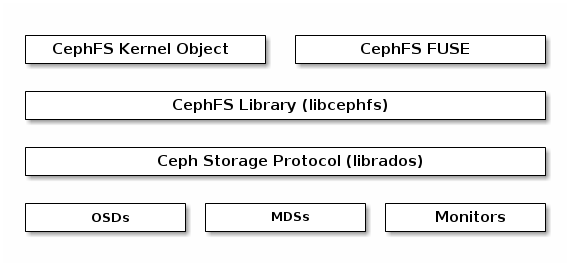
The bottom layer represents the underlying core storage cluster components:
-
Ceph OSDs (
ceph-osd) where the Ceph File System data and metadata are stored. -
Ceph Metadata Servers (
ceph-mds) that manages Ceph File System metadata. -
Ceph Monitors (
ceph-mon) that manages the master copy of the cluster map.
The Ceph Storage protocol layer represents the Ceph native librados library for interacting with the core storage cluster.
The CephFS library layer includes the CephFS libcephfs library that works on top of librados and represents the Ceph File System.
The top layer represents two types of Ceph clients that can access the Ceph File Systems.
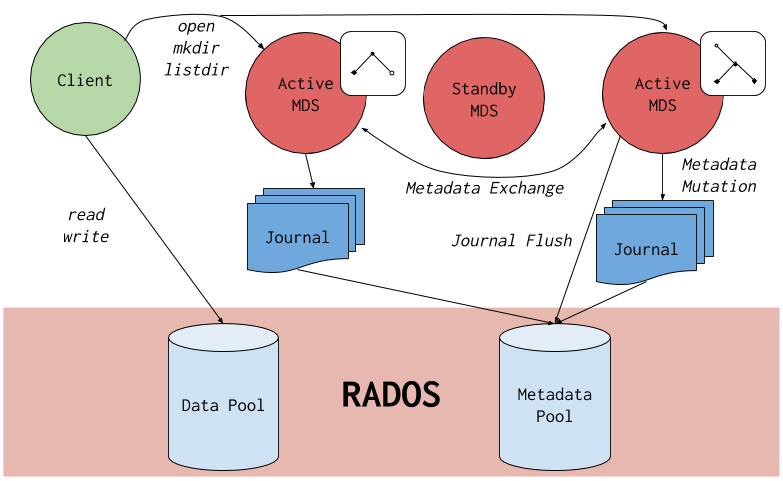
The diagram below shows more details on how the Ceph File System components interact with each other.
Additional Resources
- See the Installing Metadata servers section in the Red Hat Ceph Storage Installation Guide to install Ceph Metadata servers.
- See the Deploying Ceph File Systems section in the Red Hat Ceph Storage File System Guide to create Ceph File Systems.
1.3. Ceph File System and SELinux
Starting with Red Hat Enterprise Linux 8.3 and Red Hat Ceph Storage 4.2, support for using Security-Enhanced Linux (SELinux) on Ceph File Systems (CephFS) environments is available. You can now set any SELinux file type with CephFS, along with assigning a particular SELinux type on individual files. This support applies to the Ceph File System Metadata Server (MDS), the CephFS File System in User Space (FUSE) clients, and the CephFS kernel clients.
Additional Resources
- See the Using SELinux Guide on Red Hat Enterprise Linux 8 for more information on SELinux.
1.4. Ceph File System limitations and the POSIX standards
Creation of multiple Ceph File Systems on one Red Hat Ceph Storage cluster is disabled by default. An attempt to create an additional Ceph File System fails with the following error message:
Error EINVAL: Creation of multiple filesystems is disabled.
While technically possible, Red Hat does not support having multiple Ceph File Systems on one Red Hat Ceph Storage cluster. Doing so can cause the MDS or CephFS client nodes to terminate unexpectedly.
The Ceph File System diverges from the strict POSIX semantics in the following ways:
-
If a client’s attempt to write a file fails, the write operations are not necessarily atomic. That is, the client might call the
write()system call on a file opened with theO_SYNCflag with an 8MB buffer and then terminates unexpectedly and the write operation can be only partially applied. Almost all file systems, even local file systems, have this behavior. - In situations when the write operations occur simultaneously, a write operation that exceeds object boundaries is not necessarily atomic. For example, writer A writes "aa|aa" and writer B writes "bb|bb" simultaneously, where "|" is the object boundary, and "aa|bb" is written rather than the proper "aa|aa" or "bb|bb".
-
POSIX includes the
telldir()andseekdir()system calls that allow you to obtain the current directory offset and seek back to it. Because CephFS can fragment directories at any time, it is difficult to return a stable integer offset for a directory. As such, calling theseekdir()system call to a non-zero offset might often work but is not guaranteed to do so. Callingseekdir()to offset 0 will always work. This is an equivalent to therewinddir()system call. -
Sparse files propagate incorrectly to the
st_blocksfield of thestat()system call. CephFS does not explicitly track parts of a file that are allocated or written to, because thest_blocksfield is always populated by the quotient of file size divided by block size. This behavior causes utilities, such asdu, to overestimate used space. -
When the
mmap()system call maps a file into memory on multiple hosts, write operations are not coherently propagated to caches of other hosts. That is, if a page is cached on host A, and then updated on host B, host A page is not coherently invalidated. -
CephFS clients present a hidden
.snapdirectory that is used to access, create, delete, and rename snapshots. Although this directory is excluded from thereaddir()system call, any process that tries to create a file or directory with the same name returns an error. The name of this hidden directory can be changed at mount time with the-o snapdirname=.<new_name>option or by using theclient_snapdirconfiguration option.
Additional Resources
- See the Installing Metadata servers section in the Red Hat Ceph Storage Installation Guide to install Ceph Metadata servers.
- See the Deploying Ceph File Systems section in the Red Hat Ceph Storage File System Guide to create Ceph File Systems.
1.5. Additional Resources
- See the Installing Metadata Servers section in the Red Hat Ceph Storage Installation Guide for more details.
- If you want to use NFS Ganesha as an interface to the Ceph File System with Red Hat OpenStack Platform, see the CephFS with NFS-Ganesha deployment section in the Deploying the Shared File Systems service with CephFS through NFS guide for instructions on how to deploy such an environment.
Chapter 2. The Ceph File System Metadata Server
As a storage administrator, you can learn about the different states of the Ceph File System (CephFS) Metadata Server (MDS), along with learning about CephFS MDS ranking mechanic, configuring the MDS standby daemon, and cache size limits. Knowing these concepts can enable you to configure the MDS daemons for a storage environment.
2.1. Prerequisites
- A running, and healthy Red Hat Ceph Storage cluster.
-
Installation of the Ceph Metadata Server daemons (
ceph-mds).
2.2. Metadata Server daemon states
The Metadata Server (MDS) daemons operate in two states:
- Active — manages metadata for files and directories stores on the Ceph File System.
- Standby — serves as a backup, and becomes active when an active MDS daemon becomes unresponsive.
By default, a Ceph File System uses only one active MDS daemon. However, systems with many clients benefit from multiple active MDS daemons.
You can configure the file system to use multiple active MDS daemons so that you can scale metadata performance for larger workloads. The active MDS daemons dynamically share the metadata workload when metadata load patterns change. Note that systems with multiple active MDS daemons still require standby MDS daemons to remain highly available.
What Happens When the Active MDS Daemon Fails
When the active MDS becomes unresponsive, a Ceph Monitor daemon waits a number of seconds equal to the value specified in the mds_beacon_grace option. If the active MDS is still unresponsive after the specified time period has passed, the Ceph Monitor marks the MDS daemon as laggy. One of the standby daemons becomes active, depending on the configuration.
To change the value of mds_beacon_grace, add this option to the Ceph configuration file and specify the new value.
2.3. Metadata Server ranks
Each Ceph File System (CephFS) has a number of ranks, one by default, which starts at zero.
Ranks define the way how the metadata workload is shared between multiple Metadata Server (MDS) daemons. The number of ranks is the maximum number of MDS daemons that can be active at one time. Each MDS daemon handles a subset of the CephFS metadata that is assigned to that rank.
Each MDS daemon initially starts without a rank. The Ceph Monitor assigns a rank to the daemon. The MDS daemon can only hold one rank at a time. Daemons only lose ranks when they are stopped.
The max_mds setting controls how many ranks will be created.
The actual number of ranks in the CephFS is only increased if a spare daemon is available to accept the new rank.
Rank States
Ranks can be:
- Up - A rank that is assigned to the MDS daemon.
- Failed - A rank that is not associated with any MDS daemon.
-
Damaged - A rank that is damaged; its metadata is corrupted or missing. Damaged ranks are not assigned to any MDS daemons until the operator fixes the problem, and uses the
ceph mds repairedcommand on the damaged rank.
2.4. Metadata Server cache size limits
You can limit the size of the Ceph File System (CephFS) Metadata Server (MDS) cache by:
A memory limit: Use the
mds_cache_memory_limitoption. Red Hat recommends a value between 8 GB and 64 GB formds_cache_memory_limit. Setting more cache can cause issues with recovery. This limit is approximately 66% of the desired maximum memory use of the MDS.ImportantRed Hat recommends to use memory limits instead of inode count limits.
-
Inode count: Use the
mds_cache_sizeoption. By default, limiting the MDS cache by inode count is disabled.
In addition, you can specify a cache reservation by using the mds_cache_reservation option for MDS operations. The cache reservation is limited as a percentage of the memory or inode limit and is set to 5% by default. The intent of this parameter is to have the MDS maintain an extra reserve of memory for its cache for new metadata operations to use. As a consequence, the MDS should in general operate below its memory limit because it will recall old state from clients in order to drop unused metadata in its cache.
The mds_cache_reservation option replaces the mds_health_cache_threshold option in all situations, except when MDS nodes sends a health alert to the Ceph Monitors indicating the cache is too large. By default, mds_health_cache_threshold is 150% of the maximum cache size.
Be aware that the cache limit is not a hard limit. Potential bugs in the CephFS client or MDS or misbehaving applications might cause the MDS to exceed its cache size. The mds_health_cache_threshold option configures the storage cluster health warning message, so that operators can investigate why the MDS cannot shrink its cache.
Additional Resources
- See the Metadata Server daemon configuration reference section in the Red Hat Ceph Storage File System Guide for more information.
2.5. Configuring multiple active Metadata Server daemons
Configure multiple active Metadata Server (MDS) daemons to scale metadata performance for large systems.
Do not convert all standby MDS daemons to active ones. A Ceph File System (CephFS)requires at least one standby MDS daemon to remain highly available.
The scrubbing process is not currently supported when multiple active MDS daemons are configured.
Prerequisites
- Ceph administration capabilities on the MDS node.
Procedure
Set the
max_mdsparameter to the desired number of active MDS daemons:Syntax
ceph fs set NAME max_mds NUMBER
Example
[root@mon ~]# ceph fs set cephfs max_mds 2
This example increases the number of active MDS daemons to two in the CephFS called
cephfsNoteCeph only increases the actual number of ranks in the CephFS if a spare MDS daemon is available to take the new rank.
Verify the number of active MDS daemons:
Syntax
ceph fs status NAMEExample
[root@mon ~]# ceph fs status cephfs
cephfs - 0 clients
======
+------+--------+-------+---------------+-------+-------+
| Rank | State  |  MDS  |    Activity   |  dns  |  inos |
+------+--------+-------+---------------+-------+-------+
|  0   | active | node1 | Reqs:    0 /s |   10  |   12  |
|  1   | active | node2 | Reqs:    0 /s |   10  |   12  |
+------+--------+-------+---------------+-------+-------+
+-----------------+----------+-------+-------+
|       Pool      |   type   |  used | avail |
+-----------------+----------+-------+-------+
| cephfs_metadata | metadata | 4638  | 26.7G |
|   cephfs_data   |   data   |    0  | 26.7G |
+-----------------+----------+-------+-------+

+-------------+
| Standby MDS |
+-------------+
|    node3    |
+-------------+
Additional Resources
- See the Metadata Server daemons states section in the Red Hat Ceph Storage File System Guide for more details.
- See the Decreasing the Number of Active MDS Daemons section in the Red Hat Ceph Storage File System Guide for more details.
- See the Managing Ceph users section in the Red Hat Ceph Storage Administration Guide for more details.
2.6. Configuring the number of standby daemons
Each Ceph File System (CephFS) can specify the required number of standby daemons to be considered healthy. This number also includes the standby-replay daemon waiting for a rank failure.
Prerequisites
- User access to the Ceph Monitor node.
Procedure
Set the expected number of standby daemons for a particular CephFS:
Syntax
ceph fs set FS_NAME standby_count_wanted NUMBER
NoteSetting the NUMBER to zero disables the daemon health check.
Example
[root@mon]# ceph fs set cephfs standby_count_wanted 2
This example sets the expected standby daemon count to two.
2.7. Configuring the standby-replay Metadata Server
Configure each Ceph File System (CephFS) by adding a standby-replay Metadata Server (MDS) daemon. Doing this reduces failover time if the active MDS becomes unavailable.
This specific standby-replay daemon follows the active MDS’s metadata journal. The standby-replay daemon is only used by the active MDS of the same rank, and is not available to other ranks.
If using standby-replay, then every active MDS must have a standby-replay daemon.
Prerequisites
- User access to the Ceph Monitor node.
Procedure
Set the standby-replay for a particular CephFS:
Syntax
ceph fs set FS_NAME allow_standby_replay 1Example
[root@mon]# ceph fs set cephfs allow_standby_replay 1
In this example, the Boolean value is
1, which enables the standby-replay daemons to be assigned to the active Ceph MDS daemons.NoteSetting the
allow_standby_replayBoolean value back to0only prevents new standby-replay daemons from being assigned. To also stop the running daemons, mark them asfailedwith theceph mds failcommand.
Additional Resources
- See the Using the ceph mds fail command section in the Red Hat Ceph Storage File System Guide for details.
2.8. Decreasing the number of active Metadata Server daemons
How to decrease the number of active Ceph File System (CephFS) Metadata Server (MDS) daemons.
Prerequisites
-
The rank that you will remove must be active first, meaning that you must have the same number of MDS daemons as specified by the
max_mdsparameter.
Procedure
Set the same number of MDS daemons as specified by the
max_mdsparameter:Syntax
ceph fs status NAMEExample
[root@mon ~]# ceph fs status cephfs
cephfs - 0 clients

+------+--------+-------+---------------+-------+-------+
| Rank | State  |  MDS  |    Activity   |  dns  |  inos |
+------+--------+-------+---------------+-------+-------+
|  0   | active | node1 | Reqs:    0 /s |   10  |   12  |
|  1   | active | node2 | Reqs:    0 /s |   10  |   12  |
+------+--------+-------+---------------+-------+-------+
+-----------------+----------+-------+-------+
|       Pool      |   type   |  used | avail |
+-----------------+----------+-------+-------+
| cephfs_metadata | metadata | 4638  | 26.7G |
|   cephfs_data   |   data   |    0  | 26.7G |
+-----------------+----------+-------+-------+

+-------------+
| Standby MDS |
+-------------+
|    node3    |
+-------------+
On a node with administration capabilities, change the
max_mdsparameter to the desired number of active MDS daemons:Syntax
ceph fs set NAME max_mds NUMBER
Example
[root@mon ~]# ceph fs set cephfs max_mds 1
-
Wait for the storage cluster to stabilize to the new
max_mdsvalue by watching the Ceph File System status. Verify the number of active MDS daemons:
Syntax
ceph fs status NAMEExample
[root@mon ~]# ceph fs status cephfs
cephfs - 0 clients

+------+--------+-------+---------------+-------+-------+
| Rank | State  |  MDS  |    Activity   |  dns  |  inos |
+------+--------+-------+---------------+-------+-------+
|  0   | active | node1 | Reqs:    0 /s |   10  |   12  |
+------+--------+-------+---------------+-------+-------+
+-----------------+----------+-------+-------+
|       Pool      |   type   |  used | avail |
+-----------------+----------+-------+-------+
| cephfs_metadata | metadata | 4638  | 26.7G |
|   cephfs_data   |   data   |    0  | 26.7G |
+-----------------+----------+-------+-------+

+-------------+
| Standby MDS |
+-------------+
|    node3    |
|    node2    |
+-------------+
Additional Resources
- See the Metadata Server daemons states section in the Red Hat Ceph Storage File System Guide.
- See the Configuring multiple active Metadata Server daemons section in the Red Hat Ceph Storage File System Guide.
2.9. Additional Resources
- See the Installing Metadata servers section of the Red Hat Ceph Storage Installation Guide for details.
- See the Red Hat Ceph Storage Installation Guide for details on installing a Red Hat Ceph Storage cluster.
Chapter 3. Deployment of the Ceph File System
As a storage administrator, you can deploy Ceph File Systems (CephFS) in a storage environment and have clients mount those Ceph File Systems to meet the storage needs.
Basically, the deployment workflow is three steps:
- Create a Ceph File System on a Ceph Monitor node.
- Create a Ceph client user with the appropriate capabilities, and make the client key available on the node where the Ceph File System will be mounted.
- Mount CephFS on a dedicated node, using either a kernel client or a File System in User Space (FUSE) client.
3.1. Prerequisites
- A running, and healthy Red Hat Ceph Storage cluster.
-
Installation and configuration of the Ceph Metadata Server daemon (
ceph-mds).
3.2. Layout, quota, snapshot, and network restrictions
These user capabilities can help you restrict access to a Ceph File System (CephFS) based on the needed requirements.
All user capability flags, except rw, must be specified in alphabetical order.
Layouts and Quotas
When using layouts or quotas, clients require the p flag, in addition to rw capabilities. Setting the p flag restricts all the attributes being set by special extended attributes, those with a ceph. prefix. Also, this restricts other means of setting these fields, such as openc operations with layouts.
Example
client.0
    key: AQAz7EVWygILFRAAdIcuJ10opU/JKyfFmxhuaw==
    caps: [mds] allow rwp
    caps: [mon] allow r
    caps: [osd] allow rw tag cephfs data=cephfs_a

client.1
    key: AQAz7EVWygILFRAAdIcuJ11opU/JKyfFmxhuaw==
    caps: [mds] allow rw
    caps: [mon] allow r
    caps: [osd] allow rw tag cephfs data=cephfs_a
In this example, client.0 can modify layouts and quotas on the file system cephfs_a, but client.1 cannot.
Snapshots
When creating or deleting snapshots, clients require the s flag, in addition to rw capabilities. When the capability string also contains the p flag, the s flag must appear after it.
Example
client.0
    key: AQAz7EVWygILFRAAdIcuJ10opU/JKyfFmxhuaw==
    caps: [mds] allow rw, allow rws path=/temp
    caps: [mon] allow r
    caps: [osd] allow rw tag cephfs data=cephfs_a
In this example, client.0 can create or delete snapshots in the temp directory of file system cephfs_a.
Network
Restricting clients connecting from a particular network.
Example
client.0
  key: AQAz7EVWygILFRAAdIcuJ10opU/JKyfFmxhuaw==
  caps: [mds] allow r network 10.0.0.0/8, allow rw path=/bar network 10.0.0.0/8
  caps: [mon] allow r network 10.0.0.0/8
  caps: [osd] allow rw tag cephfs data=cephfs_a network 10.0.0.0/8
The optional network and prefix length is in CIDR notation, for example, 10.3.0.0/16.
Additional Resources
- See the Creating client users for a Ceph File System section in the Red Hat Ceph Storage File System Guide for details on setting the Ceph user capabilities.
3.3. Creating a Ceph File System
You can create a Ceph File System (CephFS) on a Ceph Monitor node.
By default, you can create only one CephFS per Ceph Storage cluster.
Prerequisites
- A running, and healthy Red Hat Ceph Storage cluster.
-
Installation and configuration of the Ceph Metadata Server daemon (
ceph-mds). - Root-level access to a Ceph monitor node.
Procedure
Create two pools, one for storing data and one for storing metadata:
Syntax
ceph osd pool create NAME _PG_NUMExample
[root@mon ~]# ceph osd pool create cephfs_data 64
[root@mon ~]# ceph osd pool create cephfs_metadata 64
Typically, the metadata pool can start with a conservative number of Placement Groups (PGs) as it will generally have far fewer objects than the data pool. It is possible to increase the number of PGs if needed. Recommended metadata pool sizes range from 64 PGs to 512 PGs. Size the data pool is proportional to the number and sizes of files you expect in the file system.
ImportantFor the metadata pool, consider to use:
- A higher replication level because any data loss to this pool can make the whole file system inaccessible.
- Storage with lower latency such as Solid-State Drive (SSD) disks because this directly affects the observed latency of file system operations on clients.
Create the CephFS:
Syntax
ceph fs new NAME METADATA_POOL DATA_POOL
Example
[root@mon ~]# ceph fs new cephfs cephfs_metadata cephfs_data
Verify that one or more MDSs enter to the active state based on you configuration.
Syntax
ceph fs status NAMEExample
[root@mon ~]# ceph fs status cephfs
cephfs - 0 clients
======
+------+--------+-------+---------------+-------+-------+
| Rank | State  |  MDS  |    Activity   |  dns  |  inos |
+------+--------+-------+---------------+-------+-------+
|  0   | active | node1 | Reqs:    0 /s |   10  |   12  |
+------+--------+-------+---------------+-------+-------+
+-----------------+----------+-------+-------+
|       Pool      |   type   |  used | avail |
+-----------------+----------+-------+-------+
| cephfs_metadata | metadata | 4638  | 26.7G |
|   cephfs_data   |   data   |    0  | 26.7G |
+-----------------+----------+-------+-------+

+-------------+
| Standby MDS |
+-------------+
|    node3    |
|    node2    |
+-------------+----
Additional Resources
- See the Enabling the Red Hat Ceph Storage Repositories section in Red Hat Ceph Storage Installation Guide for more details.
- See the Pools chapter in the Red Hat Ceph Storage Storage Strategies Guide for more details.
- See the The Ceph File System section in the Red Hat Ceph Storage File System Guide for more details on the Ceph File System limitations.
- See the Red Hat Ceph Storage Installation Guide for details on installing Red Hat Ceph Storage.
- See the Installing Metadata Servers in the Red Hat Ceph Storage Installation Guide for details.
3.4. Creating Ceph File Systems with erasure coding (Technology Preview)
By default, Ceph uses replicated pools for data pools. You can also add an additional erasure-coded data pool, if needed. Ceph File Systems (CephFS) backed by erasure-coded pools use less overall storage compared to Ceph File Systems backed by replicated pools. While erasure-coded pools use less overall storage, they also use more memory and processor resources than replicated pools.
The Ceph File System using erasure-coded pools is a Technology Preview feature. Technology Preview features are not supported with Red Hat production service level agreements (SLAs), might not be functionally complete, and Red Hat does not recommend to use them for production. These features provide early access to upcoming product features, enabling customers to test functionality and provide feedback during the development process. See the support scope for Red Hat Technology Preview features for more details.
For production environments, Red Hat recommends using a replicated pool as the default data pool.
Prerequisites
- A running Red Hat Ceph Storage cluster.
- A running CephFS environment.
- Pools using BlueStore OSDs.
- User-level access to a Ceph Monitor node.
Procedure
Create a replicated metadata pool for CephFS metadata:
Syntax
ceph osd pool create METADATA_POOL PG_NUM
Example
[root@mon ~]# ceph osd pool create cephfs-metadata 64
This example creates a pool named
cephfs-metadatawith 64 placement groups.Create a default replicated data pool for CephFS:
Syntax
ceph osd pool create DATA_POOL PG_NUM
Example
[root@mon ~]# ceph osd pool create cephfs-data 64
This example creates a replicated pool named
cephfs-datawith 64 placement groups.Create an erasure-coded data pool for CephFS:
Syntax
ceph osd pool create DATA_POOL PG_NUM erasure
Example
[root@mon ~]# ceph osd pool create cephfs-data-ec 64 erasure
This example creates an erasure-coded pool named
cephfs-data-ecwith 64 placement groups.Enable overwrites on the erasure-coded pool:
Syntax
ceph osd pool set DATA_POOL allow_ec_overwrites trueExample
[root@mon ~]# ceph osd pool set cephfs-data-ec allow_ec_overwrites true
This example enables overwrites on an erasure-coded pool named
cephfs-data-ec.Add the erasure-coded data pool to the CephFS Metadata Server (MDS):
Syntax
ceph fs add_data_pool cephfs-ec DATA_POOLExample
[root@mon ~]# ceph fs add_data_pool cephfs-ec cephfs-data-ec
Optionally, verify the data pool was added:
[root@mon ~]# ceph fs ls
Create the CephFS:
Syntax
ceph fs new cephfs METADATA_POOL DATA_POOL
Example
[root@mon ~]# ceph fs new cephfs cephfs-metadata cephfs-data
ImportantUsing an erasure-coded pool for the default data pool is not recommended.
Create the CephFS using erasure coding:
Syntax
ceph fs new cephfs-ec METADATA_POOL DATA_POOL
Example
[root@mon ~]# ceph fs new cephfs-ec cephfs-metadata cephfs-data-ec
Verify that one or more Ceph FS Metadata Servers (MDS) enters the active state:
Syntax
ceph fs status FS_ECExample
[root@mon ~]# ceph fs status cephfs-ec
cephfs-ec - 0 clients
======
+------+--------+-------+---------------+-------+-------+
| Rank | State  |  MDS  |    Activity   |  dns  |  inos |
+------+--------+-------+---------------+-------+-------+
|  0   | active | node1 | Reqs:    0 /s |   10  |   12  |
+------+--------+-------+---------------+-------+-------+
+-----------------+----------+-------+-------+
|       Pool      |   type   |  used | avail |
+-----------------+----------+-------+-------+
| cephfs-metadata | metadata | 4638  | 26.7G |
|  cephfs-data    |   data   |    0  | 26.7G |
|  cephfs-data-ec |   data   |    0  | 26.7G |
+-----------------+----------+-------+-------+

+-------------+
| Standby MDS |
+-------------+
|    node3    |
|    node2    |
+-------------+
To add a new erasure-coded data pool to an existing file system.
Create an erasure-coded data pool for CephFS:
Syntax
ceph osd pool create DATA_POOL PG_NUM erasure
Example
[root@mon ~]# ceph osd pool create cephfs-data-ec1 64 erasure
Enable overwrites on the erasure-coded pool:
Syntax
ceph osd pool set DATA_POOL allow_ec_overwrites trueExample
[root@mon ~]# ceph osd pool set cephfs-data-ec1 allow_ec_overwrites true
Add the erasure-coded data pool to the CephFS Metadata Server (MDS):
Syntax
ceph fs add_data_pool cephfs-ec DATA_POOLExample
[root@mon ~]# ceph fs add_data_pool cephfs-ec cephfs-data-ec1
Create the CephFS using erasure coding:
Syntax
ceph fs new cephfs-ec METADATA_POOL DATA_POOL
Example
[root@mon ~]# ceph fs new cephfs-ec cephfs-metadata cephfs-data-ec1
Additional Resources
- See the The Ceph File System Metadata Server chapter in the Red Hat Ceph Storage File System Guide for more information on the CephFS MDS.
- See the Installing Metadata Servers section of the Red Hat Ceph Storage Installation Guide for details on installing CephFS.
- See the Erasure-Coded Pools section in the Red Hat Ceph Storage Storage Strategies Guide for more information.
- See the Erasure Coding with Overwrites section in the Red Hat Ceph Storage Storage Strategies Guide for more information.
3.5. Creating client users for a Ceph File System
Red Hat Ceph Storage uses cephx for authentication, which is enabled by default. To use cephx with the Ceph File System, create a user with the correct authorization capabilities on a Ceph Monitor node and make its key available on the node where the Ceph File System will be mounted.
Prerequisites
- A running Red Hat Ceph Storage cluster.
- Installation and configuration of the Ceph Metadata Server daemon (ceph-mds).
- Root-level access to a Ceph monitor node.
- Root-level access to a Ceph client node.
Procedure
On a Ceph Monitor node, create a client user:
Syntax
ceph fs authorize FILE_SYSTEM_NAME client.CLIENT_NAME /DIRECTORY CAPABILITY [/DIRECTORY CAPABILITY] ...
To restrict the client to only writing in the
tempdirectory of filesystemcephfs_a:Example
[root@mon ~]# ceph fs authorize cephfs_a client.1 / r /temp rw

client.1
  key: AQBSdFhcGZFUDRAAcKhG9Cl2HPiDMMRv4DC43A==
  caps: [mds] allow r, allow rw path=/temp
  caps: [mon] allow r
  caps: [osd] allow rw tag cephfs data=cephfs_a
To completely restrict the client to the
tempdirectory, remove the root (/) directory:Example
[root@mon ~]# ceph fs authorize cephfs_a client.1 /temp rw
NoteSupplying
allor asterisk as the file system name grants access to every file system. Typically, it is necessary to quote the asterisk to protect it from the shell.Verify the created key:
Syntax
ceph auth get client.IDExample
[root@mon ~]# ceph auth get client.1
Copy the keyring to the client.
On the Ceph Monitor node, export the keyring to a file:
Syntax
ceph auth get client.ID -o ceph.client.ID.keyring
Example
[root@mon ~]# ceph auth get client.1 -o ceph.client.1.keyring
exported keyring for client.1
Copy the client keyring from the Ceph Monitor node to the
/etc/ceph/directory on the client node:Syntax
scp root@MONITOR_NODE_NAME:/root/ceph.client.1.keyring /etc/ceph/Replace_MONITOR_NODE_NAME_with the Ceph Monitor node name or IP.
Example
[root@client ~]# scp root@mon:/root/ceph.client.1.keyring /etc/ceph/ceph.client.1.keyring
Set the appropriate permissions for the keyring file:
Syntax
chmod 644 KEYRINGExample
[root@client ~]# chmod 644 /etc/ceph/ceph.client.1.keyring
Additional Resources
- See the User Management chapter in the Red Hat Ceph Storage Administration Guide for more details.
3.6. Mounting the Ceph File System as a kernel client
You can mount the Ceph File System (CephFS) as a kernel client, either manually or automatically on system boot.
Clients running on other Linux distributions, aside from Red Hat Enterprise Linux, are permitted but not supported. If issues are found in the CephFS Metadata Server or other parts of the storage cluster when using these clients, Red Hat will address them. If the cause is found to be on the client side, then the issue will have to be addressed by the kernel vendor of the Linux distribution.
Prerequisites
- Root-level access to a Linux-based client node.
- User-level access to a Ceph Monitor node.
- An existing Ceph File System.
Procedure
Configure the client node to use the Ceph storage cluster.
Enable the Red Hat Ceph Storage 4 Tools repository:
Red Hat Enterprise Linux 7
[root@client ~]# subscription-manager repos --enable=rhel-7-server-rhceph-4-tools-rpms
Red Hat Enterprise Linux 8
[root@client ~]# subscription-manager repos --enable=rhceph-4-tools-for-rhel-8-x86_64-rpms
Install the
ceph-commonpackage:Red Hat Enterprise Linux 7
[root@client ~]# yum install ceph-common
Red Hat Enterprise Linux 8
[root@client ~]# dnf install ceph-common
Copy the Ceph client keyring from the Ceph Monitor node to the client node:
Syntax
scp root@MONITOR_NODE_NAME:/etc/ceph/KEYRING_FILE /etc/ceph/
Replace MONITOR_NODE_NAME with the Ceph Monitor host name or IP address.
Example
[root@client ~]# scp root@192.168.0.1:/etc/ceph/ceph.client.1.keyring /etc/ceph/
Copy the Ceph configuration file from a Ceph Monitor node to the client node:
Syntax
scp root@MONITOR_NODE_NAME:/etc/ceph/ceph.conf /etc/ceph/ceph.confReplace MONITOR_NODE_NAME with the Ceph Monitor host name or IP address.
Example
[root@client ~]# scp root@192.168.0.1:/etc/ceph/ceph.conf /etc/ceph/ceph.conf
Set the appropriate permissions for the configuration file:
[root@client ~]# chmod 644 /etc/ceph/ceph.conf
Create a mount directory on the client node:
Syntax
mkdir -p MOUNT_POINTExample
[root@client]# mkdir -p /mnt/cephfs
Mount the Ceph File System. To specify multiple Ceph Monitor addresses, separate them with commas in the
mountcommand, specify the mount point, and set the client name:NoteAs of Red Hat Ceph Storage 4.1,
mount.cephcan read keyring files directly. As such, a secret file is no longer necessary. Just specify the client ID withname=CLIENT_ID, andmount.cephwill find the right keyring file.Syntax
mount -t ceph MONITOR-1_NAME:6789,MONITOR-2_NAME:6789,MONITOR-3_NAME:6789:/ MOUNT_POINT -o name=CLIENT_ID
Example
[root@client ~]# mount -t ceph mon1:6789,mon2:6789,mon3:6789:/ /mnt/cephfs -o name=1
NoteYou can configure a DNS server so that a single host name resolves to multiple IP addresses. Then you can use that single host name with the
mountcommand, instead of supplying a comma-separated list.NoteYou can also replace the Monitor host names with the string
:/andmount.cephwill read the Ceph configuration file to determine which Monitors to connect to.Verify that the file system is successfully mounted:
Syntax
stat -f MOUNT_POINTExample
[root@client ~]# stat -f /mnt/cephfs
Additional Resources
-
See the
mount(8)manual page. - See the Ceph user management chapter in the Red Hat Ceph Storage Administration Guide for more details on creating a Ceph user.
- See the Creating a Ceph File System section of the Red Hat Ceph Storage File System Guide for details.
3.7. Mounting the Ceph File System as a FUSE client
You can mount the Ceph File System (CephFS) as a File System in User Space (FUSE) client, either manually or automatically on system boot.
Prerequisites
- Root-level access to a Linux-based client node.
- User-level access to a Ceph Monitor node.
- An existing Ceph File System.
Procedure
Configure the client node to use the Ceph storage cluster.
Enable the Red Hat Ceph Storage 4 Tools repository:
Red Hat Enterprise Linux 7
[root@client ~]# subscription-manager repos --enable=rhel-7-server-rhceph-4-tools-rpms
Red Hat Enterprise Linux 8
[root@client ~]# subscription-manager repos --enable=rhceph-4-tools-for-rhel-8-x86_64-rpms
Install the
ceph-fusepackage:Red Hat Enterprise Linux 7
[root@client ~]# yum install ceph-fuse
Red Hat Enterprise Linux 8
[root@client ~]# dnf install ceph-fuse
Copy the Ceph client keyring from the Ceph Monitor node to the client node:
Syntax
scp root@MONITOR_NODE_NAME:/etc/ceph/KEYRING_FILE /etc/ceph/
Replace MONITOR_NODE_NAME with the Ceph Monitor host name or IP address.
Example
[root@client ~]# scp root@192.168.0.1:/etc/ceph/ceph.client.1.keyring /etc/ceph/
Copy the Ceph configuration file from a Ceph Monitor node to the client node:
Syntax
scp root@MONITOR_NODE_NAME:/etc/ceph/ceph.conf /etc/ceph/ceph.confReplace MONITOR_NODE_NAME with the Ceph Monitor host name or IP address.
Example
[root@client ~]# scp root@192.168.0.1:/etc/ceph/ceph.conf /etc/ceph/ceph.conf
Set the appropriate permissions for the configuration file:
[root@client ~]# chmod 644 /etc/ceph/ceph.conf
- Choose either automatically or manually mounting.
Manually Mounting
On the client node, create a directory for the mount point:
Syntax
mkdir PATH_TO_MOUNT_POINTExample
[root@client ~]# mkdir /mnt/mycephfs
NoteIf you used the
pathoption with MDS capabilities, then the mount point must be within what is specified bypath.Use the
ceph-fuseutility to mount the Ceph File System.Syntax
ceph-fuse -n client.CLIENT_ID MOUNT_POINT
Example
[root@client ~]# ceph-fuse -n client.1 /mnt/mycephfs
NoteIf you do not use the default name and location of the user keyring, that is
/etc/ceph/ceph.client.CLIENT_ID.keyring, then use the--keyringoption to specify the path to the user keyring, for example:Example
[root@client ~]# ceph-fuse -n client.1 --keyring=/etc/ceph/client.1.keyring /mnt/mycephfs
NoteUse the
-roption to instruct the client to treat that path as its root:Syntax
ceph-fuse -n client.CLIENT_ID MOUNT_POINT -r PATH
Example
[root@client ~]# ceph-fuse -n client.1 /mnt/cephfs -r /home/cephfs
Verify that the file system is successfully mounted:
Syntax
stat -f MOUNT_POINTExample
[user@client ~]$ stat -f /mnt/cephfs
Automatically Mounting
On the client node, create a directory for the mount point:
Syntax
mkdir PATH_TO_MOUNT_POINTExample
[root@client ~]# mkdir /mnt/mycephfs
NoteIf you used the
pathoption with MDS capabilities, then the mount point must be within what is specified bypath.Edit the
/etc/fstabfile as follows:Syntax
#DEVICE                 PATH           TYPE          OPTIONS                  DUMP  FSCK
HOST_NAME:_PORT_,     MOUNT_POINT  fuse.ceph     ceph.id=CLIENT_ID,        0     0
HOST_NAME:_PORT_,                                  ceph.client_mountpoint=/VOL/SUB_VOL_GROUP/SUB_VOL/UID_SUB_VOL,
HOST_NAME:_PORT_:/                                 [ADDITIONAL_OPTIONS]
The first column sets the Ceph Monitor host names and the port number.
The second column sets the mount point
The third column sets the file system type, in this case,
fuse.ceph, for CephFS.The fourth column sets the various options, such as, the user name and the secret file using the
nameandsecretfileoptions, respectively. You can also set specific volumes, sub-volume groups, and sub-volumes using theceph.client_mountpointoption. Set the_netdevoption to ensure that the file system is mounted after the networking subsystem starts to prevent hanging and networking issues. If you do not need access time information, then setting thenoatimeoption can increase performance.Set the fifth and sixth columns to zero.
Example
#DEVICE         PATH              TYPE         OPTIONS         DUMP  FSCK
mon1:6789,      /mnt/cephfs       fuse.ceph    ceph.id=1,         0     0
mon2:6789,                                     ceph.client_mountpoint=/my_vol/my_sub_vol_group/my_sub_vol/0,
mon3:6789:/                                    _netdev,defaults
The Ceph File System will be mounted on the next system boot.
Additional Resources
-
The
ceph-fuse(8)manual page. - See the Ceph user management chapter in the Red Hat Ceph Storage Administration Guide for more details on creating a Ceph user.
- See the Creating a Ceph File System section of the Red Hat Ceph Storage File System Guide for details.
3.8. Additional Resources
- See the Section 3.3, “Creating a Ceph File System” for details.
- See the Section 3.5, “Creating client users for a Ceph File System” for details.
- See the Section 3.6, “Mounting the Ceph File System as a kernel client” for details.
- See the Section 3.7, “Mounting the Ceph File System as a FUSE client” for details.
- See the Red Hat Ceph Storage Installation Guide for details on installing the CephFS Metadata Server.
- See the Chapter 2, The Ceph File System Metadata Server for details on configuring the CephFS Metadata Server daemon.
Chapter 4. Ceph File System administration
As a storage administrator, you can perform common Ceph File System (CephFS) administrative tasks, such as:
- To map a directory to a particular MDS rank, see Section 4.4, “Mapping directory trees to Metadata Server daemon ranks”.
- To disassociate a directory from a MDS rank, see Section 4.5, “Disassociating directory trees from Metadata Server daemon ranks”.
- To work with files and directory layouts, see Section 4.8, “Working with File and Directory Layouts”.
- To add a new data pool, see Section 4.6, “Adding data pools”.
- To work with quotas, see Section 4.7, “Working with Ceph File System quotas”.
- To remove a Ceph File System using the command-line interface, see Section 4.12, “Removing a Ceph File System using the command-line interface”.
- To remove a Ceph File System using Ansible, see Section 4.13, “Removing a Ceph File System using Ansible”.
- To set a minimum client version, see Section 4.14, “Setting a minimum client version”.
-
To use the
ceph mds failcommand, see Section 4.15, “Using theceph mds failcommand”.
4.1. Prerequisites
- A running, and healthy Red Hat Ceph Storage cluster.
-
Installation and configuration of the Ceph Metadata Server daemons (
ceph-mds). - Create and mount the Ceph File System.
4.2. Unmounting Ceph File Systems mounted as kernel clients
How to unmount a Ceph File System that is mounted as a kernel client.
Prerequisites
- Root-level access to the node doing the mounting.
Procedure
To unmount a Ceph File System mounted as a kernel client:
Syntax
umount MOUNT_POINTExample
[root@client ~]# umount /mnt/cephfs
Additional Resources
-
The
umount(8)manual page
4.3. Unmounting Ceph File Systems mounted as FUSE clients
Unmounting a Ceph File System that is mounted as a File System in User Space (FUSE) client.
Prerequisites
- Root-level access to the FUSE client node.
Procedure
To unmount a Ceph File System mounted in FUSE:
Syntax
fusermount -u MOUNT_POINTExample
[root@client ~]# fusermount -u /mnt/cephfs
Additional Resources
-
The
ceph-fuse(8)manual page
4.4. Mapping directory trees to Metadata Server daemon ranks
To map a directory and its subdirectories to a particular active Metadata Server (MDS) rank so that its metadata is only managed by the MDS daemon holding that rank. This approach enables you to evenly spread application load or limit impact of users' metadata requests to the entire storage cluster.
An internal balancer already dynamically spreads the application load. Therefore, only map directory trees to ranks for certain carefully chosen applications.
In addition, when a directory is mapped to a rank, the balancer cannot split it. Consequently, a large number of operations within the mapped directory can overload the rank and the MDS daemon that manages it.
Prerequisites
- At least two active MDS daemons.
- User access to the CephFS client node.
-
Verify that the
attrpackage is installed on the CephFS client node with a mounted Ceph File System.
Procedure
Add the
pflag to the Ceph user’s capabilities:Syntax
ceph fs authorize FILE_SYSTEM_NAME client.CLIENT_NAME /DIRECTORY CAPABILITY [/DIRECTORY CAPABILITY] ...
Example
[user@client ~]$ ceph fs authorize cephfs_a client.1 /temp rwp

client.1
  key: AQBSdFhcGZFUDRAAcKhG9Cl2HPiDMMRv4DC43A==
  caps: [mds] allow r, allow rwp path=/temp
  caps: [mon] allow r
  caps: [osd] allow rw tag cephfs data=cephfs_a
Set the
ceph.dir.pinextended attribute on a directory:Syntax
setfattr -n ceph.dir.pin -v RANK DIRECTORY
Example
[user@client ~]$ setfattr -n ceph.dir.pin -v 2 /temp
This example assigns the
/tempdirectory and all of its subdirectories to rank 2.
Additional Resources
-
See the Layout, quota, snapshot, and network restrictions section in the Red Hat Ceph Storage File System Guide for more details about the
pflag. - See the Disassociating directory trees from Metadata Server daemon ranks section in the Red Hat Ceph Storage File System Guide for more details.
- See the Configuring multiple active Metadata Server daemons section in the Red Hat Ceph Storage File System Guide for more details.
4.5. Disassociating directory trees from Metadata Server daemon ranks
Disassociate a directory from a particular active Metadata Server (MDS) rank.
Prerequisites
- User access to the Ceph File System (CephFS) client node.
-
Ensure that the
attrpackage is installed on the client node with a mounted CephFS.
Procedure
Set the
ceph.dir.pinextended attribute to -1 on a directory:Syntax
setfattr -n ceph.dir.pin -v -1 DIRECTORYExample
[user@client ~]$ serfattr -n ceph.dir.pin -v -1 /home/ceph-user
NoteAny separately mapped subdirectories of
/home/ceph-user/are not affected.
Additional Resources
- See the Mapping Directory Trees to MDS Ranks section in Red Hat Ceph Storage File System Guide for more details.
4.6. Adding data pools
The Ceph File System (CephFS) supports adding more than one pool to be used for storing data. This can be useful for:
- Storing log data on reduced redundancy pools
- Storing user home directories on an SSD or NVMe pool
- Basic data segregation.
Before using another data pool in the Ceph File System, you must add it as described in this section.
By default, for storing file data, CephFS uses the initial data pool that was specified during its creation. To use a secondary data pool, you must also configure a part of the file system hierarchy to store file data in that pool or optionally within a namespace of that pool, using file and directory layouts.
Prerequisites
- Root-level access to the Ceph Monitor node.
Procedure
Create a new data pool:
Syntax
ceph osd pool create POOL_NAME PG_NUMBER
Replace:
-
POOL_NAMEwith the name of the pool. -
PG_NUMBERwith the number of placement groups (PGs).
Example
[root@mon ~]# ceph osd pool create cephfs_data_ssd 64
pool 'cephfs_data_ssd' created
-
Add the newly created pool under the control of the Metadata Servers:
Syntax
ceph fs add_data_pool FS_NAME POOL_NAME
Replace:
-
FS_NAMEwith the name of the file system. -
POOL_NAMEwith the name of the pool.
Example:
[root@mon ~]# ceph fs add_data_pool cephfs cephfs_data_ssd
added data pool 6 to fsmap
-
Verify that the pool was successfully added:
Example
[root@mon ~]# ceph fs ls
name: cephfs, metadata pool: cephfs_metadata, data pools: [cephfs_data cephfs_data_ssd]
-
If you use the
cephxauthentication, make sure that clients can access the new pool.
Additional Resources
- See the Working with File and Directory Layouts for details.
- See the Creating Ceph File System Client Users for details.
4.7. Working with Ceph File System quotas
As a storage administrator, you can view, set, and remove quotas on any directory in the file system. You can place quota restrictions on the number of bytes or the number of files within the directory.
4.7.1. Prerequisites
-
Make sure that the
attrpackage is installed.
4.7.2. Ceph File System quotas
The Ceph File System (CephFS) quotas allow you to restrict the number of bytes or the number of files stored in the directory structure.
Limitations
- CephFS quotas rely on the cooperation of the client mounting the file system to stop writing data when it reaches the configured limit. However, quotas alone cannot prevent an adversarial, untrusted client from filling the file system.
- Once processes that write data to the file system reach the configured limit, a short period of time elapses between when the amount of data reaches the quota limit, and when the processes stop writing data. The time period generally measures in the tenths of seconds. However, processes continue to write data during that time. The amount of additional data that the processes write depends on the amount of time elapsed before they stop.
-
Previously, quotas were only supported with the userspace FUSE client. With Linux kernel version 4.17 or newer, the CephFS kernel client supports quotas against Ceph mimic or newer clusters. Those version requirements are met by Red Hat Enterprise Linux 8 and Red Hat Ceph Storage 4, respectively. The userspace FUSE client can be used on older and newer OS and cluster versions. The FUSE client is provided by the
ceph-fusepackage. -
When using path-based access restrictions, be sure to configure the quota on the directory to which the client is restricted, or to a directory nested beneath it. If the client has restricted access to a specific path based on the MDS capability, and the quota is configured on an ancestor directory that the client cannot access, the client will not enforce the quota. For example, if the client cannot access the
/home/directory and the quota is configured on/home/, the client cannot enforce that quota on the directory/home/user/. - Snapshot file data that has been deleted or changed does not count towards the quota.
4.7.3. Viewing quotas
Use the getfattr command and the ceph.quota extended attributes to view the quota settings for a directory.
If the attributes appear on a directory inode, then that directory has a configured quota. If the attributes do not appear on the inode, then the directory does not have a quota set, although its parent directory might have a quota configured. If the value of the extended attribute is 0, the quota is not set.
Prerequisites
-
Make sure that the
attrpackage is installed.
Procedure
To view CephFS quotas.
Using a byte-limit quota:
Syntax
getfattr -n ceph.quota.max_bytes DIRECTORYExample
[root@fs ~]# getfattr -n ceph.quota.max_bytes /cephfs/
Using a file-limit quota:
Syntax
getfattr -n ceph.quota.max_files DIRECTORYExample
[root@fs ~]# getfattr -n ceph.quota.max_files /cephfs/
Additional Resources
-
See the
getfattr(1)manual page for more information.
4.7.4. Setting quotas
This section describes how to use the setfattr command and the ceph.quota extended attributes to set the quota for a directory.
Prerequisites
-
Make sure that the
attrpackage is installed.
Procedure
To set CephFS quotas.
Using a byte-limit quota:
Syntax
setfattr -n ceph.quota.max_bytes -v 100000000 /some/dir
Example
[root@fs ~]# setfattr -n ceph.quota.max_bytes -v 100000000 /cephfs/
In this example, 100000000 bytes equals 100 MB.
Using a file-limit quota:
Syntax
setfattr -n ceph.quota.max_files -v 10000 /some/dir
Example
[root@fs ~]# setfattr -n ceph.quota.max_files -v 10000 /cephfs/
In this example, 10000 equals 10,000 files.
Additional Resources
-
See the
setfattr(1)manual page for more information.
4.7.5. Removing quotas
This section describes how to use the setfattr command and the ceph.quota extended attributes to remove a quota from a directory.
Prerequisites
-
Make sure that the
attrpackage is installed.
Procedure
To remove CephFS quotas.
Using a byte-limit quota:
Syntax
setfattr -n ceph.quota.max_bytes -v 0 DIRECTORYExample
[root@fs ~]# setfattr -n ceph.quota.max_bytes -v 0 /cephfs/
Using a file-limit quota:
Syntax
setfattr -n ceph.quota.max_files -v 0 DIRECTORYExample
[root@fs ~]# setfattr -n ceph.quota.max_files -v 0 /cephfs/
Additional Resources
-
See the
setfattr(1)manual page for more information.
4.7.6. Additional Resources
-
See the
getfattr(1)manual page for more information. -
See the
setfattr(1)manual page for more information.
4.8. Working with File and Directory Layouts
As a storage administrator, you can control how file or directory data is mapped to objects.
This section describes how to:
4.8.1. Prerequisites
-
The installation of the
attrpackage.
4.8.2. Overview of file and directory layouts
This section explains what file and directory layouts are in the context for the Ceph File System.
A layout of a file or directory controls how its content is mapped to Ceph RADOS objects. The directory layouts serves primarily for setting an inherited layout for new files in that directory.
To view and set a file or directory layout, use virtual extended attributes or extended file attributes (xattrs). The name of the layout attributes depends on whether a file is a regular file or a directory:
-
Regular files layout attributes are called
ceph.file.layout. -
Directories layout attributes are called
ceph.dir.layout.
The File and Directory Layout Fields table lists available layout fields that you can set on files and directories.
Layouts Inheritance
Files inherit the layout of their parent directory when you create them. However, subsequent changes to the parent directory layout do not affect children. If a directory does not have any layouts set, files inherit the layout from the closest directory with layout in the directory structure.
Additional Resources
- See the Layouts Inheritance for more details.
4.8.3. Setting file and directory layout fields
Use the setfattr command to set layout fields on a file or directory.
When you modify the layout fields of a file, the file must be empty, otherwise an error occurs.
Prerequisites
- Root-level access to the node.
Procedure
To modify layout fields on a file or directory:
Syntax
setfattr -n ceph.TYPE.layout.FIELD -v VALUE PATH
Replace:
-
TYPE with
fileordir. - FIELD with the name of the field.
- VALUE with the new value of the field.
- PATH with the path to the file or directory.
Example
[root@fs ~]# setfattr -n ceph.file.layout.stripe_unit -v 1048576 test
-
TYPE with
Additional Resources
- See the table in the Overview of the file and directory layouts section of the Red Hat Ceph Storage File System Guide for more details.
-
See the
setfattr(1)manual page.
4.8.4. Viewing file and directory layout fields
To use the getfattr command to view layout fields on a file or directory.
Prerequisites
- A running Red Hat Ceph Storage cluster.
- Root-level access to all nodes in the storage cluster.
Procedure
To view layout fields on a file or directory as a single string:
Syntax
getfattr -n ceph.TYPE.layout PATH
- Replace
- PATH with the path to the file or directory.
-
TYPE with
fileordir.
Example
[root@mon ~] getfattr -n ceph.dir.layout /home/test
ceph.dir.layout="stripe_unit=4194304 stripe_count=2 object_size=4194304 pool=cephfs_data"
A directory does not have an explicit layout until you set it. Consequently, attempting to view the layout without first setting it fails because there are no changes to display.
Additional Resources
-
The
getfattr(1)manual page. - For more information, see Setting file and directory layouts section in the Red Hat Ceph Storage File System Guide.
4.8.5. Viewing individual layout fields
Use the getfattr command to view individual layout fields for a file or directory.
Prerequisites
- A running Red Hat Ceph Storage cluster.
- Root-level access to all nodes in the storage cluster.
Procedure
To view individual layout fields on a file or directory:
Syntax
getfattr -n ceph.TYPE.layout.FIELD _PATH
- Replace
-
TYPE with
fileordir. - FIELD with the name of the field.
- PATH with the path to the file or directory.
-
TYPE with
Example
[root@mon ~] getfattr -n ceph.file.layout.pool test
ceph.file.layout.pool="cephfs_data"
NotePools in the
poolfield are indicated by name. However, newly created pools can be indicated by ID.
Additional Resources
-
The
getfattr(1)manual page. - For more information, see File and directory layout fields.
4.8.6. Removing directory layouts
Use the setfattr command to remove layouts from a directory.
When you set a file layout, you cannot change or remove it.
Prerequisites
- A directory with a layout.
Procedure
To remove a layout from a directory:
Syntax
setfattr -x ceph.dir.layout DIRECTORY_PATHExample
[user@client ~]$ setfattr -x ceph.dir.layout /home/cephfs
To remove the
pool_namespacefield:Syntax
setfattr -x ceph.dir.layout.pool_namespace DIRECTORY_PATHExample
[user@client ~]$ setfattr -x ceph.dir.layout.pool_namespace /home/cephfs
NoteThe
pool_namespacefield is the only field you can remove separately.
Additional Resources
-
The
setfattr(1)manual page
4.9. Ceph File System snapshot considerations
As a storage administrator, you can gain an understanding of the data structures, system components, and considerations to manage Ceph File System (CephFS) snapshots.
Snapshots create an immutable view of a file system at the point in time of creation. You can create a snapshot within any directory, and all data in the file system under that directory is covered.
4.9.1. Storing snapshot metadata for a Ceph File System
Storage of snapshot directory entries and their inodes occurs in-line as part of the directory they were in at the time of the snapshot. All directory entries include a first and last snapid for which they are valid.
4.9.2. Ceph File System snapshot writeback
Ceph snapshots rely on clients to help determine which operations apply to a snapshot and flush snapshot data and metadata back to the OSD and MDS clusters. Handling snapshot writeback is an involved process because snapshots apply to subtrees of the file hierarchy, and the creation of snapshots can occur anytime.
Parts of the file hierarchy that belong to the same set of snapshots are referred to by a single SnapRealm. Each snapshot applies to the subdirectory nested beneath a directory and divides the file hierarchy into multiple "realms" where all of the files contained by a realm share the same set of snapshots.
The Ceph Metadata Server (MDS) controls client access to inode metadata and file data by issuing capabilities (caps) for each inode. During snapshot creation, clients acquire dirty metadata on inodes with capabilities to describe the file state at that time. When a client receives a ClientSnap message, it updates the local SnapRealm and its links to specific inodes and generates a CapSnap for the inode. Capability writeback flushes out the CapSnap and, if dirty data exists, the CapSnap is used to block new data writes until the snapshot flushes to the OSDs.
The MDS generates snapshot-representing directory entries as part of the routine process for flushing them. The MDS keeps directory entries with outstanding CapSnap data pinned in memory and the journal until the writeback process flushes them.
Additional Resources
- See the Creating client users for a Ceph File System section in the Red Hat Ceph Storage File System Guide for details on setting the Ceph user capabilities.
4.9.3. Ceph File System snapshots and hard links
Ceph moves an inode with multiple hard links to a dummy global SnapRealm. This dummy SnapRealm covers all snapshots in the filesystem. Any new snapshots preserve the inode’s data. This preserved data covers snapshots on any linkage of the inode.
4.9.4. Updating a snapshot for a Ceph File System
The process of updating a snapshot is similar to the process of deleting a snapshot.
If you remove an inode out of its parent SnapRealm, Ceph generates a new SnapRealm for the renamed inode if the SnapRealm does not already exist. Ceph saves the IDs of snapshots that are effective on the original parent SnapRealm into the past_parent_snaps data structure of the new SnapRealm and then follows a process similar to creating a snapshot.
Additional Resources
- For details about snapshot data structures, see Ceph File System snapshot data structures in Red Hat Ceph Storage File System Guide.
4.9.5. Ceph File System snapshots and multiple file systems
Snapshots are known to not function properly with multiple file systems.
If you have multiple file systems sharing a single Ceph pool with namespaces, their snapshots will collide, and deleting one snapshot results in missing file data for other snapshots sharing the same Ceph pool.
4.9.6. Ceph File System snapshot data structures
The Ceph File System (CephFS) uses the following snapshot data structures to store data efficiently:
SnapRealm-
A
SnapRealmis created whenever you create a snapshot at a new point in the file hierarchy or when you move a snapshotted inode outside its parent snapshot. A singleSnapRealmrepresents the parts of the file hierarchy that belong to the same set of snapshots. ASnapRealmcontains asr_t_srnodeandinodes_with_capsthat are part of the snapshot. sr_t-
An
sr_tis the on-disk snapshot metadata. It contains sequence counters, time-stamps, and a list of associated snapshot IDs and thepast_parent_snaps. SnapServer-
A
SnapServermanages snapshot ID allocation, snapshot deletion, and maintaining a list of cumulative snapshots in the file system. A file system only has one instance of aSnapServer. SnapContextA
SnapContextconsists of a snapshot sequence ID (snapid) and all the snapshot IDs currently defined for an object. When a write operation occurs, a Ceph client provides aSnapContextto specify the set of snapshots that exist for an object. To generate aSnapContextlist, Ceph combines snapids associated with theSnapRealmand all valid snapids in thepast_parent_snapsdata structure.File data is stored using RADOS self-managed snapshots. In a self-managed snapshot, the client must provide the current
SnapContexton each write. Clients are careful to use the correctSnapContextwhen writing file data to the Ceph OSDs.SnapClientcached effective snapshots filter out stale snapids.SnapClient-
A
SnapClientis used to communicate with aSnapServerand cache cumulative snapshots locally. Each Metadata Server (MDS) rank has aSnapClientinstance.
4.10. Managing Ceph File System snapshots
As a storage administrator, you can take a point-in-time snapshot of a Ceph File System (CephFS) directory. CephFS snapshots are asynchronous, and you can choose which directory snapshot creation occurs in.
4.10.1. Prerequisites
- A running and healthy Red Hat Ceph Storage cluster.
- Deployment of a Ceph File System.
4.10.2. Ceph File System snapshots
A Ceph File System (CephFS) snapshot creates an immutable, point-in-time view of a Ceph File System. CephFS snapshots are asynchronous and are kept in a special hidden directory in the CephFS directory, named .snap. You can specify snapshot creation for any directory within a Ceph File System. When specifying a directory, the snapshot also includes all the subdirectories beneath it.
Each Ceph Metadata Server (MDS) cluster allocates the snap identifiers independently. Using snapshots for multiple Ceph File Systems that are sharing a single pool causes snapshot collisions and results in missing file data.
Additional Resources
- See the Creating a snapshot for a Ceph File System section in the Red Hat Ceph Storage File System Guide for more details.
4.10.3. Enabling a snapshot for a Ceph File System
New Ceph File Systems enable the snapshotting feature by default, but you must manually enable the feature on existing Ceph File Systems.
Prerequisites
- A running and healthy Red Hat Ceph Storage cluster.
- Deployment of a Ceph File System.
- Root-level access to a Ceph Metadata Server (MDS) node.
Procedure
For existing Ceph File Systems, enable the snapshotting feature:
Syntax
ceph fs set FILE_SYSTEM_NAME allow_new_snaps trueExample
[root@mds ~]# ceph fs set cephfs allow_new_snaps true
enabled new snapshots
Additional Resources
- See the Creating a snapshot for a Ceph File System section in the Red Hat Ceph Storage File System Guide for details on creating a snapshot.
- See the Deleting a snapshot for a Ceph File System section in the Red Hat Ceph Storage File System Guide for details on deleting a snapshot.
- See the Restoring a snapshot for a Ceph File System section in the Red Hat Ceph Storage File System Guide for details on restoring a snapshot.
4.10.4. Creating a snapshot for a Ceph File System
You can create an immutable, point-in-time view of a Ceph File System by creating a snapshot. A snapshot uses a hidden directory located in the directory to snapshot. The name of this directory is .snap by default.
Prerequisites
- A running and healthy Red Hat Ceph Storage cluster.
- Deployment of a Ceph File System.
- Root-level access to a Ceph Metadata Server (MDS) node.
Procedure
To create a snapshot, create a new subdirectory inside the
.snapdirectory. The snapshot name is the new subdirectory name.Syntax
mkdir NEW_DIRECTORY_PATHExample
[root@mds cephfs]# mkdir .snap/new-snaps
This example creates the
new-snapssubdirectory on a Ceph File System that is mounted on/mnt/cephfsand informs the Ceph Metadata Server (MDS) to start making snapshots.
Verification
List the new snapshot directory:
Syntax
ls -l .snap/
The
new-snapssubdirectory displays under the.snapdirectory.
Additional Resources
- See the Deleting a snapshot for a Ceph File System section in the Red Hat Ceph Storage File System Guide for details on deleting a snapshot.
- See the Restoring a snapshot for a Ceph File System section in the Red Hat Ceph Storage File System Guide for details on restoring a snapshot.
4.10.5. Deleting a snapshot for a Ceph File System
You can delete a snapshot by removing the corresponding directory in a .snap directory.
Prerequisites
- A running and healthy Red Hat Ceph Storage cluster.
- Deployment of a Ceph File System.
- Creation of snapshots on a Ceph File System.
- Root-level access to a Ceph Metadata Server (MDS) node.
Procedure
To delete a snapshot, remove the corresponding directory:
Syntax
rmdir DIRECTORY_PATHExample
[root@mds cephfs]# rmdir .snap/new-snaps
This example deletes the
new-snapssubdirectory on a Ceph File System that is mounted on/mnt/cephfs.
Contrary to a regular directory, a rmdir command succeeds even if the directory is not empty, so you do not need to use a recursive rm command.
Attempting to delete root-level snapshots, which might contain underlying snapshots, will fail.
Additional Resources
- See the Restoring a snapshot for a Ceph File System section in the Red Hat Ceph Storage File System Guide for details on restoring a snapshot.
- See the Creating a snapshot for a Ceph File System section in the Red Hat Ceph Storage File System Guide for details on creating a snapshot.
4.10.6. Restoring a snapshot for a Ceph File System
You can restore a file from a snapshot or fully restore a complete snapshot for a Ceph File System (CephFS).
Prerequisites
- A running, and healthy Red Hat Ceph Storage cluster.
- Deployment of a Ceph File System.
- Root-level access to a Ceph Metadata Server (MDS) node.
Procedure
To restore a file from a snapshot, copy it from the snapshot directory to the regular tree:
Syntax
cp -a .snap/SNAP_DIRECTORY/FILENAME
Example
[root@mds dir1]# cp .snap/new-snaps/file1 .
This example restores
file1to the current directory.You can also fully restore a snapshot from the
.snapdirectory tree. Replace the current entries with copies from the desired snapshot:Syntax
[root@mds dir1]# rm -rf *
[root@mds dir1]# cp -a .snap/SNAP_DIRECTORY/* .
Example
[root@mds dir1]# rm -rf *
[root@mds dir1]# cp -a .snap/new-snaps/* .
This example removes all files and directories under
dir1and restores the files from thenew-snapssnapshot to the current directory,dir1.
4.10.7. Additional Resources
- See the Deployment of the Ceph File System section in the Red Hat Ceph Storage File System Guide.
4.11. Taking down a Ceph File System cluster
You can take down Ceph File System (CephFS) cluster by simply setting the down flag true. Doing this gracefully shuts down the Metadata Server (MDS) daemons by flushing journals to the metadata pool and all client I/O is stopped.
You can also take the CephFS cluster down quickly for testing the deletion of a file system and bring the Metadata Server (MDS) daemons down, for example, practicing a disaster recovery scenario. Doing this sets the jointable flag to prevent the MDS standby daemons from activating the file system.
Prerequisites
- User access to the Ceph Monitor node.
Procedure
To mark the CephFS cluster down:
Syntax
ceph fs set FS_NAME down trueExmaple
[root@mon]# ceph fs set cephfs down true
To bring the CephFS cluster back up:
Syntax
ceph fs set FS_NAME down falseExmaple
[root@mon]# ceph fs set cephfs down false
or
To quickly take down a CephFS cluster:
Syntax
ceph fs fail FS_NAMEExmaple
[root@mon]# ceph fs fail cephfs
4.12. Removing a Ceph File System using the command-line interface
You can remove a Ceph File System (CephFS) using the command-line interface. Before doing so, consider backing up all the data and verifying that all clients have unmounted the file system locally.
This operation is destructive and will make the data stored on the Ceph File System permanently inaccessible.
Prerequisites
- Back-up the data.
- All clients have unmounted the Ceph File System (CephFS).
- Root-level access to a Ceph Monitor node.
Procedure
Display the CephFS status to determine the MDS ranks.
Syntax
ceph fs status
Example
[root@mon ~]# ceph fs status
cephfs - 0 clients
======
+------+--------+----------------+---------------+-------+-------+
| Rank | State  |      MDS       |    Activity   |  dns  |  inos |
+------+--------+----------------+---------------+-------+-------+
|  0   | active | cluster1-node6 | Reqs:    0 /s |   10  |   13  |
+------+--------+----------------+---------------+-------+-------+
+-----------------+----------+-------+-------+
|       Pool      |   type   |  used | avail |
+-----------------+----------+-------+-------+
| cephfs_metadata | metadata | 2688k | 15.0G |
|   cephfs_data   |   data   |    0  | 15.0G |
+-----------------+----------+-------+-------+
+----------------+
|  Standby MDS   |
+----------------+
| cluster1-node5 |
+----------------+
In the example above, the rank is 0.
Mark the CephFS as down:
Syntax
ceph fs set FS_NAME down trueReplace FS_NAME with the name of the CephFS you want to remove.
Example
[root@mon]# ceph fs set cephfs down true
marked down
Display the status of the CephFS to determine it has stopped:
Syntax
ceph fs status
Example
[root@mon ~]# ceph fs status
cephfs - 0 clients
======
+------+----------+----------------+----------+-------+-------+
| Rank |  State   |      MDS       | Activity |  dns  |  inos |
+------+----------+----------------+----------+-------+-------+
|  0   | stopping | cluster1-node6 |          |   10  |   12  |
+------+----------+----------------+----------+-------+-------+
+-----------------+----------+-------+-------+
|       Pool      |   type   |  used | avail |
+-----------------+----------+-------+-------+
| cephfs_metadata | metadata | 2688k | 15.0G |
|   cephfs_data   |   data   |    0  | 15.0G |
+-----------------+----------+-------+-------+
+----------------+
|  Standby MDS   |
+----------------+
| cluster1-node5 |
+----------------+
After some time, the MDS is no longer listed:
Example
[root@mon ~]# ceph fs status
cephfs - 0 clients
======
+------+-------+-----+----------+-----+------+
| Rank | State | MDS | Activity | dns | inos |
+------+-------+-----+----------+-----+------+
+------+-------+-----+----------+-----+------+
+-----------------+----------+-------+-------+
|       Pool      |   type   |  used | avail |
+-----------------+----------+-------+-------+
| cephfs_metadata | metadata | 2688k | 15.0G |
|   cephfs_data   |   data   |    0  | 15.0G |
+-----------------+----------+-------+-------+
+----------------+
|  Standby MDS   |
+----------------+
| cluster1-node5 |
+----------------+
Fail all MDS ranks shown in the status of step one:
Syntax
ceph mds fail RANKReplace RANK with the rank of the MDS daemons to fail.
Example
[root@mon]# ceph mds fail 0
Remove the CephFS:
Syntax
ceph fs rm FS_NAME --yes-i-really-mean-itReplace FS_NAME with the name of the Ceph File System you want to remove.
Example
[root@mon]# ceph fs rm cephfs --yes-i-really-mean-it
Verify that the file system is removed:
Syntax
ceph fs ls
Example
[root@mon ~]# ceph fs ls
No filesystems enabled
Optional: Remove the pools that were used by CephFS.
On a Ceph Monitor node, list the pools:
Syntax
ceph osd pool ls
Example
[root@mon ~]# ceph osd pool ls
rbd
cephfs_data
cephfs_metadata
In the example output,
cephfs_metadataandcephfs_dataare the pools that were used by CephFS.Remove the metadata pool:
Syntax
ceph osd pool delete CEPH_METADATA_POOL CEPH_METADATA_POOL --yes-i-really-really-mean-it
Replace CEPH_METADATA_POOL with the pool CephFS used for metadata storage by including the pool name twice.
Example
[root@mon ~]# ceph osd pool delete cephfs_metadata cephfs_metadata --yes-i-really-really-mean-it
pool 'cephfs_metadata' removed
Remove the data pool:
Syntax
ceph osd pool delete CEPH_DATA_POOL CEPH_DATA_POOL --yes-i-really-really-mean-it
Replace CEPH_DATA_POOL with the pool CephFS used for data storage by including the pool name twice.
Example
[root@mon ~]# ceph osd pool delete cephfs_data cephfs_data --yes-i-really-really-mean-it
pool 'cephfs_data' removed
Additional Resources
- See Removing a Ceph File System Using Ansible in the Red Hat Ceph Storage File System Guide.
- See the Delete a pool section in the Red Hat Ceph Storage Storage Strategies Guide.
4.13. Removing a Ceph File System using Ansible
You can remove a Ceph File System (CephFS) using ceph-ansible. Before doing so, consider backing up all the data and verifying that all clients have unmounted the file system locally.
This operation is destructive and will make the data stored on the Ceph File System permanently inaccessible.
Prerequisites
- A running Red Hat Ceph Storage cluster.
- A good backup of the data.
- All clients have unmounted the Ceph File System.
- Access to the Ansible administration node.
- Root-level access to a Ceph Monitor node.
Procedure
Navigate to the
/usr/share/ceph-ansible/directory:[admin@admin ~]$ cd /usr/share/ceph-ansible
Identify the Ceph Metadata Server (MDS) nodes by reviewing the
[mdss]section in the Ansible inventory file. On the Ansible administration node, open/usr/share/ceph-ansible/hosts:Example
[mdss]
cluster1-node5
cluster1-node6
In the example,
cluster1-node5andcluster1-node6are the MDS nodes.Set the
max_mdsparameter to1:Syntax
ceph fs set NAME max_mds NUMBER
Example
[root@mon ~]# ceph fs set cephfs max_mds 1
Run the
shrink-mds.ymlplaybook, specifying the Metadata Server (MDS) to remove:Syntax
ansible-playbook infrastructure-playbooks/shrink-mds.yml -e mds_to_kill=MDS_NODE -i hostsReplace MDS_NODE with the Metadata Server node you want to remove. The Ansible playbook will ask you if you want to shrink the cluster. Type
yesand press the enter key.Example
[admin@admin ceph-ansible]$ ansible-playbook infrastructure-playbooks/shrink-mds.yml -e mds_to_kill=cluster1-node6 -i hosts
Optional: Repeat the process for any additional MDS nodes:
Syntax
ansible-playbook infrastructure-playbooks/shrink-mds.yml -e mds_to_kill=MDS_NODE -i hostsReplace MDS_NODE with the Metadata Server node you want to remove. The Ansible playbook will ask you if you want to shrink the cluster. Type
yesand press the enter key.Example
[admin@admin ceph-ansible]$ ansible-playbook infrastructure-playbooks/shrink-mds.yml -e mds_to_kill=cluster1-node5 -i hosts
Check the status of the CephFS:
Syntax
ceph fs status
Example
[root@mon ~]# ceph fs status
cephfs - 0 clients
======
+------+--------+----------------+---------------+-------+-------+
| Rank | State  |      MDS       |    Activity   |  dns  |  inos |
+------+--------+----------------+---------------+-------+-------+
|  0   | failed | cluster1-node6 | Reqs:    0 /s |   10  |   13  |
+------+--------+----------------+---------------+-------+-------+
+-----------------+----------+-------+-------+
|       Pool      |   type   |  used | avail |
+-----------------+----------+-------+-------+
| cephfs_metadata | metadata | 2688k | 15.0G |
|   cephfs_data   |   data   |    0  | 15.0G |
+-----------------+----------+-------+-------+
+----------------+
|  Standby MDS   |
+----------------+
| cluster1-node5 |
+----------------+
Remove the
[mdss]section and the nodes in it from the Ansible inventory file so they will not be reprovisioned as metadata servers on future runs of thesite.ymlorsite-container.ymlplaybooks. Open for editing the Ansible inventory file,/usr/share/ceph-ansible/hosts:Example
[mdss]
cluster1-node5
cluster1-node6
Remove the
[mdss]section and all nodes under it.Remove the CephFS:
Syntax
ceph fs rm FS_NAME --yes-i-really-mean-itReplace FS_NAME with the name of the Ceph File System you want to remove.
Example
[root@mon]# ceph fs rm cephfs --yes-i-really-mean-it
Optional: Remove the pools that were used by CephFS.
On a Ceph Monitor node, list the pools:
Syntax
ceph osd pool ls
Find the pools that were used by CephFS.
Example
[root@mon ~]# ceph osd pool ls
rbd
cephfs_data
cephfs_metadata
In the example output,
cephfs_metadataandcephfs_dataare the pools that were used by CephFS.Remove the metadata pool:
Syntax
ceph osd pool delete CEPH_METADATA_POOL CEPH_METADATA_POOL --yes-i-really-really-mean-it
Replace CEPH_METADATA_POOL with the pool CephFS used for metadata storage by including the pool name twice.
Example
[root@mon ~]# ceph osd pool delete cephfs_metadata cephfs_metadata --yes-i-really-really-mean-it
pool 'cephfs_metadata' removed
Remove the data pool:
Syntax
ceph osd pool delete CEPH_DATA_POOL CEPH_DATA_POOL --yes-i-really-really-mean-it
Replace CEPH_METADATA_POOL with the pool CephFS used for metadata storage by including the pool name twice.
Example
[root@mon ~]# ceph osd pool delete cephfs_data cephfs_data --yes-i-really-really-mean-it
pool 'cephfs_data' removed
Verify the pools no longer exist:
Example
[root@mon ~]# ceph osd pool ls
rbd
The
cephfs_metadataandcephfs_datapools are no longer listed.
Additional Resources
- See Removing a Ceph File System Manually in the Red Hat Ceph Storage File System Guide.
- See the Delete a pool section in the Red Hat Ceph Storage Storage Strategies Guide.
4.14. Setting a minimum client version
You can set a minimum version of Ceph that a third-party client must be running to connect to a Red Hat Ceph Storage Ceph File System (CephFS). Set the min_compat_client parameter to prevent older clients from mounting the file system. CephFS will also automatically evict currently connected clients that use an older version than the version set with min_compat_client.
The rationale for this setting is to prevent older clients which might include bugs or have incomplete feature compatibility from connecting to the cluster and disrupting other clients. For example, some older versions of CephFS clients might not release capabilities properly and cause other client requests to be handled slowly.
The values of min_compat_client are based on the upstream Ceph versions. Red Hat recommends that the third-party clients use the same major upstream version as the Red Hat Ceph Storage cluster is based on. See the following table to see the upstream versions and corresponding Red Hat Ceph Storage versions.
| Value | Upstream Ceph version | Red Hat Ceph Storage version |
|---|---|---|
| luminous | 12.2 | Red Hat Ceph Storage 3 |
| mimic | 13.2 | not applicable |
| nautilus | 14.2 | Red Hat Ceph Storage 4 |
If you use Red Hat Enterprise Linux 7, do not set min_compat_client to a later version than luminous because Red Hat Enterprise Linux 7 is considered a luminous client and if you use a later version, CephFS does not allow it to access the mount point.
Prerequisites
- A working Red Hat Ceph Storage cluster with Ceph File System deployed
Procedure
Set the minimum client version:
ceph fs set name min_compat_client release
Replace name with the name of the Ceph File System and release with the minimum client version. For example to restrict clients to use the
nautilusupstream version at minimum on thecephfsCeph File System:$ ceph fs set cephfs min_compat_client nautilus
See Table 4.1, “
min_compat_clientvalues” for the full list of available values and how they correspond with Red Hat Ceph Storage versions.
4.15. Using the ceph mds fail command
Use the ceph mds fail command to:
-
Mark an MDS daemon as failed. If the daemon was active and a suitable standby daemon was available, and if the standby daemon was active after disabling the
standby-replayconfiguration, using this command forces a failover to the standby daemon. By disabling thestandby-replaydaemon, this prevents newstandby-replaydaemons from being assigned. - Restart a running MDS daemon. If the daemon was active and a suitable standby daemon was available, the "failed" daemon becomes a standby daemon.
Prerequisites
- Installation and configuration of the Ceph MDS daemons.
Procedure
To fail a daemon:
Syntax
ceph mds fail MDS_NAMEWhere MDS_NAME is the name of the
standby-replayMDS node.Example
[root@mds ~]# ceph mds fail example01
NoteYou can find the Ceph MDS name from the
ceph fs statuscommand.
Additional Resources
- See the Decreasing the Number of Active MDS Daemons in the Red Hat Ceph Storage File System Guide.
- See the Configuring Standby Metadata Server Daemons in the Red Hat Ceph Storage File System Guide.
- See the Explanation of Ranks in Metadata Server Configuration in the Red Hat Ceph Storage File System Guide.
4.16. Ceph File System client evictions
When a Ceph File System (CephFS) client is unresponsive or misbehaving, it might be necessary to forcibly terminate, or evict it from accessing the CephFS. Evicting a CephFS client prevents it from communicating further with Metadata Server (MDS) daemons and Ceph OSD daemons. If a CephFS client is buffering I/O to the CephFS at the time of eviction, then any un-flushed data will be lost. The CephFS client eviction process applies to all client types: FUSE mounts, kernel mounts, NFS gateways, and any process using libcephfs API library.
You can evict CephFS clients automatically, if they fail to communicate promptly with the MDS daemon, or manually.
Automatic Client Eviction
These scenarios cause an automatic CephFS client eviction:
-
If a CephFS client has not communicated with the active MDS daemon for over the default 300 seconds, or as set by the
session_autocloseoption. -
If the
mds_cap_revoke_eviction_timeoutoption is set, and a CephFS client has not responded to the cap revoke messages for over the set amount of seconds. Themds_cap_revoke_eviction_timeoutoption is disabled by default. -
During MDS startup or failover, the MDS daemon goes through a reconnect phase waiting for all the CephFS clients to connect to the new MDS daemon. If any CephFS clients fails to reconnect within the default time window of 45 seconds, or as set by the
mds_reconnect_timeoutoption.
Additional Resources
- See the Manually evicting a Ceph File System client section in the Red Hat Ceph Storage File System Guide for more details.
4.17. Blacklist Ceph File System clients
Ceph File System client blacklisting is enabled by default. When you send an eviction command to a single Metadata Server (MDS) daemon, it propagates the blacklist to the other MDS daemons. This is to prevent the CephFS client from accessing any data objects, so it is necessary to update the other CephFS clients, and MDS daemons with the latest Ceph OSD map, which includes the blacklisted client entries.
An internal “osdmap epoch barrier” mechanism is used when updating the Ceph OSD map. The purpose of the barrier is to verify the CephFS clients receiving the capabilities have a sufficiently recent Ceph OSD map, before any capabilities are assigned that might allow access to the same RADOS objects, as to not race with cancelled operations, such as, from ENOSPC or blacklisted clients from evictions.
If you are experiencing frequent CephFS client evictions due to slow nodes or an unreliable network, and you cannot fix the underlying issue, then you can ask the MDS to be less strict. It is possible to respond to slow CephFS clients by simply dropping their MDS sessions, but permit the CephFS client to re-open sessions and to continue talking to Ceph OSDs. By setting the mds_session_blacklist_on_timeout and mds_session_blacklist_on_evict options to false enables this mode.
When blacklisting is disabled, the evicted CephFS client has only an effect on the MDS daemon you send the command to. On a system with multiple active MDS daemons, you would need to send an eviction command to each active daemon.
4.18. Manually evicting a Ceph File System client
You might want to manually evict a Ceph File System (CephFS) client, if the client is misbehaving and you do not have access to the client node, or if a client dies, and you do not want to wait for the client session to time out.
Prerequisites
- User access to the Ceph Monitor node.
Procedure
Review the client list:
Syntax
ceph tell DAEMON_NAME client lsExmaple
[root@mon]# ceph tell mds.0 client ls
[
    {
        "id": 4305,
        "num_leases": 0,
        "num_caps": 3,
        "state": "open",
        "replay_requests": 0,
        "completed_requests": 0,
        "reconnecting": false,
        "inst": "client.4305 172.21.9.34:0/422650892",
        "client_metadata": {
            "ceph_sha1": "ae81e49d369875ac8b569ff3e3c456a31b8f3af5",
            "ceph_version": "ceph version 12.0.0-1934-gae81e49 (ae81e49d369875ac8b569ff3e3c456a31b8f3af5)",
            "entity_id": "0",
            "hostname": "senta04",
            "mount_point": "/tmp/tmpcMpF1b/mnt.0",
            "pid": "29377",
            "root": "/"
        }
    }
]
Evict the specified CephFS client:
Syntax
ceph tell DAEMON_NAME client evict id=ID_NUMBER
Exmaple
[root@mon]# ceph tell mds.0 client evict id=4305
4.19. Removing a Ceph File System client from the blacklist
In some situations, it can be useful to allow a previous blacklisted Ceph File System (CephFS) client to reconnect to the storage cluster.
Removing a CephFS client from the blacklist puts data integrity at risk, and does not guarantee a fully healthy, and functional CephFS client as a result. The best way to get a fully healthy CephFS client back after an eviction, is to unmount the CephFS client and do a fresh mount. If other CephFS clients are accessing files that the blacklisted CephFS client was doing buffered I/O to can result in data corruption.
Prerequisites
- User access to the Ceph Monitor node.
Procedure
Review the blacklist:
Exmaple
[root@mon]# ceph osd blacklist ls
listed 1 entries
127.0.0.1:0/3710147553 2020-03-19 11:32:24.716146
Remove the CephFS client from the blacklist:
Syntax
ceph osd blacklist rm CLIENT_NAME_OR_IP_ADDRExmaple
[root@mon]# ceph osd blacklist rm 127.0.0.1:0/3710147553
un-blacklisting 127.0.0.1:0/3710147553
Optionally, to have FUSE-based CephFS clients trying automatically to reconnect when removing them from the blacklist. On the FUSE client, set the following option to
true:client_reconnect_stale = true
4.20. Additional Resources
- For details, see Chapter 3, Deployment of the Ceph File System.
- For details, see the Red Hat Ceph Storage Installation Guide.
- For details, see the Configuring Metadata Server Daemons in the Red Hat Ceph Storage File System Guide.
Chapter 5. Management of Ceph File System volumes, sub-volumes, and sub-volume groups
As a storage administrator, you can use Red Hat’s Ceph Container Storage Interface (CSI) to manage Ceph File System (CephFS) exports. This also allows you to use other services, such as OpenStack’s file system service (Manila) by having a common command-line interface to interact with. The volumes module for the Ceph Manager daemon (ceph-mgr) implements the ability to export Ceph File Systems (CephFS).
The Ceph Manager volumes module implements the following file system export abstractions:
- CephFS volumes
- CephFS subvolume groups
- CephFS subvolumes
This chapter describes how to work with:
5.1. Ceph File System volumes
As a storage administrator, you can create, list, and remove Ceph File System (CephFS) volumes. CephFS volumes are an abstraction for Ceph File Systems.
This section describes how to:
5.1.1. Creating a file system volume
Ceph Manager’s orchestrator module creates a Meta Data Server (MDS) for the Ceph File System (CephFS). This section describes how to create CephFS volume.
This creates the Ceph File System, along with the data and metadata pools.
Prerequisites
- A working Red Hat Ceph Storage cluster with Ceph File System deployed.
- At least read access on the Ceph Monitor.
- Read and write capability on the Ceph Manager nodes.
Procedure
Create a CephFS volume:
Syntax
ceph fs volume create VOLUME_NAMEExample
[root@mon ~]# ceph fs volume create cephfs
5.1.2. Listing file system volume
This section describes the step to list the Ceph File system (CephFS) volumes.
Prerequisites
- A working Red Hat Ceph Storage cluster with Ceph File System deployed.
- At least read access on the Ceph Monitor.
- Read and write capability on the Ceph Manager nodes.
- A CephFS volume.
Procedure
List the CephFS volume:
Example
[root@mon ~]# ceph fs volume ls
5.1.3. Removing a file system volume
Ceph Manager’s orchestrator module removes the Meta Data Server (MDS) for the Ceph File System (CephFS). This section shows how to remove the Ceph File system (CephFS) volume.
Prerequisites
- A working Red Hat Ceph Storage cluster with Ceph File System deployed.
- At least read access on the Ceph Monitor.
- Read and write capability on the Ceph Manager nodes.
- A CephFS volume.
Procedure
Remove the CephFS volume:
Syntax
ceph fs volume rm VOLUME_NAME [--yes-i-really-mean-it]Example
[root@mon ~]# ceph fs volume rm cephfs --yes-i-really-mean-it
5.2. Ceph File System subvolumes
As a storage administrator, you can create, list, fetch absolute path, fetch metadata, and remove Ceph File System (CephFS) subvolumes.
You can also authorize Ceph client users for CephFS subvolumes. Additionally, you can also create, list and remove snapshots of these subvolumes. CephFS subvolumes are an abstraction for independent Ceph File Systems directory trees.
This section describes how to:
- Create a file system subvolume.
- List file system subvolume.
- Authorizing Ceph client users for File System subvolumes.
- Deauthorizing Ceph client users for File System subvolumes.
- Listing Ceph client users for File System subvolumes.
- Evicting Ceph client users from File System subvolumes.
- Resizing a file system subvolume.
- Fetch absolute path of a file system subvolume.
- Fetch metadata of a file system subvolume.
- Create snapshot of a file system subvolume.
- List snapshots of a file system subvolume.
- Fetching metadata of the snapshots of a file system subvolume.
- Remove a file system subvolume.
- Remove snapshot of a file system subvolume.
5.2.1. Creating a file system subvolume
This section describes how to create Ceph File system (CephFS) subvolume.
When creating a subvolume you can specify its subvolume group, data pool layout, uid, gid, file mode in octal numerals, and size in bytes. The subvolume can be created in a separate RADOS namespace by specifying`--namespace-isolated` option. By default a subvolume is created within the default subvolume group, and with an octal file mode ‘755’, uid of its subvolume group, gid of its subvolume group, data pool layout of its parent directory and no size limit.
Prerequisites
- A working Red Hat Ceph Storage cluster with Ceph File System deployed.
- At least read access on the Ceph Monitor.
- Read and write capability on the Ceph Manager nodes.
Procedure
Create a CephFS subvolume:
Syntax
ceph fs subvolume create VOLUME_NAME SUBVOLUME_NAME [--size SIZE_IN_BYTES --group_name SUBVOLUME_GROUP_NAME --pool_layout DATA_POOL_NAME --uid _UID --gid GID --mode OCTAL_MODE] [--namespace-isolated]
Example
[root@mon ~]# ceph fs subvolume create cephfs sub0 --group_name subgroup0 --namespace-isolated
The command succeeds even if the subvolume already exists.
5.2.2. Listing file system subvolume
This section describes the step to list the Ceph File system (CephFS) subvolume.
Prerequisites
- A working Red Hat Ceph Storage cluster with Ceph File System deployed.
- At least read access on the Ceph Monitor.
- Read and write capability on the Ceph Manager nodes.
- A CephFS subvolume.
Procedure
List the CephFS subvolume:
Syntax
ceph fs subvolume ls VOLUME_NAME [--group_name SUBVOLUME_GROUP_NAME]
Example
[root@mon ~]# ceph fs subvolume ls cephfs --group_name subgroup0
5.2.3. Authorizing Ceph client users for File System subvolumes
Red Hat Ceph Storage cluster uses cephx for authentication, which is enabled by default. To use cephx with the Ceph File System (CephFS) subvolumes, create a user with the correct authorization capabilities on a Ceph Monitor node and make its key available on the node where the Ceph File System is mounted. You can authorize the user to access the CephFS subvolumes using the authorize command.
Prerequisites
- A working Red Hat Ceph Storage cluster with CephFS deployed.
- At least read access on the Ceph Monitor.
- Read and write capability on the Ceph Manager nodes.
- A CephFS volume created.
Procedure
Create a CephFS subvolume:
Syntax
ceph fs subvolume create VOLUME_NAME SUBVOLUME_NAME [--size SIZE_IN_BYTES --group_name SUBVOLUME_GROUP_NAME --pool_layout DATA_POOL_NAME --uid _UID --gid GID --mode OCTAL_MODE] [--namespace-isolated]
Example
[root@mon ~]# ceph fs subvolume create cephfs sub0 --group_name subgroup0 --namespace-isolated
The command succeeds even if the subvolume already exists.
Authorize the Ceph client user,with either read or write access to CephFS subvolumes:
Syntax
ceph fs subvolume authorize VOLUME_NAME SUBVOLUME_NAME AUTH_ID [--group_name=GROUP_NAME] [--access_level=ACCESS_LEVEL]
The
ACCESS_LEVELcan be eitherrorrwandAUTH_IDis the Ceph client user, which is a string.Example
[root@mon ~]# ceph fs subvolume authorize cephfs sub0 guest --group_name=subgroup0 --access_level=rw
In this example, the 'client.guest' is authorized to access subvolume
sub0in the subvolume groupsubgroup0.
Additional Resources
- See the Ceph authentication configuration section in the Red Hat Ceph Storage Configuration Guide.
- See the Creating a file system volume section in the Red Hat Ceph Storage Ceph File System Guide.
5.2.4. Deauthorizing Ceph client users for File System subvolumes
You can deauthorize the user to access the Ceph File System (CephFS) subvolumes using the deauthorize command.
Prerequisites
- A working Red Hat Ceph Storage cluster with Ceph File System deployed.
- At least read access on the Ceph Monitor.
- Read and write capability on the Ceph Manager nodes.
- A CephFS volume and subvolume created.
- Ceph client users authorized to access CephFS subvolumes.
Procedure
Deauthorize the Ceph client user’s access to CephFS subvolumes:
Syntax
ceph fs subvolume deauthorize VOLUME_NAME SUBVOLUME_NAME AUTH_ID [--group_name=GROUP_NAME]
The
AUTH_IDis the Ceph client user, which is a string.Example
[root@mon ~]# ceph fs subvolume deauthorize cephfs sub0 guest --group_name=subgroup0
In this example, the 'client.guest' is deauthorized to access subvolume
sub0in the subvolume groupsubgroup0.
Additional Resources
- See the Authorizing Ceph client users for File System subvolumes section in the Red Hat Ceph Storage Ceph File System Guide.
5.2.5. Listing Ceph client users for File System subvolumes
You can list the user’s access to the Ceph File System (CephFS) subvolumes using the authorized_list command.
Prerequisites
- A working Red Hat Ceph Storage cluster with Ceph File System deployed.
- At least read access on the Ceph Monitor.
- Read and write capability on the Ceph Manager nodes.
- A CephFS volume and subvolume created.
- Ceph client users authorized to access CephFS subvolumes.
Procedure
List the Ceph client user’s access to CephFS subvolumes:
Syntax
ceph fs subvolume authorized_list VOLUME_NAME SUBVOLUME_NAME [--group_name=GROUP_NAME]
Example
[root@mon ~]# ceph fs subvolume authorized_list cephfs sub0 --group_name=subgroup0
[
    {
        "guest": "rw"
    }
]
Additional Resources
- See the Authorizing Ceph client users for File System subvolumes section in the Red Hat Ceph Storage Ceph File System Guide.
5.2.6. Evicting Ceph client users from File System subvolumes
You can evict the Ceph client user from the Ceph File System (CephFS) subvolumes using the evict command based on the _AUTH_ID and the subvolume mounted.
Prerequisites
- A working Red Hat Ceph Storage cluster with Ceph File System deployed.
- At least read access on the Ceph Monitor.
- Read and write capability on the Ceph Manager nodes.
- A CephFS volume and subvolume created.
- Ceph client users authorized to access CephFS subvolumes.
Procedure
Evict the Ceph client user from the CephFS subvolumes:
Syntax
ceph fs subvolume evict VOLUME_NAME SUBVOLUME_NAME AUTH_ID [--group_name=GROUP_NAME]
The
AUTH_IDis the Ceph client user, which is a string.Example
[root@mon ~]# ceph fs subvolume evict cephfs sub0 guest --group_name=subgroup0
In this example, the 'client.guest' is evicted from the subvolumegroup
subgroup0.
Additional Resources
- See the Authorizing Ceph client users for File System subvolumes section in the Red Hat Ceph Storage Ceph File System Guide.
5.2.7. Resizing a file system subvolume
This section describes the step to resize the Ceph File system (CephFS) subvolume.
The ceph fs subvolume resize command resizes the subvolume quota using the size specified by new_size. The --no_shrink flag prevents the subvolume to shrink below the current used size of the subvolume. The subvolume can be resized to an infinite size by passing inf or infinite as the new_size.
Prerequisites
- A working Red Hat Ceph Storage cluster with Ceph File System deployed.
- At least read access on the Ceph Monitor.
- Read and write capability on the Ceph Manager nodes.
- A CephFS subvolume.
Procedure
Resize a CephFS subvolume:
Syntax
ceph fs subvolume resize VOLUME_NAME SUBVOLUME_NAME_ NEW_SIZE [--group_name SUBVOLUME_GROUP_NAME] [--no_shrink]
Example
[root@mon ~]# ceph fs subvolume resize cephfs sub0 1024000000 --group_name subgroup0 --no_shrink
5.2.8. Fetching absolute path of a file system subvolume
This section shows how to fetch the absolute path of a Ceph File system (CephFS) subvolume.
Prerequisites
- A working Red Hat Ceph Storage cluster with Ceph File System deployed.
- At least read access on the Ceph Monitor.
- Read and write capability on the Ceph Manager nodes.
- A CephFS subvolume.
Procedure
Fetch the absolute path of the CephFS subvolume:
Syntax
ceph fs subvolume getpath VOLUME_NAME SUBVOLUME_NAME [--group_name SUBVOLUME_GROUP_NAME]
Example
[root@mon ~]# ceph fs subvolume getpath cephfs sub0 --group_name subgroup0

/volumes/subgroup0/sub0/c10cc8b8-851d-477f-99f2-1139d944f691
5.2.9. Fetching metadata of a file system subvolume
This section shows how to fetch metadata of a Ceph File system (CephFS) subvolume.
Prerequisites
- A working Red Hat Ceph Storage cluster with Ceph File System deployed.
- At least read access on the Ceph Monitor.
- Read and write capability on the Ceph Manager nodes.
- A CephFS subvolume.
Procedure
Fetch the metadata of a CephFS subvolume:
Syntax
ceph fs subvolume info VOLUME_NAME SUBVOLUME_NAME [--group_name SUBVOLUME_GROUP_NAME]
Example
[root@mon ~]# ceph fs subvolume info cephfs sub0 --group_name subgroup0
Example output
{
    "atime": "2020-09-08 09:27:15",
    "bytes_pcent": "undefined",
    "bytes_quota": "infinite",
    "bytes_used": 0,
    "created_at": "2020-09-08 09:27:15",
    "ctime": "2020-09-08 09:27:15",
    "data_pool": "cephfs_data",
    "features": [
        "snapshot-clone",
        "snapshot-autoprotect",
        "snapshot-retention"
    ],
    "gid": 0,
    "mode": 16877,
    "mon_addrs": [
        "10.8.128.22:6789",
        "10.8.128.23:6789",
        "10.8.128.24:6789"
    ],
    "mtime": "2020-09-08 09:27:15",
    "path": "/volumes/subgroup0/sub0/6d01a68a-e981-4ebe-84ca-96b660879173",
    "pool_namespace": "",
    "state": "complete",
    "type": "subvolume",
    "uid": 0
}
The output format is a json and contains the following fields:
- atime: access time of subvolume path in the format "YYYY-MM-DD HH:MM:SS".
- mtime: modification time of subvolume path in the format "YYYY-MM-DD HH:MM:SS".
- ctime: change time of subvolume path in the format "YYYY-MM-DD HH:MM:SS".
- uid: uid of subvolume path.
- gid: gid of subvolume path.
- mode: mode of subvolume path.
- mon_addrs: list of monitor addresses.
- bytes_pcent: quota used in percentage if quota is set, else displays "undefined".
- bytes_quota: quota size in bytes if quota is set, else displays "infinite".
- bytes_used: current used size of the subvolume in bytes.
- created_at: time of creation of subvolume in the format "YYYY-MM-DD HH:MM:SS".
- data_pool: data pool the subvolume belongs to.
- path: absolute path of a subvolume.
- type: subvolume type indicating whether it’s clone or subvolume.
- pool_namespace: RADOS namespace of the subvolume.
- features: features supported by the subvolume, such as , "snapshot-clone", "snapshot-autoprotect", or "snapshot-retention".
- state: current state of the subvolume, such as, "complete" or "snapshot-retained"
5.2.10. Creating snapshot of a file system subvolume
This section shows how to create snapshots of Ceph File System (CephFS) subvolume.
Prerequisites
- A working Red Hat Ceph Storage cluster with Ceph File System deployed.
- At least read access on the Ceph Monitor.
- Read and write capability on the Ceph Manager nodes.
- A CephFS subvolume.
-
In addition to read (
r) and write (w) capabilities, clients also requiresflag on a directory path within the file system.
Procedure
Verify that the
sflag is set on the directory:Syntax
ceph auth get CLIENT_NAMEExample
client.0 key: AQAz7EVWygILFRAAdIcuJ12opU/JKyfFmxhuaw== caps: [mds] allow rw, allow rws path=/bar 1 caps: [mon] allow r caps: [osd] allow rw tag cephfs data=cephfs_a 2Create a snapshot of the Ceph File System subvolume:
Syntax
ceph fs subvolume snapshot create VOLUME_NAME _SUBVOLUME_NAME _SNAP_NAME [--group_name GROUP_NAME]
Example
[root@mon ~]# ceph fs subvolume snapshot create cephfs sub0 snap0 --group_name subgroup0
5.2.11. Cloning subvolumes from snapshots
Subvolumes can be created by cloning subvolume snapshots. It is an asynchronous operation involving copying data from a snapshot to a subvolume.
Prerequisites
- A working Red Hat Ceph Storage cluster with Ceph File System deployed.
- At least read access on the Ceph Monitor.
- Read and write capability on the Ceph Manager nodes.
To create or delete snapshots, in addition to read and write capability, clients require
sflag on a directory path within the filesystem.Syntax
CLIENT_NAME
    key: AQAz7EVWygILFRAAdIcuJ12opU/JKyfFmxhuaw==
    caps: [mds] allow rw, allow rws path=DIRECTORY_PATH
    caps: [mon] allow r
    caps: [osd] allow rw tag cephfs data=DIRECTORY_NAME
In the following example,
client.0can create or delete snapshots in thebardirectory of filesystemcephfs_a.Example
client.0
    key: AQAz7EVWygILFRAAdIcuJ12opU/JKyfFmxhuaw==
    caps: [mds] allow rw, allow rws path=/bar
    caps: [mon] allow r
    caps: [osd] allow rw tag cephfs data=cephfs_a
Procedure
Create a Ceph File System (CephFS) volume:
Syntax
ceph fs volume create VOLUME_NAMEExample
[root@mon ~]# ceph fs volume create cephfs
This creates the CephFS file system, its data and metadata pools.
Create a subvolume group. By default, the subvolume group is created with an octal file mode '755', and data pool layout of its parent directory.
Syntax
ceph fs subvolumegroup create VOLUME_NAME GROUP_NAME [--pool_layout DATA_POOL_NAME --uid UID --gid GID --mode OCTAL_MODE]
Example
[root@mon ~]# ceph fs subvolumegroup create cephfs subgroup0
Create a subvolume. By default, a subvolume is created within the default subvolume group, and with an octal file mode ‘755’, uid of its subvolume group, gid of its subvolume group, data pool layout of its parent directory and no size limit.
Syntax
ceph fs subvolume create VOLUME_NAME SUBVOLUME_NAME [--size SIZE_IN_BYTES --group_name SUBVOLUME_GROUP_NAME --pool_layout DATA_POOL_NAME --uid _UID --gid GID --mode OCTAL_MODE]
Example
[root@mon ~]# ceph fs subvolume create cephfs sub0 --group_name subgroup0
Create a snapshot of a subvolume:
Syntax
ceph fs subvolume snapshot create VOLUME_NAME _SUBVOLUME_NAME SNAP_NAME [--group_name SUBVOLUME_GROUP_NAME]
Example
[root@mon ~]# ceph fs subvolume snapshot create cephfs sub0 snap0 --group_name subgroup0
Initiate a clone operation:
NoteBy default, cloned subvolumes are created in the default group.
If the source subvolume and the target clone are in the default group, run the following command:
Syntax
ceph fs subvolume snapshot clone VOLUME_NAME SUBVOLUME_NAME SNAP_NAME TARGET_SUBVOLUME_NAME
Example
[root@mon ~]# ceph fs subvolume snapshot clone cephfs sub0 snap0 clone0
If the source subvolume is in the non-default group, then specify the source subvolume group in the following command:
Syntax
ceph fs subvolume snapshot clone VOLUME_NAME SUBVOLUME_NAME SNAP_NAME TARGET_SUBVOLUME_NAME --group_name SUBVOLUME_GROUP_NAME
Example
[root@mon ~]# ceph fs subvolume snapshot clone cephfs sub0 snap0 clone0 --group_name subgroup0
If the target clone is to a non-default group, then specify the target group in the following command:
Syntax
ceph fs subvolume snapshot clone VOLUME_NAME SUBVOLUME_NAME SNAP_NAME TARGET_SUBVOLUME_NAME --target_group_name _SUBVOLUME_GROUP_NAME
Example
[root@mon ~]# ceph fs subvolume snapshot clone cephfs sub0 snap0 clone0 --target_group_name subgroup1
Check the status of the clone operation:
Syntax
ceph fs clone status VOLUME_NAME CLONE_NAME [--group_name TARGET_GROUP_NAME]
Example
[root@mon ~]# ceph fs clone status cephfs clone0 --group_name subgroup1

{
  "status": {
    "state": "complete"
  }
}
Additional Resources
- See the Managing Ceph Users section in the Red Hat Ceph Storage Administration Guide.
5.2.12. Listing snapshots of a file system subvolume
This section provides the step to list the snapshots of a Ceph File system (CephFS) subvolume.
Prerequisites
- A working Red Hat Ceph Storage cluster with Ceph File System deployed.
- At least read access on the Ceph Monitor.
- Read and write capability on the Ceph Manager nodes.
- A CephFS subvolume.
- Snapshots of the subvolume.
Procedure
List the snapshots of a CephFS subvolume:
Syntax
ceph fs subvolume snapshot ls VOLUME_NAME SUBVOLUME_NAME [--group_name SUBVOLUME_GROUP_NAME]
Example
[root@mon ~]# ceph fs subvolume snapshot ls cephfs sub0 --group_name subgroup0
5.2.13. Fetching metadata of the snapshots of a file system subvolume
This section provides the step to fetch the metadata of the snapshots of a Ceph File system (CephFS) subvolume.
Prerequisites
- A working Red Hat Ceph Storage cluster with CephFS deployed.
- At least read access on the Ceph Monitor.
- Read and write capability on the Ceph Manager nodes.
- A CephFS subvolume.
- Snapshots of the subvolume.
Procedure
Fetch the metadata of the snapshots of a CephFS subvolume:
Syntax
ceph fs subvolume snapshot info VOLUME_NAME SUBVOLUME_NAME SNAP_NAME [--group_name SUBVOLUME_GROUP_NAME]
Example
[root@mon ~]# ceph fs subvolume snapshot info cephfs sub0 snap0 --group_name subgroup0
Example output
{
    "created_at": "2021-09-08 06:18:47.330682",
    "data_pool": "cephfs_data",
    "has_pending_clones": "no",
    "size": 0
}
The output format is json and contains the following fields:
- created_at: time of creation of snapshot in the format "YYYY-MM-DD HH:MM:SS:ffffff".
- data_pool: data pool the snapshot belongs to.
- has_pending_clones: "yes" if snapshot clone is in progress otherwise "no".
- size: snapshot size in bytes.
5.2.14. Removing a file system subvolume
This section describes the step to remove the Ceph File system (CephFS) subvolume.
The ceph fs subvolume rm command removes the subvolume and its contents in two steps. First, it moves the subvolume to a trash folder, and then asynchronously purges its contents.
A subvolume can be removed retaining existing snapshots of the subvolume using the --retain-snapshots option. If snapshots are retained, the subvolume is considered empty for all operations not involving the retained snapshots. Retained snapshots can be used as a clone source to recreate the subvolume, or cloned to a newer subvolume.
Prerequisites
- A working Red Hat Ceph Storage cluster with Ceph File System deployed.
- At least read access on the Ceph Monitor.
- Read and write capability on the Ceph Manager nodes.
- A CephFS subvolume.
Procedure
Remove a CephFS subvolume:
Syntax
ceph fs subvolume rm VOLUME_NAME SUBVOLUME_NAME [--group_name SUBVOLUME_GROUP_NAME] [--force] [--retain-snapshots]
Example
[root@mon ~]# ceph fs subvolume rm cephfs sub0 --group_name subgroup0 --retain snapshots
To recreate a subvolume from a retained snapshot:
Syntax
ceph fs subvolume snapshot clone VOLUME_NAME DELETED_SUBVOLUME RETAINED_SNAPSHOT NEW_SUBVOLUME --group_name SUBVOLUME_GROUP_NAME --target_group_name SUBVOLUME_TARGET_GROUP_NAME
*NEW_SUBVOLUME - can either be the same subvolume which was deleted earlier or clone it to a new subvolume.
Example
ceph fs subvolume snapshot clone cephfs sub0 snap0 sub1 --group_name subgroup0 --target_group_name subgroup0
5.2.15. Removing snapshot of a file system subvolume
This section provides the step to remove snapshots of a Ceph File system (CephFS) subvolume group.
Using the --force flag allows the command to succeed that would otherwise fail if the snapshot did not exist.
Prerequisites
- A working Red Hat Ceph Storage cluster with Ceph File System deployed.
- At least read access on the Ceph Monitor.
- Read and write capability on the Ceph Manager nodes.
- A Ceph File System volume.
- A snapshot of the subvolume group.
Procedure
Remove the snapshot of the CephFS subvolume:
Syntax
ceph fs subvolume snapshot rm VOLUME_NAME SUBVOLUME_NAME _SNAP_NAME [--group_name GROUP_NAME --force]
Example
[root@mon ~]# ceph fs subvolume snapshot rm cephfs sub0 snap0 --group_name subgroup0 --force
5.3. Ceph File System subvolume groups
As a storage administrator, you can create, list, fetch absolute path, and remove Ceph File System (CephFS) subvolume groups. Additionally, you can also create, list and remove snapshots of these subvolume groups. CephFS subvolume groups are abstractions at a directory level which effects policies, for example, file layouts, across a set of subvolumes.
This section describes how to:
- Create a file system subvolume group.
- List file system subvolume groups.
- Fetch absolute path of a file system subvolume group.
- Create snapshot of a file system subvolume group.
- List snapshots of a file system subvolume group.
- Remove snapshot of a file system subvolume group.
- Remove a file system subvolume group.
5.3.1. Creating a file system subvolume group
This section describes how to create Ceph File system (CephFS) subvolume group.
When creating a subvolume group you can specify its data pool layout, uid, gid, and file mode in octal numerals. By default, the subvolume group is created with an octal file mode ‘755’, uid ‘0’, gid ‘0’ and data pool layout of its parent directory.
Prerequisites
- A working Red Hat Ceph Storage cluster with Ceph File System deployed.
- At least read access on the Ceph Monitor.
- Read and write capability on the Ceph Manager nodes.
Procedure
Create a CephFS subvolume group:
Syntax
ceph fs subvolumegroup create VOLUME_NAME GROUP_NAME [--pool_layout DATA_POOL_NAME --uid UID --gid GID --mode OCTAL_MODE]
Example
[root@mon ~]# ceph fs subvolumegroup create cephfs subgroup0
The command succeeds even if the subvolume group already exists.
5.3.2. Listing file system subvolume groups
This section describes the step to list the Ceph File system (CephFS) subvolume groups.
Prerequisites
- A working Red Hat Ceph Storage cluster with Ceph File System deployed.
- At least read access on the Ceph Monitor.
- Read and write capability on the Ceph Manager nodes.
- A CephFS subvolume group.
Procedure
List the CephFS subvolume groups:
Syntax
ceph fs subvolumegroup ls VOLUME_NAMEExample
[root@mon ~]# ceph fs subvolumegroup ls cephfs
5.3.3. Fetching absolute path of a file system subvolume group
This section shows how to fetch the absolute path of a Ceph File system (CephFS) subvolume group.
Prerequisites
- A working Red Hat Ceph Storage cluster with Ceph File System deployed.
- At least read access on the Ceph Monitor.
- Read and write capability on the Ceph Manager nodes.
- A CephFS subvolume group.
Procedure
Fetch the absolute path of the CephFS subvolume group:
Syntax
ceph fs subvolumegroup getpath VOLUME_NAME GROUP_NAME
Example
[root@mon ~]# ceph fs subvolumegroup getpath cephfs subgroup0

/volumes/subgroup0
5.3.4. Creating snapshot of a file system subvolume group
This section shows how to create snapshots of Ceph File system (CephFS) subvolume group.
Prerequisites
- A working Red Hat Ceph Storage cluster with Ceph File System deployed.
- At least read access on the Ceph Monitor.
- Read and write capability on the Ceph Manager nodes.
- CephFS subvolume group.
-
In addition to read (
r) and write (w) capabilities, clients also requiresflag on a directory path within the file system.
Procedure
Verify that the
sflag is set on the directory:Syntax
ceph auth get CLIENT_NAMEExample
client.0 key: AQAz7EVWygILFRAAdIcuJ12opU/JKyfFmxhuaw== caps: [mds] allow rw, allow rws path=/bar 1 caps: [mon] allow r caps: [osd] allow rw tag cephfs data=cephfs_a 2Create a snapshot of the CephFS subvolume group:
Syntax
ceph fs subvolumegroup snapshot create VOLUME_NAME _GROUP_NAME SNAP_NAME
Example
[root@mon ~]# ceph fs subvolumegroup snapshot create cephfs subgroup0 snap0
The command implicitly snapshots all the subvolumes under the subvolume group.
5.3.5. Listing snapshots of a file system subvolume group
This section provides the steps to list the snapshots of a Ceph File system (CephFS) subvolume group.
Prerequisites
- A working Red Hat Ceph Storage cluster with Ceph File System deployed.
- At least read access on the Ceph Monitor.
- Read and write capability on the Ceph Manager nodes.
- A CephFS subvolume group.
- Snapshots of the subvolume group.
Procedure
List the snapshots of a CephFS subvolume group:
Syntax
ceph fs subvolumegroup snapshot ls VOLUME_NAME GROUP_NAME
Example
[root@mon ~]# ceph fs subvolumegroup snapshot ls cephfs subgroup0
5.3.6. Removing snapshot of a file system subvolume group
This section provides the step to remove snapshots of a Ceph File system (CephFS) subvolume group.
Using the --force flag allows the command to succeed that would otherwise fail if the snapshot did not exist.
Prerequisites
- A working Red Hat Ceph Storage cluster with Ceph File System deployed.
- At least read access on the Ceph Monitor.
- Read and write capability on the Ceph Manager nodes.
- A Ceph File System volume.
- A snapshot of the subvolume group.
Procedure
Remove the snapshot of the CephFS subvolume group:
Syntax
ceph fs subvolumegroup snapshot rm VOLUME_NAME GROUP_NAME SNAP_NAME [--force]
Example
[root@mon ~]# ceph fs subvolumegroup snapshot rm cephfs subgroup0 snap0 --force
5.3.7. Removing a file system subvolume group
This section shows how to remove the Ceph File system (CephFS) subvolume group.
The removal of a subvolume group fails if it is not empty or non-existent. The --force flag allows the non-existent subvolume group to be removed.
Prerequisites
- A working Red Hat Ceph Storage cluster with Ceph File System deployed.
- At least read access on the Ceph Monitor.
- Read and write capability on the Ceph Manager nodes.
- A CephFS subvolume group.
Procedure
Remove the CephFS subvolume group:
Syntax
ceph fs subvolumegroup rm VOLUME_NAME GROUP_NAME [--force]
Example
[root@mon ~]# ceph fs subvolumegroup rm cephfs subgroup0 --force
5.4. Additional Resources
- See the Managing Ceph Users section in the Red Hat Ceph Storage Administration Guide.
Appendix A. Health messages for the Ceph File System
Cluster health checks
The Ceph Monitor daemons generate health messages in response to certain states of the Metadata Server (MDS). Below is the list of the health messages and their explanation:
- mds rank(s) <ranks> have failed
- One or more MDS ranks are not currently assigned to any MDS daemon. The storage cluster will not recover until a suitable replacement daemon starts.
- mds rank(s) <ranks> are damaged
- One or more MDS ranks has encountered severe damage to its stored metadata, and cannot start again until the metadata is repaired.
- mds cluster is degraded
-
One or more MDS ranks are not currently up and running, clients might pause metadata I/O until this situation is resolved. This includes ranks being failed or damaged, and includes ranks which are running on an MDS but are not in the
activestate yet — for example, ranks in thereplaystate. - mds <names> are laggy
-
The MDS daemons are supposed to send beacon messages to the monitor in an interval specified by the
mds_beacon_intervaloption, the default is 4 seconds. If an MDS daemon fails to send a message within the time specified by themds_beacon_graceoption, the default is 15 seconds. The Ceph Monitor marks the MDS daemon aslaggyand automatically replaces it with a standby daemon if any is available.
Daemon-reported health checks
The MDS daemons can identify a variety of unwanted conditions, and return them in the output of the ceph status command. These conditions have human readable messages, and also have a unique code starting MDS_HEALTH, which appears in JSON output. Below is the list of the daemon messages, their codes, and explanation.
- "Behind on trimming…"
Code: MDS_HEALTH_TRIM
CephFS maintains a metadata journal that is divided into log segments. The length of journal (in number of segments) is controlled by the
mds_log_max_segmentssetting. When the number of segments exceeds that setting, the MDS starts writing back metadata so that it can remove (trim) the oldest segments. If this process is too slow, or a software bug is preventing trimming, then this health message appears. The threshold for this message to appear is for the number of segments to be doublemds_log_max_segments.- "Client <name> failing to respond to capability release"
Code: MDS_HEALTH_CLIENT_LATE_RELEASE, MDS_HEALTH_CLIENT_LATE_RELEASE_MANY
CephFS clients are issued capabilities by the MDS. The capabilities work like locks. Sometimes, for example when another client needs access, the MDS requests clients to release their capabilities. If the client is unresponsive, it might fail to do so promptly, or fail to do so at all. This message appears if a client has taken a longer time to comply than the time specified by the
mds_revoke_cap_timeoutoption (default is 60 seconds).- "Client <name> failing to respond to cache pressure"
Code: MDS_HEALTH_CLIENT_RECALL, MDS_HEALTH_CLIENT_RECALL_MANY
Clients maintain a metadata cache. Items, such as inodes, in the client cache are also pinned in the MDS cache. When the MDS needs to shrink its cache to stay within its own cache size limits, the MDS sends messages to clients to shrink their caches too. If a client is unresponsive, it can prevent the MDS from properly staying within its cache size, and the MDS might eventually run out of memory and terminate unexpectedly. This message appears if a client has taken more time to comply than the time specified by the
mds_recall_state_timeoutoption (default is 60 seconds). See Understanding MDS Cache Size Limits for details.- "Client name failing to advance its oldest client/flush tid"
Code: MDS_HEALTH_CLIENT_OLDEST_TID, MDS_HEALTH_CLIENT_OLDEST_TID_MANY
The CephFS protocol for communicating between clients and MDS servers uses a field called oldest tid to inform the MDS of which client requests are fully complete so that the MDS can forget about them. If an unresponsive client is failing to advance this field, the MDS might be prevented from properly cleaning up resources used by client requests. This message appears if a client has more requests than the number specified by the
max_completed_requestsoption (default is 100000) that are complete on the MDS side but have not yet been accounted for in the client’s oldest tid value.- "Metadata damage detected"
Code: MDS_HEALTH_DAMAGE
Corrupt or missing metadata was encountered when reading from the metadata pool. This message indicates that the damage was sufficiently isolated for the MDS to continue operating, although client accesses to the damaged subtree return I/O errors. Use the
damage lsadministration socket command to view details on the damage. This message appears as soon as any damage is encountered.- "MDS in read-only mode"
Code: MDS_HEALTH_READ_ONLY
The MDS has entered into read-only mode and will return the
EROFSerror codes to client operations that attempt to modify any metadata. The MDS enters into read-only mode:- If it encounters a write error while writing to the metadata pool.
-
If the administrator forces the MDS to enter into read-only mode by using the
force_readonlyadministration socket command.
- "<N> slow requests are blocked"
Code: MDS_HEALTH_SLOW_REQUEST
One or more client requests have not been completed promptly, indicating that the MDS is either running very slowly, or encountering a bug. Use the
opsadministration socket command to list outstanding metadata operations. This message appears if any client requests have taken more time than the value specified by themds_op_complaint_timeoption (default is 30 seconds).- "Too many inodes in cache"
- Code: MDS_HEALTH_CACHE_OVERSIZED
The MDS has failed to trim its cache to comply with the limit set by the administrator. If the MDS cache becomes too large, the daemon might exhaust available memory and terminate unexpectedly. By default, this message appears if the MDS cache size is 50% greater than its limit.
Additional Resources
- See the Metadata Server cache size limits section in the Red Hat Ceph Storage File System Guide for details.
Appendix B. Metadata Server daemon configuration Reference
Refer the list commands that can be used for Metadata Server (MDS) daemon configuration.
- mon_force_standby_active
- Description
-
If set to
true, monitors force MDS in standby replay mode to be active. Set under the[mon]or[global]section in the Ceph configuration file. - Type
- Boolean
- Default
-
true
- max_mds
- Description
-
The number of active MDS daemons during cluster creation. Set under the
[mon]or[global]section in the Ceph configuration file. - Type
- 32-bit Integer
- Default
-
1
- mds_cache_memory_limit
- Description
-
The memory limit the MDS enforces for its cache. Red Hat recommends to use this parameter instead of the
mds cache sizeparameter. - Type
- 64-bit Integer Unsigned
- Default
-
1073741824
- mds_cache_reservation
- Description
- The cache reservation, memory or inodes, for the MDS cache to maintain. The value is a percentage of the maximum cache configured. Once the MDS begins dipping into its reservation, it recalls client state until its cache size shrinks to restore the reservation.
- Type
- Float
- Default
-
0.05
- mds_cache_size
- Description
-
The number of inodes to cache. A value of 0 indicates an unlimited number. Red Hat recommends to use the
mds_cache_memory_limitto limit the amount of memory the MDS cache uses. - Type
- 32-bit Integer
- Default
-
0
- mds_cache_mid
- Description
- The insertion point for new items in the cache LRU, from the top.
- Type
- Float
- Default
-
0.7
- mds_dir_commit_ratio
- Description
- The fraction of directory contains erroneous information before Ceph commits using a full update, instead of partial update.
- Type
- Float
- Default
-
0.5
- mds_dir_max_commit_size
- Description
- The maximum size of a directory update before Ceph breaks the directory into smaller transactions, in MB.
- Type
- 32-bit Integer
- Default
-
90
- mds_decay_halflife
- Description
- The half-life of MDS cache temperature.
- Type
- Float
- Default
-
5
- mds_beacon_interval
- Description
- The frequency, in seconds, of beacon messages sent to the monitor.
- Type
- Float
- Default
-
4
- mds_beacon_grace
- Description
-
The interval without beacons before Ceph declares an MDS
laggy, and possibly replace it. - Type
- Float
- Default
-
15
- mds_blacklist_interval
- Description
- The blacklist duration for failed MDS daemons in the OSD map.
- Type
- Float
- Default
-
24.0*60.0
- mds_session_timeout
- Description
- The interval, in seconds, of client inactivity before Ceph times out capabilities and leases.
- Type
- Float
- Default
-
60
- mds_session_autoclose
- Description
-
The interval, in seconds, before Ceph closes a
laggyclient’s session. - Type
- Float
- Default
-
300
- mds_reconnect_timeout
- Description
- The interval, in seconds, to wait for clients to reconnect during MDS restart.
- Type
- Float
- Default
-
45
- mds_tick_interval
- Description
- How frequently the MDS performs internal periodic tasks.
- Type
- Float
- Default
-
5
- mds_dirstat_min_interval
- Description
- The minimum interval, in seconds, to try to avoid propagating recursive statistics up the tree.
- Type
- Float
- Default
-
1
- mds_scatter_nudge_interval
- Description
- How quickly changes in directory statistics propagate up.
- Type
- Float
- Default
-
5
- mds_client_prealloc_inos
- Description
- The number of inode numbers to preallocate per client session.
- Type
- 32-bit Integer
- Default
-
1000
- mds_early_reply
- Description
- Determines whether the MDS allows clients to see request results before they commit to the journal.
- Type
- Boolean
- Default
-
true
- mds_use_tmap
- Description
-
Use
trivialmapfor directory updates. - Type
- Boolean
- Default
-
true
- mds_default_dir_hash
- Description
- The function to use for hashing files across directory fragments.
- Type
- 32-bit Integer
- Default
-
2,that is,rjenkins
- mds_log
- Description
-
Set to
trueif the MDS should journal metadata updates. Disable for benchmarking only. - Type
- Boolean
- Default
-
true
- mds_log_skip_corrupt_events
- Description
- Determines whether the MDS tries to skip corrupt journal events during journal replay.
- Type
- Boolean
- Default
-
false
- mds_log_max_events
- Description
-
The maximum events in the journal before Ceph initiates trimming. Set to
-1to disable limits. - Type
- 32-bit Integer
- Default
-
-1
- mds_log_max_segments
- Description
-
The maximum number of segments or objects, in the journal before Ceph initiates trimming. Set to
-1to disable limits. - Type
- 32-bit Integer
- Default
-
30
- mds_log_max_expiring
- Description
- The maximum number of segments to expire in parallels.
- Type
- 32-bit Integer
- Default
-
20
- mds_log_eopen_size
- Description
-
The maximum number of inodes in an
EOpenevent. - Type
- 32-bit Integer
- Default
-
100
- mds_bal_sample_interval
- Description
- Determines how frequently to sample directory temperature, when making fragmentation decisions.
- Type
- Float
- Default
-
3
- mds_bal_replicate_threshold
- Description
- The maximum temperature before Ceph attempts to replicate metadata to other nodes.
- Type
- Float
- Default
-
8000
- mds_bal_unreplicate_threshold
- Description
- The minimum temperature before Ceph stops replicating metadata to other nodes.
- Type
- Float
- Default
-
0
- mds_bal_frag
- Description
- Determines whether the MDS fragments directories.
- Type
- Boolean
- Default
-
false
- mds_bal_split_size
- Description
- The maximum directory size before the MDS splits a directory fragment into smaller bits. The root directory has a default fragment size limit of 10000.
- Type
- 32-bit Integer
- Default
-
10000
- mds_bal_split_rd
- Description
- The maximum directory read temperature before Ceph splits a directory fragment.
- Type
- Float
- Default
-
25000
- mds_bal_split_wr
- Description
- The maximum directory write temperature before Ceph splits a directory fragment.
- Type
- Float
- Default
-
10000
- mds_bal_split_bits
- Description
- The number of bits by which to split a directory fragment.
- Type
- 32-bit Integer
- Default
-
3
- mds_bal_merge_size
- Description
- The minimum directory size before Ceph tries to merge adjacent directory fragments.
- Type
- 32-bit Integer
- Default
-
50
- mds_bal_merge_rd
- Description
- The minimum read temperature before Ceph merges adjacent directory fragments.
- Type
- Float
- Default
-
1000
- mds_bal_merge_wr
- Description
- The minimum write temperature before Ceph merges adjacent directory fragments.
- Type
- Float
- Default
-
1000
- mds_bal_interval
- Description
- The frequency, in seconds, of workload exchanges between MDS nodes.
- Type
- 32-bit Integer
- Default
-
10
- mds_bal_fragment_interval
- Description
- The frequency, in seconds, of adjusting directory fragmentation.
- Type
- 32-bit Integer
- Default
-
5
- mds_bal_idle_threshold
- Description
- The minimum temperature before Ceph migrates a subtree back to its parent.
- Type
- Float
- Default
-
0
- mds_bal_max
- Description
- The number of iterations to run balancer before Ceph stops. For testing purposes only.
- Type
- 32-bit Integer
- Default
-
-1
- mds_bal_max_until
- Description
- The number of seconds to run balancer before Ceph stops. For testing purposes only.
- Type
- 32-bit Integer
- Default
-
-1
- mds_bal_mode
- Description
The method for calculating MDS load:
-
1= Hybrid. -
2= Request rate and latency. -
3= CPU load.
-
- Type
- 32-bit Integer
- Default
-
0
- mds_bal_min_rebalance
- Description
- The minimum subtree temperature before Ceph migrates.
- Type
- Float
- Default
-
0.1
- mds_bal_min_start
- Description
- The minimum subtree temperature before Ceph searches a subtree.
- Type
- Float
- Default
-
0.2
- mds_bal_need_min
- Description
- The minimum fraction of target subtree size to accept.
- Type
- Float
- Default
-
0.8
- mds_bal_need_max
- Description
- The maximum fraction of target subtree size to accept.
- Type
- Float
- Default
-
1.2
- mds_bal_midchunk
- Description
- Ceph migrates any subtree that is larger than this fraction of the target subtree size.
- Type
- Float
- Default
-
0.3
- mds_bal_minchunk
- Description
- Ceph ignores any subtree that is smaller than this fraction of the target subtree size.
- Type
- Float
- Default
-
0.001
- mds_bal_target_removal_min
- Description
- The minimum number of balancer iterations before Ceph removes an old MDS target from the MDS map.
- Type
- 32-bit Integer
- Default
-
5
- mds_bal_target_removal_max
- Description
- The maximum number of balancer iterations before Ceph removes an old MDS target from the MDS map.
- Type
- 32-bit Integer
- Default
-
10
- mds_replay_interval
- Description
-
The journal poll interval when in
standby-replaymode for ahot standby. - Type
- Float
- Default
-
1
- mds_shutdown_check
- Description
- The interval for polling the cache during MDS shutdown.
- Type
- 32-bit Integer
- Default
-
0
- mds_thrash_exports
- Description
- Ceph randomly exports subtrees between nodes. For testing purposes only.
- Type
- 32-bit Integer
- Default
-
0
- mds_thrash_fragments
- Description
- Ceph randomly fragments or merges directories.
- Type
- 32-bit Integer
- Default
-
0
- mds_dump_cache_on_map
- Description
- Ceph dumps the MDS cache contents to a file on each MDS map.
- Type
- Boolean
- Default
-
false
- mds_dump_cache_after_rejoin
- Description
- Ceph dumps MDS cache contents to a file after rejoining the cache during recovery.
- Type
- Boolean
- Default
-
false
- mds_verify_scatter
- Description
-
Ceph asserts that various scatter/gather invariants are
true. For developer use only. - Type
- Boolean
- Default
-
false
- mds_debug_scatterstat
- Description
-
Ceph asserts that various recursive statistics invariants are
true. For developer use only. - Type
- Boolean
- Default
-
false
- mds_debug_frag
- Description
- Ceph verifies directory fragmentation invariants when convenient. For developer use only.
- Type
- Boolean
- Default
-
false
- mds_debug_auth_pins
- Description
- The debug authentication pin invariants. For developer use only.
- Type
- Boolean
- Default
-
false
- mds_debug_subtrees
- Description
- Debugging subtree invariants. For developer use only.
- Type
- Boolean
- Default
-
false
- mds_kill_mdstable_at
- Description
- Ceph injects MDS failure in MDS Table code. For developer use only.
- Type
- 32-bit Integer
- Default
-
0
- mds_kill_export_at
- Description
- Ceph injects MDS failure in the subtree export code. For developer use only.
- Type
- 32-bit Integer
- Default
-
0
- mds_kill_import_at
- Description
- Ceph injects MDS failure in the subtree import code. For developer use only.
- Type
- 32-bit Integer
- Default
-
0
- mds_kill_link_at
- Description
- Ceph injects MDS failure in hard link code. For developer use only.
- Type
- 32-bit Integer
- Default
-
0
- mds_kill_rename_at
- Description
- Ceph injects MDS failure in the rename code. For developer use only.
- Type
- 32-bit Integer
- Default
-
0
- mds_wipe_sessions
- Description
- Ceph deletes all client sessions on startup. For testing purposes only.
- Type
- Boolean
- Default
-
0
- mds_wipe_ino_prealloc
- Description
- Ceph deletea inode preallocation metadata on startup. For testing purposes only.
- Type
- Boolean
- Default
-
0
- mds_skip_ino
- Description
- The number of inode numbers to skip on startup. For testing purposes only.
- Type
- 32-bit Integer
- Default
-
0
- mds_standby_for_name
- Description
- The MDS daemon is a standby for another MDS daemon of the name specified in this setting.
- Type
- String
- Default
- N/A
- mds_standby_for_rank
- Description
- An instance of the MDS daemon is a standby for another MDS daemon instance of this rank.
- Type
- 32-bit Integer
- Default
-
-1
- mds_standby_replay
- Description
-
Determines whether the MDS daemon polls and replays the log of an active MDS when used as a
hot standby. - Type
- Boolean
- Default
-
false
Appendix C. Journaler configuration reference
Reference of the list commands that can be used for journaler configuration.
- journaler_write_head_interval
- Description
- How frequently to update the journal head object.
- Type
- Integer
- Required
- No
- Default
-
15
- journaler_prefetch_periods
- Description
- How many stripe periods to read ahead on journal replay.
- Type
- Integer
- Required
- No
- Default
-
10
- journal_prezero_periods
- Description
- How many stripe periods to zero ahead of write position.
- Type
- Integer
- Required
- No
- Default
-
10
- journaler_batch_interval
- Description
- Maximum additional latency in seconds to incur artificially.
- Type
- Double
- Required
- No
- Default
-
.001
- journaler_batch_max
- Description
- Maximum bytes that will be delayed flushing.
- Type
- 64-bit Unsigned Integer
- Required
- No
- Default
-
0
Appendix D. Ceph File System client configuration reference
This section lists configuration options for Ceph File System (CephFS) FUSE clients. Set them in the Ceph configuration file under the [client] section.
- client_acl_type
- Description
-
Set the ACL type. Currently, only possible value is
posix_aclto enable POSIX ACL, or an empty string. This option only takes effect when thefuse_default_permissionsis set tofalse. - Type
- String
- Default
-
""(no ACL enforcement)
- client_cache_mid
- Description
- Set the client cache midpoint. The midpoint splits the least recently used lists into a hot and warm list.
- Type
- Float
- Default
-
0.75
- client_cache size
- Description
- Set the number of inodes that the client keeps in the metadata cache.
- Type
- Integer
- Default
-
16384(16 MB)
- client_caps_release_delay
- Description
- Set the delay between capability releases in seconds. The delay sets how many seconds a client waits to release capabilities that it no longer needs in case the capabilities are needed for another user space operation.
- Type
- Integer
- Default
-
5(seconds)
- client_debug_force_sync_read
- Description
-
If set to
true, clients read data directly from OSDs instead of using a local page cache. - Type
- Boolean
- Default
-
false
- client_dirsize_rbytes
- Description
-
If set to
true, use the recursive size of a directory (that is, total of all descendants). - Type
- Boolean
- Default
-
true
- client_max_inline_size
- Description
-
Set the maximum size of inlined data stored in a file inode rather than in a separate data object in RADOS. This setting only applies if the
inline_dataflag is set on the MDS map. - Type
- Integer
- Default
-
4096
- client_metadata
- Description
- Comma-delimited strings for client metadata sent to each MDS, in addition to the automatically generated version, host name, and other metadata.
- Type
- String
- Default
-
""(no additional metadata)
- client_mount_gid
- Description
- Set the group ID of CephFS mount.
- Type
- Integer
- Default
-
-1
- client_mount_timeout
- Description
- Set the timeout for CephFS mount in seconds.
- Type
- Float
- Default
-
300.0
- client_mount_uid
- Description
- Set the user ID of CephFS mount.
- Type
- Integer
- Default
-
-1
- client_mountpoint
- Description
-
An alternative to the
-roption of theceph-fusecommand. - Type
- String
- Default
-
/
- client_oc
- Description
- Enable object caching.
- Type
- Boolean
- Default
-
true
- client_oc_max_dirty
- Description
- Set the maximum number of dirty bytes in the object cache.
- Type
- Integer
- Default
-
104857600(100MB)
- client_oc_max_dirty_age
- Description
- Set the maximum age in seconds of dirty data in the object cache before writeback.
- Type
- Float
- Default
-
5.0(seconds)
- client_oc_max_objects
- Description
- Set the maximum number of objects in the object cache.
- Type
- Integer
- Default
-
1000
- client_oc_size
- Description
- Set how many bytes of data will the client cache.
- Type
- Integer
- Default
-
209715200(200 MB)
- client_oc_target_dirty
- Description
- Set the target size of dirty data. Red Hat recommends to keep this number low.
- Type
- Integer
- Default
-
8388608(8MB)
- client_permissions
- Description
- Check client permissions on all I/O operations.
- Type
- Boolean
- Default
-
true
- client_quota_df
- Description
-
Report root directory quota for the
statfsoperation. - Type
- Boolean
- Default
-
true
- client_readahead_max_bytes
- Description
-
Set the maximum number of bytes that the kernel reads ahead for future read operations. Overridden by the
client_readahead_max_periodssetting. - Type
- Integer
- Default
-
0(unlimited)
- client_readahead_max_periods
- Description
-
Set the number of file layout periods (object size * number of stripes) that the kernel reads ahead. Overrides the
client_readahead_max_bytessetting. - Type
- Integer
- Default
-
4
- client_readahead_min
- Description
- Set the minimum number bytes that the kernel reads ahead.
- Type
- Integer
- Default
-
131072(128KB)
- client_snapdir
- Description
- Set the snapshot directory name.
- Type
- String
- Default
-
".snap"
- client_tick_interval
- Description
- Set the interval in seconds between capability renewal and other upkeep.
- Type
- Float
- Default
-
1.0
- client_use_random_mds
- Description
- Choose random MDS for each request.
- Type
- Boolean
- Default
-
false
- fuse_default_permissions
- Description
-
When set to
false, theceph-fuseutility checks does its own permissions checking, instead of relying on the permissions enforcement in FUSE. Set to false together with theclient acl type=posix_acloption to enable POSIX ACL. - Type
- Boolean
- Default
-
true
These options are internal. They are listed here only to complete the list of options.
- client_debug_getattr_caps
- Description
- Check if the reply from the MDS contains required capabilities.
- Type
- Boolean
- Default
-
false
- client_debug_inject_tick_delay
- Description
- Add artificial delay between client ticks.
- Type
- Integer
- Default
-
0
- client_inject_fixed_oldest_tid
- Description, Type
- Boolean
- Default
-
false
- client_inject_release_failure
- Description, Type
- Boolean
- Default
-
false
- client_trace
- Description
-
The path to the trace file for all file operations. The output is designed to be used by the Ceph synthetic client. See the
ceph-syn(8)manual page for details. - Type
- String
- Default
-
""(disabled)