API Authentication
Choose your authentication method: API key (user_key), app identifier and keys (app_id/app_key), or OpenID Connect.
Abstract
Chapter 1. Authentication Patterns
By the end of this tutorial you will know how to set the authentication pattern on your API and the effect that this has on applications communicating with your API.
Depending on your API, you may need to use different authentication patterns to issue credentials for access to your API. These can range from API keys to openAuth tokens and custom configurations. This tutorial covers how to select from the available standard Authentication Patterns.
1.1. Authentication Patterns
3scale supports the following authentication patterns out of the box:
- Standard API Keys: Single randomized strings or hashes acting as an identifier and a secret token.
- Application Identifier and Key pairs: Immutable identifier and mutable secret key strings.
- OpenID Connect
1.2. Step 1: Select the Authentication mode for your service
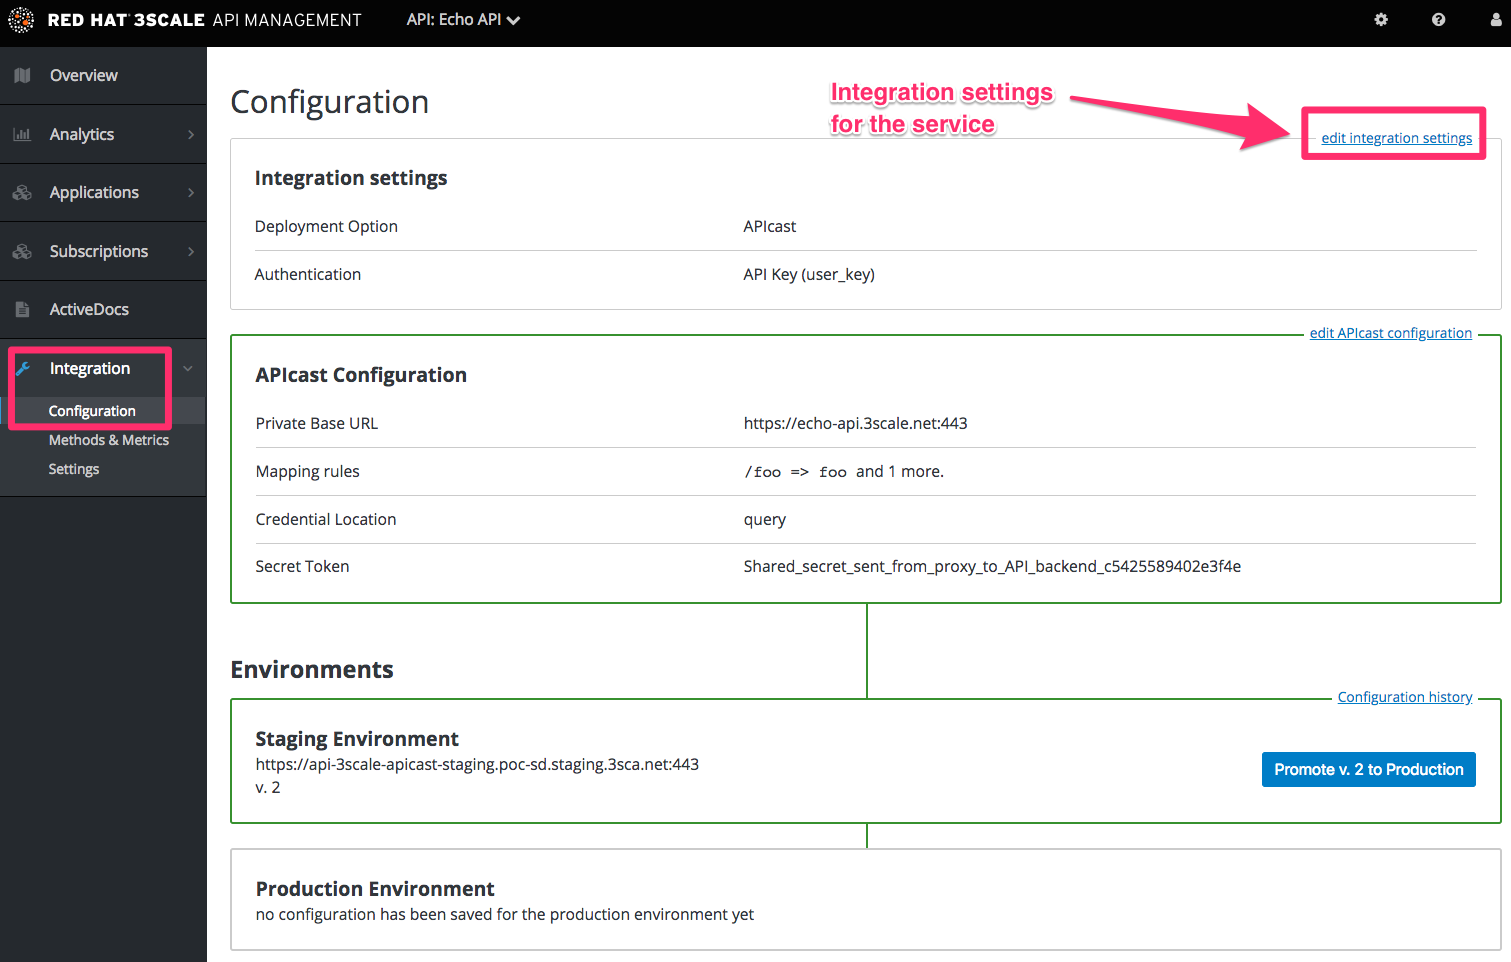
Navigate to the API service you want to work on (there may be only one service named API in which case select this). Go to the Integration section.
Each service that you operate can use a different authentication pattern, but only one pattern can be used per service.
You must not change the authentication pattern after the credentials have been registered because the behavior of the service may then become unpredictable. To change authentication patterns we recommend creating a new service and migrating customers.
1.3. Step 2: Select the Authentication mode you want to use
To select an authentication mode, scroll to the AUTHENTICATION section. Here, you can choose one of the following options:
- API Key (user_key)
- App_ID and App_Key Pair
- OpenID Connect
1.4. Step 3: Ensure your API accepts the correct types of credentials
Depending on the credential type chosen, you may need to accept different parameters in your API calls (key fields, IDs etc.). The names of these parameters may not be the same as those used internally at 3scale. The 3scale authentication will function correctly if the correct parameter names are used in calls to the 3scale backend.
1.5. Step 4: Create an application to test credentials
To ensure that the credential sets are working, you can create a new application to issue credentials to use the API. Navigate to the Accounts area of your dashboard, click the account you want to use and click new application.
Filling out the form and clicking save will create a new application with credentials to use the API. You can now use these credentials to make calls to your API and records will be checked against the 3scale list of registered applications.
1.6. Standard Authentication Patterns
3scale supports the authentication patterns detailed in the following sections.
1.6.1. API Key
The simplest form of credential supported is the single API model. Here, each application with permissions on the API has a single (unique) long character string; example:
API-key = 853a76f7c8d5f4a1ee8bf10a4e0d1f13
By default, the name of the key parameter is user_key. You can use this label or choose another, such as API-key. If choosing another label, you need to map the value before you make the authorization calls to 3scale. The string acts as both, an identifier and a secret token, for use of the API. It is recommended that you use such patterns only in environments with low security requirements or with SSL security on API calls. Following are the operations that can be carried out on the token and application:
- Application Suspend: This suspends the applications access to the API and, in effect, all calls to the API with the relevant key will be suspended.
- Application Resume: Undoes the effect of an application suspend action.
- Key Regenerate: This action generates a new random string key for the application and associates it with the application. Immediately after this action is taken, calls with the previous token will cease to be accepted.
The latter action can be triggered from the API Administration dashboard and (if permitted) from the API Developers User console.
1.6.2. App_ID and App_Key Pair
The API Key Pattern combines the identity of the application and the secret usage token in one token; however, this pattern separates the two. Each application using the API, issues an immutable initial identifier known as the Application ID (App ID). The App ID is constant and may or may not be secret. In addition, each application may have 1-n Application Keys (App_Keys). Each Key is associated directly with the App_ID and should be treated as secret.
app_id = 80a4e03 app_key = a1ee8bf10a4e0d1f13853a76f7c8d5f4
In the default setting, developers can create up to five keys per application. This allows a developer to create a new key, add it to their code, redeploy their application, and then disable old keys. This does not cause any application downtime the way an API Key Regeneration would.
Statistics and rate limits are always kept at the application ID level of granularity and not per API Key. If a developer wants to track two sets of statistics, they should create two applications rather than two keys.
It is also possible to change the mode in the system and allow applications to be created in the absence of application keys. In this case the 3scale system will authenticate access based on the App ID only (and no key checks are made). This mode is useful for widget type scenarios or where rate limits are applied to users rather than applications. In most cases you will want your API to enforce the presence of at least one application key per application present (this setting is available in the Settings menu under usage rules).
1.6.3. OpenID Connect
For information on OpenID Connect authentication, see the OpenID Connect integration section.
1.7. Referrer Filtering
3scale supports the Referrer Filtering feature that can be used to whitelist IP addresses or domain names from where an application can access the API. The API clients specify the referrer value in the Referer header. The purpose and the usage of the Referer header are described in the RFC 7231, section 5.5.2: Referer.
To enable the Referrer Filtering feature go to [your_API_name] > Integration > Settings, click the Require referrer filtering checkbox and click Update Service.
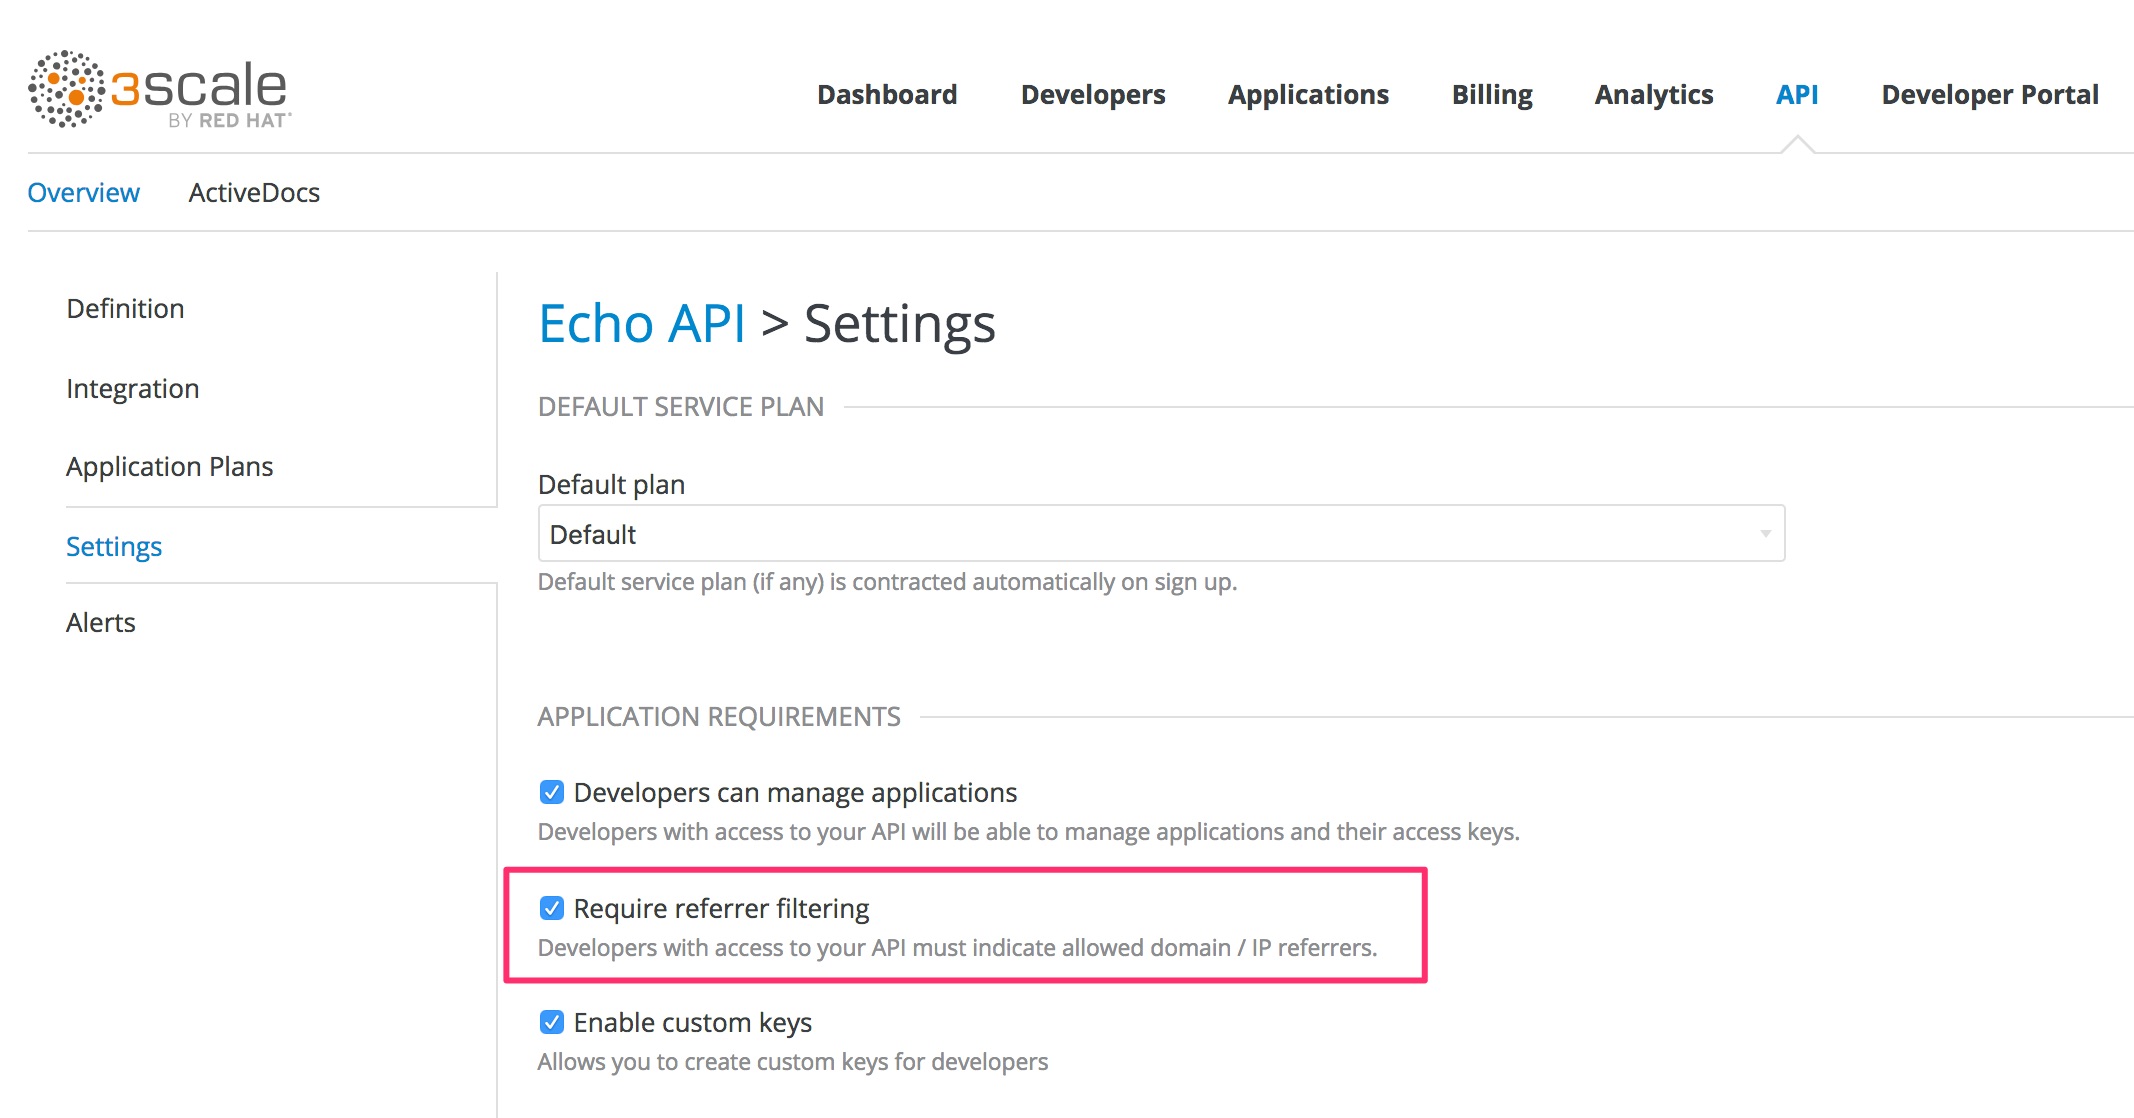
The developers with access to your API must configure allowed domain/IP referrers from the developer portal.
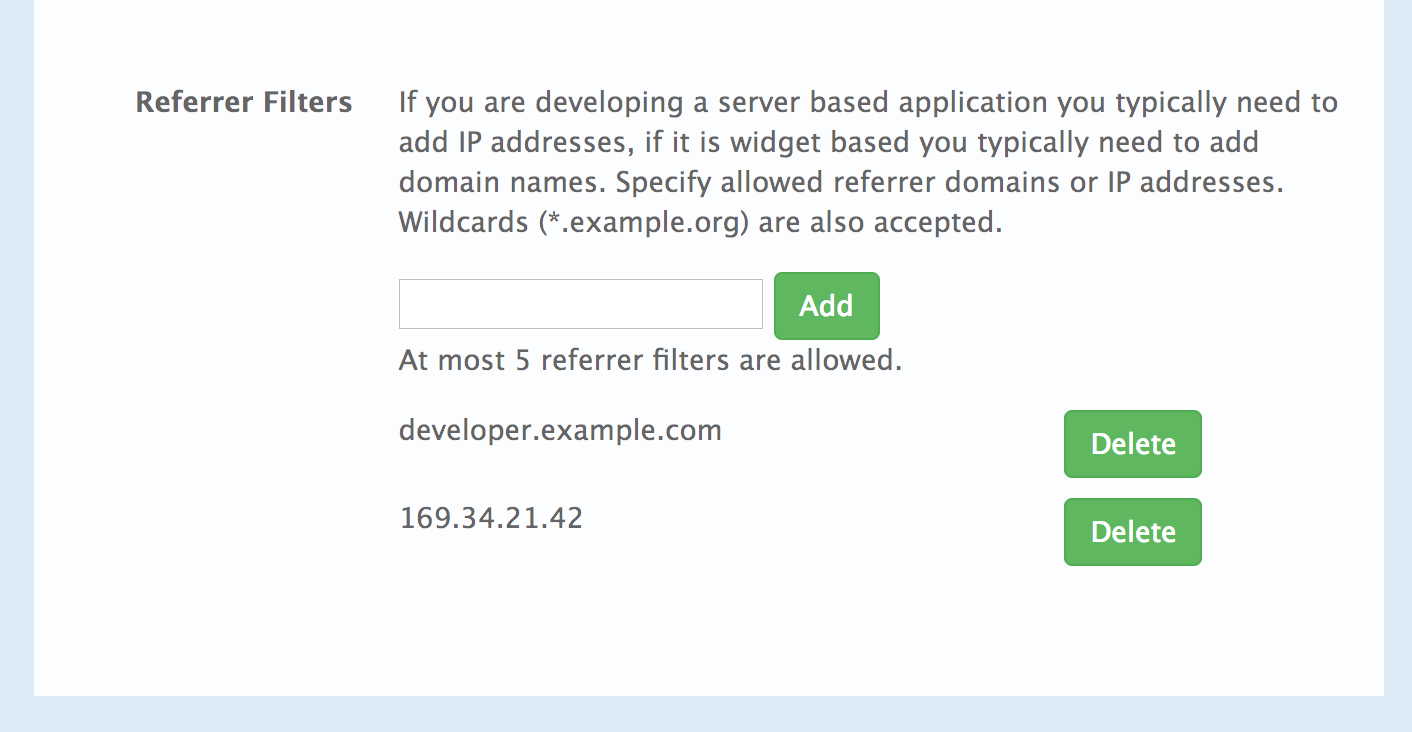
In the Admin Portal on the application details page for all applications that belong to this service a new Referrer Filters section displays. Here, the admin can also configure a whitelist of the allowed Referrer header values for this application.
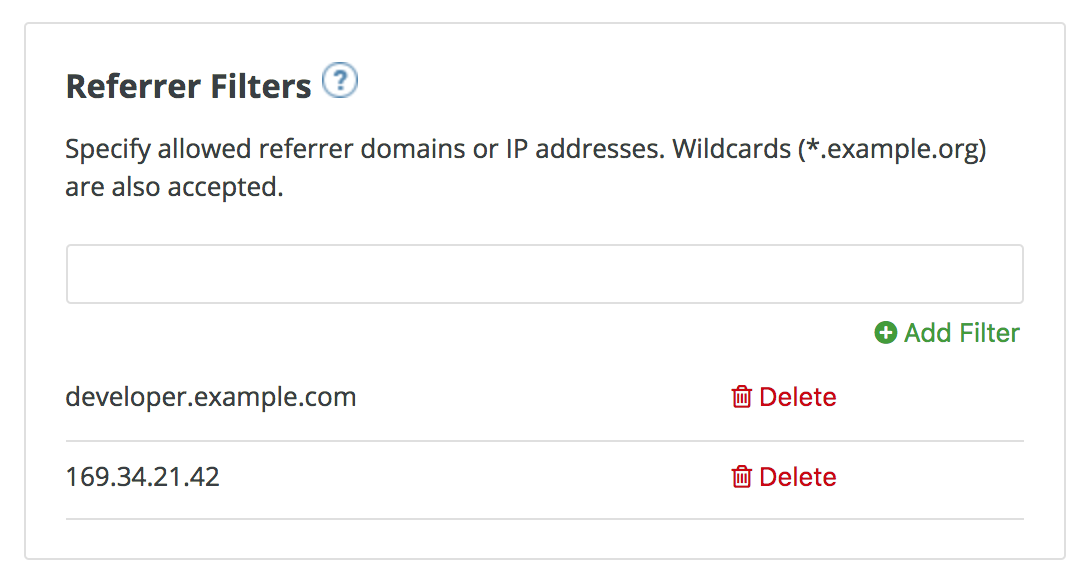
You can set a maximum of five referrer values per application.
The value can only consist of Latin letters, numbers, and special characters *, ., and -. * can be used for wildcard values. If the value is set to *, any referrer value will be allowed, so the referrer check will be bypassed.
For the Referrer Filtering feature to work, the APIcast Referrer policy must be enabled in the service policy chain.
When the Require referrer filtering feature and the 3scale Referrer policy are enabled, the authorization works as follows:
- The applications that do not have Referrer Filters specified are authorized normally only using the provided credentials.
-
For the applications that have Referrer Filters values set, APIcast extracts the referrer value from the
Refererheader of the request and sends it asreferrerparam in the AuthRep (authorize and report) request to the Service Management API. The following table shows the AuthRep responses for different combination of the referrer filtering parameters.
referrer parameter passed? | Referrer Filters configured for the app? | Referrer parameter value | HTTP Response | Response body |
|---|---|---|---|---|
| Yes | Yes | matches referrer filter | 200 OK |
|
| Yes | No | matches referrer filter | 200 OK |
|
| Yes | Yes | does not match referrer filter | 409 Conflict |
|
| Yes | No | does not match referrer filter | 200 OK |
|
| Yes | Yes |
| 200 OK |
|
| Yes | No |
| 200 OK |
|
| No | Yes | — | 409 Conflict |
|
| No | No | — | 200 OK |
|
The calls that are not authorized by AuthRep are rejected by APIcast with an "Authorization Failed" error. You can configure the exact status code and the error message on the service Integration page.
Chapter 2. OpenID Connect integration
3scale integrates with the 3rd-party Identity Providers (IdP) for authenticating the API requests using the OpenID Connect specification. OpenID Connect is built on top of OAuth 2.0 that complements the OAuth 2.0 Authorization framework with an authentication mechanism. When OpenID Connect authentication option is used, the API requests are authenticated using the access tokens in the JSON Web Token (JWT) format (RFC 7519).
The integration consists of the following two parts:
Red Hat 3scale API Management fully supports both integration points with Red Hat Single Sign-On (RH-SSO) acting as the OpenID Provider. See the supported version of RH-SSO on the Supported Configurations page. APIcast integration is also tested with ForgeRock.
In both cases, you can configure the integration by specifying the OpenID Connect Issuer field in the APIcast Configuration on the Integration page of the service using OpenID Connect authentication option. For instructions, see Section 2.3, “Configure Red Hat Single Sign-On integration”.
2.1. JWT verification and parsing by APIcast
The API requests to the service using the OpenID Connect authentication mode should provide the access token in the JWT format, issued by the OpenID Provider, in the Authorization header using Bearer schema. The header should look like the following example:
Authorization: Bearer <JWK>
Example:
Authorization: Bearer: eyJhbGciOiJSUzI1NiIsInR5cCI6IkpXVCJ9.eyJpc3MiOiJodHRwczovL2lkcC5leGFtcGxlLmNvbSIsInN1YiI6ImFiYzEyMyIsIm5iZiI6MTUzNzg5MjQ5NCwiZXhwIjoxNTM3ODk2MDk0LCJpYXQiOjE1Mzc4OTI0OTQsImp0aSI6ImlkMTIzNDU2IiwidHlwIjoiQmVhcmVyIn0.LM2PSmQ0k8mR7eDS_Z8iRdGta-Ea-pJRrf4C6bAiKz-Nzhxpm7fF7oV3BOipFmimwkQ_-mw3kN--oOc3vU1RE4FTCQGbzO1SAWHOZqG5ZUx5ugaASY-hUHIohy6PC7dQl0e2NlAeqqg4MuZtEwrpESJW-VnGdljrAS0HsXzd6nENM0Z_ofo4ZdTKvIKsk2KrdyVBOcjgVjYongtppR0cw30FwnpqfeCkuATeINN5OKHXOibRA24pQyIF1s81nnmxLnjnVbu24SFE34aMGRXYzs4icMI8sK65eKxbvwV3PIG3mM0C4ilZPO26doP0YrLfVwFcqEirmENUAcHXz7NuvA
The JWT token contains a signature that the token’s receiver can verify and ensure that the token was signed by a known issuer and that its content has not been changed. 3scale supports RSA signature based on the public/private key pair. Here, the issuer signs the JWT token using a private key. APIcast verifies this token using a public key.
APIcast uses OpenID Connect Discovery for getting the JSON Web Keys (JWK) that can be used for verifying the JWT signature.
On each request, APIcast does the following:
- Verifies the JWT token using the public key.
-
Validates the claims
nbfandexp. -
Verifies that the issuer specified in the claim
iss(Issuer) is the same as the one configured in the OpenID Connect Issuer field. -
Extracts the value of the
azporaudclaim and uses it as the Client ID (that identifies the application in 3scale) to authorize the call through the Service Management API.
If any of the JWT validation or the authorization checks fail, APIcast returns an "Authenication failed" error. Otherwise, APIcast proxies the request to the API backend. The Authorization header remains in the request, so the API backend can also use the JWT token to check the user and client identity.
2.2. Client credentials synchronization by Zync
Using the Zync component, 3scale syncronizes the client (application) credentials between 3scale and the Red Hat Single Sign-On server configured through the OpenID Connect Issuer setting. Whenever a new application is created, updated, or deleted for a service configured to use OpenID Connect, Zync receives the corresponding event and communicates the change to the Red Hat Single Sign-On instance using RH-SSO API. The Section 2.3, “Configure Red Hat Single Sign-On integration” section provides the steps required to ensure that Zync has the correct credentials to use the RH-SSO API.
2.3. Configure Red Hat Single Sign-On integration
2.3.1. Configure Zync to use custom CA certificates
You must establish an SSL connection between Zync and Red Hat Single Sign-On. 3scale 2.2 and above supports custom CA certificates for Red Hat Single Sign-On with the SSL_CERT_FILE environment variable. This variable points to the local path of the certificates bundle. Configure it as follows:
Validate the new certificate with the following cURL command. The expected response is a JSON configuration of the realm. If validation fails it is an indicator that your certificate may not be correct.
curl -v https://<secure-sso-host>/auth/realms/master --cacert customCA.pem
Add the certificate bundle to the Zync pod:
Gather the existing content of the
/etc/pki/tls/cert.pemfile on the Zync pod. Run:oc exec <zync-pod-id> cat /etc/pki/tls/cert.pem > zync.pem
Append the contents of the custom CA certificate file to
zync.pem:cat customCA.pem >> zync.pem
Attach the new file to the Zync pod as ConfigMap:
oc create configmap zync-ca-bundle --from-file=./zync.pem
oc set volume dc/zync --add --name=zync-ca-bundle --mount-path /etc/pki/tls/zync/zync.pem --sub-path zync.pem --source='{"configMap":{"name":"zync-ca-bundle","items":[{"key":"zync.pem","path":"zync.pem"}]}}'oc patch dc/zync --type=json -p '[{"op": "add", "path": "/spec/template/spec/containers/0/volumeMounts/0/subPath", "value":"zync.pem"}]'
After deployment, verify that the certificate is attached and the content is correct:
oc exec <zync-pod-id> cat /etc/pki/tls/zync/zync.pem
Configure the
SSL_CERT_FILEenvironment variable on Zync to point to the new CA certificate bundle:oc set env dc/zync SSL_CERT_FILE=/etc/pki/tls/zync/zync.pem
2.3.2. Configure Red Hat Single Sign-On
To configure Red Hat Single Sign-On, take the following steps:
-
Create a realm (
<REALM_NAME>). Create a client:
- Specify a client ID.
-
In the Client Protocol field, select
openid-connect.
To configure the client permissions, set the following values:
-
Access Type to
confidential. -
Standard Flow Enabled to
OFF. -
Direct Access Grants Enabled to
OFF. -
Service Accounts Enabled to
ON.
-
Access Type to
Set the service account roles for the client:
- Navigate to the Service Account Roles tab of the client.
-
In the Client Roles dropdown list, click
realm-management. -
In the Available Roles pane, select the
manage-clientslist item and assign the role by clicking Add selected >>.
Note the client credentials:
-
Make a note of the client ID (
<CLIENT_ID>). -
Navigate to the Credentials tab of the client and make a note of the Secret field (
<CLIENT_SECRET>).
-
Make a note of the client ID (
Add a user to the realm:
- Click the Users menu on the left side of the window.
- Click Add user.
-
Type the username, set the Email Verified switch to
ON, and click Save. -
On the Credentials tab, set the password. Enter the password in both the fields, set the Temporary switch to
OFFto avoid the password reset at the next login, and click Reset Password. - When the pop-up window displays, click Change password.
2.3.3. Configure 3scale
After you have created and configured the client in Red Hat Single Sign-On, you must configure 3scale to work with Red Hat Single Sign-On.
To configure 3scale, take the following steps:
Enable OpenID Connect.
- Select the service on which you want to enable the OpenID Connect authentication, navigate to [your_API_name] > Integration > Configuration.
- Select edit integration settings.
-
Under the
Authenticationdeployment options, selectOpenID Connect. - Click Update Service to save the settings.
Edit the APIcast Configuration:
- Navigate to [your_API_name] > Integration > Configuration.
- Select edit APIcast configuration.
Under the Authentication Settings heading, in the OpenID Connect Issuer field, enter the previously noted client credentials with the URL of your Red Hat Single Sign-On server (located at host
<RHSSO_HOST>and port<RHSSO_PORT>).https://<CLIENT_ID>:<CLIENT_SECRET>@<RHSSO_HOST>:<RHSSO_PORT>/auth/realms/<REALM_NAME>
- To save the configuration, click Update the Staging Environment.
2.4. OAuth 2.0 supported flows
The API clients must get access tokens from the OpenID Connect issuer configured in 3scale, using any OAuth 2.0 flow that is supported by this OpenID provider. In case of Red Hat Signle Sign-On, the following flows are supported (the terms used in RH-SSO clients are specified in parenthesis):
- Authorization Code (Standard Flow)
- Resource Owner Password Credentials (Direct Access Grants)
- Implicit (Implicit Flow)
- Client Credentials (Service Accounts)
When the clients (applications) are created in 3scale, the corresponding clients created by Zync in Red Hat Single Sign-On have only the Authorization Code flow enabled. This flow is recommended as the most secure and suitable for most cases. However, it is possible to enable other flows either through the RH-SSO admin console or using the Client Registration API.
The client gets the access token using the authorization request, or the token request, or both. The URLs that receive these requests can be discovered using the .well-known/openid-configuration endpoint of the OpenID provider, in the "authorization_endpoint" and "token_endpoint", accordingly. Example: https://<RHSSO_HOST>:<RHSSO_PORT>/auth/realms/<REALM_NAME>/.well-known/openid-configuration.
2.5. Test the integration
To test the integration, you must perform the steps listed in the following sections.
2.5.1. Test the client synchronization
To test the client synchronization, take the following steps:
- Create an application for the service where you configured the OpenID Connect integration.
- Note the client ID and the client Secret of the generated application.
- Verify that the client with the same client ID and client secret is now present in the configured Red Hat Single Sign-On realm.
- Update the Redirect URL of the application in the 3scale admin portal.
- Verify that the Valid Redirect URIs field of the client in Red Hat Single Sign-On has been updated accordingly.
2.5.2. Test the API authorization flow
To test the APT authorization flow, take the following steps:
- Get the access token from the Red Hat Single Sign-On server using an OAuth 2.0 flow that is enabled on the corresponding RH-SSO client.
-
Use the value of the
access_tokenretrieved from RH-SSO in theAuthorizationheader as follows:Authorization: Bearer <access_token>
If the token is correct and the corresponding application in 3scale is authorized, APIcast gateway returns a response from the API backend.
2.6. Example of the integration
The service "API" in 3scale is configured to use the OpenID Connect authentication. The Public Base URL on the service "API" is configured to be https://api.example.com and the Private Base URL is configured to be https://internal-api.example.com.
The OpenID Connect Issuer field is set to https://zync:41dbb98b-e4e9-4a89-84a3-91d1d19c4207@idp.example.com/auth/realms/myrealm in the API integration and the client zync in the realm myrealm has the correct Service Account roles.
In 3scale, there is an application having the myclientid client ID, myclientsecret client secret, and a https://myapp.example.com Redirect URL. In Red Hat Single Sign-On, in the myrealm realm, there also exists a client having a myclientid client ID, myclientsecret secret, and https://myapp.example.com Valid Redirect URIs. Standard Flow is enabled on this client. There is a user configured in the myrealm realm having the myuser username and mypassword password.
The flow is as follows:
-
Using the endpoint
https://idp.example.com/auth/realms/myrealm/protocol/openid-connect/auth, the application sends an Authorization request to RH-SSO. The application should provide the client IDmyclientsecretand Redirect URLhttps://myapp.example.comwith the request. - RH-SSO shows the login window, where the user must provide the user’s credentials: Username myuser and password mypassword.
- Depending on the configuration, and if it is the first time that the user is authenticating in this specific application, the consent window displays.
-
After the user is authenticated, the applciation sends a Token request to RH-SSO using the endpoint
https://idp.example.com/auth/realms/myrealm/protocol/openid-connect/tokenand providing the client IDmyclientid, client secretmyclientsecretand Redirect URLhttps://myapp.example.com. -
RH-SSO returns a JSON with an "access_token" field
eyJhbGciOiJSUzI1NiIsInR5cCIgOiAiSldUIiwia2lk…xBArNhqF-A. -
The application sends an API request to
https://api.example.comwith the headerAuthorization: Bearer eyJhbGciOiJSUzI1NiIsInR5cCIgOiAiSldUIiwia2lk…xBArNhqF-A. -
The application should receive a successful response from
https://internal-api.example.com.