
Red Hat Training
A Red Hat training course is available for Red Hat Satellite
Chapter 3. System Provisioning
3.1. Provisioning Through Red Hat Satellite
http://satellite.example.com/ks/dis/ks-rhel-x86_64-server-6-6.4, followed by the name of the package you wish to download, such as: http://satellite.example.com/ks/dis/ks-rhel-x86_64-server-6-6.4/GPL.
Definitions
- Kickstarting
- The process of installing a Red Hat Enterprise Linux system in an automated manner requiring little or no user intervention. Technically, kickstart refers to a mechanism in the Anaconda installation program that allows concise description of the contents and configuration of a machine to be written into the installer, which it then acts on. Such a concise system definition is referred to as a Kickstart profile.
- Kickstart profile
- The kickstart file is a text file that specifies all of the options needed to kickstart a machine, including partitioning information, network configuration, and packages to install. In Red Hat Satellite, a Kickstart Profile is a superset of a traditional Anaconda kickstart definition, as Satellite's implementation builds on Cobbler's enhancements to kickstarting. A Kickstart Profile presumes the existence of a Kickstart Tree.
- Kickstart Tree
- The software and support files needed in order to kickstart a machine. This is also often called an "install tree". This is usually the directory structure and files pulled from the installation media that ships with a particular release. In Cobbler terminology, a Kickstart Tree is part of a distribution.
- PXE (Preboot eXecution Environment)
- A low-level protocol that makes it possible to kickstart bare metal machines (usually physical, or real, machines) on power-up with no pre-configuration of the target machine itself. PXE relies on a DHCP server to inform clients about bootstrap servers. PXE must be supported in the firmware of the target machine in order to be used. It is possible to use the virtualization and reinstall facilities of Satellite without PXE, though PXE is very useful for booting new physical machines, or reinstalling machines that are not registered to Satellite.
Provisioning Scenarios
- New installations
- Provisioning a system that has not previously had an operating system installed (also known as bare metal installations).
- Virtual installations
- Satellite supports KVM, Xen fully-virtualized guests, and Xen para-virtualized guests.
- Re-provisioning
- Both physical and guest systems can be re-provisioned, provided that they have been registered to the same Satellite instance. See Section 3.4, “Reprovisioning”.
3.1.1. Kickstart Explained
- After being placed on the network and turned on, the machine's PXE logic broadcasts its MAC address and a request to be discovered.
- If a static IP address is not being used, the DHCP server recognizes the discovery request and extends an offer of network information needed for the new machine to boot. This includes an IP address, the default gateway to be used, the netmask of the network, the IP address of the TFTP or HTTP server holding the bootloader program, and the full path and file name of that program relative to the server's root.
- The machine applies the networking information and initiates a session with the server to request the bootloader program.
- The bootloader, once loaded, searches for its configuration file on the server from which it was itself loaded. This file dictates which kernel and kernel options, such as the initial RAM disk (initrd) image, should be executed on the booting machine. Assuming the bootloader program is SYSLINUX, this file is located in the
pxelinux.cfgdirectory on the server and named the hexadecimal equivalent of the new machine's IP address. For example, a bootloader configuration file for Red Hat Enterprise Linux 6 should contain:default=0 timeout=5 splashimage=(hd0,0)/grub/splash.xpm.gz hiddenmenu title Red Hat Enterprise Linux Server (2.6.32-279.22.1.el6.x86_64) root (hd0,0) kernel /vmlinuz-2.6.32-279.22.1.el6.x86_64 ro root=/dev/sda2 crashkernel=auto ks=http://example.com/ks.cfg initrd /initramfs-2.6.32-279.22.1.el6.x86_64.img
- The machine accepts and uncompresses the init image and kernel, boots the kernel, and initiates a kickstart installation with the options supplied in the bootloader configuration file, including the server containing the kickstart configuration file.
- This kickstart configuration file in turn directs the machine to the location of the installation files.
- The new machine is built based upon the parameters established within the kickstart configuration file.
3.1.2. Prerequisites
- A DHCP server. This is not required for kickstarting, but a DHCP server will ease the need to configure network settings in the kickstart file. You may also boot from the network. If you do not have a DHCP server and are using a static IP addresses, you should select static IP while developing your kickstart profile.
- An FTP server. It can be used in place of hosting the kickstart distribution trees via HTTP.
- Configure DHCP to assign required networking parameters and the bootloader program location.
- Specify the kernel to be used and the appropriate kernel options within the bootloader configuration file.
3.1.2.1. Required Packages
rhn-tools Red Hat Network (RHN) channel:
koanspacewalk-koan
rhn-tools channel in order to have access to these packages from your custom channel.
kernel and initrd files to be in specific locations within the kickstart tree. However, these locations are different for different architectures. The table below explains the different locations:
Table 3.1. Required Distribution Files by Architecture
| Architecture | kernel | Initial RAM Disk image |
|---|---|---|
| IBM System z | TREE_PATH/images/kernel.img | TREE_PATH/images/initrd.img |
| PowerPC | TREE_PATH/ppc/ppc64/vmlinuz | TREE_PATH/ppc/ppc64/initrd.img |
| All other architectures | TREE_PATH/images/pxeboot/vmlinuz | TREE_PATH/images/pxeboot/initrd.img |
3.1.2.2. Kickstart Trees
Procedure 3.1. Installing Kickstart Trees Automatically
satellite-sync.
- Choose which distribution to base the kickstarts on and locate that distribution's base channel, as well as its corresponding Red Hat Network Tools channel.For example, to use Red Hat Enterprise Linux 5 with x86 architecture, the
rhel-x86_64-server-6channel and its corresponding Red Hat Network Tools channelrhn-tools-rhel-x86_64-server-6are required. - If it is a connected Satellite, synchronize the Satellite server with the Red Hat servers directly using the
satellite-synccommand. If the Satellite server is disconnected, it is necessary to obtain disconnected channel dumps from the Red Hat servers and synchronize with those. - Synchronizing the channel will automatically create a corresponding kickstart tree for that distribution.
Procedure 3.2. Installing Kickstart Trees Manually
- Copy the installation ISO to the Satellite server and mount it to
/mnt/iso. - Copy the contents of the ISO to a custom location. It is recommended to create a directory within
/var/satellitefor all custom distributions. For example, copying a Red Hat Enterprise Linux 6 beta distribution's contents to/var/satellite/custom-distro/rhel-x86_64-server-6-beta/. - Use the Red Hat Satellite web interface to create a custom software channel. Use → → to create a parent channel with an appropriate name and label. For the example used above, use the label rhel-6-beta.
- Push the software packages from the tree location to the newly created software channel using the
rhnpushcommand:# rhnpush --server=http://localhost/APP -c 'rhel-6-beta' \ -d /var/satellite/custom-distro/rhel-x86_64-server-6-beta/Server/
The sub-directory within the tree could be different depending on the distribution. - Once the software packages have been pushed, they can be deleted from within the tree path using the
rmcommand. The packages are still stored on the Satellite server within the channel, and are no longer required in the tree.# rm /var/satellite/custom-distro/rhel-x86_64-server-6-beta/Server/*.rpm
You can choose to leave the software packages within the kickstart tree. This will allow them to be installed with theyumcommand at any time later on. - Use the Red Hat Satellite web interface to create the distribution. Use → → → to create the distribution, using an appropriate label and the full tree path (such as
/var/satellite/custom-distro/rhel-x86_64-server-6-beta/. Select the base channel that was created earlier, and the correct Installer Generation (such as Red Hat Enterprise Linux 6). To complete the creation, select Create Kickstart Distribution. - To maintain the same software across multiple environments and systems, the Red Hat Network Tools child channel from an existing Red Hat Enterprise Linux base channel can be cloned as a child channel of the newly created base channel. Cloning a child channel can be done by:
- On the Satellite web interface, click on → →
- Choose the Child Channel you wish to clone from the drop down box Clone From: and choose the clone state.
- Click Create Channel.
- Fill in the necessary information and choose the parent channel that the cloned child channel needs to be under.
- Click Create Channel.
3.1.2.3. Kickstart Profiles
Procedure 3.3. Creating a Kickstart Profile with a Wizard
- Select → →
- Provide an appropriate Label, and select the desired Base Channel and Kickstartable Tree
- Select the desired Virtualization Type. See Virtualization Types for more information about virtualization types. Click next to continue.
- Select the download location for the kickstart profile. For custom distributions, enter the location of its tree as a URL (both HTTP and FTP are supported), otherwise, use the default option. Click next to continue.
- Enter the root password and click finish to complete the profile creation.
- The complete kickstart profile will be created. View the profile by clicking Kickstart File.
Procedure 3.4. Creating a Kickstart Profile with the Raw Method
- Select → →
- Provide an appropriate label, and select the desired distribution
- Select the desired Virtualization Type. See Virtualization Types for more information about virtualization types.
- If there is an existing kickstart profile, upload the file. Otherwise, write the kickstart profile in the File Contents text box.Here is a sample raw kickstart that can be used as a starting point:
install text network --bootproto dhcp url --url http://$http_server/ks/dist/org/1/ks-rhel-x86_64-server-6-6.4 lang en_US keyboard us zerombr clearpart --all part / --fstype=ext3 --size=200 --grow part /boot --fstype=ext3 --size=200 part swap --size=1000 --maxsize=2000 bootloader --location mbr timezone America/New_York auth --enablemd5 --enableshadow rootpw --iscrypted $1$X/CrCfCE$x0veQO88TCm2VprcMkH.d0 selinux --permissive reboot firewall --disabled skipx key --skip %packages @ Base %post $SNIPPET('redhat_register') - The Red Hat Satellite server does not handle the specified distribution as the
urlin the kickstart, so remember to include theurl --urloption in the profile, similar to the following:url --url http://$http_server/ks/dist/org/1/my_distro
Replacemy_distrowith the distribution label and1with your org id. - Raw kickstart profiles use
$http_serverinstead of the Satellite's host name. This will be filled in automatically when the kickstart template is rendered. - The
redhat_registersnippet is used to handle registration.
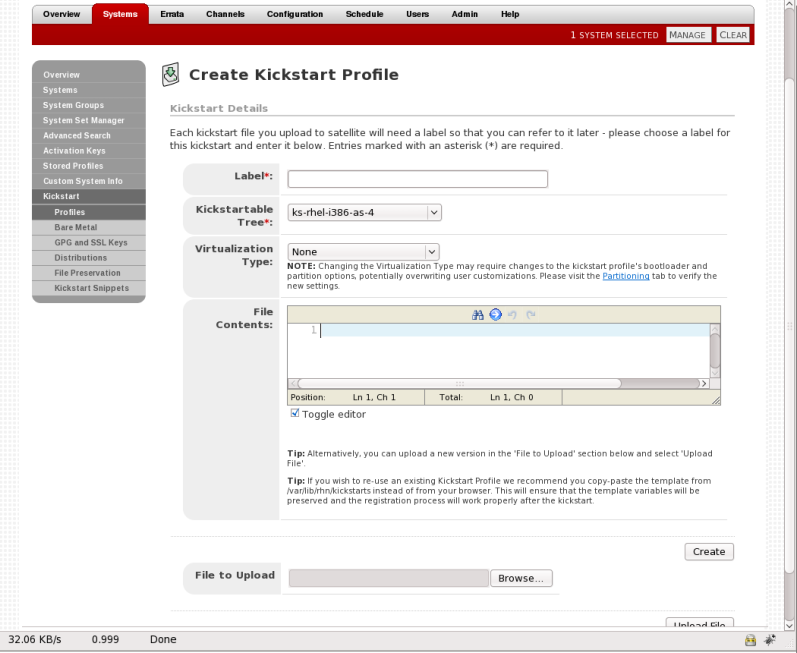
Figure 3.1. Raw Kickstart
All kickstart profiles have a virtualization type associated with them. This table outlines the different options:
Table 3.2. Virtualization Types
| Type | Description | Uses |
|---|---|---|
| none | No virtualization | Use this type for normal provisioning, bare metal installations, and virtualized installation that are not Xen or KVM (such as VMware, or Virtage) |
| KVM Virtualized Guest | KVM guests | Use this type for provisioning KVM guests |
| Xen Fully-Virtualized Guest | Xen guests | Use this type for provisioning Xen guests
Note
This option requires hardware support on the host, but does not require a modified operating system on the guest.
|
| Xen Para-Virtualized Guest | Xen Guests | Use this type for provisioning a virtual guest with Xen para-virtualization. Para-virtualization is the fastest virtualization mode. It requires a PAE flag on the system CPU, and a modified operating system. Only Red Hat Enterprise Linux 5 supports guests under para-virtualization. |
| Xen Virtualization Host | Xen hosts | Use this type for provisioning a virtual host with Xen para-virtualization. Xen para-virtualized guests and hosts are supported, if the hardware is compatible. Supported on Red Hat Enterprise Linux 5 only. |
kernel-xen package in the %packages section.
qemu package in the %packages section.
Note
3.1.2.4. Templating
for loops and if statements in the kickstart files. This is achieved using the cheetah tool.
- Reusing a particular section of a kickstart, such as a disk partitioning section, between multiple kickstarts.
- Performing some
%postactions consistently across multiple kickstarts. - Defining a snippet across multiple server roles such as DNS server, proxy server, and web server. For example, a web server might have the following snippet defined:
httpd
mod_ssl
mod_python
To create a web server profile, include the web server snippet in the%packagesection of the kickstart file. For a profile to be both a web server and a proxy server, include both snippets in the package section. To add another package to the web server snippet,mod_perlfor example, update the snippet, and all profiles that are using that snippet are dynamically updated.
Templating allows the defining of a variable to be used throughout a kickstart file. Variables are subject to a form of inheritance that allows them to be set at one level and overridden at levels below them. So, if a variable is defined at the system level, it will override the same variable defined at the profile or kickstart tree levels. Likewise, if a variable is defined at the profile level, it will override the same variable defined at the kickstart tree level.
Note
Snippets reuse pieces of code between multiple kickstart templates. They can span many lines, and include variables. They can be included in a kickstart profile by using the text $SNIPPET('snippet_name'). A snippet can be made for a package list, for a %post script, or for any text that would normally be included in a kickstart file.
/var/lib/cobbler/snippets/. Once Kickstart profiles are created, review the contents of /var/lib/rhn/kickstarts/ to see how snippets are incorportated into the profiles.
redhat_register snippet is a default snippet that is used to register machines to a Red Hat Satellite server as part of a kickstart. It uses a variable called redhat_management_key to register the machine. To use the snippet, set the redhat_management_key variable at either the system, profile, or distribution level and then add $SNIPPET('redhat_register') to a %post section of the kickstart. Any wizard-style kickstarts that are generated by the Red Hat Satellite server will already include this snippet in the %post section.
/var/lib/rhn/kickstarts/snippets/ directory. Red Hat Satellite stores snippets for different organizations in different directories, so custom snippets will be stored with a filename similar to the following, where 1 is the organization ID:
$SNIPPET('spacewalk/1/snippet_name')
Note
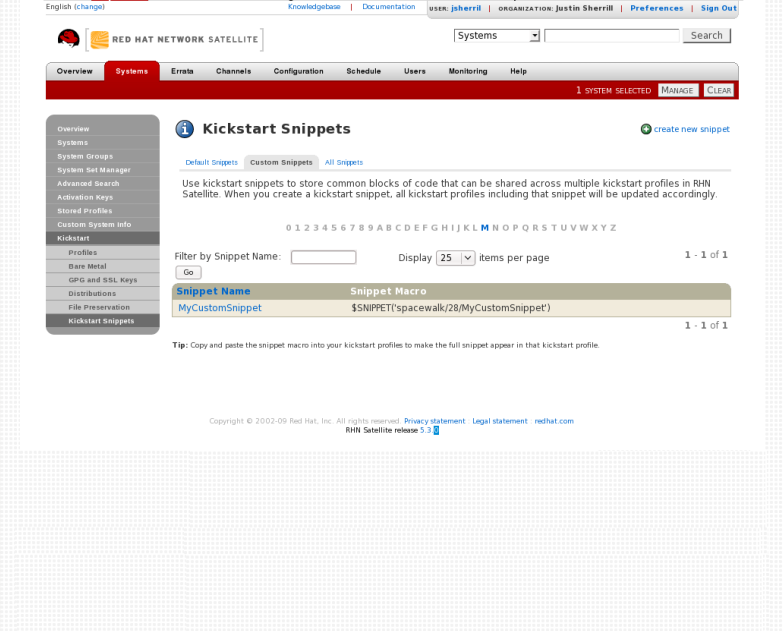
Figure 3.2. Kickstart Snippets
The $ and # characters are used during templating for specifying variables and control flow. If these characters are needed for any other purpose in a script, they will need to be escaped so that they are not recognized as a variable. This can be achieved in several ways:
- Placing a backslash character (
\) before every instance of$or#that needs to be ignored during templating. - Wrap the entire script in
#raw ... #end rawAll%preand%postscripts created using the wizard-style kickstarts are wrapped with#raw...#end rawby default. This can be toggled using the Template checkbox available when editing a%postor%prescript. - Include
#errorCatcher Echoin the first line of the snippet.
Example 3.1. Escaping Special Characters in templates
%post section:
%post
echo $foo > /tmp/foo.txt
$ being escaped, the templating engine will try to find a variable named $foo and would fail because foo does not exist as a variable.
$ is by using a backslash character (\):
%post
echo \$foo > /tmp/foo.txt
\$foo to be rendered as $foo.
#raw ... #end raw, as follows
%post
#raw
echo $foo > /tmp/foo.txt
#end raw
#errorCatcher Echo in the first line of the kickstart template. This instructs the templating engine to ignore any variables that do not exist and print out the text as is. This option is already included in the wizard-style kickstarts, and can be included in any raw kickstarts created manually.
3.1.2.5. Kickstarting a Machine
3.1.2.5.1. Kickstarting from Bare Metal
- Standard operating system installation media
- PXE boot
Procedure 3.5. Booting from Installation Media
- Insert installation media into the machine. The media must match the kickstart intended to use. For example, if the kickstart is configured to use the
ks-rhel-x86_64-server-6-6.4kickstart tree, use the Red Hat Enterprise Linux 6.4 64-bit installation media. - At the boot prompt, activate the kickstart by giving this command:
linux ks=http://satellite.example.com/path/to/kickstart
- Once the system boots up, download the kickstart file, and install automatically.
Procedure 3.6. PXE Booting
Important
If a DHCP server is deployed on another system on the network, administrative access to the DHCP server is required in order to edit the DHCP configuration file.PrerequisitesThe latest cobbler-loaders package needs to be installed. This is to ensure that the
pxelinux.0boot image is installed and available on the Satellite before PXE booting. To install the latest version:# yum install cobbler-loaders
If the machines reside on multiple networks, ensure that all of the machines can connect to the DHCP server. This can be achieved by multi-homing the DHCP server (using either a real or trunked VLAN) and configuring any routers or switches to pass the DHCP protocol across network boundaries.Configure the DHCP server so that it points to the PXE server by setting thenext-serveraddress for the systems to be managed by Red Hat Satellite.To use hostnames when performing the installation, configure the DHCP server to point to the domain and IP addresses, by including the following lines:option domain-name DOMAIN_NAME; option domain-name-servers IP_ADDRESS1, IP_ADDRESS2;
- On the DHCP server, switch to the root user and open the
/etc/dhcpd.conffile. Append a new class with options for performing PXE boot installation:allow booting; allow bootp; class "PXE" { match if substring(option vendor-class-identifier, 0, 9) = "PXEClient"; next-server 192.168.2.1; filename "pxelinux.0"; }This class will perform the following actions:- Enable network booting with the
bootpprotocol - Create a class called
PXE. If a system is configured to have PXE first in its boot priority, it will identify itself asPXEClient. - The DHCP server directs the system to the Cobbler server at the IP address 192.168.2.1
- The DHCP server refers to the boot image file at
/var/lib/tftpboot/pxelinux.0
- Configure Xinetd. Xinetd is a daemon that manages a suite of services including TFTP, the FTP server used for transferring the boot image to a PXE client.Enable Xinetd using the
chkconfigcommand:# chkconfig xinetd on
Alternatively, switch to the root user and open the/etc/xinetd.d/tftpfile. Locate thedisable = yesline and change it to readdisable = no. - Start the Xinetd service so that TFTP can start serving the
pxelinux.0boot image:# chkconfig --level 345 xinetd on # /sbin/service xinetd start
Thechkconfigcommand turns on thexinetdservice for all user runlevels, while the/sbin/servicecommand turns onxinetdimmediately.
3.1.3. Using Activation Keys
rhnreg_ks.
Note
Procedure 3.7. Managing Activation Keys
- Select → from the top and left navigation bars.
- Click the create new key link at the top-right corner.
Warning
In addition to the fields listed below, Red Hat Satellite customers may also populate the Key field itself. This user-defined string of characters can then be supplied withrhnreg_ksto register client systems with the Satellite. Do not insert commas in the key. All other characters are accepted. Commas are problematic since they are the separator used when including two or more activation keys at once. See Procedure 3.8, “Using Multiple Activation Keys at Once ” for details. - Provide the following information:
- Description - User-defined description to identify the generated activation key.
- Usage - The maximum number of registered systems that can be registered to the activation key at any one time. Leave blank for unlimited use. Deleting a system profile reduces the usage count by one and registering a system profile with the key increases the usage count by one.
- Base Channels - The primary channel for the key. Selecting nothing will enable you to select from all child channels, although systems can be subscribed to only those that are applicable.
- Add-on Entitlements - The supplemental entitlements for the key, which includes Monitoring, Provisioning, Virtualization, and Virtualization Platform. All systems will be given these entitlements with the key.
- Universal default - Whether or not this key should be considered the primary activation key for your organization.
Click .
Procedure 3.8. Using Multiple Activation Keys at Once
- base software channels - registration fails
- entitlements - registration fails
- enable config flag - configuration management is set
- Create multiple individual activation keys. See Procedure 3.7, “Managing Activation Keys” for instructions.
- On the command line, include all the activation keys, separated by a comma, as an option in
rhnreg_ks:# rhnreg_ks --activationkey=activationkey1,activationkey2,activationkey3
This may also be added into the kickstart profile within the Post tab of the Kickstart Details page. See Procedure 3.4, “Creating a Kickstart Profile with the Raw Method” for instructions.
Warning
3.1.4. Using Cobbler
Warning
- Kickstart template creation and management using the Cheetah template engine and Kickstart Snippets
- Virtual machine guest installation automation with the
koanclient-side tool - Installation environment analysis using the
cobbler checkcommand - Building installation ISOs with PXE-like menus using the
cobbler buildisocommand for Satellite systems with x86_64 architecture.
3.1.4.1. Cobbler Requirements
- To use Cobbler for system installation with PXE, install and configure the
tftp-serverpackage. - To use Cobbler to PXE boot systems for installation, your Satellite server requires either ability to act as a DHCP server for Cobbler PXE booting or access to your network DHCP server. Edit
/etc/dhcp.confto changenext-serverto the hostname or IP address of your Cobbler server. - The latest
cobbler-loaderspackage needs to be installed. This is to ensure that thepxelinux.0boot image is installed and available on the Satellite before PXE booting. To install the latest version:# yum install cobbler-loaders
3.1.4.1.1. Configuring Cobbler with DHCP
Procedure 3.9. Configuring an Existing DHCP Server
- Log in as root on the DHCP server.
- Edit the
/etc/dhcpd.conffile and append a new class with options for performing PXE boot installation. For example:allow booting; allow bootp; class "PXE" { match if substring(option vendor-class-identifier, 0, 9) = "PXEClient"; next-server 192.168.2.1; filename "pxelinux.0"; }Following each action step-by-step in the above example:- The administrator enables network booting with the
bootpprotocol. - The administrator then creates a class called
PXE. A system that is configured to have PXE first in its boot priority will identify itself as aPXEClient. - The DHCP server directs the system to the Cobbler server at 192.168.2.1.
- Finally, the DHCP server retrieves the
pxelinux.0bootloader file.
3.1.4.1.2. Configuring Xinetd and TFTP for Cobbler
- Log in as root.
- Edit the
/etc/xinetd.d/tftpand change the option:disable = yes
todisable = no
- Start the xinetd service:
# chkconfig --level 345 xinetd on
# /sbin/service xinetd start
TFTP can start serving thepxelinux.0boot image.
3.1.4.1.3. Configuring SELinux and IPTables for Cobbler Support
Procedure 3.10. Enabling Cobbler Support in SELinux
- Log in as root.
- Set the SELinux Boolean to allow HTTPD web service components:
# setsebool -P httpd_can_network_connect true
The-Pswitch is essential, as it enables HTTPD connection persistently across all system reboots.
Procedure 3.11. IPTables Configuration
- Log in as root.
- Add the following rules to the existing IPTables firewall rule sets to open the Cobbler-related ports:
- For TFTP:
# /sbin/iptables -A INPUT -m state --state NEW -m tcp -p tcp --dport 69 -j ACCEPT
# /sbin/iptables -A INPUT -m state --state NEW -m udp -p udp --dport 69 -j ACCEPT
- For HTTPD:
# /sbin/iptables -A INPUT -m state --state NEW -m tcp -p tcp --dport 80 -j ACCEPT
# /sbin/iptables -A INPUT -m state --state NEW -m tcp -p tcp --dport 443 -j ACCEPT
- For Cobbler and Koan XMLRPC:
# /sbin/iptables -A INPUT -m state --state NEW -m tcp -p tcp --dport 25151 -j ACCEPT
- Save the firewall configuration:
# /sbin/iptables-save > /etc/sysconfig/iptables
3.1.4.2. Configuring Cobbler with /etc/cobbler/settings
/etc/cobbler/settings file. The file contains several configurable settings, and offers detailed explanations for each setting regarding how it affects the functionality of Cobbler and whether it is recommended for users to change the setting for their environment.
/etc/cobbler/settings file, which documents each setting in detail.
3.1.4.3. Syncing and Starting the Cobbler Service
- Before starting the cobbler service, run a check on the cobbler service to make sure that all the prerequisites are configured according to the organization's needs:
# cobbler check
- Start the Satellite server with the following command:
# /usr/sbin/rhn-satellite start
Warning
Do not start or stop thecobblerdservice independent of the Satellite service, as doing so may cause errors and other issues.Always use/usr/sbin/rhn-satelliteto start or stop Red Hat Satellite.
3.1.4.4. Adding a Distribution to Cobbler
cobbler to create a distribution with the following syntax:
# cobbler distro add --name=string --kernel=path --initrd=path
--name=string switch is a label used to differentiate one distro choice from another (for example, rhel5server)
--kernel=path switch specifies the path to the kernel image file
--initrd=path switch specifies the path to the initial ramdisk (initrd) image file.
3.1.4.5. Adding a Profile to Cobbler
cobbler to create profiles with the following syntax:
# cobbler profile add --name=string --distro=string [--kickstart=url] [--virt-file-size=gigabytes] [--virt-ram=megabytes]
--name=string is the unique label for the profile, such as rhel5webserver or rhel4workstation .
--distro=string switch specifies the distribution that will be used for this particular profile. Distributions were added in Section 3.1.4.4, “Adding a Distribution to Cobbler”.
--kickstart=url option specifies the location of the kickstart file (if available).
--virt-file-size=gigabytes option allows you to set the size of the virtual guest file image. The default is 5 gigabytes if left unspecified.
--virt-ram=megabytes option specifies how many megabytes of physical RAM that a virtual guest system can consume. The default is 512 megabytes if left unspecified.
3.1.4.6. Adding a System to Cobbler
Note
koan and PXE menus alone, it is not required to create system records. However, system records are useful when:
- System-specific kickstart templating is required
- A specific system always receives specific set of content
- There is a specific role intended for a specific client
# cobbler system add --name=string --profile=string --mac-address=AA:BB:CC:DD:EE:FF
--name=string is the unique label for the system, such as engineeringserver or frontofficeworkstation.
--profile=string specifies one of the profile names added in Section 3.1.4.5, “Adding a Profile to Cobbler”.
--mac-address=AA:BB:CC:DD:EE:FF option allows systems with the specified MAC address to automatically be provisioned to the profile associated with the system record if they are being kickstarted.
man cobbler at a shell prompt.
3.1.4.7. Using Cobbler Templates
- Robust features that allow administrators to create and manage large amounts of profiles or systems without duplication of effort or manually creating kickstarts for every unique situation
- While templates can become complex and involve loops, conditionals and other enhanced features and syntax, they can also be used simply to make kickstart files without such complexity
3.1.4.7.1. Using Templates
/etc/sysconfig/network-scripts/. However, where templates differ from standard kickstart files are in their use of variables.
network --device=eth0 --bootproto=static --ip=192.168.100.24 --netmask=255.255.255.0 --gateway=192.168.100.1 --nameserver=192.168.100.2
network --device=$net_dev --bootproto=static --ip=$ip_addr --netmask=255.255.255.0 --gateway=$my_gateway --nameserver=$my_nameserver
3.1.4.7.2. Kickstart Snippets
$SNIPPET() function that will be parsed by Cobbler and substitute that function call with the contents of the snippet.
clearpart --all
part /boot --fstype ext3 --size=150 --asprimary
part / --fstype ext3 --size=40000 --asprimary
part swap --recommended

part pv.00 --size=1 --grow

volgroup vg00 pv.00
logvol /var --name=var vgname=vg00 --fstype ext3 --size=5000
my_partition), and place the file in /var/lib/cobbler/snippets/ so that Cobbler can access it.
$SNIPPET() function in your kickstart templates. For example:
$SNIPPET('my_partition')
my_partition file.
3.1.4.8. Using Koan
3.1.4.8.1. Using Koan to Provision Virtual Systems
koan to initiate the installation of a virtual guest on a system.
# cobbler add profile --name=virtualfileserver --distro=rhel-i386-server-5 --virt-file-size=20 --virt-ram=1000
koan:
# koan --server=hostname --list=profiles
cobbler profile add.
# koan --virt --server=cobbler-server.example.com --profile=virtualfileserver --virtname=marketingfileserver
virtualfileserver profile. The virtname option specifies a label for the virtual guest, which by default is labeled with the system's MAC address.
3.1.4.8.2. Using Koan to Re-install Running Systems
koan can help you by destructively replacing a running system with a new installation from the available Cobbler profiles.
# koan --replace-self --server=hostname --profile=name
--profile=name on the Cobbler server specified in --server=hostname.
3.1.4.9. Building ISOs with Cobbler
cobbler buildiso command provides functionality to create a boot ISO image containing a set of distributions and kernels, and a menu similar to PXE network installations.
--iso option.
# cobbler buildiso --iso=/path/to/boot.iso
--profiles and --systems options.
# cobbler buildiso --systems="system1,system2,system3" \
    --profiles="profile1,profile2,profile3"
Note
Note
cobbler buildiso --standalone option is not supported with Red Hat provided kickstart trees. The standalone option is used for provisioning machines that have no network connectivity to the cobbler server, but all of the additional functionality Satellite provisioning provides requires a network connection to the Satellite. If you need to install Red Hat Enterprise Linux on a machine with no network connectivity, install Red Hat Enterprise Linux by downloading the ISO image.