
Red Hat Training
A Red Hat training course is available for Red Hat JBoss Operations Network
Installation Guide
for installing servers and agents
Edition 3.2
Copyright © 2013 Red Hat, Inc.
Abstract
Preface
1. JBoss Operations Network Overview
- The JBoss ON servers, which centralize configuration and connect the components
- An SQL database (PostgreSQL or Oracle) which stores JBoss ON configuration settings and resource-related data, including content packages, the resource inventory, and monitoring data
- Local agents installed on managed platforms, which connect with servers to receive resource configuration updates and which collect and send monitoring data
- The JBoss ON GUI, which is a web-based interface that allows users to connect to any JBoss ON server, from any location, to view resource data and perform management tasks
2. Examples and Formatting
2.1. Command and File Examples
Example 1. Example Command
serverRoot/jon-server-3.2.0.GA/bin/rhqctl.sh start
2.2. Text Formatting and Styles
| Formatting Style | Purpose |
|---|---|
Monospace font | Monospace is used for commands, package names, files and directory paths, and any text displayed in a prompt. |
Monospace with a background | This type of formatting is used for anything entered or returned in a command prompt. |
| Italicized text | Any text which is italicized is a variable, such as instance_name or hostname. Occasionally, this is also used to emphasize a new term or other phrase. |
| Bolded text | Most phrases which are in bold are application names, such as Cygwin, or are fields or options in a user interface, such as a User Name Here: field or button. |
Note
Important
Warning
3. Document History
| Revision History | |||
|---|---|---|---|
| Revision 3.2-14 | August 27, 2014 | ||
| |||
| Revision 3.2-13 | May 24, 2014 | ||
| |||
| Revision 3.2-12 | December 11, 2013 | ||
| |||
Chapter 1. Setting up Databases
1.1. Configuring PostgreSQL
- Adequate PostgreSQL settings for memory, timeouts, connections, and related settings
- A database
- A user with adequate permissions
1.1.1. Installing PostgreSQL
YUM to install PostgreSQL:
sudo yum install postgresql postgresql-serverTo install a specific version of PostgreSQL, go to: https://yum.postgresql.org/rpmchart.php and download the
postgresql, postgresql-server and postgresql-libs RPM packages and install via yum from the download directory. For example:
sudo yum install
	postgresql91-9.1.24-2PGDG.rhel6.x86_64.rpm
	postgresql91-libs-9.1.24-2PGDG.rhel6.x86_64.rpm
	postgresql91-server-9.1.24-2PGDG.rhel6.x86_64.rpm
1.1.2. Configuring PostgreSQL
Note
- Optional. Change the password for the Unix user for PostgreSQL:
sudo passwd postgres
- Initialize the database. The database must be initialized before starting the server.
service postgresql initdb
- Start Postgres. For example, on Red Hat Enterprise Linux:
service postgresql start
On Windows:net start pgsql-8.4
- Set up a password for the
postgresuser on the database:# su - postgres $ psql postgres=# ALTER USER postgres PASSWORD 'password'; ALTER ROLE postgres=#
- Create a PostgreSQL role named
rhqadmin, where 'password' should be replaced with a strong password.postgres=# CREATE USER rhqadmin PASSWORD 'password'; CREATE ROLE
Important
Although the default postgresql credentials expected byrhqctlare userrhqadminand passwordrhqadmin, these credentials should not be used as they present a security risk. The relevant change torhqctlis covered in Section 2.6, “About the rhqctl Script”. - Create a PostgreSQL database named
rhq, specifying therhqadminrole as the owner.postgres=# CREATE DATABASE rhq OWNER rhqadmin; CREATE DATABASE
- Give users on the computer access to the database. To allow all users, add the appropriate connection settings for each connection type (local, IPv4, and IPv6) to the
data/pg_hba.confconfiguration file, for both local and external connections:# "local" is for Unix domain socket connections only local all all md5 # IPv4 local connections: host all all 127.0.0.1/32 md5 host all all 172.31.7.0/24 md5 # IPv6 local connections: host all all ::1/128 md5
Usingall allsets these settings for every user to every PostgreSQL database. This settings can be applied to only the JBoss ON database by usingrhq allor even to specific users for JBoss ON, such asrhq rhqadmin.Then, restart the database service.service postgresql restart
- Make the configuration changes in Section 1.1.3, “Setting PostgreSQL Parameters”.
1.1.3. Setting PostgreSQL Parameters
1.1.3.1. Editing the postgresql.conf File
postgresql.conf file.
- Make sure that an adequate amount of memory and system resources are assigned to accommodate the JBoss ON database.
## not necessary  if the database is started with the -i flag
listen_addresses = '*'

## performance changes for JBoss ON
shared_buffers = 80MB 		#  default is 32MB
work_mem = 2048 		#  default is 1MB
checkpoint_segments = 10	#  default is 3
- Optional. Set the statement timeout period so a size that is adequate to handle data compression in large environments. By default, the default is zero (0) seconds, which means there is no statement timeout set; not having a timeout period is the preferred setting for smaller deployments.
statement_timeout = 0s # default is 0s
Note
If there is already a global statement timeout period for that database, but you need to use a larger setting for JBoss ON, set a user-level statement timeout value that only applies to the JBoss ON user.ALTER USER rhqadmin SET statement_timeout=600000;
- JBoss ON can use up to 55 database connections for the server. PostgreSQL also allows for connections reserved for administrators. These connections are counted in the pool of
max_connectionsand therefore need to be added to the total number ofmax_connections. For example, if there are five connections reserved for the administrator, edit thepostgresql.conffile as follows:max_connections = 60 # default is 100 superuser_reserved_connections = 5 # default is 3 max_prepared_transactions = 60 # default is 0 (in v8.4)
Note
max_prepared_transactionsis set to the same value asmax_connections, as explained in the "max_prepared_transactions (integer)" in the PostgreSQL documentation.If JBoss ON is also monitoring this database instance, add one more connection per (logical) database that is set up in PostgreSQL. For further information about this plug-in, see the Postgres server section of the Resource Monitoring Reference.
1.1.3.2. Setting Kernel Parameters
1.1.3.3. Editing pg_hba.conf
pg_hba.conf file to allow the newly-created role to connect from the machine the JBoss ON server is installed on, such as localhost. Adding client connections is covered in the PostgreSQL documentation in the Client Authentication section.
pg_hba.conf file, restart PostgreSQL for the changes to take effect. If no errors are displayed, the database is now ready to support a JBoss ON installation.
1.1.3.4. Fixes for "Relation RHQ_Principal does not exist" Error
initdb in a non-C locale through PostgreSQL instances.
- Using a database explorer, create an empty table called
RHQ_PRINCIPALin the database used for JBoss ON. - Click Install server.The installer displays a warning about an existing schema. Overwrite the existing schema as it only consists of one empty table.
SQL-ASCII at creation time. For example:
initdb -D /my/test/data -E SQL_ASCII --locale en_US.UTF-8
1.2. Setting up Oracle
- A database
- A user with adequate permissions
1.2.1. Prepping Oracle Settings
1.2.1.1. Setting SGA and PGA Sizes
- sga_target
- pga_aggregate_target
1.2.1.2. Tuning Open Cursors
max_open_cur setting has a value lower than 300:
select max(a.value) as highest_open_cur, p.value as max_open_cur
from v$sesstat a, v$statname b, v$parameter p
where a.statistic# = b.statistic#
and b.name = 'opened cursors current'
and p.name= 'open_cursors'
group by p.value;
ALTER SESSION SET OPEN_CURSORS = 300 SCOPE=BOTH;
1.2.1.3. Setting the Number of Processes and Sessions
v$resource_limit limit sets the maximum number of Oracle processes and sessions which JBoss ON is allowed to have. The equation for this calculation has this general flow:
calculate the number of processes => add additional processes for Enterprise Manager => calculate the total number of sessions (final value)
Table 1.1. Calculating Oracle Processes
| Calculation Type | Equation | Example |
|---|---|---|
| Agents | 1.5 * number_of_agents | 1.5 * 100 agents = 150 |
| Servers | 60 * number_of_servers | 60 * 2 servers = 120 |
| with Oracle Enterprise Manager | highest_number_of_processes + 40 | 1.5 * 100 agents + 40 = 190 |
v$resource_limit).
Example 1.1. Calculating Oracle Processes and Sessions for JBoss ON
1.5 * 175 agents = 262.5 processes
60 * 3 servers = 180 process
262.5 + 40 = 302.5
302.5 * 1.1 = 332.75
v$resource_limit limit database setting is 333.
1.2.2. Configuring Oracle
- Create a dedicated Oracle instance to be used for JBoss ON. This process is described in the Oracle documentation.
- Log into Oracle as the system user.
[jsmith@server ~]$ sqlplus
SQL> CONNECT sys/your_sys_password AS sysdba;
- Create a database for JBoss ON. In this example, the database is named
rhq. This process is described in more detail in the Oracle documentation.SQL> CREATE DATABASE rhq; SQL> @?/rdbms/admin/catalog.sql SQL> @?/rdbms/admin/catproc.sql
- Create a user that JBoss ON will use to access Oracle. Create the user named
rhqadminwith the passwordrhqadmin. For example:SQL> CREATE USER rhqadmin IDENTIFIED BY rhqadmin;
- Grant the required permissions to the Oracle user. At a minimum, this user must have the
connectandresourceroles. For example:SQL> GRANT connect, resource TO rhqadmin;
- Set additional permissions for the JBoss ON Oracle user that define parameters to handle database commits.JBoss ON uses internally two phase commit for some of database actions. To recover from two phase commit failures, the Oracle user has to has appropriate permissions, otherwise the database will return
XAException.XAER_RMERRerrors.Set these four privileges for the user:GRANT SELECT ON sys.dba_pending_transactions TO user; GRANT SELECT ON sys.pending_trans$ TO user; GRANT SELECT ON sys.dba_2pc_pending TO user; GRANT EXECUTE ON sys.dbms_xa TO user;
TheGRANT EXECUTEline assumes that the Oracle server is version 11g R1. For an unpatched version of Oracle older than 11g R1, then use this line instead:GRANT EXECUTE ON sys.dbms_system TO user;
- Make sure that the
db_block_sizevalue is at least 8 KB.SQL> show parameter db_block_size; NAME TYPE VALUE ------------------------------------ ----------- ------------------------------ db_block_size integer 8192
1.2.3. Configuring Oracle (Advanced)
Note
- Create a new database.
- Open the Oracle Database Configuration Assistant.
- Select New Database.
- Set the
Includes datafilesparameter toNo. - Decline to install the example schemas to save space.
- Select Typical Memory configuration, and then set the database sizing type to
OLTP. - Allocate the highest percentage of system resources that the system can afford. This should be between 70% and 90%, with the highest value preferred.
Warning
Locally manage all tablespaces. - Create the JBoss ON user.
CREATE USER rhqadmin IDENTIFIED BY rhqadmin;
- Grant the required permissions to the new user.
GRANT CONNECT, RESOURCE TO rhqadmin;
- Set additional permissions for the JBoss ON Oracle user that define parameters to handle database commits.JBoss ON uses internally two phase commit for some of database actions. To recover from two phase commit failures, the Oracle user has to has appropriate permissions, otherwise the database will return
XAException.XAER_RMERRerrors.Set these four privileges for the user:GRANT SELECT ON sys.dba_pending_transactions TO rhqadmin; GRANT SELECT ON sys.pending_trans$ TO rhqadmin; GRANT SELECT ON sys.dba_2pc_pending TO rhqadmin; GRANT EXECUTE ON sys.dbms_system TO rhqadmin;
Chapter 2. Installing the JBoss ON Server
2.1. Supported Platforms, Databases, and Other Requirements
2.2. Hardware Minimums
2.3. Disk Space Considerations
2.4. Preparing for Installation on *nix Systems
2.4.1. Setting up the JDK for the JBoss ON Server
- Download and install the appropriate version of Java, if necessary.
- Set the
JAVA_HOMEenvironment variable to the installation directory.- Open the
.bashrcfor the system user that will run JBoss ON. For example:vim /home/jon/.bashrc
- Add a line to set the
JAVA_HOMEenvironment variable to the specific JDK directory. For example:export JAVA_HOME=/usr/lib/jvm/java-1.6.0-openjdk-1.6.0.0/
- Set the system to use the correct version of the JDK using the system
alternativescommand. The selected version has the*+symbols by it./usr/sbin/alternatives --config javac There are 2 programs which provide 'javac'. Selection Command ----------------------------------------------- 1 /usr/lib/jvm/java-1.6.0-bea/bin/javac *+ 2 /usr/lib/jvm/java-1.6.0-openjdk/bin/javac Enter to keep the current selection[+], or type selection number:
2.4.2. Configuring NTP
2.4.3. Configuring DNS
/etc/hosts file for each system which is managed by JBoss ON or hosts a server or storage node.
2.4.4. Configuring Ports
Table 2.2. Default JBoss ON Ports
| Port | Purpose |
|---|---|
| 7080 | Standard HTTP port for server-client communication |
| 7443 | HTTPS port for secure server-client communication |
| 16163 | For agent communication from the server |
| 9142 | For storage cluster communication |
| 7299 | For storage node JMX communication |
| 7100 | For the storage node gossip (node-to-node) communication |
2.5. Preparing for Installation on Windows
2.5.1. Setting up the JDK
- Download and install the appropriate version of Java, if necessary.
- Set the
JAVA_HOMEenvironment variable to the installation directory.C:\>set JAVA_HOME=C:\Program Files (x86)\Java
The default Java service wrapper included with JBoss ON requires a 32-bit JVM, so the Java preference set for the server must be a 32-bit JDK. The JBoss ON server must use a 32-bit JVM even on 64-bit systems. - Set the system to use the
bindirectory of the correct version of the JDK.C:>set path C:\Program Files\Java\jdk1.6.0_29\bin
- Set the classpath to the
libdirectory of the correct version of the JRE distribution.C:>set classpath C:\Program Files (x86)\Java\jre1.6.0_03\lib
2.5.2. Configuring the JVM to Run as a Service
RHQ_JAVA_HOME=C:\Program Files\Java\jdk1.6.0_29
2.5.3. Configuring NTP
2.5.4. Configuring DNS
/etc/hosts file for each system which is managed by JBoss ON or hosts a server or storage node..
2.5.5. Configuring Ports
Table 2.3. Default JBoss ON Ports
| Port | Purpose |
|---|---|
| 7080 | Standard HTTP port for server-client communication |
| 7443 | HTTPS port for secure server-client communication |
| 16163 | For agent communication from the server |
| 9142 | For storage cluster communication |
| 7299 | For storage node JMX communication |
| 7100 | For the storage node gossip (node-to-node) communication |
2.5.6. Selecting Path Names
C:\jon rather than C:\Documents and Settings\myusername\jon-server.
C:\example\jon-server-3.2.0.GA\jon-server-3.2.0.GA. Using other tools may install it to a downloads directory such as C:\Users\Administrator\Downloads.
C:\jon, which creates an installation directory of C:\jon\jon-server-3.2.0.GA.
2.5.7. Utilities to Use with JBoss ON
2.5.8. Configuring Internet Explorer
- In Internet Explorer, click the gear icon in the upper right corner and select .
- Open the Security tab, and select the Local intranet icon.
- Click the button.
- Click the button at the bottom of the pop-up window.
- Enter the JBoss ON server hostname or IP address in the Add this webiste to the zone: field, and click the .
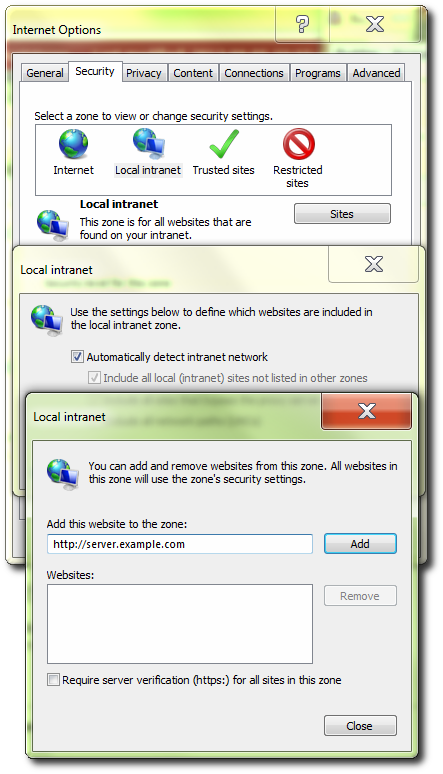
- Close out the options windows.
2.5.9. Planning the Storage Nodes
rhqctl script (the same as the server). The metrics storage database works as a cluster, so it is possible to have multiple nodes and to add and remove nodes as necessary.
- The storage node and server do not have to be located on the same machine.
- Installing a storage node does not require installing a server.
- At least one storage node must be installed before the server. (If the
rhqctlscript is run with just theinstallcommand, then it automatically installs a storage node first, then the server, then the agent.) - Multiple storage nodes can be installed before installing the server. There are several benefits to installing multiple nodes:
- For upgraded environments, it speeds data migration.
- It can minimize the administrative and resource requirements that are incurred by deploying nodes after the server is running.
2.6. About the rhqctl Script
rhqctl) has two subcommands which are relevant to the installation process: install and upgrade.
Note
JBossON-install-location/bin/rhq-server.properties and change the following attributes:
rhq.autoinstall.server.admin.passwordand
rhq.server.database.passwordusing the instructions in Section 2.6.2, “Attributes in the Properties File”.
2.6.1. Using the rhqctl Script
rhqctl script has subcommands and options:
rhqctl [command] [[options]
install.
install command which allow for more custom ways of configuring the JBoss ON server, depending on your needs.
Example 2.1. Installing with No Options
install command alone.
[root@server bin]# ./rhqctl install
23:07:00,901 INFO  [org.jboss.modules] JBoss Modules version 1.2.2.Final-redhat-1

The [jboss.bind.address] property is required but not set in [rhq-server.properties].
Do you want to set [jboss.bind.address] value now?
yes|no: yes
jboss.bind.address: 0.0.0.0
Is [0.0.0.0] correct?
yes|no: yes
- The server
- The storage database node
- The local agent
[root@server bin]# ./rhqctl start
Example 2.2. Installing and Starting Services
--start option starts all services as soon as the installation process is complete. This is the same as running the start command immediately.
[root@server bin]# ./rhqctl install --start
Example 2.3. Installing Specific Services
install command configures the JBoss ON server, storage node, and agent all at the same time.
install command has options for each service. If that option is used, the only that service is installed; the other services are excluded.
[root@server bin]# ./rhqctl install --storage --start
[root@server bin]# ./rhqctl install --server --start
[root@server bin]# ./rhqctl install --agent --start
Table 2.4. Options for Installing JBoss ON
| Option | Description |
|---|---|
| --start | Starts all services as soon as the installation process is complete. |
| --server | Installs the server. The server is installed by default; if this is specified, then the server is installed and other components are not installed (unless they are explicitly mentioned). |
| --storage | Installs the storage database node. The storage database node is installed by default; if this is specified, then the storage database and a companion agent are installed, but the server is not. |
| --storage-data-root-dir directory | Changes the directory where the storage data are stored. By default, the storage node directory is serverRoot/jon-server-3.2.0.GA/rhq-data/. |
| --agent | Installs the agent. The agent is installed by default; if this is specified, then the agent is installed and other components are not installed (unless they are explicitly mentioned). |
2.6.2. Attributes in the Properties File
rhq-server.properties file. Most of the configuration is defined by default:
- Database connection information
- The username and password for the database user
- The JBoss ON server port numbers
- The name for the server instance in the JBoss ON cloud
- The way to handle any existing schema in the JBoss ON database
- Server/agent communication settings, including SSL settings
- Connection and concurrency limits for the server
rhqctl script is run to set new values.
- The default database configuration uses a PostgreSQL database installed on the same host as the JBoss ON server.
- The bind address (IP address) for the server is left blank, and the control script prompts for a value.
- The server name is left blank, and the default value is the server's hostname.
Table 2.5. rhq-server.properties Attributes for Server Configuration
| Parameter | Description |
|---|---|
| rhq.server.high-availability.name | Sets an optional name to use to identify the server within the JBoss ON server cloud. If this is not given, then the default value is the server hostname. |
| jboss.bind.address | Gives the IP address to use to connect to the JBoss ON server. If the server is available over all interfaces, then set this to 0.0.0.0. |
| rhq.autoinstall.database | Sets how to handle any existing data in the JBoss ON database. The default is auto, which means that the installation process adds new schema but preserves any existing data. The other option is overwrite, which updates the schema and removes any existing data. |
| rhq.server.startup.web.http.port and rhq.server.startup.web.https.port | Set the standard (HTTP) and secure (HTTPS) ports for the JBoss ON server. The default values are 7080 and 7443, respectively. |
| rhq.server.database.type-mapping | Gives the type or vendor of the database that is used by the JBoss ON server. This is either PostgreSQL or Oracle10g (Oracle10g is used for both version 10 and version 11). |
| rhq.server.database.connection-url | The JDBC URL that the JBoss ON server uses when connecting to the database. This has the format (roughly) of jdbc:db-type:hostname:port[:|/]db-name. An example is jdbc:postgresql://localhost:5432/rhq or jdbc:oracle:oci:@localhost:1521:orcl. |
| rhq.server.database.user-name | The name of the user that the JBoss ON server uses when logging into the database. The default is rhqadmin. |
| rhq.server.database.password | The password of the database user that is used by the JBoss ON server when logging into the database. This password is stored in a hash. The default password is rhqadmin. If a different password was created for the database user, then it should be encrypted using the serverRoot/jon-server-3.2.0.GA/bin/rhq-encode-password.sh script, and that encrypted value should be set in the rhq.server.database.password attribute. |
| rhq.server.database.server-name | The server name where the database is found. This must match the server in the connection URL. This is currently only used when connecting to PostgreSQL. |
| rhq.server.database.port | The port on which the database is listening. This must match the port in the connection URL. This is currently only used when connecting to PostgreSQL. |
| rhq.server.database.db-name | The name of the database. This must match the name found in the connection URL. This is currently only used when connecting to PostgreSQL. |
| rhq.server.quartz.driverDelegateClass | The Quartz driver used for connections between the server and the database. The value of this is set by the installer and depends on the type of database used to store the JBoss ON information. For PostgreSQL, this is org.quartz.impl.jdbcjobstore.PostgreSQLDelegate, and for Oracle, this is org.quartz.impl.jdbcjobstore.oracle.OracleDelegate. |
2.7. Basic Setup: Installing the Server on Linux
- Log into the system as
root. - Download the JBoss ON binaries from the Customer Support Portal.
- In the Customer Support Portal, click the Downloads tab, and then the Downloads icon in the page.
- Select the JBoss Operations Network link under the System Management area in the Downloads page.
- Download the JBoss Operations Network 3.2 Base Distribution package by clicking the Download icon.
- There are additional plug-in packs available for EAP, EDS, EWS, and SOA-P. If any of those plug-ins will be used with the JBoss ON server, then download them as well.
- Unzip the server distribution to the desired home directory for JBoss ON. For example:
[root@server ~]# unzip jon-server-3.2.0.GA.zip -d /opt/jon
This creates a version-specific installation directory,/opt/jon/jon-server-3.2.0.GA. A directory with this name should not exist prior to the unzip operation. - Optional. By default, the script assumes that the backend database is a PostgreSQL server running on the same system as the server. Other settings — such as the database password, the server port numbers, the server name, and the way it handles database schema — use predefined defaults. One parameter, the bind address for the server, is empty and prompted by the control script.To change any of these defaults or to set additional information, edit the
rhq-server.propertiesfile. This is briefly covered in Section 2.6.2, “Attributes in the Properties File”.Note
To configure JBoss ON to run as a service, see Running the JBoss ON Server as a Service in the Configuring JON Servers and Agents manual.Important
It is recommended that you do not execute JBoss ON as a root user. - Run the JBoss ON control script to configure the server and other services. If the
rhq-server.propertiesfile is not edited, then the script prompts for a bind address for the server; this can be set to0.0.0.0.[root@server ~]# serverRoot/jon-server-3.2.0.GA/bin/rhqctl.sh install --start 23:07:00,901 INFO [org.jboss.modules] JBoss Modules version 1.2.2.Final-redhat-1 The [jboss.bind.address] property is required but not set in [rhq-server.properties]. Do you want to set [jboss.bind.address] value now? yes|no: yes jboss.bind.address: 0.0.0.0 Is [0.0.0.0] correct? yes|no: yes
This command does two things:- Configure the JBoss ON server, a storage node, and an agent.
- Start all services when the configuration process is complete.
- It may take several minutes for the server process to start fully. Afterward, log into the server web UI to begin configuring resources.The default administrator username and password are
rhqadmin/rhqadmin. The server URL is http://hostname:7080. For example:http://server.example.com:7080
2.8. Basic Setup: Installing the Server on Windows
- When opening the command prompt, right-click the name or icon, and select
Run as Administrator. - Download the JBoss ON binaries from the Customer Support Portal.
- In the Customer Support Portal, click the Downloads tab, and then the Downloads icon in the page.
- Select the JBoss Operations Network link under the System Management area in the Downloads page.
- Download the JBoss Operations Network 3.2 Base Distribution package by clicking the Download icon.
- There are additional plug-in packs available for EAP, EDS, EWS, and SOA-P. If any of those plug-ins will be used with the JBoss ON server, then download them as well.
- Create a directory for the server to be installed in.Use a relatively short name. Path names longer than 19 characters can cause problems running the server or executing some tasks.
- Unzip the server distribution to the desired home directory for JBoss ON. For example:
C:> winzip32 -e jon-server-3.2.0.GA.zip C:\jon
This creates a version-specific installation directory,C:\jon\jon-server-3.2.0.GA. A directory with this name should not exist prior to the unzip operation.Important
Be careful when using the extract all command. Expanding the archive automatically creates a directory called jon-server-VER.RELEASE/, which is about 20 characters. Using extract all, instead of specifying the directory to which to extract the archive, can double the directory name by extracting to the archive name and then to a subdirectory — for example,C:\example\jon-server-3.2.0.GA\jon-server-3.2.0.GA. Using other tools may install it to a downloads directory such asC:\Users\Administrator\Downloads.If directory paths are too long, then installations on Windows can fail.It is recommended that you extract the archive toC:\jon, such asC:\jon\jon-server-3.2.0.GA. - Set the directory path to the JDK installation for a 32-bit JDK. For example:
set RHQ_JAVA_HOME=C:\Program Files\Java\jdk1.6.0_29
The default Java service wrapper included with JBoss ON requires a 32-bit JVM, so the Java preference set for the server must be a 32-bit JDK. The JBoss ON server must use a 32-bit JVM even on 64-bit systems.Running the server or agent with a 32-bit JVM does not in any way affect how JBoss ON manages other resources which may run with a 64-bit JVM. JBoss ON can still manage those resources and those resources can still use the 64-bit Java libraries for their own processes. - Optional. By default, the script assumes that the backend database is a PostgreSQL server running on the same system as the server. Other settings — such as the database password, the server port numbers, the server name, and the way it handles database schema — use predefined defaults. One parameter, the bind address for the server, is empty and prompted by the control script.To change any of these defaults or to set additional information, edit the
rhq-server.propertiesfile. This is briefly covered in Section 2.6.2, “Attributes in the Properties File”. - Optional. The Windows services run by default as the local system account (Default or .\LocalSystem). It is possible to configure the services to run as different users by setting the appropriate properties in the
rhq-agent-env.batscript.TheRHQ_*_RUN_ASparameter sets the user account to use. TheRHQ_*_RUN_AS_MEparameter uses the logged in user as the service account. If both parameters are set, then theRHQ_*_RUN_AS_MEparameter is the one which is used.RHQ_SERVER_RUN_AS=.\username RHQ_SERVER_PASSWORD=password RHQ_STORAGE_RUN_AS=.\username RHQ_STORAGE_PASSWORD=password RHQ_AGENT_RUN_AS=.\username RHQ_AGENT_PASSWORD=password
The defined user account must have the log on as service permission. This may need to be granted explicitly. - Run the JBoss ON control script to configure the server and other services. If the
rhq-server.propertiesfile is not edited, then the script prompts for a bind address for the server; this can be set to0.0.0.0.C:\jon\jon-server-3.2.0.GA\bin> serverRoot/jon-server-3.2.0.GA/bin/rhqctl.sh install --start 23:07:00,901 INFO [org.jboss.modules] JBoss Modules version 1.2.2.Final-redhat-1 The [jboss.bind.address] property is required but not set in [rhq-server.properties]. Do you want to set [jboss.bind.address] value now? yes|no: yes jboss.bind.address: 0.0.0.0 Is [0.0.0.0] correct? yes|no: yes
This command does two things:- Configure the JBoss ON server, a storage node, and an agent.
- Start all services when the configuration process is complete.
- It may take several minutes for the server process to start fully. Afterward, log into the server web UI to begin configuring resources.The default administrator username and password are
rhqadmin/rhqadmin. The server URL is http://hostname:7080. For example:http://server.example.com:7080
2.9. Installing Additional Servers for High Availability
At a minimum, additional servers must be installed with the same SQL database information as the first JBoss ON server instance. The rhq-server.properties file must be edited to use the same database configuration as the original instance; the database properties are listed in Section 2.6.2, “Attributes in the Properties File”. After editing the properties file for the database settings, the server can be installed as normal:
[root@server ~]# serverRoot/jon-server-3.2.0.GA/bin/rhqctl.sh install --start
With the default install command, a server, agent, and storage node are installed. In some high availability deployments, a storage node may not be installed with every server. In that case, the configuration for the existing storage node must be added to the server configuration as part of its installation process.
- On the original server machine, check the Administration >Storage Nodes area for the list of IP addresses or hostnames for the storage nodes and for the client and gossip ports used by the nodes.
- On the new server machine, before installing the server, edit the
rhq-server.propertiesfile to include the connection information for the storage nodes.Add each storage node in a comma-separated listed to therhq.storage.nodesparameter. Then, add the client and gossip port values.[root@server ~]# vim serverRoot/jon-server-3.2.0.GA/bin/rhq-server.properties rhq.storage.nodes=192.68.0.0,192.68.0.1,192.68.0.2 rhq.storage.cql-port=9142 rhq.storage.gossip-port=7100
- Install the server and an agent. Specifying the
--serverand--agentoptions only installs those two components; the storage database is excluded.[root@server ~]# serverRoot/jon-server-3.2.0.GA/bin/rhqctl.sh install --server --agent --start
2.10. Installing Storage Nodes Before Installing the Server
Warning
Warning
rhq-storage-auth.conf file so that the allowed hosts list cannot be altered to allow an attacker to gain access to the cluster and the stored data.
Important
hosts file.
- Determine the node and cluster configuration information to use.
- Identify the hostname or IP address of each system which will host a node.
- Define the two ports which the cluster uses for communication (9142 and 7100 by default).
- Before installing any storage node, edit the storage properties file with all of the node and cluster information.
[root@server ~]# vim serverRoot/jon-server-3.2.0.GA/bin/rhq-storage.properties
For example, this configures three nodes, set in therhq.storage.seedsparameter.rhq.storage.cql-port=9142 rhq.storage.gossip-port=7100 rhq.storage.seeds=192.68.0.0, 192.68.0.1, 192.68.0.2 start=false
- Install the storage node on each system, with its companion agent. This requires the IP address of the JBoss ON server, even though the server is not yet installed.Do not start the storage node or the agent at this point. Do not use the --start option with the installation script.
[root@server ~]# serverRoot/jon-server-3.2.0.GA/bin/rhqctl install --storage --agent-preference="rhq.agent.server.bind-address=192.68.0.2"
- For each storage node, edit its local
rhq-storage-auth.conffile. This lists the hostnames or IP addresses for all of the storage nodes in the cluster, one per line.[root@server ~]# vim serverRoot/jon-server-3.2.0.GA/rhq-storage/conf/rhq-storage-auth.conf 192.68.0.0 192.68.0.1 192.68.0.2
After the server is configured, the local agent will update therhq-storage-auth.conffile with node hostnames or IP addresses as nodes are deployed and removed from the cluster. - Start each node.
[root@server ~]# serverRoot/jon-server-3.2.0.GA/bin/rhqctl.sh start --storage
- Before installing the server, edit the
rhq-server.propertiesfile to include the connection information for the storage nodes.Add each storage node in a comma-separated listed to therhq.storage.nodesparameter. Then, add the client and gossip port values.[root@server ~]# vim serverRoot/jon-server-3.2.0.GA/bin/rhq-server.properties rhq.storage.nodes=192.68.0.0,192.68.0.1,192.68.0.2 rhq.storage.cql-port=9142 rhq.storage.gossip-port=7100
- Install the server and an agent. Specifying the
--serverand--agentoptions only installs those two components; the storage database is excluded.[root@server ~]# serverRoot/jon-server-3.2.0.GA/bin/rhqctl.sh install --server --agent --start
If you are upgrading an existing JBoss ON agent, then run the upgrade script with the--use-remote-storage-noteoption, to load the storage database information from the properties file rather than installing a storage node.[root@server]# serverRoot/jon-server-3.2.0.GA/bin/rhqctl.sh upgrade --use-remote-storage-node=true
2.11. Managing the Server Service
2.11.1. Starting the Server and Other Services
start command.
[root@server ~]# serverRoot/bin/rhqctl start
Trying to start the RHQ Server...
RHQ Server (pid 27547) is starting
--server, --storage, or --agent).
[root@server ~]# serverRoot/bin/rhqctl start --server
RHQ_JAVA_HOME environment variable must be set on Red Hat Enterprise Linux systems for the server to start. This can be set to a general value like /usr/.
Note
rhqctl script, not the rhq-server.sh script.
rhqctl command. It must not be started using the rhq-agent.sh script. Additionally, the agent must be started without requiring any user intervention. The RHQ_AGENT_PASSWORD_PROMPT parameter should always be commented out or set to false so that no password is required to start the agent.
2.11.2. Opening the Server in a Console
- Stop the JBoss ON server.
[root@server ~]# serverRoot/jon-server-3.2.0.GA/bin/rhqctl.sh stop
- Run the
rhqctlscript with theconsolecommand.[root@server ~]# serverRoot/jon-server-3.2.0.GA/bin/rhqctl.sh console --server
Chapter 3. Upgrading and Removing Servers and Agents
3.1. Upgrading JBoss ON
3.1.1. Upgrade Notes
- It is not possible to revert your JBoss ON server to the previous version after it is upgraded. Back up all data before upgrading.
- There will be a minimal loss monitoring data because of the downtime required when the server and agents are being upgraded. Additionally, any monitoring data for the JBoss ON server will be lost, if the server is included in the inventory.
- The JBoss ON servers must be upgraded before the JBoss ON agents can be upgraded.
- Upgrading the JBoss ON server essentially creates a new server instance that replaces the old instance. If the JBoss ON server was added to the inventory, then the old JBoss ON server resource must be deleted from the inventory because it will not be a usable resource after upgrade. Once the upgrade process is complete, then the JBoss ON server must be added to the inventory again and all of the previous configuration for that resource (like alerts, scheduled operations, and group membership) must be redone.
- All JBoss ON servers in the high availablity cloud must be stopped when one is upgraded. Otherwise, the installer will hang when it tries to contact the database and the database is unavailable because it is in use by another JBoss ON server.
- Do not copy the new server installation on top of a previous server installation.
- On Windows. When configuring JBoss ON servers as services on Windows, it was possible to set the
RHQ_SERVER_RUN_ASparameter without setting a password. In JBoss ON 3.2, theRHQ_SERVER_PASSWORDparameter is required with theRHQ_SERVER_RUN_ASparameter.
3.1.2. About the Upgrade Script
rhqctl script is used to manage server migrations. The upgrade command, much like the install command, handles all three management components on the server system:
- Upgrades the JBoss ON server
- Upgrades the JBoss ON agent
- Installs and configures a new storage database node for monitoring data
--run-data-migrator). If this is not done, then none of the previous monitoring information is visible or accessible through JBoss ON.
Table 3.1. Options for Upgrading JBoss ON
| Option | Description |
|---|---|
| --start | Starts all services as soon as the upgrade process is complete. |
| --server | --storage | --agent | Upgrades the specified component only, rather than all management components. |
| --from-server-dir directory | Gives the directory path to the server to be upgraded. |
| --from-agent-dir directory | Gives the directory path to the agent to be upgraded. The upgrade script assumes that the agent is installed in the same directory as the server, in a subdirectory named rhq-agent/. If the agent is in a different location, then this option is required. |
| --run-data-migrator none | estimate | print-command | do-it | Migrates the data from an existing JBoss ON SQL database into a new monitoring storage database. The upgrade command creates the monitoring database. If this option is not used, than any previous monitoring data are lost.
The options allow anestimate to be made of the run time (which can be hours for large databases), to print the manual commands to migrate the data, or to run the migration.
|
3.1.3. Upgrading the JBoss ON Server and Components
Note
Warning
- Stop the JBoss ON agent running on the server machine. Agents installed with the server are not autoupdated and must be updated with the JBoss ON server. All other agents will update themselves automatically when the server is upgraded.This is done by stopping the agent service or by using the
exitcommand at the agent command prompt.[root@server ~]# agentRoot/rhq-agent/bin/rhq-agent.sh > exit
- Windows only. If the
RHQ_AGENT_RUN_ASorRHQ_AGENT_RUN_AS_MEparameter was set in the agent'srhq-agent-env.batfile, then there must be a password and the password prompt must be disabled.RHQ_AGENT_PASSWORD=secret RHQ_AGENT_PASSWORD_PROMPT=false
Note
If one of theRHQ_AGENT_RUN_AS*parameters is set without a password, then the agent upgrade process hangs.Alternatively, theRHQ_AGENT_RUN_AS*parameter can be removed prior to upgrading. - Clean up the JBoss ON configuration. It is easier to clean up the configuration before migration than it is after.
- Remove any unused or out of service platforms from the inventory.
- If the older JBoss ON server was added to the JBoss ON inventory, then remove it. The old JBoss ON server must be removed from the inventory because it is no longer a usable resource.
- Stop the JBoss ON server which is being upgraded as well as any currently running JBoss ON instances in the cloud. For example:
[root@server ~]# serverRoot/jon-server-3.1.0.GA/rhq-server.sh stop
Important
If the upgraded JBoss ON server will use a database that existing JBoss ON instances are also using, then all of the existing JBoss ON instances have to be stopped. Otherwise, the installer will hang when it tries to contact the database and the database is unavailable because it is in use by another JBoss ON server. - Back up the server database before going through the upgrade script. In case there is a problem with the upgrade process, the backup allows you to restore to its previous state.
- Unzip the server packages.
[root@server ~]# unzip jon-server-3.2.0.GA.zip -d serverRoot/jon-server-3.2.0.GA
Important
Do not copy the new server installation on top of a previous server installation.The directory structure within the server package gives the new server installation directory a version-specific name, such as/opt/jon/jon-server-3.2.0.GA. - Optional. Copy over any changes in the original
rhq-server.propertiesfile to the new file. Changes to this file include things like setting up SSL and enabling SMTP for email notifications.Copy over the changes to the properties file only — do not copy over the entire file. The new properties file contains new configuration parameters; overwriting those new parameters could cause the server not to start. - Run the
rhqctlscript with theupgradesubcommand. The required attributes are listed in Table 3.1, “Options for Upgrading JBoss ON”. For example:[root@server ~]# ./serverRoot/jon-server-3.2.0.GA/bin/rhqctl upgrade --from-server-dir /opt/rhq/rhq-server-old --from-agent-dir /home/rhq/rhq-agent-old --run-data-migrator do-it
Theupgradecommand installs and configures a storage database automatically as part of upgrade; the--run-data-migrator do-itoption migrates the existing monitoring data into the new database. Otherwise, all the historical monitoring data would be lost.Note
For large databases, it can take hours to migrate monitoring data. Consider performing a migration during an extended period of low use.To see roughly how long the migration will take, as part of planning, run the upgrade command with the--run-data-migrator estimateoption to get a time estimate.Important
It is possible to migrate the historical monitoring data by running theupgradewith the--run-data-migratorlater. However, any new monitoring data collected between the server upgrade and the data migration will be lost. - Additional plug-in packs for specific needs (such as supporting management tasks for EWS, EAP, and SOA-P) are available to be installed separate from the core JBoss ON agent packages. Each plug-in pack as at least one (and sometimes more than one) agent plug-in. Each zip file for the plug-ins has a README.txt file with specific setup instructions.The plug-in files can be unzipped anywhere. For example:
[root@server ~]# unzip jon-plugin-pack-agent_plugin_name-3.2.0.GA.zip -d /opt/jon/jon-server-3.2.0.GA
Note
If there are multiple JBoss ON servers in a high availability setup, the agent plug-in pack only has to be installed once. The other servers will pick up the plug-ins as part of the high availability polls. - Start the JBoss ON server and agent.
[root@server ~]# serverRoot/jon-server-3.2.0.GA/bin/rhqctl.sh start
- Optional. Add the new JBoss ON server as a resource in the inventory.
3.2. Re-Installing the Server
rhq-server.properties which indicates that this is an initial setup instead of an upgrade (rhq.autoinstaller.*). When the initial configuration is complete, is complete, the autoinstaller is disabled (so even setting the rhq.autoinstaller.* properties in rhq-server.properties does not re-initiate the server configuration).
3.3. Uninstalling JBoss ON
3.3.1. Uninstalling an Agent on a Managed System
3.3.1.1. Removing an Agent on Linux (JAR)
Note
rhqctl script to stop and remove it.
- Stop the agent.
- Delete the agent from JBoss ON topology.
- In the JBoss ON UI, click the Administration tab in the top menu.
- In the Topology section in the left menu, select the Agents item.
- Select the row for the agent to delete, in the list of installed agents.
- Click the button at the bottom of the page.
- Confirm that the agent should be deleted.
- On the managed system, delete the agent's installation directory.
3.3.1.2. Removing an Agent RPM
- Stop the agent service.
[root@server ~]# service jon-agent stop
- Delete the agent from JBoss ON topology.
- In the JBoss ON UI, click the Administration tab in the top menu.
- In the Topology section in the left menu, select the Agents item.
- Select the row for the agent to delete, in the list of installed agents.
- Click the button at the bottom of the page.
- Confirm that the agent should be deleted.
- If the package was installed using
yum, then use theyumto remove the package:[root@server ~]# yum remove jboss-on-agent jboss-on-agent-init
If the RPM package was installed usingrpm, then uninstall it usingrpm:[root@server ~]# rpm -e jboss-on-agent-3.2.0.GA jboss-on-agent-init-3.2.0.GA
3.3.1.3. Removing an Agent on Windows
Note
rhqctl script to stop and remove it.
- Stop the agent.
- Delete the agent from JBoss ON topology.
- In the JBoss ON UI, click the Administration tab in the top menu.
- In the Topology section in the left menu, select the Agents item.
- Select the row for the agent to delete, in the list of installed agents.
- Click the button at the bottom of the page.
- Confirm that the agent should be deleted.
- If the agent is configured as a Windows service, then remove it as a service.
> rhq-agent.bat remove
- Delete the agent's installation directory.
3.3.2. Uninstalling the Server
3.3.2.1. Removing a Server on Red Hat Enterprise Linux
- If this is the only JBoss ON server, then stop all agents. If there will be other JBoss ON servers in the topology, then agents managed by this server will naturally migrate over to the other servers in the high availability topology.
- Stop the server.
[root@server ~]# serverRoot/jon-server-3.2.0.GA/bin/rhqctl.sh stop --server
- Delete the server's installation directory.
3.3.2.2. Removing a Server on Windows
- If this is the only JBoss ON server, then stop all agents. If there will be other JBoss ON servers in the topology, then agents managed by this server will naturally migrate over to the other servers in the high availability topology.
- Stop the server.
> C:\rhq\jon-server-3.2.0.GA\bin\rhqctl.bat stop
- If the server is configured as a Windows service, then remove it as a service.
> C:\rhq\jon-server-3.2.0.GA\bin\rhqctl.bat remove
- Delete the server's installation directory.
Chapter 4. Installing and Upgrading an Agent on a Managed Platform from the JAR File
Important
4.1. Before Installing the Agent
4.1.1. Setting up the JRE for the JBoss ON Agent
- Download and install the appropriate version of the JRE, if necessary.
- Set the
RHQ_JAVA_HOMEenvironment variable to the installation directory.- Open the
.bashrcfor the system user that will run JBoss ON. For example:vim /home/jon/.bashrc
- Add a line to set the
RHQ_JAVA_HOMEenvironment variable to the specific JRE directory. For example:export RHQ_JAVA_HOME=/usr/lib/jvm/jre-1.6.0-openjdk/bin/java/
- Set the system to use the correct version of the JRE using the system
alternativescommand. The selected version has the*+symbols by it./usr/sbin/alternatives --config java There are 5 programs which provide 'java'. Selection Command ----------------------------------------------- 1 /usr/lib/jvm/jre-1.5.0-sun/bin/java 2 /usr/lib/jvm/jre-1.4.2-gcj/bin/java 3 /usr/lib/jvm/jre-1.6.0-sun/bin/java *+ 4 /usr/lib/jvm/jre-1.6.0-openjdk/bin/java 5 /usr/lib/jvm/jre-1.6.0-bea/bin/java Enter to keep the current selection[+], or type selection number:
4.1.2. Configuring the Java Path
4.1.3. Picking the Agent System User
- JBoss EAP servers
- PostgreSQL databases
- Tomcat servers
- Apache servers
- Generic JVMs
run.jar file, plus execute and search permissions for every directory in the path to the run.jar file.
- Discovery
- Deploying applications
- Executing scripts
- Running start, stop, and restart operations
- Creating child resources through the JBoss ON UI
- Viewing and editing resource configuration
Important
- Configure scripts or operations to run using
sudo. For long-running operations, such as starting a service or a process, the user which executes the script should be the same as the resource user because that user will have the proper authorization and permissions. - Set start script environment variables to use the resource's principal and credentials, if available.
- For JVM or JMX servers. Select the connection configuration based on the user settings. For different users, use JMX remoting. For the same user, use either JMX remoting or the attach API.
Table 4.1. Cheat Sheet for Agent and Resource Users
| Resource | User Information |
|---|---|
| PostgreSQL | No effect for monitoring and discovery.
The agent user must have read/write permissions to the PostgreSQL configuration file for configuration viewing and editing.
|
| Apache | No effect for monitoring and discovery.
The agent user must have read/write permissions to the Apache configuration file for configuration viewing and editing.
|
| Tomcat | Must use the same user or can't be discovered |
| JMX server or JVM | Different users are fine when using JMX remoting; cannot be discovered with different users and the attach API |
| JBoss AS/EAP | Different users are all right, but requires read permissions on run.jar and execute and search permission on all ancestor directories for run.jar |
4.2. Installing the Agent from JAR File
- Point your browser to the download URL on the server. For example:
http://server.example.com:7080/agentupdate/download
Save the agent binary update.jarin a directory where you want to install the agent. The file you save should have a.jarextension. - Copy the agent update binary
.jaryou downloaded from the JBoss ON server to the directory. - Install the JAR:
java -jar downloaded_agent_jar_file.jar --install
This will tell the agent update binary to extract the JBoss ON agent distribution and install a fresh copy of it in therhq-agentsubdirectory.Important
Do not install the agent in a directory with spaces in the name, such asC:\Program Files.Installing the agent in a directory with spaces in the pathname can cause problems for the agent establishing a connection with certain types of resources, including some JBoss services. - Set the path to the JRE as an environment variable for the agent. The agent requires that the Java home directory is set explicitly in its configuration.Open the
agentRoot/rhq-agent/bin/rhq-agent-env.shfile, and uncomment or add the line for theRHQ_JAVA_HOMEvariable.export RHQ_JAVA_HOME=/usr
- Start the agent to launch the setup process.
agentRoot/rhq-agent/bin/rhq-agent.sh
Note
It is possible to skip the setup wizard by submitting the configuration all at once. Section 4.3, “Silently Installing an Agent” has the details for setting up an file that can pass the configuration directly to the agent installer. - As prompted, supply the information to configure the agent and the server connection.
[Agent Name] agentdomain.example.com
[Agent Hostname or IP Address] agentdomain.example.com
[Agent Port] 16163
[JON Server Hostname or IP Address] server.example.com
[JON Server Port] 7080
native enable
- The agent name must be unique among all agents in the JBoss ON deployment. By default, the name is the fully-qualified domain name of the host machine.
- The port is the one that the agent uses to listen for incoming messages from the server. This is
rhq.agent.server.bind-portin the configuration file, if the default value isn't used. - The server hostname and port are used by the agent to connect to a server to register itself with the JBoss ON system. This is not necessarily the primary server that the agent will use after registration. In the configuration file, these are
rhq.agent.server.bind-addressandrhq.agent.server.bind-port
The full list of parameters, including advanced setup options, are listed in Table 4.2, “All Options Available During Advanced Setup”. - Configure the agent as a background service, as in Section 4.4, “Running the JBoss ON Agent as a Service”.
agent-configuration.xml is no longer needed or used. Editing agent-configuration.xml will no longer have any effect on the agent, even after restarting the agent. To pick up changes to the agent-configuration.xml file, the agent must be restarted with the --cleanconfig command line option or the configuration must be reloaded with the config --import agent prompt command.
Important
/logs/agent.log).
Table 4.2. All Options Available During Advanced Setup
| Setup Option | Description | Normal or Advanced Setup |
|---|---|---|
| Agent Hostname or IP Address | The address that the binds to to listen for messages from the server. This is usually the same as the address that the JBoss ON server uses to connect to the agent; if the addresses are different because of the network environment, then transport parameters must be set to resolve the address. | Normal |
| Agent Port | The port number that the agent listens on. As with the IP address, this is usually the same as the port configured for the servers to use to connect to agents, but if these ports are different because of the network environment, then transport parameters must be set to resolve the port. | Normal |
| Agent Transport Protocol | Sets the protocol that the agent expects to use to receive incoming messages from the server. This is usually socket or sslsocket. | Advanced |
| Agent Transport Parameters | Sets transport parameters to append to the end of the locator (URL-style address) used by the remoting framework for agent-server connections. | Advanced |
| RHQ Server Hostname or IP Address | Gives the IP address or hostname of the primary server that the agent communicates with. This information must be the same as the hostname or IP address that is configured in the JBoss ON server configuration. | Normal |
| RHQ Server Port | Gives the port number of the primary server that the agent communicates with. This information must be the same as the port number that is configured in the JBoss ON server configuration. | Normal |
| RHQ Server Transport Protocol | Sets the transport protocol that the agent uses for outgoing messages to the JBoss ON server. This information must be the same as the transport method that the server is configured to expect in its configuration preferences. | Advanced |
| RHQ Server Transport Parameters | Gives additional transport parameters that are to be used when the agent connects to the primary JBoss ON server. Since this is used to connect to the server, these parameters must be the same as the transport parameters set in the JBoss ON server configuration. These settings are especially important if the JBoss ON agent needs to connect to a different host or port than what the JBoss ON server actually binds to. | Advanced |
4.3. Silently Installing an Agent
agent-configuration.xml file. During installation, there are some parameters that are predefined and others that are environment-specific and must be provided. The agent setup prompts request this environment or instance-specific information.
- Copy the
agent-configuration.xmlfile to a working directory. For example:[root@server ~]# cp agentRoot/rhq-agent/conf/agent-configuration.xml /tmp/files/
- Uncomment (if necessary) and edit the desired agent parameters.Any agent parameters (such as SSL connections and other advanced configuration) can be defined in
agent-configuration.xml. At a minimum, the entry keys listed in Table 4.3, “Configuration File Keys for Agent Setup” for the agent and server have to be set in the file.[root@server ~]# vim /tmp/files/agent-configuration.xml ... <!-- agent properties --> <entry key="rhq.agent.name" value="agent.example.com"/> <entry key="rhq.communications.connector.bind-address" value="255.255.255.1" /> <entry key="rhq.communications.connector.bind-port" value="16163" /> <!-- server properties --> <entry key="rhq.agent.server.bind-address" value="255.255.255.0" /> <entry key="rhq.agent.server.bind-port" value="7080" /> <entry key="rhq.agent.disable-native-system" value="false"/> ...
- Set the
rhq.agent.configuration-setup-flagkey totrueso that the agent loads it as initial configuration.<entry key="rhq.agent.configuration-setup-flag" value="true" />
- Start the agent, specifying the edited configuration file with the
--configoption>.[jbossadmin@server !]$ agentRoot/rhq-agent/bin/rhq-agent.sh
--config /tmp/files/agent-configuration.xml
Table 4.3. Configuration File Keys for Agent Setup
| Installer Prompt Text | Key Name | Description |
|---|---|---|
| rhq.agent.configuration-setup-flag | Tells the installer that the agent configuration is already in the configuration file. This must be set to true for the installer to load the configuration file. | |
| [Agent Name] | rhq.agent.name | Gives a unique name to identify the agent to the server. |
| [Agent Hostname or IP Address] | rhq.communications.connector.bind-address | Gives the hostname or IP address that the server will use to connect to the agent. This <entry> line may need to be uncommented before it is set. |
| [Agent Port] | rhq.communications.connector.bind-port | Gives the port for the server to use to communicate with the agent. The default (16163) can be used in most cases. |
| [RHQ Server Hostname or IP Address] | rhq.agent.server.bind-address | Gives the hostname or IP address that the agent will use to connect to the server to register itself. If this is a hostname, it must be resolvable by the agent. |
| [RHQ Server Port] | rhq.agent.server.bind-port | Gives the port for the agent to use to communicate with the server. The default (7080) can be used, assuming the server was configured with the default values. |
| native | rhq.agent.disable-native-system | Enables the JNI libraries used by the agent. This enables the agent to discover and manage some types of resources using the system native libraries. |
4.4. Running the JBoss ON Agent as a Service
init.d.
4.4.1. Running the Agent as a Windows Service
- Make sure the agent is fully set up. The agent does not prompt for the configuration when it is started as a service.
- Edit the
rhq-agent-env.batscript and set the environment variable to define the system user as whom the init script will run. There are two options:RHQ_AGENT_RUN_ASexplicitly sets the user account name. This must match the format of a Windows user account name, DOMAIN\username.RHQ_AGENT_RUN_AS_MEforces the agent to run as whoever the current user is; this uses the format . \ %USERNAME %. If both environment variables are defined, this variable overridesRHQ_AGENT_RUN_AS.
Note
Before settingRHQ_AGENT_RUN_AS_MEorRHQ_AGENT_RUN_AS, make sure that the given user actually has permission to start services. If necessary, assign the user the appropriate rights. Assigning rights is covered in the Windows documentation.If neither variable is set, the agent init script runs as the local system account (Default or .\LocalSystem).Other available environment variables are listed and defined in the comments in therhq-agent-wrapper.batscript. - Run the
rhq-agent-wrapper.batscript to install the init script as a service. Use theinstallcommand to install the init script. - When prompted, fill in the password for the system user as whom the service will run.
4.4.2. Running the Agent as a Daemon or init.d Service
- Make sure the agent is fully set up. The agent does not prompt for the configuration when it is started as a service.
- Open the
rhq-agent-env.shfile. - Uncomment and configure the required environment variables for the agent's
bindirectory, the JDK directory, and the PID directory (which must be writable by the agent user).RHQ_AGENT_HOME=agentRoot/rhq-agent/ export RHQ_JAVA_HOME=/usr RHQ_AGENT_PIDFILE_DIR=/var/run
Note
When setting theRHQ_AGENT_PIDFILE_DIRon Red Hat Enterprise Linux, edit thepidfilesetting in therhq-agent-wrapper.shscript file. The wrapper script value is used bychkconfig. - Set any of the optional environment variables.
RHQ_AGENT_DEBUGenables debug logging.RHQ_AGENT_JAVA_EXE_FILE_PATHspecifies a Java executable.RHQ_AGENT_JAVA_OPTSpasses settings to the agent JVM.RHQ_AGENT_ADDITIONAL_JAVA_OPTSpasses additional Java options to the JVM.
- Optional. Configure any custom start commands, as in Section 4.4.3, “Starting an Agent with a Custom Command”.
- Log into the system as root.
Important
The rest of this procedure describes how to configure the agent init script as a service on Red Hat Enterprise Linux. For other Unix systems, follow a similar procedure that corresponds to the specific platform. - Make sure the wrapper script is executable.
[root@server rhq-agent]# chmod a+x agentRoot/rhq-agent/bin/rhq-agent-wrapper.sh
- Symlink the
rhq-agent-wrapper.shfile to/etc/init.d/. For example:[root@server rhq-agent]# ln -s agentRoot/rhq-agent/bin/rhq-agent-wrapper.sh /etc/init.d/rhq-agent-wrapper.sh
Important
On Solaris, symlinking the agent script file requires invokingreadlinkinrhq-agent-wrapper.sh.readlinkis not supplied by default in some Solaris installations. Solaris users must downloadreadlinkfrom a source such as Sunfreeware. - Register
rhq-agent-wrapper.shwithchkconfig.[root@server rhq-agent] # /sbin/chkconfig --add rhq-agent-wrapper.sh
- Enable the agent service to run at boot time and have it stop gracefully at when the system shuts down.
[root@server rhq-agent] # /sbin/chkconfig rhq-agent-wrapper.sh on
chkconfig:
[root@server rhq-agent] # /sbin/chkconfig rhq-agent-wrapper.sh off
4.4.3. Starting an Agent with a Custom Command
su or sudo, allowing the agent to run as a different user.
rhq-agent-env.sh file. There are two parts to the configuration: the start command itself and then a setting to enable a password prompt.
RHQ_AGENT_START_COMMAND="su -m test -c '${RHQ_AGENT_HOME}/bin/rhq-agent.sh'"
RHQ_AGENT_PASSWORD_PROMPT=truesudo and agent user configuration. If it is required, then the password prompt should be enabled so that the user can enter the password or a password should be set in the RHQ_AGENT_PASSWORD parameter; otherwise, the start process will appear to hang.
4.5. Changing Agent Connection Configuration
- The agent connection properties, which define the agent instance and how it communicates to the server
- The agent JVM properties, which manage agent performance and options
agent-configuration.xml and overlaid with the values entered at the setup prompts at start up. After the agent is initially configured, the agent persists that configuration and never refers to the agent-configuration.xml again. For that information to be changed, the agent connection information has to be wiped out and reset.
--cleanconfig option and run through the setup wizard again.
agentRoot/rhq-agent/bin/rhq-agent.sh --cleanconfig
rhq-agent-env.sh file, which is loaded every time the agent starts, or using agent prompt commands like setconfig. This is described in Configuring JBoss ON Servers and Agents.
4.6. About Agent Automatic Updates
4.6.1. The Process When an Agent Autoupgrades
Note
- The updated server puts the updated agent packages in a directory accessible to the agent.
- The server notifies the agent that the agent needs to update as soon as the server detects that the agent is running an older version.
- As the agent prepares to update, it begins shutting down its other process. This can take several minutes, as it gracefully shuts down each thread.
- The agent downloads the new binaries from the server.
- The agent spawns a new Java process.
- The Java process backs up the old agent configuration and applies the update.
- The Java process then restarts the agent and kills itself.
update through the agent command line:
agentRoot/rhq-agent/bin/rhq-agent.sh

> update
4.6.2. Configuring Agent Preferences
RHQ_AGENT_HOME or RHQ_AGENT_ADDITIONAL_JAVA_OPTS, should be added to the rhq-agent-env.sh file. This file is preserved during upgrade so all of the settings are carried over.
Warning
- rhq-agent.sh
- rhq-agent-wrapper.sh
- rhq-agent.bat
- rhq-agent-wrapper.bat
rhq-agent-env.sh ) are preserved during the update.
4.6.3. Upgrading Custom log4j Settings
rhq-agent-env.sh file are preserved between upgrades. However, any changes to the log settings (log4j.xml) and other files are lost between upgrades.
4.6.4. Configuring Keystores and Truststores
- The keystore files must have the word keystore in their filenames. For example,
my-agent-keystore.dat. - The truststore files must have the word truststore in their filenames. For example,
my-agent-truststore.dat. - Both the keystore and truststore files should be located in the agent's
agentRoot/rhq-agent/conf/directory. Any trust files in the agent'sconf/directory will be preserved when the agent configuration is cleaned or purged, including during upgrade.
4.6.5. Setting Write Permissions on the Agent Home Directory
/opt/rhq/rhq-agent, then the agent user should have write permissions to the /opt/rhq directory.
[root@server ~]# chown agent_user /opt/rhq
4.6.6. Starting the Agent as a Background Service
init.d.
4.7. Manually Upgrading the JBoss ON Agent
Note
- Shut down the JBoss ON agent.
- Windows only.. If the agent is running as a Windows service, uninstall the Windows service:
cd old-agent-install-dir/bin
./rhq-agent-wrapper.bat remove
- Upgrade the JBoss ON server, as in Section 3.1, “Upgrading JBoss ON”. The JBoss ON server must be upgraded before any agents are upgraded.
- Restart the upgraded JBoss ON servers if they are not yet started.
- Download the agent update binary from the server.
- Copy the agent update binary JAR file into the parent directory where the agent is installed. For example:
cp agent-update-binary.jar /opt/rhq/rhq-agent
- Extract the new JBoss ON agent from the agent update binary by running the following command:
java -jar agent-update-binary.jar --update=agent_installation_directory
This will tell the agent update binary to extract the JBoss ON agent distribution and update the current agent that is found inrhq-agentsubdirectory. At this point, the upgraded JBoss ON agent is located in the originalrhq-agentdirectory. The old agent has been backed up to therhq-agent-olddirectory. Any upgrade errors are written to the agent's log files. - Finally, start the JBoss ON agent.
4.8. Reinstalling the Agent
- The agent's persisted Java configuration should be purged.
- The agent's inventory should be purged, along with any resource history and configuration.
- The agent must be removed from the JBoss ON inventory. This can be done by deleting the agent from the JBoss ON configuration in the Administration > Agents area (preferred) or by removing the platform resource from the inventory.
- Make sure that the original agent instance is properly removed.
- Stop the agent process.
- Remove the platform entry from the JBoss ON server inventory.
- Restart the agent with the
--fullcleanconfigoption. This registers the agent with a new security token and fresh configuration settings.agentRoot/rhq-agent/bin/rhq-agent.sh --fullcleanconfig
4.9. Starting the Agent
bin/ directory.
Note
rhqctl script in the server's bin/ directory.
rhq-agent.sh script.
/opt/rhq-agent/bin/rhq-agent.sh

RHQ 3.2.0-SNAPSHOT [cda7569] (Tue Apr 13 13:39:16 EDT 2013)
>
rhq-agent-env.sh script file or by using the -D and the property name with the rhq-agent.sh script. Changing the settings with the properties file and the start script is covered in the Configuring JBoss ON Servers, Agents, and Storage Nodes.
Note
--cleanconfig to wipe the previous agent configuration and start fresh.
Chapter 5. Installing the Agent from RPM
Important
rhqctl script.
5.1. About Agent RPMs
- System user and group settings with appropriate permissions already set
- System services to start, stop, and restart the agent
- System service to change the agent's configuration
- Upgrades using system tools
5.1.1. Differences Between JAR and RPM Installations
rpm is run or the user account (root) who initiated it.
Table 5.1. Some Differences Between JAR and RPM Installations
| Configuration Area | JAR Value | RPM Value |
|---|---|---|
| Agent user | Set to the system user who installs it | jbosson-agent user, jbosson group |
| Agent service | Not set | jon-agent |
| Environment variables | installDir/bin/rhq-agent-env.sh |
|
| Home directory location | Wherever the JAR is installed | /usr/share/jboss-on-3.2.0.GA/agent/ |
| agent-configuration.xml location | In the conf/ directory where the JAR is installed | /etc/jboss-on/agent/[a] |
| Java preferences location | ~/.java/default (system user Java preferences) | /var/lib/jboss-on/agent/prefs/.java/.userPrefs/rhq-agent/default/ |
| Data directory location | agentInstallDir/data | /var/lib/jboss-on/agent/data/ |
| Log directory location | In the logs/ directory where the JAR is installed | /var/log/jboss-on/agent/[b] |
| Autoupgrade | Enabled | Disabled |
[a]
symlinked to /usr/share/jboss-on-3.2.0.GA/agent/conf
[b]
symlinked to /usr/share/jboss-on-3.2.0.GA/agent/logs
| ||
5.1.2. The JBoss ON User
Important
Note
jon-agent user and the jbosson group when it is installed. The user and group are not removed if the RPM is uninstalled.
5.1.3. Service Tools and Init Script
/etc/init.d/jon-agent. chkconfig is configured so that the agent starts when the system starts and runs as a daemon.
startstoprestartstatuskill, which forces the agent process to stopconfig, which runs through the agent configuration wizard again and refreshes the agent configuration with new settings
start, stop, restart, and status commands are available when the agent is manually configured to run as a service, as described in Section 4.4, “Running the JBoss ON Agent as a Service”. However, the kill and config commands are only available with the init script provided with the agent RPM.
/etc/init.d/jon-agent, sets the environment variables that are set in the rhq-agent-env.sh file with a JAR installation. This init script defines the agent system user and group, the log and data directory locations, and Java options. Editing the init script can, for example, allow the agent to run as a different user or to start with different JVM settings.
Important
config command or by editing the init script. Editing the rhq-agent-env.sh file or other configuration files directly is not supported.
5.1.4. Update Differences
agent-configuration.xml file that tells the agent to check for upgrades. The agent then polls the server, and if the JBoss ON server version is newer than the agent version, the agent requests updated binaries from the server.
agent-configuration.xml file is turned off, to disable attempts at an autoupgrade and to allow the local system to manage the agent packages.
<entry key="rhq.agent.agent-update.enabled" value="false" />
5.1.5. Available Channels
Table 5.3. Available Channels for the Agent RPM
| Product Name | Product Version | Channel Name |
|---|---|---|
| JBoss Enterprise Application Server (EAP) | 5, x86 | jbappplatform-5-i386-server-6-rpm |
| JBoss Enterprise Application Server (EAP) | 5, x86_64 | jbappplatform-5-x86_64-server-6-rpm |
| JBoss Enterprise Application Server (EAP) | 6, x86 | jbappplatform-6-i386-server-6-rpm |
| JBoss Enterprise Application Server (EAP) | 6, x86_64 | jbappplatform-6-x86_64-server-6-rpm |
5.2. Installing the Agent from RPM
jboss-on-agent package. This package installs all of the agent files, creates a specific JBoss ON agent system user, and configures the JBoss ON agent as a system service.
Important
rhqctl script.
5.2.1. Installing Using yum
- Configure the
yumrepos to include the JBoss ON channel (as listed in Table 5.3, “Available Channels for the Agent RPM”). For example:[root@server ~]# yum-config-manager --enable jbappplatform-6-x86_64-server-6-rpm
Note
Installing the RPM requires specific entitlements for the RHN user account for the 3.2 release. This RHN user account must be used to register the system to have access to the appropriate repositories. - Use
yumto install the package.[root@server ~]# yum install jboss-on-agent
This installs the agent in/usr/share/jboss-on-3.2.0.GA/agent. - Configure the agent by running the
service jon-agent configcommand. This runs through the advanced installer to configure the agent.[jsmith@server ~]$ sudo service jon-agent config RHQ 4.4.0.JON311GA [6910991] (Wed Aug 01 18:43:03 EDT 2012) ** Advanced Setup ** ... 8< ... Agent Name [agent.example.com] : agent1 Agent Hostname or IP Address [!*] : Agent Port [16163] : Agent Transport Protocol [socket] : Agent Transport Parameters [numAcceptThreads=1&maxPoolSize=303&clientMaxPoolSize=304&socketTimeout=60000&enableTcpNoDelay=true&backlog=200] : RHQ Server Hostname or IP Address [255.255.255.255] : RHQ Server Port [7080] : RHQ Server Transport Protocol [servlet] : RHQ Server Transport Parameters [/jboss-remoting-servlet-invoker/ServerInvokerServlet] : RHQ Server Alias [rhqserver] : The setup has been completed for the preferences at node [/rhq-agent/default].
Theconfigcommand runs through all of the advanced setup options, which configures three areas of the agent:- The agent connection information, used to register the agent to the server
- The agent name
- The agent port
- The agent host (by hostname or IP address)
- The agent-server communication settings, which include configuring SSL or secure connections and rules on how frequently the agent communicates with the agent
- The agent protocol, either socket (regular) or sslsocket (secure)For sslsocket, the JBoss ON server needs to be configured to accept SSL connections, as in the SSL chapter of Configuring JBoss ON Servers and Agents.
- Any client transport parameters to use to connect to the serverBoth the server and the agent use JBoss Remoting for communication. JBoss Remoting allows servers and clients to pass connection settings using a URL-style address. Transport parameters include things like pool sizes, timeout periods, and buffer settings. For the complete list, see the JBoss Remoting client parameters documentation.
- The server protocol which the agent uses to send messages to the server, either servlet (regular) or sslservlet (secure)The server connection settings configured on the agent must match the configuration in the server itself.
- Any server transport parameters to use to receive messages from the agentBoth the server and the agent use JBoss Remoting for communication. JBoss Remoting allows servers and clients to pass connection settings using a URL-style address. Transport parameters for the server relate to the servlet used to receive agent messages.
- The JBoss ON server to register with
- The server host (by hostname or IP address)
- The server port
- The server alias, a short nickname to identify the server instance
- Start the agent.
[jsmith@server ~]$ sudo service jon-agent start
5.2.2. Installing by Downloading the RPM
- Log into the Customer Portal at https://access.redhat.com.
- Click the Downloads tab.
- Click the Packages box to search for the agent RPM package.
- Enter
jboss-on-agentas the package name, select the In the following architectures radio button, and set the appropriate architecture for the system. - Click the package name, and then click the name for the latest agent RPM update.
- Scroll to the bottom of the page, and click the Download Package link and save the package to a convenient location on the system.
- Install using the
rpmcommand. For example:[root@server ~]# rpm -ivh /tmp/downloads/jboss-on-agent-3.2.0.GA.el6.noarch.rpm
This installs the agent in/usr/share/jboss-on-3.2.0.GA/agent. - Configure the agent by running the
service jon-agent configcommand. This runs through the advanced installer to configure the agent.[jsmith@server ~]$ sudo service jon-agent config RHQ 4.4.0.JON311GA [6910991] (Wed Aug 01 18:43:03 EDT 2012) ** Advanced Setup ** ... 8< ... Agent Name [agent.example.com] : agent1 Agent Hostname or IP Address [!*] : Agent Port [16163] : Agent Transport Protocol [socket] : Agent Transport Parameters [numAcceptThreads=1&maxPoolSize=303&clientMaxPoolSize=304&socketTimeout=60000&enableTcpNoDelay=true&backlog=200] : RHQ Server Hostname or IP Address [255.255.255.255] : RHQ Server Port [7080] : RHQ Server Transport Protocol [servlet] : RHQ Server Transport Parameters [/jboss-remoting-servlet-invoker/ServerInvokerServlet] : RHQ Server Alias [rhqserver] : The setup has been completed for the preferences at node [/rhq-agent/default].
Theconfigcommand runs through all of the advanced setup options, which configures three areas of the agent:- The agent connection information, used to register the agent to the server
- The agent name
- The agent port
- The agent host (by hostname or IP address)
- The agent-server communication settings, which include configuring SSL or secure connections and rules on how frequently the agent communicates with the agent
- The agent protocol, either socket (regular) or sslsocket (secure)For sslsocket, the JBoss ON server needs to be configured to accept SSL connections, as in the SSL chapter of Configuring JBoss ON Servers and Agents.
- Any client transport parameters to use to connect to the serverBoth the server and the agent use JBoss Remoting for communication. JBoss Remoting allows servers and clients to pass connection settings using a URL-style address. Transport parameters include things like pool sizes, timeout periods, and buffer settings. For the complete list, see the JBoss Remoting client parameters documentation.
- The server protocol which the agent uses to send messages to the server, either servlet (regular) or sslservlet (secure)The server connection settings configured on the agent must match the configuration in the server itself.
- Any server transport parameters to use to receive messages from the agentBoth the server and the agent use JBoss Remoting for communication. JBoss Remoting allows servers and clients to pass connection settings using a URL-style address. Transport parameters for the server relate to the servlet used to receive agent messages.
- The JBoss ON server to register with
- The server host (by hostname or IP address)
- The server port
- The server alias, a short nickname to identify the server instance
- Start the agent.
[jsmith@server ~]$ sudo service jon-agent start
5.3. Changing the Agent Configuration After an RPM Install
- The agent connection properties, which define the agent instance and how it communicates to the server
- The agent JVM properties, which manage agent performance and options
5.3.1. Changing Agent Connection Configuration
agent-configuration.xml and overlaid with the values entered at the setup prompts at start up. After the agent is initially configured, the agent persists that configuration in its Java preferences (/var/lib/jboss-on/agent/prefs/.java/.userPrefs/rhq-agent/default/) and never refers to the agent-configuration.xml again.
config service command to run through the setup options again. This cleans out the preferences store, re-reads the agent-configuration.xml file, and runs through the configuration setup again.
Important
[jsmith@server ~]$ sudo service jon-agent config
RHQ 4.4.0.JON311GA [6910991] (Wed Aug 01 18:43:03 EDT 2012)
** Advanced Setup **
Agent Name [agent.example.com] : agent1
Agent Hostname or IP Address [!*] :
Agent Port [16163] :
Agent Transport Protocol [socket] :
... 8< ...
config service command opens the agent start script and automatically passes a series of options which edit the agent connection configuration:
--cleanconfig, to wipe the previous configuration settings--setupand--advanced, which force the agent to run its configuration setup again--daemonand--nostart, which runs the agent command prompt without starting the agent process and then exits (so that the agent can be started as a service)
service jon-agent config command is equivalent to starting the agent with all those options:
rhq-agent.sh --cleanconfig --setup --advanced --daemon --nostart
5.3.2. Changing Agent JVM and Other Init Configuration
/etc/init.d/jon-agent file, or in the environment script, rhq-agent-env.sh. Both files are loaded every time the agent starts; it is recommended to edit the init script, which sets the additional JAVA_OPTS values.
RHQ_AGENT_ADDITIONAL_JAVA_OPTS="-Drhq.agent.data-directory=$RHQ_AGENT_DATA_DIR -Djava.util.prefs.userRoot=$RHQ_AGENT_PREFS_DIR -Xms64m -Xmx128m -Djava.net.preferIPv4Stack=true"
export RHQ_AGENT_ADDITIONAL_JAVA_OPTSsetconfig. This is described in Configuring JBoss ON Servers and Agents.
5.4. Migrating from a JAR Installation to an RPM Installation
5.4.1. Converting an Agent (Losing Configuration Data)
- Retrieve the security token for the agent.
- Click the Administration tab and select the Agents link under the Topology section on the left.
- Select the agent from the list, and click its name to open its details page.

- Copy the security token.
- Shut down the agent.
- Remove the JAR installation directory.
- Install the agent RPM.
- Edit the
agent-configuration.xmlfile and add a line for the original security token for the agent.vim /etc/jboss-on/agent/agent-configuration.xml <entry key="rhq.agent.security-token" value="abcd1234" />
- Run through the agent configuration installer.
[jsmith@server ~]$ sudo service jon-agent config
- Start the agent.
[jsmith@server ~]$ sudo service jon-agent start
5.4.2. Migrating an Agent to an RPM (Preserving Configuration Data)
- Shut down the original agent.
- Install the agent RPM.
- Copy over the previous configuration directories for the agent. This includes the data directory (which contains operational information like the changesets for drift detection or truststores used for SSL) and the log directory. For example:
[root@server ~]# cp -r agentRoot/rhq-agent/data/ /var/lib/jboss-on/agent/data/
[root@server ~]# cp -r agentRoot/rhq-agent/logs/ /var/log/jboss-on/agent/
- Using a Java preferences editor, export the Java preferences specific to the agent from the original preferences store in
~/.java/.userPrefs/rhq-agent/default(by default).Note
Be sure to retrieve the security token. The token allows the agent to re-register with the server successfully. - Using a Java preferences editor, import the Java preferences for the agent into the new preferences store in
/var/lib/jboss-on/agent/prefs/default(by default). - Run through the agent configuration installer.
[jsmith@server ~]$ sudo service jon-agent config
- Start the agent.
[jsmith@server ~]$ sudo service jon-agent start
5.5. Starting the Agent
service command:
[root@@server ~]# service jon-agent start
bin/ directory.
Note
rhqctl script in the server's bin/ directory.
rhqctl script.
rhq-agent.sh command opens the command prompt.
/opt/rhq-agent/bin/rhq-agent.sh

RHQ 3.2.0-SNAPSHOT [cda7569] (Tue Apr 13 13:39:16 EDT 2013)
>
5.6. Upgrading the Agent RPM
rhqctl tool.
5.6.1. Upgrading the Agent RPM on a Managed System
Important
rhqctl script.
- Configure the
yumrepos to include the JBoss ON channel (as listed in Table 5.3, “Available Channels for the Agent RPM”). For example:[root@server ~]# yum-config-manager --enable jbappplatform-6-x86_64-server-6-rpm
- Use
yumto upgrade the package.[root@server ~]# yum upgrade jboss-on-agent
rpm -U command:
[root@server ~]# rpm -Uvh jboss-on-agent-3.2.0.GA.el6.noarch.rpm
5.6.2. Migrating an Agent on a JBoss ON Server Machine
rhqctl). This means that agents on a JBoss ON server machine cannot be installed from an RPM.
Note
- Install a new JBoss ON 3.2 server or upgrade a server to JBoss ON 3.2.
- Get the agent name, token, bind address, and server bind address for the agent.
- Log into the JBoss ON server UI.
- Click the Administration tab in the top menu.
- In the Topology box on the left, click the Agents link.
- Click the name of the agent to be migrated in the list.
- The Agent Details area lists all of the required information. This agent information must be coped into the
agent-configuration.xmlfile to migrate the agent instance.
- Copy the existing
agent-configuration.xmlfile to the new agent location,agentRoot/rhq-agent/conf/agent-configuration.xml. - Update the
agent-configuration.xmlproperties for the agent identity information. For example:<entry key="rhq.agent.name" value="agent-01" /> <entry key="rhq.agent.security-token" value="abcd1234" /> <entry key="rhq.agent.server.bind-address" value="server.example.com" /> <entry key="rhq.communications.connector.bind-address" value="1.1.1.1" />
UI Field Name Configuration File Property Agent Name rhq.agent.name Token rhq.agent.security-token Address rhq.agent.server.bind-address Current Server rhq.communications.connector.bind-address - Stop the old agent process.
[jsmith@server ~]$ sudo service jon-agent stop
- Copy this example script, and fill in the location for the old agent installation, the updated configuration file, and the new server in the
agent-configuration-migrate.shscript.###### agent-configuration-migrate.sh ######### #!/bin/sh # # # Note: Assumes and installs agent into default location. Modify steps as necessary # if this is not true. ###################################################################### #Ex. OLDER_RPM_AGENT_INSTALL=/usr/share/jboss-on-3.1.2.GA/agent OLDER_RPM_AGENT_INSTALL= #Ex. AGENT_MIGRATION_CONFIG_LOCATION=/tmp/agent-migration.xml For security consider using $(mktemp) if you automate this further. AGENT_MIGRATION_CONFIG_LOCATION= #Ex. NEWEST_SERVER_LOCATION=/opt/jon/jboss-on-3.2.0.GA . Note bin, etc, modules are immediate sub directories. NEWEST_SERVER_LOCATION= #Install newer native agent including older agent configuration details. #NOTE: new agent will be installed to default location. Modify the following line accordingly $NEWEST_SERVER_LOCATION/bin/rhqctl install --agent --agent-config $AGENT_MIGRATION_CONFIG_LOCATION # Echo next steps to complete migration. echo -e "\n If no errors, then migration of older agent configuration was successful." echo Ex. Additional environment variables added to old agent. echo -e "\t i) (if necessary) Merge $OLDER_RPM_AGENT_INSTALL/bin/*.sh with $NEWEST_SERVER_LOCATION/../rhq-agent/bin/*.sh." echo -e "\t ii)(if necessary) Manually and carefully merge old and new agent log settings." echo -e "\t iii)Continue JON server upgrade. Ex. \n ' $NEWEST_SERVER_LOCATION/bin/rhqctl upgrade --from-server-dir (insert older jon server directory) --run-data-migrator do-it '" echo "iv)Start all desired components. Ex.' $NEWEST_SERVER_LOCATION/bin/rhqctl start'" echo "v)Verify migration and remove intermediate migration scripts/files.'" echo "Done."
- Run the migration script.
5.7. Troubleshooting RPM Installs
[jsmith@server ~]$ sudo service jon-agent config
Chapter 6. Installing JBoss Agent Plug-in Packs
- Download the plug-in JAR files from the Customer Support Portal.In the Customer Support Portal, open the Downloads tab and select the Downloads item in the JBOSS ENTERPRISE MIDDLEWARE area.
- Select the JBoss ON for Plug-in product in the drop-down box.
- Download the plug-in packs.
- Extract the additional plug-in pack archives to a temporary location. This creates a subdirectory with the name
jon-plugin-pack-plugin_name-version. For example:[root@server rhq-agent]# unzip jon-plugin-pack-eap-3.2.0.GA.zip -d /tmp
- Copy the extracted plug-in JAR files from the
jon-plugin-pack-plugin_name-3.2.0.GA/directory to the JBoss ON server plug-in directory. For example:[root@server rhq-agent]# cp /tmp/jon-plugin-pack-plugin_name-3.2.0.GA/*.jar /opt/jon/jon-server-3.2.0.GA/plugins
- Have the JBoss ON server update its plug-ins. This can be done through the JBoss ON GUI or by restarting the server.To load the plug-ins through the GUI:
- Open the Administration tab.
- In the Configuration area on the left, select the Agent Plug-ins link.
- At the bottom of the list of loaded agent plug-ins, click the button.
- All agents installed on managed platforms must update their plug-ins to use the newly-installed JBoss plug-ins. The agents can manually reload their plug-ins to load the new plug-ins from the agent's command prompt using the
pluginscommand:[root@server ~]# agentRoot/rhq-agent/bin/rhq-agent.sh > plugins update
Alternatively, if the agents have been imported into the JBoss ON inventory, this can be done in the JBoss ON GUI by scheduling an update plugins operation for an agent or a group or agents. Select the agent resource entry in the inventory, open the Operations tab, and schedule the update plug-ins operation.
Chapter 7. Installing the JBoss ON CLI
rhq-client-3.2.zip.
Note
- Open the JBoss ON GUI.
http://server.example.com:7080
- Click the Administration link in the main menu.
- Select the Downloads menu item.
- Scroll to the Command Line Client Download section, and click Download Client Installer.
- Save the
.zipfile into the directory where the CLI should be installed. - Unzip the packages.
unzip rhq-client-version.zip
Chapter 8. Troubleshooting Installation and Upgrade
- 8.1. Exceptions and Error Logs
- Q: I'm seeing null pointer exceptions for the org.apache.catalina.connector.CoyoteAdapter service. What do these mean?
- Q: I upgraded to 3.2, and there are null pointer exceptions (javax.management.InstanceNotFoundException) in my error logs about the transport service not being registered.
- Q: I'm seeing error messages when I install (or upgrade) my server. What do they mean?
- Q: I upgraded to JBoss ON 3.0.1. However, I see null pointer exceptions in my server logs and the plug-ins still show version 3.0.0. (The 'Server Name' field was changed during upgrade.)
- Q: The error log is showing ErrorCode=[2289]. Why?
- 8.2. Connection Issues
8.1. Exceptions and Error Logs
org.apache.catalina.connector.CoyoteAdapter service. What do these mean?
org.apache.catalina.connector.CoyoteAdapter service are returned when the JBoss ON 3.2 server is first installed. These errors are harmless and can be ignored. Installation will complete successfully, and both the server and the GUI will start and run properly.
[org.rhq.enterprise.server.resource.metadata.ResourceMetadataManagerBean]
Persisting new ResourceType [ModeShapePlugin:Sequencing Service(id=0)]...
2011-01-10 16:45:38,571 ERROR [org.apache.catalina.core.ContainerBase]
Servlet.service() for servlet ServerInvokerServlet threw exception
java.lang.reflect.UndeclaredThrowableException
 at $Proxy424.processRequest(Unknown Source)
 at org.jboss.remoting.transport.servlet.web.ServerInvokerServlet.processRequest(ServerInvokerServlet.java:128)
 at org.jboss.remoting.transport.servlet.web.ServerInvokerServlet.doPost(ServerInvokerServlet.java:157)
 at javax.servlet.http.HttpServlet.service(HttpServlet.java:710)
 at javax.servlet.http.HttpServlet.service(HttpServlet.java:803)
....
This is because the remoting (communications or transport) classes are loaded early in the startup sequence, before the server is completely started. This causes some communications interruptions until the server is completely started. These errors can be ignored.
ERROR [ClientCommandSenderTask] {ClientCommandSenderTask.send-failed}Failed to send
command [Command: type=[remotepojo]; cmd-in-response=[false]; config=[{rhq.timeout=1000,
rhq.send-throttle=true}]; params=[{targetInterfaceName=org.rhq.enterprise.communications.Ping,
invocation=NameBasedInvocation[ping]}]]. Cause: org.jboss.remoting.CannotConnectException:[.....]2012-03-08 20:33:34,523 ERROR [org.rhq.enterprise.server.core.plugin.ServerPluginScanner] Failed to register server plugin file [/home/hudson/jon-server-3.0.1.GA/jbossas/server/default/deploy/rhq.ear/rhq-serverplugins/rhq-serverplugin-ant-bundle-4.2.0.JON.3.0.1.GA.jar] java.lang.NullPointerException at org.rhq.enterprise.server.core.plugin.ServerPluginScanner.registerServerPlugin(ServerPluginScanner.java:212) ...
ErrorCode=[2289]. Why?
ErrorCode=[2289]. This can be ignored.
8.2. Connection Issues
java.rmi.server.hostname parameter to the real value, and it uses the default of 0.0.0.0. This parameter must be set to the real IP address of the server by manually editing the rhq-server.properties file. Restart the server after editing the properties file to load the changes.
Index
A
- agent
- automatic updates, The Process When an Agent Autoupgrades
- installation, Installing and Upgrading an Agent on a Managed Platform from the JAR File
- installation in a writable directory, Setting Write Permissions on the Agent Home Directory
- manually upgrading, Manually Upgrading the JBoss ON Agent
- setting up the JRE, Setting up the JRE for the JBoss ON Agent
- starting as a service, Running the JBoss ON Agent as a Service
- starting as background service
- for upgrade, Starting the Agent as a Background Service
- starting with init.d, Running the Agent as a Daemon or init.d Service, Starting an Agent with a Custom Command
- upgrade
- preserving keystores and truststores, Configuring Keystores and Truststores
C
- CLI
- installing, Installing the JBoss ON CLI
D
- databases
- advanced Oracle configuration, Configuring Oracle (Advanced)
- configuring, Configuring Oracle
- configuring PostgreSQL, Configuring PostgreSQL
- editing the postgresql.conf file, Editing the postgresql.conf File
- oracle
- setting the number of processes and sessions, Setting the Number of Processes and Sessions
- SGA and PGA sizes, Setting SGA and PGA Sizes
- tuning open cursors, Tuning Open Cursors
- oracle settings, Prepping Oracle Settings
- parameters
- editing the pg_hba.conf file, Editing pg_hba.conf
- postgresql
- Fixes for "Relation RHQ_Principal does not exist" Error, Fixes for "Relation RHQ_Principal does not exist" Error
- setting kernel parameters, Setting Kernel Parameters
- setting PostgreSQL parameters, Setting PostgreSQL Parameters
- setting up Oracle, Setting up Oracle
F
- firewall
- configuration, Configuring Ports, Configuring Ports
I
- installation
- overview, Installing the JBoss ON Server
- troubleshooting, Troubleshooting Installation and Upgrade
O
- oracle
- advance configuration, Configuring Oracle (Advanced)
- configuration, Configuring Oracle
S
- server
- configuring DNS, Configuring DNS, Configuring DNS
- downloading server packages, Installing the JBoss ON Server
- running on Red Hat Enterprise Linux, Installing the JBoss ON Server
- setting up the JDK, Setting up the JDK for the JBoss ON Server, Setting up the JDK
- troubleshooting install and upgrade, Troubleshooting Installation and Upgrade
- storage nodes
- security implications, Installing Storage Nodes Before Installing the Server
T
- troubleshooting, Troubleshooting Installation and Upgrade
U
- upgrade
- agent
- starting as background service, Starting the Agent as a Background Service
- troubleshooting, Troubleshooting Installation and Upgrade
- upgrading, Upgrading JBoss ON