
Red Hat Training
A Red Hat training course is available for Red Hat Fuse
Cloud Computing with Fabric
Red Hat JBoss Fuse
Centrally configure and provision assets in the cloud
Version 6.1
Copyright © 2011-2014 Red Hat, Inc. and/or its affiliates.
12 Oct 2017
Abstract
This guide describes how to use the Fuse Fabric cloud APIs to provision, configure, and deploy applications into cloud environments.
Chapter 1. Amazon EC2
Abstract
This section explains how to get started in the cloud using Amazon's Elastic Compute Cloud (EC2) and the Red Hat JBoss Fuse Fabric technology. You use JBoss Fuse Fabric to provision containers in the cloud.
1.1. Overview
Basic technologies
Amazon EC2 deployment is based on the following technology stack:
- Amazon Web Services (AWS) EC2—Amazon's Elastic Compute Cloud provides puts a variety of hardware and operating systems at your disposal, including Red Hat, Ubuntu, SUSE, and Windows. Operating systems are made available as Amazon Machine Images (AMIs).
- Red Hat Enterprise Linux O/S—we use a RHEL 6.0 AMI for this tutorial, which is available in Amazon's free usage tier.
- JDK 1.6—the Java software is automatically installed by Fuse Fabric, after a compute instance is created.
- Red Hat JBoss Fuse OSGi container—the container runtime is automatically installed by Fuse Fabric.
- Fuse Fabric—provides the infrastructure for creating, configuring, and administering a collection of containers in the cloud.
- Profiles—a Fuse profile is the natural way to package your applications in the context of Fuse Fabric. A profile consists of a collection of OSGi bundles and Karaf features. When a profile is deployed, the specified components are downloaded from Maven repositories and installed into the container.
JClouds library
JClouds is an open-source library that enables you to administer cloud providers remotely. It provides modules for communicating with a great variety of cloud providers. FuseSource supports only the Amazon and Rackspace providers, however, which can be accessed by installing the following JClouds features in your container:
jclouds-aws-ec2
jclouds-cloudservers-us
jclouds-cloudservers-uk
Fabric commands
The Fabric commands provide another layer on top of the JClouds library, providing commands that integrate container administration and cloud administration. You can get access to the Fabric commands by installing the following Karaf features into your container:
fabric-jclouds
fabric-commands
Alternatively, if your local container is managed by Fabric, you can get access to the requisite commands by adding the following profile to your local container:
cloud-aws.ec2
1.2. Create an Amazon EC2 Account
Signing up
You can sign up to Amazon Web Services (AWS) by navigating to the following page, http://aws.amazon.com/, and following the sign-up instructions.
Free usage tier
For the first year of membership, Amazon offers a free usage tier. Free usage is subject to a number of restrictions—in particular, you can only use the smallest hardware configuration,
t1.micro on Linux. For full details of what is allowed in the free usage tier, see: http://aws.amazon.com/free.
Important
You will be charged for any services you use that do not lie within the scope of the free usage tier. Always terminate compute instances to minimize charges.
1.3. Set Up an SSH Key Pair
Why do you need an SSH key pair?
After creating a compute instance on the cloud, logging in through the SSH protocol is the primary way of accessing the instance. The SSH protocol uses a key pair for authentication, where the public key is installed in the remote instance and the private key is installed on your local machine.
Creating key pairs in AWS
AWS supports the following approaches to creating SSH key pairs:
- Download a private key—in this case, you use the AWS Management Console to generate a key pair and you download the private key to your local machine. AWS keeps a copy of the public key, which is then automatically installed into new compute instances.
- Upload a public key—in this case, you generate the SSH key pair yourself and upload the public key to AWS (actually, the Fabric console commands will upload the public key for you).
Advantages of uploading a public key
Uploading a public key has several advantages over downloading a private key:
- It is more secure, because the private key never gets sent across the Internet.
- You can easily upload the same public key to instances in different provider regions and even use the same public key with different providers.
- You have more control over the parameters of the key pair, because you generate it yourself.
Default key location
The
ssh command and the Fabric console commands automatically look for the private key in the default key location. It is recommended that you install your key in the default location, because it saves you the trouble of specifying the location explicitly.
On a *NIX operating system, the default locations for an RSA key pair are:
~/.ssh/id_rsa
~/.ssh/id_rsa.pub
On a Windows operating system, the default locations for an RSA key pair are:
C:\Documents and Settings\Username\.ssh\id_rsa
C:\Documents and Settings\Username\.ssh\id_rsa.pub
Note
AWS only supports RSA keys. DSA keys do not work.
Creating a new SSH key pair
Generate an RSA key pair using the
ssh-keygen utility. Open a new command prompt and enter the following command:
ssh-keygen -t rsa -b 2048
The preceding command generates an RSA key with a key length of 2048 bits. You will then be prompted to specify the file name for the key pair:
Generating public/private rsa key pair.
Enter file in which to save the key (/Users/Username/.ssh/id_rsa):
Type return to save the key pair in the default location. You will then be prompted for a pass phrase:
Enter passphrase (empty for no passphrase):
Type return twice to select no pass phrase. This means that the private key is not encrypted.
Important
The Fabric console commands are not compatible with an encrypted private key. Hence, you must ensure that the private key is not encrypted (to protect the private key file, you should change its permissions to ensure that it can be read only by you).
Troubleshooting
Setting up an SSH key pair can sometimes be tricky. Here are a couple of hints to help with troubleshooting:
- If you get the following error when you try to invoke a JClouds or Fabric console command:
IOException: Invalid DER: length field too big (186)
It probably means you are using an encrypted private key. The Fabric console commands support only unencrypted private keys, however. - If you are having trouble with a particular SSH key pair and you want to try a different one, you must first unregister the cloud provider using the
fabric:cloud-provider-removeconsole command, and then re-register the cloud provider using thefabric:cloud-provider-addconsole command (this forces Fabric to reread the SSH private key). - Make sure you are using an RSA key. DSA format is not supported.
1.4. Initialize Your Local Container
Prerequisites
This tutorial assumes you have a fresh installation of Red Hat JBoss Fuse on your local machine (see Installation Guide). If you have previously experimented with the local container instance, it might be a good idea to perform a cold start before you proceed.
Forcing a cold start
(Optional) If you are not sure what state your local container is in or if you have previously used your local container in the context of a fabric, it is a good idea to force a cold start before you continue. This ensures that your container is in a known state (a plain, unmanaged container) and makes it more likely that you will be able to follow the tutorial steps without any problems.
To force a cold start, perform the following steps:
- If the container is currently running, shut it down by entering the following console command:
JBossFuse:karaf@root> shutdown -f
NoteIf your container has any child instances running, you must also shut the child instances down. On *NIX systems, you could use the commandps -ef | grep karafto discover any child instances. - Delete the
InstallDir/data/directory.WarningThis will completely wipe the state of the container (apart from the configuration settings stored underInstallDir/etc/).NoteIf your container has any child instances, you must also delete theInstallDir/instances/directory, which contains the data for the child instances. - Start the container by entering the following commands:
cd InstallDir/bin
./fuse
Create a fabric on your local container
To access the necessary Fabric functionality and Fabric commands, you need to create a fabric on your local container. Perform the following steps:
- Any existing users in the
InstallDir/etc/users.propertiesfile are automatically used to initialize the fabric's user data, when you create the fabric. You can populate theusers.propertiesfile, by adding one or more lines of the following form:Username=Password[,RoleA][,RoleB]...
But there must not be any users in this file that have theadminrole. If theInstallDir/etc/users.propertiesalready contains users with theadminrole, you should delete those users before creating the fabric.WarningIf you leave some administrator credentials in theusers.propertiesfile, this represents a security risk because the file could potentially be accessed by other containers in the fabric.NoteThe initialization of user data fromusers.propertieshappens only once, at the time the fabric is created. After the fabric has been created, any changes you make tousers.propertieswill have no effect on the fabric's user data. - To create the fabric container, enter the following console command:
JBossFuse:karaf@root> fabric:create --new-user AdminUser --new-user-password AdminPass
  --zookeeper-password ZooPass --wait-for-provisioning
The--new-userand--new-user-passwordoptions specify the credentials for a new administrator user. TheZooPasspassword specifies the password that is used to protect the Zookeeper registry.NoteIf you use a VPN (virtual private network) on your local machine, it is advisable to log off VPN before you create the fabric and to stay logged off while you are using the local container. A local Fabric Server is permanently associated with a fixed IP address or hostname. If VPN is enabled when you create the fabric, the underlying Java runtime is liable to detect and use the VPN hostname instead of your permanent local hostname. This can also be an issue with multi-homed machines. To be absolutely sure about the hostname, you could specify the IP address explicitly—see chapter "Creating a New Fabric" in "Fabric Guide".
Install JClouds and Fabric commands on the local container
After a cold start, the container does not have the required cloud commands installed by default. To enable support for accessing and administering the AWS EC2 provider, deploy the
cloud-aws.ec2 profile into your local container, as follows:
JBossFuse:karaf@root> fabric:container-add-profile root cloud-aws.ec2
1.5. Register the Amazon EC2 Provider
What is the purpose of registering the provider?
Instead of administering your compute instances directly through the AWS Console, Amazon provides a Web service that enables you to administer your compute instances remotely (for example, using the JClouds utilities). Registering the Amazon EC2 provider consists essentially of caching your AWS login credentials in the container, so that the JClouds library and the Fabric console commands can administer the provider.
Create a new Access Key
If you do not already have an AWS Access Key (which consists of an Access Key ID and a Secret Access Key), create a new Access Key as follows:
- Use your Web browser to navigate to http://aws.amazon.com/
- Move your mouse to the drop-down menu and select the menu item.
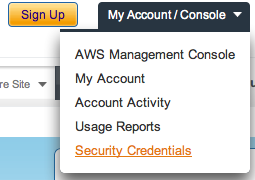
- If you are not already logged on to AWS, you are now prompted to log on using the account details you specified in Section 1.2, “Create an Amazon EC2 Account”.
- Expand the Access Keys section and click Create New Access Key.

- The Create Access Key Dialog appears. Click Download Key File and save the downloaded file,
rootkey.csv, to a secure location on your filesystem.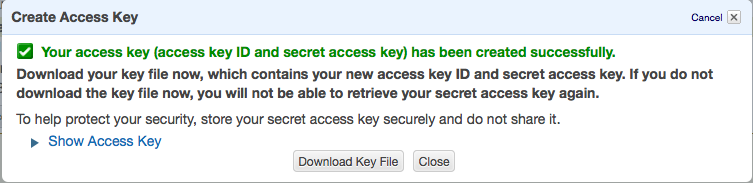 NoteThis is the only chance you get to download the Secret Access Key from AWS. If you lose the key at this point, you cannot retrieve it later (you would then need to create a new Access Key).
Registering the Amazon EC2 provider
To register the Amazon EC2 provider, perform the following steps:
- Open the file containing your Access Key (usually named
rootkey.csv), so that you can read the Access Key ID an the Secret Access Key for your Amazon account. - In your local container, register the Amazon EC2 provider by entering the following console command:
JBossFuse:karaf@root> fabric:cloud-service-add --name aws-ec2 --provider aws-ec2
--identity AccessKeyID --credential SecretAccessKey
This command can take a minute or two to complete. If it is successful, you should see some output like the following:Waiting for aws-ec2 service to initialize.
1.6. Create a Fabric Server on EC2
What is a Fabric Server?
The first step in creating a new fabric in the cloud is to create a Fabric Server instance. A Fabric Server is a container with a Fabric Registry Agent deployed inside it (there must be at least one Fabric Server in a fabric). You can think of it as a seed for the rest of the fabric.
What happens when you create a Fabric Server?
The
fabric:container-create-cloud console command, which creates the Fabric Server, is a powerful command that does a lot of things:
- Using the JClouds library, it connects to the AWS and creates a new compute instance in the cloud.
- It uploads your SSH public key to the compute instance.
- It installs all of the basic prerequisites for provisioning and running a Red Hat JBoss Fuse container in the compute instance (for example, by installing JDK 1.6).
- It installs JBoss Fuse in the compute instance.
- It starts up the JBoss Fuse container and deploys a Fabric Registry Agent into the container, so that it functions as a Fabric Server.
- It modifies the EC2 firewall settings for the compute instance (if necessary, creating a new EC2 security group).
Creating a Fabric Server on a micro instance
To create a Fabric Server on a micro instance,
t1.micro (in Amazon's free usage tier) using a Red Hat Enterprise Linux (RHEL) 6.4 image, enter the following console command:
JBossFuse:karaf@root> fabric:container-create-cloud --name aws-ec2 --ensemble-server
--new-user admin --new-user-password admin --zookeeper-password admin
--hardwareId t1.micro --os-family rhel --os-version 6.4 registry
This command creates a container called
registry and the --ensemble-server option makes the new container a Fabric Server. This command can take a minute or two to complete. If it is successfully, you should see output like the following:
Looking up for compute service.
Creating 1 nodes on aws-ec2. It may take a while ...
Node fabric-dcfaa2fd has been succesfully created.
Installing fabric agent on container registry. It may take a while...
Overriding resolver to publichostname.
[id]                 [container]  [registry password] [public addresses] [status]
us-east-1/i-dcfaa2fd registry     admin               [54.224.255.118]   success
Tip
In a production environment, you would need to allocate a permanent IP address to the Fabric Server. By default, when you restart an instance in EC2, the IP address is automatically re-allocated.
Creating a Fabric Server on a small instance
The amount of memory available in a micro instance is a bit limited for a Red Hat JBoss Fuse container instance. If you want to create a fabric for a production deployment, it is typically better to use at least a small instance,
m1.small. You can create a small instance, as follows:
JBossFuse:karaf@root> fabric:container-create-cloud --name aws-ec2 --ensemble-server
--new-user admin --new-user-password admin --zookeeper-password admin
--hardwareId m1.small --os-family rhel --os-version 6.4 registry
Important
An
m1.small instance is not covered by the Amazon free usage tier and incurs an hourly usage charge (until the instance is terminated).
SSH login to the new instance
It should now be possible to log on to the new compute instance using SSH. Open a new command prompt and enter the following command:
ssh 50.19.18.91
Where you provide the compute instance's public IP address as the argument to the
ssh command (you could also use the compute instance's public hostname). The ssh command uses the default RSA private key as credentials.
If you did not put your SSH key pair in the default location, you can specify the private key location explicitly, as follows:
ssh -i PrivateKeyFile 50.19.18.91
Hardware list
If you want to see all of the hardware options available, use the
jclouds:hardware-list console command:
karaf@root> jclouds:hardware-list
[id]         [ram] [cpu] [cores]
cc1.4xlarge  23552  32.0     8.0
cg1.4xlarge  22528  32.0     8.0
cc2.8xlarge  61952  88.0    16.0
hi1.4xlarge  61952  35.0    16.0
hs1.8xlarge 119808  35.0    16.0
g2.2xlarge   15360  26.0     8.0
t1.micro       630   1.0     1.0
c1.medium     1740   5.0     2.0
c1.xlarge     7168  20.0     8.0
c3.xlarge     7168  14.0     4.0
c3.2xlarge   15360  28.0     8.0
c3.4xlarge   30720  55.0    16.0
c3.8xlarge   61440 108.0    32.0
i2.xlarge    31232  14.0     4.0
i2.2xlarge   62464  27.0     8.0
i2.4xlarge  124928  53.0    16.0
i2.8xlarge  249856 104.0    32.0
m1.large      7680   4.0     2.0
m1.small      1740   1.0     1.0
m1.medium     3750   2.0     1.0
m1.xlarge    15360   8.0     4.0
m2.xlarge    17510   6.5     2.0
m2.2xlarge   35020  13.0     4.0
m2.4xlarge   70041  26.0     8.0
m3.medium     3840   3.0     1.0
m3.large      7680   6.5     2.0
m3.xlarge    15360  13.0     4.0
m3.2xlarge   30720  26.0     8.0
Image list
If you want to find out what machine images are available on Amazon EC2, enter the following console command:
JBossFuse:karaf@root> jclouds:image-list
Groups and security
Fabric automatically configures an Amazon EC2 security group for the new containers (default is the
jclouds#fabric security group). All of the containers in a fabric should belong to the same security group. By default, Fabric adds all of the cloud containers to the fabric group. If necessary, you can specify the group explicitly by specifying the --group option on the fabric:container-create-cloud command.
1.7. Initialize the Fabric Server on EC2
Overview
Now that you have a Fabric Server in the cloud, you need to set it up so that it is capable of expanding. You can initialize the Fabric Server so that it is capable of creating and provisioning new managed containers in the cloud.
Steps to initialize the Fabric Server
To initialize the Fabric Server on EC2, perform the following steps:
- Log on to the remote Fabric Server using the command-line client. In the
InstallDir/bindirectory there is a client utility, which you can use to get console access to the remote Fabric Server. Enter the following at the command line:cd
InstallDir/bin./client -u admin -p admin -h 50.19.18.91Where50.19.18.91should be replaced by the public IP address of theregistrycontainer that you created in the previous section. If this command is successful, you should see the following client console:| ___| | | (_) | _ | | |_ __ _| |__ _ __ _ ___ \ V / | _/ _` | '_ \| '__| |/ __|/ _ \ | || (_| | |_) | | | | (__| |_| | \_| \__,_|_.__/|_| |_|\___\_____/ Fabric8 Container (1.0.0.redhat-350) http://fabric8.io/ Type 'help' to get started and 'help [cmd]' for help on a specific command. Hit '<ctrl-d>' or 'osgi:shutdown' to shutdown this container. Open a browser to http://localhost:8181 to access the management console Create a new Fabric via 'fabric:create' or join an existing Fabric via 'fabric:join [someUrls]' Fabric8:admin@registry>
- Deploy the
cloud-aws.ec2profile, to gain access to the cloud console commands:Fabric8:admin@registry> fabric:container-add-profile registry cloud-aws.ec2
NoteDuring re-deployment, you will automatically be logged out of the client! - Log back on to the Fabric Server using the
clientutility:./client -u admin -p admin -h 50.19.18.91
- Register the Amazon EC2 provider, by entering the following console command:
Fabric8:admin@registry> fabric:cloud-service-add --name aws-ec2 --provider aws-ec2
--identity AccessKeyID --credential SecretAccessKey
- You can check that the
aws-ec2service has been registered, by entering the following command:Fabric8:admin@registry> fabric:cloud-service-list
Which should display output like the following:Compute APIs: ------------- [id] [type] [local services] [fabric services] ec2 compute [ ] [ ] stub compute [ ] [ ] Compute Providers: ------------- [id] [type] [local services] [fabric services] aws-ec2 compute [ ] [ aws-ec2 ]
1.8. Provision Containers
Provisioning containers
All of the prerequisites are now in place for provisioning Red Hat JBoss Fuse containers in the cloud. After joining your local container to the fabric (which enables you to administer the fabric remotely), you can provision a new container in the cloud by entering a single console command.
Create container and deploy profile in one step
If you already know what profiles you want to deploy in the new containers, the most efficient approach is to create the compute instances and specify the profiles all in the same command.
For example, to create a new compute instances as part of the current fabric, and to deploy the profiles
mq-default and fabric into it, perform the following steps:
- Log on to the Fabric Server on EC2 using the
clientutility:./client -u admin -p admin -h 50.19.18.91
- Enter the following console command:
Fabric8:admin@registry> fabric:container-create-cloud --name aws-ec2
--hardwareId t1.micro --os-family rhel --os-version 6.4
--profile mq-default --profile fabric mqserver
Note how you can deploy multiple profiles, by specifying the--provideroption multiple times.
The preceding
fabric:container-create-cloud command produces output like the following:
Looking up for compute service.
Creating 1 nodes on aws-ec2. It may take a while ...
Node fabric-72d5f553 has been succesfully created.
Installing fabric agent on container mqserver. It may take a while...
Overriding resolver to publichostname.
                  [id] [container]                    [public addresses]             [status]
  us-east-1/i-72d5f553 mqserver                       [54.81.141.252]                success
Create container and deploy profile in two steps
You can create containers and deploy profiles in separate steps, as follows:
- Log on to the Fabric Server on EC2 using the
clientutility:./client -u admin -p admin -h 50.19.18.91
- Create a new Fabric container,
mqserver, as follows:Fabric8:admin@registry> fabric:container-create-cloud --name aws-ec2 --hardwareId t1.micro --os-family rhel --os-version 6.4 mqserver
- Deploy the profiles
mq-defaultandfabricinto the new container, as follows:Fabric8:admin@registry> fabric:container-change-profile mqserver mq-default fabric
Check the provision status
After creating and deploying, you can test the provision status of the new containers using the
fabric:container-list command, as follows:
 Fabric8:admin@registrygt container-list
[id]       [version] [connected] [profiles]                                     [provision status]
mqserver   1.0       true        mq-default, fabric                             success
registry*  1.0       true        fabric, fabric-ensemble-0000-1, cloud-aws.ec2  success
1.9. Terminate Instances
Terminating EC2 instances
Terminating an EC2 compute instance means that the instance is completely destroyed and the hardware resources are returned to the pool. In contrast, stopping an instance (which is possible for some machine images) merely shuts down the processes running on the instance, preserving any data and software on the instance.
You can use either of the following approaches to terminate instances on Amazon EC2:
Important
You should always terminate instances when you are finished with them, in order to minimize usage charges. Stopping an instance is not the same as terminating an instance
Terminate individual instances
The cleanest way to terminate an individual compute instance is to use the
fabric:container-delete console command, as follows:
- Log on to the remote Fabric Server on EC2, using the client utility:
./client -u admin -p admin -h 50.19.18.91
- Enter the following console command:
Fabric8:admin@registry> fabric:container-delete mqserver
The advantage of this command is that all of the corresponding entries in the Fabric Registry are cleaned up, before the container's compute instance is terminated.
Terminate all containers
You can quickly terminate all of your compute instances on the EC2 cloud using the
jclouds:node-destroy-all command, as follows:
- Start up your local container:
./fuse
- Enter the following console command:
JBossFuse:karaf@root> jclouds:node-destroy-all
Note
This example assumes that your entire fabric is hosted in the cloud, so that you do not need to worry about the consistency of registry entries when you delete it. This approach would not be appropriate, however, if you have a fabric that overlaps with host machines outside the cloud.
Legal Notice
Trademark Disclaimer
The text of and illustrations in this document are licensed by Red Hat under a Creative Commons Attribution–Share Alike 3.0 Unported license ("CC-BY-SA"). An explanation of CC-BY-SA is available at http://creativecommons.org/licenses/by-sa/3.0/. In accordance with CC-BY-SA, if you distribute this document or an adaptation of it, you must provide the URL for the original version.
Red Hat, as the licensor of this document, waives the right to enforce, and agrees not to assert, Section 4d of CC-BY-SA to the fullest extent permitted by applicable law.
Red Hat, Red Hat Enterprise Linux, the Shadowman logo, JBoss, MetaMatrix, Fedora, the Infinity Logo, and RHCE are trademarks of Red Hat, Inc., registered in the United States and other countries.
Apache, ServiceMix, Camel, CXF, and ActiveMQ are trademarks of Apache Software Foundation. Any other names contained herein may be trademarks of their respective owners.
Legal Notice
Third Party Acknowledgements
One or more products in the Red Hat JBoss Fuse release includes third party components covered by licenses that require that the following documentation notices be provided:
- JLine (http://jline.sourceforge.net) jline:jline:jar:1.0License: BSD (LICENSE.txt) - Copyright (c) 2002-2006, Marc Prud'hommeaux
mwp1@cornell.eduAll rights reserved.Redistribution and use in source and binary forms, with or without modification, are permitted provided that the following conditions are met:- Redistributions of source code must retain the above copyright notice, this list of conditions and the following disclaimer.
- Redistributions in binary form must reproduce the above copyright notice, this list of conditions and the following disclaimer in the documentation and/or other materials provided with the distribution.
- Neither the name of JLine nor the names of its contributors may be used to endorse or promote products derived from this software without specific prior written permission.
THIS SOFTWARE IS PROVIDED BY THE COPYRIGHT HOLDERS AND CONTRIBUTORS "AS IS" AND ANY EXPRESS OR IMPLIED WARRANTIES, INCLUDING, BUT NOT LIMITED TO, THE IMPLIED WARRANTIES OF MERCHANTABILITY AND FITNESS FOR A PARTICULAR PURPOSE ARE DISCLAIMED. IN NO EVENT SHALL THE COPYRIGHT OWNER OR CONTRIBUTORS BE LIABLE FOR ANY DIRECT, INDIRECT, INCIDENTAL, SPECIAL, EXEMPLARY, OR CONSEQUENTIAL DAMAGES (INCLUDING, BUT NOT LIMITED TO, PROCUREMENT OF SUBSTITUTE GOODS OR SERVICES; LOSS OF USE, DATA, OR PROFITS; OR BUSINESS INTERRUPTION) HOWEVER CAUSED AND ON ANY THEORY OF LIABILITY, WHETHER IN CONTRACT, STRICT LIABILITY, OR TORT (INCLUDING NEGLIGENCE OR OTHERWISE) ARISING IN ANY WAY OUT OF THE USE OF THIS SOFTWARE, EVEN IF ADVISED OF THE POSSIBILITY OF SUCH DAMAGE. - Stax2 API (http://woodstox.codehaus.org/StAX2) org.codehaus.woodstox:stax2-api:jar:3.1.1License: The BSD License (http://www.opensource.org/licenses/bsd-license.php)Copyright (c) <YEAR>, <OWNER> All rights reserved.Redistribution and use in source and binary forms, with or without modification, are permitted provided that the following conditions are met:
- Redistributions of source code must retain the above copyright notice, this list of conditions and the following disclaimer.
- Redistributions in binary form must reproduce the above copyright notice, this list of conditions and the following disclaimer in the documentation and/or other materials provided with the distribution.
THIS SOFTWARE IS PROVIDED BY THE COPYRIGHT HOLDERS AND CONTRIBUTORS "AS IS" AND ANY EXPRESS OR IMPLIED WARRANTIES, INCLUDING, BUT NOT LIMITED TO, THE IMPLIED WARRANTIES OF MERCHANTABILITY AND FITNESS FOR A PARTICULAR PURPOSE ARE DISCLAIMED. IN NO EVENT SHALL THE COPYRIGHT HOLDER OR CONTRIBUTORS BE LIABLE FOR ANY DIRECT, INDIRECT, INCIDENTAL, SPECIAL, EXEMPLARY, OR CONSEQUENTIAL DAMAGES (INCLUDING, BUT NOT LIMITED TO, PROCUREMENT OF SUBSTITUTE GOODS OR SERVICES; LOSS OF USE, DATA, OR PROFITS; OR BUSINESS INTERRUPTION) HOWEVER CAUSED AND ON ANY THEORY OF LIABILITY, WHETHER IN CONTRACT, STRICT LIABILITY, OR TORT (INCLUDING NEGLIGENCE OR OTHERWISE) ARISING IN ANY WAY OUT OF THE USE OF THIS SOFTWARE, EVEN IF ADVISED OF THE POSSIBILITY OF SUCH DAMAGE. - jibx-run - JiBX runtime (http://www.jibx.org/main-reactor/jibx-run) org.jibx:jibx-run:bundle:1.2.3License: BSD (http://jibx.sourceforge.net/jibx-license.html) Copyright (c) 2003-2010, Dennis M. Sosnoski.All rights reserved.Redistribution and use in source and binary forms, with or without modification, are permitted provided that the following conditions are met:
- Redistributions of source code must retain the above copyright notice, this list of conditions and the following disclaimer.
- Redistributions in binary form must reproduce the above copyright notice, this list of conditions and the following disclaimer in the documentation and/or other materials provided with the distribution.
- Neither the name of JiBX nor the names of its contributors may be used to endorse or promote products derived from this software without specific prior written permission.
THIS SOFTWARE IS PROVIDED BY THE COPYRIGHT HOLDERS AND CONTRIBUTORS "AS IS" AND ANY EXPRESS OR IMPLIED WARRANTIES, INCLUDING, BUT NOT LIMITED TO, THE IMPLIED WARRANTIES OF MERCHANTABILITY AND FITNESS FOR A PARTICULAR PURPOSE ARE DISCLAIMED. IN NO EVENT SHALL THE COPYRIGHT OWNER OR CONTRIBUTORS BE LIABLE FOR ANY DIRECT, INDIRECT, INCIDENTAL, SPECIAL, EXEMPLARY, OR CONSEQUENTIAL DAMAGES (INCLUDING, BUT NOT LIMITED TO, PROCUREMENT OF SUBSTITUTE GOODS OR SERVICES; LOSS OF USE, DATA, OR PROFITS; OR BUSINESS INTERRUPTION) HOWEVER CAUSED AND ON ANY THEORY OF LIABILITY, WHETHER IN CONTRACT, STRICT LIABILITY, OR TORT (INCLUDING NEGLIGENCE OR OTHERWISE) ARISING IN ANY WAY OUT OF THE USE OF THIS SOFTWARE, EVEN IF ADVISED OF THE POSSIBILITY OF SUCH DAMAGE. - JavaAssist (http://www.jboss.org/javassist) org.jboss.javassist:com.springsource.javassist:jar:3.9.0.GA:compileLicense: MPL (http://www.mozilla.org/MPL/MPL-1.1.html)
- HAPI-OSGI-Base Module (http://hl7api.sourceforge.net/hapi-osgi-base/) ca.uhn.hapi:hapi-osgi-base:bundle:1.2License: Mozilla Public License 1.1 (http://www.mozilla.org/MPL/MPL-1.1.txt)