
Red Hat Training
A Red Hat training course is available for Red Hat Fuse
Apache CXF Development Guide
Develop applications with Apache CXF Web services
Copyright © 2011-2014 Red Hat, Inc. and/or its affiliates.
Abstract
Part I. Writing WSDL Contracts
Abstract
Chapter 1. Introducing WSDL Contracts
Abstract
1.1. Structure of a WSDL document
definition element. These elements describe a service and how an endpoint implementing that service is accessed.
- A logical part that defines the service in implementation neutral terms
- A concrete part that defines how an endpoint implementing the service is exposed on a network
The logical part
types, the message, and the portType elements. It describes the service’s interface and the messages exchanged by the service. Within the types element, XML Schema is used to define the structure of the data that makes up the messages. A number of message elements are used to define the structure of the messages used by the service. The portType element contains one or more operation elements that define the messages sent by the operations exposed by the service.
The concrete part
binding and the service elements. It describes how an endpoint that implements the service connects to the outside world. The binding elements describe how the data units described by the message elements are mapped into a concrete, on-the-wire data format, such as SOAP. The service elements contain one or more port elements which define the endpoints implementing the service.
1.2. WSDL elements
definitions— The root element of a WSDL document. The attributes of this element specify the name of the WSDL document, the document’s target namespace, and the shorthand definitions for the namespaces referenced in the WSDL document.types— The XML Schema definitions for the data units that form the building blocks of the messages used by a service. For information about defining data types see Chapter 2, Defining Logical Data Units.message— The description of the messages exchanged during invocation of a services operations. These elements define the arguments of the operations making up your service. For information on defining messages see Chapter 3, Defining Logical Messages Used by a Service.portType— A collection ofoperationelements describing the logical interface of a service. For information about defining port types see Chapter 4, Defining Your Logical Interfaces.operation— The description of an action performed by a service. Operations are defined by the messages passed between two endpoints when the operation is invoked. For information on defining operations see the section called “Operations”.binding— The concrete data format specification for an endpoint. Abindingelement defines how the abstract messages are mapped into the concrete data format used by an endpoint. This element is where specifics such as parameter order and return values are specified.service— A collection of relatedportelements. These elements are repositories for organizing endpoint definitions.port— The endpoint defined by a binding and a physical address. These elements bring all of the abstract definitions together, combined with the definition of transport details, and they define the physical endpoint on which a service is exposed.
1.3. Designing a contract
- Define the data types used by your services.
- Define the messages used by your services.
- Define the interfaces for your services.
- Define the bindings between the messages used by each interface and the concrete representation of the data on the wire.
- Define the transport details for each of the services.
Chapter 2. Defining Logical Data Units
Abstract
- Breaking the data into logical units that can be mapped into the data types used by the physical implementations of the service
- Combining the logical units into messages that are passed between endpoints to carry out the operations
2.1. Mapping data into logical data units
Available type systems for defining service data units
XML Schema as a type system
Considerations for creating your data units
- Use elements, not attributes.
- Do not use protocol-specific types as base types.
2.2. Adding data units to a contract
Procedure
- Determine all the data units used in the interface described by the contract.
- Create a
typeselement in your contract. - Create a
schemaelement, shown in Example 2.1, “Schema entry for a WSDL contract”, as a child of thetypeelement.ThetargetNamespaceattribute specifies the namespace under which new data types are defined. The remaining entries should not be changed.Example 2.1. Schema entry for a WSDL contract
<schema targetNamespace="http://schemas.iona.com/bank.idl" xmlns="http://www.w3.org/2001/XMLSchema" xmlns:wsdl="http://schemas.xmlsoap.org/wsdl/"> - For each complex type that is a collection of elements, define the data type using a
complexTypeelement. See Section 2.4.1, “Defining data structures”. - For each array, define the data type using a
complexTypeelement. See Section 2.4.2, “Defining arrays”. - For each complex type that is derived from a simple type, define the data type using a
simpleTypeelement. See Section 2.4.4, “Defining types by restriction”. - For each enumerated type, define the data type using a
simpleTypeelement. See Section 2.4.5, “Defining enumerated types”. - For each element, define it using an
elementelement. See Section 2.5, “Defining elements”.
2.3. XML Schema simple types
Entering simple types
element elements used in the types section of your contract. They are also used in the base attribute of restriction elements and extension elements.
xsd prefix. For example, to specify that an element is of type int, you would enter xsd:int in its type attribute as shown in Example 2.2, “Defining an element with a simple type”.
Example 2.2. Defining an element with a simple type
<element name="simpleInt" type="xsd:int" />
Supported XSD simple types
- xsd:string
- xsd:normalizedString
- xsd:int
- xsd:unsignedInt
- xsd:long
- xsd:unsignedLong
- xsd:short
- xsd:unsignedShort
- xsd:float
- xsd:double
- xsd:boolean
- xsd:byte
- xsd:unsignedByte
- xsd:integer
- xsd:positiveInteger
- xsd:negativeInteger
- xsd:nonPositiveInteger
- xsd:nonNegativeInteger
- xsd:decimal
- xsd:dateTime
- xsd:time
- xsd:date
- xsd:QName
- xsd:base64Binary
- xsd:hexBinary
- xsd:ID
- xsd:token
- xsd:language
- xsd:Name
- xsd:NCName
- xsd:NMTOKEN
- xsd:anySimpleType
- xsd:anyURI
- xsd:gYear
- xsd:gMonth
- xsd:gDay
- xsd:gYearMonth
- xsd:gMonthDay
2.4. Defining complex data types
2.4.1. Defining data structures
complexType elements. Specifying a complex type requires three pieces of information:
- The name of the defined type is specified in the
nameattribute of thecomplexTypeelement. - The first child element of the
complexTypedescribes the behavior of the structure’s fields when it is put on the wire. See the section called “Complex type varieties”. - Each of the fields of the defined structure are defined in
elementelements that are grandchildren of thecomplexTypeelement. See the section called “Defining the parts of a structure”.
Example 2.3. Simple Structure
struct personalInfo
{
  string name;
  int age;
};
Example 2.4. A complex type
<complexType name="personalInfo">
  <sequence>
    <element name="name" type="xsd:string" />
    <element name="age" type="xsd:int" />
  </sequence>
</complexType>
Complex type varieties
complexType element determines which variety of complex type is being used. Table 2.1, “Complex type descriptor elements” shows the elements used to define complex type behavior.
Table 2.1. Complex type descriptor elements
sequence element, an all element, or a choice is not specified, then a sequence is assumed. For example, the structure defined in Example 2.4, “A complex type” generates a message containing two elements: name and age.
choice element, as shown in Example 2.5, “Simple complex choice type”, it generates a message with either a name element or an age element.
Example 2.5. Simple complex choice type
<complexType name="personalInfo">
  <choice>
    <element name="name" type="xsd:string"/>
    <element name="age" type="xsd:int"/>
  </choice>
</complexType>
Defining the parts of a structure
element elements. Every complexType element should contain at least one element element. Each element element in the complexType element represents a field in the defined data structure.
element elements have two required attributes:
name and type, element elements have two other commonly used optional attributes: minOcurrs and maxOccurs. These attributes place bounds on the number of times the field occurs in the structure. By default, each field occurs only once in a complex type. Using these attributes, you can change how many times a field must or can appear in a structure. For example, you can define a field, previousJobs, that must occur at least three times, and no more than seven times, as shown in Example 2.6, “Simple complex type with occurrence constraints”.
Example 2.6. Simple complex type with occurrence constraints
<complexType name="personalInfo>
  <all>
    <element name="name" type="xsd:string"/>
    <element name="age" type="xsd:int"/>
    <element name="previousJobs" type="xsd:string:
             minOccurs="3" maxOccurs="7"/>
  </all>
</complexType>minOccurs to make the age field optional by setting the minOccurs to zero as shown in Example 2.7, “Simple complex type with minOccurs set to zero”. In this case age can be omitted and the data will still be valid.
Example 2.7. Simple complex type with minOccurs set to zero
<complexType name="personalInfo>
  <choice>
    <element name="name" type="xsd:string"/>
    <element name="age" type="xsd:int" minOccurs="0"/>
  </choice>
</complexType>
Defining attributes
complexType element name is an attribute. They are specified using the attribute element. It comes after the all, sequence, or choice element and are a direct child of the complexType element. Example 2.8, “Complex type with an attribute” shows a complex type with an attribute.
Example 2.8. Complex type with an attribute
<complexType name="personalInfo>
  <all>
    <element name="name" type="xsd:string"/>
    <element name="previousJobs" type="xsd:string"
             minOccurs="3" maxOccurs="7"/>
  </all>
  <attribute name="age" type="xsd:int" use="optional" />
</complexType>attribute element has three attributes:
default. The default attribute allows you to specify a default value for the attribute.
2.4.2. Defining arrays
maxOccurs attribute has a value greater than one. The second is to use SOAP arrays. SOAP arrays provide added functionality such as the ability to easily define multi-dimensional arrays and to transmit sparsely populated arrays.
Complex type arrays
maxOccurs attribute. For example, to define an array of twenty floating point numbers you use a complex type similar to the one shown in Example 2.9, “Complex type array”.
Example 2.9. Complex type array
<complexType name="personalInfo">
  <element name="averages" type="xsd:float" maxOccurs="20"/>
</complexType>
minOccurs attribute.
SOAP arrays
wsdl:arrayType element. The syntax for this is shown in Example 2.10, “Syntax for a SOAP array derived using wsdl:arrayType”.
Example 2.10. Syntax for a SOAP array derived using wsdl:arrayType
<complexType name="TypeName">
  <complexContent>
    <restriction base="SOAP-ENC:Array">
      <attribute ref="SOAP-ENC:arrayType"
                 wsdl:arrayType="ElementType<ArrayBounds>"/>
    </restriction>
  </complexContent>
</complexType>[]; to specify a two-dimensional array use either [][] or [,].
wsdl:arrayType attribute specifies the type of the array elements, xsd:string, and the number of dimensions, with [] implying one dimension.
Example 2.11. Definition of a SOAP array
<complexType name="SOAPStrings">
  <complexContent>
    <restriction base="SOAP-ENC:Array">
      <attribute ref="SOAP-ENC:arrayType"
                 wsdl:arrayType="xsd:string[]"/>
    </restriction>
  </complexContent>
</complexType>Example 2.12. Syntax for a SOAP array derived using an element
<complexType name="TypeName">
  <complexContent>
    <restriction base="SOAP-ENC:Array">
      <sequence>
        <element name="ElementName" type="ElementType"
                 maxOccurs="unbounded"/>
      </sequence>
    </restriction>
  </complexContent>
</complexType>maxOccurs attribute must always be set to unbounded.
2.4.3. Defining types by extension
alienInfo, that extends the personalInfo structure defined in Example 2.4, “A complex type” by adding a new element called planet.
- The name of the type is defined by the
nameattribute of thecomplexTypeelement. - The
complexContentelement specifies that the new type will have more than one element.NoteIf you are only adding new attributes to the complex type, you can use asimpleContentelement. - The type from which the new type is derived, called the base type, is specified in the
baseattribute of theextensionelement. - The new type’s elements and attributes are defined in the
extensionelement, the same as they are for a regular complex type.
alienInfo is defined as shown in Example 2.13, “Type defined by extension”.
Example 2.13. Type defined by extension
<complexType name="alienInfo">
  <complexContent>
    <extension base="personalInfo">
      <sequence>
        <element name="planet" type="xsd:string"/>
      </sequence>
    </extension>
  </complexContent>
</complexType>
2.4.4. Defining types by restriction
SSN, which is a string of exactly nine characters. New types defined by restricting simple types are defined using a simpleType element.
- The name of the new type is specified by the
nameattribute of thesimpleTypeelement. - The simple type from which the new type is derived, called the base type, is specified in the
restrictionelement. See the section called “Specifying the base type”. - The rules, called facets, defining the restrictions placed on the base type are defined as children of the
restrictionelement. See the section called “Defining the restrictions”.
Specifying the base type
restriction element. The restriction element is the only child of a simpleType element and has one attribute, base, that specifies the base type. The base type can be any of the XML Schema simple types.
Example 2.14. Using int as the base type
<simpleType name="restrictedInt">
  <restriction base="xsd:int">
    ...
  </restriction>
</simpleType>
Defining the restrictions
value, that defines how the facet is enforced. The available facets and their valid value settings depend on the base type. For example, xsd:string supports six facets, including:
lengthminLengthmaxLengthpatternwhitespaceenumeration
restriction element.
Example
SSN, which represents a social security number. The resulting type is a string of the form xxx-xx-xxxx. <SSN>032-43-9876<SSN> is a valid value for an element of this type, but <SSN>032439876</SSN> is not.
Example 2.15. SSN simple type description
<simpleType name="SSN">
  <restriction base="xsd:string">
    <pattern value="\d{3}-\d{2}-\d{4}"/>
  </restriction>
</simpleType>
2.4.5. Defining enumerated types
enumeration facet which is supported by all XML Schema primitive types. As with enumerated types in most modern programming languages, a variable of this type can only have one of the specified values.
Defining an enumeration in XML Schema
Example 2.16. Syntax for an enumeration
<simpleType name="EnumName">
  <restriction base="EnumType">
    <enumeration value="Case1Value"/>
    <enumeration value="Case2Value"/>
    ...
    <enumeration value="CaseNValue"/>
  </restriction>
</simpleType>Example
widgetSize, shown in Example 2.17, “widgetSize enumeration”, would be valid if it contained <widgetSize>big</widgetSize>, but it would not be valid if it contained <widgetSize>big,mungo</widgetSize>.
Example 2.17. widgetSize enumeration
<simpleType name="widgetSize">
  <restriction base="xsd:string">
    <enumeration value="big"/>
    <enumeration value="large"/>
    <enumeration value="mungo"/>
  </restriction>
</simpleType>
2.5. Defining elements
element element. Like the element element used to define the members of a complex type, they have three attributes:
name— A required attribute that specifies the name of the element as it appears in an XML document.type— Specifies the type of the element. The type can be any XML Schema primitive type or any named complex type defined in the contract. This attribute can be omitted if the type has an in-line definition.nillable— Specifies whether an element can be omitted from a document entirely. Ifnillableis set totrue, the element can be omitted from any document generated using the schema.
complexType element or a simpleType element. Once you specify if the type of data is complex or simple, you can define any type of data needed using the tools available for each type of data. In-line type definitions are discouraged because they are not reusable.
Chapter 3. Defining Logical Messages Used by a Service
Abstract
message element. The messages are made up of one or more parts that are defined using part elements.
message element in your contracts. Each logical message consists of one or more parts, defined in part elements.
Messages and parameter lists
Message design for integrating with legacy systems
types element of the contract. Your input message contains one part for each input parameter in the method. Your output message contains one part for each output parameter, plus a part to represent the return value, if needed. If a parameter is both an input and an output parameter, it is listed as a part for both the input message and the output message.
Message design for SOAP services
types element of the contract. The wrapper element has the following characteristics:
- It is a complex type containing a sequence of elements. For more information see Section 2.4, “Defining complex data types”.
- If it is a wrapper for an input message:
- It has one element for each of the method’s input parameters.
- Its name is the same as the name of the operation with which it is associated.
- If it is a wrapper for an output message:
- It has one element for each of the method’s output parameters and one element for each of the method’s inout parameters.
- Its first element represents the method’s return parameter.
- Its name would be generated by appending
Responseto the name of the operation with which the wrapper is associated.
Message naming
- Messages should only be used by a single operation.
- Input message names are formed by appending
Requestto the name of the operation. - Output message names are formed by appending
Responseto the name of the operation. - Fault message names should represent the reason for the fault.
Message parts
part element, and is identified by a name attribute and either a type attribute or an element attribute that specifies its data type. The data type attributes are listed in Table 3.1, “Part data type attributes”.
Table 3.1. Part data type attributes
foo, that is passed by reference or is an in/out, it can be a part in both the request message and the response message, as shown in Example 3.1, “Reused part”.
Example 3.1. Reused part
<message name="fooRequest">
  <part name="foo" type="xsd:int"/>
<message>
<message name="fooReply">
  <part name="foo" type="xsd:int"/>
<message>
Example
Example 3.2. personalInfo lookup method
personalInfo lookup(long empId)
Example 3.3. RPC WSDL message definitions
<message name="personalLookupRequest">
  <part name="empId" type="xsd:int"/>
<message/>
<message name="personalLookupResponse>
  <part name="return" element="xsd1:personalInfo"/>
<message/>
Example 3.4. Wrapped document WSDL message definitions
<types>
  <schema ... >
  ...
  <element name="personalLookup">
    <complexType>
      <sequence>
        <element name="empID" type="xsd:int" />
      </sequence>
    </complexType>
  </element>
  <element name="personalLookupResponse">
    <complexType>
      <sequence>
        <element name="return" type="personalInfo" />
      </sequence>
    </complexType>
  </element>
  </schema>
</types>
<message name="personalLookupRequest">
  <part name="empId" element="xsd1:personalLookup"/>
<message/>
<message name="personalLookupResponse">
  <part name="return" element="xsd1:personalLookupResponse"/>
<message/>
Chapter 4. Defining Your Logical Interfaces
Abstract
portType element.
portType element. The portType element is a collection of abstract operation definitions. Each operation is defined by the input, output, and fault messages used to complete the transaction the operation represents. When code is generated to implement the service interface defined by a portType element, each operation is converted into a method containing the parameters defined by the input, output, and fault messages specified in the contract.
Process
- Create a
portTypeelement to contain the interface definition and give it a unique name. See the section called “Port types”. - Create an
operationelement for each operation defined in the interface. See the section called “Operations”. - For each operation, specify the messages used to represent the operation’s parameter list, return type, and exceptions. See the section called “Operation messages”.
Port types
portType element is the root element in a logical interface definition. While many Web service implementations map portType elements directly to generated implementation objects, a logical interface definition does not specify the exact functionality provided by the the implemented service. For example, a logical interface named ticketSystem can result in an implementation that either sells concert tickets or issues parking tickets.
portType element is the unit of a WSDL document that is mapped into a binding to define the physical data used by an endpoint exposing the defined service.
portType element in a WSDL document must have a unique name, which is specified using the name attribute, and is made up of a collection of operations, which are described in operation elements. A WSDL document can describe any number of port types.
Operations
operation elements, define the interaction between two endpoints. For example, a request for a checking account balance and an order for a gross of widgets can both be defined as operations.
portType element must have a unique name, specified using the name attribute. The name attribute is required to define an operation.
Operation messages
Table 4.1. Operation message elements
| Element | Description |
|---|---|
input | Specifies the message the client endpoint sends to the service provider when a request is made. The parts of this message correspond to the input parameters of the operation. |
output | Specifies the message that the service provider sends to the client endpoint in response to a request. The parts of this message correspond to any operation parameters that can be changed by the service provider, such as values passed by reference. This includes the return value of the operation. |
fault | Specifies a message used to communicate an error condition between the endpoints. |
input or one output element. An operation can have both input and output elements, but it can only have one of each. Operations are not required to have any fault elements, but can, if required, have any number of fault elements.
Table 4.2. Attributes of the input and output elements
| Attribute | Description |
|---|---|
name | Identifies the message so it can be referenced when mapping the operation to a concrete data format. The name must be unique within the enclosing port type. |
message | Specifies the abstract message that describes the data being sent or received. The value of the message attribute must correspond to the name attribute of one of the abstract messages defined in the WSDL document. |
name attribute for all input and output elements; WSDL provides a default naming scheme based on the enclosing operation’s name. If only one element is used in the operation, the element name defaults to the name of the operation. If both an input and an output element are used, the element name defaults to the name of the operation with either Request or Response respectively appended to the name.
Return values
operation element is an abstract definition of the data passed during an operation, WSDL does not provide for return values to be specified for an operation. If a method returns a value it will be mapped into the output element as the last part of that message.
Example
Example 4.1. personalInfo lookup interface
interface personalInfoLookup
{
  personalInfo lookup(in int empID)
  raises(idNotFound);
}Example 4.2. personalInfo lookup port type
<message name="personalLookupRequest">
  <part name="empId" element="xsd1:personalLookup"/>
<message/>
<message name="personalLookupResponse">
  <part name="return" element="xsd1:personalLookupResponse"/>
<message/>
<message name="idNotFoundException">
  <part name="exception" element="xsd1:idNotFound"/>
<message/>
<portType name="personalInfoLookup">
  <operation name="lookup">
    <input name="empID" message="personalLookupRequest"/>
    <output name="return" message="personalLookupResponse"/>
    <fault name="exception" message="idNotFoundException"/>
  </operation>
</portType>
Part II. Web Services Bindings
Abstract
Chapter 5. Understanding Bindings in WSDL
Abstract
Overview
Port types and bindings
The WSDL elements
binding element. The binding element has a single attribute, name, that specifies a unique name for the binding. The value of this attribute is used to associate the binding with an endpoint as discussed in Chapter 4, Defining Your Logical Interfaces.
binding element. These elements vary depending on the type of payload format you decide to use. The different payload formats and the elements used to specify their mappings are discussed in the following chapters.
Adding to a contract
Supported bindings
- SOAP 1.1
- SOAP 1.2
- CORBA
- Pure XML
Chapter 6. Using SOAP 1.1 Messages
Abstract
6.1. Adding a SOAP 1.1 Binding
Using wsdl2soap
wsdl2soap {
-i port-type-name
} [
-b binding-name
] [
-d output-directory
] [
-o output-file
] [
-n soap-body-namespace
] [
-style (document/rpc)
] [
-use (literal/encoded)
] [
-v
] [[
-verbose
] | [
-quiet
]]
wsdlurl
| Option | Interpretation |
|---|---|
-i port-type-name |
Specifies the
portType element for which a binding is generated.
|
| wsdlurl | The path and name of the WSDL file containing the portType element definition. |
| Option | Interpretation |
|---|---|
-b binding-name | Specifies the name of the generated SOAP binding. |
-d output-directory | Specifies the directory to place the generated WSDL file. |
-o output-file | Specifies the name of the generated WSDL file. |
-n soap-body-namespace | Specifies the SOAP body namespace when the style is RPC. |
-style (document/rpc) | Specifies the encoding style (document or RPC) to use in the SOAP binding. The default is document. |
-use (literal/encoded) | Specifies the binding use (encoded or literal) to use in the SOAP binding. The default is literal. |
-v | Displays the version number for the tool. |
-verbose | Displays comments during the code generation process. |
-quiet | Suppresses comments during the code generation process. |
-i port-type-name and wsdlurl arguments are required. If the -style rpc argument is specified, the -n soap-body-namspace argument is also required. All other arguments are optional and may be listed in any order.
document/encoded SOAP bindings.
Example
Example 6.1. Ordering System Interface
<?xml version="1.0" encoding="UTF-8"?>
<definitions name="widgetOrderForm.wsdl"
    targetNamespace="http://widgetVendor.com/widgetOrderForm"
    xmlns="http://schemas.xmlsoap.org/wsdl/"
    xmlns:soap="http://schemas.xmlsoap.org/wsdl/soap/"
    xmlns:tns="http://widgetVendor.com/widgetOrderForm"
    xmlns:xsd="http://www.w3.org/2001/XMLSchema"
    xmlns:xsd1="http://widgetVendor.com/types/widgetTypes"
    xmlns:SOAP-ENC="http://schemas.xmlsoap.org/soap/encoding/">

<message name="widgetOrder">
  <part name="numOrdered" type="xsd:int"/>
</message>
<message name="widgetOrderBill">
  <part name="price" type="xsd:float"/>
</message>
<message name="badSize">
  <part name="numInventory" type="xsd:int"/>
</message>

<portType name="orderWidgets">
  <operation name="placeWidgetOrder">
    <input message="tns:widgetOrder" name="order"/>
    <output message="tns:widgetOrderBill" name="bill"/>
    <fault message="tns:badSize" name="sizeFault"/>
  </operation>
</portType>
...
</definitions>orderWidgets is shown in Example 6.2, “SOAP 1.1 Binding for orderWidgets”.
Example 6.2. SOAP 1.1 Binding for orderWidgets
<binding name="orderWidgetsBinding" type="tns:orderWidgets">
  <soap:binding style="document" transport="http://schemas.xmlsoap.org/soap/http"/>
    <operation name="placeWidgetOrder">
      <soap:operation soapAction="" style="document"/>
      <input name="order">
        <soap:body use="literal"/>
      </input>
      <output name="bill">
        <soap:body use="literal"/>
      </output>
      <fault name="sizeFault">
        <soap:body use="literal"/>
      </fault>
  </operation>
</binding>document/literal message style.
6.2. Adding SOAP Headers to a SOAP 1.1 Binding
Overview
soap:header elements to your default SOAP 1.1 binding. The soap:header element is an optional child of the input, output, and fault elements of the binding. The SOAP header becomes part of the parent message. A SOAP header is defined by specifying a message and a message part. Each SOAP header can only contain one message part, but you can insert as many SOAP headers as needed.
Syntax
message attribute of soap:header is the qualified name of the message from which the part being inserted into the header is taken. The part attribute is the name of the message part inserted into the SOAP header. Because SOAP headers are always document style, the WSDL message part inserted into the SOAP header must be defined using an element. Together the message and the part attributes fully describe the data to insert into the SOAP header.
Example 6.3. SOAP Header Syntax
<binding name="headwig">
  <soap:binding style="document"
                transport="http://schemas.xmlsoap.org/soap/http"/>
    <operation name="weave">
      <soap:operation soapAction="" style="document"/>
      <input name="grain">
        <soap:body ... />
        <soap:header message="QName" part="partName"/>
      </input>
...
</binding>message and part attributes, soap:header also supports the namespace, the use, and the encodingStyle attributes. These optional attributes function the same for soap:header as they do for soap:body.
Splitting messages between body and header
soap:body element has an optional attribute, parts, that takes a space delimited list of part names. When parts is defined, only the message parts listed are inserted into the SOAP body. You can then insert the remaining parts into the SOAP header.
Example
orderWidgets service shown in Example 6.1, “Ordering System Interface”. This version has been modified so that each order has an xsd:base64binary value placed in the SOAP header of the request and response. The SOAP header is defined as being the keyVal part from the widgetKey message. In this case you are responsible for adding the SOAP header to your application logic because it is not part of the input or output message.
Example 6.4. SOAP 1.1 Binding with a SOAP Header
<?xml version="1.0" encoding="UTF-8"?>
<definitions name="widgetOrderForm.wsdl"
    targetNamespace="http://widgetVendor.com/widgetOrderForm"
    xmlns="http://schemas.xmlsoap.org/wsdl/"
    xmlns:soap="http://schemas.xmlsoap.org/wsdl/soap/"
    xmlns:tns="http://widgetVendor.com/widgetOrderForm"
    xmlns:xsd="http://www.w3.org/2001/XMLSchema"
    xmlns:xsd1="http://widgetVendor.com/types/widgetTypes"
    xmlns:SOAP-ENC="http://schemas.xmlsoap.org/soap/encoding/">

<types>
  <schema targetNamespace="http://widgetVendor.com/types/widgetTypes"
           xmlns="http://www.w3.org/2001/XMLSchema"
           xmlns:wsdl="http://schemas.xmlsoap.org/wsdl/">
    <element name="keyElem" type="xsd:base64Binary"/>
  </schema>
</types>

<message name="widgetOrder">
  <part name="numOrdered" type="xsd:int"/>
</message>
<message name="widgetOrderBill">
  <part name="price" type="xsd:float"/>
</message>
<message name="badSize">
  <part name="numInventory" type="xsd:int"/>
</message>
<message name="widgetKey">
  <part name="keyVal" element="xsd1:keyElem"/>
</message>

<portType name="orderWidgets">
  <operation name="placeWidgetOrder">
    <input message="tns:widgetOrder" name="order"/>
    <output message="tns:widgetOrderBill" name="bill"/>
    <fault message="tns:badSize" name="sizeFault"/>
  </operation>
</portType>

<binding name="orderWidgetsBinding" type="tns:orderWidgets">
  <soap:binding style="document" transport="http://schemas.xmlsoap.org/soap/http"/>
    <operation name="placeWidgetOrder">
      <soap:operation soapAction="" style="document"/>
      <input name="order">
        <soap:body use="literal"/>
        <soap:header message="tns:widgetKey" part="keyVal"/>
      </input>
      <output name="bill">
        <soap:body use="literal"/>
        <soap:header message="tns:widgetKey" part="keyVal"/>
      </output>
      <fault name="sizeFault">
        <soap:body use="literal"/>
      </fault>
  </operation>
</binding>
...
</definitions>keyVal is a part of the input and output messages. In the soap:body element's parts attribute specifies that keyVal cannot be inserted into the body. However, it is inserted into the SOAP header.
Example 6.5. SOAP 1.1 Binding for orderWidgets with a SOAP Header
<?xml version="1.0" encoding="UTF-8"?>
<definitions name="widgetOrderForm.wsdl"
    targetNamespace="http://widgetVendor.com/widgetOrderForm"
    xmlns="http://schemas.xmlsoap.org/wsdl/"
    xmlns:soap="http://schemas.xmlsoap.org/wsdl/soap/"
    xmlns:tns="http://widgetVendor.com/widgetOrderForm"
    xmlns:xsd="http://www.w3.org/2001/XMLSchema"
    xmlns:xsd1="http://widgetVendor.com/types/widgetTypes"
    xmlns:SOAP-ENC="http://schemas.xmlsoap.org/soap/encoding/">

<types>
  <schema targetNamespace="http://widgetVendor.com/types/widgetTypes"
           xmlns="http://www.w3.org/2001/XMLSchema"
           xmlns:wsdl="http://schemas.xmlsoap.org/wsdl/">
    <element name="keyElem" type="xsd:base64Binary"/>
  </schema>
</types>

<message name="widgetOrder">
  <part name="numOrdered" type="xsd:int"/>
  <part name="keyVal" element="xsd1:keyElem"/>
</message>
<message name="widgetOrderBill">
  <part name="price" type="xsd:float"/>
  <part name="keyVal" element="xsd1:keyElem"/>
</message>
<message name="badSize">
  <part name="numInventory" type="xsd:int"/>
</message>

<portType name="orderWidgets">
  <operation name="placeWidgetOrder">
    <input message="tns:widgetOrder" name="order"/>
    <output message="tns:widgetOrderBill" name="bill"/>
    <fault message="tns:badSize" name="sizeFault"/>
  </operation>
</portType>

<binding name="orderWidgetsBinding" type="tns:orderWidgets">
  <soap:binding style="document" transport="http://schemas.xmlsoap.org/soap/http"/>
    <operation name="placeWidgetOrder">
      <soap:operation soapAction="" style="document"/>
      <input name="order">
        <soap:body use="literal" parts="numOrdered"/>
        <soap:header message="tns:widgetOrder" part="keyVal"/>
      </input>
      <output name="bill">
        <soap:body use="literal" parts="bill"/>
        <soap:header message="tns:widgetOrderBill" part="keyVal"/>
      </output>
      <fault name="sizeFault">
        <soap:body use="literal"/>
      </fault>
  </operation>
</binding>
...
</definitions>
Chapter 7. Using SOAP 1.2 Messages
Abstract
7.1. Adding a SOAP 1.2 Binding to a WSDL Document
Using wsdl2soap
wsdl2soap {
-i port-type-name
} [
-b binding-name
] {
-soap12
} [
-d output-directory
] [
-o output-file
] [
-n soap-body-namespace
] [
-style (document/rpc)
] [
-use (literal/encoded)
] [
-v
] [[
-verbose
] | [
-quiet
]]
wsdlurl
| Option | Interpretation |
|---|---|
-i port-type-name |
Specifies the
portType element for which a binding is generated.
|
-soap12 | Specifies that the generated binding uses SOAP 1.2. |
| wsdlurl | The path and name of the WSDL file containing the portType element definition. |
| Option | Interpretation |
|---|---|
-b binding-name | Specifies the name of the generated SOAP binding. |
-soap12 | Specifies that the generated binding will use SOAP 1.2. |
-d output-directory | Specifies the directory to place the generated WSDL file. |
-o output-file | Specifies the name of the generated WSDL file. |
-n soap-body-namespace | Specifies the SOAP body namespace when the style is RPC. |
-style (document/rpc) | Specifies the encoding style (document or RPC) to use in the SOAP binding. The default is document. |
-use (literal/encoded) | Specifies the binding use (encoded or literal) to use in the SOAP binding. The default is literal. |
-v | Displays the version number for the tool. |
-verbose | Displays comments during the code generation process. |
-quiet | Suppresses comments during the code generation process. |
-i port-type-name and wsdlurl arguments are required. If the -style rpc argument is specified, the -n soap-body-namspace argument is also required. All other arguments are optional and can be listed in any order.
document/encoded SOAP 1.2 bindings.
Example
Example 7.1. Ordering System Interface
<?xml version="1.0" encoding="UTF-8"?>
<definitions name="widgetOrderForm.wsdl"
    targetNamespace="http://widgetVendor.com/widgetOrderForm"
    xmlns="http://schemas.xmlsoap.org/wsdl/"
    xmlns:soap12="http://schemas.xmlsoap.org/wsdl/soap12/"
    xmlns:tns="http://widgetVendor.com/widgetOrderForm"
    xmlns:xsd="http://www.w3.org/2001/XMLSchema"
    xmlns:xsd1="http://widgetVendor.com/types/widgetTypes"
    xmlns:SOAP-ENC="http://schemas.xmlsoap.org/soap/encoding/">

<message name="widgetOrder">
  <part name="numOrdered" type="xsd:int"/>
</message>
<message name="widgetOrderBill">
  <part name="price" type="xsd:float"/>
</message>
<message name="badSize">
  <part name="numInventory" type="xsd:int"/>
</message>

<portType name="orderWidgets">
  <operation name="placeWidgetOrder">
    <input message="tns:widgetOrder" name="order"/>
    <output message="tns:widgetOrderBill" name="bill"/>
    <fault message="tns:badSize" name="sizeFault"/>
  </operation>
</portType>
...
</definitions>orderWidgets is shown in Example 7.2, “SOAP 1.2 Binding for orderWidgets”.
Example 7.2. SOAP 1.2 Binding for orderWidgets
<binding name="orderWidgetsBinding" type="tns:orderWidgets">
  <soap12:binding style="document" transport="http://schemas.xmlsoap.org/soap/http"/>
    <operation name="placeWidgetOrder">
      <soap12:operation soapAction="" style="document"/>
      <input name="order">
        <soap12:body use="literal"/>
      </input>
      <output name="bill">
        <wsoap12:body use="literal"/>
      </output>
      <fault name="sizeFault">
        <soap12:body use="literal"/>
      </fault>
  </operation>
</binding>document/literal message style.
7.2. Adding Headers to a SOAP 1.2 Message
Overview
soap12:header elements to your SOAP 1.2 message. The soap12:header element is an optional child of the input, output, and fault elements of the binding. The SOAP header becomes part of the parent message. A SOAP header is defined by specifying a message and a message part. Each SOAP header can only contain one message part, but you can insert as many headers as needed.
Syntax
Example 7.3. SOAP Header Syntax
<binding name="headwig">
  <soap12:binding style="document" transport="http://schemas.xmlsoap.org/soap/http"/>
    <operation name="weave">
      <soap12:operation soapAction="" style="documment"/>
      <input name="grain">
        <soap12:body ... />
        <soap12:header message="QName" part="partName"
                       use="literal|encoded"
                        encodingStyle="encodingURI"
                        namespace="namespaceURI" />
      </input>
...
</binding>soap12:header element’s attributes are described in Table 7.1, “soap12:header Attributes”.
Table 7.1. soap12:header Attributes
Splitting messages between body and header
soap12:body element has an optional attribute, parts, that takes a space delimited list of part names. When parts is defined, only the message parts listed are inserted into the body of the SOAP 1.2 message. You can then insert the remaining parts into the message's header.
Example
orderWidgets service shown in Example 7.1, “Ordering System Interface”. This version is modified so that each order has an xsd:base64binary value placed in the header of the request and the response. The header is defined as being the keyVal part from the widgetKey message. In this case you are responsible for adding the application logic to create the header because it is not part of the input or output message.
Example 7.4. SOAP 1.2 Binding with a SOAP Header
<?xml version="1.0" encoding="UTF-8"?>
<definitions name="widgetOrderForm.wsdl"
    targetNamespace="http://widgetVendor.com/widgetOrderForm"
    xmlns="http://schemas.xmlsoap.org/wsdl/"
    xmlns:soap12="http://schemas.xmlsoap.org/wsdl/soap12/"
    xmlns:tns="http://widgetVendor.com/widgetOrderForm"
    xmlns:xsd="http://www.w3.org/2001/XMLSchema"
    xmlns:xsd1="http://widgetVendor.com/types/widgetTypes"
    xmlns:SOAP-ENC="http://schemas.xmlsoap.org/soap/encoding/">

<types>
  <schema targetNamespace="http://widgetVendor.com/types/widgetTypes"
           xmlns="http://www.w3.org/2001/XMLSchema"
           xmlns:wsdl="http://schemas.xmlsoap.org/wsdl/">
    <element name="keyElem" type="xsd:base64Binary"/>
  </schema>
</types>

<message name="widgetOrder">
  <part name="numOrdered" type="xsd:int"/>
</message>
<message name="widgetOrderBill">
  <part name="price" type="xsd:float"/>
</message>
<message name="badSize">
  <part name="numInventory" type="xsd:int"/>
</message>
<message name="widgetKey">
  <part name="keyVal" element="xsd1:keyElem"/>
</message>

<portType name="orderWidgets">
  <operation name="placeWidgetOrder">
    <input message="tns:widgetOrder" name="order"/>
    <output message="tns:widgetOrderBill" name="bill"/>
    <fault message="tns:badSize" name="sizeFault"/>
  </operation>
</portType>

<binding name="orderWidgetsBinding" type="tns:orderWidgets">
  <soap12:binding style="document" transport="http://schemas.xmlsoap.org/soap/http"/>
    <operation name="placeWidgetOrder">
      <soap12:operation soapAction="" style="document"/>
      <input name="order">
        <soap12:body use="literal"/>
        <soap12:header message="tns:widgetKey" part="keyVal"/>
      </input>
      <output name="bill">
        <soap12:body use="literal"/>
        <soap12:header message="tns:widgetKey" part="keyVal"/>
      </output>
      <fault name="sizeFault">
        <soap12:body use="literal"/>
      </fault>
  </operation>
</binding>
...
</definitions>keyVal is a part of the input and output messages. In the soap12:body elements the parts attribute specifies that keyVal should not be inserted into the body. However, it is inserted into the header.
Example 7.5. SOAP 1.2 Binding for orderWidgets with a SOAP Header
<?xml version="1.0" encoding="UTF-8"?>
<definitions name="widgetOrderForm.wsdl"
    targetNamespace="http://widgetVendor.com/widgetOrderForm"
    xmlns="http://schemas.xmlsoap.org/wsdl/"
    xmlns:soap12="http://schemas.xmlsoap.org/wsdl/soap12/"
    xmlns:tns="http://widgetVendor.com/widgetOrderForm"
    xmlns:xsd="http://www.w3.org/2001/XMLSchema"
    xmlns:xsd1="http://widgetVendor.com/types/widgetTypes"
    xmlns:SOAP-ENC="http://schemas.xmlsoap.org/soap/encoding/">

<types>
  <schema targetNamespace="http://widgetVendor.com/types/widgetTypes"
           xmlns="http://www.w3.org/2001/XMLSchema"
           xmlns:wsdl="http://schemas.xmlsoap.org/wsdl/">
    <element name="keyElem" type="xsd:base64Binary"/>
  </schema>
</types>

<message name="widgetOrder">
  <part name="numOrdered" type="xsd:int"/>
  <part name="keyVal" element="xsd1:keyElem"/>
</message>
<message name="widgetOrderBill">
  <part name="price" type="xsd:float"/>
  <part name="keyVal" element="xsd1:keyElem"/>
</message>
<message name="badSize">
  <part name="numInventory" type="xsd:int"/>
</message>

<portType name="orderWidgets">
  <operation name="placeWidgetOrder">
    <input message="tns:widgetOrder" name="order"/>
    <output message="tns:widgetOrderBill" name="bill"/>
    <fault message="tns:badSize" name="sizeFault"/>
  </operation>
</portType>

<binding name="orderWidgetsBinding" type="tns:orderWidgets">
  <soap12:binding style="document" transport="http://schemas.xmlsoap.org/soap/http"/>
    <operation name="placeWidgetOrder">
      <soap12:operation soapAction="" style="document"/>
      <input name="order">
        <soap12:body use="literal" parts="numOrdered"/>
        <soap12:header message="tns:widgetOrder" part="keyVal"/>
      </input>
      <output name="bill">
        <soap12:body use="literal" parts="bill"/>
        <soap12:header message="tns:widgetOrderBill" part="keyVal"/>
      </output>
      <fault name="sizeFault">
        <soap12:body use="literal"/>
      </fault>
  </operation>
</binding>
...
</definitions>
Chapter 8. Sending Binary Data Using SOAP with Attachments
Abstract
Overview
Namespace
mime. The entry in the WSDL definitions element to set this up is shown in Example 8.1, “MIME Namespace Specification in a Contract”.
Example 8.1. MIME Namespace Specification in a Contract
xmlns:mime="http://schemas.xmlsoap.org/wsdl/mime/"
Changing the message binding
input, output, and fault elements is a soap:body element describing the body of the SOAP message representing the data. When using SOAP with attachments, the soap:body element is replaced with a mime:multipartRelated element.
mime:multipartRelated for fault messages.
mime:multipartRelated element tells Apache CXF that the message body is a multipart message that potentially contains binary data. The contents of the element define the parts of the message and their contents. mime:multipartRelated elements contain one or more mime:part elements that describe the individual parts of the message.
mime:part element must contain the soap:body element that would normally appear in a default SOAP binding. The remaining mime:part elements define the attachments that are being sent in the message.
Describing a MIME multipart message
mime:multipartRelated element that contains a number of mime:part elements. To fully describe a MIME multipart message you must do the following:
- Inside the
inputoroutputmessage you are sending as a MIME multipart message, add amime:mulipartRelatedelement as the first child element of the enclosing message. - Add a
mime:partchild element to themime:multipartRelatedelement and set itsnameattribute to a unique string. - Add a
soap:bodyelement as the child of themime:partelement and set its attributes appropriately.TipIf the contract had a default SOAP binding, you can copy thesoap:bodyelement from the corresponding message from the default binding into the MIME multipart message. - Add another
mime:partchild element to themime:multipartReleatedelement and set itsnameattribute to a unique string. - Add a
mime:contentchild element to themime:partelement to describe the contents of this part of the message.To fully describe the contents of a MIME message part themime:contentelement has the following attributes:Table 8.1.
mime:contentAttributesAttribute Description partSpecifies the name of the WSDL message part, from the parent message definition, that is used as the content of this part of the MIME multipart message being placed on the wire.typeThe MIME type of the data in this message part. MIME types are defined as a type and a subtype using the syntax type/subtype.There are a number of predefined MIME types such asimage/jpegandtext/plain. The MIME types are maintained by the Internet Assigned Numbers Authority (IANA) and described in detail in Multipurpose Internet Mail Extensions (MIME) Part One: Format of Internet Message Bodies and Multipurpose Internet Mail Extensions (MIME) Part Two: Media Types.
Example
xRay, is stored as an xsd:base64binary and is packed into the MIME multipart message's second part, imageData. The remaining two parts of the input message, patientName and patientNumber, are sent in the first part of the MIME multipart image as part of the SOAP body.
Example 8.2. Contract using SOAP with Attachments
<?xml version="1.0" encoding="UTF-8"?>
<definitions name="XrayStorage"
    targetNamespace="http://mediStor.org/x-rays"
    xmlns="http://schemas.xmlsoap.org/wsdl/"
    xmlns:tns="http://mediStor.org/x-rays"
    xmlns:mime="http://schemas.xmlsoap.org/wsdl/mime/"
    xmlns:soap="http://schemas.xmlsoap.org/wsdl/soap/"
    xmlns:xsd="http://www.w3.org/2001/XMLSchema">

  <message name="storRequest">
    <part name="patientName" type="xsd:string"/>
    <part name="patientNumber" type="xsd:int"/>
    <part name="xRay" type="xsd:base64Binary"/>
  </message>
  <message name="storResponse">
    <part name="success" type="xsd:boolean"/>
  </message>

  <portType name="xRayStorage">
    <operation name="store">
      <input message="tns:storRequest" name="storRequest"/>
      <output message="tns:storResponse" name="storResponse"/>
    </operation>
  </portType>

  <binding name="xRayStorageBinding" type="tns:xRayStorage">
    <soap:binding style="document" transport="http://schemas.xmlsoap.org/soap/http"/>
      <operation name="store">
      <soap:operation soapAction="" style="document"/>
      <input name="storRequest">
        <mime:multipartRelated>
          <mime:part name="bodyPart">
            <soap:body use="literal"/>
          </mime:part>
          <mime:part name="imageData">
            <mime:content part="xRay" type="image/jpeg"/>
          </mime:part>
        </mime:multipartRelated>
      </input>
      <output name="storResponse">
        <soap:body use="literal"/>
      </output>
    </operation>
  </binding>

  <service name="xRayStorageService">
    <port binding="tns:xRayStorageBinding" name="xRayStoragePort">
      <soap:address location="http://localhost:9000"/>
    </port>
  </service>
</definitions>
Chapter 9. Sending Binary Data with SOAP MTOM
Abstract
- Annotate the data that you are going to send as an attachment.You can annotate either your WSDL or the Java class that implements your data.
- Enable the runtime's MTOM support.This can be done either programmatically or through configuration.
- Develop a
DataHandlerfor the data being passed as an attachment.NoteDevelopingDataHandlers is beyond the scope of this book.
9.1. Annotating Data Types to use MTOM
Overview
WSDL first
Example 9.1. Message for MTOM
<?xml version="1.0" encoding="UTF-8"?>
<definitions name="XrayStorage"
    targetNamespace="http://mediStor.org/x-rays"
    xmlns="http://schemas.xmlsoap.org/wsdl/"
    xmlns:tns="http://mediStor.org/x-rays"
    xmlns:soap12="http://schemas.xmlsoap.org/wsdl/soap12/"
    xmlns:xsd1="http://mediStor.org/types/"
    xmlns:xsd="http://www.w3.org/2001/XMLSchema">

  <types>
    <schema targetNamespace="http://mediStor.org/types/"
            xmlns="http://www.w3.org/2001/XMLSchema">
      <complexType name="xRayType">
        <sequence>
          <element name="patientName" type="xsd:string" />
          <element name="patientNumber" type="xsd:int" />
          <element name="imageData" type="xsd:base64Binary" />
        </sequence>
      </complexType>
      <element name="xRay" type="xsd1:xRayType" />
    </schema>
  </types>

  <message name="storRequest">
    <part name="record" element="xsd1:xRay"/>
  </message>
  <message name="storResponse">
    <part name="success" type="xsd:boolean"/>
  </message>

  <portType name="xRayStorage">
    <operation name="store">
      <input message="tns:storRequest" name="storRequest"/>
      <output message="tns:storResponse" name="storResponse"/>
    </operation>
  </portType>

  <binding name="xRayStorageSOAPBinding" type="tns:xRayStorage">
    <soap12:binding style="document" transport="http://schemas.xmlsoap.org/soap/http"/>
    <operation name="store">
      <soap12:operation soapAction="" style="document"/>
      <input name="storRequest">
        <soap12:body use="literal"/>
      </input>
      <output name="storResponse">
        <soap12:body use="literal"/>
      </output>
    </operation>
  </binding>
  ...
</definitions>xmime:expectedContentTypes attribute to the element containing the binary data. This attribute is defined in the http://www.w3.org/2005/05/xmlmime namespace and specifies the MIME types that the element is expected to contain. You can specify a comma separated list of MIME types. The setting of this attribute changes how the code generators create the JAXB class for the data. For most MIME types, the code generator creates a DataHandler. Some MIME types, such as those for images, have defined mappings.
application/octet-stream.
Example 9.2. Binary Data for MTOM
...
  <types>
    <schema targetNamespace="http://mediStor.org/types/"
            xmlns="http://www.w3.org/2001/XMLSchema"
            xmlns:xmime="http://www.w3.org/2005/05/xmlmime">
      <complexType name="xRayType">
        <sequence>
          <element name="patientName" type="xsd:string" />
          <element name="patientNumber" type="xsd:int" />
          <element name="imageData" type="xsd:base64Binary"
                   xmime:expectedContentTypes="application/octet-stream"/>
        </sequence>
      </complexType>
      <element name="xRay" type="xsd1:xRayType" />
    </schema>
  </types>
...xmime:expectedContentTypes attribute and generates a DataHandler for the imageData field.
binding element to use MTOM. The runtime makes the appropriate changes when the data is sent.
Java first
- Make sure the field holding the binary data is a
DataHandler. - Add the
@XmlMimeType()annotation to the field containing the data you want to stream as an MTOM attachment.
Example 9.3. JAXB Class for MTOM
@XmlType
public class XRayType {
    protected String patientName;
    protected int patientNumber;
    @XmlMimeType("application/octet-stream")
    protected DataHandler imageData;
  ...
}
9.2. Enabling MTOM
9.2.1. Using JAX-WS APIs
Overview
Service provider
- Access the
Endpointobject for your published service.The easiest way to access theEndpointobject is when you publish the endpoint. For more information see Chapter 30, Publishing a Service. - Get the SOAP binding from the
Endpointusing itsgetBinding()method, as shown in Example 9.4, “Getting the SOAP Binding from an Endpoint”.Example 9.4. Getting the SOAP Binding from an Endpoint
// Endpoint ep is declared previously
SOAPBinding binding = (SOAPBinding)ep.getBinding();
You must cast the returned binding object to aSOAPBindingobject to access the MTOM property. - Set the binding's MTOM enabled property to
trueusing the binding'ssetMTOMEnabled()method, as shown in Example 9.5, “Setting a Service Provider's MTOM Enabled Property”.Example 9.5. Setting a Service Provider's MTOM Enabled Property
binding.setMTOMEnabled(true);
Consumer
- Cast the consumer's proxy to a
BindingProviderobject.TipFor information on getting a consumer proxy see Chapter 24, Developing a Consumer Without a WSDL Contract or Chapter 27, Developing a Consumer From a WSDL Contract. - Get the SOAP binding from the
BindingProviderusing itsgetBinding()method, as shown in Example 9.6, “Getting a SOAP Binding from aBindingProvider”.Example 9.6. Getting a SOAP Binding from a
BindingProvider// BindingProvider bp declared previously SOAPBinding binding = (SOAPBinding)bp.getBinding();
- Set the bindings MTOM enabled property to
trueusing the binding'ssetMTOMEnabled()method, as shown in Example 9.7, “Setting a Consumer's MTOM Enabled Property”.Example 9.7. Setting a Consumer's MTOM Enabled Property
binding.setMTOMEnabled(true);
9.2.2. Using configuration
Overview
Procedure
jaxws:endpoint element for your endpoint. To enable MTOM do the following:
- Add a
jaxws:propertychild element to the endpoint'sjaxws:endpointelement. - Add a
entrychild element to thejaxws:propertyelement. - Set the
entryelement'skeyattribute tomtom-enabled. - Set the
entryelement'svalueattribute totrue.
Example
Example 9.8. Configuration for Enabling MTOM
<beans xmlns="http://www.springframework.org/schema/beans"
       xmlns:xsi="http://www.w3.org/2001/XMLSchema-instance"
       xmlns:jaxws="http://cxf.apache.org/jaxws"
       xsi:schemaLocation="http://www.springframework.org/schema/beans
                           http://www.springframework.org/schema/beans/spring-beans-2.0.xsd
                           http://cxf.apache.org/jaxws http://cxf.apache.org/schema/jaxws.xsd">

  <jaxws:endpoint id="xRayStorage"
                  implementor="demo.spring.xRayStorImpl"
                  address="http://localhost/xRayStorage">
    <jaxws:properties>
      <entry key="mtom-enabled" value="true"/>
    </jaxws:properties>
  </jaxws:endpoint>
</beans>
Chapter 10. Using XML Documents
Abstract
XML binding namespace
xformat to represent the XML binding extensions. Add the following line to your contracts:
xmlns:xformat="http://cxf.apache.org/bindings/xformat"
Hand editing
- Add the namespace declaration to include the extensions defining the XML binding. See the section called “XML binding namespace”.
- Add a standard WSDL
bindingelement to your contract to hold the XML binding, give the binding a uniquename, and specify the name of the WSDLportTypeelement that represents the interface being bound. - Add an
xformat:bindingchild element to thebindingelement to identify that the messages are being handled as pure XML documents without SOAP envelopes. - Optionally, set the
xformat:bindingelement'srootNodeattribute to a valid QName. For more information on the effect of therootNodeattribute see the section called “XML messages on the wire”. - For each operation defined in the bound interface, add a standard WSDL
operationelement to hold the binding information for the operation's messages. - For each operation added to the binding, add the
input,output, andfaultchildren elements to represent the messages used by the operation.These elements correspond to the messages defined in the interface definition of the logical operation. - Optionally add an
xformat:bodyelement with a validrootNodeattribute to the addedinput,output, andfaultelements to override the value ofrootNodeset at the binding level.
rootNode attribute for the message to ensure that the message written on the wire is a valid, but empty, XML document.
XML messages on the wire
rootNode attribute on either the global xformat:binding element or on the individual message’s xformat:body elements. The rootNode attribute specifies the QName for the element that serves as the root node for the XML document generated by Apache CXF. When the rootNode attribute is not set, Apache CXF uses the root element of the message part as the root element when using doc style messages, or an element using the message part name as the root element when using rpc style messages.
rootNode attribute is not set the message defined in Example 10.1, “Valid XML Binding Message” would generate an XML document with the root element lineNumber.
Example 10.1. Valid XML Binding Message
<type ... >
  ...
  <element name="operatorID" type="xsd:int"/>
  ...
</types>
<message name="operator">
  <part name="lineNumber" element="ns1:operatorID"/>
</message>
rootNode attribute is not set. However, the message in Example 10.2, “Invalid XML Binding Message” would generate an invalid XML document.
Example 10.2. Invalid XML Binding Message
<types>
  ...
  <element name="pairName" type="xsd:string"/>
  <element name="entryNum" type="xsd:int"/>
  ...
</types>

<message name="matildas">
  <part name="dancing" element="ns1:pairName"/>
  <part name="number" element="ns1:entryNum"/>
</message>
rootNode attribute specified in the XML binding, Apache CXF will generate an XML document similar to Example 10.3, “Invalid XML Document” for the message defined in Example 10.2, “Invalid XML Binding Message”. The generated XML document is invalid because it has two root elements: pairName and entryNum.
Example 10.3. Invalid XML Document
<pairName>
  Fred&Linda
</pairName>
<entryNum>
  123
</entryNum>
rootNode attribute, as shown in Example 10.4, “XML Binding with rootNode set” Apache CXF will wrap the elements in the specified root element. In this example, the rootNode attribute is defined for the entire binding and specifies that the root element will be named entrants.
Example 10.4. XML Binding with rootNode set
<portType name="danceParty">
  <operation name="register">
    <input message="tns:matildas" name="contestant"/>
  </operation>
</portType>

<binding name="matildaXMLBinding" type="tns:dancingMatildas">
  <xmlformat:binding rootNode="entrants"/>
  <operation name="register">
    <input name="contestant"/>
    <output name="entered"/>
</binding>Example 10.5. XML Document generated using the rootNode attribute
<entrants>
  <pairName>
    Fred&Linda
  <entryNum>
    123
  </entryNum>
</entrants>
Overriding the binding's rootNode attribute setting
rootNode attribute for each individual message, or override the global setting for a particular message, by using the xformat:body element inside of the message binding. For example, if you wanted the output message defined in Example 10.4, “XML Binding with rootNode set” to have a different root element from the input message, you could override the binding's root element as shown in Example 10.6, “Using xformat:body”.
Example 10.6. Using xformat:body
<binding name="matildaXMLBinding" type="tns:dancingMatildas">
  <xmlformat:binding rootNode="entrants"/>
  <operation name="register">
    <input name="contestant"/>
    <output name="entered">
      <xformat:body rootNode="entryStatus" />
    </output>
  </operation>
</binding>
Part III. Web Services Transports
Abstract
Chapter 11. Understanding How Endpoints are Defined in WSDL
Abstract
Overview
Endpoints and services
The WSDL elements
service element and the WSDL port element. The service element is a collection of related port elements. The port elements define the actual endpoints.
service element has a single attribute, name, that specifies a unique name. The service element is used as the parent element of a collection of related port elements. WSDL makes no specification about how the port elements are related. You can associate the port elements in any manner you see fit.
port element has a single attribute, binding, that specifies the binding used by the endpoint. The port element is the parent element of the elements that specify the actual transport details used by the endpoint. The elements used to specify the transport details are discussed in the following sections.
Adding endpoints to a contract
Supported transports
- HTTP
- CORBA
- Java Messaging Service
Chapter 12. Using HTTP
Abstract
12.1. Adding a Basic HTTP Endpoint
Alternative HTTP runtimes
- Jetty, which is described in detail in Section 12.4, “Configuring the Jetty Runtime”.
- Netty, which is described in detail in Section 12.5, “Configuring the Netty Runtime”.
Netty HTTP URL
netty://http://RestOfURL
Payload types
- SOAP 1.1 uses the standardized
soap:addresselement. - SOAP 1.2 uses the
soap12:addresselement. - All other payload formats use the
http:address element.
SOAP 1.1
address element to specify the endpoint’s address. It has one attribute, location, that specifies the endpoint’s address as a URL. The SOAP 1.1 address element is defined in the namespace http://schemas.xmlsoap.org/wsdl/soap/.
port element used to send SOAP 1.1 messages over HTTP.
Example 12.1. SOAP 1.1 Port Element
<definitions ...
             xmlns:soap="http://schemas.xmlsoap.org/wsdl/soap/" ...>
  ...
  <service name="SOAP11Service">
    <port binding="SOAP11Binding" name="SOAP11Port">
      <soap:address location="http://artie.com/index.xml">
    </port>
  </service>
  ...
<definitions>
SOAP 1.2
address element to specify the endpoint’s address. It has one attribute, location, that specifies the endpoint’s address as a URL. The SOAP 1.2 address element is defined in the namespace http://schemas.xmlsoap.org/wsdl/soap12/.
port element used to send SOAP 1.2 messages over HTTP.
Example 12.2. SOAP 1.2 Port Element
<definitions ...
             xmlns:soap12="http://schemas.xmlsoap.org/wsdl/soap12/" ... >
  <service name="SOAP12Service">
    <port binding="SOAP12Binding" name="SOAP12Port">
      <soap12:address location="http://artie.com/index.xml">
    </port>
  </service>
  ...
</definitions>
Other messages types
address element to specify the endpoint’s address. It has one attribute, location, that specifies the endpoint’s address as a URL. The HTTP address element is defined in the namespace http://schemas.xmlsoap.org/wsdl/http/.
port element used to send an XML message.
Example 12.3. HTTP Port Element
<definitions ...
             xmlns:http="http://schemas.xmlsoap.org/wsdl/http/" ... >
  <service name="HTTPService">
    <port binding="HTTPBinding" name="HTTPPort">
      <http:address location="http://artie.com/index.xml">
    </port>
  </service>
  ...
</definitions>
12.2. Configuring a Consumer
12.2.1. Using Configuration
Namespace
http-conf. In order to use the HTTP configuration elements you must add the lines shown in Example 12.4, “HTTP Consumer Configuration Namespace” to the beans element of your endpoint's configuration file. In addition, you must add the configuration elements' namespace to the xsi:schemaLocation attribute.
Example 12.4. HTTP Consumer Configuration Namespace
<beans ...
       xmlns:http-conf="http://cxf.apache.org/transports/http/configuration"
       ...
       xsi:schemaLocation="...
                           http://cxf.apache.org/transports/http/configuration
                              http://cxf.apache.org/schemas/configuration/http-conf.xsd
                          ...">
Jetty runtime or Netty runtime
http-conf namespace to configure either the Jetty runtime or the Netty runtime.
The conduit element
http-conf:conduit element and its children. The http-conf:conduit element takes a single attribute, name, that specifies the WSDL port element corresponding to the endpoint. The value for the name attribute takes the form portQName.http-conduit. Example 12.5, “http-conf:conduit Element” shows the http-conf:conduit element that would be used to add configuration for an endpoint that is specified by the WSDL fragment <port binding="widgetSOAPBinding" name="widgetSOAPPort> when the endpoint's target namespace is http://widgets.widgetvendor.net.
Example 12.5. http-conf:conduit Element
...
  <http-conf:conduit name="{http://widgets/widgetvendor.net}widgetSOAPPort.http-conduit">
    ...
  </http-conf:conduit>
...http-conf:conduit element has child elements that specify configuration information. They are described in Table 12.1, “Elements Used to Configure an HTTP Consumer Endpoint”.
Table 12.1. Elements Used to Configure an HTTP Consumer Endpoint
| Element | Description |
|---|---|
http-conf:client |
Specifies the HTTP connection properties such as timeouts, keep-alive requests, content types, etc. See the section called “The
client element”.
|
http-conf:authorization |
Specifies the parameters for configuring the basic authentication method that the endpoint uses preemptively.
The preferred approach is to supply a Basic Authentication Supplier object.
|
http-conf:proxyAuthorization |
Specifies the parameters for configuring basic authentication against outgoing HTTP proxy servers.
|
http-conf:tlsClientParameters |
Specifies the parameters used to configure SSL/TLS.
|
http-conf:basicAuthSupplier |
Specifies the bean reference or class name of the object that supplies the basic authentication information used by the endpoint, either preemptively or in response to a
401 HTTP challenge.
|
http-conf:trustDecider |
Specifies the bean reference or class name of the object that checks the HTTP(S)
URLConnection object to establish trust for a connection with an HTTPS service provider before any information is transmitted.
|
The client element
http-conf:client element is used to configure the non-security properties of a consumer endpoint's HTTP connection. Its attributes, described in Table 12.2, “HTTP Consumer Configuration Attributes”, specify the connection's properties.
Table 12.2. HTTP Consumer Configuration Attributes
| Attribute | Description |
|---|---|
ConnectionTimeout |
Specifies the amount of time, in milliseconds, that the consumer attempts to establish a connection before it times out. The default is
30000.
0 specifies that the consumer will continue to send the request indefinitely.
|
ReceiveTimeout |
Specifies the amount of time, in milliseconds, that the consumer will wait for a response before it times out. The default is
30000.
0 specifies that the consumer will wait indefinitely.
|
AutoRedirect |
Specifies if the consumer will automatically follow a server issued redirection. The default is
false.
|
MaxRetransmits |
Specifies the maximum number of times a consumer will retransmit a request to satisfy a redirect. The default is
-1 which specifies that unlimited retransmissions are allowed.
|
AllowChunking |
Specifies whether the consumer will send requests using chunking. The default is
true which specifies that the consumer will use chunking when sending requests.
Chunking cannot be used if either of the following are true:
In both cases the value of
AllowChunking is ignored and chunking is disallowed.
|
Accept |
Specifies what media types the consumer is prepared to handle. The value is used as the value of the HTTP Accept property. The value of the attribute is specified using multipurpose internet mail extensions (MIME) types.
|
AcceptLanguage |
Specifies what language (for example, American English) the consumer prefers for the purpose of receiving a response. The value is used as the value of the HTTP AcceptLanguage property.
Language tags are regulated by the International Organization for Standards (ISO) and are typically formed by combining a language code, determined by the ISO-639 standard, and country code, determined by the ISO-3166 standard, separated by a hyphen. For example, en-US represents American English.
|
AcceptEncoding |
Specifies what content encodings the consumer is prepared to handle. Content encoding labels are regulated by the Internet Assigned Numbers Authority (IANA). The value is used as the value of the HTTP AcceptEncoding property.
|
ContentType |
Specifies the media type of the data being sent in the body of a message. Media types are specified using multipurpose internet mail extensions (MIME) types. The value is used as the value of the HTTP ContentType property. The default is
text/xml.
For web services, this should be set to
text/xml. If the client is sending HTML form data to a CGI script, this should be set to application/x-www-form-urlencoded. If the HTTP POST request is bound to a fixed payload format (as opposed to SOAP), the content type is typically set to application/octet-stream.
|
Host |
Specifies the Internet host and port number of the resource on which the request is being invoked. The value is used as the value of the HTTP Host property.
This attribute is typically not required. It is only required by certain DNS scenarios or application designs. For example, it indicates what host the client prefers for clusters (that is, for virtual servers mapping to the same Internet protocol (IP) address).
|
Connection |
Specifies whether a particular connection is to be kept open or closed after each request/response dialog. There are two valid values:
|
CacheControl |
Specifies directives about the behavior that must be adhered to by caches involved in the chain comprising a request from a consumer to a service provider. See Section 12.2.3, “Consumer Cache Control Directives”.
|
Cookie |
Specifies a static cookie to be sent with all requests.
|
BrowserType |
Specifies information about the browser from which the request originates. In the HTTP specification from the World Wide Web consortium (W3C) this is also known as the user-agent. Some servers optimize based on the client that is sending the request.
|
Referer |
Specifies the URL of the resource that directed the consumer to make requests on a particular service. The value is used as the value of the HTTP Referer property.
This HTTP property is used when a request is the result of a browser user clicking on a hyperlink rather than typing a URL. This can allow the server to optimize processing based upon previous task flow, and to generate lists of back-links to resources for the purposes of logging, optimized caching, tracing of obsolete or mistyped links, and so on. However, it is typically not used in web services applications.
If the
AutoRedirect attribute is set to true and the request is redirected, any value specified in the Referer attribute is overridden. The value of the HTTP Referer property is set to the URL of the service that redirected the consumer’s original request.
|
DecoupledEndpoint |
Specifies the URL of a decoupled endpoint for the receipt of responses over a separate provider->consumer connection. For more information on using decoupled endpoints see, Section 12.6, “Using the HTTP Transport in Decoupled Mode”.
You must configure both the consumer endpoint and the service provider endpoint to use WS-Addressing for the decoupled endpoint to work.
|
ProxyServer |
Specifies the URL of the proxy server through which requests are routed.
|
ProxyServerPort |
Specifies the port number of the proxy server through which requests are routed.
|
ProxyServerType |
Specifies the type of proxy server used to route requests. Valid values are:
|
Example
Example 12.6. HTTP Consumer Endpoint Configuration
<beans xmlns="http://www.springframework.org/schema/beans"
       xmlns:xsi="http://www.w3.org/2001/XMLSchema-instance"
       xmlns:http-conf="http://cxf.apache.org/transports/http/configuration"
       xsi:schemaLocation="http://cxf.apache.org/transports/http/configuration
                             http://cxf.apache.org/schemas/configuration/http-conf.xsd
                           http://www.springframework.org/schema/beans
                             http://www.springframework.org/schema/beans/spring-beans.xsd">

  <http-conf:conduit name="{http://apache.org/hello_world_soap_http}SoapPort.http-conduit">
    <http-conf:client Connection="Keep-Alive"
                      MaxRetransmits="1"
                      AllowChunking="false" />
  </http-conf:conduit>
</beans>
More information
12.2.2. Using WSDL
Namespace
http-conf. In order to use the HTTP configuration elements you must add the line shown in Example 12.7, “HTTP Consumer WSDL Element's Namespace” to the definitions element of your endpoint's WSDL document.
Example 12.7. HTTP Consumer WSDL Element's Namespace
<definitions ...
       xmlns:http-conf="http://cxf.apache.org/transports/http/configuration"
Jetty runtime or Netty runtime
http-conf namespace to configure either the Jetty runtime or the Netty runtime.
The client element
http-conf:client element is used to specify the connection properties of an HTTP consumer in a WSDL document. The http-conf:client element is a child of the WSDL port element. It has the same attributes as the client element used in the configuration file. The attributes are described in Table 12.2, “HTTP Consumer Configuration Attributes”.
Example
Example 12.8. WSDL to Configure an HTTP Consumer Endpoint
<service ... >
  <port ... >
    <soap:address ... />
    <http-conf:client CacheControl="no-cache" />
  </port>
</service>
12.2.3. Consumer Cache Control Directives
http-conf:client Cache Control Directives” lists the cache control directives supported by an HTTP consumer.
Table 12.3. http-conf:client Cache Control Directives
| Directive | Behavior |
|---|---|
| no-cache |
Caches cannot use a particular response to satisfy subsequent requests without first revalidating that response with the server. If specific response header fields are specified with this value, the restriction applies only to those header fields within the response. If no response header fields are specified, the restriction applies to the entire response.
|
| no-store |
Caches must not store either any part of a response or any part of the request that invoked it.
|
| max-age |
The consumer can accept a response whose age is no greater than the specified time in seconds.
|
| max-stale |
The consumer can accept a response that has exceeded its expiration time. If a value is assigned to max-stale, it represents the number of seconds beyond the expiration time of a response up to which the consumer can still accept that response. If no value is assigned, the consumer can accept a stale response of any age.
|
| min-fresh |
The consumer wants a response that is still fresh for at least the specified number of seconds indicated.
|
| no-transform |
Caches must not modify media type or location of the content in a response between a provider and a consumer.
|
| only-if-cached |
Caches should return only responses that are currently stored in the cache, and not responses that need to be reloaded or revalidated.
|
| cache-extension |
Specifies additional extensions to the other cache directives. Extensions can be informational or behavioral. An extended directive is specified in the context of a standard directive, so that applications not understanding the extended directive can adhere to the behavior mandated by the standard directive.
|
12.3. Configuring a Service Provider
12.3.1. Using Configuration
Namespace
http-conf. In order to use the HTTP configuration elements you must add the lines shown in Example 12.9, “HTTP Provider Configuration Namespace” to the beans element of your endpoint's configuration file. In addition, you must add the configuration elements' namespace to the xsi:schemaLocation attribute.
Example 12.9. HTTP Provider Configuration Namespace
<beans ...
       xmlns:http-conf="http://cxf.apache.org/transports/http/configuration"
       ...
       xsi:schemaLocation="...
                           http://cxf.apache.org/transports/http/configuration
                              http://cxf.apache.org/schemas/configuration/http-conf.xsd
                          ...">
Jetty runtime or Netty runtime
http-conf namespace to configure either the Jetty runtime or the Netty runtime.
The destination element
http-conf:destination element and its children. The http-conf:destination element takes a single attribute, name, that specifies the WSDL port element that corresponds to the endpoint. The value for the name attribute takes the form portQName.http-destination. Example 12.10, “http-conf:destination Element” shows the http-conf:destination element that is used to add configuration for an endpoint that is specified by the WSDL fragment <port binding="widgetSOAPBinding" name="widgetSOAPPort> when the endpoint's target namespace is http://widgets.widgetvendor.net.
Example 12.10. http-conf:destination Element
...
  <http-conf:destination name="{http://widgets/widgetvendor.net}widgetSOAPPort.http-destination">
    ...
  </http-conf:destination>
...http-conf:destination element has a number of child elements that specify configuration information. They are described in Table 12.4, “Elements Used to Configure an HTTP Service Provider Endpoint”.
Table 12.4. Elements Used to Configure an HTTP Service Provider Endpoint
| Element | Description |
|---|---|
http-conf:server |
Specifies the HTTP connection properties. See the section called “The
server element”.
|
http-conf:contextMatchStrategy |
Specifies the parameters that configure the context match strategy for processing HTTP requests.
|
http-conf:fixedParameterOrder |
Specifies whether the parameter order of an HTTP request handled by this destination is fixed.
|
The server element
http-conf:server element is used to configure the properties of a service provider endpoint's HTTP connection. Its attributes, described in Table 12.5, “HTTP Service Provider Configuration Attributes”, specify the connection's properties.
Table 12.5. HTTP Service Provider Configuration Attributes
| Attribute | Description |
|---|---|
ReceiveTimeout |
Sets the length of time, in milliseconds, the service provider attempts to receive a request before the connection times out. The default is
30000.
0 specifies that the provider will not timeout.
|
SuppressClientSendErrors |
Specifies whether exceptions are to be thrown when an error is encountered on receiving a request. The default is
false; exceptions are thrown on encountering errors.
|
SuppressClientReceiveErrors |
Specifies whether exceptions are to be thrown when an error is encountered on sending a response to a consumer. The default is
false; exceptions are thrown on encountering errors.
|
HonorKeepAlive |
Specifies whether the service provider honors requests for a connection to remain open after a response has been sent. The default is
false; keep-alive requests are ignored.
|
RedirectURL |
Specifies the URL to which the client request should be redirected if the URL specified in the client request is no longer appropriate for the requested resource. In this case, if a status code is not automatically set in the first line of the server response, the status code is set to
302 and the status description is set to Object Moved. The value is used as the value of the HTTP RedirectURL property.
|
CacheControl |
Specifies directives about the behavior that must be adhered to by caches involved in the chain comprising a response from a service provider to a consumer. See Section 12.3.3, “Service Provider Cache Control Directives”.
|
ContentLocation |
Sets the URL where the resource being sent in a response is located.
|
ContentType |
Specifies the media type of the information being sent in a response. Media types are specified using multipurpose internet mail extensions (MIME) types. The value is used as the value of the HTTP ContentType location.
|
ContentEncoding |
Specifies any additional content encodings that have been applied to the information being sent by the service provider. Content encoding labels are regulated by the Internet Assigned Numbers Authority (IANA). Possible content encoding values include
zip, gzip, compress, deflate, and identity. This value is used as the value of the HTTP ContentEncoding property.
The primary use of content encodings is to allow documents to be compressed using some encoding mechanism, such as zip or gzip. Apache CXF performs no validation on content codings. It is the user’s responsibility to ensure that a specified content coding is supported at application level.
|
ServerType |
Specifies what type of server is sending the response. Values take the form
program-name/version; for example, Apache/1.2.5.
|
Example
Example 12.11. HTTP Service Provider Endpoint Configuration
<beans xmlns="http://www.springframework.org/schema/beans"
       xmlns:xsi="http://www.w3.org/2001/XMLSchema-instance"
       xmlns:http-conf="http://cxf.apache.org/transports/http/configuration"
       xsi:schemaLocation="http://cxf.apache.org/transports/http/configuration
                             http://cxf.apache.org/schemas/configuration/http-conf.xsd
                           http://www.springframework.org/schema/beans
                             http://www.springframework.org/schema/beans/spring-beans.xsd">

  <http-conf:destination name="{http://apache.org/hello_world_soap_http}SoapPort.http-destination">
    <http-conf:server SuppressClientSendErrors="true"
                      SuppressClientReceiveErrors="true"
                      HonorKeepAlive="true" />
  </http-conf:destination>
</beans>
12.3.2. Using WSDL
Namespace
http-conf. To use the HTTP configuration elements you must add the line shown in Example 12.12, “HTTP Provider WSDL Element's Namespace” to the definitions element of your endpoint's WSDL document.
Example 12.12. HTTP Provider WSDL Element's Namespace
<definitions ...
       xmlns:http-conf="http://cxf.apache.org/transports/http/configuration"
Jetty runtime or Netty runtime
http-conf namespace to configure either the Jetty runtime or the Netty runtime.
The server element
http-conf:server element is used to specify the connection properties of an HTTP service provider in a WSDL document. The http-conf:server element is a child of the WSDL port element. It has the same attributes as the server element used in the configuration file. The attributes are described in Table 12.5, “HTTP Service Provider Configuration Attributes”.
Example
Example 12.13. WSDL to Configure an HTTP Service Provider Endpoint
<service ... >
  <port ... >
    <soap:address ... />
    <http-conf:server CacheControl="no-cache" />
  </port>
</service>
12.3.3. Service Provider Cache Control Directives
http-conf:server Cache Control Directives” lists the cache control directives supported by an HTTP service provider.
Table 12.6. http-conf:server Cache Control Directives
| Directive | Behavior |
|---|---|
| no-cache |
Caches cannot use a particular response to satisfy subsequent requests without first revalidating that response with the server. If specific response header fields are specified with this value, the restriction applies only to those header fields within the response. If no response header fields are specified, the restriction applies to the entire response.
|
| public |
Any cache can store the response.
|
| private |
Public (shared) caches cannot store the response because the response is intended for a single user. If specific response header fields are specified with this value, the restriction applies only to those header fields within the response. If no response header fields are specified, the restriction applies to the entire response.
|
| no-store |
Caches must not store any part of the response or any part of the request that invoked it.
|
| no-transform |
Caches must not modify the media type or location of the content in a response between a server and a client.
|
| must-revalidate |
Caches must revalidate expired entries that relate to a response before that entry can be used in a subsequent response.
|
| proxy-revalidate |
Does the same as must-revalidate, except that it can only be enforced on shared caches and is ignored by private unshared caches. When using this directive, the public cache directive must also be used.
|
| max-age |
Clients can accept a response whose age is no greater that the specified number of seconds.
|
| s-max-age |
Does the same as max-age, except that it can only be enforced on shared caches and is ignored by private unshared caches. The age specified by s-max-age overrides the age specified by max-age. When using this directive, the proxy-revalidate directive must also be used.
|
| cache-extension |
Specifies additional extensions to the other cache directives. Extensions can be informational or behavioral. An extended directive is specified in the context of a standard directive, so that applications not understanding the extended directive can adhere to the behavior mandated by the standard directive.
|
12.4. Configuring the Jetty Runtime
Overview
Maven dependency
pom.xml file:
<dependency>
    <groupId>org.apache.cxf</groupId>
    <artifactId>cxf-rt-transports-http-jetty</artifactId>
    <version>${cxf-version}</version>
</dependency>
Namespace
httpj. In order to use the Jetty configuration elements you must add the lines shown in Example 12.14, “Jetty Runtime Configuration Namespace” to the beans element of your endpoint's configuration file. In addition, you must add the configuration elements' namespace to the xsi:schemaLocation attribute.
Example 12.14. Jetty Runtime Configuration Namespace
<beans ...
       xmlns:httpj="http://cxf.apache.org/transports/http-jetty/configuration"
       ...
       xsi:schemaLocation="...
                           http://cxf.apache.org/transports/http-jetty/configuration
                              http://cxf.apache.org/schemas/configuration/http-jetty.xsd
                          ...">
The engine-factory element
httpj:engine-factory element is the root element used to configure the Jetty runtime used by an application. It has a single required attribute, bus, whose value is the name of the Bus that manages the Jetty instances being configured.
cxf which is the name of the default Bus instance.
httpj:engine-factory element has three children that contain the information used to configure the HTTP ports instantiated by the Jetty runtime factory. The children are described in Table 12.7, “Elements for Configuring a Jetty Runtime Factory”.
Table 12.7. Elements for Configuring a Jetty Runtime Factory
| Element | Description |
|---|---|
httpj:engine |
Specifies the configuration for a particular Jetty runtime instance. See the section called “The
engine element”.
|
httpj:identifiedTLSServerParameters |
Specifies a reusable set of properties for securing an HTTP service provider. It has a single attribute,
id, that specifies a unique identifier by which the property set can be referred.
|
httpj:identifiedThreadingParameters |
Specifies a reusable set of properties for controlling a Jetty instance's thread pool. It has a single attribute,
id, that specifies a unique identifier by which the property set can be referred.
|
The engine element
httpj:engine element is used to configure specific instances of the Jetty runtime. It has a single attribute, port, that specifies the number of the port being managed by the Jetty instance.
0 for the port attribute. Any threading properties specified in an httpj:engine element with its port attribute set to 0 are used as the configuration for all Jetty listeners that are not explicitly configured.
httpj:engine element can have two children: one for configuring security properties and one for configuring the Jetty instance's thread pool. For each type of configuration you can either directly provide the configuration information or you can provide a reference to a set of configuration properties defined in the parent httpj:engine-factory element.
Table 12.8. Elements for Configuring a Jetty Runtime Instance
| Element | Description |
|---|---|
httpj:tlsServerParameters |
Specifies a set of properties for configuring the security used for the specific Jetty instance.
|
httpj:tlsServerParametersRef |
Refers to a set of security properties defined by a
identifiedTLSServerParameters element. The id attribute provides the id of the referred identifiedTLSServerParameters element.
|
httpj:threadingParameters |
Specifies the size of the thread pool used by the specific Jetty instance. See the section called “Configuring the thread pool”.
|
httpj:threadingParametersRef |
Refers to a set of properties defined by a
identifiedThreadingParameters element. The id attribute provides the id of the referred identifiedThreadingParameters element.
|
Configuring the thread pool
- Specifying the size of the thread pool using a
identifiedThreadingParameterselement in theengine-factoryelement. You then refer to the element using athreadingParametersRefelement. - Specifying the size of the of the thread pool directly using a
threadingParameterselement.
threadingParameters has two attributes to specify the size of a thread pool. The attributes are described in Table 12.9, “Attributes for Configuring a Jetty Thread Pool”.
httpj:identifiedThreadingParameters element has a single child threadingParameters element.
Example
Example 12.15. Configuring a Jetty Instance
<beans xmlns="http://www.springframework.org/schema/beans"
  xmlns:xsi="http://www.w3.org/2001/XMLSchema-instance"
  xmlns:sec="http://cxf.apache.org/configuration/security"
  xmlns:http="http://cxf.apache.org/transports/http/configuration"
  xmlns:httpj="http://cxf.apache.org/transports/http-jetty/configuration"
  xmlns:jaxws="http://java.sun.com/xml/ns/jaxws"
  xsi:schemaLocation="http://cxf.apache.org/configuration/security
  		      http://cxf.apache.org/schemas/configuration/security.xsd
            http://cxf.apache.org/transports/http/configuration
            http://cxf.apache.org/schemas/configuration/http-conf.xsd
            http://cxf.apache.org/transports/http-jetty/configuration
            http://cxf.apache.org/schemas/configuration/http-jetty.xsd
            http://www.springframework.org/schema/beans
            http://www.springframework.org/schema/beans/spring-beans-2.0.xsd">
  ...

  <httpj:engine-factory bus="cxf">
    <httpj:identifiedTLSServerParameters id="secure">
      <sec:keyManagers keyPassword="password">
        <sec:keyStore type="JKS" password="password"
                      file="certs/cherry.jks"/>
      </sec:keyManagers>
    </httpj:identifiedTLSServerParameters>

    <httpj:engine port="9001">
      <httpj:tlsServerParametersRef id="secure" />
      <httpj:threadingParameters minThreads="5"
                                 maxThreads="15" />
    </httpj:engine>
  </httpj:engine-factory>
 </beans>
12.5. Configuring the Netty Runtime
Overview
Maven dependencies
pom.xml file:
<dependency>
    <groupId>org.apache.cxf</groupId>
    <artifactId>cxf-rt-transports-http-netty-server</artifactId>
    <version>${cxf-version}</version>
</dependency>pom.xml file:
<dependency>
    <groupId>org.apache.cxf</groupId>
    <artifactId>cxf-rt-transports-http-netty-client</artifactId>
    <version>${cxf-version}</version>
</dependency>
Namespace
httpn. In order to use the Netty configuration elements you must add the lines shown in Example 12.16, “Netty Runtime Configuration Namespace” to the beans element of your endpoint's configuration file. In addition, you must add the configuration elements' namespace to the xsi:schemaLocation attribute.
Example 12.16. Netty Runtime Configuration Namespace
<beans ...
       xmlns:httpn="http://cxf.apache.org/transports/http-netty-server/configuration"
       ...
       xsi:schemaLocation="...
               http://cxf.apache.org/transports/http-netty-server/configuration
            http://cxf.apache.org/schemas/configuration/http-netty-server.xsd
               ...">
The engine-factory element
httpn:engine-factory element is the root element used to configure the Netty runtime used by an application. It has a single required attribute, bus, whose value is the name of the Bus that manages the Netty instances being configured.
cxf, which is the name of the default Bus instance.
httpn:engine-factory element has three children that contain the information used to configure the HTTP ports instantiated by the Netty runtime factory. The children are described in Table 12.10, “Elements for Configuring a Netty Runtime Factory”.
Table 12.10. Elements for Configuring a Netty Runtime Factory
| Element | Description |
|---|---|
httpn:engine |
Specifies the configuration for a particular Netty runtime instance. See the section called “The
engine element”.
|
httpn:identifiedTLSServerParameters |
Specifies a reusable set of properties for securing an HTTP service provider. It has a single attribute,
id, that specifies a unique identifier by which the property set can be referred.
|
httpn:identifiedThreadingParameters |
Specifies a reusable set of properties for controlling a Netty instance's thread pool. It has a single attribute,
id, that specifies a unique identifier by which the property set can be referred.
|
The engine element
httpn:engine element is used to configure specific instances of the Netty runtime. Table 12.11, “Attributes for Configuring a Netty Runtime Instance” shows the attributes supported by the httpn:engine element.
Table 12.11. Attributes for Configuring a Netty Runtime Instance
| Attribute | Description |
|---|---|
port | Specifies the port used by the Netty HTTP server instance. You can specify a value of 0 for the port attribute. Any threading properties specified in an engine element with its port attribute set to 0 are used as the configuration for all Netty listeners that are not explicitly configured. |
host | Specifies the listen address used by the Netty HTTP server instance. The value can be a hostname or an IP address. If not specified, Netty HTTP server will listen on all local addresses. |
readIdleTime | Specifies the maximum read idle time for a Netty connection. The timer is reset whenever there are any read actions on the underlying stream. |
writeIdleTime | Specifies the maximum write idle time for a Netty connection. The timer is reset whenever there are any write actions on the underlying stream. |
maxChunkContentSize | Specifies the maximum aggregated content size for a Netty connection. The default value is 10MB. |
httpn:engine element has one child element for configuring security properties and one child element for configuring the Netty instance's thread pool. For each type of configuration you can either directly provide the configuration information or you can provide a reference to a set of configuration properties defined in the parent httpn:engine-factory element.
httpn:engine are shown in Table 12.12, “Elements for Configuring a Netty Runtime Instance”.
Table 12.12. Elements for Configuring a Netty Runtime Instance
| Element | Description |
|---|---|
httpn:tlsServerParameters |
Specifies a set of properties for configuring the security used for the specific Netty instance.
|
httpn:tlsServerParametersRef |
Refers to a set of security properties defined by a
identifiedTLSServerParameters element. The id attribute provides the id of the referred identifiedTLSServerParameters element.
|
httpn:threadingParameters |
Specifies the size of the thread pool used by the specific Netty instance. See the section called “Configuring the thread pool”.
|
httpn:threadingParametersRef |
Refers to a set of properties defined by a
identifiedThreadingParameters element. The id attribute provides the id of the referred identifiedThreadingParameters element.
|
httpn:sessionSupport | When true, enables support for HTTP sessions. Default is false. |
httpn:reuseAddress | Specifies a boolean value to set the ReuseAddress TCP socket option. Default is false. |
Configuring the thread pool
- Specifying the size of the thread pool using a
identifiedThreadingParameterselement in theengine-factoryelement. You then refer to the element using athreadingParametersRefelement. - Specifying the size of the of the thread pool directly using a
threadingParameterselement.
threadingParameters element has one attribute to specify the size of a thread pool, as described in Table 12.13, “Attributes for Configuring a Netty Thread Pool”.
httpn:identifiedThreadingParameters element has a single child threadingParameters element.
Table 12.13. Attributes for Configuring a Netty Thread Pool
| Attribute | Description |
|---|---|
threadPoolSize |
Specifies the number of threads available to the Netty instance for processing requests.
|
Example
Example 12.17. Configuring a Netty Instance
<?xml version="1.0" encoding="UTF-8"?>
<beans xmlns="http://www.springframework.org/schema/beans"
       xmlns:beans="http://www.springframework.org/schema/beans"
       xmlns:xsi="http://www.w3.org/2001/XMLSchema-instance"
       xmlns:h="http://cxf.apache.org/transports/http/configuration"
       xmlns:httpn="http://cxf.apache.org/transports/http-netty-server/configuration"
       xmlns:sec="http://cxf.apache.org/configuration/security"
       xsi:schemaLocation="
        http://www.springframework.org/schema/beans
            http://www.springframework.org/schema/beans/spring-beans.xsd
        http://cxf.apache.org/configuration/security
            http://cxf.apache.org/schemas/configuration/security.xsd
        http://cxf.apache.org/transports/http/configuration
            http://cxf.apache.org/schemas/configuration/http-conf.xsd
        http://cxf.apache.org/transports/http-netty-server/configuration
            http://cxf.apache.org/schemas/configuration/http-netty-server.xsd"
>
    ...
    <httpn:engine-factory bus="cxf">
       <httpn:identifiedTLSServerParameters id="sample1">
         <httpn:tlsServerParameters jsseProvider="SUN" secureSocketProtocol="TLS">
            <sec:clientAuthentication want="false" required="false"/>
         </httpn:tlsServerParameters>
       </httpn:identifiedTLSServerParameters>

       <httpn:identifiedThreadingParameters id="sampleThreading1">
          <httpn:threadingParameters threadPoolSize="120"/>
       </httpn:identifiedThreadingParameters>

       <httpn:engine port="9000" readIdleTime="30000" writeIdleTime="90000">
          <httpn:threadingParametersRef id="sampleThreading1"/>
       </httpn:engine>

       <httpn:engine port="0">
          <httpn:threadingParameters threadPoolSize="400"/>
       </httpn:engine>

       <httpn:engine port="9001" readIdleTime="40000" maxChunkContentSize="10000">
         <httpn:threadingParameters threadPoolSize="99" />
         <httpn:sessionSupport>true</httpn:sessionSupport>
       </httpn:engine>

       <httpn:engine port="9002">
         <httpn:tlsServerParameters>
           <sec:clientAuthentication want="true" required="true"/>
         </httpn:tlsServerParameters>
       </httpn:engine>

       <httpn:engine port="9003">
          <httpn:tlsServerParametersRef id="sample1"/>
       </httpn:engine>

    </httpn:engine-factory>
</beans>
12.6. Using the HTTP Transport in Decoupled Mode
Overview
200.
202 Accepted response to the consumer over the back-channel of the HTTP connection on which the request was received. It then processes the request and sends the response back to the consumer using a new decoupled server->client HTTP connection. The consumer runtime receives the incoming response and correlates it with the appropriate request before returning to the application code.
Configuring decoupled interactions
- Configure the consumer to use WS-Addressing.
- Configure the consumer to use a decoupled endpoint.
- Configure any service providers that the consumer interacts with to use WS-Addressing.
Configuring an endpoint to use WS-Addressing
- Adding the
wswa:UsingAddressingelement to the endpoint's WSDLportelement as shown in Example 12.18, “Activating WS-Addressing using WSDL”.Example 12.18. Activating WS-Addressing using WSDL
... <service name="WidgetSOAPService"> <port name="WidgetSOAPPort" binding="tns:WidgetSOAPBinding"> <soap:address="http://widgetvendor.net/widgetSeller" /> <wswa:UsingAddressing xmlns:wswa="http://www.w3.org/2005/02/addressing/wsdl"/> </port> </service> ... - Adding the WS-Addressing policy to the endpoint's WSDL
portelement as shown in Example 12.19, “Activating WS-Addressing using a Policy”.Example 12.19. Activating WS-Addressing using a Policy
...
<service name="WidgetSOAPService">
  <port name="WidgetSOAPPort" binding="tns:WidgetSOAPBinding">
    <soap:address="http://widgetvendor.net/widgetSeller" />
    <wsp:Policy xmlns:wsp="http://www.w3.org/2006/07/ws-policy">
      <wsam:Addressing xmlns:wsam="http://www.w3.org/2007/02/addressing/metadata">
        <wsp:Policy/>
      </wsam:Addressing>
    </wsp:Policy>
  </port>
</service>
...
wswa:UsingAddressing WSDL element.
Configuring the consumer
DecoupledEndpoint attribute of the http-conf:conduit element.
Example 12.20. Configuring a Consumer to Use a Decoupled HTTP Endpoint
<beans xmlns="http://www.springframework.org/schema/beans"
       xmlns:xsi="http://www.w3.org/2001/XMLSchema-instance"
       xmlns:http="http://cxf.apache.org/transports/http/configuration"
       xsi:schemaLocation="http://cxf.apache.org/transports/http/configuration
                             http://cxf.apache.org/schemas/configuration/http-conf.xsd
                           http://www.springframework.org/schema/beans
                             http://www.springframework.org/schema/beans/spring-beans.xsd">

  <http:conduit name="{http://widgetvendor.net/services}WidgetSOAPPort.http-conduit">
    <http:client DecoupledEndpoint="http://widgetvendor.net:9999/decoupled_endpoint" />
  </http:conduit>
</beans>
How messages are processed
Figure 12.1. Message Flow in for a Decoupled HTTP Transport
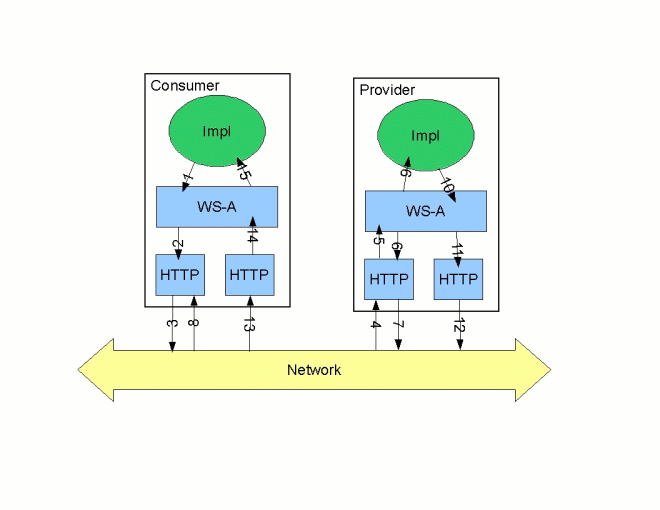
- The consumer implementation invokes an operation and a request message is generated.
- The WS-Addressing layer adds the WS-A headers to the message.When a decoupled endpoint is specified in the consumer's configuration, the address of the decoupled endpoint is placed in the WS-A ReplyTo header.
- The message is sent to the service provider.
- The service provider receives the message.
- The request message from the consumer is dispatched to the provider's WS-A layer.
- Because the WS-A ReplyTo header is not set to anonymous, the provider sends back a message with the HTTP status code set to
202, acknowledging that the request has been received. - The HTTP layer sends a
202 Acceptedmessage back to the consumer using the original connection's back-channel. - The consumer receives the
202 Acceptedreply on the back-channel of the HTTP connection used to send the original message.When the consumer receives the202 Acceptedreply, the HTTP connection closes. - The request is passed to the service provider's implementation where the request is processed.
- When the response is ready, it is dispatched to the WS-A layer.
- The WS-A layer adds the WS-Addressing headers to the response message.
- The HTTP transport sends the response to the consumer's decoupled endpoint.
- The consumer's decoupled endpoint receives the response from the service provider.
- The response is dispatched to the consumer's WS-A layer where it is correlated to the proper request using the WS-A RelatesTo header.
- The correlated response is returned to the client implementation and the invoking call is unblocked.
Chapter 13. Using SOAP Over JMS
Abstract
13.1. Basic configuration
Overview
- Specify that the transport type is SOAP/JMS.
- Specify the target destination using a JMS URI.
- Optionally, configure the JNDI connection.
- Optionally, add additional JMS configuration.
Specifying the JMS transport type
soap:binding element's transport attribute to http://www.w3.org/2010/soapjms/. Example 13.1, “SOAP over JMS binding specification” shows a WSDL binding that uses SOAP/JMS.
Example 13.1. SOAP over JMS binding specification
<wsdl:binding ... >
  <soap:binding style="document"
                transport="http://www.w3.org/2010/soapjms/" />
  ...
</wsdl:binding>
Specifying the target destination
soap:address element and attribute as a SOAP/HTTP endpoint. The difference is the address specification. JMS endpoints use a JMS URI as defined in the URI Scheme for JMS 1.0. Example 13.2, “JMS URI syntax” shows the syntax for a JMS URI.
Example 13.2. JMS URI syntax
jms:variant:destination?options
Table 13.1. JMS URI variants
| Variant | Description |
|---|---|
| jndi | Specifies that the destination is a JNDI name for the target destination. When using this variant, you must provide the configuration for accessing the JNDI provider. |
| topic | Specifies that the destination is the name of the topic to be used as the target destination. The string provided is passed into Session.createTopic() to create a representation of the destination. |
| queue | Specifies that the destination is the name of the queue to be used as the target destination. The string provided is passed into Session.createQueue() to create a representation of the destination. |
Example 13.3. SOAP/JMS endpoint address
<wsdl:port ... >
  ...
  <soap:address location="jms:jndi:dynamicQueues/test.cxf.jmstransport.queue" />
</wsdl:port>
Configuring JNDI and the JMS transport
13.2. JMS URIs
Overview
Syntax
?). Multiple options are separated by an ampersand(&). Example 13.4, “Syntax for JMS URI options” shows the syntax for using multiple options in a JMS URI.
Example 13.4. Syntax for JMS URI options
jmsAddress?option1=value1&option2=value2&...optionN=valueN
JMS properties
Table 13.2. JMS properties settable as URI options
| Property | Default | Description |
|---|---|---|
deliveryMode | PERSISTENT | Specifies whether to use JMS PERSISTENT or NON_PERSISTENT message semantics. In the case of PERSISTENT delivery mode, the JMS broker stores messages in persistent storage before acknowledging them; whereas NON_PERSISTENT messages are kept in memory only. |
replyToName |
Explicitly specifies the reply destination to appear in the
JMSReplyTo header. Setting this property is recommended for applications that have request-reply semantics because the JMS provider will assign a temporary reply queue if one is not explicitly set.
The value of this property has an interpretation that depends on the variant specified in the JMS URI:
| |
priority | 4 | Specifies the JMS message priority, which ranges from 0 (lowest) to 9 (highest). |
timeToLive | 0 | Time (in milliseconds) after which the message will be discarded by the JMS provider. A value of 0 represents an infinite lifetime (the default). |
JNDI properties
Table 13.3. JNDI properties settable as URI options
| Property | Description |
|---|---|
jndiConnectionFactoryName | Specifies the JNDI name of the JMS connection factory. |
jndiInitialContextFactory | Specifies the fully qualified Java class name of the JNDI provider (which must be of javax.jms.InitialContextFactory type). Equivalent to setting the java.naming.factory.initial Java system property. |
jndiURL | Specifies the URL that initializes the JNDI provider. Equivalent to setting the java.naming.provider.url Java system property. |
Additional JNDI properties
java.naming.factory.initial and java.naming.provider.url, are standard properties, which are required to initialize any JNDI provider. Sometimes, however, a JNDI provider might support custom properties in addition to the standard ones. In this case, you can set an arbitrary JNDI property by setting a URI option of the form jndi-PropertyName.
java.naming.factory.control, in a JMS URI as shown in Example 13.5, “Setting a JNDI property in a JMS URI”.
Example 13.5. Setting a JNDI property in a JMS URI
jms:queue:FOO.BAR?jndi-java.naming.factory.control=com.sun.jndi.ldap.ResponseControlFactory
Example
test.cxf.jmstransport.queue, use the URI shown in Example 13.6, “JMS URI that configures a JNDI connection”.
Example 13.6. JMS URI that configures a JNDI connection
jms:jndi:dynamicQueues/test.cxf.jmstransport.queue
?jndiInitialContextFactory=org.apache.activemq.jndi.ActiveMQInitialContextFactory
&jndiConnectionFactoryName=ConnectionFactory
&jndiURL=tcp://localhost:61616
13.3. WSDL extensions
Overview
InitialContext, which can then be used to look up JMS destinations. You can also set some properties that affect the behavior of the JMS transport layer.
SOAP/JMS namespace
http://www.w3.org/2010/soapjms/ namespace. To use them in your WSDL contracts add the following setting to the wsdl:definitions element:
<wsdl:definitions ...
    xmlns:soapjms="http://www.w3.org/2010/soapjms/"
  ... >
WSDL extension elements
Table 13.4. SOAP/JMS WSDL extension elements
| Element | Default | Description |
|---|---|---|
soapjms:jndiInitialContextFactory | Specifies the fully qualified Java class name of the JNDI provider. Equivalent to setting the java.naming.factory.initial Java system property. | |
soapjms:jndiURL | Specifies the URL that initializes the JNDI provider. Equivalent to setting the java.naming.provider.url Java system property. | |
soapjms:jndiContextParameter | Enables you to specify an additional property for creating the JNDI InitialContext. Use the name and value attributes to specify the property. | |
soapjms:jndiConnectionFactoryName | Specifies the JNDI name of the JMS connection factory. | |
soapjms:deliveryMode | PERSISTENT | Specifies whether to use JMS PERSISTENT or NON_PERSISTENT message semantics. In the case of PERSISTENT delivery mode, the JMS broker stores messages in persistent storage before acknowledging them; whereas NON_PERSISTENT messages are kept in memory only. |
soapjms:replyToName |
Explicitly specifies the reply destination to appear in the
JMSReplyTo header. Setting this property is recommended for SOAP invocations that have request-reply semantics. If this property is not set the JMS provider allocates a temporary queue with an automatically generated name.
The value of this property has an interpretation that depends on the variant specified in the JMS URI, as follows:
| |
soapjms:priority | 4 | Specifies the JMS message priority, which ranges from 0 (lowest) to 9 (highest). |
soapjms:timeToLive | 0 | Time, in milliseconds, after which the message will be discarded by the JMS provider. A value of 0 represents an infinite lifetime. |
Configuration scopes
wsdl:binding element, the wsdl:service element, or the wsdl:port element. The parent of the SOAP/JMS elements determine which of the following scopes the configuration is placed into.
- Binding scope
- You can configure the JMS transport at the binding scope by placing extension elements inside the
wsdl:bindingelement. Elements in this scope define the default configuration for all endpoints that use this binding. Any settings in the binding scope can be overridden at the service scope or the port scope. - Service scope
- You can configure the JMS transport at the service scope by placing extension elements inside a
wsdl:serviceelement. Elements in this scope define the default configuration for all endpoints in this service. Any settings in the service scope can be overridden at the port scope. - Port scope
- You can configure the JMS transport at the port scope by placing extension elements inside a
wsdl:portelement. Elements in the port scope define the configuration for this port. They override any defaults defined at the service scope or at the binding scope.
Example
Example 13.7. WSDL contract with SOAP/JMS configuration
<wsd;definitions ...
1    xmlns:soapjms="http://www.w3.org/2010/soapjms/"
  ... >
  ...
  <wsdl:binding name="JMSGreeterPortBinding" type="tns:JMSGreeterPortType">
    ...
2    <soapjms:jndiInitialContextFactory>
      org.apache.activemq.jndi.ActiveMQInitialContextFactory
    </soapjms:jndiInitialContextFactory>
    <soapjms:jndiURL>tcp://localhost:61616</soapjms:jndiURL>
    <soapjms:jndiConnectionFactoryName>
      ConnectionFactory
    </soapjms:jndiConnectionFactoryName>
    ...
  </wsdl:binding>
  ...
  <wsdl:service name="JMSGreeterService">
    ...
3    <soapjms:deliveryMode>NON_PERSISTENT</soapjms:deliveryMode>
    <soapjms:timeToLive>60000</soapjms:timeToLive>
    ...
    <wsdl:port binding="tns:JMSGreeterPortBinding" name="GreeterPort">
4      <soap:address location="jms:jndi:dynamicQueues/test.cxf.jmstransport.queue" />
5      <soapjms:replyToName>
        dynamicQueues/greeterReply.queue
      </soapjms:replyToName>
      ...
    </wsdl:port>
    ...
  </wsdl:service>
  ...
</wsdl:definitions>
- 1
- Declare the namespace for the SOAP/JMS extensions.
- 2
- Configure the JNDI connections in the binding scope.
- 3
- Configure the JMS delivery style to non-persistent and each message to live for one minute.
- 4
- Specify the target destination.
- 5
- Configure the JMS transport so that reply messages are delivered on the
greeterReply.queuequeue.
Chapter 14. Using Generic JMS
Abstract
TextMessage or ByteMessage.
14.1. Using the JMS configuration bean
Overview
org.apache.cxf.transport.jms.JMSConfiguration class. It can be used to either configure endpoint's directly or to configure the JMS conduits and destinations.
Configuration namespace
Example 14.1. Declaring the Spring p-namespace
<beans ...
  xmlns:p="http://www.springframework.org/schema/p"
  ... >
  ...
</beans>
Specifying the configuration
org.apache.cxf.transport.jms.JMSConfiguration. The properties of the bean provide the configuration settings for the transport.
Table 14.1. General JMS Configuration Properties
| Property | Default | Description |
|---|---|---|
connectionFactory-ref | Specifies a reference to a bean that defines a JMS ConnectionFactory. | |
wrapInSingleConnectionFactory | true | Specifies whether to wrap the ConnectionFactory with a Spring SingleConnectionFactory. Doing so can improve the performance of the JMS transport when the specified connection factory does not pool connections. |
reconnectOnException | false | Specifies whether to create a new connection in the case of an exception. This property is only used when wrapping the connection factory with a Spring SingleConnectionFactory. |
targetDestination | Specifies the JNDI name or provider specific name of a destination. | |
replyDestination | Specifies the JMS name of the JMS destinations where replies are sent. This attribute allows you to use a user defined destination for replies. For more details see Section 14.3, “Using a Named Reply Destination”. | |
destinationResolver | Specifies a reference to a Spring DestinationResolver. This allows you to define how destination names are resolved. By default a DynamicDestinationResolver is used. It resolves destinations using the JMS providers features. If you reference a JndiDestinationResolver you can resolve the destination names using JNDI. | |
transactionManager | Specifies a reference to a Spring transaction manager. This allows the service to participate in JTA Transactions. | |
taskExecutor | Specifies a reference to a Spring TaskExecutor. This is used in listeners to decide how to handle incoming messages. By default the transport uses the Spring SimpleAsyncTaskExecutor. | |
useJms11 | false | Specifies whether JMS 1.1 features are available. |
messageIdEnabled | true | Specifies whether the JMS transport wants the JMS broker to provide message IDs. Setting this to false causes the endpoint to call its message producer's setDisableMessageID() method with a value of true. The JMS broker is then given a hint that it does not need to generate message IDs or add them to the messages from the endpoint. The JMS broker can choose to accept the hint or ignore it. |
messageTimestampEnabled | true | Specifies whether the JMS transport wants the JMS broker to provide message time stamps. Setting this to false causes the endpoint to call its message producer's setDisableMessageTimestamp() method with a value of true. The JMS broker is then given a hint that it does not need to generate time stamps or add them to the messages from the endpoint. The JMS broker can choose to accept the hint or ignore it. |
cacheLevel | 3 | Specifies the level of caching allowed by the listener. Valid values are 0(CACHE_NONE), 1(CACHE_CONNECTION), 2(CACHE_SESSION), 3(CACHE_CONSUMER), 4(CACHE_AUTO). |
pubSubNoLocal | false | Specifies whether to receive messages produced from the same connection. |
receiveTimeout | 0 | Specifies, in milliseconds, the amount of time to wait for response messages. 0 means wait indefinitely. |
explicitQosEnabled | false | Specifies whether the QoS settings like priority, persistence, and time to live are explicitly set for each message or if they are allowed to use default values. |
deliveryMode | 1 |
Specifies if a message is persistent. The two values are:
|
priority | 4 | Specifies the message's priority for the messages. JMS priority values can range from 0 to 9. The lowest priority is 0 and the highest priority is 9. |
timeToLive | 0 | Specifies, in milliseconds, the message will be available after it is sent. 0 specifies an infinite time to live. |
sessionTransacted | false | Specifies if JMS transactions are used. |
concurrentConsumers | 1 | Specifies the minimum number of concurrent consumers created by the listener. |
maxConcurrentConsumers | 1 | Specifies the maximum number of concurrent consumers by listener. |
messageSelector | Specifies the string value of the selector. For more information on the syntax used to specify message selectors, see the JMS 1.1 specification. | |
subscriptionDurable | false | Specifies whether the server uses durrable subscriptions. |
durableSubscriptionName | Specifies the string used to register the durable subscription. | |
messageType | text | Specifies how the message data will be packaged as a JMS message. text specifies that the data will be packaged as a TextMessage. binary specifies that the data will be packaged as an ByteMessage. |
pubSubDomain | false | Specifies whether the target destination is a topic. |
jmsProviderTibcoEms | false | Specifies if your JMS provider is Tibco EMS. This causes the principal in the security context to be populated from the JMS_TIBCO_SENDER header. |
useMessageIDAsCorrelationID | false | Specifies whether JMS will use the message ID to correlate messages. If not, the client will set a generated correlation ID. |
bean element. They are all declared in the Spring p namespace.
Example 14.2. JMS configuration bean
<bean id="jmsConfig"
      class="org.apache.cxf.transport.jms.JMSConfiguration"
      p:connectionFactory-ref="connectionFactory"
      p:targetDestination="dynamicQueues/greeter.request.queue"
      p:pubSubDomain="false" />
Applying the configuration to an endpoint
JMSConfiguration bean can be applied directly to both server and client endpoints using the Apache CXF features mechanism. To do so:
- Set the endpoint's
addressattribute tojms://. - Add a
jaxws:featureelement to the endpoint's configuration. - Add a bean of type
org.apache.cxf.transport.jms.JMSConfigFeatureto the feature. - Set the
beanelement'sp:jmsConfig-refattribute to the ID of theJMSConfigurationbean.
Example 14.3. Adding JMS configuration to a JAX-WS client
<jaxws:client id="CustomerService"
              xmlns:customer="http://customerservice.example.com/"
              serviceName="customer:CustomerServiceService"
              endpointName="customer:CustomerServiceEndpoint"
              address="jms://"
              serviceClass="com.example.customerservice.CustomerService">
  <jaxws:features>
    <bean class="org.apache.cxf.transport.jms.JMSConfigFeature"
          p:jmsConfig-ref="jmsConfig"/>
  </jaxws:features>
</jaxws:client>
Applying the configuration to the transport
JMSConfiguration bean can be applied to JMS conduits and JMS destinations using the jms:jmsConfig-ref element. The jms:jmsConfig-ref element's value is the ID of the JMSConfiguration bean.
Example 14.4. Adding JMS configuration to a JMS conduit
<jms:conduit name="{http://cxf.apache.org/jms_conf_test}HelloWorldQueueBinMsgPort.jms-conduit">
  ...
  <jms:jmsConfig-ref>jmsConf</jms:jmsConfig-ref>
</jms:conduit>
14.2. Using WSDL to configure JMS
Example 14.5. JMS WSDL extension namespace
xmlns:jms="http://cxf.apache.org/transports/jms"
14.2.1. Basic JMS configuration
Overview
jms:address element and its child, the jms:JMSNamingProperties element. The jms:address element’s attributes specify the information needed to identify the JMS broker and the destination. The jms:JMSNamingProperties element specifies the Java properties used to connect to the JNDI service.
Specifying the JMS address
jms:address element as the child of your service’s port element. The jms:address element used in WSDL is identical to the one used in the configuration file. Its attributes are listed in Table 14.2, “JMS endpoint attributes”.
Table 14.2. JMS endpoint attributes
| Attribute | Description |
|---|---|
destinationStyle | Specifies if the JMS destination is a JMS queue or a JMS topic. |
jndiConnectionFactoryName | Specifies the JNDI name bound to the JMS connection factory to use when connecting to the JMS destination. |
jmsDestinationName | Specifies the JMS name of the JMS destination to which requests are sent. |
jmsReplyDestinationName | Specifies the JMS name of the JMS destinations where replies are sent. This attribute allows you to use a user defined destination for replies. For more details see Section 14.3, “Using a Named Reply Destination”. |
jndiDestinationName | Specifies the JNDI name bound to the JMS destination to which requests are sent. |
jndiReplyDestinationName | Specifies the JNDI name bound to the JMS destinations where replies are sent. This attribute allows you to use a user defined destination for replies. For more details see Section 14.3, “Using a Named Reply Destination”. |
connectionUserName | Specifies the user name to use when connecting to a JMS broker. |
connectionPassword | Specifies the password to use when connecting to a JMS broker. |
jms:address WSDL element uses a jms:JMSNamingProperties child element to specify additional information needed to connect to a JNDI provider.
Specifying JNDI properties
jms:address element has a child element, jms:JMSNamingProperties, that allows you to specify the values used to populate the properties used when connecting to the JNDI provider. The jms:JMSNamingProperties element has two attributes: name and value. name specifies the name of the property to set. value attribute specifies the value for the specified property. jms:JMSNamingProperties element can also be used for specification of provider specific properties.
java.naming.factory.initialjava.naming.provider.urljava.naming.factory.objectjava.naming.factory.statejava.naming.factory.url.pkgsjava.naming.dns.urljava.naming.authoritativejava.naming.batchsizejava.naming.referraljava.naming.security.protocoljava.naming.security.authenticationjava.naming.security.principaljava.naming.security.credentialsjava.naming.languagejava.naming.applet
Example
port specification.
Example 14.6. JMS WSDL port specification
<service name="JMSService">
  <port binding="tns:Greeter_SOAPBinding" name="SoapPort">
    <jms:address jndiConnectionFactoryName="ConnectionFactory"
                 jndiDestinationName="dynamicQueues/test.Celtix.jmstransport" >
      <jms:JMSNamingProperty name="java.naming.factory.initial"
                             value="org.activemq.jndi.ActiveMQInitialContextFactory" />
      <jms:JMSNamingProperty name="java.naming.provider.url"
                             value="tcp://localhost:61616" />
    </jms:address>
  </port>
</service>
14.2.2. JMS client configuration
Overview
ByteMessage or a JMS TextMessage.
ByteMessage the consumer endpoint uses a byte[] as the method for storing data into and retrieving data from the JMS message body. When messages are sent, the message data, including any formating information, is packaged into a byte[] and placed into the message body before it is placed on the wire. When messages are received, the consumer endpoint will attempt to unmarshall the data stored in the message body as if it were packed in a byte[].
TextMessage, the consumer endpoint uses a string as the method for storing and retrieving data from the message body. When messages are sent, the message information, including any format-specific information, is converted into a string and placed into the JMS message body. When messages are received the consumer endpoint will attempt to unmarshall the data stored in the JMS message body as if it were packed into a string.
TextMessage, the receiving JMS application will get a text message containing all of the SOAP envelope information.
Specifying the message type
jms:client element. The jms:client element is a child of the WSDL port element and has one attribute:
Example
Example 14.7. WSDL for a JMS consumer endpoint
<service name="JMSService">
  <port binding="tns:Greeter_SOAPBinding" name="SoapPort">
    <jms:address jndiConnectionFactoryName="ConnectionFactory"
                 jndiDestinationName="dynamicQueues/test.Celtix.jmstransport" >
      <jms:JMSNamingProperty name="java.naming.factory.initial"
                             value="org.activemq.jndi.ActiveMQInitialContextFactory" />
      <jms:JMSNamingProperty name="java.naming.provider.url"
                             value="tcp://localhost:61616" />
    </jms:address>
    <jms:client messageType="binary" />
  </port>
</service>
14.2.3. JMS provider configuration
Overview
- how messages are correlated
- the use of durable subscriptions
- if the service uses local JMS transactions
- the message selectors used by the endpoint
Specifying the configuration
jms:server element. The jms:server element is a child of the WSDL wsdl:port element and has the following attributes:
Table 14.4. JMS provider endpoint WSDL extensions
| Attribute | Description |
|---|---|
useMessageIDAsCorrealationID | Specifies whether JMS will use the message ID to correlate messages. The default is false. |
durableSubscriberName | Specifies the name used to register a durable subscription. |
messageSelector | Specifies the string value of a message selector to use. For more information on the syntax used to specify message selectors, see the JMS 1.1 specification. |
transactional | Specifies whether the local JMS broker will create transactions around message processing. The default is false. [a] |
Example
Example 14.8. WSDL for a JMS provider endpoint
<service name="JMSService">
  <port binding="tns:Greeter_SOAPBinding" name="SoapPort">
    <jms:address jndiConnectionFactoryName="ConnectionFactory"
                 jndiDestinationName="dynamicQueues/test.Celtix.jmstransport" >
      <jms:JMSNamingProperty name="java.naming.factory.initial"
                             value="org.activemq.jndi.ActiveMQInitialContextFactory" />
      <jms:JMSNamingProperty name="java.naming.provider.url"
                             value="tcp://localhost:61616" />
    </jms:address>
    <jms:server messageSelector="cxf_message_selector"
                useMessageIDAsCorrelationID="true"
                transactional="true"
                durableSubscriberName="cxf_subscriber" />
  </port>
</service>
14.3. Using a Named Reply Destination
Overview
Setting the reply destination name
jmsReplyDestinationName attribute or the jndiReplyDestinationName attribute in the endpoint's JMS configuration. A client endpoint will listen for replies on the specified destination and it will specify the value of the attribute in the ReplyTo field of all outgoing requests. A service endpoint will use the value of the jndiReplyDestinationName attribute as the location for placing replies if there is no destination specified in the request’s ReplyTo field.
Example
Example 14.9. JMS Consumer Specification Using a Named Reply Queue
<jms:conduit name="{http://cxf.apache.org/jms_endpt}HelloWorldJMSPort.jms-conduit">
    <jms:address destinationStyle="queue"
                 jndiConnectionFactoryName="myConnectionFactory"
                 jndiDestinationName="myDestination"
                 jndiReplyDestinationName="myReplyDestination" >
      <jms:JMSNamingProperty name="java.naming.factory.initial"
                             value="org.apache.cxf.transport.jms.MyInitialContextFactory" />
      <jms:JMSNamingProperty name="java.naming.provider.url"
                             value="tcp://localhost:61616" />
    </jms:address>
  </jms:conduit>
Appendix A. Integrating with Apache ActiveMQ
Overview
The initial context factory
ActiveMQInitialContextFactory class. This class is used to create a JNDI InitialContext instance, which you can then use to access JMS destinations in the JMS broker.
InitialContext that is integrated with Apache ActiveMQ.
Example A.1. SOAP/JMS WSDL to connect to Apache ActiveMQ
<soapjms:jndiInitialContextFactory>
  org.apache.activemq.jndi.ActiveMQInitialContextFactory
</soapjms:jndiInitialContextFactory>
<soapjms:jndiURL>tcp://localhost:61616</soapjms:jndiURL>
tcp://localhost:61616.
Looking up the connection factory
InitialContext instance, you must specify the JNDI name that is bound to a javax.jms.ConnectionFactory instance. In the case of Apache ActiveMQ, there is a predefined binding in the InitialContext instance, which maps the JNDI name ConnectionFactory to an ActiveMQConnectionFactory instance. Example A.2, “SOAP/JMS WSDL for specifying the Apache ActiveMQ connection factory” shaows the SOAP/JMS extension element for specifying the Apache ActiveMQ connection factory.
Example A.2. SOAP/JMS WSDL for specifying the Apache ActiveMQ connection factory
<soapjms:jndiConnectionFactoryName>
  ConnectionFactory
</soapjms:jndiConnectionFactoryName>
Syntax for dynamic destinations
dynamicQueues/QueueName
dynamicTopics/TopicName
Example A.3. WSDL port specification with a dynamically created queue
<service name="JMSService">
  <port binding="tns:GreeterBinding" name="JMSPort">
    <jms:address jndiConnectionFactoryName="ConnectionFactory"
                 jndiDestinationName="dynamicQueues/greeter.request.queue" >
      <jms:JMSNamingProperty name="java.naming.factory.initial"
                             value="org.activemq.jndi.ActiveMQInitialContextFactory" />
      <jms:JMSNamingProperty name="java.naming.provider.url"
                             value="tcp://localhost:61616" />
    </jms:address>
  </port>
</service>greeter.request.queue exists. If it does not exist, it will create a new queue and bind it to the JNDI name greeter.request.queue.
Appendix B. Conduits
Abstract
Overview
Conduit interface. This allows for a standardized interface between the application level functionality and the transports.
- Implementing a custom transport
- Advanced application tuning to manage limited resources
Conduit life-cycle
- When the client implementation object is created, it is given a reference to a
ConduitSelectorobject. - When the client needs to send a message is request's a reference to a conduit from the conduit selector.If the message is for a new endpoint, the conduit selector creates a new conduit and passes it to the client implementation. Otherwise, it passes the client a reference to the conduit for the target endpoint.
- The conduit sends messages when needed.
- When the client implementation object is destroyed, all of the conduits associated with it are destroyed.
Conduit weight
Session object and one or more JMSListenerContainer objects.
Part IV. Configuring Web Service Endpoints
Abstract
Chapter 15. Configuring JAX-WS Endpoints
Abstract
jaxws:client element. For service providers you can use either the jaxws:endpoint element or the jaxws:server element.
15.1. Configuring Service Providers
jaxws:endpoint element injects properties into the org.apache.cxf.jaxws.EndpointImpl object created to support a service endpoint. The jaxws:server element injects properties into the org.apache.cxf.jaxws.support.JaxWsServerFactoryBean object created to support the endpoint. The EndpointImpl object passes the configuration data to the JaxWsServerFactoryBean object. The JaxWsServerFactoryBean object is used to create the actual service object. Because either configuration element will configure a service endpoint, you can choose based on the syntax you prefer.
15.1.1. Using the jaxws:endpoint Element
Overview
jaxws:endpoint element is the default element for configuring JAX-WS service providers. Its attributes and children specify all of the information needed to instantiate a service provider. Many of the attributes map to information in the service's contract. The children are used to configure interceptors and other advanced features.
Identifying the endpoint being configured
jaxws:endpoint element's implementor attribute.
- a combination of the
serviceNameattribute and theendpointNameattributeTheserviceNameattribute specifies thewsdl:serviceelement defining the service's endpoint. TheendpointNameattribute specifies the specificwsdl:portelement defining the service's endpoint. Both attributes are specified as QNames using the formatns:name. ns is the namespace of the element and name is the value of the element'snameattribute.TipIf thewsdl:serviceelement only has onewsdl:portelement, theendpointNameattribute can be omitted. - the
nameattributeThenameattribute specifies the QName of the specificwsdl:portelement defining the service's endpoint. The QName is provided in the format{ns}localPart. ns is the namespace of thewsdl:portelement and localPart is the value of thewsdl:portelement'snameattribute.
Attributes
jaxws:endpoint element configure the basic properties of the endpoint. These properties include the address of the endpoint, the class that implements the endpoint, and the bus that hosts the endpoint.
jaxws:endpoint Element” describes the attribute of the jaxws:endpoint element.
Table 15.1. Attributes for Configuring a JAX-WS Service Provider Using the jaxws:endpoint Element
| Attribute | Description |
|---|---|
id | Specifies a unique identifier that other configuration elements can use to refer to the endpoint. |
implementor | Specifies the class implementing the service. You can specify the implementation class using either the class name or an ID reference to a Spring bean configuring the implementation class. This class must be on the classpath. |
implementorClass | Specifies the class implementing the service. This attribute is useful when the value provided to the implementor attribute is a reference to a bean that is wrapped using Spring AOP. |
address | Specifies the address of an HTTP endpoint. This value overrides the value specified in the services contract. |
wsdlLocation | Specifies the location of the endpoint's WSDL contract. The WSDL contract's location is relative to the folder from which the service is deployed. |
endpointName | Specifies the value of the service's wsdl:port element's name attribute. It is specified as a QName using the format ns:name where ns is the namespace of the wsdl:port element. |
serviceName | Specifies the value of the service's wsdl:service element's name attribute. It is specified as a QName using the format ns:name where ns is the namespace of the wsdl:service element. |
publish | Specifies if the service should be automatically published. If this is set to false, the developer must explicitly publish the endpoint. |
bus | Specifies the ID of the Spring bean configuring the bus used to manage the service endpoint. This is useful when configuring several endpoints to use a common set of features. |
bindingUri | Specifies the ID of the message binding the service uses. A list of valid binding IDs is provided in Appendix C, Apache CXF Binding IDs. |
name | Specifies the stringified QName of the service's wsdl:port element. It is specified as a QName using the format {ns}localPart. ns is the namespace of the wsdl:port element and localPart is the value of the wsdl:port element's name attribute. |
abstract | Specifies if the bean is an abstract bean. Abstract beans act as parents for concrete bean definitions and are not instantiated. The default is false. Setting this to true instructs the bean factory not to instantiate the bean. |
depends-on | Specifies a list of beans that the endpoint depends on being instantiated before it can be instantiated. |
createdFromAPI |
Specifies that the user created that bean using Apache CXF APIs, such as
Endpoint.publish() or Service.getPort().
The default is
false.
Setting this to
true does the following:
|
publishedEndpointUrl | The URL that is placed in the address element of the generated WSDL. If this value is not specified, the value of the address attribute is used. This attribute is useful when the "public" URL is not be the same as the URL on which the service is deployed. |
jaxws:endpoint Element”, you might need to use multiple xmlns:shortName attributes to declare the namespaces used by the endpointName and serviceName attributes.
Example
Example 15.1. Simple JAX-WS Endpoint Configuration
<beans ...
  xmlns:jaxws="http://cxf.apache.org/jaxws"
  ...
  schemaLocation="...
    http://cxf.apache.org/jaxws http://cxf.apache.org/schemas/jaxws.xsd
    ...">
  <jaxws:endpoint id="example"
                  implementor="org.apache.cxf.example.DemoImpl"
                  address="http://localhost:8080/demo" />
</beans>serviceName attribute.
Example 15.2. JAX-WS Endpoint Configuration with a Service Name
<beans ...
  xmlns:jaxws="http://cxf.apache.org/jaxws"
  ...
  schemaLocation="...
    http://cxf.apache.org/jaxws http://cxf.apache.org/schemas/jaxws.xsd
    ...">

  <jaxws:endpoint id="example2"
                  implementor="org.apache.cxf.example.DemoImpl"
                  serviceName="samp:demoService2"
                  xmlns:samp="http://org.apache.cxf/wsdl/example" />

</beans>xmlns:samp attribute specifies the namespace in which the WSDL service element is defined.
15.1.2. Using the jaxws:server Element
Overview
jaxws:server element is an element for configuring JAX-WS service providers. It injects the configuration information into the org.apache.cxf.jaxws.support.JaxWsServerFactoryBean. This is a Apache CXF specific object. If you are using a pure Spring approach to building your services, you will not be forced to use Apache CXF specific APIs to interact with the service.
jaxws:server element specify all of the information needed to instantiate a service provider. The attributes specify the information that is required to instantiate an endpoint. The children are used to configure interceptors and other advanced features.
Identifying the endpoint being configured
jaxws:server element's serviceBean attribute.
- a combination of the
serviceNameattribute and theendpointNameattributeTheserviceNameattribute specifies thewsdl:serviceelement defining the service's endpoint. TheendpointNameattribute specifies the specificwsdl:portelement defining the service's endpoint. Both attributes are specified as QNames using the formatns:name. ns is the namespace of the element and name is the value of the element'snameattribute.TipIf thewsdl:serviceelement only has onewsdl:portelement, theendpointNameattribute can be omitted. - the
nameattributeThenameattribute specifies the QName of the specificwsdl:portelement defining the service's endpoint. The QName is provided in the format{ns}localPart. ns is the namespace of thewsdl:portelement and localPart is the value of thewsdl:portelement'snameattribute.
Attributes
jaxws:server element configure the basic properties of the endpoint. These properties include the address of the endpoint, the class that implements the endpoint, and the bus that hosts the endpoint.
jaxws:server Element” describes the attribute of the jaxws:server element.
Table 15.2. Attributes for Configuring a JAX-WS Service Provider Using the jaxws:server Element
| Attribute | Description |
|---|---|
id | Specifies a unique identifier that other configuration elements can use to refer to the endpoint. |
serviceBean | Specifies the class implementing the service. You can specify the implementation class using either the class name or an ID reference to a Spring bean configuring the implementation class. This class must be on the classpath. |
serviceClass | Specifies the class implementing the service. This attribute is useful when the value provided to the implementor attribute is a reference to a bean that is wrapped using Spring AOP. |
address | Specifies the address of an HTTP endpoint. This value will override the value specified in the services contract. |
wsdlLocation | Specifies the location of the endpoint's WSDL contract. The WSDL contract's location is relative to the folder from which the service is deployed. |
endpointName | Specifies the value of the service's wsdl:port element's name attribute. It is specified as a QName using the format ns:name, where ns is the namespace of the wsdl:port element. |
serviceName | Specifies the value of the service's wsdl:service element's name attribute. It is specified as a QName using the format ns:name, where ns is the namespace of the wsdl:service element. |
start | Specifies if the service should be automatically published. If this is set to false, the developer must explicitly publish the endpoint. |
bus | Specifies the ID of the Spring bean configuring the bus used to manage the service endpoint. This is useful when configuring several endpoints to use a common set of features. |
bindingId | Specifies the ID of the message binding the service uses. A list of valid binding IDs is provided in Appendix C, Apache CXF Binding IDs. |
name | Specifies the stringified QName of the service's wsdl:port element. It is specified as a QName using the format {ns}localPart, where ns is the namespace of the wsdl:port element and localPart is the value of the wsdl:port element's name attribute. |
abstract | Specifies if the bean is an abstract bean. Abstract beans act as parents for concrete bean definitions and are not instantiated. The default is false. Setting this to true instructs the bean factory not to instantiate the bean. |
depends-on | Specifies a list of beans that the endpoint depends on being instantiated before the endpoint can be instantiated. |
createdFromAPI |
Specifies that the user created that bean using Apache CXF APIs, such as
Endpoint.publish() or Service.getPort().
The default is
false.
Setting this to
true does the following:
|
jaxws:server Element”, you might need to use multiple xmlns:shortName attributes to declare the namespaces used by the endpointName and serviceName attributes.
Example
Example 15.3. Simple JAX-WS Server Configuration
<beans ...
  xmlns:jaxws="http://cxf.apache.org/jaxws"
  ...
  schemaLocation="...
    http://cxf.apache.org/jaxws http://cxf.apache.org/schemas/jaxws.xsd
    ...">
  <jaxws:server id="exampleServer"
                  serviceBean="org.apache.cxf.example.DemoImpl"
                  address="http://localhost:8080/demo" />
</beans>
15.1.3. Adding Functionality to Service Providers
Overview
jaxws:endpoint and the jaxws:server elements provide the basic configuration information needed to instantiate a service provider. To add functionality to your service provider or to perform advanced configuration you must add child elements to the configuration.
Elements
jaxws:endpoint supports.
Table 15.3. Elements Used to Configure JAX-WS Service Providers
| Element | Description |
|---|---|
jaxws:handlers | Specifies a list of JAX-WS Handler implementations for processing messages. |
jaxws:inInterceptors | Specifies a list of interceptors that process inbound requests. For more information see Part VII, “Developing Apache CXF Interceptors”. |
jaxws:inFaultInterceptors | Specifies a list of interceptors that process inbound fault messages. For more information see Part VII, “Developing Apache CXF Interceptors”. |
jaxws:outInterceptors | Specifies a list of interceptors that process outbound replies. For more information see Part VII, “Developing Apache CXF Interceptors”. |
jaxws:outFaultInterceptors | Specifies a list of interceptors that process outbound fault messages. For more information see Part VII, “Developing Apache CXF Interceptors”. |
jaxws:binding | Specifies a bean configuring the message binding used by the endpoint. Message bindings are configured using implementations of the org.apache.cxf.binding.BindingFactory interface.[a] |
jaxws:dataBinding [b] | Specifies the class implementing the data binding used by the endpoint. This is specified using an embedded bean definition. |
jaxws:executor | Specifies a Java executor that is used for the service. This is specified using an embedded bean definition. |
jaxws:features | Specifies a list of beans that configure advanced features of Apache CXF. You can provide either a list of bean references or a list of embedded beans. |
jaxws:invoker | Specifies an implementation of the org.apache.cxf.service.Invoker interface used by the service. [c] |
jaxws:properties | Specifies a Spring map of properties that are passed along to the endpoint. These properties can be used to control features like enabling MTOM support. |
jaxws:serviceFactory | Specifies a bean configuring the JaxWsServiceFactoryBean object used to instantiate the service. |
[a]
The SOAP binding is configured using the soap:soapBinding bean.
[c]
The Invoker implementation controls how a service is invoked. For example, it controls whether each request is handled by a new instance of the service implementation or if state is preserved across invocations.
| |
15.2. Configuring Consumer Endpoints
Overview
jaxws:client element. The element's attributes provide the basic information necessary to create a consumer.
jaxws:client element. Child elements are also used to configure the endpoint's logging behavior and to inject other properties into the endpoint's implementation.
Basic Configuration Properties
Table 15.4. Attributes Used to Configure a JAX-WS Consumer
| Attribute | Description |
|---|---|
address | Specifies the HTTP address of the endpoint where the consumer will make requests. This value overrides the value set in the contract. |
bindingId | Specifies the ID of the message binding the consumer uses. A list of valid binding IDs is provided in Appendix C, Apache CXF Binding IDs. |
bus | Specifies the ID of the Spring bean configuring the bus managing the endpoint. |
endpointName | Specifies the value of the wsdl:port element's name attribute for the service on which the consumer is making requests. It is specified as a QName using the format ns:name, where ns is the namespace of the wsdl:port element. |
serviceName | Specifies the value of the wsdl:service element's name attribute for the service on which the consumer is making requests. It is specified as a QName using the format ns:name where ns is the namespace of the wsdl:service element. |
username | Specifies the username used for simple username/password authentication. |
password | Specifies the password used for simple username/password authentication. |
serviceClass | Specifies the name of the service endpoint interface(SEI). |
wsdlLocation | Specifies the location of the endpoint's WSDL contract. The WSDL contract's location is relative to the folder from which the client is deployed. |
name | Specifies the stringified QName of the wsdl:port element for the service on which the consumer is making requests. It is specified as a QName using the format {ns}localPart, where ns is the namespace of the wsdl:port element and localPart is the value of the wsdl:port element's name attribute. |
abstract | Specifies if the bean is an abstract bean. Abstract beans act as parents for concrete bean definitions and are not instantiated. The default is false. Setting this to true instructs the bean factory not to instantiate the bean. |
depends-on | Specifies a list of beans that the endpoint depends on being instantiated before it can be instantiated. |
createdFromAPI |
Specifies that the user created that bean using Apache CXF APIs like
Service.getPort().
The default is
false.
Setting this to
true does the following:
|
xmlns:shortName attributes to declare the namespaces used by the endpointName and the serviceName attributes.
Adding functionality
Table 15.5. Elements For Configuring a Consumer Endpoint
| Element | Description |
|---|---|
jaxws:binding | Specifies a bean configuring the message binding used by the endpoint. Message bindings are configured using implementations of the org.apache.cxf.binding.BindingFactory interface.[a] |
jaxws:dataBinding | Specifies the class implementing the data binding used by the endpoint. You specify this using an embedded bean definition. The class implementing the JAXB data binding is org.apache.cxf.jaxb.JAXBDataBinding. |
jaxws:features | Specifies a list of beans that configure advanced features of Apache CXF. You can provide either a list of bean references or a list of embedded beans. |
jaxws:handlers | Specifies a list of JAX-WS Handler implementations for processing messages. |
jaxws:inInterceptors | Specifies a list of interceptors that process inbound responses. For more information see Part VII, “Developing Apache CXF Interceptors”. |
jaxws:inFaultInterceptors | Specifies a list of interceptors that process inbound fault messages. For more information see Part VII, “Developing Apache CXF Interceptors”. |
jaxws:outInterceptors | Specifies a list of interceptors that process outbound requests. For more information see Part VII, “Developing Apache CXF Interceptors”. |
jaxws:outFaultInterceptors | Specifies a list of interceptors that process outbound fault messages. For more information see Part VII, “Developing Apache CXF Interceptors”. |
jaxws:properties | Specifies a map of properties that are passed to the endpoint. |
jaxws:conduitSelector | Specifies an org.apache.cxf.endpoint.ConduitSelector implementation for the client to use. A ConduitSelector implementation will override the default process used to select the Conduit object that is used to process outbound requests. |
[a]
The SOAP binding is configured using the soap:soapBinding bean.
| |
Example
Example 15.4. Simple Consumer Configuration
<beans ...
  xmlns:jaxws="http://cxf.apache.org/jaxws"
  ...
  schemaLocation="...
    http://cxf.apache.org/jaxws http://cxf.apache.org/schemas/jaxws.xsd
    ...">
  <jaxws:client id="bookClient"
                serviceClass="org.apache.cxf.demo.BookClientImpl"
                address="http://localhost:8080/books"/>
  ...
</beans>
Chapter 16. Apache CXF Logging
Abstract
16.1. Overview of Apache CXF Logging
Overview
java.util.logging. Logging is configured in a logging configuration file that is written using the standard java.util.Properties format. To run logging on an application, you can specify logging programmatically or by defining a property at the command that points to the logging configuration file when you start the application.
Default logging.properties file
logging.properties file, which is located in your InstallDir/etc directory. This file configures both the output destination for the log messages and the message level that is published. The default configuration sets the loggers to print message flagged with the WARNING level to the console. You can either use the default file without changing any of the configuration settings or you can change the configuration settings to suit your specific application.
Logging feature
Example 16.1. Configuration for Enabling Logging
<jaxws:endpoint...>
  <jaxws:features>
    <bean class="org.apache.cxf.feature.LoggingFeature"/>
  </jaxws:features>
</jaxws:endpoint>Where to begin?
More information on java.util.logging
java.util.logging utility is one of the most widely used Java logging frameworks. There is a lot of information available online that describes how to use and extend this framework. As a starting point, however, the following documents gives a good overview of java.util.logging:
16.2. Simple Example of Using Logging
Changing the log levels and output destination
- Run the sample server as described in the Running the demo using java section of the
README.txtfile in theInstallDir/samples/wsdl_firstdirectory. Note that the server start command specifies the defaultlogging.propertiesfile, as follows:Platform Command Windows start java -Djava.util.logging.config.file=%CXF_HOME%\etc\logging.properties demo.hw.server.ServerUNIX java -Djava.util.logging.config.file=$CXF_HOME/etc/logging.properties demo.hw.server.Server &The defaultlogging.propertiesfile is located in theInstallDir/etcdirectory. It configures the Apache CXF loggers to printWARNINGlevel log messages to the console. As a result, you see very little printed to the console. - Stop the server as described in the
README.txtfile. - Make a copy of the default
logging.propertiesfile, name itmylogging.propertiesfile, and save it in the same directory as the defaultlogging.propertiesfile. - Change the global logging level and the console logging levels in your
mylogging.propertiesfile toINFOby editing the following lines of configuration:.level= INFO java.util.logging.ConsoleHandler.level = INFO
- Restart the server using the following command:
Platform Command Windows start java -Djava.util.logging.config.file=%CXF_HOME%\etc\mylogging.properties demo.hw.server.ServerUNIX java -Djava.util.logging.config.file=$CXF_HOME/etc/mylogging.properties demo.hw.server.Server &Because you configured the global logging and the console logger to log messages of levelINFO, you see a lot more log messages printed to the console.
16.3. Default logging configuration file
logging.properties, is located in the InstallDir/etc directory. It configures the Apache CXF loggers to print WARNING level messages to the console. If this level of logging is suitable for your application, you do not have to make any changes to the file before using it. You can, however, change the level of detail in the log messages. For example, you can change whether log messages are sent to the console, to a file or to both. In addition, you can specify logging at the level of individual packages.
logging.properties file. There are, however, many other java.util.logging configuration properties that you can set. For more information on the java.util.logging API, see the java.util.logging javadoc at: http://java.sun.com/j2se/1.5/docs/api/java/util/logging/package-summary.html.
16.3.1. Configuring Logging Output
java.util.logging, uses handler classes to output log messages. Table 16.1, “Java.util.logging Handler Classes” shows the handlers that are configured in the default logging.properties file.
Table 16.1. Java.util.logging Handler Classes
| Handler Class | Outputs to |
|---|---|
ConsoleHandler | Outputs log messages to the console |
FileHandler | Outputs log messages to a file |
Configuring the console handler
Example 16.2. Configuring the Console Handler
handlers= java.util.logging.ConsoleHandler
Example 16.3. Console Handler Properties
- 1
- The console handler supports a separate log level configuration property. This allows you to limit the log messages printed to the console while the global logging setting can be different (see Section 16.3.2, “Configuring Logging Levels”). The default setting is
WARNING. - 2
- Specifies the
java.util.loggingformatter class that the console handler class uses to format the log messages. The default setting is thejava.util.logging.SimpleFormatter.
Configuring the file handler
Example 16.4. Configuring the File Handler
handlers= java.util.logging.FileHandler
Example 16.5. File Handler Configuration Properties
- 1
- Specifies the location and pattern of the output file. The default setting is your home directory.
- 2
- Specifies, in bytes, the maximum amount that the logger writes to any one file. The default setting is
50000. If you set it to zero, there is no limit on the amount that the logger writes to any one file. - 3
- Specifies how many output files to cycle through. The default setting is
1. - 4
- Specifies the
java.util.loggingformatter class that the file handler class uses to format the log messages. The default setting is thejava.util.logging.XMLFormatter.
Configuring both the console handler and the file handler
Example 16.6. Configuring Both Console Logging and File Logging
handlers= java.util.logging.FileHandler, java.util.logging.ConsoleHandler
16.3.2. Configuring Logging Levels
Logging levels
java.util.logging framework supports the following levels of logging, from the least verbose to the most verbose:
SEVEREWARNINGINFOCONFIGFINEFINERFINEST
Configuring the global logging level
Example 16.7. Configuring Global Logging Levels
.level= WARNING
Configuring logging at an individual package level
java.util.logging framework supports configuring logging at the level of an individual package. For example, the line of code shown in Example 16.8, “Configuring Logging at the Package Level” configures logging at a SEVERE level on classes in the com.xyz.foo package.
Example 16.8. Configuring Logging at the Package Level
com.xyz.foo.level = SEVERE
16.4. Enabling Logging at the Command Line
Overview
java.util.logging.config.file property when you start the application. You can either specify the default logging.properties file or a logging.properties file that is unique to that application.
Specifying the log configuration file on application start-up
Example 16.9. Flag to Start Logging on the Command Line
-Djava.util.logging.config.file=myfile
16.5. Logging for Subsystems and Services
com.xyz.foo.level configuration property described in the section called “Configuring logging at an individual package level” to set fine-grained logging for specified Apache CXF logging subsystems.
Apache CXF logging subsystems
Table 16.2. Apache CXF Logging Subsystems
| Subsystem | Description |
|---|---|
org.apache.cxf.aegis | Aegis binding |
org.apache.cxf.binding.coloc | colocated binding |
org.apache.cxf.binding.http | HTTP binding |
org.apache.cxf.binding.jbi | JBI binding |
org.apache.cxf.binding.object | Java Object binding |
org.apache.cxf.binding.soap | SOAP binding |
org.apache.cxf.binding.xml | XML binding |
org.apache.cxf.bus | Apache CXF bus |
org.apache.cxf.configuration | configuration framework |
org.apache.cxf.endpoint | server and client endpoints |
org.apache.cxf.interceptor | interceptors |
org.apache.cxf.jaxws | Front-end for JAX-WS style message exchange, JAX-WS handler processing, and interceptors relating to JAX-WS and configuration |
org.apache.cxf.jbi | JBI container integration classes |
org.apache.cxf.jca | JCA container integration classes |
org.apache.cxf.js | JavaScript front-end |
org.apache.cxf.transport.http | HTTP transport |
org.apache.cxf.transport.https | secure version of HTTP transport, using HTTPS |
org.apache.cxf.transport.jbi | JBI transport |
org.apache.cxf.transport.jms | JMS transport |
org.apache.cxf.transport.local | transport implementation using local file system |
org.apache.cxf.transport.servlet | HTTP transport and servlet implementation for loading JAX-WS endpoints into a servlet container |
org.apache.cxf.ws.addressing | WS-Addressing implementation |
org.apache.cxf.ws.policy | WS-Policy implementation |
org.apache.cxf.ws.rm | WS-ReliableMessaging (WS-RM) implementation |
org.apache.cxf.ws.security.wss4j | WSS4J security implementation |
Example
InstallDir/samples/ws_addressing directory. Logging is configured in the logging.properties file located in that directory. The relevant lines of configuration are shown in Example 16.10, “Configuring Logging for WS-Addressing”.
Example 16.10. Configuring Logging for WS-Addressing
java.util.logging.ConsoleHandler.formatter = demos.ws_addressing.common.ConciseFormatter ... org.apache.cxf.ws.addressing.soap.MAPCodec.level = INFO
README.txt file located in the InstallDir/samples/ws_addressing directory.
16.6. Logging Message Content
Configuring message content logging
Adding the logging feature to an endpoint
Example 16.11. Adding Logging to Endpoint Configuration
<jaxws:endpoint ...>
<jaxws:features>
<bean class="org.apache.cxf.feature.LoggingFeature"/>
</jaxws:features>
</jaxws:endpoint>Adding the logging feature to a consumer
Example 16.12. Adding Logging to Client Configuration
<jaxws:client ...>
<jaxws:features>
<bean class="org.apache.cxf.feature.LoggingFeature"/>
</jaxws:features>
</jaxws:client>Set logging to log INFO level messages
logging.properties file associated with your service is configured to log INFO level messages, as shown in Example 16.13, “Setting the Logging Level to INFO”.
Example 16.13. Setting the Logging Level to INFO
.level= INFO
java.util.logging.ConsoleHandler.level = INFO
Logging SOAP messages
InstallDir/samples/wsdl_first directory, as follows:
- Add the
jaxws:featureselement shown in Example 16.14, “Endpoint Configuration for Logging SOAP Messages” to thecxf.xmlconfiguration file located in the wsdl_first sample's directory:Example 16.14. Endpoint Configuration for Logging SOAP Messages
<jaxws:endpoint name="{http://apache.org/hello_world_soap_http}SoapPort" createdFromAPI="true"> <jaxws:properties> <entry key="schema-validation-enabled" value="true" /> </jaxws:properties> <jaxws:features> <bean class="org.apache.cxf.feature.LoggingFeature"/> </jaxws:features> </jaxws:endpoint> - The sample uses the default
logging.propertiesfile, which is located in theInstallDir/etcdirectory. Make a copy of this file and name itmylogging.properties. - In the
mylogging.propertiesfile, change the logging levels toINFOby editing the.leveland thejava.util.logging.ConsoleHandler.levelconfiguration properties as follows:.level= INFO java.util.logging.ConsoleHandler.level = INFO
- Start the server using the new configuration settings in both the
cxf.xmlfile and themylogging.propertiesfile as follows:Platform Command Windows start java -Djava.util.logging.config.file=%CXF_HOME%\etc\mylogging.properties demo.hw.server.ServerUNIX java -Djava.util.logging.config.file=$CXF_HOME/etc/mylogging.properties demo.hw.server.Server & - Start the hello world client using the following command:
Platform Command Windows java -Djava.util.logging.config.file=%CXF_HOME%\etc\mylogging.properties demo.hw.client.Client .\wsdl\hello_world.wsdlUNIX java -Djava.util.logging.config.file=$CXF_HOME/etc/mylogging.properties demo.hw.client.Client ./wsdl/hello_world.wsdl
Chapter 17. Deploying WS-Addressing
Abstract
17.1. Introduction to WS-Addressing
Overview
- A structure for communicating a reference to a Web service endpoint
- A set of Message Addressing Properties (MAP) that associate addressing information with a particular message
Supported specifications
Further information
17.2. WS-Addressing Interceptors
Overview
WS-Addressing Interceptors
Table 17.1. WS-Addressing Interceptors
| Interceptor | Description |
|---|---|
org.apache.cxf.ws.addressing.MAPAggregator | A logical interceptor responsible for aggregating the Message Addressing Properties (MAPs) for outgoing messages. |
org.apache.cxf.ws.addressing.soap.MAPCodec | A protocol-specific interceptor responsible for encoding and decoding the Message Addressing Properties (MAPs) as SOAP headers. |
17.3. Enabling WS-Addressing
Overview
- RMAssertion and WS-Policy Framework
- Using Policy Assertion in a WS-Addressing Feature
Adding WS-Addressing as a Feature
Example 17.1. client.xml—Adding WS-Addressing Feature to Client Configuration
<?xml version="1.0" encoding="UTF-8"?>
<beans xmlns="http://www.springframework.org/schema/beans"
       xmlns:xsi="http://www.w3.org/2001/XMLSchema-instance"
       xmlns:jaxws="http://cxf.apache.org/jaxws"
       xmlns:wsa="http://cxf.apache.org/ws/addressing"
       xsi:schemaLocation="
       http://www.springframework.org/schema/beans http://www.springframework.org/schema/beans/spring-beans.xsd">

    <jaxws:client ...>
        <jaxws:features>
            <wsa:addressing/>
        </jaxws:features>
    </jaxws:client>
</beans>
Example 17.2. server.xml—Adding WS-Addressing Feature to Server Configuration
<?xml version="1.0" encoding="UTF-8"?>
<beans xmlns="http://www.springframework.org/schema/beans"
       xmlns:xsi="http://www.w3.org/2001/XMLSchema-instance"
       xmlns:jaxws="http://cxf.apache.org/jaxws"
       xmlns:wsa="http://cxf.apache.org/ws/addressing"
       xsi:schemaLocation="
http://www.springframework.org/schema/beans http://www.springframework.org/schema/beans/spring-beans.xsd">

    <jaxws:endpoint ...>
        <jaxws:features>
            <wsa:addressing/>
        </jaxws:features>
    </jaxws:endpoint>
</beans>
17.4. Configuring WS-Addressing Attributes
Overview
http://cxf.apache.org/ws/addressing. It supports the two attributes described in Table 17.2, “WS-Addressing Attributes”.
Table 17.2. WS-Addressing Attributes
| Attribute Name | Value |
|---|---|
allowDuplicates | A boolean that determines if duplicate MessageIDs are tolerated. The default setting is true. |
usingAddressingAdvisory | A boolean that indicates if the presence of the UsingAddressing element in the WSDL is advisory only; that is, its absence does not prevent the encoding of WS-Addressing headers. |
Configuring WS-Addressing attributes
allowDublicates attribute to false on the server endpoint:
<beans ... xmlns:wsa="http://cxf.apache.org/ws/addressing" ...>
    <jaxws:endpoint ...>
        <jaxws:features>
            <wsa:addressing allowDuplicates="false"/>
        </jaxws:features>
    </jaxws:endpoint>
</beans>
Using a WS-Policy assertion embedded in a feature
policies element.
Example 17.3. Using the Policies to Configure WS-Addressing
<?xml version="1.0" encoding="UTF-8"?>
<beans xmlns="http://www.springframework.org/schema/beans"
        xmlns:xsi="http://www.w3.org/2001/XMLSchema-instance"
        xmlns:wsa="http://cxf.apache.org/ws/addressing"
        xmlns:wsp="http://www.w3.org/2006/07/ws-policy"
        xmlns:policy="http://cxf.apache.org/policy-config"
        xmlns:wsu="http://docs.oasis-open.org/wss/2004/01/oasis-200401-wss-wssecurity-utility-1.0.xsd"
        xmlns:jaxws="http://cxf.apache.org/jaxws"
        xsi:schemaLocation="
http://www.w3.org/2006/07/ws-policy http://www.w3.org/2006/07/ws-policy.xsd
http://cxf.apache.org/ws/addressing http://cxf.apache.org/schema/ws/addressing.xsd
http://cxf.apache.org/jaxws http://cxf.apache.org/schemas/jaxws.xsd
http://www.springframework.org/schema/beans http://www.springframework.org/schema/beans/spring-beans.xsd">

    <jaxws:endpoint name="{http://cxf.apache.org/greeter_control}GreeterPort"
                    createdFromAPI="true">
        <jaxws:features>
            <policy:policies>
                <wsp:Policy xmlns:wsam="http://www.w3.org/2007/02/addressing/metadata">
                    <wsam:Addressing>
                        <wsp:Policy>
                            <wsam:NonAnonymousResponses/>
                        </wsp:Policy>
                    </wsam:Addressing>
                </wsp:Policy>
            <policy:policies>
        </jaxws:features>
    </jaxws:endpoint>
</beans>
Chapter 18. Enabling Reliable Messaging
Abstract
18.1. Introduction to WS-RM
Overview
How WS-RM works
Figure 18.1. Web Services Reliable Messaging
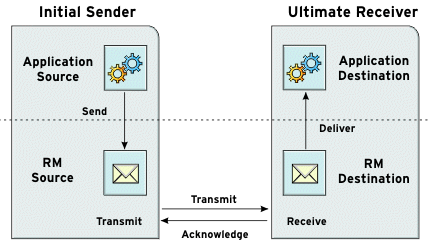
- The RM source sends a
CreateSequenceprotocol message to the RM destination. This contains a reference for the endpoint that receives acknowledgements (thewsrm:AcksToendpoint). - The RM destination sends a
CreateSequenceResponseprotocol message back to the RM source. This message contains the sequence ID for the RM sequence session. - The RM source adds an RM
Sequenceheader to each message sent by the application source. This header contains the sequence ID and a unique message ID. - The RM source transmits each message to the RM destination.
- The RM destination acknowledges the receipt of the message from the RM source by sending messages that contain the RM
SequenceAcknowledgementheader. - The RM destination delivers the message to the application destination in an exactly-once-in-order fashion.
- The RM source retransmits a message that it has not yet received an acknowledgement.The first retransmission attempt is made after a base retransmission interval. Successive retransmission attempts are made, by default, at exponential back-off intervals or, alternatively, at fixed intervals. For more details, see Section 18.4, “Configuring WS-RM”.
WS-RM delivery assurances
Supported specifications
Further information
18.2. WS-RM Interceptors
Overview
Apache CXF WS-RM Interceptors
Table 18.1. Apache CXF WS-ReliableMessaging Interceptors
| Interceptor | Description |
|---|---|
org.apache.cxf.ws.rm.RMOutInterceptor |
Deals with the logical aspects of providing reliability guarantees for outgoing messages.
Responsible for sending the
CreateSequence requests and waiting for their CreateSequenceResponse responses.
Also responsible for aggregating the sequence properties—ID and message number—for an application message.
|
org.apache.cxf.ws.rm.RMInInterceptor | Responsible for intercepting and processing RM protocol messages and SequenceAcknowledgement messages that are piggybacked on application messages. |
org.apache.cxf.ws.rm.soap.RMSoapInterceptor | Responsible for encoding and decoding the reliability properties as SOAP headers. |
org.apache.cxf.ws.rm.RetransmissionInterceptor | Responsible for creating copies of application messages for future resending. |
Enabling WS-RM
RMOutInterceptor sends a CreateSequence request and waits to process the original application message until it receives the CreateSequenceResponse response. In addition, the WS-RM interceptors add the sequence headers to the application messages and, on the destination side, extract them from the messages. It is not necessary to make any changes to your application code to make the exchange of messages reliable.
Configuring WS-RM Attributes
1).
18.3. Enabling WS-RM
Overview
- Explicitly, by adding them to the dispatch chains using Spring beans
- Implicitly, using WS-Policy assertions, which cause the Apache CXF runtime to transparently add the interceptors on your behalf.
Spring beans—explicitly adding interceptors
InstallDir/samples/ws_rm directory. The configuration file, ws-rm.cxf, shows the WS-RM and WS-Addressing interceptors being added one-by-one as Spring beans (see Example 18.1, “Enabling WS-RM Using Spring Beans”).
Example 18.1. Enabling WS-RM Using Spring Beans
<?xml version="1.0" encoding="UTF-8"?>
1<beans xmlns="http://www.springframework.org/schema/beans"
       xmlns:xsi="http://www.w3.org/2001/XMLSchema-instance"
       xsi:schemaLocation="http://www.springframework.org/schema/
   beans http://www.springframework.org/schema/beans/spring-beans.xsd">
2   <bean id="mapAggregator" class="org.apache.cxf.ws.addressing.MAPAggregator"/>
   <bean id="mapCodec" class="org.apache.cxf.ws.addressing.soap.MAPCodec"/>
3   <bean id="rmLogicalOut" class="org.apache.cxf.ws.rm.RMOutInterceptor">
        <property name="bus" ref="cxf"/>
   </bean>
   <bean id="rmLogicalIn" class="org.apache.cxf.ws.rm.RMInInterceptor">
        <property name="bus" ref="cxf"/>
   </bean>
   <bean id="rmCodec" class="org.apache.cxf.ws.rm.soap.RMSoapInterceptor"/>
   <bean id="cxf" class="org.apache.cxf.bus.CXFBusImpl">
4        <property name="inInterceptors">
            <list>
                <ref bean="mapAggregator"/>
                <ref bean="mapCodec"/>
                <ref bean="rmLogicalIn"/>
                <ref bean="rmCodec"/>
            </list>
        </property>
5        <property name="inFaultInterceptors">
            <list>
                <ref bean="mapAggregator"/>
                <ref bean="mapCodec"/>
                <ref bean="rmLogicalIn"/>
                <ref bean="rmCodec"/>
            </list>
        </property>
6        <property name="outInterceptors">
            <list>
                <ref bean="mapAggregator"/>
                <ref bean="mapCodec"/>
                <ref bean="rmLogicalOut"/>
                <ref bean="rmCodec"/>
            </list>
        </property>
7        <property name="outFaultInterceptors">
            <list>
                <ref bean="mapAggregator">
                <ref bean="mapCodec"/>
                <ref bean="rmLogicalOut"/>
                <ref bean="rmCodec"/>
            </list>
        </property>
    </bean>
</beans>
- 1
- A Apache CXF configuration file is a Spring XML file. You must include an opening Spring
beanselement that declares the namespaces and schema files for the child elements that are encapsulated by thebeanselement. - 2
- Configures each of the WS-Addressing interceptors—
MAPAggregatorandMAPCodec. For more information on WS-Addressing, see Chapter 17, Deploying WS-Addressing. - 3
- Configures each of the WS-RM interceptors—
RMOutInterceptor,RMInInterceptor, andRMSoapInterceptor. - 4
- Adds the WS-Addressing and WS-RM interceptors to the interceptor chain for inbound messages.
- 5
- Adds the WS-Addressing and WS-RM interceptors to the interceptor chain for inbound faults.
- 6
- Adds the WS-Addressing and WS-RM interceptors to the interceptor chain for outbound messages.
- 7
- Adds the WS-Addressing and WS-RM interceptors to the interceptor chain for outbound faults.
WS-Policy framework—implicitly adding interceptors
- Add the policy feature to your client and server endpoint. Example 18.2, “Configuring WS-RM using WS-Policy” shows a reference bean nested within a
jaxws:featureelement. The reference bean specifies theAddressingPolicy, which is defined as a separate element within the same configuration file.Example 18.2. Configuring WS-RM using WS-Policy
<jaxws:client> <jaxws:features> <ref bean="AddressingPolicy"/> </jaxws:features> </jaxws:client> <wsp:Policy wsu:Id="AddressingPolicy" xmlns:wsam="http://www.w3.org/2007/02/addressing/metadata"> <wsam:Addressing> <wsp:Policy> <wsam:NonAnonymousResponses/> </wsp:Policy> </wsam:Addressing> </wsp:Policy> - Add a reliable messaging policy to the
wsdl:serviceelement—or any other WSDL element that can be used as an attachment point for policy or policy reference elements—to your WSDL file, as shown in Example 18.3, “Adding an RM Policy to Your WSDL File”.Example 18.3. Adding an RM Policy to Your WSDL File
<wsp:Policy wsu:Id="RM"
   xmlns:wsp="http://www.w3.org/2006/07/ws-policy"
   xmlns:wsu="http://docs.oasis-open.org/wss/2004/01/oasis-200401-wss-wssecurity-utility-1.0.xsd">
    <wsam:Addressing xmlns:wsam="http://www.w3.org/2007/02/addressing/metadata">
        <wsp:Policy/>
    </wsam:Addressing>
    <wsrmp:RMAssertion xmlns:wsrmp="http://schemas.xmlsoap.org/ws/2005/02/rm/policy">
        <wsrmp:BaseRetransmissionInterval Milliseconds="10000"/>
    </wsrmp:RMAssertion>
</wsp:Policy>
...
<wsdl:service name="ReliableGreeterService">
    <wsdl:port binding="tns:GreeterSOAPBinding" name="GreeterPort">
        <soap:address location="http://localhost:9020/SoapContext/GreeterPort"/>
        <wsp:PolicyReference URI="#RM" xmlns:wsp="http://www.w3.org/2006/07/ws-policy"/>
    </wsdl:port>
</wsdl:service>
18.4. Configuring WS-RM
- Setting Apache CXF-specific attributes that are defined in the Apache CXF WS-RM manager namespace,
http://cxf.apache.org/ws/rm/manager. - Setting standard WS-RM policy attributes that are defined in the http://schemas.xmlsoap.org/ws/2005/02/rm/policy namespace.
18.4.1. Configuring Apache CXF-Specific WS-RM Attributes
Overview
rmManager Spring bean. Add the following to your configuration file:
- The
http://cxf.apache.org/ws/rm/managernamespace to your list of namespaces. - An
rmManagerSpring bean for the specific attribute that your want to configure.
Example 18.4. Configuring Apache CXF-Specific WS-RM Attributes
<beans xmlns="http://www.springframework.org/schema/beans"
       xmlns:xsi="http://www.w3.org/2001/XMLSchema-instance"
       xmlns:wsrm-mgr="http://cxf.apache.org/ws/rm/manager"
      xsi:schemaLocation="http://www.springframework.org/schema/beans http://www.springframework.org/schema/beans/spring-beans.xsd
 http://cxf.apache.org/ws/rm/manager http://cxf.apache.org/schemas/configuration/wsrm-manager.xsd">
...
<wsrm-mgr:rmManager>
<!--
  ...Your configuration goes here
-->
</wsrm-mgr:rmManager>
Children of the rmManager Spring bean
rmManager Spring bean, defined in the http://cxf.apache.org/ws/rm/manager namespace.
Table 18.2. Children of the rmManager Spring Bean
| Element | Description |
|---|---|
RMAssertion | An element of type RMAssertion |
deliveryAssurance | An element of type DeliveryAssuranceType that describes the delivery assurance that should apply |
sourcePolicy | An element of type SourcePolicyType that allows you to configure details of the RM source |
destinationPolicy | An element of type DestinationPolicyType that allows you to configure details of the RM destination |
Example
18.4.2. Configuring Standard WS-RM Policy Attributes
Overview
WS-Policy RMAssertion Children
http://schemas.xmlsoap.org/ws/2005/02/rm/policy namespace:
Table 18.3. Children of the WS-Policy RMAssertion Element
| Name | Description |
|---|---|
InactivityTimeout | Specifies the amount of time that must pass without receiving a message before an endpoint can consider an RM sequence to have been terminated due to inactivity. |
BaseRetransmissionInterval | Sets the interval within which an acknowledgement must be received by the RM Source for a given message. If an acknowledgement is not received within the time set by the BaseRetransmissionInterval, the RM Source will retransmit the message. |
ExponentialBackoff |
Indicates the retransmission interval will be adjusted using the commonly known exponential backoff algorithm (Tanenbaum).
For more information, see Computer Networks, Andrew S. Tanenbaum, Prentice Hall PTR, 2003.
|
AcknowledgementInterval | In WS-RM, acknowledgements are sent on return messages or sent stand-alone. If a return message is not available to send an acknowledgement, an RM Destination can wait for up to the acknowledgement interval before sending a stand-alone acknowledgement. If there are no unacknowledged messages, the RM Destination can choose not to send an acknowledgement. |
More detailed reference information
RMAssertion in rmManager Spring bean
RMAssertion within a Apache CXF rmManager Spring bean. This is the best approach if you want to keep all of your WS-RM configuration in the same configuration file; that is, if you want to configure Apache CXF-specific attributes and standard WS-RM policy attributes in the same file.
- A standard WS-RM policy attribute,
BaseRetransmissionInterval, configured using anRMAssertionwithin anrmManagerSpring bean. - An Apache CXF-specific RM attribute,
intraMessageThreshold, configured in the same configuration file.
Example 18.5. Configuring WS-RM Attributes Using an RMAssertion in an rmManager Spring Bean
<beans xmlns:wsrm-policy="http://schemas.xmlsoap.org/ws/2005/02/rm/policy"
       xmlns:wsrm-mgr="http://cxf.apache.org/ws/rm/manager"
...>
<wsrm-mgr:rmManager id="org.apache.cxf.ws.rm.RMManager">
    <wsrm-policy:RMAssertion>
        <wsrm-policy:BaseRetransmissionInterval Milliseconds="4000"/>
    </wsrm-policy:RMAssertion>
    <wsrm-mgr:destinationPolicy>
        <wsrm-mgr:acksPolicy intraMessageThreshold="0" />
    </wsrm-mgr:destinationPolicy>
</wsrm-mgr:rmManager>
</beans>
Policy within a feature
Example 18.6. Configuring WS-RM Attributes as a Policy within a Feature
<xml version="1.0" encoding="UTF-8"?>
<beans xmlns="http://www.springframework.org/schema/beans"
        xmlns:xsi="http://www.w3.org/2001/XMLSchema-instance"
        xmlns:wsa="http://cxf.apache.org/ws/addressing"
        xmlns:wsp="http://www.w3.org/2006/07/ws-policy"
        xmlns:wsu="http://docs.oasis-open.org/wss/2004/01/oasis-200401-wss-wssecurity-utility-1.0.xsd"
        xmlns:jaxws="http://cxf.apache.org/jaxws"
        xsi:schemaLocation="
http://www.w3.org/2006/07/ws-policy http://www.w3.org/2006/07/ws-policy.xsd
http://cxf.apache.org/ws/addressing http://cxf.apache.org/schema/ws/addressing.xsd
http://cxf.apache.org/jaxws http://cxf.apache.org/schemas/jaxws.xsd
http://www.springframework.org/schema/beans http://www.springframework.org/schema/beans/spring-beans.xsd">
    <jaxws:endpoint name="{http://cxf.apache.org/greeter_control}GreeterPort" createdFromAPI="true">
        <jaxws:features>
               <wsp:Policy>
                   <wsrm:RMAssertion xmlns:wsrm="http://schemas.xmlsoap.org/ws/2005/02/rm/policy">
                     <wsrm:AcknowledgementInterval Milliseconds="200" />
                   </wsrm:RMAssertion>
                   <wsam:Addressing xmlns:wsam="http://www.w3.org/2007/02/addressing/metadata">
                       <wsp:Policy>
                            <wsam:NonAnonymousResponses/>
                       </wsp:Policy>
                   </wsam:Addressing>
              </wsp:Policy>
        </jaxws:features>
    </jaxws:endpoint>
</beans>
WSDL file
External attachment
Example 18.7. Configuring WS-RM in an External Attachment
<attachments xmlns:wsp="http://www.w3.org/2006/07/ws-policy" xmlns:wsa="http://www.w3.org/2005/08/addressing">
    <wsp:PolicyAttachment>
        <wsp:AppliesTo>
           <wsa:EndpointReference>
                <wsa:Address>http://localhost:9020/SoapContext/GreeterPort</wsa:Address>
            </wsa:EndpointReference>
        </wsp:AppliesTo>
        <wsp:Policy>
            <wsam:Addressing xmlns:wsam="http://www.w3.org/2007/02/addressing/metadata">
                <wsp:Policy/>
            </wsam:Addressing>
            <wsrmp:RMAssertion xmlns:wsrmp="http://schemas.xmlsoap.org/ws/2005/02/rm/policy">
                <wsrmp:BaseRetransmissionInterval Milliseconds="30000"/>
            </wsrmp:RMAssertion>
        </wsp:Policy>
    </wsp:PolicyAttachment>
</attachments>/
18.4.3. WS-RM Configuration Use Cases
Overview
RMAssertion within an rmManager Spring bean is shown. For details of how to set such attributes as a policy within a feature; in a WSDL file, or in an external attachment, see Section 18.4.2, “Configuring Standard WS-RM Policy Attributes”.
Base retransmission interval
BaseRetransmissionInterval element specifies the interval at which an RM source retransmits a message that has not yet been acknowledged. It is defined in the http://schemas.xmlsoap.org/ws/2005/02/rm/wsrm-policy.xsd schema file. The default value is 3000 milliseconds.
Example 18.8. Setting the WS-RM Base Retransmission Interval
<beans xmlns:wsrm-policy="http://schemas.xmlsoap.org/ws/2005/02/rm/policy
...>
<wsrm-mgr:rmManager id="org.apache.cxf.ws.rm.RMManager">
    <wsrm-policy:RMAssertion>
        <wsrm-policy:BaseRetransmissionInterval Milliseconds="4000"/>
    </wsrm-policy:RMAssertion>
</wsrm-mgr:rmManager>
</beans>
Exponential backoff for retransmission
ExponentialBackoff element determines if successive retransmission attempts for an unacknowledged message are performed at exponential intervals.
ExponentialBackoff element enables this feature. An exponential backoff ratio of 2 is used by default.
Example 18.9. Setting the WS-RM Exponential Backoff Property
<beans xmlns:wsrm-policy="http://schemas.xmlsoap.org/ws/2005/02/rm/policy
...>
<wsrm-mgr:rmManager id="org.apache.cxf.ws.rm.RMManager">
    <wsrm-policy:RMAssertion>
        <wsrm-policy:ExponentialBackoff="4"/>
    </wsrm-policy:RMAssertion>
</wsrm-mgr:rmManager>
</beans>
Acknowledgement interval
AcknowledgementInterval element specifies the interval at which the WS-RM destination sends asynchronous acknowledgements. These are in addition to the synchronous acknowledgements that it sends on receipt of an incoming message. The default asynchronous acknowledgement interval is 0 milliseconds. This means that if the AcknowledgementInterval is not configured to a specific value, acknowledgements are sent immediately (that is, at the first available opportunity).
- The RM destination is using a non-anonymous
wsrm:acksToendpoint. - The opportunity to piggyback an acknowledgement on a response message does not occur before the expiry of the acknowledgement interval.
Example 18.10. Setting the WS-RM Acknowledgement Interval
<beans xmlns:wsrm-policy="http://schemas.xmlsoap.org/ws/2005/02/rm/policy
...>
<wsrm-mgr:rmManager id="org.apache.cxf.ws.rm.RMManager">
    <wsrm-policy:RMAssertion>
        <wsrm-policy:AcknowledgementInterval Milliseconds="2000"/>
    </wsrm-policy:RMAssertion>
</wsrm-mgr:rmManager>
</beans>
Maximum unacknowledged messages threshold
maxUnacknowledged attribute sets the maximum number of unacknowledged messages that can accrue per sequence before the sequence is terminated.
Example 18.11. Setting the WS-RM Maximum Unacknowledged Message Threshold
<beans xmlns:wsrm-mgr="http://cxf.apache.org/ws/rm/manager
...>
<wsrm-mgr:reliableMessaging>
    <wsrm-mgr:sourcePolicy>
        <wsrm-mgr:sequenceTerminationPolicy maxUnacknowledged="20" />
    </wsrm-mgr:sourcePolicy>
</wsrm-mgr:reliableMessaging>
</beans>
Maximum length of an RM sequence
maxLength attribute sets the maximum length of a WS-RM sequence. The default value is 0, which means that the length of a WS-RM sequence is unbound.
Example 18.12. Setting the Maximum Length of a WS-RM Message Sequence
<beans xmlns:wsrm-mgr="http://cxf.apache.org/ws/rm/manager
...>
<wsrm-mgr:reliableMessaging>
    <wsrm-mgr:sourcePolicy>
        <wsrm-mgr:sequenceTerminationPolicy maxLength="100" />
    </wsrm-mgr:sourcePolicy>
</wsrm-mgr:reliableMessaging>
</beans>
Message delivery assurance policies
AtMostOnce— The RM destination delivers the messages to the application destination only once. If a message is delivered more than once an error is raised. It is possible that some messages in a sequence may not be delivered.AtLeastOnce— The RM destination delivers the messages to the application destination at least once. Every message sent will be delivered or an error will be raised. Some messages might be delivered more than once.InOrder— The RM destination delivers the messages to the application destination in the order that they are sent. This delivery assurance can be combined with theAtMostOnceorAtLeastOnceassurances.
Example 18.13. Setting the WS-RM Message Delivery Assurance Policy
<beans xmlns:wsrm-mgr="http://cxf.apache.org/ws/rm/manager
...>
<wsrm-mgr:reliableMessaging>
    <wsrm-mgr:deliveryAssurance>
        <wsrm-mgr:AtLeastOnce />
    </wsrm-mgr:deliveryAssurance>
</wsrm-mgr:reliableMessaging>
</beans>
18.5. Configuring WS-RM Persistence
Overview
How it works
- At the RM source endpoint, an outgoing message is persisted before transmission. It is evicted from the persistent store after the acknowledgement is received.
- After a recovery from crash, it recovers the persisted messages and retransmits until all the messages have been acknowledged. At that point, the RM sequence is closed.
- At the RM destination endpoint, an incoming message is persisted, and upon a successful store, the acknowledgement is sent. When a message is successfully dispatched, it is evicted from the persistent store.
- After a recovery from a crash, it recovers the persisted messages and dispatches them. It also brings the RM sequence to a state where new messages are accepted, acknowledged, and delivered.
Enabling WS-persistence
Example 18.14. Configuration for the Default WS-RM Persistence Store
<bean id="RMTxStore" class="org.apache.cxf.ws.rm.persistence.jdbc.RMTxStore"/>
<wsrm-mgr:rmManager id="org.apache.cxf.ws.rm.RMManager">
    <property name="store" ref="RMTxStore"/>
</wsrm-mgr:rmManager>
Configuring WS-persistence
Table 18.4. JDBC Store Properties
Example 18.15. Configuring the JDBC Store for WS-RM Persistence
<bean id="RMTxStore" class="org.apache.cxf.ws.rm.persistence.jdbc.RMTxStore">
    <property name="driverClassName" value="com.acme.jdbc.Driver"/>
    <property name="url" value="jdbc:acme:rmdb;create=true"/>
</bean>
Chapter 19. Enabling High Availability
Abstract
19.1. Introduction to High Availability
Overview
HA with static failover
19.2. Enabling HA with Static Failover
Overview
Encode replica details in your service WSDL file
Example 19.1. Enabling HA with Static Failover—WSDL File
1<wsdl:service name="ClusteredService">
2    <wsdl:port binding="tns:Greeter_SOAPBinding" name="Replica1">
        <soap:address location="http://localhost:9001/SoapContext/Replica1"/>
    </wsdl:port>

3    <wsdl:port binding="tns:Greeter_SOAPBinding" name="Replica2">
        <soap:address location="http://localhost:9002/SoapContext/Replica2"/>
    </wsdl:port>

4    <wsdl:port binding="tns:Greeter_SOAPBinding" name="Replica3">
        <soap:address location="http://localhost:9003/SoapContext/Replica3"/>
    </wsdl:port>

</wsdl:service>
- 1
- Defines a service,
ClusterService, which is exposed on three ports:Replica1Replica2Replica3
- 2
- Defines
Replica1to expose theClusterServiceas a SOAP over HTTP endpoint on port9001. - 3
- Defines
Replica2to expose theClusterServiceas a SOAP over HTTP endpoint on port9002. - 4
- Defines
Replica3to expose theClusterServiceas a SOAP over HTTP endpoint on port9003.
Add the clustering feature to your client configuration
Example 19.2. Enabling HA with Static Failover—Client Configuration
<?xml version="1.0" encoding="UTF-8"?>
<beans xmlns="http://www.springframework.org/schema/beans"
       xmlns:xsi="http://www.w3.org/2001/XMLSchema-instance"
       xmlns:jaxws="http://cxf.apache.org/jaxws"
       xmlns:clustering="http://cxf.apache.org/clustering"
         xsi:schemaLocation="http://cxf.apache.org/jaxws
         http://cxf.apache.org/schemas/jaxws.xsd
         http://www.springframework.org/schema/beans
         http://www.springframework.org/schema/beans/spring-beans.xsd">

    <jaxws:client name="{http://apache.org/hello_world_soap_http}Replica1"
                  createdFromAPI="true">
        <jaxws:features>
            <clustering:failover/>
        </jaxws:features>
    </jaxws:client>

    <jaxws:client name="{http://apache.org/hello_world_soap_http}Replica2"
                  createdFromAPI="true">
        <jaxws:features>
            <clustering:failover/>
        </jaxws:features>
    </jaxws:client>

    <jaxws:client name="{http://apache.org/hello_world_soap_http}Replica3"
                  createdFromAPI="true">
        <jaxws:features>
            <clustering:failover/>
        </jaxws:features>
    </jaxws:client>

</beans>
19.3. Configuring HA with Static Failover
Overview
Configuring a random strategy
Example 19.3. Configuring a Random Strategy for Static Failover
<beans ...>
1    <bean id="Random" class="org.apache.cxf.clustering.RandomStrategy"/>

    <jaxws:client name="{http://apache.org/hello_world_soap_http}Replica3"
                  createdFromAPI="true">
        <jaxws:features>
            <clustering:failover>
2                <clustering:strategy>
                    <ref bean="Random"/>
                </clustering:strategy>
            </clustering:failover>
        </jaxws:features>
    </jaxws:client>
</beans>
Chapter 20. Enabling High Availability in Fuse Fabric
Abstract
20.1. Load Balancing Cluster
20.1.1. Introduction to Load Balancing
Overview
Fuse Fabric
Load-balancing cluster
Figure 20.1. Fabric Load Balancing for Apache CXF
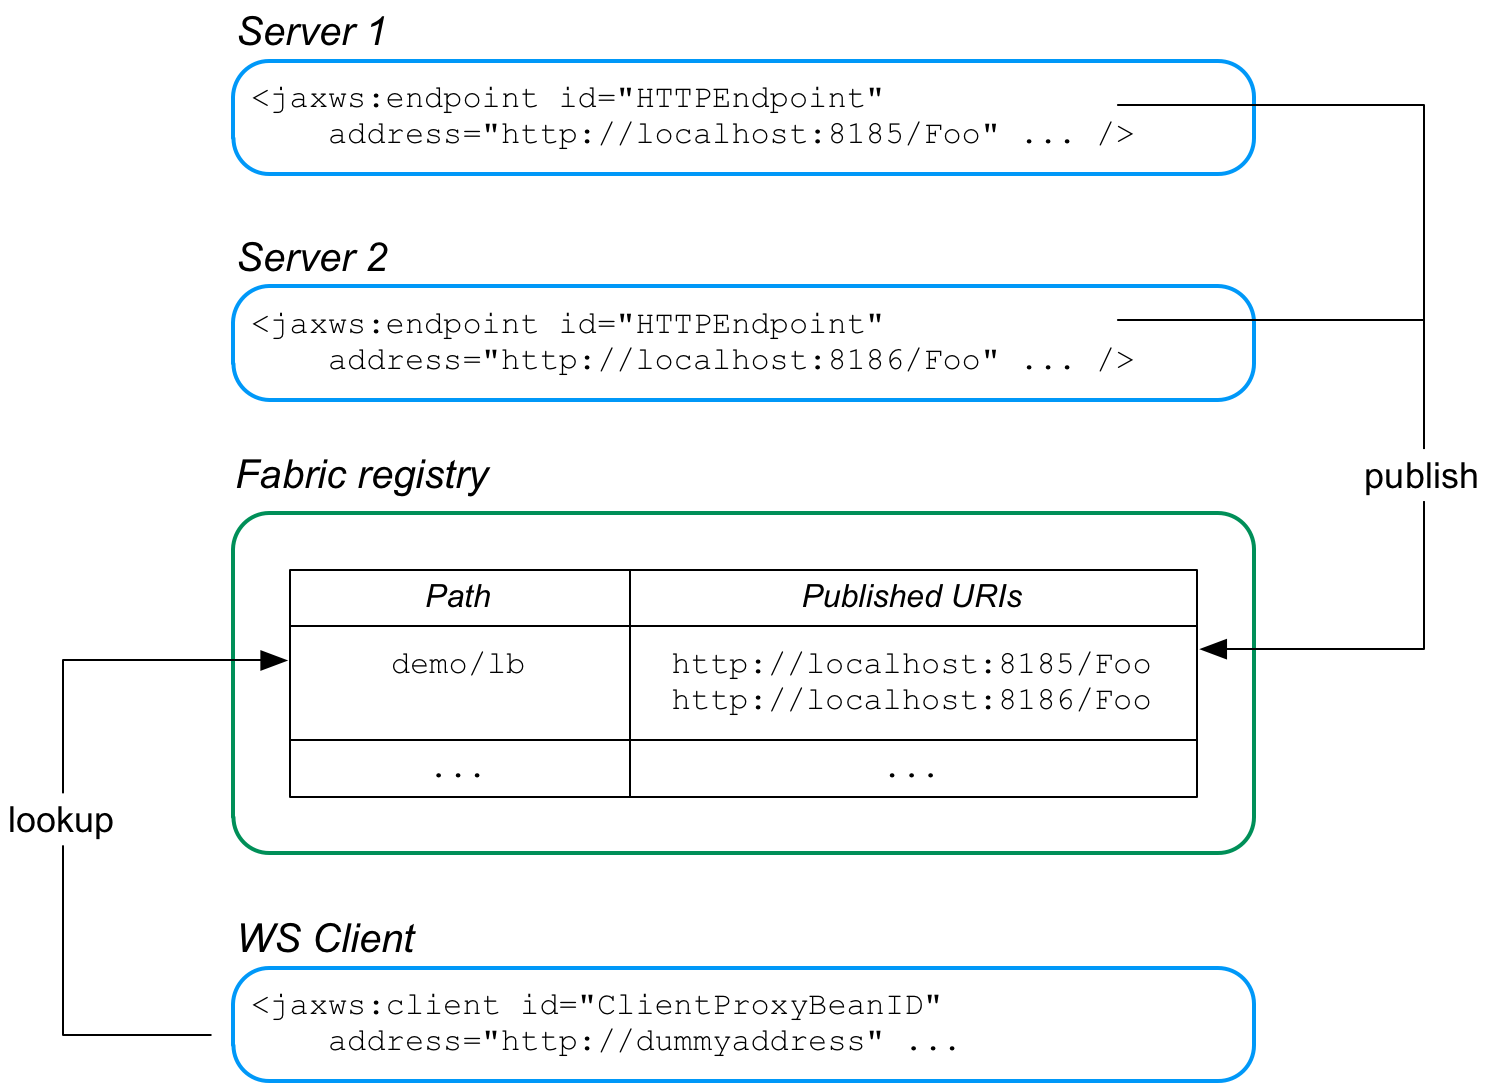
http://localhost:8185/Foo and http://localhost:8186/Foo. For both of these servers, the load balancer feature is configured to store the cluster endpoints under the path, demo/lb, in the fabric registry.
demo/lb, in the fabric registry. Because the demo/lb path is associated with multiple endpoint addresses, fabric implements a random load balancing algorithm to choose one of the available URIs to connect to.
FabricLoadBalancerFeature
io.fabric8.cxf.FabricLoadBalancerFeature
FabricLoadBalancerFeature class exposes the following bean properties:
-
fabricPath - This property specifies a node in the fabric registry (specified relative to the base node,
/fabric/cxf/endpoints) that is used to store the data for a particular endpoint cluster. -
curator - A proxy reference to the OSGi service exposed by the fabric agent (of type,
org.apache.curator.framework.CuratorFramework). -
maximumConnectionTimeout - The maximum length of time to attempt to connect to the fabric agent, specified in milliseconds. The default is 10000 (10 seconds).
-
connectionRetryTime - How long to wait between connection attempts, specified in milliseconds. The default is 100.
-
loadBalanceStrategy - By implementing a bean of type
io.fabric8.cxf.LoadBalanceStrategyand setting this property, you can customise the load balancing algorithm used by the load balancing feature.
Prerequisites
Maven dependency
fabric-cxf Maven artifact. Add the following dependency to your project's POM file:
<dependency>
    <groupId>io.fabric8</groupId>
    <artifactId>fabric-cxf</artifactId>
    <version>6.1.0.redhat-379</version>
</dependency>
OSGi package import
io.fabric8.cxf to the list of imported packages. For example, using the Maven bundle plug-in, you can specify this package import by adding io.fabric8.cxf to the comma-separated list in the Import-Package element, as follows:
<plugin>
    <groupId>org.apache.felix</groupId>
    <artifactId>maven-bundle-plugin</artifactId>
    <version>2.2.0</version>
    <extensions>true</extensions>
    <configuration>
        <instructions>
            <Bundle-SymbolicName>${project.artifactId}</Bundle-SymbolicName>
            <Import-Package>
                ...
 io.fabric8.cxf,
                *
            </Import-Package>
            ...
        </instructions>
    </configuration>
</plugin>
Fabric deployment
Required feature
fabric-cxf Apache Karaf feature to be installed in the container. In the context of a fabric, this means you must add the fabric-cxf feature to the relevant deployment profile. For example, if you are using the cxf-lb-server profile to deploy a load-balancing WS server, you can add the fabric-cxf feature by entering the following console command:
JBossFuse:karaf@root> profile-edit -f fabric-cxf cxf-lb-server
20.1.2. Configure the Server
Overview
Prerequisites
Blueprint XML
FabricLoadBalancerFeature, to an Apache CXF bus. Any Apache CXF endpoints subsequently created on this bus will automatically have the load-balancer feature enabled.
<blueprint xmlns="http://www.osgi.org/xmlns/blueprint/v1.0.0"
           ...
           xmlns:cxf="http://cxf.apache.org/blueprint/core"
           ...
>
    ...
    <reference id="curator"
               interface="org.apache.curator.framework.CuratorFramework" />

    <!-- The FabricFailOverFeature will try to access other service endpoint with round rad -->
    <bean id="fabricLoadBalancerFeature" class="io.fabric8.cxf.FabricLoadBalancerFeature">
        <property name="curator" ref="curator" />
        <property name="fabricPath" value="cxf/demo" />
    </bean>

    <!-- setup the feature on the bus to help publish the services to the fabric-->
    <cxf:bus bus="cxf">
        <cxf:features>
            <ref component-id="fabricLoadBalancerFeature"/>
        </cxf:features>
    </cxf:bus>
    ...
</blueprint>curatorreference- The
curatorreference is a proxy of the local fabric agent, which it accesses through theorg.apache.curator.framework.CuratorFrameworkinterface. This reference is needed in order to integrate the load balancer feature with the underlying fabric. FabricLoadBalancerFeaturebean- The
FabricLoadBalancerFeaturebean is initialized with the following properties:-
curator - A reference to the Apache Curator client,
CuratorFramework. -
fabricPath - The path of a node in the fabric registry, where the cluster data is stored (for example, the addresses of the endpoints in the load-balancing cluster). The node path is specified relative to the base node,
/fabric/cxf/endpoints.
-
- Apache CXF bus
- The
cxf:buselement installs the fabric load balancer feature in the default bus instance.
Example using Blueprint XML
Example 20.1. WS Server with Fabric Load Balancer Feature
<blueprint xmlns="http://www.osgi.org/xmlns/blueprint/v1.0.0"
           xmlns:xsi="http://www.w3.org/2001/XMLSchema-instance"
           xmlns:cxf="http://cxf.apache.org/blueprint/core"
           xmlns:jaxws="http://cxf.apache.org/blueprint/jaxws"
           xmlns:cm="http://aries.apache.org/blueprint/xmlns/blueprint-cm/v1.0.0"
           xsi:schemaLocation="
           http://www.osgi.org/xmlns/blueprint/v1.0.0
           http://www.osgi.org/xmlns/blueprint/v1.0.0/blueprint.xsd
           http://cxf.apache.org/schemas/blueprint/core
           http://cxf.apache.org/schemas/blueprint/core.xsd
           http://cxf.apache.org/blueprint/jaxws
           http://cxf.apache.org/blueprint/jaxws.xsd
           ">

    <reference id="curator" interface="org.apache.curator.framework.CuratorFramework" />

    <!-- The FabricFailOverFeature will try to access other service endpoint with round rad -->
    <bean id="fabicLoadBalancerFeature" class="io.fabric8.cxf.FabricLoadBalancerFeature">
        <property name="curator" ref="curator" />
        <property name="fabricPath" value="cxf/demo" />
    </bean>

    <!-- setup the feature on the bus to help publish the services to the fabric-->
    <cxf:bus bus="cxf">
        <cxf:features>
            <ref component-id="fabicLoadBalancerFeature"/>
        </cxf:features>
    </cxf:bus>

    <bean id="hello1" class="io.fabric8.demo.cxf.server.HelloImpl">
        <property name="hello" value="Hi"/>
    </bean>

    <bean id="hello2" class="io.fabric8.demo.cxf.server.HelloImpl">
        <property name="hello" value="Hello"/>
    </bean>

    <!--
    TODO: We should use address in the form of http://$[bind.address]:$[app1.port]/server/server1, but currently only fuseenterprise
    has appX.port system properties defined
    -->

    <!-- publish the service with the address of fail, cxf client will get the simulated IOException -->
    <jaxws:server id="service1" serviceClass="io.fabric8.demo.cxf.Hello" address="http://localhost:9000/server/server1">
        <jaxws:serviceBean>
             <ref component-id="hello1" />
        </jaxws:serviceBean>
    </jaxws:server>

    <jaxws:server id="service2" serviceClass="io.fabric8.demo.cxf.Hello" address="http://localhost:9000/server/server2">
        <jaxws:serviceBean>
            <ref component-id="hello2" />
        </jaxws:serviceBean>
    </jaxws:server>

</blueprint>
- Enabling the fabric load balancing feature—the fabric load balancing feature is installed in the default bus instance, as previously described. In this example, the
fabricPathproperty is set to the value,cxf/demo. - Creating the WS endpoints—create the WS endpoints in the usual way, using the
jaxws:serverelement (this can be used as an alternative to thejaxws:endpointelement). By default, this endpoint is automatically associated with the default bus instance, which has load balancing enabled.
20.1.3. Configure the Client
Overview
Prerequisites
Blueprint XML
FabricLoadBalancerFeature, directly into a WS client proxy instance.
<blueprint xmlns="http://www.osgi.org/xmlns/blueprint/v1.0.0"
           ...
           xmlns:jaxws="http://cxf.apache.org/blueprint/jaxws"
           xmlns:cxf="http://cxf.apache.org/blueprint/core"
           ...
>
    <!-- Create a client proxy, with load balancing enabled -->
    <jaxws:client id="ClientProxyBeanID"
        address="http://dummyaddress"
        serviceClass="SEI">
        <jaxws:features>
            <ref component-id="fabricLoadBalancerFeature" />
        </jaxws:features>
    </jaxws:client>
    ...
    <reference id="curator"
               interface="org.apache.curator.framework.CuratorFramework" />

    <!-- The FabricFailOverFeature will try to access other service endpoint with round rad -->
    <bean id="fabricLoadBalancerFeature" class="io.fabric8.cxf.FabricLoadBalancerFeature">
        <property name="curator" ref="curator" />
        <property name="fabricPath" value="ZKPath" />
    </bean>
    ...
</blueprint>jaxws:features element (or, as in this case, by inserting a bean reference to the actual instance). The following beans are used to initialise the fabric load-balancer feature:
curatorreference- The
curatorreference is a proxy of the local fabric agent, which it accesses through theorg.apache.curator.framework.CuratorFrameworkinterface. This reference is needed in order to integrate the load balancer feature with the underlying fabric. FabricLoadBalancerFeaturebean- The
FabricLoadBalancerFeaturebean is initialized with the following properties:-
curator - A reference to the Apache Curator client,
curator. -
fabricPath - The path of a node in the fabric registry, where the cluster data is stored (for example, the addresses of the endpoints in the load-balancing cluster). The node path is specified relative to the base node,
/fabric/cxf/endpoints.
-
Java
Hello Web service.
// Java
package io.fabric8.demo.cxf.client;

import org.apache.cxf.feature.AbstractFeature;
import org.apache.cxf.frontend.ClientProxyFactoryBean;
import org.apache.cxf.jaxws.JaxWsProxyFactoryBean;
import io.fabric8.cxf.FabricLoadBalancerFeature;
import io.fabric8.demo.cxf.Hello;

import java.util.ArrayList;
import java.util.List;

public class Client {

    private Hello hello;

    public void initializeHelloProxy() {
        // The feature will try to create a zookeeper client itself
        // by checking the system property of zookeeper.url
        FabricLoadBalancerFeature feature = new FabricLoadBalancerFeature();
        // Feature will use this path to locate the service
        feature.setFabricPath("demo/lb");

        ClientProxyFactoryBean clientFactory = new JaxWsProxyFactoryBean();
        clientFactory.setServiceClass(ClientProxyFactoryBean.class);
        // The address is not the actual address that the client will access
        clientFactory.setAddress("http://dummyaddress");

        List<AbstractFeature> features = new ArrayList<AbstractFeature>();
        features.add(feature);
        // we need to setup the feature on the client factory
        clientFactory.setFeatures(features);

        // Create the proxy of Hello
        hello = clientFactory.create(Hello.class);
    }

    public static void main(String args[]) {
        initializeHelloProxy();
        ...
    }
}fabricPath property is set to the value, demo/lb (which matches the example value used by the server in Example 20.1, “WS Server with Fabric Load Balancer Feature”).
http://dummyaddress, because this value is not used. When the client is initialized, the load balancer feature substitutes the address value retrieved from the demo/lb node of the fabric registry.
20.2. Failover Cluster
Overview
Failover cluster
Figure 20.2. Fabric Failover for Apache CXF
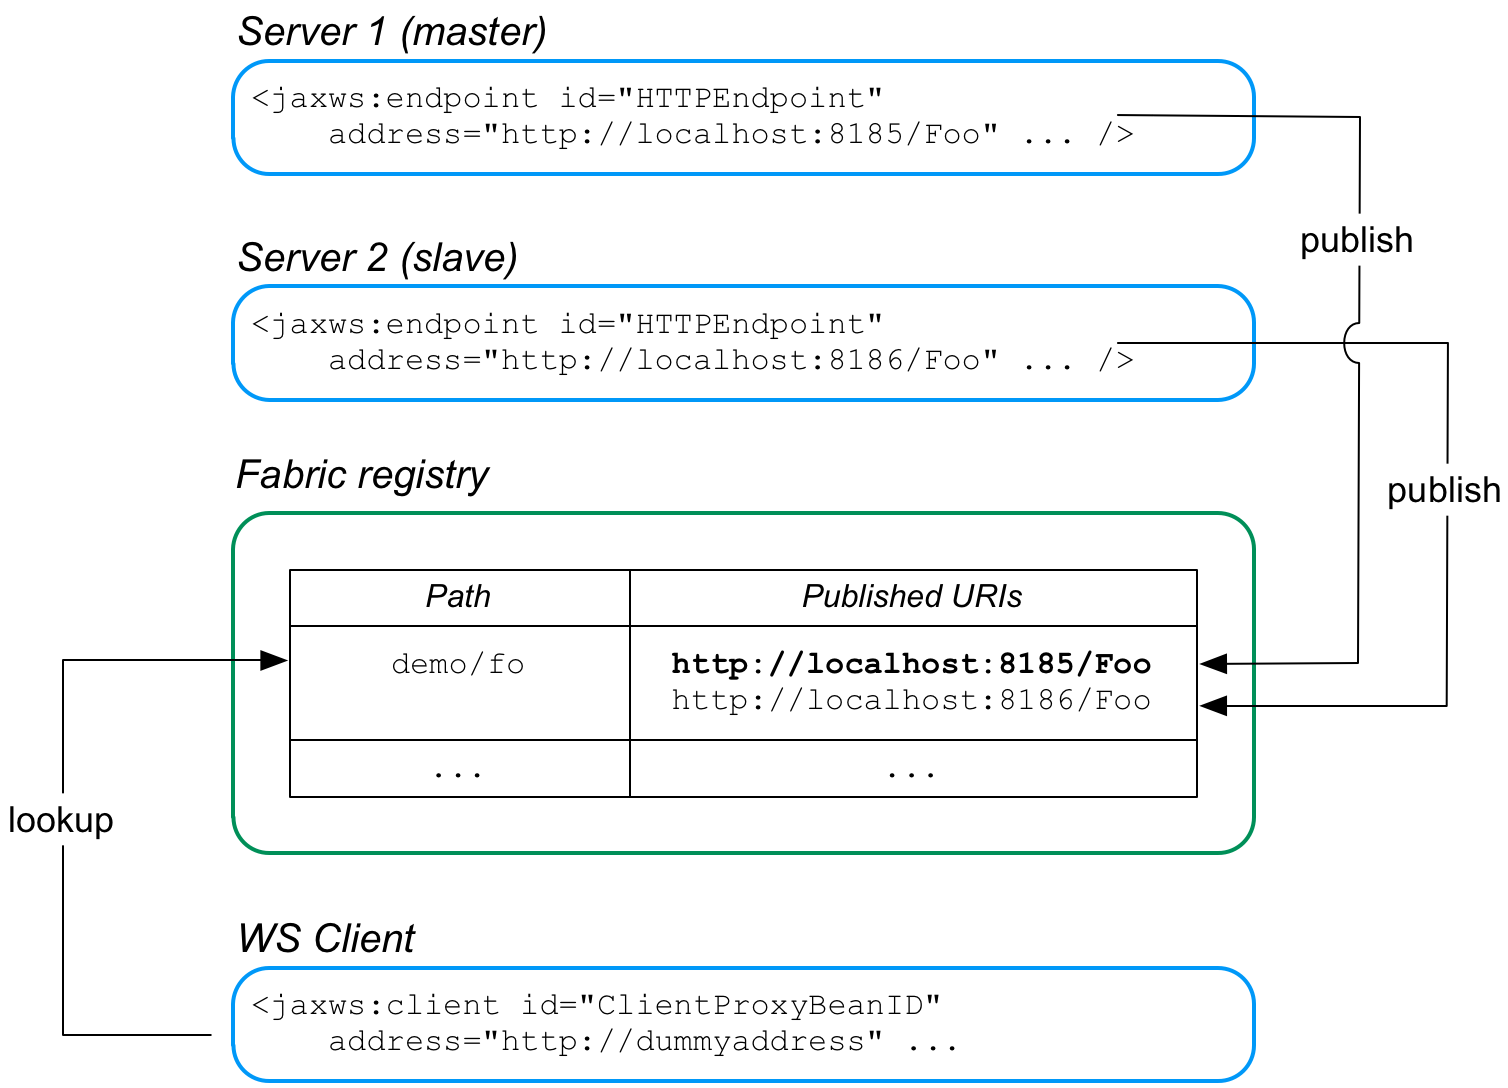
http://localhost:8185/Foo and http://localhost:8186/Foo. In both servers, the failover feature is configured to store the cluster endpoints under the path, demo/fo, in the fabric registry. The cluster endpoints stored under demo/fo are ordered. The first endpoint in the cluster is the master and all of the other endpoints are slaves.
- When the WS client starts, it is configured to look up the cluster path,
demo/fo, in the fabric registry. The failover feature initially returns the first address registered underdemo/fo(the master). - At some point, the master server could fail. The client determines whether the master has failed by catching the exception that occurs when it tries to make an invocation: if the caught exception matches one of the exceptions in a specified list (by default, just the
java.io.IOException), the master is deemed to have failed and the client now ignores the corresponding address entry underdemo/fo. - The client selects the next address entry under
demo/foand attempts to connect to that server. Assuming that this server is healthy, it is effectively the new master. - At some point in the future, if the failed old master is restarted successfully, it creates a new address entry under
demo/foafter the existing entries, and is then available to clients, in case the other server (or servers) fail.
FabricFailOverFeature
io.fabric8.cxf.FabricFailOverFeature
FabricFailOverFeature class exposes the following bean properties:
-
fabricPath - This property specifies a node in the fabric registry (specified relative to the base node,
/fabric/cxf/endpoints) that is used to store the data for a particular endpoint cluster. -
curator - A proxy reference to the OSGi service (of type,
org.apache.curator.framework.CuratorFramework) for the Apache Curator client, which is exposed by the fabric agent. -
maximumConnectionTimeout - The maximum length of time to attempt to connect to the fabric agent, specified in milliseconds. The default is 10000 (10 seconds).
-
connectionRetryTime - How long to wait between connection attempts, specified in milliseconds. The default is 100.
-
exceptions - A semicolon-separated list of exceptions that signal to the client that a server has failed. If not set, this property defaults to
java.io.IOException.For example, you could set theexceptionsproperty to a value like the following:java.io.IOException;javax.xml.ws.soap.SOAPFaultException
Blueprint XML
FabricLoadBalancerFeature bean, you must instantiate and reference a FabricFailOverFeature bean.
FabricFailOverFeature bean instance as follows:
<blueprint xmlns="http://www.osgi.org/xmlns/blueprint/v1.0.0"
           ...
           xmlns:cxf="http://cxf.apache.org/blueprint/core"
           ...
>
    ...
    <!-- Reference the fabric agent -->
    <reference id="curator"
               interface="org.apache.curator.framework.CuratorFramework" />

    <!-- Create the Fabric load balancer feature -->
    <bean id="failoverFeature"
          class="io.fabric8.cxf.FabricFailOverFeature">
        <property name="curator" ref="curator" />
        <property name="fabricPath" value="ZKPath" />
    </bean>
    ...
</blueprint>fabricPath property and to reference the appropriate bean ID (failoverFeature in the preceding example).
Chapter 21. Packaging an Application
Abstract
Creating a bundle
Required bundle
org.apache.cxf.cxf-bundle. This bundle needs to be installed in the JBoss Fuse container before your application's bundle can be started.
Required packages
- javax.jws
- javax.wsdl
- META-INF.cxf
- META-INF.cxf.osgi
- org.apache.cxf.bus
- org.apache.cxf.bus.spring
- org.apache.cxf.bus.resource
- org.apache.cxf.configuration.spring
- org.apache.cxf.resource
- org.apache.servicemix.cxf.transport.http_osgi
- org.springframework.beans.factory.config
Example
Example 21.1. Apache CXF Application Manifest
Manifest-Version: 1.0
Built-By: FinnMcCumial
Created-By: Apache Maven Bundle Plugin
Bundle-License: http://www.apache.org/licenses/LICENSE-2.0.txt
Import-Package: javax.jws,javax.wsdl,META-INF.cxf,META-INF.cxf.osgi,
org.apache.cxf.bus,org.apache.cxf.bus.spring,org.apache.bus.resource,
org.apache.cxf.configuration.spring, org.apache.cxf.resource,
org.apache.servicemix.cxf.transport.http_cxf,
org.springframework.beans.factory.config
Bnd-LastModified: 1222079507224
Bundle-Version: 4.0.0.fuse
Bundle-Name: Fuse CXF Example
Bundle-Description: This is a sample CXF manifest.
Build-Jdk: 1.5.0_08
Private-Package: org.apache.servicemix.examples.cxf
Required-Bundle: org.apache.cxf.cxf-bundle
Bundle-ManifestVersion: 2
Bundle-SymbolicName: cxf-wsdl-first-osgi
Tool: Bnd-0.0.255
Chapter 22. Deploying an Application
Abstract
Overview
- Rely on the hot deployment mechanism.
- Use the console.
Hot deployment
/deploy. Any bundle placed in this folder is installed into the container. If its dependencies can be resolved, the bundle is activated.
Deploying from the console
servicemix>osgi install -s file:/home/finn/ws/widgetapp.jar
widgetapp.jar which is located in /home/finn/ws.
-s flag. That will install the bundle without attempting to start it. You will then have to manually start the bundle using the osgi start command.
Refreshing an application
Stopping an application
Uninstalling an application
Appendix C. Apache CXF Binding IDs
Table C.1. Binding IDs for Message Bindings
| Binding | ID |
|---|---|
| CORBA | http://cxf.apache.org/bindings/corba |
| HTTP/REST | http://apache.org/cxf/binding/http |
| SOAP 1.1 | http://schemas.xmlsoap.org/wsdl/soap/http |
| SOAP 1.1 w/ MTOM | http://schemas.xmlsoap.org/wsdl/soap/http?mtom=true |
| SOAP 1.2 | http://www.w3.org/2003/05/soap/bindings/HTTP/ |
| SOAP 1.2 w/ MTOM | http://www.w3.org/2003/05/soap/bindings/HTTP/?mtom=true |
| XML | http://cxf.apache.org/bindings/xformat |
Appendix D. Using the Maven OSGi Tooling
Abstract
D.1. Setting up a Red Hat JBoss Fuse OSGi project
Overview
Directory structure
src folder. As in all Maven projects, you place all Java source code in the src/java folder, and you place any non-Java resources in the src/resources folder.
beans.xml file located in the src/resources/META-INF/spring folder.
Adding a bundle plug-in
Example D.1. Adding an OSGi bundle plug-in to a POM
...
<dependencies>
  <dependency> 1
    <groupId>org.apache.felix</groupId>
    <artifactId>org.osgi.core</artifactId>
    <version>1.0.0</version>
  </dependency>
...
</dependencies>
...
<build>
  <plugins>
    <plugin> 2
      <groupId>org.apache.felix</groupId>
      <artifactId>maven-bundle-plugin</artifactId>
      <configuration>
        <instructions>
          <Bundle-SymbolicName>${pom.artifactId}</Bundle-SymbolicName> 3
          <Import-Package>*,org.apache.camel.osgi</Import-Package> 4
          <Private-Package>org.apache.servicemix.examples.camel</Private-Package> 5
        </instructions>
      </configuration>
    </plugin>
  </plugins>
</build>
...
- 1
- Adds the dependency on Apache Felix
- 2
- Adds the bundle plug-in to your project
- 3
- Configures the plug-in to use the project's artifact ID as the bundle's symbolic name
- 4
- Configures the plug-in to include all Java packages imported by the bundled classes; also imports the org.apache.camel.osgi package
- 5
- Configures the plug-in to bundle the listed class, but not to include them in the list of exported packages
Activating a bundle plug-in
packaging element to bundle.
Useful Maven archetypes
Spring OSGi archetype
org.springframework.osgi/spring-bundle-osgi-archetype/1.1.2
mvn archetype:create -DarchetypeGroupId=org.springframework.osgi -DarchetypeArtifactId=spring-osgi-bundle-archetype -DarchetypeVersion=1.12 -DgroupId=groupId -DartifactId=artifactId -Dversion=versionApache CXF code-first archetype
org.apache.servicemix.tooling/servicemix-osgi-cxf-code-first-archetype/2008.01.0.3-fuse
mvn archetype:create -DarchetypeGroupId=org.apache.servicemix.tooling -DarchetypeArtifactId=spring-osgi-bundle-archetype -DarchetypeVersion=2008.01.0.3-fuse -DgroupId=groupId -DartifactId=artifactId -Dversion=versionApache CXF wsdl-first archetype
org.apache.servicemix.tooling/servicemix-osgi-cxf-wsdl-first-archetype/2008.01.0.3-fuse
mvn archetype:create -DarchetypeGroupId=org.apache.servicemix.tooling -DarchetypeArtifactId=servicemix-osgi-cxf-wsdl-first-archetype -DarchetypeVersion=2008.01.0.3-fuse -DgroupId=groupId -DartifactId=artifactId -Dversion=versionApache Camel archetype
org.apache.servicemix.tooling/servicemix-osgi-camel-archetype/2008.01.0.3-fuse
mvn archetype:create -DarchetypeGroupId=org.apache.servicemix.tooling -DarchetypeArtifactId=servicemix-osgi-camel-archetype -DarchetypeVersion=2008.01.0.3-fuse -DgroupId=groupId -DartifactId=artifactId -Dversion=version D.2. Configuring the Bundle Plug-In
Overview
instructions element.
Configuration properties
Setting a bundle's symbolic name
+ "." + artifactId, with the following exceptions:
- If groupId has only one section (no dots), the first package name with classes is returned.For example, if the group Id is
commons-logging:commons-logging, the bundle's symbolic name isorg.apache.commons.logging. - If artifactId is equal to the last section of groupId, then groupId is used.For example, if the POM specifies the group ID and artifact ID as
org.apache.maven:maven, the bundle's symbolic name isorg.apache.maven. - If artifactId starts with the last section of groupId, that portion is removed.For example, if the POM specifies the group ID and artifact ID as
org.apache.maven:maven-core, the bundle's symbolic name isorg.apache.maven.core.
Bundle-SymbolicName child in the plug-in's instructions element, as shown in Example D.2.
Example D.2. Setting a bundle's symbolic name
<plugin>
  <groupId>org.apache.felix</groupId>
  <artifactId>maven-bundle-plugin</artifactId>
  <configuration>
   <instructions>
     <Bundle-SymbolicName>${project.artifactId}</Bundle-SymbolicName>
     ...
    </instructions>
  </configuration>
</plugin>
Setting a bundle's name
${project.name}.
Bundle-Name child to the plug-in's instructions element, as shown in Example D.3.
Example D.3. Setting a bundle's name
<plugin>
  <groupId>org.apache.felix</groupId>
  <artifactId>maven-bundle-plugin</artifactId>
  <configuration>
   <instructions>
     <Bundle-Name>JoeFred</Bundle-Name>
     ...
    </instructions>
  </configuration>
</plugin>
Setting a bundle's version
${project.version}. Any dashes (-) are replaced with dots (.) and the number is padded up to four digits. For example, 4.2-SNAPSHOT becomes 4.2.0.SNAPSHOT.
Bundle-Version child to the plug-in's instructions element, as shown in Example D.4.
Example D.4. Setting a bundle's version
<plugin>
  <groupId>org.apache.felix</groupId>
  <artifactId>maven-bundle-plugin</artifactId>
  <configuration>
   <instructions>
     <Bundle-Version>1.0.3.1</Bundle-Version>
     ...
    </instructions>
  </configuration>
</plugin>
Specifying exported packages
Export-Package list is populated by all of the packages in your local Java source code (under src/main/java), except for the deault package, ., and any packages containing .impl or .internal.
Private-Package element in your plug-in configuration and you do not specify a list of packages to export, the default behavior includes only the packages listed in the Private-Package element in the bundle. No packages are exported.
Export-Package child to the plug-in's instructions element.
Export-Package element specifies a list of packages that are to be included in the bundle and that are to be exported. The package names can be specified using the * wildcard symbol. For example, the entry com.fuse.demo.* includes all packages on the project's classpath that start with com.fuse.demo.
!. For example, the entry !com.fuse.demo.private excludes the package com.fuse.demo.private.
!com.fuse.demo.private,com.fuse.demo.*
Specifying private packages
Private-Package instruction to the bundle plug-in configuration. By default, if you do not specify a Private-Package instruction, all packages in your local Java source are included in the bundle.
Private-Package element and the Export-Package element, the Export-Package element takes precedence. The package is added to the bundle and exported.
Private-Package element works similarly to the Export-Package element in that you specify a list of packages to be included in the bundle. The bundle plug-in uses the list to find all classes on the project's classpath that are to be included in the bundle. These packages are packaged in the bundle, but not exported (unless they are also selected by the Export-Package instruction).
Example D.5. Including a private package in a bundle
<plugin>
  <groupId>org.apache.felix</groupId>
  <artifactId>maven-bundle-plugin</artifactId>
  <configuration>
   <instructions>
     <Private-Package>org.apache.cxf.wsdlFirst.impl</Private-Package>
     ...
    </instructions>
  </configuration>
</plugin>
Specifying imported packages
Import-Package property with a list of all the packages referred to by the contents of the bundle.
Import-Package child to the plug-in's instructions element. The syntax for the package list is the same as for the Export-Package element and the Private-Package element.
Import-Package element, the plug-in does not automatically scan the bundle's contents to determine if there are any required imports. To ensure that the contents of the bundle are scanned, you must place an * as the last entry in the package list.
Example D.6. Specifying the packages imported by a bundle
<plugin>
  <groupId>org.apache.felix</groupId>
  <artifactId>maven-bundle-plugin</artifactId>
  <configuration>
   <instructions>
     <Import-Package>javax.jws,
         javax.wsdl,
         org.apache.cxf.bus,
         org.apache.cxf.bus.spring,
         org.apache.cxf.bus.resource,
         org.apache.cxf.configuration.spring,
         org.apache.cxf.resource,
         org.springframework.beans.factory.config,
         *
     </Import-Package>
     ...
   </instructions>
  </configuration>
</plugin>
More information
Part V. Developing Applications Using JAX-WS
Abstract
Chapter 23. Bottom-Up Service Development
Abstract
- Create a Service Endpoint Interface (SEI) that defines the methods you want to expose as a service.TipYou can work directly from a Java class, but working from an interface is the recommended approach. Interfaces are better suited for sharing with the developers who are responsible for developing the applications consuming your service. The interface is smaller and does not provide any of the service's implementation details.
- Add the required annotations to your code.
- Generate the WSDL contract for your service.TipIf you intend to use the SEI as the service's contract, it is not necessary to generate a WSDL contract.
- Publish the service as a service provider.
23.1. Creating the SEI
Overview
- Green field development — In this pattern, you are developing a new service without any existing Java code or WSDL. It is best to start by creating the SEI. You can then distribute the SEI to any developers that are responsible for implementing the service providers and consumers that use the SEI.NoteThe recommended way to do green field service development is to start by creating a WSDL contract that defines the service and its interfaces. See Chapter 25, A Starting Point WSDL Contract.
- Service enablement — In this pattern, you typically have an existing set of functionality that is implemented as a Java class, and you want to service enable it. This means that you must do two things:
- Create an SEI that contains only the operations that are going to be exposed as part of the service.
- Modify the existing Java class so that it implements the SEI.
NoteAlthough you can add the JAX-WS annotations to a Java class, it is not recommended.
Writing the interface
wsdl:portType element. The methods defined by the SEI correspond to wsdl:operation elements in the wsdl:portType element.
Example 23.1. Simple SEI
package com.fusesource.demo;

public interface quoteReporter
{
  public Quote getQuote(String ticker);
}
Implementing the interface
Example 23.2. Simple Implementation Class
package com.fusesource.demo;

import java.util.*;

public class stockQuoteReporter implements quoteReporter
{
  ...
public Quote getQuote(String ticker)
  {
    Quote retVal = new Quote();
    retVal.setID(ticker);
    retVal.setVal(Board.check(ticker));[2]
    Date retDate = new Date();
    retVal.setTime(retDate.toString());
    return(retVal);
  }
}
23.2. Annotating the Code
- The target namespace for the service.
- The name of the class used to hold the request message
- The name of the class used to hold the response message
- If an operation is a one way operation
- The binding style the service uses
- The name of the class used for any custom exceptions
- The namespaces under which the types used by the service are defined
23.2.1. Required Annotations
Overview
@WebService annotation on both the SEI and the implementation class.
The @WebService annotation
@WebService annotation is defined by the javax.jws.WebService interface and it is placed on an interface or a class that is intended to be used as a service. @WebService has the properties described in Table 23.1, “@WebService Properties”
Table 23.1. @WebService Properties
| Property | Description |
|---|---|
| name | Specifies the name of the service interface. This property is mapped to the name attribute of the wsdl:portType element that defines the service's interface in a WSDL contract. The default is to append PortType to the name of the implementation class. [a] |
| targetNamespace | Specifies the target namespace where the service is defined. If this property is not specified, the target namespace is derived from the package name. |
| serviceName | Specifies the name of the published service. This property is mapped to the name attribute of the wsdl:service element that defines the published service. The default is to use the name of the service's implementation class. [a] |
| wsdlLocation | Specifies the URL where the service's WSDL contract is stored. This must be specified using a relative URL. The default is the URL where the service is deployed. |
| endpointInterface | Specifies the full name of the SEI that the implementation class implements. This property is only specified when the attribute is used on a service implementation class. |
| portName | Specifies the name of the endpoint at which the service is published. This property is mapped to the name attribute of the wsdl:port element that specifies the endpoint details for a published service. The default is the append Port to the name of the service's implementation class.[a] |
[a]
When you generate WSDL from an SEI the interface's name is used in place of the implementation class' name.
| |
@WebService annotation's properties. However, it is recommended that you provide as much information as you can.
Annotating the SEI
@WebService annotation. Because the SEI is the contract that defines the service, you should specify as much detail as possible about the service in the @WebService annotation's properties.
@WebService Annotation” shows the interface defined in Example 23.1, “Simple SEI” with the @WebService annotation.
Example 23.3. Interface with the @WebService Annotation
package com.fusesource.demo;

import javax.jws.*;

@WebService(name="quoteUpdater", 1
            targetNamespace="http:\\demos.redhat.com", 2
	        serviceName="updateQuoteService", 3
            wsdlLocation="http:\\demos.redhat.com\quoteExampleService?wsdl", 4
            portName="updateQuotePort") 5
public interface quoteReporter
{
  public Quote getQuote(String ticker);
}
@WebService annotation in Example 23.3, “Interface with the @WebService Annotation” does the following:
- 1
- Specifies that the value of the
nameattribute of thewsdl:portTypeelement defining the service interface isquoteUpdater. - 2
- Specifies that the target namespace of the service is http:\\demos.redhat.com.
- 3
- Specifies that the value of the
nameof thewsdl:serviceelement defining the published service isupdateQuoteService. - 4
- Specifies that the service will publish its WSDL contract at http:\\demos.redhat.com\quoteExampleService?wsdl.
- 5
- Specifies that the value of the
nameattribute of thewsdl:portelement defining the endpoint exposing the service isupdateQuotePort.
Annotating the service implementation
@WebService annotation, you also must annotate the service implementation class with the @WebService annotation. When adding the annotation to the service implementation class you only need to specify the endpointInterface property. As shown in Example 23.4, “Annotated Service Implementation Class” the property must be set to the full name of the SEI.
Example 23.4. Annotated Service Implementation Class
package org.eric.demo;

import javax.jws.*;

@WebService(endpointInterface="com.fusesource.demo.quoteReporter")
public class stockQuoteReporter implements quoteReporter
{
public Quote getQuote(String ticker)
  {
  ...
  }
}
23.2.2. Optional Annotations
@WebService annotation is sufficient for service enabling a Java interface or a Java class, it does not fully describe how the service will be exposed as a service provider. The JAX-WS programming model uses a number of optional annotations for adding details about your service, such as the binding it uses, to the Java code. You add these annotations to the service's SEI.
23.2.2.1. Defining the Binding Properties with Annotations
Overview
The @SOAPBinding annotation
@SOAPBinding annotation is defined by the javax.jws.soap.SOAPBinding interface. It provides details about the SOAP binding used by the service when it is deployed. If the @SOAPBinding annotation is not specified, a service is published using a wrapped doc/literal SOAP binding.
@SOAPBinding annotation on the SEI and any of the SEI's methods. When it is used on a method, setting of the method's @SOAPBinding annotation take precedence.
@SOAPBinding Properties” shows the properties for the @SOAPBinding annotation.
Table 23.2. @SOAPBinding Properties
| Property | Values | Description |
|---|---|---|
| style | Style.DOCUMENT (default)
Style.RPC
| Specifies the style of the SOAP message. If RPC style is specified, each message part within the SOAP body is a parameter or return value and appears inside a wrapper element within the soap:body element. The message parts within the wrapper element correspond to operation parameters and must appear in the same order as the parameters in the operation. If DOCUMENT style is specified, the contents of the SOAP body must be a valid XML document, but its form is not as tightly constrained. |
| use | Use.LITERAL (default)
Use.ENCODED[a]
| Specifies how the data of the SOAP message is streamed. |
| parameterStyle [b] | ParameterStyle.BARE
ParameterStyle.WRAPPED (default)
| Specifies how the method parameters, which correspond to message parts in a WSDL contract, are placed into the SOAP message body. If BARE is specified, each parameter is placed into the message body as a child element of the message root. If WRAPPED is specified, all of the input parameters are wrapped into a single element on a request message and all of the output parameters are wrapped into a single element in the response message. |
[a]
Use.ENCODED is not currently supported.
| ||
Document bare style parameters
@SOAPBinding annotation with its style property set to Style.DOCUMENT, and its parameterStyle property set to ParameterStyle.BARE.
- The operation must have no more than one input or input/output parameter.
- If the operation has a return type other than void, it must not have any output or input/output parameters.
- If the operation has a return type of void, it must have no more than one output or input/output parameter.
@WebParam annotation or the @WebResult annotation are not counted against the number of allowed parameters.
Document wrapped parameters
@SOAPBinding annotation with its style property set to Style.DOCUMENT, and its parameterStyle property set to ParameterStyle.WRAPPED.
@RequestWrapper annotation” annotation and the the section called “The @ResponseWrapper annotation” annotation.
Example
Example 23.5. Specifying a Document Bare SOAP Binding with the SOAP Binding Annotation
package org.eric.demo;

import javax.jws.*;
import javax.jws.soap.*;
import javax.jws.soap.SOAPBinding.*;

@WebService(name="quoteReporter")
@SOAPBinding(parameterStyle=ParameterStyle.BARE)
public interface quoteReporter
{
  ...
}
23.2.2.2. Defining Operation Properties with Annotations
Overview
- What the exchanged messages look like in XML
- If the message can be optimized as a one way message
- The namespaces where the messages are defined
The @WebMethod annotation
@WebMethod annotation is defined by the javax.jws.WebMethod interface. It is placed on the methods in the SEI. The @WebMethod annotation provides the information that is normally represented in the wsdl:operation element describing the operation to which the method is associated.
@WebMethod Properties” describes the properties of the @WebMethod annotation.
Table 23.3. @WebMethod Properties
The @RequestWrapper annotation
@RequestWrapper annotation is defined by the javax.xml.ws.RequestWrapper interface. It is placed on the methods in the SEI. The @RequestWrapper annotation specifies the Java class implementing the wrapper bean for the method parameters of the request message starting a message exchange. It also specifies the element names, and namespaces, used by the runtime when marshalling and unmarshalling the request messages.
@RequestWrapper Properties” describes the properties of the @RequestWrapper annotation.
Table 23.4. @RequestWrapper Properties
| Property | Description |
|---|---|
| localName | Specifies the local name of the wrapper element in the XML representation of the request message. The default value is either the name of the method, or the value of the the section called “The @WebMethod annotation” annotation's operationName property. |
| targetNamespace | Specifies the namespace under which the XML wrapper element is defined. The default value is the target namespace of the SEI. |
| className | Specifies the full name of the Java class that implements the wrapper element. |
@SOAPBinding annotation, and its parameterStyle property is set to ParameterStyle.BARE, this annotation is ignored.
The @ResponseWrapper annotation
@ResponseWrapper annotation is defined by the javax.xml.ws.ResponseWrapper interface. It is placed on the methods in the SEI. The @ResponseWrapper specifies the Java class implementing the wrapper bean for the method parameters in the response message in the message exchange. It also specifies the element names, and namespaces, used by the runtime when marshaling and unmarshalling the response messages.
@ResponseWrapper Properties” describes the properties of the @ResponseWrapper annotation.
Table 23.5. @ResponseWrapper Properties
| Property | Description |
|---|---|
| localName | Specifies the local name of the wrapper element in the XML representation of the response message. The default value is either the name of the method with Response appended, or the value of the the section called “The @WebMethod annotation” annotation's operationName property with Response appended. |
| targetNamespace | Specifies the namespace where the XML wrapper element is defined. The default value is the target namespace of the SEI. |
| className | Specifies the full name of the Java class that implements the wrapper element. |
@SOAPBinding annotation and its parameterStyle property is set to ParameterStyle.BARE, this annotation is ignored.
The @WebFault annotation
@WebFault annotation is defined by the javax.xml.ws.WebFault interface. It is placed on exceptions that are thrown by your SEI. The @WebFault annotation is used to map the Java exception to a wsdl:fault element. This information is used to marshall the exceptions into a representation that can be processed by both the service and its consumers.
@WebFault Properties” describes the properties of the @WebFault annotation.
Table 23.6. @WebFault Properties
The @Oneway annotation
@Oneway annotation is defined by the javax.jws.Oneway interface. It is placed on the methods in the SEI that will not require a response from the service. The @Oneway annotation tells the run time that it can optimize the execution of the method by not waiting for a response and by not reserving any resources to process a response.
- They return void
- They have no parameters that implement the
Holderinterface - They do not throw any exceptions that can be passed back to a consumer
Example
Example 23.6. SEI with Annotated Methods
package com.fusesource.demo;

import javax.jws.*;
import javax.xml.ws.*;

@WebService(name="quoteReporter")
public interface quoteReporter
{
  @WebMethod(operationName="getStockQuote")
  @RequestWrapper(targetNamespace="http://demo.redhat.com/types",
                  className="java.lang.String")
  @ResponseWrapper(targetNamespace="http://demo.redhat.com/types",
                   className="org.eric.demo.Quote")
  public Quote getQuote(String ticker);
}
23.2.2.3. Defining Parameter Properties with Annotations
Overview
wsdl:message elements and their wsdl:part elements. JAX-WS provides annotations that allow you to describe the wsdl:part elements that are generated for the method parameters.
The @WebParam annotation
@WebParam annotation is defined by the javax.jws.WebParam interface. It is placed on the parameters of the methods defined in the SEI. The @WebParam annotation allows you to specify the direction of the parameter, if the parameter will be placed in the SOAP header, and other properties of the generated wsdl:part.
@WebParam Properties” describes the properties of the @WebParam annotation.
Table 23.7. @WebParam Properties
| Property | Values | Description |
|---|---|---|
| name | Specifies the name of the parameter as it appears in the generated WSDL document. For RPC bindings, this is the name of the wsdl:part representing the parameter. For document bindings, this is the local name of the XML element representing the parameter. Per the JAX-WS specification, the default is argN, where N is replaced with the zero-based argument index (i.e., arg0, arg1, etc.). | |
| targetNamespace | Specifies the namespace for the parameter. It is only used with document bindings where the parameter maps to an XML element. The default is to use the service's namespace. | |
| mode | Mode.IN (default)[a]
Mode.OUT
Mode.INOUT
| Specifies the direction of the parameter. |
| header | false (default)
true
| Specifies if the parameter is passed as part of the SOAP header. |
| partName | Specifies the value of the name attribute of the wsdl:part element for the parameter. This property is used for document style SOAP bindings. | |
The @WebResult annotation
@WebResult annotation is defined by the javax.jws.WebResult interface. It is placed on the methods defined in the SEI. The @WebResult annotation allows you to specify the properties of the wsdl:part that is generated for the method's return value.
@WebResult Properties” describes the properties of the @WebResult annotation.
Table 23.8. @WebResult Properties
Example
Example 23.7. Fully Annotated SEI
package com.fusesource.demo;

import javax.jws.*;
import javax.xml.ws.*;
import javax.jws.soap.*;
import javax.jws.soap.SOAPBinding.*;
import javax.jws.WebParam.*;

@WebService(targetNamespace="http://demo.redhat.com",
            name="quoteReporter")
@SOAPBinding(style=Style.RPC, use=Use.LITERAL)
public interface quoteReporter
{
  @WebMethod(operationName="getStockQuote")
  @RequestWrapper(targetNamespace="http://demo.redhat.com/types",
                  className="java.lang.String")
  @ResponseWrapper(targetNamespace="http://demo.redhat.com/types",
                   className="org.eric.demo.Quote")
  @WebResult(targetNamespace="http://demo.redhat.com/types",
             name="updatedQuote")
  public Quote getQuote(
                        @WebParam(targetNamespace="http://demo.redhat.com/types",
                                  name="stockTicker",
                                  mode=Mode.IN)
                        String ticker
  );
}
23.2.3. Apache CXF Annotations
23.2.3.1. WSDL Documentation
@WSDLDocumentation annotation
@WSDLDocumentation annotation is defined by the org.apache.cxf.annotations.WSDLDocumentation interface. It can be placed on the SEI or the SEI methods.
wsdl:documentation elements after the SEI is converted to WSDL. By default, the documentation elements appear inside the port type, but you can specify the placement property to make the documentation appear at other locations in the WSDL file. Table 23.9, “@WSDLDocumentation properties” shows the properties supported by the @WSDLDocumentation annotation.
Table 23.9. @WSDLDocumentation properties
| Property | Description |
|---|---|
value | (Required) A string containing the documentation text. |
placement | (Optional) Specifies where in the WSDL file this documentation is to appear. For the list of possible placement values, see the section called “Placement in the WSDL contract”. |
faultClass | (Optional) If the placement is set to be FAULT_MESSAGE, PORT_TYPE_OPERATION_FAULT, or BINDING_OPERATION_FAULT, you must also set this property to the Java class that represents the fault. |
@WSDLDocumentationCollection annotation
@WSDLDocumentationCollection annotation is defined by the org.apache.cxf.annotations.WSDLDocumentationCollection interface. It can be placed on the SEI or the SEI methods.
Placement in the WSDL contract
placement property, which is of type WSDLDocumentation.Placement. The placement can have one of the following values:
WSDLDocumentation.Placement.BINDINGWSDLDocumentation.Placement.BINDING_OPERATIONWSDLDocumentation.Placement.BINDING_OPERATION_FAULTWSDLDocumentation.Placement.BINDING_OPERATION_INPUTWSDLDocumentation.Placement.BINDING_OPERATION_OUTPUTWSDLDocumentation.Placement.DEFAULTWSDLDocumentation.Placement.FAULT_MESSAGEWSDLDocumentation.Placement.INPUT_MESSAGEWSDLDocumentation.Placement.OUTPUT_MESSAGEWSDLDocumentation.Placement.PORT_TYPEWSDLDocumentation.Placement.PORT_TYPE_OPERATIONWSDLDocumentation.Placement.PORT_TYPE_OPERATION_FAULTWSDLDocumentation.Placement.PORT_TYPE_OPERATION_INPUTWSDLDocumentation.Placement.PORT_TYPE_OPERATION_OUTPUTWSDLDocumentation.Placement.SERVICEWSDLDocumentation.Placement.SERVICE_PORTWSDLDocumentation.Placement.TOP
Example of @WSDLDocumentation
@WSDLDocumentation annotation to the SEI and to one of its methods.
Example 23.8. Using @WSDLDocumentation
@WebService
@WSDLDocumentation("A very simple example of an SEI")
public interface HelloWorld {
    @WSDLDocumentation("A traditional form of greeting")
    String sayHi(@WebParam(name = "text") String text);
}documentation elements are, respectively, PORT_TYPE and PORT_TYPE_OPERATION.
Example 23.9. WSDL generated with documentation
<wsdl:definitions ... >
  ...
  <wsdl:portType name="HelloWorld">
 <wsdl:documentation>A very simple example of an SEI</wsdl:documentation>
    <wsdl:operation name="sayHi">
 <wsdl:documentation>A traditional form of greeting</wsdl:documentation>
      <wsdl:input name="sayHi" message="tns:sayHi">
    </wsdl:input>
      <wsdl:output name="sayHiResponse" message="tns:sayHiResponse">
    </wsdl:output>
    </wsdl:operation>
  </wsdl:portType>
  ...
</wsdl:definitions>
Example of @WSDLDocumentationCollection
@WSDLDocumentationCollection annotation to an SEI.
Example 23.10. Using @WSDLDocumentationCollection
@WebService
@WSDLDocumentationCollection(
    {
        @WSDLDocumentation("A very simple example of an SEI"),
        @WSDLDocumentation(value = "My top level documentation",
                           placement = WSDLDocumentation.Placement.TOP),
        @WSDLDocumentation(value = "Binding documentation",
                           placement = WSDLDocumentation.Placement.BINDING)
    }
)
public interface HelloWorld {
    @WSDLDocumentation("A traditional form of Geeky greeting")
    String sayHi(@WebParam(name = "text") String text);
}
23.2.3.2. Schema Validation of Messages
@SchemaValidation annotation
@SchemaValidation annotation is defined by the org.apache.cxf.annotations.SchemaValidation interface. It is placed on the SEI.
Example
HelloWorld SEI.
Example 23.11. Activating schema validation
@WebService
@SchemaValidation
public interface HelloWorld {
    String sayHi(@WebParam(name = "text") String text);
}
23.2.3.3. Specifying the Data Binding
@DataBinding annotation
@DataBinding annotation is defined by the org.apache.cxf.annotations.DataBinding interface. It is placed on the SEI.
@DataBinding annotation must be the class that provides the data binding, ClassName.class.
Supported data bindings
org.apache.cxf.jaxb.JAXBDataBinding(Default) The standard JAXB data binding.org.apache.cxf.sdo.SDODataBindingThe Service Data Objects (SDO) data binding is based on the Apache Tuscany SDO implementation. If you want to use this data binding in the context of a Maven build, you need to add a dependency on thecxf-rt-databinding-sdoartifact.org.apache.cxf.aegis.databinding.AegisDatabindingIf you want to use this data binding in the context of a Maven build, you need to add a dependency on thecxf-rt-databinding-aegisartifact.org.apache.cxf.xmlbeans.XmlBeansDataBindingIf you want to use this data binding in the context of a Maven build, you need to add a dependency on thecxf-rt-databinding-xmlbeansartifact.org.apache.cxf.databinding.source.SourceDataBindingThis data binding belongs to the Apache CXF core.org.apache.cxf.databinding.stax.StaxDataBindingThis data binding belongs to the Apache CXF core.
Example
HelloWorld SEI
Example 23.12. Setting the data binding
@WebService
@DataBinding(org.apache.cxf.sdo.SDODataBinding.class)
public interface HelloWorld {
    String sayHi(@WebParam(name = "text") String text);
}
23.2.3.4. Compressing Messages
@GZIP annotation
@GZIP annotation is defined by the org.apache.cxf.annotations.GZIP interface. It is placed on the SEI.
Accept header will be added and, if the server supports GZIP compression, the response will be gzipped and any subsequent requests will be also.
@GZIP annotation.
Table 23.10. @GZIP Properties
| Property | Description |
|---|---|
threshold | Messages smaller than the size specified by this property are not gzipped. Default is -1 (no limit). |
@FastInfoset
@FastInfoset annotation is defined by the org.apache.cxf.annotations.FastInfoset interface. It is placed on the SEI.
Accept header will be added and, if the server supports FastInfoset, the response will be in FastInfoset and any subsequent requests will be also.
@FastInfoset annotation.
Table 23.11. @FastInfoset Properties
| Property | Description |
|---|---|
force | A boolean property that forces the use of FastInfoset format, instead of negotiating. When true, force the use of FastInfoset format; otherwise, negotiate. Default is false. |
Example of @GZIP
HelloWorld SEI.
Example 23.13. Enabling GZIP
@WebService
@GZIP
public interface HelloWorld {
    String sayHi(@WebParam(name = "text") String text);
}
Exampe of @FastInfoset
HelloWorld SEI.
Example 23.14. Enabling FastInfoset
@WebService
@FastInfoset
public interface HelloWorld {
    String sayHi(@WebParam(name = "text") String text);
}
23.2.3.5. Enable Logging on an Endpoint
@Logging annotation
@Logging annotation is defined by the org.apache.cxf.annotations.Logging interface. It is placed on the SEI.
Table 23.12. @Logging Properties
| Property | Description |
|---|---|
limit | Specifies the size limit, beyond which the message is truncated in the logs. Default is 64K. |
inLocation | Specifies the location to log incoming messages. Can be either <stderr>, <stdout>, <logger>, or a filename. Default is <logger>. |
outLocation | Specifies the location to log outgoing messages. Can be either <stderr>, <stdout>, <logger>, or a filename. Default is <logger>. |
Example
HelloWorld SEI, where incoming messages are sent to <stdout> and outgoing messages are sent to <logger>.
Example 23.15. Logging configuration using annotations
@WebService
@Logging(limit=16000, inLocation="<stdout>")
public interface HelloWorld {
    String sayHi(@WebParam(name = "text") String text);
}
23.2.3.6. Adding Properties and Policies to an Endpoint
wsdl:policy elements that appear in the WSDL contract. By contrast, properties are Apache CXF-specific and they are normally set by defining jaxws:properties elements in the Apache CXF Spring configuration file.
23.2.3.6.1. Adding properties
@EndpointProperty annotation
@EndpointProperty annotation is defined by the org.apache.cxf.annotations.EndpointProperty interface. It is placed on the SEI.
jaxws:properties element in a Spring configuration file as follows:
<beans xmlns="http://www.springframework.org/schema/beans"
   xmlns:xsi="http://www.w3.org/2001/XMLSchema-instance"
   xmlns:jaxws="http://cxf.apache.org/jaxws"
   ... >

   <jaxws:endpoint
      id="MyService"
      address="https://localhost:9001/MyService"
      serviceName="interop:MyService"
      endpointName="interop:MyServiceEndpoint"
      implementor="com.foo.MyService">

      <jaxws:properties>
         <entry key="ws-security.callback-handler" value="interop.client.UTPasswordCallback"/>
         <entry key="ws-security.signature.properties" value="etc/keystore.properties"/>
         <entry key="ws-security.encryption.properties" value="etc/truststore.properties"/>
         <entry key="ws-security.encryption.username" value="useReqSigCert"/>
      </jaxws:properties>

   </jaxws:endpoint>
</beans>@EndpointProperty annotations to the SEI, as shown in Example 23.16, “Configuring WS-Security Using @EndpointProperty Annotations”.
Example 23.16. Configuring WS-Security Using @EndpointProperty Annotations
@WebService
@EndpointProperty(name="ws-security.callback-handler" value="interop.client.UTPasswordCallback")
@EndpointProperty(name="ws-security.signature.properties" value="etc/keystore.properties")
@EndpointProperty(name="ws-security.encryption.properties" value="etc/truststore.properties")
@EndpointProperty(name="ws-security.encryption.username" value="useReqSigCert")
public interface HelloWorld {
    String sayHi(@WebParam(name = "text") String text);
}
@EndpointProperties annotation
@EndpointProperties annotation is defined by the org.apache.cxf.annotations.EndpointProperties interface. It is placed on the SEI.
@EndpointProperty annotations into a list. Using @EndpointProperties, it is possible to re-write Example 23.16, “Configuring WS-Security Using @EndpointProperty Annotations” as shown in Example 23.17, “Configuring WS-Security Using an @EndpointProperties Annotation”.
Example 23.17. Configuring WS-Security Using an @EndpointProperties Annotation
@WebService
@EndpointProperties(
  {
  @EndpointProperty(name="ws-security.callback-handler" value="interop.client.UTPasswordCallback"),
  @EndpointProperty(name="ws-security.signature.properties" value="etc/keystore.properties"),
  @EndpointProperty(name="ws-security.encryption.properties" value="etc/truststore.properties"),
  @EndpointProperty(name="ws-security.encryption.username" value="useReqSigCert")
})
public interface HelloWorld {
    String sayHi(@WebParam(name = "text") String text);
}
23.2.3.6.2. Adding policies
@Policy annotation
@Policy annotation is defined by the org.apache.cxf.annotations.Policy interface. It can be placed on the SEI or the SEI methods.
wsdl:policy element. If a WSDL contract is to be generated from the SEI (for example, using the java2ws command-line tool), you can specify whether or not you want to include this policy in the WSDL.
@Policy annotation.
Table 23.13. @Policy Properties
| Property | Description |
|---|---|
uri | (Required) The location of the file containing the policy definition. |
includeInWSDL | (Optional) Whether to include the policy in the generated contract, when generating WSDL. Default is true. |
placement | (Optional) Specifies where in the WSDL file this documentation is to appear. For the list of possible placement values, see the section called “Placement in the WSDL contract”. |
faultClass | (Optional) If the placement is set to be BINDING_OPERATION_FAULT or PORT_TYPE_OPERATION_FAULT, you must also set this property to specify which fault this policy applies to. The value is the Java class that represents the fault. |
@Policies annotation
@Policies annotation is defined by the org.apache.cxf.annotations.Policies interface. It can be placed on the SEI or thse SEI methods.
@Policy annotations into a list.
Placement in the WSDL contract
placement property, which is of type Policy.Placement. The placement can have one of the following values:
Policy.Placement.BINDING
Policy.Placement.BINDING_OPERATION
Policy.Placement.BINDING_OPERATION_FAULT
Policy.Placement.BINDING_OPERATION_INPUT
Policy.Placement.BINDING_OPERATION_OUTPUT
Policy.Placement.DEFAULT
Policy.Placement.PORT_TYPE
Policy.Placement.PORT_TYPE_OPERATION
Policy.Placement.PORT_TYPE_OPERATION_FAULT
Policy.Placement.PORT_TYPE_OPERATION_INPUT
Policy.Placement.PORT_TYPE_OPERATION_OUTPUT
Policy.Placement.SERVICE
Policy.Placement.SERVICE_PORT
Example of @Policy
HelloWorld SEI and how to associate a policy with the sayHi method. The policies themselves are stored in XML files in the file system, under the annotationpolicies directory.
@WebService
@Policy(uri = "annotationpolicies/TestImplPolicy.xml",
        placement = Policy.Placement.SERVICE_PORT),
@Policy(uri = "annotationpolicies/TestPortTypePolicy.xml",
        placement = Policy.Placement.PORT_TYPE)
public interface HelloWorld {
    @Policy(uri = "annotationpolicies/TestOperationPTPolicy.xml",
            placement = Policy.Placement.PORT_TYPE_OPERATION),
    String sayHi(@WebParam(name = "text") String text);
}
Example of @Policies
@Policies annotation to group multiple @Policy annotations into a list, as shown in the following example:
@WebService
@Policies({
    @Policy(uri = "annotationpolicies/TestImplPolicy.xml",
            placement = Policy.Placement.SERVICE_PORT),
    @Policy(uri = "annotationpolicies/TestPortTypePolicy.xml",
            placement = Policy.Placement.PORT_TYPE)
})
public interface HelloWorld {
    @Policy(uri = "annotationpolicies/TestOperationPTPolicy.xml",
            placement = Policy.Placement.PORT_TYPE_OPERATION),
    String sayHi(@WebParam(name = "text") String text);
}
23.3. Generating WSDL
Using Maven
java2ws Maven plug-in's -wsdl option. For a detailed listing of options for the java2ws Maven plug-in see java2ws.
java2ws Maven plug-in to generate WSDL.
Example 23.18. Generating WSDL from Java
<plugin>
  <groupId>org.apache.cxf</groupId>
  <artifactId>cxf-java2ws-plugin</artifactId>
  <version>${cxf.version}</version>
  <executions>
    <execution>
      <id>process-classes</id>
      <phase>process-classes</phase>
      <configuration>
        <className>className</className>
        <genWsdl>true</genWsdl>
      </configuration>
      <goals>
        <goal>java2ws</goal>
      </goals>
    </execution>
  </executions>
</plugin>
Example
Example 23.19. Generated WSDL from an SEI
<?xml version="1.0" encoding="UTF-8"?>
<wsdl:definitions targetNamespace="http://demo.eric.org/"
          xmlns:tns="http://demo.eric.org/"
		  xmlns:ns1=""
		  xmlns:xsd="http://www.w3.org/2001/XMLSchema"
		  xmlns:ns2="http://demo.eric.org/types"
		  xmlns:soap="http://schemas.xmlsoap.org/wsdl/soap/"
		  xmlns:wsdl="http://schemas.xmlsoap.org/wsdl/">
  <wsdl:types>
    <xsd:schema>
      <xs:complexType name="quote">
        <xs:sequence>
          <xs:element name="ID" type="xs:string" minOccurs="0"/>
          <xs:element name="time" type="xs:string" minOccurs="0"/>
          <xs:element name="val" type="xs:float"/>
        </xs:sequence>
      </xs:complexType>
    </xsd:schema>
  </wsdl:types>
  <wsdl:message name="getStockQuote">
    <wsdl:part name="stockTicker" type="xsd:string">
    </wsdl:part>
  </wsdl:message>
  <wsdl:message name="getStockQuoteResponse">
    <wsdl:part name="updatedQuote" type="tns:quote">
    </wsdl:part>
  </wsdl:message>
  <wsdl:portType name="quoteReporter">
    <wsdl:operation name="getStockQuote">
      <wsdl:input name="getQuote" message="tns:getStockQuote">
    </wsdl:input>
      <wsdl:output name="getQuoteResponse" message="tns:getStockQuoteResponse">
    </wsdl:output>
    </wsdl:operation>
  </wsdl:portType>
  <wsdl:binding name="quoteReporterBinding" type="tns:quoteReporter">
    <soap:binding style="rpc" transport="http://schemas.xmlsoap.org/soap/http" />
    <wsdl:operation name="getStockQuote">
      <soap:operation style="rpc" />
      <wsdl:input name="getQuote">
        <soap:body use="literal" />
      </wsdl:input>
      <wsdl:output name="getQuoteResponse">
        <soap:body use="literal"/>
      </wsdl:output>
    </wsdl:operation>
  </wsdl:binding>
  <wsdl:service name="quoteReporterService">
    <wsdl:port name="quoteReporterPort" binding="tns:quoteReporterBinding">
      <soap:address location="http://localhost:9000/quoteReporterService" />
    </wsdl:port>
  </wsdl:service>
</wsdl:definitions>Chapter 24. Developing a Consumer Without a WSDL Contract
Abstract
- Create a
Serviceobject for the service on which the consumer will invoke operations. - Add a port to the
Serviceobject.
24.1. Creating a Service Object
Overview
javax.xml.ws.Service class represents the wsdl:service element which contains the definition of all of the endpoints that expose a service. As such, it provides methods that allow you to get endpoints, defined by wsdl:port elements, that are proxies for making remote invocations on a service.
Service class provides the abstractions that allow the client code to work with Java types as opposed to working with XML documents.
The create() methods
Service class has two static create() methods that can be used to create a new Service object. As shown in Example 24.1, “Service create() Methods”, both of the create() methods take the QName of the wsdl:service element the Service object will represent, and one takes a URI specifying the location of the WSDL contract.
?wsdl.
Example 24.1. Service create() Methods
public static Service create(URL wsdlLocation,
                             QName serviceName)
    throws WebServiceException;
public static Service create(QName serviceName)
throws WebServiceException;serviceName parameter is a QName. The value of its namespace part is the target namespace of the service. The service's target namespace is specified in the targetNamespace property of the @WebService annotation. The value of the QName's local part is the value of wsdl:service element's name attribute. You can determine this value in one of the following ways:
- It is specified in the serviceName property of the
@WebServiceannotation. - You append
Serviceto the value of the name property of the@WebServiceannotation. - You append
Serviceto the name of the SEI.
Example
Service Object” shows code for creating a Service object for the SEI shown in Example 23.7, “Fully Annotated SEI”.
Example 24.2. Creating a Service Object
Service Object” does the following:
- 1
- Builds the QName for the service using the targetNamespace property and the name property of the
@WebServiceannotation. - 2
- Calls the single parameter
create()method to create a newServiceobject.NoteUsing the single parametercreate()frees you from having any dependencies on accessing a WSDL contract.
24.2. Adding a Port to a Service
Overview
wsdl:port element, and the Service object creates a proxy instance for each of the endpoints defined in a WSDL contract, if one is specified. If you do not specify a WSDL contract when you create your Service object, the Service object has no information about the endpoints that implement your service, and therefore cannot create any proxy instances. In this case, you must provide the Service object with the information needed to represent a wsdl:port element using the addPort() method.
The addPort() method
Service class defines an addPort() method, shown in Example 24.3, “The addPort() Method”, that is used in cases where there is no WSDL contract available to the consumer implementation. The addPort() method allows you to give a Service object the information, which is typically stored in a wsdl:port element, necessary to create a proxy for a service implementation.
Example 24.3. The addPort() Method
void addPort(QName portName,
             String bindingId,
             String endpointAddress)
throws WebServiceException;portName is a QName. The value of its namespace part is the target namespace of the service. The service's target namespace is specified in the targetNamespace property of the @WebService annotation. The value of the QName's local part is the value of wsdl:port element's name attribute. You can determine this value in one of the following ways:
- Specify it in the portName property of the
@WebServiceannotation. - Append
Portto the value of the name property of the@WebServiceannotation. - Append
Portto the name of the SEI.
bindingId parameter is a string that uniquely identifies the type of binding used by the endpoint. For a SOAP binding you use the standard SOAP namespace: http://schemas.xmlsoap.org/soap/. If the endpoint is not using a SOAP binding, the value of the bindingId parameter is determined by the binding developer.
endpointAddress parameter is the address where the endpoint is published. For a SOAP/HTTP endpoint, the address is an HTTP address. Transports other than HTTP use different address schemes.
Example
Service Object” shows code for adding a port to the Service object created in Example 24.2, “Creating a Service Object”.
Example 24.4. Adding a Port to a Service Object
package com.fusesource.demo;

import javax.xml.namespace.QName;
import javax.xml.ws.Service;

public class Client
{
public static void main(String args[])
  {
    ...
1    QName portName = new QName("http://demo.redhat.com", "stockQuoteReporterPort");
2    s.addPort(portName,
3              "http://schemas.xmlsoap.org/soap/",
4              "http://localhost:9000/StockQuote");
    ...
  }
}Service Object” does the following:
24.3. Getting a Proxy for an Endpoint
Overview
Service object provides service proxies for all of the endpoints it is aware of through the getPort() method. Once you have a service proxy, you can invoke its methods. The proxy forwards the invocation to the remote service endpoint using the connection details specified in the service's contract.
The getPort() method
getPort() method, shown in Example 24.5, “The getPort() Method”, returns a service proxy for the specified endpoint. The returned proxy is of the same class as the SEI.
Example 24.5. The getPort() Method
public <T> T getPort(QName portName,
                     Class<T> serviceEndpointInterface)
throws WebServiceException;portName parameter is a QName that identifies the wsdl:port element that defines the endpoint for which the proxy is created. The value of the serviceEndpointInterface parameter is the fully qualified name of the SEI.
portName parameter is typically the same as the value used for the portName parameter when calling addPort().
Example
Service Object”.
Example 24.6. Getting a Service Proxy
package com.fusesource.demo;

import javax.xml.namespace.QName;
import javax.xml.ws.Service;

public class Client
{
public static void main(String args[])
  {
    ...
    quoteReporter proxy = s.getPort(portName, quoteReporter.class);
    ...
  }
}
24.4. Implementing the Consumer's Business Logic
Overview
@OneWay annotation, the call returns immediately.
Example
Example 24.7. Consumer Implemented without a WSDL Contract
package com.fusesource.demo;

import java.io.File;
import java.net.URL;
import javax.xml.namespace.QName;
import javax.xml.ws.Service;

public class Client
{
public static void main(String args[])
  {
    QName serviceName = new QName("http://demo.eric.org", "stockQuoteReporter");
1  Service s = Service.create(serviceName);

    QName portName = new QName("http://demo.eric.org", "stockQuoteReporterPort");
2  s.addPort(portName, "http://schemas.xmlsoap.org/soap/", "http://localhost:9000/EricStockQuote");

3  quoteReporter proxy = s.getPort(portName, quoteReporter.class);

4  Quote quote = proxy.getQuote("ALPHA");
    System.out.println("Stock "+quote.getID()+" is worth "+quote.getVal()+" as of "+quote.getTime());
  }
}Chapter 25. A Starting Point WSDL Contract
Greeter, in the wsdl:portType element. The contract also defines the endpoint which will implement the service in the wsdl:port element.
Example 25.1. HelloWorld WSDL Contract
<?xml version="1.0" encoding=";UTF-8"?>
<wsdl:definitions name="HelloWorld"
                  targetNamespace="http://apache.org/hello_world_soap_http"
                  xmlns="http://schemas.xmlsoap.org/wsdl/"
                  xmlns:soap="http://schemas.xmlsoap.org/wsdl/soap/"
                  xmlns:tns="http://apache.org/hello_world_soap_http"
                  xmlns:x1="http://apache.org/hello_world_soap_http/types"
                  xmlns:wsdl="http://schemas.xmlsoap.org/wsdl/"
                  xmlns:xsd="http://www.w3.org/2001/XMLSchema">
  <wsdl:types>
    <schema targetNamespace="http://apache.org/hello_world_soap_http/types"
            xmlns="http://www.w3.org/2001/XMLSchema"
            elementFormDefault="qualified"><element name="sayHi">
      <element name="sayHi">
        <complexType>
          <sequence>
            <element name="requestType" type="string"/>
          </sequence>
        </complexType>
      </element>
      <element name="sayHiResponse">
        <complexType>
          <sequence>
            <element name="responseType" type="string"/>
          </sequence>
        </complexType>
      </element>
      <element name="greetMe">
        <complexType>
          <sequence>
            <element name="requestType" type="string"/>
          </sequence>
        </complexType>
      </element>
      <element name="greetMeResponse">
        <complexType>
          <sequence>
            <element name="responseType" type="string"/>
          </sequence>
        </complexType>
      </element>
      <element name="greetMeOneWay">
        <complexType>
          <sequence>
            <element name="requestType" type="string"/>
          </sequence>
        </complexType>
      </element>
      <element name="pingMe">
        <complexType/>
      </element>
      <element name="pingMeResponse">
        <complexType/>
      </element>
      <element name="faultDetail">
        <complexType>
          <sequence>
            <element name="minor" type="short"/>
            <element name="major" type="short"/>
          </sequence>
        </complexType>
      </element>
    </schema>
  </wsdl:types>

  <wsdl:message name="sayHiRequest">
    <wsdl:part element="x1:sayHi" name="in"/>
  </wsdl:message>
  <wsdl:message name="sayHiResponse">
    <wsdl:part element="x1:sayHiResponse" name="out"/>
  </wsdl:message>
  <wsdl:message name="greetMeRequest">
    <wsdl:part element="x1:greetMe" name="in"/>
  </wsdl:message>
  <wsdl:message name="greetMeResponse">
    <wsdl:part element="x1:greetMeResponse" name="out"/>
  </wsdl:message>
  <wsdl:message name="greetMeOneWayRequest">
    <wsdl:part element="x1:greetMeOneWay" name="in"/>
  </wsdl:message>
  <wsdl:message name="pingMeRequest">
    <wsdl:part name="in" element="x1:pingMe"/>
  </wsdl:message>
  <wsdl:message name="pingMeResponse">
    <wsdl:part name="out" element="x1:pingMeResponse"/>
  </wsdl:message>
  <wsdl:message name="pingMeFault">
    <wsdl:part name="faultDetail" element="x1:faultDetail"/>
  </wsdl:message>

  <wsdl:portType name="Greeter">
1    <wsdl:operation name="sayHi">
      <wsdl:input message="tns:sayHiRequest" name="sayHiRequest"/>
      <wsdl:output message="tns:sayHiResponse" name="sayHiResponse"/>
    </wsdl:operation>

2    <wsdl:operation name="greetMe">
      <wsdl:input message="tns:greetMeRequest" name="greetMeRequest"/>
      <wsdl:output message="tns:greetMeResponse" name="greetMeResponse"/>
    </wsdl:operation>

3    <wsdl:operation name="greetMeOneWay">
      <wsdl:input message="tns:greetMeOneWayRequest" name="greetMeOneWayRequest"/>
    </wsdl:operation>

4    <wsdl:operation name="pingMe">
      <wsdl:input name="pingMeRequest" message="tns:pingMeRequest"/>
      <wsdl:output name="pingMeResponse" message="tns:pingMeResponse"/>
      <wsdl:fault name="pingMeFault" message="tns:pingMeFault"/>
    </wsdl:operation>
  </wsdl:portType>

  <wsdl:binding name="Greeter_SOAPBinding" type="tns:Greeter">
    ...
  </wsdl:binding>

  <wsdl:service name="SOAPService">
    <wsdl:port binding="tns:Greeter_SOAPBinding" name="SoapPort">
      <soap:address location="http://localhost:9000/SoapContext/SoapPort"/>
    </wsdl:port>
  </wsdl:service>
</wsdl:definitions>Greeter interface defined in Example 25.1, “HelloWorld WSDL Contract” defines the following operations:
- 1
- sayHi — Has a single output parameter, of xsd:string.
- 2
- greetMe — Has an input parameter, of xsd:string, and an output parameter, of xsd:string.
- 3
- greetMeOneWay — Has a single input parameter, of xsd:string. Because this operation has no output parameters, it is optimized to be a oneway invocation (that is, the consumer does not wait for a response from the server).
- 4
- pingMe — Has no input parameters and no output parameters, but it can raise a fault exception.
Chapter 26. Top-Down Service Development
Abstract
26.1. Generating the Starting Point Code
Overview
wsdl:portType element, is mapped to a service endpoint interface (SEI). Any complex types defined in the WSDL are mapped into Java classes following the mapping defined by the Java Architecture for XML Binding (JAXB) specification. The endpoint defined by the wsdl:service element is also generated into a Java class that is used by consumers to access service providers implementing the service.
cxf-codegen-plugin Maven plug-in generates this code. It also provides options for generating starting point code for your implementation. The code generator provides a number of options for controlling the generated code.
Running the code generator
Example 26.1. Service Code Generation
<plugin>
  <groupId>org.apache.cxf</groupId>
  <artifactId>cxf-codegen-plugin</artifactId>
  <version>${cxf.version}</version>
  <executions>
    <execution>
      <id>generate-sources</id>
      <phase>generate-sources</phase>
      <configuration>
        <sourceRoot>outputDir</sourceRoot>
        <wsdlOptions>
          <wsdlOption>
            <wsdl>wsdl</wsdl>
            <extraargs>
              <extraarg>-server</extraarg>
              <extraarg>-impl</extraarg>
            </extraargs>
          </wsdlOption>
        </wsdlOptions>
      </configuration>
      <goals>
        <goal>wsdl2java</goal>
      </goals>
    </execution>
  </executions>
</plugin>- The
-imploption generates a shell implementation class for eachwsdl:portTypeelement in the WSDL contract. - The
-serveroption generates a simplemain()to run your service provider as a stand alone application. - The
sourceRootspecifies that the generated code is written to a directory called outputDir. wsdlelement specifies the WSDL contract from which code is generated.
Generated code
Table 26.1. Generated Classes for a Service Provider
| File | Description |
|---|---|
portTypeName.java | The SEI. This file contains the interface your service provider implements. You should not edit this file. |
serviceName.java | The endpoint. This file contains the Java class consumers use to make requests on the service. |
portTypeNameImpl.java | The skeleton implementation class. Modify this file to build your service provider. |
portTypeNameServer.java | A basic server mainline that allows you to deploy your service provider as a stand alone process. For more information see Chapter 30, Publishing a Service. |
Generated packages
wsdl:portType element, the wsdl:service element, and the wsdl:port element) are placed in a package based on the target namespace of the WSDL contract. The classes generated to implement the types defined in the types element of the contract are placed in a package based on the targetNamespace attribute of the types element.
- The leading
http://orurn://are stripped off the namespace. - If the first string in the namespace is a valid Internet domain, for example it ends in
.comor.gov, then the leadingwww.is stripped off the string, and the two remaining components are flipped. - If the final string in the namespace ends with a file extension of the pattern
.xxxor.xx, then the extension is stripped. - The remaining strings in the namespace are appended to the resulting string and separated by dots.
- All letters are made lowercase.
26.2. Implementing the Service Provider
Generating the implementation code
-impl flag.
Generated code
portTypeName.java— The service interface(SEI) for the service.portTypeNameImpl.java— The class you will use to implement the operations defined by the service.
Implement the operation's logic
portTypeNameImpl.java. You usually use standard Java to implement the business logic. If your service uses custom XML Schema types, you must use the generated classes for each type to manipulate them. There are also some Apache CXF specific APIs that can be used to access some advanced features.
Example
Example 26.2. Implementation of the Greeter Service
package demo.hw.server;

import org.apache.hello_world_soap_http.Greeter;

@javax.jws.WebService(portName = "SoapPort", serviceName = "SOAPService",
                      targetNamespace = "http://apache.org/hello_world_soap_http",
                      endpointInterface = "org.apache.hello_world_soap_http.Greeter")

public class GreeterImpl implements Greeter {

    public String greetMe(String me) {
       System.out.println("Executing operation greetMe");
       System.out.println("Message received: " + me + "\n");
       return "Hello " + me;
    }

    public void greetMeOneWay(String me) {
       System.out.println("Executing operation greetMeOneWay\n");
       System.out.println("Hello there " + me);
    }

    public String sayHi() {
       System.out.println("Executing operation sayHi\n");
       return "Bonjour";
    }

    public void pingMe() throws PingMeFault {
       FaultDetail faultDetail = new FaultDetail();
       faultDetail.setMajor((short)2);
       faultDetail.setMinor((short)1);
       System.out.println("Executing operation pingMe, throwing PingMeFault exception\n");
       throw new PingMeFault("PingMeFault raised by server", faultDetail);
    }
}
Chapter 27. Developing a Consumer From a WSDL Contract
Abstract
27.1. Generating the Stub Code
Overview
cxf-codegen-plugin Maven plug-in generates the stub code from the WSDL contract. The stub code provides the supporting code that is required to invoke operations on the remote service.
cxf-codegen-plugin Maven plug-in generates the following types of code:
- Stub code — Supporting files for implementing a consumer.
- Starting point code — Sample code that connects to the remote service and invokes every operation on the remote service.
Generating the consumer code
cxf-codegen-plugin Maven plug-in. Example 27.1, “Consumer Code Generation” shows how to use the code generator to generate consumer code.
Example 27.1. Consumer Code Generation
<plugin>
  <groupId>org.apache.cxf</groupId>
  <artifactId>cxf-codegen-plugin</artifactId>
  <version>${cxf.version}</version>
  <executions>
    <execution>
      <id>generate-sources</id>
      <phase>generate-sources</phase>
      <configuration>
        <sourceRoot>outputDir</sourceRoot>
        <wsdlOptions>
          <wsdlOption>
            <wsdl>wsdl</wsdl>
            <extraargs>
              <extraarg>-client</extraarg>
            </extraargs>
          </wsdlOption>
        </wsdlOptions>
      </configuration>
      <goals>
        <goal>wsdl2java</goal>
      </goals>
    </execution>
  </executions>
</plugin>-client option generates starting point code for the consumer's main() method.
cxf-codegen-plugin Maven plug-in see cxf-codegen-plugin.
Generated code
- org.apache.hello_world_soap_http — This package is generated from the
http://apache.org/hello_world_soap_httptarget namespace. All of the WSDL entities defined in this namespace (for example, the Greeter port type and the SOAPService service) map to Java classes this Java package. - org.apache.hello_world_soap_http.types — This package is generated from the
http://apache.org/hello_world_soap_http/typestarget namespace. All of the XML types defined in this namespace (that is, everything defined in thewsdl:typeselement of the HelloWorld contract) map to Java classes in this Java package.
cxf-codegen-plugin Maven plug-in fall into the following categories:
- Classes representing WSDL entities in the org.apache.hello_world_soap_http package. The following classes are generated to represent WSDL entities:
Greeter— A Java interface that represents the Greeterwsdl:portTypeelement. In JAX-WS terminology, this Java interface is the service endpoint interface (SEI).SOAPService— A Java service class (extendingjavax.xml.ws.Service) that represents the SOAPServicewsdl:serviceelement.PingMeFault— A Java exception class (extendingjava.lang.Exception) that represents the pingMeFaultwsdl:faultelement.
- Classes representing XML types in the org.objectweb.hello_world_soap_http.types package. In the HelloWorld example, the only generated types are the various wrappers for the request and reply messages. Some of these data types are useful for the asynchronous invocation model.
27.2. Implementing a Consumer
Overview
- Service class
- SEI
Generated service class
ServiceName_Service[3], which extends the javax.xml.ws.Service base class.
Example 27.2. Outline of a Generated Service Class
@WebServiceClient(name="..." targetNamespace="..."
                  wsdlLocation="...")
public class ServiceName extends javax.xml.ws.Service
{
  ...
  public ServiceName(URL wsdlLocation, QName serviceName) { }

  public ServiceName() { }

  @WebEndpoint(name="...")
  public SEI getPortName() { }
  .
  .
  .
}ServiceName class in Example 27.2, “Outline of a Generated Service Class” defines the following methods:
ServiceName(URL wsdlLocation, QName serviceName)— Constructs a service object based on the data in thewsdl:serviceelement with the QName ServiceName service in the WSDL contract that is obtainable from wsdlLocation.ServiceName()— The default constructor. It constructs a service object based on the service name and the WSDL contract that were provided at the time the stub code was generated (for example, when running the wsdl2java tool). Using this constructor presupposes that the WSDL contract remains available at a specified location.getPortName()— Returns a proxy for the endpoint defined by thewsdl:portelement with thenameattribute equal to PortName. A getter method is generated for everywsdl:portelement defined by the ServiceName service. Awsdl:serviceelement that contains multiple endpoint definitions results in a generated service class with multiplegetPortName()methods.
Service endpoint interface
wsdl:portType element. Each operation defined in the original wsdl:portType element maps to a corresponding method in the SEI. The operation's parameters are mapped as follows:
- The input parameters are mapped to method arguments.
- The first output parameter is mapped to a return value.
- If there is more than one output parameter, the second and subsequent output parameters map to method arguments (moreover, the values of these arguments must be passed using Holder types).
wsdl:portType element defined in Example 25.1, “HelloWorld WSDL Contract”. For simplicity, Example 27.3, “The Greeter Service Endpoint Interface” omits the standard JAXB and JAX-WS annotations.
Example 27.3. The Greeter Service Endpoint Interface
package org.apache.hello_world_soap_http;
  ...
public interface Greeter
{
  public String sayHi();
  public String greetMe(String requestType);
  public void greetMeOneWay(String requestType);
  public void pingMe() throws PingMeFault;
}
Consumer main function
Example 27.4. Consumer Implementation Code
package demo.hw.client;

import java.io.File;
import java.net.URL;
import javax.xml.namespace.QName;
import org.apache.hello_world_soap_http.Greeter;
import org.apache.hello_world_soap_http.PingMeFault;
import org.apache.hello_world_soap_http.SOAPService;

public final class Client {

  private static final QName SERVICE_NAME =
  new QName("http://apache.org/hello_world_soap_http",
            "SOAPService");

  private Client()
  {
  }

  public static void main(String args[]) throws Exception
  {
1 if (args.length == 0)
    {
      System.out.println("please specify wsdl");
      System.exit(1);
    }

2 URL wsdlURL;
    File wsdlFile = new File(args[0]);
    if (wsdlFile.exists())
    {
      wsdlURL = wsdlFile.toURL();
    }
    else
    {
      wsdlURL = new URL(args[0]);
    }

    System.out.println(wsdlURL);
3 SOAPService ss = new SOAPService(wsdlURL,SERVICE_NAME);
4 Greeter port = ss.getSoapPort();
    String resp;

5 System.out.println("Invoking sayHi...");
    resp = port.sayHi();
    System.out.println("Server responded with: " + resp);
    System.out.println();

    System.out.println("Invoking greetMe...");
    resp = port.greetMe(System.getProperty("user.name"));
    System.out.println("Server responded with: " + resp);
    System.out.println();

    System.out.println("Invoking greetMeOneWay...");
    port.greetMeOneWay(System.getProperty("user.name"));
    System.out.println("No response from server as method is OneWay");
    System.out.println();

6 try {
      System.out.println("Invoking pingMe, expecting exception...");
      port.pingMe();
    } catch (PingMeFault ex) {
      System.out.println("Expected exception: PingMeFault has occurred.");
      System.out.println(ex.toString());
    }
    System.exit(0);
  }
}Client.main() method from Example 27.4, “Consumer Implementation Code” proceeds as follows:
- 1
- Provided that the Apache CXF runtime classes are on your classpath, the runtime is implicitly initialized. There is no need to call a special function to initialize Apache CXF.
- 2
- The consumer expects a single string argument that gives the location of the WSDL contract for HelloWorld. The WSDL contract's location is stored in
wsdlURL. - 3
- You create a service object using the constructor that requires the WSDL contract's location and service name.
- 4
- Call the appropriate
getPortName()method to obtain an instance of the required port. In this case, the SOAPService service supports only the SoapPort port, which implements theGreeterservice endpoint interface. - 5
- The consumer invokes each of the methods supported by the
Greeterservice endpoint interface. - 6
- In the case of the
pingMe()method, the example code shows how to catch thePingMeFaultfault exception.
Chapter 28. Finding WSDL at Runtime
Abstract
28.1. Instantiating a Proxy by Injection
Overview
Procedure
- Deploy the required WSDL documents in a well known location that all parts of the application can access.TipIf you are deploying the application as a WAR file, it is recommended that you place all of the WSDL documents and XML Schema documents in the
WEB-INF/wsdlfolder of the WAR.TipIf you are deploying the application as a JAR file, it is recommended that you place all of the WSDL documents and XML Schema documents in theMETA-INF/wsdlfolder of the JAR. - Configure a JAX-WS client endpoint for the proxy that is being injected.
- Inject the proxy into your service provide using the
@Resourceannotation.
Configuring the proxy
jaxws:client element in you application's configuration file. This tells the runtime to instantiate a org.apache.cxf.jaxws.JaxWsClientProxy object with the specified properties. This object is the proxy that will be injected into the service provider.
id—Specifies the ID used to identify the client to be injected.serviceClass—Specifies the SEI of the service on which the proxy makes requests.
Example 28.1. Configuration for a Proxy to be Injected into a Service Implementation
<beans ...
  xmlns:jaxws="http://cxf.apache.org/jaxws"
  ...
  schemaLocation="...
    http://cxf.apache.org/jaxws http://cxf.apache.org/schemas/jaxws.xsd
    ...">
  <jaxws:client id="bookClient"
                serviceClass="org.apache.cxf.demo.BookService"
                wsdlLocation="classpath:books.wsdl"/>
  ...
</beans>wsdlLocation attribute instructs the runtime to load the WSDL from the classpath. If books.wsdl in on the classpath, the runtime will be able to find it.
Coding the provider implementation
@Resource as shown in Example 28.2, “Injecting a Proxy into a Service Implementation”.
Example 28.2. Injecting a Proxy into a Service Implementation
package demo.hw.server;

import org.apache.hello_world_soap_http.Greeter;

@javax.jws.WebService(portName = "SoapPort", serviceName = "SOAPService",
                      targetNamespace = "http://apache.org/hello_world_soap_http",
                      endpointInterface = "org.apache.hello_world_soap_http.Greeter")
public class StoreImpl implements Store {

@Resource(name="bookClient")
private BookService proxy;

}id attribute. The configured proxy is injected into the BookService object declared immediately after the annotation. You can use this object to make invocations on the proxy's external service.
28.2. Using a JAX-WS Catalog
Overview
a standard catalog facility to be used when resolving any Web service document that is part of the description of a Web service, specifically WSDL and XML Schema documents.
Writing the catalog
- a document's public identifier and/or a system identifier to a URI.
- the URI of a resource to another URI.
Table 28.1. Common JAX-WS Catalog Elements
| Element | Description |
|---|---|
uri | Maps a URI to an alternate URI. |
rewriteURI | Rewrites the beginning of a URI. For example, this element allows you to map all URIs that start with http://cxf.apache.org to URIs that start with classpath:. |
uriSuffix | Maps a URI to an alternate URI based on the suffix of the original URI. For example you could map all URIs that end in foo.xsd to classpath:foo.xsd. |
Packaging the catalog
META-INF/jax-ws-catalog.xml. If your application is packaged into a single JAR, or WAR, you can place the catalog into a single file.
28.3. Using a contract resolver
Overview
ServiceContractResolver interface. You also need to register your custom resolver with the bus.
Implementing the contract resolver
org.apache.cxf.endpoint.ServiceContractResolver interface. As shown in Example 28.3, “ServiceContractResolver Interface”, this interface has a single method, getContractLocation(), that needs to be implemented. getContractLocation() takes the QName of a service and returns the URI for the service's WSDL contract.
Example 28.3. ServiceContractResolver Interface
public interface ServiceContractResolver
{
   URI getContractLocation(QName qname);
}Registering the contract resolver programmatically
org.apache.cxf.endpoint.ServiceContractResolverRegistry interface. However, you do not need to implement your own registry. Apache CXF provides a default implementation in the org.apache.cxf.endpoint.ServiceContractResolverRegistryImpl class.
- Get a reference to the default bus object.
- Get the service contract registry from the bus using the bus'
getExtension()method. - Create an instance of your contract resolver.
- Register your contract resolver with the registry using the registry's
register()method.
Example 28.4. Registering a Contract Resolver
Registering a contract resolver using configuration
- Add an
init()method to your contract resolver implementation. - Add logic to your
init()method that registers the contract resolver with the contract resolver registry as shown in Example 28.4, “Registering a Contract Resolver”. - Decorate the
init()method with the@PostConstructannotation.
Example 28.5. Service Contract Resolver that can be Registered Using Configuration
import javax.annotation.PostConstruct;
import javax.annotation.Resource;
import javax.xml.namespace.QName;

import org.apache.cxf.Bus;
import org.apache.cxf.BusFactory;

public class UddiResolver implements ServiceContractResolver
{
  private Bus bus;
  ...

  @PostConstruct
  public void init()
  {
    BusFactory bf=BusFactory.newInstance();
    Bus bus=bf.createBus();
    if (null != bus)
    {
      ServiceContractResolverRegistry resolverRegistry = bus.getExtension(ServiceContractResolverRegistry.class);
      if (resolverRegistry != null)
      {
        resolverRegistry.register(this);
      }
    }
  }

  public URI getContractLocation(QName serviceName)
  {
    ...
  }
}bean element to the client's configuration. The bean element's class attribute is the name of the class implementing the contract resolver.
org.apache.cxf.demos.myContractResolver class.
Example 28.6. Bean Configuring a Contract Resolver
<beans xmlns="http://www.springframework.org/schema/beans"
      xmlns:xsi="http://www.w3.org/2001/XMLSchema-instance"
       xsi:schemaLocation="
http://www.springframework.org/schema/beans http://www.springframework.org/schema/beans/spring-beans.xsd">
  ...
  <bean id="myResolver" class="org.apache.cxf.demos.myContractResolver" />
  ...
</beans>
Contract resolution order
getContractLocation() method in the order in which the resolvers were registered. It returns the first URI returned from one of the registered contract resolvers.
Chapter 29. Generic Fault Handling
Abstract
29.1. Runtime Faults
Overview
javax.xml.ws.WebServiceException exception.
APIs that throw WebServiceException
WebServiceException” lists some of the JAX-WS APIs that can throw the generic WebServiceException exception.
Table 29.1. APIs that Throw WebServiceException
| API | Reason |
|---|---|
Binding.setHandlerChain() | There is an error in the handler chain configuration. |
BindingProvider.getEndpointReference() | The specified class is not assigned from a W3CEndpointReference. |
Dispatch.invoke() | There is an error in the Dispatch instance's configuration or an error occurred while communicating with the service. |
Dispatch.invokeAsync() | There is an error in the Dispatch instance's configuration. |
Dispatch.invokeOneWay() | There is an error in the Dispatch instance's configuration or an error occurred while communicating with the service. |
LogicalMessage.getPayload() | An error occurred when using a supplied JAXBContext to unmarshall the payload. The cause field of the WebServiceException contains the original JAXBException. |
LogicalMessage.setPayload() | An error occurred when setting the payload of the message. If the exception is thrown when using a JAXBContext, the cause field of the WebServiceException contains the original JAXBException. |
WebServiceContext.getEndpointReference() | The specified class is not assigned from a W3CEndpointReference. |
29.2. Protocol Faults
Overview
Types of protocol exceptions
Table 29.2. Types of Generic Protocol Exceptions
| Exception Class | When Thrown |
|---|---|
javax.xml.ws.ProtocolException | This exception is the generic protocol exception. It can be caught regardless of the protocol in use. It can be cast into a specific fault type if you are using the SOAP binding or the HTTP binding. When using the XML binding in combination with the HTTP or JMS transports, the generic protocol exception cannot be cast into a more specific fault type. |
javax.xml.ws.soap.SOAPFaultException | This exception is thrown by remote invocations when using the SOAP binding. For more information see the section called “Using the SOAP protocol exception”. |
| javax.xml.ws.http.HTTPException | This exception is thrown when using the Apache CXF HTTP binding to develop RESTful Web services. For more information see Part VI, “Developing RESTful Web Services”. |
Using the SOAP protocol exception
SOAPFaultException exception wraps a SOAP fault. The underlying SOAP fault is stored in the fault field as a javax.xml.soap.SOAPFault object.
SOAPFaultException using the exceptions creator and throw it back to the consumer. Example 29.1, “Throwing a SOAP Protocol Exception” shows code for creating and throwing a SOAPFaultException if the method is passed an invalid parameter.
Example 29.1. Throwing a SOAP Protocol Exception
public Quote getQuote(String ticker)
{
  ...
  if(tickers.length()<3)
  {
    SOAPFault fault = SOAPFactory.newInstance().createFault();
    fault.setFaultString("Ticker too short");
    throw new SOAPFaultException(fault);
  }
  ...
}SOAPFaultException exception they can retrieve the underlying cause of the exception by examining the wrapped SOAPFault exception. As shown in Example 29.2, “Getting the Fault from a SOAP Protocol Exception”, the SOAPFault exception is retrieved using the SOAPFaultException exception's getFault() method.
Example 29.2. Getting the Fault from a SOAP Protocol Exception
...
try
{
  proxy.getQuote(ticker);
}
catch (SOAPFaultException sfe)
{
  SOAPFault fault = sfe.getFault();
  ...
}
Chapter 30. Publishing a Service
Abstract
- deploying a server as a standalone Java application
- deploying a server into an OSGi container without Spring-DM
30.1. APIs Used to Publish a Service
Overview
javax.xml.ws.Enddpoint class does the work of publishing a JAX-WS service provider. To publishing an endpoint do the following:
- Create an
Endpointobject for your service provider. - Publish the endpoint.
- Stop the endpoint when application shuts down.
Endpoint class provides methods for creating and publishing service providers. It also provides a method that can create and publish a service provider in a single method call.
Instantiating an service provider
Endpoint object. You instantiate an Endpoint object for your service provider using one of the following methods:
static Endpoint create(Object implementor);Thiscreate()method returns anEndpointfor the specified service implementation. TheEndpointobject is created using the information provided by the implementation class'javax.xml.ws.BindingTypeannotation, if it is present. If the annotation is not present, theEndpointuses a default SOAP 1.1/HTTP binding.static Endpoint create(URI bindingID,
Object implementor);Thiscreate()method returns anEndpointobject for the specified implementation object using the specified binding. This method overrides the binding information provided by thejavax.xml.ws.BindingTypeannotation, if it is present. If thebindingIDcannot be resolved, or it isnull, the binding specified in thejavax.xml.ws.BindingTypeis used to create theEndpoint. If neither thebindingIDor thejavax.xml.ws.BindingTypecan be used, theEndpointis created using a default SOAP 1.1/HTTP binding.static Endpoint publish(String address,
Object implementor);Thepublish()method creates anEndpointobject for the specified implementation, and publishes it. The binding used for theEndpointobject is determined by the URL scheme of the providedaddress. The list of bindings available to the implementation are scanned for a binding that supports the URL scheme. If one is found theEndpointobject is created and published. If one is not found, the method fails.TipUsingpublish()is the same as invoking one of thecreate()methods, and then invoking thepublish()method used in publish to an address.
Endpoint creation methods must either be an instance of a class annotated with javax.jws.WebService and meeting the requirements for being an SEI implementation or it must be an instance of a class annotated with javax.xml.ws.WebServiceProvider and implementing the Provider interface.
Publishing a service provider
Endpoint methods:
void publish(String address);Thispublish()method publishes the service provider at the address specified.ImportantTheaddress's URL scheme must be compatible with one of the service provider's bindings.void publish(Object serverContext);Thispublish()method publishes the service provider based on the information provided in the specified server context. The server context must define an address for the endpoint, and the context must also be compatible with one of the service provider's available bindings.
Stopping a published service provider
stop() method. The stop() method, shown in Example 30.1, “Method for Stopping a Published Endpoint”, shuts down the endpoint and cleans up any resources it is using.
Example 30.1. Method for Stopping a Published Endpoint
void stop();30.2. Publishing a Service in a Plain Java Application
Overview
main() method. Apache CXF provides you two options for writing your application's main() method.
- use the
main()method generated by the wsdl2java tool - write a custom
main()method that publishes the endpoints
Generating a Server Mainline
-server flag makes the tool generate a simple server mainline. The generated server mainline, as shown in Example 30.2, “Generated Server Mainline”, publishes one service provider for each port element in the specified WSDL contract.
Example 30.2. Generated Server Mainline
package org.apache.hello_world_soap_http;

import javax.xml.ws.Endpoint;

public class GreeterServer {

    protected GreeterServer() throws Exception {
        System.out.println("Starting Server");
1        Object implementor = new GreeterImpl();
2        String address = "http://localhost:9000/SoapContext/SoapPort";
3        Endpoint.publish(address, implementor);
    }

    public static void main(String args[]) throws Exception {
        new GreeterServer();
        System.out.println("Server ready...");

        Thread.sleep(5 * 60 * 1000);
        System.out.println("Server exiting");
        System.exit(0);
    }
}Writing a Server Mainline
- Instantiate an
javax.xml.ws.Endpointobject for the service provider. - Create an optional server context to use when publishing the service provider.
- Publish the service provider using one of the
publish()methods. - Stop the service provider when the application is ready to exit.
Example 30.3. Custom Server Mainline
package org.apache.hello_world_soap_http;

import javax.xml.ws.Endpoint;

public class GreeterServer
{
  protected GreeterServer() throws Exception
  {
  }

  public static void main(String args[]) throws Exception
  {
1    GreeterImpl impl = new GreeterImpl();
2    Endpoint endpt.create(impl);
3    endpt.publish("http://localhost:9000/SoapContext/SoapPort");

    boolean done = false;
4   while(!done)
    {
      ...
    }

5   endpt.stop();
    System.exit(0);
  }
}30.3. Publishing a Service in an OSGi Container
Overview
The bundle activator interface
org.osgi.framework.BundleActivator interface. The BundleActivator interface, shown in Example 30.4, “Bundle Activator Interface”, it has two methods that need to be implemented.
Example 30.4. Bundle Activator Interface
interface BundleActivator
{
  public void start(BundleContext context)
  throws java.lang.Exception;

  public void stop(BundleContext context)
  throws java.lang.Exception;
}start() method is called by the container when it starts the bundle. This is where you instantiate and publish the endpoints.
stop() method is called by the container when it stops the bundle. This is where you would stop the endpoints.
Implementing the start method
- Instantiate an
javax.xml.ws.Endpointobject for the service provider. - Create an optional server context to use when publishing the service provider.
- Publish the service provider using one of the
publish()methods.
Example 30.5. Bundle Activator Start Method for Publishing an Endpoint
package com.widgetvendor.osgi;

import javax.xml.ws.Endpoint;
import org.osgi.framework.BundleActivator;
import org.osgi.framework.BundleContext;

public class widgetActivator implements BundleActivator
{
  private Endpoint endpt;
  ...

  public void start(BundleContext context)
  {
1    WidgetOrderImpl impl = new WidgetOrderImpl();
2    endpt = Endpoint.create(impl);
3    endpt.publish("http://localhost:9000/SoapContext/SoapPort");
  }

  ...

}Implementing the stop method
Example 30.6. Bundle Activator Stop Method for Stopping an Endpoint
package com.widgetvendor.osgi;

import javax.xml.ws.Endpoint;
import org.osgi.framework.BundleActivator;
import org.osgi.framework.BundleContext;

public class widgetActivator implements BundleActivator
{
  private Endpoint endpt;
  ...

  public void stop(BundleContext context)
  {
    endpt.stop();
  }

  ...

}
Informing the container
com.widgetvendor.osgi.widgetActivator.
Example 30.7. Bundle Activator Manifest Entry
Bundle-Activator: com.widgetvendor.osgi.widgetActivator
Chapter 31. Basic Data Binding Concepts
Abstract
31.1. Including and Importing Schema Definitions
Overview
<include/> and <import/> schema tags. These tags enable you to insert definitions from external files or resources into the scope of a schema element. The essential difference between including and importing is:
- Including brings in definitions that belong to the same target namespace as the enclosing schema element.
- Importing brings in definitions that belong to a different target namespace from the enclosing schema element.
xsd:include syntax
<include schemaLocation="anyURI" />
Example 31.1. Example of a Schema that Includes Another Schema
<definitions targetNamespace="http://schemas.redhat.com/tests/schema_parser"
             xmlns:tns="http://schemas.redhat.com/tests/schema_parser"
             xmlns:xsd="http://www.w3.org/2001/XMLSchema"
             xmlns="http://schemas.xmlsoap.org/wsdl/">
  <types>
    <schema targetNamespace="http://schemas.redhat.com/tests/schema_parser"
            xmlns="http://www.w3.org/2001/XMLSchema">
      <include schemaLocation="included.xsd"/>
      <complexType name="IncludingSequence">
        <sequence>
          <element name="includedSeq" type="tns:IncludedSequence"/>
        </sequence>
      </complexType>
    </schema>
  </types>
  ...
</definitions>
Example 31.2. Example of an Included Schema
<schema targetNamespace="http://schemas.redhat.com/tests/schema_parser"
        xmlns="http://www.w3.org/2001/XMLSchema">
  <!-- Included type definitions -->
  <complexType name="IncludedSequence">
    <sequence>
      <element name="varInt" type="int"/>
      <element name="varString" type="string"/>
    </sequence>
  </complexType>
</schema>
xsd:import syntax
<import namespace="namespaceAnyURI"
schemaLocation="schemaAnyURI" />Example 31.3. Example of a Schema that Includes Another Schema
<definitions targetNamespace="http://schemas.redhat.com/tests/schema_parser"
             xmlns:tns="http://schemas.redhat.com/tests/schema_parser"
             xmlns:xsd="http://www.w3.org/2001/XMLSchema"
             xmlns="http://schemas.xmlsoap.org/wsdl/">
  <types>
    <schema targetNamespace="http://schemas.redhat.com/tests/schema_parser"
            xmlns="http://www.w3.org/2001/XMLSchema">
      <import namespace="http://schemas.redhat.com/tests/imported_types"
              schemaLocation="included.xsd"/>
      <complexType name="IncludingSequence">
        <sequence>
          <element name="includedSeq" type="tns:IncludedSequence"/>
        </sequence>
      </complexType>
    </schema>
  </types>
  ...
</definitions>
Example 31.4. Example of an Included Schema
<schema targetNamespace="http://schemas.redhat.com/tests/imported_types"
        xmlns="http://www.w3.org/2001/XMLSchema">
  <!-- Included type definitions -->
  <complexType name="IncludedSequence">
    <sequence>
      <element name="varInt" type="int"/>
      <element name="varString" type="string"/>
    </sequence>
  </complexType>
</schema>
Using non-referenced schema documents
- Convert the schema document to a WSDL document using the xsd2wsdl tool.
- Generate Java for the types using the wsdl2java tool on the generated WSDL document.ImportantYou will get a warning from the wsdl2java tool stating that the WSDL document does not define any services. You can ignore this warning.
- Add the generated classes to your classpath.
31.2. XML Namespace Mapping
Overview
Package naming
- The URI scheme, if present, is stripped.NoteApache CXF will only strip the http:, https:, and urn: schemes.For example, the namespace
http:\\www.widgetvendor.com\types\widgetTypes.xsdbecomes\\widgetvendor.com\types\widgetTypes.xsd. - The trailing file type identifier, if present, is stripped.For example,
\\www.widgetvendor.com\types\widgetTypes.xsdbecomes\\widgetvendor.com\types\widgetTypes. - The resulting string is broken into a list of strings using
/and:as separators.So,\\www.widgetvendor.com\types\widgetTypesbecomes the list{"www.widegetvendor.com", "types", "widgetTypes"}. - If the first string in the list is an internet domain name, it is decomposed as follows:
- The leading
www.is stripped. - The remaining string is split into its component parts using the
.as the separator. - The order of the list is reversed.
So,{"www.widegetvendor.com", "types", "widgetTypes"}becomes{"com", "widegetvendor", "types", "widgetTypes"}NoteInternet domain names end in one of the following:.com,.net,.edu,.org,.gov, or in one of the two-letter country codes. - The strings are converted into all lower case.So,
{"com", "widegetvendor", "types", "widgetTypes"}becomes{"com", "widegetvendor", "types", "widgettypes"}. - The strings are normalized into valid Java package name components as follows:
- If the strings contain any special characters, the special characters are converted to an underscore(
_). - If any of the strings are a Java keyword, the keyword is prefixed with an underscore(
_). - If any of the strings begin with a numeral, the string is prefixed with an underscore(
_).
- The strings are concatenated using
.as a separator.So,{"com", "widegetvendor", "types", "widgettypes"}becomes the package name com.widgetvendor.types.widgettypes.
http:\\www.widgetvendor.com\types\widgetTypes.xsd are mapped to the Java package com.widgetvendor.types.widgettypes.
Package contents
- A class implementing each complex type defined in the schemaFor more information on complex type mapping see Chapter 34, Using Complex Types.
- An enum type for any simple types defined using the
enumerationfacetFor more information on how enumerations are mapped see Section 33.3, “Enumerations”. - A public
ObjectFactoryclass that contains methods for instantiating objects from the schemaFor more information on theObjectFactoryclass see Section 31.3, “The Object Factory”. - A
package-info.javafile that provides metadata about the classes in the package
31.3. The Object Factory
Overview
Complex type factory methods
typeName createtypeName();
widgetType, Apache CXF generates a class called WidgetType to implement it. Example 31.5, “Complex Type Object Factory Entry” shows the generated creation method in the object factory.
Example 31.5. Complex Type Object Factory Entry
public class ObjectFactory
{
  ...
  WidgetType createWidgetType()
  {
    return new WidgetType();
  }
  ...
}
Element factory methods
JAXBElement<T> objects. The creation method takes the form:
public JAXBElement<elementType> createelementName(elementType value);
comment of type xsd:string, Apache CXF generates the object factory method shown in Example 31.6, “Element Object Factory Entry”
Example 31.6. Element Object Factory Entry
public class ObjectFactory
{
  ...
    @XmlElementDecl(namespace = "...", name = "comment")
    public JAXBElement<String> createComment(String value) {
        return new JAXBElement<String>(_Comment_QNAME, String.class, null, value);
    }
  ...
}
31.4. Adding Classes to the Runtime Marshaller
Overview
schema element. It also contains any types that are generated from the namespaces of any schemas that are imported into the WSDL contract.
schema element is accomplished using the @XmlSeeAlso annotation. If your application needs to work with types that are generated outside the scope of your application's WSDL document, you can edit the @XmlSeeAlso annotation to add them to the JAXB map.
Using the @XmlSeeAlso annotation
@XmlSeeAlso annotation can be added to the SEI of your service. It contains a comma separated list of classes to include in the JAXB context. Example 31.7, “Syntax for Adding Classes to the JAXB Context” shows the syntax for using the @XmlSeeAlso annotation.
Example 31.7. Syntax for Adding Classes to the JAXB Context
import javax.xml.bind.annotation.XmlSeeAlso;
@WebService()
@XmlSeeAlso({Class1.class, Class2.class, ..., ClassN.class})
   public class GeneratedSEI {
       ...
    }
ObjectFactory classes generated to support the needed types. Including the ObjectFactory class includes all of the classes that are known to the object factory.
Example
@XmlSeeAlso.
Example 31.8. Adding Classes to the JAXB Context
...
import javax.xml.bind.annotation.XmlSeeAlso;
...
@WebService()
@XmlSeeAlso({org.apache.schemas.types.test.ObjectFactory.class,org.apache.schemas.tests.group_test.ObjectFactory.class})
   public interface Foo {
       ...
   }
Chapter 32. Using XML Elements
Abstract
Overview
element element in the global scope of an XML Schema document To make it easier for Java developers to work with elements, Apache CXF maps globally scoped elements to either a special JAXB element class or to a Java class that is generated to match its content type.
type attribute or if the element is defined using an in-line type definition. Elements defined with in-line type definitions are mapped to Java classes.
XML Schema mapping
element elements. element elements has one required attribute. The name specifies the name of the element as it appears in an XML document.
name attribute element elements have the optional attributes listed in Table 32.1, “Attributes Used to Define an Element”.
Table 32.1. Attributes Used to Define an Element
| Attribute | Description |
|---|---|
type | Specifies the type of the element. The type can be any XML Schema primitive type or any named complex type defined in the contract. If this attribute is not specified, you will need to include an in-line type definition. |
nillable | Specifies if an element can be left out of a document entirely. If nillable is set to true, the element can be omitted from any document generated using the schema. |
abstract | Specifies if an element can be used in an instance document. true indicates that the element cannot appear in the instance document. Instead, another element whose substitutionGroup attribute contains the QName of this element must appear in this element's place. For information on how this attribute effects code generation see the section called “Java mapping of abstract elements”. |
substitutionGroup | Specifies the name of an element that can be substituted with this element. For more information on using type substitution see Chapter 36, Element Substitution. |
default | Specifies a default value for an element. For information on how this attribute effects code generation see the section called “Java mapping of elements with a default value”. |
fixed | Specifies a fixed value for the element. |
Example 32.1. Simple XML Schema Element Definition
<element name="joeFred" type="xsd:string" />
complexType element or a simpleType element. Once you specify whether the type of data is complex or simple, you can define any type of data needed using the tools available for each type of data.
Example 32.2. XML Schema Element Definition with an In-Line Type
<element name="skate">
  <complexType>
    <sequence>
      <element name="numWheels" type="xsd:int" />
      <element name="brand" type="xsd:string" />
    </sequence>
  </complexType>
</element>
Java mapping of elements with a named type
JAXBElement<T> objects where the template class is determined by the value of the element element's type attribute. For primitive types, the template class is derived using the wrapper class mapping described in the section called “Wrapper classes”. For complex types, the Java class generated to support the complex type is used as the template class.
Example 32.3. Object Factory Method for a Globally Scoped Element
public class ObjectFactory {

    private final static QName _name_QNAME = new QName("targetNamespace", "localName");

  ...

   @XmlElementDecl(namespace = "targetNamespace", name = "localName")
    public JAXBElement<type> createname(type value);

}Example 32.4. Object Factory for a Simple Element
public class ObjectFactory {

    private final static QName _JoeFred_QNAME = new QName("...", "joeFred");

  ...

   @XmlElementDecl(namespace = "...", name = "joeFred")
    public JAXBElement<String> createJoeFred(String value);

}
Example 32.5. Using a Globally Scoped Element
JAXBElement<String> element = createJoeFred("Green");
String color = element.getValue();
Using elements with named types in WSDL
JAXBElement<T>. Instead it is mapped to a regular Java type or class.
Example 32.6. WSDL Using an Element as a Message Part
<?xml version="1.0" encoding=";UTF-8"?>
<wsdl:definitions name="HelloWorld"
targetNamespace="http://apache.org/hello_world_soap_http"
xmlns="http://schemas.xmlsoap.org/wsdl/"
xmlns:soap="http://schemas.xmlsoap.org/wsdl/soap/"
xmlns:tns="http://apache.org/hello_world_soap_http"
xmlns:x1="http://apache.org/hello_world_soap_http/types"
xmlns:wsdl="http://schemas.xmlsoap.org/wsdl/"
xmlns:xsd="http://www.w3.org/2001/XMLSchema">
<wsdl:types>
<schema targetNamespace="http://apache.org/hello_world_soap_http/types"
xmlns="http://www.w3.org/2001/XMLSchema"
elementFormDefault="qualified"><element name="sayHi">
<element name="sayHi" type="string"/>
<element name="sayHiResponse" type="string"/>
</schema>
</wsdl:types>
<wsdl:message name="sayHiRequest">
<wsdl:part element="x1:sayHi" name="in"/>
</wsdl:message>
<wsdl:message name="sayHiResponse">
<wsdl:part element="x1:sayHiResponse" name="out"/>
</wsdl:message>
<wsdl:portType name="Greeter">
<wsdl:operation name="sayHi">
<wsdl:input message="tns:sayHiRequest" name="sayHiRequest"/>
<wsdl:output message="tns:sayHiResponse" name="sayHiResponse"/>
</wsdl:operation>
</wsdl:portType>
...
</wsdl:definitions>sayHi operation.
Example 32.7. Java Method Using a Global Element as a Part
String sayHi(String in);Java mapping of elements with an in-line type
@XmlRootElement annotation. The @XmlRootElement annotation has two useful properties: name and namespace. These attributes are described in Table 32.2, “Properties for the @XmlRootElement Annotation”.
Table 32.2. Properties for the @XmlRootElement Annotation
| Property | Description |
|---|---|
| name | Specifies the value of the XML Schema element element's name attribute. |
| namespace | Specifies the namespace in which the element is defined. If this element is defined in the target namespace, the property is not specified. |
@XmlRootElement annotation is not used if the element meets one or more of the following conditions:
- The element's
nillableattribute is set totrue - The element is the head element of a substitution groupFor more information on substitution groups see Chapter 36, Element Substitution.
Java mapping of abstract elements
abstract attribute is set to true the object factory method for instantiating instances of the type is not generated. If the element is defined using an in-line type, the Java class supporting the in-line type is generated.
Java mapping of elements with a default value
default attribute is used the defaultValue property is added to the generated @XmlElementDecl annotation. For example, the element defined in Example 32.8, “XML Schema Element with a Default Value” results in the object factory method shown in Example 32.9, “Object Factory Method for an Element with a Default Value”.
Example 32.8. XML Schema Element with a Default Value
<element name="size" type="xsd:int" default="7"/>
Example 32.9. Object Factory Method for an Element with a Default Value
@XmlElementDecl(namespace = "...", name = "size", defaultValue = "7")
public JAXBElement<Integer> createUnionJoe(Integer value) {
return new JAXBElement<Integer>(_Size_QNAME, Integer.class, null, value);
}Chapter 33. Using Simple Types
Abstract
simpleType element. They are used to specify elements that do not contain any children or attributes. They are generally mapped to native Java constructs and do not require the generation of special classes to implement them. Enumerated simple types do not result in generated code because they are mapped to Java enum types.
33.1. Primitive Types
Overview
Mappings
Table 33.1. XML Schema Primitive Type to Java Native Type Mapping
| XML Schema Type | Java Type |
|---|---|
| xsd:string | String |
| xsd:integer | BigInteger |
| xsd:int | int |
| xsd:long | long |
| xsd:short | short |
| xsd:decimal | BigDecimal |
| xsd:float | float |
| xsd:double | double |
| xsd:boolean | boolean |
| xsd:byte | byte |
| xsd:QName | QName |
| xsd:dateTime | XMLGregorianCalendar |
| xsd:base64Binary | byte[] |
| xsd:hexBinary | byte[] |
| xsd:unsignedInt | long |
| xsd:unsignedShort | int |
| xsd:unsignedByte | short |
| xsd:time | XMLGregorianCalendar |
| xsd:date | XMLGregorianCalendar |
| xsd:g | XMLGregorianCalendar |
| xsd:anySimpleType [a] | Object |
| xsd:anySimpleType [b] | String |
| xsd:duration | Duration |
| xsd:NOTATION | QName |
[a]
For elements of this type.
[b]
For attributes of this type.
| |
Wrapper classes
- An
elementelement with itsnillableattribute set totrueas shown:<element name="finned" type="xsd:boolean" nillable="true" /> - An
elementelement with itsminOccursattribute set to0and itsmaxOccursattribute set to1, or itsmaxOccursattribute not specified, as shown :<element name="plane" type="xsd:string" minOccurs="0" />
- An
attributeelement with itsuseattribute set tooptional, or not specified, and having neither itsdefaultattribute nor itsfixedattribute specified, as shown:<element name="date"> <complexType> <sequence/> <attribute name="calType" type="xsd:string" use="optional" /> </complexType> </element>
Table 33.2. Primitive Schema Type to Java Wrapper Class Mapping
| Schema Type | Java Type |
|---|---|
| xsd:int | java.lang.Integer |
| xsd:long | java.lang.Long |
| xsd:short | java.lang.Short |
| xsd:float | java.lang.Float |
| xsd:double | java.lang.Double |
| xsd:boolean | java.lang.Boolean |
| xsd:byte | java.lang.Byte |
| xsd:unsignedByte | java.lang.Short |
| xsd:unsignedShort | java.lang.Integer |
| xsd:unsignedInt | java.lang.Long |
| xsd:unsignedLong | java.math.BigInteger |
| xsd:duration | java.lang.String |
33.2. Simple Types Defined by Restriction
Overview
simpleType element.
Procedure
- Determine the base type for your new simple type.
- Determine what restrictions define the new type based on the available facets for the chosen base type.
- Using the syntax shown in this section, enter the appropriate
simpleTypeelement into the types section of your contract.
Defining a simple type in XML Schema
Example 33.1. Simple type syntax
<simpleType name="typeName">
<restriction base="baseType">
<facet value="value" />
<facet value="value" />
...
</restriction>
</simpleType>simpleType element and identified by the value of the name attribute. The base type from which the new simple type is being defined is specified by the base attribute of the xsd:restriction element. Each facet element is specified within the restriction element. The available facets and their valid settings depend on the base type. For example, xsd:string has a number of facets including:
lengthminLengthmaxLengthpatternwhitespace
TX is a valid value, but tx or tX are not valid values.
Example 33.2. Postal Code Simple Type
<xsd:simpleType name="postalCode">
<xsd:restriction base="xsd:string">
<xsd:pattern value="[A-Z]{2}" />
</xsd:restriction>
</xsd:simpleType>Mapping to Java
String because the base type of postalCode is xsd:string. For example, the WSDL fragment shown in Example 33.3, “Credit Request with Simple Types” results in a Java method, state(), that takes a parameter, postalCode, of String.
Example 33.3. Credit Request with Simple Types
<message name="stateRequest">
<part name="postalCode" type="postalCode" />
</message>
...
<portType name="postalSupport">
<operation name="state">
<input message="tns:stateRequest" name="stateRec" />
<output message="tns:stateResponse" name="credResp" />
</operation>
</portType>Enforcing facets
true. Example 33.4, “Service Provider Configured to Use Schema Validation” shows the configuration for a service provider that uses schema validation
Example 33.4. Service Provider Configured to Use Schema Validation
<jaxws:endpoint name="{http://apache.org/hello_world_soap_http}SoapPort"
wsdlLocation="wsdl/hello_world.wsdl"
createdFromAPI="true">
<jaxws:properties>
<entry key="schema-validation-enabled" value="true" />
</jaxws:properties>
</jaxws:endpoint>33.3. Enumerations
Overview
xsd:enumeration facet. Unlike atomic simple types, they are mapped to Java enums.
Defining an enumerated type in XML Schema
xsd:enumeration facet. Each xsd:enumeration facet defines one possible value for the enumerated type.
biglargemungogargantuan
Example 33.5. XML Schema Defined Enumeration
<simpleType name="widgetSize">
<restriction base="xsd:string">
<enumeration value="big"/>
<enumeration value="large"/>
<enumeration value="mungo"/>
<enumeration value="gargantuan"/>
</restriction>Mapping to Java
- The name of the type is taken from the
nameattribute of the simple type definition and converted to a Java identifier.In general, this means converting the first character of the XML Schema's name to an uppercase letter. If the first character of the XML Schema's name is an invalid character, an underscrore (_) is prepended to the name. - For each
enumerationfacet, an enum constant is generated based on the value of thevalueattribute.The constant's name is derived by converting all of the lowercase letters in the value to their uppercase equivalent. - A constructor is generated that takes the Java type mapped from the enumeration's base type.
- A public method called
value()is generated to access the facet value that is represented by an instance of the type.The return type of thevalue()method is the base type of the XML Schema type. - A public method called
fromValue()is generated to create an instance of the enum type based on a facet value.The parameter type of thevalue()method is the base type of the XML Schema type. - The class is decorated with the
@XmlEnumannotation.
Example 33.6. Generated Enumerated Type for a String Bases XML Schema Enumeration
@XmlType(name = "widgetSize")
@XmlEnum
public enum WidgetSize {
@XmlEnumValue("big")
BIG("big"),
@XmlEnumValue("large")
LARGE("large"),
@XmlEnumValue("mungo")
MUNGO("mungo"),
@XmlEnumValue("gargantuan")
GARGANTUAN("gargantuan");
private final String value;
WidgetSize(String v) {
value = v;
}
public String value() {
return value;
}
public static WidgetSize fromValue(String v) {
for (WidgetSize c: WidgetSize.values()) {
if (c.value.equals(v)) {
return c;
}
}
throw new IllegalArgumentException(v);
}
}33.4. Lists
Overview
primeList, using a list type is shown in Example 33.7, “List Type Example”.
Example 33.7. List Type Example
<primeList>1 3 5 7 9 11 13<\primeList>
List<T> objects. The only variation to this pattern is when a message part is mapped directly to an instance of an XML Schema list type.
Defining list types in XML Schema
simpleType element. The most common syntax used to define a list type is shown in Example 33.8, “Syntax for XML Schema List Types”.
Example 33.8. Syntax for XML Schema List Types
<simpleType name="listType">
<list itemType="atomicType">
<facet value="value" />
<facet value="value" />
...
</list>
</simpleType>Table 33.3. List Type Facets
| Facet | Effect |
|---|---|
length | Defines the number of elements in an instance of the list type. |
minLength | Defines the minimum number of elements allowed in an instance of the list type. |
maxLength | Defines the maximum number of elements allowed in an instance of the list type. |
enumeration | Defines the allowable values for elements in an instance of the list type. |
pattern | Defines the lexical form of the elements in an instance of the list type. Patterns are defined using regular expressions. |
simpleList element shown in Example 33.7, “List Type Example”, is shown in Example 33.9, “Definition of a List Type”.
Example 33.9. Definition of a List Type
<simpleType name="primeListType"> <list itemType="int"/> </simpleType> <element name="primeList" type="primeListType"/>
Example 33.10. Alternate Syntax for List Types
<simpleType name="listType">
<list>
<simpleType>
<restriction base="atomicType">
<facet value="value"/>
<facet value="value"/>
...
</restriction>
</simpleType>
</list>
</simpleType>Mapping list type elements to Java
List<T> object. The template class used by the List<T> is the wrapper class mapped from the list's base type. For example, the list type defined in Example 33.9, “Definition of a List Type” is mapped to a List<Integer>.
Mapping list type parameters to Java
List<T> object. The base type of the array is the wrapper class of the list type's base class.
Example 33.11. WSDL with a List Type Message Part
<definitions ...>
...
<types ...>
<schema ... >
<simpleType name="primeListType">
<list itemType="int"/>
</simpleType>
<element name="primeList" type="primeListType"/>
</schemas>
</types>
<message name="numRequest">
<part name="inputData" element="xsd1:primeList" />
</message>
<message name="numResponse">;
<part name="outputData" type="xsd:int">
...
<portType name="numberService">
<operation name="primeProcessor">
<input name="numRequest" message="tns:numRequest" />
<output name="numResponse" message="tns:numResponse" />
</operation>
...
</portType>
...
</definitions>Example 33.12. Java Method with a List Type Parameter
public interface NumberService {
@XmlList
@WebResult(name = "outputData", targetNamespace = "", partName = "outputData")
@WebMethod
public int primeProcessor(
@WebParam(partName = "inputData", name = "primeList", targetNamespace = "...")
java.lang.Integer[] inputData
);
}33.5. Unions
Overview
1 or the string first. Unions are mapped to Java Strings.
Defining in XML Schema
simpleType element. They contain at least one union element that defines the member types of the union. The member types of the union are the valid types of data that can be stored in an instance of the union. They are defined using the union element's memberTypes attribute. The value of the memberTypes attribute contains a list of one or more defined simple type names. Example 33.13, “Simple Union Type” shows the definition of a union that can store either an integer or a string.
Example 33.13. Simple Union Type
<simpleType name="orderNumUnion"> <union memberTypes="xsd:string xsd:int" /> </simpleType>
union element. Example 33.14, “Union with an Anonymous Member Type” shows an example of a union containing an anonymous member type that restricts the possible values of a valid integer to the range 1 through 10.
Example 33.14. Union with an Anonymous Member Type
<simpleType name="restrictedOrderNumUnion">
<union memberTypes="xsd:string">
<simpleType>
<restriction base="xsd:int">
<minInclusive value="1" />
<maxInclusive value="10" />
</restriction>
</simpleType>
</union>
</simpleType>Mapping to Java
String objects. By default, Apache CXF does not validate the contents of the generated object. To have Apache CXF validate the contents you will must configure the runtime to use schema validation as described in the section called “Enforcing facets”.
33.6. Simple Type Substitution
Overview
xsi:type attribute. The default mapping of simple types to Java primitive types, however, does not fully support simple type substitution. The runtime can handle basic simple type substitution, but information is lost. The code generators can be customized to generate Java classes that facilitate lossless simple type substitution.
Default mapping and marshaling
xsi:type attribute meets one of the following conditions:
- It specifies a primitive type that is compatible with the element's schema type.
- It specifies a type that derives by restriction from the element’s schema type.
- It specifies a complex type that derives by extension from the element’s schema type.
xsi:type attribute. If the type substitution is from a complex type to a simple type, only the value directly related to the simple type is preserved. Any other elements and attributes added by extension are lost.
Supporting lossless type substitution
- Set the
globalBindingscustomization element'smapSimpleTypeDeftotrue.This instructs the code generator to create Java value classes for all named simple types defined in the global scope.For more information see Section 37.3, “Generating Java Classes for Simple Types”. - Add a
javaTypeelement to theglobalBindingscustomization element.This instructs the code generators to map all instances of an XML Schema primitive type to s specific class of object.For more information see Section 37.2, “Specifying the Java Class of an XML Schema Primitive”. - Add a
baseTypecustomization element to the specific elements you want to customize.ThebaseTypecustomization element allows you to specify the Java type generated to represent a property. To ensure the best compatibility for simple type substitution, usejava.lang.Objectas the base type.For more information see Section 37.6, “Specifying the Base Type of an Element or an Attribute”.
Chapter 34. Using Complex Types
Abstract
34.1. Basic Complex Type Mapping
Overview
Defining in XML Schema
complexType element. The complexType element wraps the rest of elements used to define the structure of the data. It can appear either as the parent element of a named type definition, or as the child of an element element anonymously defining the structure of the information stored in the element. When the complexType element is used to define a named type, it requires the use of the name attribute. The name attribute specifies a unique identifier for referencing the type.
Table 34.1. Elements for Defining How Elements Appear in a Complex Type
| Element | Description |
|---|---|
all | All of the elements defined as part of the complex type must appear in an instance of the type. However, they can appear in any order. |
choice | Only one of the elements defined as part of the complex type can appear in an instance of the type. |
sequence | All of the elements defined as part of the complex type must appear in an instance of the type, and they must also appear in the order specified in the type definition. |
element element children to the definition.
Example 34.1. XML Schema Complex Type
<complexType name="sequence">
<sequence>
<element name="name" type="xsd:string" />
<element name="street" type="xsd:short" />
<element name="city" type="xsd:string" />
<element name="state" type="xsd:string" />
<element name="zipCode" type="xsd:string" />
</sequence>
</complexType>Mapping to Java
@XmlType annotation. If the mapping is for a named complex type, the annotations name is set to the value of the complexType element's name attribute. If the complex type is defined as part of an element definition, the value of the @XmlType annotation's name property is the value of the element element's name attribute.
@XmlRootElement annotation if it is generated for a complex type defined as part of an element definition.
- All Complex Type
- All complex types are defined using the
allelement. They are annotated as follows:- The
@XmlTypeannotation's propOrder property is empty. - Each element is decorated with the
@XmlElementannotation. - The
@XmlElementannotation's required property is set totrue.
Example 34.2, “Mapping of an All Complex Type” shows the mapping for an all complex type with two elements.Example 34.2. Mapping of an All Complex Type
@XmlType(name = "all", propOrder = { }) public class All { @XmlElement(required = true) protected BigDecimal amount; @XmlElement(required = true) protected String type; public BigDecimal getAmount() { return amount; } public void setAmount(BigDecimal value) { this.amount = value; } public String getType() { return type; } public void setType(String value) { this.type = value; } } - Choice Complex Type
- Choice complex types are defined using the
choiceelement. They are annotated as follows:- The
@XmlTypeannotation's propOrder property lists the names of the elements in the order they appear in the XML Schema definition. - None of the member variables are annotated.
Example 34.3, “Mapping of a Choice Complex Type” shows the mapping for a choice complex type with two elements.Example 34.3. Mapping of a Choice Complex Type
@XmlType(name = "choice", propOrder = { "address", "floater" }) public class Choice { protected Sequence address; protected Float floater; public Sequence getAddress() { return address; } public void setAddress(Sequence value) { this.address = value; } public Float getFloater() { return floater; } public void setFloater(Float value) { this.floater = value; } } - Sequence Complex Type
- A sequence complex type is defined using the
sequenceelement. It is annotated as follows:- The
@XmlTypeannotation's propOrder property lists the names of the elements in the order they appear in the XML Schema definition. - Each element is decorated with the
@XmlElementannotation. - The
@XmlElementannotation's required property is set totrue.
Example 34.4, “Mapping of a Sequence Complex Type” shows the mapping for the complex type defined in Example 34.1, “XML Schema Complex Type”.Example 34.4. Mapping of a Sequence Complex Type
@XmlType(name = "sequence", propOrder = { "name", "street", "city", "state", "zipCode" }) public class Sequence { @XmlElement(required = true) protected String name; protected short street; @XmlElement(required = true) protected String city; @XmlElement(required = true) protected String state; @XmlElement(required = true) protected String zipCode; public String getName() { return name; } public void setName(String value) { this.name = value; } public short getStreet() { return street; } public void setStreet(short value) { this.street = value; } public String getCity() { return city; } public void setCity(String value) { this.city = value; } public String getState() { return state; } public void setState(String value) { this.state = value; } public String getZipCode() { return zipCode; } public void setZipCode(String value) { this.zipCode = value; } }
34.2. Attributes
Overview
attribute elements and attributeGroup elements within the scope of a complexType element. When defining structures for an XML document attribute declarations provide a means of adding information that is specified within the tag, not the value that the tag contains. For example, when describing the XML element <value currency="euro">410<\value> in XML Schema the currency attribute is described using an attribute element as shown in Example 34.5, “XML Schema Defining and Attribute”.
attributeGroup element allows you to define a group of reusable attributes that can be referenced by all complex types defined by the schema. For example, if you are defining a series of elements that all use the attributes category and pubDate, you could define an attribute group with these attributes and reference them in all the elements that use them. This is shown in Example 34.7, “Attribute Group Definition”.
use attribute is set to either optional or required are treated as elements of a structure. For each attribute declaration contained within a complex type description, an element is generated in the class for the attribute, along with the appropriate getter and setter methods.
Defining an attribute in XML Schema
attribute element has one required attribute, name, that is used to identify the attribute. It also has four optional attributes that are described in Table 34.2, “Optional Attributes Used to Define Attributes in XML Schema”.
Table 34.2. Optional Attributes Used to Define Attributes in XML Schema
| Attribute | Description |
|---|---|
use | Specifies if the attribute is required. Valid values are required, optional, or prohibited. optional is the default value. |
type | Specifies the type of value the attribute can take. If it is not used the schema type of the attribute must be defined in-line. |
default | Specifies a default value to use for the attribute. It is only used when the attribute element's use attribute is set to optional. |
fixed | Specifies a fixed value to use for the attribute. It is only used when the attribute element's use attribute is set to optional. |
Example 34.5. XML Schema Defining and Attribute
<element name="value">
<complexType>
<xsd:simpleContent>
<xsd:extension base="xsd:integer">
<xsd:attribute name="currency" type="xsd:string"
use="required"/>
</xsd:extension>
</xsd:simpleContent>
</xsd:complexType>
</xsd:element>type attribute is omitted from the attribute element, the format of the data must be described in-line. Example 34.6, “Attribute with an In-Line Data Description” shows an attribute element for an attribute, category, that can take the values autobiography, non-fiction, or fiction.
Example 34.6. Attribute with an In-Line Data Description
<attribute name="category" use="required">
<simpleType>
<restriction base="xsd:string">
<enumeration value="autobiography"/>
<enumeration value="non-fiction"/>
<enumeration value="fiction"/>
</restriction>
</simpleType>
</attribute>Using an attribute group in XML Schema
- Define the attribute group.An attribute group is defined using an
attributeGroupelement with a number ofattributechild elements. TheattributeGrouprequires anameattribute that defines the string used to refer to the attribute group. Theattributeelements define the members of the attribute group and are specified as shown in the section called “Defining an attribute in XML Schema”. Example 34.7, “Attribute Group Definition” shows the description of the attribute groupcatalogIndecies. The attribute group has two members:category, which is optional, andpubDate, which is required.Example 34.7. Attribute Group Definition
<attributeGroup name="catalogIndices"> <attribute name="category" type="catagoryType" /> <attribute name="pubDate" type="dateTime" use="required" /> </attributeGroup> - Use the attribute group in the definition of a complex type.You use attribute groups in complex type definitions by using the
attributeGroupelement with therefattribute. The value of therefattribute is the name given the attribute group that you want to use as part of the type definition. For example if you want to use the attribute groupcatalogIndeciesin the complex type dvdType, you would use <attributeGroup ref="catalogIndecies" /> as shown in Example 34.8, “Complex Type with an Attribute Group”.Example 34.8. Complex Type with an Attribute Group
<complexType name="dvdType"> <sequence> <element name="title" type="xsd:string" /> <element name="director" type="xsd:string" /> <element name="numCopies" type="xsd:int" /> </sequence> <attributeGroup ref="catalogIndices" /> </complexType>
Mapping attributes to Java
@XmlAttribute annotation. If the attribute is required, the @XmlAttribute annotation's required property is set to true.
Example 34.9. techDoc Description
<complexType name="techDoc">
<all>
<element name="product" type="xsd:string" />
<element name="version" type="xsd:short" />
</all>
<attribute name="usefullness" type="xsd:float"
use="optional" default="0.01" />
</complexType>Example 34.10. techDoc Java Class
@XmlType(name = "techDoc", propOrder = {
})
public class TechDoc {
@XmlElement(required = true)
protected String product;
protected short version;
@XmlAttribute
protected Float usefullness;
public String getProduct() {
return product;
}
public void setProduct(String value) {
this.product = value;
}
public short getVersion() {
return version;
}
public void setVersion(short value) {
this.version = value;
}
public float getUsefullness() {
if (usefullness == null) {
return 0.01F;
} else {
return usefullness;
}
}
public void setUsefullness(Float value) {
this.usefullness = value;
}
}default attribute and the fixed attribute instruct the code generators to add code to the getter method generated for the attribute. This additional code ensures that the specified value is returned if no value is set.
fixed attribute is treated the same as the default attribute. If you want the fixed attribute to be treated as a Java constant you can use the customization described in Section 37.5, “Customizing Fixed Value Attribute Mapping”.
Mapping attribute groups to Java
category and pubDate to support the members of the attribute group as shown in Example 34.11, “dvdType Java Class”.
Example 34.11. dvdType Java Class
@XmlType(name = "dvdType", propOrder = {
"title",
"director",
"numCopies"
})
public class DvdType {
@XmlElement(required = true)
protected String title;
@XmlElement(required = true)
protected String director;
protected int numCopies;
@XmlAttribute
protected CatagoryType category;
@XmlAttribute(required = true)
@XmlSchemaType(name = "dateTime")
protected XMLGregorianCalendar pubDate;
public String getTitle() {
return title;
}
public void setTitle(String value) {
this.title = value;
}
public String getDirector() {
return director;
}
public void setDirector(String value) {
this.director = value;
}
public int getNumCopies() {
return numCopies;
}
public void setNumCopies(int value) {
this.numCopies = value;
}
public CatagoryType getCatagory() {
return catagory;
}
public void setCatagory(CatagoryType value) {
this.catagory = value;
}
public XMLGregorianCalendar getPubDate() {
return pubDate;
}
public void setPubDate(XMLGregorianCalendar value) {
this.pubDate = value;
}
}34.3. Deriving Complex Types from Simple Types
Overview
Derivation by extension
Example 34.12. Deriving a Complex Type from a Simple Type by Extension
<complexType name="internationalPrice">
<simpleContent>
<extension base="xsd:decimal">
<attribute name="currency" type="xsd:string"/>
</extension>
</simpleContent>
</complexType>simpleContent element indicates that the new type does not contain any sub-elements. The extension element specifies that the new type extends xsd:decimal.
Derivation by restriction
Example 34.13. Deriving a Complex Type from a Simple Type by Restriction
<complexType name="idType">
<simpleContent>
<restriction base="xsd:string">
<length value="10" />
<attribute name="expires" type="xsd:dateTime" />
</restriction>
</simpleContent>
</complexType>simpleContent element signals that the new type does not contain any children. This example uses a restriction element to constrain the possible values used in the new type. The attribute element adds the element to the new type.
Mapping to Java
@XmlType annotation. The generated class contains a member variable, value, of the simple type from which the complex type is derived. The member variable is decorated with the @XmlValue annotation. The class also has a getValue() method and a setValue() method. In addition, the generated class has a member variable, and the associated getter and setter methods, for each attribute that extends the simple type.
Example 34.14. idType Java Class
@XmlType(name = "idType", propOrder = {
"value"
})
public class IdType {
@XmlValue
protected String value;
@XmlAttribute
@XmlSchemaType(name = "dateTime")
protected XMLGregorianCalendar expires;
public String getValue() {
return value;
}
public void setValue(String value) {
this.value = value;
}
public XMLGregorianCalendar getExpires() {
return expires;
}
public void setExpires(XMLGregorianCalendar value) {
this.expires = value;
}
}34.4. Deriving Complex Types from Complex Types
Overview
complexContent element. When generating the Java class to represent the derived complex type, Apache CXF extends the base type’s class. In this way, the generated Java code preserves the inheritance hierarchy intended in the XML Schema.
Schema syntax
complexContent element, and either the extension element or the restriction element. The complexContent element specifies that the included data description includes more than one field. The extension element and the restriction element, which are children of the complexContent element, specify the base type being modified to create the new type. The base type is specified by the base attribute.
Extending a complex type
extension element to define the additional elements and attributes that make up the new type. All elements that are allowed in a complex type description are allowable as part of the new type’s definition. For example, you can add an anonymous enumeration to the new type, or you can use the choice element to specify that only one of the new fields can be valid at a time.
orderNumber and amtDue.
Example 34.15. Deriving a Complex Type by Extension
<complexType name="widgetOrderInfo">
<sequence>
<element name="amount" type="xsd:int"/>
<element name="order_date" type="xsd:dateTime"/>
<element name="type" type="xsd1:widgetSize"/>
<element name="shippingAddress" type="xsd1:Address"/>
</sequence>
<attribute name="rush" type="xsd:boolean" use="optional" />
</complexType>
<complexType name="widgetOrderBillInfo">
<complexContent>
<extension base="xsd1:widgetOrderInfo">
<sequence>
<element name="amtDue" type="xsd:decimal"/>
<element name="orderNumber" type="xsd:string"/>
</sequence>
<attribute name="paid" type="xsd:boolean"
default="false" />
</extension>
</complexContent>
</complexType>Restricting a complex type
restriction element to limit the possible values of the base type's elements or attributes. When restricting a complex type you must list all of the elements and attributes of the base type. For each element you can add restrictive attributes to the definition. For example, you can add a maxOccurs attribute to an element to limit the number of times it can occur. You can also use the fixed attribute to force one or more of the elements to have predetermined values.
city element, the state element, and the zipCode element are fixed.
Example 34.16. Defining a Complex Type by Restriction
<complexType name="Address">
<sequence>
<element name="name" type="xsd:string"/>
<element name="street" type="xsd:short" maxOccurs="3"/>
<element name="city" type="xsd:string"/>
<element name="state" type="xsd:string"/>
<element name="zipCode" type="xsd:string"/>
</sequence>
</complexType>
<complexType name="wallawallaAddress">
<complexContent>
<restriction base="xsd1:Address">
<sequence>
<element name="name" type="xsd:string"/>
<element name="street" type="xsd:short"
maxOccurs="3"/>
<element name="city" type="xsd:string"
fixed="WallaWalla"/>
<element name="state" type="xsd:string"
fixed="WA" />
<element name="zipCode" type="xsd:string"
fixed="99362" />
</sequence>
</restriction>
</complexContent>
</complexType>Mapping to Java
@XmlSeeAlso annotation. The base class' @XmlSeeAlso annotation lists all of the classes that extend the base class.
WidgetOrderInfo and WidgetBillOrderInfo. WidgetOrderBillInfo extends WidgetOrderInfo because widgetOrderBillInfo is derived by extension from widgetOrderInfo. Example 34.17, “WidgetOrderBillInfo” shows the generated class for widgetOrderBillInfo.
Example 34.17. WidgetOrderBillInfo
@XmlType(name = "widgetOrderBillInfo", propOrder = {
"amtDue",
"orderNumber"
})
public class WidgetOrderBillInfo
extends WidgetOrderInfo
{
@XmlElement(required = true)
protected BigDecimal amtDue;
@XmlElement(required = true)
protected String orderNumber;
@XmlAttribute
protected Boolean paid;
public BigDecimal getAmtDue() {
return amtDue;
}
public void setAmtDue(BigDecimal value) {
this.amtDue = value;
}
public String getOrderNumber() {
return orderNumber;
}
public void setOrderNumber(String value) {
this.orderNumber = value;
}
public boolean isPaid() {
if (paid == null) {
return false;
} else {
return paid;
}
}
public void setPaid(Boolean value) {
this.paid = value;
}
}34.5. Occurrence Constraints
34.5.1. Occurrence Constraints on the All Element
XML Schema
all element do not allow for multiple occurrences of the structure defined by the all element. You can, however, make the structure defined by the all element optional by setting its minOccurs attribute to 0.
Mapping to Java
all element's minOccurs attribute to 0 has no effect on the generated Java class.
34.5.2. Occurrence Constraints on the Choice Element
Overview
choice element can only appear once in an instance of a complex type. You can change the number of times the element chosen to represent the structure defined by a choice element is allowed to appear using its minOccurs attribute and its mxOccurs attribute. Using these attributes you can specify that the choice type can occur zero to an unlimited number of times in an instance of a complex type. The element chosen for the choice type does not need to be the same for each occurrence of the type.
Using in XML Schema
minOccurs attribute specifies the minimum number of times the choice type must appear. Its value can be any positive integer. Setting the minOccurs attribute to 0 specifies that the choice type does not need to appear inside an instance of the complex type.
maxOccurs attribute specifies the maximum number of times the choice type can appear. Its value can be any non-zero, positive integer or unbounded. Setting the maxOccurs attribute to unbounded specifies that the choice type can appear an infinite number of times.
Example 34.18. Choice Occurrence Constraints
<complexType name="ClubEvent">
<choice minOccurs="0" maxOccurs="unbounded">
<element name="MemberName" type="xsd:string"/>
<element name="GuestName" type="xsd:string"/>
</choice>
</complexType>Mapping to Java
List<T> object that holds all of the data for the multiple occurrences of the sequence. For example, if the sequence defined in Example 34.18, “Choice Occurrence Constraints” occurred two times, then the list would have two items.
Or and the first letter of the variable name is converted to lower case. For example, the member variable generated from Example 34.18, “Choice Occurrence Constraints” would be named memberNameOrGuestName.
- If the member elements are of the same type the generated list will contain
JAXBElement<T>objects. The base type of theJAXBElement<T>objects is determined by the normal mapping of the member elements' type. - If the member elements are of different types and their Java representations implement a common interface, the list will contains objects of the common interface.
- If the member elements are of different types and their Java representations extend a common base class, the list will contains objects of the common base class.
- If none of the other conditions are met, the list will contain
Objectobjects.
@XmlType annotation. The annotation's name property is set to the value of the name attribute from the parent element of the XML Schema definition. The annotation's propOrder property contains the single member variable representing the elements in the sequence.
@XmlElements annotation. The @XmlElements annotation contains a comma separated list of @XmlElement annotations. The list has one @XmlElement annotation for each member element defined in the XML Schema definition of the type. The @XmlElement annotations in the list have their name property set to the value of the XML Schema element element's name attribute and their type property set to the Java class resulting from the mapping of the XML Schema element element's type.
Example 34.19. Java Representation of Choice Structure with an Occurrence Constraint
@XmlType(name = "ClubEvent", propOrder = {
"memberNameOrGuestName"
})
public class ClubEvent {
@XmlElementRefs({
@XmlElementRef(name = "GuestName", type = JAXBElement.class),
@XmlElementRef(name = "MemberName", type = JAXBElement.class)
})
protected List<JAXBElement<String>> memberNameOrGuestName;
public List<JAXBElement<String>> getMemberNameOrGuestName() {
if (memberNameOrGuestName == null) {
memberNameOrGuestName = new ArrayList<JAXBElement<String>>();
}
return this.memberNameOrGuestName;
}
}minOccurs set to 0
minOccurs element is specified and its value is 0, the code generators generate the Java class as if the minOccurs attribute were not set.
34.5.3. Occurrence Constraints on Elements
Overview
element element's minOccurs attribute and maxOccurs attribute. The default value for both attributes is 1.
minOccurs set to 0
minOccurs attribute to 0, the @XmlElement annotation decorating the corresponding Java member variable is changed. Instead of having its required property set to true, the @XmlElement annotation's required property is set to false.
minOccurs set to a value greater than 1
element element's minOccurs attribute to a value greater than one. However, the generated Java class will not support the XML Schema constraint. Apache CXF generates the supporting Java member variable as if the minOccurs attribute were not set.
Elements with maxOccurs set
maxOccurs attribute to a value greater than 1. You can set the maxOccurs attribute's value to unbounded to specify that the member element can appear an unlimited number of times.
maxOccurs attribute set to a value greater than 1 to a Java member variable that is a List<T> object. The base class of the list is determined by mapping the element's type to Java. For XML Schema primitive types, the wrapper classes are used as described in the section called “Wrapper classes”. For example, if the member element is of type xsd:int the generated member variable is a List<Integer> object.
34.5.4. Occurrence Constraints on Sequences
Overview
sequence element can only appear once in an instance of a complex type. You can change the number of times the sequence of elements defined by a sequence element is allowed to appear using its minOccurs attribute and its maxOccurs attribute. Using these attributes you can specify that the sequence type can occur zero to an unlimited number of times in an instance of a complex type.
Using XML Schema
minOccurs attribute specifies the minimum number of times the sequence must occur in an instance of the defined complex type. Its value can be any positive integer. Setting the minOccurs attribute to 0 specifies that the sequence does not need to appear inside an instance of the complex type.
maxOccurs attribute specifies the upper limit for how many times the sequence can occur in an instance of the defined complex type. Its value can be any non-zero, positive integer or unbounded. Setting the maxOccurs attribute to unbounded specifies that the sequence can appear an infinite number of times.
Example 34.20. Sequence with Occurrence Constraints
<complexType name="CultureInfo">
<sequence minOccurs="0" maxOccurs="2">
<element name="Name" type="string"/>
<element name="Lcid" type="int"/>
</sequence>
</complexType>Mapping to Java
List<T> object that holds all of the data for the multiple occurrences of the sequence. For example, if the sequence defined in Example 34.20, “Sequence with Occurrence Constraints” occurred two times, then the list would have four items.
And and the first letter of the variable name is converted to lower case. For example, the member variable generated from Example 34.20, “Sequence with Occurrence Constraints” is named nameAndLcid.
- If the member elements are of the same type the generated list will contain
JAXBElement<T>objects. The base type of theJAXBElement<T>objects is determined by the normal mapping of the member elements' type. - If the member elements are of different types and their Java representations implement a common interface, the list will contains objects of the common interface.
- If the member elements are of different types and their Java representations extend a common base class, the list will contain objects of the common base class.
- If none of the other conditions are met, the list will contain
Objectobjects.
@XmlType annotation. The annotation's name property is set to the value of the name attribute from the parent element of the XML Schema definition. The annotation's propOrder property contains the single member variable representing the elements in the sequence.
@XmlElements annotation. The @XmlElements annotation contains a comma separated list of @XmlElement annotations. The list has one @XmlElement annotation for each member element defined in the XML Schema definition of the type. The @XmlElement annotations in the list have their name property set to the value of the XML Schema element element's name attribute and their type property set to the Java class resulting from the mapping of the XML Schema element element's type.
Example 34.21. Java Representation of Sequence with an Occurrence Constraint
@XmlType(name = "CultureInfo", propOrder = {
"nameAndLcid"
})
public class CultureInfo {
@XmlElements({
@XmlElement(name = "Name", type = String.class),
@XmlElement(name = "Lcid", type = Integer.class)
})
protected List<Serializable> nameAndLcid;
public List<Serializable> getNameAndLcid() {
if (nameAndLcid == null) {
nameAndLcid = new ArrayList<Serializable>();
}
return this.nameAndLcid;
}
}minOccurs set to 0
minOccurs element is specified and its value is 0, the code generators generate the Java class as if the minOccurs attribute is not set.
34.6. Using Model Groups
Overview
group element, and are similar to complex type definitions. The mapping of model groups to Java is also similar to the mapping for complex types.
Defining a model group in XML Schema
group element with the name attribute. The value of the name attribute is a string that is used to refer to the group throughout the schema. The group element, like the complexType element, can have the sequence element, the all element, or the choice element as its immediate child.
element elements. For each member of the group, specify one element element. Group members can use any of the standard attributes for the element element including minOccurs and maxOccurs. So, if your group has three elements and one of them can occur up to three times, you define a group with three element elements, one of which uses maxOccurs="3". Example 34.22, “XML Schema Model Group” shows a model group with three elements.
Example 34.22. XML Schema Model Group
<group name="passenger">
<sequence>
<element name="name" type="xsd:string" />
<element name="clubNum" type="xsd:long" />
<element name="seatPref" type="xsd:string"
maxOccurs="3" />
</sequence>
</group>Using a model group in a type definition
group element with the ref attribute. The value of the ref attribute is the name given to the group when it was defined. For example, to use the group defined in Example 34.22, “XML Schema Model Group” you use <group ref="tns:passenger" /> as shown in Example 34.23, “Complex Type with a Model Group”.
Example 34.23. Complex Type with a Model Group
<complexType name="reservation">
<sequence>
<group ref="tns:passenger" />
<element name="origin" type="xsd:string" />
<element name="destination" type="xsd:string" />
<element name="fltNum" type="xsd:long" />
</sequence>
</complexType>passenger element and it contains the member elements defined by the group shown in Example 34.22, “XML Schema Model Group”. An example of an instance of reservation is shown in Example 34.24, “Instance of a Type with a Model Group”.
Example 34.24. Instance of a Type with a Model Group
<reservation> <passenger> <name>A. Smart</name> <clubNum>99</clubNum> <seatPref>isle1</seatPref> </passenger> <origin>LAX</origin> <destination>FRA</destination> <fltNum>34567</fltNum> </reservation>
Mapping to Java
Example 34.25. Type with a Group
@XmlType(name = "reservation", propOrder = {
"name",
"clubNum",
"seatPref",
"origin",
"destination",
"fltNum"
})
public class Reservation {
@XmlElement(required = true)
protected String name;
protected long clubNum;
@XmlElement(required = true)
protected List<String> seatPref;
@XmlElement(required = true)
protected String origin;
@XmlElement(required = true)
protected String destination;
protected long fltNum;
public String getName() {
return name;
}
public void setName(String value) {
this.name = value;
}
public long getClubNum() {
return clubNum;
}
public void setClubNum(long value) {
this.clubNum = value;
}
public List<String> getSeatPref() {
if (seatPref == null) {
seatPref = new ArrayList<String>();
}
return this.seatPref;
}
public String getOrigin() {
return origin;
}
public void setOrigin(String value) {
this.origin = value;
}
public String getDestination() {
return destination;
}
public void setDestination(String value) {
this.destination = value;
}
public long getFltNum() {
return fltNum;
}
public void setFltNum(long value) {
this.fltNum = value;
}Multiple occurrences
group element's maxOccurs attribute to a value greater than one. To allow for multiple occurrences of the model group Apache CXF maps the model group to a List<T> object. The List<T> object is generated following the rules for the group's first child:
- If the group is defined using a
sequenceelement see Section 34.5.4, “Occurrence Constraints on Sequences”. - If the group is defined using a
choiceelement see Section 34.5.2, “Occurrence Constraints on the Choice Element”.
Chapter 35. Using Wild Card Types
Abstract
35.1. Using Any Elements
Overview
any element is used to create a wild card place holder in complex type definitions. When an XML element is instantiated for an XML Schema any element, it can be any valid XML element. The any element does not place any restrictions on either the content or the name of the instantiated XML element.
Example 35.1. XML Schema Type Defined with an Any Element
<element name="FlyBoy">
<complexType>
<sequence>
<any />
<element name="rank" type="xsd:int" />
</sequence>
</complexType>
</element>Example 35.2. XML Document with an Any Element
<FlyBoy> <learJet>CL-215</learJet> <rank>2</rank> </element> <FlyBoy> <viper>Mark II</viper> <rank>1</rank> </element>
any elements are mapped to either a Java Object object or a Java org.w3c.dom.Element object.
Specifying in XML Schema
any element can be used when defining sequence complex types and choice complex types. In most cases, the any element is an empty element. It can, however, take an annotation element as a child.
any element's attributes.
Table 35.1. Attributes of the XML Schema Any Element
| Attribute | Description |
|---|---|
namespace |
Specifies the namespace of the elements that can be used to instantiate the element in an XML document. The valid values are:
|
maxOccurs | Specifies the maximum number of times an instance of the element can appear in the parent element. The default value is 1. To specify that an instance of the element can appear an unlimited number of times, you can set the attribute's value to unbounded. |
minOccurs | Specifies the minimum number of times an instance of the element can appear in the parent element. The default value is 1. |
processContents |
Specifies how the element used to instantiate the any element should be validated. Valid values are:
|
any element
Example 35.3. Complex Type Defined with an Any Element
<complexType name="surprisePackage">
<sequence>
<any processContents="lax" />
<element name="to" type="xsd:string" />
<element name="from" type="xsd:string" />
</sequence>
</complexType>Mapping to Java
any elements result in the creation of a Java property named any. The property has associated getter and setter methods. The type of the resulting property depends on the value of the element's processContents attribute. If the any element's processContents attribute is set to skip, the element is mapped to a org.w3c.dom.Element object. For all other values of the processContents attribute an any element is mapped to a Java Object object.
@XmlAnyElement annotation. This annotation has an optional lax property that instructs the runtime what to do when marshaling the data. Its default value is false which instructs the runtime to automatically marshal the data into a org.w3c.dom.Element object. Setting lax to true instructs the runtime to attempt to marshal the data into JAXB types. When the any element's processContents attribute is set to skip, the lax property is set to its default value. For all other values of the processContents attribute, lax is set to true.
Example 35.4. Java Class with an Any Element
public class SurprisePackage {
@XmlAnyElement(lax = true)
protected Object any;
@XmlElement(required = true)
protected String to;
@XmlElement(required = true)
protected String from;
public Object getAny() {
return any;
}
public void setAny(Object value) {
this.any = value;
}
public String getTo() {
return to;
}
public void setTo(String value) {
this.to = value;
}
public String getFrom() {
return from;
}
public void setFrom(String value) {
this.from = value;
}
}Marshalling
any element has its lax set to false, or the property is not specified, the runtime makes no attempt to parse the XML data into JAXB objects. The data is always stored in a DOM Element object.
any element has its lax set to true, the runtime attempts to marshal the XML data into the appropriate JAXB objects. The runtime attempts to identify the proper JAXB classes using the following procedure:
- It checks the element tag of the XML element against the list of elements known to the runtime. If it finds a match, the runtime marshals the XML data into the proper JAXB class for the element.
- It checks the XML element's
xsi:typeattribute. If it finds a match, the runtime marshals the XML element into the proper JAXB class for that type. - If it cannot find a match it marshals the XML data into a DOM
Elementobject.
wsdl:types element, any data types added to the contract through inclusion, and any types added to the contract through importing other schemas. You can also make the runtime aware of additional types using the @XmlSeeAlso annotation which is described in Section 31.4, “Adding Classes to the Runtime Marshaller”.
Unmarshalling
any element has its lax set to false, or the property is not specified, the runtime will only accept DOM Element objects. Attempting to use any other type of object will result in a marshalling error.
any element has its lax set to true, the runtime uses its internal map between Java data types and the XML Schema constructs they represent to determine the XML structure to write to the wire. If the runtime knows the class and can map it to an XML Schema construct, it writes out the data and inserts an xsi:type attribute to identify the type of data the element contains.
@XmlSeeAlso annotation which is described in Section 31.4, “Adding Classes to the Runtime Marshaller”.
35.2. Using the XML Schema anyType Type
Overview
Object class. It is the class from which all other Java classes are sub-typed.
Using in XML Schema
element element's type element. It can also be used as the base type from which other types are defined.
Example 35.5. Complex Type with a Wild Card Element
<complexType name="wildStar">
<sequence>
<element name="name" type="xsd:string" />
<element name="ship" type="xsd:anyType" />
</sequence>
</complexType>Mapping to Java
Object objects. Example 35.6, “Java Representation of a Wild Card Element” shows the mapping of Example 35.5, “Complex Type with a Wild Card Element” to a Java class.
Example 35.6. Java Representation of a Wild Card Element
public class WildStar {
@XmlElement(required = true)
protected String name;
@XmlElement(required = true)
protected Object ship;
public String getName() {
return name;
}
public void setName(String value) {
this.name = value;
}
public Object getShip() {
return ship;
}
public void setShip(Object value) {
this.ship = value;
}
}Marshalling
xsi:type attribute to determine the actual type used to construct the data in the element. If the xsi:type attribute is not present, the runtime attempts to identify the element's actual data type by introspection. If the element's actual data type is determined to be one of the types known by the application's JAXB context, the element is marshaled into a JAXB object of the proper type.
org.w3c.dom.Element object. You will then need to work with the element's content using the DOM APis.
wsdl:types element, any data types added to the contract through inclusion, and any types added to the contract through importing other schema documents. You can also make the runtime aware of additional types using the @XmlSeeAlso annotation which is described in Section 31.4, “Adding Classes to the Runtime Marshaller”.
Unmarshalling
xsi:type attribute to identify the type of data the element contains. If the data is stored in a org.w3c.dom.Element object, the runtime writes the XML structure represented by the object but it does not include an xsi:type attribute.
@XmlSeeAlso annotation which is described in Section 31.4, “Adding Classes to the Runtime Marshaller”.
35.3. Using Unbound Attributes
Overview
Defining in XML Schema
anyAttribute element. It can be used wherever an attribute element can be used. The anyAttribute element has no attributes, as shown in Example 35.7, “Complex Type with an Undeclared Attribute”.
Example 35.7. Complex Type with an Undeclared Attribute
<complexType name="arbitter">
<sequence>
<element name="name" type="xsd:string" />
<element name="rate" type="xsd:float" />
</sequence>
<anyAttribute />
</complexType>Example 35.8. Examples of Elements Defined with a Wild Card Attribute
<officer rank="12"><name>...</name><rate>...</rate></officer> <lawyer type="divorce"><name>...</name><rate>...</rate></lawyer> <judge><name>...</name><rate>...</rate></judge>
Mapping to Java
anyAttribute element is mapped to Java, the code generator adds a member called otherAttributes to the generated class. otherAttributes is of type java.util.Map<QName, String> and it has a getter method that returns a live instance of the map. Because the map returned from the getter is live, any modifications to the map are automatically applied. Example 35.9, “Class for a Complex Type with an Undeclared Attribute” shows the class generated for the complex type defined in Example 35.7, “Complex Type with an Undeclared Attribute”.
Example 35.9. Class for a Complex Type with an Undeclared Attribute
public class Arbitter {
@XmlElement(required = true)
protected String name;
protected float rate;
@XmlAnyAttribute
private Map<QName, String> otherAttributes = new HashMap<QName, String>();
public String getName() {
return name;
}
public void setName(String value) {
this.name = value;
}
public float getRate() {
return rate;
}
public void setRate(float value) {
this.rate = value;
}
public Map<QName, String> getOtherAttributes() {
return otherAttributes;
}
}Working with undeclared attributes
otherAttributes member of the generated class expects to be populated with a Map object. The map is keyed using QNames. Once you get the map , you can access any attributes set on the object and set new attributes on the object.
Example 35.10. Working with Undeclared Attributes
Chapter 36. Element Substitution
Abstract
36.1. Substitution Groups in XML Schema
Overview
Syntax
substitutionGroup attribute of the XML Schema element element. The value of the substitutionGroup attribute is the name of the element that the element being defined replaces. For example, if your head element is widget, adding the attribute substitutionGroup="widget" to an element named woodWidget specifies that anywhere a widget element is used, you can substitute a woodWidget element. This is shown in Example 36.1, “Using a Substitution Group”.
Example 36.1. Using a Substitution Group
<element name="widget" type="xsd:string" />
<element name="woodWidget" type="xsd:string"
substitutionGroup="widget" />Type restrictions
Example 36.2. Substitution Group with Complex Types
<complexType name="widgetType">
<sequence>
<element name="shape" type="xsd:string" />
<element name="color" type="xsd:string" />
</sequence>
</complexType>
<complexType name="woodWidgetType">
<complexContent>
<extension base="widgetType">
<sequence>
<element name="woodType" type="xsd:string" />
</sequence>
</extension>
</complexContent>
</complexType>
<complexType name="plasticWidgetType">
<complexContent>
<extension base="widgetType">
<sequence>
<element name="moldProcess" type="xsd:string" />
</sequence>
</extension>
</complexContent>
</complexType>
<element name="widget" type="widgetType" />
<element name="woodWidget" type="woodWidgetType"
substitutionGroup="widget" />
<element name="plasticWidget" type="plasticWidgetType"
substitutionGroup="widget" />
<complexType name="partType">
<sequence>
<element ref="widget" />
</sequence>
</complexType>
<element name="part" type="partType" />widget, is defined as being of type widgetType. Each element of the substitution group extends widgetType to include data that is specific to ordering that type of widget.
part elements in Example 36.3, “XML Document using a Substitution Group” are valid.
Example 36.3. XML Document using a Substitution Group
<part>
<widget>
<shape>round</shape>
<color>blue</color>
</widget>
</part>
<part>
<plasticWidget>
<shape>round</shape>
<color>blue</color>
<moldProcess>sandCast</moldProcess>
</plasticWidget>
</part>
<part>
<woodWidget>
<shape>round</shape>
<color>blue</color>
<woodType>elm</woodType>
</woodWidget>
</part>Abstract head elements
abstract attribute of an element element to true, as shown in Example 36.4, “Abstract Head Definition”. Using this schema, a valid review element can contain either a positiveComment element or a negativeComment element, but cannot contain a comment element.
Example 36.4. Abstract Head Definition
<element name="comment" type="xsd:string" abstract="true" />
<element name="positiveComment" type="xsd:string"
substitutionGroup="comment" />
<element name="negtiveComment" type="xsd:string"
substitutionGroup="comment" />
<element name="review">
<complexContent>
<all>
<element name="custName" type="xsd:string" />
<element name="impression" ref="comment" />
</all>
</complexContent>
</element>36.2. Substitution Groups in Java
Overview
JAXBElement class' support for wildcard definitions. Because the members of a substitution group must all share a common base type, the classes generated to support the elements' types also share a common base type. In addition, Apache CXF maps instances of the head element to JAXBElement<? extends T> properties.
Generated object factory methods
@XmlElementDecl annotation decorating the object factory method includes two additional properties, as described in Table 36.1, “Properties for Declaring a JAXB Element is a Member of a Substitution Group”.
Table 36.1. Properties for Declaring a JAXB Element is a Member of a Substitution Group
| Property | Description |
|---|---|
| substitutionHeadNamespace | Specifies the namespace where the head element is defined. |
| substitutionHeadName | Specifies the value of the head element's name attribute. |
@XmlElementDecl contains only the default namespace property and the default name property.
Example 36.5. Object Factory Method for a Substitution Group
public class ObjectFactory {
private final static QName _Widget_QNAME = new QName(...);
private final static QName _PlasticWidget_QNAME = new QName(...);
private final static QName _WoodWidget_QNAME = new QName(...);
public ObjectFactory() {
}
public WidgetType createWidgetType() {
return new WidgetType();
}
public PlasticWidgetType createPlasticWidgetType() {
return new PlasticWidgetType();
}
public WoodWidgetType createWoodWidgetType() {
return new WoodWidgetType();
}
@XmlElementDecl(namespace="...", name = "widget")
public JAXBElement<WidgetType> createWidget(WidgetType value) {
return new JAXBElement<WidgetType>(_Widget_QNAME, WidgetType.class, null, value);
}
@XmlElementDecl(namespace = "...", name = "plasticWidget", substitutionHeadNamespace = "...", substitutionHeadName = "widget")
public JAXBElement<PlasticWidgetType> createPlasticWidget(PlasticWidgetType value) {
return new JAXBElement<PlasticWidgetType>(_PlasticWidget_QNAME, PlasticWidgetType.class, null, value);
}
@XmlElementDecl(namespace = "...", name = "woodWidget", substitutionHeadNamespace = "...", substitutionHeadName = "widget")
public JAXBElement<WoodWidgetType> createWoodWidget(WoodWidgetType value) {
return new JAXBElement<WoodWidgetType>(_WoodWidget_QNAME, WoodWidgetType.class, null, value);
}
}Substitution groups in interfaces
JAXBElement<? extends T> class. The runtime relies on Java's native type hierarchy to support the type substitution, and Java will catch any attempts to use unsupported types.
@XmlSeeAlso annotation. This annotation specifies a list of classes required by the runtime for marshalling. Fore more information on using the @XmlSeeAlso annotation see Section 31.4, “Adding Classes to the Runtime Marshaller”.
Example 36.6. WSDL Interface Using a Substitution Group
<message name="widgetMessage">
<part name="widgetPart" element="xsd1:widget" />
</message>
<message name="numWidgets">
<part name="numInventory" type="xsd:int" />
</message>
<message name="badSize">
<part name="numInventory" type="xsd:int" />
</message>
<portType name="orderWidgets">
<operation name="placeWidgetOrder">
<input message="tns:widgetOrder" name="order" />
<output message="tns:widgetOrderBill" name="bill" />
<fault message="tns:badSize" name="sizeFault" />
</operation>
<operation name="checkWidgets">
<input message="tns:widgetMessage" name="request" />
<output message="tns:numWidgets" name="response" />
</operation>
</portType>Example 36.7. Generated Interface Using a Substitution Group
@WebService(targetNamespace = "...", name = "orderWidgets")
@XmlSeeAlso({com.widgetvendor.types.widgettypes.ObjectFactory.class})
public interface OrderWidgets {
@SOAPBinding(parameterStyle = SOAPBinding.ParameterStyle.BARE)
@WebResult(name = "numInventory", targetNamespace = "", partName = "numInventory")
@WebMethod
public int checkWidgets(
@WebParam(partName = "widgetPart", name = "widget", targetNamespace = "...")
com.widgetvendor.types.widgettypes.WidgetType widgetPart
);
}@XmlSeeAlso annotation. Listing the object factory for a namespace provides access to all of the generated classes for that namespace.
Substitution groups in complex types
JAXBElement<? extends T> property. It does not map it to a property containing an instance of the generated class generated to support the substitution group.
Example 36.8. Complex Type Using a Substitution Group
<complexType name="widgetOrderInfo">
<sequence>
<element name="amount" type="xsd:int"/>
<element ref="xsd1:widget"/>
</sequence>
</complexType>Example 36.9. Java Class for a Complex Type Using a Substitution Group
@XmlAccessorType(XmlAccessType.FIELD)
@XmlType(name = "widgetOrderInfo", propOrder = {"amount","widget",})
public class WidgetOrderInfo {
protected int amount;
@XmlElementRef(name = "widget", namespace = "...", type = JAXBElement.class)
protected JAXBElement<? extends WidgetType> widget;
public int getAmount() {
return amount;
}
public void setAmount(int value) {
this.amount = value;
}
public JAXBElement<? extends WidgetType> getWidget() {
return widget;
}
public void setWidget(JAXBElement<? extends WidgetType> value) {
this.widget = ((JAXBElement<? extends WidgetType> ) value);
}
}Setting a substitution group property
JAXBElement<? extends T> class. When the element is simply mapped to an object of the generated value class, you work with the object the same way you work with other Java objects that are part of a type hierarchy. You can substitute any of the subclasses for the parent class. You can inspect the object to determine its exact class, and cast it appropriately.
JAXBElement<? extends T> object to hold instances of a substitution group, you must wrap the element's value in a JAXBElement<? extends T> object. The best method to do this is to use the element creation methods provided by the object factory. They provide an easy means for creating an element based on its value.
Example 36.10. Setting a Member of a Substitution Group
ObjectFactory of = new ObjectFactory(); 1 PlasticWidgetType pWidget = of.createPlasticWidgetType(); 2 pWidget.setShape = "round'; pWidget.setColor = "green"; pWidget.setMoldProcess = "injection"; JAXBElement<PlasticWidgetType> widget = of.createPlasticWidget(pWidget); 3 WidgetOrderInfo order = of.createWidgetOrderInfo(); 4 order.setWidget(widget); 5
- 1
- Instantiates an object factory.
- 2
- Instantiates a
PlasticWidgetTypeobject. - 3
- Instantiates a
JAXBElement<PlasticWidgetType>object to hold a plastic widget element. - 4
- Instantiates a
WidgetOrderInfoobject. - 5
- Sets the
WidgetOrderInfoobject's widget to theJAXBElementobject holding the plastic widget element.
Getting the value of a substitution group property
JAXBElement<? extends T> object. You must to use the JAXBElement<? extends T> object's getValue() method. The following options determine the type of object returned by the getValue() method:
- Use the
isInstance()method of all the possible classes to determine the class of the element's value object. - Use the
JAXBElement<? extends T>object'sgetName()method to determine the element's name.ThegetName()method returns a QName. Using the local name of the element, you can determine the proper class for the value object. - Use the
JAXBElement<? extends T>object'sgetDeclaredType()method to determine the class of the value object.ThegetDeclaredType()method returns theClassobject of the element's value object.WarningThere is a possibility that thegetDeclaredType()method will return the base class for the head element regardless of the actual class of the value object.
getName() method.
Example 36.11. Getting the Value of a Member of the Substitution Group
String elementName = order.getWidget().getName().getLocalPart();
if (elementName.equals("woodWidget")
{
WoodWidgetType widget=order.getWidget().getValue();
}
else if (elementName.equals("plasticWidget")
{
PlasticWidgetType widget=order.getWidget().getValue();
}
else
{
WidgetType widget=order.getWidget().getValue();
}36.3. Widget Vendor Example
checkWidgets and placeWidgetOrder. Example 36.12, “Widget Ordering Interface” shows the interface for the ordering service.
Example 36.12. Widget Ordering Interface
<message name="widgetOrder">
<part name="widgetOrderForm" type="xsd1:widgetOrderInfo"/>
</message>
<message name="widgetOrderBill">
<part name="widgetOrderConformation"
type="xsd1:widgetOrderBillInfo"/>
</message>
<message name="widgetMessage">
<part name="widgetPart" element="xsd1:widget" />
</message>
<message name="numWidgets">
<part name="numInventory" type="xsd:int" />
</message>
<portType name="orderWidgets">
<operation name="placeWidgetOrder">
<input message="tns:widgetOrder" name="order"/>
<output message="tns:widgetOrderBill" name="bill"/>
</operation>
<operation name="checkWidgets">
<input message="tns:widgetMessage" name="request" />
<output message="tns:numWidgets" name="response" />
</operation>
</portType>Example 36.13. Widget Ordering SEI
@WebService(targetNamespace = "http://widgetVendor.com/widgetOrderForm", name = "orderWidgets")
@XmlSeeAlso({com.widgetvendor.types.widgettypes.ObjectFactory.class})
public interface OrderWidgets {
@SOAPBinding(parameterStyle = SOAPBinding.ParameterStyle.BARE)
@WebResult(name = "numInventory", targetNamespace = "", partName = "numInventory")
@WebMethod
public int checkWidgets(
@WebParam(partName = "widgetPart", name = "widget", targetNamespace = "http://widgetVendor.com/types/widgetTypes")
com.widgetvendor.types.widgettypes.WidgetType widgetPart
);
@SOAPBinding(parameterStyle = SOAPBinding.ParameterStyle.BARE)
@WebResult(name = "widgetOrderConformation", targetNamespace = "", partName = "widgetOrderConformation")
@WebMethod
public com.widgetvendor.types.widgettypes.WidgetOrderBillInfo placeWidgetOrder(
@WebParam(partName = "widgetOrderForm", name = "widgetOrderForm", targetNamespace = "")
com.widgetvendor.types.widgettypes.WidgetOrderInfo widgetOrderForm
) throws BadSize;
}36.3.1. The checkWidgets Operation
Overview
checkWidgets is a simple operation that has a parameter that is the head member of a substitution group. This operation demonstrates how to deal with individual parameters that are members of a substitution group. The consumer must ensure that the parameter is a valid member of the substitution group. The service must properly determine which member of the substitution group was sent in the request.
Consumer implementation
checkWidgets() without using any special code. When developing the logic to invoke checkWidgets() you can pass in an object of one of the classes generated to support the widget substitution group.
checkWidgets()” shows a consumer invoking checkWidgets().
Example 36.14. Consumer Invoking checkWidgets()
System.out.println("What type of widgets do you want to order?");
System.out.println("1 - Normal");
System.out.println("2 - Wood");
System.out.println("3 - Plastic");
System.out.println("Selection [1-3]");
String selection = reader.readLine();
String trimmed = selection.trim();
char widgetType = trimmed.charAt(0);
switch (widgetType)
{
case '1':
{
WidgetType widget = new WidgetType();
...
break;
}
case '2':
{
WoodWidgetType widget = new WoodWidgetType();
...
break;
}
case '3':
{
PlasticWidgetType widget = new PlasticWidgetType();
...
break;
}
default :
System.out.println("Invaid Widget Selection!!");
}
proxy.checkWidgets(widgets);Service implementation
checkWidgets() gets a widget description as a WidgetType object, checks the inventory of widgets, and returns the number of widgets in stock. Because all of the classes used to implement the substitution group inherit from the same base class, you can implement checkWidgets() without using any JAXB specific APIs.
widget extend the WidgetType class. Because of this fact, you can use instanceof to determine what type of widget was passed in and simply cast the widgetPart object into the more restrictive type if appropriate. Once you have the proper type of object, you can check the inventory of the right kind of widget.
checkWidgets()” shows a possible implementation.
Example 36.15. Service Implementation of checkWidgets()
public int checkWidgets(WidgetType widgetPart)
{
if (widgetPart instanceof WidgetType)
{
return checkWidgetInventory(widgetType);
}
else if (widgetPart instanceof WoodWidgetType)
{
WoodWidgetType widget = (WoodWidgetType)widgetPart;
return checkWoodWidgetInventory(widget);
}
else if (widgetPart instanceof PlasticWidgetType)
{
PlasticWidgetType widget = (PlasticWidgetType)widgetPart;
return checkPlasticWidgetInventory(widget);
}
}36.3.2. The placeWidgetOrder Operation
Overview
placeWidgetOrder uses two complex types containing the substitution group. This operation demonstrates to use such a structure in a Java implementation. Both the consumer and the service must get and set members of a substitution group.
Consumer implementation
placeWidgetOrder() the consumer must construct a widget order containing one element of the widget substitution group. When adding the widget to the order, the consumer should use the object factory methods generated for each element of the substitution group. This ensures that the runtime and the service can correctly process the order. For example, if an order is being placed for a plastic widget, the ObjectFactory.createPlasticWidget() method is used to create the element before adding it to the order.
WidgetOrderInfo object.
Example 36.16. Setting a Substitution Group Member
ObjectFactory of = new ObjectFactory();
WidgetOrderInfo order = new of.createWidgetOrderInfo();
...
System.out.println();
System.out.println("What color widgets do you want to order?");
String color = reader.readLine();
System.out.println();
System.out.println("What shape widgets do you want to order?");
String shape = reader.readLine();
System.out.println();
System.out.println("What type of widgets do you want to order?");
System.out.println("1 - Normal");
System.out.println("2 - Wood");
System.out.println("3 - Plastic");
System.out.println("Selection [1-3]");
String selection = reader.readLine();
String trimmed = selection.trim();
char widgetType = trimmed.charAt(0);
switch (widgetType)
{
case '1':
{
WidgetType widget = of.createWidgetType();
widget.setColor(color);
widget.setShape(shape);
JAXB<WidgetType> widgetElement = of.createWidget(widget);
order.setWidget(widgetElement);
break;
}
case '2':
{
WoodWidgetType woodWidget = of.createWoodWidgetType();
woodWidget.setColor(color);
woodWidget.setShape(shape);
System.out.println();
System.out.println("What type of wood are your widgets?");
String wood = reader.readLine();
woodWidget.setWoodType(wood);
JAXB<WoodWidgetType> widgetElement = of.createWoodWidget(woodWidget);
order.setWoodWidget(widgetElement);
break;
}
case '3':
{
PlasticWidgetType plasticWidget = of.createPlasticWidgetType();
plasticWidget.setColor(color);
plasticWidget.setShape(shape);
System.out.println();
System.out.println("What type of mold to use for your
widgets?");
String mold = reader.readLine();
plasticWidget.setMoldProcess(mold);
JAXB<WidgetType> widgetElement = of.createPlasticWidget(plasticWidget);
order.setPlasticWidget(widgetElement);
break;
}
default :
System.out.println("Invaid Widget Selection!!");
}Service implementation
placeWidgetOrder() method receives an order in the form of a WidgetOrderInfo object, processes the order, and returns a bill to the consumer in the form of a WidgetOrderBillInfo object. The orders can be for a plain widget, a plastic widget, or a wooden widget. The type of widget ordered is determined by what type of object is stored in widgetOrderForm object’s widget property. The widget property is a substitution group and can contain a widget element, a woodWidget element, or a plasticWidget element.
JAXBElement<? extends T> object's getName() method to determine the element's QName. The QName can then be used to determine which element in the substitution group is in the order. Once the element included in the bill is known, you can extract its value into the proper type of object.
placeWidgetOrder()” shows a possible implementation.
Example 36.17. Implementation of placeWidgetOrder()
public com.widgetvendor.types.widgettypes.WidgetOrderBillInfo placeWidgetOrder(WidgetOrderInfo widgetOrderForm)
{
ObjectFactory of = new ObjectFactory(); 1
WidgetOrderBillInfo bill = new WidgetOrderBillInfo() 2
// Copy the shipping address and the number of widgets
// ordered from widgetOrderForm to bill
...
int numOrdered = widgetOrderForm.getAmount(); 3
String elementName = widgetOrderForm.getWidget().getName().getLocalPart(); 4
if (elementName.equals("woodWidget") 5
{
WoodWidgetType widget=order.getWidget().getValue(); 6
buildWoodWidget(widget, numOrdered);
// Add the widget info to bill
JAXBElement<WoodWidgetType> widgetElement = of.createWoodWidget(widget); 7
bill.setWidget(widgetElement); 8
float amtDue = numOrdered * 0.75;
bill.setAmountDue(amtDue); 9
}
else if (elementName.equals("plasticWidget")
{
PlasticWidgetType widget=order.getWidget().getValue();
buildPlasticWidget(widget, numOrdered);
// Add the widget info to bill
JAXBElement<PlasticWidgetType> widgetElement = of.createPlasticWidget(widget);
bill.setWidget(widgetElement);
float amtDue = numOrdered * 0.90;
bill.setAmountDue(amtDue);
}
else
{
WidgetType widget=order.getWidget().getValue();
buildWidget(widget, numOrdered);
// Add the widget info to bill
JAXBElement<WidgetType> widgetElement = of.createWidget(widget);
bill.setWidget(widgetElement);
float amtDue = numOrdered * 0.30;
bill.setAmountDue(amtDue);
}
return(bill);
}placeWidgetOrder()” does the following:
- 1
- Instantiates an object factory to create elements.
- 2
- Instantiates a
WidgetOrderBillInfoobject to hold the bill. - 3
- Gets the number of widgets ordered.
- 4
- Gets the local name of the element stored in the order.
- 5
- Checks to see if the element is a
woodWidgetelement. - 6
- Extracts the value of the element from the order to the proper type of object.
- 7
- Creates a
JAXBElement<T>object placed into the bill. - 8
- Sets the bill object's widget property.
- 9
- Sets the bill object's amountDue property.
Chapter 37. Customizing How Types are Generated
Abstract
37.1. Basics of Customizing Type Mappings
Overview
Namespace
http://java.sun.com/xml/ns/jaxb. You must add a namespace declaration similar to the one shown in Example 37.1, “JAXB Customization Namespace”. This is added to the root element of all XML documents defining JAXB customizations.
Example 37.1. JAXB Customization Namespace
xmlns:jaxb="http://java.sun.com/xml/ns/jaxb"
Version declaration
jaxb:version attribute to the root element of the external binding declaration. If you are using in-line customization, you must include the jaxb:version attribute in the schema element containing the customizations. The value of the attribute is always 2.0.
jaxb:version attribute used in a schema element.
Example 37.2. Specifying the JAXB Customization Version
< schema ...
jaxb:version="2.0">Using in-line customization
xsd:appinfo element of the XML schema construct that is being modified.
Example 37.3. Customized XML Schema
<schema targetNamespace="http://widget.com/types/widgetTypes"
xmlns="http://www.w3.org/2001/XMLSchema"
xmlns:jaxb="http://java.sun.com/xml/ns/jaxb"
jaxb:version="2.0">
<complexType name="size">
<annotation>
<appinfo>
<jaxb:class name="widgetSize" />
</appinfo>
</annotation>
<sequence>
<element name="longSize" type="xsd:string" />
<element name="numberSize" type="xsd:int" />
</sequence>
</complexType>
<schema>Using an external binding declaration
jaxb:bindings elements. Example 37.4, “JAXB External Binding Declaration Syntax” shows the syntax of an external binding declaration.
Example 37.4. JAXB External Binding Declaration Syntax
<jaxb:bindings xmlns:jaxb="http://java.sun.com/xml/ns/jaxb"
xmlns:xsd="http://www.w3.org/2001/XMLSchema"
jaxb:version="2.0">
<jaxb:bindings [schemaLocation="schemaUri" | wsdlLocation="wsdlUri">
<jaxb:bindings node="nodeXPath">
binding declaration
</jaxb:bindings>
...
</jaxb:bindings>
<jaxb:bindings>schemaLocation attribute and the wsdlLocation attribute are used to identify the schema document to which the modifications are applied. Use the schemaLocation attribute if you are generating code from a schema document. Use the wsdlLocation attribute if you are generating code from a WSDL document.
node attribute is used to identify the specific XML schema construct that is to be modified. It is an XPath statement that resolves to an XML Schema element.
widgetSchema.xsd, shown in Example 37.5, “XML Schema File”, the external binding declaration shown in Example 37.6, “External Binding Declaration” modifies the generation of the complex type size.
Example 37.5. XML Schema File
<schema targetNamespace="http://widget.com/types/widgetTypes"
xmlns="http://www.w3.org/2001/XMLSchema"
xmlns:wsdl="http://schemas.xmlsoap.org/wsdl/"
version="1.0">
<complexType name="size">
<sequence>
<element name="longSize" type="xsd:string" />
<element name="numberSize" type="xsd:int" />
</sequence>
</complexType>
<schema>Example 37.6. External Binding Declaration
<jaxb:bindings xmlns:jaxb="http://java.sun.com/xml/ns/jaxb"
xmlns:xsd="http://www.w3.org/2001/XMLSchema"
jaxb:version="2.0">
<jaxb:bindings schemaLocation="wsdlSchema.xsd">
<jaxb:bindings node="xsd:complexType[@name='size']">
<jaxb:class name="widgetSize" />
</jaxb:bindings>
</jaxb:bindings>
<jaxb:bindings>-b binding-file option, as shown below:
wsdl2java -b widgetBinding.xml widget.wsdl37.2. Specifying the Java Class of an XML Schema Primitive
Overview
javaType customization element allows you to customize the mapping between an XML Schema primitive type and a Java primitive type. It can be used to customize the mappings at both the global level and the individual instance level. You can use the javaType element as part of a simple type definition or as part of a complex type definition.
javaType customization element you must specify methods for converting the XML representation of the primitive type to and from the target Java class. Some mappings have default conversion methods. For instances where there are no default mappings, Apache CXF provides JAXB methods to ease the development of the required methods.
Syntax
javaType customization element takes four attributes, as described in Table 37.1, “Attributes for Customizing the Generation of a Java Class for an XML Schema Type”.
Table 37.1. Attributes for Customizing the Generation of a Java Class for an XML Schema Type
| Attribute | Required | Description |
|---|---|---|
name | Yes | Specifies the name of the Java class to which the XML Schema primitive type is mapped. It must be either a valid Java class name or the name of a Java primitive type. You must ensure that this class exists and is accessible to your application. The code generator does not check for this class. |
xmlType | No | Specifies the XML Schema primitive type that is being customized. This attribute is only used when the javaType element is used as a child of the globalBindings element. |
parseMethod | No | Specifies the method responsible for parsing the string-based XML representation of the data into an instance of the Java class. For more information see the section called “Specifying the converters”. |
printMethod | No | Specifies the method responsible for converting a Java object to the string-based XML representation of the data. For more information see the section called “Specifying the converters”. |
javaType customization element can be used in three ways:
- To modify all instances of an XML Schema primitive type — The
javaTypeelement modifies all instances of an XML Schema type in the schema document when it is used as a child of theglobalBindingscustomization element. When it is used in this manner, you must specify a value for thexmlTypeattribute that identifies the XML Schema primitive type being modified.Example 37.7, “Global Primitive Type Customization” shows an in-line global customization that instructs the code generators to usejava.lang.Integerfor all instances of xsd:short in the schema.Example 37.7. Global Primitive Type Customization
<schema targetNamespace="http://widget.com/types/widgetTypes" xmlns="http://www.w3.org/2001/XMLSchema" xmlns:wsdl="http://schemas.xmlsoap.org/wsdl/" xmlns:jaxb="http://java.sun.com/xml/ns/jaxb" jaxb:version="2.0"> <annotation> <appinfo> <jaxb:globalBindings ...> <jaxb:javaType name="java.lang.Integer" xmlType="xsd:short" /> </globalBindings </appinfo> </annotation> ... </schema> - To modify a simple type definition — The
javaTypeelement modifies the class generated for all instances of an XML simple type when it is applied to a named simple type definition. When using thejavaTypeelement to modify a simple type definition, do not use thexmlTypeattribute.Example 37.8, “Binding File for Customizing a Simple Type” shows an external binding file that modifies the generation of a simple type named zipCode.Example 37.8. Binding File for Customizing a Simple Type
<jaxb:bindings xmlns:jaxb="http://java.sun.com/xml/ns/jaxb" xmlns:xsd="http://www.w3.org/2001/XMLSchema" jaxb:version="2.0"> <jaxb:bindings wsdlLocation="widgets.wsdl"> <jaxb:bindings node="xsd:simpleType[@name='zipCode']"> <jaxb:javaType name="com.widgetVendor.widgetTypes.zipCodeType" parseMethod="com.widgetVendor.widgetTypes.support.parseZipCode" printMethod="com.widgetVendor.widgetTypes.support.printZipCode" /> </jaxb:bindings> </jaxb:bindings> <jaxb:bindings> - To modify an element or attribute of a complex type definition — The
javaTypecan be applied to individual parts of a complex type definition by including it as part of a JAXB property customization. ThejavaTypeelement is placed as a child to the property'sbaseTypeelement. When using thejavaTypeelement to modify a specific part of a complex type definition, do not use thexmlTypeattribute.Example 37.9, “Binding File for Customizing an Element in a Complex Type” shows a binding file that modifies an element of a complex type.Example 37.9. Binding File for Customizing an Element in a Complex Type
<jaxb:bindings xmlns:jaxb="http://java.sun.com/xml/ns/jaxb" xmlns:xsd="http://www.w3.org/2001/XMLSchema" jaxb:version="2.0"> <jaxb:bindings schemaLocation="enumMap.xsd"> <jaxb:bindings node="xsd:ComplexType[@name='widgetOrderInfo']"> <jaxb:bindings node="xsd:element[@name='cost']"> <jaxb:property> <jaxb:baseType> <jaxb:javaType name="com.widgetVendor.widgetTypes.costType" parseMethod="parseCost" printMethod="printCost" > </jaxb:baseType> </jaxb:property> </jaxb:bindings> </jaxb:bindings> </jaxb:bindings> <jaxb:bindings>For more information on using thebaseTypeelement see Section 37.6, “Specifying the Base Type of an Element or an Attribute”.
Specifying the converters
javaType element to customize the mapping of an XML Schema primitive type, the code generator creates an adapter class that is used to marshal and unmarshal the customized XML Schema primitive type. A sample adapter class is shown in Example 37.10, “JAXB Adapter Class”.
Example 37.10. JAXB Adapter Class
public class Adapter1 extends XmlAdapter<String, javaType>
{
public javaType unmarshal(String value)
{
return(parseMethod(value));
}
public String marshal(javaType value)
{
return(printMethod(value));
}
}parseMethod attribute and printMethod attribute. The values must identify valid Java methods. You can specify the method's name in one of two ways:
- A fully qualified Java method name in the form of packagename.ClassName.methodName
- A simple method name in the form of methodNameWhen you only provide a simple method name, the code generator assumes that the method exists in the class specified by the
javaTypeelement'snameattribute.
parseMethod attribute is not provided, the code generator assumes that the Java class specified by the name attribute has a constructor whose first parameter is a Java String object. The generated adapter's unmarshal() method uses the assumed constructor to populate the Java object with the XML data.
printMethod attribute is not provided, the code generator assumes that the Java class specified by the name attribute has a toString() method. The generated adapter's marshal() method uses the assumed toString() method to convert the Java object to XML data.
javaType element's name attribute specifies a Java primitive type, or one of the Java primitive's wrapper types, the code generators use the default converters. For more information on default converters see the section called “Default primitive type converters”.
What is generated
javaType customization element triggers the generation of one adapter class for each customization of an XML Schema primitive type. The adapters are named in sequence using the pattern AdapterN. If you specify two primitive type customizations, the code generators create two adapter classes: Adapter1 and Adapter2.
- The method is decorated with an
@XmlJavaTypeAdapterannotation.The annotation instructs the runtime which adapter class to use when processing instances of this element. The adapter class is specified as a class object. - The default type is replaced by the class specified by the
javaTypeelement'snameattribute.
Example 37.11. Customized Object Factory Method for a Global Element
@XmlElementDecl(namespace = "http://widgetVendor.com/types/widgetTypes", name = "shorty")
@XmlJavaTypeAdapter(org.w3._2001.xmlschema.Adapter1 .class)
public JAXBElement<Integer> createShorty(Integer value) {
return new JAXBElement<Integer>(_Shorty_QNAME, Integer.class, null, value);
}- The property is decorated with an
@XmlJavaTypeAdapterannotation.The annotation instructs the runtime which adapter class to use when processing instances of this element. The adapter class is specified as a class object. - The property's
@XmlElementincludes a type property.The value of the type property is the class object representing the generated object's default base type. In the case of XML Schema primitive types, the class isString. - The property is decorated with an
@XmlSchemaTypeannotation.The annotation identifies the XML Schema primitive type of the construct. - The default type is replaced by the class specified by the
javaTypeelement'snameattribute.
Example 37.12. Customized Complex Type
public class NumInventory {
@XmlElement(required = true, type = String.class)
@XmlJavaTypeAdapter(Adapter1 .class)
@XmlSchemaType(name = "short")
protected Integer numLeft;
@XmlElement(required = true)
protected String size;
public Integer getNumLeft() {
return numLeft;
}
public void setNumLeft(Integer value) {
this.numLeft = value;
}
public String getSize() {
return size;
}
public void setSize(String value) {
this.size = value;
}
}Implementing converters
javaType element, except that it should call the methods specified by the parseMethod attribute and the printMethod attribute. You are responsible for providing implementations of the methods the runtime calls. The implemented methods must be capable of working with the lexical structures of the XML primitive type.
javax.xml.bind.DatatypeConverter class. This class provides methods for parsing and printing all of the XML Schema primitive types. The parse methods take string representations of the XML data and they return an instance of the default type defined in Table 33.1, “XML Schema Primitive Type to Java Native Type Mapping”. The print methods take an instance of the default type and they return a string representation of the XML data.
DatatypeConverter class can be found at http://java.sun.com/webservices/docs/1.6/api/javax/xml/bind/DatatypeConverter.html.
Default primitive type converters
javaType element's name attribute, it is not necessary to specify values for the parseMethod attribute or the printMethod attribute. The Apache CXF runtime substitutes default converters if no values are provided.
DatatypeConverter class to parse the XML data. The default converters will also provide any type casting necessary to make the conversion work.
37.3. Generating Java Classes for Simple Types
Overview
globalBindings customization element's mapSimpleTypeDef to true.
Adding the customization
globalBinding element's mapSimpleTypeDef attribute and set its value to true.
Example 37.13. in-Line Customization to Force Generation of Java Classes for SimpleTypes
<schema targetNamespace="http://widget.com/types/widgetTypes"
xmlns="http://www.w3.org/2001/XMLSchema"
xmlns:wsdl="http://schemas.xmlsoap.org/wsdl/"
xmlns:jaxb="http://java.sun.com/xml/ns/jaxb"
jaxb:version="2.0">
<annotation>
<appinfo>
<jaxb:globalBindings mapSimpleTypeDef="true" />
</appinfo>
</annotation>
...
</schema>Example 37.14. Binding File to Force Generation of Constants
<jaxb:bindings xmlns:jaxb="http://java.sun.com/xml/ns/jaxb"
xmlns:xsd="http://www.w3.org/2001/XMLSchema"
jaxb:version="2.0">
<jaxb:bindings schemaLocation="types.xsd">
<jaxb:globalBindings mapSimpleTypeDef="true" />
<jaxb:bindings>
<jaxb:bindings>Generated classes
Example 37.15. Simple Type for Customized Mapping
<simpleType name="simpleton">
<restriction base="xsd:string">
<maxLength value="10"/>
</restriction>
</simpleType>Example 37.16. Customized Mapping of a Simple Type
@XmlAccessorType(XmlAccessType.FIELD)
@XmlType(name = "simpleton", propOrder = {"value"})
public class Simpleton {
@XmlValue
protected String value;
public String getValue() {
return value;
}
public void setValue(String value) {
this.value = value;
}
}37.4. Customizing Enumeration Mapping
Overview
jaxb:typesafeEnumClass element along with one or more jaxb:typesafeEnumMember elements.
globalBindings customization.
Member name customizer
globalBinding element's typesafeEnumMemberName attribute. The typesafeEnumMemberName attribute's values are described in Table 37.2, “Values for Customizing Enumeration Member Name Generation”.
Table 37.2. Values for Customizing Enumeration Member Name Generation
| Value | Description |
|---|---|
skipGeneration(default) | Specifies that the Java enum type is not generated and generates a warning. |
generateName | Specifies that member names will be generated following the pattern VALUE_N. N starts off at one, and is incremented for each member of the enumeration. |
generateError | Specifies that the code generator generates an error when it cannot map an enumeration to a Java enum type. |
Example 37.17. Customization to Force Type Safe Member Names
<schema targetNamespace="http://widget.com/types/widgetTypes"
xmlns="http://www.w3.org/2001/XMLSchema"
xmlns:wsdl="http://schemas.xmlsoap.org/wsdl/"
xmlns:jaxb="http://java.sun.com/xml/ns/jaxb"
jaxb:version="2.0">
<annotation>
<appinfo>
<jaxb:globalBindings typesafeEnumMemberName="generateName" />
</appinfo>
</annotation>
...
</schema>Class customizer
jaxb:typesafeEnumClass element specifies that an XML Schema enumeration should be mapped to a Java enum type. It has two attributes that are described in Table 37.3, “Attributes for Customizing a Generated Enumeration Class”. When the jaxb:typesafeEnumClass element is specified in-line, it must be placed inside the xsd:annotation element of the simple type it is modifying.
Table 37.3. Attributes for Customizing a Generated Enumeration Class
| Attribute | Description |
|---|---|
name | Specifies the name of the generated Java enum type. This value must be a valid Java identifier. |
map | Specifies if the enumeration should be mapped to a Java enum type. The default value is true. |
Member customizer
jaxb:typesafeEnumMember element specifies the mapping between an XML Schema enumeration facet and a Java enum type constant. You must use one jaxb:typesafeEnumMember element for each enumeration facet in the enumeration being customized.
- It can be placed inside the
xsd:annotationelement of theenumerationfacet it is modifying. - They can all be placed as children of the
jaxb:typesafeEnumClasselement used to customize the enumeration.
jaxb:typesafeEnumMember element has a name attribute that is required. The name attribute specifies the name of the generated Java enum type constant. It's value must be a valid Java identifier.
jaxb:typesafeEnumMember element also has a value attribute. The value is used to associate the enumeration facet with the proper jaxb:typesafeEnumMember element. The value of the value attribute must match one of the values of an enumeration facets' value attribute. This attribute is required when you use an external binding specification for customizing the type generation, or when you group the jaxb:typesafeEnumMember elements as children of the jaxb:typesafeEnumClass element.
Examples
Example 37.18. In-line Customization of an Enumerated Type
<schema targetNamespace="http://widget.com/types/widgetTypes"
xmlns="http://www.w3.org/2001/XMLSchema"
xmlns:wsdl="http://schemas.xmlsoap.org/wsdl/"
xmlns:jaxb="http://java.sun.com/xml/ns/jaxb"
jaxb:version="2.0">
<simpleType name="widgetInteger">
<annotation>
<appinfo>
<jaxb:typesafeEnumClass />
</appinfo>
</annotation>
<restriction base="xsd:int">
<enumeration value="1">
<annotation>
<appinfo>
<jaxb:typesafeEnumMember name="one" />
</appinfo>
</annotation>
</enumeration>
<enumeration value="2">
<annotation>
<appinfo>
<jaxb:typesafeEnumMember name="two" />
</appinfo>
</annotation>
</enumeration>
<enumeration value="3">
<annotation>
<appinfo>
<jaxb:typesafeEnumMember name="three" />
</appinfo>
</annotation>
</enumeration>
<enumeration value="4">
<annotation>
<appinfo>
<jaxb:typesafeEnumMember name="four" />
</appinfo>
</annotation>
</enumeration>
</restriction>
</simpleType>
<schema>Example 37.19. In-line Customization of an Enumerated Type Using a Combined Mapping
<schema targetNamespace="http://widget.com/types/widgetTypes"
xmlns="http://www.w3.org/2001/XMLSchema"
xmlns:wsdl="http://schemas.xmlsoap.org/wsdl/"
xmlns:jaxb="http://java.sun.com/xml/ns/jaxb"
jaxb:version="2.0">
<simpleType name="widgetInteger">
<annotation>
<appinfo>
<jaxb:typesafeEnumClass>
<jaxb:typesafeEnumMember value="1" name="one" />
<jaxb:typesafeEnumMember value="2" name="two" />
<jaxb:typesafeEnumMember value="3" name="three" />
<jaxb:typesafeEnumMember value="4" name="four" />
</jaxb:typesafeEnumClass>
</appinfo>
</annotation>
<restriction base="xsd:int">
<enumeration value="1" />
<enumeration value="2" />
<enumeration value="3" />
<enumeration value="4" >
</restriction>
</simpleType>
<schema>Example 37.20. Binding File for Customizing an Enumeration
<jaxb:bindings xmlns:jaxb="http://java.sun.com/xml/ns/jaxb"
xmlns:xsd="http://www.w3.org/2001/XMLSchema"
jaxb:version="2.0">
<jaxb:bindings schemaLocation="enumMap.xsd">
<jaxb:bindings node="xsd:simpleType[@name='widgetInteger']">
<jaxb:typesafeEnumClass>
<jaxb:typesafeEnumMember value="1" name="one" />
<jaxb:typesafeEnumMember value="2" name="two" />
<jaxb:typesafeEnumMember value="3" name="three" />
<jaxb:typesafeEnumMember value="4" name="four" />
</jaxb:typesafeEnumClass>
</jaxb:bindings>
</jaxb:bindings>
<jaxb:bindings>37.5. Customizing Fixed Value Attribute Mapping
Overview
globalBindings customization element. You can also customize the mapping of fixed value attributes to Java constants at a more localized level using the property element.
Global customization
globalBinding element's fixedAttributeAsConstantProperty attribute. Setting this attribute to true instructs the code generator to map any attribute defined using fixed attribute to a Java constant.
Example 37.21. in-Line Customization to Force Generation of Constants
<schema targetNamespace="http://widget.com/types/widgetTypes"
xmlns="http://www.w3.org/2001/XMLSchema"
xmlns:wsdl="http://schemas.xmlsoap.org/wsdl/"
xmlns:jaxb="http://java.sun.com/xml/ns/jaxb"
jaxb:version="2.0">
<annotation>
<appinfo>
<jaxb:globalBindings fixedAttributeAsConstantProperty="true" />
</appinfo>
</annotation>
...
</schema>Example 37.22. Binding File to Force Generation of Constants
<jaxb:bindings xmlns:jaxb="http://java.sun.com/xml/ns/jaxb"
xmlns:xsd="http://www.w3.org/2001/XMLSchema"
jaxb:version="2.0">
<jaxb:bindings schemaLocation="types.xsd">
<jaxb:globalBindings fixedAttributeAsConstantProperty="true" />
<jaxb:bindings>
<jaxb:bindings>Local mapping
property element's fixedAttributeAsConstantProperty attribute. Setting this attribute to true instructs the code generator to map any attribute defined using fixed attribute to a Java constant.
Example 37.23. In-Line Customization to Force Generation of Constants
<schema targetNamespace="http://widget.com/types/widgetTypes"
xmlns="http://www.w3.org/2001/XMLSchema"
xmlns:wsdl="http://schemas.xmlsoap.org/wsdl/"
xmlns:jaxb="http://java.sun.com/xml/ns/jaxb"
jaxb:version="2.0">
<complexType name="widgetAttr">
<sequence>
...
</sequence>
<attribute name="fixer" type="xsd:int" fixed="7">
<annotation>
<appinfo>
<jaxb:property fixedAttributeAsConstantProperty="true" />
</appinfo>
</annotation>
</attribute>
</complexType>
...
</schema>Example 37.24. Binding File to Force Generation of Constants
<jaxb:bindings xmlns:jaxb="http://java.sun.com/xml/ns/jaxb"
xmlns:xsd="http://www.w3.org/2001/XMLSchema"
jaxb:version="2.0">
<jaxb:bindings schemaLocation="types.xsd">
<jaxb:bindings node="xsd:complexType[@name='widgetAttr']">
<jaxb:bindings node="xsd:attribute[@name='fixer']">
<jaxb:property fixedAttributeAsConstantProperty="true" />
</jaxb:bindings>
</jaxb:bindings>
</jaxb:bindings>
<jaxb:bindings>Java mapping
fixed attribute, the attribute is mapped to a Java constant, as shown in Example 37.25, “Mapping of a Fixed Value Attribute to a Java Constant”.
Example 37.25. Mapping of a Fixed Value Attribute to a Java Constant
@XmlAttribute public final static type NAME = value;
attribute element's name attribute to all capital letters.
attribute element's fixed attribute.
Example 37.26. Fixed Value Attribute Mapped to a Java Constant
@XmlRootElement(name = "widgetAttr")
public class WidgetAttr {
...
@XmlAttribute
public final static int FIXER = 7;
...
}37.6. Specifying the Base Type of an Element or an Attribute
Overview
Customization usage
baseType customization element. The baseType customization element is a child of the JAXB property element, so it must be properly nested.
baseType customization element's name attribute, or a javaType child element. The name attribute is used to map the default class of the generated object to another class within the same class hierarchy. The javaType element is used when you want to map XML Schema primitive types to a Java class.
name attribute and a javaType child element in the same baseType customization element.
Specializing or generalizing the default mapping
baseType customization element's name attribute is used to redefine the class of the generated object to a class within the same Java class hierarchy. The attribute specifies the fully qualified name of the Java class to which the XML Schema construct is mapped. The specified Java class must be either a super-class or a sub-class of the Java class that the code generator normally generates for the XML Schema construct. For XML Schema primitive types that map to Java primitive types, the wrapper class is used as the default base class for the purpose of customization.
java.lang.Integer as its default base class. The value of the name attribute can specify any super-class of Integer such as Number or Object.
Object object.
Object object.
Example 37.27. In-Line Customization of a Base Type
<complexType name="widgetOrderInfo">
<all>
<element name="amount" type="xsd:int" />
<element name="shippingAdress" type="Address>
<annotation>
<appinfo>
<jaxb:property>
<jaxb:baseType name="java.lang.Object" />
</jaxb:property>
</appinfo>
</annotation>
</element>
<element name="type" type="xsd:string"/>
</all>
</complexType>Example 37.28. External Binding File to Customize a Base Type
<jaxb:bindings xmlns:jaxb="http://java.sun.com/xml/ns/jaxb"
xmlns:xsd="http://www.w3.org/2001/XMLSchema"
jaxb:version="2.0">
<jaxb:bindings schemaLocation="enumMap.xsd">
<jaxb:bindings node="xsd:ComplexType[@name='widgetOrderInfo']">
<jaxb:bindings node="xsd:element[@name='shippingAddress']">
<jaxb:property>
<jaxb:baseType name="java.lang.Object" />
</jaxb:property>
</jaxb:bindings>
</jaxb:bindings>
</jaxb:bindings>
<jaxb:bindings>@XmlElement annotation includes a type property. The value of the type property is the class object representing the generated object's default base type. In the case of XML Schema primitive types, the class is the wrapper class of the corresponding Java primitive type.
Example 37.29. Java Class with a Modified Base Class
public class WidgetOrderInfo {
protected int amount;
@XmlElement(required = true)
protected String type;
@XmlElement(required = true, type = Address.class)
protected Object shippingAddress;
...
public Object getShippingAddress() {
return shippingAddress;
}
public void setShippingAddress(Object value) {
this.shippingAddress = value;
}
}Usage with javaType
javaType element can be used to customize how elements and attributes defined using XML Schema primitive types are mapped to Java objects. Using the javaType element provides a lot more flexibility than simply using the baseType element's name attribute. The javaType element allows you to map a primitive type to any class of object.
javaType element, see Section 37.2, “Specifying the Java Class of an XML Schema Primitive”.
Chapter 38. Using A JAXBContext Object
Abstract
JAXBContext object allows the Apache CXF's runtime to transform data between XML elements and Java object. Application developers need to instantiate a JAXBContext object they want to use JAXB objects in message handlers and when implementing consumers that work with raw XML messages.
Overview
JAXBContext object is a low-level object used by the runtime. It allows the runtime to convert between XML elements and their corresponding Java representations. An application developer generally does not need to work with JAXBContext objects. The marshaling and unmarshaling of XML data is typically handled by the transport and binding layers of a JAX-WS application.
JAXBContext object using one of the two available JAXBContext.newInstance() methods.
Best practices
JAXBContext objects are resource intensive to instantiate. It is recommended that an application create as few instances as possible. One way to do this is to create a single JAXBContext object that can manage all of the JAXB objects used by your application and share it among as many parts of your application as possible.
JAXBContext objects are thread safe.
Getting a JAXBContext object using an object factory
JAXBContext class provides a newInstance() method, shown in Example 38.1, “Getting a JAXB Context Using Classes”, that takes a list of classes that implement JAXB objects.
Example 38.1. Getting a JAXB Context Using Classes
static JAXBContext newInstance(Class... classesToBeBound)
throws JAXBException;JAXBObject object will be able to marshal and unmarshal data for the JAXB object implemented by the classes passed into the method. It will also be able to work with any classes that are statically referenced from any of the classes passed into the method.
newInstance() method it is not efficient. A more efficient way to accomplish the same goal is to pass in the object factory, or object factories, generated for your application. The resulting JAXBContext object will be able to manage any JAXB classes the specified object factories can instantiate.
Getting a JAXBContext object using package names
JAXBContext class provides a newInstance() method, shown in Example 38.2, “Getting a JAXB Context Using Classes”, that takes a colon (:) seperated list of package names. The specified packages should contain JAXB objects derived from XML Schema.
Example 38.2. Getting a JAXB Context Using Classes
static JAXBContext newInstance(String contextPath)
throws JAXBException;JAXBContext object will be able to marshal and unmarshal data for all of the JAXB objects implemented by the classes in the specified packages.
Chapter 39. Using SOAP over JMS
Overview
- SOAP/JMS service addressed are specified using a special JMS URI
- you must use the Apache CXF specific factory objects to use SOAP/JMS endpoints
JMS URIs
Example 39.1. JMS URI syntax
jms:variant:destination?options
Table 39.1. JMS URI variants
| Variant | Description |
|---|---|
| jndi | Specifies that the destination is a JNDI name for the target destination. When using this variant, you must provide the configuration for accessing the JNDI provider. |
| topic | Specifies that the destination is the name of the topic to be used as the target destination. The string provided is passed into Session.createTopic() to create a representation of the destination. |
| queue | Specifies that the destination is the name of the queue to be used as the target destination. The string provided is passed into Session.createQueue() to create a representation of the destination. |
Table 39.2. JMS properties settable as URI options
| Property | Default | Description |
|---|---|---|
deliveryMode | PERSISTENT | Specifies whether to use JMS PERSISTENT or NON_PERSISTENT message semantics. In the case of PERSISTENT delivery mode, the JMS broker stores messages in persistent storage before acknowledging them; whereas NON_PERSISTENT messages are kept in memory only. |
replyToName |
Explicitly specifies the reply destination to appear in the
JMSReplyTo header. Setting this property is recommended for applications that have request-reply semantics because the JMS provider will assign a temporary reply queue if one is not explicitly set.
The value of this property has an interpretation that depends on the variant specified in the JMS URI:
| |
priority | 4 | Specifies the JMS message priority, which ranges from 0 (lowest) to 9 (highest). |
timeToLive | 0 | Time (in milliseconds) after which the message will be discarded by the JMS provider. 0 represents an infinite lifetime. |
jndiConnectionFactoryName | Specifies the JNDI name of the JMS connection factory. | |
jndiInitialContextFactory | Specifies the fully qualified Java class name of the JNDI provider (which must be of javax.jms.InitialContextFactory type). Equivalent to setting the java.naming.factory.initial Java system property. | |
jndiURL | Specifies the URL that initializes the JNDI provider. Equivalent to setting the java.naming.provider.url Java system property. |
Publishing a service
publish() method cannot be used to publish a SOAP/JMS service. Instead, you must use the Apache CXF's JaxWsServerFactoryBean class as shown in Example 39.2, “Publishing a SOAP/JMS service”.
Example 39.2. Publishing a SOAP/JMS service
1String address = "jms:jndi:dynamicQueues/test.cxf.jmstransport.queue3" + "?jndiInitialContextFactory" + "=org.apache.activemq.jndi.ActiveMQInitialContextFactory" + "&jndiConnectionFactoryName=ConnectionFactory" + "&jndiURL=tcp://localhost:61500"; Hello implementor = new HelloImpl(); 2JaxWsServerFactoryBean svrFactory = new JaxWsServerFactoryBean(); svrFactory.setServiceClass(Hello.class); 3svrFactory.setAddress(address); 4svrFactory.setTransportId(JMSSpecConstants.SOAP_JMS_SPECIFICIATION_TRANSPORTID); svrFactory.setServiceBean(implementor); svrFactory.create();
Consuming a service
JaxWsProxyFactoryBean class as shown in Example 39.3, “Consuming a SOAP/JMS service”.
Example 39.3. Consuming a SOAP/JMS service
// Java
public void invoke() throws Exception {
1 String address = "jms:jndi:dynamicQueues/test.cxf.jmstransport.queue3"
+ "?jndiInitialContextFactory"
+ "=org.apache.activemq.jndi.ActiveMQInitialContextFactory"
+ "&jndiConnectionFactoryName=ConnectionFactory&jndiURL=tcp://localhost:61500";
2 JaxWsProxyFactoryBean factory = new JaxWsProxyFactoryBean();
3 factory.setAddress(address);
4 factory.setTransportId(JMSSpecConstants.SOAP_JMS_SPECIFICIATION_TRANSPORTID);
factory.setServiceClass(Hello.class);
Hello client = (Hello)factory.create();
String reply = client.sayHi(" HI");
System.out.println(reply);
}Chapter 40. Developing Asynchronous Applications
Abstract
- Polling approach — To invoke the remote operation using the polling approach, you call a method that has no output parameters, but returns a
javax.xml.ws.Responseobject. TheResponseobject (which inherits from thejavax.util.concurrency.Futureinterface) can be polled to check whether or not a response message has arrived. - Callback approach — To invoke the remote operation using the callback approach, you call a method that takes a reference to a callback object (of
javax.xml.ws.AsyncHandlertype) as one of its parameters. When the response message arrives at the client, the runtime calls back on theAsyncHandlerobject, and gives it the contents of the response message.
40.1. WSDL for Asynchronous Examples
GreeterAsync, which contains a single operation, greetMeSometime.
Example 40.1. WSDL Contract for Asynchronous Example
<?xml version="1.0" encoding="UTF-8"?><wsdl:definitions xmlns="http://schemas.xmlsoap.org/wsdl/"
xmlns:soap="http://schemas.xmlsoap.org/wsdl/soap/"
xmlns:tns="http://apache.org/hello_world_async_soap_http"
xmlns:x1="http://apache.org/hello_world_async_soap_http/types"
xmlns:wsdl="http://schemas.xmlsoap.org/wsdl/"
xmlns:xsd="http://www.w3.org/2001/XMLSchema"
targetNamespace="http://apache.org/hello_world_async_soap_http"
name="HelloWorld">
<wsdl:types>
<schema targetNamespace="http://apache.org/hello_world_async_soap_http/types"
xmlns="http://www.w3.org/2001/XMLSchema"
xmlns:x1="http://apache.org/hello_world_async_soap_http/types"
elementFormDefault="qualified">
<element name="greetMeSometime">
<complexType>
<sequence>
<element name="requestType" type="xsd:string"/>
</sequence>
</complexType>
</element>
<element name="greetMeSometimeResponse">
<complexType>
<sequence>
<element name="responseType"
type="xsd:string"/>
</sequence>
</complexType>
</element>
</schema>
</wsdl:types>
<wsdl:message name="greetMeSometimeRequest">
<wsdl:part name="in" element="x1:greetMeSometime"/>
</wsdl:message>
<wsdl:message name="greetMeSometimeResponse">
<wsdl:part name="out"
element="x1:greetMeSometimeResponse"/>
</wsdl:message>
<wsdl:portType name="GreeterAsync">
<wsdl:operation name="greetMeSometime">
<wsdl:input name="greetMeSometimeRequest"
message="tns:greetMeSometimeRequest"/>
<wsdl:output name="greetMeSometimeResponse"
message="tns:greetMeSometimeResponse"/>
</wsdl:operation>
</wsdl:portType>
<wsdl:binding name="GreeterAsync_SOAPBinding"
type="tns:GreeterAsync">
...
</wsdl:binding>
<wsdl:service name="SOAPService">
<wsdl:port name="SoapPort"
binding="tns:GreeterAsync_SOAPBinding">
<soap:address location="http://localhost:9000/SoapContext/SoapPort"/>
</wsdl:port>
</wsdl:service>
</wsdl:definitions>40.2. Generating the Stub Code
Overview
jaxws:bindings tag (where the jaxws prefix is tied to the http://java.sun.com/xml/ns/jaxws namespace). There are two ways of specifying a binding declaration:
- External Binding Declaration
- When using an external binding declaration the
jaxws:bindingselement is defined in a file separate from the WSDL contract. You specify the location of the binding declaration file to code generator when you generate the stub code. - Embedded Binding Declaration
- When using an embedded binding declaration you embed the
jaxws:bindingselement directly in a WSDL contract, treating it as a WSDL extension. In this case, the settings injaxws:bindingsapply only to the immediate parent element.
Using an external binding declaration
Example 40.2. Template for an Asynchronous Binding Declaration
<bindings xmlns:xsd="http://www.w3.org/2001/XMLSchema"
xmlns:wsdl="http://schemas.xmlsoap.org/wsdl/"
wsdlLocation="AffectedWSDL"
xmlns="http://java.sun.com/xml/ns/jaxws">
<bindings node="AffectedNode">
<enableAsyncMapping>true</enableAsyncMapping>
</bindings>
</bindings>wsdl:definitions, if you want the entire WSDL contract to be affected. The jaxws:enableAsyncMapping element is set to true to enable the asynchronous invocation feature.
GreeterAsync interface, you can specify <bindings node="wsdl:definitions/wsdl:portType[@name='GreeterAsync']"> in the preceding binding declaration.
async_binding.xml, you would set up your POM as shown in Example 40.3, “Consumer Code Generation”.
Example 40.3. Consumer Code Generation
<plugin>
<groupId>org.apache.cxf</groupId>
<artifactId>cxf-codegen-plugin</artifactId>
<version>${cxf.version}</version>
<executions>
<execution>
<id>generate-sources</id>
<phase>generate-sources</phase>
<configuration>
<sourceRoot>outputDir</sourceRoot>
<wsdlOptions>
<wsdlOption>
<wsdl>hello_world.wsdl</wsdl>
<extraargs>
<extraarg>-client</extraarg>
<extraarg>-b async_binding.xml</extraarg>
</extraargs>
</wsdlOption>
</wsdlOptions>
</configuration>
<goals>
<goal>wsdl2java</goal>
</goals>
</execution>
</executions>
</plugin>-b option tells the code generator where to locate the external binding file.
Using an embedded binding declaration
jaxws:bindings element and its associated jaxws:enableAsynchMapping child directly into the WSDL. You also must add a namespace declaration for the jaxws prefix.
Example 40.4. WSDL with Embedded Binding Declaration for Asynchronous Mapping
<wsdl:definitions xmlns="http://schemas.xmlsoap.org/wsdl/"
...
xmlns:jaxws="http://java.sun.com/xml/ns/jaxws"
...>
...
<wsdl:portType name="GreeterAsync">
<wsdl:operation name="greetMeSometime">
<jaxws:bindings>
<jaxws:enableAsyncMapping>true</jaxws:enableAsyncMapping>
</jaxws:bindings>
<wsdl:input name="greetMeSometimeRequest"
message="tns:greetMeSometimeRequest"/>
<wsdl:output name="greetMeSometimeResponse"
message="tns:greetMeSometimeResponse"/>
</wsdl:operation>
</wsdl:portType>
...
</wsdl:definitions>wsdl:definitions element the code generator creates asynchronous methods for all of the operations defined in the WSDL document. If it is placed as a child of a wsdl:portType element the code generator creates asynchronous methods for all of the operations defined in the interface. If it is placed as a child of a wsdl:operation element the code generator creates asynchronous methods for only that operation.
Generated interface
GreeterAsync SEI (in the file GreeterAsync.java) is defined as shown in Example 40.5, “Service Endpoint Interface with Methods for Asynchronous Invocations”.
Example 40.5. Service Endpoint Interface with Methods for Asynchronous Invocations
package org.apache.hello_world_async_soap_http;
import org.apache.hello_world_async_soap_http.types.GreetMeSometimeResponse;
...
public interface GreeterAsync
{
public Future<?> greetMeSometimeAsync(
java.lang.String requestType,
AsyncHandler<GreetMeSometimeResponse> asyncHandler
);
public Response<GreetMeSometimeResponse> greetMeSometimeAsync(
java.lang.String requestType
);
public java.lang.String greetMeSometime(
java.lang.String requestType
);
}greetMeSometime(), two asynchronous methods are also generated for the greetMeSometime operation:
40.3. Implementing an Asynchronous Client with the Polling Approach
OperationNameAsync() and is returned a Response<T> object that it polls for a response. What the client does while it is waiting for a response is depends on the requirements of the application. There are two basic patterns for handling the polling:
- Non-blocking polling — You periodically check to see if the result is ready by calling the non-blocking
Response<T>.isDone()method. If the result is ready, the client processes it. If it not, the client continues doing other things. - Blocking polling — You call
Response<T>.get()right away, and block until the response arrives (optionally specifying a timeout).
Using the non-blocking pattern
Example 40.6. Non-Blocking Polling Approach for an Asynchronous Operation Call
package demo.hw.client;
import java.io.File;
import java.util.concurrent.Future;
import javax.xml.namespace.QName;
import javax.xml.ws.Response;
import org.apache.hello_world_async_soap_http.*;
public final class Client {
private static final QName SERVICE_NAME
= new QName("http://apache.org/hello_world_async_soap_http",
"SOAPService");
private Client() {}
public static void main(String args[]) throws Exception {
// set up the proxy for the client
1 Response<GreetMeSometimeResponse> greetMeSomeTimeResp =
port.greetMeSometimeAsync(System.getProperty("user.name"));
2 while (!greetMeSomeTimeResp.isDone()) {
// client does some work
}
3 GreetMeSometimeResponse reply = greetMeSomeTimeResp.get();
// process the response
System.exit(0);
}
}- 1
- Invokes the
greetMeSometimeAsync()on the proxy.The method call returns theResponse<GreetMeSometimeResponse>object to the client immediately. The Apache CXF runtime handles the details of receiving the reply from the remote endpoint and populating theResponse<GreetMeSometimeResponse>object.NoteThe runtime transmits the request to the remote endpoint'sgreetMeSometime()method and handles the details of the asynchronous nature of the call transparently. The endpoint, and therefore the service implementation, never worries about the details of how the client intends to wait for a response. - 2
- Checks to see if a response has arrived by checking the
isDone()of the returnedResponseobject.If the response has not arrived, the client continues working before checking again. - 3
- When the response arrives, the client retrieves it from the
Responseobject using theget()method.
Using the blocking pattern
Response object's isDone() is never called. Instead, the Response object's get() method is called immediately after invoking the remote operation. The get() blocks until the response is available.
get() method.
Example 40.7. Blocking Polling Approach for an Asynchronous Operation Call
package demo.hw.client;
import java.io.File;
import java.util.concurrent.Future;
import javax.xml.namespace.QName;
import javax.xml.ws.Response;
import org.apache.hello_world_async_soap_http.*;
public final class Client {
private static final QName SERVICE_NAME
= new QName("http://apache.org/hello_world_async_soap_http",
"SOAPService");
private Client() {}
public static void main(String args[]) throws Exception {
// set up the proxy for the client
Response<GreetMeSometimeResponse> greetMeSomeTimeResp =
port.greetMeSometimeAsync(System.getProperty("user.name"));
GreetMeSometimeResponse reply = greetMeSomeTimeResp.get();
// process the response
System.exit(0);
}
}40.4. Implementing an Asynchronous Client with the Callback Approach
- Create a callback class that implements the
AsyncHandlerinterface.NoteYour callback object can perform any amount of response processing required by your application. - Make remote invocations using the
operationNameAsync()that takes the callback object as a parameter and returns aFuture<?>object. - If your client requires access to the response data, you can poll the returned
Future<?>object'sisDone()method to see if the remote endpoint has sent the response.TipIf the callback object does all of the response processing, it is not necessary to check if the response has arrived.
Implementing the callback
javax.xml.ws.AsyncHandler interface. The interface defines a single method:
void handleResponse(Response<T> res);handleResponse() method to notify the client that the response has arrived. Example 40.8, “The javax.xml.ws.AsyncHandler Interface” shows an outline of the AsyncHandler interface that you must implement.
Example 40.8. The javax.xml.ws.AsyncHandler Interface
public interface javax.xml.ws.AsyncHandler
{
void handleResponse(Response<T> res)
}Example 40.9. Callback Implementation Class
package demo.hw.client;
import javax.xml.ws.AsyncHandler;
import javax.xml.ws.Response;
import org.apache.hello_world_async_soap_http.types.*;
public class GreeterAsyncHandler implements AsyncHandler<GreetMeSometimeResponse>
{
1 private GreetMeSometimeResponse reply;
2 public void handleResponse(Response<GreetMeSometimeResponse>
response)
{
try
{
reply = response.get();
}
catch (Exception ex)
{
ex.printStackTrace();
}
}
3 public String getResponse()
{
return reply.getResponseType();
}
}- 1
- Defines a member variable,
response, that holds the response returned from the remote endpoint. - 2
- Implements
handleResponse().This implementation simply extracts the response and assigns it to the member variablereply. - 3
- Implements an added method called
getResponse().This method is a convenience method that extracts the data fromreplyand returns it.
Implementing the consumer
Example 40.10. Callback Approach for an Asynchronous Operation Call
package demo.hw.client;
import java.io.File;
import java.util.concurrent.Future;
import javax.xml.namespace.QName;
import javax.xml.ws.Response;
import org.apache.hello_world_async_soap_http.*;
public final class Client {
...
public static void main(String args[]) throws Exception
{
...
// Callback approach
1 GreeterAsyncHandler callback = new GreeterAsyncHandler();
2 Future<?> response =
port.greetMeSometimeAsync(System.getProperty("user.name"),
callback);
3 while (!response.isDone())
{
// Do some work
}
4 resp = callback.getResponse();
...
System.exit(0);
}
}- 1
- Instantiates a callback object.
- 2
- Invokes the
greetMeSometimeAsync()that takes the callback object on the proxy.The method call returns theFuture<?>object to the client immediately. The Apache CXF runtime handles the details of receiving the reply from the remote endpoint, invoking the callback object'shandleResponse()method, and populating theResponse<GreetMeSometimeResponse>object.NoteThe runtime transmits the request to the remote endpoint'sgreetMeSometime()method and handles the details of the asynchronous nature of the call without the remote endpoint's knowledge. The endpoint, and therefore the service implementation, does not need to worry about the details of how the client intends to wait for a response. - 3
- Uses the returned
Future<?>object'sisDone()method to check if the response has arrived from the remote endpoint. - 4
- Invokes the callback object's
getResponse()method to get the response data.
40.5. Catching Exceptions Returned from a Remote Service
Overview
ExecutionException exception. The actual exception thrown by the service is stored in the ExecutionException exception's cause field.
Catching the exception
Response<T> object's get() method throws the exception. The consumer will not discover that an error was encountered in processing the request until it attempts to retrieve the response message.
Response<T> object's get() method does not throw either user modeled exceptions nor the generic JAX-WS exceptions. Instead, it throws a java.util.concurrent.ExecutionException exception.
Getting the exception details
ExecutionException exception's cause field. The details about the remote exception are extracted by getting the value of the cause field and examining the stored exception. The stored exception can be any user defined exception or one of the generic JAX-WS exceptions.
Example
Example 40.11. Catching an Exception using the Polling Approach
package demo.hw.client;
import java.io.File;
import java.util.concurrent.Future;
import javax.xml.namespace.QName;
import javax.xml.ws.Response;
import org.apache.hello_world_async_soap_http.*;
public final class Client
{
private static final QName SERVICE_NAME
= new QName("http://apache.org/hello_world_async_soap_http",
"SOAPService");
private Client() {}
public static void main(String args[]) throws Exception
{
...
// port is a previously established proxy object.
Response<GreetMeSometimeResponse> resp =
port.greetMeSometimeAsync(System.getProperty("user.name"));
while (!resp.isDone())
{
// client does some work
}
try 1
{
GreetMeSometimeResponse reply = greetMeSomeTimeResp.get();
// process the response
}
catch (ExecutionException ee) 2
{
Throwable cause = ee.getCause(); 3
System.out.println("Exception "+cause.getClass().getName()+" thrown by the remote service.");
}
}
}Chapter 41. Using Raw XML Messages
Abstract
Dispatch interface is the client-side interface, and the Provider interface is the server-side interface.
41.1. Using XML in a Consumer
Dispatch interface is a low-level JAX-WS API that allows you work directly with raw messages. It accepts and returns messages, or payloads, of a number of types including DOM objects, SOAP messages, and JAXB objects. Because it is a low-level API, the Dispatch interface does not perform any of the message preparation that the higher-level JAX-WS APIs perform. You must ensure that the messages, or payloads, that you pass to the Dispatch object are properly constructed, and make sense for the remote operation being invoked.
41.1.1. Usage Modes
Overview
Dispatch objects have two usage modes:
- Message mode
- Message Payload mode (Payload mode)
Dispatch object determines the amount of detail that is passed to the user level code.
Message mode
Dispatch object works with complete messages. A complete message includes any binding specific headers and wrappers. For example, a consumer interacting with a service that requires SOAP messages must provide the Dispatch object's invoke() method a fully specified SOAP message. The invoke() method also returns a fully specified SOAP message. The consumer code is responsible for completing and reading the SOAP message's headers and the SOAP message's envelope information.
Dispatch object uses message mode provide the value java.xml.ws.Service.Mode.MESSAGE when creating the Dispatch object. For more information about creating a Dispatch object see the section called “Creating a Dispatch object”.
Payload mode
Dispatch object works with only the payload of a message. For example, a Dispatch object working in payload mode works only with the body of a SOAP message. The binding layer processes any binding level wrappers and headers. When a result is returned from the invoke() method the binding level wrappers and headers are already striped away, and only the body of the message is left.
Dispatch object uses payload mode provide the value java.xml.ws.Service.Mode.PAYLOAD when creating the Dispatch object. For more information about creating a Dispatch object see the section called “Creating a Dispatch object”.
41.1.2. Data Types
Overview
Dispatch objects are low-level objects, they are not optimized for using the same JAXB generated types as the higher level consumer APIs. Dispatch objects work with the following types of objects:
Using Source objects
Dispatch object accepts and returns objects that are derived from the javax.xml.transform.Source interface. Source objects are supported by any binding, and in either message mode or payload mode.
Source objects are low level objects that hold XML documents. Each Source implementation provides methods that access the stored XML documents and then manipulate its contents. The following objects implement the Source interface:
DOMSource- Holds XML messages as a Document Object Model(DOM) tree. The XML message is stored as a set of
Nodeobjects that are accessed using thegetNode()method. Nodes can be either updated or added to the DOM tree using thesetNode()method. SAXSource- Holds XML messages as a Simple API for XML (SAX) object. SAX objects contain an
InputSourceobject that holds the raw data and anXMLReaderobject that parses the raw data. StreamSource- Holds XML messages as a data stream. The data stream can be manipulated the same as any other data stream.
Dispatch object so that it uses generic Source objects, Apache CXF returns the messages as SAXSource objects.
Using SOAPMessage objects
Dispatch objects can use javax.xml.soap.SOAPMessage objects when the following conditions are true:
- The
Dispatchobject is using the SOAP binding - The
Dispatchobject is using message mode
SOAPMessage object holds a SOAP message. They contain one SOAPPart object and zero or more AttachmentPart objects. The SOAPPart object contains the SOAP specific portions of the SOAP message including the SOAP envelope, any SOAP headers, and the SOAP message body. The AttachmentPart objects contain binary data that is passed as an attachment.
Using DataSource objects
Dispatch objects can use objects that implement the javax.activation.DataSource interface when the following conditions are true:
- The
Dispatchobject is using the HTTP binding - The
Dispatchobject is using message mode
DataSource objects provide a mechanism for working with MIME typed data from a variety of sources, including URLs, files, and byte arrays.
Using JAXB objects
Dispatch objects are intended to be low level APIs that allow you to work with raw messages, they also allow you to work with JAXB objects. To work with JAXB objects a Dispatch object must be passed a JAXBContext that can marshal and unmarshal the JAXB objects in use. The JAXBContext is passed when the Dispatch object is created.
JAXBContext object as the parameter to the invoke() method. You can also cast the returned message into any JAXB object understood by the JAXBContext object.
JAXBContext object see Chapter 38, Using A JAXBContext Object.
41.1.3. Working with Dispatch Objects
Procedure
Dispatch object to invoke a remote service the following sequence should be followed:
Creating a Dispatch object
Dispatch object do the following:
- Create a
Serviceobject to represent thewsdl:serviceelement that defines the service on which theDispatchobject will make invocations. See Section 24.1, “Creating a Service Object”. - Create the
Dispatchobject using theServiceobject'screateDispatch()method, shown in Example 41.1, “ThecreateDispatch()Method”.Example 41.1. The
createDispatch()Methodpublic Dispatch<T> createDispatch(QName portName,
java.lang.Class<T> type,
Service.Mode mode)
throws WebServiceException;NoteIf you are using JAXB objects the method signature forcreateDispatch()is:public Dispatch<T> createDispatch(QName portName,
javax.xml.bind.JAXBContext context,
Service.Mode mode)
throws WebServiceException;Table 41.1, “Parameters forcreateDispatch()” describes the parameters for thecreateDispatch()method.Table 41.1. Parameters for
createDispatch()Parameter Description portNameSpecifies the QName of the wsdl:portelement that represents the service provider where theDispatchobject will make invocations.typeSpecifies the data type of the objects used by theDispatchobject. See Section 41.1.2, “Data Types”.When working with JAXB objects, this parameter specifies theJAXBContextobject used to marshal and unmarshal the JAXB objects.modeSpecifies the usage mode for the Dispatchobject. See Section 41.1.1, “Usage Modes”.
Dispatch Object” shows the code for creating a Dispatch object that works with DOMSource objects in payload mode.
Example 41.2. Creating a Dispatch Object
package com.fusesource.demo;
import javax.xml.namespace.QName;
import javax.xml.ws.Service;
public class Client
{
public static void main(String args[])
{
QName serviceName = new QName("http://org.apache.cxf", "stockQuoteReporter");
Service s = Service.create(serviceName);
QName portName = new QName("http://org.apache.cxf", "stockQuoteReporterPort");
Dispatch<DOMSource> dispatch = s.createDispatch(portName,
DOMSource.class,
Service.Mode.PAYLOAD);
...Constructing request messages
Dispatch objects, requests must be built from scratch. The developer is responsible for ensuring that the messages passed to a Dispatch object match a request that the targeted service provider can process. This requires precise knowledge about the messages used by the service provider and what, if any, header information it requires.
- The root element of the request is based in the value of the
nameattribute of thewsdl:operationelement corresponding to the operation being invoked.WarningIf the service being invoked uses doc/literal bare messages, the root element of the request is based on the value of thenameattribute of thewsdl:partelement referred to by thewsdl:operationelement. - The root element of the request is namespace qualified.
- If the service being invoked uses rpc/literal messages, the top-level elements in the request will not be namespace qualified.ImportantThe children of top-level elements may be namespace qualified. To be certain you must check their schema definitions.
- If the service being invoked uses rpc/literal messages, none of the top-level elements can be null.
- If the service being invoked uses doc/literal messages, the schema definition of the message determines if any of the elements are namespace qualified.
Synchronous invocation
Dispatch object's invoke() method shown in Example 41.3, “The Dispatch.invoke() Method”.
Example 41.3. The Dispatch.invoke() Method
T invoke(T msg)
throws WebServiceException;invoke() method are determined when the Dispatch object is created. For example if you create a Dispatch object using createDispatch(portName, SOAPMessage.class, Service.Mode.MESSAGE), both the response and the request are SOAPMessage objects.
JAXBContext object can marshal and unmarshal. Also, the response and the request can be different JAXB objects.
Dispatch Object” shows code for making a synchronous invocation on a remote service using a DOMSource object.
Example 41.4. Making a Synchronous Invocation Using a Dispatch Object
// Creating a DOMSource Object for the request
DocumentBuilder db = DocumentBuilderFactory.newDocumentBuilder();
Document requestDoc = db.newDocument();
Element root = requestDoc.createElementNS("http://org.apache.cxf/stockExample",
"getStockPrice");
root.setNodeValue("DOW");
DOMSource request = new DOMSource(requestDoc);
// Dispatch disp created previously
DOMSource response = disp.invoke(request);Asynchronous invocation
Dispatch objects also support asynchronous invocations. As with the higher level asynchronous APIs discussed in Chapter 40, Developing Asynchronous Applications, Dispatch objects can use both the polling approach and the callback approach.
invokeAsync() method returns a Response<t> object that can be polled to see if the response has arrived. Example 41.5, “The Dispatch.invokeAsync() Method for Polling” shows the signature of the method used to make an asynchronous invocation using the polling approach.
Example 41.5. The Dispatch.invokeAsync() Method for Polling
Response <T> invokeAsync(T msg)
throws WebServiceException;invokeAsync() method takes an AsyncHandler implementation that processes the response when it is returned. Example 41.6, “The Dispatch.invokeAsync() Method Using a Callback” shows the signature of the method used to make an asynchronous invocation using the callback approach.
Example 41.6. The Dispatch.invokeAsync() Method Using a Callback
Future<?> invokeAsync(T msg,
AsyncHandler<T> handler)
throws WebServiceException;invoke() method, the type of the response and the type of the request are determined when you create the Dispatch object.
Oneway invocation
Dispatch object's invokeOneWay(). Example 41.7, “The Dispatch.invokeOneWay() Method” shows the signature for this method.
Example 41.7. The Dispatch.invokeOneWay() Method
void invokeOneWay(T msg)
throws WebServiceException;Dispatch object is created. For example if the Dispatch object is created using createDispatch(portName, DOMSource.class, Service.Mode.PAYLOAD), then the request is packaged into a DOMSource object.
JAXBContext object can marshal and unmarshal.
Dispatch Object” shows code for making a oneway invocation on a remote service using a JAXB object.
Example 41.8. Making a One Way Invocation Using a Dispatch Object
// Creating a JAXBContext and an Unmarshaller for the request
JAXBContext jbc = JAXBContext.newInstance("org.apache.cxf.StockExample");
Unmarshaller u = jbc.createUnmarshaller();
// Read the request from disk
File rf = new File("request.xml");
GetStockPrice request = (GetStockPrice)u.unmarshal(rf);
// Dispatch disp created previously
disp.invokeOneWay(request);41.2. Using XML in a Service Provider
Provider interface is a low-level JAX-WS API that allows you to implement a service provider that works directly with messages as raw XML. The messages are not packaged into JAXB objects before being passed to an object that implements the Provider interface.
41.2.1. Messaging Modes
Overview
Provider interface have two messaging modes:
Message mode
Provider implementation works with complete messages. A complete message includes any binding specific headers and wrappers. For example, a Provider implementation that uses a SOAP binding receives requests as fully specified SOAP message. Any response returned from the implementation must be a fully specified SOAP message.
Provider implementation uses message mode by provide the value java.xml.ws.Service.Mode.MESSAGE as the value to the javax.xml.ws.ServiceMode annotation, as shown in Example 41.9, “Specifying that a Provider Implementation Uses Message Mode”.
Example 41.9. Specifying that a Provider Implementation Uses Message Mode
@WebServiceProvider
@ServiceMode(value=Service.Mode.MESSAGE)
public class stockQuoteProvider implements Provider<SOAPMessage>
{
...
}Payload mode
Provider implementation works with only the payload of a message. For example, a Provider implementation working in payload mode works only with the body of a SOAP message. The binding layer processes any binding level wrappers and headers.
Provider implementation uses payload mode by provide the value java.xml.ws.Service.Mode.PAYLOAD as the value to the javax.xml.ws.ServiceMode annotation, as shown in Example 41.10, “Specifying that a Provider Implementation Uses Payload Mode”.
Example 41.10. Specifying that a Provider Implementation Uses Payload Mode
@WebServiceProvider
@ServiceMode(value=Service.Mode.PAYLOAD)
public class stockQuoteProvider implements Provider<DOMSource>
{
...
}@ServiceMode annotation, the Provider implementation uses payload mode.
41.2.2. Data Types
Overview
Provider implementations cannot use the same JAXB generated types as the higher level consumer APIs. Provider implementations work with the following types of objects:
Using Source objects
Provider implementation can accept and return objects that are derived from the javax.xml.transform.Source interface. Source objects are low level objects that hold XML documents. Each Source implementation provides methods that access the stored XML documents and manipulate its contents. The following objects implement the Source interface:
DOMSource- Holds XML messages as a Document Object Model(DOM) tree. The XML message is stored as a set of
Nodeobjects that are accessed using thegetNode()method. Nodes can be either updated or added to the DOM tree using thesetNode()method. SAXSource- Holds XML messages as a Simple API for XML (SAX) object. SAX objects contain an
InputSourceobject that holds the raw data and anXMLReaderobject that parses the raw data. StreamSource- Holds XML messages as a data stream. The data stream can be manipulated the same as any other data stream.
Provider object so that it uses generic Source objects, Apache CXF returns the messages as SAXSource objects.
Source objects the developer is responsible for ensuring that all required binding specific wrappers are added to the message. For example, when interacting with a service expecting SOAP messages, the developer must ensure that the required SOAP envelope is added to the outgoing request and that the SOAP envelope's contents are correct.
Using SOAPMessage objects
Provider implementations can use javax.xml.soap.SOAPMessage objects when the following conditions are true:
- The
Providerimplementation is using the SOAP binding - The
Providerimplementation is using message mode
SOAPMessage object holds a SOAP message. They contain one SOAPPart object and zero or more AttachmentPart objects. The SOAPPart object contains the SOAP specific portions of the SOAP message including the SOAP envelope, any SOAP headers, and the SOAP message body. The AttachmentPart objects contain binary data that is passed as an attachment.
Using DataSource objects
Provider implementations can use objects that implement the javax.activation.DataSource interface when the following conditions are true:
- The implementation is using the HTTP binding
- The implementation is using message mode
DataSource objects provide a mechanism for working with MIME typed data from a variety of sources, including URLs, files, and byte arrays.
41.2.3. Implementing a Provider Object
Overview
Provider interface is relatively easy to implement. It only has one method, invoke(), that must be implemented. In addition it has three simple requirements:
- An implementation must have the
@WebServiceProviderannotation. - An implementation must have a default public constructor.
- An implementation must implement a typed version of the
Providerinterface.In other words, you cannot implement aProvider<T>interface. You must implement a version of the interface that uses a concrete data type as listed in Section 41.2.2, “Data Types”. For example, you can implement an instance of aProvider<SAXSource>.
Provider interface is in the logic handling the request messages and building the proper responses.
Working with messages
Provider implementations receive requests as raw XML data, and must send responses as raw XML data. This requires that the developer has intimate knowledge of the messages used by the service being implemented. These details can typically be found in the WSDL document describing the service.
- The root element of a request is based in the value of the
nameattribute of thewsdl:operationelement that corresponds to the operation that is invoked.WarningIf the service uses doc/literal bare messages, the root element of the request is based on the value ofnameattribute of thewsdl:partelement referred to by thewsdl:operationelement. - The root element of all messages is namespace qualified.
- If the service uses rpc/literal messages, the top-level elements in the messages are not namespace qualified.ImportantThe children of top-level elements might be namespace qualified, but to be certain you will must check their schema definitions.
- If the service uses rpc/literal messages, none of the top-level elements can be null.
- If the service uses doc/literal messages, then the schema definition of the message determines if any of the elements are namespace qualified.
The @WebServiceProvider annotation
Provider implementation must be decorated with the @WebServiceProvider annotation.
@WebServiceProvider Properties” describes the properties that can be set for the @WebServiceProvider annotation.
Table 41.2. @WebServiceProvider Properties
| Property | Description |
|---|---|
| portName | Specifies the value of the name attribute of the wsdl:port element that defines the service's endpoint. |
| serviceName | Specifies the value of the name attribute of the wsdl:service element that contains the service's endpoint. |
| targetNamespace | Specifies the targetname space of the service's WSDL definition. |
| wsdlLocation | Specifies the URI for the WSDL document defining the service. |
Implementing the invoke() method
Provider interface has only one method, invoke(), that must be implemented. The invoke() method receives the incoming request packaged into the type of object declared by the type of Provider interface being implemented, and returns the response message packaged into the same type of object. For example, an implementation of a Provider<SOAPMessage> interface receives the request as a SOAPMessage object and returns the response as a SOAPMessage object.
Provider implementation determines the amount of binding specific information the request and the response messages contain. Implementations using message mode receive all of the binding specific wrappers and headers along with the request. They must also add all of the binding specific wrappers and headers to the response message. Implementations using payload mode only receive the body of the request. The XML document returned by an implementation using payload mode is placed into the body of the request message.
Examples
Provider<SOAPMessage> Implementation” shows a Provider implementation that works with SOAPMessage objects in message mode.
Example 41.11. Provider<SOAPMessage> Implementation
import javax.xml.ws.Provider; import javax.xml.ws.Service; import javax.xml.ws.ServiceMode; import javax.xml.ws.WebServiceProvider; 1@WebServiceProvider(portName="stockQuoteReporterPort" serviceName="stockQuoteReporter") 2@ServiceMode(value="Service.Mode.MESSAGE") public class stockQuoteReporterProvider implements Provider<SOAPMessage> { 3public stockQuoteReporterProvider() { } 4public SOAPMessage invoke(SOAPMessage request) { 5 SOAPBody requestBody = request.getSOAPBody(); 6 if(requestBody.getElementName.getLocalName.equals("getStockPrice")) { 7 MessageFactory mf = MessageFactory.newInstance(); SOAPFactory sf = SOAPFactory.newInstance(); 8 SOAPMessage response = mf.createMessage(); SOAPBody respBody = response.getSOAPBody(); Name bodyName = sf.createName("getStockPriceResponse"); respBody.addBodyElement(bodyName); SOAPElement respContent = respBody.addChildElement("price"); respContent.setValue("123.00"); response.saveChanges(); 9 return response; } ... } }
Provider<SOAPMessage> Implementation” does the following:
- 1
- Specifies that the following class implements a
Providerobject that implements the service whosewsdl:serviceelement is namedstockQuoteReporter, and whosewsdl:portelement is namedstockQuoteReporterPort. - 2
- Specifies that this
Providerimplementation uses message mode. - 3
- Provides the required default public constructor.
- 4
- Provides an implementation of the
invoke()method that takes aSOAPMessageobject and returns aSOAPMessageobject. - 5
- Extracts the request message from the body of the incoming SOAP message.
- 6
- Checks the root element of the request message to determine how to process the request.
- 7
- Creates the factories required for building the response.
- 8
- Builds the SOAP message for the response.
- 9
- Returns the response as a
SOAPMessageobject.
Provider<DOMSource> Implementation” shows an example of a Provider implementation using DOMSource objects in payload mode.
Example 41.12. Provider<DOMSource> Implementation
import javax.xml.ws.Provider; import javax.xml.ws.Service; import javax.xml.ws.ServiceMode; import javax.xml.ws.WebServiceProvider; 1@WebServiceProvider(portName="stockQuoteReporterPort" serviceName="stockQuoteReporter") 2@ServiceMode(value="Service.Mode.PAYLOAD") public class stockQuoteReporterProvider implements Provider<DOMSource> 3public stockQuoteReporterProvider() { } 4public DOMSource invoke(DOMSource request) { DOMSource response = new DOMSource(); ... return response; } }
Provider<DOMSource> Implementation” does the following:
- 1
- Specifies that the class implements a
Providerobject that implements the service whosewsdl:serviceelement is namedstockQuoteReporter, and whosewsdl:portelement is namedstockQuoteReporterPort. - 2
- Specifies that this
Providerimplementation uses payload mode. - 3
- Provides the required default public constructor.
- 4
- Provides an implementation of the
invoke()method that takes aDOMSourceobject and returns aDOMSourceobject.
Chapter 42. Working with Contexts
Abstract
42.1. Understanding Contexts
Overview
Handler implementations have direct access to the contexts and can access all properties that are set in them. Service implementations access contexts by having them injected, and can only access properties that are set in the APPLICATION scope. Consumer implementations can only access properties that are set in the APPLICATION scope.
Figure 42.1. Message Contexts and Message Processing Path
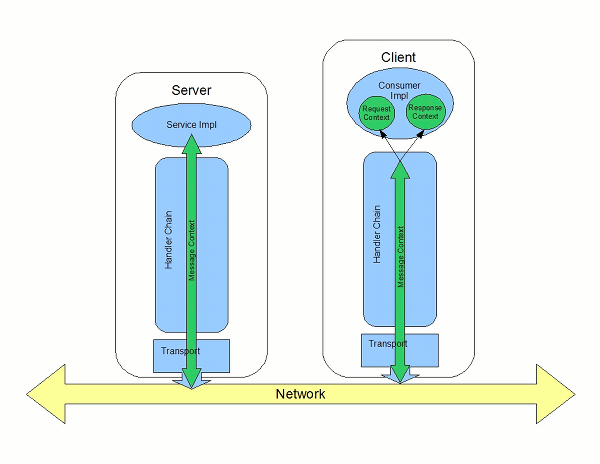
How properties are stored in a context
javax.xml.ws.handler.MessageContext interface. The MessageContext interface extends the java.util.Map<String key, Object value> interface. Map objects store information as key value pairs.
String that identifies the property. The value of a property can be any value stored in any Java object. When the value is returned from a message context, the application must know the type to expect and cast accordingly. For example, if a property's value is stored in a UserInfo object it is still returned from a message context as an Object object that must be cast back into a UserInfo object.
Property scopes
APPLICATION- Properties scoped as
APPLICATIONare available to JAX-WSHandlerimplementations, consumer implementation code, and service provider implementation code. If a handler needs to pass a property to the service provider implementation, it sets the property's scope toAPPLICATION. All properties set from either the consumer implementation or the service provider implementation contexts are automatically scoped asAPPLICATION. HANDLER- Properties scoped as
HANDLERare only available to JAX-WSHandlerimplementations. Properties stored in a message context from aHandlerimplementation are scoped asHANDLERby default.
setScope() method. Example 42.1, “The MessageContext.setScope() Method” shows the method's signature.
Example 42.1. The MessageContext.setScope() Method
void setScope(String key,
MessageContext.Scope scope)
throws java.lang.IllegalArgumentException;MessageContext.Scope.APPLICATIONMessageContext.Scope.HANDLER
Overview of contexts in handlers
Handler interface have direct access to a message's context information. The message's context information is passed into the Handler implementation's handleMessage(), handleFault(), and close() methods.
Handler implementations have access to all of the properties stored in the message context, regardless of their scope. In addition, logical handlers use a specialized message context called a LogicalMessageContext. LogicalMessageContext objects have methods that access the contents of the message body.
Overview of contexts in service implementations
APPLICATION from the message context. The service provider's implementation object accesses the message context through the WebServiceContext object.
Overview of contexts in consumer implementations
- Request context — holds a copy of the properties used for outgoing requests
- Response context — holds a copy of the properties from an incoming response
Handler implementations.
APPLICATION in its message context to the consumer implementation's response context.
42.2. Working with Contexts in a Service Implementation
Overview
WebServiceContext interface. From the WebServiceContext object you can obtain a MessageContext object that is populated with the current request's context properties in the application scope. You can manipulate the values of the properties, and they are propagated back through the response chain.
MessageContext interface inherits from the java.util.Map interface. Its contents can be manipulated using the Map interface's methods.
Obtaining a context
- Declare a variable of type
WebServiceContext. - Decorate the variable with the
javax.annotation.Resourceannotation to indicate that the context information is being injected into the variable. - Obtain the
MessageContextobject from theWebServiceContextobject using thegetMessageContext()method.ImportantgetMessageContext()can only be used in methods that are decorated with the@WebMethodannotation.
Example 42.2. Obtaining a Context Object in a Service Implementation
import javax.xml.ws.*;
import javax.xml.ws.handler.*;
import javax.annotation.*;
@WebServiceProvider
public class WidgetServiceImpl
{
@Resource
WebServiceContext wsc;
@WebMethod
public String getColor(String itemNum)
{
MessageContext context = wsc.getMessageContext();
}
...
}Reading a property from a context
MessageContext object for your implementation, you can access the properties stored there using the get() method shown in Example 42.3, “The MessageContext.get() Method”.
Example 42.3. The MessageContext.get() Method
V get(Object key);get() is inherited from the Map interface.
key parameter is the string representing the property you want to retrieve from the context. The get() returns an object that must be cast to the proper type for the property. Table 42.1, “Properties Available in the Service Implementation Context” lists a number of the properties that are available in a service implementation's context.
operation element that represents the invoked operation.
Example 42.4. Getting a Property from a Service's Message Context
import javax.xml.ws.handler.MessageContext; import org.apache.cxf.message.Message; ... // MessageContext context retrieved in a previous example QName wsdl_operation = (QName)context.get(Message.WSDL_OPERATION);
Setting properties in a context
MessageContext object for your implementation, you can set properties, and change existing properties, using the put() method shown in Example 42.5, “The MessageContext.put() Method”.
Example 42.5. The MessageContext.put() Method
V put(K key,
V value)
throws ClassCastException, IllegalArgumentException, NullPointerException;put() method replaces the existing value with the new value and returns the old value. If the property does not already exist in the message context, the put() method sets the property and returns null.
Example 42.6. Setting a Property in a Service's Message Context
import javax.xml.ws.handler.MessageContext; import org.apache.cxf.message.Message; ... // MessageContext context retrieved in a previous example context.put(Message.RESPONSE_CODE, new Integer(404));
Supported contexts
Table 42.1. Properties Available in the Service Implementation Context
| Base Class | |
|---|---|
| Property Name | Description |
org.apache.cxf.message.Message | |
PROTOCOL_HEADERS[a] | Specifies the transport specific header information. The value is stored as a java.util.Map<String, List<String>>. |
RESPONSE_CODE[a] | Specifies the response code returned to the consumer. The value is stored as an Integer object. |
ENDPOINT_ADDRESS | Specifies the address of the service provider. The value is stored as a String. |
HTTP_REQUEST_METHOD[a] | Specifies the HTTP verb sent with a request. The value is stored as a String. |
PATH_INFO[a] |
Specifies the path of the resource being requested. The value is stored as a
String.
The path is the portion of the URI after the hostname and before any query string. For example, if an endpoint's URI is http://cxf.apache.org/demo/widgets the path is
/demo/widgets.
|
QUERY_STRING[a] |
Specifies the query, if any, attached to the URI used to invoke the request. The value is stored as a
String.
Queries appear at the end of the URI after a
?. For example, if a request is made to http://cxf.apache.org/demo/widgets?color the query is color.
|
MTOM_ENABLED | Specifies whether or not the service provider can use MTOM for SOAP attachments. The value is stored as a Boolean. |
SCHEMA_VALIDATION_ENABLED | Specifies whether or not the service provider validates messages against a schema. The value is stored as a Boolean. |
FAULT_STACKTRACE_ENABLED | Specifies if the runtime provides a stack trace along with a fault message. The value is stored as a Boolean. |
CONTENT_TYPE | Specifies the MIME type of the message. The value is stored as a String. |
BASE_PATH |
Specifies the path of the resource being requested. The value is stored as a
java.net.URL.
The path is the portion of the URI after the hostname and before any query string. For example, if an endpoint's URL is http://cxf.apache.org/demo/widgets the base path is
/demo/widgets.
|
ENCODING | Specifies the encoding of the message. The value is stored as a String. |
FIXED_PARAMETER_ORDER | Specifies whether the parameters must appear in the message in a particular order. The value is stored as a Boolean. |
MAINTAIN_SESSION | Specifies if the consumer wants to maintain the current session for future requests. The value is stored as a Boolean. |
WSDL_DESCRIPTION[a] | Specifies the WSDL document that defines the service being implemented. The value is stored as a org.xml.sax.InputSource object. |
WSDL_SERVICE[a] | Specifies the qualified name of the wsdl:service element that defines the service being implemented. The value is stored as a QName. |
WSDL_PORT[a] | Specifies the qualified name of the wsdl:port element that defines the endpoint used to access the service. The value is stored as a QName. |
WSDL_INTERFACE[a] | Specifies the qualified name of the wsdl:portType element that defines the service being implemented. The value is stored as a QName. |
WSDL_OPERATION[a] | Specifies the qualified name of the wsdl:operation element that corresponds to the operation invoked by the consumer. The value is stored as a QName. |
javax.xml.ws.handler.MessageContext | |
MESSAGE_OUTBOUND_PROPERTY | Specifies if a message is outbound. The value is stored as a Boolean. true specifies that a message is outbound. |
INBOUND_MESSAGE_ATTACHMENTS |
Contains any attachments included in the request message. The value is stored as a
java.util.Map<String, DataHandler>.
The key value for the map is the MIME Content-ID for the header.
|
OUTBOUND_MESSAGE_ATTACHMENTS |
Contains any attachments for the response message. The value is stored as a
java.util.Map<String, DataHandler>.
The key value for the map is the MIME Content-ID for the header.
|
WSDL_DESCRIPTION | Specifies the WSDL document that defines the service being implemented. The value is stored as a org.xml.sax.InputSource object. |
WSDL_SERVICE | Specifies the qualified name of the wsdl:service element that defines the service being implemented. The value is stored as a QName. |
WSDL_PORT | Specifies the qualified name of the wsdl:port element that defines the endpoint used to access the service. The value is stored as a QName. |
WSDL_INTERFACE | Specifies the qualified name of the wsdl:portType element that defines the service being implemented. The value is stored as a QName. |
WSDL_OPERATION | Specifies the qualified name of the wsdl:operation element that corresponds to the operation invoked by the consumer. The value is stored as a QName. |
HTTP_RESPONSE_CODE | Specifies the response code returned to the consumer. The value is stored as an Integer object. |
HTTP_REQUEST_HEADERS | Specifies the HTTP headers on a request. The value is stored as a java.util.Map<String, List<String>>. |
HTTP_RESPONSE_HEADERS | Specifies the HTTP headers for the response. The value is stored as a java.util.Map<String, List<String>>. |
HTTP_REQUEST_METHOD | Specifies the HTTP verb sent with a request. The value is stored as a String. |
SERVLET_REQUEST | Contains the servlet's request object. The value is stored as a javax.servlet.http.HttpServletRequest. |
SERVLET_RESPONSE | Contains the servlet's response object. The value is stored as a javax.servlet.http.HttpResponse. |
SERVLET_CONTEXT | Contains the servlet's context object. The value is stored as a javax.servlet.ServletContext. |
PATH_INFO |
Specifies the path of the resource being requested. The value is stored as a
String.
The path is the portion of the URI after the hostname and before any query string. For example, if an endpoint's URL is http://cxf.apache.org/demo/widgets the path is
/demo/widgets.
|
QUERY_STRING |
Specifies the query, if any, attached to the URI used to invoke the request. The value is stored as a
String.
Queries appear at the end of the URI after a
?. For example, if a request is made to http://cxf.apache.org/demo/widgets?color the query string is color.
|
REFERENCE_PARAMETERS | Specifies the WS-Addressing reference parameters. This includes all of the SOAP headers whose wsa:IsReferenceParameter attribute is set to true. The value is stored as a java.util.List. |
org.apache.cxf.transport.jms.JMSConstants | |
JMS_SERVER_HEADERS | Contains the JMS message headers. For more information see Section 42.4, “Working with JMS Message Properties”. |
[a]
When using HTTP this property is the same as the standard JAX-WS defined property.
| |
42.3. Working with Contexts in a Consumer Implementation
Overview
BindingProvider interface. The BindingProvider instance holds context information in two separate contexts:
- Request Context
- The request context enables you to set properties that affect outbound messages. Request context properties are applied to a specific port instance and, once set, the properties affect every subsequent operation invocation made on the port, until such time as a property is explicitly cleared. For example, you might use a request context property to set a connection timeout or to initialize data for sending in a header.
- Response Context
- The response context enables you to read the property values set by the response to the last operation invocation made from the current thread. Response context properties are reset after every operation invocation. For example, you might access a response context property to read header information received from the last inbound message.
Obtaining a context
javax.xml.ws.BindingProvider interface. The BindingProvider interface has two methods for obtaining a context:
getRequestContext()- The
getRequestContext()method, shown in Example 42.7, “ThegetRequestContext()Method”, returns the request context as aMapobject. The returnedMapobject can be used to directly manipulate the contents of the context.Example 42.7. The
getRequestContext()MethodMap<String, Object> getRequestContext(); getResponseContext()- The
getResponseContext(), shown in Example 42.8, “ThegetResponseContext()Method”, returns the response context as aMapobject. The returnedMapobject's contents reflect the state of the response context's contents from the most recent successful request on a remote service made in the current thread.Example 42.8. The
getResponseContext()MethodMap<String, Object> getResponseContext();
BindingProvider interface, a BindingProvider object can be obtained by casting a proxy object. The contexts obtained from the BindingProvider object are only valid for operations invoked on the proxy object used to create it.
Example 42.9. Getting a Consumer's Request Context
// Proxy widgetProxy obtained previously BindingProvider bp = (BindingProvider)widgetProxy; Map<String, Object> responseContext = bp.getResponseContext();
Reading a property from a context
java.util.Map<String, Object> objects. The map has keys that are String objects and values that contain arbitrary objects. Use java.util.Map.get() to access an entry in the map of response context properties.
Example 42.10. Reading a Response Context Property
// Invoke an operation. port.SomeOperation(); // Read response context property. java.util.Map<String, Object> responseContext = ((javax.xml.ws.BindingProvider)port).getResponseContext(); PropertyType propValue = (PropertyType) responseContext.get(ContextPropertyName);
Setting properties in a context
java.util.Map<String, Object> objects. The map has keys that are String objects and values that are arbitrary objects. To set a property in a context use the java.util.Map.put() method.
BindingProvider.ENDPOINT_ADDRESS_PROPERTY.
Example 42.11. Setting a Request Context Property
// Set request context property.
java.util.Map<String, Object> requestContext =
((javax.xml.ws.BindingProvider)port).getRequestContext();
requestContext.put(BindingProvider.ENDPOINT_ADDRESS_PROPERTY, "http://localhost:8080/widgets");
// Invoke an operation.
port.SomeOperation();Supported contexts
Table 42.2. Consumer Context Properties
| Base Class | |
|---|---|
| Property Name | Description |
javax.xml.ws.BindingProvider | |
ENDPOINT_ADDRESS_PROPERTY | Specifies the address of the target service. The value is stored as a String. |
USERNAME_PROPERTY[a] | Specifies the username used for HTTP basic authentication. The value is stored as a String. |
PASSWORD_PROPERTY[b] | Specifies the password used for HTTP basic authentication. The value is stored as a String. |
SESSION_MAINTAIN_PROPERTY[c] | Specifies if the client wants to maintain session information. The value is stored as a Boolean object. |
| org.apache.cxf.ws.addressing.JAXWSAConstants | |
CLIENT_ADDRESSING_PROPERTIES | Specifies the WS-Addressing information used by the consumer to contact the desired service provider. The value is stored as a org.apache.cxf.ws.addressing.AddressingProperties. |
| org.apache.cxf.transports.jms.context.JMSConstants | |
JMS_CLIENT_REQUEST_HEADERS | Contains the JMS headers for the message. For more information see Section 42.4, “Working with JMS Message Properties”. |
[a]
This property is overridden by the username defined in the HTTP security settings.
[b]
This property is overridden by the password defined in the HTTP security settings.
[c]
The Apache CXF ignores this property.
| |
42.4. Working with JMS Message Properties
42.4.1. Inspecting JMS Message Headers
org.apache.cxf.transports.jms.context.JMSMessageHeadersType object.
Getting the JMS Message Headers in a Service
WebServiceContext object, do the following:
- Obtain the context as described in the section called “Obtaining a context”.
- Get the message headers from the message context using the message context's
get()method with the parameterorg.apache.cxf.transports.jms.JMSConstants.JMS_SERVER_HEADERS.
Example 42.12. Getting JMS Message Headers in a Service Implementation
import org.apache.cxf.transport.jms.JMSConstants;
import org.apache.cxf.transports.jms.context.JMSMessageHeadersType;
@WebService(serviceName = "HelloWorldService",
portName = "HelloWorldPort",
endpointInterface = "org.apache.cxf.hello_world_jms.HelloWorldPortType",
targetNamespace = "http://cxf.apache.org/hello_world_jms")
public class GreeterImplTwoWayJMS implements HelloWorldPortType
{
@Resource
protected WebServiceContext wsContext;
...
@WebMethod
public String greetMe(String me)
{
MessageContext mc = wsContext.getMessageContext();
JMSMessageHeadersType headers = (JMSMessageHeadersType) mc.get(JMSConstants.JMS_SERVER_HEADERS);
...
}
...
}Getting JMS Message Header Properties in a Consumer
- Get the response context as described in the section called “Obtaining a context”.
- Get the JMS message header properties from the response context using the context's
get()method withorg.apache.cxf.transports.jms.JMSConstants.JMS_CLIENT_RESPONSE_HEADERSas the parameter.
Example 42.13. Getting the JMS Headers from a Consumer Response Header
import org.apache.cxf.transports.jms.context.*; // Proxy greeter initialized previously 1BindingProvider bp = (BindingProvider)greeter; 2Map<String, Object> responseContext = bp.getResponseContext(); 3JMSMessageHeadersType responseHdr = (JMSMessageHeadersType) responseContext.get(JMSConstants.JMS_CLIENT_REQUEST_HEADERS); ... }
42.4.2. Inspecting the Message Header Properties
Standard JMS Header Properties
Table 42.3. JMS Header Properties
| Property Name | Property Type | Getter Method |
|---|---|---|
| Correlation ID | string | getJMSCorralationID() |
| Delivery Mode | int | getJMSDeliveryMode() |
| Message Expiration | long | getJMSExpiration() |
| Message ID | string | getJMSMessageID() |
| Priority | int | getJMSPriority() |
| Redelivered | boolean | getJMSRedlivered() |
| Time Stamp | long | getJMSTimeStamp() |
| Type | string | getJMSType() |
| Time To Live | long | getTimeToLive() |
Optional Header Properties
JMSMessageHeadersType.getProperty(). The optional properties are returned as a List of org.apache.cxf.transports.jms.context.JMSPropertyType. Optional properties are stored as name/value pairs.
Example
Example 42.14. Reading the JMS Header Properties
// JMSMessageHeadersType messageHdr retrieved previously 1System.out.println("Correlation ID: "+messageHdr.getJMSCorrelationID()); 2System.out.println("Message Priority: "+messageHdr.getJMSPriority()); 3System.out.println("Redelivered: "+messageHdr.getRedelivered()); JMSPropertyType prop = null; 4List<JMSPropertyType> optProps = messageHdr.getProperty(); 5Iterator<JMSPropertyType> iter = optProps.iterator(); 6while (iter.hasNext()) { prop = iter.next(); System.out.println("Property name: "+prop.getName()); System.out.println("Property value: "+prop.getValue()); }
- 1
- Prints the value of the message's correlation ID.
- 2
- Prints the value of the message's priority property.
- 3
- Prints the value of the message's redelivered property.
- 4
- Gets the list of the message's optional header properties.
- 5
- Gets an
Iteratorto traverse the list of properties. - 6
- Iterates through the list of optional properties and prints their name and value.
42.4.3. Setting JMS Properties
JMS Header Properties
Table 42.4. Settable JMS Header Properties
| Property Name | Property Type | Setter Method |
|---|---|---|
| Correlation ID | string | setJMSCorralationID() |
| Delivery Mode | int | setJMSDeliveryMode() |
| Priority | int | setJMSPriority() |
| Time To Live | long | setTimeToLive() |
- Create an
org.apache.cxf.transports.jms.context.JMSMessageHeadersTypeobject. - Populate the values you want to set using the appropriate setter methods described in Table 42.4, “Settable JMS Header Properties”.
- Set the values to the request context by calling the request context's
put()method usingorg.apache.cxf.transports.jms.JMSConstants.JMS_CLIENT_REQUEST_HEADERSas the first argument, and the newJMSMessageHeadersTypeobject as the second argument.
Optional JMS Header Properties
JMSMessageHeadersType object that is used to set the other JMS header properties. They are stored as a List object containing org.apache.cxf.transports.jms.context.JMSPropertyType objects. To add optional properties to the JMS header do the following:
- Create a
JMSPropertyTypeobject. - Set the property's name field using
setName(). - Set the property's value field using
setValue(). - Add the property to the JMS message header using
JMSMessageHeadersType.getProperty().add(JMSPropertyType). - Repeat the procedure until all of the properties have been added to the message header.
Client Receive Timeout
put() method with org.apache.cxf.transports.jms.JMSConstants.JMS_CLIENT_RECEIVE_TIMEOUT as the first argument and a long representing the amount of time in milliseconds that you want the consumer to wait as the second argument.
Example
Example 42.15. Setting JMS Properties using the Request Context
import org.apache.cxf.transports.jms.context.*; // Proxy greeter initialized previously 1InvocationHandler handler = Proxy.getInvocationHandler(greeter); BindingProvider bp= null; 2if (handler instanceof BindingProvider) { 3 bp = (BindingProvider)handler; 4 Map<String, Object> requestContext = bp.getRequestContext(); 5 JMSMessageHeadersType requestHdr = new JMSMessageHeadersType(); 6 requestHdr.setJMSCorrelationID("WithBob"); 7 requestHdr.setJMSExpiration(3600000L); 8 JMSPropertyType prop = new JMSPropertyType; 9 prop.setName("MyProperty"); prop.setValue("Bluebird"); 10 requestHdr.getProperty().add(prop); 11 requestContext.put(JMSConstants.CLIENT_REQUEST_HEADERS, requestHdr); 12 requestContext.put(JMSConstants.CLIENT_RECEIVE_TIMEOUT, new Long(1000)); }
- 1
- Gets the
InvocationHandlerfor the proxy whose JMS properties you want to change. - 2
- Checks to see if the
InvocationHandleris aBindingProvider. - 3
- Casts the returned
InvocationHandlerobject into aBindingProviderobject to retrieve the request context. - 4
- Gets the request context.
- 5
- Creates a
JMSMessageHeadersTypeobject to hold the new message header values. - 6
- Sets the Correlation ID.
- 7
- Sets the Expiration property to 60 minutes.
- 8
- Creates a new
JMSPropertyTypeobject. - 9
- Sets the values for the optional property.
- 10
- Adds the optional property to the message header.
- 11
- Sets the JMS message header values into the request context.
- 12
- Sets the client receive timeout property to 1 second.
Chapter 43. Writing Handlers
Abstract
43.1. Handlers: An Introduction
Overview
Figure 43.1. Message Exchange Path
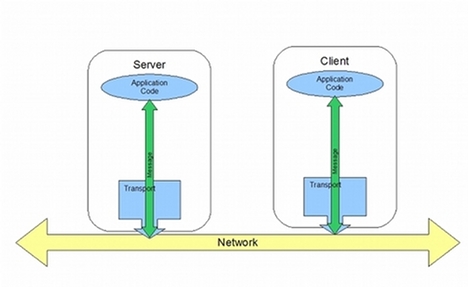
Figure 43.2. Message Exchange Path with Handlers
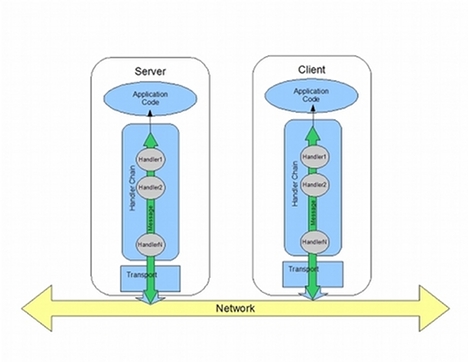
Handler types
- Logical Handler
- Logical handlers can process the message payload and the properties stored in the message context. For example, if the application uses pure XML messages, the logical handlers have access to the entire message. If the application uses SOAP messages, the logical handlers have access to the contents of the SOAP body. They do not have access to either the SOAP headers or any attachments unless they were placed into the message context.Logical handlers are placed closest to the application code on the handler chain. This means that they are executed first when a message is passed from the application code to the transport. When a message is received from the network and passed back to the application code, the logical handlers are executed last.
- Protocol Handler
- Protocol handlers can process the entire message received from the network and the properties stored in the message context. For example, if the application uses SOAP messages, the protocol handlers would have access to the contents of the SOAP body, the SOAP headers, and any attachments.Protocol handlers are placed closest to the transport on the handler chain. This means that they are executed first when a message is received from the network. When a message is sent to the network from the application code, the protocol handlers are executed last.TipThe only protocol handler supported by Apache CXF is specific to SOAP.
Implementation of handlers
- handleMessage()
- The
handleMessage()method is the central method in any handler. It is the method responsible for processing normal messages. - handleFault()
handleFault()is the method responsible for processing fault messages.- close()
close()is called on all executed handlers in a handler chain when a message has reached the end of the chain. It is used to clean up any resources consumed during message processing.
- The specific interface that is implementedAll handlers implement an interface that derives from the
Handlerinterface. Logical handlers implement theLogicalHandlerinterface. Protocol handlers implement protocol specific extensions of theHandlerinterface. For example, SOAP handlers implement theSOAPHandlerinterface. - The amount of information available to the handlerProtocol handlers have access to the contents of messages and all of the protocol specific information that is packaged with the message content. Logical handlers can only access the contents of the message. Logical handlers have no knowledge of protocol details.
Adding handlers to an application
- Determine whether the handler is going to be used on the service providers, the consumers, or both.
- Determine which type of handler is the most appropriate for the job.
- Implement the proper interface.To implement a logical handler see Section 43.2, “Implementing a Logical Handler”.To implement a protocol handler see Section 43.4, “Implementing a Protocol Handler”.
- Configure your endpoint(s) to use the handlers.
43.2. Implementing a Logical Handler
Overview
javax.xml.ws.handler.LogicalHandler interface. The LogicalHandler interface, shown in Example 43.1, “LogicalHandler Synopsis” passes a LogicalMessageContext object to the handleMessage() method and the handleFault() method. The context object provides access to the body of the message and to any properties set into the message exchange's context.
Example 43.1. LogicalHandler Synopsis
public interface LogicalHandler extends Handler
{
boolean handleMessage(LogicalMessageContext context);
boolean handleFault(LogicalMessageContext context);
void close(LogicalMessageContext context);
}Procedure
- Implement any initialization logic required by the handler.
- Implement the message handling logic.
- Implement the fault handling logic.
- Implement the logic for closing the handler when it is finished.
- Implement any logic for cleaning up the handler's resources before it is destroyed.
43.3. Handling Messages in a Logical Handler
Overview
handleMessage() method.
handleMessage() method receives a LogicalMessageContext object that provides access to the message body and any properties stored in the message context.
handleMessage() method returns either true or false depending on how message processing is to continue. It can also throw an exception.
Getting the message data
LogicalMessageContext object passed into logical message handlers allows access to the message body using the context's getMessage() method. The getMessage() method, shown in Example 43.2, “Method for Getting the Message Payload in a Logical Handler”, returns the message payload as a LogicalMessage object.
Example 43.2. Method for Getting the Message Payload in a Logical Handler
LogicalMessage getMessage();LogicalMessage object, you can use it to manipulate the message body. The LogicalMessage interface, shown in Example 43.3, “Logical Message Holder”, has getters and setters for working with the actual message body.
Example 43.3. Logical Message Holder
LogicalMessage {Source getPayload();Object getPayload(JAXBContext context);void setPayload(Object payload,
JAXBContext context);void setPayload(Source payload);
}
Working with the message body as an XML object
javax.xml.transform.dom.DOMSource object.
getPayload() method that has no parameters returns the message payload as a DOMSource object. The returned object is the actual message payload. Any changes made to the returned object change the message body immediately.
DOMSource object using the setPayload() method that takes the single Source object.
Working with the message body as a JAXB object
JAXBContext object to transform the message payload into JAXB objects.
- Get a
JAXBContextobject that can manage the data types in the message body.For information on creating aJAXBContextobject see Chapter 38, Using AJAXBContextObject. - Get the message body as shown in Example 43.4.
Example 43.4. Getting the Message Body as a JAXB Object
JAXBContext jaxbc = JAXBContext(myObjectFactory.class); Object body = message.getPayload(jaxbc); - Cast the returned object to the proper type.
- Manipulate the message body as needed.
- Put the updated message body back into the context as shown in Example 43.5.
Example 43.5. Updating the Message Body Using a JAXB Object
message.setPayload(body, jaxbc);
Working with context properties
APPLICATION scope and the HANDLER scope.
Map. To access the properties stored in the context, you use the get() method and put() method inherited from the Map interface.
HANDLER. If you want the application code to be able to access the property you need to use the context's setScope() method to explicitly set the property's scope to APPLICATION.
Determining the direction of the message
MessageContext.MESSAGE_OUTBOUND_PROPERTY key as shown in Example 43.6, “Getting the Message's Direction from the SOAP Message Context”.
Example 43.6. Getting the Message's Direction from the SOAP Message Context
Boolean outbound; outbound = (Boolean)smc.get(MessageContext.MESSAGE_OUTBOUND_PROPERTY);
Boolean object. You can use the object's booleanValue() method to determine the property's value. If the property is set to true, the message is outbound. If the property is set to false the message is inbound.
Determining the return value
handleMessage() method completes its message processing has a direct impact on how message processing proceeds. It can complete by doing one of the following actions:
- Return
true—Returningtruesignals to the Apache CXF runtime that message processing should continue normally. The next handler, if any, has itshandleMessage()invoked. - Return
false—Returningfalsesignals to the Apache CXF runtime that normal message processing must stop. How the runtime proceeds depends on the message exchange pattern in use for the current message.For request-response message exchanges the following happens:- The direction of message processing is reversed.For example, if a request is being processed by a service provider, the message stops progressing toward the service's implementation object. Instead, it is sent back towards the binding for return to the consumer that originated the request.
- Any message handlers that reside along the handler chain in the new processing direction have their
handleMessage()method invoked in the order in which they reside in the chain. - When the message reaches the end of the handler chain it is dispatched.
For one-way message exchanges the following happens:- Message processing stops.
- All previously invoked message handlers have their
close()method invoked. - The message is dispatched.
- Throw a
ProtocolExceptionexception—Throwing aProtocolExceptionexception, or a subclass of this exception, signals the Apache CXF runtime that fault message processing is beginning. How the runtime proceeds depends on the message exchange pattern in use for the current message.For request-response message exchanges the following happens:- If the handler has not already created a fault message, the runtime wraps the message in a fault message.
- The direction of message processing is reversed.For example, if a request is being processed by a service provider, the message stops progressing toward the service's implementation object. Instead, it is sent back towards the binding for return to the consumer that originated the request.
- Any message handlers that reside along the handler chain in the new processing direction have their
handleFault()method invoked in the order in which they reside in the chain. - When the fault message reaches the end of the handler chain it is dispatched.
For one-way message exchanges the following happens:- If the handler has not already created a fault message, the runtime wraps the message in a fault message.
- Message processing stops.
- All previously invoked message handlers have their
close()method invoked. - The fault message is dispatched.
- Throw any other runtime exception—Throwing a runtime exception other than a
ProtocolExceptionexception signals the Apache CXF runtime that message processing is to stop. All previously invoked message handlers have theclose()method invoked and the exception is dispatched. If the message is part of a request-response message exchange, the exception is dispatched so that it is returned to the consumer that originated the request.
Example
handleMessage() message for a logical message handler that is used by a service consumer. It processes requests before they are sent to the service provider.
Example 43.7. Logical Message Handler Message Processing
public class SmallNumberHandler implements LogicalHandler<LogicalMessageContext>
{
public final boolean handleMessage(LogicalMessageContext messageContext)
{
try
{
boolean outbound = (Boolean)messageContext.get(MessageContext.MESSAGE_OUTBOUND_PROPERTY);
if (outbound) 1
{
LogicalMessage msg = messageContext.getMessage(); 2
JAXBContext jaxbContext = JAXBContext.newInstance(ObjectFactory.class);
Object payload = msg.getPayload(jaxbContext); 3
if (payload instanceof JAXBElement)
{
payload = ((JAXBElement)payload).getValue();
}
if (payload instanceof AddNumbers) 4
{
AddNumbers req = (AddNumbers)payload;
int a = req.getArg0();
int b = req.getArg1();
int answer = a + b;
if (answer < 20) 5
{
AddNumbersResponse resp = new AddNumbersResponse(); 6
resp.setReturn(answer);
msg.setPayload(new ObjectFactory().createAddNumbersResponse(resp),
jaxbContext);
return false; 7
}
}
else
{
throw new WebServiceException("Bad Request"); 8
}
}
return true; 9
}
catch (JAXBException ex) 10
{
throw new ProtocolException(ex);
}
}
...
}- 1
- Checks if the message is an outbound request.If the message is an outbound request, the handler does additional message processing.
- 2
- Gets the
LogicalMessagerepresentation of the message payload from the message context. - 3
- Gets the actual message payload as a JAXB object.
- 4
- Checks to make sure the request is of the correct type.If it is, the handler continues processing the message.
- 5
- Checks the value of the sum.If it is less than the threshold of 20 then it builds a response and returns it to the client.
- 6
- Builds the response.
- 7
- Returns
falseto stop message processing and return the response to the client. - 8
- Throws a runtime exception if the message is not of the correct type.This exception is returned to the client.
- 9
- Returns
trueif the message is an inbound response or the sum does not meet the threshold.Message processing continues normally. - 10
- Throws a
ProtocolExceptionif a JAXB marshalling error is encountered.The exception is passed back to the client after it is processed by thehandleFault()method of the handlers between the current handler and the client.
43.4. Implementing a Protocol Handler
Overview
javax.xml.ws.handler.soap.SOAPHandler interface.
SOAPHandler interface, shown in Example 43.8, “SOAPHandler Synopsis”, uses a SOAP specific message context that provides access to the message as a SOAPMessage object. It also allows you to access the SOAP headers.
Example 43.8. SOAPHandler Synopsis
public interface SOAPHandler extends Handler
{
boolean handleMessage(SOAPMessageContext context);
boolean handleFault(SOAPMessageContext context);
void close(SOAPMessageContext context);
Set<QName> getHeaders()
}getHeaders(). This additional method returns the QNames of the header blocks the handler can process.
Procedure
- Implement any initialization logic required by the handler.
- Implement the message handling logic.
- Implement the fault handling logic.
- Implement the
getHeaders()method. - Implement the logic for closing the handler when it is finished.
- Implement any logic for cleaning up the handler's resources before it is destroyed.
Implementing the getHeaders() method
getHeaders(), shown in Example 43.9, “The SOAPHander.getHeaders() Method”, method informs the Apache CXF runtime what SOAP headers the handler is responsible for processing. It returns the QNames of the outer element of each SOAP header the handler understands.
Example 43.9. The SOAPHander.getHeaders() Method
Set<QName> getHeaders();null is sufficient. However, if the application uses the mustUnderstand attribute of any of the SOAP headers, then it is important to specify the headers understood by the application's SOAP handlers. The runtime checks the set of SOAP headers that all of the registered handlers understand against the list of headers with the mustUnderstand attribute set to true. If any of the flagged headers are not in the list of understood headers, the runtime rejects the message and throws a SOAP must understand exception.
43.5. Handling Messages in a SOAP Handler
Overview
handleMessage() method.
handleMessage() method receives a SOAPMessageHandler object that provides access to the message body as a SOAPMessage object and the SOAP headers associated with the message. In addition, the context provides access to any properties stored in the message context.
handleMessage() method returns either true or false depending on how message processing is to continue. It can also throw an exception.
Working with the message body
getMessage() method. It returns the message as a live SOAPMessage object. Any changes to the message in the handler are automatically reflected in the message stored in the context.
setMessage() method. The setMessage() method takes a SOAPMessage object.
Getting the SOAP headers
SOAPMessage object's getHeader() method. This will return the SOAP header as a SOAPHeader object that you will need to inspect to find the header elements you wish to process.
getHeaders() method, shown in Example 43.10, “The SOAPMessageContext.getHeaders() Method”, that will return an array containing JAXB objects for the specified SOAP headers.
Example 43.10. The SOAPMessageContext.getHeaders() Method
Ojbect[] getHeaders(QName header,
JAXBContext context,
boolean allRoles);allRoles parameter to false. That instructs the runtime to only return the SOAP headers that are applicable to the active SOAP roles.
JAXBContext object see Chapter 38, Using A JAXBContext Object.
Working with context properties
APPLICATION scope and the Handler scope.
Map. To access the properties stored in the context, you use the get() method and put() method inherited from the Map interface.
HANDLER. If you want the application code to be able to access the property you need to use the context's setScope() method to explicitly set the property's scope to APPLICATION.
Determining the direction of the message
MessageContext.MESSAGE_OUTBOUND_PROPERTY key as shown in Example 43.11, “Getting the Message's Direction from the SOAP Message Context”.
Example 43.11. Getting the Message's Direction from the SOAP Message Context
Boolean outbound; outbound = (Boolean)smc.get(MessageContext.MESSAGE_OUTBOUND_PROPERTY);
Boolean object. You can use the object's booleanValue() method to determine the property's value. If the property is set to true, the message is outbound. If the property is set to false the message is inbound.
Determining the return value
handleMessage() method completes its message processing has a direct impact on how message processing proceeds. It can complete by doing one of the following actions:
- return
true—Returningtruesignals to the Apache CXF runtime that message processing should continue normally. The next handler, if any, has itshandleMessage()invoked. - return
false—Returningfalsesignals to the Apache CXF runtime that normal message processing is to stop. How the runtime proceeds depends on the message exchange pattern in use for the current message.For request-response message exchanges the following happens:- The direction of message processing is reversed.For example, if a request is being processed by a service provider, the message will stop progressing toward the service's implementation object. It will instead be sent back towards the binding for return to the consumer that originated the request.
- Any message handlers that reside along the handler chain in the new processing direction have their
handleMessage()method invoked in the order in which they reside in the chain. - When the message reaches the end of the handler chain it is dispatched.
For one-way message exchanges the following happens:- Message processing stops.
- All previously invoked message handlers have their
close()method invoked. - The message is dispatched.
- throw a
ProtocolExceptionexception—Throwing aProtocolExceptionexception, or a subclass of this exception, signals the Apache CXF runtime that fault message processing is to start. How the runtime proceeds depends on the message exchange pattern in use for the current message.For request-response message exchanges the following happens:- If the handler has not already created a fault message, the runtime wraps the message in a fault message.
- The direction of message processing is reversed.For example, if a request is being processed by a service provider, the message will stop progressing toward the service's implementation object. It will be sent back towards the binding for return to the consumer that originated the request.
- Any message handlers that reside along the handler chain in the new processing direction have their
handleFault()method invoked in the order in which they reside in the chain. - When the fault message reaches the end of the handler chain it is dispatched.
For one-way message exchanges the following happens:- If the handler has not already created a fault message, the runtime wraps the message in a fault message.
- Message processing stops.
- All previously invoked message handlers have their
close()method invoked. - The fault message is dispatched.
- throw any other runtime exception—Throwing a runtime exception other than a
ProtocolExceptionexception signals the Apache CXF runtime that message processing is to stop. All previously invoked message handlers have theclose()method invoked and the exception is dispatched. If the message is part of a request-response message exchange the exception is dispatched so that it is returned to the consumer that originated the request.
Example
handleMessage() implementation that prints the SOAP message to the screen.
Example 43.12. Handling a Message in a SOAP Handler
public boolean handleMessage(SOAPMessageContext smc)
{
PrintStream out;
Boolean outbound = (Boolean)smc.get(MessageContext.MESSAGE_OUTBOUND_PROPERTY); 1
if (outbound.booleanValue()) 2
{
out.println("\nOutbound message:");
}
else
{
out.println("\nInbound message:");
}
SOAPMessage message = smc.getMessage(); 3
message.writeTo(out); 4
out.println();
return true;
}43.6. Initializing a Handler
Overview
Order of initialization
- The handler's constructor is called.
- Any resources that are specified by the
@Resourceannotation are injected. - The method decorated with
@PostConstructannotation, if it is present, is called.NoteMethods decorated with the@PostConstructannotation must have a void return type and have no parameters. - The handler is place in the
Readystate.
43.7. Handling Fault Messages
Overview
handleFault() method for processing fault messages when a ProtocolException exception is thrown during message processing.
handleFault() method receives either a LogicalMessageContext object or SOAPMessageContext object depending on the type of handler. The received context gives the handler's implementation access to the message payload.
handleFault() method returns either true or false, depending on how fault message processing is to proceed. It can also throw an exception.
Getting the message payload
handleFault() method is similar to the one received by the handleMessage() method. You use the context's getMessage() method to access the message payload in the same way. The only difference is the payload contained in the context.
LogicalMessageContext see Section 43.3, “Handling Messages in a Logical Handler”.
SOAPMessageContext see Section 43.5, “Handling Messages in a SOAP Handler”.
Determining the return value
handleFault() method completes its message processing has a direct impact on how message processing proceeds. It completes by performing one of the following actions:
- Return
true - Returning
truesignals that fault processing should continue normally. ThehandleFault()method of the next handler in the chain will be invoked. - Return
false - Returning
falsesignals that fault processing stops. Theclose()method of the handlers that were invoked in processing the current message are invoked and the fault message is dispatched. - Throw an exception
- Throwing an exception stops fault message processing. The
close()method of the handlers that were invoked in processing the current message are invoked and the exception is dispatched.
Example
handleFault() that prints the message body to the screen.
Example 43.13. Handling a Fault in a Message Handler
public final boolean handleFault(LogicalMessageContext messageContext)
{
System.out.println("handleFault() called with message:");
LogicalMessage msg=messageContext.getMessage();
System.out.println(msg.getPayload());
return true;
}43.8. Closing a Handler
close() method. This is the appropriate place to clean up any resources that were used by the handler during message processing or resetting any properties to a default state.
close() method.
43.9. Releasing a Handler
Overview
Order of release
- The handler finishes processing any active messages.
- The runtime invokes the method decorated with the
@PreDestroyannotation.This method should clean up any resources used by the handler. - The handler's destructor is called.
43.10. Configuring Endpoints to Use Handlers
43.10.1. Programmatic Configuration
43.10.1.1. Adding a Handler Chain to a Consumer
Overview
Binding object.
Procedure
- Create a
List<Handler>object to hold the handler chain. - Create an instance of each handler that will be added to the chain.
- Add each of the instantiated handler objects to the list in the order they are to be invoked by the runtime.
- Get the
Bindingobject from the service proxy.TipApache CXF provides an implementation of theBindinginterface calledorg.apache.cxf.jaxws.binding.DefaultBindingImpl. - Set the handler chain on the proxy using the
Bindingobject'ssetHandlerChain()method.
Example
Example 43.14. Adding a Handler Chain to a Consumer
import javax.xml.ws.BindingProvider; import javax.xml.ws.handler.Handler; import java.util.ArrayList; import java.util.List; import org.apache.cxf.jaxws.binding.DefaultBindingImpl; ... SmallNumberHandler sh = new SmallNumberHandler(); 1 List<Handler> handlerChain = new ArrayList<Handler>(); 2 handlerChain.add(sh); 3 DefaultBindingImpl binding = ((BindingProvider)proxy).getBinding(); 4 binding.getBinding().setHandlerChain(handlerChain); 5
43.10.1.2. Adding a Handler Chain to a Service Provider
Overview
@HandlerChain annotation. The annotation points to a meta-data file defining the handler chain used by the service provider.
Procedure
- Decorate the provider's implementation class with the
@HandlerChainannotation. - Create a handler configuration file that defines the handler chain.
The @HandlerChain annotation
javax.jws.HandlerChain annotation decorates service provider's implementation class. It instructs the runtime to load the handler chain configuration file specified by its file property.
- a URL
- a relative path name
handlers.xml. handlers.xml must be located in the directory from which the service provider is run.
Example 43.15. Service Implementation that Loads a Handler Chain
import javax.jws.HandlerChain;
import javax.jws.WebService;
...
@WebService(name = "AddNumbers",
targetNamespace = "http://apache.org/handlers",
portName = "AddNumbersPort",
endpointInterface = "org.apache.handlers.AddNumbers",
serviceName = "AddNumbersService")
@HandlerChain(file = "handlers.xml")
public class AddNumbersImpl implements AddNumbers
{
...
}Handler configuration file
http://java.sun.com/xml/ns/javaee.
handler-chains element. The handler-chains element has one or more handler-chain elements.
handler-chain element define a handler chain. Table 43.1, “Elements Used to Define a Server-Side Handler Chain” describes the handler-chain element's children.
Table 43.1. Elements Used to Define a Server-Side Handler Chain
| Element | Description |
|---|---|
handler | Contains the elements that describe a handler. |
service-name-pattern | Specifies the QName of the WSDL service element defining the service to which the handler chain is bound. You can use * as a wildcard when defining the QName. |
port-name-pattern | Specifies the QName of the WSDL port element defining the endpoint to which the handler chain is bound. You can use * as a wildcard when defining the QName. |
protocol-binding |
Specifies the message binding for which the handler chain is used. The binding is specified as a URI or using one of the following aliases:
##SOAP11_HTTP, ##SOAP11_HTTP_MTOM, ##SOAP12_HTTP, ##SOAP12_HTTP_MTOM, or ##XML_HTTP.
For more information about message binding URIs see Appendix C, Apache CXF Binding IDs.
|
handler-chain element is only required to have a single handler element as a child. It can, however, support as many handler elements as needed to define the complete handler chain. The handlers in the chain are executed in the order they specified in the handler chain definition.
protocol-binding, are used to limit the scope of the defined handler chain. For example, if you use the service-name-pattern element, the handler chain will only be attached to service providers whose WSDL port element is a child of the specified WSDL service element. You can only use one of these limiting children in a handler element.
handler element defines an individual handler in a handler chain. Its handler-class child element specifies the fully qualified name of the class implementing the handler. The handler element can also have an optional handler-name element that specifies a unique name for the handler.
Example 43.16. Handler Configuration File
<handler-chains xmlns="http://java.sun.com/xml/ns/javaee"
xmlns:xsi="http://www.w3.org/2001/XMLSchema-instance"
xsi:schemaLocation="http://java.sun.com/xml/ns/javaee">
<handler-chain>
<handler>
<handler-name>LoggingHandler</handler-name>
<handler-class>demo.handlers.common.LoggingHandler</handler-class>
</handler>
<handler>
<handler-name>AddHeaderHandler</handler-name>
<handler-class>demo.handlers.common.AddHeaderHandler</handler-class>
</handler>
</handler-chain>
</handler-chains>43.10.2. Spring Configuration
Overview
jaxwxs:handlers child to the element configuring the endpoint.
Procedure
- If the endpoint does not already have a configuration element, add one.For more information on configuring Apache CXF endpoints see Chapter 15, Configuring JAX-WS Endpoints.
- Add a
jaxws:handlerschild element to the endpoint's configuration element. - For each handler in the chain, add a
beanelement specifying the class that implements the handler.TipIf your handler implementation is used in more than one place you can reference abeanelement using therefelement.
The handlers element
jaxws:handlers element defines a handler chain in an endpoint's configuration. It can appear as a child to all of the JAX-WS endpoint configuration elements. These are:
jaxws:endpointconfigures a service provider.jaxws:serveralso configures a service provider.jaxws:clientconfigures a service consumer.
- add a
beanelement defining the implementation class - use a
refelement to refer to a namedbeanelement from elsewhere in the configuration file
Example
Example 43.17. Configuring an Endpoint to Use a Handler Chain In Spring
<beans ...
xmlns:jaxws="http://cxf.apache.org/jaxws"
...
schemaLocation="...
http://cxf.apache.org/jaxws http://cxf.apache.org/schemas/jaxws.xsd
...">
<jaxws:endpoint id="HandlerExample"
implementor="org.apache.cxf.example.DemoImpl"
address="http://localhost:8080/demo">
<jaxws:handlers>
<bean class="demo.handlers.common.LoggingHandler" />
<bean class="demo.handlers.common.AddHeaderHandler" />
</jaxws:handlers>
</jaws:endpoint>
</beans>Appendix E. Maven Tooling Reference
Name
Plug-in Setup — before you can use the Apache CXF plug-ins, you must first add the proper dependencies and repositories to your POM.
Dependencies
- the JAX-WS frontend
<dependency> <groupId>org.apache.cxf</groupId> <artifactId>cxf-rt-frontend-jaxws</artifactId> <version>version</version> </dependency>
- the HTTP transport
<dependency> <groupId>org.apache.cxf</groupId> <artifactId>cxf-rt-transports-http</artifactId> <version>version</version> </dependency>
- the Jetty transport
<dependency> <groupId>org.apache.cxf</groupId> <artifactId>cxf-rt-transports-http-jetty</artifactId> <version>version</version> </dependency>
Repositories
- the plug-in repository
<pluginRepository> <id>fusesource.m2</id> <name>Apache CXF Open Source Community Release Repository</name> <url>http://repo.fusesource.com/nexus/content/groups/public/</url> <snapshots> <enabled>false</enabled> </snapshots> <releases> <enabled>true</enabled> </releases> </pluginRepository> - the Apache CXF release repository
<repository> <id>fusesource.m2</id> <name>Apache CXF Open Source Community Release Repository</name> <url>http://repo.fusesource.com/nexus/content/groups/public/</url> <snapshots> <enabled>false</enabled> </snapshots> <releases> <enabled>true</enabled> </releases> </repository> - the Apache CXF snapshot repository
<repository> <id>fusesource.m2-snapshot</id> <name>Apache CXF Open Source Community Snapshot Repository</name> <url>http://repo.fusesource.com/nexus/content/groups/public-snapshots/</url> <snapshots> <enabled>true</enabled> </snapshots> <releases> <enabled>false</enabled> </releases> </repository>
Name
cxf-codegen-plugin — generates JAX-WS compliant Java code from a WSDL document
Synopsis
<plugin>
<groupId>org.apache.cxf</groupId>
<artifactId>cxf-codegen-plugin</artifactId>
<version>version</version>
<executions>
<execution>
<id>generate-sources</id>
<configuration>
<defaultOptions>
<option>...</option>
...
</defaultOptions>
<wsdlOptions>
<wsdlOption>
<wsdl>wsdlPath</wsdl>
<option>...</option>
...
</wsdlOption>
...
</wsdlOptions>
</configuration>
<goals>
<goal>wsdl2java</goal>
</goals>
</execution>
</executions>
</plugin>Description
wsdl2java task takes a WSDL document and generates fully annotated Java code from which to implement a service. The WSDL document must have a valid portType element, but it does not need to contain a binding element or a service element. Using the optional arguments you can customize the generated code.
WSDL options
wsdlOptions element is required to configure the plug-in. The wsdlOptions element's wsdl child is required and specifies a WSDL document to be processed by the plug-in. In addition to the wsdl element, the wsdlOptions element can take a number of children that can customize how the WSDL document is processed.
wsdlOptions element can be listed in the plug-in configuration. Each element configures a single WSDL document for processing.
Default options
defaultOptions element is an optional element. It can be used to set options that are used across all of the specified WSDL documents.
wsdlOptions element, the value in the wsdlOptions element takes precedent.
Options
| Option | Interpretation |
|---|---|
-? | Displays the online help for this utility. |
-help | |
-h | |
-fe frontend | Specifies the front end used by the code generator. The default is jaxws.[a] |
-db databinding | Specifies the data binding used by the code generator. The default is jaxb.[b] |
-wv wsdlVersion | Specifies the WSDL version expected by the tool. The default is 1.1.[c] |
-p [wsdlNamespace=]PackageName | Specifies zero, or more, package names to use for the generated code. Optionally specifies the WSDL namespace to package name mapping. |
-b bindingName | Specifies zero, or more, JAXWS or JAXB binding files. Use spaces to separate multiple entries. |
-sn serviceName | Specifies the name of the WSDL service for which code is to be generated. The default is to generate code for every service in the WSDL document. |
-d output-directory | Specifies the directory into which the generated code files are written. |
-catalog catalogUrl | Specifies the URL of an XML catalog to use for resolving imported schemas and WSDL documents. |
-compile | Compiles generated Java files. |
-classdir complile-class-dir | Specifies the directory into which the compiled class files are written. |
-client | Generates starting point code for a client mainline. |
-server | Generates starting point code for a server mainline. |
-impl | Generates starting point code for an implementation object. |
-all | Generates all starting point code: types, service proxy, service interface, server mainline, client mainline, implementation object, and an Ant build.xml file. |
-ant | Generates the Ant build.xml file. |
-keep | Instructs the tool to not overwrite any existing files. |
-defaultValues[=DefaultValueProvider] | Instructs the tool to generate default values for the generated client and the generated implementation. Optionally, you can also supply the name of the class used to generate the default values. By default, the RandomValueProvider class is used. |
-nexclude schema-namespace[=java-packagename] | Ignore the specified WSDL schema namespace when generating code. This option may be specified multiple times. Also, optionally specifies the Java package name used by types described in the excluded namespace(s). |
-exsh (true/false) | Enables or disables processing of extended soap header message binding. Default is false. |
-dns (true/false) | Enables or disables the loading of the default namespace package name mapping. Default is true. |
-dex (true/false) | Enables or disables the loading of the default excludes namespace mapping. Default is true. |
-wsdlLocation wsdlLocation | Specifies the value of the @WebService annotation's wsdlLocation property. |
-xjcargs | Specifies a comma separated list of arguments to be passed to directly to the XJC when the JAXB data binding is being used. To get a list of all possible XJC arguments use the -xjc-X. |
-noAddressBinding | Instructs the tool to use the Apache CXF proprietary WS-Addressing type instead of the JAX-WS 2.1 compliant mapping. |
-validate | Instructs the tool to validate the WSDL document before attempting to generate any code. |
-v | Displays the version number for the tool. |
-verbose | Displays comments during the code generation process. |
-quiet | Suppresses comments during the code generation process. |
| wsdlfile | The path and name of the WSDL file to use in generating the code. |
[a]
Currently, Apache CXF only provides the JAX-WS front end for the code generator.
[b]
Currently, Apache CXF only provides the JAXB data binding for the code generator.
[c]
Currently, Apache CXF only provides WSDL 1.1 support for the code generator.
| |
Name
java2ws — generates a WSDL document from Java code
Synopsis
<plugin>
<groupId>org.apache.cxf</groupId>
<artifactId>cxf-java2ws-plugin</artifactId>
<version>version</version>
<executions>
<execution>
<id>process-classes</id>
<phase>process-classes</phase>
<configuration>
<className>className</className>
<option>...</option>
...
</configuration>
<goals>
<goal>java2ws</goal>
</goals>
</execution>
</executions>
</plugin>Description
- a WSDL document
- the server code needed to deploy the service as a POJO
- client code for accessing the service
- wrapper and fault beans
Required configuration
className configuration element is present. The element's value is the fully qualified name of the SEI to be processed.
Optional configuration
| Element | Description |
|---|---|
frontend | Specifies front end to use for processing the SEI and generating the support classes. jaxws is the default. simple is also supported. |
databinding | Specifies the data binding used for processing the SEI and generating the support classes. The default when using the JAX-WS front end is jaxb. The default when using the simple frontend is aegis. |
genWsdl | Instructs the tool to generate a WSDL document when set to true. |
genWrapperbean | Instructs the tool to generate the wrapper bean and the fault beans when set to true. |
genClient | Instructs the tool to generate client code when set to true. |
genServer | Instructs the tool to generate server code when set to true. |
outputFile | Specifies the name of the generated WSDL file. |
classpath | Specifies the classpath searched when processing the SEI. |
soap12 | Specifies that the generated WSDL document is to include a SOAP 1.2 binding when set to true. |
targetNamespace | Specifies the target namespace to use in the generated WSDL file. |
serviceName | Specifies the value of the generated service element's name attribute. |
Part VI. Developing RESTful Web Services
Abstract
Chapter 44. Introduction to RESTful Web Services
Abstract
Overview
Basic REST principles
- Application state and functionality are divided into resources.
- Resources are addressable using standard URIs that can be used as hypermedia links.
- All resources use only the four HTTP verbs.
DELETEGETPOSTPUT
- All resources provide information using the MIME types supported by HTTP.
- The protocol is stateless.
- Responses are cacheable.
- The protocol is layered.
Resources
REST best practices
- Provide a distinct URI for each resource you wish to expose.For example, if you are building a system that deals with driving records, each record should have a unique URI. If the system also provides information on parking violations and speeding fines, each type of resource should also have a unique base. For example, speeding fines could be accessed through /speedingfines/driverID and parking violations could be accessed through /parkingfines/driverID.
- Use nouns in your URIs.Using nouns highlights the fact that resources are things and not actions. URIs such as /ordering imply an action, whereas /orders implies a thing.
- Methods that map to
GETshould not change any data. - Use links in your responses.Putting links to other resources in your responses makes it easier for clients to follow a chain of data. For example, if your service returns a collection of resources, it would be easier for a client to access each of the individual resources using the provided links. If links are not included, a client needs to have additional logic to follow the chain to a specific node.
- Make your service stateless.Requiring the client or the service to maintain state information forces a tight coupling between the two. Tight couplings make upgrading and migrating more difficult. Maintaining state can also make recovery from communication errors more difficult.
Designing a RESTful Web Service
- Define the resources the service will expose.In general, a service will expose one or more resources that are organized as a tree. For example, a driving record service could be organized into three resources:
- /license/driverID
- /license/driverID/speedingfines
- /license/driverID/parkingfines
- Define what actions you want to be able to perform on each resource.For example, you may want to be able to update a diver's address or remove a parking ticket from a driver's record.
- Map the actions to the appropriate HTTP verbs.
Implementing REST with Apache CXF
- Create a root resource class for the resource that represents the top of the service's resource tree.
- Map the service's other resources into sub-resources.
- Create methods to implement each of the HTTP verbs used by each of the resources.
Data bindings
Chapter 45. Creating Resources
Abstract
45.1. Introduction
Overview
Types of resources
- A Section 45.3, “Root resource classes” is the entry point to a service's resource tree. It is decorated with the
@Pathannotation to define the base URI for the resources in the service. - Section 45.5, “Working with sub-resources” are accessed through the root resource. They are implemented by methods that are decorated with the
@Pathannotation. A sub-resource's@Pathannotation defines a URI relative to the base URI of a root resource.
Example
Example 45.1. Simple resource class
45.2. Basic JAX-RS annotations
Overview
- the URI of the service's resources
- how the class' methods are mapped to the HTTP verbs
Setting the path
@Path annotation specifies the URI of a resource. The annotation is defined by the javax.ws.rs.Path interface and it can be used to decorate either a resource class or a resource method. It takes a string value as its only parameter. The string value is a URI template that specifies the location of an implemented resource.
- unprocessed path components
- parameter identifiers surrounded by
{}NoteParameter identifiers can include regular expressions to alter the default path processing.
Example 45.2. URI template syntax
@Path("resourceName/{param1}/../{paramN}")color parameter is assigned to blue. The value of the number parameter is assigned 12.
@Path annotation is decorating. If it is placed on a root resource class, the URI template is the root URI of all resources in the tree and it is appended directly to the URI at which the service is published. If the annotation decorates a sub-resource, it is relative to the root resource URI.
Specifying HTTP verbs
javax.ws.rs.DELETEspecifies that the method maps to aDELETE.javax.ws.rs.GETspecifies that the method maps to aGET.javax.ws.rs.POSTspecifies that the method maps to aPOST.javax.ws.rs.PUTspecifies that the method maps to aPUT.javax.ws.rs.HEADspecifies that the method maps to aHEAD.
PUT or a POST. Mapping it to a GET or a DELETE would result in unpredictable behavior.
45.3. Root resource classes
Overview
@Path that specifies the root URI of the resources implemented by the service. Its methods either directly implement operations on the resource or provide access to sub-resources.
Requirements
- The class must be decorated with the
@Pathannotation.The specified path is the root URI for all of the resources implemented by the service. If the root resource class specifies that its path is widgets and one of its methods implements theGETverb, then aGETon widgets invokes that method. If a sub-resource specifies that its URI is {id}, then the full URI template for the sub-resource is widgets/{id} and it will handle requests made to URIs like widgets/12 and widgets/42. - The class must have a public constructor for the runtime to invoke.The runtime must be able to provide values for all of the constructor's parameters. The constructor's parameters can include parameters decorated with the JAX-RS parameter annotations. For more information on the parameter annotations see Chapter 46, Passing Information into Resource Classes and Methods.
- At least one of the classes methods must either be decorated with an HTTP verb annotation or the
@Pathannotation.
Example
Example 45.3. Root resource class
package demo.jaxrs.server;
import javax.ws.rs.DELETE;
import javax.ws.rs.GET;
import javax.ws.rs.POST;
import javax.ws.rs.PUT;
import javax.ws.rs.Path;
import javax.ws.rs.PathParam;
import javax.ws.rs.QueryParam;
import javax.ws.rs.core.Response;
@Path("/customerservice/") 1
public class CustomerService
{
public CustomerService() 2
{
...
}
@GET 3
public Customer getCustomer(@QueryParam("id") String id)
{
...
}
@DELETE
public Response deleteCustomer(@QueryParam("id") String id)
{
...
}
@PUT
public Response updateCustomer(Customer customer)
{
...
}
@POST
public Response addCustomer(Customer customer)
{
...
}
@Path("/orders/{orderId}/") 4
public Order getOrder(@PathParam("orderId") String orderId)
{
...
}
}- 1
- The class is decorated with the
@Pathannotation. The root URI for the resources exposed by the service is customerservice. - 2
- The class has a public constructor. In this case the no argument constructor is used for simplicity.
- 3
- The class implements each of the four HTTP verbs for the resource.
- 4
- The class also provides access to a sub-resource through the
getOrder()method. The URI for the sub-resource, as specified using the the@Pathannotation, is customerservice/order/id. The sub-resource is implemented by theOrderclass.For more information on implementing sub-resources see Section 45.5, “Working with sub-resources”.
45.4. Working with resource methods
Overview
General constraints
- It must be public.
- It must be decorated with one of the HTTP method annotations described in the section called “Specifying HTTP verbs”.
- It must not have more than one entity parameter as described in the section called “Parameters”.
Parameters
- entity parameters—Entity parameters are not annotated. Their value is mapped from the request entity body. An entity parameter can be of any type for which your application has an entity provider. Typically they are JAXB objects.ImportantA resource method can have only one entity parameter.For more information on entity providers see Chapter 49, Entity Support.
- annotated parameters—Annotated parameters use one of the JAX-RS annotations that specify how the value of the parameter is mapped from the request. Typically, the value of the parameter is mapped from portions of the request URI.For more information about using the JAX-RS annotations for mapping request data to method parameters see Chapter 46, Passing Information into Resource Classes and Methods.
Example 45.4. Resource method with a valid parameter list
@POST
@Path("disaster/monster/giant/{id}")
public void addDaikaiju(Kaiju kaiju,
@PathParam("id") String id)
{
...
}Example 45.5. Resource method with an invalid parameter list
@POST
@Path("disaster/monster/giant/")
public void addDaikaiju(Kaiju kaiju,
String id)
{
...
}Return values
void- any Java class for which the application has an entity providerFor more information on entity providers see Chapter 49, Entity Support.
- a
ResponseobjectFor more information onResponseobjects see Section 47.2, “Fine tuning an application's responses”. - a
GenericEntity<T>objectFor more information onGenericEntity<T>objects see Section 47.3, “Returning entities with generic type information”.
void or the value being returned is null, the resource method sets the HTTP status code to 204. When the resource method returns any value other than null, it sets the HTTP status code to 200.
45.5. Working with sub-resources
Overview
@Path annotation to a resource class' method. Sub-resources can be implemented in one of two ways:
- Sub-resource method—directly implements an HTTP verb for a sub-resource and is decorated with one of the annotations described in the section called “Specifying HTTP verbs”.
- Sub-resource locator—points to a class that implements the sub-resource.
Specifying a sub-resource
@Path annotation. The URI of the sub-resource is constructed as follows:
- Append the value of the sub-resource's
@Pathannotation to the value of the sub-resource's parent resource's@Pathannotation.The parent resource's@Pathannotation maybe located on a method in a resource class that returns an object of the class containing the sub-resource. - Repeat the previous step until the root resource is reached.
- The assembled URI is appended to the base URI at which the service is deployed.
Example 45.6. Order sub-resource
...
@Path("/customerservice/")
public class CustomerService
{
...
@Path("/orders/{orderId}/")
@GET
public Order getOrder(@PathParam("orderId") String orderId)
{
...
}
}Sub-resource methods
@Path annotation and one of the HTTP verb annotations. The sub-resource method is directly responsible for handling a request made on the resource using the specified HTTP verb.
getOrder()handles HTTPGETrequests for resources whose URI matches /customerservice/orders/{orderId}/.updateOrder()handles HTTPPUTrequests for resources whose URI matches /customerservice/orders/{orderId}/.newOrder()handles HTTPPOSTrequests for the resource at /customerservice/orders/.
Example 45.7. Sub-resource methods
...
@Path("/customerservice/")
public class CustomerService
{
...
@Path("/orders/{orderId}/")
@GET
public Order getOrder(@PathParam("orderId") String orderId)
{
...
}
@Path("/orders/{orderId}/")
@PUT
public Order updateOrder(@PathParam("orderId") String orderId,
Order order)
{
...
}
@Path("/orders/")
@POST
public Order newOrder(Order order)
{
...
}
}Sub-resource locators
processOrder() method is a sub-resource locator. When a request is made on a URI matching the URI template /orders/{orderId}/ it returns an instance of the Order class. The Order class has methods that are decorated with HTTP verb annotations. A PUT request is handled by the updateOrder() method.
Example 45.8. Sub-resource locator returning a specific class
...
@Path("/customerservice/")
public class CustomerService
{
...
@Path("/orders/{orderId}/")
public Order processOrder(@PathParam("orderId") String orderId)
{
...
}
...
}
public class Order
{
...
@GET
public Order getOrder(@PathParam("orderId") String orderId)
{
...
}
@PUT
public Order updateOrder(@PathParam("orderId") String orderId,
Order order)
{
...
}
}Object, an abstract class, or the top of a class hierarchy. For example, if your service needed to process both PayPal orders and credit card orders, the processOrder() method's signature from Example 45.8, “Sub-resource locator returning a specific class” could remain unchanged. You would simply need to implement two classes, ppOrder and ccOder, that extended the Order class. The implementation of processOrder() would instantiate the desired implementation of the sub-resource based on what ever logic is required.
45.6. Resource selection method
Overview
@Path("customerservice/{id}") or @Path("customerservice/{id}/{state}"). JAX-RS specifies a detailed algorithm for matching a resource method to a request. The algorithm compares the normalized URI, the HTTP verb, and the media types of the request and response entities to the annotations on the resource classes.
The basic selection algorithm
- Determine the root resource class.The request URI is matched against all of the classes decorated with the
@Pathannotation. The classes whose@Pathannotation matches the request URI are determined.If the value of the resource class'@Pathannotation matches the entire request URI, the class' methods are used as input into the third stage. - Determine the object will handle the request.If the request URI is longer than the value of the selected class'
@Pathannotation, the values of the resource methods'@Pathannotations are used to look for a sub-resource that can process the request.If one or more sub-resource methods match the request URI, these methods are used as input for the third stage.If the only matches for the request URI are sub-resource locaters, the resource methods of the object created by the sub-resource locater to match the request URI. This stage is repeated until a sub-resource method matches the request URI. - Select the resource method that will handle the request.The resource method whose HTTP verb annotation matches the HTTP verb in the request. In addition, the selected resource method must accept the media type of the request entity body and be capable of producing a response that conforms to the media type(s) specified in the request.
Selecting from multiple resource classes
- Prefer the resource with the most literal characters in its URI template.Literal characters are characters that are not part of a template variable. For example, /widgets/{id}/{color} has ten literal characters and /widgets/1/{color} has eleven literal characters. So, the request URI /widgets/1/red would be matched to the resource with /widgets/1/{color} as its URI template.NoteA trailing slash (
/) counts as a literal character. So /joefred/ will be preferred over /joefred. - Prefer the resource with the most variables in its URI template.The request URI /widgets/30/green could match both /widgets/{id}/{color} and /widgets/{amount}/. However, the resource with the URI template /widgets/{id}/{color} will be selected because it has two variables.
- Prefer the resource with the most variables containing regular expressions.The request URI /widgets/30/green could match both /widgets/{number}/{color} and /widgets/{id:.+}/{color}. However, the resource with the URI template /widgets/{id:.+}/{color} will be selected because it has a variable containing a regular expression.
Selecting from multiple resource methods
@Consumes annotation. The type of responses a resource method can produce are specified using the @Produces annotation.
- Prefer resource methods over sub-resources.
- Prefer sub-resource methods over sub-resource locaters.
- Prefer methods that use the most specific values in the
@Consumesannotation and the@Producesannotation.For example, a method that has the annotation@Consumes(text/xml)would be preferred over a method that has the annotation@Consumes(text/*). Both methods would be preferred over a method without an@Consumesannotation or the annotation@Consumes(*/*). - Prefer methods that most closely match the content type of the request body entity.TipThe content type of the request body entity is specified in the HTTP Content-Type property.
- Prefer methods that most closely match the content type accepted as a response.TipThe content types accepted as a response are specified in the HTTP Accept property.
Customizing the selection process
org.apache.cxf.jaxrs.ext.ResourceComparator interface which can be used to customize how the runtime handles multiple matching resource classes. The ResourceComparator interface, shown in Example 45.9, “Interface for customizing resource selection”, has to methods that need to be implemented. One compares two resource classes and the other compares two resource methods.
Example 45.9. Interface for customizing resource selection
package org.apache.cxf.jaxrs.ext;
import org.apache.cxf.jaxrs.model.ClassResourceInfo;
import org.apache.cxf.jaxrs.model.OperationResourceInfo;
import org.apache.cxf.message.Message;
public interface ResourceComparator
{
int compare(ClassResourceInfo cri1,
ClassResourceInfo cri2,
Message message);
int compare(OperationResourceInfo oper1,
OperationResourceInfo oper2,
Message message);
}- Return
1if the first parameter is a better match than the second parameter - Return
-1if the second parameter is a better match than the first parameter
0 is returned then the runtime will proceed with the default selection algorithm
ResourceComparator implementation by adding a resourceComparator child to the service's jaxrs:server element.
Chapter 46. Passing Information into Resource Classes and Methods
Abstract
46.1. Basics of injecting data
Overview
When data is injected
@Path annotation or an object returned from a sub-resource locator method.
Supported data types
- primitives such as int, char, or long
- Objects that have a constructor that accepts a single String argument
- Objects that have a static
valueOf()method that accepts a single String argument List<T>,Set<T>, orSortedSet<T>objects where T satisfies the other conditions in the list
46.2. Using JAX-RS APIs
46.2.1. Injecting data from a request URI
Overview
Getting data from the URI's path
javax.ws.rs.PathParam annotation. The @PathParam annotation has a single parameter that identifies the URI template variable from which the data will be injected.
@PathParam annotation specifies that the value of the URI template variable color is injected into the itemColor field.
Example 46.1. Injecting data from a URI template variable
import javax.ws.rs.Path;
import javax.ws.rs.PathParam
...
@Path("/boxes/{shape}/{color}")
class Box
{
...
@PathParam("color")
String itemColor;
...
}@PathParam annotation are different from the ones described in the section called “Supported data types”. The entity into which the @PathParam annotation injects data must be of one of the following types:
PathSegmentThe value will be the final segment of the matching part of the path.List<PathSegment>The value will be a list ofPathSegmentobjects corresponding to the path segment(s) that matched the named template parameter.- primitives such as int, char, or long
- Objects that have a constructor that accepts a single String argument
- Objects that have a static
valueOf()method that accepts a single String argument
Using query parameters
?). They consist of one, or more, name value pairs where the name and value are separated by an equal sign(=). When more than one query parameter is specified, the pairs are separated from each other by either a semicolon(;) or an ampersand(&). Example 46.2, “URI with a query string” shows the syntax of a URI with query parameters.
Example 46.2. URI with a query string
http://fusesource.org?name=value;name2=value2;...javax.ws.rs.QueryParam annotation extracts the value of a query parameter and injects it into a JAX-RS resource. The annotation takes a single parameter that identifies the name of the query parameter from which the value is extracted and injected into the specified field, bean property, or parameter. The @QueryParam annotation supports the types described in the section called “Supported data types”.
id into the method's id parameter.
Example 46.3. Resource method using data from a query parameter
import javax.ws.rs.QueryParam;
import javax.ws.rs.PathParam;
import javax.ws.rs.POST;
import javax.ws.rs.Path;
...
@Path("/monstersforhire/")
public class MonsterService
{
...
@POST
@Path("\{type}")
public void updateMonster(@PathParam("type") String type,
@QueryParam("id") String id)
{
...
}
...
}POST to /monstersforhire/daikaiju?id=jonas the updateMonster() method's type is set to daikaiju and the id is set to jonas.
Using matrix parameters
;). /mostersforhire/daikaiju;id=jonas has one matrix parameter called id and /monstersforhire/japan;type=daikaiju/flying;wingspan=40 has two matrix parameters called type and wingspan.
javax.ws.rs.MatrixParam annotation. The annotation takes a single parameter that identifies the name of the matrix parameter from which the value is extracted and injected into the specified field, bean property, or parameter. The @MatrixParam annotation supports the types described in the section called “Supported data types”.
type and id into the method's parameters.
Example 46.4. Resource method using data from matrix parameters
import javax.ws.rs.MatrixParam;
import javax.ws.rs.POST;
import javax.ws.rs.Path;
...
@Path("/monstersforhire/")
public class MonsterService
{
...
@POST
public void updateMonster(@MatrixParam("type") String type,
@MatrixParam("id") String id)
{
...
}
...
}POST to /monstersforhire;type=daikaiju;id=whale the updateMonster() method's type is set to daikaiju and the id is set to whale.
Disabling URI decoding
javax.ws.rs.Encoded annotation to deactivate the URI decoding. The annotation can be used to deactivate URI decoding at the following levels:
- class level—Decorating a class with the
@Encodedannotation deactivates the URI decoding for all parameters, field, and bean properties in the class. - method level—Decorating a method with the
@Encodedannotation deactivates the URI decoding for all parameters of the class. - parameter/field level—Decorating a parameter or field with the
@Encodedannotation deactivates the URI decoding for all parameters of the class.
getMonster() method does not use URI decoding. The addMonster() method only disables URI decoding for the type parameter.
Example 46.5. Disabling URI decoding
@Path("/monstersforhire/")
public class MonsterService
{
...
@GET
@Encoded
@Path("\{type}")
public Monster getMonster(@PathParam("type") String type,
@QueryParam("id") String id)
{
...
}
@PUT
@Path("\{id}")
public void addMonster(@Encoded @PathParam("type") String type,
@QueryParam("id") String id)
{
...
}
...
}Error handling
WebApplicationException exception wraps the original exception is generated. The WebApplicationException exception's status is set to 404.
46.2.2. Injecting data from the HTTP message header
Overview
Injecting information from the HTTP headers
javax.ws.rs.HeaderParam annotation is used to inject the data from an HTTP header field into a parameter, field, or bean property. It has a single parameter that specifies the name of the HTTP header field from which the value is extracted and injected into the resource implementation. The associated parameter, field, or bean property must conform to the data types described in the section called “Supported data types”.
If-Modified-Since header into a class' oldestDate field.
Example 46.6. Injecting the If-Modified-Since header
import javax.ws.rs.HeaderParam; ... class RecordKeeper { ... @HeaderParam("If-Modified-Since") String oldestDate; ... }
Injecting information from a cookie
javax.ws.rs.CookieParam annotation extracts the value from a cookie's field and injects it into a resource implementation. It takes a single parameter that specifies the name of the cookie's field from which the value is to be extracted. In addition to the data types listed in the section called “Supported data types”, entities decorated with the @CookieParam can also be a Cookie object.
handle cookie into a field in the CB class.
Example 46.7. Injecting a cookie
import javax.ws.rs.CookieParam; ... class CB { ... @CookieParam("handle") String handle; ... }
Error handling
WebApplicationException exception wrapping the original exception is generated. The WebApplicationException exception's status is set to 400.
46.2.3. Injecting data from HTML forms
Overview
GET requests and HTTP POST requests:
- GET
- When form data is sent as part of an HTTP
GETrequest the data is appended to the URI as a set of query parameters. Injecting data from query parameters is discussed in the section called “Using query parameters”. - POST
- When form data is sent as part of an HTTP
POSTrequest the data is placed in the HTTP message body. The form data can be handled using a regular entity parameter that supports the form data. It can also be handled by using the@FormParamannotation to extract the data and inject the pieces into resource method parameters.
Using the @FormParam annotation to inject form data
javax.ws.rs.FormParam annotation extracts field values from form data and injects the value into resource method parameters. The annotation takes a single parameter that specifies the key of the field from which it extracts the values. The associated parameter must conform to the data types described in the section called “Supported data types”.
@FormParam annotation can be placed on fields, methods, and parameters. However, the @FormParam annotation is only meaningful when placed on resource method parameters.
Example
title, tags, and body—that contain string data.
Example 46.8. Injecting form data into resource method parameters
import javax.ws.rs.FormParam;
import javax.ws.rs.POST;
...
@POST
public boolean updatePost(@FormParam("title") String title,
@FormParam("tags") String tags,
@FormParam("body") String post)
{
...
}46.2.4. Specifying a default value to inject
Overview
javax.ws.rs.DefaultValue annotation can be used in conjunction with the following injection annotations:
@PathParam@QueryParam@MatrixParam@FormParam@HeaderParam@CookieParam
@DefaultValue annotation specifies a default value to be used when the data corresponding to the injection annotation is not present in the request.
Syntax
@DefaultValue annotation.
Example 46.9. Syntax for setting the default value of a parameter
import javax.ws.rs.DefaultValue; ... void resourceMethod(@MatrixParam("matrix") @DefaultValue("value) int someValue, ... ) ...
@DefaultValue annotation relative to the accompanying injection annotation does not matter.
@DefaultValue annotation takes a single parameter. This parameter is the value that will be injected into the field if the proper data cannot be extracted based on the injection annotation. The value can be any String value. The value should be compatible with type of the associated field. For example, if the associated field is of type int, a default value of blue results in an exception.
Dealing with lists and sets
List, Set, or SortedSet then the resulting collection will have a single entry mapped from the supplied default value.
Example
@DefaultValue to specify a default value for a field whose value is injected.
Example 46.10. Setting default values
import javax.ws.rs.DefaultValue;
import javax.ws.rs.PathParam;
import javax.ws.rs.QueryParam;
import javax.ws.rs.GET;
import javax.ws.rs.Path;
@Path("/monster")
public class MonsterService
{
@Get
public Monster getMonster(@QueryParam("id") @DefaultValue("42") int id,
@QueryParam("type") @DefaultValue("bogeyman") String type)
{
...
}
...
}getMonster() method in Example 46.10, “Setting default values” is invoked when a GET request is sent to baseURI/monster. The method expects two query parameters, id and type, appended to the URI. So a GET request using the URI baseURI/monster?id=1&type=fomóiri would return the Fomóiri with the id of one.
@DefaultValue annotation is placed on both parameters, the getMonster() method can function if the query parameters are omitted. A GET request sent to baseURI/monster is equivalent to a GET request using the URI baseURI/monster?id=42&type=bogeyman.
46.3. Using Apache CXF extensions
Overview
id, type, and size, it could use a single @QueryParam annotation to inject all of the parameters into a bean with corresponding fields.
Supported injection annotations
@PathParam@QueryParam@MatrixParam@FormParam
Syntax
- Specify the annotation's parameter as an empty string. For example
@PathParam("")specifies that a sequence of URI template variables are to be serialized into a bean. - Ensure that the annotated parameter is a bean with fields that match the values being injected.
Example
type and id. Their values are injected into the corresponding fields of the Monster bean.
Example 46.11. Injecting query parameters into a bean
import javax.ws.rs.QueryParam;
import javax.ws.rs.PathParam;
import javax.ws.rs.POST;
import javax.ws.rs.Path;
...
@Path("/monstersforhire/")
public class MonsterService
{
...
@POST
public void updateMonster(@QueryParam("") Monster bean)
{
...
}
...
}
public class Monster
{
String type;
String id;
...
}Chapter 47. Returning Information to the Consumer
Abstract
GenericEntity object. When the resource method needs to return additional metadata along with the response entity, JAX-RS resource methods can return a Response object containing any needed HTTP headers or other metadata.
- common Java types return basic information with HTTP return codes determined by the JAX-RS runtime.
- JAXB objects return complex information with HTTP return codes determined by the JAX-RS runtime.
- JAX-RS return complex information with a programmatically determined HTTP return status. The
Responseobject also allows HTTP headers to be specified. - JAX-RS return complex information with HTTP return codes determined by the JAX-RS runtime. The
GenericEnitityobject provides more information to the runtime components serializing the data.
47.1. Returning plain Java constructs
Overview
Returnable types
void or any Java type for which an entity writer is provided. By default, the runtime has providers for the following:
- the Java primitives
- the
Numberrepresentations of the Java primitives - JAXB objects
MIME types
@Produces annotation. If it finds one, it uses the MIME type specified in the annotation. If it does not find one specified by the resource implementation, it relies on the entity providers to determine the proper MIME type.
- Java primitives and their
Numberrepresentations are assigned a MIME type ofapplication/octet-stream. - JAXB objects are assigned a MIME type of
application/xml.
Response codes
204(No Content)—the resource method's return type isvoid204(No Content)—the value of the returned entity isnull200(OK)—the value of the returned entity is notnull
47.2. Fine tuning an application's responses
47.2.1. Basics of building responses
Overview
Response class allows a resource method to have some control over the return status sent to the consumer and to specify HTTP message headers and cookies in the response.
Response objects wrap the object representing the entity that is returned to the consumer. Response objects are instantiated using the ResponseBuilder class as a factory.
ResponseBuilder class also has many of the methods used to manipulate the response's metadata. For instance the ResonseBuilder class contains the methods for setting HTTP headers and cache control directives.
Relationship between a response and a response builder
Response class has a protected constructor, so they cannot be instantiated directly. They are created using the ResponseBuilder class enclosed by the Response class. The ResponseBuilder class is a holder for all of the information that will be encapsulated in the response created from it. The ResponseBuilder class also has all of the methods responsible for setting HTTP header properties on the message.
Response class does provide some methods that ease setting the proper response code and wrapping the entity. There are methods for each of the common response status codes. The methods corresponding to status that include an entity body, or required metadata, include versions that allow for directly setting the information into the associated response builder.
ResponseBuilder class' build() method returns a response object containing the information stored in the response builder at the time the method is invoked. After the response object is returned, the response builder is returned to a clean state.
Getting a response builder
- Using the static methods of the
Responseclass as shown in Example 47.1, “Getting a response builder using theResponseclass”.Example 47.1. Getting a response builder using the
Responseclassimport javax.ws.rs.core.Response; Response r = Response.ok().build();
When getting a response builder this way you do not get access to an instance you can manipulate in multiple steps. You must string all of the actions into a single method call. - Using the Apache CXF specific
ResponseBuilderImplclass. This class allows you to work directly with a response builder. However, it requires that you manually set all of the response builders information manually.Example 47.2, “Getting a response builder using theResponseBuilderImplclass” shows how Example 47.1, “Getting a response builder using theResponseclass” could be rewritten using theResponseBuilderImplclass.Example 47.2. Getting a response builder using the
ResponseBuilderImplclassimport javax.ws.rs.core.Response; import org.apache.cxf.jaxrs.impl.ResponseBuilderImpl; ResponseBuilderImpl builder = new ResponseBuilderImpl(); builder.status(200); Response r = builder.build();
TipYou could also simply assign theResponseBuilderreturned from aResponseclass' method to aResponseBuilderImplobject.
More information
Response class see the Response class' Javadoc.
ResponseBuilder class see the ResponseBuilder class' Javadoc.
ResponseBuilderIml class see the ResponseBuilderImpl Javadoc.
47.2.2. Creating responses for common use cases
Overview
Response class provides shortcut methods for handling the more common responses that a RESTful service will need. These methods handle setting the proper headers using either provided values or default values. They also handle populating the entity body when appropriate.
Creating responses for successful requests
OK. An OK response typically contains an entity that corresponds to the request. The Response class has an overloaded ok() method that sets the response status to 200 and adds a supplied entity to the enclosed response builder. There are five versions of the ok() method. The most commonly used variant are:
Response.ok()—creates a response with a status of200and an empty entity body.Response.ok(java.lang.Object entity)—creates a response with a status of200, stores the supplied object in the responses entity body, and determines the entities media type by introspecting the object.
200 response” shows an example of creating a response with an OK status.
Example 47.3. Creating a response with an 200 response
import javax.ws.rs.core.Response;
import demo.jaxrs.server.Customer;
...
Customer customer = new Customer("Jane", 12);
return Response.ok(customer).build();204 No Content status instead of an 200 OK status. The Response.noContent() method will create an appropriate response object.
204 status” shows an example of creating a response with an 204 status.
Example 47.4. Creating a response with a 204 status
import javax.ws.rs.core.Response; return Response.noContent().build();
Creating responses for redirection
Response class provides methods for handling three of the redirection response statuses.
303 See Other- The
303 See Otherstatus is useful when the requested resource needs to permanently redirect the consumer to a new resource to process the request.TheResponseclassesseeOther()method creates a response with a303status and places the new resource URI in the message'sLocationfield. TheseeOther()method takes a single parameter that specifies the new URI as ajava.net.URIobject. 304 Not Modified- The
304 Not Modifiedstatus can be used for different things depending on the nature of the request. It can be used to signify that the requested resource has not changed since a previousGETrequest. It can also be used to signify that a request to modify the resource did not result in the resource being changed.TheResponseclassesnotModified()methods creates a response with a304status and sets the modified date property on the HTTP message. There are three versions of thenotModified()method:notModified();notModified(javax.ws.rs.core.Entity tag);notModified(java.lang.String tag);
307 Temporary Redirect- The
307 Temporary Redirectstatus is useful when the requested resource needs to direct the consumer to a new resource, but wants the consumer to continue using this resource to handle future requests.TheResponseclassestemporaryRedirect()method creates a response with a307status and places the new resource URI in the message'sLocationfield. ThetemporaryRedirect()method takes a single parameter that specifies the new URI as ajava.net.URIobject.
304 status” shows an example of creating a response with an 304 status.
Example 47.5. Creating a response with a 304 status
import javax.ws.rs.core.Response; return Response.notModified().build();
Creating responses to signal errors
Response class provides methods to create responses for two basic processing errors:
serverError()();—creates a response with a status of500 Internal Server Error.notAcceptable()(java.util.List<javax.ws.rs.core.Variant> variants);—creates a response with a406 Not Acceptablestatus and an entity body containing a list of acceptable resource types.
500 status” shows an example of creating a response with an 500 status.
Example 47.6. Creating a response with a 500 status
import javax.ws.rs.core.Response; return Response.serverError().build();
47.2.3. Handling more advanced responses
Overview
Response class methods provide short cuts for creating responses for common cases. When you need to address more complicated cases such as specifying cache control directives, adding custom HTTP headers, or sending a status not handled by the Response class, you need to use the ResponseBuilder classes methods to populate the response before using the build() method to generate the response object.
ResponseBuilderImpl class to create a response builder instance that can be manipulated directly.
Adding custom headers
ResponseBuilder class' header() method. The header() method takes two parameters:
name—a string specifying the name of the headervalue—a Java object containing the data stored in the header
header() method repeatedly.
Example 47.7. Adding a header to a response
import javax.ws.rs.core.Response;
import org.apache.cxf.jaxrs.impl.ResponseBuilderImpl;
ResponseBuilderImpl builder = new ResponseBuilderImpl();
builder.header("username", "joe");
Response r = builder.build();Adding a cookie
ResponseBuilder class' cookie() method. The cookie() method takes one or more cookies. Each cookie is stored in a javax.ws.rs.core.NewCookie object. The easiest of the NewCookie class' contructors to use takes two parameters:
name—a string specifying the name of the cookievalue—a string specifying the value of the cookie
cookie() method repeatedly.
Example 47.8. Adding a cookie to a response
import javax.ws.rs.core.Response;
import javax.ws.rs.core.NewCookie;
NewCookie cookie = new NewCookie("username", "joe");
Response r = Response.ok().cookie(cookie).build();cookie() method with a null parameter list erases any cookies already associated with the response.
Setting the response status
Response class' helper methods, you can use the ResponseBuilder class' status() method to set the response's status code. The status() method has two variants. One takes an int that specifies the response code. The other takes a Response.Status object to specify the response code.
Response.Status class is an enumeration enclosed in the Response class. It has entries for most of the defined HTTP response codes.
404 Not Found.
Example 47.9. Adding a header to a response
import javax.ws.rs.core.Response; import org.apache.cxf.jaxrs.impl.ResponseBuilderImpl; ResponseBuilderImpl builder = new ResponseBuilderImpl(); builder.status(404); Response r = builder.build();
Setting cache control directives
ResponseBuilder class' cacheControl() method allows you to set the cache control headers on the response. The cacheControl() method takes a javax.ws.rs.CacheControl object that specifies the cache control directives for the response.
CacheControl class has methods that correspond to all of the cache control directives supported by the HTTP specification. Where the directive is a simple on or off value the setter method takes a boolean value. Where the directive requires a numeric value, such as the max-age directive, the setter takes an int value.
no-store cache control directive.
Example 47.10. Adding a header to a response
import javax.ws.rs.core.Response; import javax.ws.rs.core.CacheControl; import org.apache.cxf.jaxrs.impl.ResponseBuilderImpl; CacheControl cache = new CacheControl(); cache.setNoCache(true); ResponseBuilderImpl builder = new ResponseBuilderImpl(); builder.cacheControl(cache); Response r = builder.build();
47.3. Returning entities with generic type information
Overview
javax.ws.rs.core.GenericEntity<T> class provides finer control over the serializing of entities by providing a mechanism for specifying the generic type of the object representing the entity.
Using a GenericEntity<T> object
Response object is returned, the runtime cannot determine the generic type of the wrapped entity and the actual Java class of the object is used as the Java type.
GenericEntity<T> object before being added to the Response object being returned.
GenericEntity<T> object. In practice, this approach is rarely used. The generic type information determined by reflection of an unwrapped entity and the generic type information stored for an entity wrapped in a GenericEntity<T> object are typically the same.
Creating a GenericEntity<T> object
GenericEntity<T> object:
- Create a subclass of the
GenericEntity<T>class using the entity being wrapped. Example 47.11, “Creating aGenericEntity<T>object using a subclass” shows how to create aGenericEntity<T>object containing an entity of typeList<String>whose generic type will be available at runtime.Example 47.11. Creating a
GenericEntity<T>object using a subclassimport javax.ws.rs.core.GenericEntity; List<String> list = new ArrayList<String>(); ... GenericEntity<List<String>> entity = new GenericEntity<List<String>>(list) {}; Response response = Response.ok(entity).build();TipThe subclass used to create aGenericEntity<T>object is typically anonymous. - Create an instance directly by supplying the generic type information with the entity. Example 47.12, “Directly instantiating a
GenericEntity<T>object” shows how to create a response containing an entity of typeAtomicInteger.Example 47.12. Directly instantiating a
GenericEntity<T>objectimport javax.ws.rs.core.GenericEntity; AtomicInteger result = new AtomicInteger(12); GenericEntity<AtomicInteger> entity = new GenericEntity<AtomicInteger>(result, result.getClass().getGenericSuperclass()); Response response = Response.ok(entity).build();
Chapter 48. Handling Exceptions
Abstract
WebApplicaitonException exception. You can also provide ExceptionMapper<E> implementations to map exceptions to appropriate responses.
48.1. Using WebApplicaitonException exceptions to report errors
Overview
WebApplicationException runtime exception to provide an easy way for resource methods to create exceptions that are appropriate for RESTful clients to consume. WebApplicationException exceptions can include a Response object that defines the entity body to return to the originator of the request. It also provides a mechanism for specifying the HTTP status code to be returned to the client if no entity body is provided.
Creating a simple exception
WebApplicaitonException exception is to use either the no argument constructor or the constructor that wraps the original exception in a WebApplicationException exception. Both constructors create a WebApplicaitonException with an empty response.
500 Server Error.
Setting the status code returned to the client
500, you can use one of the four WebApplicaitonException constructors that allow you to specify the status. Two of these constructors, shown in Example 48.1, “Creating a WebApplicationException with a status code”, take the return status as an integer.
Example 48.1. Creating a WebApplicationException with a status code
WebApplicationException(int status);WebApplicationException(java.lang.Throwable cause,
int status);WebApplicationException with a status code” take the response status as an instance of Response.Status.
Example 48.2. Creating a WebApplicationException with a status code
WebApplicationException(javax.ws.rs.core.Response.Status status);WebApplicationException(java.lang.Throwable cause,
javax.ws.rs.core.Response.Status status);Providing an entity body
WebApplicationException constructors that takes a Response object. The runtime uses the Response object to create the response sent to the client. The entity stored in the response is mapped to the entity body of the message and the status field of the response is mapped to the HTTP status of the message.
409 Conflict.
Example 48.3. Sending a message with an exception
import javax.ws.rs.core.Response;
import javax.ws.rs.WebApplicationException;
import org.apache.cxf.jaxrs.impl.ResponseBuilderImpl;
...
ResponseBuilderImpl builder = new ResponseBuilderImpl();
builder.status(Response.Status.CONFLICT);
builder.entity("The requested resource is conflicted.");
Response response = builder.build();
throw WebApplicationException(response);Extending the generic exception
WebApplicationException exception. This would allow you to create custom exceptions and eliminate some boiler plate code.
WebApplicationException” shows a new exception that creates a similar response to the code in Example 48.3, “Sending a message with an exception”.
Example 48.4. Extending WebApplicationException
public class ConflicteddException extends WebApplicationException
{
public ConflictedException(String message)
{
ResponseBuilderImpl builder = new ResponseBuilderImpl();
builder.status(Response.Status.CONFLICT);
builder.entity(message);
super(builder.build());
}
}
...
throw ConflictedException("The requested resource is conflicted.");48.2. Mapping exceptions to responses
Overview
WebApplicationException exception is impractical or impossible. For example, you may not want to catch all possible exceptions and then create a WebApplicationException for them. You may also want to use custom exceptions that make working with your application code easier.
Response object to send to a client. Custom exception providers are created by implementing the ExceptionMapper<E> interface. When registered with the Apache CXF runtime, the custom provider will be used whenever an exception of type E is thrown.
How exception mappers are selected
- When a
WebApplicationException, or one of its subclasses, with an empty entity body is thrown, the runtime will check to see if there is an exception mapper that handlesWebApplicationExceptionexceptions. If there is the exception mapper is used to create the response sent to the consumer. - When any exception other than a
WebApplicationExceptionexception, or one of its subclasses, is thrown, the runtime will check for an appropriate exception mapper. An exception mapper is selected if it handles the specific exception thrown. If there is not an exception mapper for the specific exception that was thrown, the exception mapper for the nearest superclass of the exception is selected.
ServletException exception and passed onto the container runtime. The container runtime will then determine how to handle the exception.
Implementing an exception mapper
javax.ws.rs.ext.ExceptionMapper<E> interface. As shown in Example 48.5, “Exception mapper interface”, the interface has a single method, toResponse(), that takes the original exception as a parameter and returns a Response object.
Example 48.5. Exception mapper interface
public interface ExceptionMapper<E extends java.lang.Throwable>
{
public Response toResponse(E exception);
}Response object created by the exception mapper is processed by the runtime just like any other Response object. The resulting response to the consumer will contain the status, headers, and entity body encapsulated in the Response object.
@Provder annotation.
Response object, the runtime will a response with a status of 500 Server Error to the consumer.
AccessDeniedException exceptions and generates a response with a 403 Forbidden status and an empty entity body.
Example 48.6. Mapping an exception to a response
import javax.ws.rs.core.Response;
import javax.ws.rs.ext.ExceptionMapper;
import org.springframework.security.AccessDeniedException;
@Provider
public class SecurityExceptionMapper implements ExceptionMapper<AccessDeniedException>
{
public Response toResponse(AccessDeniedException exception)
{
return Response.status(Response.Status.FORBIDDEN).build();
}
}AccessDeniedException exceptions and create a Response object with no entity body and a status of 403. The runtime will then process the Response object as it would for a normal response. The result is that the consumer will receive an HTTP response with a status of 403.
Registering an exception mapper
jaxrs:providers element in the application's configuration file.
jaxrs:providers element is a child of the jaxrs:server element and contains a list of bean elements. Each bean element defines one exception mapper.
Example 48.7. Registering exception mappers with the runtime
<beans ...>
<jaxrs:server id="customerService" address="/">
...
<jaxrs:providers>
<bean id="securityException" class="com.bar.providers.SecurityExceptionMapper"/>
</jaxrs:providers>
</jaxrs:server>
</beans>Chapter 49. Entity Support
Abstract
Overview
MessageBodyReader and MessageBodyWriter implementations to serialize and de-serialize data between the HTTP messages and their Java representations. The readers and writers can restrict the MIME types they are capable of processing.
MessageBodyReader interface and/or the MessageBodyWriter interface. Custom readers and writers are registered with the runtime when the application is started.
Natively supported types
Table 49.1. Natively supported entity mappings
| Java Type | MIME Type |
|---|---|
| primitive types | text/plain |
java.lang.Number | text/plain |
| byte[] | */* |
java.lang.String | */* |
java.io.InputStream | */* |
java.io.Reader | */* |
java.io.File | */* |
javax.activation.DataSource | */* |
javax.xml.transform.Source | text/xml, application/xml, application/*+xml |
javax.xml.bind.JAXBElement | text/xml, application/xml, application/*+xml |
| JAXB annotated objects | text/xml, application/xml, application/*+xml |
javax.ws.rs.core.MultivaluedMap<String, String> | application/x-www-form-urlencoded [a] |
javax.ws.rs.core.StreamingOutput | */* [b] |
[a]
This mapping is used for handling HTML form data.
[b]
This mapping is only supported for returning data to a consumer.
| |
Custom readers
javax.ws.rs.ext.MessageBodyReader interface.
Example 49.1. Message reader interface
package javax.ws.rs.ext;
public interface MessageBodyReader<T>
{
public boolean isReadable(java.lang.Class<?> type,
java.lang.reflect.Type genericType,
java.lang.annotation.Annotation[] annotations,
javax.ws.rs.core.MediaType mediaType);
public T readFrom(java.lang.Class<T> type,
java.lang.reflect.Type genericType,
java.lang.annotation.Annotation[] annotations,
javax.ws.rs.core.MediaType mediaType,
javax.ws.rs.core.MultivaluedMap<String, String> httpHeaders,
java.io.InputStream entityStream)
throws java.io.IOException, WebApplicationException;
}isReadable()- The
isReadable()method determines if the reader is capable of reading the data stream and creating the proper type of entity representation. If the reader can create the proper type of entity the method returnstrue.Table 49.2, “Parameters used to determine if a reader can produce an entity” describes theisReadable()method's parameters.Table 49.2. Parameters used to determine if a reader can produce an entity
Parameter Type Description typeClass<T>Specifies the actual Java class of the object used to store the entity. genericTypeTypeSpecifies the Java type of the object used to store the entity. For example, if the message body is to be converted into a method parameter, the value will be the type of the method parameter as returned by the Method.getGenericParameterTypes()method.annotationsAnnotation[]Specifies the list of annotations on the declaration of the object created to store the entity. For example if the message body is to be converted into a method parameter, this will be the annotations on that parameter returned by the Method.getParameterAnnotations()method.mediaTypeMediatTypeSpecifies the MIME type of the HTTP entity. readFrom()- The
readFrom()method reads the HTTP entity and coverts it into the desired Java object. If the reading is successful the method returns the created Java object containing the entity. If an error occurs when reading the input stream the method should throw anIOExceptionexception. If an error occurs that requires an HTTP error response, anWebApplicationExceptionwith the HTTP response should be thrown.Table 49.3, “Parameters used to read an entity” describes thereadFrom()method's parameters.Table 49.3. Parameters used to read an entity
Parameter Type Description typeClass<T>Specifies the actual Java class of the object used to store the entity. genericTypeTypeSpecifies the Java type of the object used to store the entity. For example, if the message body is to be converted into a method parameter, the value will be the type of the method parameter as returned by the Method.getGenericParameterTypes()method.annotationsAnnotation[]Specifies the list of annotations on the declaration of the object created to store the entity. For example if the message body is to be converted into a method parameter, this will be the annotations on that parameter returned by the Method.getParameterAnnotations()method.mediaTypeMediatTypeSpecifies the MIME type of the HTTP entity. httpHeadersMultivaluedMap<String, String>Specifies the HTTP message headers associated with the entity. entityStreamInputStreamSpecifies the input stream containing the HTTP entity. ImportantThis method should not close the input stream.
MessageBodyReader implementation can be used as an entity reader, it must be decorated with the javax.ws.rs.ext.Provider annotation. The @Provider annotation alerts the runtime that the supplied implementation provides additional functionality. The implementation must also be registered with the runtime as described in the section called “Registering readers and writers”.
javax.ws.rs.Consumes annotation. The @Consumes annotation specifies a comma separated list of MIME types that the custom entity provider reads. If an entity is not of a specified MIME type, the entity provider will not be selected as a possible reader.
Source object.
Example 49.2. XML source entity reader
import java.io.IOException;
import java.io.InputStream;
import java.lang.annotation.Annotation;
import java.lang.reflect.Type;
import javax.ws.rs.Consumes;
import javax.ws.rs.WebApplicationException;
import javax.ws.rs.core.MediaType;
import javax.ws.rs.core.MultivaluedMap;
import javax.ws.rs.ext.MessageBodyReader;
import javax.ws.rs.ext.Provider;
import javax.xml.parsers.DocumentBuilder;
import javax.xml.parsers.DocumentBuilderFactory;
import javax.xml.transform.Source;
import javax.xml.transform.dom.DOMSource;
import javax.xml.transform.stream.StreamSource;
import org.w3c.dom.Document;
import org.apache.cxf.jaxrs.ext.xml.XMLSource;
@Provider
@Consumes({"application/xml", "application/*+xml", "text/xml", "text/html" })
public class SourceProvider implements MessageBodyReader<Object>
{
public boolean isReadable(Class<?> type,
Type genericType,
Annotation[] annotations,
MediaType mt)
{
return Source.class.isAssignableFrom(type) || XMLSource.class.isAssignableFrom(type);
}
public Object readFrom(Class<Object> source,
Type genericType,
Annotation[] annotations,
MediaType mediaType,
MultivaluedMap<String, String> httpHeaders,
InputStream is)
throws IOException
{
if (DOMSource.class.isAssignableFrom(source))
{
Document doc = null;
DocumentBuilderFactory factory = DocumentBuilderFactory.newInstance();
DocumentBuilder builder;
try
{
builder = factory.newDocumentBuilder();
doc = builder.parse(is);
}
catch (Exception e)
{
IOException ioex = new IOException("Problem creating a Source object");
ioex.setStackTrace(e.getStackTrace());
throw ioex;
}
return new DOMSource(doc);
}
else if (StreamSource.class.isAssignableFrom(source) || Source.class.isAssignableFrom(source))
{
return new StreamSource(is);
}
else if (XMLSource.class.isAssignableFrom(source))
{
return new XMLSource(is);
}
throw new IOException("Unrecognized source");
}
}Custom writers
javax.ws.rs.ext.MessageBodyWriter interface.
Example 49.3. Message writer interface
package javax.ws.rs.ext;
public interface MessageBodyWriter<T>
{
public boolean isWriteable(java.lang.Class<?> type,
java.lang.reflect.Type genericType,
java.lang.annotation.Annotation[] annotations,
javax.ws.rs.core.MediaType mediaType);
public long getSize(T t,
java.lang.Class<?> type,
java.lang.reflect.Type genericType,
java.lang.annotation.Annotation[] annotations,
javax.ws.rs.core.MediaType mediaType);
public void writeTo(T t,
java.lang.Class<?> type,
java.lang.reflect.Type genericType,
java.lang.annotation.Annotation[] annotations,
javax.ws.rs.core.MediaType mediaType,
javax.ws.rs.core.MultivaluedMap<String, Object> httpHeaders,
java.io.OutputStream entityStream)
throws java.io.IOException, WebApplicationException;
}isWriteable()- The
isWriteable()method determines if the entity writer can map the Java type to the proper entity type. If the writer can do the mapping, the method returnstrue.Table 49.4, “Parameters used to read an entity” describes theisWritable()method's parameters.Table 49.4. Parameters used to read an entity
Parameter Type Description typeClass<T>Specifies the Java class of the object being written. genericTypeTypeSpecifies the Java type of object to be written, obtained either by reflection of a resource method return type or via inspection of the returned instance. The GenericEntityclass, described in Section 47.3, “Returning entities with generic type information”, provides support for controlling this value.annotationsAnnotation[]Specifies the list of annotations on the method returning the entity. mediaTypeMediatTypeSpecifies the MIME type of the HTTP entity. getSize()- The
getSize()method is called before thewriteTo(). It returns the length, in bytes, of the entity being written. If a positive value is returned the value is written into the HTTP message'sContent-Lengthheader.Table 49.5, “Parameters used to read an entity” describes thegetSize()method's parameters.Table 49.5. Parameters used to read an entity
Parameter Type Description tgeneric Specifies the instance being written. typeClass<T>Specifies the Java class of the object being written. genericTypeTypeSpecifies the Java type of object to be written, obtained either by reflection of a resource method return type or via inspection of the returned instance. The GenericEntityclass, described in Section 47.3, “Returning entities with generic type information”, provides support for controlling this value.annotationsAnnotation[]Specifies the list of annotations on the method returning the entity. mediaTypeMediatTypeSpecifies the MIME type of the HTTP entity. writeTo()- The
writeTo()method converts a Java object into the desired entity type and writes the entity to the output stream. If an error occurs when writing the entity to the output stream the method should throw anIOExceptionexception. If an error occurs that requires an HTTP error response, anWebApplicationExceptionwith the HTTP response should be thrown.Table 49.6, “Parameters used to read an entity” describes thewriteTo()method's parameters.Table 49.6. Parameters used to read an entity
Parameter Type Description tgeneric Specifies the instance being written. typeClass<T>Specifies the Java class of the object being written. genericTypeTypeSpecifies the Java type of object to be written, obtained either by reflection of a resource method return type or via inspection of the returned instance. The GenericEntityclass, described in Section 47.3, “Returning entities with generic type information”, provides support for controlling this value.annotationsAnnotation[]Specifies the list of annotations on the method returning the entity. mediaTypeMediatTypeSpecifies the MIME type of the HTTP entity. httpHeadersMultivaluedMap<String, Object>Specifies the HTTP response headers associated with the entity. entityStreamOutputStreamSpecifies the output stream into which the entity is written.
MessageBodyWriter implementation can be used as an entity writer, it must be decorated with the javax.ws.rs.ext.Provider annotation. The @Provider annotation alerts the runtime that the supplied implementation provides additional functionality. The implementation must also be registered with the runtime as described in the section called “Registering readers and writers”.
javax.ws.rs.Produces annotation. The @Produces annotation specifies a comma separated list of MIME types that the custom entity provider generates. If an entity is not of a specified MIME type, the entity provider will not be selected as a possible writer.
Source objects and produces XML entities.
Example 49.4. XML source entity writer
import java.io.IOException;
import java.io.OutputStream;
import java.lang.annotation.Annotation;
import java.lang.reflect.Type;
import javax.ws.rs.Produces;
import javax.ws.rs.WebApplicationException;
import javax.ws.rs.core.MediaType;
import javax.ws.rs.core.MultivaluedMap;
import javax.ws.rs.ext.MessageBodyWriter;
import javax.ws.rs.ext.Provider;
import javax.xml.transform.Source;
import javax.xml.transform.Transformer;
import javax.xml.transform.TransformerException;
import javax.xml.transform.TransformerFactory;
import javax.xml.transform.stream.StreamResult;
import org.w3c.dom.Document;
import org.apache.cxf.jaxrs.ext.xml.XMLSource;
@Provider
@Produces({"application/xml", "application/*+xml", "text/xml" })
public class SourceProvider implements MessageBodyWriter<Source>
{
public boolean isWriteable(Class<?> type,
Type genericType,
Annotation[] annotations,
MediaType mt)
{
return Source.class.isAssignableFrom(type);
}
public void writeTo(Source source,
Class<?> clazz,
Type genericType,
Annotation[] annotations,
MediaType mediatype,
MultivaluedMap<String, Object> httpHeaders,
OutputStream os)
throws IOException
{
StreamResult result = new StreamResult(os);
TransformerFactory tf = TransformerFactory.newInstance();
try
{
Transformer t = tf.newTransformer();
t.transform(source, result);
}
catch (TransformerException te)
{
te.printStackTrace();
throw new WebApplicationException(te);
}
}
public long getSize(Source source,
Class<?> type,
Type genericType,
Annotation[] annotations,
MediaType mt)
{
return -1;
}
}Registering readers and writers
jaxrs:providers element in the application's configuration file or using the JAXRSServerFactoryBean class.
jaxrs:providers element is a child of the jaxrs:server element and contains a list of bean elements. Each bean element defines one entity provider.
Example 49.5. Registering entity providers with the runtime
<beans ...>
<jaxrs:server id="customerService" address="/">
...
<jaxrs:providers>
<bean id="isProvider" class="com.bar.providers.InputStreamProvider"/>
<bean id="longProvider" class="com.bar.providers.LongProvider"/>
</jaxrs:providers>
</jaxrs:server>
</beans>JAXRSServerFactoryBean class is a Apache CXF extension that provides access to the configuration APIs. It has a setProvider() method that allows you to add instantiated entity providers to an application. Example 49.6, “Programmatically registering an entity provider” shows code for registering an entity provider programmatically.
Example 49.6. Programmatically registering an entity provider
import org.apache.cxf.jaxrs.JAXRSServerFactoryBean; ... JAXRSServerFactoryBean sf = new JAXRSServerFactoryBean(); ... SourceProvider provider = new SourceProvider(); sf.setProvider(provider); ...
Chapter 50. Getting and Using Context Information
Abstract
50.1. Introduction to contexts
Context annotation
javax.ws.rs.core.Context annotation. Annotating a field or parameter of one of the context types will instruct the runtime to inject the appropriate context information into the annotated field or parameter.
Types of contexts
Table 50.1. Context types
Where context information can be used
- resource classes
- resource methods
- entity providers
- exception mappers
Scope
@Context annotation is specific to the current request. This is true in all cases including entity providers and exception mappers.
Adding contexts
Context<T> object and registering it with the runtime.
50.2. Working with the full request URI
UriInfo object. The UriInfo interface provides functions for decomposing the URI in a number of ways. It can also provide the URI as a UriBuilder object that allows you to construct URIs to return to clients.
50.2.1. Injecting the URI information
Overview
UriInfo object is decorated with the @Context annotation, the URI context for the current request is injected into the UriInfo object.
Example
Example 50.1. Injecting the URI context into a class field
import javax.ws.rs.core.Context;
import javax.ws.rs.core.UriInfo;
import javax.ws.rs.Path;
...
@Path("/monstersforhire/")
public class MonsterService
{
@Context
UriInfo requestURI;
...
}50.2.2. Working with the URI
Overview
UriInfo interface provides methods for accessing the parts of the URI:
- the base URI
- the resource path
- the full URI
Getting the Base URI
@Path annotations. For example if a service implementing the resource defined in Example 46.5, “Disabling URI decoding” were published to http://fusesource.org and a request was made on http://fusesource.org/montersforhire/nightstalker?12 the base URI would be http://fusesource.org.
Table 50.2. Methods for accessing a resource's base URI
Getting the path
rootPath— /monstersforhire/getterPath— /mostersforhire/nightstalkerTheGETrequest was made on /monstersforhire/nightstalker.putterPath— /mostersforhire/911ThePUTrequest was made on /monstersforhire/911.
Example 50.2. Getting a resource's path
@Path("/monstersforhire/")
public class MonsterService
{
@Context
UriInfo rootUri;
...
@GET
public List<Monster> getMonsters(@Context UriInfo getUri)
{
String rootPath = rootUri.getPath();
...
}
@GET
@Path("\{type}")
public Monster getMonster(@PathParam("type") String type,
@Context UriInfo getUri)
{
String getterPath = getUri.getPath();
...
}
@PUT
@Path("\{id}")
public void addMonster(@Encoded @PathParam("type") String type,
@Context UriInfo putUri)
{
String putterPath = putUri.getPath();
...
}
...
}Table 50.3. Methods for accessing a resource's path
Getting the full request URI
Table 50.4. Methods for accessing the full request URI
getRequestUri() methods would return http://fusesource.org/montersforhire/nightstalker?12. The getAbsolutePath() method would return http://fusesource.org/montersforhire/nightstalker.
50.2.3. Getting the value of URI template variables
Overview
Methods for getting the path parameters
UriInfo interface provides two methods, shown in Example 50.3, “Methods for returning path parameters from the URI context”, that return a list of the path parameters.
Example 50.3. Methods for returning path parameters from the URI context
MultivaluedMap<java.lang.String, java.lang.String> getPathParameters();MultivaluedMap<java.lang.String, java.lang.String> getPathParameters(boolean decode);getPathParameters() method that does not take any parameters automatically decodes the path parameters. If you want to disable URI decoding use getPathParameters(false).
color and note.
Example
Example 50.4. Extracting path parameters from the URI context
import javax.ws.rs.Path;
import javax.ws.rs.Get;
import javax.ws.rs.core.Context;
import javax.ws.rs.core.UriInfo;
import javax.ws.rs.core.MultivaluedMap;
@Path("/monstersforhire/")
public class MonsterService
@GET
@Path("\{type}\{size}")
public Monster getMonster(@Context UriInfo uri)
{
MultivaluedMap paramMap = uri.getPathParameters();
String type = paramMap.getFirst("type");
String size = paramMap.getFirst("size");
}
}Chapter 51. Annotation Inheritance
Abstract
Overview
Inheritance rules
Kaijin class' getMonster() method inherits the @Path, @GET, and @PathParam annotations from the Kaiju interface.
Example 51.1. Annotation inheritance
public interface Kaiju
{
@GET
@Path("/{id}")
public Monster getMonster(@PathParam("id") int id);
...
}
@Path("/kaijin")
public class Kaijin implements Kaiju
{
public Monster getMonster(int id)
{
...
}
...
}Overriding inherited annotations
Kaijin class' getMonster() method does not inherit any of the annotations from the Kaiju interface. The implementation class overrides the @Produces annotation which causes all of the annotations from the interface to be ignored.
Example 51.2. Overriding annotation inheritance
public interface Kaiju
{
@GET
@Path("/{id}")
@Produces("text/xml");
public Monster getMonster(@PathParam("id") int id);
...
}
@Path("/kaijin")
public class Kaijin implements Kaiju
{
@GET
@Path("/{id}")
@Produces("application/octect-stream");
public Monster getMonster(@PathParam("id") int id)
{
...
}
...
}Part VII. Developing Apache CXF Interceptors
Abstract
Chapter 52. Interceptors in the Apache CXF Runtime
Abstract
Overview
Figure 52.1. Apache CXF interceptor chains
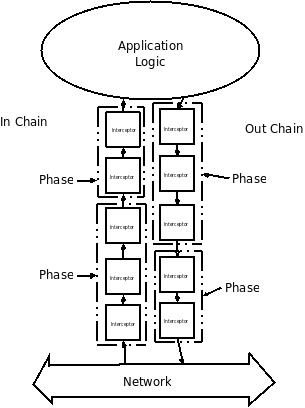
Message processing in Apache CXF
- The Apache CXF runtime creates an outbound interceptor chain to process the request.
- If the invocation starts a two-way message exchange, the runtime creates an inbound interceptor chain and a fault processing interceptor chain.
- The request message is passed sequentially through the outbound interceptor chain.Each interceptor in the chain performs some processing on the message. For example, the Apache CXF supplied SOAP interceptors package the message in a SOAP envelope.
- If any of the interceptors on the outbound chain create an error condition the chain is unwound and control is returned to the application level code.An interceptor chain is unwound by calling the fault processing method on all of the previously invoked interceptors.
- The request is dispatched to the appropriate service provider.
- When the response is received, it is passed sequentially through the inbound interceptor chain.NoteIf the response is an error message, it is passed into the fault processing interceptor chain.
- If any of the interceptors on the inbound chain create an error condition, the chain is unwound.
- When the message reaches the end of the inbound interceptor chain, it is passed back to the application code.
- The Apache CXF runtime creates an inbound interceptor chain to process the request message.
- If the request is part of a two-way message exchange, the runtime also creates an outbound interceptor chain and a fault processing interceptor chain.
- The request is passed sequentially through the inbound interceptor chain.
- If any of the interceptors on the inbound chain create an error condition, the chain is unwound and a fault is dispatched to the consumer.An interceptor chain is unwound by calling the fault processing method on all of the previously invoked interceptors.
- When the request reaches the end of the inbound interceptor chain, it is passed to the service implementation.
- When the response is ready it is passed sequentially through the outbound interceptor chain.NoteIf the response is an exception, it is passed through the fault processing interceptor chain.
- If any of the interceptors on the outbound chain create an error condition, the chain is unwound and a fault message is dispatched.
- Once the request reaches the end of the outbound chain, it is dispatched to the consumer.
Interceptors
- the interceptor's chain
- the interceptor's phase
- the other interceptors that occur earlier in the chain
Phases
Interceptor chains
- a chain for inbound messages
- a chain for outbound messages
- a chain for error messages
Developing interceptors
- Apache CXF provides a number of abstract interceptors to make it easier to develop custom interceptors.
- Interceptors require certain parts of a message to be available and require the data to be in a certain format. The contents of the message and the format of the data is partially determined by an interceptor's phase.
- In general, the ordering of interceptors within a phase is not important. However, in certain situations it may be important to ensure that an interceptor is executed before, or after, other interceptors in the same phase.
- If an error occurs in the active interceptor chain after the interceptor has executed, its fault processing logic is invoked.
Chapter 53. The Interceptor APIs
Abstract
PhaseInterceptor interface which extends the base Interceptor interface. This interface defines a number of methods used by the Apache CXF's runtime to control interceptor execution and are not appropriate for application developers to implement. To simplify interceptor development, Apache CXF provides a number of abstract interceptor implementations that can be extended.
Interfaces
Interceptor interface shown in Example 53.1, “Base interceptor interface”.
Example 53.1. Base interceptor interface
package org.apache.cxf.interceptor;
public interface Interceptor<T extends Message>
{
void handleMessage(T message) throws Fault;
void handleFault(T message);
}Interceptor interface defines the two methods that a developer needs to implement for a custom interceptor:
- handleMessage()
- The
handleMessage()method does most of the work in an interceptor. It is called on each interceptor in a message chain and receives the contents of the message being processed. Developers implement the message processing logic of the interceptor in this method. For detailed information about implementing thehandleMessage()method, see Section 55.1, “Processing messages”. - handleFault()
- The
handleFault()method is called on an interceptor when normal message processing has been interrupted. The runtime calls thehandleFault()method of each invoked interceptor in reverse order as it unwinds an interceptor chain. For detailed information about implementing thehandleFault()method, see Section 55.2, “Unwinding after an error”.
Interceptor interface. Instead, they implement the PhaseInterceptor interface shown in Example 53.2, “The phase interceptor interface”. The PhaseInterceptor interface adds four methods that allow an interceptor the participate in interceptor chains.
Example 53.2. The phase interceptor interface
package org.apache.cxf.phase;
...
public interface PhaseInterceptor<T extends Message> extends Interceptor<T>
{
Set<String> getAfter();
Set<String> getBefore();
String getId();
String getPhase();
}Abstract interceptor class
PhaseInterceptor interface, developers should extend the AbstractPhaseInterceptor class. This abstract class provides implementations for the phase management methods of the PhaseInterceptor interface. The AbstractPhaseInterceptor class also provides a default implementation of the handleFault() method.
handleMessage() method. They can also provide a different implementation for the handleFault() method. The developer-provided implementations can manipulate the message data using the methods provided by the generic org.apache.cxf.message.Message interface.
AbstractSoapInterceptor class. Extending this class provides the handleMessage() method and the handleFault() method with access to the message data as an org.apache.cxf.binding.soap.SoapMessage object. SoapMessage objects have methods for retrieving the SOAP headers, the SOAP envelope, and other SOAP metadata from the message.
Chapter 54. Determining When the Interceptor is Invoked
Abstract
- Specifying the interceptor's phase
- Specifying constraints on the location of the interceptor within the phase
54.1. Specifying an interceptor's phase
Overview
Phase
Figure 54.1. An interceptor phase
RECEIVE phase of an inbound interceptor chain processes transport level details using the raw message data picked up from the wire.
Specifying a phase
org.apache.cxf.Phase class to use for specifying a phase. The class is a collection of constants. Each phase defined by Apache CXF has a corresponding constant in the Phase class. For example, the RECEIVE phase is specified by the value Phase.RECEIVE.
Setting the phase
AbstractPhaseInterceptor class defines three constructors for instantiating an interceptor:
public AbstractPhaseInterceptor(String phase)—sets the phase of the interceptor to the specified phase and automatically sets the interceptor's id to the interceptor's class name.TipThis constructor will satisfy most use cases.public AbstractPhaseInterceptor(String id, String phase)—sets the interceptor's id to the string passed in as the first parameter and the interceptor's phase to the second string.public AbstractPhaseInterceptor(String phase, boolean uniqueId)—specifies if the interceptor should use a unique, system generated id. If theuniqueIdparameter istrue, the interceptor's id will be calculated by the system. If theuniqueIdparameter isfalsethe interceptor's id is set to the interceptor's class name.
AbstractPhaseInterceptor constructor using the super() method as shown in Example 54.1, “Setting an interceptor's phase”.
Example 54.1. Setting an interceptor's phase
import org.apache.cxf.message.Message;
import org.apache.cxf.phase.AbstractPhaseInterceptor;
import org.apache.cxf.phase.Phase;
public class StreamInterceptor extends AbstractPhaseInterceptor<Message>
{
public StreamInterceptor()
{
super(Phase.PRE_STREAM);
}
}StreamInterceptor interceptor shown in Example 54.1, “Setting an interceptor's phase” is placed into the PRE_STREAM phase.
54.2. Constraining an interceptors placement in a phase
Overview
Add to the chain before
AbstractPhaseInterceptor class provides two addBefore() methods.
Example 54.2. Methods for adding an interceptor before other interceptors
public void addBefore(String i);public void addBefore(Collection<String> i);addBefore() method in the constuctor of a custom interceptor.
Example 54.3. Specifying a list of interceptors that must run after the current interceptor
public class MyPhasedOutInterceptor extends AbstractPhaseInterceptor
{
public MyPhasedOutInterceptor() {
super(Phase.PRE_LOGICAL);
addBefore(HolderOutInterceptor.class.getName());
}
...
}Add to the chain after
AbstractPhaseInterceptor class provides two addAfter() methods for cases where an interceptor needs to be placed after one or more other interceptors.
Example 54.4. Methods for adding an interceptor after other interceptors
public void addAfter(String i);public void addAfter(Collection<String> i);addAfter() method in the constuctor of a custom interceptor.
Example 54.5. Specifying a list of interceptors that must run before the current interceptor
public class MyPhasedOutInterceptor extends AbstractPhaseInterceptor
{
public MyPhasedOutInterceptor() {
super(Phase.PRE_LOGICAL);
addAfter(StartingOutInterceptor.class.getName());
}
...
}Chapter 55. Implementing the Interceptors Processing Logic
Abstract
handleMessage() method. This method receives the message data and manipulates it as needed. Developers may also want to add some special logic to handle fault processing cases.
Figure 55.1. Flow through an interceptor

handleMessage() method is called. The handleMessage() method is where the interceptor's message processing logic is placed.
handleMessage() method of the interceptor, or any subsequent interceptor in the interceptor chain, the handleFault() method is called. The handleFault() method is useful for cleaning up after an interceptor in the event of an error. It can also be used to alter the fault message.
55.1. Processing messages
Overview
handleMessage() method is invoked. It receives that message data as a Message object. Along with the actual contents of the message, the Message object may contain a number of properties related to the message or the message processing state. The exact contents of the Message object depends on the interceptors preceding the current interceptor in the chain.
Getting the message contents
Message interface provides two methods that can be used in extracting the message contents:
public <T> T getContent(java.lang.Class<T> format);ThegetContent()method returns the content of the message in an object of the specified class. If the contents are not available as an instance of the specified class, null is returned. The list of available content types is determined by the interceptor's location on the interceptor chain and the direction of the interceptor chain.public Collection<Attachment> getAttachments();ThegetAttachments()method returns a JavaCollectionobject containing any binary attachments associated with the message. The attachments are stored inorg.apache.cxf.message.Attachmentobjects.Attachmentobjects provide methods for managing the binary data.ImportantAttachments are only available after the attachment processing interceptors have executed.
Determining the message's direction
getExchange() method. As shown in Example 55.1, “Getting the message exchange”, getExchange() does not take any parameters and returns the message exchange as a org.apache.cxf.message.Exchange object.
Example 55.1. Getting the message exchange
Exchange getExchange();Exchange object has four methods, shown in Example 55.2, “Getting messages from a message exchange”, for getting the messages associated with an exchange. Each method will either return the message as a org.apache.cxf.Message object or it will return null if the message does not exist.
Example 55.2. Getting messages from a message exchange
Message getInMessage();Message getInFaultMessage();Message getOutMessage();Message getOutFaultMessage();Example 55.3. Checking the direction of a message chain
public static boolean isOutbound()
{
Exchange exchange = message.getExchange();
return message != null
&& exchange != null
&& (message == exchange.getOutMessage()
|| message == exchange.getOutFaultMessage());
}Example
Example 55.4. Example message processing method
import java.io.IOException;
import java.io.InputStream;
import java.util.zip.GZIPInputStream;
import org.apache.cxf.message.Message;
import org.apache.cxf.phase.AbstractPhaseInterceptor;
import org.apache.cxf.phase.Phase;
public class StreamInterceptor extends AbstractPhaseInterceptor<Message>
{
...
public void handleMessage(Message message)
{
boolean isOutbound = false;
isOutbound = message == message.getExchange().getOutMessage()
|| message == message.getExchange().getOutFaultMessage();
if (!isOutbound)
{
try
{
InputStream is = message.getContent(InputStream.class);
GZIPInputStream zipInput = new GZIPInputStream(is);
message.setContent(InputStream.class, zipInput);
}
catch (IOException ioe)
{
ioe.printStackTrace();
}
}
else
{
// zip the outbound message
}
}
...
}55.2. Unwinding after an error
Overview
handleFault() method of any interceptors in the chain that have already been executed.
handleFault() method can be used to clean up any resources used by an interceptor during normal message processing. It can also be used to rollback any actions that should only stand if message processing completes successfully. In cases where the fault message will be passed on to an outbound fault processing interceptor chain, the handleFault() method can also be used to add information to the fault message.
Getting the message payload
handleFault() method receives the same Message object as the handleMessage() method used in normal message processing. Getting the message contents from the Message object is described in the section called “Getting the message contents”.
Example
Example 55.5. Handling an unwinding interceptor chain
@Override
public void handleFault(SoapMessage message)
{
super.handleFault(message);
XMLStreamWriter writer = (XMLStreamWriter)message.get(ORIGINAL_XML_WRITER);
if (writer != null)
{
message.setContent(XMLStreamWriter.class, writer);
}
}Chapter 56. Configuring Endpoints to Use Interceptors
Abstract
56.1. Deciding where to attach interceptors
Overview
- the endpoint object
- the service object
- the proxy object
- the factory object used to create the endpoint or the proxy
- the binding
- the central
Busobject
Endpoints and proxies
Factories
Bindings
Buses
Combining attachment points
56.2. Adding interceptors using configuration
Overview
Configuration elements
Table 56.1. Interceptor chain configuration elements
list child element. The list element has one child for each of the interceptors being attached to the chain. Interceptors can be specified using either a bean element directly configuring the interceptor or a ref element that refers to a bean element that configures the interceptor.
Examples
Example 56.1. Attaching interceptors to the bus
<beans xmlns="http://www.springframework.org/schema/beans"
xmlns:xsi="http://www.w3.org/2001/XMLSchema-instance"
xmlns:cxf="http://cxf.apache.org/core"
xmlns:http="http://cxf.apache.org/transports/http/configuration"
xsi:schemaLocation="
http://cxf.apache.org/core http://cxf.apache.org/schemas/core.xsd
http://cxf.apache.org/transports/http/configuration http://cxf.apache.org/schemas/configuration/http-conf.xsd
http://www.springframework.org/schema/beans http://www.springframework.org/schema/beans/spring-beans.xsd">
...
<bean id="GZIPStream" class="demo.stream.interceptor.StreamInterceptor"/>
<cxf:bus>
<cxf:inInterceptors>
<list>
<ref bean="GZIPStream"/>
</list>
</cxf:inInterceptors>
</cxf:bus>
</beans>Example 56.2. Attaching interceptors to a JAX-WS service provider
<beans xmlns="http://www.springframework.org/schema/beans"
xmlns:xsi="http://www.w3.org/2001/XMLSchema-instance"
xmlns:jaxws="http://cxf.apache.org/jaxws"
xmlns:wsa="http://cxf.apache.org/ws/addressing"
xsi:schemaLocation="
http://www.springframework.org/schema/beans
http://www.springframework.org/schema/beans/spring-beans.xsd">
<jaxws:endpoint ...>
<jaxws:outInterceptors>
<list>
<bean id="GZIPStream" class="demo.stream.interceptor.StreamInterceptor" />
</list>
</jaxws:outInterceptors>
</jaxws:endpoint>
</beans>More information
56.3. Adding interceptors programmatically
- the
InterceptorProviderAPI - Java annotations
InterceptorProvider API allows the developer to attach interceptors to any of the runtime components that have interceptor chains, but it requires working with the underlying Apache CXF classes. The Java annotations can only be added to service interfaces or service implementations, but they allow developers to stay within the JAX-WS API or the JAX-RS API.
56.3.1. Using the interceptor provider API
Overview
InterceptorProvider interface shown in Example 56.3, “The interceptor provider interface”.
Example 56.3. The interceptor provider interface
package org.apache.cxf.interceptor;
import java.util.List;
public interface InterceptorProvider
{
List<Interceptor<? extends Message>> getInInterceptors();
List<Interceptor<? extends Message>> getOutInterceptors();
List<Interceptor<? extends Message>> getInFaultInterceptors();
List<Interceptor<? extends Message>> getOutFaultInterceptors();
}List object. Using the methods offered by the Java List object, developers can add and remove interceptors to any of the chains.
Procedure
InterceptorProvider API to attach an interceptor to a runtime component's interceptor chain, you must:
- Get access to the runtime component with the chain to which the interceptor is being attached.Developers must use Apache CXF specific APIs to access the runtime components from standard Java application code. The runtime components are usually accessible by casting the JAX-WS or JAX-RS artifacts into the underlying Apache CXF objects.
- Create an instance of the interceptor.
- Use the proper get method to retrieve the desired interceptor chain.
- Use the
Listobject'sadd()method to attach the interceptor to the interceptor chain.TipThis step is usually combined with retrieving the interceptor chain.
Attaching an interceptor to a consumer
Example 56.4. Attaching an interceptor to a consumer programmatically
package com.fusesource.demo;
import java.io.File;
import java.net.URL;
import javax.xml.namespace.QName;
import javax.xml.ws.Service;
import org.apache.cxf.endpoint.ClientProxy;
import org.apache.cxf.endpoint.ClientProxy;
public class Client
{
public static void main(String args[])
{
QName serviceName = new QName("http://demo.eric.org", "stockQuoteReporter");
Service s = Service.create(serviceName); 1
QName portName = new QName("http://demo.eric.org", "stockQuoteReporterPort");
s.addPort(portName, "http://schemas.xmlsoap.org/soap/", "http://localhost:9000/EricStockQuote"); 2
quoteReporter proxy = s.getPort(portName, quoteReporter.class); 3
Client cxfClient = ClientProxy.getClient(proxy); 4
ValidateInterceptor validInterceptor = new ValidateInterceptor(); 5
cxfClient.getInInterceptor().add(validInterceptor); 6
...
}
}- 1
- Creates a JAX-WS
Serviceobject for the consumer. - 2
- Adds a port to the
Serviceobject that provides the consumer's target address. - 3
- Creates the proxy used to invoke methods on the service provider.
- 4
- Gets the Apache CXF
Clientobject associated with the proxy. - 5
- Creates an instance of the interceptor.
- 6
- Attaches the interceptor to the inbound interceptor chain.
Attaching an interceptor to a service provider
Example 56.5. Attaching an interceptor to a service provider programmatically
package com.fusesource.demo;
import java.util.*;
import org.apache.cxf.endpoint.Server;
import org.apache.cxf.frontend.ServerFactoryBean;
import org.apache.cxf.frontend.EndpointImpl;
public class stockQuoteReporter implements quoteReporter
{
...
public stockQuoteReporter()
{
ServerFactoryBean sfb = new ServerFactoryBean(); 1
Server server = sfb.create(); 2
EndpointImpl endpt = server.getEndpoint(); 3
AuthTokenInterceptor authInterceptor = new AuthTokenInterceptor(); 4
endpt.getOutInterceptor().add(authInterceptor); 5
}
}- 1
- Creates a
ServerFactoryBeanobject that will provide access to the underlying Apache CXF objects. - 2
- Gets the
Serverobject that Apache CXF uses to represent the endpoint. - 3
- Gets the Apache CXF
EndpointImplobject for the service provider. - 4
- Creates an instance of the interceptor.
- 5
- Attaches the interceptor to the endpoint;s outbound interceptor chain.
Attaching an interceptor to a bus
Example 56.6. Attaching an interceptor to a bus
WatchInterceptor will be attached to the inbound interceptor chain of all endpoints created by the runtime instance.
56.3.2. Using Java annotations
Overview
Where to place the annotations
- the service endpoint interface(SEI) defining the endpointIf the annotations are placed on an SEI, all of the service providers that implement the interface and all of the consumers that use the SEI to create proxies will be affected.
- a service implementation classIf the annotations are placed on an implementation class, all of the service providers using the implementation class will be affected.
The annotations
Table 56.2. Interceptor chain annotations
Listing the interceptors
Example 56.7. Syntax for listing interceptors in a chain annotation
interceptors={"interceptor1", "interceptor2", ..., "interceptorN"}Example
SayHiImpl.
Example 56.8. Attaching interceptors to a service implementation
import org.apache.cxf.interceptor.InInterceptors;
@InInterceptors(interceptors={"com.sayhi.interceptors.FirstLast", "com.sayhi.interceptors.LogName"})
public class SayHiImpl implements SayHi
{
...
}Chapter 57. Manipulating Interceptor Chains on the Fly
Abstract
Overview
Chain life-cycle
Getting the interceptor chain
Message.getInterceptorChain() method shown in Example 57.1, “Method for getting an interceptor chain”. The interceptor chain is returned as a org.apache.cxf.interceptor.InterceptorChain object.
Example 57.1. Method for getting an interceptor chain
InterceptorChain getInterceptorChain();Adding interceptors
InterceptorChain object has two methods, shown in Example 57.2, “Methods for adding interceptors to an interceptor chain”, for adding interceptors to an interceptor chain. One allows you to add a single interceptor and the other allows you to add multiple interceptors.
Example 57.2. Methods for adding interceptors to an interceptor chain
void add(Interceptor<? extends Message> i);void add(Collection<Interceptor<? extends Message>> i);Example 57.3. Adding an interceptor to an interceptor chain on-the-fly
- 1
- Instantiates a copy of the interceptor to be added to the chain.ImportantThe interceptor being added to the chain should be in either the same phase as the current interceptor or a latter phase than the current interceptor.
- 2
- Gets the interceptor chain for the current message.
- 3
- Adds the new interceptor to the chain.
Removing interceptors
InterceptorChain object has one method, shown in Example 57.4, “Methods for removing interceptors from an interceptor chain”, for removing an interceptor from an interceptor chain.
Example 57.4. Methods for removing interceptors from an interceptor chain
void remove(Interceptor<? extends Message> i);Example 57.5. Removing an interceptor from an interceptor chain on-the-fly
void handleMessage(Message message)
{
...
Iterator<Interceptor<? extends Message>> iterator =
message.getInterceptorChain().iterator();
Interceptor<?> removeInterceptor = null;
for (; iterator.hasNext(); ) {
Interceptor<?> interceptor = iterator.next();
if (interceptor.getClass().getName().equals("InterceptorClassName")) {
removeInterceptor = interceptor;
break;
}
}
if (removeInterceptor != null) {
log.debug("Removing interceptor {}",removeInterceptor.getClass().getName());
message.getInterceptorChain().remove(removeInterceptor);
}
...
}InterceptorClassName is the class name of the interceptor you want to remove from the chain.
Appendix F. Apache CXF Message Processing Phases
Inbound phases
Table F.1. Inbound message processing phases
| Phase | Description |
|---|---|
RECEIVE | Performs transport specific processing, such as determining MIME boundaries for binary attachments. |
PRE_STREAM | Processes the raw data stream received by the transport. |
USER_STREAM | |
POST_STREAM | |
READ | Determines if a request is a SOAP or XML message and builds adds the proper interceptors. SOAP message headers are also processed in this phase. |
PRE_PROTOCOL | Performs protocol level processing. This includes processing of WS-* headers and processing of the SOAP message properties. |
USER_PROTOCOL | |
POST_PROTOCOL | |
UNMARSHAL | Unmarshals the message data into the objects used by the application level code. |
PRE_LOGICAL | Processes the unmarshalled message data. |
USER_LOGICAL | |
POST_LOGICAL | |
PRE_INVOKE | |
INVOKE | Passes the message to the application code. On the server side, the service implementation is invoked in this phase. On the client side, the response is handed back to the application. |
POST_INVOKE | Invokes the outbound interceptor chain. |
Outbound phases
Table F.2. Inbound message processing phases
| Phase | Description |
|---|---|
SETUP | Performs any set up that is required by later phases in the chain. |
PRE_LOGICAL | Performs processing on the unmarshalled data passed from the application level. |
USER_LOGICAL | |
POST_LOGICAL | |
PREPARE_SEND | Opens the connection for writing the message on the wire. |
PRE_STREAM | Performs processing required to prepare the message for entry into a data stream. |
PRE_PROTOCOL | Begins processing protocol specific information. |
WRITE | Writes the protocol message. |
PRE_MARSHAL | Marshals the message. |
MARSHAL | |
POST_MARSHAL | |
USER_PROTOCOL | Process the protocol message. |
POST_PROTOCOL | |
USER_STREAM | Process the byte-level message. |
POST_STREAM | |
SEND | Sends the message and closes the transport stream. |
_ENDING. The ending phases are used interceptors that require some terminal action to occur before data is written on the wire.
Appendix G. Apache CXF Provided Interceptors
G.1. Core Apache CXF Interceptors
Inbound
Table G.1. Core inbound interceptors
| Class | Phase | Description |
|---|---|---|
ServiceInvokerInterceptor | INVOKE | Invokes the proper method on the service. |
Outbound
G.2. Front-Ends
JAX-WS
Table G.2. Inbound JAX-WS interceptors
| Class | Phase | Description |
|---|---|---|
HolderInInterceptor | PRE_INVOKE | Creates holder objects for any out or in/out parameters in the message. |
WrapperClassInInterceptor | POST_LOGICAL | Unwraps the parts of a wrapped doc/literal message into the appropriate array of objects. |
LogicalHandlerInInterceptor | PRE_PROTOCOL | Passes message processing to the JAX-WS logical handlers used by the endpoint. When the JAX-WS handlers complete, the message is passed along to the next interceptor on the inbound chain. |
SOAPHandlerInterceptor | PRE_PROTOCOL | Passes message processing to the JAX-WS SOAP handlers used by the endpoint. When the SOAP handlers finish with the message, the message is passed along to the next interceptor in the chain. |
Table G.3. Outbound JAX-WS interceptors
| Class | Phase | Description |
|---|---|---|
HolderOutInterceptor | PRE_LOGICAL | Removes the values of any out and in/out parameters from their holder objects and adds the values to the message's parameter list. |
WebFaultOutInterceptor | PRE_PROTOCOL | Processes outbound fault messages. |
WrapperClassOutInterceptor | PRE_LOGICAL | Makes sure that wrapped doc/literal messages and rpc/literal messages are properly wrapped before being added to the message. |
LogicalHandlerOutInterceptor | PRE_MARSHAL | Passes message processing to the JAX-WS logical handlers used by the endpoint. When the JAX-WS handlers complete, the message is passed along to the next interceptor on the outbound chain. |
SOAPHandlerInterceptor | PRE_PROTOCOL | Passes message processing to the JAX-WS SOAP handlers used by the endpoint. When the SOAP handlers finish processing the message, it is passed along to the next interceptor in the chain. |
MessageSenderInterceptor | PREPARE_SEND | Calls back to the Destination object to have it setup the output streams, headers, etc. to prepare the outgoing transport. |
JAX-RS
Table G.4. Inbound JAX-RS interceptors
| Class | Phase | Description |
|---|---|---|
JAXRSInInterceptor | PRE_STREAM | Selects the root resource class, invokes any configured JAX-RS request filters, and determines the method to invoke on the root resource. |
ServiceInvokerInInterceptor interceptor. No other interceptors will be invoked after the JAXRSInInterceptor.
Table G.5. Outbound JAX-RS interceptors
| Class | Phase | Description |
|---|---|---|
JAXRSOutInterceptor | MARSHAL | Marshals the response into the proper format for transmission. |
G.3. Message bindings
SOAP
Table G.6. Inbound SOAP interceptors
| Class | Phase | Description |
|---|---|---|
CheckFaultInterceptor | POST_PROTOCOL | Checks if the message is a fault message. If the message is a fault message, normal processing is aborted and fault processing is started. |
MustUnderstandInterceptor | PRE_PROTOCOL | Processes the must understand headers. |
RPCInInterceptor | UNMARSHAL | Unmarshals rpc/literal messages. If the message is bare, the message is passed to a BareInInterceptor object to deserialize the message parts. |
ReadsHeadersInterceptor | READ | Parses the SOAP headers and stores them in the message object. |
SoapActionInInterceptor | READ | Parses the SOAP action header and attempts to find a unique operation for the action. |
SoapHeaderInterceptor | UNMARSHAL | Binds the SOAP headers that map to operation parameters to the appropriate objects. |
AttachmentInInterceptor | RECEIVE | Parses the mime headers for mime boundaries, finds the root part and resets the input stream to it, and stores the other parts in a collection of Attachment objects. |
DocLiteralInInterceptor | UNMARSHAL | Examines the first element in the SOAP body to determine the appropriate operation and calls the data binding to read in the data. |
StaxInInterceptor | POST_STREAM | Creates an XMLStreamReader object from the message. |
URIMappingInterceptor | UNMARSHAL | Handles the processing of HTTP GET methods. |
SwAInInterceptor | PRE_INVOKE | Creates the required MIME handlers for binary SOAP attachments and adds the data to the parameter list. |
Table G.7. Outbound SOAP interceptors
| Class | Phase | Description |
|---|---|---|
RPCOutInterceptor | MARSHAL | Marshals rpc style messages for transmission. |
SoapHeaderOutFilterInterceptor | PRE_LOGICAL | Removes all SOAP headers that are marked as inbound only. |
SoapPreProtocolOutInterceptor | POST_LOGICAL | Sets up the SOAP version and the SOAP action header. |
AttachmentOutInterceptor | PRE_STREAM | Sets up the attachment marshalers and the mime stuff required to process any attachments that might be in the message. |
BareOutInterceptor | MARSHAL | Writes the message parts. |
StaxOutInterceptor | PRE_STREAM | Creates an XMLStreamWriter object from the message. |
WrappedOutInterceptor | MARSHAL | Wraps the outbound message parameters. |
SoapOutInterceptor | WRITE | Writes the soap:envelope element and the elements for the header blocks in the message. Also writes an empty soap:body element for the remaining interceptors to populate. |
SwAOutInterceptor | PRE_LOGICAL | Removes any binary data that will be packaged as a SOAP attachment and stores it for later processing. |
XML
Table G.8. Inbound XML interceptors
| Class | Phase | Description |
|---|---|---|
AttachmentInInterceptor | RECEIVE | Parses the mime headers for mime boundaries, finds the root part and resets the input stream to it, and then stores the other parts in a collection of Attachment objects. |
DocLiteralInInterceptor | UNMARSHAL | Examines the first element in the message body to determine the appropriate operation and then calls the data binding to read in the data. |
StaxInInterceptor | POST_STREAM | Creates an XMLStreamReader object from the message. |
URIMappingInterceptor | UNMARSHAL | Handles the processing of HTTP GET methods. |
XMLMessageInInterceptor | UNMARSHAL | Unmarshals the XML message. |
Table G.9. Outbound XML interceptors
| Class | Phase | Description |
|---|---|---|
StaxOutInterceptor | PRE_STREAM | Creates an XMLStreamWriter objects from the message. |
WrappedOutInterceptor | MARSHAL | Wraps the outbound message parameters. |
XMLMessageOutInterceptor | MARSHAL | Marshals the message for transmission. |
CORBA
Table G.10. Inbound CORBA interceptors
| Class | Phase | Description |
|---|---|---|
CorbaStreamInInterceptor | PRE_STREAM | Deserializes the CORBA message. |
BareInInterceptor | UNMARSHAL | Deserializes the message parts. |
Table G.11. Outbound CORBA interceptors
| Class | Phase | Description |
|---|---|---|
CorbaStreamOutInterceptor | PRE_STREAM | Serializes the message. |
BareOutInterceptor | MARSHAL | Writes the message parts. |
CorbaStreamOutEndingInterceptor | USER_STREAM | Creates a streamable object for the message and stores it in the message context. |
G.4. Other features
Logging
Table G.12. Inbound logging interceptors
| Class | Phase | Description |
|---|---|---|
LoggingInInterceptor | RECEIVE | Writes the raw message data to the logging system. |
Table G.13. Outbound logging interceptors
| Class | Phase | Description |
|---|---|---|
LoggingOutInterceptor | PRE_STREAM | Writes the outbound message to the logging system. |
WS-Addressing
Table G.14. Inbound WS-Addressing interceptors
| Class | Phase | Description |
|---|---|---|
MAPCodec | PRE_PROTOCOL | Decodes the message addressing properties. |
Table G.15. Outbound WS-Addressing interceptors
| Class | Phase | Description |
|---|---|---|
MAPAggregator | PRE_LOGICAL | Aggregates the message addressing properties for a message. |
MAPCodec | PRE_PROTOCOL | Encodes the message addressing properties. |
WS-RM
Table G.16. Inbound WS-RM interceptors
| Class | Phase | Description |
|---|---|---|
RMInInterceptor | PRE_LOGICAL | Handles the aggregation of message parts and acknowledgement messages. |
RMSoapInterceptor | PRE_PROTOCOL | Encodes and decodes the WS-RM properties from messages. |
Table G.17. Outbound WS-RM interceptors
| Class | Phase | Description |
|---|---|---|
RMOutInterceptor | PRE_LOGICAL | Handles the chunking of messages and the transmission of the chunks. Also handles the processing of acknowledgements and resend requests. |
RMSoapInterceptor | PRE_PROTOCOL | Encodes and decodes the WS-RM properties from messages. |
Appendix H. Interceptor Providers
Overview
org.apache.cxf.interceptor.InterceptorProvider interface. Developers can attach their own interceptors to any interceptor provider.
List of providers
AddressingPolicyInterceptorProviderClientFactoryBeanClientImplClientProxyFactoryBeanCorbaBindingCXFBusImplorg.apache.cxf.jaxws.EndpointImplorg.apache.cxf.endpoint.EndpointImplExtensionManagerBusJAXRSClientFactoryBeanJAXRSServerFactoryBeanJAXRSServiceImplJaxWsClientEndpointImplJaxWsClientFactoryBeanJaxWsEndpointImplJaxWsProxyFactoryBeanJaxWsServerFactoryBeanJaxwsServiceBuilderMTOMPolicyInterceptorProviderNoOpPolicyInterceptorProviderObjectBindingRMPolicyInterceptorProviderServerFactoryBeanServiceImplSimpleServiceBuilderSoapBindingWrappedEndpointWrappedServiceXMLBinding
Index
Symbols
- @Consumes, Custom readers
- @Context, Context annotation, Overview
- @CookieParam, Injecting information from a cookie
- @DataBinding, Specifying the Data Binding
- @DefaultValue, Specifying a default value to inject
- @DELETE, Specifying HTTP verbs
- @Encoded, Disabling URI decoding
- @EndpointProperties, @EndpointProperties annotation
- @EndpointProperty, @EndpointProperty annotation
- @FastInfoset, @FastInfoset
- @FormParam, Injecting data from HTML forms
- @GET, Specifying HTTP verbs
- @GZIP, @GZIP annotation
- @HandlerChain, The @HandlerChain annotation
- @HEAD, Specifying HTTP verbs
- @HeaderParam, Injecting information from the HTTP headers
- @InFaultInterceptors, The annotations
- @InInterceptors, The annotations
- @Logging, Enable Logging on an Endpoint
- @MatrixParam, Using matrix parameters
- @Oneway, The @Oneway annotation
- @OutFaultInterceptors, The annotations
- @OutInterceptors, The annotations
- @Path, Setting the path, Requirements, Specifying a sub-resource
- @PathParam, Getting data from the URI's path
- @Policies, @Policies annotation
- @Policy, @Policy annotation
- @POST, Specifying HTTP verbs
- @PostConstruct, Order of initialization
- @PreDestroy, Releasing a Handler
- @Produces, Custom writers
- @Provider, Implementing an exception mapper, Custom readers, Custom writers
- @PUT, Specifying HTTP verbs
- @QueryParam, Using query parameters
- @RequestWrapper, The @RequestWrapper annotation
- className property, The @RequestWrapper annotation
- localName property, The @RequestWrapper annotation
- targetNamespace property, The @RequestWrapper annotation
- @Resource, Coding the provider implementation, Obtaining a context, Order of initialization
- @ResponseWrapper, The @ResponseWrapper annotation
- className property, The @ResponseWrapper annotation
- localName property, The @ResponseWrapper annotation
- targetNamespace property, The @ResponseWrapper annotation
- @SchemaValidation, Schema Validation of Messages
- @ServiceMode, Message mode, Payload mode
- @SOAPBinding, The @SOAPBinding annotation
- parameterStyle property, The @SOAPBinding annotation
- style property, The @SOAPBinding annotation
- use property, The @SOAPBinding annotation
- @WebFault, The @WebFault annotation
- faultName property, The @WebFault annotation
- name property, The @WebFault annotation
- targetNamespace property, The @WebFault annotation
- @WebMethod, The @WebMethod annotation, Obtaining a context
- action property, The @WebMethod annotation
- exclude property, The @WebMethod annotation
- operationName property, The @WebMethod annotation
- @WebParam, The @WebParam annotation
- header property, The @WebParam annotation
- mode property, The @WebParam annotation
- name property, The @WebParam annotation
- partName property, The @WebParam annotation
- targetNamespace property, The @WebParam annotation
- @WebResult, The @WebResult annotation
- header property, The @WebResult annotation
- name property, The @WebResult annotation
- partName property, The @WebResult annotation
- targetNamespace property, The @WebResult annotation
- @WebService, The @WebService annotation
- endpointInterface property, The @WebService annotation
- name property, The @WebService annotation
- portName property, The @WebService annotation
- serviceName property, The @WebService annotation
- targetNamespace property, The @WebService annotation
- wsdlLocation property, The @WebService annotation
- @WebServiceProvider, The @WebServiceProvider annotation
- @WSDLDocumentation, @WSDLDocumentation annotation
- @WSDLDocumentationCollection, @WSDLDocumentationCollection annotation
- @XmlAnyElement, Mapping to Java
- @XmlAttribute, Mapping attributes to Java
- @XmlElement, Mapping to Java, Mapping to Java, Mapping to Java
- required property, minOccurs set to 0
- type property, What is generated, Specializing or generalizing the default mapping
- @XmlElementDecl
- defaultValue, Java mapping of elements with a default value
- substitutionHeadName, Generated object factory methods
- substitutionHeadNamespace, Generated object factory methods
- @XmlElements, Mapping to Java, Mapping to Java
- @XmlEnum, Mapping to Java
- @XmlJavaTypeAdapter, What is generated
- @XmlRootElement, Java mapping of elements with an in-line type
- @XmlSchemaType, What is generated
- @XmlSeeAlso, Using the @XmlSeeAlso annotation, Mapping to Java, Substitution groups in interfaces
- @XmlType, Mapping to Java, Mapping to Java, Mapping to Java
A
- AbstractPhaseInterceptor, Abstract interceptor class
- addAfter(), Add to the chain after
- addBefore(), Add to the chain before
- constructor, Setting the phase
- AcknowledgementInterval, Acknowledgement interval
- all element, Complex type varieties
- annotations
- @Consumes (see @Consumes)
- @Context (see @Context)
- @CookieParam (see @CookieParam)
- @DataBinding (see @DataBinding)
- @DefaultValue (see @DefaultValue)
- @DELETE (see @DELETE)
- @Encoded (see @Encoded)
- @EndpointProperties (see @EndpointProperties)
- @EndpointProperty (see @EndpointProperty)
- @FastInfoset (see @FastInfoset)
- @FormParam (see @FormParam)
- @GET (see @GET)
- @GZIP (see @GZIP)
- @HandlerChain (see @HandlerChain)
- @HEAD (see @HEAD)
- @HeaderParam (see @HeaderParam)
- @Logging (see @Logging)
- @MatrixParam (see @MatrixParam)
- @Oneway (see @Oneway)
- @Path (see @Path)
- @PathParam (see @PathParam)
- @Policies (see @Policies)
- @Policy (see @Policy)
- @POST (see @POST)
- @PostConstruct (see @PostConstruct)
- @PreDestroy (see @PreDestroy)
- @Produces (see @Produces)
- @Provider (see @Provider)
- @PUT (see @PUT)
- @QueryParam (see @QueryParam)
- @RequestWrapper (see @RequestWrapper)
- @Resource (see @Resource)
- @ResponseWrapper (see @ResponseWrapper)
- @SchemaValidation (see @SchemaValidation)
- @ServiceMode (see @ServiceMode)
- @SOAPBinding (see @SOAPBinding)
- @WebFault (see @WebFault)
- @WebMethod (see @WebMethod)
- @WebParam (see @WebParam)
- @WebResult (see @WebResult)
- @WebService (see @WebService)
- @WebServiceProvider (see @WebServiceProvider)
- @WSDLDocumentation (see @WSDLDocumentation)
- @WSDLDocumentationCollection (see @WSDLDocumentationCollection)
- @XmlAttribute (see @XmlAttribute)
- @XmlElement (see @XmlElement)
- @XmlElementDecl (see @XmlElementDecl)
- @XmlEnum (see @XmlEnum)
- @XmlJavaTypeAdapter (see @XmlJavaTypeAdapter)
- @XmlRootElement (see @XmlRootElement)
- @XmlSchemaType (see @XmlSchemaType)
- @XmlType (see @XmlType)
- inheritance, Annotation Inheritance
- any element, Specifying in XML Schema
- anyAttribute, Defining in XML Schema
- anyType, Using in XML Schema
- mapping to Java, Mapping to Java
- application source, How WS-RM works
- asynchronous applications
- callback approach, Developing Asynchronous Applications
- implementation
- polling approach, Developing Asynchronous Applications
- implementation patterns, Implementing an Asynchronous Client with the Polling Approach
- using a Dispatch object, Asynchronous invocation
- asynchronous methods, Generated interface
- callback approach, Generated interface
- pooling approach, Generated interface
- AtLeastOnce, Message delivery assurance policies
- AtMostOnce, Message delivery assurance policies
- attribute element, Defining attributes
- name attribute, Defining attributes
- type attribute, Defining attributes
- use attribute, Defining attributes
- attributes
- optional, Wrapper classes
B
- BaseRetransmissionInterval, Base retransmission interval
- baseType, Supporting lossless type substitution, Customization usage
- name attribute, Specializing or generalizing the default mapping
- binding element, WSDL elements
- BindingProvider
- getRequestContext() method, Obtaining a context
- getResponseContext() method, Obtaining a context
- bindings
- SOAP with Attachments, Describing a MIME multipart message
- XML, Hand editing
- build(), Relationship between a response and a response builder
- Bundle-Name, Setting a bundle's name
- Bundle-SymbolicName, Setting a bundle's symbolic name
- Bundle-Version, Setting a bundle's version
- BundleActivator, The bundle activator interface
- bundles
- exporting packages, Specifying exported packages
- importing packages, Specifying imported packages
- name, Setting a bundle's name
- private packages, Specifying private packages
- symbolic name, Setting a bundle's symbolic name
- version, Setting a bundle's version
C
- CacheControl, Setting cache control directives
- cacheControl(), Setting cache control directives
- choice element, Complex type varieties
- close(), Implementation of handlers
- code generation
- consumer, Generating the consumer code
- customization, Generating the Stub Code
- service provider, Running the code generator
- service provider implementation, Generating the implementation code
- WSDL contract, Generating WSDL
- code generator, Generating a Server Mainline
- complex types
- all type, Complex type varieties
- choice type, Complex type varieties
- elements, Defining the parts of a structure
- occurrence constraints, Defining the parts of a structure
- sequence type, Complex type varieties
- complexType element, Defining data structures
- concrete part, The concrete part
- configuration
- HTTP consumer connection properties, The client element
- HTTP consumer endpoint, Using Configuration
- HTTP service provider connection properties, The server element
- HTTP service provider endpoint, Using Configuration
- HTTP thread pool, Configuring the thread pool, Configuring the thread pool
- inbound fault interceptors, Configuration elements, The annotations
- inbound interceptors, Configuration elements, The annotations
- Jetty engine, The engine-factory element
- Jetty instance, The engine element
- Netty engine, The engine-factory element
- Netty instance, The engine element
- outbound fault interceptors, Configuration elements, The annotations
- outbound interceptors, Configuration elements, The annotations
- constants, Customizing Fixed Value Attribute Mapping
- consumer
- implementing business logic, Implementing the Consumer's Business Logic, Consumer main function
- consumer contexts, Working with Contexts in a Consumer Implementation
- context
- request
- consumer, Overview
- WebServiceContext (see WebServiceContext)
- ContextResolver<T>, Adding contexts
- contract resolver
- implementing, Implementing the contract resolver
- registering, Registering the contract resolver programmatically
- cookie(), Adding a cookie
- cookies, Injecting information from a cookie
- createDispatch(), Creating a Dispatch object
- CreateSequence, How WS-RM works
- CreateSequenceResponse, How WS-RM works
- cxf-codegen-plugin, Running the code generator, Generating the implementation code, Generating the Stub Code, Generating a Server Mainline
D
- DataSource, Using DataSource objects, Using DataSource objects
- DatatypeConverter, Implementing converters
- definitions element, WSDL elements
- Dispatch object
- creating, Creating a Dispatch object
- invoke() method, Synchronous invocation
- invokeAsync() method, Asynchronous invocation
- invokeOneWay() method, Oneway invocation
- message mode, Message mode
- message payload mode, Payload mode
- payload mode, Payload mode
- DOMSource, Using Source objects, Using Source objects
- driverClassName, Configuring WS-persistence
E
- element, XML Schema mapping
- element element, Defining the parts of a structure
- maxOccurs attribute, Defining the parts of a structure
- minOccurrs attribute, Defining the parts of a structure
- name attribute, Defining the parts of a structure
- type attribute, Defining the parts of a structure
- elements
- custom mapping, Customizing Fixed Value Attribute Mapping
- mapping to Java
- in-line type definition, Java mapping of elements with an in-line type
- named type definition, Java mapping of elements with a named type
- XML Schema definition, XML Schema mapping
- endpoint
- adding to a Service object, Adding a Port to a Service
- determining the address, The addPort() method
- determining the binding type, The addPort() method
- determining the port name, The addPort() method
- getting, Getting a Proxy for an Endpoint, Generated service class, Instantiating an service provider
- Endpoint
- entity parameter, Parameters
- enumerations
- custom mapping, Customizing Enumeration Mapping
- defining in schema, Defining an enumerated type in XML Schema
- ExceptionMapper<E>, Implementing an exception mapper
- Exchange
- getInFaultMessage(), Determining the message's direction
- getInMessage(), Determining the message's direction
- getOutFaultMessage(), Determining the message's direction
- getOutMessage(), Determining the message's direction
- ExecutionException, Catching the exception
- ExponentialBackoff, Exponential backoff for retransmission
- Export-Package, Specifying exported packages
F
- facets
- enforcing, Enforcing facets
- form parameters, Injecting data from HTML forms
- forms, Injecting data from HTML forms
G
- generated code
- asynchronous operations, Generated interface
- consumer, Generated code
- packages, Generated packages, Generated code
- server mainline, Generating a Server Mainline
- service implementation, Generated code
- service provider, Generated code
- stub code, Generated code
- WSDL contract, Generating WSDL
- GenericEntity<T>, Returning entities with generic type information
- getRequestContext(), Obtaining a context
- getResponseContext(), Obtaining a context
- globalBindings
- fixedAttributeAsConstantProperty attribute, Global customization
- mapSimpleTypeDef, Supporting lossless type substitution
- mapSimpleTypeDef attribute, Adding the customization
- typesafeEnumMemberName attribute, Member name customizer
H
- handleFault(), Implementation of handlers, Unwinding after an error
- handleMessage(), Implementation of handlers, Processing messages
- handler, Handler configuration file
- handler-chain, Handler configuration file
- handler-chains, Handler configuration file
- handler-class, Handler configuration file
- handler-name, Handler configuration file
- handleResponse(), Implementing the callback
- handlers
- constructor, Order of initialization
- initializing, Order of initialization
- logical, Handler types
- protocol, Handler types
- header(), Adding custom headers
- high availability
- client configuration, Add the clustering feature to your client configuration
- configuring random strategy, Configuring a random strategy
- configuring static failover, Overview
- enabling static failover, Overview
- static failover, HA with static failover
- HTML forms, Injecting data from HTML forms
- HTTP
- DELETE, Specifying HTTP verbs
- endpoint address, Adding a Basic HTTP Endpoint
- GET, Specifying HTTP verbs
- HEAD, Specifying HTTP verbs
- POST, Specifying HTTP verbs
- PUT, Specifying HTTP verbs
- HTTP headers, Injecting information from the HTTP headers, Types of contexts
- http-conf:authorization, The conduit element
- http-conf:basicAuthSupplier, The conduit element
- http-conf:client, The client element
- Accept, The client element
- AcceptEncoding, The client element
- AcceptLanguage, The client element
- AllowChunking, The client element
- AutoRedirect, The client element
- BrowserType, The client element
- CacheControl, The client element, Consumer Cache Control Directives
- Connection, The client element
- ConnectionTimeout, The client element
- ContentType, The client element
- Cookie, The client element
- DecoupledEndpoint, The client element, Configuring the consumer
- Host, The client element
- MaxRetransmits, The client element
- ProxyServer, The client element
- ProxyServerPort, The client element
- ProxyServerType, The client element
- ReceiveTimeout, The client element
- Referer, The client element
- http-conf:conduit, The conduit element
- name attribute, The conduit element
- http-conf:contextMatchStrategy, The destination element
- http-conf:destination, The destination element
- name attribute, The destination element
- http-conf:fixedParameterOrder, The destination element
- http-conf:proxyAuthorization, The conduit element
- http-conf:server, The destination element, The server element
- CacheControl, The server element, Service Provider Cache Control Directives
- ContentEncoding, The server element
- ContentLocation, The server element
- ContentType, The server element
- HonorKeepAlive, The server element
- ReceiveTimeout, The server element
- RedirectURL, The server element
- ServerType, The server element
- SuppressClientReceiveErrors, The server element
- SuppressClientSendErrors, The server element
- http-conf:tlsClientParameters, The conduit element
- http-conf:trustDecider, The conduit element
- http:address, Other messages types
- HttpHeaders, Types of contexts
- httpj:engine, The engine element
- httpj:engine-factory, The engine-factory element
- httpj:identifiedThreadingParameters, The engine-factory element, Configuring the thread pool
- httpj:identifiedTLSServerParameters, The engine-factory element
- httpj:threadingParameters, The engine element, Configuring the thread pool
- maxThreads, Configuring the thread pool
- minThreads, Configuring the thread pool
- httpj:threadingParametersRef, The engine element
- httpj:tlsServerParameters, The engine element
- httpj:tlsServerParametersRef, The engine element
- httpn:engine, The engine element
- httpn:engine-factory, The engine-factory element
- httpn:identifiedThreadingParameters, The engine-factory element, Configuring the thread pool
- httpn:identifiedTLSServerParameters, The engine-factory element
- httpn:threadingParameters, The engine element, Configuring the thread pool
- httpn:threadingParametersRef, The engine element
- httpn:tlsServerParameters, The engine element
- httpn:tlsServerParametersRef, The engine element
I
- implementation
- asynchronous callback object, Implementing the callback
- asynchronous client
- callback approach, Implementing an Asynchronous Client with the Callback Approach
- callbacks, Implementing the consumer
- polling approach, Implementing an Asynchronous Client with the Polling Approach
- consumer, Implementing the Consumer's Business Logic, Consumer main function, Using XML in a Consumer
- SEI, Implementing the interface
- server mainline, Writing a Server Mainline
- service, Implementing a Provider Object
- service operations, Implementing the interface, Implement the operation's logic
- Import-Package, Specifying imported packages
- inFaultInterceptors, Configuration elements
- inInterceptors, Configuration elements
- InOrder, Message delivery assurance policies
- interceptor
- definition, Interceptors
- life-cycle, Chain life-cycle
- Interceptor, Interfaces
- interceptor chain
- definition, Interceptor chains
- life-cycle, Chain life-cycle
- programmatic configuration, Adding interceptors programmatically
- Spring configuration, Adding interceptors using configuration
- InterceptorChain
- add(), Adding interceptors
- remove(), Removing interceptors
J
- java.util.concurrent.ExecutionException, Catching the exception
- java2ws, Generating WSDL
- javaType, Syntax, Usage with javaType
- parseMethod attribute, Specifying the converters
- printMethod attribute, Specifying the converters
- javax.xml.ws.AsyncHandler, Implementing the callback
- javax.xml.ws.Service (see Service object)
- javax.xml.ws.WebServiceException, Runtime Faults
- jaxb:bindings, Using an external binding declaration
- jaxb:property, Customization usage
- JAXBContext, Using A JAXBContext Object
- newInstance(Class...), Getting a JAXBContext object using an object factory
- newInstance(String), Getting a JAXBContext object using package names
- jaxws:binding, Elements, Adding functionality
- jaxws:client
- abstract, Basic Configuration Properties
- address, Basic Configuration Properties
- bindingId, Basic Configuration Properties
- bus, Basic Configuration Properties
- createdFromAPI, Basic Configuration Properties
- depends-on, Basic Configuration Properties
- endpointName, Basic Configuration Properties
- name, Basic Configuration Properties
- password, Basic Configuration Properties
- serviceClass, Basic Configuration Properties
- serviceName, Basic Configuration Properties
- username, Basic Configuration Properties
- wsdlLocation, Basic Configuration Properties, Configuring the proxy
- jaxws:conduitSelector, Adding functionality
- jaxws:dataBinding, Elements, Adding functionality
- jaxws:endpoint
- abstract, Attributes
- address, Attributes
- bindingUri, Attributes
- bus, Attributes
- createdFromAPI, Attributes
- depends-on, Attributes
- endpointName, Attributes
- id, Attributes
- implementor, Attributes
- implementorClass, Attributes
- name, Attributes
- publish, Attributes
- publishedEndpointUrl, Attributes
- serviceName, Attributes
- wsdlLocation, Attributes
- jaxws:exector, Elements
- jaxws:features, Elements, Adding functionality
- jaxws:handlers, Elements, Adding functionality, The handlers element
- jaxws:inFaultInterceptors, Elements, Adding functionality
- jaxws:inInterceptors, Elements, Adding functionality
- jaxws:invoker, Elements
- jaxws:outFaultInterceptors, Elements, Adding functionality
- jaxws:outInterceptors, Elements, Adding functionality
- jaxws:properties, Elements, Adding functionality
- jaxws:server
- abstract, Attributes
- address, Attributes
- bindingId, Attributes
- bus, Attributes
- createdFromAPI, Attributes
- depends-on, Attributes
- endpointName, Attributes
- id, Attributes
- name, Attributes
- publish, Attributes
- serviceBean, Attributes
- serviceClass, Attributes
- serviceName, Attributes
- wsdlLocation, Attributes
- jaxws:serviceFactory, Elements
- JaxWsProxyFactoryBean, Consuming a service
- JaxWsServerFactoryBean, Publishing a service
- JMS
- getting JMS message headers in a service, Getting the JMS Message Headers in a Service
- getting optional header properties, Optional Header Properties
- inspecting message header properties, Inspecting JMS Message Headers
- setting message header properties, JMS Header Properties
- setting optional message header properties, Optional JMS Header Properties
- setting the client's timeout, Client Receive Timeout
- specifying the message type, Specifying the message type
- JMS destination
- specifying, Specifying the JMS address
- JMS URIs, JMS URIs
- jms:address, Specifying the JMS address
- connectionPassword attribute, Specifying the JMS address
- connectionUserName attribute, Specifying the JMS address
- destinationStyle attribute, Specifying the JMS address
- jmsDestinationName attribute, Specifying the JMS address
- jmsiReplyDestinationName attribute, Using a Named Reply Destination
- jmsReplyDestinationName attribute, Specifying the JMS address
- jndiConnectionFactoryName attribute, Specifying the JMS address
- jndiDestinationName attribute, Specifying the JMS address
- jndiReplyDestinationName attribute, Specifying the JMS address, Using a Named Reply Destination
- jms:client, Specifying the message type
- messageType attribute, Specifying the message type
- jms:JMSNamingProperties, Specifying JNDI properties
- jms:server, Specifying the configuration
- durableSubscriberName, Specifying the configuration
- messageSelector, Specifying the configuration
- transactional, Specifying the configuration
- useMessageIDAsCorrealationID, Specifying the configuration
- JMSConfiguration, Specifying the configuration
- JNDI
- specifying the connection factory, Specifying the JMS address
L
- list type
- XML Schema definition, Defining list types in XML Schema
- logical handler, Handler types
- logical part, The logical part
- LogicalHander
- handleFault(), Handling Fault Messages
- handleMessage(), Handling Messages in a Logical Handler
- LogicalHandler
- close(), Closing a Handler
- LogicalMessage, Getting the message data
- LogicalMessageContext, Overview of contexts in handlers
- getMessage(), Getting the message data
M
- matrix parameters, Using matrix parameters
- Maven archetypes, Useful Maven archetypes
- Maven tooling
- adding the bundle plug-in, Adding a bundle plug-in
- maxLength, Maximum length of an RM sequence
- maxUnacknowledged, Maximum unacknowledged messages threshold
- Message
- getAttachments(), Getting the message contents
- getContent(), Getting the message contents
- getExchange(), Determining the message's direction
- getInterceptorChain(), Getting the interceptor chain
- message context
- getting a property, Reading a property from a context
- properties, How properties are stored in a context, Property scopes
- property scopes
- APPLICATION, Property scopes
- HANDLER, Property scopes
- reading values, Reading a property from a context
- request
- consumer, Setting JMS Properties
- response
- setting a property, Setting properties in a context
- setting properties, Setting properties in a context
- message element, WSDL elements, Defining Logical Messages Used by a Service
- MessageBodyReader, Custom readers
- MessageBodyWriter, Custom writers
- MessageContext, Obtaining a context
- get() method, Reading a property from a context
- put() method, Setting properties in a context
- setScope() method, Property scopes
- MessageContext.MESSAGE_OUTBOUND_PROPERTY, Determining the direction of the message, Determining the direction of the message
- mime:content, Describing a MIME multipart message
- mime:multipartRelated, Changing the message binding
- mime:part, Changing the message binding, Describing a MIME multipart message
- name attribute, Describing a MIME multipart message
- MTOM, Sending Binary Data with SOAP MTOM
- enabling
- configuration, Using configuration
- consumer, Consumer
- service provider, Service provider
- Java first, Java first
- WSDL first, WSDL first
N
- named reply destination
- specifying in WSDL, Specifying the JMS address
- using, Using a Named Reply Destination
- namespace
- package name mapping, Package naming
- NewCookie, Adding a cookie
- nillable, Wrapper classes
- noContent(), Creating responses for successful requests
- notAcceptable(), Creating responses to signal errors
- notModified(), Creating responses for redirection
O
- object factory
- creating complex type instances, Complex type factory methods
- creating element instances, Element factory methods
- ObjectFactory
- complex type factory, Complex type factory methods
- element factory, Element factory methods
- ok(), Creating responses for successful requests
- operation element, WSDL elements
- org.apache.cxf.Phase, Specifying a phase
- osgi install, Deploying from the console
- osgi refresh, Refreshing an application
- osgi start, Deploying from the console
- osgi stop, Stopping an application
- osgi uninstall, Uninstalling an application
- outFaultInterceptors, Configuration elements
- outInterceptors, Configuration elements
P
- package name mapping, Generated packages
- parameter constraints, Parameters
- parameter mapping, Service endpoint interface
- part element, Defining Logical Messages Used by a Service, Message parts
- element attribute, Message parts
- name attribute, Message parts
- type attribute, Message parts
- passWord, Configuring WS-persistence
- PathSegment, Getting the path
- PhaseInterceptor, Interfaces
- phases
- definition, Phases
- inbound, Inbound phases
- outbound, Outbound phases
- setting, Setting the phase
- port element, WSDL elements
- port-name-pattern, Handler configuration file
- portType element, WSDL elements, Port types
- primitive types, Mappings
- Private-Package, Specifying private packages
- property
- fixedAttributeAsConstantProperty attribute, Local mapping
- protocol handler, Handler types
- protocol-binding, Handler configuration file
- Provider
- invoke() method, Implementing the invoke() method
- message mode, Message mode
- payload mode, Payload mode
Q
- query parameters, Using query parameters
R
- random strategy, Configuring a random strategy
- replicated services, Overview
- Request, Types of contexts
- request context, Working with Contexts in a Consumer Implementation, Setting JMS Properties
- accessing, Obtaining a context
- consumer, Overview
- setting properties, Setting properties in a context
- ResourceComparator, Customizing the selection process
- Response, Relationship between a response and a response builder, Providing an entity body, Implementing an exception mapper
- response context, Working with Contexts in a Consumer Implementation
- accessing, Obtaining a context
- consumer, Overview, Getting JMS Message Header Properties in a Consumer
- getting JMS message headers, Getting JMS Message Header Properties in a Consumer
- reading values, Reading a property from a context
- Response.Status, Setting the status code returned to the client
- Response<T>.get()
- exceptions, Catching the exception
- ResponseBuilder, Relationship between a response and a response builder, Getting a response builder, Handling more advanced responses
- ResponseBuilderImpl, Getting a response builder, Handling more advanced responses
- RMAssertion, WS-Policy RMAssertion Children
- root resource
- requirements, Requirements
- root URI, Requirements, Working with the URI
- RPC style design, Message design for integrating with legacy systems
S
- SAXSource, Using Source objects, Using Source objects
- schema validation, Enforcing facets
- SecurityContext, Types of contexts
- seeOther(), Creating responses for redirection
- SEI, Creating the SEI, Generated code, Service endpoint interface
- annotating, Annotating the Code
- creating, Writing the interface
- creation patterns, Overview
- generated from WSDL contract, Generated code
- relationship to wsdl:portType, Writing the interface, Service endpoint interface
- required annotations, Annotating the SEI
- Sequence, How WS-RM works
- sequence element, Complex type varieties
- SequenceAcknowledgment, How WS-RM works
- serverError(), Creating responses to signal errors
- service
- implementing the operations, Implement the operation's logic
- service element, WSDL elements
- service enablement, Overview
- service endpoint interface (see SEI)
- service implementation, Generated code, Implementing a Provider Object
- operations, Implementing the interface
- required annotations, Annotating the service implementation
- Service object, Creating a Service Object
- adding an endpoint, Adding a Port to a Service
- determining the port name, The addPort() method
- addPort() method, Adding a Port to a Service
- bindingId parameter, The addPort() method
- endpointAddress parameter, The addPort() method
- portName parameter, The addPort() method
- create() method, The create() methods
- serviceName parameter, The create() methods
- createDispatch() method, Creating a Dispatch object
- creating, The create() methods, Generated service class
- determining the service name, The create() methods
- generated from a WSDL contract, Generated code
- generated methods, Generated service class
- getPort() method, The getPort() method
- portName parameter, The getPort() method
- getting a service proxy, Getting a Proxy for an Endpoint
- relationship to wsdl:service element, Creating a Service Object, Generated code
- service provider
- implementation, Implementing a Provider Object
- publishing, Publishing a service provider
- service provider implementation
- generating, Generating the implementation code
- service providers contexts, Working with Contexts in a Service Implementation
- service proxy
- service-name-pattern, Handler configuration file
- Service.Mode.MESSAGE, Message mode, Message mode
- Service.Mode.PAYLOAD, Payload mode, Payload mode
- ServiceContractResolver, Implementing the contract resolver
- simple type
- define by restriction, Defining a simple type in XML Schema
- simple types
- enumerations, Defining an enumerated type in XML Schema
- mapping to Java, Mapping to Java
- primitive, Mappings
- wrapper classes, Wrapper classes
- SOAP 1.1
- endpoint address, SOAP 1.1
- SOAP 1.2
- endpoint address, SOAP 1.2
- SOAP headers
- mustUnderstand, Implementing the getHeaders() method
- SOAP Message Transmission Optimization Mechanism, Sending Binary Data with SOAP MTOM
- SOAP/JMS, Using SOAP over JMS
- address, JMS URIs
- consuming, Consuming a service
- publishing, Publishing a service
- soap12:address, SOAP 1.2
- soap12:body
- soap12:header, Overview
- soap:address, SOAP 1.1
- soap:body
- soap:header, Overview
- SOAPHander
- getHeaders(), Implementing the getHeaders() method
- handleFault(), Handling Fault Messages
- handleMessage(), Handling Messages in a SOAP Handler
- SOAPHandler
- close(), Closing a Handler
- SOAPMessage, Using SOAPMessage objects, Using SOAPMessage objects, Working with the message body
- SOAPMessageContext
- get(), Working with context properties
- getMessage(), Working with the message body
- Source, Using Source objects, Using Source objects
- static failover, HA with static failover
- status(), Setting the response status
- StreamSource, Using Source objects, Using Source objects
- sub-resource locator, Sub-resource locators
- sub-resource method, Sub-resource methods
- substitution group
- in complex types, Substitution groups in complex types
- in interfaces, Substitution groups in interfaces
- object factory, Generated object factory methods
T
- temporaryRedirect(), Creating responses for redirection
- type customization
- external declaration, Using an external binding declaration
- in-line, Using in-line customization
- JAXB version, Version declaration
- namespace, Namespace
- type packages
- contents, Package contents
- name generation, Package naming
- types element, WSDL elements
- typesafeEnumClass, Class customizer
- typesafeEnumMember, Member customizer
U
- union types
- mapping to Java, Mapping to Java
- XML Schema definition, Defining in XML Schema
- URI
- decoding, Disabling URI decoding
- injecting, Overview
- matrix parameters, Using matrix parameters
- query parameters, Using query parameters
- root, Requirements, Working with the URI
- template variables, Getting data from the URI's path, Getting the value of URI template variables
- UriBuilder, Getting the Base URI, Getting the full request URI
- UriInfo, Types of contexts, Working with the full request URI
- userName, Configuring WS-persistence
W
- WebApplicationException, Using WebApplicaitonException exceptions to report errors
- WebServiceContext
- getMessageContext() method, Obtaining a context
- getting the JMS message headers, Getting the JMS Message Headers in a Service
- WebServiceException, Runtime Faults
- wrapped document style, Message design for SOAP services
- WS-Addressing
- WS-RM
- AcknowledgementInterval, Acknowledgement interval
- AtLeastOnce, Message delivery assurance policies
- AtMostOnce, Message delivery assurance policies
- BaseRetransmissionInterval, Base retransmission interval
- configuring, Configuring WS-RM
- destination, How WS-RM works
- driverClassName, Configuring WS-persistence
- enabling, Enabling WS-RM
- ExponentialBackoff, Exponential backoff for retransmission
- externaL attachment, External attachment
- initial sender, How WS-RM works
- InOrder, Message delivery assurance policies
- interceptors, Apache CXF WS-RM Interceptors
- maxLength, Maximum length of an RM sequence
- maxUnacknowledged, Maximum unacknowledged messages threshold
- passWord, Configuring WS-persistence
- rmManager, Children of the rmManager Spring bean
- source, How WS-RM works
- ultimate receiver, How WS-RM works
- url, Configuring WS-persistence
- userName, Configuring WS-persistence
- wsam:Addressing, Configuring an endpoint to use WS-Addressing
- WSDL
- binding element, The WSDL elements
- name attribute, The WSDL elements
- port element, The WSDL elements
- binding attribute, The WSDL elements
- service element, The WSDL elements
- name attribute, The WSDL elements
- WSDL contract
- generation, Generating WSDL
- WSDL design
- RPC style, Message design for integrating with legacy systems
- wrapped document style, Message design for SOAP services
- WSDL extensors
- jms:address (see jms:address)
- jms:client (see jms:client)
- jms:JMSNamingProperties (see jms:JMSNamingProperties)
- jms:server (see jms:server)
- wsdl2soap, Using wsdl2soap, Using wsdl2soap
- wsdl:documentation, WSDL Documentation
- wsdl:portType, Writing the interface, Generated code, Service endpoint interface
- wsdl:service, Creating a Service Object, Generated code
- wsrm:AcksTo, How WS-RM works
- wswa:UsingAddressing, Configuring an endpoint to use WS-Addressing
X
- xformat:binding, Hand editing
- rootNode, Hand editing
- xformat:body, Hand editing
- rootNode, Hand editing
Legal Notice
Trademark Disclaimer
Legal Notice
Third Party Acknowledgements
- JLine (http://jline.sourceforge.net) jline:jline:jar:1.0License: BSD (LICENSE.txt) - Copyright (c) 2002-2006, Marc Prud'hommeaux
mwp1@cornell.eduAll rights reserved.Redistribution and use in source and binary forms, with or without modification, are permitted provided that the following conditions are met:- Redistributions of source code must retain the above copyright notice, this list of conditions and the following disclaimer.
- Redistributions in binary form must reproduce the above copyright notice, this list of conditions and the following disclaimer in the documentation and/or other materials provided with the distribution.
- Neither the name of JLine nor the names of its contributors may be used to endorse or promote products derived from this software without specific prior written permission.
THIS SOFTWARE IS PROVIDED BY THE COPYRIGHT HOLDERS AND CONTRIBUTORS "AS IS" AND ANY EXPRESS OR IMPLIED WARRANTIES, INCLUDING, BUT NOT LIMITED TO, THE IMPLIED WARRANTIES OF MERCHANTABILITY AND FITNESS FOR A PARTICULAR PURPOSE ARE DISCLAIMED. IN NO EVENT SHALL THE COPYRIGHT OWNER OR CONTRIBUTORS BE LIABLE FOR ANY DIRECT, INDIRECT, INCIDENTAL, SPECIAL, EXEMPLARY, OR CONSEQUENTIAL DAMAGES (INCLUDING, BUT NOT LIMITED TO, PROCUREMENT OF SUBSTITUTE GOODS OR SERVICES; LOSS OF USE, DATA, OR PROFITS; OR BUSINESS INTERRUPTION) HOWEVER CAUSED AND ON ANY THEORY OF LIABILITY, WHETHER IN CONTRACT, STRICT LIABILITY, OR TORT (INCLUDING NEGLIGENCE OR OTHERWISE) ARISING IN ANY WAY OUT OF THE USE OF THIS SOFTWARE, EVEN IF ADVISED OF THE POSSIBILITY OF SUCH DAMAGE. - Stax2 API (http://woodstox.codehaus.org/StAX2) org.codehaus.woodstox:stax2-api:jar:3.1.1License: The BSD License (http://www.opensource.org/licenses/bsd-license.php)Copyright (c) <YEAR>, <OWNER> All rights reserved.Redistribution and use in source and binary forms, with or without modification, are permitted provided that the following conditions are met:
- Redistributions of source code must retain the above copyright notice, this list of conditions and the following disclaimer.
- Redistributions in binary form must reproduce the above copyright notice, this list of conditions and the following disclaimer in the documentation and/or other materials provided with the distribution.
THIS SOFTWARE IS PROVIDED BY THE COPYRIGHT HOLDERS AND CONTRIBUTORS "AS IS" AND ANY EXPRESS OR IMPLIED WARRANTIES, INCLUDING, BUT NOT LIMITED TO, THE IMPLIED WARRANTIES OF MERCHANTABILITY AND FITNESS FOR A PARTICULAR PURPOSE ARE DISCLAIMED. IN NO EVENT SHALL THE COPYRIGHT HOLDER OR CONTRIBUTORS BE LIABLE FOR ANY DIRECT, INDIRECT, INCIDENTAL, SPECIAL, EXEMPLARY, OR CONSEQUENTIAL DAMAGES (INCLUDING, BUT NOT LIMITED TO, PROCUREMENT OF SUBSTITUTE GOODS OR SERVICES; LOSS OF USE, DATA, OR PROFITS; OR BUSINESS INTERRUPTION) HOWEVER CAUSED AND ON ANY THEORY OF LIABILITY, WHETHER IN CONTRACT, STRICT LIABILITY, OR TORT (INCLUDING NEGLIGENCE OR OTHERWISE) ARISING IN ANY WAY OUT OF THE USE OF THIS SOFTWARE, EVEN IF ADVISED OF THE POSSIBILITY OF SUCH DAMAGE. - jibx-run - JiBX runtime (http://www.jibx.org/main-reactor/jibx-run) org.jibx:jibx-run:bundle:1.2.3License: BSD (http://jibx.sourceforge.net/jibx-license.html) Copyright (c) 2003-2010, Dennis M. Sosnoski.All rights reserved.Redistribution and use in source and binary forms, with or without modification, are permitted provided that the following conditions are met:
- Redistributions of source code must retain the above copyright notice, this list of conditions and the following disclaimer.
- Redistributions in binary form must reproduce the above copyright notice, this list of conditions and the following disclaimer in the documentation and/or other materials provided with the distribution.
- Neither the name of JiBX nor the names of its contributors may be used to endorse or promote products derived from this software without specific prior written permission.
THIS SOFTWARE IS PROVIDED BY THE COPYRIGHT HOLDERS AND CONTRIBUTORS "AS IS" AND ANY EXPRESS OR IMPLIED WARRANTIES, INCLUDING, BUT NOT LIMITED TO, THE IMPLIED WARRANTIES OF MERCHANTABILITY AND FITNESS FOR A PARTICULAR PURPOSE ARE DISCLAIMED. IN NO EVENT SHALL THE COPYRIGHT OWNER OR CONTRIBUTORS BE LIABLE FOR ANY DIRECT, INDIRECT, INCIDENTAL, SPECIAL, EXEMPLARY, OR CONSEQUENTIAL DAMAGES (INCLUDING, BUT NOT LIMITED TO, PROCUREMENT OF SUBSTITUTE GOODS OR SERVICES; LOSS OF USE, DATA, OR PROFITS; OR BUSINESS INTERRUPTION) HOWEVER CAUSED AND ON ANY THEORY OF LIABILITY, WHETHER IN CONTRACT, STRICT LIABILITY, OR TORT (INCLUDING NEGLIGENCE OR OTHERWISE) ARISING IN ANY WAY OUT OF THE USE OF THIS SOFTWARE, EVEN IF ADVISED OF THE POSSIBILITY OF SUCH DAMAGE. - JavaAssist (http://www.jboss.org/javassist) org.jboss.javassist:com.springsource.javassist:jar:3.9.0.GA:compileLicense: MPL (http://www.mozilla.org/MPL/MPL-1.1.html)
- HAPI-OSGI-Base Module (http://hl7api.sourceforge.net/hapi-osgi-base/) ca.uhn.hapi:hapi-osgi-base:bundle:1.2License: Mozilla Public License 1.1 (http://www.mozilla.org/MPL/MPL-1.1.txt)