
Red Hat Training
A Red Hat training course is available for Red Hat Fuse
Web Services and Routing with Camel CXF
Easy Web services with Apache Camel's CXF component
Copyright © 2013 Red Hat, Inc. and/or its affiliates.
Abstract
Chapter 1. Demonstration Code for Camel/CXF
Abstract
1.1. Downloading and Installing the Demonstrations
Overview
Prerequisites
- Java platform—the demonstrations must run on the Java 6 platform from Oracle.
- Apache Maven build tool—to build the demonstration, you require Apache Maven 3.0.x (or Maven 2.2.1).
- Internet connection—Maven requires an Internet connection in order to download required dependencies from remote repositories while performing a build.
- Red Hat JBoss Fuse—the demonstrations are deployed into the JBoss Fuse container.
Downloading the demonstration package
cxf-webinars-assembly-1.1.4-src.zip, and is available from the following location:
Installing the package
1.2. Running the Demonstrations
Building the demonstrations
DemoDir/src/fuse-webinars/cxf-webinars, and enter the following command:
mvn install
cxf-webinars directory (where the demonstrations are defined to be submodules of the cxf-webinars/pom.xml project). While Maven is building the demonstration code, it downloads whatever dependencies it needs from the Internet and installs them in the local Maven repository.
Starting and configuring the Red Hat JBoss Fuse container
- (Optional) If your local Maven repository is in a non-standard location, you might need to edit the JBoss Fuse configuration to specify your custom location. Edit the
InstallDir/etc/org.ops4j.pax.url.mvn.cfgfile and set theorg.ops4j.pax.url.mvn.localRepositoryproperty to the location of your local Maven repository:# # Path to the local maven repository which is used to avoid downloading # artifacts when they already exist locally. # The value of this property will be extracted from the settings.xml file # above, or defaulted to: # System.getProperty( "user.home" ) + "/.m2/repository" # #org.ops4j.pax.url.mvn.localRepository= org.ops4j.pax.url.mvn.localRepository=file:E:/Data/.m2/repository
- Launch the JBoss Fuse container. Open a new command prompt, change directory to
InstallDir/bin, and enter the following command:./fuse
- For convenience, each of the demonstrations can be deployed into the JBoss Fuse container as an Apache Karaf feature (which automatically installs any required dependencies along with the demonstration bundle). But first, you must specify the location of the features repository, by entering the following console command:
JBossFuse:karaf@root> features:addUrl mvn:org.fusesource.sparks.fuse-webinars.cxf-webinars/customer-features/Version/xml
Where Version is the current version of the demonstration package (see the value of theproject/versionelement in theDemoDir/src/pom.xmlfile).
Demonstration features
features:list | grep customer to check the status of these features):
customer-ws
customer-ws-client
customer-ws-cxf-payload
customer-ws-cxf-pojo
customer-ws-cxf-provider
Running the customer-ws-osgi-bundle demonstration
JBossFuse:karaf@root> features:install customer-ws
JBossFuse:karaf@root> features:install customer-ws-client
JBossFuse:karaf@root> log:tail -n 4
18:03:58,609 | INFO  | qtp5581640-231   | CustomerServiceImpl              | ?                                   ? |
 218 - org.fusesource.sparks.fuse-webinars.cxf-webinars.customer-ws-osgi-bundle - 1.1.4 | Getting status for custome
 r 1234
18:03:58,687 | INFO  |  invoker thread. | ClientInvoker                    | ?                                   ? |
 219 - org.fusesource.sparks.fuse-webinars.cxf-webinars.customer-ws-client - 1.1.4 | Got back: status = Active, stat
 usMessage = In the park, playing with my frisbee.
18:04:00,687 | INFO  | qtp5581640-232   | CustomerServiceImpl              | ?                                   ? |
 218 - org.fusesource.sparks.fuse-webinars.cxf-webinars.customer-ws-osgi-bundle - 1.1.4 | Getting status for custome
 r 1234
18:04:00,703 | INFO  |  invoker thread. | ClientInvoker                    | ?                                   ? |
 219 - org.fusesource.sparks.fuse-webinars.cxf-webinars.customer-ws-client - 1.1.4 | Got back: status = Active, stat
 usMessage = In the park, playing with my frisbee.
osgi:list console command. For example:
JBossFuse:karaf@root> list | grep customer-ws-client
[ 219] [Active     ] [            ] [Started] [   60] customer-ws-client (1.1.4)
osgi:stop console command. For example:
JBossFuse:karaf@root> stop 219
JBossFuse:karaf@root> shutdown -f
Chapter 2. Java-First Service Implementation
2.1. Java-First Overview
Overview
Service Endpoint Interface (SEI)
@WebService annotation.[1]
- Base type of the Web service implementation (server side)—you define the Web service by implementing the SEI.
- Proxy type (client side)—on the client side, you use the SEI to invoke operations on the client proxy object.
- Basis for generating the WSDL contract—in the Java-first approach, you generate the WSDL contract by converting the SEI to WSDL.
WSDL contract
The CustomerService demonstration
CustomerService Web service using the Java-first approach.
Figure 2.1. Building a Java-First Web Service
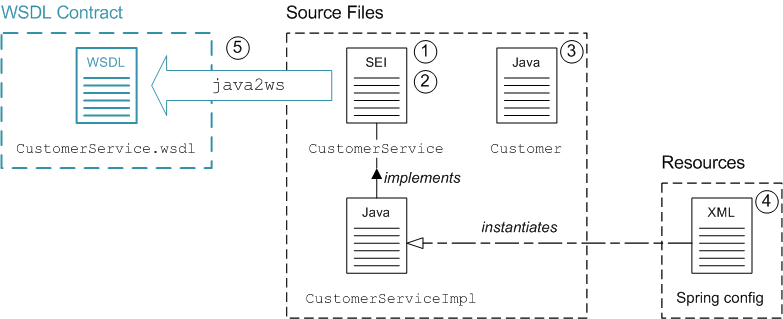
Implementing and building the service
- Implement the SEI, which constitutes the basic definition of the Web service's interface.
- Annotate the SEI (you can use the annotations to influence the ultimate form of the generated WSDL contract).
- Implement any other requisite Java classes. In particular, implement the following:
- Any data types referenced by the SEI—for example, the
Customerclass. - The implementation of the SEI,
CustomerServiceImpl.
- Instantiate the Web service endpoint, by adding the appropriate code to a Spring XML file.
- Generate the WSDL contract using a Java-to-WSDL converter.
2.2. Define SEI and Related Classes
Overview
CustomerService interface, which enables you to access the details of a customer's account.
The CustomerService SEI
CustomerService interface, which defines methods for accessing the Customer data type:
// Java
package com.fusesource.demo.wsdl.customerservice;

// NOT YET ANNOTATED!
public interface CustomerService {

    public com.fusesource.demo.customer.Customer lookupCustomer(
        java.lang.String customerId
    );

    public void updateCustomer(
        com.fusesource.demo.customer.Customer cust
    );

    public void getCustomerStatus(
        java.lang.String customerId,
        javax.xml.ws.Holder<java.lang.String> status,
        javax.xml.ws.Holder<java.lang.String> statusMessage
    );
}CustomerService interface, this interface provides the basis for defining the CustomerService Web service.
javax.xml.ws.Holder<?> types
getCustomerStatus method from the CustomerService interface has parameters declared to be of javax.xml.ws.Holder<String> type. These so-called holder types are needed in order to declare the OUT or INOUT parameters of a WSDL operation.
getStringValues(), which takes a holder type as its second parameter:
// Java
public void getStringValues(
    String wrongWay,
    javax.xml.ws.Holder<String> rightWay
) {
    wrongWay = "Caller will never see this string!";
    rightWay.value = "But the caller *can* see this string.";
}rightWay string as rightWay.value. For example:
// Java
String wrongWay = "This string never changes";
javax.xml.ws.Holder<String> rightWay.value =  "This value *can* change.";

sampleObject.getStringValues(wrongWay, rightWay);

System.out.println("Unchanged string: " + wrongWay);
System.out.println("Changed string: " + rightWay.value);Holder<> types in a Java-first example, because this is not a normal Java idiom. But it is interesting to include OUT parameters in the example, so that you can see how a Web service processes this kind of parameter.
Related classes
Default constructor for related classes
The Customer class
Customer class appears as a related class in the definition of the CustomerService SEI (the section called “The CustomerService SEI”). The Customer class consists of a collection of String fields and the only special condition it needs to satisfy is that it includes a default constructor:
// Java
package com.fusesource.demo.customer;

public class Customer {
    protected String firstName;
    protected String lastName;
    protected String phoneNumber;
    protected String id;

    // Default constructor, required by JAX-WS
 public Customer() { }

    public Customer(String firstName, String lastName, String phoneNumber,
            String id) {
        super();
        this.firstName = firstName;
        this.lastName = lastName;
        this.phoneNumber = phoneNumber;
        this.id = id;
    }

    public String getFirstName() {
        return firstName;
    }

    public void setFirstName(String value) {
        this.firstName = value;
    }

    public String getLastName() {
        return lastName;
    }

    public void setLastName(String value) {
        this.lastName = value;
    }

    public String getPhoneNumber() {
        return phoneNumber;
    }

    public void setPhoneNumber(String value) {
        this.phoneNumber = value;
    }

    public String getId() {
        return id;
    }

    public void setId(String value) {
        this.id = value;
    }
}
2.3. Annotate SEI for JAX-WS
Overview
serviceName and portName (there can be more than one implementation of a given SEI).
Minimal annotation
@WebService. For example, the CustomerService SEI could be minimally annotated as follows:
// Java
package com.fusesource.demo.wsdl.customerservice;

import javax.jws.WebService;

@WebService
public interface CustomerService {
  ...
}
@WebService annotation
@WebService annotation without any attributes, it is usually better to specify some attributes to provide a more descriptive WSDL service name and WSDL port name. You will also usually want to specify the XML target namespace. For this, you can specify the following optional attributes of the @WebService annotation:
name- Specifies the name of the WSDL contract (appearing in the
wsdl:definitionselement). serviceName- Specifies the name of the WSDL service (a SOAP service is defined by default in the generated contract).
portName- Specifies the name of the WSDL port (a SOAP/HTTP port is defined by default in the generated contract).
targetNamespace- The XML schema namespace that is used, by default, to qualify the elements and types defined in the contract.
@WebParam annotation
@WebParam annotation to method arguments in the SEI. The @WebParam annotation is optional, but there are a couple of good reasons for adding it:
- By default, JAX-WS maps Java arguments to parameters with names like
arg0, ...,argN. Messages are much easier to read, however, when the parameters have meaningful names. - It is a good idea to define parameter elements without a namespace. This makes the XML encoding of requests and responses more compact.
- To enable support for WSDL OUT and INOUT parameters.
@WebParam annotations with the following attributes:
name- Specifies the mapped name of the parameter.
targetNamespace- Specifies the namespace of the mapped parameter. Set this to a blank string for a more compact XML encoding.
mode- Can have one of the following values:
WebParam.Mode.IN—(default) parameter is passed from client to service (in request).WebParam.Mode.INOUT—parameter is passed from client to service (request) and from the service back to the client (in reply).WebParam.Mode.OUT—parameter is passed from service back to the client (in reply).
OUT and INOUT parameters
- Declare the corresponding Java argument using a
javax.xml.ws.Holder<ParamType>type, whereParamTypeis the type of the parameter you want to send. - Annotate the Java argument with
@WebParam, setting eithermode = WebParam.Mode.OUTormode = WebParam.Mode.INOUT.
Annotated CustomerService SEI
CustomerService SEI after it has been annotated. Many other annotations are possible, but this level of annotation is usually adequate for a WSDL-first project.
// Java
package com.fusesource.demo.wsdl.customerservice;

import javax.jws.WebParam;
import javax.jws.WebService;

@WebService(
  targetNamespace = "http://demo.fusesource.com/wsdl/CustomerService/",
  name = "CustomerService",
  serviceName = "CustomerService",
  portName = "SOAPOverHTTP"
)
public interface CustomerService {

    public com.fusesource.demo.customer.Customer lookupCustomer(
 @WebParam(name = "customerId", targetNamespace = "")
        java.lang.String customerId
    );

    public void updateCustomer(
 @WebParam(name = "cust", targetNamespace = "")
        com.fusesource.demo.customer.Customer cust
    );

    public void getCustomerStatus(
 @WebParam(name = "customerId", targetNamespace = "")
        java.lang.String customerId,
 @WebParam(mode = WebParam.Mode.OUT, name = "status", targetNamespace = "")
        javax.xml.ws.Holder<java.lang.String> status,
 @WebParam(mode = WebParam.Mode.OUT, name = "statusMessage", targetNamespace = "")
        javax.xml.ws.Holder<java.lang.String> statusMessage
    );
}
2.4. Instantiate the WS Endpoint
Overview
jaxws:endpoint element in XML. The WS endpoint is effectively the runtime representation of the Web service: it opens an IP port to listen for SOAP/HTTP requests, is responsible for marshalling and unmarshalling messages (making use of the generated Java stub code), and routes incoming requests to the relevant methods on the implementor class.
- Create an instance of the implementor class, using the Spring
beanelement. - Create a WS endpoint, using the
jaxws:endpointelement.
The jaxws:endpoint element
jaxws:endpoint element in a Spring file, where the jaxws: prefix is associated with the http://cxf.apache.org/jaxws namespace.
jaxws:endpoint element with the cxf:cxfEndpoint element, which you meet later in this guide: the jaxws:endpoint element is used to integrate a WS endpoint with a Java implementation class; whereas the cxf:cxfEndpoint is used to integrate a WS endpoint with a Camel route.
Define JAX-WS endpoint in XML
jaxws:endpoint element.
<?xml version="1.0" encoding="UTF-8"?>
<beans xmlns="http://www.springframework.org/schema/beans"
      xmlns:xsi="http://www.w3.org/2001/XMLSchema-instance"
      xmlns:jaxws="http://cxf.apache.org/jaxws"
      xmlns:soap="http://cxf.apache.org/bindings/soap"
      xsi:schemaLocation="
http://www.springframework.org/schema/beans http://www.springframework.org/schema/beans/spring-beans.xsd
http://cxf.apache.org/bindings/soap http://cxf.apache.org/schemas/configuration/soap.xsd
http://cxf.apache.org/jaxws http://cxf.apache.org/schemas/jaxws.xsd">

  <jaxws:endpoint
    xmlns:customer="http://demo.fusesource.com/wsdl/CustomerService/"
    id="customerService"
    address="/Customer"
    serviceName="customer:CustomerService"
    endpointName="customer:SOAPOverHTTP"
    implementor="#customerServiceImpl">
  </jaxws:endpoint>

  <bean id="customerServiceImpl"
      class="com.fusesource.customer.ws.CustomerServiceImpl"/>

</beans>
Address for the Jetty container
address attribute of jaxws:endpoint is therefore used to configure the addressing information for the endpoint in the Jetty container.
- Address syntax for default servlet container—to use the default servlet container, specify only the servlet context for this endpoint. Do not specify the protocol, host, and IP port in the address. For example, to deploy the endpoint to the
/Customersservlet context in the default servlet container:address="/Customers"
- Address syntax for custom servlet container—to instantiate a custom Jetty container for the endpoint, specify a complete HTTP URL, including the host and IP port (the value of the IP port effectively identifies the target Jetty container). Typically, for a Jetty container, you specify the host as
0.0.0.0, which is interpreted as a wildcard that matches every IP network interface on the local machine (that is, if deployed on a multi-homed host, Jetty opens a listening port on every network card). For example, to deploy the endpoint to the custom Jetty container listening on IP port,8083:address="http://0.0.0.0:8083/Customers"
NoteIf you want to configure a secure endpoint (secured by SSL), you would specify thehttps:scheme in the address.
Referencing the service implementation
implementor attribute of the jaxws:endpoint element references the implementation of the WS service. The value of this attribute can either be the name of the implementation class or (as in this example) a bean reference in the format, #BeanID, where the # character indicates that the following identifier is the name of a bean in the bean registry.
2.5. Java-to-WSDL Maven Plug-In
Overview
java2ws command-line utility or the cxf-java2ws-plugin Maven plug-in. The plug-in approach is ideal for Maven-based projects: after you paste the requisite plug-in configuration into your POM file, the WSDL code generation step is integrated into your build.
Configure the Java-to-WSDL Maven plug-in
plugin element into your project's POM file, there are just a few basic settings that need to be customized, as follows:
- CXF version—make sure that the plug-in's dependencies are using the latest version of Apache CXF.
- SEI class name—specify the fully-qualified class name of the SEI in the
configuration/classNameelement. - Location of output—specify the location of the generated WSDL file in the
configuration/outputFileelement.
cxf-java2ws-plugin plug-in to generate WSDL from the CustomerService SEI:
<project ...>
  ...
  <properties>
 <cxf.version>2.6.0.redhat-60024</cxf.version>
  </properties>

  <build>
    <defaultGoal>install</defaultGoal>
    <plugins>
      ...
      <plugin>
        <groupId>org.apache.cxf</groupId>
        <artifactId>cxf-java2ws-plugin</artifactId>
        <version>${cxf.version}</version>
        <dependencies>
          <dependency>
            <groupId>org.apache.cxf</groupId>
            <artifactId>cxf-rt-frontend-jaxws</artifactId>
            <version>${cxf.version}</version>
          </dependency>
          <dependency>
            <groupId>org.apache.cxf</groupId>
            <artifactId>cxf-rt-frontend-simple</artifactId>
            <version>${cxf.version}</version>
          </dependency>
        </dependencies>
        <executions>
          <execution>
            <id>process-classes</id>
            <phase>process-classes</phase>
            <configuration>
              <className>org.fusesource.demo.camelcxf.ws.server.CustomerService</className>
              <outputFile>${basedir}/../src/main/resources/wsdl/CustomerService.wsdl</outputFile>
              <genWsdl>true</genWsdl>
              <verbose>true</verbose>
            </configuration>
            <goals>
              <goal>java2ws</goal>
            </goals>
          </execution>
        </executions>
      </plugin>
    </plugins>
  </build>

</project>
Generated WSDL
outputFile configuration element.
outputFile configuration element, the generated WSDL is sent to the following location, by default:
BaseDir/target/generated/wsdl/SEIClassName.wsdl
Reference
Chapter 3. WSDL-First Service Implementation
3.1. WSDL-First Overview
Overview
Demonstration location
DemoDir/src/fuse-webinars/cxf-webinars/customer-ws-osgi-bundleWSDL contract
Service Endpoint Interface (SEI)
- Base type of the Web service implementation (server side)—you define the Web service by implementing the SEI.
- Proxy type (client side)—on the client side, you use the SEI to invoke operations on the client proxy object.
The CustomerService demonstration
CustomerService Web service using the WSDL-first approach.
Figure 3.1. Building a WSDL-First Web Service
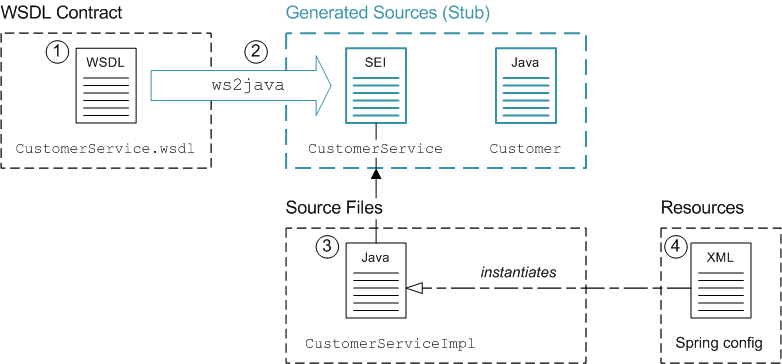
Implementing and building the service
- Create the WSDL contract.
- Generate the Java stub code from the WSDL contract using a WSDL-to-Java converter,
ws2java. This gives you the SEI,CustomerService, and its related classes, such asCustomer. - Write the implementation of the SEI,
CustomerServiceImpl. - Instantiate the Web service endpoint, by adding the appropriate code to a Spring XML file.
3.2. CustomerService WSDL Contract
Sample WSDL contract
CustomerService WSDL contract, which is available in the following location:
/fuse-webinars/cxf-webinars/src/main/resources
CustomerSerivice WSDL contract exposes the following operations:
lookupCustomer- Given a customer ID, the operation returns the corresponding
Customerdata object. updateCustomer- Stores the given
Customerdata object against the given customer ID. getCustomerStatus- Returns the status of the customer with the given customer ID.
Parts of the WSDL contract
Port type
wsdl:portType element. It is analogous to an interface and it defines the operations that can be invoked on the Web service.
wsdl:portType definition from the CustomerService WSDL contract:
<wsdl:definitions name="CustomerService"
	targetNamespace="http://demo.fusesource.com/wsdl/CustomerService/"
    ...>

    ...
    <wsdl:portType name="CustomerService">
        <wsdl:operation name="lookupCustomer">
            <wsdl:input message="tns:lookupCustomer"></wsdl:input>
            <wsdl:output message="tns:lookupCustomerResponse"></wsdl:output>
        </wsdl:operation>
        <wsdl:operation name="updateCustomer">
            <wsdl:input message="tns:updateCustomer"></wsdl:input>
            <wsdl:output message="tns:updateCustomerResponse"></wsdl:output>
        </wsdl:operation>
        <wsdl:operation name="getCustomerStatus">
            <wsdl:input message="tns:getCustomerStatus"></wsdl:input>
            <wsdl:output message="tns:getCustomerStatusResponse"></wsdl:output>
        </wsdl:operation>
    </wsdl:portType>
    ...
</wsdl:definitions>
WSDL binding
WSDL port
CustomerService WSDL contract defines the following WSDL port:
<wsdl:definitions ...>
    ...
    <wsdl:service name="CustomerService">
        <wsdl:port name="SOAPOverHTTP" binding="tns:CustomerServiceSOAP">
            <soap:address location="http://0.0.0.0:8183/CustomerService" />
        </wsdl:port>
    </wsdl:service>

</wsdl:definitions>soap:address element's location attribute in the original WSDL contract is typically overridden at run time, however.
The getCustomerStatus operation
getCustomerStatus operation has its request parameters (IN parameters) encoded by the getCustomerStatus element and its response parameters (OUT parameters) encoded by the getCustomerStatusResponse element, as follows:
<wsdl:definitions name="CustomerService"
	targetNamespace="http://demo.fusesource.com/wsdl/CustomerService/"
    ...>
    <wsdl:types>
        <xsd:schema ...>
            ...
            <xsd:element name="getCustomerStatus">
                <xsd:complexType>
                    <xsd:sequence>
                        <xsd:element name="customerId" type="xsd:string"/>
                    </xsd:sequence>
                </xsd:complexType>
            </xsd:element>
            <xsd:element name="getCustomerStatusResponse">
                <xsd:complexType>
                    <xsd:sequence>
                        <xsd:element name="status" type="xsd:string"/>
                        <xsd:element name="statusMessage" type="xsd:string"/>
                    </xsd:sequence>
                </xsd:complexType>
            </xsd:element>
        </xsd:schema>
    </wsdl:types>
    ...
</wsdl:definitions>
References
3.3. WSDL-to-Java Maven Plug-In
Overview
ws2java command-line utility or the cxf-codegen-plugin Maven plug-in. The plug-in approach is ideal for Maven-based projects: after you paste the requisite plug-in configuration into your POM file, the WSDL-to-Java code generation step is integrated into your build.
Configure the WSDL-to-Java Maven plug-in
plugin element into your project's POM file, there are just a few basic settings that need to be customized, as follows:
- CXF version—make sure that the plug-in's dependencies are using the latest version of Apache CXF.
- WSDL file location—specify the WSDL file location in the
configuration/wsdlOptions/wsdlOption/wsdlelement. - Location of output—specify the root directory of the generated Java source files in the
configuration/sourceRootelement.
cxf-codegen-plugin plug-in to generate Java stub code from the CustomerService.wsdl WSDL file:
<project ...>
  ...
  <properties>
    <cxf.version>2.6.0.redhat-60024</cxf.version>
  </properties>

  <build>
    <defaultGoal>install</defaultGoal>
    <plugins>
      ...
      <plugin>
        <groupId>org.apache.cxf</groupId>
        <artifactId>cxf-codegen-plugin</artifactId>
        <version>${cxf.version}</version>
        <executions>
          <execution>
            <id>generate-sources</id>
            <phase>generate-sources</phase>
            <configuration>
              <!-- Maven auto-compiles any source files under target/generated-sources/ -->
              <sourceRoot>${basedir}/target/generated-sources/jaxws</sourceRoot>
              <wsdlOptions>
                <wsdlOption>
                  <wsdl>${basedir}/../src/main/resources/wsdl/CustomerService.wsdl</wsdl>
                </wsdlOption>
              </wsdlOptions>
            </configuration>
            <goals>
              <goal>wsdl2java</goal>
            </goals>
          </execution>
        </executions>
      </plugin>

    </plugins>
  </build>

</project>
Generated Java source code
target/generated-sources/jaxws directory. Note that the Web service implementation is dependent on this generated stub code—for example, the service implementation class must implement the generated CustomerService SEI.
Adding the generated source to an IDE
target/generated-sources/jaxws directory to the project as a source code directory.
Compiling the generated code
BaseDir/target/generated-sources/
Reference
3.4. Instantiate the WS Endpoint
Overview
jaxws:endpoint element in XML. The WS endpoint is effectively the runtime representation of the Web service: it opens an IP port to listen for SOAP/HTTP requests, is responsible for marshalling and unmarshalling messages (making use of the generated Java stub code), and routes incoming requests to the relevant methods on the implementor class.
- Create an instance of the implementor class, using the Spring
beanelement. - Create a WS endpoint, using the
jaxws:endpointelement.
Define JAX-WS endpoint in XML
jaxws:endpoint element.
<?xml version="1.0" encoding="UTF-8"?>
<beans xmlns="http://www.springframework.org/schema/beans"
      xmlns:xsi="http://www.w3.org/2001/XMLSchema-instance"
      xmlns:jaxws="http://cxf.apache.org/jaxws"
      xmlns:soap="http://cxf.apache.org/bindings/soap"
      xsi:schemaLocation="
http://www.springframework.org/schema/beans http://www.springframework.org/schema/beans/spring-beans.xsd
http://cxf.apache.org/bindings/soap http://cxf.apache.org/schemas/configuration/soap.xsd
http://cxf.apache.org/jaxws http://cxf.apache.org/schemas/jaxws.xsd">

  <jaxws:endpoint
    xmlns:customer="http://demo.fusesource.com/wsdl/CustomerService/"
    id="customerService"
    address="/Customer"
    serviceName="customer:CustomerService"
    endpointName="customer:SOAPOverHTTP"
    implementor="#customerServiceImpl">
  </jaxws:endpoint>

  <bean id="customerServiceImpl"
      class="com.fusesource.customer.ws.CustomerServiceImpl"/>

</beans>
Address for the Jetty container
address attribute of the jaxws:endpoint element specifies the servlet context for this endpoint, relative to the Jetty container in which it is deployed.
Referencing the service implementation
implementor attribute of the jaxws:endpoint element is used to reference the implementation of the WS service. The value of this attribute can either be the name of the implementation class or (as in this example) a bean reference in the format, #BeanID, where the # character indicates that the following identifier is the name of a bean in the bean registry.
3.5. Deploy to an OSGi Container
Overview
- Bundles are a relatively lightweight deployment option (because dependencies can be shared between deployed bundles).
- OSGi provides sophisticated dependency management, ensuring that only version-consistent dependencies are added to the bundle's classpath.
Using the Maven bundle plug-in
pom.xml file:
- Change the packaging type to
bundle(by editing the value of theproject/packagingelement in the POM). - Add the Maven bundle plug-in to your POM file and configure it as appropriate.
Sample bundle plug-in configuration
<?xml version="1.0"?>
<project  ...>
  ...
  <groupId>org.fusesource.sparks.fuse-webinars.cxf-webinars</groupId>
  <artifactId>customer-ws-osgi-bundle</artifactId>
  <name>customer-ws-osgi-bundle</name>
  <url>http://www.fusesource.com</url>
 <packaging>bundle</packaging>
  ...
  <build>
    <plugins>
      ...
      <plugin>
        <groupId>org.apache.felix</groupId>
        <artifactId>maven-bundle-plugin</artifactId>
        <version>${maven-bundle-plugin.version}</version>
        <extensions>true</extensions>
        <configuration>
          <instructions>
            <Export-Package>
              !com.fusesource.customer.ws,
              !com.fusesource.demo.customer,
              !com.fusesource.demo.wsdl.customerservice
            </Export-Package>
            <Import-Package>
              META-INF.cxf,
              META-INF.cxf.osgi,
              *
            </Import-Package>
            <DynamicImport-Package>
              org.apache.cxf.*,
              org.springframework.beans.*
            </DynamicImport-Package>
          </instructions>
        </configuration>
      </plugin>
      ...
    </plugins>
  </build>
</project>
Dynamic imports
DynamicImport-Package element). This is a pragmatic way of dealing with the fact that Spring XML files are not terribly well integrated with the Maven bundle plug-in. At build time, the Maven bundle plug-in is not able to figure out which Java classes are required by the Spring XML code. By listing wildcarded package names in the DynamicImport-Package element, however, you allow the OSGi container to figure out which Java classes are needed by the Spring XML code at run time.
DynamicImport-Package headers is not recommended in OSGi, because it short-circuits OSGi version checking. Normally, what should happen is that the Maven bundle plug-in lists the Java packages used at build time, along with their versions, in the Import-Package header. At deploy time, the OSGi container then checks that the available Java packages are compatible with the build-time versions listed in the Import-Package header. With dynamic imports, this version checking cannot be performed.
Build and deploy the service bundle
mvn install
karaf@root> install -s mvn:org.fusesource.sparks.fuse-webinars.cxf-webinars/customer-ws-osgi-bundle
org.ops4j.pax.url.mvn.localRepository property in the EsbInstallDir/etc/org.ops4j.pax.url.mvn.cfg file, before you can use the mvn: scheme to access Maven artifacts.
Red Hat JBoss Fuse default servlet container
cxf/. Hence, any WS endpoint whose address attribute is configured in the jaxws:endpoint element as /EndpointContext will have the following effective address:
http://Hostname:8181/cxf/EndpointContext
EsbInstallDir/etc/org.ops4j.pax.web.cfg
Check that the service is running
http://localhost:8181/cxf/Customers?wsdl
Chapter 4. Implementing a WS Client
4.1. WS Client Overview
Overview
jaxws:client element in Spring XML.
Demonstration location
DemoDir/src/fuse-webinars/cxf-webinars/customer-ws-clientWSDL contract
Service Endpoint Interface (SEI)
WS client proxy
The CustomerService client
customer-ws-client demonstration, which is available from the following location:
DemoDir/src/fuse-webinars/cxf-webinars/customer-ws-client
Figure 4.1. Building a WS Client
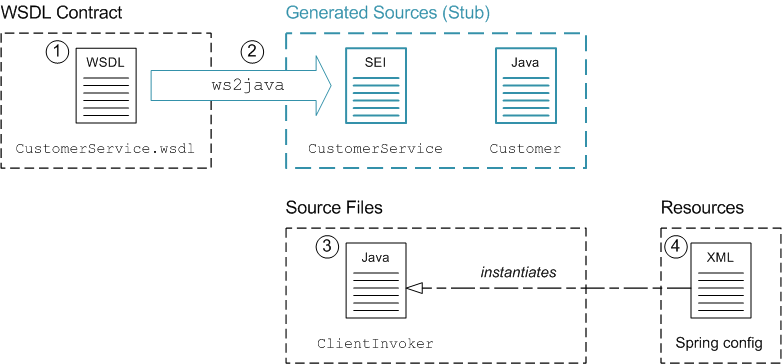
Implementing and building the WS client
- Obtain a copy of the WSDL contract.
- Generate the Java stub code from the WSDL contract using a WSDL-to-Java converter,
ws2java. This gives you the SEI,CustomerService, and its related classes, such asCustomer. - Implement the main client class,
ClientInvoker, which invokes the Web service operations. In this class define a bean property of type,CustomerService, so that the client class can receive a reference to the WS client proxy by property injection. - In a Spring XML file, instantiate the WS client proxy and inject it into the main client class,
ClientInvoker.
4.2. WSDL-to-Java Maven Plug-In
Overview
ws2java command-line utility or the cxf-codegen-plugin Maven plug-in. When using Maven, the plug-in approach is ideal: after you paste the requisite plug-in configuration into your POM file, the WSDL-to-Java code generation step is integrated into your build.
Configure the WSDL-to-Java Maven plug-in
plugin element into your project's POM file, there are just a few basic settings that need to be customized, as follows:
- CXF version—make sure that the plug-in's dependencies are using the latest version of Apache CXF.
- WSDL file location—specify the WSDL file location in the
configuration/wsdlOptions/wsdlOption/wsdlelement. - Location of output—specify the root directory of the generated Java source files in the
configuration/sourceRootelement.
cxf-codegen-plugin plug-in to generate Java stub code from the CustomerService.wsdl WSDL file:
<project ...>
  ...
  <properties>
    <cxf.version>2.6.0.redhat-60024</cxf.version>
  </properties>

  <build>
    <defaultGoal>install</defaultGoal>
    <plugins>
      ...
      <plugin>
        <groupId>org.apache.cxf</groupId>
        <artifactId>cxf-codegen-plugin</artifactId>
        <version>${cxf.version}</version>
        <executions>
          <execution>
            <id>generate-sources</id>
            <phase>generate-sources</phase>
            <configuration>
              <sourceRoot>${basedir}/target/generated-sources/jaxws</sourceRoot>
              <wsdlOptions>
                <wsdlOption>
                  <wsdl>${basedir}/../src/main/resources/wsdl/CustomerService.wsdl</wsdl>
                </wsdlOption>
              </wsdlOptions>
            </configuration>
            <goals>
              <goal>wsdl2java</goal>
            </goals>
          </execution>
        </executions>
      </plugin>

    </plugins>
  </build>

</project>
Generated Java source code
target/generated-sources/jaxws directory. Note that the client implementation is dependent on this generated stub code—for example, the client invokes the proxy using the generated CustomerService SEI.
Add generated source to IDE
target/generated-sources/jaxws directory to the project as a source code directory.
Compiling the generated code
BaseDir/target/generated-sources/
Reference
4.3. Instantiate the WS Client Proxy
Overview
jaxws:client element.
Define the WS client in XML
jaxws:client element.
<?xml version="1.0" encoding="UTF-8"?>
<beans xmlns="http://www.springframework.org/schema/beans"
      xmlns:xsi="http://www.w3.org/2001/XMLSchema-instance"
      xmlns:jaxws="http://cxf.apache.org/jaxws"
      xmlns:soap="http://cxf.apache.org/bindings/soap"
      xsi:schemaLocation="
http://www.springframework.org/schema/beans http://www.springframework.org/schema/beans/spring-beans.xsd
http://cxf.apache.org/bindings/soap http://cxf.apache.org/schemas/configuration/soap.xsd
http://cxf.apache.org/jaxws http://cxf.apache.org/schemas/jaxws.xsd">

  <jaxws:client
    id="customerServiceProxy"
    address="http://localhost:8181/cxf/Customers"
    serviceClass="com.fusesource.demo.wsdl.customerservice.CustomerService"
    />

  <bean id="customerServiceClient"
      class="com.fusesource.customer.client.ClientInvoker"
      init-method="init" destroy-method="destroy">
       <property name="customerService" ref="customerServiceProxy"/>
  </bean>

</beans>
The jaxws:client element
jaxws:client element creates a client proxy dynamically (that is, there is no dedicated class that represents a proxy implementation in the Java stub code). The following attributes are used to define the proxy:
-
id - The ID that you specify here is entered in the bean registry and can be used to reference the proxy instance from other beans.
-
address - The full address of the remote Web service that this proxy connects to.
-
serviceClass - The fully-qualified class name of the Web service's SEI (you invoke methods on the proxy through the SEI).
Injecting with the proxy reference
customerServiceProxy, you can inject it into a bean property using the Spring property element, as follows:
<bean ...>
  <property name="customerService" ref="customerServiceProxy"/>
</bean>setCustomerService setter method—for example:
// Java
...
public class ClientInvoker implements Runnable {
  ...
  public void setCustomerService(CustomerService customerService) {
    this.customerService = customerService;
  }

}
4.4. Invoke WS Operations
Proxy interface is SEI interface
Invoking the lookupCustomer operation
CustomerService SEI exposes the lookupCustomer method, which takes a customer ID as its argument and returns a Customer data object. Using the proxy instance, customerService, you can invoke the lookupCustomer operation as follows:
// Java
com.fusesource.demo.customer.Customer response
	= customerService.lookupCustomer("1234");

log.info("Got back " + response.getFirstName() + " "
    + response.getLastName()
    + ", ph:" + response.getPhoneNumber() );
The ClientInvoker class
cxf-webinars/customer-ws-client project, there is a ClientInvoker class (located in src/main/java/com/fusesource/customer/client), which defines a continuous loop that invokes the lookupCustomer operation.
ClientInvoker class, possibly adding operation invocations.
4.5. Deploy to an OSGi Container
Overview
- Bundles are a relatively lightweight deployment option (because dependencies can be shared between deployed bundles).
- OSGi provides sophisticated dependency management, ensuring that only version-consistent dependencies are added to the bundle's classpath.
Using the Maven bundle plug-in
pom.xml file:
- Change the packaging type to
bundle(by editing the value of theproject/packagingelement in the POM). - Add the Maven bundle plug-in to your POM file and configure it as appropriate.
Sample bundle plug-in configuration
<?xml version="1.0"?>
<project  ...>
  ...
  <groupId>org.fusesource.sparks.fuse-webinars.cxf-webinars</groupId>
  <artifactId>customer-ws-osgi-bundle</artifactId>
  <name>customer-ws-osgi-bundle</name>
  <url>http://www.fusesource.com</url>
 <packaging>bundle</packaging>
  ...
  <build>
    <plugins>
      ...
      <plugin>
        <groupId>org.apache.felix</groupId>
        <artifactId>maven-bundle-plugin</artifactId>
        <version>${maven-bundle-plugin.version}</version>
        <extensions>true</extensions>
        <configuration>
          <instructions>
            <Export-Package>
              !com.fusesource.customer.client,
              !com.fusesource.demo.customer,
              !com.fusesource.demo.wsdl.customerservice
            </Export-Package>
            <Import-Package>
              META-INF.cxf,
              *
            </Import-Package>
            <DynamicImport-Package>
              org.apache.cxf.*,
              org.springframework.beans.*
            </DynamicImport-Package>
          </instructions>
        </configuration>
      </plugin>
      ...
    </plugins>
  </build>
</project>
Dynamic imports
DynamicImport-Package element). This is a pragmatic way of dealing with the fact that Spring XML files are not terribly well integrated with the Maven bundle plug-in. At build time, the Maven bundle plug-in is not able to figure out which Java classes are required by the Spring XML code. By listing wildcarded package names in the DynamicImport-Package element, however, you allow the OSGi container to figure out which Java classes are needed by the Spring XML code at run time.
DynamicImport-Package headers is not recommended in OSGi, because it short-circuits OSGi version checking. Normally, what should happen is that the Maven bundle plug-in lists the Java packages used at build time, along with their versions, in the Import-Package header. At deploy time, the OSGi container then checks that the available Java packages are compatible with the build time versions listed in the Import-Package header. With dynamic imports, this version checking cannot be performed.
Build and deploy the client bundle
mvn install
karaf@root> install -s mvn:org.fusesource.sparks.fuse-webinars.cxf-webinars/customer-ws-client
org.ops4j.pax.url.mvn.localRepository property in the EsbInstallDir/etc/org.ops4j.pax.url.mvn.cfg file, before you can use the mvn: scheme to access Maven artifacts.
Check that the client is running
karaf@root> log:display -n 10
Chapter 5. Pojo-Based Route
5.1. Processing Messages in POJO Format
Overview
- The big advantage of the POJO data format is that the operation parameters are encoded using the JAX-B standard, which makes them easy to manipulate in Java.
- The downside of the POJO data format, on the other hand, is that it requires that the WSDL metadata is converted to Java in advance (as defined by the JAX-WS and JAX-B mappings) and compiled into your application. This means that a POJO-based route is not very dynamic.
Demonstration location
DemoDir/src/fuse-webinars/cxf-webinars/customer-ws-camel-cxf-pojoCamel CXF component
cxf:cxfEndpoint XML element and are implemented by the Apache Camel project—are not to be confused with the Apache CXF JAX-WS endpoints—which are instantiated using the jaxws:endpoint XML element and are implemented by the Apache CXF project.
POJO data format
- JAX-WS and JAX-B stub code (as generated from the WSDL contract) must be provided.
- The SOAP body is marshalled into a list of Java objects.
- One Java object for each part or parameter of the corresponding WSDL operation.
- The type of the message body is
org.apache.cxf.message.MessageContentsList.
- The SOAP headers are converted into headers in the exchange's In message.
Implementing and building a POJO route
- Obtain a copy of the WSDL contract that is to be integrated into the route.
- Generate the Java stub code from the WSDL contract using a WSDL-to-Java converter. This gives you the SEI,
CustomerService, and its related classes, such asCustomer. - Instantiate the Camel CXF endpoint in Spring, using the
cxf:cxfEndpointelement. - Implement the route in XML, where you can use the content-based router to sort requests by operation name.
- Implement the operation processor beans, which are responsible for processing each operation. When implementing these beans, the message contents must be accessed in POJO data format.
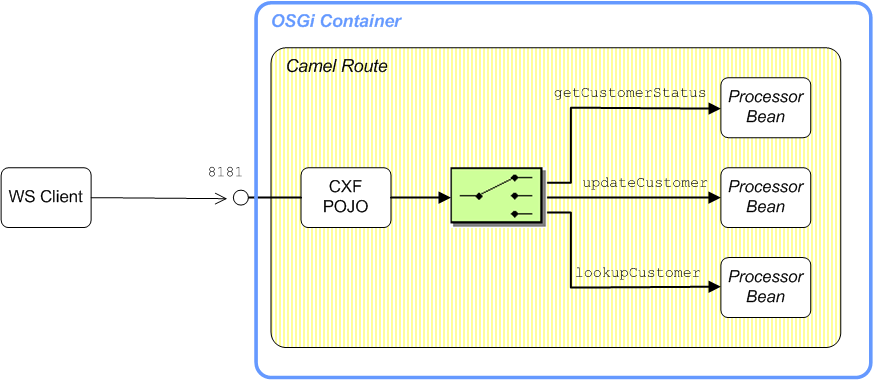
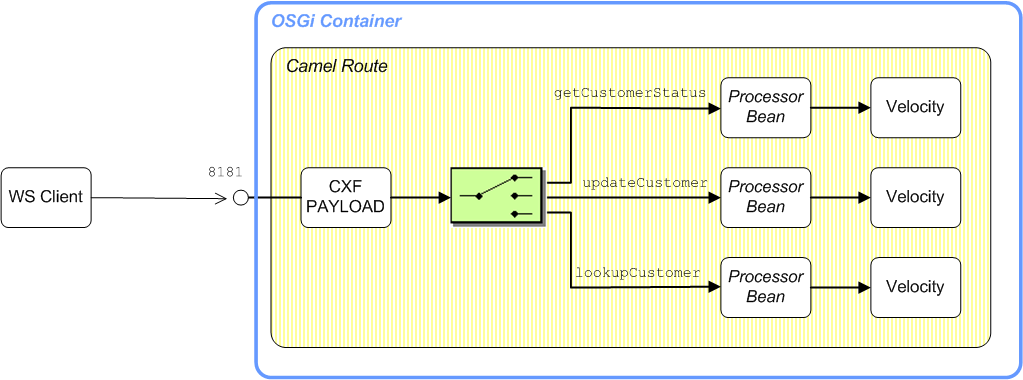
Sample POJO route
CustomerService Web service using the POJO data format. After sorting the request messages by operation name, an operation-specific processor bean reads the incoming request parameters and then generates a response in the POJO data format.
Figure 5.1. Sample POJO Route
5.2. WSDL-to-Java Maven Plug-In
Overview
ws2java command-line utility or the cxf-codegen-plugin Maven plug-in. When using Maven, the plug-in approach is ideal: after you paste the requisite plug-in configuration into your POM file, the WSDL-to-Java code generation step is integrated into your build.
Configure the WSDL-to-Java Maven plug-in
plugin element into your project's POM file, there are just a few basic settings that need to be customized, as follows:
- CXF version—make sure that the plug-in's dependencies are using the latest version of Apache CXF.
- WSDL file location—specify the WSDL file location in the
configuration/wsdlOptions/wsdlOption/wsdlelement. - Location of output—specify the root directory of the generated Java source files in the
configuration/sourceRootelement.
cxf-codegen-plugin plug-in to generate Java stub code from the CustomerService.wsdl WSDL file:
<project ...>
  ...
  <properties>
    <cxf.version>2.6.0.redhat-60024</cxf.version>
  </properties>

  <build>
    <defaultGoal>install</defaultGoal>
    <plugins>
      ...
      <plugin>
        <groupId>org.apache.cxf</groupId>
        <artifactId>cxf-codegen-plugin</artifactId>
        <version>${cxf.version}</version>
        <executions>
          <execution>
            <id>generate-sources</id>
            <phase>generate-sources</phase>
            <configuration>
              <sourceRoot>${basedir}/target/generated-sources/jaxws</sourceRoot>
              <wsdlOptions>
                <wsdlOption>
                  <wsdl>${basedir}/../src/main/resources/wsdl/CustomerService.wsdl</wsdl>
                </wsdlOption>
              </wsdlOptions>
            </configuration>
            <goals>
              <goal>wsdl2java</goal>
            </goals>
          </execution>
        </executions>
      </plugin>

    </plugins>
  </build>

</project>
Generated Java source code
target/generated-sources/jaxws directory. Note that the route is dependent on this generated stub code—for example, when processing the POJO parameters, the parameter processor uses the Customer data type from the stub code.
Add generated code to IDE
target/generated-sources/jaxws directory to the project as a source code directory.
Compiling the generated code
BaseDir/target/generated-sources/
Reference
5.3. Instantiate the WS Endpoint
Overview
- Consumer—(at the start of a route) represents a Web service instance, which integrates with the route. The type of payload injected into the route depends on the value of the endpoint's
dataFormatoption. - Producer—(at other points in the route) represents a WS client proxy, which converts the current exchange object into an operation invocation on a remote Web service. The format of the current exchange must match the endpoint's
dataFormatsetting.
dataFormat option set to POJO.
Maven dependency
camel-cxf component in your Maven POM. For example, the pom.xml file from the customer-ws-camel-cxf-pojo demonstration project includes the following dependency:
<dependency>
  <groupId>org.apache.camel</groupId>
  <artifactId>camel-cxf</artifactId>
  <version>${camel-version}</version>
</dependency>
The cxf:bean: URI syntax
cxf:bean: URI is used to bind an Apache CXF endpoint to a route and has the following general syntax:
cxf:bean:CxfEndpointID[?Options]
CxfEndpointID is the ID of a bean created using the cxf:cxfEndpoint element, which configures the details of the WS endpoint. You can append options to this URI (where the options are described in detail in chapter "CXF" in "EIP Component Reference"). If you do not specify any additional options, the endpoint uses the POJO data format by default.
customer-ws, define the route as follows:
<route>
    <from uri="cxf:bean:customer-ws"/>
    ...
</route>cxf://WsAddress[?Options], which enables you to specify all of the WS endpoint details in the URI (so there is no need to reference a bean instance). This typically results in a long and cumbersome URI, but is useful in some cases.
The cxf:cxfEndpoint element
cxf:cxfEndpoint element is used to define a WS endpoint that binds either to the start (consumer endpoint) or the end (producer endpoint) of a route. For example, to define the customer-ws WS endpoint referenced in the preceding route, you would define a cxf:cxfEndpoint element as follows:
<?xml version="1.0" encoding="UTF-8"?>
<beans ...
   xmlns:cxf="http://camel.apache.org/schema/cxf"  ...>
    ...
    <cxf:cxfEndpoint id="customer-ws"
        address="/Customer"
        endpointName="c:SOAPOverHTTP"
        serviceName="c:CustomerService"
        serviceClass="com.fusesource.demo.wsdl.customerservice.CustomerService"
        xmlns:c="http://demo.fusesource.com/wsdl/CustomerService/"/>
    ...
</beans>cxf:cxfEndpoint element and the jaxws:endpoint element use different XML schemas (although the syntax looks superficially similar). These elements bind a WS endpoint in different ways: the cxf:cxfEndpoint element instantiates and binds a WS endpoint to an Apache Camel route, whereas the jaxws:endpoint element instantiates and binds a WS endpoint to a Java class using the JAX-WS mapping.
Address for the Jetty container
address attribute of cxf:cxfEndpoint is therefore used to configure the addressing information for the endpoint in the Jetty container.
- Address syntax for default servlet container—to use the default servlet container, specify only the servlet context for this endpoint. Do not specify the protocol, host, and IP port in the address. For example, to deploy the endpoint to the
/Customersservlet context in the default servlet container:address="/Customers"
- Address syntax for custom servlet container—to instantiate a custom Jetty container for this endpoint, specify a complete HTTP URL, including the host and IP port (the value of the IP port effectively identifies the target Jetty container). Typically, for a Jetty container, you specify the host as
0.0.0.0, which is interpreted as a wildcard that matches every IP network interface on the local machine (that is, if deployed on a multi-homed host, Jetty opens a listening port on every network card). For example, to deploy the endpoint to the custom Jetty container listening on IP port,8083:address="http://0.0.0.0:8083/Customers"
NoteIf you want to configure a secure endpoint (secured by SSL), you would specify thehttps:scheme in the address.
Referencing the SEI
serviceClass attribute of the cxf:cxfEndpoint element references the SEI of the Web service, which in this case is the CustomerService interface.
5.4. Sort Messages by Operation Name
The operationName header
operationName header to the name of the invoked operation. You can then use this header to sort messages by operation name.
Sorting by operation name
customer-ws-camel-cxf-pojo demonstration defines the following route, which uses the content-based router pattern to sort incoming messages, based on the operation name. The when predicates check the value of the operationName header using simple language expressions, sorting messages into invocations on the updateCustomer operation, the lookupCustomer operation, or the getCustomerStatus operation.
<beans ...>
    ...
    <camelContext id="camel" xmlns="http://camel.apache.org/schema/spring">
        <route>
            <from uri="cxf:bean:customer-ws"/>
            <choice>
                <when>
                    <simple>${in.header.operationName} == 'updateCustomer'</simple>
                    <to uri="updateCustomer"/>
                </when>
                <when>
                    <simple>${in.header.operationName} == 'lookupCustomer'</simple>
                    <to uri="lookupCustomer"/>
                </when>
                <when>
                    <simple>${in.header.operationName} == 'getCustomerStatus'</simple>
                    <to uri="getCustomerStatus"/>
                </when>
            </choice>
        </route>
    </camelContext>

    <bean id="updateCustomer"
        class="com.fusesource.customerwscamelcxfpojo.UpdateCustomerProcessor"/>

    <bean id="getCustomerStatus"
        class="com.fusesource.customerwscamelcxfpojo.GetCustomerStatusProcessor"/>

    <bean id="lookupCustomer"
        class="com.fusesource.customerwscamelcxfpojo.LookupCustomerProcessor"/>

</beans>
Beans as endpoints
choice DSL to a different processor bean. The DSL for sending exchanges to producer endpoints (for example, <to uri="Destination"/>) is integrated with the bean registry: if the Destination does not resolve to an endpoint or a component, the Destination is used as a bean ID to look up the bean registry. In this example, the exchange is routed to processor beans (which implement the org.apache.camel.Processor interface).
5.5. Process Operation Parameters
Overview
Contents of request message body
org.apache.cxf.message.MessageContentsList object. You can also obtain the message body as an Object[] array (where type conversion is automatic).
Object[] array, the array contains the list of all the operation's IN, INOUT, and OUT parameters in exactly the same order as defined in the WSDL contract (and in the same order as the corresponding operation signature of the SEI). The parameter mode affects the content as follows:
IN- Contains a parameter value from the client.
INOUT- Contains a
Holderobject containing a parameter value from the client. OUT- Contains an empty
Holderobject, which is a placeholder for the response.
Object[] array to represent a return value.
Contents of response message body
org.apache.cxf.message.MessageContentsList object or an Object[] array.
Object[] array, the array should contain only the operation's INOUT and OUT parameters in the same order as defined in the WSDL contract, omitting the IN parameters. The parameter mode affects the content as follows:
INOUT- Contains a
Holderobject, which you must set to a response value. TheHolderobject used here must be exactly theHolderobject for the corresponding parameter that was extracted from the requestObject[]array. Creating and inserting a newHolderobject into theObject[]array does not work. OUT- Contains a
Holderobject, which you must initialize with a response value. TheHolderobject used here must be exactly theHolderobject for the corresponding parameter that was extracted from the requestObject[]array. Creating and inserting a newHolderobject into theObject[]array does not work.
Object[] array. The return type is set as a plain object: it does not use a Holder object.
Example: getCustomerStatus operation
getCustomerStatus operation takes three parameters: IN, OUT, and OUT, respectively. The corresponding method signature in the SEI is, as follows:
// Java
public void getCustomerStatus(
    @WebParam(name = "customerId", targetNamespace = "")
    java.lang.String customerId,

    @WebParam(mode = WebParam.Mode.OUT, name = "status", targetNamespace = "")
    javax.xml.ws.Holder<java.lang.String> status,

    @WebParam(mode = WebParam.Mode.OUT, name = "statusMessage", targetNamespace = "")
    javax.xml.ws.Holder<java.lang.String> statusMessage
);
Example: request and response bodies
getCustomerStatus operation, the bodies of the request message and the response message have the following contents:
- Request message—as an
Object[]array type, the contents are:{ String customerId, Holder<String> status, Holder<String> statusMessage }. - Response message—as an
Object[]array type, the contents are:{Holder<String> status, Holder<String> statusMessage }
Example: processing getCustomerStatus
GetCustomerStatusProcessor class is responsible for processing incoming getCustomerStatus invocations. The following sample implementation for POJO mode shows how to read the request parameters from the In message body and then set the response parameters in the Out message body.
// Java
package com.fusesource.customerwscamelcxfpojo;

import javax.xml.ws.Holder;
import org.apache.camel.Exchange;
import org.apache.camel.Processor;
import org.slf4j.Logger;
import org.slf4j.LoggerFactory;


public class GetCustomerStatusProcessor implements Processor {
    public static final Logger log = LoggerFactory.getLogger(GetCustomerStatusProcessor.class);

    public void process(Exchange exchng) throws Exception {
        Object[] args =  exchng.getIn().getBody(Object[].class);

        String id = (String) args[0];
        Holder<String> status = (Holder<String>) args[1];
        Holder<String> statusMsg = (Holder<String>) args[2];

        log.debug("Getting status for customer '" + id + "'");

        // This is where you'd actually do the work! Setting
        // the holder values to constants for the sake of brevity.
        //
        status.value = "Offline";
        statusMsg.value = "Going to sleep now!";

        exchng.getOut().setBody(new Object[] {status , statusMsg});
    }

}
5.6. Deploy to OSGi
Overview
- Bundles are a relatively lightweight deployment option (because dependencies can be shared between deployed bundles).
- OSGi provides sophisticated dependency management, ensuring that only version-consistent dependencies are added to the bundle's classpath.
Using the Maven bundle plug-in
pom.xml file:
- Change the packaging type to
bundle(by editing the value of theproject/packagingelement in the POM). - Add the Maven bundle plug-in to your POM file and configure it as appropriate.
Sample bundle plug-in configuration
<?xml version="1.0"?>
<project  ...>
  ...
  <groupId>org.fusesource.sparks.fuse-webinars.cxf-webinars</groupId>
  <artifactId>customer-ws-camel-cxf-pojo</artifactId>

  <name>customer-ws-camel-cxf-pojo</name>
  <url>http://www.fusesource.com</url>
 <packaging>bundle</packaging>
  ...
  <build>
    <plugins>
      ...
      <plugin>
        <groupId>org.apache.felix</groupId>
        <artifactId>maven-bundle-plugin</artifactId>
        <extensions>true</extensions>
        <configuration>
         <instructions>
            <Import-Package>
              META-INF.cxf,
              META-INF.cxf.osgi,
              *
            </Import-Package>
            <DynamicImport-Package>
              org.apache.cxf.*,
              org.springframework.beans.*
            </DynamicImport-Package>
          </instructions>
        </configuration>
      </plugin>
      ...
    </plugins>
  </build>
</project>
Dynamic imports
DynamicImport-Package element). This is a pragmatic way of dealing with the fact that Spring XML files are not terribly well integrated with the Maven bundle plug-in. At build time, the Maven bundle plug-in is not able to figure out which Java classes are required by the Spring XML code. By listing wildcarded package names in the DynamicImport-Package element, however, you allow the OSGi container to figure out which Java classes are needed by the Spring XML code at run time.
DynamicImport-Package headers is not recommended in OSGi, because it short-circuits OSGi version checking. Normally, what should happen is that the Maven bundle plug-in lists the Java packages used at build time, along with their versions, in the Import-Package header. At deploy time, the OSGi container then checks that the available Java packages are compatible with the build time versions listed in the Import-Package header. With dynamic imports, this version checking cannot be performed.
Build and deploy the POJO route bundle
mvn install
karaf@root> install -s mvn:org.fusesource.sparks.fuse-webinars.cxf-webinars/customer-ws-camel-cxf-pojo
org.ops4j.pax.url.mvn.localRepository property in the EsbInstallDir/etc/org.ops4j.pax.url.mvn.cfg file, before you can use the mvn: scheme to access Maven artifacts.
Chapter 6. Payload-Based Route
6.1. Processing Messages in PAYLOAD Format
Overview
org.w3c.dom.Node type). One of the advantages of the PAYLOAD format is that no JAX-WS and JAX-B stub code is required, which allows your application to be dynamic, potentially handling many different WSDL interfaces.
Demonstration location
DemoDir/src/fuse-webinars/cxf-webinars/customer-ws-camel-cxf-payloadCamel CXF component
cxf:cxfEndpoint XML element and are implemented by the Apache Camel project—are not to be confused with the Apache CXF JAX-WS endpoints—which are instantiated using the jaxws:endpoint XML element and are implemented by the Apache CXF project.
PAYLOAD data format
dataFormat=PAYLOAD option on a Camel CXF endpoint URI and it has the following characteristics:
- Enables you to access the message body as a DOM object (XML payload).
- No JAX-WS or JAX-B stub code required.
- The SOAP body is marshalled as follows:
- The message body is effectively an XML payload of
org.w3c.dom.Nodetype (wrapped in aCxfPayloadobject). - The type of the message body is
org.apache.camel.component.cxf.CxfPayload.
- The SOAP headers are converted into headers in the exchange's In message, of
org.apache.cxf.binding.soap.SoapHeadertype.
Implementing and building a PAYLOAD route
- Instantiate the Camel CXF endpoint in Spring, using the
cxf:cxfEndpointelement. - Implement the route in XML, where you can use the content-based router to sort requests by operation name.
- For each operation, define a processor bean to process the request.
- Define velocity templates for generating the reponse messages.
Sample PAYLOAD route
CustomerService Web service using the PAYLOAD data format. After sorting the request messages by operation name, an operation-specific processor bean reads the incoming request parameters. Finally, the response messages are generated using Velocity templates.
Figure 6.1. Sample PAYLOAD Route
6.2. Instantiate the WS Endpoint
Overview
- Consumer endpoint—(at the start of a route) represents a Web service instance, which integrates with the route. The type of payload injected into the route depends on the value of the endpoint's
dataFormatoption. - Producer endpoint—represents a special kind of WS client proxy, which converts the current exchange object into an operation invocation on a remote Web service. The format of the current exchange must match the endpoint's
dataFormatsetting.
The cxf:bean: URI syntax
cxf:bean: URI is used to bind an Apache CXF endpoint to a route and has the following general syntax:
cxf:bean:CxfEndpointID[?Options]
CxfEndpointID is the ID of a bean created using the cxf:cxfEndpoint element, which configures the details of the WS endpoint. You can append options to this URI (where the options are described in detail in chapter "CXF" in "EIP Component Reference"). To enable payload mode, you must set the URI option, dataFormat=PAYLOAD.
customer-ws bean, define the route as follows:
<route>
    <from uri="cxf:bean:customer-ws?dataFormat=PAYLOAD"/>
    ...
</route>
The cxf:cxfEndpoint element
cxf:cxfEndpoint element is used to define a WS endpoint that binds either to the start (consumer endpoint) or the end (producer endpoint) of a route. For example, to define the customer-ws WS endpoint in PAYLOAD mode, you define a cxf:cxfEndpoint element as follows:
<?xml version="1.0" encoding="UTF-8"?>
<beans ...>
    ...
    <cxf:cxfEndpoint id="customer-ws"
        address="/Customer"
        endpointName="c:SOAPOverHTTP"
        serviceName="c:CustomerService"
        wsdlURL="wsdl/CustomerService.wsdl"
        xmlns:c="http://demo.fusesource.com/wsdl/CustomerService/"/>
    ...
</beans>Address for the Jetty container
address attribute of cxf:cxfEndpoint is therefore used to configure the addressing information for the endpoint in the Jetty container.
- Address syntax for default servlet container—to use the default servlet container, specify only the servlet context for this endpoint. Do not specify the protocol, host, and IP port in the address. For example, to deploy the endpoint to the
/Customersservlet context in the default servlet container:address="/Customers"
- Address syntax for custom servlet container—to instantiate a custom Jetty container for this endpoint, specify a complete HTTP URL, including the host and IP port (the value of the IP port effectively identifies the target Jetty container). Typically, for a Jetty container, you specify the host as
0.0.0.0, which is interpreted as a wildcard that matches every IP network interface on the local machine (that is, if deployed on a multi-homed host, Jetty opens a listening port on every network card). For example, to deploy the endpoint to the custom Jetty container listening on IP port,8083:address="http://0.0.0.0:8083/Customers"
NoteIf you want to configure a secure endpoint (secured by SSL), you would specify thehttps:scheme in the address.
Specifying the WSDL location
wsdlURL attribute of the cxf:cxfEndpoint element is used to specify the location of the WSDL contract for this endpoint. The WSDL contract is used exclusively as the source of metadata for this endpoint: there is need to specify an SEI in PAYLOAD mode.
6.3. Sort Messages by Operation Name
The operationName header
operationName header to the name of the invoked operation. You can then use this header to sort messages by operation name.
Sorting by operation name
customer-ws-camel-cxf-payload demonstration defines the following route, which uses the content-based router pattern to sort incoming messages, based on the operation name. The when predicates check the value of the operationName header using simple language expressions, sorting messages into invocations on the updateCustomer operation, the lookupCustomer operation, or the getCustomerStatus operation.
<beans ...>
    ...
    <camelContext id="camel" xmlns="http://camel.apache.org/schema/spring">
        <route>
            <from uri="cxf:bean:customer-ws?dataFormat=PAYLOAD"/>
            <choice>
                <when>
                    <simple>${in.header.operationName} == 'updateCustomer'</simple>
                    ...
                </when>
                <when>
                    <simple>${in.header.operationName} == 'lookupCustomer'</simple>
                    ...
                </when>
                <when>
                    <simple>${in.header.operationName} == 'getCustomerStatus'</simple>
                    ...
                </when>
            </choice>
        </route>
    </camelContext>

</beans>
6.4. SOAP/HTTP-to-JMS Bridge Use Case
Overview
Figure 6.2. SOAP/HTTP-to-JMS Bridge
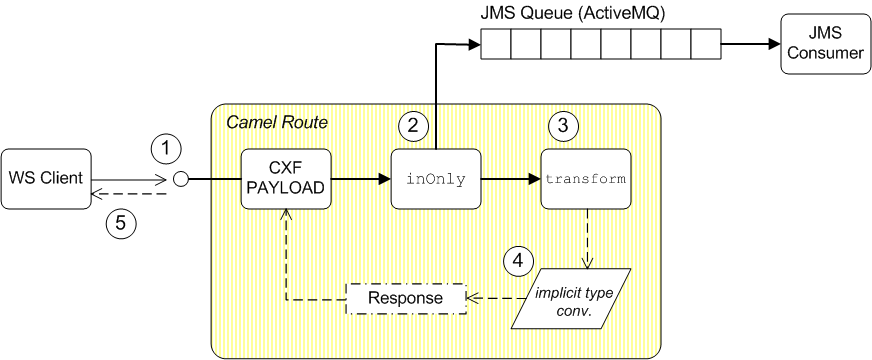
Transforming RPC operations to One Way
- The WS client invokes a synchronous operation on the Camel CXF endpoint at the start of the route. The Camel CXF endpoint then creates an initial InOut exchange at the start of the route, where the body of the exchange message contains a payload in XML format.
- The
inOnlyDSL command pushes a copy of the XML payload onto a JMS queue, so that it can be processed offline at some later time. - The
transformDSL command constructs an immediate response to send back to the client, where the response has the form of an XML string. - The Camel CXF component supports implicit type conversion of the XML string to payload format.
- The response is sent back to the WS client, thus completing the synchronous operation invocation.
Creating a broker instance
amq:broker element in the Spring XML file, as follows:
<beans xmlns="http://www.springframework.org/schema/beans"
      ...
      xmlns:amq="http://activemq.apache.org/schema/core"
      ...>

  <amq:broker brokerName="CxfPayloadDemo" persistent="false">
      <amq:transportConnectors>
          <amq:transportConnector name="openwire" uri="tcp://localhost:51616"/>
          <amq:transportConnector name="vm" uri="vm:local"/>
      </amq:transportConnectors>
  </amq:broker>
  ...
</beans>persistent attribute set to false, so that the messages are stored only in memory.
Configuring the JMS component
<beans ...>
    ...
    <bean id="activemq" class="org.apache.activemq.camel.component.ActiveMQComponent">
        <property name="brokerURL" value="vm:local"/>
    </bean>
    ...
</beans>id value of activemq, you are implicitly overriding the component associated with the endpoint URI prefix, activemq:. In other words, your custom ActiveMQComponent instance is used instead of the default ActiveMQComponent instance from the camel-activemq JAR file.
Sample SOAP/HTTP-to-JMS route
updateCustomer operation from the CustomerService SEI, as follows:
<when>
    <simple>${in.header.operationName} == 'updateCustomer'</simple>
    <log message="Placing update customer message onto queue."/>
    <inOnly uri="activemq:queue:CustomerUpdates?jmsMessageType=Text"/>
    <transform>
        <constant>
        <![CDATA[
<ns2:updateCustomerResponse xmlns:ns2="http://demo.fusesource.com/wsdl/CustomerService/"/>
        ]]>
        </constant>
    </transform>
</when>
Sending to the JMS endpoint in inOnly mode
inOnly DSL command instead of the to DSL command. When you send a message using the to DSL command, the default behavior is to use the same invocation mode as the current exchange. But the current exchange has an InOut MEP, which means that the to DSL command would wait forever for a response message from JMS.
inOnly DSL command into the route.
jmsMessageType=Text, Camel CXF implicitly converts the message payload to an XML string before pushing it onto the JMS queue.
Returning a literal response value
transform DSL command uses an expression to set the body of the exchange's Out message and this message is then used as the response to the client. Your first impulse when defining a response in XML format might be to use a DOM API, but in this example, the response is specified as a string literal. This approach has the advantage of being both efficient and very easy to program.
6.5. Generating Responses Using Templates
Overview
Figure 6.3. Response Generated by Velocity

Sample template-based route
getCustoemrStatus operation, as follows:
        ...
        <when>
          <simple>${in.header.operationName} == 'getCustomerStatus'</simple>
          <convertBodyTo type="org.w3c.dom.Node"/>
          <setHeader headerName="customerId">
            <xpath resultType="java.lang.String">/cus:getCustomerStatus/customerId</xpath>
          </setHeader>
          <to uri="getCustomerStatus"/>
          <to uri="velocity:getCustomerStatusResponse.vm"/>
        </when>
      </choice>
    </route>
  </camelContext
  ...
  <bean id="getCustomerStatus"
    class="com.fusesource.customerwscamelcxfpayload.GetCustomerStatus"/>
Route processing steps
getCustomerStatus would be processed as follows:
- To facilitate processing the payload body, the first step uses
convertBodyToto convert the body type fromorg.apache.camel.component.cxf.CxfPayload(the default payload type) toorg.w3c.dom.Node. - The route then applies an XPath expression to the message in order to extract the customer ID value and then stashes it in the
customerIdheader. - The next step sends the message to the
getCustomerStatusbean, which does whatever processing is required to get the customer status for the specified customer ID. The results from this step are stashed in message headers. - Finally, a response is generated using a velocity template.
Converting XPath result to a string
- Specify the result type explicitly using the
resultTypeattribute, as follows:<xpath resultType="java.lang.String">/cus:getCustomerStatus/customerId</xpath> - Modify the expression so that it returns a
text()node, which automatically converts to string:<xpath>/cus:getCustomerStatus/customerId/text()</xpath>
getCustomerStatus processor bean
getCustomerStatus processor bean is an instance of the GetCustomerStatus processor class, which is defined as follows:
// Java
package com.fusesource.customerwscamelcxfpayload;

import org.apache.camel.Exchange;
import org.apache.camel.Processor;

public class GetCustomerStatus implements Processor
{
    public void process(Exchange exchng) throws Exception {
        String id = exchng.getIn().getHeader("customerId", String.class);

        // Maybe do some kind of lookup here!
        //

        exchng.getIn().setHeader("status", "Away");
        exchng.getIn().setHeader("statusMessage", "Going to sleep.");
    }
}status and statusMessage are simply set to constant values and stashed in message headers.
null, the next processor in the route gets a copy of the current In message instead
null.
getCustomerStatusResponse.vm Velocity template
${header.HeaderName} substitutes the value of a named header.
getCustomerStatus reponse is located in the customer-ws-camel-cxf-payload/src/main/resources directory and it contains the following template script:
<ns2:getCustomerStatusResponse xmlns:ns2="http://demo.fusesource.com/wsdl/CustomerService/">
   <status>${headers.status}</status>
   <statusMessage>${headers.statusMessage}</statusMessage>
</ns2:getCustomerStatusResponse>
6.6. Deploy to OSGi
Overview
- Bundles are a relatively lightweight deployment option (because dependencies can be shared between deployed bundles).
- OSGi provides sophisticated dependency management, ensuring that only version-consistent dependencies are added to the bundle's classpath.
Using the Maven bundle plug-in
pom.xml file:
- Change the packaging type to
bundle(by editing the value of theproject/packagingelement in the POM). - Add the Maven bundle plug-in to your POM file and configure it as appropriate.
Sample bundle plug-in configuration
<?xml version="1.0"?>
<project  ...>
  ...
  <groupId>org.fusesource.sparks.fuse-webinars.cxf-webinars</groupId>
  <artifactId>customer-ws-camel-cxf-payload</artifactId>

  <name>customer-ws-camel-cxf-payload</name>
  <url>http://www.fusesource.com</url>
 <packaging>bundle</packaging>
  ...
  <build>
    <plugins>
      ...
      <plugin>
        <groupId>org.apache.felix</groupId>
        <artifactId>maven-bundle-plugin</artifactId>
        <extensions>true</extensions>
        <configuration>
         <instructions>
            <Import-Package>
              org.apache.camel.component.velocity,
              META-INF.cxf,
              META-INF.cxf.osgi,
              javax.jws,
              javax.wsdl,
              javax.xml.bind,
              javax.xml.bind.annotation,
              javax.xml.namespace,
              javax.xml.ws,
              org.w3c.dom,
              <!-- Workaround to access DOM XPathFactory -->
              org.apache.xpath.jaxp,
              *
            </Import-Package>
            <DynamicImport-Package>
              org.apache.cxf.*,
              org.springframework.beans.*
            </DynamicImport-Package>
          </instructions>
        </configuration>
      </plugin>
      ...
    </plugins>
  </build>
</project>
Dynamic imports
DynamicImport-Package element). This is a pragmatic way of dealing with the fact that Spring XML files are not terribly well integrated with the Maven bundle plug-in. At build time, the Maven bundle plug-in is not able to figure out which Java classes are required by the Spring XML code. By listing wildcarded package names in the DynamicImport-Package element, however, you allow the OSGi container to figure out which Java classes are needed by the Spring XML code at run time.
DynamicImport-Package headers is not recommended in OSGi, because it short-circuits OSGi version checking. Normally, what should happen is that the Maven bundle plug-in lists the Java packages used at build time, along with their versions, in the Import-Package header. At deploy time, the OSGi container then checks that the available Java packages are compatible with the build time versions listed in the Import-Package header. With dynamic imports, this version checking cannot be performed.
Build and deploy the client bundle
mvn install
karaf@root> install -s mvn:org.fusesource.sparks.fuse-webinars.cxf-webinars/customer-ws-camel-cxf-payload
org.ops4j.pax.url.mvn.localRepository property in the EsbInstallDir/etc/org.ops4j.pax.url.mvn.cfg file, before you can use the mvn: scheme to access Maven artifacts.
Chapter 7. Provider-Based Route
7.1. Provider-Based JAX-WS Endpoint
Overview
SAXSource. Since the XMLstreaming types are more efficient than DOM objects, the provider-based approach is ideal for large XML messages.
Demonstration location
DemoDir/src/fuse-webinars/cxf-webinars/customer-ws-camel-cxf-providerCamel CXF component
cxf:cxfEndpoint XML element and are implemented by the Apache Camel project—are not to be confused with the Apache CXF JAX-WS endpoints—which are instantiated using the jaxws:endpoint XML element and are implemented by the Apache CXF project.
Provider-based approach and the PAYLOAD data format
- Define a custom
javax.xml.ws.Provider<StreamType>class, where the StreamType type is an XML streaming type, such asSAXSource. - The PAYLOAD data format is selected by an annotation on the custom
Provider<?>class (see the section called “The SAXSourceService provider class”). - The custom
Provider<?>class is referenced by setting theserviceClassattribute of thecxf:cxfEndpointelement in XML configuration.
- Enables you to access the message body as a streamed XML type—for example,
javax.xml.transform.sax.SAXSource. - No JAX-WS or JAX-B stub code required.
- The SOAP body is marshalled into a stream-based
SAXSourcetype. - The SOAP headers are converted into headers in the exchange's In message, of
org.apache.cxf.binding.soap.SoapHeadertype.
Implementing and building a provider-based route
- Define a custom
javax.xml.ws.Provider<StreamType>class (the current demonstration usesSAXSourceas the StreamType type). - Instantiate the Camel CXF endpoint in Spring, using the
cxf:cxfEndpointelement and reference the custom provider class (using theserviceClassattribute). - Implement the route in XML, where you can use the content-based router to sort requests by operation name.
- For each operation, define a processor bean to process the request.
- Define velocity templates for generating the reponse messages.
- Define a custom type converter, to support converting a
Stringmessage body to aSAXSourcemessage body.
Sample provider-based route
CustomerService Web service using the provider-based approach. After sorting the request messages by operation name, an operation-specific processor bean reads the incoming request parameters. Finally, the response messages are generated using Velocity templates.
Figure 7.1. Sample Provider-Based Route

7.2. Create a Provider<?> Implementation Class
Overview
Provider<> class that implements the invoke() method. In fact, the sole purpose of this class is to provide runtime type information for Apache CXF: the invoke() method never gets called!
SAXSource.
The SAXSourceService provider class
SAXSourceService, is as follows:
// Java
package com.fusesource.customerwscamelcxfprovider;

import javax.xml.transform.sax.SAXSource;
import javax.xml.ws.Provider;
import javax.xml.ws.Service.Mode;
import javax.xml.ws.ServiceMode;
import javax.xml.ws.WebServiceProvider;

@WebServiceProvider()
@ServiceMode(Mode.PAYLOAD)
public class SAXSourceService implements Provider<SAXSource>
{
  public SAXSource invoke(SAXSource t) {
    throw new UnsupportedOperationException("Not supported yet.");
  }
}SAXSourceService, must be annotated by the @WebServiceProvider annotation to mark it as a provider class and can be optionally annotated by the @ServiceMode annotation to select PAYLOAD mode.
7.3. Instantiate the WS Endpoint
Overview
- Consumer endpoint—(at the start of a route) represents a Web service instance, which integrates with the route. The type of payload injected into the route depends on the value of the endpoint's
dataFormatoption. - Producer endpoint—represents a special kind of WS client proxy, which converts the current exchange object into an operation invocation on a remote Web service. The format of the current exchange must match the endpoint's
dataFormatsetting.
The cxf:bean: URI syntax
cxf:bean: URI is used to bind an Apache CXF endpoint to a route and has the following general syntax:
cxf:bean:CxfEndpointID[?Options]
CxfEndpointID is the ID of a bean created using the cxf:cxfEndpoint element, which configures the details of the WS endpoint. You can append options to this URI (where the options are described in detail in chapter "CXF" in "EIP Component Reference"). Provider mode is essentially a variant of PAYLOAD mode: you could specify this mode on the URI (by setting dataFormat=PAYLOAD), but this is not necessary, because PAYLOAD mode is already selected by the @ServiceMode annotation on the custom Provider class.
customer-ws bean, define the route as follows:
<route>
    <from uri="cxf:bean:customer-ws"/>
    ...
</route>
The cxf:cxfEndpoint element
cxf:cxfEndpoint element is used to define a WS endpoint that binds either to the start (consumer endpoint) or the end (producer endpoint) of a route. For example, to define the customer-ws WS endpoint in provider mode, you define a cxf:cxfEndpoint element as follows:
<?xml version="1.0" encoding="UTF-8"?>
<beans ...>
    ...
    <cxf:cxfEndpoint id="customer-ws"
        address="/Customer"
        endpointName="c:SOAPOverHTTP"
        serviceName="c:CustomerService"
        wsdlURL="wsdl/CustomerService.wsdl"
        serviceClass="com.fusesource.customerwscamelcxfprovider.SAXSourceService"
        xmlns:c="http://demo.fusesource.com/wsdl/CustomerService/"/>
    ...
</beans>
Specifying the WSDL location
wsdlURL attribute of the cxf:cxfEndpoint element is used to specify the location of the WSDL contract for this endpoint. The WSDL contract is used as the source of metadata for this endpoint.
Specifying the service class
serviceClass attribute must be set to the provider class, SAXSourceService.
7.4. Sort Messages by Operation Name
The operationName header
operationName header to the name of the invoked operation. You can then use this header to sort messages by operation name.
Sorting by operation name
customer-ws-camel-cxf-provider demonstration defines the following route, which uses the content-based router pattern to sort incoming messages, based on the operation name. The when predicates check the value of the operationName header using simple language expressions, sorting messages into invocations on the updateCustomer operation, the lookupCustomer operation, or the getCustomerStatus operation.
<beans ...>
    ...
    <camelContext id="camel" xmlns="http://camel.apache.org/schema/spring">
        <route>
            <from uri="cxf:bean:customer-ws"/>
            <choice>
                <when>
                    <simple>${in.header.operationName} == 'updateCustomer'</simple>
                    ...
                </when>
                <when>
                    <simple>${in.header.operationName} == 'lookupCustomer'</simple>
                    ...
                </when>
                <when>
                    <simple>${in.header.operationName} == 'getCustomerStatus'</simple>
                    ...
                </when>
            </choice>
        </route>
    </camelContext>
    ...
</beans>
7.5. SOAP/HTTP-to-JMS Bridge Use Case
Overview
Figure 7.2. SOAP/HTTP-to-JMS Bridge

Transforming RPC operations to One Way
- The WS client invokes a synchronous operation on the Camel CXF endpoint at the start of the route. The Camel CXF endpoint then creates an initial InOut exchange at the start of the route, where the body of the exchange message contains a payload in XML format.
- The
inOnlyDSL command pushes a copy of the XML payload onto a JMS queue, so that it can be processed offline at some later time. - The
transformDSL command constructs an immediate response to send back to the client, where the response has the form of an XML string. - The route explicitly converts the XML string to the
javax.xml.transform.sax.SAXSourcetype. - The response is sent back to the WS client, thus completing the synchronous operation invocation.
Creating a broker instance
amq:broker element in the Spring XML file, as follows:
<beans xmlns="http://www.springframework.org/schema/beans"
      ...
      xmlns:amq="http://activemq.apache.org/schema/core"
      ...>

  <amq:broker brokerName="CxfPayloadDemo" persistent="false">
      <amq:transportConnectors>
          <amq:transportConnector name="openwire" uri="tcp://localhost:51616"/>
          <amq:transportConnector name="vm" uri="vm:local"/>
      </amq:transportConnectors>
  </amq:broker>
  ...
</beans>persistent attribute set to false, so that the messages are stored only in memory.
Configuring the JMS component
<beans ...>
    ...
    <bean id="activemq" class="org.apache.activemq.camel.component.ActiveMQComponent">
        <property name="brokerURL" value="vm:local"/>
    </bean>
    ...
</beans>id value of activemq, you are implicitly overriding the component associated with the endpoint URI prefix, activemq:. In other words, your custom ActiveMQComponent instance is used instead of the default ActiveMQComponent instance from the camel-activemq JAR file.
Sample SOAP/HTTP-to-JMS route
updateCustomer operation from the CustomerService SEI, as follows:
<when>
    <simple>${in.header.operationName} == 'updateCustomer'</simple>
    <log message="Placing update customer message onto queue."/>
    <inOnly uri="activemq:queue:CustomerUpdates?jmsMessageType=Text"/>
    <transform>
        <constant>
        <![CDATA[
<ns2:updateCustomerResponse xmlns:ns2="http://demo.fusesource.com/wsdl/CustomerService/"/>
        ]]>
        </constant>
    </transform>
    <convertBodyTo type="javax.xml.transform.sax.SAXSource"/>
</when>
Sending to the JMS endpoint in inOnly mode
inOnly DSL command instead of the to DSL command. When you send a message using the to DSL command, the default behavior is to use the same invocation mode as the current exchange. But the current exchange has an InOut MEP, which means that the to DSL command would wait forever for a response message from JMS.
inOnly DSL command into the route.
jmsMessageType=Text, Camel CXF implicitly converts the message payload to an XML string before pushing it onto the JMS queue.
Returning a literal response value
transform DSL command uses an expression to set the body of the exchange's Out message and this message is then used as the response to the client. Your first impulse when defining a response in XML format might be to use a DOM API, but in this example, the response is specified as a string literal. This approach has the advantage of being both efficient and very easy to program.
Type conversion of the response message
javax.xml.transform.sax.SAXSource. In the last step of the route, therefore, you must convert the message body from String type to javax.xml.transform.sax.SAXSource type, by invoking the convertBodyTo DSL command.
SAXSource conversion is provided by a custom type converter, as described in Section 7.7, “TypeConverter for SAXSource”.
7.6. Generating Responses Using Templates
Overview
Figure 7.3. Response Generated by Velocity
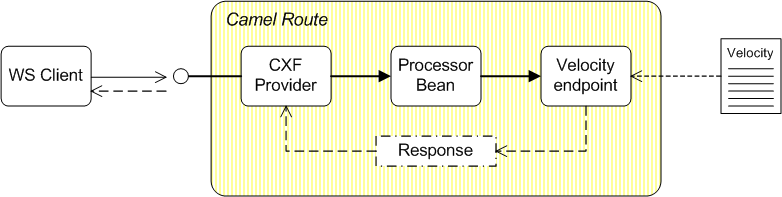
Sample template-based route
getCustoemrStatus operation, as follows:
        ...
        <when>
          <simple>${in.header.operationName} == 'getCustomerStatus'</simple>
          <setHeader headerName="customerId">
            <xpath resultType="java.lang.String">/cus:getCustomerStatus/customerId</xpath>
          </setHeader>
          <to uri="getCustomerStatus"/>
          <to uri="velocity:getCustomerStatusResponse.vm"/>
          <convertBodyTo type="javax.xml.transform.sax.SAXSource"/>
        </when>
      </choice>
    </route>
  </camelContext
  ...
  <bean id="getCustomerStatus"
    class="com.fusesource.customerwscamelcxfpayload.GetCustomerStatus"/>
Route processing steps
getCustomerStatus would be processed as follows:
- The route applies an XPath expression to the message in order to extract the customer ID value and then stashes it in the
customerIdheader. - The next step sends the message to the
getCustomerStatusbean, which does whatever processing is required to get the customer status for the specified customer ID. The results from this step are stashed in message headers. - A response is generated using a Velocity template.
- Finally, the XML string generated by the Velocity template must be explicitly converted to the
javax.xml.transform.sax.SAXSourcetype usingconvertBodyTo(which implicitly relies on a type converter).
XPath expressions and SAXSource
getCustomerStatus processor bean
getCustomerStatus processor bean is an instance of the GetCustomerStatus processor class, which is defined as follows:
// Java
package com.fusesource.customerwscamelcxfpayload;

import org.apache.camel.Exchange;
import org.apache.camel.Processor;

public class GetCustomerStatus implements Processor
{
    public void process(Exchange exchng) throws Exception {
        String id = exchng.getIn().getHeader("customerId", String.class);

        // Maybe do some kind of lookup here!
        //

        exchng.getIn().setHeader("status", "Away");
        exchng.getIn().setHeader("statusMessage", "Going to sleep.");
    }
}status and statusMessage are simply set to constant values and stashed in message headers.
getCustomerStatusResponse.vm Velocity template
${header.HeaderName} substitutes the value of a named header.
getCustomerStatus reponse is located in the customer-ws-camel-cxf-provider/src/main/resources directory and it contains the following template script:
<ns2:getCustomerStatusResponse xmlns:ns2="http://demo.fusesource.com/wsdl/CustomerService/">
   <status>${headers.status}</status>
   <statusMessage>${headers.statusMessage}</statusMessage>
</ns2:getCustomerStatusResponse>
7.7. TypeConverter for SAXSource
Overview
String objects to SAXSource objects.
String to SAXSource type converter
AdditionalConverters class, as follows:
// Java
package com.fusesource.customerwscamelcxfprovider;

import java.io.ByteArrayInputStream;
import javax.xml.transform.sax.SAXSource;
import org.apache.camel.Converter;
import org.xml.sax.InputSource;

@Converter
public class AdditionalConverters {

  @Converter
  public static SAXSource toSAXSource(String xml) {
      return new SAXSource(new InputSource(new ByteArrayInputStream(xml.getBytes())));
  }
}
Reference
7.8. Deploy to OSGi
Overview
- Bundles are a relatively lightweight deployment option (because dependencies can be shared between deployed bundles).
- OSGi provides sophisticated dependency management, ensuring that only version-consistent dependencies are added to the bundle's classpath.
Using the Maven bundle plug-in
pom.xml file:
- Change the packaging type to
bundle(by editing the value of theproject/packagingelement in the POM). - Add the Maven bundle plug-in to your POM file and configure it as appropriate.
Sample bundle plug-in configuration
<?xml version="1.0"?>
<project  ...>
  ...
  <groupId>org.fusesource.sparks.fuse-webinars.cxf-webinars</groupId>
  <artifactId>customer-ws-camel-cxf-provider</artifactId>

  <name>customer-ws-camel-cxf-provider</name>
  <url>http://www.fusesource.com</url>
 <packaging>bundle</packaging>
  ...
  <build>
    <plugins>
      ...
      <plugin>
        <groupId>org.apache.felix</groupId>
        <artifactId>maven-bundle-plugin</artifactId>
        <extensions>true</extensions>
        <configuration>
         <instructions>
            <Import-Package>
              org.apache.camel.component.velocity,
              META-INF.cxf,
              META-INF.cxf.osgi,
              javax.jws,
              javax.wsdl,
              javax.xml.bind,
              javax.xml.bind.annotation,
              javax.xml.namespace,
              javax.xml.ws,
              org.w3c.dom,
              <!-- Workaround to access DOM XPathFactory -->
              org.apache.xpath.jaxp,
              *
            </Import-Package>
            <DynamicImport-Package>
              org.apache.cxf.*,
              org.springframework.beans.*
            </DynamicImport-Package>
          </instructions>
        </configuration>
      </plugin>
      ...
    </plugins>
  </build>
</project>
Dynamic imports
DynamicImport-Package element). This is a pragmatic way of dealing with the fact that Spring XML files are not terribly well integrated with the Maven bundle plug-in. At build time, the Maven bundle plug-in is not able to figure out which Java classes are required by the Spring XML code. By listing wildcarded package names in the DynamicImport-Package element, however, you allow the OSGi container to figure out which Java classes are needed by the Spring XML code at run time.
DynamicImport-Package headers is not recommended in OSGi, because it short-circuits OSGi version checking. Normally, what should happen is that the Maven bundle plug-in lists the Java packages used at build time, along with their versions, in the Import-Package header. At deploy time, the OSGi container then checks that the available Java packages are compatible with the build time versions listed in the Import-Package header. With dynamic imports, this version checking cannot be performed.
Build and deploy the client bundle
mvn install
karaf@root> install -s mvn:org.fusesource.sparks.fuse-webinars.cxf-webinars/customer-ws-camel-cxf-provider
org.ops4j.pax.url.mvn.localRepository property in the EsbInstallDir/etc/org.ops4j.pax.url.mvn.cfg file, before you can use the mvn: scheme to access Maven artifacts.
Chapter 8. Proxying a Web Service
Abstract
8.1. Proxying with HTTP
Overview
Figure 8.1. Proxy Route with Message in HTTP Format

Alternatives for the consumer endpoint
- Jetty endpoint—is a lightweight Web server. You can use Jetty to handle messages for any HTTP-based protocol, including the commonly-used Web service SOAP/HTTP protocol.
- Camel CXF endpoint in MESSAGE mode—when a Camel CXF endpoint is used in MESSAGE mode, the body of the exchange message is the raw message received from the transport layer (which is HTTP). In other words, the Camel CXF endpoint in MESSAGE mode is equivalent to a Jetty endpoint in the case of HTTP-based protocols.
Consumer endpoint for HTTP
jetty:HttpAddress. To configure the Jetty endpoint to be a proxy for a Web service, use a HttpAddress value that is almost identical to the HTTP address the client connects to, except that Jetty's version of HttpAddress uses the special hostname, 0.0.0.0 (which matches all of the network interfaces on the current machine).
<route>
    <from uri="jetty:http://0.0.0.0:9093/Customers?matchOnUriPrefix=true"/>
    ...
</route>
matchOnUriPrefix option
http://localhost:9093/Customers would be accepted, but a request sent to http://localhost:9093/Customers/Foo would be rejected. By setting matchOnUriPrefix to true, however, you enable a kind of wildcarding on the context path, so that any context path prefixed by /Customers is accepted.
Alternatives for the producer endpoint
- Jetty HTTP client endpoint—(recommended) the Jetty library implements a HTTP client. In particular, the Jetty HTTP client features support for
HttpClientthread pools, which means that the Jetty implementation scales particularly well. - HTTP endpoint—the HTTP endpoint implements a HTTP client based on the
HttpClient3.x API. - HTTP4 endpoint—the HTTP endpoint implements a HTTP client based on the
HttpClient4.x API.
Producer endpoint for HTTP
uri attribute of the to element at the end of the route to be the address of the remote Web service, as follows:
<route>
...
<to uri="jetty:http://localhost:8083/Customers?bridgeEndpoint=true&throwExceptionOnFailure=false"/>
</route>bridgeEndpoint option
bridgeEndpoint option, which you can enable on a HTTP producer endpoint to configure the endpoint appropriately for operating in a HTTP-to-HTTP bridge (as is the case in this demonstration). In particular, when bridgeEndpoint=true, the HTTP endpoint ignores the value of the Exchange.HTTP_URI header, using the HTTP address from the endpoint URI instead.
throwExceptionOnFailure option
throwExceptionOnFailure to false ensures that any HTTP exceptions are relayed back to the original WS client, instead of being thrown within the route.
Handling message headers
CamelHttp* headers set by the consumer endpoint at the start of the route can affect the behavior of the producer endpoint. For this reason, in a bridge application it is advisable to remove the CamelHttp* headers before the message reaches the producer endpoint, as follows:
<route>
    <from uri="jetty:http:..."/>
    ...
 <removeHeaders pattern="CamelHttp*"/>
    <to uri="jetty:http:..."/>
</route>
Outgoing HTTP headers
Camel will be converted into HTTP headers and sent out over the wire by the HTTP producer endpoint. This could have adverse consequences on the behavior of your application, so it is important to be aware of any headers that are set in the exchange object and to remove them, if necessary.
8.2. Proxying with POJO Format
Overview
Figure 8.2. Proxy Route with Message in POJO Format

Consumer endpoint for CXF/POJO
cxf:bean:BeanID URI format to reference the Camel CXF endpoint as follows (where the dataFormat option defaults to POJO):
<route>
    <from uri="cxf:bean:customerServiceProxy"/>
    ...
</route>customerServiceProxy, is a Camel CXF/POJO endpoint, which is defined as follows:
<?xml version="1.0" encoding="UTF-8"?>
<beans ...>
  ...
  <cxf:cxfEndpoint
      id="customerServiceProxy"
      xmlns:c="http://demo.fusesource.org/wsdl/camelcxf"
      address="/Customers"
      endpointName="c:SOAPOverHTTP"
      serviceName="c:CustomerService"
      wsdlURL="wsdl/CustomerService.wsdl"
      serviceClass="org.fusesource.demo.wsdl.camelcxf.CustomerService"
  />
  ...
</beans>
Producer endpoint for CXF/POJO
cxf:bean:BeanID URI format to reference the Camel CXF endpoint as follows (where the dataFormat option defaults to POJO):
<route>
    ...
    <to uri="cxf:bean:customerServiceReal"/>
</route>customerServiceReal, is a Camel CXF/POJO endpoint, which is defined as follows:
<?xml version="1.0" encoding="UTF-8"?>
<beans ...>
  ...
  <cxf:cxfEndpoint
      id="customerServiceReal"
      xmlns:c="http://demo.fusesource.org/wsdl/camelcxf"
      address="http://localhost:8083/Customers"
      endpointName="c:SOAPOverHTTP"
      serviceName="c:CustomerService"
      wsdlURL="wsdl/CustomerService.wsdl"
      serviceClass="org.fusesource.demo.wsdl.camelcxf.CustomerService"
  />
  ...
</beans>
8.3. Proxying with PAYLOAD Format
Overview
org.w3c.dom.Node object). The key advantate of using PAYLOAD format is that you can easily process the contents of a message, by accessing the message body as an XML document.
Figure 8.3. Proxy Route with Message in PAYLOAD Format

Consumer endpoint for CXF/PAYLOAD
cxf:bean:BeanID URI format to reference the Camel CXF endpoint as follows, where you must set the dataFormat option to PAYLOAD:
<route>
    <from uri="cxf:bean:customerServiceProxy?dataFormat=PAYLOAD"/>
    ...
</route>customerServiceProxy, is a Camel CXF/PAYLOAD endpoint, which is defined as follows:
<?xml version="1.0" encoding="UTF-8"?>
<beans ...>
  ...
  <cxf:cxfEndpoint
      id="customerServiceProxy"
      xmlns:c="http://demo.fusesource.org/wsdl/camelcxf"
      address="/Customers"
      endpointName="c:SOAPOverHTTP"
      serviceName="c:CustomerService"
      wsdlURL="wsdl/CustomerService.wsdl"
  />
  ...
</beans>
Producer endpoint for CXF/PAYLOAD
cxf:bean:BeanID URI format to reference the Camel CXF endpoint as follows, where you must set the dataFormat option to PAYLOAD:
<route>
    ...
    <to uri="cxf:bean:customerServiceReal?dataFormat=PAYLOAD"/>
</route>customerServiceReal, is a Camel CXF/PAYLOAD endpoint, which is defined as follows:
<?xml version="1.0" encoding="UTF-8"?>
<beans ...>
  ...
  <cxf:cxfEndpoint
      id="customerServiceReal"
      xmlns:c="http://demo.fusesource.org/wsdl/camelcxf"
      address="http://localhost:8083/Customers"
      endpointName="c:SOAPOverHTTP"
      serviceName="c:CustomerService"
      wsdlURL="wsdl/CustomerService.wsdl"
  />
  ...
</beans>
Outgoing HTTP headers
Camel will be converted into HTTP headers and sent out over the wire by the Camel CXF producer endpoint. This could have adverse consequences on the behavior of your application, so it is important to be aware of any headers that are set in the exchange object and to remove them, if necessary.
8.4. Handling HTTP Headers
Overview
HTTP-based components
camel-http), but also a number of other HTTP-based components, including:
camel-http
camel-http4
camel-jetty
camel-restlet
camel-cxf
HTTP consumer endpoint
CamelHttp*headers- Several headers with the
CamelHttpprefix are created, which record the status of the incoming message. For details of these internal headers, see HTTP. - HTTP headers
- All of the HTTP headers from the original incoming message are mapped to headers on the exchange's In message.
- URL options (Jetty only)
- The URL options from the original HTTP request URL are mapped to headers on the exchange's In message. For example, given the client request with the URL,
http://myserver/myserver?orderid=123, a Jetty consumer endpoint creates theorderidheader with value123.
HTTP producer endpoint
CamelHttp*- Headers prefixed by
CamelHttpare used to control the behavior of the HTTP producer entpoint. Any headers of this kind are consumed by the HTTP producer endpoint and the endpoint behaves as directed. Camel*- All other headers prefixed by
Camelare presumed to be meant for internal use and are not mapped to HTTP headers in the target message (in other words, these headers are ignored). *- All other headers are converted to HTTP headers in the target message, with the exception of the following headers, which are blocked (based on a case-insensitive match):
content-length
content-type
cache-control
connection
date
pragma
trailer
transfer-encoding
upgrade
via
warning
Implications for HTTP bridge applications
CamelHttp* headers set by the consumer endpoint at the start of the route can affect the behavior of the producer endpoint. For this reason, in a bridge application it is advisable to remove the CamelHttp* headers, as follows:
from("http://0.0.0.0/context/path")
 .removeHeaders("CamelHttp*)
  ...
  .to("http://remoteHost/context/path");
Setting a custom header filter
headerFilterStrategy option on the endpoint URI. For example, to configure a producer endpoint with the myHeaderFilterStrategy filter, you could use a URI like the following:
http://remoteHost/context/path?headerFilterStrategy=#myHeaderFilterStrategy
myHeaderFilterStrategy is the bean ID of your custom filter instance.
Chapter 9. Filtering SOAP Message Headers
Abstract
9.1. Basic Configuration
Overview
CxfHeaderFilterStrategy
CxfHeaderFilterStrategy class. Basic configuration of the CxfHeaderFilterStrategy class involves setting one or more of the following options:
relayHeaders option
relayHeaders option can be summarized as follows:
| In-band headers | Out-of-band headers | |
relayHeaders=true, dataFormat=PAYLOAD | Filter | Filter |
relayHeaders=true, dataFormat=POJO | Relay all | Filter |
relayHeaders=false | Block | Block |
In-band headers
Out-of-band headers
Payload format
POJO- (Default) Only out-of-band headers are available for filtering, because the in-band headers have already been processed and removed from the list by CXF. The in-band headers are incorporated into the
MessageContentListin POJO mode. If you require access to headers in POJO mode, you have the option of implementing a custom CXF interceptor or JAX-WS handler. PAYLOAD- In this mode, both in-band and out-of-band headers are available for filtering.
MESSAGE- Not applicable. (In this mode, the message remains in a raw format and the headers are not processed at all.)
Default filter
SoapMessageHeaderFilter, which removes only the SOAP headers that the SOAP specification expects an intermediate Web service to consume. For more details, see the section called “SoapMessageHeaderFilter”.
Overriding the default filter
CxfHeaderFilterStrategy instance by defining a new CxfHeaderFilterStrategy bean and associating it with a CXF endpoint.
Sample relayHeaders configuration
relayHeaders option to create a CxfHeaderFilterStrategy bean that blocks all message headers. The CXF endpoints in the route use the headerFilterStrategy option to install the filter strategy in the endpoint, where the headerFilterStrategy setting has the syntax, headerFilterStrategy=#BeanID.
<beans ...>
  ...
  <bean id="dropAllMessageHeadersStrategy" class="org.apache.camel.component.cxf.common.header.CxfHeaderFilterStrategy">
      <!--  Set relayHeaders to false to drop all SOAP headers -->
      <property name="relayHeaders" value="false"/>
  </bean>

  <camelContext id="camel" xmlns="http://camel.apache.org/schema/spring">
      <route>
          <from uri="cxf:bean:routerNoRelayEndpoint?headerFilterStrategy=#dropAllMessageHeadersStrategy"/>
          <to uri="cxf:bean:serviceNoRelayEndpoint?headerFilterStrategy=#dropAllMessageHeadersStrategy"/>
      </route>
  </camelContext>
  ...
</beans>
relayAllMessageHeaders option
relayAllMessageHeaders option is used to propagate all SOAP headers, without applying any filtering (any installed filters would be bypassed). In order to enable this feature, you must set both relayHeaders and relayAllMessageHeaders to true.
Sample relayAllMessageHeaders configuration
propagateAllMessages filter strategy sets both relayHeaders and relayAllMessageHeaders to true.
<beans ...>
  ...
  <bean id="propagateAllMessages" class="org.apache.camel.component.cxf.common.header.CxfHeaderFilterStrategy">
      <!--  Set both properties to true to propagate *all* SOAP headers -->
      <property name="relayHeaders" value="true"/>
      <property name="relayAllMessageHeaders" value="true"/>
  </bean>

  <camelContext id="camel" xmlns="http://camel.apache.org/schema/spring">
      <route>
          <from uri="cxf:bean:routerNoRelayEndpoint?headerFilterStrategy=#propagateAllMessages"/>
          <to uri="cxf:bean:serviceNoRelayEndpoint?headerFilterStrategy=#propagateAllMessages"/>
      </route>
  </camelContext>
  ...
</beans>
9.2. Header Filtering
Overview
CxfHeaderFilterStrategy instance. The filtering mechanism then uses the header's XML namespace to lookup a particular filter, which it then applies to the header.
Filter map
CxfHeaderFilterStrategy instance. For each filter that you install in CxfHeaderFilterStrategy, corresponding entries are made in the filter map, where one or more XML schema namespaces are associated with each filter.
Figure 9.1. Filter Map
Filter behavior
PAYLOAD mode
POJO mode
9.3. Implementing a Custom Filter
Overview
MessageHeaderFilter Java interface. You must associate a filter with one or more XML schema namespaces (representing the header's namespace) and it is possible to differentiate between request message headers and response message headers.
MessageHeaderFilter interface
MessageHeaderFilter interface is defined in the org.apache.camel.component.cxf.common.header package, as follows:
// Java
package org.apache.camel.component.cxf.common.header;

import java.util.List;

import org.apache.camel.spi.HeaderFilterStrategy.Direction;
import org.apache.cxf.headers.Header;

public interface MessageHeaderFilter {
    List<String> getActivationNamespaces();

    void filter(Direction direction, List<Header> headers);
}
Implementing the filter() method
MessageHeaderFilter.filter() method is reponsible for applying header filtering. Filtering is applied both before and after an operation is invoked on an endpoint. Hence, there are two directions to which filtering is applied, as follows:
Direction.OUT- When the
directionparameter equalsDirection.OUT, the filter is being applied to a request either leaving a consumer endpoint or entering a producer endpoint (that is, it applies to a WS request message propagating through a route). Direction.IN- When the
directionparameter equalsDirection.IN, the filter is being applied to a response either leaving a producer endpoint or entering a consumer endpoint (that is, it applies to a WS response message being sent back).
headers. Any headers left in the list are propagated.
Binding filters to XML namespaces
getActivationNamespaces() method, which returns the list of bound XML namespaces.
Identifying the namespace to bind to
Example 9.1. Sample Binding Namespaces
<wsdl:definitions targetNamespace="http://cxf.apache.org/schemas/cxf/idl/bank"
    xmlns:tns="http://cxf.apache.org/schemas/cxf/idl/bank"
    xmlns:xsd="http://www.w3.org/2001/XMLSchema"
    xmlns:soap="http://schemas.xmlsoap.org/wsdl/soap/"
    xmlns:wsdl="http://schemas.xmlsoap.org/wsdl/">
    ...
    <wsdl:binding name="BankSOAPBinding" type="tns:Bank">
        <soap:binding style="document" transport="http://schemas.xmlsoap.org/soap/http" />
        <wsdl:operation name="getAccount">
            ...
        </wsdl:operation>
        ...
    </wsdl:binding>
    ...
</wsdl>soap:binding tag, you can infer that namespace associated with the SOAP binding is http://schemas.xmlsoap.org/wsdl/soap/.
Implementing a custom filter
MessageHeaderFilter interface and implement its methods as described in this section. For example, Example 9.2, “Sample Header Filter Implementation” shows an example of a custom filter, CustomHeaderFilter, that binds to the namespace, http://cxf.apache.org/bindings/custom, and relays all of the headers that pass through it.
Example 9.2. Sample Header Filter Implementation
// Java
package org.apache.camel.component.cxf.soap.headers;

import java.util.Arrays;
import java.util.List;

import org.apache.camel.component.cxf.common.header.MessageHeaderFilter;
import org.apache.camel.spi.HeaderFilterStrategy.Direction;
import org.apache.cxf.headers.Header;

public class CustomHeaderFilter implements MessageHeaderFilter {

    public static final String ACTIVATION_NAMESPACE = "http://cxf.apache.org/bindings/custom";
    public static final List<String> ACTIVATION_NAMESPACES = Arrays.asList(ACTIVATION_NAMESPACE);

    public List<String> getActivationNamespaces() {
        return ACTIVATION_NAMESPACES;
    }

    public void filter(Direction direction, List<Header> headers) {
    }
}
9.4. Installing Filters
Overview
messageHeaderFilters property of the CxfHeaderFilterStrategy object. When you initialize this property with a list of message header filters, the header filter strategy combines the specified filters to make a filter map.
messageHeaderFilters property is of type, List<MessageHeaderFilter>.
Installing filters in XML
CxfHeaderFilterStrategy instance, specifying a customized list of header filters in the messageHeaderFilters property. There are two header filters in this example: SoapMessageHeaderFilter and CustomHeaderFilter.
<bean id="customMessageFilterStrategy" class="org.apache.camel.component.cxf.common.header.CxfHeaderFilterStrategy">
    <property name="messageHeaderFilters">
        <list>
            <!--  SoapMessageHeaderFilter is the built in filter.  It can be removed by omitting it. -->
            <bean class="org.apache.camel.component.cxf.common.header.SoapMessageHeaderFilter"/>

            <!--  Add custom filter here -->
            <bean class="org.apache.camel.component.cxf.soap.headers.CustomHeaderFilter"/>
        </list>
    </property>
    <!-- The 'relayHeaders' property is 'true' by default -->
</bean>
SoapMessageHeaderFilter
SoapMessageHeaderFilter filter, which is the default header filter. This filter is designed to filter standard SOAP headers and is bound to the following XML namespaces:
http://schemas.xmlsoap.org/soap/
http://schemas.xmlsoap.org/wsdl/soap/
http://schemas.xmlsoap.org/wsdl/soap12/
soap:actor attribute (SOAP 1.1) or the soap:role attribute (SOAP 1.2) is present and has the value next, the header is removed from the message. Otherwise, the header is propagated.
Namespace clashes
allowFilterNamespaceClash property to true in the CxfHeaderFilterStrategy instance. When this policy is set to true, the nearest to last filter is selected, in the event of a namespace clash.
Legal Notice
Trademark Disclaimer
Legal Notice
Third Party Acknowledgements
- JLine (http://jline.sourceforge.net) jline:jline:jar:1.0License: BSD (LICENSE.txt) - Copyright (c) 2002-2006, Marc Prud'hommeaux
mwp1@cornell.eduAll rights reserved.Redistribution and use in source and binary forms, with or without modification, are permitted provided that the following conditions are met:- Redistributions of source code must retain the above copyright notice, this list of conditions and the following disclaimer.
- Redistributions in binary form must reproduce the above copyright notice, this list of conditions and the following disclaimer in the documentation and/or other materials provided with the distribution.
- Neither the name of JLine nor the names of its contributors may be used to endorse or promote products derived from this software without specific prior written permission.
THIS SOFTWARE IS PROVIDED BY THE COPYRIGHT HOLDERS AND CONTRIBUTORS "AS IS" AND ANY EXPRESS OR IMPLIED WARRANTIES, INCLUDING, BUT NOT LIMITED TO, THE IMPLIED WARRANTIES OF MERCHANTABILITY AND FITNESS FOR A PARTICULAR PURPOSE ARE DISCLAIMED. IN NO EVENT SHALL THE COPYRIGHT OWNER OR CONTRIBUTORS BE LIABLE FOR ANY DIRECT, INDIRECT, INCIDENTAL, SPECIAL, EXEMPLARY, OR CONSEQUENTIAL DAMAGES (INCLUDING, BUT NOT LIMITED TO, PROCUREMENT OF SUBSTITUTE GOODS OR SERVICES; LOSS OF USE, DATA, OR PROFITS; OR BUSINESS INTERRUPTION) HOWEVER CAUSED AND ON ANY THEORY OF LIABILITY, WHETHER IN CONTRACT, STRICT LIABILITY, OR TORT (INCLUDING NEGLIGENCE OR OTHERWISE) ARISING IN ANY WAY OUT OF THE USE OF THIS SOFTWARE, EVEN IF ADVISED OF THE POSSIBILITY OF SUCH DAMAGE. - Stax2 API (http://woodstox.codehaus.org/StAX2) org.codehaus.woodstox:stax2-api:jar:3.1.1License: The BSD License (http://www.opensource.org/licenses/bsd-license.php)Copyright (c) <YEAR>, <OWNER> All rights reserved.Redistribution and use in source and binary forms, with or without modification, are permitted provided that the following conditions are met:
- Redistributions of source code must retain the above copyright notice, this list of conditions and the following disclaimer.
- Redistributions in binary form must reproduce the above copyright notice, this list of conditions and the following disclaimer in the documentation and/or other materials provided with the distribution.
THIS SOFTWARE IS PROVIDED BY THE COPYRIGHT HOLDERS AND CONTRIBUTORS "AS IS" AND ANY EXPRESS OR IMPLIED WARRANTIES, INCLUDING, BUT NOT LIMITED TO, THE IMPLIED WARRANTIES OF MERCHANTABILITY AND FITNESS FOR A PARTICULAR PURPOSE ARE DISCLAIMED. IN NO EVENT SHALL THE COPYRIGHT HOLDER OR CONTRIBUTORS BE LIABLE FOR ANY DIRECT, INDIRECT, INCIDENTAL, SPECIAL, EXEMPLARY, OR CONSEQUENTIAL DAMAGES (INCLUDING, BUT NOT LIMITED TO, PROCUREMENT OF SUBSTITUTE GOODS OR SERVICES; LOSS OF USE, DATA, OR PROFITS; OR BUSINESS INTERRUPTION) HOWEVER CAUSED AND ON ANY THEORY OF LIABILITY, WHETHER IN CONTRACT, STRICT LIABILITY, OR TORT (INCLUDING NEGLIGENCE OR OTHERWISE) ARISING IN ANY WAY OUT OF THE USE OF THIS SOFTWARE, EVEN IF ADVISED OF THE POSSIBILITY OF SUCH DAMAGE. - jibx-run - JiBX runtime (http://www.jibx.org/main-reactor/jibx-run) org.jibx:jibx-run:bundle:1.2.3License: BSD (http://jibx.sourceforge.net/jibx-license.html) Copyright (c) 2003-2010, Dennis M. Sosnoski.All rights reserved.Redistribution and use in source and binary forms, with or without modification, are permitted provided that the following conditions are met:
- Redistributions of source code must retain the above copyright notice, this list of conditions and the following disclaimer.
- Redistributions in binary form must reproduce the above copyright notice, this list of conditions and the following disclaimer in the documentation and/or other materials provided with the distribution.
- Neither the name of JiBX nor the names of its contributors may be used to endorse or promote products derived from this software without specific prior written permission.
THIS SOFTWARE IS PROVIDED BY THE COPYRIGHT HOLDERS AND CONTRIBUTORS "AS IS" AND ANY EXPRESS OR IMPLIED WARRANTIES, INCLUDING, BUT NOT LIMITED TO, THE IMPLIED WARRANTIES OF MERCHANTABILITY AND FITNESS FOR A PARTICULAR PURPOSE ARE DISCLAIMED. IN NO EVENT SHALL THE COPYRIGHT OWNER OR CONTRIBUTORS BE LIABLE FOR ANY DIRECT, INDIRECT, INCIDENTAL, SPECIAL, EXEMPLARY, OR CONSEQUENTIAL DAMAGES (INCLUDING, BUT NOT LIMITED TO, PROCUREMENT OF SUBSTITUTE GOODS OR SERVICES; LOSS OF USE, DATA, OR PROFITS; OR BUSINESS INTERRUPTION) HOWEVER CAUSED AND ON ANY THEORY OF LIABILITY, WHETHER IN CONTRACT, STRICT LIABILITY, OR TORT (INCLUDING NEGLIGENCE OR OTHERWISE) ARISING IN ANY WAY OUT OF THE USE OF THIS SOFTWARE, EVEN IF ADVISED OF THE POSSIBILITY OF SUCH DAMAGE. - JavaAssist (http://www.jboss.org/javassist) org.jboss.javassist:com.springsource.javassist:jar:3.9.0.GA:compileLicense: MPL (http://www.mozilla.org/MPL/MPL-1.1.html)
- HAPI-OSGI-Base Module (http://hl7api.sourceforge.net/hapi-osgi-base/) ca.uhn.hapi:hapi-osgi-base:bundle:1.2License: Mozilla Public License 1.1 (http://www.mozilla.org/MPL/MPL-1.1.txt)