
Red Hat Training
A Red Hat training course is available for Red Hat Fuse
Using the Apache CXF Binding Component
Implementing Web services
Copyright © 2013 Red Hat, Inc. and/or its affiliates.
Abstract
Chapter 1. Introduction to the Apache CXF Binding Component
Abstract
Overview
- consumer endpoint
- A consumer endpoint listens for messages on a specified address. When it receives a message it sends it to the NMR for delivery to the appropriate endpoint. If the message is part of a two-way exchange, then the consumer endpoint is also responsible for returning the response to the external endpoint.For information about configuring consumer endpoints see Chapter 9, Consumer Endpoints.
- provider endpoint
- A provider endpoint receives messages from the NMR. It then packages the message as a SOAP message and sends it to the specified external address. If the message is part of a two-way message exchange, the provider endpoint waits for the response from the external endpoint. The provider endpoint will then direct the response back to the NMR.For information about configuring provider endpoints see Chapter 10, Provider Endpoints.
Key features
- HTTP support
- JMS 1.1 support
- SOAP 1.1 support
- SOAP 1.2 support
- MTOM support
- Support for all MEPs as consumers or providers
- SSL support
- WS-Security support
- WS-Policy support
- WS-RM support
- WS-Addressing support
Steps for working with the Apache CXF binding component
- Defining the contract for your endpoint in WSDL.
- Configuring the endpoint and packaging it into a service unit.
- Bundling the service unit into a service assembly for deployment into the Red Hat JBoss Fuse container.
More information
Part I. Defining an Endpoint in WSDL
Abstract
Chapter 2. Introducing WSDL Contracts
Abstract
2.1. Structure of a WSDL document
definition element. These elements describe a service and how an endpoint implementing that service is accessed.
- A logical part that defines the service in implementation neutral terms
- A concrete part that defines how an endpoint implementing the service is exposed on a network
The logical part
types, the message, and the portType elements. It describes the service’s interface and the messages exchanged by the service. Within the types element, XML Schema is used to define the structure of the data that makes up the messages. A number of message elements are used to define the structure of the messages used by the service. The portType element contains one or more operation elements that define the messages sent by the operations exposed by the service.
The concrete part
binding and the service elements. It describes how an endpoint that implements the service connects to the outside world. The binding elements describe how the data units described by the message elements are mapped into a concrete, on-the-wire data format, such as SOAP. The service elements contain one or more port elements which define the endpoints implementing the service.
2.2. WSDL elements
definitions— The root element of a WSDL document. The attributes of this element specify the name of the WSDL document, the document’s target namespace, and the shorthand definitions for the namespaces referenced in the WSDL document.types— The XML Schema definitions for the data units that form the building blocks of the messages used by a service. For information about defining data types see Chapter 3, Defining Logical Data Units.message— The description of the messages exchanged during invocation of a services operations. These elements define the arguments of the operations making up your service. For information on defining messages see Chapter 4, Defining Logical Messages Used by a Service.portType— A collection ofoperationelements describing the logical interface of a service. For information about defining port types see Chapter 5, Defining Your Logical Interfaces.operation— The description of an action performed by a service. Operations are defined by the messages passed between two endpoints when the operation is invoked. For information on defining operations see the section called “Operations”.binding— The concrete data format specification for an endpoint. Abindingelement defines how the abstract messages are mapped into the concrete data format used by an endpoint. This element is where specifics such as parameter order and return values are specified.service— A collection of relatedportelements. These elements are repositories for organizing endpoint definitions.port— The endpoint defined by a binding and a physical address. These elements bring all of the abstract definitions together, combined with the definition of transport details, and they define the physical endpoint on which a service is exposed.
2.3. Designing a contract
- Define the data types used by your services.
- Define the messages used by your services.
- Define the interfaces for your services.
- Define the bindings between the messages used by each interface and the concrete representation of the data on the wire.
- Define the transport details for each of the services.
Chapter 3. Defining Logical Data Units
Abstract
- Breaking the data into logical units that can be mapped into the data types used by the physical implementations of the service
- Combining the logical units into messages that are passed between endpoints to carry out the operations
3.1. Mapping data into logical data units
Available type systems for defining service data units
XML Schema as a type system
Considerations for creating your data units
- Use elements, not attributes.
- Do not use protocol-specific types as base types.
3.2. Adding data units to a contract
Procedure
- Determine all the data units used in the interface described by the contract.
- Create a
typeselement in your contract. - Create a
schemaelement, shown in Example 3.1, “Schema entry for a WSDL contract”, as a child of thetypeelement.ThetargetNamespaceattribute specifies the namespace under which new data types are defined. The remaining entries should not be changed.Example 3.1. Schema entry for a WSDL contract
<schema targetNamespace="http://schemas.iona.com/bank.idl" xmlns="http://www.w3.org/2001/XMLSchema" xmlns:wsdl="http://schemas.xmlsoap.org/wsdl/"> - For each complex type that is a collection of elements, define the data type using a
complexTypeelement. See Section 3.4.1, “Defining data structures”. - For each array, define the data type using a
complexTypeelement. See Section 3.4.2, “Defining arrays”. - For each complex type that is derived from a simple type, define the data type using a
simpleTypeelement. See Section 3.4.4, “Defining types by restriction”. - For each enumerated type, define the data type using a
simpleTypeelement. See Section 3.4.5, “Defining enumerated types”. - For each element, define it using an
elementelement. See Section 3.5, “Defining elements”.
3.3. XML Schema simple types
Entering simple types
element elements used in the types section of your contract. They are also used in the base attribute of restriction elements and extension elements.
xsd prefix. For example, to specify that an element is of type int, you would enter xsd:int in its type attribute as shown in Example 3.2, “Defining an element with a simple type”.
Example 3.2. Defining an element with a simple type
<element name="simpleInt" type="xsd:int" />
Supported XSD simple types
- xsd:string
- xsd:normalizedString
- xsd:int
- xsd:unsignedInt
- xsd:long
- xsd:unsignedLong
- xsd:short
- xsd:unsignedShort
- xsd:float
- xsd:double
- xsd:boolean
- xsd:byte
- xsd:unsignedByte
- xsd:integer
- xsd:positiveInteger
- xsd:negativeInteger
- xsd:nonPositiveInteger
- xsd:nonNegativeInteger
- xsd:decimal
- xsd:dateTime
- xsd:time
- xsd:date
- xsd:QName
- xsd:base64Binary
- xsd:hexBinary
- xsd:ID
- xsd:token
- xsd:language
- xsd:Name
- xsd:NCName
- xsd:NMTOKEN
- xsd:anySimpleType
- xsd:anyURI
- xsd:gYear
- xsd:gMonth
- xsd:gDay
- xsd:gYearMonth
- xsd:gMonthDay
3.4. Defining complex data types
3.4.1. Defining data structures
complexType elements. Specifying a complex type requires three pieces of information:
- The name of the defined type is specified in the
nameattribute of thecomplexTypeelement. - The first child element of the
complexTypedescribes the behavior of the structure’s fields when it is put on the wire. See the section called “Complex type varieties”. - Each of the fields of the defined structure are defined in
elementelements that are grandchildren of thecomplexTypeelement. See the section called “Defining the parts of a structure”.
Example 3.3. Simple Structure
struct personalInfo
{
  string name;
  int age;
};
Example 3.4. A complex type
<complexType name="personalInfo">
  <sequence>
    <element name="name" type="xsd:string" />
    <element name="age" type="xsd:int" />
  </sequence>
</complexType>
Complex type varieties
complexType element determines which variety of complex type is being used. Table 3.1, “Complex type descriptor elements” shows the elements used to define complex type behavior.
Table 3.1. Complex type descriptor elements
sequence element, an all element, or a choice is not specified, then a sequence is assumed. For example, the structure defined in Example 3.4, “A complex type” generates a message containing two elements: name and age.
choice element, as shown in Example 3.5, “Simple complex choice type”, it generates a message with either a name element or an age element.
Example 3.5. Simple complex choice type
<complexType name="personalInfo">
  <choice>
    <element name="name" type="xsd:string"/>
    <element name="age" type="xsd:int"/>
  </choice>
</complexType>
Defining the parts of a structure
element elements. Every complexType element should contain at least one element element. Each element element in the complexType element represents a field in the defined data structure.
element elements have two required attributes:
name and type, element elements have two other commonly used optional attributes: minOcurrs and maxOccurs. These attributes place bounds on the number of times the field occurs in the structure. By default, each field occurs only once in a complex type. Using these attributes, you can change how many times a field must or can appear in a structure. For example, you can define a field, previousJobs, that must occur at least three times, and no more than seven times, as shown in Example 3.6, “Simple complex type with occurrence constraints”.
Example 3.6. Simple complex type with occurrence constraints
<complexType name="personalInfo>
  <all>
    <element name="name" type="xsd:string"/>
    <element name="age" type="xsd:int"/>
    <element name="previousJobs" type="xsd:string:
             minOccurs="3" maxOccurs="7"/>
  </all>
</complexType>minOccurs to make the age field optional by setting the minOccurs to zero as shown in Example 3.7, “Simple complex type with minOccurs set to zero”. In this case age can be omitted and the data will still be valid.
Example 3.7. Simple complex type with minOccurs set to zero
<complexType name="personalInfo>
  <choice>
    <element name="name" type="xsd:string"/>
    <element name="age" type="xsd:int" minOccurs="0"/>
  </choice>
</complexType>
Defining attributes
complexType element name is an attribute. They are specified using the attribute element. It comes after the all, sequence, or choice element and are a direct child of the complexType element. Example 3.8, “Complex type with an attribute” shows a complex type with an attribute.
Example 3.8. Complex type with an attribute
<complexType name="personalInfo>
  <all>
    <element name="name" type="xsd:string"/>
    <element name="previousJobs" type="xsd:string"
             minOccurs="3" maxOccurs="7"/>
  </all>
  <attribute name="age" type="xsd:int" use="optional" />
</complexType>attribute element has three attributes:
default. The default attribute allows you to specify a default value for the attribute.
3.4.2. Defining arrays
maxOccurs attribute has a value greater than one. The second is to use SOAP arrays. SOAP arrays provide added functionality such as the ability to easily define multi-dimensional arrays and to transmit sparsely populated arrays.
Complex type arrays
maxOccurs attribute. For example, to define an array of twenty floating point numbers you use a complex type similar to the one shown in Example 3.9, “Complex type array”.
Example 3.9. Complex type array
<complexType name="personalInfo">
  <element name="averages" type="xsd:float" maxOccurs="20"/>
</complexType>
minOccurs attribute.
SOAP arrays
wsdl:arrayType element. The syntax for this is shown in Example 3.10, “Syntax for a SOAP array derived using wsdl:arrayType”.
Example 3.10. Syntax for a SOAP array derived using wsdl:arrayType
<complexType name="TypeName">
  <complexContent>
    <restriction base="SOAP-ENC:Array">
      <attribute ref="SOAP-ENC:arrayType"
                 wsdl:arrayType="ElementType<ArrayBounds>"/>
    </restriction>
  </complexContent>
</complexType>[]; to specify a two-dimensional array use either [][] or [,].
wsdl:arrayType attribute specifies the type of the array elements, xsd:string, and the number of dimensions, with [] implying one dimension.
Example 3.11. Definition of a SOAP array
<complexType name="SOAPStrings">
  <complexContent>
    <restriction base="SOAP-ENC:Array">
      <attribute ref="SOAP-ENC:arrayType"
                 wsdl:arrayType="xsd:string[]"/>
    </restriction>
  </complexContent>
</complexType>Example 3.12. Syntax for a SOAP array derived using an element
<complexType name="TypeName">
  <complexContent>
    <restriction base="SOAP-ENC:Array">
      <sequence>
        <element name="ElementName" type="ElementType"
                 maxOccurs="unbounded"/>
      </sequence>
    </restriction>
  </complexContent>
</complexType>maxOccurs attribute must always be set to unbounded.
3.4.3. Defining types by extension
alienInfo, that extends the personalInfo structure defined in Example 3.4, “A complex type” by adding a new element called planet.
- The name of the type is defined by the
nameattribute of thecomplexTypeelement. - The
complexContentelement specifies that the new type will have more than one element.NoteIf you are only adding new attributes to the complex type, you can use asimpleContentelement. - The type from which the new type is derived, called the base type, is specified in the
baseattribute of theextensionelement. - The new type’s elements and attributes are defined in the
extensionelement, the same as they are for a regular complex type.
alienInfo is defined as shown in Example 3.13, “Type defined by extension”.
Example 3.13. Type defined by extension
<complexType name="alienInfo">
  <complexContent>
    <extension base="personalInfo">
      <sequence>
        <element name="planet" type="xsd:string"/>
      </sequence>
    </extension>
  </complexContent>
</complexType>
3.4.4. Defining types by restriction
SSN, which is a string of exactly nine characters. New types defined by restricting simple types are defined using a simpleType element.
- The name of the new type is specified by the
nameattribute of thesimpleTypeelement. - The simple type from which the new type is derived, called the base type, is specified in the
restrictionelement. See the section called “Specifying the base type”. - The rules, called facets, defining the restrictions placed on the base type are defined as children of the
restrictionelement. See the section called “Defining the restrictions”.
Specifying the base type
restriction element. The restriction element is the only child of a simpleType element and has one attribute, base, that specifies the base type. The base type can be any of the XML Schema simple types.
Example 3.14. Using int as the base type
<simpleType name="restrictedInt">
  <restriction base="xsd:int">
    ...
  </restriction>
</simpleType>
Defining the restrictions
value, that defines how the facet is enforced. The available facets and their valid value settings depend on the base type. For example, xsd:string supports six facets, including:
lengthminLengthmaxLengthpatternwhitespaceenumeration
restriction element.
Example
SSN, which represents a social security number. The resulting type is a string of the form xxx-xx-xxxx. <SSN>032-43-9876<SSN> is a valid value for an element of this type, but <SSN>032439876</SSN> is not.
Example 3.15. SSN simple type description
<simpleType name="SSN">
  <restriction base="xsd:string">
    <pattern value="\d{3}-\d{2}-\d{4}"/>
  </restriction>
</simpleType>
3.4.5. Defining enumerated types
enumeration facet which is supported by all XML Schema primitive types. As with enumerated types in most modern programming languages, a variable of this type can only have one of the specified values.
Defining an enumeration in XML Schema
Example 3.16. Syntax for an enumeration
<simpleType name="EnumName">
  <restriction base="EnumType">
    <enumeration value="Case1Value"/>
    <enumeration value="Case2Value"/>
    ...
    <enumeration value="CaseNValue"/>
  </restriction>
</simpleType>Example
widgetSize, shown in Example 3.17, “widgetSize enumeration”, would be valid if it contained <widgetSize>big</widgetSize>, but it would not be valid if it contained <widgetSize>big,mungo</widgetSize>.
Example 3.17. widgetSize enumeration
<simpleType name="widgetSize">
  <restriction base="xsd:string">
    <enumeration value="big"/>
    <enumeration value="large"/>
    <enumeration value="mungo"/>
  </restriction>
</simpleType>
3.5. Defining elements
element element. Like the element element used to define the members of a complex type, they have three attributes:
name— A required attribute that specifies the name of the element as it appears in an XML document.type— Specifies the type of the element. The type can be any XML Schema primitive type or any named complex type defined in the contract. This attribute can be omitted if the type has an in-line definition.nillable— Specifies whether an element can be omitted from a document entirely. Ifnillableis set totrue, the element can be omitted from any document generated using the schema.
complexType element or a simpleType element. Once you specify if the type of data is complex or simple, you can define any type of data needed using the tools available for each type of data. In-line type definitions are discouraged because they are not reusable.
Chapter 4. Defining Logical Messages Used by a Service
Abstract
message element. The messages are made up of one or more parts that are defined using part elements.
message element in your contracts. Each logical message consists of one or more parts, defined in part elements.
Messages and parameter lists
Message design for integrating with legacy systems
types element of the contract. Your input message contains one part for each input parameter in the method. Your output message contains one part for each output parameter, plus a part to represent the return value, if needed. If a parameter is both an input and an output parameter, it is listed as a part for both the input message and the output message.
Message design for SOAP services
types element of the contract. The wrapper element has the following characteristics:
- It is a complex type containing a sequence of elements. For more information see Section 3.4, “Defining complex data types”.
- If it is a wrapper for an input message:
- It has one element for each of the method’s input parameters.
- Its name is the same as the name of the operation with which it is associated.
- If it is a wrapper for an output message:
- It has one element for each of the method’s output parameters and one element for each of the method’s inout parameters.
- Its first element represents the method’s return parameter.
- Its name would be generated by appending
Responseto the name of the operation with which the wrapper is associated.
Message naming
- Messages should only be used by a single operation.
- Input message names are formed by appending
Requestto the name of the operation. - Output message names are formed by appending
Responseto the name of the operation. - Fault message names should represent the reason for the fault.
Message parts
part element, and is identified by a name attribute and either a type attribute or an element attribute that specifies its data type. The data type attributes are listed in Table 4.1, “Part data type attributes”.
Table 4.1. Part data type attributes
foo, that is passed by reference or is an in/out, it can be a part in both the request message and the response message, as shown in Example 4.1, “Reused part”.
Example 4.1. Reused part
<message name="fooRequest">
  <part name="foo" type="xsd:int"/>
<message>
<message name="fooReply">
  <part name="foo" type="xsd:int"/>
<message>
Example
Example 4.2. personalInfo lookup method
personalInfo lookup(long empId)
Example 4.3. RPC WSDL message definitions
<message name="personalLookupRequest">
  <part name="empId" type="xsd:int"/>
<message/>
<message name="personalLookupResponse>
  <part name="return" element="xsd1:personalInfo"/>
<message/>
Example 4.4. Wrapped document WSDL message definitions
<types>
  <schema ... >
  ...
  <element name="personalLookup">
    <complexType>
      <sequence>
        <element name="empID" type="xsd:int" />
      </sequence>
    </complexType>
  </element>
  <element name="personalLookupResponse">
    <complexType>
      <sequence>
        <element name="return" type="personalInfo" />
      </sequence>
    </complexType>
  </element>
  </schema>
</types>
<message name="personalLookupRequest">
  <part name="empId" element="xsd1:personalLookup"/>
<message/>
<message name="personalLookupResponse">
  <part name="return" element="xsd1:personalLookupResponse"/>
<message/>
Chapter 5. Defining Your Logical Interfaces
Abstract
portType element.
portType element. The portType element is a collection of abstract operation definitions. Each operation is defined by the input, output, and fault messages used to complete the transaction the operation represents. When code is generated to implement the service interface defined by a portType element, each operation is converted into a method containing the parameters defined by the input, output, and fault messages specified in the contract.
Process
- Create a
portTypeelement to contain the interface definition and give it a unique name. See the section called “Port types”. - Create an
operationelement for each operation defined in the interface. See the section called “Operations”. - For each operation, specify the messages used to represent the operation’s parameter list, return type, and exceptions. See the section called “Operation messages”.
Port types
portType element is the root element in a logical interface definition. While many Web service implementations map portType elements directly to generated implementation objects, a logical interface definition does not specify the exact functionality provided by the the implemented service. For example, a logical interface named ticketSystem can result in an implementation that either sells concert tickets or issues parking tickets.
portType element is the unit of a WSDL document that is mapped into a binding to define the physical data used by an endpoint exposing the defined service.
portType element in a WSDL document must have a unique name, which is specified using the name attribute, and is made up of a collection of operations, which are described in operation elements. A WSDL document can describe any number of port types.
Operations
operation elements, define the interaction between two endpoints. For example, a request for a checking account balance and an order for a gross of widgets can both be defined as operations.
portType element must have a unique name, specified using the name attribute. The name attribute is required to define an operation.
Operation messages
Table 5.1. Operation message elements
| Element | Description |
|---|---|
input | Specifies the message the client endpoint sends to the service provider when a request is made. The parts of this message correspond to the input parameters of the operation. |
output | Specifies the message that the service provider sends to the client endpoint in response to a request. The parts of this message correspond to any operation parameters that can be changed by the service provider, such as values passed by reference. This includes the return value of the operation. |
fault | Specifies a message used to communicate an error condition between the endpoints. |
input or one output element. An operation can have both input and output elements, but it can only have one of each. Operations are not required to have any fault elements, but can, if required, have any number of fault elements.
Table 5.2. Attributes of the input and output elements
| Attribute | Description |
|---|---|
name | Identifies the message so it can be referenced when mapping the operation to a concrete data format. The name must be unique within the enclosing port type. |
message | Specifies the abstract message that describes the data being sent or received. The value of the message attribute must correspond to the name attribute of one of the abstract messages defined in the WSDL document. |
name attribute for all input and output elements; WSDL provides a default naming scheme based on the enclosing operation’s name. If only one element is used in the operation, the element name defaults to the name of the operation. If both an input and an output element are used, the element name defaults to the name of the operation with either Request or Response respectively appended to the name.
Return values
operation element is an abstract definition of the data passed during an operation, WSDL does not provide for return values to be specified for an operation. If a method returns a value it will be mapped into the output element as the last part of that message.
Example
Example 5.1. personalInfo lookup interface
interface personalInfoLookup
{
  personalInfo lookup(in int empID)
  raises(idNotFound);
}Example 5.2. personalInfo lookup port type
<message name="personalLookupRequest">
  <part name="empId" element="xsd1:personalLookup"/>
<message/>
<message name="personalLookupResponse">
  <part name="return" element="xsd1:personalLookupResponse"/>
<message/>
<message name="idNotFoundException">
  <part name="exception" element="xsd1:idNotFound"/>
<message/>
<portType name="personalInfoLookup">
  <operation name="lookup">
    <input name="empID" message="personalLookupRequest"/>
    <output name="return" message="personalLookupResponse"/>
    <fault name="exception" message="idNotFoundException"/>
  </operation>
</portType>
Chapter 6. Using HTTP
Abstract
6.1. Adding a Basic HTTP Endpoint
Overview
- SOAP 1.1 uses the standardized
soap:addresselement. - SOAP 1.2 uses the
soap12:addresselement. - All other payload formats use the
http:address element.
SOAP 1.1
address element to specify the endpoint’s address. It has one attribute, location, that specifies the endpoint’s address as a URL. The SOAP 1.1 address element is defined in the namespace http://schemas.xmlsoap.org/wsdl/soap/.
port element used to send SOAP 1.1 messages over HTTP.
Example 6.1. SOAP 1.1 Port Element
<definitions ...
             xmlns:soap="http://schemas.xmlsoap.org/wsdl/soap/" ...>
  ...
  <service name="SOAP11Service">
    <port binding="SOAP11Binding" name="SOAP11Port">
      <soap:address location="http://artie.com/index.xml">
    </port>
  </service>
  ...
<definitions>
SOAP 1.2
address element to specify the endpoint’s address. It has one attribute, location, that specifies the endpoint’s address as a URL. The SOAP 1.2 address element is defined in the namespace http://schemas.xmlsoap.org/wsdl/soap12/.
port element used to send SOAP 1.2 messages over HTTP.
Example 6.2. SOAP 1.2 Port Element
<definitions ...
             xmlns:soap12="http://schemas.xmlsoap.org/wsdl/soap12/" ... >
  <service name="SOAP12Service">
    <port binding="SOAP12Binding" name="SOAP12Port">
      <soap12:address location="http://artie.com/index.xml">
    </port>
  </service>
  ...
</definitions>
Other messages types
address element to specify the endpoint’s address. It has one attribute, location, that specifies the endpoint’s address as a URL. The HTTP address element is defined in the namespace http://schemas.xmlsoap.org/wsdl/http/.
port element used to send an XML message.
Example 6.3. HTTP Port Element
<definitions ...
             xmlns:http="http://schemas.xmlsoap.org/wsdl/http/" ... >
  <service name="HTTPService">
    <port binding="HTTPBinding" name="HTTPPort">
      <http:address location="http://artie.com/index.xml">
    </port>
  </service>
  ...
</definitions>
6.2. Consumer Configuration
Namespace
http-conf. In order to use the HTTP configuration elements you must add the line shown in Example 6.4, “HTTP Consumer WSDL Element's Namespace” to the definitions element of your endpoint's WSDL document.
Example 6.4. HTTP Consumer WSDL Element's Namespace
<definitions ...
       xmlns:http-conf="http://cxf.apache.org/transports/http/configuration"
Configuring the endpoint
http-conf:client element is used to specify the connection properties of an HTTP consumer in a WSDL document. The http-conf:client element is a child of the WSDL port element. The attributes are described in Table 6.1, “HTTP Consumer Configuration Attributes”.
Table 6.1. HTTP Consumer Configuration Attributes
| Attribute | Description |
|---|---|
ConnectionTimeout |
Specifies the amount of time, in milliseconds, that the consumer attempts to establish a connection before it times out. The default is
30000.
0 specifies that the consumer will continue to send the request indefinitely.
|
ReceiveTimeout |
Specifies the amount of time, in milliseconds, that the consumer will wait for a response before it times out. The default is
30000.
0 specifies that the consumer will wait indefinitely.
|
AutoRedirect |
Specifies if the consumer will automatically follow a server issued redirection. The default is
false.
|
MaxRetransmits |
Specifies the maximum number of times a consumer will retransmit a request to satisfy a redirect. The default is
-1 which specifies that unlimited retransmissions are allowed.
|
AllowChunking |
Specifies whether the consumer will send requests using chunking. The default is
true which specifies that the consumer will use chunking when sending requests.
Chunking cannot be used if either of the following are true:
In both cases the value of
AllowChunking is ignored and chunking is disallowed.
|
Accept |
Specifies what media types the consumer is prepared to handle. The value is used as the value of the HTTP Accept property. The value of the attribute is specified using multipurpose internet mail extensions (MIME) types.
|
AcceptLanguage |
Specifies what language (for example, American English) the consumer prefers for the purpose of receiving a response. The value is used as the value of the HTTP AcceptLanguage property.
Language tags are regulated by the International Organization for Standards (ISO) and are typically formed by combining a language code, determined by the ISO-639 standard, and country code, determined by the ISO-3166 standard, separated by a hyphen. For example, en-US represents American English.
|
AcceptEncoding |
Specifies what content encodings the consumer is prepared to handle. Content encoding labels are regulated by the Internet Assigned Numbers Authority (IANA). The value is used as the value of the HTTP AcceptEncoding property.
|
ContentType |
Specifies the media type of the data being sent in the body of a message. Media types are specified using multipurpose internet mail extensions (MIME) types. The value is used as the value of the HTTP ContentType property. The default is
text/xml.
For web services, this should be set to
text/xml. If the client is sending HTML form data to a CGI script, this should be set to application/x-www-form-urlencoded. If the HTTP POST request is bound to a fixed payload format (as opposed to SOAP), the content type is typically set to application/octet-stream.
|
Host |
Specifies the Internet host and port number of the resource on which the request is being invoked. The value is used as the value of the HTTP Host property.
This attribute is typically not required. It is only required by certain DNS scenarios or application designs. For example, it indicates what host the client prefers for clusters (that is, for virtual servers mapping to the same Internet protocol (IP) address).
|
Connection |
Specifies whether a particular connection is to be kept open or closed after each request/response dialog. There are two valid values:
|
CacheControl |
Specifies directives about the behavior that must be adhered to by caches involved in the chain comprising a request from a consumer to a service provider. See the section called “Consumer Cache Control Directives”.
|
Cookie |
Specifies a static cookie to be sent with all requests.
|
BrowserType |
Specifies information about the browser from which the request originates. In the HTTP specification from the World Wide Web consortium (W3C) this is also known as the user-agent. Some servers optimize based on the client that is sending the request.
|
Referer |
Specifies the URL of the resource that directed the consumer to make requests on a particular service. The value is used as the value of the HTTP Referer property.
This HTTP property is used when a request is the result of a browser user clicking on a hyperlink rather than typing a URL. This can allow the server to optimize processing based upon previous task flow, and to generate lists of back-links to resources for the purposes of logging, optimized caching, tracing of obsolete or mistyped links, and so on. However, it is typically not used in web services applications.
If the
AutoRedirect attribute is set to true and the request is redirected, any value specified in the Referer attribute is overridden. The value of the HTTP Referer property is set to the URL of the service that redirected the consumer’s original request.
|
DecoupledEndpoint |
Specifies the URL of a decoupled endpoint for the receipt of responses over a separate provider->consumer connection. For more information on using decoupled endpoints see, Section 6.4, “Using the HTTP Transport in Decoupled Mode”.
You must configure both the consumer endpoint and the service provider endpoint to use WS-Addressing for the decoupled endpoint to work.
|
ProxyServer |
Specifies the URL of the proxy server through which requests are routed.
|
ProxyServerPort |
Specifies the port number of the proxy server through which requests are routed.
|
ProxyServerType |
Specifies the type of proxy server used to route requests. Valid values are:
|
Consumer Cache Control Directives
http-conf:client Cache Control Directives” lists the cache control directives supported by an HTTP consumer.
Table 6.2. http-conf:client Cache Control Directives
| Directive | Behavior |
|---|---|
| no-cache |
Caches cannot use a particular response to satisfy subsequent requests without first revalidating that response with the server. If specific response header fields are specified with this value, the restriction applies only to those header fields within the response. If no response header fields are specified, the restriction applies to the entire response.
|
| no-store |
Caches must not store either any part of a response or any part of the request that invoked it.
|
| max-age |
The consumer can accept a response whose age is no greater than the specified time in seconds.
|
| max-stale |
The consumer can accept a response that has exceeded its expiration time. If a value is assigned to max-stale, it represents the number of seconds beyond the expiration time of a response up to which the consumer can still accept that response. If no value is assigned, the consumer can accept a stale response of any age.
|
| min-fresh |
The consumer wants a response that is still fresh for at least the specified number of seconds indicated.
|
| no-transform |
Caches must not modify media type or location of the content in a response between a provider and a consumer.
|
| only-if-cached |
Caches should return only responses that are currently stored in the cache, and not responses that need to be reloaded or revalidated.
|
| cache-extension |
Specifies additional extensions to the other cache directives. Extensions can be informational or behavioral. An extended directive is specified in the context of a standard directive, so that applications not understanding the extended directive can adhere to the behavior mandated by the standard directive.
|
Example
Example 6.5. WSDL to Configure an HTTP Consumer Endpoint
<service ... >
  <port ... >
    <soap:address ... />
    <http-conf:client CacheControl="no-cache" />
  </port>
</service>
6.3. Provider Configuration
Namespace
http-conf. To use the HTTP configuration elements you must add the line shown in Example 6.6, “HTTP Provider WSDL Element's Namespace” to the definitions element of your endpoint's WSDL document.
Example 6.6. HTTP Provider WSDL Element's Namespace
<definitions ...
       xmlns:http-conf="http://cxf.apache.org/transports/http/configuration"
Configuring the endpoint
http-conf:server element is used to specify the connection properties of an HTTP service provider in a WSDL document. The http-conf:server element is a child of the WSDL port element. The attributes are described in Table 6.3, “HTTP Service Provider Configuration Attributes”.
Table 6.3. HTTP Service Provider Configuration Attributes
| Attribute | Description |
|---|---|
ReceiveTimeout |
Sets the length of time, in milliseconds, the service provider attempts to receive a request before the connection times out. The default is
30000.
0 specifies that the provider will not timeout.
|
SuppressClientSendErrors |
Specifies whether exceptions are to be thrown when an error is encountered on receiving a request. The default is
false; exceptions are thrown on encountering errors.
|
SuppressClientReceiveErrors |
Specifies whether exceptions are to be thrown when an error is encountered on sending a response to a consumer. The default is
false; exceptions are thrown on encountering errors.
|
HonorKeepAlive |
Specifies whether the service provider honors requests for a connection to remain open after a response has been sent. The default is
false; keep-alive requests are ignored.
|
RedirectURL |
Specifies the URL to which the client request should be redirected if the URL specified in the client request is no longer appropriate for the requested resource. In this case, if a status code is not automatically set in the first line of the server response, the status code is set to
302 and the status description is set to Object Moved. The value is used as the value of the HTTP RedirectURL property.
|
CacheControl |
Specifies directives about the behavior that must be adhered to by caches involved in the chain comprising a response from a service provider to a consumer. See the section called “Service Provider Cache Control Directives”.
|
ContentLocation |
Sets the URL where the resource being sent in a response is located.
|
ContentType |
Specifies the media type of the information being sent in a response. Media types are specified using multipurpose internet mail extensions (MIME) types. The value is used as the value of the HTTP ContentType location.
|
ContentEncoding |
Specifies any additional content encodings that have been applied to the information being sent by the service provider. Content encoding labels are regulated by the Internet Assigned Numbers Authority (IANA). Possible content encoding values include
zip, gzip, compress, deflate, and identity. This value is used as the value of the HTTP ContentEncoding property.
The primary use of content encodings is to allow documents to be compressed using some encoding mechanism, such as zip or gzip. Apache CXF performs no validation on content codings. It is the user’s responsibility to ensure that a specified content coding is supported at application level.
|
ServerType |
Specifies what type of server is sending the response. Values take the form
program-name/version; for example, Apache/1.2.5.
|
Service Provider Cache Control Directives
http-conf:server Cache Control Directives” lists the cache control directives supported by an HTTP service provider.
Table 6.4. http-conf:server Cache Control Directives
| Directive | Behavior |
|---|---|
| no-cache |
Caches cannot use a particular response to satisfy subsequent requests without first revalidating that response with the server. If specific response header fields are specified with this value, the restriction applies only to those header fields within the response. If no response header fields are specified, the restriction applies to the entire response.
|
| public |
Any cache can store the response.
|
| private |
Public (shared) caches cannot store the response because the response is intended for a single user. If specific response header fields are specified with this value, the restriction applies only to those header fields within the response. If no response header fields are specified, the restriction applies to the entire response.
|
| no-store |
Caches must not store any part of the response or any part of the request that invoked it.
|
| no-transform |
Caches must not modify the media type or location of the content in a response between a server and a client.
|
| must-revalidate |
Caches must revalidate expired entries that relate to a response before that entry can be used in a subsequent response.
|
| proxy-revalidate |
Does the same as must-revalidate, except that it can only be enforced on shared caches and is ignored by private unshared caches. When using this directive, the public cache directive must also be used.
|
| max-age |
Clients can accept a response whose age is no greater that the specified number of seconds.
|
| s-max-age |
Does the same as max-age, except that it can only be enforced on shared caches and is ignored by private unshared caches. The age specified by s-max-age overrides the age specified by max-age. When using this directive, the proxy-revalidate directive must also be used.
|
| cache-extension |
Specifies additional extensions to the other cache directives. Extensions can be informational or behavioral. An extended directive is specified in the context of a standard directive, so that applications not understanding the extended directive can adhere to the behavior mandated by the standard directive.
|
Example
Example 6.7. WSDL to Configure an HTTP Service Provider Endpoint
<service ... >
  <port ... >
    <soap:address ... />
    <http-conf:server CacheControl="no-cache" />
  </port>
</service>
6.4. Using the HTTP Transport in Decoupled Mode
Overview
200.
202 Accepted response to the consumer over the back-channel of the HTTP connection on which the request was received. It then processes the request and sends the response back to the consumer using a new decoupled server->client HTTP connection. The consumer runtime receives the incoming response and correlates it with the appropriate request before returning to the application code.
Configuring decoupled interactions
- Configure the consumer to use WS-Addressing.
- Configure the consumer to use a decoupled endpoint.
- Configure any service providers that the consumer interacts with to use WS-Addressing.
Configuring an endpoint to use WS-Addressing
- Adding the
wswa:UsingAddressingelement to the endpoint's WSDLportelement as shown in Example 6.8, “Activating WS-Addressing using WSDL”.Example 6.8. Activating WS-Addressing using WSDL
... <service name="WidgetSOAPService"> <port name="WidgetSOAPPort" binding="tns:WidgetSOAPBinding"> <soap:address="http://widgetvendor.net/widgetSeller" /> <wswa:UsingAddressing xmlns:wswa="http://www.w3.org/2005/02/addressing/wsdl"/> </port> </service> ... - Adding the WS-Addressing policy to the endpoint's WSDL
portelement as shown in Example 6.9, “Activating WS-Addressing using a Policy”.Example 6.9. Activating WS-Addressing using a Policy
...
<service name="WidgetSOAPService">
  <port name="WidgetSOAPPort" binding="tns:WidgetSOAPBinding">
    <soap:address="http://widgetvendor.net/widgetSeller" />
    <wsp:Policy xmlns:wsp="http://www.w3.org/2006/07/ws-policy">
      <wsam:Addressing xmlns:wsam="http://www.w3.org/2007/02/addressing/metadata">
        <wsp:Policy/>
      </wsam:Addressing>
    </wsp:Policy>
  </port>
</service>
...
wswa:UsingAddressing WSDL element.
Configuring the consumer
DecoupledEndpoint attribute of the http-conf:conduit element.
Example 6.10. Configuring a Consumer to Use a Decoupled HTTP Endpoint
<beans xmlns="http://www.springframework.org/schema/beans"
       xmlns:xsi="http://www.w3.org/2001/XMLSchema-instance"
       xmlns:http="http://cxf.apache.org/transports/http/configuration"
       xsi:schemaLocation="http://cxf.apache.org/transports/http/configuration
                             http://cxf.apache.org/schemas/configuration/http-conf.xsd
                           http://www.springframework.org/schema/beans
                             http://www.springframework.org/schema/beans/spring-beans.xsd">

  <http:conduit name="{http://widgetvendor.net/services}WidgetSOAPPort.http-conduit">
    <http:client DecoupledEndpoint="http://widgetvendor.net:9999/decoupled_endpoint" />
  </http:conduit>
</beans>
How messages are processed
Figure 6.1. Message Flow in for a Decoupled HTTP Transport
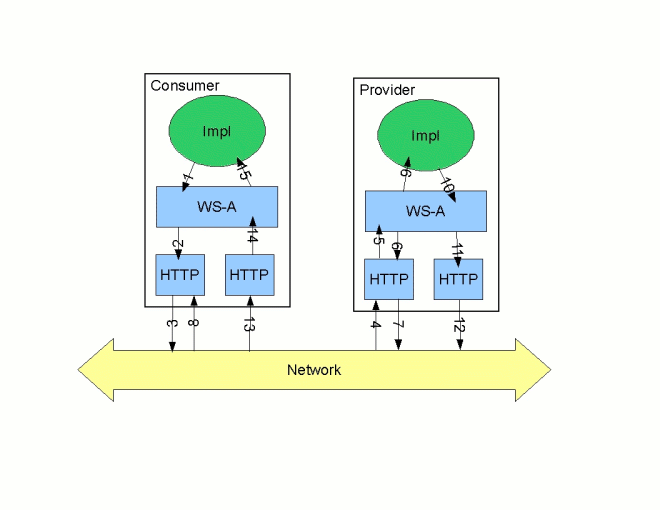
- The consumer implementation invokes an operation and a request message is generated.
- The WS-Addressing layer adds the WS-A headers to the message.When a decoupled endpoint is specified in the consumer's configuration, the address of the decoupled endpoint is placed in the WS-A ReplyTo header.
- The message is sent to the service provider.
- The service provider receives the message.
- The request message from the consumer is dispatched to the provider's WS-A layer.
- Because the WS-A ReplyTo header is not set to anonymous, the provider sends back a message with the HTTP status code set to
202, acknowledging that the request has been received. - The HTTP layer sends a
202 Acceptedmessage back to the consumer using the original connection's back-channel. - The consumer receives the
202 Acceptedreply on the back-channel of the HTTP connection used to send the original message.When the consumer receives the202 Acceptedreply, the HTTP connection closes. - The request is passed to the service provider's implementation where the request is processed.
- When the response is ready, it is dispatched to the WS-A layer.
- The WS-A layer adds the WS-Addressing headers to the response message.
- The HTTP transport sends the response to the consumer's decoupled endpoint.
- The consumer's decoupled endpoint receives the response from the service provider.
- The response is dispatched to the consumer's WS-A layer where it is correlated to the proper request using the WS-A RelatesTo header.
- The correlated response is returned to the client implementation and the invoking call is unblocked.
Chapter 7. Using JMS
Abstract
7.1. Using SOAP/JMS
7.1.1. Basic configuration
Overview
- Specify that the transport type is SOAP/JMS.
- Specify the target destination using a JMS URI.
- Optionally, configure the JNDI connection.
- Optionally, add additional JMS configuration.
Specifying the JMS transport type
soap:binding element's transport attribute to http://www.w3.org/2010/soapjms/. Example 7.1, “SOAP over JMS binding specification” shows a WSDL binding that uses SOAP/JMS.
Example 7.1. SOAP over JMS binding specification
<wsdl:binding ... >
  <soap:binding style="document"
                transport="http://www.w3.org/2010/soapjms/" />
  ...
</wsdl:binding>
Specifying the target destination
soap:address element and attribute as a SOAP/HTTP endpoint. The difference is the address specification. JMS endpoints use a JMS URI as defined in the URI Scheme for JMS 1.0. Example 7.2, “JMS URI syntax” shows the syntax for a JMS URI.
Example 7.2. JMS URI syntax
jms:variant:destination?options
Table 7.1. JMS URI variants
| Variant | Description |
|---|---|
| jndi | Specifies that the destination is a JNDI name for the target destination. When using this variant, you must provide the configuration for accessing the JNDI provider. |
| topic | Specifies that the destination is the name of the topic to be used as the target destination. The string provided is passed into Session.createTopic() to create a representation of the destination. |
| queue | Specifies that the destination is the name of the queue to be used as the target destination. The string provided is passed into Session.createQueue() to create a representation of the destination. |
Example 7.3. SOAP/JMS endpoint address
<wsdl:port ... >
  ...
  <soap:address location="jms:jndi:dynamicQueues/test.cxf.jmstransport.queue" />
</wsdl:port>
Configuring JNDI and the JMS transport
7.1.2. JMS URIs
Overview
Syntax
?). Multiple options are separated by an ampersand(&). Example 7.4, “Syntax for JMS URI options” shows the syntax for using multiple options in a JMS URI.
Example 7.4. Syntax for JMS URI options
jmsAddress?option1=value1&option2=value2&...optionN=valueN
JMS properties
Table 7.2. JMS properties settable as URI options
| Property | Default | Description |
|---|---|---|
deliveryMode | PERSISTENT | Specifies whether to use JMS PERSISTENT or NON_PERSISTENT message semantics. In the case of PERSISTENT delivery mode, the JMS broker stores messages in persistent storage before acknowledging them; whereas NON_PERSISTENT messages are kept in memory only. |
replyToName |
Explicitly specifies the reply destination to appear in the
JMSReplyTo header. Setting this property is recommended for applications that have request-reply semantics because the JMS provider will assign a temporary reply queue if one is not explicitly set.
The value of this property has an interpretation that depends on the variant specified in the JMS URI:
| |
priority | 4 | Specifies the JMS message priority, which ranges from 0 (lowest) to 9 (highest). |
timeToLive | 0 | Time (in milliseconds) after which the message will be discarded by the JMS provider. A value of 0 represents an infinite lifetime (the default). |
JNDI properties
Table 7.3. JNDI properties settable as URI options
| Property | Description |
|---|---|
jndiConnectionFactoryName | Specifies the JNDI name of the JMS connection factory. |
jndiInitialContextFactory | Specifies the fully qualified Java class name of the JNDI provider (which must be of javax.jms.InitialContextFactory type). Equivalent to setting the java.naming.factory.initial Java system property. |
jndiURL | Specifies the URL that initializes the JNDI provider. Equivalent to setting the java.naming.provider.url Java system property. |
Additional JNDI properties
java.naming.factory.initial and java.naming.provider.url, are standard properties, which are required to initialize any JNDI provider. Sometimes, however, a JNDI provider might support custom properties in addition to the standard ones. In this case, you can set an arbitrary JNDI property by setting a URI option of the form jndi-PropertyName.
java.naming.factory.control, in a JMS URI as shown in Example 7.5, “Setting a JNDI property in a JMS URI”.
Example 7.5. Setting a JNDI property in a JMS URI
jms:queue:FOO.BAR?jndi-java.naming.factory.control=com.sun.jndi.ldap.ResponseControlFactory
Example
test.cxf.jmstransport.queue, use the URI shown in Example 7.6, “JMS URI that configures a JNDI connection”.
Example 7.6. JMS URI that configures a JNDI connection
jms:jndi:dynamicQueues/test.cxf.jmstransport.queue
?jndiInitialContextFactory=org.apache.activemq.jndi.ActiveMQInitialContextFactory
&jndiConnectionFactoryName=ConnectionFactory
&jndiURL=tcp://localhost:61616
7.1.3. WSDL extensions
Overview
InitialContext, which can then be used to look up JMS destinations. You can also set some properties that affect the behavior of the JMS transport layer.
SOAP/JMS namespace
http://www.w3.org/2010/soapjms/ namespace. To use them in your WSDL contracts add the following setting to the wsdl:definitions element:
<wsdl:definitions ...
    xmlns:soapjms="http://www.w3.org/2010/soapjms/"
  ... >
WSDL extension elements
Table 7.4. SOAP/JMS WSDL extension elements
| Element | Default | Description |
|---|---|---|
soapjms:jndiInitialContextFactory | Specifies the fully qualified Java class name of the JNDI provider. Equivalent to setting the java.naming.factory.initial Java system property. | |
soapjms:jndiURL | Specifies the URL that initializes the JNDI provider. Equivalent to setting the java.naming.provider.url Java system property. | |
soapjms:jndiContextParameter | Enables you to specify an additional property for creating the JNDI InitialContext. Use the name and value attributes to specify the property. | |
soapjms:jndiConnectionFactoryName | Specifies the JNDI name of the JMS connection factory. | |
soapjms:deliveryMode | PERSISTENT | Specifies whether to use JMS PERSISTENT or NON_PERSISTENT message semantics. In the case of PERSISTENT delivery mode, the JMS broker stores messages in persistent storage before acknowledging them; whereas NON_PERSISTENT messages are kept in memory only. |
soapjms:replyToName |
Explicitly specifies the reply destination to appear in the
JMSReplyTo header. Setting this property is recommended for SOAP invocations that have request-reply semantics. If this property is not set the JMS provider allocates a temporary queue with an automatically generated name.
The value of this property has an interpretation that depends on the variant specified in the JMS URI, as follows:
| |
soapjms:priority | 4 | Specifies the JMS message priority, which ranges from 0 (lowest) to 9 (highest). |
soapjms:timeToLive | 0 | Time, in milliseconds, after which the message will be discarded by the JMS provider. A value of 0 represents an infinite lifetime. |
Configuration scopes
wsdl:binding element, the wsdl:service element, or the wsdl:port element. The parent of the SOAP/JMS elements determine which of the following scopes the configuration is placed into.
- Binding scope
- You can configure the JMS transport at the binding scope by placing extension elements inside the
wsdl:bindingelement. Elements in this scope define the default configuration for all endpoints that use this binding. Any settings in the binding scope can be overridden at the service scope or the port scope. - Service scope
- You can configure the JMS transport at the service scope by placing extension elements inside a
wsdl:serviceelement. Elements in this scope define the default configuration for all endpoints in this service. Any settings in the service scope can be overridden at the port scope. - Port scope
- You can configure the JMS transport at the port scope by placing extension elements inside a
wsdl:portelement. Elements in the port scope define the configuration for this port. They override any defaults defined at the service scope or at the binding scope.
Example
Example 7.7. WSDL contract with SOAP/JMS configuration
<wsd;definitions ...
1    xmlns:soapjms="http://www.w3.org/2010/soapjms/"
  ... >
  ...
  <wsdl:binding name="JMSGreeterPortBinding" type="tns:JMSGreeterPortType">
    ...
2    <soapjms:jndiInitialContextFactory>
      org.apache.activemq.jndi.ActiveMQInitialContextFactory
    </soapjms:jndiInitialContextFactory>
    <soapjms:jndiURL>tcp://localhost:61616</soapjms:jndiURL>
    <soapjms:jndiConnectionFactoryName>
      ConnectionFactory
    </soapjms:jndiConnectionFactoryName>
    ...
  </wsdl:binding>
  ...
  <wsdl:service name="JMSGreeterService">
    ...
3    <soapjms:deliveryMode>NON_PERSISTENT</soapjms:deliveryMode>
    <soapjms:timeToLive>60000</soapjms:timeToLive>
    ...
    <wsdl:port binding="tns:JMSGreeterPortBinding" name="GreeterPort">
4      <soap:address location="jms:jndi:dynamicQueues/test.cxf.jmstransport.queue" />
5      <soapjms:replyToName>
        dynamicQueues/greeterReply.queue
      </soapjms:replyToName>
      ...
    </wsdl:port>
    ...
  </wsdl:service>
  ...
</wsdl:definitions>
- 1
- Declare the namespace for the SOAP/JMS extensions.
- 2
- Configure the JNDI connections in the binding scope.
- 3
- Configure the JMS delivery style to non-persistent and each message to live for one minute.
- 4
- Specify the target destination.
- 5
- Configure the JMS transport so that reply messages are delivered on the
greeterReply.queuequeue.
7.2. Using WSDL to configure JMS
Example 7.8. JMS WSDL extension namespace
xmlns:jms="http://cxf.apache.org/transports/jms"
7.2.1. Basic JMS configuration
Overview
jms:address element and its child, the jms:JMSNamingProperties element. The jms:address element’s attributes specify the information needed to identify the JMS broker and the destination. The jms:JMSNamingProperties element specifies the Java properties used to connect to the JNDI service.
Specifying the JMS address
jms:address element as the child of your service’s port element. The jms:address element used in WSDL is identical to the one used in the configuration file. Its attributes are listed in Table 7.5, “JMS endpoint attributes”.
Table 7.5. JMS endpoint attributes
| Attribute | Description |
|---|---|
destinationStyle | Specifies if the JMS destination is a JMS queue or a JMS topic. |
jndiConnectionFactoryName | Specifies the JNDI name bound to the JMS connection factory to use when connecting to the JMS destination. |
jmsDestinationName | Specifies the JMS name of the JMS destination to which requests are sent. |
jmsReplyDestinationName | Specifies the JMS name of the JMS destinations where replies are sent. This attribute allows you to use a user defined destination for replies. For more details see Section 7.3, “Using a Named Reply Destination”. |
jndiDestinationName | Specifies the JNDI name bound to the JMS destination to which requests are sent. |
jndiReplyDestinationName | Specifies the JNDI name bound to the JMS destinations where replies are sent. This attribute allows you to use a user defined destination for replies. For more details see Section 7.3, “Using a Named Reply Destination”. |
connectionUserName | Specifies the user name to use when connecting to a JMS broker. |
connectionPassword | Specifies the password to use when connecting to a JMS broker. |
jms:address WSDL element uses a jms:JMSNamingProperties child element to specify additional information needed to connect to a JNDI provider.
Specifying JNDI properties
jms:address element has a child element, jms:JMSNamingProperties, that allows you to specify the values used to populate the properties used when connecting to the JNDI provider. The jms:JMSNamingProperties element has two attributes: name and value. name specifies the name of the property to set. value attribute specifies the value for the specified property. jms:JMSNamingProperties element can also be used for specification of provider specific properties.
java.naming.factory.initialjava.naming.provider.urljava.naming.factory.objectjava.naming.factory.statejava.naming.factory.url.pkgsjava.naming.dns.urljava.naming.authoritativejava.naming.batchsizejava.naming.referraljava.naming.security.protocoljava.naming.security.authenticationjava.naming.security.principaljava.naming.security.credentialsjava.naming.languagejava.naming.applet
Example
port specification.
Example 7.9. JMS WSDL port specification
<service name="JMSService">
  <port binding="tns:Greeter_SOAPBinding" name="SoapPort">
    <jms:address jndiConnectionFactoryName="ConnectionFactory"
                 jndiDestinationName="dynamicQueues/test.Celtix.jmstransport" >
      <jms:JMSNamingProperty name="java.naming.factory.initial"
                             value="org.activemq.jndi.ActiveMQInitialContextFactory" />
      <jms:JMSNamingProperty name="java.naming.provider.url"
                             value="tcp://localhost:61616" />
    </jms:address>
  </port>
</service>
7.2.2. JMS client configuration
Overview
ByteMessage or a JMS TextMessage.
ByteMessage the consumer endpoint uses a byte[] as the method for storing data into and retrieving data from the JMS message body. When messages are sent, the message data, including any formating information, is packaged into a byte[] and placed into the message body before it is placed on the wire. When messages are received, the consumer endpoint will attempt to unmarshall the data stored in the message body as if it were packed in a byte[].
TextMessage, the consumer endpoint uses a string as the method for storing and retrieving data from the message body. When messages are sent, the message information, including any format-specific information, is converted into a string and placed into the JMS message body. When messages are received the consumer endpoint will attempt to unmarshall the data stored in the JMS message body as if it were packed into a string.
TextMessage, the receiving JMS application will get a text message containing all of the SOAP envelope information.
Specifying the message type
jms:client element. The jms:client element is a child of the WSDL port element and has one attribute:
Example
Example 7.10. WSDL for a JMS consumer endpoint
<service name="JMSService">
  <port binding="tns:Greeter_SOAPBinding" name="SoapPort">
    <jms:address jndiConnectionFactoryName="ConnectionFactory"
                 jndiDestinationName="dynamicQueues/test.Celtix.jmstransport" >
      <jms:JMSNamingProperty name="java.naming.factory.initial"
                             value="org.activemq.jndi.ActiveMQInitialContextFactory" />
      <jms:JMSNamingProperty name="java.naming.provider.url"
                             value="tcp://localhost:61616" />
    </jms:address>
    <jms:client messageType="binary" />
  </port>
</service>
7.2.3. JMS provider configuration
Overview
- how messages are correlated
- the use of durable subscriptions
- if the service uses local JMS transactions
- the message selectors used by the endpoint
Specifying the configuration
jms:server element. The jms:server element is a child of the WSDL wsdl:port element and has the following attributes:
Table 7.7. JMS provider endpoint WSDL extensions
| Attribute | Description |
|---|---|
useMessageIDAsCorrealationID | Specifies whether JMS will use the message ID to correlate messages. The default is false. |
durableSubscriberName | Specifies the name used to register a durable subscription. |
messageSelector | Specifies the string value of a message selector to use. For more information on the syntax used to specify message selectors, see the JMS 1.1 specification. |
transactional | Specifies whether the local JMS broker will create transactions around message processing. The default is false. [a] |
Example
Example 7.11. WSDL for a JMS provider endpoint
<service name="JMSService">
  <port binding="tns:Greeter_SOAPBinding" name="SoapPort">
    <jms:address jndiConnectionFactoryName="ConnectionFactory"
                 jndiDestinationName="dynamicQueues/test.Celtix.jmstransport" >
      <jms:JMSNamingProperty name="java.naming.factory.initial"
                             value="org.activemq.jndi.ActiveMQInitialContextFactory" />
      <jms:JMSNamingProperty name="java.naming.provider.url"
                             value="tcp://localhost:61616" />
    </jms:address>
    <jms:server messageSelector="cxf_message_selector"
                useMessageIDAsCorrelationID="true"
                transactional="true"
                durableSubscriberName="cxf_subscriber" />
  </port>
</service>
7.3. Using a Named Reply Destination
Overview
Setting the reply destination name
jmsReplyDestinationName attribute or the jndiReplyDestinationName attribute in the endpoint's JMS configuration. A client endpoint will listen for replies on the specified destination and it will specify the value of the attribute in the ReplyTo field of all outgoing requests. A service endpoint will use the value of the jndiReplyDestinationName attribute as the location for placing replies if there is no destination specified in the request’s ReplyTo field.
Example
Example 7.12. JMS Consumer Specification Using a Named Reply Queue
<jms:conduit name="{http://cxf.apache.org/jms_endpt}HelloWorldJMSPort.jms-conduit">
    <jms:address destinationStyle="queue"
                 jndiConnectionFactoryName="myConnectionFactory"
                 jndiDestinationName="myDestination"
                 jndiReplyDestinationName="myReplyDestination" >
      <jms:JMSNamingProperty name="java.naming.factory.initial"
                             value="org.apache.cxf.transport.jms.MyInitialContextFactory" />
      <jms:JMSNamingProperty name="java.naming.provider.url"
                             value="tcp://localhost:61616" />
    </jms:address>
  </jms:conduit>
Part II. Configuring and Packaging Endpoints
Abstract
xbean.xml file. The endpoints are then packaged into a service unit that can be deployed to Red Hat JBoss Fuse.
Chapter 8. Introduction to the Apache CXF Binding Component
Abstract
Contents of a file component service unit
xbean.xml- The
xbean.xmlfile contains the XML configuration for the endpoint defined by the service unit. The contents of this file are the focus of this guide.NoteThe service unit can define more than one endpoint. - WSDL file
- The WSDL file defines the endpoint the interface exposes.
- Spring configuration file
- The Spring configuration file contains configuration for the Apache CXF runtime.
meta-inf/jbi.xml- The
jbi.xmlfile is the JBI descriptor for the service unit. Example 8.1, “JBI Descriptor for a Apache CXF Binding Component Service Unit” shows a JBI descriptor for a Apache CXF binding component service unit.Example 8.1. JBI Descriptor for a Apache CXF Binding Component Service Unit
<jbi xmlns="http://java.sun.com/xml/ns/jbi" version="1.0">
  <services binding-component="false" />
</jbi>
OSGi Packaging
- you will need to include an OSGi bundle manifest in the
META-INFfolder of the bundle. - You need to add the following to your service unit's configuration file:
<bean class="org.apache.servicemix.common.osgi.EndpointExporter" />
Namespace
http://servicemix.apache.org/cxfbc/1.0 namespace. You will need to add a namespace declaration similar to the one in Example 8.2, “Namespace Declaration for Using Apache CXF Binding Component Endpoints” to your xbeans.xml file's beans element.
Example 8.2. Namespace Declaration for Using Apache CXF Binding Component Endpoints
<beans ...
       xmlns:cxfbc="http://servicemix.apache.org/cxfbc/1.0"
       ... >
  ...
</beans>beans element's xsi:schemaLocation as shown in Example 8.3, “Schema Location for Using Apache CXF Binding Component Endpoints”.
Example 8.3. Schema Location for Using Apache CXF Binding Component Endpoints
<beans ...
xsi:schemaLocation="...
http://servicemix.apache.org/cxfbc/1.0 http://servicemix.apache.org/cxfbc/1.0/servicemix-cxfbc.xsd
...">
...
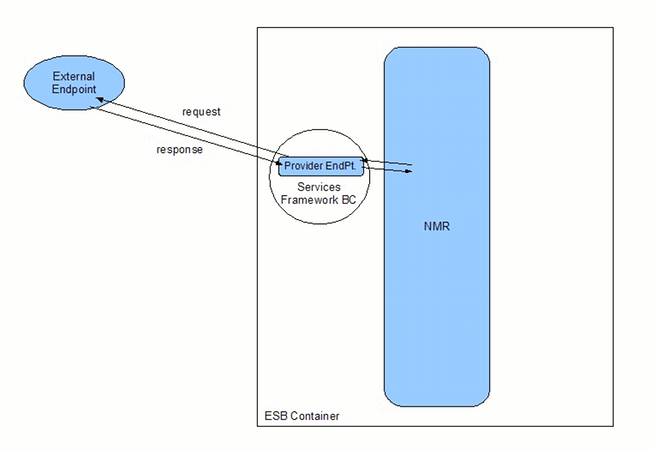
</beans>Chapter 9. Consumer Endpoints
Abstract
Overview
Figure 9.1. Consumer Endpoint

Procedure
- Add a
consumerelement to yourxbean.xmlfile. - Add a
wsdlattribute to theconsumerelement. - If your WSDL defines more than one service, you will need to specify a value for the
serviceattribute. - If the service you choose defines more than one endpoint, you will need to specify a value for the
endpointattribute. - Specify the details for the target of the requests received by the endpoint.
- If your endpoint is going to be receiving binary attachments set its
mtomEnabledattribute totrue. - If your endpoint does not need to process the JBI wrapper set its
useJbiWrapperattribute tofalse. - If you are using any of the advanced features, such as WS-Addressing or WS-Policy, specify a value for the
busCfgattribute.
Specifying the WSDL
wsdl attribute is the only required attribute to configure a consumer endpoint. It specifies the location of the WSDL document that defines the endpoint being exposed. The path used is relative to the top-level of the exploded service unit.
Example 9.1. Minimal Consumer Endpoint Configuration
<beans xmlns:cxfbc="http://servicemix.apache.org/cxfbc/1.0"
       ... >
  ...
  <cxfbc:consumer wsdl="/wsdl/widget.wsdl" />

  ...
</beans>Specifying the endpoint details
service element you will need to specify a value for the consumer's service attribute. The value of the consumer's service attribute is the QName of the WSDL service element that defines the desired service in the WSDL document. For example, if you wanted your endpoint to use the WidgetSalesService in the WSDL shown in Example 9.2, “WSDL with Two Services” you would use the configuration shown in Example 9.3, “Consumer Endpoint with a Defined Service Name”.
Example 9.2. WSDL with Two Services
<definitions ...
             xmlns:soap="http://schemas.xmlsoap.org/wsdl/soap/"
             targetNamespace="http://demos.widgetVendor.com" ...>
  ...
  <service name="WidgetSalesService">
    <port binding="WidgetSalesBinding" name="WidgetSalesPort">
      <soap:address location="http://widget.sales.com/index.xml">
    </port>
  </service>

  <service name="WidgetInventoryService">
    <port binding="WidgetInventoryBinding" name="WidgetInventoryPort">
      <soap:address location="http://widget.inventory.com/index.xml">
    </port>
  </service>
  ...
<definitions>
Example 9.3. Consumer Endpoint with a Defined Service Name
<beans xmlns:cxfbc="http://servicemix.apache.org/cxfbc/1.0"
       xmlns:widgets="http://demos.widgetVendor.com"
       ... >
  ...
  <cxfbc:consumer wsdl="/wsdl/widget.wsdl"
                  service="widgets:WidgetSalesService" />

  ...
</beans>endpoint attribute. The value of the endpoint attribute corresponds to the value of the WSDL port element's name attribute. For example, if you wanted your endpoint to use the WidgetEasternSalesPort in the WSDL shown in Example 9.4, “Service with Two Endpoints” you would use the configuration shown in Example 9.5, “Consumer Endpoint with a Defined Endpoint Name”.
Example 9.4. Service with Two Endpoints
<definitions ...
             xmlns:soap="http://schemas.xmlsoap.org/wsdl/soap/"
             targetNamespace="http://demos.widgetVendor.com" ...>
  ...
  <service name="WidgetSalesService">
    <port binding="WidgetSalesBinding" name="WidgetWesternSalesPort">
      <soap:address location="http://widget.sales.com/index.xml">
    </port>
    <port binding="WidgetSalesBinding" name="WidgetEasternSalesPort">
      <jms:address jndiConnectionFactoryName="ConnectionFactory"
                   jndiDestinationName="dynamicQueues/test.Celtix.jmstransport" >
        <jms:JMSNamingProperty name="java.naming.factory.initial"
                               value="org.activemq.jndi.ActiveMQInitialContextFactory" />
        <jms:JMSNamingProperty name="java.naming.provider.url"
                               value="tcp://localhost:61616" />
      </jms:address>
    </port>
  </service>
  ...
<definitions>
Example 9.5. Consumer Endpoint with a Defined Endpoint Name
<beans xmlns:cxfbc="http://servicemix.apache.org/cxfbc/1.0"
       xmlns:widgets="http://demos.widgetVendor.com"
       ... >
  ...
  <cxfbc:consumer wsdl="/wsdl/widget.wsdl"
                  endpoint="WidgetEasternSalesService" />
  ...
</beans>
Specifying the target endpoint
- If you explicitly specify an endpoint using both the
targetServiceattribute and thetargetEndpointattribute, the ESB will use that endpoint. - If you only specify a value for the
targetServiceattribute, the ESB will attempt to find an appropriate endpoint on the specified service. - If you specify an the name of an interface that can accept the message using the
targetInterfaceattribute, the ESB will attempt to locate an endpoint that implements the specified interface and direct the messages to it. - If you do not use any of the target attributes, the ESB will use the values used in configuring the endpoint's service name and endpoint name to determine the target endpoint.
Example 9.6. Consumer Endpoint Configuration Specifying a Target Endpoint
<beans xmlns:cxfbc="http://servicemix.apache.org/cxfbc/1.0"
       xmlns:widgets="http://demos.widgetVendor.com"
       ... >
  ...
  <cxfbc:consumer wsdl="/wsdl/widget.wsdl"
                  targetEndpoint="WidgetSalesTargetPort"
                  targetService="widgets:WidgetSalesTargetService" />

  ...
</beans>Chapter 10. Provider Endpoints
Abstract
Overview
Figure 10.1. Provider Endpoint
Procedure
- Add a
providerelement to yourxbean.xmlfile. - Add a
wsdlattribute to theproviderelement. - If your WSDL defines more than one service, you will need to specify a value for the
serviceattribute. - If the service you choose defines more than one endpoint, you will need to specify a value for the
endpointattribute. - If your endpoint is going to be receiving binary attachments set its
mtomEnabledattribute totrue. - If your endpoint does not need to process the JBI wrapper set its
useJbiWrapperattribute tofalse. - If you are using any of the advanced features, such as WS-Addressing or WS-Policy, specify a value for the
busCfgattribute.
Specifying the WSDL
wsdl attribute is the only required attribute to configure a provider endpoint. It specifies the location of the WSDL document that defines the endpoint being exposed. The path used is relative to the top-level of the exploded service unit.
Example 10.1. Minimal Provider Endpoint Configuration
<beans xmlns:cxfbc="http://servicemix.apache.org/cxfbc/1.0"
       ... >
  ...
  <cxfbc:provider wsdl="/wsdl/widget.wsdl" />

  ...
</beans>Specifying the endpoint details
service element you will need to specify a value for the provider's service attribute. The value of the provider's service attribute is the QName of the WSDL service element that defines the desired service in the WSDL document. For example, if you wanted your endpoint to use the WidgetInventoryService in the WSDL shown in Example 10.2, “WSDL with Two Services” you would use the configuration shown in Example 10.3, “Provider Endpoint with a Defined Service Name”.
Example 10.2. WSDL with Two Services
<definitions ...
             xmlns:soap="http://schemas.xmlsoap.org/wsdl/soap/"
             targetNamespace="http://demos.widgetVendor.com" ...>
  ...
  <service name="WidgetSalesService">
    <port binding="WidgetSalesBinding" name="WidgetSalesPort">
      <soap:address location="http://widget.sales.com/index.xml">
    </port>
  </service>

  <service name="WidgetInventoryService">
    <port binding="WidgetInventoryBinding" name="WidgetInventoryPort">
      <soap:address location="http://widget.inventory.com/index.xml">
    </port>
  </service>
  ...
<definitions>
Example 10.3. Provider Endpoint with a Defined Service Name
<beans xmlns:cxfbc="http://servicemix.apache.org/cxfbc/1.0"
       xmlns:widgets="http://demos.widgetVendor.com"
       ... >
  ...
  <cxfbc:provider wsdl="/wsdl/widget.wsdl"
                  service="widgets:WidgetInventoryService" />

  ...
</beans>endpoint attribute. The value of the endpoint attribute corresponds to the value of the WSDL port element's name attribute. For example, if you wanted your endpoint to use the WidgetWesternSalesPort in the WSDL shown in Example 10.4, “Service with Two Endpoints” you would use the configuration shown in Example 10.5, “Provider Endpoint with a Defined Endpoint Name”.
Example 10.4. Service with Two Endpoints
<definitions ...
             xmlns:soap="http://schemas.xmlsoap.org/wsdl/soap/"
             targetNamespace="http://demos.widgetVendor.com" ...>
  ...
  <service name="WidgetSalesService">
    <port binding="WidgetSalesBinding" name="WidgetWesternSalesPort">
      <soap:address location="http://widget.sales.com/index.xml">
    </port>
    <port binding="WidgetSalesBinding" name="WidgetEasternSalesPort">
      <jms:address jndiConnectionFactoryName="ConnectionFactory"
                   jndiDestinationName="dynamicQueues/test.Celtix.jmstransport" >
        <jms:JMSNamingProperty name="java.naming.factory.initial"
                               value="org.activemq.jndi.ActiveMQInitialContextFactory" />
        <jms:JMSNamingProperty name="java.naming.provider.url"
                               value="tcp://localhost:61616" />
      </jms:address>
    </port>
  </service>
  ...
<definitions>
Example 10.5. Provider Endpoint with a Defined Endpoint Name
<beans xmlns:cxfbc="http://servicemix.apache.org/cxfbc/1.0"
       xmlns:widgets="http://demos.widgetVendor.com"
       ... >
  ...
  <cxfbc:provider wsdl="/wsdl/widget.wsdl"
                  endpoint="WidgetWesternSalesService" />
  ...
</beans>
Chapter 11. Using MTOM to Process Binary Content
Abstract
Overview
Configuring an endpoint to support MTOM
mtomEnabled attribute to true.
Example 11.1. Configuring an Endpoint to Use MTOM
<beans xmlns:cxfbc="http://servicemix.apache.org/cxfbc/1.0"
       ...>

  <cxfbc:consumer wsdl="/wsdl/widget.wsdl"
                  mtomEnabled="true" />

  ...
</beans>
Chapter 12. Working with the JBI Wrapper
Abstract
Overview
Turning of JBI wrapper processing
useJbiWrapper attribute to false. This instructs the endpoint to disable the processing of the JBI wrapper. If the endpoint does receive a message that uses the JBI wrapper, it will fail to process the message and generate an error.
Example
Example 12.1. Configuring a Consumer to Not Use the JBI Wrapper
<beans xmlns:cxfbc="http://servicemix.apache.org/cxfbc/1.0"
       ... >
  ...
  <cxfbc:consumer wsdl="/wsdl/widget.wsdl"
                  useJbiWrapper="false" />
  ...
</beans>
Chapter 13. Using Message Interceptors
Abstract
Overview
Configuring an endpoint's interceptor chain
- in interceptors
- On consumer endpoints the in interceptors process messages when they are received from the external endpoint.On provider endpoints the in interceptors process messages when they are received from the NMR.
- in fault interceptors
- The in fault interceptors process fault messages that are generated before the service implementation gets called.
- out interceptors
- On consumer endpoints the out interceptors process messages as they pass from the service implementation to the external endpoint.On provider endpoints the out interceptors process messages as they pass from the service implementation to the NMR.
- out fault interceptors
- The out fault interceptors process fault messages that are generated by the service implementation or by an out interceptor.
consumer element or provider element. Table 13.1, “Elements Used to Configure an Endpoint's Interceptor Chain” lists the elements used to configure an endpoint's interceptor chain.
Table 13.1. Elements Used to Configure an Endpoint's Interceptor Chain
Example 13.1. Configuring an Interceptor Chain
<cxfbc:consumer ...>
  ...
  <cxfbc:inInterceptors>
    <bean class="org.apache.cxf.interceptor.LoggingInInterceptor" />
  </cxfbc:inInterceptors>
  <cxfbc:outInterceptors>
    <bean class="org.apache.cxf.interceptor.LoggingOutInterceptor" />
  </cxfbc:outInterceptors>
  <cxfbc:inFaultInterceptors>
    <bean class="org.apache.cxf.interceptor.LoggingInInterceptor" />
  </cxfbc:inFaultInterceptors>
  <cxfbc:outFaultInterceptors>
    <bean class="org.apache.cxf.interceptor.LoggingOutInterceptor" />
  </cxfbc:outFaultInterceptors>
</cxfbc:consumer>
Implementing an interceptor
org.apache.cxf.phase.AbstractPhaseInterceptor class or one of its sub-classes. Extending AbstractPhaseInterceptor provides you with access to the generic message handling APIs used by Apache CXF. Extending one of the sub-classes provides you with more specific APIs. For example, extending the AbstractSoapInterceptor class allows your interceptor to work directly with the SOAP APIs.
More information
Part III. Configuring the CXF Runtime
Abstract
busCfg attribute.
Chapter 14. Configuring the Endpoints to Load Apache CXF Runtime Configuration
Abstract
busCfg attribute to configure the endpoint to load Apache CXF runtime configuration. Its value points to a Apache CXF configuration file.
Specifying the configuration to load
busCfg attribute. Both the provider element and the consumer element accept this attribute. The attribute's value is the path to a file containing configuration information used by the Apache CXF runtime. This path is relative to the location of the endpoint's xbean.xml file.
Example
jms-config.xml.
Example 14.1. Provider Endpoint that Loads Apache CXF Runtime Configuration
<beans xmlns:cxfbc="http://servicemix.apache.org/cxfbc/1.0"
       xmlns:greeter="http://cxf.apache.org/jms_greeter"
       xmlns:test="http://test">

  <cxfbc:provider wsdl="classpath:jms_greeter.wsdl"
                  service="greeter:JMSGreeterService"
                  endpoint="GreeterPort"
                  interfaceName="greeter:JMSGreeterPortType"
                  useJBIWrapper="false"
                  busCfg="./jms-config.xml" />

</beans>
Chapter 15. Transport Configuration
15.1. Using the JMS configuration bean
Overview
org.apache.cxf.transport.jms.JMSConfiguration class. It can be used to either configure endpoint's directly or to configure the JMS conduits and destinations.
Configuration namespace
Example 15.1. Declaring the Spring p-namespace
<beans ...
  xmlns:p="http://www.springframework.org/schema/p"
  ... >
  ...
</beans>
Specifying the configuration
org.apache.cxf.transport.jms.JMSConfiguration. The properties of the bean provide the configuration settings for the transport.
Table 15.1. General JMS Configuration Properties
| Property | Default | Description |
|---|---|---|
connectionFactory-ref | Specifies a reference to a bean that defines a JMS ConnectionFactory. | |
wrapInSingleConnectionFactory | true | Specifies whether to wrap the ConnectionFactory with a Spring SingleConnectionFactory. Doing so can improve the performance of the JMS transport when the specified connection factory does not pool connections. |
reconnectOnException | false | Specifies whether to create a new connection in the case of an exception. This property is only used when wrapping the connection factory with a Spring SingleConnectionFactory. |
targetDestination | Specifies the JNDI name or provider specific name of a destination. | |
replyDestination | Specifies the JMS name of the JMS destinations where replies are sent. This attribute allows you to use a user defined destination for replies. For more details see Section 7.3, “Using a Named Reply Destination”. | |
destinationResolver | Specifies a reference to a Spring DestinationResolver. This allows you to define how destination names are resolved. By default a DynamicDestinationResolver is used. It resolves destinations using the JMS providers features. If you reference a JndiDestinationResolver you can resolve the destination names using JNDI. | |
transactionManager | Specifies a reference to a Spring transaction manager. This allows the service to participate in JTA Transactions. | |
taskExecutor | Specifies a reference to a Spring TaskExecutor. This is used in listeners to decide how to handle incoming messages. By default the transport uses the Spring SimpleAsyncTaskExecutor. | |
useJms11 | false | Specifies whether JMS 1.1 features are available. |
messageIdEnabled | true | Specifies whether the JMS transport wants the JMS broker to provide message IDs. Setting this to false causes the endpoint to call its message producer's setDisableMessageID() method with a value of true. The JMS broker is then given a hint that it does not need to generate message IDs or add them to the messages from the endpoint. The JMS broker can choose to accept the hint or ignore it. |
messageTimestampEnabled | true | Specifies whether the JMS transport wants the JMS broker to provide message time stamps. Setting this to false causes the endpoint to call its message producer's setDisableMessageTimestamp() method with a value of true. The JMS broker is then given a hint that it does not need to generate time stamps or add them to the messages from the endpoint. The JMS broker can choose to accept the hint or ignore it. |
cacheLevel | 3 | Specifies the level of caching allowed by the listener. Valid values are 0(CACHE_NONE), 1(CACHE_CONNECTION), 2(CACHE_SESSION), 3(CACHE_CONSUMER), 4(CACHE_AUTO). |
pubSubNoLocal | false | Specifies whether to receive messages produced from the same connection. |
receiveTimeout | 0 | Specifies, in milliseconds, the amount of time to wait for response messages. 0 means wait indefinitely. |
explicitQosEnabled | false | Specifies whether the QoS settings like priority, persistence, and time to live are explicitly set for each message or if they are allowed to use default values. |
deliveryMode | 1 |
Specifies if a message is persistent. The two values are:
|
priority | 4 | Specifies the message's priority for the messages. JMS priority values can range from 0 to 9. The lowest priority is 0 and the highest priority is 9. |
timeToLive | 0 | Specifies, in milliseconds, the message will be available after it is sent. 0 specifies an infinite time to live. |
sessionTransacted | false | Specifies if JMS transactions are used. |
concurrentConsumers | 1 | Specifies the minimum number of concurrent consumers created by the listener. |
maxConcurrentConsumers | 1 | Specifies the maximum number of concurrent consumers by listener. |
messageSelector | Specifies the string value of the selector. For more information on the syntax used to specify message selectors, see the JMS 1.1 specification. | |
subscriptionDurable | false | Specifies whether the server uses durrable subscriptions. |
durableSubscriptionName | Specifies the string used to register the durable subscription. | |
messageType | text | Specifies how the message data will be packaged as a JMS message. text specifies that the data will be packaged as a TextMessage. binary specifies that the data will be packaged as an ByteMessage. |
pubSubDomain | false | Specifies whether the target destination is a topic. |
jmsProviderTibcoEms | false | Specifies if your JMS provider is Tibco EMS. This causes the principal in the security context to be populated from the JMS_TIBCO_SENDER header. |
useMessageIDAsCorrelationID | false | Specifies whether JMS will use the message ID to correlate messages. If not, the client will set a generated correlation ID. |
bean element. They are all declared in the Spring p namespace.
Example 15.2. JMS configuration bean
<bean id="jmsConfig"
      class="org.apache.cxf.transport.jms.JMSConfiguration"
      p:connectionFactory-ref="connectionFactory"
      p:targetDestination="dynamicQueues/greeter.request.queue"
      p:pubSubDomain="false" />
Applying the configuration to an endpoint
JMSConfiguration bean can be applied directly to both server and client endpoints using the Apache CXF features mechanism. To do so:
- Set the endpoint's
addressattribute tojms://. - Add a
jaxws:featureelement to the endpoint's configuration. - Add a bean of type
org.apache.cxf.transport.jms.JMSConfigFeatureto the feature. - Set the
beanelement'sp:jmsConfig-refattribute to the ID of theJMSConfigurationbean.
Example 15.3. Adding JMS configuration to a JAX-WS client
<jaxws:client id="CustomerService"
              xmlns:customer="http://customerservice.example.com/"
              serviceName="customer:CustomerServiceService"
              endpointName="customer:CustomerServiceEndpoint"
              address="jms://"
              serviceClass="com.example.customerservice.CustomerService">
  <jaxws:features>
    <bean class="org.apache.cxf.transport.jms.JMSConfigFeature"
          p:jmsConfig-ref="jmsConfig"/>
  </jaxws:features>
</jaxws:client>
Applying the configuration to the transport
JMSConfiguration bean can be applied to JMS conduits and JMS destinations using the jms:jmsConfig-ref element. The jms:jmsConfig-ref element's value is the ID of the JMSConfiguration bean.
Example 15.4. Adding JMS configuration to a JMS conduit
<jms:conduit name="{http://cxf.apache.org/jms_conf_test}HelloWorldQueueBinMsgPort.jms-conduit">
  ...
  <jms:jmsConfig-ref>jmsConf</jms:jmsConfig-ref>
</jms:conduit>
15.2. Configuring the Jetty Runtime
Overview
Namespace
httpj. In order to use the Jetty configuration elements you must add the lines shown in Example 15.5, “Jetty Runtime Configuration Namespace” to the beans element of your endpoint's configuration file. In addition, you must add the configuration elements' namespace to the xsi:schemaLocation attribute.
Example 15.5. Jetty Runtime Configuration Namespace
<beans ...
       xmlns:httpj="http://cxf.apache.org/transports/http-jetty/configuration"
       ...
       xsi:schemaLocation="...
                           http://cxf.apache.org/transports/http-jetty/configuration
                              http://cxf.apache.org/schemas/configuration/http-jetty.xsd
                          ...">
The engine-factory element
httpj:engine-factory element is the root element used to configure the Jetty runtime used by an application. It has a single required attribute, bus, whose value is the name of the Bus that manages the Jetty instances being configured.
cxf which is the name of the default Bus instance.
httpj:engine-factory element has three children that contain the information used to configure the HTTP ports instantiated by the Jetty runtime factory. The children are described in Table 15.2, “Elements for Configuring a Jetty Runtime Factory”.
Table 15.2. Elements for Configuring a Jetty Runtime Factory
| Element | Description |
|---|---|
httpj:engine |
Specifies the configuration for a particular Jetty runtime instance. See the section called “The
engine element”.
|
httpj:identifiedTLSServerParameters |
Specifies a reusable set of properties for securing an HTTP service provider. It has a single attribute,
id, that specifies a unique identifier by which the property set can be referred.
|
httpj:identifiedThreadingParameters |
Specifies a reusable set of properties for controlling a Jetty instance's thread pool. It has a single attribute,
id, that specifies a unique identifier by which the property set can be referred.
|
The engine element
httpj:engine element is used to configure specific instances of the Jetty runtime. It has a single attribute, port, that specifies the number of the port being managed by the Jetty instance.
0 for the port attribute. Any threading properties specified in an httpj:engine element with its port attribute set to 0 are used as the configuration for all Jetty listeners that are not explicitly configured.
httpj:engine element can have two children: one for configuring security properties and one for configuring the Jetty instance's thread pool. For each type of configuration you can either directly provide the configuration information or you can provide a reference to a set of configuration properties defined in the parent httpj:engine-factory element.
Table 15.3. Elements for Configuring a Jetty Runtime Instance
| Element | Description |
|---|---|
httpj:tlsServerParameters |
Specifies a set of properties for configuring the security used for the specific Jetty instance.
|
httpj:tlsServerParametersRef |
Refers to a set of security properties defined by a
identifiedTLSServerParameters element. The id attribute provides the id of the referred identifiedTLSServerParameters element.
|
httpj:threadingParameters |
Specifies the size of the thread pool used by the specific Jetty instance. See the section called “Configuring the thread pool”.
|
httpj:threadingParametersRef |
Refers to a set of properties defined by a
identifiedThreadingParameters element. The id attribute provides the id of the referred identifiedThreadingParameters element.
|
Configuring the thread pool
- Specifying the size of the thread pool using a
identifiedThreadingParameterselement in theengine-factoryelement. You then refer to the element using athreadingParametersRefelement. - Specifying the size of the of the thread pool directly using a
threadingParameterselement.
threadingParameters has two attributes to specify the size of a thread pool. The attributes are described in Table 15.4, “Attributes for Configuring a Jetty Thread Pool”.
httpj:identifiedThreadingParameters element has a single child threadingParameters element.
Example
Example 15.6. Configuring a Jetty Instance
<beans xmlns="http://www.springframework.org/schema/beans"
  xmlns:xsi="http://www.w3.org/2001/XMLSchema-instance"
  xmlns:sec="http://cxf.apache.org/configuration/security"
  xmlns:http="http://cxf.apache.org/transports/http/configuration"
  xmlns:httpj="http://cxf.apache.org/transports/http-jetty/configuration"
  xmlns:jaxws="http://java.sun.com/xml/ns/jaxws"
  xsi:schemaLocation="http://cxf.apache.org/configuration/security
  		      http://cxf.apache.org/schemas/configuration/security.xsd
            http://cxf.apache.org/transports/http/configuration
            http://cxf.apache.org/schemas/configuration/http-conf.xsd
            http://cxf.apache.org/transports/http-jetty/configuration
            http://cxf.apache.org/schemas/configuration/http-jetty.xsd
            http://www.springframework.org/schema/beans
            http://www.springframework.org/schema/beans/spring-beans-2.0.xsd">
  ...

  <httpj:engine-factory bus="cxf">
    <httpj:identifiedTLSServerParameters id="secure">
      <sec:keyManagers keyPassword="password">
        <sec:keyStore type="JKS" password="password"
                      file="certs/cherry.jks"/>
      </sec:keyManagers>
    </httpj:identifiedTLSServerParameters>

    <httpj:engine port="9001">
      <httpj:tlsServerParametersRef id="secure" />
      <httpj:threadingParameters minThreads="5"
                                 maxThreads="15" />
    </httpj:engine>
  </httpj:engine-factory>
 </beans>
Chapter 16. Deploying WS-Addressing
Abstract
16.1. Introduction to WS-Addressing
Overview
- A structure for communicating a reference to a Web service endpoint
- A set of Message Addressing Properties (MAP) that associate addressing information with a particular message
Supported specifications
Further information
16.2. WS-Addressing Interceptors
Overview
WS-Addressing Interceptors
Table 16.1. WS-Addressing Interceptors
| Interceptor | Description |
|---|---|
org.apache.cxf.ws.addressing.MAPAggregator | A logical interceptor responsible for aggregating the Message Addressing Properties (MAPs) for outgoing messages. |
org.apache.cxf.ws.addressing.soap.MAPCodec | A protocol-specific interceptor responsible for encoding and decoding the Message Addressing Properties (MAPs) as SOAP headers. |
16.3. Enabling WS-Addressing
Overview
- RMAssertion and WS-Policy Framework
- Using Policy Assertion in a WS-Addressing Feature
Adding WS-Addressing as a Feature
Example 16.1. client.xml—Adding WS-Addressing Feature to Client Configuration
<?xml version="1.0" encoding="UTF-8"?>
<beans xmlns="http://www.springframework.org/schema/beans"
       xmlns:xsi="http://www.w3.org/2001/XMLSchema-instance"
       xmlns:jaxws="http://cxf.apache.org/jaxws"
       xmlns:wsa="http://cxf.apache.org/ws/addressing"
       xsi:schemaLocation="
       http://www.springframework.org/schema/beans http://www.springframework.org/schema/beans/spring-beans.xsd">

    <jaxws:client ...>
        <jaxws:features>
            <wsa:addressing/>
        </jaxws:features>
    </jaxws:client>
</beans>
Example 16.2. server.xml—Adding WS-Addressing Feature to Server Configuration
<?xml version="1.0" encoding="UTF-8"?>
<beans xmlns="http://www.springframework.org/schema/beans"
       xmlns:xsi="http://www.w3.org/2001/XMLSchema-instance"
       xmlns:jaxws="http://cxf.apache.org/jaxws"
       xmlns:wsa="http://cxf.apache.org/ws/addressing"
       xsi:schemaLocation="
http://www.springframework.org/schema/beans http://www.springframework.org/schema/beans/spring-beans.xsd">

    <jaxws:endpoint ...>
        <jaxws:features>
            <wsa:addressing/>
        </jaxws:features>
    </jaxws:endpoint>
</beans>
16.4. Configuring WS-Addressing Attributes
Overview
http://cxf.apache.org/ws/addressing. It supports the two attributes described in Table 16.2, “WS-Addressing Attributes”.
Table 16.2. WS-Addressing Attributes
| Attribute Name | Value |
|---|---|
allowDuplicates | A boolean that determines if duplicate MessageIDs are tolerated. The default setting is true. |
usingAddressingAdvisory | A boolean that indicates if the presence of the UsingAddressing element in the WSDL is advisory only; that is, its absence does not prevent the encoding of WS-Addressing headers. |
Configuring WS-Addressing attributes
allowDublicates attribute to false on the server endpoint:
<beans ... xmlns:wsa="http://cxf.apache.org/ws/addressing" ...>
    <jaxws:endpoint ...>
        <jaxws:features>
            <wsa:addressing allowDuplicates="false"/>
        </jaxws:features>
    </jaxws:endpoint>
</beans>
Using a WS-Policy assertion embedded in a feature
policies element.
Example 16.3. Using the Policies to Configure WS-Addressing
<?xml version="1.0" encoding="UTF-8"?>
<beans xmlns="http://www.springframework.org/schema/beans"
        xmlns:xsi="http://www.w3.org/2001/XMLSchema-instance"
        xmlns:wsa="http://cxf.apache.org/ws/addressing"
        xmlns:wsp="http://www.w3.org/2006/07/ws-policy"
        xmlns:policy="http://cxf.apache.org/policy-config"
        xmlns:wsu="http://docs.oasis-open.org/wss/2004/01/oasis-200401-wss-wssecurity-utility-1.0.xsd"
        xmlns:jaxws="http://cxf.apache.org/jaxws"
        xsi:schemaLocation="
http://www.w3.org/2006/07/ws-policy http://www.w3.org/2006/07/ws-policy.xsd
http://cxf.apache.org/ws/addressing http://cxf.apache.org/schema/ws/addressing.xsd
http://cxf.apache.org/jaxws http://cxf.apache.org/schemas/jaxws.xsd
http://www.springframework.org/schema/beans http://www.springframework.org/schema/beans/spring-beans.xsd">

    <jaxws:endpoint name="{http://cxf.apache.org/greeter_control}GreeterPort"
                    createdFromAPI="true">
        <jaxws:features>
            <policy:policies>
                <wsp:Policy xmlns:wsam="http://www.w3.org/2007/02/addressing/metadata">
                    <wsam:Addressing>
                        <wsp:Policy>
                            <wsam:NonAnonymousResponses/>
                        </wsp:Policy>
                    </wsam:Addressing>
                </wsp:Policy>
            <policy:policies>
        </jaxws:features>
    </jaxws:endpoint>
</beans>
Chapter 17. Enabling Reliable Messaging
Abstract
17.1. Introduction to WS-RM
Overview
How WS-RM works
Figure 17.1. Web Services Reliable Messaging
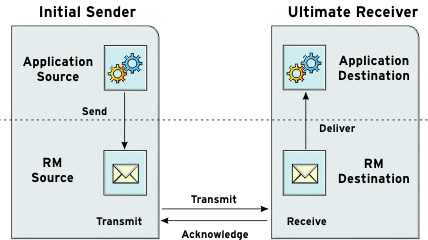
- The RM source sends a
CreateSequenceprotocol message to the RM destination. This contains a reference for the endpoint that receives acknowledgements (thewsrm:AcksToendpoint). - The RM destination sends a
CreateSequenceResponseprotocol message back to the RM source. This message contains the sequence ID for the RM sequence session. - The RM source adds an RM
Sequenceheader to each message sent by the application source. This header contains the sequence ID and a unique message ID. - The RM source transmits each message to the RM destination.
- The RM destination acknowledges the receipt of the message from the RM source by sending messages that contain the RM
SequenceAcknowledgementheader. - The RM destination delivers the message to the application destination in an exactly-once-in-order fashion.
- The RM source retransmits a message that it has not yet received an acknowledgement.The first retransmission attempt is made after a base retransmission interval. Successive retransmission attempts are made, by default, at exponential back-off intervals or, alternatively, at fixed intervals. For more details, see Section 17.4, “Configuring WS-RM”.
WS-RM delivery assurances
Supported specifications
Further information
17.2. WS-RM Interceptors
Overview
Apache CXF WS-RM Interceptors
Table 17.1. Apache CXF WS-ReliableMessaging Interceptors
| Interceptor | Description |
|---|---|
org.apache.cxf.ws.rm.RMOutInterceptor |
Deals with the logical aspects of providing reliability guarantees for outgoing messages.
Responsible for sending the
CreateSequence requests and waiting for their CreateSequenceResponse responses.
Also responsible for aggregating the sequence properties—ID and message number—for an application message.
|
org.apache.cxf.ws.rm.RMInInterceptor | Responsible for intercepting and processing RM protocol messages and SequenceAcknowledgement messages that are piggybacked on application messages. |
org.apache.cxf.ws.rm.soap.RMSoapInterceptor | Responsible for encoding and decoding the reliability properties as SOAP headers. |
org.apache.cxf.ws.rm.RetransmissionInterceptor | Responsible for creating copies of application messages for future resending. |
Enabling WS-RM
RMOutInterceptor sends a CreateSequence request and waits to process the original application message until it receives the CreateSequenceResponse response. In addition, the WS-RM interceptors add the sequence headers to the application messages and, on the destination side, extract them from the messages. It is not necessary to make any changes to your application code to make the exchange of messages reliable.
Configuring WS-RM Attributes
1).
17.3. Enabling WS-RM
Overview
- Explicitly, by adding them to the dispatch chains using Spring beans
- Implicitly, using WS-Policy assertions, which cause the Apache CXF runtime to transparently add the interceptors on your behalf.
Spring beans—explicitly adding interceptors
InstallDir/samples/ws_rm directory. The configuration file, ws-rm.cxf, shows the WS-RM and WS-Addressing interceptors being added one-by-one as Spring beans (see Example 17.1, “Enabling WS-RM Using Spring Beans”).
Example 17.1. Enabling WS-RM Using Spring Beans
<?xml version="1.0" encoding="UTF-8"?>
1<beans xmlns="http://www.springframework.org/schema/beans"
       xmlns:xsi="http://www.w3.org/2001/XMLSchema-instance"
       xsi:schemaLocation="http://www.springframework.org/schema/
   beans http://www.springframework.org/schema/beans/spring-beans.xsd">
2   <bean id="mapAggregator" class="org.apache.cxf.ws.addressing.MAPAggregator"/>
   <bean id="mapCodec" class="org.apache.cxf.ws.addressing.soap.MAPCodec"/>
3   <bean id="rmLogicalOut" class="org.apache.cxf.ws.rm.RMOutInterceptor">
        <property name="bus" ref="cxf"/>
   </bean>
   <bean id="rmLogicalIn" class="org.apache.cxf.ws.rm.RMInInterceptor">
        <property name="bus" ref="cxf"/>
   </bean>
   <bean id="rmCodec" class="org.apache.cxf.ws.rm.soap.RMSoapInterceptor"/>
   <bean id="cxf" class="org.apache.cxf.bus.CXFBusImpl">
4        <property name="inInterceptors">
            <list>
                <ref bean="mapAggregator"/>
                <ref bean="mapCodec"/>
                <ref bean="rmLogicalIn"/>
                <ref bean="rmCodec"/>
            </list>
        </property>
5        <property name="inFaultInterceptors">
            <list>
                <ref bean="mapAggregator"/>
                <ref bean="mapCodec"/>
                <ref bean="rmLogicalIn"/>
                <ref bean="rmCodec"/>
            </list>
        </property>
6        <property name="outInterceptors">
            <list>
                <ref bean="mapAggregator"/>
                <ref bean="mapCodec"/>
                <ref bean="rmLogicalOut"/>
                <ref bean="rmCodec"/>
            </list>
        </property>
7        <property name="outFaultInterceptors">
            <list>
                <ref bean="mapAggregator">
                <ref bean="mapCodec"/>
                <ref bean="rmLogicalOut"/>
                <ref bean="rmCodec"/>
            </list>
        </property>
    </bean>
</beans>
- 1
- A Apache CXF configuration file is a Spring XML file. You must include an opening Spring
beanselement that declares the namespaces and schema files for the child elements that are encapsulated by thebeanselement. - 2
- Configures each of the WS-Addressing interceptors—
MAPAggregatorandMAPCodec. For more information on WS-Addressing, see Chapter 16, Deploying WS-Addressing. - 3
- Configures each of the WS-RM interceptors—
RMOutInterceptor,RMInInterceptor, andRMSoapInterceptor. - 4
- Adds the WS-Addressing and WS-RM interceptors to the interceptor chain for inbound messages.
- 5
- Adds the WS-Addressing and WS-RM interceptors to the interceptor chain for inbound faults.
- 6
- Adds the WS-Addressing and WS-RM interceptors to the interceptor chain for outbound messages.
- 7
- Adds the WS-Addressing and WS-RM interceptors to the interceptor chain for outbound faults.
WS-Policy framework—implicitly adding interceptors
- Add the policy feature to your client and server endpoint. Example 17.2, “Configuring WS-RM using WS-Policy” shows a reference bean nested within a
jaxws:featureelement. The reference bean specifies theAddressingPolicy, which is defined as a separate element within the same configuration file.Example 17.2. Configuring WS-RM using WS-Policy
<jaxws:client> <jaxws:features> <ref bean="AddressingPolicy"/> </jaxws:features> </jaxws:client> <wsp:Policy wsu:Id="AddressingPolicy" xmlns:wsam="http://www.w3.org/2007/02/addressing/metadata"> <wsam:Addressing> <wsp:Policy> <wsam:NonAnonymousResponses/> </wsp:Policy> </wsam:Addressing> </wsp:Policy> - Add a reliable messaging policy to the
wsdl:serviceelement—or any other WSDL element that can be used as an attachment point for policy or policy reference elements—to your WSDL file, as shown in Example 17.3, “Adding an RM Policy to Your WSDL File”.Example 17.3. Adding an RM Policy to Your WSDL File
<wsp:Policy wsu:Id="RM"
   xmlns:wsp="http://www.w3.org/2006/07/ws-policy"
   xmlns:wsu="http://docs.oasis-open.org/wss/2004/01/oasis-200401-wss-wssecurity-utility-1.0.xsd">
    <wsam:Addressing xmlns:wsam="http://www.w3.org/2007/02/addressing/metadata">
        <wsp:Policy/>
    </wsam:Addressing>
    <wsrmp:RMAssertion xmlns:wsrmp="http://schemas.xmlsoap.org/ws/2005/02/rm/policy">
        <wsrmp:BaseRetransmissionInterval Milliseconds="10000"/>
    </wsrmp:RMAssertion>
</wsp:Policy>
...
<wsdl:service name="ReliableGreeterService">
    <wsdl:port binding="tns:GreeterSOAPBinding" name="GreeterPort">
        <soap:address location="http://localhost:9020/SoapContext/GreeterPort"/>
        <wsp:PolicyReference URI="#RM" xmlns:wsp="http://www.w3.org/2006/07/ws-policy"/>
    </wsdl:port>
</wsdl:service>
17.4. Configuring WS-RM
- Setting Apache CXF-specific attributes that are defined in the Apache CXF WS-RM manager namespace,
http://cxf.apache.org/ws/rm/manager. - Setting standard WS-RM policy attributes that are defined in the http://schemas.xmlsoap.org/ws/2005/02/rm/policy namespace.
17.4.1. Configuring Apache CXF-Specific WS-RM Attributes
Overview
rmManager Spring bean. Add the following to your configuration file:
- The
http://cxf.apache.org/ws/rm/managernamespace to your list of namespaces. - An
rmManagerSpring bean for the specific attribute that your want to configure.
Example 17.4. Configuring Apache CXF-Specific WS-RM Attributes
<beans xmlns="http://www.springframework.org/schema/beans"
       xmlns:xsi="http://www.w3.org/2001/XMLSchema-instance"
       xmlns:wsrm-mgr="http://cxf.apache.org/ws/rm/manager"
      xsi:schemaLocation="http://www.springframework.org/schema/beans http://www.springframework.org/schema/beans/spring-beans.xsd
 http://cxf.apache.org/ws/rm/manager http://cxf.apache.org/schemas/configuration/wsrm-manager.xsd">
...
<wsrm-mgr:rmManager>
<!--
  ...Your configuration goes here
-->
</wsrm-mgr:rmManager>
Children of the rmManager Spring bean
rmManager Spring bean, defined in the http://cxf.apache.org/ws/rm/manager namespace.
Table 17.2. Children of the rmManager Spring Bean
| Element | Description |
|---|---|
RMAssertion | An element of type RMAssertion |
deliveryAssurance | An element of type DeliveryAssuranceType that describes the delivery assurance that should apply |
sourcePolicy | An element of type SourcePolicyType that allows you to configure details of the RM source |
destinationPolicy | An element of type DestinationPolicyType that allows you to configure details of the RM destination |
Example
17.4.2. Configuring Standard WS-RM Policy Attributes
Overview
WS-Policy RMAssertion Children
http://schemas.xmlsoap.org/ws/2005/02/rm/policy namespace:
Table 17.3. Children of the WS-Policy RMAssertion Element
| Name | Description |
|---|---|
InactivityTimeout | Specifies the amount of time that must pass without receiving a message before an endpoint can consider an RM sequence to have been terminated due to inactivity. |
BaseRetransmissionInterval | Sets the interval within which an acknowledgement must be received by the RM Source for a given message. If an acknowledgement is not received within the time set by the BaseRetransmissionInterval, the RM Source will retransmit the message. |
ExponentialBackoff |
Indicates the retransmission interval will be adjusted using the commonly known exponential backoff algorithm (Tanenbaum).
For more information, see Computer Networks, Andrew S. Tanenbaum, Prentice Hall PTR, 2003.
|
AcknowledgementInterval | In WS-RM, acknowledgements are sent on return messages or sent stand-alone. If a return message is not available to send an acknowledgement, an RM Destination can wait for up to the acknowledgement interval before sending a stand-alone acknowledgement. If there are no unacknowledged messages, the RM Destination can choose not to send an acknowledgement. |
More detailed reference information
RMAssertion in rmManager Spring bean
RMAssertion within a Apache CXF rmManager Spring bean. This is the best approach if you want to keep all of your WS-RM configuration in the same configuration file; that is, if you want to configure Apache CXF-specific attributes and standard WS-RM policy attributes in the same file.
- A standard WS-RM policy attribute,
BaseRetransmissionInterval, configured using anRMAssertionwithin anrmManagerSpring bean. - An Apache CXF-specific RM attribute,
intraMessageThreshold, configured in the same configuration file.
Example 17.5. Configuring WS-RM Attributes Using an RMAssertion in an rmManager Spring Bean
<beans xmlns:wsrm-policy="http://schemas.xmlsoap.org/ws/2005/02/rm/policy"
       xmlns:wsrm-mgr="http://cxf.apache.org/ws/rm/manager"
...>
<wsrm-mgr:rmManager id="org.apache.cxf.ws.rm.RMManager">
    <wsrm-policy:RMAssertion>
        <wsrm-policy:BaseRetransmissionInterval Milliseconds="4000"/>
    </wsrm-policy:RMAssertion>
    <wsrm-mgr:destinationPolicy>
        <wsrm-mgr:acksPolicy intraMessageThreshold="0" />
    </wsrm-mgr:destinationPolicy>
</wsrm-mgr:rmManager>
</beans>
Policy within a feature
Example 17.6. Configuring WS-RM Attributes as a Policy within a Feature
<xml version="1.0" encoding="UTF-8"?>
<beans xmlns="http://www.springframework.org/schema/beans"
        xmlns:xsi="http://www.w3.org/2001/XMLSchema-instance"
        xmlns:wsa="http://cxf.apache.org/ws/addressing"
        xmlns:wsp="http://www.w3.org/2006/07/ws-policy"
        xmlns:wsu="http://docs.oasis-open.org/wss/2004/01/oasis-200401-wss-wssecurity-utility-1.0.xsd"
        xmlns:jaxws="http://cxf.apache.org/jaxws"
        xsi:schemaLocation="
http://www.w3.org/2006/07/ws-policy http://www.w3.org/2006/07/ws-policy.xsd
http://cxf.apache.org/ws/addressing http://cxf.apache.org/schema/ws/addressing.xsd
http://cxf.apache.org/jaxws http://cxf.apache.org/schemas/jaxws.xsd
http://www.springframework.org/schema/beans http://www.springframework.org/schema/beans/spring-beans.xsd">
    <jaxws:endpoint name="{http://cxf.apache.org/greeter_control}GreeterPort" createdFromAPI="true">
        <jaxws:features>
               <wsp:Policy>
                   <wsrm:RMAssertion xmlns:wsrm="http://schemas.xmlsoap.org/ws/2005/02/rm/policy">
                     <wsrm:AcknowledgementInterval Milliseconds="200" />
                   </wsrm:RMAssertion>
                   <wsam:Addressing xmlns:wsam="http://www.w3.org/2007/02/addressing/metadata">
                       <wsp:Policy>
                            <wsam:NonAnonymousResponses/>
                       </wsp:Policy>
                   </wsam:Addressing>
              </wsp:Policy>
        </jaxws:features>
    </jaxws:endpoint>
</beans>
WSDL file
External attachment
Example 17.7. Configuring WS-RM in an External Attachment
<attachments xmlns:wsp="http://www.w3.org/2006/07/ws-policy" xmlns:wsa="http://www.w3.org/2005/08/addressing">
    <wsp:PolicyAttachment>
        <wsp:AppliesTo>
           <wsa:EndpointReference>
                <wsa:Address>http://localhost:9020/SoapContext/GreeterPort</wsa:Address>
            </wsa:EndpointReference>
        </wsp:AppliesTo>
        <wsp:Policy>
            <wsam:Addressing xmlns:wsam="http://www.w3.org/2007/02/addressing/metadata">
                <wsp:Policy/>
            </wsam:Addressing>
            <wsrmp:RMAssertion xmlns:wsrmp="http://schemas.xmlsoap.org/ws/2005/02/rm/policy">
                <wsrmp:BaseRetransmissionInterval Milliseconds="30000"/>
            </wsrmp:RMAssertion>
        </wsp:Policy>
    </wsp:PolicyAttachment>
</attachments>/
17.4.3. WS-RM Configuration Use Cases
Overview
RMAssertion within an rmManager Spring bean is shown. For details of how to set such attributes as a policy within a feature; in a WSDL file, or in an external attachment, see Section 17.4.2, “Configuring Standard WS-RM Policy Attributes”.
Base retransmission interval
BaseRetransmissionInterval element specifies the interval at which an RM source retransmits a message that has not yet been acknowledged. It is defined in the http://schemas.xmlsoap.org/ws/2005/02/rm/wsrm-policy.xsd schema file. The default value is 3000 milliseconds.
Example 17.8. Setting the WS-RM Base Retransmission Interval
<beans xmlns:wsrm-policy="http://schemas.xmlsoap.org/ws/2005/02/rm/policy
...>
<wsrm-mgr:rmManager id="org.apache.cxf.ws.rm.RMManager">
    <wsrm-policy:RMAssertion>
        <wsrm-policy:BaseRetransmissionInterval Milliseconds="4000"/>
    </wsrm-policy:RMAssertion>
</wsrm-mgr:rmManager>
</beans>
Exponential backoff for retransmission
ExponentialBackoff element determines if successive retransmission attempts for an unacknowledged message are performed at exponential intervals.
ExponentialBackoff element enables this feature. An exponential backoff ratio of 2 is used by default.
Example 17.9. Setting the WS-RM Exponential Backoff Property
<beans xmlns:wsrm-policy="http://schemas.xmlsoap.org/ws/2005/02/rm/policy
...>
<wsrm-mgr:rmManager id="org.apache.cxf.ws.rm.RMManager">
    <wsrm-policy:RMAssertion>
        <wsrm-policy:ExponentialBackoff="4"/>
    </wsrm-policy:RMAssertion>
</wsrm-mgr:rmManager>
</beans>
Acknowledgement interval
AcknowledgementInterval element specifies the interval at which the WS-RM destination sends asynchronous acknowledgements. These are in addition to the synchronous acknowledgements that it sends on receipt of an incoming message. The default asynchronous acknowledgement interval is 0 milliseconds. This means that if the AcknowledgementInterval is not configured to a specific value, acknowledgements are sent immediately (that is, at the first available opportunity).
- The RM destination is using a non-anonymous
wsrm:acksToendpoint. - The opportunity to piggyback an acknowledgement on a response message does not occur before the expiry of the acknowledgement interval.
Example 17.10. Setting the WS-RM Acknowledgement Interval
<beans xmlns:wsrm-policy="http://schemas.xmlsoap.org/ws/2005/02/rm/policy
...>
<wsrm-mgr:rmManager id="org.apache.cxf.ws.rm.RMManager">
    <wsrm-policy:RMAssertion>
        <wsrm-policy:AcknowledgementInterval Milliseconds="2000"/>
    </wsrm-policy:RMAssertion>
</wsrm-mgr:rmManager>
</beans>
Maximum unacknowledged messages threshold
maxUnacknowledged attribute sets the maximum number of unacknowledged messages that can accrue per sequence before the sequence is terminated.
Example 17.11. Setting the WS-RM Maximum Unacknowledged Message Threshold
<beans xmlns:wsrm-mgr="http://cxf.apache.org/ws/rm/manager
...>
<wsrm-mgr:reliableMessaging>
    <wsrm-mgr:sourcePolicy>
        <wsrm-mgr:sequenceTerminationPolicy maxUnacknowledged="20" />
    </wsrm-mgr:sourcePolicy>
</wsrm-mgr:reliableMessaging>
</beans>
Maximum length of an RM sequence
maxLength attribute sets the maximum length of a WS-RM sequence. The default value is 0, which means that the length of a WS-RM sequence is unbound.
Example 17.12. Setting the Maximum Length of a WS-RM Message Sequence
<beans xmlns:wsrm-mgr="http://cxf.apache.org/ws/rm/manager
...>
<wsrm-mgr:reliableMessaging>
    <wsrm-mgr:sourcePolicy>
        <wsrm-mgr:sequenceTerminationPolicy maxLength="100" />
    </wsrm-mgr:sourcePolicy>
</wsrm-mgr:reliableMessaging>
</beans>
Message delivery assurance policies
AtMostOnce— The RM destination delivers the messages to the application destination only once. If a message is delivered more than once an error is raised. It is possible that some messages in a sequence may not be delivered.AtLeastOnce— The RM destination delivers the messages to the application destination at least once. Every message sent will be delivered or an error will be raised. Some messages might be delivered more than once.InOrder— The RM destination delivers the messages to the application destination in the order that they are sent. This delivery assurance can be combined with theAtMostOnceorAtLeastOnceassurances.
Example 17.13. Setting the WS-RM Message Delivery Assurance Policy
<beans xmlns:wsrm-mgr="http://cxf.apache.org/ws/rm/manager
...>
<wsrm-mgr:reliableMessaging>
    <wsrm-mgr:deliveryAssurance>
        <wsrm-mgr:AtLeastOnce />
    </wsrm-mgr:deliveryAssurance>
</wsrm-mgr:reliableMessaging>
</beans>
17.5. Configuring WS-RM Persistence
Overview
How it works
- At the RM source endpoint, an outgoing message is persisted before transmission. It is evicted from the persistent store after the acknowledgement is received.
- After a recovery from crash, it recovers the persisted messages and retransmits until all the messages have been acknowledged. At that point, the RM sequence is closed.
- At the RM destination endpoint, an incoming message is persisted, and upon a successful store, the acknowledgement is sent. When a message is successfully dispatched, it is evicted from the persistent store.
- After a recovery from a crash, it recovers the persisted messages and dispatches them. It also brings the RM sequence to a state where new messages are accepted, acknowledged, and delivered.
Enabling WS-persistence
Example 17.14. Configuration for the Default WS-RM Persistence Store
<bean id="RMTxStore" class="org.apache.cxf.ws.rm.persistence.jdbc.RMTxStore"/>
<wsrm-mgr:rmManager id="org.apache.cxf.ws.rm.RMManager">
    <property name="store" ref="RMTxStore"/>
</wsrm-mgr:rmManager>
Configuring WS-persistence
Table 17.4. JDBC Store Properties
Example 17.15. Configuring the JDBC Store for WS-RM Persistence
<bean id="RMTxStore" class="org.apache.cxf.ws.rm.persistence.jdbc.RMTxStore">
    <property name="driverClassName" value="com.acme.jdbc.Driver"/>
    <property name="url" value="jdbc:acme:rmdb;create=true"/>
</bean>
Appendix A. Consumer Endpoint Properties
Table A.1. Consumer Endpoint Attributes
| Name | Type | Description | Required |
|---|---|---|---|
wsdl | String | Specifies the location of the WSDL defining the endpoint. | yes |
service | QName | Specifies the service name of the proxied endpoint. This corresponds to WSDL service element's name attribute. | no[a] |
endpoint | String | Specifies the endpoint name of the proxied endpoint. This corresponds to WSDL port element's name attribute. | no[b] |
interfaceName | QName | Specifies the interface name of the proxied endpoint. This corresponds to WSDL portType element's name attribute. | no |
targetService | QName | Specifies the service name of the target endpoint. | no (defaults to the value of the service attribute) |
targetEndpoint | String | Specifies the endpoint name of the target endpoint. | no (defaults to the value of the endpoint attribute) |
targetInterfaceName | QName | Specifies the interface name of the target endpoint. | no |
busCfg | String | Specifies the location of a spring configuration file used for Apache CXF bus initialization. | no |
mtomEnabled | boolean | Specifies if MTOM / attachment support is enabled. | no (defaults to false) |
useJbiWrapper | boolean | Specifies if the JBI wrapper is sent in the body of the message. | no (defaults to true) |
timeout | int | Specifies the number of seconds to wait for a response. | no (defaults to 10 |
[a]
If the WSDL defining the service has more than one service element, this attribute is required.
[b]
If the service being used defines more than one endpoint, this attribute is required.
| |||
Appendix B. Provider Endpoint Properties
Table B.1. Provider Endpoint Attributes
| Attribute | Type | Description | Required |
|---|---|---|---|
wsdl | String | Specifies the location of the WSDL defining the endpoint. | yes |
service | QName | Specifies the service name of the exposed endpoint. | no[a] |
endpoint | String | Specifies the endpoint name of the exposed endpoint. | no[b] |
locationURI | URI | Specifies the URL of the target service. | no[c][d] |
interfaceName | QName | Specifies the interface name of the exposed jbi endpoint. | no |
busCfg | String | Specifies the location of the spring configuration file used for Apache CXF bus initialization. | no |
mtomEnabled | boolean | Specifies if MTOM / attachment support is enabled. | no (defaults to false) |
useJbiWrapper | boolean | Specifies if the JBI wrapper is sent in the body of the message. | no (defaults to true) |
[a]
If the WSDL defining the service has more than one service element, this attribute is required.
[b]
If the service being used defines more than one endpoint, this attribute is required.
[c]
If specified, the value of this attribute overrides the HTTP address specified in the WSDL contract.
[d]
This attribute is ignored if the endpoint uses a JMS address in the WSDL.
| |||
Appendix C. Using the Maven JBI Tooling
Abstract
- automatic generation of JBI descriptors
- dependency checking
- Set up a top-level project to build all of the service units and the final service assembly.
- Create a project for each of your service units..
- Create a project for the service assembly.
C.1. Setting up a Red Hat JBoss Fuse JBI project
Overview
- It allows you to control the dependencies for all of the parts of an application in a central location.
- It limits the number of times you need to specify the proper repositories to load.
- It provides you a central location from which to build and deploy the application.
Directory structure
- A source directory containing the information required for the Maven assembly plug-in
- A directory to store the service assembly project
- At least one directory containing a service unit projectTipYou will need a project folder for each service unit that is to be included in the generated service assembly.
Setting up the Maven tools
Example C.1. POM elements for using Red Hat JBoss Fuse Maven tooling
...
<pluginRepositories>
  <pluginRepository>
    <id>fusesource.m2</id>
    <name>FuseSource Open Source Community Release Repository</name>
    <url>http://repo.fusesource.com/nexus/content/groups/public/</url>
    <snapshots>
      <enabled>false</enabled>
    </snapshots>
    <releases>
      <enabled>true</enabled>
    </releases>
  </pluginRepository>
</pluginRepositories>
<repositories>
  <repository>
    <id>fusesource.m2</id>
    <name>FuseSource Open Source Community Release Repository</name>
    <url>http://repo.fusesource.com/nexus/content/groups/public/</url>
    <snapshots>
       <enabled>false</enabled>
    </snapshots>
    <releases>
      <enabled>true</enabled>
    </releases>
  </repository>
  <repository>
    <id>fusesource.m2-snapshot</id>
    <name>FuseSource Open Source Community Snapshot Repository</name>
    <url>http://repo.fusesource.com/nexus/content/groups/public-snapshots/</url>
    <snapshots>
      <enabled>true</enabled>
    </snapshots>
    <releases>
      <enabled>false</enabled>
    </releases>
  </repository>
</repositories>
  ...
<build>
  <plugins>
    <plugin>
      <groupId>org.apache.servicemix.tooling</groupId>
      <artifactId>jbi-maven-plugin</artifactId>
      <version>servicemix-version</version>
      <extensions>true</extensions>
    </plugin>
  </plugins>
</build>
...Listing the sub-projects
modules element. The modules element contains one module element for each service unit in the assembly. You also need a module element for the service assembly.
Example JBI project pOM
Example C.2. Top-level POM for a Red Hat JBoss Fuse JBI project
<project xmlns="http://maven.apache.org/POM/4.0.0"
         xmlns:xsi="http://www.w3.org/2001/XMLSchema-instance"
         xsi:schemaLocation="http://maven.apache.org/POM/4.0.0
                             http://maven.apache.org/maven-v4_0_0.xsd">
  <modelVersion>4.0.0</modelVersion>

  <parent>
    <groupId>com.widgets</groupId>
    <artifactId>demos</artifactId>
    <version>1.0</version>
  </parent>

  <groupId>com.widgets.demo</groupId>
  <artifactId>cxf-wsdl-first</artifactId>
  <name>CXF WSDL Fisrt Demo</name>
  <packaging>pom</packaging>

  <pluginRepositories> 1
    <pluginRepository>
      <id>fusesource.m2</id>
      <name>FuseSource Open Source Community Release Repository</name>
      <url>http://repo.fusesource.com/nexus/content/groups/public/</url>
      <snapshots>
        <enabled>false</enabled>
      </snapshots>
      <releases>
        <enabled>true</enabled>
      </releases>
    </pluginRepository>
  </pluginRepositories>
  <repositories>
    <repository>
      <id>fusesource.m2</id>
      <name>FuseSource Open Source Community Release Repository</name>
      <url>http://repo.fusesource.com/nexus/content/groups/public/</url>
      <snapshots>
         <enabled>false</enabled>
      </snapshots>
      <releases>
        <enabled>true</enabled>
      </releases>
    </repository>
    <repository>
      <id>fusesource.m2-snapshot</id>
      <name>FuseSource Open Source Community Snapshot Repository</name>
      <url>http://repo.fusesource.com/nexus/content/groups/public-snapshots/</url>
      <snapshots>
        <enabled>true</enabled>
      </snapshots>
      <releases>
        <enabled>false</enabled>
      </releases>
    </repository>
  </repositories>

  <modules> 2
    <module>wsdl-first-cxfse-su</module>
     <module>wsdl-first-cxf-sa</module>
  </modules>

  <build>
    <plugins>
      <plugin> 3
        <groupId>org.apache.maven.plugins</groupId>
        <artifactId>maven-assembly-plugin</artifactId>
         <version>2.1</version>
         <inherited>false</inherited>
           <executions>
             <execution>
                <id>src</id>
                <phase>package</phase>
                <goals>
                  <goal>single</goal>
                </goals>
                <configuration>
                  <descriptors>
                    <descriptor>src/main/assembly/src.xml</descriptor>
                  </descriptors>
                 </configuration>
               </execution>
             </executions>
           </plugin>
           <plugin> 4
             <groupId>org.apache.servicemix.tooling</groupId>
             <artifactId>jbi-maven-plugin</artifactId>
             <extensions>true</extensions>
           </plugin>
    </plugins>
  </build>
</project>- 1
- Configures Maven to use the FuseSource repositories for loading the JBoss Fuse plug-ins.
- 2
- Lists the sub-projects used for this application. The
wsdl-first-cxfse-sumodule is the module for the service unit. Thewsdl-first-cxf-samodule is the module for the service assembly - 3
- Configures the Maven assembly plug-in.
- 4
- Loads the JBoss Fuse JBI plug-in.
C.2. A service unit project
Overview
Seeding a project using a Maven artifact
groupId value and the artifactId values correspond to the project's group ID and artifact ID.
Example C.3. Maven archetype command for service units
smx-arch
su suArchetypeName
[
"-DgroupId=my.group.id"
] [
"-DartifactId=my.artifact.id"
]
") are required when using the -DgroupId argument and the -DartifactId argument.
Table C.1. Service unit archetypes
| Name | Description |
|---|---|
| camel | Creates a project for using the Apache Camel service engine |
| cxf-se | Creates a project for developing a Java-first service using the Apache CXF service engine |
| cxf-se-wsdl-first | Creates a project for developing a WSDL-first service using the Apache CXF service engine |
| cxf-bc | Creates an endpoint project targeted at the Apache CXF binding component |
| http-consumer | Creates a consumer endpoint project targeted at the HTTP binding component |
| http-provider | Creates a provider endpoint project targeted at the HTTP binding component |
| jms-consumer | Creates a consumer endpoint project targeted at the JMS binding component (see "Using the JMS Binding Component") |
| jms-provider | Creates a provider endpoint project targeted at the JMS binding component (see "Using the JMS Binding Component") |
| file-poller | Creates a polling (consumer) endpoint project targeted at the file binding component (see chapter "Using Poller Endpoints" in "Using the File Binding Component") |
| file-sender | Creates a sender (provider) endpoint project targeted at the file binding component (see chapter "Using Sender Endpoints" in "Using the File Binding Component") |
| ftp-poller | Creates a polling (consumer) endpoint project targeted at the FTP binding component |
| ftp-sender | Creates a sender (provider) endpoint project targeted at the FTP binding component |
| jsr181-annotated | Creates a project for developing an annotated Java service to be run by the JSR181 service engine [a] |
| jsr181-wsdl-first | Creates a project for developing a WSDL generated Java service to be run by the JSR181 service engine [a] |
| saxon-xquery | Creates a project for executing xquery statements using the Saxon service engine |
| saxon-xslt | Creates a project for executing XSLT scripts using the Saxon service engine |
| eip | Creates a project for using the EIP service engine. [b] |
| lwcontainer | Creates a project for deploying functionality into the lightweight container [c] |
| bean | Creates a project for deploying a POJO to be executed by the bean service engine |
| ode | Create a project for deploying a BPEL process into the ODE service engine |
[a]
The JSR181 has been deprecated. The Apache CXF service engine has superseded it.
[b]
The EIP service engine has been deprecated. The Apache Camel service engine has superseded it.
[c]
The lightweight container has been deprecated.
| |
Contents of a project
- a POM file that configures the JBI plug-in to create a service unit
- an XML configuration file stored in
src/main/resourcesFor many of the components, the XML configuration file is calledxbean.xml. The Apache Camel component uses a file calledcamel-context.xml.
Configuring the Maven plug-in
packaging element to jbi-service-unit as shown in Example C.4.
Example C.4. Configuring the maven plug-in to build a service unit
<project ...>
  <modelVersion>4.0.0</modelVersion>

  ...
  <groupId>com.widgets.demo.cxf-wsdl-first</groupId>
  <artifactId>cxfse-wsdl-first-su</artifactId>
  <name>CXF WSDL Fisrt Demo :: SE Service Unit</name>
  <packaging>jbi-service-unit</packaging>
  ...
</project>
Specifying the target components
- List the targeted component as a dependency
- Add a
componentNameproperty specifying the targeted component
- Add a
componentNameproperty specifying the targeted component. - Add the remaining components to the list dependencies.
Example C.5. Specifying the target components for a service unit
...
<dependencies>
  <dependency>
    <groupId>org.apache.servicemix</groupId>
    <artifactId>servicemix-cxf-bc</artifactId>
    <version>3.3.1.0-fuse</version>[1]
  </dependency>
>/dependencies>
...componentName element. This element is added to the standard Maven properties block and it specifies the name of a targeted component, as specified in Example C.6.
Example C.6. Specifying a target component for a service unit
...
<properties>
  <componentName>servicemix-bean</componentName>
</properties>
...
componentName element, Maven does not check to see if the component is installed, nor does it download the required component.
Example
Example C.7. POM file for a service unit project
<project xmlns="http://maven.apache.org/POM/4.0.0"
         xmlns:xsi="http://www.w3.org/2001/XMLSchema-instance"
         xsi:schemaLocation="http://maven.apache.org/POM/4.0.0
                             http://maven.apache.org/maven-v4_0_0.xsd">

    <modelVersion>4.0.0</modelVersion>

    <parent> 1
        <groupId>com.widgets.demo</groupId>
        <artifactId>cxf-wsdl-first</artifactId>
        <version>1.0</version>
    </parent>

  <groupId>com.widgets.demo.cxf-wsdl-first</groupId>
  <artifactId>cxfse-wsdl-first-su</artifactId>
  <name>CXF WSDL Fisrt Demo :: SE Service Unit</name>
  <packaging>jbi-service-unit</packaging> 2

  <dependencies> 3
    <dependency>
      <groupId>org.apache.servicemix</groupId>
      <artifactId>servicemix-cxf-bc</artifactId>
      <version>3.3.1.0-fuse</version>
    </dependency>
  >/dependencies>

  <build>
    <plugins>
      <plugin> 4
        <groupId>org.apache.servicemix.tooling</groupId>
        <artifactId>jbi-maven-plugin</artifactId>
        <extensions>true</extensions>
      </plugin>
    </plugins>
  </build>
</project>- 1
- Specifies that it is a part of the top-level project shown in Example C.2, “Top-level POM for a Red Hat JBoss Fuse JBI project”
- 2
- Specifies that this project builds a service unit
- 3
- Specifies that the service unit targets the Apache CXF binding component
- 4
- Specifies to use the Red Hat JBoss Fuse Maven plug-in
C.3. A service assembly project
Overview
Seeding a project using a Maven artifact
groupId value and the artifactId values, which correspond to the project's group ID and artifact ID.
Example C.8. Maven archetype command for service assemblies
smx-arch
sa
[
"-DgroupId=my.group.id"
] [
"-DartifactId=my.artifact.id"
]
-DgroupId argument and the -DartifactId argument.
Contents of a project
Configuring the Maven plug-in
packaging element to jbi-service-assembly, as shown in Example C.9.
Example C.9. Configuring the Maven plug-in to build a service assembly
<project ...>
  <modelVersion>4.0.0</modelVersion>

  ...
  <groupId>com.widgets.demo.cxf-wsdl-first</groupId>
  <artifactId>cxf-wsdl-first-sa</artifactId>
  <name>CXF WSDL Fisrt Demo :: Service Assembly</name>
  <packaging>jbi-service-assembly</packaging>
  ...
</project>
Specifying the target components
dependencies element. Add a dependency child element for each service unit. Example C.10 shows the configuration for a service assembly that bundles two service units.
Example C.10. Specifying the target components for a service unit
...
<dependencies>
  <dependency>
    <groupId>com.widgets.demo.cxf-wsdl-first</groupId>
    <artifactId>cxfse-wsdl-first-su</artifactId>
    <version>1.0</version>
  </dependency>
  <dependency>
    <groupId>com.widgets.demo.cxf-wsdl-first</groupId>
    <artifactId>cxfbc-wsdl-first-su</artifactId>
    <version>1.0</version>
  </dependency>
</dependencies>
...
Example
Example C.11. POM for a service assembly project
<project xmlns="http://maven.apache.org/POM/4.0.0"
         xmlns:xsi="http://www.w3.org/2001/XMLSchema-instance"
         xsi:schemaLocation="http://maven.apache.org/POM/4.0.0
                             http://maven.apache.org/maven-v4_0_0.xsd">

    <modelVersion>4.0.0</modelVersion>

    <parent> 1
        <groupId>com.widgets.demo</groupId>
        <artifactId>cxf-wsdl-first</artifactId>
        <version>1.0</version>
    </parent>

  <groupId>com.widgets.demo.cxf-wsdl-first</groupId>
  <artifactId>cxf-wsdl-first-sa</artifactId>
  <name>CXF WSDL Fisrt Demo ::  Service Assemby</name>
  <packaging>jbi-service-assembly</packaging> 2

  <dependencies> 3
    <dependency>
      <groupId>com.widgets.demo.cxf-wsdl-first</groupId>
      <artifactId>cxfse-wsdl-first-su</artifactId>
      <version>1.0</version>
    </dependency>
    <dependency>
      <groupId>com.widgets.demo.cxf-wsdl-first</groupId>
      <artifactId>cxfbc-wsdl-first-su</artifactId>
      <version>1.0</version>
    </dependency>
  </dependencies>

  <build>
    <plugins>
      <plugin> 4
        <groupId>org.apache.servicemix.tooling</groupId>
        <artifactId>jbi-maven-plugin</artifactId>
        <extensions>true</extensions>
      </plugin>
    </plugins>
  </build>
</project>- 1
- Specifies that it is a part of the top-level project shown in Example C.2, “Top-level POM for a Red Hat JBoss Fuse JBI project”
- 2
- Specifies that this project builds a service assembly
- 3
- Specifies the service units being bundled by the service assembly
- 4
- Specifies to use the JBoss Fuse Maven plug-in
Appendix D. Using the Maven OSGi Tooling
Abstract
D.1. Setting up a Red Hat JBoss Fuse OSGi project
Overview
Directory structure
src folder. As in all Maven projects, you place all Java source code in the src/java folder, and you place any non-Java resources in the src/resources folder.
beans.xml file located in the src/resources/META-INF/spring folder.
Adding a bundle plug-in
Example D.1. Adding an OSGi bundle plug-in to a POM
...
<dependencies>
  <dependency> 1
    <groupId>org.apache.felix</groupId>
    <artifactId>org.osgi.core</artifactId>
    <version>1.0.0</version>
  </dependency>
...
</dependencies>
...
<build>
  <plugins>
    <plugin> 2
      <groupId>org.apache.felix</groupId>
      <artifactId>maven-bundle-plugin</artifactId>
      <configuration>
        <instructions>
          <Bundle-SymbolicName>${pom.artifactId}</Bundle-SymbolicName> 3
          <Import-Package>*,org.apache.camel.osgi</Import-Package> 4
          <Private-Package>org.apache.servicemix.examples.camel</Private-Package> 5
        </instructions>
      </configuration>
    </plugin>
  </plugins>
</build>
...
- 1
- Adds the dependency on Apache Felix
- 2
- Adds the bundle plug-in to your project
- 3
- Configures the plug-in to use the project's artifact ID as the bundle's symbolic name
- 4
- Configures the plug-in to include all Java packages imported by the bundled classes; also imports the org.apache.camel.osgi package
- 5
- Configures the plug-in to bundle the listed class, but not to include them in the list of exported packages
Activating a bundle plug-in
packaging element to bundle.
Useful Maven archetypes
Spring OSGi archetype
org.springframework.osgi/spring-bundle-osgi-archetype/1.1.2
mvn archetype:create -DarchetypeGroupId=org.springframework.osgi -DarchetypeArtifactId=spring-osgi-bundle-archetype -DarchetypeVersion=1.12 -DgroupId=groupId -DartifactId=artifactId -Dversion=versionApache CXF code-first archetype
org.apache.servicemix.tooling/servicemix-osgi-cxf-code-first-archetype/2008.01.0.3-fuse
mvn archetype:create -DarchetypeGroupId=org.apache.servicemix.tooling -DarchetypeArtifactId=spring-osgi-bundle-archetype -DarchetypeVersion=2008.01.0.3-fuse -DgroupId=groupId -DartifactId=artifactId -Dversion=versionApache CXF wsdl-first archetype
org.apache.servicemix.tooling/servicemix-osgi-cxf-wsdl-first-archetype/2008.01.0.3-fuse
mvn archetype:create -DarchetypeGroupId=org.apache.servicemix.tooling -DarchetypeArtifactId=servicemix-osgi-cxf-wsdl-first-archetype -DarchetypeVersion=2008.01.0.3-fuse -DgroupId=groupId -DartifactId=artifactId -Dversion=versionApache Camel archetype
org.apache.servicemix.tooling/servicemix-osgi-camel-archetype/2008.01.0.3-fuse
mvn archetype:create -DarchetypeGroupId=org.apache.servicemix.tooling -DarchetypeArtifactId=servicemix-osgi-camel-archetype -DarchetypeVersion=2008.01.0.3-fuse -DgroupId=groupId -DartifactId=artifactId -Dversion=version D.2. Configuring the Bundle Plug-In
Overview
instructions element.
Configuration properties
Setting a bundle's symbolic name
+ "." + artifactId, with the following exceptions:
- If groupId has only one section (no dots), the first package name with classes is returned.For example, if the group Id is
commons-logging:commons-logging, the bundle's symbolic name isorg.apache.commons.logging. - If artifactId is equal to the last section of groupId, then groupId is used.For example, if the POM specifies the group ID and artifact ID as
org.apache.maven:maven, the bundle's symbolic name isorg.apache.maven. - If artifactId starts with the last section of groupId, that portion is removed.For example, if the POM specifies the group ID and artifact ID as
org.apache.maven:maven-core, the bundle's symbolic name isorg.apache.maven.core.
Bundle-SymbolicName child in the plug-in's instructions element, as shown in Example D.2.
Example D.2. Setting a bundle's symbolic name
<plugin>
  <groupId>org.apache.felix</groupId>
  <artifactId>maven-bundle-plugin</artifactId>
  <configuration>
   <instructions>
     <Bundle-SymbolicName>${project.artifactId}</Bundle-SymbolicName>
     ...
    </instructions>
  </configuration>
</plugin>
Setting a bundle's name
${project.name}.
Bundle-Name child to the plug-in's instructions element, as shown in Example D.3.
Example D.3. Setting a bundle's name
<plugin>
  <groupId>org.apache.felix</groupId>
  <artifactId>maven-bundle-plugin</artifactId>
  <configuration>
   <instructions>
     <Bundle-Name>JoeFred</Bundle-Name>
     ...
    </instructions>
  </configuration>
</plugin>
Setting a bundle's version
${project.version}. Any dashes (-) are replaced with dots (.) and the number is padded up to four digits. For example, 4.2-SNAPSHOT becomes 4.2.0.SNAPSHOT.
Bundle-Version child to the plug-in's instructions element, as shown in Example D.4.
Example D.4. Setting a bundle's version
<plugin>
  <groupId>org.apache.felix</groupId>
  <artifactId>maven-bundle-plugin</artifactId>
  <configuration>
   <instructions>
     <Bundle-Version>1.0.3.1</Bundle-Version>
     ...
    </instructions>
  </configuration>
</plugin>
Specifying exported packages
Export-Package list is populated by all of the packages in your local Java source code (under src/main/java), except for the deault package, ., and any packages containing .impl or .internal.
Private-Package element in your plug-in configuration and you do not specify a list of packages to export, the default behavior includes only the packages listed in the Private-Package element in the bundle. No packages are exported.
Export-Package child to the plug-in's instructions element.
Export-Package element specifies a list of packages that are to be included in the bundle and that are to be exported. The package names can be specified using the * wildcard symbol. For example, the entry com.fuse.demo.* includes all packages on the project's classpath that start with com.fuse.demo.
!. For example, the entry !com.fuse.demo.private excludes the package com.fuse.demo.private.
!com.fuse.demo.private,com.fuse.demo.*
Specifying private packages
Private-Package instruction to the bundle plug-in configuration. By default, if you do not specify a Private-Package instruction, all packages in your local Java source are included in the bundle.
Private-Package element and the Export-Package element, the Export-Package element takes precedence. The package is added to the bundle and exported.
Private-Package element works similarly to the Export-Package element in that you specify a list of packages to be included in the bundle. The bundle plug-in uses the list to find all classes on the project's classpath that are to be included in the bundle. These packages are packaged in the bundle, but not exported (unless they are also selected by the Export-Package instruction).
Example D.5. Including a private package in a bundle
<plugin>
  <groupId>org.apache.felix</groupId>
  <artifactId>maven-bundle-plugin</artifactId>
  <configuration>
   <instructions>
     <Private-Package>org.apache.cxf.wsdlFirst.impl</Private-Package>
     ...
    </instructions>
  </configuration>
</plugin>
Specifying imported packages
Import-Package property with a list of all the packages referred to by the contents of the bundle.
Import-Package child to the plug-in's instructions element. The syntax for the package list is the same as for the Export-Package element and the Private-Package element.
Import-Package element, the plug-in does not automatically scan the bundle's contents to determine if there are any required imports. To ensure that the contents of the bundle are scanned, you must place an * as the last entry in the package list.
Example D.6. Specifying the packages imported by a bundle
<plugin>
  <groupId>org.apache.felix</groupId>
  <artifactId>maven-bundle-plugin</artifactId>
  <configuration>
   <instructions>
     <Import-Package>javax.jws,
         javax.wsdl,
         org.apache.cxf.bus,
         org.apache.cxf.bus.spring,
         org.apache.cxf.bus.resource,
         org.apache.cxf.configuration.spring,
         org.apache.cxf.resource,
         org.springframework.beans.factory.config,
         *
     </Import-Package>
     ...
   </instructions>
  </configuration>
</plugin>
More information
Index
A
- AcknowledgementInterval, Acknowledgement interval
- all element, Complex type varieties
- application source, How WS-RM works
- AtLeastOnce, Message delivery assurance policies
- AtMostOnce, Message delivery assurance policies
- attribute element, Defining attributes
- name attribute, Defining attributes
- type attribute, Defining attributes
- use attribute, Defining attributes
B
- BaseRetransmissionInterval, Base retransmission interval
- binding element, WSDL elements
- Bundle-Name, Setting a bundle's name
- Bundle-SymbolicName, Setting a bundle's symbolic name
- Bundle-Version, Setting a bundle's version
- bundles
- exporting packages, Specifying exported packages
- importing packages, Specifying imported packages
- name, Setting a bundle's name
- private packages, Specifying private packages
- symbolic name, Setting a bundle's symbolic name
- version, Setting a bundle's version
C
- choice element, Complex type varieties
- complex types
- all type, Complex type varieties
- choice type, Complex type varieties
- elements, Defining the parts of a structure
- occurrence constraints, Defining the parts of a structure
- sequence type, Complex type varieties
- complexType element, Defining data structures
- componentName, Specifying the target components
- concrete part, The concrete part
- configuration
- HTTP thread pool, Configuring the thread pool
- Jetty engine, The engine-factory element
- Jetty instance, The engine element
- consumer
- busCfg, Specifying the configuration to load
- endpoint, Specifying the endpoint details, Specifying the endpoint details
- mtomEnabled, Configuring an endpoint to support MTOM
- service, Specifying the endpoint details, Specifying the endpoint details
- targetEndpoint, Specifying the target endpoint
- targetInterface, Specifying the target endpoint
- targetService, Specifying the target endpoint
- useJbiWrapper, Turning of JBI wrapper processing
- wsdl, Specifying the WSDL
- consumer endpoint, Overview
- CreateSequence, How WS-RM works
- CreateSequenceResponse, How WS-RM works
D
- definitions element, WSDL elements
- driverClassName, Configuring WS-persistence
E
- element element, Defining the parts of a structure
- maxOccurs attribute, Defining the parts of a structure
- minOccurrs attribute, Defining the parts of a structure
- name attribute, Defining the parts of a structure
- type attribute, Defining the parts of a structure
- ExponentialBackoff, Exponential backoff for retransmission
- Export-Package, Specifying exported packages
H
- HTTP
- endpoint address, Adding a Basic HTTP Endpoint
- http-conf:client
- Accept, Configuring the endpoint
- AcceptEncoding, Configuring the endpoint
- AcceptLanguage, Configuring the endpoint
- AllowChunking, Configuring the endpoint
- AutoRedirect, Configuring the endpoint
- BrowserType, Configuring the endpoint
- CacheControl, Configuring the endpoint, Consumer Cache Control Directives
- Connection, Configuring the endpoint
- ConnectionTimeout, Configuring the endpoint
- ContentType, Configuring the endpoint
- Cookie, Configuring the endpoint
- DecoupledEndpoint, Configuring the endpoint, Configuring the consumer
- Host, Configuring the endpoint
- MaxRetransmits, Configuring the endpoint
- ProxyServer, Configuring the endpoint
- ProxyServerPort, Configuring the endpoint
- ProxyServerType, Configuring the endpoint
- ReceiveTimeout, Configuring the endpoint
- Referer, Configuring the endpoint
- http-conf:server
- CacheControl, Configuring the endpoint
- ContentEncoding, Configuring the endpoint
- ContentLocation, Configuring the endpoint
- ContentType, Configuring the endpoint
- HonorKeepAlive, Configuring the endpoint
- ReceiveTimeout, Configuring the endpoint
- RedirectURL, Configuring the endpoint
- ServerType, Configuring the endpoint
- SuppressClientReceiveErrors, Configuring the endpoint
- SuppressClientSendErrors, Configuring the endpoint
- http:address, Other messages types
- httpj:engine, The engine element
- httpj:engine-factory, The engine-factory element
- httpj:identifiedThreadingParameters, The engine-factory element, Configuring the thread pool
- httpj:identifiedTLSServerParameters, The engine-factory element
- httpj:threadingParameters, The engine element, Configuring the thread pool
- maxThreads, Configuring the thread pool
- minThreads, Configuring the thread pool
- httpj:threadingParametersRef, The engine element
- httpj:tlsServerParameters, The engine element
- httpj:tlsServerParametersRef, The engine element
I
- Import-Package, Specifying imported packages
- inFaultInterceptors, Configuring an endpoint's interceptor chain
- inInterceptors, Configuring an endpoint's interceptor chain
- InOrder, Message delivery assurance policies
J
- jbi.xml, Contents of a file component service unit
- JMS
- specifying the message type, Specifying the message type
- JMS destination
- specifying, Specifying the JMS address
- jms:address, Specifying the JMS address
- connectionPassword attribute, Specifying the JMS address
- connectionUserName attribute, Specifying the JMS address
- destinationStyle attribute, Specifying the JMS address
- jmsDestinationName attribute, Specifying the JMS address
- jmsiReplyDestinationName attribute, Using a Named Reply Destination
- jmsReplyDestinationName attribute, Specifying the JMS address
- jndiConnectionFactoryName attribute, Specifying the JMS address
- jndiDestinationName attribute, Specifying the JMS address
- jndiReplyDestinationName attribute, Specifying the JMS address, Using a Named Reply Destination
- jms:client, Specifying the message type
- messageType attribute, Specifying the message type
- jms:JMSNamingProperties, Specifying JNDI properties
- jms:server, Specifying the configuration
- durableSubscriberName, Specifying the configuration
- messageSelector, Specifying the configuration
- transactional, Specifying the configuration
- useMessageIDAsCorrealationID, Specifying the configuration
- JMSConfiguration, Specifying the configuration
- JNDI
- specifying the connection factory, Specifying the JMS address
L
- logical part, The logical part
M
- Maven archetypes, Useful Maven archetypes
- Maven tooling
- adding the bundle plug-in, Adding a bundle plug-in
- set up, Setting up the Maven tools
- maxLength, Maximum length of an RM sequence
- maxUnacknowledged, Maximum unacknowledged messages threshold
- message element, WSDL elements, Defining Logical Messages Used by a Service
N
- named reply destination
- specifying in WSDL, Specifying the JMS address
- using, Using a Named Reply Destination
- namespace, Namespace
O
- operation element, WSDL elements
- outFaultInterceptors, Configuring an endpoint's interceptor chain
- outInterceptors, Configuring an endpoint's interceptor chain
P
- part element, Defining Logical Messages Used by a Service, Message parts
- element attribute, Message parts
- name attribute, Message parts
- type attribute, Message parts
- passWord, Configuring WS-persistence
- port element, WSDL elements
- portType element, WSDL elements, Port types
- Private-Package, Specifying private packages
- provider
- busCfg, Specifying the configuration to load
- mtomEnabled, Configuring an endpoint to support MTOM
- useJbiWrapper, Turning of JBI wrapper processing
- wsdl, Specifying the WSDL
- provider endpoint, Overview
R
- RMAssertion, WS-Policy RMAssertion Children
- RPC style design, Message design for integrating with legacy systems
S
- Sequence, How WS-RM works
- sequence element, Complex type varieties
- SequenceAcknowledgment, How WS-RM works
- service assembly
- seeding, Seeding a project using a Maven artifact
- specifying the service units, Specifying the target components
- service element, WSDL elements
- service unit
- seeding, Seeding a project using a Maven artifact
- specifying the target component, Specifying the target components
- smx-arch, Seeding a project using a Maven artifact, Seeding a project using a Maven artifact
- SOAP 1.1
- endpoint address, SOAP 1.1
- SOAP 1.2
- endpoint address, SOAP 1.2
- soap12:address, SOAP 1.2
- soap:address, SOAP 1.1
T
- types element, WSDL elements
U
- userName, Configuring WS-persistence
W
- wrapped document style, Message design for SOAP services
- WS-Addressing
- WS-RM
- AcknowledgementInterval, Acknowledgement interval
- AtLeastOnce, Message delivery assurance policies
- AtMostOnce, Message delivery assurance policies
- BaseRetransmissionInterval, Base retransmission interval
- configuring, Configuring WS-RM
- destination, How WS-RM works
- driverClassName, Configuring WS-persistence
- enabling, Enabling WS-RM
- ExponentialBackoff, Exponential backoff for retransmission
- externaL attachment, External attachment
- initial sender, How WS-RM works
- InOrder, Message delivery assurance policies
- interceptors, Apache CXF WS-RM Interceptors
- maxLength, Maximum length of an RM sequence
- maxUnacknowledged, Maximum unacknowledged messages threshold
- passWord, Configuring WS-persistence
- rmManager, Children of the rmManager Spring bean
- source, How WS-RM works
- ultimate receiver, How WS-RM works
- url, Configuring WS-persistence
- userName, Configuring WS-persistence
- wsam:Addressing, Configuring an endpoint to use WS-Addressing
- WSDL design
- RPC style, Message design for integrating with legacy systems
- wrapped document style, Message design for SOAP services
- WSDL extensors
- jms:address (see jms:address)
- jms:client (see jms:client)
- jms:JMSNamingProperties (see jms:JMSNamingProperties)
- jms:server (see jms:server)
- wsrm:AcksTo, How WS-RM works
- wswa:UsingAddressing, Configuring an endpoint to use WS-Addressing
X
- xbean.xml, Contents of a file component service unit
Legal Notice
Trademark Disclaimer
Legal Notice
Third Party Acknowledgements
- JLine (http://jline.sourceforge.net) jline:jline:jar:1.0License: BSD (LICENSE.txt) - Copyright (c) 2002-2006, Marc Prud'hommeaux
mwp1@cornell.eduAll rights reserved.Redistribution and use in source and binary forms, with or without modification, are permitted provided that the following conditions are met:- Redistributions of source code must retain the above copyright notice, this list of conditions and the following disclaimer.
- Redistributions in binary form must reproduce the above copyright notice, this list of conditions and the following disclaimer in the documentation and/or other materials provided with the distribution.
- Neither the name of JLine nor the names of its contributors may be used to endorse or promote products derived from this software without specific prior written permission.
THIS SOFTWARE IS PROVIDED BY THE COPYRIGHT HOLDERS AND CONTRIBUTORS "AS IS" AND ANY EXPRESS OR IMPLIED WARRANTIES, INCLUDING, BUT NOT LIMITED TO, THE IMPLIED WARRANTIES OF MERCHANTABILITY AND FITNESS FOR A PARTICULAR PURPOSE ARE DISCLAIMED. IN NO EVENT SHALL THE COPYRIGHT OWNER OR CONTRIBUTORS BE LIABLE FOR ANY DIRECT, INDIRECT, INCIDENTAL, SPECIAL, EXEMPLARY, OR CONSEQUENTIAL DAMAGES (INCLUDING, BUT NOT LIMITED TO, PROCUREMENT OF SUBSTITUTE GOODS OR SERVICES; LOSS OF USE, DATA, OR PROFITS; OR BUSINESS INTERRUPTION) HOWEVER CAUSED AND ON ANY THEORY OF LIABILITY, WHETHER IN CONTRACT, STRICT LIABILITY, OR TORT (INCLUDING NEGLIGENCE OR OTHERWISE) ARISING IN ANY WAY OUT OF THE USE OF THIS SOFTWARE, EVEN IF ADVISED OF THE POSSIBILITY OF SUCH DAMAGE. - Stax2 API (http://woodstox.codehaus.org/StAX2) org.codehaus.woodstox:stax2-api:jar:3.1.1License: The BSD License (http://www.opensource.org/licenses/bsd-license.php)Copyright (c) <YEAR>, <OWNER> All rights reserved.Redistribution and use in source and binary forms, with or without modification, are permitted provided that the following conditions are met:
- Redistributions of source code must retain the above copyright notice, this list of conditions and the following disclaimer.
- Redistributions in binary form must reproduce the above copyright notice, this list of conditions and the following disclaimer in the documentation and/or other materials provided with the distribution.
THIS SOFTWARE IS PROVIDED BY THE COPYRIGHT HOLDERS AND CONTRIBUTORS "AS IS" AND ANY EXPRESS OR IMPLIED WARRANTIES, INCLUDING, BUT NOT LIMITED TO, THE IMPLIED WARRANTIES OF MERCHANTABILITY AND FITNESS FOR A PARTICULAR PURPOSE ARE DISCLAIMED. IN NO EVENT SHALL THE COPYRIGHT HOLDER OR CONTRIBUTORS BE LIABLE FOR ANY DIRECT, INDIRECT, INCIDENTAL, SPECIAL, EXEMPLARY, OR CONSEQUENTIAL DAMAGES (INCLUDING, BUT NOT LIMITED TO, PROCUREMENT OF SUBSTITUTE GOODS OR SERVICES; LOSS OF USE, DATA, OR PROFITS; OR BUSINESS INTERRUPTION) HOWEVER CAUSED AND ON ANY THEORY OF LIABILITY, WHETHER IN CONTRACT, STRICT LIABILITY, OR TORT (INCLUDING NEGLIGENCE OR OTHERWISE) ARISING IN ANY WAY OUT OF THE USE OF THIS SOFTWARE, EVEN IF ADVISED OF THE POSSIBILITY OF SUCH DAMAGE. - jibx-run - JiBX runtime (http://www.jibx.org/main-reactor/jibx-run) org.jibx:jibx-run:bundle:1.2.3License: BSD (http://jibx.sourceforge.net/jibx-license.html) Copyright (c) 2003-2010, Dennis M. Sosnoski.All rights reserved.Redistribution and use in source and binary forms, with or without modification, are permitted provided that the following conditions are met:
- Redistributions of source code must retain the above copyright notice, this list of conditions and the following disclaimer.
- Redistributions in binary form must reproduce the above copyright notice, this list of conditions and the following disclaimer in the documentation and/or other materials provided with the distribution.
- Neither the name of JiBX nor the names of its contributors may be used to endorse or promote products derived from this software without specific prior written permission.
THIS SOFTWARE IS PROVIDED BY THE COPYRIGHT HOLDERS AND CONTRIBUTORS "AS IS" AND ANY EXPRESS OR IMPLIED WARRANTIES, INCLUDING, BUT NOT LIMITED TO, THE IMPLIED WARRANTIES OF MERCHANTABILITY AND FITNESS FOR A PARTICULAR PURPOSE ARE DISCLAIMED. IN NO EVENT SHALL THE COPYRIGHT OWNER OR CONTRIBUTORS BE LIABLE FOR ANY DIRECT, INDIRECT, INCIDENTAL, SPECIAL, EXEMPLARY, OR CONSEQUENTIAL DAMAGES (INCLUDING, BUT NOT LIMITED TO, PROCUREMENT OF SUBSTITUTE GOODS OR SERVICES; LOSS OF USE, DATA, OR PROFITS; OR BUSINESS INTERRUPTION) HOWEVER CAUSED AND ON ANY THEORY OF LIABILITY, WHETHER IN CONTRACT, STRICT LIABILITY, OR TORT (INCLUDING NEGLIGENCE OR OTHERWISE) ARISING IN ANY WAY OUT OF THE USE OF THIS SOFTWARE, EVEN IF ADVISED OF THE POSSIBILITY OF SUCH DAMAGE. - JavaAssist (http://www.jboss.org/javassist) org.jboss.javassist:com.springsource.javassist:jar:3.9.0.GA:compileLicense: MPL (http://www.mozilla.org/MPL/MPL-1.1.html)
- HAPI-OSGI-Base Module (http://hl7api.sourceforge.net/hapi-osgi-base/) ca.uhn.hapi:hapi-osgi-base:bundle:1.2License: Mozilla Public License 1.1 (http://www.mozilla.org/MPL/MPL-1.1.txt)