
Red Hat Training
A Red Hat training course is available for Red Hat Enterprise Linux
3.2. Making Installation USB Media
You can use a USB drive or an SD card instead of a CD or DVD to create bootable media for installing Red Hat Enterprise Linux on 64-bit AMD, Intel, or ARM systems. The exact procedure varies depending on whether you want to perform it on a Linux or Windows system. You can create minimal boot media and full installation media using the same procedure; the only limitation is the capacity of the USB drive - it must have enough space to fit the entire image, which means roughly 450 MB for minimal boot media and 4.8 GB for full installation media.
3.2.1. Making Installation USB Media on Linux
The following procedure assumes you are using a Linux system and that you have downloaded an appropriate ISO image as described in Chapter 2, Downloading Red Hat Enterprise Linux. On most Linux distributions, it will work without the need for installing any additional packages.
Warning
This procedure is destructive. Any data on the USB flash drive will be destroyed with no warning. Make sure that you specify the correct drive, and make sure that this drive does not contain any data you want to preserve.
Many Linux distributions provide their own tools for creating live USB media: liveusb-creator on Fedora, usb-creator on Ubuntu, and others. Describing these tools is beyond the scope of this book; the following procedure will work on most Linux systems.
Procedure 3.1. Making USB Media on Linux
- Connect a USB flash drive to the system and execute the
dmesgcommand. A log detailing all recent events will be displayed. At the bottom of this log, you will see a set of messages caused by the USB flash drive you just connected. It will look like a set of lines similar to the following:[ 170.171135] sd 5:0:0:0: [sdb] Attached SCSI removable diskNote the name of the connected device - in the above example, it issdb. - Log in as
root:$su -Provide your root password when prompted. - Make sure that the device is not mounted. First, use the
findmnt devicecommand and the device name you found in the earlier steps. For example, if the device name issdb, use the following command:#findmnt /dev/sdbIf the command displays no output, you can proceed with the next step. However, if the command does provide output, it means that the device was automatically mounted and you must unmount it before proceeding. A sample output will look similar to the following:#findmnt /dev/sdbTARGET SOURCE FSTYPE OPTIONS /mnt/iso /dev/sdb iso9660 ro,relatimeNote theTARGETcolumn. Next, use theumount targetcommand to unmount the device:#umount /mnt/iso - Use the
ddcommand to write the installation ISO image directly to the USB device:#dd if=/image_directory/image.iso of=/dev/device bs=blocksizeReplace /image_directory/image.iso with the full path to the ISO image file you downloaded, device with the device name as reported by thedmesgcommand earlier, and blocksize with a reasonable block size (for example,512k) to speed up the writing process. Thebsparameter is optional, but it can speed up the process considerably.Important
Make sure to specify the output as the device name (for example,/dev/sda), not as a name of a partition on the device (for example,/dev/sda1).For example, if the ISO image is located in/home/testuser/Downloads/rhel-server-7-x86_64-boot.isoand the detected device name issdb, the command will look like the following:#dd if=/home/testuser/Downloads/rhel-server-7-x86_64-boot.iso of=/dev/sdb bs=512k - Wait for
ddto finish writing the image to the device. Note that no progress bar is displayed; the data transfer is finished when the#prompt appears again. After the prompt is displayed, log out from therootaccount and unplug the USB drive.
The USB drive is now ready to be used as a boot device. You can continue with Chapter 7, Booting the Installation on 64-bit AMD, Intel, and ARM systems on AMD, Intel, and ARM systems, or Chapter 12, Booting the Installation on IBM Power Systems on IBM Power Systems servers.
Note
Non-virtualized installations (known as "bare metal" installations) on IBM Power Systems servers require that the
inst.stage2= boot option is specified. Refer to Section 23.1, “Configuring the Installation System at the Boot Menu” for information about the inst.stage2= boot option.
3.2.2. Making Installation USB Media on Windows
The procedure of creating bootable USB media on Windows depends on which tool you use. There are many different utilities which allow you to write an ISO image to a USB drive. Red Hat recommends using the Fedora Media Writer, available for download at https://github.com/FedoraQt/MediaWriter/releases .
Note
Fedora Media Writer is a community product and is not supported by Red Hat. Any issues with the tool can be reported at https://github.com/FedoraQt/MediaWriter/issues.
Important
Transferring the ISO image file to the USB drive using Windows Explorer or a similar file manager will not work - you will not be able to boot from the device.
Procedure 3.2. Making USB Media on Windows
- Download and install Fedora Media Writer.
- Download the Red Hat Enterprise Linux ISO image you want to use to create the media. (See Chapter 2, Downloading Red Hat Enterprise Linux for instructions on obtaining ISO images.)
- Plug in the USB drive you will be using to create bootable media.
- Open Fedora Media Writer.
- In the main window, click Custom Image and select the downloaded Red Hat Enterprise Linux ISO image.
- From the drop-down menu, select the drive you want to use. If the drive does not appear, verify that the USB drive is connected and restart Fedora Media Writer.
- Click Write to disk. The boot media creation process will begin. Do not unplug the drive until the operation completes. Depending on the size of the ISO image and the write speed of the USB drive, writing the image can take several minutes.
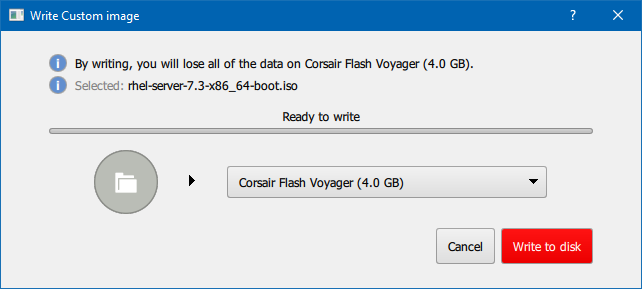
Figure 3.1. Fedora Media Writer
- When the creation process finishes and the
Complete!message appears, unmount the USB drive using the Safely remove hardware icon in the system's notification area.
The USB drive is now ready to be used as a boot device. You can continue with Chapter 7, Booting the Installation on 64-bit AMD, Intel, and ARM systems on AMD, Intel, and ARM systems, or Chapter 12, Booting the Installation on IBM Power Systems on IBM Power Systems servers.
3.2.3. Making Installation USB Media on Mac OS X
This procedure involves using the
dd command line tool to write the installation image to a USB flash drive. Note that some steps involve use of the sudo command, which is only available when logged in with an administrator account that requires a password.
Warning
All data on the USB flash drive will be deleted by this procedure.
Procedure 3.3. Making USB Media on Mac OS X
- Connect a USB flash drive to the system and identify the device path with the
diskutil listcommand. The device path has the format of/dev/disknumber, where number is the number of the disk. The disks are numbered starting at zero (0). Disk 0 is likely to be the OS X recovery disk, and Disk 1 is likely to be your main OS X installation. In the following example, it isdisk2:$
diskutil list/dev/disk0 #: TYPE NAME SIZE IDENTIFIER 0: GUID_partition_scheme *500.3 GB disk0 1: EFI EFI 209.7 MB disk0s1 2: Apple_CoreStorage 400.0 GB disk0s2 3: Apple_Boot Recovery HD 650.0 MB disk0s3 4: Apple_CoreStorage 98.8 GB disk0s4 5: Apple_Boot Recovery HD 650.0 MB disk0s5 /dev/disk1 #: TYPE NAME SIZE IDENTIFIER 0: Apple_HFS YosemiteHD *399.6 GB disk1 Logical Volume on disk0s1 8A142795-8036-48DF-9FC5-84506DFBB7B2 Unlocked Encrypted /dev/disk2 #: TYPE NAME SIZE IDENTIFIER 0: FDisk_partition_scheme *8.0 GB disk2 1: Windows_NTFS SanDisk USB 8.0 GB disk2s1To identify your USB flash drive, compare theNAME,TYPEandSIZEcolumns to what you know about your flash drive. For example, theNAMEshould be the same as the title of the flash drive icon in the Finder. You can also compare these values to those in the flash drive's information panel; right-click on the drive icon and select Get Info. - Use the
diskutil unmountDiskcommand to unmount the flash drive's filesystem volumes:$
diskutil unmountDisk /dev/disknumberUnmount of all volumes on disknumber was successfulWhen you do this, the icon for the flash drive disappears from your desktop. If it does not, you might have identified the wrong disk. If you attempt to unmount the system disk accidentally, you get afailed to unmounterror. - Use the
ddcommand as a parameter of thesudocommand to write the ISO image to the flash drive:$
sudo dd if=/path/to/image.iso of=/dev/rdisknumber bs=1m>Note
Mac OS X provides both a block (/dev/disk*) and character device (/dev/rdisk*) file for each storage device. Writing an image to the/dev/rdisknumbercharacter device is faster than to the/dev/disknumberblock device.Example 3.1. Writing an ISO Image to a Disk
To write the/Users/user_name/Downloads/rhel-server-7-x86_64-boot.isofile to the/dev/rdisk2device:$
sudo dd if=/Users/user_name/Downloads/rhel-server-7-x86_64-boot.iso of=/dev/rdisk2 - Wait for the command to finish. Note that no progress bar is displayed; however, to check the status of the operation while it is still running, press Ctrl+t in the terminal:
load: 1.02  cmd: dd 3668 uninterruptible 0.00u 1.91s
112+0 records in
111+0 records out
116391936 bytes transferred in 114.834860 secs (1013559 bytes/sec)
- The speed of the data transfer depends on the speed of your USB ports and the flash drive. After the prompt is displayed again, the data transfer is finished. You can then unplug the flash drive.
The flash drive is now ready to be used as a boot device. You can continue with Chapter 7, Booting the Installation on 64-bit AMD, Intel, and ARM systems on AMD64 and Intel 64 systems or Chapter 12, Booting the Installation on IBM Power Systems on IBM Power Systems servers.