
Red Hat Training
A Red Hat training course is available for Red Hat Enterprise Linux
8.4. Using the IdM Web UI
In order to use the web UI, the user must be authenticated with the IdM Kerberos domain and have an active Kerberos ticket, see Section 8.3, “Logging into IdM”. Generally, the web UI can only be accessed from an IdM server or client machine and the user must be locally authenticated. There are a couple of ways to work around this, either by configuring Kerberos on a non-domain machine to connect to the Kerberos domain, see Section 8.4.4, “Using a Browser on Another System”, or by password authentication to the UI.
8.4.1. About the Web UI
The web UI has three major functional areas which correspond to each of the major functions of IdM: identity management, policy management, and domain configuration.
Table 8.1. Configuration Areas Per Tab
| Main Menu Tab | Configuration Areas |
|---|---|
| Identity |
|
| Policy |
|
| IdM Server (access controls within Identity Management) |
|
The main menu at the top of every page has three tabs which correspond to the functional areas listed in Table 8.1, “Configuration Areas Per Tab”. When a tab is selected, there is a submenu of the different configuration areas. Some configuration areas may have multiple possible entries; for example, role-based access controls define user roles/groups, the areas that access can be granted or denied (privileges), and then the permissions granted to those areas. Each separate configuration entry has its own task area beneath the primary configuration area.
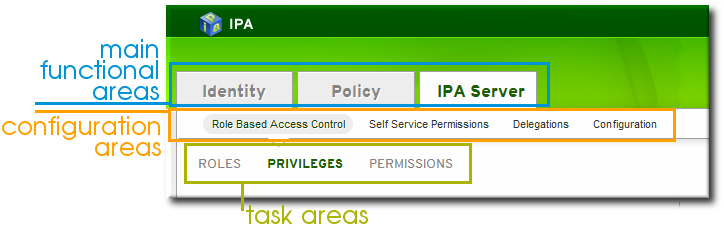
Figure 8.1. The Main Menu
8.4.2. Opening the IdM Web UI
The browser must be properly configured, as described in Section 8.4.3, “Configuring the Browser”, to support Kerberos authentication so that the user can connect to the UI.
To open the web UI:
- Get a valid Kerberos ticket using
kinit, as in Section 8.3, “Logging into IdM”. - Open the IdM URL. The full URL is
https://IPAserver-FQDN/ipa/ui, but this service is also accessed simply by openinghttps://IPAserver-FQDN. For example:https://server.example.com https://server.example.com/ipa/ui
8.4.3. Configuring the Browser
Supported web browsers for connecting to the web UI are Firefox, starting with version 17, and Google Chrome. For information on the browser configuration, see the appropriate section:
8.4.3.1. Configuring Firefox
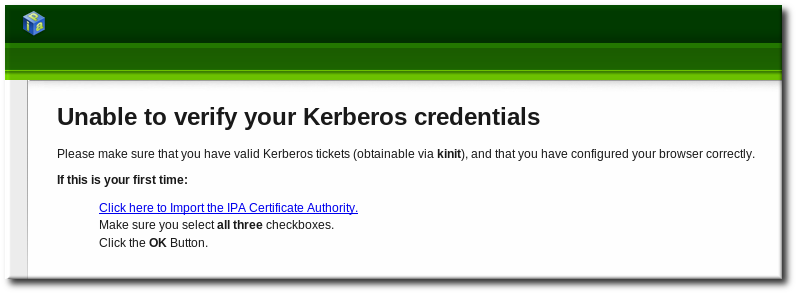
Firefox can use Kerberos credentials to authenticate to the IdM UI, but Kerberos negotiation needs to be configured to use the IdM domain. At the first log-in attempt, if Firefox has not been configured to support Kerberos authentication, then an error message appears.

Figure 8.2. Kerberos Authentication Error
If you see that error, then the IdM web UI can perform the required configuration:
- Click the follow these directions link.
- Click the link to import the CA certificate for the IdM server.
- Set the web site and software developer (first and last) trust bits for the CA certificate.

- Click the Configure Firefox button. This automatically fills out all the
negotiatesettings in the Firefox configuration to use the IdM domain settings. When the process is complete, a success box pops up saying that Firefox has been configured for single sign-on. From there, you are redirected to the IdM web UI.
This procedure can also be done manually:
- Start Firefox.
- Type
about:configin the address bar. - In the Search field, type
negotiateto filter out the Kerberos-related parameters. - On Red Hat Enterprise Linux, enter the domain name for the URI parameters, including the preceding period (.) and set the
gsslibparameter to true:network.negotiate-auth.trusted-uris .example.com network.negotiate-auth.using-native-gsslib true
On Windows, set the trusted URIs and library path, and disable the built-in Microsoft Kerberos for authentication:network.negotiate-auth.trusted-uris .example.com network.auth.use-sspi false network.negotiate-auth.gsslib: C:\Program Files\MIT\Kerberos\bin\gssapi32.dll
On a 64-bit system, the library location is inC:\Program Files(x86)\MIT\Kerberos\bin\gssapi32.dll. - Open the web UI by going to the fully-qualified domain name of the IdM server such as
http://ipaserver.example.com. Make sure that you can open the web UI and that there are no Kerberos authentication errors. - Next, download the IdM server's CA certificate from
http://ipa.example.com/ipa/config/ca.crt. - In the Downloading Certificate window that appears, select the first (Trust this CA to identify web sites) and third (Trust this CA to identify software developers) check boxes.
8.4.3.2. Configuring Chrome
- Import CA Certificate
- Download the CA certificate from
http://my.ipa.server/ipa/config/ca.crt. Alternatively, if the host is also an IdM client, you can find the certificate in/etc/ipa/ca.crt. - Click the menu button with the
Customize and control Google Chrometooltip, which is by default in the top right-hand corner of Chrome, and click Settings.
- Click Show advanced settings to display more options, and then click the Manage certificates button located under the
HTTPS/SSLheading.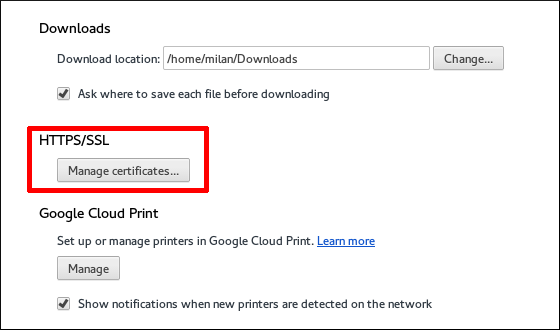
- In the Authorities tab, click the Import button at the bottom.
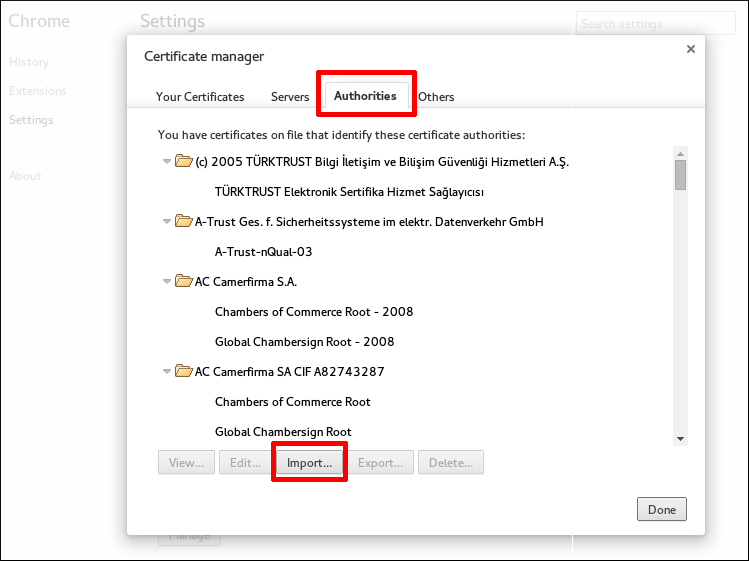
- Select the CA certificate file that you downloaded in the first step.
- Enable SPNEGO (Simple and Protected GSSAPI Negotiation Mechanism) to Use Kerberos Authentication in Chrome
- Make sure you have the necessary directory created by running
[root@client]# mkdir -p /etc/opt/chrome/policies/managed/
- Create a new
/etc/opt/chrome/policies/managed/mydomain.jsonfile with write privileges limited to the system administrator or root, and include the following line:{ "AuthServerWhitelist": "*.example.com" }You can do this by running[root@server]# echo '{ "AuthServerWhitelist": "*.example.com" }' > /etc/opt/chrome/policies/managed/mydomain.json
8.4.4. Using a Browser on Another System
It is possible to connect to the Identity Management web UI from a system which is not a member of the IdM domain. In this case, it is possible to specify an IdM-specific Kerberos configuration file on the external (non-IdM) machine before running
kinit, and then the user can authenticate against the IdM server domain.
This is especially useful there are multiple realms or overlapping domains across your infrastructure.
- Copy the
/etc/krb5.conffile from the IdM server.# scp /etc/krb5.conf root@externalmachine.example.com:/etc/krb5_ipa.conf
Warning
Do not overwrite the existingkrb5.conffile. - On the external machine, set the terminal session to use the copied IdM Kerberos configuration file:
$ export KRB5_CONFIG=/etc/krb5_ipa.conf
- Configure Firefox on the external machine as in Section 8.4.3, “Configuring the Browser”.
8.4.5. Logging in with Simple Username/Password Credentials
If Kerberos authentication fails, then browser login also fails. That prevents access to the IdM web UI. Simple authentication for the UI allows users to log in even if there are problems with the Kerberos service or if the system is outside the IdM domain.
When the IdM server cannot find a valid Kerberos ticket for the user attempting to log into the web UI, it splashes an error message. Since the preferred method of connecting to IdM domain services (including the UI) is using Kerberos authentication, the error first says to renew the Kerberos credentials or to configure the browser to support Kerberos authentication.
The second part of the message offers the alternative of using simple authentication. The form-based authentication link opens a login page.
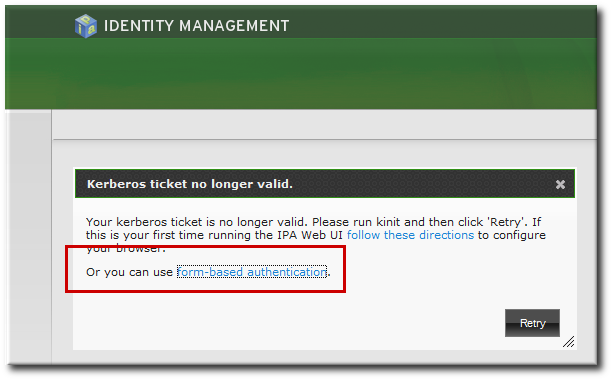
Figure 8.3. IdM Form-Based Login Option
Then simply supply the UID and password for a configured IdM user.
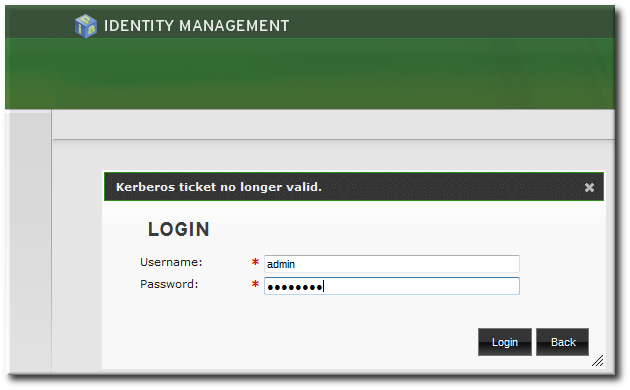
Figure 8.4. IdM Password Prompt
8.4.6. Using the UI with Proxy Servers
Proxy servers can be used to access the web UI without any additional configuration in IdM.
Port forwarding is not supported with the IdM server. However, because it is possible to use proxy servers with IdM, an operation similar to port forwarding can be configured using proxy forwarding with OpenSSH and the SOCKS option.