
Deployment Guide
Installing and Configuring OpenShift Enterprise
Abstract
- Introductory information that includes hardware and software prerequisites, architecture information, upgrading from previous installations, and general information about the sample installation.
- Instructions on how to install and configure broker hosts and all necessary components and services.
- Instructions on how to install and configure node hosts and all necessary components and services.
- Information on how to test and validate an OpenShift Enterprise installation, and install and configure a developer workstation.
Chapter 1. Introduction to OpenShift Enterprise
1.1. Product Features
| Ease of administration | With OpenShift Enterprise, system administrators no longer have to create development, testing, and production environments. Developers can create their own application stacks using the OpenShift Enterprise Management Console, client tools, or the REST API. |
| Choice | Developers can choose their tools, languages, frameworks, and services. |
| Automatic scaling | With OpenShift Enterprise, applications can scale out as necessary, adjusting resources based on demand. |
| Avoid lock-in | Using standard languages and middleware runtimes means that customers are not tied to OpenShift Enterprise, and can easily move to another platform. |
| Multiple clouds | OpenShift Enterprise can be deployed on physical hardware, private clouds, public clouds, hybrid clouds, or a mixture of these, allowing full control over where applications are run. |
1.2. What's New in Current Release
Chapter 2. Prerequisites
2.1. Supported Operating Systems
Note
Important
2.2. Hardware Requirements
- AMD64 or Intel® 64 architecture
- Minimum 1 GB of memory
- Minimum 8 GB of hard disk space
- Network connectivity
2.3. Red Hat Subscription Requirements
- Red Hat Enterprise Linux 6 Server
- Red Hat Software Collections 1
- OpenShift Enterprise Infrastructure (broker and supporting services)
- OpenShift Enterprise Application Node
- OpenShift Enterprise Client Tools
- JBoss Enterprise Web Server 2
- JBoss Enterprise Application Platform 6
- Red Hat OpenShift Enterprise JBoss EAP add-on
Note
Chapter 3. Architecture

Figure 3.1. OpenShift Enterprise Components Legend

Figure 3.2. OpenShift Enterprise Host Types
Warning
3.1. Communication Mechanisms

Figure 3.3. OpenShift Enterprise Communication Mechanisms
3.2. State Management
Table 3.1. Sections of Application Data
| Section | Description |
|---|---|
| State | This is the general application state where the data is stored using MongoDB by default. |
| DNS | This is the dynamic DNS state where BIND handles the data by default. |
| Auth | This is the user state for authentication and authorization. This state is stored using any authentication mechanism supported by Apache, such as mod_auth_ldap and mod_auth_kerb. |
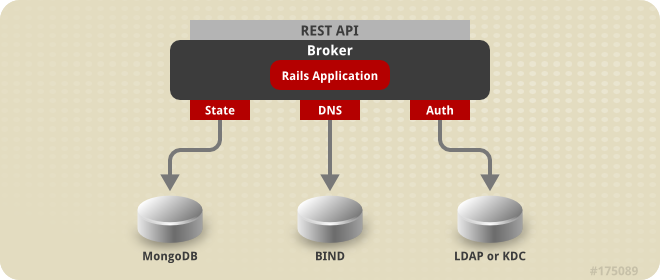
Figure 3.4. OpenShift Enterprise State Management
3.3. Redundancy
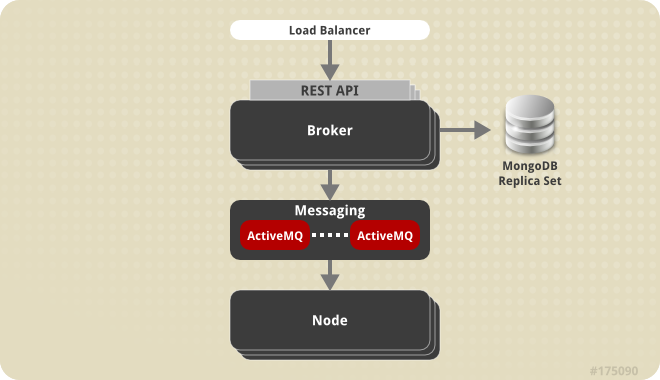
Figure 3.5. Implementing Redundancy in OpenShift Enterprise
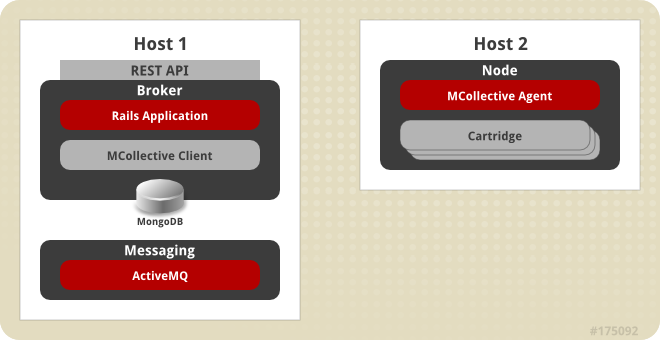
Figure 3.6. Simplified OpenShift Enterprise Installation Topology
3.4. Security
- SELinux
- SELinux is an implementation of a mandatory access control (MAC) mechanism in the Linux kernel. It checks for allowed operations at a level beyond what standard discretionary access controls (DAC) provide. SELinux can enforce rules on files and processes, and on their actions based on defined policy. SELinux provides a high level of isolation between applications running within OpenShift Enterprise because each gear and its contents are uniquely labeled.
- Control Groups (cgroups)
- Control Groups allow you to allocate processor, memory, and input and output (I/O) resources among applications. They provide control of resource utilization in terms of memory consumption, storage and networking I/O utilization, and process priority. This enables the establishment of policies for resource allocation, thus ensuring that no system resource consumes the entire system and affects other gears or services.
- Kernel Namespaces
- Kernel namespaces separate groups of processes so that they cannot see resources in other groups. From the perspective of a running OpenShift Enterprise application, for example, the application has access to a running Red Hat Enterprise Linux system, although it could be one of many applications running within a single instance of Red Hat Enterprise Linux.
It is important to understand how routing works on a node to better understand the security architecture of OpenShift Enterprise. An OpenShift Enterprise node includes several front ends to proxy traffic to the gears connected to its internal network.
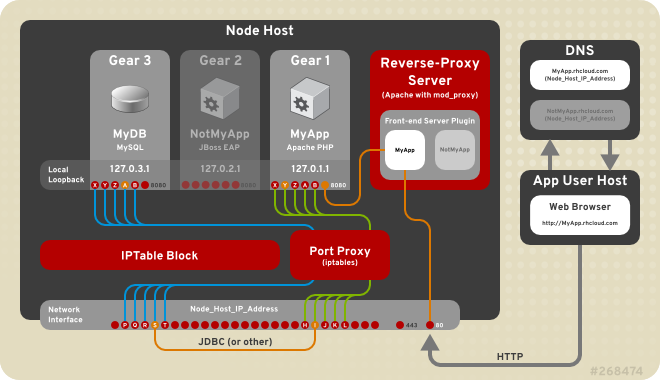
Figure 3.7. OpenShift Enterprise Networking
Warning
Chapter 4. Upgrading from Previous Versions
ose-upgrade tool. If you are deploying OpenShift Enterprise for the first time, see Section 6.3, “Using the Sample Deployment Steps” for installation instructions. If you are attempting to apply the latest errata within a minor release of OpenShift Enterprise 2 (for example, updating from release 2.1.6 to 2.1.8), see Chapter 15, Asynchronous Errata Updates for specific update instructions.
ose-upgrade tool to upgrade from 2.0 to 2.1, then use the tool again to upgrade from 2.1 to 2.2.
- Broker services are disabled during the upgrade.
- Applications are unavailable during certain steps of the upgrade. During the outage, users can still access their gears using
SSH, but should be advised against performing any Git pushes. See the section on your relevant upgrade path for more specific outage information. - Although it may not be necessary, Red Hat recommends rebooting all hosts after an upgrade. Due to the scheduled outage, this is a good time to apply any kernel updates that are included.
yum update command.
4.1. Upgrade Tool
ose-upgrade tool.
- Each step typically consists of one or more scripts to be executed and varies depending on the type of host.
- Upgrade steps and scripts must be executed in a given order, and are tracked by the
ose-upgradetool. The upgrade tool tracks all steps that have been executed and those that have failed. The next step or script is not executed when a previous one has failed. - Failed steps can be reattempted after the issues are resolved. Note that only scripts that previously failed are executed again, so ensure you are aware of the impact and that the issue has been resolved correctly. If necessary, use the
--skipoption to mark a step complete and proceed to the next step. However, only do this when absolutely required. - The
ose-upgradetool log file is stored at/var/log/openshift/upgrade.logfor review if required.
ose-upgrade status command to list the known steps and view the next step that must be performed. Performing all the steps without pausing with the ose-upgrade all command is only recommended for node hosts. For broker hosts, Red Hat recommends that you pause after each step to better understand the process, and understand the next step to be performed.
4.2. Preparing for an Upgrade
Procedure 4.1. To Prepare OpenShift Enterprise for an Upgrade:
- Perform the required backup steps before starting with the upgrade. Only proceed to the next step after the backup is complete, and the relevant personnel are notified of the upcoming outage.
- Disable any change management software that is being used to manage your OpenShift Enterprise installation configuration, and update it accordingly after the upgrade.
- If a configuration file already exists on disk during an update, the RPM package that provides the file does one of the following, depending on how the package is built:
- Backs up the existing file with an
.rpmsaveextension and creates the new file. - Leaves the existing file in place and creates the new file with an
.rpmnewextension.
Before updating, find any.rpm*files still on disk from previous updates using the following commands:#
updatedb#locate --regex '\.rpm(save|new)$'Compare these files to the relevant configuration files currently in use and note any differences. Manually merge any desired settings into the current configuration files, then either move the.rpm*files to an archive directory or remove them. - Before attempting to upgrade, ensure the latest errata have been applied for the current minor version of your OpenShift Enterprise installation. Run the
yum updatecommand, then check again for any new configuration files that have changed:#
yum update -y#updatedb#locate --regex '\.rpm(save|new)$'Resolve any.rpm*files found again as described in the previous step.Additional steps may also be required depending on the errata being applied. For more information on errata updates, see the relevant OpenShift Enterprise Release Notes at http://access.redhat.com/site/documentation. - Restart any services that had their configuration files updated.
- Run the
oo-admin-chkscript on a broker host:#
oo-admin-chkThis command checks the integrity of the MongoDB datastore against the actual deployment of application gears on the node hosts. Resolve any issues reported by this script, if possible, prior to performing an upgrade. For more information on using theoo-admin-chkscript and fixing gear discrepancies, see the OpenShift Enterprise Troubleshooting Guide at http://access.redhat.com/site/documentation. - Run the
oo-diagnosticsscript on all hosts:#
oo-diagnosticsUse the output of this command to compare after the upgrade is complete.
4.3. Upgrading from OpenShift Enterprise 1.2 to OpenShift Enterprise 2.0
begin step, adjusts the yum configurations in preparation for the upgrade. Red Hat recommends that you perform this step in advance of the scheduled outage to ensure any subscription issues are resolved before you proceed with the upgrade.
Procedure 4.2. To Bootstrap the Upgrade and Perform the begin Step:
- The openshift-enterprise-release RPM package includes the
ose-upgradetool that guides you through the upgrade process. Install the openshift-enterprise-release package on each host, and update it to the most current version.#
yum install openshift-enterprise-release - The
beginstep of the upgrade process applies to all hosts, and includes those hosts that contain only supporting services such as MongoDB and ActiveMQ. Hosts using Red Hat Subscription Management (RHSM) or Red Hat Network (RHN) Classic are unsubscribed from the 1.2 channels and subscribed to the new 2.0 channels.Warning
This step assumes that the channel names come directly from Red Hat Network. If the package source is an instance of Red Hat Satellite or Subscription Asset Manager and the channel names are remapped differently, you must change this yourself. Examine the scripts in the/usr/lib/ruby/site_ruby/1.8/ose-upgrade/host/upgrades/2/directory for use as models. You can also add your custom script to a subdirectory to be executed with theose-upgradetool.In addition to updating the channel set, modifications to theyumconfiguration give priority to the OpenShift Enterprise, Red Hat Enterprise Linux, and JBoss repositories. However, packages from other sources are excluded as required to prevent certain issues with dependency management that occur between the various channels.Run thebeginstep on each host. Note that the command output is different depending on the type of host. The following example output is from a broker host:#
ose-upgrade beginINFO: OpenShift broker installed. INFO: Setting host step 'begin' status to UPGRADING INFO: Starting upgrade number 2 to version 2.0. [...] INFO: Setting host step 'begin' status to COMPLETE INFO: To continue the upgrade, install a specific upgrade package.
Procedure 4.3. To Install the Upgrade RPM Specific to a Host:
- Depending on the host type, install the latest upgrade RPM package from the new OpenShift Enterprise 2.0 channels. For broker hosts, install the openshift-enterprise-upgrade-broker package:
#
yum install openshift-enterprise-upgrade-brokerFor node hosts, install the openshift-enterprise-upgrade-node package:#
yum install openshift-enterprise-upgrade-nodeIf the package is already installed because of a previous upgrade, it still must be updated to the latest package version for the OpenShift Enterprise 2.0 upgrade. - The
ose-upgradetool guides the upgrade process by listing the necessary steps that are specific to the upgrade scenario, and identifies the step to be performed next. Theose-upgrade statuscommand, orose-upgrade, provides a current status report. The command output varies depending on the type of host. The following example output is from a broker host:#
ose-upgrade statusINFO: OpenShift broker installed. Current upgrade is number 2 to version 2.0. Step sequence: begin pre outage rpms conf maintenance_mode pending_ops confirm_nodes data gears end_maintenance_mode post Next step is: pre
Procedure 4.4. To Perform the pre Step on Broker and Node Hosts:
- The
prestep manages the following actions:- Backs up OpenShift Enterprise configuration files.
- Clears pending operations older than one hour. (Broker hosts only)
- Performs any pre-upgrade datastore migration steps. (Broker hosts only)
- Updates authorization indexes. (Broker hosts only)
Run theprestep on one broker host and each node host:#
ose-upgrade preWhen one broker host begins this step, any attempts made by other broker hosts to run theprestep simultaneously will fail. - After the
prestep completes on the first broker host, run it on any remaining broker hosts.
Procedure 4.5. To Perform the outage Step on Broker and Node Hosts:
- The
outagestep stops services as required depending on the type of host.Warning
The broker enters outage mode during this upgrade step. A substantial outage also begins for applications on the node hosts. Scaled applications are unable to contact any child gears during the outage. These outages last until theend_maintenance_modestep is complete.Perform this step on all broker hosts first, and then on all node hosts. This begins the broker outage, and all communication between the broker host and the node hosts is stopped. Perform theoutagestep with the following command:#
ose-upgrade outageAfter the command completes on all hosts, node and broker hosts can be upgraded simultaneously until the upgrade steps are complete on all node hosts, and the broker host reaches theconfirm_nodesstep. - For all other hosts that are not a broker or a node host, run
yum updateto upgrade any services that are installed, such as MongoDB or ActiveMQ:#
yum update
Procedure 4.6. To Perform the rpms Step on Broker and Node Hosts:
- The
rpmsstep updates RPM packages installed on the node host, and installs any new RPM packages that are required.Run therpmsstep on each host:#
ose-upgrade rpms
Procedure 4.7. To Perform the conf Step on Broker and Node Hosts:
- The
confstep changes the OpenShift Enterprise configuration to match the new codebase installed in the previous step. Each modified file is first copied to a file with the same name plus a.ugsaveextension and a timestamp. This makes it easier to determine what files have changed.Run theconfstep on each host:#
ose-upgrade confWarning
If the configuration files have been significantly modified from the recommended configuration, manual intervention may be required to merge configuration changes so that they can be used with OpenShift Enterprise.
Procedure 4.8. To Perform the maintenance_mode Step on Broker and Node Hosts:
- The
maintenance_modestep manages the following actions:- Configures the broker to disable the API and return an outage notification to any requests. (Broker hosts only)
- Starts the broker service and, if installed, the console service in maintenance mode so that they provide clients with an outage notification. (Broker hosts only)
- Clears the broker and console caches. (Broker hosts only)
- Enables gear upgrade extensions. (Node hosts only)
- Starts the
ruby193-mcollectiveservice. (Node hosts only)
Run themaintenance_modestep on each host:#
ose-upgrade maintenance_mode
Procedure 4.9. To Perform the pending_ops Step on a Broker Host:
- The
pending_opsstep clears records of any pending application operations; the outage prevents them from ever completing. Run thepending_opsstep on one broker host. Do not run this command on multiple broker hosts at the same time. When one broker host begins this step, any attempts made by other broker hosts to run thepending_opsstep simultaneously will fail:#
ose-upgrade pending_ops - After the
pending_opsstep completes on the first broker host, run the command on any remaining broker hosts.
Procedure 4.10. To Perform the confirm_nodes Step on Broker Hosts:
- The
confirm_nodesstep attempts to access all known node hosts to determine whether they have all been upgraded before proceeding. This step fails if themaintenance_modestep has not been completed on all node hosts, or if MCollective cannot access any node hosts.Run theconfirm_nodesstep on a broker host:#
ose-upgrade confirm_nodes - If this step fails due to node hosts that are no longer deployed, you may need to skip the
confirm_nodesstep. Ensure that all node hosts reported missing are not actually expected to respond, then skip theconfirm_nodesstep with the following command:#
ose-upgrade --skip confirm_nodes
Procedure 4.11. To Perform the data Step on Broker Hosts:
- The
datastep runs a data migration against the shared broker datastore. Run thedatastep on one broker host:#
ose-upgrade dataWhen one broker host begins this step, any attempts made by other broker hosts to run thedatastep simultaneously will fail. - After the
datastep completes on the first broker host, run it on any remaining broker hosts.
Procedure 4.12. To Perform the gears Step on Broker Hosts:
- The
gearsstep runs a gear migration through the required changes so that they can be used in OpenShift Enterprise 2.0. Run thegearsstep on one broker host:#
ose-upgrade gearsWhen one broker host begins this step, any attempts made by other broker hosts to run thegearsstep simultaneously will fail. - After the
gearsstep completes on the first broker host, run it on any remaining broker hosts.
Procedure 4.13. To Perform the test_gears_complete Step on Node Hosts:
- The
test_gears_completestep verifies the gear migrations are complete before proceeding. This step blocks the upgrade on node hosts by waiting until thegearsstep has completed on an associated broker host. Run thetest_gears_completestep on all node hosts:#
ose-upgrade test_gears_complete
Procedure 4.14. To Perform the end_maintenance_mode Step on Broker and Node Hosts:
- The
end_maintenance_modestep starts the services that were stopped in themaintenance_modestep or added in the interim. It gracefully restartshttpdto complete the node host upgrade, and restarts the broker service and, if installed, the console service. Complete this step on all node hosts first before running it on the broker hosts:#
ose-upgrade end_maintenance_mode - Run the
oo-accept-nodescript on each node host to verify that it is correctly configured:#
oo-accept-node
Procedure 4.15. To Perform the post Step on Broker Hosts:
- The
poststep manages the following actions on the broker host:- Performs any post-upgrade datastore migration steps.
- Publishes updated district UIDs to the node hosts.
- Clears the broker and console caches.
Run thepoststep on a broker host:#
ose-upgrade postWhen one broker host begins this step, any attempts made by other broker hosts to run thepoststep simultaneously will fail. - After the
poststep completes on the first broker host, run it on any remaining broker hosts. - The upgrade is now complete for an OpenShift Enterprise installation. Run
oo-diagnosticson each host to diagnose any problems:#
oo-diagnostics
Although the goal is to make the upgrade process as easy as possible, some known issues must be addressed manually:
- Because Jenkins applications cannot be migrated, follow these steps to regain functionality:
- Save any modifications made to existing Jenkins jobs.
- Remove the existing Jenkins application.
- Add the Jenkins application again.
- Add the Jenkins client cartridge as required.
- Reapply the required modifications from the first step.
- There are no notifications when a gear is successfully migrated but fails to start. This may not be a migration failure because there may be multiple reasons why a gear fails to start. However, Red Hat recommends that you verify the operation of your applications after upgrading. The
service openshift-gears statuscommand may be helpful in certain situations.
4.4. Upgrading from OpenShift Enterprise 2.0 to OpenShift Enterprise 2.1
begin step, adjusts the yum configurations in preparation for the upgrade. Red Hat recommends that you perform this step in advance of the scheduled outage to ensure any subscription issues are resolved before you proceed with the upgrade.
Procedure 4.16. To Bootstrap the Upgrade and Perform the begin Step:
- The openshift-enterprise-release RPM package includes the
ose-upgradetool that guides you through the upgrade process. Install the openshift-enterprise-release package on each host, and update it to the most current version.#
yum install openshift-enterprise-release - The
beginstep of the upgrade process applies to all hosts, and includes those hosts that contain only supporting services such as MongoDB and ActiveMQ. Hosts using Red Hat Subscription Management (RHSM) or Red Hat Network (RHN) Classic are unsubscribed from the 2.0 channels and subscribed to the new 2.1 channels.Warning
This step assumes that the channel names come directly from Red Hat Network. If the package source is an instance of Red Hat Satellite or Subscription Asset Manager and the channel names are remapped differently, you must change this yourself. Examine the scripts in the/usr/lib/ruby/site_ruby/1.8/ose-upgrade/host/upgrades/3/directory for use as models. You can also add your custom script to a subdirectory to be executed with theose-upgradetool.In addition to updating the channel set, modifications to theyumconfiguration give priority to the OpenShift Enterprise, Red Hat Enterprise Linux, and JBoss repositories. However, packages from other sources are excluded as required to prevent certain issues with dependency management that occur between the various channels.Run thebeginstep on each host. Note that the command output is different depending on the type of host. The following example output is from a broker host:#
ose-upgrade beginINFO: OpenShift broker installed. INFO: Setting host step 'begin' status to UPGRADING INFO: Starting upgrade number 3 to version 2.1. [...] INFO: updating /etc/openshift-enterprise-release INFO: Setting host step 'begin' status to COMPLETE INFO: To continue the upgrade, install a specific upgrade package.Important
Theoo-admin-yum-validator --oo-version 2.1 --fix-allcommand is run automatically during thebeginstep. When using RHN Classic, the command does not automatically subscribe a system to the OpenShift Enterprise 2.1 channels, but instead reports the manual steps required. After the channels are manually subscribed, running thebeginstep again sets the properyumpriorities and continues as expected.
Procedure 4.17. To Install the Upgrade RPM Specific to a Host:
- Depending on the host type, install the latest upgrade RPM package from the new OpenShift Enterprise 2.1 channels. For broker hosts, install the openshift-enterprise-upgrade-broker package:
#
yum install openshift-enterprise-upgrade-brokerFor node hosts, install the openshift-enterprise-upgrade-node package:#
yum install openshift-enterprise-upgrade-nodeIf the package is already installed because of a previous upgrade, it still must be updated to the latest package version for the OpenShift Enterprise 2.1 upgrade. - The
ose-upgradetool guides the upgrade process by listing the necessary steps that are specific to the upgrade scenario, and identifies the step to be performed next. Theose-upgrade statuscommand, orose-upgrade, provides a current status report. The command output varies depending on the type of host. The following example output is from a broker host:#
ose-upgrade statusINFO: OpenShift broker installed. Current upgrade is number 3 to version 2.1. Step sequence: begin pre outage rpms conf maintenance_mode pending_ops confirm_nodes data gears end_maintenance_mode post Next step is: pre
Procedure 4.18. To Perform the pre Step on Broker and Node Hosts:
- The
prestep manages the following actions:- Backs up OpenShift Enterprise configuration files.
- Clears pending operations older than one hour. (Broker hosts only)
- Performs any pre-upgrade datastore migration steps. (Broker hosts only)
Run theprestep on one broker host and each node host:#
ose-upgrade preWhen one broker host begins this step, any attempts made by other broker hosts to run theprestep simultaneously will fail. - After the
prestep completes on the first broker host, run it on any remaining broker hosts.
Procedure 4.19. To Perform the outage Step on Broker and Node Hosts:
- The
outagestep stops services as required depending on the type of host.Warning
The broker enters outage mode during this upgrade step. A substantial outage also begins for applications on the node hosts. Scaled applications are unable to contact any child gears during the outage. These outages last until theend_maintenance_modestep is complete.Perform this step on all broker hosts first, and then on all node hosts. This begins the broker outage, and all communication between the broker host and the node hosts is stopped. Perform theoutagestep with the following command:#
ose-upgrade outageAfter the command completes on all hosts, node and broker hosts can be upgraded simultaneously until the upgrade steps are complete on all node hosts, and the broker host reaches theconfirm_nodesstep. - For all other hosts that are not a broker or a node host, run
yum updateto upgrade any services that are installed, such as MongoDB or ActiveMQ:#
yum update
Procedure 4.20. To Perform the rpms Step on Broker and Node Hosts:
- The
rpmsstep updates RPM packages installed on the host, and installs any new RPM packages that are required. For node hosts, this includes the recommended cartridge dependency metapackages for any cartridge already installed on a node. See Section 9.8.3, “Installing Cartridge Dependency Metapackages” for more information about cartridge dependency metapackages.Run therpmsstep on each host:#
ose-upgrade rpms
Procedure 4.21. To Perform the conf Step on Broker and Node Hosts:
- The
confstep changes the OpenShift Enterprise configuration to match the new codebase installed in the previous step. Each modified file is first copied to a file with the same name plus a.ugsaveextension and a timestamp. This makes it easier to determine what files have changed.Run theconfstep on each host:#
ose-upgrade confWarning
If the configuration files have been significantly modified from the recommended configuration, manual intervention may be required to merge configuration changes so that they can be used with OpenShift Enterprise.
Procedure 4.22. To Perform the maintenance_mode Step on Broker and Node Hosts:
- The
maintenance_modestep manages the following actions:- Configures the broker to disable the API and return an outage notification to any requests. (Broker hosts only)
- Starts the broker service and, if installed, the console service in maintenance mode so that they provide clients with an outage notification. (Broker hosts only)
- Clears the broker and console caches. (Broker hosts only)
- Enables gear upgrade extensions. (Node hosts only)
- Saves and regenerates configurations for any
apache-vhostfront ends. (Node hosts only) - Stops the
openshift-iptables-port-proxyservice. (Node hosts only) - Starts the
ruby193-mcollectiveservice. (Node hosts only)
Run themaintenance_modestep on each host:#
ose-upgrade maintenance_mode
Procedure 4.23. To Perform the pending_ops Step on Broker Hosts:
- The
pending_opsstep clears records of any pending application operations because the outage prevents them from ever completing. Run thepending_opsstep on one broker host only:#
ose-upgrade pending_ops - On any remaining broker hosts, run the following command to skip the
pending_opsstep:#
ose-upgrade pending_ops --skip
Procedure 4.24. To Perform the confirm_nodes Step on Broker Hosts:
- The
confirm_nodesstep attempts to access all known node hosts to determine whether they have all been upgraded before proceeding. This step fails if themaintenance_modestep has not been completed on all node hosts, or if MCollective cannot access any node hosts.Run theconfirm_nodesstep on a broker host:#
ose-upgrade confirm_nodes - If this step fails due to node hosts that are no longer deployed, you may need to skip the
confirm_nodesstep. Ensure that all node hosts reported missing are not actually expected to respond, then skip theconfirm_nodesstep with the following command:#
ose-upgrade --skip confirm_nodes
Procedure 4.25. To Perform the data Step on Broker Hosts:
- The
datastep runs a data migration against the shared broker datastore. Run thedatastep on one broker host:#
ose-upgrade dataWhen one broker host begins this step, any attempts made by other broker hosts to run thedatastep simultaneously will fail. - After the
datastep completes on the first broker host, run it on any remaining broker hosts.
Procedure 4.26. To Perform the gears Step on Broker Hosts:
- The
gearsstep runs a gear migration through the required changes so that they can be used in OpenShift Enterprise 2.1. Run thegearsstep on one broker host:#
ose-upgrade gearsWhen one broker host begins this step, any attempts made by other broker hosts to run thegearsstep simultaneously will fail. - After the
gearsstep completes on the first broker host, run it on any remaining broker hosts.
Procedure 4.27. To Perform the test_gears_complete Step on Node Hosts:
- The
test_gears_completestep verifies the gear migrations are complete before proceeding. This step blocks the upgrade on node hosts by waiting until thegearsstep has completed on an associated broker host. Run thetest_gears_completestep on all node hosts:#
ose-upgrade test_gears_complete
Procedure 4.28. To Perform the end_maintenance_mode Step on Broker and Node Hosts:
- The
end_maintenance_modestep starts the services that were stopped in themaintenance_modestep or added in the interim. It gracefully restartshttpdto complete the node host upgrade, and restarts the broker service and, if installed, the console service. Complete this step on all node hosts first before running it on the broker hosts:#
ose-upgrade end_maintenance_mode - Run the
oo-accept-nodescript on each node host to verify that it is correctly configured:#
oo-accept-node
Procedure 4.29. To Perform the post Step on Broker Hosts:
- The
poststep manages the following actions on the broker host:- Imports cartridges to the datastore.
- Performs any post-upgrade datastore migration steps.
- Clears the broker and console caches.
Run thepoststep on a broker host:#
ose-upgrade postWhen one broker host begins this step, any attempts made by other broker hosts to run thepoststep simultaneously will fail. - After the
poststep completes on the first broker host, run it on any remaining broker hosts. - The upgrade is now complete for an OpenShift Enterprise installation. Run
oo-diagnosticson each host to diagnose any problems:#
oo-diagnostics
Although the goal is to make the upgrade process as easy as possible, some known issues must be addressed manually:
- Because Jenkins applications cannot be migrated, follow these steps to regain functionality:
- Save any modifications made to existing Jenkins jobs.
- Remove the existing Jenkins application.
- Add the Jenkins application again.
- Add the Jenkins client cartridge as required.
- Reapply the required modifications from the first step.
- There are no notifications when a gear is successfully migrated but fails to start. This may not be a migration failure because there may be multiple reasons why a gear fails to start. However, Red Hat recommends that you verify the operation of your applications after upgrading. The
service openshift-gears statuscommand may be helpful in certain situations.
4.5. Upgrading from OpenShift Enterprise 2.1 to OpenShift Enterprise 2.2
begin step, adjusts the yum configurations in preparation for the upgrade. Red Hat recommends that you perform this step in advance of the scheduled outage to ensure any subscription issues are resolved before you proceed with the upgrade.
Procedure 4.30. To Bootstrap the Upgrade and Perform the begin Step:
- The openshift-enterprise-release RPM package includes the
ose-upgradetool that guides you through the upgrade process. Install the openshift-enterprise-release package on each host, and update it to the most current version.#
yum install openshift-enterprise-release - The
beginstep of the upgrade process applies to all hosts, and includes those hosts that contain only supporting services such as MongoDB and ActiveMQ. Hosts using Red Hat Subscription Management (RHSM) or Red Hat Network (RHN) Classic are unsubscribed from the 2.1 channels and subscribed to the new 2.2 channels.Warning
This step assumes that the channel names come directly from Red Hat Network. If the package source is an instance of Red Hat Satellite or Subscription Asset Manager and the channel names are remapped differently, you must change this yourself. Examine the scripts in the/usr/lib/ruby/site_ruby/1.8/ose-upgrade/host/upgrades/4/directory for use as models. You can also add your custom script to a subdirectory to be executed with theose-upgradetool.In addition to updating the channel set, modifications to theyumconfiguration give priority to the OpenShift Enterprise, Red Hat Enterprise Linux, and JBoss repositories. However, packages from other sources are excluded as required to prevent certain issues with dependency management that occur between the various channels.Run thebeginstep on each host. Note that the command output is different depending on the type of host. The following example output is from a broker host:#
ose-upgrade beginINFO: OpenShift broker installed. INFO: Setting host step 'begin' status to UPGRADING INFO: Starting upgrade number 4 to version 2.2. [...] INFO: updating /etc/openshift-enterprise-release INFO: Setting host step 'begin' status to COMPLETE INFO: To continue the upgrade, install a specific upgrade package.Important
Theoo-admin-yum-validator --oo-version 2.2 --fix-allcommand is run automatically during thebeginstep. When using RHN Classic, the command does not automatically subscribe a system to the OpenShift Enterprise 2.2 channels, but instead reports the manual steps required. After the channels are manually subscribed, running thebeginstep again sets the properyumpriorities and continues as expected.
Procedure 4.31. To Install the Upgrade RPM Specific to a Host:
- Depending on the host type, install the latest upgrade RPM package from the new OpenShift Enterprise 2.2 channels. For broker hosts, install the openshift-enterprise-upgrade-broker package:
#
yum install openshift-enterprise-upgrade-brokerFor node hosts, install the openshift-enterprise-upgrade-node package:#
yum install openshift-enterprise-upgrade-nodeIf the package is already installed because of a previous upgrade, it still must be updated to the latest package version for the OpenShift Enterprise 2.2 upgrade. - The
ose-upgradetool guides the upgrade process by listing the necessary steps that are specific to the upgrade scenario, and identifies the step to be performed next. Theose-upgrade statuscommand, orose-upgrade, provides a current status report. The command output varies depending on the type of host. The following example output is from a broker host:#
ose-upgrade statusINFO: OpenShift broker installed. Current upgrade is number 4 to version 2.2. Step sequence: begin pre outage rpms conf maintenance_mode pending_ops confirm_nodes data gears end_maintenance_mode post Next step is: pre
Procedure 4.32. To Perform the pre Step on Broker and Node Hosts:
- The
prestep manages the following actions:- Backs up OpenShift Enterprise configuration files.
- Clears pending operations older than one hour. (Broker hosts only)
- Performs any pre-upgrade datastore migration steps. (Broker hosts only)
Run theprestep on one broker host and each node host:#
ose-upgrade preWhen one broker host begins this step, any attempts made by other broker hosts to run theprestep simultaneously will fail. - After the
prestep completes on the first broker host, run it on any remaining broker hosts. - After the
prestep completes on all hosts, theose-upgradetool allows you to continue through the node and broker host upgrade steps in parallel. On broker hosts, the tool will block theconfirm_nodesstep if the associated node hosts have not completed theirmaintenance_modestep. On node hosts, the tool blocks thetest_gears_completestep if the associated broker has not completed thegearsstep.Continue through the following procedures for instructions on each subsequent step.
Procedure 4.33. To Perform the rpms Step on Broker and Node Hosts:
- The
rpmsstep updates RPM packages installed on the host and installs any new RPM packages that are required. For node hosts, this includes the recommended cartridge dependency metapackages for any cartridge already installed on a node. See Section 9.8.3, “Installing Cartridge Dependency Metapackages” for more information about cartridge dependency metapackages.Run therpmsstep on each host:#
ose-upgrade rpms - For all other hosts that are not a broker or a node host, run
yum updateto upgrade any services that are installed, such as MongoDB or ActiveMQ:#
yum update
Procedure 4.34. To Perform the conf Step on Broker and Node Hosts:
- The
confstep changes the OpenShift Enterprise configuration to match the new codebase installed in the previous step. Each modified file is first copied to a file with the same name plus a.ugsaveextension and a timestamp. This makes it easier to determine what files have changed.This step also disables the SSLv3 protocol on each broker host in favor of TLS due to CVE-2014-3566.Run theconfstep on each host:#
ose-upgrade confWarning
If the configuration files have been significantly modified from the recommended configuration, manual intervention may be required to merge configuration changes so that they can be used with OpenShift Enterprise.
Procedure 4.35. To Perform the maintenance_mode Step on Broker and Node Hosts:
Warning
end_maintenance_mode step is complete.
- Starting with OpenShift Enterprise 2.2, the
apache-mod-rewritefront-end server proxy plug-in is deprecated. New deployments of OpenShift Enterprise 2.2 now use theapache-vhostplug-in as the default.Important
Any new nodes added to your deployment after the upgrade will use theapache-vhostplug-in by default. Note that theapache-mod-rewriteplug-in is incompatible with theapache-vhostplug-in, and the front-end server configuration on all nodes across a deployment must be consistent. See Section 10.1, “Front-End Server Proxies” for more information.The default behavior of themaintenance_modestep is to leave theapache-mod-rewriteplug-in in place, if it is installed. Do not set theOSE_UPGRADE_MIGRATE_VHOSTenvironment variable at all, not even tofalseor0, if you require this default behavior.However, if your OpenShift Enterprise 2.1 deployment was configured to use theapache-mod-rewriteplug-in before starting the 2.2 upgrade, you can optionally allow theose-upgradetool to migrate your node hosts to the newly-defaultapache-vhostplug-in. To enable this option, set theOSE_UPGRADE_MIGRATE_VHOSTenvironment variable on each node host:# export OSE_UPGRADE_MIGRATE_VHOST=true
- The
maintenance_modestep manages actions in the following order:- Configures the broker to disable the API and return an outage notification to any requests. (Broker hosts only)
- Restarts the broker service and, if installed, the console service in maintenance mode so that they provide clients with an outage notification. (Broker hosts only)
- Clears the broker and console caches. (Broker hosts only)
- Stops the
ruby193-mcollectiveservice. (Node hosts only) - Saves the front-end server proxy configuration. (Node hosts only)
- If the
OSE_UPGRADE_MIGRATE_VHOSTenvironment variable was set in the previous step, migrates from theapache-mod-rewriteplug-in to theapache-vhostplug-in. (Node hosts only) - Disables the SSLv3 protocol in favor of TLS due to CVE-2014-3566. (Node hosts only)
- Enables gear upgrade extensions. (Node hosts only)
- Starts the
ruby193-mcollectiveservice. (Node hosts only)
Run themaintenance_modestep on each host:#
ose-upgrade maintenance_mode
Procedure 4.36. To Perform the pending_ops Step on Broker Hosts:
- The
pending_opsstep clears records of any pending application operations because the outage prevents them from ever completing. Run thepending_opsstep on one broker host:#
ose-upgrade pending_opsWhen one broker host begins this step, any attempts made by other broker hosts to run thepending_opsstep simultaneously will fail. - After the
pending_opsstep completes on the first broker host, run it on any remaining broker hosts.
Procedure 4.37. To Perform the confirm_nodes Step on Broker Hosts:
- The
confirm_nodesstep attempts to access all known node hosts to determine whether they have all been upgraded before proceeding. This step fails if themaintenance_modestep has not been completed on all node hosts, or if MCollective cannot access any node hosts.Run theconfirm_nodesstep on a broker host:#
ose-upgrade confirm_nodes - If this step fails due to node hosts that are no longer deployed, you may need to skip the
confirm_nodesstep. Ensure that all node hosts reported missing are not actually expected to respond, then skip theconfirm_nodesstep with the following command:#
ose-upgrade --skip confirm_nodes
Procedure 4.38. To Perform the data Step on Broker Hosts:
- The
datastep runs a data migration against the shared broker datastore. Run thedatastep on one broker host:#
ose-upgrade dataWhen one broker host begins this step, any attempts made by other broker hosts to run thedatastep simultaneously will fail. - After the
datastep completes on the first broker host, run it on any remaining broker hosts.
Procedure 4.39. To Perform the gears Step on Broker Hosts:
- The
gearsstep runs a gear migration through the required changes so that they can be used in OpenShift Enterprise 2.2. Run thegearsstep on one broker host:#
ose-upgrade gearsWhen one broker host begins this step, any attempts made by other broker hosts to run thegearsstep simultaneously will fail. - After the
gearsstep completes on the first broker host, run it on any remaining broker hosts.
Procedure 4.40. To Perform the test_gears_complete Step on Node Hosts:
- The
test_gears_completestep verifies the gear migrations are complete before proceeding. This step blocks the upgrade on node hosts by waiting until thegearsstep has completed on an associated broker host. Run thetest_gears_completestep on all node hosts:#
ose-upgrade test_gears_complete
Procedure 4.41. To Perform the end_maintenance_mode Step on Broker and Node Hosts:
- The
end_maintenance_modestep restarts the following services on the node hosts:httpd(Restarts gracefully)ruby193-mcollectiveopenshift-iptables-port-proxyopenshift-node-web-proxyopenshift-sni-proxyopenshift-watchman
Complete this step on all node hosts first before running it on the broker hosts:#
ose-upgrade end_maintenance_mode - After the
end_maintenance_modecommand has completed on all node hosts, run the same command on the broker hosts to disable the outage notification enabled during the brokermaintenance_modestep and restart the broker service and, if installed, the console service:#
ose-upgrade end_maintenance_modeThis allows the broker to respond to client requests normally again. - Run the
oo-accept-nodescript on each node host to verify that it is correctly configured:#
oo-accept-node
Procedure 4.42. To Perform the post Step on Broker Hosts:
- The
poststep manages the following actions on the broker host:- Imports cartridges to the datastore.
- Performs any post-upgrade datastore migration steps.
- Clears the broker and console caches.
Run thepoststep on a broker host:#
ose-upgrade postWhen one broker host begins this step, any attempts made by other broker hosts to run thepoststep simultaneously will fail. - After the
poststep completes on the first broker host, run it on any remaining broker hosts. - The upgrade is now complete for an OpenShift Enterprise installation. Run
oo-diagnosticson each host to diagnose any problems:#
oo-diagnostics
Although the goal is to make the upgrade process as easy as possible, some known issues must be addressed manually:
- Because Jenkins applications cannot be migrated, follow these steps to regain functionality:
- Save any modifications made to existing Jenkins jobs.
- Remove the existing Jenkins application.
- Add the Jenkins application again.
- Add the Jenkins client cartridge as required.
- Reapply the required modifications from the first step.
- There are no notifications when a gear is successfully migrated but fails to start. This may not be a migration failure because there may be multiple reasons why a gear fails to start. However, Red Hat recommends that you verify the operation of your applications after upgrading. The
service openshift-gears statuscommand may be helpful in certain situations.
Chapter 5. Host Preparation
5.1. Default umask Setting
umask value (022) for Red Hat Enterprise Linux 6 be set on all hosts prior to installing any OpenShift Enterprise packages. If a custom umask setting is used, it is possible for incorrect permissions to be set during installation for many files critical to OpenShift Enterprise operation.
5.2. Network Access
iptables firewall configuration by default to enable network access. If your environment requires a custom or external firewall solution, the configuration must accommodate the port requirements of OpenShift Enterprise.
5.2.1. Custom and External Firewalls
public in the Direction column. Ensure the firewall exposes these ports publicly.
Table 5.1. Required Ports for OpenShift Enterprise
| Host | Port | Protocol | Direction | Use |
|---|---|---|---|---|
| All | 22 | TCP | Inbound internal network | Remote administration. |
| All | 53 | TCP/UDP | Outbound to nameserver | Name resolution. |
| Broker | 22 | TCP | Outbound to node hosts | rsync access to gears for moving gears between nodes. |
| Broker | 80 | TCP | Inbound public traffic |
HTTP access. HTTP requests to port 80 are redirected to HTTPS on port 443.
|
| Broker | 443 | TCP | Inbound public traffic |
HTTPS access to the broker REST API by
rhc and Eclipse integration. HTTPS access to the Management Console.
|
| Broker | 27017 | TCP | Outbound to datastore host. | Optional if the same host has both the broker and datastore components. |
| Broker | 61613 | TCP | Outbound to ActiveMQ hosts |
ActiveMQ connections to communicate with node hosts.
|
| Node | 22 | TCP | Inbound public traffic |
Developers running
git push to their gears. Developer remote administration on their gears.
|
| Node | 80 | TCP | Inbound public traffic | HTTP requests to applications hosted on OpenShift Enterprise. |
| Node | 443 | TCP | Inbound public traffic | HTTPS requests to applications hosted on OpenShift Enterprise. |
| Node | 8000 | TCP | Inbound public traffic |
WebSocket connections to applications hosted on OpenShift Enterprise. Optional if you are not using WebSockets.
|
| Node | 8443 | TCP | Inbound public traffic |
Secure WebSocket connections to applications hosted on OpenShift Enterprise. Optional if you are not using secure WebSockets.
|
| Node | 2303 - 2308 [a] | TCP | Inbound public traffic |
Gear access through the SNI proxy. Optional if you are not using the SNI proxy.
|
| Node | 443 | TCP | Outbound to broker hosts | REST API calls to broker hosts. |
| Node | 35531 - 65535 [b] | TCP | Inbound public traffic |
Gear access through the
port-proxy service. Optional unless applications need to expose external ports in addition to the front-end proxies.
|
| Node | 35531 - 65535 [b] | TCP | Inbound/outbound with other node hosts |
Communications between cartridges running on separate gears.
|
| Node | 61613 | TCP | Outbound to ActiveMQ hosts | ActiveMQ connections to communicate with broker hosts. |
| ActiveMQ | 61613 | TCP | Inbound from broker and node hosts | Broker and node host connections to ActiveMQ. |
| ActiveMQ | 61616 | TCP | Inbound/outbound with other ActiveMQ brokers |
Communications between ActiveMQ hosts. Optional if no redundant ActiveMQ hosts exist.
|
| Datastore | 27017 | TCP | Inbound from broker hosts |
Broker host connections to MongoDB. Optional if the same host has both the broker and datastore components.
|
| Datastore | 27017 | TCP | Inbound/outbound with other MongoDB hosts |
Replication between datastore hosts. Optional if no redundant datastore hosts exist.
|
| Nameserver | 53 | TCP/UDP | Inbound from broker hosts | Publishing DNS updates. |
| Nameserver | 53 | TCP/UDP | Inbound public traffic | Name resolution for applications hosted on OpenShift Enterprise. |
| Nameserver | 53 | TCP/UDP | Outbound public traffic |
DNS forwarding. Optional unless the nameserver is recursively forwarding requests to other nameservers.
|
[a]
Note: The size and location of these SNI port range are configurable.
[b]
Note: If the value of PROXY_BEGIN in the /etc/openshift/node.conf file changes from 35531, adjust this port range accordingly.
| ||||
5.2.2. Manually Configuring an iptables Firewall
iptables commands to allow access on each host as needed:
Procedure 5.1. To Configure an iptables Firewall:
- Use the following command to make any changes to an
iptablesconfiguration:#
iptables --insert Rule --in-interface Network_Interface --protocol Protocol --source IP_Address --dport Destination_Port --jump ACCEPTExample 5.1. Allowing Broker Access to MongoDB
The following is an example set of commands for allowing a set of brokers with IP addresses 10.0.0.1-3 access to the MongoDB datastore:iptables --insert INPUT -i eth0 -p tcp --source 10.0.0.1 --dport 27017 --jump ACCEPT iptables --insert INPUT -i eth0 -p tcp --source 10.0.0.2 --dport 27017 --jump ACCEPT iptables --insert INPUT -i eth0 -p tcp --source 10.0.0.3 --dport 27017 --jump ACCEPT
Example 5.2. Allowing Public Access to the Nameserver
The following example allows inbound public DNS requests to the nameserver:iptables --insert INPUT --protocol tcp --dport 53 -j ACCEPT iptables --insert INPUT --protocol udp --dport 53 -j ACCEPT
Note that because the command is for public access, there is no--sourceoption. - Save any firewall changes to make them persistent:
#
service iptables save
5.2.3. IPv6 Tolerance
- OpenShift Enterprise client tools (
rhc) - OpenShift Enterprise Management Console
- ActiveMQ and MCollective
- Application access
- MongoDB can be configured to listen on IPv6 so that some client tools can connect over IPv6 if the
mongoclient is running version 1.10.0 or newer. However, the broker usesmongoidwhich currently requires IPv4. - Broker DNS updates may require IPv4, however IPv6 connectivity can be used when using the nsupdate DNS plug-in.
Caveats and Known Issues for IPv6 Tolerance
- Inter-gear communication relies on IPv6 to IPv4 fallback. If for some reason the application or library initiating the connection does not properly handle the fallback, then the connection fails.
- The OpenShift Enterprise installation script and Puppet module do not configure MongoDB to use IPv6 and configures IPv4 addresses for other settings where required, for example in the nsupdate DNS plug-in configuration.
- OpenShift Enterprise internals explicitly query interfaces for IPv4 addresses in multiple places.
- The
apache-mod-rewriteandnodejs-websocketfront-end server plug-ins have been tested, however the following components have not:- The
apache-vhostandhaproxy-sni-proxyfront-end server plug-ins. - DNS plug-ins other than nsupdate.
- Routing plug-in.
- Rsyslog plug-in.
- Individual cartridges for full IPv6 tolerance.
- Known Issue: BZ#1104337
- Known Issue: BZ#1107816
5.3. Configuring Time Synchronization
ntpdate command to set the system clock, replacing the NTP servers to suit your environment:
# ntpdate clock.redhat.com/etc/ntp.conf file to keep the clock synchronized during operation.
"the NTP socket is in use, exiting" is displayed after running the ntpdate command, it means that the ntpd daemon is already running. However, the clock may not be synchronized due to a substantial time difference. In this case, run the following commands to stop the ntpd service, set the clock, and start the service again:
# service ntpd stop# ntpdate clock.redhat.com# service ntpd start
hwclock command to synchronize the hardware clock to the system clock. Skip this step if you are installing on a virtual machine, such as an Amazon EC2 instance. For a physical hardware installation, run the following command:
# hwclock --systohcNote
synchronize_clock function performs these steps.
5.4. Enabling Remote Administration
# mkdir /root/.ssh# chmod 700 /root/.ssh
ssh-keygen command to generate a new key pair, or use an existing public key. In either case, edit the /root/.ssh/authorized_keys file on the host and append the public key, or use the ssh-copy-id command to do the same. For example, on your local workstation, run the following command, replacing the example IP address with the IP address of your broker host:
# ssh-copy-id root@10.0.0.1Chapter 6. Deployment Methods
- The
oo-installinstallation utility interactively gathers information about a deployment before automating the installation of a OpenShift Enterprise host. This method is intended for trials of simple deployments. - The installation scripts, available as either a kickstart or bash script, include configurable parameters that help automate the installation of a OpenShift Enterprise host. This method allows for increased customization of the installation process for use in production deployments.
- The sample deployment steps detailed later in this guide describe the various actions of the installation scripts. This method allows for a manual installation of a OpenShift Enterprise host.
6.1. Using the Installation Utility
oo-install installation utility, which is a front end to the basic installation scripts. The installation utility provides a UI for a single- or multi-host deployment either from your workstation, or from one of the hosts to be installed.
~/.openshift/oo-install-cfg.yml, which saves your responses to the installation utility so you can use them in future installations if your initial deployment is interrupted. After completing an initial deployment, only additional node hosts can be added to the deployment using the utility. To add broker, message server, or DB server components to an existing deployment, see Section 8.3, “Separating Broker Components by Host” or Section 8.4, “Configuring Redundancy” for more information.
Before running the installation utility, consider the following:
- Do you have ruby-1.8.7 or later, curl, tar, and gzip installed on your system? If required, the installation utility offers suggestions to install RPM packages of utilities that are missing.
- Does
yum repolistshow the correct repository setup? - Plan your host roles. Do you know which of your hosts will be the broker host and node hosts? If running the tool with the
-aoption, do you have hosts for MongoDB and ActivemQ? - Do you have password-less SSH login access into the instances where you will be running the oo-install command? Do your hosts have password-less SSH as well?
- You can use an existing DNS server. During installation, the oo-install tool asks if you would like to install a DNS server on the same host as the broker host. Answering
noresults in a BIND server being set up for you. However, answeringyesrequires you to input the settings of your existing DNS server. This BIND instance provides lookup information for applications that are created by any application developers.
There are two methods for using the installation utility. Both are outlined in the following procedures:
Procedure 6.1. To Run the Installation Utility From the Internet:
- You can run the installation utility directly from the Internet with the following command:
$
Additional options can be used with the command. These options are outlined later in this section:sh <(curl -s https://install.openshift.com/ose-2.2)$
sh <(curl -s https://install.openshift.com/ose-2.2) -s rhsm -u user@company.com - Follow the on-screen instructions to either deploy a new OpenShift Enterprise host, or add a node host to an existing deployment.
Procedure 6.2. To Download and Run the Installation Utility:
- Download and unpack the installation utility:
$
curl -o oo-install-ose.tgz https://install.openshift.com/portable/oo-install-ose.tgz$tar -zxf oo-install-ose.tgz - Execute the installation utility to interactively configure one or more hosts:
$
./oo-install-oseTheoo-install-oseutility automatically runs the installation utility in OpenShift Enterprise mode. Additional options can be used with the command. These options are outlined later in this section:$
./oo-install-ose -s rhsm -u user@company.com - Follow the on-screen instructions to either deploy a new OpenShift Enterprise host, or add a node host to an existing deployment.
The current iteration of the installation utility enables the initial deployment and configuration of OpenShift Enterprise according to the following scenarios:
- Broker, message server (ActiveMQ), and DB server (MongoDB) components on one host, and the node components on separate hosts.
- Broker, message server (ActiveMQ), DB server (MongoDB), and node components on separate hosts (using
-afor advanced mode only). - All components on one host.
Warning
Starting with OpenShift Enterprise 2.2, the installation utility can install a highly-available OpenShift Enterprise deployment by configuring your defined hosts for redundancy within the installation utility prompts. By default, and without the -a option, the installation utility scales and installs ActiveMQ and MongoDB services along with the defined broker hosts. If the -a option is used, you can define redundant services on separate hosts as well.
When you run the installation utility for the first time, you are asked a number of questions related to the components of your planned OpenShift Enterprise deployment, such as the following:
- User names and either the host names or IP addresses for access to hosts.
- DNS configuration for hosts.
- Valid gear sizes for the deployment.
- Default gear capabilities for new users.
- Default gear size for new applications.
- User names and passwords for configured services, with an option to automatically generate passwords.
- Gear size for new node hosts (profile name only).
- District membership for new node hosts.
- Red Hat subscription type. Note that when using the installation utility you can add multiple pool IDs by separating each pool ID with a space. You can find the required pool IDs with the procedure outlined in Section 7.1.1, “Using Red Hat Subscription Management on Broker Hosts”.
The installation utility can be used with the following options:
- -a (--advanced-mode)
- By default, the installation utility installs MongoDB and ActiveMQ on the system designated as the broker host. Use the
-aoption to install these services on a different host. - -c (--config-file) FILE_PATH
- Use the
-coption with the desired filepath to specify a configuration file other than the default~/.openshift/oo-install-cfg.ymlfile. If the specified file does not exist, a file will be created with some basic settings. - -l (--list-workflows)
- Before using the
-woption, use the-loption to find the desired workflow ID. - -w (--workflow) WORKFLOW_ID
- If you already have an OpenShift Enterprise deployment configuration file, use the install utility with the
-woption and theenterprise_deployworkflow ID to run the deployment without any user interaction. The configuration is assessed, then deployed if no problems are found. This is useful for restarting after a failed deployment or for running multiple similar deployments. - -s (--subscription-type) TYPE
- The
-soption determines how the deployment will obtain the RPMs needed to install OpenShift Enterprise, and overrides any method specified in the configuration file. Use the option with one of the following types:rhsm Red Hat Subscription Manager is used to register and configure the OpenShift software channels according to user, password, and pool settings. rhn RHN Classic is used to register and configure the OpenShift software channels according to user, password, and optional activation key settings. RHN Classic is primarily intended for existing, legacy systems. Red Hat strongly recommends that you use Red Hat Subscription Manager for new installations, because RHN Classic is being deprecated. yum New yumrepository entries are created in the/etc/yum.repos.d/directory according to several repository URL settings. This is not a standard subscription and it is assumed you have already created or have access to these repositories in the layout specified in theopenshift.shfile.none The default setting. Use this option when the software subscriptions on your deployment hosts are already configured as desired and changes are not needed. - -u (--username) USERNAME
- Use the
-uoption to specify the user for the Red Hat Subscription Management or RHN Classic subscription methods from the command line instead of in the configuration file. - -p (--password) PASSWORD
- Similar to the
-uoption, use the-poption to specify the password for the Red Hat Subscription Management or RHN Classic subscription methods from the command line instead of in the configuration file. As an alternative, the interactive UI mode also provides an option for entering subscription parameters for a one-time use without them being saved to the system. - -d (--debug)
- When using the
-doption, the installation utility prints information regarding any attempts to establish SSH sessions as it is running. This can be useful for debugging remote deployments.
Important
none is used for the subscription type, either by using the -s flag or by not configuring subscription information through the interactive UI or .yml configuration file, you must manually configure the correct yum repositories with the proper priorities before running the installation utility. See Section 7.1, “Configuring Broker Host Entitlements” and Section 9.1, “Configuring Node Host Entitlements” for instructions.
Once the oo-install tool has completed the install without errors, you have a working OpenShift Enterprise installation. Consult the following list for directions on what to do next:
- See information on creating any additional users in Section 12.2, “Creating a User Account”.
- See information on creating an application in the OpenShift Enterprise User Guide.
- See information on adding an external routing layer in Section 8.6, “Using an External Routing Layer for High-Availability Applications”.
6.2. Using the Installation Scripts
openshift.ks kickstart script is available at:
Example 6.1. Downloading the openshift.ks Kickstart Script
$ curl -O https://raw.githubusercontent.com/openshift/openshift-extras/enterprise-2.2/enterprise/install-scripts/openshift.ksopenshift.sh bash script is the extracted %post section of the openshift.ks script and is available at:
Example 6.2. Downloading the openshift.sh Bash Script
$ curl -O https://raw.githubusercontent.com/openshift/openshift-extras/enterprise-2.2/enterprise/install-scripts/generic/openshift.shImportant
When using the openshift.ks script, you can supply parameters as kernel parameters during the kickstart process. When using the openshift.sh script, you can similarly supply parameters as command-line arguments. See the commented notes in the header of the scripts for alternative methods of supplying parameters using the openshift.sh script.
Note
openshift.sh script by supplying parameters as command-line arguments. The same parameters can be supplied as kernel parameters for kickstarts using the openshift.ks script.
6.2.1. Selecting Components to Install
install_components parameter, the scripts can be configured to install one or more of the following components on a single host:
Table 6.1. Options for the install_components Parameter
| Options | Description |
|---|---|
broker | Installs the broker application and tools. |
named | Supporting service. Installs a BIND DNS server. |
activemq | Supporting service. Installs the messaging bus. |
datastore | Supporting service. Installs the MongoDB datastore. |
node | Installs node functionality, including cartridges. |
Warning
openshift.sh script and installs the broker, named, activemq, and datastore components on a single host, using default values for all unspecified parameters:
Example 6.3. Installing the broker, named, activemq, and datastore Components Using openshift.sh
$ sudo sh openshift.sh install_components=broker,named,activemq,datastoreopenshift.sh script and installs only the node component on a single host, using default values for all unspecified parameters:
Example 6.4. Installing the node Component Using openshift.sh
$ sudo sh openshift.sh install_components=node6.2.2. Selecting a Package Source
install_method parameter, the scripts assume that the installation source has already been configured to provide the required packages. Using the install_method parameter, the scripts can be configured to install packages from one of the following sources:
Table 6.2. Options for the install_method Parameter
| Parameter | Description | Additional Related Parameters |
|---|---|---|
yum | Configures yum based on supplied additional parameters. | rhel_repo, rhel_optional_repo, jboss_repo_base, rhscl_repo_base, ose_repo_base, ose_extra_repo_base |
rhsm | Uses Red Hat Subscription Management. | rhn_user, rhn_pass, sm_reg_pool, rhn_reg_opts |
rhn | Uses RHN Classic. | rhn_user, rhn_pass, rhn_reg_opts, rhn_reg_actkey |
Note
openshift.sh script and uses Red Hat Subscription Management as the package source, using default values for all unspecified parameters:
Example 6.5. Selecting a Package Source Using openshift.sh
$ sudo sh openshift.sh install_method=rhsm rhn_user=user@example.com rhn_pass=password sm_reg_pool=Example_3affb61f013b3ef6a5fe0b9a 6.2.3. Selecting Password Options
no_scramble parameter set to true to have default, insecure passwords used across the deployment.
install_component options:
Table 6.3. User Name and Password Parameters
| User Name Parameter | Password Parameter | Description |
|---|---|---|
mcollective_user
Default:
mcollective
| mcollective_password | These credentials are shared and must be the same between all broker and nodes for communicating over the mcollective topic channels in ActiveMQ. They must be specified and shared between separate ActiveMQ and broker hosts. These parameters are used by the install_component options broker and node. |
mongodb_broker_user
Default:
openshift
| mongodb_broker_password | These credentials are used by the broker and its MongoDB plug-in to connect to the MongoDB datastore. They must be specified and shared between separate MongoDB and broker hosts, as well as between any replicated MongoDB hosts. These parameters are used by the install_component options datastore and broker. |
|
Not available.
| mongodb_key
|
This key is shared and must be the same between any replicated MongoDB hosts. This parameter is used by the
install_component option datastore.
|
mongodb_admin_user
Default:
admin
| mongodb_admin_password | The credentials for this administrative user created in the MongoDB datastore are not used by OpenShift Enterprise, but an administrative user must be added to MongoDB so it can enforce authentication. These parameters are used by the install_component option datastore. |
openshift_user1
Default:
demo
| openshift_password1 | These credentials are created in the /etc/openshift/htpasswd file for the test OpenShift Enterprise user account. This test user can be removed after the installation is completed. These parameters are used by the install_component option broker. |
|
Not available.
Default:
amq
| activemq_amq_user_password | The password set for the ActiveMQ amq user is required by replicated ActiveMQ hosts to communicate with one another. The amq user is enabled only if replicated hosts are specified using the activemq_replicants parameter. If set, ensure the password is the same between all ActiveMQ hosts. These parameters are used by the install_component option activemq. |
openshift.sh script and sets unique passwords for various configured services, using default values for all unspecified parameters:
Example 6.6. Setting Unique Passwords Using openshift.sh
$ sudo sh openshift.sh install_components=broker,activemq,datastore mcollective_password=password1 mongodb_broker_password=password2 openshift_password1=password36.2.4. Setting Broker and Supporting Service Parameters
Table 6.4. Broker and Supporting Service Parameters
| Parameter | Description |
|---|---|
domain | This sets the network domain under which DNS entries for applications are placed. |
hosts_domain | If specified and host DNS is to be created, this domain is created and used for creating host DNS records; application records are still placed in the domain specified with the domain parameter. |
hostname | This is used to configure the host's actual host name. This value defaults to the value of the broker_hostname parameter if the broker component is being installed, otherwise named_hostname if installing named, activemq_hostname if installing activemq, or datastore_hostname if installing datastore. |
broker_hostname | This is used as a default for the hostname parameter when installing the broker component. It is also used both when configuring the broker and when configuring the node, so that the node can contact the broker's REST API for actions such as scaling applications up or down. It is also used when adding DNS records, if the named_entries parameter is not specified. |
named_ip_addr | This is used by every host to configure its primary name server. It defaults to the current IP address if installing the named component, otherwise it defaults to the broker_ip_addr parameter. |
named_entries | This specifies the host DNS entries to be created in comma-separated, colon-delimited hostname:ipaddress pairs, or can be set to none so that no DNS entries are created for hosts. The installation script defaults to creating entries only for other components being installed on the same host when the named component is installed. |
bind_key | This sets a key for updating BIND instead of generating one. If you are installing the broker component on a separate host from the named component, or are using an external DNS server, configure the BIND key so that the broker can update it. Any Base64-encoded value can be used, but ideally an HMAC-SHA256 key generated by dnssec-keygen should be used. For other key algorithms or sizes, ensure the bind_keyalgorithm and bind_keysize parameters are appropriately set as well. |
valid_gear_sizes | This is a comma-separated list of gear sizes that are valid for use in applications, and sets the VALID_GEAR_SIZES parameter in the /etc/openshift/broker.conf file. |
default_gear_size | This is the default gear size used when new gears are created, and sets the DEFAULT_GEAR_SIZE parameter in the /etc/openshift/broker.conf file. |
default_gear_capabilities | This is a comma-separated list of default gear sizes allowed on a new user account, and sets the DEFAULT_GEAR_CAPABILITIES parameter in the /etc/openshift/broker.conf file. |
VALID_GEAR_SIZES, DEFAULT_GEAR_SIZE, and DEFAULT_GEAR_CAPABILITIES parameters in the /etc/openshift/broker.conf file.
openshift.sh script and sets various parameters for the broker and supporting services, using default values for all unspecified parameters:
Example 6.7. Setting Broker and Supporting Service Parameters Using openshift.sh
$ sudo sh openshift.sh install_components=broker,named,activemq,datastore domain=apps.example.com hosts_domain=hosts.example.com broker_hostname=broker.hosts.example.com named_entries=broker:192.168.0.1,activemq:192.168.0.1,node1:192.168.0.2 valid_gear_sizes=medium default_gear_size=medium default_gear_capabilities=medium6.2.5. Setting Node Parameters
Table 6.5. Node Parameters
| Parameter | Description |
|---|---|
domain | This sets the network domain under which DNS entries for applications are placed. |
hosts_domain | If specified and host DNS is to be created, this domain is created and used for creating host DNS records; application records are still placed in the domain specified with the domain parameter. |
hostname | This is used to configure the host's actual host name. |
node_hostname | This is used as a default for the hostname parameter when installing the node component. It is also used when adding DNS records, if the named_entries parameter is not specified. |
named_ip_addr | This is used by every host to configure its primary name server. It defaults to the current IP address if installing the named component, otherwise it defaults to the broker_ip_addr parameter. |
node_ip_addr | This is used by the node to provide a public IP address if different from one on its NIC. It defaults to the current IP address when installing the node component. |
broker_hostname | This is used by the node to record the host name of its broker, as the node must be able to contact the broker's REST API for actions such as scaling applications up or down. |
node_profile | This sets the name of the node profile, also known as a gear profile or gear size, to be used on the node being installed. The value must also be a member of the valid_gear_sizes parameter used by the broker. |
cartridges | This is a comma-separated list of cartridges to install on the node and defaults to standard, which installs all cartridges that do not require add-on subscriptions. See the commented notes in the header of the scripts for the full list of individual cartridges and more detailed usage. |
openshift.sh script and sets various node parameters, using default values for all unspecified parameters:
Example 6.8. Setting Node Parameters Using openshift.sh
$ sudo sh openshift.sh install_components=node domain=apps.example.com hosts_domain=hosts.example.com node_hostname=node1.hosts.example.com broker_ip_addr=192.168.0.1 broker_hostname=broker.hosts.example.com node_profile=medium cartridges=php,ruby,postgresql,haproxy,jenkins6.2.6. Deploying Sample Broker and Node Hosts Using openshift.sh
openshift.sh script. Whereas the preceding openshift.sh examples demonstrate various parameters discussed in their respective sections, the examples in this section use a combination of the parameters discussed up to this point to demonstrate a specific deployment scenario. The broker and supporting service components are installed on one host (Host 1), and the node component is installed on a separate host (Host 2).
openshift.sh
For Host 1, the command shown in the example runs the openshift.sh script with:
- Red Hat Subscription Manager set as the package source.
- The
broker,named,activemq, anddatastoreoptions set as the installation components. - Unique passwords set for MCollective, ActiveMQ, MongoDB, and the test OpenShift Enterprise user account.
- Various parameters set for the broker and supporting services.
- Default values set for all unspecified parameters.
Example 6.9. Installing and Configuring a Sample Broker Host Using openshift.sh
$ sudo sh openshift.sh install_method=rhsm rhn_user=user@example.com rhn_pass=password sm_reg_pool=Example_3affb61f013b3ef6a5fe0b9a install_components=broker,named,activemq,datastore mcollective_password=password1 mongodb_broker_password=password2 openshift_password1=password3 domain=apps.example.com hosts_domain=hosts.example.com broker_hostname=broker.hosts.example.com named_entries=broker:192.168.0.1,activemq:192.168.0.1,node1:192.168.0.2 valid_gear_sizes=medium default_gear_size=medium default_gear_capabilities=medium 2>&1 | tee -a openshift.sh.logopenshift.sh.log file. If a new kernel package was installed during the installation, the host must be restarted before the new kernel is loaded.
openshift.sh
For Host 2, the command shown in the example runs the openshift.sh script with:
- Red Hat Subscription Manager set as the package source.
- The
nodeoption set as the installation component. - The same unique password set for the MCollective user account that was set during the broker host installation.
- Various node parameters set, including which cartridges to install.
- Default values set for all unspecified parameters.
Example 6.10. Installing and Configuring a Sample Node Host Using openshift.sh
$ sudo sh openshift.sh install_method=rhsm rhn_user=user@example.com rhn_pass=password sm_reg_pool=Example_3affb61f013b3ef6a5fe0b9a install_components=node mcollective_password=password1 domain=apps.example.com hosts_domain=hosts.example.com node_hostname=node1.hosts.example.com broker_ip_addr=192.168.0.1 broker_hostname=broker.hosts.example.com node_profile=medium cartridges=php,ruby,postgresql,haproxy,jenkins 2>&1 | tee -a openshift.sh.logopenshift.sh.log file. If a new kernel package was installed during the installation, the host must be restarted before the new kernel is loaded.
6.2.7. Performing Required Post-Deployment Tasks
Important
- Cartridge manifests must be imported on the broker host before cartridges can be used in applications.
- At least one district must be created before applications can be created.
You can perform these tasks manually on the broker host. Run the following command to import the cartridge manifests for all cartridges installed on nodes:
# oo-admin-ctl-cartridge -c import-profile --activate --obsoleteopenshift.sh
Alternatively, you can perform these tasks using the openshift.sh script by running the post_deploy action. This action is not run by default, but by supplying the actions parameter, you can specify that it only run post_deploy. When running the post_deploy action, ensure that the script is run on the broker host using the broker installation component.
Important
valid_gear_sizes, default_gear_capabilities, or default_gear_size parameters were supplied during the initial broker host installation, ensure that the same values are supplied again when running the post_deploy action. Otherwise, your configured values will be overridden by default values.
valid_gear_sizes parameter is supplied when running the post_deploy action, districts are created for each size in valid_gear_sizes with names in the format default-gear_size_name. If you do not want these default districts created, see the instructions for manually performing these tasks.
post_deploy action of the openshift.sh script. It supplies the same values for the valid_gear_sizes, default_gear_capabilities, and default_gear_size used during the sample broker host installation and uses default values for all unspecified parameters:
Example 6.11. Running the post_deploy Action on the Broker Host
$ sudo sh openshift.sh actions=post_deploy install_components=broker valid_gear_sizes=medium default_gear_size=medium default_gear_capabilities=medium 2>&1 | tee -a openshift.sh.logopenshift.sh.log file. Cartridge manifests are imported on the broker host, and a district named default-medium is created.
6.3. Using the Sample Deployment Steps
- Host 1
- The broker host detailed in Chapter 7, Manually Installing and Configuring a Broker Host.
- Host 2
- The node host detailed in Chapter 9, Manually Installing and Configuring Node Hosts.
yum repositories during installation, including the unsupported Red Hat Enterprise Linux Server Optional channel. Proper yum configurations for OpenShift Enterprise installations are covered in Section 7.2, “Configuring Yum on Broker Hosts” and Section 9.2, “Configuring Yum on Node Hosts”.
yum update command to update all packages before installing OpenShift Enterprise.
Warning
6.3.1. Service Parameters
| Service domain | example.com |
| Broker IP address | DHCP |
| Broker host name | broker.example.com |
| Node 0 IP address | DHCP |
| Node 0 host name | node.example.com |
| Datastore service | MongoDB |
| Authentication service | Basic Authentication using httpd mod_auth_basic |
| DNS service | BIND, configured as follows:
|
| Messaging service | MCollective using ActiveMQ |
Important
6.3.2. DNS Information
Chapter 7. Manually Installing and Configuring a Broker Host
Prerequisites:
Warning
7.1. Configuring Broker Host Entitlements
Table 7.1. OpenShift Enterprise Broker Host Channels
| Channel Name | Purpose | Required | Provided By |
|---|---|---|---|
| Red Hat OpenShift Enterprise 2.2 Infrastructure. | Base channel for OpenShift Enterprise 2.2 broker hosts. | Yes. | "OpenShift Enterprise Broker Infrastructure" subscription. |
| Red Hat OpenShift Enterprise 2.2 Client Tools. | Provides access to the OpenShift Enterprise 2.2 client tools. | Not required for broker functionality, but required during installation for testing and troubleshooting purposes. | "OpenShift Enterprise Broker Infrastructure" subscription. |
| Red Hat Software Collections 1. | Provides access to the latest version of programming languages, database servers, and related packages. | Yes. | "OpenShift Enterprise Broker Infrastructure" subscription. |
7.1.1. Using Red Hat Subscription Management on Broker Hosts
Procedure 7.1. To Configure Broker Host Entitlements with Red Hat Subscription Management:
- On your Red Hat Enterprise Linux instance, register the system:
Example 7.1. Registering Using the Subscription Manager
#
subscription-manager registerUsername: Password: The system has been registered with id: 3tghj35d1-7c19-4734-b638-f24tw8eh6246 - Locate the desired OpenShift Enterprise subscription pool IDs in the list of available subscriptions for your account:
Example 7.2. Finding the OpenShift Enterprise Pool ID
#
subscription-manager list --available+-------------------------------------------+ Available Subscriptions +-------------------------------------------+ Subscription Name: OpenShift Enterprise Broker Infrastructure SKU: SYS#### Pool Id: Example_3affb61f013b3ef6a5fe0b9a Quantity: 1 Service Level: Layered Service Type: L1-L3 Multi-Entitlement: No Ends: 01/01/2020 System Type: Physical - Attach the desired subscription. Replace
pool-idin the following command with your relevantPool IDvalue from the previous step:#
subscription-manager attach --pool pool-id - Enable only the
Red Hat OpenShift Enterprise 2.2 Infrastructurechannel:#
subscription-manager repos --enable rhel-6-server-ose-2.2-infra-rpms - Confirm that
yum repolistdisplays the enabled channel:#
yum repolistrepo id repo name rhel-6-server-ose-2.2-infra-rpms Red Hat OpenShift Enterprise 2.2 Infrastructure (RPMs)OpenShift Enterprise broker hosts require a customizedyumconfiguration to install correctly. For continued steps to correctly configureyum, see Section 7.2, “Configuring Yum on Broker Hosts”.
7.1.2. Using Red Hat Network Classic on Broker Hosts
Note
Procedure 7.2. To Configure Entitlements with Red Hat Network (RHN) Classic:
- On your Red Hat Enterprise Linux instance, register the system. Replace
usernameandpasswordin the following command with your Red Hat Network account credentials.#
rhnreg_ks --username username --password password - Enable only the
Red Hat OpenShift Enterprise 2.2 Infrastructurechannel.#
rhn-channel -a -c rhel-x86_64-server-6-ose-2.2-infrastructure - Confirm that
yum repolistdisplays the enabled channel.#
yum repolistrepo id repo name rhel-x86_64-server-6-ose-2.2-infrastructure Red Hat OpenShift Enterprise 2.2 Infrastructure - x86_64OpenShift Enterprise broker hosts require a customizedyumconfiguration to install correctly. For continued steps to correctly configureyum, see Section 7.2, “Configuring Yum on Broker Hosts”.
7.2. Configuring Yum on Broker Hosts
exclude directives in the yum configuration files.
exclude directives work around the cases that priorities will not solve. The oo-admin-yum-validator tool consolidates this yum configuration process for specified component types called roles.
oo-admin-yum-validator Tool
After configuring the selected subscription method as described in Section 7.1, “Configuring Broker Host Entitlements”, use the oo-admin-yum-validator tool to configure yum and prepare your host to install the broker components. This tool reports a set of problems, provides recommendations, and halts by default so that you can review each set of proposed changes. You then have the option to apply the changes manually, or let the tool attempt to fix the issues that have been found. This process may require you to run the tool several times. You also have the option of having the tool both report all found issues, and attempt to fix all issues.
Procedure 7.3. To Configure Yum on Broker Hosts:
- Install the latest openshift-enterprise-release package:
#
yum install openshift-enterprise-release - Run the
oo-admin-yum-validatorcommand with the-ooption for version2.2and the-roption for thebrokerrole. This reports the first detected set of problems, provides a set of proposed changes, and halts.Example 7.3. Detecting Problems
#
oo-admin-yum-validator -o 2.2 -r brokerPlease note: --role=broker implicitly enables --role=client to ensure /usr/bin/rhc is available for testing and troubleshooting. Detected OpenShift Enterprise repository subscription managed by Red Hat Subscription Manager. The required OpenShift Enterprise repositories are disabled: rhel-server-rhscl-6-rpms rhel-6-server-ose-2.2-rhc-rpms rhel-6-server-rpms Enable these repositories by running these commands: # subscription-manager repos --enable=rhel-server-rhscl-6-rpms # subscription-manager repos --enable=rhel-6-server-ose-2.2-rhc-rpms # subscription-manager repos --enable=rhel-6-server-rpms Please re-run this tool after making any recommended repairs to this systemAlternatively, use the--report-alloption to report all detected problems.#
oo-admin-yum-validator -o 2.2 -r broker --report-all - After reviewing the reported problems and their proposed changes, either fix them manually or let the tool attempt to fix the first set of problems using the same command with the
--fixoption. This may require several repeats of steps 2 and 3.Example 7.4. Fixing Problems
#
oo-admin-yum-validator -o 2.2 -r broker --fixPlease note: --role=broker implicitly enables --role=client to ensure /usr/bin/rhc is available for testing and troubleshooting. Detected OpenShift Enterprise repository subscription managed by Red Hat Subscription Manager. Enabled repository rhel-server-rhscl-6-rpms Enabled repository rhel-6-server-ose-2.2-rhc-rpms Enabled repository rhel-6-server-rpmsAlternatively, use the--fix-alloption to allow the tool to attempt to fix all of the problems that are found.#
oo-admin-yum-validator -o 2.2 -r broker --fix-allNote
If the host is using Red Hat Network (RHN) Classic, the--fixand--fix-alloptions do not automatically enable any missing OpenShift Enterprise channels as they do when the host is using Red Hat Subscription Management. Enable the recommended channels with therhn-channelcommand. Replacerepo-idin the following command with the repository ID reported in theoo-admin-yum-validatorcommand output.#
rhn-channel -a -c repo-idImportant
For either subscription method, the--fixand--fix-alloptions do not automatically install any packages. The tool reports if any manual steps are required. - Repeat steps 2 and 3 until the
oo-admin-yum-validatorcommand displays the following message.No problems could be detected!
7.3. Installing and Configuring BIND and DNS
7.3.1. Installing BIND and DNS Packages
# yum install bind bind-utils7.3.2. Configuring BIND and DNS
$domain environment variable to simplify the process with the following command, replacing example.com with the domain name to suit your environment:
# domain=example.com$keyfile environment variable so that it contains the file name for a new DNSSEC key for your domain, which is created in the subsequent step:
# keyfile=/var/named/$domain.keydnssec-keygen tool to generate the new DNSSEC key for the domain. Run the following commands to delete any old keys and generate a new key:
#rm -vf /var/named/K$domain*#pushd /var/named#dnssec-keygen -a HMAC-SHA256 -b 256 -n USER -r /dev/urandom $domain#KEY="$(grep Key: K$domain*.private | cut -d ' ' -f 2)"#popd
Note
$KEY environment variable has been set to hold the newly-generated key. This key is used in a later step.
Ensure that a key exists so that the broker can communicate with BIND. Use the rndc-confgen command to generate the appropriate configuration files for rndc, which is the tool that the broker uses to perform this communication:
# rndc-confgen -a -r /dev/urandomEnsure that the ownership, permissions, and SELinux context are set appropriately for this new key:
#restorecon -v /etc/rndc.* /etc/named.*#chown -v root:named /etc/rndc.key#chmod -v 640 /etc/rndc.key
7.3.2.1. Configuring Sub-Domain Host Name Resolution
dns-nsupdate plug-in includes an example database, used in this example as a template.
Procedure 7.4. To Configure Sub-Domain Host Name Resolution:
- Delete and create the
/var/named/dynamicdirectory:#
rm -rvf /var/named/dynamic#mkdir -vp /var/named/dynamic - Create an initial
nameddatabase in a new file called/var/named/dynamic/$domain.db, replacing domain with your chosen domain. If the shell syntax is unfamiliar, see the BASH documentation at http://www.gnu.org/software/bash/manual/bashref.html#Here-Documents.#
cat <<EOF > /var/named/dynamic/${domain}.db\$ORIGIN . \$TTL 1 ; 1 seconds (for testing only) ${domain} IN SOA ns1.${domain}. hostmaster.${domain}. ( 2011112904 ; serial 60 ; refresh (1 minute) 15 ; retry (15 seconds) 1800 ; expire (30 minutes) 10 ; minimum (10 seconds) ) NS ns1.${domain}. MX 10 mail.${domain}. \$ORIGIN ${domain}. ns1 A 127.0.0.1 EOF
Procedure 7.5. To Install the DNSSEC Key for a Domain:
- Create the file
/var/named/$domain.key, where domain is your chosen domain:#
cat <<EOF > /var/named/$domain.keykey $domain { algorithm HMAC-SHA256; secret "${KEY}"; }; EOF - Set the permissions and SELinux context to the correct values:
#
chgrp named -R /var/named#chown named -R /var/named/dynamic#restorecon -rv /var/named
/etc/named.conf file.
Procedure 7.6. To Configure a New /etc/named.conf File:
- Create the required file:
#
cat <<EOF > /etc/named.conf// named.conf // // Provided by Red Hat bind package to configure the ISC BIND named(8) DNS // server as a caching only nameserver (as a localhost DNS resolver only). // // See /usr/share/doc/bind*/sample/ for example named configuration files. // options { listen-on port 53 { any; }; directory "/var/named"; dump-file "/var/named/data/cache_dump.db"; statistics-file "/var/named/data/named_stats.txt"; memstatistics-file "/var/named/data/named_mem_stats.txt"; allow-query { any; }; recursion no; /* Path to ISC DLV key */ bindkeys-file "/etc/named.iscdlv.key"; }; logging { channel default_debug { file "data/named.run"; severity dynamic; }; }; // use the default rndc key include "/etc/rndc.key"; controls { inet 127.0.0.1 port 953 allow { 127.0.0.1; } keys { "rndc-key"; }; }; include "/etc/named.rfc1912.zones"; include "$domain.key"; zone "$domain" IN { type master; file "dynamic/$domain.db"; allow-update { key $domain ; } ; }; EOF - Set the permissions and SELinux context to the correct values:
#
chown -v root:named /etc/named.conf#restorecon /etc/named.conf
7.3.2.2. Configuring Host Name Resolution
/etc/resolv.conf file on the broker host (Host 1) so that it uses the local named service. This allows the broker to resolve its own host name, existing node host names, and any future nodes that are added. Also configure the firewall and named service to serve local and remote DNS requests for the domain.
Procedure 7.7. To Configure Host Name Resolution:
- Edit the
/etc/resolv.conffile on the broker host. - Add the following entry as the first name server:
nameserver 127.0.0.1
- Save and close the file.
- Open a shell and run the following commands. This allows DNS access through the firewall, and ensures the
namedservice starts on boot.# lokkit --service=dns# chkconfig named on - Use the
servicecommand to start thenamedservice (that is, BIND) for some immediate updates:# service named start - Use the
nsupdatecommand to open an interactive session to BIND and pass relevant information about the broker. In the following example,server,update,andsendare commands to thensupdatecommand.Important
Remember to replacebroker.example.comwith the fully-qualified domain name,10.0.0.1with the IP address of your broker, and keyfile with the new key file.Update your BIND configuration:# nsupdate -k $keyfileserver 127.0.0.1update delete broker.example.com Aupdate add broker.example.com 180 A 10.0.0.1send - Press Ctrl+D to save the changes and close the session.
Note
configure_named and configure_dns_resolution functions perform these steps.
7.3.3. Verifying the BIND Configuration
# dig @127.0.0.1 broker.example.comANSWER SECTION of the output, and ensure it contains the correct IP address.
# dig broker.example.com

(An example AUTHORITY section:)
;; AUTHORITY SECTION:
example.com.    1    IN    NS    ns1.example.com.
AUTHORITY SECTION of the output to verify that it contains the broker host name. If you have BIND configured on a separate host, verify that it returns that host name.
/etc/resolv.conf file, they can be queried for other domains. Because the dig command will only query the BIND instance by default, use the host command to test requests for other host names.
# host icann.org

icann.org has address 192.0.43.7
icann.org has IPv6 address 2001:500:88:200::7
icann.org mail is handled by 10 pechora1.icann.org.
7.4. Configuring DHCP and Host Name Resolution
Note
7.4.1. Configuring the DHCP Client on the Broker Host
Procedure 7.8. To Configure DHCP on the Broker Host:
- Create the
/etc/dhcp/dhclient-eth0.conffile:#
touch/etc/dhcp/dhclient-eth0.conf - Edit the file to contain the following lines:
prepend domain-name-servers 10.0.0.1;
prepend domain-search "example.com";
- Open the
/etc/sysconfig/networkfile. Locate the line that begins withHOSTNAME=and ensure it is set to your broker host name:HOSTNAME=broker.example.com
- Run the following command to immediately set the host name. Remember to replace the example value with the fully-qualified domain name of your broker host.
# hostname broker.example.com
Note
configure_dns_resolution and configure_hostname functions perform these steps.
7.4.2. Verifying the DHCP Configuration
# hostname7.5. Installing and Configuring MongoDB
- Configuring authentication
- Specifying the default database size
- Creating an administrative user
- Creating a regular user
7.5.1. Installing MongoDB
# yum install mongodb-server mongodb7.5.2. Configuring MongoDB
- Configuring authentication
- Configuring default database size
- Configuring the firewall and
mongoddaemon
Procedure 7.9. To Configure Authentication and Default Database Size for MongoDB:
- Open the
/etc/mongodb.conffile. - Locate the line beginning with
auth =and ensure it is set totrue:auth = true
- Add the following line at the end of the file:
smallfiles = true
- Ensure no other lines exist that begin with either
auth =orsmallfiles =. - Save and close the file.
Procedure 7.10. To Configure the Firewall and Mongo Daemon:
- Ensure the
mongoddaemon starts on boot:# chkconfig mongod on - Start the
mongoddaemon immediately:# service mongod start
Note
configure_datastore function performs these steps.
Before continuing with further configuration, verify that you can connect to the MongoDB database:
# mongoImportant
mongo command, wait and try again. When MongoDB is ready, it will write a "waiting for connections" message in the /var/log/mongodb/mongodb.log file. A connection to the MongoDB database is required for the ensuing steps.
7.5.3. Configuring MongoDB User Accounts
Note
/etc/openshift/broker.conf file later in Section 7.8.7, “Configuring the Broker Datastore”.
Procedure 7.11. To Create a MongoDB Account:
- Open an interactive MongoDB session:
#
mongo - At the MongoDB interactive session prompt, select the
admindatabase:>
use admin - Add the
adminuser to theadmindatabase. Replacepasswordin the command with a unique password:>
db.addUser("admin", "password") - Authenticate using the
adminaccount created in the previous step. Replacepasswordin the command with the appropriate password:>
db.auth("admin", "password") - Switch to the
openshift_brokerdatabase:>
use openshift_broker - Add the
openshiftuser to theopenshift_brokerdatabase. Replacepasswordin the command with a unique password:>
db.addUser("openshift", "password") - Press CTRL+D to exit the MongoDB interactive session.
The following instructions describe how to verify that the openshift account has been created.
Procedure 7.12. To Verify a MongoDB Account:
- Open an interactive MongoDB session:
#
mongo - Switch to the
openshift_brokerdatabase:>
use openshift_broker - Authenticate using the
openshiftaccount. Replacepasswordin the command with the appropriate password:>
db.auth("openshift", "password") - Retrieve a list of MongoDB users:
>
db.system.users.find()An entry for theopenshiftuser is displayed. - Press CTRL+D to exit the MongoDB interactive session.
7.6. Installing and Configuring ActiveMQ
7.6.1. Installing ActiveMQ
# yum install activemq activemq-client7.6.2. Configuring ActiveMQ
/etc/activemq/activemq.xml file to correctly configure ActiveMQ. You can download a sample configuration file from https://raw.github.com/openshift/openshift-extras/enterprise-2.2/enterprise/install-scripts/activemq.xml. Copy this file into the /etc/activemq/ directory, and make the following configuration changes:
- Replace
activemq.example.comin this file with the actual fully-qualified domain name (FQDN) of this host. - Substitute your own passwords for the example passwords provided, and use them in the MCollective configuration that follows.
activemq service to start on boot:
# lokkit --port=61613:tcp# chkconfig activemq on
activemq service:
# service activemq startNote
configure_activemq function performs these steps.
Important
localhost interface. It is important to limit access to the ActiveMQ console for security.
Procedure 7.13. To Secure the ActiveMQ Console:
- Ensure authentication is enabled:
# sed -i -e '/name="authenticate"/s/false/true/' /etc/activemq/jetty.xml - For the console to answer only on the
localhostinterface, check the/etc/activemq/jetty.xmlfile. Ensure that theConnectorbean has thehostproperty with the value of127.0.0.1.Example 7.5.
ConnectorBean Configuration<bean id="Connector" class="org.eclipse.jetty.server.nio.SelectChannelConnector"> <!-- see the jettyPort bean --> <property name="port" value="#{systemProperties['jetty.port']}" /> <property name="host" value="127.0.0.1" /> </bean> - Ensure that the line for the
adminuser in the/etc/activemq/jetty-realm.propertiesfile is uncommented, and change the default password to a unique one. User definitions in this file take the following form:username: password [,role ...]
Example 7.6.
adminUser Definitionadmin: password, admin
- Restart the
activemqservice for the changes to take effect:#
service activemq restart
7.6.3. Verifying the ActiveMQ Configuration
activemq daemon to finish initializing and start answering queries.
password with your password:
# curl --head --user admin:password http://localhost:8161/admin/xml/topics.jsp200 OK message should be displayed, followed by the remaining header lines. If you see a 401 Unauthorized message, it means your user name or password is incorrect.
password with your password:
# curl --user admin:password --silent http://localhost:8161/admin/xml/topics.jsp | grep -A 4 topic--silent argument, and without using grep to filter messages:
# curl http://localhost:8161/admin/xml/topics.jspcurl: (7) couldn't connect to host
activemq daemon is running, look in the ActiveMQ log file:
# more /var/log/activemq/activemq.logjetty.xml. This can be done by editing activemq.xml manually or by running the following command:
# sed -ie "s/\(.*import resource.*jetty.xml.*\)/<\!-- \1 -->/" /etc/activemq/activemq.xml
activemq service for the changes to take effect:
# service activemq restart
7.7. Installing and Configuring MCollective Client
7.7.1. Installing MCollective Client
# yum install ruby193-mcollective-client7.7.2. Configuring MCollective Client
/opt/rh/ruby193/root/etc/mcollective/client.cfg file with the following configuration. Change the setting for plugin.activemq.pool.1.host from localhost to the actual host name of Host 1, and use the same password for the MCollective user specified in /etc/activemq/activemq.xml. Also ensure that you set the password for the plugin.psk parameter, and the figures for the heartbeat parameters. This prevents any node failures when you install MCollective on a node host using Section 9.7, “Installing and Configuring MCollective on Node Hosts”. However, you can leave these as the default values:
main_collective = mcollective
collectives = mcollective
libdir = /opt/rh/ruby193/root/usr/libexec/mcollective
logger_type = console
loglevel = warn
direct_addressing = 0

# Plugins
securityprovider = psk
plugin.psk = asimplething

connector = activemq
plugin.activemq.pool.size = 1
plugin.activemq.pool.1.host = localhost
plugin.activemq.pool.1.port = 61613
plugin.activemq.pool.1.user = mcollective
plugin.activemq.pool.1.password = marionette

plugin.activemq.heartbeat_interval = 30
plugin.activemq.max_hbread_fails = 2
plugin.activemq.max_hbrlck_fails = 2

# Broker will retry ActiveMQ connection, then report error
plugin.activemq.initial_reconnect_delay = 0.1
plugin.activemq.max_reconnect_attempts = 6

# Facts
factsource = yaml
plugin.yaml = /opt/rh/ruby193/root/etc/mcollective/facts.yaml
Note
configure_mcollective_for_activemq_on_broker function performs these steps.
7.8. Installing and Configuring the Broker Application
7.8.1. Installing the Broker Application
# yum install openshift-origin-broker openshift-origin-broker-util rubygem-openshift-origin-auth-remote-user rubygem-openshift-origin-msg-broker-mcollective rubygem-openshift-origin-dns-nsupdateNote
install_broker_pkgs function performs this step.
7.8.2. Setting Ownership and Permissions for MCollective Client Configuration File
#chown apache:apache /opt/rh/ruby193/root/etc/mcollective/client.cfg#chmod 640 /opt/rh/ruby193/root/etc/mcollective/client.cfg
Note
configure_mcollective_for_activemq_on_broker function performs this step.
7.8.3. Modifying Broker Proxy Configuration
mod_ssl includes a configuration file with a VirtualHost that can cause spurious warnings. In some cases, it may interfere with requests to the OpenShift Enterprise broker application.
/etc/httpd/conf.d/ssl.conf file to prevent these issues:
# sed -i '/VirtualHost/,/VirtualHost/ d' /etc/httpd/conf.d/ssl.conf7.8.4. Configuring the Required Services
# chkconfig httpd on# chkconfig network on# chkconfig ntpd on# chkconfig sshd on
# lokkit --nostart --service=ssh# lokkit --nostart --service=https# lokkit --nostart --service=http
ServerName in the Apache configuration on the broker:
# sed -i -e "s/ServerName .*\$/ServerName `hostname`/" \/etc/httpd/conf.d/000002_openshift_origin_broker_servername.conf
Note
enable_services_on_broker function performs these steps.
Generate a broker access key, which is used by Jenkins and other optional services. The access key is configured with the /etc/openshift/broker.conf file. This includes the expected key file locations, which are configured in the lines shown in the sample screen output. The following AUTH_PRIV_KEY_FILE and AUTH_PUB_KEY_FILE settings show the default values, which can be changed as required. The AUTH_PRIV_KEY_PASS setting can also be configured, but it is not required.
AUTH_PRIV_KEY_FILE="/etc/openshift/server_priv.pem"
AUTH_PRIV_KEY_PASS=""
AUTH_PUB_KEY_FILE="/etc/openshift/server_pub.pem"
Note
AUTH_PRIV_KEY_FILE, AUTH_PRIV_KEY_PASS and AUTH_PUB_KEY_FILE settings must specify the same private key on all associated brokers for the Jenkins authentication to work.
AUTH_PRIV_KEY_FILE or AUTH_PRIV_KEY_PASS settings, replace /etc/openshift/server_priv.pem or /etc/openshift/server_pub.pem in the following commands as necessary.
# openssl genrsa -out /etc/openshift/server_priv.pem 2048# openssl rsa -in /etc/openshift/server_priv.pem -pubout > /etc/openshift/server_pub.pem# chown apache:apache /etc/openshift/server_pub.pem# chmod 640 /etc/openshift/server_pub.pem
AUTH_SALT setting in the /etc/openshift/broker.conf file must also be set. It must be secret and set to the same value across all brokers in a cluster, or scaling and Jenkins integration will not work. Create the random string using:
# openssl rand -base64 64Important
AUTH_SALT is changed after the broker is running, the broker service must be restarted:
# service openshift-broker restartoo-admin-broker-auth tool to recreate the broker authentication keys. Run the following command to rekey authentication tokens for all applicable gears:
# oo-admin-broker-auth --rekey-all--help output and man page for additional options and more detailed use cases.
SESSION_SECRET setting in the /etc/openshift/broker.conf file to sign the Rails sessions. Ensure it is the same across all brokers in a cluster. Create the random string using:
# openssl rand -hex 64AUTH_SALT, if the SESSION_SECRET setting is changed after the broker is running, the broker service must be restarted. Note that all sessions are dropped when the broker service is restarted.
# ssh-keygen -t rsa -b 2048 -f ~/.ssh/rsync_id_rsa# cp ~/.ssh/rsync_id_rsa* /etc/openshift/
Note
configure_access_keys_on_broker function performs these steps.
7.8.5. Configuring the Standard SELinux Boolean Variables
# setsebool -P httpd_unified=on httpd_execmem=on httpd_can_network_connect=on httpd_can_network_relay=on httpd_run_stickshift=on named_write_master_zones=on allow_ypbind=onTable 7.2. SELinux Boolean Variable Options
| Boolean Variable | Purpose |
|---|---|
httpd_unified | Allow the broker to write files in the http file context. |
httpd_execmem | Allow httpd processes to write to and execute the same memory. This capability is required by Passenger (used by both the broker and the console) and by The Ruby Racer/V8 (used by the console). |
httpd_can_network_connect | Allow the broker application to access the network. |
httpd_can_network_relay | Allow the SSL termination Apache instance to access the back-end broker application. |
httpd_run_stickshift | Enable Passenger-related permissions. |
named_write_master_zones | Allow the broker application to configure DNS. |
allow_ypbind | Allow the broker application to use ypbind to communicate directly with the name server. |
# fixfiles -R ruby193-rubygem-passenger restore# fixfiles -R ruby193-mod_passenger restore# restorecon -rv /var/run# restorecon -rv /opt
Note
configure_selinux_policy_on_broker function performs these steps.
7.8.6. Configuring the Broker Domain
# sed -i -e "s/^CLOUD_DOMAIN=.*\$/CLOUD_DOMAIN=$domain/" /etc/openshift/broker.confNote
configure_controller function performs this step.
7.8.7. Configuring the Broker Datastore
MONGO_USER, MONGO_PASSWORD, and MONGO_DB fields are configured correctly in the /etc/openshift/broker.conf file.
Example 7.7. Example MongoDB configuration in /etc/openshift/broker.conf
MONGO_USER="openshift"
MONGO_PASSWORD="password"
MONGO_DB="openshift_broker"
7.8.8. Configuring the Broker Plug-ins
/etc/openshift/plugins.d directory. For example, the example.conf file enables the example plug-in. The contents of the example.conf file contain configuration settings in the form of lines containing key=value pairs. In some cases, the only requirement is to copy an example configuration. Other plug-ins, such as the DNS plug-in, require further configuration.
/etc/openshift/plugins.d/ directory to access the files needed for the following configuration steps:
# cd /etc/openshift/plugins.dProcedure 7.14. To Configure the Required Plug-ins:
- Copy the example configuration file for the remote user authentication plug-in:
# cp openshift-origin-auth-remote-user.conf.example openshift-origin-auth-remote-user.conf - Copy the example configuration file for the MCollective messaging plug-in:
# cp openshift-origin-msg-broker-mcollective.conf.example openshift-origin-msg-broker-mcollective.conf - Configure the
dns-nsupdateplug-in:# cat << EOF > openshift-origin-dns-nsupdate.confBIND_SERVER="127.0.0.1"BIND_PORT=53BIND_KEYNAME="$domain"BIND_KEYVALUE="$KEY"BIND_KEYALGORITHM=HMAC-SHA256BIND_ZONE="$domain"EOFImportant
Verify that$domainand$KEYare configured correctly as described in Section 7.3.2, “Configuring BIND and DNS”.
Note
configure_httpd_auth, configure_messaging_plugin, and configure_dns_plugin functions perform these steps.
7.8.9. Configuring OpenShift Enterprise Authentication
httpd service to handle authentication and pass on the authenticated user, or "remote user". Therefore, it is necessary to configure authentication in httpd. In a production environment, you can configure httpd to use LDAP, Kerberos, or another industrial-strength technology. This example uses Apache Basic Authentication and a htpasswd file to configure authentication.
Procedure 7.15. To Configure Authentication for the OpenShift Enterprise Broker:
- Copy the example file to the correct location. This configures
httpdto use/etc/openshift/htpasswdfor its password file.# cp /var/www/openshift/broker/httpd/conf.d/openshift-origin-auth-remote-user-basic.conf.sample /var/www/openshift/broker/httpd/conf.d/openshift-origin-auth-remote-user.confImportant
The/var/www/openshift/broker/httpd/conf.d/openshift-origin-auth-remote-user.conffile must be readable by Apache for proper authentication. Red Hat recommends not making the file unreadable byhttpd. - Create the
htpasswdfile with an initial user "demo":# htpasswd -c /etc/openshift/htpasswd demoNew password: Re-type new password: Adding password for user demo
Note
configure_httpd_auth function performs these steps. The script creates the demo user with a default password, which is set to changeme in OpenShift Enterprise 2.0 and prior releases. With OpenShift Enterprise 2.1 and later, the default password is randomized and displayed after the installation completes. The demo user is intended for testing an installation, and must not be enabled in a production installation.
7.8.10. Configuring Bundler
# cd /var/www/openshift/broker# scl enable ruby193 'bundle --local'
Your bundle is complete! Use `bundle show [gemname]` to see where a bundled gem is installed.
# chkconfig openshift-broker onNote
configure_controller function performs these steps.
# service httpd start# service openshift-broker start
7.8.11. Verifying the Broker Configuration
curl command on the broker host to retrieve the REST API base as a quick test to verify your broker configuration:
# curl -Ik https://localhost/broker/rest/api200 OK response is returned. Otherwise, try the command again without the -I option and look for an error message or Ruby backtrace:
# curl -k https://localhost/broker/rest/apiChapter 8. Continuing Broker Host Installation for Enterprise
8.1. Installing and Configuring DNS Plug-ins
# rpm -ql rubygem-openshift-origin-dns-nsupdateGem_Location/lib/openshift/nsupdate_plugin.rb file to observe the necessary functions.
8.1.1. Installing and Configuring the Fog DNS Plug-in
Procedure 8.1. To Install and Configure the Fog DNS Plug-in:
- Install the Fog DNS plug-in:
#
yum install rubygem-openshift-origin-dns-fog - Copy the example to create the configuration file:
#
cp/etc/openshift/plugins.d/openshift-origin-dns-fog.conf.example/etc/openshift/plugins.d/openshift-origin-dns-fog.conf - Edit the
/etc/openshift/plugins.d/openshift-origin-dns-fog.conffile and set your Rackspace® Cloud DNS credentials.Example 8.1. Fog DNS Plug-in Configuration Using Rackspace® Cloud DNS
FOG_RACKSPACE_USERNAME="racker"
FOG_RACKSPACE_API_KEY="apikey"
FOG_RACKSPACE_REGION="ord"
- Disable any other DNS plug-in that may be in use by moving its configuration file from the
/etc/openshift/plugins.d/directory or renaming it so that it does not end with a.confextension. - Restart the broker service to reload the configuration:
#
service openshift-broker restart
8.1.2. Installing and Configuring the DYN® DNS Plug-in
Procedure 8.2. To Install and Configure the DYN® DNS Plug-in:
- Install the DYN® DNS plug-in:
#
yum install rubygem-openshift-origin-dns-dynect - Copy the example to create the configuration file:
#
cp/etc/openshift/plugins.d/openshift-origin-dns-dynect.conf.example/etc/openshift/plugins.d/openshift-origin-dns-dynect.conf - Edit the
/etc/openshift/plugins.d/openshift-origin-dns-dynect.conffile and set your DYN® DNS credentials.Example 8.2. DYN® DNS Plug-in Configuration
ZONE=Cloud_Domain
DYNECT_CUSTOMER_NAME=Customer_Name
DYNECT_USER_NAME=Username
DYNECT_PASSWORD=Password
DYNECT_URL=https://api2.dynect.net
- Disable any other DNS plug-in that may be in use by moving its configuration file from the
/etc/openshift/plugins.d/directory or renaming it so that it does not end with a.confextension. - Restart the broker service to reload the configuration:
#
service openshift-broker restart
8.1.3. Configuring the nsupdate DNS Plug-in for Compatible DNS Services
Because Infoblox® supports TSIG and GSS-TSIG updates, you can configure the nsupdate DNS plug-in to use an Infoblox® service to publish OpenShift Enterprise applications. See https://www.infoblox.com for more information on Infoblox®.
Procedure 8.3. To Configure the nsupdate DNS Plug-in to Update an Infoblox® Service:
- The nsupdate DNS plug-in is installed by default during a basic installation of OpenShift Enterprise, but if it is not currently installed, install the rubygem-openshift-origin-dns-nsupdate package:
#
yum install rubygem-openshift-origin-dns-nsupdate - Edit the
/etc/openshift/plugins.d/openshift-origin-dns-nsupdate.conffile and set values appropriate for your Infoblox® service and zone:BIND_SERVER="Infoblox_Name_Server" BIND_PORT=53 BIND_KEYNAME="Key_Name" BIND_KEYVALUE="Key_Value" BIND_KEYALGORITHM=Key_Algorithm_Type BIND_ZONE="Zone_Name"
- Disable any other DNS plug-in that may be in use by moving its configuration file from the
/etc/openshift/plugins.d/directory or renaming it so that it does not end with a.confextension. - Restart the broker service to reload the configuration:
#
service openshift-broker restart
8.2. Configuring User Authentication for the Broker
REMOTE_USER Apache environment variable securely. The following sections provide details on configuring user authentication on the broker for a number of popular authentication methods.
Important
8.2.1. Authenticating Using htpasswd
/etc/openshift/htpasswd file that contains hashes of user passwords. Although this simple and standard method allows access with the httpd service, it is not very manageable, nor is it scalable. It is only intended for testing and demonstration purposes.
/etc/openshift/htpasswd file on the broker host. You must have administrative access to the broker host to create and update this file. If multiple broker hosts are used for redundancy, a copy of the /etc/openshift/htpasswd file must exist on each broker host.
htpasswd tool, which is available for most operating systems from http://httpd.apache.org/docs/2.2/programs/htpasswd.html. For Red Hat Enterprise Linux, the htpasswd tool is part of the httpd-tools RPM.
htpasswd from wherever it is available to create a hash for a user password:
Example 8.3. Creating a Password Hash
# htpasswd -n bob

New password:  ######
Re-type new password:  ######
user:$apr1$IOzWzW6K$81cqXmwmZKqp6nWJPB6q31
/etc/openshift/htpasswd file to provide access to users with their chosen password. Because the user password is a hash of the password, the user's password is not visible to the administrator.
8.2.2. Authenticating Using LDAP
/var/www/openshift/broker/httpd/conf.d/openshift-origin-auth-remote-user.conf file to configure LDAP authentication to allow OpenShift Enterprise users. The following process assumes that an Active Directory server already exists.
mod_authnz_ldap for support in authenticating to directory servers. Therefore, every other directory server with the same option is supported by OpenShift Enterprise. To configure the mod_authnz_ldap option, configure the openshift-origin-auth-remote-user.conf file on the broker host to allow both broker and node host access.
#cd /var/www/openshift/broker/httpd/conf.d/#cp openshift-origin-auth-remote-user-ldap.conf.sample openshift-origin-auth-remote-user.conf#vim openshift-origin-auth-remote-user.conf
Important
/var/www/openshift/console/httpd/conf.d/openshift-origin-auth-remote-user.conf file.
AuthLDAPURL setting. Ensure the LDAP server's firewall is configured to allow access by the broker hosts. See the mod_authnz_ldap documentation at http://httpd.apache.org/docs/2.2/mod/mod_authnz_ldap.html for more information.
# service openshift-broker restartNote
8.2.3. Authenticating Using Kerberos
#cd /var/www/openshift/broker/httpd/conf.d/#cp openshift-origin-auth-remote-user-kerberos.conf.sample openshift-origin-auth-remote-user.conf#vim openshift-origin-auth-remote-user.conf
KrbServiceName and KrbAuthRealms settings to suit the requirements of your Kerberos service. Ensure the Kerberos server's firewall is configured to allow access by the broker hosts. See the mod_auth_kerb documentation at http://modauthkerb.sourceforge.net/configure.html for more information.
# service openshift-broker restartNote
8.2.4. Authenticating Using Mutual SSL
REMOTE_USER to the broker.
Procedure 8.4. To Modify the Broker Proxy Configuration for Mutual SSL Authentication:
/etc/httpd/conf.d/000002_openshift_origin_broker_proxy.conf file.
- Edit the
/etc/httpd/conf.d/000002_openshift_origin_broker_proxy.conffile on the broker host and add the following lines in the<VirtualHost *:443>block directly after theSSLProxyEnginedirective, removing any otherSSLCertificateFile,SSLCertificateKeyFile, andSSLCACertificateFiledirectives that may have previously been set:SSLOptions +StdEnvVars SSLCertificateFile
path/to/SSL/certificate/fileSSLCertificateKeyFilepath/to/certificate/keyfileSSLCACertificateFilepath/to/SSLCA/certificate/fileSSLVerifyClient optional SSLVerifyDepth 2 RequestHeader set X-Remote-User %{SSL_CLIENT_S_DN_CN}e env=SSL_CLIENT_S_DN_CNThese directives serve the following functions for the SSL virtual host:- The
SSLCertificateFile,SSLCertificateKeyFile, andSSLCACertificateFiledirectives are critical, because they set the paths to the certificates. - The
SSLVerifyClientdirective set tooptionalis also critical as it accommodates certain broker API calls that do not require authentication. - The
SSLVerifyDepthdirective can be changed based on the number of certificate authorities used to create the certificates. - The
RequestHeaderdirective set to the above options allows a mostly standard broker proxy to turn the CN from the client certificate subject into anX_REMOTE_USERheader that is trusted by the back-end broker. Importantly, ensure that the traffic between the SSL termination proxy and the broker application is trusted.
- Restart the broker proxy:
#
service httpd restart
Procedure 8.5. To Modify the Broker Application Configuration for Mutual SSL Authentication:
- Edit the
/var/www/openshift/broker/httpd/conf.d/openshift-origin-auth-remote-user.conffile on the broker host to be exactly as shown:<Location /broker> # Broker handles auth tokens SetEnvIfNoCase Authorization Bearer passthrough # Console traffic will hit the local port. mod_proxy will set this header automatically. SetEnvIf X-Forwarded-For "^$" passthrough=1 # Turn the Trusted header into the Apache environment variable for the broker remote-user plugin SetEnvIf X-Remote-User "(..*)" REMOTE_USER=$1 passthrough=1 # Old-style auth keys are POSTed as parameters. The deployment registration # and snapshot-save use this. BrowserMatchNoCase ^OpenShift passthrough # Older-style auth keys are POSTed in a header. The Jenkins cartridge does # this. SetEnvIf broker_auth_key "^[A-Za-z0-9+/=]+$" passthrough=1 Allow from env=passthrough # Allow the specific requests that can passthrough and then deny everything else. The following requests can passthrough: # # * Use Bearer authentication # * Use Broker authentication tokens # * Originate from the trusted Console Order Allow,Deny </Location> # The following APIs do not require auth: # # /api # /environment # /cartridges # /quickstarts # # We want to match requests in the form of: # # /api # /api.json # /api/ # # But not: # # /api_with_auth <LocationMatch ^/broker/rest/(api|environment|cartridges|quickstarts)(\.\w+|/?|/.*)$> <IfVersion >= 2.4> Require all granted </IfVersion> <IfVersion < 2.4> Allow from all </IfVersion> </LocationMatch> - Set the following in the
/etc/openshift/plugins.d/openshift-origin-auth-remote-user.conffile:TRUSTED_HEADER="HTTP_X_REMOTE_USER"
- Restart the broker service for the changes to take effect:
#
service openshift-broker restart
Procedure 8.6. To Modify the Management Console Configuration for Mutual SSL Authentication:
- Edit the
/var/www/openshift/console/httpd/conf.d/openshift-origin-auth-remote-user.conffile on the broker host and add the following:<Location /console> # The node->broker auth is handled in the Ruby code BrowserMatch Openshift passthrough Allow from env=passthrough # Turn the Console output header into the Apache environment variable for the broker remote-user plugin SetEnvIf X-Remote-User "(..*)" REMOTE_USER=$1 Order Deny,Allow </Location> - Set the following in the
/etc/openshift/console.conffile:REMOTE_USER_HEADER=HTTP_X_REMOTE_USER
- Restart the Management Console service for the changes to take effect:
#
service openshift-console restart
Procedure 8.7. To Test the Mutual SSL Configuration:
- Run the following command and ensure it returns successfully:
#
curl -k https://broker.example.com/broker/rest/api - Run the following command and ensure it returns with a
403 Forbiddenstatus code:#
curl -k https://broker.example.com/broker/rest/user - Run the following commands and ensure they return successfully:
#
curl --cert path/to/certificate/file --key path/to/certificate/keyfile --cacert path/to/SSLCA/certificate/file https://broker.example.com/broker/rest/api#curl --cert path/to/certificate/file --key path/to/certificate/keyfile --cacert path/to/SSLCA/certificate/file https://broker.example.com/broker/rest/userNote that the above commands may need to be altered with the--keyoption if your key and certificate are not located in the same PEM file. This option is used to specify the key location if it differs from your certificate file.
8.2.5. Integrating Active Directory Authentication with Identity Management
Note
Procedure 8.8. To Configure the Firewall Ports:
- Save the existing firewall configuration and keep as a backup:
#
cp -p /etc/sysconfig/iptables{,.pre-idm} - Create a new chain named ipa-client-chain. This contains the firewall rules for the ports needed by IdM:
#
iptables --new-chain ipa-client-chain#iptables --insert INPUT --jump ipa-client-chain - Perform the following step for each required port:
#
A list of ports that may be being used in your instance are listed in Section 5.2.1, “Custom and External Firewalls”. Theiptables --append ipa-client-chain --protocol Protocol --destination-port Port_Number --jump ACCEPT--protocoloption indicates the protocol of the rule to check. The specified protocol can be tcp, udp, udplite, icmp, esp, ah, or sctp, or you can use ""all" to indicate all protocols. - Save the new firewall configuration, restart the iptables service, then ensure the changes are set upon reboot:
#
iptables-save > /etc/sysconfig/iptables#service iptables restart#chkconfig iptables on - For each OpenShift host, verify that the IdM server and replica are listed in the
/etc/resolv.conffile. The IdM server and replica must be listed before any additional servers.Example 8.4. Featured IdM Server and Replica in the
/etc/resolv.confFiledomain broker.example.com search broker.example.com nameserver 10.19.140.101 nameserver 10.19.140.102 nameserver 10.19.140.423 - Now that the IdM server has been configured, configure each OpenShift host to be a IdM client, then verify the Kerberos and IdM lookups. Install the ipa-client package on each host, then run the install tool:
#
Theyum install ipa-client#ipa-client-install --enable-dns-updates --ssh-trust-dns --mkhomedir--enable-dns-updatesoption permits the IdM client to dynamically register its IP address with the DNS service on the IdM server. The--ssh-trust-dnsoption configures OpenSSH to allow any IdM DNS records where the host keys are stored. The--mkhomediroption automatically creates a home directory on the client upon the user's first login. Note that if DNS is properly configured, then the install tool will detect the IdM server through autodiscovery. If the autodiscovery fails, the install can be run with the--serveroption with the IdM server's FQDN. - Next, verify that Kerberos and IdM lookups are functioning by using the following command on each host, entering a password when prompted:
#
Then, use the same command for each user:kinit adminPassword for admin@BROKER.EXAMPLE.COM: ******* #klist#id admin#
id UsernameNote
If the IdM server has been re-deployed since installation, the CA certificate may be out of sync. If so, you might receive an error with your LDAP configuration. To correct the issue, list the certificate files, re-name the certificate file, then re-run the install:#
ll /etc/ipa#mv /etc/ipa/ca.crt /etc/ipa/ca.crt.bad#ipa-client-install --enable-dns-updates --ssh-trust-dns --mkhomedir
While your OpenShift Enterprise instance is now configured for IdM use, the next step is to configure any application developer interaction with the broker host for use with IdM. This will allow each developer to authenticate to the broker host.
Procedure 8.9. To Authorize Developer Interaction with the Broker Host:
- On the IdM server, create a HTTP web server for each of your running brokers. This allows the broker host to authenticate to the IdM server using Kerberos. Ensure to replace broker1 with the hostname of the desired broker host, and broker.example,com with the IdM server hostname configured in the above procedure:
#
ipa service-add HTTP/broker1.broker.example.com - Create a HTTP Kerberos keytab on the broker host. This will provide secure access to the broker web services:
#
If you have multiple brokers, copy the keyfile to the other brokers.ipa-getkeytab -s idm-srv1.broker.example.com \#ipa-getkeytab -p HTTP/broker1.broker.example.com@BROKER.EXAMPLE.COM \#ipa-getkeytab -k /var/www/openshift/broker/httpd/conf.d/http.keytab#chown apache:apache /var/www/openshift/broker/httpd/conf.d/http.keytab - If your instance has not completed Section 8.2.3, “Authenticating Using Kerberos” in the OpenShift Enterprise Deployment Guide, follow it now to authenticate to the broker host using Kerberos.
- Restart the broker and Console services:
#
service openshift-broker restart#service openshift-console restart - Create a backup of the nsupdate plug-in. The nsupdate plug-in facilitates any updates to the dynamic DNS zones without the need to edit zone files or restart the DNS server:
#
Then, edit the file and replace with the contents below:cp -p /etc/openshift/plugins.d/openshift-origin-dns-nsupdate.conf{,.orig}BIND_SERVER="10.19.140.101" BIND_PORT=53 BIND_ZONE="broker.example.com" BIND_KRB_PRINCIPAL="DNS/broker1.broker.example.com@BROKER.EXAMPLE.COM" BIND_KRB_KEYTAB="/etc/dns.keytab"
Ensure thatBIND_SERVERpoints to the IP address of the IdM server,BIND_ZONEpoints to the domain name, and theBIND_KRB_PRINCIPALis correct. TheBIND_KRB_KEYTABis configured after the DNS service is created and when the zones are modified for dynamic DNS. - Create the broker DNS service. Run the following command for each broker host:
#
ipa service-add DNS/broker1.broker.example.com - Modify the DNS zone to allow the broker host to dynamically register applications with IdM. Perform the following on the idM server:
#
Ensure to repeat the second line for each broker if you have multiple broker hosts.ipa dnszone-mod interop.example.com --dynamic-update=true --update-policy= \ "grant DNS\047\broker1.broker.example.com@BROKER.EXAMPLE.COM wildcard * ANY;\" - Generate DNS keytabs on the broker using the
ipa-getkeytab. Repeat the following for each broker host:#
ipa-getkeytab -s idm-srv1.interop.example.com \#ipa-getkeytab -p DNS/broker1.broker.example.com \#ipa-getkeytab -k /etc/dns.keytab#chown apache:apache /etc/dns.keytab - Restart the broker service:
#
service openshift-broker restart - The dynamic DNS is now ready for use with the client tools. Configure the client tools by running
rhc setupspecifying the IdM broker as the server:#
rhc setup --server=broker.broker.example.com - To verify the client tools, check the domain connectivity and deploy a test application:
#
To verify the OpenShift Enterprise broker host, run therhc domain show#rhc app create App_Name Cartridge_Nameoo-accept-brokerutility from the broker host. Test the full environment with theoo-diagnosticsutility:#
Additionally, you can verify the broker and Console access by obtaining a Kerberos ticket and testing the authentication with the following command:oo-accept-broker#oo-diagnostics#
Then running the following commands for each broker host:kinit IdM_Server_Hostname#
curl -Ik --negotiate -u : https://broker1.broker.example.com/broker/rest/domains#curl -Ik --negotiate -u : https://broker1.broker.example.com/console
8.3. Separating Broker Components by Host
8.3.1. BIND and DNS
dnssec-keygen tool in Section 7.3.2, “Configuring BIND and DNS” is saved in the /var/named/domain.key file, where domain is your chosen domain. Note the value of the secret parameter and enter it in the CONF_BIND_KEY field in the OpenShift Enterprise install script. Alternatively, enter it directly in the BIND_KEYVALUE field of the /etc/openshift/plugins.d/openshift-origin-dns-nsupdate.conf broker host configuration file.
oo-register-dns command registers a node host's DNS name with BIND, and it can be used to register a localhost or a remote name server. This command is intended as a convenience tool that can be used with demonstrating OpenShift Enterprise installations that use standalone BIND DNS.
oo-register-dns command is not required because existing IT processes handle host DNS. However, if the command is used for defining host DNS, the update key must be available for the domain that contains the hosts.
oo-register-dns command requires a key file to perform updates. If you created the /var/named/$domain.key file described in Section 7.3.2.1, “Configuring Sub-Domain Host Name Resolution”, copy this to the same location on every broker host as required. Alternatively, use the randomized .key file generated directly by the dnssec-keygen command, but renamed to $domain.key. The oo-register-dns command passes the key file to nsupdate, so either format is valid.
8.3.2. MongoDB
localhost access. Bind MongoDB to an external IP address and open the correct port in the firewall to use a remote MongoDB with the broker application.
bind_ip setting in the /etc/mongodb.conf file to bind MongoDB to an external address. Either use the specific IP address, or substitute 0.0.0.0 to make it available on all interfaces:
# sed -i -e "s/^bind_ip = .*\$/bind_ip = 0.0.0.0/" /etc/mongodb.conf# service mongod restartlokkit command to open the MongoDB port in the firewall:
# lokkit --port=27017:tcpImportant
iptables to specify which hosts (in this case, all configured broker hosts) are allowed to connect. Otherwise, use a network topology that only allows authorized hosts to connect. Most importantly, ensure that node hosts are not allowed to connect to MongoDB.
Note
localhost and use an SSH tunnel from the remote broker hosts to provide access.
8.4. Configuring Redundancy
- Install broker, ActiveMQ, MongoDB, and name server on each host
- Install broker, ActiveMQ, MongoDB, and name server separately on different hosts
- Install broker and MongoDB together on multiple hosts, and install ActiveMQ separately on multiple hosts
Note
rsync_id_rsa.pub public key of each broker host. See Section 9.9, “Configuring SSH Keys on the Node Host” for more information.
8.4.1. BIND and DNS
8.4.2. Authentication
8.4.3. MongoDB
- Replication - http://docs.mongodb.org/manual/replication/
- Convert a Standalone to a Replica Set - http://docs.mongodb.org/manual/tutorial/convert-standalone-to-replica-set/
Procedure 8.10. To Install MongoDB on Each Host:
- On a minimum of three hosts, install MongoDB and turn on the MongoDB service to make it persistent:
#
yum install -y mongodb-server mongodb#chkconfig mongod on - If you choose to install MongoDB using the basic install script provided, you must also delete the initial data from all but one installation to make it a part of the replica set. Stop the MongoDB service and delete the data using:
#
service mongod stop#rm -rf /var/lib/mongodb/*
Procedure 8.11. To Configure the MongoDB Service on Each Host:
- Edit the
/etc/mongodb.conffile and modify or add the following information:bind_ip = 0.0.0.0 # allow access from all interfaces auth = true rest = true smallfiles = true keyFile = /etc/mongodb.keyfile replSet = ose journal = true
The following table provides a brief description of each setting from the example above.Table 8.1. Descriptions of
/etc/mongodb.confSettingsSetting Description bind_ip This specifies the IP address MongoDB listens on for connections. Although the value must be an external address to form a replica set, this procedure also requires it to be reachable on the localhostinterface. Specifying0.0.0.0binds to both.auth This enables the MongoDB authentication system, which requires a login to access databases or other information. rest This enables the simple REST API used by the replica set creation process. replSet This names a replica set, and must be consistent among all the members for replication to take place. keyFile This specifies the shared authentication key for the replica set, which is created in the next step. journal This enables writes to be journaled, which enables faster recoveries from crashes. smallfiles This reduces the initial size of data files, limits the files to 512MB, and reduces the size of the journal from 1GB to 128MB. - Create the shared key file with a secret value to synchronize the replica set. For security purposes, create a randomized value, and then copy it to all of the members of the replica set. Verify that the permissions are set correctly:
#
echo "sharedkey" > /etc/mongodb.keyfile#chown mongodb.mongodb /etc/mongodb.keyfile#chmod 400 /etc/mongodb.keyfile - Configure the firewall to allow MongoDB traffic on each host using the
lokkitcommand:#
lokkit --port=27017:tcpRed Hat Enterprise Linux provides different methods for configuring firewall ports. Alternatively, useiptablesdirectly to configure firewall ports. - Start the MongoDB service on each host:
#
service mongod start
Note
configure_datastore_add_replicants function performs the steps in the previous two procedures.
Procedure 8.12. To Form a Replica Set:
- Authenticate to the
admindatabase and initiate theosereplica set:#
mongo>use adminswitched to db admin >db.auth("admin", "password")1 >rs.initiate(){ "info2" : "no configuration explicitly specified -- making one", "me" : "mongo1.example.com:27017", "info" : "Config now saved locally. Should come online in about a minute.", "ok" : 1 } - Wait a few moments then press Enter until you see the
ose:PRIMARYprompt. Then add new members to the replica set:ose:PRIMARY>
rs.add("mongo2.example.com:27017"){ "ok" : 1 }Repeat as required for all datastore hosts, using the FQDN or any resolvable name for each host. - Verify the replica set members:
ose:PRIMARY>
rs.status(){ "set" : "ose", "date" : ISODate("2013-12-02T21:33:43Z"), "myState" : 1, "members" : [ { "_id" : 0, "name" : "mongo1.example.com:27017", "health" : 1, "state" : 1, "stateStr" : "PRIMARY", "uptime" : 1416, "optime" : Timestamp(1386019903, 1), "optimeDate" : ISODate("2013-12-02T21:31:43Z"), "self" : true }, { "_id" : 1, "name" : "mongo2.example.com:27017", "health" : 1, "state" : 2, "stateStr" : "SECONDARY", "uptime" : 120, "optime" : Timestamp(1386019903, 1), "optimeDate" : ISODate("2013-12-02T21:31:43Z"), "lastHeartbeat" : ISODate("2013-12-02T21:33:43Z"), "lastHeartbeatRecv" : ISODate("2013-12-02T21:33:43Z"), "pingMs" : 1, "syncingTo" : "mongo1.example.com:27017" } ], "ok" : 1 } [...]
Procedure 8.13. To Configure the Broker Application to Use a Replica Set:
- If you have not configured a MongoDB user named
openshiftto allow access to the broker host before forming the replica set as described in Chapter 7, Manually Installing and Configuring a Broker Host, add it now. Database changes at this point are synchronized among all members of the replica set. - Edit the
/etc/openshift/broker.conffile on all broker hosts and setMONGO_HOST_PORTto the appropriate replica set members:# For replica sets, use ',' delimiter for multiple servers # Eg: MONGO_HOST_PORT="<host1:port1>,<host2:port2>..." MONGO_HOST_PORT="mongo1.example.com:27017,mongo2.example.com:27017,mongo3.example.com:27017" MONGO_USER="openshift" MONGO_PASSWORD="password" MONGO_DB="openshift_broker"
8.4.4. ActiveMQ
- Distributes queues and topics among ActiveMQ brokers
- Allows clients to connect to any Active MQ broker on the network
- Failover to another ActiveMQ broker if one fails
- Clustering - http://activemq.apache.org/clustering.html
- How do distributed queues work - http://activemq.apache.org/how-do-distributed-queues-work.html
8.4.4.1. Configuring a Network of ActiveMQ Brokers
activemq1.example.comactivemq2.example.comactivemq3.example.com
Procedure 8.14. To Configure a Network of ActiveMQ Brokers:
- Install ActiveMQ with:
#
yum install -y activemq - Modify the
/etc/activemq/activemq.xmlconfiguration file. Red Hat recommends downloading and using the sampleactivemq.xmlfile provided at https://raw.github.com/openshift/openshift-extras/enterprise-2.2/enterprise/install-scripts/activemq-network.xml as a starting point. Modify the host names, user names, and passwords to suit your requirements.However, if you choose to modify the default/etc/activemq/activemq.xmlconfiguration file, use the following instructions to do so. Each change that must be made in the default/etc/activemq/activemq.xmlfile is described accordingly. Red Hat recommends that you create a backup of the default/etc/activemq/activemq.xmlfile before modifying it, using the following command:#
cp /etc/activemq/activemq.xml{,.orig}- In the
brokerelement, modify thebrokerNameanddataDirectoryattributes, and adduseJmx="true":<broker xmlns="http://activemq.apache.org/schema/core" brokerName="activemq1.example.com" useJmx="true" dataDirectory="${activemq.base}/data"> - Modify the
destinationPolicyelement:<destinationPolicy> <policyMap> <policyEntries> <policyEntry topic=">" producerFlowControl="false"/> <policyEntry queue="*.reply.>" gcInactiveDestinations="true" inactiveTimoutBeforeGC="300000" /> </policyEntries> </policyMap> </destinationPolicy> - Comment out or remove the
persistenceAdapterelement, and replace it with thenetworkConnectorselement. This example is for the first ActiveMQ broker.<networkConnectors> <networkConnector name="broker1-broker2-topic" uri="static:(tcp://activemq2.example.com:61616)" userName="amquser" password="amqpass"> <excludedDestinations> <queue physicalName=">" /> </excludedDestinations> </networkConnector> <networkConnector name="broker1-broker2-queue" uri="static:(tcp://activemq2.example.com:61616)" userName="amquser" password="amqpass" conduitSubscriptions="false"> <excludedDestinations> <topic physicalName=">" /> </excludedDestinations> </networkConnector> <networkConnector name="broker1-broker3-topic" uri="static:(tcp://activemq3.example.com:61616)" userName="amquser" password="amqpass"> <excludedDestinations> <queue physicalName=">" /> </excludedDestinations> </networkConnector> <networkConnector name="broker1-broker3-queue" uri="static:(tcp://activemq3.example.com:61616)" userName="amquser" password="amqpass" conduitSubscriptions="false"> <excludedDestinations> <topic physicalName=">" /> </excludedDestinations> </networkConnector> </networkConnectors>ThenetworkConnectorselement provides one-way message paths to other ActiveMQ brokers on the network. For a fault-tolerant configuration, thenetworkConnectorelement for each ActiveMQ broker must point to the other ActiveMQ brokers, and is specific to each host. In the example above, theactivemq1.example.comhost is shown.EachnetworkConnectorelement requires a unique name and ActiveMQ broker. The names used here are in thelocalhost -> remotehostformat, reflecting the direction of the connection. For example, the first ActiveMQ broker has anetworkConnectorelement name prefixed withbroker1-broker2, and the address corresponds to a connection to the second host.TheuserNameandpasswordattributes are for connections between the ActiveMQ brokers, and match the definitions described in the next step. - Add the
pluginselement to define authentication and authorization for MCollective, inter-broker connections, and administration purposes. Thepluginselement must be after thenetworkConnectorselement. Substitute user names and passwords according to your local IT policy.<plugins> <statisticsBrokerPlugin/> <simpleAuthenticationPlugin> <users> <authenticationUser username="mcollective" password="marionette" groups="mcollective,everyone"/> <authenticationUser username="amquser" password="amqpass" groups="admins,everyone"/> <authenticationUser username="admin" password="password" groups="mcollective,admin,everyone"/> </users> </simpleAuthenticationPlugin> <authorizationPlugin> <map> <authorizationMap> <authorizationEntries> <authorizationEntry queue=">" write="admins" read="admins" admin="admins" /> <authorizationEntry topic=">" write="admins" read="admins" admin="admins" /> <authorizationEntry topic="mcollective.>" write="mcollective" read="mcollective" admin="mcollective" /> <authorizationEntry queue="mcollective.>" write="mcollective" read="mcollective" admin="mcollective" /> <authorizationEntry topic="ActiveMQ.Advisory.>" read="everyone" write="everyone" admin="everyone"/> </authorizationEntries> </authorizationMap> </map> </authorizationPlugin> </plugins> - Add the
stomptransportConnector(for use by MCollective) to thetransportConnectorselement. TheopenwiretransportConnectoris used for ActiveMQ inter-broker transport, and must not be modified. Configure thetransportConnectorselement as shown in the following example.<transportConnectors> <transportConnector name="openwire" uri="tcp://0.0.0.0:61616"/> <transportConnector name="stomp" uri="stomp://0.0.0.0:61613"/> </transportConnectors>
- Secure the ActiveMQ console by configuring Jetty, as described in the basic installation.
- Enable authentication and restrict the console to
localhost:#
cp /etc/activemq/jetty.xml{,.orig}#sed -i -e '/name="authenticate"/s/false/true/' /etc/activemq/jetty.xml - Change the default
adminpassword in the/etc/activemq/jetty-realm.propertiesfile. The password is the same as theadminpassword in the authentication plug-in.#
cp /etc/activemq/jetty-realm.properties{,.orig}#sed -i -e '/admin:/s/admin,/password,/' /etc/activemq/jetty-realm.properties
- Modify the firewall to allow ActiveMQ
stompandopenshifttraffic:#
lokkit --port=61613:tcp#lokkit --port=61616:tcpThe basic installation only opens port 61613. Here, port 61616 has also been opened to allow ActiveMQ inter-broker traffic. - Restart the ActiveMQ service and make it persistent on boot:
#
service activemq restart#chkconfig activemq on
Note
configure_activemq function performs these steps when multiple members are specified with CONF_ACTIVEMQ_REPLICANTS.
8.4.4.2. Verifying a Network of ActiveMQ Brokers Using the ActiveMQ Console
# curl --head --user admin:password http://localhost:8161/admin/xml/topics.jsp

HTTP/1.1 200 OK
[...]200 means authentication is working correctly.
# curl --user admin:password --silent http://localhost:8161/admin/xml/topics.jsp

<topics>
</topics>localhost, use a text browser such as elinks to verify locally. Alternatively, connect to your workstation using a secure tunnel and use a browser of your choice, as shown in the following example:
# ssh -L8161:localhost:8161 activemq1.example.comhttp://localhost:8161/. The password from the /etc/activemq/jetty-realm.properties file is required.
http://localhost:8161/admin/network.jsp shows two connections for each server on the network. For example, for a three broker network from the first server, it may be similar to the following example.
Example 8.5. Example Network Tab Output
                                                     Created  Messages  Messages
  Remote Broker                Remote Address          By     Enqueued  Dequeued
                                                     Duplex
  activemq2.example.com   tcp://192.168.59.163:61616 false    15        15
activemq3.example.com tcp://192.168.59.147:61616 false 15 15Note
/etc/activemq/activemq.xml file for loading the /etc/activemq/jetty.xml file.
8.4.4.3. Configuring MCollective for Redundant ActiveMQ Services
/opt/rh/ruby193/root/etc/mcollective/client.cfg file on a broker host to configure MCollective to use a pool of ActiveMQ services. Likewise, edit the /opt/rh/ruby193/root/etc/mcollective/server.cfg file on a node host to do the same. In either case, replace the single ActiveMQ host connection with a pool configuration as shown in the following example.
Example 8.6. Example MCollective Configuration File
connector = activemq
plugin.activemq.pool.size = 3
plugin.activemq.pool.1.host=activemq1.example.com
plugin.activemq.pool.1.port=61613
plugin.activemq.pool.1.user=mcollective
plugin.activemq.pool.1.password=marionette
plugin.activemq.pool.2.host=activemq2.example.com
plugin.activemq.pool.2.port=61613
plugin.activemq.pool.2.user=mcollective
plugin.activemq.pool.2.password=marionette
plugin.activemq.pool.3.host=activemq3.example.com
plugin.activemq.pool.3.port=61613
plugin.activemq.pool.3.user=mcollective
plugin.activemq.pool.3.password=marionette
Note
configure_mcollective_for_activemq_on_broker fuction performs this step on the broker host, while the configure_mcollective_for_activemq_on_node function performs this step on the node host.
8.4.5. Broker Web Application
Host: header by which it is addressed; this includes URLs to various functionality. Clients can be directed to private URLs by way of the API document if the reverse proxy request does not preserve the client's Host: header.
broker.example.com that distributes loads to broker1.example.com and broker2.example.com, the proxy request to broker1.example.com should be https://broker.example.com. If a httpd proxy is used, for example, enable the ProxyPreserveHost directive. For more information, see ProxyPreserveHost Directive at http://httpd.apache.org/docs/2.2/mod/mod_proxy.html#proxypreservehost.
Important
/etc/openshift/server_pub.pem and /etc/openshift/server_priv.pem, and update the AUTH_SALT setting in the/etc/openshift/broker.conf file. Failure to synchronize these will result in authentication failures where gears make requests to a broker host while using credentials created by a different broker host in scenarios such as auto-scaling, Jenkins builds, and recording deployments.
8.5. Installing and Configuring the Gear Placement Plug-in
Procedure 8.15. To Install and Configure the Gear Placement Plug-in:
- Install the gear placement plug-in on each broker host:
# yum install rubygem-openshift-origin-gear-placementThis installs a gem with a Rails engine containing theGearPlacementPluginclass. - On each broker host, copy the
/etc/openshift/plugins.d/openshift-origin-gear-placement.conf.examplefile to/etc/openshift/plugins.d/openshift-origin-gear-placement.conf:#
cp /etc/openshift/plugins.d/openshift-origin-gear-placement.conf.example /etc/openshift/plugins.d/openshift-origin-gear-placement.confAs long as this configuration file with a.confextension exists, the broker automatically loads a gem matching the file name, and the gem can use the file to configure itself. - Restart the broker service:
# service openshift-broker restartIf you make further modifications to the configuration file of the gear placement plug-in, you must restart the broker service again after making your final changes. - The default implementation of the plug-in simply logs the plug-in inputs and delegates the actual gear placement to the default algorithm. You can verify that the plug-in is correctly installed and configured with the default implementation by creating an application and checking the
/var/log/openshift/broker/production.logfile.Example 8.7. Checking Broker Logs for Default Gear Placement Plug-in Activity
2014-10-17 12:53:18.476 [INFO ] Parameters: {"cartridges"=>["php-5.4"], "scale"=>true, "name"=>"mytestapp", "domain_id"=>"demo"} (pid:14508)
2014-10-17 12:53:24.715 [INFO ] Using gear placement plugin to choose node. (pid:14508)
2014-10-17 12:53:24.715 [INFO ] selecting from nodes: node2.example.com, node1.example.com (pid:14508)
2014-10-17 12:53:24.718 [INFO ] server_infos: [#<NodeProperties:0x00000007675438
  @district_available_capacity=5994,
  @district_id="5441e3896892df06a4000001",
  @name="node2.example.com",
  @node_consumed_capacity=3.3333333333333335,
  @region_id=nil,
  @zone_id=nil>,
 #<NodeProperties:0x00000006e302a0
  @district_available_capacity=5994,
  @district_id="5441e3896892df06a4000001",
  @name="node1.example.com",
  @node_consumed_capacity=6.666666666666667,
  @region_id=nil,
  @zone_id=nil>] (pid:14508)
2014-10-17 12:53:24.719 [INFO ] app_props: #<ApplicationProperties:0x000000078b97a8
 @id="54446b0e6892dff4b5000001",
 @name="mytestapp",
 @web_cartridge="php-5.4"> (pid:14508)
2014-10-17 12:53:24.720 [INFO ] current_gears: [] (pid:14508)
2014-10-17 12:53:24.721 [INFO ] comp_list: [#<ComponentProperties:0x000000076a8b08
  @cartridge_name="haproxy-1.4",
  @cartridge_vendor="redhat",
  @component_name="web_proxy",
  @version="1.4">,
 #<ComponentProperties:0x000000076a88d8
  @cartridge_name="php-5.4",
  @cartridge_vendor="redhat",
  @component_name="php-5.4",
  @version="5.4">] (pid:14508)
2014-10-17 12:53:24.724 [INFO ] user_props: #<UserProperties:0x000000078b8f38
 @capabilities=
  {"ha"=>false,
   "subaccounts"=>false,
   "gear_sizes"=>["small"],
   "max_domains"=>10,
   "max_gears"=>100,
   "max_teams"=>0,
   "view_global_teams"=>false,
   "max_storage_per_gear"=>0},
 @consumed_gears=7,
 @id="5441e5f26892df39e9000001",
 @login="demo",
 @plan_id=nil,
 @plan_state=nil> (pid:14508)
2014-10-17 12:53:24.724 [INFO ] selected node: 'node2.example.com' (pid:14508)
8.5.1. Developing and Implementing a Custom Gear Placement Algorithm
# rpm -ql rubygem-openshift-origin-gear-placement- Gem_Location/lib/openshift/gear_placement_plugin.rb
- This contains the
GearPlacementPluginclass. Modify theself.select_best_fit_node_implmethod to customize the algorithm. - Gem_Location/config/initializers/openshift-origin-gear-placement.rb
- This is the plug-in initializer that loads any configuration settings, if relevant.
- /etc/openshift/plugins.d/openshift-origin-gear-placement.conf
- This is where any relevant configuration settings for the plug-in can be defined.
When you install the rubygem-openshift-origin-gear-placement RPM package, a gem with a Rails engine containing the GearPlacementPlugin class is also installed. The only method you must modify is self.select_best_fit_node_impl in the Gem_Location/lib/openshift/gear_placement_plugin.rb file, because it is the method invoked by the OpenShift::ApplicationContainerProxy class. Whenever a gear is created, the ApplicationContainerProxy.select_best_fit_node method is invoked, and if the gear placement plug-in is installed, that method invokes the plug-in.
self.select_best_fit_node_impl method signature, there are multiple data structures available for use in the algorithm:
GearPlacementPlugin.select_best_fit_node_impl(server_infos, app_props,
current_gears, comp_list, user_props, request_time)server_infos; it cannot be a node outside of this list. The Gem_Location/lib/openshift/ directory contains several example algorithms for reference, which are also described in Section 8.5.2, “Example Gear Placement Algorithms”.
Table 8.2. Input Data Structures
| Data Structure | Description | Properties |
|---|---|---|
| server_infos | Array of server information: objects of class NodeProperties. | :name, :node_consumed_capacity, :district_id, :district_available_capacity, :region_id, :zone_id |
| app_props | Properties of the application to which the gear is being added: objects of class ApplicationProperties. | :id, :name, :web_cartridge |
| current_gears | Array of existing gears in the application: objects of class GearProperties. | :id, :name, :server, :district, :cartridges, :region, :zone |
| comp_list | Array of components that will be present on the new gear: objects of class ComponentProperties. | :cartridge_name, :component_name, :version, :cartridge_vendor |
| user_props | Properties of the user: object of class UserProperties. | :id, :login, :consumed_gears, :capabilities, :plan_id, :plan_state |
| request_time | The time that the request was sent to the plug-in: Time on the OpenShift Broker host. | Time.now |
/var/log/openshift/broker/production.log file in Section 8.5, “Installing and Configuring the Gear Placement Plug-in” for examples of these inputs.
server_infos entries provided to the algorithm are already filtered for compatibility with the gear request. They can be filtered by:
- Specified profile.
- Specified region.
- Full, deactivated, or undistricted nodes.
- Nodes without a region and zone, if regions and zones are in use.
- Zones being used in a high-availability application, depending on the configuration.
- Nodes being used in a scaled application. If this would return zero nodes, then only one is returned.
- Availability of UID and other specified constraints when a gear is being moved.
server_infos list presented to the algorithm to only contain one node when the developer might expect there to be plenty of other nodes from which to choose. The intent of the plug-in currently is not to enable complete flexibility of node choice, but rather to enforce custom constraints or to load balance based on preferred parameters.
Optionally, you can implement configuration settings with the plug-in. To do so, you must:
- Load them in the plug-in initializer in the
Gem_Location/config/initializers/openshift-origin-gear-placement.rbfile, and - Add and define the settings in the
/etc/openshift/plugins.d/openshift-origin-gear-placement.conffile.
Gem_Location/config/initializers/openshift-origin-gear-placement.rb file are loaded using the following syntax:
 config.gear_placement = { :confkey1 => conf.get("CONFKEY1", "value1"),
                           :confkey2 => conf.get("CONFKEY2", "value2"),
:confkey3 => conf.get("CONFKEY3", "value3") }Gem_Location/config/initializers/ directory contains several example initializers for use with their respective example algorithms described in Section 8.5.2, “Example Gear Placement Algorithms”.
Any changes to the Gem_Location/lib/openshift/gear_placement_plugin.rb, Gem_Location/config/initializers/openshift-origin-gear-placement.rb, or /etc/openshift/plugins.d/openshift-origin-gear-placement.conf files must be done equally across all broker hosts in your environment. After making the desired changes to any of these files, the broker service must be restarted to load the changes:
# service openshift-broker restart/var/log/openshift/broker/production.log file for the expected logs.
8.5.2. Example Gear Placement Algorithms
Prerequisites:
Gem_Location/lib/openshift/ directory, with any related example initializers and configuration files located in the Gem_Location/config/initializers/ and /etc/openshift/plugins.d/ directories, respectively. See Section 8.5.1, “Developing and Implementing a Custom Gear Placement Algorithm” for information on implementing custom algorithms in your environment.
The following are administrator constraint example algorithms for the gear placement plug-in.
Example 8.8. Return the First Node in the List
def self.select_best_fit_node_impl(server_infos, app_props, current_gears, comp_list, user_props, request_time)
  return server_infos.first
end
Example 8.9. Place PHP Applications on Specific Nodes
def self.select_best_fit_node_impl(server_infos, app_props, current_gears, comp_list, user_props, request_time)
  unless %w[php-5.3 php-5.4].include? app_props.web_cartridge
    Rails.logger.debug("'#{app_props.web_cartridge}' is not a PHP app; selecting a node normally.")
    return OpenShift::MCollectiveApplicationContainerProxy.select_best_fit_node_impl(server_infos)
  end
  php_hosts = Broker::Application.config.gear_placement[:php_hosts]
  Rails.logger.debug("selecting a php node from: #{php_hosts.join ', '}")
  # figure out which of the nodes given is allowed for php carts
  matched_server_infos = server_infos.select {|x| php_hosts.include?(x.name) }
  matched_server_infos.empty? and
    raise "The gear-placement PHP_HOSTS setting doesn't match any of the NodeProfile names"
  return matched_server_infos.sample #chooses randomly from the matched hosts
endGem_Location/lib/openshift/gear_placement_plugin.rb.pin-php-to-host-example file. However, to prevent scalable or highly-available applications from behaving unpredictably as a result of the server_infos filters mentioned in Section 8.5.1, “Developing and Implementing a Custom Gear Placement Algorithm”, use the VALID_GEAR_SIZES_FOR_CARTRIDGE parameter in the /etc/openshift/broker.conf file in conjunction with profiles.
Example 8.10. Restrict a User's Applications to Slow Hosts
def self.select_best_fit_node_impl(server_infos, app_props, current_gears, comp_list, user_props, request_time)
  config = Broker::Application.config.gear_placement
  pinned_user = config[:pinned_user]
  if pinned_user == user_props.login
    slow_hosts = config[:slow_hosts]
    Rails.logger.debug("user '#{pinned_user}' needs a gear; restrict to '#{slow_hosts.join ', '}'")
    matched_server_infos = server_infos.select {|x| slow_hosts.include?(x.name)}
    matched_server_infos.empty? and
      raise "The gear-placement SLOW_HOSTS setting does not match any available NodeProfile names"
    return matched_server_infos.first
  else
    Rails.logger.debug("user '#{user_props.login}' is not pinned; choose a node normally")
    return OpenShift::MCollectiveApplicationContainerProxy.select_best_fit_node_impl(server_infos)
  end
endGem_Location/lib/openshift/gear_placement_plugin.rb.pin-user-to-host-example file. However, this could prevent the user from scaling applications in some situations as a result of the server_infos filters mentioned in Section 8.5.1, “Developing and Implementing a Custom Gear Placement Algorithm”.
Example 8.11. Ban a Specific Vendor's Cartridges
def self.select_best_fit_node_impl(server_infos, app_props, current_gears, comp_list, user_props, request_time)
  Rails.logger.debug("Using blacklist gear placement plugin to choose node.")
  Rails.logger.debug("selecting from nodes: #{server_infos.map(:name).join ', '}")
  blacklisted_vendor = Broker::Application.config.gear_placement[:blacklisted_vendor]
  unless blacklisted_vendor.nil?
    comp_list.each do |comp|
      if blacklisted_vendor == comp.cartridge_vendor
        raise "Applications containing cartridges from #{blacklisted_vendor} are blacklisted"
      end
    end
  end
  Rails.logger.debug("no contraband found, choosing node as usual")
  return OpenShift::MCollectiveApplicationContainerProxy.select_best_fit_node_impl(server_infos)
endGem_Location/lib/openshift/gear_placement_plugin.rb.blacklisted-vendor-example file.
The following are resource usage example algorithms for the gear placement plug-in.
Example 8.12. Place a Gear on the Node with the Most Free Memory
def self.select_best_fit_node_impl(server_infos, app_props, current_gears, comp_list, user_props, request_time)
  # collect memory statistic from all nodes
  memhash = Hash.new(0)
  OpenShift::MCollectiveApplicationContainerProxy.rpc_get_fact('memoryfree') {|name,mem| memhash[name] = to_bytes(mem)}
  Rails.logger.debug("node memory hash: #{memhash.inspect}")
  # choose the one from our list with the largest value
  return server_infos.max_by {|server| memhash[server.name]}
end

def self.to_bytes(mem)
  mem.to_f * case mem
    when /TB/; 1024 ** 4
    when /GB/; 1024 ** 3
    when /MB/; 1024 ** 2
    when /KB/; 1024
    else     ; 1
  end
endGem_Location/lib/openshift/gear_placement_plugin.rb.free-memory-example file.
Example 8.13. Sort Nodes by Gear Usage (Round Robin)
def self.select_best_fit_node_impl(server_infos, app_props, current_gears, comp_list, user_props, request_time)
  return server_infos.sort_by {|x| x.node_consumed_capacity.to_f}.first
endGem_Location/lib/openshift/gear_placement_plugin.rb.round-robin-example file. The nodes in each profile fill evenly, unless complications arise, for example due to scaled applications, gears being deleted unevenly, or MCollective fact updates trailing behind. Implementing true round robin requires writing out a state file owned by this algorithm and using that for scheduling the placement rotation.
8.6. Using an External Routing Layer for High-Availability Applications
- Adding and deleting applications
- Scaling applications up or down
- Adding or removing aliases and custom certificates
See Also:
8.6.1. Selecting an External Routing Solution
nginx is a web and proxy server with a focus on high concurrency, performance, and low memory usage. It can be installed on a Red Hat Enterprise Linux 6 host and is currently included in Red Hat Software Collections 1.2. The Red Hat Software Collections version does not include the Nginx Plus® commercial features. If you want to use the Nginx Plus® commercial features, install Nginx Plus® using the subscription model offered directly from http://nginx.com.
server.conf and pool_*.conf files under the configured directory. After each update, the routing daemon reloads the configured nginx or Nginx Plus® service.
Important
#rhc alias add App_Name Custom_Domain_Alias#rhc alias update-cert App_Name Custom_Domain_Alias --certificate Cert_File --private-key Key_File
Procedure 8.16. To Install nginx from Red Hat Software Collections:
- Register a Red Hat Enterprise Linux 6 host to Red Hat Network and ensure the
Red Hat Enterprise Linux 6 ServerandRed Hat Software Collections 1channels are enabled. For example, after registering the host with Red Hat Subscription Management (RHSM), enable the channels with the following command:#
subscription-manager repos --enable=rhel-6-server-rpms --enable=rhel-server-rhscl-6-rpms - Install nginx:
#
yum install nginx16 - Enable the following SELinux Boolean:
#
setsebool -P httpd_can_network_connect=true - Start the nginx service:
#
chkconfig nginx16-nginx on#service nginx16-nginx start
Starting in OpenShift Enterprise 2.2.4, the sample routing daemon supports integration with F5 BIG-IP LTM® (Local Traffic Manager™) version 11.6.0. See the official LTM® documentation for installation instructions.
Important
client-ssl profile must also be configured as the default SNI client-ssl profile. Although the naming of the default client-ssl profile is unimportant, it must be added to the HTTPS virtual server.
Administrator role, for example, the default admin account. Without this role, the user that the routing daemon authenticates will not have the correct privileges or configuration to use the advanced shell. Also, the LTM® admin user's Terminal Access must be set to Advanced Shell so that remote bash commands can be executed.
Procedure 8.17. To Grant a User Advanced Shell Execution:
- On the F5® console, navigate to ->->->Username.
- In the dropdown box labeled Terminal Access, choose the Advanced Shell option.
- Click on the button.
Note
Administrator role, and the different options for the Terminal Access dropdown box.
BIGIP_SSHKEY public key must be added to the LTM® admin user's .ssh/authorized_keys file.
- Creates pools and associated local-traffic policy rules.
- Adds profiles to the virtual servers.
- Adds members to the pools.
- Deletes members from the pools.
- Deletes empty pools and unused policy rules when appropriate.
/Common/ose-#{app_name}-#{namespace} and creates policy rules to forward requests to pools comprising the gears of the named application. Detailed configuration instructions for the routing daemon itself are provided later in Section 8.6.3, “Configuring a Routing Daemon or Listener”.
8.6.2. Configuring the Sample Routing Plug-In
Procedure 8.18. To Enable and Configure the Sample Routing Plug-in:
- Add a new user, topic, and queue to ActiveMQ. On each ActiveMQ broker, edit the
/etc/activemq/activemq.xmlfile and add the following line within the<users>section, replacingroutinginfopasswdwith your own password:<authenticationUser username="routinginfo" password="routinginfopasswd" groups="routinginfo,everyone"/>
Example 8.14. Example <users> Section
<users>
  <authenticationUser username="mcollective" password="marionette" groups="mcollective,everyone"/>
  <authenticationUser username="admin" password="secret" groups="mcollective,admin,everyone"/>
  <authenticationUser username="routinginfo" password="routinginfopasswd" groups="routinginfo,everyone"/>
</users>
- Add the following lines within the
<authorizationEntries>section:<authorizationEntry topic="routinginfo.>" write="routinginfo" read="routinginfo" admin="routinginfo" /> <authorizationEntry queue="routinginfo.>" write="routinginfo" read="routinginfo" admin="routinginfo" />
Example 8.15. Example <authorizationEntries> Section
<authorizationEntries>
  <authorizationEntry queue=">" write="admins" read="admins" admin="admins" />
  <authorizationEntry topic=">" write="admins" read="admins" admin="admins" />
  <authorizationEntry topic="mcollective.>" write="mcollective" read="mcollective" admin="mcollective" />
  <authorizationEntry queue="mcollective.>" write="mcollective" read="mcollective" admin="mcollective" />
  <authorizationEntry topic="ActiveMQ.Advisory.>" read="everyone" write="everyone" admin="everyone"/>
  <authorizationEntry topic="routinginfo.>" write="routinginfo" read="routinginfo" admin="routinginfo" />
  <authorizationEntry queue="routinginfo.>" write="routinginfo" read="routinginfo" admin="routinginfo" />
</authorizationEntries>
- Add the following lines within the
<plugins>section:<redeliveryPlugin fallbackToDeadLetter="true" sendToDlqIfMaxRetriesExceeded="true"> <redeliveryPolicyMap> <redeliveryPolicyMap> <redeliveryPolicyEntries> <redeliveryPolicy queue="routinginfo" maximumRedeliveries="4" useExponentialBackOff="true" backOffMultiplier="4" initialRedeliveryDelay="2000" /> </redeliveryPolicyEntries> </redeliveryPolicyMap> </redeliveryPolicyMap> </redeliveryPlugin> - Add the
schedulerSupport="true"directive within the<broker>section:<broker xmlns="http://activemq.apache.org/schema/core" brokerName="activemq.example.com" dataDirectory="${activemq.data}" schedulePeriodForDestinationPurge="60000" schedulerSupport="true" > - Restart the
activemqservice:#
service activemq restart - On the broker host, verify that the rubygem-openshift-origin-routing-activemq package is installed:
#
yum install rubygem-openshift-origin-routing-activemq - Copy the
/etc/openshift/plugins.d/openshift-origin-routing-activemq.conf.examplefile to/etc/openshift/plugins.d/openshift-origin-routing-activemq.conf:#
cp /etc/openshift/plugins.d/openshift-origin-routing-activemq.conf.example /etc/openshift/plugins.d/openshift-origin-routing-activemq.conf - Edit the
/etc/openshift/plugins.d/openshift-origin-routing-activemq.conffile and ensure theACTIVEMQ_HOSTandACTIVEMQ_PORTparameters are set appropriately for your ActiveMQ broker. Set theACTIVEMQ_PASSWORDparameter to the password chosen for theroutinginfouser:Example 8.16. Example Routing Plug-in Configuration File
ACTIVEMQ_TOPIC='/topic/routinginfo'
ACTIVEMQ_USERNAME='routinginfo'
ACTIVEMQ_PASSWORD='routinginfopasswd'
ACTIVEMQ_HOST='127.0.0.1'
ACTIVEMQ_PORT='61613'
In OpenShift Enterprise 2.1.2 and later, you can set theACTIVEMQ_HOSTparameter as a comma-separated list of host:port pairs if you are using multiple ActiveMQ brokers:Example 8.17. Example
ACTIVEMQ_HOSTSetting Using Multiple ActiveMQ BrokersACTIVEMQ_HOST='192.168.59.163:61613,192.168.59.147:61613'
- You can optionally enable SSL connections per ActiveMQ host. To do so, set the
MCOLLECTIVE_CONFIGparameter in the/etc/openshift/plugins.d/openshift-origin-routing-activemq.conffile to the MCollective client configuration file used by the broker:MCOLLECTIVE_CONFIG='/opt/rh/ruby193/root/etc/mcollective/client.cfg'
Note that while setting theMCOLLECTIVE_CONFIGparameter overrides theACTIVEMQ_HOSTandACTIVEMQ_PORTparameters in this file, theACTIVEMQ_USERNAMEandACTIVEMQ_PASSWORDparameters in this file are still used by the routing plug-in and must be set. - Restart the broker service:
#
service openshift-broker restart
8.6.3. Configuring a Routing Daemon or Listener
Prerequisites:
The following procedure assumes that you have already set up nginx, Nginx Plus®, or LTM® as a routing back end as described in Section 8.6.1, “Selecting an External Routing Solution”.
Procedure 8.19. To Install and Configure the Sample Routing Daemon:
- The sample routing daemon is provided by the rubygem-openshift-origin-routing-daemon package. The host you are installing the routing daemon on must have the
Red Hat OpenShift Enterprise 2.2 Infrastructurechannel enabled to access the package. See Section 7.1, “Configuring Broker Host Entitlements” for more information.For nginx or Nginx Plus® usage, because the routing daemon directly manages the nginx configuration files, you must install the package on the same host where nginx or Nginx Plus® is running. Nginx Plus® offers features such as a REST API and clustering, but the current version of the routing daemon must still be run on the same host.For LTM® usage, you must install the package on a Red Hat Enterprise Linux 6 host that is separate from the host where LTM® is running. This is because the daemon manages LTM® using a SOAP or REST interface.Install the rubygem-openshift-origin-routing-daemon package on the appropriate host:#
yum install rubygem-openshift-origin-routing-daemon - Edit the
/etc/openshift/routing-daemon.conffile and set theACTIVEMQ_*parameters to the appropriate host address, credentials, and ActiveMQ topic or queue destination:ACTIVEMQ_HOST=broker.example.com ACTIVEMQ_USER=routinginfo ACTIVEMQ_PASSWORD=routinginfopasswd ACTIVEMQ_PORT=61613 ACTIVEMQ_DESTINATION=/topic/routinginfo
In OpenShift Enterprise 2.1.2 and later, you can set theACTIVEMQ_HOSTparameter as a comma-separated list of host:port pairs if you are using multiple ActiveMQ brokers:ACTIVEMQ_HOST='192.168.59.163:61613,192.168.59.147:61613'
- If you optionally enabled SSL connections per ActiveMQ host in the routing plug-in, set the
plugin.activemq*parameters in this file to the same values used in the/opt/rh/ruby193/root/etc/mcollective/client.cfgfile on the broker:plugin.activemq.pool.size = 1 plugin.activemq.pool.1.host = activemq.example.com plugin.activemq.pool.1.port = 61614 plugin.activemq.pool.1.ssl = true plugin.activemq.pool.1.ssl.ca = /etc/keys/activemq.example.com.crt plugin.activemq.pool.1.ssl.key = /etc/keys/activemq.example.com.key plugin.activemq.pool.1.ssl.cert = /etc/keys/activemq.example.com.crt
If you have multiple pools, ensure thatplugin.activemq.pool.sizeis set appropriately and create unique blocks for each pool:plugin.activemq.pool.size = 2 plugin.activemq.pool.1.host = activemq1.example.com plugin.activemq.pool.1.port = 61614 plugin.activemq.pool.1.ssl = true plugin.activemq.pool.1.ssl.ca = /etc/keys/activemq1.example.com.crt plugin.activemq.pool.1.ssl.key = /etc/keys/activemq1.example.com.key plugin.activemq.pool.1.ssl.cert = /etc/keys/activemq1.example.com.crt plugin.activemq.pool.2.host = activemq2.example.com plugin.activemq.pool.2.port = 61614 plugin.activemq.pool.2.ssl = true plugin.activemq.pool.2.ssl.ca = /etc/keys/activemq2.example.com.crt plugin.activemq.pool.2.ssl.key = /etc/keys/activemq2.example.com.key plugin.activemq.pool.2.ssl.cert = /etc/keys/activemq2.example.com.crt
The files set in the*ssl.ca,*ssl.key, and*ssl.certparameters must be copied from the ActiveMQ broker or brokers and placed locally for the routing daemon to use.Note that while setting theplugin.activemq*parameters overrides theACTIVEMQ_HOSTandACTIVEMQ_PORTparameters in this file, theACTIVEMQ_USERNAMEandACTIVEMQ_PASSWORDparameters in this file are still used by the routing daemon and must be set. - Set the
CLOUD_DOMAINparameter to the domain you are using:CLOUD_DOMAIN=example.com
- To use a different prefix in URLs for high-availability applications, you can modify the
HA_DNS_PREFIXparameter:HA_DNS_PREFIX="ha-"
This parameter and theHA_DNS_PREFIXparameter in the/etc/openshift/broker.conffile, covered in Section 8.6.4, “Enabling Support for High-Availability Applications” , must be set to the same value. - If you are using nginx or Nginx Plus®, set the
LOAD_BALANCERparameter to thenginxmodule:LOAD_BALANCER=nginx
If you are using LTM®, set theLOAD_BALANCERparameter to thef5module:LOAD_BALANCER=f5
Ensure that only oneLOAD_BALANCERline is uncommented and enabled in the file. - If you are using nginx or Nginx Plus®, set the appropriate values for the following
nginxmodule parameters if they differ from the defaults:NGINX_CONFDIR=/opt/rh/nginx16/root/etc/nginx/conf.d NGINX_SERVICE=nginx16-nginx
If you are using Nginx Plus®, you can uncomment and set the following parameters to enable health checking. This enables active health checking and takes servers out of the upstream pool without having a client request initiate the check.NGINX_PLUS=true NGINX_PLUS_HEALTH_CHECK_INTERVAL=2s NGINX_PLUS_HEALTH_CHECK_FAILS=1 NGINX_PLUS_HEALTH_CHECK_PASSES=5 NGINX_PLUS_HEALTH_CHECK_URI=/ NGINX_PLUS_HEALTH_CHECK_MATCH_STATUS=200 NGINX_PLUS_HEALTH_CHECK_SHARED_MEMORY=64k
- If you are using LTM®, set the appropriate values for the following parameters to match your LTM® configuration:
BIGIP_HOST=127.0.0.1
BIGIP_USERNAME=admin
BIGIP_PASSWORD=passwd
BIGIP_SSHKEY=/etc/openshift/bigip.key
Set the following parameters to match the LTM® virtual server names you created:VIRTUAL_SERVER=ose-vserver VIRTUAL_HTTPS_SERVER=https-ose-vserver
Also set theMONITOR_NAMEparameter to match your LTM® configuration:MONITOR_NAME=monitor_name
For thelbaasmodule, set the appropriate values for the following parameters to match your LBaaS configuration:LBAAS_HOST=127.0.0.1 LBAAS_TENANT=openshift LBAAS_TIMEOUT=300 LBAAS_OPEN_TIMEOUT=300 LBAAS_KEYSTONE_HOST=10.0.0.1 LBAAS_KEYSTONE_USERNAME=user LBAAS_KEYSTONE_PASSWORD=passwd LBAAS_KEYSTONE_TENANT=lbms
- By default, new pools are created and named with the form
pool_ose_{appname}_{namespace}_80. You can optionally override this defaults by setting appropriate value for thePOOL_NAMEparameter:POOL_NAME=pool_ose_%a_%n_80
If you change this value, set it to contain the following format so each application gets its own uniquely named pool:%ais expanded to the name of the application.%nis expanded to the application's namespace (domain).
- The BIG-IP LTM back end can add an existing monitor to newly created pools. The following settings control how these monitors are created:
#MONITOR_NAME=monitor_ose_%a_%n
#MONITOR_PATH=/health_check.php
#MONITOR_UP_CODE=1
MONITOR_TYPE=http-ecv
#MONITOR_TYPE=https-ecv
#MONITOR_INTERVAL=10
#MONITOR_TIMEOUT=5
Set theMONITOR_NAMEparameter to the name of the monitor to use, and set theMONITOR_PATHparameter to the path name to use for the monitor. Alternatively, leave either parameter unspecified to disable the monitor functionality.As with thePOOL_NAMEandROUTE_NAMEparameters, theMONITOR_NAMEandMONITOR_PATHparameters both can contain%aand%nformats, which are expanded the same way. Unlike thePOOL_NAMEandROUTE_NAMEparameters, however, you may or may not want to reuse the same monitor for different applications. The routing daemon automatically creates a new monitor when the format used from theMONITOR_NAMEparameter expands a string that does not match the name of any existing monitor.Set theMONITOR_UP_CODEparameter to the code that indicates that a pool member is up, or leave it unspecified to use the default value of1.MONITOR_TYPEspecifies the type of probe that the external load-balancer should use to check the health status of applications. The only other recognized value forMONITOR_TYPEishttps-ecv, which defines the protocol to be HTTPS. All other values forMONITOR_TYPEtranslate to HTTP.Note that ECV stands for “extended content verification", referring to the fact that the monitor makes an HTTP request and looks at the reply to verify that it is the expected response (meaning the application server is responding), as opposed to merely pinging the server to ensure it is returning an ICMP ping reply (meaning the operating system is responding).Set theMONITOR_INTERVALparameter to the interval at which the monitor sends requests, or leave it unspecified to use the default value of10.Set theMONITOR_TIMEOUTparameter to the monitor's timeout for its requests, or leave it unset to use the default value of5.It is expected that for each pool member, the routing solution sends aGETrequest to the resource identified on that host by the value of theMONITOR_PATHparameter for the associated monitor, and that the host responds with the value of theMONITOR_UP_CODEparameter if the host is up or some other response if the host is not up. - You can change the port that nginx or Nginx Plus® listens on for HTTP or HTTPS, if required, by setting the following parameters:
SSL_PORT=443
HTTP_PORT=80
For Nginx Plus®, setting the above parameters is all that is required. For nginx 1.6 (from Red Hat Software Collections), however, you must also modify the/opt/rh/nginx16/root/etc/nginx/nginx.conffile to listen on different ports. For example for HTTP, change80on the following line to another port:listen 80;
In both cases (nginx 1.6 and Nginx Plus®), ensure theSSL_PORTandHTTP_PORTparameters are set to the ports you intend nginx or Nginx Plus® to listen to, and ensure your host firewall configuration allows ingress traffic on these ports. - Start the routing daemon:
#
chkconfig openshift-routing-daemon on#service openshift-routing-daemon start
If you are not using the sample routing daemon, you can develop your own listener to listen to the event notifications published on ActiveMQ by the sample routing plug-in. The plug-in creates notification messages for the following events:
Table 8.3. Sample Routing Plug-in Notifications
| Event | Message Format | Additional Details |
|---|---|---|
| Application created |
:action => :create_application,
:app_name => app.name,
:namespace => app.domain.namespace,
:scalable => app.scalable,
:ha => app.ha,
| |
| Application deleted |
:action => :delete_application,
:app_name => app.name,
:namespace => app.domain.namespace
:scalable => app.scalable,
:ha => app.ha,
| |
| Public endpoint created |
:action => :add_public_endpoint,
:app_name => app.name,
:namespace => app.domain.namespace,
:gear_id => gear._id.to_s,
:public_port_name => endpoint_name,
:public_address => public_ip,
:public_port => public_port.to_i,
:protocols => protocols,
:types => types,
:mappings => mappings
|
Values for the
protocols variable include:
Values for the
types variable include:
These variables depend on values set in the cartridge manifest.
|
| Public endpoint deleted |
:action => :remove_public_endpoint,
:app_name => app.name,
:namespace => app.domain.namespace,
:gear_id => gear._id.to_s,
:public_address => public_ip,
:public_port => public_port.to_i
| |
| SSL certificate added |
:action => :add_ssl,
:app_name => app.name,
:namespace => app.domain.namespace,
:alias => fqdn,
:ssl => ssl_cert,
:private_key => pvt_key,
:pass_phrase => passphrase
| |
| SSL certificate removed |
:action => :remove_ssl,
:app_name => app.name,
:namespace => app.domain.namespace,
:alias => fqdn
| |
| Alias added |
:action => :add_alias,
:app_name => app.name,
:namespace => app.domain.namespace,
:alias => alias_str
| |
| Alias removed |
:action => :remove_alias,
:app_name => app.name,
:namespace => app.domain.namespace,
:alias => alias_str
|
Note
add_gear and delete_gear actions have been deprecated. Use add_public_endpoint for add_gear and remove_public_endpoint for delete_gear instead.
Routing Listener Guidelines
- Listen to the ActiveMQ topic
routinginfo. Verify that the user credentials match those configured in the/etc/openshift/plugins.d/openshift-origin-routing-activemq.conffile of the sample routing plug-in. - For each gear event, reload the routing table of the router.
- Use the
protocolsvalue provided with theadd_public_endpointaction to tailor your routing methods. - Use the
typesvalue to identify the type of endpoint. - Use the
mappingsvalue to identify URL routes. Routes that are not root may require source IP or SSL certificate verifications. A common use case involves administrative consoles such as phpMyAdmin.
- Look for actions involving SSL certificates, such as
add_sslandremove_ssl, and decide whether to configure the router accordingly for incoming requests. - Look for actions involving aliases, such as
add_aliasandremove_alias. Aliases must always be accommodated for during the application's life cycle.
Note
add_public_endpoint and remove_public_endpoint actions do not correspond to the actual addition and removal of gears, but rather to the exposure and concealment of ports. One gear added to an application may result in several exposed ports, which will all result in respective add_public_endpoint notifications at the router level.
Example 8.18. Simple Routing Listener
listener.rb script file is an example model for a simple routing listener. This Ruby script uses Nginx as the external routing solution, and the pseudo code provided is an example only. The example handles the following tasks:
- Look for messages with an
add_public_endpointaction and aload_balancertype, then edit the router configuration file for the application. - Look for messages with a
remove_public_endpointaction and aload_balancertype, then edit the router configuration file for the application. - Look for messages with a
delete_applicationaction and remove the router configuration file for the application.
#!/usr/bin/ruby

require 'rubygems'
require 'stomp'
require 'yaml'

CONF_DIR='/etc/nginx/conf.d/'

def add_haproxy(appname, namespace, ip, port)
  scope = "#{appname}-#{namespace}"
  file = File.join(CONF_DIR, "#{scope}.conf")
  if File.exist?(file)
    `sed -i 's/upstream #{scope} {/&\\n      server #{ip}:#{port};/' #{file}`
  else
    # write a new one
    template = <<-EOF
    upstream #{scope} {
      server #{ip}:#{port};
    }
    server {
      listen 8000;
      server_name ha-#{scope}.dev.rhcloud.com;
      location / {
        proxy_pass http://#{scope};
      }
    }
EOF
    File.open(file, 'w') { |f| f.write(template) }
  end
  `nginx -s reload`
end


c = Stomp::Client.new("routinginfo", "routinginfopasswd", "localhost", 61613, true)
c.subscribe('/topic/routinginfo') { |msg|
  h = YAML.load(msg.body)
  if h[:action] == :add_public_endpoint
    if h[:types].include? "load_balancer"
       add_haproxy(h[:app_name], h[:namespace], h[:public_address], h[:public_port])
       puts "Added routing endpoint for #{h[:app_name]}-#{h[:namespace]}"
    end
  elsif h[:action] == :remove_public_endpoint
  # script does not actually act upon the remove_public_endpoint as written
  elsif h[:action] == :delete_application
     scope = '#{h[:app_name]}-#{h[:namespace]}'
     file = File.join(CONF_DIR, "#{scope}.conf")
     if File.exist?(file)
       `rm -f #{file}`
       `nginx -s reload`
       puts "Removed configuration for #{scope}"
     end
  end
}
c.join
8.6.4. Enabling Support for High-Availability Applications
Prerequisites:
Procedure 8.20. To Enable Support for High-Availability Applications:
- To allow scalable applications to become highly available using the configured external router, edit the
/etc/openshift/broker.conffile on the broker host and set theALLOW_HA_APPLICATIONSparameter to"true":ALLOW_HA_APPLICATIONS="true"
Note that this parameter controls whether high-availability applications are allowed in general, but does not adjust user account capabilities. User account capabilities are discussed in a later step. - A scaled application that is not highly available uses the following URL form:
http://${APP_NAME}-${DOMAIN_NAME}.${CLOUD_DOMAIN}When high-availability is enabled, HAproxy instances are deployed in multiple gears of the application, which are spread across multiple node hosts. In order to load balance user requests, a high-availability application requires a new high-availability DNS name that points to the external routing layer rather than directly to the application head gear. The routing layer then forwards requests directly to the application's HAproxy instances, which are then distributed to the framework gears. In order to create DNS entries for high-availability applications that point to the routing layer, OpenShift Enterprise adds either a prefix or suffix, or both, to the regular application name:http://${HA_DNS_PREFIX}${APP_NAME}-${DOMAIN_NAME}${HA_DNS_SUFFIX}.${CLOUD_DOMAIN}To change the prefix or suffix used in the high-availability URL, you can modify theHA_DNS_PREFIXorHA_DNS_SUFFIXparameters:HA_DNS_PREFIX="ha-" HA_DNS_SUFFIX=""
If you modify theHA_DNS_PREFIXparameter and are using the sample routing daemon, ensure this parameter and theHA_DNS_PREFIXparameter in the/etc/openshift/routing-daemon.conffile are set to the same value. - DNS entries for high-availability applications can either be managed by OpenShift Enterprise or externally. By default, this parameter is set to
"false", which means the entries must be created externally; failure to do so could prevent the application from receiving traffic through the external routing layer. To allow OpenShift Enterprise to create and delete these entries when applications are created and deleted, set theMANAGE_HA_DNSparameter to"true":MANAGE_HA_DNS="true"
Then set theROUTER_HOSTNAMEparameter to the public hostname of the external routing layer, which the DNS entries for high-availability applications point to. Note that the routing layer host must be resolvable by the broker:ROUTER_HOSTNAME="www.example.com"
- For developers to enable high-availability support with their scalable applications, they must have the
HA allowedcapability enabled on their account. By default, theDEFAULT_ALLOW_HAparameter is set to"false", which means user accounts are created with theHA allowedcapability initially disabled. To have this capability enabled by default for new user accounts, setDEFAULT_ALLOW_HAto"true":DEFAULT_ALLOW_HA="true"
You can also adjust theHA allowedcapability per user account using theoo-admin-ctl-usercommand with the--allowhaoption:#
oo-admin-ctl-user -l user --allowha true - To make any changes made to the
/etc/openshift/broker.conffile take effect, restart the broker service:#
service openshift-broker restart
Note
8.7. Integrating with External Single Sign-on (SSO) Providers
- Gear creation and deletion
- Alias addition and removal
- Environment variables addition, modification, and deletion
Procedure 8.21. To Install and Configure the SSO Plug-in:
- On the broker host, install the rubygem-openshift-origin-sso-activemq package:
#
yum install rubygem-openshift-origin-sso-activemq - Before enabling this plug-in, you must add a new user, topic, and queue to ActiveMQ. Edit the
/etc/activemq/activemq.xmlfile and add the following user in the appropriate section:<authenticationUser username="ssoinfo" password="ssoinfopasswd" groups="ssoinfo,everyone"/>
Also add the following topic and queue to the appropriate sections:<authorizationEntry topic="ssoinfo.>" write="ssoinfo" read="ssoinfo" admin="ssoinfo" /> <authorizationEntry queue="ssoinfo.>" write="ssoinfo" read="ssoinfo" admin="ssoinfo" />
- Restart ActiveMQ:
#
service activemq restart - To enable the plug-in, copy the
/etc/openshift/plugins.d/openshift-origin-sso-activemq.conf.examplefile to/etc/openshift/plugins.d/openshift-origin-sso-activemq.confon the broker host:#
cp /etc/openshift/plugins.d/openshift-origin-sso-activemq.conf.example \ /etc/openshift/plugins.d/openshift-origin-sso-activemq.conf - In the
/etc/openshift/plugins.d/openshift-origin-sso-activemq.conffile you just created, uncomment the last line specifying the/opt/rh/ruby193/root/etc/mcollective/client.cfgfile:MCOLLECTIVE_CONFIG="/opt/rh/ruby193/root/etc/mcollective/client.cfg"
Alternatively, edit the values for theACTIVE_*parameters with the appropriate information for your environment. - Restart the broker service for your changes take effect:
#
service openshift-broker restart - Create a listener that will connect to ActiveMQ on the new topic that was added. The listener can be run on any system that can connect to the ActiveMQ server. The following is an example that simply echoes any messages received:
#!/usr/bin/ruby require 'rubygems' require 'stomp' require 'yaml' c = Stomp::Client.new("ssoinfo", "ssoinfopasswd", "127.0.0.1", 61613) puts "Got stomp client, listening for messages on '/topic/ssoinfo':" c.subscribe('/topic/ssoinfo') { |msg| h = YAML.load(msg.body) puts "Message received: " puts h.inspect } c.join - Save and run your listener script. For example, if the script was saved at
/root/listener.rb:#
ruby /root/listener.rb - To verify that the plug-in and listener are working, perform several application actions with the client tools or Management Console using a test user account. For example, create an application, add an alias, remove an alias, and remove the application. You should see messages reported by the listener script for each action performed.
8.8. Backing Up Broker Host Files
- Backup Strategies for MongoDB Systems - http://docs.mongodb.org/manual/administration/backups/
/var/lib/mongodb directory, which can be used as a potential mount point for fault tolerance or as a backup storage.
8.9. Management Console
8.9.1. Installing the Management Console
Procedure 8.22. To Install the OpenShift Enterprise Management Console:
- Install the required software package:
#
yum install openshift-origin-console - Modify the corresponding sample httpd configuration file located in the
/var/www/openshift/console/httpd/conf.ddirectory to suit the requirements of your authentication model. For example, useopenshift-origin-auth-remote-user-ldap.conf.sampleto replaceopenshift-origin-auth-remote-user.conf, and modify it as necessary to suit your authentication configuration. This is similar to what was done for broker authentication in the/var/www/openshift/broker/httpd/conf.d/directory. - Make the service persistent on boot, and start the service using the following commands:
#
chkconfig openshift-console on#service openshift-console start
SESSION_SECRET setting in the /etc/openshift/console.conf file, which is used for signing the Rails sessions. Run the following command to create the random string:
# openssl rand -hex 64Note
SESSION_SECRET must be the same across all consoles in a cluster, but does not necessarily need to be the same as the SESSION_SECRET used in /etc/openshift/broker.conf.
Important
CONSOLE_SECURITY setting in the /etc/openshift/console.conf file has the default setting of remote_user. This is a requirement of OpenShift Enterprise and ensures proper HTTP authentication.
CONSOLE_SECURITY=remote_user
SESSION_SECRET setting is modified. Note that all sessions are dropped.
# service openshift-console restarthttps://broker.example.com/console using a web browser. Use the correct domain name according to your installation.
8.9.2. Creating an SSL Certificate
/etc/pki/tls/private/localhost.key, and the default certificate is /etc/pki/tls/certs/localhost.crt. These files are created automatically when mod_ssl is installed. You can recreate the key and the certificate files with suitable parameters using the openssl command, as shown in the following example.
#openssl req -new \-newkey rsa:2048 -keyout /etc/pki/tls/private/localhost.key \-x509 -days 3650 \-out /etc/pki/tls/certs/localhost.crt
openssl command prompts for information to be entered in the certificate. The most important field is Common Name, which is the host name that developers use to browse the Management Console; for example, broker.example.com. This way the certificate created now correctly matches the URL for the Management Console in the browser, although it is still self-signed.
#openssl req -new \-key /etc/pki/tls/private/localhost.key \-out /etc/pki/tls/certs/localhost.csr
openssl command prompts for information to be entered in the certificate, including Common Name. The localhost.csr signing request file must then be processed by an appropriate certificate authority to generate a signed certificate for use with the secure server.
httpd service to enable them for use:
# service httpd restart
8.10. Administration Console
8.10.1. Installing the Administration Console
/etc/openshift/plugins.d/openshift-origin-admin-console.conf directory. Install the rubygem-openshift-origin-admin-console RPM package to install both the gem and the configuration file:
# yum install rubygem-openshift-origin-admin-console/etc/openshift/plugins.d/openshift-origin-admin-console.conf configuration file contains comments on the available parameters. Edit the file to suit your requirements.
# service openshift-broker restart
8.10.2. Accessing the Administration Console
httpd proxy configuration of the OpenShift Enterprise broker host blocks external access to the URI of the Administration Console. Refusing external access is a security feature to avoid exposing the Administration Console publicly by accident.
Note
/admin-console by default, but is configurable in /etc/openshift/plugins.d/openshift-origin-admin-console.conf.
Procedure 8.23. To View the Administration Console Using Port Forwarding:
- On your local workstation, replace user@broker.example.com in the following example with your relevant user name and broker host:
$
ssh -f user@broker.example.com -L 8080:localhost:8080 -NThis command uses a secure shell (SSH) to connect to user@broker.example.com and attaches the local workstation port8080(the first number) to the broker host's local port8080(the second number), where the broker application listens behind the host proxy. - Browse to
http://localhost:8080/admin-consoleusing a web browser to access the Administration Console.
Procedure 8.24. To Enable External Access to the Administration Console:
httpd proxy to enable external access through the broker host.
- On each broker host, edit the
/etc/httpd/conf.d/000002_openshift_origin_broker_proxy.confconfiguration file. Inside the<VirtualHost *:443>section, add additionalProxyPassentries for the Administration Console and its static assets after the existingProxyPassentry for the broker. The completed<VirtualHost *:443>section looks similar to the following:Example 8.19. Example
<VirtualHost *:443>sectionProxyPass /broker http://127.0.0.1:8080/broker ProxyPass /admin-console http://127.0.0.1:8080/admin-console ProxyPass /assets http://127.0.0.1:8080/assets ProxyPassReverse / http://127.0.0.1:8080/
- Optionally, you can add any
httpdaccess controls you deem necessary to prevent access to the Administration Console. See Section 8.10.3, “Configuring Authentication for the Administration Console” for examples. - Restart the
httpdservice to load the new configuration:#
service httpd restart
8.10.3. Configuring Authentication for the Administration Console
httpd proxy configuration as described in Section 8.10.2, “Accessing the Administration Console”, you can also configure authentication for the Administration Console by implementing a <Location /admin-console> section in the same /etc/httpd/conf.d/000002_openshift_origin_broker_proxy.conf file. For example, you can configure the Administration Console to authenticate based on user credentials or client IP. See the Apache HTTP Server documentation at http://httpd.apache.org/docs/2.2/howto/auth.html for more information on available authentication methods.
The following examples show how you can configure authentication for the Administration Console using various methods. You can add one of the example <Location /admin-console> sections before the ProxyPass /admin-console entry inside the <VirtualHost *:443> section in the /etc/httpd/conf.d/000002_openshift_origin_broker_proxy.conf file on each broker host. Note that the httpd service must be restarted to load any configuration changes.
Example 8.20. Authenticating by Host Name or IP Address
mod_authz_host Apache module, you can configure authentication for the Administration Console based on the client host name or IP address.
example.com domain and denies access for all other hosts:
<Location /admin-console>
    Order Deny,Allow
    Deny from all
    Allow from example.com
</Location>mod_authz_host documentation at http://httpd.apache.org/docs/2.2/mod/mod_authz_host.html for more example usage.
Example 8.21. Authenticating Using LDAP
mod_authnz_ldap Apache module, you can configure user authentication for the Administration Console to use an LDAP directory. This example assumes that an LDAP server already exists. See Section 8.2.2, “Authenticating Using LDAP” for details on how the mod_authnz_ldap module is used for broker user authentication.
<Location /admin-console>
    AuthName "OpenShift Administration Console"
    AuthType Basic
    AuthBasicProvider ldap
    AuthLDAPURL "ldap://localhost:389/ou=People,dc=my-domain,dc=com?uid?sub?(objectClass=*)"
    require valid-user

    Order Deny,Allow
    Deny from all
    Satisfy any
</Location>AuthLDAPURL setting. Ensure the LDAP server's firewall is configured to allow access by the broker hosts.
require valid-user directive in the above section uses the mod_authz_user module and grants access to all successfully authenticated users. You can change this to instead only allow specific users or only members of a group. See the mod_authnz_ldap documentation at http://httpd.apache.org/docs/2.2/mod/mod_authnz_ldap.html for more example usage.
Example 8.22. Authenticating Using Kerberos
mod_auth_kerb Apache module, you can configure user authentication for the Administration Console to use a Kerberos service. This example assumes that a Kerberos server already exists. See Section 8.2.3, “Authenticating Using Kerberos” for details on how the mod_auth_kerb module is used for broker user authentication.
<Location /admin-console>
    AuthName "OpenShift Administration Console"
    AuthType Kerberos
    KrbMethodNegotiate On
    KrbMethodK5Passwd On
    # The KrbLocalUserMapping enables conversion to local users, using
    # auth_to_local rules in /etc/krb5.conf. By default it strips the
    # @REALM part. See krb5.conf(5) for details how to set up specific rules.
    KrbLocalUserMapping On
    KrbServiceName HTTP/www.example.com
    KrbAuthRealms EXAMPLE.COM
    Krb5KeyTab /var/www/openshift/broker/httpd/conf.d/http.keytab
    require valid-user

    Order Deny,Allow
    Deny from all
    Satisfy any
</Location>KrbServiceName and KrbAuthRealms settings to suit the requirements of your Kerberos service. Ensure the Kerberos server's firewall is configured to allow access by the broker hosts.
require valid-user directive in the above section uses the mod_authz_user module and grants access to all successfully authenticated users. You can change this to instead only allow specific users. See the mod_auth_kerb documentation at http://modauthkerb.sourceforge.net/configure.html for more example usage.
Example 8.23. Authenticating Using htpasswd
mod_auth_basic Apache module, you can configure user authentication for the Administration Console to use a flat htpasswd file. This method is only intended for testing and demonstration purposes. See Section 8.2.1, “Authenticating Using htpasswd” for details on how the /etc/openshift/htpasswd file is used for broker user authentication by a basic installation of OpenShift Enterprise.
/etc/openshift/htpasswd file:
<Location /admin-console>
    AuthName "OpenShift Administration Console"
    AuthType Basic
    AuthUserFile /etc/openshift/htpasswd
    require valid-user

    Order Deny,Allow
    Deny from all
    Satisfy any
</Location>require valid-user directive in the above section uses the mod_authz_user module and grants access to all successfully authenticated users. You can change this to instead only allow specific users or only members of a group. See the mod_auth_basic documentation at http://httpd.apache.org/docs/2.2/mod/mod_auth_basic.html and http://httpd.apache.org/docs/2.2/howto/auth.html for more example usage.
8.11. Clearing Broker and Management Console Application Cache
Creating a cron job to regularly clear the cache at a low-traffic time of the week is useful to prevent your cache from reaching capacity. Add the following to the /etc/cron.d/openshift-rails-caches file to perform a weekly cron job:
# Clear rails caches once a week on Sunday at 1am
0 1 * * Sun root /usr/sbin/oo-admin-broker-cache -qc
0 1 * * Sun root /usr/sbin/oo-admin-console-cache -qc
Alternatively, you can manually clear each cache for an immediate refresh. Clear the broker cache with the following command:
# oo-admin-broker-cache --clear# oo-admin-console-cache --clearChapter 9. Manually Installing and Configuring Node Hosts
Prerequisites:
Warning
9.1. Configuring Node Host Entitlements
Table 9.1. OpenShift Enterprise Node Host Channels
| Channel Name | Purpose | Required | Provided By |
|---|---|---|---|
|
Red Hat OpenShift Enterprise 2.2 Application Node (for RHSM), or
Red Hat OpenShift Enterprise 2.2 Node (for RHN Classic).
| Base channel for OpenShift Enterprise 2.2 node hosts. | Yes. | "OpenShift Enterprise" subscription. |
| Red Hat Software Collections 1. | Provides access to the latest versions of programming languages, database servers, and related packages. | Yes. | "OpenShift Enterprise" subscription. |
| Red Hat OpenShift Enterprise 2.2 JBoss EAP add-on. | Provides the JBoss EAP premium xPaaS cartridge. | Only to support the JBoss EAP cartridge. | "JBoss Enterprise Application Platform for OpenShift Enterprise" subscription. |
| JBoss Enterprise Application Platform. | Provides JBoss EAP. | Only to support the JBoss EAP cartridge. | "JBoss Enterprise Application Platform for OpenShift Enterprise" subscription. |
| Red Hat OpenShift Enterprise 2.2 JBoss Fuse add-on. | Provides the JBoss Fuse premium xPaaS cartridge (available starting in OpenShift Enterprise 2.1.7). | Only to support the JBoss Fuse cartridge. | "JBoss Fuse for xPaaS" subscription. |
| Red Hat OpenShift Enterprise 2.2 JBoss A-MQ add-on. | Provides the JBoss A-MQ premium xPaaS cartridge (available starting in OpenShift Enterprise 2.1.7). | Only to support the JBoss A-MQ cartridge. | "JBoss A-MQ for xPaaS" subscription. |
| JBoss Enterprise Web Server 2. | Provides Tomcat 6 and Tomcat 7. | Only to support the JBoss EWS (Tomcat 6 and 7) standard cartridges. | "OpenShift Enterprise" subscription. |
| Red Hat OpenShift Enterprise Client Tools 2.2. | Provides access to the OpenShift Enterprise 2.2 client tools. | Only if client tools are used on the node host. | "OpenShift Enterprise" subscription. |
9.1.1. Using Red Hat Subscription Management on Node Hosts
Procedure 9.1. To Configure Node Host Subscriptions Using Red Hat Subscription Management:
- Use the
subscription-manager registercommand to register your Red Hat Enterprise Linux system.Example 9.1. Registering the System
#
subscription-manager registerUsername: Password: The system has been registered with id: 3tghj35d1-7c19-4734-b638-f24tw8eh6246 - Use the
subscription-manager list --availablecommand and locate any desired OpenShift Enterprise subscription pool IDs in the output of available subscriptions on your account.Example 9.2. Finding Subscription Pool IDs
#
subscription-manager list --available+-------------------------------------------+ Available Subscriptions +-------------------------------------------+ Subscription Name: OpenShift Enterprise SKU: MCT#### Pool Id: Example_3cf49557013d418c52992690 Quantity: 1 Service Level: Standard Service Type: L1-L3 Multi-Entitlement: No Ends: 01/01/2020 System Type: Physical Subscription Name: JBoss Enterprise Application Platform for OpenShift Enterprise SKU: SYS#### Pool Id: Example_3cf49557013d418c52182681 Quantity: 1 Service Level: Premium Service Type: L1-L3 Multi-Entitlement: No Ends: 01/01/2020 System Type: PhysicalThe "OpenShift Enterprise" subscription is the only subscription required for basic node operation. Additional subscriptions, detailed in Section 9.1, “Configuring Node Host Entitlements”, are optional and only required based on your planned usage of OpenShift Enterprise. For example, locate the pool ID for the "JBoss Enterprise Application Platform for OpenShift Enterprise" subscription if you plan to install the JBoss EAP premium xPaaS cartridge. - Attach the desired subscription(s). Replace
pool-idin the following command with your relevantPool Idvalue(s) from the previous step:#
subscription-manager attach --pool pool-id --pool pool-id - Enable the
Red Hat OpenShift Enterprise 2.2 Application Nodechannel:#
subscription-manager repos --enable rhel-6-server-ose-2.2-node-rpms - Verify that the
yum repolistcommand lists the enabled channel(s).Example 9.3. Verifying the Enabled Node Channel
#
yum repolistrepo id repo name rhel-server-6-ose-2.2-node-rpms Red Hat OpenShift Enterprise 2.2 Application Node (RPMs)OpenShift Enterprise node hosts require a customizedyumconfiguration to install correctly. For continued steps to correctly configureyum, see Section 9.2, “Configuring Yum on Node Hosts”.
9.1.2. Using Red Hat Network Classic on Node Hosts
Note
Procedure 9.2. To Configure Node Host Subscriptions Using Red Hat Network Classic:
- Use the
rhnreg_kscommand to register your Red Hat Enterprise Linux system. Replaceusernameandpasswordin the following command with your Red Hat Network account credentials:#
rhnreg_ks --username username --password password - Enable the
Red Hat OpenShift Enterprise 2.2 Nodechannel:#
rhn-channel -a -c rhel-x86_64-server-6-ose-2.2-node - Verify that the
yum repolistcommand lists the enabled channel(s).Example 9.4. Verifying the Enabled Node Channel
#
yum repolistrepo id repo name rhel-x86_64-server-6-ose-2.2-node Red Hat OpenShift Enterprise 2.2 Node - x86_64
yum configuration to install correctly. For continued steps to correctly configure yum, see Section 9.2, “Configuring Yum on Node Hosts”.
9.2. Configuring Yum on Node Hosts
exclude directives in the yum configuration files.
exclude directives work around the cases that priorities will not solve. The oo-admin-yum-validator tool consolidates this yum configuration process for specified component types called roles.
oo-admin-yum-validator Tool
After configuring the selected subscription method as described in Section 9.1, “Configuring Node Host Entitlements”, use the oo-admin-yum-validator tool to configure yum and prepare your host to install the node components. This tool reports a set of problems, provides recommendations, and halts by default so that you can review each set of proposed changes. You then have the option to apply the changes manually, or let the tool attempt to fix the issues that have been found. This process may require you to run the tool several times. You also have the option of having the tool both report all found issues, and attempt to fix all issues.
Procedure 9.3. To Configure Yum on Node Hosts:
- Install the latest openshift-enterprise-release package:
#
yum install openshift-enterprise-release - Run the
oo-admin-yum-validatorcommand with the-ooption for version2.2and the-roption for thenoderole.If you intend to install one or more xPaaS premium cartridge and the relevant subscription(s) are in place as described in Section 9.1, “Configuring Node Host Entitlements”, replacenodewith one or more of thenode-eap,node-amq, ornode-fuseroles as needed for the respective cartridge(s). If you add more than one role, use an-roption when defining each role.The command reports the first detected set of problems, provides a set of proposed changes, and halts.Example 9.5. Finding Problems
#
oo-admin-yum-validator -o 2.2 -r node-eapDetected OpenShift Enterprise repository subscription managed by Red Hat Subscription Manager. The required OpenShift Enterprise repositories are disabled: jb-ews-2-for-rhel-6-server-rpms rhel-6-server-rpms rhel-6-server-ose-2.2-jbosseap-rpms rhel-server-rhscl-6-rpms jb-eap-6-for-rhel-6-server-rpms Enable these repositories by running these commands: # subscription-manager repos --enable=jb-ews-2-for-rhel-6-server-rpms # subscription-manager repos --enable=rhel-6-server-rpms # subscription-manager repos --enable=rhel-6-server-ose-2.2-jbosseap-rpms # subscription-manager repos --enable=rhel-server-rhscl-6-rpms # subscription-manager repos --enable=jb-eap-6-for-rhel-6-server-rpms Please re-run this tool after making any recommended repairs to this systemAlternatively, use the--report-alloption to report all detected problems.#
oo-admin-yum-validator -o 2.2 -r node-eap --report-all - After reviewing the reported problems and their proposed changes, either fix them manually or let the tool attempt to fix the first set of problems using the same command with the
--fixoption. This may require several repeats of steps 2 and 3.Example 9.6. Fixing Problems
#
oo-admin-yum-validator -o 2.2 -r node-eap --fixDetected OpenShift Enterprise repository subscription managed by Red Hat Subscription Manager. Enabled repository jb-ews-2-for-rhel-6-server-rpms Enabled repository rhel-6-server-rpms Enabled repository rhel-6-server-ose-2.2-jbosseap-rpms Enabled repository rhel-server-rhscl-6-rpms Enabled repository jb-eap-6-for-rhel-6-server-rpmsAlternatively, use the--fix-alloption to allow the tool to attempt to fix all of the problems that are found.#
oo-admin-yum-validator -o 2.2 -r node-eap --fix-allNote
If the host is using Red Hat Network (RHN) Classic, the--fixand--fix-alloptions do not automatically enable any missing OpenShift Enterprise channels as they do when the host is using Red Hat Subscription Management. Enable the recommended channels with therhn-channelcommand. Replacerepo-idin the following command with the repository ID reported in theoo-admin-yum-validatorcommand output.#
rhn-channel -a -c repo-idImportant
For either subscription method, the--fixand--fix-alloptions do not automatically install any packages. The tool reports if any manual steps are required. - Repeat steps 2 and 3 until the
oo-admin-yum-validatorcommand displays the following message.No problems could be detected!
9.3. Creating a Node DNS Record
example.com with the chosen domain name, node with Host 2's short name, and 10.0.0.2 with Host 2's IP address:
# oo-register-dns -h node -d example.com -n 10.0.0.2nsupdate command demonstrated in the Host 1 configuration.
Note
named_entries parameter can be used to define all hosts in advance when installing named.
9.4. Configuring Node Host Name Resolution
named service running on the broker (Host 1). This allows Host 2 to resolve the host names of the broker and any other broker or node hosts configured, and vice versa, so that Host 1 can resolve the host name of Host 2.
/etc/resolv.conf on Host 2 and add the following entry as the first name server. Replace 10.0.0.1 with the IP address of Host 1:
nameserver 10.0.0.1
Note
configure_dns_resolution function performs this step.
9.5. Configuring the Node Host DHCP and Host Name
eth0 in the file names with the appropriate network interface for your system in the examples that follow.
Procedure 9.4. To Configure the DHCP Client and Host Name on the Node Host:
- Create the
/etc/dhcp/dhclient-eth0.conffile, then add the following lines to configure the DHCP client to send DNS requests to the broker (Host 1) and assume the appropriate host name and domain name. Replace10.0.0.1with the actual IP address of Host 1 andexample.comwith the actual domain name of Host 2. If you are using a network interface other thaneth0, edit the configuration file for that interface instead.prepend domain-name-servers 10.0.0.1; prepend domain-search "example.com";
- Edit the
/etc/sysconfig/networkfile on Host 2, and set theHOSTNAMEparameter to the fully-qualified domain name (FQDN) of Host 2. Replacenode.example.comin the following example with the host name of Host 2.HOSTNAME=node.example.com
Important
Red Hat does not recommend changing the node host name after the initial configuration. When an application is created on a node host, application data is stored in a database. If the node host name is modified, the data does not automatically change, which can cause the instance to fail. The node host name cannot be changed without deleting and recreating all gears on the node host. Therefore, verify that the host name is configured correctly before deploying any applications on a node host. - Set the host name immediately:
#
hostname node.example.comNote
If you use the kickstart or bash script, theconfigure_dns_resolutionandconfigure_hostnamefunctions perform these steps. - Run the
hostnamecommand on Host 2:#
hostname
9.6. Installing the Core Node Host Packages
# yum install rubygem-openshift-origin-node ruby193-rubygem-passenger-native openshift-origin-node-util policycoreutils-python rubygem-openshift-origin-container-selinux rubygem-openshift-origin-frontend-nodejs-websocket rubygem-openshift-origin-frontend-apache-mod-rewriteNote
install_node_pkgs function performs this step.
9.7. Installing and Configuring MCollective on Node Hosts
Procedure 9.5. To Install and Configure MCollective on the Node Host:
- Install all required packages for MCollective on Host 2 with the following command:
# yum install openshift-origin-msg-node-mcollective - Replace the contents of the
/opt/rh/ruby193/root/etc/mcollective/server.cfgfile with the following configuration. Remember to change the setting forplugin.activemq.pool.1.hostfrombroker.example.comto the host name of Host 1. Use the same password for the MCollective user specified in the/etc/activemq/activemq.xmlfile on Host 1. Use the same password for theplugin.pskparameter, and the same numbers for theheartbeatparameters specified in the/opt/rh/ruby193/root/etc/mcollective/client.cfgfile on Host 1:main_collective = mcollective collectives = mcollective libdir = /opt/rh/ruby193/root/usr/libexec/mcollective logfile = /var/log/openshift/node/ruby193-mcollective.log loglevel = debug daemonize = 1 direct_addressing = 0 # Plugins securityprovider = psk plugin.psk = asimplething connector = activemq plugin.activemq.pool.size = 1 plugin.activemq.pool.1.host = broker.example.com plugin.activemq.pool.1.port = 61613 plugin.activemq.pool.1.user = mcollective plugin.activemq.pool.1.password = marionette plugin.activemq.heartbeat_interval = 30 plugin.activemq.max_hbread_fails = 2 plugin.activemq.max_hbrlck_fails = 2 # Node should retry connecting to ActiveMQ forever plugin.activemq.max_reconnect_attempts = 0 plugin.activemq.initial_reconnect_delay = 0.1 plugin.activemq.max_reconnect_delay = 4.0 # Facts factsource = yaml plugin.yaml = /opt/rh/ruby193/root/etc/mcollective/facts.yaml
- Configure the
ruby193-mcollectiveservice to start on boot:# chkconfig ruby193-mcollective on - Start the
ruby193-mcollectiveservice immediately:# service ruby193-mcollective startNote
If you use the kickstart or bash script, theconfigure_mcollective_for_activemq_on_nodefunction performs these steps. - Run the following command on the broker host (Host 1) to verify that Host 1 recognizes Host 2:
# oo-mco ping
9.7.1. Facter
/opt/rh/ruby193/root/etc/mcollective/facts.yaml file, and lists the facts of interest about a node host for inspection using MCollective. Visit www.puppetlabs.com for more information about how Facter is used with MCollective. There is no central registry for node hosts, so any node host listening with MCollective advertises its capabilities as compiled by the Facter.
facts.yaml file to determine the capabilities of all node hosts. The broker host issues a filtered search that includes or excludes node hosts based on entries in the facts.yaml file to find a host for a particular gear.
/etc/cron.minutely/openshift-facts cron job file. You can also run this script manually to immediately inspect the new facts.yaml file.
9.8. Installing Cartridges
Important
9.8.1. Installing Web Cartridges
Table 9.2. Available Web Cartridges
| Package Name | Description |
|---|---|
| openshift-origin-cartridge-amq | JBoss A-MQ support [a] |
| openshift-origin-cartridge-diy | DIY ("do it yourself") application type |
| openshift-origin-cartridge-fuse | JBoss Fuse support [a] |
| openshift-origin-cartridge-fuse-builder | JBoss Fuse Builder support [a] |
| openshift-origin-cartridge-haproxy | HAProxy support |
| openshift-origin-cartridge-jbossews | JBoss EWS support |
| openshift-origin-cartridge-jbosseap | JBoss EAP support [a] |
| openshift-origin-cartridge-jenkins | Jenkins server for continuous integration |
| openshift-origin-cartridge-nodejs | Node.js support |
| openshift-origin-cartridge-ruby | Ruby Rack support running on Phusion Passenger |
| openshift-origin-cartridge-perl | mod_perl support |
| openshift-origin-cartridge-php | PHP support |
| openshift-origin-cartridge-python | Python support |
[a]
Premium cartridge. If installing, see Section 9.1, “Configuring Node Host Entitlements” to ensure the correct premium add-on subscriptions are configured.
| |
# yum install package_nameNote
install_cartridges function performs this step. This function currently installs all cartridges listed. Edit this function to install a different set of cartridges.
Important
9.8.2. Installing Add-on Cartridges
Table 9.3. Available Add-on Cartridges
| Package Name | Description |
|---|---|
| openshift-origin-cartridge-cron | Embedded crond support. |
| openshift-origin-cartridge-jenkins-client | Embedded Jenkins client. |
| openshift-origin-cartridge-mysql | Embedded MySQL. |
| openshift-origin-cartridge-postgresql | Embedded PostgreSQL. |
| openshift-origin-cartridge-mongodb | Embedded MongoDB. Available starting in OpenShift Enterprise 2.1.1. |
# yum install package_nameNote
install_cartridges function performs this step. This function currently installs all cartridges listed. Edit this function to install a different set of cartridges.
9.8.3. Installing Cartridge Dependency Metapackages
- openshift-origin-cartridge-dependencies-recommended-php
- openshift-origin-cartridge-dependencies-optional-php
Table 9.4. Available Cartridge Dependency Metapackages
| Type | Package Name Format | Description |
|---|---|---|
| Recommended | openshift-origin-cartridge-dependencies-recommended-cartridge_short_name | Provides the additional recommended packages for the base cartridge. Useful for compatibility with OpenShift Online. |
| Optional | openshift-origin-cartridge-dependencies-optional-cartridge_short_name | Provides both the additional recommended and optional packages for the base cartridge. Useful for compatibility with OpenShift Online, however these packages might be removed from a future version of OpenShift Enterprise. |
# yum install package_nameNote
install_cartridges function performs this step. By default, this function currently installs the recommended cartridge dependency metapackages for all installed cartridges.
9.9. Configuring SSH Keys on the Node Host
rsync_id_rsa.pub public key of each broker host by repeating steps three through five of the following procedure for each broker host.
Procedure 9.6. To Configure SSH Keys on the Node Host:
- On the node host, create a
/root/.sshdirectory if it does not exist:#
mkdir -p /root/.ssh - Configure the appropriate permissions for the
/root/.sshdirectory:#
chmod 700/root/.ssh - Copy the SSH key from the broker host to each node host:
#
scp root@broker.example.com:/etc/openshift/rsync_id_rsa.pub /root/.ssh/ - Supply the root user password of the broker host when prompted:
root@broker.example.com's password:
- Copy the contents of the SSH key to the
/root/.ssh/authorized_keysfile:#
cat/root/.ssh/rsync_id_rsa.pub>>/root/.ssh/authorized_keys - Configure the appropriate permissions for the
/root/.ssh/authorized_keysfile:#
chmod 600/root/.ssh/authorized_keys - Remove the SSH key:
#
rm -f/root/.ssh/rsync_id_rsa.pub
Important
9.10. Configuring Required Services on Node Hosts
sshd daemon is required to provide access to Git repositories, and the node host must also allow HTTP and HTTPS connections to the applications running within gears on the node host. The openshift-node-web-proxy daemon is required for WebSockets usage, which also requires that ports 8000 and 8443 be opened.
# lokkit --nostart --service=ssh# lokkit --nostart --service=https# lokkit --nostart --service=http# lokkit --nostart --port=8000:tcp# lokkit --nostart --port=8443:tcp# chkconfig httpd on# chkconfig network on# chkconfig ntpd on# chkconfig sshd on# chkconfig oddjobd on# chkconfig openshift-node-web-proxy on
Note
enable_services_on_node function performs these steps.
9.10.1. Configuring PAM
SSH. Only gear login accounts are polyinstantiated; other local users are unaffected.
#sed -i -e 's|pam_selinux|pam_openshift|g' /etc/pam.d/sshd#for f in "runuser" "runuser-l" "sshd" "su" "system-auth-ac"dot="/etc/pam.d/$f"if ! grep -q "pam_namespace.so" "$t"thenprintf 'session\t\t[default=1 success=ignore]\tpam_succeed_if.so quiet shell = /usr/bin/oo-trap-user\n' >> "$t"printf 'session\t\trequired\tpam_namespace.so no_unmount_on_close\n' >> "$t"fidone
#printf '/tmp $HOME/.tmp/ user:iscript=/usr/sbin/oo-namespace-init root,adm\n' > /etc/security/namespace.d/tmp.confprintf '/dev/shm tmpfs tmpfs:mntopts=size=5M:iscript=/usr/sbin/oo-namespace-init root,adm\n' > /etc/security/namespace.d/shm.conf
#cat /etc/security/namespace.d/tmp.conf/tmp $HOME/.tmp/ user:iscript=/usr/sbin/oo-namespace-init root,adm #cat /etc/security/namespace.d/shm.conf/dev/shm tmpfs tmpfs:mntopts=size=5M:iscript=/usr/sbin/oo-namespace-init root,adm
Note
configure_pam_on_node function performs these steps.
9.10.2. Configuring Cgroups
cgroups to contain application processes and to allocate resources fairly. cgroups use two services that must both be running for cgroups containment to be in effect:
- The
cgconfigservice provides the LVFS interface to thecgroupsubsystems. Use the/etc/cgconfig.conffile to configure this service. - The
cgred"rules" daemon assigns new processes to acgroupbased on matching rules. Use the/etc/cgrules.conffile to configure this service.
cgroups:
#for f in "runuser" "runuser-l" "sshd" "system-auth-ac"do t="/etc/pam.d/$f"if ! grep -q "pam_cgroup" "$t"then printf 'session\t\toptional\tpam_cgroup.so\n' >> "$t"fidone#cp -vf /opt/rh/ruby193/root/usr/share/gems/doc/openshift-origin-node-*/cgconfig.conf /etc/cgconfig.conf#restorecon -v /etc/cgconfig.conf#restorecon -v /etc/cgrules.conf#mkdir -p /cgroup#restorecon -rv /cgroup#chkconfig cgconfig on#chkconfig cgred on#service cgconfig restart#service cgred restart
Important
cgroups services in the following order for OpenShift Enterprise to function correctly:
cgconfigcgred
service service-name start command to start each of these services in order.
Note
configure_cgroups_on_node function performs these steps.
When cgroups have been configured correctly you should see the following:
- The
/etc/cgconfig.conffile exists with SELinux labelsystem_u:object_r:cgconfig_etc_t:s0. - The
/etc/cgconfig.conffile mountscpu,cpuacct,memory,andnet_clson the/cgroupdirectory. - The
/cgroupdirectory exists, with SELinux labelsystem_u:object_r:cgroup_t:s0. - The command
service cgconfig statusreturnsRunning. - The
/cgroupdirectory exists and contains subsystem files forcpu,cpuacct,memory,andnet_cls.
cgred service is running correctly you should see the following:
- The
/etc/cgrules.conffile exists with SELinux labelsystem_u:object_r:cgrules_etc_t:s0. - The
service cgred statuscommand shows thatcgredis running.
Important
unconfined_u and not system_u. For example, the SELinux label in /etc/cgconfig.conf would be unconfined_u:object_r:cgconfig_etc_t:s0.
9.10.3. Configuring Disk Quotas
/etc/openshift/resource_limits.conf file. Modify these values to suit your requirements.
Table 9.5. Disk Quota Configuration Options:
| Option | Description |
|---|---|
quota_files | The number of files the gear is allowed to own. |
quota_blocks | The amount of space the gear is allowed to consume in blocks (1 block = 1024 bytes). |
Important
quota_blocks parameter is 1 GB.
Procedure 9.7. To Enable Disk Quotas:
- Consult the
/etc/fstabfile to determine which device is mounted as/var/lib/openshift. In a simple setup, it is the root partition, but in a production system, it is more likely a RAID or NAS mount at/var/lib/openshift. The following steps in this procedure use the root partition as the example mount point. Adjust these to suit your system requirements. - Add a
usrquotaoption for that mount point entry in the/etc/fstabfile.Example 9.7. Example Entry in the
/etc/fstabfileUUID=4f182963-5e00-4bfc-85ed-9f14149cbc79 / ext4 defaults,usrquota 1 1
- Reboot the node host or remount the mount point:
#
mount -o remount / - Generate user quota information for the mount point:
#
quotacheck -cmug / - Fix the SELinux permissions on the
aquota.userfile located in the top directory of the mount point:#
restorecon /aquota.user - Re-enable quotas on the mount point:
#
quotaon /
Create an application and then run the following command to verify that your disk quota is correct:
# repquota -a | grep gear-uuid9.10.4. Configuring SELinux
# setsebool -P httpd_unified=on httpd_can_network_connect=on httpd_can_network_relay=on httpd_read_user_content=on httpd_enable_homedirs=on httpd_run_stickshift=on allow_polyinstantiation=onTable 9.6. Boolean Value Options
| Boolean Value | Purpose |
|---|---|
httpd_unified | Allow the node host to write files in the http file context. |
httpd_can_network_connect | Allow the node host to access the network. |
httpd_can_network_relay | Allow the node host to access the network. |
httpd_read_user_content | Allow the node host to read application data. |
httpd_enable_homedirs | Allow the node host to read application data. |
httpd_run_stickshift | Allow the node host to read application data. |
allow_polyinstantiation | Allow polyinstantiation for gear containment. |
#restorecon -rv /var/run#restorecon -rv /var/lib/openshift /etc/openshift/node.conf /etc/httpd/conf.d/openshift
Note
configure_selinux_policy_on_node function performs these steps.
9.10.5. Configuring System Control Settings
/etc/sysctl.conf file to enable this usage.
Procedure 9.8. To Configure the sysctl Settings:
- Open the
/etc/sysctl.conffile and append the following line to increase kernel semaphores to accommodate more httpds:kernel.sem = 250 32000 32 4096
- Append the following line to the same file to increase the ephemeral port range to accommodate application proxies:
net.ipv4.ip_local_port_range = 15000 35530
- Append the following line to the same file to increase the connection-tracking table size:
net.netfilter.nf_conntrack_max = 1048576
- Append the following line to the same file to enable forwarding for the port proxy:
net.ipv4.ip_forward = 1
- Append the following line to the same file to allow the port proxy to route using loopback addresses:
net.ipv4.conf.all.route_localnet = 1
- Run the following command to reload the
sysctl.conffile and activate the new settings:# sysctl -p /etc/sysctl.conf
Note
configure_sysctl_on_node function performs these steps.
9.10.6. Configuring Secure Shell Access
sshd service on the node host:
- Append the following line to the
/etc/ssh/sshd_configfile to configure thesshddaemon to pass theGIT_SSHenvironment variable:AcceptEnv GIT_SSH
- The
sshddaemon handles a high number ofSSHconnections from developers connecting to the node host to push their changes. Increase the limits on the number of connections to the node host to accommodate this volume:#
sed -i -e "s/^#MaxSessions .*\$/MaxSessions 40/" /etc/ssh/sshd_config#sed -i -e "s/^#MaxStartups .*\$/MaxStartups 40/" /etc/ssh/sshd_config
Note
configure_sshd_on_node function performs these steps.
9.10.7. Configuring the Port Proxy
iptables to listen on external-facing ports and forwards incoming requests to the appropriate application.
Procedure 9.9. To Configure the OpenShift Port Proxy:
- Verify that
iptablesis running and will start on boot.#
service iptables restart#chkconfig iptables on - Verify that the port proxy starts on boot:
# chkconfig openshift-iptables-port-proxy on - Modify the
iptablesrules:# sed -i '/:OUTPUT ACCEPT \[.*\]/a :rhc-app-comm - [0:0]' /etc/sysconfig/iptables# sed -i '/-A INPUT -i lo -j ACCEPT/a -A INPUT -j rhc-app-comm' /etc/sysconfig/iptablesWarning
After you run these commands, do not run any furtherlokkitcommands on the node host. Runninglokkitcommands after this point overwrites the requirediptablesrules and causes theopenshift-iptables-port-proxyservice to fail during startup.Restart theiptablesservice for the changes to take effect:#
service iptables restart - Start the service immediately:
# service openshift-iptables-port-proxy start - Run the following command so that the
openshift-gearsservice script starts on boot. Theopenshift-gearsservice script starts gears when a node host is rebooted:# chkconfig openshift-gears on
Note
configure_port_proxy function performs these steps.
9.10.8. Configuring Node Settings
Procedure 9.10. To Configure the Node Host Settings:
- Open the
/etc/openshift/node.conffile and set the value ofPUBLIC_IPto the IP address of the node host. - Set the value of
CLOUD_DOMAINto the domain you are using for your OpenShift Enterprise installation. - Set the value of
PUBLIC_HOSTNAMEto the host name of the node host. - Set the value of
BROKER_HOSTto the host name or IP address of your broker host (Host 1). - Open the
/etc/openshift/env/OPENSHIFT_BROKER_HOSTfile and enter the host name of your broker host (Host 1). - Open the
/etc/openshift/env/OPENSHIFT_CLOUD_DOMAINfile and enter the domain you are using for your OpenShift Enterprise installation. - Run the following command to set the appropriate
ServerNamein the node host's Apache configuration:# sed -i -e "s/ServerName .*\$/ServerName `hostname`/" \/etc/httpd/conf.d/000001_openshift_origin_node_servername.conf
Note
configure_node function performs these steps.
9.10.9. Updating the Facter Database
Facter generates metadata files for MCollective and is normally run by cron. Run the following command to execute facter immediately to create the initial database, and to ensure it runs properly:
# /etc/cron.minutely/openshift-factsNote
update_openshift_facts_on_node function performs this step.
Important
9.11. Enabling Network Isolation for Gears
localhost as well as IP addresses belonging to other gears on the node, allowing users access to unprotected network resources running in another user's gear. To prevent this, starting with OpenShift Enterprise 2.2 the oo-gear-firewall command is invoked by default at installation when using the oo-install installation utility or the installation scripts. It must be invoked explicitly on each node host during manual installations.
Note
oo-gear-firewall command is available in OpenShift Enterprise 2.1 starting with release 2.1.9.
oo-gear-firewall command configures nodes with firewall rules using the iptables command and SELinux policies using the semanage command to prevent gears from binding or connecting on IP addresses that belong to other gears.
oo-gear-firewall command creates static sets of rules and policies to isolate all possible gears in the range. The UID range must be the same across all hosts in a gear profile. By default, the range used by the oo-gear-firewall command is taken from existing district settings if known, or 1000 through 6999 if unknown. The tool can be re-run to apply rules and policies for an updated UID range if the range is changed later.
# oo-gear-firewall -i enable -s enable# oo-gear-firewall -i enable -s enable -b District_Beginning_UID -e District_Ending_UID9.12. Configuring Node Hosts for xPaaS Cartridges
The JBoss Fuse and JBoss A-MQ premium xPaaS cartridges have the following configuration requirements:
- All node and broker hosts must be updated to OpenShift Enterprise release 2.1.7 or later.
- Because the openshift-origin-cartridge-fuse and openshift-origin-cartridge-amq cartridge RPMs are each provided in separate channels, the node host must have the "JBoss Fuse for xPaaS" or "JBoss A-MQ for xPaaS" add-on subscription attached to enable the relevant channel(s) before installing either cartridge RPM. See Section 9.1, “Configuring Node Host Entitlements” for information on these subscriptions and using the
oo-admin-yum-validatortool to automatically configure the correct repositories starting in releases 2.1.8 and 2.2. - The configuration in the
/etc/openshift/resource_limits.conf.xpaas.m3.xlargeexample file must be used as the gear profile on the node host in place of the defaultsmallgear profile. - The cartridges require 15 external ports per gear. All of these ports are not necessarily used at the same time, but each is intended for a different purpose.
- The cartridges require 10 ports on the SNI front-end server proxy.
- Due to the above gear profile requirement, a new district must be created for the gear profile. Further, due to the above 15 external ports per gear requirement, the new district's capacity must be set to a maximum of 2000 gears instead of the default 6000 gears.
- Starting in OpenShift Enterprise 2.2, restrict the xPaaS cartridges to the
xpaasgear size by adding to theVALID_GEAR_SIZES_FOR_CARTRIDGElist in the/etc/openshift/broker.conffile on broker hosts. For example:VALID_GEAR_SIZES_FOR_CARTRIDGE="fuse-cart-name|xpaas amq-cart-name|xpaas"
The JBoss Fuse Builder premium xPaaS cartridge can run on a default node host configuration. However, because the openshift-origin-cartridge-fuse-builder cartridge RPM is provided in the same separate channels as the JBoss Fuse and JBoss A-MQ cartridges, the node host must have either the "JBoss Fuse for xPaaS" or "JBoss A-MQ for xPaaS" add-on subscription attached to enable either of the channels before installing the cartridge RPM. See Section 9.1, “Configuring Node Host Entitlements” for more information.
The JBoss EAP premium xPaaS cartridge has the following configuration requirement and recommendation:
- Because the openshift-origin-cartridge-jbosseap cartridge RPM is provided in a separate channel, the node host must have the "JBoss Enterprise Application Platform for OpenShift Enterprise" add-on subscription attached to enable the channel before installing the cartridge RPM. See Section 9.1, “Configuring Node Host Entitlements” for more information.
- Red Hat recommends setting the following values in the node host's
/etc/openshift/resource_limits.conffile:limits_nproc=500 memory_limit_in_bytes=5368709120 # 5G memory_memsw_limit_in_bytes=5473566720 # 5G + 100M (100M swap)
You can set these values while following the instructions in Section 9.13, “Configuring Gear Profiles (Sizes)” through to the end of the chapter.
9.13. Configuring Gear Profiles (Sizes)
/etc/openshift/resource_limits.conf file.
Important
small. See https://bugzilla.redhat.com/show_bug.cgi?id=1027390 for more details.
9.13.1. Adding or Modifying Gear Profiles
- Define the new gear profile on the node host.
- Update the list of valid gear sizes on the broker host.
- Grant users access to the new gear size.
Procedure 9.11. To Define a New Gear Profile:
small. Edit the /etc/openshift/resource_limits.conf file on the node host to define a new gear profile.
Note
resource_limits.conf files based on other gear profile and host type configurations are included in the /etc/openshift/ directory on nodes. For example, files for medium and large example profiles are included, as well as an xpaas profile for use on nodes hosting xPaaS cartridges. These files are available as a reference or can be used to copy over the existing /etc/openshift/resource_limits.conf file.
- Edit the
/etc/openshift/resource_limits.conffile on the node host and modify its parameters to your desired specifications. See the file's commented lines for information on available parameters. - Modify the
node_profileparameter to set a new name for the gear profile, if desired. - Restart the
ruby193-mcollectiveservice on the node host:#
service ruby193-mcollective restart - If Traffic Control is enabled in the
/etc/openshift/node.conffile, run the following command to apply any bandwidth setting changes:#
oo-admin-ctl-tc restart
Procedure 9.12. To Update the List of Valid Gear Sizes:
- Edit the
/etc/openshift/broker.conffile on the broker host and modify the comma-separated list in theVALID_GEAR_SIZESparameter to include the new gear profile. - Consider adding the new gear profile to the comma-separated list in the
DEFAULT_GEAR_CAPABILITIESparameter as well, which determines the default available gear sizes for new users. - Restart the broker service:
#
service openshift-broker restart - For existing users, you must grant their accounts access to the new gear size before they can create gears of that size. Run the following command on the broker host for the relevant user name and gear size:
#
oo-admin-ctl-user -l Username --addgearsize Gear_Size - See Section 9.14, “Configuring Districts” for more information on how to create and populate a district, which are required for gear deployment, using the new gear profile.
- If gears already exist on the node host and the
memory_limit_in_bytesvariable has been updated in theresource_limits.conf, run the following command to ensure the memory limit for the new gear profile is applied to the existing gears. Replace 512 with the new memory limit in megabytes:#
for i in /var/lib/openshift/*/.env/OPENSHIFT_GEAR_MEMORY_MB; do echo 512 > "$i"; doneNote that the original variable fromresource_limits.confis in bytes, while the environment variable is actually in megabytes.
9.14. Configuring Districts
9.14.1. Creating a District
Procedure 9.13. To Create a District and Add a Node Host:
- Create an empty district and specify the gear profile with:
#
oo-admin-ctl-district -c create -n district_name -p gear_profile - Add an empty node host to the district. Only node hosts that do not have any gears can be added to a district, and the node host must have the same gear profile as the district:
#
oo-admin-ctl-district -c add-node -n district_name -i hostnameThe following example shows how to create an empty district, then add an empty node host to it.Example 9.8. Creating an Empty District and Adding a Node Host
#
oo-admin-ctl-district -c create -n small_district -p smallSuccessfully created district: 7521a7801686477f8409e74f67b693f4 {"active_server_identities_size"=>0, "node_profile"=>"small", "creation_time"=>"2012-10-24T02:14:48-04:00", "name"=>"small_district", "externally_reserved_uids_size"=>0, "uuid"=>"7521a7801686477f8409e74f67b693f4", "max_capacity"=>6000, "available_uids"=>"<6000 uids hidden>", "max_uid"=>6999, "available_capacity"=>6000, "server_identities"=>{}}#
oo-admin-ctl-district -c add-node -n small_district -i node1.example.comSuccess! {... "server_identities"=>{"node1.example.com"=>{"active"=>true}}, "uuid"=>"7521a7801686477f8409e74f67b693f4", "name"=>"small_district", ...}Note
The command outputs in the previous example show the JSON object representing the district in the MongoDB.
9.14.2. Viewing a District
# oo-admin-ctl-district# oo-admin-ctl-district -n district_name -c list-availableNote
9.15. Importing Cartridges
Important
# oo-admin-ctl-cartridge -c import-profile --activate
Chapter 10. Continuing Node Host Installation for Enterprise
10.1. Front-End Server Proxies
Virtual Hosts front-end is the default for deployments. However, alternate front-end servers can be installed and configured and are available as a set of plug-ins. When multiple plug-ins are used at one time, every method call for a front-end event, such as creating or deleting a gear, becomes a method call in each loaded plug-in. The results are merged in a contextually sensitive manner. For example, each plug-in typically only records and returns the specific connection options that it parses. In OpenShift Enterprise, connection options for all loaded plug-ins are merged and reported as one connection with all set options from all plug-ins.
iptables to listen on external-facing ports and forwards incoming requests to the appropriate application. High-range ports are reserved on node hosts for scaled applications to allow inter-node connections. See Section 9.10.7, “Configuring the Port Proxy” for information on iptables port proxy.
iptables proxy listens on ports that are unique to each gear.
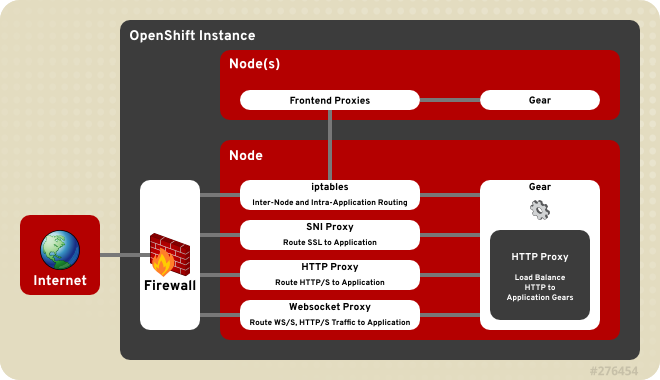
Figure 10.1. OpenShift Enterprise Front-End Server Proxies
10.1.1. Configuring Front-end Server Plug-ins
OPENSHIFT_FRONTEND_HTTP_PLUGINS parameter in the /etc/openshift/node.conf file. The value of this parameter is a comma-separated list of names of the Ruby gems that must be loaded for each plug-in. The gem name of a plug-in is found after the rubygem- in its RPM package name.
/etc/openshift/node.conf file, any plug-ins which are loaded into the running environment as a dependency of those explicitly listed are also used.
Example 10.1. Front-end Server Plug-in Configuration
# Gems for managing the frontend http server
# NOTE: Steps must be taken both before and after these values are changed.
#       Run "oo-frontend-plugin-modify  --help" for more information.
OPENSHIFT_FRONTEND_HTTP_PLUGINS=openshift-origin-frontend-apache-vhost,openshift-origin-frontend-nodejs-websocket,openshift-origin-frontend-haproxy-sni-proxy
10.1.2. Installing and Configuring the HTTP Proxy Plug-in
Note
prefork module and the multi-threaded worker module in Apache are supported. The prefork module is used by default, but for better performance you can change to the worker module. This can be changed in the /etc/sysconfig/httpd file:
HTTPD=/usr/sbin/httpd.worker
apache-vhost and apache-mod-rewrite, and both have a dependency, the apachedb plug-in, which is installed when using either.
apache-vhost, which is based on Apache Virtual Hosts. The apache-vhost plug-in is provided by the rubygem-openshift-origin-frontend-apache-vhost RPM package. The virtual host configurations are written to .conf files in the /etc/httpd/conf.d/openshift directory, which is a symbolic link to the /var/lib/openshift/.httpd.d directory.
apache-mod-rewrite plug-in provides a front end based on Apache's mod_rewrite module, but configured by a set of Berkley DB files to route application web requests to their respective gears. The mod_rewrite front end owns the default Apache Virtual Hosts with limited flexibility. However, it can scale high-density deployments with thousands of gears on a node host and maintain optimum performance. The apache-mod-rewrite plug-in is provided by the rubygem-openshift-origin-frontend-apache-mod-rewrite RPM package, and the mappings for each application are persisted in the /var/lib/openshift/.httpd.d/*.txt file.
apache-mod-rewrite plug-in as the default. However, this has been deprecated, making the apache-vhost plug-in the new default for OpenShift Enterprise 2.2. The Apache mod_rewrite front end plug-in is best suited for deployments with thousands of gears per node host, and where gears are frequently created and destroyed. However, the default Apache Virtual Hosts plug-in is best suited for more stable deployments with hundreds of gears per node host, and where gears are infrequently created and destroyed. See Section 10.1.2.1, “Changing the Front-end HTTP Configuration for Existing Deployments” for information on how to change the HTTP front-end proxy of an already existing deployment to the new default.
Table 10.1. Apache Virtual Hosts Front-end Plug-in Information
| Plug-in Name | openshift-origin-frontend-apache-vhost |
| RPM | rubygem-openshift-origin-frontend-apache-vhost |
| Service | httpd |
| Ports | 80, 443 |
| Configuration Files | /etc/httpd/conf.d/000001_openshift_origin_frontend_vhost.conf |
| | /var/lib/openshift/.httpd.d/frontend-vhost-http-template.erb, the configurable template for HTTP vhosts
|
| | /var/lib/openshift/.httpd.d/frontend-vhost-https-template.erb, the configurable template for HTTPS vhosts
|
| | /etc/httpd/conf.d/openshift-http-vhost.include, optional, included by each HTTP vhost if present
|
| | /etc/httpd/conf.d/openshift-https-vhost.include, optional, included by each HTTPS vhost if present
|
Table 10.2. Apache mod_rewrite Front-end Plug-in Information
| Plug-in Name | openshift-origin-frontend-apache-mod-rewrite |
| RPM | rubygem-openshift-origin-frontend-apache-mod-rewrite |
| Service | httpd |
| Ports | 80, 443 |
| Configuration Files | /etc/httpd/conf.d/000001_openshift_origin_node.conf |
| | /var/lib/openshift/.httpd.d/frontend-mod-rewrite-https-template.erb, configurable template for alias-with-custom-cert HTTPS vhosts
|
Important
apache-mod-rewrite plug-in is not compatible with the apache-vhost plug-in, ensure your HTTP front-end proxy is consistent across your deployment. Installing both of their RPMs on the same node host will cause conflicts at the host level. Whichever HTTP front-end you use must be consistent across the node hosts of your deployment. If your node hosts have a mix of HTTP front-ends, moving gears between them will cause conflicts at the deployment level. This is important to note if you change from the default front-end.
The apachedb plug-in is a dependency of the apache-mod-rewrite, apache-vhost, and nodejs-websocket plug-ins and provides base functionality. The GearDBPlugin plug-in provides common bookkeeping operations and is automatically included in plug-ins that require apachedb. The apachedb plug-in is provided by the rubygem-openshift-origin-frontend-apachedb RPM package.
Note
CONF_NODE_APACHE_FRONTEND parameter can be specified to override the default HTTP front-end server configuration.
10.1.2.1. Changing the Front-end HTTP Configuration for Existing Deployments
Virtual Hosts front-end HTTP proxy is the default for new deployments. If your nodes are currently using the previous default, the Apache mod_rewrite plug-in, you can use the following procedure to change the front-end configuration of your existing deployment.
Procedure 10.1. To Change the Front-end HTTP Configuration on an Existing Deployment:
- To prevent the broker from making any changes to the front-end during this procedure, stop the ruby193-mcollective service on the node host:
#
Then set the following environment variable to prevent each front-end change from restarting the httpd service:service ruby193-mcollective stop#
export APACHE_HTTPD_DO_NOT_RELOAD=1 - Back up the existing front-end configuration. You will use this backup to restore the complete state of the front end after the process is complete. Replace filename with your desired backup storage location:
#
oo-frontend-plugin-modify --save > filename - Delete the existing front-end configuration:
#
oo-frontend-plugin-modify --delete - Remove and install the front-end plug-in packages as necessary:
#
yum remove rubygem-openshift-origin-frontend-apache-mod-rewrite#yum -y install rubygem-openshift-origin-frontend-apache-vhost - Replicate any Apache customizations reliant on the old plug-in onto the new plug-in, then restart the httpd service:
#
service httpd restart - Change the
OPENSHIFT_FRONTEND_HTTP_PLUGINSvalue in the/etc/openshift/node.conffile fromopenshift-origin-frontend-apache-mod-rewritetoopenshift-origin-frontend-apache-vhost:OPENSHIFT_FRONTEND_HTTP_PLUGINS="openshift-origin-frontend-apache-vhost"
- Un-set the previous environment variable to restarting the httpd service as normal after any front-end changes:
#
export APACHE_HTTPD_DO_NOT_RELOAD="" - Restart the MCollective service:
#
service ruby193-mcollective restart - Restore the HTTP front-end configuration from the backup you created in step one:
#
oo-frontend-plugin-modify --restore < filename
10.1.3. Installing and Configuring the SNI Proxy Plug-in
PROXY_PORTS parameter in the /etc/openshift/node-plugins.d/openshift-origin-frontend-haproxy-sni-proxy.conf file. The configured ports must be exposed externally by adding a rule in iptables so that they are accessible on all node hosts where the SNI proxy is running. These ports must be available to all application end users. The SNI proxy also requires that a client uses TLS with the SNI extension and a URL containing either the fully-qualified domain name or OpenShift Enterprise alias of the application. See the OpenShift Enterprise User Guide [9] for more information on setting application aliases.
/var/lib/openshift/.httpd.d/sniproxy.json file. These mappings must be entered during gear creation, so the SNI proxy must be enabled prior to deploying any applications that require the proxy.
Table 10.3. SNI Proxy Plug-in Information
| Plug-in Name | openshift-origin-frontend-haproxy-sni-proxy |
| RPM | rubygem-openshift-origin-frontend-haproxy-sni-proxy |
| Service | openshift-sni-proxy |
| Ports | 2303-2308 (configurable) |
| Configuration Files | /etc/openshift/node-plugins.d/openshift-origin-frontend-haproxy-sni-proxy.conf |
Important
Procedure 10.2. To Enable the SNI Front-end Plug-in:
- Install the required RPM package:
#
yum install rubygem-openshift-origin-frontend-haproxy-sni-proxy - Open the necessary ports in the firewall. Add the following to the
/etc/sysconfig/iptablesfile just before the-A INPUT -j REJECTrule:-A INPUT -m state --state NEW -m tcp -p tcp --dport 2303:2308 -j ACCEPT
- Restart the
iptablesservice:#
If gears have already been deployed on the node, you might need to also restart the port proxy to enable connections to the gears of scaled applications:service iptables restart#
service node-iptables-port-proxy restart - Enable and start the SNI proxy service:
#
chkconfig openshift-sni-proxy on#service openshift-sni-proxy start - Add
openshift-origin-frontend-haproxy-sni-proxyto theOPENSHIFT_FRONTEND_HTTP_PLUGINSparameter in the/etc/openshift/node.conffile:Example 10.2. Adding the SNI Plug-in to the
/etc/openshift/node.confFileOPENSHIFT_FRONTEND_HTTP_PLUGINS=openshift-origin-frontend-apache-vhost,openshift-origin-frontend-nodejs-websocket,openshift-origin-frontend-haproxy-sni-proxy
- Restart the MCollective service:
#
service ruby193-mcollective restart
Note
CONF_ENABLE_SNI_PROXY parameter is set to "true", which is the default if the CONF_NODE_PROFILE parameter is set to "xpaas".
10.1.4. Installing and Configuring the Websocket Proxy Plug-in
nodejs-websocket plug-in manages the Node.js proxy with Websocket support at ports 8000 and 8443 by default. Requests are routed to the application according to the application's fully qualified domain name or alias. It can be installed with either of the HTTP plug-ins outlined in Section 10.1.2, “Installing and Configuring the HTTP Proxy Plug-in”.
nodejs-websocket plug-in is provided by the rubygem-openshift-origin-frontend-nodejs-websocket RPM package. The mapping rules of the external node address to the cartridge's listening ports are persisted in the /var/lib/openshift/.httpd.d/routes.json file. The configuration of the default ports and SSL certificates can be found in the /etc/openshift/web-proxy-config.json file.
Important
nodejs-websocket plug-in, because all traffic is routed to the first gear of an application.
Table 10.4. Websocket Front-end Plug-in Information
| Plug-in Name | nodejs-websocket |
| RPM | rubygem-openshift-origin-frontend-nodejs-websocket (required and configured by the rubygem-openshift-origin-node RPM) |
| Service | openshift-node-web-proxy |
| Ports | 8000, 8443 |
| Configuration Files | /etc/openshift/web-proxy-config.json |
OPENSHIFT_FRONTEND_HTTP_PLUGINS parameter in the node.conf file, stop and disable the service, and close the firewall ports. Any of these would disable the plug-ins, but to be consistent perform all.
10.1.5. Installing and Configuring the iptables Proxy Plug-in
iptables port proxy is essential for scalable applications. While not exactly a plug-in like the others outlined above, it is a required functionality of any scalable application, and does not need to be listed in the OPENSHIFT_FRONTEND_HTTP_PLUGINS parameter in the node.conf file. The configuration steps for this plug-in were performed earlier in Section 9.10.7, “Configuring the Port Proxy”. The iptables rules generated for the port proxy are stored in the /etc/openshift/iptables.filter.rules and /etc/openshift/iptables.nat.rules files and are applied each time the service is restarted.
iptables plug-in is intended to provide external ports that bypass the other front-end proxies. These ports have two main uses:
- Direct HTTP requests from load-balancer gears or the routing layer.
- Exposing services (such as a database service) on one gear to the other gears in the application.
iptables rules to route a single external port to a single internal port belonging to the corresponding gear.
Important
PORTS_PER_USER and PORT_BEGIN parameters in the /etc/openshift/node.conf file allow for carefully configuring the number of external ports allocated to each gear and the range of ports used by the proxy. Ensure these are consistent across all nodes in order to enable gear movement between them.
Table 10.5. iptables Front-end Plug-in Information
| RPM | rubygem-openshift-origin-node |
| Service | openshift-iptables-port-proxy |
| Ports | 35531 - 65535 |
| Configuration Files | The PORTS_PER_USER and PORT_BEGIN parameters in the /etc/openshift/node.conf file |
10.2. Enabling Seamless Gear Migration with Node Host SSH Keys
10.2.1. rsync Keys
/etc/openshift/rsync_id_rsa key is used for authentication, so the corresponding public key must be added to the /root/.ssh/authorized_keys file of each node host. If you have multiple broker hosts, you can either copy the private key to each broker host, or add the public key of every broker host to every node host. This enables migration without having to specify node host root passwords during the process.
10.2.2. SSH Host Keys
- Administrator deploys OpenShift Enterprise.
- Developer creates an OpenShift Enterprise account.
- Developer creates an application that is deployed to node1.
- When an application is created, the application's Git repository is cloned using SSH. The host name of the application is used in this case, which is a cname to the node host where it resides.
- Developer verifies the host key, either manually or as defined in the SSH configuration, which is then added to the developer's local
~/.ssh/known_hostsfile for verification during future attempts to access the application gear.
- Administrator moves the gear to node2, which causes the application cname to change to node2.
- Developer attempts to connect to the application gear again, either with a Git operation or directly using SSH. However, this time SSH generates a warning message and refuses the connection, as shown in the following example:
Example 10.3. SSH Warning Message After an Application Gear Moves
@@@@@@@@@@@@@@@@@@@@@@@@@@@@@@@@@@@@@@@@@@@@@@@@@@@@@@@@@@@
@    WARNING: REMOTE HOST IDENTIFICATION HAS CHANGED!     @
@@@@@@@@@@@@@@@@@@@@@@@@@@@@@@@@@@@@@@@@@@@@@@@@@@@@@@@@@@@
IT IS POSSIBLE THAT SOMEONE IS DOING SOMETHING NASTY!
Someone could be eavesdropping on you right now (man-in-the-middle attack)!
It is also possible that the RSA host key has just been changed.
The fingerprint for the RSA key sent by the remote host is
ab:cd:ef:12:34:cd:11:10:3a:cd:1b:a2:91:cd:e5:1c.
Please contact your system administrator.
Add correct host key in /home/user/.ssh/known_hosts to get rid of this message.
Offending key in /home/user/.ssh/known_hosts:1
RSA host key for app-domain.example.com has changed and you have requested strict checking.
Host key verification failed.
This is because the host ID of the application has changed, and it no longer matches what is stored in the developer'sknown_hostsfile.
Procedure 10.3. To Duplicate SSH Host Keys:
- On each node host, back up all
/etc/ssh/ssh_host_*files:#
cd /etc/ssh/#mkdir hostkeybackup#cp ssh_host_* hostkeybackup/. - From the first node, copy the
/etc/ssh/ssh_host_*files to the other nodes:#
scp /etc/ssh/ssh_host_* node2:/etc/ssh/.#scp /etc/ssh/ssh_host_* node3:/etc/ssh/....You can also manage this with a configuration management system. - Restart the SSH service on each node host:
#
service sshd restart
.ssh/known_hosts file as a workaround for this problem. Because all nodes have the same fingerprint now, verifying the correct fingerprint at the next attempt to connect should be relatively easy. In fact, you may wish to publish the node host fingerprint prominently so that developers creating applications on your OpenShift Enterprise installation can do the same.
10.3. SSL Certificates
httpd proxy. OpenShift Enterprise supports associating a certificate with a specific application alias, distinguishing them by way of the SNI extension to the SSL protocol. However, the host-wide wildcard certificate should still be configured for use with default host names.
- The certificate common name (CN) does not match the application URL.
- The certificate is self-signed.
- Assuming the end-user accepts the certificate anyway, if the application gear is migrated between node hosts, the new host will present a different certificate from the one the browser has accepted previously.
10.3.1. Creating a Matching Certificate
Note
configure_wildcard_ssl_cert_on_node function performs this step.
Procedure 10.4. To Create a Matching Certificate:
- Configure the
$domainenvironment variable to simplify the process with the following command, replacingexample.comwith the domain name to suit your environment:#
domain=example.com - Create the matching certificate using the following commands:
#
cat << EOF | openssl req -new -rand /dev/urandom \-newkey rsa:2048 -nodes -keyout /etc/pki/tls/private/localhost.key \-x509 -days 3650 \-out /etc/pki/tls/certs/localhost.crt 2> /dev/nullXXSomeStateSomeCitySomeOrganizationSomeOrganizationalUnit*.$domainroot@$domainEOFThe self-signed wildcard certificate created expires after 3650 days, or approximately 10 years. - Restart the
httpdservice:#
service httpd restart
10.3.2. Creating a Properly Signed Certificate
#openssl req -new \-key /etc/pki/tls/private/localhost.key \-out /etc/pki/tls/certs/localhost.csr
/etc/pki/tls/certs/localhost.csr file.
/etc/pki/tls/certs/localhost.crt file.
httpd service:
# restart service httpd
10.3.3. Reusing the Certificate
/etc/pki/tls/private/localhost.key and copy the certificate to /etc/pki/tls/certs/localhost.crt on all node hosts.
#chmod 400 /etc/pki/tls/private/localhost.key /etc/pki/tls/certs/localhost.crt#chown root:root /etc/pki/tls/private/localhost.key /etc/pki/tls/certs/localhost.crt#restorecon /etc/pki/tls/private/localhost.key /etc/pki/tls/certs/localhost.crt
httpd service on each node host after modifying the key and the certificate.
10.4. Idling and Overcommitment
10.4.1. Manually Idling a Gear
oo-admin-ctl-gears command with the idlegear option and the specific gear ID to manually idle a gear:
# oo-admin-ctl-gears idlegear gear_ID
unidlegear option:
# oo-admin-ctl-gears unidlegear gear_ID
List any idled gears with the listidle option. The output will give the gear ID of any idled gears:
# oo-admin-ctl-gears listidle
10.4.2. Automated Gear Idling
oo-last-access and oo-auto-idler commands in a cron job to automatically idle inactive gears. The oo-last-access command compiles the last time each gear was accessed from the web front-end logs, excluding any access originating from the same node on which the gear is located. The oo-auto-idler command idles any gears when the associated URL has not been accessed, or the associated Git repository has not been updated, in the specified number of hours.
/etc/cron.hourly/auto-idler, containing the following contents, specifying the desired hourly interval:
(
/usr/sbin/oo-last-access
/usr/sbin/oo-auto-idler idle --interval 24
) >> /var/log/openshift/node/auto-idler.log 2>&1
Then, make the file executable:
# chmod +x /etc/cron.hourly/auto-idler
- Gears that have no web end point. For example, a custom message bus cartridge.
- Non-primary gears in a scaled application.
- Any gear with a UUID listed in
/etc/openshift/node/idler_ignorelist.conf
Note
configure_idler_on_node function performs this step.
10.4.3. Automatically Restoring Idled Gears
oddjobd service, a local message bus, automatically activates an idle gear that is accessed from the web. When idling a gear, first ensure the oddjobd service is available and is running so that the gear is restored when a web request is made:
#chkconfig messagebus on#service messagebus start#chkconfig oddjobd on#service oddjobd start
10.5. Backing Up Node Host Files
tar or cpio, to perform this backup. Red Hat recommends backing up the following node host files and directories:
/opt/rh/ruby193/root/etc/mcollective/etc/passwd/var/lib/openshift/etc/openshift
Important
/var/lib/openshift directory is paramount to recovering a node host, including head gears of scaled applications, which contain data that cannot be recreated. If the file is recoverable, then it is possible to recreate a node from the existing data. Red Hat recommends this directory be backed up on a separate volume from the root file system, preferably on a Storage Area Network.
Even though applications on OpenShift Enterprise are stateless by default, developers can also use persistent storage for stateful applications by placing files in their $OPENSHIFT_DATA_DIR directory. See the OpenShift Enterprise User Guide for more information.
cron scripts to clean up these hosts. For stateful applications, Red Hat recommends keeping the state on a separate shared storage volume. This ensures the quick recovery of a node host in the event of a failure.
Note
Chapter 11. Testing an OpenShift Enterprise Deployment
11.1. Testing the MCollective Configuration
Important
ruby193-mcollective daemon on the broker. The ruby193-mcollective daemon runs on node hosts and the broker runs the ruby193-mcollective client to contact node hosts. If the ruby193-mcollective daemon is run on the broker, the broker will respond to the oo-mco ping command and behave as both a broker and a node. This results in problems when creating applications, unless you have also run the node configuration on the broker host.
ruby193-mcollective service is running:
# service ruby193-mcollective status# service ruby193-mcollective startoo-mco command. This command can be used to perform diagnostics concerning communication between the broker and node hosts. Get a list of available commands with the following command:
# oo-mco helpoo-mco ping command to display all node hosts the current broker is aware of. An output similar to the following example is displayed:
node.example.com                         time=100.02 ms

---- ping statistics ----
1 replies max: 100.02 min: 100.02 avg: 100.02
oo-mco help command to see the full list of MCollective command line options.
11.2. Testing Clock Skew
oo-mco ping command if its clock is substantially behind.
/var/log/openshift/node/ruby193-mcollective.log file on node hosts to verify:
W, [2012-09-28T11:32:26.249636 #11711] WARN -- : runner.rb:62:in `run' Message 236aed5ad9e9967eb1447d49392e76d8 from uid=0@broker.example.com created at 1348845978 is 368 seconds old, TTL is 60
date command on the different hosts and compare the output across those hosts to verify that the clocks are synchronized.
NTP, as described in a previous section. Alternatively, see Section 5.3, “Configuring Time Synchronization” for information on how to set the time manually.
11.3. Testing the BIND and DNS Configuration
host or ping commands.
Procedure 11.1. To Test the BIND and DNS Configuration:
- On all node hosts, run the following command, substituting your broker host name for the example shown here:
#
host broker.example.com - On the broker, run the following command, substituting your node host's name for the example shown here:
#
host node.example.com - If the host names are not resolved, verify that your DNS configuration is correct in the
/etc/resolv.conffile and thenamedconfiguration files. Inspect the/var/named/dynamic/$domain.dbfile and check that the domain names of nodes and applications have been added to the BIND database. See Section 7.3.2, “Configuring BIND and DNS” for more information.
Note
/var/named/dynamic/$domain.db.jnl. If the $domain.db file is out of date, check the $domain.db.jnl file for any recent changes.
11.4. Testing the MongoDB Configuration
# service mongod status/var/log/mongodb/mongodb.log file and look for any "multiple_occurrences" error messages. If you see this error, inspect /etc/mongodb.conf for duplicate configuration lines, as any duplicates may cause the startup to fail.
mongod service is running, try to connect to the database:
# mongo openshift_brokerChapter 12. Configuring a Developer Workstation
12.1. Configuring Workstation Entitlements
12.2. Creating a User Account
Procedure 12.1. To Create a User Account:
- Run the following command on the broker to create a user account:
# htpasswd -c /etc/openshift/htpasswd usernameThis command prompts for a password for the new user account, and then creates a new/etc/openshift/htpasswdfile and adds the user to that file. - Use the same command without the
-coption when creating additional user accounts:# htpasswd /etc/openshift/htpasswd newuser - Inspect the
/etc/openshift/htpasswdfile to verify that the accounts have been created:# cat /etc/openshift/htpasswd
12.3. Installing and Configuring the Client Tools
Note
12.4. Configuring DNS on the Workstation
- Edit the
/etc/resolv.conffile on the client host, and add the DNS server from your OpenShift Enterprise deployment to the top of the list. - Install and use the OpenShift Enterprise client tools on a host within your OpenShift Enterprise deployment. For convenience, the kickstart script installs the client tools when installing the broker host. Otherwise, see Section 12.3, “Installing and Configuring the Client Tools” for more information.
12.5. Configuring the Client Tools on a Workstation
--server option to override the default server. Use the rhc setup command with the --server option to configure the default server. Replace the example host name with the host name of your broker.
~/.openshift/express.conf file:
# rhc setup --server=broker.example.com12.6. Using Multiple OpenShift Configuration Files
express.conf configuration file in the ~/.openshift directory with the specified user and server settings. Multiple configuration files can be created, but you must then use the --config option with the client tools to select the appropriate configuration file.
Procedure 12.2. To Create a New Configuration File:
- Run
rhc setupwith the--configcommand to create a new configuration file:# rhc setup --config=~/.openshift/bob.conf - Verify that you can connect to OpenShift using different configuration files. Run an
rhccommand without specifying the configuration file. In this example, the domain for the account configured in theexpress.conffile is displayed.# rhc domain show - Run the
rhccommand with--configoption. In this example, the domain for the account configured in thebob.conffile is displayed.# rhc domain show --config=~/.openshift/bob.conf
Note
12.7. Switching Between Multiple OpenShift Environments
OPENSHIFT_CONFIG, which overrides the default configuration file that the client tools will read from. This enables specifying only once the configuration file rather than having to specify it every time using the --config option. See Section 12.6, “Using Multiple OpenShift Configuration Files”. When you define the OPENSHIFT_CONFIG setting in your environment, the client tool will read the defined configuration file.
Procedure 12.3. To Switch Between OpenShift Environments
- Set the
OPENSHIFT_CONFIGenvironment variable under a bash shell using the following command:#
export OPENSHIFT_CONFIG=bob - Run
rhc setupto create the new configuration file: ~/.openshift/bob.conf. Specify which broker server you want to connect to using the--serveroption:#
rhc setup --server broker.example.com - Verify that you are connected to the defined environment by running an
rhccommand:# rhc domain show - Restore to default configuration by removing the value in
OPENSHIFT_CONFIGwith the following command:# export OPENSHIFT_CONFIG=
Note
# rhc account12.8. Creating a Domain and Application
# rhc domain create testdom# rhc app create testapp php
testdom and a test PHP application called testapp respectively.
-d option to provide additional debugging output, and then inspect the broker's log files for hints. If you still cannot find the source of the errors, see the OpenShift Enterprise Troubleshooting Guide at https://access.redhat.com/site/documentation for further information, or visit the website at https://openshift.redhat.com.
Chapter 13. OpenShift Enterprise by Red Hat Offline Developer Virtual Machine Image
13.1. Downloading the Image
vmdk and qcow2 file formats on the Red Hat Customer Portal at https://access.redhat.com/. The image is accessible using a Red Hat account with an active OpenShift Enterprise subscription.
Procedure 13.1. To Download the Image:
- Go to https://access.redhat.com/ and log into the Red Hat Customer Portal using your Red Hat account credentials.
- Go to the downloads page for the OpenShift Enterprise minor version you require:
- OpenShift Enterprise 2.2: https://rhn.redhat.com/rhn/software/channel/downloads/Download.do?cid=23917
- OpenShift Enterprise 2.1: https://rhn.redhat.com/rhn/software/channel/downloads/Download.do?cid=21355
These pages provide the latest available images within a minor version. Images for older releases within a minor version are also provided, if available. - Click the download link for the image in your desired file format:
- OSEoD Virtual Machine (
OSEoD-Release_Version.x86_64.vmdk) - OSEoD OpenStack Virtual Machine (
OSEoD-Release_Version.x86_64.qcow2)
13.2. Using the Image
- OpenShift Enterprise
- Red Hat Enterprise Linux
- Red Hat Software Collections
- JBoss Enterprise Application Platform (EAP)
- JBoss Enterprise Web Server (EWS)
- JBoss Developer Studio
vmdk image can be used on such hypervisors as VirtualBox or VMware Player. The qcow2 image can be used on Red Hat Enterprise Linux, CentOS, and Fedora servers and workstations that leverage KVM, as well as on OpenStack. If you need a different file format, you can use the hypervisor utility of your choice to convert the images. Red Hat
recommends running the image with at least 2 vCPUs and 2GB RAM.
Chapter 14. Customizing OpenShift Enterprise
14.1. Creating Custom Application Templates
Note
--from-code option when creating an application to specify a different application template.
Procedure 14.1. To Create an Application Template:
- Create an application using the desired cartridge, then change into the Git directory:
$
rhc app create App_Name Cart_Name$cd App_Name - Make any desired changes to the default cartridge template. Templates can include more than application content, such as application server configuration files.If you are creating an application template from a JBoss EAP or JBoss EWS cartridge, you may want to modify settings such as
groupIdandartifactIdin thepom.xmlfile, as these settings are equal to theApp_Namevalue used above. It is possible to use environment variables, such as${env.OPENSHIFT_APP_DNS}, however it is not recommended by Red Hat because Maven will issue warnings on each subsequent build, and the ability to use environment variables might be removed in future versions of Maven. - Commit the changes to the local Git repository:
$
You can now use this repository as an application template.git add .$git commit -am "Template Customization" - Place the template into a shared space that is readable by each node host. This could be on Github, an internal Git server, or a directory on each node host. Red Hat recommends creating a local directory named
templates, then cloning the template into the new directory:$
mkdir -p /etc/openshift/templates$git clone --bare App_Name /etc/openshift/templates/Cart_Name.git - Next, edit the
/etc/openshift/broker.conffile on the broker host, specifying the new template repository as the default location to pull from each time an application is created:DEFAULT_APP_TEMPLATES=Cart_Name|file:///etc/openshift/templates/Cart_Name.git
Note
The broker provides the same cartridge template location to all nodes, so the template location must be available on all node hosts or application creation will fail. - Restart the broker for the changes to take effect:
$
Any applications created using the specified cartridge will now draw from the customized template.service openshift-broker restart
14.2. Customizing the Management Console
/etc/openshift/console.conf file on the broker host. This allows you to add organizational branding to your deployment.
PRODUCT_LOGO parameter to the local or remote path of your choice.
Example 14.1. Default PRODUCT_LOGO Setting
PRODUCT_LOGO=logo-enterprise-horizontal.svg
PRODUCT_TITLE to a custom name.
Example 14.2. Default PRODUCT_TITLE Setting
PRODUCT_TITLE=OpenShift Enterprise
# service openshift-console restart14.3. Configuring the Logout Destination
LOGOUT_LINK parameter in the /etc/openshift/console.conf file on the broker host:
LOGOUT_LINK="LOGOUT_DESTINATION_URL"
# service openshift-console restartChapter 15. Asynchronous Errata Updates
When Red Hat releases asynchronous errata updates within a minor release, the errata can include upgrades to shipped cartridges. After installing the updated cartridge packages using the yum command, further steps are often necessary to upgrade cartridges on existing gears to the latest available version and to apply gear-level changes that affect cartridges. The OpenShift Enterprise runtime contains a system for accomplishing these tasks.
oo-admin-upgrade command provides the command line interface for the upgrade system and can upgrade all gears in an OpenShift Enterprise environment, all gears on a single node, or a single gear. This command queries the OpenShift Enterprise broker to determine the locations of the gears to migrate and uses MCollective calls to trigger the upgrade for a gear. While the ose-upgrade command, outlined in Chapter 4, Upgrading from Previous Versions, handles running the oo-admin-upgrade command during major platform upgrades, oo-admin-upgrade must be run by an administrator when applying asynchronous errata updates that require cartridge upgrades.
During a cartridge upgrade, the upgrade process can be classified as either compatible or incompatible. As mentioned in the OpenShift Enterprise Cartridge Specification Guide, to be compatible with a previous cartridge version, the code changes to be made during the cartridge upgrade must not require a restart of the cartridge or of an application using the cartridge. If the previous cartridge version is not in the Compatible-Versions list of the updated cartridge's manifest.yml file, the upgrade is handled as an incompatible upgrade.
oo-admin-upgrade Usage
Instructions for applying asynchronous errata updates are provided in Section 15.1, “Applying Asynchronous Errata Updates”; in the event that cartridge upgrades are required after installing the updated packages, the oo-admin-upgrade command syntax as provided in those instructions upgrades all gears on all nodes by default. Alternatively, to only upgrade a single node or gear, the following oo-admin-upgrade command examples are provided. Replace 2.y.z in any of the following examples with the target version.
Important
oo-admin-upgrade archive command.
#oo-admin-upgrade archive#oo-admin-upgrade upgrade-node --version=2.y.z
#oo-admin-upgrade archive#oo-admin-upgrade upgrade-node --upgrade-node=node1.example.com --version=2.y.z
#oo-admin-upgrade archive#oo-admin-upgrade upgrade-gear --app-name=testapp --login=demo --upgrade-gear=gear-UUID --version=2.y.z
15.1. Applying Asynchronous Errata Updates
Procedure 15.1. To Apply Asynchronous Errata Updates:
- On each host, run the following command to ensure that the
yumconfiguration is still appropriate for the type of host and its OpenShift Enterprise version:#
oo-admin-yum-validatorIf run without any options, this command attempts to determine the type of host and its version, and report any problems that are found. See Section 7.2, “Configuring Yum on Broker Hosts” or Section 9.2, “Configuring Yum on Node Hosts” for more information on how to use theoo-admin-yum-validatorcommand when required. - Ensure all previously released errata relevant to your systems have been fully applied, including errata from required Red Hat Enterprise Linux channels and, if applicable, JBoss channels.
- On each host, install the updated packages. Note that running the
yum updatecommand on a host installs packages for all pending updates at once:#
yum update - After the
yum updatecommand is completed, verify whether there are any additional update instructions that apply to the releases you have just installed. These instructions are provided in the "Asynchronous Errata Updates" chapter of the OpenShift Enterprise Release Notes at https://access.redhat.com/documentation relevant to your installed minor version.For example, if you have OpenShift Enterprise 2.1.3 installed and are updating to release 2.1.5, you must check for additional instructions for releases 2.1.4 and 2.1.5 in the OpenShift Enterprise 2.1 Release Notes at:Guidance on aggregating steps when applying multiple updates is provided as well. Additional steps can include restarting certain services, or using theoo-admin-upgradecommand to apply certain cartridge changes. The update is complete after you have performed any additional steps that are required as described in the relevant OpenShift Enterprise Release Notes.
Appendix A. Revision History
| Revision History | |||||||||||||||||||||
|---|---|---|---|---|---|---|---|---|---|---|---|---|---|---|---|---|---|---|---|---|---|
| Revision 2.2-11 | Wed Nov 23 2016 | ||||||||||||||||||||
| |||||||||||||||||||||
| Revision 2.2-10 | Thu Sep 08 2016 | ||||||||||||||||||||
| |||||||||||||||||||||
| Revision 2.2-8 | Thurs Aug 20 2015 | ||||||||||||||||||||
| |||||||||||||||||||||
| Revision 2.2-7 | Mon Jul 20 2015 | ||||||||||||||||||||
| |||||||||||||||||||||
| Revision 2.2-6 | Fri Apr 10 2015 | ||||||||||||||||||||
| |||||||||||||||||||||
| Revision 2.2-5 | Thu Feb 12 2015 | ||||||||||||||||||||
| |||||||||||||||||||||
| Revision 2.2-3 | Wed Dec 10 2014 | ||||||||||||||||||||
| Revision 2.2-2 | Thu Nov 6 2014 | ||||||||||||||||||||
| |||||||||||||||||||||
| Revision 2.2-1 | Tue Nov 4 2014 | ||||||||||||||||||||
| |||||||||||||||||||||
| Revision 2.2-0 | Tue Nov 4 2014 | ||||||||||||||||||||
| Revision 2.1-7 | Thu Oct 23 2014 | ||||||||||||||||||||
| |||||||||||||||||||||
| Revision 2.1-6 | Thu Sep 11 2014 | ||||||||||||||||||||
| |||||||||||||||||||||
| Revision 2.1-5 | Tue Aug 26 2014 | ||||||||||||||||||||
| |||||||||||||||||||||
| Revision 2.1-4 | Thu Aug 7 2014 | ||||||||||||||||||||
| |||||||||||||||||||||
| Revision 2.1-3 | Tue Jun 24 2014 | ||||||||||||||||||||
| |||||||||||||||||||||
| Revision 2.1-2 | Mon Jun 9 2014 | ||||||||||||||||||||
| |||||||||||||||||||||
| Revision 2.1-1 | Wed Jun 4 2014 | ||||||||||||||||||||
| |||||||||||||||||||||
| Revision 2.1-0 | Fri May 16 2014 | ||||||||||||||||||||
| Revision 2.0-4 | Fri Apr 11 2014 | ||||||||||||||||||||
| |||||||||||||||||||||
| Revision 2.0-3 | Mon Feb 10 2014 | ||||||||||||||||||||
| |||||||||||||||||||||
| Revision 2.0-2 | Tue Jan 28 2014 | ||||||||||||||||||||
| |||||||||||||||||||||
| Revision 2.0-1 | Tue Jan 14 2014 | ||||||||||||||||||||
| |||||||||||||||||||||
| Revision 2.0-0 | Tue Dec 10 2013 | ||||||||||||||||||||
| |||||||||||||||||||||