
Red Hat Ceph Storage 1.3 Storage Strategies
Creating storage strategies for Ceph clusters.
Legal Notice
Abstract
Preface
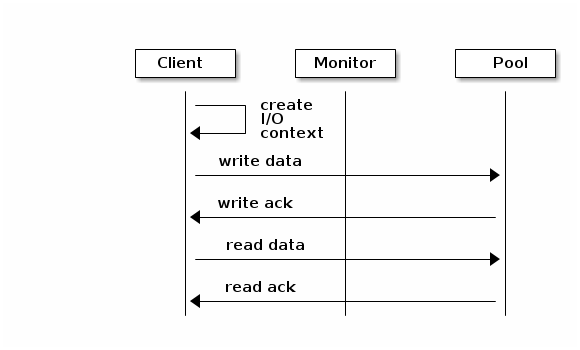
From the perspective of a Ceph client, interacting with the Ceph storage cluster is remarkably simple:
- Connect to the Cluster
- Create a Pool I/O Context
This remarkably simple interface is how a Ceph client selects one of the storage strategies you define. Storage strategies are invisible to the Ceph client in all but storage capacity and performance.
Chapter 1. What are Storage Strategies?
A storage strategy is a method of storing data that serves a particular use case. For example, if you need to store volumes and images for a cloud platform like OpenStack, you might choose to store data on reasonably performant SAS drives with SSD-based journals. By contrast, if you need to store object data for an S3- or Swift-compliant gateway, you might choose to use something more economical, like SATA drives. Ceph can accommodate both scenarios in the same Ceph cluster, but you need a means of providing the SAS/SSD storage strategy to the cloud platform (e.g., Glance and Cinder in OpenStack), and a means of providing SATA storage for your object store.
Storage strategies include the storage media (hard drives, SSDs, etc.), the CRUSH maps that set up performance and failure domains for the storage media, the number of placement groups, and the pool interface. Ceph supports multiple storage strategies. Use cases, cost/benefit performance tradeoffs and data durability are the primary considerations that drive storage strategies.
- Use Cases: Ceph provides massive storage capacity, and it supports numerous use cases. For example, the Ceph Block Device client is a leading storage backend for cloud platforms like OpenStack—providing limitless storage for volumes and images with high performance features like copy-on-write cloning. By contrast, the Ceph Object Gateway client is a leading storage backend for cloud platforms that provides RESTful S3-compliant and Swift-compliant object storage for objects like audio, bitmap, video and other data.
- Cost/Benefit of Performance: Faster is better. Bigger is better. High durability is better. However, there is a price for each superlative quality, and a corresponding cost/benefit trade off. Consider the following use cases from a performance perspective: SSDs can provide very fast storage for relatively small amounts of data, cache tiers, and journaling. Storing a database or object index may benefit from a pool of very fast SSDs, but prove too expensive for other data. SAS drives with SSD journaling provide fast performance at an economical price for volumes and images. SATA drives without SSD journaling provide cheap storage with lower overall performance. When you create a CRUSH hierarchy of OSDs, you need to consider the use case and an acceptable cost/performance trade off.
-
Durability: In large scale clusters, hardware failure is an expectation, not an exception. However, data loss and service interruption remain unacceptable. For this reason, data durability is very important. Ceph addresses data durability with multiple deep copies of an object or with erasure coding and multiple coding chunks. Multiple copies or multiple coding chunks present an additional cost/benefit tradeoff: it’s cheaper to store fewer copies or coding chunks, but it may lead to the inability to service write requests in a degraded state. Generally, one object with two additional copies (i.e.,
size = 3) or two coding chunks may allow a cluster to service writes in a degraded state while the cluster recovers. The CRUSH algorithm aids this process by ensuring that Ceph stores additional copies or coding chunks in different locations within the cluster. This ensures that the failure of a single storage device or node doesn’t lead to a loss of all of the copies or coding chunks necessary to preclude data loss.
You can capture use cases, cost/benefit performance tradeoffs and data durability in a storage strategy and present it to a Ceph client as a storage pool.
Ceph’s object copies or coding chunks make RAID obsolete. Do not use RAID, because Ceph already handles data durability, a degraded RAID has a negative impact on performance, and recovering data using RAID is substantially slower than using deep copies or erasure coding chunks.
Chapter 2. Configuring Storage Strategies
Configuring storage strategies is about assigning Ceph OSDs to a CRUSH hierarchy, defining the number of placement groups for a pool, and creating a pool. The general steps are:
- Define a Storage Strategy: Storage strategies require you to analyze your use case, cost/benefit performance tradeoffs and data durability. Then, you create OSDs suitable for that use case. For example, you can create SSD-backed OSDs for a high performance pool or cache tier; SAS drive/SSD journal-backed OSDs for high-performance block device volumes and images; or, SATA-backed OSDs for low cost storage. Ideally, each OSD for a use case should have the same hardware configuration so that you have a consistent performance profile.
-
Define a CRUSH Hierarchy: Ceph rules select a node (usually the
root) in a CRUSH hierarchy, and identify the appropriate OSDs for storing placement groups and the objects they contain. You must create a CRUSH hierarchy and a CRUSH rule for your storage strategy (cache tiers require one for the hot tier and one for the cold or backing tier). CRUSH hierarchies get assigned directly to a pool by the CRUSH ruleset setting; however, cache tiers are assigned to the backing tier, and the backing tier ruleset gets assigned to the pool. - Calculate Placement Groups: Ceph shards a pool into placement groups. You need to set an appropriate number of placement groups for your pool, and remain within a healthy maximum number of placement groups in the event that you assign multiple pools to the same CRUSH ruleset.
-
Create a Pool: Finally, you must create a pool and determine whether it uses replicated or erasure-coded storage and whether it supports a cache tier. You must set the number of placement groups for the pool, the ruleset for the pool and the durability (size or
K+Mcoding chunks).
Remember, the pool is the Ceph client’s interface to the storage cluster, but the storage strategy is completely transparent to the Ceph client (except for capacity and performance).
Part I. CRUSH Administration
The CRUSH (Controlled Replication Under Scalable Hashing) algorithm determines how to store and retrieve data by computing data storage locations.
Any sufficiently advanced technology is indistinguishable from magic. | ||
| -- Arthur C. Clarke | ||
Chapter 3. Introduction to CRUSH
The CRUSH map for your storage cluster describes your device locations within CRUSH hierarchies and a ruleset for each hierarchy that determines how Ceph will store data.
The CRUSH map contains at least one hierarchy of nodes and leaves. The nodes of a hierarchy—called "buckets" in Ceph—are any aggregation of storage locations (e.g., rows, racks, chassis, hosts, etc.) as defined by their type. Each leaf of the hierarchy consists essentially of one of the storage devices in the list of storage devices (note: storage devices or OSDs are added to the CRUSH map when you add an OSD to the cluster). A leaf is always contained in one node or "bucket." A CRUSH map also has a list of rules that tell CRUSH how it should store and retrieve data.
The CRUSH algorithm distributes data objects among storage devices according to a per-device weight value, approximating a uniform probability distribution. CRUSH distributes objects and their replicas (or coding chunks) according to the hierarchical cluster map you define. Your CRUSH map represents the available storage devices and the logical buckets that contain them for the ruleset, and by extension each pool that uses the ruleset.
To map placement groups to OSDs across failure domains or performance domains, a CRUSH map defines a hierarchical list of bucket types (i.e., under types in the generated CRUSH map). The purpose of creating a bucket hierarchy is to segregate the leaf nodes by their failure domains and/or performance domains. Failure domains include hosts, chassis, racks, power distribution units, pods, rows, rooms and data centers. Performance domains include failure domains and OSDs of a particular configuration (e.g., SSDs, SAS drives with SSD journals, SATA drives), etc.
With the exception of the leaf nodes representing OSDs, the rest of the hierarchy is arbitrary, and you may define it according to your own needs if the default types don’t suit your requirements. We recommend adapting your CRUSH map bucket types to your organization’s hardware naming conventions and using instance names that reflect the physical hardware names. Your naming practice can make it easier to administer the cluster and troubleshoot problems when an OSD and/or other hardware malfunctions and the administrator needs remote or physical access to the host or other hardware.
In the following example, the bucket hierarchy has four leaf buckets (osd 1-4), two node buckets (host 1-2) and one rack node (rack 1).
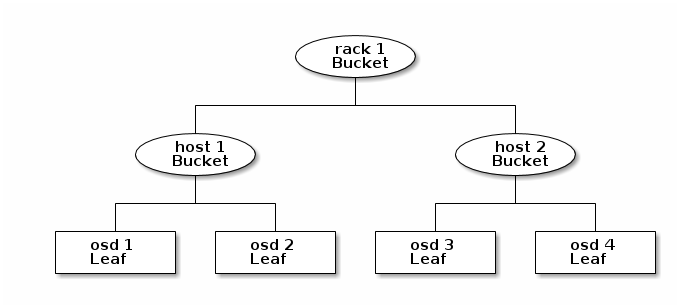
Since leaf nodes reflect storage devices declared under the devices list at the beginning of the CRUSH map, you do not need to declare them as bucket instances. The second lowest bucket type in your hierarchy usually aggregates the devices (i.e., it’s usually the computer containing the storage media, and uses whatever term you prefer to describe it, such as "node", "computer", "server," "host", "machine", etc.). In high density environments, it is increasingly common to see multiple hosts/nodes per card and per chassis. You should account for card and chassis failure too—e.g., the need to pull a card or chassis if a node fails may result in bringing down numerous hosts/nodes and their OSDs.
When declaring a bucket instance, you must specify its type, give it a unique name (string), assign it a unique ID expressed as a negative integer (optional), specify a weight relative to the total capacity/capability of its item(s), specify the bucket algorithm (usually straw), and the hash (usually 0, reflecting hash algorithm rjenkins1). A bucket may have one or more items. The items may consist of node buckets or leaves. Items may have a weight that reflects the relative weight of the item.
3.1. Dynamic Data Placement
Ceph Clients and Ceph OSDs both use the CRUSH map and the CRUSH algorithm.
- Ceph Clients: By distributing CRUSH maps to Ceph clients, CRUSH empowers Ceph clients to communicate with OSDs directly. This means that Ceph clients avoid a centralized object look-up table that could act as a single point of failure, a performance bottleneck, a connection limitation at a centralized look-up server and a physical limit to the storage cluster’s scalability.
- Ceph OSDs: By distributing CRUSH maps to Ceph OSDs, Ceph empowers OSDs to handle replication, backfilling and recovery. This means that the Ceph OSDs handle storage of object replicas (or coding chunks) on behalf of the Ceph client. It also means that Ceph OSDs know enough about the cluster to re-balance the cluster (backfilling) and recover from failures dynamically.
3.2. Failure Domains
Having multiple object replicas (or M coding chunks) may help prevent data loss, but it isn’t sufficient to address high availability. By reflecting the underlying physical organization of the Ceph Storage Cluster, CRUSH can model—and thereby address—potential sources of correlated device failures. By encoding the cluster’s topology into the cluster map, CRUSH placement policies can separate object replicas (or coding chunks) across different failure domains while still maintaining the desired pseudo-random distribution. For example, to address the possibility of concurrent failures, it may be desirable to ensure that data replicas (or coding chunks) are on devices using different shelves, racks, power supplies, controllers, and/or physical locations. This helps to prevent data loss and allows you to operate a cluster in a degraded state.
3.3. Performance Domains
Ceph can support multiple hierarchies to separate one type of hardware performance profile (e.g., SSDs) from another type of hardware performance profile (e.g., hard drives, hard drives with SSD journals, etc.). Performance domains—hierarchies that take the performance profile of the underlying hardware into consideration—are increasingly popular due to the need to support different performance characteristics. Operationally, these are just CRUSH maps with more than one root type bucket. Use case examples include:
- VMs: Ceph hosts that serve as a back end to cloud platforms like OpenStack, CloudStack, ProxMox or OpenNebula tend to use the most stable and performant filesystem (i.e., XFS) on SAS drives with a partitioned high performance SSD for journaling, because XFS doesn’t journal and write simultaneously. To maintain a consistent performance profile, such use cases should aggregate similar hardware in a CRUSH hierarchy.
- Object Storage: Ceph hosts that serve as an object storage back end for S3 and Swift interfaces may take advantage of less expensive storage media such as SATA drives that may not be suitable for VMs—reducing the cost per gigabyte for object storage, while separating more economical storage hosts from more performant ones intended for storing volumes and images on cloud platforms. HTTP tends to be the bottleneck in object storage systems.
- Cold Storage: Systems designed for cold storage (infrequently accessed data, or data retrieval with relaxed performance requirements) may take advantage of less expensive storage media and erasure coding. However, erasure coding may require a bit of additional RAM and CPU, and thus differ in RAM and CPU requirements from a host used for object storage or VMs.
-
SSD-backed Pools: SSDs are expensive, but they provide significant advantages over hard drives. SSDs have no seek time and they provide high total throughput. In addition to using SSDs for journaling, you can create SSD-backed pools in Ceph. Common use cases include cache-tiering or high performance SSD pools (e.g., mapping the
.rgw.buckets.indexpool for the Ceph Object Gateway to SSDs instead of SATA drives). Even in cache tiering scenarios, you can take advantage of less expensive SSDs that have relatively poor write performance if your intended use is for read-only cache tiers, whereas such hardware might prove unsuitable for writeback cache tiers that require fast sequential writes.
Chapter 4. CRUSH Hierarchies
The CRUSH map is a directed acyclic graph, so it may accommodate multiple hierarchies (e.g., performance domains). The easiest way to create and modify a CRUSH hierarchy is with the Ceph CLI; however, you can also decompile a CRUSH map, edit it, recompile it, and activate it.
When declaring a bucket instance with the Ceph CLI, you must specify its type and give it a unique name (string). Ceph will automatically assign a bucket ID, set the algorithm to straw, set the hash to 0 reflecting rjenkins1 and set a weight. When modifying a decompiled CRUSH map, assign the bucket a unique ID expressed as a negative integer (optional), specify a weight relative to the total capacity/capability of its item(s), specify the bucket algorithm (usually straw), and the hash (usually 0, reflecting hash algorithm rjenkins1).
A bucket may have one or more items. The items may consist of node buckets (e.g., racks, rows, hosts) or leaves (e.g., an OSD disk). Items may have a weight that reflects the relative weight of the item.
When modifying a decompiled CRUSH map, you may declare a node bucket with the following syntax:
[bucket-type] [bucket-name] {
    id [a unique negative numeric ID]
    weight [the relative capacity/capability of the item(s)]
    alg [the bucket type: uniform | list | tree | straw ]
    hash [the hash type: 0 by default]
    item [item-name] weight [weight]
}
For example, using the diagram above, we would define two host buckets and one rack bucket. The OSDs are declared as items within the host buckets:
host node1 {
    id -1
    alg straw
    hash 0
    item osd.0 weight 1.00
    item osd.1 weight 1.00
}

host node2 {
    id -2
    alg straw
    hash 0
    item osd.2 weight 1.00
    item osd.3 weight 1.00
}

rack rack1 {
    id -3
    alg straw
    hash 0
    item node1 weight 2.00
    item node2 weight 2.00
}In the foregoing example, note that the rack bucket does not contain any OSDs. Rather it contains lower level host buckets, and includes the sum total of their weight in the item entry.
4.1. CRUSH Location
A CRUSH location is the position of an OSD in terms of the CRUSH map’s hierarchy. When you express a CRUSH location on the command line interface, a CRUSH location specifier takes the form of a list of name/value pairs describing the OSD’s position. For example, if an OSD is in a particular row, rack, chassis and host, and is part of the default CRUSH tree, its crush location could be described as:
root=default row=a rack=a2 chassis=a2a host=a2a1
Note:
- The order of the keys does not matter.
-
The key name (left of
=) must be a valid CRUSHtype. By default these includeroot,datacenter,room,row,pod,pdu,rack,chassisandhost. You may edit the CRUSH map to change the types to suit your needs. -
You do not need to specify all the buckets/keys. For example, by default, Ceph automatically sets a
ceph-osddaemon’s location to beroot=default host={HOSTNAME}(based on the output fromhostname -s).
4.1.1. ceph-crush-location hook
Upon startup, Ceph will get the CRUSH location of each daemon using the ceph-crush-location tool by default. The ceph-crush-location utility returns the CRUSH location of a given daemon. Its CLI usage consists of:
ceph-crush-location --cluster {cluster-name} --id {ID} --type {daemon-type}
For example, the following will return the location of OSD.0:
ceph-crush-location --cluster ceph --id 0 --type osd
By default, the ceph-crush-location utility will return a CRUSH location string for a given daemon. The location returned in order of precedence is based on:
-
A
{TYPE}_crush_locationoption in the Ceph configuration file. For example, for OSD daemons,{TYPE}would beosdand the setting would look likeosd_crush_location. -
A
crush_locationoption for a particular daemon in the Ceph configuration file. -
A default of
root=default host=HOSTNAMEwhere the hostname is returned by thehostname -scommand.
In a typical deployment scenario, provisioning software (or the system administrator) can simply set the crush_location field in a host’s Ceph configuration file to describe that machine’s location within the datacenter or cluster. This provides location awareness to Ceph daemons and clients alike.
It is possible to manage the CRUSH location using the CRUSH map exclusively, which means that Ceph will get the CRUSH location from the CRUSH map rather than using ceph-crush-location to update it from the Ceph configuration (or the default) on start-up. To use CRUSH map’s hierarchy, set osd_crush_update_on_start to false in the Ceph configuration file. For example:
osd_crush_update_on_start = false
Ensure that you push the updated Ceph configuration file to your Ceph nodes.
ceph-deploy --overwrite-conf config push {node-name} [{node-name}...{node-name}]4.1.2. Custom location hooks
A custom location hook can be used in place of the generic hook for OSD daemon placement in the hierarchy. (On startup, each OSD ensures its position is correct.):
osd_crush_location_hook = /path/to/script
This hook is passed several arguments (below) and should output a single line to stdout with the CRUSH location description.:
ceph-crush-location --cluster {cluster-name} --id {ID} --type {daemon-type}
where the --cluster name is typically ceph, the --id is the daemon identifier (the OSD number), and the daemon --type is typically osd.
4.2. Add a Bucket
To add a bucket instance to your CRUSH hierarchy, specify the bucket name and its type. Bucket names must be unique in the CRUSH map.
ceph osd crush add-bucket {name} {type}
If you plan to use multiple hierarchies (e.g., for different hardware performance profiles), we recommend a colon-delimited naming convention of {type}:{name}. where {type} is the type of hardware or use case and {name} is the bucket name.
For example, you could create a hierarchy for solid state drives (ssd), a hierarchy for SAS disks with SSD journals (hdd-journal), and another hierarchy for SATA drives (hdd):
ceph osd crush add-bucket ssd:root root
ceph osd crush add-bucket hdd-journal:root root
ceph osd crush add-bucket hdd:root root
The Ceph CLI will echo back:
added bucket ssd:root type root to crush map
added bucket hdd-journal:root type root to crush map
added bucket hdd:root type root to crush map
Add an instance of each bucket type you need for your hierarchy. In the following example, we will demonstrate adding buckets for a row with a rack of SSD hosts and a rack of hosts for object storage.
ceph osd crush add-bucket ssd:row1 row
ceph osd crush add-bucket ssd:row1-rack1 rack
ceph osd crush add-bucket ssd:row1-rack1-host1 host
ceph osd crush add-bucket ssd:row1-rack1-host2 host
ceph osd crush add-bucket hdd:row1 row
ceph osd crush add-bucket hdd:row1-rack2 rack
ceph osd crush add-bucket hdd:row1-rack1-host1 host
ceph osd crush add-bucket hdd:row1-rack1-host2 host
ceph osd crush add-bucket hdd:row1-rack1-host3 host
ceph osd crush add-bucket hdd:row1-rack1-host4 host
If you have already used ceph-deploy or another tool to add OSDs to your cluster, your host nodes may already be in your CRUSH map.
Once you have completed these steps, you can view your tree.
ceph osd tree
Notice that the hierarchy remains flat. You must move your buckets into hierarchical position after you add them to the CRUSH map.
4.3. Move a Bucket
When you create your initial cluster, Ceph will have a default CRUSH map with a root bucket named default and your initial OSD hosts will appear under the default bucket. When you add a bucket instance to your CRUSH map, it appears in the CRUSH hierarchy, but it doesn’t necessarily appear under a particular bucket.
To move a bucket instance to a particular location in your CRUSH hierarchy, specify the bucket name and its type. For example:
ceph osd crush move ssd:row1 root=ssd:root
ceph osd crush move ssd:row1-rack1 row=ssd:row1
ceph osd crush move ssd:row1-rack1-host1 rack=ssd:row1-rack1
ceph osd crush move ssd:row1-rack1-host2 rack=ssd:row1-rack1
Once you have completed these steps, you can view your tree.
ceph osd tree
You can also use ceph osd crush create-or-move to create a location while moving an OSD.
4.4. Remove a Bucket
To remove a bucket instance from your CRUSH hierarchy, specify the bucket name. For example:
ceph osd crush remove {bucket-name}Or:
ceph osd crush rm {bucket-name}The bucket must be empty in order to remove it.
If you are removing higher level buckets (e.g., a root like default), check to see if a pool uses a CRUSH rule that selects that bucket. If so, you will need to modify your CRUSH rules; otherwise, peering will fail.
4.5. Bucket Algorithms (Advanced)
When you create buckets using the Ceph CLI, Ceph sets the algorithm to straw by default. Ceph supports four bucket algorithms, each representing a tradeoff between performance and reorganization efficiency. If you are unsure of which bucket type to use, we recommend using a straw bucket. The bucket algorithms are:
-
Uniform: Uniform buckets aggregate devices with exactly the same weight. For example, when firms commission or decommission hardware, they typically do so with many machines that have exactly the same physical configuration (e.g., bulk purchases). When storage devices have exactly the same weight, you may use the
uniformbucket type, which allows CRUSH to map replicas into uniform buckets in constant time. With non-uniform weights, you should use another bucket algorithm. - List: List buckets aggregate their content as linked lists. Based on the RUSH (Replication Under Scalable Hashing) P algorithm, a list is a natural and intuitive choice for an expanding cluster: either an object is relocated to the newest device with some appropriate probability, or it remains on the older devices as before. The result is optimal data migration when items are added to the bucket. Items removed from the middle or tail of the list, however, can result in a significant amount of unnecessary movement, making list buckets most suitable for circumstances in which they never (or very rarely) shrink.
- Tree: Tree buckets use a binary search tree. They are more efficient than list buckets when a bucket contains a larger set of items. Based on the RUSH (Replication Under Scalable Hashing) R algorithm, tree buckets reduce the placement time to O(log n), making them suitable for managing much larger sets of devices or nested buckets.
- Straw (default): List and Tree buckets use a divide and conquer strategy in a way that either gives certain items precedence (e.g., those at the beginning of a list) or obviates the need to consider entire subtrees of items at all. That improves the performance of the replica placement process, but can also introduce suboptimal reorganization behavior when the contents of a bucket change due an addition, removal, or re-weighting of an item. The straw bucket type allows all items to fairly “compete” against each other for replica placement through a process analogous to a draw of straws.
Chapter 5. Ceph OSDs in CRUSH
Once you have a CRUSH hierarchy for your OSDs, you can add OSDs to the CRUSH hierarchy. You can also move or remove OSDs from an existing hierarchy. The Ceph CLI usage has the following values:
id
- Description
- The numeric ID of the OSD.
- Type
- Integer
- Required
- Yes
- Example
-
0
name
- Description
- The full name of the OSD.
- Type
- String
- Required
- Yes
- Example
-
osd.0
weight
- Description
- The CRUSH weight for the OSD.
- Type
- Double
- Required
- Yes
- Example
-
2.0
root
- Description
- The name of the root bucket of the hierarchy/tree in which the OSD resides.
- Type
- Key/value pair.
- Required
- Yes
- Example
-
root=default,root=replicated_ruleset, etc.
bucket-type
- Description
- One or more name/value pairs, where the name is the bucket type and the value is the bucket’s name. You may specify the a CRUSH location for an OSD in the CRUSH hierarchy.
- Type
- Key/value pairs.
- Required
- No
- Example
-
datacenter=dc1 room=room1 row=foo rack=bar host=foo-bar-1
5.1. Adding an OSD to CRUSH
Adding an OSD to a CRUSH hierarchy is the final step before you start an OSD (rendering it up and in) and Ceph assigns placement groups to the OSD. You must prepare an OSD before you add it to the CRUSH hierarchy. Deployment tools such as ceph-deploy may perform this step for you. Refer to Adding/Removing OSDs for additional details.
The CRUSH hierarchy is notional, so the ceph osd crush add command allows you to add OSDs to the CRUSH hierarchy wherever you wish. The location you specify should reflect its actual location. If you specify at least one bucket, the command will place the OSD into the most specific bucket you specify, and it will move that bucket underneath any other buckets you specify.
To add an OSD to a CRUSH hierarchy, execute the following:
ceph osd crush add {id-or-name} {weight} [{bucket-type}={bucket-name} ...]If you specify only the root bucket, the command will attach the OSD directly to the root, but CRUSH rules expect OSDs to be inside of hosts or chassis, and hosts/chassis should be inside of other buckets reflecting your cluster topology.
The following example adds osd.0 to the hierarchy:
ceph osd crush add osd.0 1.0 root=default datacenter=dc1 room=room1 row=foo rack=bar host=foo-bar-1
You may also use ceph osd crush set or ceph osd crush create-or-move to add an OSD to the CRUSH hierarchy.
5.2. Moving an OSD within a CRUSH Hierarchy
If your deployment tool (e.g., ceph-deploy) added your OSD to the CRUSH map at a sub-optimal CRUSH location, or if your cluster topology changes, you may move an OSD in the CRUSH hierarchy to reflect its actual location.
Moving an OSD in the CRUSH hierarchy means that Ceph will recompute which placement groups get assigned to the OSD, potentially resulting in significant redistribution of data.
To move an OSD within the CRUSH hierarchy, execute the following:
ceph osd crush set {id-or-name} {weight} root={pool-name} [{bucket-type}={bucket-name} ...]
You may also use ceph osd crush create-or-move to move an OSD within the CRUSH hierarchy.
5.3. Remove an OSD from a CRUSH Hierarchy
Removing an OSD from a CRUSH hierarchy is the first step when you want to remove an OSD from your cluster. When you remove the OSD from the CRUSH map, CRUSH will recompute which OSDs will get the placement groups and data will rebalance accordingly. Refer to Adding/Removing OSDs for additional details.
To remove an OSD from the CRUSH map of a running cluster, execute the following:
ceph osd crush remove {name}Chapter 6. CRUSH Weights
The CRUSH algorithm assigns a weight value per device with the objective of approximating a uniform probability distribution for I/O requests. As a best practice, we recommend creating pools with devices of the same type and size, and assigning the same relative weight. Since this is not always practical, you may incorporate devices of different size and use a relative weight so that Ceph will distribute more data to larger drives and less data to smaller drives.
To adjust an OSD’s crush weight in the CRUSH map of a running cluster, execute the following:
ceph osd crush reweight {name} {weight}Where:
name
- Description
- The full name of the OSD.
- Type
- String
- Required
- Yes
- Example
-
osd.0
weight
- Description
- The CRUSH weight for the OSD.
- Type
- Double
- Required
- Yes
- Example
-
2.0
You can also set weights on osd crush add or osd crush set (move).
CRUSH buckets reflect the sum of the weights of the buckets or the devices they contain. For example, a rack containing a two hosts with two OSDs each, might have a weight of 4.0 and each host a weight of 2.0--the sum for each OSD, where the weight per OSD is 1.00. Generally, we recommend using 1.0 as the measure of 1TB of data.
Introducing devices of different size and performance characteristics in the same pool can lead to variance in data distribution and performance.
CRUSH weight is a persistent setting, and it affects how CRUSH assigns data to OSDs. Ceph also has temporary reweight settings if the cluster gets out of balance. For example, whereas a Ceph Block Device will shard a block device image into a series of smaller objects and stripe them across the cluster, using librados to store data without normalizing the size of objects can lead to imbalanced clusters (e.g., storing 100 1MB objects and 10 4MB objects will make a few OSDs have more data than the others).
You can temporarily increase or decrease the weight of particular OSDs by executing:
ceph osd reweight {id} {weight}Where:
-
idis the OSD number. -
weightis a range from 0.0-1.0.
You can also temporarily reweight OSDs by utilization.
ceph osd reweight-by-utilization {threshold}Where:
-
thresholdis a percentage of utilization where OSDs facing higher loads will receive a lower weight. The default value is 120, reflecting 120%. Any value from 100+ is a valid threshold.
Restarting the cluster will wipe out osd reweight and osd reweight-by-utilization, but osd crush reweight settings are persistent.
Chapter 7. Primary Affinity
When a Ceph Client reads or writes data, it always contacts the primary OSD in the acting set. For set [2, 3, 4], osd.2 is the primary. Sometimes an OSD isn’t well suited to act as a primary compared to other OSDs (e.g., it has a slow disk or a slow controller). To prevent performance bottlenecks (especially on read operations) while maximizing utilization of your hardware, you can set a Ceph OSD’s primary affinity so that CRUSH is less likely to use the OSD as a primary in an acting set. :
ceph osd primary-affinity <osd-id> <weight>
Primary affinity is 1 by default (i.e., an OSD may act as a primary). You may set the OSD primary range from 0-1, where 0 means that the OSD may NOT be used as a primary and 1 means that an OSD may be used as a primary. When the weight is < 1, it is less likely that CRUSH will select the Ceph OSD Daemon to act as a primary.
Chapter 8. CRUSH Rules
CRUSH rules define how a Ceph client selects buckets and the primary OSD within them to store object, and how the primary OSD selects buckets and the secondary OSDs to store replicas (or coding chunks). For example, you might create a rule that selects a pair of target OSDs backed by SSDs for 2 object replicas, and another rule that select 3 target OSDs backed by SAS drives in different data centers for 3 replicas.
A rule takes the following form:
rule <rulename> {

    ruleset <ruleset>
    type [ replicated | raid4 ]
    min_size <min-size>
    max_size <max-size>
    step take <bucket-type>
    step [choose|chooseleaf] [firstn|indep] <N> <bucket-type>
    step emit
}
ruleset
- Description
- A means of classifying a rule as belonging to a set of rules. Activated by setting the ruleset in a pool.
- Purpose
- A component of the rule mask.
- Type
- Integer
- Required
- Yes
- Default
- 0
type
- Description
- Describes a rule for either a storage drive (replicated) or a RAID.
- Purpose
- A component of the rule mask.
- Type
- String
- Required
- Yes
- Default
-
replicated - Valid Values
-
Currently only
replicated
min_size
- Description
- If a pool makes fewer replicas than this number, CRUSH will NOT select this rule.
- Type
- Integer
- Purpose
- A component of the rule mask.
- Required
- Yes
- Default
-
1
max_size
- Description
- If a pool makes more replicas than this number, CRUSH will NOT select this rule.
- Type
- Integer
- Purpose
- A component of the rule mask.
- Required
- Yes
- Default
- 10
step take <bucket-name>
- Description
- Takes a bucket name, and begins iterating down the tree.
- Purpose
- A component of the rule.
- Required
- Yes
- Example
-
step take data
step choose firstn <num> type <bucket-type>
- Description
Selects the number of buckets of the given type. The number is usually the number of replicas in the pool (i.e., pool size). +
-
If
<num> == 0, choosepool-num-replicasbuckets (all available). -
If
<num> > 0 && < pool-num-replicas, choose that many buckets. -
If
<num> < 0, it meanspool-num-replicas - {num}.
-
If
- Purpose
- A component of the rule.
- Prerequisite
-
Follows
step takeorstep choose. - Example
-
step choose firstn 1 type row
step chooseleaf firstn <num> type <bucket-type>
- Description
Selects a set of buckets of
{bucket-type}and chooses a leaf node from the subtree of each bucket in the set of buckets. The number of buckets in the set is usually the number of replicas in the pool (i.e., pool size). +-
If
<num> == 0, choosepool-num-replicasbuckets (all available). -
If
<num> > 0 && < pool-num-replicas, choose that many buckets. -
If
<num> < 0, it meanspool-num-replicas - <num>.
-
If
- Purpose
- A component of the rule. Usage removes the need to select a device using two steps.
- Prerequisite
-
Follows
step takeorstep choose. - Example
-
step chooseleaf firstn 0 type row
step emit
- Description
- Outputs the current value and empties the stack. Typically used at the end of a rule, but may also be used to pick from different trees in the same rule.
- Purpose
- A component of the rule.
- Prerequisite
-
Follows
step choose. - Example
-
step emit
To activate one or more rules with a common ruleset number to a pool, set the ruleset number of the pool.
8.1. List Rules
To list CRUSH rules from the command line, execute the following:
ceph osd crush rule list
ceph osd crush rule ls
8.2. Dump a Rule
To dump the contents of a specific CRUSH rule, execute the following:
ceph osd crush rule dump {name}8.3. Add a Simple Rule
To add a CRUSH rule, you must specify a rule name, the root node of the hierarchy you wish to use, the type of bucket you want to replicate across (e.g., rack, row, etc) and the mode for choosing the bucket.
ceph osd crush rule create-simple {rulename} {root} {bucket-type} {first|indep}
Ceph will create a rule with chooseleaf and 1 bucket of the type you specify.
For example:
ceph osd crush rule create-simple deleteme default host firstn
Create the following rule:
{ "rule_id": 1,
  "rule_name": "deleteme",
  "ruleset": 1,
  "type": 1,
  "min_size": 1,
  "max_size": 10,
  "steps": [
        { "op": "take",
          "item": -1,
          "item_name": "default"},
        { "op": "chooseleaf_firstn",
          "num": 0,
          "type": "host"},
        { "op": "emit"}]}
8.4. Add an Erasure Code Rule
To add a CRUSH rule for use with an erasure coded pool, you may specify a rule name and an erasure code profile.
ceph osd crush rule create-erasure {rulename} {profilename}8.5. Remove a Rule
To remove a rule, execute the following and specify the CRUSH rule name:
ceph osd crush rule rm {name}Chapter 9. CRUSH Tunables
The Ceph project has grown exponentially with many changes and many new features. Beginning with the first commercially supported major release of Ceph, v0.48 (Argonaut), Ceph provides the ability to adjust certain parameters of the CRUSH algorithm (i.e., the settings aren’t frozen into the source code).
A few important points to consider:
- Adjusting CRUSH values may result in the shift of some PGs between storage nodes. If the Ceph cluster is already storing a lot of data, be prepared for some fraction of the data to move.
-
The
ceph-osdandceph-mondaemons will start requiring the feature bits of new connections as soon as they receive an updated map. However, already-connected clients are effectively grandfathered in, and will misbehave if they do not support the new feature. Make sure when you upgrade your Ceph Storage Cluster daemons that you also update your Ceph clients. -
If the CRUSH tunables are set to non-legacy values and then later changed back to the legacy values,
ceph-osddaemons will not be required to support the feature. However, the OSD peering process requires examining and understanding old maps. Therefore, you should not run old versions of theceph-osddaemon if the cluster has previously used non-legacy CRUSH values, even if the latest version of the map has been switched back to using the legacy defaults.
9.1. The Evolution of CRUSH Tunables
Ceph clients and daemons prior to v0.48 do not detect for tunables and are not compatible with v0.48 and beyond (you must upgrade). The ability to adjust tunable CRUSH values has also evolved with major Ceph releases.
- In Hierarchies with a small number of devices in the leaf buckets, some PGs map to fewer than the desired number of replicas. This commonly happens for hierarchies with "host" nodes with a small number (1-3) of OSDs nested beneath each one.
- For large clusters, some small percentages of PGs map to less than the desired number of OSDs. This is more prevalent when there are several layers of the hierarchy (e.g., row, rack, host, osd).
- When some OSDs are marked out, the data tends to get redistributed to nearby OSDs instead of across the entire hierarchy.
We strongly encourage upgrading both Ceph clients and Ceph daemons to major supported releases to take advantage of CRUSH tunables. We recommend that all cluster daemons and clients use the same release version.
-
choose_local_tries: Number of local retries. Legacy value is 2, optimal value is 0. -
choose_local_fallback_tries: Legacy value is 5, optimal value is 0. -
choose_total_tries: Total number of attempts to choose an item. Legacy value was 19, subsequent testing indicates that a value of 50 is more appropriate for typical clusters. For extremely large clusters, a larger value might be necessary.
CRUSH_TUNABLES and the following setting for CRUSH_TUNABLES2:
-
chooseleaf_descend_once: Whether a recursive chooseleaf attempt will retry, or only try once and allow the original placement to retry. Legacy default is 0, optimal value is 1.
CRUSH_TUNABLES, CRUSH_TUNABLES2 and the following setting for CRUSH_TUNABLES3:
-
chooseleaf_vary_r: Whether a recursive chooseleaf attempt will start with a non-zero value of r, based on how many attempts the parent has already made. Legacy default is 0, but with this value CRUSH is sometimes unable to find a mapping. The optimal value (in terms of computational cost and correctness) is 1. However, for legacy clusters that have lots of existing data, changing from 0 to 1 will cause a lot of data to move; a value of 4 or 5 will allow CRUSH to find a valid mapping but will make less data move.
9.2. Tuning CRUSH
Before you tune CRUSH, you should ensure that all Ceph clients and all Ceph daemons use the same version. If you have recently upgraded, ensure that you have restarted daemons and reconnected clients.
The simplest way to adjust the CRUSH tunables is by changing to a known profile. Those are:
-
legacy: the legacy behavior from v0.47 (pre-Argonaut) and earlier. -
argonaut: the legacy values supported by v0.48 (Argonaut) release. -
bobtail: the values supported by the v0.56 (Bobtail) release. -
firefly: the values supported by the v0.80 (Firefly) release. -
optimal: the current best values. -
default: the current default values for a new cluster.
You can select a profile on a running cluster with the command:
ceph osd crush tunables {PROFILE}This may result in some data movement.
Generally, you should set the CRUSH tunables after you upgrade, or if you receive a warning. Starting with version v0.74, Ceph will issue a health warning if the CRUSH tunables are not set to their optimal values (the optimal values are the default as of v0.73). To make this warning go away, you have two options:
Adjust the tunables on the existing cluster. Note that this will result in some data movement (possibly as much as 10%). This is the preferred route, but should be taken with care on a production cluster where the data movement may affect performance. You can enable optimal tunables with:
ceph osd crush tunables optimal
If things go poorly (e.g., too much load) and not very much progress has been made, or there is a client compatibility problem (old kernel cephfs or rbd clients, or pre-bobtail librados clients), you can switch back to an earlier profile:
ceph osd crush tunables {profile}For example, to restore the pre-v0.48 (Argonaut) values, execute:
ceph osd crush tunables legacy
You can make the warning go away without making any changes to CRUSH by adding the following option to the
[mon]section of yourceph.conffile:mon warn on legacy crush tunables = false
For the change to take effect, you will need to restart the monitors, or apply the option to running monitors with:
ceph tell mon.\* injectargs --no-mon-warn-on-legacy-crush-tunables
9.3. Tuning CRUSH, the hard way
If you can ensure that all clients are running recent code, you can adjust the tunables by extracting the CRUSH map, modifying the values, and reinjecting it into the cluster.
Extract the latest CRUSH map:
ceph osd getcrushmap -o /tmp/crush
Adjust tunables. These values appear to offer the best behavior for both large and small clusters we tested with. You will need to additionally specify the
--enable-unsafe-tunablesargument tocrushtoolfor this to work. Please use this option with extreme care.:crushtool -i /tmp/crush --set-choose-local-tries 0 --set-choose-local-fallback-tries 0 --set-choose-total-tries 50 -o /tmp/crush.new
Reinject modified map:
ceph osd setcrushmap -i /tmp/crush.new
9.4. Legacy values
For reference, the legacy values for the CRUSH tunables can be set with:
crushtool -i /tmp/crush --set-choose-local-tries 2 --set-choose-local-fallback-tries 5 --set-choose-total-tries 19 --set-chooseleaf-descend-once 0 --set-chooseleaf-vary-r 0 -o /tmp/crush.legacy
Again, the special --enable-unsafe-tunables option is required. Further, as noted above, be careful running old versions of the ceph-osd daemon after reverting to legacy values as the feature bit is not perfectly enforced.
Chapter 10. Editing a CRUSH Map
Generally, modifying your CRUSH map at runtime with the Ceph CLI is more convenient than editing the CRUSH map manually. However, there are times when you may choose to edit it, such as changing the default bucket types, or using a bucket algorithm other than straw.
To edit an existing CRUSH map:
- Get the CRUSH map.
- Decompile the CRUSH map.
- Edit at least one of devices, and Buckets and rules.
- Recompile the CRUSH map.
- Set the CRUSH map.
To activate CRUSH Map rules for a specific pool, identify the common ruleset number for those rules and specify that ruleset number for the pool. See Set Pool Values for details.
10.1. Get a CRUSH Map
To get the CRUSH map for your cluster, execute the following:
ceph osd getcrushmap -o {compiled-crushmap-filename}Ceph will output (-o) a compiled CRUSH map to the filename you specified. Since the CRUSH map is in a compiled form, you must decompile it first before you can edit it.
10.2. Decompile a CRUSH Map
To decompile a CRUSH map, execute the following:
crushtool -d {compiled-crushmap-filename} -o {decompiled-crushmap-filename}Ceph will decompile (-d) the compiled CRUSH map and output (-o) it to the filename you specified.
10.3. Compile a CRUSH Map
To compile a CRUSH map, execute the following:
crushtool -c {decompiled-crush-map-filename} -o {compiled-crush-map-filename}Ceph will store a compiled CRUSH map to the filename you specified.
10.4. Set a CRUSH Map
To set the CRUSH map for your cluster, execute the following:
ceph osd setcrushmap -i {compiled-crushmap-filename}Ceph will input the compiled CRUSH map of the filename you specified as the CRUSH map for the cluster.
Chapter 11. CRUSH Storage Strategy Examples
Suppose you want to have most pools default to OSDs backed by large hard drives, but have some pools mapped to OSDs backed by fast solid-state drives (SSDs). It’s possible to have multiple independent CRUSH hierarchies within the same CRUSH map to reflect different performance domains. Cache-tiering is an example. Define two hierarchies with two different root nodes—one for hard disks (e.g., "root platter") and one for SSDs (e.g., "root ssd") as shown below:
device 0 osd.0
device 1 osd.1
device 2 osd.2
device 3 osd.3
device 4 osd.4
device 5 osd.5
device 6 osd.6
device 7 osd.7

  host ceph-osd-ssd-server-1 {
      id -1
      alg straw
      hash 0
      item osd.0 weight 1.00
      item osd.1 weight 1.00
  }

  host ceph-osd-ssd-server-2 {
      id -2
      alg straw
      hash 0
      item osd.2 weight 1.00
      item osd.3 weight 1.00
  }

  host ceph-osd-platter-server-1 {
      id -3
      alg straw
      hash 0
      item osd.4 weight 1.00
      item osd.5 weight 1.00
  }

  host ceph-osd-platter-server-2 {
      id -4
      alg straw
      hash 0
      item osd.6 weight 1.00
      item osd.7 weight 1.00
  }

  root platter {
      id -5
      alg straw
      hash 0
      item ceph-osd-platter-server-1 weight 2.00
      item ceph-osd-platter-server-2 weight 2.00
  }

  root ssd {
      id -6
      alg straw
      hash 0
      item ceph-osd-ssd-server-1 weight 2.00
      item ceph-osd-ssd-server-2 weight 2.00
  }

  rule data {
      ruleset 0
      type replicated
      min_size 2
      max_size 2
      step take platter
      step chooseleaf firstn 0 type host
      step emit
  }

  rule metadata {
      ruleset 1
      type replicated
      min_size 0
      max_size 10
      step take platter
      step chooseleaf firstn 0 type host
      step emit
  }

  rule rbd {
      ruleset 2
      type replicated
      min_size 0
      max_size 10
      step take platter
      step chooseleaf firstn 0 type host
      step emit
  }

  rule platter {
      ruleset 3
      type replicated
      min_size 0
      max_size 10
      step take platter
      step chooseleaf firstn 0 type host
      step emit
  }

  rule ssd {
      ruleset 4
      type replicated
      min_size 0
      max_size 4
      step take ssd
      step chooseleaf firstn 0 type host
      step emit
  }

  rule ssd-primary {
      ruleset 5
      type replicated
      min_size 5
      max_size 10
      step take ssd
      step chooseleaf firstn 1 type host
      step emit
      step take platter
      step chooseleaf firstn -1 type host
      step emit
  }
You can then set a pool to use the SSD rule by executing:
ceph osd pool set <poolname> crush_ruleset 4
Your SSD pool can serve as the hot storage tier for cache tiering. Similarly, you could use the ssd-primary rule to cause each placement group in the pool to be placed with an SSD as the primary and platters as the replicas.
Part II. Placement Groups (PGs)
Placement Groups (PGs) are invisible to Ceph clients, but they play an important role in Ceph Storage Clusters.
A Ceph Storage Cluster may require many thousands of OSDs to reach an exabyte level of storage capacity. Ceph clients store objects in pools, which are a logical subset of the overall cluster. The number of objects stored in a pool may easily run into the millions and beyond. A system with millions of objects or more cannot realistically track placement on a per-object basis and still perform well. Ceph assigns objects to placement groups, and placement groups to OSDs to make re-balancing dynamic and efficient.
All problems in computer science can be solved by another level of indirection, except of course for the problem of too many indirections. | ||
| -- David Wheeler | ||
Chapter 12. About Placement Groups
Tracking object placement on a per-object basis within a pool is computationally expensive at scale. To facilitate high performance at scale, Ceph subdivides a pool into placement groups, assigns each individual object to a placement group, and assigns the placement group to a primary OSD. If an OSD fails or the cluster re-balances, Ceph can move or replicate an entire placement group—i.e., all of the objects in the placement groups—without having to address each object individually. This allows a Ceph cluster to re-balance or recover efficiently.
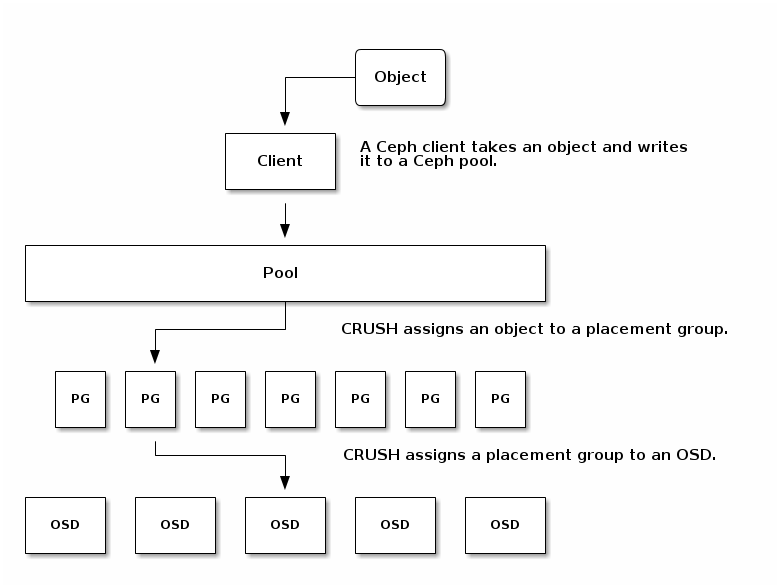
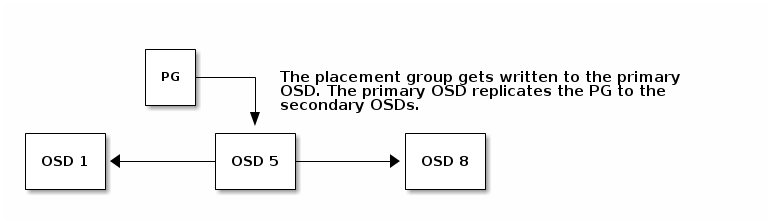
When CRUSH assigns a placement group to an OSD, it calculates a series of OSDs—the first being the primary. The osd_pool_default_size setting minus 1 for replicated pools, and the number of coding chunks M for erasure-coded pools determine the number of OSDs storing a placement group that can fail without losing data permanently. Primary OSDs use CRUSH to identify the secondary OSDs and copy the placement group’s contents to the secondary OSDs. For example, if CRUSH assigns an object to a placement group, and the placement group is assigned to OSD 5 as the primary OSD, if CRUSH calculates that OSD 1 and OSD 8 are secondary OSDs for the placement group, the primary OSD 1 will copy the data to OSDs 1 and 8. By copying data on behalf of clients, Ceph simplifies the client interface and reduces the client workload. The same process allows the Ceph cluster to recover and rebalance dynamically.
Should the primary OSD fail and get marked out of the cluster, CRUSH will assign the placement group to another OSD, which will will receive copies of objects in the placement group. Another OSD in the Up Set will assume the role of the primary OSD.
When you increase the number of object replicas or coding chunks, CRUSH will assign each placement group to additional OSDs as required.
PGs do not own OSDs. CRUSH assigns many placement groups to each OSD pseudo-randomly to ensure that data gets distributed evenly across the cluster.
Chapter 13. Placement Group Tradeoffs
Data durability and data distribution among all OSDs call for more placement groups but their number should be reduced to the minimum required for maximum performance to conserve CPU and memory resources.
13.1. Data Durability
Ceph strives to prevent the permanent loss of data. However, after an OSD fails, the risk of permanent data loss increases until the data it contained is fully recovered. Permanent data loss, though rare, is still possible. The following scenario describes how Ceph could permanently lose data in a single placement group with three copies of the data:
- An OSD fails and all copies of the object it contains are lost. For all objects within a placement group stored on the OSD, the number of replicas suddenly drops from three to two.
- Ceph starts recovery for each placement group stored on the failed OSD by choosing a new OSD to re-create the third copy of all objects for each placement group.
- The second OSD containing a copy of the same placement group fails before the new OSD is fully populated with the third copy. Some objects will then only have one surviving copy.
- Ceph picks yet another OSD and keeps copying objects to restore the desired number of copies.
- The third OSD containing a copy of the same placement group fails before recovery is complete. If this OSD contained the only remaining copy of an object, the object is lost permanently.
Hardware failure isn’t an exception, but an expectation. To prevent the foregoing scenario, ideally the recovery process should be as fast as reasonably possible. The size of your cluster, your hardware configuration and the number of placement groups play an important role in total recovery time.
(512 * 3) / 10 = ~150 placement groups. When the first OSD fails, the cluster will start recovery for all 150 placement groups simultaneously.
It is likely that Ceph stored the remaining 150 placement groups randomly across the 9 remaining OSDs. Therefore, each remaining OSD is likely to send copies of objects to all other OSDs and also receive some new objects, because the remaining OSDs become responsible for some of the 150 placement groups now assigned to them.
The total recovery time depends upon the hardware supporting the pool. For example, in a 10 OSD cluster, if a host contains one OSD with a 1TB SSD, and a 10GB/s switch connects each of the 10 hosts, the recovery time will take M minutes. By contrast, if a host contains two SATA OSDs and a 1GB/s switch connects the five hosts, recovery will take substantially longer. Interestingly, in a cluster of this size, the number of placement groups has almost no influence on data durability. The placement group count could be 128 or 8192 and the recovery would not be slower or faster.
However, growing the same Ceph cluster to 20 OSDs instead of 10 OSDs is likely to speed up recovery and therefore improve data durability significantly. Why? Each OSD now participates in only 75 placement groups instead of 150. The 20 OSD cluster will still require all 19 remaining OSDs to perform the same amount of copy operations in order to recover. In the 10 OSD cluster, each OSDs had to copy approximately 100GB. In the 20 OSD cluster each OSD only has to copy 50GB each. If the network was the bottleneck, recovery will happen twice as fast. In other words, recovery time decreases as the number of OSDs increases.
(7 * 3) OSDs in these placement groups: recovery will take longer than when there were 40 OSDs, meaning the number of placement groups should be increased!
No matter how short the recovery time, there is a chance for another OSD storing the placement group to fail while recovery is in progress.
In the 10 OSD cluster described above, if any OSD fails, then approximately 8 placement groups (i.e. 75 pgs / 9 osds being recovered) will only have one surviving copy. And if any of the 8 remaining OSDs fail, the last objects of one placement group are likely to be lost (i.e. 8 pgs / 8 osds with only one remaining copy being recovered). This is why starting with a somewhat larger cluster is preferred (e.g., 50 OSDs).
When the size of the cluster grows to 20 OSDs, the number of placement groups damaged by the loss of three OSDs drops. The second OSD lost will degrade approximately 2 (i.e. 35 pgs / 19 osds being recovered) instead of 8 and the third OSD lost will only lose data if it is one of the two OSDs containing the surviving copy. In other words, if the probability of losing one OSD is 0.0001% during the recovery time frame, it goes from 8 * 0.0001% in the cluster with 10 OSDs to 2 * 0.0001% in the cluster with 20 OSDs. Having 512 or 4096 placement groups is roughly equivalent in a cluster with less than 50 OSDs as far as data durability is concerned.
In a nutshell, more OSDs means faster recovery and a lower risk of cascading failures leading to the permanent loss of a placement group and its objects.
When you add an OSD to the cluster, it may take a long time top populate the new OSD with placement groups and objects. However there is no degradation of any object and adding the OSD has no impact on data durability.
13.2. Data Distribution
Ceph seeks to avoid hot spots—i.e., some OSDs receive substantially more traffic than other OSDs. Ideally, CRUSH assigns objects to placement groups evenly so that when the placement groups get assigned to OSDs (also pseudo randomly), the primary OSDs store objects such that they are evenly distributed across the cluster and hot spots and network over-subscription problems cannot develop because of data distribution.
Since CRUSH computes the placement group for each object, but does not actually know how much data is stored in each OSD within this placement group, the ratio between the number of placement groups and the number of OSDs may influence the distribution of the data significantly.
For instance, if there was only one a placement group with ten OSDs in a three replica pool, Ceph would only use three OSDs to store data because CRUSH would have no other choice. When more placement groups are available, CRUSH is more likely to be evenly spread objects across OSDs. CRUSH also evenly assigns placement groups to OSDs.
As long as there are one or two orders of magnitude more placement groups than OSDs, the distribution should be even. For instance, 300 placement groups for 3 OSDs, 1000 placement groups for 10 OSDs etc.
The ratio between OSDs and placement groups usually solves the problem of uneven data distribution for Ceph clients that implement advanced features like object striping. For example, a 4TB block device might get sharded up into 4MB objects.
The ratio between OSDs and placement groups does not address uneven data distribution in other cases, because CRUSH does not take object size into account. Using the librados interface to store some relatively small objects and some very large objects can lead to uneven data distribution. For example, one million 4K objects totaling 4GB are evenly spread among 1000 placement groups on 10 OSDs. They will use 4GB / 10 = 400MB on each OSD. If one 400MB object is added to the pool, the three OSDs supporting the placement group in which the object has been placed will be filled with 400MB + 400MB = 800MB while the seven others will remain occupied with only 400MB.
13.3. Resource Usage
For each placement group, OSDs and Ceph monitors need memory, network and CPU at all times, and even more during recovery. Sharing this overhead by clustering objects within a placement group is one of the main reasons placement groups exist.
Minimizing the number of placement groups saves significant amounts of resources.
Chapter 14. PG Count
The number of placement groups in a pool plays a significant role in how a cluster peers, distributes data and rebalances. Small clusters don’t see as many performance improvements compared to large clusters by increasing the number of placement groups. However, clusters that have many pools accessing the same OSDs may need to carefully consider PG count so that Ceph OSDs use resources efficiently.
14.1. PG Calculator
The PG calculator calculates the number of placement groups for you and addresses specific use cases. The PG calculator is especially helpful when using Ceph clients like the Ceph Object Gateway where there are many pools typically using same ruleset (CRUSH hierarchy). You may still calculate PGs manually using the guidelines in PG Count for Small Clusters and Calculating PG Count. However, the PG calculator is the preferred method of calculating PGs.
See Ceph Placement Groups (PGs) per Pool Calculator for details.
14.2. Configuring Default PG Counts
When you create a pool, you also create a number of placement groups for the pool. If you don’t specify the number of placement groups, Ceph will use the default value of 8, which is unacceptably low. You can increase the number of placement groups for a pool, but we recommend setting reasonable default values in your Ceph configuration file too.
osd pool default pg num = 100
osd pool default pgp num = 100
You need to set both the number of placement groups (total), and the number of placement groups used for objects (used in PG splitting). They should be equal.
14.3. PG Count for Small Clusters
Small clusters don’t benefit from large numbers of placement groups. So you should consider the following values:
-
Less than 5 OSDs set
pg_numandpgp_numto 128. -
Between 5 and 10 OSDs set
pg_numandpgp_numto 512 -
Between 10 and 50 OSDs set
pg_numandpgp_numto 4096 -
If you have more than 50 OSDs, you need to understand the tradeoffs and how to calculate the
pg_numandpgp_numvalues. See Calculating PG Count.
As the number of OSDs increase, choosing the right value for pg_num and pgp_num becomes more important because it has a significant influence on the behavior of the cluster as well as the durability of the data when something goes wrong (i.e. the probability that a catastrophic event leads to data loss).
14.4. Calculating PG Count
If you have more than 50 OSDs, we recommend approximately 50-100 placement groups per OSD to balance out resource usage, data durability and distribution. If you have less than 50 OSDs, choosing among the PG Count for Small Clusters is ideal. For a single pool of objects, you can use the following formula to get a baseline:
                (OSDs * 100)
   Total PGs =  ------------
                 pool size
Where pool size is either the number of replicas for replicated pools or the K+M sum for erasure coded pools (as returned by ceph osd erasure-code-profile get).
You should then check if the result makes sense with the way you designed your Ceph cluster to maximize data durability, data distribution and minimize resource usage.
The result should be rounded up to the nearest power of two. Rounding up is optional, but recommended for CRUSH to evenly balance the number of objects among placement groups.
For a cluster with 200 OSDs and a pool size of 3 replicas, you would estimate your number of PGs as follows:
   (200 * 100)
   ----------- = 6667. Nearest power of 2: 8192
        3
With 8192 placement groups distributed across 200 OSDs, that evaluates to approximately 41 placement groups per OSD. You also need to consider the number of pools you are likely to use in your cluster, since each pool will create placement groups too. Ensure that you have a reasonable maximum PG count.
14.5. Maximum PG Count
When using multiple data pools for storing objects, you need to ensure that you balance the number of placement groups per pool with the number of placement groups per OSD so that you arrive at a reasonable total number of placement groups. The aim is to achieve reasonably low variance per OSD without taxing system resources or making the peering process too slow.
In an exemplary Ceph Storage Cluster consisting of 10 pools, each pool with 512 placement groups on ten OSDs, there is a total of 5,120 placement groups spread over ten OSDs, or 512 placement groups per OSD. That may not use too many resources depending on your hardware configuration. By contrast, if you create 1,000 pools with 512 placement groups each, the OSDs will handle ~50,000 placement groups each and it would require significantly more resources. Operating with too many placement groups per OSD can significantly reduce performance, especially during rebalancing or recovery.
The Ceph Storage Cluster has a default maximum value of 300 placement groups per OSD. You can set a different maximum value in your Ceph configuration file.
mon pg warn max per osd
Ceph Object Gateways deploy with 10-15 pools, so you may consider using less than 100 PGs per OSD to arrive at a reasonable maximum number.
Chapter 15. PG Command Line Reference
The ceph CLI allows you to set and get the number of placement groups for a pool, view the PG map and retrieve PG statistics.
15.1. Set the Number of PGs
To set the number of placement groups in a pool, you must specify the number of placement groups at the time you create the pool. See Create a Pool for details. Once you’ve set placement groups for a pool, you may increase the number of placement groups (but you cannot decrease the number of placement groups). To increase the number of placement groups, execute the following:
ceph osd pool set {pool-name} pg_num {pg_num}
Once you increase the number of placement groups, you must also increase the number of placement groups for placement (pgp_num) before your cluster will rebalance. The pgp_num should be equal to the pg_num. To increase the number of placement groups for placement, execute the following:
ceph osd pool set {pool-name} pgp_num {pgp_num}15.2. Get the Number of PGs
To get the number of placement groups in a pool, execute the following:
ceph osd pool get {pool-name} pg_num15.3. Get a Cluster’s PG Statistics
To get the statistics for the placement groups in your cluster, execute the following:
ceph pg dump [--format {format}]
Valid formats are plain (default) and json.
15.4. Get Statistics for Stuck PGs
To get the statistics for all placement groups stuck in a specified state, execute the following:
ceph pg dump_stuck inactive|unclean|stale [--format <format>] [-t|--threshold <seconds>]
Inactive Placement groups cannot process reads or writes because they are waiting for an OSD with the most up-to-date data to come up and in.
Unclean Placement groups contain objects that are not replicated the desired number of times. They should be recovering.
Stale Placement groups are in an unknown state - the OSDs that host them have not reported to the monitor cluster in a while (configured by mon_osd_report_timeout).
Valid formats are plain (default) and json. The threshold defines the minimum number of seconds the placement group is stuck before including it in the returned statistics (default 300 seconds).
15.5. Get a PG Map
To get the placement group map for a particular placement group, execute the following:
ceph pg map {pg-id}For example:
ceph pg map 1.6c
Ceph will return the placement group map, the placement group, and the OSD status:
osdmap e13 pg 1.6c (1.6c) -> up [1,0] acting [1,0]
15.6. Get a PGs Statistics
To retrieve statistics for a particular placement group, execute the following:
ceph pg {pg-id} query15.7. Scrub a Placement Group
To scrub a placement group, execute the following:
ceph pg scrub {pg-id}Ceph checks the primary and any replica nodes, generates a catalog of all objects in the placement group and compares them to ensure that no objects are missing or mismatched, and their contents are consistent. Assuming the replicas all match, a final semantic sweep ensures that all of the snapshot-related object metadata is consistent. Errors are reported via logs.
15.8. Revert Lost
If the cluster has lost one or more objects, and you have decided to abandon the search for the lost data, you must mark the unfound objects as lost.
If all possible locations have been queried and objects are still lost, you may have to give up on the lost objects. This is possible given unusual combinations of failures that allow the cluster to learn about writes that were performed before the writes themselves are recovered.
Currently the only supported option is "revert", which will either roll back to a previous version of the object or (if it was a new object) forget about it entirely. To mark the "unfound" objects as "lost", execute the following:
ceph pg {pg-id} mark_unfound_lost revert|deleteUse this feature with caution, because it may confuse applications that expect the object(s) to exist.
Part III. Pools
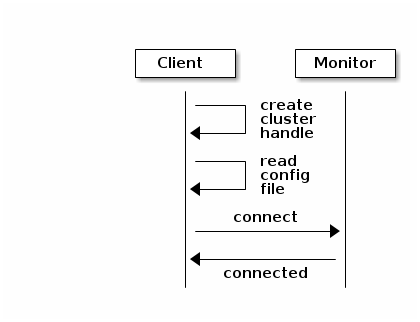
Ceph clients store data in pools. When you create pools, you are creating an I/O interface for clients to store data. From the perspective of a Ceph client (i.e., block device, gateway, etc.), interacting with the Ceph storage cluster is remarkably simple: create a cluster handle and connect to the cluster; then, create an I/O context for reading and writing objects and their extended attributes.
ceph by default) and an initial monitor address. Ceph clients usually retrieve these parameters using the default path for the Ceph configuration file and then read it from the file, but a user may also specify the parameters on the command line too. The Ceph client also provides a user name and secret key (authentication is on by default). Then, the client contacts the Ceph monitor cluster and retrieves a recent copy of the cluster map, including its monitors, OSDs and pools.
Ceph’s architecture enables the storage cluster to provide this remarkably simple interface to Ceph clients so that clients may select one of the sophisticated storage strategies you define simply by specifying a pool name and creating an I/O context. Storage strategies are invisible to the Ceph client in all but capacity and performance. Similarly, the complexities of Ceph clients (mapping objects into a block device representation, providing an S3/Swift RESTful service) are invisible to the Ceph storage cluster.
A pool provides you with:
-
Resilience: You can set how many OSD are allowed to fail without losing data. For replicated pools, it is the desired number of copies/replicas of an object. A typical configuration stores an object and one additional copy (i.e.,
size = 2), but you can determine the number of copies/replicas. For erasure coded pools, it is the number of coding chunks (i.e.m=2in the erasure code profile) - Placement Groups: You can set the number of placement groups for the pool. A typical configuration uses approximately 50-100 placement groups per OSD to provide optimal balancing without using up too many computing resources. When setting up multiple pools, be careful to ensure you set a reasonable number of placement groups for both the pool and the cluster as a whole.
- CRUSH Rules: When you store data in a pool, a CRUSH ruleset mapped to the pool enables CRUSH to identify a rule for the placement of each object and its replicas (or chunks for erasure coded pools) in your cluster. You can create a custom CRUSH rule for your pool.
-
Snapshots: When you create snapshots with
ceph osd pool mksnap, you effectively take a snapshot of a particular pool. -
Quotas: When you set quotas on a pool with
ceph osd pool set-quotayou may limit the maximum number of objects or the maximum number of bytes stored in the specified pool. - Set Ownership: You can set a user ID as the owner of a pool.
Chapter 16. Pools and Storage Strategies
To manage pools, you can list, create, and remove pools. You can also view the utilization statistics for each pool.
Chapter 17. List Pools
To list your cluster’s pools, execute:
ceph osd lspools
Chapter 18. Create a Pool
Before creating pools, refer to the Pool, PG and CRUSH Config Reference. Ideally, you should override the default value for the number of placement groups in your Ceph configuration file, as the default is NOT ideal. For example:
osd pool default pg num = 100
osd pool default pgp num = 100
To create a pool, execute:
ceph osd pool create <pool-name> <pg-num> [<pgp-num>] [replicated] \
         [crush-ruleset-name]
ceph osd pool create <pool-name> <pg-num>  <pgp-num>   erasure \
         [erasure-code-profile] [crush-ruleset-name]
Where:
<pool-name>
- Description
- The name of the pool. It must be unique.
- Type
- String
- Required
- Yes. Picks up default or Ceph configuration value if not specified.
<pg-num>
- Description
-
The total number of placement groups for the pool. See Placement Groups and the See Ceph Placement Groups (PGs) per Pool Calculator for details on calculating a suitable number. The default value
8is NOT suitable for most systems. - Type
- Integer
- Required
- Yes
- Default
- 8
<pgp-num>
- Description
- The total number of placement groups for placement purposes. This should be equal to the total number of placement groups, except for placement group splitting scenarios.
- Type
- Integer
- Required
- Yes. Picks up default or Ceph configuration value if not specified.
- Default
- 8
<replicated or erasure>
- Description
- The pool type which may either be replicated to recover from lost OSDs by keeping multiple copies of the objects or erasure to get a kind of generalized RAID5 capability. The replicated pools require more raw storage but implement all Ceph operations. The erasure pools require less raw storage but only implement a subset of the available operations.
- Type
- String
- Required
- No.
- Default
- replicated
[crush-ruleset-name]
- Description
- The name of the crush ruleset for this pool. If specified ruleset doesn’t exist, the creation of replicated pool will fail with -ENOENT. But replicated pool will create a new erasure ruleset with specified name.
- Type
- String
- Required
- No.
- Default
- "erasure-code" for erasure pool. Pick up Ceph configuration variable osd_pool_default_crush_replicated_ruleset for replicated pool.
[erasure-code-profile=profile]
- Description
- For erasure pools only. Use the erasure code profile. It must be an existing profile as defined by osd erasure-code-profile set.
- Type
- String
- Required
- No.
When you create a pool, set the number of placement groups to a reasonable value (e.g., 100). Consider the total number of placement groups per OSD too. Placement groups are computationally expensive, so performance will degrade when you have many pools with many placement groups (e.g., 50 pools with 100 placement groups each). The point of diminishing returns depends upon the power of the OSD host.
See Placement Groups and See Ceph Placement Groups (PGs) per Pool Calculator for details on calculating an appropriate number of placement groups for your pool.
Chapter 19. Set Pool Quotas
You can set pool quotas for the maximum number of bytes and/or the maximum number of objects per pool.
ceph osd pool set-quota <pool-name> [max_objects <obj-count>] [max_bytes <bytes>]
For example:
ceph osd pool set-quota data max_objects 10000
To remove a quota, set its value to 0.
Chapter 20. Delete a Pool
To delete a pool, execute:
ceph osd pool delete <pool-name> [<pool-name> --yes-i-really-really-mean-it]
If you created your own rulesets and rules for a pool you created, you should consider removing them when you no longer need your pool. If you created users with permissions strictly for a pool that no longer exists, you should consider deleting those users too.
Chapter 21. Rename a Pool
To rename a pool, execute:
ceph osd pool rename <current-pool-name> <new-pool-name>
If you rename a pool and you have per-pool capabilities for an authenticated user, you must update the user’s capabilities (i.e., caps) with the new pool name.
Chapter 22. Show Pool Statistics
To show a pool’s utilization statistics, execute:
rados df
Chapter 23. Make a Snapshot of a Pool
To make a snapshot of a pool, execute:
ceph osd pool mksnap <pool-name> <snap-name>
If you create a pool snapshot, you will never be able to take RBD image snapshots within the pool and it will be irreversible.
Chapter 24. Remove a Snapshot of a Pool
To remove a snapshot of a pool, execute:
ceph osd pool rmsnap <pool-name> <snap-name>
Chapter 25. Set Pool Values
To set a value to a pool, execute the following:
ceph osd pool set <pool-name> <key> <value>
You may set values for the following keys:
size
- Description
- Sets the number of replicas for objects in the pool. See Set the Number of Object Replicas_ for further details. Replicated pools only.
- Type
- Integer
min_size
- Description
- Sets the minimum number of replicas required for I/O. See Set the Number of Object Replicas_ for further details. Replicated pools only.
- Type
- Integer
- Version
-
0.54and above
crash_replay_interval
- Description
- The number of seconds to allow clients to replay acknowledged, but uncommitted requests.
- Type
- Integer
pgp_num
- Description
- The effective number of placement groups to use when calculating data placement.
- Type
- Integer
- Valid Range
-
Equal to or less than
pg_num.
crush_ruleset
- Description
- The ruleset to use for mapping object placement in the cluster.
- Type
- Integer
hashpspool
- Description
- Set/Unset HASHPSPOOL flag on a given pool.
- Type
- Integer
- Valid Range
- 1 sets flag, 0 unsets flag
- Version
-
Version
0.48Argonaut and above.
hit_set_type
- Description
- Enables hit set tracking for cache pools.
- Type
- String
- Valid Settings
-
bloom,explicit_hash,explicit_object - Default
-
bloom. Other values are for testing.
hit_set_count
- Description
-
The number of hit sets to store for cache pools. The higher the number, the more RAM consumed by the
ceph-osddaemon. - Type
- Integer
- Valid Range
-
1. Agent doesn’t handle > 1 yet.
hit_set_period
- Description
-
The duration of a hit set period in seconds for cache pools. The higher the number, the more RAM consumed by the
ceph-osddaemon. - Type
- Integer
- Example
-
36001hr
hit_set_fpp
- Description
-
The false positive probability for the
bloomhit set type. - Type
- Double
- Valid Range
- 0.0 - 1.0
- Default
-
0.05
cache_target_dirty_ratio
- Description
- The percentage of the cache pool containing modified (dirty) objects before the cache tiering agent will flush them to the backing storage pool.
- Type
- Double
- Default
-
.4
cache_target_full_ratio
- Description
- The percentage of the cache pool containing unmodified (clean) objects before the cache tiering agent will evict them from the cache pool.
- Type
- Double
- Default
-
.8
target_max_bytes
- Description
-
Ceph will begin flushing or evicting objects when the
max_bytesthreshold is triggered. - Type
- Integer
- Example
-
1000000000000#1-TB
target_max_objects
- Description
-
Ceph will begin flushing or evicting objects when the
max_objectsthreshold is triggered. - Type
- Integer
- Example
-
1000000#1M objects
cache_min_flush_age
- Description
- The time (in seconds) before the cache tiering agent will flush an object from the cache pool to the storage pool.
- Type
- Integer
- Example
-
60010min
cache_min_evict_age
- Description
- The time (in seconds) before the cache tiering agent will evict an object from the cache pool.
- Type
- Integer
- Example
-
180030min
Chapter 26. Get Pool Values
To get a value from a pool, execute the following:
ceph osd pool get <pool-name> <key>
You may get values for the following keys:
size
- Description
- Gets the number of replicas for objects in the pool. See Set the Number of Object Replicas_ for further details. Replicated pools only.
- Type
- Integer
min_size
- Description
- Gets the minimum number of replicas required for I/O. See Set the Number of Object Replicas_ for further details. Replicated pools only.
- Type
- Integer
- Version
-
0.54and above
crash_replay_interval
- Description
- The number of seconds to allow clients to replay acknowledged, but uncommitted requests.
- Type
- Integer
pgp_num
- Description
- The effective number of placement groups to use when calculating data placement.
- Type
- Integer
- Valid Range
-
Equal to or less than
pg_num.
crush_ruleset
- Description
- The ruleset to use for mapping object placement in the cluster.
- Type
- Integer
hit_set_type
- Description
- Enables hit set tracking for cache pools.
- Type
- String
- Valid Settings
-
bloom,explicit_hash,explicit_object
hit_set_count
- Description
-
The number of hit sets to store for cache pools. The higher the number, the more RAM consumed by the
ceph-osddaemon. - Type
- Integer
hit_set_period
- Description
-
The duration of a hit set period in seconds for cache pools. The higher the number, the more RAM consumed by the
ceph-osddaemon. - Type
- Integer
hit_set_fpp
- Description
-
The false positive probability for the
bloomhit set type. - Type
- Double
cache_target_dirty_ratio
- Description
- The percentage of the cache pool containing modified (dirty) objects before the cache tiering agent will flush them to the backing storage pool.
- Type
- Double
cache_target_full_ratio
- Description
- The percentage of the cache pool containing unmodified (clean) objects before the cache tiering agent will evict them from the cache pool.
- Type
- Double
target_max_bytes
- Description
-
Ceph will begin flushing or evicting objects when the
max_bytesthreshold is triggered. - Type
- Integer
target_max_objects
- Description
-
Ceph will begin flushing or evicting objects when the
max_objectsthreshold is triggered. - Type
- Integer
cache_min_flush_age
- Description
- The time (in seconds) before the cache tiering agent will flush an object from the cache pool to the storage pool.
- Type
- Integer
cache_min_evict_age
- Description
- The time (in seconds) before the cache tiering agent will evict an object from the cache pool.
- Type
- Integer
Chapter 27. Set the Number of Object Replicas
To set the number of object replicas on a replicated pool, execute the following:
ceph osd pool set <poolname> size <num-replicas>
The <num-replicas> includes the object itself. If you want the object and two copies of the object for a total of three instances of the object, specify 3.
For example:
ceph osd pool set data size 3
You may execute this command for each pool. Note: An object might accept I/Os in degraded mode with fewer than pool size replicas. To set a minimum number of required replicas for I/O, you should use the min_size setting. For example:
ceph osd pool set data min_size 2
This ensures that no object in the data pool will receive I/O with fewer than min_size replicas.
Chapter 28. Get the Number of Object Replicas
To get the number of object replicas, execute the following:
ceph osd dump | grep 'replicated size'
Ceph will list the pools, with the replicated size attribute highlighted. By default, ceph Creates two replicas of an object (a total of three copies, or a size of 3).
Part IV. Erasure Code Pools
Ceph storage strategies involve defining data durability requirements (the ability to sustain the loss of one or more OSDs without losing data). Ceph uses replicated pools by default, meaning Ceph copies every object to a primary OSD and to one or more secondary OSDs. You may specify erasure (erasure-coded pool) to save storage space. Erasure-coding will reduce the amount of disk space required to ensure data durability, but it is computationally a bit more expensive than replication.
Erasure coding is a method of storing an object in the Ceph Storage cluster durably where the erasure code algorithm breaks the object into data chunks (k) and coding chunks (m), and stores those chunks in different OSDs. In the event of the failure of an OSD, Ceph can retrieve the remaining data (k) and coding (m) chunks from the other OSDs and the erasure code algorithm can restore the object from those chunks. Erasure coding uses storage capacity more efficiently than replication. The n-replication approach maintains n copies of an object (3x by default in Ceph), whereas erasure coding maintains only k + m chunks (e.g., 3 data and 2 coding chunks use 1.5x the storage space of the original object) and has similar durability characteristics when compared to having multiple deep copies of an object. While erasure coding uses less storage overhead than replication, the erasure code algorithm uses more RAM and CPU than replication when it accesses or recovers objects. Erasure coding is advantageous when data storage must be durable and fault tolerant, but doesn’t require fast read performance (e.g., cold storage, historical records, etc).
For a mathematical and detailed explanation on how erasure code works in Ceph, refer to section Erasure Coded I/O in Red Hat Ceph Storage 1.3 Architecture Guide.
Ceph creates a default erasure code profile when initializing a cluster with k=2 and m=1, meaning Ceph will spread the object data over three OSDs (k+m == 3) and Ceph can lose one of those OSDs without losing data. To know more about erasure code profiling see Erasure Code Profiles
Erasure-coded pools are only supported with the RADOS Gateway (RGW). Using erasure-coded pools with a RADOS Block Device (RBD) is not supported. Please see Erasure-coded Pools and Cache Tiering, for more details on erasure coding and cache tiering.
Chapter 29. Creating a sample erasure coded pool
The simplest erasure coded pool is equivalent to RAID5 and requires at least three hosts:
$ ceph osd pool create ecpool 50 50 erasure
pool 'ecpool' created
$ echo ABCDEFGHI | rados --pool ecpool put NYAN -
$ rados --pool ecpool get NYAN -
ABCDEFGHI
the 50 in pool create stands for the number of placement groups.
Chapter 30. Erasure code profiles
The default erasure code profile sustains the loss of a single OSD. It is equivalent to a replicated pool of size two but requires 1.5TB instead of 2TB to store 1TB of data. The default profile can be displayed with:
$ ceph osd erasure-code-profile get default
directory=.libs
k=2
m=1
plugin=jerasure
ruleset-failure-domain=host
technique=reed_sol_van
Choosing the right profile is important because you cannot change the profile after you create the pool. To modify a profile, you must create a new pool with a different profile and migrate the objects from the old pool to the new pool.
The most important parameters of the profile are K, M and ruleset-failure-domain because they define the storage overhead and the data durability. For instance, if the desired architecture must sustain the loss of two racks with a storage overhead of 40% overhead, the following profile can be defined:
$ ceph osd erasure-code-profile set myprofile \
   k=3 \
   m=2 \
   ruleset-failure-domain=rack
$ ceph osd pool create ecpool 12 12 erasure *myprofile*
$ echo ABCDEFGHI | rados --pool ecpool put NYAN -
$ rados --pool ecpool get NYAN -
ABCDEFGHI
The primary OSD will divide the NYAN object in three (K=3) and create two additional chunks (M=2). The value of M defines how many OSDs can be lost simultaneously without losing any data. The ruleset-failure-domain=rack will create a CRUSH ruleset that ensures no two chunks are stored in the same rack.
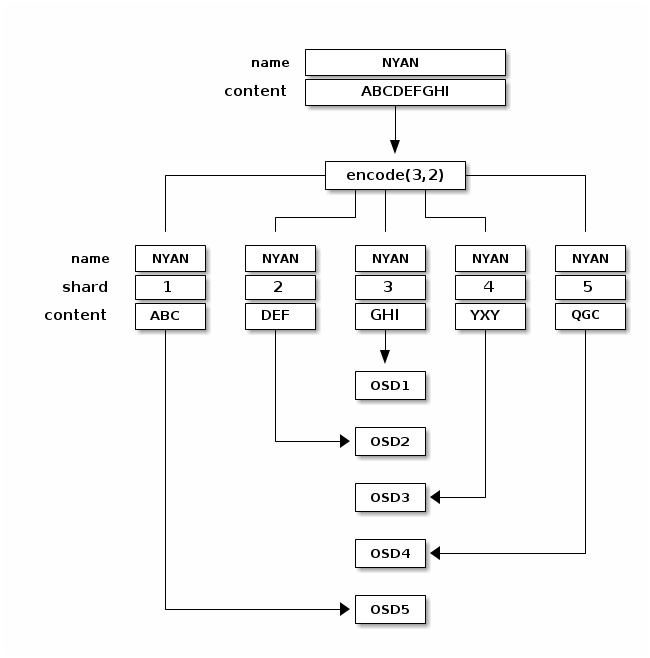
Chapter 31. Erasure-coded Pools and Cache Tiering
Erasure coded pools require more resources than replicated pools and lack some functionality such as partial writes. To overcome these limitations, we recommend to set a cache tier before setting the erasure-coded pool.
For instance, if the pool hot-storage is made of fast storage:
$ ceph osd tier add ecpool hot-storage
$ ceph osd tier cache-mode hot-storage writeback
$ ceph osd tier set-overlay ecpool hot-storage
will place the hot-storage pool as tier of ecpool in writeback mode so that every write and read to the ecpool are actually using the hot-storage and benefit from its flexibility and speed.
It is not possible to create an RBD image on an erasure coded pool because it requires partial writes. It is however possible to create an RBD image on an erasure coded pools when a replicated pool tier set a cache tier:
$ rbd --pool ecpool create --size 10 myvolume
Cache tiering is a technical preview feature and not supported for production environments.
Chapter 32. Erasure Code Profiles
Ceph defines an erasure-coded pool with a profile. Ceph uses a profile when creating an erasure-coded pool and the associated crush ruleset.
Ceph creates a default erasure code profile when initializing a cluster, and it provides the same level of redundancy as two copies in a replicated pool, but uses 25% less storage capacity. The default profiles defines k=2 and m=1, meaning Ceph will spread the object data over three OSDs (k+m == 3) and Ceph can lose one of those OSDs without losing data.
You can create a new profile to improve redundancy without increasing raw storage requirements. For instance, a profile with k=10 and m=4 can sustain the loss of four (m=4) OSDs by distributing an object on fourteen (k+m=14) OSDs. Ceph divides the object into 10 chunks (if the object is 10MB, each chunk is 1MB) and computes 4 coding chunks for recovery (each coding chunk has the same size as the data chunk, i.e. 1MB). The raw space overhead is only 40% and the object will not be lost even if four OSDs fail simultaneously.
32.1. osd erasure-code-profile set
To create a new erasure code profile:
ceph osd erasure-code-profile set <name> \
         [<directory=directory>] \
         [<plugin=plugin>] \
         [<key=value> ...] \
         [--force]
Where:
<directory=directory>
- Description
- Set the directory name from which the erasure code plugin is loaded.
- Type
- String
- Required
- No.
- Default
- /usr/lib/ceph/erasure-code
<plugin=plugin>
- Description
- Use the erasure code plugin to compute coding chunks and recover missing chunks. See the list of available plugins_ for more information.
- Type
- String
- Required
- No.
- Default
- jerasure
<key=value>
- Description
- The semantic of the remaining key/value pairs is defined by the erasure code plugin.
- Type
- String
- Required
- No.
--force
- Description
- Override an existing profile by the same name.
- Type
- String
- Required
- No.
32.2. osd erasure-code-profile rm
To remove an erasure code profile:
ceph osd erasure-code-profile rm <name>
If the profile is referenced by a pool, the deletion will fail.
32.3. osd erasure-code-profile get
To display an erasure code profile:
ceph osd erasure-code-profile get <name>
32.4. osd erasure-code-profile ls
To list the names of all erasure code profiles:
ceph osd erasure-code-profile ls
Chapter 33. Erasure Code Plugins (Advanced)
Ceph supports erasure coding with a plug-in architecture, which means you can create erasure coded pools using different types of algorithms. Ceph supports:
- Jerasure (Default)
- Locally Repairable
- ISA (Intel only)
The following sections describe these plug-ins in greater detail.
33.1. Jerasure erasure code plugin
The jerasure plugin is the most generic and flexible plugin, it is also the default for Ceph erasure coded pools.
The jerasure plugin encapsulates the JerasureH library. It is recommended to read the jerasure documentation to get a better understanding of the parameters.
To create a new jerasure erasure code profile:
ceph osd erasure-code-profile set <name> \
     plugin=jerasure \
     k=<data-chunks> \
     m=<coding-chunks> \
     technique=<reed_sol_van|reed_sol_r6_op|cauchy_orig|cauchy_good|liberation|blaum_roth|liber8tion> \
     [ruleset-root=<root>] \
     [ruleset-failure-domain=<bucket-type>] \
     [directory=<directory>] \
     [--force]
Where:
k=<data chunks>
- Description
- Each object is split in data-chunks parts, each stored on a different OSD.
- Type
- Integer
- Required
- Yes.
- Example
- 4
m=<coding-chunks>
- Description
- Compute coding chunks for each object and store them on different OSDs. The number of coding chunks is also the number of OSDs that can be down without losing data.
- Type
- Integer
- Required
- Yes.
- Example
- 2
technique=<reed_sol_van or reed_sol_r6_op or cauchy_orig or cauchy_good or liberation or blaum_roth or liber8tion>
- Description
- The more flexible technique is reed_sol_van : it is enough to set k and m. The cauchy_good technique can be faster but you need to chose the packetsize carefully. All of reed_sol_r6_op, liberation, blaum_roth, liber8tion are RAID6 equivalents in the sense that they can only be configured with m=2.
- Type
- String
- Required
- No.
- Default
- reed_sol_van
packetsize=<bytes>
- Description
- The encoding will be done on packets of bytes size at a time. Chosing the right packet size is difficult. The jerasure documentation contains extensive information on this topic.
- Type
- Integer
- Required
- No.
- Default
- 2048
ruleset-root=<root>
- Description
- The name of the crush bucket used for the first step of the ruleset. For intance step take default.
- Type
- String
- Required
- No.
- Default
- default
ruleset-failure-domain=<bucket-type>
- Description
- Ensure that no two chunks are in a bucket with the same failure domain. For instance, if the failure domain is host no two chunks will be stored on the same host. It is used to create a ruleset step such as step chooseleaf host.
- Type
- String
- Required
- No.
- Default
- host
directory=<directory>
- Description
- Set the directory name from which the erasure code plugin is loaded.
- Type
- String
- Required
- No.
- Default
- /usr/lib/ceph/erasure-code
--force
- Description
- Override an existing profile by the same name.
- Type
- String
- Required
- No.
33.2. Locally Repairable Erasure Code (LRC) Plugin
With the jerasure plugin, when Ceph stores an erasure-coded object on multiple OSDs, recovering from the loss of one OSD requires reading from all the others. For instance if you configure jerasure with k=8 and m=4, losing one OSD requires reading from the eleven others to repair.
The lrc erasure code plugin creates local parity chunks to be able to recover using fewer OSDs. For instance if you configure lrc with k=8, m=4 and l=4, it will create an additional parity chunk for every four OSDs. When Ceph loses a single OSD, it can recover the object data with only four OSDs instead of eleven.
Although it is probably not an interesting use case when all hosts are connected to the same switch, you can actually observe reduced bandwidth usage between racks when using the lrc erasure code plugin.
$ ceph osd erasure-code-profile set LRCprofile \
     plugin=lrc \
     k=4 m=2 l=3 \
     ruleset-failure-domain=host
$ ceph osd pool create lrcpool 12 12 erasure LRCprofile
In v0.80.x, you will only observe reduced bandwidth if the primary OSD is in the same rack as the lost chunk.:
$ ceph osd erasure-code-profile set LRCprofile \
     plugin=lrc \
     k=4 m=2 l=3 \
     ruleset-locality=rack \
     ruleset-failure-domain=host
$ ceph osd pool create lrcpool 12 12 erasure LRCprofile
33.2.1. Create an LRC Profile
To create a new LRC erasure code profile:
ceph osd erasure-code-profile set <name> \
     plugin=lrc \
     k=<data-chunks> \
     m=<coding-chunks> \
     l=<locality> \
     [ruleset-root=<root>] \
     [ruleset-locality=<bucket-type>] \
     [ruleset-failure-domain=<bucket-type>] \
     [directory=<directory>] \
     [--force]
Where:
k=<data chunks>
- Description
- Each object is split in data-chunks parts, each stored on a different OSD.
- Type
- Integer
- Required
- Yes.
- Example
- 4
m=<coding-chunks>
- Description
- Compute coding chunks for each object and store them on different OSDs. The number of coding chunks is also the number of OSDs that can be down without losing data.
- Type
- Integer
- Required
- Yes.
- Example
- 2
l=<locality>
- Description
- Group the coding and data chunks into sets of size locality. For instance, for k=4 and m=2, when locality=3 two groups of three are created. Each set can be recovered without reading chunks from another set.
- Type
- Integer
- Required
- Yes.
- Example
- 3
ruleset-root=<root>
- Description
- The name of the crush bucket used for the first step of the ruleset. For intance step take default.
- Type
- String
- Required
- No.
- Default
- default
ruleset-locality=<bucket-type>
- Description
- The type of the crush bucket in which each set of chunks defined by l will be stored. For instance, if it is set to rack, each group of l chunks will be placed in a different rack. It is used to create a ruleset step such as step choose rack. If it is not set, no such grouping is done.
- Type
- String
- Required
- No.
ruleset-failure-domain=<bucket-type>
- Description
- Ensure that no two chunks are in a bucket with the same failure domain. For instance, if the failure domain is host no two chunks will be stored on the same host. It is used to create a ruleset step such as step chooseleaf host.
- Type
- String
- Required
- No.
- Default
- host
directory=<directory>
- Description
- Set the directory name from which the erasure code plugin is loaded.
- Type
- String
- Required
- No.
- Default
- /usr/lib/ceph/erasure-code
--force
- Description
- Override an existing profile by the same name.
- Type
- String
- Required
- No.
33.2.2. Create an LRC Profile (low-level)
The sum of k and m must be a multiple of the l parameter. The low level configuration parameters do not impose such a restriction and it may be more convenient to use it for specific purposes. It is for instance possible to define two groups, one with 4 chunks and another with 3 chunks. It is also possible to recursively define locality sets, for instance datacenters and racks into datacenters. The k/m/l are implemented by generating a low level configuration.
The lrc erasure code plugin recursively applies erasure code techniques so that recovering from the loss of some chunks only requires a subset of the available chunks, most of the time.
For instance, when three coding steps are described as:
chunk nr    01234567
step 1      _cDD_cDD
step 2      cDDD____
step 3      ____cDDD
where c are coding chunks calculated from the data chunks D, the loss of chunk 7 can be recovered with the last four chunks. And the loss of chun 2 chunk can be recovered with the first four chunks.
The miminal testing scenario is strictly equivalent to using the default erasure-code profile. The DD implies K=2, the c implies M=1 and uses the jerasure plugin by default.
$ ceph osd erasure-code-profile set LRCprofile \
     plugin=lrc \
     mapping=DD_ \
     layers='[ [ "DDc", "" ] ]'
$ ceph osd pool create lrcpool 12 12 erasure LRCprofile
The lrc plugin is particularly useful for reducing inter-rack bandwidth usage. Although it is probably not an interesting use case when all hosts are connected to the same switch, reduced bandwidth usage can actually be observed. It is equivalent to k=4, m=2 and l=3 although the layout of the chunks is different:
$ ceph osd erasure-code-profile set LRCprofile \
     plugin=lrc \
     mapping=__DD__DD \
     layers='[
               [ "_cDD_cDD", "" ],
               [ "cDDD____", "" ],
               [ "____cDDD", "" ],
             ]'
$ ceph osd pool create lrcpool 12 12 erasure LRCprofile
In Firefly the reduced bandwidth will only be observed if the primary OSD is in the same rack as the lost chunk.:
$ ceph osd erasure-code-profile set LRCprofile \
     plugin=lrc \
     mapping=__DD__DD \
     layers='[
               [ "_cDD_cDD", "" ],
               [ "cDDD____", "" ],
               [ "____cDDD", "" ],
             ]' \
     ruleset-steps='[
                     [ "choose", "rack", 2 ],
                     [ "chooseleaf", "host", 4 ],
                    ]'
$ ceph osd pool create lrcpool 12 12 erasure LRCprofile
LRC now uses jerasure as the default EC backend. It is possible to specify the EC backend/algorithm on a per layer basis using the low level configuration. The second argument in layers=[ [ "DDc", "" ] ] is actually an erasure code profile to be used for this level. The example below specifies the ISA backend with the Cauchy technique to be used in the lrcpool.:
$ ceph osd erasure-code-profile set LRCprofile \
     plugin=lrc \
     mapping=DD_ \
     layers='[ [ "DDc", "plugin=isa technique=cauchy" ] ]'
$ ceph osd pool create lrcpool 12 12 erasure LRCprofile
You could also use a different erasure code profile for for each layer.:
$ ceph osd erasure-code-profile set LRCprofile \
     plugin=lrc \
     mapping=__DD__DD \
     layers='[
               [ "_cDD_cDD", "plugin=isa technique=cauchy" ],
               [ "cDDD____", "plugin=isa" ],
               [ "____cDDD", "plugin=jerasure" ],
             ]'
$ ceph osd pool create lrcpool 12 12 erasure LRCprofile
33.3. Controlling CRUSH Placement
The default CRUSH ruleset provides OSDs that are on different hosts. For instance:
chunk nr    01234567

step 1      _cDD_cDD
step 2      cDDD____
step 3      ____cDDD
needs exactly 8 OSDs, one for each chunk. If the hosts are in two adjacent racks, the first four chunks can be placed in the first rack and the last four in the second rack. Recovering from the loss of a single OSD does not require using bandwidth between the two racks.
For instance:
ruleset-steps='[ [ "choose", "rack", 2 ], [ "chooseleaf", "host", 4 ] ]'
will create a ruleset that will select two crush buckets of type rack and for each of them choose four OSDs, each of them located in different bucket of type host.
The ruleset can also be manually crafted for finer control.
Chapter 34. ISA erasure code plugin
The isa plugin is encapsulates the ISA library. It only runs on Intel processors.
To create a new jerasure erasure code profile:
ceph osd erasure-code-profile set <name> \
     plugin=isa \
     technique=<reed_sol_van|cauchy> \
     [k=<data-chunks>] \
     [m=<coding-chunks>] \
     [ruleset-root=<root>] \
     [ruleset-failure-domain=<bucket-type>] \
     [directory=<directory>] \
     [--force]
Where:
k=<data chunks>
- Description
- Each object is split in data-chunks parts, each stored on a different OSD.
- Type
- Integer
- Required
- No.
- Default
- 7
m=<coding-chunks>
- Description
- Compute coding chunks for each object and store them on different OSDs. The number of coding chunks is also the number of OSDs that can be down without losing data.
- Type
- Integer
- Required
- No.
- Default
- 3
technique=<reed_sol_van or cauchy>
- Description
- The ISA plugin comes in two Reed Solomon forms. If reed_sol_van is set, it is Vandermonde, if cauchy is set, it is Cauchy.
- Type
- String
- Required
- No.
- Default
- reed_sol_van
ruleset-root=<root>
- Description
- The name of the crush bucket used for the first step of the ruleset. For intance step take default.
- Type
- String
- Required
- No.
- Default
- default
ruleset-failure-domain=<bucket-type>
- Description
- Ensure that no two chunks are in a bucket with the same failure domain. For instance, if the failure domain is host no two chunks will be stored on the same host. It is used to create a ruleset step such as step chooseleaf host.
- Type
- String
- Required
- No.
- Default
- host
directory=<directory>
- Description
- Set the directory name from which the erasure code plugin is loaded.
- Type
- String
- Required
- No.
- Default
- /usr/lib/ceph/erasure-code
--force
- Description
- Override an existing profile by the same name.
- Type
- String
- Required
- No.
Chapter 35. Pyramid Erasure Code
Pyramid erasure code is basically an improved algorithm based on the original erasure code algorithm to improve the access and recovery of data. It is simply a derivation of any existing MDS (Maximum Distance Separable) code like Reed-Solomon for any given (n, k) where k is the original number of data chunks and n is the total number of data chunks after the coding process. As Pyramid code is based on standard MDS code, it has the same encoding/decoding approach. A pyramid coded data pool has the same write overhead and same recovery ability of arbitrary failures like a normal erasure coded pool. The only advantage of pyramid code is that it significantly reduces the read overhead in comparison to normal erasure code.
Let’s take an example of a (11, 8) erasure coded pool and apply the pyramid code approach on it. We will convert the (11, 8) erasure coded pool into a (12, 8) Pyramid coded pool. The erasure coded pool has 8 data chunks and 11 - 8 = 3 redundant chunks. The Pyramid Code separates the 8 data chunks into 2 equal size groups, say P1 = {a1, a2, a3, a4} and P2 = {a5, a6, a7, a8}. It keeps two of the redundant chunks from the erasure code unchanged (say b2 and b3). These two chunks are now called global redundant chunks, because they cover all the 8 data chunks. Next, a new redundant chunk is computed for group P1, which is denoted as group (or local) redundant chunk b1,1. The computation is done as if computing b1 in the original erasure code, except for setting all the data chunks in P2 to 0. Similarly, a group redundant chunks b1,2 is computed for P2. The group redundant chunks are only affected by data chunks in the corresponding groups and not by other groups at all. The group redundant chunks can be interpreted as the projection of the original redundant chunk in the erasure code onto each group i.e, b1,1 + b1,2 = b1. So, in this approach, when one data chunk fails, it can be recovered using a read overhead of 4 instead of 8 for the normal erasure coded pool. For instance, if a3 in P1 fails and a1 is the primary OSD in charge of scrubbing, it can use a1, a2, a4 and b1,1 to recover a3 instead of reading from P2. Reading all chunks is only required when more than one chunk goes missing in the same group.
This Pyramid code has the same write overhead as the original erasure code. Whenever any data chunk is updated, the Pyramid Code needs to update 3 redundant chunks (both b2, b3, plus either b1,1 or b1,2), while the erasure code also updates 3 redundant chunks (b1, b2 and b3). Also, it can recover 3 arbitrary erasures same as the normal erasure code. The only benefit is lesser read overhead as mentioned above which comes at the cost of using one additional redundant chunk. So, Pyramid code trades storage space for access efficiency.
The below diagram shows the constructed pyramid code:
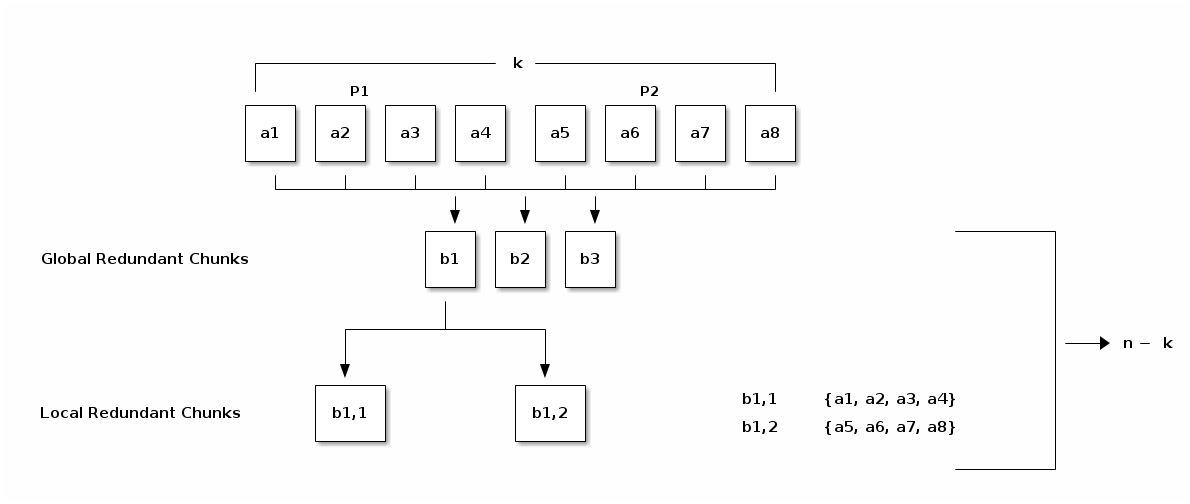
Part V. Cache Tiering (Tech Preview)
A cache tier provides Ceph Clients with better I/O performance for a subset of the data stored in a backing storage tier. Cache tiering involves creating a pool of relatively fast/expensive storage devices (e.g., solid state drives) configured to act as a cache tier, and a backing pool of either erasure-coded or relatively slower/cheaper devices configured to act as an economical storage tier. The Ceph objecter handles where to place the objects and the tiering agent determines when to flush objects from the cache to the backing storage tier. So the cache tier and the backing storage tier are completely transparent to Ceph clients.
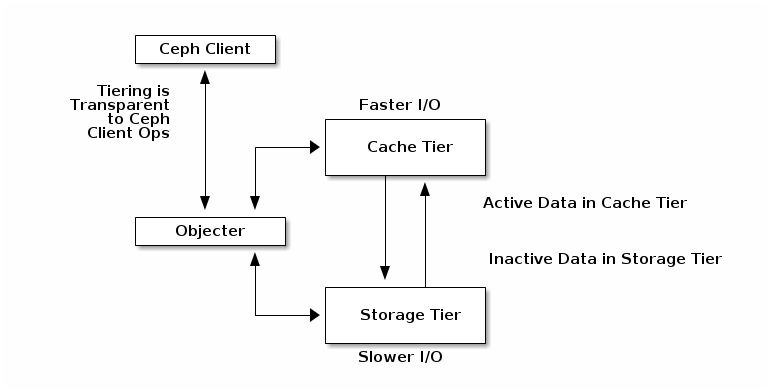
The cache tiering agent handles the migration of data between the cache tier and the backing storage tier automatically. However, admins have the ability to configure how this migration takes place. There are two main scenarios:
-
Writeback Mode: When admins configure tiers with
writebackmode, Ceph clients write data to the cache tier and receive an ACK from the cache tier. In time, the data written to the cache tier migrates to the storage tier and gets flushed from the cache tier. Conceptually, the cache tier is overlaid "in front" of the backing storage tier. When a Ceph client needs data that resides in the storage tier, the cache tiering agent migrates the data to the cache tier on read, then it is sent to the Ceph client. Thereafter, the Ceph client can perform I/O using the cache tier, until the data becomes inactive. This is ideal for mutable data (e.g., photo/video editing, transactional data, etc.). -
Read-only Mode: When admins configure tiers with
readonlymode, Ceph clients write data to the backing tier. On read, Ceph copies the requested object(s) from the backing tier to the cache tier. Stale objects get removed from the cache tier based on the defined policy. This approach is ideal for immutable data (e.g., presenting pictures/videos on a social network, DNA data, X-Ray imaging, etc.), because reading data from a cache pool that might contain out-of-date data provides weak consistency. Do not usereadonlymode for mutable data.
Since all Ceph clients can use cache tiering, it has the potential to improve I/O performance for Ceph Block Devices, Ceph Object Storage, the Ceph Filesystem and native bindings.
Chapter 36. Setting Up Pools
To set up cache tiering, you must have two pools. One will act as the backing storage and the other will act as the cache.
36.1. Setting Up a Backing Storage Pool
Setting up a backing storage pool typically involves one of two scenarios:
- Standard Storage: In this scenario, the pool stores multiple copies of an object in the Ceph Storage Cluster.
- Erasure Coding: In this scenario, the pool uses erasure coding to store data much more efficiently with a small performance tradeoff.
In the standard storage scenario, you can setup a CRUSH ruleset to establish the failure domain (e.g., osd, host, chassis, rack, row, etc.). Ceph OSD Daemons perform optimally when all storage drives in the ruleset are of the same size, speed (both RPMs and throughput) and type. See CRUSH Maps for details on creating a ruleset. Once you have created a ruleset, create a backing storage pool.
In the erasure coding scenario, the pool creation arguments will generate the appropriate ruleset automatically. See Create a Pool for details.
In subsequent examples, we will refer to the backing storage pool as cold-storage.
36.2. Setting Up a Cache Pool
Setting up a cache pool follows the same procedure as the standard storage scenario, but with this difference: the drives for the cache tier are typically high performance drives that reside in their own servers and have their own ruleset. When setting up a ruleset, it should take account of the hosts that have the high performance drives while omitting the hosts that don’t. See CRUSH Storage Strategy Examples.
In subsequent examples, we will refer to the cache pool as hot-storage and the backing pool as cold-storage.
For cache tier configuration and default values, see Pools - Set Pool Values.
36.3. Creating a Cache Tier
Setting up a cache tier involves associating a backing storage pool with a cache pool :
ceph osd tier add {storagepool} {cachepool}For example :
ceph osd tier add cold-storage hot-storage
To set the cache mode, execute the following:
ceph osd tier cache-mode {cachepool} {cache-mode}For example:
ceph osd tier cache-mode hot-storage writeback
Writeback cache tiers overlay the backing storage tier, so they require one additional step: you must direct all client traffic from the storage pool to the cache pool. To direct client traffic directly to the cache pool, execute the following:
ceph osd tier set-overlay {storagepool} {cachepool}For example:
ceph osd tier set-overlay cold-storage hot-storage
36.4. Configuring a Cache Tier
Cache tiers have several configuration options. You may set cache tier configuration options with the following usage:
ceph osd pool set {cachepool} {key} {value}See Pools - Set Pool Values for details.
36.5. Target Size and Type
Ceph’s production cache tiers use a Bloom Filter for the hit_set_type:
ceph osd pool set {cachepool} hit_set_type bloomFor example:
ceph osd pool set hot-storage hit_set_type bloom
The hit_set_count and hit_set_period define how much time each HitSet should cover, and how many such HitSets to store. Currently there is minimal benefit for hit_set_count > 1 since the agent does not yet act intelligently on that information. :
ceph osd pool set {cachepool} hit_set_count 1
ceph osd pool set {cachepool} hit_set_period 3600
ceph osd pool set {cachepool} target_max_bytes 1000000000000
Binning accesses over time allows Ceph to determine whether a Ceph client accessed an object at least once, or more than once over a time period ("age" vs "temperature").
The longer the period and the higher the count, the more RAM the ceph-osd daemon consumes. In particular, when the agent is active to flush or evict cache objects, all hit_set_count HitSets are loaded into RAM.
36.6. Cache Sizing
The cache tiering agent performs two main functions:
- Flushing: The agent identifies modified (or dirty) objects and forwards them to the storage pool for long-term storage.
- Evicting: The agent identifies objects that haven’t been modified (or clean) and evicts the least recently used among them from the cache.
36.6.1. Relative Sizing
The cache tiering agent can flush or evict objects relative to the size of the cache pool. When the cache pool consists of a certain percentage of modified (or dirty) objects, the cache tiering agent will flush them to the storage pool. To set the cache_target_dirty_ratio, execute the following:
ceph osd pool set {cachepool} cache_target_dirty_ratio {0.0..1.0}
For example, setting the value to 0.4 will begin flushing modified (dirty) objects when they reach 40% of the cache pool’s capacity:
ceph osd pool set hot-storage cache_target_dirty_ratio 0.4
When the cache pool reaches a certain percentage of its capacity, the cache tiering agent will evict objects to maintain free capacity. To set the cache_target_full_ratio, execute the following:
ceph osd pool set {cachepool} cache_target_full_ratio {0.0..1.0}
For example, setting the value to 0.8 will begin flushing unmodified (clean) objects when they reach 80% of the cache pool’s capacity:
ceph osd pool set hot-storage cache_target_full_ratio 0.8
36.6.2. Absolute Sizing
The cache tiering agent can flush or evict objects based upon the total number of bytes or the total number of objects. To specify a maximum number of bytes, execute the following:
ceph osd pool set {cachepool} target_max_bytes {#bytes}For example, to flush or evict at 1 TB, execute the following:
ceph osd pool hot-storage target_max_bytes 1000000000000
To specify the maximum number of objects, execute the following:
ceph osd pool set {cachepool} target_max_objects {#objects}For example, to flush or evict at 1M objects, execute the following:
ceph osd pool set hot-storage target_max_objects 1000000
If you specify both limits, the cache tiering agent will begin flushing or evicting when either threshold is triggered.
36.7. Cache Age
You can specify the minimum age of an object before the cache tiering agent flushes a recently modified (or dirty) object to the backing storage pool:
ceph osd pool set {cachepool} cache_min_flush_age {#seconds}For example, to flush modified (or dirty) objects after 10 minutes, execute the following:
ceph osd pool set hot-storage cache_min_flush_age 600
You can specify the minimum age of an object before it will be evicted from the cache tier:
ceph osd pool {cache-tier} cache_min_evict_age {#seconds}For example, to evict objects after 30 minutes, execute the following:
ceph osd pool set hot-storage cache_min_evict_age 1800
Chapter 37. Removing a Cache Tier
Removing a cache tier differs depending on whether it is a writeback cache or a read-only cache.
37.1. Removing a Read-Only Cache
Since a read-only cache does not have modified data, you can disable and remove it without losing any recent changes to objects in the cache.
Change the cache-mode to
noneto disable it. :ceph osd tier cache-mode {cachepool} noneFor example:
ceph osd tier cache-mode hot-storage none
Remove the cache pool from the backing pool. :
ceph osd tier remove {storagepool} {cachepool}For example:
ceph osd tier remove cold-storage hot-storage
37.2. Removing a Writeback Cache
Since a writeback cache may have modified data, you must take steps to ensure that you do not lose any recent changes to objects in the cache before you disable and remove it.
Change the cache mode to
forwardso that new and modified objects will flush to the backing storage pool. :ceph osd tier cache-mode {cachepool} forwardFor example:
ceph osd tier cache-mode hot-storage forward
Ensure that the cache pool has been flushed. This may take a few minutes:
rados -p {cachepool} lsIf the cache pool still has objects, you can flush them manually. For example:
rados -p {cachepool} cache-flush-evict-allRemove the overlay so that clients will not direct traffic to the cache. :
ceph osd tier remove-overlay {storagetier}For example:
ceph osd tier remove-overlay cold-storage
Finally, remove the cache tier pool from the backing storage pool. :
ceph osd tier remove {storagepool} {cachepool}For example:
ceph osd tier remove cold-storage hot-storage
Comments