Red Hat Training

A Red Hat training course is available for Red Hat Enterprise Linux

23.6. Storage Devices

You can install Red Hat Enterprise Linux on a large variety of storage devices. For System z, select Specialized Storage Devices
Storage devices

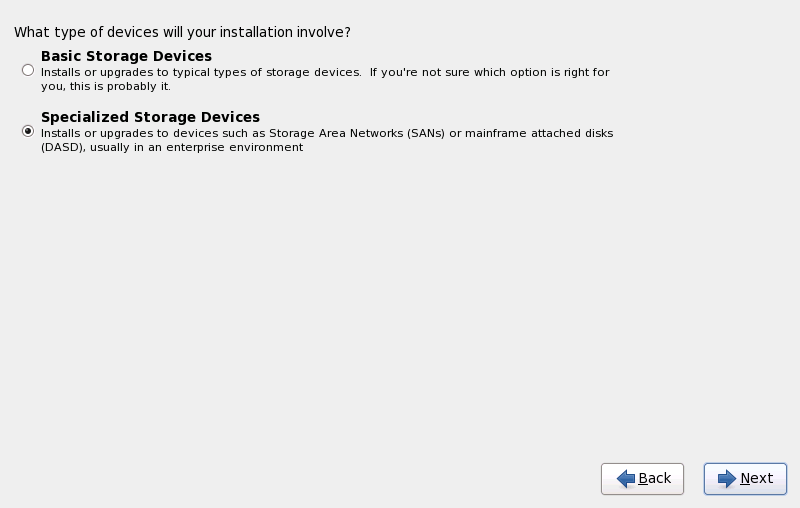
Figure 23.4. Storage devices

Basic Storage Devices
This option does not apply to System z.
Specialized Storage Devices
Select Specialized Storage Devices to install Red Hat Enterprise Linux on the following storage devices:
  • Direct access storage devices (DASDs)
  • Multipath devices such as FCP-attachable SCSI LUN with multiple paths
  • Storage area networks (SANs) such as FCP-attachable SCSI LUNs with a single path
Use the Specialized Storage Devices option to configure Internet Small Computer System Interface (iSCSI) connections. You cannot use the FCoE (Fiber Channel over Ethernet) option on System z; this option is grayed out.

Note

Monitoring of LVM and software RAID devices by the mdeventd daemon is not performed during installation.

23.6.1.  The Storage Devices Selection Screen

The storage devices selection screen displays all storage devices to which anaconda has access.
Devices are grouped under the following tabs:
Basic Devices
Basic storage devices directly connected to the local system, such as hard disk drives and solid-state drives. On System z, this contains activated DASDs.
Firmware RAID
Storage devices attached to a firmware RAID controller. This does not apply to System z.
Multipath Devices
Storage devices accessible through more than one path, such as through multiple SCSI controllers or Fiber Channel ports on the same system.

Important

The installer only detects multipath storage devices with serial numbers that are 16 or 32 characters in length.
Other SAN Devices
Any other devices available on a storage area network (SAN) such as FCP LUNs attached over one single path.
Select storage devices — Basic Devices

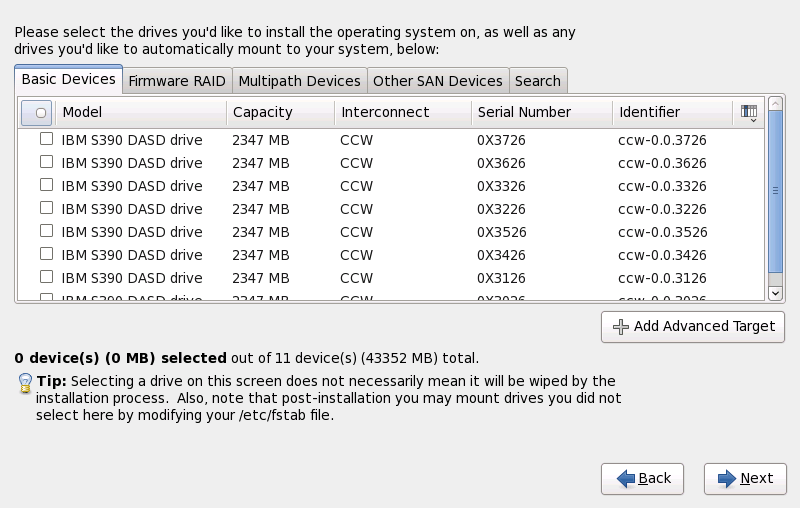
Figure 23.5. Select storage devices — Basic Devices

Select storage devices — Multipath Devices

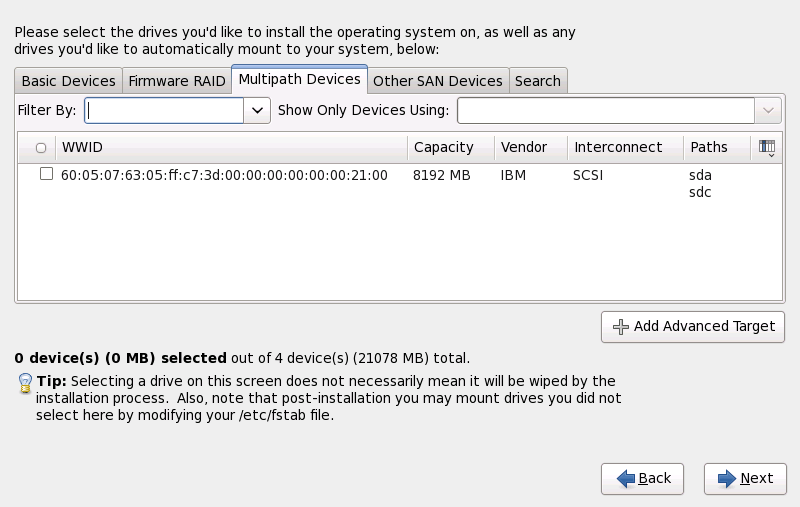
Figure 23.6. Select storage devices — Multipath Devices

Select storage devices — Other SAN Devices

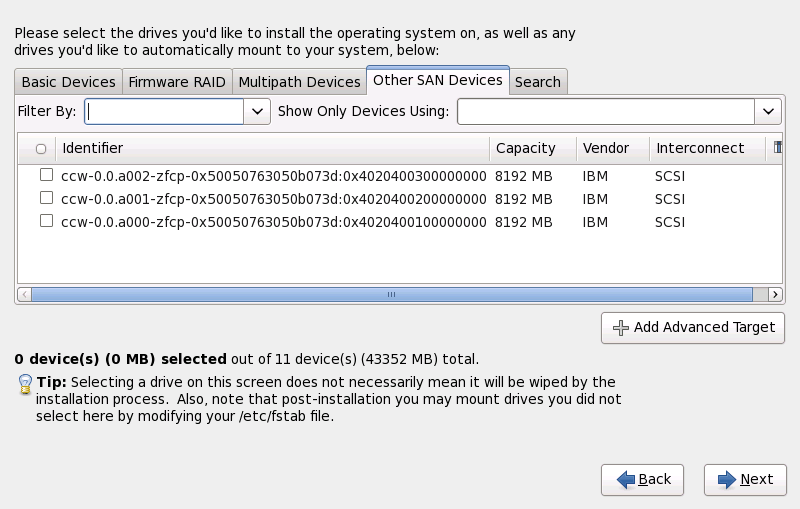
Figure 23.7. Select storage devices — Other SAN Devices

The storage devices selection screen also contains a Search tab that allows you to filter storage devices either by their World Wide Identifier (WWID) or by the port, target, or logical unit number (LUN) at which they are accessed.
The Storage Devices Search Tab

Figure 23.8. The Storage Devices Search Tab

The tab contains a drop-down menu to select searching by port, target, WWID, or LUN (with corresponding text boxes for these values). Searching by WWID or LUN requires additional values in the corresponding text box.
Each tab presents a list of devices detected by anaconda, with information about the device to help you to identify it. A small drop-down menu marked with an icon is located to the right of the column headings. This menu allows you to select the types of data presented on each device. For example, the menu on the Multipath Devices tab allows you to specify any of WWID, Capacity, Vendor, Interconnect, and Paths to include among the details presented for each device. Reducing or expanding the amount of information presented might help you to identify particular devices.
Selecting Columns

Figure 23.9. Selecting Columns

Each device is presented on a separate row, with a checkbox to its left. Click the checkbox to make a device available during the installation process, or click the radio button at the left of the column headings to select or deselect all the devices listed in a particular screen. Later in the installation process, you can choose to install Red Hat Enterprise Linux onto any of the devices selected here, and can choose to automatically mount any of the other devices selected here as part of the installed system.
Note that the devices that you select here are not automatically erased by the installation process. Selecting a device on this screen does not, in itself, place data stored on the device at risk. Note also that any devices that you do not select here to form part of the installed system can be added to the system after installation by modifying the /etc/fstab file.
when you have selected the storage devices to make available during installation, click Next and proceed to Section 23.7, “Setting the Hostname”

23.6.1.1. DASD low-level formatting

Any DASDs used must be low-level formatted. The installer detects this and lists the DASDs that need formatting.
If any of the DASDs specified interactively in linuxrc or in a parameter or configuration file are not yet low-level formatted, the following confirmation dialog appears:
Unformatted DASD Devices Found

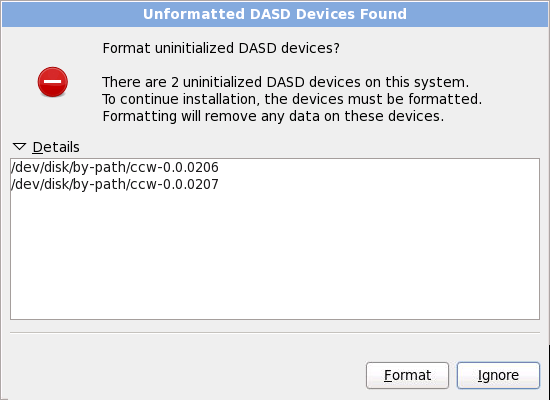
Figure 23.10. Unformatted DASD Devices Found

To automatically allow low-level formatting of unformatted online DASDs specify the kickstart command zerombr. Refer to Chapter 32, Kickstart Installations for more details.

23.6.1.2.  Advanced Storage Options

From this screen you can configure an iSCSI (SCSI over TCP/IP) target or FCP LUNs. Refer to Appendix B, iSCSI Disks for an introduction to iSCSI.
Advanced Storage Options

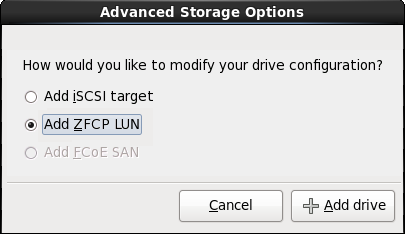
Figure 23.11. Advanced Storage Options

23.6.1.2.1. Configure iSCSI parameters
To use iSCSI storage devices for the installation, anaconda must be able to discover them as iSCSI targets and be able to create an iSCSI session to access them. Each of these steps might require a username and password for CHAP (Challenge Handshake Authentication Protocol) authentication. Additionally, you can configure an iSCSI target to authenticate the iSCSI initiator on the system to which the target is attached (reverse CHAP), both for discovery and for the session. Used together, CHAP and reverse CHAP are called mutual CHAP or two-way CHAP. Mutual CHAP provides the greatest level of security for iSCSI connections, particularly if the username and password are different for CHAP authentication and reverse CHAP authentication.
Repeat the iSCSI discovery and iSCSI login steps as many times as necessary to add all required iSCSI storage. However, you cannot change the name of the iSCSI initiator after you attempt discovery for the first time. To change the iSCSI initiator name, you must restart the installation.

Procedure 23.1. iSCSI discovery

Use the iSCSI Discovery Details dialog to provide anaconda with the information that it needs to discover the iSCSI target.
The iSCSI Discovery Details dialog

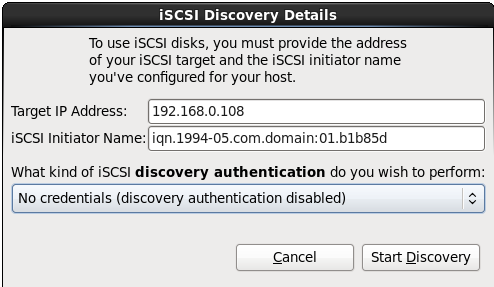
Figure 23.12. The iSCSI Discovery Details dialog

  1. Enter the IP address of the iSCSI target in the Target IP Address field.
  2. Provide a name in the iSCSI Initiator Name field for the iSCSI initiator in iSCSI qualified name (IQN) format.
    A valid IQN contains:
    • the string iqn. (note the period)
    • a date code that specifies the year and month in which your organization's Internet domain or subdomain name was registered, represented as four digits for the year, a dash, and two digits for the month, followed by a period. For example, represent September 2010 as 2010-09.
    • your organization's Internet domain or subdomain name, presented in reverse order with the top-level domain first. For example, represent the subdomain storage.example.com as com.example.storage
    • a colon followed by a string that uniquely identifies this particular iSCSI initiator within your domain or subdomain. For example, :diskarrays-sn-a8675309.
    A complete IQN therefore resembles: iqn.2010-09.storage.example.com:diskarrays-sn-a8675309, and anaconda pre-populates the iSCSI Initiator Name field with a name in this format to help you with the structure.
    For more information on IQNs, refer to 3.2.6. iSCSI Names in RFC 3720 - Internet Small Computer Systems Interface (iSCSI) available from http://tools.ietf.org/html/rfc3720#section-3.2.6 and 1. iSCSI Names and Addresses in RFC 3721 - Internet Small Computer Systems Interface (iSCSI) Naming and Discovery available from http://tools.ietf.org/html/rfc3721#section-1.
  3. Use the drop-down menu to specify the type of authentication to use for iSCSI discovery:
    iSCSI discovery authentication

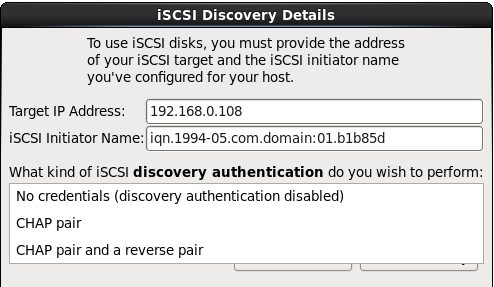
    Figure 23.13. iSCSI discovery authentication

    • no credentials
    • CHAP pair
    • CHAP pair and a reverse pair
    • If you selected CHAP pair as the authentication type, provide the username and password for the iSCSI target in the CHAP Username and CHAP Password fields.
      CHAP pair

      Figure 23.14. CHAP pair

    • If you selected CHAP pair and a reverse pair as the authentication type, provide the username and password for the iSCSI target in the CHAP Username and CHAP Password field and the username and password for the iSCSI initiator in the Reverse CHAP Username and Reverse CHAP Password fields.
      CHAP pair and a reverse pair

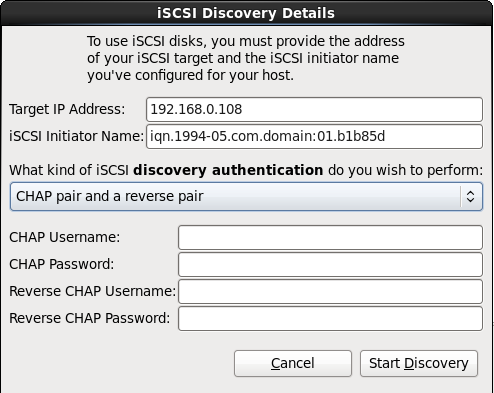
      Figure 23.15. CHAP pair and a reverse pair

  4. Click Start Discovery. Anaconda attempts to discover an iSCSI target based on the information that you provided. If discovery succeeds, the iSCSI Discovered Nodes dialog presents you with a list of all the iSCSI nodes discovered on the target.
  5. Each node is presented with a checkbox beside it. Click the checkboxes to select the nodes to use for installation.
    The iSCSI Discovered Nodes dialog

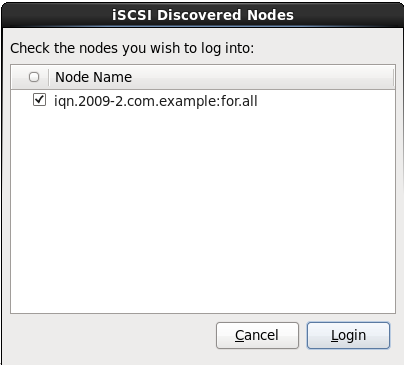
    Figure 23.16. The iSCSI Discovered Nodes dialog

  6. Click Login to initiate an iSCSI session.

Procedure 23.2. Starting an iSCSI session

Use the iSCSI Nodes Login dialog to provide anaconda with the information that it needs to log into the nodes on the iSCSI target and start an iSCSI session.
The iSCSI Nodes Login dialog

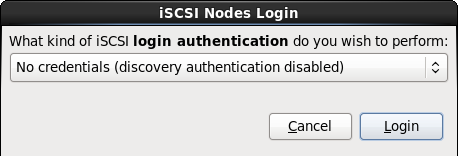
Figure 23.17. The iSCSI Nodes Login dialog

  1. Use the drop-down menu to specify the type of authentication to use for the iSCSI session:
    iSCSI session authentication

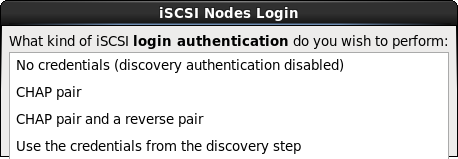
    Figure 23.18. iSCSI session authentication

    • no credentials
    • CHAP pair
    • CHAP pair and a reverse pair
    • Use the credentials from the discovery step
    If your environment uses the same type of authentication and same username and password for iSCSI discovery and for the iSCSI session, select Use the credentials from the discovery step to reuse these credentials.
    • If you selected CHAP pair as the authentication type, provide the username and password for the iSCSI target in the CHAP Username and CHAP Password fields.
      CHAP pair

      Figure 23.19. CHAP pair

    • If you selected CHAP pair and a reverse pair as the authentication type, provide the username and password for the iSCSI target in the CHAP Username and CHAP Password fields and the username and password for the iSCSI initiator in the Reverse CHAP Username and Reverse CHAP Password fields.
      CHAP pair and a reverse pair

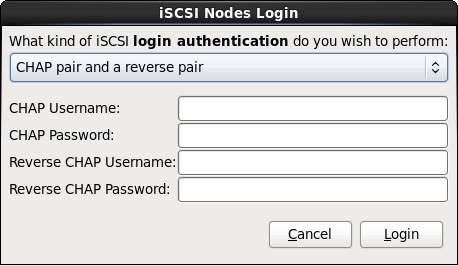
      Figure 23.20. CHAP pair and a reverse pair

  2. Click Login. Anaconda attempts to log into the nodes on the iSCSI target based on the information that you provided. The iSCSI Login Results dialog presents you with the results.
    The iSCSI Login Results dialog

    Figure 23.21. The iSCSI Login Results dialog

  3. Click OK to continue.
23.6.1.2.2. FCP Devices
FCP devices enable IBM System z to use SCSI devices rather than, or in addition to, DASD devices. FCP devices provide a switched fabric topology that enables System z systems to use SCSI LUNs as disk devices in addition to traditional DASD devices.
IBM System z requires that any FCP device be entered manually (either in the installation program interactively, or specified as unique parameter entries in the parameter or CMS configuration file) for the installation program to activate FCP LUNs. The values entered here are unique to each site in which they are set up.

Notes

  • Interactive creation of an FCP device is only possible in graphical mode. It is not possible to interactively configure an FCP device in a text-only install.
  • Each value entered should be verified as correct, as any mistakes made may cause the system not to operate properly. Use only lower-case letters in hex values.
  • For more information on these values, refer to the hardware documentation check with the system administrator who set up the network for this system.
To configure a Fiber Channel Protocol SCSI device, select Add ZFCP LUN and click Add Drive. In the Add FCP device dialog, fill in the details for the 16-bit device number, 64-bit World Wide Port Number (WWPN) and 64-bit FCP LUN. Click the Add button to connect to the FCP device using this information.
Add FCP Device

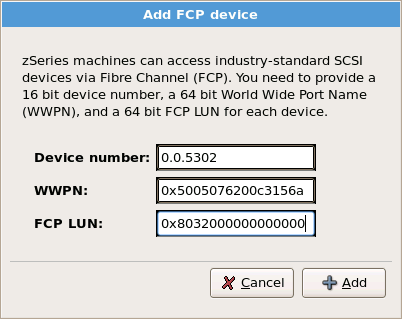
Figure 23.22. Add FCP Device

The newly added device should then be present and usable in the storage device selection screen on the Multipath Devices tab, if you have activated more than one path to the same LUN, or on Other SAN Devices, if you have activated only one path to the LUN.

Important

The installer requires the definition of a DASD. For a SCSI-only installation, enter none as the parameter interactively during phase 1 of an interactive installation, or add DASD=none in the parameter or CMS configuration file. This satisfies the requirement for a defined DASD parameter, while resulting in a SCSI-only environment.