
Red Hat Training
A Red Hat training course is available for Red Hat Enterprise Linux
Chapter 7. Booting the Installer
7.1. Starting the Installation Program
Important
Red Hat Enterprise Linux 6.9 does not support UEFI for 32-bit x86 systems.
On 64-bit systems, boot configurations of UEFI and BIOS differ significantly from each other. Therefore, the installed system must boot using the same firmware that was used during installation. You cannot install the operating system on a system that uses BIOS and then boot this installation on a system that uses UEFI.
To start, first make sure that you have all necessary resources for the installation. If you have already read through Chapter 3, Planning for Installation on the x86 Architecture, and followed the instructions, you should be ready to start the installation process. When you have verified that you are ready to begin, boot the installation program using the Red Hat Enterprise Linux DVD or any boot media that you have created.
Note
Occasionally, some hardware components require a driver update during the installation. A driver update adds support for hardware that is not otherwise supported by the installation program. Refer to Chapter 6, Updating Drivers During Installation on Intel and AMD Systems for more information.
7.1.1. Booting the Installation Program on x86, AMD64, and Intel 64 Systems
You can boot the installation program using any one of the following media (depending upon what your system can support):
- Red Hat Enterprise Linux DVD — Your machine supports a bootable DVD drive and you have the Red Hat Enterprise Linux installation DVD.
- Boot CD-ROM — Your machine supports a bootable CD-ROM drive and you want to perform network or hard drive installation.
- USB flash drive — Your machine supports booting from a USB device.
- PXE boot via network — Your machine supports booting from the network. This is an advanced installation path. Refer to Chapter 30, Setting Up an Installation Server for additional information on this method.
Important
Red Hat Enterprise Linux 6.9 does not support UEFI for 32-bit x86 systems.
On 64-bit systems, boot configurations of UEFI and BIOS differ significantly from each other. Therefore, the installed system must boot using the same firmware that was used during installation. You cannot install the operating system on a system that uses BIOS and then boot this installation on a system that uses UEFI.
To start the installation program from a Red Hat Enterprise Linux DVD or from minimal boot media, follow this procedure:
- Disconnect any external FireWire or USB disks that you do not need for installation. Refer to Section 3.4.3, “FireWire and USB Disks” for more information.
- Power on your computer system.
- Insert the media in your computer.
- Power off your computer with the boot media still inside.
- Power on your computer system.
To create a boot CD-ROM or to prepare your USB flash drive for booting or installation, refer to Section 2.2, “Making Minimal Boot Media”.
Insert the boot media and reboot the system.
You might need to press a specific key or combination of keys to boot from the media. On most computers, a message appears briefly on the screen very soon after you turn on the computer. Typically, it is worded something like
Press F10 to select boot device, although the specific wording and the key that you must press varies widely from computer to computer. Consult the documentation for your computer or motherboard, or seek support from the hardware manufacturer or vendor.
If your computer does not allow you to select a boot device as it starts up, you might need to configure your system's Basic Input/Output System (BIOS) to boot from the media.
To change your BIOS settings on an x86, AMD64, or Intel 64 system, watch the instructions provided on your display when your computer first boots. A line of text appears, telling you which key to press to enter the BIOS settings.
Once you have entered your BIOS setup program, find the section where you can alter your boot sequence. The default is often C, A or A, C (depending on whether you boot from your hard drive [C] or a diskette drive [A]). Change this sequence so that the DVD is first in your boot order and that C or A (whichever is your typical boot default) is second. This instructs the computer to first look at the DVD drive for bootable media; if it does not find bootable media on the DVD drive, it then checks your hard drive or diskette drive.
Save your changes before exiting the BIOS. For more information, refer to the documentation that came with your system.
After a short delay, the graphical boot screen appears, which contains information on a variety of boot options. Installation program automatically begins if you take no action within the first minute. For a description of the options available on this screen, refer to Section 7.1.2, “The Boot Menu”.
Alternatively, press the Esc key to access the
boot: prompt, at which you can enter additional boot options as described in Section 7.1.3, “Additional Boot Options”.
Important
Excessive input (e.g. clicking the mouse repeatedly) during the boot sequence may cause the installer to ignore keyboard input later in the installation process.
7.1.2. The Boot Menu
The boot media displays a graphical boot menu with several options. If no key is hit within 60 seconds, the default boot option runs. To choose the default, either wait for the timer to run out or hit Enter on the keyboard. To select a different option than the default, use the arrow keys on your keyboard, and hit Enter when the correct option is highlighted. If you want to customize the boot options for a particular option, press the Tab key. To access the
boot: prompt at which you can specify custom boot options, press the Esc key and refer to Section 7.1.3, “Additional Boot Options”.
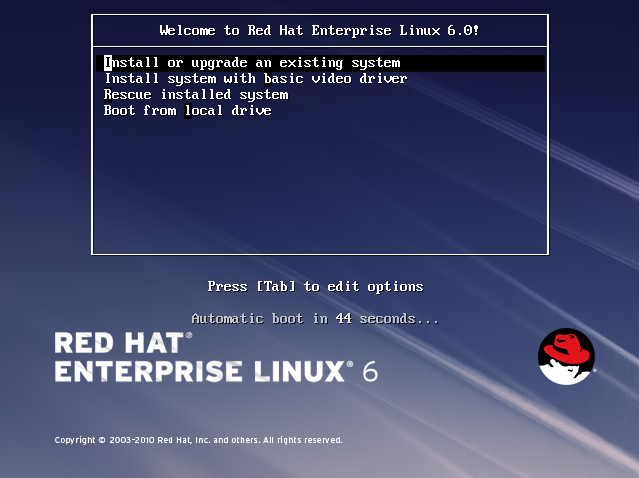
Figure 7.1. The boot screen
For a listing and explanation of common boot options, refer to Chapter 28, Boot Options.
The boot menu options are:
- Install or upgrade an existing system
- This option is the default. Choose this option to install Red Hat Enterprise Linux onto your computer system using the graphical installation program.
- Install system with basic video driver
- This option allows you to install Red Hat Enterprise Linux in graphical mode even if the installation program is unable to load the correct driver for your video card. If your screen appears distorted or goes blank when using the Install or upgrade an existing system option, restart your computer and try this option instead.
- Rescue installed system
- Choose this option to repair a problem with your installed Red Hat Enterprise Linux system that prevents you from booting normally. Although Red Hat Enterprise Linux is an exceptionally stable computing platform, it is still possible for occasional problems to occur that prevent booting. The rescue environment contains utility programs that allow you fix a wide variety of these problems.
- Boot from local drive
- This option boots the system from the first installed disk. If you booted this disc accidentally, use this option to boot from the hard disk immediately without starting the installer.
Note
To abort the installation, either press Ctrl+Alt+Del or power off your computer with the power switch. You may abort the installation process without consequence at any time prior to selecting on the Write partitioning to disk screen. Red Hat Enterprise Linux makes no permanent changes to your computer until that point. Please be aware that stopping the installation after partitioning has begun can leave your computer unusable.
7.1.3. Additional Boot Options
While it is easiest to boot using a DVD and perform a graphical installation, sometimes there are installation scenarios where booting in a different manner may be needed. This section discusses additional boot options available for Red Hat Enterprise Linux.
To pass options to the boot loader on an x86, AMD64, or Intel 64 system, press the Esc key at boot time. The
boot: prompt appears, at which you can use the boot loader options described below.
Note
Refer to Chapter 28, Boot Options for additional boot options not covered in this section.
linux textlinux repo=cdrom:devicelinux repo=ftp://username:password@URLlinux repo=http://URLlinux repo=hd:devicelinux repo=nfs:options:server:/pathlinux repo=nfsiso:options:server:/pathIn these examples,cdromrefers to a CD or DVD drive,ftprefers to a location accessible by FTP,httprefers to a location accessible by HTTP,hdrefers to an ISO image file accessible on a hard drive partition,nfsrefers to an expanded tree of installation files accessible by NFS, andnfsisorefers to an ISO image file accessible by NFS.- ISO images have an SHA256 checksum embedded in them. To test the checksum integrity of an ISO image, at the installation boot prompt, type:
linux mediacheckThe installation program prompts you to insert a DVD or select an ISO image to test, and select to perform the checksum operation. This checksum operation can be performed on any Red Hat Enterprise Linux DVD. It is strongly recommended to perform this operation on any Red Hat Enterprise Linux DVD that was created from downloaded ISO images. This command works with the DVD, hard drive ISO, and NFS ISO installation methods. linux console=<device>For text mode installations, use:linux text console=<device>In the above command, <device> should be the device you are using (such as ttyS0 or ttyS1). For example,linux text console=ttyS0.Text mode installations using a serial terminal work best when the terminal supports UTF-8. Under UNIX and Linux, Kermit supports UTF-8. For Windows, Kermit '95 works well. Non-UTF-8 capable terminals works as long as only English is used during the installation process. An enhanced serial display can be used by passing theutf8command as a boot-time option to the installation program. For example:linux console=ttyS0 utf8
7.1.3.1. Kernel Options
Options can also be passed to the kernel. For example, to apply updates for the anaconda installation program from a USB storage device enter:
linux updates
For text mode installations, use:
linux text updates
This command results in a prompt for the path to the device that contains updates for anaconda. It is not needed if you are performing a network installation and have already placed the updates image contents in
rhupdates/ on the server.
After entering any options, press Enter to boot using those options.
If you need to specify boot options to identify your hardware, please write them down. The boot options are needed during the boot loader configuration portion of the installation (refer to Section 9.18, “x86, AMD64, and Intel 64 Boot Loader Configuration” for more information).
For more information on kernel options refer to Chapter 28, Boot Options.