
Installing trust between IdM and AD
Managing a cross-forest trust between an IdM and AD domain
Abstract
Making open source more inclusive
Red Hat is committed to replacing problematic language in our code, documentation, and web properties. We are beginning with these four terms: master, slave, blacklist, and whitelist. Because of the enormity of this endeavor, these changes will be implemented gradually over several upcoming releases. For more details, see our CTO Chris Wright’s message.
In Identity Management, planned terminology replacements include:
- block list replaces blacklist
- allow list replaces whitelist
- secondary replaces slave
The word master is being replaced with more precise language, depending on the context:
- IdM server replaces IdM master
- CA renewal server replaces CA renewal master
- CRL publisher server replaces CRL master
- multi-supplier replaces multi-master
Providing feedback on Red Hat documentation
We appreciate your feedback on our documentation. Let us know how we can improve it.
Submitting feedback through Jira (account required)
- Log in to the Jira website.
- Click Create in the top navigation bar
- Enter a descriptive title in the Summary field.
- Enter your suggestion for improvement in the Description field. Include links to the relevant parts of the documentation.
- Click Create at the bottom of the dialogue.
Chapter 1. Prerequisites for establishing a trust
This documentation aims to help you create a trust between your Identity Management IdM server and Active Directory (AD), where both servers are located in the same forest.
Prerequisites
- First, read the Planning a cross-forest trust between Identity Management and Active Directory document.
- AD is installed with a domain controller on it.
The IdM server is installed and running.
For details, see Installing Identity Management.
- Both the AD server and the IdM server must have their clocks in sync because Kerberos requires max 5 mins delay in communication.
Unique NetBIOS names for each of the servers placed in the trust because the NetBIOS names are critical for identifying the Active Directory domain.
The NetBIOS name of an Active Directory or IdM domain is usually the first part of the corresponding DNS domain. If the DNS domain is
ad.example.com, the NetBIOS name is typicallyAD. However, it is not required. Important is that the NetBIOS name is just one word without periods. The maximum length of a NetBIOS name is 15 characters.The IdM system must have the IPv6 protocol enabled in the kernel.
If IPv6 is disabled, then the CLDAP plug-in used by the IdM services fails to initialize.
- NOTE
- In RHEL 7, synchronization and trust were two possible approaches to indirect integration of RHEL systems to Active Directory (AD). In RHEL 8, synchronization is deprecated and in RHEL 9, it is not available any more. To integrate IdM and AD, use the trust approach instead. To migrate from synchronization to trust in RHEL 8, see Migrating an existing environment from synchronization to trust in the context of integrating a Linux domain with an Active Directory domain.
Chapter 2. Supported versions of Windows Server
You can establish a trust relationship with Active Directory (AD) forests that use the following forest and domain functional levels:
- Forest functional level range: Windows Server 2012 — Windows Server 2016
- Domain functional level range: Windows Server 2012 — Windows Server 2016
Identity Management (IdM) supports establishing a trust with Active Directory domain controllers running the following operating systems:
- Windows Server 2022 (RHEL 9.1 and later)
- Windows Server 2019
- Windows Server 2016
- Windows Server 2012 R2
- Windows Server 2012
Identity Management (IdM) does not support establishing trust to Active Directory with Active Directory domain controllers running Windows Server 2008 R2 or earlier versions. RHEL IdM requires SMB encryption when establishing the trust relationship, which is only supported in Windows Server 2012 or later.
Chapter 3. How the trust works
The trust between Identity Management IdM and Active Directory (AD) is established on the Cross-realm Kerberos trust. This solution uses the Kerberos capability to establish trusts between different identity sources. Therefore, all AD users can:
- Log in to access Linux systems and resources.
- Use single sign-on (SSO).
All IdM objects are managed in IdM in the trust.
All AD objects are managed in AD in the trust.
In complex environments, a single IdM forest can be connected to multiple AD forests. This setup enables better separation of duties for different functions in the organization. AD administrators can focus on users and policies related to users while Linux administrators have full control over the Linux infrastructure. In such a case, the Linux realm controlled by IdM is analogous to an AD resource domain or realm but with Linux systems in it.
From the perspective of AD, Identity Management represents a separate AD forest with a single AD domain. When cross-forest trust between an AD forest root domain and an IdM domain is established, users from the AD forest domains can interact with Linux machines and services from the IdM domain.
In trust environments, IdM enables you to use ID views to configure POSIX attributes for AD users on the IdM server.
Chapter 4. AD administration rights
When you want to build a trust between AD (Active Directory) and IdM (Identity Management), you will need to use an AD administrator account with appropriate AD privileges.
Such an AD administrator must be a member of one of the following groups:
- Enterprise Admin group in the AD forest
- Domain Admins group in the forest root domain for your AD forest
Additional resources
- For details about Enterprise Admins, see Enterprise Admins.
- For details about Domain Admins, see Domain Admins.
- For details about AD trust, see How Domain and Forest Trusts Work.
Chapter 5. Ensuring support for common encryption types in AD and RHEL
By default, Identity Management establishes a cross-realm trust with support for RC4, AES-128, and AES-256 Kerberos encryption types. Additionally, by default SSSD and Samba Winbind support RC4, AES-128, and AES-256 Kerberos encryption types.
RC4 encryption has been deprecated and disabled by default, as it is considered less secure than the newer AES-128 and AES-256 encryption types. In contrast, Active Directory (AD) user credentials and trusts between AD domains support RC4 encryption and they might not support AES encryption types.
Without any common encryption types, communication between RHEL hosts and AD domains might not work, or some AD accounts might not be able to authenticate. To address this situation, modify one of the configurations outlined below.
5.1. Enabling AES encryption in AD (recommended)
To ensure trusts between Active Directory (AD) domains in an AD forest support strong AES encryption types, see the following Microsoft article: AD DS: Security: Kerberos "Unsupported etype" error when accessing a resource in a trusted domain
5.2. Enabling the AES encryption type in Active Directory using a GPO
This section describes how to enable the AES encryption type in Active Directory (AD) using a group policy object (GPO). Certain features on RHEL, such as running a Samba server on an IdM client, require this encryption type.
Note that RHEL no longer supports the weak DES and RC4 encryption types.
Prerequisites
- You are logged into AD as a user who can edit group policies.
-
The
Group Policy Management Consoleis installed on the computer.
Procedure
-
Open the
Group Policy Management Console. -
Right-click
Default Domain Policy, and selectEdit. TheGroup Policy Management Editoropens. -
Navigate to
Computer Configuration→Policies→Windows Settings→Security Settings→Local Policies→Security Options. -
Double-click the
Network security: Configure encryption types allowed for Kerberospolicy. -
Select
AES256_HMAC_SHA1and, optionally,Future encryption types. - Click .
-
Close the
Group Policy Management Editor. -
Repeat the steps for the
Default Domain Controller Policy. Wait until the Windows domain controllers (DC) applied the group policy automatically. Alternatively, to apply the GPO manually on a DC, enter the following command using an account that has administrator permissions:
C:\> gpupdate /force /target:computer
5.3. Enabling RC4 support in RHEL
On every RHEL host where authentication against AD Domain Controllers takes place, complete the steps outlined below.
Procedure
Use the
update-crypto-policiescommand to enable theAD-SUPPORT-LEGACYcryptographic subpolicy in addition to theDEFAULTcryptographic policy.[root@host ~]# update-crypto-policies --set DEFAULT:AD-SUPPORT-LEGACY Setting system policy to DEFAULT:AD-SUPPORT-LEGACY Note: System-wide crypto policies are applied on application start-up. It is recommended to restart the system for the change of policies to fully take place.- Restart the host.
5.4. Additional resources
Chapter 6. Ports required for communication between IdM and AD
To enable communication between your Active Directory (AD) and Identity Management (IdM) environments, open the following ports on the firewalls of your AD Domain Controllers and IdM servers.
Table 6.1. Ports required for an AD trust
| Service | Port | Protocol |
|---|---|---|
| Endpoint resolution portmapper | 135 | TCP |
| NetBIOS-DGM | 138 | TCP and UDP |
| NetBIOS-SSN | 139 | TCP and UDP |
| Microsoft-DS | 445 | TCP and UDP |
| Dynamic RPC | 49152-65535 | TCP |
| AD Global Catalog | 3268 | TCP |
| LDAP | 389 | TCP and UDP |
The TCP port 389 is not required to be open on IdM servers for trust, but it is necessary for clients communicating with the IdM server.
The TCP port 135 is required for the DCE RPC end-point mapper to work and is used during the IdM-AD trust creation.
To open ports, you can use the following methods:
firewalldservice — you can enable the particular ports or enable the following services which includes the ports:- FreeIPA trust setup
- FreeIPA with LDAP
- Kerberos
- DNS
For details, see the
firewall-cmdman page.
If you are using RHEL 8.2 and earlier, the freeipa-trust firewalld service includes an RPC port range of 1024-1300, which is incorrect. On RHEL 8.2 and earlier, you must manually open the TCP port range 49152-65535 in addition to enabling the freeipa-trust firewalld service.
This issue has been fixed for RHEL 8.3 and later in Bug 1850418 - update freeipa-trust.xml definition to include correct dynamic RPC range.
The RHEL web console, which is a UI with firewall settings based on the
firewalldservice.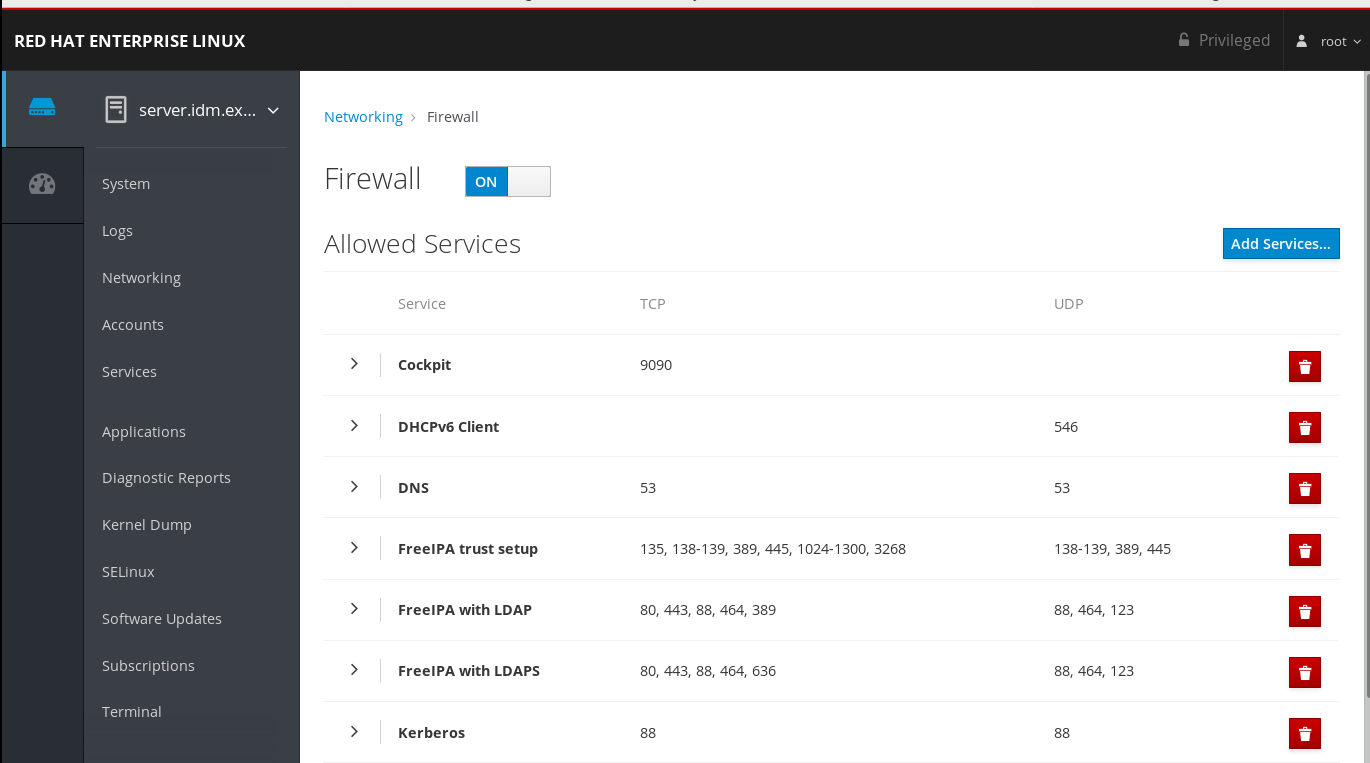
For details about firewall configuration through the web console, see Enabling services on the firewall using the web console
NoteIf you are using RHEL 8.2 and earlier, the
FreeIPA Trust Setupservice includes an RPC port range of1024-1300, which is incorrect. On RHEL 8.2 and earlier, you must manually open the TCP port range49152-65535in addition to enabling theFreeIPA Trust Setupservice in the RHEL web console.This issue has been fixed for RHEL 8.3 and later in Bug 1850418 - update freeipa-trust.xml definition to include correct dynamic RPC range.
Table 6.2. Ports required by IdM servers in a trust
| Service | Port | Protocol |
|---|---|---|
| Kerberos | 88, 464 | TCP and UDP |
| LDAP | 389 | TCP |
| DNS | 53 | TCP and UDP |
Table 6.3. Ports required by IdM clients in an AD trust
| Service | Port | Protocol |
|---|---|---|
| Kerberos | 88 | UDP and TCP |
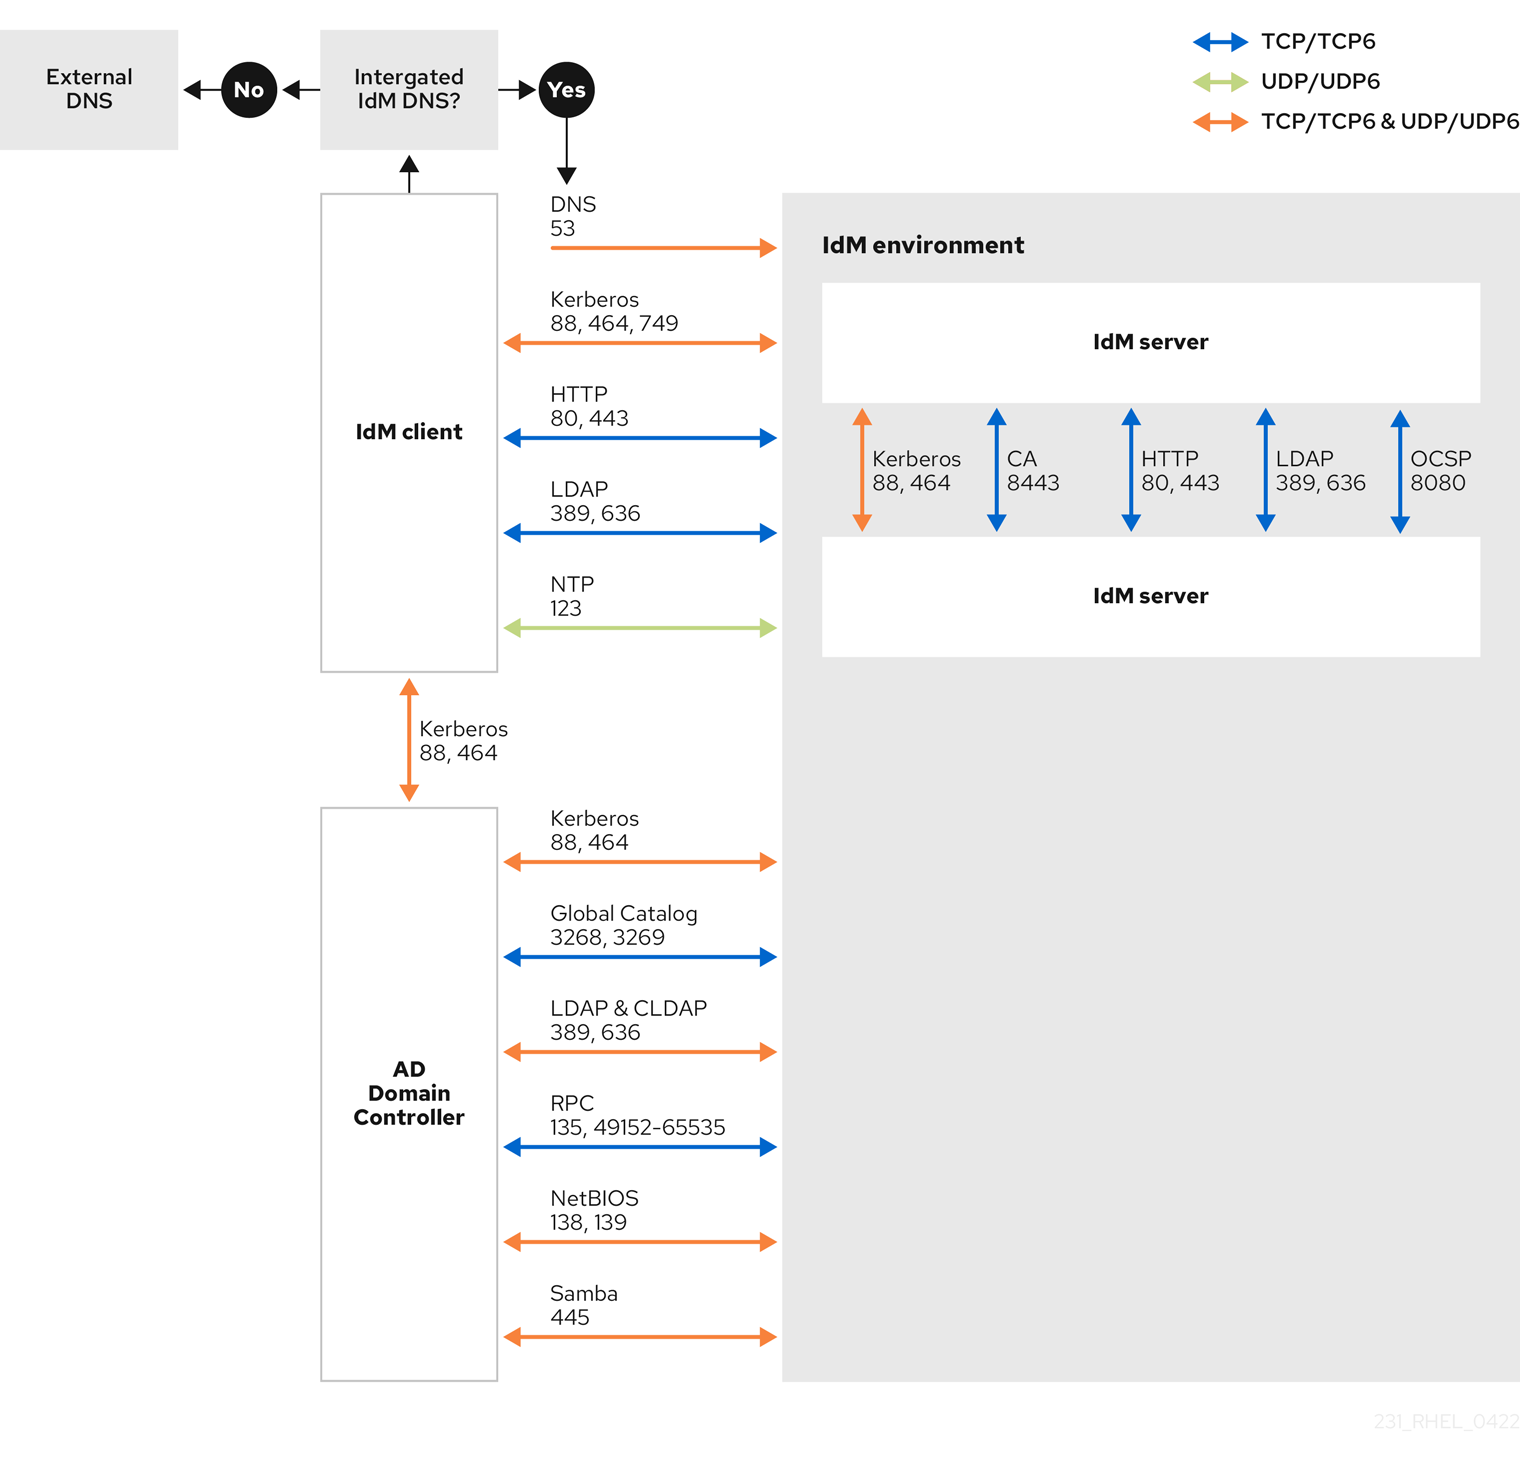
The libkrb5 library uses UDP and falls back to the TCP protocol if the data sent from the Key Distribution Center (KDC) is too large. Active Directory attaches a Privilege Attribute Certificate (PAC) to the Kerberos ticket, which increases the size and requires to use the TCP protocol. To avoid the fall-back and resending the request, by default, SSSD in Red Hat Enterprise Linux 7.4 and later uses TCP for user authentication. If you want to configure the size before libkrb5 uses TCP, set the udp_preference_limit in the /etc/krb5.conf file. For details, see the krb5.conf(5) man page.
The following diagram shows communication sent by IdM clients, and received and responded to by IdM servers and AD Domain Controllers. To set the incoming and outgoing ports and protocols on your firewall, Red Hat recommends using the firewalld service, which already has definitions for FreeIPA services.
Additional resources
- For more information about the Dynamic RPC port range in Windows Server 2008 and later, see The default dynamic port range for TCP/IP has changed since Windows Vista and in Windows Server 2008.
Chapter 7. Configuring DNS and realm settings for a trust
Before you connect Identity Management (IdM) and Active Directory (AD) in a trust, you need to ensure that servers see each other and resolve domain names correctly. To configure DNS to allow using domain names between:
- One primary IdM server using integrated DNS server and Certification Authority.
- One AD Domain Controller.
DNS settings require:
- Configuring DNS zones in the IdM server
- Configuring conditional DNS forwarding in AD
- Verifying correctness of the DNS configuration
7.1. Unique primary DNS domains
In Windows, every domain is a Kerberos realm and a DNS domain at the same time. Every domain managed by the domain controller needs to have its own dedicated DNS zone. The same applies when Identity Management (IdM) is trusted by Active Directory (AD) as a forest. AD expects IdM to have its own DNS domain. For the trust setup to work, the DNS domain needs to be dedicated to the Linux environment.
Each system must have its own unique primary DNS domain configured. For example:
-
ad.example.comfor AD andidm.example.comfor IdM -
example.comfor AD andidm.example.comfor IdM -
ad.example.comfor AD andexample.comfor IdM
The most convenient management solution is an environment where each DNS domain is managed by integrated DNS servers, but it is possible to use any other standard-compliant DNS server as well.
- Kerberos realm names as upper-case versions of primary DNS domain names
-
Kerberos realm names must be the same as the primary DNS domain names, with all letters uppercase. For example, if the domain names are
ad.example.comfor AD andidm.example.comfor IdM, the Kerberos realm names are required to beAD.EXAMPLE.COMandIDM.EXAMPLE.COM. - DNS records resolvable from all DNS domains in the trust
- All machines must be able to resolve DNS records from all DNS domains involved in the trust relationship.
- IdM and AD DNS Domains
- Systems joined to IdM can be distributed over multiple DNS domains. Red Hat recommends that you deploy IdM clients in a DNS zone different to the ones owned by Active Directory. The primary IdM DNS domain must have proper SRV records to support AD trusts.
In some environments with trusts between IdM and Active Directory, you can install an IdM client on a host that is part of the Active Directory DNS domain. The host can then benefit from the Linux-focused features of IdM. This is not a recommended configuration and has some limitations. See Configuring IdM clients in an Active Directory DNS domain for more details.
You can acquire a list of the required SRV records specific to your system setup by running the following command:
$ ipa dns-update-system-records --dry-run
The generated list can look for example like this:
IPA DNS records:
  _kerberos-master._tcp.idm.example.com. 86400 IN SRV 0 100 88 server.idm.example.com.
  _kerberos-master._udp.idm.example.com. 86400 IN SRV 0 100 88 server.idm.example.com.
  _kerberos._tcp.idm.example.com. 86400 IN SRV 0 100 88 server.idm.example.com.
  _kerberos._tcp.idm.example.com. 86400 IN SRV 0 100 88 server.idm.example.com.
  _kerberos.idm.example.com. 86400 IN TXT "IDM.EXAMPLE.COM"
  _kpasswd._tcp.idm.example.com. 86400 IN SRV 0 100 464 server.idm.example.com.
  _kpasswd._udp.idm.example.com. 86400 IN SRV 0 100 464 server.idm.example.com.
  _ldap._tcp.idm.example.com. 86400 IN SRV 0 100 389 server.idm.example.com.
  _ipa-ca.idm.example.com. 86400 IN A 192.168.122.2
For other DNS domains that are part of the same IdM realm, it is not required for the SRV records to be configured when the trust to AD is configured. The reason is that AD domain controllers do not use SRV records to discover KDCs but rather base the KDC discovery on name suffix routing information for the trust.
7.2. Configuring a DNS forward zone in the IdM Web UI
Follow this procedure to add a DNS forward zone to the Identity Management (IdM) server by using the IdM Web UI.
With DNS forward zones, you can forward DNS queries for a specific zone to a different DNS server. For example, you can forward DNS queries for the Active Directory (AD) domain to an AD DNS server.
Prerequisites
- Access to the IdM Web UI with a user account that has administrator rights.
- Correctly configured DNS server.
Procedure
- Log in to the IdM Web UI with administrator privileges. For details, see Accessing the IdM Web UI in a web browser.
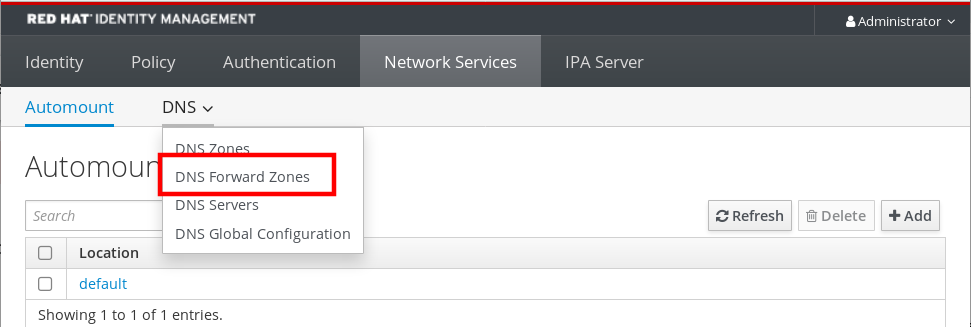
- Click on the Network Services tab.
- Click on the DNS tab.
In the drop down menu, click on the DNS Forward Zones item.
- Click on the Add button.
- In the Add DNS forward zone dialog box, add a zone name.
- In the Zone forwarders item, click on the Add button.
- In the Zone forwarders field, add the IP address of the server for which you want to create the forward zone.
Click on the Add button.

The forwarded zone has been added to the DNS settings and you can verify it in the DNS Forward Zones settings. The Web UI informs you about success with the following pop-up message: DNS Forward Zone successfully added.
The Web UI might display a warning about a DNSSEC validation failure after adding a forward zone to the configuration.
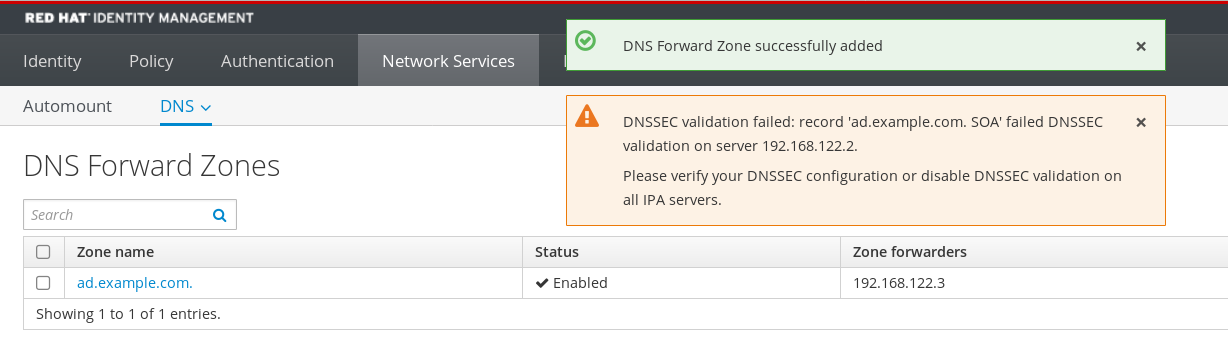
DNSSEC (Domain Name System Security Extensions) secures DNS data with a digital signature to protect DNS from attacks. This service is enabled by default in the IdM server. The warning appears because the remote DNS server does not use DNSSEC. Red Hat recommends that you enable DNSSEC on the remote DNS server.
If you cannot enable DNSSEC validation on the remote server, you can disable DNSSEC in the IdM server:
Choose the appropriate configuration file to edit:
-
If your IdM server is using RHEL 8.0 or RHEL 8.1, open the
/etc/named.conffile. -
If your IdM server is using RHEL 8.2 or later, open the
/etc/named/ipa-options-ext.conffile.
-
If your IdM server is using RHEL 8.0 or RHEL 8.1, open the
Add the following DNSSEC parameters:
dnssec-enable no;
dnssec-validation no;
- Save and close the configuration file.
Restart the DNS service:
# systemctl restart named-pkcs11
Verification steps
Use the
nslookupcommand with the name of the remote DNS server:$ nslookup ad.example.com Server: 192.168.122.2 Address: 192.168.122.2#53 No-authoritative answer: Name: ad.example.com Address: 192.168.122.3
If you configured the domain forwarding correctly, the IP address of the remote DNS server is displayed.
7.3. Configuring a DNS forward zone in the CLI
Follow this procedure to add a new DNS forward zone to the Identity Management (IdM) server using the command line interface (CLI).
With DNS forward zones, you can forward DNS queries for a specific zone to a different DNS server. For example, you can forward DNS queries for the Active Directory (AD) domain to an AD DNS server.
Prerequisites
- Access to the CLI with a user account that has administrator rights.
- Correctly configured DNS server.
Procedure
Create a DNS forward zone for the AD domain, and specify the IP address of the remote DNS server with the
--forwarderoption:# ipa dnsforwardzone-add ad.example.com --forwarder=192.168.122.3 --forward-policy=first
You might see a warning about a DNSSEC validation failure in the /var/log/messages system logs after adding a new forward zone to the configuration:
named-pkcs11[2572]: no valid DS resolving 'host.ad.example.com/A/IN': 192.168.100.25#53
DNSSEC (Domain Name System Security Extensions) secures DNS data with a digital signature to protect DNS from attacks. This service is enabled by default in the IdM server. The warning appears because the remote DNS server does not use DNSSEC. Red Hat recommends that you enable DNSSEC on the remote DNS server.
If you cannot enable DNSSEC validation on the remote server, you can disable DNSSEC in the IdM server:
-
Open the
/etc/named/ipa-options-ext.conffile. Add the following DNSSEC parameters:
dnssec-enable no;
dnssec-validation no;
- Save and close the configuration file.
Restart the DNS service:
# systemctl restart named-pkcs11
Verification steps
Use the
nslookupcommand with the name of the remote DNS server:$ nslookup ad.example.com Server: 192.168.122.2 Address: 192.168.122.2#53 No-authoritative answer: Name: ad.example.com Address: 192.168.122.3
If the domain forwarding is configured correctly, the
nslookuprequest displays an IP address of the remote DNS server.
7.4. Configuring DNS forwarding in AD
Follow this procedure to set up a DNS forwarding in Active Directory (AD) for the Identity Management (IdM) server.
Prerequisites
- Windows Server with AD installed.
- DNS port open on both servers.
Procedure
- Log in to the Windows Server.
- Open Server Manager.
- Open DNS Manager.
In Conditional Forwarders, add a new conditional forwarder with:
- The IdM server IP address
-
A fully qualified domain name, for example,
server.idm.example.com
- Save the settings.
7.5. Verifying the DNS configuration
Before configuring trust, verify that the Identity Management (IdM) and Active Directory (AD) servers can resolve themselves and each other.
Prerequisites
- You need to be logged in with sudo permissions.
Procedure
Run a DNS query for the Kerberos over UDP and LDAP over TCP service records.
[admin@server ~]# dig +short -t SRV _kerberos._udp.idm.example.com.
0 100 88 server.idm.example.com.

[admin@server ~]# dig +short -t SRV _ldap._tcp.idm.example.com.
0 100 389 server.idm.example.com.
The commands are expected to list all IdM servers.
Run a DNS query for the TXT record with the IdM Kerberos realm name. The obtained value is expected to match the Kerberos realm you specified when installing IdM.
[admin@server ~]# dig +short -t TXT _kerberos.idm.example.com.
"IDM.EXAMPLE.COM"
If the previous steps did not return all the expected records, update the DNS configuration with the missing records:
If your IdM environment uses an integrated DNS server, enter the
ipa dns-update-system-recordscommand without any options to update your system records:[admin@server ~]$ ipa dns-update-system-records
If your IdM environment does not use an integrated DNS server:
On the IdM server, export the IdM DNS records into a file:
[admin@server ~]$ ipa dns-update-system-records --dry-run --out dns_records_file.nsupdate
The command creates a file named dns_records_file.nsupdate with the relevant IdM DNS records.
-
Submit a DNS update request to your DNS server using the
nsupdateutility and the dns_records_file.nsupdate file. For more information, see Updating External DNS Records Using nsupdate in RHEL 7 documentation. Alternatively, refer to your DNS server documentation for adding DNS records.
Verify that IdM is able to resolve service records for AD with a command that runs a DNS query for Kerberos and LDAP over TCP service records:
[admin@server ~]# dig +short -t SRV _kerberos._tcp.dc._msdcs.ad.example.com.
0 100 88 addc1.ad.example.com.

[admin@server ~]# dig +short -t SRV _ldap._tcp.dc._msdcs.ad.example.com.
0 100 389 addc1.ad.example.com.
Chapter 8. Configuring IdM clients in an Active Directory DNS domain
If you have client systems in a DNS domain controlled by Active Directory and you require those clients to be able to join the IdM Server to benefit from its RHEL features, you can configure users to access a client using a host name from the Active Directory DNS domain.
This is not a recommended configuration and has some limitations. Red Hat recommends to always deploy IdM clients in a DNS zone different from the ones owned by Active Directory and access IdM clients through their IdM host names.
Your IdM client configuration depends on whether you require single sign-on with Kerberos.
8.1. Configuring an IdM client without Kerberos single sign-on
Password authentication is the only authentication method that is available for users to access resources on IdM clients if the IdM clients are in an Active Directory DNS domain. Follow this procedure to configure your client without Kerberos single sign-on.
Procedure
Install the IdM client with the
--domain=IPA_DNS_Domainoption to ensure the System Security Services Daemon (SSSD) can communicate with the IdM servers:[root@idm-client.ad.example.com ~]# ipa-client-install --domain=idm.example.com
This option disables the SRV record auto-detection for the Active Directory DNS domain.
Open the
/etc/krb5.confconfiguration file and locate the existing mapping for the Active Directory domain in the[domain_realm]section..ad.example.com = IDM.EXAMPLE.COM ad.example.com = IDM.EXAMPLE.COM
Replace both lines with an entry mapping the fully qualified domain name (FQDN) of the Linux clients in the Active Directory DNS zone to the IdM realm:
idm-client.ad.example.com = IDM.EXAMPLE.COM
By replacing the default mapping, you prevent Kerberos from sending its requests for the Active Directory domain to the IdM Kerberos Distribution Center (KDC). Instead Kerberos uses auto-discovery through SRV DNS records to locate the KDC.
8.2. Requesting SSL certificates without single sign-on
SSL-based services require a certificate with dNSName extension records that cover all system host names, because both original (A/AAAA) and CNAME records must be in the certificate. Currently, IdM only issues certificates to host objects in the IdM database.
In the described setup without single sign-on available, IdM already has a host object for the FQDN in the database, and certmonger can request a certificate using this name.
Prerequisites
- Installed and configured the IdM client by following the procedure in Configuring an IdM client without Kerberos single sign-on.
Procedure
Use
certmongerto request a certificate using the FQDN:[root@idm-client.ad.example.com ~]# ipa-getcert request -r \ -f /etc/httpd/alias/server.crt \ -k /etc/httpd/alias/server.key \ -N CN=ipa-client.ad.example.com \ -D ipa-client.ad.example.com \ -K host/idm-client.ad.example.com@IDM.EXAMPLE.COM \ -U id-kp-serverAuth
The certmonger service uses the default host key stored in the /etc/krb5.keytab file to authenticate to the IdM Certificate Authority (CA).
8.3. Configuring an IdM client with Kerberos single sign-on
If you require Kerberos single sign-on to access resources on the IdM client, the client must be within the IdM DNS domain, for example idm-client.idm.example.com. You must create a CNAME record idm-client.ad.example.com in the Active Directory DNS domain pointing to the A/AAAA record of the IdM client.
For Kerberos-based application servers, MIT Kerberos supports a method to allow the acceptance of any host-based principal available in the application’s keytab.
Procedure
On the IdM client, disable the strict checks on what Kerberos principal is used to target the Kerberos server by setting the following option in the
[libdefaults]section of the/etc/krb5.confconfiguration file:ignore_acceptor_hostname = true
8.4. Requesting SSL certificates with single sign-on
SSL-based services require a certificate with dNSName extension records that cover all system host names, because both original (A/AAAA) and CNAME records must be in the certificate. Currently, IdM only issues certificates to host objects in the IdM database.
Follow this procedure to create a host object for ipa-client.example.com in IdM and make sure the real IdM machine’s host object is able to manage this host.
Prerequisites
- You have disabled the strict checks on what Kerberos principal is used to target the Kerberos server as outlined in Configuring an IdM client with Kerberos single sign-on.
Procedure
Create a new host object on the IdM server:
[root@idm-server.idm.example.com ~]# ipa host-add idm-client.ad.example.com --force
Use the
--forceoption, because the host name is a CNAME and not an A/AAAA record.On the IdM server, allow the IdM DNS host name to manage the Active Directory host entry in the IdM database:
[root@idm-server.idm.example.com ~]# ipa host-add-managedby idm-client.ad.example.com \
      --hosts=idm-client.idm.example.com
Your can now request an SSL certificate for your IdM client with the
dNSNameextension record for its host name within the Active Directory DNS domain:[root@idm-client.idm.example.com ~]# ipa-getcert request -r \ -f /etc/httpd/alias/server.crt \ -k /etc/httpd/alias/server.key \ -N CN=`hostname --fqdn` \ -D `hostname --fqdn` \ -D idm-client.ad.example.com \ -K host/idm-client.idm.example.com@IDM.EXAMPLE.COM \ -U id-kp-serverAuth
Chapter 9. Setting up a trust
This section describes how to configure the Identity Management (IdM)/Active Directory (AD) trust on the IdM side using the command line.
Prerequisites
- DNS is correctly configured. Both IdM and AD servers must be able to resolve each other names. For details, see Configuring DNS and realm settings for a trust.
- Supported versions of AD and IdM are deployed. For details, see Supported versions of Windows Server.
- You have obtained a Kerberos ticket. For details, see Using kinit to log in to IdM manually.
9.1. Preparing the IdM server for the trust
Before you can establish a trust with AD, you must prepare the IdM domain using the ipa-adtrust-install utility on an IdM server.
Any system where you run the ipa-adtrust-install command automatically becomes an AD trust controller. However, you must run ipa-adtrust-install only once on an IdM server.
Prerequisites
- IdM server is installed.
- You need root privileges to install packages and restart IdM services.
Procedure
Install the required packages:
[root@ipaserver ~]# dnf install ipa-server-trust-ad samba-clientAuthenticate as the IdM administrative user:
[root@ipaserver ~]# kinit adminRun the
ipa-adtrust-installutility:[root@ipaserver ~]# ipa-adtrust-installThe DNS service records are created automatically if IdM was installed with an integrated DNS server.
If you installed IdM without an integrated DNS server,
ipa-adtrust-installprints a list of service records that you must manually add to DNS before you can continue.The script prompts you that the
/etc/samba/smb.confalready exists and will be rewritten:WARNING: The smb.conf already exists. Running ipa-adtrust-install will break your existing Samba configuration. Do you wish to continue? [no]:
yesThe script prompts you to configure the
slapi-nisplug-in, a compatibility plug-in that allows older Linux clients to work with trusted users:Do you want to enable support for trusted domains in Schema Compatibility plugin? This will allow clients older than SSSD 1.9 and non-Linux clients to work with trusted users. Enable trusted domains support in slapi-nis? [no]:
yesWhen prompted, enter the NetBIOS name for the IdM domain or press Enter to accept the name suggested:
Trust is configured but no NetBIOS domain name found, setting it now.
Enter the NetBIOS name for the IPA domain.
Only up to 15 uppercase ASCII letters, digits and dashes are allowed.
Example: EXAMPLE.

NetBIOS domain name [IDM]:
You are prompted to run the SID generation task to create a SID for any existing users:
Do you want to run the ipa-sidgen task? [no]:
yesThis is a resource-intensive task, so if you have a high number of users, you can run this at another time.
(Optional) By default, the Dynamic RPC port range is defined as
49152-65535for Windows Server 2008 and later. If you need to define a different Dynamic RPC port range for your environment, configure Samba to use different ports and open those ports in your firewall settings. The following example sets the port range to55000-65000.[root@ipaserver ~]# net conf setparm global 'rpc server dynamic port range' 55000-65000 [root@ipaserver ~]# firewall-cmd --add-port=55000-65000/tcp [root@ipaserver ~]# firewall-cmd --runtime-to-permanent
Make sure that DNS is properly configured, as described in Verifying the DNS configuration for a trust.
ImportantRed Hat strongly recommends you verify the DNS configuration as described in Verifying the DNS configuration for a trust every time after running
ipa-adtrust-install, especially if IdM or AD do not use integrated DNS servers.Restart the
ipaservice:[root@ipaserver ~]# ipactl restartUse the
smbclientutility to verify that Samba responds to Kerberos authentication from the IdM side:[root@ipaserver ~]#
smbclient -L server.idm.example.com -U user_name --use-kerberos=requiredlp_load_ex: changing to config backend registry Sharename Type Comment --------- ---- ------- IPC$ IPC IPC Service (Samba 4.15.2) ...
9.2. Setting up a trust agreement using the command line
Follow this procedure to set up the trust agreement using the command line. The Identity Management (IdM) server allows you to configure three types of trust agreements:
- One-way trust — default option. One-way trust enables Active Directory (AD) users and groups to access resources in IdM, but not the other way around. The IdM domain trusts the AD forest, but the AD forest does not trust the IdM domain.
Two-way trust — Two-way trust enables AD users and groups to access resources in IdM.
You must configure a two-way trust for solutions such as Microsoft SQL Server that expect the
S4U2SelfandS4U2ProxyMicrosoft extensions to the Kerberos protocol to work over a trust boundary. An application on a RHEL IdM host might requestS4U2SelforS4U2Proxyinformation from an Active Directory domain controller about an AD user, and a two-way trust provides this feature.Note that this two-way trust functionality does not allow IdM users to login to Windows systems, and the two-way trust in IdM does not give the users any additional rights compared to the one-way trust solution in AD.
-
To create the two-way trust, add the following option to the command:
--two-way=true
-
To create the two-way trust, add the following option to the command:
External trust — a trust relationship between IdM and an AD domain in different forests. While a forest trust always requires establishing a trust between IdM and the root domain of an Active Directory forest, an external trust can be established from IdM to a domain within a forest. This is only recommended if it is not possible to establish a forest trust between forest root domains due to administrative or organizational reasons.
-
To create the external trust, add the following option to the command:
--external=true
-
To create the external trust, add the following option to the command:
The steps below show you how to create a one-way trust agreement.
Prerequisites
- User name and password of a Windows administrator.
- You have prepared the IdM server for the trust.
Procedure
Create a trust agreement for the AD domain and the IdM domain by using the
ipa trust-addcommand:To have SSSD automatically generate UIDs and GIDs for AD users based on their SID, create a trust agreement with the
Active Directory domainID range type. This is the most common configuration.[root@server ~]# ipa trust-add --type=ad ad.example.com --admin <ad_admin_username> --password --range-type=ipa-ad-trust
If you have configured POSIX attributes for your users in Active Directory (such as
uidNumberandgidNumber) and you want SSSD to process this information, create a trust agreement with theActive Directory domain with POSIX attributesID range type:[root@server ~]# ipa trust-add --type=ad ad.example.com --admin <ad_admin_username> --password --range-type=ipa-ad-trust-posix
If you do not specify an ID Range type when creating a trust, IdM attempts to automatically select the appropriate range type by requesting details from AD domain controllers in the forest root domain. If IdM does not detect any POSIX attributes, the trust installation script selects the Active Directory domain ID range.
If IdM detects any POSIX attributes in the forest root domain, the trust installation script selects the Active Directory domain with POSIX attributes ID range and assumes that UIDs and GIDs are correctly defined in AD. If POSIX attributes are not correctly set in AD, you will not be able to resolve AD users.
For example, if the users and groups that need access to IdM systems are not part of the forest root domain, but instead are located in a child domain of the forest domain, the installation script may not detect the POSIX attributes defined in the child AD domain. In this case, Red Hat recommends that you explicitly choose the POSIX ID range type when establishing the trust.
9.3. Setting up a trust agreement in the IdM Web UI
Follow this procedure to configure the Identity Management (IdM)/Active Directory (AD) trust agreement on the IdM side using the IdM Web UI.
Prerequisites
- DNS is correctly configured. Both IdM and AD servers must be able to resolve each other names.
- Supported versions of AD and IdM are deployed.
- You have obtained a Kerberos ticket.
- Before creating a trust in the Web UI, prepare the IdM server for the trust as described in: Preparing the IdM server for the trust.
- You need to be logged in as an IdM administrator.
Procedure
- Log in to the IdM Web UI with administrator privileges. For details, see Accessing the IdM Web UI in a web browser.
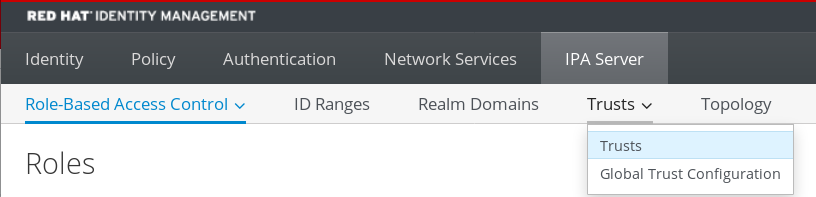
- In the IdM Web UI, click the IPA Server tab.
- In the IPA Server tab, click the Trusts tab.
In the drop down menu, select the Trusts option.
- Click the Add button.
- In the Add Trust dialog box, enter the name of the Active Directory domain.
In the Account and Password fields, add the administrator credentials of the Active Directory administrator.
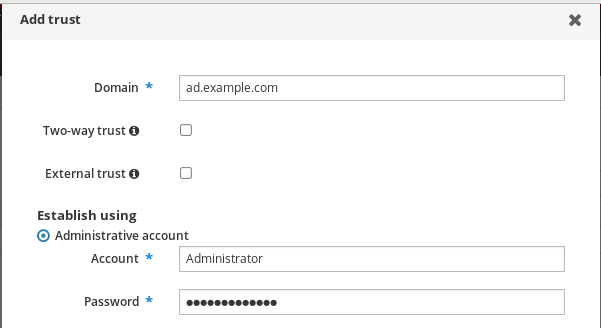
- (Optional) Select Two-way trust, if you want to enable AD users and groups to access resources in IdM. However, the two-way trust in IdM does not give the users any additional rights compared to the one-way trust solution in AD. Both solutions are considered equally secure because of default cross-forest trust SID filtering settings.
- (Optional) Select External trust if you are configuring a trust with an AD domain that is not the root domain of an AD forest. While a forest trust always requires establishing a trust between IdM and the root domain of an Active Directory forest, you can establish an external trust from IdM to any domain within an AD forest.
(Optional) By default, the trust installation script tries to detect the appropriate ID range type. You can also explicitly set the ID range type by choosing one of the following options:
-
To have SSSD automatically generate UIDs and GIDs for AD users based on their SID, select the
Active Directory domainID range type. This is the most common configuration. If you have configured POSIX attributes for your users in Active Directory (such as
uidNumberandgidNumber) and you want SSSD to process this information, select theActive Directory domain with POSIX attributesID range type. Warning
If you leave the Range type setting on the default
Detectoption, IdM attempts to automatically select the appropriate range type by requesting details from AD domain controllers in the forest root domain. If IdM does not detect any POSIX attributes, the trust installation script selects theActive Directory domainID range.If IdM detects any POSIX attributes in the forest root domain, the trust installation script selects the
Active Directory domain with POSIX attributesID range and assumes that UIDs and GIDs are correctly defined in AD. If POSIX attributes are not correctly set in AD, you will not be able to resolve AD users.For example, if the users and groups that need access to IdM systems are not part of the forest root domain, but instead are located in a child domain of the forest domain, the installation script may not detect the POSIX attributes defined in the child AD domain. In this case, Red Hat recommends that you explicitly choose the POSIX ID range type when establishing the trust.
-
To have SSSD automatically generate UIDs and GIDs for AD users based on their SID, select the
- Click Add.
Verification steps
If the trust has been successfully added to the IdM server, you can see the green pop-up window in the IdM Web UI. It means that the:
- Domain name exists
User name and password of the Windows Server has been added correctly.

Now you can continue to test the trust connection and Kerberos authentication.
9.4. Setting up a trust agreement using Ansible
Follow this procedure to set up a one-way trust agreement between Identity Management (IdM) and Active Directory (AD) by using an Ansible playbook. You can configure three types of trust agreements:
- One-way trust — default option. One-way trust enables Active Directory (AD) users and groups to access resources in IdM, but not the other way around. The IdM domain trusts the AD forest, but the AD forest does not trust the IdM domain.
Two-way trust — Two-way trust enables AD users and groups to access resources in IdM.
You must configure a two-way trust for solutions such as Microsoft SQL Server that expect the
S4U2SelfandS4U2ProxyMicrosoft extensions to the Kerberos protocol to work over a trust boundary. An application on a RHEL IdM host might requestS4U2SelforS4U2Proxyinformation from an Active Directory domain controller about an AD user, and a two-way trust provides this feature.Note that this two-way trust functionality does not allow IdM users to login to Windows systems, and the two-way trust in IdM does not give the users any additional rights compared to the one-way trust solution in AD.
-
To create the two-way trust, add the following variable to the playbook task below:
two_way: true
-
To create the two-way trust, add the following variable to the playbook task below:
External trust — a trust relationship between IdM and an AD domain in different forests. While a forest trust always requires establishing a trust between IdM and the root domain of an Active Directory forest, an external trust can be established from IdM to a domain within a forest. This is only recommended if it is not possible to establish a forest trust between forest root domains due to administrative or organizational reasons.
-
To create the external trust, add the following variable to the playbook task below:
external: true
-
To create the external trust, add the following variable to the playbook task below:
Prerequisites
- User name and password of a Windows administrator.
-
The IdM
adminpassword. - You have prepared the IdM server for the trust.
-
You are using the 4.8.7 version of IdM or later. To view the version of IdM you have installed on your server, run
ipa --version. You have configured your Ansible control node to meet the following requirements:
- You are using Ansible version 2.14 or later.
-
You have installed the
ansible-freeipapackage on the Ansible controller. - The example assumes that in the ~/MyPlaybooks/ directory, you have created an Ansible inventory file with the fully-qualified domain name (FQDN) of the IdM server.
-
The example assumes that the secret.yml Ansible vault stores your
ipaadmin_password.
-
The target node, that is the node on which the
ansible-freeipamodule is executed, is part of the IdM domain as an IdM client, server or replica.
Procedure
Navigate to your ~/MyPlaybooks/ directory:
$ cd ~/MyPlaybooks/Select one of the following scenarios based on your use case:
To create an ID mapping trust agreement, in which SSSD automatically generates UIDs and GIDs for AD users and groups based on their SIDs, create an
add-trust.ymlplaybook with the following content:--- - name: Playbook to create a trust hosts: ipaserver vars_files: - /home/user_name/MyPlaybooks/secret.yml tasks: - name: ensure the trust is present ipatrust: ipaadmin_password: "{{ ipaadmin_password }}" realm: ad.example.com admin: Administrator password: secret_password range_type: ipa-ad-trust state: presentIn the example:
-
realmdefines the AD realm name string. -
admindefines the AD domain administrator string. -
passworddefines the AD domain administrator’s password string.
-
To create a POSIX trust agreement, in which SSSD processes POSIX attributes stored in AD, such as
uidNumberandgidNumber, create anadd-trust.ymlplaybook with the following content:--- - name: Playbook to create a trust hosts: ipaserver vars_files: - /home/user_name/MyPlaybooks/secret.yml tasks: - name: ensure the trust is present ipatrust: ipaadmin_password: "{{ ipaadmin_password }}" realm: ad.example.com admin: Administrator password: secret_password range_type: ipa-ad-trust-posix state: presentTo create a trust agreement in which IdM attempts to automatically select the appropriate range type,
ipa-ad-trustoripa-ad-trust-posix, by requesting details from AD domain controllers in the forest root domain, create anadd-trust.ymlplaybook with the following content:--- - name: Playbook to create a trust hosts: ipaserver vars_files: - /home/user_name/MyPlaybooks/secret.yml tasks: - name: ensure the trust is present ipatrust: ipaadmin_password: "{{ ipaadmin_password }}" realm: ad.example.com admin: Administrator password: secret_password state: present
WarningIf you do not specify an ID range type when creating a trust, and if IdM does not detect any POSIX attributes in the AD forest root domain, the trust installation script selects the
Active Directory domainID range.If IdM detects any POSIX attributes in the forest root domain, the trust installation script selects the
Active Directory domain with POSIX attributesID range and assumes that UIDs and GIDs are correctly defined in AD.However, if POSIX attributes are not correctly set in AD, you will not be able to resolve AD users. For example, if the users and groups that need access to IdM systems are not part of the forest root domain, but instead are located in a child domain of the forest domain, the installation script may not detect the POSIX attributes defined in the child AD domain. In this case, Red Hat recommends that you explicitly choose the POSIX ID range type when establishing the trust.
- Save the file.
Run the Ansible playbook. Specify the playbook file, the file storing the password protecting the secret.yml file, and the inventory file:
$ ansible-playbook --vault-password-file=password_file -v -i inventory add-trust.yml
Additional resources
- /usr/share/doc/ansible-freeipa/README-trust.md
- /usr/share/doc/ansible-freeipa/playbooks/trust
9.5. Verifying the Kerberos configuration
To verify the Kerberos configuration, test if it is possible to obtain a ticket for an Identity Management (IdM) user and if the IdM user can request service tickets.
Procedure
Request a ticket for an Active Directory (AD) user:
[root@ipaserver ~]# kinit user@AD.EXAMPLE.COM
Request service tickets for a service within the IdM domain:
[root@server ~]# kvno -S host server.idm.example.com
If the AD service ticket is successfully granted, there is a cross-realm ticket-granting ticket (TGT) listed with all of the other requested tickets. The TGT is named krbtgt/IPA.DOMAIN@AD.DOMAIN.
[root@server ]# klist
Ticket cache: KEYRING:persistent:0:krb_ccache_hRtox00
Default principal: user@AD.EXAMPLE.COM

Valid starting       Expires              Service principal
03.05.2016 18:31:06  04.05.2016 04:31:01  host/server.idm.example.com@IDM.EXAMPLE.COM
	renew until 04.05.2016 18:31:00
03.05.2016 18:31:06 04.05.2016 04:31:01 krbtgt/IDM.EXAMPLE.COM@AD.EXAMPLE.COM
	renew until 04.05.2016 18:31:00
03.05.2016 18:31:01  04.05.2016 04:31:01  krbtgt/AD.EXAMPLE.COM@AD.EXAMPLE.COM
	renew until 04.05.2016 18:31:00
The localauth plug-in maps Kerberos principals to local System Security Services Daemon (SSSD) user names. This allows AD users to use Kerberos authentication and access Linux services, which support GSSAPI authentication directly.
9.6. Verifying the trust configuration on IdM
Before configuring trust, verify that the Identity Management (IdM) and Active Directory (AD) servers can resolve themselves and each other.
Prerequisites
- You need to be logged in with administrator privileges.
Procedure
Run a DNS query for the MS DC Kerberos over UDP and LDAP over TCP service records.
[root@server ~]# dig +short -t SRV _kerberos._udp.dc._msdcs.idm.example.com.
0 100 88 server.idm.example.com.

[root@server ~]# dig +short -t SRV _ldap._tcp.dc._msdcs.idm.example.com.
0 100 389 server.idm.example.com.
These commands list all IdM servers on which
ipa-adtrust-installhas been executed. The output is empty ifipa-adtrust-installhas not been executed on any IdM server, which is typically before establishing the first trust relationship.Run a DNS query for the Kerberos and LDAP over TCP service records to verify that IdM is able to resolve service records for AD:
[root@server ~]# dig +short -t SRV _kerberos._tcp.dc._msdcs.ad.example.com.
0 100 88 addc1.ad.example.com.

[root@ipaserver ~]# dig +short -t SRV _ldap._tcp.dc._msdcs.ad.example.com.
0 100 389 addc1.ad.example.com.
.
9.7. Verifying the trust configuration on AD
After configuring the trust, verify that:
- The Identity Management (IdM)-hosted services are resolvable from the Active Directory (AD) server.
- AD services are resolvable from the AD server.
Prerequisites
- You need to be logged in with administrator privileges.
Procedure
On the AD server, set the
nslookup.exeutility to look up service records.C:\>nslookup.exe > set type=SRV
Enter the domain name for the Kerberos over UDP and LDAP over TCP service records.
> _kerberos._udp.idm.example.com. _kerberos._udp.idm.example.com. SRV service location: priority = 0 weight = 100 port = 88 svr hostname = server.idm.example.com > _ldap._tcp.idm.example.com _ldap._tcp.idm.example.com SRV service location: priority = 0 weight = 100 port = 389 svr hostname = server.idm.example.comChange the service type to TXT and run a DNS query for the TXT record with the IdM Kerberos realm name.
C:\>nslookup.exe > set type=TXT > _kerberos.idm.example.com. _kerberos.idm.example.com. text = "IDM.EXAMPLE.COM"Run a DNS query for the MS DC Kerberos over UDP and LDAP over TCP service records.
C:\>nslookup.exe > set type=SRV > _kerberos._udp.dc._msdcs.idm.example.com. _kerberos._udp.dc._msdcs.idm.example.com. SRV service location: priority = 0 weight = 100 port = 88 svr hostname = server.idm.example.com > _ldap._tcp.dc._msdcs.idm.example.com. _ldap._tcp.dc._msdcs.idm.example.com. SRV service location: priority = 0 weight = 100 port = 389 svr hostname = server.idm.example.comActive Directory only expects to discover domain controllers that can respond to AD-specific protocol requests, such as other AD domain controllers and IdM trust controllers. Use the
ipa-adtrust-installtool to promote an IdM server to a trust controller, and you can verify which servers are trust controllers with theipa server-role-find --role 'AD trust controller'command.Verify that AD services are resolvable from the AD server.
C:\>nslookup.exe
> set type=SRV
Enter the domain name for the Kerberos over UDP and LDAP over TCP service records.
> _kerberos._udp.dc._msdcs.ad.example.com.
_kerberos._udp.dc._msdcs.ad.example.com. 	SRV service location:
    priority = 0
    weight = 100
    port = 88
    svr hostname = addc1.ad.example.com
> _ldap._tcp.dc._msdcs.ad.example.com.
_ldap._tcp.dc._msdcs.ad.example.com. 	SRV service location:
    priority = 0
    weight = 100
    port = 389
    svr hostname = addc1.ad.example.com
9.8. Creating a trust agent
A trust agent is an IdM server that can perform identity lookups against AD domain controllers.
For example, if you are creating a replica of an IdM server that has a trust with Active Directory, you can set up the replica as a trust agent. A replica does not automatically have the AD trust agent role installed.
Prerequisites
- IdM is installed with an Active Directory trust.
-
The
sssd-toolspackage is installed.
Procedure
On an existing trust controller, run the
ipa-adtrust-install --add-agentscommand:[root@existing_trust_controller]# ipa-adtrust-install --add-agents
The command starts an interactive configuration session and prompts you for the information required to set up the agent.
Restart the IdM service on the trust agent.
[root@new_trust_agent]# ipactl restart
Remove all entries from the SSSD cache on the trust agent:
[root@new_trust_agent]# sssctl cache-remove
Verify that the replica has the AD trust agent role installed:.
[root@existing_trust_controller]# ipa server-show new_replica.idm.example.com
...
Enabled server roles: CA server, NTP server, AD trust agent
Additional resources
-
For further information about the
--add-agentsoption, see theipa-adtrust-install(1)man page. - For more information about trust agents, see Trust controllers and trust agents in the Planning Identity Management guide.
9.9. Enabling automatic private group mapping for a POSIX ID range on the CLI
By default, SSSD does not map private groups for Active Directory (AD) users if you have established a POSIX trust that relies on POSIX data stored in AD. If any AD users do not have primary groups configured, IdM is not be able to resolve them.
This procedure explains how to enable automatic private group mapping for an ID range by setting the hybrid option for the auto_private_groups SSSD parameter on the command line. As a result, IdM is able to resolve AD users that do not have primary groups configured in AD.
Prerequisites
- You have successfully established a POSIX cross-forest trust between your IdM and AD environments.
Procedure
Display all ID ranges and make note of the AD ID range you want to modify.
[root@server ~]# ipa idrange-find
----------------
2 ranges matched
----------------
  Range name: IDM.EXAMPLE.COM_id_range
  First Posix ID of the range: 882200000
  Number of IDs in the range: 200000
  Range type: local domain range

  Range name: AD.EXAMPLE.COM_id_range
  First Posix ID of the range: 1337000000
  Number of IDs in the range: 200000
  Domain SID of the trusted domain: S-1-5-21-4123312420-990666102-3578675309
  Range type: Active Directory trust range with POSIX attributes
----------------------------
Number of entries returned 2
----------------------------
Adjust the automatic private group behavior for the AD ID range with the
ipa idrange-modcommand.[root@server ~]# ipa idrange-mod --auto-private-groups=hybrid AD.EXAMPLE.COM_id_rangeReset the SSSD cache to enable the new setting.
[root@server ~]# sss_cache -E
Additional resources
9.10. Enabling automatic private group mapping for a POSIX ID range in the IdM WebUI
By default, SSSD does not map private groups for Active Directory (AD) users if you have established a POSIX trust that relies on POSIX data stored in AD. If any AD users do not have primary groups configured, IdM is not be able to resolve them.
This procedure explains how to enable automatic private group mapping for an ID range by setting the hybrid option for the auto_private_groups SSSD parameter in the Identity Management (IdM) WebUI. As a result, IdM is able to resolve AD users that do not have primary groups configured in AD.
Prerequisites
- You have successfully established a POSIX cross-forest trust between your IdM and AD environments.
Procedure
- Log into the IdM Web UI with your user name and password.
- Open the IPA Server → ID Ranges tab.
-
Select the ID range you want to modify, such as
AD.EXAMPLE.COM_id_range. From the Auto private groups drop down menu, select the
hybridoption.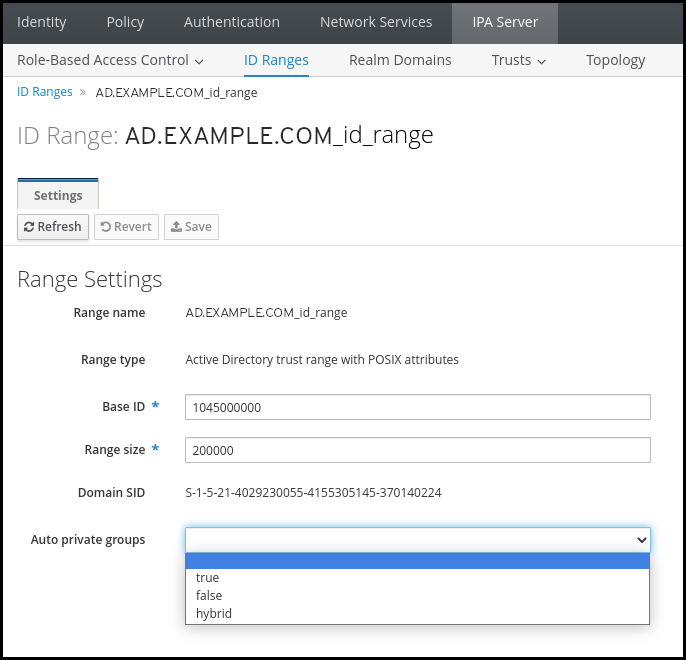
- Click the Save button to save your changes.
Additional resources
Chapter 10. Troubleshooting setting up a cross-forest trust
Learn more about troubleshooting the process of configuring a cross-forest trust between your Identity Management (IdM) environment and an Active Directory (AD) forest.
10.1. Sequence of events when establishing a cross-forest trust with AD
When you use the ipa trust-add command to establish a cross-forest trust with an Active Directory (AD) Domain Controller (DC), the command operates on behalf of the user who ran the command and performs the following actions on the IdM server. If you have trouble establishing a cross-forest trust, you can use this list to help narrow down and troubleshoot your issue.
Part 1: The command verifies settings and inputs
- Verify that the IdM server has the Trust Controller role.
-
Validate the options passed to the
ipa trust-addcommand. -
Validate the ID range associated with a trusted forest root domain. If you did not specify the ID range type and properties as options to the
ipa trust-addcommand, they are discovered from Active Directory.
Part 2: The command attempts to establish a trust to an Active Directory domain
- Create a separate trust object for each trust direction. Each of the objects get created on both sides (IdM and AD). If you are establishing a one-way trust, only one object is created on each side.
The IdM server uses the Samba suite to handle domain controller capabilities for Active Directory and creates a trust object on the target AD PDC:
-
The IdM server establishes a secure connection to the
IPC$share on the target DC. Since RHEL 8.4, the connection requires at least the SMB3 protocol with Windows Server 2012 and above to ensure the connection is sufficiently secure with AES-based encryption used for the session. -
The IdM server queries for the presence of the trusted domain object (TDO) using an
LSA QueryTrustedDomainInfoByNamecall. If the TDO is already present, remove it with an
LSA DeleteTrustedDomaincall.NoteThis call fails if the AD user account used to establish the trust does not have full Enterprise Admin (EA) or Domain Admin (DA) privileges for the forest root, such as members of the Incoming Forest Trust Builders group. If the old TDO is not automatically removed, an AD Administrator must manually remove it from AD.
-
The IdM server creates a new TDO with an
LSA CreateTrustedDomainEx2call. The TDO credentials are randomly generated using a Samba-provided password generator with 128 random characters. The new TDO is then modified with an
LSA SetInformationTrustedDomaincall to make sure encryption types supported by the trust are set properly:-
The
RC4_HMAC_MD5encryption type is enabled, even if there are no RC4 keys in use, due to how Active Directory is designed. AES128_CTS_HMAC_SHA1_96andAES256_CTS_HMAC_SHA1_96encryption types are enabled.NoteBy default, RHEL 9 does not allow SHA-1 encryption, which is an algorithm that AD requires. Make sure you have enabled the
AD-SUPPORTsystem-wide cryptographic subpolicy to allow SHA-1 encryption in your RHEL 9 IdM servers for communication with AD Domain Controllers. See <link TBA>.
-
The
-
The IdM server establishes a secure connection to the
-
For a forest trust, verify that in-forest domains can be reached transitively with an
LSA SetInformationTrustedDomaincall. Add trust topology information about the other forest (IdM in the case of communicating with AD, AD in the case of communicating with IdM) using an
LSA RSetForestTrustInformationcall.NoteThis step might cause a conflict for one of three reasons:
-
A SID namespace conflict, reported as an
LSA_SID_DISABLED_CONFLICTerror. This conflict cannot be resolved. -
A NetBIOS namespace conflict, reported as an
LSA_NB_DISABLED_CONFLICTerror. This conflict cannot be resolved. -
A DNS namespace conflict with a top level name (TLN), reported as an
LSA_TLN_DISABLED_CONFLICTerror. The IdM server can automatically resolve a TLN conflict if it is caused by another forest.
To resolve a TLN conflict, the IdM server performs the following steps:
- Retrieve forest trust information for the conflicting forest.
- Add an exclusion entry for the IdM DNS namespace to the AD forest.
- Set forest trust information for the forest we conflict on.
- Re-try establishing the trust to the original forest.
The IdM server can only resolve these conflicts if you authenticated the
ipa trust-addcommand with the privileges of an AD administrator that can change forest trusts. If you do not have access to those privileges, the administrator of the original forest must manually perform the steps above in the Active Directory Domains and Trusts section of the Windows UI.-
A SID namespace conflict, reported as an
- If it does not exist, create the ID range for the trusted domain.
- For a forest trust, query Active Directory domain controllers from the forest root for details about the forest topology. The IdM server uses this information to create additional ID ranges for any additional domains from the trusted forest.
Additional resources
- Trust controllers and trust agents
- Overview Documents (Microsoft)
- Technical Documents (Microsoft)
- Privileged Accounts and Groups in Active Directory (Microsoft)
10.2. Checklist of prerequisites for establishing an AD trust
You can use the following checklist to review the prerequisites for creating a trust with an AD domain.
Table 10.1. Table
| Component | Configuration | Additional details |
|---|---|---|
| Product versions | Your Active Directory domain is using a supported version of Windows Server. | |
| AD Administrator privileges | The Active Directory administration account must be a member of one of the following groups:
| |
| Networking | IPv6 support is enabled in the Linux kernel for all IdM servers. | |
| Date and time | Verify the date and time settings on both servers match. | |
| Encryption types | The following AD accounts have AES encryption keys:
If you have recently enabled AES encryption in AD, generate new AES keys with the following steps:
| |
| Firewall | You have opened all necessary ports on IdM servers and AD Domain Controllers for bidirectional communication. | |
| DNS |
| |
| Topology | Ensure you are attempting to establish a trust with an IdM server you have configured as a trust controller. |
10.3. Gathering debug logs of an attempt to establish an AD trust
If you are experiencing issues with establishing a trust between an IdM environment and AD domain, use the following steps to enable detailed error logging so you can gather logs of an attempt to establish a trust. You can review these logs to help with your troubleshooting efforts, or you can provide them in a Red Hat Technical Support case.
Prerequisites
- You need root permissions to restart IdM services.
Procedure
To enable debugging for the IdM server, create the file
/etc/ipa/server.confwith the following contents.[global] debug=True
Restart the
httpdservice to load the debugging configuration.[root@trust_controller ~]# systemctl restart httpd
Stop the
smbandwinbindservices.[root@trust_controller ~]# systemctl stop smb winbind
Set the debugging log level for the
smbandwinbindservices.[root@trust_controller ~]# net conf setparm global 'log level' 100
To enable debug logging for Samba client code used by the IdM framework, edit the
/usr/share/ipa/smb.conf.emptyconfiguration file to have the following contents.[global] log level = 100Remove previous Samba logs.
[root@trust_controller ~]# rm /var/log/samba/log.*
Start the
smbandwinbindservices.[root@trust_controller ~]# systemctl start smb winbind
Print a timestamp as you attempt to establish a trust with verbose mode enabled.
[root@trust_controller ~]# date; ipa -vvv trust-add --type=ad ad.example.com
Review the following error log files for information about the failed request:
-
/var/log/httpd/error_log -
/var/log/samba/log.*
-
Disable debugging.
[root@trust_controller ~]# mv /etc/ipa/server.conf /etc/ipa/server.conf.backup
[root@trust_controller ~]# systemctl restart httpd
[root@trust_controller ~]# systemctl stop smb winbind
[root@trust_controller ~]# net conf setparm global 'log level' 0
[root@trust_controller ~]# mv /usr/share/ipa/smb.conf.empty /usr/share/ipa/smb.conf.empty.backup
[root@trust_controller ~]# systemctl start smb winbind
(Optional) If you are unable to determine the cause of the authentication issue:
Collect and archive the log files you recently generated.
[root@trust_controller ~]# tar -cvf debugging-trust.tar /var/log/httpd/error_log /var/log/samba/log.*
- Open a Red Hat Technical Support case and provide the timestamp and debug logs from the attempt.
Additional resources
Chapter 11. Troubleshooting client access to services in the other forest
After configuring a trust between your Identity Management (IdM) and Active Directory (AD) environments, you might experience issues where a client in one domain is not able to access a service in the other domain. Use the following diagrams to troubleshoot the issue.
11.1. Flow of information when a host in the AD forest root domain requests services from an IdM server
The following diagram explains the flow of information when an Active Directory (AD) client requests a service in the Identity Management (IdM) domain.
If you have trouble accessing IdM services from AD clients, you can use this information to narrow your troubleshooting efforts and identify the source of the issue.

- The AD client contacts the AD Kerberos Distribution Center (KDC) to perform a TGS Request for the service in the IdM domain.
- The AD KDC recognizes that the service belongs to the trusted IdM domain.
- The AD KDC sends the client a cross-realm ticket-granting ticket (TGT), along with a referral to the trusted IdM KDC.
- The AD client uses the cross-realm TGT to request a ticket to the IdM KDC.
- The IdM KDC validates the Privileged Attribute Certificate (MS-PAC) that is transmitted with the cross-realm TGT.
- The IPA-KDB plugin might check the LDAP directory to see if foreign principals are allowed to get tickets for the requested service.
- The IPA-KDB plugin decodes the MS-PAC, verifies, and filters the data. It performs lookups in the LDAP server to check if it needs to augment the MS-PAC with additional information, such as local groups.
- The IPA-KDB plugin then encodes the PAC, signs it, attaches it to the service ticket, and sends it to the AD client.
- The AD client can now contact the IdM service using the service ticket issued by IdM KDC.
11.2. Flow of information when a host in an AD child domain requests services from an IdM server
The following diagram explains the flow of information when an Active Directory (AD) host in a child domain requests a service in the Identity Management (IdM) domain. In this scenario, the AD client contacts the Kerberos Distribution Center (KDC) in the child domain, then contacts the KDC in the AD forest root, and finally contacts the IdM KDC to request access to the IdM service.
If you have trouble accessing IdM services from AD clients, and your AD client belongs to a domain that is a child domain of an AD forest root, you can use this information to narrow your troubleshooting efforts and identify the source of the issue.

- The AD client contacts the AD Kerberos Distribution Center (KDC) in its own domain to perform a TGS Request for the service in the IdM domain.
-
The AD KDC in
child.ad.example.com, the child domain, recognizes that the service belongs to the trusted IdM domain. -
The AD KDC in the child domain sends the client a referral ticket for the AD forest root domain
ad.example.com. - The AD client contacts the KDC in the AD forest root domain for the service in the IdM domain.
- The KDC in the forest root domain recognizes that the service belongs to the trusted IdM domain.
- The AD KDC sends the client a cross-realm ticket-granting ticket (TGT), along with a referral to the trusted IdM KDC.
- The AD client uses the cross-realm TGT to request a ticket to the IdM KDC.
- The IdM KDC validates the Privileged Attribute Certificate (MS-PAC) that is transmitted with the cross-realm TGT.
- The IPA-KDB plugin might check the LDAP directory to see if foreign principals are allowed to get tickets for the requested service.
- The IPA-KDB plugin decodes the MS-PAC, verifies, and filters the data. It performs lookups in the LDAP server to check if it needs to augment the MS-PAC with additional information, such as local groups.
- The IPA-KDB plugin then encodes the PAC, signs it, attaches it to the service ticket, and sends it to the AD client.
- The AD client can now contact the IdM service using the service ticket issued by IdM KDC.
11.3. Flow of information when an IdM client requests services from an AD server
The following diagram explains the flow of information when an Identity Management (IdM) client requests a service in the Active Directory (AD) domain when you have configured a two-way trust between IdM and AD.
If you have trouble accessing AD services from IdM clients, you can use this information to narrow your troubleshooting efforts and identify the source of the issue.
By default, IdM establishes a one-way trust to AD, which means it is not possible to issue cross-realm ticket-granting ticket (TGT) for resources in an AD forest. To be able to request tickets to services from trusted AD domains, configure a two-way trust.

- The IdM client requests a ticket-granting ticket (TGT) from the IdM Kerberos Distribution Center (KDC) for the AD service it wants to contact.
- The IdM KDC recognizes that the service belongs to the AD realm, verifies that the realm is known and trusted, and that the client is allowed to request services from that realm.
- Using information from the IdM Directory Server about the user principal, the IdM KDC creates a cross-realm TGT with a Privileged Attribute Certificate (MS-PAC) record about the user principal.
- The IdM KDC sends back a cross-realm TGT to the IdM client.
- The IdM client contacts the AD KDC to request a ticket for the AD service, presenting the cross-realm TGT that contains the MS-PAC provided by the IdM KDC.
- The AD server validates and filters the PAC, and returns a ticket for the AD service.
- The IPA client can now contact the AD service.
Additional resources
Chapter 12. Removing the trust using the command line
Follow this procedure to remove the Identity Management (IdM)/Active Directory (AD) trust on the IdM side using the command line interface.
Prerequisites
- You have obtained a Kerberos ticket as an IdM administrator. For details, see Logging in to IdM in the Web UI: Using a Kerberos ticket.
Procedure
Use the
ipa trust-delcommand to remove the trust configuration from IdM.[root@server ~]# ipa trust-del ad_domain_name ------------------------------ Deleted trust "ad_domain_name" ------------------------------
- Remove the trust object from your Active Directory configuration.
Removing the trust configuration does not automatically remove the ID range IdM has created for AD users. This way, if you add the trust again, the existing ID range is re-used. Also, if AD users have created files on an IdM client, their POSIX IDs are preserved in the file metadata.
To remove all information related to an AD trust, remove the AD user ID range after removing the trust configuration and trust object:
# ipa idrange-del AD.EXAMPLE.COM_id_range
# systemctl restart sssd
Verification steps
Use the
ipa trust-showcommand to confirm that the trust has been removed.[root@server ~]# ipa trust-show ad.example.com ipa: ERROR: ad.example.com: trust not found
Additional resources
Chapter 13. Removing the trust using the IdM Web UI
Follow this procedure to remove the Identity Management (IdM)/Active Directory (AD) trust using the IdM Web UI.
Prerequisites
- You have obtained a Kerberos ticket. For details, see Logging in to IdM in the Web UI: Using a Kerberos ticket.
Procedure
- Log in to the IdM Web UI with administrator privileges. For details, see Accessing the IdM Web UI in a web browser.
- In the IdM Web UI, click the IPA Server tab.
- In the IPA Server tab, click the Trusts tab.
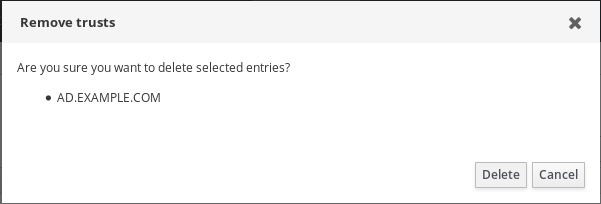
Select the trust you want to remove.

- Click the Delete button.
In the Remove trusts dialog box, click Delete.
- Remove the trust object from your Active Directory configuration.
Removing the trust configuration does not automatically remove the ID range IdM has created for AD users. This way, if you add the trust again, the existing ID range is re-used. Also, if AD users have created files on an IdM client, their POSIX IDs are preserved in the file metadata.
To remove all information related to an AD trust, remove the AD user ID range in the ID Ranges tab after removing the trust configuration and trust object.
Verification steps
If the trust has been successfully deleted, the Web UI displays a green pop-up with the text:
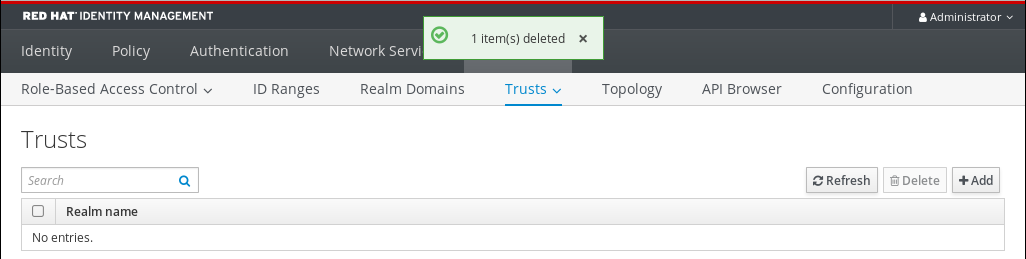
Additional resources
Chapter 14. Removing the trust using Ansible
Follow this procedure to remove the Identity Management (IdM)/Active Directory (AD) trust on the IdM side by using an Ansible playbook.
Prerequisites
- You have obtained a Kerberos ticket as an IdM administrator. For details, see Logging in to IdM in the Web UI: Using a Kerberos ticket.
You have configured your Ansible control node to meet the following requirements:
- You are using Ansible version 2.14 or later.
-
You have installed the
ansible-freeipapackage on the Ansible controller. - The example assumes that in the ~/MyPlaybooks/ directory, you have created an Ansible inventory file with the fully-qualified domain name (FQDN) of the IdM server.
-
The example assumes that the secret.yml Ansible vault stores your
ipaadmin_password.
-
The target node, that is the node on which the
ansible-freeipamodule is executed, is part of the IdM domain as an IdM client, server or replica.
Procedure
Navigate to your ~/MyPlaybooks/ directory:
$ cd ~/MyPlaybooks/Create an
del-trust.ymlplaybook with the following content:--- - name: Playbook to delete trust hosts: ipaserver vars_files: - /home/user_name/MyPlaybooks/secret.yml tasks: - name: ensure the trust is absent ipatrust: ipaadmin_password: "{{ ipaadmin_password }}" realm: ad.example.com state: absentIn the example,
realmdefines the AD realm name string.- Save the file.
Run the Ansible playbook. Specify the playbook file, the file storing the password protecting the secret.yml file, and the inventory file:
$ ansible-playbook --vault-password-file=password_file -v -i inventory del-trust.yml
Removing the trust configuration does not automatically remove the ID range IdM has created for AD users. This way, if you add the trust again, the existing ID range is re-used. Also, if AD users have created files on an IdM client, their POSIX IDs are preserved in the file metadata.
To remove all information related to an AD trust, remove the AD user ID range after removing the trust configuration and trust object:
# ipa idrange-del AD.EXAMPLE.COM_id_range
# systemctl restart sssd
Verification steps
Use the
ipa trust-showcommand to confirm that the trust has been removed.[root@server ~]# ipa trust-show ad.example.com ipa: ERROR: ad.example.com: trust not found
Additional resources
- /usr/share/doc/ansible-freeipa/README-trust.md
- /usr/share/doc/ansible-freeipa/playbooks/trust
- Removing an ID range after removing a trust to AD
Chapter 15. Removing an ID range after removing a trust to AD
If you have removed a trust between your IdM and Active Directory (AD) environments, you might want to remove the ID range associated with it.
IDs allocated to ID ranges associated with trusted domains might still be used for ownership of files and directories on systems enrolled into IdM.
If you remove the ID range that corresponds to an AD trust that you have removed, you will not be able to resolve the ownership of any files and directories owned by AD users.
Prerequisites
- You have removed a trust to an AD environment.
Procedure
Display all the ID ranges that are currently in use:
[root@server ~]# ipa idrange-find-
Identify the name of the ID range associated with the trust you have removed. The first part of the name of the ID range is the name of the trust, for example
AD.EXAMPLE.COM_id_range. Remove the range:
[root@server ~]# ipa idrange-del AD.EXAMPLE.COM_id_rangeRestart the SSSD service to remove references to the ID range you have removed.
[root@server ~]# systemctl restart sssd
Additional resources