
Red Hat Training
A Red Hat training course is available for Red Hat Virtualization
自承载引擎指南
第 1 章 介绍
表 1.1. 支持部署自承载引擎的操作系统版本
|
系统类型
|
支持的版本
|
|---|---|
|
Red Hat Enterprise Linux 主机
|
7.3
|
|
Red Hat Virtualization Host
|
7.3
|
|
HostedEngine-VM (Manager)
|
7.3
|
重要
hosted-engine --deploy 部署自承载引擎的工作流程:
注意
hosted-engine --deploy 或 Cockpit 用户界面来部署自承载引擎。在 Red Hat Virtualization Host(RHVH)上,使用 Cockpit 用户界面来执行自承载引擎部署。Cockpit 用户界面是承载引擎脚本的 UI 版本,可辅助配置主机和 Manager 虚拟机。

第 2 章 部署自承载引擎
2.1. 在 Red Hat Enterprise Linux 主机上初始化自承载引擎部署
2.1.1. 安装自承载引擎软件包
hosted-engine --deploy 从命令行安装自承载引擎,或通过 Cockpit 用户界面安装。根据您选择的方法,需要用到不同软件包。
过程 2.1. 安装自承载引擎
- 安装部署自承载引擎所需的软件包。
- 使用
hosted-engine --deploy安装自承载引擎:# yum install ovirt-hosted-engine-setup
- 使用 Cockpit 用户界面安装自承载引擎:
yum install cockpit-ovirt-dashboard
- 另外,还可以为 Manager 虚拟机安装 RHV-M Virtual Appliance 软件包。或者,脚本会提示您在部署期间下载该软件包。
# yum install rhvm-appliance
2.1.2. 开始自承载引擎部署
hosted-engine 脚本或 Cockpit 用户界面可协助用户配置主机和 Manager 虚拟机。采用这两种方法都需要您回答一系列问题,系统会根据您的回答配置环境。
前提条件
- 您必须全新安装 Red Hat Enterprise Linux 7 系统,并在其中安装 ovirt-hosted-engine-setup 或 cockpit-ovirt-dashboard 软件包。
- 必须为自承载引擎环境准备好存储。至少需要两个存储域:如需了解有关存储准备的更多信息,请参阅管理指南中的存储 部分。
- 一个是 Manager 虚拟机专用的共享存储域。此存储域创建于自承载引擎部署期间,至少要有 60 GB。
- 另一个是用于保存常规虚拟机数据的数据存储域。部署完成后,必须将此存储域添加到自承载引擎环境中。
重要
如果您使用的是 iSCSI 存储,则不要在共享存储域和数据存储域中使用相同的 iSCSI 目标。 - 您必须为 Manager 和主机准备好完全限定域名(FQDN)。DNS 中必须设有正向和反向查询记录。
- 您可以在部署之前,通过安装 rhvm-appliance 软件包来手动安装 RHV-M Virtual Appliance。或者,在部署期间由脚本或 Cockpit 用户界面下载。不支持使用其他方法来安装 Manager 虚拟机操作系统。
- 要在 Manager 安装中使用 RHV-M Virtual Appliance,需要有一个至少达到 5 GB 的目录。部署过程中会检查
/var/tmp是否具备足够的文件提取空间。如果空间不够,您可以指定不同的目录,或者挂载外部存储器。VDSM 用户和 KVM 群组必须具备在目录上读写和执行操作的权限。
过程 2.2. 开始基于 RHEL 的自承载引擎部署
开始承载引擎部署
取决于选择的是hosted-engine --deploy命令还是 Cockpit 用户界面,部署的开始方式会有所不同。- 使用
hosted-engine --deploy部署自承载引擎时,建议使用screen窗口管理器来运行脚本,这样可以避免因为网络或终端中断造成会话丢失。如果尚未安装该程序,请安装 screen 软件包,该软件包可在标准 Red Hat Enterprise Linux 存储库中找到。# yum install screen
# screen
# hosted-engine --deploy
注意
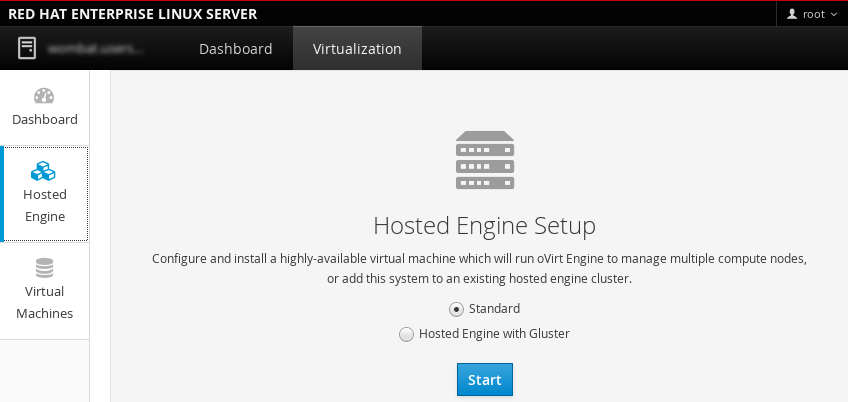
使用 CTRL+D 组合键可以随时退出脚本来中止部署。如果会话超时或连接中断,请运行screen -d -r来恢复hosted-engine部署会话。 - 要使用 Cockpit 用户界面部署自承载引擎,请通过 https://HostIPorFQDN:9090 登录到 UI,然后使用虚拟化 > 承载的引擎。选择标准 来执行标准自承载引擎安装,然后点击。
2.2. 在 Red Hat Virtualization Host 上开始自承载引擎部署
hosted-engine 脚本的一个 UI 版本,可以帮助进行主机和 Manager 虚拟机的配置。这个脚本会要求您回答一系列问题,然后根据提供的信息对环境进行配置。
前提条件
- 您必须具备一个全新安装的 Red Hat Virtualization Host 系统。Cockpit 用户界面的系统子标签页中的 Performance Profile 需要被设置为
virtual-host。 - 必须为自承载引擎环境准备好存储。至少需要两个存储域:如需了解有关存储准备的更多信息,请参阅管理指南中的存储 章节。
- 一个是 Manager 虚拟机专用的共享存储域。此存储域创建于自承载引擎部署期间,至少要有 60 GB。
- 另一个是用于保存常规虚拟机数据的数据存储域。部署完成后,必须将此存储域添加到自承载引擎环境中。
重要
如果您使用的是 iSCSI 存储,则不要在共享存储域和数据存储域中使用相同的 iSCSI 目标。 - 您必须为 Manager 和主机准备好完全限定域名(FQDN)。DNS 中必须设有正向和反向查询记录。
- 要在 Manager 安装中使用 RHV-M Virtual Appliance,需要有一个至少有 5 GB 的目录。
hosted-engine脚本首先会检查/var/tmp是否具备足够的文件提取空间。如果空间不够,您可以指定不同的目录,或者挂载外部存储器。VDSM 用户和 KVM 群组必须具备在目录上读写和执行操作的权限。
过程 2.3. 启动基于 RHVH 的自承载引擎
开始自承载引擎部署
登录到 Cockpit 用户界面(https://HostIPorFQDN:9090)。进入虚拟化 > 承载的引擎,点击。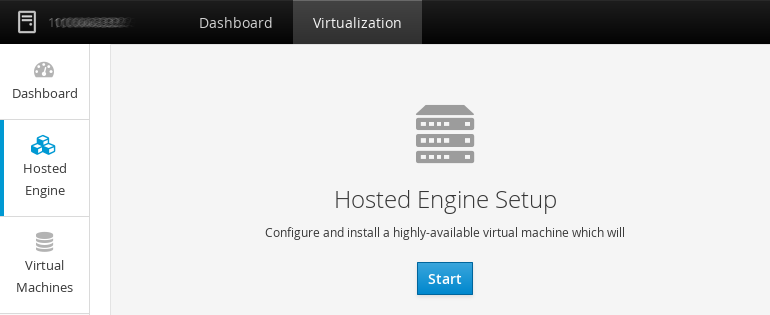
2.3. 部署自承载引擎
hosted-engine --deploy 或者 Cockpit 用户界面初始化自承载引擎部署之后,您需要问答一系列问题,才能配置主机和 Manager 虚拟机。部署脚本中的字段会预先填充默认答案(如果存在);请根据需要更改或输入您的答案。
过程 2.4. 部署自承载引擎
开始部署
选择开始部署。During customization use CTRL-D to abort. Continuing will configure this host for serving as hypervisor and create a VM where you have to install the engine afterwards. Are you sure you want to continue? (Yes, No)[Yes]:
下载 RHV-M Virtual Appliance
如果尚未手动下载 RHV-M Virtual Appliance,您可以在部署期间下载和安装它。请选择来下载 RHV-M Virtual Appliance。The oVirt engine appliance is now required to deploy hosted-engine. You could get oVirt engine appliance installing ovirt-engine-appliance rpm. Do you want to install ovirt-engine-appliance rpm? (Yes, No) [Yes]:
配置存储
选择要使用的存储类型。Please specify the storage you would like to use (glusterfs, iscsi, fc, nfs3, nfs4)[nfs3]:
- 对于 NFS 存储类型,使用 FQDN 或 IP 地址指定它的完整地址,并指定共享存储域的路径名。
Please specify the full shared storage connection path to use (example: host:/path): storage.example.com:/hosted_engine/nfs
- 对于 iSCSI,指定 iSCSI 门户 IP 地址、端口、用户名和密码,并从自动检测到的列表中选择一个目标名。在部署过程中只能选择一个 iSCSI 目标:
Please specify the iSCSI portal IP address:
Please specify the iSCSI portal port [3260]:
Please specify the iSCSI portal user:
Please specify the iSCSI portal password:
Please specify the target name (auto-detected values) [default]:
- 对于 Gluster 存储类型,使用 FQDN 或 IP 地址指定它的完整地址,并指定共享存储域的路径名。
重要
当前只支持 replica 3 Gluster 存储。请确认已进行了以下配置:- 在所有 3 个 Gluster 服务器的
/etc/glusterfs/glusterd.vol文件中,把rpc-auth-allow-insecure设置为on。option rpc-auth-allow-insecure on
- 对卷进行以下配置:
gluster volume set volume cluster.quorum-type auto
gluster volume set volume network.ping-timeout 10
gluster volume set volume auth.allow \*
gluster volume set volume group virt
gluster volume set volume storage.owner-uid 36
gluster volume set volume storage.owner-gid 36
gluster volume set volume server.allow-insecure on
Please specify the full shared storage connection path to use (example: host:/path): storage.example.com:/hosted_engine/gluster_volume
- 对于光纤通道设备,必须对主机的总线适配器进行配置和连接,
hosted-engine脚本会自动检测到有效的 LUN。LUN 不能包括任何已存在的数据。The following luns have been found on the requested target: [1] 3514f0c5447600351 30GiB XtremIO XtremApp status: used, paths: 2 active [2] 3514f0c5447600352 30GiB XtremIO XtremApp status: used, paths: 2 active Please select the destination LUN (1, 2) [1]:
配置网络
部署过程中会检测可用作当前环境管理网桥的网络接口控制器(NIC)。iptables was detected on your computer, do you wish setup to configure it? (Yes, No)[Yes]:
Please indicate a nic to set ovirtmgmt bridge on: (eth1, eth0) [eth1]:
请指定可连接的网关 IP 地址 [X.X.X.X]:
配置虚拟机
此脚本会自动检测可用的 RHV-M Virtual Appliance;请选择适用的设备。The following appliance have been found on your system: [1] - The oVirt Engine Appliance image (OVA) [2] - Directly select an OVA file Please select an appliance (1, 2) [1]:
选择连接到虚拟机的 或 控制台类型。Please specify the console type you would like to use to connect to the VM (vnc, spice) [vnc]:
如果想要 cloud-init 对 Manager 虚拟机进行初始配置,则选Yes。选择来使用 cloud-init 执行任务,如设置 root 密码、配置网络、配置主机名、为engine-setup提供应答文件、在引导时运行engine-setup。另外,如果已有存在的 cloud-init 脚本,则可以选择来使用这个脚本实现更高级 cloud-init 功能。Would you like to use cloud-init to customize the appliance on the first boot (Yes, No)[Yes]?
Would you like to generate on-fly a cloud-init ISO image (of no-cloud type)
or do you have an existing one (Generate, Existing)[Generate]?
注意
如需了解与 cloud-init 相关的更多信息,请参阅 https://cloudinit.readthedocs.org/en/latest/。为 Manager 虚拟机指定 FQDN。Please provide the FQDN you would like to use for the engine appliance. Note: This will be the FQDN of the engine VM you are now going to launch. It should not point to the base host or to any other existing machine. Engine VM FQDN: (leave it empty to skip): manager.example.com
如果未采用默认设置,请指明 Manager 使用的域名称。Please provide the domain name you would like to use for the engine appliance. Engine VM domain: [domain.example.com]
指明是否在启动 Manager 时自动执行engine-seup,并作为监测服务重新启动 Manager 虚拟机。Automatically execute engine-setup on the engine appliance on first boot (Yes, No)[Yes]?
Automatically restart the engine VM as a monitored service after engine-setup (Yes, No)[Yes]?
为 Manager 输入 root 密码。Enter root password that will be used for the engine appliance (leave it empty to skip): p@ssw0rd
Confirm appliance root password: p@ssw0rd
输入一个您日后能以 root 用户身份登录到 Manager 的 SSH 公开密钥,并指明是否为 root 用户激活 SSH 访问权限。Enter ssh public key for the root user that will be used for the engine appliance (leave it empty to skip): ssh-rsa AAAAB3NzaBlyc2EAAAADAQABAAABAQDN79V0/3Y3R0iyoCvu7fbw0Mtggm7tHb76yMA4asmU2DBk7ql3AguTNAK9p7Hkc1FANjXGvAZh2vBk+OFN51F/mqe4mgWM1CrpJcsM5ouReT+HkJpMb2f8tU14ZGVRuB/JYfwzsXhs6Jx6Nhh810yqlduTODRDhR9tOtvmtv4cb5VoJhlpppsQOkVxGfB7fPRVucw5PMAUJDwFsOqvtqjuvbGniMYvSZwhv7Nw5Su8WOpMnyr3WfUfDdIAWli5rk4hBHWRZC4zbRsZK03V8wua3PZE0sX3iNvJy4g/s5ynwLytTz7zPXjdyTsYm7BMX8IDhariXY10cYso+fIfjyjf example@redhat.com
Do you want to enable ssh access for the root user (yes, no, without-password) [yes]:
指定 Manager 磁盘大小和存储器大小。Please specify the size of the VM disk in GB: [50]:
Please specify the memory size of the VM in MB (Defaults to appliance OVF value): [4096]:
指定 Manager 使用的 CPU 类型和使用的虚拟 CPU 的数量。The following CPU types are supported by this host: - model_SandyBridge: Intel SandyBridge Family - model_Westmere: Intel Westmere Family - model_Nehalem: Intel Nehalem Family - model_Penryn: Intel Penryn Family - model_Conroe: Intel Conroe Family Please specify the CPU type to be used by the VM [model_SandyBridge]:
Please specify the number of virtual CPUs for the VM [Defaults to appliance OVF value: 4]:
为 Manager 虚拟机指定一个 MAC 地址,或采用随机生成的地址。在虚拟机上安装操作系统之前,可使用 MAC 地址更新您的 DHCP 和 DNS 服务器。如果需要通过 DHCP 为 Manager 虚拟机提供 IP 地址,请确保在 DHCP 配置中具备该 MAC 地址的有效预留。部署脚本不会为您配置 DHCP 服务器。You may specify a MAC address for the VM or accept a randomly generated default [00:16:3e:77:b2:a4]:
指定虚拟机的网络连接详情。How should the engine VM network be configured (DHCP, Static)[DHCP]?
如果您指定静态,请输入 Manager 的 IP 地址。Please enter the IP address to be used for the engine VM [10.x.x.x]:
Please provide a comma-separated list (max3) of IP addresses of domain name servers for the engine VM
Engine VM DNS (leave it empty to skip):
Add lines for the appliance itself and for this host to /etc/hosts on the engine VM?
Note: ensuring that this host could resolve the engine VM hostname is still up to you (Yes, No)[No]
配置自承载引擎
指定admin@internal用户访问管理门户所使用的密码。提供 SMTP 服务器的名称和 TCP 端口号、用于发送事件通知的电子邮件地址,以及需要接收事件通知的电子邮件地址的列表(以逗号分隔)。Enter engine admin password: p@ssw0rd
Confirm engine admin password: p@ssw0rd
Please provide the name of the SMTP server through which we will send notifications [localhost]:
Please provide the TCP port number of the SMTP server [25]:
Please provide the email address from which notifications will be sent [root@localhost]:
Please provide a comma-separated list of email addresses which will get notifications [root@localhost]:
配置预览
在进入下一步前,系统会显示已输入的配置值,并提示您确认这些信息。Please confirm installation settings (Yes, No)[Yes]: Yes
ovirt-engine 和高可用性服务,并把主机和共享存储域连接到 Manager 虚拟机。
hosted-engine 部署成功完成后,Red Hat Virtualization Manager 便已完成配置并在您的主机上运行。Manager 已经配置好了数据中心、集群、主机、Manager 虚拟机,以及 Manager 虚拟机专用的共享存储域。
重要
ovirt-engine-extension-aaa-ldap-setup 交互设置脚本在您的环境中添加目录服务器。如需了解更多相关信息,请参阅管理指南中的配置一个外部 LDAP 供应商。
--generate-answer=<file> 参数指定目标地址,默认在 /etc/ovirt-hosted-engine/answers.conf 中生成应答文件。
2.4. 管理 Manager 虚拟机
hosted-engine 工具用于协助管理 Manager 虚拟机。它能够在该环境中的任意自承载引擎主机上运行。如需查看全部选项,请运行 hosted-engine --help。如需详细了解某条命令,运行 hosted-engine --command --help。请参考 第 3.1 节 “对 Manager 虚拟机进行故障排除” 了解更多信息。
过程 2.5. 在共享存储域上更新自承载引擎配置
/var/lib/ovirt-hosted-engine-ha/broker.conf) 。目前,您可以使用 SMTP 配置电子邮件通知,用以提醒自承载引擎主机上发生的任意 HA 状态变化。可更新的关键字包括: smtp-server、smtp-port、source-email、destination-emails 和 state_transition。
- 在自承载引擎主机上,将
smtp-server关键字设置为所需的 SMTP 服务器地址:# hosted-engine --set-shared-config smtp-server smtp.example.com --type=broker
注意
为了确认自承载引擎配置文件是否已更新,请运行:# hosted-engine --get-shared-config smtp-server --type=broker broker : smtp.example.com, type : broker
- 确认是否已配置默认的 SMTP 端口(端口 25):
# hosted-engine --get-shared-config smtp-port --type=broker
broker : 25, type : broker
- 指定您希望 SMTP 服务器用于发送电子邮件通知的电子邮件地址。只能指定一个地址。
# hosted-engine --set-shared-config source-email source@example.com --type=broker
- 指定接收电子邮件通知的目标电子邮件地址。如果要指定多个电子邮件地址,请用逗号将它们隔开。
# hosted-engine --set-shared-config destination-emails destination1@example.com,destination2@example.com --type=broker
第 3 章 对自承载引擎进行故障排除
3.1. 对 Manager 虚拟机进行故障排除
过程 3.1. 对 Manager 虚拟机进行故障排除
- 运行
hosted-engine --vm-status检查 Manager 虚拟机的状态。注意
对 Manager 虚拟机所做的修改大约需要经过 20 秒后才会反映在状态命令的输出中。如果 Manager 虚拟机已启动并在运行,您将可以看到以下输出:--== Host 1 status ==-- Status up-to-date : True Hostname : hypervisor.example.com Host ID : 1 Engine status : {"health": "good", "vm": "up", "detail": "up"} Score : 3400 stopped : False Local maintenance : False crc32 : 99e57eba Host timestamp : 248542 - 如果 是“bad”或 是“down”,启用全局维护模式使主机不再被 HA 服务管理。
- 在管理门户中,右键点击任一自承载引擎主机,选择启用全局 HA 维护。
- 您也可以通过命令行设置维护模式:
# hosted-engine --set-maintenance --mode=global
- 如果 Manager 虚拟机已关闭,启动 Manager 虚拟机。如果虚拟机已启动,跳过这一步。
# hosted-engine ---vm-start
- 设置控制台密码:
# hosted-engine --add-console-password
- 连接到控制台。在提示时输入前一步中设置的密码。如需了解更多与控制台选项相关的信息,请参阅 https://access.redhat.com/solutions/2221461。
# hosted-engine --console
- 找出 Manager 虚拟机关闭或处于一个“不健康状态”的原因。检查
/var/log/messages和/var/log/ovirt-engine/engine.log。在解决了相关问题后,重新启动 Manager 虚拟机。 - 以 root 用户身份登录到 Manager 虚拟机,检查
ovirt-engine已被启动并在运行:# systemctl status ovirt-engine.service
- 在确认 Manager 虚拟机已启动并运行后,关闭控制台会话,禁用维护模式并重新启用 HA 服务:
# hosted-engine --set-maintenance --mode=none
额外的故障排除命令:
重要
hosted-engine --reinitialize-lockspace:当 sanlock 的锁定空间出现问题时可以使用这个命令。在使用这个命令重新初始化 sanlock 锁定空间前,请确认已启用了全局维护模式, Manager 虚拟机已被停止。hosted-engine --clean-metadata:从全局状态数据库中删除主机代理的元数据。这将会使其它所有主机都忘掉这个主机。请确认目标主机已被关闭,全局维护模式已启用。hosted-engine --check-liveliness:这个命令用来检查 ovirt-engine 服务的活性(liveliness)页。您也可以通过使用一个网络浏览器连接到https://engine-fqdn/ovirt-engine/services/health/进行检查。hosted-engine --connect-storage:这个命令会指示 VDSM 准备主机和 Manager 虚拟机所需的所有存储连接。这通常在自承载引擎部署过程中在后端运行。如果需要运行这个命令来对存储进行故障排除,请确定已启用了全局维护模式。
3.2. 清理一个失败的自承载引擎部署
过程 3.2. 运行清理脚本
- 运行
/usr/sbin/ovirt-hosted-engine-cleanup,然后选择y,清除自承载引擎部署失败留下的任何残余痕迹。# /usr/sbin/ovirt-hosted-engine-cleanup This will de-configure the host to run ovirt-hosted-engine-setup from scratch. Caution, this operation should be used with care. Are you sure you want to proceed? [y/n]
- 确定是在同一个共享存储设备上重新安装,还是重新选择一个不同的共享存储设备。
- 如果要在同一个存储域上部署安装,则在 NFS、Gluster、PosixFS 或本地存储域上运行下列命令,以便清理存储域:
# rm -rf
storage location/* - 对于 iSCSI 或 Fibre Channel Protocol (FCP) 存储,请查看 https://access.redhat.com/solutions/2121581 了解如何清理存储。
- 或者,选择一个不同的共享存储设备。
- 重新部署自承载引擎。
第 4 章 迁移到一个基于 RHEL 的自承载环境
4.1. 迁移到自承载环境
hosted-engine 脚本来简化迁移的过程。这个脚本会要求用户输入一系列信息,并根据提供的信息对环境进行配置。在以下过程中,标准 Red Hat Virtualization 环境中的 Manager 被称为 BareMetal-Manager。
engine-setup。在迁移过程中,用户需要手工运行 engine-setup,这样才可以提前在新的 Manager 虚拟机上恢复 BareMetal-Manager 备份文件。
- 运行
hosted-engine脚本来配置主机作为自承载引擎的主机,并创建一个新的 Red Hat Virtualization 虚拟机。 - 使用
engine-backup工具程序备份引擎数据库和配置文件,把备份数据复制到新的 Manager 虚拟机上,并使用带有--mode=restore选项的engine-backup命令恢复备份。运行engine-setup对 Manager 虚拟机进行配置。 - 使用
hosted-engine脚本进行设置。
先决条件
- 准备一个安装了 ovirt-hosted-engine-setup 软件包的新主机。请参阅 第 2.1 节 “在 Red Hat Enterprise Linux 主机上初始化自承载引擎部署” 以获得相关的详细信息。主机需要是当前 Red Hat Virtualization 环境支持的版本。
注意
如果选择使用一个已存在的主机,请把它设置为维护模式并从当前的环境中移除。请参阅 管理指南中的删除一个主机了解详情。 - 为您的自承载引擎环境准备好存储。自承载引擎需要使用 Manager 虚拟机专用的共享存储域。此存储域创建于部署期间,应至少为 60 GB。如需了解与存储准备有关的更多信息,请参阅管理指南中的存储 章节。
重要
如果您使用的是 iSCSI 存储,则不要在共享存储域和数据存储域中使用相同的 iSCSI 目标。 - 通过安装 rhevm-appliance 软件包可以获得 RHV-M Virtual Appliance。RHV-M Virtual Appliance 总是基于最新支持的 Manager 版本。请确认您当前环境中的 Manager 版本已被更新到最新支持的 Y-stream 版本,因为 Manager 的版本需要相同才可以进行迁移。
- 要在 Manager 安装中使用 RHV-M Virtual Appliance,需要有一个至少有 5 GB 的目录。
hosted-engine脚本首先会检查/var/tmp是否具备足够的文件提取空间。如果空间不够,您可以指定不同的目录,或者挂载外部存储器。VDSM 用户和 KVM 群组必须具备在目录上读写和执行操作的权限。 - 新的 Manager 的完全限定域名需要和原始 BareMetal-Manager 的完全限定域名相同。DNS 中需要有它的正向和反向查询记录。
- 需要有访问和修改 BareMetal-Manager 的权限。
- BareMetal-Manager 迁入到的虚拟机必须与 BareMetal-Manager 原来所在物理机器具备等量的 RAM。如果迁入 BareMetal-Manager 的虚拟机的 RAM 比 BareMetal-Manager 原来所在物理机的 RAM 少,请参阅下列红帽知识库文章:https://access.redhat.com/articles/2705841。
过程 4.1. 迁移到自承载环境
开始自承载引擎部署
注意
如果您从 3.5 或更早版本更新,您必须运行hosted-engine --deploy --config-append=/etc/ovirt-hosted-engine/answers.conf命令。文件answers.conf必须包含OVEHOSTED_NETWORK/bridgeName=str:rhevm参数。从 3.5 版本升级到 3.6 版本或更高版本时,如果不设置该参数,将导致默认管理网络无法运行。运行hosted-engine脚本。使用 CTRL+D 可以随时中断部署。我们推荐在运行脚本时使用screen程序,这样可以避免因为网络中断或其它原因造成脚本运行被中断。screen 软件包包括在标准的 Red Hat Enterprise Linux 软件仓库中。# yum install screen
# screen
# hosted-engine --deploy
注意
当网络中断或超时时,可以运行screen -d -r来恢复当前运行的hosted-engine。配置存储
选择使用的存储类型。During customization use CTRL-D to abort. Please specify the storage you would like to use (glusterfs, iscsi, fc, nfs3, nfs4)[nfs3]:
- 对于 NFS 存储类型,使用 FQDN 或 IP 地址指定它的完整地址,以及共享存储域的路径名。
Please specify the full shared storage connection path to use (example: host:/path): storage.example.com:/hosted_engine/nfs
- 对于 iSCSI,指定 iSCSI 门户 IP 地址、端口、用户名和密码,并从检测到的列表中选择一个目标名。在部署的过程中只能选择一个 iSCSI 目标:
Please specify the iSCSI portal IP address:
Please specify the iSCSI portal port [3260]:
Please specify the iSCSI portal user:
Please specify the iSCSI portal password:
Please specify the target name (auto-detected values) [default]:
- 对于 Gluster 存储类型,使用 FQDN 或 IP 地址指定它的完整地址,以及共享存储域的路径名。
重要
当前只支持 replica 3 Gluster 存储。请确认已进行了以下配置:- 在所有 3 个 Gluster 服务器的
/etc/glusterfs/glusterd.vol文件中,把rpc-auth-allow-insecure设置为on。option rpc-auth-allow-insecure on
- 对卷进行以下配置:
gluster volume set volume cluster.quorum-type auto
gluster volume set volume network.ping-timeout 10
gluster volume set volume auth.allow \*
gluster volume set volume group virt
gluster volume set volume storage.owner-uid 36
gluster volume set volume storage.owner-gid 36
gluster volume set volume server.allow-insecure on
Please specify the full shared storage connection path to use (example: host:/path): storage.example.com:/hosted_engine/gluster_volume
- 对于光纤通道设备,主机的总线适配器需要被配置和连接,
hosted-engine脚本会自动检测到有效的 LUN。LUN 不能包括任何额外的数据。The following luns have been found on the requested target: [1] 3514f0c5447600351 30GiB XtremIO XtremApp status: used, paths: 2 active [2] 3514f0c5447600352 30GiB XtremIO XtremApp status: used, paths: 2 active Please select the destination LUN (1, 2) [1]:
配置网络
这个脚本会检测可以被用来对环境进行管理的网卡(NIC),然后会检查防火墙的配置,并根据控制台(SPICE 或 VNC)访问 HostedEngine-VM 的需要来修改防火墙的配置。另外,提供一个可以被 ping 到的网络 IP 地址,ovirt-ha-agent会使用它来决定 HostedEngine-VM 是否在正常运行。Please indicate a nic to set rhvm bridge on: (eth1, eth0) [eth1]: iptables was detected on your computer, do you wish setup to configure it? (Yes, No)[Yes]: Please indicate a pingable gateway IP address [X.X.X.X]:
配置虚拟机
这个脚本会创建一个被配置为 Red Hat Virtualization Manager 的虚拟机(称为 HostedEngine-VM)。选择 作为引导设备类型,脚本会自动检测可用的 RHV-M Appliance。选择一个 appliance。Please specify the device to boot the VM from (choose disk for the oVirt engine appliance) (cdrom, disk, pxe) [disk]: Please specify the console type you would like to use to connect to the VM (vnc, spice) [vnc]: vnc [ INFO ] Detecting available oVirt engine appliances The following appliance have been found on your system: [1] - The oVirt Engine Appliance image (OVA) [2] - Directly select an OVA file Please select an appliance (1, 2) [1]: [ INFO ] Checking OVF archive content (could take a few minutes depending on archive size)如果使用 cloud-init 对 Manager 虚拟机进行初始设置,则选Yes。选择 来使用 cloud-init 进行配置,如设置 root 密码、配置网络、配置主机名。或选择 来使用一个已存在的 cloud-init 脚本来处理相关的 cloud-init 功能。为 Manager 虚拟机设置 FQDN。这需要和 BareMetal-Manager 的 FQDN 相同。注意
如需了解更多与 cloud-init 相关的信息,请参阅 https://cloudinit.readthedocs.org/en/latest/。Would you like to use cloud-init to customize the appliance on the first boot (Yes, No)[Yes]? Yes Would you like to generate on-fly a cloud-init no-cloud ISO image or do you have an existing one(Generate, Existing)[Generate]? Generate Please provide the FQDN you would like to use for the engine appliance. Note: This will be the FQDN of the engine VM you are now going to launch. It should not point to the base host or to any other existing machine. Engine VM FQDN: (leave it empty to skip): manager.example.com
对于以下问题,回答No,这样才可以在运行engine-setup前在 HostedEngine-VM 上恢复 BareMetal-Manager 备份文件。Automatically execute engine-setup on the engine appliance on first boot (Yes, No)[Yes]? No
配置 Manager 的域名、root 密码、网络、硬件和控制台访问详情。Enter root password that will be used for the engine appliance (leave it empty to skip): p@ssw0rd Confirm appliance root password: p@ssw0rd The following CPU types are supported by this host: - model_Penryn: Intel Penryn Family - model_Conroe: Intel Conroe Family Please specify the CPU type to be used by the VM [model_Penryn]: Please specify the number of virtual CPUs for the VM [Defaults to appliance OVF value: 4]: You may specify a MAC address for the VM or accept a randomly generated default [00:16:3e:77:b2:a4]: How should the engine VM network be configured (DHCP, Static)[DHCP]? Static Please enter the IP address to be used for the engine VM: 192.168.x.x Please provide a comma-separated list (max3) of IP addresses of domain name servers for the engine VM Engine VM DNS (leave it empty to skip): Add lines for the appliance itself and for this host to /etc/hosts on the engine VM? Note: ensuring that this host could resolve the engine VM hostname is still up to you (Yes, No)[No] Yes配置自承载引擎
指定在 Red Hat Virtualization 环境中标识 Host-HE1 的名称,以及访问管理门户所使用的admin@internal用户的密码。最后,提供 SMTP 的名称和 TCP 端口号、发送事件通知的电子邮件地址、以及需要接收事件通知的用户的电子邮件地址列表(以逗号分隔)。Enter engine admin password: p@ssw0rd Confirm engine admin password: p@ssw0rd Enter the name which will be used to identify this host inside the Administrator Portal [hosted_engine_1]: Please provide the FQDN for the engine you would like to use. This needs to match the FQDN that you will use for the engine installation within the VM. Note: This will be the FQDN of the VM you are now going to create, it should not point to the base host or to any other existing machine. Engine FQDN: []: manager.example.com Please provide the name of the SMTP server through which we will send notifications [localhost]: Please provide the TCP port number of the SMTP server [25]: Please provide the email address from which notifications will be sent [root@localhost]: Please provide a comma-separated list of email addresses which will get notifications [root@localhost]:配置预览
在实际进行配置前,hosted-engine脚本会显示已输入的信息,并提示您确认这些信息。Bridge interface : eth1 Engine FQDN : manager.example.com Bridge name : ovirtmgmt Host address : host.example.com SSH daemon port : 22 Firewall manager : iptables Gateway address : X.X.X.X Host name for web application : Host-HE1 Host ID : 1 Image size GB : 50 Storage connection : storage.example.com:/hosted_engine/nfs Console type : vnc Memory size MB : 4096 MAC address : 00:16:3e:77:b2:a4 Boot type : pxe Number of CPUs : 2 CPU Type : model_Penryn Please confirm installation settings (Yes, No)[Yes]:
配置 HostedEngine-VM
这个脚本会创建虚拟机 HostedEngine-VM,并提供和它进行连接的信息。您需要在 HostedEngine-VM 上恢复备份文件后,手工运行engine-setup,这样才能继续在 Host-HE1 上执行hosted-engine脚本。[ INFO ] Stage: Transaction setup ... [ INFO ] Creating VM You can now connect to the VM with the following command: /bin/remote-viewer vnc://localhost:5900 Use temporary password "3463VnKn" to connect to vnc console. Please note that in order to use remote-viewer you need to be able to run graphical applications. This means that if you are using ssh you have to supply the -Y flag (enables trusted X11 forwarding). Otherwise you can run the command from a terminal in your preferred desktop environment. If you cannot run graphical applications you can connect to the graphic console from another host or connect to the serial console using the following command: socat UNIX-CONNECT:/var/run/ovirt-vmconsole-console/8f74b589-8c6f-4a32-9adf-6e615b69de07.sock,user=ovirt-vmconsole STDIO,raw,echo=0,escape=1 Please ensure that your Guest OS is properly configured to support serial console according to your distro documentation. Follow http://www.ovirt.org/Serial_Console_Setup#I_need_to_access_the_console_the_old_way for more info. If you need to reboot the VM you will need to start it manually using the command: hosted-engine --vm-start You can then set a temporary password using the command: hosted-engine --add-console-password Please install and setup the engine in the VM. You may also be interested in subscribing to "agent" RHN/Satellite channel and installing rhevm-guest-agent-common package in the VM. The VM has been rebooted. To continue please install oVirt-Engine in the VM (Follow http://www.ovirt.org/Quick_Start_Guide for more info). Make a selection from the options below: (1) Continue setup - oVirt-Engine installation is ready and ovirt-engine service is up (2) Abort setup (3) Power off and restart the VM (4) Destroy VM and abort setup (1, 2, 3, 4)[1]:运行以下命令使用 VNC 协议连接到虚拟机。使用自承载引擎主机的 FQDN 或 IP 地址替换其中的 FQDN。# /bin/remote-viewer vnc://FQDN:5900
在 HostedEngine-VM 上启用 SSH
默认情况下,SSH 密码验证不会在 RHV-M Virtual Appliance 中启动,您可以通过 VNC 连接到 HostedEngine-VM 并启用 SSH 密码验证功能,这样,就可以通过 SSH 访问虚拟机来恢复 BareMetal-Manager 备份文件并配置新的 Manager。确认sshd服务已在运行。编辑/etc/ssh/sshd_config,把以下两个选项设置为yes:[...] PermitRootLogin yes [...] PasswordAuthentication yes
重启sshd服务来使所做的修改生效。# systemctl restart sshd.service
禁用 BareMetal-Manager
连接到 BareMetal-Manager(Red Hat Virtualization 环境中的 Manager),停止引擎并禁止它在系统引导时运行。# systemctl stop ovirt-engine.service # systemctl disable ovirt-engine.service
注意
推荐停止运行 BareMetal-Manager,这可以确保在系统备份被创建后,不会再对虚拟环境进行改变。另外,它还可以防止 BareMetal-Manager 和 HostedEngine-VM 同时管理存在的资源。更新 DNS
更新您的 DNS,从而使 Red Hat Virtualization 环境的 FQDN 可以正确地解析 HostedEngine-VM 的 IP 地址,以及在 Host-HE1 上配置hosted-engine部署脚本所提供的 FQDN。在这里,FQDN 被设置为 manager.example.com,因为所提供引擎的 FQDN 和新设置引擎的 FQDN 必须相同。为 BareMetal-Manager 创建一个备份
连接到 BareMetal-Manager,运行engine-backup命令。使用--mode=backup、--file=FILE和--log=LogFILE参数来分别指定备份的模式、备份文件的名称以及日志文件的名称。# engine-backup --mode=backup --file=FILE --log=LogFILE
把备份文件复制到 HostedEngine-VM
登录到 BareMetal-Manager,把备份文件复制到 HostedEngine-VM 上。在以下的例子中,manager.example.com 是 HostedEngine-VM 的 FQDN,/backup/ 是备份文件要被复制到的目录或路径。如果这些目录和路径还没有存在,您需要登录到 HostedEngine-VM 上后创建它们。# scp -p FILE LogFILE manager.example.com:/backup/
在 HostedEngine-VM 上恢复备份文件
使用engine-backup工具程序恢复一个完整的备份。如果在执行engine-setup的过程中手工配置了 BareMetal-Manager 数据库,则需要根据 第 6.2.3 节 “手工恢复自承载引擎 Manager” 中的内容手工恢复备份的环境。- 如果只恢复 Manager,运行以下命令:
# engine-backup --mode=restore --file=file_name --log=log_file_name --provision-db --restore-permissions
- 如果恢复 Manager 和 Data Warehouse,运行以下命令:
# engine-backup --mode=restore --file=file_name --log=log_file_name --provision-db --provision-dwh-db --restore-permissions
如果运行成功,以下输出会被显示:You should now run engine-setup. Done.
配置 HostedEngine-VM
配置恢复的 Manager 虚拟机。这个过程会检测到存在的配置设置和数据库内容。确认这些设置。完成后,系统会提供一个 SSH 指纹(fingerprint)和一个内部的证书授权哈希数据(Certificate Authority hash)。# engine-setup
[ INFO  ] Stage: Initializing
[ INFO  ] Stage: Environment setup
Configuration files: ['/etc/ovirt-engine-setup.conf.d/10-packaging.conf', '/etc/ovirt-engine-setup.conf.d/20-setup-ovirt-post.conf']
Log file: /var/log/ovirt-engine/setup/ovirt-engine-setup-20140304075238.log
Version: otopi-1.1.2 (otopi-1.1.2-1.el6ev)
[ INFO  ] Stage: Environment packages setup
[ INFO  ] Yum Downloading: rhel-65-zstream/primary_db 2.8 M(70%)
[ INFO  ] Stage: Programs detection
[ INFO  ] Stage: Environment setup
[ INFO  ] Stage: Environment customization

          --== PACKAGES ==--

[ INFO  ] Checking for product updates...
[ INFO  ] No product updates found

          --== NETWORK CONFIGURATION ==--

Setup can automatically configure the firewall on this system.
Note: automatic configuration of the firewall may overwrite current settings.
Do you want Setup to configure the firewall? (Yes, No) [Yes]:
[ INFO  ] iptables will be configured as firewall manager.

          --== DATABASE CONFIGURATION ==--


          --== OVIRT ENGINE CONFIGURATION ==--


          --== PKI CONFIGURATION ==--


          --== APACHE CONFIGURATION ==--


          --== SYSTEM CONFIGURATION ==--


          --== END OF CONFIGURATION ==--

[ INFO  ] Stage: Setup validation
[ INFO  ] Cleaning stale zombie tasks

          --== CONFIGURATION PREVIEW ==--

          Default SAN wipe after delete           : False
          Firewall manager                        : iptables
          Update Firewall                         : True
          Host FQDN                               : manager.example.com
          Engine database secured connection      : False
          Engine database host                    : X.X.X.X
          Engine database user name               : engine
          Engine database name                    : engine
          Engine database port                    : 5432
          Engine database host name validation    : False
          Engine installation                     : True
          PKI organization                        : example.com
          NFS mount point                         : /var/lib/exports/iso
          Configure VMConsole Proxy               : True
          Engine Host FQDN                        : manager.example.com
          Configure WebSocket Proxy               : True

          Please confirm installation settings (OK, Cancel) [OK]:
把主机和 Manager 进行同步
返回到 Host-HE1,选择选项 1 来继续hosted-engine脚本:(1) Continue setup - oVirt-Engine installation is ready and ovirt-engine service is up
这个脚本会显示内部 CA 的内容,并提示您选择 Host-HE1 要加入的集群。[ INFO ] Engine replied: DB Up!Welcome to Health Status! [ INFO ] Acquiring internal CA cert from the engine [ INFO ] The following CA certificate is going to be used, please immediately interrupt if not correct: [ INFO ] Issuer: C=US, O=example.com, CN=manager.example.com.23240, Subject: C=US, O=example.com, CN=manager.example.com.23240, Fingerprint (SHA-1): XXXXXXXXXXXXXXXXXXXXXXXXXXXXXXXXXXXXXXXX [ INFO ] Connecting to the Engine Enter the name of the cluster to which you want to add the host (DB1, DB2, Default) [Default]: [ INFO ] Waiting for the host to become operational in the engine. This may take several minutes... [ INFO ] The VDSM Host is now operational [ INFO ] Saving hosted-engine configuration on the shared storage domain Please shutdown the VM allowing the system to launch it as a monitored service. The system will wait until the VM is down.关闭 HostedEngine-VM
关闭 HostedEngine-VM。# shutdown -h now
设置确认
返回到 Host-HE1,确认它检测到 HostedEngine-VM 已经被关闭。[ INFO ] Enabling and starting HA services [ INFO ] Stage: Clean up [ INFO ] Generating answer file '/var/lib/ovirt-hosted-engine-setup/answers/answers-20160509162843.conf' [ INFO ] Generating answer file '/etc/ovirt-hosted-engine/answers.conf' [ INFO ] Stage: Pre-termination [ INFO ] Stage: Termination [ INFO ] Hosted Engine successfully set up
第 5 章 维护和升级资源
5.1. 维护自承载引擎
global- 机器中的所有高可用代理都不会监测引擎虚拟机的状态。当要进行的设置或升级操作需要停止引擎时,您需要设置 global 维护模式。例如,升级 Red Hat Virtualization。local- 发出命令的主机上的高可用性代理不会监测引擎虚拟机的状态。当主机处于local维护模式时,它不会被用来运行虚拟机;如果把正在运行引擎虚拟机的主机设为这个模式,引擎会被迁移到另外一个主机上。当应用系统改变或更新主机时,我们推荐您把主机设为 local 维护模式。none- 禁用维护模式,确保高可用性代理可以正常工作。
过程 5.1. 维护一个基于 RHEL 的自承载引擎(local 维护模式)
- 把一个自承载引擎主机设置为本地维护模式:
- 在管理门户中,把主机设置为维护模式,主机会自动进入本地维护模式。
- 您也可以通过命令行设置维护模式:
# hosted-engine --set-maintenance --mode=local
- 在进行完维护任务后,禁用维护模式:
# hosted-engine --set-maintenance --mode=none
过程 5.2. 维护一个基于 RHEL 的自承载引擎(global 维护模式)
- 把自承载引擎主机设置为全局维护模式:
- 在管理门户中,右键点击任一自承载引擎主机,选择启用全局 HA 维护。
- 您也可以通过命令行设置维护模式:
# hosted-engine --set-maintenance --mode=global
- 在进行完维护任务后,禁用维护模式:
# hosted-engine --set-maintenance --mode=none
5.2. 从自承载引擎环境中删除一个主机
过程 5.3. 从自承载引擎环境中删除一个主机
- 在管理门户中,点击主机选项卡。选择主机,然后点击维护将主机设置为本地维护模式。
- 选择同一个主机,然后点击编辑打开编辑主机窗口。
- 点击子选项卡,选择未部署单选按钮。此操作可终止
ovirt-ha-agent和ovirt-ha-broker服务,并移除自承载引擎配置文件。注意
主机可见,但在运行hosted-engine --vm-status时显示为不可用。这是因为在解除主机部署时并未删除元数据。在未更新元数据的情况下,被移除的主机将在约一周时间内消失。如果要强制删除主机的元数据,请遵循如何在承载引擎设置中清除已解除部署的主机的元数据中的步骤。 - 或者,选择相同的主机,点击删除打开删除主机确认窗口。点击。
5.3. 升级自承载引擎环境
- 把管理 Manager 虚拟机的高可用性代理设置为全局维护模式。
- 升级 Manager 虚拟机。
- 把自承载引擎主机设置为维护模式。必要时,Manager 虚拟机和其他虚拟机将会迁移至集群中的另一个主机。
- 更新自承载引擎主机。对所有主机重复此过程。建议在当前环境中更新所有主机,包括标准主机。
- 在集群中的所有主机和 Manager 虚拟机都完成升级之后,把集群的兼容性版本更改为 4.1。
过程 5.4. 升级自承载引擎环境
- 禁用所有自承载引擎主机上的高可用性代理。 在主机选项卡中,右键点击自承载引擎主机,然后选择启用全局 HA 维护。等待几分钟,然后检查详情窗格的 常规选项卡中是否显示了 Hosted Engine HA:已启用全局维护 ,由此确认环境是否已设置为维护模式。
- 登录到 Manager 虚拟机来升级 Red Hat Virtualization Manager。
- 启用 Red Hat Virtualization Manager 4.1 和 Red Hat Virtualization Tools 存储库:
# subscription-manager repos --enable=rhel-7-server-rhv-4.1-rpms
# subscription-manager repos --enable=rhel-7-server-rhv-4-tools-rpms
- 更新 setup 软件包:
# yum update ovirt\*setup\*
- 运行
engine-setup命令并根据提示升级 Red Hat Virtualization Manager:# engine-setup
- 移除或禁用 Red Hat Virtualization Manager 4.0 存储库,以确保系统不会使用任何 Red Hat Virtualization Manager 4.0 软件包:
# subscription-manager repos --disable=rhel-7-server-rhvm-4.0-rpms
- 更新基本操作系统:
# yum update
重要
如果更新了任何内核软件包,请重启虚拟机完成本次更新。
- 禁用全局维护。右键点击自承载引擎主机,选择禁用全局 HA 维护。
- 更新自承载引擎主机,然后更新该环境中的任意标准主机:
- 选择主机,然后点击 。如果该主机正托管 Manager 虚拟机,则虚拟机将迁移到另一台主机。余下的其他虚拟机将按照您的虚拟机迁移策略迁移。高可用性代理将自动进入本地维护模式。
- 确保已启用正确的存储库:
# subscription-manager repos --enable=rhel-7-server-rhv-4-mgmt-agent-rpms
- 更新主机:
- 在 Red Hat Enterprise Linux 主机上,登录主机,然后运行以下命令:
# yum update
- 在 Red Hat Virtualization Host(RHVH)上,登录 Cockpit 用户界面,点击 工具 > Terminal,然后运行以下命令:
# yum update
重要
如果更新了任何内核软件包请重启主机完成本次更新。 - 选择同一主机,然后点击 。
- 重复这些步骤,更新所有主机。
- 将集群和数据中心的兼容性版本更新到 4.1 版本。请参阅升级指南中的升级后续任务 部分,了解更多信息。
重要
仅当所有主机都更新到 Red Hat Virtualization 4.1后,才更新兼容性版本,以免某些主机变得不可用。
第 6 章 备份和恢复基于 RHEL 的自承载引擎环境
注意
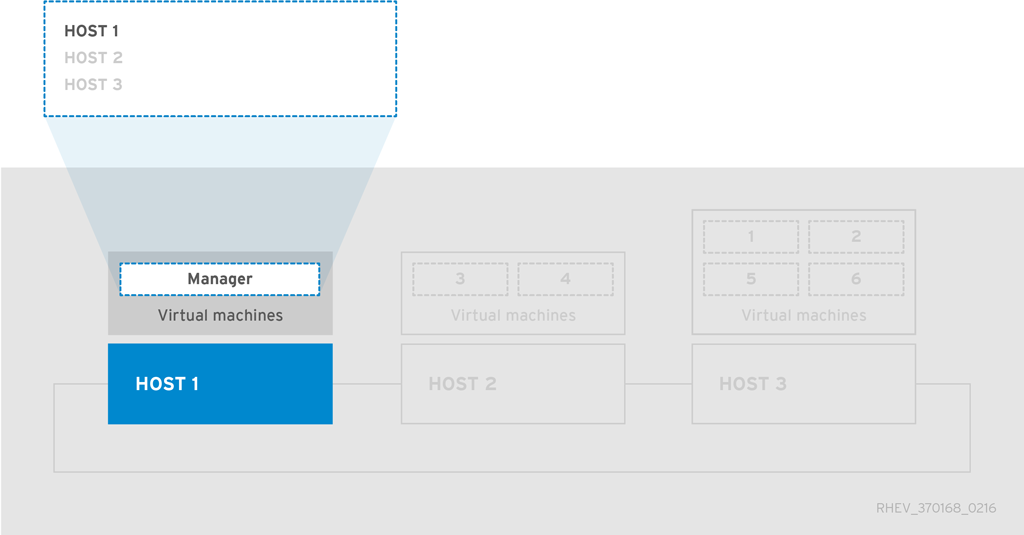
过程 6.1. 备份自承载引擎环境的流程
- 引擎虚拟机运行在
Host 2上,其它 6 个普通的虚拟机被平均分配在 3 个主机上运行。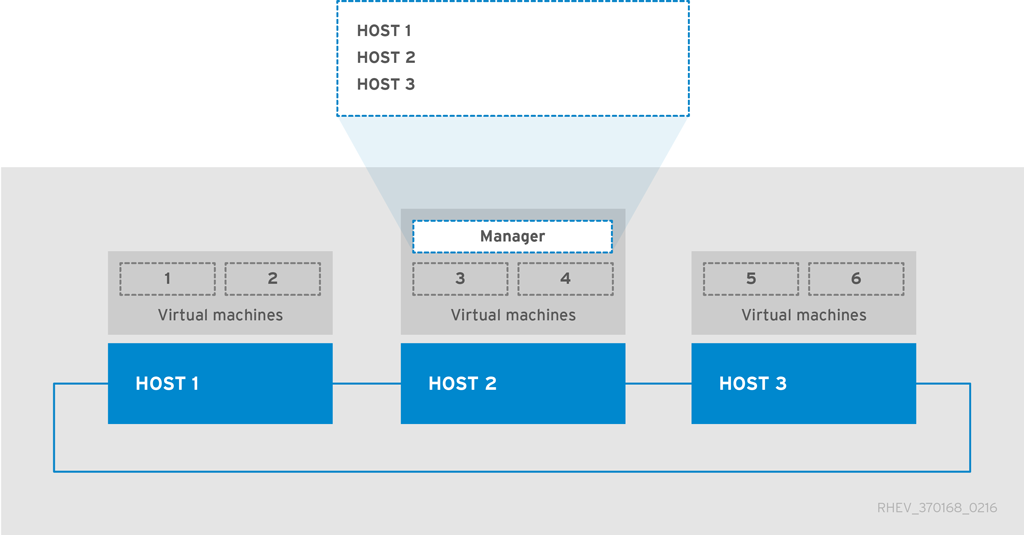 把
把Host 1设置为维护模式。这会把在Host 1上运行的虚拟机迁移到其它主机上,使它不再运行虚拟机负载,并在备份时作为故障转移主机。 Host 1现在是维护模式。以前在它上面运行的虚拟机被迁移到 Host 3。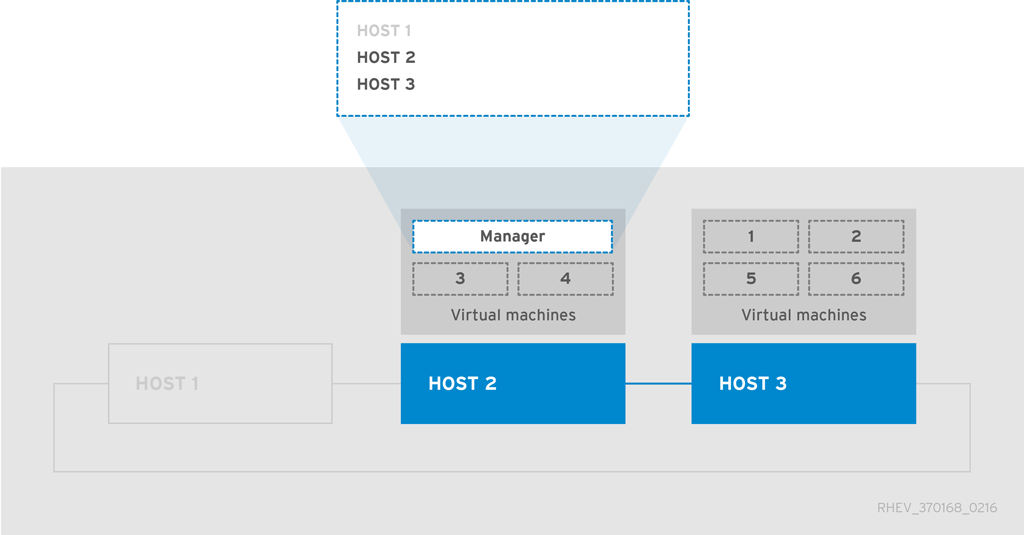 使用
使用engine-backup命令对环境进行备份。在备份完成后,Host 1可以被重新激活来运行包括引擎虚拟机在内的虚拟机。
过程 6.2. 恢复自承载引擎环境的流程
Host 1被用来部署一个新的自承载引擎,并恢复了在前面的示例中进行的备份。部署恢复的环境包括一些额外的步骤:- 当 Red Hat Virtualization Manager 在引擎虚拟机上安装后,但还没有运行
engine-setup前,使用engine-backup工具程序恢复备份。 - 在
engine-setup配置并恢复了 Manager 后,登录到管理门户并删除Host 1(它存在于备份中)。当在部署新的Host 1时,如果旧的Host 1没有被删除并存在于 Manager 中,引擎虚拟机将无法和新的Host 1进行同步,从而导致部署失败。
 当
当Host 1和引擎虚拟机进行同步后,部署过程就已完成,现在的环境可以被看作为一个可以进行基本操作的环境。因为只有一个承载引擎的主机,引擎主机无法实现高可用性功能。但是,如果需要,具有高优先级的虚拟机可以在Host 1上运行。所有标准的 RHEL 主机(存在于环境中,但不是自承载引擎主机)将会成为活跃的主机,那些在备份时活跃的虚拟机现在可以在这些主机上运行,并在 Manager 中有效。- 在它们当前的状态下,
Host 2和Host 3无法被恢复。这些主机需要从环境中删除并使用 hosted-engine 部署脚本重新把它们添加进环境。如需了解更详细的相关信息,请参阅 第 6.2.4 节 “从恢复的自承载引擎环境中删除状态为 Non-Operational 的主机” 和 第 7 章 在自承载环境中安装额外的主机。
Host 2和Host 3被重新部署到恢复的环境中。除了引擎虚拟机在Host 1上运行外,现在的环境与在进行备份前的状态完全相同。
6.1. 备份自承载引擎 Manager 虚拟机
engine-backup,它可以在不影响 ovirt-engine 服务的情况下进行。engine-backup 只备份 Red Hat Virtualization Manager 虚拟机,而不备份 Manager 虚拟机所在的主机,或环境中的其它虚拟机。
过程 6.3. 备份原始的 Red Hat Virtualization Manager
准备故障转移主机(failover host)
故障转移主机(一个可以运行引擎的主机)需要被设置为维护模式,从而保证在备份时它没有运行虚拟机。这个主机在以后可以被用来部署恢复的自承载引擎环境。任何一个可以运行引擎的主机都可以作为一个故障转移主机,但是使用Host 1会使恢复的过程更加直接。Host 1主机的默认名是hosted_engine_1,它在 hosted-engine 部署脚本初始运行时被设置。- 登录到可以运行引擎的一个主机上。
- 确认
hosted_engine_1主机是Host 1;# hosted-engine --vm-status
- 登录到管理门户。
- 点主机标签页。
- 在结果列表中选
hosted_engine_1主机,点。 - 点。
取决于主机上的虚拟负载,迁移主机上的所有虚拟机会需要一些时间完成。当主机状态变为Maintenance时,进行下一步操作。创建一个 Manager 的备份
在 Manager 虚拟机上,备份配置设置和数据库的内容。把 [EngineBackupFile] 替换为备份文件的文件名;把 [LogFILE] 替换为备份日志文件的文件名。# engine-backup --mode=backup --file=[EngineBackupFile] --log=[LogFILE]
把文件备份到一个外部服务器上
把文件备份到一个外部服务器上。在以下的例子中,[Storage.example.com] 是保存备份文件的一个网络存储服务器的完全限定域名;/backup/ 是保存备份文件的目录或路径。备份的文件需要可以被访问来恢复环境设置以及数据库中的数据。# scp -p [EngineBackupFiles] [Storage.example.com:/backup/EngineBackupFiles]
激活故障转移主机
取消hosted_engine_1主机的维护模式。- 登录到管理门户。
- 点主机标签页。
- 在结果列表中选
hosted_engine_1。 - 点。
6.2. 恢复自承载引擎环境
engine-backup 工具程序。
- 创建一个全新安装的 Red Hat Enterprise Linux 主机并运行 hosted-engine 部署脚本。
- 在新的 Manager 虚拟机上恢复 Red Hat Enterprise Manager 的配置设置,以及数据库的内容。
- 删除处于 Non Operational 状态的主机,并在恢复的自承载环境中重新安装它们。
前提条件
- 一个安装了全新 Red Hat Enterprise Linux 系统的物理主机来恢复自承载引擎环境。
- 新的主机和 Manager 的操作系统版本必须和原来的版本相同。
- 新环境需要具有 Red Hat Subscription Manager 权利。如需获得所需存储库的完整列表,请参阅安装指南中的订阅所需的权利。
- 新的 Manager 的完全限定域名需要和原始 Manager 的完全限定域名相同。DNS 中需要有它的正向和反向查询记录。
- 您必须为新的自承载引擎环境准备好存储,用作 Manager 虚拟机的共享存储域。共享存储域应至少为 60 GB。如需了解与存储准备有关的更多信息,请参考管理指南中的存储章节。
6.2.1. 创建一个新的自承载引擎环境作为恢复的环境
Host 1)使用默认的值作为主机名 - hosted_engine_1,这个主机名也在这里使用。因为自承载引擎恢复的特性,在对所恢复的引擎进行最后的同步前,使用的故障转移主机需要被删除(这要求在进行备份时,主机上没有运行任何虚拟机)。另外,您也可以在备份环境外的硬件上进行恢复。
重要
过程 6.4. 创建一个新的自承载环境作为恢复的环境
更新 DNS
更新 DNS,使 Red Hat Virtualization 环境的完全限定域名与新 Manager 的 IP 地址相对应。在以下过程中,完全限定域名被设置为 Manager.example.com。引擎的完全限定域名需要和备份中的原始引擎使用的值相同。初始化引擎
在新安装的 Red Hat Enterprise Linux 主机上运行hosted-engine脚本开始部署的过程。您可以在任何时候使用 CTRL+D 键终止部署的过程。如果通过网络运行hosted-engine部署脚本,则推荐使用screen窗口管理程序以避免在出现网络问题或其它问题时丢失部署进程。如果还没有安装,请安装 screen。# screen
# hosted-engine --deploy
准备初始化
脚本开始会要求您确认在自承载引擎环境中作为虚拟机管理程序(hypervisor)的主机信息。Continuing will configure this host for serving as hypervisor and create a VM where you have to install oVirt Engine afterwards. Are you sure you want to continue? (Yes, No)[Yes]:
配置存储
选择使用的存储类型。During customization use CTRL-D to abort. Please specify the storage you would like to use (glusterfs, iscsi, fc, nfs3, nfs4)[nfs3]:
- 对于 NFS 存储类型,使用 FQDN 或 IP 地址指定它的完整地址,以及共享存储域的路径名。
Please specify the full shared storage connection path to use (example: host:/path): storage.example.com:/hosted_engine/nfs
- 对于 iSCSI,指定 iSCSI 门户 IP 地址、端口、用户名和密码,并从检测到的列表中选择一个目标名。在部署的过程中只能选择一个 iSCSI 目标:
Please specify the iSCSI portal IP address:
Please specify the iSCSI portal port [3260]:
Please specify the iSCSI portal user:
Please specify the iSCSI portal password:
Please specify the target name (auto-detected values) [default]:
- 对于 Gluster 存储类型,使用 FQDN 或 IP 地址指定它的完整地址,以及共享存储域的路径名。
重要
当前只支持 replica 3 Gluster 存储。请确认已进行了以下配置:- 在所有 3 个 Gluster 服务器的
/etc/glusterfs/glusterd.vol文件中,把rpc-auth-allow-insecure设置为on。option rpc-auth-allow-insecure on
- 对卷进行以下配置:
gluster volume set volume cluster.quorum-type auto
gluster volume set volume network.ping-timeout 10
gluster volume set volume auth.allow \*
gluster volume set volume group virt
gluster volume set volume storage.owner-uid 36
gluster volume set volume storage.owner-gid 36
gluster volume set volume server.allow-insecure on
Please specify the full shared storage connection path to use (example: host:/path): storage.example.com:/hosted_engine/gluster_volume
- 对于光纤通道设备,主机的总线适配器需要被配置和连接,
hosted-engine脚本会自动检测到有效的 LUN。LUN 不能包括任何额外的数据。The following luns have been found on the requested target: [1] 3514f0c5447600351 30GiB XtremIO XtremApp status: used, paths: 2 active [2] 3514f0c5447600352 30GiB XtremIO XtremApp status: used, paths: 2 active Please select the destination LUN (1, 2) [1]:
配置网络
这个脚本会检索可以作为环境的管理网桥的网卡(NIC),然后检查防火墙的配置,并根据控制台(SPICE 或 VNC)访问 Manager 虚拟机的需要来修改防火墙的配置。另外,它还需要一个可以被 ping 到的网关 IP 地址,ovirt-ha-agent会使用它来决定主机是否适合运行 Manager 虚拟机。Please indicate a nic to set ovirtmgmt bridge on: (eth1, eth0) [eth1]: iptables was detected on your computer, do you wish setup to configure it? (Yes, No)[Yes]: Please indicate a pingable gateway IP address [X.X.X.X]:
配置新的 Manager 虚拟机
这个脚本会创建一个新的 Manager 虚拟机。根据具体情况指定引导设备、安装媒体的路径名、镜像别名、CPU 类型、虚拟 CPU 的数量以及磁盘的大小。为 Manager 虚拟机指定一个 MAC 地址,或使用系统自动创建的地址。在为 Manager 虚拟机安装操作系统前,这个 MAC 地址可以被用来更新 DHCP 服务器。为所创建的 Manager 虚拟机指定内存的大小和控制台连接类型。Please specify the device to boot the VM from (cdrom, disk, pxe) [cdrom]: Please specify an alias for the Hosted Engine image [hosted_engine]: The following CPU types are supported by this host: - model_Penryn: Intel Penryn Family - model_Conroe: Intel Conroe Family Please specify the CPU type to be used by the VM [model_Penryn]: Please specify the number of virtual CPUs for the VM [Defaults to minimum requirement: 2]: Please specify the disk size of the VM in GB [Defaults to minimum requirement: 25]: You may specify a MAC address for the VM or accept a randomly generated default [00:16:3e:77:b2:a4]: Please specify the memory size of the VM in MB [Defaults to minimum requirement: 4096]: Please specify the console type you want to use to connect to the VM (vnc, spice) [vnc]:指定主机的名称
指定admin@internal用户用来访问管理门户的密码。为主机提供一个唯一的名称,避免与从备份中恢复的名称冲突。hosted_engine_1这个名称可以在此使用,因为在进行备份前,这个主机已被设置为维护模式,它会在恢复引擎操作和在主机与引擎进行最后的同步操作间被删除。Enter engine admin password: Confirm engine admin password: Enter the name which will be used to identify this host inside the Administration Portal [hosted_engine_1]:
配置引擎
提供新的 Manager 虚拟机的完全限定域名。在这里使用 Manager.example.com 作为完全限定域名。指定 SMTP 服务器的名称、TCP 端口号、发送通知电子邮件的电邮地址、接收通知的一组电邮地址(以逗号分隔)。重要
为引擎提供的完全限定域名(Manager.example.com)必须和初始设置原始 Manager 时提供的完全限定域名相同。Please provide the FQDN for the engine you would like to use. This needs to match the FQDN that you will use for the engine installation within the VM. Note: This will be the FQDN of the VM you are now going to create, it should not point to the base host or to any other existing machine. Engine FQDN: Manager.example.com Please provide the name of the SMTP server through which we will send notifications [localhost]: Please provide the TCP port number of the SMTP server [25]: Please provide the email address from which notifications will be sent [root@localhost]: Please provide a comma-separated list of email addresses which will get notifications [root@localhost]:
配置预览
在实际进行配置前,hosted-engine脚本会显示您已输入的信息,并提示您确认这些信息。Bridge interface : eth1 Engine FQDN : Manager.example.com Bridge name : ovirtmgmt SSH daemon port : 22 Firewall manager : iptables Gateway address : X.X.X.X Host name for web application : hosted_engine_1 Host ID : 1 Image alias : hosted_engine Image size GB : 25 Storage connection : storage.example.com:/hosted_engine/nfs Console type : vnc Memory size MB : 4096 MAC address : 00:16:3e:77:b2:a4 Boot type : pxe Number of CPUs : 2 CPU Type : model_Penryn Please confirm installation settings (Yes, No)[Yes]:
创建新的 Manager 虚拟机
这个脚本创建的虚拟机会被配置为 Manager 虚拟机,并提供和它进行连接的信息。在hosted-engine脚本可以继续配置引擎前,您需要在这个虚拟机上安装一个操作系统 。[ INFO ] Stage: Transaction setup [ INFO ] Stage: Misc configuration [ INFO ] Stage: Package installation [ INFO ] Stage: Misc configuration [ INFO ] Configuring libvirt [ INFO ] Configuring VDSM [ INFO ] Starting vdsmd [ INFO ] Waiting for VDSM hardware info [ INFO ] Waiting for VDSM hardware info [ INFO ] Configuring the management bridge [ INFO ] Creating Storage Domain [ INFO ] Creating Storage Pool [ INFO ] Connecting Storage Pool [ INFO ] Verifying sanlock lockspace initialization [ INFO ] Creating VM Image [ INFO ] Disconnecting Storage Pool [ INFO ] Start monitoring domain [ INFO ] Configuring VM [ INFO ] Updating hosted-engine configuration [ INFO ] Stage: Transaction commit [ INFO ] Stage: Closing up [ INFO ] Creating VM You can now connect to the VM with the following command: /usr/bin/remote-viewer vnc://localhost:5900 Use temporary password "3477XXAM" to connect to vnc console. Please note that in order to use remote-viewer you need to be able to run graphical applications. This means that if you are using ssh you have to supply the -Y flag (enables trusted X11 forwarding). Otherwise you can run the command from a terminal in your preferred desktop environment. If you cannot run graphical applications you can connect to the graphic console from another host or connect to the console using the following command: virsh -c qemu+tls://Test/system console HostedEngine If you need to reboot the VM you will need to start it manually using the command: hosted-engine --vm-start You can then set a temporary password using the command: hosted-engine --add-console-password The VM has been started. Install the OS and shut down or reboot it. To continue please make a selection: (1) Continue setup - VM installation is complete (2) Reboot the VM and restart installation (3) Abort setup (4) Destroy VM and abort setup (1, 2, 3, 4)[1]:使用以下命令通过 VNC 连接到虚拟机:/usr/bin/remote-viewer vnc://hosted_engine_1.example.com:5900
安装虚拟机操作系统
连接到 Manager 虚拟机,安装 Red Hat Enterprise Linux 7 作为操作系统。把主机和 Manager 进行同步
返回到主机,选择选项 1 来继续hosted-engine脚本:(1) Continue setup - VM installation is complete
Waiting for VM to shut down...
[ INFO  ] Creating VM
You can now connect to the VM with the following command:
      /usr/bin/remote-viewer vnc://localhost:5900
Use temporary password "3477XXAM" to connect to vnc console.
Please note that in order to use remote-viewer you need to be able to run graphical applications.
This means that if you are using ssh you have to supply the -Y flag (enables trusted X11 forwarding).
Otherwise you can run the command from a terminal in your preferred desktop environment.
If you cannot run graphical applications you can connect to the graphic console from another host or connect to the console using the following command:
virsh -c qemu+tls://Test/system console HostedEngine
If you need to reboot the VM you will need to start it manually using the command:
hosted-engine --vm-start
You can then set a temporary password using the command:
hosted-engine --add-console-password
Please install and setup the engine in the VM.
You may also be interested in subscribing to "agent" RHN/Satellite channel and installing rhevm-guest-agent-common package in the VM.
To continue make a selection from the options below:
  (1) Continue setup - engine installation is complete
  (2) Power off and restart the VM
  (3) Abort setup
  (4) Destroy VM and abort setup

  (1, 2, 3, 4)[1]:
安装 Manager
连接到新的 Manager 虚拟机,确认所有安装的软件包都是最新版本,安装 rhevm 软件包。# yum update
注意
如果与内核相关的软件包已被更新,则需要重启机器。# yum install rhevm
6.2.2. 恢复自承载引擎 Manager
engine-backup 工具程序来自动为备份的自承载引擎 Manager 虚拟机和 Data Warehouse 恢复设置以及数据库的内容。这些内容只适用于初始运行 engine-setup 时自动配置的组件。如果在运行 engine-setup 时手工配置了数据库,请参照 第 6.2.3 节 “手工恢复自承载引擎 Manager” 中的内容手工恢复备份的环境。
过程 6.5. 恢复自承载引擎 Manager
- 把备份文件安全地复制到新的 Manager 虚拟机上。以下示例把文件从一个网络存储服务器复制到 第 6.1 节 “备份自承载引擎 Manager 虚拟机” 所复制的文件中。Storage.example.com 是存储服务器的完全限定域名;/backup/EngineBackupFiles 是备份文件在存储服务器上的文件路径;/backup/ 是文件要被复制到的、在新 Manager 机器上的文件路径。
# scp -p Storage.example.com:/backup/EngineBackupFiles /backup/
- 使用
engine-backup工具程序恢复一个完整的备份。- 如果只恢复 Manager,运行以下命令:
# engine-backup --mode=restore --file=file_name --log=log_file_name --provision-db --restore-permissions
- 如果恢复 Manager 和 Data Warehouse,运行以下命令:
# engine-backup --mode=restore --file=file_name --log=log_file_name --provision-db --provision-dwh-db --restore-permissions
如果运行成功,以下输出会被显示:You should now run engine-setup. Done.
- 配置恢复的 Manager 虚拟机。这个过程会检测到存在的配置设置和数据库内容。确认这些设置。完成后,系统会提供一个 SSH 指纹(fingerprint)和一个内部的证书授权哈希数据(Certificate Authority hash)。
# engine-setup
[ INFO  ] Stage: Initializing
[ INFO  ] Stage: Environment setup
Configuration files: ['/etc/ovirt-engine-setup.conf.d/10-packaging.conf', '/etc/ovirt-engine-setup.conf.d/20-setup-ovirt-post.conf']
Log file: /var/log/ovirt-engine/setup/ovirt-engine-setup-20140304075238.log
Version: otopi-1.1.2 (otopi-1.1.2-1.el6ev)
[ INFO  ] Stage: Environment packages setup
[ INFO  ] Yum Downloading: rhel-65-zstream/primary_db 2.8 M(70%)
[ INFO  ] Stage: Programs detection
[ INFO  ] Stage: Environment setup
[ INFO  ] Stage: Environment customization

          --== PACKAGES ==--

[ INFO  ] Checking for product updates...
[ INFO  ] No product updates found

          --== NETWORK CONFIGURATION ==--

Setup can automatically configure the firewall on this system.
Note: automatic configuration of the firewall may overwrite current settings.
Do you want Setup to configure the firewall? (Yes, No) [Yes]:
[ INFO  ] iptables will be configured as firewall manager.

          --== DATABASE CONFIGURATION ==--


          --== OVIRT ENGINE CONFIGURATION ==--

          Skipping storing options as database already prepared

          --== PKI CONFIGURATION ==--

          PKI is already configured

          --== APACHE CONFIGURATION ==--


          --== SYSTEM CONFIGURATION ==--


          --== END OF CONFIGURATION ==--

[ INFO  ] Stage: Setup validation
[ INFO  ] Cleaning stale zombie tasks

          --== CONFIGURATION PREVIEW ==--

          Database name                      : engine
          Database secured connection        : False
          Database host                      : X.X.X.X
          Database user name                 : engine
          Database host name validation      : False
          Database port                      : 5432
          NFS setup                          : True
          Firewall manager                   : iptables
          Update Firewall                    : True
          Configure WebSocket Proxy          : True
          Host FQDN                          : Manager.example.com
          NFS mount point                    : /var/lib/exports/iso
          Set application as default page    : True
          Configure Apache SSL               : True

          Please confirm installation settings (OK, Cancel) [OK]:
从恢复的环境中删除主机
如果被恢复的自承载引擎部署在一个新硬件中,而这个硬件系统的名称没有出现在备份的引擎中,则跳过这一步。这一步只适用于在一个故障转移主机上(hosted_engine_1)进行部署的情况。因为这个主机在备份时已存在,它仍然还会存在于恢复的引擎中。因此,在进行最后的同步前,需要把它先从环境中删除。- 登录到管理门户
- 点主机标签页。故障转移主机(
hosted_engine_1)会处于维护模式,而且没有运行任何虚拟机。 - 点。
- 点。
注意
如果需要删除的主机的状态为 non-operational,请参照 第 6.2.4 节 “从恢复的自承载引擎环境中删除状态为 Non-Operational 的主机” 中的介绍来强制删除这个主机。把主机和 Manager 进行同步
返回到主机,选择选项 1 来继续hosted-engine脚本:(1) Continue setup - engine installation is complete
[ INFO  ] Engine replied: DB Up!Welcome to Health Status!
[ INFO  ] Waiting for the host to become operational in the engine. This may take several minutes...
[ INFO  ] Still waiting for VDSM host to become operational...
在此阶段,hosted_engine_1会出现在管理门户中,它的状态会在变为 Non Operational 前经历 Installing 状态和 Initializing 状态。主机会等待 VDSM 主机变为正常运行的状态,并最终发生超时。这是因为环境中的另外一个主机具有 SPM 角色,而这个具有 SPM 角色的主机处于 Non Responsive 的状态,因此,hosted_engine_1无法和存储域进行交流。当超时发生时,您会被提示关闭虚拟机来完成部署的过程。当部署完成后,主机可以被手工设置为维护模式,并通过管理门户激活。[ INFO ] Still waiting for VDSM host to become operational... [ ERROR ] Timed out while waiting for host to start. Please check the logs. [ ERROR ] Unable to add hosted_engine_2 to the manager Please shutdown the VM allowing the system to launch it as a monitored service. The system will wait until the VM is down.- 关闭新的 Manager 虚拟机。
# shutdown -h now
- 返回到主机,确认它检测到 Manager 虚拟机已被关闭。
[ INFO ] Enabling and starting HA services Hosted Engine successfully set up [ INFO ] Stage: Clean up [ INFO ] Stage: Pre-termination [ INFO ] Stage: Termination - 激活主机。
- 登录到管理门户
- 点主机标签页。
- 选
hosted_engine_1并点维护按钮。主机可能会需要几分钟时间进入维护模式。 - 点按钮。
一旦激活后,hosted_engine_1就可以竞争成为 SPM,存储域和数据中心都变为活跃状态。 - 对状态为 Non Responsive 的主机进行手工隔离(fencing),这会使它上面的虚拟机迁移到其它活跃的主机上。在管理门户中,点主机右键,选确认“主机已被重启”。当进行备份时在那个主机上运行的所有虚拟机都会被从那个主机上删除,并从 Unknown 状态变为 Down 状态。这些虚拟机现在可以在
hosted_engine_1上运行。使用 REST API 把被隔离的主机强制删除。
hosted_engine_1 活跃时的状态,并可以在恢复的环境中运行虚拟机。那些处于 Non Operational 状态的、可以运行引擎的主机现在就可以按照 第 6.2.4 节 “从恢复的自承载引擎环境中删除状态为 Non-Operational 的主机” 中的步骤被删除,并根据 第 7 章 在自承载环境中安装额外的主机 中介绍的步骤在新环境中重新安装。
注意
6.2.3. 手工恢复自承载引擎 Manager
过程 6.6. 恢复自承载引擎 Manager
- 手工创建一个空的数据库来保存从备份中恢复的数据库内容。以下操作需要在数据库所在的机器上执行。
- 如果数据库不在 Manager 虚拟机上,则需要安装 postgresql-server 软件包。如果虚拟机位于 Manager 所在的虚拟机上,则不需要进行这一步,因为这个软件包已包括在 rhevm 软件包中。
# yum install postgresql-server
- 初始化
postgresql数据库,启动postgresql服务,把它设置为在系统引导时被自动启动:# postgresql-setup initdb # systemctl start postgresql.service # systemctl enable postgresql.service
- 进入 postgresql 命令行:
# su postgres
$ psql
- 创建
engine用户:postgres=# create role engine with login encrypted password 'password';
如果还需要恢复 Data Warehouse,在相关的主机上创建ovirt_engine_history用户:postgres=# create role ovirt_engine_history with login encrypted password 'password';
- 创建新数据库:
postgres=# create database database_name owner engine template template0 encoding 'UTF8' lc_collate 'en_US.UTF-8' lc_ctype 'en_US.UTF-8';
如果还需要恢复 Data Warehouse,在相关的主机上创建数据库:postgres=# create database database_name owner ovirt_engine_history template template0 encoding 'UTF8' lc_collate 'en_US.UTF-8' lc_ctype 'en_US.UTF-8';
- 退出 postgresql 命令行并登出 postgres 用户:
postgres=# \q
$ exit
- 编辑
/var/lib/pgsql/data/pg_hba.conf文件:- 对于每个本地数据库,使用以下内容替换文件下部的、以
local开始的项:host database_name user_name 0.0.0.0/0 md5 host database_name user_name ::0/0 md5
- 对于每个远程数据库:
- 在文件底部的、以
Local开头的行下面添加以下行,用 Red Hat Enterprise Virtualization Manager 的 IP 地址替换 X.X.X.X:host database_name user_name X.X.X.X/32 md5
- 允许 TCP/IP 到数据库的连接。编辑
/var/lib/pgsql/data/postgresql.conf文件,添加以下行:listen_addresses='*'
在这个例子中,postgresql服务被配置为监听所有接口上的连接。您可以使用 IP 地址来指定只监听特定接口上的连接。 - 修改防火墙规则来打开 PostgreSQL 数据库连接所使用的默认端口,然后保存更新的防火墙规则:
# iptables -I INPUT 5 -p tcp -s Manager_IP_Address --dport 5432 -j ACCEPT
# service iptables save
- 重启
postgresql服务:# systemctl restart postgresql.service
- 把备份文件安全地复制到新的 Manager 虚拟机上。以下示例把文件从一个网络存储服务器复制到 第 6.1 节 “备份自承载引擎 Manager 虚拟机” 所复制的文件中。Storage.example.com 是存储服务器的完全限定域名;/backup/EngineBackupFiles 是备份文件在存储服务器上的文件路径;/backup/ 是文件要被复制到的、在新 Manager 机器上的文件路径。
# scp -p Storage.example.com:/backup/EngineBackupFiles /backup/
- 恢复一个完整备份或数据库备份(通过
--change-db-credentials参数指定新数据库的凭证信息)。Manager 本地数据库的 database_location 是localhost:注意
在以下的例子中,对于每个数据库都使用了没有指定密码的--*password选项,这会使数据库在相应的阶段要求用户输入密码。虽然可以在命令中使用这些选项指定密码,但是这些密码信息会被保存在 shell 的历史记录中,因此我们不推荐使用这个方法来提供密码。另外,也可以选择使用--*passfile=password_file 选项来为engine-backup安全地传递每个数据库的密码,而不再需要人工输入密码。- 恢复一个完全备份:
# engine-backup --mode=restore --file=file_name --log=log_file_name --change-db-credentials --db-host=database_location --db-name=database_name --db-user=engine --db-password
如果需要恢复作为完全备份一部分的 Data Warehouse,则要包括这个数据库的凭证:engine-backup --mode=restore --file=file_name --log=log_file_name --change-db-credentials --db-host=database_location --db-name=database_name --db-user=engine --db-password --change-dwh-db-credentials --dwh-db-host=database_location --dwh-db-name=database_name --dwh-db-user=ovirt_engine_history --dwh-db-password
- 恢复只包括数据库的备份会恢复配置文件和数据库备份:
# engine-backup --mode=restore --scope=files --scope=db --file=file_name --log=file_name --change-db-credentials --db-host=database_location --db-name=database_name --db-user=engine --db-password
以上示例恢复了一个 Manager 数据库的备份。# engine-backup --mode=restore --scope=files --scope=dwhdb --file=file_name --log=file_name --change-dwh-db-credentials --dwh-db-host=database_location --dwh-db-name=database_name --dwh-db-user=ovirt_engine_history --dwh-db-password
以上示例恢复了 Data Warehouse 数据库的备份。
如果运行成功,以下输出会被显示:You should now run engine-setup. Done.
- 配置恢复的 Manager 虚拟机。这个过程会检测到存在的配置设置和数据库内容。确认这些设置。完成后,系统会提供一个 SSH 指纹(fingerprint)和一个内部的证书授权哈希数据(Certificate Authority hash)。
# engine-setup
[ INFO  ] Stage: Initializing
[ INFO  ] Stage: Environment setup
Configuration files: ['/etc/ovirt-engine-setup.conf.d/10-packaging.conf', '/etc/ovirt-engine-setup.conf.d/20-setup-ovirt-post.conf']
Log file: /var/log/ovirt-engine/setup/ovirt-engine-setup-20140304075238.log
Version: otopi-1.1.2 (otopi-1.1.2-1.el6ev)
[ INFO  ] Stage: Environment packages setup
[ INFO  ] Yum Downloading: rhel-65-zstream/primary_db 2.8 M(70%)
[ INFO  ] Stage: Programs detection
[ INFO  ] Stage: Environment setup
[ INFO  ] Stage: Environment customization

          --== PACKAGES ==--

[ INFO  ] Checking for product updates...
[ INFO  ] No product updates found

          --== NETWORK CONFIGURATION ==--

Setup can automatically configure the firewall on this system.
Note: automatic configuration of the firewall may overwrite current settings.
Do you want Setup to configure the firewall? (Yes, No) [Yes]:
[ INFO  ] iptables will be configured as firewall manager.

          --== DATABASE CONFIGURATION ==--


          --== OVIRT ENGINE CONFIGURATION ==--

          Skipping storing options as database already prepared

          --== PKI CONFIGURATION ==--

          PKI is already configured

          --== APACHE CONFIGURATION ==--


          --== SYSTEM CONFIGURATION ==--


          --== END OF CONFIGURATION ==--

[ INFO  ] Stage: Setup validation
[ INFO  ] Cleaning stale zombie tasks

          --== CONFIGURATION PREVIEW ==--

          Database name                      : engine
          Database secured connection        : False
          Database host                      : X.X.X.X
          Database user name                 : engine
          Database host name validation      : False
          Database port                      : 5432
          NFS setup                          : True
          Firewall manager                   : iptables
          Update Firewall                    : True
          Configure WebSocket Proxy          : True
          Host FQDN                          : Manager.example.com
          NFS mount point                    : /var/lib/exports/iso
          Set application as default page    : True
          Configure Apache SSL               : True

          Please confirm installation settings (OK, Cancel) [OK]:
从恢复的环境中删除主机
如果被恢复的自承载引擎部署在一个新硬件中,而这个硬件系统的名称没有出现在备份的引擎中,则跳过这一步。这一步只适用于在一个故障转移主机上(hosted_engine_1)进行部署的情况。因为这个主机在备份时已存在,它仍然还会存在于恢复的引擎中。因此,在进行最后的同步前,需要把它先从环境中删除。- 登录到管理门户。
- 点主机标签页。故障转移主机(
hosted_engine_1)会处于维护模式,而且没有运行任何虚拟机。 - 点。
- 点。
把主机和 Manager 进行同步
返回到主机,选择选项 1 来继续hosted-engine脚本:(1) Continue setup - engine installation is complete
[ INFO  ] Engine replied: DB Up!Welcome to Health Status!
[ INFO  ] Waiting for the host to become operational in the engine. This may take several minutes...
[ INFO  ] Still waiting for VDSM host to become operational...
在此阶段,hosted_engine_1会出现在管理门户中,它的状态会在变为 Non Operational 前经历 Installing 状态和 Initializing 状态。主机会等待 VDSM 主机变为正常运行的状态,并最终发生超时。这是因为环境中的另外一个主机具有 SPM 角色,而这个具有 SPM 角色的主机处于 Non Responsive 的状态,因此,hosted_engine_1无法和存储域进行交流。当超时发生时,您会被提示关闭虚拟机来完成部署的过程。当部署完成后,主机可以被手工设置为维护模式,并通过管理门户激活。[ INFO ] Still waiting for VDSM host to become operational... [ ERROR ] Timed out while waiting for host to start. Please check the logs. [ ERROR ] Unable to add hosted_engine_2 to the manager Please shutdown the VM allowing the system to launch it as a monitored service. The system will wait until the VM is down.- 关闭新的 Manager 虚拟机。
# shutdown -h now
- 返回到主机,确认它检测到 Manager 虚拟机已被关闭。
[ INFO ] Enabling and starting HA services Hosted Engine successfully set up [ INFO ] Stage: Clean up [ INFO ] Stage: Pre-termination [ INFO ] Stage: Termination - 激活主机。
- 登录到管理门户。
- 点主机标签页。
- 选
hosted_engine_1并点维护按钮。主机可能会需要几分钟时间进入维护模式。 - 点按钮。
一旦激活后,hosted_engine_1就可以竞争成为 SPM,存储域和数据中心都变为活跃状态。 - 对状态为 Non Responsive 的主机进行手工隔离(fencing),这会使它上面的虚拟机迁移到其它活跃的主机上。在管理门户中,点主机右键,选确认“主机已被重启”。当进行备份时在那个主机上运行的所有虚拟机都会被从那个主机上删除,并从 Unknown 状态变为 Down 状态。这些虚拟机现在可以在
hosted_engine_1上运行。使用 REST API 把被隔离的主机强制删除。
hosted_engine_1 活跃时的状态,并可以在恢复的环境中运行虚拟机。那些处于 Non Operational 状态的、可以运行引擎的主机现在就可以按照 第 6.2.4 节 “从恢复的自承载引擎环境中删除状态为 Non-Operational 的主机” 中的步骤被删除,并根据 第 7 章 在自承载环境中安装额外的主机 中介绍的步骤在新环境中重新安装。
注意
6.2.4. 从恢复的自承载引擎环境中删除状态为 Non-Operational 的主机
隔离无法正常工作的主机
在管理门户中,在主机上点鼠标右键,选确认“主机已被重启”。当进行备份时在那个主机上运行的所有虚拟机都会被从那个主机上删除,并从 Unknown 状态变为 Down 状态。使用 REST API 把被隔离的主机强制删除。获得 Manager 的证书颁发机构(CA)
连接到 Manager 虚拟机,在命令行中使用 cURL 进行以下请求。使用GET请求获得 Manager 的 CA 以供今后的 API 请求使用。在下面的示例中,使用--output选项指定 hosted-engine.ca 文件作为 Manager CA 证书的输出。--insecure选项意味着这个初始的请求不包括证书。# curl --output hosted-engine.ca --insecure https://[Manager.example.com]/ca.crt
获得要被删除的主机的 GUID
在主机集合中使用一个GET请求获得要被删除的主机的 GUID。以下例子中包括了 Manager CA 证书文件,使用admin@internal用户进行验证,并在命令执行过程中会被提示输入它的密码。# curl --request GET --cacert hosted-engine.ca --user admin@internal https://[Manager.example.com]/api/hosts
这个请求会返回环境中所有主机的信息。主机的 GUID 是和主机名相连的十六进制字符串。如需了解更多与 Red Hat Virtualization REST API 相关的信息,请参阅 Red Hat Virtualization REST API Guide。删除隔离的主机
使用带有被隔离主机的 GUID 的DELETE请求从环境中删除这个主机。除了以前请求中使用的参数,这个例子中的请求还包括使用 XML 的头(header),以及内容(body)项。在内容项中,把force操作设置为true。curl --request DELETE --cacert hosted-engine.ca --user admin@internal --header "Content-Type: application/xml" --header "Accept: application/xml" --data "<action><force>true</force></action>" https://[Manager.example.com]/api/hosts/ecde42b0-de2f-48fe-aa23-1ebd5196b4a5
只要指定了相应的 GUID,就可以使用这个DELETE请求来移除自承载引擎环境中的每一个隔离的主机。从主机上删除自承载引擎配置
删除存在的主机自承载引擎配置,从而可以在主机被重新安装到一个自承载引擎环境中时对它进行配置。登录到主机,删除配置文件:# rm /etc/ovirt-hosted-engine/hosted-engine.conf
第 7 章 在自承载环境中安装额外的主机
预备条件
- 对于一个基于 RHEL 的自承载引擎环境,您必须已在一台物理主机上全新安装了 Red Hat Enterprise Linux 系统,并为主机订阅了所需的权利。如需了解更多与订阅相关的信息,请参阅安装指南中的订阅所需的权利章节。
- 对于一个基于 RHVH 的自承载引擎环境,您必须已在一台物理主机上全新安装了 Red Hat Virtualization Host 系统。相关信息请参阅安装指南中的 Red Hat Virtualization Host 章节。
- 如果重新使用一个自承载引擎主机,则需要删除它的已存在的自承载引擎配置。相关信息,请参阅 第 5.2 节 “从自承载引擎环境中删除一个主机”。
过程 7.1. 添加额外的自承载引擎主机
- 在管理门户中点主机资源标签页。
- 点。如需了解其它主机设置,请参阅管理指南中的新建主机和编辑主机窗口中的设置和控制介绍。
- 使用数据中心和主机集群下拉列表为这个新主机选择数据中心和主机集群。
- 输入新主机的名称和地址。标准的 SSH 端口(22)会被自动填充到 SSH 端口项中。
- 选择 Manager 用来访问这个主机的身份验证方法。
- 输入 root 用户的密码。
- 或者,如果需要使用公共密钥进行验证,把 SSH 公共密钥项中的密钥复制到主机的
/root/.ssh/authorized_keys文件中。
- 如果主机中有被支持的电源管理卡,则可以配置电源管理功能。相关信息,请参阅管理指南中的主机电源管理设置介绍。
- 点承载引擎子标签页。
- 选部署选项。
- 点 。
第 8 章 把自承载引擎数据库迁移到一个远程服务器数据库中
engine 数据库迁移到一个远程数据库服务器中。使用 engine-backup 来创建数据库备份,并在新数据库服务器上进行恢复。这个过程需要新的数据库服务器安装了 Red Hat Enterprise Linux 7,并正确配置了相关的订阅。请查看安装指南中的 订阅所需的权利部分。
过程 8.1. 迁移数据库
- 登录到任何一台自承载引擎主机,把环境设置为
global维护模式。这会禁用高可用性代理,防止在数据库迁移过程中出现 Manager 迁移的情况:# hosted-engine --set-maintenance --mode=global
- 登录到 Red Hat Virtualization Manager 所在的机器,停止
ovirt-engine服务,从而使它不会影响到引擎的备份:# systemctl stop ovirt-engine.service
- 创建
engine数据库备份:# engine-backup --scope=files --scope=db --mode=backup --file=file_name --log=backup_log_name
- 把备份文件复制到新的数据库服务器上:
# scp /tmp/engine.dump root@new.database.server.com:/tmp
- 登录到新的数据库服务器上,然后安装
engine-backup:# yum install ovirt-engine-tools-backup
- 在新的数据库服务器上恢复该数据库。file_name 是从 Manager 复制而来的备份文件。
# engine-backup --mode=restore --scope=files --scope=db --file=file_name --log=restore_log_name --provision-db --no-restore-permissions
- 现在,数据库已完成迁移,启动
ovirt-engine服务:# systemctl start ovirt-engine.service
- 登录到自承载引擎主机,关闭维护模式,启用高可用性代理:
# hosted-engine --set-maintenance --mode=none