
Red Hat Software Certification Workflow Guide
For Use with Red Hat Enterprise Linux and Red Hat OpenShift
Abstract
Making open source more inclusive
Red Hat is committed to replacing problematic language in our code and documentation. We are beginning with these four terms: master, slave, blacklist, and whitelist. Due to the enormity of this endeavor, these changes will be gradually implemented over upcoming releases. For more details on making our language more inclusive, see our CTO Chris Wright’s message.
Chapter 1. Introduction to Red Hat software certification program
Use this guide to certify and distribute your software application product on the Red Hat Enterprise Linux and Red Hat OpenShift platforms.
1.1. The Red Hat certification program overview
The Red Hat software certification program ensures compatibility of your software application products targeting Red Hat Enterprise Linux and Red Hat OpenShift as the deployment platform.
The program has five main elements:
- Product listing: A source of all the essential product information that potential customers look for before using your product.
- Components: It comprises the containers, operators, helm charts, and various other infrastructure services that are attached to the product listing. Additionally, it includes the online workflow where the progress and status of certification requests are tracked and reported.
- Test suite: Tests implemented as an integrated pipeline for software application products undergoing certification.
Publication:
- Non-containerized products: Certified traditional, non-containerized products are published on the Red Hat Ecosystem Catalog.
Containerized applications: It has the following product categories:
- Containers: Certified containers are published on the Red Hat Ecosystem Catalog.
- Operators: Certified Operators are published on the Red Hat Ecosystem Catalog and in the embedded OperatorHub.
- Helm Charts: Certified Helm Charts are published on the Red Hat Ecosystem Catalog.
Functional certification for OpenShit badges:
- Cloud-native Network Functions (CNFs): Vendor Validated and Certified CNFs are attached to the product listings and are published on the Red Hat Ecosystem Catalog.
- Container Network Interface (CNI): Certified CNIs are published on the Red Hat Ecosystem Catalog.
- Container Storage Interface (CSI): Certified CSIs are published on the Red Hat Ecosystem Catalog.
- Applications on OpenStack Infrastructure: Non-containerized, containerized, and VNF applications are certified on OpenStack Infrastructure and published on the Red Hat Ecosystem Catalog.
Support: A joint support relationship between you and Red Hat to ensure customer success when deploying certified software application products.
This table summarizes the basic differences between a product listing and components:
| Product listing | Component (Project) |
|---|---|
| Includes detailed information about your product. | The individual containers, operators, helm charts, and infrastructure services that you test, certify, and then add to the product listing. |
| Products are composed of one or more components. | Components are added to a product listing. |
| You add components to a product for proceeding with certification. | A component can be used in multiple products by adding it to each product listing. |
| A product can not be published without certified components. | Certified components are published as part of a product listing. |
1.2. Getting help and giving feedback
For any questions related to the Red Hat certification toolset, certification process, or procedure described in this documentation, refer to the KB Articles, Red Hat Customer Portal, and Red Hat Partner Connect.
To receive Red Hat product assistance, it is necessary to have the required product entitlements or subscriptions, which may be separate from the partner program and certification program memberships.
Opening a support case
To open a support case, see How do I open and manage a support case?
To open a support case for any certification issue, complete the Support Case Form for Partner Acceleration Desk with special attention to the following fields:
- From the Issue Category, select Product Certification.
- From the Product field, select the required product.
- From the Product Version field, select the version on which your product or application is being certified.
- In the Problem Statement field, type a problem statement or issue or feedback using the following format:
{Partner Certification} (The Issue/Problem or Feedback)
Replace
(The Issue/Problem or Feedback)with either the issue or problem faced in the certification process or Red Hat product or feedback on the certification toolset or documentation.For example: {Partner Certification} Error occurred while submitting certification test results using the Red Hat Certification application.
Red Hat recommends that you are a Red Hat Certified Engineer or hold equivalent experience before starting the certification process.
Additional resources
- To know more about the software certification program and platforms, see Red Hat certified software.
- For a one-stop solution on all your certification needs, see Red Hat Software Certification Quick Start Guide.
- For more information about program requirements and policies, see Red Hat OpenShift Software Certification Policy Guide and Red Hat Enterprise Linux Software Certification Policy Guide .
Chapter 2. Onboarding certification partners
Use the Red Hat Partner Connect Portal to create a new account if you are a new partner, or use your existing Red Hat account if you are a current partner to onboard with Red Hat for certifying your products.
2.1. Onboarding existing certification partners
As an existing partner you could be:
A member of the one-to-many EPM program who has some degree of representation on the EPM team, but does not have any assistance with the certification process.
OR
- A member fully managed by the EPM team in the traditional manner with a dedicated EPM team member who is assigned to manage the partner, including questions about the certification requests.
If you think your company has an existing Red Hat account but are not sure who is the Organization Administrator for your company, email connect@redhat.com to add you to your company’s existing account.
Prerequisites
You have an existing Red Hat account.
Procedure
- Access Red Hat Partner Connect and click Log in.
Enter your Red Hat login or email address and click Next.
Then, use either of the following options:
- Log in with company single sign-on
- Log in with Red Hat account
From the menu bar on the header, click your avatar to view the account details.
- If an account number is associated with your account, then log in to the Red Hat Partner Connect, to proceed with the certification process.
If an account number is not associated with your account, then first contact the Red Hat global customer service team to raise a request for creating a new account number.
After that, log in to the Red Hat Partner Connect to proceed with the certification process.
2.2. Onboarding new certification partners
Creating a new Red Hat account is the first step in onboarding new certification partners.
- Access Red Hat Partner Connect and click Log in.
- Click Register for a Red Hat account.
Enter the following details to create a new Red Hat account:
- Choose a Red Hat login and password.
If your login ID is associated with multiple accounts, then do not use your contact email as the login ID as this can cause issues during login. Also, you cannot change your login ID once created.
- Enter your Personal information and Company information.
Select Corporate for the Account Type field.
If you have created a Corporate type account and require an account number, contact the Red Hat global customer service team.
Ensure that you create a company account and not a personal account. The account created during this step is also used to sign in to the Red Hat Ecosystem Catalog when working with certification requests.
- Enter your Contact information.
Click Create My Account.
A new Red Hat account is created. Log in to the Red Hat Partner Connect, to proceed with the certification process.
2.3. Exploring the Partner landing page
After logging in to Red Hat Partner Connect, the partner landing page opens. This page serves as a centralized hub, offering access to various partner services and capabilities that enable you to start working on opportunities.
The Partner landing page offers the following services:
- Certified technology portal
- Deal registrations
- Red Hat Partner Training Portal
- Access to our library of marketing, sales & technical content
- Help and support
- Email preference center
- Partner subscriptions
- User account
As part of the Red Hat partnership, partners receive access to various Red Hat systems and services that enable them to create shared value with Red Hat for our joint customers.
Select the Certified technology portal tile to begin your product certification journey. The personalized Certified Technology partner dashboard opens.
Part I. Certifying Standalone Applications
Chapter 3. Introduction to non-containerized product certification
The Red Hat Software certification program for traditional, non-containerized products helps Independent Software Vendors (ISV) to build, certify and distribute their application software on systems and server environments running Red Hat Enterprise Linux (RHEL) in a jointly supported customer environment. A strong working knowledge of RHEL is required.
Chapter 4. Certification workflow for non-containerized application
Red Hat recommends that you are a Red Hat Certified Engineer or hold equivalent experience before starting the certification process.
Task Summary
The certification workflow includes three primary stages -
4.1. Certification onboarding
Perform the steps outlined for certification onboarding:
- Join the Red Hat Connect for Technology Partner Program.
- Agree to the program terms and conditions.
Create your product listing by selecting your desired product category. You can select from the available product categories:
- Containerized Application
- Standalone Application
- OpenStack Infrastructure
- Complete your company profile.
- Add components to the product listing.
- Certify components for your product listing.
Additional resources
For detailed instructions about creating your first product listing, see Creating a product.
4.2. Certification testing
Follow these high-level steps to run a certification test:
- Log in to the Red Hat Certification portal.
- Download the test plan.
- Configure the system under test (SUT) for running the tests.
- Download the test plan to our SUT.
- Run the certification tests on your system.
- Review and upload the test results to the certification portal.
Additional resources
For detailed instructions about certification testing, see Setting up the test environment for non-containerized application testing.
4.3. Publishing the certified application
When you complete all the certification checks successfully, you can submit the test results to Red Hat. Upon successful validation, you can publish your product on the Red Hat Ecosystem Catalog.
Additional resources
For detailed instructions about publishing your application, see Publishing the certified application.
Chapter 5. Creating a product
The product listing provides marketing and technical information, showcasing your product’s features and advantages to potential customers. It lays the foundation for adding all necessary components to your product for certification.
Prerequisites
Verify the functionality of your product on the target Red Hat platform, in addition to the specific certification testing requirements. If running your product on the targeted Red Hat platform results in a substandard experience then you must resolve the issues before certification.
Procedure
Red Hat recommends completing all optional fields in the listing tabs for a comprehensive product listing. More information helps mutual customers make informed choices.
Red Hat encourages collaboration with your product manager, marketing representative, or other product experts when entering information for your product listing.
Fields marked with an asterisk (*) are mandatory.
Procedure
- Log in to the Red Hat Partner Connect Portal.
- Go to the Certified technology portal tab and click Visit the portal.
- On the header bar, click Product management.
- From the Listing and certification tab click Manage products.
From the My Products page, click Create Product.
A Create New Product dialog opens.
- Enter the Product name.
From the What kind of product would you like to certify? drop-down, select the required product category and click Create product. For example, select Standalone Application for creating a non containerized product listing.
A new page with your Product name opens. It comprises the following tabs:
- Section 5.1, “Overview”
- Section 5.2, “Product Information”
- Section 5.3, “Components”
Along with the following tabs, the page header provides the Product Score details. Product Score evaluates your product information and displays a score. It can be:
- Fair
- Good
- Excellent
Best
Click How do I improve my score? to improve your product score.
- After providing the product listing details, click Save before moving to the next section.
5.1. Overview
This tab consists of a series of tasks that you must complete to publish your product:
5.1.1. Complete product listing details
To complete your product listing details, click Start.
The Product Information tab opens.
- Enter all the essential product details and click Save.
5.1.2. Complete company profile information
- To complete your company profile information, click Start. After entering all the details, click Submit.
- To modify the existing details, click Review. The Account Details page opens.
- Review and modify the Company profile information and click Submit.
5.1.3. Add at least one product component
Click Start. You are redirected to the Components tab.
To add a new or existing product component, click Add component.
For adding a new component,
- In the Component Name text box, enter the component name.
- For What kind of standalone component are you creating? select the component that you wish to certify. For example, for certifying a non containerized component, select Non-containerized Application.
For Red Hat Enterprise Linux Version, select the major RHEL version for which you are certifying your component.
NoteYou can’t modify the version after creating the product listing.
- Click Create new component.
For adding an existing component, from the Add Component dialog, select Existing Component.
- From the Available components list, search and select the components that you wish to certify and click the forward arrow. The selected components are added to the Chosen components list.
- Click Attach existing component.
5.1.4. Certify components for your listing
To certify the components for your listing, click Start. If you have existing product components, you can view the list of Attached Components and their details:
- Name
- Certification
- Security
- Type
- Created
- Click more options to archive or remove the components
- Select the components for certification.
After completing all the above tasks you will see a green tick mark corresponding to all the options.
The Overview tab also provides the following information:
Product contacts - Provides Product marketing and Technical contact information.
- Click Add contacts to product to provide the contact information
- Click Edit to update the information.
Components in product - Provides the list of the components attached to the product along with their last updated information.
- Click Add components to product to add new or existing components to your product.
- Click Edit components to update the existing component information.
After publishing the product listing, you can view your Product Readiness Score and Ways to raise your score on the Overview tab.
5.2. Product Information
Through this tab you can provide all the essential information about your product. The product details are published along with your product on the Red Hat Ecosystem catalog.
General tab:
Provide basic details of the product, including product name and description.
- Enter the Product Name.
- Optional: Upload the Product Logo according to the defined guidelines.
- Enter a Brief description and a Long description.
- Click Save.
Features & Benefits tab:
Provide important features of your product.
- Optional: Enter the Title and Description.
- Optional: To add additional features for your product, click + Add new feature.
- Click Save.
Quick start & Config tab:
Add links to any quick start guide or configuration document to help customers deploy and start using your product.
- Optional: Enter Quick start & configuration instructions.
- Click Save.
- Select Hide default instructions check box, if you don’t want to display them.
Linked resources tab:
Add links to supporting documentation to help our customers use your product. The information is mapped to and is displayed in the Documentation section on the product’s catalog page.
It is mandatory to add a minimum of three resources. Red Hat encourages you to add more resources, if available.
- Select the Type drop-down menu, and enter the Title and Description of the resource.
- Enter the Resource URL.
- Optional: To add additional resources for your product, click + Add new Resource.
- Click Save.
FAQs tab:
Add frequently asked questions and answers of the product’s purpose, operation, installation, or other attribute details. You can include common customer queries about your product and services.
- Enter Question and Answer.
- Optional: To add additional FAQs for your product, click + Add new FAQ.
- Click Save.
Support tab:
This tab lets you provide contact information of your Support team.
- Enter the Support description, Support web site, Support phone number, and Support email address.
- Click Save.
Contacts tab:
Provide contact information of your marketing and technical team.
- Enter the Marketing contact email address and Technical contact email address.
- Optional: To add additional contacts, click + Add another.
- Click Save.
Legal tab:
Provide the product related license and policy information.
- Enter the License Agreement URL for the product and Privacy Policy URL.
- Click Save.
SEO tab:
Use this tab to improve the discoverability of your product for our mutual customers, enhancing visibility both within the Red Hat Ecosystem Catalog search and on internet search engines. Providing a higher number of search aliases (key and value pairs) will increase the discoverability of your product.
- Select the Product Category.
- Enter the Key and Value to set up Search aliases.
- Click Save.
- Optional: To add additional key-value pair, click + Add new key-value pair.
Add at least one Search alias for your product. Red Hat encourages you to add more aliases, if available.
5.3. Components
Use this tab to add components to your product listing. Through this tab you can also view a list of attached components linked to your Product Listing.
Alternatively, to attach a component to the Product Listing, you can complete the Add at least one product component option available on the Overview tab of a Container, Operator, or Helm Chart product listing.
- To add a new or existing product component, click Add component.
For adding a new component, in the Component Name text box, enter the component name.
- For What kind of standalone component are you creating? select the component that you wish to certify. For example, for certifying a non containerized component, select Non-containerized Application.
For Red Hat Enterprise Linux Version, select the RHEL version on which you are certifying your non-containerized component.
NoteYou cannot modify the RHEL version after creating the product listing.
- Click Next.
For adding an existing component, from the Add Component dialog, select Existing Component.
- From the Available components list, search and select the components that you wish to certify and click the forward arrow. The selected components are added to the Chosen components list.
Click Attach existing component.
NoteYou can add the same component to multiple products listings. All attached components must be published before the product listing can be published.
After attaching components, you can view the list of Attached Components and their details:
- Name
- Certification
- Security
- Type
- Created
- Click more options to archive or remove the attached components
Alternatively, to search for specific components, type the component’s name in the Search by component Name text box.
5.4. Support
The Red Hat Partner Acceleration Desk (PAD) is a Products and Technologies level partner help desk service that allows the current and prospective partners a central location to ask non-technical questions pertaining to Red Hat offerings, partner programs, product certification, engagement process, and so on.
You can also contact the Red Hat Partner Acceleration Desk for any technical questions you may have regarding the Certification. Technical help requests will be redirected to the Certification Operations team.
Through the Partner Subscriptions program, Red Hat offers free, not-for-resale software subscriptions that you can use to validate your product on the target Red Hat platform. To request access to the program, follow the instructions on the Partner Subscriptions site.
- To request support, click Open a support case. See PAD - How to open & manage PAD cases, to open a PAD ticket.
- To view the list of existing support cases, click View support cases.
5.5. Removing a product
After creating a product listing if you wish to remove it, go to the Overview tab and click Delete.
A published product must first be unpublished before it can be deleted. Red Hat retains information related to deleted products even after you delete the product.
Chapter 6. Adding certification components
After creating the new product listing, add the certification components for the newly created product listing. You can configure the following options for the newly added components:
The component configurations differ for different product categories.
To configure the component options, go to the Components tab and click on any of the existing components.
6.1. Certification
Validate the functionality of your product on Red Hat Enterprise Linux
Validate the functionality of your product on Red Hat Enterprise Linux by using the Certification tab. You can perform the following functions:
This feature allows you to perform the following functions: . Run the Red Hat Certification Tool locally . Download the test plan . Share the test results with the Red Hat certification team . Interact with the certification team, if required.
To validate the functionality of your product, perform the following steps:
- If you are a new partner, click Request a partner subscription. When your request is approved, you get active subscriptions added to your account.
- When you have active partner subscriptions, then click Start certification.
- Click Go to Red Hat certification tool.
A new certification case gets created on the Red Hat Certification portal, and you are redirected to the appropriate component portal page.
The certification team will contact you to start the certification testing process and will follow up with you in case of a problem. After successful verification, a green check mark is displayed with the validate complete message.
To review the validated product details, click Review.
6.2. Component Details
Enter the required project details in the following fields:
- Project name - Enter the project name. This name is not published and is only for internal use.
- Red Hat Enterprise Linux (RHEL) Version - Specifies the RHEL version on which you wish to certify your non-containerized product component.
You cannot change the RHEL version after you have created the component.
6.3. Contact Information
Providing information for this tab is optional.
In the Contact Information tab, enter the primary technical contact details of your product component.
- Optional: In the Technical contact email address field, enter the email address of the image maintainer.
- Optional: To add additional contacts for your component, click + Add new contact.
- Click Save.
6.4. Associated products
The Associated Product tab provides the list of products that are associated with your product component along with the following information:
- Product Name
- Type - Traditional application
- Visibility - Published or Not Published
- Last Activity - number of days before you ran the test
To add products to your component, perform the following:
- If you want to find a product by its name, enter the product name in the Search by name text box and click the search icon.
- If you are not sure of the product name, click Find a product. From the Add product dialog, select the required product from the Available products list box and click the forward arrow. The selected product is added to the Chosen products list box. Click Update attached products. Added products are listed in the Associated product list.
All the fields marked with an asterisk * are required and must be completed before you can proceed with the certification.
Chapter 7. Setting up the test environment for non-containerized application testing
The first step towards certifying your product is setting up the environment where you can run the tests.
The test environment consists of a system in which all the certification tests are run.
7.1. Setting up a system that acts as a system under test
A system on which the product that needs certification is installed or configured is referred to as the system under test (SUT).
Prerequisites
- The SUT has RHEL version 8 or 9 installed. For convenience, Red Hat provides kickstart files to install the SUT’s operating system. Follow the instructions in the file that is appropriate for your system before launching the installation process.
Procedure
Configure the Red Hat Certification repository:
Use your RHN credentials to register your system using Red Hat Subscription Management:
$ subscription-manager register
Display the list of available subscriptions for your system:
$ subscription-manager list --available*
- Search for the subscription which provides the Red Hat Certification (for RHEL Server) repository and make a note of the subscription and its Pool ID.
Attach the subscription to your system:
$ subscription-manager attach --pool=<pool_ID>Replace the pool_ID with the Pool ID of the subscription.
You don’t have to attach the subscription to your system, if you enable the option Simple content access for Red Hat Subscription Management. For more details, see How do I enable Simple Content Access for Red Hat Subscription Management?
Subscribe to the Red Hat Certification channel:
On RHEL 8:
$ subscription-manager repos --enable=cert-1-for-rhel-8-<HOSTTYPE>-rpmsReplace HOSTTYPE with the system architecture. To find out the system architecture, run
$ uname -m
Example:
$ subscription-manager repos --enable=cert-1-for-rhel-8-x86_64-rpms
On RHEL 9:
$ subscription-manager repos --enable=cert-1-for-rhel-9-<HOSTTYPE>-rpmsReplace HOSTTYPE with the system architecture. To find out the system architecture, run
$ uname -m
Example:
$ subscription-manager repos --enable=cert-1-for-rhel-9-x86_64-rpms
Install the software test suite package:
$ dnf install redhat-certification-software
Chapter 8. Downloading the test plan from Red Hat Certification Portal
Procedure
- Log in to Red Hat Certification portal.
- Search for the case number related to your product certification, and copy it.
- Click Cases → enter the product case number.
Optional: Click Test Plans.
The test plan displays a list of components that will be tested during the test run.
Click Download Test Plan.
- If you plan to use CLI to run the tests, see Running certification tests by using CLI and downloading the results file.
- Otherwise, if you plan to use Cockpit to run the tests, see the Appendix.
Chapter 9. Running certification tests by using CLI and downloading the results file
To run the certification tests by using CLI you must download the test plan to the SUT. After running the tests, download the results and review them.
9.1. Running the certification tests using CLI
Procedure
Run the following command:
# rhcert-run
When prompted, choose whether to run each test by typing
yesorno.You can also run particular tests from the list by typing
select.
After a test reboot, rhcert is running in the background to verify the image. Use tail -f /var/log/rhcert/RedHatCertDaemon.log to see the current progress and status of the verification.
9.2. Reviewing and downloading the results file of the executed test plan
Procedure
Download the test results file:
# rhcert-save
-
Download the results file by using the
rhcert-savecommand to your local system.
Additional resources
For more details on setting up and using cockpit for running the certification tests, see the Appendix.
Chapter 10. Uploading the results file of the executed test plan to Red Hat Certification portal
Prerequisites
- You have downloaded the test results file from either the SUT or Cockpit.
Procedure
- Log in to Red Hat Certification portal.
On the homepage, enter the product case number in the search bar.
Select the case number from the list that is displayed.
- On the Summary tab, under the Files section, click Upload.
Red Hat will review the submitted test results file and suggest the next steps.
Additional resources
For more information, visit Red Hat Certification portal.
Chapter 11. Recertification
As an existing partner you must recertify your application:
- on every major and minor release of the Red Hat Enterprise Linux
- on every major and minor release of your application
To recertify your application, it is mandatory to create a new certification request for recertification.
To recertify your application, submit a new certification request through the Red Hat Certification tool or create a new component in the Red Hat Partner Connect. Run the certification tests on SUT and proceed with the regular certification workflow, like a new certification.
Chapter 12. Publishing the certified application
After submitting your test results through the Red Hat certification portal, your application is scanned for vulnerabilities.
When the scanning is completed, the publish button will be enabled for your application on the Product Listings page. After providing all the necessary information, click the publish button. Your application will be available on the Red Hat Ecosystem Catalog.
The Red Hat software certification does not conduct testing of the Partner’s product in how it functions or performs on the chosen platform. Any and all aspects of the certification candidate product’s quality assurance remains the partner’s sole responsibility.
Appendix A. Running the certification tests by using cockpit
Using cockpit to run the certification tests is optional.
Use the following procedure to set up and run the certification tests by using cockpit.
A.1. Configuring the system and running tests by using Cockpit
To run the certification tests by using Cockpit you need to upload the test plan to the SUT first. After running the tests, download the results and review them.
Although it is not mandatory, Red Hat recommends you to configure and use Cockpit for the certification process. Configuring cockpit greatly helps you to manage and monitor the certification process on the SUT.
A.1.1. Setting up the Cockpit server
Cockpit is a RHEL tool that lets you change the configuration of your systems as well as monitor their resources from a user-friendly web-based interface.
- You must set up Cockpit either on the SUT or a new system.
- Ensure that the Cockpit has access to SUT.
Prerequisites
- The Cockpit server has RHEL version 8 or 9 installed.
- You have installed the Cockpit plugin on your system.
- You have enabled the Cockpit service.
Procedure
- Log in to the system where you installed Cockpit.
Install the Cockpit RPM provided by the Red Hat Certification team.
# dnf install redhat-certification-cockpit
By default, Cockpit runs on port 9090.
Additional resources
For more information on installing and configuring Cockpit, see Getting Started using the RHEL web console on RHEL 8, Getting Started using the RHEL web console on RHEL 9 and Introducing Cockpit.
A.1.2. Adding system under test to Cockpit
Adding the system under test (SUT) to Cockpit lets them communicate by using passwordless SSH.
Prerequisites
- You have the IP address or hostname of the SUT.
Procedure
- Enter http://<Cockpit_system_IP>:9090/ in your browser to launch the Cockpit web application.
- Enter the username and password, and then click Login.
Click the down-arrow on the logged-in cockpit user name→Add new host.
The dialog box displays.
- In the Host field, enter the IP address or hostname of the system.
- In the User name field, enter the name you want to assign to this system.
- Optional: Select the predefined color or select a new color of your choice for the host added.
- Click Add.
- Click Accept key and connect to let Cockpit communicate with the SUT through passwordless SSH.
- Enter the Password.
- Select the Authorize SSH Key checkbox.
- Click Log in.
Verification
On the left panel, click Tools →Red Hat Certification.
Verify that the SUT you just added displays below the Hosts section on the right.
A.1.3. Getting authorization on the Red Hat SSO network
Procedure
- Enter http://<Cockpit_system_IP>:9090/ in your browser’s address bar to launch the Cockpit web application.
- Enter the username and password, and then click Login.
- Select Tools → Red Hat Certification in the left panel.
On the Cockpit homepage, click Authorize, to establish connectivity with the Red Hat system.
The Log in to your Red Hat account page displays.
Enter your credentials and click Next.
The Grant access to rhcert-cwe page displays.
- Click Grant access. A confirmation message displays a successful device login. You are now connected to the Cockpit web application.
A.1.4. Downloading test plans in Cockpit from Red Hat certification portal
For Non-authorized or limited access users:
- To download the test plan, see Downloading the test plan from Red Hat Certification portal.
For authorized users:
Procedure
- Enter http://<Cockpit_system_IP>:9090/ in your browser’s address bar to launch the Cockpit web application.
- Enter the username and password, and then click Login.
- Select Tools → Red Hat Certification in the left panel.
- Click the Test Plans tab. A list of Recent Certification Support Cases will appear.
- Click Download Test Plan. A message displays confirming the successful addition of the test plan.
- The downloaded test plan will be listed under the File Name of the Test Plan Files section.
A.1.5. Using the test plan to prepare the system under test for testing
Provisioning the system under test (SUT) includes the following operations:
- setting up passwordless SSH communication with cockpit
- installing the required packages on your system based on the certification type
- creating a final test plan to run, which is a list of common tests taken from both the test plan provided by Red Hat and tests generated on discovering the system requirements.
For instance, required software packages will be installed if the test plan is designed for certifying a software product.
Prerequisites
Procedure
- Enter http://<Cockpit_system_IP>:9090/ in your browser address bar to launch the Cockpit web application.
- Enter the username and password, and then click Login.
- Select Tools → Red Hat Certification in the left panel.
- Click the Hosts tab, and then click the host under test on which you want to run the tests.
Click Provision.
A dialog box appears.
Click Upload, and then select the new test plan .xml file. Then, click Next. A successful upload message is displayed.
Optionally, if you want to reuse the previously uploaded test plan, then select it again to reupload.
NoteDuring the certification process, if you receive a redesigned test plan for the ongoing product certification, then you can upload it following the previous step. However, you must run
rhcert-clean allin the Terminal tab before proceeding.-
In the Role field, select System under test and click Submit. By default, the file is uploaded to path:
/var/rhcert/plans/<testplanfile.xml>
A.1.6. Running the certification tests using Cockpit
Prerequisites
- You have prepared the system under test.
Procedure
- Enter http://<Cockpit_system_IP>:9090/ in your browser address bar to launch the Cockpit web application.
- Enter the username and password, and click Login.
- Select Tools → Red Hat Certification in the left panel.
- Click the Hosts tab and click on the host on which you want to run the tests.
Click the Terminal tab and select Run.
A list of recommended tests based on the test plan uploaded displays. The final test plan to run is a list of common tests taken from both the test plan provided by Red Hat and tests generated on discovering the system requirements.
When prompted, choose whether to run each test by typing
yesorno.You can also run particular tests from the list by typing
select.
A.1.7. Reviewing and downloading the results file of the executed test plan
Procedure
- Enter http://<Cockpit_system_IP>:9090/ in your browser address bar to launch the Cockpit web application.
- Enter the username and password, and then click Login.
- Select Tools → Red Hat Certification in the left panel.
Click the Result Files tab to view the test results generated.
- Optional: Click Preview to view the results of each test.
-
Click Download beside the result files. By default, the result file is saved as
/var/rhcert/save/hostname-date-time.xml.
A.1.8. Submitting the test results from Cockpit to the Red Hat Certification Portal
Procedure
- Enter http://<Cockpit_system_IP>:9090/ in your browser’s address bar to launch the Cockpit web application.
- Enter the username and password, and then click Login.
- Select Tools → Red Hat Certification in the left panel.
Click the Result Files tab and select the case number from the displayed list.
- For the authorized users click Submit. A message displays confirming the successful upload of the test result file.
- For non-authorized users see, Uploading the results file of the executed test plan to Red Hat Certification portal.
The test result file of the executed test plan will be uploaded to the Red Hat Certification portal.
Part II. Certifying Containerized Applications
Chapter 13. Working with containers
13.1. Introduction to containers
Containers include all the necessary components like libraries, frameworks, and other additional dependencies that are isolated and self-sufficient within their own executable. A Red Hat container certification ensures supportability of both the operating system and the application layers. It provides enhanced security by vulnerability scanning and health grading of the Red Hat components, and lifecycle commitment whenever the Red Hat or partner components are updated.
However, containers running in privileged mode, or privileged containers, stretch their boundaries and interact with their host to run commands or access the host’s resources. For example, a container that reads or writes to a filesystem mounted on the host must run in privileged mode.
Privileged containers might create a security risk. A compromised privileged container might also compromise its host and the integrity of the environment as a whole.
Moreover, privileged containers are susceptible to incompatibilities with the host as operating system interfaces such as commands, libraries, ABI, and APIs might change or deprecate over time. This can put privileged containers at risk of interacting with the host in an unsupported way.
You must ensure that your containers can run on any supported hosts in the customer’s environment. Red Hat encourages you to adopt a continuous integration model that lets you test your containers with public betas or earlier versions of Red Hat products to maximize compatibility.
13.2. Container certification workflow
Red Hat recommends that you are a Red Hat Certified Engineer or hold equivalent experience before starting the certification process.
Task Summary
The certification workflow includes the three primary stages-
13.2.1. Certification on-boarding
Perform the steps outlined for certification onboarding:
- Join the Red Hat Connect for Technology Partner Program.
- Agree to the program terms and conditions.
Create your product listing by selecting your desired product category. You can select from the available product categories:
- Containerized Application
- Standalone Application
- OpenStack Infrastructure
- Complete your company profile.
- Add components to the product listing.
- Certify components for your product listing.
Additional resources
For detailed instructions about creating your first product listing, see Creating a product.
13.2.2. Certification testing for containerized applications
Follow these high-level steps to run a certification test:
- Build your container image.
- Upload your container image to your chosen registry. You can choose any registry of your choice.
You can perform Red Hat Container certification by using a custom container registry. This enables you to provide an access token to the registry, which thereby helps to verify the availability of the container images for users. Also, it ensures that the container image can undergo scanning by the security scanner and can be published on the Red Hat Ecosystem Catalog. Custom registries employ diverse authentication methods, and the Red Hat Software certification program supports the following authentication methods along with the standard OCI registry API:
- Bearer Authentication
- OAuth2
- Basic Authentication
For more details about the authentication methods, see Supported auth methods.
- Download the Preflight certification utility.
- Run Preflight with your container image.
- Submit results on Red Hat Partner Connect.
Additional resources
For detailed instructions about certification testing, see Running the certification test suite.
13.2.3. Publishing the certified product listing on the Red Hat Ecosystem Catalog
Certified container images are delivered to customers through the Red Hat Connect Image Registry, which you can then run on a supported Red Hat container platform. Your product and its images get listed on the Red Hat Container Catalog using the listing information that you provide.
Additional resources
- For more details about publishing your certified container image, see Publishing the certified container on Red Hat Ecosystem Catalog.
For more information about containers, see:
13.3. Testing multi-arch container certification using preflight
Follow these steps to perform a multi-arch container certification test:
Procedure
- Build your multi-arch container images. See Building and pushing multi-arch container images using Podman for more information.
- Upload your container images to your chosen registry. You can select any OCI registry of your choice.
You can perform Red Hat Container certification by using a custom container registry. This enables you to provide an access token to the registry, which thereby helps to verify the availability of the container images for users. Also, it ensures that the container image can be scanned by the security scanner and published on the Red Hat Ecosystem Catalog. Custom registries employ diverse authentication methods, and the Red Hat Software certification program supports the following authentication methods along with the standard OCI registry API:
- Bearer Authentication
- OAuth2
- Basic Authentication
For more details about the authentication methods, see Supported auth methods.
- Download the Preflight certification utility. Ensure that you have the latest version to benefit from any updates or improvements.
- Run preflight with your multi-arch container image. Preflight will automatically run and submit results for all architectures if the supplied image is a manifest list.
- Review and address the preflight certification results.
- Submit results on Red Hat Partner Connect.
13.3.1. Building and pushing multi-arch container images using Podman
Follow the instructions to build and push multi-arch images using Podman:
Prerequisites
- Podman is installed on your system.
- You have a Dockerfile that defines the image you want to build for multiple architectures.
- You have a Quay.io account or any other container registry account.
Procedure
- Prepare Your Dockerfile.
- Build and push the multi-arch container Images. Check the podman-manifest documentation for instructions on building and pushing the multi-arch container images.
Chapter 14. Create a product
The product listing provides marketing and technical information, showcasing your product’s features and advantages to potential customers. It lays the foundation for adding all necessary components to your product for certification.
Prerequisites
Verify the functionality of your product on the target Red Hat platform, in addition to the specific certification testing requirements. If running your product on the targeted Red Hat platform results in a substandard experience then you must resolve the issues before certification.
You must construct your container images so that they meet the certification criteria and policy. For more details, see image content requirements. You can also use Red Hat base images for building your container images. See Red Hat Enterprise Linux Container Compatibility Matrix before matching your container images with the container hosts.
Procedure
Red Hat recommends completing all optional fields in the listing tabs for a comprehensive product listing. More information helps mutual customers make informed choices.
Red Hat encourages collaboration with your product manager, marketing representative, or other product experts when entering information for your product listing.
Fields marked with an asterisk (*) are mandatory.
Procedure
- Log in to the Red Hat Partner Connect Portal.
- Go to the Certified technology portal tab and click Visit the portal.
- On the header bar, click Product management.
- From the Listing and certification tab click Manage products.
From the My Products page, click Create Product.
A Create New Product dialog opens.
- Enter the Product name.
From the What kind of product would you like to certify? drop-down, select the required product category and click Create product. For example, select Containerized Application for creating a containerized product listing.
A new page with your Product name opens. It comprises the following tabs:
Along with the following tabs, the page header provides the Product Score details. Product Score evaluates your product information and displays a score. It can be:
- Fair
- Good
- Excellent
- Best
- Click How do I improve my score? to improve your product score.
- After providing the product listing details, click Save before moving to the next section.
14.1. Overview
This tab consists of a series of tasks that you must complete to publish your product:
- Section 14.1.1, “Complete product listing details for containerized applications”
- Section 14.1.2, “Complete company profile information for containerized applications”
- Section 14.1.3, “Accept legal agreements for containerized applications”
- Section 14.1.4, “Add at least one product component for containerized applications”
- Section 14.1.5, “Certify components for your listing for containerized applications”
14.1.1. Complete product listing details for containerized applications
To complete your product listing details, click Start.
The Product Information tab opens.
- Enter all the essential product details and click Save.
14.1.2. Complete company profile information for containerized applications
- To complete your company profile information, click Start. After entering all the details, click Submit.
- To modify the existing details, click Review. The Account Details page opens.
- Review and modify the Company profile information and click Submit.
14.1.3. Accept legal agreements for containerized applications
To publish your product image, agree to the terms regarding the distribution of partner container images.
- To accept the legal agreements, click Start.
- To preview or download the agreement, click Review.
The Red Hat Partner Connect Container Appendix document displays. Read the document to know the terms related to the distribution of container images.
14.1.4. Add at least one product component for containerized applications
Click Start. You are redirected to the Components tab.
To add a new or existing product component, click Add component.
For adding a new component,
- In the Component Name text box, enter the component name.
For What kind of standalone component are you creating? select the component that you wish to certify. For example, for certifying your containers, based on your requirements select from the following options:
- Container Image
- Containerized application for RHEL
- Containerized application for OpenStack
- Click Next.
For Red Hat Enterprise Linux Version, select the major RHEL version for which you are certifying your component.
NoteYou can’t modify the version after creating the product listing.
- Click Create new component.
For adding an existing component, from the Add Component dialog, select Existing Component.
- From the Available components list, search and select the components that you wish to certify and click the forward arrow. The selected components are added to the Chosen components list.
- Click Attach existing component.
14.1.5. Certify components for your listing for containerized applications
To certify the components for your listing, click Start. If you have existing product components, you can view the list of Attached Components and their details:
- Name
- Certification
- Security
- Type
- Created
- Click more options to archive or remove the components
- Select the components for certification.
After completing all the above tasks you will see a green tick mark corresponding to all the options.
The Overview tab also provides the following information:
Product contacts - Provides Product marketing and Technical contact information.
- Click Add contacts to product to provide the contact information
- Click Edit to update the information.
Components in product - Provides the list of the components attached to the product along with their last updated information.
- Click Add components to product to add new or existing components to your product.
- Click Edit components to update the existing component information.
After publishing the product listing, you can view your Product Readiness Score and Ways to raise your score on the Overview tab.
14.2. Product Information
Through this tab you can provide all the essential information about your product. The product details are published along with your product on the Red Hat Ecosystem catalog.
General tab:
Provide basic details of the product, including product name and description.
- Enter the Product Name.
- Optional: Upload the Product Logo according to the defined guidelines.
- Enter a Brief description and a Long description.
- Click Save.
Features & Benefits tab:
Provide important features of your product.
- Optional: Enter the Title and Description.
- Optional: To add additional features for your product, click + Add new feature.
- Click Save.
Quick start & Config tab:
Add links to any quick start guide or configuration document to help customers deploy and start using your product.
- Optional: Enter Quick start & configuration instructions.
- Click Save.
- Select Hide default instructions check box, if you don’t want to display them.
Linked resources tab:
Add links to supporting documentation to help our customers use your product. The information is mapped to and is displayed in the Documentation section on the product’s catalog page.
It is mandatory to add a minimum of three resources. Red Hat encourages you to add more resources, if available.
- Select the Type drop-down menu, and enter the Title and Description of the resource.
- Enter the Resource URL.
- Optional: To add additional resources for your product, click + Add new Resource.
- Click Save.
FAQs tab:
Add frequently asked questions and answers of the product’s purpose, operation, installation, or other attribute details. You can include common customer queries about your product and services.
- Enter Question and Answer.
- Optional: To add additional FAQs for your product, click + Add new FAQ.
- Click Save.
Support tab:
This tab lets you provide contact information of your Support team.
- Enter the Support description, Support web site, Support phone number, and Support email address.
- Click Save.
Contacts tab:
Provide contact information of your marketing and technical team.
- Enter the Marketing contact email address and Technical contact email address.
- Optional: To add additional contacts, click + Add another.
- Click Save.
Legal tab:
Provide the product related license and policy information.
- Enter the License Agreement URL for the product and Privacy Policy URL.
- Click Save.
SEO tab:
Use this tab to improve the discoverability of your product for our mutual customers, enhancing visibility both within the Red Hat Ecosystem Catalog search and on internet search engines. Providing a higher number of search aliases (key and value pairs) will increase the discoverability of your product.
- Select the Product Category.
- Enter the Key and Value to set up Search aliases.
- Click Save.
- Optional: To add additional key-value pair, click + Add new key-value pair.
Add at least one Search alias for your product. Red Hat encourages you to add more aliases, if available.
14.3. Components tab for containers
Use this tab to add components to your product listing. Additionally, you can view a list of attached components linked to your Product Listing.
Select from the following options:
Alternatively, to attach a component to the Product Listing, you can complete the Add at least one product component option available on the Overview tab of a Container, Operator, or Helm Chart product listing.
14.3.1. Container images
- To add a new or existing product component, click Add component.
For adding a new component perform the steps,
- In the Component Name text box, enter the component name.
- For What kind of standalone component are you creating? select the component that you wish to certify. For example, for certifying your containers, select Container Image.
- Click Next.
On the Create and Add component page, select the preferred OS Content-Type and Distribution Method for the component:
For What base image does your container use?, select the type of image that you want to use for your component:
- Red Hat Universal Base Image - You can distribute UBI-based container images through the Red Hat Container registry or any other third-party registry.
- Red Hat Enterprise Linux - You can distribute RHEL-based container images through the Red Hat Container registry only.
For Select your preferred Distribution Method, select the container registry that you will use for distributing your container images. Customers will pull your container images from this location and in all the following methods your container images remain hosted on a registry that you manage. Red Hat recommends Quay.io to host your images, but you can use any Kubernetes-compatible registry.
- Red Hat Container Registry - Select this option, if you want Red Hat to distribute your containers through Red Hat’s container registry. Select the I need Red Hat to host my registry check box. When you select this option, images with this distribution method are hosted on your container registry, but are distributed to customers through a Red Hat registry proxy address. Customers will have access to your containers without adding registries to their configuration, but you will not have visibility on customer-specific download metrics or other usage data from the proxy.
- Your own Container Registry - Select this option to publish your certified containers on your registry. When using your own third-party registry, customers will need to authenticate to your registry, to pull your certified containers, and use your product. In disconnected environments, customers must add your registry to their Red Hat platforms to install your certified containers. NOTE - Red Hat recommends self-hosting on your registry because you can access your entire container metrics and have full control of the access of your product. Red Hat recommends using Quay.io for this purpose, however, you can use any Kubernetes-compatible registry.
- Click Add Component.
For adding an existing component, from the Add Component dialog, select Existing Component.
- From the Available components list, search and select the components that you wish to certify and click the forward arrow. The selected components are added to the Chosen components list.
- Click Attach existing component.
14.3.2. Containerized application for RHEL
- To add a new or existing product component, click Add component.
For adding a new component perform the steps,
- In the Component Name text box, enter the component name.
- For What kind of standalone component are you creating? select the component that you wish to certify. For example, select Containerized application for RHEL.
- Click Next.
On the Create and Add component page, select the preferred RHEL version and Distribution Method for the component:
For What major version of RHEL will you be certifying your image for?, select the preferred RHEL version:
- 8
9
NoteYou cannot modify the version after creating the product component.
For Distribution Method, select the container registry that you will use for distributing your container images. Customers will pull your container images from this location and in all the following methods your container images remain hosted on a registry that you manage. Red Hat recommends Quay.io to host your images, but you can use any Kubernetes-compatible registry.
- Red Hat Container Registry - Select this option, if you want Red Hat to distribute your containers through Red Hat’s container registry. Select the I need Red Hat to host my registry check box. When you select this option, images with this distribution method are hosted on your container registry but are distributed to customers through a Red Hat registry proxy address. Customers will have access to your containers without adding registries to their configuration, but you will not have visibility on customer-specific download metrics or other usage data from the proxy.
- Your own Container Registry - Select this option to publish your certified containers on your registry. When using your own third-party registry, customers will need to authenticate to your registry to pull your certified containers and use your product. In disconnected environments, customers must add your registry to their Red Hat platforms to install your certified containers. NOTE - Red Hat recommends self-hosting on your registry because you can your entire container metrics and have full control of the access of your product. Red Hat recommends using Quay.io for this purpose, however, you can use any Kubernetes-compatible registry.
- Click Add Component.
For adding an existing component, from the Add Component dialog, select Existing Component.
- From the Available components list, search and select the components that you wish to certify and click the forward arrow. The selected components are added to the Chosen components list.
- Click Attach existing component.
14.3.3. Containerized application for OpenStack
- To add a new or existing product component, click Add component.
For adding a new component, in the Component Name text box, enter the component name.
- For What kind of standalone component are you creating? select the component that you wish to certify. For example, for certifying a containerized application for Red Hat OpenStack platform, select Containerized application for OpenStack.
- For What major version of OpenStack will you be certifying your image for? version 17 is enabled by default. You cannot modify this field.
- Click Create new Component.
For adding an existing component, from the Add Component dialog, select Existing Component.
- From the Available components list, search and select the components that you wish to certify and click the forward arrow. The selected components are added to the Chosen components list.
Click Attach existing component.
NoteYou can add one component to multiple products listings. All attached components must be published before the product listing can be published.
After attaching components, you can view the list of Attached Components and their details:
- Name
- Certification
- Security
- Type
- Created
- Click more options to archive or remove the attached components
Alternatively, to search for specific components, type the component’s name in the Search by component Name text box.
14.4. Support
The Red Hat Partner Acceleration Desk (PAD) is a Products and Technologies level partner help desk service that allows the current and prospective partners a central location to ask non-technical questions pertaining to Red Hat offerings, partner programs, product certification, engagement process, and so on.
You can also contact the Red Hat Partner Acceleration Desk for any technical questions you may have regarding the Certification. Technical help requests will be redirected to the Certification Operations team.
Through the Partner Subscriptions program, Red Hat offers free, not-for-resale software subscriptions that you can use to validate your product on the target Red Hat platform. To request access to the program, follow the instructions on the Partner Subscriptions site.
- To request support, click Open a support case. See PAD - How to open & manage PAD cases, to open a PAD ticket.
- To view the list of existing support cases, click View support cases.
14.5. Removing a product
After creating a product listing if you wish to remove it, go to the Overview tab and click Delete.
A published product must first be unpublished before it can be deleted. Red Hat retains information related to deleted products even after you delete the product.
Chapter 15. Adding certification components
After creating the new product listing, add the certification components for the newly created product listing.
You can configure the following options for the newly added components:
The component configurations differ for different product categories.
To configure the options, go to the Components tab and click on any of the existing components.
15.1. Images
The Images tab provides the test results for the container images that you submit by using the preflight tool. You have to configure preflight and push your container images to view the test results.
- To push your container images, click Set up Preflight.
- For detailed instructions about certification testing, see Running the certification test suite.
When your testing is complete you can see two categories of images:
- Manifest Digests - denotes container images that are available for multiple architectures.
- Standalone Container Images - denotes container images that are available only for a single architecture.
This page provides the following details of your container images:
- Specific image ID or the SHA ID
- Image Tag(s)
- Certification - Certified or Not certified, pass or fail status based on the checks performed. Click on it for more details.
- Architecture - specific architecture of your image, if applicable.
- Security - check for any vulnerabilities, if any.
- Health Index - Container Health Index is a measure of the oldest and most severe security updates available for a container image. 'A' is more up-to-date than 'F'. See Container Health Index grades as used inside the Red Hat Container Catalog for more details.
- Created - the day on which you submitted the certification.
Click the Actions menu to perform the following tasks:
- Delete Image - click this option to delete your container image when your image is unpublished.
- Sync Tags - when you have altered your image tag, use this option to synchronize the container image information available on both Red Hat Partner Connect and Red Hat Container catalog.
- View in Catalog - When your container image is published, click this option to view the published container image on the Red Hat Ecosystem Container catalog.
- Click Publish, to publish your certified container images.
15.2. Certification for containers
15.2.1. For Container images
The Certification tab provides detailed information about the Export control questionnaire, all the certification tests performed for the attached container images and ways to submit your container image for certification.
Export Control Questionnaire
The Export control questionnaire contains a series of questions through which the Red Hat legal team evaluates the export compliance by third-party vendors. Partner’s legal representative must review and answer the questions. Red Hat takes approximately five business days to evaluate the responses and based on the responses Red Hat approves partner or declines partner or defers decision or requests more information.
- Click Start questionnaire, to enter all the legal information about your product.
- Click Review to modify the existing details.
If you are using a version of Universal Base Image (UBI) to build your container image, you can host your image in a private repository. This allows you to skip the Export Compliance questionnaire. This form is required only if you are hosting your images on the Red Hat Container Catalog.
Certification tests
It provides the status of the Manifest Digests Certification Tests or Standalone Certification Tests performed for the attached container images, which includes the following details:
- Results - total number of tests run along with the result. Click on it for more details.
- Image - specific image ID or SHA ID
- Last activity - number of days before you ran the test
Submit your container image for verification
- Run the certification suite on your container image. See Running the certification test suite.
- Upload the test results. You can later see the test results on the Images tab.
- Publish the container image certification on the Red Hat catalog. See Publishing the certified container on Red Hat Ecosystem Catalog.
This step certifies your container only. Use the Certifications tab to certify the functionality.
15.2.2. For Containerized applications on RHEL
Export Control Questionnaire
The Export control questionnaire contains a series of questions through which the Red Hat legal team evaluates the export compliance by third-party vendors. Partner’s legal representative must review and answer the questions. Red Hat takes approximately five business days to evaluate the responses and based on the responses Red Hat approves partner or declines partner or defers decision or requests more information.
- Click Start questionnaire, to enter all the legal information about your product.
- Click Review to modify the existing details.
If you are using a version of Universal Base Image (UBI) to build your container image, you can host your image in a private repository. This allows you to skip the Export Compliance questionnaire. This form is required only if you are hosting your images on the Red Hat Container Catalog.
Validate the functionality of your product on Red Hat Enterprise Linux
Validate the functionality of your product on Red Hat Enterprise Linux by using the Certification tab. You can perform the following functions:
- Run the Red Hat Certification Tool locally
- Download the test plan
- Share the test results with the Red Hat certification team.
Interact with the certification team, if required.
To validate the functionality of your product perform the following steps:
- If you are a new partner, click Request a partner subscription. When your request is approved, you get active subscriptions added to your account.
When you have active partner subscriptions, then click Start certification and then click Go to Red Hat certification tool.
A new certification case gets created on the Red Hat Certification portal, and you are redirected to the appropriate certification portal page.
The certification team will contact you to start the certification testing process, and will follow up with you in case of a problem. After successful verification, a green check mark is displayed with the validate complete message.
To review the validated product details, click Review.
Submit your container image for verification
- Run the certification suite on your container image. See Running the certification test suite.
Upload the test results.
You can later see the test results on the Images tab.
- Publish the container image certification on the Red Hat catalog. See Publishing the certified container on Red Hat Ecosystem Catalog.
This step certifies your container only. Use the Certifications tab to certify the functionality.
15.2.3. For Containerized applications for OpenStack
The Certification tab provides detailed information about the Export control questionnaire and ways to submit your container image for certification.
Export Control Questionnaire
The Export control questionnaire contains a series of questions through which the Red Hat legal team evaluates the export compliance by third-party vendors. Partner’s legal representative must review and answer the questions. Red Hat takes approximately five business days to evaluate the responses and based on the responses Red Hat approves partner or declines partner or defers decision or requests more information.
- Click Start questionnaire, to enter all the legal information about your product.
- Click Review to modify the existing details.
If you are using a version of Universal Base Image (UBI) to build your container image, you can host your image in a private repository. This allows you to skip the Export Compliance questionnaire. This form is required only if you are hosting your images on the Red Hat Container Catalog.
Submit your container image for verification
- Run the certification suite on your container image. See Running the certification test suite.
- Upload the test results. You can later see the test results on the Images tab.
- Publish the container image certification on the Red Hat catalog. See Publishing the certified container on Red Hat Ecosystem Catalog.
This step certifies your container only. Use the Certifications tab to certify the functionality.
15.3. Optional Qualifications
This tab is applicable only for Operator, Helm and OpenShift container images.
The Optional qualifications tab provides tests to check if your attached product component follows Red Hat’s recommended guidelines and best practices for deploying your product on Red Hat OpenShift clusters.
To test your product,
- Click Start Testing.
- Click Go to Red Hat certification tool to reach the Red Hat Partner Certification (rhcert) portal.
In the Red Hat Partner Certification (rhcert) portal, go to the Summary tab.
- To submit your test results, from the Files section click Upload. A successful upload message is displayed.
- Add your queries related to certification, if any, in the Discussions text box.
- Click Add Comment. By using this option, you can communicate your questions to the Red Hat certification team. The Red Hat certification team will provide clarifications for your queries.
When your testing is complete and to make any changes to the test, click Review.
The test results are published for your reference.
15.4. Security
The security tab provides the health status of the attached product components. Red Hat uses a Health Index to identify security risks with your components that Red Hat provides through the Red Hat Ecosystem Catalog.
The Health Index is a measure of the oldest and most severe security updates available for a container image. An image with a grade of 'A' is more up-to-date than one with a grade of 'F. For more information, see Container Health Index grades as used inside the Red Hat Container Catalog.
This tab provides the health index of your images which includes the following details:
- Image ID
- Health index
15.5. Repository information
You can configure the registry and repository details by using the Repository information tab.
Enter the required details in the following fields:
| Field name | Description |
|---|---|
| Container registry namespace | Registry name set when the container was created. This field becomes non-editable when the container gets published. |
| Outbound repository name | Repository name that you have selected or the name obtained from your private registry in which your image is hosted, for example, ubi-minimal. |
| Repository summary | Repository summary obtained from the container image. |
| Repository description | Repository description obtained from the container image. |
| Instructions for users to get your company’s image on the Red Hat Container catalog | Provide specific instructions that you want users to follow when they get your container image. This field is applicable only for container images. |
After configuring all the mandatory fields click Save.
All the fields marked with an asterisk * are required and must be completed before you can proceed with container certification.
15.6. Component details
Configure the product component details by using this tab.
Enter the required details in the following fields:
| Field name | Description |
|---|---|
| Image Type | Select the respective image type for your product component.
|
| Application categories | Select the respective application type of your software product. |
| Host level access | Select between the two options:
Note If your product’s functionality requires root access, you must select the privileged option, before running the preflight tool. This setting is subject to Red Hat review. |
| Release Category | Select between the two options:
|
| Project name | Name of the project for internal purposes. |
| Auto-publish | When you enable this option, the container image gets automatically published on the Red Hat Container catalog, after passing all the certification tests. |
| Red Hat Enterprise Linux Version | It denotes the version of RHEL on which you are certifying your containerized application. Note This field is non-editable and is applicable only for containerized applications on RHEL. |
| Red Hat OpenStack platform | It denotes the version of the OpenStack platform on which you are certifying your containerized application. Note This field is non-editable and is applicable only for containerized applications on Red Hat OpenStack platform. |
15.7. Contact Information
Providing information for this tab is optional.
In the Contact Information tab, enter the primary technical contact details of your product component.
- Optional: In the Technical contact email address field, enter the email address of the image maintainer.
- Optional: To add additional contacts for your component, click + Add new contact.
- Click Save.
15.8. Associated products for containers
The Associated Product tab provides the list of products that are associated with your product component along with the following information:
- Product Name
- Type
- Visibility - Published or Not Published
- Last Activity - number of days before you ran the test
To add products to your component, perform the following:
- If you want to find a product by its name, enter the product name in the Search by name text box and click the search icon.
- If you are not sure of the product name, click Find a product. From the Add product dialog, select the required product from the Available products list box and click the forward arrow. The selected product is added to the Chosen products list box. Click Update attached products. Added products are listed in the Associated product list.
All the fields marked with an asterisk * are required and must be completed before you can proceed with the certification.
Chapter 16. Running the certification test suite
Follow the instructions to run the certification test suite:
Prerequisites
- You have a Red Hat Enterprise Linux (RHEL) system.
You can use Podman to log in to your image registry. For example:
$ podman login --username <your_username> --password <your_password> --authfile ./temp-authfile.json <registry>
- You have set up your container on the Red Hat Partner Connect portal. The product listing must at least be in progress.
- You have a pyxis API key.
Procedure
Build your container image by using Podman.
NoteUsing Podman to build container images is optional.
- Upload your container to any private or public registry of your choice.
- Download the latest Preflight certification utility.
Perform the following steps to verify the functionality of the container being certified:
Run the Preflight certification utility:
$ preflight check container \
registry.example.org/<namespace>/<image_name>:<image_tag>
Review the log information and change the container as needed. For more information, see the troubleshooting information page.
If you find any issues, either submit a support ticket or run the following command:
$ preflight support
Red Hat welcomes community contributions. If you experience a bug related to Preflight or the Red Hat Partner Connect Portal, or if you have a suggestion for a feature improvement or contribution, please report the issue. Before reporting an issue, ensure to review the open issues to avoid duplication.
- Run the container certification utility and make changes until all the tests pass.
Submit the certification test results by running the following command:
$ preflight check container \
registry.example.org/<namespace>/<image_name>:<image_tag> \
--submit \
--pyxis-api-token=<api_token> \
--certification-project-id=<project_id> \
--docker-config=./temp-authfile.json
After you submit your test results to the Red Hat Partner Connect portal, Red Hat will scan the layers of your container for package vulnerabilities.
- Review your certification and vulnerability test results in the certification component UI by navigating to the Images tab in the Red Hat Partner Connect portal.
Additional resources
If you are certifying a RHEL application, validate the functionality of your product by following the Non-container certification workflow.
You can also certify your RHEL application container by using the Red Hat Certification tool, which has the built-in pre-flight tool, thereby enabling you to validate your container.
Procedure
Follow the steps to use the built-in preflight tool:
Install the preflight package:
# dnf install redhat-certification-preflightRun rhcert and follow the instructions:
# rhcert-runReview and save the test results:
# rhcert-save
Chapter 17. Publishing the certified container on Red Hat Ecosystem Catalog
After you submit your test results from the preflight tool on your Partner Connect portal, your container images are scanned for vulnerabilities. When the scanning is successfully completed, the publish button will be enabled for your image. After you click the publish button, your image will be available on the Red Hat Ecosystem Catalog.
The Red Hat software certification does not conduct testing of the Partner’s product in how it functions or performs on the chosen platform. Any and all aspects of the certification candidate product’s quality assurance remains the partner’s sole responsibility.
Part III. Operator certification
Chapter 18. Working with Operators
Certify your operator image or necessary container image as a component before proceeding with Red Hat Operator certification. All containers referenced in an Operator Bundle must already be certified and published in the Red Hat Ecosystem Catalog prior to beginning to certify an Operator Bundle.
18.1. Introduction to Operators
A Kubernetes operator is a method of packaging, deploying, and managing a Kubernetes application. Our Operator certification program ensures that the partner’s operator is deployable by the Operator Lifecycle Manager on the OpenShift platform and is formatted properly, using Red Hat certified container images.
18.2. Certification workflow for Operators
Red Hat recommends that you are a Red Hat Certified Engineer or hold equivalent experience before starting the certification process.
Task Summary
The certification workflow includes three primary steps-
18.2.1. Certification on-boarding for Operators
Perform the steps outlined for certification onboarding:
- Join the Red Hat Connect for Technology Partner Program.
- Agree to the program terms and conditions.
Create your product listing by selecting your desired product category. You can select from the available product categories:
- Containerized Application
- Standalone Application
- OpenStack Infrastructure
- Complete your company profile.
- Add components to the product listing.
- Certify components for your product listing.
Additional resources
For detailed instructions about creating your first product listing, see Creating a product.
18.2.2. Certification testing for Operators
To run the certification test:
- Fork the Red Hat upstream repository.
- Install and run the Red Hat certification pipeline on your test environment.
- Review the test results and troubleshoot, if any issues.
- Submit the certification results to Red Hat through a pull request.
- If you want Red Hat to run all the tests then create a pull request. This triggers the certification hosted pipeline to run all the certification checks on Red Hat infrastructure.
It is possible that some operator releases seemingly disappear from the catalog, which happens when the graph gets automatically pruned, resulting in some operator versions being excluded from the update graph. Because of that, you will get blocked from releasing an operator bundle when it results in a channel with fewer or equal release versions than the one before.
In the case that you want to prune the graph intentionally, you can do so by skipping a test and restarting the pipeline using the following available commands in your pull request:
|
| test_case_name test will be skipped. Note that only a subset of tests can be skipped. |
|
| The hosted pipeline will re-trigger. |
Additional resources
For detailed instructions about certification testing, see Running the certification test suite.
18.2.3. Publishing the certified Operator on the Red Hat Ecosystem Catalog
When you complete all the certification checks successfully, you can submit the test results to Red Hat. You can turn on or off this result submission step depending on your individual goals. When the test results are submitted, it triggers the Red Hat infrastructure to automatically merge your pull request and publish your Operator.
Additional resources
For more details about operators, see:
Chapter 19. Create a product
The product listing provides marketing and technical information, showcasing your product’s features and advantages to potential customers. It lays the foundation for adding all necessary components to your product for certification.
Prerequisites
Verify the functionality of your product on the target Red Hat platform, in addition to the specific certification testing requirements. If running your product on the targeted Red Hat platform results in a substandard experience then you must resolve the issues before certification.
Certify your operator image or necessary container image as a container application component before creating an operator bundle.
Procedure
Red Hat recommends completing all optional fields in the listing tabs for a comprehensive product listing. More information helps mutual customers make informed choices.
Red Hat encourages collaboration with your product manager, marketing representative, or other product experts when entering information for your product listing.
Fields marked with an asterisk (*) are mandatory.
Procedure
- Log in to the Red Hat Partner Connect Portal.
- Go to the Certified technology portal tab and click Visit the portal.
- On the header bar, click Product management.
- From the Listing and certification tab click Manage products.
From the My Products page, click Create Product.
A Create New Product dialog opens.
- Enter the Product name.
From the What kind of product would you like to certify? drop-down, select the required product category and click Create product. For example, select Containerized Application for creating a containerized product listing.
A new page with your Product name opens. It comprises the following tabs:
Along with the following tabs, the page header provides the Product Score details. Product Score evaluates your product information and displays a score. It can be:
- Fair
- Good
- Excellent
- Best
- Click How do I improve my score? to improve your product score.
- After providing the product listing details, click Save before moving to the next section.
19.1. Overview
This tab consists of a series of tasks that you must complete to publish your product:
- Section 19.1.1, “Complete product listing details for Operators”
- Section 19.1.2, “Complete company profile information for Operators”
- Section 19.1.3, “Accept legal agreements for Operators”
- Section 19.1.4, “Add at least one product component for Operators”
- Section 19.1.5, “Certify components for your listing for Operators”
19.1.1. Complete product listing details for Operators
To complete your product listing details, click Start.
The Product Information tab opens.
- Enter all the essential product details and click Save.
19.1.2. Complete company profile information for Operators
- To complete your company profile information, click Start. After entering all the details, click Submit.
- To modify the existing details, click Review. The Account Details page opens.
- Review and modify the Company profile information and click Submit.
19.1.3. Accept legal agreements for Operators
To publish your product image, agree to the terms regarding the distribution of partner container images.
- To accept the legal agreements, click Start.
- To preview or download the agreement, click Review.
The Red Hat Partner Connect Container Appendix document displays. Read the document to know the terms related to the distribution of container images.
19.1.4. Add at least one product component for Operators
Click Start. You are redirected to the Components tab.
To add a new or existing product component, click Add component.
For adding a new component,
- In the Component Name text box, enter the component name.
- For What kind of OpenShift component are you creating? select the component that you wish to certify. For example, for certifying your operators, select Operator Bundle.
- Click Next.
Specialized Certification - This feature allows you to certify a specialized operator.
Select My operator is a CNI or CSI checkbox, if you want to certify a specialized operator. …Select the required operator:
- Container Network Interface (CNI)
- Cloud Storage Interface (CSI)
Publication Options - Select one of the following options for publishing your operator:
- Web catalog only (catalog.redhat.com) - The operator is published to the Red Hat Container Catalog and is not visible on Red Hat OpenShift OperatorHub. This is the default option when you create a new operator component and this option is suitable for partners who do not want their operator publicly installable within OpenShift, but require a proof of certification. Select this option only if you have a distribution, entitlement, or other business requirements that is not otherwise accommodated within the OpenShift In-product Catalog (Certified) option.
- OpenShift In-product Catalog (Certified) - The operator is listed on the Red Hat Container Catalog and published to the certified operator index embedded in the OperatorHub of OpenShift.
- Click Add component.
For adding an existing component, from the Add Component dialog, select Existing Component.
- From the Available components list, search and select the components that you wish to certify and click the forward arrow. The selected components are added to the Chosen components list.
- Click Attach existing component.
19.1.5. Certify components for your listing for Operators
To certify the components for your listing, click Start. If you have existing product components, you can view the list of Attached Components and their details:
- Name
- Certification
- Security
- Type
- Created
- Click more options to archive or remove the components
- Select the components for certification.
After completing all the above tasks you will see a green tick mark corresponding to all the options.
The Overview tab also provides the following information:
Product contacts - Provides Product marketing and Technical contact information.
- Click Add contacts to product to provide the contact information
- Click Edit to update the information.
Components in product - Provides the list of the components attached to the product along with their last updated information.
- Click Add components to product to add new or existing components to your product.
- Click Edit components to update the existing component information.
After publishing the product listing, you can view your Product Readiness Score and Ways to raise your score on the Overview tab.
19.2. Product Information
Through this tab you can provide all the essential information about your product. The product details are published along with your product on the Red Hat Ecosystem catalog.
General tab:
Provide basic details of the product, including product name and description.
- Enter the Product Name.
- Optional: Upload the Product Logo according to the defined guidelines.
- Enter a Brief description and a Long description.
- Click Save.
Features & Benefits tab:
Provide important features of your product.
- Optional: Enter the Title and Description.
- Optional: To add additional features for your product, click + Add new feature.
- Click Save.
Quick start & Config tab:
Add links to any quick start guide or configuration document to help customers deploy and start using your product.
- Optional: Enter Quick start & configuration instructions.
- Click Save.
- Select Hide default instructions check box, if you don’t want to display them.
Linked resources tab:
Add links to supporting documentation to help our customers use your product. The information is mapped to and is displayed in the Documentation section on the product’s catalog page.
It is mandatory to add a minimum of three resources. Red Hat encourages you to add more resources, if available.
- Select the Type drop-down menu, and enter the Title and Description of the resource.
- Enter the Resource URL.
- Optional: To add additional resources for your product, click + Add new Resource.
- Click Save.
FAQs tab:
Add frequently asked questions and answers of the product’s purpose, operation, installation, or other attribute details. You can include common customer queries about your product and services.
- Enter Question and Answer.
- Optional: To add additional FAQs for your product, click + Add new FAQ.
- Click Save.
Support tab:
This tab lets you provide contact information of your Support team.
- Enter the Support description, Support web site, Support phone number, and Support email address.
- Click Save.
Contacts tab:
Provide contact information of your marketing and technical team.
- Enter the Marketing contact email address and Technical contact email address.
- Optional: To add additional contacts, click + Add another.
- Click Save.
Legal tab:
Provide the product related license and policy information.
- Enter the License Agreement URL for the product and Privacy Policy URL.
- Click Save.
SEO tab:
Use this tab to improve the discoverability of your product for our mutual customers, enhancing visibility both within the Red Hat Ecosystem Catalog search and on internet search engines. Providing a higher number of search aliases (key and value pairs) will increase the discoverability of your product.
- Select the Product Category.
- Enter the Key and Value to set up Search aliases.
- Click Save.
- Optional: To add additional key-value pair, click + Add new key-value pair.
Add at least one Search alias for your product. Red Hat encourages you to add more aliases, if available.
19.3. Components
Use this tab to add components to your product listing. Through this tab you can also view a list of attached components linked to your Product Listing.
Alternatively, to attach a component to the Product Listing, you can complete the Add at least one product component option available in the Overview tab of a Container, Operator, or Helm Chart product listing.
- To add a new or existing product component, click Add component.
For adding a new component,
- In the Component Name text box, enter the component name.
- For What kind of OpenShift component are you creating? select the component that you wish to certify. For example, for certifying your operators, select Operator Bundle.
- Click Next.
Specialized Certification - This feature allows you to certify a specialized operator.
- Select My operator is a CNI or CSI checkbox, if you want to certify a specialized operator.
Select the required operator:
- Container Network Interface (CNI)
- Cloud Storage Interface (CSI)
Publication Options - Select one of the following options for publishing your operator:
- Web catalog only (catalog.redhat.com) - The operator is published to the Red Hat Container Catalog but is not visible on Red Hat OpenShift OperatorHub. This is the default option when you create a new operator bundle component.
- OpenShift In-product Catalog (Certified) - The operator is listed on the Red Hat Container Catalog and published to the certified operator index embedded in the OperatorHub of OpenShift. This option gives customers the availability of installing your operator directly from OperatorHub in the OpenShift UI.
- Click Add Component.
For adding an existing component, from the Add Component dialog, select Existing Component.
- From the Available components list, search and select the components that you wish to add and click the forward arrow. The selected components are added to the Chosen components list.
- Click Attach existing component.
You can add the same component to multiple products listings. All attached components must be published before the product listing can be published.
After attaching components, you can view the list of Attached Components and their details:
- Name
- Certification
- Security
- Type
- Created
- Click more options to archive or remove the attached components
Alternatively, to search for specific components, type the component’s name in the Search by component Name text box.
19.4. Support
The Red Hat Partner Acceleration Desk (PAD) is a Products and Technologies level partner help desk service that allows the current and prospective partners a central location to ask non-technical questions pertaining to Red Hat offerings, partner programs, product certification, engagement process, and so on.
You can also contact the Red Hat Partner Acceleration Desk for any technical questions you may have regarding the Certification. Technical help requests will be redirected to the Certification Operations team.
Through the Partner Subscriptions program, Red Hat offers free, not-for-resale software subscriptions that you can use to validate your product on the target Red Hat platform. To request access to the program, follow the instructions on the Partner Subscriptions site.
- To request support, click Open a support case. See PAD - How to open & manage PAD cases, to open a PAD ticket.
- To view the list of existing support cases, click View support cases.
19.5. Removing a product
After creating a product listing if you wish to remove it, go to the Overview tab and click Delete.
A published product must first be unpublished before it can be deleted. Red Hat retains information related to deleted products even after you delete the product.
Chapter 20. Adding certification components
After creating the new product listing, add the certification components for the newly created product listing.
You can configure the following options for the newly added components:
The component configurations differ for different product categories.
- Section 20.1, “Certification for Operators”
- Section 20.2, “Optional Qualifications for Operators”
- Section 20.3, “Repository Information for Operators”
- Section 20.4, “Component details for Operators”
- Section 20.5, “Contact Information for Operators”
- Section 20.6, “Associated products for Operators”
- Section 20.7, “Update Graph”
To configure the options, go to the Components tab and click on any of the existing components.
20.1. Certification for Operators
Validate the functionality of your CNI or CSI on Red Hat OpenShift
NoteThis feature is applicable for CNI and CSI operators only.
This feature allows you to run the certification test locally and share the test results with the Red Hat certification team.
To validate the functionality of your specialized CNI or CSI operator:
- Click Go to Red Hat certification tool. A new certification case gets created on the Red Hat Certification portal after which you are redirected to the appropriate portal page.
- On the Summary tab, navigate to the Files section and click Upload, to upload your test results.
Add any relevant comments in the Discussions section, and then click Add Comment.
Red Hat will review the results file you submitted and validate your specialized CNI or CSI operator. Upon successful validation, your operator will get approved and published.
Operator Certification
To run the Operator certification suite, go to Testing Options. It displays two tabs to determine how to test and certify your operator.
- Test locally with OpenShift Use the OpenShift cluster of your choice for testing and certification. This option allows you to integrate the provided pipeline to your own workflows for continuous verification and access to comprehensive logs for a faster feedback loop. This is the recommended approach. For more information, see Running the certification test suite locally.
Test with Red Hat’s hosted pipeline This approach is separate from your OpenShift software testing from certification. After you have tested your operator on the version of OpenShift you wish to certify, you can use this approach if you don’t want the comprehensive logs, or are not ready to include it in your own workflows. For more information, see Running the certification suite with the Red Hat hosted pipeline.
Comparing certification testing options
In the long term, Red Hat recommends using the "local testing" option, also referred to as the CI Pipeline, for testing your Operator. This method allows you to incorporate the tests into your CI/CD workflows and development processes, therefore ensuring the proper functioning of your product on the OpenShift platform and streamlining future updates and recertifications for the Operator.
Although initially learning about the method and debugging errors may take some time, it is an advanced method and provides the best and quickest feedback. On the other hand, Red Hat recommends using the hosted pipeline, running on the Red Hat infrastructure option for several use cases , such as when working on an urgent deadline, or when enough resources and time are not available to learn and use the tooling.
You can use the hosted pipeline simultaneously with the CI/local pipeline as you learn to incorporate the local tooling long term.
Most recent test run tab provides the latest test results, if any.
The certification table provides the following information:
- Operator version
- Pull request
- Tested on
- Test result - Pass or Fail
- Created
Click View all tests for detailed information about all the tests. It has two tabs:
- Test Results - Displays a summary of all the certification tests along with their results.
- Test Artifacts - Displays log files.
20.2. Optional Qualifications for Operators
This tab is applicable only for Operator, Helm and OpenShift container images.
The Optional qualifications tab provides tests to check if your attached product component follows Red Hat’s recommended guidelines and best practices for deploying your product on Red Hat OpenShift clusters.
To test your product,
- Click Start Testing.
- Click Go to Red Hat certification tool to reach the Red Hat Partner Certification (rhcert) portal.
In the Red Hat Partner Certification (rhcert) portal, go to the Summary tab.
- To submit your test results, from the Files section click Upload. A successful upload message is displayed.
- Add your queries related to certification, if any, in the Discussions text box.
- Click Add Comment. By using this option, you can communicate your questions to the Red Hat certification team. The Red Hat certification team will provide clarifications for your queries.
When your testing is complete and to make any changes to the test, click Review.
The test results are published for your reference.
20.3. Repository Information for Operators
You can configure the registry and repository details by using the Repository information tab.
Enter the required details in the following fields:
| Field name | Description |
|---|---|
| Container registry namespace | Registry name set when the container was created. This field becomes non-editable when the container gets published. |
| Outbound repository name | Repository name that you have selected or the name obtained from your private registry in which your image is hosted, for example, ubi-minimal. |
| Authorized GitHub user accounts | It denotes the GitHub users who are allowed to submit operators for certification on behalf of your company. |
| OpenShift Object YAML | Use this option to add a docker config.json secret, if you are using a private container registry. |
| Repository summary | Repository summary obtained from the container image. |
| Repository description | Repository description obtained from the container image. |
After configuring all the mandatory fields click Save.
All the fields marked with an asterisk * are required and must be completed before you can proceed with container certification.
20.4. Component details for Operators
Configure the product component details by using this tab.
Enter the required details in the following fields:
| Field name | Description |
|---|---|
| Image Type | Operator bundle is selected by default. |
| Application categories | Select the respective application type of your software product. |
| Project name | Name of the project for internal purposes. |
After configuring all the mandatory fields click Save.
20.5. Contact Information for Operators
Providing information for this tab is optional.
In the Contact Information tab, enter the primary technical contact details of your product component.
- Optional: In the Technical contact email address field, enter the email address of the image maintainer.
- Optional: To add additional contacts for your component, click + Add new contact.
- Click Save.
20.6. Associated products for Operators
The Associated Product tab provides the list of products that are associated with your product component along with the following information:
- Product Name
- Type
- Visibility - Published or Not Published
- Last Activity - number of days before you ran the test
To add products to your component, perform the following:
- If you want to find a product by its name, enter the product name in the Search by name text box and click the search icon.
- If you are not sure of the product name, click Find a product. From the Add product dialog, select the required product from the Available products list box and click the forward arrow. The selected product is added to the Chosen products list box. Click Update attached products. Added products are listed in the Associated product list.
All the fields marked with an asterisk * are required and must be completed before you can proceed with the certification.
20.7. Update Graph
Select the OpenShift product version and Channel details for your component through this tab.
- Select the required version from the OpenShift Version list box.
- Select the required channel from the Channel list box.
The Update graph table provides the following information:
- Version
- Update Paths
- Other Available Channels
See Operator update documentation tile below the header, for more information on the upgrades.
All the fields marked with asterisk * are required and must be completed before you can proceed with Operator bundle certification.
Chapter 21. Running the certification test suite locally
By selecting this option, you can run the certification tooling on your own OpenShift cluster.
Red Hat recommends you to follow this method to certify your operators.
This option is an advanced method for partners who:
- are interested in integrating the tooling into their own developer workflows for continuous verification,
- want access to comprehensive logs for a faster feedback loop,
- or have dependencies that are not available in a default OpenShift installation.
Here’s an overview of the process:
Figure 21.1. Overview of running the certification test suite locally
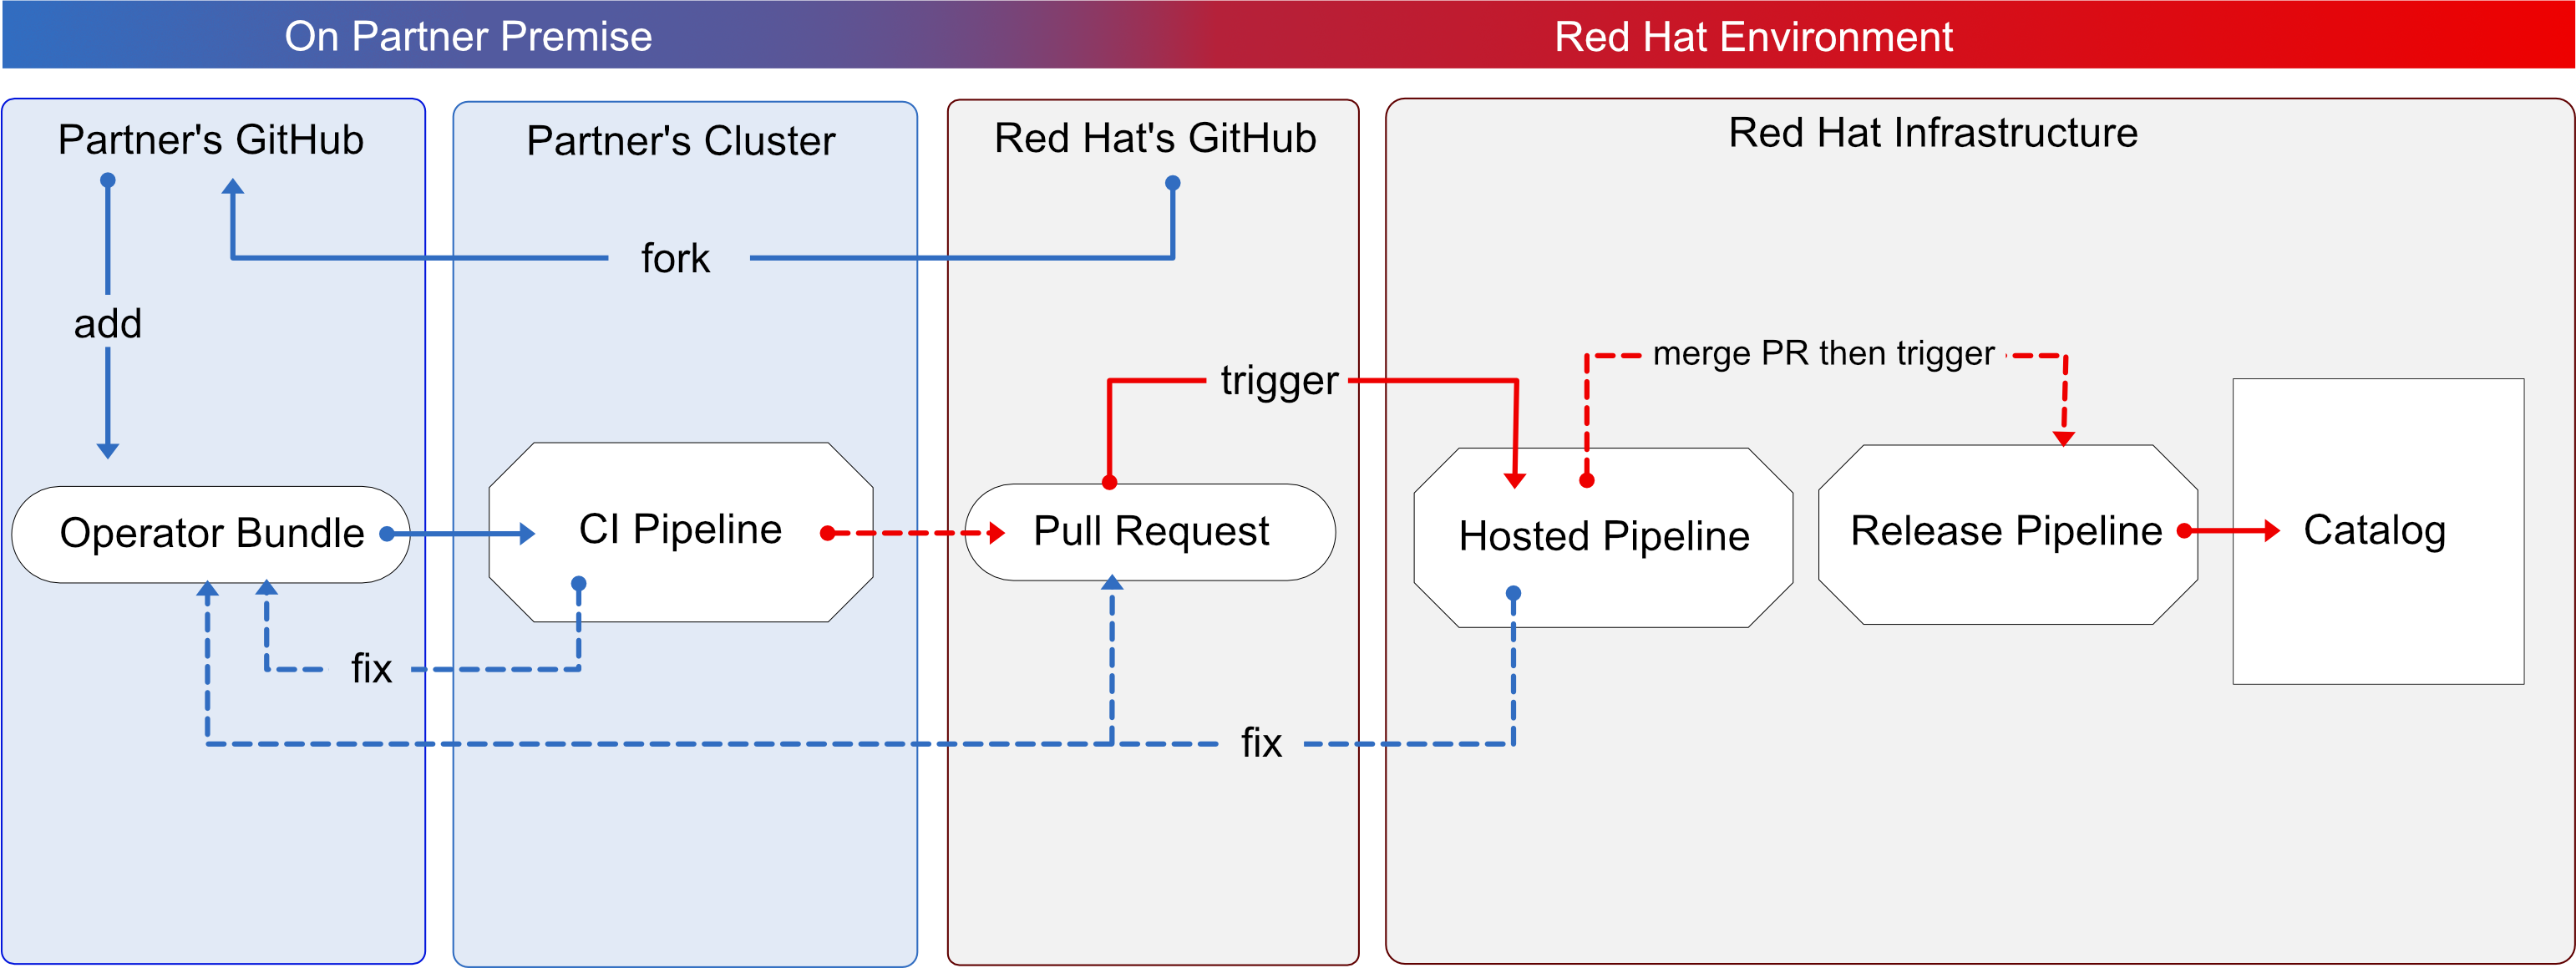
You use OpenShift pipelines based on Tekton, to run the certification tests, enabling the viewing of comprehensive logs and debugging information in real time. Once you are ready to certify and publish your operator bundle, the pipeline submits a pull request (PR) to GitHub on your behalf. If everything passes successfully, your operator is automatically merged and published in the Red Hat Container Catalog and the embedded operatorHub in OpenShift.
Follow the instructions to run the certification test suite locally:
Prerequisites
To certify your software product on Red Hat OpenShift test environment, ensure to have:
- The OpenShift cluster version 4.8 or later is installed.
The OpenShift Operator Pipeline creates a persistent volume claim for a 5GB volume. If you are running an OpenShift cluster on bare metal, ensure you have configured dynamic volume provisioning. If you do not have dynamic volume provisioning configured, consider setting up a local volume. To prevent from getting Permission Denied errors, modify the local volume storage path to have the container_file_t SELinux label, by using the following command:
chcon -Rv -t container_file_t "storage_path(/.*)?"
- You have the kubeconfig file for an admin user that has cluster admin privileges.
- You have a valid operator bundle.
- The OpenShift CLI tool (oc) version 4.7.13 or later is installed.
- The Git CLI tool (git) version 2.32.0 or later is installed.
- The Tekton CLI tool (tkn) version 0.19.1 or later is installed.
Additional resources
For program prerequisites, see Red Hat Openshift certification prerequisites.
21.1. Adding your operator bundle
In the operators directory of your fork, there are a series of subdirectories.
21.1.1. If you have certified this operator before -
Find the respective folder for your operator in the operators directory. Place the contents of your operator Bundle in this directory.
Make sure your package name is consistent with the existing folder name for your operator.
21.1.2. If you are newly certifying this operator -
If the newly certifying operator does not have a subdirectory already under the operator’s parent directory then you have to create one.
Create a new directory under operators. The name of this directory should match your operator’s package name. For example, my-operator.
In this operators directory, create a new subdirectory with the name of your operator, for example,
<my-operator>and create a version directory for example,<V1.0>and place your bundle. These directories are preloaded for operators that have been certified before.├── operators └── my-operator └── v1.0-
Under the version directory, add a
manifestsfolder containing all your OpenShift manifests including yourclusterserviceversion.yamlfile.
Recommended directory structure
The following example illustrates the recommended directory structure.
├── config.yaml
├── operators
    └── my-operator
        ├── v1.4.8
        │   ├── manifests
        │   │   ├── cache.example.com_my-operators.yaml
        │   │   ├── my-operator-controller-manager-metrics-service_v1_service.yaml
        │   │   ├── my-operator-manager-config_v1_configmap.yaml
        │   │   ├── my-operator-metrics-reader_rbac.authorization.k8s.io_v1_clusterrole.yaml
        │   │   └── my-operator.clusterserviceversion.yaml
        │   └── metadata
        │       └── annotations.yaml
└── ci.yaml| Configuration file | Description |
|---|---|
| config.yaml |
In this file include the organization of your operator. It can be |
| ci.yaml | In this file include your Red Hat Technology Partner project ID and the organization target for this operator.
For example, |
| annotations.yaml |
In this file include an annotation of OpenShift versions, which refers to the range of OpenShift versions . For example,
For example,
Note that the letter 'v' must be used before the version, and spaces are not allowed. The syntax is as follows:
|
Additional resources
- For more details, see Managing OpenShift Versions.
- For an example of an operator Bundle, see here.
21.2. Forking the repository
- Log in to GitHub and fork the RedHat OpenShift operators upstream repository.
- Fork the appropriate repositories from the following table, depending on the Catalogs that you are targeting for distribution:
| Catalog | Upstream Repository |
|---|---|
| Certified Catalog | https://github.com/redhat-openshift-ecosystem/certified-operators |
- Clone the forked certified-operators repository.
- Add the contents of your operator bundle to the operators directory available in your forked repository.
If you want to publish your operator bundle in multiple catalogs, you can fork each catalog and complete the certification once for each fork.
Additional resources
For more information about creating a fork in GitHub, see Fork a repo.
21.3. Installing the OpenShift Operator Pipeline
Prerequisites
Administrator privileges on your OpenShift cluster.
Procedure
You can install the OpenShift Operator Pipeline by two methods:
- Automated process (Red Hat recommended process)
- Manual process
21.3.1. Automated process
Red Hat recommends using the automated process for installing the OpenShift Operator Pipeline. The automated process ensures the cluster is properly configured before executing the CI Pipeline. This process installs an operator to the cluster that helps you to automatically update all the CI Pipeline tasks without requiring any manual intervention. This process also supports multitenant scenarios in which you can test many operators iteratively within the same cluster.
Follow these steps to install the OpenShift Operator Pipeline through an Operator:
Keep the source files of your Operator bundle ready before installing the Operator Pipeline.
21.3.1.1. Prerequisites
Before installing the OpenShift Operator Pipeline, in a terminal window run the following commands, to configure all the prerequisites:
The Operator watches all the namespaces. Hence, if secrets/configs/etc already exist in another namespace, you can use the existing namespace for installing the Operator Pipeline.
Create a new namespace:
oc new-project oco
Set
kubeconfigenvironment variable:export KUBECONFIG=/path/to/your/cluster/kubeconfig
NoteThis
kubeconfigvariable is used to deploy the Operator under test and run the certification checks.oc create secret generic kubeconfig --from-file=kubeconfig=$KUBECONFIG
Execute the following commands for submitting the certification results:
Add the github API token to the repository where the pull request will be created:
oc create secret generic github-api-token --from-literal GITHUB_TOKEN=<github token>
Add RedHat Container API access key:
oc create secret generic pyxis-api-secret --from-literal pyxis_api_key=< API KEY >
This API access key is specifically related to your unique partner account on the Red Hat Partner Connect portal.
Prerequisites for running OpenShift cluster on bare metal:
If you are running an OpenShift cluster on bare metal, the Operator pipeline requires a 5Gi persistent volume to run. The following yaml template helps you to create a 5Gi persistent volume by using local storage.
For example:
apiVersion: v1
kind: PersistentVolume
metadata:
  name: my-local-pv
spec:
  capacity:
    storage: 5Gi
  volumeMode: Filesystem
  accessModes:
    - ReadWriteOnce
  persistentVoumeReclaimPolicy: Delete
  local:
    path: /dev/vda4  ← use a path from your cluster
  nodeAffinity:
    required:
      nodeSelectorTerms:
        - matchExpressions:
          - key: kubernetes.io/hostname
            operator: In
            values:
              - crc-8k6jw-master-0  ← use the name of one of your cluster’s node
The CI pipeline automatically builds your operator bundle image and bundle image index for testing and verification. By default, the pipeline creates images in the OpenShift container registry on the cluster.
To use this registry on bare metal, set up the internal image registry before running the pipeline. For detailed instructions on setting up the internal image registry, see Image registry storage configuration.
If you want to use an external private registry then provide your access credentials to the cluster by adding a secret. For detailed instructions, see Using a private container registry.
Additional resources
- For instructions on obtaining your API key, see Get API Key.
- For additional repository configurations, see Configuring the repository for submitting the certification results.
21.3.1.2. Installing the pipeline through an Operator
Follow these steps to add the Operator to your cluster:
Install the Operator Certification Operator.
- Log in to your OpenShift cluster console.
- From the main menu, navigate to Operators → OperatorHub.
- Type Operator Certification Operator in the All Items - Filter by keyword filter/search box.
- Select Operator Certification Operator tile when it displays. The Operator Certification Operator page displays.
- Click Install. The Install Operator web page displays.
- Scroll down and click Install.
- Click View Operator, to verify the installation.
Apply Custom Resource for the newly installed Operator Pipeline.
- Log in to your OpenShift Cluster Console.
- From the Projects drop-down menu, select the project for which you wish to apply the Custom Resource.
Expand Operator Pipeline and then click Create instance.
The Create Operator Pipeline screen is auto-populated with the default values.
NoteYou need not change any of the default values if you have created all the resource names according to the prerequisites.
- Click Create.
The Custom Resource is created and the Operator starts reconciling.
Verification Steps
Check the Conditions of the Custom Resource.
- Log in to your OpenShift cluster console.
- Navigate to the project for which you have newly created the Operator Pipeline Custom Resource and click the Custom Resource.
- Scroll down to the Conditions section and check if all the Status values are set to True.
If a resource fails reconciliation, check the Message section to identify the next steps to fix the error.
Check the Operator logs.
In a terminal window run the following command:
oc get pods -n openshift-marketplace
Record the full podman name of the
certification-operator-controller-managerpod and run the command:oc get logs -f -n openshift-marketplace <pod name> manager
- Check if the reconcillation of the Operator has occurred.
Additional resources
To uninstall the Operator Pipeline Custom Resource:
- Log in to your OpenShift Cluster Console.
- Navigate to the Operator Certification Operator main page and click the Operator Pipeline that you wish to uninstall.
- Click the Custom Resource overflow menu and select Uninstall.
To uninstall the Operator:
- Log in to your OpenShift Cluster Console.
- Navigate to Operators → Installed Operators and search for the Operator that you wish to uninstall.
- Click the overflow menu of the respective Operator and click Uninstall Operator.
21.3.1.3. Executing the pipeline
For executing the pipeline, ensure you have workspace-template.yml file in a templates folder in the directory, from where you want to run the tkn commands.
To create a workspace-template.yml file, in a terminal window run the following command:
cat <<EOF> workspace-template.yml
spec:
  accessModes:
    - ReadWriteOnce
  resources:
    requests:
      storage: 5Gi
EOF
You can run the pipeline through different methods.
21.3.2. Manual process
Follow these steps to manually install the OpenShift Operator Pipeline:
21.3.2.1. Installing the OpenShift Pipeline Operator
- Log in to your OpenShift cluster console.
- From the main menu, navigate to Operators > OperatorHub.
- Type OpenShift Pipelines in the All Items - Filter by keyword filter/search box.
- Select Red Hat OpenShift Pipelines tile when it displays. The Red Hat OpenShift Pipelines page displays.
- Click Install. The Install Operator web page displays.
- Scroll down and click Install.
21.3.2.2. Configuring the OpenShift (oc) CLI tool
A file that is used to configure access to a cluster is called a kubeconfig file. This is a generic way of referring to configuration files. Use kubeconfig files to organize information about clusters, users, namespaces, and authentication mechanisms.
The kubectl command-line tool uses kubeconfig files to find the information it needs to choose a cluster and communicate with the API server of a cluster.
- In a terminal window, set the KUBECONFIG environment variable:
export KUBECONFIG=/path/to/your/cluster/kubeconfig
The kubeconfig file deploys the Operator under test and runs the certification checks.
Additional resources
For more information on kubeconfig files, see Organizing Cluster Access Using kubeconfig Files.
21.3.2.3. Creating an OpenShift Project
Create a new namespace to start your work on the pipeline.
To create a namespace, in a terminal window run the following command:
oc adm new-project <my-project-name> # create the project
oc project <my-project-name> # switch into the project
Do not run the pipeline in the default project or namespace. Red Hat recommends creating a new project for the pipeline.
21.3.2.4. Adding the kubeconfig secret
Create a kubernetes secret containing your kubeconfig for authentication to the cluster running the certification pipeline. The certification pipeline requires kubeconfig to execute a test deployment of your Operator on the OpenShift cluster.
To add the kubeconfig secret, in a terminal window run the following command:
oc create secret generic kubeconfig --from-file=kubeconfig=$KUBECONFIG
Additional resources
For more information on the kubeconfig secret, see Secrets.
21.3.2.5. Importing Operator from Red Hat Catalog
Import Operators from the Red Hat catalog.
In a terminal window, run the following commands:
oc import-image certified-operator-index \
  --from=registry.redhat.io/redhat/certified-operator-index \
  --reference-policy local \
  --scheduled \
  --confirm \
  --all
If you are using OpenShift on IBM Power cluster for ppc64le architecture, run the following command to avoid permission issues:
oc adm policy add-scc-to-user anyuid -z pipeline
This command grants the anyuid security context constraints (SCC) to the default pipeline service account.
21.3.2.6. Installing the certification pipeline dependencies
In a terminal window, install the certification pipeline dependencies on your cluster using the following commands:
$git clone https://github.com/redhat-openshift-ecosystem/operator-pipelines
$cd operator-pipelines
$oc apply -R -f ansible/roles/operator-pipeline/templates/openshift/pipelines
$oc apply -R -f ansible/roles/operator-pipeline/templates/openshift/tasks
21.3.2.7. Configuring the repository for submitting the certification results
In a terminal window, run the following commands to configure your repository for submitting the certification results:
21.3.2.7.1. Adding GitHub API Token
After performing all the configurations, the pipeline can automatically open a pull request to submit your Operator to Red Hat.
To enable this functionally, add a GitHub API Token and use --param submit=true when running the pipeline:
oc create secret generic github-api-token --from-literal GITHUB_TOKEN=<github token>
21.3.2.7.2. Adding Red Hat Container API access key
Add the specific container API access key that you receive from Red Hat:
oc create secret generic pyxis-api-secret --from-literal pyxis_api_key=< API KEY >
21.3.2.7.3. Enabling digest pinning
This step is mandatory to submit the certification results to Red Hat.
The OpenShift Operator pipeline can automatically replace all the image tags in your bundle with image Digest SHAs. This allows the pipeline to ensure if it is using a pinned version of all the images. The pipeline commits the pinned version of your bundle to your GitHub repository as a new branch.
To enable this functionality, add a private key having access to GitHub to your cluster as a secret.
Use Base64 to encode a private key which has access to the GitHub repository containing the bundle.
base64 /path/to/private/key
Create a secret that contains the base64 encoded private key.
cat << EOF > ssh-secret.yml
kind: Secret
apiVersion: v1
metadata:
  name: github-ssh-credentials
data:
  id_rsa: |
    <base64 encoded private key>
EOF
Add the secret to the cluster.
oc create -f ssh-secret.yml
21.3.2.7.4. Using a private container registry
The pipeline automatically builds your Operator bundle image and bundle image index for testing and verification. By default, the pipeline creates images in the OpenShift Container Registry on the cluster. If you want to use an external private registry then you have to provide credentials by adding a secret to the cluster.
oc create secret docker-registry registry-dockerconfig-secret \
    --docker-server=quay.io \
    --docker-username=<registry username> \
    --docker-password=<registry password> \
    --docker-email=<registry email>
21.4. Execute the OpenShift Operator pipeline
You can run the OpenShift Operator pipeline through the following methods.
From the following examples, remove or add parameters and workspaces according to your requirements.
If you are using Red Hat OpenShift Local, formerly known as Red Hat CodeReady Containers (CRC), or Red Hat OpenShift on IBM Power for ppc64le architecture, pass the following tekton CLI argument to every ci pipeline command to avoid permission issues:
--pod-template templates/crc-pod-template.yml
Troubleshooting
If your OpenShift Pipelines operator 1.9 or later doesn’t work, follow the procedure to fix it:
Prerequisites
Ensure that you have administrator privileges for your cluster before creating a custom security context constraint (SCC).
Procedure
For OpenShift Pipelines operator 1.9 or later to work and to execute a subset of tasks in the ci-pipeline that requires privilege escalation, create a custom security context constraint (SCC) and link it to the pipeline service account by using the following commands:
To create a new SCC:
oc apply -f ansible/roles/operator-pipeline/templates/openshift/openshift-pipelines-custom-scc.yml
To add the new SCC to a ci-pipeline service account:
oc adm policy add-scc-to-user pipelines-custom-scc -z pipeline
Additional resources
For more information on SCCs, see About security context constraints.
21.4.1. Running the Minimal pipeline
Procedure
In a terminal window, run the following commands:
GIT_REPO_URL=<Git URL to your certified-operators fork >
BUNDLE_PATH=<path to the bundle in the Git Repo> (For example - operators/my-operator/1.2.8)

tkn pipeline start operator-ci-pipeline \
  --param git_repo_url=$GIT_REPO_URL \
  --param git_branch=main \
  --param bundle_path=$BUNDLE_PATH \
  --param env=prod \
  --workspace name=pipeline,volumeClaimTemplateFile=templates/workspace-template.yml \
  --showlog
After running the command, the pipeline prompts you to provide additional parameters. Accept all the default values to finish executing the pipeline.
The following is set as default and doesn’t need to be explicitly included, but can be overridden if your kubeconfig secret is created under a different name.
--param kubeconfig_secret_name=kubeconfig \
--param kubeconfig_secret_key=kubeconfig
If you are running the ci pipeline on ppc64le and s390x architecture, edit the value of the parameter param pipeline_image from the default value quay.io/redhat-isv/operator-pipelines-images:released to quay.io/redhat-isv/operator-pipelines-images:multi-arch.
Troubleshooting
If you get a Permission Denied error when you are using the SSH URL, try the GITHUB HTTPS URL.
21.4.2. Running the pipeline with image digest pinning
Prerequisites
Execute the instructions Enabling digest pinning.
Procedure
In a terminal window, run the following commands:
GIT_REPO_URL=<Git URL to your certified-operators fork >
BUNDLE_PATH=<path to the bundle in the Git Repo> (ie: operators/my-operator/1.2.8)
GIT_USERNAME=<your github username>
GIT_EMAIL=<your github email address>

tkn pipeline start operator-ci-pipeline \
  --param git_repo_url=$GIT_REPO_URL \
  --param git_branch=main \
  --param bundle_path=$BUNDLE_PATH \
  --param env=prod \
  --param pin_digests=true \
  --param git_username=$GIT_USERNAME \
  --param git_email=$GIT_EMAIL \
  --workspace name=pipeline,volumeClaimTemplateFile=templates/workspace-template.yml \
  --workspace name=ssh-dir,secret=github-ssh-credentials \
  --showlog
Troubleshooting
When you get an error - could not read Username for https://github.com, provide the SSH github URL for --param git_repo_url.
21.4.3. Running the pipeline with a private container registry
Prerequisites
Execute the instructions included under By using a private container registry.
Procedure
In a terminal window, run the following commands:
GIT_REPO_URL=<Git URL to your certified-operators fork >
BUNDLE_PATH=<path to the bundle in the Git Repo> (ie: operators/my-operator/1.2.8)
GIT_USERNAME=<your github username>
GIT_EMAIL=<your github email address>
REGISTRY=<your image registry.  ie: quay.io>
IMAGE_NAMESPACE=<namespace in the container registry>

tkn pipeline start operator-ci-pipeline \
  --param git_repo_url=$GIT_REPO_URL \
  --param git_branch=main \
  --param bundle_path=$BUNDLE_PATH \
  --param env=prod \
  --param pin_digests=true \
  --param git_username=$GIT_USERNAME \
  --param git_email=$GIT_EMAIL \
  --param registry=$REGISTRY \
  --param image_namespace=$IMAGE_NAMESPACE \
  --workspace name=pipeline,volumeClaimTemplateFile=templates/workspace-template.yml \
  --workspace name=ssh-dir,secret=github-ssh-credentials \
  --workspace name=registry-credentials,secret=registry-docker config-secret \
  --showlog \
21.5. Submit certification results
Following procedure helps you to submit the certification test results to Red Hat.
Prerequisites
- Execute the instructions Configuring the repository for submitting the certification results.
Add the following parameters to the GitHub upstream repository from where you want to submit the pull request for Red Hat certification. It is the Red Hat certification repository by default, but you can use your own repository for testing.
-param upstream_repo_name=$UPSTREAM_REPO_NAME #Repo where Pull Request (PR) will be opened

--param submit=true
The following is set as default and doesn’t need to be explicitly included, but can be overridden if your Pyxis secret is created under a different name.
--param pyxis_api_key_secret_name=pyxis-api-secret \
--param pyxis_api_key_secret_key=pyxis_api_key
Procedure
You can submit the Red Hat certification test results for four different scenarios:
21.5.1. Submitting test results from the minimal pipeline
Procedure
In a terminal window, execute the following commands:
GIT_REPO_URL=<Git URL to your certified-operators fork >
BUNDLE_PATH=<path to the bundle in the Git Repo> (ie: operators/my-operator/1.2.8)

tkn pipeline start operator-ci-pipeline \
  --param git_repo_url=$GIT_REPO_URL \
  --param git_branch=main \
  --param bundle_path=$BUNDLE_PATH \
  --param upstream_repo_name=redhat-openshift-ecosystem/certified-operators \
  --param submit=true \
  --param env=prod \
  --workspace name=pipeline,volumeClaimTemplateFile=templates/workspace-template.yml \
  --showlog
21.5.2. Submitting test results with image digest pinning
In a terminal window, execute the following commands:
Prerequisites
Execute the instructions included for:
Procedure
GIT_REPO_URL=<Git URL to your certified-operators fork >
BUNDLE_PATH=<path to the bundle in the Git Repo> (ie: operators/my-operator/1.2.8)
GIT_USERNAME=<your github username>
GIT_EMAIL=<your github email address>

tkn pipeline start operator-ci-pipeline \
  --param git_repo_url=$GIT_REPO_URL \
  --param git_branch=main \
  --param bundle_path=$BUNDLE_PATH \
  --param env=prod \
  --param pin_digests=true \
  --param git_username=$GIT_USERNAME \
  --param git_email=$GIT_EMAIL \
  --param upstream_repo_name=red-hat-openshift-ecosystem/certified-operators \
  --param submit=true \
  --workspace name=pipeline,volumeClaimTemplateFile=templates/workspace-template.yml \
  --workspace name=ssh-dir,secret=github-ssh-credentials \
  --showlog
Troubleshooting
When you get an error - could not read Username for https://github.com, provide the SSH github URL for --param git_repo_url.
21.5.3. Submitting test results from a private container registry
In a terminal window, execute the following commands:
Prerequisites
Execute the instructions included for:
Procedure
GIT_REPO_URL=<Git URL to your certified-operators fork >
BUNDLE_PATH=<path to the bundle in the Git Repo> (ie: operators/my-operator/1.2.8)
GIT_USERNAME=<your github username>
GIT_EMAIL=<your github email address>
REGISTRY=<your image registry.  ie: quay.io>
IMAGE_NAMESPACE=<namespace in the container registry>

tkn pipeline start operator-ci-pipeline \
  --param git_repo_url=$GIT_REPO_URL \
  --param git_branch=main \
  --param bundle_path=$BUNDLE_PATH \
  --param env=prod \
  --param pin_digests=true \
  --param git_username=$GIT_USERNAME \
  --param git_email=$GIT_EMAIL \
  --param registry=$REGISTRY \
  --param image_namespace=$IMAGE_NAMESPACE \
  --param upstream_repo_name=red hat-openshift-ecosystem/certified-operators \
  --param submit=true \
  --workspace name=pipeline,volumeClaimTemplateFile=templates/workspace-template.yml \
  --workspace name=ssh-dir,secret=github-ssh-credentials \
  --workspace name=registry-credentials,secret=registry-docker config-secret \
  --showlog
21.5.4. Submitting test results with image digest pinning and from a private container registry
In a terminal window, execute the following commands:
Prerequisites
Execute the instructions included for:
Procedure
GIT_REPO_URL=<Git URL to your certified-operators fork >
BUNDLE_PATH=<path to the bundle in the Git Repo> (ie: operators/my-operator/1.2.8)
GIT_USERNAME=<your github username>
GIT_EMAIL=<your github email address>
REGISTRY=<your image registry.  ie: quay.io>
IMAGE_NAMESPACE=<namespace in the container registry>

tkn pipeline start operator-ci-pipeline \
  --param git_repo_url=$GIT_REPO_URL \
  --param git_branch=main \
  --param bundle_path=$BUNDLE_PATH \
  --param env=prod \
  --param pin_digests=true \
  --param git_username=$GIT_USERNAME \
  --param git_email=$GIT_EMAIL \
  --param upstream_repo_name=red-hat-openshift-ecosystem/certified-operators \
  --param registry=$REGISTRY \
  --param image_namespace=$IMAGE_NAMESPACE \
  --param submit=true \
  --workspace name=pipeline,volumeClaimTemplateFile=templates/workspace-template.yml \
  --workspace name=ssh-dir,secret=github-ssh-credentials \
  --workspace name=registry-credentials,secret=registry-docker config-secret \
  --showlog
After a successful certification, the certified product gets listed on Red Hat Ecosystem Catalog.
Certified operators are listed in and consumed by customers through the embedded OpenShift operatorHub, providing them the ability to easily deploy and run your solution. Additionally, your product and operator image will be listed on the Red Hat Ecosystem Catalog.
Chapter 22. Running the certification suite with Red Hat hosted pipeline
If you want to certify your operator with the Red Hat Hosted Pipeline you have to create a pull request for the Red Hat certification repository.
Choose this path if you are not interested in receiving comprehensive logs, or are not ready to include the tooling in your own CI/CD workflows.
Here’s an overview of the process:
Figure 22.1. Overview of Red Hat hosted pipeline

The process begins by submitting your Operator bundle through a GitHub pull request. Red Hat then runs the certification tests using an in-house OpenShift cluster. This path is similar to previous Operator bundle certification. You can see the certification test results both as comments on the pull request and within your Red Hat Partner Connect Operator bundle. If all the certification tests are successful, your Operator will be automatically merged and published to the Red Hat Container Catalog and the embedded OperatorHub in OpenShift.
Follow the instructions to certify your Operator with Red Hat hosted pipeline:
Prerequisites
- Complete the Product listing available on the Red Hat Partner Connect website.
On the Red Hat Partner Connect website, go to Components tab.
- In the Authorized GitHub user accounts field, enter your GitHub username to the list of authorized GitHub users.
-
If you are using a private container registry, from the OpenShift Object YAML field, click Add, to add a docker
config.jsonsecret and click Save.
Procedure
Follow this procedure only if you want to run the Red Hat OpenShift Operator certification on the Red Hat hosted pipeline.
22.1. Forking the repository
- Log in to GitHub and fork the RedHat OpenShift operators upstream repository.
- Fork the appropriate repositories from the following table, depending on the Catalogs that you are targeting for distribution:
| Catalog | Upstream Repository |
|---|---|
| Certified Catalog | https://github.com/redhat-openshift-ecosystem/certified-operators |
- Clone the forked certified-operators repository.
- Add the contents of your operator bundle to the operators directory available in your forked repository.
If you want to publish your operator bundle in multiple catalogs, you can fork each catalog and complete the certification once for each fork.
Additional resources
For more information about creating a fork in GitHub, see Fork a repo.
22.2. Adding your operator bundle
In the operators directory of your fork, there are a series of subdirectories.
22.2.1. If you have certified this operator before -
Find the respective folder for your operator in the operators directory. Place the contents of your operator Bundle in this directory.
Make sure your package name is consistent with the existing folder name for your operator.
22.2.2. If you are newly certifying this operator -
If the newly certifying operator does not have a subdirectory already under the operator’s parent directory then you have to create one.
Create a new directory under operators. The name of this directory should match your operator’s package name. For example, my-operator.
In this operators directory, create a new subdirectory with the name of your operator, for example,
<my-operator>and create a version directory for example,<V1.0>and place your bundle. These directories are preloaded for operators that have been certified before.├── operators └── my-operator └── v1.0-
Under the version directory, add a
manifestsfolder containing all your OpenShift manifests including yourclusterserviceversion.yamlfile.
Recommended directory structure
The following example illustrates the recommended directory structure.
├── config.yaml
├── operators
    └── my-operator
        ├── v1.4.8
        │   ├── manifests
        │   │   ├── cache.example.com_my-operators.yaml
        │   │   ├── my-operator-controller-manager-metrics-service_v1_service.yaml
        │   │   ├── my-operator-manager-config_v1_configmap.yaml
        │   │   ├── my-operator-metrics-reader_rbac.authorization.k8s.io_v1_clusterrole.yaml
        │   │   └── my-operator.clusterserviceversion.yaml
        │   └── metadata
        │       └── annotations.yaml
└── ci.yaml| Configuration file | Description |
|---|---|
| config.yaml |
In this file include the organization of your operator. It can be |
| ci.yaml | In this file include your Red Hat Technology Partner project ID and the organization target for this operator.
For example, |
| annotations.yaml |
In this file include an annotation of OpenShift versions, which refers to the range of OpenShift versions . For example,
For example,
Note that the letter 'v' must be used before the version, and spaces are not allowed. The syntax is as follows:
|
Additional resources
- For more details, see Managing OpenShift Versions.
- For an example of an operator Bundle, see here.
22.3. Creating a Pull Request
The final step is to create a pull request for the targeted upstream repo.
| Catalog | Upstream Repository |
|---|---|
| Certified Catalog | https://github.com/redhat-openshift-ecosystem/certified-operators |
If you want to publish your Operator bundle in multiple catalogs, you can create a pull request for each target catalog.
If you are not familiar with creating a pull request in GitHub you can find instructions here.
The title of your pull request must conform to the following format. operator my-operator (v1.4.8). It should begin with the word operator followed by your Operator package name, followed by the version number in parenthesis.
When you create a pull request it triggers the Red Hat hosted pipeline and provides an update through a pull request comment whenever it has failed or completed.
22.3.1. Guidelines to follow
- You can re-trigger the Red Hat hosted pipeline by closing and reopening your pull request.
- You can only have one open pull request at a time for a given Operator version.
- Once a pull request has been successfully merged it can not be changed. You have to bump the version of your Operator and open a new pull request.
- You must use the package name of your Operator as the directory name that you created under operators. This package name should match the package annotation in the annotations.yaml file. This package name should also match the prefix of the clusterserviceversion.yaml filename.
- Your pull requests should only modify files in a single Operator version directory. Do not attempt to combine updates to multiple versions or updates across multiple Operators.
- The version indicator used to name your version directory should match the version indicator used in the title of the pull request.
- Image tags are not accepted for running the certification tests, only SHA digest are used. Replace all references to image tags with the corresponding SHA digest.
Chapter 23. Publishing the certified Operator
The certification is considered complete and your Operator will appear in the Red Hat Container Catalog and embedded OperatorHub within OpenShift after all the tests have passed successfully, and the certification pipeline is enabled to submit results to Red Hat.
Additionally, the entry will appear on Red Hat Certification Ecosystem.
The Red Hat OpenShift software certification does not conduct testing of the Partner’s product in how it functions or performs outside of the Operator constructs and its impact on the Red Hat platform on which it was installed and executed. Any and all aspects of the certification candidate product’s quality assurance remains the Partner’s sole responsibility.
Chapter 24. Troubleshooting Guidelines
For troubleshooting tips and workarounds, see Troubleshooting the Operator Cert Pipeline.
Appendix B. Helm and Ansible Operators
- For information on building a Helm operator, see Building a Helm Operator.
- For information on building an Ansible operator, see Building an Ansible Operator.
Part IV. Helm chart certification
Chapter 25. Working with Helm charts
Certify your container application component before proceeding with Red Hat Helm chart certification. All the containers referenced in a Helm chart component must already be certified and published on the Red Hat Ecosystem Catalog before certifying a Helm chart component.
25.1. Introduction to Helm charts
Helm is a Kubernetes-native automation technology and software package manager that simplifies deployment of applications and services. Helm uses a packaging format called charts. A chart is a collection of files that describe a related set of Kubernetes resources. A running instance of a specific version of the chart in a cluster is called a release. A new release is created every time a chart is installed on the cluster. Each time a chart is installed, or a release is upgraded or rolled back, an incremental revision is created. Charts go through an automated Red Hat OpenShift certification workflow, which guarantees security compliance as well as best integration and experience with the platform.
25.2. Certification workflow for Helm charts
Red Hat recommends that you are a Red Hat Certified Engineer or hold equivalent experience before starting the certification process.
Task Summary
The certification workflow includes three primary steps-
25.2.1. Certification on-boarding for Helm charts
Perform the steps outlined for certification onboarding:
- Join the Red Hat Connect for Technology Partner Program.
- Agree to the program terms and conditions.
Create your product listing by selecting your desired product category. You can select from the available product categories:
- Containerized Application
- Standalone Application
- OpenStack Infrastructure
- Complete your company profile.
- Add components to the product listing.
- Certify components for your product listing.
Additional resources
For detailed instructions about creating your first product listing, see Creating a product.
25.2.2. Certification testing for Helm charts
Follow these high-level steps to run a certification test:
- Fork the Red Hat upstream repository.
- Install and run the chart verifier tool on your test environment.
- Review the test results and troubleshoot, if any issues.
- Submit the certification results to Red Hat through a pull request.
Additional resources
For detailed instructions about certification testing, see Validating Helm charts for certification.
25.2.3. Publishing the certified Helm chart on the Red Hat Ecosystem Catalog
Certified helm charts are published on the Product Listings page of the Red Hat partner connect portal, which you can then run on a supported Red Hat container platform. Your product along with its Helm chart gets listed on the Red Hat Container Catalog using the listing information that you provide.
Additional resources
- For more details about publishing your certified Helm chart, see Publishing the certified Helm chart.
For more information about Helm charts, see:
Chapter 26. Validating Helm charts for certification
You can validate your Helm charts by using the chart-verifier CLI tool. Chart-verifier is a CLI based open source tool that runs a list of configurable checks to verify if your Helm charts have all the associated metadata and formatting required to meet the Red Hat Certification standards. It validates if the Helm charts are distribution ready and works seamlessly on the Red Hat OpenShift Container Platform and can be submitted as a certified Helm chart entry to the Red HatOpenShift Helm chart repository.
The tool also validates a Helm chart URL and provides a report in YAML format with human-readable descriptions in which each check has a positive or negative result. A negative result from a check indicates a problem with the chart, which needs correction. You can also customize the checks that you wish to execute during the verification process.
Red Hat strongly recommends using the latest version of the chart-verifier tool to validate your Helm charts on your local test environment. This enables you to check the results on your own during the chart development cycle, preventing the need to submit the results to Red Hat every time.
Additional resources
For more information about the chart-verifier CLI tool, see chart-verifier.
26.1. Preparing the test environment
The first step towards certifying your product is setting up the environment where you can run the tests. To run the full set of chart-verifier tests, you require access to the Red Hat OpenShift cluster environment. You can install the chart-verifier tool and execute all the chart related tests in this environment. You can disable these tests by using several configurable command line options, but it is mandatory to run the tests for the certification to be approved by Red Hat.
As an authorized Red Hat partner, you have free access to the Red Hat OpenShift Container Platform, and you can install a cluster in your own test environment using the Red Hat Partner Subscription (RHPS) program. To learn more about the benefits of software access as a part of the Red Hat Partner Connect program, see the program guide.
To set up your own test environment,
- Install a fully managed cluster by using Red Hat Managed Services Openshift cluster. This is a trial option that is valid only for 60 days.
- Install a self-managed cluster that you can install in your cloud environment, datacenter or computer. Through this option you can use your partner subscriptions, also known as NFRs, for permanent deployments.
For more information on setting up your environment, see Try Red Hat OpenShift.
Additional resources
To know more about installing the cluster and configuring your helm charts, see:
26.2. Running the Helm chart-verifier tool
The recommended directory structure for executing the chart-verifier tool is as follows:
.
└── src
    ├── Chart.yaml
    ├── README.md
    ├── templates
    │   ├── deployment.yaml
    │   ├── _helpers.tpl
    │   ├── hpa.yaml
    │   ├── ingress.yaml
    │   ├── NOTES.txt
    │   ├── serviceaccount.yaml
    │   ├── service.yaml
    │   └── tests
    │       └── test-connection.yaml
    ├── values.schema.json
    └── values.yaml
Prerequisites
- A container engine in which Podman or Docker CLI is installed.
- Internet connection to check that the images are Red Hat certified.
- GitHub profile to submit the chart to the OpenShift Helm Charts Repository.
- Red Hat OpenShift Container Platform cluster.
Before running the chart-verifier tool, package your Helm chart by using the following command:
$ helm package <helmchart folder>
This command will archive your Helm chart and convert it to a
.tgzfile format.
Procedure
You can run the full set of chart-verifier tool by using two methods:
26.2.1. By using Podman or Docker
Run all the available checks for a chart available remotely using a universal resource identifier (uri), assuming that the kube config file is available at the location
${HOME}/.kube:$ podman run --rm -i \ -e KUBECONFIG=/.kube/config \ -v "${HOME}/.kube":/.kube \ "quay.io/redhat-certification/chart-verifier" \ verify \ <chart-uri>In this command, chart-uri is the location of the chart archive available on the https uri. Ensure that the archive must be in
.tgzformat.Run all the available checks for a chart available locally on your system, assuming that the chart is available on the current directory and the kube config file is available at the location
${HOME}/.kube:$ podman run --rm \ -e KUBECONFIG=/.kube/config \ -v "${HOME}/.kube":/.kube \ -v $(pwd):/charts \ "quay.io/redhat-certification/chart-verifier" \ verify \ /charts/<chart>In this command, chart-uri is the location of the chart archive available in your local directory. Ensure that the archive must be in
.tgzformat.Run the following verify command to get the list of available options associated with the command along with its usage:
$ podman run -it --rm quay.io/redhat-certification/chart-verifier verify --help
The output of the command is similar to the following example:
Verifies a Helm chart by checking some of its characteristics

Usage:
  chart-verifier verify <chart-uri> [flags]

Flags:
  -S, --chart-set strings           set values for the chart (can specify multiple or separate values with commas: key1=val1,key2=val2)
  -G, --chart-set-file strings      set values from respective files specified via the command line (can specify multiple or separate values with commas: key1=path1,key2=path2)
  -X, --chart-set-string strings    set STRING values for the chart (can specify multiple or separate values with commas: key1=val1,key2=val2)
  -F, --chart-values strings        specify values in a YAML file or a URL (can specify multiple)
      --debug                       enable verbose output
  -x, --disable strings             all checks will be enabled except the informed ones
  -e, --enable strings              only the informed checks will be enabled
      --helm-install-timeout duration   helm install timeout (default 5m0s)
  -h, --help                        help for verify
      --kube-apiserver string       the address and the port for the Kubernetes API server
      --kube-as-group stringArray   group to impersonate for the operation, this flag can be repeated to specify multiple groups.
      --kube-as-user string         username to impersonate for the operation
      --kube-ca-file string         the certificate authority file for the Kubernetes API server connection
      --kube-context string         name of the kubeconfig context to use
      --kube-token string           bearer token used for authentication
      --kubeconfig string           path to the kubeconfig file
  -n, --namespace string            namespace scope for this request
  -V, --openshift-version string    set the value of certifiedOpenShiftVersions in the report
  -o, --output string               the output format: default, json or yaml
  -k, --pgp-public-key string       file containing gpg public key of the key used to sign the chart
  -W, --web-catalog-only            set this to indicate that the distribution method is web catalog only (default: true)
      --registry-config string      path to the registry config file (default "/home/baiju/.config/helm/registry.json")
      --repository-cache string     path to the file containing cached repository indexes (default "/home/baiju/.cache/helm/repository")
      --repository-config string    path to the file containing repository names and URLs (default "/home/baiju/.config/helm/repositories.yaml")
  -s, --set strings                 overrides a configuration, e.g: dummy.ok=false
  -f, --set-values strings          specify application and check configuration values in a YAML file or a URL (can specify multiple)
  -E, --suppress-error-log          suppress the error log (default: written to ./chartverifier/verifier-<timestamp>.log)
      --timeout duration            time to wait for completion of chart install and test (default 30m0s)
  -w, --write-to-file               write report to ./chartverifier/report.yaml (default: stdout)
Global Flags:
      --config string   config file (default is $HOME/.chart-verifier.yaml)
Run a subset of the checks:
$ podman run --rm -i                                  \
        -e KUBECONFIG=/.kube/config                   \
        -v "${HOME}/.kube":/.kube                     \
        "quay.io/redhat-certification/chart-verifier" \
        verify -enable images-are-certified,helm-lint      \
        <chart-uri>
Run all the checks except a subset:
$ podman run --rm -i \ -e KUBECONFIG=/.kube/config \ -v "${HOME}/.kube":/.kube \ "quay.io/redhat-certification/chart-verifier" \ verify -disable images-are-certified,helm-lint \ <chart-uri>NoteRunning a subset of checks is intended to reduce the feedback loop for development. To certify your chart, you must run all the required checks.
Provide chart-override values:
$ podman run --rm -i                                  \
        -e KUBECONFIG=/.kube/config                   \
        -v "${HOME}/.kube":/.kube                     \
        "quay.io/redhat-certification/chart-verifier" \
        verify –chart-set default.port=8080                   \
        <chart-uri>
Provide chart-override values from a file located in the current directory:
$ podman run --rm -i                                  \
        -e KUBECONFIG=/.kube/config                   \
        -v "${HOME}/.kube":/.kube                     \
        -v $(pwd):/values                             \
        "quay.io/redhat-certification/chart-verifier" \
        verify –chart-values /values/overrides.yaml              \
        <chart-uri>
26.2.1.1. Configuring the timeout option
Increase the timeout value if the chart-testing process is delayed. By default, the chart-testing process takes about 30 minutes to complete.
$ podman run --rm -i                                  \
        -e KUBECONFIG=/.kube/config                   \
        -v "${HOME}/.kube":/.kube                     \
        -v $(pwd):/values                             \
        "quay.io/redhat-certification/chart-verifier" \
        verify --timeout 40m                          \
<chart-uri>If you observe a delay in the chart-testing process, Red Hat recommends you to submit the report to the Red Hat certification team for verification.
26.2.1.2. Saving the report
When the chart-testing process is complete, the report messages are displayed by default. You can save the report by redirecting it to a file.
For example:
  $ podman run --rm -i                                  \
          -e KUBECONFIG=/.kube/config                   \
          -v "${HOME}/.kube":/.kube                     \
          "quay.io/redhat-certification/chart-verifier" \
          verify –enable images-are-certified,helm-lint      \
          <chart-uri> > report.yaml
Along with this command use the -w option to write the report directly to the file ./chartverifier/report.yaml. To get this file, you have to volume mount the file to /app/chartverifer.
For example:
  $ podman run --rm -i                                  \
          -e KUBECONFIG=/.kube/config                   \
          -v "${HOME}/.kube":/.kube                     \
          -v $(pwd)/chartverifier:/app/chartverifier    \
          -w                                            \
          "quay.io/redhat-certification/chart-verifier" \
          verify –enable images-are-certified,helm-lint      \
          <chart-uri>
If the file already exists, it is overwritten by the new report.
26.2.1.3. Configuring the error log
By default, an error log is generated and saved to the file ./chartverifier/verify-<timestamp>.yaml. It includes the error messages, the results of each check and additional information about chart testing. To get a copy of the error log you have to volume mount the file to /app/chartverifer.
For example:
 $ podman run --rm -i                                  \
          -e KUBECONFIG=/.kube/config                   \
          -v "${HOME}/.kube":/.kube                     \
          -v $(pwd)/chartverifier:/app/chartverifier    \
          "quay.io/redhat-certification/chart-verifier" \
          verify –enable images-are-certified,helm-lint      \
          <chart-uri> > report.yaml
If you want to store multiple logs to the same directory, you can store a maximum of 10 log files at a time. When the maximum file limit is reached, older log files are automatically replaced with the newer log files.
Use the -E or –suppress-error-log option to suppress the error log output.
Error and warning messages are standard error output messages and are not suppressed by using the -E or –suppress-error-log option.
26.2.2. By using the binary file
This method is applicable only for Linux systems.
- Download and install the latest chart-verifier binary from the releases page.
Unzip the tarball binary by using the following command:
$ tar zxvf <tarball>
Run the following command on the unzipped directory to perform all the Helm chart checks :
$ ./chart-verifier verify <chart-uri>
In this command,
chart-uriis the location of the chart archive available on your server. Ensure that the archive must be in.tgzformat. By default, the chart-verifier tool assumes that the kube config file is available at the default location$HOME/.kube. Set the environment variable toKUBECONFIGif the file is not available at the default location.The output of the chart-verifier includes the details of the tests executed along with a result status for each test. It also indicates whether each test is mandatory or recommended for Red Hat certification. For more detailed information, see Types of Helm chart checks.
Additional resources
To know more about the chart-verifier tool, see Helm chart checks for Red Hat OpenShift certification.
Chapter 27. Create a product
The product listing provides marketing and technical information, showcasing your product’s features and advantages to potential customers. It lays the foundation for adding all necessary components to your product for certification.
Prerequisites
Verify the functionality of your product on the target Red Hat platform, in addition to the specific certification testing requirements. If running your product on the targeted Red Hat platform results in a substandard experience then you must resolve the issues before certification.
Certify your chart’s container images as a container application before creating a Helm chart component.
Procedure
Red Hat recommends completing all optional fields in the listing tabs for a comprehensive product listing. More information helps mutual customers make informed choices.
Red Hat encourages collaboration with your product manager, marketing representative, or other product experts when entering information for your product listing.
Fields marked with an asterisk (*) are mandatory.
Procedure
- Log in to the Red Hat Partner Connect Portal.
- Go to the Certified technology portal tab and click Visit the portal.
- On the header bar, click Product management.
- From the Listing and certification tab click Manage products.
From the My Products page, click Create Product.
A Create New Product dialog opens.
- Enter the Product name.
From the What kind of product would you like to certify? drop-down, select the required product category and click Create product. For example, select Containerized Application for creating a containerized product listing.
A new page with your Product name opens. It comprises the following tabs:
Along with the following tabs, the page header provides the Product Score details. Product Score evaluates your product information and displays a score. It can be:
- Fair
- Good
- Excellent
- Best
- Click How do I improve my score? to improve your product score.
- After providing the product listing details, click Save before moving to the next section.
27.1. Overview for Helm charts
This tab consists of a series of tasks that you must complete to publish your product:
- Section 27.1.1, “Complete product listing details for Helm charts”
- Section 27.1.2, “Complete company profile information for Helm charts”
- Section 27.1.3, “Accept legal agreements for Helm charts”
- Section 27.1.4, “Add at least one product component for Helm charts”
- Section 27.1.5, “Certify components for your listing for Helm charts”
27.1.1. Complete product listing details for Helm charts
To complete your product listing details, click Start.
The Product Information tab opens.
- Enter all the essential product details and click Save.
27.1.2. Complete company profile information for Helm charts
- To complete your company profile information, click Start. After entering all the details, click Submit.
- To modify the existing details, click Review. The Account Details page opens.
- Review and modify the Company profile information and click Submit.
27.1.3. Accept legal agreements for Helm charts
To publish your product image, agree to the terms regarding the distribution of partner container images.
- To accept the legal agreements, click Start.
- To preview or download the agreement, click Review.
The Red Hat Partner Connect Container Appendix document displays. Read the document to know the terms related to the distribution of container images.
27.1.4. Add at least one product component for Helm charts
Click Start. You are redirected to the Components tab.
To add a new or existing product component, click Add component.
For adding a new component,
- In the Component Name text box, enter the component name.
- For What kind of standalone component are you creating? select the component that you wish to certify. For example, for certifying your Helm Charts, select Helm Chart.
- Click Next.
- In the Chart Name text box, enter a unique name for your chart.
Distribution Method - Select one of the following options for publishing your Helm Chart:
Helm chart repository charts.openshift.io - The Helm chart is published to the Red Hat Helm chart repository,
charts.openshift.ioand the users can pull your chart from this repository.NoteWhen you select the checkbox The certified helm chart will be distributed from my company’s repository, an entry about the location of your chart is added to the index of Red Hat Helm chart repository,
charts.openshift.io.-
Web catalog only (catalog.redhat.com) - The Helm chart is not published to the Red Hat Helm chart repository,
charts.openshift.ioand is not visible on Red Hat OpenShift OperatorHub. This is the default option when you create a new component and this option is suitable for partners who do not want their Helm chart publicly installable within OpenShift, but require a proof of certification. Select this option only if you have a distribution, entitlement, or other business requirements that is not otherwise accommodated within the OpenShift In-product Catalog (Certified) option.
- Click Add component.
For adding an existing component, from the Add Component dialog, select Existing Component.
- From the Available components list, search and select the components that you wish to certify and click the forward arrow. The selected components are added to the Chosen components list.
- Click Attach existing component.
27.1.5. Certify components for your listing for Helm charts
To certify the components for your listing, click Start. If you have existing product components, you can view the list of Attached Components and their details:
- Name
- Certification
- Security
- Type
- Created
- Click more options to archive or remove the components
- Select the components for certification.
After completing all the above tasks you will see a green tick mark corresponding to all the options.
The Overview tab also provides the following information:
Product contacts - Provides Product marketing and Technical contact information.
- Click Add contacts to product to provide the contact information
- Click Edit to update the information.
Components in product - Provides the list of the components attached to the product along with their last updated information.
- Click Add components to product to add new or existing components to your product.
- Click Edit components to update the existing component information.
After publishing the product listing, you can view your Product Readiness Score and Ways to raise your score on the Overview tab.
Additional resources
For more information about the distribution methods, see Helm Chart Distribution methods.
27.2. Product Information for Helm charts
Through this tab you can provide all the essential information about your product. The product details are published along with your product on the Red Hat Ecosystem catalog.
General tab:
Provide basic details of the product, including product name and description.
- Enter the Product Name.
- Optional: Upload the Product Logo according to the defined guidelines.
- Enter a Brief description and a Long description.
- Click Save.
Features & Benefits tab:
Provide important features of your product.
- Optional: Enter the Title and Description.
- Optional: To add additional features for your product, click + Add new feature.
- Click Save.
Quick start & Config tab:
Add links to any quick start guide or configuration document to help customers deploy and start using your product.
- Optional: Enter Quick start & configuration instructions.
- Click Save.
- Select Hide default instructions check box, if you don’t want to display them.
Linked resources tab:
Add links to supporting documentation to help our customers use your product. The information is mapped to and is displayed in the Documentation section on the product’s catalog page.
It is mandatory to add a minimum of three resources. Red Hat encourages you to add more resources, if available.
- Select the Type drop-down menu, and enter the Title and Description of the resource.
- Enter the Resource URL.
- Optional: To add additional resources for your product, click + Add new Resource.
- Click Save.
FAQs tab:
Add frequently asked questions and answers of the product’s purpose, operation, installation, or other attribute details. You can include common customer queries about your product and services.
- Enter Question and Answer.
- Optional: To add additional FAQs for your product, click + Add new FAQ.
- Click Save.
Support tab:
This tab lets you provide contact information of your Support team.
- Enter the Support description, Support web site, Support phone number, and Support email address.
- Click Save.
Contacts tab:
Provide contact information of your marketing and technical team.
- Enter the Marketing contact email address and Technical contact email address.
- Optional: To add additional contacts, click + Add another.
- Click Save.
Legal tab:
Provide the product related license and policy information.
- Enter the License Agreement URL for the product and Privacy Policy URL.
- Click Save.
SEO tab:
Use this tab to improve the discoverability of your product for our mutual customers, enhancing visibility both within the Red Hat Ecosystem Catalog search and on internet search engines. Providing a higher number of search aliases (key and value pairs) will increase the discoverability of your product.
- Select the Product Category.
- Enter the Key and Value to set up Search aliases.
- Click Save.
- Optional: To add additional key-value pair, click + Add new key-value pair.
Add at least one Search alias for your product. Red Hat encourages you to add more aliases, if available.
27.3. Components for Helm charts
Use this tab to add components to your product listing. Through this tab you can also view a list of attached components linked to your Product Listing.
Alternatively, to attach a component to the Product Listing, you can complete the Add at least one product component option available in the Overview tab of a Container, Operator, or Helm Chart product listing.
- To add a new or existing product component, click Add component.
For adding a new component,
- In the Component Name text box, enter the component name.
- For What kind of OpenShift component are you creating? select the component that you wish to certify. For example, for certifying your Helm Charts, select Helm Chart.
- Click Next.
- In the Chart Name text box, enter a unique name for your chart.
Distribution Method - Select one of the following options for publishing your Helm Chart:
Helm chart repository charts.openshift.io - The Helm chart is published to the Red Hat Helm chart repository,
charts.openshift.ioand the users can pull your chart from this repository.NoteWhen you select the checkbox The certified helm chart will be distributed from my company’s repository, an entry about the location of your chart is added to the index of Red Hat Helm chart repository,
charts.openshift.io.-
Web catalog only (catalog.redhat.com) - The Helm chart is not published to the Red Hat Helm chart repository,
charts.openshift.ioand is not visible on Red Hat OpenShift OperatorHub. This is the default option when you create a new component and this option is suitable for partners who do not want their Helm chart publicly installable within OpenShift, but require a proof of certification. Select this option only if you have a distribution, entitlement, or other business requirements that is not otherwise accommodated within the OpenShift In-product Catalog (Certified) option.
- Click Add component.
For adding an existing component, from the Add Component dialog, select Existing Component.
- From the Available components list, search and select the components that you wish to certify and click the forward arrow. The selected components are added to the Chosen components list.
- Click Attach existing component.
You can add the same component to multiple products listings. All attached components must be published before the product listing can be published.
After attaching components, you can view the list of Attached Components and their details:
- Name
- Certification
- Security
- Type
- Created
- Click more options to archive or remove the attached components
Alternatively, to search for specific components, type the component’s name in the Search by component Name text box.
27.4. Support for Helm charts
The Red Hat Partner Acceleration Desk (PAD) is a Products and Technologies level partner help desk service that allows the current and prospective partners a central location to ask non-technical questions pertaining to Red Hat offerings, partner programs, product certification, engagement process, and so on.
You can also contact the Red Hat Partner Acceleration Desk for any technical questions you may have regarding the Certification. Technical help requests will be redirected to the Certification Operations team.
Through the Partner Subscriptions program, Red Hat offers free, not-for-resale software subscriptions that you can use to validate your product on the target Red Hat platform. To request access to the program, follow the instructions on the Partner Subscriptions site.
- To request support, click Open a support case. See PAD - How to open & manage PAD cases, to open a PAD ticket.
- To view the list of existing support cases, click View support cases.
27.5. Removing a product
After creating a product listing if you wish to remove it, go to the Overview tab and click Delete.
A published product must first be unpublished before it can be deleted. Red Hat retains information related to deleted products even after you delete the product.
Chapter 28. Adding certification components
After creating the new product listing, add the certification components for the newly created product listing.
You can configure the following options for the newly added components:
The component configurations differ for different product categories.
- Section 28.1, “Certification for Helm charts”
- Section 28.2, “Optional Qualifications for Helm charts”
- Section 28.3, “Repository information for Helm charts”
- Section 28.4, “Component details for Helm charts”
- Section 28.5, “Contact Information for Helm charts”
- Section 28.6, “Associated products for Helm charts”
To configure the options, go to the Components tab and click on any of the existing components.
28.1. Certification for Helm charts
GitHub Verification
After creating your Helm Chart component on Red Hat partner connect, submit your Helm Chart for verification.
- From the Certification tab, go to GitHub Verification.
- Click Go to GitHub. You are redirected to the OpenShift Helm Charts Repository.
- Submit a pull request.
The pull request is reviewed by the Red Hat certification team. After successful verification, your Helm Chart is published on the Red Hat Ecosystem Catalog.
Additional resources
For more information about submitting your pull request, see Submitting your Helm chart for certification.
28.2. Optional Qualifications for Helm charts
This tab is applicable only for Operator, Helm and OpenShift container images.
The Optional qualifications tab provides tests to check if your attached product component follows Red Hat’s recommended guidelines and best practices for deploying your product on Red Hat OpenShift clusters.
To test your product,
- Click Start Testing.
- Click Go to Red Hat certification tool to reach the Red Hat Partner Certification (rhcert) portal.
In the Red Hat Partner Certification (rhcert) portal, go to the Summary tab.
- To submit your test results, from the Files section click Upload. A successful upload message is displayed.
- Add your queries related to certification, if any, in the Discussions text box.
- Click Add Comment. By using this option, you can communicate your questions to the Red Hat certification team. The Red Hat certification team will provide clarifications for your queries.
When your testing is complete and to make any changes to the test, click Review.
The test results are published for your reference.
28.3. Repository information for Helm charts
Distribution via External Helm chart repository
When your Helm chart is verified, it is published on the Red Hat Ecosystem catalog along with the following details.
Enter the required details in the following fields:
| Field name | Description |
|---|---|
| Chart name | Unique name of your Helm chart |
| Container registry namespace | Registry name set when the container was created. This field becomes non-editable when the container gets published. |
| Helm chart repository | It denotes the location of your Helm chart repository. |
| Any additional instructions for users to access your Helm chart | This information will be published on the Red Hat Ecosystem Catalog. |
| Public PGP Key | It is an optional field. Enter the key if you want to sign your certification test results. |
| Authorized GitHub user accounts | It denotes the GitHub users who are allowed to submit Helm charts for certification on behalf of your company. |
| Short and Long repository descriptions | This information will be used when listing your Helm chart on the Red Hat Ecosystem Catalog. |
After configuring all the mandatory fields click Save.
All the fields marked with an asterisk * are required and must be completed before you can proceed with Helm Chart certification.
28.4. Component details for Helm charts
Configure the product component details by using this tab.
Enter the required details in the following fields:
| Field name | Description |
|---|---|
| Application categories | Select the respective application type of your software product. |
| Project name | Name of the project for internal purposes. |
After configuring all the mandatory fields click Save.
28.5. Contact Information for Helm charts
Providing information for this tab is optional.
In the Contact Information tab, enter the primary technical contact details of your product component.
- Optional: In the Technical contact email address field, enter the email address of the image maintainer.
- Optional: To add additional contacts for your component, click + Add new contact.
- Click Save.
28.6. Associated products for Helm charts
The Associated Product tab provides the list of products that are associated with your product component along with the following information:
- Product Name
- Type - Traditional application
- Visibility - Published or Not Published
- Last Activity - number of days before you ran the test
To add products to your component, perform the following:
- If you want to find a product by its name, enter the product name in the Search by name text box and click the search icon.
- If you are not sure of the product name, click Find a product. From the Add product dialog, select the required product from the Available products list box and click the forward arrow. The selected product is added to the Chosen products list box. Click Update attached products. Added products are listed in the Associated product list.
All the fields marked with an asterisk * are required and must be completed before you can proceed with the certification.
Chapter 29. Submitting your Helm chart for certification
After configuring and setting up your Helm chart component on the Red Hat Partner Connect, submit your Helm charts for certification by creating a pull request to the Red Hat’s OpenShift Helm chart repository. In the pull request, you can either include your chart or the report generated by the chart-verifier tool or both. Based on the content of your pull request, the chart will be certified, and the chart-verifier will run if a report is not provided.
Prerequisites
Before creating a pull request, ensure to have the following prerequisites:
Fork the Red Hat’s OpenShift Helm chart repository and clone it to your local system. Here, you can see a directory already created for your company under the partner’s directory.
NoteThe directory name is the same as the container registry namespace that you set while certifying your containers.
Within your company’s directory, there will be a subdirectory for each chart certification component you created in the previous step. To verify if this is set up correctly, review the
OWNERSfile. TheOWNERSfile is automatically created in your chart directory within your organization directory. It contains information about your component, including the GitHub users authorized to certify Helm charts on behalf of your company. You can locate the file at the locationcharts/partners/acme/awesome/OWNERS. If you want to edit the GitHub user details, navigate to the Settings page.For example, if your organization name is
acmeand the chart name isawesome. The content of theOWNERSfile is as follows:chart: name: awesome shortDescription: A Helm chart for Awesomeness publicPgpKey: null providerDelivery: False users: - githubUsername: <username-one> - githubUsername: <username-two> vendor: label: acme name: ACME Inc.
The name of the chart that you are submitting must match the value in the
OWNERSfile.Before submitting the Helm chart source or the Helm chart verification report, create a directory with its version number. For example, if you are publishing the
0.1.0 versionof theawesomechart, create a directory as follows:charts/partners/acme/awesome/0.1.0/
NoteFor charts that represent a product supported by Red Hat, submit the pull request to the main branch with the
OWNERSfile located at the charts, redhat directory available in your organization directory. For example, for a Red Hat chart named awesome, submit your pull request to the main branch located atcharts/redhat/redhat/awesome/OWNERS. Note that for Red Hat supported components, your organization name is also redhat.
Procedure
You can submit your Helm chart for certification by using three methods:
29.1. Submitting a Helm chart without the chart verification report
You can submit your Helm chart for certification without the chart verification report in two different formats:
29.1.1. Chart as a tarball
If you want to submit your Helm chart as a tarball, you can create a tarball of your Helm chart using the Helm package command and place it directly in the 0.1.0 directory.
For example, if your Helm chart is awesome for an organization acme
charts/partners/acme/awesome/0.1.0/awesome-0.1.0.tgz
charts/partners/acme/awesome/0.1.0/awesome-0.1.0.tgz.prov
29.1.2. Chart in a directory
If you want to submit your Helm chart in a directory, place your Helm chart in a directory with the chart source.
If you have signed the chart, place the providence file in the same directory. You can include a base64 encoded public key for the chart in the OWNERS file. When a base64 encoded public key is present, the key will be decoded and specified when the chart-verifier is used to create a report for the chart.
If the public key does not match the chart, the verifier report will include a check failure, and the pull request will end with an error.
If the public key matches with the chart and there are no other failures, a release will be created, which will include the tarball, the providence file, the public key file, and the generated report.
For example,
awesome-0.1.0.tgz
awesome-0.1.0.tgz.prov
awesome-0.1.0.tgz.key
report.yaml
If the OWNERS file does not include the public key, the chart verifier check is skipped and will not affect the outcome of the pull request. Further, the public key file will not be included in the release.
If the chart is a directory with the chart source, create a src directory to place the chart source.
For example,
A Path can be charts/partners/acme/awesome/0.1.0/src/
And the file structure can be
.
└── src
    ├── Chart.yaml
    ├── README.md
    ├── templates
    │   ├── deployment.yaml
    │   ├── _helpers.tpl
    │   ├── hpa.yaml
    │   ├── ingress.yaml
    │   ├── NOTES.txt
    │   ├── serviceaccount.yaml
    │   ├── service.yaml
    │   └── tests
    │       └── test-connection.yaml
    ├── values.schema.json
    └── values.yaml
29.2. Submitting a chart verification report without the Helm chart
Generate the report using the chart-verifier tool and save it with a file name report.yaml in the directory 0.1.0. You can submit two types of reports:
29.2.1. For submitting a signed report
Before submitting your report for certification, you can add a PGP public key to the chart verification report. Adding a PGP public key is optional. When you add it to your report, you can find your public key in the OWNERS file under your chart directory within your organization directory. The PGP public key is available in the publicPgpKey attribute. The value of this attribute must follow ASCII armor format.
When submitting a chart verification report without the chart, you can sign your report and save the signature in ASCII armor format.
For example,
gpg --sign --armor --detach-sign --output report.yaml.asc report.yaml
You can see a warning message on the console if the signature verification fails.
29.2.2. For submitting a report for a signed chart
For submitting the chart verification report for a signed chart, when you provide a PGP public key to the chart verifier tool while generating the report, it includes a digest of the key along with the report.
Also, when you include a base64 encoded PGP public key to the OWNERS file, a check is made to confirm if the digest of the decoded key in the OWNERS file matches the key digest in the report.
When they do not match, the pull request fails. But if the key digest matches with the report and there are no other errors when processing the pull request, a release is generated containing the public key and the report.
For example,
awesome-0.1.0.tgz.key
report.yaml
A release is not generated if you have enabled the provider control delivery.
29.3. Submitting a chart verification report along with the Helm chart
You can also submit a chart along with the report. Follow Submitting a Chart without Chart Verification Report procedure and place the source or tarball in the version number directory. Similarly, follow the steps in Submitting a Chart Verification Report without the Chart and place the report.yaml file in the same version number directory.
29.3.1. For submitting a signed report
You can sign the report and submit for verification. You can see a warning message on the console if the signature verification fails. For more information, see, 'For submitting a signed report' section of Submitting a Chart Verification Report without the Chart.
29.3.2. For submitting a signed Helm chart
For a signed chart you must include a tarball and a providence file in addition to the report file. For more information, see, 'For submitting a report for a signed chart' section of Submitting a Chart Verification Report without the Chart.
29.4. Summary of certification submission options
Follow the table that summarizes the scenarios for submitting your Helm charts for certification, depending on how you want to access your chart and also to check whether the chart tests have some dependencies on your local environment.
| Objective | Include Helm chart | Include chart verification report | Red Hat certification outcome | Methods to publish your certified Helm chart |
|---|---|---|---|---|
|
If you want to perform the following actions:
| Yes | No | The chart-verifier tool is executed in the Red Hat CI environment to ensure compliance. |
Your customers can download the certified Helm charts from |
|
If you want to perform the following actions:
| Yes | Yes | The Red Hat certification team reviews the results to ensure compliance. |
Your customers can download the certified Helm charts from |
|
If you don’t want to store your certified charts at | No | Yes | The Red Hat certification team reviews the results to ensure compliance. |
Your customers can download the certified Helm chart from your designated Helm chart repository. A corresponding entry is added to the |
29.5. Verification Steps
After submitting the pull request, it will take a few minutes to run all the checks and merge the pull request automatically. Perform the following steps after submitting your pull request:
- Check for any messages in the new pull request.
- If you see an error message, see Troubleshooting Pull Request Failures. Update the pull request accordingly with necessary changes to rectify the issue.
If you see a success message, it indicates that the chart repository index is updated successfully. You can verify it by checking the latest commit in the gh-pages branch. The commit message is in this format:
<partner-label>-<chart-name>-<version-number> index.yaml (#<PR-number>) (e.g, acme-psql-service-0.1.1 index.yaml (#7)).
You can see your chart related changes in the
index.yamlfile.-
If you have submitted a chart source, a GitHub release with the chart and corresponding report is available on the GitHub releases page. The release tag is in this format:
<partner-label>-<chart-name>-<version-number> (e.g., acme-psql-service-0.1.1). - You can find the certified Helm charts on the Red Hat’s official Helm chart repository. Follow the instructions listed here to install the certified Helm chart on your OpenShift cluster.
Chapter 30. Publishing the certified Helm chart
When you submit the Helm chart for validation through a pull request, the Red Hat certification team reviews and verifies your component for certification. After successful validation, your Helm chart is certified through GitHub.
Follow the steps to publish your certified Helm chart:
- Access the Partner connect web page. My Products web page displays the Product Listings.
- Navigate to the Product Listings tab and search for the required product listing.
- Click the newly created product listing that you wish to publish. Review all the details of your product listing.
- Go to the Components tab.
Click Add component and go to Existing component tab to attach your certified Helm chart to this listing. Also add the certified containers used by your Helm chart. Both the components must be in Published status.
The Publish button is enabled when you specify all the required information for the product listing along with the attached components.
- Click Publish.
Your certified Helm chart is now available for public access on the Red Hat Ecosystem Catalog.
Part V. Functional certification for OpenShift badges: CNF, CNI, CSI
Red Hat OpenShift certification badges extend the Red Hat OpenShift Operator certification to specific functional areas or infrastructure services that are key in cloud-native deployments for our joint customers. These certifications are built on the foundation of container and operator certification, and by receiving a Red Hat OpenShift Certification Badge, partners can confirm that their solution is Kubernetes enabled and utilizes specific Kubernetes APIs for addressing the respective use cases.
The current OpenShift certification badges that are available are as follows:
- Cloud-Native Network Functions (CNF)—for the implementation of telecommunication functions deployed as containers.
- Container Networking Interface (CNI)—for the delivery of networking services through a pluggable framework.
- Container Storage Interface (CSI) —for providing and supporting a block or file persistent storage backend for Red Hat OpenShift.
Chapter 31. CNF certification and Vendor Validation
31.1. Working with Cloud-native Network Function (CNF) certification
31.1.1. Introduction to Cloud-native Network Function
Cloud-native Network Functions (CNFs) are containerized instances of classic physical or Virtual Network Functions (VNFs) that have been decomposed into microservices supporting elasticity, lifecycle management, security, logging, and other capabilities in a Cloud-native format.
The CNF badge is a specialization within Red Hat OpenShift certification. It is available for products that implement a network function delivered in a container format with Red Hat OpenShift as the deployment platform. Red Hat offers two levels of CNF certification:
- Vendor Validation - Select this type of CNF certification, if your container base image is neither RHEL nor UBI. For this type of certification, Vendor Validate your CNF product by testing it internally, before publishing it as a Vendor Validated CNF product on the Red Hat Ecosystem catalog.
- Certified CNF - Select this type of CNF certification, if your container base image is RHEL or UBI. For this type of certification, Vendor Validate your CNF product, run the certification tests on your workload and then submit it for verification. After successful verification your CNF product gets listed as a Certified CNF product on the Red Hat Ecosystem catalog.
Products that meet the requirements and complete the certification workflow get listed on the Red Hat Ecosystem Catalog and are identified with the CNF badge. Partners will receive a logo to promote their product certification.
Additional resources
For more information about CNF, see:
- To know more about the advantages of Vendor Validated CNF and Certified CNF, see Cloud-native network functions (CNF).
- To know about the requirements for pursuing a CNF certification, see Requirements for CNF.
- To know more about the best practices and common recommendations for OLM and SDK projects, see Operator Best Practices.
31.1.2. Certification workflow for CNF
Red Hat recommends that you are a Red Hat Certified Engineer or hold equivalent experience before starting the certification process.
Task Summary
The certification workflow includes the following three primary stages-
31.1.2.1. Certification onboarding for cnf
Perform the steps outlined for the certification onboarding:
- Join the Red Hat Connect for Technology Partner Program.
- Agree to the program terms and conditions.
Create your product listing by selecting your desired product category. You can select from the available product categories:
- Containerized Application
- Standalone Application
- OpenStack Infrastructure
- Complete your company profile.
Create individual CNF components for each partner product version and its corresponding Red Hat base version. If you want to certify your CNF component then create separate CNF components for each attached CNF component such as container images and operator bundle or Helm chart.
Additional resources
For detailed instructions about creating your CNF product, see Creating a product listing.
31.1.2.2. Completing the product listing for cnf
Perform the steps outlined for completing the checklist:
- Provide details for your validation.
- Validate the functionality of your CNF on Red Hat OpenShift for Vendor Validation.
- Complete the product listing details for certifying your CNF components.
- Add components to the product listing.
- Certify components for your product listing.
Additional resources
For more details about completing the product listing, see Adding certification components.
31.1.2.3. Publishing the product listing on the Red Hat Ecosystem Catalog
The Certified or Vendor Validated CNF component must be added to your product’s Product Listing page on the Red Hat Partner Connect portal. Once published, your product listing is displayed on the Red Hat Ecosystem Catalog, by using the product information that you provide. You can publish both the Vendor Validated and Certified CNF products on the Red Hat Ecosystem Catalog with the respective labels.
Additional resources
- For more details about publishing your CNF component, see Publishing the product listing on the Red Hat Ecosystem Catalog.
31.2. Create a product
The product listing provides marketing and technical information, showcasing your product’s features and advantages to potential customers. It lays the foundation for adding all necessary components to your product for certification.
Prerequisites
Ensure that your product meets the following requirements before proceeding with the certification process:
- Your product is generally available for public access
- Your product is tested and deployed on Red Hat OpenShift
- Your product is commercially supported on Red Hat OpenShift
Verify the functionality of your product on the target Red Hat platform, in addition to the specific certification testing requirements. If running your product on the targeted Red Hat platform results in a substandard experience then you must resolve the issues before certification.
Procedure
Red Hat recommends completing all optional fields in the listing tabs for a comprehensive product listing. More information helps mutual customers make informed choices.
Red Hat encourages collaboration with your product manager, marketing representative, or other product experts when entering information for your product listing.
Fields marked with an asterisk (*) are mandatory.
Procedure
- Log in to the Red Hat Partner Connect Portal.
- Go to the Certified technology portal tab and click Visit the portal.
- On the header bar, click Product management.
- From the Listing and certification tab click Manage products.
From the My Products page, click Create Product.
A Create New Product dialog opens.
- Enter the Product name.
From the What kind of product would you like to certify? drop-down, select the required product category and click Create product. For example, select Containerized Application for creating a containerized product listing.
A new page with your Product name opens. It comprises the following tabs:
Along with the following tabs, the page header provides the Product Score details. Product Score evaluates your product information and displays a score. It can be:
- Fair
- Good
- Excellent
- Best
- Click How do I improve my score? to improve your product score.
- After providing the product listing details, click Save before moving to the next section.
31.2.1. Overview for CNF
This tab consists of a series of tasks that you must complete to publish your product:
- Section 31.2.1.1, “Complete product listing details for CNF”
- Section 31.2.1.2, “Complete company profile information for CNF”
- Section 31.2.1.3, “Accept legal agreements for CNF”
- Section 31.2.1.4, “Add at least one product component for CNF”
- Section 31.2.1.5, “Certify components for your listing for CNF”
31.2.1.1. Complete product listing details for CNF
To complete your product listing details, click Start.
The Product Information tab opens.
- Enter all the essential product details and click Save.
31.2.1.2. Complete company profile information for CNF
- To complete your company profile information, click Start. After entering all the details, click Submit.
- To modify the existing details, click Review. The Account Details page opens.
- Review and modify the Company profile information and click Submit.
31.2.1.3. Accept legal agreements for CNF
To publish your product image, agree to the terms regarding the distribution of partner container images.
- To accept the legal agreements, click Start.
- To preview or download the agreement, click Review.
The Red Hat Partner Connect Container Appendix document displays. Read the document to know the terms related to the distribution of container images.
31.2.1.4. Add at least one product component for CNF
Click Start. You are redirected to the Components tab.
To add a new or existing product component, click Add component.
For adding a new component,
In the Component Name text box, enter the component name. This name is not published and is only for internal use.
NoteRed Hat recommends including the product version in the component name to aid easy identification of the newly created CNF component. For example,
<CompanyName ProductName> 1.2 - OCP 4.12.2)- For What kind of OpenShift component are you creating? select the component that you wish to certify. For example, for certifying your CNF, select Cloud Native Function (CNF).
- Click Create new component.
For adding an existing component, from the Add Component dialog, select Existing Component.
- From the Available components list, search and select the components that you wish to certify and click the forward arrow. The selected components are added to the Chosen components list.
- Click Attach existing component.
Create individual CNF components for each partner product version and its corresponding Red Hat base version. Also create and attach certification components such as container images and operator bundle or Helm chart, which are required for the certification. You can create more than one CNF component for a product.
31.2.1.5. Certify components for your listing for CNF
To certify the components for your listing, click Start. If you have existing product components, you can view the list of Attached Components and their details:
- Name
- Certification
- Security
- Type
- Created
- Click more options to archive or remove the components
- Select the components for certification.
After completing all the above tasks you will see a green tick mark corresponding to all the options.
The Overview tab also provides the following information:
Product contacts - Provides Product marketing and Technical contact information.
- Click Add contacts to product to provide the contact information
- Click Edit to update the information.
Components in product - Provides the list of the components attached to the product along with their last updated information.
- Click Add components to product to add new or existing components to your product.
- Click Edit components to update the existing component information.
After publishing the product listing, you can view your Product Readiness Score and Ways to raise your score on the Overview tab.
31.2.2. Product Information for CNF
Through this tab you can provide all the essential information about your product. The product details are published along with your product on the Red Hat Ecosystem catalog.
General tab:
Provide basic details of the product, including product name and description.
- Enter the Product Name.
- Optional: Upload the Product Logo according to the defined guidelines.
- Enter a Brief description and a Long description.
- Click Save.
Features & Benefits tab:
Provide important features of your product.
- Optional: Enter the Title and Description.
- Optional: To add additional features for your product, click + Add new feature.
- Click Save.
Quick start & Config tab:
Add links to any quick start guide or configuration document to help customers deploy and start using your product.
- Optional: Enter Quick start & configuration instructions.
- Click Save.
- Select Hide default instructions check box, if you don’t want to display them.
Linked resources tab:
Add links to supporting documentation to help our customers use your product. The information is mapped to and is displayed in the Documentation section on the product’s catalog page.
It is mandatory to add a minimum of three resources. Red Hat encourages you to add more resources, if available.
- Select the Type drop-down menu, and enter the Title and Description of the resource.
- Enter the Resource URL.
- Optional: To add additional resources for your product, click + Add new Resource.
- Click Save.
FAQs tab:
Add frequently asked questions and answers of the product’s purpose, operation, installation, or other attribute details. You can include common customer queries about your product and services.
- Enter Question and Answer.
- Optional: To add additional FAQs for your product, click + Add new FAQ.
- Click Save.
Support tab:
This tab lets you provide contact information of your Support team.
- Enter the Support description, Support web site, Support phone number, and Support email address.
- Click Save.
Contacts tab:
Provide contact information of your marketing and technical team.
- Enter the Marketing contact email address and Technical contact email address.
- Optional: To add additional contacts, click + Add another.
- Click Save.
Legal tab:
Provide the product related license and policy information.
- Enter the License Agreement URL for the product and Privacy Policy URL.
- Click Save.
SEO tab:
Use this tab to improve the discoverability of your product for our mutual customers, enhancing visibility both within the Red Hat Ecosystem Catalog search and on internet search engines. Providing a higher number of search aliases (key and value pairs) will increase the discoverability of your product.
- Select the Product Category.
- Enter the Key and Value to set up Search aliases.
- Click Save.
- Optional: To add additional key-value pair, click + Add new key-value pair.
Add at least one Search alias for your product. Red Hat encourages you to add more aliases, if available.
31.2.3. Components for CNF
Use this tab to add components to your product listing. Through this tab you can also view a list of attached components linked to your Product Listing.
Alternatively, to attach a component to the Product Listing, you can complete the Add at least one product component option available in the Overview tab of a Container, Operator, or Helm Chart product listing.
- To add a new or existing product component, click Add component.
For adding a new component,
- In the Component Name text box, enter the component name.
In the Component Name text box, enter the component name. This name is not published and is only for internal use.
NoteRed Hat recommends including the product version in the component name to aid easy identification of the newly created CNF component. For example,
<CompanyName ProductName> 1.2 - OCP 4.12.2)- For What kind of OpenShift component are you creating? select the component that you wish to certify. For example, for certifying your CNF, select Cloud Native Function (CNF).
- Click Create new component.
For adding an existing component, from the Add Component dialog, select Existing Component.
- From the Available components list, search and select the components that you wish to certify and click the forward arrow. The selected components are added to the Chosen components list.
- Click Attach existing component.
You can add one component to multiple products listings. All attached components must be published before the product listing can be published.
After attaching components, you can view the list of Attached Components and their details:
- Name
- Certification
- Security
- Type
- Created
- Click more options to archive or remove the attached components
Alternatively, to search for specific components, type the component’s name in the Search by component Name text box.
31.2.3.1. Certify components for your listing
To certify the components for your listing, click Start. If you have existing product components, you can view the list of Attached Components and their details:
- Name
- Certification
- Security
- Type
- Created
- Click more options to archive or remove the components
- Select the components for certification.
31.2.4. Support for CNF
The Red Hat Partner Acceleration Desk (PAD) is a Products and Technologies level partner help desk service that allows the current and prospective partners a central location to ask non-technical questions pertaining to Red Hat offerings, partner programs, product certification, engagement process, and so on.
You can also contact the Red Hat Partner Acceleration Desk for any technical questions you may have regarding the Certification. Technical help requests will be redirected to the Certification Operations team.
Through the Partner Subscriptions program, Red Hat offers free, not-for-resale software subscriptions that you can use to validate your product on the target Red Hat platform. To request access to the program, follow the instructions on the Partner Subscriptions site.
- To request support, click Open a support case. See PAD - How to open & manage PAD cases, to open a PAD ticket.
- To view the list of existing support cases, click View support cases.
31.2.5. Removing a product
After creating a product listing if you wish to remove it, go to the Overview tab and click Delete.
A published product must first be unpublished before it can be deleted. Red Hat retains information related to deleted products even after you delete the product.
31.3. Adding certification components
After creating the new product listing, add the certification components for the newly created product listing.
You can configure the following options for the newly added components:
The component configurations differ for different product categories.
31.3.1. Certification for CNF
Validate and certify the functionality of your CNF on Red Hat OpenShift by using the Certification tab.
31.3.1.1. Validate the functionality of your CNF on Red Hat OpenShift
By using this feature the Red Hat CNF certification team checks if your product meets all the standards for Vendor Validation.
To validate the functionality of your CNF component, perform the following:
- Select this option and click Start questionnaire. The CNF Questionnaire page displays.
- Enter all your product and company information.
- After filling in all the details, click Submit.
- To modify the existing details, click Review. The CNF Questionnaire page displays, allowing you to review and modify the entered information.
After you click Submit, a new functional certification request is created. The Red Hat CNF certification team will review and validate the entered details of the CNF questionnaire. After successful review and validation, your functional certification request will be approved, and the Certification Level field in the Product listing will be set to Vendor Validated.
After completing each step, a green check mark will appear beside each tile to indicate that particular configuration item is complete. When all items are completed in the checklist, the disclosure caret to the left of Pre-publication Checklist will be closed.
Additional resources
For detailed information about the validation process, see CNF workflow.
31.3.1.2. Certify the functionality of your CNF on Red Hat OpenShift
Select this option only if you want to certify your vendor validated CNF component.
This is an optional feature that allows you to certify your Vendor Validated component by using the Red Hat certification tool. For every Vendor Validated component, a new functional certification request will be created on the Red Hat Partner Certification portal. When you place a request for certification, your functional certification request will be processed by the CNF team for certification.
If you certify your Vendor Validated CNF component then it will be displayed on the Red Hat Ecosystem Catalog with the Certified label.
Prerequisites
- Complete the product listing before proceeding with the certification.
- Certify your attached container images, operator bundles or helm charts before submitting your CNF component for certification.
Procedure
To certify your Vendor Validated CNF component, perform the following steps:
- Go to the Certification tab and from the Certify the functionality of your CNF on Red Hat OpenShift tile, click Start. A new functional certification request is created and will be redirected to your component on the Red Hat Partner Certification (rhcert) portal.
- Run the CNF certification test suite or use DCI OpenShift App Agent . It consists of a series of test cases derived from best practices to evaluate whether your product adheres to these principles and satisfies the Red Hat certification standards.
To certify your CNF component, perform the following steps on your CNF component page on the Red Hat Partner Certification (rhcert) portal:
Go to the Summary tab,
-
To submit your CNF certification test results, from the Files section click Upload. Select the
claims.jsonandtnf_config.ymlfiles. Then, click Next. You can see a successful upload message. - Add your queries related to certification, if any, in the Discussions text box.
- Click Add Comment. By using this option, you can communicate your questions to the Red Hat CNF certification team. The Red Hat CNF certification team will provide clarifications for your queries.
-
To submit your CNF certification test results, from the Files section click Upload. Select the
In the Summary tab,
- Navigate to the Partner Product category.
- Click the edit icon below the Partner Product Version option to enter your product version and then click the checkmark button. Your product version gets updated.
Navigate to the Properties tab,
- Click the Platform list menu to select the platform on which you want to certify your CNF component. For example - x86_64
- Click the Product Version list menu to select the Red Hat product version on which you want to certify your CNF component. For example - Red Hat OpenShift Platform
- Click Update Values. The selected values are updated.
All the versions of partner products are not certified for use with every version of Red Hat products. You need to certify each version of your product with the selected Red Hat base version. For example, if you certify your product version 5.11 with Red Hat OpenShift Container Platform version 4.13, you can use only the 5.11 version and not the later versions. Therefore certify every version of your product individually with the latest version of the Red Hat base product.
The Red Hat CNF certification team will review and verify the details of your CNF component. When the Red Hat CNF certification team identifies issues or violations in the recommended best practices with your CNF, joint discussions will ensue to find the remediation options and timeline. The team also considers temporary exceptions if there is a commitment to fix the issues with an identified release target or timeline. All exceptions will be documented and published in a KIE base article listing all non compliant items before CNF gets listed on the Red Hat Ecosystem Catalog but the technical details will remain private.
All the containers, operators or Helm charts referenced in your CNF product must be recertified before beginning to certify a CNF component in the prescribed order.
After successful verification by the Red Hat CNF certification team, your Vendor Validated CNF component will become certified, and will be automatically published on the Red Hat Ecosystem Catalog with the Certified label.
Additional resources
- For more information about the CNF Certification test suite, see Overview and test catalog.
- For more information about installing and configuring DCI OpenShift App Agent, see DCI OpenShift App Agent.
31.3.2. Component details for CNF
Configure the product component details by using this tab.
Enter the required details in the following fields:
- Project name - Enter the project name. This name is not published and is only for internal use.
Red Hat recommends including the product version to the component name to aid easy identification of the newly created CNF component. For example, <CompanyName ProductName> 1.2 - OCP 4.12.2)
- Click Save.
31.3.3. Contact Information for CNF
Providing information for this tab is optional.
In the Contact Information tab, enter the primary technical contact details of your product component.
- Optional: In the Technical contact email address field, enter the email address of the image maintainer.
- Optional: To add additional contacts for your component, click + Add new contact.
- Click Save.
31.3.4. Associated products for CNF
The Associated Product tab provides the list of products that are associated with your product component along with the following information:
- Product Name
- Type - Traditional application
- Visibility - Published or Not Published
- Last Activity - number of days before you ran the test
To add products to your component, perform the following:
- If you want to find a product by its name, enter the product name in the Search by name text box and click the search icon.
- If you are not sure of the product name, click Find a product. From the Add product dialog, select the required product from the Available products list box and click the forward arrow. The selected product is added to the Chosen products list box. Click Update attached products. Added products are listed in the Associated product list.
All the fields marked with an asterisk * are required and must be completed before you can proceed with the certification.
31.4. Publishing the product listing on the Red Hat Ecosystem Catalog
When you submit your CNF component for validation, the Red Hat CNF certification team will review and verify the entered details of the CNF Questionnaire. If you want to certify your Vendor Validated CNF component, complete the Certification details.
The Red Hat certification team will review the submitted CNF test results. After successful verification, to publish your product on the Red Hat Ecosystem Catalog, go to the Product Listings page to attach the Vendor Validated or Certified CNF component.
Follow these steps to publish your product listing:
- Access the Red Hat Partner connect web page. My Product web page displays the Product Listings.
- Navigate to the Product Listings tab and search for the required product listing.
- Click the newly created product listing that you want to publish. Review all the details of your product listing.
- Go to the Components tab.
Click Add Component to add new component to your product listing.
NoteYou must publish all the attached components before publishing your product version and product certification.
Click Attach Component to attach your Vendor Validated or Certified CNF component to this listing. While attaching a certified CNF component, it is mandatory to add the certified container image and an operator bundle or Helm chart used by your CNF component.
NoteAll the attached components must be in Published status.
For Vendor Validated components, this step is not required. The Publish button is enabled when you specify all the required information for the product listing, including the attached components.
- Click Publish.
Your new CNF product listing is now available for public access with respective Vendor Validated or Certified CNF labels on the Red Hat Ecosystem Catalog. The Certifications table on your product listings page displays the following details:
- Product - for example, Red Hat OpenShift Container Platform
- Version - selected Red Hat base product version. for example, 4.12 - 4.x
- Architecture - for example, x86_64
- Partner product version - for example, 5.11
- Certification type - for example, RHOCP 4 CNF
- Level - for example, Vendor Validated or Certified
You need to certify each version of your product with the selected Red Hat base version. Hence the Certifications table can have multiple versions of your product for the same Red Hat base version. For example,
| Product | Version | Architecture | Partner product version | Certification type | Certification level |
|---|---|---|---|---|---|
| Red Hat OpenShift Container Platform | 4.12 | x86_64 | 5.11 | RHOCP 4 CNF | Vendor Validated |
| Red Hat OpenShift Container Platform | 4.12 | x86_64 | 5.12 | RHOCP 4 CNF | Certified |
| Red Hat OpenShift Container Platform | 4.12 | x86_64 | 5.13 | RHOCP 4 CNF | Certified |
| Red Hat OpenShift Container Platform | 4.12 | x86_64 | 5.14 | RHOCP 4 CNF | Vendor Validated |
31.5. Recertifying a CNF package
Recertification workflow is similar to the regular CNF certification workflow. Red Hat recommends to recertify your application in the following scenarios:
- on every major release of the Red Hat OpenShift Container Platform.
- on every major release of your application.
To recertify your application, it is mandatory to create a new certification request for recertification.
Procedure
- Create a new CNF component on the Red Hat Partner Connect.
-
In the Project name field enter the product name and its version. For example -
<CompanyName ProductName> 1.2 - OCP 4.12.2 - Complete all the tasks on the overview tab, except the CNF Questionnaire and proceed with the regular CNF certification workflow, like a new certification.
- Submit a new certification request through the Red Hat Partner Certification (rhcert) portal.
Recertify the entire CNF package along with recertifying each CNF component individually as a standalone CNF. In case, if you have deployed your CNF application by using a separate helm chart or an operator, you must recertify each CNF separately. Also, if you are recertifying a new version of your CNF product on the same Red Hat product version, you don’t have to recertify the unaltered CNF image containers.
After successful verification by the Red Hat CNF certification team, the new version of your CNF package is recertified, and will be automatically published on the Red Hat Ecosystem Catalog with the Certified label.
Chapter 32. CNI certification
32.1. Working with Container Network Interface (CNI) certification
To certify a CNI plug-in, it must be configured to be deployed and managed by using an Operator. Before proceeding with the Red Hat CNI Certification, the operator, along with all the containers referenced by your CNI operator bundle, including the plug-in must already be certified and published on the Red Hat Ecosystem Catalog prior to certifying the CNI plug-in.
32.1.1. Introduction to Container Network Interface
Container Network Interface (CNI) is a specification to configure network interfaces in Linux containers. It consists of a specification and libraries for writing plug-ins to configure network interfaces in Linux containers, along with a number of supported plug-ins. CNI is mainly helpful with adding, connecting, deleting and disconnecting containers to networks.
The CNI badge is a specialization within Red Hat OpenShift certification. It is available to products that implement a network function delivered in a container format by using a CNI plug-in with Red Hat OpenShift as the deployment platform.
The products that meet the requirements and complete the certification workflow can be referred to and promoted as Certified CNI on the Red Hat OpenShift Container platform. After the certification is approved, the certified CNI product will be listed on the Red Hat Ecosystem Catalog as well as on the OperatorHub within the web console in Red Hat OpenShift. The certified CNI operators are identified with the CNI badge. Partners will receive a logo to promote their product certification.
Additional resources
For more information about CNI, see:
32.1.2. Certification workflow for CNI
Red Hat recommends that you are a Red Hat Certified Engineer or hold equivalent experience before starting the certification process.
Task Summary
The certification workflow includes three primary steps-
32.1.2.1. Certification on-boarding for CNI
Perform the steps outlined for certification onboarding:
- Join the Red Hat Connect for Technology Partner Program.
- Agree to the program terms and conditions.
Create your product listing by selecting your desired product category. You can select from the available product categories:
- Containerized Application
- Standalone Application
- OpenStack Infrastructure
- Complete your company profile.
- Add components to the product listing.
- Certify components for your product listing.
Additional resources
For detailed instructions about creating a product listing, see Creating a product listing.
32.1.2.2. Certification testing for CNI
Follow these high-level steps to run a certification test:
- Fork the Red Hat upstream repository.
- Install and run the Red Hat certification pipeline on your test environment.
- Review the test results and troubleshoot, if you face any issues.
- Submit the certification results to Red Hat through a pull request.
Additional resources
For detailed instructions about attaching product components and validating the functionality of your CNI operators on Red Hat OpenShift, see Adding certification components.
32.1.2.3. Publishing the product listing on the Red Hat Ecosystem Catalog
When you complete all the certification checks successfully, you can submit the test results to Red Hat. You can turn on or off this results submission step depending on your individual goals. When the test results are submitted, it triggers the Red Hat infrastructure to automatically merge your pull request and publish your operator.
Additional resources
For detailed instructions about publishing the product listing on the Red Hat Ecosystem Catalog, see Publishing the product listing on the Red Hat Ecosystem Catalog.
32.2. Creating a Product
For detailed instructions about creating a product listing, see Creating a product listing.
32.3. Adding certification components
For detailed instructions about attaching product components and validating the functionality of your CNI operators on Red Hat OpenShift, see Adding certification components.
32.4. Working with the OpenShift Operator Pipeline
Follow the steps to certify your operator before proceeding with the CNI certification:
Certified operators are listed in and consumed by customers through the embedded OpenShift operatorHub, providing them the ability to easily deploy and run your solution. Additionally, your product and operator image will be listed on the Red Hat Ecosystem Catalog.
32.5. Configuring your test environment for running the CNI tests
Before running the CNI tests, verify if the Red Hat OpenShift environment that you use for running the CNI tests meets the following criteria:
- Use a Red Hat OpenShift version within the full support phase of the life cycle. Red Hat recommends using the latest supported release. For more information on OpenShift releases, see Red Hat OpenShift Container Platform Life Cycle Policy.
- Deploy the networking product only by using the documented installation procedure.
- Install the Red Hat OpenShift Virtualization.
- If you want to test Service Mesh, install the Red Hat Service Mesh operator and the Service Mesh Control Plane (SMCP).
- Configure a host with access to the OpenShift cluster to use as the test client for running the CNI certification tests. This environment must include the utilities such as gcc,git, go, make, openssl and sonobuoy.
Run your own product verification tests on the same configuration to ensure that your product functionality works as expected on the Red Hat OpenShift environment.
Red Hat Partner Connect offers free access to software as a program benefit. To know how to obtain a subscription to the Red Hat OpenShift environment, see Red Hat Partner Connect Program Guide.
32.6. Running the CNI tests
To run the Red Hat OpenShift networking conformance test suite, place the
kubeconfig.yamlfile in the current working directory and run the following command:$ podman run -v `pwd`:/data:z --rm -it \ registry.redhat.io/openshift4/ose-tests sh -c \ "KUBECONFIG=/data/kubeconfig.yaml /usr/bin/openshift-tests run openshift/network/third-party -o /data/results.txt"
The command uses the test suite that corresponds to the current minor release of Red Hat OpenShift, for example, 4.x. If you want to run the tests for a previous minor release, use an image tag to indicate the required version. For example, when running the tests for OpenShift 4.6, add the version number to the above command such as, ose-tests:v4.6. See the ose-tests repository page for information on tags available.
Follow the steps to run the Red Hat OpenShift Virtualization conformance test suite:
Download the conformance tests specific to your environment by using the following command:
$ curl -L https://github.com/kubevirt/kubevirt/releases/download/v<KubeVirt version>/conformance.yaml -o kubevirt-conformance.yaml
In this command
<KubeVirt version>corresponds to the OpenShift Virtualization version that you use. For more details, see the Version mapping table.Execute the tests by using the following command:
$ sonobuoy run --skip-preflight --plugin kubevirt-conformance.yaml
In this command
<KubeVirt version>denotes the version of the kubevirt.Monitor the status of the test by using the following command:
$ sonobuoy status
When the test run is completed, fetch the results by using the following command:
$ sonobuoy retrieve
It generates a compressed tar file.
Verification steps
Verify that the tests are completed successfully, by using the following command:
$ sonobuoy results <tarball>
The output should look similar to this:
Plugin: kubevirt-conformance
Status: passed
Total: 637
Passed: 9
Failed: 0
Skipped: 628
Follow the steps to run the Red Hat OpenShift Service Mesh test suite:
- Clone the Maistra Test tool GitHub repository.
Run the tests as per the instructions provided in the README.md file in the repository. Note that these tests may take approximately 3 hours to complete.
If you face any issues that cause the suite to fail quickly, inspect the impacted pods by using the following command to check for
ImagePullBackOff errors:$ describe
-
After successful test completion,
results.xmlandtest.logfiles are generated. Submit the files along with the CNI conformance test results to the Red Hat certification team for verification.
32.7. Submitting your CNI operator for certification
Capture the output of the end-to-end CNI tests, the OpenShift Virtualization tests and the Service Mesh tests, if applicable and submit the results through the Red Hat Certification portal.
- Log in to the Red Hat Certification portal.
- On the homepage, enter the product case number in the search bar. Select the case number from the list that is displayed.
- On the Summary tab, under the Files section, click Upload.
Before uploading the results ensure that all CNI tests are completed successfully. If a particular test does not apply to the certified product, include an explanation along with the result submission.
32.8. Publishing the product listing on the Red Hat Ecosystem Catalog
When you submit the CNI component for validation through the Red Hat certification portal , the Red Hat certification team reviews and verifies your component for certification. After successful verification, your certified product gets published on the Red Hat Ecosystem Catalog.
Follow the steps to publish your certified CNI operator :
- Access the Partner connect web page. My Products web page displays the Product Listings.
- Search for the required product listing.
- Click the newly created product listing that you wish to publish. Review all the details of your product listing.
- Go to the Components tab.
Click Add Component to attach your certified CNI operator to this listing. Also add the certified containers used by your CNI component. All the components must be in Published status.
The Publish button is enabled when you specify all the required information for the product listing along with the attached components.
- Click Publish.
Your certified CNI operator is now available for public access on the Red Hat Ecosystem Catalog. The certified CNI operator will also be listed in the OperatorHub within the web console in OpenShift. Partners will receive a logo to promote their certified product on the Red Hat OpenShift platform.
The Red Hat OpenShift software certification does not conduct functional or performance testing of the Partner’s product outside the Operator constructs and its impact on the Red Hat platform on which it was installed and executed. All aspects of the certification candidate product’s quality assurance remain the Partner’s sole responsibility.
Chapter 33. CSI certification
33.1. Working with Container Storage Interface (CSI) certification
To certify a CSI plug-in, it must be configured to be deployed and managed by using an Operator. Before proceeding with the Red Hat CSI Certification, the operator, along with all the containers referenced by your CSI operator bundle, including the plug-in must already be certified and published on the Red Hat Ecosystem Catalog prior to certifying the CSI driver.
33.1.1. Introduction to Container Storage Interface
The Container Storage Interface (CSI) allows products on the OpenShift Container Platform to consume storage from storage back ends that implement the CSI interface as persistent storage. CSI drivers are typically shipped as container images. The CSI badge is a specialization within Red Hat OpenShift certification. It is available to storage products that integrate by using a CSI driver with Red Hat OpenShift as the deployment platform.
The products that meet the requirements and complete the certification workflow can be referred to and promoted as Certified CSI products on the Red Hat OpenShift Container platform. After the certification is approved, the certified CSI product will be listed on the Red Hat Ecosystem Catalog and the OperatorHub within the web console in Red Hat OpenShift. The certified CSI operators are identified with the CSI badge. Partners will receive a logo to promote their product certification.
Additional resources
For more information about CSI, see:
33.1.2. Certification workflow for CSI
Red Hat recommends that you are a Red Hat Certified Engineer or hold equivalent experience before starting the certification process.
Task Summary
The certification workflow includes three primary steps-
33.1.2.1. Certification on-boarding for CSI
Perform the steps outlined for certification onboarding:
- Join the Red Hat Connect for Technology Partner Program.
- Agree to the program terms and conditions.
Create your product listing by selecting your desired product category. You can select from the available product categories:
- Containerized Application
- Standalone Application
- OpenStack Infrastructure
- Complete your company profile.
- Add components to the product listing.
- Certify components for your product listing.
Additional resources
For detailed instructions about creating a product listing, see Creating a product listing.
33.1.2.2. Certification testing for CSI
To run the certification test,
- Fork the Red Hat upstream repository.
- Install and run the Red Hat certification pipeline on your test environment.
- Review the test results and troubleshoot, if any issues.
- Submit the certification results to Red Hat through a pull request.
Additional resources
For detailed instructions about attaching product components and validating the functionality of your CNI operators on Red Hat OpenShift, see Adding certification components.
33.1.2.3. Publishing the product listing on the Red Hat Ecosystem Catalog
When you complete all the certification checks successfully, you can submit the test results to Red Hat. You can turn on or off this results submission step depending on your individual goals. When the test results are submitted, it triggers the Red Hat infrastructure to automatically merge your pull request and publish your operator.
Additional resources
For detailed instructions about publishing the product listing on the Red Hat Ecosystem Catalog, see Publishing the product listing on the Red Hat Ecosystem Catalog.
33.2. Creating a Product
For detailed instructions about creating a product listing, see Creating a product listing.
33.3. Adding certification components
For detailed instructions about attaching product components and validating the functionality of your CNI operators on Red Hat OpenShift, see Adding certification components.
33.4. Working with the OpenShift Operator Pipeline
Follow the steps to certify your operator before proceeding with the CSI certification:
Certified operators are listed in and consumed by customers through the embedded OpenShift operatorHub, providing them the ability to easily deploy and run your solution. Additionally, your product and operator image will be listed on the Red Hat Ecosystem Catalog.
33.5. Configuring your test environment for running the CSI tests
Before running the CSI tests, verify if the Red Hat OpenShift environment that you use for running the CSI tests meets the following criteria:
- Use a Red Hat OpenShift version within the full support phase of the life cycle. Red Hat recommends using the latest supported release. For more information on OpenShift releases, see Red Hat OpenShift Container Platform Life Cycle Policy.
- Install the CSI driver by using its Operator.
- Install the Red Hat OpenShift Virtualization.
- Configure a RHEL host with access to the OpenShift cluster to use as the test client for running the CSI certification tests.
Run your own product verification tests on the same configuration to ensure that your product functionality works as expected on the Red Hat OpenShift environment.
Red Hat Partner Connect offers free access to software as a program benefit. To know how to obtain a subscription to the Red Hat OpenShift environment, see Red Hat Partner Connect Program Guide.
33.6. Accessing the CSI certification tests
The CSI certification tests are packaged in a container and are included in the OpenShift End-to-End repository. To retrieve the current version of the tests, navigate to the Red Hat Ecosystem catalog and follow the instructions available on the Get this image tab.
When accessing the OpenShift End-to-End Tests container, make sure to pull the corresponding tag of the OpenShift version that you are using for your product certification.
33.7. Setting up the CSI test parameters
The CSI certification tests require the following files to be present on the client host:
A
kubeconfig.yamlfile with credentials to access the OpenShift cluster under test. This file is automatically created during the OpenShift installation, but you can recreate a copy by using the following command:$ oc config view --raw > kubeconfig.yaml
-
A
manifest.yamlfile that describes the capabilities of your driver. This file is used to determine the tests that must be executed. For more information, see the example file.
33.8. Running the CSI tests
On the test client, place the kubeconfig.yaml and manifest.yaml files in the current working directory and run the following command:
$ podman run -v `pwd`:/data:z --rm -it registry.redhat.io/openshift4/ose-tests sh -c "KUBECONFIG=/data/kubeconfig.yaml TEST_CSI_DRIVER_FILES=/data/manifest.yaml /usr/bin/openshift-tests run openshift/csi --junit-dir /data/results”
If you execute the tests on a version of OpenShift previous to the latest release, make sure to add the right tag to the container image name:registry.redhat.io/openshift4/ose-tests:<tag>. See OpenShift End-to-End Tests repository page for a list of available tags.
Verification Steps
The output of the command includes a summary of the tests for the CSI capabilities and for container native virtualization (CNV) in OpenShift. Following is a sample output:
Storage Capabilities (guaranteed only on full CSI test suite with 0 fails)
============================================================
Driver short name: ceph-test
Driver name: test.rbd.csi.ceph.com
Storage class: ceph-rbd-sc.yaml
Supported OpenShift / CSI features:
Persistent volumes: true
Raw block mode: true
FSGroup: true
Executable files on a volume: true
Volume snapshots: true
Volume cloning: true
Use volume from multiple pods on a node:true
ReadWriteMany access mode: true
Volume expansion for controller: true
Volume expansion for node: true
Volume limits: true
Volume can run on single node: true
Topology: true
Supported CNV features:
Raw block VM disks: true
Live migration: true
VM snapshots: true
Storage-assisted cloning: true
The detailed results will be placed in the
resultssubdirectory.If you want to see a list of the tests that are run for CSI certification, run the following command:
podman run -v `pwd`:/data:z --rm -it registry.redhat.io/openshift4/ose-tests sh -c "KUBECONFIG=/data/kubeconfig.yaml TEST_CSI_DRIVER_FILES=/data/manifest.yaml /usr/bin/openshift-tests run --dry-run openshift/csi
Execute separate tests for each supported storage protocol.
33.9. Submitting CSI test results
Make sure to have the following ready before submitting your test results:
- Contents in the results directory
- manifest.yaml file
Output of the following commands:
$ oc get clusterversion -o yaml
and
$ podman image list registry.redhat.io/openshift4/ose-tests
Follow the procedure to submit the result files through the Red Hat Certification portal:
- Log in to the Red Hat Certification portal.
- On the homepage, enter the product case number in the search bar. Select the case number from the list that is displayed.
- On the Summary tab, under the Files section, click Upload.
Before uploading the results ensure that all CSI tests are completed successfully. If a particular test does not apply to the certified product, include an explanation along with the result submission.
33.10. Publishing the product listing on the Red Hat Ecosystem Catalog
When you submit the CSI component for validation through the Red Hat certification portal , the Red Hat certification team reviews and verifies your component for certification. After successful verification, your certified product gets published on the Red Hat Ecosystem Catalog.
Follow the steps to publish your certified CSI operator :
- Access the Partner connect web page. My Products web page displays the Product Listings.
- Search for the required product listing.
- Click the newly created product listing that you wish to publish. Review all the details of your product listing.
- Go to the Components tab.
Click Add Component to attach your certified CSI operator to this listing. Also add any additional certified containers used by your CSI component. All the components must be in Published status.
The Publish button is enabled when you specify all the required information for the product listing along with the attached components.
- Click Publish.
Your certified CSI operator is now available for public access on the Red Hat Ecosystem Catalog. The certified CSI operator will also be listed in the OperatorHub within the web console in OpenShift. Partners will receive a logo to promote their certified product on the Red Hat OpenShift platform.
The Red Hat OpenShift software certification does not conduct functional or performance testing of the Partner’s product outside the Operator constructs and its impact on the Red Hat platform on which it was installed and executed. All aspects of the certification candidate product’s quality assurance remain the Partner’s sole responsibility.