
使用负载平衡器配置 Capsule
在 Capsule 服务器间分布负载
摘要
向红帽文档提供反馈
我们感谢您对文档提供反馈信息。请让我们了解如何改进文档。
您可以通过在 Bugzilla 中记录一个 ticket 来提交反馈:
- 导航到 Bugzilla 网站。
-
在 Component 字段中,使用
Documentation。 - 在 Description 字段中,输入您要改进的建议。包括文档相关部分的链接。
- 点 Submit Bug。
第 1 章 负载均衡解决方案架构
您可以将 Satellite 服务器配置为使用负载平衡器在多个 Capsule 服务器之间分发客户端请求和网络负载。这会提高 Capsule 服务器上的整体性能。
本指南概述了如何为负载平衡准备 Satellite 服务器和 Capsule 服务器的指南,并提供了有关如何配置负载平衡器并在负载平衡设置中注册客户端的指南。
负载均衡设置由以下组件组成:
- Satellite Server
- 两个或多个 Capsule 服务器
- 一个负载均衡器
- 多个客户端
图 1.1. Satellite 负载均衡解决方案架构
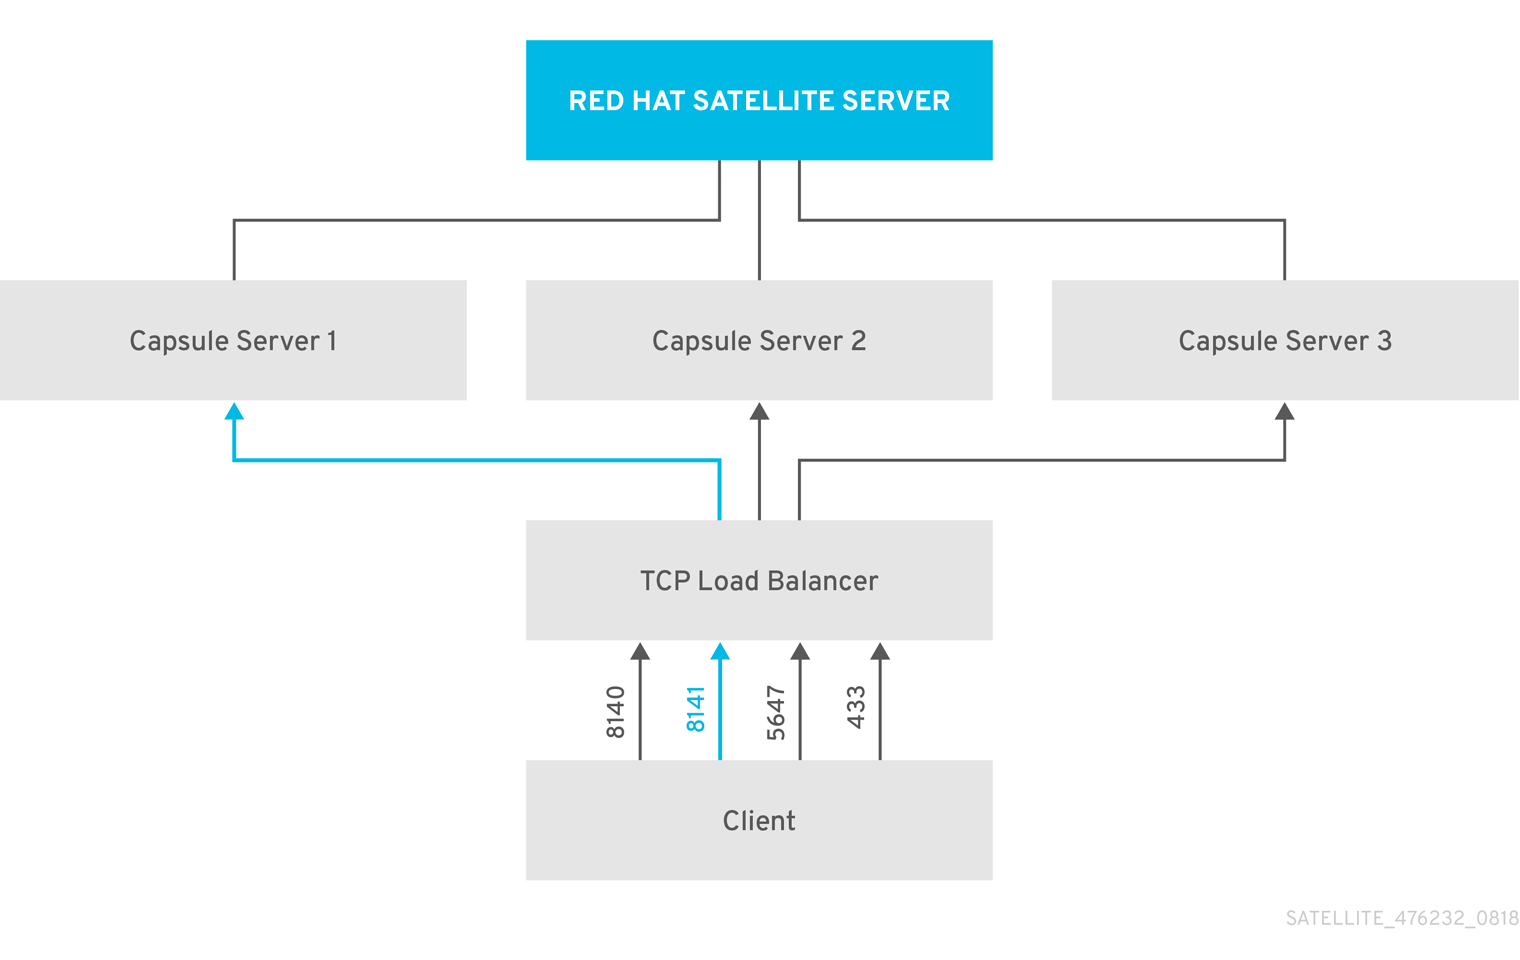
在负载平衡设置中,在计划或计划维护时,几乎所有 Capsule 功能都会继续按预期工作。负载均衡器可用于以下服务和功能:
-
使用
subscription-manager注册 -
使用
yum软件仓库进行内容管理 - 可选: Puppet
在负载均衡设置中,负载均衡器只针对上述服务和功能分发负载。如果其他服务(如 provisioning 或 virt-who)在单独的 Capsule 上运行,您必须直接通过 Capsule 访问这些服务,而不是通过负载均衡器访问。
管理 Puppet 限制
Puppet 证书颁发机构(CA)管理不支持负载均衡设置中的证书签名请求。Puppet CA 在文件系统中存储证书信息,如序列号计数器和 CRL。尝试使用相同数据的多个写入器进程可能会破坏它。
要管理此 Puppet 限制,请完成以下步骤:
- 在一个 Capsule 服务器上配置 Puppet 证书签名请求,通常是配置胶囊式服务器以进行负载平衡的第一个系统。
- 配置客户端,将 CA 请求发送到负载均衡器上的端口 8141。
- 配置负载均衡器,将来自端口 8141 的 CA 请求重定向到您将 Capsule 服务器配置为签署 Puppet 证书的系统上的端口 8140。
第 2 章 负载均衡注意事项
在多个 Capsule 服务器间分布负载可防止任何一个 Capsule 成为单点故障。配置 Capsule 以使用负载均衡器可为计划和计划外的中断提供弹性。这提高了可用性和响应性。
在配置负载均衡时请考虑以下准则:
- 如果使用 Puppet,则 Puppet 证书签名请求会被分配给您配置的第一个 Capsule。如果第一个 Capsule 停机,客户端将无法获取 Puppet 内容。
- 这个解决方案不使用 Pacemaker 或其他类似的 HA 工具在所有 Capsule 中维护一个状态。要排除问题,请重复每个 Capsule 上的问题,绕过负载平衡器。
负载均衡需要额外的维护
配置 Capsule 以使用负载平衡器会导致更复杂的环境,并需要额外的维护。
负载均衡需要以下额外步骤:
- 您必须确保所有 Capsule 都具有相同的内容视图,并将所有 Capsule 同步到相同的内容视图版本
- 您必须按顺序升级每个 Capsule
- 您必须定期备份配置的每个 Capsule
在负载均衡配置中升级 Capsule 服务器
要将 Capsule 服务器从 6.10 升级到 6.11,请完成升级和更新 Red Hat Satellite 中的 升级 Capsule 服务器 流程。在负载平衡配置中,Capsule 服务器不需要额外的步骤。
第 3 章 为负载均衡配置 Capsule 服务器的先决条件
要为负载平衡配置 Capsule 服务器,请完成以下步骤,请参阅安装 Capsule 服务器。Satellite 不支持配置现有的 Capsule 服务器进行负载平衡。
第 4 章 为负载均衡配置 Capsule 服务器
本章概述了如何配置胶囊式服务器以进行负载平衡。根据您的 Satellite 服务器配置,继续以下部分之一:
对您为每个 Capsule 服务器创建的 Katello 证书使用不同的文件名。例如,使用 Capsule 服务器 FQDN 为证书归档文件命名。
4.1. 在没有 Puppet 的情况下为负载均衡配置带有默认 SSL 证书的 Capsule 服务器
下面的部分论述了如何配置使用默认 SSL 证书进行负载平衡的 Capsule 服务器,而无需 Puppet。
在您要配置用于负载平衡的每个 Capsule 服务器上完成这个步骤。
流程
在 Satellite 服务器上,为 Capsule 服务器生成 Katello 证书,例如:
# capsule-certs-generate \
--foreman-proxy-fqdn capsule.example.com \
--certs-tar "/root/capsule.example.com-certs.tar" \
--foreman-proxy-cname loadbalancer.example.com
为安装 Capsule 服务器证书保留示例
satellite命令的副本,该命令由其输出。-installer将证书存档文件从 Satellite 服务器复制到 Capsule 服务器。
# scp /root/capsule.example.com-certs.tar \
root@capsule.example.com:/root/capsule.example.com-certs.tar
在 satellite-installer 命令中获取的
satellite-installer命令中附加以下选项,该命令从 thethecerts-generate命令的输出中获取。--certs-cname "loadbalancer.example.com" \ --enable-foreman-proxy-plugin-remote-execution-ssh在 Capsule 服务器上,输入
satellite-installer命令,例如:# satellite-installer --scenario capsule \ --foreman-proxy-register-in-foreman "true" \ --foreman-proxy-foreman-base-url "https://satellite.example.com" \ --foreman-proxy-trusted-hosts "satellite.example.com" \ --foreman-proxy-trusted-hosts "capsule.example.com" \ --foreman-proxy-oauth-consumer-key "oauth key" \ --foreman-proxy-oauth-consumer-secret "oauth secret" \ --certs-tar-file "capsule.example.com-certs.tar" \ --certs-cname "loadbalancer.example.com" \ --enable-foreman-proxy-plugin-remote-execution-ssh
4.2. 使用 Puppet 为负载均衡配置具有默认 SSL 证书的 Capsule 服务器
下面的部分论述了如何配置使用默认 SSL 证书通过 Puppet 进行负载均衡的 Capsule 服务器。
如果在 Satellite 配置中使用 Puppet,您必须完成以下步骤:
配置 Capsule 服务器以生成和签名 Puppet 证书
仅对您要配置 Capsule 服务器的系统完成此流程,以为您配置用于负载平衡的所有其他 Capsule 服务器生成和签署 Puppet 证书。在此流程示例中,此 Capsule 服务器的 FQDN 是 evince -ca.example.com。
在 Satellite 服务器上,为配置 Capsule 服务器以生成和签署 Puppet 证书的系统生成 Katello 证书:
# capsule-certs-generate \
--foreman-proxy-fqdn capsule-ca.example.com \
--certs-tar "/root/capsule-ca.example.com-certs.tar" \
--foreman-proxy-cname loadbalancer.example.com
为安装 Capsule 服务器证书保留示例
satellite命令的副本,该命令由其输出。-installer将证书存档文件从 Satellite 服务器复制到 Capsule 服务器:
# scp /root/capsule-ca.example.com-certs.tar \
root@capsule-ca.example.com:capsule-ca.example.com-certs.tar
在
satellite-installer命令中获取的 satellite-installer 命令中附加以下选项:--certs-cname "loadbalancer.example.com" \ --puppet-dns-alt-names "loadbalancer.example.com" \ --puppet-ca-server "capsule-ca.example.com" \ --foreman-proxy-puppetca "true" \ --puppet-server-ca "true" \ --enable-foreman-proxy-plugin-remote-execution-ssh
在 Capsule 服务器上,输入
satellite-installer命令,例如:# satellite-installer --scenario capsule \ --foreman-proxy-register-in-foreman "true" \ --foreman-proxy-foreman-base-url "https://satellite.example.com" \ --foreman-proxy-trusted-hosts "satellite.example.com" \ --foreman-proxy-trusted-hosts "capsule-ca.example.com" \ --foreman-proxy-oauth-consumer-key "oauth key" \ --foreman-proxy-oauth-consumer-secret "oauth secret" \ --certs-tar-file "capsule-ca.example.com-certs.tar" \ --puppet-server-foreman-url "https://satellite.example.com" \ --certs-cname "loadbalancer.example.com" \ --puppet-dns-alt-names "loadbalancer.example.com" \ --puppet-ca-server "capsule-ca.example.com" \ --foreman-proxy-puppetca "true" \ --puppet-server-ca "true" \ --enable-foreman-proxy-plugin-remote-execution-script \ --foreman-proxy-content-puppet true \ --enable-puppet \ --puppet-server true \ --puppet-server-foreman-ssl-ca /etc/pki/katello/puppet/puppet_client_ca.crt \ --puppet-server-foreman-ssl-cert /etc/pki/katello/puppet/puppet_client.crt \ --puppet-server-foreman-ssl-key /etc/pki/katello/puppet/puppet_client.key
在 Capsule 服务器上,停止 Puppet 服务器:
# puppet resource service puppetserver ensure=stopped
为您配置的所有其他 Capsule 服务器生成 Puppet 证书,但您配置 Puppet 证书的第一个系统除外:
# puppetserver ca generate --certname capsule.example.com \
--subject-alt-names loadbalancer.example.com --ca-client
此命令在将 Capsule 服务器配置为为 Puppet 证书签名的系统中创建以下文件:
-
/etc/puppetlabs/puppet/ssl/certs/ca.pem -
/etc/puppetlabs/puppet/ssl/certs/capsule.example.com.pem -
/etc/puppetlabs/puppet/ssl/private_keys/capsule.example.com.pem -
/etc/puppetlabs/puppet/ssl/public_keys/capsule.example.com.pem
-
恢复 Puppet 服务器:
# puppet resource service puppetserver ensure=running
为负载均衡配置剩余 Capsule 服务器
在每个胶囊式服务器上完成此流程,不包括您配置 Capsule 服务器以签署 Puppet 证书的系统。
在 Satellite 服务器上,为 Capsule 服务器生成 Katello 证书:
# capsule-certs-generate \
--foreman-proxy-fqdn capsule.example.com \
--certs-tar "/root/capsule.example.com-certs.tar" \
--foreman-proxy-cname loadbalancer.example.com
为安装 Capsule 服务器证书保留示例
satellite命令的副本,该命令由其输出。-installer将证书存档文件从 Satellite 服务器复制到 Capsule 服务器:
# scp /root/capsule.example.com-certs.tar \
root@capsule.example.com:/root/capsule.example.com-certs.tar
在 Capsule 服务器上安装
puppetserver软件包:# satellite-maintain packages install puppetserver
在 Capsule 服务器上,为 puppet 证书创建目录:
# mkdir -p /etc/puppetlabs/puppet/ssl/certs/ \
/etc/puppetlabs/puppet/ssl/private_keys/ \
/etc/puppetlabs/puppet/ssl/public_keys/
在 Capsule 服务器上,从您配置 Capsule 服务器的系统中复制此 Capsule 服务器的 Puppet 证书,以签署 Puppet 证书:
# scp root@capsule-ca.example.com:/etc/puppetlabs/puppet/ssl/certs/ca.pem \
/etc/puppetlabs/puppet/ssl/certs/ca.pem
# scp root@capsule-ca.example.com:/etc/puppetlabs/puppet/ssl/certs/capsule.example.com.pem \
/etc/puppetlabs/puppet/ssl/certs/capsule.example.com.pem
# scp root@capsule-ca.example.com:/etc/puppetlabs/puppet/ssl/private_keys/capsule.example.com.pem \
/etc/puppetlabs/puppet/ssl/private_keys/capsule.example.com.pem
# scp root@capsule-ca.example.com:/etc/puppetlabs/puppet/ssl/public_keys/capsule.example.com.pem \
/etc/puppetlabs/puppet/ssl/public_keys/capsule.example.com.pem
在 Capsule 服务器上,将目录所有权改为 user
puppet、grouppuppet并设置 SELinux 上下文:# chown -R puppet:puppet /etc/puppetlabs/puppet/ssl/ # restorecon -Rv /etc/puppetlabs/puppet/ssl/
在
satellite-installer命令中获取的 satellite-installer 命令中附加以下选项:--certs-cname "loadbalancer.example.com" \ --puppet-dns-alt-names "loadbalancer.example.com" \ --puppet-ca-server "capsule-ca.example.com" \ --foreman-proxy-puppetca "false" \ --puppet-server-ca "false" \ --enable-foreman-proxy-plugin-remote-execution-ssh
在 Capsule 服务器上,输入
satellite-installer命令,例如:# satellite-installer --scenario capsule \ --foreman-proxy-register-in-foreman "true" \ --foreman-proxy-foreman-base-url "https://satellite.example.com" \ --foreman-proxy-trusted-hosts "satellite.example.com" \ --foreman-proxy-trusted-hosts "capsule.example.com" \ --foreman-proxy-oauth-consumer-key "oauth key" \ --foreman-proxy-oauth-consumer-secret "oauth secret" \ --certs-tar-file "capsule.example.com-certs.tar" \ --puppet-server-foreman-url "https://satellite.example.com" \ --certs-cname "loadbalancer.example.com" \ --puppet-dns-alt-names "loadbalancer.example.com" \ --puppet-ca-server "capsule-ca.example.com" \ --foreman-proxy-puppetca "false" \ --puppet-server-ca "false" \ --enable-foreman-proxy-plugin-remote-execution-ssh
4.3. 在没有 Puppet 的情况下为负载均衡配置带有自定义 SSL 证书的 Capsule 服务器
下面的部分论述了如何配置使用自定义 SSL 证书进行负载平衡的 Capsule 服务器,而无需 Puppet。
4.3.1. 为 Capsule 服务器创建自定义 SSL 证书
此流程概述了如何为证书签名请求创建配置文件,并将负载均衡器和 Capsule 服务器用作主题备用名称(SAN)。在您要配置用于负载平衡的每个 Capsule 服务器上完成这个步骤。
流程
在 Capsule 服务器上,创建一个目录来包含所有源证书文件,只能通过
root用户访问:# mkdir /root/capsule_cert # cd /root/capsule_cert
创建为证书签名请求(CSR)签名的私钥。
请注意,私钥必须是未加密的。如果您使用密码保护的私钥,请删除私钥密码。
如果您已拥有此 Capsule 服务器的私钥,请跳过这一步。
# openssl genrsa -out /root/capsule_cert/capsule_cert_key.pem 4096
使用以下内容创建证书请求配置文件:
[ req ]
default_bits       = 4096
distinguished_name = req_distinguished_name
req_extensions     = req_ext
prompt = no

[ req_distinguished_name ]
countryName=2 Letter Country Code
stateOrProvinceName=State or Province Full Name
localityName=Locality Name
0.organizationName=Organization Name
organizationalUnitName=Capsule Organization Unit Name
commonName=capsule.example.com  1
emailAddress=Email Address

[ req_ext ]
#authorityKeyIdentifier=keyid,issuer
#basicConstraints=CA:FALSE
keyUsage = digitalSignature, nonRepudiation, keyEncipherment, dataEncipherment
subjectAltName = @alt_names

[alt_names]                  2
DNS.1 = loadbalancer.example.com
DNS.2 = capsule.example.com
为 SAN 证书创建证书签名请求(CSR)。
# openssl req -new \
-key /root/capsule_cert/capsule_cert_key.pem \ 1
-config SAN_config.cfg \                   2
-out /root/capsule_cert/capsule_cert_csr.pem   3
将证书请求发送到证书颁发机构:
当您提交请求时,指定证书的 Lifespan。发送证书请求的方法会有所不同,因此请参阅证书颁发机构以获取首选方法。根据请求,您可以在单独的文件中接收证书颁发机构捆绑包和签名证书。
- 将您从证书颁发机构接收的证书颁发机构捆绑包和 Capsule 服务器证书文件复制到 Satellite 服务器。
在 Satellite 服务器上,验证 Capsule 服务器证书输入文件:
# katello-certs-check \
-c /root/capsule_cert/capsule_cert.pem \      1
-k /root/capsule_cert/capsule_cert_key.pem \  2
-b /root/capsule_cert/ca_cert_bundle.pem      3
如果将
commonName=设置为通配符值,您必须将-t\":\" 选项添加到katello-certs-check命令中。保留由
katello命令的副本。-certs-check命令创建证书归档文件(用于为此 Capsule 服务器创建证书归档文件)输出的示例,example-certs-generate
4.3.2. 在没有 Puppet 的情况下为负载均衡配置带有自定义 SSL 证书的 Capsule 服务器
在您要配置用于负载平衡的每个 Capsule 服务器上完成这个步骤。
流程
将以下选项附加到从
katello命令中:-certs-check命令的输出中获取的 evince-certs-generate--foreman-proxy-cname loadbalancer.example.com在 Satellite 服务器上,输入
evince-certs-generate命令来生成 Capsule 证书。例如:# capsule-certs-generate \ --foreman-proxy-fqdn capsule.example.com \ --certs-tar /root/capsule_cert/capsule.tar \ --server-cert /root/capsule_cert/capsule.pem \ --server-key /root/capsule_cert/capsule.pem \ --server-ca-cert /root/capsule_cert/ca_cert_bundle.pem \ --foreman-proxy-cname loadbalancer.example.com
为安装 Capsule 服务器证书的输出保留
satellite-installer命令示例副本。将证书存档文件从 Satellite 服务器复制到 Capsule 服务器:
# scp /root/capsule.example.com-certs.tar \
root@capsule.example.com:capsule.example.com-certs.tar
在 satellite-installer 命令中获取的
satellite-installer命令中附加以下选项,该命令从 thethecerts-generate命令的输出中获取。--certs-cname "loadbalancer.example.com" \ --enable-foreman-proxy-plugin-remote-execution-ssh在 Capsule 服务器上,输入
satellite-installer命令,例如:# satellite-installer --scenario capsule \ --foreman-proxy-register-in-foreman "true" \ --foreman-proxy-foreman-base-url "https://satellite.example.com" \ --foreman-proxy-trusted-hosts "satellite.example.com" \ --foreman-proxy-trusted-hosts "capsule.example.com" \ --foreman-proxy-oauth-consumer-key "oauth key" \ --foreman-proxy-oauth-consumer-secret "oauth secret" \ --certs-tar-file "capsule.example.com-certs.tar" \ --certs-cname "loadbalancer.example.com" \ --enable-foreman-proxy-plugin-remote-execution-ssh
4.4. 使用 Puppet 为负载均衡配置带有自定义 SSL 证书的 Capsule 服务器
下面的部分论述了如何配置使用自定义 SSL 证书通过 Puppet 进行负载平衡的 Capsule 服务器。
4.4.1. 为 Capsule 服务器创建自定义 SSL 证书
此流程概述了如何为证书签名请求创建配置文件,并将负载均衡器和 Capsule 服务器用作主题备用名称(SAN)。在您要配置用于负载平衡的每个 Capsule 服务器上完成这个步骤。
流程
在 Capsule 服务器上,创建一个目录来包含所有源证书文件,只能通过
root用户访问:# mkdir /root/capsule_cert # cd /root/capsule_cert
创建为证书签名请求(CSR)签名的私钥。
请注意,私钥必须是未加密的。如果您使用密码保护的私钥,请删除私钥密码。
如果您已拥有此 Capsule 服务器的私钥,请跳过这一步。
# openssl genrsa -out /root/capsule_cert/capsule.pem 4096
使用以下内容创建证书请求配置文件:
[ req ]
default_bits       = 4096
distinguished_name = req_distinguished_name
req_extensions     = req_ext
prompt = no

[ req_distinguished_name ]
countryName=2 Letter Country Code
stateOrProvinceName=State or Province Full Name
localityName=Locality Name
0.organizationName=Organization Name
organizationalUnitName=Capsule Organization Unit Name
commonName=capsule.example.com  1
emailAddress=Email Address

[ req_ext ]
#authorityKeyIdentifier=keyid,issuer
#basicConstraints=CA:FALSE
keyUsage = digitalSignature, nonRepudiation, keyEncipherment, dataEncipherment
subjectAltName = @alt_names

[alt_names]                  2
DNS.1 = loadbalancer.example.com
DNS.2 = capsule.example.com
为 SAN 证书创建证书签名请求(CSR):
# openssl req -new \
-key /root/capsule_cert/capsule.pem \ 1
-config SAN_config.cfg \          2
-out /root/capsule_cert/capsule.pem   3
将证书请求发送到证书颁发机构:
当您提交请求时,指定证书的 Lifespan。发送证书请求的方法会有所不同,因此请参阅证书颁发机构以获取首选方法。根据请求,您可以在单独的文件中接收证书颁发机构捆绑包和签名证书。
- 将您从证书颁发机构接收的证书颁发机构捆绑包和 Capsule 服务器证书文件复制到 Satellite 服务器,以将 Capsule 服务器私钥复制到 Satellite 服务器以验证它们。
在 Satellite 服务器上,验证 Capsule 服务器证书输入文件:
# katello-certs-check \
-c /root/capsule_cert/capsule.pem \      1
-k /root/capsule_cert/capsule.pem \      2
-b /root/capsule_cert/ca_cert_bundle.pem 3
4.4.2. 使用 Puppet 为负载均衡配置带有自定义 SSL 证书的 Capsule 服务器
如果您在 Satellite 配置中使用 Puppet,则必须完成以下步骤:
配置 Capsule 服务器以生成和签名 Puppet 证书
仅对您要配置 Capsule 服务器的系统完成此步骤,以为您配置用于负载平衡的所有其他 Capsule 服务器生成 Puppet 证书。在此流程示例中,此 Capsule 服务器的 FQDN 是 evince -ca.example.com。
将以下选项附加到从
katello命令中:-certs-check命令的输出中获取的 evince-certs-generate--foreman-proxy-cname loadbalancer.example.com在 Satellite 服务器上,输入
evince-certs-generate命令来生成 Capsule 证书。例如:# capsule-certs-generate \ --foreman-proxy-fqdn capsule-ca.example.com \ --certs-tar /root/capsule_cert/capsule-ca.tar \ --server-cert /root/capsule_cert/capsule-ca.pem \ --server-key /root/capsule_cert/capsule-ca.pem \ --server-ca-cert /root/capsule_cert/ca_cert_bundle.pem \ --foreman-proxy-cname loadbalancer.example.com
为安装 Capsule 服务器证书的输出保留
satellite-installer命令示例副本。- 将证书存档文件从 Satellite 服务器复制到 Capsule 服务器。
在
satellite-installer命令中获取的 satellite-installer 命令中附加以下选项:--puppet-dns-alt-names "loadbalancer.example.com" \ --puppet-ca-server "capsule-ca.example.com" \ --foreman-proxy-puppetca "true" \ --puppet-server-ca "true" \ --enable-foreman-proxy-plugin-remote-execution-ssh
在 Capsule 服务器上,输入
satellite-installer命令,例如:satellite-installer --scenario capsule \ --foreman-proxy-register-in-foreman "true" \ --foreman-proxy-foreman-base-url "https://satellite.example.com" \ --foreman-proxy-trusted-hosts "satellite.example.com" \ --foreman-proxy-trusted-hosts "capsule-ca.example.com" \ --foreman-proxy-oauth-consumer-key "oauth key" \ --foreman-proxy-oauth-consumer-secret "oauth secret" \ --certs-tar-file "certs.tgz" \ --puppet-server-foreman-url "https://satellite.example.com" \ --certs-cname "loadbalancer.example.com" \ --puppet-dns-alt-names "loadbalancer.example.com" \ --puppet-ca-server "capsule-ca.example.com" \ --foreman-proxy-puppetca "true" \ --puppet-server-ca "true" \ --enable-foreman-proxy-plugin-remote-execution-script \ --foreman-proxy-content-puppet true \ --enable-puppet \ --puppet-server true \ --puppet-server-foreman-ssl-ca /etc/pki/katello/puppet/puppet_client_ca.crt \ --puppet-server-foreman-ssl-cert /etc/pki/katello/puppet/puppet_client.crt \ --puppet-server-foreman-ssl-key /etc/pki/katello/puppet/puppet_client.key
在 Capsule 服务器上,为您配置用于负载平衡的所有其他 Capsule 生成 Puppet 证书,但这是配置 Puppet 证书签名请求的第一个系统:
# puppet cert generate capsule.example.com \
--dns_alt_names=loadbalancer.example.com
此命令在 Puppet 证书签名请求上创建以下文件:
-
/etc/puppetlabs/puppet/ssl/certs/ca.pem -
/etc/puppetlabs/puppet/ssl/certs/capsule.example.com.pem -
/etc/puppetlabs/puppet/ssl/private_keys/capsule.example.com.pem -
/etc/puppetlabs/puppet/ssl/public_keys/capsule.example.com.pem
-
为负载均衡配置剩余 Capsule 服务器
为每个 Capsule 服务器完成此流程,但不包括您配置 Capsule 服务器以签署 Puppet 证书的系统。
将以下选项附加到从
katello命令中:-certs-check命令的输出中获取的 evince-certs-generate--foreman-proxy-cname loadbalancer.example.com在 Satellite 服务器上,输入
evince-certs-generate命令来生成 Capsule 证书。例如:# capsule-certs-generate \ --foreman-proxy-fqdn capsule.example.com \ --certs-tar /root/capsule_cert/capsule.tar \ --server-cert /root/capsule_cert/capsule.pem \ --server-key /root/capsule_cert/capsule.pem \ --server-ca-cert /root/capsule_cert/ca_cert_bundle.pem \ --foreman-proxy-cname loadbalancer.example.com
为安装 Capsule 服务器证书的输出保留
satellite-installer命令示例副本。将证书存档文件从 Satellite 服务器复制到 Capsule 服务器。
# scp /root/capsule.example.com-certs.tar \
root@capsule.example.com:capsule.example.com-certs.tar
在 Capsule 服务器上安装
puppetserver软件包:# satellite-maintain packages install puppetserver
在 Capsule 服务器上,为 puppet 证书创建目录:
# mkdir -p /etc/puppetlabs/puppet/ssl/certs/ \
/etc/puppetlabs/puppet/ssl/private_keys/ \
/etc/puppetlabs/puppet/ssl/public_keys/
在 Capsule 服务器上,从您配置 Capsule 服务器的系统中复制此 Capsule 服务器的 Puppet 证书,以签署 Puppet 证书:
# scp root@capsule-ca.example.com:/etc/puppetlabs/puppet/ssl/certs/ca.pem \
/etc/puppetlabs/puppet/ssl/certs/ca.pem
# scp root@capsule-ca.example.com:/etc/puppetlabs/puppet/ssl/certs/capsule.example.com.pem \
/etc/puppetlabs/puppet/ssl/certs/capsule.example.com.pem
# scp root@capsule-ca.example.com:/etc/puppetlabs/puppet/ssl/private_keys/capsule.example.com.pem \
/etc/puppetlabs/puppet/ssl/private_keys/capsule.example.com.pem
# scp root@capsule-ca.example.com:/etc/puppetlabs/puppet/ssl/public_keys/capsule.example.com.pem \
/etc/puppetlabs/puppet/ssl/public_keys/capsule.example.com.pem
在 Capsule 服务器上,将目录所有权改为 user
puppet、grouppuppet并设置 SELinux 上下文:# chown -R puppet:puppet /etc/puppetlabs/puppet/ssl/ # restorecon -Rv /etc/puppetlabs/puppet/ssl/
在
satellite-installer命令中获取的 satellite-installer 命令中附加以下选项:--certs-cname "loadbalancer.example.com" \ --puppet-dns-alt-names "loadbalancer.example.com" \ --puppet-ca-server "capsule-ca.example.com" \ --foreman-proxy-puppetca "false" \ --puppet-server-ca "false" \ --enable-foreman-proxy-plugin-remote-execution-ssh
在 Capsule 服务器上,输入
satellite-installer命令,例如:# satellite-installer --scenario capsule \ --foreman-proxy-register-in-foreman "true" \ --foreman-proxy-foreman-base-url "https://satellite.example.com" \ --foreman-proxy-trusted-hosts "satellite.example.com" \ --foreman-proxy-trusted-hosts "capsule.example.com" \ --foreman-proxy-oauth-consumer-key "oauth key" \ --foreman-proxy-oauth-consumer-secret "oauth secret" \ --certs-tar-file "capsule.example.com-certs.tar" \ --puppet-server-foreman-url "https://satellite.example.com" \ --certs-cname "loadbalancer.example.com" \ --puppet-dns-alt-names "loadbalancer.example.com" \ --puppet-ca-server "capsule-ca.example.com" \ --foreman-proxy-puppetca "false" \ --puppet-server-ca "false" \ --enable-foreman-proxy-plugin-remote-execution-ssh
第 5 章 安装 Load Balancer
以下示例提供了配置 HAProxy 负载均衡器的一般指导。但是,您可以安装任何支持 TCP 转发的负载平衡软件解决方案。
在 Red Hat Enterprise Linux 7 主机上安装 HAProxy:
# yum install haproxy
安装包含以下软件包,其中包括
semanage工具:# yum install policycoreutils-python
配置 SELinux 以允许 HAProxy 绑定任何端口:
# semanage boolean --modify --on haproxy_connect_any
配置负载均衡器以平衡端口的网络负载,如 表 5.1 “Load Balancer 的端口配置” 所述。例如,要为 HAProxy 配置端口,请编辑
/etc/haproxy/haproxy.cfg文件,使其与表对应。如需更多信息,请参阅红帽知识库中的 带有 Satellite 6 的 HAProxy 负载均衡器的 haproxy.cfg 配置示例。表 5.1. Load Balancer 的端口配置
服务 端口 模式 平衡模式 目的地 HTTP
80
TCP
roundrobin
所有 Capsule 服务器上的端口 80
HTTPS 和 RHSM
443
TCP
source
所有 Capsule 服务器上的端口 443
AMQP
5647
TCP
roundrobin
所有 Capsule 服务器上的端口 5647
puppet (可选)
8140
TCP
roundrobin
所有 Capsule 服务器上的端口 8140
PuppetCA (可选)
8141
TCP
roundrobin
仅在配置 Capsule 服务器为 Puppet 证书签名的系统中端口 8140
SmartProxy (OpenScap 的可选)
9090
TCP
roundrobin
所有 Capsule 服务器上的端口 9090
- 配置负载均衡器,以禁用 SSL 卸载,并允许客户端 SSL 证书传递给后端服务器。这是必要的,因为从客户端到 Capsule 服务器的通信取决于客户端 SSL 证书。
启动并启用 HAProxy 服务:
# systemctl start haproxy
# systemctl enable haproxy
第 6 章 注册客户端
您可以将运行 Red Hat Enterprise Linux 6、7 或 8 操作系统的客户端注册到您配置为负载均衡的 Capsule 服务器中。有关注册客户端并将其配置为使用 Puppet 的更多信息,请参阅 管理主机 指南中的注册主机。
要注册客户端,请执行以下步骤之一:
6.1. Red Hat Satellite 主机注册
您可以使用主机注册功能、Satellite API 或hammer CLI 将主机注册到 Satellite。
流程
- 在 Satellite Web UI 中,导航到 Hosts > Register Host。
- 点 Generate 来创建注册命令。
- 点 文件 图标将命令复制到您的剪贴板中。
- 登录到您要注册的主机并运行之前生成的命令。
更新
rhsm.baseurl和server.hostname的订阅管理器配置:# subscription-manager config \ --rhsm.baseurl=https://loadbalancer.example.com/pulp/content \ --server.hostname=loadbalancer.example.com
-
检查
/etc/yum.repos.d/redhat.repo文件,并确保已启用适当的存储库。
CLI 过程
使用hammer CLI 生成主机注册命令:
# hammer host-registration generate-command \
--activation-keys "My_Activation_Key"
如果您的主机不信任 Satellite 服务器的 SSL 证书,您可以通过在注册命令中添加
--insecure标志来禁用 SSL 验证。# hammer host-registration generate-command \ --activation-keys "My_Activation_Key" \ --insecure true- 登录到您要注册的主机并运行之前生成的命令。
更新
rhsm.baseurl和server.hostname的订阅管理器配置:# subscription-manager config \ --rhsm.baseurl=https://loadbalancer.example.com/pulp/content \ --server.hostname=loadbalancer.example.com
-
检查
/etc/yum.repos.d/redhat.repo文件,并确保已启用适当的存储库。
API 流程
使用 Satellite API 生成主机注册命令:
# curl -X POST https://satellite.example.com/api/registration_commands \
--user "My_User_Name" \
-H 'Content-Type: application/json' \
-d '{ "registration_command": { "activation_keys": ["My_Activation_Key_1, My_Activation_Key_2"] }}'
如果您的主机不信任 Satellite 服务器的 SSL 证书,您可以通过在注册命令中添加
--insecure标志来禁用 SSL 验证。# curl -X POST https://satellite.example.com/api/registration_commands \ --user "My_User_Name" \ -H 'Content-Type: application/json' \ -d '{ "registration_command": { "activation_keys": ["My_Activation_Key_1, My_Activation_Key_2"], "insecure": true }}'
使用激活码简化指定环境。如需更多信息,请参阅 内容管理指南中的管理 激活码。
要以命令行参数形式输入密码,请使用
username:password语法。请记住,这会在 shell 历史记录中保存密码。有关注册的更多信息 ,请参阅管理主机中的将主机注册到 Red Hat Satellite。
- 登录到您要注册的主机并运行之前生成的命令。
更新
rhsm.baseurl和server.hostname的订阅管理器配置:# subscription-manager config \ --rhsm.baseurl=https://loadbalancer.example.com/pulp/content \ --server.hostname=loadbalancer.example.com
-
检查
/etc/yum.repos.d/redhat.repo文件,并确保已启用适当的存储库。
6.2. (已弃用) 使用 Bootstrap 脚本注册客户端
要注册客户端,请在客户端上输入以下命令。您必须为每个客户端完成注册过程。
前提条件
确保在客户端上安装 bootstrap 脚本,并将脚本的文件权限改为可执行。如需更多信息,请参阅 管理主机 指南中的使用引导 脚本将主机注册到 Red Hat Satellite。
在 Red Hat Enterprise Linux 8 中,输入以下命令:
# /usr/libexec/platform-python bootstrap.py \
--login=admin \
--server loadbalancer.example.com \
--organization="My_Organization" \
--location="My_Location" \
--hostgroup="My_Hostgroup" \
--activationkey="My_Activation_Key" \
--enablerepos=satellite-client-6-for-rhel-8-<arch>-rpms \
--puppet-ca-port 8141 \    1
--force                    2
在 Red Hat Enterprise Linux 7、6 或 5 中输入以下命令:
# python bootstrap.py --login=admin \
--server loadbalancer.example.com \
--organization="My_Organization" \
--location="My_Location" \
--hostgroup="My_Hostgroup" \
--activationkey="My_Activation_Key" \
--enablerepos=rhel-7-server-satellite-client-6-rpms \
--puppet-ca-port 8141 \    1
--force                    2
该脚本提示您输入与您使用 --login 选项输入的 Satellite 用户名对应的密码。
6.3. (已弃用) 使用 katello-ca-consumer rpm 手动注册客户端
要手动注册客户端,请在您注册的每个客户端上完成以下步骤。
流程
如果安装了
katello-ca-consumer软件包,请删除它:# yum remove 'katello-ca-consumer*'
从负载均衡器安装
katello-ca-consumer软件包:# rpm -Uvh http://loadbalancer.example.com/pub/katello-ca-consumer-latest.noarch.rpm注册客户端并包含
--serverurl和--baseurl选项:# subscription-manager register \ --activationkey=My_Activation_Key \ --baseurl=https://loadbalancer.example.com/pulp/content/ \ --org=Your_Organization \ --serverurl=https://loadbalancer.example.com/rhsm
第 7 章 验证负载均衡配置
您可以通过为您配置的每个 Capsule 服务器完成以下步骤来验证负载均衡配置:
- 关闭您的 Capsule 服务器的基本操作系统。
-
验证内容或订阅管理功能是否在注册到此 Capsule 的客户端中可用。例如,在客户端上输入
subscription-manager refresh命令。 - 为您的 Capsule 服务器重启基础操作系统。
第 8 章 通过 Load Balancer 传播 SCAP 内容
如果使用 OpenSCAP 来管理客户端的安全合规性,您必须将 SCAP 客户端配置为将 ARF 报告发送到负载均衡器而不是 Capsule。配置过程取决于您选择部署合规策略的方法。
8.1. 使用 Ansible 部署传播 SCAP 内容
使用这个流程,您可以通过 Ansible 部署方法范围内的负载均衡器提升安全内容自动化协议(SCAP)内容。
前提条件
- 确保您已为 Ansible 部署策略配置了 Satellite。如需更多信息,请参阅管理 Red Hat Satellite 中的配置合规策略部署方法。
流程
- 在 Satellite Web UI 中,进入到 Configure > Variables。
-
搜索
foreman_scap_client_port变量,再单击其名称。 - 在 Default Behavior 区域中,确保选择了 Override 复选框。
-
在 Parameter Type 列表中,确保选择了
整数。 -
在 Default Value 字段中,输入
9090。 - 在 Specify Matchers 区域中,删除所有覆盖默认值的 matchers。
- 点 Submit。
-
搜索
foreman_scap_client_server变量,再单击其名称。 - 在 Default Behavior 区域中,确保选择了 Override 复选框。
-
在 Parameter Type 列表中,确保选择了
字符串。 -
在 Default Value 字段中,输入负载均衡器的 FQDN,如
loadbalancer.example.com。 - 在 Specify Matchers 区域中,删除所有覆盖默认值的 matchers。
- 点 Submit。
使用 Ansible 继续部署合规策略。如需更多信息,请参阅:
验证
在客户端上,验证
/etc/foreman_scap_client/config.yaml文件是否包含以下行:# Foreman proxy to which reports should be uploaded :server: 'loadbalancer.example.com' :port: 9090
8.2. 使用 Puppet 部署传播 SCAP 内容
使用此流程,您可以通过 Puppet 部署方法范围内的负载均衡器提升安全内容自动化协议(SCAP)内容。
前提条件
- 确保您为 Puppet 部署策略配置了 Satellite。如需更多信息,请参阅管理 Red Hat Satellite 中的配置合规策略部署方法。
流程
-
在 Satellite Web UI 中,导航到 Configure > Classes,再点
foreman_scap_client。 - 单击 Smart Class 参数 选项卡。
-
在 智能类参数 窗口左侧的窗格中,单击
端口。 - 在 默认行为 区域中,选中 Override 复选框。
-
从 Key Type 列表中,选择
整数。 -
在 Default Value 字段中,输入
9090。 -
在 智能类参数 窗口左侧的窗格中,单击
server。 - 在 默认行为 区域中,选中 Override 复选框。
-
从 Key Type 列表中,选择
字符串。 -
在 Default Value 字段中,输入负载均衡器的 FQDN,如
loadbalancer.example.com。 - 在 智能类参数 窗口左下角,单击 Submit。
使用 Puppet 继续部署合规策略。如需更多信息,请参阅:
验证
在客户端上,验证
/etc/foreman_scap_client/config.yaml文件是否包含以下行:# Foreman proxy to which reports should be uploaded :server: 'loadbalancer.example.com' :port: 9090