
部署到 Spring Boot
以独立模式构建并运行 Spring Boot 应用程序
摘要
使开源包含更多
红帽致力于替换我们的代码、文档和 Web 属性中存在问题的语言。我们从这四个术语开始:master、slave、黑名单和白名单。由于此项工作十分艰巨,这些更改将在即将推出的几个发行版本中逐步实施。详情请查看我们的 CTO Chris Wright 信息。
第 1 章 Spring Boot 独立入门
1.1. 关于 Spring Boot 独立部署模式
在单机部署模式中,Spring Boot 应用程序打包为 Jar 文件,直接在 Java 虚拟机(JVM)中运行。这种打包和运行应用程序的方法与微服务原则一致,其中的服务打包成了最低一组要求。可以使用带有 -jar 选项的 java 命令直接运行 Spring Boot 应用程序。例如:
java -jar SpringBootApplication.jar
其中 Spring Boot 为可执行 Jar 提供主类。在 Fuse 中构建 Spring Boot 独立应用程序需要以下元素:
Materials(BOM)的 Fuse Bill s(BOM)定义通过红帽 Maven 存储库中的一组精心设计的依赖项。BOM 利用 Maven 的依赖项管理机制来定义适当的 Maven 依赖项版本。
注: 仅支持 Fuse BOM 中定义的依赖项。
- Spring Boot Maven Plugin abrt- the implementation 在 Maven 中独立 Spring Boot 应用程序的构建过程。此插件负责将 Spring Boot 应用程序打包为可执行 Jar 文件。
1.2. 部署到 Spring Boot 2
在独立部署模式中,您可以选择将 部署到 Spring Boot 2。
如需有关 OpenShift 部署模式的详细信息,请参阅 OpenShift 上的 Fuse 指南。
1.3. Spring Boot 2 的新 Camel 组件
Spring Boot 2 支持 Camel 版本 2.23,并支持以下一些新的 camel 组件:
Spring Boot 2 的新 Camel 组件
- as2-component
- aws-iam-component
- fhir-component
- google-calendar-stream-component
- google-mail-stream-component
- google-sheets-component
- google-sheets-stream-component
- ipfs-component
- kubernetes-hpa-component
- kubernetes-job-component
- micrometer-component
- mybatis-bean-component
- nsq-component
- rxjava2
- service-component
- spring-cloud-consul
- spring-cloud-zookeeper
- testcontainers-spring
- testcontainers
- web3j-component
第 2 章 使用 Fuse boosters
Red Hat Fuse 提供以下增强器以帮助您开始使用 Fuse 应用程序并演示有用的组件:
- 第 2.2 节 “构建并运行 Circuit Breaker booster” - 支持分布式应用程序以中断连接和后端服务暂时不可用的示例。
- 第 2.3 节 “构建并运行外部配置增强器” - 如何外部化 Apache Camel 路由配置的示例。
- 第 2.4 节 “构建并运行 REST API booster” - 引入了使用 HTTP 协议与远程(由 Apache Camel 提供)服务交互的方法。
构建并运行增强器演示的先决条件,安装以下先决条件:
2.1. 生成 booster 项目
Fuse booster 项目存在帮助开发人员开始运行独立应用程序。此处提供的说明,您可以生成其中一个增强程序项目,即 Circuit Breaker booster。本练习演示了在 Spring Boot 上 Fuse 的有用组件。
Netflix/Hystrix 电路断路器支持分布式应用程序处理对网络连接中断以及后端服务的临时不可用。断路器模式的基本理念是,会自动检测到相依服务的丢失,如果后端服务暂时不可用,可以编程替代行为。
Fuse 断路器提升程序由两个相关服务组成:
-
名称服务,返回
名称到 greet 的后端服务。 -
一个
greetings服务,调用name服务的 frontend 服务以获取名称,然后返回字符串Hello, NAME。
在本增强器演示中,Hystrix 断路器在 greetings 服务和 名称服务 之间插入。如果 后端名称 服务不可用,则 greetings 服务可以回退到替代行为,并立即响应客户端,而不必在等待 名称服务 重启时被阻止。
先决条件
- 您必须有权访问 {NameDevelopersPlatform}。
- 您必须具有受支持的 Java Developer Kit(JDK)版本。详情请查看 支持的配置 页面。
- 您必须已安装并配置了 Apache Maven 3.3.x 或更高版本,如 在 本地设置 Maven所述。
流程
- 导航到 https://developers.redhat.com/launch。
单击 START。
launcher 向导提示您登录到您的红帽帐户。
- 单击登录或注册按钮,然后登录。
- 在 Launcher 页面上,单击 Deploy an Example Application 按钮。
- 在 Create Example Application 页面上,在 Create Example Application 中输入 名称 fuse-circuit-breaker。
- 点 Select an Example。
在 示例 对话框中,选择 Circuit Breaker 选项。此时会出现一个 运行时 下拉菜单。
- 从 选择运行时 下拉菜单中选择 Fuse。
-
从版本下拉菜单中,选择 7.11(Red Hat Fuse )(不要选择
2.21.2(Community)版本。 - 点击 Save。
- 在 Create Example Application 页面中,点 Download。
-
当您看到 Your Application is Ready 对话框时,点
Download.zip。您的浏览器下载生成的 booster 项目(打包为 ZIP 文件)。 - 使用存档实用程序将生成的项目提取到本地文件系统中的便捷位置。
2.2. 构建并运行 Circuit Breaker booster
Netflix/Hystrix 电路断路器组件使分布式应用程序能够应对对网络服务的网络连接和临时不可用的问题。断路器模式的基本理念是,会自动检测到相依服务的丢失,如果后端服务暂时不可用,可以编程替代行为。
Fuse 断路器提升程序由两个相关服务组成:
- 名称服务,它将返回名称到 greet
-
greeting s 服务,它调用 name 服务以获取名称,然后返回字符串
Hello, NAME。
在本次演示中,Hystrix 断路器在问候服务与名称服务之间插入。如果名称服务不可用,则 greetings 服务可以回退到替代行为,并立即响应客户端,而不必在等待 name 服务重启时阻止或超时。
先决条件
- 您已完成了 第 2.1 节 “生成 booster 项目” 部分提到的步骤。
流程
按照以下步骤构建并运行 Circuit breaker booster 项目:
使用 Maven 打开 shell 提示符并从命令行构建项目:
cd PROJECT_DIR
mvn clean package
打开一个新 shell 提示符并启动名称服务,如下所示:
cd name-service
mvn spring-boot:run -DskipTests -Dserver.port=8081
在 Spring Boot 启动时,您应该看到如下一些输出:
...
2017-12-08 15:44:24.223  INFO 22758 --- [           main] o.a.camel.spring.SpringCamelContext      : Total 1 routes, of which 1 are started
2017-12-08 15:44:24.227  INFO 22758 --- [           main] o.a.camel.spring.SpringCamelContext      : Apache Camel 2.20.0 (CamelContext: camel-1) started in 0.776 seconds
2017-12-08 15:44:24.234  INFO 22758 --- [           main] org.jboss.fuse.boosters.cb.Application   : Started Application in 4.137 seconds (JVM running for 4.744)
打开一个新 shell 提示符并启动问候服务,如下所示:
cd greetings-service
mvn spring-boot:run -DskipTests
在 Spring Boot 启动时,您应该看到如下一些输出:
...
2017-12-08 15:46:58.521  INFO 22887 --- [           main] o.a.c.c.s.CamelHttpTransportServlet      : Initialized CamelHttpTransportServlet[name=CamelServlet, contextPath=]
2017-12-08 15:46:58.524  INFO 22887 --- [           main] s.b.c.e.t.TomcatEmbeddedServletContainer : Tomcat started on port(s): 8080 (http)
2017-12-08 15:46:58.536  INFO 22887 --- [           main] org.jboss.fuse.boosters.cb.Application   : Started Application in 6.263 seconds (JVM running for 6.819)
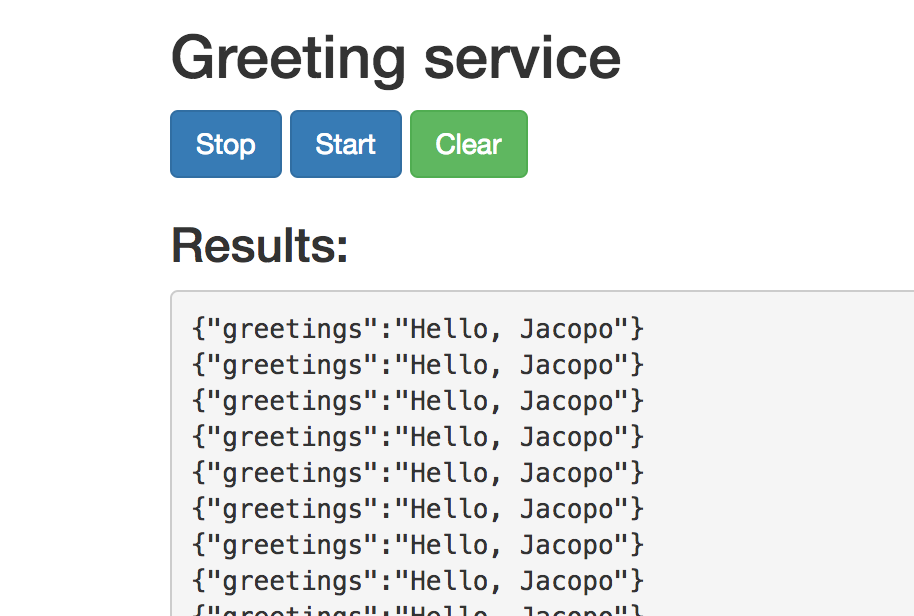
问候服务在 URL
http://localhost:8080/camel/greetings上公开 REST 端点。当您打开此页面时,它会调用 Greeting Service:
此页面也提供到 Hystrix 仪表板的链接,它可监控断路器的状态。

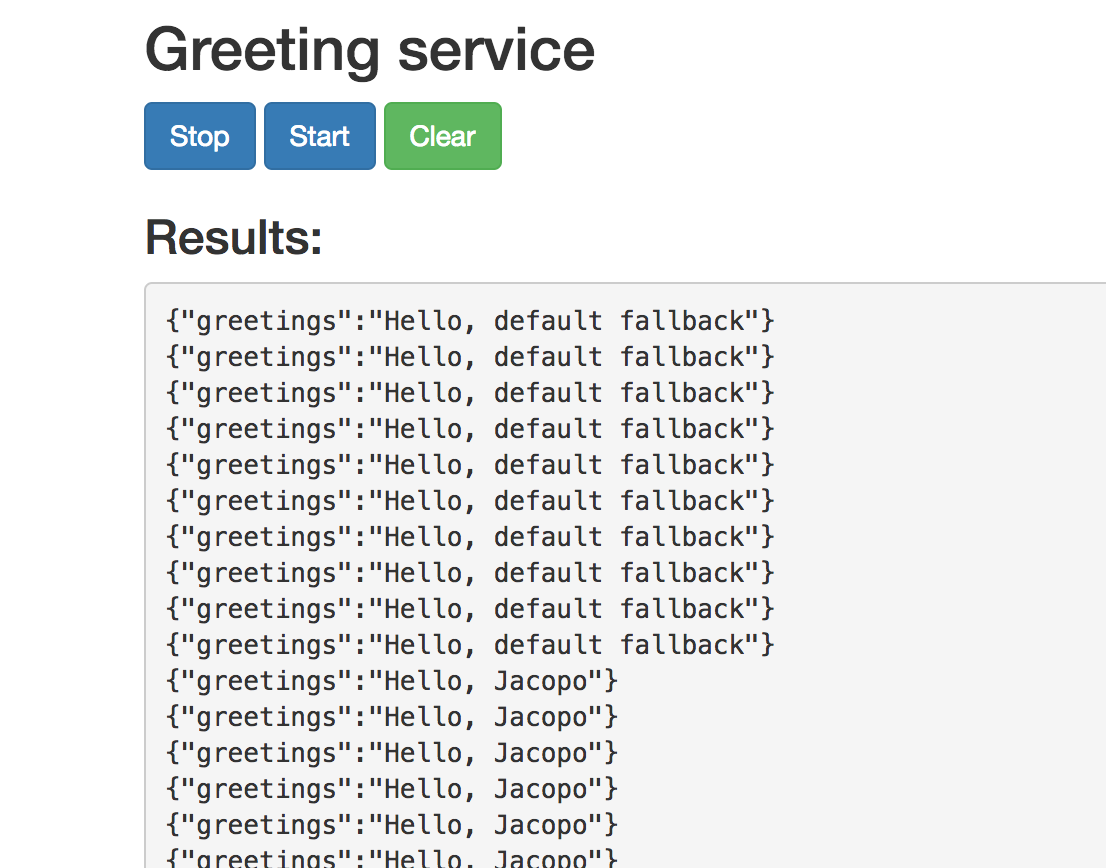
要演示 Camel Hystrix 提供的断路器功能,可在运行名称服务的 shell 提示符窗口中按 Ctrl+C 来终止后端服务。
现在名称服务不可用,断路器在启动后启动,以防止在调用时导致 greetings 服务挂起。
观察 Hystrix Monitor 仪表板和 Greeting Service 输出中的更改:
2.3. 构建并运行外部配置增强器
Externalized Configuration booster 提供了如何外部化 Apache Camel 路由配置的示例。对于 Spring Boot 独立部署,配置数据存储在 application.properties 文件中。
对于 OpenShift 部署上的 Fuse,配置数据存储在 ConfigMap 对象中。
先决条件
- 您已完成了 第 2.1 节 “生成 booster 项目” 部分提到的步骤。
流程
在按照 外部配置 任务的 第 2.1 节 “生成 booster 项目” 步骤完成后,请按照以下步骤构建并运行外部配置增强器,作为本地机器上的独立项目:
- 下载项目并在您的本地文件系统中提取存档。
删除项目:
cd PROJECT_DIR
mvn clean package
运行服务:
mvn spring-boot:run
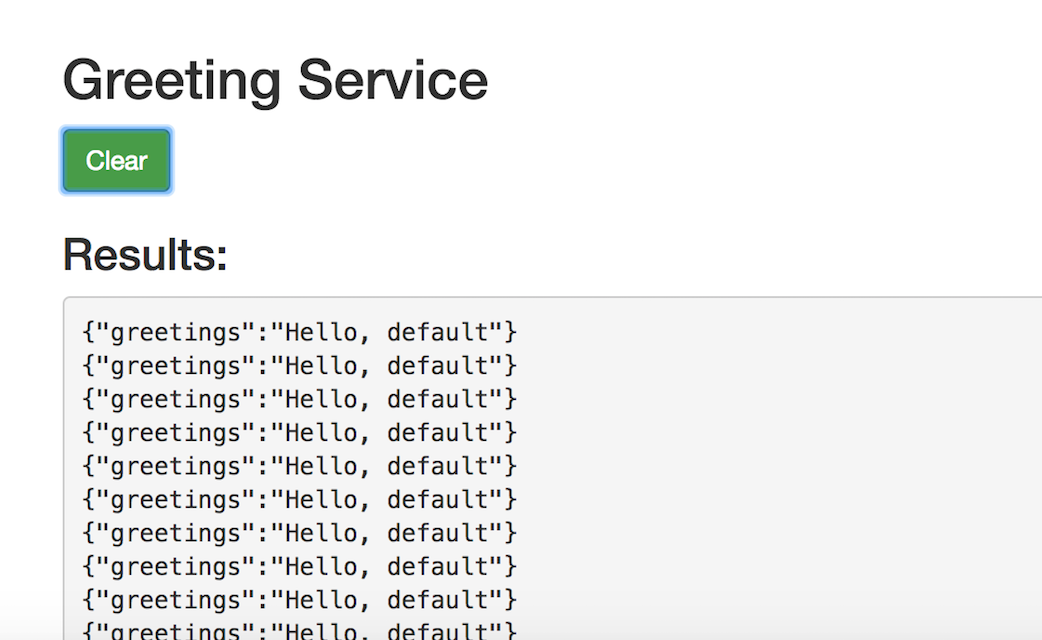
打开 Web 浏览器到 http://localhost:8080。此页面每 5 秒调用 Greeting 服务。Greetings Service 通过使用
target/classes/application来响应。.properties文件中的 booster.nameToGreetetvalueGreeting 服务每 5 秒打印一个问候到"默认":
修改
booster.nameToGreet值:-
在编辑器中打开
target/classes/application.properties文件。 将
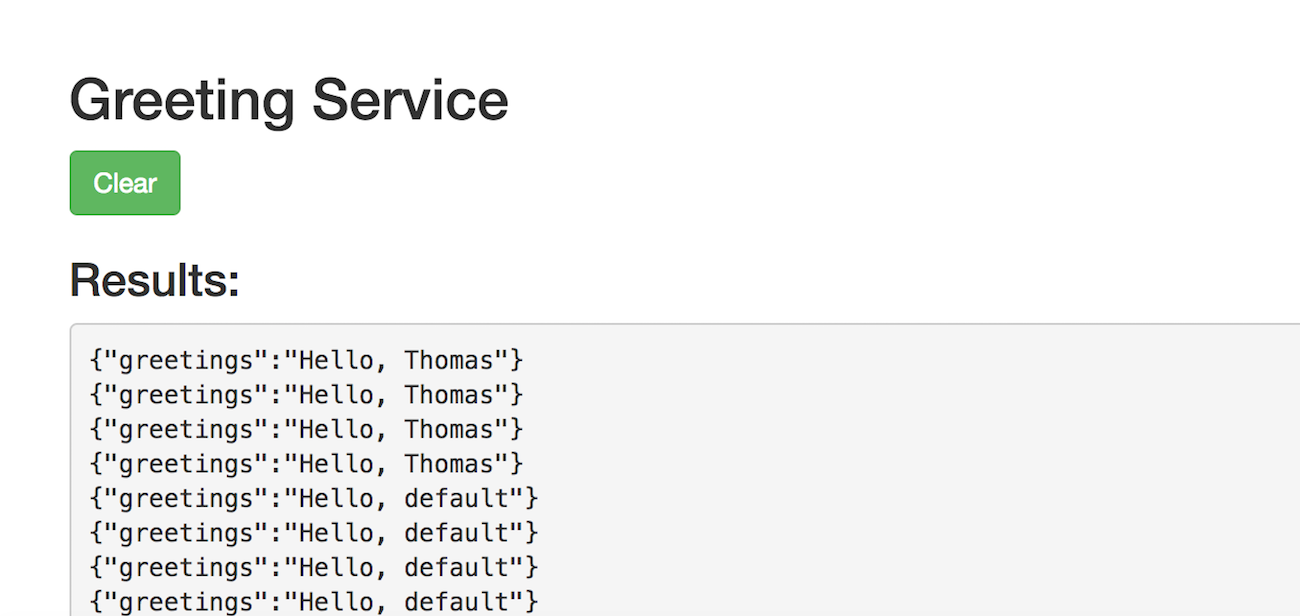
booster.nameToGreetvalue的值从 默认值 更改为另一个值,例如 Thomas :booster.nameToGreetvalue=Thomas
-
在编辑器中打开
- 在终端窗口中,按 CTRL+C 来停止该服务。
再次运行服务:
mvn spring-boot:run
在网页浏览器中,返回到 http://localhost:8080 页面,在 Greeting Service 的结果窗口中查看已更改的值。
2.4. 构建并运行 REST API booster
REST API 级别 0 任务演示了如何通过使用 REST 框架通过 HTTP 将业务操作映射到远程过程调用端点。这个任务与 Richardson Maturity Model 中的级别 0 对应。
REST API 增强器引进了使用 HTTP 协议与远程(由 Apache Camel 提供)交互的 mechanics。通过使用此 Fuse 增强器,您可以快速建模和灵活地设计 REST API。
使用这个 booster:
-
在
camel/greetings/{name}端点上执行 HTTP GET 请求。此请求以 JSON 格式生成响应,其载荷为Hello, $name!(其中$name被替换为 HTTP GET 请求中的 URL 参数的值)。 -
更改 URL
{name}参数的值,以查看响应中已更改的值。 - 查看 REST API 的 Swagger 页面。
先决条件
- 您已完成了 第 2.1 节 “生成 booster 项目” 部分提到的步骤。
流程
按照以下步骤,在本地机器上构建并运行 REST API booster 作为独立项目:
- 下载项目并在您的本地文件系统中提取存档。
删除项目:
cd PROJECT_DIR
mvn clean package
运行服务:
mvn spring-boot:run
- 打开一个 Web 浏览器 :http://localhost:8080
要执行示例 HTTP GET 请求,请点击 camel/greetings/{name} 按钮。
此时会打开一个新的 Web 浏览器窗口,其中包含
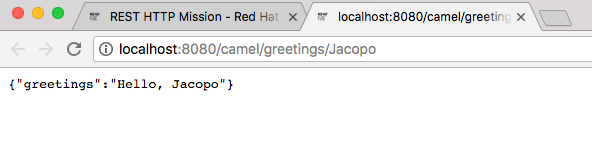
localhost:8080/camel/greetings/JacopoURL。URL{name}参数的默认值为 Jacopo。JSON 响应会出现在浏览器窗口中:
要更改
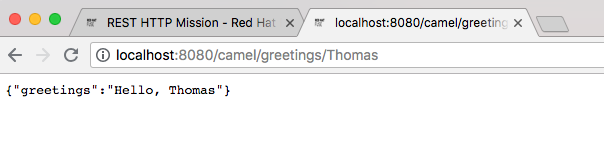
{name}参数的值,请更改 URL。例如,要将名称更改为 Thomas,请使用以下 URLlocalhost:8080/camel/greetings/Thomas。更新的 JSON 响应会出现在浏览器窗口中:
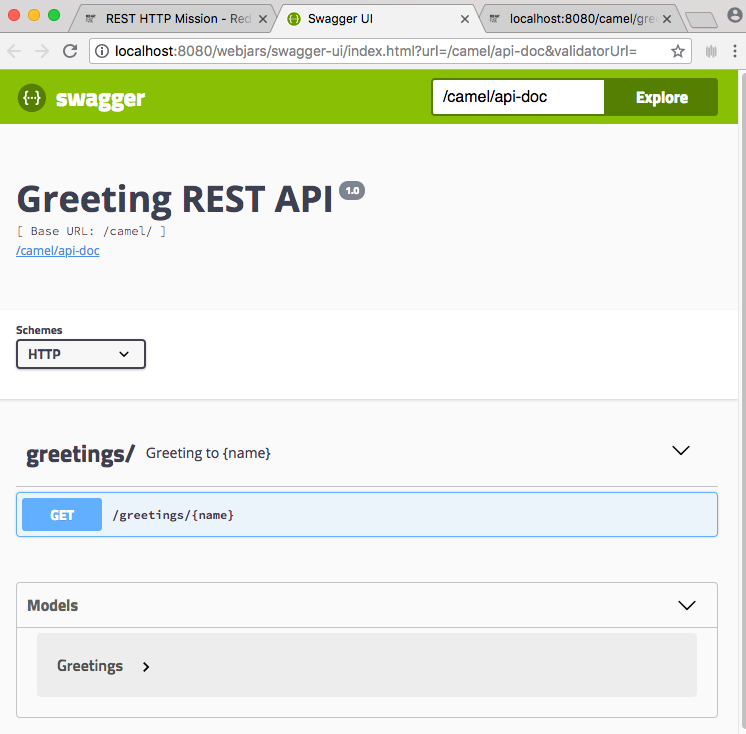
要查看 REST API 的 Swagger 页面,请点击 API Swagger 页面按钮。
API swagger 页面会在浏览器窗口中打开。
第 3 章 在 Spring Boot 中使用 Red Hat Single Sign-On
Red Hat Single Sign-On 客户端适配器是库,可让您轻松使用 Red Hat Single Sign-On 保护应用程序和服务。您可以使用 Keycloak Spring Boot 适配器来保护 Spring Boot 项目。
3.1. 构建和部署 Spring Boot CXF JAXRS Keycloak quickStart
本例演示了如何使用 Apache CXF JAXRS(由 Keycloak 使用 Spring Boot 保护)。Quickstarts 使用 Spring Boot 来配置一个启用了 Swagger 的 CXF JAXRS 端点的应用程序,该端点由 Keycloak 保护。您可以在独立模式中运行此快速入门。
这是一个上游的演示,红帽不提供支持。请参阅部署到 Spring Boot BOM 中的 Spring Boot BOM 一节
流程
要在您的本地机器上作为独立项目运行此快速入门:
- 下载 Spring Boot CXF JAXRS Keycloak Quickstart[https://github.com/ffang/spring-boot-cxf-keycloak] 并在您的本地文件系统中提取存档。
导航到 Quickstart 目录并构建项目。
cd PROJECT_DIR
mvn clean package
运行以下命令以构建和部署 Spring Boot CXF JAXRS Keycloak quickstart。
mvn spring-boot:run
这将使用预定义的配置(./src/main/resources/keycloak-config/realm-export-new.json)以及 CXF JAXRS SB2 端点启动 Keycloak auth 服务器。
-
然后,您可以直接从 Web 浏览器访问 CXF JAXRS 端点,例如,打开
http://localhost:8080/services/helloservice/sayHello/FIS以访问端点。由于 CXF JAXRS 端点由 Keycloak 保护,因此这会将请求重定向到 Keycloak auth 服务器。 -
输入
admin作为用户名,passw0rd作为密码。这将获取 OAuth2 JWT 令牌,并重定向到 CXF JAXRS 端点。您可以在浏览器中看到Hello FIS, Welcome to CXF RS Spring Boot World!!消息。
第 4 章 如何在 Spring Boot 中使用加密属性占位符
在保护容器时,不建议在配置文件中使用纯文本密码。避免使用纯文本密码的一种方法是尽可能使用加密属性占位符。
4.1. 关于用于加密值的 master 密码
要使用 Jasypt 加密值,需要使用 master 密码。或者管理员可以选择主密码。Jasypt 提供了几种设置主密码的方法。Jasypt 可以集成到 Spring 配置框架中,这样属性值会在加载配置文件时解密。种方法是在 Spring 引导配置中以纯文本指定 master 密码。
Spring 使用 PropertyPlaceholder 框架将令牌替换为属性文件中的值,Jasypt 的方法来将 PropertyPlaceholderConfigurer 类替换为可识别加密字符串并解密它们。
示例
<bean id="propertyPlaceholderConfigurer"
      class="org.jasypt.spring.properties.EncryptablePropertyPlaceholderConfigurer">
  <constructor-arg ref="configurationEncryptor" />
  <property name="location" value="/WEB-INF/application.properties" />
</bean>

<bean id="configurationEncryptor" class="org.jasypt.encryption.pbe.StandardPBEStringEncryptor">
  <property name="config" ref="environmentVariablesConfiguration" />
</bean>

<bean id="environmentVariablesConfiguration"
      class="org.jasypt.encryption.pbe.config.EnvironmentStringPBEConfig">
  <property name="algorithm" value="PBEWithMD5AndDES" />
  <property name="password" value="myPassword" />
</bean>
您可以使用环境变量设置 master 密码,而不必使用纯文本指定 master 密码。在 Spring Boot 配置文件中,将这个环境变量指定为 passwordEnvName 属性的值。例如,如果您将 MASTER_PW 环境变量设置为 master 密码,则在 Spring Boot 配置文件中具有此条目:
<property name="passwordEnvName" value="MASTER_PW">
4.2. 在 Spring Boot 中使用 Encrypted Property Placeholders
通过使用 Jasypt,您可以为属性源提供加密,应用程序可以解密加密的属性并检索原始值。以下流程解释了如何在 Spring Boot 中加密和解密属性源。
流程
将
jasypt依赖项添加到项目的pom.xml文件。<dependency> <groupId>com.github.ulisesbocchio</groupId> <artifactId>jasypt-spring-boot-starter</artifactId> <version>3.0.3</version> </dependency>将 Maven 存储库添加到项目的 pom.xml。
<repository>
<id>jasypt-basic</id>
<name>Jasypt Repository</name>
<url>https://repo1.maven.org/maven2/</url>
</repository>
将 Jasypt Maven 插件添加到您的项目中,并允许您使用 Maven 命令加密和解密。
<plugin>
   <groupId>com.github.ulisesbocchio</groupId>
   <artifactId>jasypt-maven-plugin</artifactId>
   <version>3.0.3</version>
 </plugin>
将插件存储库添加到
pom.xml。<pluginRepository> <id>jasypt-basic</id> <name>Jasypt Repository</name> <url>https://repo1.maven.org/maven2/</url> </pluginRepository>
要加密
application.properties文件中列出的用户名和密码,请在DEC()中嵌套这些值,如下所示。spring.datasource.username=DEC(root) spring.datasource.password=DEC(Password@1)
运行以下命令来加密用户名和密码。
mvn jasypt:encrypt -Djasypt.encryptor.password=mypassword
这会将
application.properties文件中的 DEC()占位符替换为加密值,例如:spring.datasource.username=ENC(3UtB1NhSZdVXN9xQBwkT0Gn+UxR832XP+tOOfFTlNL57FiMM7BWPRTeychVtLLhB) spring.datasource.password=ENC(4ErqElyCHjjFnqPOCZNAaTdRC7u7yJSy16UsHtVkwPIr+3zLyabNmQwwpFo7F7LU)
要在 Spring 应用程序配置文件中解密凭证,请运行以下命令。
mvn jasypt:decrypt -Djasypt.encryptor.password=mypassword
这会打印在加密前
application.properties文件的内容。但是,这不会更新配置文件。
第 5 章 使用 Maven 构建
在 Fuse 中开发用于 Spring Boot 的应用程序的标准方法是使用 Apache Maven 构建工具,并将源代码构建为 Maven 项目。Fuse 提供 Maven 快速入门,供您快速启动,许多 Fuse 构建工具都作为 Maven 插件提供。因此,强烈建议您在 Fuse 中将 Maven 作为 Spring Boot 项目的构建工具。
5.1. 生成 Maven 项目
Fuse 提供了一个基于 Maven archetypes 的快速入门选择,您可以使用它来为 Spring Boot 应用程序生成初始 Maven 项目。为防止您记住各种 Maven archetypes 的位置信息和版本,Fuse 提供了可帮助您为独立 Spring Boot 项目生成 Maven 项目的工具。
5.1.1. developers.redhat.com/launch 的项目生成器
在 Fuse 中使用 Spring Boot standalone 的最快速方法是导航到 developers.redhat.com/launch,并遵循 Spring Boot 独立运行时的说明,以生成新的 Maven 项目。按照屏幕说明后,系统将提示您下载存档文件,该文件包含完整的 Maven 项目,您可以在本地构建和运行。
5.1.2. Developer Studio 中的 Fuse 工具向导
或者,您可以下载并安装 Red Hat JBoss Developer Studio(包括 Fuse 工具)。使用 Fuse New Integration Project 向导,您可以生成新的 Spring Boot 独立项目,并继续在基于 Eclipse 的 IDE 中进行开发。
5.2. 使用 Spring Boot BOM
创建并构建第一个 Spring Boot 项目后,您将很快添加更多组件。但是,您是如何知道要添加到项目的 Maven 依赖项的哪个版本?最简单的(及推荐的)方法是使用相关的 Materials(BOM)文件,该文件自动为您定义所有版本依赖项。
5.2.1. 用于 Spring Boot 的 BOM 文件
Maven Bill of Materials(BOM) 文件的目的是提供一组精心设计的 Maven 依赖项版本,从而防止您为每个 Maven 工件单独定义版本。
请确定您使用正确的 Fuse BOM,具体取决于您使用的 Spring Boot 版本。
用于 Spring Boot 的 Fuse BOM 具有以下优点:
- 定义 Maven 依赖项的版本,因此当您向 POM 添加依赖项时,您不需要指定版本。
- 定义一组经过策展的依赖关系,这些依赖项是针对特定版本的 Fuse 完全测试和支持的。
- 简化 Fuse 升级.
红帽只支持由 Fuse BOM 定义的一组依赖项。
5.2.2. 融合 BOM 文件
要将 BOM 文件合并到 Maven 项目中,请在项目的 pom.xml 文件中指定一个 dependencyManagement 元素(或者在父 POM 文件中,如 Spring Boot 2 的示例中所示:
Spring Boot 2 BOM
<?xml version="1.0" encoding="UTF-8" standalone="no"?>
<project ...>
  ...
  <properties>
    <project.build.sourceEncoding>UTF-8</project.build.sourceEncoding>

    <!-- configure the versions you want to use here -->
    <fuse.version>7.11.1.fuse-sb2-7_11_1-00022-redhat-00002</fuse.version>
  </properties>

  <dependencyManagement>
    <dependencies>
      <dependency>
        <groupId>org.jboss.redhat-fuse</groupId>
        <artifactId>fuse-springboot-bom</artifactId>
        <version>${fuse.version}</version>
        <type>pom</type>
        <scope>import</scope>
      </dependency>
    </dependencies>
  </dependencyManagement>
  ...
</project>
在使用依赖关系管理机制指定 BOM 后,可以在不指定工件版本的情况下将 Maven 依赖项添加到 POM 中。例如,要为 camel-hystrix 组件添加一个依赖项,您要将以下 XML 片段添加到 POM 中的 dependencies 元素中:
<dependency>
  <groupId>org.apache.camel</groupId>
  <artifactId>camel-hystrix-starter</artifactId>
</dependency>
请注意,Camel 工件 ID 如何通过 -starter 后缀是:将 Camel Hystrix 组件指定为 camel-hystrix-starter,而非 camel-hystrix。Camel 启动程序组件以针对 Spring Boot 环境进行优化的方式打包。
5.2.3. Spring Boot Maven 插件
Spring Boot Maven 插件由 Spring Boot 提供,它是用于构建和运行 Spring Boot 项目的开发人员实用程序:
-
通过在项目目录中输入命令
mvn 软件包,为 Spring Boot 应用程序创建可执行的 Jar 软件包。构建的输出放置在 Maven 项目的target/子目录中。 -
为方便起见,可以使用命令
mvn spring-boot:start运行新构建的应用程序。
要将 Spring Boot Maven 插件整合到项目 POM 文件中,请将插件配置添加到您的 pom.xml 文件的 project/build/plugins 部分,如下例所示。
示例
<?xml version="1.0" encoding="UTF-8" standalone="no"?>
<project ...>
  ...
  <properties>
    <project.build.sourceEncoding>UTF-8</project.build.sourceEncoding>

    <!-- configure the versions you want to use here -->
    <fuse.version>7.11.1.fuse-sb2-7_11_1-00022-redhat-00002</fuse.version>

  </properties>
  ...
  <build>
    <plugins>
      <plugin>
        <groupId>org.jboss.redhat-fuse</groupId>
        <artifactId>spring-boot-maven-plugin</artifactId>
        <version>${fuse.version}</version>
        <executions>
          <execution>
            <goals>
              <goal>repackage</goal>
            </goals>
          </execution>
        </executions>
      </plugin>
    </plugins>
  </build>
  ...
</project>
第 6 章 在 Spring Boot 中运行 Apache Camel 应用程序
Apache Camel Spring Boot 组件自动为 Spring Boot 配置 Camel 上下文。Camel 上下文的自动配置自动检测 Spring 上下文中提供的 Camel 路由,并注册主要 Camel 实用程序,如制作者模板、消费者模板以及 type converter 作为 Bean。Apache Camel 组件包含一个 Spring Boot starter 模块,它允许您使用 starters 开发 Spring Boot 应用程序。
6.1. Camel Spring Boot 组件介绍
每个 Camel Spring Boot 应用程序都必须使用项目的 pom.xml 中的 dependencyManagement 元素来指定依赖项的产品化版本。这些依赖项在 Red Hat Fuse BOM 中定义,并受 Red Hat Fuse 的特定版本的支持。您可以省略 additional starters 的版本号属性,以便不要覆盖 BOM 中的版本。如需更多信息 ,请参阅 Quickstart pom。
示例
<dependencyManagement>
	<dependencies>
		<dependency>
			<groupId>org.jboss.redhat-fuse</groupId>
			<artifactId>fuse-springboot-bom</artifactId>
			<version>${fuse.version}</version>
			<type>pom</type>
			<scope>import</scope>
		</dependency>
	</dependencies>
</dependencyManagement>
camel-spring-boot jar 包含 spring.factories 文件,该文件可让您将依赖关系添加到类路径中,以便 Spring Boot 自动配置 Camel 上下文。
6.2. Camel Spring Boot starter 模块简介
Starters 是要在 Spring Boot 应用程序中使用的 Apache Camel 模块。每个 Camel 组件都有一个 camel-xxx-starter 模块(在 第 6.3 节 “没有起始模块的 Camel 组件列表” 部分列出了一些例外)。
开始者满足以下要求:
- 使用与 IDE 工具兼容的原生 Spring Boot 配置系统,允许自动配置组件。
- 允许自动配置数据格式和语言。
- 管理传输日志依赖项,以与 Spring Boot 日志记录系统集成。
- 包括额外的依赖项,并匹配过渡依赖关系,以尽可能减少创建正常工作的 Spring Boot 应用程序。
每个初级测试 /camel-itest-spring-boot 中都有自己的集成测试,验证与 Spring Boot 当前发行版本的兼容性。
如需了解更多详细信息,请参阅链接: Apache Camel Spring-Boot 示例。
6.3. 没有起始模块的 Camel 组件列表
以下组件没有入门模块,因为兼容性问题:
- Camel-blueprint (仅限 OSGi 意)
- Camel-cdi (仅限于 CDI 的预期)
- Camel-core-osgi (仅限 OSGi 想)
- Camel-ejb (仅 JEE 想想)
- Camel-eventadmin (仅限 OSGi 意)
-
Camel-ibatis (包括
camel-mybatis-starter) - camel-jclouds
-
Camel-mina (包括
camel-mina2-starter) - Camel-paxlogging (仅限 OSGi 意)
-
Camel-quartz (包括
camel-quartz2-starter) - camel-spark-rest
-
Camel-openapi-java (包括
camel-openapi-java-starter)
6.4. 使用 Camel Spring Boot 启动器
Apache Camel 提供了一个入门模块,可让您快速开始开发 Spring Boot 应用程序。
流程
在 Spring Boot pom.xml 文件中添加以下依赖项:
<dependency>
    <groupId>org.apache.camel</groupId>
    <artifactId>camel-spring-boot-starter</artifactId>
</dependency>
按照下面的代码片段所示,使用 Camel 路由添加类。这些路由添加到类路径后,路由会自动启动。
package com.example;

import org.apache.camel.builder.RouteBuilder;
import org.springframework.stereotype.Component;

@Component
public class MyRoute extends RouteBuilder {

    @Override
    public void configure() throws Exception {
        from("timer:foo")
          .to("log:bar");
    }
}
可选。为保持主线程阻止,Camel 保持正常状态,请执行以下操作之一:
-
包含
spring-boot-starter-web依赖项, 或者将
camel.springboot.main-run-controller=true添加到application.properties或application.yml文件中。您可以使用
camel.springboot.* 属性在文件中自定义 Camel 应用程序。application.properties或application.yml
-
包含
可选。要使用 bean 的 ID 名称引用自定义 bean,请在
src/main/resources/application.properties(或application.yml)文件中配置选项。以下示例显示了 xslt 组件如何使用 bean ID 来引用自定义 Bean。请参考 id
myExtensionFactory的自定义 bean。camel.component.xslt.saxon-extension-functions=myExtensionFactory
然后,使用 Spring Boot @Bean 注释创建自定义 bean。
@Bean(name = "myExtensionFactory")
public ExtensionFunctionDefinition myExtensionFactory() {
    }
或者,对于 Jackson ObjectMapper,在
camel-jacksondata-format 中:camel.dataformat.json-jackson.object-mapper=myJacksonMapper
6.5. 关于 Spring Boot 的 Camel 上下文自动配置
Camel Spring Boot auto-configuration 提供 CamelContext 实例,并创建一个 SpringCamelContext。它还初始化并执行该上下文的关机。此 Camel 上下文在 Spring 应用程序上下文中注册,其名称为 camelContext an,您可以像其他 Springan 那样访问它。您可以访问以下所示的 camelContext。
示例
@Configuration
public class MyAppConfig {

  @Autowired
  CamelContext camelContext;

  @Bean
  MyService myService() {
    return new DefaultMyService(camelContext);
  }

}
6.6. 在 Spring Boot Applications 中自动探测 Camel 路由
Camel 自动配置从 Spring 上下文收集所有 RouteBuilder 实例,并将其自动注入到 CamelContext 中。这简化了使用 Spring Boot 启动程序创建新 Camel 路由的过程。您可以创建路由,如下所示:
示例
将 @Component 注释的类添加到类路径。
@Component
public class MyRouter extends RouteBuilder {

  @Override
  public void configure() throws Exception {
    from("jms:invoices").to("file:/invoices");
  }

}
或者,在您的 @Configuration 类中创建新的路由 RouteBuilder bean。
@Configuration
public class MyRouterConfiguration {

  @Bean
  RoutesBuilder myRouter() {
    return new RouteBuilder() {

      @Override
      public void configure() throws Exception {
        from("jms:invoices").to("file:/invoices");
      }

    };
  }

}
6.7. 为 Camel Spring Boot 自动配置配置 Camel 属性
Spring Boot auto-configuration 连接到 Spring Boot 外部配置,如属性占位符、操作系统环境变量或带有 Camel 属性支持的系统属性。
流程
在
application.properties文件中定义属性:route.from = jms:invoices
或者将 Camel 正确设置为系统属性,例如:
java -Droute.to=jms:processed.invoices -jar mySpringApp.jar
使用配置的属性作为 Camel 路由中的占位符,如下所示:
@Component
public class MyRouter extends RouteBuilder {

  @Override
  public void configure() throws Exception {
    from("{{route.from}}").to("{{route.to}}");
  }

}
6.8. 配置自定义 Camel 上下文
要在 CamelContext bean 上由 Camel Spring Boot auto-configuration 创建操作,请在 Spring 上下文中注册 CamelContextConfiguration 实例。
流程
在 Spring 上下文中注册
CamelContextConfiguration实例,如下所示。@Configuration public class MyAppConfig { ... @Bean CamelContextConfiguration contextConfiguration() { return new CamelContextConfiguration() { @Override void beforeApplicationStart(CamelContext context) { // your custom configuration goes here } }; } }
在启动 Spring 上下文之前调用 CamelContextConfiguration 和 beforeApplicationStart(CamelContext) 方法,因此传递给这个回调的 CamelContext 实例将完全自动配置。您可以将许多 CamelContextConfiguration 实例添加到 Spring 上下文,并将执行所有这些实例。
6.9. 在自动配置的 CamelContext 中禁用 JMX
要在自动配置的 CamelContext 中禁用 JMX,您可以使用 camel.springboot.jmxEnabled 属性,因为 JMX 会被默认启用。
流程
将以下属性添加到您的
application.properties文件中,并将其设置为false:camel.springboot.jmxEnabled = false
6.10. 将自动配置的使用者和制作者模板注入到 Spring 管理的 Bean 中
Camel 自动配置提供预配置的 ConsumerTemplate 和 ProducerTemplate 实例。您可以将它们注入 Spring 管理的 Bean。
示例
@Component
public class InvoiceProcessor {

  @Autowired
  private ProducerTemplate producerTemplate;

  @Autowired
  private ConsumerTemplate consumerTemplate;
  public void processNextInvoice() {
    Invoice invoice = consumerTemplate.receiveBody("jms:invoices", Invoice.class);
    ...
    producerTemplate.sendBody("netty-http:http://invoicing.com/received/" + invoice.id());
  }

}
默认情况下,使用者模板和制作者模板会将端点缓存大小设置为 1000。您可以通过将以下 Spring 属性设置为所需的缓存大小来更改这些值,例如:
camel.springboot.consumerTemplateCacheSize = 100
camel.springboot.producerTemplateCacheSize = 200
6.11. 关于 Spring 上下文中的自动配置 TypeConverter
Camel 自动配置在 Spring 上下文中注册一个名为 typeConverter 的 TypeConverter 实例。
示例
@Component
public class InvoiceProcessor {

  @Autowired
  private TypeConverter typeConverter;

  public long parseInvoiceValue(Invoice invoice) {
    String invoiceValue = invoice.grossValue();
    return typeConverter.convertTo(Long.class, invoiceValue);
  }

}
6.12. Spring 类型转换 API 网桥
Spring 由强大的 类型转换 API 组成。Spring API 与 Camel 类型转换器 API 类似。由于两个 API Camel Spring Boot 之间的相似之处会自动注册一个桥接转换器(SpringTypeConverter,)被委派给 Spring conversion API。这意味着,开箱即用的 Camel 将对待与 Camel 类似的 Spring Converters。
这可让您使用 Camel TypeConverter API 访问 Camel 和 Spring 转换器,如下所示:
示例
@Component
public class InvoiceProcessor {

  @Autowired
  private TypeConverter typeConverter;

  public UUID parseInvoiceId(Invoice invoice) {
    // Using Spring's StringToUUIDConverter
    UUID id = invoice.typeConverter.convertTo(UUID.class, invoice.getId());
  }

}
在这里,Spring Boot 将转换委派给应用程序上下文中提供的 Spring ConversionService 实例。如果没有 ConversionService 实例,Camel Spring Boot 自动配置会创建一个 ConversionService 实例。
6.13. 禁用类型转换功能
要禁用 Camel Spring Boot 类型转换功能,请将 camel.springboot.typeConversion 属性设置为 false。当此属性设置为 false 时,自动配置不会注册类型转换程序实例,且不会启用到 Spring Boot 类型转换 API 的转换类型转换。
流程
要禁用 Camel Spring Boot 组件的类型转换功能,请将
camel.springboot.typeConversion属性设置为false,如下所示:camel.springboot.typeConversion = false
6.14. 在用于自动配置的类路径中添加 XML 路由
默认情况下,Camel Spring Boot 组件会自动探测,并在 camel 目录中包含类路径中的 Camel XML 路由。您可以使用配置选项配置目录名称或禁用此功能。
流程
按照如下所示,在类路径中配置 Camel Spring Boot XML 路由。
// turn off
camel.springboot.xmlRoutes = false
// scan in the com/foo/routes classpath
camel.springboot.xmlRoutes = classpath:com/foo/routes/*.xml
注意XML 文件应定义 Camel XML 路由元素而不是
CamelContext元素,例如:<routes xmlns="http://camel.apache.org/schema/spring"> <route id="test"> <from uri="timer://trigger"/> <transform> <simple>ref:myBean</simple> </transform> <to uri="log:out"/> </route> </routes>
使用 Spring XML 文件
要将 Spring XML 文件与 <camelContext> 搭配使用,您可以在 Spring XML 文件 或应用程序.properties 文件中配置 Camel 上下文。要设置 Camel 上下文的名称并打开流缓存,请在 application.properties 文件中添加以下内容:
camel.springboot.name = MyCamel
camel.springboot.stream-caching-enabled=true
6.15. 为自动配置添加 XML Rest-DSL 路由
Camel Spring Boot 组件自动探测并嵌入在 camel-rest 目录下的类路径中添加的 Camel Rest-DSL XML 路由。您可以使用配置选项配置目录名称或禁用此功能。
流程
按照如下所示,在类路径中配置 Camel Spring Boot Rest-DSL XML 路由:
// turn off
camel.springboot.xmlRests = false
// scan in the com/foo/routes classpath
camel.springboot.xmlRests = classpath:com/foo/rests/*.xml
注意Rest-DSL XML 文件应当定义 Camel XML REST 元素而不是
CamelContext元素,例如:<rests xmlns="http://camel.apache.org/schema/spring"> <rest> <post uri="/persons"> <to uri="direct:postPersons"/> </post> <get uri="/persons"> <to uri="direct:getPersons"/> </get> <get uri="/persons/{personId}"> <to uri="direct:getPersionId"/> </get> <put uri="/persons/{personId}"> <to uri="direct:putPersionId"/> </put> <delete uri="/persons/{personId}"> <to uri="direct:deletePersionId"/> </delete> </rest> </rests>
6.16. 使用 Camel Spring Boot 测试
当 Camel 在 Spring Boot 上运行时,Spring Boot 会自动嵌入 Camel 及其路由,这些路由标有 @Component。在测试 Spring Boot 时,使用 @SpringBootTest 而不是 @ContextConfiguration 来指定要使用的配置类。
当您在不同的 RouteBuilder 类中有多个 Camel 路由时,Camel Spring Boot 组件会在运行应用程序时自动嵌入所有这些路由。因此,当您要从一个 RouteBuilder 类测试路由时,您可以使用以下模式包含或排除要启用的 RouteBuilders:
- java-routes-include-pattern:用于包含与模式匹配的 RouteBuilder 类。
- java-routes-exclude-pattern:用于排除与模式匹配的 RouteBuilder 类。排除的优先级高于 include。
流程
将单元测试类中的
include或exclude模式指定为@SpringBootTest注释的属性,如下所示:@RunWith(CamelSpringBootRunner.class) @SpringBootTest(classes = {MyApplication.class); properties = {"camel.springboot.java-routes-include-pattern=**/Foo*"}) public class FooTest {在
FooTest类中,include 模式为**/Foo*,它代表 Ant 风格模式。在这里,模式以双星号开头,与所有前导软件包名称匹配。/foo*表示类名称必须以 Foo 开头,例如 FooRoute。使用以下 maven 命令运行测试:
mvn test -Dtest=FooTest
6.17. 使用 Spring Boot、Apache Camel 和外部消息代理
Fuse 使用外部消息传递代理。如需有关支持的代理、客户端和 Camel 组件组合的更多信息,请参阅支持的配置。
Camel 组件必须连接到 JMS 连接-factory。以下示例演示了如何将 camel-amqp 组件连接到 JMS connection-factory。
import org.apache.activemq.jms.pool.PooledConnectionFactory;
import org.apache.camel.component.amqp.AMQPComponent;
import org.apache.qpid.jms.JmsConnectionFactory;
...

AMQPComponent amqpComponent(AMQPConfiguration config) {
       JmsConnectionFactory qpid = new JmsConnectionFactory(config.getUsername(), config.getPassword(), "amqp://"+ config.getHost() + ":" + config.getPort());
       qpid.setTopicPrefix("topic://");

       PooledConnectionFactory factory = new PooledConnectionFactory();
       factory.setConnectionFactory(qpid);

AMQPComponent amqpcomp = new AMQPComponent(factory);
第 7 章 修补 Red Hat Fuse 应用程序
使用新的 patch-maven-plugin 机制,您可以在 Red Hat Fuse 应用程序应用补丁。这种机制允许您更改由不同 Red Hat Fuse BOMS 提供的独立版本,例如 fuse-springboot-bom 和 fuse-karaf-bom。
7.1. 关于 patch-maven-plugin
patch-maven-plugin 执行以下操作:
- 检索与当前红帽 Fuse BOM 相关的补丁元数据。
-
将版本更改应用到从 BOMs 导入的 &
lt;dependencyManagement>。
在 patch-maven-plugin 获取元数据后,它会遍历声明插件的项目的所有管理和直接依赖项,并使用 CVE/patch 元数据替换依赖关系版本(如果它们匹配)。替换了版本后,Maven 构建会通过标准的 Maven 项目阶段继续和发展。
7.2. 对 Red Hat Fuse 应用程序应用补丁
patch-maven-plugin 的目的是,将 Red Hat Fuse BOM 中列出的依赖项版本更新至您要应用到应用程序的补丁元数据中指定的版本。
流程
以下流程解释了如何将补丁应用到您的应用程序。
将
patch-maven-plugin添加到项目的pom.xml文件中。patch-maven-plugin的版本必须与 Fuse BOM 的版本相同。<build> <plugins> <plugin> <groupId>org.jboss.redhat-fuse</groupId> <artifactId>patch-maven-plugin</artifactId> <version>${version.org.jboss-redhat-fuse}</version> <extensions>true</extensions> </plugin> </plugins> </build>当您运行任何
mvn clean deploy或mvn dependency:tree命令时,插件会搜索项目模块,以检查是否使用其中一个 Red Hat Fuse BOM。只有 2 视为受支持的 BOM:-
org.jboss.redhat-fuse:fuse-karaf-bom: 用于 Fuse Karaf BOM -
org.jboss.redhat-fuse:fuse-springboot-bom: for Fuse Spring Boot BOM
-
如果没有找到上述 BOMs,则插件会显示以下信息:
$ mvn clean install
[INFO] Scanning for projects...
[INFO]

========== Red Hat Fuse Maven patching ==========

[INFO] [PATCH] No project in the reactor uses Fuse Karaf or Fuse Spring Boot BOM. Skipping patch processing.
[INFO] [PATCH] Done in 3ms
如果同时找到了 Fuse BOMs,则
patch-maven-plugin会停止并带有以下警告:$ mvn clean install [INFO] Scanning for projects... [INFO] ========== Red Hat Fuse Maven patching ========== [WARNING] [PATCH] Reactor uses both Fuse Karaf and Fuse Spring Boot BOMs. Please use only one. Skipping patch processing. [INFO] [PATCH] Done in 3ms
patch-maven-plugin尝试获取以下 Maven 元数据值之一。-
对于 Fuse Karaf BOM 的项目,将解决
org.jboss.redhat-fuse/fuse-karaf-patch-metadata/maven-metadata.xml。这是带有org.jboss.redhat-fuse:fuse-karaf-patch-metadata:RELEASE协调的工件的元数据。 对于 Fuse Spring Boot BOM 项目的项目,则已解析
org.jboss.redhat-fuse/fuse-springboot-patch-metadata/maven-metadata.xml。这是带有org.jboss.redhat-fuse:fuse-springboot-patch-metadata:RELEASE协调的工件的元数据。Maven 生成的元数据示例
<?xml version="1.0" encoding="UTF-8"?>
<metadata>
  <groupId>org.jboss.redhat-fuse</groupId>
  <artifactId>fuse-springboot-patch-metadata</artifactId>
  <versioning>
    <release>7.8.1.fuse-sb2-781025</release>
    <versions>
      <version>7.8.0.fuse-sb2-780025</version>
      <version>7.7.0.fuse-sb2-770010</version>
      <version>7.7.0.fuse-770010</version>
      <version>7.8.1.fuse-sb2-781025</version>
    </versions>
    <lastUpdated>20201023131724</lastUpdated>
  </versioning>
</metadata>
-
对于 Fuse Karaf BOM 的项目,将解决
-
patch-maven-plugin解析元数据以选择适用于当前项目的版本。这只适用于使用 Fuse BOM 版本 7.8.xxx 的 Maven 项目。只有与版本范围 7.8、7.7 或更高版本匹配的元数据才适用,且只会获取元数据的最新版本。 patch-maven-plugin收集在下载由groupId、artifactId和version标识的补丁元数据时使用的远程 Maven 存储库列表。这些 Maven 存储库是活跃配置集的 <repositories>元素中列出的它们,以及来自settings.xml文件的软件仓库。$ mvn clean install [INFO] Scanning for projects... [INFO] ========== Red Hat Fuse Maven patching ========== [INFO] [PATCH] Reading patch metadata and artifacts from 2 project repositories [INFO] [PATCH] - local-nexus: http://everfree.forest:8081/repository/maven-releases/ [INFO] [PATCH] - central: https://repo.maven.apache.org/maven2 Downloading from local-nexus: http://everfree.forest:8081/repository/maven-releases/org/jboss/redhat-fuse/fuse-springboot-patch-metadata/maven-metadata.xml ...
另外,如果您想要使用离线存储库,您可以使用
-Dpatch选项指定由fuse-karaf/fuse-karaf-patch-repository生成的 ZIP 文件,或 fuse-springboot/fuse-springboot模块。这些 ZIP 文件具有与 Maven 存储库结构相同的内部结构。例如,/fuse-springboot-patch-repository$ mvn clean install -Dpatch=../../../test/resources/patch-3.zip [INFO] Scanning for projects... [INFO] ========== Red Hat Fuse Maven patching ========== [INFO] [PATCH] Reading metadata and artifacts from /data/sources/github.com/jboss-fuse/redhat-fuse/fuse-tools/patch-maven-plugin/src/test/resources/patch-3.zip Downloading from fuse-patch: zip:file:/tmp/patch-3.zip-1742974214598205745/org/jboss/redhat-fuse/fuse-springboot-patch-metadata/maven-metadata.xml Downloaded from fuse-patch: zip:file:/tmp/patch-3.zip-1742974214598205745/org/jboss/redhat-fuse/fuse-springboot-patch-metadata/maven-metadata.xml (406 B at 16 kB/s) Downloading from fuse-patch: zip:file:/tmp/patch-3.zip-1742974214598205745/org/jboss/redhat-fuse/fuse-springboot-patch-metadata/7.8.0.fuse-sb2-781023/fuse-springboot-patch-metadata-7.8.0.fuse-sb2-781023.xml Downloaded from fuse-patch: zip:file:/tmp/patch-3.zip-1742974214598205745/org/jboss/redhat-fuse/fuse-springboot-patch-metadata/7.8.0.fuse-sb2-781023/fuse-springboot-patch-metadata-7.8.0.fuse-sb2-781023.xml (926 B at 309 kB/s) [INFO] [PATCH] Resolved patch descriptor: /home/user/.m2/repository/org/jboss/redhat-fuse/fuse-springboot-patch-metadata/7.8.0.fuse-sb2-781023/fuse-springboot-patch-metadata-7.8.0.fuse-sb2-781023.xml ...
元数据是否来自远程存储库、本地存储库或 ZIP 文件,它由
patch-maven-plugin分析。获取的元数据包含 CVE 以及每个 CVE,我们都有受影响的 Maven 工件(由 glob 模式和版本范围指定)的列表以及包含给定 CVE 修复的版本。例如,<?xml version="1.0" encoding="UTF-8" ?> <metadata xmlns="urn:redhat:fuse:patch-metadata:1"> <product-bom groupId="org.jboss.redhat-fuse" artifactId="fuse-springboot-bom" versions="[7.8,7.9)" /> <cves> <cve id="CVE-2020-xyz" description="Jetty can be configured to listen on port 8080" cve-link="https://nvd.nist.gov/vuln/detail/CVE-2020-xyz" bz-link="https://bugzilla.redhat.com/show_bug.cgi?id=42"> <affects groupId="org.eclipse.jetty" artifactId="jetty-*" versions="[9.4,9.4.32)" fix="9.4.32.v20200930" /> <affects groupId="org.eclipse.jetty.http2" artifactId="http2-*" versions="[9.4,9.4.32)" fix="9.4.32.v20200930" /> </cve> </cves> <fixes /> </metadata>最后,当迭代当前项目中所有管理的依赖关系时,会参考补丁元数据中指定的修复列表。这些与匹配的依赖项(及受管依赖关系)被更改为固定版本。例如:
$ mvn clean install -U
[INFO] Scanning for projects...
[INFO

========== Red Hat Fuse Maven patching ==========

[INFO] [PATCH] Reading patch metadata and artifacts from 2 project repositories
[INFO] [PATCH]  - local-nexus: http://everfree.forest:8081/repository/maven-releases/
[INFO] [PATCH]  - central: https://repo.maven.apache.org/maven2
Downloading from local-nexus: http://everfree.forest:8081/repository/maven-releases/org/jboss/redhat-fuse/fuse-springboot-patch-metadata/maven-metadata.xml
Downloading from central: https://repo.maven.apache.org/maven2/org/jboss/redhat-fuse/fuse-springboot-patch-metadata/maven-metadata.xml
Downloaded from local-nexus: http://everfree.forest:8081/repository/maven-releases/org/jboss/redhat-fuse/fuse-springboot-patch-metadata/maven-metadata.xml (363 B at 4.3 kB/s)
[INFO] [PATCH] Resolved patch descriptor: /home/user/.m2/repository/org/jboss/redhat-fuse/fuse-springboot-patch-metadata/7.8.0.fuse-sb2-780032/fuse-springboot-patch-metadata-7.8.0.fuse-sb2-780032.xml
[INFO] [PATCH] Patch metadata found for org.jboss.redhat-fuse/fuse-springboot-bom/[7.8,7.9)
[INFO] [PATCH]  - patch contains 1 CVE fix
[INFO] [PATCH] Processing managed dependencies to apply CVE fixes... (https://nvd.nist.gov/vuln/detail/CVE-2020-xyz, https://bugzilla.redhat.com/show_bug.cgi?id=42_
[INFO] [PATCH] - CVE-2020-xyz: Jetty can be configured to expose itself on port 8080
[INFO] [PATCH]   Applying change org.eclipse.jetty/jetty-*/[9.4,9.4.32) -> 9.4.32.v20200930
[INFO] [PATCH]    - managed dependency: org.eclipse.jetty/jetty-alpn-client/9.4.30.v20200611 -> 9.4.32.v20200930
...
[INFO] [PATCH]    - managed dependency: org.eclipse.jetty/jetty-openid/9.4.30.v20200611 -> 9.4.32.v20200930
[INFO] [PATCH]   Applying change org.eclipse.jetty.http2/http2-*/[9.4,9.4.32) -> 9.4.32.v20200930
[INFO] [PATCH]    - managed dependency: org.eclipse.jetty.http2/http2-client/9.4.30.v20200611 -> 9.4.32.v20200930
...
[INFO] [PATCH] Done in 635ms

=================================================
跳过补丁
如果您不想将特定的补丁应用到项目,则 patch-maven-plugin 提供了一个 跳过 选项。假设您已经将 patch-maven-plugin 添加到项目的 pom.xml 文件,并且您不希望修改版本,您可以使用以下方法之一跳过补丁。
-
将 skip 选项添加到您的项目的
pom.xml文件中,如下所示:
<build>
    <plugins>
        <plugin>
            <groupId>org.jboss.redhat-fuse</groupId>
            <artifactId>patch-maven-plugin</artifactId>
            <version>${version.org.jboss-redhat-fuse}</version>
            <extensions>true</extensions>
            <configuration>
                <skip>true</skip>
            </configuration>
        </plugin>
    </plugins>
</build>-
或者在运行
mvn命令时使用-DskipPatch选项,如下所示:
$ mvn dependency:tree -DskipPatch
[INFO] Scanning for projects...
[INFO]
[INFO] ------< org.jboss.redhat-fuse:cve-dependency-management-module1 >-------
[INFO] Building cve-dependency-management-module1 7.8.0.fuse-sb2-780033
[INFO] --------------------------------[ jar ]---------------------------------
...
如上方输出中所示,未调用 patch-maven-plugin,这会导致不会应用到应用的补丁。
附录 A. 准备使用 Maven
本节概述了如何准备 Maven 来构建 Red Hat Fuse 项目,并介绍了 Maven 协调(用于定位 Maven 工件)的概念。
A.1. 准备设置 Maven
Maven 是一个来自 Apache 的免费开源构建工具。通常,您使用 Maven 来构建 Fuse 应用程序。
流程
- 从 Maven 下载 页面下载 Maven 的最新版本。
确定您的系统已连接到互联网。
构建项目时,默认行为是 Maven 搜索外部存储库并下载所需的工件。Maven 会查找可通过互联网访问的存储库。
您可以更改此行为,以便 Maven 只搜索本地网络上的存储库。也就是说,Maven 可以在离线模式下运行。在离线模式下,Maven 会在其本地存储库中查找工件。请参阅 第 A.3 节 “使用本地 Maven 软件仓库”。
A.2. 将红帽软件仓库添加到 Maven
要访问 Red Hat Maven 存储库中的工件,您需要将这些存储库添加到 Maven 的 settings.xml 文件中。Maven 在用户主目录的 .m2 目录中查找 settings.xml 文件。如果没有用户指定的 settings.xml 文件,则 Maven 将使用 M2_HOME/conf/ 中的系统级 settings.xml 文件。
settings.xml
前提条件
您知道要在其中添加 Red Hat 软件仓库的 settings.xml 文件的位置。
流程
在 settings.xml 文件中,为红帽软件仓库添加存储库元素,如下例所示:
<?xml version="1.0"?>
<settings>

  <profiles>
    <profile>
      <id>extra-repos</id>
      <activation>
        <activeByDefault>true</activeByDefault>
      </activation>
      <repositories>
       <repository>
            <id>redhat-ga-repository</id>
            <url>https://maven.repository.redhat.com/ga</url>
            <releases>
                <enabled>true</enabled>
            </releases>
            <snapshots>
                <enabled>false</enabled>
            </snapshots>
        </repository>
        <repository>
            <id>redhat-ea-repository</id>
            <url>https://maven.repository.redhat.com/earlyaccess/all</url>
            <releases>
                <enabled>true</enabled>
            </releases>
            <snapshots>
                <enabled>false</enabled>
            </snapshots>
        </repository>
        <repository>
          <id>jboss-public</id>
          <name>JBoss Public Repository Group</name>
          <url>https://repository.jboss.org/nexus/content/groups/public/</url>
        </repository>
      </repositories>
      <pluginRepositories>
        <pluginRepository>
            <id>redhat-ga-repository</id>
            <url>https://maven.repository.redhat.com/ga</url>
            <releases>
                <enabled>true</enabled>
            </releases>
            <snapshots>
                <enabled>false</enabled>
            </snapshots>
        </pluginRepository>
        <pluginRepository>
            <id>redhat-ea-repository</id>
            <url>https://maven.repository.redhat.com/earlyaccess/all</url>
            <releases>
                <enabled>true</enabled>
            </releases>
            <snapshots>
                <enabled>false</enabled>
            </snapshots>
        </pluginRepository>
        <pluginRepository>
          <id>jboss-public</id>
          <name>JBoss Public Repository Group</name>
          <url>https://repository.jboss.org/nexus/content/groups/public</url>
        </pluginRepository>
      </pluginRepositories>
    </profile>
  </profiles>

  <activeProfiles>
    <activeProfile>extra-repos</activeProfile>
  </activeProfiles>

</settings>
A.3. 使用本地 Maven 软件仓库
如果您在没有互联网连接的情况下运行容器,且您需要部署一个具有离线依赖项的应用程序,您可以使用 Maven 依赖项插件将应用程序的依赖项下载到 Maven 离线存储库中。然后,您可以将此自定义的 Maven 离线存储库分发到没有互联网连接的机器。
流程
在包含
pom.xml文件的项目目录中,通过运行以下命令为 Maven 项目下载存储库,如下所示:mvn org.apache.maven.plugins:maven-dependency-plugin:3.1.0:go-offline -Dmaven.repo.local=/tmp/my-project
在本例中,构建项目所需的 Maven 依赖项和插件下载到
/tmp/my-project目录中。- 将此自定义的 Maven 脱机存储库分发给任何没有互联网连接的机器。
A.4. 关于 Maven 工件和协调
在 Maven 构建系统中,基本构建块是一个 工件。构建后,工件的输出通常是一个存档,如 JAR 或 WAR 文件。
Maven 的一个关键方面是能够定位工件并管理它们之间的依赖关系。Maven 协调 是标识特定工件位置的一组值。基本协调过程使用以下形式的三个值:
groupId:artifactId:version
有时,Maven 与一个 打包值或者一个打包 值和 分类器 值增加了基本的协调。Maven 协调可以具有以下格式之一:
groupId:artifactId:version
groupId:artifactId:packaging:version
groupId:artifactId:packaging:classifier:version
以下是值的描述:
- groupdId
-
定义工件名称的范围。您通常使用软件包名称的所有或部分作为组群 ID。例如,
org.fusesource.example。 - artifactId
- 定义相对于组 ID 的工件名称。
- version
-
指定工件的版本。版本号最多可以有 4 个部分:
n.n.n.n,其中版本号的最后一部分可以包含非数字字符。例如,1.0-SNAPSHOT的最后一部分是字母数字子字符串0-SNAPSHOT。 - 打包
-
定义构建项目时生成的打包实体。对于 OSGi 项目,打包是
捆绑包。默认值为jar。 - 分类器
- 可让您区分从同一 POM 构建但具有不同内容的工件。
工件的 POM 文件中的元素定义工件的组 ID、构件 ID、打包和版本,如下所示:
<project ... >
  ...
  <groupId>org.fusesource.example</groupId>
  <artifactId>bundle-demo</artifactId>
  <packaging>bundle</packaging>
  <version>1.0-SNAPSHOT</version>
  ...
</project>
要定义上述构件的依赖项,您要将以下 依赖项元素添加到 POM 文件中:
<project ... >
  ...
  <dependencies>
    <dependency>
      <groupId>org.fusesource.example</groupId>
      <artifactId>bundle-demo</artifactId>
      <version>1.0-SNAPSHOT</version>
    </dependency>
  </dependencies>
  ...
</project>
不需要在前面的依赖项中指定 捆绑 软件包类型,因为捆绑包只是特定类型的 JAR 文件,jar 是默认的 Maven 软件包类型。但是,如果您需要在依赖项中明确指定打包类型,您可以使用 type 元素。
附录 B. Spring Boot Maven 插件
Spring Boot Maven 插件在 Maven 中提供 Spring Boot 支持,并允许您打包可执行文件 jar 或 war 存档并运行应用程序。
B.1. Spring Boot Maven 插件目标
Spring Boot Maven 插件包括以下目标:
-
Spring-boot:运行Spring Boot 应用程序。 -
spring-boot:重新打包您的.jar和.war文件才能变为可执行文件。 -
spring-boot:start和spring-boot:stopboth 用于管理 Spring Boot 应用程序的生命周期。 -
spring-boot:build-info生成构建信息,可供 Actuator 使用。
B.2. 使用 Spring Boot Maven 插件
您可以在以下位置找到有关如何使用 Spring Boot 插件的通用说明 :https://docs.spring.io/spring-boot/docs/current/maven-plugin/reference/htmlsingle/#using。以下示例演示了为 Spring Boot 使用 spring-boot-maven-plugin。
有关 Spring Boot Maven 插件的更多信息,请参阅 https://docs.spring.io/spring-boot/docs/current/maven-plugin/reference/htmlsingle/ 链接。
B.2.1. 为 Spring Boot 2 使用 Spring Boot Maven 插件
以下示例演示了在 Spring Boot 2 中使用 spring-boot-maven-plugin。
示例
<project>
  <modelVersion>4.0.0</modelVersion>

  <groupId>com.redhat.fuse</groupId>
  <artifactId>spring-boot-camel</artifactId>
  <version>1.0-SNAPSHOT</version>

    <properties>
        <project.build.sourceEncoding>UTF-8</project.build.sourceEncoding>
        <project.reporting.outputEncoding>UTF-8</project.reporting.outputEncoding>

        <!-- configure the Fuse version you want to use here -->
        <fuse.bom.version>7.11.1.fuse-sb2-7_11_1-00022-redhat-00002</fuse.bom.version>

        <!-- maven plugin versions -->
        <maven-compiler-plugin.version>3.7.0</maven-compiler-plugin.version>
        <maven-surefire-plugin.version>2.19.1</maven-surefire-plugin.version>
    </properties>


    <build>
        <defaultGoal>spring-boot:run</defaultGoal>

        <plugins>
            <plugin>
                <groupId>org.jboss.redhat-fuse</groupId>
                <artifactId>spring-boot-maven-plugin</artifactId>
                <version>${fuse.bom.version}</version>
                <executions>
                    <execution>
                        <goals>
                            <goal>repackage</goal>
                        </goals>
                    </execution>
                </executions>
            </plugin>
        </plugins>
    </build>

    <repositories>
        <repository>
            <id>redhat-ga-repository</id>
            <url>https://maven.repository.redhat.com/ga</url>
            <releases>
                <enabled>true</enabled>
            </releases>
            <snapshots>
                <enabled>false</enabled>
            </snapshots>
        </repository>
        <repository>
            <id>redhat-ea-repository</id>
            <url>https://maven.repository.redhat.com/earlyaccess/all</url>
            <releases>
                <enabled>true</enabled>
            </releases>
            <snapshots>
                <enabled>false</enabled>
            </snapshots>
        </repository>
    </repositories>

    <pluginRepositories>
        <pluginRepository>
            <id>redhat-ga-repository</id>
            <url>https://maven.repository.redhat.com/ga</url>
            <releases>
                <enabled>true</enabled>
            </releases>
            <snapshots>
                <enabled>false</enabled>
            </snapshots>
        </pluginRepository>
        <pluginRepository>
            <id>redhat-ea-repository</id>
            <url>https://maven.repository.redhat.com/earlyaccess/all</url>
            <releases>
                <enabled>true</enabled>
            </releases>
            <snapshots>
                <enabled>false</enabled>
            </snapshots>
        </pluginRepository>
    </pluginRepositories>
</project>