
部署到 JBoss EAP
将应用程序软件包部署到 JBoss Enterprise Application Platform(EAP)容器中
摘要
使开源包含更多
红帽致力于替换我们的代码、文档和 Web 属性中存在问题的语言。我们从这四个术语开始:master、slave、黑名单和白名单。由于此项工作十分艰巨,这些更改将在即将推出的几个发行版本中逐步实施。详情请查看我们的 CTO Chris Wright 信息。
第 1 章 JBoss EAP 部署中的 JBoss Fuse 概述
在 JBoss 企业应用平台(JBoss EAP)上安装 Fuse 软件包后,便可将 Fuse 应用程序部署到 JBoss EAP 容器中。
本节介绍在 EAP 子系统中使用 Camel 的部署模型。Fuse 中的 Apache Camel 允许您选择容器来运行集成应用程序。
红帽 JBoss EAP 具有一系列应用程序部署和配置选项,可促进管理员和开发人员。如需有关 JBOSS EAP 配置和部署流程的更多信息,请参阅红帽 JBoss EAP 配置指南。
1.1. 支持的产品版本
要查看支持 Fuse 7.11 的 JBoss EAP 的最新版本,请参阅 支持的配置 页面。
1.2. EAP 子系统上的 Camel
EAP 子系统中的 Camel 直接将 Apache Camel 集成到 JBoss EAP 容器中。在将 EAP 软件包的 Fuse 安装到 JBoss EAP 容器内后,此子系统可用。它为 Camel 部署提供了许多优势,包括简化 Camel 组件部署并与底层 JBoss EAP 容器集成。
红帽建议使用 Camel on EAP 子系统部署模型,以便在 JBoss EAP 上部署 Apache Camel 应用程序。
第 2 章 在 JBoss EAP 上构建应用程序
2.1. 概述
以下示例演示了在 EAP 上使用 camel-cdi 组件与红帽 Fuse 将 CDI Bean 与 Camel 路由集成。
在本例中,Camel 路由从 servlet HTTP GET 请求中获取消息有效负载,并将其传递到直接端点。然后,它会将有效负载传递到 Camel CDI Bean 调用,以生成消息响应并在 Web 浏览器页面中显示输出。
2.2. 运行项目
在运行项目之前,请确保您的设置包括 Maven 和红帽 Fuse 的应用服务器。
如果使用 Java 17,则必须在启动应用程序前启用 JBoss EAP Elytron 子系统,方法是使用 JBoss EAP Elytron subsystem。
-
对于 Linux:
${JBOSS_HOME}/bin/jboss-cli.sh --file=docs/examples/enable-elytron-se17.cli -Dconfig=standalone-full.xml -
对于 Windows:
%JBOSS_HOME%\bin\jboss-cli.bat --file=docss\enable-elytron-se17.cli -Dconfig=standalone-full.xml
执行以下步骤来运行项目:
以独立模式启动应用服务器:
-
对于 Linux:
${JBOSS_HOME}/bin/standalone.sh -c standalone-full.xml -
对于 Windows:
%JBOSS_HOME%\bin\standalone.bat -c standalone-full.xml
-
对于 Linux:
-
构建和部署项目:
mvn install -Pdeploy -
现在,浏览到
http://localhost:8080/example-camel-cdi/?name=World位置。在网页上,以下消息Hello World from 127.0.0.1显示为输出。另外,您还可以在MyRouteBuilder.java类下查看 Camel Route,如下所示:
from("direct:start").bean("helloBean");
bean DSL 使 Camel 在 bean 注册表中查找名为 helloBean 的 bean。另外,由于 some Bean 类,bean 可供 Camel 使用。通过使用 @Named 注释,camel-cdi 会将 bean 添加到 Camel Bean 注册表。
@Named("helloBean")

public class SomeBean {

     public String someMethod(String name) throws Exception {

        return String.format("Hello %s from %s", name, InetAddress.getLocalHost().getHostAddress());

    }

}
如需更多信息,请参阅 $ EAP_HOME/quickstarts/camel/camel-cdi 目录。
2.3. 用于 JBoss EAP 的 BOM 文件
Maven Bill of Materials(BOM) 文件的目的是提供一组精心设计的 Maven 依赖项版本,从而为您保存每个 Maven 工件的版本,从而单独定义每个 Maven 工件的版本。
JBoss EAP 的 Fuse BOM 具有以下优点:
- 定义 Maven 依赖项的版本,因此当您向 POM 添加依赖项时,您不需要指定版本。
- 定义一组经过策展的依赖关系,这些依赖项是针对特定版本的 Fuse 完全测试和支持的。
- 简化 Fuse 升级.
红帽只支持由 Fuse BOM 定义的一组依赖项。
要将 BOM 文件合并到 Maven 项目中,请在项目的 pom.xml 文件中指定 dependencyManagement 元素(或者,在父 POM 文件中可能),如下例所示:
<?xml version="1.0" encoding="UTF-8" standalone="no"?>
<project ...>
  ...
  <properties>
    <project.build.sourceEncoding>UTF-8</project.build.sourceEncoding>

    <!-- configure the versions you want to use here -->
    <fuse.version>7.11.1.fuse-sb2-7_11_1-00022-redhat-00002</fuse.version>

  </properties>

  <dependencyManagement>
    <dependencies>
      <dependency>
        <groupId>org.jboss.redhat-fuse</groupId>
        <artifactId>fuse-eap-bom</artifactId>
        <version>${fuse.version}</version>
        <type>pom</type>
        <scope>import</scope>
      </dependency>
    </dependencies>
  </dependencyManagement>
  ...
</project>
在使用依赖关系管理机制指定 BOM 后,可以在不 指定工件版本的情况下,将 Maven 依赖项添加到 POM 中。例如,要为 camel-velocity 组件添加一个依赖项,您要将以下 XML 片段添加到 POM 中的 dependencies 元素中:
<dependency>
  <groupId>org.apache.camel</groupId>
  <artifactId>camel-velocity</artifactId>
  <scope>provided</scope>
</dependency>
注意 version 元素是如何从这个依赖关系定义中省略的。
第 3 章 功能
本章介绍了 Camel 关于 EAP 功能的必要信息。
Camel 上下文定义
Camel 上下文可以在 standalone-camel.xml 和 domain.xml 中进行配置,作为子系统定义的一部分,
<subsystem xmlns="urn:jboss:domain:camel:1.0">
   <camelContext id="system-context-1">
     <![CDATA[
     <route>
       <from uri="direct:start"/>
       <transform>
         <simple>Hello #{body}</simple>
       </transform>
     </route>
     ]]>
   </camelContext>
</subsystem>
Camel 上下文部署
您可以使用 -camel-context.xml 后缀将 camel 上下文部署到 JBoss EAP 中:
- 独立 XML 文件
- 另一个支持的部署的一部分
一个部署可以包含多个 -camel-context.xml 文件。
已部署的 Camel 上下文是 CDI 注入的,如下所示
@Resource(lookup = "java:jboss/camel/context/mycontext")
CamelContext camelContext;
[discrete]
### Management Console
默认情况下,对管理控制台的访问受到保护。因此,您需要先设置管理用户。
$ bin/add-user.sh

What type of user do you wish to add?
 a) Management User (mgmt-users.properties)
 b) Application User (application-users.properties)
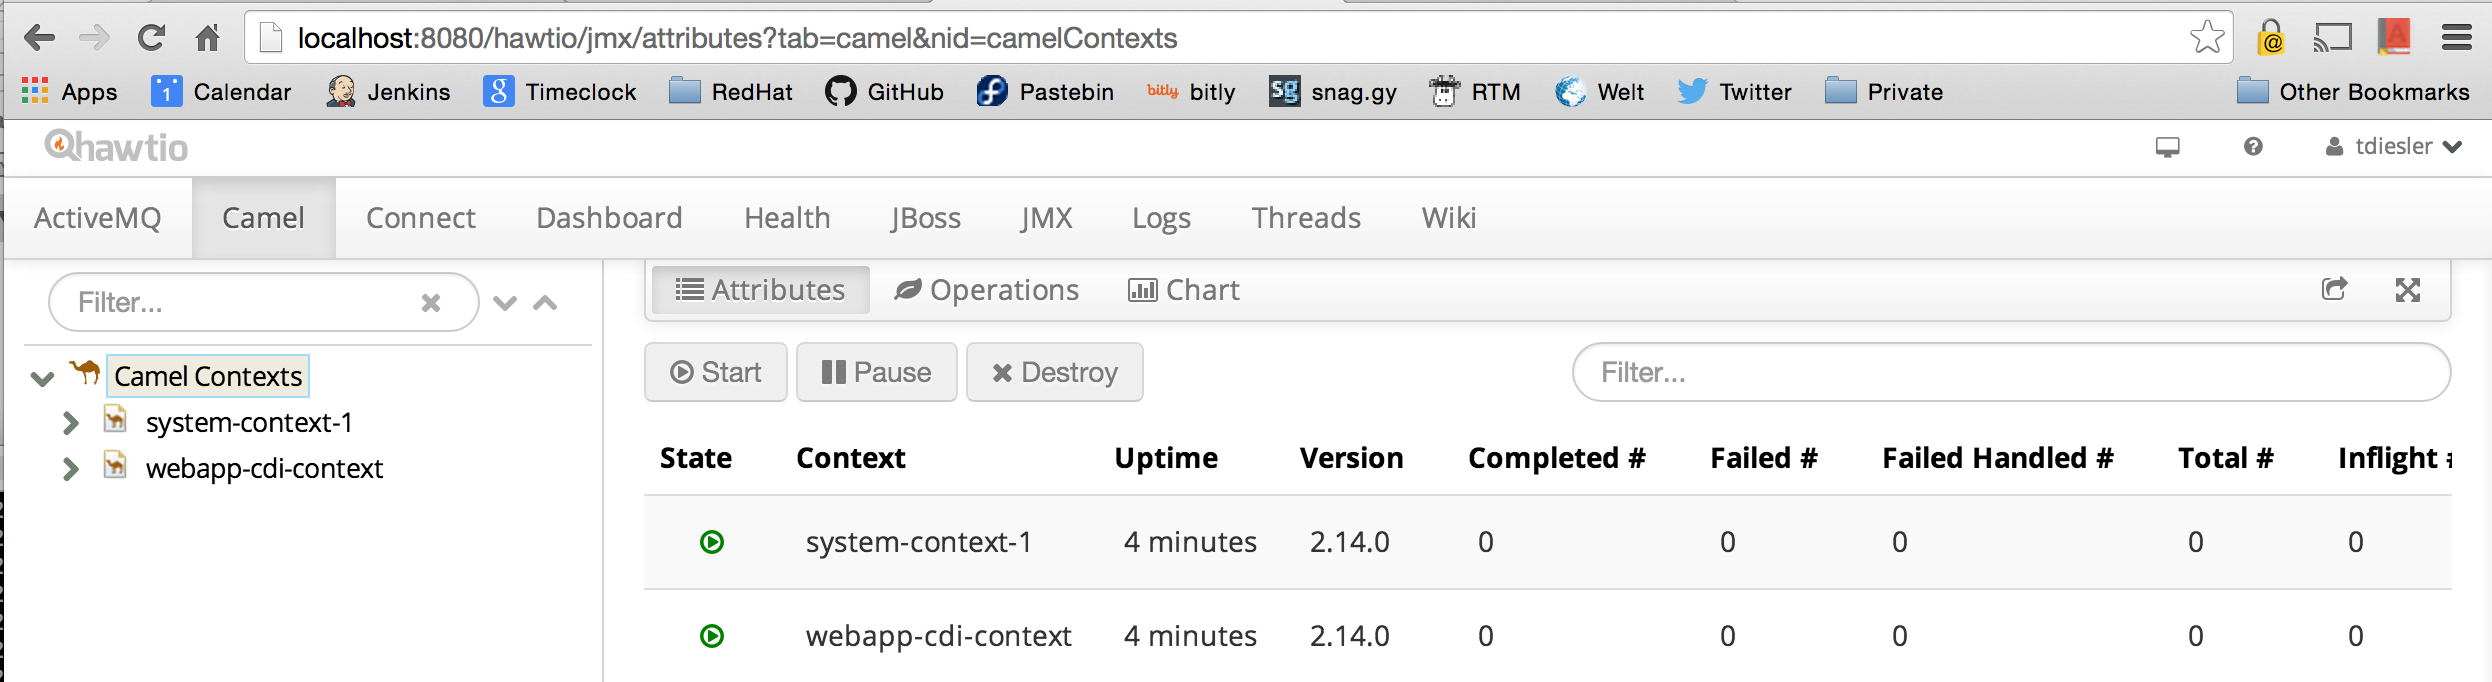
Hawt.io 控制台应显示来自子系统配置的上下文。
Arquillian 测试支持
EAP 测试套件上的 Camel 使用 WildFly Arquillian 受管容器。这可连接到已在运行的 JBoss EAP 实例,或者在需要时启动单机服务器实例。
实施了很多测试增强器,可让您在 EAP 特定类型上将这些 Camel 注入到您的 Arquillian 测试案例中。
@ArquillianResource
CamelContextFactory contextFactory;

@ArquillianResource
CamelContextRegistry contextRegistry;
第 4 章 配置
本章介绍了 Camel 子系统和部署配置的必要信息。
Camel 子系统配置
Camel 子系统配置可能包含静态系统路由。但是,系统会自动启动路由。
<subsystem xmlns="urn:jboss:domain:camel:1.0">
   <camelContext id="system-context-1">
     <![CDATA[
     <route>
       <from uri="direct:start"/>
       <transform>
         <simple>Hello #{body}</simple>
       </transform>
     </route>
     ]]>
   </camelContext>
</subsystem>
Camel 部署配置
如果要修改 Camel 部署默认配置,可以在部署中编辑 WEB-INF/jboss-all.xml 或 META-INF/jboss-all.xml 配置文件。
使用 > XML 元素来控制 camel 配置。
jboss-all.xml 文件中的 <jboss-camel
禁用 Camel 子系统
如果您不想将 camel 子系统添加到部署中,请在 jboss-camel XML 元素上设置 enabled="false" 属性。
jboss-all.xml 文件示例:
<jboss umlns="urn:jboss:1.0">
  <jboss-camel xmlns="urn:jboss:jboss-camel:1.0" enabled="false"/>
</jboss>
选择组件
如果您添加嵌套的 & lt;component > 或 <component-module > XML 元素,而不是将默认 Camel 组件列表添加到部署中,则只有指定的组件才会添加到部署中。
jboss-all.xml 文件示例:
<jboss umlns="urn:jboss:1.0">
  <jboss-camel xmlns="urn:jboss:jboss-camel:1.0">
    <component name="camel-ftp"/>
    <component-module name="org.apache.camel.component.rss"/>
  </jboss-camel>
</jboss>
第 5 章 jakrkarta EE 集成
本章介绍了与 Jarkarta EE 集成点所需的信息。
5.1. CDI
Camel CDI 组件使用 CDI 作为依赖性注入框架,为 Apache Camel 提供自动配置。但是,它基于 convention-over-configuration。它实施标准的 camel bean 集成,以便您可以在 CDI Bean 中轻松使用 Camel 注解。
有关 CDI 的更多信息,请参阅 cdi 文档。
以下示例论述了如何通过路由来消耗和分配 Camel 上下文。
@Startup
@ApplicationScoped
@ContextName("cdi-context")
public class MyRouteBuilder extends RouteBuilder {

    @Override
    public void configure() throws Exception {
    	from("direct:start").transform(body().prepend("Hi"));
    }
}
@Inject
@ContextName("cdi-context")
private CamelContext camelctx;5.1.1. 导入 XML DSL 配置
Camel CDI 集成允许您通过 @ImportResource 注释导入现有的 XML DSL 文件:
@ImportResource("camel-context.xml")
class MyBean {
}
导入文件的位置必须存在于部署类路径中。将文件放在 WEB-INF 等位置无法正常工作。但是,WEB-INF/classes 将可以正常工作。
5.2. EJB
通过与 EJB3 子系统集成的 ejb 组件提供管理支持。
CamelContext camelctx = new DefaultCamelContext();
    camelctx.addRoutes(new RouteBuilder() {
        @Override
        public void configure() throws Exception {
            from("direct:start").to("ejb:java:module/HelloBean");
        }
    });
5.3. JAXB
JAXB 支持通过 Camel JAXB 数据格式。
Camel 支持将 XML 数据解除到 JAXB 的类,以及从类到 XML 的总结.以下演示了使用 Camel JAXB 数据格式类进行汇总和解包的简单 Camel 路由。
5.3.1. JAXB Annotated 类
@XmlRootElement(name = "customer")
@XmlAccessorType(XmlAccessType.FIELD)
public class Customer implements Serializable {

    private String firstName;
    private String lastName;

    public Customer() {
    }

    public Customer(String firstName, String lastName) {
        this.firstName = firstName;
        this.lastName = lastName;
    }

    public String getFirstName() {
        return firstName;
    }

    public void setFirstName(String firstName) {
        this.firstName = firstName;
    }

    public String getLastName() {
        return lastName;
    }

    public void setLastName(String lastName) {
        this.lastName = lastName;
    }
}
5.3.2. JAXB 类 XML 表示
<customer xmlns="http://org/wildfly/test/jaxb/model/Customer">
    <firstName>John</firstName>
    <lastName>Doe</lastName>
</customer>
5.3.3. Camel JAXB Unmarshalling
WildFlyCamelContext camelctx = contextFactory.createCamelContext(getClass().getClassLoader());

final JaxbDataFormat jaxb = new JaxbDataFormat();
jaxb.setContextPath("org.wildfly.camel.test.jaxb.model");

camelctx.addRoutes(new RouteBuilder() {
    @Override
    public void configure() throws Exception {
        from("direct:start")
        .unmarshal(jaxb);
    }
});
camelctx.start();

ProducerTemplate producer = camelctx.createProducerTemplate();

// Send an XML representation of the customer to the direct:start endpoint
Customer customer = producer.requestBody("direct:start", readCustomerXml(), Customer.class);
Assert.assertEquals("John", customer.getFirstName());
Assert.assertEquals("Doe", customer.getLastName());
5.3.4. Camel JAXB Marshalling
WildFlyCamelContext camelctx = contextFactory.createCamelContext();

final JaxbDataFormat jaxb = new JaxbDataFormat();
jaxb.setContextPath("org.wildfly.camel.test.jaxb.model");

camelctx.addRoutes(new RouteBuilder() {
    @Override
    public void configure() throws Exception {
        from("direct:start")
        .marshal(jaxb);
    }
});
camelctx.start();

ProducerTemplate producer = camelctx.createProducerTemplate();
Customer customer = new Customer("John", "Doe");
String customerXML = producer.requestBody("direct:start", customer, String.class);
Assert.assertEquals(readCustomerXml(), customerXML);
5.4. JAX-RS
JAX-RS 支持由 Camel CXF-RS 提供。
5.4.1. CXF-RS Producer
<beans xmlns="http://www.springframework.org/schema/beans"
    xmlns:xsi="http://www.w3.org/2001/XMLSchema-instance"
    xmlns:cxf="http://camel.apache.org/schema/cxf"
    xsi:schemaLocation="
        http://www.springframework.org/schema/beans http://www.springframework.org/schema/beans/spring-beans.xsd
        http://camel.apache.org/schema/cxf http://camel.apache.org/schema/cxf/camel-cxf.xsd
        http://camel.apache.org/schema/spring http://camel.apache.org/schema/spring/camel-spring.xsd">

    <cxf:rsClient id="cxfProducer"
                  address="http://localhost:8080/rest"
                  serviceClass="org.wildfly.camel.examples.cxf.jaxrs.GreetingService" />

    <camelContext id="cxfrs-camel-context" xmlns="http://camel.apache.org/schema/spring">
        <route>
            <from uri="direct:start" />
            <setHeader headerName="operationName">
                <simple>greet</simple>
            </setHeader>
            <setHeader headerName="CamelCxfRsUsingHttpAPI">
                <constant>false</constant>
            </setHeader>
            <to uri="cxfrs:bean:cxfProducer" />
        </route>
    </camelContext>
</beans>
5.4.2. CXF-RS Consumer
<beans xmlns="http://www.springframework.org/schema/beans"
    xmlns:xsi="http://www.w3.org/2001/XMLSchema-instance"
    xmlns:cxf="http://camel.apache.org/schema/cxf"
    xsi:schemaLocation="
        http://www.springframework.org/schema/beans http://www.springframework.org/schema/beans/spring-beans.xsd
        http://camel.apache.org/schema/cxf http://camel.apache.org/schema/cxf/camel-cxf.xsd
        http://camel.apache.org/schema/spring http://camel.apache.org/schema/spring/camel-spring.xsd">

    <cxf:rsServer id="cxfConsumer"
                  address="http://localhost:8080/rest"
                  serviceClass="org.wildfly.camel.examples.cxf.jaxrs.GreetingService" />

    <camelContext id="cxfrs-camel-context" xmlns="http://camel.apache.org/schema/spring">
        <route>
            <from uri="cxfrs:bean:cxfConsumer" />
            <setBody>
                <constant>Hello world</constant>
            </setBody>
        </route>
    </camelContext>
</beans>
5.4.3. 使用 Camel REST DSL 的 JAX-RS Consumer
Camel REST DSL 提供了编写充当 JAX-RS 消费者的 Camel 路由的功能。以下 RouteBuilder 类显示如下:
@Startup
@ApplicationScoped
@ContextName("rest-camel-context")
public class RestConsumerRouteBuilder extends RouteBuilder {
  @Override
  public void configure() throws Exception {

    // Use the camel-undertow component to provide REST integration
    restConfiguration().component("undertow")
      .contextPath("/rest").port(8080).bindingMode(RestBindingMode.json);

    rest("/customer")
      // GET /rest/customer
      .get()
        .produces(MediaType.APPLICATION_JSON)
        .to("direct:getCustomers")
      // GET /rest/customer/1
      .get("/{id}")
        .produces(MediaType.APPLICATION_JSON)
        .to("direct:getCustomer")
      // POST /rest/customer
      .post()
        .type(Customer.class)
        .to("direct:createCustomer");
      // PUT /rest/customer
      .put()
        .type(Customer.class)
        .to("direct:updateCustomer");
      // DELETE /rest/customer/1
      .delete("/{id}")
        .to("direct:deleteCustomer");
  }
}
通过设置绑定模式,Camel canmarshal 和 unmarshal JSON 数据可以通过指定 'produces()' 或 'type()' 配置步骤。
-
REST DSL 配置从
restConfiguration().component("undertow")开始。 - EAP 子系统上的 Camel 仅支持 camel-servlet 和 camel-undertow 组件,以用于 REST DSL。但是,如果您配置其他组件,它将无法正常工作。
5.4.4. 安全性
请参阅 JAX-RS 安全性部分。
5.4.5. EAP 上的 Fuse 中的 Quickstart 示例
在快速入门 /camel/camel-cxf-jaxrs 目录的 Fuse 中提供了快速入门 示例。
5.5. JAX-WS
WebService 支持通过 CXF 组件提供,该组件与使用 Apache CXF 的 JBoss EAP WebServices 子系统集成。
5.5.1. JAX-WS CXF Producer
以下代码示例使用 CXF 来消耗已由 WildFly Web 服务子系统部署的 Web 服务。
5.5.1.1. JAX-WS Web 服务
以下简单的 Web 服务具有一个简单的"greet"方法,它将串联两个字符串参数并返回它们。
当 JBoss EAP Web 服务子系统检测到包含 JAX-WS 注释的类时,它会引导 CXF 端点。在本例中,服务端点将位于 http://hostname:port/context-root/greeting。
// Service interface
@WebService(name = "greeting")
public interface GreetingService {
    @WebMethod(operationName = "greet", action = "urn:greet")
    String greet(@WebParam(name = "message") String message, @WebParam(name = "name") String name);
}

// Service implementation
public class GreetingServiceImpl implements GreetingService{
    public String greet(String message, String name) {
        return message + " " + name ;
    }
}
5.5.1.2. Camel 路由配置
此 RouteBuilder 配置 CXF producer 端点,它将使用上面定义的"问候语"Web 服务。CDI 与 camel-cdi 组件结合使用,用于引导 RouteBuilder 和 CamelContext。
@Startup
@ApplicationScoped
@ContextName("cxf-camel-context")
public class CxfRouteBuilder extends RouteBuilder {

    @Override
    public void configure() throws Exception {
        from("direct:start")
        .to("cxf://http://localhost:8080/example-camel-cxf/greeting?serviceClass=" + GreetingService.class.getName());
    }
}
问候 Web 服务"greet"需要两个参数。它们可以通过 ProducerTemplate 方式提供给上述路由。Web 服务方法参数值通过构造对象数组来配置,该数组作为交换正文传递。
String message = "Hello"
String name = "Kermit"

ProducerTemplate producer = camelContext.createProducerTemplate();
Object[] serviceParams = new Object[] {message, name};
String result = producer.requestBody("direct:start", serviceParams, String.class);
5.5.2. Camel CXF JAX-WS Consumer
<beans xmlns="http://www.springframework.org/schema/beans"
       xmlns:xsi="http://www.w3.org/2001/XMLSchema-instance"
       xmlns:cxf="http://camel.apache.org/schema/cxf"
       xsi:schemaLocation="
        http://www.springframework.org/schema/beans http://www.springframework.org/schema/beans/spring-beans.xsd
        http://camel.apache.org/schema/cxf http://camel.apache.org/schema/cxf/camel-cxf.xsd
        http://camel.apache.org/schema/spring http://camel.apache.org/schema/spring/camel-spring.xsd">

    <cxf:cxfEndpoint id="cxfConsumer"
                     address="http://localhost:8080/webservices/greeting"
                     serviceClass="org.wildfly.camel.examples.cxf.jaxws.GreetingService" />

    <camelContext id="cxfws-camel-context" xmlns="http://camel.apache.org/schema/spring">
        <route>
            <from uri="cxf:bean:cxfConsumer" />
            <to uri="log:ws" />
        </route>
    </camelContext>

</beans>
5.5.3. 安全性
请参阅 JAX-WS 安全性部分。
5.5.4. EAP 上的 Fuse 中的 Quickstart 示例
在快速入门 /camel/camel-cxf-jaxws 目录的 Fuse 中提供了快速入门 示例。
5.6. JMS
消息传递支持通过 JMS 组件提供,它们与 JBoss EAP Messaging(ActiveMQintroduction)子系统集成。
通过配置特定于供应商的资源适配器或不可用(如果使用 JBoss 通用 JMS 资源适配器),可以与其他 JMS 实现集成。
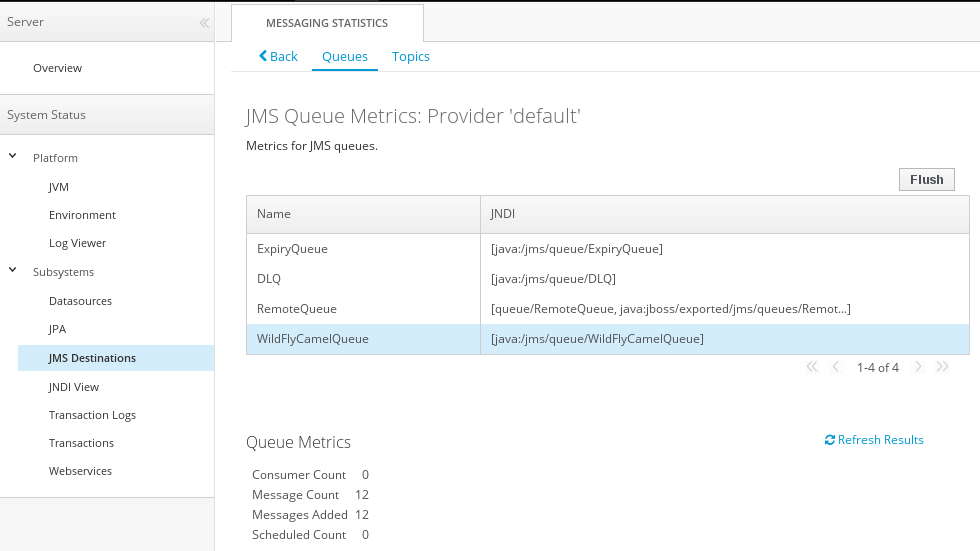
5.6.1. JBoss EAP JMS 配置
您可以通过标准的 JBoss EAP XML 配置文件配置 JBoss EAP 消息传递子系统。https://docs.jboss.org/author/display/WFLY8/Messaging+configuration例如: standalone.xml 或 domain.xml。
例如,之后您在内存实例中使用嵌入的 ActiveMQ Artemis。您首先,通过将以下 XML 配置添加到jms-destinations 部分,在 messaging 子系统上配置新的 JMS 队列。
<jms-queue name="WildFlyCamelQueue">
  <entry name="java:/jms/queue/WildFlyCamelQueue"/>
</jms-queue>
或者您可以使用 CLI 脚本添加队列。
$ jms-queue add --queue-address=WildFlyCamelQueue --entries=queue/WildFlyCamelQueue,java:/jms/queue/WildFlyCamelQueue
另外,您还可以在自定义 jms.xml 部署描述符中创建消息传递 部署配置。如需更多信息,请参阅 JBoss EAP messaging 子系统文档中的部署 -jms.xml 文件部分。
5.6.2. Camel 路由配置
以下 JMS producer 和使用者示例利用 JBoss EAP 嵌入式 ActiveMQ Artemis 服务器发布和使用消息到目的地。
示例还将 CDI 与 camel-cdi 组件结合使用。JMS ConnectionFactory 实例通过 JNDI 查找注入到 Camel RouteBuilder 中。
5.6.2.1. JMS Producer
DefaultJMSConnectionFactory 连接工厂从 JNDI 注入到 RouteBuilder 中。在 JBoss EAP XML 配置下,您可以在 messaging 子系统内找到连接工厂。
接下来,计时器端点每 10 秒运行一次,以将 XML 有效负载发送到之前配置的 WildFlyCamelQueue 目标。
@Startup
@ApplicationScoped
@ContextName("jms-camel-context")
public class JmsRouteBuilder extends RouteBuilder {
@Resource(mappedName = "java:jboss/DefaultJMSConnectionFactory")
private ConnectionFactory connectionFactory;
@Override
public void configure() throws Exception {
JmsComponent component = new JmsComponent();
component.setConnectionFactory(connectionFactory);
getContext().addComponent("jms", component);
from("timer://sendJMSMessage?fixedRate=true&period=10000")
.transform(constant("<?xml version='1.0><message><greeting>hello world</greeting></message>"))
.to("jms:queue:WildFlyCamelQueue")
.log("JMS Message sent");
}
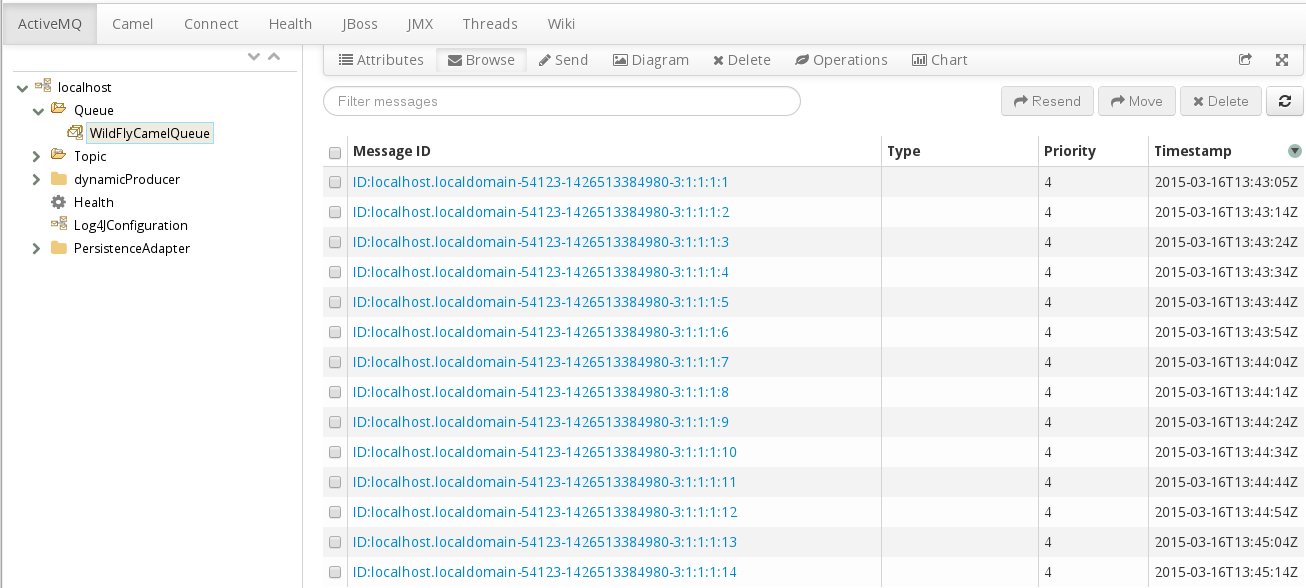
}每次将 JMS 消息添加到 WildFlyCamelQueue 目的地时,都将向控制台输出日志消息。要验证消息是否放置在队列上,您可以使用 JBoss EAP 管理控制台。
5.6.2.2. JMS Consumer
要使用 JMS 消息,Camel RouteBuilder 实施与制作者示例类似。
如前文所述,连接工厂从 JNDI 发现,并注入了 JMSComponent 实例。
当 JMS 端点消耗来自 WildFlyCamelQueue 目的地的消息时,内容将记录到控制台。
@Override
public void configure() throws Exception {
  JmsComponent component = new JmsComponent();
  component.setConnectionFactory(connectionFactory);

  getContext().addComponent("jms", component);

  from("jms:queue:WildFlyCamelQueue")
  .to("log:jms?showAll=true");
}
5.6.2.3. JMS 事务
为了使 Camel JMS 路由能够参与 JMS 事务,需要使用一些额外的配置。由于 camel-jms 围绕 spring-jms 构建,因此您需要配置一些 Spring 类,使其能与 JBoss EAP 的事务管理器和连接工厂一起工作。以下代码示例演示了如何使用 CDI 配置事务性 JMS Camel 路由。
camel-jms 组件需要类型为 org.springframework.transaction.PlatformTransactionManager 的事务管理器。因此,您首先创建一个扩展 JtaTransactionManager。请注意,an 标注了 @Named,以便 bean 在 Camel Bean 注册表中注册。另请注意,JBoss EAP 事务管理器和用户事务实例使用 CDI 注入。
@Named("transactionManager")
public class CdiTransactionManager extends JtaTransactionManager {

  @Resource(mappedName = "java:/TransactionManager")
  private TransactionManager transactionManager;

  @Resource
  private UserTransaction userTransaction;

  @PostConstruct
  public void initTransactionManager() {
    setTransactionManager(transactionManager);
    setUserTransaction(userTransaction);
  }
}
接下来,您需要声明要使用的事务策略。再次使用 @Named 注释,使 bean 可供 Camel 使用。事务管理器也注入,以便可使用所需的事务策略创建 TransactionTemplate。本例中为 PROPAGATION_REQUIRED。
@Named("PROPAGATION_REQUIRED")
public class CdiRequiredPolicy extends SpringTransactionPolicy {
  @Inject
  public CdiRequiredPolicy(CdiTransactionManager cdiTransactionManager) {
    super(new TransactionTemplate(cdiTransactionManager,
      new DefaultTransactionDefinition(TransactionDefinition.PROPAGATION_REQUIRED)));
  }
}
现在,您可以配置 Camel RouteBuilder 类,并注入 Camel JMS 组件所需的依赖项。JBoss EAP XA 连接工厂与之前配置的事务管理器一起注入。
在本示例 RouteBuilder 中,每当来自 queue1 的消息被使用时,它们都会路由到名为 queue2 的其他 JMS 队列。来自 queue2 的消息会使用 rollback()DSL 方法回滚 JMS 事务。这将导致原始消息放置在死信队列(DLQ)上。
@Startup
@ApplicationScoped
@ContextName("jms-camel-context")
public class JMSRouteBuilder extends RouteBuilder {

  @Resource(mappedName = "java:/JmsXA")
  private ConnectionFactory connectionFactory;

  @Inject
  CdiTransactionManager transactionManager;

  @Override
  public void configure() throws Exception {
    // Creates a JMS component which supports transactions
    JmsComponent jmsComponent = JmsComponent.jmsComponentTransacted(connectionFactory, transactionManager);
    getContext().addComponent("jms", jmsComponent);

    from("jms:queue:queue1")
      .transacted("PROPAGATION_REQUIRED")
      .to("jms:queue:queue2");

    // Force the transaction to roll back. The message will end up on the Wildfly 'DLQ' message queue
    from("jms:queue:queue2")
      .to("log:end")
      .rollback();
  }
5.6.2.4. 远程 JMS 目的地
个 JBoss EAP 实例可以通过 远程 JNDI 将消息发送到另一 JBoss EAP 实例上配置的消息。
需要额外的 JBoss EAP 配置才能实现这一点。首先配置导出的 JMS 队列。
只有 java:jboss/exported 命名空间中的 JNDI 名称才会被视为远程客户端的候选者,因此队列会被适当地命名。
您必须在 JBoss EAP 客户端 应用服务器和JBoss EAP 远程服务器上配置队列。
<jms-queue name="RemoteQueue">
  <entry name="java:jboss/exported/jms/queues/RemoteQueue"/>
</jms-queue>
在客户端可以连接到远程服务器前,需要配置用户访问凭证。在远程服务器中运行 add user 实用程序在 "guest"组中创建新应用用户。这个示例的用户名为 'admin' 且密码为 'secret'。
RouteBuilder 实施与上例不同。您需要配置 InitialContext 并从 JNDI 中检索它,而不是注入连接工厂。
configureInitialContext 方法创建了这个 InitialContext。请注意,您需要设置提供程序 URL,该 URL 应引用您的远程 JBoss EAP 实例主机名和端口号。本示例使用 JBoss EAP JMS http-connector,但 此处列出了 alternatives。
最后,路由配置为每 10 秒发送一次 XML 有效负载到之前配置的远程目的地 - 'RemoteQueue'。
@Override
public void configure() throws Exception {
  Context initialContext = configureInitialContext();
  ConnectionFactory connectionFactory = (ConnectionFactory) initialContext.lookup("java:jms/RemoteConnectionFactory");

  JmsComponent component = new JmsComponent();
  component.setConnectionFactory(connectionFactory);

  getContext().addComponent("jms", component);

  from("timer://foo?fixedRate=true&period=10000")
  .transform(constant("<?xml version='1.0><message><greeting>hello world</greeting></message>"))
  .to("jms:queue:RemoteQueue?username=admin&password=secret")
  .to("log:jms?showAll=true");
}

private Context configureInitialContext() throws NamingException {
  final Properties env = new Properties();
  env.put(Context.INITIAL_CONTEXT_FACTORY, "org.jboss.naming.remote.client.InitialContextFactory");
  env.put(Context.PROVIDER_URL, System.getProperty(Context.PROVIDER_URL, "http-remoting://my-remote-host:8080"));
  env.put(Context.SECURITY_PRINCIPAL, System.getProperty("username", "admin"));
  env.put(Context.SECURITY_CREDENTIALS, System.getProperty("password", "secret"));
  return new InitialContext(env);
}
5.6.3. 安全性
请参阅 JMS 安全部分。
5.6.4. EAP 上的 Fuse 中的 Quickstart 示例
在 快速入门/camel/camel-jms 目录中,您的 Fuse 中提供了 EAP 安装的快速入门示例。
5.7. JMX
您可以通过与 JBoss EAP JMX 子系统集成的 JMX 组件提供管理支持。
CamelContext camelctx = contextFactory.createWildflyCamelContext(getClass().getClassLoader());
camelctx.addRoutes(new RouteBuilder() {
    @Override
    public void configure() throws Exception {
        String host = InetAddress.getLocalHost().getHostName();
        from("jmx:platform?format=raw&objectDomain=org.apache.camel&key.context=" + host + "/system-context-1&key.type=routes&key.name=\"route1\"" +
        "&monitorType=counter&observedAttribute=ExchangesTotal&granularityPeriod=500").
        to("direct:end");
    }
});
camelctx.start();

ConsumerTemplate consumer = camelctx.createConsumerTemplate();
MonitorNotification notifcation = consumer.receiveBody("direct:end", MonitorNotification.class);
Assert.assertEquals("ExchangesTotal", notifcation.getObservedAttribute());
5.8. JNDI
JNDI 集成由 JBoss EAP 特定的 CamelContext 提供,如下所示:
InitialContext inictx = new InitialContext();
CamelContextFactory factory = inictx.lookup("java:jboss/camel/CamelContextFactory");
WildFlyCamelContext camelctx = factory.createCamelContext();
在 WildFlyCamelContext 中,您可以获取预配置的命名上下文
Context context = camelctx.getNamingContext();
context.bind("helloBean", new HelloBean());
然后可从 Camel 路由中引用该路由。
camelctx.addRoutes(new RouteBuilder() {
    @Override
    public void configure() throws Exception {
        from("direct:start").beanRef("helloBean");
    }
});
camelctx.start();
5.9. JPA
JPA 集成由 Camel JPA 组件 提供。您可以通过提供 persistence.xml 配置文件和一些 JPA 所标注的类来开发 Camel JPA 应用程序。
5.9.1. persistence.xml 示例
在以下示例中,您可以使用 JBoss EAP 内存中 ExampleDS 数据源(在 JBoss EAP standalone.xml 配置文件中配置)。
<persistence version="2.0"
    xmlns="http://java.sun.com/xml/ns/persistence" xmlns:xsi="http://www.w3.org/2001/XMLSchema-instance"
    xsi:schemaLocation="http://java.sun.com/xml/ns/persistence http://java.sun.com/xml/ns/persistence/persistence_2_0.xsd">

    <persistence-unit name="camel">
        <jta-data-source>java:jboss/datasources/ExampleDS</jta-data-source>
        <class>org.wildfly.camel.test.jpa.model.Customer</class>
        <properties>
            <property name="hibernate.hbm2ddl.auto" value="create-drop"/>
            <property name="hibernate.show_sql" value="true"/>
        </properties>
    </persistence-unit>

</persistence>
5.9.2. JPA entitiy 示例
@Entity
@Table(name = "customer")
public class Customer implements Serializable {
    @Id
    @GeneratedValue
    private Long id;
    private String firstName;
    private String lastName;

    public Customer() {
    }

    public Customer(String firstName, String lastName) {
        this.firstName = firstName;
        this.lastName = lastName;
    }

    public Long getId() {
        return id;
    }

    public void setId(final Long id) {
        this.id = id;
    }

    public String getFirstName() {
        return firstName;
    }

    public void setFirstName(String firstName) {
        this.firstName = firstName;
    }

    public String getLastName() {
        return lastName;
    }

    public void setLastName(String lastName) {
        this.lastName = lastName;
    }
}
5.9.3. Camel JPA 端点/路由配置
配置了 JPA,您可以使用 CDI 将 EntityManager 和 UserTransaction 实例注入到 RouteBuilder 类或测试问题单中:
@PersistenceContext
EntityManager em;

@Inject
UserTransaction userTransaction;
现在配置 Camel 路由和 JPA 端点:
WildFlyCamelContext camelctx = contextFactory.createCamelContext(getClass().getClassLoader());

EntityManagerFactory entityManagerFactory = em.getEntityManagerFactory();

// Configure a transaction manager
JtaTransactionManager transactionManager = new JtaTransactionManager();
transactionManager.setUserTransaction(userTransaction);
transactionManager.afterPropertiesSet();

// Configure the JPA endpoint to use the correct EntityManagerFactory and JtaTransactionManager
final JpaEndpoint jpaEndpoint = new JpaEndpoint();
jpaEndpoint.setCamelContext(camelctx);
jpaEndpoint.setEntityType(Customer.class);
jpaEndpoint.setEntityManagerFactory(entityManagerFactory);
jpaEndpoint.setTransactionManager(transactionManager);

camelctx.addRoutes(new RouteBuilder() {
@Override
public void configure() throws Exception {
    from("direct:start")
    .to(jpaEndpoint);
}
});

camelctx.start();
最后,您可以将"Customer"实体发送到"direct:start"端点,然后查询 ExampleDS 数据源以验证已保存了记录。
Customer customer = new Customer("John", "Doe");
ProducerTemplate producer = camelctx.createProducerTemplate();
producer.sendBody("direct:start", customer);

// Query the in memory database customer table to verify that a record was saved
CriteriaBuilder criteriaBuilder = em.getCriteriaBuilder();
CriteriaQuery<Long> query = criteriaBuilder.createQuery(Long.class);
query.select(criteriaBuilder.count(query.from(Customer.class)));

long recordCount = em.createQuery(query).getSingleResult();

Assert.assertEquals(1L, recordCount);
第 6 章 Camel 组件
本章详细介绍了支持的 camel 组件信息
6.1. camel-activemq
Camel ActiveMQ 集成由 activemq 组件提供。
组件可以配置为处理嵌入式或外部代理。对于 Wildfly / EAP 容器管理的连接池和 XA-Transaction 支持,可以将 ActiveMQ 资源适配器 配置为容器配置文件。
6.1.1. JBoss EAP ActiveMQ 资源适配器配置
下载 ActiveMQ 资源适配器 rar 文件。以下步骤概述了如何配置 ActiveMQ 资源适配器。
- 停止您的 JBoss EAP 实例。
下载资源适配器并将 复制到相关的 JBoss EAP 部署目录。对于独立模式:
cp activemq-rar-5.11.1.rar ${JBOSS_HOME}/standalone/deployments/activemq-rar.rar- 为 ActiveMQ 适配器配置 JBoss EAP 资源适配器子系统。
<subsystem xmlns="urn:jboss:domain:resource-adapters:2.0">
     <resource-adapters>
         <resource-adapter id="activemq-rar.rar">
             <archive>
                 activemq-rar.rar
             </archive>
             <transaction-support>XATransaction</transaction-support>
             <config-property name="UseInboundSession">
                 false
             </config-property>
             <config-property name="Password">
                 defaultPassword
             </config-property>
             <config-property name="UserName">
                 defaultUser
             </config-property>
             <config-property name="ServerUrl">
                 tcp://localhost:61616?jms.rmIdFromConnectionId=true
             </config-property>
             <connection-definitions>
                 <connection-definition class-name="org.apache.activemq.ra.ActiveMQManagedConnectionFactory" jndi-name="java:/ActiveMQConnectionFactory" enabled="true" pool-name="ConnectionFactory">
                     <xa-pool>
                         <min-pool-size>1</min-pool-size>
                         <max-pool-size>20</max-pool-size>
                         <prefill>false</prefill>
                         <is-same-rm-override>false</is-same-rm-override>
                     </xa-pool>
                 </connection-definition>
             </connection-definitions>
             <admin-objects>
                 <admin-object class-name="org.apache.activemq.command.ActiveMQQueue" jndi-name="java:/queue/HELLOWORLDMDBQueue" use-java-context="true" pool-name="HELLOWORLDMDBQueue">
                     <config-property name="PhysicalName">
                         HELLOWORLDMDBQueue
                     </config-property>
                 </admin-object>
                 <admin-object class-name="org.apache.activemq.command.ActiveMQTopic" jndi-name="java:/topic/HELLOWORLDMDBTopic" use-java-context="true" pool-name="HELLOWORLDMDBTopic">
                     <config-property name="PhysicalName">
                         HELLOWORLDMDBTopic
                     </config-property>
                 </admin-object>
             </admin-objects>
         </resource-adapter>
     </resource-adapters>
 </subsystem>
如果您的资源适配器存档文件名与 located-rar.rar 不同,您必须更改上述配置中 archive 元素的内容以匹配存档文件的名称。
必须选择 UserName 和 Password 配置属性的值以匹配外部代理中有效用户的凭证。
您可能需要更改 ServerUrl 配置属性的值,以匹配外部代理公开的实际主机名和端口。
4) 启动 JBoss EAP。如果一切配置正确,您应该可以看到 JBoss EAP server.log 中的消息,如下所示:
13:16:08,412 INFO [org.jboss.as.connector.deployment] (MSC service thread 1-5) JBAS010406: Registered connection factory java:/AMQConnectionFactory`
6.1.2. Camel 路由配置
以下 ActiveMQ producer 和使用者示例利用 ActiveMQ 嵌入式代理和"vm' 传输(避免对外部 ActiveMQ 代理的需求)。
示例将 CDI 与 camel-cdi 组件结合使用。JMS ConnectionFactory 实例通过 JNDI 查找注入到 Camel RouteBuilder 中。
6.1.2.1. ActiveMQ Producer
@Startup
@ApplicationScoped
@ContextName("activemq-camel-context")
public class ActiveMQRouteBuilder extends RouteBuilder {

  @Override
  public void configure() throws Exception {
    from("timer://sendJMSMessage?fixedRate=true&period=10000")
    .transform(constant("<?xml version='1.0><message><greeting>hello world</greeting></message>"))
    .to("activemq:queue:WildFlyCamelQueue?brokerURL=vm://localhost")
    .log("JMS Message sent");
  }
}
每次将消息添加到 WildFlyCamelQueue 目的地时,都将向控制台输出日志消息。要验证消息实际上是否已放置到队列中,您可以使用由 Camel on EAP 子系统提供的 ../features/hawtio.md[Hawtio 控制台、window=_THREE]。
6.1.2.2. ActiveMQ Consumer
若要利用 ActiveMQ 消息,Camel RouteBuilder 实施与制作者示例类似。
当 ActiveMQ 端点消耗来自 WildFlyCamelQueue 目的地的消息时,内容将记录到控制台。
@Override
public void configure() throws Exception {
  from("activemq:queue:WildFlyCamelQueue?brokerURL=vm://localhost")
  .to("log:jms?showAll=true");
}
6.1.2.3. ActiveMQ 事务
6.1.2.3.1. ActiveMQ 资源适配器配置
需要 ActiveMQ 资源适配器以利用 XA 事务支持、连接池等。
以下 XML 片段演示了如何在 JBoss EAP 服务器 XML 配置中配置资源适配器。请注意 ,serverURL 设置为使用嵌入式代理。连接工厂与 JNDI 名称 java:/ActiveMQConnectionFactory 绑定。这将在 RouteBuilder 示例中查找。
最后,两个队列配置为名为 'queue1' 和 'queue2'。
<subsystem xmlns="urn:jboss:domain:resource-adapters:2.0">
  <resource-adapters>
    <resource-adapter id="activemq-rar.rar">
      ...
      <admin-objects>
        <admin-object class-name="org.apache.activemq.command.ActiveMQQueue" jndi-name="java:/queue/queue1" use-java-context="true" pool-name="queue1pool">
          <config-property name="PhysicalName">queue1</config-property>
        </admin-object>
        <admin-object class-name="org.apache.activemq.command.ActiveMQQueue" jndi-name="java:/queue/queue2" use-java-context="true" pool-name="queue2pool">
          <config-property name="PhysicalName">queue2</config-property>
        </admin-object>
      </admin-objects>
    </resource-adapter>
  </resource-adapters>
</subsystem>
6.1.2.4. 事务管理器
camel-activemq 组件需要类型为 org.springframework.transaction.PlatformTransactionManager 的事务管理器。因此,您可以首先创建一个满足此要求的 bean 扩展 JtaTransactionManager。请注意,an 标注了 @Named,以便 bean 在 Camel Bean 注册表中注册。另请注意,JBoss EAP 事务管理器和用户事务实例使用 CDI 注入。
@Named("transactionManager")
public class CdiTransactionManager extends JtaTransactionManager {

  @Resource(mappedName = "java:/TransactionManager")
  private TransactionManager transactionManager;

  @Resource
  private UserTransaction userTransaction;

  @PostConstruct
  public void initTransactionManager() {
    setTransactionManager(transactionManager);
    setUserTransaction(userTransaction);
  }
}
6.1.2.5. 事务策略
接下来,您需要声明要使用的事务策略。再次使用 @Named 注释,使 bean 可供 Camel 使用。事务管理器也注入,以便可使用所需的事务策略创建 TransactionTemplate。本例中为 PROPAGATION_REQUIRED。
@Named("PROPAGATION_REQUIRED")
public class CdiRequiredPolicy extends SpringTransactionPolicy {
  @Inject
  public CdiRequiredPolicy(CdiTransactionManager cdiTransactionManager) {
    super(new TransactionTemplate(cdiTransactionManager,
      new DefaultTransactionDefinition(TransactionDefinition.PROPAGATION_REQUIRED)));
  }
}
6.1.2.6. 路由构建器
现在,您可以配置 Camel RouteBuilder 类,并注入 Camel ActiveMQ 组件所需的依赖项。您在资源适配器配置上配置的 ActiveMQ 连接工厂会与您之前配置的事务管理器一起注入。
在本示例 RouteBuilder 中,每当来自 queue1 的消息被使用时,它们都会路由到名为 queue2 的其他 JMS 队列。来自 queue2 的消息会使用 rollback()DSL 方法回滚 JMS 事务。这将导致原始消息放置在死信队列(DLQ)上。
@Startup
@ApplicationScoped
@ContextName("activemq-camel-context")
public class ActiveMQRouteBuilder extends RouteBuilder {

  @Resource(mappedName = "java:/ActiveMQConnectionFactory")
  private ConnectionFactory connectionFactory;

  @Inject
  private CdiTransactionManager transactionManager;

  @Override
  public void configure() throws Exception {
    ActiveMQComponent activeMQComponent = ActiveMQComponent.activeMQComponent();
    activeMQComponent.setTransacted(false);
    activeMQComponent.setConnectionFactory(connectionFactory);
    activeMQComponent.setTransactionManager(transactionManager);

    getContext().addComponent("activemq", activeMQComponent);

      errorHandler(deadLetterChannel("activemq:queue:ActiveMQ.DLQ")
      .useOriginalMessage()
      .maximumRedeliveries(0)
      .redeliveryDelay(1000));

    from("activemq:queue:queue1F")
      .transacted("PROPAGATION_REQUIRED")
      .to("activemq:queue:queue2");

    from("activemq:queue:queue2")
      .to("log:end")
      .rollback();
  }
}
6.1.3. 安全性
请参阅 JMS 安全部分。
6.1.4. GitHub 上的代码示例
GitHub 上提供了 camel-activemq 应用程序 的示例。
6.2. camel-jms
有两种支持的方法将 camel-jms、camel-sjms 和 camel-sjms2 端点连接到远程 AMQ 7 代理。
- 使用 pooled-connection-factory 配置远程连接器,如"JBoss EAP 配置消息传递指南》中的"配置" Resource Adapter to Connect to Red Hat JBoss AMQ 7 一节中所述。
- 使用 connection-factory 配置远程连接器,如 使用 connection-factory 配置远程连接器
第一个选项是首选的方法,因为它提供连接池和 XA 事务支持。
对于使用持久订阅者的消息传递场景,由于 JavaEE 7 规格所施加的限制,JBoss EAP 上的 Fuse 7.11 不支持 pooled-connection-factory。在这种情况下,最好配置标准未池连接。
使用 connection-factory 配置远程连接器
创建一个指向远程消息传递服务器的出站套接字绑定:
/socket-binding-group=standard-sockets/remote-destination-outbound-socket-binding=messaging-remote-throughput:add(host=localhost, port=61616)
创建引用在第 1 步中创建的出站套接字绑定的远程连接器。
/subsystem=messaging-activemq/server=default/remote-connector=netty-remote-throughput:add(socket-binding=messaging-remote-throughput)
创建连接因素,引用第 2 步中创建的远程连接器。
/subsystem=messaging-activemq/server=default/connection-factory=simple-remote-artemis-connection-factory:add(entries=[java:/jms/RemoteJms],connectors=[netty-remote-throughput])
6.2.1. 消息传递代理和客户端
摘要
Fuse 7.11 不提供默认的内部消息传递代理,但它旨在与外部 JMS 代理进行接口。
JBoss EAP 上的 Fuse 7.11 使用在 JBoss EAP 上配置消息传递 代理时详述的资源适配器。
有关 JBoss EAP 上 Fuse 7.11 上可用的外部代理、JCA 适配器和 Camel 组件组合的更多信息,请参阅支持的配置。https://access.redhat.com/articles/310603
有关使用 JMS 的 JBoss EAP 上 Fuse 连接到外部代理的更多信息,请参阅 第 6.2 节 “camel-jms”。
Camel-jms Quickstart
提供了快速入门,以演示在 JBoss EAP 上使用 Fuse 来制作和使用 JMS 消息的 camel-jms 组件。
在此快速入门中,Camel 路由会使用来自 EAP_HOME/standalone/data/orders 的文件,并将其内容放在名为 OrdersQueue 的内存中 ActiveMQ root 队列上。然后,另一个 Camel 路由消耗 OrdersQueue 的内容,并将订单排序为 EAP_HOME/standalone/data/orders/processed 中的各个国家目录。
CLI 命令创建和删除 OrdersQueue CLI 脚本,以便在部署应用和取消部署时为您创建并移除 JMS OrdersQueue。这些脚本位于 EAP_HOME/quickstarts/camel-jms/src/main/resources/cli 目录中。
先决条件
要运行此快速入门,您必须有一个 Fuse 7.11 工作版本
您还需遵循 使用 JBoss AMQ 进行远程 JMS 通信 中的说明,以连接到外部 AMQ 7 代理。然后您可以使用默认连接工厂注入连接工厂。
@Resource(mappedName = "java:jboss/RemoteJmsXA")
ConnectionFactory connectionFactory;
设置快速入门
- 以单机模式启动 JBOSS EAP。
-
导航到
EAP_HOME/quickstarts/camel/camel-jms -
输入
mvn clean install -Pdeploy'以构建和部署 Quickstart。 - 浏览至 http://localhost:8080/example-camel-jms
您应该会看到一个名为"Orders Received"的页面。随着向示例应用程序发送订单,在此页中将列出每个国家每个国家的订单列表。
运行快速入门
EAP_HOME/quickstarts/camel-jms/src/main/resources 目录中有一些示例顺序 XML 文件。Camel 将每 5 秒随机选择一个文件,并将其复制到 EAP_HOME/standalone/data/orders 中进行处理。
控制台将输出信息详细描述了每个订购所发生的情况。输出将如下所示:
JmsConsumer[OrdersQueue]) Sending order to the UK
JmsConsumer[OrdersQueue]) Sending order to another country
JmsConsumer[OrdersQueue]) Sending order to the US
当文件被使用后,您可以返回到 http://localhost:8080/example-camel-jms/orders。每个国家的接收订单的数目应该已由 1 增加。
所有处理的订购将分成以下目的地:
EAP_HOME/standalone/data/orders/processed/uk
EAP_HOME/standalone/data/orders/processed/us
EAP_HOME/standalone/data/orders/processed/other
取消部署
要取消部署示例,可导航到 EAP_HOME/quickstarts/camel/camel-jms run mvn clean -Pdeploy。
6.3. camel-mail
与电子邮件的交互由 邮件 组件提供。
默认情况下,Camel 将创建自己的邮件会话,并使用它来与您的邮件服务器进行交互。由于 JBoss EAP 已经为安全连接、用户名和密码加密提供所有相关支持,因此建议在 JBoss EAP 配置中配置您的邮件会话,并使用 JNDI 将它们连接到您的 Camel 端点。
6.3.1. JBoss EAP 配置
首先,您为 Mail 服务器配置 JBoss EAP 邮件子系统。以下示例添加了 Google 邮件 IMAP 和 SMTP 的配置。
在"默认"会话后配置一个 mail-session。
<subsystem xmlns="urn:jboss:domain:mail:2.0">
    <mail-session name="default" jndi-name="java:jboss/mail/Default">
      <smtp-server outbound-socket-binding-ref="mail-smtp"/>
    </mail-session>
<mail-session debug="true" name="gmail" jndi-name="java:jboss/mail/gmail">
<smtp-server outbound-socket-binding-ref="mail-gmail-smtp" ssl="true" username="your-username-here" password="your-password-here"/>
<imap-server outbound-socket-binding-ref="mail-gmail-imap" ssl="true" username="your-username-here" password="your-password-here"/>
</mail-session>
</subsystem>
您可以配置 'mail-gmail-smtp' 和 'mail-gmail-imap' 的 outbound-socket-binding-ref 值。
下一步是配置这些套接字绑定。您可以按照以下方法在 socket-binding-group 配置中添加额外的绑定。
<outbound-socket-binding name="mail-gmail-smtp">
  <remote-destination host="smtp.gmail.com" port="465"/>
</outbound-socket-binding>

<outbound-socket-binding name="mail-gmail-imap">
  <remote-destination host="imap.gmail.com" port="993"/>
</outbound-socket-binding>
这会将邮件会话配置为连接到端口 465 和 192.168.0.3 上的端口 465.gmail.com 上的 host smtp.gmail.com。如果您使用不同的邮件主机,则此详细信息会有所不同。
6.3.2. POP3 配置
如果您需要配置 POP3 会话,则与以上示例中定义的原则相同。
<!-- Server configuration -->
<pop3-server outbound-socket-binding-ref="mail-pop3" ssl="true" username="your-username-here" password="your-password-here"/>

<!-- Socket binding configuration -->
<outbound-socket-binding name="mail-gmail-imap">
  <remote-destination host="pop3.gmail.com" port="993"/>
</outbound-socket-binding>
6.3.3. Camel 路由配置
6.3.3.1. mail producer
这个示例使用 SMTPS 协议和 CDI 与 camel-cdi 组件一起。您在 JBoss EAP 配置中配置的 Java 邮件会话通过 JNDI 注入到 Camel RouteBuilder 中。
6.3.3.1.1. 路由构建器 SMTP 示例
GMail 邮件会话使用 @Resource 注释注入 Producer 类,并引用您之前配置的 jndi-name 属性。这可让您在 camel-mail 端点配置中引用邮件会话。
public class MailSessionProducer {
    @Resource(lookup = "java:jboss/mail/greenmail")
    private Session mailSession;

    @Produces
    @Named
    public Session getMailSession() {
        return mailSession;
    }
}
public class MailRouteBuilder extends RouteBuilder {
@Override
public void configure() throws Exception {
from("direct:start")
.to("smtps://smtp.gmail.com?session=#mailSession");
}
}要发送电子邮件,您可以创建一个 ProducerTemplate,并将适当的正文与必要的电子邮件标头一起发送。
Map<String, Object> headers = new HashMap<String, Object>();
headers.put("To", "destination@test.com");
headers.put("From", "sender@example.com");
headers.put("Subject", "Camel on Wildfly rocks");

String body = "Hi,\n\nCamel on Wildfly rocks!.";

ProducerTemplate template = camelContext.createProducerTemplate();
template.sendBodyAndHeaders("direct:start", body, headers);
6.3.3.2. 邮件消费者
要接收电子邮件,您可以使用 IMAP 邮件端点。Camel 路由配置如下所示:
public void configure() throws Exception {
   from("imaps://imap.gmail.com?session=#mailSession")
   .to("log:email");
}
6.3.4. 安全性
6.3.4.1. SSL 配置
JBoss EAP 可以配置为管理 Java 邮件会话,以及使用 SSL / TLS 管理它们的相关传输。在配置邮件会话时,您可以在服务器类型上配置 SSL 或 TLS:
- smtp-server
- imap-server
- pop-server
通过设置属性 ssl="true" 或 tls="true"。
6.3.4.2. 保护密码
建议您不要对配置文件中的密码使用明文。您可以使用 WildFly Vault 屏蔽敏感数据。
6.3.4.3. Camel 安全
6.3.5. GitHub 上的代码示例
GitHub 上提供了 camel-mail 应用程序示例,供您尝试发送/接收电子邮件。
6.4. camel-rest
其它组件允许您使用 Rest DSL 和作为 REST 传输其他 Camel 组件来定义 REST 端点。http://camel.apache.org/rest.html
EAP 子系统上的 Camel 仅支持 camel-servlet 和 camel-undertow 组件,以用于 REST DSL。但是,如果您尝试配置其他组件,子系统不起作用。
CamelContext camelctx = new DefaultCamelContext();
camelctx.addRoutes(new RouteBuilder() {
    @Override
    public void configure() throws Exception {
        restConfiguration().component("servlet").contextPath("camel/rest").port(8080);
        rest("/hello").get("/{name}").to("direct:hello");
        from("direct:hello").transform(simple("Hello ${header.name}"));
    }
});
6.5. camel-rest-swagger
rest-swagger 组件可以从 Swagger 文档配置 REST 制作者,并委派给实施 RestProducer onnectionFactoryy 接口的组件,例如:
6.6. camel-sql
SQL 组件允许您使用 JDBC 查询来处理数据库。此组件和 JDBC 组件之间的区别是,如果 SQL,查询是端点的属性,它使用消息有效负载作为传递给查询的参数。
CamelContext camelctx = new DefaultCamelContext();
camelctx.addRoutes(new RouteBuilder() {
    @Override
    public void configure() throws Exception {
        from("sql:select name from information_schema.users?dataSource=java:jboss/datasources/ExampleDS")
        .to("direct:end");
    }
});
上方显示的 JNDI 数据源查找仅在配置 DefaultCamelContext 时正常工作。请参阅以下关于 CdiCamelContext 和 SpringCamelContext 示例。
当与 camel-cdi 组件一同使用时,Jarkarta EE 注解可以向 Camel 提供数据源。本例使用 @Named 注释,以便 Camel 能够发现所需的数据源。
public class DatasourceProducer {
    @Resource(lookup = "java:jboss/datasources/ExampleDS")
    DataSource dataSource;

    @Produces
    @Named("wildFlyExampleDS")
    public DataSource getDataSource() {
        return dataSource;
    }
}
现在,数据源可以通过 camel-sql 端点配置上的 dataSource 参数来引用。
@ApplicationScoped
@ContextName("camel-sql-cdi-context")
@Startup
public class CdiRouteBuilder extends RouteBuilder {
    @Override
    public void configure() throws Exception {
        from("sql:select name from information_schema.users?dataSource=wildFlyExampleDS")
        .to("direct:end");
    }
}
使用 camel-spring 时,路由配置将类似如下:
<beans xmlns="http://www.springframework.org/schema/beans"
       xmlns:xsi="http://www.w3.org/2001/XMLSchema-instance"
       xmlns:jee="http://www.springframework.org/schema/jee"
       xsi:schemaLocation="
       http://www.springframework.org/schema/beans http://www.springframework.org/schema/beans/spring-beans.xsd
       http://camel.apache.org/schema/spring http://camel.apache.org/schema/spring/camel-spring.xsd
       http://www.springframework.org/schema/jee http://www.springframework.org/schema/jee/spring-jee.xsd">

    <jee:jndi-lookup id="wildFlyExampleDS" jndi-name="java:jboss/datasources/ExampleDS"/>

    <camelContext id="sql-spring-context" xmlns="http://camel.apache.org/schema/spring">
        <route>
            <from uri="sql:select name from information_schema.users?dataSource=#wildFlyExampleDS" />
            <to uri="direct:end" />
        </route>
    </camelContext>

</beans>
6.6.1. Spring JDBC XML 命名空间支持
支持以下 Spring JDBC XML 配置
jdbc:embedded-database
<jdbc:embedded-database id="datasource" type="H2">
  <jdbc:script location="db-schema.sql"/>
</jdbc:embedded-database>
默认情况下只支持 H2 数据库,因为 JBoss EAP 具有此支持的原生支持。如果要使用其他嵌入式数据库供应商,则需要安装适当的数据库驱动程序。
jdbc:initialize-database
<jdbc:initialize-database data-source="datasource">
  <jdbc:script location="classpath:db-init.sql"/>
</jdbc:initialize-database>
6.7. camel-soap-rest-bridge
简单的 Camel 路由可以将 REST 调用桥接到旧 SOAP 服务。提供了 Quickstart 示例,演示使用 Camel 的 REST DSL( Camel 的 REST DSL)使用 camel-SOAp-rest-bridge 组件来公开后端 SOAP API 服务。
在此快速入门中,由 RH SSO 支持的 REST 端点和 SOAP 端点都涉及到安全性。前端 REST API 通过 OAuth 和 OpenID Connect 保护,客户端将使用 "Resource Owner Password Credentials" OAuth2 模式从 RH SSO 获取 JWT(JSON Web 令牌)访问令牌。客户端使用此令牌访问 REST 端点。
在网桥 Camel 路由中,客户端身份从 SecurityContext 传播,当 camel-cxf producer 与后端 WS-SECURITY 保护的 SOAP 服务对话时,它将首先使用此客户端身份获取由 CXF STS 服务发布的 SAML2 令牌(由 RH SSO 作为身份提供程序支持)。SAML2 令牌已签名并添加到 WS-SECURITY 标头中,后端 WS-SECURITY 保护的 SOAP 服务将验证此 SAML2 令牌。
SOAP 调用还包括 XSD 架构验证。如果令牌验证成功,后端 SOAP 服务会返回对发起请求的 REST 客户端的响应。
先决条件
- 已安装 JBoss EAP 7.3 或更高版本。
- 已安装 Apache Maven 3.3.x 或更高版本。
- 已安装并配置了 RH SSO 7.4 - 按照安装说明 https://access.redhat.com/documentation/zh-cn/red_hat_single_sign-on/7.4/html/getting_started_guide/installing-standalone_#installing-server-product
- 已安装 RH SSO EAP 适配器 - 按照安装说明 https://access.redhat.com/documentation/zh-cn/red_hat_single_sign-on/7.4/html/getting_started_guide/securing-sample-app_#installing-client-adapter
设置快速入门
- 以单机模式启动 JBOSS EAP。
-
导航到
EAP_HOME/quickstarts/camel/camel-SOAp-rest-bridge -
输入
mvn clean install -Pdeploy以构建和部署 Quickstart。 配置 RH SSO
- 从 http://localhost:8180/auth 使用 admin 作为用户名/密码登录 RH SSO Admin Console
- 点 Add realm
- 点 Select file
- 选择 ./src/main/resources/keycloak-config/realm-export-new.json,该示例将导入预定义所需的 realm/client/user/role。
- 点 Create
EAP 上的 Fuse 中的 Quickstart 示例
此快速入门示例包含有关运行快速启动和测试案例结果的附加信息,可在 EAP 安装中使用 EAP 安装( EAP_HOME/quickstarts/camel/camel-soap-rest-bridge 目录)。
取消部署
要取消部署示例,请导航到 EAP_HOME/quickstarts/camel/camel-soap-rest-bridge 目录,并运行 mvn clean -Pdeploy。
6.8. 添加组件
为附加 Camel 组件添加支持非常简单
添加 module.xml 定义
module.xml 描述符可定义您的组件的类加载行为。它应该被放入 modules/system/layers/fuse/org/apache/camel/component 中组件的 jar。为直接编译时间依赖项,应设置模块依赖项。
下面是 camel-ftp 组件的示例
<module xmlns="urn:jboss:module:1.1" name="org.apache.camel.component.ftp">
  <resources>
    <resource-root path="camel-ftp-2.14.0.jar" />
  </resources>
  <dependencies>
    <module name="com.jcraft.jsch" />
    <module name="javax.xml.bind.api" />
    <module name="org.apache.camel.core" />
    <module name="org.apache.commons.net" />
  </dependencies>
</module>
请确保您没有已在 WildFly 中提供且可重复使用的模块。
添加对组件的引用
要使此模块默认对任意 JavaEE 部署可见,请添加对 modules/system/layers/fuse/org/apache/camel/component/main/module.xml的引用
<module xmlns="urn:jboss:module:1.3" name="org.apache.camel.component">
  <dependencies>
    ...
    <module name="org.apache.camel.component.ftp" export="true" services="export"/>
  </dependencies>
</module>
第 7 章 安全性
JBoss EAP 中的安全性是一个很大的主题。JBoss EAP 和 Camel 均有良好的记录,规范配置、端点和载荷的安全方法。
7.1. Hawtio 安全
可以通过下列步骤来保护 Hawtio 控制台。
1.在 standalone.xml 中添加系统属性
<system-properties>
    <property name="hawtio.authenticationEnabled" value="true" />
    <property name="hawtio.realm" value="hawtio-domain" />
</system-properties>2.在 security 子系统中为 Hawtio 添加安全域
<security-domain name="hawtio-domain" cache-type="default">
    <authentication>
        <login-module code="RealmDirect" flag="required">
            <module-option name="realm" value="ManagementRealm"/>
        </login-module>
    </authentication>
</security-domain>3.配置管理用户
$JBOSS_HOME/bin/add-user.sh -u someuser -p s3cret
浏览 http://localhost:8080/hawtio,并使用为管理用户配置的凭据进行身份验证。
7.2. JAX-RS 安全性
以下主题解释了如何保护 JAX-RS 端点。
7.3. JAX-WS Security
以下主题解释了如何保护 JAX-WS 端点。
7.4. JMS 安全性
以下主题解释了如何保护 JMS 端点。
另外,您可以使用 Camel 认为路由策略与 JBoss EAP 安全系统集成。
7.5. 路由策略
Camel 支持 RoutePolicies 的概念,可用于与 JBoss EAP 安全系统集成。目前有两种支持的安全集成场景。
7.5.1. Camel 称为 Jarkarta EE
当 camel 路由调用受保护的 Jarkarta EE 组件时,它会作为客户端提供与调用关联的适当凭证。
您可以使用 ClientAuthorizationPolicy 分离路由,如下所示:
CamelContext camelctx = new DefaultCamelContext();
camelctx.addRoutes(new RouteBuilder() {
    @Override
    public void configure() throws Exception {
        from("direct:start")
        .policy(new ClientAuthorizationPolicy())
        .to("ejb:java:module/AnnotatedSLSB?method=doSelected");
    }
});
这不会进行任何身份验证和授权,作为 camel 消息处理的一部分。相反,它会将 Camel Exchange 附带的凭据与调用 EJB3 层相关联。
调用消息消费者的客户端必须在 AUTHENTICATION 标头中提供适当的凭证,如下所示:
ProducerTemplate producer = camelctx.createProducerTemplate();
Subject subject = new Subject();
subject.getPrincipals().add(new DomainPrincipal(domain));
subject.getPrincipals().add(new EncodedUsernamePasswordPrincipal(username, password));
producer.requestBodyAndHeader("direct:start", "Kermit", Exchange.AUTHENTICATION, subject, String.class);
认证和授权将在 Jarkarta EE 层中进行。
7.5.2. 保护 Camel 路由
为了保护 Camel 路由,您可以将 DomainAuthorizationPolicy 与路由关联。此策略要求针对给定的安全域和"Role2"授权成功身份验证。
CamelContext camelctx = new DefaultCamelContext();
camelctx.addRoutes(new RouteBuilder() {
    @Override
    public void configure() throws Exception {
        from("direct:start")
        .policy(new DomainAuthorizationPolicy().roles("Role2"))
        .transform(body().prepend("Hello "));
    }
});
camelctx.start();
同样,调用消息消费者的客户端必须在 AUTHENTICATION 标头中提供适当的凭证,如下所示:
ProducerTemplate producer = camelctx.createProducerTemplate();
Subject subject = new Subject();
subject.getPrincipals().add(new DomainPrincipal(domain));
subject.getPrincipals().add(new EncodedUsernamePasswordPrincipal(username, password));
producer.requestBodyAndHeader("direct:start", "Kermit", Exchange.AUTHENTICATION, subject, String.class);
7.6. 部署 CXF JAX-WS 快速入门
本示例演示了在 EAP 上使用 camel-cxf 组件来生成和使用由 Elytron 安全域保护的 JAX-WS Web 服务。Elytron 是自 EAP 7.1 起提供的一个新安全框架。在此快速入门中,Camel 路由从直接端点获取消息有效负载,并将其传递给 CXF producer 端点。producer 使用有效负载将参数传递给 BASIC HTTP 身份验证保护的 CXF JAX-WS Web 服务。
先决条件
- 确保已安装和配置 Maven。
- 确保安装和配置了具有 Red Hat Fuse 的应用程序服务器。
流程
设置
JBOSS_HOME环境变量,以指向应用服务器安装的根目录。对于 Linux
export JBOSS_HOME=...
对于 Windows:
set JBOSS_HOME=...
使用
add-user脚本创建新服务器应用用户和组。对于 Linux
${JBOSS_HOME}/bin/add-user.sh -a -u testUser -p testPassword1+ -g testRole对于 Windows:
%JBOSS_HOME%\bin\add-user.bat -a -u testUser -p testPassword1+ -g testRole
以独立模式启动应用服务器。
对于 Linux
${JBOSS_HOME}/bin/standalone.sh -c standalone-full.xml对于 Windows:
%JBOSS_HOME%\bin\standalone.bat -c standalone-full.xml
此项目的
webapp/WEB-INF目录中的jboss-web-xml和web.xml文件设置应用程序安全性域、安全角色和限制。
构建和部署项目。
mvn install -Pdeploy
此命令还调用 CLI 脚本
configure-basic-security.cli,用于创建安全域和一些其他管理对象。浏览至
http://localhost:8080/example-camel-cxf-jaxws-secure/此时会显示标题为 Send A Greeting 的页面。此 UI 可让您与已启动的 测试 问候 Web 服务进行交互。服务 WSDL 位于
http://localhost:8080/webservices/greeting-security-basic?wsdl单个服务操作名为 greet,它取两个名为 message 和 name 的 String 参数。调用 Web 服务将返回这些值链接在一起的响应。
测试 Camel Secure CXF JAX-WS 快速入门
- 浏览至 http://localhost:8080/example-camel-cxf-jaxws-secure/
在 Send A Greeting web 表单上,在文本字段中输入 消息和 名称,然后按" 发送 "按钮。
您输入的信息显示为 UI 上的问候语。
CamelCxfWsServlet处理来自 Web UI 的 POST 请求。它从参数值中检索消息和名称,并构造对象数组。此对象数组是发送到direct:start端点的消息有效负载。ProducerTemplate将消息有效负载发送到 Camel。direct:start端点将对象数组传递到cxf:beanweb 服务制作者。CamelCxfWsServlet使用 Web 服务响应来显示 Web UI 上的问候语。您可以在src/main/webapp/WEB-INF/cxfws-security-camel-context.xml文件中查看完整的 Camel 路由。
取消部署快速入门
运行以下命令以取消部署 quickstart。
mvn clean -Pdeploy