
使用 Ansible 安装和管理身份管理
使用 Ansible 维护 IdM 环境
摘要
ansible-freeipa 软件包,使管理员能够使用 Ansible 运行红帽身份管理(IdM)。您可以使用 playbook 安装 IdM 并管理用户、组、主机、访问控制和配置设置。
使开源包含更多
红帽致力于替换我们的代码、文档和 Web 属性中存在问题的语言。我们从这四个术语开始:master、slave、黑名单和白名单。由于此项工作十分艰巨,这些更改将在即将推出的几个发行版本中逐步实施。有关更多详情,请参阅我们的首席技术官 Chris Wright 提供的消息。
在身份管理中,计划中的术语变化包括:
- 使用 block list 替换 blacklist
- 使用 allow list 替换 whitelist
- 使用 secondary 替换 slave
master 会根据上下文被替换为其他更适当的术语:
- 使用 IdM server 替换 IdM master
- 使用 CA renewal server 替换 CA renewal master
- 使用 CRL publisher server 替换 CRL master
- 使用 multi-supplier 替换 multi-master
对红帽文档提供反馈
我们感谢您对我们文档的反馈。让我们了解如何改进它。
通过 Jira 提交反馈(需要帐户)
- 登录到 Jira 网站。
- 在顶部导航栏中点 Create
- 在 Summary 字段中输入描述性标题。
- 在 Description 字段中输入您对改进的建议。包括文档相关部分的链接。
- 点对话框底部的 Create。
第 1 章 Ansible 术语
此标题中的章节使用官方 Ansible 术语。如果您不熟悉术语,请先阅读 Ansible 上游官方文档,然后再继续,特别是以下部分:
- Ansible 部分中的基本概念 概述了 Ansible 中最常使用的概念。
- 用户指南概述了开始使用 Ansible 时最常见的情况和问题,例如使用命令行;使用清单;与数据交互;编写任务、play 和 playbook;以及执行 playbook。
- 如何构建您的清单,提供了有关如何设计清单的提示。清单 (inventory) 是 Ansible 用于针对基础架构中的多个受管节点或主机的一组列表。
- Playbook 简介引入了 Ansible playbook 的概念,作为可重复和可重复使用的系统来管理配置、部署机器和部署复杂应用。
- Ansible roles 部分中介绍如何根据已知的文件结构自动加载变量、任务和处理程序。
- Glossary 解释了 Ansible 文档其中使用的术语。
第 2 章 使用 Ansible playbook 来安装身份管理服务器
了解如何使用 Ansible 将系统配置为 IdM 服务器。将系统配置为 IdM 服务器建立 IdM 域并让系统向 IdM 客户端提供 IdM 服务。您可以使用 ipaserver Ansible 角色来管理部署。
先决条件
您了解 Ansible 和 IdM 概念:
- Ansible 角色
- Ansible 节点
- Ansible 清单
- Ansible 任务
- Ansible 模块
- Ansible play 和 playbook
2.1. Ansible 及其安装 IdM 的优点
Ansible 是一个自动化工具,用于配置系统、部署软件和执行滚动更新。Ansible 包含对身份验证(IdM)的支持,您可以使用 Ansible 模块来自动执行安装任务,如 IdM 服务器、副本、客户端或整个 IdM 拓扑的设置。
使用 Ansible 安装 IdM 的优点
以下列表提供了使用 Ansible 安装身份管理与手动安装的优点。
- 您不需要登录受管节点。
- 您不需要配置每个主机上的设置来单独部署。反之,您可以有一个清单文件来部署完整的集群。
- 您可以稍后重复将清单文件用于管理任务,例如添加用户和主机。即使与 IdM 相关的任务,也可以重复使用清单文件。
2.2. 安装 ansible-freeipa 软件包
按照以下流程安装 ansible-freeipa 软件包,该软件包为安装和管理身份管理(IdM)提供 Ansible 角色和模块。
先决条件
在 受管节点 上:
- 确保受管节点是一个具有静态 IP 地址和可正常工作的软件包管理器的 Red Hat Enterprise Linux 8 系统。
在 控制器 上:
- 确定控制器是一个带有有效订阅的 Red Hat Enterprise Linux 系统。否则,请参阅官方 Ansible 文档 安装指南 来获取替代安装说明。
-
确保您可以通过
SSH协议,从控制器访问受管节点。检查该受管节点是否已列在控制器的/root/.ssh/known_hosts文件中。
流程
在 Ansible 控制器上使用以下步骤。
如果您的系统在 RHEL 8.5 及更早版本中运行,请启用所需的软件仓库:
# subscription-manager repos --enable ansible-2.8-for-rhel-8-x86_64-rpms如果您的系统在 RHEL 8.5 及更早版本中运行,请安装
ansible软件包:# dnf install ansible安装
ansible-freeipa软件包:# dnf install ansible-freeipa角色和模块安装到
/usr/share/ansible/roles/和/usr/share/ansible/plugins/modules目录中。
2.3. 在文件系统中的 Ansible 角色位置
默认情况下,ansible-freeipa 角色安装到 /usr/share/ansible/roles/ 目录。ansible-freeipa 软件包的结构如下:
/usr/share/ansible/roles/目录将ipaserver、ipareplica和ipaclient角色存储在 Ansible 控制器上。每个角色目录都会在README.mdMarkdown 文件中保存示例、基本概述、有关角色的许可证和文档。[root@server]# ls -1 /usr/share/ansible/roles/ ipaclient ipareplica ipaserver/usr/share/doc/ansible-freeipa/目录将有关各个角色和拓扑的文档存储在README.mdMarkdown 文件中。它还存储了playbooks/子目录。[root@server]# ls -1 /usr/share/doc/ansible-freeipa/ playbooks README-client.md README.md README-replica.md README-server.md README-topology.md/usr/share/doc/ansible-freeipa/playbooks/目录存储示例 playbook:[root@server]# ls -1 /usr/share/doc/ansible-freeipa/playbooks/ install-client.yml install-cluster.yml install-replica.yml install-server.yml uninstall-client.yml uninstall-cluster.yml uninstall-replica.yml uninstall-server.yml
2.4. 为带有集成 DNS 和集成 CA 作为根 CA 的部署设置参数
完成这个流程,来在使用 IdM 集成 DNS 解决方案的环境中为安装带有集成 CA 作为根 CA 的 IdM 服务器配置清单文件。
此流程中的清单使用 INI 格式。或者,也可以使用 YAML 或 JSON 格式。
流程
创建一个
~/MyPlaybooks/目录:$ mkdir MyPlaybooks
-
创建一个
~/MyPlaybooks/inventory文件。 打开清单文件进行编辑。指定您要用作 IdM 服务器的主机的完全限定域名(
FQDN)。确保FQDN满足以下条件:- 只允许字母数字字符和连字符(-)。例如,不允许使用下划线,这可能导致 DNS 失败。
- 主机名必须都是小写。
- 指定 IdM 域和域信息。
通过添加以下选项来指定您要使用集成的 DNS:
ipaserver_setup_dns=yes指定 DNS 转发设置。选择以下选项之一:
-
如果您希望安装程序使用来自
/etc/resolv.conf文件中的转发,请使用ipaserver_auto_forwarders=yes选项。如果在/etc/resolv.conf文件中指定的名称服务器是 localhost 127.0.0.1 地址,或者位于虚拟私有网络中,并且您使用的 DNS 服务器通常无法从公共互联网访问,则不要使用这个选项。 -
使用
ipaserver_forwarders选项手动指定您的转发器。安装过程将转发器 IP 地址添加到安装的 IdM 服务器上的/etc/named.conf文件中。 使用
ipaserver_no_forwarders=yes选项来配置要使用的根 DNS 服务器。注意如果没有 DNS 转发器,您的环境会被隔离,且基础架构中的其他 DNS 域的名称不会被解析。
-
如果您希望安装程序使用来自
指定 DNS 反向记录和区域设置。从以下选项中选择:
-
使用
ipaserver_allow_zone_overlap=yes选项来允许创建(反向)区域,即使区域已可解析。 -
使用
ipaserver_reverse_zones选项来手动指定反向区域。 如果您不希望安装程序创建反向 DNS 区域,请使用
ipaserver_no_reverse=yes选项。注意使用 IdM 管理反向区是可选的。您可以改为使用外部 DNS 服务来实现这一目的。
-
使用
-
指定
admin和Directory Manager的密码。使用 Ansible Vault 来存储密码,并从 playbook 文件中引用 Vault 文件。另外,也可以更安全地指定清单文件中直接的密码。 (可选)指定要由 IdM 服务器使用的自定义
firewalld区域。如果您没有设置自定义区,IdM 会将其服务添加到默认的firewalld区域中。预定义的默认区域是public。重要指定的
firewalld区域必须存在,并且是永久的。包含所需服务器信息的清单文件示例(密码除外)
[ipaserver]
server.idm.example.com

[ipaserver:vars]
ipaserver_domain=idm.example.com
ipaserver_realm=IDM.EXAMPLE.COM
ipaserver_setup_dns=yes
ipaserver_auto_forwarders=yes
[...]
包含所需服务器信息(包括密码)的清单文件示例
[ipaserver]
server.idm.example.com

[ipaserver:vars]
ipaserver_domain=idm.example.com
ipaserver_realm=IDM.EXAMPLE.COM
ipaserver_setup_dns=yes
ipaserver_auto_forwarders=yes
ipaadmin_password=MySecretPassword123
ipadm_password=MySecretPassword234

[...]
带有自定义
firewalld区的清单文件示例[ipaserver] server.idm.example.com [ipaserver:vars] ipaserver_domain=idm.example.com ipaserver_realm=IDM.EXAMPLE.COM ipaserver_setup_dns=yes ipaserver_auto_forwarders=yes ipaadmin_password=MySecretPassword123 ipadm_password=MySecretPassword234 ipaserver_firewalld_zone=custom zone使用存储在 Ansible Vault 文件中的 admin 和 Directory Manager 密码设置 IdM 服务器的 playbook 示例
---
- name: Playbook to configure IPA server
  hosts: ipaserver
  become: true
  vars_files:
  - playbook_sensitive_data.yml

  roles:
  - role: ipaserver
    state: present
使用清单文件中的 admin 和 Directory Manager 密码来设置 IdM 服务器的 playbook 示例
---
- name: Playbook to configure IPA server
  hosts: ipaserver
  become: true

  roles:
  - role: ipaserver
    state: present
其他资源
-
有关转发策略的默认设置,请参阅
ipa-dns-install(1)手册页中的--forward-policy描述。 -
有关
ipaserver角色使用的 DNS 变量的更多信息,请参阅/usr/share/doc/ansible-freeipa目录中README-server.md文件中的 DNS 变量部分。 - 有关清单文件的更多信息,请参阅 如何构建您的清单。
2.5. 为带有外部 DNS 和集成 CA 作为根 CA 的部署设置参数
完成这个流程,来为在使用外部 DNS 解决方案的环境中安装带有集成 CA 作为根 CA 的 IdM 服务器配置清单文件。
此流程中的清单文件使用 INI 格式。或者,也可以使用 YAML 或 JSON 格式。
流程
创建一个
~/MyPlaybooks/目录:$ mkdir MyPlaybooks
-
创建一个
~/MyPlaybooks/inventory文件。 打开清单文件进行编辑。指定您要用作 IdM 服务器的主机的完全限定域名(
FQDN)。确保FQDN满足以下条件:- 只允许字母数字字符和连字符(-)。例如,不允许使用下划线,这可能导致 DNS 失败。
- 主机名必须都是小写。
- 指定 IdM 域和域信息。
-
确保
ipaserver_setup_dns选项被设为no或空缺。 -
指定
admin和Directory Manager的密码。使用 Ansible Vault 来存储密码,并从 playbook 文件中引用 Vault 文件。另外,也可以更安全地指定清单文件中直接的密码。 (可选)指定要由 IdM 服务器使用的自定义
firewalld区域。如果您没有设置自定义区,IdM 会将其服务添加到默认的firewalld区域中。预定义的默认区域是public。重要指定的
firewalld区域必须存在,并且是永久的。包含所需服务器信息的清单文件示例(密码除外)
[ipaserver]
server.idm.example.com

[ipaserver:vars]
ipaserver_domain=idm.example.com
ipaserver_realm=IDM.EXAMPLE.COM
ipaserver_setup_dns=no
[...]
包含所需服务器信息(包括密码)的清单文件示例
[ipaserver]
server.idm.example.com

[ipaserver:vars]
ipaserver_domain=idm.example.com
ipaserver_realm=IDM.EXAMPLE.COM
ipaserver_setup_dns=no
ipaadmin_password=MySecretPassword123
ipadm_password=MySecretPassword234

[...]
带有自定义
firewalld区的清单文件示例[ipaserver] server.idm.example.com [ipaserver:vars] ipaserver_domain=idm.example.com ipaserver_realm=IDM.EXAMPLE.COM ipaserver_setup_dns=no ipaadmin_password=MySecretPassword123 ipadm_password=MySecretPassword234 ipaserver_firewalld_zone=custom zone使用存储在 Ansible Vault 文件中的 admin 和 Directory Manager 密码设置 IdM 服务器的 playbook 示例
---
- name: Playbook to configure IPA server
  hosts: ipaserver
  become: true
  vars_files:
  - playbook_sensitive_data.yml

  roles:
  - role: ipaserver
    state: present
使用清单文件中的 admin 和 Directory Manager 密码来设置 IdM 服务器的 playbook 示例
---
- name: Playbook to configure IPA server
  hosts: ipaserver
  become: true

  roles:
  - role: ipaserver
    state: present
其他资源
- 有关清单文件的更多信息,请参阅 如何构建您的清单。
2.6. 使用 Ansible playbook 将集成 CA 的 IdM 服务器部署为 root CA
完成此流程,来使用 Ansible playbook 部署带有集成证书颁发机构(CA)作为根 CA 的 IdM 服务器。
此流程中的清单使用 INI 格式。或者,也可以使用 YAML 或 JSON 格式。
先决条件
您已通过选择以下流程之一设置了与您的场景相应的参数:
-
您已阅读并理解您了可以与
ipaserver角色一起使用的变量,如/usr/share/doc/ansible-freeipa/README-server.md文件中所述。
流程
运行带有 playbook 文件名(例如
install-server.yml)的ansible-playbook命令。使用-i选项指定清单文件:$ ansible-playbook --vault-password-file=password_file -v -i ~/MyPlaybooks/inventory ~/MyPlaybooks/install-server.yml使用
-v、-vv或-vvv选项来指定详细程度。您可以查看在命令行界面(CLI)上的 Ansible playbook 脚本的输出。以下输出显示该脚本运行成功,有 0 个任务失败:
PLAY RECAP
server.idm.example.com : ok=18   changed=10   unreachable=0    failed=0    skipped=21   rescued=0    ignored=0
选择以下选项之一:
如果您的 IdM 部署使用外部 DNS:将包含在
/tmp/ipa.system.records.UFRPto.db文件中的 DNS 资源记录添加到现有的外部 DNS 服务器中。更新 DNS 记录的过程因特定的 DNS 解决方案而异。... Restarting the KDC Please add records in this file to your DNS system: /tmp/ipa.system.records.UFRBto.db Restarting the web server ...
重要在将 DNS 记录添加到现有 DNS 服务器之前,服务器安装不会完成。
如果您的 IdM 部署使用集成的 DNS:
将父域中的 DNS 委托程序添加到 IdM DNS 域。例如,如果 IdM DNS 域是
idm.example.com,请在example.com父域中添加一个名字服务器(NS)记录。重要每次安装 IdM DNS 服务器后都会重复这个步骤。
-
将时间服务器的
_ntp._udp服务(SRV)记录添加到您的 IdM DNS。IdM DNS 中新安装的 IdM 服务器的时间服务器的 SRV 记录可确保将来的副本和客户端安装会自动配置为与此主 IdM 服务器使用的时间服务器同步。
其他资源
- 有关如何部署将 外部 CA 作为 root CA 的 IdM 服务器的说明,请参阅 使用 Ansible playbook 部署将外部 CA 作为 root CA 的 IdM 服务器
2.7. 为带有集成 DNS 和外部 CA 作为根 CA 的部署设置参数
完成这个流程,来为在使用 IdM 集成 DNS 解决方案的环境中安装带有外部 CA 作为根 CA 的 IdM 服务器配置清单文件。
此流程中的清单文件使用 INI 格式。或者,也可以使用 YAML 或 JSON 格式。
流程
创建一个
~/MyPlaybooks/目录:$ mkdir MyPlaybooks
-
创建一个
~/MyPlaybooks/inventory文件。 打开清单文件进行编辑。指定您要用作 IdM 服务器的主机的完全限定域名(
FQDN)。确保FQDN满足以下条件:- 只允许字母数字字符和连字符(-)。例如,不允许使用下划线,这可能导致 DNS 失败。
- 主机名必须都是小写。
- 指定 IdM 域和域信息。
通过添加以下选项来指定您要使用集成的 DNS:
ipaserver_setup_dns=yes指定 DNS 转发设置。选择以下选项之一:
-
如果您希望安装过程使用
/etc/resolv.conf文件中的转发器,请使用ipaserver_auto_forwarders=yes选项。如果/etc/resolv.conf文件中指定的名字服务器是 localhost 127.0.0.1 地址,或者如果您在虚拟私有网络中,并且您使用的 DNS 服务器通常无法从公共互联网访问,则不建议使用此选项。 -
使用
ipaserver_forwarders选项手动指定您的转发器。安装过程将转发器 IP 地址添加到安装的 IdM 服务器上的/etc/named.conf文件中。 使用
ipaserver_no_forwarders=yes选项来配置要使用的根 DNS 服务器。注意如果没有 DNS 转发器,您的环境会被隔离,且基础架构中的其他 DNS 域的名称不会被解析。
-
如果您希望安装过程使用
指定 DNS 反向记录和区域设置。从以下选项中选择:
-
使用
ipaserver_allow_zone_overlap=yes选项来允许创建(反向)区域,即使区域已可解析。 -
使用
ipaserver_reverse_zones选项来手动指定反向区域。 如果您不希望安装过程创建反向 DNS 区域,请使用
ipaserver_no_reverse=yes选项。注意使用 IdM 管理反向区是可选的。您可以改为使用外部 DNS 服务来实现这一目的。
-
使用
-
指定
admin和Directory Manager的密码。使用 Ansible Vault 来存储密码,并从 playbook 文件中引用 Vault 文件。另外,也可以更安全地指定清单文件中直接的密码。 (可选)指定要由 IdM 服务器使用的自定义
firewalld区域。如果您没有设置自定义区,IdM 会将其服务添加到默认的firewalld区中。预定义的默认区域是public。重要指定的
firewalld区域必须存在,并且是永久的。包含所需服务器信息的清单文件示例(密码除外)
[ipaserver]
server.idm.example.com

[ipaserver:vars]
ipaserver_domain=idm.example.com
ipaserver_realm=IDM.EXAMPLE.COM
ipaserver_setup_dns=yes
ipaserver_auto_forwarders=yes
[...]
包含所需服务器信息(包括密码)的清单文件示例
[ipaserver]
server.idm.example.com

[ipaserver:vars]
ipaserver_domain=idm.example.com
ipaserver_realm=IDM.EXAMPLE.COM
ipaserver_setup_dns=yes
ipaserver_auto_forwarders=yes
ipaadmin_password=MySecretPassword123
ipadm_password=MySecretPassword234

[...]
带有自定义
firewalld区的清单文件示例[ipaserver] server.idm.example.com [ipaserver:vars] ipaserver_domain=idm.example.com ipaserver_realm=IDM.EXAMPLE.COM ipaserver_setup_dns=yes ipaserver_auto_forwarders=yes ipaadmin_password=MySecretPassword123 ipadm_password=MySecretPassword234 ipaserver_firewalld_zone=custom zone [...]为安装的第一个步骤创建一个 playbook。输入有关生成证书签名请求(CSR),并将其从控制器复制到受管节点的说明。
---
- name: Playbook to configure IPA server Step 1
  hosts: ipaserver
  become: true
  vars_files:
  - playbook_sensitive_data.yml
  vars:
    ipaserver_external_ca: yes

  roles:
  - role: ipaserver
    state: present

  post_tasks:
  - name: Copy CSR /root/ipa.csr from node to "{{ groups.ipaserver[0] + '-ipa.csr' }}"
    fetch:
      src: /root/ipa.csr
      dest: "{{ groups.ipaserver[0] + '-ipa.csr' }}"
      flat: yes
为安装的最后步骤创建另一个 playbook。
---
- name: Playbook to configure IPA server Step -1
  hosts: ipaserver
  become: true
  vars_files:
  - playbook_sensitive_data.yml
  vars:
    ipaserver_external_cert_files: "/root/chain.crt"

  pre_tasks:
  - name: Copy "{{ groups.ipaserver[0] + '-chain.crt' }}" to /root/chain.crt on node
    copy:
      src: "{{ groups.ipaserver[0] + '-chain.crt' }}"
      dest: "/root/chain.crt"
      force: yes

  roles:
  - role: ipaserver
    state: present
其他资源
-
有关转发策略的默认设置,请参阅
ipa-dns-install(1)手册页中的--forward-policy描述。 -
有关
ipaserver角色使用的 DNS 变量的更多信息,请参阅/usr/share/doc/ansible-freeipa目录中README-server.md文件中的 DNS 变量部分。 - 有关清单文件的更多信息,请参阅 如何构建您的清单。
2.8. 为带有外部 DNS 和外部 CA 作为根 CA 的部署设置参数
完成这个流程,来为在使用外部 DNS 解决方案的环境中安装带有外部 CA 作为根 CA 的 IdM 服务器配置清单文件。
此流程中的清单文件使用 INI 格式。或者,也可以使用 YAML 或 JSON 格式。
流程
创建一个
~/MyPlaybooks/目录:$ mkdir MyPlaybooks
-
创建一个
~/MyPlaybooks/inventory文件。 打开清单文件进行编辑。指定您要用作 IdM 服务器的主机的完全限定域名(
FQDN)。确保FQDN满足以下条件:- 只允许字母数字字符和连字符(-)。例如,不允许使用下划线,这可能导致 DNS 失败。
- 主机名必须都是小写。
- 指定 IdM 域和域信息。
-
确保
ipaserver_setup_dns选项被设为no或空缺。 -
指定
admin和Directory Manager的密码。使用 Ansible Vault 来存储密码,并从 playbook 文件中引用 Vault 文件。另外,也可以更安全地指定清单文件中直接的密码。 (可选)指定要由 IdM 服务器使用的自定义
firewalld区域。如果您没有设置自定义区,IdM 会将其服务添加到默认的firewalld区域中。预定义的默认区域是public。重要指定的
firewalld区域必须存在,并且是永久的。包含所需服务器信息的清单文件示例(密码除外)
[ipaserver]
server.idm.example.com

[ipaserver:vars]
ipaserver_domain=idm.example.com
ipaserver_realm=IDM.EXAMPLE.COM
ipaserver_setup_dns=no
[...]
包含所需服务器信息(包括密码)的清单文件示例
[ipaserver]
server.idm.example.com

[ipaserver:vars]
ipaserver_domain=idm.example.com
ipaserver_realm=IDM.EXAMPLE.COM
ipaserver_setup_dns=no
ipaadmin_password=MySecretPassword123
ipadm_password=MySecretPassword234

[...]
带有自定义
firewalld区的清单文件示例[ipaserver] server.idm.example.com [ipaserver:vars] ipaserver_domain=idm.example.com ipaserver_realm=IDM.EXAMPLE.COM ipaserver_setup_dns=no ipaadmin_password=MySecretPassword123 ipadm_password=MySecretPassword234 ipaserver_firewalld_zone=custom zone [...]为安装的第一个步骤创建一个 playbook。输入有关生成证书签名请求(CSR),并将其从控制器复制到受管节点的说明。
---
- name: Playbook to configure IPA server Step 1
  hosts: ipaserver
  become: true
  vars_files:
  - playbook_sensitive_data.yml
  vars:
    ipaserver_external_ca: yes

  roles:
  - role: ipaserver
    state: present

  post_tasks:
  - name: Copy CSR /root/ipa.csr from node to "{{ groups.ipaserver[0] + '-ipa.csr' }}"
    fetch:
      src: /root/ipa.csr
      dest: "{{ groups.ipaserver[0] + '-ipa.csr' }}"
      flat: yes
为安装的最后步骤创建另一个 playbook。
---
- name: Playbook to configure IPA server Step -1
  hosts: ipaserver
  become: true
  vars_files:
  - playbook_sensitive_data.yml
  vars:
    ipaserver_external_cert_files: "/root/chain.crt"

  pre_tasks:
  - name: Copy "{{ groups.ipaserver[0] + '-chain.crt' }}" to /root/chain.crt on node
    copy:
      src: "{{ groups.ipaserver[0] + '-chain.crt' }}"
      dest: "/root/chain.crt"
      force: yes

  roles:
  - role: ipaserver
    state: present
其他资源
- 有关安装具有外部 DNS 和外部签名 CA 的 IdM 服务器时可用选项的详情,请参阅 安装 IdM 服务器:没有集成 DNS ,外部 CA 作为根 CA。
- 有关清单文件的更多信息,请参阅 如何构建您的清单。
2.9. 使用 Ansible playbook 将外部 CA 部署 IdM 服务器作为 root CA
完成此流程,来使用 Ansible playbook 部署具有外部证书颁发机构(CA)作为根 CA 的 IdM 服务器。
此流程中的清单文件使用 INI 格式。或者,也可以使用 YAML 或 JSON 格式。
先决条件
您已通过选择以下流程之一设置了与您的场景相应的参数:
-
您已阅读并理解您了可以与
ipaserver角色一起使用的变量,如/usr/share/doc/ansible-freeipa/README-server.md文件中所述。
流程
运行
ansible-playbook命令,并带有 playbook 文件名,该文件包含安装的第一步的说明,如install-server-step1.yml。使用-i选项指定清单文件:$ ansible-playbook --vault-password-file=password_file -v -i ~/MyPlaybooks/inventory ~/MyPlaybooks/install-server-step1.yml使用
-v、-vv或-vvv选项来指定详细程度。您可以查看在命令行界面(CLI)上的 Ansible playbook 脚本的输出。以下输出显示该脚本运行成功,有 0 个任务失败:
PLAY RECAP server.idm.example.com : ok=18 changed=10 unreachable=0 failed=0 skipped=21 rescued=0 ignored=0-
在控制器上找到
ipa.csr证书签名请求文件,并提交给外部的 CA。 - 将外部 CA 签名的 IdM CA 证书放在控制器文件系统中,以便下一步中的 playbook 可以找到它。
运行
ansible-playbook命令,并带有 playbook 文件名,该文件包含安装的最后一步的说明,如install-server-step2.yml。使用-i选项指定清单文件:$ ansible-playbook -v -i ~/MyPlaybooks/inventory ~/MyPlaybooks/install-server-step2.yml选择以下选项之一:
如果您的 IdM 部署使用外部 DNS:将包含在
/tmp/ipa.system.records.UFRPto.db文件中的 DNS 资源记录添加到现有的外部 DNS 服务器中。更新 DNS 记录的过程因特定的 DNS 解决方案而异。... Restarting the KDC Please add records in this file to your DNS system: /tmp/ipa.system.records.UFRBto.db Restarting the web server ...
重要在将 DNS 记录添加到现有 DNS 服务器之前,服务器安装不会完成。
如果您的 IdM 部署使用集成的 DNS:
将父域中的 DNS 委托程序添加到 IdM DNS 域。例如,如果 IdM DNS 域是
idm.example.com,请在example.com父域中添加一个名字服务器(NS)记录。重要每次安装 IdM DNS 服务器后都会重复这个步骤。
-
将时间服务器的
_ntp._udp服务(SRV)记录添加到您的 IdM DNS。IdM DNS 中新安装的 IdM 服务器的时间服务器的 SRV 记录可确保将来的副本和客户端安装会自动配置为与此主 IdM 服务器使用的时间服务器同步。
其他资源
有关如何部署将 集成的 CA 作为 root CA 的 IdM 服务器的说明,请参阅 使用 Ansible playbook 部署将集成的 CA 作为 root CA 的 IdM 服务器
2.10. 使用 Ansible playbook 卸载 IdM 服务器
在现有的身份管理(IdM)部署中,副本 和 服务器 是可交换的术语。
完成此流程,使用 Ansible playbook 来卸载 IdM 副本。在本例中:
- 从 server123.idm.example.com 卸载 IdM 配置。
- server123.idm.example.com 和关联的主机条目从 IdM 拓扑中删除。
先决条件
在控制节点上:
- 您使用 Ansible 版本 2.14 或更高版本。
-
您已安装
ansible-freeipa软件包。 - 您已在 ~/MyPlaybooks/ 目录中创建了一个带有 IdM 服务器的完全限定域名(FQDN)的 Ansible 清单文件。
-
您已将
ipaadmin_password存储在 secret.yml Ansible vault 中。 -
要使
ipaserver_remove_from_topology选项正常工作,系统必须运行在 RHEL 9.3 或更高版本上。
在受管节点上:
- 系统运行在 RHEL 7.6 或更高版本上。
流程
使用以下内容创建 Ansible playbook 文件 uninstall-server.yml :
--- - name: Playbook to uninstall an IdM replica hosts: ipaserver become: true roles: - role: ipaserver ipaserver_remove_from_domain: true state: absentipaserver_remove_from_domain选项从 IdM 拓扑中取消主机注册。注意如果 server123.idm.example.com 的删除导致断开连接的拓扑,则删除操作将被中止。如需更多信息,请参阅 如果这会导致断开连接的拓扑,请使用 Ansible playbook 卸载 IdM 服务器。
卸载副本:
$ ansible-playbook --vault-password-file=password_file -v -i <path_to_inventory_directory>/hosts <path_to_playbooks_directory>/uninstall-server.yml- 确保指向 server123.idm.example.com 的所有名称服务器(NS) DNS 记录都从 DNS 区域中删除。无论您使用由 IdM 还是外部 DNS 管理的集成 DNS,这个均适用。有关如何从 IdM 中删除 DNS 记录的更多信息,请参阅 在 IdM CLI 中删除 DNS 记录。
2.11. 如果这会导致断开连接的拓扑,请使用 Ansible playbook 卸载 IdM 服务器
在现有的身份管理(IdM)部署中,副本 和 服务器 是可交换的术语。
完成此流程,使用 Ansible playbook 卸载 IdM 副本,即使这会导致断开连接的 IdM 拓扑。在示例中,server456.idm.example.com 用于从拓扑中删除副本和 FQDN 为 server123.idm.example.com server123.idm.example.com 的相关的主机条目,使某些副本与 server456.idm.example.com 以及拓扑的其余部分断开连接。
如果只使用 remove_server_from_domain 从拓扑中删除副本不会导致断开连接的拓扑,则不需要其他选项。如果结果是断开连接的拓扑,您必须指定您要保留域的哪一部分。在这种情况下,您必须执行以下操作:
-
指定
ipaserver_remove_on_server值。 -
将
ipaserver_ignore_topology_disconnect设置为 True。
先决条件
在控制节点上:
- 您使用 Ansible 版本 2.14 或更高版本。
- 系统运行在 RHEL 9.3 或更高版本上。
-
您已安装
ansible-freeipa软件包。 - 您已在 ~/MyPlaybooks/ 目录中创建了一个带有 IdM 服务器的完全限定域名(FQDN)的 Ansible 清单文件。
-
您已将
ipaadmin_password存储在 secret.yml Ansible vault 中。
在受管节点上:
- 系统运行在 RHEL 7.6 或更高版本上。
流程
使用以下内容创建 Ansible playbook 文件 uninstall-server.yml :
--- - name: Playbook to uninstall an IdM replica hosts: ipaserver become: true roles: - role: ipaserver ipaserver_remove_from_domain: true ipaserver_remove_on_server: server456.idm.example.com ipaserver_ignore_topology_disconnect: true state: absent注意正常情况下,如果删除 server123 不会造成断开连接的拓扑:如果
ipaserver_remove_on_server的值没有设置,则 server123 上的副本会使用 server123 的复制协议自动删除。卸载副本:
$ ansible-playbook --vault-password-file=password_file -v -i <path_to_inventory_directory>/hosts <path_to_playbooks_directory>/uninstall-server.yml- 确保指向 server123.idm.example.com 的所有名称服务器(NS) DNS 记录都从 DNS 区域中删除。无论您使用由 IdM 还是外部 DNS 管理的集成 DNS,这个均适用。有关如何从 IdM 中删除 DNS 记录的更多信息,请参阅 在 IdM CLI 中删除 DNS 记录。
2.12. 其他资源
- 规划副本拓扑
- 使用 Ansible playbook 备份和恢复 IdM 服务器
- 清单基础知识:格式、主机和组
-
您可以在上游
ansible-freeipa上游文档 中看到用于安装 IdM 服务器的 Ansible playbook 示例,以及可能的变量列表。
第 3 章 使用 Ansible playbook 安装身份管理副本
使用 Ansible 将其注册到 IdM 域来将系统配置为 IdM 副本,并让系统在域中的 IdM 服务器上使用 IdM 服务。
部署是由 ipareplica Ansible 角色来管理的。该角色可以使用自动发现模式来识别 IdM 服务器、域和其他设置。但是,如果您以类似于层的模式部署多个副本,在不同时间部署不同的副本组,您必须为每个组定义特定的服务器或副本。
先决条件
- 您已在 Ansible 控制节点上安装了 ansible-freeipa 软件包。
您了解 Ansible 和 IdM 概念:
- Ansible 角色
- Ansible 节点
- Ansible 清单
- Ansible 任务
- Ansible 模块
- Ansible play 和 playbook
其他资源
3.1. 指定用于安装 IdM 副本的基础、服务器和客户端变量
完成这个步骤来配置用于安装 IdM 副本的清单文件。
先决条件
您已配置了 Ansible 控制节点以满足以下要求:
- 您使用 Ansible 版本 2.14 或更高版本。
-
您已在 Ansible 控制器上安装了
ansible-freeipa软件包。 - 示例假定在 ~/MyPlaybooks/ 目录中,您已创建了带有 IdM 服务器的完全限定域名(FQDN)的 Ansible 清单文件。
-
示例假定 secret.yml Ansible vault 存储了
ipaadmin_password。
流程
打开清单文件进行编辑。指定主机的完全限定域名(FQDN)来成为 IdM 副本。FQDN 必须是有效的 DNS 名称:
-
仅允许数字、字母字符和连字符(
-)。例如,不允许使用下划线,这可能导致 DNS 失败。 主机名必须都是小写。
仅定义副本 FQDN 的简单清单主机文件示例
[ipareplicas]
replica1.idm.example.com
replica2.idm.example.com
replica3.idm.example.com
[...]
如果 IdM 服务器已经部署,且在 IdM DNS 区中正确设置了 SRV 记录,那么脚本会自动发现所有其他必需的值。
-
仅允许数字、字母字符和连字符(
[可选] 根据您的拓扑设计方式在清单文件中提供额外的信息:
- 场景 1
如果要避免自动发现,并且使
[ipareplicas]部分中列出的所有副本都使用特定的 IdM 服务器,请在清单文件的[ipaservers]部分中设置服务器。带有 IdM 服务器 FQDN 和定义的副本的清单主机文件示例
[ipaservers]
server.idm.example.com

[ipareplicas]
replica1.idm.example.com
replica2.idm.example.com
replica3.idm.example.com
[...]
- 场景 2
或者,如果您想避免自动发现,但希望使用特定的服务器来部署特定副本,请分别在清单文件的
[ipareplicas]部分中为特定副本设置服务器。为特定副本定义了特定 IdM 服务器的清单文件示例
[ipaservers]
server.idm.example.com
replica1.idm.example.com

[ipareplicas]
replica2.idm.example.com
replica3.idm.example.com ipareplica_servers=replica1.idm.example.com
在上例中,
replica3.idm.example.com使用已部署的replica1.idm.example.com作为其复制源。- 场景 3
如果您在一个批处理中部署多个副本,并且时间是您关心的问题,那么多层副本部署可能对您很有用。在清单文件中定义特定的副本组,如
[ipareplicas_tier1]和[ipareplicas_tier2],并在install-replica.ymlplaybook 中为每个组设计单独的 play。定义了副本层的清单文件示例
[ipaservers]
server.idm.example.com

[ipareplicas_tier1]
replica1.idm.example.com

[ipareplicas_tier2]
replica2.idm.example.com \ ipareplica_servers=replica1.idm.example.com,server.idm.example.com
将使用
ipareplica_servers中的第一个条目。第二个条目将用作回退选项。在使用多个层来部署 IdM 副本时,您必须在 playbook 中有单独的任务来首先从 tier1 部署副本,然后从 tier2 部署副本。为不同副本组使用不同 play 的 playbook 文件示例
---
- name: Playbook to configure IPA replicas (tier1)
  hosts: ipareplicas_tier1
  become: true

  roles:
  - role: ipareplica
    state: present

- name: Playbook to configure IPA replicas (tier2)
  hosts: ipareplicas_tier2
  become: true

  roles:
  - role: ipareplica
    state: present
[可选] 提供有关
firewalld和 DNS 的额外信息:- 场景 1
如果您希望副本使用指定的
firewalld区域而不是默认区域,您可以在清单文件中指定它。例如,当您要为您的 IdM 安装使用内部firewalld区域而不是默认设置的公共区时,这非常有用。如果您没有设置自定义区,IdM 会将其服务添加到默认的
firewalld区域中。预定义的默认区域是public。重要指定的
firewalld区域必须存在,并且是永久的。带有自定义
firewalld区域的简单清单主机文件示例[ipaservers] server.idm.example.com [ipareplicas] replica1.idm.example.com replica2.idm.example.com replica3.idm.example.com [...] [ipareplicas:vars] ipareplica_firewalld_zone=custom zone- 场景 2
如果您希望副本托管 IdM DNS 服务,请将 ipareplica_setup_dns=yes 行添加到
[ipareplicas:vars]部分。另外,请指定您是否要使用每服务器 DNS 转发器:-
要配置每服务器转发器,请将
ipareplica_forwarders变量和字符串列表添加到[ipareplicas:vars]部分,例如:ipareplica_forwarders=192.0.2.1,192.0.2.2 -
若要配置无每服务器转发器,请将以下行添加到
[ipareplicas:vars]部分:ipareplica_no_forwarders=yes。 -
要根据副本的
/etc/resolv.conf文件中列出的转发器配置每服务器转发器,请将ipareplica_auto_forwarders变量添加到[ipareplicas:vars]部分。
带有在副本上设置 DNS 和每个服务器转发器的指令的清单文件示例
[ipaservers]
server.idm.example.com

[ipareplicas]
replica1.idm.example.com
replica2.idm.example.com
replica3.idm.example.com
[...]

[ipareplicas:vars]
ipareplica_setup_dns=yes
ipareplica_forwarders=192.0.2.1,192.0.2.2
-
要配置每服务器转发器,请将
- 场景 3
使用
ipaclient_configure_dns_resolve和ipaclient_dns_servers选项指定 DNS 解析器,以简化集群部署。如果您的 IdM 部署使用集成 DNS ,则这特别有用:指定 DNS 解析器的清单文件片段:
[...]
[ipaclient:vars]
ipaclient_configure_dns_resolver=true
ipaclient_dns_servers=192.168.100.1
注意ipaclient_dns_servers列表必须仅包含 IP 地址。主机名不允许。
其他资源
-
有关
ipareplica变量的更多信息,请参阅/usr/share/ansible/roles/ipareplica/README.mdMarkdown 文件。
3.2. 使用 Ansible playbook 指定用于安装 IdM 副本的凭证
完成这个步骤来配置安装 IdM 副本的授权。
先决条件
您已配置了 Ansible 控制节点以满足以下要求:
- 您使用 Ansible 版本 2.14 或更高版本。
-
您已在 Ansible 控制器上安装了
ansible-freeipa软件包。 - 示例假定在 ~/MyPlaybooks/ 目录中,您已创建了带有 IdM 服务器的完全限定域名(FQDN)的 Ansible 清单文件。
-
示例假定 secret.yml Ansible vault 存储了
ipaadmin_password。
流程
指定 授权部署副本的用户的密码,如 IdM
admin。红帽建议使用 Ansible Vault 来存储密码,并从 playbook 文件引用 Vault 文件,如
install-replica.yml:使用来自清单文件和 Ansible Vault 文件中的密码的主体的 playbook 文件示例
- name: Playbook to configure IPA replicas hosts: ipareplicas become: true vars_files: -
playbook_sensitive_data.ymlroles: - role: ipareplica state: present有关如何使用 Ansible Vault 的详细信息,请参阅官方 Ansible Vault 文档。
直接在清单文件中提供
admin的凭证不太安全。请在清单文件的[ipareplicas:vars]部分中使用ipaadmin_password选项。然后,清单文件和install-replica.ymlplaybook 文件类似如下:清单 hosts.replica 文件示例
[...]
[ipareplicas:vars]
ipaadmin_password=Secret123
使用清单文件中的主体和密码的 playbook 示例
- name: Playbook to configure IPA replicas
  hosts: ipareplicas
  become: true

  roles:
  - role: ipareplica
    state: present
或者,在清单文件中提供授权直接部署副本的另一个用户的凭证也不太安全。要指定不同的授权用户,请使用
ipaadmin_principal选项作为用户名,使用ipaadmin_password选项作为密码。然后,清单文件和install-replica.ymlplaybook 文件类似如下:清单 hosts.replica 文件示例
[...]
[ipareplicas:vars]
ipaadmin_principal=my_admin
ipaadmin_password=my_admin_secret123
使用清单文件中的主体和密码的 playbook 示例
- name: Playbook to configure IPA replicas
  hosts: ipareplicas
  become: true

  roles:
  - role: ipareplica
    state: present
其他资源
-
有关
ipareplicaAnsible 角色可接受的选项的详情,请查看/usr/share/ansible/roles/ipareplica/README.mdMarkdown 文件。
3.3. 使用 Ansible playbook 部署 IdM 副本
完成此流程,使用 Ansible playbook 来部署 IdM 副本。
先决条件
- 您已经配置了 用于安装 IdM 副本的清单文件。
- 您已经配置了 安装 IdM 副本的授权。
流程
要使用 Ansible playbook 来安装 IdM 副本,请使用
ansible-playbook命令及 playbook 文件名,如install-replica.yml。使用-i选项指定清单文件:$ ansible-playbook --vault-password-file=password_file -v -i <path_to_inventory_directory>/hosts.replica <path_to_playbooks_directory>/install-replica.yml使用
-v、-vv或-vvv选项来指定详细程度。Ansible 告知您执行 Ansible playbook 脚本。以下输出显示该脚本运行成功,有 0 个任务失败:
PLAY RECAP
replica.idm.example.com : ok=18   changed=10   unreachable=0    failed=0    skipped=21   rescued=0    ignored=0
您现在已安装了 IdM 副本。
3.4. 使用 Ansible playbook 卸载一个 IdM 副本
在现有的身份管理(IdM)部署中,副本 和 服务器 是可交换的术语。有关如何卸载 IdM 服务器的详情,请参考 使用 Ansible playbook 卸载 IdM 服务器 或 使用 Ansible playbook 卸载 IdM 服务器,即使这会导致断开连接的拓扑。
其他资源
第 4 章 使用 Ansible playbook 安装身份管理客户端
了解如何使用 Ansible 将系统配置为身份管理(IdM)客户端。将系统配置为 IdM 客户端将其注册到 IdM 域中,并让系统在域中的 IdM 服务器中使用 IdM 服务。
部署是由 ipaclient Ansible 角色来管理的。默认情况下,该角色使用 autodiscovery 模式来识别 IdM 服务器、域和其他设置。角色可以被修改为使用 Ansible playbook 使用指定的设置,例如在清单文件中。
先决条件
- 您已在 Ansible 控制节点上安装了 ansible-freeipa 软件包。
您了解 Ansible 和 IdM 概念:
- Ansible 角色
- Ansible 节点
- Ansible 清单
- Ansible 任务
- Ansible 模块
- Ansible play 和 playbook
4.1. 为自动发现客户端安装模式设置清单文件的参数
要使用 Ansible playbook 安装身份管理客户端,请在清单文件,如 inventory/hosts 中配置目标主机参数:
- 有关主机的信息
- 对任务的授权
根据您拥有的清单插件,清单文件可以采用多种格式。INI 格式是 Ansible 的默认值之一,如下例中使用。
要在 RHEL 中将智能卡与图形用户界面搭配使用,请确保在 Ansible playbook 中包含 ipaclient_mkhomedir 变量。
先决条件
- 您已检查控制节点上的部署说明,请参阅 检查 install-client.yml 文件中的参数。
流程
指定主机的完全限定主机名(FQDN),使其成为 IdM 客户端。完全限定域名必须是有效的 DNS 名称:
-
仅允许数字、字母字符和连字符(
-)。例如,不允许使用下划线,这可能导致 DNS 失败。 - 主机名必须都是小写。不允许使用大写字母。
如果在 IdM DNS 区域中正确设置了 SRV 记录,该脚本会自动发现所有其他必要的值。
只带有客户端 FQDN 定义的简单的清单主机文件示例
[ipaclients]
client.idm.example.com
[...]
-
仅允许数字、字母字符和连字符(
指定注册客户端的凭证。可用的验证方法如下:
注册 客户端的用户权限的密码。这是默认选项。
红帽建议使用 Ansible Vault 来存储密码,并从 playbook 文件引用 Vault 文件,如
install-client.yml:使用来自清单文件和 Ansible Vault 文件中的密码的主体的 playbook 文件示例
- name: Playbook to configure IPA clients with username/password
  hosts: ipaclients
  become: true
  vars_files:
  - playbook_sensitive_data.yml

  roles:
  - role: ipaclient
    state: present
在
inventory/hosts文件的[ipaclients:vars]部分中使用ipaadmin_password选项来提供admin的凭证不太安全。或者,指定不同的授权用户,请使用ipaadmin_principal选项作为用户名,使用ipaadmin_password选项作为密码。然后,inventory/hosts清单文件和install-client.ymlplaybook 文件类似如下:清单主机文件示例
[...]
[ipaclients:vars]
ipaadmin_principal=my_admin
ipaadmin_password=Secret123
使用清单文件中的主体和密码的 Playbook 示例
- name: Playbook to unconfigure IPA clients
  hosts: ipaclients
  become: true

  roles:
  - role: ipaclient
    state: true
之前注册的客户端 keytab,(如果其仍然可用):
如果系统之前作为身份管理客户端注册,则可以使用这个选项。要使用此身份验证方法,请取消
#ipaclient_keytab选项的注释,指定存储 keytab 的文件的路径,例如在inventory/hosts的[ipaclient:vars]部分。在注册过程中生成的随机一次性密码 (OTP)。要使用此身份验证方法,请在清单文件中使用
ipaclient_use_otp=yes选项。例如,您可以取消inventory/hosts文件的[ipaclients:vars]部分中的ipaclient _use_otp=yes选项的注释。请注意,对于 OTP,还必须指定以下选项之一:-
授权注册客户端的用户的密码 ,例如,为
inventory/hosts文件的[ipaclients:vars]部分的ipaadmin_password提供值。 -
admin keytab,例如,为
inventory/hosts的[ipaclients:vars]部分中的ipaadmin_keytab提供值。
-
授权注册客户端的用户的密码 ,例如,为
[可选] 使用
ipaclient_configure_dns_resolve和ipaclient_dns_servers选项(如果可用的话)指定 DNS 解析器,以简化集群部署。如果您的 IdM 部署使用集成 DNS ,则这特别有用:指定 DNS 解析器的清单文件片段:
[...] [ipaclients:vars] ipaadmin_password: "{{ ipaadmin_password }}" ipaclient_domain=idm.example.com ipaclient_configure_dns_resolver=true ipaclient_dns_servers=192.168.100.1注意ipaclient_dns_servers列表必须仅包含 IP 地址。主机名不允许。-
从 RHEL 9.3 开始,您还可以指定
ipaclient_subid: true选项,来在 IdM 级别上为 IdM 用户配置 subid 范围。
其他资源
-
/usr/share/ansible/roles/ipaclient/README.md - 手动管理 subID 范围
4.2. 当在客户端安装过程中无法自动发现时设置清单文件的参数
要使用 Ansible playbook 安装身份管理客户端,请在清单文件,如 inventory/hosts 中配置目标主机参数:
- 有关主机、IdM 服务器和 IdM 域或 IdM 领域的信息
- 对任务的授权
根据您拥有的清单插件,清单文件可以采用多种格式。INI 格式是 Ansible 的默认值之一,如下例中使用。
要在 RHEL 中将智能卡与图形用户界面搭配使用,请确保在 Ansible playbook 中包含 ipaclient_mkhomedir 变量。
先决条件
- 您已检查控制节点上的部署说明,请参阅 检查 install-client.yml 文件中的参数。
流程
指定主机的完全限定主机名(FQDN),使其成为 IdM 客户端。完全限定域名必须是有效的 DNS 名称:
-
仅允许数字、字母字符和连字符(
-)。例如,不允许使用下划线,这可能导致 DNS 失败。 - 主机名必须都是小写。不允许使用大写字母。
-
仅允许数字、字母字符和连字符(
在
inventory/hosts文件的相关部分中指定其他选项:-
[ipaservers]部分中服务器的 FQDN 指示客户端将注册到哪个 IdM 服务器 以下两个选项之一:
-
[ipaclients:vars]部分中的ipaclient_domain选项指示客户端将注册到的 IdM 服务器的 DNS 域名 [ipaclients:vars]部分中的ipaclient_realm选项指示 IdM 服务器控制的 Kerberos 域的名称带有客户端 FQDN、服务器 FQDN 和定义的域的清单主机文件示例
[ipaclients]
client.idm.example.com

[ipaservers]
server.idm.example.com

[ipaclients:vars]
ipaclient_domain=idm.example.com
[...]
-
-
指定注册客户端的凭证。可用的验证方法如下:
注册 客户端的用户权限的密码。这是默认选项。
红帽建议使用 Ansible Vault 来存储密码,并从 playbook 文件引用 Vault 文件,如
install-client.yml:使用来自清单文件和 Ansible Vault 文件中的密码的主体的 playbook 文件示例
- name: Playbook to configure IPA clients with username/password
  hosts: ipaclients
  become: true
  vars_files:
  - playbook_sensitive_data.yml

  roles:
  - role: ipaclient
    state: present
不安全的是,使用
inventory/hosts文件的[ipaclients:vars]部分中的ipaadmin_password选项提供的admin的凭证。或者,指定不同的授权用户,请使用ipaadmin_principal选项作为用户名,使用ipaadmin_password选项作为密码。install-client.ymlplaybook 文件类似如下:清单主机文件示例
[...]
[ipaclients:vars]
ipaadmin_principal=my_admin
ipaadmin_password=Secret123
使用清单文件中的主体和密码的 Playbook 示例
- name: Playbook to unconfigure IPA clients hosts: ipaclients become: true roles: - role: ipaclient state: true之前注册的客户端 keytab,如果仍然可用:
如果系统之前作为身份管理客户端注册,则可以使用这个选项。要使用此身份验证方法,请取消
ipaclient_keytab选项的注释,指定存储 keytab 的文件的路径,例如在inventory/hosts的[ipaclient:vars]部分。在注册过程中生成的随机一次性密码 (OTP)。要使用此身份验证方法,请在清单文件中使用
ipaclient_use_otp=yes选项。例如,您可以取消inventory/hosts文件的[ipaclients:vars]部分中#ipaclient_use_otp=yes选项的注释。请注意,对于 OTP,还必须指定以下选项之一:-
授权注册客户端的用户的密码 ,例如,为
inventory/hosts文件的[ipaclients:vars]部分的ipaadmin_password提供值。 -
admin keytab,例如,为
inventory/hosts的[ipaclients:vars]部分中的ipaadmin_keytab提供值。
-
授权注册客户端的用户的密码 ,例如,为
-
从 RHEL 9.3 开始,您还可以指定
ipaclient_subid: true选项,来在 IdM 级别上为 IdM 用户配置 subid 范围。
其他资源
-
有关
ipaclientAnsible 角色接受的选项的详情,请查看/usr/share/ansible/roles/ipaclient/README.md文件。 - 手动管理 subID 范围
4.3. 检查 install-client.yml 文件中的参数
install-client.yml playbook 文件包含 IdM 客户端部署的指令。
流程
打开该文件,检查 playbook 中的说明是否与您计划部署的内容对应。通常,内容类似如下:
---
- name: Playbook to configure IPA clients with username/password
  hosts: ipaclients
  become: true

  roles:
  - role: ipaclient
    state: present
这代表单个条目:
-
主机条目指定
inventory/hosts文件的一部分,其中 ansible 脚本搜索ipa-client-install脚本将在其上运行的主机的FQDN。 -
become: true条目指定在执行ipa-client-install脚本的过程中将调用的 root 的凭证。 -
role: ipaclient条目指定主机上要安装的角色:本例中为 ipa 客户端角色。 -
state: present条目指定应安装的客户端,而不是要卸载的客户端 (absent)。
-
主机条目指定
4.4. 使用 Ansible playbook 进行 IdM 客户端注册的授权选项
IdM 客户端注册的单个授权选项以及清单和 playbook 文件示例如下:
表 4.1. 使用 Ansible 的 IdM 客户端注册的授权选项
| 授权选项 | 备注 | 清单文件示例 | install-client.yml playbook 文件示例 |
|---|---|---|---|
| 有权注册客户端的用户密码:选项 1 | 存储在 Ansible vault 中的密码 |
[ipaclients:vars] [...] |
- name: Playbook to configure IPA clients with username/password
  hosts: ipaclients
  become: true
  vars_files:
  - playbook_sensitive_data.yml

  roles:
  - role: ipaclient
    state: present
|
| 有权注册客户端的用户密码:选项 2 | 保存在清单文件中的密码 |
[ipaclients:vars] ipaadmin_password=Secret123 |
- name: Playbook to configure IPA clients
  hosts: ipaclients
  become: true

  roles:
  - role: ipaclient
    state: true
|
| 一个随机的一次性密码(OTP):选项 1 | OTP + 管理员密码 |
[ipaclients:vars] ipaadmin_password=Secret123 ipaclient_use_otp=true |
- name: Playbook to configure IPA clients
  hosts: ipaclients
  become: true

  roles:
  - role: ipaclient
    state: true
|
| 一个随机的一次性密码(OTP):选项 2 | OTP + admin keytab |
[ipaclients:vars] ipaadmin_keytab=/root/admin.keytab ipaclient_use_otp=true |
- name: Playbook to configure IPA clients
  hosts: ipaclients
  become: true

  roles:
  - role: ipaclient
    state: true
|
| 之前注册中的客户端 keytab |
[ipaclients:vars] ipaclient_keytab=/root/krb5.keytab |
- name: Playbook to configure IPA clients
  hosts: ipaclients
  become: true

  roles:
  - role: ipaclient
    state: true
|
从 RHEL 9.2 开始,在上述两个 OTP 授权场景中,使用 kinit 命令请求管理员的 TGT 在第一个指定的或发现的 IdM 服务器上发生。因此,不需要对 Ansible 控制节点进行额外的修改。在 RHEL 9.2 之前,控制节点上需要 krb5-workstation 软件包。
4.5. 使用 Ansible playbook 部署 IdM 客户端
完成此流程,使用 Ansible playbook 在 IdM 环境中部署 IdM 客户端。
先决条件
您已将 IdM 客户端部署的参数设置为与您的部署场景相对应:
- 您已检查了 install-client.yml 中的参数。
流程
要使用 Ansible playbook 来安装 IdM 客户端,请使用
ansible-playbook命令及 playbook 文件名,如install-client.yml。使用-i选项指定清单文件:$ ansible-playbook --vault-password-file=password_file -v -i inventory/hosts install-client.yml使用
-v、-vv或-vvv选项来指定详细程度。Ansible 告知您执行 Ansible playbook 脚本。以下输出显示,该脚本因为没有失败而成功运行:
PLAY RECAP client1.idm.example.com : ok=18 changed=10 unreachable=0 failed=0 skipped=21 rescued=0 ignored=0注意Ansible 使用不同的颜色来提供有关运行中过程的不同类型信息。您可以修改
/etc/ansible/ansible.cfg文件的[colors]部分中的默认颜色:[colors] [...] #error = red #debug = dark gray #deprecate = purple #skip = cyan #unreachable = red #ok = green #changed = yellow [...]
现在,您已使用 Ansible playbook 在主机上安装 IdM 客户端了。
4.6. Ansible 安装后测试身份管理客户端
命令行界面(CLI)告知您 ansible-playbook 命令已成功完成,但您也可以自行进行测试。
要测试身份管理客户端是否可以获取服务器上定义的用户的信息,请检查您是否能够解析服务器上定义的用户。例如,检查默认的 admin 用户:
[user@client1 ~]$ id admin
uid=1254400000(admin) gid=1254400000(admins) groups=1254400000(admins)
要测试身份验证是否正常工作,请su - 为另一个已存在的 IdM 用户:
[user@client1 ~]$ su - idm_user
Last login: Thu Oct 18 18:39:11 CEST 2018 from 192.168.122.1 on pts/0
[idm_user@client1 ~]$
4.7. 使用 Ansible playbook 卸载 IdM 客户端
完成此流程,使用 Ansible playbook 将主机卸载为 IdM 客户端。
先决条件
- IdM 管理员凭证。
步骤
要卸载 IdM 客户端,请使用
ansible-playbook命令及 playbook 文件名,如uninstall-client.yml。使用-i选项指定清单文件,也可选择使用-v、-vv或-vvv选项来指定详细程度:$ ansible-playbook --vault-password-file=password_file -v -i inventory/hosts uninstall-client.yml
卸载客户端只从主机中删除基本的 IdM 配置,但会在主机上保留配置文件,以防您决定重新安装客户端。另外,卸载有以下限制:
- 它不会从 IdM LDAP 服务器中删除客户端主机条目。卸载仅是将主机取消注册。
- 它不会从 IdM 中删除任何位于客户端的服务。
- 它不会从 IdM 服务器中删除客户端的 DNS 条目。
-
它不会删除
/etc/krb5.keytab之外的 keytab 的旧主体。
请注意,卸载会删除 IdM CA 为主机发布的所有证书。
其他资源
- 请参阅 卸载 IdM 客户端。
第 5 章 准备您的环境以使用 Ansible playbook 管理 IdM
作为管理身份管理 (IdM) 的系统管理员,在使用 Red Hat Ansible Engine 时,最好执行以下操作:
- 在您的主目录中保留专用于 Ansible playbook 的子目录,如 ~/MyPlaybooks。
-
将示例 Ansible playbook 从
/usr/share/doc/ansible-freeipa/*和/usr/share/doc/rhel-system-roles/*目录以及它们的子目录复制到 ~/MyPlaybooks 目录中并进行调整。 - 将清单文件包含在 ~/MyPlaybooks 目录中。
使用这个实践,您可以在一个地方找到所有 playbook。
您可以在受管节点上运行 ansible-freeipa playbook,而无需调用 root 特权。例外包括使用 ipaserver、ipareplica、ipaclient、ipasmartcard_server、ipasmartcard_client 和 ipabackup ansible-freeipa 角色的 playbook。这些角色需要具有目录和 dnf 软件包管理器的特权访问权限。
Red Hat Enterprise Linux IdM 文档中的 playbook 假设以下 安全配置 :
-
IdM
admin是受管节点上的远程 Ansible 用户。 -
您可以将 IdM
admin密码加密存储在 Ansible vault 中。 - 您已将保护 Ansible vault 的密码放置在密码文件中。
- 您阻止除本地 ansible 用户以外的任何人访问 vault 密码文件。
- 您定期删除并重新创建 vault 密码文件。
还要考虑 其他安全配置。
5.1. 使用 Ansible playbook 准备控制节点和受管节点以管理 IdM
按照以下流程创建 ~/MyPlaybooks 目录并进行配置,以便您可以使用它来存储和运行 Ansible playbook。
先决条件
- 您已在受管节点上安装了 IdM 服务器 server.idm.example.com 和 replica.idm.example.com。
- 您已配置了 DNS 和网络,以便您可以直接从控制节点登录到受管节点 server.idm.example.com 和 replica.idm.example.com。
-
您需要知道 IdM
admin密码。
步骤
进入 ~/MyPlaybooks/ 目录:
$ cd ~/MyPlaybooks使用以下内容创建 ~/MyPlaybooks/ansible.cfg 文件:
[defaults]
inventory = /home/your_username/MyPlaybooks/inventory
remote_user = admin
使用以下内容创建 ~/MyPlaybooks/inventory 文件:
[eu]
server.idm.example.com

[us]
replica.idm.example.com

[ipaserver:children]
eu
us
此配置定义了两个主机组,即 eu 和 us,用于这些位置中的主机。此外,此配置定义了 ipaserver 主机组,它包含来自 eu 和 us 组的所有主机。
[可选] 创建 SSH 公钥和私钥。要在测试环境中简化访问,请不要在私钥中设置密码:
$ ssh-keygen将 SSH 公钥复制到每个受管节点上的 IdM
admin帐户:$ ssh-copy-id admin@server.idm.example.com $ ssh-copy-id admin@replica.idm.example.com
这些命令要求您输入 IdM
admin密码。创建一个包含 vault 密码的 password_file 文件:
redhat更改权限以修改文件:
$ chmod 0600 password_file创建一个 secret.yml Ansible vault 来存储 IdM
admin密码:配置 password_file 以存储 vault 密码:
$ ansible-vault create --vault-password-file=password_file secret.yml出现提示时,输入 secret.yml 文件的内容:
ipaadmin_password: Secret123
要在 playbook 中使用加密的 ipaadmin_password,您必须使用 vars_file 指令。例如,一个删除 IdM 用户的简单 playbook 如下所示:
---
- name: Playbook to handle users
  hosts: ipaserver

  vars_files:
  - /home/user_name/MyPlaybooks/secret.yml

  tasks:
  - name: Delete user robot
    ipauser:
      ipaadmin_password: "{{ ipaadmin_password }}"
      name: robot
      state: absent
在执行 playbook 时,通过添加 --vault-password-file=password_file 选项来指示 Ansible 使用 vault 密码来解密 ipaadmin_password。例如:
ansible-playbook -i inventory --vault-password-file=password_file del-user.yml为安全起见,在每次会话后删除 vault 密码文件,并在每次新会话开始时重复步骤 7-9。
5.2. 为 ansible-freeipa playbook 提供所需凭证的不同方法
不同的方法都有一些优点和缺点,为运行使用 ansible-freeipa 角色和模块的 playbook 提供所需的凭证。
将密码以纯文本形式存储在 playbook 中
优点 :
- 运行 playbook 时,不会一直提示。
- 易于实现。
缺点 :
- 有权访问该文件的人都可以读取密码。设置错误的权限并共享文件(例如在内部或外部存储库中)都可能会破坏安全性。
- 高维护性工作:如果更改了密码,则需要在所有 playbook 中进行更改。
执行 playbook 时以交互方式输入密码
优点 :
- 无人可以窃取密码,因为它不存储在任何地方。
- 您可以轻松地更新密码。
- 易于实现。
缺点 :
- 如果您在脚本中使用 Ansible playbook,要求以交互方式输入密码可能不太方便。
将密码存储在 Ansible vault 中,将 vault 密码存储在文件中:
优点 :
- 用户密码以加密方式存储。
- 您可以通过创建一个新的 Ansible vault 来轻松地更新用户密码。
-
您可以使用
ansible-vault rekey --new-vault-password-file=NEW_VAULT_PASSWORD_FILE secret.yml命令轻松地更新保护 ansible vault 的密码文件。 - 如果您在脚本中使用 Ansible playbook,则不以交互方式输入保护 Ansible vault 的密码很方便。
缺点 :
- 通过文件权限和其他安全措施保护包含敏感纯文本密码的文件很重要。
将密码存储在 Ansible vault中,并以交互方式输入 vault 密码
优点 :
- 用户密码以加密方式存储。
- 无人可以窃取 vault 密码,因为它不存储在任何地方。
- 您可以通过创建一个新的 Ansible vault 来轻松地更新用户密码。
-
您还可以使用
ansible-vault rekey file_name命令轻松地更新 vault 密码。
缺点 :
- 如果您在脚本中使用 Ansible playbook,则需要以交互方式输入 vault 密码很不方便。
第 6 章 使用 Ansible playbook 配置全局 IdM 设置
使用 Ansible config 模块,您可以检索和设置 Identity Management (IdM) 的全局配置参数。
6.1. 使用 Ansible playbook 检索 IdM 配置
以下流程描述了如何使用 Ansible playbook 来检索有关当前全局 IdM 配置的信息。
先决条件
- 您知道 IdM 管理员密码。
您已配置了 Ansible 控制节点以满足以下要求:
- 您使用 Ansible 版本 2.14 或更高版本。
-
您已在 Ansible 控制器上安装了
ansible-freeipa软件包。 - 示例假定在 ~/MyPlaybooks/ 目录中,您已创建了带有 IdM 服务器的完全限定域名(FQDN)的 Ansible 清单文件。
-
示例假定 secret.yml Ansible vault 存储了
ipaadmin_password。
流程
打开
/usr/share/doc/ansible-freeipa/playbooks/config/retrieve-config.ymlAnsible playbook 文件进行编辑:--- - name: Playbook to handle global IdM configuration hosts: ipaserver become: no gather_facts: no vars_files: - /home/user_name/MyPlaybooks/secret.yml tasks: - name: Query IPA global configuration ipaconfig: ipaadmin_password: "{{ ipaadmin_password }}" register: serverconfig - debug: msg: "{{ serverconfig }}"通过更改以下内容来调整文件:
- IdM 管理员的密码。
- 其他值(如有必要)。
- 保存这个文件。
运行 Ansible playbook。指定 playbook 文件、存储保护 secret.yml 文件的密码,以及清单文件:
$ ansible-playbook --vault-password-file=password_file -v -i path_to_inventory_directory/inventory.file /usr/share/doc/ansible-freeipa/playbooks/config/retrieve-config.yml
[...]
TASK [debug]
ok: [server.idm.example.com] => {
    "msg": {
        "ansible_facts": {
            "discovered_interpreter_
        },
        "changed": false,
        "config": {
            "ca_renewal_master_server": "server.idm.example.com",
            "configstring": [
                "AllowNThash",
                "KDC:Disable Last Success"
            ],
            "defaultgroup": "ipausers",
            "defaultshell": "/bin/bash",
            "emaildomain": "idm.example.com",
            "enable_migration": false,
            "groupsearch": [
                "cn",
                "description"
            ],
            "homedirectory": "/home",
            "maxhostname": "64",
            "maxusername": "64",
            "pac_type": [
                "MS-PAC",
                "nfs:NONE"
            ],
            "pwdexpnotify": "4",
            "searchrecordslimit": "100",
            "searchtimelimit": "2",
            "selinuxusermapdefault": "unconfined_u:s0-s0:c0.c1023",
            "selinuxusermaporder": [
                "guest_u:s0$xguest_u:s0$user_
            ],
            "usersearch": [
                "uid",
                "givenname",
                "sn",
                "telephonenumber",
                "ou",
                "title"
            ]
        },
        "failed": false
    }
}
6.2. 使用 Ansible playbook 配置 IdM CA 续订服务器
在使用嵌入式证书颁发机构 (CA) 的 Identity Management (IdM) 部署中,CA 续订服务器维护并更新 IdM 系统证书。它确保了强大的 IdM 部署。
有关 IdM CA 续订服务器角色的详情,请参阅 使用 IdM CA 续订服务器。
以下流程描述了如何使用 Ansible playbook 配置 IdM CA 续订服务器。
先决条件
- 您知道 IdM 管理员密码。
您已配置了 Ansible 控制节点以满足以下要求:
- 您使用 Ansible 版本 2.14 或更高版本。
-
您已在 Ansible 控制器上安装了
ansible-freeipa软件包。 - 示例假定在 ~/MyPlaybooks/ 目录中,您已创建了带有 IdM 服务器的完全限定域名(FQDN)的 Ansible 清单文件。
-
示例假定 secret.yml Ansible vault 存储了
ipaadmin_password。
流程
可选:识别当前 IdM CA 续订服务器:
$ ipa config-show | grep 'CA renewal'
  IPA CA renewal master: server.idm.example.com
创建一个清单文件,如
inventory.file,并在该文件中定义ipaserver:[ipaserver] server.idm.example.com
打开
/usr/share/doc/ansible-freeipa/playbooks/config/set-ca-renewal-master-server.ymlAnsible playbook 文件进行编辑:--- - name: Playbook to handle global DNS configuration hosts: ipaserver become: no gather_facts: no vars_files: - /home/user_name/MyPlaybooks/secret.yml tasks: - name: set ca_renewal_master_server ipaconfig: ipaadmin_password: "{{ ipaadmin_password }}" ca_renewal_master_server: carenewal.idm.example.com通过更改调整文件:
-
ipaadmin_password变量设置的 IdM 管理员密码。 -
ca_renewal_master_server变量所设置的 CA 续订服务器的名称。
-
- 保存这个文件。
运行 Ansible playbook。指定 playbook 文件、存储保护 secret.yml 文件的密码,以及清单文件:
$ ansible-playbook --vault-password-file=password_file -v -i path_to_inventory_directory/inventory.file /usr/share/doc/ansible-freeipa/playbooks/config/set-ca-renewal-master-server.yml
验证步骤
您可以验证 CA 续订服务器是否已更改:
以 IdM 管理员身份登录到
ipaserver:$ ssh admin@server.idm.example.com Password: [admin@server /]$请求 IdM CA 续订服务器的身份:
$ ipa config-show | grep ‘CA renewal’ IPA CA renewal master: carenewal.idm.example.com输出显示 watchnewal.idm.example.com 服务器是新的 CA 续订服务器。
6.3. 使用 Ansible playbook 为 IdM 用户配置默认 shell
shell 是一个接受和解释命令的程序。Red Hat Enterprise Linux (RHEL) 中提供了多个 shell,如 bash、sh、ksh、zsh、fish 等。Bash 或 /bin/bash 是大多数 Linux 系统中常用的 shell,它通常是 RHEL 上用户帐户的默认 shell。
以下流程描述了如何使用 Ansible playbook 将 sh (替代 shell)配置为 IdM 用户的默认 shell。
先决条件
- 您知道 IdM 管理员密码。
您已配置了 Ansible 控制节点以满足以下要求:
- 您使用 Ansible 版本 2.14 或更高版本。
-
您已在 Ansible 控制器上安装了
ansible-freeipa软件包。 - 示例假定在 ~/MyPlaybooks/ 目录中,您已创建了带有 IdM 服务器的完全限定域名(FQDN)的 Ansible 清单文件。
-
示例假定 secret.yml Ansible vault 存储了
ipaadmin_password。
步骤
-
可选: 使用
retrieve-config.ymlAnsible playbook 来识别 IdM 用户的当前 shell。详情请参阅 使用 Ansible playbook 检索 IdM 配置。 创建一个清单文件,如
inventory.file,并在该文件中定义ipaserver:[ipaserver] server.idm.example.com
打开
/usr/share/doc/ansible-freeipa/playbooks/config/ensure-config-options-are-set.ymlAnsible playbook 文件进行编辑:--- - name: Playbook to ensure some config options are set hosts: ipaserver vars_files: - /home/user_name/MyPlaybooks/secret.yml tasks: # Set defaultlogin and maxusername - ipaconfig: ipaadmin_password: "{{ ipaadmin_password }}" defaultshell: /bin/bash maxusername: 64通过更改以下内容来调整文件:
-
ipaadmin_password变量设置的 IdM 管理员密码。 -
IdM 用户的默认 shell 由
/bin/sh中的defaultshell设置。
-
- 保存这个文件。
运行 Ansible playbook。指定 playbook 文件、存储保护 secret.yml 文件的密码,以及清单文件:
$ ansible-playbook --vault-password-file=password_file -v -i path_to_inventory_directory/inventory.file /usr/share/doc/ansible-freeipa/playbooks/config/ensure-config-options-are-set.yml
验证步骤
您可以通过在 IdM 中启动一个新会话来验证默认用户 shell 是否已更改:
以 IdM 管理员身份登录到
ipaserver:$ ssh admin@server.idm.example.com Password: [admin@server /]$显示当前的 shell:
[admin@server /]$ echo "$SHELL" /bin/sh登录用户正在使用
shshell。
6.4. 使用 Ansible 为 IdM 域配置 NetBIOS 名称
NetBIOS 名称用于 Microsoft Windows 的(SMB)类型的共享和消息。您可以使用 NetBIOS 名称映射驱动器或连接到打印机。
按照以下流程,使用 Ansible playbook 为您的身份管理(IdM)域配置 NetBIOS 名称。
先决条件
您已配置了 Ansible 控制节点以满足以下要求:
- 您使用 Ansible 版本 2.14 或更高版本。
-
ansible-freeipa软件包已安装。
假设
- 示例假定在 ~/MyPlaybooks/ 目录中,您已创建了带有 IdM 服务器的完全限定域名(FQDN)的 Ansible 清单文件。
-
示例假定 secret.yml Ansible vault 存储您的
ipaadmin_password,并且您知道 vault 文件的密码。
流程
进入您的 ~/MyPlaybooks/ 目录:
$ cd ~/MyPlaybooks/- 创建一个 netbios-domain-name-present.yml Ansible playbook 文件。
在文件中添加以下内容:
--- - name: Playbook to change IdM domain netbios name hosts: ipaserver become: no gather_facts: no vars_files: - /home/user_name/MyPlaybooks/secret.yml tasks: - name: Set IdM domain netbios name ipaconfig: ipaadmin_password: "{{ ipaadmin_password }}" netbios_name: IPADOM- 保存这个文件。
运行 Ansible playbook。指定 playbook 文件、存储保护 secret.yml 文件的密码,以及清单文件:
$ ansible-playbook --vault-password-file=password_file -v -i inventory netbios-domain-name-present.yml出现提示时,提供 vault 文件密码。
其他资源
6.5. 使用 Ansible 确保 IdM 用户和组有 SID
身份管理(IdM)服务器可以根据本地域的 ID 范围中的数据,给 IdM 用户和组在内部分配唯一安全标识符(SID)。SID 存储在用户和组对象中。
确保 IdM 用户和组有 SID 的目标是允许生成特权属性证书(PAC),这是 IdM-IdM 信任的第一步。如果 IdM 用户和组有 SID,则 IdM 可以发布具有 PAC 数据的 Kerberos 票据。
按照以下流程实现以下目标:
- 为已存在的 IdM 用户和用户组生成 SID。
- 启用为 IdM 新用户和组生成 SID。
先决条件
您已配置了 Ansible 控制节点以满足以下要求:
- 您使用 Ansible 版本 2.14 或更高版本。
-
ansible-freeipa软件包已安装。
假设
- 示例假定在 ~/MyPlaybooks/ 目录中,您已创建了带有 IdM 服务器的完全限定域名(FQDN)的 Ansible 清单文件。
-
示例假定 secret.yml Ansible vault 存储您的
ipaadmin_password,并且您知道 vault 文件的密码。
流程
进入您的 ~/MyPlaybooks/ 目录:
$ cd ~/MyPlaybooks/- 创建一个 sids-for-users-and-groups-present.yml Ansible playbook 文件。
在文件中添加以下内容:
--- - name: Playbook to ensure SIDs are enabled and users and groups have SIDs hosts: ipaserver become: no gather_facts: no vars_files: - /home/user_name/MyPlaybooks/secret.yml tasks: - name: Enable SID and generate users and groups SIDS ipaconfig: ipaadmin_password: "{{ ipaadmin_password }}" enable_sid: true add_sids: trueenable_sid变量为将来的 IdM 用户和组启用 SID 生成。add_sids变量为现有的 IdM 用户和组生成 SID。注意使用
add_sids: true时,您还必须将enable_sid变量设为true。- 保存这个文件。
运行 Ansible playbook。指定 playbook 文件、存储保护 secret.yml 文件的密码,以及清单文件:
$ ansible-playbook --vault-password-file=password_file -v -i inventory sids-for-users-and-groups-present.yml出现提示时,提供 vault 文件密码。
其他资源
6.6. 其他资源
-
请参阅
/usr/share/doc/ansible-freeipa/目录中的README-config.md。 -
请参阅
/usr/share/doc/ansible-freeipa/playbooks/config目录中的 playbook 示例。
第 7 章 使用 Ansible playbook 管理用户帐户
您可以使用 Ansible playbook 管理 IdM 中的用户。在介绍了用户生命周期后,本章将介绍如何将 Ansible playbook 用于以下操作:
7.1. 用户生命周期
身份管理(IdM)支持三个用户帐户状态:
- Stage(预发布) 用户不允许进行身份验证。这是初始状态。活动用户所需的一些用户帐户属性无法在这里设置,例如组成员资格。
- Active(活跃)用户被允许进行身份验证。所有必需的用户帐户属性都需要在这个阶段设置。
- Preserved(保留)用户是以前活跃的用户,但现在被视为不活跃且无法通过 IdM 进行身份验证。保留用户保留他们作为活跃用户的大多数帐户属性,但它们不属于任何用户组。
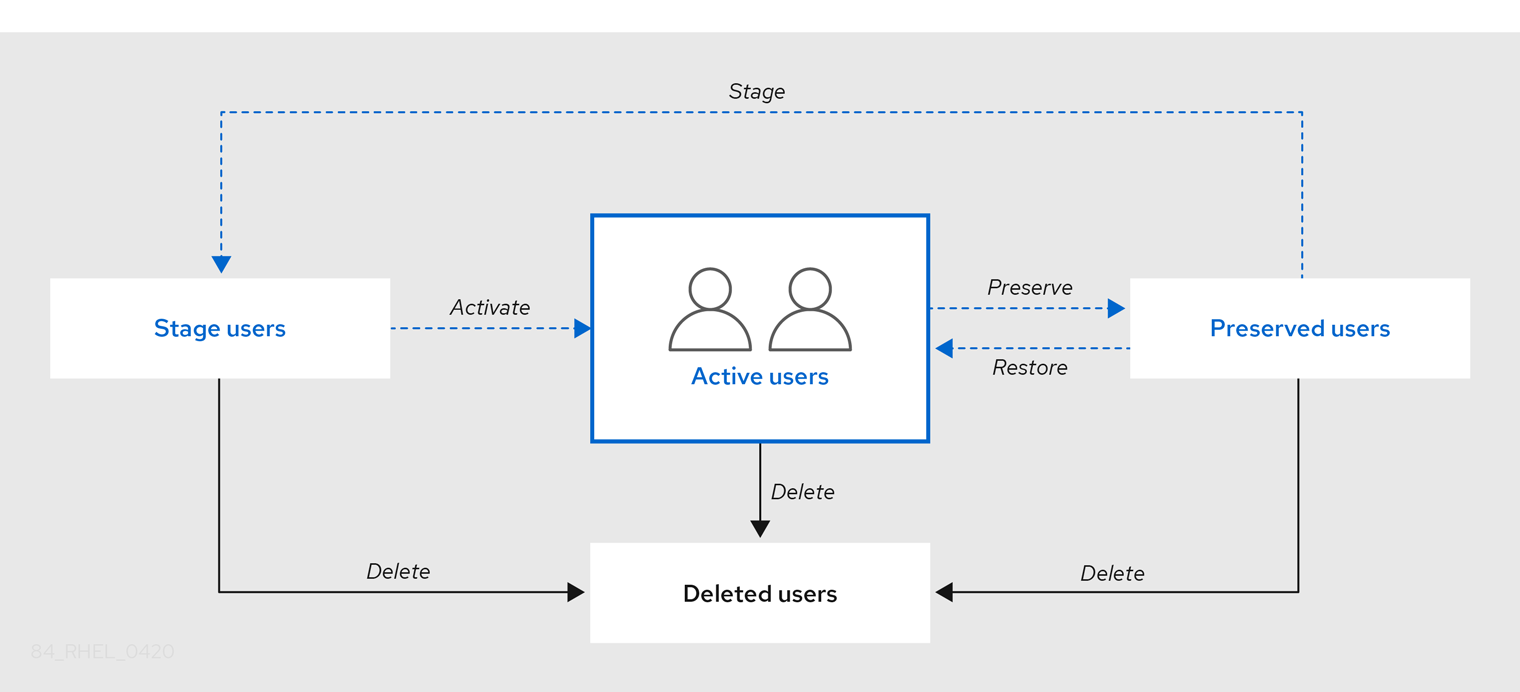
您可以从 IdM 数据库永久删除用户条目。
删除的用户帐户无法恢复。当您删除用户帐户时,与帐户相关的所有信息都将永久丢失。
只能由具备管理员权限的用户(如默认的 admin 用户)才能创建新的管理员。如果您意外删除所有管理员帐户,目录管理器必须在 Directory 服务器中手动创建新管理员。
不要删除 admin 用户。由于 admin 是 IdM 所需的预定义用户,因此此操作会导致某些命令出现问题。如果要定义和使用另外的 admin 用户,请先至少为一个其他用户授予 admin 权限,然后再使用 ipa user-disable admin 命令来禁用预定义的 admin 用户。
不要将本地用户添加到 IdM。NSS(Name Service Switch)在解析本地用户和组前,总会先解析 IdM 的用户和组。这意味着 IdM 组成员资格不适用于本地用户。
7.2. 使用 Ansible playbook 确保存在一个 IdM 用户
以下流程描述了确保使用 Ansible playbook 在 IdM 中存在用户。
先决条件
-
您需要知道 IdM
admin密码。 您已配置了 Ansible 控制节点以满足以下要求:
- 您使用 Ansible 版本 2.14 或更高版本。
-
您已在 Ansible 控制器上安装了
ansible-freeipa软件包。 - 示例假定在 ~/MyPlaybooks/ 目录中,您已创建了带有 IdM 服务器的完全限定域名(FQDN)的 Ansible 清单文件。
-
示例假定 secret.yml Ansible vault 存储了
ipaadmin_password。
流程
创建一个清单文件,如
inventory.file,并在该文件中定义ipaserver:[ipaserver] server.idm.example.com
创建一个 Ansible playbook 文件,其中包含您要确保的 IdM 中存在的用户数据。要简化此步骤,您可以复制并修改
/usr/share/doc/ansible-freeipa/playbooks/user/add-user.yml文件中的示例。例如,创建名为 idm_user 的用户并添加 Password123 作为用户密码:--- - name: Playbook to handle users hosts: ipaserver vars_files: - /home/user_name/MyPlaybooks/secret.yml tasks: - name: Create user idm_user ipauser: ipaadmin_password: "{{ ipaadmin_password }}" name: idm_user first: Alice last: Acme uid: 1000111 gid: 10011 phone: "+555123457" email: idm_user@acme.com passwordexpiration: "2023-01-19 23:59:59" password: "Password123" update_password: on_create您必须使用以下选项来添加用户:
- name:登录名称
- first:名(字符串)
- last:姓(字符串)
有关可用用户选项的完整列表,请参阅
/usr/share/doc/ansible-freeipa/README-user.mdMarkdown 文件。注意如果您使用
update_password: on_create选项,Ansible 仅在创建用户时创建用户密码。如果已使用密码创建了用户,Ansible 不会生成新的密码。运行 playbook:
$ ansible-playbook --vault-password-file=password_file -v -i path_to_inventory_directory/inventory.file path_to_playbooks_directory/add-IdM-user.yml
验证步骤
您可以使用
ipa user-show命令验证 IdM 中是否存在新用户帐户:以 admin 用户身份登录
ipaserver:$ ssh admin@server.idm.example.com Password: [admin@server /]$为 admin 请求一个 Kerberos ticket:
$ kinit admin Password for admin@IDM.EXAMPLE.COM:请求有关 idm_user 的信息:
$ ipa user-show idm_user User login: idm_user First name: Alice Last name: Acme ....
IdM 中存在名为 idm_user 的用户。
7.3. 使用 Ansible playbook 确保存在多个 IdM 用户
以下流程描述了使用 Ansible playbook 确定在 IdM 中存在多个用户。
先决条件
-
您需要知道 IdM
admin密码。 您已配置了 Ansible 控制节点以满足以下要求:
- 您使用 Ansible 版本 2.14 或更高版本。
-
您已在 Ansible 控制器上安装了
ansible-freeipa软件包。 - 示例假定在 ~/MyPlaybooks/ 目录中,您已创建了带有 IdM 服务器的完全限定域名(FQDN)的 Ansible 清单文件。
-
示例假定 secret.yml Ansible vault 存储了
ipaadmin_password。
流程
创建一个清单文件,如
inventory.file,并在该文件中定义ipaserver:[ipaserver] server.idm.example.com
创建一个 Ansible playbook 文件,其中包含您要在 IdM 中确保存在的用户的数据。要简化此步骤,您可以复制并修改
/usr/share/doc/ansible-freeipa/playbooks/user/ensure-users-present.yml文件中的示例。例如,要创建用户 idm_user_1、idm_user_2 和 idm_user_3,并添加 Password123 作为密码 idm_user_1 :--- - name: Playbook to handle users hosts: ipaserver vars_files: - /home/user_name/MyPlaybooks/secret.yml tasks: - name: Create user idm_users ipauser: ipaadmin_password: "{{ ipaadmin_password }}" users: - name: idm_user_1 first: Alice last: Acme uid: 10001 gid: 10011 phone: "+555123457" email: idm_user@acme.com passwordexpiration: "2023-01-19 23:59:59" password: "Password123" - name: idm_user_2 first: Bob last: Acme uid: 100011 gid: 10011 - name: idm_user_3 first: Eve last: Acme uid: 1000111 gid: 10011注意如果没有指定 update_password: on_create 选项,Ansible 每次运行 playbook 时都会重新设置用户密码:如果用户自上次运行 playbook 起更改了密码,则 Ansible 重新设置密码。
运行 playbook:
$ ansible-playbook --vault-password-file=password_file -v -i path_to_inventory_directory/inventory.file path_to_playbooks_directory/add-users.yml
验证步骤
您可以使用
ipa user-show命令验证用户帐户是否存在于 IdM 中:以管理员身份登录到
ipaserver:$ ssh administrator@server.idm.example.com Password: [admin@server /]$显示有关 idm_user_1 的信息:
$ ipa user-show idm_user_1 User login: idm_user_1 First name: Alice Last name: Acme Password: True ....
IdM 中存在名为 idm_user_1 的用户。
7.4. 使用 Ansible playbook 确保存在 JSON 文件中的多个 IdM 用户
以下流程描述了如何使用 Ansible playbook 确保在 IdM 中存在多个用户。用户存储在 JSON 文件中。
先决条件
-
您需要知道 IdM
admin密码。 您已配置了 Ansible 控制节点以满足以下要求:
- 您使用 Ansible 版本 2.14 或更高版本。
-
您已在 Ansible 控制器上安装了
ansible-freeipa软件包。 - 示例假定在 ~/MyPlaybooks/ 目录中,您已创建了带有 IdM 服务器的完全限定域名(FQDN)的 Ansible 清单文件。
-
示例假定 secret.yml Ansible vault 存储了
ipaadmin_password。
流程
创建一个清单文件,如
inventory.file,并在该文件中定义ipaserver:[ipaserver] server.idm.example.com
创建包含必要任务的 Ansible playbook 文件。使用您要确保存在的用户数据引用
JSON文件。要简化此步骤,您可以复制并修改/usr/share/doc/ansible-freeipa/ensure-users-present-ymlfile.yml文件中的示例:--- - name: Ensure users' presence hosts: ipaserver vars_files: - /home/user_name/MyPlaybooks/secret.yml tasks: - name: Include users.json include_vars: file: users.json - name: Users present ipauser: ipaadmin_password: "{{ ipaadmin_password }}" users: "{{ users }}"创建
users.json文件,并将 IdM 用户添加到其中。要简化此步骤,您可以复制并修改/usr/share/doc/ansible-freeipa/playbooks/user/users.json文件中的示例。例如,要创建用户 idm_user_1、idm_user_2 和 idm_user_3,并添加 Password123 作为密码 idm_user_1 :{ "users": [ { "name": "idm_user_1", "first": "Alice", "last": "Acme", "password": "Password123" }, { "name": "idm_user_2", "first": "Bob", "last": "Acme" }, { "name": "idm_user_3", "first": "Eve", "last": "Acme" } ] }运行 Ansible playbook。指定 playbook 文件、存储保护 secret.yml 文件的密码,以及清单文件:
$ ansible-playbook --vault-password-file=password_file -v -i path_to_inventory_directory/inventory.file path_to_playbooks_directory/ensure-users-present-jsonfile.yml
验证步骤
您可以使用
ipa user-show命令验证 IdM 中是否存在用户帐户:以管理员身份登录到
ipaserver:$ ssh administrator@server.idm.example.com Password: [admin@server /]$显示有关 idm_user_1 的信息:
$ ipa user-show idm_user_1 User login: idm_user_1 First name: Alice Last name: Acme Password: True ....
IdM 中存在名为 idm_user_1 的用户。
7.5. 确保没有用户使用 Ansible playbook
以下流程描述了如何使用 Ansible playbook 来确保 IdM 中没有特定用户。
先决条件
-
您需要知道 IdM
admin密码。 您已配置了 Ansible 控制节点以满足以下要求:
- 您使用 Ansible 版本 2.14 或更高版本。
-
您已在 Ansible 控制器上安装了
ansible-freeipa软件包。 - 示例假定在 ~/MyPlaybooks/ 目录中,您已创建了带有 IdM 服务器的完全限定域名(FQDN)的 Ansible 清单文件。
-
示例假定 secret.yml Ansible vault 存储了
ipaadmin_password。
流程
创建一个清单文件,如
inventory.file,并在该文件中定义ipaserver:[ipaserver] server.idm.example.com
创建 Ansible playbook 文件,使其包含没有 IdM 的用户。要简化此步骤,您可以复制并修改
/usr/share/doc/ansible-freeipa/playbooks/user/ensure-users-present.yml文件中的示例。例如,要删除用户 idm_user_1、idm_user_2 和 idm_user_3 :--- - name: Playbook to handle users hosts: ipaserver vars_files: - /home/user_name/MyPlaybooks/secret.yml tasks: - name: Delete users idm_user_1, idm_user_2, idm_user_3 ipauser: ipaadmin_password: "{{ ipaadmin_password }}" users: - name: idm_user_1 - name: idm_user_2 - name: idm_user_3 state: absent运行 Ansible playbook。指定 playbook 文件、存储保护 secret.yml 文件的密码,以及清单文件:
$ ansible-playbook --vault-password-file=password_file -v -i path_to_inventory_directory/inventory.file path_to_playbooks_directory/delete-users.yml
验证步骤
您可以使用 ipa user-show 命令验证 IdM 中是否不存在用户帐户:
以管理员身份登录到
ipaserver:$ ssh administrator@server.idm.example.com Password: [admin@server /]$请求有关 idm_user_1 的信息:
$ ipa user-show idm_user_1 ipa: ERROR: idm_user_1: user not foundIdM 中不存在名为 idm_user_1 的用户。
7.6. 其他资源
-
请参阅
/usr/share/doc/ansible-freeipa/目录中的README-user.mdMarkdown 文件。 -
请参阅
/usr/share/doc/ansible-freeipa/playbooks/user目录中的 Ansible playbook 示例。
第 8 章 使用 Ansible playbook 管理用户组
本节介绍使用 Ansible playbook 进行用户组管理。
用户组是一组具有常见特权、密码策略和其他特征的用户。
Identity Management (IdM) 中的用户组可以包括:
- IdM 用户
- 其他 IdM 用户组
- 外部用户,即 IdM 之外的用户
本节包括以下主题:
8.1. IdM 中的不同组类型
IdM 支持以下类型的组:
- POSIX 组(默认)
POSIX 组支持其成员的 Linux POSIX 属性。请注意,与 Active Directory 交互的组无法使用 POSIX 属性。
POSIX 属性将用户识别为单独的实体。与用户相关的 POSIX 属性示例包括
uidNumber(一个用户号 (UID))和gidNumber(一个组号 (GID))。- 非 POSIX 组
非 POSIX 组不支持 POSIX 属性。例如,这些组没有定义 GID。
这种组的所有成员必须属于 IdM 域。
- 外部组
使用外部组添加存在于 IdM 域外部的身份存储中的组成员,例如:
- 本地系统
- Active Directory 域
- 目录服务
外部组不支持 POSIX 属性。例如,这些组没有定义 GID。
表 8.1. 默认创建的用户组
| 组名称 | 默认组成员 |
|---|---|
|
| 所有 IdM 用户 |
|
|
具有管理特权的用户,包括默认的 |
|
| 这是一个旧的组,不再具有任何特殊权限 |
|
| 具有管理 Active Directory 信任权限的用户 |
将用户添加到用户组时,该用户将获得与组关联的特权和策略。例如,若要向用户授予管理特权,可将该用户添加到 admins 组。
不要删除 admins 组。由于 admins 是 IdM 要求的预定义组,因此此操作会导致某些命令出现问题。
另外,当在 IdM 中创建新用户时,IdM 默认会创建用户私有组。有关私有组的更多信息,请参阅在没有私有组的情况下添加用户。
8.2. 直接和间接组成员
IdM 中的用户组属性适用于直接和间接成员:当组 B 是组 A 的成员时,组 B 中的所有用户都被视为组 A 的间接成员。
例如,在下图中:
- 用户 1 和用户 2 是组 A 的直接成员。
- 用户 3、用户 4 和用户 5 是组 A 的间接成员。
图 8.1. 直接和间接组成员身份

如果您为用户组 A 设置密码策略,该策略也适用于用户组 B 中的所有用户。
8.3. 使用 Ansible playbook 确保存在 IdM 组和组成员
以下流程描述了使用 Ansible playbook 确保存在 IdM 组和组成员(用户和用户组)。
先决条件
- 您知道 IdM 管理员密码。
您已配置了 Ansible 控制节点以满足以下要求:
- 您使用 Ansible 版本 2.14 或更高版本。
-
您已在 Ansible 控制器上安装了
ansible-freeipa软件包。 - 示例假定在 ~/MyPlaybooks/ 目录中,您已创建了带有 IdM 服务器的完全限定域名(FQDN)的 Ansible 清单文件。
-
示例假定 secret.yml Ansible vault 存储了
ipaadmin_password。
- IdM 中已存在您想要引用的用户。有关确保存在使用 Ansible 的用户的详细信息,请参阅使用 Ansible playbook 管理用户帐户。
流程
创建一个清单文件,如
inventory.file,并在该文件中定义ipaserver:[ipaserver] server.idm.example.com
使用必要的用户和组信息创建一个 Ansible playbook 文件:
--- - name: Playbook to handle groups hosts: ipaserver vars_files: - /home/user_name/MyPlaybooks/secret.yml tasks: - name: Create group ops with gid 1234 ipagroup: ipaadmin_password: "{{ ipaadmin_password }}" name: ops gidnumber: 1234 - name: Create group sysops ipagroup: ipaadmin_password: "{{ ipaadmin_password }}" name: sysops user: - idm_user - name: Create group appops ipagroup: ipaadmin_password: "{{ ipaadmin_password }}" name: appops - name: Add group members sysops and appops to group ops ipagroup: ipaadmin_password: "{{ ipaadmin_password }}" name: ops group: - sysops - appops运行 playbook:
$ ansible-playbook --vault-password-file=password_file -v -i path_to_inventory_directory/inventory.file path_to_playbooks_directory/add-group-members.yml
验证步骤
您可以使用 ipa group-show 命令验证 ops 组是否包含 sysops 和 appops 作为直接成员,idm_user 作为间接成员:
以管理员身份登录到
ipaserver:$ ssh admin@server.idm.example.com Password: [admin@server /]$显示关于 ops 的信息:
ipaserver]$ ipa group-show ops Group name: ops GID: 1234 Member groups: sysops, appops Indirect Member users: idm_userIdM 中已存在 appops 和 sysops 组,后者包括 idm_user 用户。
其他资源
-
请参阅
/usr/share/doc/ansible-freeipa/README-group.mdMarkdown 文件。
8.4. 使用 Ansible 在一个任务中添加多个 IdM 组
您可以使用 ansible-freeipa ipagroup 模块,使用一个 Ansible 任务添加、修改和删除多个身份管理(IdM)用户组。为此,请使用 ipagroup 模块的 groups 选项。
使用 groups 选项,您还可以指定多个仅应用到特定组的组变量。根据 name 变量定义此组,这是 groups 选项的唯一强制变量。
完成此流程,以确保在一个任务中在 IdM 中存在 sysops 和 appops 组。将 sysops 组定义为 nonposix 组,并将 appops 组定义为外部组。
先决条件
在控制节点上:
- 您使用 Ansible 版本 2.14 或更高版本。
-
您已安装
ansible-freeipa软件包。 - 您已在 ~/MyPlaybooks/ 目录中创建了一个带有 IdM 服务器的完全限定域名(FQDN)的 Ansible 清单文件。
- 您使用 RHEL 9.3 及更新版本。
-
您已将
ipaadmin_password存储在 secret.yml Ansible vault 中。
流程
使用以下内容创建 Ansible playbook 文件 add-nonposix-and-external-groups.yml :
--- - name: Playbook to add nonposix and external groups hosts: ipaserver vars_files: - /home/user_name/MyPlaybooks/secret.yml tasks: - name: Add nonposix group sysops and external group appops ipagroup: ipaadmin_password: "{{ ipaadmin_password }}" groups: - name: sysops nonposix: true - name: appops external: true运行 playbook:
$ ansible-playbook --vault-password-file=password_file -v -i <path_to_inventory_directory>/hosts <path_to_playbooks_directory>/add-nonposix-and-external-groups.yml
8.5. 使用 Ansible 启用 AD 用户来管理 IdM
按照以下流程,使用 Ansible playbook 确保户 ID 覆盖在身份管理(IdM)组中存在。用户 ID 覆盖是您在建立与 AD 的信任后您在默认信任视图中创建的活动目录(AD)用户的覆盖。因此,运行 playbook ,AD 用户,例如 AD 管理员能够完全管理 IdM,而无需两个不同的帐户和密码。
先决条件
-
您需要知道 IdM
admin密码。 - 您已 安装了具有 AD 的信任。
-
AD 用户的用户 ID 覆盖在IdM 中已存在。如果不存在,请使用
ipa idoverrideuser-add 'default trust view' ad_user@ad.example.com命令创建它。 - IdM 中已存在您要添加用户 ID 覆盖的组。
-
您可以使用 IdM 的 4.8.7 版本或更高版本。要查看您在服务器上安装的 IdM 版本,请输入
ipa --version。 您已配置了 Ansible 控制节点以满足以下要求:
- 您使用 Ansible 版本 2.14 或更高版本。
-
您已在 Ansible 控制器上安装了
ansible-freeipa软件包。 - 示例假定在 ~/MyPlaybooks/ 目录中,您已创建了带有 IdM 服务器的完全限定域名(FQDN)的 Ansible 清单文件。
-
示例假定 secret.yml Ansible vault 存储了
ipaadmin_password。
流程
进入您的 ~/MyPlaybooks/ 目录:
$ cd ~/MyPlaybooks/使用以下内容创建一个
add-useridoverride-to-group.ymlplaybook:--- - name: Playbook to ensure presence of users in a group hosts: ipaserver - name: Ensure the ad_user@ad.example.com user ID override is a member of the admins group: ipagroup: ipaadmin_password: "{{ ipaadmin_password }}" name: admins idoverrideuser: - ad_user@ad.example.com在示例中:
-
Secret123 是 IdM
admin密码。 -
admins是您要添加 ad_user@ad.example.com ID 覆盖的 IdM POSIX 组的名称。此组成员具有全部的管理员特权。 - ad_user@ad.example.com 是 AD 管理员的用户 ID 覆盖。用户存储在已建立信任的 AD 域中。
-
Secret123 是 IdM
- 保存这个文件。
运行 Ansible playbook。指定 playbook 文件、存储保护 secret.yml 文件的密码,以及清单文件:
$ ansible-playbook --vault-password-file=password_file -v -i inventory add-useridoverride-to-group.yml
其他资源
- AD 用户的 ID 覆盖
- /usr/share/doc/ansible-freeipa/README-group.md
- /usr/share/doc/ansible-freeipa/playbooks/user
- 在 Active Directory 环境中使用 ID 视图
- 启用 AD 用户管理 IdM
8.6. 使用 Ansible playbook 确保 IdM 用户组中存在成员管理器
以下流程描述了使用 Ansible playbook 确保存在 IdM 成员管理器(用户和用户组)。
先决条件
- 您知道 IdM 管理员密码。
您已配置了 Ansible 控制节点以满足以下要求:
- 您使用 Ansible 版本 2.14 或更高版本。
-
您已在 Ansible 控制器上安装了
ansible-freeipa软件包。 - 示例假定在 ~/MyPlaybooks/ 目录中,您已创建了带有 IdM 服务器的完全限定域名(FQDN)的 Ansible 清单文件。
-
示例假定 secret.yml Ansible vault 存储了
ipaadmin_password。
- 您必须具有要添加为成员管理器的用户名以及您要管理的组的名称。
流程
创建一个清单文件,如
inventory.file,并在该文件中定义ipaserver:[ipaserver] server.idm.example.com
使用必要的用户和组成员管理信息创建一个 Ansible playbook 文件:
--- - name: Playbook to handle membership management hosts: ipaserver vars_files: - /home/user_name/MyPlaybooks/secret.yml tasks: - name: Ensure user test is present for group_a ipagroup: ipaadmin_password: "{{ ipaadmin_password }}" name: group_a membermanager_user: test - name: Ensure group_admins is present for group_a ipagroup: ipaadmin_password: "{{ ipaadmin_password }}" name: group_a membermanager_group: group_admins运行 playbook:
$ ansible-playbook --vault-password-file=password_file -v -i path_to_inventory_directory/inventory.file path_to_playbooks_directory/add-member-managers-user-groups.yml
验证步骤
您可以使用 ipa group-show 命令验证 group_a 组是否包含 test 作为成员管理者,以及 group_admins 为 group_a 的成员管理者:
以管理员身份登录到
ipaserver:$ ssh admin@server.idm.example.com Password: [admin@server /]$显示 managergroup1 的信息:
ipaserver]$ ipa group-show group_a Group name: group_a GID: 1133400009 Membership managed by groups: group_admins Membership managed by users: test
其他资源
-
请参阅
ipa host-add-member-manager --help。 -
请参阅
ipaman page。
8.7. 使用 Ansible playbook 确保 IdM 用户组中没有成员管理者
以下流程描述了在使用 Ansible playbook 时确保 IdM 成员管理者(用户和用户组)不存在。
先决条件
- 您知道 IdM 管理员密码。
您已配置了 Ansible 控制节点以满足以下要求:
- 您使用 Ansible 版本 2.14 或更高版本。
-
您已在 Ansible 控制器上安装了
ansible-freeipa软件包。 - 示例假定在 ~/MyPlaybooks/ 目录中,您已创建了带有 IdM 服务器的完全限定域名(FQDN)的 Ansible 清单文件。
-
示例假定 secret.yml Ansible vault 存储了
ipaadmin_password。
- 您必须具有要删除的现有成员管理者用户或组的名称,以及它们要管理的组的名称。
流程
创建一个清单文件,如
inventory.file,并在该文件中定义ipaserver:[ipaserver] server.idm.example.com
使用必要的用户和组成员管理信息创建一个 Ansible playbook 文件:
--- - name: Playbook to handle membership management hosts: ipaserver vars_files: - /home/user_name/MyPlaybooks/secret.yml tasks: - name: Ensure member manager user and group members are absent for group_a ipagroup: ipaadmin_password: "{{ ipaadmin_password }}" name: group_a membermanager_user: test membermanager_group: group_admins action: member state: absent运行 playbook:
$ ansible-playbook --vault-password-file=password_file -v -i path_to_inventory_directory/inventory.file path_to_playbooks_directory/ensure-member-managers-are-absent.yml
验证步骤
您可以使用 ipa group-show 命令验证 group_a 组不包含 test 作为成员管理者,以及 group_admins 为 group_a 的成员管理者:
以管理员身份登录到
ipaserver:$ ssh admin@server.idm.example.com Password: [admin@server /]$显示 group_a 的信息:
ipaserver]$ ipa group-show group_a Group name: group_a GID: 1133400009
其他资源
-
请参阅
ipa host-remove-member-manager --help。 -
请参阅
ipaman page。
第 9 章 使用 Ansible 在 IdM 中自动化组成员资格
通过自动化组成员资格,您可以根据其属性自动分配用户、主机用户组和主机组。例如,您可以:
-
根据员工的经理、地点、职位或任何其他属性将员工的用户条目分成不同的组。您可以通过在命令行中输入
ipa user-add --help来列出所有属性。 -
根据它们的类、位置或任何其他属性,将主机分成不同的组。您可以通过在命令行中输入
ipa host-add --help来列出所有属性。 - 将所有用户或全部主机添加到单个全局组。
您可以使用 Red Hat Ansible Engine 来自动管理身份管理(IdM)中的自动化组成员资格。
本节涵盖了以下主题:
9.1. 使用 Ansible 确保 IdM 用户组的自动成员规则存在
以下流程描述了如何使用 Ansible playbook 确保身份管理(IdM)组的 自动成员 规则存在。在示例中,确保 testing_group 用户组的 自动成员 规则存在。
先决条件
-
您需要知道 IdM
admin密码。 - IdM 中存在 testing_group 用户组。
您已配置了 Ansible 控制节点以满足以下要求:
- 您使用 Ansible 版本 2.14 或更高版本。
-
您已在 Ansible 控制器上安装了
ansible-freeipa软件包。 - 示例假定在 ~/MyPlaybooks/ 目录中,您已创建了带有 IdM 服务器的完全限定域名(FQDN)的 Ansible 清单文件。
-
示例假定 secret.yml Ansible vault 存储了
ipaadmin_password。
流程
进入您的 ~/MyPlaybooks/ 目录:
$ cd ~/MyPlaybooks/复制位于
/usr/share/doc/ansible-freeipa/playbooks/automember/目录中的automember-group-present.ymlAnsible playbook 文件:$ cp /usr/share/doc/ansible-freeipa/playbooks/automember/automember-group-present.yml automember-group-present-copy.yml-
打开
automember-group-present-copy.yml文件进行编辑。 通过在
ipaautomember任务部分中设置以下变量来调整该文件:-
将
ipaadmin_password变量设置为 IdMadmin的密码。 -
将
name变量设为 testing_group。 -
将
automember_type变量设为 group。 -
确保
state变量设置为present。
这是当前示例修改的 Ansible playbook 文件:
--- - name: Automember group present example hosts: ipaserver vars_files: - /home/user_name/MyPlaybooks/secret.yml tasks: - name: Ensure group automember rule admins is present ipaautomember: ipaadmin_password: "{{ ipaadmin_password }}" name: testing_group automember_type: group state: present-
将
- 保存这个文件。
运行 Ansible playbook。指定 playbook 文件、存储保护 secret.yml 文件的密码,以及清单文件:
$ ansible-playbook --vault-password-file=password_file -v -i inventory automember-group-present-copy.yml
9.2. 使用 Ansible 确保指定的条件在 IdM 用户组自动成员规则中存在
其他资源
以下流程描述了如何使用 Ansible playbook 来确保指定的条件在身份管理(IdM)组的 自动成员 规则中存在。在示例中,确保 testing_group 组的 自动成员 规则中存在与 UID 相关的条件。通过指定 .* 条件,您可以确保所有将来的 IdM 用户都自动成为 testing_group 的成员。
先决条件
-
您需要知道 IdM
admin密码。 - testing_group 用户组和自动成员用户组规则在 IdM 中存在。
您已配置了 Ansible 控制节点以满足以下要求:
- 您使用 Ansible 版本 2.14 或更高版本。
-
您已在 Ansible 控制器上安装了
ansible-freeipa软件包。 - 示例假定在 ~/MyPlaybooks/ 目录中,您已创建了带有 IdM 服务器的完全限定域名(FQDN)的 Ansible 清单文件。
-
示例假定 secret.yml Ansible vault 存储了
ipaadmin_password。
流程
进入您的 ~/MyPlaybooks/ 目录:
$ cd ~/MyPlaybooks/复制位于
/usr/share/doc/ansible-freeipa/playbooks/automember/目录中的automember-hostgroup-rule-present.ymlAnsible playbook 文件,并将它命名为 automember-usergroup-rule-present.yml :$ cp /usr/share/doc/ansible-freeipa/playbooks/automember/automember-hostgroup-rule-present.yml automember-usergroup-rule-present.yml-
打开
automember-usergroup-rule-present.yml文件进行编辑。 通过修改以下参数来调整文件:
- 重命名 playbook 以便对应于您的用例,例如:自动成员用户组规则成员存在。
- 重命名任务以便对应于您的用例,例如:确保用户组的自动成员条件存在。
在
ipaautomember任务部分中设置以下变量:-
将
ipaadmin_password变量设置为 IdMadmin的密码。 -
将
name变量设为 testing_group。 -
将
automember_type变量设为group。 -
确保
state变量设置为present。 -
确保
action变量设为member。 -
将
inclusivekey变量设为UID。 -
将
inclusiveexpression变量设为 .*
-
将
这是当前示例修改的 Ansible playbook 文件:
--- - name: Automember user group rule member present hosts: ipaserver vars_files: - /home/user_name/MyPlaybooks/secret.yml tasks: - name: Ensure an automember condition for a user group is present ipaautomember: ipaadmin_password: "{{ ipaadmin_password }}" name: testing_group automember_type: group state: present action: member inclusive: - key: UID expression: .*
- 保存这个文件。
运行 Ansible playbook。指定 playbook 文件、存储保护 secret.yml 文件的密码,以及清单文件:
$ ansible-playbook --vault-password-file=password_file -v -i inventory automember-usergroup-rule-present.yml
验证步骤
以 IdM 管理员身份登录。
$ kinit admin例如,添加用户:
$ ipa user-add user101 --first user --last 101 ----------------------- Added user "user101" ----------------------- User login: user101 First name: user Last name: 101 ... Member of groups: ipausers, testing_group ...
9.3. 使用 Ansible 确保条件在 IdM 用户组自动成员规则中不存在
其他资源
以下流程描述了如何使用 Ansible playbook 确保条件在身份管理(IdM)组的 自动成员 规则中不存在。在示例中,条件在 自动成员 规则中不存在确保了应包含指定 首字母 为 dp 的用户。将自动成员规则应用到 testing_group 组。通过应用条件,您可以确保将来首字母为 dp 的用户不会成为 testing_group 的成员。
先决条件
-
您需要知道 IdM
admin密码。 - testing_group 用户组和自动成员用户组规则在 IdM 中存在。
您已配置了 Ansible 控制节点以满足以下要求:
- 您使用 Ansible 版本 2.14 或更高版本。
-
您已在 Ansible 控制器上安装了
ansible-freeipa软件包。 - 示例假定在 ~/MyPlaybooks/ 目录中,您已创建了带有 IdM 服务器的完全限定域名(FQDN)的 Ansible 清单文件。
-
示例假定 secret.yml Ansible vault 存储了
ipaadmin_password。
流程
进入您的 ~/MyPlaybooks/ 目录:
$ cd ~/MyPlaybooks/复制位于
/usr/share/doc/ansible-freeipa/playbooks/automember/目录中的automember-hostgroup-rule-absent.ymlAnsible playbook 文件,并将其命名为 automember-usergroup-rule-absent.yml :$ cp /usr/share/doc/ansible-freeipa/playbooks/automember/automember-hostgroup-rule-absent.yml automember-usergroup-rule-absent.yml-
打开
automember-usergroup-rule-absent.yml文件进行编辑。 通过修改以下参数来调整文件:
- 重命名 playbook 以对应于您的用例,例如:自动成员用户组规则成员不存在。
- 重命名任务以对应于您的用例,例如:确保用户组的自动成员条件不存在。
在
ipaautomember任务部分中设置以下变量:-
将
ipaadmin_password变量设置为 IdMadmin的密码。 -
将
name变量设为 testing_group。 -
将
automember_type变量设为 group。 -
确保
state变量设置为absent。 -
确保
action变量设为member。 -
将
inclusivekey变量设为initials。 -
将
inclusiveexpression变量设为 dp。
-
将
这是当前示例修改的 Ansible playbook 文件:
--- - name: Automember user group rule member absent hosts: ipaserver vars_files: - /home/user_name/MyPlaybooks/secret.yml tasks: - name: Ensure an automember condition for a user group is absent ipaautomember: ipaadmin_password: "{{ ipaadmin_password }}" name: testing_group automember_type: group state: absent action: member inclusive: - key: initials expression: dp
- 保存这个文件。
运行 Ansible playbook。指定 playbook 文件、存储保护 secret.yml 文件的密码,以及清单文件:
$ ansible-playbook --vault-password-file=password_file -v -i inventory automember-usergroup-rule-absent.yml
验证步骤
以 IdM 管理员身份登录。
$ kinit admin查看自动成员组:
$ ipa automember-show --type=group testing_group Automember Rule: testing_group
输出中没有 Inclusive Regex: initials=dp 条目确认 testing_group 自动成员规则不包含指定的条件。
9.4. 使用 Ansible 确保 IdM 用户组的自动成员规则不存在
其他资源
以下流程描述了如何使用 Ansible playbook 确保身份管理(IdM)组的 自动成员 规则不存在。在示例中,确保 testing_group 组的 automember 规则不存在。
删除自动成员规则也会删除与规则相关的所有条件。要从规则中只删除特定的条件,请参阅 使用 Ansible 确保条件在 IdM 用户组自动成员规则中不存在。
先决条件
-
您需要知道 IdM
admin密码。 您已配置了 Ansible 控制节点以满足以下要求:
- 您使用 Ansible 版本 2.14 或更高版本。
-
您已在 Ansible 控制器上安装了
ansible-freeipa软件包。 - 示例假定在 ~/MyPlaybooks/ 目录中,您已创建了带有 IdM 服务器的完全限定域名(FQDN)的 Ansible 清单文件。
-
示例假定 secret.yml Ansible vault 存储了
ipaadmin_password。
流程
进入您的 ~/MyPlaybooks/ 目录:
$ cd ~/MyPlaybooks/复制位于
/usr/share/doc/ansible-freeipa/playbooks/automember/目录中的automember-group-absent.ymlAnsible playbook 文件:$ cp /usr/share/doc/ansible-freeipa/playbooks/automember/automember-group-absent.yml automember-group-absent-copy.yml-
打开
automember-group-absent-copy.yml文件进行编辑。 通过在
ipaautomember任务部分中设置以下变量来调整该文件:-
将
ipaadmin_password变量设置为 IdMadmin的密码。 -
将
name变量设为 testing_group。 -
将
automember_type变量设为 group。 -
确保
state变量设置为absent。
这是当前示例修改的 Ansible playbook 文件:
--- - name: Automember group absent example hosts: ipaserver vars_files: - /home/user_name/MyPlaybooks/secret.yml tasks: - name: Ensure group automember rule admins is absent ipaautomember: ipaadmin_password: "{{ ipaadmin_password }}" name: testing_group automember_type: group state: absent-
将
- 保存这个文件。
运行 Ansible playbook。指定 playbook 文件、存储保护 secret.yml 文件的密码,以及清单文件:
$ ansible-playbook --vault-password-file=password_file -v -i inventory automember-group-absent.yml
其他资源
-
请参阅
/usr/share/doc/ansible-freeipa/目录中的README-automember.md文件。 -
请参阅
/usr/share/doc/ansible-freeipa/playbooks/automember目录。
9.5. 使用 Ansible 确保 IdM 主机组自动成员规则中存在条件
按照以下流程,使用 Ansible 确保条件在 IdM 主机组自动成员规则中存在。示例描述了如何确保 FQDN 为 .*.idm.example.com 的主机是 primary_dns_domain_hosts 主机组的成员,以及 FQDN 为 .*.example.org 的主机不是 primary_dns_domain_hosts 主机组的成员。
先决条件
-
您需要知道 IdM
admin密码。 - IdM 中存在 primary_dns_domain_hosts 主机组和自动成员主机组规则。
您已配置了 Ansible 控制节点以满足以下要求:
- 您使用 Ansible 版本 2.14 或更高版本。
-
您已在 Ansible 控制器上安装了
ansible-freeipa软件包。 - 示例假定在 ~/MyPlaybooks/ 目录中,您已创建了带有 IdM 服务器的完全限定域名(FQDN)的 Ansible 清单文件。
-
示例假定 secret.yml Ansible vault 存储了
ipaadmin_password。
流程
进入您的 ~/MyPlaybooks/ 目录:
$ cd ~/MyPlaybooks/复制位于
/usr/share/doc/ansible-freeipa/playbooks/automember/目录中的automember-hostgroup-rule-present.ymlAnsible playbook 文件:$ cp /usr/share/doc/ansible-freeipa/playbooks/automember/automember-hostgroup-rule-present.yml automember-hostgroup-rule-present-copy.yml-
打开
automember-hostgroup-rule-present-copy.yml文件进行编辑。 通过在
ipaautomember任务部分中设置以下变量来调整该文件:-
将
ipaadmin_password变量设置为 IdMadmin的密码。 -
将
name变量设为 primary_dns_domain_hosts。 -
将
automember_type变量设为 hostgroup。 -
确保
state变量设置为present。 -
确保
action变量设为member。 -
确保
inclusivekey变量设为fqdn。 -
将对应的
inclusiveexpression变量设为 .*.idm.example.com。 -
将
exclusivekey变量设为fqdn。 -
将对应的
exclusiveexpression变量设为 .*.example.org。
这是当前示例修改的 Ansible playbook 文件:
--- - name: Automember user group rule member present hosts: ipaserver vars_files: - /home/user_name/MyPlaybooks/secret.yml tasks: - name: Ensure an automember condition for a user group is present ipaautomember: ipaadmin_password: "{{ ipaadmin_password }}" name: primary_dns_domain_hosts automember_type: hostgroup state: present action: member inclusive: - key: fqdn expression: .*.idm.example.com exclusive: - key: fqdn expression: .*.example.org-
将
- 保存这个文件。
运行 Ansible playbook。指定 playbook 文件、存储保护 secret.yml 文件的密码,以及清单文件:
$ ansible-playbook --vault-password-file=password_file -v -i inventory automember-hostgroup-rule-present-copy.yml
其他资源
-
请参阅
/usr/share/doc/ansible-freeipa/目录中的README-automember.md文件。 -
请参阅
/usr/share/doc/ansible-freeipa/playbooks/automember目录。
第 10 章 使用 Ansible playbook 管理 IdM 中的自助服务规则
本节介绍 Identity Management (IdM) 中的自助服务规则,并介绍如何使用 Ansible playbook 创建和编辑自助服务访问规则。自助服务访问控制规则允许 IdM 实体在其 IdM 目录服务器条目上执行指定操作。
10.1. IdM 中的自助服务访问控制
自助服务访问控制规则定义 Identity Management (IdM) 实体可以在其 IdM 目录服务器条目上执行的操作:例如,IdM 用户能够更新自己的密码。
这种控制方法允许经过身份验证的 IdM 实体编辑其 LDAP 条目中的特定属性,但不允许对整个条目的 add 或 delete 操作。
使用自助服务访问控制规则时要小心:不当配置访问控制规则可能会意外地提升实体的特权。
10.2. 使用 Ansible 确保存在自助服务规则
以下流程描述了如何使用 Ansible playbook 定义自助服务规则并确保它们在身份管理 (IdM) 服务器上存在。在本例中,新的 Users can manage their own name details 规则会授予用户更改其 givenname、displayname、title 和 initials 属性的权限。例如,这允许他们更改其显示名称或缩写(如果想更改)。
先决条件
- 您知道 IdM 管理员密码。
您已配置了 Ansible 控制节点以满足以下要求:
- 您使用 Ansible 版本 2.14 或更高版本。
-
您已在 Ansible 控制器上安装了
ansible-freeipa软件包。 - 示例假定在 ~/MyPlaybooks/ 目录中,您已创建了带有 IdM 服务器的完全限定域名(FQDN)的 Ansible 清单文件。
-
示例假定 secret.yml Ansible vault 存储了
ipaadmin_password。
流程
进入 ~/MyPlaybooks/ 目录:
$ cd ~/MyPlaybooks/复制位于
/usr/share/doc/ansible-freeipa/playbooks/selfservice/目录中的selfservice-present.yml文件副本:$ cp /usr/share/doc/ansible-freeipa/playbooks/selfservice/selfservice-present.yml selfservice-present-copy.yml-
打开
selfservice-present-copy.ymlAnsible playbook 文件以进行编辑。 通过在
ipaselfservice任务部分设置以下变量来调整文件:-
将
ipaadmin_password变量设置为 IdM 管理员的密码。 -
将
name变量设置为新自助服务规则的名称。 -
将
permission变量设置为以逗号分隔的权限列表,以授予:read和write。 -
将
attribute变量设置为用户可以自己管理的属性列表:givenname、displayname、title和initials。
这是当前示例修改的 Ansible playbook 文件:
--- - name: Self-service present hosts: ipaserver vars_files: - /home/user_name/MyPlaybooks/secret.yml tasks: - name: Ensure self-service rule "Users can manage their own name details" is present ipaselfservice: ipaadmin_password: "{{ ipaadmin_password }}" name: "Users can manage their own name details" permission: read, write attribute: - givenname - displayname - title - initials-
将
- 保存这个文件。
运行 Ansible playbook。指定 playbook 文件、存储保护 secret.yml 文件的密码,以及清单文件:
$ ansible-playbook --vault-password-file=password_file -v -i inventory selfservice-present-copy.yml
其他资源
- 请参阅 IdM 中的自助服务访问控制。
-
请参阅
/usr/share/doc/ansible-freeipa/目录中的README-selfservice.md文件。 -
请参阅
/usr/share/doc/ansible-freeipa/playbooks/selfservice目录。
10.3. 使用 Ansible 确保缺少自助服务规则
以下流程描述了如何使用 Ansible playbook 来确保 IdM 配置中没有指定的自助服务规则。以下示例描述了如何确保 Users can manage their own name details 自助服务规则在 IdM 中不存在。这将确保用户无法更改自己的显示名称或缩写。
先决条件
- 您知道 IdM 管理员密码。
您已配置了 Ansible 控制节点以满足以下要求:
- 您使用 Ansible 版本 2.14 或更高版本。
-
您已在 Ansible 控制器上安装了
ansible-freeipa软件包。 - 示例假定在 ~/MyPlaybooks/ 目录中,您已创建了带有 IdM 服务器的完全限定域名(FQDN)的 Ansible 清单文件。
-
示例假定 secret.yml Ansible vault 存储了
ipaadmin_password。
流程
进入 ~/MyPlaybooks/ 目录:
$ cd ~/MyPlaybooks/创建位于
/usr/share/doc/ansible-freeipa/playbooks/selfservice/目录中的selfservice-absent.yml文件的副本:$ cp /usr/share/doc/ansible-freeipa/playbooks/selfservice/selfservice-absent.yml selfservice-absent-copy.yml-
打开
selfservice-absent-copy.ymlAnsible playbook 文件以进行编辑。 通过在
ipaselfservice任务部分设置以下变量来调整文件:-
将
ipaadmin_password变量设置为 IdM 管理员的密码。 -
将
name变量设置为自助服务规则的名称。 -
将
state变量设置为absent。
这是当前示例修改的 Ansible playbook 文件:
--- - name: Self-service absent hosts: ipaserver vars_files: - /home/user_name/MyPlaybooks/secret.yml tasks: - name: Ensure self-service rule "Users can manage their own name details" is absent ipaselfservice: ipaadmin_password: "{{ ipaadmin_password }}" name: "Users can manage their own name details" state: absent-
将
- 保存这个文件。
运行 Ansible playbook。指定 playbook 文件、存储保护 secret.yml 文件的密码,以及清单文件:
$ ansible-playbook --vault-password-file=password_file -v -i inventory selfservice-absent-copy.yml
其他资源
- 请参阅 IdM 中的自助服务访问控制。
-
请参阅
/usr/share/doc/ansible-freeipa/目录中的README-selfservice.md文件。 -
请参阅
/usr/share/doc/ansible-freeipa/playbooks/selfservice目录中的 playbook 示例。
10.4. 使用 Ansible 确保自助服务规则具有特定属性
以下流程描述了如何使用 Ansible playbook 确保现有自助服务规则具有特定的设置。在示例中,您可以确认 Users can manage their own name details 自助服务规则也具有 surname 成员属性。
先决条件
- 您知道 IdM 管理员密码。
您已配置了 Ansible 控制节点以满足以下要求:
- 您使用 Ansible 版本 2.14 或更高版本。
-
您已在 Ansible 控制器上安装了
ansible-freeipa软件包。 - 示例假定在 ~/MyPlaybooks/ 目录中,您已创建了带有 IdM 服务器的完全限定域名(FQDN)的 Ansible 清单文件。
-
示例假定 secret.yml Ansible vault 存储了
ipaadmin_password。
- Users can manage their own name details 自助服务规则存在于 IdM 中。
流程
进入 ~/MyPlaybooks/ 目录:
$ cd ~/MyPlaybooks/创建位于
/usr/share/doc/ansible-freeipa/playbooks/selfservice/目录中的selfservice-member-present.yml文件的副本:$ cp /usr/share/doc/ansible-freeipa/playbooks/selfservice/selfservice-member-present.yml selfservice-member-present-copy.yml-
打开
selfservice-member-present-copy.ymlAnsible playbook 文件以进行编辑。 通过在
ipaselfservice任务部分设置以下变量来调整文件:-
将
ipaadmin_password变量设置为 IdM 管理员的密码。 -
将
name变量设置为要修改的自助服务规则的名称。 -
将
attribute变量设置为surname。 -
将
action变量设置为member。
这是当前示例修改的 Ansible playbook 文件:
--- - name: Self-service member present hosts: ipaserver vars_files: - /home/user_name/MyPlaybooks/secret.yml tasks: - name: Ensure selfservice "Users can manage their own name details" member attribute surname is present ipaselfservice: ipaadmin_password: "{{ ipaadmin_password }}" name: "Users can manage their own name details" attribute: - surname action: member-
将
- 保存这个文件。
运行 Ansible playbook。指定 playbook 文件、存储保护 secret.yml 文件的密码,以及清单文件:
$ ansible-playbook --vault-password-file=password_file -v -i inventory selfservice-member-present-copy.yml
其他资源
- 请参阅 IdM 中的自助服务访问控制。
-
请参阅
/usr/share/doc/ansible-freeipa/目录中提供的README-selfservice.md文件。 -
请参阅
/usr/share/doc/ansible-freeipa/playbooks/selfservice目录中的 playbook 示例。
10.5. 使用 Ansible 确保自助服务规则没有特定属性
以下流程描述了如何使用 Ansible playbook 来确保自助服务规则没有特定的设置。您可以使用此 playbook 确保自助服务规则没有授予不需要的访问权限。在示例中,您可以确定 Users can manage their own name details 自助服务规则没有包括 givenname 和 surname成员属性。
先决条件
- 您知道 IdM 管理员密码。
您已配置了 Ansible 控制节点以满足以下要求:
- 您使用 Ansible 版本 2.14 或更高版本。
-
您已在 Ansible 控制器上安装了
ansible-freeipa软件包。 - 示例假定在 ~/MyPlaybooks/ 目录中,您已创建了带有 IdM 服务器的完全限定域名(FQDN)的 Ansible 清单文件。
-
示例假定 secret.yml Ansible vault 存储了
ipaadmin_password。
- Users can manage their own name details 自助服务规则存在于 IdM 中。
流程
进入 ~/MyPlaybooks/ 目录:
$ cd ~/MyPlaybooks/创建位于
/usr/share/doc/ansible-freeipa/playbooks/selfservice/目录中的selfservice-member-absent.yml文件的副本:$ cp /usr/share/doc/ansible-freeipa/playbooks/selfservice/selfservice-member-absent.yml selfservice-member-absent-copy.yml-
打开
selfservice-member-absent-copy.ymlAnsible playbook 文件进行编辑。 通过在
ipaselfservice任务部分设置以下变量来调整文件:-
将
ipaadmin_password变量设置为 IdM 管理员的密码。 -
将
name变量设置为您要修改的自助服务规则的名称。 -
将
attribute变量设置为givenname和 topname。 -
将
action变量设置为member。 -
将
state变量设置为absent。
这是当前示例修改的 Ansible playbook 文件:
--- - name: Self-service member absent hosts: ipaserver vars_files: - /home/user_name/MyPlaybooks/secret.yml tasks: - name: Ensure selfservice "Users can manage their own name details" member attributes givenname and surname are absent ipaselfservice: ipaadmin_password: "{{ ipaadmin_password }}" name: "Users can manage their own name details" attribute: - givenname - surname action: member state: absent-
将
- 保存这个文件。
运行 Ansible playbook。指定 playbook 文件、存储保护 secret.yml 文件的密码,以及清单文件:
$ ansible-playbook --vault-password-file=password_file -v -i inventory selfservice-member-absent-copy.yml
其他资源
- 请参阅 IdM 中的自助服务访问控制。
-
请参阅
/usr/share/doc/ansible-freeipa/目录中的README-selfservice.md文件。 -
请参阅
/usr/share/doc/ansible-freeipa/playbooks/selfservice目录中的 playbook 示例。
第 11 章 委派权限到用户组,以使用 Ansible playbook 管理用户
委派是 IdM 中的访问控制方法之一,以及自助服务规则和基于角色的访问控制 (RBAC)。您可以使用委派(delegation)为一组用户分配权限,以管理另一组用户的条目。
本节涵盖了以下主题:
11.1. 委派规则
您可以通过创建委派规则,将权限委派给用户组来管理用户。
委派规则允许特定用户组对另一用户组中用户的特定属性执行写入(编辑)操作。这种形式的访问控制规则仅限于编辑您在委派规则中指定的属性子集的值;它不授予添加或删除整个条目或控制未指定属性的权限。
委派规则向 IdM 中的现有用户组授予权限。例如,您可以使用委派功能,允许 managers 用户组管理 employees 用户组中的选定用户属性。
11.2. 为 IdM 创建 Ansible 清单文件
在使用 Ansible 时,最好在主目录中创建一个专用于 Ansible playbook 的子目录,您可复制 /usr/share/doc/ansible-freeipa/* 和 /usr/share/doc/rhel-system-roles/* 子目录并进行相应的调整。这种做法有以下优点:
- 您可以在一个位置找到所有 playbook。
-
您可以运行 playbook,而无需调用
root特权。
流程
在主目录中为您的 Ansible 配置和 playbook 创建目录:
$ mkdir ~/MyPlaybooks/进入 ~/MyPlaybooks/ 目录:
$ cd ~/MyPlaybooks使用以下内容创建 ~/MyPlaybooks/ansible.cfg 文件:
[defaults] inventory = /home/<username>/MyPlaybooks/inventory [privilege_escalation] become=True使用以下内容创建 ~/MyPlaybooks/inventory 文件:
[eu] server.idm.example.com [us] replica.idm.example.com [ipaserver:children] eu us
此配置定义了两个主机组,即 eu 和 us,用于这些位置中的主机。此外,此配置定义了 ipaserver 主机组,它包含来自 eu 和 us 组的所有主机。
11.3. 使用 Ansible 确保存在委派规则
以下流程描述了如何使用 Ansible playbook 为新的 IdM 委派规则定义特权并确保其存在。在这个示例中,新的 basic manager attributes 委派规则授予 managers 组为 employees 组成员读取和写入以下属性的权限:
-
businesscategory -
departmentnumber -
employeenumber -
employeetype
先决条件
- 您知道 IdM 管理员密码。
您已配置了 Ansible 控制节点以满足以下要求:
- 您使用 Ansible 版本 2.14 或更高版本。
-
您已在 Ansible 控制器上安装了
ansible-freeipa软件包。 - 示例假定在 ~/MyPlaybooks/ 目录中,您已创建了带有 IdM 服务器的完全限定域名(FQDN)的 Ansible 清单文件。
-
示例假定 secret.yml Ansible vault 存储了
ipaadmin_password。
流程
进入 ~/MyPlaybooks/ 目录:
$ cd ~/MyPlaybooks/制作位于
/usr/share/doc/ansible-freeipa/playbooks/delegation/目录中的delegation-present.yml文件的副本:$ cp /usr/share/doc/ansible-freeipa/playbooks/delegation/delegation-present.yml delegation-present-copy.yml-
打开
delegation-present-copy.ymlAnsible playbook 文件以进行编辑。 通过在
ipadelegation任务部分设置以下变量来调整文件:-
将
ipaadmin_password变量设置为 IdM 管理员的密码。 -
将
name变量设置为新委派规则的名称。 -
将
permission变量设置为以逗号分隔的权限列表,以授予:read和write。 -
将
attribute变量设置为委派的用户组可以管理的属性列表:businesscategory、departmentnumber、employeenumber和employeetype。 -
将
group变量设置为被授予查看或修改属性访问权限的组名称。 -
将
membergroup变量设置为组的名称,其属性可以查看或修改。
这是当前示例修改的 Ansible playbook 文件:
--- - name: Playbook to manage a delegation rule hosts: ipaserver vars_files: - /home/user_name/MyPlaybooks/secret.yml tasks: - name: Ensure delegation "basic manager attributes" is present ipadelegation: ipaadmin_password: "{{ ipaadmin_password }}" name: "basic manager attributes" permission: read, write attribute: - businesscategory - departmentnumber - employeenumber - employeetype group: managers membergroup: employees-
将
- 保存这个文件。
运行 Ansible playbook。指定 playbook 文件、存储保护 secret.yml 文件的密码,以及清单文件:
$ ansible-playbook --vault-password-file=password_file -v -i ~/MyPlaybooks/inventory delegation-present-copy.yml
其他资源
- 请参阅 委派规则。
-
请参阅
/usr/share/doc/ansible-freeipa/目录中的README-delegation.md文件。 -
请参阅
/usr/share/doc/ansible-freeipa/playbooks/ipadelegation目录中的 playbook 示例。
11.4. 使用 Ansible 确保没有委派规则
以下流程描述了如何使用 Ansible playbook 来确保您的 IdM 配置中没有指定的委托规则。以下示例描述了如何确保 IdM 中没有存在自定义 basic manager attributes 委派规则。
先决条件
- 您知道 IdM 管理员密码。
您已配置了 Ansible 控制节点以满足以下要求:
- 您使用 Ansible 版本 2.14 或更高版本。
-
您已在 Ansible 控制器上安装了
ansible-freeipa软件包。 - 示例假定在 ~/MyPlaybooks/ 目录中,您已创建了带有 IdM 服务器的完全限定域名(FQDN)的 Ansible 清单文件。
-
示例假定 secret.yml Ansible vault 存储了
ipaadmin_password。
流程
进入 ~/MyPlaybooks/ 目录:
$ cd ~/MyPlaybooks>/制作位于
/usr/share/doc/ansible-freeipa/playbooks/delegation/目录中的delegation-absent.yml文件的副本:$ cp /usr/share/doc/ansible-freeipa/playbooks/delegation/delegation-present.yml delegation-absent-copy.yml-
打开
delegation-absent-copy.ymlAnsible playbook 文件以进行编辑。 通过在
ipadelegation任务部分设置以下变量来调整文件:-
将
ipaadmin_password变量设置为 IdM 管理员的密码。 -
将
name变量设置为委派规则的名称。 -
将
state变量设置为absent。
这是当前示例修改的 Ansible playbook 文件:
--- - name: Delegation absent hosts: ipaserver vars_files: - /home/user_name/MyPlaybooks/secret.yml tasks: - name: Ensure delegation "basic manager attributes" is absent ipadelegation: ipaadmin_password: "{{ ipaadmin_password }}" name: "basic manager attributes" state: absent-
将
- 保存这个文件。
运行 Ansible playbook。指定 playbook 文件、存储保护 secret.yml 文件的密码,以及清单文件:
$ ansible-playbook --vault-password-file=password_file -v -i ~/MyPlaybooks/inventory delegation-absent-copy.yml
其他资源
- 请参阅 委派规则。
-
请参阅
/usr/share/doc/ansible-freeipa/目录中的README-delegation.md文件。 -
请参阅
/usr/share/doc/ansible-freeipa/playbooks/ipadelegation目录中的 playbook 示例。
11.5. 使用 Ansible 确保委派规则具有特定属性
以下流程描述了如何使用 Ansible playbook 确保委派规则具有特定的设置。您可以使用此 playbook 修改您之前创建的委派角色。在示例中,您可以确保 basic manager attributes 委派规则仅具有 departmentnumber 成员属性。
先决条件
- 您知道 IdM 管理员密码。
您已配置了 Ansible 控制节点以满足以下要求:
- 您使用 Ansible 版本 2.14 或更高版本。
-
您已在 Ansible 控制器上安装了
ansible-freeipa软件包。 - 示例假定在 ~/MyPlaybooks/ 目录中,您已创建了带有 IdM 服务器的完全限定域名(FQDN)的 Ansible 清单文件。
-
示例假定 secret.yml Ansible vault 存储了
ipaadmin_password。
- IdM 中存在 basic manager attributes委派规则。
流程
进入 ~/MyPlaybooks/ 目录:
$ cd ~/MyPlaybooks/制作位于
/usr/share/doc/ansible-freeipa/playbooks/delegation/目录中的delegation-member-present.yml文件的副本:$ cp /usr/share/doc/ansible-freeipa/playbooks/delegation/delegation-member-present.yml delegation-member-present-copy.yml-
打开
delegation-member-present-copy.ymlAnsible playbook 文件以进行编辑。 通过在
ipadelegation任务部分设置以下变量来调整文件:-
将
ipaadmin_password变量设置为 IdM 管理员的密码。 -
将
name变量设置为要修改的委派规则的名称。 -
将
attribute变量设置为departmentnumber。 -
将
action变量设置为member。
这是当前示例修改的 Ansible playbook 文件:
--- - name: Delegation member present hosts: ipaserver vars_files: - /home/user_name/MyPlaybooks/secret.yml tasks: - name: Ensure delegation "basic manager attributes" member attribute departmentnumber is present ipadelegation: ipaadmin_password: "{{ ipaadmin_password }}" name: "basic manager attributes" attribute: - departmentnumber action: member-
将
- 保存这个文件。
运行 Ansible playbook。指定 playbook 文件、存储保护 secret.yml 文件的密码,以及清单文件:
$ ansible-playbook --vault-password-file=password_file -v -i ~/MyPlaybooks/inventory delegation-member-present-copy.yml
其他资源
- 请参阅 委派规则。
-
请参阅
/usr/share/doc/ansible-freeipa/目录中的README-delegation.md文件。 -
请参阅
/usr/share/doc/ansible-freeipa/playbooks/ipadelegation目录中的 playbook 示例。
11.6. 使用 Ansible 确保委派规则没有特定属性
以下流程描述了如何使用 Ansible playbook 来确保委派规则没有特定的设置。您可以使用此 playbook 确保委派角色不授予不需要的访问权限。在该示例中,您可以确保 basic manager attributes 委派规则没有 employeenumber 和 employeetype 成员属性。
先决条件
- 您知道 IdM 管理员密码。
您已配置了 Ansible 控制节点以满足以下要求:
- 您使用 Ansible 版本 2.14 或更高版本。
-
您已在 Ansible 控制器上安装了
ansible-freeipa软件包。 - 示例假定在 ~/MyPlaybooks/ 目录中,您已创建了带有 IdM 服务器的完全限定域名(FQDN)的 Ansible 清单文件。
-
示例假定 secret.yml Ansible vault 存储了
ipaadmin_password。
- IdM 中存在 basic manager attributes委派规则。
流程
进入 ~/MyPlaybooks/ 目录:
$ cd ~/MyPlaybooks/制作位于
/usr/share/doc/ansible-freeipa/playbooks/delegation/目录中的delegation-member-absent.yml文件的副本:$ cp /usr/share/doc/ansible-freeipa/playbooks/delegation/delegation-member-absent.yml delegation-member-absent-copy.yml-
打开
delegation-member-absent-copy.ymlAnsible playbook 文件以进行编辑。 通过在
ipadelegation任务部分设置以下变量来调整文件:-
将
ipaadmin_password变量设置为 IdM 管理员的密码。 -
将
name变量设置为要修改的委派规则的名称。 -
将
attribute变量设置为employeenumber和employeetype。 -
将
action变量设置为member。 -
将
state变量设置为absent。
这是当前示例修改的 Ansible playbook 文件:
--- - name: Delegation member absent hosts: ipaserver vars_files: - /home/user_name/MyPlaybooks/secret.yml tasks: - name: Ensure delegation "basic manager attributes" member attributes employeenumber and employeetype are absent ipadelegation: ipaadmin_password: "{{ ipaadmin_password }}" name: "basic manager attributes" attribute: - employeenumber - employeetype action: member state: absent-
将
- 保存这个文件。
运行 Ansible playbook。指定 playbook 文件、存储保护 secret.yml 文件的密码,以及清单文件:
$ ansible-playbook --vault-password-file=password_file -v -i ~/MyPlaybooks/inventory delegation-member-absent-copy.yml
其他资源
- 请参阅 委派规则。
-
请参阅
/usr/share/doc/ansible-freeipa/目录中的README-delegation.md文件。 -
请参阅
/usr/share/doc/ansible-freeipa/playbooks/ipadelegation目录中的 playbook 示例。
第 12 章 在 IdM 中使用 Ansible playbook 管理基于角色的访问控制
基于角色的访问控制 (RBAC) 是一种基于角色和特权定义的策略中立访问控制机制。在 Identity Management (IdM) 中的 RBAC 组件是角色、权限和权限:
- Permissions 授予执行特定任务的权利,如添加或删除用户、修改组并启用读访问。
- Privileges(特权) 结合了权限,例如添加新用户所需的所有权限。
- Roles(角色) 向用户、用户组、主机或主机组授予一组特权。
尤其是在大型公司,使用 RBAC 可以帮助创建具有各个职责领域的管理员分层系统。
本章介绍了使用 Ansible playbook 管理 RBAC 时执行的以下操作:
12.1. IdM 中的权限
权限是基于角色的访问控制的最低级别单元,它们定义这些操作所应用到的 LDAP 条目。与构建块类似,可以根据需要将权限分配给多个特权。
一个或多个权利定义了允许的操作 :
-
write -
读取 -
搜索 -
compare -
添加 -
删除 -
all
这些操作适用于三个基本目标:
-
subtree:域名 (DN);此 DN 下的子树 -
target filter:LDAP 过滤器 -
target:可以带有通配符的 DN 指定条目
此外,以下方便选项可设置对应的属性:
-
type:对象类型(用户、组等);设置subtree和target filter -
memberof:组成员;设置target filter -
targetgroup:授予修改特定组的权限(如授予管理组成员资格的权限);设置target
使用 IdM 权限,您可以控制哪些用户有权访问哪些对象,甚至控制这些对象的属性。IdM 允许您允许或阻止单个属性,或更改特定 IdM 功能(如用户、组或 sudo)的所有可见性,适用于所有匿名用户、所有经过身份验证的用户,或者只更改一组特定的特权用户。
例如,如果管理员只想将用户或组的访问权限限制到这些用户或组需要访问的特定部分,并且使其他部分完全隐藏于他们,此方法的灵活性对管理员很有用。
权限不能包含其他权限。
12.2. 默认管理的权限
管理的权限是 IdM 默认附带的权限。它们的行为与用户创建的其他权限类似,但有以下区别:
- 您无法删除它们或修改其名称、位置和目标属性。
它们有三组属性:
- Default 属性,用户无法修改它们,因为它们由 IdM 管理
- Included 属性,它们是用户添加的额外属性
- Excluded 属性,这些属性由用户删除
管理的权限适用于 default 和 included 属性集中显示的所有属性,但不应用到排除集中的所有属性。
虽然您无法删除受管权限,但将其绑定类型设置为权限并从所有特权中删除托管权限会有效地禁用该权限。
所有受管权限的名称都以 System: 开头,例如 System: Add Sudo rule 或 System: Modify Services。IdM 的早期版本将不同的方案用于默认权限。例如,用户无法删除它们,而只能将它们分配到特权。这些默认权限大部分已转换为受管权限,但以下权限仍使用以前的方案:
- 添加自动成员重新构建成员身份任务
- 添加配置子条目
- 添加复制协议
- 证书删除冻结
- 从 CA 获取证书状态
- 读取 DNA 范围
- 修改 DNA 范围
- 读取 PassSync Manager 配置
- 修改 PassSync Manager 配置
- 阅读复制协议
- 修改复制协议
- 删除复制协议
- 读取 LDBM 数据库配置
- 请求证书
- 请求证书忽略 CA ACL
- 从不同主机请求证书
- 从 CA 检索证书
- 吊销证书
- 写入 IPA 配置
如果您试图通过命令行修改受管权限,系统不允许更改您无法修改的属性,命令会失败。如果您试图从 Web UI 修改受管权限,则无法修改的属性将被禁用。
12.3. IdM 中的特权
特权是一组适用于角色的权限。
虽然权限提供了执行单个操作的权限,但某些 IdM 任务需要多个权限才能成功。因此,特权组合了执行特定任务所需的不同权限。
例如,为新 IdM 用户设置帐户需要以下权限:
- 创建新用户条目
- 重置用户密码
- 将新用户添加到默认 IPA 用户组
将这三个低级别任务合并到一个更高级别的任务中,例如名为 Add User,可使系统管理员更加轻松地管理角色。IdM 已包含几个默认权限。除了用户和用户组外,还将特权分配到主机和主机组,以及网络服务。这种方法允许精细控制一组主机上使用特定网络服务的操作。
特权可能不包含其他特权。
12.4. IdM 中的角色
角色是用户为角色指定的特权列表。
实际上,权限授予执行给定低级别任务(如创建用户条目和向组添加条目)的能力,特权组合了更高级别任务所需的一个或多个这些权限(如在给定组中创建新用户)。角色根据需要收集权限:例如,用户管理员角色能够添加、修改和删除用户。
角色用于对允许的操作进行分类。它们不用作实施特权升级或防止特权升级的工具。
角色不能包含其他角色。
12.5. Identity Management 中的预定义角色
Red Hat Identity Management 提供以下预定义角色范围:
表 12.1. 身份管理中的预定义角色
| 角色 | 特权 | 描述 |
|---|---|---|
| Enrollment Administrator | 主机注册 | 负责客户端或主机、注册 |
| helpdesk | 改用户和重置密码,修改组成员身份 | 负责执行简单的用户管理任务 |
| IT Security Specialist | Netgroups 管理员, HBAC 管理员, Sudo 管理员 | 负责管理安全策略,如基于主机的访问控制、sudo 规则 |
| IT Specialist | 主机管理员、主机组管理员、服务管理员、自动装载管理员 | 负责管理主机 |
| Security Architect | 委派管理员、复制管理员、写 IPA 配置、密码策略管理员 | 负责管理身份管理环境、创建信任、创建复制协议 |
| User Administrator | 用户管理员、组管理员、阶段用户管理员 | 负责创建用户和组 |
12.6. 使用 Ansible 确保存在带有特权的 IdM RBAC 角色
要对身份管理 (IdM) 中的资源 (IdM) 中的资源进行更加精细的控制,请创建自定义角色。
以下流程描述了如何使用 Ansible playbook 为新的 IdM 自定义角色定义特权并确保其存在。在这个示例中,新的 user_and_host_administrator 角色默认包含 IdM 中的以下权限的唯一组合:
-
Group Administrators -
User Administrators -
Stage User Administrators -
Group Administrators
先决条件
- 您知道 IdM 管理员密码。
您已配置了 Ansible 控制节点以满足以下要求:
- 您使用 Ansible 版本 2.14 或更高版本。
-
您已在 Ansible 控制器上安装了
ansible-freeipa软件包。 - 示例假定在 ~/MyPlaybooks/ 目录中,您已创建了带有 IdM 服务器的完全限定域名(FQDN)的 Ansible 清单文件。
-
示例假定 secret.yml Ansible vault 存储了
ipaadmin_password。
流程
进入 ~/<MyPlaybooks>/ 目录:
$ cd ~/<MyPlaybooks>/创建位于
/usr/share/doc/ansible-freeipa/playbooks/role/目录的role-member-user-present.yml文件的副本:$ cp /usr/share/doc/ansible-freeipa/playbooks/role/role-member-user-present.yml role-member-user-present-copy.yml-
打开
role-member-user-present-copy.ymlAnsible playbook 文件以进行编辑。 通过在
iparole任务部分设置以下变量来调整文件:-
将
ipaadmin_password变量设置为 IdM 管理员的密码。 -
将
name变量设置为新角色的名称。 -
将
privilege列表设置为您要包含在新角色中的 IdM 权限的名称。 -
(可选)将
user变量设置为您要授予新角色的用户名称。 -
(可选)将
group变量设置为要授予新角色的组的名称。
这是当前示例修改的 Ansible playbook 文件:
--- - name: Playbook to manage IPA role with members. hosts: ipaserver become: true gather_facts: no vars_files: - /home/user_name/MyPlaybooks/secret.yml tasks: - iparole: ipaadmin_password: "{{ ipaadmin_password }}" name: user_and_host_administrator user: idm_user01 group: idm_group01 privilege: - Group Administrators - User Administrators - Stage User Administrators - Group Administrators-
将
- 保存这个文件。
运行 Ansible playbook。指定 playbook 文件、存储保护 secret.yml 文件的密码,以及清单文件:
$ ansible-playbook --vault-password-file=password_file -v -i ~/<MyPlaybooks>/inventory role-member-user-present-copy.yml
其他资源
- 请参阅 使用 Ansible Vault 加密内容。
- 请参阅 IdM 中的角色。
-
请参阅
/usr/share/doc/ansible-freeipa/目录中的README-role文件。 -
请参阅
/usr/share/doc/ansible-freeipa/playbooks/iparole目录中的 playbook 示例。
12.7. 使用 Ansible 确保缺少 IdM RBAC 角色
作为管理身份管理 (IdM) 中基于角色的访问控制 (RBAC) 的系统管理员,您可能希望确保没有过时的角色,以便任何管理员不会意外将它分配给任何用户。
以下流程描述了如何使用 Ansible playbook 来确保缺少角色。以下示例描述了如何确保 IdM 中不存在自定义 user_and_host_administrator 角色。
先决条件
- 您知道 IdM 管理员密码。
您已配置了 Ansible 控制节点以满足以下要求:
- 您使用 Ansible 版本 2.14 或更高版本。
-
您已在 Ansible 控制器上安装了
ansible-freeipa软件包。 - 示例假定在 ~/MyPlaybooks/ 目录中,您已创建了带有 IdM 服务器的完全限定域名(FQDN)的 Ansible 清单文件。
-
示例假定 secret.yml Ansible vault 存储了
ipaadmin_password。
流程
进入 ~/<MyPlaybooks>/ 目录:
$ cd ~/<MyPlaybooks>/创建位于
/usr/share/doc/ansible-freeipa/playbooks/role/目录的role-is-absent.yml文件的副本:$ cp /usr/share/doc/ansible-freeipa/playbooks/role/role-is-absent.yml role-is-absent-copy.yml-
打开
role-is-absent-copy.ymlAnsible playbook 文件以进行编辑。 通过在
iparole任务部分设置以下变量来调整文件:-
将
ipaadmin_password变量设置为 IdM 管理员的密码。 -
将
name变量设置为角色的名称。 -
确保
state变量设置为absent。
这是当前示例修改的 Ansible playbook 文件:
--- - name: Playbook to manage IPA role with members. hosts: ipaserver become: true gather_facts: no vars_files: - /home/user_name/MyPlaybooks/secret.yml tasks: - iparole: ipaadmin_password: "{{ ipaadmin_password }}" name: user_and_host_administrator state: absent-
将
- 保存这个文件。
运行 Ansible playbook。指定 playbook 文件、存储保护 secret.yml 文件的密码,以及清单文件:
$ ansible-playbook --vault-password-file=password_file -v -i ~/<MyPlaybooks>/inventory role-is-absent-copy.yml
其他资源
- 请参阅 使用 Ansible Vault 加密内容。
- 请参阅 IdM 中的角色。
-
请参阅
/usr/share/doc/ansible-freeipa/目录中的README-roleMarkdown 文件。 -
请参阅
/usr/share/doc/ansible-freeipa/playbooks/iparole目录中的 playbook 示例。
12.8. 使用 Ansible 确保为一组用户分配 IdM RBAC 角色
作为管理身份管理 (IdM) 中基于角色的访问控制 (RBAC) 的系统管理员,您可能希望为一组特定的用户(如初级管理员)分配角色。
以下示例描述了如何使用 Ansible playbook 来确保为 junior_sysadmins 分配内置 IdM RBAC helpdesk 角色。
先决条件
- 您知道 IdM 管理员密码。
您已配置了 Ansible 控制节点以满足以下要求:
- 您使用 Ansible 版本 2.14 或更高版本。
-
您已在 Ansible 控制器上安装了
ansible-freeipa软件包。 - 示例假定在 ~/MyPlaybooks/ 目录中,您已创建了带有 IdM 服务器的完全限定域名(FQDN)的 Ansible 清单文件。
-
示例假定 secret.yml Ansible vault 存储了
ipaadmin_password。
流程
进入 ~/<MyPlaybooks>/ 目录:
$ cd ~/<MyPlaybooks>/创建位于
/usr/share/doc/ansible-freeipa/playbooks/role/目录的role-member-group-present.yml文件的副本:$ cp /usr/share/doc/ansible-freeipa/playbooks/role/role-member-group-present.yml role-member-group-present-copy.yml-
打开
role-member-group-present-copy.ymlAnsible playbook 文件以进行编辑。 通过在
iparole任务部分设置以下变量来调整文件:-
将
ipaadmin_password变量设置为 IdM 管理员的密码。 -
将
name变量设置为您要分配的角色的名称。 -
将
group变量设置为组的名称。 -
将
action变量设置为member。
这是当前示例修改的 Ansible playbook 文件:
--- - name: Playbook to manage IPA role with members. hosts: ipaserver become: true gather_facts: no vars_files: - /home/user_name/MyPlaybooks/secret.yml tasks: - iparole: ipaadmin_password: "{{ ipaadmin_password }}" name: helpdesk group: junior_sysadmins action: member-
将
- 保存这个文件。
运行 Ansible playbook。指定 playbook 文件、存储保护 secret.yml 文件的密码,以及清单文件:
$ ansible-playbook --vault-password-file=password_file -v -i ~/<MyPlaybooks>/inventory role-member-group-present-copy.yml
其他资源
- 请参阅 使用 Ansible Vault 加密内容。
- 请参阅 IdM 中的角色。
-
请参阅
/usr/share/doc/ansible-freeipa/目录中的README-roleMarkdown 文件。 -
请参阅
/usr/share/doc/ansible-freeipa/playbooks/iparole目录中的 playbook 示例。
12.9. 使用 Ansible 确保没有将特定用户分配给 IdM RBAC 角色
作为系统管理员,在身份管理 (IdM) 中管理基于角色的访问控制 (RBAC),您可能需要确保在特定用户已移至公司内的不同位置后,不会为其分配 RBAC 角色。
以下流程描述了如何使用 Ansible playbook 来确保没有将名为 user_01 和 user_02 的用户分配到 helpdesk 角色。
先决条件
- 您知道 IdM 管理员密码。
您已配置了 Ansible 控制节点以满足以下要求:
- 您使用 Ansible 版本 2.14 或更高版本。
-
您已在 Ansible 控制器上安装了
ansible-freeipa软件包。 - 示例假定在 ~/MyPlaybooks/ 目录中,您已创建了带有 IdM 服务器的完全限定域名(FQDN)的 Ansible 清单文件。
-
示例假定 secret.yml Ansible vault 存储了
ipaadmin_password。
流程
进入 ~/<MyPlaybooks>/ 目录:
$ cd ~/<MyPlaybooks>/创建位于
/usr/share/doc/ansible-freeipa/playbooks/role/目录的role-member-user-absent.yml文件的副本:$ cp /usr/share/doc/ansible-freeipa/playbooks/role/role-member-user-absent.yml role-member-user-absent-copy.yml-
打开
role-member-user-absent-copy.ymlAnsible playbook 文件以进行编辑。 通过在
iparole任务部分设置以下变量来调整文件:-
将
ipaadmin_password变量设置为 IdM 管理员的密码。 -
将
name变量设置为您要分配的角色的名称。 -
将
user列表设置为用户的名称。 -
将
action变量设置为member。 -
将
state变量设置为absent。
这是当前示例修改的 Ansible playbook 文件:
--- - name: Playbook to manage IPA role with members. hosts: ipaserver become: true gather_facts: no vars_files: - /home/user_name/MyPlaybooks/secret.yml tasks: - iparole: ipaadmin_password: "{{ ipaadmin_password }}" name: helpdesk user - user_01 - user_02 action: member state: absent-
将
- 保存这个文件。
运行 Ansible playbook。指定 playbook 文件、存储保护 secret.yml 文件的密码,以及清单文件:
$ ansible-playbook --vault-password-file=password_file -v -i ~/<MyPlaybooks>/inventory role-member-user-absent-copy.yml
其他资源
- 请参阅 使用 Ansible Vault 加密内容。
- 请参阅 IdM 中的角色。
-
请参阅
/usr/share/doc/ansible-freeipa/目录中的README-roleMarkdown 文件。 -
请参阅
/usr/share/doc/ansible-freeipa/playbooks/iparole目录中的 playbook 示例。
12.10. 使用 Ansible 确保服务是 IdM RBAC 角色的成员
作为管理身份管理 (IdM) 中基于角色的访问控制 (RBAC) 的系统管理员,您可能希望确保注册 IdM 的特定服务是特定角色的成员。以下示例描述了如何确保自定义 web_administrator 角色可以管理 client01.idm.example.com 服务器上运行的 HTTP 服务。
先决条件
- 您知道 IdM 管理员密码。
您已配置了 Ansible 控制节点以满足以下要求:
- 您使用 Ansible 版本 2.14 或更高版本。
-
您已在 Ansible 控制器上安装了
ansible-freeipa软件包。 - 示例假定在 ~/MyPlaybooks/ 目录中,您已创建了带有 IdM 服务器的完全限定域名(FQDN)的 Ansible 清单文件。
-
示例假定 secret.yml Ansible vault 存储了
ipaadmin_password。
- web_administrator 角色存在于 IdM 中。
- IdM 中存在 HTTP/client01.idm.example.com@IDM.EXAMPLE.COM 服务。
流程
进入 ~/<MyPlaybooks>/ 目录:
$ cd ~/<MyPlaybooks>/创建位于
/usr/share/doc/ansible-freeipa/playbooks/role/目录的role-member-service-present.yml文件的副本:$ cp /usr/share/doc/ansible-freeipa/playbooks/role/role-member-service-present-absent.yml role-member-service-present-copy.yml-
打开
role-member-service-present-copy.ymlAnsible playbook 文件以进行编辑。 通过在
iparole任务部分设置以下变量来调整文件:-
将
ipaadmin_password变量设置为 IdM 管理员的密码。 -
将
name变量设置为您要分配的角色的名称。 -
将
service列表设置为服务的名称。 -
将
action变量设置为member。
这是当前示例修改的 Ansible playbook 文件:
--- - name: Playbook to manage IPA role with members. hosts: ipaserver become: true gather_facts: no vars_files: - /home/user_name/MyPlaybooks/secret.yml tasks: - iparole: ipaadmin_password: "{{ ipaadmin_password }}" name: web_administrator service: - HTTP/client01.idm.example.com action: member-
将
- 保存这个文件。
运行 Ansible playbook。指定 playbook 文件、存储保护 secret.yml 文件的密码,以及清单文件:
$ ansible-playbook --vault-password-file=password_file -v -i ~/<MyPlaybooks>/inventory role-member-service-present-copy.yml
其他资源
- 请参阅 使用 Ansible Vault 加密内容。
- 请参阅 IdM 中的角色。
-
请参阅
/usr/share/doc/ansible-freeipa/目录中的README-roleMarkdown 文件。 -
请参阅
/usr/share/doc/ansible-freeipa/playbooks/iparole目录中的 playbook 示例。
12.11. 使用 Ansible 确保主机是 IdM RBAC 角色的成员
作为在身份管理 (IdM) 中管理基于角色的访问控制的系统管理员,您可能希望确保特定的主机或主机组与特定角色关联。以下示例描述了如何确保自定义 web_administrator 角色可以管理运行 HTTP 服务的 client01.idm.example.com IdM 主机。
先决条件
- 您知道 IdM 管理员密码。
您已配置了 Ansible 控制节点以满足以下要求:
- 您使用 Ansible 版本 2.14 或更高版本。
-
您已在 Ansible 控制器上安装了
ansible-freeipa软件包。 - 示例假定在 ~/MyPlaybooks/ 目录中,您已创建了带有 IdM 服务器的完全限定域名(FQDN)的 Ansible 清单文件。
-
示例假定 secret.yml Ansible vault 存储了
ipaadmin_password。
- web_administrator 角色存在于 IdM 中。
- client01.idm.example.com 主机存在于 IdM 中。
流程
进入 ~/<MyPlaybooks>/ 目录:
$ cd ~/<MyPlaybooks>/创建位于
/usr/share/doc/ansible-freeipa/playbooks/role/目录的role-member-host-present.yml文件的副本:$ cp /usr/share/doc/ansible-freeipa/playbooks/role/role-member-host-present.yml role-member-host-present-copy.yml-
打开
role-member-host-present-copy.ymlAnsible playbook 文件以进行编辑。 通过在
iparole任务部分设置以下变量来调整文件:-
将
ipaadmin_password变量设置为 IdM 管理员的密码。 -
将
name变量设置为您要分配的角色的名称。 -
将
host列表设置为主机的名称。
这是当前示例修改的 Ansible playbook 文件:
--- - name: Playbook to manage IPA role with members. hosts: ipaserver become: true gather_facts: no vars_files: - /home/user_name/MyPlaybooks/secret.yml tasks: - iparole: ipaadmin_password: "{{ ipaadmin_password }}" name: web_administrator host: - client01.idm.example.com action: member-
将
- 保存这个文件。
运行 Ansible playbook。指定 playbook 文件、存储保护 secret.yml 文件的密码,以及清单文件:
$ ansible-playbook --vault-password-file=password_file -v -i ~/<MyPlaybooks>/inventory role-member-host-present-copy.yml
其他资源
- 请参阅 使用 Ansible Vault 加密内容。
- 请参阅 IdM 中的角色。
-
请参阅
/usr/share/doc/ansible-freeipa/目录中的README-roleMarkdown 文件。 -
请参阅
/usr/share/doc/ansible-freeipa/playbooks/iparole目录中的 playbook 示例。
12.12. 使用 Ansible 确保主机组是 IdM RBAC 角色的成员
作为在身份管理 (IdM) 中管理基于角色的访问控制的系统管理员,您可能希望确保特定的主机或主机组与特定角色关联。以下示例描述了如何确保自定义 web_administrator 角色可以管理运行 HTTP 服务的 IdM 主机组的 web_servers 组。
先决条件
- 您知道 IdM 管理员密码。
您已配置了 Ansible 控制节点以满足以下要求:
- 您使用 Ansible 版本 2.14 或更高版本。
-
您已在 Ansible 控制器上安装了
ansible-freeipa软件包。 - 示例假定在 ~/MyPlaybooks/ 目录中,您已创建了带有 IdM 服务器的完全限定域名(FQDN)的 Ansible 清单文件。
-
示例假定 secret.yml Ansible vault 存储了
ipaadmin_password。
- web_administrator 角色存在于 IdM 中。
- web_servers 主机组存在于 IdM 中。
流程
进入 ~/<MyPlaybooks>/ 目录:
$ cd ~/<MyPlaybooks>/创建位于
/usr/share/doc/ansible-freeipa/playbooks/role/目录的role-member-hostgroup-present.yml文件的副本:$ cp /usr/share/doc/ansible-freeipa/playbooks/role/role-member-hostgroup-present.yml role-member-hostgroup-present-copy.yml-
打开
role-member-hostgroup-present-copy.ymlAnsible playbook 文件以进行编辑。 通过在
iparole任务部分设置以下变量来调整文件:-
将
ipaadmin_password变量设置为 IdM 管理员的密码。 -
将
name变量设置为您要分配的角色的名称。 -
将
hostgroup列表设置为 hostgroup 的名称。
这是当前示例修改的 Ansible playbook 文件:
--- - name: Playbook to manage IPA role with members. hosts: ipaserver become: true gather_facts: no vars_files: - /home/user_name/MyPlaybooks/secret.yml tasks: - iparole: ipaadmin_password: "{{ ipaadmin_password }}" name: web_administrator hostgroup: - web_servers action: member-
将
- 保存这个文件。
运行 Ansible playbook。指定 playbook 文件、存储保护 secret.yml 文件的密码,以及清单文件:
$ ansible-playbook --vault-password-file=password_file -v -i ~/<MyPlaybooks>/inventory role-member-hostgroup-present-copy.yml
其他资源
- 请参阅 使用 Ansible Vault 加密内容。
- 请参阅 IdM 中的角色。
-
请参阅
/usr/share/doc/ansible-freeipa/目录中的README-roleMarkdown 文件。 -
请参阅
/usr/share/doc/ansible-freeipa/playbooks/iparole目录中的 playbook 示例。
第 13 章 使用 Ansible playbook 管理 RBAC 特权
基于角色的访问控制 (RBAC) 是一种基于角色、特权和权限定义的策略中立访问控制机制。尤其是在大型公司,使用 RBAC 可以帮助创建具有各个职责领域的管理员分层系统。
本章介绍了以下操作,以使用 Ansible playbook 管理身份管理 (IdM) 中的 RBAC 特权:
先决条件
- 您已了解 RBAC 的概念和原则。
13.1. 使用 Ansible 确保存在自定义 IdM RBAC 特权
要在 Identity Management (IdM) 基于角色的访问控制 (RBAC) 中有一个完全设计的自定义权限,您需要逐步进行:
- 创建没有附加权限的特权。
- 将您选择的权限添加到特权。
以下流程描述了如何使用 Ansible playbook 创建空特权,以便稍后您可以向它添加权限。这个示例描述了如何创建名为 full_host_administration 的特权,它旨在组合与主机管理相关的所有 IdM 权限。
先决条件
- 您知道 IdM 管理员密码。
您已配置了 Ansible 控制节点以满足以下要求:
- 您使用 Ansible 版本 2.14 或更高版本。
-
您已在 Ansible 控制器上安装了
ansible-freeipa软件包。 - 示例假定在 ~/MyPlaybooks/ 目录中,您已创建了带有 IdM 服务器的完全限定域名(FQDN)的 Ansible 清单文件。
-
示例假定 secret.yml Ansible vault 存储了
ipaadmin_password。
流程
进入 ~/MyPlaybooks/ 目录:
$ cd ~/MyPlaybooks/生成位于
/usr/share/doc/ansible-freeipa/playbooks/privilege/目录中的privilege-present.yml文件副本:$ cp /usr/share/doc/ansible-freeipa/playbooks/privilege/privilege-present.yml privilege-present-copy.yml-
打开
privilege-present-copy.ymlAnsible playbook 文件以进行编辑。 通过在
ipaprivilege任务部分设置以下变量来调整文件:-
将
ipaadmin_password变量设置为 IdM 管理员的密码。 -
将
name变量设置为新特权 full_host_administration 的名称。 -
(可选)利用
description变量描述特权。
这是当前示例修改的 Ansible playbook 文件:
--- - name: Privilege present example hosts: ipaserver vars_files: - /home/user_name/MyPlaybooks/secret.yml tasks: - name: Ensure privilege full_host_administration is present ipaprivilege: ipaadmin_password: "{{ ipaadmin_password }}" name: full_host_administration description: This privilege combines all IdM permissions related to host administration-
将
- 保存这个文件。
运行 Ansible playbook。指定 playbook 文件、存储保护 secret.yml 文件的密码,以及清单文件:
$ ansible-playbook --vault-password-file=password_file -v -i inventory privilege-present-copy.yml
13.2. 使用 Ansible 确保自定义 IdM RBAC 特权中存在成员权限
要在 Identity Management (IdM) 基于角色的访问控制 (RBAC) 中有一个完全设计的自定义权限,您需要逐步进行:
- 创建没有附加权限的特权。
- 将您选择的权限添加到特权。
以下流程描述了如何使用 Ansible playbook 向上一步中创建的特权添加权限。这个示例描述了如何将与主机管理相关的所有 IdM 权限添加到名为 full_host_administration 的特权中。默认情况下,权限在 Host Enrollment、Host Administrators 和 Host Group Administrator 特权之间分发。
先决条件
- 您知道 IdM 管理员密码。
您已配置了 Ansible 控制节点以满足以下要求:
- 您使用 Ansible 版本 2.14 或更高版本。
-
您已在 Ansible 控制器上安装了
ansible-freeipa软件包。 - 示例假定在 ~/MyPlaybooks/ 目录中,您已创建了带有 IdM 服务器的完全限定域名(FQDN)的 Ansible 清单文件。
-
示例假定 secret.yml Ansible vault 存储了
ipaadmin_password。
- full_host_administration 特权存在。有关如何使用 Ansible 创建特权的详情,请参阅 使用 Ansible 确保自定义 IdM RBAC 特权存在。
流程
进入 ~/MyPlaybooks/ 目录:
$ cd ~/MyPlaybooks/生成位于
/usr/share/doc/ansible-freeipa/playbooks/privilege/目录中的privilege-member-present.yml文件副本:$ cp /usr/share/doc/ansible-freeipa/playbooks/privilege/privilege-member-present.yml privilege-member-present-copy.yml-
打开
privilege-member-present-copy.ymlAnsible playbook 文件以进行编辑。 通过在
ipaprivilege任务部分设置以下变量来调整文件:-
调整任务的
name,使其与您的用例对应。 -
将
ipaadmin_password变量设置为 IdM 管理员的密码。 -
将
name变量设置为特权的名称。 -
将
permission列表设置为您要包含在权限中的权限名称。 -
确保
action变量设置为member。
这是当前示例修改的 Ansible playbook 文件:
--- - name: Privilege member present example hosts: ipaserver vars_files: - /home/user_name/MyPlaybooks/secret.yml tasks: - name: Ensure that permissions are present for the "full_host_administration" privilege ipaprivilege: ipaadmin_password: "{{ ipaadmin_password }}" name: full_host_administration permission: - "System: Add krbPrincipalName to a Host" - "System: Enroll a Host" - "System: Manage Host Certificates" - "System: Manage Host Enrollment Password" - "System: Manage Host Keytab" - "System: Manage Host Principals" - "Retrieve Certificates from the CA" - "Revoke Certificate" - "System: Add Hosts" - "System: Add krbPrincipalName to a Host" - "System: Enroll a Host" - "System: Manage Host Certificates" - "System: Manage Host Enrollment Password" - "System: Manage Host Keytab" - "System: Manage Host Keytab Permissions" - "System: Manage Host Principals" - "System: Manage Host SSH Public Keys" - "System: Manage Service Keytab" - "System: Manage Service Keytab Permissions" - "System: Modify Hosts" - "System: Remove Hosts" - "System: Add Hostgroups" - "System: Modify Hostgroup Membership" - "System: Modify Hostgroups" - "System: Remove Hostgroups"-
调整任务的
- 保存这个文件。
运行 Ansible playbook。指定 playbook 文件、存储保护 secret.yml 文件的密码,以及清单文件:
$ ansible-playbook --vault-password-file=password_file -v -i inventory privilege-member-present-copy.yml
13.3. 使用 Ansible 确保 IdM RBAC 特权不包括权限
作为身份管理系统管理员 (IdM),您可以自定义 IdM 基于角色的访问控制。
以下流程描述了如何使用 Ansible playbook 从特权中删除权限。示例描述了如何从默认 Certificate Administrators 特权中删除 Request Certificates ignoring CA ACLs 权限,例如,管理员认为它存在安全风险。
先决条件
- 您知道 IdM 管理员密码。
您已配置了 Ansible 控制节点以满足以下要求:
- 您使用 Ansible 版本 2.14 或更高版本。
-
您已在 Ansible 控制器上安装了
ansible-freeipa软件包。 - 示例假定在 ~/MyPlaybooks/ 目录中,您已创建了带有 IdM 服务器的完全限定域名(FQDN)的 Ansible 清单文件。
-
示例假定 secret.yml Ansible vault 存储了
ipaadmin_password。
流程
进入 ~/MyPlaybooks/ 目录:
$ cd ~/MyPlaybooks/生成位于
/usr/share/doc/ansible-freeipa/playbooks/privilege/目录中的privilege-member-present.yml文件副本:$ cp /usr/share/doc/ansible-freeipa/playbooks/privilege/privilege-member-absent.yml privilege-member-absent-copy.yml-
打开
privilege-member-absent-copy.ymlAnsible playbook 文件以进行编辑。 通过在
ipaprivilege任务部分设置以下变量来调整文件:-
调整任务的
name,使其与您的用例对应。 -
将
ipaadmin_password变量设置为 IdM 管理员的密码。 -
将
name变量设置为特权的名称。 -
将
permission列表设置为您要从特权中删除的权限名称。 -
确保
action变量设置为member。 -
确保
state变量设置为absent。
这是当前示例修改的 Ansible playbook 文件:
--- - name: Privilege absent example hosts: ipaserver vars_files: - /home/user_name/MyPlaybooks/secret.yml tasks: - name: Ensure that the "Request Certificate ignoring CA ACLs" permission is absent from the "Certificate Administrators" privilege ipaprivilege: ipaadmin_password: "{{ ipaadmin_password }}" name: Certificate Administrators permission: - "Request Certificate ignoring CA ACLs" action: member state: absent-
调整任务的
- 保存这个文件。
运行 Ansible playbook。指定 playbook 文件、存储保护 secret.yml 文件的密码,以及清单文件:
$ ansible-playbook --vault-password-file=password_file -v -i inventory privilege-member-absent-copy.yml
13.4. 使用 Ansible 重命名自定义 IdM RBAC 特权
作为身份管理系统管理员 (IdM),您可以自定义 IdM 基于角色的访问控制。
以下流程描述了如何重命名权限,例如,您已从其中删除了一些权限。因此,特权的名称不再准确。在示例中,管理员将 full_host_administration 特权重命名为 limited_host_administration。
先决条件
- 您知道 IdM 管理员密码。
您已配置了 Ansible 控制节点以满足以下要求:
- 您使用 Ansible 版本 2.14 或更高版本。
-
您已在 Ansible 控制器上安装了
ansible-freeipa软件包。 - 示例假定在 ~/MyPlaybooks/ 目录中,您已创建了带有 IdM 服务器的完全限定域名(FQDN)的 Ansible 清单文件。
-
示例假定 secret.yml Ansible vault 存储了
ipaadmin_password。
- full_host_administration 特权存在。有关如何添加特权的更多信息,请参阅 使用 Ansible 确保自定义 IdM RBAC 特权存在。
流程
进入 ~/MyPlaybooks/ 目录:
$ cd ~/MyPlaybooks/生成位于
/usr/share/doc/ansible-freeipa/playbooks/privilege/目录中的privilege-present.yml文件副本:$ cp /usr/share/doc/ansible-freeipa/playbooks/privilege/privilege-present.yml rename-privilege.yml-
打开
rename-privilege.ymlAnsible playbook 文件以进行编辑。 通过在
ipaprivilege任务部分设置以下变量来调整文件:-
将
ipaadmin_password变量设置为 IdM 管理员的密码。 -
将
name变量设置为特权的当前名称。 -
添加
rename变量,并将它设置为特权的新名称。 -
添加
state变量,并将它设置为重命名。
-
将
重新命名 playbook 本身,例如:
--- - name: Rename a privilege hosts: ipaserver在 playbook 中重命名任务,例如:
[...] tasks: - name: Ensure the full_host_administration privilege is renamed to limited_host_administration ipaprivilege: [...]这是当前示例修改的 Ansible playbook 文件:
--- - name: Rename a privilege hosts: ipaserver vars_files: - /home/user_name/MyPlaybooks/secret.yml tasks: - name: Ensure the full_host_administration privilege is renamed to limited_host_administration ipaprivilege: ipaadmin_password: "{{ ipaadmin_password }}" name: full_host_administration rename: limited_host_administration state: renamed
- 保存这个文件。
运行 Ansible playbook。指定 playbook 文件、存储保护 secret.yml 文件的密码,以及清单文件:
$ ansible-playbook --vault-password-file=password_file -v -i inventory rename-privilege.yml
13.5. 使用 Ansible 确保缺少 IdM RBAC 特权
作为身份管理系统管理员 (IdM),您可以自定义 IdM 基于角色的访问控制。以下流程描述了如何使用 Ansible playbook 来确保缺少 RBAC 特权。这个示例描述了如何确保缺少 CA administrator 特权。因此,admin 成为在 IdM 中管理证书颁发机构的唯一用户。
先决条件
- 您知道 IdM 管理员密码。
您已配置了 Ansible 控制节点以满足以下要求:
- 您使用 Ansible 版本 2.14 或更高版本。
-
您已在 Ansible 控制器上安装了
ansible-freeipa软件包。 - 示例假定在 ~/MyPlaybooks/ 目录中,您已创建了带有 IdM 服务器的完全限定域名(FQDN)的 Ansible 清单文件。
-
示例假定 secret.yml Ansible vault 存储了
ipaadmin_password。
流程
进入 ~/MyPlaybooks/ 目录:
$ cd ~/MyPlaybooks/生成位于
/usr/share/doc/ansible-freeipa/playbooks/privilege/目录中的privilege-absent.yml文件副本:$ cp /usr/share/doc/ansible-freeipa/playbooks/privilege/privilege-absent.yml privilege-absent-copy.yml-
打开
privilege-absent-copy.ymlAnsible playbook 文件以进行编辑。 通过在
ipaprivilege任务部分设置以下变量来调整文件:-
将
ipaadmin_password变量设置为 IdM 管理员的密码。 -
将
name变量设置为您要删除的特权的名称。 -
确保
state变量设置为absent。
-
将
在 playbook 中重命名任务,例如:
[...] tasks: - name: Ensure privilege "CA administrator" is absent ipaprivilege: [...]这是当前示例修改的 Ansible playbook 文件:
--- - name: Privilege absent example hosts: ipaserver vars_files: - /home/user_name/MyPlaybooks/secret.yml tasks: - name: Ensure privilege "CA administrator" is absent ipaprivilege: ipaadmin_password: "{{ ipaadmin_password }}" name: CA administrator state: absent
- 保存这个文件。
运行 Ansible playbook。指定 playbook 文件、存储保护 secret.yml 文件的密码,以及清单文件:
$ ansible-playbook --vault-password-file=password_file -v -i inventory privilege-absent-copy.yml
13.6. 其他资源
第 14 章 使用 Ansible playbook 在 IdM 中管理 RBAC 权限
基于角色的访问控制 (RBAC) 是一种基于角色、特权和权限定义的策略中立访问控制机制。尤其是在大型公司,使用 RBAC 可以帮助创建具有各个职责领域的管理员分层系统。
本章介绍了使用 Ansible playbook 管理身份管理 (IdM) 中 RBAC 权限时执行的以下操作:
先决条件
- 您已了解 RBAC 的概念和原则。
14.1. 使用 Ansible 确保存在 RBAC 权限
作为身份管理系统管理员 (IdM),您可以自定义 IdM 基于角色的访问控制 (RBAC)。
以下流程描述了如何使用 Ansible playbook 确保 IdM 中存在权限,以便它可以添加到特权中。这个示例描述了如何确保以下目标状态:
-
MyPermission权限存在。 -
MyPermission权限只能应用到主机。 授予了包含权限的用户可以对条目执行以下所有可能的操作:
- 写
- 读
- 搜索
- 比较
- 添加
- 删除
先决条件
- 您知道 IdM 管理员密码。
您已配置了 Ansible 控制节点以满足以下要求:
- 您使用 Ansible 版本 2.14 或更高版本。
-
您已在 Ansible 控制器上安装了
ansible-freeipa软件包。 - 示例假定在 ~/MyPlaybooks/ 目录中,您已创建了带有 IdM 服务器的完全限定域名(FQDN)的 Ansible 清单文件。
-
示例假定 secret.yml Ansible vault 存储了
ipaadmin_password。
流程
进入 ~/MyPlaybooks/ 目录:
$ cd ~/MyPlaybooks/制作位于
/usr/share/doc/ansible-freeipa/playbooks/permission/目录中的permission-present.yml文件的副本:$ cp /usr/share/doc/ansible-freeipa/playbooks/permission/permission-present.yml permission-present-copy.yml-
打开
permission-present-copy.ymlAnsible playbook 文件进行编辑。 通过在
ipapermission任务部分中设置以下变量来调整文件:-
调整任务的
name,使其与您的用例对应。 -
将
ipaadmin_password变量设置为 IdM 管理员的密码。 -
将
name变量设置为权限的名称。 -
将
object_type变量设置为host。 -
将
right变量设置为all。
这是当前示例修改的 Ansible playbook 文件:
--- - name: Permission present example hosts: ipaserver vars_files: - /home/user_name/MyPlaybooks/secret.yml tasks: - name: Ensure that the "MyPermission" permission is present ipapermission: ipaadmin_password: "{{ ipaadmin_password }}" name: MyPermission object_type: host right: all
-
调整任务的
- 保存这个文件。
运行 Ansible playbook。指定 playbook 文件、存储保护 secret.yml 文件的密码,以及清单文件:
$ ansible-playbook --vault-password-file=password_file -v -i inventory permission-present-copy.yml
14.2. 使用 Ansible 确保存在带有属性的 RBAC 权限
作为身份管理系统管理员 (IdM),您可以自定义 IdM 基于角色的访问控制 (RBAC)。
以下流程描述了如何使用 Ansible playbook 确保 IdM 中存在权限,以便它可以添加到特权中。这个示例描述了如何确保以下目标状态:
- MyPermission 权限存在。
- MyPermission 权限只能用于添加主机。
获得了包含权限的用户可以在主机条目上执行以下所有可能的操作:
- 写
- 读
- 搜索
- 比较
- 添加
- 删除
-
被授予特权的用户创建的主机条目包含 MyPermission 权限,可以具有
description值。
创建或修改权限时可以指定的属性类型不受 IdM LDAP 模式的限制。但是,当 object_type 是 host 时指定 attrs: car_licence,会导致在使用权限并为一个主机添加特定的 car 许可证时出现 ipa: ERROR: attribute "car-license" not allowed 错误。
先决条件
- 您知道 IdM 管理员密码。
您已配置了 Ansible 控制节点以满足以下要求:
- 您使用 Ansible 版本 2.14 或更高版本。
-
您已在 Ansible 控制器上安装了
ansible-freeipa软件包。 - 示例假定在 ~/MyPlaybooks/ 目录中,您已创建了带有 IdM 服务器的完全限定域名(FQDN)的 Ansible 清单文件。
-
示例假定 secret.yml Ansible vault 存储了
ipaadmin_password。
流程
进入 ~/MyPlaybooks/ 目录:
$ cd ~/MyPlaybooks/制作位于
/usr/share/doc/ansible-freeipa/playbooks/permission/目录中的permission-present.yml文件的副本:$ cp /usr/share/doc/ansible-freeipa/playbooks/permission/permission-present.yml permission-present-with-attribute.yml-
打开
permission-present-with-attribute.ymlAnsible playbook 文件进行编辑。 通过在
ipapermission任务部分中设置以下变量来调整文件:-
调整任务的
name,使其与您的用例对应。 -
将
ipaadmin_password变量设置为 IdM 管理员的密码。 -
将
name变量设置为权限的名称。 -
将
object_type变量设置为host。 -
将
right变量设置为all。 -
将
attrs变量设置为description。
这是当前示例修改的 Ansible playbook 文件:
--- - name: Permission present example hosts: ipaserver vars_files: - /home/user_name/MyPlaybooks/secret.yml tasks: - name: Ensure that the "MyPermission" permission is present with an attribute ipapermission: ipaadmin_password: "{{ ipaadmin_password }}" name: MyPermission object_type: host right: all attrs: description
-
调整任务的
- 保存这个文件。
运行 Ansible playbook。指定 playbook 文件、存储保护 secret.yml 文件的密码,以及清单文件:
$ ansible-playbook --vault-password-file=password_file -v -i inventory permission-present-with-attribute.yml
其他资源
- 请参阅 RHEL 7 中的 Linux 域身份、身份验证和策略指南 中的 用户和组模式。
14.3. 使用 Ansible 确保缺少 RBAC 权限
作为身份管理系统管理员 (IdM),您可以自定义 IdM 基于角色的访问控制 (RBAC)。
以下流程描述了如何使用 Ansible playbook 确保 IdM 中缺少权限,因此无法将其添加到特权中。
先决条件
- 您知道 IdM 管理员密码。
您已配置了 Ansible 控制节点以满足以下要求:
- 您使用 Ansible 版本 2.14 或更高版本。
-
您已在 Ansible 控制器上安装了
ansible-freeipa软件包。 - 示例假定在 ~/MyPlaybooks/ 目录中,您已创建了带有 IdM 服务器的完全限定域名(FQDN)的 Ansible 清单文件。
-
示例假定 secret.yml Ansible vault 存储了
ipaadmin_password。
流程
进入 ~/MyPlaybooks/ 目录:
$ cd ~/MyPlaybooks/制作位于
/usr/share/doc/ansible-freeipa/playbooks/permission/目录中的permission-present.yml文件的副本:$ cp /usr/share/doc/ansible-freeipa/playbooks/permission/permission-absent.yml permission-absent-copy.yml-
打开
permission-absent-copy.ymlAnsible playbook 文件进行编辑。 通过在
ipapermission任务部分中设置以下变量来调整文件:-
调整任务的
name,使其与您的用例对应。 -
将
ipaadmin_password变量设置为 IdM 管理员的密码。 -
将
name变量设置为权限的名称。
这是当前示例修改的 Ansible playbook 文件:
--- - name: Permission absent example hosts: ipaserver vars_files: - /home/user_name/MyPlaybooks/secret.yml tasks: - name: Ensure that the "MyPermission" permission is absent ipapermission: ipaadmin_password: "{{ ipaadmin_password }}" name: MyPermission state: absent
-
调整任务的
- 保存这个文件。
运行 Ansible playbook。指定 playbook 文件、存储保护 secret.yml 文件的密码,以及清单文件:
$ ansible-playbook --vault-password-file=password_file -v -i inventory permission-absent-copy.yml
14.4. 使用 Ansible 确保属性是 IdM RBAC 权限的成员
作为身份管理系统管理员 (IdM),您可以自定义 IdM 基于角色的访问控制 (RBAC)。
以下流程描述了如何使用 Ansible playbook 确保属性是 IdM 中 RBAC 权限的成员。因此,拥有权限的用户可以创建具有属性的条目。
示例描述了如何确保特权包含 MyPermission 权限的用户创建的主机条目可以具有 gecos 和 description 值。
创建或修改权限时可以指定的属性类型不受 IdM LDAP 模式的限制。但是,当 object_type 是 host 时指定 attrs: car_licence,会导致在使用权限并为一个主机添加特定的 car 许可证时出现 ipa: ERROR: attribute "car-license" not allowed 错误。
先决条件
- 您知道 IdM 管理员密码。
您已配置了 Ansible 控制节点以满足以下要求:
- 您使用 Ansible 版本 2.14 或更高版本。
-
您已在 Ansible 控制器上安装了
ansible-freeipa软件包。 - 示例假定在 ~/MyPlaybooks/ 目录中,您已创建了带有 IdM 服务器的完全限定域名(FQDN)的 Ansible 清单文件。
-
示例假定 secret.yml Ansible vault 存储了
ipaadmin_password。
- MyPermission 权限存在。
流程
进入 ~/MyPlaybooks/ 目录:
$ cd ~/MyPlaybooks/制作位于
/usr/share/doc/ansible-freeipa/playbooks/permission/目录中的permission-member-present.yml文件的副本:$ cp /usr/share/doc/ansible-freeipa/playbooks/permission/permission-member-present.yml permission-member-present-copy.yml-
打开
permission-member-present-copy.ymlAnsible playbook 文件以进行编辑。 通过在
ipapermission任务部分中设置以下变量来调整文件:-
调整任务的
name,使其与您的用例对应。 -
将
ipaadmin_password变量设置为 IdM 管理员的密码。 -
将
name变量设置为权限的名称。 -
将
attrs列表设置为description和gecos变量。 -
确保
action变量设置为member。
这是当前示例修改的 Ansible playbook 文件:
--- - name: Permission member present example hosts: ipaserver vars_files: - /home/user_name/MyPlaybooks/secret.yml tasks: - name: Ensure that the "gecos" and "description" attributes are present in "MyPermission" ipapermission: ipaadmin_password: "{{ ipaadmin_password }}" name: MyPermission attrs: - description - gecos action: member
-
调整任务的
- 保存这个文件。
运行 Ansible playbook。指定 playbook 文件、存储保护 secret.yml 文件的密码,以及清单文件:
$ ansible-playbook --vault-password-file=password_file -v -i inventory permission-member-present-copy.yml
14.5. 使用 Ansible 确保属性不是 IdM RBAC 权限的成员
作为身份管理系统管理员 (IdM),您可以自定义 IdM 基于角色的访问控制 (RBAC)。
以下流程描述了如何使用 Ansible playbook 确保属性不是 IdM 中 RBAC 权限的成员。因此,当拥有权限的用户在 IdM LDAP 中创建条目时,该条目不能具有与属性关联的值。
这个示例描述了如何确保以下目标状态:
- MyPermission 权限存在。
-
具有特权的用户创建的主机条目包含 MyPermission 权限,不能具有
description属性。
先决条件
- 您知道 IdM 管理员密码。
您已配置了 Ansible 控制节点以满足以下要求:
- 您使用 Ansible 版本 2.14 或更高版本。
-
您已在 Ansible 控制器上安装了
ansible-freeipa软件包。 - 示例假定在 ~/MyPlaybooks/ 目录中,您已创建了带有 IdM 服务器的完全限定域名(FQDN)的 Ansible 清单文件。
-
示例假定 secret.yml Ansible vault 存储了
ipaadmin_password。
- MyPermission 权限存在。
流程
进入 ~/MyPlaybooks/ 目录:
$ cd ~/MyPlaybooks/制作位于
/usr/share/doc/ansible-freeipa/playbooks/permission/目录中的permission-member-absent.yml文件的副本:$ cp /usr/share/doc/ansible-freeipa/playbooks/permission/permission-member-absent.yml permission-member-absent-copy.yml-
打开
permission-member-absent-copy.ymlAnsible playbook 文件进行编辑。 通过在
ipapermission任务部分中设置以下变量来调整文件:-
调整任务的
name,使其与您的用例对应。 -
将
ipaadmin_password变量设置为 IdM 管理员的密码。 -
将
name变量设置为权限的名称。 -
将
attrs变量设置为description。 -
将
action变量设置为member。 -
确保
state变量设置为absent
这是当前示例修改的 Ansible playbook 文件:
--- - name: Permission absent example hosts: ipaserver vars_files: - /home/user_name/MyPlaybooks/secret.yml tasks: - name: Ensure that an attribute is not a member of "MyPermission" ipapermission: ipaadmin_password: "{{ ipaadmin_password }}" name: MyPermission attrs: description action: member state: absent
-
调整任务的
- 保存这个文件。
运行 Ansible playbook。指定 playbook 文件、存储保护 secret.yml 文件的密码,以及清单文件:
$ ansible-playbook --vault-password-file=password_file -v -i inventory permission-member-absent-copy.yml
14.6. 使用 Ansible 重命名 IdM RBAC 权限
作为身份管理系统管理员 (IdM),您可以自定义 IdM 基于角色的访问控制。
以下流程描述了如何使用 Ansible playbook 重新命名权限。这个示例描述了如何将 MyPermission 重命名为 MyNewPermission。
先决条件
- 您知道 IdM 管理员密码。
您已配置了 Ansible 控制节点以满足以下要求:
- 您使用 Ansible 版本 2.14 或更高版本。
-
您已在 Ansible 控制器上安装了
ansible-freeipa软件包。 - 示例假定在 ~/MyPlaybooks/ 目录中,您已创建了带有 IdM 服务器的完全限定域名(FQDN)的 Ansible 清单文件。
-
示例假定 secret.yml Ansible vault 存储了
ipaadmin_password。
- MyPermission 存在于 IdM 中。
- IdM 中不存在 MyNewPermission。
流程
进入 ~/MyPlaybooks/ 目录:
$ cd ~/MyPlaybooks/制作位于
/usr/share/doc/ansible-freeipa/playbooks/permission/目录中的permission-renamed.yml文件的副本:$ cp /usr/share/doc/ansible-freeipa/playbooks/permission/permission-renamed.yml permission-renamed-copy.yml-
打开
permission-renamed-copy.ymlAnsible playbook 文件进行编辑。 通过在
ipapermission任务部分中设置以下变量来调整文件:-
调整任务的
name,使其与您的用例对应。 -
将
ipaadmin_password变量设置为 IdM 管理员的密码。 -
将
name变量设置为权限的名称。
这是当前示例修改的 Ansible playbook 文件:
--- - name: Permission present example hosts: ipaserver vars_files: - /home/user_name/MyPlaybooks/secret.yml tasks: - name: Rename the "MyPermission" permission ipapermission: ipaadmin_password: "{{ ipaadmin_password }}" name: MyPermission rename: MyNewPermission state: renamed
-
调整任务的
- 保存这个文件。
运行 Ansible playbook。指定 playbook 文件、存储保护 secret.yml 文件的密码,以及清单文件:
$ ansible-playbook --vault-password-file=password_file -v -i inventory permission-renamed-copy.yml
14.7. 其他资源
第 15 章 使用 Ansible 管理 IdM 中的复制拓扑
您可以维护多个身份管理 (IdM) 服务器,并使它们相互复制,以实现冗余目的,以减少或防止服务器丢失。例如,如果一个服务器失败,其他服务器就会为域提供服务。您还可以根据剩余的服务器创建新副本来恢复丢失的服务器。
存储在 IdM 服务器上的数据会根据复制协议复制:当两台服务器配置了复制协议时,它们将共享其数据。复制的数据存储在拓扑后缀中。当两个副本在其后缀之间具有复制协议时,后缀组成一个拓扑片段(segment)。
本章论述了如何使用 Red Hat Ansible Engine 管理 IdM 复制协议、拓扑片段和拓扑后缀。本章包含以下部分:
15.1. 使用 Ansible 确保 IdM 中存在复制协议
存储在身份管理 (IdM) 服务器上的数据存储基于复制协议:配置了两个服务器时,它们共享其数据。复制协议始终为现实:数据从第一个副本复制到另一个副本,另一个副本复制到第一个副本。
按照以下流程,使用 Ansible playbook 确保 server.idm.example.com 和 replica.idm.example.com 之间存在 domain 类型的复制协议。
先决条件
- 确保您了解 拓扑中连接 IdM 副本的指南 中列出的设计 IdM 拓扑的建议。
-
您需要知道 IdM
admin密码。 您已配置了 Ansible 控制节点以满足以下要求:
- 您使用 Ansible 版本 2.14 或更高版本。
-
您已在 Ansible 控制器上安装了
ansible-freeipa软件包。 - 示例假定在 ~/MyPlaybooks/ 目录中,您已创建了带有 IdM 服务器的完全限定域名(FQDN)的 Ansible 清单文件。
-
示例假定 secret.yml Ansible vault 存储了
ipaadmin_password。
流程
进入您的 ~/MyPlaybooks/ 目录:
$ cd ~/MyPlaybooks/复制位于
/usr/share/doc/ansible-freeipa/playbooks/topology/目录中的add-topologysegment.yml Ansible playbook文件:$ cp /usr/share/doc/ansible-freeipa/playbooks/topology/add-topologysegment.yml add-topologysegment-copy.yml-
打开
add-topologysegment-copy.yml文件进行编辑。 通过在
ipatopologysegment任务部分设置以下变量来调整文件:-
将
ipaadmin_password变量设置为 IdMadmin的密码。 -
根据您要添加的分段类型,将
suffix变量设置为domain或ca。 -
将
left变量设置为您要作为复制协议左侧节点的 IdM 服务器的名称。 -
将
right变量设置为您要作为复制协议正确节点的 IdM 服务器的名称。 -
确保
state变量设置为present。
这是当前示例修改的 Ansible playbook 文件:
--- - name: Playbook to handle topologysegment hosts: ipaserver vars_files: - /home/user_name/MyPlaybooks/secret.yml tasks: - name: Add topology segment ipatopologysegment: ipaadmin_password: "{{ ipaadmin_password }}" suffix: domain left: server.idm.example.com right: replica.idm.example.com state: present-
将
- 保存这个文件。
运行 Ansible playbook。指定 playbook 文件、存储保护 secret.yml 文件的密码,以及清单文件:
$ ansible-playbook --vault-password-file=password_file -v -i inventory add-topologysegment-copy.yml
其他资源
- 请参阅 解释复制协议、拓扑后缀和拓扑段。
-
请参阅
/usr/share/doc/ansible-freeipa/目录中的README-topology.md文件。 -
请参阅
/usr/share/doc/ansible-freeipa/playbooks/topology目录中的 playbook 示例。
15.2. 使用 Ansible 确保多个 IdM 副本之间存在复制协议
存储在身份管理 (IdM) 服务器上的数据存储基于复制协议:配置了两个服务器时,它们共享其数据。复制协议始终为现实:数据从第一个副本复制到另一个副本,另一个副本复制到第一个副本。
按照以下流程确保复制协议在 IdM 中的多个副本对之间存在。
先决条件
- 确保您了解拓扑中连接副本中列出的 IdM 拓扑的建议。
-
您需要知道 IdM
admin密码。 您已配置了 Ansible 控制节点以满足以下要求:
- 您使用 Ansible 版本 2.14 或更高版本。
-
您已在 Ansible 控制器上安装了
ansible-freeipa软件包。 - 示例假定在 ~/MyPlaybooks/ 目录中,您已创建了带有 IdM 服务器的完全限定域名(FQDN)的 Ansible 清单文件。
-
示例假定 secret.yml Ansible vault 存储了
ipaadmin_password。
流程
进入您的 ~/MyPlaybooks/ 目录:
$ cd ~/MyPlaybooks/复制位于
/usr/share/doc/ansible-freeipa/playbooks/topology/目录中的add-topologysegments.ymlAnsible playbook 文件:$ cp /usr/share/doc/ansible-freeipa/playbooks/topology/add-topologysegments.yml add-topologysegments-copy.yml-
打开
add-topologysegments-copy.yml文件进行编辑。 通过在
vars部分中设置以下变量来调整文件:-
将
ipaadmin_password变量设为 IdMadmin的密码。 对于每个拓扑片段,在
ipatopology_segments部分添加一个行并设置以下变量:-
根据您要添加的分段类型,将
suffix变量设置为domain或ca。 -
将
left变量设置为您要作为复制协议左侧节点的 IdM 服务器的名称。 -
将
right变量设置为您要作为复制协议正确节点的 IdM 服务器的名称。
-
根据您要添加的分段类型,将
-
将
在
add-topologysegments-copy.yml文件的tasks部分中,确保state变量设置为present。这是当前示例修改的 Ansible playbook 文件:
--- - name: Add topology segments hosts: ipaserver gather_facts: false vars: ipaadmin_password: "{{ ipaadmin_password }}" ipatopology_segments: - {suffix: domain, left: replica1.idm.example.com , right: replica2.idm.example.com } - {suffix: domain, left: replica2.idm.example.com , right: replica3.idm.example.com } - {suffix: domain, left: replica3.idm.example.com , right: replica4.idm.example.com } - {suffix: domain+ca, left: replica4.idm.example.com , right: replica1.idm.example.com } vars_files: - /home/user_name/MyPlaybooks/secret.yml tasks: - name: Add topology segment ipatopologysegment: ipaadmin_password: "{{ ipaadmin_password }}" suffix: "{{ item.suffix }}" name: "{{ item.name | default(omit) }}" left: "{{ item.left }}" right: "{{ item.right }}" state: present #state: absent #state: checked #state: reinitialized loop: "{{ ipatopology_segments | default([]) }}"- 保存这个文件。
运行 Ansible playbook。指定 playbook 文件、存储保护 secret.yml 文件的密码,以及清单文件:
$ ansible-playbook --vault-password-file=password_file -v -i inventory add-topologysegments-copy.yml
其他资源
- 请参阅 解释复制协议、拓扑后缀和拓扑段。
-
请参阅
/usr/share/doc/ansible-freeipa/目录中的README-topology.md文件。 -
请参阅
/usr/share/doc/ansible-freeipa/playbooks/topology目录中的 playbook 示例。
15.3. 使用 Ansible 检查两个副本之间是否存在复制协议
存储在身份管理 (IdM) 服务器上的数据存储基于复制协议:配置了两个服务器时,它们共享其数据。复制协议始终为现实:数据从第一个副本复制到另一个副本,另一个副本复制到第一个副本。
按照以下流程验证是否复制协议在 IdM 中的多个副本对之间存在。
先决条件
- 确保您了解拓扑中连接副本中列出的 IdM 拓扑的建议。
-
您需要知道 IdM
admin密码。 您已配置了 Ansible 控制节点以满足以下要求:
- 您使用 Ansible 版本 2.14 或更高版本。
-
您已在 Ansible 控制器上安装了
ansible-freeipa软件包。 - 示例假定在 ~/MyPlaybooks/ 目录中,您已创建了带有 IdM 服务器的完全限定域名(FQDN)的 Ansible 清单文件。
-
示例假定 secret.yml Ansible vault 存储了
ipaadmin_password。
流程
进入您的 ~/MyPlaybooks/ 目录:
$ cd ~/MyPlaybooks/复制位于
/usr/share/doc/ansible-freeipa/playbooks/topology/目录中的check-topologysegments.ymlAnsible playbook 文件:$ cp /usr/share/doc/ansible-freeipa/playbooks/topology/check-topologysegments.yml check-topologysegments-copy.yml-
打开
check-topologysegments-copy.yml文件进行编辑。 通过在
vars部分中设置以下变量来调整文件:-
将
ipaadmin_password变量设为 IdMadmin的密码。 对于每个拓扑片段,在
ipatopology_segments部分添加一个行并设置以下变量:-
根据您要添加的分段类型,将
suffix变量设置为domain或ca。 -
将
left变量设置为您要作为复制协议左侧节点的 IdM 服务器的名称。 -
将
right变量设置为您要作为复制协议正确节点的 IdM 服务器的名称。
-
根据您要添加的分段类型,将
-
将
在
check-topologysegments-copy.yml文件的tasks部分中,确保state变量设置为present。这是当前示例修改的 Ansible playbook 文件:
--- - name: Add topology segments hosts: ipaserver gather_facts: false vars: ipaadmin_password: "{{ ipaadmin_password }}" ipatopology_segments: - {suffix: domain, left: replica1.idm.example.com, right: replica2.idm.example.com } - {suffix: domain, left: replica2.idm.example.com , right: replica3.idm.example.com } - {suffix: domain, left: replica3.idm.example.com , right: replica4.idm.example.com } - {suffix: domain+ca, left: replica4.idm.example.com , right: replica1.idm.example.com } vars_files: - /home/user_name/MyPlaybooks/secret.yml tasks: - name: Check topology segment ipatopologysegment: ipaadmin_password: "{{ ipaadmin_password }}" suffix: "{{ item.suffix }}" name: "{{ item.name | default(omit) }}" left: "{{ item.left }}" right: "{{ item.right }}" state: checked loop: "{{ ipatopology_segments | default([]) }}"- 保存这个文件。
运行 Ansible playbook。指定 playbook 文件、存储保护 secret.yml 文件的密码,以及清单文件:
$ ansible-playbook --vault-password-file=password_file -v -i inventory check-topologysegments-copy.yml
其他资源
- 有关拓扑协议、后缀和段概念的更多信息,请参阅 解释复制协议、拓扑后缀和拓扑段。
-
请参阅
/usr/share/doc/ansible-freeipa/目录中的README-topology.md文件。 -
请参阅
/usr/share/doc/ansible-freeipa/playbooks/topology目录中的 playbook 示例。
15.4. 使用 Ansible 验证 IdM 中是否存在拓扑后缀
在身份管理 (IdM) 中的复制协议中,拓扑后缀存储要复制的数据。IdM 支持两种类型的拓扑后缀:domain 和 ca。每个后缀代表一个单独的后端,即一个单独的复制拓扑。配置复制协议时,它会在两个不同的服务器上加入同一类型的两个拓扑后缀。
domain 后缀包含与域相关的所有数据,如用户、组和策略。ca 后缀包含证书系统组件的数据。它仅存在于安装有证书颁发机构 (CA) 的服务器上。
按照以下流程,使用 Ansible playbook 确保拓扑后缀在 IdM 中存在。这个示例描述了如何确保 IdM 中存在 domain 后缀。
先决条件
-
您需要知道 IdM
admin密码。 您已配置了 Ansible 控制节点以满足以下要求:
- 您使用 Ansible 版本 2.14 或更高版本。
-
您已在 Ansible 控制器上安装了
ansible-freeipa软件包。 - 示例假定在 ~/MyPlaybooks/ 目录中,您已创建了带有 IdM 服务器的完全限定域名(FQDN)的 Ansible 清单文件。
-
示例假定 secret.yml Ansible vault 存储了
ipaadmin_password。
流程
进入您的 ~/MyPlaybooks/ 目录:
$ cd ~/MyPlaybooks/复制位于
/usr/share/doc/ansible-freeipa/playbooks/topology/目录中的verify-topologysuffix.ymlAnsible playbook 文件:$ cp /usr/share/doc/ansible-freeipa/playbooks/topology/ verify-topologysuffix.yml verify-topologysuffix-copy.yml-
打开
verify-topologysuffix-copy.ymlAnsible playbook 文件进行编辑。 通过在
ipatopologysuffix部分中设置以下变量来调整文件:-
将
ipaadmin_password变量设为 IdMadmin的密码。 -
将
suffix变量设置为domain。如果您要验证ca后缀是否存在,请将 变量设置为ca。 -
确保
state变量设置为verify。不允许使用其他选项。
这是当前示例修改的 Ansible playbook 文件:
--- - name: Playbook to handle topologysuffix hosts: ipaserver vars_files: - /home/user_name/MyPlaybooks/secret.yml tasks: - name: Verify topology suffix ipatopologysuffix: ipaadmin_password: "{{ ipaadmin_password }}" suffix: domain state: verified-
将
- 保存这个文件。
运行 Ansible playbook。指定 playbook 文件、存储保护 secret.yml 文件的密码,以及清单文件:
$ ansible-playbook --vault-password-file=password_file -v -i inventory verify-topologysuffix-copy.yml
其他资源
- 请参阅 解释复制协议、拓扑后缀和拓扑段。
-
请参阅
/usr/share/doc/ansible-freeipa/目录中的README-topology.md文件。 -
请参阅
/usr/share/doc/ansible-freeipa/playbooks/topology目录中的 playbook 示例。
15.5. 使用 Ansible 重新初始化 IdM 副本
如果副本已长时间离线或者其数据库已损坏,您可以重新初始化它。重新初始化会使用更新的一组数据来刷新副本。例如,如果需要从备份进行权威恢复,则可以使用重新初始化。
与复制更新不同,副本仅互相发送更改的条目,重新初始化会刷新整个数据库。
运行命令的本地主机是重新初始化的副本。要指定从中获取数据的副本,请使用 direction 选项。
按照以下流程,使用 Ansible playbook 从 server.idm.example.com 中重新初始化 replica.idm.example.com 上的 domain 数据。
先决条件
-
您需要知道 IdM
admin密码。 您已配置了 Ansible 控制节点以满足以下要求:
- 您使用 Ansible 版本 2.14 或更高版本。
-
您已在 Ansible 控制器上安装了
ansible-freeipa软件包。 - 示例假定在 ~/MyPlaybooks/ 目录中,您已创建了带有 IdM 服务器的完全限定域名(FQDN)的 Ansible 清单文件。
-
示例假定 secret.yml Ansible vault 存储了
ipaadmin_password。
流程
进入您的 ~/MyPlaybooks/ 目录:
$ cd ~/MyPlaybooks/复制位于
/usr/share/doc/ansible-freeipa/playbooks/topology/目录中的reinitialize-topologysegment.ymlAnsible playbook 文件:$ cp /usr/share/doc/ansible-freeipa/playbooks/topology/reinitialize-topologysegment.yml reinitialize-topologysegment-copy.yml-
打开
reinitialize-topologysegment-copy.yml文件进行编辑。 通过在
ipatopologysegment部分中设置以下变量来调整文件:-
将
ipaadmin_password变量设为 IdMadmin的密码。 -
将
suffix变量设置为domain。如果您要重新初始化ca数据,请将变量设置为ca。 -
将
left变量设置为复制协议的左侧节点。 -
将
right变量设置为复制协议的右节点。 -
将
direction变量设置为重新初始化数据的方向。left-to-right方向表示数据从左侧节点流到右侧节点。 确保将
state变量设置为reinitialized。这是当前示例修改的 Ansible playbook 文件:
--- - name: Playbook to handle topologysegment hosts: ipaserver vars_files: - /home/user_name/MyPlaybooks/secret.yml tasks: - name: Reinitialize topology segment ipatopologysegment: ipaadmin_password: "{{ ipaadmin_password }}" suffix: domain left: server.idm.example.com right: replica.idm.example.com direction: left-to-right state: reinitialized
-
将
- 保存这个文件。
运行 Ansible playbook。指定 playbook 文件、存储保护 secret.yml 文件的密码,以及清单文件:
$ ansible-playbook --vault-password-file=password_file -v -i inventory reinitialize-topologysegment-copy.yml
其他资源
- 请参阅 解释复制协议、拓扑后缀和拓扑段。
-
请参阅
/usr/share/doc/ansible-freeipa/目录中的README-topology.md文件。 -
请参阅
/usr/share/doc/ansible-freeipa/playbooks/topology目录中的 playbook 示例。
15.6. 使用 Ansible 确保 IdM 中没有复制协议
存储在身份管理 (IdM) 服务器上的数据存储基于复制协议:配置了两个服务器时,它们共享其数据。复制协议始终为现实:数据从第一个副本复制到另一个副本,另一个副本复制到第一个副本。
按照以下流程确保两个副本之间的复制协议在 IdM 中不存在。这个示例描述了如何确保在 replica01.idm.example.com 和 replica02.idm.example.com IdM 服务器之间不存在 domain 类型的复制协议。
先决条件
- 确保您了解拓扑中连接副本中列出的 IdM 拓扑的建议。
-
您需要知道 IdM
admin密码。 您已配置了 Ansible 控制节点以满足以下要求:
- 您使用 Ansible 版本 2.14 或更高版本。
-
您已在 Ansible 控制器上安装了
ansible-freeipa软件包。 - 示例假定在 ~/MyPlaybooks/ 目录中,您已创建了带有 IdM 服务器的完全限定域名(FQDN)的 Ansible 清单文件。
-
示例假定 secret.yml Ansible vault 存储了
ipaadmin_password。
流程
进入您的 ~/MyPlaybooks/ 目录:
$ cd ~/MyPlaybooks/复制位于
/usr/share/doc/ansible-freeipa/playbooks/topology/目录中的delete-topologysegment.ymlAnsible playbook 文件:$ cp /usr/share/doc/ansible-freeipa/playbooks/topology/delete-topologysegment.yml delete-topologysegment-copy.yml-
打开
delete-topologysegment-copy.yml文件进行编辑。 通过在
ipatopologysegment任务部分设置以下变量来调整文件:-
将
ipaadmin_password变量设为 IdMadmin的密码。 -
将
suffix变量设置为domain。或者,如果您确保ca数据不在左侧和右侧节点之间复制,请将变量设置为ca。 -
将
left变量设置为您要作为复制协议左侧节点的 IdM 服务器的名称。 -
将
right变量设置为 IdM 服务器的名称,该服务器是复制协议的右节点。 -
确保
state变量设置为absent。
这是当前示例修改的 Ansible playbook 文件:
--- - name: Playbook to handle topologysegment hosts: ipaserver vars_files: - /home/user_name/MyPlaybooks/secret.yml tasks: - name: Delete topology segment ipatopologysegment: ipaadmin_password: "{{ ipaadmin_password }}" suffix: domain left: replica01.idm.example.com right: replica02.idm.example.com: state: absent-
将
- 保存这个文件。
运行 Ansible playbook。指定 playbook 文件、存储保护 secret.yml 文件的密码,以及清单文件:
$ ansible-playbook --vault-password-file=password_file -v -i inventory delete-topologysegment-copy.yml
其他资源
- 请参阅 解释复制协议、拓扑后缀和拓扑段。
-
请参阅
/usr/share/doc/ansible-freeipa/目录中的README-topology.md文件。 -
请参阅
/usr/share/doc/ansible-freeipa/playbooks/topology目录中的 playbook 示例。
15.7. 其他资源
第 16 章 使用 Ansible 管理 IdM 服务器
您可以使用 Red Hat Ansible Engine 来管理身份管理(IdM)拓扑中的服务器。您可以使用 ansible-freeipa 软件包中的 server 模块来检查 IdM 拓扑中是否存在服务器。您还可以隐藏任何副本或使副本可见。
这部分包含以下主题:
16.1. 使用 Ansible 检查 IdM 服务器是否存在
您可以在 Ansible playbook 中使用 ipaserver ansible-freeipa 模块来验证是否存在身份管理(IdM)服务器。
ipaserver Ansible 模块不会安装 IdM 服务器。
先决条件
-
您需要知道 IdM
admin密码。 您已配置了 Ansible 控制节点以满足以下要求:
- 您使用 Ansible 版本 2.14 或更高版本。
-
您已在 Ansible 控制器上安装了
ansible-freeipa软件包。 - 示例假定在 ~/MyPlaybooks/ 目录中,您已创建了带有 IdM 服务器的完全限定域名(FQDN)的 Ansible 清单文件。
-
示例假定 secret.yml Ansible vault 存储了
ipaadmin_password。 -
清单文件中定义的从控制节点到 IdM 服务器的
SSH连接工作正常。
流程
进入您的 ~/MyPlaybooks/ 目录:
$ cd ~/MyPlaybooks/复制位于
/usr/share/doc/ansible-freeipa/playbooks/server/目录中的server-present.ymlAnsible playbook 文件:$ cp /usr/share/doc/ansible-freeipa/playbooks/server/server-present.yml server-present-copy.yml-
打开
server-present-copy.yml文件进行编辑。 通过在
ipaserver任务部分中设置以下变量来调整文件,并保存文件:-
将
ipaadmin_password变量设为 IdMadmin的密码。 -
将
name变量设为服务器的FQDN。示例服务器的FQDN是 server123.idm.example.com。
--- - name: Server present example hosts: ipaserver vars_files: - /home/user_name/MyPlaybooks/secret.yml tasks: - name: Ensure server server123.idm.example.com is present ipaserver: ipaadmin_password: "{{ ipaadmin_password }}" name: server123.idm.example.com-
将
运行 Ansible playbook ,并指定 playbook 文件和清单文件:
$ ansible-playbook --vault-password-file=password_file -v -i inventory server-present-copy.yml
其他资源
- 请参阅 使用 Ansible playbook 安装身份管理服务器。
-
请参阅
/usr/share/doc/ansible-freeipa/目录中的README-server.md文件。 -
请参阅
/usr/share/doc/ansible-freeipa/playbooks/server目录中的 playbook 示例。
16.2. 使用 Ansible 确保 IdM 拓扑中没有 IdM 服务器
使用 Ansible playbook 确保 IdM 拓扑中不存在身份管理(IdM)服务器,即使作为主机也不存在。
与 ansible-freeipa ipaserver 角色不同,此 playbook 中使用的 ipaserver 模块不会从服务器卸载 IdM 服务。
先决条件
-
您需要知道 IdM
admin密码。 您已配置了 Ansible 控制节点以满足以下要求:
- 您使用 Ansible 版本 2.14 或更高版本。
-
您已在 Ansible 控制器上安装了
ansible-freeipa软件包。 - 示例假定在 ~/MyPlaybooks/ 目录中,您已创建了带有 IdM 服务器的完全限定域名(FQDN)的 Ansible 清单文件。
-
示例假定 secret.yml Ansible vault 存储了
ipaadmin_password。 -
清单文件中定义的从控制节点到 IdM 服务器的
SSH连接工作正常。
流程
进入您的 ~/MyPlaybooks/ 目录:
$ cd ~/MyPlaybooks/复制位于
/usr/share/doc/ansible-freeipa/playbooks/server/目录中的server-absent.ymlAnsible playbook 文件:$ cp /usr/share/doc/ansible-freeipa/playbooks/server/server-absent.yml server-absent-copy.yml-
打开
server-absent-copy.yml文件进行编辑。 通过在
ipaserver任务部分中设置以下变量来调整文件,并保存文件:-
将
ipaadmin_password变量设为 IdMadmin的密码。 -
将
name变量设为服务器的FQDN。示例服务器的FQDN是 server123.idm.example.com。 -
确保
state变量设置为absent。
--- - name: Server absent example hosts: ipaserver vars_files: - /home/user_name/MyPlaybooks/secret.yml tasks: - name: Ensure server server123.idm.example.com is absent ipaserver: ipaadmin_password: "{{ ipaadmin_password }}" name: server123.idm.example.com state: absent-
将
运行 Ansible playbook ,并指定 playbook 文件和清单文件:
$ ansible-playbook --vault-password-file=password_file -v -i inventory server-absent-copy.yml- 确保指向 server123.idm.example.com 的所有名称服务器(NS)DNS 记录都已从 DNS 区域中删除。无论您使用由 IdM 还是外部 DNS 管理的集成 DNS,这个均适用。
其他资源
- 请参阅 卸载 IdM 服务器。
-
请参阅
/usr/share/doc/ansible-freeipa/目录中的README-server.md文件。 -
请参阅
/usr/share/doc/ansible-freeipa/playbooks/server目录中的 playbook 示例。
16.3. 确保尽管拥有最后一个 IdM 服务器角色,也不存在 IdM 服务器
您可以使用 Ansible 来确保没有身份管理(IdM)服务器,即使最后一个 IdM 服务实例正在服务器上运行。证书颁发机构(CA)、密钥恢复机构(KRA)或 DNS 服务器都是 IdM 服务的示例。
如果您删除了作为 CA、KRA 或 DNS 服务器的最后一台服务器,会严重破坏 IdM 功能。您可以使用 ipa service-find 命令手动检查哪些服务运行在哪些 IdM 服务器上。CA 服务器的主要名称为 dogtag/server_name/REALM_NAME。
与 ansible-freeipa ipaserver 角色不同,此 playbook 中使用的 ipaserver 模块不会从服务器卸载 IdM 服务。
先决条件
-
您需要知道 IdM
admin密码。 您已配置了 Ansible 控制节点以满足以下要求:
- 您使用 Ansible 版本 2.14 或更高版本。
-
您已在 Ansible 控制器上安装了
ansible-freeipa软件包。 - 示例假定在 ~/MyPlaybooks/ 目录中,您已创建了带有 IdM 服务器的完全限定域名(FQDN)的 Ansible 清单文件。
-
示例假定 secret.yml Ansible vault 存储了
ipaadmin_password。 -
清单文件中定义的从控制节点到 IdM 服务器的
SSH连接工作正常。
流程
进入您的 ~/MyPlaybooks/ 目录:
$ cd ~/MyPlaybooks/复制位于
/usr/share/doc/ansible-freeipa/playbooks/server/目录中的server-absent-ignore-last-of-role.ymlAnsible playbook 文件:$ cp /usr/share/doc/ansible-freeipa/playbooks/server/server-absent-ignore-last-of-role.yml server-absent-ignore-last-of-role-copy.yml-
打开
server-absent-ignore-last-of-role-copy.yml文件进行编辑。 通过在
ipaserver任务部分中设置以下变量来调整文件,并保存文件:-
将
ipaadmin_password变量设为 IdMadmin的密码。 -
将
name变量设为服务器的FQDN。示例服务器的FQDN是 server123.idm.example.com。 -
确保
ignore_last_of_role变量设为yes。 -
将
state变量设置为absent。
--- - name: Server absent with last of role skip example hosts: ipaserver vars_files: - /home/user_name/MyPlaybooks/secret.yml tasks: - name: Ensure server “server123.idm.example.com” is absent with last of role skip ipaserver: ipaadmin_password: "{{ ipaadmin_password }}" name: server123.idm.example.com ignore_last_of_role: yes state: absent-
将
运行 Ansible playbook ,并指定 playbook 文件和清单文件:
$ ansible-playbook --vault-password-file=password_file -v -i inventory server-absent-ignore-last-of-role-copy.yml- 确保指向 server123.idm.example.com 的所有名称服务器(NS)DNS 记录已从 DNS 区域中删除。无论您使用由 IdM 还是外部 DNS 管理的集成 DNS,这个均适用。
其他资源
- 请参阅 卸载 IdM 服务器。
-
请参阅
/usr/share/doc/ansible-freeipa/目录中的README-server.md文件。 -
请参阅
/usr/share/doc/ansible-freeipa/playbooks/server目录中的 playbook 示例。
16.4. 确保 IdM 服务器不存在,但不一定与其他 IdM 服务器断开连接
如果要从拓扑中删除身份管理(IdM)服务器,您可以使用 Ansible playbook 使其复制协议保持不变。playbook 还确保 IdM 服务器在 IdM 中不存在,即使作为主机也是如此。
仅当其他服务器是您计划删除的工作不正常的服务器时,才建议在删除时忽略服务器的复制协议。删除拓扑中作为中心点的服务器会将拓扑分成两个断开连接的集群。
您可以使用 ipa server-del 命令从拓扑中删除工作不正常的服务器。
如果删除了作为证书颁发机构(CA)、密钥恢复机构(KRA)或 DNS 服务器的最后一台服务器,将会严重破坏身份管理(IdM)功能。为防止此问题,playbook 在卸载充当 CA、KRA 或 DNS 服务器的服务器之前,确保这些服务运行在域中的另一台服务器上。
与 ansible-freeipa ipaserver 角色不同,此 playbook 中使用的 ipaserver 模块不会从服务器卸载 IdM 服务。
先决条件
-
您需要知道 IdM
admin密码。 您已配置了 Ansible 控制节点以满足以下要求:
- 您使用 Ansible 版本 2.14 或更高版本。
-
您已在 Ansible 控制器上安装了
ansible-freeipa软件包。 - 示例假定在 ~/MyPlaybooks/ 目录中,您已创建了带有 IdM 服务器的完全限定域名(FQDN)的 Ansible 清单文件。
-
示例假定 secret.yml Ansible vault 存储了
ipaadmin_password。 -
清单文件中定义的从控制节点到 IdM 服务器的
SSH连接工作正常。
流程
进入您的 ~/MyPlaybooks/ 目录:
$ cd ~/MyPlaybooks/复制位于
/usr/share/doc/ansible-freeipa/playbooks/server/目录中的server-absent-ignore_topology_disconnect.ymlAnsible playbook 文件:$ cp /usr/share/doc/ansible-freeipa/playbooks/server/server-absent-ignore_topology_disconnect.yml server-absent-ignore_topology_disconnect-copy.yml-
打开
server-absent-ignore_topology_disconnect-copy.yml文件进行编辑。 通过在
ipaserver任务部分中设置以下变量来调整文件,并保存文件:-
将
ipaadmin_password变量设为 IdMadmin的密码。 -
将
name变量设为服务器的FQDN。示例服务器的FQDN是 server123.idm.example.com。 -
确保
ignore_topology_disconnect变量设为yes。 -
确保
state变量设置为absent。
--- - name: Server absent with ignoring topology disconnects example hosts: ipaserver vars_files: - /home/user_name/MyPlaybooks/secret.yml tasks: - name: Ensure server “server123.idm.example.com” with ignoring topology disconnects ipaserver: ipaadmin_password: "{{ ipaadmin_password }}" name: server123.idm.example.com ignore_topology_disconnect: yes state: absent-
将
运行 Ansible playbook ,并指定 playbook 文件和清单文件:
$ ansible-playbook --vault-password-file=password_file -v -i inventory server-absent-ignore_topology_disconnect-copy.yml- [可选] 确保指向 server123.idm.example.com 的所有名称服务器(NS)DNS 记录已从 DNS 区域中删除。无论您使用由 IdM 还是外部 DNS 管理的集成 DNS,这个均适用。
其他资源
- 请参阅 卸载 IdM 服务器。
-
请参阅
/usr/share/doc/ansible-freeipa/目录中的README-server.md文件。 -
请参阅
/usr/share/doc/ansible-freeipa/playbooks/server目录中的 playbook 示例。
16.6. 使用 Ansible playbook 确保现有的 IdM 服务器可见
使用 Ansible playbook 中的 ipaserver ansible-freeipa 模块,来确保可以现有的身份管理(IdM)服务器可见。请注意,此 playbook 没有安装 IdM 服务器。
先决条件
-
您需要知道 IdM
admin密码。 您已配置了 Ansible 控制节点以满足以下要求:
- 您使用 Ansible 版本 2.14 或更高版本。
-
您已在 Ansible 控制器上安装了
ansible-freeipa软件包。 - 示例假定在 ~/MyPlaybooks/ 目录中,您已创建了带有 IdM 服务器的完全限定域名(FQDN)的 Ansible 清单文件。
-
示例假定 secret.yml Ansible vault 存储了
ipaadmin_password。 -
清单文件中定义的从控制节点到 IdM 服务器的
SSH连接工作正常。
流程
进入您的 ~/MyPlaybooks/ 目录:
$ cd ~/MyPlaybooks/复制位于
/usr/share/doc/ansible-freeipa/playbooks/server/目录中的server-not-hidden.ymlAnsible playbook 文件:$ cp /usr/share/doc/ansible-freeipa/playbooks/server/server-not-hidden.yml server-not-hidden-copy.yml-
打开
server-not-hidden-copy.yml文件进行编辑。 通过在
ipaserver任务部分中设置以下变量来调整文件,并保存文件:-
将
ipaadmin_password变量设为 IdMadmin的密码。 -
将
name变量设为服务器的FQDN。示例服务器的FQDN是 server123.idm.example.com。 -
确保
hidden变量设为no。
--- - name: Server not hidden example hosts: ipaserver vars_files: - /home/user_name/MyPlaybooks/secret.yml tasks: - name: Ensure server server123.idm.example.com is not hidden ipaserver: ipaadmin_password: "{{ ipaadmin_password }}" name: server123.idm.example.com hidden: no-
将
运行 Ansible playbook ,并指定 playbook 文件和清单文件:
$ ansible-playbook --vault-password-file=password_file -v -i inventory server-not-hidden-copy.yml
其他资源
- 请参阅 使用 Ansible playbook 安装身份管理服务器。
- 请参阅 隐藏的副本模式。
-
请参阅
/usr/share/doc/ansible-freeipa/目录中的README-server.md文件。 -
请参阅
/usr/share/doc/ansible-freeipa/playbooks/server目录中的 playbook 示例。
16.7. 确保现有的 IdM 服务器被分配了 IdM DNS 位置
使用 Ansible playbook 中的 ipaserver ansible-freeipa 模块来确保为现有身份管理(IdM)服务器分配了特定的 IdM DNS 位置。
请注意,ipaserver Ansible 模块没有安装 IdM 服务器。
先决条件
-
您需要知道 IdM
admin密码。 - IdM DNS 位置存在。位置示例为 germany。
-
您有访问服务器的
root权限。服务器示例是 server123.idm.example.com。 您已配置了 Ansible 控制节点以满足以下要求:
- 您使用 Ansible 版本 2.14 或更高版本。
-
您已在 Ansible 控制器上安装了
ansible-freeipa软件包。 - 示例假定在 ~/MyPlaybooks/ 目录中,您已创建了带有 IdM 服务器的完全限定域名(FQDN)的 Ansible 清单文件。
-
示例假定 secret.yml Ansible vault 存储了
ipaadmin_password。 -
清单文件中定义的从控制节点到 IdM 服务器的
SSH连接工作正常。
流程
进入您的 ~/MyPlaybooks/ 目录:
$ cd ~/MyPlaybooks/复制位于
/usr/share/doc/ansible-freeipa/playbooks/server/目录中的server-location.ymlAnsible playbook 文件:$ cp /usr/share/doc/ansible-freeipa/playbooks/server/server-location.yml server-location-copy.yml-
打开
server-location-copy.yml文件进行编辑。 通过在
ipaserver任务部分中设置以下变量来调整文件,并保存文件:-
将
ipaadmin_password变量设为 IdMadmin的密码。 -
将
name变量设为 server123.idm.example.com。 -
将
location变量设为 germany。
这是当前示例修改的 Ansible playbook 文件:
--- - name: Server enabled example hosts: ipaserver vars_files: - /home/user_name/MyPlaybooks/secret.yml tasks: - name: Ensure server server123.idm.example.com with location “germany” is present ipaserver: ipaadmin_password: "{{ ipaadmin_password }}" name: server123.idm.example.com location: germany-
将
运行 Ansible playbook ,并指定 playbook 文件和清单文件:
$ ansible-playbook --vault-password-file=password_file -v -i inventory server-location-copy.yml以
root用户身份使用SSH连接到 server123.idm.example.com :ssh root@server123.idm.example.com重新启动服务器上的
named-pkcs11服务,以使更新立即生效:[root@server123.idm.example.com ~]# systemctl restart named-pkcs11
其他资源
- 请参阅 使用 Ansible playbook 安装身份管理服务器。
- 请参阅 使用 Ansible 来确保 IdM 位置存在。
-
请参阅
/usr/share/doc/ansible-freeipa/目录中的README-server.md文件。 -
请参阅
/usr/share/doc/ansible-freeipa/playbooks/server目录中的 playbook 示例。
16.8. 确保现有的 IdM 服务器没有分配 IdM DNS 位置
使用 Ansible playbook 中的 ipaserver ansible-freeipa 模块,来确保现有身份管理(IdM)服务器没有为其分配的 IdM DNS 位置。不要将 DNS 位置分配给经常更改地理位置的服务器。请注意,playbook 不安装 IdM 服务器。
先决条件
-
您需要知道 IdM
admin密码。 -
您有访问服务器的
root权限。服务器示例是 server123.idm.example.com。 您已配置了 Ansible 控制节点以满足以下要求:
- 您使用 Ansible 版本 2.14 或更高版本。
-
您已在 Ansible 控制器上安装了
ansible-freeipa软件包。 - 示例假定在 ~/MyPlaybooks/ 目录中,您已创建了带有 IdM 服务器的完全限定域名(FQDN)的 Ansible 清单文件。
-
示例假定 secret.yml Ansible vault 存储了
ipaadmin_password。 -
清单文件中定义的从控制节点到 IdM 服务器的
SSH连接工作正常。
流程
进入您的 ~/MyPlaybooks/ 目录:
$ cd ~/MyPlaybooks/复制位于
/usr/share/doc/ansible-freeipa/playbooks/server/目录中的server-no-location.ymlAnsible playbook 文件:$ cp /usr/share/doc/ansible-freeipa/playbooks/server/server-no-location.yml server-no-location-copy.yml-
打开
server-no-location-copy.yml文件进行编辑。 通过在
ipaserver任务部分中设置以下变量来调整文件,并保存文件:-
将
ipaadmin_password变量设为 IdMadmin的密码。 -
将
name变量设为 server123.idm.example.com。 -
确保
location变量设为 ""。
--- - name: Server no location example hosts: ipaserver vars_files: - /home/user_name/MyPlaybooks/secret.yml tasks: - name: Ensure server server123.idm.example.com is present with no location ipaserver: ipaadmin_password: "{{ ipaadmin_password }}" name: server123.idm.example.com location: “”-
将
运行 Ansible playbook ,并指定 playbook 文件和清单文件:
$ ansible-playbook --vault-password-file=password_file -v -i inventory server-no-location-copy.yml以
root用户身份使用SSH连接到 server123.idm.example.com :ssh root@server123.idm.example.com重新启动服务器上的
named-pkcs11服务,以使更新立即生效:[root@server123.idm.example.com ~]# systemctl restart named-pkcs11
其他资源
- 请参阅 使用 Ansible playbook 安装身份管理服务器。
- 请参阅 在 IdM 中使用 Ansible 来管理 DNS 位置。
-
请参阅
/usr/share/doc/ansible-freeipa/目录中的README-server.md文件。 -
请参阅
/usr/share/doc/ansible-freeipa/playbooks/server目录中的 playbook 示例。
第 17 章 使用 Ansible playbook 管理主机
Ansible 是一个自动化工具,用于配置系统、部署软件和执行滚动更新。Ansible 包含对身份管理 (IdM) 的支持,您可以使用 Ansible 模块自动执行主机管理。
在使用 Ansible playbook 管理主机和主机条目时,将执行以下概念和操作:
17.1. 使用 Ansible playbook 确保存在带有 FQDN 的 IdM 主机条目
按照以下流程,使用 Ansible playbook 确保主机条目在身份管理(IdM)中存在。主机条目仅通过其 完全限定域名 (FQDN) 定义。
如果至少适用以下条件之一,则指定主机的 FQDN 名称就足够:
- IdM 服务器没有配置为管理 DNS。
-
主机没有静态 IP 地址,或者在配置主机时不知道该 IP 地址。添加仅由
FQDN定义的主机实质上会在 IdM DNS 服务中创建占位符条目。例如,笔记本电脑可能预配置为 IdM 客户端,但它们在配置时没有 IP 地址。当 DNS 服务动态更新其记录时,将检测主机的当前 IP 地址,并更新其 DNS 记录。
如果没有 Ansible,则使用 ipa host-add 命令在 IdM 中创建主机条目。将主机添加到 IdM 的结果是 IdM 中存在的主机状态。由于 Ansible 依赖于 idempotence,要使用 Ansible 将主机添加到 IdM,您必须创建一个 playbook,将主机的状态定义为 present: state: present。
先决条件
- 您知道 IdM 管理员密码。
您已配置了 Ansible 控制节点以满足以下要求:
- 您使用 Ansible 版本 2.14 或更高版本。
-
您已在 Ansible 控制器上安装了
ansible-freeipa软件包。 - 示例假定在 ~/MyPlaybooks/ 目录中,您已创建了带有 IdM 服务器的完全限定域名(FQDN)的 Ansible 清单文件。
-
示例假定 secret.yml Ansible vault 存储了
ipaadmin_password。
流程
创建一个清单文件,如
inventory.file,并在该文件中定义ipaserver:[ipaserver] server.idm.example.com
创建一个 Ansible playbook 文件,其中包含您要确保的 IdM 中的
FQDN。要简化此步骤,您可以复制并修改/usr/share/doc/ansible-freeipa/playbooks/host/add-host.yml文件中的示例:--- - name: Host present hosts: ipaserver vars_files: - /home/user_name/MyPlaybooks/secret.yml tasks: - name: Host host01.idm.example.com present ipahost: ipaadmin_password: "{{ ipaadmin_password }}" name: host01.idm.example.com state: present force: yes运行 playbook:
$ ansible-playbook --vault-password-file=password_file -v -i path_to_inventory_directory/inventory.file path_to_playbooks_directory/ensure-host-is-present.yml
这个过程会导致在 IdM LDAP 服务器中创建主机条目,但不将主机注册到 IdM Kerberos 域。为此,您必须将主机部署为 IdM 客户端。详情请参阅使用 Ansible playbook 安装身份管理客户端。
验证步骤
以 admin 用户身份登录您的 IdM 服务器:
$ ssh admin@server.idm.example.com Password:输入
ipa host-show命令并指定主机名称:$ ipa host-show host01.idm.example.com Host name: host01.idm.example.com Principal name: host/host01.idm.example.com@IDM.EXAMPLE.COM Principal alias: host/host01.idm.example.com@IDM.EXAMPLE.COM Password: False Keytab: False Managed by: host01.idm.example.com
输出确认 IdM 中存在 host01.idm.example.com。
17.2. 使用 Ansible playbook 确保存在含有 DNS 信息的 IdM 主机条目
按照以下流程,使用 Ansible playbook 确保主机条目在身份管理(IdM)中存在。主机条目通过其 完全限定域名 (FQDN)及其 IP 地址定义。
如果没有 Ansible,则使用 ipa host-add 命令在 IdM 中创建主机条目。将主机添加到 IdM 的结果是 IdM 中存在的主机状态。由于 Ansible 依赖于 idempotence,要使用 Ansible 将主机添加到 IdM,您必须创建一个 playbook,将主机的状态定义为 present: state: present。
先决条件
- 您知道 IdM 管理员密码。
您已配置了 Ansible 控制节点以满足以下要求:
- 您使用 Ansible 版本 2.14 或更高版本。
-
您已在 Ansible 控制器上安装了
ansible-freeipa软件包。 - 示例假定在 ~/MyPlaybooks/ 目录中,您已创建了带有 IdM 服务器的完全限定域名(FQDN)的 Ansible 清单文件。
-
示例假定 secret.yml Ansible vault 存储了
ipaadmin_password。
流程
创建一个清单文件,如
inventory.file,并在该文件中定义ipaserver:[ipaserver] server.idm.example.com
创建一个 Ansible playbook 文件,其中包含您要确保的 IdM 中的
完全限定域名(FQDN)。另外,如果 IdM 服务器配置为管理 DNS,并且您知道主机的 IP 地址,请为ip_address参数指定一个值。主机需要 IP 地址才能存在于 DNS 资源记录中。要简化此步骤,您可以复制并修改/usr/share/doc/ansible-freeipa/playbooks/host/host-present.yml文件中的示例。您还可以包含其他附加信息:--- - name: Host present hosts: ipaserver vars_files: - /home/user_name/MyPlaybooks/secret.yml tasks: - name: Ensure host01.idm.example.com is present ipahost: ipaadmin_password: "{{ ipaadmin_password }}" name: host01.idm.example.com description: Example host ip_address: 192.168.0.123 locality: Lab ns_host_location: Lab ns_os_version: CentOS 7 ns_hardware_platform: Lenovo T61 mac_address: - "08:00:27:E3:B1:2D" - "52:54:00:BD:97:1E" state: present运行 playbook:
$ ansible-playbook --vault-password-file=password_file -v -i path_to_inventory_directory/inventory.file path_to_playbooks_directory/ensure-host-is-present.yml
这个过程会导致在 IdM LDAP 服务器中创建主机条目,但不将主机注册到 IdM Kerberos 域。为此,您必须将主机部署为 IdM 客户端。详情请参阅使用 Ansible playbook 安装身份管理客户端。
验证步骤
以 admin 用户身份登录您的 IdM 服务器:
$ ssh admin@server.idm.example.com Password:输入
ipa host-show命令并指定主机名称:$ ipa host-show host01.idm.example.com Host name: host01.idm.example.com Description: Example host Locality: Lab Location: Lab Platform: Lenovo T61 Operating system: CentOS 7 Principal name: host/host01.idm.example.com@IDM.EXAMPLE.COM Principal alias: host/host01.idm.example.com@IDM.EXAMPLE.COM MAC address: 08:00:27:E3:B1:2D, 52:54:00:BD:97:1E Password: False Keytab: False Managed by: host01.idm.example.com
输出确认 IdM 中存在 host01.idm.example.com。
17.3. 使用 Ansible playbook 确保存在带有随机密码的多个 IdM 主机条目
ipahost 模块允许系统管理员使用一个 Ansible 任务来确保 IdM 中存在或不存在多个主机条目。按照以下流程,确保仅由 完全限定域名 (FQDN)定义的多个主机条目存在。运行 Ansible playbook 会为主机生成随机密码。
如果没有 Ansible,则使用 ipa host-add 命令在 IdM 中创建主机条目。将主机添加到 IdM 的结果是 IdM 中存在的主机状态。由于 Ansible 依赖于 idempotence,要使用 Ansible 将主机添加到 IdM,您必须创建一个 playbook,将主机的状态定义为 present: state: present。
先决条件
- 您知道 IdM 管理员密码。
您已配置了 Ansible 控制节点以满足以下要求:
- 您使用 Ansible 版本 2.14 或更高版本。
-
您已在 Ansible 控制器上安装了
ansible-freeipa软件包。 - 示例假定在 ~/MyPlaybooks/ 目录中,您已创建了带有 IdM 服务器的完全限定域名(FQDN)的 Ansible 清单文件。
-
示例假定 secret.yml Ansible vault 存储了
ipaadmin_password。
流程
创建一个清单文件,如
inventory.file,并在该文件中定义ipaserver:[ipaserver] server.idm.example.com
创建一个 Ansible playbook 文件,其中包含您要确保的 IdM 中的
完全限定域名(FQDN)。要使 Ansible playbook 为各个主机生成随机密码,即使主机已存在于 IdM 中,并且update_password设置为on_create,请添加random: yes和force: yes选项。要简化此步骤,您可以复制/usr/share/doc/ansible-freeipa/README-host.mdMarkdown 文件并对其进行相应的修改:--- - name: Ensure hosts with random password hosts: ipaserver vars_files: - /home/user_name/MyPlaybooks/secret.yml tasks: - name: Hosts host01.idm.example.com and host02.idm.example.com present with random passwords ipahost: ipaadmin_password: "{{ ipaadmin_password }}" hosts: - name: host01.idm.example.com random: yes force: yes - name: host02.idm.example.com random: yes force: yes register: ipahost运行 playbook:
$ ansible-playbook --vault-password-file=password_file -v -i path_to_inventory_directory/inventory.file path_to_playbooks_directory/ensure-hosts-are-present.yml [...] TASK [Hosts host01.idm.example.com and host02.idm.example.com present with random passwords] changed: [r8server.idm.example.com] => {"changed": true, "host": {"host01.idm.example.com": {"randompassword": "0HoIRvjUdH0Ycbf6uYdWTxH"}, "host02.idm.example.com": {"randompassword": "5VdLgrf3wvojmACdHC3uA3s"}}}
要使用随机的、一次性密码(OTP)将主机部署为 IdM 客户端,请参阅 使用 Ansible playbook 进行 IdM 客户端注册的授权选项 或 使用一次性密码安装客户端:交互式安装。
验证步骤
以 admin 用户身份登录您的 IdM 服务器:
$ ssh admin@server.idm.example.com Password:输入
ipa host-show命令并指定其中一个主机的名称:$ ipa host-show host01.idm.example.com Host name: host01.idm.example.com Password: True Keytab: False Managed by: host01.idm.example.com
输出确认 IdM 中存在 host01.idm.example.com,并带有随机密码。
17.4. 使用 Ansible playbook 确保存在具有多个 IP 地址的 IdM 主机条目
按照以下流程,使用 Ansible playbook 确保主机条目在身份管理(IdM)中存在。主机条目通过其 完全限定域名 (FQDN)及其多个 IP 地址来定义。
与 ipa host 实用程序相比,Ansible ipahost 模块可以确保主机存在或不存在多个 IPv4 和 IPv6 地址。ipa host-mod 命令无法处理 IP 地址。
先决条件
- 您知道 IdM 管理员密码。
您已配置了 Ansible 控制节点以满足以下要求:
- 您使用 Ansible 版本 2.14 或更高版本。
-
您已在 Ansible 控制器上安装了
ansible-freeipa软件包。 - 示例假定在 ~/MyPlaybooks/ 目录中,您已创建了带有 IdM 服务器的完全限定域名(FQDN)的 Ansible 清单文件。
-
示例假定 secret.yml Ansible vault 存储了
ipaadmin_password。
流程
创建一个清单文件,如
inventory.file,并在该文件中定义ipaserver:[ipaserver] server.idm.example.com
创建 Ansible playbook 文件。将主机的
完全限定域名(FQDN) 指定为ipahost变量的name,用于确保主机的 IdM 中存在。使用 - ip_address 语法指定多个 IPv4 和 IPv6ip_address值,每个地址有一个独立的行。要简化此步骤,您可以复制并修改/usr/share/doc/ansible-freeipa/playbooks/host/host-member-ipaddresses-present.yml文件中的示例。您还可以包含附加信息:--- - name: Host member IP addresses present hosts: ipaserver vars_files: - /home/user_name/MyPlaybooks/secret.yml tasks: - name: Ensure host101.example.com IP addresses present ipahost: ipaadmin_password: "{{ ipaadmin_password }}" name: host01.idm.example.com ip_address: - 192.168.0.123 - fe80::20c:29ff:fe02:a1b3 - 192.168.0.124 - fe80::20c:29ff:fe02:a1b4 force: yes运行 playbook:
$ ansible-playbook --vault-password-file=password_file -v -i path_to_inventory_directory/inventory.file path_to_playbooks_directory/ensure-host-with-multiple-IP-addreses-is-present.yml
这个过程在 IdM LDAP 服务器中创建主机条目,但不将主机注册到 IdM Kerberos 域。为此,您必须将主机部署为 IdM 客户端。详情请参阅使用 Ansible playbook 安装身份管理客户端。
验证步骤
以 admin 用户身份登录您的 IdM 服务器:
$ ssh admin@server.idm.example.com Password:输入
ipa host-show命令并指定主机名称:$ ipa host-show host01.idm.example.com Principal name: host/host01.idm.example.com@IDM.EXAMPLE.COM Principal alias: host/host01.idm.example.com@IDM.EXAMPLE.COM Password: False Keytab: False Managed by: host01.idm.example.com输出确认 IdM 中存在 host01.idm.example.com。
要验证 IdM DNS 记录中是否存在主机的多个 IP 地址,请输入
ipa dnsrecord-show命令并指定以下信息:- IdM 域的名称
主机的名称
$ ipa dnsrecord-show idm.example.com host01 [...] Record name: host01 A record: 192.168.0.123, 192.168.0.124 AAAA record: fe80::20c:29ff:fe02:a1b3, fe80::20c:29ff:fe02:a1b4
输出确认 playbook 中指定的所有 IPv4 和 IPv6 地址都已与 host01.idm.example.com 主机条目正确关联。
17.5. 使用 Ansible playbook 确保没有 IdM 主机条目
按照以下流程,使用 Ansible playbook 确保主机条目在身份管理(IdM)中不存在。
先决条件
- IdM 管理员凭证
流程
创建一个清单文件,如
inventory.file,并在该文件中定义ipaserver:[ipaserver] server.idm.example.com
创建 Ansible playbook 文件,使其包含没有存在于 IdM 中的主机的
完全限定域名(FQDN)。如果您的 IdM 域集成了 DNS,请使用updatedns: yes选项从 DNS 中删除主机任意类型的关联记录。要简化此步骤,您可以复制并修改
/usr/share/doc/ansible-freeipa/playbooks/host/delete-host.yml文件中的示例:--- - name: Host absent hosts: ipaserver vars_files: - /home/user_name/MyPlaybooks/secret.yml tasks: - name: Host host01.idm.example.com absent ipahost: ipaadmin_password: "{{ ipaadmin_password }}" name: host01.idm.example.com updatedns: yes state: absent运行 playbook:
$ ansible-playbook --vault-password-file=password_file -v -i path_to_inventory_directory/inventory.file path_to_playbooks_directory/ensure-host-absent.yml
这个过程会产生:
- IdM Kerberos 域中没有的主机。
- IdM LDAP 服务器中不存在主机条目。
要从客户端主机本身中删除系统服务的特定 IdM 配置,如系统安全服务守护进程 (SSSD),您必须在客户端上运行 ipa-client-install --uninstall 命令。详情请参阅卸载 IdM 客户端。
验证步骤
以 admin 用户身份登录
ipaserver:$ ssh admin@server.idm.example.com Password: [admin@server /]$显示 host01.idm.example.com 的信息:
$ ipa host-show host01.idm.example.com ipa: ERROR: host01.idm.example.com: host not found
输出确认 IdM 中不存在该主机。
17.6. 其他资源
-
请参阅
/usr/share/doc/ansible-freeipa/README-host.mdMarkdown 文件。 -
请参阅
/usr/share/doc/ansible-freeipa/playbooks/host目录中的其它 playbook。
第 18 章 使用 Ansible playbook 管理主机组
要了解更多有关 身份管理(IdM)中主机组 的信息,并使用 Ansible 来执行涉及身份管理(IdM)中主机组的操作,请参阅:
18.1. IdM 中的主机组
IdM 主机组可用于集中控制重要管理任务,特别是访问控制。
主机组的定义
主机组是包含一组具有通用访问控制规则和其他特征的 IdM 主机的实体。例如,您可以根据公司部门、物理位置或访问控制要求来定义主机组。
IdM 中的主机组可以包括:
- IdM 服务器和客户端
- 其他 IdM 主机组
默认创建的主机组
默认情况下,IdM 服务器为所有 IdM 服务器主机创建主机组 ipaservers。
直接和间接组成员
IdM 中的组属性同时适用于直接和间接成员:当主机组 B 是主机组 A 的成员时,主机组 B 的所有成员都被视为主机组 A 的间接成员。
18.2. 使用 Ansible playbook 确保存在 IdM 主机组
按照以下流程,使用 Ansible playbook 确保在主机组在身份管理(IdM)中存在。
如果没有 Ansible,则使用 ipa hostgroup-add 命令在 IdM 中创建主机组条目。将主机组添加到 IdM 的结果是 IdM 中存在主机组的状态。由于 Ansible 依赖幂等性,要使用 Ansible 将主机组添加到 IdM,您必须创建一个 playbook,其中将主机组的状态定义为 present: state: present。
先决条件
- 您知道 IdM 管理员密码。
您已配置了 Ansible 控制节点以满足以下要求:
- 您使用 Ansible 版本 2.14 或更高版本。
-
您已在 Ansible 控制器上安装了
ansible-freeipa软件包。 - 示例假定在 ~/MyPlaybooks/ 目录中,您已创建了带有 IdM 服务器的完全限定域名(FQDN)的 Ansible 清单文件。
-
示例假定 secret.yml Ansible vault 存储了
ipaadmin_password。
流程
创建一个清单文件,如
inventory.file,并使用目标 IdM 服务器列表定义ipaserver:[ipaserver] server.idm.example.com
使用必要的主机组信息,创建 Ansible playbook 文件。例如,若要确保存在名为 databases 的主机组,可在
- ipahostgroup任务中指定name: databases。要简化此步骤,您可以复制并修改/usr/share/doc/ansible-freeipa/playbooks/user/ensure-hostgroup-is-present.yml文件中的示例。--- - name: Playbook to handle hostgroups hosts: ipaserver vars_files: - /home/user_name/MyPlaybooks/secret.yml tasks: # Ensure host-group databases is present - ipahostgroup: ipaadmin_password: "{{ ipaadmin_password }}" name: databases state: present在 playbook 中,state: present 表示将主机组添加到 IdM 的请求,除非该主机组在那里已存在。
运行 playbook:
$ ansible-playbook --vault-password-file=password_file -v -i path_to_inventory_directory/inventory.file path_to_playbooks_directory/ensure-hostgroup-is-present.yml
验证步骤
以 admin 用户身份登录
ipaserver:$ ssh admin@server.idm.example.com Password: [admin@server /]$为 admin 请求一个 Kerberos ticket:
$ kinit admin Password for admin@IDM.EXAMPLE.COM:显示在 IdM 中存在的主机组的信息,以确保:
$ ipa hostgroup-show databases Host-group: databases
IdM 中存在 databases 主机组。
18.3. 确保使用 Ansible playbook 在 IdM 主机组中存在主机
按照以下流程,使用 Ansible playbook 确保主机在身份管理(IdM)中的主机组中存在。
先决条件
- 您知道 IdM 管理员密码。
您已配置了 Ansible 控制节点以满足以下要求:
- 您使用 Ansible 版本 2.14 或更高版本。
-
您已在 Ansible 控制器上安装了
ansible-freeipa软件包。 - 示例假定在 ~/MyPlaybooks/ 目录中,您已创建了带有 IdM 服务器的完全限定域名(FQDN)的 Ansible 清单文件。
-
示例假定 secret.yml Ansible vault 存储了
ipaadmin_password。
- IdM 中已存在您要引用的主机。详情请参阅使用 Ansible playbook 确保存在 IdM 主机条目。
- 您从 Ansible playbook 文件中引用的主机组已添加到 IdM 中。详情请参阅确保使用 Ansible playbook 确保 IdM 主机组存在。
流程
创建一个清单文件,如
inventory.file,并使用目标 IdM 服务器列表定义ipaserver:[ipaserver] server.idm.example.com
使用必要的主机信息,创建 Ansible playbook 文件。使用
ipahostgroup变量的name参数,指定主机组的名称。使用ipahostgroup变量的host参数指定主机名称。要简化此步骤,您可以复制并修改/usr/share/doc/ansible-freeipa/playbooks/hostgroup/ensure-hosts-and-hostgroups-are-present-in-hostgroup.yml文件中的示例:--- - name: Playbook to handle hostgroups hosts: ipaserver vars_files: - /home/user_name/MyPlaybooks/secret.yml tasks: # Ensure host-group databases is present - ipahostgroup: ipaadmin_password: "{{ ipaadmin_password }}" name: databases host: - db.idm.example.com action: member此 playbook 将 db.idm.example.com 主机添加到 databases 主机组。
action: member行表示在 playbook 运行时,不会尝试添加 databases 组本身。相反,只尝试将 db.idm.example.com 添加到数据库。运行 playbook:
$ ansible-playbook --vault-password-file=password_file -v -i path_to_inventory_directory/inventory.file path_to_playbooks_directory/ensure-hosts-or-hostgroups-are-present-in-hostgroup.yml
验证步骤
以 admin 用户身份登录
ipaserver:$ ssh admin@server.idm.example.com Password: [admin@server /]$为 admin 请求一个 Kerberos ticket:
$ kinit admin Password for admin@IDM.EXAMPLE.COM:显示主机组的信息以查看其中存在哪些主机:
$ ipa hostgroup-show databases Host-group: databases Member hosts: db.idm.example.com
db.idm.example.com 主机显示为 databases 主机组的成员。
18.4. 使用 Ansible playbook 嵌套 IdM 主机组
按照以下流程,使用 Ansible playbook 确保嵌套的主机组在身份管理(IdM)主机组中存在。
先决条件
- 您知道 IdM 管理员密码。
您已配置了 Ansible 控制节点以满足以下要求:
- 您使用 Ansible 版本 2.14 或更高版本。
-
您已在 Ansible 控制器上安装了
ansible-freeipa软件包。 - 示例假定在 ~/MyPlaybooks/ 目录中,您已创建了带有 IdM 服务器的完全限定域名(FQDN)的 Ansible 清单文件。
-
示例假定 secret.yml Ansible vault 存储了
ipaadmin_password。
- IdM 中已存在您从 Ansible playbook 文件中引用的主机组。详情请参阅确保使用 Ansible playbook 确保 IdM 主机组存在。
流程
创建一个清单文件,如
inventory.file,并使用目标 IdM 服务器列表定义ipaserver:[ipaserver] server.idm.example.com
使用必要的主机组信息,创建 Ansible playbook 文件。为确保嵌套的主机组 A 存在于主机组 B 中:在 Ansible playbook 的
- ipahostgroup变量中使用name变量指定主机组 B 的名称。使用hostgroup变量指定嵌套主机组 A 的名称。要简化此步骤,您可以复制并修改/usr/share/doc/ansible-freeipa/playbooks/hostgroup/ensure-hosts-and-hostgroups-are-present-in-hostgroup.yml文件中的示例:--- - name: Playbook to handle hostgroups hosts: ipaserver vars_files: - /home/user_name/MyPlaybooks/secret.yml tasks: # Ensure hosts and hostgroups are present in existing databases hostgroup - ipahostgroup: ipaadmin_password: "{{ ipaadmin_password }}" name: databases hostgroup: - mysql-server - oracle-server action: member此 Ansible playbook 确保在 databases 主机组中存在 myqsl-server 和 oracle-server 主机组。
action: member行表示在 playbook 运行时,不会尝试将 databases 组本身添加到 IdM。运行 playbook:
$ ansible-playbook --vault-password-file=password_file -v -i path_to_inventory_directory/inventory.file path_to_playbooks_directory/ensure-hosts-or-hostgroups-are-present-in-hostgroup.yml
验证步骤
以 admin 用户身份登录
ipaserver:$ ssh admin@server.idm.example.com Password: [admin@server /]$为 admin 请求一个 Kerberos ticket:
$ kinit admin Password for admin@IDM.EXAMPLE.COM:显示有关存在嵌套主机组的主机组的信息:
$ ipa hostgroup-show databases Host-group: databases Member hosts: db.idm.example.com Member host-groups: mysql-server, oracle-server
mysql-server 和 oracle-server 主机组存在于 databases 主机组中。
18.5. 使用 Ansible Playbook 在 IDM 主机组中存在成员管理器
以下流程描述了确保使用 Ansible playbook 在 IdM 主机和主机组中存在成员管理器。
先决条件
- 您知道 IdM 管理员密码。
您已配置了 Ansible 控制节点以满足以下要求:
- 您使用 Ansible 版本 2.14 或更高版本。
-
您已在 Ansible 控制器上安装了
ansible-freeipa软件包。 - 示例假定在 ~/MyPlaybooks/ 目录中,您已创建了带有 IdM 服务器的完全限定域名(FQDN)的 Ansible 清单文件。
-
示例假定 secret.yml Ansible vault 存储了
ipaadmin_password。
- 您必须具有要添加为成员管理器的主机或主机组的名称,以及您要管理的主机组的名称。
流程
创建一个清单文件,如
inventory.file,并在该文件中定义ipaserver:[ipaserver] server.idm.example.com
使用必要的主机和主机组成员管理信息创建一个 Ansible playbook 文件:
--- - name: Playbook to handle host group membership management hosts: ipaserver vars_files: - /home/user_name/MyPlaybooks/secret.yml tasks: - name: Ensure member manager user example_member is present for group_name ipahostgroup: ipaadmin_password: "{{ ipaadmin_password }}" name: group_name membermanager_user: example_member - name: Ensure member manager group project_admins is present for group_name ipahostgroup: ipaadmin_password: "{{ ipaadmin_password }}" name: group_name membermanager_group: project_admins运行 playbook:
$ ansible-playbook --vault-password-file=password_file -v -i path_to_inventory_directory/inventory.file path_to_playbooks_directory/add-member-managers-host-groups.yml
验证步骤
您可以使用 ipa group-show 命令验证 group_name 组是否包含 example_member 和project_admins 作为成员管理者:
以管理员身份登录到
ipaserver:$ ssh admin@server.idm.example.com Password: [admin@server /]$显示有关 testhostgroup 的信息:
ipaserver]$ ipa hostgroup-show group_name Host-group: group_name Member hosts: server.idm.example.com Member host-groups: testhostgroup2 Membership managed by groups: project_admins Membership managed by users: example_member
其他资源
-
请参阅
ipa hostgroup-add-member-manager --help。 -
请参阅
ipaman page。
18.6. 使用 Ansible playbook 确保 IdM 主机组中没有主机
按照以下流程,使用 Ansible playbook 确保主机组中的主机在身份管理(IdM)中不存在。
先决条件
- 您知道 IdM 管理员密码。
您已配置了 Ansible 控制节点以满足以下要求:
- 您使用 Ansible 版本 2.14 或更高版本。
-
您已在 Ansible 控制器上安装了
ansible-freeipa软件包。 - 示例假定在 ~/MyPlaybooks/ 目录中,您已创建了带有 IdM 服务器的完全限定域名(FQDN)的 Ansible 清单文件。
-
示例假定 secret.yml Ansible vault 存储了
ipaadmin_password。
- IdM 中已存在您要引用的主机。详情请参阅使用 Ansible playbook 确保存在 IdM 主机条目。
- IdM 中已存在您从 Ansible playbook 文件中引用的主机组。详情请参阅确保使用 Ansible playbook 确保 IdM 主机组存在。
流程
创建一个清单文件,如
inventory.file,并使用目标 IdM 服务器列表定义ipaserver:[ipaserver] server.idm.example.com
创建含有必要的主机和主机组信息的 Ansible playbook 文件。使用
ipahostgroup变量的name参数,指定主机组的名称。使用ipahostgroup变量的host参数指定要确保其不存在于主机组中的主机名称。要简化此步骤,您可以复制并修改/usr/share/doc/ansible-freeipa/playbooks/hostgroup/ensure-hosts-and-hostgroups-are-absent-in-hostgroup.yml文件中的示例:--- - name: Playbook to handle hostgroups hosts: ipaserver vars_files: - /home/user_name/MyPlaybooks/secret.yml tasks: # Ensure host-group databases is absent - ipahostgroup: ipaadmin_password: "{{ ipaadmin_password }}" name: databases host: - db.idm.example.com action: member state: absent此 playbook 确保 db.idm.example.com 主机没有存在于 databases 主机组中。action: member 行表示在 playbook 运行时,不会尝试删除 databases 组本身。
运行 playbook:
$ ansible-playbook --vault-password-file=password_file -v -i path_to_inventory_directory/inventory.file path_to_playbooks_directory/ensure-hosts-or-hostgroups-are-absent-in-hostgroup.yml
验证步骤
以 admin 用户身份登录
ipaserver:$ ssh admin@server.idm.example.com Password: [admin@server /]$为 admin 请求一个 Kerberos ticket:
$ kinit admin Password for admin@IDM.EXAMPLE.COM:显示主机组及其包含的主机的信息:
$ ipa hostgroup-show databases Host-group: databases Member host-groups: mysql-server, oracle-server
在 databases 主机组中不存在 db.idm.example.com 主机。
18.7. 使用 Ansible playbook 确保 IdM 主机组没有嵌套的主机组
按照以下流程,使用 Ansible playbook 确保来自外部主机组的嵌套的主机组在身份管理(IdM)中不存在。
先决条件
- 您知道 IdM 管理员密码。
您已配置了 Ansible 控制节点以满足以下要求:
- 您使用 Ansible 版本 2.14 或更高版本。
-
您已在 Ansible 控制器上安装了
ansible-freeipa软件包。 - 示例假定在 ~/MyPlaybooks/ 目录中,您已创建了带有 IdM 服务器的完全限定域名(FQDN)的 Ansible 清单文件。
-
示例假定 secret.yml Ansible vault 存储了
ipaadmin_password。
- IdM 中已存在您从 Ansible playbook 文件中引用的主机组。详情请参阅确保使用 Ansible playbook 确保 IdM 主机组存在。
流程
创建一个清单文件,如
inventory.file,并使用目标 IdM 服务器列表定义ipaserver:[ipaserver] server.idm.example.com
使用必要的主机组信息,创建 Ansible playbook 文件。在
- ipahostgroup变量中使用name变量指定外部主机组的名称。使用hostgroup变量指定嵌套主机组的名称。要简化此步骤,您可以复制并修改/usr/share/doc/ansible-freeipa/playbooks/hostgroup/ensure-hosts-and-hostgroups-are-absent-in-hostgroup.yml文件中的示例:--- - name: Playbook to handle hostgroups hosts: ipaserver vars_files: - /home/user_name/MyPlaybooks/secret.yml tasks: # Ensure hosts and hostgroups are absent in existing databases hostgroup - ipahostgroup: ipaadmin_password: "{{ ipaadmin_password }}" name: databases hostgroup: - mysql-server - oracle-server action: member state: absent此 playbook 确保 mysql-server 和 oracle-server 主机组没有存在于 databases 主机组中。
action: member行表示,在 playbook 运行时,不会尝试确保从 IdM 中删除 databases 组本身。运行 playbook:
$ ansible-playbook --vault-password-file=password_file -v -i path_to_inventory_directory/inventory.file path_to_playbooks_directory/ensure-hosts-or-hostgroups-are-absent-in-hostgroup.yml
验证步骤
以 admin 用户身份登录
ipaserver:$ ssh admin@server.idm.example.com Password: [admin@server /]$为 admin 请求一个 Kerberos ticket:
$ kinit admin Password for admin@IDM.EXAMPLE.COM:显示应当缺少嵌套主机组的主机组的信息:
$ ipa hostgroup-show databases Host-group: databases
输出确认,外部 databases 主机组中没有mysql-server 和 oracle-server 嵌套式主机组。
18.8. 使用 Ansible playbook 确保没有 IdM 主机组
按照以下流程,使用 Ansible playbook 确保主机组在身份管理(IdM)中不存在。
如果没有 Ansible,则使用 ipa hostgroup-del 命令从 IdM 中删除主机组条目。从 IdM 中删除主机组的结果是 IdM 中缺少主机组的状态。由于 Ansible 依赖于 idempotence,若要使用 Ansible 从 IdM 中删除主机组,您必须创建一个 playbook,它将主机组的状态定义为 absent: state: absent。
先决条件
- 您知道 IdM 管理员密码。
您已配置了 Ansible 控制节点以满足以下要求:
- 您使用 Ansible 版本 2.14 或更高版本。
-
您已在 Ansible 控制器上安装了
ansible-freeipa软件包。 - 示例假定在 ~/MyPlaybooks/ 目录中,您已创建了带有 IdM 服务器的完全限定域名(FQDN)的 Ansible 清单文件。
-
示例假定 secret.yml Ansible vault 存储了
ipaadmin_password。
流程
创建一个清单文件,如
inventory.file,并使用目标 IdM 服务器列表定义ipaserver:[ipaserver] server.idm.example.com
使用必要的主机组信息,创建 Ansible playbook 文件。要简化此步骤,您可以复制并修改
/usr/share/doc/ansible-freeipa/playbooks/user/ensure-hostgroup-is-absent.yml文件中的示例。--- - name: Playbook to handle hostgroups hosts: ipaserver vars_files: - /home/user_name/MyPlaybooks/secret.yml tasks: - Ensure host-group databases is absent ipahostgroup: ipaadmin_password: "{{ ipaadmin_password }}" name: databases state: absent此 playbook 确保 IdM 中没有 databases 主机组。
state: absent表示从 IdM 中删除主机组的请求,除非它已被删除。运行 playbook:
$ ansible-playbook --vault-password-file=password_file -v -i path_to_inventory_directory/inventory.file path_to_playbooks_directory/ensure-hostgroup-is-absent.yml
验证步骤
以 admin 用户身份登录
ipaserver:$ ssh admin@server.idm.example.com Password: [admin@server /]$为 admin 请求一个 Kerberos ticket:
$ kinit admin Password for admin@IDM.EXAMPLE.COM:显示您没有保证的主机组的信息:
$ ipa hostgroup-show databases ipa: ERROR: databases: host group not found
IdM 中不存在 databases 主机组。
18.9. 使用 Ansible playbook 确保 IdM 主机组中没有成员管理器
以下流程描述了确保使用 Ansible playbook 在 IdM 主机和主机组中存在成员管理器。
先决条件
- 您知道 IdM 管理员密码。
您已配置了 Ansible 控制节点以满足以下要求:
- 您使用 Ansible 版本 2.14 或更高版本。
-
您已在 Ansible 控制器上安装了
ansible-freeipa软件包。 - 示例假定在 ~/MyPlaybooks/ 目录中,您已创建了带有 IdM 服务器的完全限定域名(FQDN)的 Ansible 清单文件。
-
示例假定 secret.yml Ansible vault 存储了
ipaadmin_password。
- 您必须具有要作为成员管理者删除的用户或用户组的名称,以及它们所管理的主机组的名称。
流程
创建一个清单文件,如
inventory.file,并在该文件中定义ipaserver:[ipaserver] server.idm.example.com
使用必要的主机和主机组成员管理信息创建一个 Ansible playbook 文件:
--- - name: Playbook to handle host group membership management hosts: ipaserver vars_files: - /home/user_name/MyPlaybooks/secret.yml tasks: - name: Ensure member manager host and host group members are absent for group_name ipahostgroup: ipaadmin_password: "{{ ipaadmin_password }}" name: group_name membermanager_user: example_member membermanager_group: project_admins action: member state: absent运行 playbook:
$ ansible-playbook --vault-password-file=password_file -v -i path_to_inventory_directory/inventory.file path_to_playbooks_directory/ensure-member-managers-host-groups-are-absent.yml
验证步骤
您可以使用 ipa group-show 命令验证 group_name 组不包含 example_member 或 project_admins 作为成员管理者:
以管理员身份登录到
ipaserver:$ ssh admin@server.idm.example.com Password: [admin@server /]$显示有关 testhostgroup 的信息:
ipaserver]$ ipa hostgroup-show group_name Host-group: group_name Member hosts: server.idm.example.com Member host-groups: testhostgroup2
其他资源
-
请参阅
ipa hostgroup-add-member-manager --help。 -
请参阅
ipaman page。
第 19 章 定义 IdM 密码策略
本章论述了 Identity Management (IdM) 密码策略,以及如何使用 Ansible playbook 在 IdM 中添加新的密码策略。
19.1. 什么是密码策略
密码策略是密码必须满足的一组规则。例如,password 策略可以定义最小密码长度和最大密码生命周期。受此策略影响的所有用户都必须设置足够长的密码,并经常更改密码以满足指定条件。这样,密码策略有助于降低某人发现和滥用用户密码的风险。
19.2. IdM 中的密码策略
密码是 Identity Management (IdM) 用户对 IdM Kerberos 域进行身份验证的最常用方式。密码策略定义了这些 IdM 用户密码必须满足的要求。
IdM 密码策略在底层 LDAP 目录中设置,但 Kerberos 密钥分发中心 (KDC) 强制执行密码策略。
密码策略属性列出了您可以在 IdM 中定义密码策略的属性。
表 19.1. 密码策略属性
| 属性 | 介绍 | 示例 |
|---|---|---|
| Max lifetime | 密码在必须重置密码之前有效的最长时间(以天为单位)。默认值为 90 天。 请注意,如果属性设为 0,则密码永远不会过期。 | max lifetime = 180 用户密码仅 180 天有效。之后,IdM 会提示用户更改它们。 |
| Min lifetime | 两个密码更改操作之间必须经过的最短时间(以小时为单位)。 | Min Life = 1 用户更改密码后,他们必须至少等待 1 小时后再重新更改密码。 |
| History size | 保存的之前密码的数量。用户无法重复使用其密码历史记录中的密码,但可以重复利用未存储的旧密码。 | History size = 0 在这种情况下,密码历史记录为空,用户可以重复使用他们之前的任何密码。 |
| Character classes | 用户必须在密码中使用的不同字符类别的数量。字符类为: * 大写字符 * 小写字符 * 数字 * 特殊字符,如逗号(,)、句点(.)、星号(*) * 其他 UTF-8 字符 当一个字符连续使用三次或更多次时,会将该字符类减一。例如:
*
* | 字符类 = 0
需要的默认类数为 0。要配置数字,请使用 另请参阅此表下的 重要 备注。 |
| Min length | 密码中的最少字符数. 如果设置了 任何其他密码策略选项,则密码的最小长度为 6 个字符。 | Min length = 8 用户不能使用少于 8 个字符的密码。 |
| Max failures | IdM 锁定用户帐户前允许的失败登录的最多次数。 | Max failures = 6 当用户连续 7 次输入了错误的密码时,IdM 会锁定用户帐户。 |
| Failure reset interval | 在这个间隔后 IdM 重置当前失败登录尝试次数(以秒为单位)。 | Failure reset interval = 60
如果用户在 |
| 锁定持续时间 |
在 | Lockout duration = 600 锁定帐户的用户在 10 分钟内无法登录。 |
如果您一组不同的硬件可能不能使用国际字符和符号,则字符类要求应为英语字母和常用符号。有关密码中字符类策略的更多信息,请参阅红帽知识库中的密码中哪些字符有效?
19.3. 使用 Ansible playbook 在 IdM 中存在密码策略
按照以下流程,使用 Ansible playbook 确保密码策略在身份管理(IdM)中存在。
在 IdM 中的默认 global_policy 密码策略中,密码中不同字符类的数量设置为 0。历史记录大小也设置为 0。
完成此步骤,以使用 Ansible playbook 为 IdM 组强制执行更强大的密码策略。
您只能为 IdM 组定义密码策略。您无法为单个用户定义密码策略。
先决条件
您已配置了 Ansible 控制节点以满足以下要求:
- 您使用 Ansible 版本 2.14 或更高版本。
-
您已在 Ansible 控制器上安装了
ansible-freeipa软件包。 - 示例假定在 ~/MyPlaybooks/ 目录中,您已创建了带有 IdM 服务器的完全限定域名(FQDN)的 Ansible 清单文件。
-
示例假定 secret.yml Ansible vault 存储了
ipaadmin_password。
- 您知道 IdM 管理员密码。
- 正在确保 IdM 中存在密码策略的组。
流程
创建一个清单文件,如
inventory.file,并在[ipaserver]部分中定义 IdM 服务器的FQDN:[ipaserver] server.idm.example.com
创建 Ansible playbook 文件,以定义您要确保的密码策略。要简化此步骤,请复制并修改
/usr/share/doc/ansible-freeipa/playbooks/pwpolicy/pwpolicy_present.yml文件中的示例:--- - name: Tests hosts: ipaserver vars_files: - /home/user_name/MyPlaybooks/secret.yml tasks: - name: Ensure presence of pwpolicy for group ops ipapwpolicy: ipaadmin_password: "{{ ipaadmin_password }}" name: ops minlife: 7 maxlife: 49 history: 5 priority: 1 lockouttime: 300 minlength: 8 minclasses: 4 maxfail: 3 failinterval: 5有关单个变量含义的详情,请参阅密码策略属性。
运行 playbook:
$ ansible-playbook --vault-password-file=password_file -v -i path_to_inventory_directory/inventory.file path_to_playbooks_directory_/new_pwpolicy_present.yml
您已成功使用 Ansible playbook 确保 IdM 中存在 ops 组的密码策略。
ops 密码策略的优先级设置为 1,而 global_policy 密码策略没有设置优先级。因此,ops 策略会自动取代 ops 组的 global_policy,并立即强制执行。
当没有为用户设置任何组策略时,global_policy 充当备份策略,并且永远不会优先于组策略。
其他资源
-
请参阅
/usr/share/doc/ansible-freeipa/目录中的README-pwpolicy.md文件。 - 请参阅 密码策略优先级。
19.4. IdM 中的附加密码策略选项
作为身份管理 (IdM) 管理员,您可以通过启用基于 libpwquality 功能集的额外密码策略选项来增强默认密码要求。额外的密码策略选项包括:
--maxrepeat- 指定新密码中相同连续字符的最大可接受数。
--maxsequence- 指定新密码中单例字符序列的最大长度。此类序列的示例为 12345 或 fedcb。此类密码多数都不会通过简单检查。
--dictcheck-
如果非零,则检查密码是否与字典中的词语匹配(如果可能修改)。目前,
libpwquality使用cracklib库执行字典检查。 --usercheck- 如果非零,请检查密码是否以某种形式包含用户名,并可能进行修改。它不适用于少于 3 个字符的用户名。
您不能将额外的密码策略选项应用到现有密码。如果您应用了任何附加选项,IdM 会自动将 --minlength 选项(密码中的最少字符数)设置为 6 个字符。
在使用 RHEL 7、RHEL 8 和 RHEL 9 服务器的混合环境中,您只能在在 RHEL 8.4 及更新版本上运行的服务器中强制实施额外的密码策略设置。如果用户登录到 IdM 客户端,IdM 客户端与在 RHEL 8.3 或更早版本中运行的 IdM 服务器进行通信,则系统管理员设置的新密码策略要求不会被应用。为确保行为的一致,请将所有服务器升级或更新至 RHEL 8.4 或更新的版本。
其他资源:
- 将额外密码策略应用到 IdM 组
-
pwquality(3)man page
19.5. 将其他密码策略选项应用到 IdM 组
按照以下流程在身份管理(IdM)中应用额外的密码策略选项。这个示例描述了如何通过确保新密码不包含用户相应的用户名以及密码不包含两个以上相同的字符来增强 managers 组的密码策略。
先决条件
- 您以 IdM 管理员身份登录。
- managers 组存在于 IdM 中。
- IdM 中存在 managers 密码策略。
流程
将用户名检查应用到 managers 组中用户建议的所有新密码:
$ ipa pwpolicy-mod --usercheck=True managers注意如果没有指定密码策略的名称,则会修改默认的
global_policy。在 manager 密码策略中,将相同连续字符的最大数量设置为 2:
$ ipa pwpolicy-mod --maxrepeat=2 managers现在不接受包含 2 个以上连续相同的字符的密码。例如,eR873mUi111YJQ 组合是不可接受的,因为它包含三个连续的 1。
验证
添加名为 test_user 的测试用户:
$ ipa user-add test_user First name: test Last name: user ---------------------------- Added user "test_user" ----------------------------将 test 用户添加到 managers 组:
- 在 IdM Web UI 中,点 → → 。
- 点 managers。
-
点
Add。 - 在 Add users to user group 'managers' 页面中,检查 test_user。
-
点击
>箭头将用户移到 Prospective列中。 -
点
Add。
重置测试用户的密码:
- 进入 → 。
- 单击 test_user。
-
在
Actions菜单中,单击Reset Password。 - 输入用户的临时密码。
在命令行中,尝试为 test_user 获取 Kerberos 票据授予票据 (TGT):
$ kinit test_user- 输入临时密码。
系统会通知您必须更改密码。输入包含用户名 test_user 的密码:
Password expired. You must change it now. Enter new password: Enter it again: Password change rejected: Password not changed. Unspecified password quality failure while trying to change password. Please try again.
注意Kerberos 没有精细的错误密码策略报告,在某些情况下,没有提供拒绝密码的明确原因。
系统通知您输入的密码被拒绝。输入包含连续三个或多个相同字符的密码:
Password change rejected: Password not changed. Unspecified password quality failure while trying to change password. Please try again. Enter new password: Enter it again:
系统通知您输入的密码被拒绝。输入满足 managers 密码策略条件的密码:
Password change rejected: Password not changed. Unspecified password quality failure while trying to change password. Please try again. Enter new password: Enter it again:
查看获取的 TGT:
$ klist Ticket cache: KCM:0:33945 Default principal: test_user@IDM.EXAMPLE.COM Valid starting Expires Service principal 07/07/2021 12:44:44 07/08/2021 12:44:44 krbtgt@IDM.EXAMPLE.COM@IDM.EXAMPLE.COM
managers 密码策略现在可以为 managers 组中的用户正常工作。
其他资源
19.6. 使用 Ansible playbook 将额外的密码策略选项应用到 IdM 组
您可以使用 Ansible playbook 应用额外的密码策略选项,以加强特定 IdM 组的密码策略要求。为此,您可以使用 maxrepeat、maxsequence、dictcheck 和 usercheck 密码策略选项。这个示例描述了如何为 managers 组设置以下要求:
- 用户的新密码不包含用户对应的用户名。
- 密码在不包含两个以上相同的字符。
- 密码中的任何单调字符序列不超过 3 个字符。这意味着系统不接受如 1234 或 abcd 这样序列的密码。
先决条件
您已配置了 Ansible 控制节点以满足以下要求:
- 您使用 Ansible 版本 2.14 或更高版本。
-
您已在 Ansible 控制器上安装了
ansible-freeipa软件包。 - 您已在 ~/MyPlaybooks/ 目录中创建了一个带有 IdM 服务器的完全限定域名(FQDN)的 Ansible 清单文件。
-
您已将
ipaadmin_password存储在 secret.yml Ansible vault 中。
- 正在确保 IdM 中存在密码策略的组。
流程
创建 Ansible playbook 文件 manager_pwpolicy_present.yml,以定义您要确保其存在的密码策略。要简化此步骤,请复制并修改以下示例:
--- - name: Tests hosts: ipaserver vars_files: - /home/user_name/MyPlaybooks/secret.yml tasks: - name: Ensure presence of usercheck and maxrepeat pwpolicy for group managers ipapwpolicy: ipaadmin_password: "{{ ipaadmin_password }}" name: managers usercheck: True maxrepeat: 2 maxsequence: 3运行 playbook:
$ ansible-playbook --vault-password-file=password_file -v -i path_to_inventory_directory/inventory.file path_to_playbooks_directory_/manager_pwpolicy_present.yml
验证
添加名为 test_user 的测试用户:
$ ipa user-add test_user First name: test Last name: user ---------------------------- Added user "test_user" ----------------------------将 test 用户添加到 managers 组:
- 在 IdM Web UI 中,点 → → 。
- 点 managers。
-
点
Add。 - 在 Add users to user group 'managers' 页面中,检查 test_user。
-
点击
>箭头将用户移到 Prospective列中。 -
点
Add。
重置测试用户的密码:
- 进入 → 。
- 单击 test_user。
-
在
Actions菜单中,单击Reset Password。 - 输入用户的临时密码。
在命令行中,尝试为 test_user 获取 Kerberos 票据授予票据 (TGT):
$ kinit test_user- 输入临时密码。
系统会通知您必须更改密码。输入包含用户名 test_user 的密码:
Password expired. You must change it now. Enter new password: Enter it again: Password change rejected: Password not changed. Unspecified password quality failure while trying to change password. Please try again.
注意Kerberos 没有精细的错误密码策略报告,在某些情况下,没有提供拒绝密码的明确原因。
系统通知您输入的密码被拒绝。输入包含连续三个或多个相同字符的密码:
Password change rejected: Password not changed. Unspecified password quality failure while trying to change password. Please try again. Enter new password: Enter it again:
系统通知您输入的密码被拒绝。输入一个包含超过 3 个字符的单调字符序列的密码。此类序列的示例包括 1234 和 fedc :
Password change rejected: Password not changed. Unspecified password quality failure while trying to change password. Please try again. Enter new password: Enter it again:
系统通知您输入的密码被拒绝。输入满足 managers 密码策略条件的密码:
Password change rejected: Password not changed. Unspecified password quality failure while trying to change password. Please try again. Enter new password: Enter it again:
验证您是否已获得 TGT,这只能在输入有效密码后才可以:
$ klist Ticket cache: KCM:0:33945 Default principal: test_user@IDM.EXAMPLE.COM Valid starting Expires Service principal 07/07/2021 12:44:44 07/08/2021 12:44:44 krbtgt@IDM.EXAMPLE.COM@IDM.EXAMPLE.COM
其他资源
- IdM 中的额外密码策略
-
/usr/share/doc/ansible-freeipa/README-pwpolicy.md -
/usr/share/doc/ansible-freeipa/playbooks/pwpolicy
第 20 章 为 IdM 客户端上的 IdM 用户授予 sudo 访问权限
了解有关在身份管理中授予用户 sudo 访问权限的更多信息。
20.1. IdM 客户端上的 sudo 访问权限
系统管理员可以授予 sudo 访问权限,以允许非 root 用户执行通常为 root 用户保留的管理命令。因此,当用户需要执行通常为 root 用户保留的管理命令时,他们会在此命令前面使用 sudo。输入密码后,将像 root 用户一样执行 命令。要将 sudo 命令作为另一个用户或组(如数据库服务帐户)执行,您可以为 sudo 规则配置 RunAs 别名。
如果 Red Hat Enterprise Linux (RHEL) 8 主机注册为 Identity Management (IdM) 客户端,您可以指定 sudo 规则来定义哪些 IdM 用户可以在主机上执行哪些命令:
-
本地的
/etc/sudoers文件中 - 集中在 IdM 中
您可以使用命令行界面(CLI)和 IdM Web UI 为 IdM 客户端创建 central sudo 规则。
您还可以使用通用安全服务应用程序编程接口 (GSSAPI) 为 sudo 配置免密码身份验证,这是基于 UNIX 的操作系统访问和验证 Kerberos 服务的本地方式。您可以使用 pam_sss_gss.so 可插拔验证模块 (PAM) 通过 SSSD 服务调用 GSSAPI 身份验证,允许用户通过有效的 Kerberos 票据向 sudo 命令进行身份验证。
其他资源
- 请参阅 管理 sudo 访问。
20.2. 使用 CLI 向 IdM 客户端上的 IdM 用户授予 sudo 访问权限
在 Identity Management (IdM) 中,您可以将特定命令的 sudo 访问权限授予特定 IdM 主机上的 IdM 用户帐户。首先,添加 sudo 命令,然后为一个或多个命令创建 sudo 规则。
例如,完成这个过程以创建 idm_user_reboot sudo 规则,为 idm_user 帐户授予在 idmclient 机器上运行 /usr/sbin/reboot 命令的权限。
先决条件
- 以 IdM 管理员身份登录。
- 您已在 IdM 中创建 了 idm_user 的用户帐户,并通过为用户创建密码来解锁帐户。有关使用 CLI 添加新 IdM 用户的详情,请参阅使用命令行添加用户。
-
idmclient 主机上没有本地的 idm_user。idm_user 用户未列在本地
/etc/passwd文件中。
流程
获取 Kerberos 票据作为 IdM
admin。[root@idmclient ~]# kinit admin在
sudo命令的 IdM 数据库中添加/usr/sbin/reboot命令:[root@idmclient ~]# ipa sudocmd-add /usr/sbin/reboot ------------------------------------- Added Sudo Command "/usr/sbin/reboot" ------------------------------------- Sudo Command: /usr/sbin/reboot创建名为 idm_user_reboot 的
sudo规则:[root@idmclient ~]# ipa sudorule-add idm_user_reboot --------------------------------- Added Sudo Rule "idm_user_reboot" --------------------------------- Rule name: idm_user_reboot Enabled: TRUE在 idm_user_reboot 规则中添加
/usr/sbin/reboot命令:[root@idmclient ~]# ipa sudorule-add-allow-command idm_user_reboot --sudocmds '/usr/sbin/reboot' Rule name: idm_user_reboot Enabled: TRUE Sudo Allow Commands: /usr/sbin/reboot ------------------------- Number of members added 1 -------------------------将 idm_user_reboot 规则应用到 IdM idmclient 主机:
[root@idmclient ~]# ipa sudorule-add-host idm_user_reboot --hosts idmclient.idm.example.com Rule name: idm_user_reboot Enabled: TRUE Hosts: idmclient.idm.example.com Sudo Allow Commands: /usr/sbin/reboot ------------------------- Number of members added 1 -------------------------在 idm_user_reboot 规则中添加 idm_user 帐户:
[root@idmclient ~]# ipa sudorule-add-user idm_user_reboot --users idm_user Rule name: idm_user_reboot Enabled: TRUE Users: idm_user Hosts: idmclient.idm.example.com Sudo Allow Commands: /usr/sbin/reboot ------------------------- Number of members added 1 -------------------------(可选)定义 idm_user_reboot 规则的有效性:
要定义
sudo规则开始有效的时间,请使用带有--setattr sudonotbefore=DATE选项的ipa sudorule-mod sudo_rule_name命令。DATE 值必须遵循 yyyymmddHHMMSSZ 格式,以秒为单位。例如,要将 idm_user_reboot 规则的有效期的开始时间设为 2025 年 12 月 31 日 12:34:00,请输入:[root@idmclient ~]# ipa sudorule-mod idm_user_reboot --setattr sudonotbefore=20251231123400Z要定义 sudo 规则停止有效期的时间,请使用
--setattr sudonotafter=DATE选项。例如:要将 idm_user_reboot 规则有效期的截止时间设为 2026 年 12 月 31 日 12:34:00,请输入:[root@idmclient ~]# ipa sudorule-mod idm_user_reboot --setattr sudonotafter=20261231123400Z
将更改从服务器传播到客户端可能需要几分钟时间。
验证步骤
- 以 idm_user 帐户身份登录 idmclient 主机。
显示允许 idm_user 帐户执行的
sudo规则。[idm_user@idmclient ~]$ sudo -l Matching Defaults entries for idm_user on idmclient: !visiblepw, always_set_home, match_group_by_gid, always_query_group_plugin, env_reset, env_keep="COLORS DISPLAY HOSTNAME HISTSIZE KDEDIR LS_COLORS", env_keep+="MAIL PS1 PS2 QTDIR USERNAME LANG LC_ADDRESS LC_CTYPE", env_keep+="LC_COLLATE LC_IDENTIFICATION LC_MEASUREMENT LC_MESSAGES", env_keep+="LC_MONETARY LC_NAME LC_NUMERIC LC_PAPER LC_TELEPHONE", env_keep+="LC_TIME LC_ALL LANGUAGE LINGUAS _XKB_CHARSET XAUTHORITY KRB5CCNAME", secure_path=/sbin\:/bin\:/usr/sbin\:/usr/bin User idm_user may run the following commands on idmclient: (root) /usr/sbin/reboot
使用
sudo重新启动计算机。在提示时输入 idm_user 的密码:[idm_user@idmclient ~]$ sudo /usr/sbin/reboot [sudo] password for idm_user:
20.3. 使用 CLI 在 IdM 客户端上授予 sudo 访问 AD 用户的权限
身份管理(IdM)系统管理员可以使用 IdM 用户组来设置访问权限、基于主机的访问控制、sudo 规则,以及对 IdM 用户的其他控制。IdM 用户组授予并限制对 IdM 域资源的访问权限。
您可以将活动目录(AD) 用户 和 AD 组 添加到 IdM 用户组中。要做到这一点:
- 将 AD 用户或组添加到 非 POSIX 外部 IdM 组。
- 将非 POSIX 外部 IdM 组添加到 IdM POSIX 组中。
然后,您可以通过管理 POSIX 组的权限来管理 AD 用户的权限。例如,您可以为特定 IdM 主机上的 IdM POSIX 用户组授予特定命令的 sudo 访问权限。
也可以将 AD 用户组作为成员添加到 IdM 外部组中。通过将用户和组管理放在一个 AD 域中,可以更轻松地为 Windows 用户定义策略。
不要 对 IdM 中的 SUDO 规则使用 AD 用户的 ID 覆盖。AD 用户的 ID 覆盖只代表 AD 用户的 POSIX 属性,而不是 AD 用户本身。
您可以将 ID 覆盖添加为组成员。但是,您只能使用此功能管理 IdM API 中的 IdM 资源。将 ID 覆盖添加为组群成员没有扩展到 POSIX 环境,因此您无法将其用于 sudo 或基于主机的访问控制(HBAC)规则中的成员。
按照以下流程创建 ad_users_reboot sudo 规则,为 administrator@ad-domain.com AD 用户授予在 idmclient IdM 主机上运行 /usr/sbin/reboot 命令的权限,其通常为 root 用户保留。administrator@ad-domain.com 是 ad_users_external 非 POSIX 组的成员,即 ad_users POSIX 组的成员。
先决条件
-
已获得了 IdM
adminKerberos票据授予票据(TGT)。 - IdM 域和 ad-domain.com AD 域间的跨林信任已存在。
-
idmclient 主机上没有本地 administrator 账户:administrator 用户没有列在本地
/etc/passwd文件中。
流程
使用 administrator@ad-domain 成员创建包含 ad_users_external 组的 ad_users 组:
- 可选 :在 AD 域中创建或选择对应的组来管理 IdM 域中的 AD 用户。您可以使用多个 AD 组,并将其添加到 IdM 端的不同组中。
创建 ad_users_external 组,并通过添加
--external选项来表示它包含来自 IdM 域以外的成员:[root@ipaserver ~]# ipa group-add --desc='AD users external map' ad_users_external --external ------------------------------- Added group "ad_users_external" ------------------------------- Group name: ad_users_external Description: AD users external map注意确保此处指定的外部组是一个具有
global或universal组范围的AD 安全组,如 活动目录安全组 文档中所定义的。例如,无法使用 Domain users 或 Domain admins AD 安全组,因为其组范围是domain local。创建 ad_users 组:
[root@ipaserver ~]# ipa group-add --desc='AD users' ad_users ---------------------- Added group "ad_users" ---------------------- Group name: ad_users Description: AD users GID: 129600004将 administrator@ad-domain.com AD 用户作为外部成员添加到 ad_users_external 中:
[root@ipaserver ~]# ipa group-add-member ad_users_external --external "administrator@ad-domain.com" [member user]: [member group]: Group name: ad_users_external Description: AD users external map External member: S-1-5-21-3655990580-1375374850-1633065477-513 ------------------------- Number of members added 1 -------------------------AD 用户必须被完全限定名称识别,如
DOMAIN\user_name或user_name@DOMAIN。然后,AD 身份被映射到用户的 AD SID。同样适用于添加 AD 组。将 ad_users_external 作为成员添加到 ad_users:
[root@ipaserver ~]# ipa group-add-member ad_users --groups ad_users_external Group name: ad_users Description: AD users GID: 129600004 Member groups: ad_users_external ------------------------- Number of members added 1 -------------------------
为 ad_users 的成员授予权限,以在 idmclient 主机上运行
/usr/sbin/reboot:在
sudo命令的 IdM 数据库中添加/usr/sbin/reboot命令:[root@idmclient ~]# ipa sudocmd-add /usr/sbin/reboot ------------------------------------- Added Sudo Command "/usr/sbin/reboot" ------------------------------------- Sudo Command: /usr/sbin/reboot创建一个名为 ad_users_reboot 的
sudo规则:[root@idmclient ~]# ipa sudorule-add ad_users_reboot --------------------------------- Added Sudo Rule "ad_users_reboot" --------------------------------- Rule name: ad_users_reboot Enabled: True向 ad_users_reboot 规则中添加
/usr/sbin/reboot命令:[root@idmclient ~]# ipa sudorule-add-allow-command ad_users_reboot --sudocmds '/usr/sbin/reboot' Rule name: ad_users_reboot Enabled: True Sudo Allow Commands: /usr/sbin/reboot ------------------------- Number of members added 1 -------------------------将 ad_users_reboot 规则应用到 IdM idmclient 主机:
[root@idmclient ~]# ipa sudorule-add-host ad_users_reboot --hosts idmclient.idm.example.com Rule name: ad_users_reboot Enabled: True Hosts: idmclient.idm.example.com Sudo Allow Commands: /usr/sbin/reboot ------------------------- Number of members added 1 -------------------------将
ad_users组添加到 ad_users_reboot 规则中:[root@idmclient ~]# ipa sudorule-add-user ad_users_reboot --groups ad_users Rule name: ad_users_reboot Enabled: TRUE User Groups: ad_users Hosts: idmclient.idm.example.com Sudo Allow Commands: /usr/sbin/reboot ------------------------- Number of members added 1 -------------------------
将更改从服务器传播到客户端可能需要几分钟时间。
验证步骤
以 administrator@ad-domain.com 身份登录到 idmclient 主机,它是
ad_users组的间接成员:$ ssh administrator@ad-domain.com@ipaclient Password:另外,显示
administrator@ad-domain.com允许执行的sudo命令:[administrator@ad-domain.com@idmclient ~]$ sudo -l Matching Defaults entries for administrator@ad-domain.com on idmclient: !visiblepw, always_set_home, match_group_by_gid, always_query_group_plugin, env_reset, env_keep="COLORS DISPLAY HOSTNAME HISTSIZE KDEDIR LS_COLORS", env_keep+="MAIL PS1 PS2 QTDIR USERNAME LANG LC_ADDRESS LC_CTYPE", env_keep+="LC_COLLATE LC_IDENTIFICATION LC_MEASUREMENT LC_MESSAGES", env_keep+="LC_MONETARY LC_NAME LC_NUMERIC LC_PAPER LC_TELEPHONE", env_keep+="LC_TIME LC_ALL LANGUAGE LINGUAS _XKB_CHARSET XAUTHORITY KRB5CCNAME", secure_path=/sbin\:/bin\:/usr/sbin\:/usr/bin User administrator@ad-domain.com may run the following commands on idmclient: (root) /usr/sbin/reboot
使用
sudo重新启动计算机。提示时输入administrator@ad-domain.com的密码:[administrator@ad-domain.com@idmclient ~]$ sudo /usr/sbin/reboot [sudo] password for administrator@ad-domain.com:
20.4. 使用 IdM Web UI 向 IdM 客户端上的 IdM 用户授予 sudo 访问权限
在 Identity Management (IdM) 中,您可以将特定命令的 sudo 访问权限授予特定 IdM 主机上的 IdM 用户帐户。首先,添加 sudo 命令,然后为一个或多个命令创建 sudo 规则。
完成此步骤以创建 idm_user_reboot sudo 规则,为 idm_user 帐户授予在 idmclient 计算机上运行 /usr/sbin/reboot 命令的权限。
先决条件
- 以 IdM 管理员身份登录。
-
您已在 IdM 中创建
了 idm_user的用户帐户,并通过为用户创建密码来解锁帐户。有关使用命令行界面添加新 IdM 用户的详情,请参阅使用命令行添加用户。 -
idmclient主机上没有本地的idm_user。idm_user用户未列在本地/etc/passwd文件中。
流程
在
sudo命令的 IdM 数据库中添加/usr/sbin/reboot命令:- 导航到 Policy → Sudo → Sudo Commands。
- 单击右上角的 Add,以打开 Add sudo 命令对话框。
输入您希望用户能够使用
sudo执行的命令:/usr/sbin/reboot。图 20.1. 添加 IdM sudo 命令

- 点击 Add。
使用新的
sudo命令条目创建一个 sudo 规则来允许 idm_user 重启 idmclient 机器:- 导航到 Policy → Sudo → Sudo rules。
- 单击右上角的 Add,以打开 Add sudo 规则对话框。
-
输入
sudo规则的名称: idm_user_reboot。 - 点 Add and Edit。
指定用户:
- 在 Who 部分中,选中指定的用户和组单选按钮。
- 在 User category the rule applies to 子小节中,点 Add 打开 Add users into sudo rule "idm_user_reboot" 对话框。
- 在 Available 栏的 Add users into sudo rule "idm_user_reboot" 对话框中,选择 idm_user,并把它移到 Prospective 栏。
- 点击 Add。
指定主机:
- 在 Access this host 部分中,选中指定的 Hosts and Groups 单选按钮。
- 在 Host category this rule applies to 子小节中,点 Add 打开 Add hosts into sudo rule "idm_user_reboot" 对话框。
- 在 Available 列中的 Add hosts to sudo rule "idm_user_reboot" 对话框中,选中 idmclient.idm.example.com 复选框,并将它移到 Prospective 列。
- 点击 Add。
指定命令:
- 在 Run Commands 一节的 Command category the rule applies to 子小节中,选择 Specified Commands and Groups 单选按钮。
- 在 Sudo Allow Commands 子节中,单击 Add 以打开 Add allow sudo commands into sudo rule "idm_user_reboot"对话框。
-
在 Available 列中的 Add allow sudo commands into sudo rule "idm_user_reboot" 对话框中,选中
/usr/sbin/reboot复选框,并将它移到 Prospective 列。 - 点 Add 返回到 idm_sudo_reboot 页。
图 20.2. 添加 IdM sudo 规则

- 单击左上角的 Save。
新规则默认为启用。
将更改从服务器传播到客户端可能需要几分钟时间。
验证步骤
-
以
idm_user用户身份登录idmclient。 使用
sudo重新启动计算机。在提示时输入idm_user的密码:$ sudo /usr/sbin/reboot [sudo] password for idm_user:
如果正确配置了 sudo 规则,机器将重启。
20.5. 在 CLI 上创建 sudo 规则,以作为 IdM 客户端上的服务帐户运行命令
在 IdM 中,您可以使用 RunAs alias 配置 sudo 规则,以便以另一个用户或组身份运行 sudo 命令。例如,您可能有一个托管数据库应用的 IdM 客户端,您需要以与该应用对应的本地服务帐户运行命令。
使用此示例在命令行上创建名为 run_third-party-app_report 的 sudo 规则,以允许 idm_user 帐户以 idmclient 主机上 thirdpartyapp 服务帐户的身份运行/opt/third-party-app/bin/report 命令。
先决条件
- 以 IdM 管理员身份登录。
-
您已在 IdM 中创建
了 idm_user的用户帐户,并通过为用户创建密码来解锁帐户。有关使用 CLI 添加新 IdM 用户的详情,请参阅使用命令行添加用户。 -
idmclient主机上没有本地的idm_user。idm_user用户未列在本地/etc/passwd文件中。 -
您有一个名为
third-party-app的自定义应用程序安装在idmclient主机上。 -
third-party-app应用程序的report命令安装在/opt/third-party-app/bin/report目录中。 -
您已创建了一个名为
thirdpartyapp的本地服务帐户,来为third-party-app应用程序执行命令。
流程
获取 Kerberos 票据作为 IdM
admin。[root@idmclient ~]# kinit admin将
/opt/third-party-app/bin/report命令添加到sudo命令的 IdM 数据库:[root@idmclient ~]# ipa sudocmd-add /opt/third-party-app/bin/report ---------------------------------------------------- Added Sudo Command "/opt/third-party-app/bin/report" ---------------------------------------------------- Sudo Command: /opt/third-party-app/bin/report创建一个名为
run_third-party-app_report的sudo规则:[root@idmclient ~]# ipa sudorule-add run_third-party-app_report -------------------------------------------- Added Sudo Rule "run_third-party-app_report" -------------------------------------------- Rule name: run_third-party-app_report Enabled: TRUE使用
--users=<user>选项来为sudorule-add-runasuser命令指定 RunAs 用户:[root@idmclient ~]# ipa sudorule-add-runasuser run_third-party-app_report --users=thirdpartyapp Rule name: run_third-party-app_report Enabled: TRUE RunAs External User: thirdpartyapp ------------------------- Number of members added 1 -------------------------用户(或使用
--groups=*选项指定 的组)可以是 IdM 的外部用户,如本地服务帐户或活动目录用户。不要为组名称添加%前缀。将
/opt/third-party-app/bin/report命令添加到run_third-party-app_report规则中:[root@idmclient ~]# ipa sudorule-add-allow-command run_third-party-app_report --sudocmds '/opt/third-party-app/bin/report' Rule name: run_third-party-app_report Enabled: TRUE Sudo Allow Commands: /opt/third-party-app/bin/report RunAs External User: thirdpartyapp ------------------------- Number of members added 1 -------------------------将
run_third- party-app_report规则应用到 IdMidmclient主机:[root@idmclient ~]# ipa sudorule-add-host run_third-party-app_report --hosts idmclient.idm.example.com Rule name: run_third-party-app_report Enabled: TRUE Hosts: idmclient.idm.example.com Sudo Allow Commands: /opt/third-party-app/bin/report RunAs External User: thirdpartyapp ------------------------- Number of members added 1 -------------------------将
idm_user帐户添加到run_third- party-app_report规则中:[root@idmclient ~]# ipa sudorule-add-user run_third-party-app_report --users idm_user Rule name: run_third-party-app_report Enabled: TRUE Users: idm_user Hosts: idmclient.idm.example.com Sudo Allow Commands: /opt/third-party-app/bin/report RunAs External User: thirdpartyapp ------------------------- Number of members added 1
将更改从服务器传播到客户端可能需要几分钟时间。
验证步骤
-
以
idm_user帐户身份登录idmclient主机。 测试新的 sudo 规则:
显示允许
idm_user帐户执行的sudo规则。[idm_user@idmclient ~]$ sudo -l Matching Defaults entries for idm_user@idm.example.com on idmclient: !visiblepw, always_set_home, match_group_by_gid, always_query_group_plugin, env_reset, env_keep="COLORS DISPLAY HOSTNAME HISTSIZE KDEDIR LS_COLORS", env_keep+="MAIL PS1 PS2 QTDIR USERNAME LANG LC_ADDRESS LC_CTYPE", env_keep+="LC_COLLATE LC_IDENTIFICATION LC_MEASUREMENT LC_MESSAGES", env_keep+="LC_MONETARY LC_NAME LC_NUMERIC LC_PAPER LC_TELEPHONE", env_keep+="LC_TIME LC_ALL LANGUAGE LINGUAS _XKB_CHARSET XAUTHORITY KRB5CCNAME", secure_path=/sbin\:/bin\:/usr/sbin\:/usr/bin User idm_user@idm.example.com may run the following commands on idmclient: (thirdpartyapp) /opt/third-party-app/bin/report
作为
thirdpartyapp服务帐户,运行report命令。[idm_user@idmclient ~]$ sudo -u thirdpartyapp /opt/third-party-app/bin/report [sudo] password for idm_user@idm.example.com: Executing report... Report successful.
20.6. 在 IdM Web UI 中创建一个 sudo 规则,该规则在 IdM 客户端上以服务帐户的身份运行命令
在 IdM 中,您可以使用 RunAs alias 配置 sudo 规则,以便以另一个用户或组身份运行 sudo 命令。例如,您可能有一个托管数据库应用的 IdM 客户端,您需要以与该应用对应的本地服务帐户运行命令。
使用此示例在 IdM Web UI 中创建一个名为 run_third-party-app_report 的 sudo 规则,以允许 idm_user 帐户以 idmclient 主机上 thirdpartyapp 服务账号的身份运行 /opt/third-party-app/bin/report 命令。
先决条件
- 以 IdM 管理员身份登录。
-
您已在 IdM 中创建
了 idm_user的用户帐户,并通过为用户创建密码来解锁帐户。有关使用 CLI 添加新 IdM 用户的详情,请参阅使用命令行添加用户。 -
idmclient主机上没有本地的idm_user。idm_user用户未列在本地/etc/passwd文件中。 -
您有一个名为
third-party-app的自定义应用程序安装在idmclient主机上。 -
third-party-app应用程序的report命令安装在/opt/third-party-app/bin/report目录中。 -
您已创建了一个名为
thirdpartyapp的本地服务帐户,来为third-party-app应用程序执行命令。
流程
将
/opt/third-party-app/bin/report命令添加到sudo命令的 IdM 数据库:- 导航到 Policy → Sudo → Sudo Commands。
- 单击右上角的 Add,以打开 Add sudo 命令对话框。
输入命令:
/opt/third-party-app/bin/report。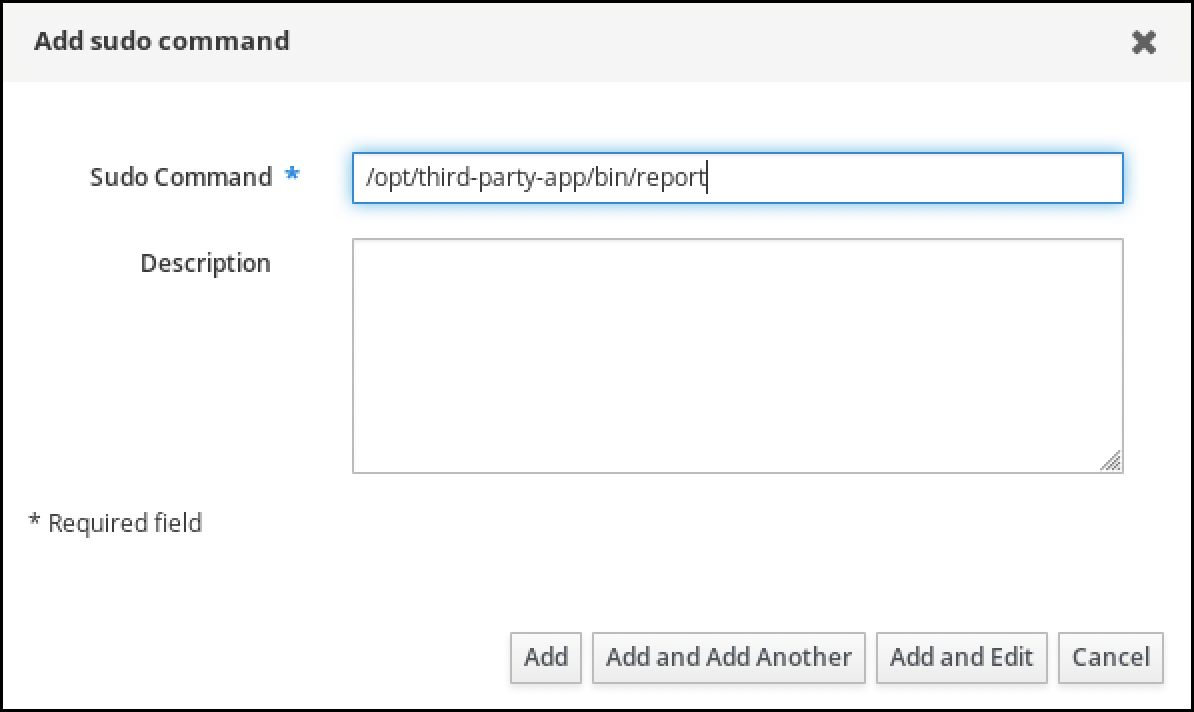
- 点击 Add。
使用新的
sudo命令条目来创建新的sudo规则:- 导航到 Policy → Sudo → Sudo rules。
- 单击右上角的 Add,以打开 Add sudo 规则对话框。
输入
sudo规则的名称:run_third-party-app_report。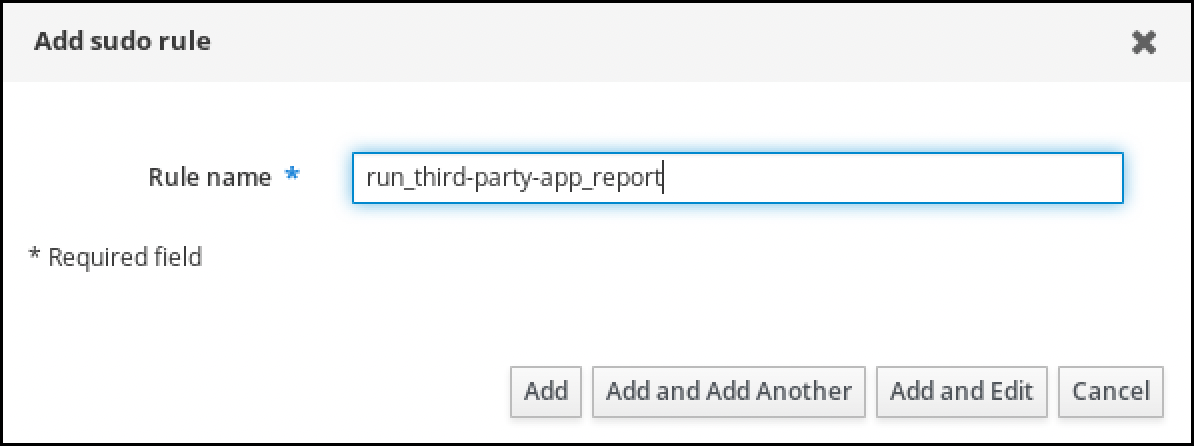
- 点 Add and Edit。
指定用户:
- 在 Who 部分中,选中指定的用户和组单选按钮。
- 在 规则应用到的用户类别 子部分,单击 Add 来打开 将用户添加到 sudo 规则 "run_third-party-app_report" 对话框。
在 Available 栏的 Add users into sudo rule "run_third-party-app_report" 对话框中,选择 idm_user,并把它移到 Prospective 栏。

- 点击 Add。
指定主机:
- 在 Access this host 部分中,选中指定的 Hosts and Groups 单选按钮。
- 在 此规则应用到主机类别 子部分中,单击 Add 来打开 将主机添加到 sudo 规则 "run_third- third-app_report" 对话框。
在 Available 栏的 Add hosts to sudo rule "run_third- party-app_report" 对话框中,选中 idmclient.idm.example.com 复选框,并将它移到 Prospective 列。

- 点击 Add。
指定命令:
- 在 Run Commands 一节的 Command category the rule applies to 子小节中,选择 Specified Commands and Groups 单选按钮。
- 在 Sudo 允许的命令 子部分中,单击 Add 来打开 将允许的 sudo 命令添加到 sudo 规则 "run_third-app_report" 对话框。
在 Available 栏的 Add allow sudo commands into sudo rule "run_third-party-app_report" 对话框中,选中
/opt/third-party-app/bin/report并将其移到 Prospective 栏。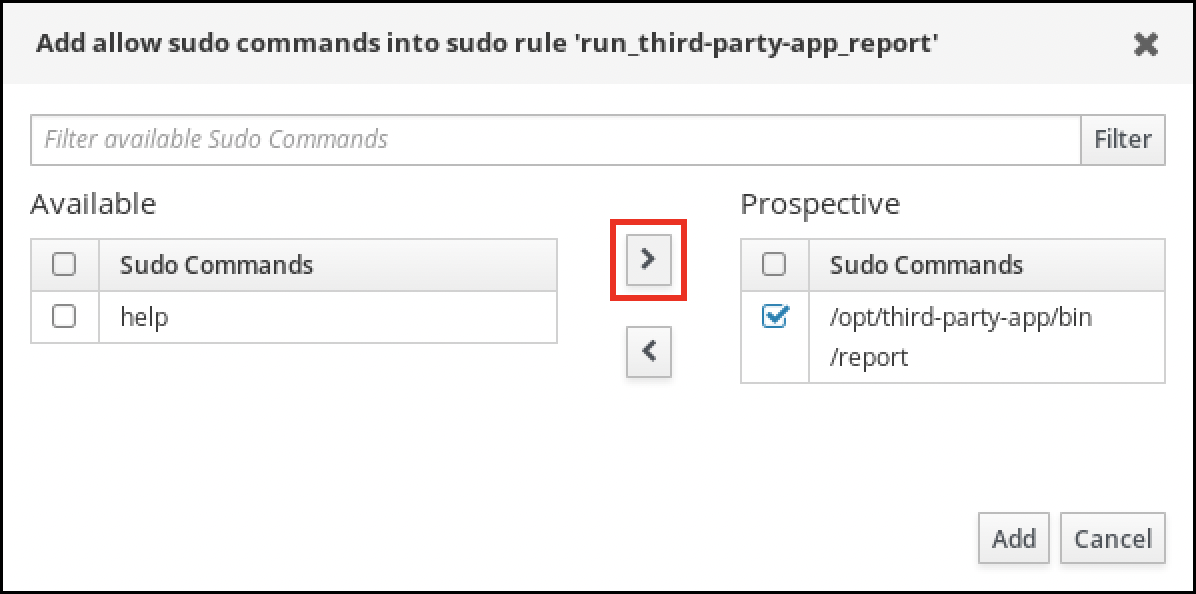
- 单击 Add 以返回到 run_third-party-app_report 页面。
指定 RunAs 用户:
- 在 As Whom 部分中,选中 指定的用户和组 单选按钮。
- 在 RunAs Users 子部分中,单击 Add 以打开 将 RunAs 用户添加到 sudo 规则 "run_third-app_report" 对话框。
在 将 RunAs 用户添加到 sudo 规则 "run_third-app_report" 对话框中,在 External 框中输入
thirdpartyapp服务帐户,并将其移到 Prospective 列中。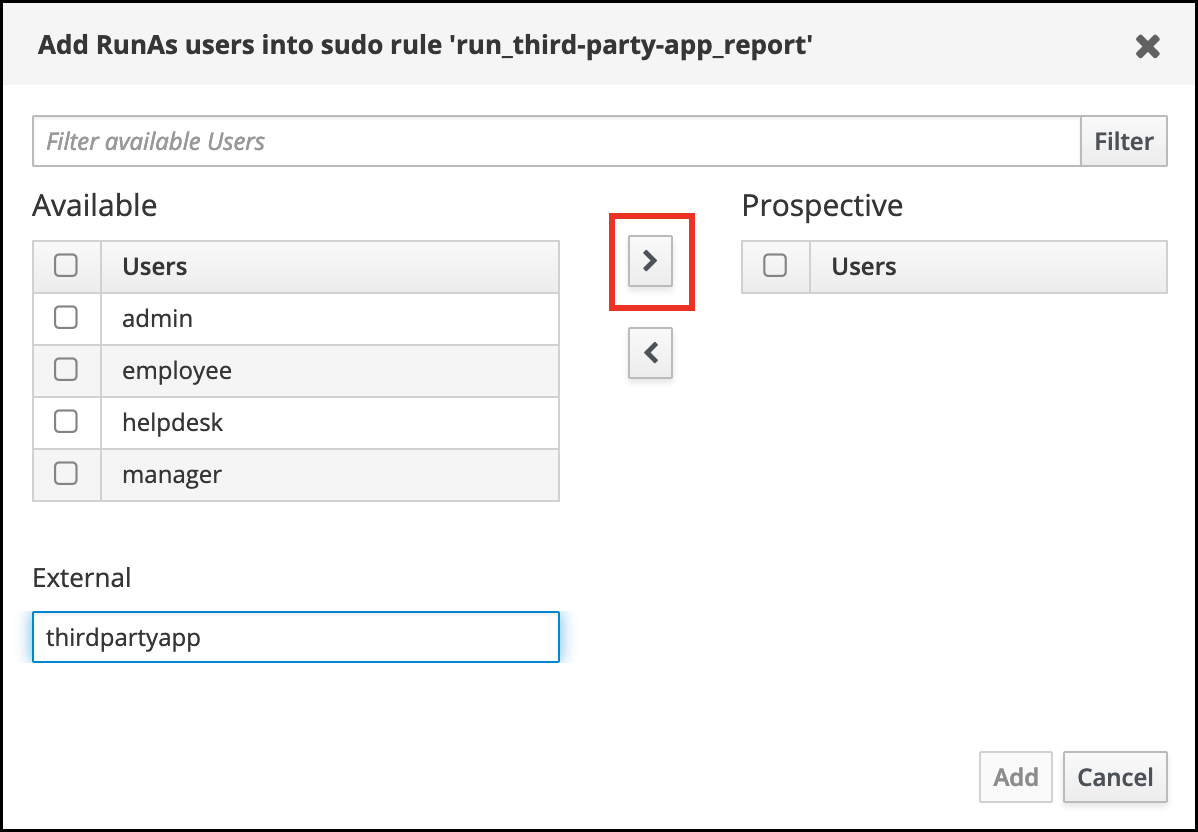
- 单击 Add 以返回到 run_third-party-app_report 页面。
- 单击左上角的 Save。
新规则默认为启用。
图 20.3. sudo 规则的详情
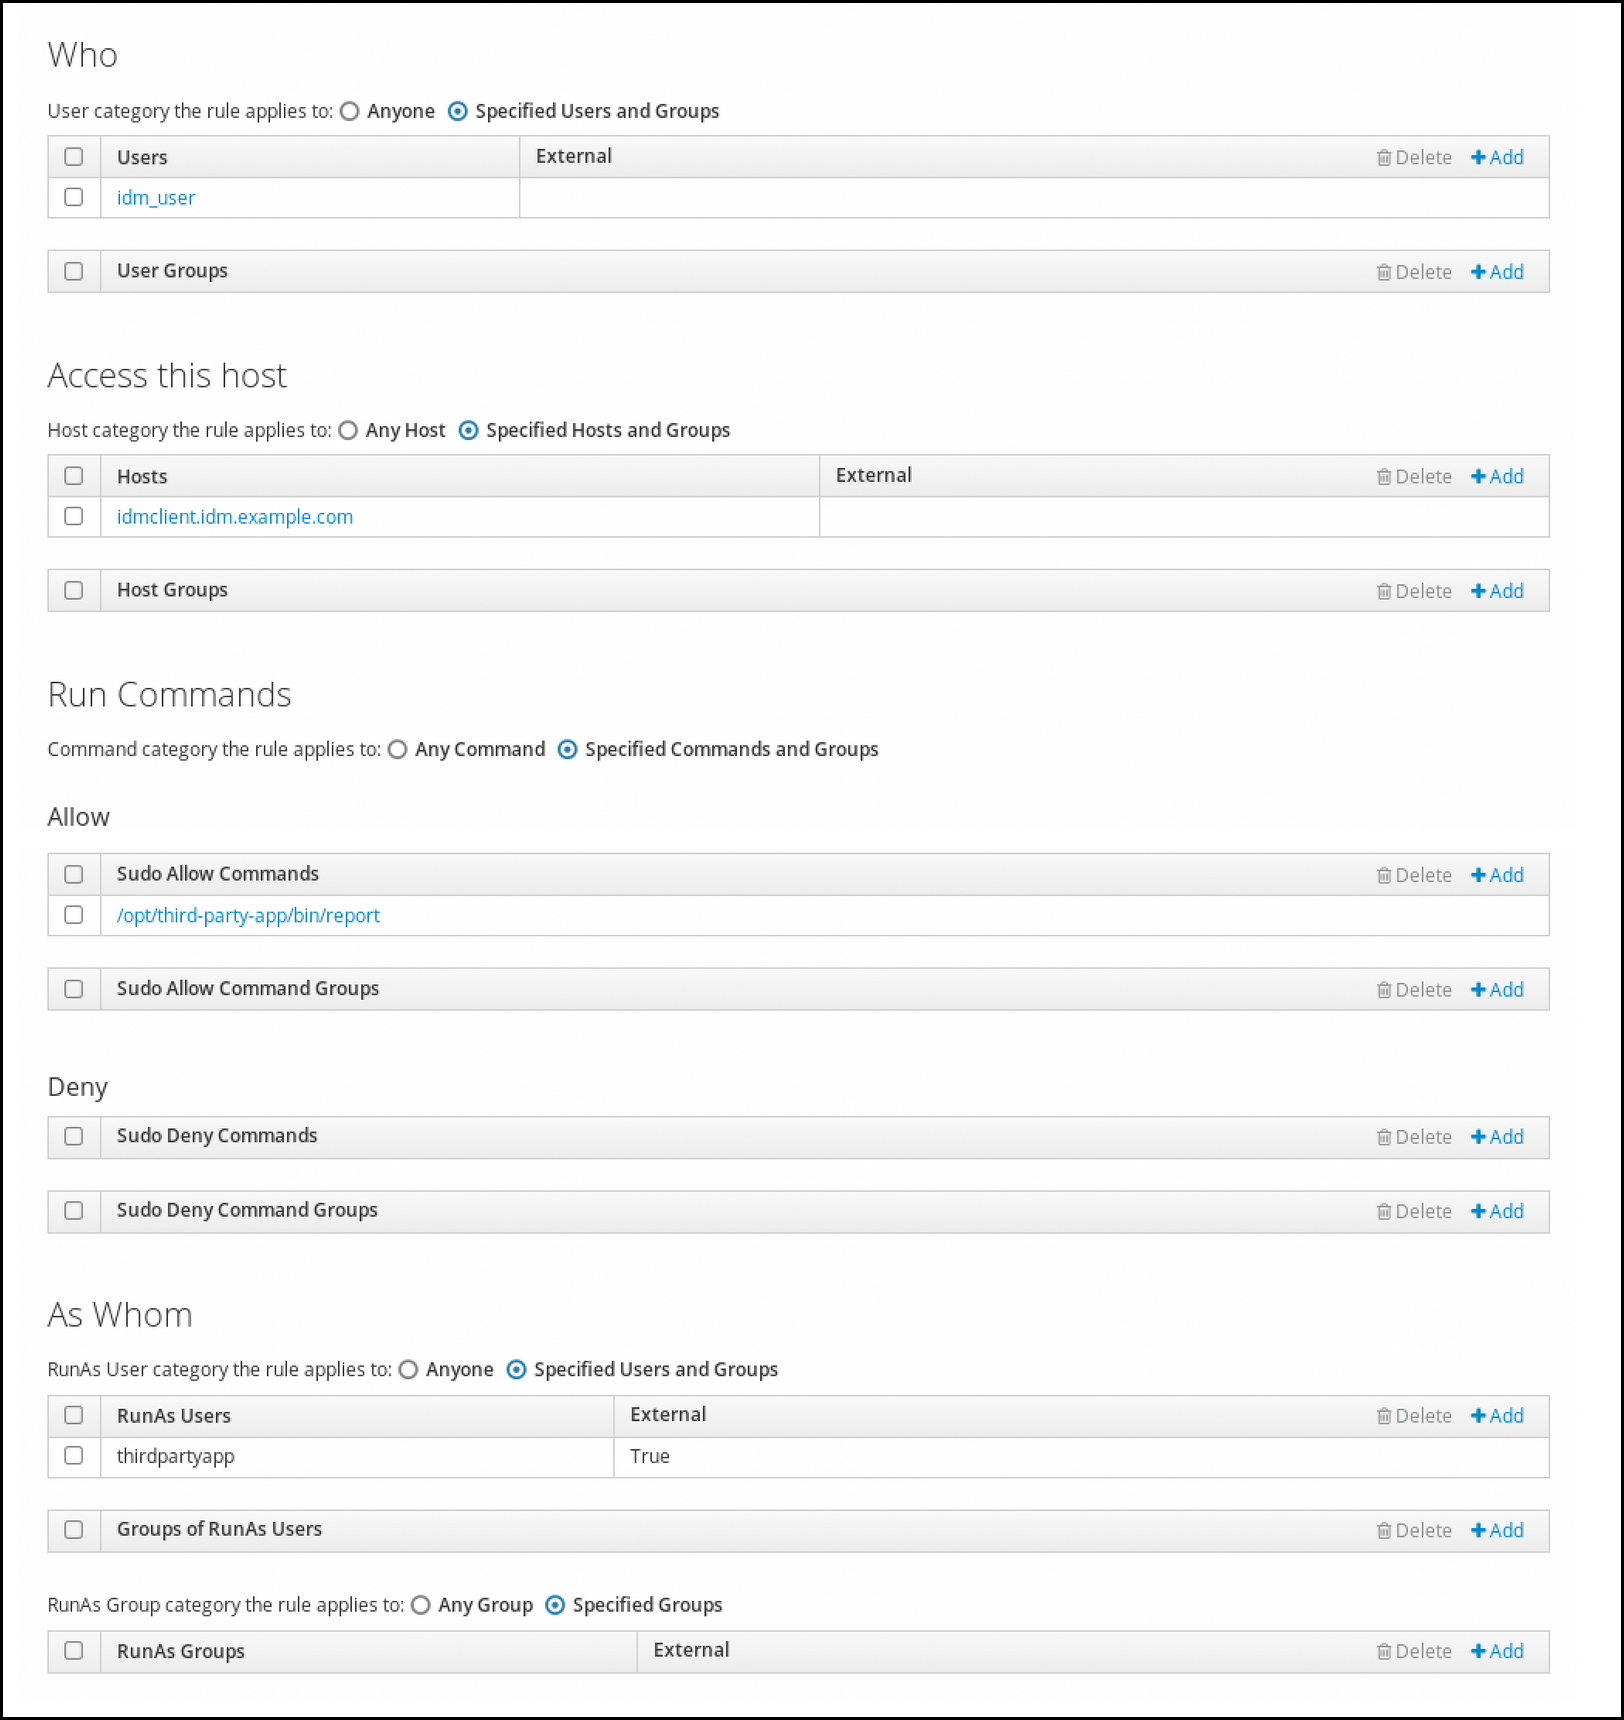
将更改从服务器传播到客户端可能需要几分钟时间。
验证步骤
-
以
idm_user帐户身份登录idmclient主机。 测试新的 sudo 规则:
显示允许
idm_user帐户执行的sudo规则。[idm_user@idmclient ~]$ sudo -l Matching Defaults entries for idm_user@idm.example.com on idmclient: !visiblepw, always_set_home, match_group_by_gid, always_query_group_plugin, env_reset, env_keep="COLORS DISPLAY HOSTNAME HISTSIZE KDEDIR LS_COLORS", env_keep+="MAIL PS1 PS2 QTDIR USERNAME LANG LC_ADDRESS LC_CTYPE", env_keep+="LC_COLLATE LC_IDENTIFICATION LC_MEASUREMENT LC_MESSAGES", env_keep+="LC_MONETARY LC_NAME LC_NUMERIC LC_PAPER LC_TELEPHONE", env_keep+="LC_TIME LC_ALL LANGUAGE LINGUAS _XKB_CHARSET XAUTHORITY KRB5CCNAME", secure_path=/sbin\:/bin\:/usr/sbin\:/usr/bin User idm_user@idm.example.com may run the following commands on idmclient: (thirdpartyapp) /opt/third-party-app/bin/report
作为
thirdpartyapp服务帐户,运行report命令。[idm_user@idmclient ~]$ sudo -u thirdpartyapp /opt/third-party-app/bin/report [sudo] password for idm_user@idm.example.com: Executing report... Report successful.
20.7. 在 IdM 客户端上为 sudo 启用 GSSAPI 身份验证
以下流程描述了通过 pam_sss_gss.so PAM 模块在 IdM 客户端上为 sudo 和 sudo -i 命令启用通用安全服务应用程序接口(GSSAPI)身份验证。使用这个配置,IdM 用户可以使用它们的 Kerberos 票据对 sudo 命令进行身份验证。
先决条件
-
您已为应用于 IdM 主机的 IdM 用户创建了
sudo规则。在本例中,您已创建了idm_user_rebootsudo规则,为idm_user帐户授予在idmclient主机上运行/usr/sbin/reboot命令的权限。 -
您需要
root权限来修改/etc/sssd/sssd.conf文件和/etc/pam.d/目录中的 PAM 文件。
流程
-
打开
/etc/sssd/sssd.conf配置文件: 在
[domain/<domain_name> ]部分中添加以下条目。[domain/<domain_name>] pam_gssapi_services = sudo, sudo-i
-
保存并关闭
/etc/sssd/sssd.conf文件。 重启 SSSD 服务以载入配置更改。
[root@idmclient ~]# systemctl restart sssd如果您正在运行 RHEL 9.2 或更高版本:
[可选] 确定如果您选择了
sssdauthselect配置文件:# authselect current Profile ID: sssd输出显示选择了
sssdauthselect配置文件。如果选择了
sssdauthselect配置文件,请启用 GSSAPI 身份验证:# authselect enable-feature with-gssapi如果没有选择
sssdauthselect配置文件,请选择它并启用 GSSAPI 身份验证:# authselect select sssd with-gssapi
如果您正在运行 RHEL 9.1 或更早版本:
-
打开
/etc/pam.d/sudoPAM 配置文件。 添加下列条目,作为
/etc/pam.d/sudo文件中的auth部分的第一行。#%PAM-1.0 auth sufficient pam_sss_gss.so auth include system-auth account include system-auth password include system-auth session include system-auth-
保存并关闭
/etc/pam.d/sudo文件。
-
打开
验证步骤
以
idm_user帐户身份登录到主机。[root@idm-client ~]# ssh -l idm_user@idm.example.com localhost idm_user@idm.example.com's password:验证您有一个票据授予票据作为
idm_user帐户。[idmuser@idmclient ~]$ klist Ticket cache: KCM:1366201107 Default principal: idm_user@IDM.EXAMPLE.COM Valid starting Expires Service principal 01/08/2021 09:11:48 01/08/2021 19:11:48 krbtgt/IDM.EXAMPLE.COM@IDM.EXAMPLE.COM renew until 01/15/2021 09:11:44
(可选) 如果您没有
idm_user帐户的 Kerberos 凭证,请删除您当前的 Kerberos 凭证,并请求正确的凭证。[idm_user@idmclient ~]$ kdestroy -A [idm_user@idmclient ~]$ kinit idm_user@IDM.EXAMPLE.COM Password for idm_user@idm.example.com:
使用
sudo重启机器,而不用指定密码。[idm_user@idmclient ~]$ sudo /usr/sbin/reboot
其他资源
- IdM 术语 列表中的 GSSAPI 条目
- 使用 IdM Web UI ,授予 sudo 访问 IdM 客户端上 IdM 用户的权限
- 使用 CLI 向 IdM 客户端上的 IdM 用户授予 sudo 访问权限
-
pam_sss_gss(8)手册页 -
sssd.conf(5)手册页
20.8. 在 IdM 客户端上为 sudo 启用 GSSAPI 身份验证,并强制实施 Kerberos 身份验证指标
以下流程描述了通过 pam_sss_gss.so PAM 模块在 IdM 客户端上为 sudo 和 sudo -i 命令启用通用安全服务应用程序接口(GSSAPI)身份验证。此外,只有已使用智能卡登录的用户才能使用 他们的 Kerberos 票据对这些命令进行身份验证。
您可以将此流程作为模板,使用 SSSD 为其他 PAM 感知的服务配置 GSSAPI 身份验证,并进一步限制只对那些在其 Kerberos 票据上附加了特定身份验证指标的用户进行访问。
先决条件
-
您已为应用于 IdM 主机的 IdM 用户创建了
sudo规则。在本例中,您已创建了idm_user_rebootsudo规则,为idm_user帐户授予在idmclient主机上运行/usr/sbin/reboot命令的权限。 -
您已为
idmclient主机配置了智能卡身份验证。 -
您需要
root权限来修改/etc/sssd/sssd.conf文件和/etc/pam.d/目录中的 PAM 文件。
流程
-
打开
/etc/sssd/sssd.conf配置文件: 将以下条目添加到
[domain/<domain_name>]部分中。[domain/<domain_name>] pam_gssapi_services = sudo, sudo-i pam_gssapi_indicators_map = sudo:pkinit, sudo-i:pkinit
-
保存并关闭
/etc/sssd/sssd.conf文件。 重启 SSSD 服务以载入配置更改。
[root@idmclient ~]# systemctl restart sssd-
打开
/etc/pam.d/sudoPAM 配置文件。 添加下列条目,作为
/etc/pam.d/sudo文件中的auth部分的第一行。#%PAM-1.0 auth sufficient pam_sss_gss.so auth include system-auth account include system-auth password include system-auth session include system-auth-
保存并关闭
/etc/pam.d/sudo文件。 -
打开
/etc/pam.d/sudo-iPAM 配置文件。 添加下列条目,作为
/etc/pam.d/sudo-i文件中的auth部分的第一行。#%PAM-1.0 auth sufficient pam_sss_gss.so auth include sudo account include sudo password include sudo session optional pam_keyinit.so force revoke session include sudo-
保存并关闭
/etc/pam.d/sudo-i文件。
验证步骤
以
idm_user帐户登录到主机,并使用智能卡进行身份验证。[root@idmclient ~]# ssh -l idm_user@idm.example.com localhost PIN for smart_card验证作为智能卡用户,您有一个票据授予票据。
[idm_user@idmclient ~]$ klist Ticket cache: KEYRING:persistent:1358900015:krb_cache_TObtNMd Default principal: idm_user@IDM.EXAMPLE.COM Valid starting Expires Service principal 02/15/2021 16:29:48 02/16/2021 02:29:48 krbtgt/IDM.EXAMPLE.COM@IDM.EXAMPLE.COM renew until 02/22/2021 16:29:44
显示允许
idm_user帐户执行的sudo规则。[idm_user@idmclient ~]$ sudo -l Matching Defaults entries for idmuser on idmclient: !visiblepw, always_set_home, match_group_by_gid, always_query_group_plugin, env_reset, env_keep="COLORS DISPLAY HOSTNAME HISTSIZE KDEDIR LS_COLORS", env_keep+="MAIL PS1 PS2 QTDIR USERNAME LANG LC_ADDRESS LC_CTYPE", env_keep+="LC_COLLATE LC_IDENTIFICATION LC_MEASUREMENT LC_MESSAGES", env_keep+="LC_MONETARY LC_NAME LC_NUMERIC LC_PAPER LC_TELEPHONE", env_keep+="LC_TIME LC_ALL LANGUAGE LINGUAS _XKB_CHARSET XAUTHORITY KRB5CCNAME", secure_path=/sbin\:/bin\:/usr/sbin\:/usr/bin User idm_user may run the following commands on idmclient: (root) /usr/sbin/reboot
使用
sudo重启机器,而不用指定密码。[idm_user@idmclient ~]$ sudo /usr/sbin/reboot
其他资源
- SSSD 选项控制对 PAM 服务的 GSSAPI 身份验证
- IdM 术语 列表中的 GSSAPI 条目
- 为智能卡验证配置身份管理
- Kerberos 认证指示符
- 使用 IdM Web UI ,授予 sudo 访问 IdM 客户端上 IdM 用户的权限
- 使用 CLI 向 IdM 客户端上的 IdM 用户授予 sudo 访问权限。
-
pam_sss_gss(8)手册页 -
sssd.conf(5)手册页
20.9. SSSD 选项控制对 PAM 服务的 GSSAPI 身份验证
您可以对 /etc/sssd/sssd.conf 配置文件使用以下选项来调整 SSSD 服务中的 GSSAPI 配置。
- pam_gssapi_services
-
默认情况下,禁用带有 SSSD 的 GSSAPI 身份验证。您可以使用此选项来指定一个以逗号分隔的 PAM 服务列表,允许这些服务使用
pam_sss_gss.gss.soPAM 模块尝试 GSSAPI 身份验证。要显式禁用 GSSAPI 身份验证,将这个选项设为-。 - pam_gssapi_indicators_map
这个选项只适用于身份管理(IdM)域。使用这个选项列出授予 PAM 访问服务所需的 Kerberos 身份验证指标。配对的格式必须是
<PAM_service>: _<required_authentication_indicator>_。有效的验证指标为:
-
OTP用于双因素身份验证 -
radius用于 RADIUS 身份验证 -
pkinit用于 PKINIT、智能卡或证书身份验证 -
hardened用于强化的密码
-
- pam_gssapi_check_upn
-
默认启用这个选项,并将其设为
true。如果启用了这个选项,SSSD 服务要求用户名与 Kerberos 凭证匹配。如果为false,pam_ss_gss.soPAM 模块将对能够获取所需服务票据的每个用户进行身份验证。
示例
以下选项为 sudo 和 sudo-i 服务启用 Kerberos 身份验证,要求 sudo 用户使用一次性密码进行身份验证,用户名必须与 Kerberos 主体匹配。由于这些设置位于 [pam] 部分中,因此适用于所有域:
[pam] pam_gssapi_services = sudo, sudo-i pam_gssapi_indicators_map = sudo:otp pam_gssapi_check_upn = true
您还可以在单独的 [domain] 部分中设置这些选项,来覆盖 [pam] 部分中的任何全局值。以下选项对每个域应用不同的 GSSAPI 设置:
- 对于
idm.example.com域 -
为
sudo和sudo -i服务启用 GSSAPI 身份验证。 -
sudo命令需要证书或智能卡身份验证器。 -
sudo -i命令需要一次性密码身份验证器. - 强制匹配用户名和 Kerberos 主体.
-
为
- 对于
ad.example.com域 -
仅为
sudo服务启用 GSSAPI 身份验证。 - 不强制匹配用户名和主体。
-
仅为
[domain/idm.example.com] pam_gssapi_services = sudo, sudo-i pam_gssapi_indicators_map = sudo:pkinit, sudo-i:otp pam_gssapi_check_upn = true ... [domain/ad.example.com] pam_gssapi_services = sudo pam_gssapi_check_upn = false ...
其他资源
20.10. sudo 的 GSSAPI 身份验证故障排除
如果您无法使用 IdM 的 Kerberos 票据对 sudo 服务进行身份验证,请使用以下场景对您的配置进行故障排除。
先决条件
-
您已为
sudo服务启用了 GSSAPI 身份验证。请参阅 在 IdM 客户端上为 sudo 启用 GSSAPI 身份验证。 -
您需要
root权限来修改/etc/sssd/sssd.conf文件和/etc/pam.d/目录中的 PAM 文件。
流程
如果您看到以下错误,Kerberos 服务可能无法为基于主机名的服务票据解析正确的域:
Server not found in Kerberos database
在这种情况下,将主机名直接添加到
/etc/krb5.confKerberos 配置文件中的[domain_realm]部分:[idm-user@idm-client ~]$ cat /etc/krb5.conf ... [domain_realm] .example.com = EXAMPLE.COM example.com = EXAMPLE.COM server.example.com = EXAMPLE.COM如果看到以下错误,则您没有任何 Kerberos 凭证:
No Kerberos credentials available
在这种情况下,使用
kinit工具检索 Kerberos 凭证,或者通过 SSSD 进行身份验证:[idm-user@idm-client ~]$ kinit idm-user@IDM.EXAMPLE.COM Password for idm-user@idm.example.com:
如果您在
/var/log/sssd/sssd_pam.log日志文件中看到以下错误之一,则 Kerberos 凭证与当前登录的用户的用户名不匹配:User with UPN [<UPN>] was not found. UPN [<UPN>] does not match target user [<username>].
在这种情况下,验证您使用 SSSD 进行身份验证,或考虑禁用
/etc/sssd/sssd.conf文件中的pam_gssapi_check_upn选项:[idm-user@idm-client ~]$ cat /etc/sssd/sssd.conf ... pam_gssapi_check_upn = false若要进行额外的故障排除,您可以对
pam_sss_gss.soPAM 模块启用调试输出。在 PAM 文件(如
/etc/pam.d/sudo和/etc/pam.d/sudo-i)中所有pam_sss_gss.so条目的末尾添加debug选项:[root@idm-client ~]# cat /etc/pam.d/sudo #%PAM-1.0 auth sufficient pam_sss_gss.so debug auth include system-auth account include system-auth password include system-auth session include system-auth[root@idm-client ~]# cat /etc/pam.d/sudo-i #%PAM-1.0 auth sufficient pam_sss_gss.so debug auth include sudo account include sudo password include sudo session optional pam_keyinit.so force revoke session include sudo尝试使用
pam_sss_gss.so模块进行身份验证,并查看控制台输出。在本例中,用户没有任何 Kerberos 凭据。[idm-user@idm-client ~]$ sudo ls -l /etc/sssd/sssd.conf pam_sss_gss: Initializing GSSAPI authentication with SSSD pam_sss_gss: Switching euid from 0 to 1366201107 pam_sss_gss: Trying to establish security context pam_sss_gss: SSSD User name: idm-user@idm.example.com pam_sss_gss: User domain: idm.example.com pam_sss_gss: User principal: pam_sss_gss: Target name: host@idm.example.com pam_sss_gss: Using ccache: KCM: pam_sss_gss: Acquiring credentials, principal name will be derived pam_sss_gss: Unable to read credentials from [KCM:] [maj:0xd0000, min:0x96c73ac3] pam_sss_gss: GSSAPI: Unspecified GSS failure. Minor code may provide more information pam_sss_gss: GSSAPI: No credentials cache found pam_sss_gss: Switching euid from 1366200907 to 0 pam_sss_gss: System error [5]: Input/output error
20.11. 使用 Ansible playbook 确保 IdM 客户端上的 IdM 用户具有 sudo 访问权限
在身份管理(IdM)中,您可以确保对特定命令的 sudo 访问权限被授予给特定 IdM 主机上的 IdM 用户帐户。
完成此流程以确保名为 idm_user_reboot 的 sudo 规则存在。该规则授予 idm_user 在 idmclient 机器上运行 /usr/sbin/reboot 命令的权限。
先决条件
您已配置了 Ansible 控制节点以满足以下要求:
- 您使用 Ansible 版本 2.14 或更高版本。
-
您已在 Ansible 控制器上安装了
ansible-freeipa软件包。 - 示例假定在 ~/MyPlaybooks/ 目录中,您已创建了带有 IdM 服务器的完全限定域名(FQDN)的 Ansible 清单文件。
-
示例假定 secret.yml Ansible vault 存储了
ipaadmin_password。
- 您已 确保 IdM 中存在 idm_user 用户帐户,并通过为用户创建密码解锁了帐户。有关使用命令行界面添加新 IdM 用户的详情,请参考链接:使用命令行添加用户。
-
idmclient 中没有本地 idm_user 帐户。idm_user 用户未列在 idmclient 上的
/etc/passwd文件中。
流程
创建一个清单文件,如
inventory.file,并在其中定义ipaservers:[ipaservers] server.idm.example.com
添加一个或多个
sudo命令:创建一个
ensure-reboot-sudocmd-is-present.ymlAnsible playbook,来确保sudo命令的 IdM 数据库中存在/usr/sbin/reboot命令。要简化此步骤,您可以复制并修改/usr/share/doc/ansible-freeipa/playbooks/sudocmd/ensure-sudocmd-is-present.yml文件中的示例:--- - name: Playbook to manage sudo command hosts: ipaserver vars_files: - /home/user_name/MyPlaybooks/secret.yml tasks: # Ensure sudo command is present - ipasudocmd: ipaadmin_password: "{{ ipaadmin_password }}" name: /usr/sbin/reboot state: present运行 playbook:
$ ansible-playbook --vault-password-file=password_file -v -i path_to_inventory_directory/inventory.file path_to_playbooks_directory/ensure-reboot-sudocmd-is-present.yml
创建一个引用命令的
sudo规则:创建一个
ensure-sudorule-for-idmuser-on-idmclient-is-present.ymlAnsible playbook,来使用sudo命令条目确保存在 sudo 规则。sudo 规则允许 idm_user 重新启动 idmclient 机器。要简化此步骤,您可以复制并修改/usr/share/doc/ansible-freeipa/playbooks/sudorule/ensure-sudorule-is-present.yml文件中的示例:--- - name: Tests hosts: ipaserver vars_files: - /home/user_name/MyPlaybooks/secret.yml tasks: # Ensure a sudorule is present granting idm_user the permission to run /usr/sbin/reboot on idmclient - ipasudorule: ipaadmin_password: "{{ ipaadmin_password }}" name: idm_user_reboot description: A test sudo rule. allow_sudocmd: /usr/sbin/reboot host: idmclient.idm.example.com user: idm_user state: present运行 playbook:
$ ansible-playbook -v -i path_to_inventory_directory/inventory.file path_to_playbooks_directory/ensure-sudorule-for-idmuser-on-idmclient-is-present.yml
验证步骤
通过验证 idm_user 能够使用 sudo 重启 idmclient,来测试您在 IdM 服务器上确认其存在性的 sudo 规则是否在 idmclient 上可以工作。请注意,可能需要过几分钟后,服务器上所做的更改才会对客户端生效。
- 以 idm_user 用户身份登录到 idmclient。
使用
sudo重新启动计算机。在提示时输入 idm_user 的密码:$ sudo /usr/sbin/reboot [sudo] password for idm_user:
如果正确配置了 sudo,则机器将重启。
其他资源
-
请参阅
/usr/share/doc/ansible-freeipa/目录中的README-sudocmd.md,README-sudocmdgroup.md和README-sudorule.md文件。
第 21 章 确保使用 Ansible playbook 的基于主机的访问控制规则在 IdM 中存在
Ansible 是一个自动化工具,用于配置系统、部署软件和执行滚动更新。它包括对身份管理(IdM)的支持。
了解更多有关基于主机的访问策略的信息,以及如何使用 Ansible 定义它们。
21.1. IdM 中基于主机的访问控制规则
基于主机的访问控制(HBAC)规则定义哪些用户或用户组可以通过哪些服务或服务组中的哪些服务来访问哪些主机或主机组。作为系统管理员,您可以使用 HBAC 规则来实现以下目标:
- 将您域中对指定系统的访问权限限制为特定用户组的成员。
- 仅允许使用特定服务来访问域中的系统。
默认情况下,IdM 是使用一个名为 allow_all 的默认 HBAC 规则配置的,这意味着每个用户都可以通过整个 IdM 域中每个相关服务对每个主机进行通用访问。
您可以通过将默认的 allow_all 规则替换为您自己的一组 HBAC 规则来微调对不同主机的访问。对于集中式和简化的访问控制管理,您可以将 HBAC 规则应用到用户组、主机组或服务组,而不是单个用户、主机或服务。
21.2. 使用 Ansible playbook 确保在 IdM 中存在 HBAC 规则
按照以下流程,使用 Ansible playbook 确保基于主机的访问控制(HBAC)规则在身份管理(IdM)中存在。
先决条件
您已配置了 Ansible 控制节点以满足以下要求:
- 您使用 Ansible 版本 2.14 或更高版本。
-
您已在 Ansible 控制器上安装了
ansible-freeipa软件包。 - 示例假定在 ~/MyPlaybooks/ 目录中,您已创建了带有 IdM 服务器的完全限定域名(FQDN)的 Ansible 清单文件。
-
示例假定 secret.yml Ansible vault 存储了
ipaadmin_password。
- IdM 中存在您要用于 HBAC 规则的用户和用户组。详情请参阅 使用 Ansible playbook 管理用户帐户 ,以及 使用 Ansible playbook 确保 IdM 组和组成员存在。
- 您要应用 HBAC 规则的主机和主机组在 IdM 中存在。详情请参阅 使用 Ansible playbook 管理主机,以及 使用 Ansible playbook 管理主机组。
流程
创建一个清单文件,如
inventory.file,并在该文件中定义ipaserver:[ipaserver] server.idm.example.com
创建 Ansible playbook 文件,该文件定义您要确保其存在的 HBAC 策略。要简化此步骤,您可以复制并修改
/usr/share/doc/ansible-freeipa/playbooks/hbacrule/ensure-hbacrule-allhosts-present.yml文件中的示例:--- - name: Playbook to handle hbacrules hosts: ipaserver vars_files: - /home/user_name/MyPlaybooks/secret.yml tasks: # Ensure idm_user can access client.idm.example.com via the sshd service - ipahbacrule: ipaadmin_password: "{{ ipaadmin_password }}" name: login user: idm_user host: client.idm.example.com hbacsvc: - sshd state: present运行 playbook:
$ ansible-playbook --vault-password-file=password_file -v -i path_to_inventory_directory/inventory.file path_to_playbooks_directory/ensure-new-hbacrule-present.yml
验证步骤
- 以管理员身份登录到 IdM Web UI。
- 导航到 Policy → Host-Based-Access-Control → HBAC Test。
- 在 Who 选项卡中,选择 idm_user。
- 在 Accessing 选项卡中,选择 client.idm.example.com。
- 在 Via service 选项卡中,选择 sshd。
- 在 Rules 选项卡中,选择 login。
- 在 Run test 选项卡中,单击 Run test 按钮。如果您看到 ACCESS GRANTED,则 HBAC 规则成功实现。
其他资源
-
请参阅
/usr/share/doc/ansible-freeipa目录中的README-hbacsvc.md,README-hbacsvcgroup.md和README-hbacrule.md文件。 -
请参阅
/usr/share/doc/ansible-freeipa/playbooks目录的子目录中的 playbook。
第 22 章 使用 Ansible 管理 IdM 证书
您可以使用 ansible-freeipa ipacert 模块为身份管理(IdM)用户、主机和服务请求、撤销和检索 SSL 证书。您还可以恢复已搁置的证书。
22.1. 使用 Ansible 为 IdM 主机、服务和用户请求 SSL 证书
您可以使用 ansible-freeipa ipacert 模块为身份管理(IdM)用户、主机和服务请求 SSL 证书。然后,他们可以使用这些证书向 IdM 进行身份验证。
完成此流程,使用 Ansible playbook 从 IdM 证书颁发机构(CA)为 HTTP 服务器请求一个证书。
先决条件
在控制节点上:
- 您使用 Ansible 版本 2.14 或更高版本。
-
您已安装
ansible-freeipa软件包。 - 您已在 ~/MyPlaybooks/ 目录中创建了一个带有 IdM 服务器的完全限定域名(FQDN)的 Ansible 清单文件。
-
您已将
ipaadmin_password存储在 secret.yml Ansible vault 中。
- 您的 IdM 部署有一个集成的 CA。
流程
为您的用户、主机或服务生成证书签名请求(CSR)。例如,要使用
openssl工具为运行在 client.idm.example.com 上的HTTP服务生成一个 CSR,请输入:# openssl req -new -newkey rsa:2048 -days 365 -nodes -keyout new.key -out new.csr -subj '/CN=client.idm.example.com,O=IDM.EXAMPLE.COM'因此,CSR 存储在 new.csr 中。
使用以下内容创建 Ansible playbook 文件 request-certificate.yml :
--- - name: Playbook to request a certificate hosts: ipaserver vars_files: - /home/user_name/MyPlaybooks/secret.yml tasks: - name: Request a certificate for a web server ipacert: ipaadmin_password: "{{ ipaadmin_password }}" state: requested csr: | -----BEGIN CERTIFICATE REQUEST----- MIGYMEwCAQAwGTEXMBUGA1UEAwwOZnJlZWlwYSBydWxlcyEwKjAFBgMrZXADIQBs HlqIr4b/XNK+K8QLJKIzfvuNK0buBhLz3LAzY7QDEqAAMAUGAytlcANBAF4oSCbA 5aIPukCidnZJdr491G4LBE+URecYXsPknwYb+V+ONnf5ycZHyaFv+jkUBFGFeDgU SYaXm/gF8cDYjQI= -----END CERTIFICATE REQUEST----- principal: HTTP/client.idm.example.com register: cert将证书请求替换为 new.csr 中的 CSR。
请求证书:
$ ansible-playbook --vault-password-file=password_file -v -i <path_to_inventory_directory>/hosts <path_to_playbooks_directory>/request-certificate.yml
22.2. 使用 Ansible 为 IdM 主机、服务和用户撤销 SSL 证书
您可以使用 ansible-freeipa ipacert 模块撤销身份管理(IdM)用户、主机和服务用来向 IdM 进行身份验证的 SSL 证书。
完成此流程,使用 Ansible playbook 为 HTTP 服务器撤销一个证书。撤销证书的原因是 "keyCompromise"。
先决条件
在控制节点上:
- 您使用 Ansible 版本 2.14 或更高版本。
-
您已安装
ansible-freeipa软件包。 - 您已在 ~/MyPlaybooks/ 目录中创建了一个带有 IdM 服务器的完全限定域名(FQDN)的 Ansible 清单文件。
-
您已将
ipaadmin_password存储在 secret.yml Ansible vault 中。 -
您已得到了证书的序列号,例如通过输入
openssl x509 -noout -text -in <path_to_certificate>命令。在本例中,证书的序列号为 123456789。
- 您的 IdM 部署有一个集成的 CA。
流程
使用以下内容创建 Ansible playbook 文件 revoke-certificate.yml :
--- - name: Playbook to revoke a certificate hosts: ipaserver vars_files: - /home/user_name/MyPlaybooks/secret.yml tasks: - name: Revoke a certificate for a web server ipacert: ipaadmin_password: "{{ ipaadmin_password }}" serial_number: 123456789 revocation_reason: "keyCompromise" state: revoked撤销证书:
$ ansible-playbook --vault-password-file=password_file -v -i <path_to_inventory_directory>/hosts <path_to_playbooks_directory>/revoke-certificate.yml
其他资源
-
ansible-freeipa上游 docs 中的 cert 模块 - RFC 5280 中的 原因代码
22.3. 使用 Ansible 为 IdM 用户、主机和服务恢复 SSL 证书
您可以使用 ansible-freeipa ipacert 模块恢复之前由身份管理(IdM)用户、主机或服务向 IdM 进行身份验证撤销的 SSL 证书。
您只能恢复搁置的证书。您可能已将其搁置,例如,您不确定私钥是否已丢失。但是,您现在已恢复了密钥,并且您确定没有人在同时访问它,所以您希望重新恢复证书。
完成此流程,使用 Ansible playbook 为注册到 IdM 的服务的搁置的证书发布一个证书。这个示例描述了如何为 HTTP 服务的搁置的证书发布一个证书。
先决条件
在控制节点上:
- 您使用 Ansible 版本 2.14 或更高版本。
-
您已安装
ansible-freeipa软件包。 - 您已在 ~/MyPlaybooks/ 目录中创建了一个带有 IdM 服务器的完全限定域名(FQDN)的 Ansible 清单文件。
-
您已将
ipaadmin_password存储在 secret.yml Ansible vault 中。
- 您的 IdM 部署有一个集成的 CA。
-
您已得到证书的序列号,例如通过输入
openssl x509 -noout -text -in path/to/certificate命令。在本例中,证书序列号为 123456789。
流程
使用以下内容创建 Ansible playbook 文件 restore-certificate.yml :
--- - name: Playbook to restore a certificate hosts: ipaserver vars_files: - /home/user_name/MyPlaybooks/secret.yml tasks: - name: Restore a certificate for a web service ipacert: ipaadmin_password: "{{ ipaadmin_password }}" serial_number: 123456789 state: released运行 playbook:
$ ansible-playbook --vault-password-file=password_file -v -i <path_to_inventory_directory>/hosts <path_to_playbooks_directory>/restore-certificate.yml
22.4. 使用 Ansible 为 IdM 用户、主机和服务检索 SSL 证书
您可以使用 ansible-freeipa ipacert 模块检索为身份管理(IdM)用户、主机或服务发布的 SSL 证书,并将其存储在受管节点上的一个文件中。
先决条件
在控制节点上:
- 您使用 Ansible 版本 2.14 或更高版本。
-
您已安装
ansible-freeipa软件包。 - 您已在 ~/MyPlaybooks/ 目录中创建了一个带有 IdM 服务器的完全限定域名(FQDN)的 Ansible 清单文件。
-
您已将
ipaadmin_password存储在 secret.yml Ansible vault 中。
-
您已得到了证书的序列号,例如通过输入
openssl x509 -noout -text -in <path_to_certificate>命令。在本例中,证书的序列号为 123456789,存储检索到的证书的文件是 cert.pem。
流程
使用以下内容创建 Ansible playbook 文件 retrieve-certificate.yml :
--- - name: Playbook to retrieve a certificate and store it locally on the managed node hosts: ipaserver vars_files: - /home/user_name/MyPlaybooks/secret.yml tasks: - name: Retrieve a certificate and save it to file 'cert.pem' ipacert: ipaadmin_password: "{{ ipaadmin_password }}" serial_number: 123456789 certificate_out: cert.pem state: retrieved检索证书:
$ ansible-playbook --vault-password-file=password_file -v -i <path_to_inventory_directory>/hosts <path_to_playbooks_directory>/retrieve-certificate.yml
第 23 章 IdM 中的 vaults
本章论述了 Identity Management(IdM)中的库。它介绍了以下主题:
23.1. 库及其优点
对于希望在一个位置保持所有敏感数据存储的 Identity Management(IdM)用户,库是一个有用的功能。 有各种类型的 vault,您应该根据您的要求选择要使用的 vault。
vault 是(IdM)中的安全位置,用于存储、检索、共享和恢复 secret。secret 是安全敏感的数据,通常是身份验证凭据,仅有限的人员或实体可以访问。例如,secret 包括:
- 密码
- PINs
- 私有 SSH 密钥
vault 与密码管理器相当。与密码管理器类似,vault 通常要求用户生成并记住一个主密码,以解锁和访问密码库中存储的任何信息。但是,用户也可以决定使用标准 vault。标准密码库不要求用户输入任何密码来访问密码库中存储的 secret。
IdM 中的 vaults 的目的是存储身份验证凭证,可让您向外部、非 IdM 相关的服务进行身份验证。
IdM 库的其他重要特性包括:
- vaults 只能供 vault 所有者以及 vault 所有者选择为 vault 成员的用户访问。另外,IdM 管理员也可以访问 vault。
- 如果用户没有足够的权限来创建 vault,IdM 管理员可以创建 vault 并将用户设置为其所有者。
- 用户和服务可以从 IdM 域中注册的任何机器访问存储在 vault 中的 secret。
- 一个 vault 只能包含一个 secret,例如一个文件。但是,文件本身可以包含多个 secret,如密码、keytabs 或证书。
Vault 仅适用于 IdM 命令行(CLI),而不能从 IdM Web UI 使用。
23.2. Vault 所有者、成员和管理员
Identity Management(IdM)可区分以下 vault 用户类型:
- Vault 所有者
vault 所有者是具有密码库上基本管理特权的用户或服务。例如,vault 所有者可以修改 vault 的属性或添加新的 vault 成员。
每个 vault 必须至少有一个所有者。库也可以有多个所有者。
- Vault 成员
- vault 成员是用户访问由另一个用户或服务创建的库的用户或服务。
- Vault 管理员
Vault 管理员对所有 vaults 具有不受限制的访问权限,并且可以执行所有 vault 操作。
注意对称和非对称的密码库使用密码或密钥进行保护,并应用特殊的访问控制规则(请参阅 Vault 类型)。管理员必须满足以下条件:
- 访问对称和非对称库中的 secret。
- 更改或重置 vault 密码或密钥。
vault 管理员是具有
Vault Administrators权限。在 IdM 中基于角色的访问控制(RBAC)的上下文中,权限是一个可应用于角色的权限组。- Vault 用户
vault 用户代表密码库所在的用户。
Vault 用户信息显示在特定命令的输出中,如ipa vault-show:$ ipa vault-show my_vault Vault name: my_vault Type: standard Owner users: user Vault user: user有关 vault 容器和用户 vault 的详情,请参阅 Vault 容器。
其他资源
- 如需有关 vault 类型的详情,请参阅 标准的、对称的和非对称的vault 。
23.3. 标准、对称和非对称库
根据安全性和访问控制级别,IdM 将 vaults 统一为以下类型:
- 标准库
- Vault 所有者和 vault 成员可以存档和检索机密,而无需使用密码或密钥。
- 对称库
- 密码库中的 secret 使用对称密钥进行保护。Vault 所有者和成员可以存档并检索机密,但它们必须提供 vault 密码。
- 非对称库
- 密码库中的 secret 使用非对称密钥进行保护。用户使用公钥归档密码,并使用私钥检索该密码。Vault 成员只能存档机密,而 vault 所有者可以执行、存档和检索机密。
23.5. Vault 容器
vault 容器是密码库的集合。下表列出了 Identity Management (IdM) 提供的默认 vault 容器。
表 23.2. IdM 中的默认 vault 容器
| 类型 | 描述 | 目的 |
|---|---|---|
| 用户容器 | 用户的私有容器 | 为特定用户存储用户密码库 |
| 服务容器 | 服务的私有容器 | 为特定服务存储服务库 |
| 共享容器 | 用于多个用户和服务的容器 | 存储可由多个用户或服务共享的 vault |
当为用户或服务创建第一个私有密码库时,IdM 会自动为每个用户或服务创建用户和服务容器。删除用户或服务后,IdM 会删除容器及其内容。
23.6. 基本 IdM vault 命令
您可以使用以下介绍的基本命令管理身份管理(IdM) vault。下表 包含 ipa vault-* 命令的列表,并解释了它们的用途。
在运行任何 ipa vault-* 命令前,请将密钥恢复授权 (KRA) 证书系统组件安装到 IdM 域中的一个或多个服务器上。详情请参阅在 IdM 中安装密钥恢复授权。
表 23.3. 基本 IdM vault 命令解释
| 命令 | 目的 |
|---|---|
|
| 显示有关 IdM 库和示例密码库命令的概念信息。 |
|
|
在特定的 |
|
| 在将密码库作为 vault 成员访问时,您必须指定 vault 所有者。如果您没有指定 vault 所有者,IdM 会通知您没有找到密码库: [admin@server ~]$ ipa vault-show user_vault ipa: ERROR: user_vault: vault not found |
|
| 在访问共享密码库时,您必须指定您要访问的 vault 是共享密码库。否则,IdM 会通知您没有找到密码库: [admin@server ~]$ ipa vault-show shared_vault ipa: ERROR: shared_vault: vault not found |
23.7. 在 IdM 中安装密钥恢复授权
按照以下流程,通过在特定的 IdM 服务器上安装密钥恢复授权(KRA)证书系统(CS)组件来在身份管理(IdM)中启用 vault。
先决条件
-
您已以
root身份登录到 IdM 服务器。 - IdM 证书颁发机构已安装在 IdM 服务器上。
-
您有
目录管理器凭证。
流程
安装 KRA:
# ipa-kra-install
您可以在隐藏的副本上安装 IdM 集群的第一个 KRA。但是,在在非隐藏的副本上安装 KRA 克隆前,安装额外的 KRA 克隆需要临时激活隐藏的副本。然后您可以再次隐藏原始隐藏的副本。
要使密码库服务高可用且具有弹性,请在两个或多个 IdM 服务器上安装 KRA。维护多个 KRA 服务器可防止数据丢失。
其他资源
- 请参阅 降级或提升隐藏的副本。
- 请参阅 隐藏的副本模式。
第 24 章 使用 Ansible 管理 IdM 用户库:存储和检索 secret
本章论述了如何使用 Ansible vault 模块在身份管理中管理用户密码库。具体来说,它描述了用户可以如何使用 Ansible playbook 执行以下三个连续操作:
用户可以通过两个不同的 IdM 客户端进行存储和检索。
先决条件
- 密钥恢复授权中心 (KRA) 证书系统组件已安装在您的 IdM 域中的一个或多个服务器上。详情请参阅在 IdM 中安装密钥恢复授权。
24.1. 使用 Ansible 在 IdM 中存在标准用户库
按照以下流程,使用 Ansible playbook 创建具有一个或多个私有 vault 的 vault 容器,以安全地存储敏感信息。在以下步骤中使用的示例中,idm_user 用户创建名为 my_vault 的标准类型库。标准密码库类型确保无需 idm_user 在访问该文件时进行身份验证。idm_user 能够从用户登录的任何 IdM 客户端检索 文件。
先决条件
- 您已在 Ansible 控制器上安装了 ansible-freeipa 软件包,这是您在该流程中执行步骤的主机。
- 您知道 idm_user 的密码。
流程
导航到
/usr/share/doc/ansible-freeipa/playbooks/vault目录:$ cd /usr/share/doc/ansible-freeipa/playbooks/vault创建一个清单文件,如 inventory.file :
$ touch inventory.file打开 inventory.file,并在
[ipaserver]部分中定义您要配置的 IdM 服务器。例如,要指示 Ansible 配置 server.idm.example.com,请输入:[ipaserver] server.idm.example.com
生成 ensure-standard-vault-is-present.yml Ansible playbook 文件的副本。例如:
$ cp ensure-standard-vault-is-present.yml ensure-standard-vault-is-present-copy.yml- 打开 ensure-standard-vault-is-present-copy.yml 文件进行编辑。
通过在
ipavault任务部分设置以下变量来调整文件:-
将
ipaadmin_principal变量设置为 idm_user。 -
将
ipaadmin_password变量设置为 idm_user 密码。 -
将
user变量设置为 idm_user。 -
将
name变量设置为 my_vault。 将
vault_type变量设置为 standard。对于当前示例为修改过的 Ansible playbook 文件:
--- - name: Tests hosts: ipaserver gather_facts: false vars_files: - /home/user_name/MyPlaybooks/secret.yml tasks: - ipavault: ipaadmin_principal: idm_user ipaadmin_password: idm_user_password user: idm_user name: my_vault vault_type: standard-
将
- 保存这个文件。
运行 playbook:
$ ansible-playbook --vault-password-file=password_file -v -i inventory.file ensure-standard-vault-is-present-copy.yml
24.2. 使用 Ansible 将 secret 归档到 IdM 中的标准用户库中
按照以下流程,使用 Ansible playbook 将敏感信息存储在个人 vault 中。在使用的示例中,idm_user 用户在名为 my_vault 的库中归档含有名为 password.txt 的敏感信息的文件。
先决条件
- 您已在 Ansible 控制器上安装了 ansible-freeipa 软件包,这是您在该流程中执行步骤的主机。
- 您知道 idm_user 的密码。
- idm_user 是所有者,或者至少是 my_vault 的成员用户。
- 您可以访问 password.txt,这是要在 my_vault 中存档的机密。
流程
导航到
/usr/share/doc/ansible-freeipa/playbooks/vault目录:$ cd /usr/share/doc/ansible-freeipa/playbooks/vault打开清单文件,并确保
[ipaserver]部分中列出了您要配置的 IdM 服务器。例如,要指示 Ansible 配置 server.idm.example.com,请输入:[ipaserver] server.idm.example.com
制作 data-archive-in-symmetric-vault.yml Ansible playbook 文件的副本,但将"symmetric"替换为 "standard"。例如:
$ cp data-archive-in-symmetric-vault.yml data-archive-in-standard-vault-copy.yml- 打开 data-archive-in-standard-vault-copy.yml 文件进行编辑。
通过在
ipavault任务部分设置以下变量来调整文件:-
将
ipaadmin_principal变量设置为 idm_user。 -
将
ipaadmin_password变量设置为 idm_user 密码。 -
将
user变量设置为 idm_user。 -
将
name变量设置为 my_vault。 -
将
in变量设置为包含敏感信息的文件的完整路径。 将
action变量设置为 member。对于当前示例为修改过的 Ansible playbook 文件:
--- - name: Tests hosts: ipaserver gather_facts: false vars_files: - /home/user_name/MyPlaybooks/secret.yml tasks: - ipavault: ipaadmin_principal: idm_user ipaadmin_password: idm_user_password user: idm_user name: my_vault in: /usr/share/doc/ansible-freeipa/playbooks/vault/password.txt action: member-
将
- 保存这个文件。
运行 playbook:
$ ansible-playbook --vault-password-file=password_file -v -i inventory.file data-archive-in-standard-vault-copy.yml
24.3. 使用 Ansible 从 IdM 中的标准用户库检索 secret
按照以下流程,使用 Ansible playbook 从用户个人vault 中检索 secret。在以下步骤中使用的示例中,idm_user 用户从名为 my_vault 的标准类型库检索包含敏感数据的文件,并检索名为 host01 的 IdM 客户端。idm_user 在访问该文件时不必进行身份验证。idm_user 可以使用 Ansible 从安装 Ansible 的任何 IdM 客户端检索 文件。
先决条件
您已配置了 Ansible 控制节点以满足以下要求:
- 您使用 Ansible 版本 2.14 或更高版本。
-
您已在 Ansible 控制器上安装了
ansible-freeipa软件包。 - 示例假定在 ~/MyPlaybooks/ 目录中,您已创建了带有 IdM 服务器的完全限定域名(FQDN)的 Ansible 清单文件。
-
示例假定 secret.yml Ansible vault 存储了
ipaadmin_password。
- 您知道 idm_user 的密码。
- idm_user 是 my_vault 的所有者。
- idm_user 已将 secret 存储在 my_vault 中。
- Ansible 可以写入要检索该 secret 的 IdM 主机上的 目录。
- idm_user 可以从要检索 secret 的 IdM 主机上的 目录读取。
流程
导航到
/usr/share/doc/ansible-freeipa/playbooks/vault目录:$ cd /usr/share/doc/ansible-freeipa/playbooks/vault打开清单文件,并在一个明确定义的部分中提到您要检索该 secret 的 IdM 客户端。例如,要指示 Ansible 在 host01.idm.example.com 上检索 secret,请输入:
[ipahost] host01.idm.example.com
生成 retrive-data-symmetric-vault.yml Ansible playbook 文件的副本。将 "symmetric" 替换为 "standard"。例如:
$ cp retrive-data-symmetric-vault.yml retrieve-data-standard-vault.yml-copy.yml- 打开 retrieve-data-standard-vault.yml-copy.yml 文件进行编辑。
-
通过将
hosts变量设置为 ipahost 来调整 文件。 通过在
ipavault任务部分设置以下变量来调整文件:-
将
ipaadmin_principal变量设置为 idm_user。 -
将
ipaadmin_password变量设置为 idm_user 密码。 -
将
user变量设置为 idm_user。 -
将
name变量设置为 my_vault。 -
将
out变量设置为您要将 secret 导出到的文件的完整路径。 将
state变量设置为 retrieve。对于当前示例为修改过的 Ansible playbook 文件:
--- - name: Tests hosts: ipahost gather_facts: false vars_files: - /home/user_name/MyPlaybooks/secret.yml tasks: - ipavault: ipaadmin_principal: idm_user ipaadmin_password: idm_user_password user: idm_user name: my_vault out: /tmp/password_exported.txt state: retrieved-
将
- 保存这个文件。
运行 playbook:
$ ansible-playbook --vault-password-file=password_file -v -i inventory.file retrieve-data-standard-vault.yml-copy.yml
验证步骤
以 user01 身份通过
SSH连接到 host01:$ ssh user01@host01.idm.example.com查看 Ansible playbook 文件中
out变量指定的文件:$ vim /tmp/password_exported.txt
现在,您可以看到导出的 secret。
-
有关使用 Ansible 管理 IdM vaults 和用户 secret 以及 playbook 变量的更多信息,请参阅
/usr/share/doc/ansible-freeipa/目录中的 README-vault.md Markdown 文件,和/usr/share/doc/ansible-freeipa/playbooks/vault/目录中的示例 playbook。
第 25 章 使用 Ansible 管理 IdM 服务库:存储和检索 secret
本节介绍管理员可以如何使用 ansible-freeipa vault 模块安全地将服务 secret 存储在集中式位置。示例中使用的 vault 是非对称的,这意味着要使用它,管理员需要执行以下步骤:
-
使用
openssl实用程序生成私钥。 - 根据私钥生成公钥。
当管理员将服务 secret 归档到密码库时,会用公钥对其进行加密。之后,托管在域中特定计算机上的服务实例使用私钥检索该 secret。只有服务和管理员可以访问该 secret。
如果该机密泄露,管理员可以在服务 vault 中替换它,然后将它重新分发到尚未遭入侵的服务实例。
先决条件
- 密钥恢复授权中心 (KRA) 证书系统组件已安装在您的 IdM 域中的一个或多个服务器上。详情请参阅在 IdM 中安装密钥恢复授权。
本节包括以下步骤:
在流程中:
- admin 是管理服务密码的管理员。
- private-key-to-an-externally-certificate.pem 是包含服务 secret 的文件,本例中为外部签名证书的私钥。请勿将此私钥与用于从密码库检索机密的私钥混淆。
- secret_vault 是为存储服务 secret 而创建的库。
- HTTP/webserver1.idm.example.com 是密码库的所有者服务。
- HTTP/webserver2.idm.example.com 和 HTTP/webserver3.idm.example.com 是 vault 成员服务。
- service-public.pem 是用于加密 password_vault 中存储的密码的服务公钥。
- service-private.pem 是用于解密 secret_vault 中存储的密码的服务私钥。
25.1. 使用 Ansible 在 IdM 中存在非对称服务库
按照以下流程,使用 Ansible playbook 创建一个具有一个或多个私有 vault 的服务 vault 容器,以安全地存储敏感信息。在以下流程中使用的示例中,管理员创建名为 secret_vault 的非对称库。这样可确保 vault 成员必须使用私钥进行身份验证,以检索 vault 中的机密。vault 成员能够从任何 IdM 客户端检索 文件。
先决条件
您已配置了 Ansible 控制节点以满足以下要求:
- 您使用 Ansible 版本 2.14 或更高版本。
-
您已在 Ansible 控制器上安装了
ansible-freeipa软件包。 - 示例假定在 ~/MyPlaybooks/ 目录中,您已创建了带有 IdM 服务器的完全限定域名(FQDN)的 Ansible 清单文件。
-
示例假定 secret.yml Ansible vault 存储了
ipaadmin_password。
- 您知道 IdM 管理员密码。
流程
导航到
/usr/share/doc/ansible-freeipa/playbooks/vault目录:$ cd /usr/share/doc/ansible-freeipa/playbooks/vault获取服务实例的公钥。例如,使用
openssl工具:生成
service-private.pem私钥。$ openssl genrsa -out service-private.pem 2048 Generating RSA private key, 2048 bit long modulus .+++ ...........................................+++ e is 65537 (0x10001)根据私钥生成
service-public.pem公钥。$ openssl rsa -in service-private.pem -out service-public.pem -pubout writing RSA key
可选:如果不存在,创建一个清单文件(如 inventory.file)。
$ touch inventory.file打开清单文件,并在
[ipaserver]部分中定义您要配置的 IdM 服务器。例如,要指示 Ansible 配置 server.idm.example.com,请输入:[ipaserver] server.idm.example.com
生成 ensure-asymmetric-vault-is-present.yml Ansible playbook 文件的副本。例如:
$ cp ensure-asymmetric-vault-is-present.yml ensure-asymmetric-service-vault-is-present-copy.yml- 打开 ensure-asymmetric-vault-is-present-copy.yml 文件进行编辑。
- 添加一个任务,该任务将 service-public.pem 公钥从 Ansible 控制器复制到 server.idm.example.com 服务器。
通过在
ipavault任务部分设置以下变量来修改文件的其余部分:-
将
ipaadmin_password变量设置为 IdM 管理员密码。 -
使用
name变量定义 vault 的名称,如 secret_vault。 -
将
vault_type变量设置为非 对称。 -
将
service变量设置为拥有密码库的服务主体,如 HTTP/webserver1.idm.example.com。 将
public_key_file设置为您的公钥的位置。这是当前示例修改的 Ansible playbook 文件:
--- - name: Tests hosts: ipaserver gather_facts: false vars_files: - /home/user_name/MyPlaybooks/secret.yml tasks: - name: Copy public key to ipaserver. copy: src: /path/to/service-public.pem dest: /usr/share/doc/ansible-freeipa/playbooks/vault/service-public.pem mode: 0600 - name: Add data to vault, from a LOCAL file. ipavault: ipaadmin_password: "{{ ipaadmin_password }}" name: secret_vault vault_type: asymmetric service: HTTP/webserver1.idm.example.com public_key_file: /usr/share/doc/ansible-freeipa/playbooks/vault/service-public.pem-
将
- 保存这个文件。
运行 playbook:
$ ansible-playbook --vault-password-file=password_file -v -i inventory.file ensure-asymmetric-service-vault-is-present-copy.yml
25.2. 使用 Ansible 将成员服务添加到非对称库
按照以下流程,使用 Ansible playbook 将成员服务添加到服务 vault 中,以便它们都可以检索 vault 中存储的 secret。在以下流程中使用的示例中,IdM 管理员将 HTTP/webserver2.idm.example.com 和 HTTP/webserver3.idm.example.com 服务主体添加到由 HTTP/webserver1.idm.example.com 所有的 secret_vault vault 中。
先决条件
您已配置了 Ansible 控制节点以满足以下要求:
- 您使用 Ansible 版本 2.14 或更高版本。
-
您已在 Ansible 控制器上安装了
ansible-freeipa软件包。 - 示例假定在 ~/MyPlaybooks/ 目录中,您已创建了带有 IdM 服务器的完全限定域名(FQDN)的 Ansible 清单文件。
-
示例假定 secret.yml Ansible vault 存储了
ipaadmin_password。
- 您知道 IdM 管理员密码。
- 您已创建了非对称密码库用于存储服务机密。
流程
导航到
/usr/share/doc/ansible-freeipa/playbooks/vault目录:$ cd /usr/share/doc/ansible-freeipa/playbooks/vault可选:如果不存在,创建一个清单文件(如 inventory.file)。
$ touch inventory.file打开清单文件,并在
[ipaserver]部分中定义您要配置的 IdM 服务器。例如,要指示 Ansible 配置 server.idm.example.com,请输入:[ipaserver] server.idm.example.com
生成 data-archive-in-asymmetric-vault.yml Ansible playbook 文件的副本。例如:
$ cp data-archive-in-asymmetric-vault.yml add-services-to-an-asymmetric-vault.yml- 打开 data-archive-in-asymmetric-vault-copy.yml 文件进行编辑。
通过在
ipavault任务部分设置以下变量来修改该文件:-
将
ipaadmin_password变量设置为 IdM 管理员密码。 -
将
name变量设置为 vault 的名称,如 secret_vault。 -
将
service变量设置为密码库的服务所有者,如 HTTP/webserver1.idm.example.com。 -
定义您要使用
services变量访问 vault 机密的服务。 将
action变量设置为member。对于当前示例为修改过的 Ansible playbook 文件:
--- - name: Tests hosts: ipaserver gather_facts: false vars_files: - /home/user_name/MyPlaybooks/secret.yml tasks: - ipavault: ipaadmin_password: "{{ ipaadmin_password }}" name: secret_vault service: HTTP/webserver1.idm.example.com services: - HTTP/webserver2.idm.example.com - HTTP/webserver3.idm.example.com action: member-
将
- 保存这个文件。
运行 playbook:
$ ansible-playbook --vault-password-file=password_file -v -i inventory.file add-services-to-an-asymmetric-vault.yml
25.3. 使用 Ansible 将 IdM 服务 secret 存储在非对称库中
按照以下流程,使用 Ansible playbook 将 secret 存储在服务 vault 中,以便稍后可被服务检索。在以下流程中使用的示例中,管理员将带有 secret 的 PEM 文件存储在名为 secret_vault 的非对称库中。这样可确保服务必须使用私钥进行身份验证,以便从 vault 中检索机密。vault 成员能够从任何 IdM 客户端检索 文件。
先决条件
您已配置了 Ansible 控制节点以满足以下要求:
- 您使用 Ansible 版本 2.14 或更高版本。
-
您已在 Ansible 控制器上安装了
ansible-freeipa软件包。 - 示例假定在 ~/MyPlaybooks/ 目录中,您已创建了带有 IdM 服务器的完全限定域名(FQDN)的 Ansible 清单文件。
-
示例假定 secret.yml Ansible vault 存储了
ipaadmin_password。
- 您知道 IdM 管理员密码。
- 您已创建了非对称密码库用于存储服务机密。
- secret 存储在 Ansible 控制器上,例如 /usr/share/doc/ansible-freeipa/playbooks/vault/private-key-to-an-externally-certificate.pem 文件中。
流程
导航到
/usr/share/doc/ansible-freeipa/playbooks/vault目录:$ cd /usr/share/doc/ansible-freeipa/playbooks/vault可选:如果不存在,创建一个清单文件(如 inventory.file)。
$ touch inventory.file打开清单文件,并在
[ipaserver]部分中定义您要配置的 IdM 服务器。例如,要指示 Ansible 配置 server.idm.example.com,请输入:[ipaserver] server.idm.example.com
生成 data-archive-in-asymmetric-vault.yml Ansible playbook 文件的副本。例如:
$ cp data-archive-in-asymmetric-vault.yml data-archive-in-asymmetric-vault-copy.yml- 打开 data-archive-in-asymmetric-vault-copy.yml 文件进行编辑。
通过在
ipavault任务部分设置以下变量来修改该文件:-
将
ipaadmin_password变量设置为 IdM 管理员密码。 -
将
name变量设置为 vault 的名称,如 secret_vault。 -
将
service变量设置为密码库的服务所有者,如 HTTP/webserver1.idm.example.com。 -
将
in变量设置为 "{{ lookup('file', 'private-key-to-an-externally-certificate.pem')| b64encode }}"。这可确保 Ansible 使用私钥从 Ansible 控制器上的工作目录检索文件,而不是从 IdM 服务器检索。 将
action变量设置为member。对于当前示例为修改过的 Ansible playbook 文件:
--- - name: Tests hosts: ipaserver gather_facts: false vars_files: - /home/user_name/MyPlaybooks/secret.yml tasks: - ipavault: ipaadmin_password: "{{ ipaadmin_password }}" name: secret_vault service: HTTP/webserver1.idm.example.com in: "{{ lookup('file', 'private-key-to-an-externally-signed-certificate.pem') | b64encode }}" action: member-
将
- 保存这个文件。
运行 playbook:
$ ansible-playbook --vault-password-file=password_file -v -i inventory.file data-archive-in-asymmetric-vault-copy.yml
25.4. 使用 Ansible 为 IdM 服务检索服务 secret
按照以下流程,使用 Ansible playbook 代表服务从服务 vault 中检索 secret。在以下流程中使用的示例中,运行 playbook 从名为 secret_vault 的非对称库检索带有 secret 的 PEM 文件,并将它存储在 Ansible 清单文件中列出的所有主机上的指定位置,存为 ipaservers。
服务使用 keytabs 验证 IdM,并使用私钥与密码库进行身份验证。您可以代表服务从安装 ansible-freeipa 的任何 IdM 客户端检索 文件。
先决条件
您已配置了 Ansible 控制节点以满足以下要求:
- 您使用 Ansible 版本 2.14 或更高版本。
-
您已在 Ansible 控制器上安装了
ansible-freeipa软件包。 - 示例假定在 ~/MyPlaybooks/ 目录中,您已创建了带有 IdM 服务器的完全限定域名(FQDN)的 Ansible 清单文件。
-
示例假定 secret.yml Ansible vault 存储了
ipaadmin_password。
- 您知道 IdM 管理员密码。
- 您已创建了非对称密码库用于存储服务机密。
- 您已在密码库中存档了机密。
-
您已将用于检索服务 vault secret 的私钥存储在 Ansible 控制器上的
private_key_file变量指定的位置。
流程
导航到
/usr/share/doc/ansible-freeipa/playbooks/vault目录:$ cd /usr/share/doc/ansible-freeipa/playbooks/vault可选:如果不存在,创建一个清单文件(如 inventory.file)。
$ touch inventory.file打开清单文件并定义以下主机:
-
在
[ipaserver]部分中定义您的 IdM 服务器。 -
在
[webservers]部分中定义要检索机密的主机。例如,要指示 Ansible 获取到 webserver1.idm.example.com、webserver2.idm.example.com 和 webserver3.idm.example.com 的 secret,请输入:
[ipaserver] server.idm.example.com [webservers] webserver1.idm.example.com webserver2.idm.example.com webserver3.idm.example.com
-
在
生成 retrieve-data-asymmetric-vault.yml Ansible playbook 文件的副本。例如:
$ cp retrieve-data-asymmetric-vault.yml retrieve-data-asymmetric-vault-copy.yml- 打开 retrieve-data-asymmetric-vault-copy.yml 文件进行编辑。
通过在
ipavault任务部分设置以下变量来修改该文件:-
将
ipaadmin_password变量设置为 IdM 管理员密码。 -
将
name变量设置为 vault 的名称,如 secret_vault。 -
将
service变量设置为密码库的服务所有者,如 HTTP/webserver1.idm.example.com。 -
将
private_key_file变量设置为用于检索服务 vault secret 的私钥的位置。 -
将
out变量设置为 IdM 服务器上您要检索 private-key-to-an-externally-certificate.pem 机密的位置,如当前工作目录。 将
action变量设置为member。对于当前示例为修改过的 Ansible playbook 文件:
--- - name: Retrieve data from vault hosts: ipaserver become: no gather_facts: false vars_files: - /home/user_name/MyPlaybooks/secret.yml tasks: - name: Retrieve data from the service vault ipavault: ipaadmin_password: "{{ ipaadmin_password }}" name: secret_vault service: HTTP/webserver1.idm.example.com vault_type: asymmetric private_key: "{{ lookup('file', 'service-private.pem') | b64encode }}" out: private-key-to-an-externally-signed-certificate.pem state: retrieved-
将
在 playbook 中添加一个部分,它将从 IdM 服务器检索数据文件到 Ansible 控制器:
--- - name: Retrieve data from vault hosts: ipaserver become: no gather_facts: false tasks: [...] - name: Retrieve data file fetch: src: private-key-to-an-externally-signed-certificate.pem dest: ./ flat: yes mode: 0600在 playbook 中添加一个部分,将检索到的 private-key-to-an-externally-signed-certificate.pem 文件从 Ansible 控制器所在的地方传输到清单文件的
webservers部分所列出的 webserver 中:--- - name: Send data file to webservers become: no gather_facts: no hosts: webservers tasks: - name: Send data to webservers copy: src: private-key-to-an-externally-signed-certificate.pem dest: /etc/pki/tls/private/httpd.key mode: 0444- 保存这个文件。
运行 playbook:
$ ansible-playbook --vault-password-file=password_file -v -i inventory.file retrieve-data-asymmetric-vault-copy.yml
25.5. 在使用 Ansible 泄露时更改 IdM 服务 vault secret
当服务实例被破坏时,请按照此流程重新使用 Ansible playbook 来更改存储在服务 vault 中的 secret。以下示例中,假设获取的机密在 webserver3.idm.example.com 上已被破坏,而存储机密的非对称 vault 存储的密钥没有被破坏。在示例中,管理员重复利用在非对称库中存储一个 secret 时,以及从非对称库中获取一个 secret 导入到 IdM 主机 时使用的 Ansible playbook。在流程开始时,IdM 管理员将新的 PEM 文件存储在非对称的密码库中,对清单文件进行调整,以便不会从已被侵入的 Web 服务器(webserver3.idm.example.com)检索新机密,,然后重新运行这两个过程。
先决条件
您已配置了 Ansible 控制节点以满足以下要求:
- 您使用 Ansible 版本 2.14 或更高版本。
-
您已在 Ansible 控制器上安装了
ansible-freeipa软件包。 - 示例假定在 ~/MyPlaybooks/ 目录中,您已创建了带有 IdM 服务器的完全限定域名(FQDN)的 Ansible 清单文件。
-
示例假定 secret.yml Ansible vault 存储了
ipaadmin_password。
- 您知道 IdM 管理员密码。
- 您已创建了非对称密码库用于存储服务机密。
-
您已为 IdM 主机上运行的 web 服务生成了一个新的
httpd密钥,以替换已被破坏的旧密钥。 -
新
httpd密钥存储在本地 Ansible 控制器上,例如 /usr/share/doc/ansible-freeipa/playbooks/vault/private-key-to-an-externally-certificate.pem 文件中。
流程
导航到
/usr/share/doc/ansible-freeipa/playbooks/vault目录:$ cd /usr/share/doc/ansible-freeipa/playbooks/vault打开清单文件,并确保正确定义了以下主机:
-
在
[ipaserver]部分中的 IdM 服务器。 要在
[webservers]部分中检索 secret 的主机。例如,要指示 Ansible 获取到 webserver1.idm.example.com 和 webserver2.idm.example.com 的 secret,请输入:[ipaserver] server.idm.example.com [webservers] webserver1.idm.example.com webserver2.idm.example.com
重要确保列表不包含被入侵的 webserver,在当前的示例 webserver3.idm.example.com 中。
-
在
- 打开 data-archive-in-asymmetric-vault-copy.yml 文件进行编辑。
通过在
ipavault任务部分设置以下变量来修改该文件:-
将
ipaadmin_password变量设置为 IdM 管理员密码。 -
将
name变量设置为 vault 的名称,如 secret_vault。 -
将
service变量设置为 vault 的服务所有者,如 HTTP/webserver.idm.example.com。 -
将
in变量设置为 "{{ lookup('file', 'new-private-key-to-an-externally-signed-certificate.pem') | b64encode }}"。这可确保 Ansible 使用私钥从 Ansible 控制器上的工作目录检索文件,而不是从 IdM 服务器检索。 将
action变量设置为member。对于当前示例为修改过的 Ansible playbook 文件:
--- - name: Tests hosts: ipaserver gather_facts: false vars_files: - /home/user_name/MyPlaybooks/secret.yml tasks: - ipavault: ipaadmin_password: "{{ ipaadmin_password }}" name: secret_vault service: HTTP/webserver.idm.example.com in: "{{ lookup('file', 'new-private-key-to-an-externally-signed-certificate.pem') | b64encode }}" action: member-
将
- 保存这个文件。
运行 playbook:
$ ansible-playbook --vault-password-file=password_file -v -i inventory.file data-archive-in-asymmetric-vault-copy.yml- 打开 retrieve-data-asymmetric-vault-copy.yml 文件进行编辑。
通过在
ipavault任务部分设置以下变量来修改该文件:-
将
ipaadmin_password变量设置为 IdM 管理员密码。 -
将
name变量设置为 vault 的名称,如 secret_vault。 -
将
service变量设置为密码库的服务所有者,如 HTTP/webserver1.idm.example.com。 -
将
private_key_file变量设置为用于检索服务 vault secret 的私钥的位置。 -
将
out变量设置为 IdM 服务器上您要检索 new-private-key-to-an-externally-signed-certificate.pem 机密的位置,如当前工作目录。 将
action变量设置为member。对于当前示例为修改过的 Ansible playbook 文件:
--- - name: Retrieve data from vault hosts: ipaserver become: no gather_facts: false vars_files: - /home/user_name/MyPlaybooks/secret.yml tasks: - name: Retrieve data from the service vault ipavault: ipaadmin_password: "{{ ipaadmin_password }}" name: secret_vault service: HTTP/webserver1.idm.example.com vault_type: asymmetric private_key: "{{ lookup('file', 'service-private.pem') | b64encode }}" out: new-private-key-to-an-externally-signed-certificate.pem state: retrieved-
将
在 playbook 中添加一个部分,它将从 IdM 服务器检索数据文件到 Ansible 控制器:
--- - name: Retrieve data from vault hosts: ipaserver become: true gather_facts: false tasks: [...] - name: Retrieve data file fetch: src: new-private-key-to-an-externally-signed-certificate.pem dest: ./ flat: yes mode: 0600在 playbook 中添加一个部分,将检索到的 new-private-key-to-an-externally-signed-certificate.pem 文件从 Ansible 控制器所在的地方传输到清单文件的
webservers部分所列出的 webserver 中:--- - name: Send data file to webservers become: true gather_facts: no hosts: webservers tasks: - name: Send data to webservers copy: src: new-private-key-to-an-externally-signed-certificate.pem dest: /etc/pki/tls/private/httpd.key mode: 0444- 保存这个文件。
运行 playbook:
$ ansible-playbook --vault-password-file=password_file -v -i inventory.file retrieve-data-asymmetric-vault-copy.yml
25.6. 其他资源
-
请参阅
/usr/share/doc/ansible-freeipa/目录中的 README-vault.md Markdown 文件。 -
请参阅
/usr/share/doc/ansible-freeipa/playbooks/vault/目录中的 playbook 示例。
第 26 章 使用 Ansible 确保 IdM 中存在和不存在服务
使用 Ansible service 模块,Identity Management(IdM)管理员可以确保 IdM 中没有对于 IdM 为非原生的特定服务。例如,您可以使用 service 模块来:
检查 IdM 客户端中是否存在手动安装的服务,并在缺少该服务时自动安装该服务。详情请查看:
- 检查在 IdM 中注册的服务是否附加了证书,并在缺少证书时自动安装该证书。详情请查看:
- 确保 IdM 服务条目中存在外部签名的证书。
允许 IdM 用户和主机检索并创建 service keytab。详情请查看:
允许 IdM 用户和主机向服务中添加 Kerberos 别名。详情请查看:
检查 IdM 客户端中是否不存在服务,并在服务存在时自动删除该服务。详情请查看:
26.1. 使用 Ansible playbook 确保 IdM 中是否存在 HTTP 服务
按照以下流程,使用 Ansible playbook 确保 HTTP 服务器在 IdM 中存在。
先决条件
- 托管 HTTP 服务的系统是 IdM 客户端。
- 您有 IdM 管理员密码。
流程
创建一个清单文件,如
inventory.file:$ touch inventory.file打开
inventory.file,并在[ipaserver]部分定义您要配置的 IdM 服务器。例如,要指示 Ansible 配置 server.idm.example.com,请输入:[ipaserver] server.idm.example.com
复制
/usr/share/doc/ansible-freeipa/playbooks/service/service-is-present.ymlAnsible playbook 文件。例如:$ cp /usr/share/doc/ansible-freeipa/playbooks/service/service-is-present.yml /usr/share/doc/ansible-freeipa/playbooks/service/service-is-present-copy.yml打开
/usr/share/doc/ansible-freeipa/playbooks/service/service-is-present-copy.ymlAnsible playbook 文件进行编辑:--- - name: Playbook to manage IPA service. hosts: ipaserver gather_facts: false vars_files: - /home/user_name/MyPlaybooks/secret.yml tasks: # Ensure service is present - ipaservice: ipaadmin_password: "{{ ipaadmin_password }}" name: HTTP/client.idm.example.com改写文件:
-
更改
ipaadmin_password变量定义的 IdM 管理员密码。 -
更改运行 HTTP 服务的 IdM 客户端的名称,如
ipaservice任务的name变量所定义。
-
更改
- 保存并退出 文件。
运行 Ansible playbook。指定 playbook 文件、存储保护 secret.yml 文件的密码,以及清单文件:
$ ansible-playbook --vault-password-file=password_file -v -i path_to_inventory_directory/inventory.file /usr/share/doc/ansible-freeipa/playbooks/service/service-is-present-copy.yml
验证步骤
- 以 IdM 管理员身份登录 IdM Web UI。
-
进入到
Identity→Services。
如果在 Services 列表中列出了 HTTP/client.idm.example.com@IDM.EXAMPLE.COM,代表 Ansible playbook 已成功添加到 IdM。
其他资源
- 要保护 HTTP 服务器和浏览器客户端之间的通信,请参阅 向 Apache HTTP 服务器 添加 TLS 加密。
- 要为 HTTP 服务请求证书,请参阅 使用 certmonger 为服务获取 IdM 证书 中描述的流程。
26.2. 使用一个 Ansible 任务确保在 IdM 客户端上的 IdM 中存在多个服务
您可以使用 ansible-freeipa ipaservice 模块,使用一个 Ansible 任务添加、修改和删除多个身份管理(IdM)服务。为此,请使用 ipaservice 模块的 services 选项。
使用 services 选项,您还可以指定多个仅应用到特定的服务的服务变量。根据 name 变量定义此服务,这是 services 选项的唯一强制变量。
完成此流程,以使用一个任务确保 IdM 中存在 HTTP/client01.idm.example.com@IDM.EXAMPLE.COM 和 ftp/client02.idm.example.com@IDM.EXAMPLE.COM 服务。
先决条件
在控制节点上:
- 您使用 Ansible 版本 2.14 或更高版本。
-
您已安装
ansible-freeipa软件包。 - 您已在 ~/MyPlaybooks/ 目录中创建了一个带有 IdM 服务器的完全限定域名(FQDN)的 Ansible 清单文件。
- 您使用 RHEL 9.3 及更新版本。
-
您已将
ipaadmin_password存储在 secret.yml Ansible vault 中。
流程
使用以下内容创建您的 Ansible playbook 文件 add-http-and-ftp-services.yml :
--- - name: Playbook to add multiple services in a single task hosts: ipaserver vars_files: - /home/user_name/MyPlaybooks/secret.yml tasks: - name: Add HTTP and ftp services ipaservice: ipaadmin_password: "{{ ipaadmin_password }}" services: - name: HTTP/client01.idm.example.com@IDM.EXAMPLE.COM - name: ftp/client02.idm.example.com@IDM.EXAMPLE.COM运行 playbook:
$ ansible-playbook --vault-password-file=password_file -v -i inventory add-http-and-ftp-services.yml
26.3. 使用 Ansible playbook 确保 IdM 中非 IdM 客户端中存在 HTTP 服务
按照以下流程,使用 Ansible playbook 确保 IdM 中的 HTTP 服务器在不是 IdM 客户端的主机上存在。通过将 HTTP 服务器添加到 IdM 中,您还要将主机添加到 IdM。
先决条件
- 您在主机上已 安装了 HTTP 服务。
- 您在其上设置 HTTP 的主机不是 IdM 客户端。否则,请按照 将 HTTP 服务注册到 IdM 中的步骤进行操作。
- 您有 IdM 管理员密码。
- DNS A 记录 - 或 AAAA 记录(如果使用 IPv6) 对于主机可用。
- 如果服务器运行 RHEL 9.2 或更高版本,并且启用了 FIPS 模式,客户端必须支持 Extended Master Secret (EMS)扩展或使用 TLS 1.3。没有 EMS 的 TLS 1.2 连接会失败。如需更多信息,请参阅 强制 TLS 扩展"Extended Master Secret" 知识库文章。
流程
创建一个清单文件,如
inventory.file:$ touch inventory.file打开
inventory.file,并在[ipaserver]部分定义您要配置的 IdM 服务器。例如,要指示 Ansible 配置 server.idm.example.com,请输入:[ipaserver] server.idm.example.com
创建
/usr/share/doc/ansible-freeipa/playbooks/service/service-is-present-without-host-check.ymlAnsible playbook 文件的副本。例如:$ cp /usr/share/doc/ansible-freeipa/playbooks/service/service-is-present-without-host-check.yml /usr/share/doc/ansible-freeipa/playbooks/service/service-is-present-without-host-check-copy.yml打开复制的文件
/usr/share/doc/ansible-freeipa/playbooks/service/service-is-present-without-host-check-copy.yml进行编辑。在ipaservice任务中找到ipaadmin_password和name变量:--- - name: Playbook to manage IPA service. hosts: ipaserver gather_facts: false vars_files: - /home/user_name/MyPlaybooks/secret.yml tasks: # Ensure service is present - ipaservice: ipaadmin_password: "{{ ipaadmin_password }}" name: HTTP/www2.example.com skip_host_check: yes改写文件:
-
将
ipaadmin_password变量设置为 IdM 管理员密码。 -
将
name变量设置为运行 HTTP 服务的主机的名称。
-
将
- 保存并退出 文件。
运行 Ansible playbook。指定 playbook 文件、存储保护 secret.yml 文件的密码,以及清单文件:
$ ansible-playbook --vault-password-file=password_file -v -i path_to_inventory_directory/inventory.file /usr/share/doc/ansible-freeipa/playbooks/service/service-is-present-without-host-check-copy.yml
验证步骤
- 以 IdM 管理员身份登录 IdM Web UI。
-
进入到
Identity→Services。
现在,您可以看到 Services 列表中列出的 HTTP/client.idm.example.com@IDM.EXAMPLE.COM。
其他资源
- 要保护通信,请参阅 向 Apache HTTP 服务器 添加 TLS 加密。
26.4. 使用 Ansible playbook 确保没有 DNS 在 IdM 客户端上存在 HTTP 服务
按照以下流程,使用 Ansible playbook 确保运行在没有 DNS 条目的 IdM 客户端上的 HTTP 服务器存在。这种情况意味着,如果使用了 IPv6 而不是 IPv4,IdM 主机没有可用的 DNS A 条目,或者没有 DNS AAAA 条目。
先决条件
- 托管 HTTP 服务的系统在 IdM 中注册。
- 主机的 DNS A 或 DNS AAAA 记录可能不存在。否则,如果主机的 DNS 记录存在,请按照 使用 Ansible playbook 确保 HTTP 服务在 IdM 中存在 的流程进行操作。
- 您有 IdM 管理员密码。
流程
创建一个清单文件,如
inventory.file:$ touch inventory.file打开
inventory.file,并在[ipaserver]部分定义您要配置的 IdM 服务器。例如,要指示 Ansible 配置 server.idm.example.com,请输入:[ipaserver] server.idm.example.com
创建
/usr/share/doc/ansible-freeipa/playbooks/service/service-is-present-with-host-force.ymlAnsible playbook 文件的副本。例如:$ cp /usr/share/doc/ansible-freeipa/playbooks/service/service-is-present-with-host-force.yml /usr/share/doc/ansible-freeipa/playbooks/service/service-is-present-with-host-force-copy.yml打开复制的文件
/usr/share/doc/ansible-freeipa/playbooks/service/service-is-present-with-host-force-copy.yml进行编辑。在ipaservice任务中找到ipaadmin_password和name变量:--- - name: Playbook to manage IPA service. hosts: ipaserver gather_facts: false vars_files: - /home/user_name/MyPlaybooks/secret.yml tasks: # Ensure service is present - ipaservice: ipaadmin_password: "{{ ipaadmin_password }}" name: HTTP/ihavenodns.info force: yes改写文件:
-
将
ipaadmin_password变量设置为 IdM 管理员密码。 -
将
name变量设置为运行 HTTP 服务的主机的名称。
-
将
- 保存并退出 文件。
运行 Ansible playbook。指定 playbook 文件、存储保护 secret.yml 文件的密码,以及清单文件:
$ ansible-playbook --vault-password-file=password_file -v -i path_to_inventory_directory/inventory.file /usr/share/doc/ansible-freeipa/playbooks/service/service-is-present-with-host-force-copy.yml
验证步骤
- 以 IdM 管理员身份登录 IdM Web UI。
-
进入到
Identity→Services。
现在,您可以看到 Services 列表中列出的 HTTP/client.idm.example.com@IDM.EXAMPLE.COM。
其他资源
- 要保护通信,请参阅 向 Apache HTTP 服务器 添加 TLS 加密。
26.5. 使用 Ansible playbook 确保 IdM 服务条目中存在外部签名的证书
按照以下流程,使用 ansible-freeipa service 模块确保外部证书颁发机构(CA)发布的证书附加到 HTTP 服务的 IdM 条目。如果您的 IdM CA 使用自签名证书,由外部 CA 签名的 HTTP 服务证书而不是 IdM CA 特别有用。
先决条件
- 您在主机上已 安装了 HTTP 服务。
- 您已 向 IdM 中注册了 HTTP 服务。
- 您有 IdM 管理员密码。
- 您有一个外部签名证书,其 Subject 对应于 HTTP 服务的主体。
流程
创建一个清单文件,如
inventory.file:$ touch inventory.file打开
inventory.file,并在[ipaserver]部分定义您要配置的 IdM 服务器。例如,要指示 Ansible 配置 server.idm.example.com,请输入:[ipaserver] server.idm.example.com
复制
/usr/share/doc/ansible-freeipa/playbooks/service/service-member-certificate-present.yml文件,例如:$ cp /usr/share/doc/ansible-freeipa/playbooks/service/service-member-certificate-present.yml /usr/share/doc/ansible-freeipa/playbooks/service/service-member-certificate-present-copy.yml可选:如果证书采用 Privacy Enhanced 邮件(PEM)格式,请将证书转换为可辨识的 Encoding 规则(DER)格式,以便通过命令行界面(CLI)更容易处理:
$ openssl x509 -outform der -in cert1.pem -out cert1.der使用
base64命令,解码DER文件到标准输出。使用-w0选项禁用嵌套:$ base64 cert1.der -w0 MIIC/zCCAeegAwIBAgIUV74O+4kXeg21o4vxfRRtyJm...- 将标准输出中的证书复制到剪贴板。
打开
/usr/share/doc/ansible-freeipa/playbooks/service/service-member-certificate-present-copy.yml文件,进行编辑并查看其内容:--- - name: Service certificate present. hosts: ipaserver gather_facts: false vars_files: - /home/user_name/MyPlaybooks/secret.yml tasks: # Ensure service certificate is present - ipaservice: ipaadmin_password: "{{ ipaadmin_password }}" name: HTTP/client.idm.example.com certificate: | - MIICBjCCAW8CFHnm32VcXaUDGfEGdDL/... [...] action: member state: present改写文件:
-
使用您从 CLI 复制的证书替换由
certificate变量定义的证书。请注意,如果使用certificate:变量,并带有"|"管道字符,您可以使用这个方式输入证书,而不必在一行中输入它。这样可以更轻松地读取证书。 -
更改由
ipaadmin_password变量定义的 IdM 管理员密码。 -
更改运行 HTTP 服务的 IdM 客户端的名称,由
name变量定义。 - 更改任何其他相关变量。
-
使用您从 CLI 复制的证书替换由
- 保存并退出 文件。
运行 Ansible playbook。指定 playbook 文件、存储保护 secret.yml 文件的密码,以及清单文件:
$ ansible-playbook --vault-password-file=password_file -v -i path_to_inventory_directory/inventory.file /usr/share/doc/ansible-freeipa/playbooks/service/service-member-certificate-present-copy.yml
验证步骤
- 以 IdM 管理员身份登录 IdM Web UI。
-
进入到
Identity→Services。 - 点带有新添加的证书的服务名称,如 HTTP/client.idm.example.com。
在右侧的 Service Certificate 部分,您可以看到新添加的证书。
26.6. 使用 Ansible playbook 允许 IdM 用户、组、主机或主机组创建服务的 keytab
keytab 是包含 Kerberos 主体和加密密钥对的文件。keytab 文件通常用于允许脚本使用 Kerberos 自动进行身份验证,而无需人为交互或访问存储在纯文本文件中的密码。然后,该脚本能够使用获取的凭证来访问存储在远程系统中的文件。
作为 Identity Management(IdM)管理员,您可以允许其他用户检索甚至为 IdM 中运行的服务创建一个 keytab。通过允许特定用户和用户组创建 keytab,您可以在不共享 IdM 管理员密码的情况下将该服务管理委派给他们。此委托提供了更加精细的系统管理。
按照以下流程,允许特定的 IdM 用户、用户组、主机和主机组为运行在 IdM 客户端上的 HTTP 服务创建 keytab。特别是,它描述了如何允许 user01 IdM 用户为在名为 client.idm.example.com 的 IdM 客户端上运行的 HTTP 服务创建一个 keytab。
先决条件
- 您知道 IdM 管理员密码。
您已配置了 Ansible 控制节点以满足以下要求:
- 您使用 Ansible 版本 2.14 或更高版本。
-
您已在 Ansible 控制器上安装了
ansible-freeipa软件包。 - 示例假定在 ~/MyPlaybooks/ 目录中,您已创建了带有 IdM 服务器的完全限定域名(FQDN)的 Ansible 清单文件。
-
示例假定 secret.yml Ansible vault 存储了
ipaadmin_password。
- 您已 向 IdM 中注册了 HTTP 服务。
- 托管 HTTP 服务的系统是 IdM 客户端。
- IdM 用户和组要允许在 IdM 中创建 keytab。
- 您希望允许在 IdM 中创建 keytab 的 IdM 主机和主机组。
流程
创建一个清单文件,如
inventory.file:$ touch inventory.file打开
inventory.file,并在[ipaserver]部分定义您要配置的 IdM 服务器。例如,要指示 Ansible 配置 server.idm.example.com,请输入:[ipaserver] server.idm.example.com
复制
/usr/share/doc/ansible-freeipa/playbooks/service/service-member-allow_create_keytab-present.ymlAnsible playbook 文件。例如:$ cp /usr/share/doc/ansible-freeipa/playbooks/service/service-member-allow_create_keytab-present.yml /usr/share/doc/ansible-freeipa/playbooks/service/service-member-allow_create_keytab-present-copy.yml-
打开
/usr/share/doc/ansible-freeipa/playbooks/service/service-member-allow_create_keytab-present-copy.ymlAnsible playbook 文件进行编辑。 通过更改以下内容来调整文件:
-
由
ipaadmin_password变量指定的 IdM 管理员密码。 - 运行 HTTP 服务的 IdM 客户端名称。在当前示例中,它是 HTTP/client.idm.example.com
-
在
allow_create_keytab_user:部分列出的 IdM 用户的名称。在当前示例中,它是 user01。 -
在
allow_create_keytab_group:部分中列出的 IdM 用户组名称。 -
在
allow_create_keytab_host:部分列出的 IdM 主机的名称。 -
在
allow_create_keytab_hostgroup:部分中列出的 IdM 主机组的名称。 由
tasks部分中name变量指定的任务的名称。为当前示例进行调整后,复制的文件如下所示:
--- - name: Service member allow_create_keytab present hosts: ipaserver vars_files: - /home/user_name/MyPlaybooks/secret.yml tasks: - name: Service HTTP/client.idm.example.com members allow_create_keytab present for user01 ipaservice: ipaadmin_password: "{{ ipaadmin_password }}" name: HTTP/client.idm.example.com allow_create_keytab_user: - user01 action: member-
由
- 保存这个文件。
运行 Ansible playbook。指定 playbook 文件、存储保护 secret.yml 文件的密码,以及清单文件:
$ ansible-playbook --vault-password-file=password_file -v -i path_to_inventory_directory/inventory.file /usr/share/doc/ansible-freeipa/playbooks/service/service-member-allow_create_keytab-present-copy.yml
验证步骤
以 IdM 用户身份通过 SSH 到 IdM 服务器,该用户为特定 HTTP 服务创建 keytab:
$ ssh user01@server.idm.example.com Password:使用
ipa-getkeytab命令生成 HTTP 服务的新 keytab:$ ipa-getkeytab -s server.idm.example.com -p HTTP/client.idm.example.com -k /etc/httpd/conf/krb5.keytab-s选项指定密钥分发中心(KDC)服务器来生成 keytab。-p选项指定您要创建的 keytab 的主体。-k选项指定要将新密钥附加到的 keytab 文件。如果文件不存在,则会创建此文件。
如果命令没有出现错误,您已成功以 user01 创建了 HTTP/client.idm.example.com 的 keytab。
26.7. 使用 Ansible playbook 允许 IdM 用户、组、主机或主机组检索服务的 keytab
keytab 是包含 Kerberos 主体和加密密钥对的文件。keytab 文件通常用于允许脚本使用 Kerberos 自动进行身份验证,而无需人为交互或访问存储在纯文本文件中的密码。然后,该脚本能够使用获取的凭证来访问存储在远程系统中的文件。
作为 IdM 管理员,您可以允许其他用户检索甚至为 IdM 中运行的服务创建 keytab。
按照以下流程,允许特定的 IdM 用户、用户组、主机和主机组检索运行在 IdM 客户端上的 HTTP 服务的 keytab。特别是,它描述了如何允许 user01 IdM 用户检索 client.idm.example.com 上运行的 HTTP 服务的 keytab。
先决条件
- 您知道 IdM 管理员密码。
您已配置了 Ansible 控制节点以满足以下要求:
- 您使用 Ansible 版本 2.14 或更高版本。
-
您已在 Ansible 控制器上安装了
ansible-freeipa软件包。 - 示例假定在 ~/MyPlaybooks/ 目录中,您已创建了带有 IdM 服务器的完全限定域名(FQDN)的 Ansible 清单文件。
-
示例假定 secret.yml Ansible vault 存储了
ipaadmin_password。
- 您已 向 IdM 中注册了 HTTP 服务。
- IdM 用户和组要允许检索 IdM 中存在 keytab。
- IdM 主机和主机组允许检索 IdM 中存在 keytab。
流程
创建一个清单文件,如
inventory.file:$ touch inventory.file打开
inventory.file,并在[ipaserver]部分定义您要配置的 IdM 服务器。例如,要指示 Ansible 配置 server.idm.example.com,请输入:[ipaserver] server.idm.example.com
复制
/usr/share/doc/ansible-freeipa/playbooks/service/service-member-allow_retrieve_keytab-present.ymlAnsible playbook 文件。例如:$ cp /usr/share/doc/ansible-freeipa/playbooks/service/service-member-allow_retrieve_keytab-present.yml /usr/share/doc/ansible-freeipa/playbooks/service/service-member-allow_retrieve_keytab-present-copy.yml-
打开复制的文件
/usr/share/doc/ansible-freeipa/playbooks/service/service-member-allow_retrieve_keytab-present-copy.yml进行编辑: 改写文件:
-
将
ipaadmin_password变量设置为 IdM 管理员密码。 -
将
ipaservice任务的name变量设置为 HTTP 服务的主体。在当前示例中,它是 HTTP/client.idm.example.com -
在
allow_retrieve_keytab_group:部分中指定 IdM 用户的名称。在当前示例中,它是 user01。 -
在
allow_retrieve_keytab_group:部分中指定 IdM 用户组的名称。 -
在
allow_retrieve_keytab_group:部分中指定 IdM 主机的名称。 -
在
allow_retrieve_keytab_group:部分中指定 IdM 主机组的名称。 使用
tasks部分中的name变量来指定任务的名称。为当前示例进行调整后,复制的文件如下所示:
--- - name: Service member allow_retrieve_keytab present hosts: ipaserver vars_files: - /home/user_name/MyPlaybooks/secret.yml tasks: - name: Service HTTP/client.idm.example.com members allow_retrieve_keytab present for user01 ipaservice: ipaadmin_password: "{{ ipaadmin_password }}" name: HTTP/client.idm.example.com allow_retrieve_keytab_user: - user01 action: member-
将
- 保存这个文件。
运行 Ansible playbook。指定 playbook 文件、存储保护 secret.yml 文件的密码,以及清单文件:
$ ansible-playbook --vault-password-file=password_file -v -i path_to_inventory_directory/inventory.file /usr/share/doc/ansible-freeipa/playbooks/service/service-member-allow_retrieve_keytab-present-copy.yml
验证步骤
以 IdM 用户身份通过 SSH 到 IdM 服务器,有权检索 HTTP 服务的 keytab:
$ ssh user01@server.idm.example.com Password:使用
ipa-getkeytab命令和-r选项来检索 keytab:$ ipa-getkeytab -r -s server.idm.example.com -p HTTP/client.idm.example.com -k /etc/httpd/conf/krb5.keytab-s选项指定您要从中检索 keytab 的 Key Distribution Center(KDC)服务器。-p选项指定您要检索的 keytab 的主体。-k选项指定您要将检索到的密钥附加到的 keytab 文件。如果文件不存在,则会创建此文件。
如果命令没有出现错误,您已成功以 user01 获取了 HTTP/client.idm.example.com 的 keytab。
26.8. 使用 Ansible playbook 确保服务的 Kerberos 主体别名存在
在某些情况下,IdM 管理员对启用 IdM 用户、主机或服务使用 Kerberos 主体别名进行身份验证非常有用。这些情况包括:
- 用户名被更改,但用户应能够使用上述和新用户名登录系统。
- 用户需要使用电子邮件地址登录,即使 IdM Kerberos 域与电子邮件域不同。
按照以下流程,为运行 client.idm.example.com 上的 HTTP 服务创建 HTTP/mycompany.idm.example.com 主体别名。
先决条件
- 您知道 IdM 管理员密码。
您已配置了 Ansible 控制节点以满足以下要求:
- 您使用 Ansible 版本 2.14 或更高版本。
-
您已在 Ansible 控制器上安装了
ansible-freeipa软件包。 - 示例假定在 ~/MyPlaybooks/ 目录中,您已创建了带有 IdM 服务器的完全限定域名(FQDN)的 Ansible 清单文件。
-
示例假定 secret.yml Ansible vault 存储了
ipaadmin_password。
- 您已在主机上 建立了一个 HTTP 服务。
- 您已 向 IdM 中注册了 HTTP 服务。
- 设置 HTTP 的主机是一个 IdM 客户端。
流程
创建一个清单文件,如
inventory.file:$ touch inventory.file打开
inventory.file,并在[ipaserver]部分定义您要配置的 IdM 服务器。例如,要指示 Ansible 配置 server.idm.example.com,请输入:[ipaserver] server.idm.example.com
复制
/usr/share/doc/ansible-freeipa/playbooks/service/service-member-principal-present.ymlAnsible playbook 文件。例如:$ cp /usr/share/doc/ansible-freeipa/playbooks/service/service-member-principal-present.yml /usr/share/doc/ansible-freeipa/playbooks/service/service-member-principal-present-copy.yml-
打开
/usr/share/doc/ansible-freeipa/playbooks/service/service-member-principal-present-copy.ymlAnsible playbook 文件进行编辑。 通过更改以下内容来调整文件:
-
由
ipaadmin_password变量指定的 IdM 管理员密码。 -
由
name变量指定的服务名称。这是服务的规范主体名称。在当前示例中,它是 HTTP/client.idm.example.com。 -
由
principal变量指定的 Kerberos 主体别名。这是您要添加到name变量定义的服务中的别名。在当前示例中,它是 host/mycompany.idm.example.com。 由
tasks部分中name变量指定的任务的名称。为当前示例进行调整后,复制的文件如下所示:
--- - name: Service member principal present hosts: ipaserver vars_files: - /home/user_name/MyPlaybooks/secret.yml tasks: - name: Service HTTP/client.idm.example.com member principals host/mycompany.idm.exmaple.com present ipaservice: ipaadmin_password: "{{ ipaadmin_password }}" name: HTTP/client.idm.example.com principal: - host/mycompany.idm.example.com action: member-
由
- 保存这个文件。
运行 Ansible playbook。指定 playbook 文件、存储保护 secret.yml 文件的密码,以及清单文件:
$ ansible-playbook --vault-password-file=password_file -v -i path_to_inventory_directory/inventory.file /usr/share/doc/ansible-freeipa/playbooks/service/service-member-principal-present-copy.yml
如果运行 playbook 的结果为 0 个无法访问和 0 个失败,则代表您已成功为 HTTP/client.idm.example.com 服务创建了 host/mycompany.idm.example.com Kerberos 主体。
其他资源
26.9. 使用 Ansible playbook 确保 IdM 中没有 HTTP 服务
按照以下流程从 IdM 取消服务的注册。更具体地说,它描述了如何使用 Ansible playbook 来确保 IdM 中没有名为 HTTP/client.idm.example.com 的 HTTP 服务器。
先决条件
- 您有 IdM 管理员密码。
流程
创建一个清单文件,如
inventory.file:$ touch inventory.file打开
inventory.file,并在[ipaserver]部分定义您要配置的 IdM 服务器。例如,要指示 Ansible 配置 server.idm.example.com,请输入:[ipaserver] server.idm.example.com
创建
/usr/share/doc/ansible-freeipa/playbooks/service/service-is-absent.ymlAnsible playbook 文件的副本。例如:$ cp /usr/share/doc/ansible-freeipa/playbooks/service/service-is-absent.yml /usr/share/doc/ansible-freeipa/playbooks/service/service-is-absent-copy.yml-
打开
/usr/share/doc/ansible-freeipa/playbooks/service/service-is-absent-copy.ymlAnsible playbook 文件进行编辑。 通过更改以下内容来调整文件:
-
IdM 管理员密码由
ipaadmin_password变量定义。 HTTP 服务的 Kerberos 主体,由
ipaservice任务的name变量定义。为当前示例进行调整后,复制的文件如下所示:
--- - name: Playbook to manage IPA service. hosts: ipaserver gather_facts: false vars_files: - /home/user_name/MyPlaybooks/secret.yml tasks: # Ensure service is absent - ipaservice: ipaadmin_password: "{{ ipaadmin_password }}" name: HTTP/client.idm.example.com state: absent-
IdM 管理员密码由
- 保存并退出 文件。
运行 Ansible playbook。指定 playbook 文件、存储保护 secret.yml 文件的密码,以及清单文件:
$ ansible-playbook --vault-password-file=password_file -v -i path_to_inventory_directory/inventory.file /usr/share/doc/ansible-freeipa/playbooks/service/service-is-absent-copy.yml
验证步骤
- 以 IdM 管理员身份登录 IdM Web UI。
-
进入到
Identity→Services。
如果 Services 列表中没有 HTTP/client.idm.example.com@IDM.EXAMPLE.COM 服务,则代表它不存在于 IdM 中。
26.10. 其他资源
-
请参阅
/usr/share/doc/ansible-freeipa/目录中的README-service.mdMarkdown 文件。 -
请参阅
/usr/share/doc/ansible-freeipa/playbooks/config目录中的 playbook 示例。
第 27 章 使用 Ansible playbook 管理 IdM 中的全局 DNS 配置
使用 Red Hat Ansible Engine dnsconfig 模块,您可以为 Identity Management(IdM)DNS 配置全局配置。全局 DNS 配置中定义的设置适用于所有 IdM DNS 服务器。但是,全局配置的优先级低于特定 IdM DNS 区的配置。
dnsconfig 模块支持以下变量:
- 全局转发器,特别是其 IP 地址以及用于通信的端口。
- 全局转发策略:only, first, 或 none。有关这些 DNS 转发策略类型的详情,请参阅 IdM 中的 DNS 转发策略。
- 转发查找和反向查找区域的同步。
先决条件
DNS 服务安装在 IdM 服务器中。有关如何安装带有集成 DNS 的 IdM 服务器的详情,请查看以下链接之一:
本章包括以下部分:
- IdM 如何确保 /etc/resolv.conf 中的全局转发器不会被 NetworkManager 删除
- 使用 Ansible 在 IdM 中存在 DNS 全局转发器
- 使用 Ansible 确保 IdM 中没有 DNS 全局转发器
-
ipadnsconfig ansible-freeipa 模块中的
action: member选项 - IdM 中 DNS 转发策略介绍
- 使用 Ansible playbook 来确保在 IdM DNS 全局配置中设置了转发第一个策略
- 使用 Ansible playbook 来确保 IdM DNS 中禁用了全局转发器
- 使用 Ansible playbook 来确保 IdM DNS 中禁用了转发和反向查询区的同步
27.1. IdM 如何确保 /etc/resolv.conf 中的全局转发器不会被 NetworkManager 删除
安装带有集成 DNS 的身份管理(IdM),配置 /etc/resolv.conf 文件指向 127.0.0.1 localhost 地址:
# Generated by NetworkManager search idm.example.com nameserver 127.0.0.1
在某些环境中,比如使用 Dynamic Host Configuration Protocol (DHCP) 的网络,NetworkManager 服务可能会恢复对 /etc/resolv.conf 文件的更改。要使 DNS 配置持久,IdM DNS 安装过程还会使用以下方法配置 NetworkManager 服务:
DNS 安装脚本会创建一个
/etc/NetworkManager/conf.d/zzz-ipa.confNetworkManager配置文件来控制搜索顺序和 DNS 服务器列表:# auto-generated by IPA installer [main] dns=default [global-dns] searches=$DOMAIN [global-dns-domain-*] servers=127.0.0.1
-
NetworkManager服务被重新载入,它总是使用/etc/NetworkManager/conf.d/目录中的最后一个文件中的设置创建/etc/resolv.conf文件。在这种情况下,zzz-ipa.conf文件。
不要手动修改 /etc/resolv.conf 文件。
27.2. 使用 Ansible 在 IdM 中存在 DNS 全局转发器
按照以下流程,使用 Ansible playbook 确保 DNS 全局转发器在 IdM 中存在。在下例中,IdM 管理员确保在 DNS 服务器中存在一个到 IPv4 地址为 7.7.9.9,IP v6 地址为 2001:db8::1:0,端口 53 的 DNS global forwarder。
先决条件
您已配置了 Ansible 控制节点以满足以下要求:
- 您使用 Ansible 版本 2.14 或更高版本。
-
您已在 Ansible 控制器上安装了
ansible-freeipa软件包。 - 示例假定在 ~/MyPlaybooks/ 目录中,您已创建了带有 IdM 服务器的完全限定域名(FQDN)的 Ansible 清单文件。
-
示例假定 secret.yml Ansible vault 存储了
ipaadmin_password。
- 您知道 IdM 管理员密码。
流程
进入
/usr/share/doc/ansible-freeipa/playbooks/dnsconfig目录:$ cd /usr/share/doc/ansible-freeipa/playbooks/dnsconfig
打开清单文件,并确保
[ipaserver]部分中列出了您要配置的 IdM 服务器。例如,要指示 Ansible 配置server.idm.example.com,请输入:[ipaserver] server.idm.example.com
复制
forwarders-absent.ymlAnsible playbook 文件。例如:$ cp forwarders-absent.yml ensure-presence-of-a-global-forwarder.yml
-
打开
ensure-presence-of-a-global-forwarder.yml文件进行编辑。 通过设置以下变量来调整文件:
-
将 playbook 的
name变量更改为Playbook,以确保 IdM DNS 中存在全局转发器。 -
在
tasks部分中,将任务name更改为Ensure the presence of a DNS global forwarder to 7.7.9.9 and 2001:db8::1:0 on port 53。 在
ipadnsconfig部分的forwarders部分:-
将第一个
ip_address值更改为全局转发器的 IPv4 地址:7.7.9.9。 -
将第二个
ip_address值更改为全局转发器的 IPv6 地址:2001:db8::1:0。 -
验证
port值被设置为53。
-
将第一个
将
state该为present。对于当前示例为修改过的 Ansible playbook 文件:
--- - name: Playbook to ensure the presence of a global forwarder in IdM DNS hosts: ipaserver vars_files: - /home/user_name/MyPlaybooks/secret.yml tasks: - name: Ensure the presence of a DNS global forwarder to 7.7.9.9 and 2001:db8::1:0 on port 53 ipadnsconfig: forwarders: - ip_address: 7.7.9.9 - ip_address: 2001:db8::1:0 port: 53 state: present-
将 playbook 的
- 保存这个文件。
运行 playbook:
$ ansible-playbook --vault-password-file=password_file -v -i inventory.file ensure-presence-of-a-global-forwarder.yml
其他资源
-
请参阅
/usr/share/doc/ansible-freeipa/目录中的README-dnsconfig.md文件。
27.3. 使用 Ansible 确保 IdM 中没有 DNS 全局转发器
按照以下流程,使用 Ansible playbook 确保 DNS 全局转发器在 IdM 中不存在。在以下示例流程中,IdM 管理员确保在端口 53 上没有互联网协议(IP)v4 地址为 8.8.6.6 和 IP v6 地址为 2001:4860:4860::8800 的 DNS 全局转发器。
先决条件
您已配置了 Ansible 控制节点以满足以下要求:
- 您使用 Ansible 版本 2.14 或更高版本。
-
您已在 Ansible 控制器上安装了
ansible-freeipa软件包。 - 示例假定在 ~/MyPlaybooks/ 目录中,您已创建了带有 IdM 服务器的完全限定域名(FQDN)的 Ansible 清单文件。
-
示例假定 secret.yml Ansible vault 存储了
ipaadmin_password。
- 您知道 IdM 管理员密码。
流程
进入
/usr/share/doc/ansible-freeipa/playbooks/dnsconfig目录:$ cd /usr/share/doc/ansible-freeipa/playbooks/dnsconfig
打开清单文件,并确保
[ipaserver]部分中列出了您要配置的 IdM 服务器。例如,要指示 Ansible 配置server.idm.example.com,请输入:[ipaserver] server.idm.example.com
复制
forwarders-absent.ymlAnsible playbook 文件。例如:$ cp forwarders-absent.yml ensure-absence-of-a-global-forwarder.yml
-
打开
ensure-absence-of-a-global-forwarder.yml文件进行编辑。 通过设置以下变量来调整文件:
-
将 playbook 的
name变量更改为Playbook,以确保 IdM DNS 中没有全局转发器。 -
在
tasks部分,将任务的name改为Ensure the absence of a DNS global forwarder to 8.8.6.6 and 2001:4860:4860::8800 on port 53。 在
ipadnsconfig部分的forwarders部分:-
将第一个
ip_address值更改为全局转发器的 IPv4 地址:8.8.6.6。 -
将第二个
ip_address值更改为全局转发器的 IPv6 地址:2001:4860:4860::8800。 -
验证
port值被设置为53。
-
将第一个
-
将
action变量设置为member。 -
验证
state被设置为absent。
对于当前示例为修改过的 Ansible playbook 文件:
--- - name: Playbook to ensure the absence of a global forwarder in IdM DNS hosts: ipaserver vars_files: - /home/user_name/MyPlaybooks/secret.yml tasks: - name: Ensure the absence of a DNS global forwarder to 8.8.6.6 and 2001:4860:4860::8800 on port 53 ipadnsconfig: forwarders: - ip_address: 8.8.6.6 - ip_address: 2001:4860:4860::8800 port: 53 action: member state: absent重要如果您仅在 playbook 中使用
state: absent选项,而不使用action: member,则 playbook 会失败。-
将 playbook 的
- 保存这个文件。
运行 playbook:
$ ansible-playbook --vault-password-file=password_file -v -i inventory.file ensure-absence-of-a-global-forwarder.yml
其他资源
-
/usr/share/doc/ansible-freeipa/目录中的README-dnsconfig.md文件 -
ipadnsconfig ansible-freeipa 模块中的
action: member选项
27.4. ipadnsconfig ansible-freeipa 模块中的 action: member 选项
使用 ansible-freeipa ipadnsconfig 模块在身份管理(IdM)中排除全局转发器,除了使用 state: absent 选项外,还需要使用 action: member 选项。如果您只使用 playbook 中的 state: absent,而没有使用 action: member,则 playbook 将失败。因此,要删除所有全局转发器,您必须在 playbook 中单独指定它们。相反,state: present 选项不需要 action: member。
下表 提供了添加和删除 DNS 全局转发器的配置示例,其演示了 action: member 选项的正确使用。表中每一行显示了:
- 执行 playbook 前配置的全局转发器
- playbook 摘录
- 执行 playbook 后配置的全局转发器
表 27.1. 全局转发器的 ipadnsconfig 管理
| 之前的转发器 | Playbook 摘录 | 之后的转发器 |
|---|---|---|
| 8.8.6.6 |
[...]
tasks:
- name: Ensure the presence of DNS global forwarder 8.8.6.7
ipadnsconfig:
forwarders:
- ip_address: 8.8.6.7
state: present
| 8.8.6.7 |
| 8.8.6.6 |
[...]
tasks:
- name: Ensure the presence of DNS global forwarder 8.8.6.7
ipadnsconfig:
forwarders:
- ip_address: 8.8.6.7
action: member
state: present
| 8.8.6.6, 8.8.6.7 |
| 8.8.6.6, 8.8.6.7 |
[...]
tasks:
- name: Ensure the absence of DNS global forwarder 8.8.6.7
ipadnsconfig:
forwarders:
- ip_address: 8.8.6.7
state: absent
| 尝试执行 playbook 会导致错误。原始配置 - 8.8.6.6、8.8.6.7 - 保持不变。 |
| 8.8.6.6, 8.8.6.7 |
[...]
tasks:
- name: Ensure the absence of DNS global forwarder 8.8.6.7
ipadnsconfig:
forwarders:
- ip_address: 8.8.6.7
action: member
state: absent
| 8.8.6.6 |
27.5. IdM 中的 DNS 转发策略
IdM 支持 first 和 only 标准 BIND 转发策略,以及 none 特定于 IdM 的转发策略。
- Forward first (默认)
-
IdM BIND 服务将 DNS 查询转发到配置的转发器。如果因为服务器错误或超时导致查询失败,BIND 会使用互联网上的服务器返回到递归解析。
forward first策略是默认策略,它适用于优化 DNS 流量。 - Forward only
-
IdM BIND 服务将 DNS 查询转发到配置的转发器。如果因为服务器错误或超时而查询失败,BIND 会将错误返回到客户端。对于带有 split DNS 配置的环境,建议使用
forward only策略。 - None (禁用转发)
-
DNS 查询不会通过
none转发策略转发。禁用转发只作为全局转发配置的特定区覆盖很有用。这个选项等同于在 BIND 配置中指定空转发器列表。
您不能使用转发将 IdM 中的数据与来自其他 DNS 服务器的数据合并。您只能为 IdM DNS 中主区的特定子区转发查询。
默认情况下,如果查询的 DNS 名称属于 IdM 服务器有权威的区域,则 BIND 服务不会将查询转发到另一台服务器。在这种情况下,如果在 IdM 数据库中找不到查询的 DNS 名称,则返回 NXDOMAIN 回答。未使用转发功能。
例 27.1. 使用情况示例
IdM 服务器对 test.example 具有权威性。DNS 区域。BIND 被配置为把查询转发到带有 192.0.2.254 IP 地址的 DNS 服务器。
当客户发送对 nonexistent.test.example. 的查询DNS 名称,BIND 检测到 IdM 服务器对 test.example. 区域具有权威,且不会将查询转发到 192.0.2.254. 服务器。因此,DNS 客户端接收 NXDomain 错误消息,告知用户查询域不存在。
27.6. 使用 Ansible playbook 来确保在 IdM DNS 全局配置中设置了转发第一个策略
按照以下流程,使用 Ansible playbook 确保 IdM DNS 中的全局转发策略被设置为 forward first。
如果您使用 forward first DNS 转发策略,DNS 查询会转发到配置的转发器。如果因为服务器错误或超时导致查询失败,BIND 会使用互联网上的服务器返回到递归解析。forward first 是默认的策略。它适用于流量优化。
先决条件
您已配置了 Ansible 控制节点以满足以下要求:
- 您使用 Ansible 版本 2.14 或更高版本。
-
您已在 Ansible 控制器上安装了
ansible-freeipa软件包。 - 示例假定在 ~/MyPlaybooks/ 目录中,您已创建了带有 IdM 服务器的完全限定域名(FQDN)的 Ansible 清单文件。
-
示例假定 secret.yml Ansible vault 存储了
ipaadmin_password。
- 您知道 IdM 管理员密码。
- 您的 IdM 环境包含一个集成的 DNS 服务器。
流程
进入
/usr/share/doc/ansible-freeipa/playbooks/dnsconfig目录:$ cd /usr/share/doc/ansible-freeipa/playbooks/dnsconfig打开您的清单文件,并确保您要配置的 IdM 服务器列在
[ipaserver]部分。例如,要指示 Ansible 配置 server.idm.example.com,请输入:[ipaserver] server.idm.example.com
复制 set-configuration.yml Ansible playbook 文件。例如:
$ cp set-configuration.yml set-forward-policy-to-first.yml- 打开 set-forward-policy-to-first.yml 文件进行编辑。
通过在
ipadnsconfig任务部分中设置以下变量来修改该文件:-
将
ipaadmin_password变量设置为 IdM 管理员密码。 将
forward_policy变量设置为 first。删除原始 playbook 中所有无关的行。这是当前示例修改的 Ansible playbook 文件:
--- - name: Playbook to set global forwarding policy to first hosts: ipaserver become: true tasks: - name: Set global forwarding policy to first. ipadnsconfig: ipaadmin_password: "{{ ipaadmin_password }}" forward_policy: first-
将
- 保存这个文件。
运行 playbook:
$ ansible-playbook --vault-password-file=password_file -v -i inventory.file set-forward-policy-to-first.yml
其他资源
- 请参阅 IdM 中的 DNS 转发策略。
-
请参阅
/usr/share/doc/ansible-freeipa/目录中的README-dnsconfig.md文件。 -
如需更多 playbook 示例,请参阅
/usr/share/doc/ansible-freeipa/playbooks/dnsconfig目录。
27.7. 使用 Ansible playbook 来确保 IdM DNS 中禁用了全局转发器
按照以下流程,使用 Ansible playbook 确保全局转发器在 IdM DNS 中被禁用。禁用过程可通过将 forward_policy 变量设置为 none 来完成。
禁用全局转发器会导致无法转发 DNS 查询。禁用转发只作为全局转发配置的特定区覆盖很有用。这个选项等同于在 BIND 配置中指定空转发器列表。
先决条件
您已配置了 Ansible 控制节点以满足以下要求:
- 您使用 Ansible 版本 2.14 或更高版本。
-
您已在 Ansible 控制器上安装了
ansible-freeipa软件包。 - 示例假定在 ~/MyPlaybooks/ 目录中,您已创建了带有 IdM 服务器的完全限定域名(FQDN)的 Ansible 清单文件。
-
示例假定 secret.yml Ansible vault 存储了
ipaadmin_password。
- 您知道 IdM 管理员密码。
- 您的 IdM 环境包含一个集成的 DNS 服务器。
流程
进入
/usr/share/doc/ansible-freeipa/playbooks/dnsconfig目录:$ cd /usr/share/doc/ansible-freeipa/playbooks/dnsconfig打开您的清单文件,并确保您要配置的 IdM 服务器列在
[ipaserver]部分。例如,要指示 Ansible 配置 server.idm.example.com,请输入:[ipaserver] server.idm.example.com
复制 disable-global-forwarders.yml Ansible playbook 文件。例如:
$ cp disable-global-forwarders.yml disable-global-forwarders-copy.yml- 打开 disable-global-forwarders-copy.yml 文件进行编辑。
通过在
ipadnsconfig任务部分中设置以下变量来修改该文件:-
将
ipaadmin_password变量设置为 IdM 管理员密码。 将
forward_policy变量设置为 none。这是当前示例修改的 Ansible playbook 文件:
--- - name: Playbook to disable global DNS forwarders hosts: ipaserver become: true tasks: - name: Disable global forwarders. ipadnsconfig: ipaadmin_password: "{{ ipaadmin_password }}" forward_policy: none-
将
- 保存这个文件。
运行 playbook:
$ ansible-playbook --vault-password-file=password_file -v -i inventory.file disable-global-forwarders-copy.yml
其他资源
- 请参阅 IdM 中的 DNS 转发策略。
-
请参阅
/usr/share/doc/ansible-freeipa/目录中的README-dnsconfig.md文件。 -
请参阅
/usr/share/doc/ansible-freeipa/playbooks/dnsconfig目录中的更多 playbook 示例。
27.8. 使用 Ansible playbook 来确保 IdM DNS 中禁用了转发和反向查询区的同步
按照以下流程,使用 Ansible playbook 确保正向和反向查找区域在 IdM DNS 中未同步。
先决条件
您已配置了 Ansible 控制节点以满足以下要求:
- 您使用 Ansible 版本 2.14 或更高版本。
-
您已在 Ansible 控制器上安装了
ansible-freeipa软件包。 - 示例假定在 ~/MyPlaybooks/ 目录中,您已创建了带有 IdM 服务器的完全限定域名(FQDN)的 Ansible 清单文件。
-
示例假定 secret.yml Ansible vault 存储了
ipaadmin_password。
- 您知道 IdM 管理员密码。
- 您的 IdM 环境包含一个集成的 DNS 服务器。
流程
进入
/usr/share/doc/ansible-freeipa/playbooks/dnsconfig目录:$ cd /usr/share/doc/ansible-freeipa/playbooks/dnsconfig打开您的清单文件,并确保您要配置的 IdM 服务器列在
[ipaserver]部分。例如,要指示 Ansible 配置 server.idm.example.com,请输入:[ipaserver] server.idm.example.com
复制 disallow-reverse-sync.yml Ansible playbook 文件。例如:
$ cp disallow-reverse-sync.yml disallow-reverse-sync-copy.yml- 打开 disallow-reverse-sync-copy.yml 文件进行编辑。
通过在
ipadnsconfig任务部分中设置以下变量来修改该文件:-
将
ipaadmin_password变量设置为 IdM 管理员密码。 将
allow_sync_ptr变量设置为 no。这是当前示例修改的 Ansible playbook 文件:
--- - name: Playbook to disallow reverse record synchronization hosts: ipaserver become: true tasks: - name: Disallow reverse record synchronization. ipadnsconfig: ipaadmin_password: "{{ ipaadmin_password }}" allow_sync_ptr: no-
将
- 保存这个文件。
运行 playbook:
$ ansible-playbook --vault-password-file=password_file -v -i inventory.file disallow-reverse-sync-copy.yml
其他资源
-
请参阅
/usr/share/doc/ansible-freeipa/目录中的README-dnsconfig.md文件。 -
如需更多 playbook 示例,请参阅
/usr/share/doc/ansible-freeipa/playbooks/dnsconfig目录。
第 28 章 使用 Ansible playbook 管理 IdM DNS 区域
作为 Identity Management(IdM)管理员,您可以使用 ansible-freeipa 软件包中的 dnszone 模块来管理 IdM DNS 区域的工作方式。
先决条件
- DNS 服务安装在 IdM 服务器中。有关如何使用 Red Hat Ansible Engine 安装带有集成 DNS 的 IdM 服务器的更多信息,请参阅 使用 Ansible playbook 安装身份管理服务器。
28.1. 支持的 DNS 区类型
身份管理 (IdM) 支持两种类型的 DNS 区域:primary 和 forward区域。此处描述了这两种类型的区域,包括 DNS 转发的示例场景。
本指南对区域类型使用 BIND 术语,它与用于 Microsoft Windows DNS 的术语不同。BIND 服务器中的 Primary zones 与 Microsoft Windows DNS 中的 forward lookup zones 和 reverse lookup zones 作用相同。BIND 中的转发区与 Microsoft Windows DNS 中的 条件转发转发器 相同。
- 主 DNS 区域
主 DNS 区域包含权威 DNS 数据,并可以接受动态 DNS 更新。这个行为等同于标准 BIND 配置中的
type master设置。您可以使用ipa dnszone-*命令管理主区。在符合标准 DNS 规则的情况下,每个主区域必须包含
start of authority(SOA) andnameserver(NS) 记录。IdM 在创建 DNS 区域时自动生成这些记录,但您必须手动将 NS 记录复制到父区以创建正确的委托。根据标准 BIND 行为,查询该服务器不是权威服务器将转发到其他 DNS 服务器的名称。这些 DNS 服务器(如转发器)可能或对查询没有权威。
例 28.1. DNS 转发示例
IdM 服务器包含
test.example.primary zone。此区域包含sub.test.example.name 的 NS 委派记录。另外,test.example.区域被配置为sub.text.example子区的192.0.2.254转发器 IP 地址。查询名称
nonexistent.test.example.的客户端会接收到NXDomain回答,且不会发生转发,因为 IdM 服务器对该名称具有权威。另一方面,查询
host1.sub.test.example.名称将转发到配置的 forwarder192.0.2.254,因为 IdM 服务器对这个名称没有权威。- 转发 DNS 区域
从 IdM 的角度来看,转发 DNS 区域不包含任何权威数据。实际上,转发的"zone"通常仅包含两部分信息:
- 一个域名
- 与域关联的 DNS 服务器的 IP 地址
属于定义域的名称的所有查询都转发到指定的 IP 地址。这个行为等同于标准 BIND 配置中的 type forward 设置。您可以使用 ipa dnsforwardzone-* 命令管理转发区。
在 IdM-Active Directory(AD)信任上下文中转发 DNS 区域特别有用。如果 IdM DNS 服务器对 idm.example.com 区域有权威,并且 AD DNS 服务器对 ad.example.com 区域有权威,则 ad.example.com 是 idm.example.com 主区域的 DNS 转发区。这意味着,当来自一个 IdM 客户端查询 somehost.ad.example.com 的 IP 地址,查询将转发到 ad.example.com IdM DNS 转发区中指定的 AD 域控制器。
28.2. 主 IdM DNS 区的配置属性
Identity Management(IdM)会创建一个带有特定默认配置的新区,如刷新周期、传输设置或缓存设置。在 IdM DNS zone attributes 中,您可以使用以下选项之一查找您可以修改的默认区域配置的属性:
-
命令行界面(CLI)中的
dnszone-mod命令。如需更多信息,请参阅 在 IdM CLI 中编辑主 DNS 区的配置。 - IdM Web UI。如需更多信息,请参阅 在 IdM Web UI 中编辑主 DNS 区的配置。
-
使用
ipadnszone模块的 Ansible playbook。如需更多信息,请参阅在 IdM 中管理 DNS 区域。
除了设置区的实际信息外,该设置还会定义 DNS 服务器如何处理 start of authority (SOA)记录条目,以及如何从 DNS 名称服务器更新其记录。
表 28.1. IdM DNS 区属性
| 属性 | ansible-freeipa 变量 | 描述 |
|---|---|---|
| 权威名称服务器 |
| 设置主 DNS 名称服务器的域名,也称为 SOA MNAME。
默认情况下,每个 IdM 服务器在 SOA MNAME 字段中公告自己。因此,使用 |
| 管理员电子邮件地址 |
| 设置用于区域管理员的电子邮件地址。默认为主机上的 root 帐户。 |
| SOA 串行 |
| 在 SOA 记录中设置序列号。请注意,IdM 会自动设置版本号,用户不应该修改它。 |
| SOA 刷新 |
| 在从主 DNS 服务器请求更新前,设置二级 DNS 服务器要等待的时间间隔(以秒为单位)。 |
| SOA 重试 |
| 设定重试失败的刷新操作前等待的时间(以秒为单位)。 |
| SOA 过期 |
| 设定二级 DNS 服务器在操作尝试前尝试执行刷新更新的时间(以秒为单位)。 |
| 最少 SOA |
| 根据 RFC 2308,将负缓存的时间设置为 live(TTL)值(以秒为单位)。 |
| SOA 时间到实时 |
|
在 zone apex 的记录设置 TTL(以秒为单位)。例如,在区域 |
| 默认时间变为实时 |
|
将一个区中所有值的默认时间(TTL)设置为 live(TTL)值(以秒为单位)设置之前设置的独立 TTL 值。更改后,需要在所有 IdM DNS 服务器上重启 |
| BIND 更新策略 |
| 设置 DNS 区域中客户端允许的权限。 |
| 动态更新 |
| 为客户端启用对 DNS 记录的动态更新。 请注意,如果将其设置为 false,IdM 客户端机器将无法添加或更新其 IP 地址。 |
| 允许传输 |
| 指定允许传输给定区的 IP 地址或网络名称列表,用分号(;)分隔。
默认情况下禁用区域传送。默认的 |
| 允许查询 |
| 指定允许发出 DNS 查询的 IP 地址或网络名称列表,用分号(;)分隔。 |
| 允许 PTR 同步 |
| 设定区域的 A 或 AAAA 记录(转发记录)是否与 PTR(逆转)记录自动同步。 |
| 域转发 |
| 指定一个只为 DNS 区域配置的转发器。这与 IdM 域中使用的任何全局转发分开。 要指定多个转发器,请多次使用选项。 |
| 转发策略 |
| 指定转发策略。有关支持的策略的详情,请参考 IdM 中的 DNS 转发策略。 |
其他资源
-
请参阅
/usr/share/doc/ansible-freeipa/目录中的README-dnszone.md文件。
28.3. 使用 Ansible 在 IdM DNS 中创建主区
按照以下流程,使用 Ansible playbook 确保主 DNS 区域存在。在以下流程使用的示例中,您确保 zone.idm.example.com DNS 区域存在。
先决条件
您已配置了 Ansible 控制节点以满足以下要求:
- 您使用 Ansible 版本 2.14 或更高版本。
-
您已在 Ansible 控制器上安装了
ansible-freeipa软件包。 - 示例假定在 ~/MyPlaybooks/ 目录中,您已创建了带有 IdM 服务器的完全限定域名(FQDN)的 Ansible 清单文件。
-
示例假定 secret.yml Ansible vault 存储了
ipaadmin_password。
- 您知道 IdM 管理员密码。
流程
进入
/usr/share/doc/ansible-freeipa/playbooks/dnszone目录:$ cd /usr/share/doc/ansible-freeipa/playbooks/dnszone打开您的清单文件,并确保您要配置的 IdM 服务器列在
[ipaserver]部分。例如,要指示 Ansible 配置 server.idm.example.com,请输入:[ipaserver] server.idm.example.com
复制 dnszone-present.yml Ansible playbook 文件。例如:
$ cp dnszone-present.yml dnszone-present-copy.yml- 打开 dnszone-present-copy.yml 文件进行编辑。
通过在
ipadnszonetask 部分中设置以下变量来修改该文件:-
将
ipaadmin_password变量设置为 IdM 管理员密码。 将
zone_name变量设置为 zone.idm.example.com。这是当前示例修改的 Ansible playbook 文件:
--- - name: Ensure dnszone present hosts: ipaserver become: true tasks: - name: Ensure zone is present. ipadnszone: ipaadmin_password: "{{ ipaadmin_password }}" zone_name: zone.idm.example.com state: present-
将
- 保存这个文件。
运行 playbook:
$ ansible-playbook --vault-password-file=password_file -v -i inventory.file dnszone-present-copy.yml
其他资源
- 请参阅 支持的 DNS 区域类型。
-
请参阅
/usr/share/doc/ansible-freeipa/目录中的README-dnszone.md文件。 -
请参阅
/usr/share/doc/ansible-freeipa/playbooks/dnszone目录中的 Ansible playbook 示例。
28.4. 使用 Ansible playbook 来确保 IdM 中存在带有多个变量的主 DNS 区域
按照以下流程,使用 Ansible playbook 确保主 DNS 区域存在。在下面的流程中使用的示例中,IdM 管理员可确保存在 zone.idm.example.com DNS 区域。Ansible playbook 配置区的多个参数。
先决条件
您已配置了 Ansible 控制节点以满足以下要求:
- 您使用 Ansible 版本 2.14 或更高版本。
-
您已在 Ansible 控制器上安装了
ansible-freeipa软件包。 - 示例假定在 ~/MyPlaybooks/ 目录中,您已创建了带有 IdM 服务器的完全限定域名(FQDN)的 Ansible 清单文件。
-
示例假定 secret.yml Ansible vault 存储了
ipaadmin_password。
- 您知道 IdM 管理员密码。
流程
进入
/usr/share/doc/ansible-freeipa/playbooks/dnszone目录:$ cd /usr/share/doc/ansible-freeipa/playbooks/dnszone打开您的清单文件,并确保您要配置的 IdM 服务器列在
[ipaserver]部分。例如,要指示 Ansible 配置 server.idm.example.com,请输入:[ipaserver] server.idm.example.com
复制 dnszone-all-params.yml Ansible playbook 文件。例如:
$ cp dnszone-all-params.yml dnszone-all-params-copy.yml- 打开 dnszone-all-params-copy.yml 文件进行编辑。
通过在
ipadnszonetask 部分中设置以下变量来修改该文件:-
将
ipaadmin_password变量设置为 IdM 管理员密码。 -
将
zone_name变量设置为 zone.idm.example.com。 -
如果要允许同步转发和反向记录,请将
allow_sync_ptr变量设置为 true,即 A 和 AAAA 记录与 PTR 记录同步。 -
将
dynamic_update变量设置为 true,以启用 IdM 客户端机器添加或更新其 IP 地址。 -
将
dnssec变量设置为 true,以允许在区域中进行内联 DNSSEC 签名。 -
将
allow_transfer变量设置为区域中次要名称服务器的 IP 地址。 -
将
allow_query变量设置为允许发出查询的 IP 地址或网络。 -
将
forwarders变量设置为全局转发器的 IP 地址。 -
将
serial变量设置为 SOA 记录序列号。 -
为区中的 DNS 定义
refresh,retry,expire,minimum,ttl, 和default_ttl值。 -
使用
nsec3param_rec变量,为区域定义 NSEC3PARAM 记录。 -
将
skip_overlap_check变量设置为 true,以便在它与现有区重叠时也强制进行 DNS 创建。 将
skip_nameserver_check设置为 true,以便在名称服务器无法解析时也强制进行 DNS 区创建。这是当前示例修改的 Ansible playbook 文件:
--- - name: Ensure dnszone present hosts: ipaserver become: true tasks: - name: Ensure zone is present. ipadnszone: ipaadmin_password: "{{ ipaadmin_password }}" zone_name: zone.idm.example.com allow_sync_ptr: true dynamic_update: true dnssec: true allow_transfer: - 1.1.1.1 - 2.2.2.2 allow_query: - 1.1.1.1 - 2.2.2.2 forwarders: - ip_address: 8.8.8.8 - ip_address: 8.8.4.4 port: 52 serial: 1234 refresh: 3600 retry: 900 expire: 1209600 minimum: 3600 ttl: 60 default_ttl: 90 name_server: server.idm.example.com. admin_email: admin.admin@idm.example.com nsec3param_rec: "1 7 100 0123456789abcdef" skip_overlap_check: true skip_nameserver_check: true state: present-
将
- 保存这个文件。
运行 playbook:
$ ansible-playbook --vault-password-file=password_file -v -i inventory.file dnszone-all-params-copy.yml
其他资源
- 请参阅 支持的 DNS 区域类型。
- 请参阅 主 IdM DNS 区域的配置属性。
-
请参阅
/usr/share/doc/ansible-freeipa/目录中的README-dnszone.md文件。 -
请参阅
/usr/share/doc/ansible-freeipa/playbooks/dnszone目录中的 Ansible playbook 示例。
28.5. 使用 Ansible playbook 以确保在指定 IP 地址时存在用于反向 DNS 查找的区域
按照以下流程,使用 Ansible playbook 确保反向 DNS 区域存在。在下面的流程中使用的示例中,IdM 管理员确保使用 IdM 主机的 IP 地址和前缀长度,是否存在反向 DNS 查找区。
使用 name_from_ip 变量提供 DNS 服务器的 IP 地址的前缀长度可让您控制区名称。如果没有声明前缀长度,系统会查询区的 DNS 服务器,并根据 name_from_ip 值 192.168.1.2,查询会返回以下 DNS 区域:
- 1.168.192.in-addr.arpa.
- 168.192.in-addr.arpa.
- 192.in-addr.arpa.
由于查询返回的区域可能不是您所期望的,name_from_ip 只能与 state 选项设置为 present 一起使用,以防止意外移除区域。
先决条件
您已配置了 Ansible 控制节点以满足以下要求:
- 您使用 Ansible 版本 2.14 或更高版本。
-
您已在 Ansible 控制器上安装了
ansible-freeipa软件包。 - 示例假定在 ~/MyPlaybooks/ 目录中,您已创建了带有 IdM 服务器的完全限定域名(FQDN)的 Ansible 清单文件。
-
示例假定 secret.yml Ansible vault 存储了
ipaadmin_password。
- 您知道 IdM 管理员密码。
流程
进入
/usr/share/doc/ansible-freeipa/playbooks/dnszone目录:$ cd /usr/share/doc/ansible-freeipa/playbooks/dnszone打开您的清单文件,并确保您要配置的 IdM 服务器列在
[ipaserver]部分。例如,要指示 Ansible 配置 server.idm.example.com,请输入:[ipaserver] server.idm.example.com
复制 dnszone-reverse-from-ip.yml Ansible playbook 文件。例如:
$ cp dnszone-reverse-from-ip.yml dnszone-reverse-from-ip-copy.yml- 打开 dnszone-reverse-from-ip-copy.yml 文件进行编辑。
通过在
ipadnszonetask 部分中设置以下变量来修改该文件:-
将
ipaadmin_password变量设置为 IdM 管理员密码。 将
name_from_ip变量设置为 IdM 名称服务器的 IP,并提供其前缀长度。这是当前示例修改的 Ansible playbook 文件:
--- - name: Ensure dnszone present hosts: ipaserver become: true tasks: - name: Ensure zone for reverse DNS lookup is present. ipadnszone: ipaadmin_password: "{{ ipaadmin_password }}" name_from_ip: 192.168.1.2/24 state: present register: result - name: Display inferred zone name. debug: msg: "Zone name: {{ result.dnszone.name }}"
playbook 创建一个区,用于从 192.168.1.2 IP 地址及其前缀长度 24 中反向 DNS 查找。接下来,playbook 显示生成的区域名称。
-
将
- 保存这个文件。
运行 playbook:
$ ansible-playbook --vault-password-file=password_file -v -i inventory.file dnszone-reverse-from-ip-copy.yml
其他资源
- 请参阅 支持的 DNS 区域类型。
-
请参阅
/usr/share/doc/ansible-freeipa/目录中的README-dnszone.md文件。 -
请参阅
/usr/share/doc/ansible-freeipa/playbooks/dnszone目录中的 Ansible playbook 示例。
第 29 章 使用 Ansible 管理 IdM 中的 DNS 位置
作为 Identity Management(IdM)管理员,您可以使用 ansible-freeipa 软件包中的 location 模块来管理 IdM DNS 位置。
29.1. 基于 DNS 的服务发现
基于 DNS 的服务发现过程是一个进程,客户端使用 DNS 协议在提供特定服务(如 LDAP 或 Kerberos )的网络中查找服务器。一种典型的操作是允许客户端在最接近的网络基础架构内找到身份验证服务器,因为它们提供更高的吞吐量并降低网络延迟,从而降低整体成本。
服务发现的主要优点是:
- 不需要为客户端使用近似服务器名称显式配置。
- DNS 服务器用作策略的中央提供程序。使用相同 DNS 服务器的客户端可以访问与服务提供商及其首选顺序相同的策略。
在 Identity Management(IdM)域中,LDAP、Kerberos 和其他服务都存在 DNS 服务记录(SRV 记录)。例如,以下命令查询 DNS 服务器以获取在 IdM DNS 域中提供基于 TCP 的 Kerberos 服务的主机:
例 29.1. DNS 位置独立结果
$ dig -t SRV +short _kerberos._tcp.idm.example.com
0 100 88 idmserver-01.idm.example.com.
0 100 88 idmserver-02.idm.example.com.输出包含以下信息:
-
0(优先级):目标主机的优先级。一个较低的值是首选的。 -
100(权重).为具有相同优先级的条目指定一个相对权重。如需更多信息,请参阅 RFC 2782,第 3 节。 -
88(端口号):服务的端口号。 - 提供该服务的主机的规范名称。
在示例中,返回的两个主机名具有相同的优先级和权重。在这种情况下,客户端使用结果列表中的随机条目。
当客户端改为时,配置为查询在 DNS 位置中配置的 DNS 服务器,输出会有所不同。对于分配给位置的 IdM 服务器,返回定制的值。在以下示例中,客户端配置为查询位置 germany 中的 DNS 服务器:
例 29.2. 基于 DNS 位置的结果
$ dig -t SRV +short _kerberos._tcp.idm.example.com
_kerberos._tcp.germany._locations.idm.example.com.
0 100 88 idmserver-01.idm.example.com.
50 100 88 idmserver-02.idm.example.com.IdM DNS 服务器自动返回一个 DNS 别名(CNAME),指向首选本地服务器的 DNS 位置特定 SRV 记录。此 CNAME 记录显示在输出的第一行中。在示例中,主机 idmserver-01.idm.example.com 具有最低优先级值,因此首选。idmserver-02.idm.example.com 具有更高的优先级,因此仅在首选主机不可用时用作备份。
29.2. DNS 位置的部署注意事项
在使用集成的 DNS 时,身份管理(IdM)可以生成特定于位置的服务(SRV)记录。因为每个 IdM DNS 服务器都会生成特定于位置的 SRV 记录,所以您必须在每个 DNS 位置至少安装一个 IdM DNS 服务器。
客户端与 DNS 位置的关联性仅由客户端收到的 DNS 记录定义。因此,您可以将 IdM DNS 服务器与非 IdM DNS 消费者服务器合并,并在客户端从 IdM DNS 服务器中解析特定于位置的记录时进行 recursors。
在带有混合 IdM 和非 IdM DNS 服务的大部分部署中,DNS 递归器会使用往返时间指标自动选择最接近的 IdM DNS 服务器。通常,这样可确保使用非 IdM DNS 服务器的客户端为最接近的 DNS 位置获取记录,然后使用 IdM 服务器的最佳组。
29.3. DNS 时间到实时(TTL)
客户端可以将 DNS 资源记录缓存在区域配置中设定的时间。由于此缓存,客户端可能无法在生存时间(TTL)值过期前收到更改。Identity Management(IdM)中的默认 TTL 值是 1 天。
如果您的客户端计算机在站点间所需,您应该调整 IdM DNS 区的 TTL 值。将值设置为比客户端在站点间的 roam 需要的时间值低。这样可确保在客户端上缓存的 DNS 条目在重新连接到另一个站点前过期,因此查询 DNS 服务器以刷新特定于位置的 SRV 记录。
其他资源
- 请参阅 主 IdM DNS 区域的配置属性。
29.4. 使用 Ansible 确保存在 IdM 位置
作为 Identity Management(IdM)的系统管理员,您可以将 IdM DNS 位置配置为允许客户端查找最接近的网络基础架构中的身份验证服务器。
以下流程描述了如何使用 Ansible playbook 来确保 IdM 中存在 DNS 位置。这个示例描述了如何确保 IdM 中存在 germany DNS 位置。因此,您可以将特定的 IdM 服务器分配给这个位置,以便本地 IdM 客户端使用它来减少服务器响应时间。
先决条件
- 您知道 IdM 管理员密码。
您已配置了 Ansible 控制节点以满足以下要求:
- 您使用 Ansible 版本 2.14 或更高版本。
-
您已在 Ansible 控制器上安装了
ansible-freeipa软件包。 - 示例假定在 ~/MyPlaybooks/ 目录中,您已创建了带有 IdM 服务器的完全限定域名(FQDN)的 Ansible 清单文件。
-
示例假定 secret.yml Ansible vault 存储了
ipaadmin_password。
- 您了解 DNS 位置的部署注意事项。
流程
进入 ~/MyPlaybooks/ 目录:
$ cd ~/MyPlaybooks/生成位于
/usr/share/doc/ansible-freeipa/playbooks/location/目录中的location-present.yml文件的副本:$ cp /usr/share/doc/ansible-freeipa/playbooks/location/location-present.yml location-present-copy.yml-
打开
location-present-copy.ymlAnsible playbook 文件进行编辑。 通过在
ipalocationtask 部分中设置以下变量来修改该文件:-
调整任务的
name,使其与您的用例对应。 -
将
ipaadmin_password变量设置为 IdM 管理员的密码。 -
将
name变量设置为位置的名称。
这是当前示例修改的 Ansible playbook 文件:
--- - name: location present example hosts: ipaserver vars_files: - /home/user_name/MyPlaybooks/secret.yml tasks: - name: Ensure that the "germany" location is present ipalocation: ipaadmin_password: "{{ ipaadmin_password }}" name: germany
-
调整任务的
- 保存这个文件。
运行 Ansible playbook。指定 playbook 文件、存储保护 secret.yml 文件的密码,以及清单文件:
$ ansible-playbook --vault-password-file=password_file -v -i inventory location-present-copy.yml
29.5. 使用 Ansible 确保不存在 IdM 位置
作为 Identity Management(IdM)的系统管理员,您可以将 IdM DNS 位置配置为允许客户端查找最接近的网络基础架构中的身份验证服务器。
以下流程描述了如何使用 Ansible playbook 来确保 IdM 中没有 DNS 位置。这个示例描述了如何确保 IdM 中没有 germany DNS 位置。因此,您无法为这个位置分配特定的 IdM 服务器,本地 IdM 客户端无法使用它们。
先决条件
- 您知道 IdM 管理员密码。
- 没有 IdM 服务器被分配给 germany DNS 位置。
您已配置了 Ansible 控制节点以满足以下要求:
- 您使用 Ansible 版本 2.14 或更高版本。
-
您已在 Ansible 控制器上安装了
ansible-freeipa软件包。 - 示例假定在 ~/MyPlaybooks/ 目录中,您已创建了带有 IdM 服务器的完全限定域名(FQDN)的 Ansible 清单文件。
-
示例假定 secret.yml Ansible vault 存储了
ipaadmin_password。
- 示例假定您已 创建并配置了 ~/MyPlaybooks/ 目录,来作为存储示例 playbook 副本的中心位置。
流程
进入 ~/MyPlaybooks/ 目录:
$ cd ~/MyPlaybooks/在
/usr/share/doc/ansible-freeipa/playbooks/location/目录中复制location-absent.yml文件:$ cp /usr/share/doc/ansible-freeipa/playbooks/location/location-absent.yml location-absent-copy.yml-
打开
location-absent-copy.ymlAnsible playbook 文件进行编辑。 通过在
ipalocationtask 部分中设置以下变量来修改该文件:-
调整任务的
name,使其与您的用例对应。 -
将
ipaadmin_password变量设置为 IdM 管理员的密码。 -
将
name变量设置为 DNS 位置的名称。 -
确保
state变量设置为absent。
这是当前示例修改的 Ansible playbook 文件:
--- - name: location absent example hosts: ipaserver vars_files: - /home/user_name/MyPlaybooks/secret.yml tasks: - name: Ensure that the "germany" location is absent ipalocation: ipaadmin_password: "{{ ipaadmin_password }}" name: germany state: absent
-
调整任务的
- 保存这个文件。
运行 Ansible playbook。指定 playbook 文件、存储保护 secret.yml 文件的密码,以及清单文件:
$ ansible-playbook --vault-password-file=password_file -v -i inventory location-absent-copy.yml
29.6. 其他资源
-
请参阅
/usr/share/doc/ansible-freeipa/目录中的README-location.md文件。 -
请参阅
/usr/share/doc/ansible-freeipa/playbooks/location目录中的 Ansible playbook 示例。
第 30 章 在 IdM 中管理 DNS 转发
按照以下流程,在身份管理(IdM) Web UI、IdM CLI 和使用 Ansible 中配置 DNS 全局转发器和 DNS 转发区域:
- IdM DNS 服务器的两个角色
- IdM 中的 DNS 转发策略
- 在 IdM Web UI 中添加全局转发器
- 在 CLI 中添加全局转发器
- 在 IdM Web UI 中添加 DNS 转发区域
- 在 CLI 中添加 DNS 转发区域
- 使用 Ansible 在 IdM 中建立 DNS 全局转发器
- 使用 Ansible 确保 IdM 中存在 DNS 全局转发器
- 使用 Ansible 确保 IdM 中没有 DNS 全局转发器
- 使用 Ansible 确保 DNS 全局转发器在 IdM 中被禁用
- 使用 Ansible 确保 IdM 中存在 DNS 转发区域
- 使用 Ansible 确保 DNS 转发区域 在 IdM 中有多个转发器
- 使用 Ansible 确保 IdM 中 DNS Forward 区域被禁用
- 使用 Ansible 确保 IdM 中没有 DNS 转发区域
30.1. IdM DNS 服务器的两个角色
DNS 转发会影响 DNS 服务如何响应 DNS 查询。默认情况下,集成了 IdM 的 Berkeley Internet Name Domain (BIND) 作为一个 authoritative 和一个 recursive DNS 服务器:
- 权威 DNS 服务器
- 当 DNS 客户端查询属于 IdM 服务器权威的 DNS 区域的名称时,BIND 会回复配置区中包含的数据。权威数据始终优先于任何其他数据。
- 递归 DNS 服务器
- 当 DNS 客户端查询 IdM 服务器不是权威的名称时,BIND 会尝试使用其他 DNS 服务器解析查询。如果没有定义转发器,BIND 会询问互联网上的 root 服务器,并使用递归解析算法来响应 DNS 查询。
在某些情况下,不需要让 BIND 直接联系其他 DNS 服务器,并根据 Internet 上可用的数据执行递归。您可以将 BIND 配置为使用另外一个 DNS 服务器(转发器)来解析查询。
当您将 BIND 配置为使用转发器时,在 IdM 服务器和转发器之间转发查询和答案,IdM 服务器充当非授权数据的 DNS 缓存。
30.2. IdM 中的 DNS 转发策略
IdM 支持 first 和 only 标准 BIND 转发策略,以及 none 特定于 IdM 的转发策略。
- Forward first (默认)
-
IdM BIND 服务将 DNS 查询转发到配置的转发器。如果因为服务器错误或超时导致查询失败,BIND 会使用互联网上的服务器返回到递归解析。
forward first策略是默认策略,它适用于优化 DNS 流量。 - Forward only
-
IdM BIND 服务将 DNS 查询转发到配置的转发器。如果因为服务器错误或超时而查询失败,BIND 会将错误返回到客户端。对于带有 split DNS 配置的环境,建议使用
forward only策略。 - None (禁用转发)
-
DNS 查询不会通过
none转发策略转发。禁用转发只作为全局转发配置的特定区覆盖很有用。这个选项等同于在 BIND 配置中指定空转发器列表。
您不能使用转发将 IdM 中的数据与来自其他 DNS 服务器的数据合并。您只能为 IdM DNS 中主区的特定子区转发查询。
默认情况下,如果查询的 DNS 名称属于 IdM 服务器有权威的区域,则 BIND 服务不会将查询转发到另一台服务器。在这种情况下,如果在 IdM 数据库中找不到查询的 DNS 名称,则返回 NXDOMAIN 回答。未使用转发功能。
例 30.1. 使用情况示例
IdM 服务器对 test.example 具有权威性。DNS 区域。BIND 被配置为把查询转发到带有 192.0.2.254 IP 地址的 DNS 服务器。
当客户发送对 nonexistent.test.example. 的查询DNS 名称,BIND 检测到 IdM 服务器对 test.example. 区域具有权威,且不会将查询转发到 192.0.2.254. 服务器。因此,DNS 客户端接收 NXDomain 错误消息,告知用户查询域不存在。
30.3. 在 IdM Web UI 中添加全局转发器
按照以下流程在身份管理(IdM) Web UI 中添加全局 DNS 转发器。
先决条件
- 以 IdM 管理员身份登录 IdM WebUI。
- 您知道 DNS 服务器的 Internet 协议(IP)地址,以将查询转发到。
流程
在 IdM Web UI 中,选择
Network Services→DNS Global Configuration→DNS。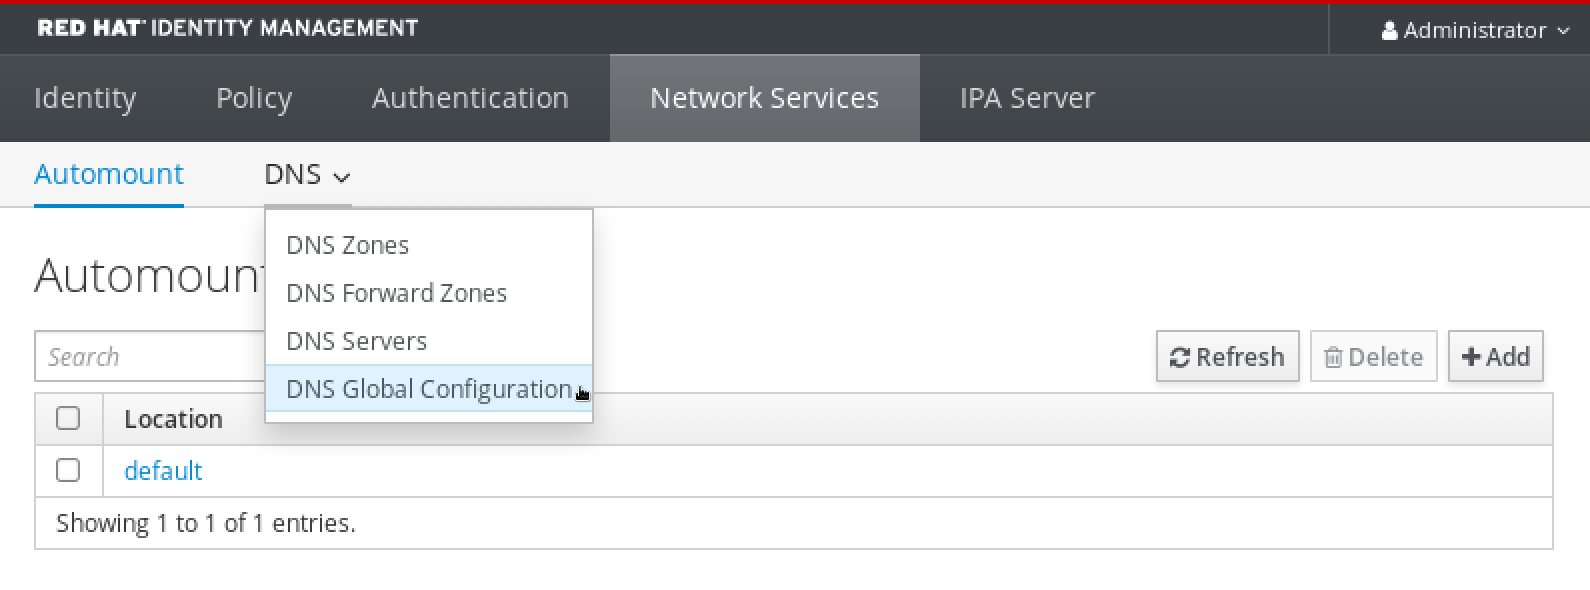
在
DNS Global Configuration部分中,点Add。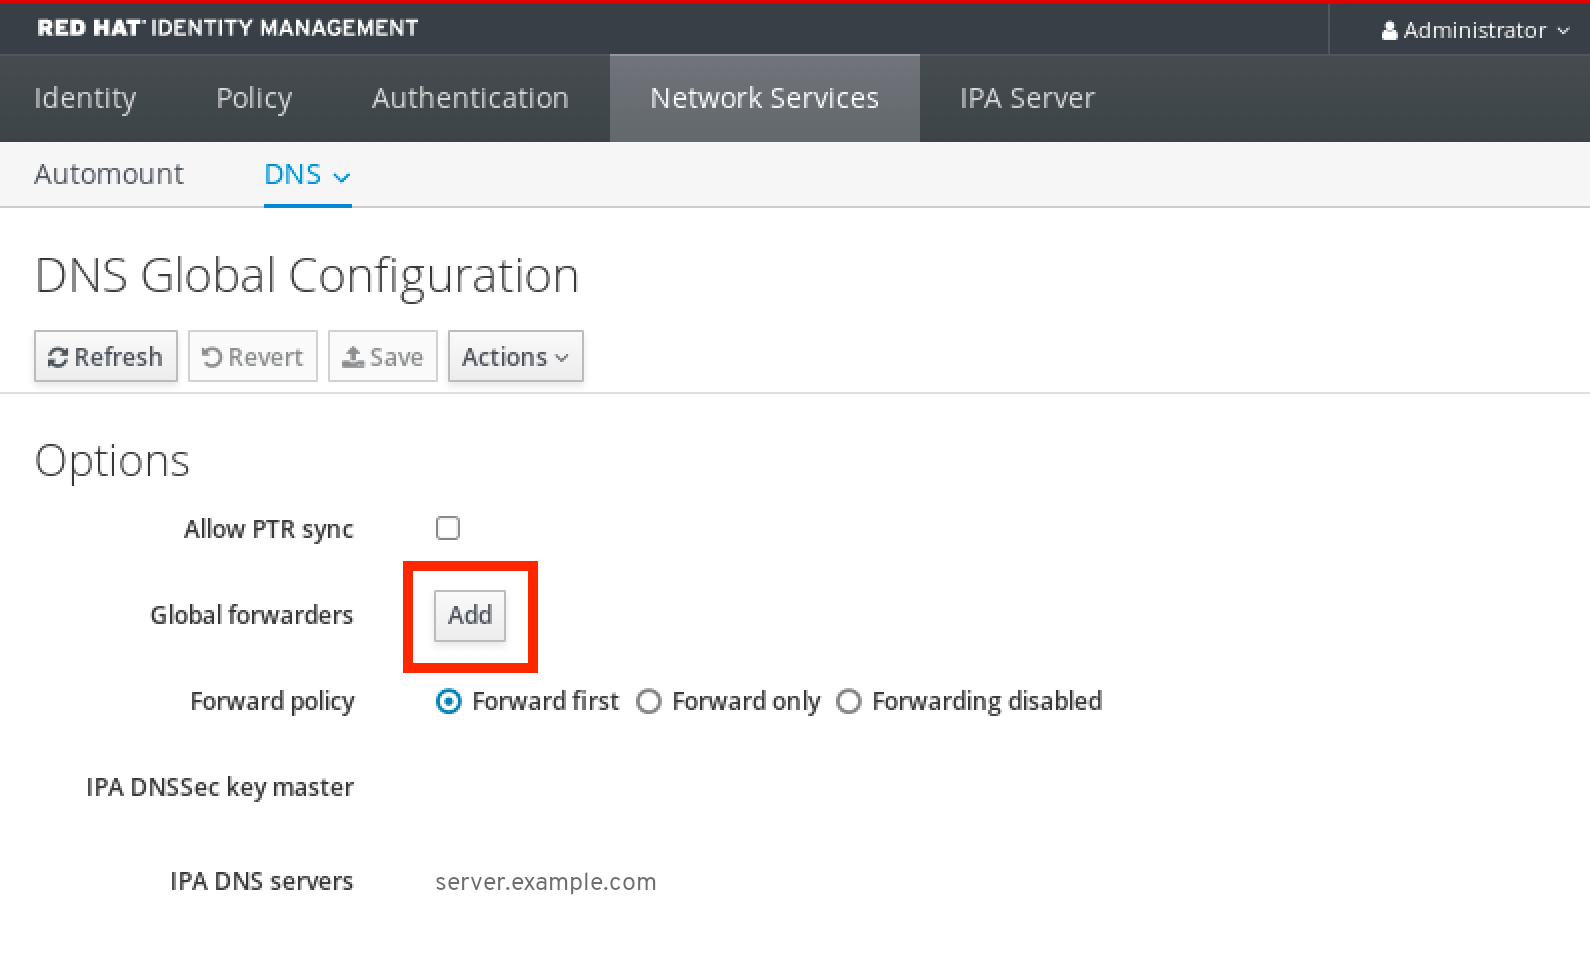
指定接收转发 DNS 查询的 DNS 服务器的 IP 地址。
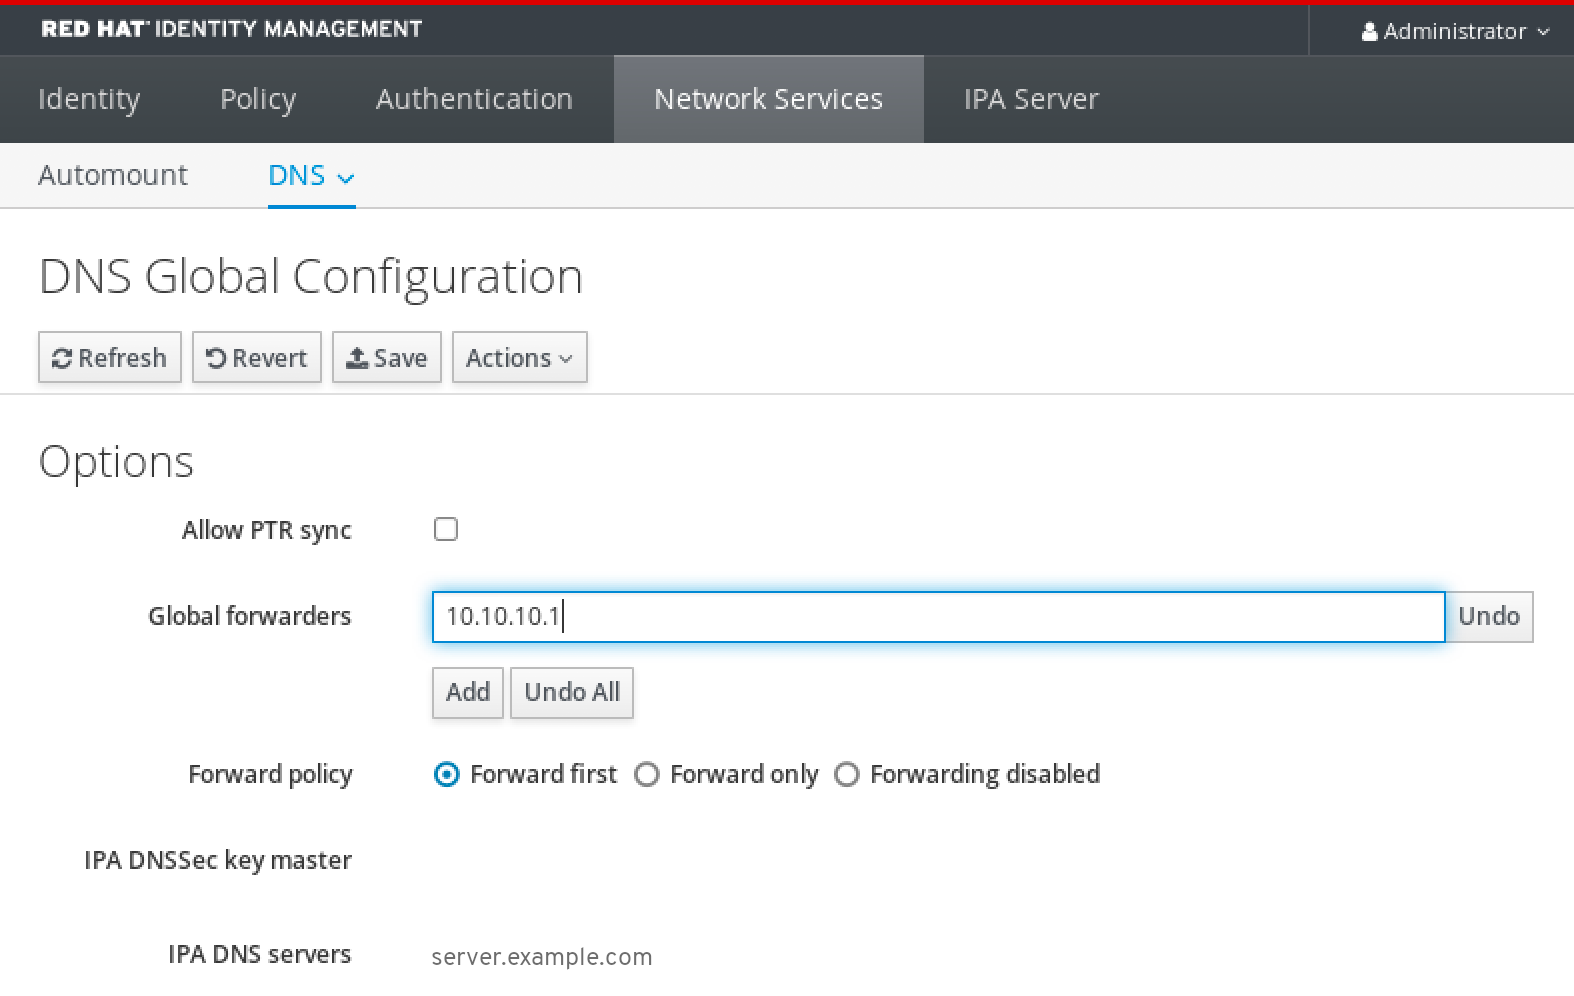
选择
转发策略。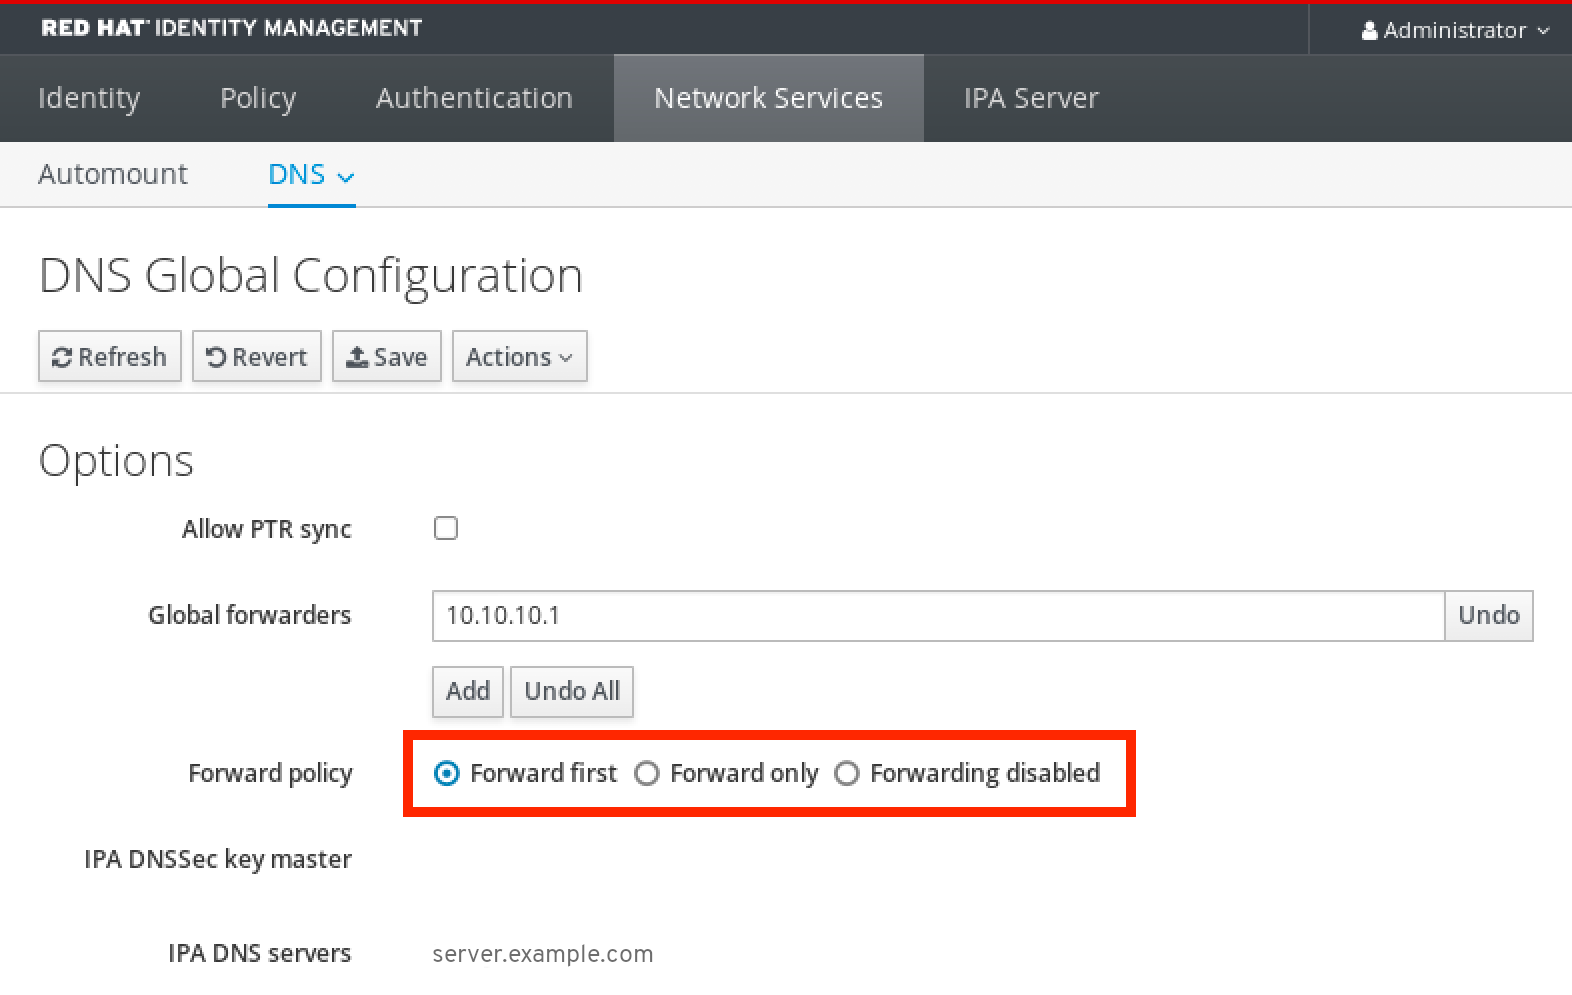
-
点窗口顶部的
Save。
验证步骤
选择
Network Services→DNS Global Configuration→DNS。验证 IdM Web UI 中存在并启用带有您指定的转发策略的全局转发器。
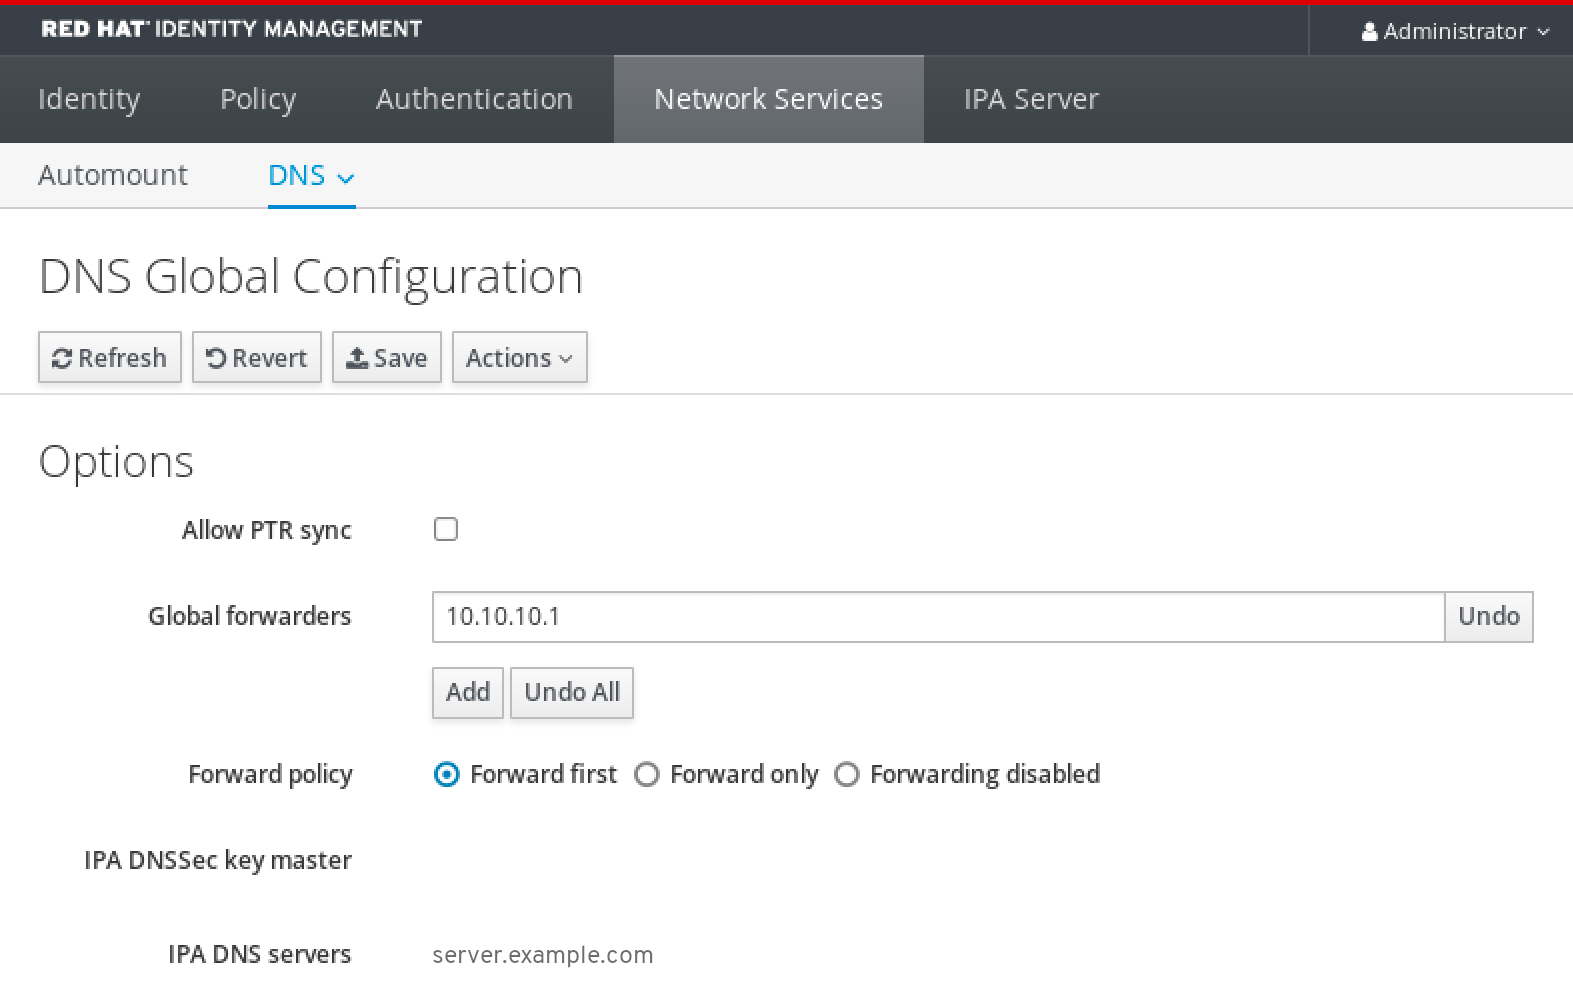
30.4. 在 CLI 中添加全局转发器
按照以下流程,使用命令行界面(CLI)添加全局 DNS 转发器。
先决条件
- 以 IdM 管理员身份登录。
- 您知道 DNS 服务器的 Internet 协议(IP)地址,以将查询转发到。
流程
使用
ipa dnsconfig-mod命令添加新的全局转发器。使用--forwarder选项指定 DNS 转发器的 IP 地址。[user@server ~]$ ipa dnsconfig-mod --forwarder=10.10.0.1 Server will check DNS forwarder(s). This may take some time, please wait ... Global forwarders: 10.10.0.1 IPA DNS servers: server.example.com
验证步骤
使用
dnsconfig-show命令显示全局转发器。[user@server ~]$ ipa dnsconfig-show Global forwarders: 10.10.0.1 IPA DNS servers: server.example.com
30.5. 在 IdM Web UI 中添加 DNS 转发区域
按照以下流程在身份管理(IdM) Web UI 中添加 DNS 转发区域。
除非绝对需要,否则不要使用转发区域。转发区不是标准解决方案,使用它们可能会导致意外和有问题的行为。如果必须使用 forward 区域,请限制其使用来覆盖全局转发配置。
在创建新的 DNS 区域时,红帽建议使用名称服务器(NS)记录和避免转发区域,始终使用标准 DNS 委托。在大多数情况下,使用全局转发器就足够了,不需要转发区域。
先决条件
- 以 IdM 管理员身份登录 IdM WebUI。
- 您知道 DNS 服务器的 Internet 协议(IP)地址,以将查询转发到。
流程
在 IdM Web UI 中,选择
Network Services→DNS Forward Zones→DNS。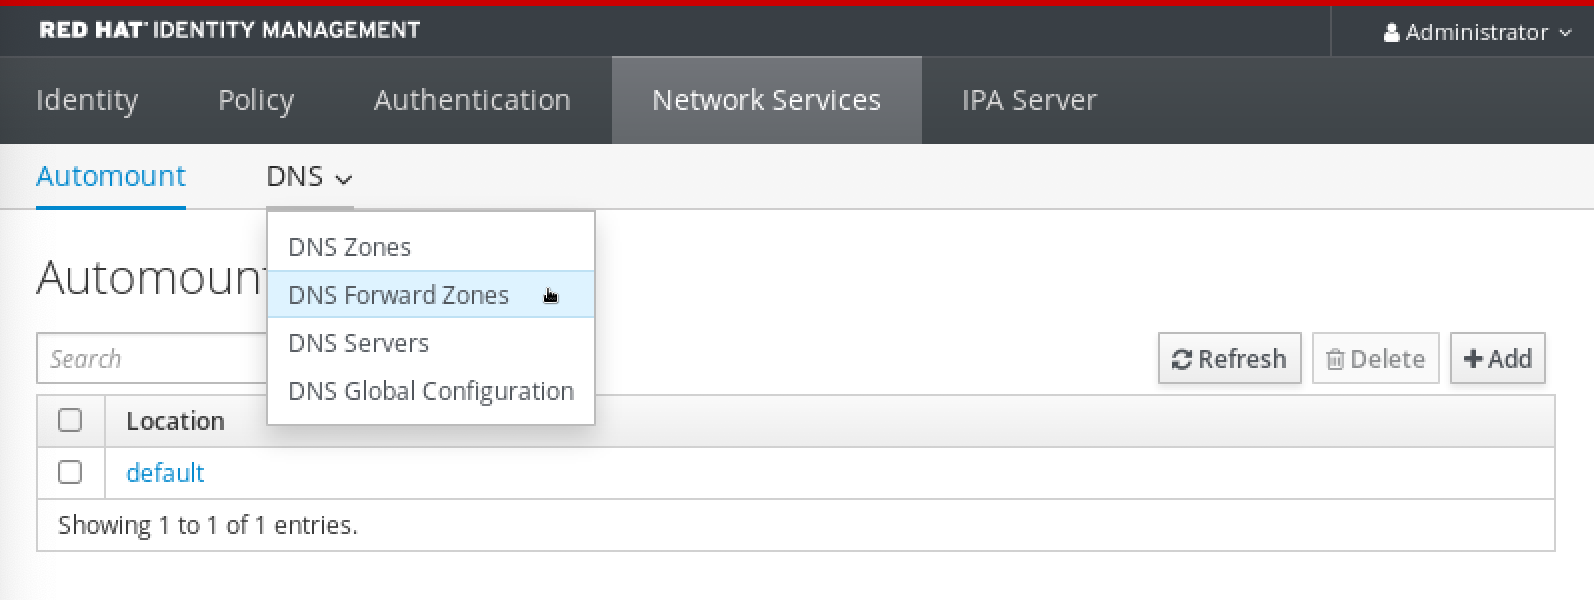
在
DNS Forward Zones部分,点Add。
在
Add DNS forward zone窗口中指定转发区名称。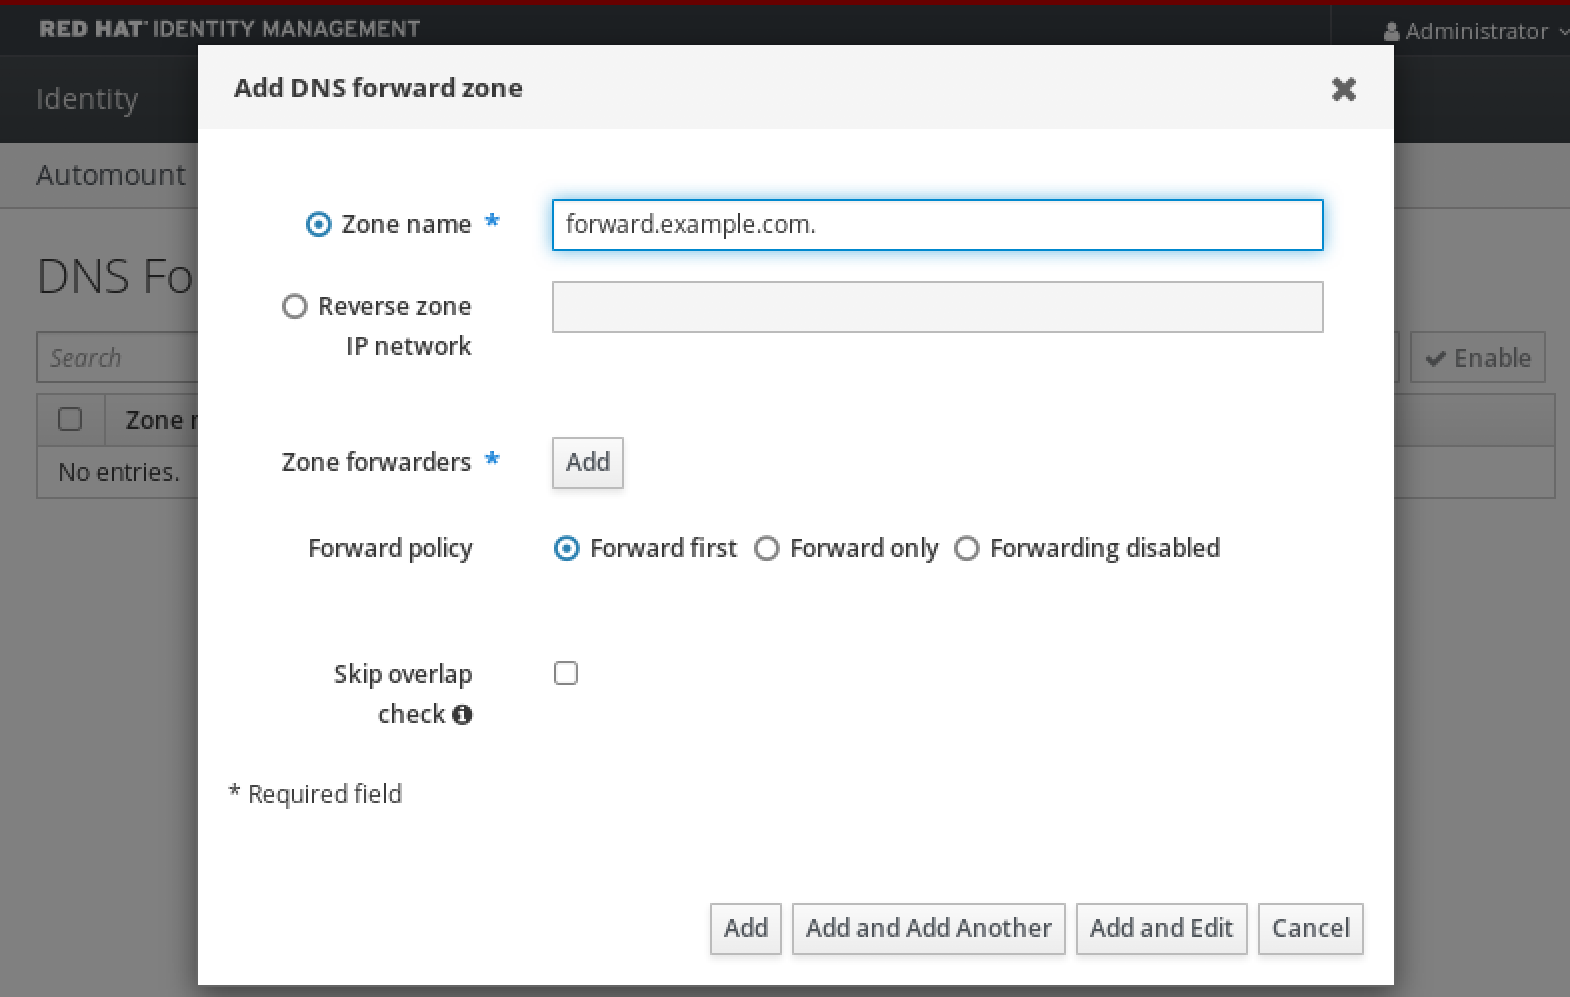
点
Add按钮并指定 DNS 服务器的 IP 地址来接收转发请求。您可以为每个转发区指定多个转发器。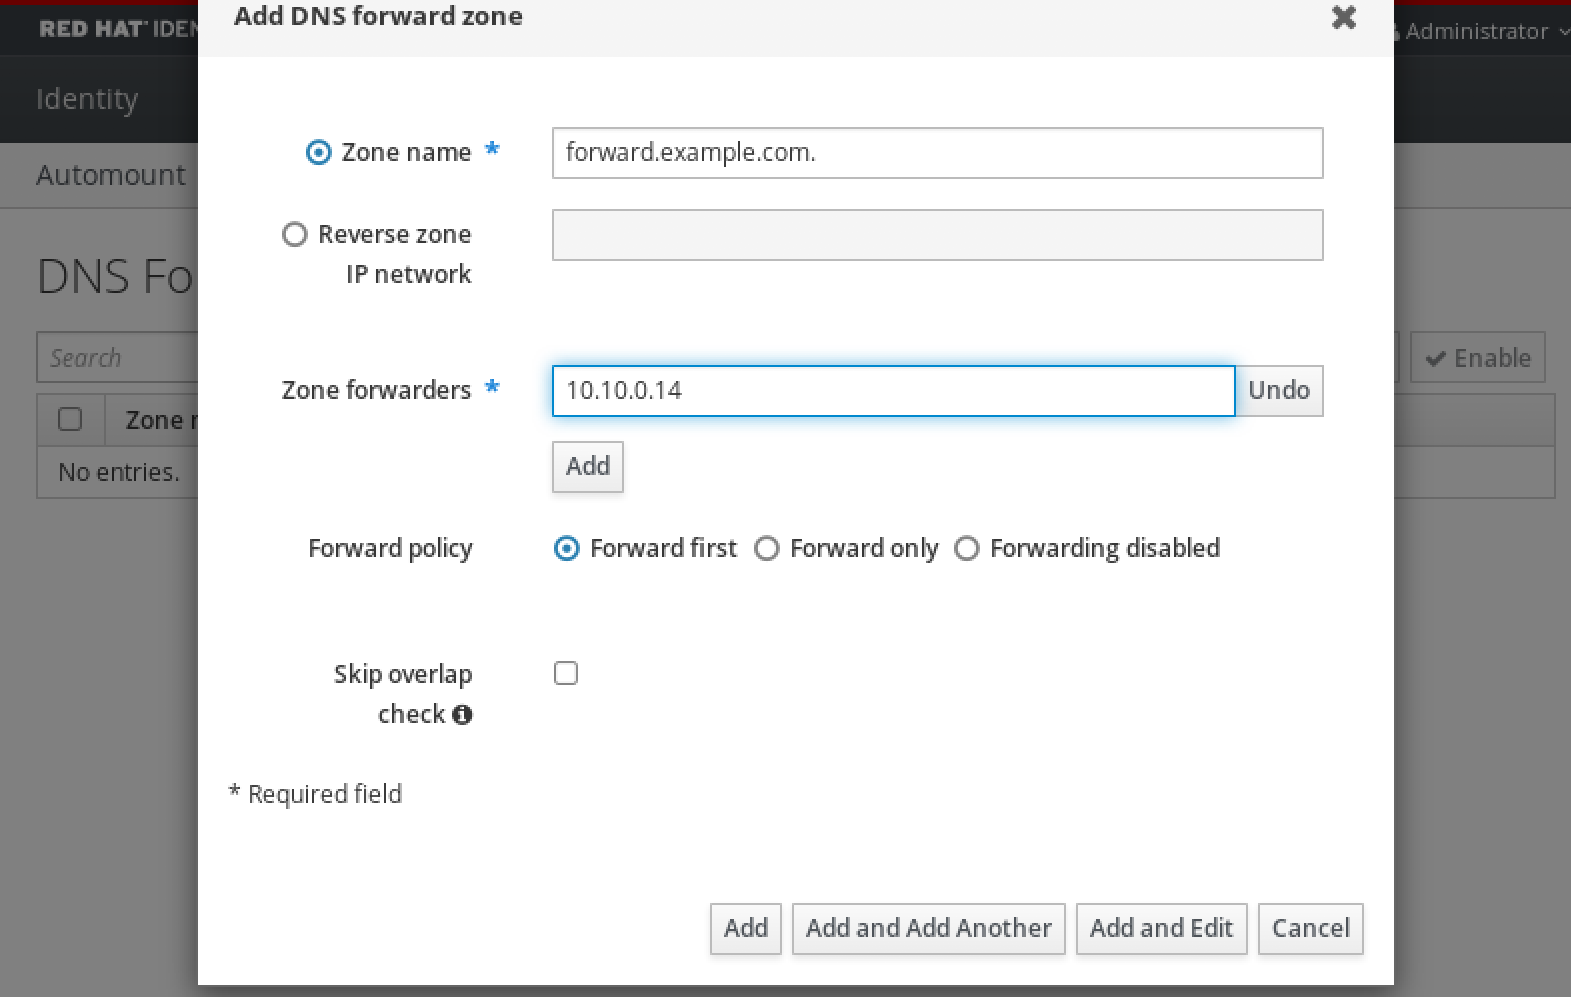
选择
转发策略。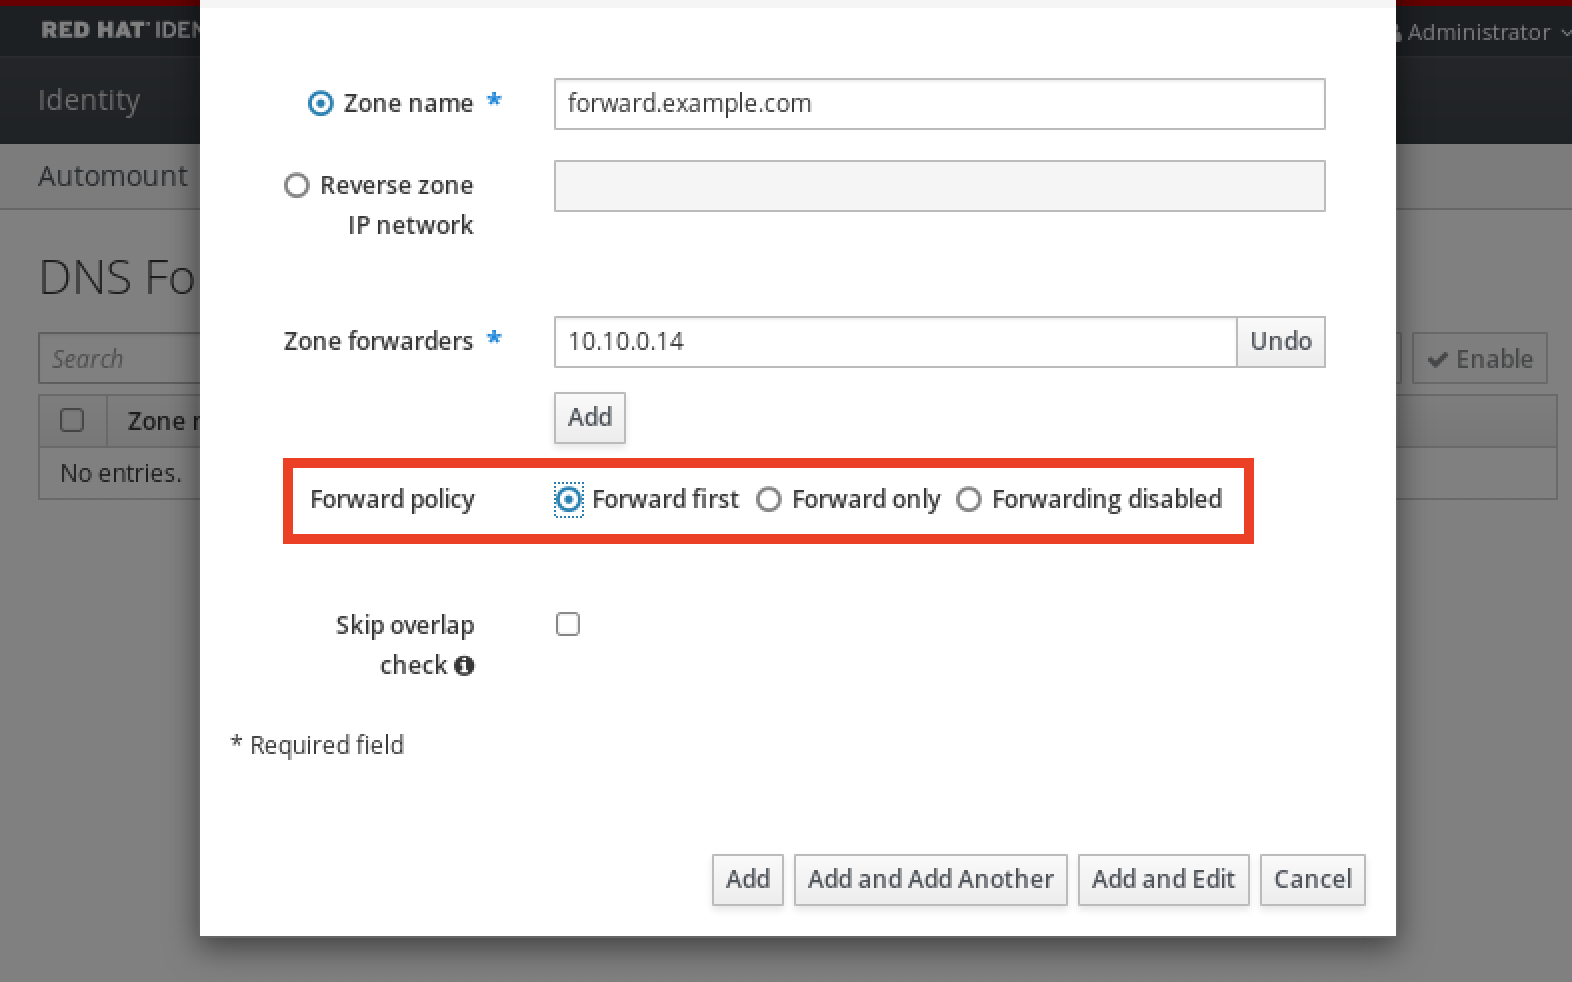
-
单窗口底部的
Add以添加新转发区域。
验证步骤
在 IdM Web UI 中,选择
Network Services→DNS Forward Zones→DNS。验证您创建的转发区(带有您指定的转发器和转发策略)是否在 IdM Web UI 中存在并启用。
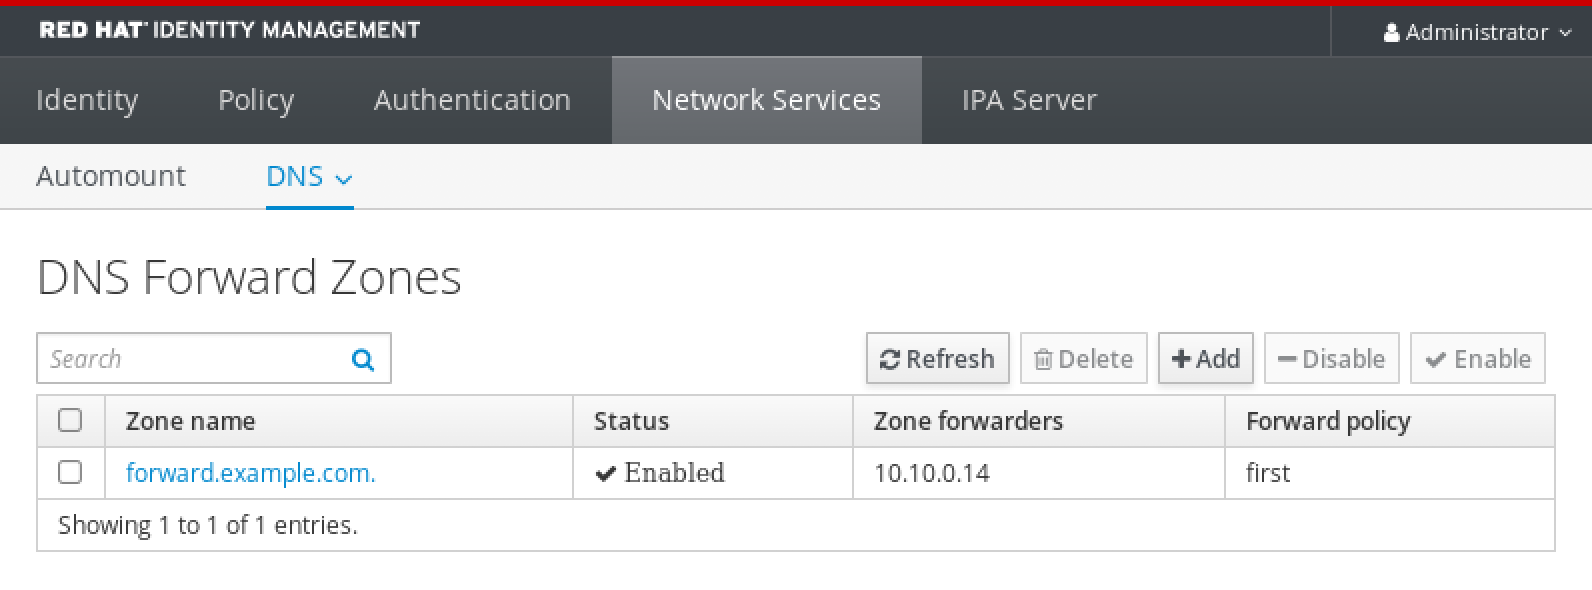
30.6. 在 CLI 中添加 DNS 转发区域
按照以下流程使用命令行界面(CLI)添加 DNS 转发区域。
除非绝对需要,否则不要使用转发区域。转发区不是标准解决方案,使用它们可能会导致意外和有问题的行为。如果必须使用 forward 区域,请限制其使用来覆盖全局转发配置。
在创建新的 DNS 区域时,红帽建议使用名称服务器(NS)记录和避免转发区域,始终使用标准 DNS 委托。在大多数情况下,使用全局转发器就足够了,不需要转发区域。
先决条件
- 以 IdM 管理员身份登录。
- 您知道 DNS 服务器的 Internet 协议(IP)地址,以将查询转发到。
流程
使用
dnsforwardzone-add命令添加新转发区。如果转发策略不是none,使用--forwarder选项指定至少一个转发器 ,并使用--forward-policy选项指定转发策略。[user@server ~]$ ipa dnsforwardzone-add forward.example.com. --forwarder=10.10.0.14 --forwarder=10.10.1.15 --forward-policy=first Zone name: forward.example.com. Zone forwarders: 10.10.0.14, 10.10.1.15 Forward policy: first
验证步骤
使用
dnsforwardzone-show命令显示您刚才创建的 DNS 转发区。[user@server ~]$ ipa dnsforwardzone-show forward.example.com. Zone name: forward.example.com. Zone forwarders: 10.10.0.14, 10.10.1.15 Forward policy: first
30.7. 使用 Ansible 在 IdM 中建立 DNS 全局转发器
按照以下流程,使用 Ansible playbook 在 IdM 中建立 DNS Global Forwarder。
在以下示例中,IdM 管理员会创建一个 DNS 全局转发程序到带有 IPv4 地址为 8.8.6.6,IPv6 地址为 2001:4860:4860::8800 的端口 53 DNS 服务器 。
先决条件
您已配置了 Ansible 控制节点以满足以下要求:
- 您使用 Ansible 版本 2.14 或更高版本。
-
您已在 Ansible 控制器上安装了
ansible-freeipa软件包。 - 示例假定在 ~/MyPlaybooks/ 目录中,您已创建了带有 IdM 服务器的完全限定域名(FQDN)的 Ansible 清单文件。
-
示例假定 secret.yml Ansible vault 存储了
ipaadmin_password。
- 您知道 IdM 管理员密码。
流程
进入
/usr/share/doc/ansible-freeipa/playbooks/dnsconfig目录:$ cd /usr/share/doc/ansible-freeipa/playbooks/dnsconfig
打开清单文件,并确保
[ipaserver]部分中列出了您要配置的 IdM 服务器。例如,要指示 Ansible 配置server.idm.example.com,请输入:[ipaserver] server.idm.example.com
复制
set-configuration.ymlAnsible playbook 文件。例如:$ cp set-configuration.yml establish-global-forwarder.yml
-
打开
establish-global-forwarder.yml文件进行编辑。 通过设置以下变量来调整文件:
-
将 playbook 的
name变量更改为Playbook,以在 IdM DNS 中建立全局转发器。 -
在
tasks部分中,将任务的name更改为Create a DNS global forwarder to 8.8.6.6 and 2001:4860:4860::8800。 在
ipadnsconfig部分的forwarders部分:-
将第一个
ip_address值更改为全局转发器的 IPv4 地址:8.8.6.6。 -
将第二个
ip_address值更改为全局转发器的 IPv6 地址:2001:4860:4860::8800。 -
验证
port值被设置为53。
-
将第一个
将
forward_policy更改为first。对于当前示例为修改过的 Ansible playbook 文件:
--- - name: Playbook to establish a global forwarder in IdM DNS hosts: ipaserver vars_files: - /home/user_name/MyPlaybooks/secret.yml tasks: - name: Create a DNS global forwarder to 8.8.6.6 and 2001:4860:4860::8800 ipadnsconfig: forwarders: - ip_address: 8.8.6.6 - ip_address: 2001:4860:4860::8800 port: 53 forward_policy: first allow_sync_ptr: yes-
将 playbook 的
- 保存这个文件。
运行 playbook:
$ ansible-playbook --vault-password-file=password_file -v -i inventory.file establish-global-forwarder.yml
其他资源
-
请参阅
/usr/share/doc/ansible-freeipa/目录中的README-dnsconfig.md文件。
30.8. 使用 Ansible 确保 IdM 中存在 DNS 全局转发器
按照以下流程,使用 Ansible playbook 确保 DNS 全局转发器在 IdM 中存在。在下例中,IdM 管理员确保在 DNS 服务器中存在一个到 IPv4 地址为 7.7.9.9,IP v6 地址为 2001:db8::1:0,端口 53 的 DNS global forwarder。
先决条件
您已配置了 Ansible 控制节点以满足以下要求:
- 您使用 Ansible 版本 2.14 或更高版本。
-
您已在 Ansible 控制器上安装了
ansible-freeipa软件包。 - 示例假定在 ~/MyPlaybooks/ 目录中,您已创建了带有 IdM 服务器的完全限定域名(FQDN)的 Ansible 清单文件。
-
示例假定 secret.yml Ansible vault 存储了
ipaadmin_password。
- 您知道 IdM 管理员密码。
流程
进入
/usr/share/doc/ansible-freeipa/playbooks/dnsconfig目录:$ cd /usr/share/doc/ansible-freeipa/playbooks/dnsconfig
打开清单文件,并确保
[ipaserver]部分中列出了您要配置的 IdM 服务器。例如,要指示 Ansible 配置server.idm.example.com,请输入:[ipaserver] server.idm.example.com
复制
forwarders-absent.ymlAnsible playbook 文件。例如:$ cp forwarders-absent.yml ensure-presence-of-a-global-forwarder.yml
-
打开
ensure-presence-of-a-global-forwarder.yml文件进行编辑。 通过设置以下变量来调整文件:
-
将 playbook 的
name变量更改为Playbook,以确保 IdM DNS 中存在全局转发器。 -
在
tasks部分中,将任务name更改为Ensure the presence of a DNS global forwarder to 7.7.9.9 and 2001:db8::1:0 on port 53。 在
ipadnsconfig部分的forwarders部分:-
将第一个
ip_address值更改为全局转发器的 IPv4 地址:7.7.9.9。 -
将第二个
ip_address值更改为全局转发器的 IPv6 地址:2001:db8::1:0。 -
验证
port值被设置为53。
-
将第一个
将
state该为present。对于当前示例为修改过的 Ansible playbook 文件:
--- - name: Playbook to ensure the presence of a global forwarder in IdM DNS hosts: ipaserver vars_files: - /home/user_name/MyPlaybooks/secret.yml tasks: - name: Ensure the presence of a DNS global forwarder to 7.7.9.9 and 2001:db8::1:0 on port 53 ipadnsconfig: forwarders: - ip_address: 7.7.9.9 - ip_address: 2001:db8::1:0 port: 53 state: present-
将 playbook 的
- 保存这个文件。
运行 playbook:
$ ansible-playbook --vault-password-file=password_file -v -i inventory.file ensure-presence-of-a-global-forwarder.yml
其他资源
-
请参阅
/usr/share/doc/ansible-freeipa/目录中的README-dnsconfig.md文件。
30.9. 使用 Ansible 确保 IdM 中没有 DNS 全局转发器
按照以下流程,使用 Ansible playbook 确保 DNS 全局转发器在 IdM 中不存在。在以下示例流程中,IdM 管理员确保在端口 53 上没有互联网协议(IP)v4 地址为 8.8.6.6 和 IP v6 地址为 2001:4860:4860::8800 的 DNS 全局转发器。
先决条件
您已配置了 Ansible 控制节点以满足以下要求:
- 您使用 Ansible 版本 2.14 或更高版本。
-
您已在 Ansible 控制器上安装了
ansible-freeipa软件包。 - 示例假定在 ~/MyPlaybooks/ 目录中,您已创建了带有 IdM 服务器的完全限定域名(FQDN)的 Ansible 清单文件。
-
示例假定 secret.yml Ansible vault 存储了
ipaadmin_password。
- 您知道 IdM 管理员密码。
流程
进入
/usr/share/doc/ansible-freeipa/playbooks/dnsconfig目录:$ cd /usr/share/doc/ansible-freeipa/playbooks/dnsconfig
打开清单文件,并确保
[ipaserver]部分中列出了您要配置的 IdM 服务器。例如,要指示 Ansible 配置server.idm.example.com,请输入:[ipaserver] server.idm.example.com
复制
forwarders-absent.ymlAnsible playbook 文件。例如:$ cp forwarders-absent.yml ensure-absence-of-a-global-forwarder.yml
-
打开
ensure-absence-of-a-global-forwarder.yml文件进行编辑。 通过设置以下变量来调整文件:
-
将 playbook 的
name变量更改为Playbook,以确保 IdM DNS 中没有全局转发器。 -
在
tasks部分,将任务的name改为Ensure the absence of a DNS global forwarder to 8.8.6.6 and 2001:4860:4860::8800 on port 53。 在
ipadnsconfig部分的forwarders部分:-
将第一个
ip_address值更改为全局转发器的 IPv4 地址:8.8.6.6。 -
将第二个
ip_address值更改为全局转发器的 IPv6 地址:2001:4860:4860::8800。 -
验证
port值被设置为53。
-
将第一个
-
将
action变量设置为member。 -
验证
state被设置为absent。
对于当前示例为修改过的 Ansible playbook 文件:
--- - name: Playbook to ensure the absence of a global forwarder in IdM DNS hosts: ipaserver vars_files: - /home/user_name/MyPlaybooks/secret.yml tasks: - name: Ensure the absence of a DNS global forwarder to 8.8.6.6 and 2001:4860:4860::8800 on port 53 ipadnsconfig: forwarders: - ip_address: 8.8.6.6 - ip_address: 2001:4860:4860::8800 port: 53 action: member state: absent重要如果您仅在 playbook 中使用
state: absent选项,而不使用action: member,则 playbook 会失败。-
将 playbook 的
- 保存这个文件。
运行 playbook:
$ ansible-playbook --vault-password-file=password_file -v -i inventory.file ensure-absence-of-a-global-forwarder.yml
其他资源
-
/usr/share/doc/ansible-freeipa/目录中的README-dnsconfig.md文件 -
ipadnsconfig ansible-freeipa 模块中的
action: member选项
30.10. 使用 Ansible 确保 DNS 全局转发器在 IdM 中被禁用
按照以下流程,使用 Ansible playbook 确保 DNS Global Forwarders 在 IdM 中被禁用了。在以下示例中,IdM 管理员确保将全局转发器的转发策略设置为 none,这将有效禁用全局转发器。
先决条件
您已配置了 Ansible 控制节点以满足以下要求:
- 您使用 Ansible 版本 2.14 或更高版本。
-
您已在 Ansible 控制器上安装了
ansible-freeipa软件包。 - 示例假定在 ~/MyPlaybooks/ 目录中,您已创建了带有 IdM 服务器的完全限定域名(FQDN)的 Ansible 清单文件。
-
示例假定 secret.yml Ansible vault 存储了
ipaadmin_password。
- 您知道 IdM 管理员密码。
流程
进入
/usr/share/doc/ansible-freeipa/playbooks/dnsconfig目录:$ cd /usr/share/doc/ansible-freeipa/playbooks/dnsconfig
打开清单文件,并确保
[ipaserver]部分中列出了您要配置的 IdM 服务器。例如,要指示 Ansible 配置server.idm.example.com,请输入:[ipaserver] server.idm.example.com
验证
disable-global-forwarders.ymlAnsible playbook 文件的内容,该文件已被配置为禁用所有 DNS 全局转发器。例如:$ cat disable-global-forwarders.yml --- - name: Playbook to disable global DNS forwarders hosts: ipaserver vars_files: - /home/user_name/MyPlaybooks/secret.yml tasks: - name: Disable global forwarders. ipadnsconfig: forward_policy: none运行 playbook:
$ ansible-playbook --vault-password-file=password_file -v -i inventory.file disable-global-forwarders.yml
其他资源
-
请参阅
/usr/share/doc/ansible-freeipa/目录中的README-dnsconfig.md文件。
30.11. 使用 Ansible 确保 IdM 中存在 DNS 转发区域
按照以下流程,使用 Ansible playbook 确保 DNS 转发区域在 IdM 中存在。在以下示例中,IdM 管理员确保将 example.com 的 DNS 转发区存在到带有 Internet 协议(IP)地址的 DNS 服务器,地址为 8.8.8.8。
先决条件
您已配置了 Ansible 控制节点以满足以下要求:
- 您使用 Ansible 版本 2.14 或更高版本。
-
您已在 Ansible 控制器上安装了
ansible-freeipa软件包。 - 示例假定在 ~/MyPlaybooks/ 目录中,您已创建了带有 IdM 服务器的完全限定域名(FQDN)的 Ansible 清单文件。
-
示例假定 secret.yml Ansible vault 存储了
ipaadmin_password。
- 您知道 IdM 管理员密码。
流程
进入
/usr/share/doc/ansible-freeipa/playbooks/dnsconfig目录:$ cd /usr/share/doc/ansible-freeipa/playbooks/dnsconfig
打开清单文件,并确保
[ipaserver]部分中列出了您要配置的 IdM 服务器。例如,要指示 Ansible 配置server.idm.example.com,请输入:[ipaserver] server.idm.example.com
复制
forwarders-absent.ymlAnsible playbook 文件。例如:$ cp forwarders-absent.yml ensure-presence-forwardzone.yml
-
打开
ensure-presence-forwardzone.yml文件进行编辑。 通过设置以下变量来调整文件:
-
将 playbook 的
name变量更改为Playbook,以确保 IdM DNS 中存在 dnsforwardzone。 -
在
tasks部分中,将任务的name更改为Ensure presence of a dnsforwardzone for example.com to 8.8.8.8。 -
在
tasks部分中,将ipadnsconfig标题更改为ipadnsforwardzone。 在
ipadnsforwardzone部分:-
添加
ipaadmin_password变量,并将其设置为您的 IdM 管理员密码。 -
添加
name变量,并将它设置为example.com。 在
forwarders部分:-
删除
ip_address和port行。 通过在横线后指定该 DNS 服务器的 IP 地址来接收转发的请求:
- 8.8.8.8
-
删除
-
添加
forwardpolicy变量,并将它设为first。 -
添加
skip_overlap_check变量,并将其设置为true。 -
将
state变量更改为present。
对于当前示例为修改过的 Ansible playbook 文件:
-
添加
--- - name: Playbook to ensure the presence of a dnsforwardzone in IdM DNS hosts: ipaserver vars_files: - /home/user_name/MyPlaybooks/secret.yml tasks: - name: Ensure the presence of a dnsforwardzone for example.com to 8.8.8.8 ipadnsforwardzone: ipaadmin_password: "{{ ipaadmin_password }}" name: example.com forwarders: - 8.8.8.8 forwardpolicy: first skip_overlap_check: true state: present-
将 playbook 的
- 保存这个文件。
运行 playbook:
$ ansible-playbook --vault-password-file=password_file -v -i inventory.file ensure-presence-forwardzone.yml
其他资源
-
请参阅
/usr/share/doc/ansible-freeipa/目录中的README-dnsforwardzone.md文件。
30.12. 使用 Ansible 确保 DNS 转发区域 在 IdM 中有多个转发器
按照以下流程,使用 Ansible playbook 确保 IdM 中的 DNS Forward Zone 有多个转发器。在以下示例中,IdM 管理员确保 example.com 的 DNS 转发区转发到 8.8.8.8 和 4.4.4.4。
先决条件
您已配置了 Ansible 控制节点以满足以下要求:
- 您使用 Ansible 版本 2.14 或更高版本。
-
您已在 Ansible 控制器上安装了
ansible-freeipa软件包。 - 示例假定在 ~/MyPlaybooks/ 目录中,您已创建了带有 IdM 服务器的完全限定域名(FQDN)的 Ansible 清单文件。
-
示例假定 secret.yml Ansible vault 存储了
ipaadmin_password。
- 您知道 IdM 管理员密码。
流程
进入
/usr/share/doc/ansible-freeipa/playbooks/dnsconfig目录:$ cd /usr/share/doc/ansible-freeipa/playbooks/dnsconfig
打开清单文件,并确保
[ipaserver]部分中列出了您要配置的 IdM 服务器。例如,要指示 Ansible 配置server.idm.example.com,请输入:[ipaserver] server.idm.example.com
复制
forwarders-absent.ymlAnsible playbook 文件。例如:$ cp forwarders-absent.yml ensure-presence-multiple-forwarders.yml
-
打开
ensure-presence-multiple-forwarders.yml文件进行编辑。 通过设置以下变量来调整文件:
-
将 playbook 的
name变量更改为Playbook,以确保 IdM DNS 中的 dnsforwardzone 中存在多个转发器。 -
在
tasks项中,把任务的name改为Ensure presence of 8.8.8.8 and 4.4.4.4 forwarders in dnsforwardzone for example.com。 -
在
tasks部分中,将ipadnsconfig标题更改为ipadnsforwardzone。 在
ipadnsforwardzone部分:-
添加
ipaadmin_password变量,并将其设置为您的 IdM 管理员密码。 -
添加
name变量,并将它设置为example.com。 在
forwarders部分:-
删除
ip_address和port行。 添加您要保证的 DNS 服务器的 IP 地址存在,在前面添加一个短划线:
- 8.8.8.8 - 4.4.4.4
-
删除
- 将 state 变量更改为 present。
对于当前示例为修改过的 Ansible playbook 文件:
-
添加
--- - name: name: Playbook to ensure the presence of multiple forwarders in a dnsforwardzone in IdM DNS hosts: ipaserver vars_files: - /home/user_name/MyPlaybooks/secret.yml tasks: - name: Ensure presence of 8.8.8.8 and 4.4.4.4 forwarders in dnsforwardzone for example.com ipadnsforwardzone: ipaadmin_password: "{{ ipaadmin_password }}" name: example.com forwarders: - 8.8.8.8 - 4.4.4.4 state: present-
将 playbook 的
- 保存这个文件。
运行 playbook:
$ ansible-playbook --vault-password-file=password_file -v -i inventory.file ensure-presence-multiple-forwarders.yml
其他资源
-
请参阅
/usr/share/doc/ansible-freeipa/目录中的README-dnsforwardzone.md文件。
30.13. 使用 Ansible 确保 IdM 中 DNS Forward 区域被禁用
按照以下流程,使用 Ansible playbook 确保 DNS Forward Zone 在 IdM 中被禁用了。在以下示例中,IdM 管理员确保 example.com 的 DNS 转发区已被禁用。
先决条件
您已配置了 Ansible 控制节点以满足以下要求:
- 您使用 Ansible 版本 2.14 或更高版本。
-
您已在 Ansible 控制器上安装了
ansible-freeipa软件包。 - 示例假定在 ~/MyPlaybooks/ 目录中,您已创建了带有 IdM 服务器的完全限定域名(FQDN)的 Ansible 清单文件。
-
示例假定 secret.yml Ansible vault 存储了
ipaadmin_password。
- 您知道 IdM 管理员密码。
流程
进入
/usr/share/doc/ansible-freeipa/playbooks/dnsconfig目录:$ cd /usr/share/doc/ansible-freeipa/playbooks/dnsconfig
打开清单文件,并确保
[ipaserver]部分中列出了您要配置的 IdM 服务器。例如,要指示 Ansible 配置server.idm.example.com,请输入:[ipaserver] server.idm.example.com
复制
forwarders-absent.ymlAnsible playbook 文件。例如:$ cp forwarders-absent.yml ensure-disabled-forwardzone.yml
-
打开
ensure-disabled-forwardzone.yml文件进行编辑。 通过设置以下变量来调整文件:
-
将 playbook 的
name变量更改为Playbook,以确保 IdM DNS 中禁用了 dnsforwardzone。 -
在
tasks项中,将任务的name改为Ensure a dnsforwardzone for example.com is disabled。 -
在
tasks部分中,将ipadnsconfig标题更改为ipadnsforwardzone。 在
ipadnsforwardzone部分:-
添加
ipaadmin_password变量,并将其设置为您的 IdM 管理员密码。 -
添加
name变量,并将它设置为example.com。 -
删除整个
forwarders部分。 -
将
state变量更改为disabled。
对于当前示例为修改过的 Ansible playbook 文件:
-
添加
--- - name: Playbook to ensure a dnsforwardzone is disabled in IdM DNS hosts: ipaserver vars_files: - /home/user_name/MyPlaybooks/secret.yml tasks: - name: Ensure a dnsforwardzone for example.com is disabled ipadnsforwardzone: ipaadmin_password: "{{ ipaadmin_password }}" name: example.com state: disabled-
将 playbook 的
- 保存这个文件。
运行 playbook:
$ ansible-playbook --vault-password-file=password_file -v -i inventory.file ensure-disabled-forwardzone.yml
其他资源
-
请参阅
/usr/share/doc/ansible-freeipa/目录中的README-dnsforwardzone.md文件。
30.14. 使用 Ansible 确保 IdM 中没有 DNS 转发区域
按照以下流程,使用 Ansible playbook 确保 DNS 转发区域在 IdM 中不存在。在以下示例中,IdM 管理员确保 example.com 没有 DNS 转发区。
先决条件
您已配置了 Ansible 控制节点以满足以下要求:
- 您使用 Ansible 版本 2.14 或更高版本。
-
您已在 Ansible 控制器上安装了
ansible-freeipa软件包。 - 示例假定在 ~/MyPlaybooks/ 目录中,您已创建了带有 IdM 服务器的完全限定域名(FQDN)的 Ansible 清单文件。
-
示例假定 secret.yml Ansible vault 存储了
ipaadmin_password。
- 您知道 IdM 管理员密码。
流程
进入
/usr/share/doc/ansible-freeipa/playbooks/dnsconfig目录:$ cd /usr/share/doc/ansible-freeipa/playbooks/dnsconfig
打开清单文件,并确保
[ipaserver]部分中列出了您要配置的 IdM 服务器。例如,要指示 Ansible 配置server.idm.example.com,请输入:[ipaserver] server.idm.example.com
复制
forwarders-absent.ymlAnsible playbook 文件。例如:$ cp forwarders-absent.yml ensure-absence-forwardzone.yml
-
打开
ensure-absence-forwardzone.yml文件进行编辑。 通过设置以下变量来调整文件:
-
将 playbook 的
name变量更改为Playbook,以确保 IdM DNS 中不存在 dnsforwardzone。 -
在
tasks项中,把任务的name改为Ensure the absence of a dnsforwardzone for example.com。 -
在
tasks部分中,将ipadnsconfig标题更改为ipadnsforwardzone。 在
ipadnsforwardzone部分:-
添加
ipaadmin_password变量,并将其设置为您的 IdM 管理员密码。 -
添加
name变量,并将它设置为example.com。 -
删除整个
forwarders部分。 -
将
state变量保留为absent。
对于当前示例为修改过的 Ansible playbook 文件:
-
添加
--- - name: Playbook to ensure the absence of a dnsforwardzone in IdM DNS hosts: ipaserver vars_files: - /home/user_name/MyPlaybooks/secret.yml tasks: - name: Ensure the absence of a dnsforwardzone for example.com ipadnsforwardzone: ipaadmin_password: "{{ ipaadmin_password }}" name: example.com state: absent-
将 playbook 的
- 保存这个文件。
运行 playbook:
$ ansible-playbook --vault-password-file=password_file -v -i inventory.file ensure-absence-forwardzone.yml
其他资源
-
请参阅
/usr/share/doc/ansible-freeipa/目录中的README-dnsforwardzone.md文件。
第 31 章 使用 Ansible 管理 IdM 中的 DNS 记录
本章论述了如何使用 Ansible playbook 管理 Identity Management(IdM)中的 DNS 记录。作为 IdM 管理员,您可以在 IdM 中添加、修改和删除 DNS 记录。本章包含以下部分:
31.1. IdM 中的 DNS 记录
身份管理(IdM)支持许多不同的 DNS 记录类型。以下是最频繁使用的四个项:
- 一个
这是主机名和 IPv4 地址的基本映射。A 记录的记录名称是一个主机名,如
www。A 记录的IP 地址值是一个 IPv4 地址,如192.0.2.1。有关 A 记录的更多信息,请参阅 RFC 1035。
- AAAA
这是主机名和 IPv6 地址的基本映射。AAAA 记录的记录名称是一个主机名,如
www。IP 地址值是一个 IPv6 地址,如2001:DB8::1111。有关 AAAA 记录的更多信息,请参阅 RFC 3596。
- SRV
服务 (SRV)资源记录将服务名称映射到提供该特定服务的服务器的 DNS 名称。例如,此记录类型可以将类似 LDAP 目录的服务映射到管理它的服务器。
SRV 记录的记录名称格式为
_service._protocol,如_ldap._tcp。SRV 记录的配置选项包括优先级、权重、端口号和目标服务的主机名。有关 SRV 记录的更多信息,请参阅 RFC 2782。
- PTR
指针记录(PTR)添加反向 DNS 记录,它将 IP 地址映射到域名。
注意IPv4 地址的所有反向 DNS 查找都使用在
in-addr.arpa.域中定义的反向条目。反向地址采用人类可读形式,与常规 IP 地址完全相反,它附加了in-addr.arpa.域。例如,对于本网络地址192.0.2.0/24,反向区域为2.0.192.in-addr.arpa。PTR 的记录名称必须是 RFC 1035 中指定的标准格式,它在 RFC 2317 和 RFC 3596 中扩展。主机名值必须是您要为其创建记录的主机的规范主机名。
注意还可以为 IPv6 地址配置反向区域,即
.ip6.arpa.域中的区域。有关 IPv6 反向区的更多信息,请参阅 RFC 3596。
添加 DNS 资源记录时,请注意很多记录需要不同的数据。例如,CNAME 记录需要一个主机名,而 A 记录则需要一个 IP 地址。在 IdM Web UI 中,用于添加新记录的表单字段会自动更新,以反映当前所选记录类型所需的数据。
31.2. 常见 ipa dnsrecord-* 选项
您可以在身份管理(IdM)中添加、修改和删除最常见的 DNS 资源记录类型时,您可以使用以下选项:
- A (IPv4)
- AAAA (IPv6)
- SRV
- PTR
在 Bash 中,您可以通过列出大括号内的逗号分隔列表中的值来定义多个条目,如 --option={val1,val2,val3}。
表 31.1. 常规记录选项
| 选项 | 描述 |
|---|---|
|
| 将记录的时间设置为实时。 |
|
| 解析原始 DNS 记录,并以结构化格式返回它们。 |
表 31.2. "A" 记录选项
| 选项 | 描述 | 示例 |
|---|---|---|
|
| 传递单个 A 记录或 A 记录列表。 |
|
| 可以创建具有给定 IP 地址的通配符 A 记录。 |
| |
|
|
为记录指定 IP 地址。在创建记录时,指定 |
|
[a]
这个示例创建通配符 A 记录,其 IP 地址为 192.0.2.123。
| ||
表 31.3. "AAAA"记录选项
| 选项 | 描述 | 示例 |
|---|---|---|
|
| 通过单个 AAAA(IPv6)记录或 AAAA 记录列表。 |
|
|
|
为记录指定 IPv6 地址。在创建记录时,指定 |
|
表 31.4. "PTR"记录选项
| 选项 | 描述 | 示例 |
|---|---|---|
|
|
传递单个 PTR 记录或 PTR 记录列表。当添加反向 DNS 记录时,与 |
|
|
| ||
|
| 为记录提供主机名。 |
表 31.5. "SRV"记录选项
| 选项 | 描述 | 示例 |
|---|---|---|
|
|
通过单个 SRV 记录或 SRV 记录列表。在右侧的示例中,_ldap._tcp 定义 SRV 记录的服务类型和连接协议。 |
|
|
| ||
|
| 设置记录的优先级。服务类型可以有多个 SRV 记录。优先级(0 - 65535)设置记录排名;编号越低,优先级越高。服务必须首先使用优先级最高的记录。 |
|
|
| 设置记录的权重。这有助于决定具有相同优先级的 SRV 记录顺序。设定的权重应添加最多 100,代表使用特定记录的概率(以百分比表示)。 |
|
|
| 为目标主机上的 服务指定端口。 |
|
|
| 指定目标主机的域名。如果域中没有服务,则这可以是一个句点(.)。 |
其他资源
-
运行
ipa dnsrecord-add --help。
31.3. 使用 Ansible 确保 IdM 中存在 A 和 AAAA DNS 记录
按照以下流程,使用 Ansible playbook 确保特定 IdM 主机的 A 和 AAAA 记录存在。在以下流程中使用的示例中,IdM 管理员可确保在 idm.example.com DNS 区域中存在 host1 的 A 和 AAAA 记录。
先决条件
您已配置了 Ansible 控制节点以满足以下要求:
- 您使用 Ansible 版本 2.14 或更高版本。
-
您已在 Ansible 控制器上安装了
ansible-freeipa软件包。 - 示例假定在 ~/MyPlaybooks/ 目录中,您已创建了带有 IdM 服务器的完全限定域名(FQDN)的 Ansible 清单文件。
-
示例假定 secret.yml Ansible vault 存储了
ipaadmin_password。
- 您知道 IdM 管理员密码。
- idm.example.com 区域存在,由 IdM DNS 管理。有关在 IdM DNS 中添加主 DNS 区域的更多信息,请参阅 使用 Ansible playbook 管理 IdM DNS 区域。
流程
进入
/usr/share/doc/ansible-freeipa/playbooks/dnsrecord目录:$ cd /usr/share/doc/ansible-freeipa/playbooks/dnsrecord打开您的清单文件,并确保您要配置的 IdM 服务器列在
[ipaserver]部分。例如,要指示 Ansible 配置 server.idm.example.com,请输入:[ipaserver] server.idm.example.com
复制 ensure-A-and-AAAA-records-are-present.yml Ansible playbook 文件。例如:
$ cp ensure-A-and-AAAA-records-are-present.yml ensure-A-and-AAAA-records-are-present-copy.yml- 打开 ensure-A-and-AAAA-records-are-present-copy.yml 文件进行编辑。
通过在
ipadnsrecordtask 部分中设置以下变量来修改该文件:-
将
ipaadmin_password变量设置为 IdM 管理员密码。 -
将
zone_name变量设置为 idm.example.com。 -
在
records变量中,将name变量设置为 host1,将a_ip_address变量设置为 192.168.122.123。 在
records变量中,将name变量设置为 host1,并将aaaa_ip_address变量设置为 ::1。这是当前示例修改的 Ansible playbook 文件:
--- - name: Ensure A and AAAA records are present hosts: ipaserver become: true gather_facts: false tasks: # Ensure A and AAAA records are present - name: Ensure that 'host1' has A and AAAA records. ipadnsrecord: ipaadmin_password: "{{ ipaadmin_password }}" zone_name: idm.example.com records: - name: host1 a_ip_address: 192.168.122.123 - name: host1 aaaa_ip_address: ::1-
将
- 保存这个文件。
运行 playbook:
$ ansible-playbook --vault-password-file=password_file -v -i inventory.file ensure-A-and-AAAA-records-are-present-copy.yml
其他资源
- 请参阅 IdM 中的 DNS 记录。
-
请参阅
/usr/share/doc/ansible-freeipa/目录中的README-dnsrecord.md文件。 -
请参阅
/usr/share/doc/ansible-freeipa/playbooks/dnsrecord目录中的 Ansible playbook 示例。
31.4. 使用 Ansible 确保 IdM 中存在 A 和 PTR DNS 记录
按照以下流程,使用 Ansible playbook 确保特定 IdM 主机的 A 记录存在,并包含对应的 PTR 记录。在以下流程中使用的示例中,IdM 管理员可确保在 idm.example.com 区域中有 IP 地址为 192.168.122.45 的 host1 的 A 和 PTR 记录。
先决条件
您已配置了 Ansible 控制节点以满足以下要求:
- 您使用 Ansible 版本 2.14 或更高版本。
-
您已在 Ansible 控制器上安装了
ansible-freeipa软件包。 - 示例假定在 ~/MyPlaybooks/ 目录中,您已创建了带有 IdM 服务器的完全限定域名(FQDN)的 Ansible 清单文件。
-
示例假定 secret.yml Ansible vault 存储了
ipaadmin_password。
- 您知道 IdM 管理员密码。
- idm.example.com DNS 区域存在,并由 IdM DNS 管理。有关在 IdM DNS 中添加主 DNS 区域的更多信息,请参阅 使用 Ansible playbook 管理 IdM DNS 区域。
流程
进入
/usr/share/doc/ansible-freeipa/playbooks/dnsrecord目录:$ cd /usr/share/doc/ansible-freeipa/playbooks/dnsrecord打开您的清单文件,并确保您要配置的 IdM 服务器列在
[ipaserver]部分。例如,要指示 Ansible 配置 server.idm.example.com,请输入:[ipaserver] server.idm.example.com
复制 ensure-dnsrecord-with-reverse-is-present.yml Ansible playbook 文件。例如:
$ cp ensure-dnsrecord-with-reverse-is-present.yml ensure-dnsrecord-with-reverse-is-present-copy.yml- 打开 ensure-dnsrecord-with-reverse-is-present-copy.yml 文件进行编辑。
通过在
ipadnsrecordtask 部分中设置以下变量来修改该文件:-
将
ipaadmin_password变量设置为 IdM 管理员密码。 -
将
name变量设置为 host1。 -
将
zone_name变量设置为 idm.example.com。 -
将
ip_address变量设置为 192.168.122.45。 将
create_reverse变量设置为 yes。这是当前示例修改的 Ansible playbook 文件:
--- - name: Ensure DNS Record is present. hosts: ipaserver become: true gather_facts: false tasks: # Ensure that dns record is present - ipadnsrecord: ipaadmin_password: "{{ ipaadmin_password }}" name: host1 zone_name: idm.example.com ip_address: 192.168.122.45 create_reverse: yes state: present-
将
- 保存这个文件。
运行 playbook:
$ ansible-playbook --vault-password-file=password_file -v -i inventory.file ensure-dnsrecord-with-reverse-is-present-copy.yml
其他资源
- 请参阅 IdM 中的 DNS 记录。
-
请参阅
/usr/share/doc/ansible-freeipa/目录中的README-dnsrecord.md文件。 -
请参阅
/usr/share/doc/ansible-freeipa/playbooks/dnsrecord目录中的 Ansible playbook 示例。
31.5. 使用 Ansible 确保 IdM 中存在多个 DNS 记录
按照以下流程,使用 Ansible playbook 确保多个值与特定 IdM DNS 记录相关联。在以下示例中,IdM 管理员确保在 idm.example.com DNS 区域中存在 host1 的多个 A 记录。
先决条件
您已配置了 Ansible 控制节点以满足以下要求:
- 您使用 Ansible 版本 2.14 或更高版本。
-
您已在 Ansible 控制器上安装了
ansible-freeipa软件包。 - 示例假定在 ~/MyPlaybooks/ 目录中,您已创建了带有 IdM 服务器的完全限定域名(FQDN)的 Ansible 清单文件。
-
示例假定 secret.yml Ansible vault 存储了
ipaadmin_password。
- 您知道 IdM 管理员密码。
- idm.example.com 区域存在,由 IdM DNS 管理。有关在 IdM DNS 中添加主 DNS 区域的更多信息,请参阅使用 Ansible playbook 管理 IdM DNS 区域。
流程
进入
/usr/share/doc/ansible-freeipa/playbooks/dnsrecord目录:$ cd /usr/share/doc/ansible-freeipa/playbooks/dnsrecord打开您的清单文件,并确保您要配置的 IdM 服务器列在
[ipaserver]部分。例如,要指示 Ansible 配置 server.idm.example.com,请输入:[ipaserver] server.idm.example.com
复制 ensure-presence-multiple-records.yml Ansible playbook 文件。例如:
$ cp ensure-presence-multiple-records.yml ensure-presence-multiple-records-copy.yml- 打开 ensure-presence-multiple-records-copy.yml 文件进行编辑。
通过在
ipadnsrecordtask 部分中设置以下变量来修改该文件:-
将
ipaadmin_password变量设置为 IdM 管理员密码。 -
在
records部分中,将name变量设置为 host1。 -
在
records部分中,将zone_name变量设置为 idm.example.com。 -
在
records项中,将a_rec变量设置为 192.168.122.112,以及 192.168.122.122。 在
records部分中定义第二条记录:-
将
name变量设置为 host1。 -
将
zone_name变量设置为 idm.example.com。 -
将
aaaa_rec变量设置为 ::1。
这是当前示例修改的 Ansible playbook 文件:
-
将
--- - name: Test multiple DNS Records are present. hosts: ipaserver become: true gather_facts: false tasks: # Ensure that multiple dns records are present - ipadnsrecord: ipaadmin_password: "{{ ipaadmin_password }}" records: - name: host1 zone_name: idm.example.com a_rec: 192.168.122.112 a_rec: 192.168.122.122 - name: host1 zone_name: idm.example.com aaaa_rec: ::1-
将
- 保存这个文件。
运行 playbook:
$ ansible-playbook --vault-password-file=password_file -v -i inventory.file ensure-presence-multiple-records-copy.yml
其他资源
- 请参阅 IdM 中的 DNS 记录。
-
请参阅
/usr/share/doc/ansible-freeipa/目录中的README-dnsrecord.md文件。 -
请参阅
/usr/share/doc/ansible-freeipa/playbooks/dnsrecord目录中的 Ansible playbook 示例。
31.6. 使用 Ansible 确保 IdM 中存在多个 CNAME 记录
Canonical Name 记录(CNAME 记录)是域名系统(DNS)中的一种资源记录,可将一个域名(别名)映射到另一个名称(规范名称)。
从一个 IP 地址运行多个服务时,您可能会发现 CNAME 记录很有用:例如,FTP 服务和 Web 服务,各自在不同端口中运行。
按照以下流程,使用 Ansible playbook 确保 IdM DNS 中存在多个 CNAME 记录。在以下示例中,host03 既是 HTTP 服务器和 FTP 服务器。IdM 管理员确保 idm.example.com 区域中存在 host03 A 记录的 www 和 ftp CNAME 记录。
先决条件
您已配置了 Ansible 控制节点以满足以下要求:
- 您使用 Ansible 版本 2.14 或更高版本。
-
您已在 Ansible 控制器上安装了
ansible-freeipa软件包。 - 示例假定在 ~/MyPlaybooks/ 目录中,您已创建了带有 IdM 服务器的完全限定域名(FQDN)的 Ansible 清单文件。
-
示例假定 secret.yml Ansible vault 存储了
ipaadmin_password。
- 您知道 IdM 管理员密码。
- idm.example.com 区域存在,由 IdM DNS 管理。有关在 IdM DNS 中添加主 DNS 区域的更多信息,请参阅使用 Ansible playbook 管理 IdM DNS 区域。
- host03 A 记录存在于 idm.example.com 区域中。
流程
进入
/usr/share/doc/ansible-freeipa/playbooks/dnsrecord目录:$ cd /usr/share/doc/ansible-freeipa/playbooks/dnsrecord打开您的清单文件,并确保您要配置的 IdM 服务器列在
[ipaserver]部分。例如,要指示 Ansible 配置 server.idm.example.com,请输入:[ipaserver] server.idm.example.com
复制 ensure-CNAME-record-is-present.yml Ansible playbook 文件。例如:
$ cp ensure-CNAME-record-is-present.yml ensure-CNAME-record-is-present-copy.yml- 打开 ensure-CNAME-record-is-present-copy.yml 文件进行编辑。
通过在
ipadnsrecordtask 部分中设置以下变量来修改该文件:-
(可选)使用 play 的
name提供的描述。 -
将
ipaadmin_password变量设置为 IdM 管理员密码。 -
将
zone_name变量设置为 idm.example.com。 在
records变量部分,设置以下变量和值:-
将
name变量设置为 www。 -
将
cname_hostname变量设置为 host03。 -
将
name变量设置为 ftp。 -
将
cname_hostname变量设置为 host03。
这是当前示例修改的 Ansible playbook 文件:
-
将
--- - name: Ensure that 'www.idm.example.com' and 'ftp.idm.example.com' CNAME records point to 'host03.idm.example.com'. hosts: ipaserver become: true gather_facts: false tasks: - ipadnsrecord: ipaadmin_password: "{{ ipaadmin_password }}" zone_name: idm.example.com records: - name: www cname_hostname: host03 - name: ftp cname_hostname: host03-
(可选)使用 play 的
- 保存这个文件。
运行 playbook:
$ ansible-playbook --vault-password-file=password_file -v -i inventory.file ensure-CNAME-record-is-present.yml
其他资源
-
请参阅
/usr/share/doc/ansible-freeipa/目录中的README-dnsrecord.md文件。 -
请参阅
/usr/share/doc/ansible-freeipa/playbooks/dnsrecord目录中的 Ansible playbook 示例。
31.7. 使用 Ansible 确保 IdM 中是否存在 SRV 记录
DNS 服务 (SRV) 记录定义域中可用服务的主机名、端口号、传输协议、优先级和权重。在 Identity Management(IdM)中,您可以使用 SRV 记录来定位 IdM 服务器和副本。
按照以下流程,使用 Ansible playbook 确保 SRV 记录在 IdM DNS 中存在。在以下示例中,IdM 管理员可确保存在 _kerberos._udp.idm.example.com SRV 记录,其值为 10 50 88 idm.example.com。这将设置以下值:
- 它将服务的优先级设置为 10。
- 它将服务的权重设置为 50。
- 它将服务要使用的端口设置为 88。
先决条件
您已配置了 Ansible 控制节点以满足以下要求:
- 您使用 Ansible 版本 2.14 或更高版本。
-
您已在 Ansible 控制器上安装了
ansible-freeipa软件包。 - 示例假定在 ~/MyPlaybooks/ 目录中,您已创建了带有 IdM 服务器的完全限定域名(FQDN)的 Ansible 清单文件。
-
示例假定 secret.yml Ansible vault 存储了
ipaadmin_password。
- 您知道 IdM 管理员密码。
- idm.example.com 区域存在,由 IdM DNS 管理。有关在 IdM DNS 中添加主 DNS 区域的更多信息,请参阅 使用 Ansible playbook 管理 IdM DNS 区域。
流程
进入
/usr/share/doc/ansible-freeipa/playbooks/dnsrecord目录:$ cd /usr/share/doc/ansible-freeipa/playbooks/dnsrecord打开您的清单文件,并确保您要配置的 IdM 服务器列在
[ipaserver]部分。例如,要指示 Ansible 配置 server.idm.example.com,请输入:[ipaserver] server.idm.example.com
复制 ensure-SRV-record-is-present.yml Ansible playbook 文件。例如:
$ cp ensure-SRV-record-is-present.yml ensure-SRV-record-is-present-copy.yml- 打开 ensure-SRV-record-is-present-copy.yml 文件进行编辑。
通过在
ipadnsrecordtask 部分中设置以下变量来修改该文件:-
将
ipaadmin_password变量设置为 IdM 管理员密码。 -
将
name变量设置为 _kerberos._udp.idm.example.com。 -
将
srv_rec变量设置为 '10 50 88 idm.example.com'。 将
zone_name变量设置为 idm.example.com。对于当前示例为修改过的 Ansible playbook 文件:
--- - name: Test multiple DNS Records are present. hosts: ipaserver become: true gather_facts: false tasks: # Ensure a SRV record is present - ipadnsrecord: ipaadmin_password: "{{ ipaadmin_password }}" name: _kerberos._udp.idm.example.com srv_rec: ’10 50 88 idm.example.com’ zone_name: idm.example.com state: present-
将
- 保存这个文件。
运行 playbook:
$ ansible-playbook --vault-password-file=password_file -v -i inventory.file ensure-SRV-record-is-present.yml
其他资源
- 请参阅 IdM 中的 DNS 记录。
-
请参阅
/usr/share/doc/ansible-freeipa/目录中的README-dnsrecord.md文件。 -
请参阅
/usr/share/doc/ansible-freeipa/playbooks/dnsrecord目录中的 Ansible playbook 示例。
第 33 章 使用 Ansible 将 IdM 与 NIS 域和 netgroups 集成
33.1. NIS 及其优点
在 UNIX 环境中,网络信息服务(NIS)是一种集中管理身份和身份验证的通用方法。NIS 最初被命名为 Yellow Pages (YP),集中管理身份验证和身份信息,例如:
- 用户和密码
- 主机名和 IP 地址
- POSIX 组
对于现代网络基础设施,NIS 被视为太不安全,例如,它既不提供主机身份验证,也不会通过网络发送加密数据。要临时解决这个问题,NIS 通常与其他协议集成以增强安全性。
如果您使用身份管理(IdM),您可以使用 NIS 服务器插件来连接无法完全迁移到 IdM 的客户端。IdM 将 netgroups 和其他 NIS 数据集成到 IdM 域。另外,您可以轻松地将用户和主机身份从 NIS 域迁移到 IdM。
netgroups 可在 NIS 组期望的任何地方使用。
33.2. IdM 中的 NIS
IdM 中的 NIS 对象
NIS 对象集成并存储在目录服务器后端中,以符合 RFC 2307。IdM 在 LDAP 目录中创建 NIS 对象,客户端使用加密的 LDAP 连接检索它们,例如:通过系统安全服务守护进程(SSSD)或 nss_ldap。
IdM 管理 netgroups、帐户、组、主机和其他数据。IdM 使用 NIS 侦听器将密码、组和网络组映射到 IdM 条目。
IdM 中的 NIS 插件
对于 NIS 支持,IdM 使用 slapi-nis 软件包中提供的以下插件:
- NIS 服务器插件
- NIS 服务器插件使 IdM 集成的 LDAP 服务器充当客户端的 NIS 服务器。在此角色中,目录服务器会根据配置动态生成并更新 NIS 映射。使用插件,IdM 使用 NIS 协议作为 NIS 服务器为客户端服务。
- 模式兼容性插件
模式兼容性插件可让目录服务器后端提供一个存储在目录信息树(DIT)部分中的条目的替代视图。这包括添加、删除或重命名属性值,以及选择性地从树中的多个条目检索属性值。
详情请查看
/usr/share/doc/slapi-nis-version/sch-getting-started.txt文件。
33.3. IdM 中的 NIS netgroups
NIS 实体可以存储在 netgroups 中。与 UNIX 组相比,netgroups 为以下提供支持:
- 嵌套组(作为其他组成员的组)。
- 对主机分组。
netgroup 定义一组以下信息:主机、用户和域。这个集合被称为 triple。这三个字段可以包含:
- 值。
-
短划线(
-),指定 "没有有效值" - 无值。空字段指定一个通配符。
(host.example.com,,nisdomain.example.com) (-,user,nisdomain.example.com)
当客户端请求 NIS netgroup 时,Idm 会将 LDAP 条目转换为:
- 传统的 NIS 映射,并使用 NIS 插件通过 NIS 协议将其发送给客户端。
- 与 RFC 2307 或 RFC 2307bis 兼容的 LDAP 格式。
33.4. 使用 Ansible 确保 netgroup 存在
您可以使用 Ansible playbook 确保 IdM netgroup 存在。这个示例描述了如何确保 TestNetgroup1 组存在。
先决条件
您已配置了 Ansible 控制节点以满足以下要求:
- 您使用 Ansible 版本 2.14 或更高版本。
-
您已在 Ansible 控制器上安装了
ansible-freeipa软件包。 - 您已在 ~/MyPlaybooks/ 目录中创建了一个带有 IdM 服务器的完全限定域名(FQDN)的 Ansible 清单文件。
-
您已将
ipaadmin_password存储在 secret.yml Ansible vault 中。
流程
使用以下内容创建您的 Ansible playbook 文件 netgroup-present.yml :
--- - name: Playbook to manage IPA netgroup. hosts: ipaserver become: no vars_files: - /home/user_name/MyPlaybooks/secret.yml tasks: - name: Ensure netgroup members are present ipanetgroup: ipaadmin_password: "{{ ipaadmin_password }}" name: TestNetgroup1运行 playbook:
$ ansible-playbook --vault-password-file=password_file -v -i path_to_inventory_directory/inventory.file path_to_playbooks_directory_/netgroup-present.yml
其他资源
- IdM 中的 NIS
-
/usr/share/doc/ansible-freeipa/README-netgroup.md -
/usr/share/doc/ansible-freeipa/playbooks/netgroup
33.5. 使用 Ansible 确保成员在 netgroup 中存在
您可以使用 Ansible playbook 确保 IdM 用户、组和网络组是 netgroup 的成员。这个示例描述了如何确保 TestNetgroup1 组有以下成员:
- user1 和 user2 IdM 用户
- group1 IdM 组
- admins netgroup
- 是 IdM 客户端的 idmclient1 主机
先决条件
您已配置了 Ansible 控制节点以满足以下要求:
- 您使用 Ansible 版本 2.14 或更高版本。
-
您已在 Ansible 控制器上安装了
ansible-freeipa软件包。 - 您已在 ~/MyPlaybooks/ 目录中创建了一个带有 IdM 服务器的完全限定域名(FQDN)的 Ansible 清单文件。
-
您已将
ipaadmin_password存储在 secret.yml Ansible vault 中。
- TestNetgroup1 IdM netgroup 存在。
- user1 和 user2 IdM 用户存在。
- group1 IdM 组存在。
- admins IdM netgroup 存在。
流程
使用以下内容创建 Ansible playbook 文件 IdM-members-present-in-a-netgroup.yml :
--- - name: Playbook to manage IPA netgroup. hosts: ipaserver become: no vars_files: - /home/user_name/MyPlaybooks/secret.yml tasks: - name: Ensure netgroup members are present ipanetgroup: ipaadmin_password: "{{ ipaadmin_password }}" name: TestNetgroup1 user: user1,user2 group: group1 host: idmclient1 netgroup: admins action: member运行 playbook:
$ ansible-playbook --vault-password-file=password_file -v -i path_to_inventory_directory/inventory.file path_to_playbooks_directory_/IdM-members-present-in-a-netgroup.yml
其他资源
- IdM 中的 NIS
-
/usr/share/doc/ansible-freeipa/README-netgroup.md -
/usr/share/doc/ansible-freeipa/playbooks/netgroup
33.6. 使用 Ansible 确保成员不在 netgroup 中
您可以使用 Ansible playbook 确保 IdM 用户是 netgroup 的成员。这个示例描述了如何确保 TestNetgroup1 组在其 members. netgroup 中没有 user1 IdM 用户。
先决条件
您已配置了 Ansible 控制节点以满足以下要求:
- 您使用 Ansible 版本 2.14 或更高版本。
-
您已在 Ansible 控制器上安装了
ansible-freeipa软件包。 - 您已在 ~/MyPlaybooks/ 目录中创建了一个带有 IdM 服务器的完全限定域名(FQDN)的 Ansible 清单文件。
-
您已将
ipaadmin_password存储在 secret.yml Ansible vault 中。
- TestNetgroup1 netgroup 存在。
流程
使用以下内容创建 Ansible playbook 文件 IdM-member-absent-from-a-netgroup.yml :
--- - name: Playbook to manage IPA netgroup. hosts: ipaserver become: no vars_files: - /home/user_name/MyPlaybooks/secret.yml tasks: - name: Ensure netgroup user, "user1", is absent ipanetgroup: ipaadmin_password: "{{ ipaadmin_password }}" name: TestNetgroup1 user: "user1" action: member state: absent运行 playbook:
$ ansible-playbook --vault-password-file=password_file -v -i path_to_inventory_directory/inventory.file path_to_playbooks_directory_/IdM-member-absent-from-a-netgroup.yml
其他资源
- IdM 中的 NIS
-
/usr/share/doc/ansible-freeipa/README-netgroup.md -
/usr/share/doc/ansible-freeipa/playbooks/netgroup
33.7. 使用 Ansible 确保 netgroup 不存在
您可以使用 Ansible playbook 确保 netgroup 在身份管理(IdM)中不存在。这个示例描述了如何确保 TestNetgroup1 组在 IdM 域中不存在。
先决条件
您已配置了 Ansible 控制节点以满足以下要求:
- 您使用 Ansible 版本 2.14 或更高版本。
-
您已在 Ansible 控制器上安装了
ansible-freeipa软件包。 - 您已在 ~/MyPlaybooks/ 目录中创建了一个带有 IdM 服务器的完全限定域名(FQDN)的 Ansible 清单文件。
-
您已将
ipaadmin_password存储在 secret.yml Ansible vault 中。
流程
使用以下内容创建您的 Ansible playbook 文件 netgroup-absent.yml :
--- - name: Playbook to manage IPA netgroup. hosts: ipaserver become: no vars_files: - /home/user_name/MyPlaybooks/secret.yml tasks: - name: Ensure netgroup my_netgroup1 is absent ipanetgroup: ipaadmin_password: "{{ ipaadmin_password }}" name: my_netgroup1 state: absent运行 playbook:
$ ansible-playbook --vault-password-file=password_file -v -i path_to_inventory_directory/inventory.file path_to_playbooks_directory_/netgroup-absent.yml
其他资源
- IdM 中的 NIS
-
/usr/share/doc/ansible-freeipa/README-netgroup.md -
/usr/share/doc/ansible-freeipa/playbooks/netgroup
第 34 章 使用 Ansible 在 IdM 中配置 HBAC 和 sudo 规则
在身份管理(IdM)中使用基于主机的访问控制(HBAC),您可以定义根据以下内容限制对主机或服务访问权限的策略:
- 尝试登录的用户以及此用户的组
- 用户尝试访问的主机以及该主机所属的主机组
- 用于访问主机的服务
使用 sudo,用户可以以另一个具有不同特权的用户身份运行程序,如 root 特权。在 IdM 中,您可以集中管理 sudo 规则。您可以根据用户组、主机组和命令组以及单个用户、主机和命令定义 sudo 规则。
完成这个流程以确保 IdM 用户的以下 HBAC 和 sudo 规则存在:
- jane 只能访问主机 client01.idm.example.com。
- john 只能访问主机 client02.idm.example.com。
-
包括默认的
admin用户以及常规 alice 用户的admins组的成员可以访问任何 IdM 主机。 admins组的成员可以在任何 IdM 主机上使用以下命令运行sudo:-
/usr/sbin/reboot -
/usr/bin/less -
/usr/sbin/setenforce
-
下图显示了上述所需配置:
图 34.1. IdM HBAC 和 SUDO 规则图
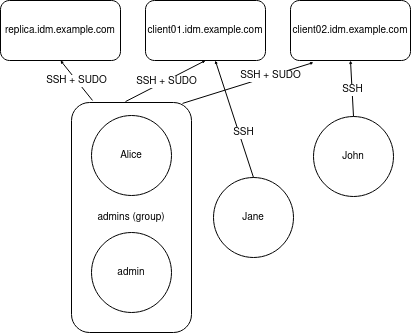
先决条件
在控制节点上:
- 您使用 Ansible 版本 2.14 或更高版本。
-
您已安装
ansible-freeipa软件包。 - 您已在 ~/MyPlaybooks/ 目录中创建了一个带有 IdM 服务器的完全限定域名(FQDN)的 Ansible 清单文件。
-
您已将
ipaadmin_password存储在 secret.yml Ansible vault 中。
- 用户 jane、john 和 alice 在 IdM 中存在 。为这些帐户配置的密码。
流程
使用以下内容创建您的 Ansible playbook 文件 add-hbac-and-sudo-rules-to-idm.yml :
--- - name: Playbook to manage IPA HBAC and SUDO rules hosts: ipaserver become: false gather_facts: false vars_files: - /home/<user_name>/MyPlaybooks/secret.yml module_defaults: ipahbacrule: ipaadmin_password: "{{ ipaadmin_password }}" ipagroup: ipaadmin_password: "{{ ipaadmin_password }}" ipasudocmd: ipaadmin_password: "{{ ipaadmin_password }}" ipasudocmdgroup: ipaadmin_password: "{{ ipaadmin_password }}" ipasudorule: ipaadmin_password: "{{ ipaadmin_password }}" tasks: - name: HBAC Rule for Jane - can log in to client01 ipahbacrule: # Creates the rule name: Jane_rule hbacsvc: - sshd - login host: # Host name - client01.idm.example.com user: - jane - name: HBAC Rule for John - can log in to client02 ipahbacrule: # Creates the rule name: john_rule hbacsvc: - sshd - login host: # Host name - client02.idm.example.com user: - john - name: Add user member alice to group admins ipagroup: name: admins action: member user: - alice - name: HBAC Rule for IdM administrators ipahbacrule: # Rule to allow admins full access name: admin_access # Rule name servicecat: all # All services hostcat: all # All hosts group: # User group - admins - name: Add reboot command to SUDO ipasudocmd: name: /usr/sbin/reboot state: present - name: Add less command to SUDO ipasudocmd: name: /usr/bin/less state: present - name: Add setenforce command to SUDO ipasudocmd: name: /usr/sbin/setenforce state: present - name: Create a SUDO command group ipasudocmdgroup: name: cmd_grp_1 description: "Group of important commands" sudocmd: - /usr/sbin/setenforce - /usr/bin/less - /usr/sbin/reboot action: sudocmdgroup state: present - name: Create a SUDO rule with a SUDO command group ipasudorule: name: sudo_rule_1 allow_sudocmdgroup: - cmd_grp_1 group: admins state: present - name: Disable allow_all HBAC Rule ipahbacrule: # Rule to allow admins full access name: allow_all # Rule name state: disabled # Disables rule to allow everyone the ability to login运行 playbook:
$ ansible-playbook --vault-password-file=password_file -i inventory add-hbac-and-sudo-rules-to-idm.yml
验证
以 jane 用户身份连接到 client01:
~]$ ssh jane@client01 Password: Last login: Fri Aug 11 15:32:18 2023 from 192.168.122.1 [jane@client01 ~]$输出会验证 jane 是否已登录到 client01。
尝试以 jane 用户身份连接到 client02 :
~]$ ssh jane@client02 Password: Connection closed by 192.168.122.47 port 22输出会验证 jane 是否无法登录到 client02。
以 alice 用户身份连接到 client02 :
~]$ ssh alice@client02 Password: Last login: Fri Aug 10 16:13:43 2023 from 192.168.122.1输出会验证 alice 是否已登录到 client02。
尝试在不调用超级用户权限的情况下,使用
less查看/etc/sssd/sssd.conf文件的内容:[alice@client02 ~]$ less /etc/sssd/sssd.conf /etc/sssd/sssd.conf: Permission denied尝试失败,因为文件对任何人都不可读,除了文件的所有者,即
root。调用
root特权以使用less查看/etc/sssd/sssd.conf文件的内容:[alice@client02 ~]$ sudo less /etc/sssd/sssd.conf [sudo] password for alice: [domain/idm.example.com] id_provider = ipa ipa_server_mode = True [...]输出会验证 alice 是否可以对
/etc/sssd/sssd.conf文件执行less命令。
第 35 章 使用 RHEL 系统角色,使用 Ansible 将 RHEL 系统直接集成到 AD
使用 ad_integration 系统角色,您可以使用 Red Hat Ansible Automation Platform 自动将 RHEL 系统与活动目录(AD)集成。
ad_integration 系统角色不包含在 ansible-freeipa 软件包中。它是 rhel-system-roles 软件包的一部分。您可以在附加了 Red Hat Enterprise Linux Server 订阅的系统上安装 rhel-system-roles。
本章涵盖了以下主题:
35.1. ad_integration 系统角色
使用 ad_integration 系统角色,您可以将 RHEL 系统直接连接到 活动目录(AD)。
该角色使用以下组件:
- SSSD 与中央身份和身份验证源交互
-
realmd来检测可用的 AD 域,并配置底层 RHEL 系统服务(在本例中为 SSSD)来连接到所选 AD 域
ad_integration 角色用于使用没有身份管理(IdM)环境的直接 AD 集成的部署。对于 IdM 环境,请使用 ansible-freeipa 角色。
35.2. ad_integration RHEL 系统角色的变量
ad_integration RHEL 系统角色使用以下参数:
| 角色变量 | 描述 |
|---|---|
| ad_integration_realm | 活动目录领域或要加入的域名。 |
| ad_integration_password | 在将机器加入到域时用来进行身份验证的用户密码。不要使用纯文本。反之,使用 Ansible Vault 来加密值。 |
| ad_integration_manage_crypto_policies |
如果为
默认: |
| ad_integration_allow_rc4_crypto |
如果为
提供此变量会自动将
默认: |
| ad_integration_timesync_source |
与系统时钟同步的时间源的主机名或 IP 地址。提供此变量会自动将 |
其他资源
-
/usr/share/ansible/roles/rhel-system-roles.ad_integration/README.md文件。
35.3. 使用 ad_integration 系统角色将 RHEL 系统直接连接到 AD
您可以使用 ad_integration 系统角色,通过运行 Ansible playbook 配置 RHEL 系统和 AD 域之间的直接集成。
从 RHEL8 开始,RHEL 默认不再支持 RC4 加密。如果无法在 AD 域中启用 AES,您必须启用 AD-SUPPORT 加密策略,并在 playbook 中允许 RC4 加密。
RHEL 服务器和 AD 之间的时间必须同步。您可以通过在 playbook 中使用 timesync 系统角色来确保这一点。
在本例中,RHEL 系统使用 AD Administrator 用户和存储在 Ansible vault 中的此用户的密码加入 domain.example.com AD 域。playbook 还设置 AD-SUPPORT 加密策略,并允许 RC4 加密。为确保 RHEL 系统和 AD 之间的时间同步,playbook 会将 adserver.domain.example.com 服务器设置为 timesync 源。
先决条件
- 访问一个或多个 受管节点。
对 控制节点 的访问和权限。
在控制节点上:
-
ansible-core和rhel-system-roles软件包已安装 。 - 列出受管节点的清单文件。
-
AD 域控制器上的以下端口已开放,并可从 RHEL 服务器访问:
表 35.1. 使用
ad_integration系统角色将 Linux 系统直接集成到 AD 所需的端口源端口 目的地端口 协议 Service 1024:65535
53
UDP 和 TCP
DNS
1024:65535
389
UDP 和 TCP
LDAP
1024:65535
636
TCP
LDAPS
1024:65535
88
UDP 和 TCP
Kerberos
1024:65535
464
UDP 和 TCP
Kerberos 更改/设置密码(
kadmin)1024:65535
3268
TCP
LDAP 全局目录
1024:65535
3269
TCP
LDAP 全局目录 SSL/TLS
1024:65535
123
UDP
NTP/Chrony (可选)
1024:65535
323
UDP
NTP/Chrony (可选)
流程
使用以下内容创建一个新的
ad_integration.yml文件:--- - hosts: all vars: ad_integration_realm: "domain.example.com" ad_integration_password: !vault | vault encrypted password ad_integration_manage_crypto_policies: true ad_integration_allow_rc4_crypto: true ad_integration_timesync_source: "adserver.domain.example.com" roles: - linux-system-roles.ad_integration ---可选:验证 playbook 语法。
# ansible-playbook --syntax-check ad_integration.yml -i inventory_file在清单文件上运行 playbook:
# ansible-playbook -i inventory_file /path/to/file/ad_integration.yml
验证
显示 AD 用户详情,如
administrator用户:getent passwd administrator@ad.example.com administrator@ad.example.com:*:1450400500:1450400513:Administrator:/home/administrator@ad.example.com:/bin/bash
35.4. 其他资源
-
/usr/share/ansible/roles/rhel-system-roles.ad_integration/README.md文件。 -
man ansible-playbook (1)