
充分利用您的支持体验
使用 sos 程序从 RHEL 服务器收集故障排除信息
摘要
使开源包含更多
红帽致力于替换我们的代码、文档和 Web 属性中存在问题的语言。我们从这四个术语开始:master、slave、黑名单和白名单。由于此项工作十分艰巨,这些更改将在即将推出的几个发行版本中逐步实施。详情请查看 CTO Chris Wright 的信息。
对红帽文档提供反馈
我们感谢您对我们文档的反馈。让我们了解如何改进它。
通过 Jira 提交反馈(需要帐户)
- 登录到 Jira 网站。
- 在顶部导航栏中点 Create
- 在 Summary 字段中输入描述性标题。
- 在 Description 字段中输入您的改进建议。包括到文档相关部分的链接。
- 点对话框底部的 Create。
第 1 章 为技术支持生成 sos 报告
使用 sos 工具,您可以收集配置、诊断和故障排除数据,并将这些文件提供给红帽技术支持。
1.1. sos 工具的作用
在分析 RHEL 系统的服务请求时,sos 报告通常是红帽技术支持工程师的起点。sos 工具(也称为 sosreport)提供了一种标准化的方法,可以帮助红帽支持工程师在调查支持问题单中报告的问题时参考这些信息。使用 sos 程序有助于确保您不再重复要求数据输出。
sos 实用程序允许从一个或多个系统收集各种调试信息,选择清理敏感数据,并将其以报告的形式上传到红帽。更具体来说,三个 sos 组件如下:
sos report从一个系统中收集调试信息。注意这个程序最初被命名为
sosreport。使用相同参数运行sosreport仍可以正常工作,现在被称为sos report。-
sos collect可以从一个指定的节点集合中运行并收集每个节点的独立sos报告。 -
sos clean模糊处理可能存在的敏感信息,如用户名、主机名、IP 或 MAC 地址或其他用户指定的数据。
报告中收集的信息包括 RHEL 系统的配置详情、系统信息和诊断信息,例如:
- 运行的内核版本。
- 载入的内核模块。
- 系统和服务配置文件。
- 诊断命令输出。
- 安装的软件包列表。
sos 实用程序将所收集的数据写入一个名为 sosreport-<host_name>-<support_case_number>-<YYYY-MM-DD>-<unique_random_characters>.tar.xz 的文件存档。
该程序会在 /var/tmp/ 目录中保存存档及其 MD5 checksum:
[root@server1 ~]# ll /var/tmp/sosreport*
total 18704
-rw-------. 1 root root 19136596 Jan 25 07:42 sosreport-server1-12345678-2022-01-25-tgictvu.tar.xz
-rw-r--r--. 1 root root       33 Jan 25 07:42 sosreport-server1-12345678-2022-01-25-tgictvu.tar.xz.md5
其它资源
-
sosreport(1)man page
1.2. 从命令行安装 sos 软件包
要使用 sos 实用程序,请安装 sos 软件包。
先决条件
-
您需要
root权限。
流程
安装
sos软件包。[root@server ~]# dnf install sos
验证步骤
使用
rpm程序来校验是否安装了sos软件包。[root@server ~]# rpm -q sos sos-4.2-15.el9.noarch
1.3. 从命令行生成 sos 报告
使用 sos report 命令从 RHEL 服务器收集 sos 报告。
先决条件
-
您已安装了
sos软件包。 -
您需要
root权限。
步骤
运行
sos report命令并按照屏幕的说明进行操作。您可以添加--upload选项,以在生成后将sos报告立即转移到红帽。[user@server1 ~]$ sudo sos report [sudo] password for user: sos report (version 4.2) This command will collect diagnostic and configuration information from this Red Hat Enterprise Linux system and installed applications. An archive containing the collected information will be generated in /var/tmp/sos.qkn_b7by and may be provided to a Red Hat support representative. ... Press ENTER to continue, or CTRL-C to quit.
(可选) 如果您已经向红帽创建了技术支持问题单,请输入问题单号将其嵌入到
sos报告文件名称中,如果您指定了--upload选项,则会上传到该问题单。如果您没有问题单号,请将此字段留空。输入问题单号是可选的,不会影响sos实用程序的操作。Please enter the case id that you are generating this report for []: <8-digit_case_number>记录下控制台输出末尾显示的
sos报告文件名称。... Finished running plugins Creating compressed archive... Your sos report has been generated and saved in: /var/tmp/sosreport-server1-12345678-2022-04-17-qmtnqng.tar.xz Size 16.51MiB Owner root md5 bba955bbd9a434954e18da0c6778ba9a Please send this file to your support representative.
-
您可以使用
--batch选项在不提示交互式输入的情况下生成sos报告。
[user@server1 ~]$ sudo sos report --batch --case-id <8-digit_case_number>
-
您还可以使用
--clean选项混淆收集的sos报告。
[user@server1 ~]$ sudo sos report --clean验证步骤
验证
sos实用程序在/var/tmp/中创建了与命令输出的描述匹配的存档。[user@server1 ~]$ sudo ls -l /var/tmp/sosreport* [sudo] password for user: -rw-------. 1 root root 17310544 Sep 17 19:11 /var/tmp/sosreport-server1-12345678-2022-04-17-qmtnqng.tar.xz
其他资源
1.4. 同时在多个系统中生成并收集 sos 报告
您可以使用 sos 程序在多个系统上触发 sos report 命令。等待报告终止并收集所有生成的报告。
先决条件
- 您知道要在其上运行的集群类型或节点列表。
-
您已安装了所有系统上的
sos软件包。 -
在所有系统中具有
root帐户的ssh密钥,或者您可以通过--password选项提供 root 密码。
步骤
运行
sos collect命令并按照屏幕上的说明进行操作。注意默认情况下,
sos collect会尝试识别在其上运行的集群类型,以自动识别要从其中收集报告的节点。-
您可以使用
--cluster或--nodes选项来手工设置集群或节点类型。 -
您还可以使用
--master选项指定在远程节点上的sos程序来确定集群类型和节点列表。因此,您不必登录到其中一个集群节点来收集sos报告;您可以从您的工作站进行。 -
您可以添加
--upload选项,以在生成后将sos 报告立即发送到红帽。 -
可以进一步提供任何有效的
sos report选项,它们会被传递到所有sos报告的执行。例如--batch和--clean选项。
-
您可以使用
[root@primary-rhel9 ~]# sos collect --nodes=sos-node1,sos-node2 -o process,apache --log-size=50

sos-collector (version 4.2)

This utility is used to collect sosreports from multiple nodes simultaneously.
It uses OpenSSH's ControlPersist feature to connect to nodes and run commands remotely. If your system installation of OpenSSH is older than 5.6, please upgrade.

An archive of sosreport tarballs collected from the nodes will be generated in /var/tmp/sos.o4l55n1s and may be provided to an appropriate support representative.

The generated archive may contain data considered sensitive and its content should be reviewed by the originating organization before being passed to any third party.

No configuration changes will be made to the system running this utility or remote systems that it connects to.


Press ENTER to continue, or CTRL-C to quit


Please enter the case id you are collecting reports for: <8-digit_case_number>

sos-collector ASSUMES that SSH keys are installed on all nodes unless the
--password option is provided.

The following is a list of nodes to collect from:
    primary-rhel9
    sos-node1
    sos-node2


Press ENTER to continue with these nodes, or press CTRL-C to quit


Connecting to nodes...

Beginning collection of sosreports from 3 nodes, collecting a maximum of 4 concurrently

primary-rhel9 : Generating sosreport...
sos-node1  : Generating sosreport...
sos-node2 : Generating sosreport...
primary-rhel9 : Retrieving sosreport...
sos-node1  : Retrieving sosreport...
primary-rhel9  : Successfully collected sosreport
sos-node1 : Successfully collected sosreport
sos-node2 : Retrieving sosreport...
sos-node2 : Successfully collected sosreport

The following archive has been created. Please provide it to your support team.
    /var/tmp/sos-collector-2022-05-15-pafsr.tar.xz

[root@primary-rhel9 ~]#
验证步骤
验证
sos collect命令在/var/tmp/目录中创建了与命令输出的描述匹配的存档。[root@primary-rhel9 ~]# ls -l /var/tmp/sos-collector* -rw-------. 1 root root 160492 May 15 13:35 /var/tmp/sos-collector-2022-05-15-pafsr.tar.xz
其他资源
-
有关使用
--batch和--clean选项的示例,请参阅从命令行生成sos报告。
1.5. 清理 sos 报告
sos 实用程序提供了一个代码来混淆潜在的敏感数据,如用户名、主机名、IP 或 MAC 地址或其他用户指定的关键字。原始的 sos report 或 sos collect 都会保持不变,但会生成一个新的 *-obfuscated.tar.xz 文件用于在与第三方共享。
您可以同使用 --clean 选项为 sos report 或 sos collect 命令增加清理的功能。
[user@server1 ~]$ sudo sos report --clean
先决条件
-
您已生成了
sos report或sos collecttarball。 - (可选) 您拥有特定关键字列表,除了用户名、主机名和其他您要模糊处理的数据之外。
步骤
针对
sos report或sos collecttarball 运行sos clean命令,并按照屏幕上的说明进行操作。-
您可以添加
--keywords选项,以额外清理指定关键字列表。 您可以添加
--usernames选项以进一步混淆敏感用户名。自动用户名清理将通过
lastlog文件为 UID 为 1000 及以上的用户自动运行。这个选项适用于可能不显示为实际登录的 LDAP 用户,但可能会在某些日志文件中发生。
-
您可以添加
[user@server1 ~]$ sudo sos clean /var/tmp/sos-collector-2022-05-15-pafsr.tar.xz
[sudo] password for user:

sos clean (version 4.2)

This command will attempt to obfuscate information that is generally considered to be potentially sensitive. Such information includes IP addresses, MAC addresses, domain names, and any user-provided keywords.

Note that this utility provides a best-effort approach to data obfuscation, but it does not guarantee that such obfuscation provides complete coverage of all such data in the archive, or that any obfuscation is provided to data that does not fit the description above.

Users should review any resulting data and/or archives generated or processed by this utility for remaining sensitive content before being passed to a third party.


Press ENTER to continue, or CTRL-C to quit.

Found 4 total reports to obfuscate, processing up to 4 concurrently

sosreport-primary-rhel9-2022-05-15-nchbdmd :      Extracting...
sosreport-sos-node1-2022-05-15-wmlomgu :      Extracting...
sosreport-sos-node2-2022-05-15-obsudzc :      Extracting...
sos-collector-2022-05-15-pafsr :                   Beginning obfuscation...
sosreport-sos-node1-2022-05-15-wmlomgu :      Beginning obfuscation...
sos-collector-2022-05-15-pafsr :                   Obfuscation completed
sosreport-primary-rhel9-2022-05-15-nchbdmd :      Beginning obfuscation...
sosreport-sos-node2-2022-05-15-obsudzc :      Beginning obfuscation...
sosreport-primary-rhel9-2022-05-15-nchbdmd :      Re-compressing...
sosreport-sos-node2-2022-05-15-obsudzc :      Re-compressing...
sosreport-sos-node1-2022-05-15-wmlomgu :      Re-compressing...
sosreport-primary-rhel9-2022-05-15-nchbdmd :      Obfuscation completed
sosreport-sos-node2-2022-05-15-obsudzc :      Obfuscation completed
sosreport-sos-node1-2022-05-15-wmlomgu :      Obfuscation completed

Successfully obfuscated 4 report(s)

A mapping of obfuscated elements is available at
    /var/tmp/sos-collector-2022-05-15-pafsr-private_map

The obfuscated archive is available at
    /var/tmp/sos-collector-2022-05-15-pafsr-obfuscated.tar.xz

    Size    157.10KiB
    Owner    root

Please send the obfuscated archive to your support representative and keep the mapping file private
验证步骤
验证
sos clean命令在与命令输出的描述上创建了模糊的归档和/var/tmp/目录中的模糊处理映射。[user@server1 ~]$ sudo ls -l /var/tmp/sos-collector-2022-05-15-pafsr-private_map /var/tmp/sos-collector-2022-05-15-pafsr-obfuscated.tar.xz [sudo] password for user: -rw-------. 1 root root 160868 May 15 16:10 /var/tmp/sos-collector-2022-05-15-pafsr-obfuscated.tar.xz -rw-------. 1 root root 96622 May 15 16:10 /var/tmp/sos-collector-2022-05-15-pafsr-private_map检查
*-private_map文件中的模糊处理映射:[user@server1 ~]$ sudo cat /var/tmp/sos-collector-2022-05-15-pafsr-private_map [sudo] password for user: { "hostname_map": { "pmoravec-rhel9": "host0" }, "ip_map": { "10.44.128.0/22": "100.0.0.0/22", .. "username_map": { "foobaruser": "obfuscateduser0", "jsmith": "obfuscateduser1", "johndoe": "obfuscateduser2" } }
将原始的 unobfuscated 归档和 *private_map 文件在本地保留,因为红帽支持可能会需要您提供与模糊术语相关的原始数据。
1.6. 生成 sos 报告并使用 GPG 密码短语加密进行保护
这个步骤描述了如何生成 sos 报告,并使用一个密码口令对报告的数据进行对称 GPG2 加密保护。您可能希望使用密码保护 sos 报告的内容,例如您需要通过公共网络将其传送到第三方时。
确定您在创建加密的 sos 报告时有足够的空间,因为它会临时使用双倍磁盘空间:
-
sos工具会创建一个未加密的sos报告。 -
该工具将
sos报告加密作为一个新文件。 - 然后,这个工具会删除未加密的报告。
先决条件
-
您已安装了
sos软件包。 -
您需要
root权限。
步骤
运行
sos report命令并使用--encrypt-pass选项指定密码短语。您可以添加--upload选项,以在生成后将sos报告立即转移到红帽。[user@server1 ~]$ sudo sos report --encrypt-pass my-passphrase [sudo] password for user: sosreport (version 4.2) This command will collect diagnostic and configuration information from this Red Hat Enterprise Linux system and installed applications. An archive containing the collected information will be generated in /var/tmp/sos.6lck0myd and may be provided to a Red Hat support representative. ... Press ENTER to continue, or CTRL-C to quit.
(可选) 如果您已经向红帽创建了技术支持问题单,请输入问题单号将其嵌入到
sos报告文件名称中,如果您指定了--upload选项,则会上传到该问题单。如果您没有问题单号,请将此字段留空。输入问题单号是可选的,不会影响sos实用程序的操作。Please enter the case id that you are generating this report for []: <8-digit_case_number>-
记录下控制台输出末尾显示的
sos报告文件名称。
Finished running plugins
Creating compressed archive...

Your sosreport has been generated and saved in:
/var/tmp/secured-sosreport-server1-12345678-2022-01-24-ueqijfm.tar.xz.gpg

Size    17.53MiB
Owner   root
md5     32e2bdb23a9ce3d35d59e1fc4c91fe54

Please send this file to your support representative.
验证步骤
验证
sos工具是否创建了满足以下要求的归档:-
文件名称以
secured开头。 -
文件名称以
.gpg扩展结尾。 位于
/var/tmp/目录中。[user@server1 ~]$ sudo ls -l /var/tmp/sosreport* [sudo] password for user: -rw-------. 1 root root 18381537 Jan 24 17:55 /var/tmp/secured-sosreport-server1-12345678-2022-01-24-ueqijfm.tar.xz.gpg
-
文件名称以
确定您可以使用您用来加密的同一密码短语解密存档。
使用
gpg命令来解密归档。[user@server1 ~]$ sudo gpg --output decrypted-sosreport.tar.gz --decrypt /var/tmp/secured-sosreport-server1-12345678-2022-01-24-ueqijfm.tar.xz.gpg在提示时,输入用来加密归档的密码短语。
┌──────────────────────────────────────────────────────┐
│ Enter passphrase                                     │
│                                                      │
│                                                      │
│ Passphrase: <passphrase>                             │
│                                                      │
│       <OK>                              <Cancel>     │
└──────────────────────────────────────────────────────┘
验证
gpg工具创建了一个未加密的、使用.tar.gz文件扩展的归档。[user@server1 ~]$ sudo ls -l decrypted-sosreport.tar.gz [sudo] password for user: -rw-r--r--. 1 root root 18381537 Jan 24 17:59 decrypted-sosreport.tar.gz
其它资源
1.7. 生成一个sos 报告,并使用基于一个密钥对的 GPG 加密对其进行保护
这个步骤描述了如何根据 GPG 密钥环中的密钥来生成 sos 报告并使用 GPG2 加密进行保护。您可以使用这种加密方式来保护 sos 报告的内容,例如您需要保护保存在一个服务器中的 sos 报告内容。
确定您在创建加密的 sos 报告时有足够的空间,因为它会临时使用双倍磁盘空间:
-
sos工具会创建一个未加密的sos报告。 -
该工具将
sos报告加密作为一个新文件。 - 然后,这个工具会删除未加密的报告。
先决条件
-
您已安装了
sos软件包。 -
您需要
root权限。 - 您已创建了 GPG2 密钥。
步骤
运行
sos report命令,并使用--encrypt-key选项指定拥有 GPG 密钥环的用户名。您可以添加--upload选项,以在生成后将sos报告立即转移到红帽。注意运行
sos report命令的用户必须是拥有用于加密和解密sos报告的 GPG 密钥环的用户。如果用户使用sudo运行sos report命令,还必须使用sudo设置密钥环,或者用户必须具有对该帐户的直接 shell 访问权限。[user@server1 ~]$ sudo sos report --encrypt-key root [sudo] password for user: sosreport (version 4.2) This command will collect diagnostic and configuration information from this Red Hat Enterprise Linux system and installed applications. An archive containing the collected information will be generated in /var/tmp/sos.6ucjclgf and may be provided to a Red Hat support representative. ... Press ENTER to continue, or CTRL-C to quit.
(可选) 如果您已经向红帽创建了技术支持问题单,请输入问题单号将其嵌入到
sos报告文件名称中,如果您指定了--upload选项,则会上传到该问题单。如果您没有问题单号,请将此字段留空。输入问题单号是可选的,不会影响sos实用程序的操作。Please enter the case id that you are generating this report for []: <8-digit_case_number>记录下控制台输出末尾显示的
sos报告文件名称。... Finished running plugins Creating compressed archive... Your sosreport has been generated and saved in: /var/tmp/secured-sosreport-server1-23456789-2022-02-27-zhdqhdi.tar.xz.gpg Size 15.44MiB Owner root md5 ac62697e33f3271dbda92290583d1242 Please send this file to your support representative.
验证步骤
验证
sos工具是否创建了满足以下要求的归档:-
文件名称以
secured开头。 -
文件名称以
.gpg扩展结尾。 位于
/var/tmp/目录中。[user@server1 ~]$ sudo ls -l /var/tmp/sosreport* [sudo] password for user: -rw-------. 1 root root 16190013 Jan 24 17:55 /var/tmp/secured-sosreport-server1-23456789-2022-01-27-zhdqhdi.tar.xz.gpg
-
文件名称以
确定您可以使用您用来加密的同一密钥解密存档。
使用
gpg命令来解密归档。[user@server1 ~]$ sudo gpg --output decrypted-sosreport.tar.gz --decrypt /var/tmp/secured-sosreport-server1-23456789-2022-01-27-zhdqhdi.tar.xz.gpg提示时,请输入创建 GPG 密钥时使用的密码短语。
┌────────────────────────────────────────────────────────────────┐
│ Please enter the passphrase to unlock the OpenPGP secret key:  │
│ "GPG User (first key) <root@example.com>"                      │
│ 2048-bit RSA key, ID BF28FFA302EF4557,                         │
│ created 2020-01-13.                                            │
│                                                                │
│                                                                │
│ Passphrase: <passphrase>                                       │
│                                                                │
│         <OK>                                    <Cancel>       │
└────────────────────────────────────────────────────────────────┘
验证
gpg工具创建了一个未加密的、使用.tar.gz文件扩展的归档。[user@server1 ~]$ sudo ll decrypted-sosreport.tar.gz [sudo] password for user: -rw-r--r--. 1 root root 16190013 Jan 27 17:47 decrypted-sosreport.tar.gz
其它资源
1.8. 创建 GPG2 密钥
下面的步骤描述了如何生成使用加密工具的 GPG2 密钥。
先决条件
-
您需要
root权限。
流程
安装并配置
pinentry工具。[root@server ~]# dnf install pinentry [root@server ~]# mkdir ~/.gnupg -m 700 [root@server ~]# echo "pinentry-program /usr/bin/pinentry-curses" >> ~/.gnupg/gpg-agent.conf
创建一个
key-input文件来生成附带您想要的详细信息的 GPG 密钥对。例如:[root@server ~]# cat >key-input <<EOF %echo Generating a standard key Key-Type: RSA Key-Length: 2048 Name-Real: GPG User Name-Comment: first key Name-Email: root@example.com Expire-Date: 0 %commit %echo Finished creating standard key EOF
(可选) 默认情况下,GPG2 在
~/.gnupg文件中保存其密钥环。要使用自定义的密钥环位置,请将GNUPGHOME环境变量设置为只可由根用户访问的目录。[root@server ~]# export GNUPGHOME=/root/backup [root@server ~]# mkdir -p $GNUPGHOME -m 700
根据
key-input文件的内容生成一个新的 GPG2 密钥。[root@server ~]# gpg2 --batch --gen-key key-input输入密码短语来保护 GPG2 密钥。您可以使用这个密码短语访问解密的私钥。
┌──────────────────────────────────────────────────────┐
│ Please enter the passphrase to                       │
│ protect your new key                                 │
│                                                      │
│ Passphrase: <passphrase>                             │
│                                                      │
│	 <OK>                             <Cancel>         │
└──────────────────────────────────────────────────────┘
再输入一次来确认正确的密码短语。
┌──────────────────────────────────────────────────────┐
│ Please re-enter this passphrase                      │
│                                                      │
│ Passphrase: <passphrase>                             │
│                                                      │
│	 <OK>                             <Cancel>         │
└──────────────────────────────────────────────────────┘
验证新 GPG2 密钥是否已成功创建。
gpg: keybox '/root/backup/pubring.kbx' created
gpg: Generating a standard key
gpg: /root/backup/trustdb.gpg: trustdb created
gpg: key BF28FFA302EF4557 marked as ultimately trusted
gpg: directory '/root/backup/openpgp-revocs.d' created
gpg: revocation certificate stored as '/root/backup/openpgp-revocs.d/8F6FCF10C80359D5A05AED67BF28FFA302EF4557.rev'
gpg: Finished creating standard key
验证步骤
列出服务器中的 GPG 密钥。
[root@server ~]# gpg2 --list-secret-keys
gpg: checking the trustdb
gpg: marginals needed: 3  completes needed: 1  trust model: pgp
gpg: depth: 0  valid:   1  signed:   0  trust: 0-, 0q, 0n, 0m, 0f, 1u
/root/backup/pubring.kbx
------------------------
sec   rsa2048 2020-01-13 [SCEA]
      8F6FCF10C80359D5A05AED67BF28FFA302EF4557
uid           [ultimate] GPG User (first key) <root@example.com>
其他资源
1.9. 从救援环境中生成 sos 报告
如果一个 Red Hat Enterprise Linux(RHEL)主机无法正确引导,您可以将主机引导至 救援环境 中来收集 sos 报告。
使用救援环境,您可以在 /mnt/sysroot 下挂载目标系统,访问其内容,并运行 sos report 命令。
先决条件
- 如果主机是裸机服务器,则需要对该机器进行的物理访问。
- 如果主机是虚拟机,您需要访问虚拟机管理程序中的虚拟机设置。
- RHEL 安装源,如 ISO 镜像文件、安装 DVD、netboot CD 或提供 RHEL 安装树的 Preboot Execution Environment(PXE)配置。
流程
- 从安装源引导主机。
在安装介质的引导菜单中,选择
Troubleshooting选项。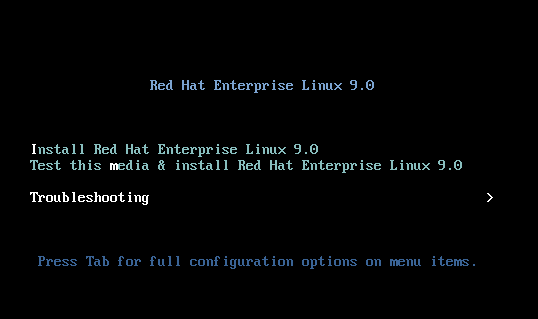
在故障排除菜单中选择
Rescue a Red Hat Enterprise Linux system选项。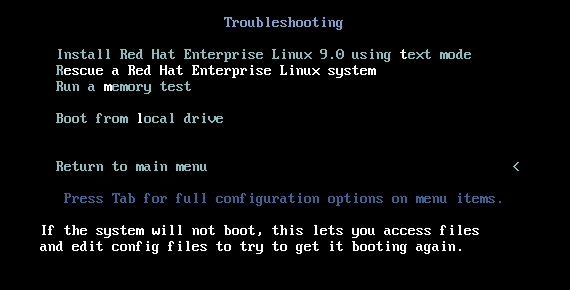
在 Rescue 菜单中,选择
1,按 Enter 键继续,将系统挂载在/mnt/sysroot目录下。
提示时按 Enter 键进行一个 shell。
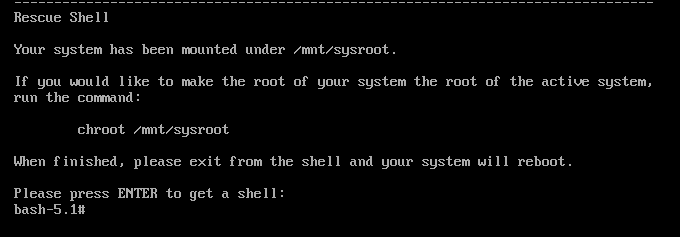
使用
chroot命令将救援会话的显式根目录改为/mnt/sysroot目录。
可选: 您的网络可能没有在初始 Rescue Environment 中建立,因此请确保首先建立它。例如,如果网络需要静态 IP 地址,并且您希望通过网络传输
sos报告,请配置网络:确定您要使用的以太网设备:
# ip link show … 2: enp1s0: <BROADCAST,MULTICAST,UP,LOWER_UP> mtu 1500 qdisc fq_codel state UP mode DEFAULT group default qlen 1000 link/ether 52:54:00:74:79:56 brd ff:ff:ff:ff:ff:ff为网络接口分配一个 IP 地址,并设置默认网关。例如,如果您要将子网为 255.255.255.0(其 CIDR 为 24)的 IP 地址 192.168.0.1 添加到设备 enp1s0,请输入:
# ip address add <192.168.0.1/24> dev <enp1s0>
# ip route add default via <192.168.0.254>
在
/etc/resolv.conf文件中添加nameserver条目,例如:# nameserver <192.168.0.5>
运行
sos report命令并按照屏幕的说明进行操作。您可以添加--upload选项,以在生成后将sos报告立即转移到红帽。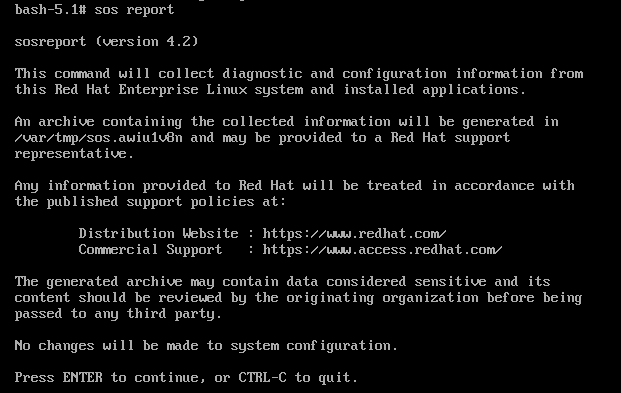
可选 :如果您已经向红帽开了一个技术支持问题单,请输入问题单号,来将其嵌入到
sos报告文件名称中,如果您指定了--upload选项,且您的您的主机已连接到互联网,则它将被上传到该问题单中。如果您没有问题单号,请将此字段留空。输入问题单号是可选的,不会影响sos实用程序的操作。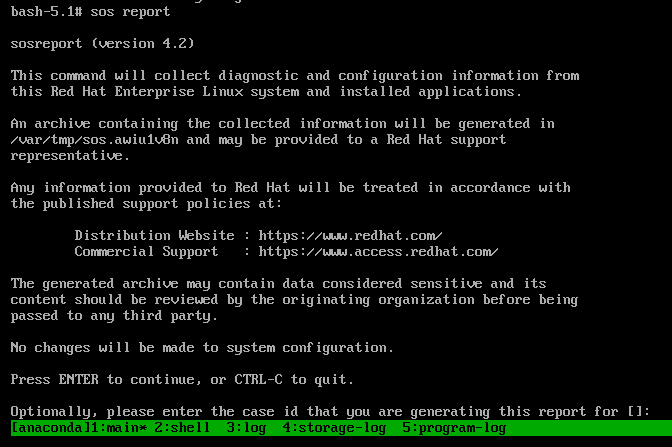
记录下控制台输出末尾显示的
sos报告文件名称。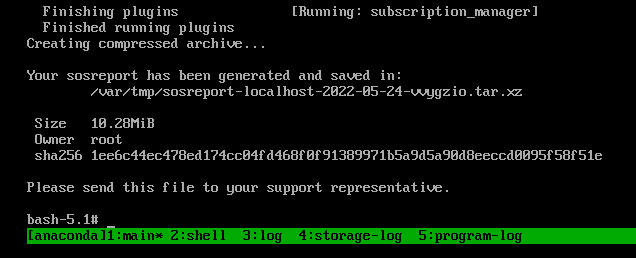
-
如果您的主机还没有连接到互联网,使用
scp将sos报告传送到网络中的另一台主机,然后将其上传到红帽技术支持问题单。
验证步骤
验证
sos实用程序在/var/tmp/目录中创建了存档。
其他资源
- 如何从救援环境生成 sosreport。
- 在没有 chrooting 的救援环境中启用网络。
- 要下载 RHEL 安装 DVD 的 ISO,请访问红帽客户门户网站的下载部分。请参阅 产品下载。
-
向红帽技术支持提供
sos报告的方法。
1.10. 向红帽技术支持提供 sos 报告的方法
您可以使用以下方法将 sos 报告上传到红帽技术支持。
- 使用
sos report命令上传 您可以使用
--upload选项,在生成后将sos报告立即转移到红帽。-
如果您在提示时提供了一个问题单号,或使用
--case-id或--ticket-number选项,sos实用程序会在使用红帽客户门户网站帐户验证后将sos报告上传到相应的问题单中。 如果没有提供问题单号或您没有验证,工具会将
sos报告上传到红帽公共 SFTP 站点。为红帽技术支持工程师提供sos报告归档的名称,以便可以访问它。[user@server1 ~]$ sudo sos report --upload [sudo] password for user: sosreport (version 4.2) This command will collect diagnostic and configuration information from this Red Hat Enterprise Linux system and installed applications. ... Please enter the case id that you are generating this report for []: <8-digit_case_number> Enter your Red Hat Customer Portal username (empty to use public dropbox): <Red_Hat_Customer_Portal_ID> Please provide the upload password for <user@domain.com>: ... Attempting upload to Red Hat Customer Portal Uploaded archive successfully
-
如果您在提示时提供了一个问题单号,或使用
- 通过红帽客户门户网站上传文件
使用您的红帽用户帐户,您可以登录到红帽客户门户网站网页的
支持问题单部分,并将sos报告上传到技术支持问题单中。要登录,请访问支持问题单。
其他资源
-
有关如何向红帽技术支持提供
sos报告的其他方法,如 SFTP 和curl,请参阅红帽知识库文章 如何向红帽支持提供文件(vmcore、rhev logcollector、sosreports、堆转储、日志文件等)
第 2 章 使用 RHEL web 控制台生成和维护诊断报告
在 RHEL web 控制台中生成、下载和删除诊断报告。
2.1. 使用 RHEL web 控制台生成诊断报告
先决条件
- 已安装 RHEL web 控制台。详情请参阅安装 Web 控制台。
-
cockpit-storaged软件包已安装在您的系统上。 - 有管理员特权。
流程
- 登录到 RHEL web 控制台。详情请参阅 Web 控制台的日志记录。
- 在左侧菜单中,选择 Tools >> Diagnostic report。
要生成新的诊断报告,请点 按钮。
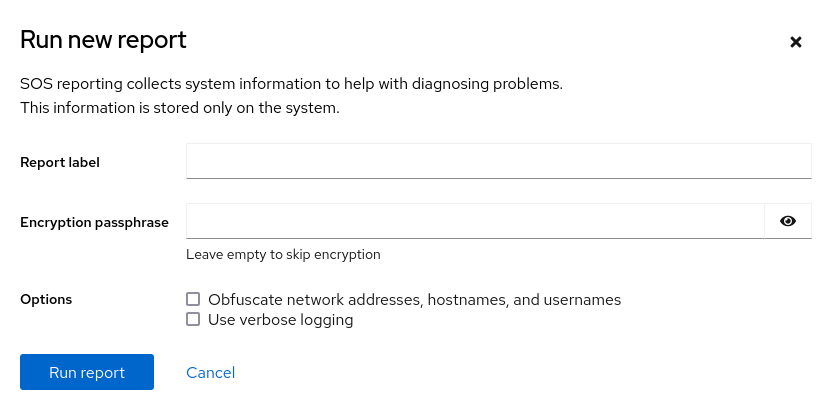
- 为您要创建的报告输入标签。
(可选) 自定义报告。
- 输入加密密码短语以加密您的报告。如果要跳过报告的加密,请将字段留空。
- 选中 Obfuscate network addresses, hostnames, and usernames 复选框,以模糊某些数据。
- 选中 Use verbose logging 复选框来提高日志详细程度。
- 点 按钮生成报告,并等待进程完成。您可以使用 按钮停止生成报告。
2.2. 使用 RHEL web 控制台下载诊断报告
先决条件
- 已安装 RHEL web 控制台。详情请参阅安装 Web 控制台。
- 有管理员特权。
- 一个或多个诊断报告已生成。
流程
- 登录到 RHEL web 控制台。详情请参阅 Web 控制台的日志记录。
- 在左侧菜单中,选择 Tools >> Diagnostic report。
- 点您要下载的报告旁的 按钮。下载将自动启动。
后续步骤
有关如何向红帽技术支持提供诊断报告的方法,请参阅向红帽技术支持提供 sos 报告的方法。
2.3. 使用 RHEL web 控制台删除诊断报告
先决条件
- 已安装 RHEL web 控制台。详情请参阅安装 Web 控制台。
- 有管理员特权。
- 一个或多个诊断报告已生成。
流程
- 登录到 RHEL web 控制台。详情请参阅 Web 控制台的日志记录。
- 在左侧菜单中,选择 Tools >> Diagnostic report。
- 点您要删除的报告旁边的 按钮旁边的垂直省略号,然后点 按钮。
- 在 Delete report permanently? 窗口中,单击 按钮来删除报告。