
自定义 Anaconda
更改安装程序外观,并在 Red Hat Enterprise Linux 上创建自定义附加组件
摘要
使开源包含更多
红帽承诺替换我们的代码、文档和网页属性中存在问题的语言。我们从这四个术语开始: master、slave、blacklist 和 whitelist。这些更改将在即将发行的几个发行本中逐渐实施。如需了解更多详细信息,请参阅 CTO Chris Wright 信息。
对红帽文档提供反馈
我们感谢您对我们文档的反馈。让我们了解如何改进它。
通过 Jira 提交反馈(需要帐户)
- 登录到 Jira 网站。
- 单击顶部导航栏中的 Create。
- 在 Summary 字段中输入描述性标题。
- 在 Description 字段中输入您的改进建议。包括文档相关部分的链接。
- 点对话框底部的 Create。
第 1 章 Anaconda 自定义介绍
1.1. Anaconda 自定义介绍
Red Hat Enterprise Linux 和 Fedora 安装程序 Anaconda 对其最新版本进行了很多改进。这些改进之一就是提高了定制性。现在,您可以编写附加组件来扩展基本的安装程序功能,并更改图形用户界面的外观。
本文档将介绍如何自定义以下内容:
- 引导菜单 - 预配置选项、颜色方案以及后台
- 图形界面的外形 - 徽标、背景、产品名称
- 安装程序功能 - 附加组件可通过在图形和文本用户界面中添加新的 Kickstart 命令和新屏幕来增强安装程序
另请注意,本文档只适用于 Red Hat Enterprise Linux 8 和 Fedora 17 及更新的版本。
本书中描述的步骤是为 Red Hat Enterprise Linux 8 或者类似的系统编写。在其他系统上,所用的工具和应用程序(如用于创建自定义 ISO 映像的 genisoimage )可能有所不同,流程可能需要调整。
第 2 章 执行预自定义任务
2.1. 使用 ISO 镜像
在这个部分中,您将了解如何:
- 提取红帽 ISO。
- 创建包含自定义的新引导镜像。
2.2. 下载 RH 引导镜像
在开始自定义安装程序前,请下载红帽提供的引导镜像。您可以在登录到您的帐户后从红帽 客户门户网站获取 Red Hat Enterprise Linux 8 引导介质。
- 您的帐户必须有足够的权限下载 Red Hat Enterprise Linux 8 镜像。
-
您必须下载
Binary DVD或Boot ISO镜像,并且可以使用任何镜像变体(Server 或 ComputeNode)。 -
您不能使用其他可用的下载(如 KVM 客户机镜像或补充 DVD)自定义安装程序;其他可用的下载,如
KVM 客户机镜像或补充 DVD。
有关 Binary DVD 和引导 ISO 下载的更多信息,请参阅 Red Hat Enterprise Linux 8 执行高级 RHEL 8 安装。
2.3. 提取 Red Hat Enterprise Linux 引导镜像
执行以下步骤提取引导镜像的内容。
流程
-
确保目录
/mnt/iso存在,并且当前未在那里挂载任何内容。 挂载下载的镜像。
# mount -t iso9660 -o loop path/to/image.iso /mnt/iso
其中 path/to/image.iso 是下载的引导镜像的路径。
创建您要放置 ISO 镜像内容的工作目录。
$mkdir /tmp/ISO将挂载镜像的所有内容复制到新工作目录中。确保使用
-p选项来保留文件和目录的权限和所有权。#cp -pRf /mnt/iso /tmp/ISO卸载镜像。
#umount /mnt/iso
其它资源
- 有关 Binary DVD 和引导 ISO 下载的详细下载说明和描述,请查看 Red Hat Enterprise Linux 8 。
第 3 章 自定义引导菜单
本节介绍引导菜单自定义了什么以及如何自定义它。
先决条件
有关下载和提取引导镜像的详情,请参考提取 Red Hat Enterprise Linux 引导镜像
引导菜单自定义涉及以下高级别任务:
- 完成先决条件。
- 自定义引导菜单。
- 创建自定义引导镜像。
3.2. 系统带有 bios 固件
ISOLINUX 引导装载程序用于带有 BIOS 固件的系统。
图 3.1. ISOLINUX 引导菜单
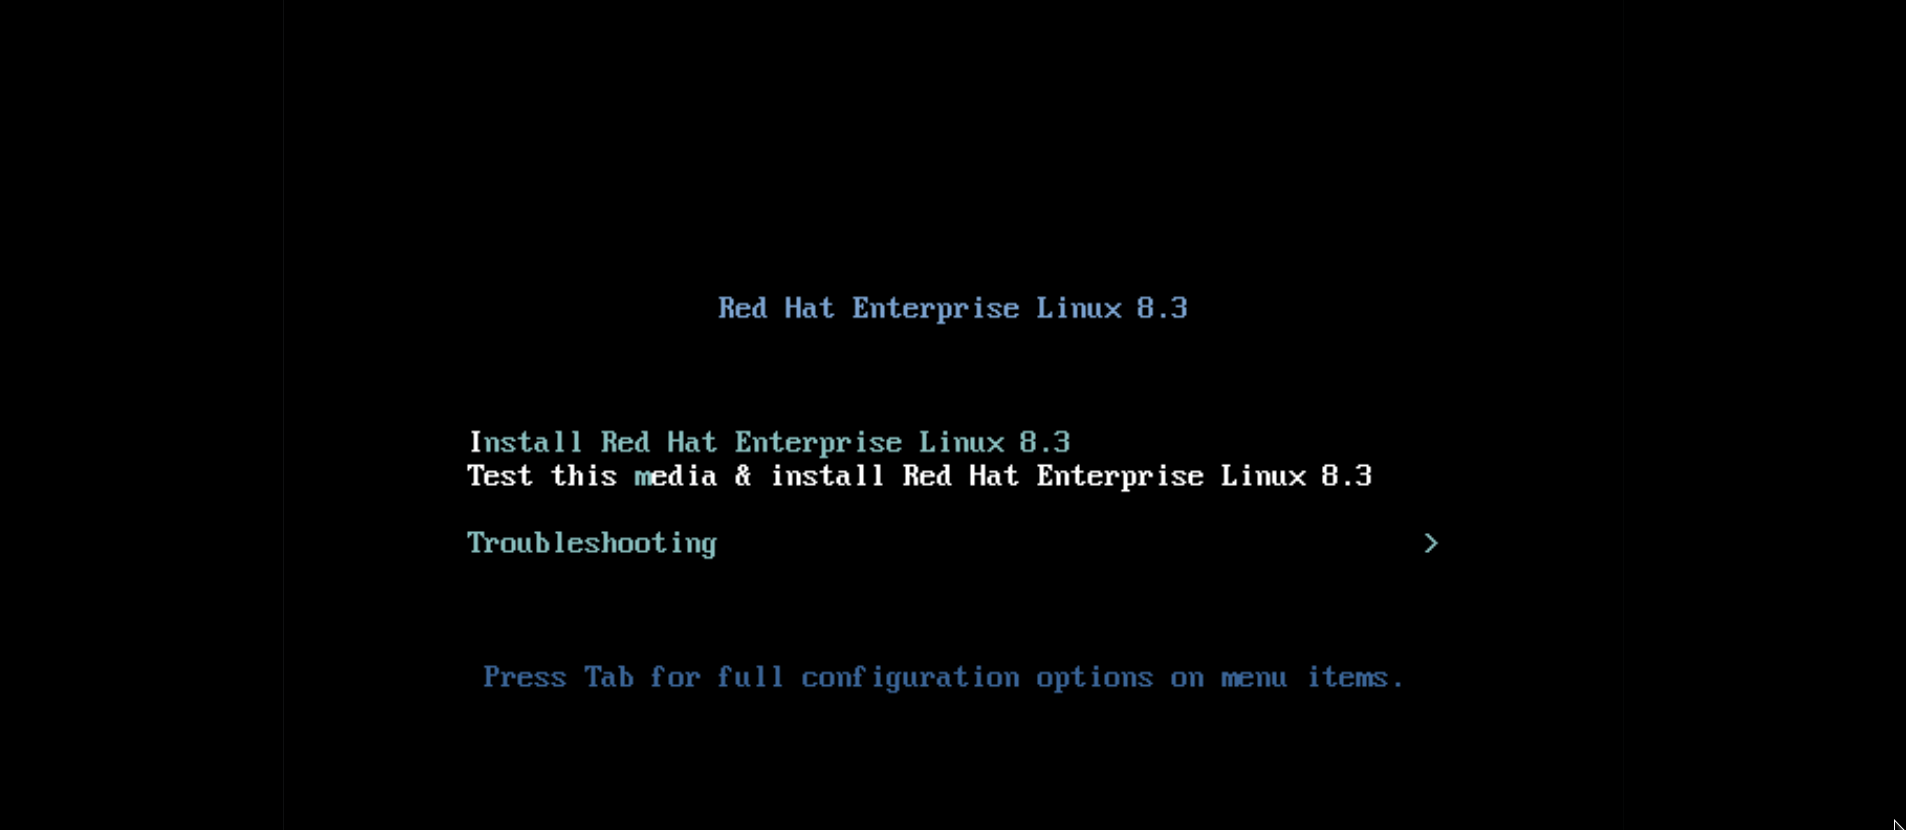
引导介质上的 isolinux/isolinux.cfg 配置文件包含设置颜色模式和菜单结构(实体和子菜单)的指令。
在配置文件中,Red Hat Enterprise Linux 的默认菜单条目(测试此介质并安装 Red Hat Enterprise Linux 8)在以下块中定义:
label check
  menu label Test this ^media & install Red Hat Enterprise Linux 8.
  menu default
  kernel vmlinuz
  append initrd=initrd.img inst.stage2=hd:LABEL=RHEL-8-BaseOS-x86_64 rd.live.check
quiet
其中:
-
menu label- 确定菜单中如何命名条目。^字符确定其键盘快捷键( m 键)。 -
menu default- 提供默认的选择,即使它不是列表中的第一个选项。 -
kernel- 加载安装程序内核。在大多数情况下不应该更改它。 append- 包含额外的内核选项。initrd=和inst.stage2选项是必需的,您还可以添加其他选项。有关适用于 Anaconda 选项的详情,请参考 Red Hat Enterprise Linux 8 执行标准 RHEL 8 安装指南。
一个值得注意的选项是
inst.ks=,它允许您指定 Kickstart 文件的位置。您可以将 Kickstart 文件放在引导 ISO 镜像上,并使用 inst.ks= 选项指定它的位置;例如,您可以将kickstart.ks文件放在镜像的根目录中,并使用inst.ks=hd:LABEL=RHEL-8-BaseOS-x86_64:/kickstart.ks。您还可以使用
dracut.cmdline(7)手册页中列出的dracut选项。重要当使用磁盘标签来指向特定驱动器时(如
inst.stage2=hd:LABEL=RHEL-8-BaseOS-x86_64选项中所示),将所有空格替换为\x20。
菜单条目定义中没有包括的其它重要选项有:
timeout- 确定在自动使用默认菜单条目之前显示引导菜单的时间。默认值为600,这意味着菜单显示 60 秒。将此值设为0可禁用 timeout 选项。注意在执行无头安装时,将 timeout 设为低值(如
1)非常有用。这有助于避免等待默认超时完成。menu begin和menu end- 确定 submenu 块的开头和结尾,允许您添加额外的选项,如在子菜单中进行故障排除和分组。包含两个选项(一个用来继续,一个用来回到主菜单)的简单子菜单类似如下:menu begin ^Troubleshootingmenu title Troubleshooting label rescue menu label ^Rescue a Red Hat Enterprise Linux system kernel vmlinuz append initrd=initrd.img inst.stage2=hd:LABEL=RHEL-8-BaseOS-x86_64 rescue quiet menu separator label returntomain menu label Return to ^main menu menu exitmenu end子菜单条目的定义类似于普通的菜单条目,但在菜单
menu begin和menu end语句之间分组。第二个选项中的menu exit行会退出子菜单,并返回到主菜单。-
menu background- 菜单背景可以是纯色(请参见下面的menu color),也可以是 PNG、JPEG 或 LSS16 格式的图像。在使用图像时,请确保其尺寸与使用set resolution语句设置的分辨率相对应。默认尺寸是 640x480。 menu color- 确定菜单元素的颜色。完整格式为:menu color element ansi foreground background shadow这个命令最重要的部分包括:
- element - 决定颜色将应用到哪些元素。
foreground and background - 决定实际颜色。
颜色是使用十六进制格式的
#AARRGGBB表示法描述的,来确定透明度:-
00,完全透明。 -
ff完全不透明。 -
menu helptextfile- 创建菜单条目,当选择它时,会显示帮助文本文件。
其它资源
- 有关 ISOLINUX 配置文件选项的完整列表,请查看 Syslinux Wiki。
第 4 章 图形用户界面的品牌塑造和镀铬
Anaconda 用户界面的自定义可能包括自定义图形元素和自定义产品名称。
本节介绍了如何定制图形元素和产品名称。
先决条件
- 您已下载并提取 ISO 镜像。
- 您已创建了自己的品牌资料。
有关下载和提取引导镜像的详情,请参考提取 Red Hat Enterprise Linux 引导镜像
用户界面自定义涉及以下高级别任务:
- 完成先决条件。
- 创建自定义品牌资料(如果您计划自定义图形元素)
- 定制图形元素(如果您计划自定义它)
- 自定义产品名称(如果您计划自定义它)
- 创建 product.img 文件
- 创建自定义引导镜像
要创建自定义品牌塑造材料,首先参考默认的图形元素文件类型和尺寸。您可以相应地创建自定义资料。有关默认图形元素的详情在 自定义图形元素 部分中提供的示例文件中提供。
4.1. 定制图形元素
要自定义图形元素,您可以使用自定义的品牌材料修改或替换可自定义的元素,并更新容器文件。
安装程序的可自定义图形元素存储在安装程序运行时文件系统的 /usr/share/anaconda/pixmaps/ 目录中。该目录包括以下可定制文件:
pixmaps
├─ anaconda-password-show-off.svg
├─ anaconda-password-show-on.svg
├─ right-arrow-icon.png
├─ sidebar-bg.png
├─ sidebar-logo.png
└─ topbar-bg.png
此外,/usr/share/anaconda/ 目录包含一个名为 anaconda-gtk.css 的 CSS 样式表,它决定了主 UI 元素的文件名和参数,即徽标,边栏和顶栏的背景。该文件有以下内容可以根据您的需要自定义:
/* theme colors/images */

@define-color product_bg_color @redhat;

/* logo and sidebar classes */

.logo-sidebar {
   background-image: url('/usr/share/anaconda/pixmaps/sidebar-bg.png');
   background-color: @product_bg_color;
   background-repeat: no-repeat;
}

/* Add a logo to the sidebar */

.logo {
   background-image: url('/usr/share/anaconda/pixmaps/sidebar-logo.png');
   background-position: 50% 20px;
   background-repeat: no-repeat;
   background-color: transparent;
}

/* This is a placeholder to be filled by a product-specific logo. */

.product-logo {
   background-image: none;
   background-color: transparent;
}

AnacondaSpokeWindow #nav-box {
   background-color: @product_bg_color;
   background-image: url('/usr/share/anaconda/pixmaps/topbar-bg.png');
   background-repeat: no-repeat;
   color: white;
}
CSS 文件最重要的部分是根据分辨率处理缩放的方法。PNG 镜像背景无法扩展,它们始终以真实尺寸显示。相反,背景信息具有透明背景,样式表在 @define-color 行上定义了匹配的背景颜色。因此,背景 图像 “淡出”为背景 颜色,这意味着背景可以在所有分辨率下工作,而无需图像缩放。
您还可以更改 background-repeat 参数来平铺背景;或者,如果您确信将要安装的每个系统都具有相同的显示分辨率,则您可以使用填充整个栏的背景图像。
以上列出的任何文件都可以自定义。执行此操作后,请按照第 2.2 节中的说明,"创建 product.img 文件"来用自定义图形创建您自己的 product.img,然后按照第 2.3 节"创建自定义引导映像"来创建包含您的更改的新的可引导 ISO 镜像。
4.2. 自定义产品名称
若要自定义产品名称,您必须创建一个自定义 .buildstamp 文件。为此,请使用以下内容创建新文件 .buildstamp.py :
[Main]
Product=My Distribution
Version=8
BugURL=https://bugzilla.redhat.com/
IsFinal=True
UUID=202007011344.x86_64
[Compose]
Lorax=28.14.49-1
将 My Distribution 更改为您要在安装程序中显示的名称。
在创建自定义 .buildstamp 文件后,请按照 创建 product.img 文件 部分中的步骤来创建一个包含自定义的新 product.img 文件,并按照创建自定义引导文件中的内容创建新的、包括您所做的变化的可引导 ISO 文件。
4.3. 自定义默认配置
您可以创建您自己的配置文件,并使用它来自定义安装程序的配置。
4.3.1. 配置默认配置文件
您可以以 .ini 文件格式编写 Anaconda 配置文件。Anaconda 配置文件由section、options 和 comments 组成。每个 section 都由一个 [section] 标头定义,注释以 # 字符开头,键用来定义 options 。生成的配置文件使用 configparser 配置文件解析器进行处理。
默认配置文件位于 /etc/anaconda/anaconda.conf 中,包含记录的部分和支持的选项。该文件提供了安装程序的完整默认配置。您可以修改 /etc/anaconda/product.d/ 中的产品配置文件,以及 /etc/anaconda/conf.d/ 中的自定义配置文件。
以下配置文件描述了 RHEL 8 的默认配置:
[Anaconda]
# Run Anaconda in the debugging mode.
debug = False

# Enable Anaconda addons.
addons_enabled = True

# List of enabled Anaconda DBus modules for RHEL.
kickstart_modules =
    org.fedoraproject.Anaconda.Modules.Timezone
    org.fedoraproject.Anaconda.Modules.Network
    org.fedoraproject.Anaconda.Modules.Localization
    org.fedoraproject.Anaconda.Modules.Security
    org.fedoraproject.Anaconda.Modules.Users
    org.fedoraproject.Anaconda.Modules.Payloads
    org.fedoraproject.Anaconda.Modules.Storage
    org.fedoraproject.Anaconda.Modules.Services

[Installation System]
# Should the installer show a warning about enabled SMT?
can_detect_enabled_smt = False

[Installation Target]
# Type of the installation target.
type = HARDWARE

# A path to the physical root of the target.
physical_root = /mnt/sysimage

# A path to the system root of the target.
system_root = /mnt/sysroot

# Should we install the network configuration?
can_configure_network = True

[Network]
# Network device to be activated on boot if none was configured so.
# Valid values:
#
#   NONE                   No device
#   DEFAULT_ROUTE_DEVICE   A default route device
#   FIRST_WIRED_WITH_LINK  The first wired device with link
#
default_on_boot = NONE

[Payload]
# Default package environment.
default_environment =

# List of ignored packages.
ignored_packages =

# Enable installation of latest updates.
enable_updates = True

# List of .treeinfo variant types to enable.
# Valid items:
#
#   addon
#   optional
#   variant
#
enabled_repositories_from_treeinfo = addon optional variant

# Enable installation from the closest mirror.
enable_closest_mirror = True

# Default installation source.
# Valid values:
#
#    CLOSEST_MIRROR  Use closest public repository mirror.
#    CDN             Use Content Delivery Network (CDN).
#
default_source = CLOSEST_MIRROR

# Enable ssl verification for all HTTP connection
verify_ssl = True

[Security]
# Enable SELinux usage in the installed system.
# Valid values:
#
#  -1  The value is not set.
#   0  SELinux is disabled.
#   1  SELinux is enabled.
#
selinux = -1

[Bootloader]
# Type of the bootloader.
# Supported values:
#
#   DEFAULT   Choose the type by platform.
#   EXTLINUX  Use extlinux as the bootloader.
#
type = DEFAULT

# Name of the EFI directory.
efi_dir = default

# Hide the GRUB menu.
menu_auto_hide = False

# Are non-iBFT iSCSI disks allowed?
nonibft_iscsi_boot = False

# Arguments preserved from the installation system.
preserved_arguments =
     cio_ignore rd.znet rd_ZNET zfcp.allow_lun_scan
     speakup_synth apic noapic apm ide noht acpi video
     pci nodmraid nompath nomodeset noiswmd fips selinux
     biosdevname ipv6.disable net.ifnames net.ifnames.prefix
     nosmt

[Storage]
# Enable dmraid usage during the installation.
dmraid = True

# Enable iBFT usage during the installation.
ibft = True

# Do you prefer creation of GPT disk labels?
gpt = False

# Tell multipathd to use user friendly names when naming devices during the installation.
multipath_friendly_names = True

# Do you want to allow imperfect devices (for example, degraded mdraid array devices)?
allow_imperfect_devices = False

# Default file system type. Use whatever Blivet uses by default.
file_system_type =

# Default partitioning.
# Specify a mount point and its attributes on each line.
#
# Valid attributes:
#
#   size <SIZE>    The size of the mount point.
#   min <MIN_SIZE> The size will grow from MIN_SIZE to MAX_SIZE.
#   max <MAX_SIZE> The max size is unlimited by default.
#   free <SIZE>    The required available space.
#
default_partitioning =
    /     (min 1 GiB, max 70 GiB)
    /home (min 500 MiB, free 50 GiB)
    swap

# Default partitioning scheme.
# Valid values:
#
#    PLAIN      Create standard partitions.
#    BTRFS      Use the Btrfs scheme.
#    LVM        Use the LVM scheme.
#    LVM_THINP  Use LVM Thin Provisioning.
#
default_scheme = LVM

# Default version of LUKS.
# Valid values:
#
#   luks1  Use version 1 by default.
#   luks2  Use version 2 by default.
#
luks_version = luks2

[Storage Constraints]
# Minimal size of the total memory.
min_ram = 320 MiB

# Minimal size of the available memory for LUKS2.
luks2_min_ram = 128 MiB

# Should we recommend to specify a swap partition?
swap_is_recommended = True

# Recommended minimal sizes of partitions.
# Specify a mount point and a size on each line.
min_partition_sizes =
    /      250 MiB
    /usr   250 MiB
    /tmp   50  MiB
    /var   384 MiB
    /home  100 MiB
    /boot  200 MiB

# Required minimal sizes of partitions.
# Specify a mount point and a size on each line.

# Allowed device types of the / partition if any.
# Valid values:
#
#  LVM        Allow LVM.
#  MD         Allow RAID.
#  PARTITION  Allow standard partitions.
#  BTRFS      Allow Btrfs.
#  DISK       Allow disks.
#  LVM_THINP  Allow LVM Thin Provisioning.
#
root_device_types =

# Mount points that must be on a linux file system.
# Specify a list of mount points.
must_be_on_linuxfs = / /var /tmp /usr /home /usr/share /usr/lib

# Paths that must be directories on the / file system.
# Specify a list of paths.
must_be_on_root = /bin /dev /sbin /etc /lib /root /mnt lost+found /proc

# Paths that must NOT be directories on the / file system.
# Specify a list of paths.
must_not_be_on_root =

[User Interface]
# The path to a custom stylesheet.
custom_stylesheet =

# The path to a directory with help files.
help_directory =

# A list of spokes to hide in UI.
# FIXME: Use other identification then names of the spokes.
hidden_spokes =

[License]
# A path to EULA (if any)
#
# If the given distribution has an EULA & feels the need to
# tell the user about it fill in this variable by a path
# pointing to a file with the EULA on the installed system.
#
# This is currently used just to show the path to the file to
# the user at the end of the installation.
eula =
4.3.2. 配置产品配置文件
产品配置文件有一个或者两个额外的部分来识别这个产品。[Product] 部分指定产品的产品名称。[Base Product] 部分指定基础产品的产品名称(如果有的话)。例如:Red Hat Enterprise Linux 是 Red Hat Virtualization 的基本产品。
安装程序在加载指定产品的配置文件之前加载基础产品的配置文件。例如:它会首先载入 Red Hat Enterprise Linux 配置,然后载入 Red Hat Virtualization 的配置。
请参阅 Red Hat Enterprise Linux 的产品配置文件示例:
# Anaconda configuration file for Red Hat Enterprise Linux.

[Product]
product_name = Red Hat Enterprise Linux

[Anaconda]
kickstart_modules =
     org.fedoraproject.Anaconda.Modules.Timezone
     org.fedoraproject.Anaconda.Modules.Network
     org.fedoraproject.Anaconda.Modules.Localization
     org.fedoraproject.Anaconda.Modules.Security
     org.fedoraproject.Anaconda.Modules.Users
     org.fedoraproject.Anaconda.Modules.Payloads
     org.fedoraproject.Anaconda.Modules.Storage
     org.fedoraproject.Anaconda.Modules.Services
     org.fedoraproject.Anaconda.Modules.Subscription

[Installation System]
can_detect_enabled_smt = True

[Network]
default_on_boot = DEFAULT_ROUTE_DEVICE

[Payload]
ignored_packages =
    ntfsprogs
    btrfs-progs
    dmraid

enable_closest_mirror = False
default_source = CDN

[Bootloader]
efi_dir = redhat

[Storage]
file_system_type = xfs
default_partitioning =
    /     (min 1 GiB, max 70 GiB)
    /home (min 500 MiB, free 50 GiB)
    swap

[Storage Constraints]
swap_is_recommended = True

[User Interface]
help_directory = /usr/share/anaconda/help/rhel
custom_stylesheet = /usr/share/anaconda/pixmaps/redhat.css

[License]
eula = /usr/share/redhat-release/EULA
请参阅 Red Hat Virtualization 产品配置文件示例:
# Anaconda configuration file for Red Hat Virtualization.

[Product]
product_name = Red Hat Virtualization (RHVH)

[Base Product]
product_name = Red Hat Enterprise Linux

[Storage]
default_scheme = LVM_THINP
default_partitioning =
    /              (min 6 GiB)
    /home          (size 1 GiB)
    /tmp           (size 1 GiB)
    /var           (size 15 GiB)
    /var/crash     (size 10 GiB)
    /var/log       (size 8 GiB)
    /var/log/audit (size 2 GiB)
    swap

[Storage Constraints]
root_device_types = LVM_THINP
must_not_be_on_root = /var
req_partition_sizes =
	/var   10 GiB
	/boot  1  GiB
要为您的产品自定义安装程序配置,您必须创建一个产品配置文件。创建名为 my-distribution.conf 的新文件,其内容与上例类似。将 [Product] 部分中的 product_name 更改为产品的名称,如 My Distribution。产品名称应当与 .buildstamp 文件中使用的名称相同。
创建自定义配置文件后,请按照创建 product.img 文件 部分的步骤来创建包含自定义的新 product.img 文件,以及 创建自定义引导镜像以使用包含您的更改创建新的可引导 ISO 文件。
4.3.3. 配置自定义配置文件
要自定义与产品名称无关的安装程序配置,您必须创建一个自定义配置文件。要做到这一点,创建一个名为 100-my-configuration.conf 的新文件,其内容类似于 配置默认配置文件中的示例,省略 [Product] 和 [Base Product] 部分。
创建自定义配置文件后,请按照创建 product.img 文件 部分的步骤来创建包含自定义的新 product.img 文件,以及 创建自定义引导镜像以使用包含您的更改创建新的可引导 ISO 文件。
第 5 章 开发安装程序附加组件
本节详细介绍了 Anaconda 及其架构,以及如何开发您自己的附加组件。Anaconda 及其架构的详情可帮助您了解 Anaconda 后端和附加组件工作的各种插件。它还有助于开发附加组件。
5.1. Anaconda 和附加组件介绍
Anaconda 是 Fedora、Red Hat Enterprise Linux 及其变体使用的操作系统安装程序。它是一组 Python 模块和脚本,以及一些额外的文件,如 Gtk widgets(用 C 编写的)、systemd 单元和 dracut 库。它们一起形成了一个允许用户设置结果(目标)系统参数的工具,然后在计算机上设置此系统。安装过程有四个主要步骤:
- 准备安装目的地(通常是磁盘分区)
- 安装软件包和数据
- 安装并配置引导装载程序
- 配置新安装的系统
使用 Anaconda 可让您使用以下三种方法安装 Fedora、Red Hat Enterprise Linux 及其变体:
使用图形用户界面(GUI):
这是最常用的安装方法。该界面允许用户在开始安装前,只需很少或无需配置即可以交互方式安装系统。这个方法涵盖了所有常见的用例,包括设置复杂的分区布局。
图形界面支持通过 VNC 的远程访问,即使在没有图形卡或未连接显示器的系统上,您也能够使用 GUI。
使用文本用户界面(TUI):
TUI 的工作方式类似于单色行打印机,它允许在不支持光标移动、颜色和其他高级功能的串行控制台上工作。文本模式是有限的,它只允许您自定义最常用的选项,如网络设置、语言选项或安装(软件包)源;在此界面中没有手动分区等高级功能。
使用 Kickstart 文件:
Kickstart 文件是一个纯文本文件,它使用类似 shell 的语法,可包含驱动器安装过程的数据。Kickstart 文件允许您部分或完全自动化安装。要完全自动化安装,需要一组命令来配置所有必填区域。如果缺少一个或多个命令,则安装需要用户参与才能完成。
除了安装程序本身的自动化外,Kickstart 文件还可以包含安装过程中在特定时间运行的自定义脚本。
5.2. Anaconda 构架
Anaconda 是一组 Python 模块和脚本。它还使用几个外部软件包和程序库。这个工具组的主要组件包括以下软件包:
-
pykickstart- 解析并验证 Kickstart 文件。另外,提供存储安装值的数据结构。 -
yum- 安装软件包及解决依赖项的软件包管理器 -
blivet- 处理与存储管理相关的所有活动 -
pyanaconda- 包含 Anaconda 的用户界面和模块,如键盘和时区选择、网络配置和用户创建。同时提供各种执行面向系统功能的工具 -
python-meh- 包含一个异常处理程序,它在崩溃时收集和存储额外的系统信息,并将这些信息传递给libreport库,后者本身是 ABRT 项目 的一部分 -
dasbus- 启用D-Bus库与 anaconda 模块和外部组件之间的通信 -
python-simpleline- 文本 UI 框架库,用于在 Anaconda 文本模式中管理用户交互 -
gtk- 用于创建和管理 GUI 的 Gnome 工具包库
除了上面提到的软件包外,Anaconda 在内部被分成用户界面和一组模块,这些模块作为独立的进程运行,并使用 D-Bus 库进行通信。这些模块是:
-
Boss- 管理内部模块发现、生命周期和协调 -
Localization- 管理区域设置 -
Network- 处理网络 -
Payloads- 处理以不同格式的安装数据,如rpm、ostree、tar和其他安装格式。有效负载管理安装的数据源 ; 源的格式可能会有所不同,比如 CD-ROM、HDD、NFS、URL 和其他来源 -
Security- 管理与安全相关的方面 -
Services- 处理服务 -
Storage- 使用blivet管理存储 -
Subscription- 处理subscription-manager工具和洞察力。 -
Timezone- 处理时间、日期、区域和时间同步。 -
Users- 创建用户和组。
每个模块声明其处理 Kickstart 的哪些部分,并具方法来将配置从 Kickstart 应用到安装环境和安装的系统。
Anaconda(pyanaconda)的 Python 代码部分作为拥有用户界面的"主"进程启动。您提供的任何 Kickstart 数据都使用 pykickstart 模块解析,并且启动 Boss 模块,其发现所有其他模块,并启动它们。然后主进程会根据其声明的功能将 Kickstart 数据发送到模块。模块处理数据,将配置应用到安装环境,UI 将验证是否已做了所有必要的选择。如果没有,您必须在互动安装模式中提供数据。完成所有必要的选择后,安装就可以开始 - 把数据写入安装系统的模块。
5.3. Anaconda 用户界面
Anaconda 用户界面(UI)有一个非线性结构,也称 hub 和 spoke 模型。
Anaconda hub 和 spoke 模型的优点是:
- 进入安装程序屏幕的灵活性。
- 保留默认设置的灵活性。
- 提供对配置的值的概述信息。
- 支持可扩展性。您可以添加 hub,而无需对任何内容重新排序,并可解决一些复杂的依赖关系。
- 支持使用图形和文本模式安装。
下图显示了安装程序布局以及hub与spoke之间可能的交互 (创建):
图 5.1. Hub 和 spoke 模型
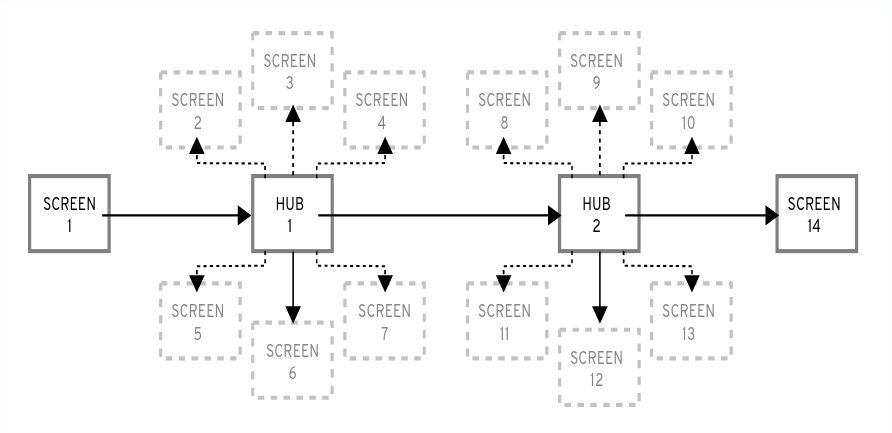
在图中,屏幕 2-13 称为 普通 spoke,屏幕 1 和 14 称为 独立 spoke 。独立 spoke 是可在独立 spoke 或 hub 之前或之后使用的屏幕。例如,安装开始时的 Welcome 屏幕提示您为剩余的安装选择语言。
-
安装概述是 Anaconda 中唯一的 hub。它显示了在安装开始前配置的选项概述
每个 spoke 都具有以下预定义的属性来反映 hub。
-
ready- 说明您能否访问 spoke 。例如,当安装程序配置软件包源时,spoke 的颜色是灰色的,在配置完成后前您无法访问它。 -
completed- 标记 spoke 是否已完成 (已设置所有必需的值)。 -
mandatory- 决定在继续安装前是否 必须 访问 spoke ;例如,您必须访问Installation Destinationspoke,即使您想要使用自动磁盘分区 -
status- 提供在 spoke 中配置的值的简短概述(在 hub 的 spoke 名称下显示)
要使用户界面更清晰,可将 spoke 分组为不同的类别。例如,Localization 类别为键盘布局选择、语言支持和时区设置组合在一起。
每个 spoke 都包含 UI 控制,这些控制显示并允许您修改来自一个或多个模块的值。同样适用于附加组件提供的 spoke。
5.4. 跨 Anaconda 线程通信
有些您需要在安装过程中执行的动作可能需要很长时间。例如:扫描磁盘以了解现有分区或下载软件包元数据。为防止您等待并保持响应,Anaconda 在单独的线程中运行这些操作。
Gtk 工具包不支持多个线程的元素更改。Gtk 的主事件循环运行在 Anaconda 进程的主线程中。因此,所有与 GUI 相关的操作都必须在主线程中执行。为此,请使用 GLib.idle_add,这并不总是容易或需要的。pyanaconda.ui.gui.utils 模块中定义的几个帮助程序功能和 decorators 可能会造成困难。
@gtk_action_wait 和 @gtk_action_nowait 修饰符以这样一种方式更改修饰函数或方法,即当调用此函数或方法时,它会自动排队到在主线程中运行的 Gtk 的主循环中。返回值要么返回给调用者,要么被丢弃。
在 spoke 和 hub 通讯中,一个 spoke 会声明何时就绪且不会被阻断。hubQ 消息队列处理此功能,并定期检查主事件循环。当 spoke 变为可访问时,它会向队列发送一条消息来宣布更改,并且该更改不应再被阻止。
当 spoke 需要刷新其状态或完成一个标志时,也是如此。Configuration and Progress hub 有一个名为 progressQ 的不同的队列,它充当传输安装进度更新的介质。
这些机制也用于文本界面。在文本模式中,没有主循环,但可能需要大量事件进行键盘输入。
5.5. Anaconda 模块和 D-Bus 库
Anaconda 模块作为独立进程运行。要通过其 D-Bus API 与这些进程进行通信,请使用 dasbus 库。
通过 D-Bus API 调用方法是异步的,但使用 dasbus 库,您可以在 Python 中将它们转换为同步方法调用。您还可以写入以下程序之一:
- 带有异步调用和返回处理程序的程序
- 调用者需要等待调用完成的程序。
有关线程和通信的更多信息,请参阅 Anaconda 线程之间的通信。
另外,Anaconda 使用模块中运行的任务对象。任务具有 D-Bus API 和方法,可在其他线程中自动执行。要成功运行任务,请使用 sync_run_task 和 async_run_task 助手函数。
5.6. Hello World addon 示例
Anaconda 开发人员发布了一个名为"Hello World"的示例附加组件,位于 GitHub:https://github.com/rhinstaller/hello-world-anaconda-addon/ 中,后面章节的描述会在这里重现。
5.7. Anaconda 附加组件结构
Anaconda 附加组件是 Python 软件包,其中包含含有 __init__.py 和其他源目录(子软件包)的目录。由于 Python 只允许您导入每个软件包名称一次,因此请为软件包顶级目录指定唯一的名称。您可以使用任意名称,因为附加组件都会被加载,而无论它们的名称是什么,唯一的要求是它们必须被放在特定的目录中。
对附加组件的建议的命名约定类似于 Java 软件包或 D-Bus 服务名称。
要使目录名称成为 Python 软件包的唯一标识符,请使用组织的反向域名作为加载项名称的前缀,并使用下划线(_)而不是点。例如,com_example_hello_world。
确保在每个目录中创建一个 __init__.py 文件。缺少这个文件的目录被视为无效的 Python 软件包。
在编写附加组件时,请确定以下几项:
-
对每个界面(图形界面和文本界面)的支持可由单独的子软件包提供,对于图形界面,这些子软件包被命名为
gui,对于基于文本的界面,这些子软件包被命名为tui。 -
gui和tui软件包包含一个spokes子软件包。[1] - 软件包中包含的模块有一个任意名称。
-
gui/和tui/目录包含带有任何名称的 Python 模块。 - 有的服务可以执行附加组件的实际工作。可使用 Python 或者其他任何语言编写该服务。
- 该服务实现了对 D-Bus 和 Kickstart 的支持。
- 这个附加组件包含启用自动启动该服务的文件。
以下是支持每个接口(Kickstart、GUI 和 TUI)的附加目录结构示例:
例 5.1. 附加组件结构示例
com_example_hello_world
├─ gui
│  ├─ init.py
│  └─ spokes
│     └─ init.py
└─ tui
   ├─ init.py
   └─ spokes
   └─ init.py
每个软件包必须至少包含一个带有任意名称的模块,该名称定义了从 API 中定义的一个或多个类继承的类。
如果附加组件需要定义一个新类别,您可以包含类别子软件包,但不建议这样做。
5.8. Anaconda 服务及配置文件
Anaconda 服务和配置文件包含在 data/ 目录中。这些文件是启动附加组件服务并配置 D-Bus 所需要的。
以下是 Anaconda Hello World 附加组件的一些示例:
例 5.2. addon-name.conf 示例:
<!DOCTYPE busconfig PUBLIC
"-//freedesktop//DTD D-BUS Bus Configuration 1.0//EN"
"http://www.freedesktop.org/standards/dbus/1.0/busconfig.dtd">
<busconfig>
       <policy user="root">
               <allow own="org.fedoraproject.Anaconda.Addons.HelloWorld"/>
               <allow send_destination="org.fedoraproject.Anaconda.Addons.HelloWorld"/>
       </policy>
       <policy context="default">
               <deny own="org.fedoraproject.Anaconda.Addons.HelloWorld"/>
               <allow send_destination="org.fedoraproject.Anaconda.Addons.HelloWorld"/>
       </policy>
</busconfig>
此文件必须放在安装环境中的 /usr/share/anaconda/dbus/confs/ 目录中。字符串 org.fedoraproject.Anaconda.Addons.HelloWorld 必须与 D-Bus 上附加服务的位置相对应。
例 5.3. addon-name.service 示例:
[D-BUS Service]
# Start the org.fedoraproject.Anaconda.Addons.HelloWorld service.
# Runs org_fedora_hello_world/service/main.py
Name=org.fedoraproject.Anaconda.Addons.HelloWorld
Exec=/usr/libexec/anaconda/start-module org_fedora_hello_world.service
User=root
此文件必须放在安装环境中的 /usr/share/anaconda/dbus/services/ 目录中。字符串 org.fedoraproject.Anaconda.Addons.HelloWorld 必须与 D-Bus 上附加服务的位置相对应。以 Exec= 开头的行中的值必须是在安装环境中启动服务的有效命令。
5.9. GUI 附加组件基本特性
与附加组件中的 Kickstart 支持类似,GUI 支持要求附加组件的每一个部分都必须至少包含一个模块,并带有一个继承自 API 定义的特定类的类定义。对于图形附加组件支持,您唯一应添加的类是 NormalSpoke 类,该类在 pyanaconda.ui.gui.spokes 中定义,作为屏幕普通spoke 类型的一个类。要了解有关它的更多信息,请参阅 Anaconda 用户界面。
要实现继承自 NormalSpoke 的新类,您必须定义 API 所需的以下类属性:
-
builderObjects- 列出了来自 spoke 的.glade文件中的所有顶级对象,它们应与其子对象(递归方式)一起暴露给 spoke。如果所有内容都应暴露给 spoke(不建议),则列表应为空。 -
mainWidgetName- 包含.glade文件中定义的主窗口小部件(Add Link)的 id。 -
uiFile- 包含.glade文件的名称。 -
category- 包含 spoke 所属类别的类。 -
icon- 包含用于 hub 上 spoke 的图标的标识符。 -
title- 定义要用于 hub 上的 spoke 的标题。
5.10. 对附加图形用户界面(GUI)添加支持
这部分描述了如何通过执行以下高级步骤来为您的附加组件的图形用户界面(GUI)添加支持:
- 定义 Normalspoke 类所需的属性
-
定义
__init__和initialize方法 -
定义
refresh、apply和execute方法 -
定义
status、ready、completed和mandatory属性
先决条件
- 您的附加组件包括对 Kickstart 的支持。请参阅 Anaconda 附加组件结构。
-
安装 anaconda-widgets 和 anaconda-widgets-devel 软件包,其中包含特定于
Anaconda的 Gtk 小部件,如SpokeWindow。
流程
- 根据以下示例,创建带有所有必要的定义的以下模块,来添加对 Add-on 图形用户界面(GUI)的支持。
例 5.4. 定义 Normalspoke 类所需的属性:
# will never be translated
_ = lambda x: x
N_ = lambda x: x

# the path to addons is in sys.path so we can import things from org_fedora_hello_world
from org_fedora_hello_world.gui.categories.hello_world import HelloWorldCategory
from pyanaconda.ui.gui.spokes import NormalSpoke

# export only the spoke, no helper functions, classes or constants
all = ["HelloWorldSpoke"]

class HelloWorldSpoke(FirstbootSpokeMixIn, NormalSpoke):
    """
    Class for the Hello world spoke. This spoke will be in the Hello world
    category and thus on the Summary hub. It is a very simple example of a unit
    for the Anaconda's graphical user interface. Since it is also inherited form
    the FirstbootSpokeMixIn, it will also appear in the Initial Setup (successor
    of the Firstboot tool).

    :see: pyanaconda.ui.common.UIObject
    :see: pyanaconda.ui.common.Spoke
    :see: pyanaconda.ui.gui.GUIObject
    :see: pyanaconda.ui.common.FirstbootSpokeMixIn
    :see: pyanaconda.ui.gui.spokes.NormalSpoke

    """

    # class attributes defined by API #

    # list all top-level objects from the .glade file that should be exposed
    # to the spoke or leave empty to extract everything
    builderObjects = ["helloWorldSpokeWindow", "buttonImage"]

    # the name of the main window widget
    mainWidgetName = "helloWorldSpokeWindow"

    # name of the .glade file in the same directory as this source
    uiFile = "hello_world.glade"

    # category this spoke belongs to
    category = HelloWorldCategory

    # spoke icon (will be displayed on the hub)
    # preferred are the -symbolic icons as these are used in Anaconda's spokes
    icon = "face-cool-symbolic"

    # title of the spoke (will be displayed on the hub)
    title = N_("_HELLO WORLD")
__all__ 属性导出 spoke 类,后跟包括之前在 GUI 附加组件基本功能 中提到的属性定义的其定义的第一行。这些属性值引用 com_example_hello_world/gui/spokes/hello.glade 文件中定义的小部件。还有两个值得注意的属性:
-
category,它的值从com_example_hello_world.gui.gui.categories模块的HelloWorldCategory类导入。附加组件路径HelloWorldCategory位于sys.path中,因此值可以从com_example_hello_world软件包导入。category属性是N_function名称的一部分,用于标记要转换的字符串;但会返回字符串的非转换版本,因为转换发生在后续阶段。 -
title,其定义中包含一个下划线。title属性下划线标记标题本身的开头,并使用Alt+H键盘快捷键使 spoke 可访问。
通常在类定义标头和类 属性 定义后面是初始化类实例的构造器。如果是 Anaconda 图形界面对象,有两初始化新实例的种方法:__init__ 方法和 initialize 方法。
这两个函数背后的原因是,GUI 对象可以一次在内存中创建 ,并在不同时间完全初始化,而 spoke 初始化可能会很耗时。因此,__init__ 方法应只调用父类的 __init__ 方法,例如初始化非 GUI 属性。另一方面,安装程序图形用户界面初始化时调用的 initialize 方法应该完成 spoke 的整个初始化过程。
在 Hello World add-on 示例中,定义了如下两种方法:注意传给 __init__ 方法的编号和描述参数。
例 5.5. 定义 __init__ 和初始化方法:
def __init__(self, data, storage, payload):
    """
    :see: pyanaconda.ui.common.Spoke.init
    :param data: data object passed to every spoke to load/store data
    from/to it
    :type data: pykickstart.base.BaseHandler
    :param storage: object storing storage-related information
    (disks, partitioning, bootloader, etc.)
    :type storage: blivet.Blivet
    :param payload: object storing packaging-related information
    :type payload: pyanaconda.packaging.Payload

    """

    NormalSpoke.init(self, data, storage, payload)
    self._hello_world_module = HELLO_WORLD.get_proxy()

def initialize(self):
    """
    The initialize method that is called after the instance is created.
    The difference between init and this method is that this may take
    a long time and thus could be called in a separate thread.
    :see: pyanaconda.ui.common.UIObject.initialize
    """
    NormalSpoke.initialize(self)
    self._entry = self.builder.get_object("textLines")
    self._reverse = self.builder.get_object("reverseCheckButton")
传给 __init__ 方法的数据参数是存储所有数据的 Kickstart 文件的内存树状表示。在祖先的一个 __init__ 方法中,它存储在 self.data 属性中,这个属性允许类中的所有其他方法读取和修改结构。
从 RHEL8 开始,存储对象 不再可用。如果您的附加组件需要与存储配置进行交互,请使用 Storage DBus 模块。
由于 HelloWorldData 类已在 Hello World 附加组件示例 中定义了,因此此附加组件的 self.data 中已有一个子树。它的根(一个类的实例)作为 self.data.addons.com_example_hello_world 提供。
祖先的 __init__ 的所做的另一个操作是使用 spoke 的 .glade 文件初始化 GtkBuilder 的实例,并将它存储为 self.builder。initialize 方法使用这个来获取用于显示和修改 Kickstart 文件的 %addon 部分中文本的 GtkTextEntry。
在创建 spoke 时,__init__ 和 initialize 方法都很重要。但是,spoke 的主要作用是希望被更改或查看 spoke 值显示和集合的用户访问。要启用此功能,可以使用其他三种方法:
-
refresh- 在要访问 spoke 时调用 ;此方法会刷新 spoke 的状态,主要是它的 UI 元素,以确保显示的数据与内部数据结构相匹配,并通过它来确保显示 self.data 结构中存储的当前值。 -
apply- 当 spoke 离开时调用,用于将 UI 元素的值存储回self.data结构。 -
execute- 当用户离开 spoke 时调用,用于根据 spoke 的新状态来执行任何运行时更改。
这些功能在 Hello World 附加组件示例中以以下方式实现:
例 5.6. 定义 refresh 、apply 和 execute 方法
def refresh(self):
    """
    The refresh method that is called every time the spoke is displayed.
    It should update the UI elements according to the contents of
    internal data structures.
    :see: pyanaconda.ui.common.UIObject.refresh
    """
    lines = self._hello_world_module.Lines
    self._entry.get_buffer().set_text("".join(lines))
    reverse = self._hello_world_module.Reverse
    self._reverse.set_active(reverse)

def apply(self):
    """
    The apply method that is called when user leaves the spoke. It should
    update the D-Bus service with values set in the GUI elements.
    """
    buf = self._entry.get_buffer()
    text = buf.get_text(buf.get_start_iter(),
                        buf.get_end_iter(),
                        True)
    lines = text.splitlines(True)
    self._hello_world_module.SetLines(lines)

    self._hello_world_module.SetReverse(self._reverse.get_active())

def execute(self):
  """
  The execute method that is called when the spoke is exited. It is
  supposed to do all changes to the runtime environment according to
  the values set in the GUI elements.

  """

  # nothing to do here
  pass
您可以使用几个额外的方法来控制 spoke 的状态:
-
ready- 确定 spoke 是否准备好被访问;如果值为"False",则不能访问spoke,例如,在配置软件包源之前的Package Selectionspoke。 -
completed- 确定 spoke 是否已完成。 -
mandatory- 确定 spoke 是强制还是非强制的,例如,Installation Destinationspoke,其必须一直被访问,即使您想使用自动分区。
所有这些属性都需要根据安装过程的当前状态动态确定。
以下是在 Hello World 附加组件中实现这些方法的示例,这需要在 HelloWorldData 类的文本属性中设置一个特定的值:
例 5.7. 定义 ready 、completed 和 mandatory 方法
@property
def ready(self):
    """
    The ready property reports whether the spoke is ready, that is, can be visited
    or not. The spoke is made (in)sensitive based on the returned value of the ready
    property.

    :rtype: bool

    """

    # this spoke is always ready
    return True


@property
def mandatory(self):
    """
    The mandatory property that tells whether the spoke is mandatory to be
    completed to continue in the installation process.

    :rtype: bool

    """

    # this is an optional spoke that is not mandatory to be completed
    return False
在定义了这些属性后,spoke 可以控制其可访问性和完整性,但不能提供其中配置的值的摘要 - 您必须访问 spoke 以查看它是如何配置的,这可能不是必需的。因此,存在名为 status 的额外属性。此属性包含一文本行,并带有已配置值的简短摘要,然后其可显示在 spoke 标题下的 hub 中。
status 属性定义在 Hello World 示例附加组件中,如下所示:
例 5.8. 定义 status 属性
@property
def status(self):
    """
    The status property that is a brief string describing the state of the
    spoke. It should describe whether all values are set and if possible
    also the values themselves. The returned value will appear on the hub
    below the spoke's title.
    :rtype: str
    """
    lines = self._hello_world_module.Lines
    if not lines:
        return _("No text added")
    elif self._hello_world_module.Reverse:
        return _("Text set with {} lines to reverse").format(len(lines))
    else:
        return _("Text set with {} lines").format(len(lines))
在定义了示例中描述的所有属性后,附加组件完全支持显示图形用户界面(GUI)以及 Kickstart。
此处演示的示例非常简单,不包含任何控制;需要掌握 Python Gtk 编程知识才能在 GUI 中开发功能性的、交互式 spoke 。
一个值得注意的限制是每个 spoke 都必须有自己的主窗口,即 SpokeWindow 小部件的一个实例。此小部件以及其他特定于 Anaconda 的小部件可在 anaconda-widgets 软件包中找到。您可以在 anaconda-widgets-devel 软件包中找到使用 GUI 支持开发附加组件所需的其他文件,如 Glade 定义。
一旦图形界面支持模块包含所有必要的方法,您可以继续使用以下部分来添加对基于文本的用户界面的支持,或者您可以继续 部署和测试 Anaconda 附加组件 ,并测试附加组件。
5.11. 附加组件 GUI 高级功能
pyanaconda 软件包包含多个帮助程序和工具函数,以及用于 hub 和 spoke 的结构。其中大多数位于 pyanaconda.ui.gui.utils 软件包中。
Hello World 附加组件示例演示了englightbox 内容管理器的用法,Anaconda 也使用它。此内容管理器可以将窗口置于 lightbox 中,以提高其可见性并聚焦它,以防止用户与底层窗口进行交互。为了演示此功能,示例附加组件包含一个打开新对话框窗口的按钮;对话框本身是一个继承于 GUIObject 类的特殊 HelloWorldDialog,其在 pyanaconda.ui.gui.init 中定义。
对话框类定义运行和销毁可通过 self.window 属性访问的内部 Gtk 对话框的 run 方法,其使用具有同样含义的 mainWidgetName 类属性填充。因此,定义对话框的代码非常简单,如下例所示:
例 5.9. 定义 englightbox 对话框
        # every GUIObject gets ksdata in init
        dialog = HelloWorldDialog(self.data)

        # show dialog above the lightbox
        with self.main_window.enlightbox(dialog.window):
            dialog.run()
定义 englightbox 对话框 示例代码会创建一个对话框实例,然后使用 enlightbox 内容管理器在 lightbox 中运行对话框。上下文管理器有一个对 spoke 窗口的引用,只需要对话框的窗口来实例化对话框的 lightbox 。
Anaconda 提供的另一个有用功能是能够定义一个 spoke ,其在安装期间和第一次重启后将显示。Initial Setup 工具在 为 Add-on 图形用户界面(GUI)添加支持 中进行了描述。要使一个 spoke 在 Anaconda 和 Initial Setup 中都可用,它必须继承特殊的 FirstbootSpokeMixIn 类(也称为 mixin),来作为 pyanaconda.ui.common 模块中定义的第一个继承的类。
要在 Anaconda 中提供 spoke 和 Initial Setup 的重新配置模式,它必须继承特殊的 FirstbootSpokeMixIn 类,也称为 mixin,作为 pyanaconda.ui.common 模块中定义的第一个继承类。
如果您只想在 Initial Setup 中提供一个特定的 spoke,则这个 spoke 应该继承 FirstbootOnlySpokeMixIn 类。
要使 spoke 始终在 Anaconda 和 Initial Setup 中都可用,spoke 应重新定义 should_run 方法,如下例所示:
例 5.10. 重新定义 should_run 方法
@classmethod
    def should_run(cls, environment, data):
    """Run this spoke for Anaconda and Initial Setup"""
    return True
pyanaconda 软件包提供了更多高级的功能,如 @gtk_action_wait 和 @gtk_action_nowait 修饰符,但它们不在本指南范围之内。有关更多示例,请参阅安装程序的源。
5.12. TUI 附加组件基本特性
Anaconda 还支持基于文本的界面(TUI)。这个界面在功能方面有更多限制,但在某些系统上,它可能是交互式安装的唯一选择。有关基于文本的界面和图形界面与 TUI 的限制的更多信息,请参阅 Anaconda 简介和附加组件。
要在附加组件中添加对文本接口的支持,请在 tui 目录下创建新的子软件包集合,如 Anaconda 附加组件结构所述。
安装程序中的文本模式支持是基于 simpleline 库,该库仅允许非常简单的用户交互。文本模式界面:
- 不支持光标移动 - 相反,其行为类似一台行打印机。
- 不支持任何视觉增强,例如使用不同的颜色或字体。
在内部,simpleline 工具包有三个主要类: App、UIScreen 和 Widget。Widget 是包含要在屏幕上打印的信息的单元。它们被放在 UIScreens 上,由 App 类的一个实例切换。在基本元素之上,hub spoke 和对话框 都 以类似图形界面的方式包含各种小部件。
附加组件最重要的类是 NormalTUISpoke ,其它各种类定义在 pyanaconda.ui.tui.spokes 软件包中。所有这些类都基于 TUIObject 类,这本身等同于 附加 GUI 高级功能中讨论的 GUIObject 类。每个 TUI spoke 都是继承于 NormalTUISpoke 类的 Python 类,覆盖 API 定义的特殊参数和方法。因为文本界面比 GUI 简单,所以只有两个这样的参数:
-
title- 确定 spoke 的标题,类似于 GUI 中的标题参数. -
category- 确定作为字符串的 spoke 类;类名称不在任何地方显示,它仅用于分组。
TUI 处理类的方式与 GUI 不同。建议为您的新 spoke 分配一个预先存在的类。创建新类需要修补 Anaconda,这不会带来任何好处。
每个 spoke 还应覆盖多种方法,即 init、initialize、refresh、refresh、apply、execute、input、prompt 和 properties (ready、completed、mandatory 和 status)。
其它资源
- 请参阅 Add-on GUI 的支持。
5.13. 定义一个简单的 TUI Spoke
以下示例演示了在 Hello World 示例附加组件中一个简单的文本用户界面(TUI) spoke 的实现:
先决条件
- 您已在 tui 目录下创建了一组新的子软件包,如 Anaconda 附加组件结构所述。
流程
- 根据以下示例,创建带有所有必要定义的模块来添加对附加文本用户界面(TUI)的支持:
例 5.11. 定义一个简单的 TUI Spoke
def __init__(self, *args, **kwargs):
    """
    Create the representation of the spoke.

    :see: simpleline.render.screen.UIScreen
    """
    super().__init__(*args, **kwargs)
    self.title = N_("Hello World")
    self._hello_world_module = HELLO_WORLD.get_proxy()
    self._container = None
    self._reverse = False
    self._lines = ""

def initialize(self):
    """
    The initialize method that is called after the instance is created.
    The difference between __init__ and this method is that this may take
    a long time and thus could be called in a separated thread.

    :see: pyanaconda.ui.common.UIObject.initialize
    """
    # nothing to do here
    super().initialize()

def setup(self, args=None):
    """
    The setup method that is called right before the spoke is entered.
    It should update its state according to the contents of DBus modules.

    :see: simpleline.render.screen.UIScreen.setup
    """
    super().setup(args)

    self._reverse = self._hello_world_module.Reverse
    self._lines = self._hello_world_module.Lines

    return True

def refresh(self, args=None):
    """
    The refresh method that is called every time the spoke is displayed.
    It should generate the UI elements according to its state.

    :see: pyanaconda.ui.common.UIObject.refresh
    :see: simpleline.render.screen.UIScreen.refresh
    """
    super().refresh(args)

    self._container = ListColumnContainer(
        columns=1
    )
    self._container.add(
        CheckboxWidget(
            title="Reverse",
            completed=self._reverse
        ),
        callback=self._change_reverse
    )
    self._container.add(
        EntryWidget(
            title="Hello world text",
            value="".join(self._lines)
        ),
        callback=self._change_lines
    )

    self.window.add_with_separator(self._container)

def _change_reverse(self, data):
    """
    Callback when user wants to switch checkbox.
    Flip state of the "reverse" parameter which is boolean.
    """
    self._reverse = not self._reverse

def _change_lines(self, data):
    """
    Callback when user wants to input new lines.
    Show a dialog and save the provided lines.
    """
    dialog = Dialog("Lines")
    result = dialog.run()
    self._lines = result.splitlines(True)

def input(self, args, key):
    """
    The input method that is called by the main loop on user's input.

    * If the input should not be handled here, return it.
    * If the input is invalid, return InputState.DISCARDED.
    * If the input is handled and the current screen should be refreshed,
      return InputState.PROCESSED_AND_REDRAW.
    * If the input is handled and the current screen should be closed,
      return InputState.PROCESSED_AND_CLOSE.

    :see: simpleline.render.screen.UIScreen.input
    """
    if self._container.process_user_input(key):
        return InputState.PROCESSED_AND_REDRAW

    if key.lower() == Prompt.CONTINUE:
        self.apply()
        self.execute()
        return InputState.PROCESSED_AND_CLOSE

    return super().input(args, key)

def apply(self):
    """
    The apply method is not called automatically for TUI. It should be called
    in input() if required. It should update the contents of internal data
    structures with values set in the spoke.
    """
    self._hello_world_module.SetReverse(self._reverse)
    self._hello_world_module.SetLines(self._lines)

def execute(self):
    """
    The execute method is not called automatically for TUI. It should be called
    in input() if required. It is supposed to do all changes to the runtime
    environment according to the values set in the spoke.
    """
    # nothing to do here
    pass
如果仅调用祖先的 init,则不需要覆盖 init 方法,但示例中的注释描述了以可理解的方式传递给 spoke 类构造器的参数。
在上例中:
-
setup方法为每个条目上的 spoke 的内部属性设置默认值,然后由refresh方法显示,通过input方法更新并使用apply方法来更新内部数据结构。 -
execute方法与 GUI 中的等效方法具有相同的目的;在这种情况下,该方法没有任何效果。 -
input方法特定于文本界面;在 Kickstart 或 GUI 中没有等效的方法。input方法负责用户交互。 -
input方法处理输入的字符串,并根据其类型和值采取措施。上例要求输入任何值,然后将它存储为内部属性(密钥)。在更复杂的附加组件中,您通常需要执行一些不平凡的操作,如将字母解析为操作、将数字转换为整数、显示额外的屏幕或切换布尔值。 -
输入类的
返回值必须是InputState枚举或input字符串本身,如果此 input 应该由不同的屏幕处理。与图形模式不同,apply和execute方法不会在保留 spoke 时自动调用;它们必须从输入法显式调用。同样适用于关闭(隐藏) spoke 屏幕:必须从close方法显式调用它。
若要显示另一个屏幕,例如,您需要在不同的 spoke 中输入的附加信息,您可以实例化另一个 TUIObject ,并使用 ScreenHandler.push_screen_modal() 来显示它。
由于基于文本的界面的限制,TUI spoke 往往具有非常相似的结构,由用户应选中或取消选中并填充的复选框或条目列表组成。
5.14. 使用 NormalTUISpoke 来定义文本接口 Spoke
重新定义简单 TUI Spoke 示例演示了一种实现 TUI spoke 的方法,其中它的方法处理打印和处理可用的和提供的数据。但是,有不同的方法来实现这一目标,即使用 pyanaconda.ui.tui.spokes 软件包中的 Normal EditTUISpoke 类。通过继承此类,您只需指定应在其中设置的字段和属性,就可实现典型的 TUI spoke 。以下示例演示了这一点:
先决条件
-
您已在
TUI目录下添加了一组新的子软件包,如 Anaconda 附加组件结构中所述。
流程
- 根据以下示例,创建带有所有必要定义的模块,来对 Add-on 文本用户界面(TUI)添加支持。
例 5.12. 使用 NormalTUISpoke 来定义文本接口 Spoke
class HelloWorldEditSpoke(NormalTUISpoke):
    """Example class demonstrating usage of editing in TUI"""

    category = HelloWorldCategory

    def init(self, data, storage, payload):
        """
        :see: simpleline.render.screen.UIScreen
        :param data: data object passed to every spoke to load/store data
                     from/to it
        :type data: pykickstart.base.BaseHandler
        :param storage: object storing storage-related information
                        (disks, partitioning, bootloader, etc.)
        :type storage: blivet.Blivet
        :param payload: object storing packaging-related information
        :type payload: pyanaconda.packaging.Payload
        """
        NormalTUISpoke.init(self, data, storage, payload)

        self.title = N_("Hello World Edit")
        self._container = None
        # values for user to set
        self._checked = False
        self._unconditional_input = ""
        self._conditional_input = ""

    def refresh(self, args=None):
        """
        The refresh method that is called every time the spoke is displayed.
        It should update the UI elements according to the contents of
        self.data.
        :see: pyanaconda.ui.common.UIObject.refresh
        :see: simpleline.render.screen.UIScreen.refresh
        :param args: optional argument that may be used when the screen is
                     scheduled
        :type args: anything
        """
        super().refresh(args)
        self._container = ListColumnContainer(columns=1)

        # add ListColumnContainer to window (main window container)
        # this will automatically add numbering and will call callbacks when required
        self.window.add(self._container)

        self._container.add(CheckboxWidget(title="Simple checkbox", completed=self._checked),
                            callback=self._checkbox_called)
        self._container.add(EntryWidget(title="Unconditional text input",
                                        value=self._unconditional_input),
                            callback=self._get_unconditional_input)

        # show conditional input only if the checkbox is checked
        if self._checked:
            self._container.add(EntryWidget(title="Conditional password input",
                                            value="Password set" if self._conditional_input
                                            else ""),
                                callback=self._get_conditional_input)

        self._window.add_separator()


    @property
    def completed(self):
        # completed if user entered something non-empty to the Conditioned input
        return bool(self._conditional_input)
    @property
    def status(self):
        return "Hidden input %s" % ("entered" if self._conditional_input
                                    else "not entered")

    def apply(self):
        # nothing needed here, values are set in the self.args tree
        pass
5.15. 部署和测试 Anaconda 附加组件
您可以在安装环境中部署并测试您自己的 Anaconda 附加组件。要做到这一点,请按照以下步骤执行:
先决条件
- 您创建了附加组件。
-
您有权访问您的
D-Bus文件。
流程
-
在您喜欢的位置创建一个
DIR目录。 -
将
Add-onpython 文件添加到DIR/usr/share/anaconda/addons/中。 -
将您的
D-Bus服务文件复制到DIR/usr/share/anaconda/dbus/services/中。 -
将您的
D-Bus服务配置文件复制到/usr/share/anaconda/dbus/confs/。 创建 updates 镜像。
访问
DIR目录:cd DIR查找 updates 镜像。
find . | cpio -c -o | pigz -9cv > DIR/updates.img
- 提取 ISO 引导镜像的内容。
使用生成的
updates镜像:-
将
updates.img文件添加到您未打包的 ISO 内容的 images 目录中。 - 重新打包镜像。
-
设置 Web 服务器,来通过 HTTP 向 Anaconda 安装程序提供
updates.img 文件。 通过在引导选项中添加以下规范,在引导时加载
updates.img 文件:inst.updates=http://your-server/whatever/updates.img to boot options.
-
将
有关解包现有引导镜像、创建 product.img 文件并重新打包镜像的具体步骤,请参阅 提取 Red Hat Enterprise Linux 引导镜像。
第 6 章 完成自定义后的任务
要完成自定义配置,请执行以下任务:
- 创建 product.img 文件(仅适用于图形化定制)。
- 创建自定义引导镜像。
这部分提供有关如何创建 product.img 镜像文件以及创建自定义引导镜像的信息。
6.1. 创建 product.img 文件
product.img 镜像文件是包含新安装程序文件的存档文件,这些安装程序文可在运行时取代现有的安装程序文件。
在系统启动期间,Anaconda 将从引导介质上的 images/ 目录中加载 product.img 文件。然后,它会使用此目录中的文件替换安装程序文件系统中同名的文件。替换时的文件会自定义安装程序(例如,将默认镜像替换为自定义镜像)。
注意: product.img 镜像必须包含与安装程序相同的目录结构。有关安装程序目录结构的更多信息,请参阅下表。
表 6.1. 安装程序目录结构和自定义内容
| 自定义内容类型 | 文件系统位置 |
|---|---|
| Pixmaps(logo、sidebar、top bar 等) |
|
| GUI 风格表 |
|
| Anaconda 附加组件 |
|
| 产品配置文件 |
|
| 自定义配置文件 |
|
| Anaconda DBus 服务配置文件 |
|
| Anaconda DBus 服务文件 |
|
以下流程解释了如何创建 product.img 文件。
流程
导航到工作目录,如
/tmp,创建名为product/的子目录:$cd /tmp创建一个子目录 product/
$mkdir product/创建一个与您要替换的文件位置相同的目录结构。例如,如果要测试安装系统上
/usr/share/anaconda/addons目录中的附加组件,请在您的工作目录中创建同样的结构:$mkdir -p product/usr/share/anaconda/addons注意要查看安装程序的运行时文件,请引导安装并切换到虚拟控制台 1 (Ctrl+Alt+F1),然后切换到第二个 tmux 窗口(Ctrl+b+2)。可用来浏览文件系统打开的 shell 提示符。
将自定义文件(在这个示例中, Anaconda 的自定义附加组件)放在新创建的目录中:
$cp -r ~/path/to/custom/addon/ product/usr/share/anaconda/addons/- 重复步骤 3 和 4(为您要添加到安装程序的每个文件创建目录结构并将自定义文件放在其中)。
在目录的根目录中创建一个
.buildstamp文件。.buildstamp文件描述了系统版本、产品和其他几个参数。以下是 Red Hat Enterprise Linux 8.4 中的.buildstamp文件示例:[Main] Product=Red Hat Enterprise Linux Version=8.4 BugURL=https://bugzilla.redhat.com/ IsFinal=True UUID=202007011344.x86_64 [Compose] Lorax=28.14.49-1
IsFinal参数指定镜像是否是产品的发行版本(GA)版本(True),还是预发布,如 Alpha、Beta 版还是一个内部里程碑(False)。进到
product/目录,创建product.img归档文件:$cd product$find . | cpio -c -o | gzip -9cv > ../product.img这会在
product/目录的上一级目录中创建product.img文件。-
将
product.img文件移到提取的 ISO 映像的images/目录。
现在 product.img 文件已创建好,您要做的自定义内容被放在各自的目录中。
您可以把这个文件放在不同的地方,而不是在引导介质上添加 product.img 文件,并在引导菜单中使用 inst.updates= 引导选项加载它,。在这种情况下,只要可以从安装系统访问该位置,镜像文件可以是任何名称,并可放在任意位置(USB 闪存驱动器、硬盘、HTTP、FTP 或者 NFS 服务器)。
有关 Anaconda 引导选项的详情请参考 Anaconda 引导选项。
6.2. 创建自定义引导镜像
自定义引导镜像和 GUI 布局后,创建一个新镜像,其中包含您所做的更改。
要创建自定义引导镜像,请按照以下步骤操作。
流程
-
请确定您的所有更改都包含在工作目录中。例如,如果您要测试附加组件,请确保将
product.img放在images/目录中。 -
确保您的当前工作目录是提取的 ISO 镜像的顶级目录,例如
/tmp/ISO/iso/。 使用
genisoimage创建新的 ISO 镜像:#genisoimage -U -r -v -T -J -joliet-long -V "RHEL-8 Server.x86_64" -volset "RHEL-8 Server.x86_64" -A "RHEL-8 Server.x86_64" -b isolinux/isolinux.bin -c isolinux/boot.cat -no-emul-boot -boot-load-size 4 -boot-info-table -eltorito-alt-boot -e images/efiboot.img -no-emul-boot -o ../NEWISO.iso .在上例中:
如果对需要在同一磁盘上加载文件的位置的选项使
LABEL=指令,请确保-V、-volset和-A选项的值与镜像的引导装载程序配置相匹配。如果您的引导装载程序配置(对 BIOS 是isolinux/isolinux.cfg,对 UEFI 是EFI/BOOT/grub.cfg)使用inst.stage2=LABEL=disk_label段来从同一磁盘加载安装程序的第二阶段,那么磁盘标签必须匹配。重要在引导装载程序配置文件中,将磁盘标签中的所有空格替换为
\x20。例如,如果您创建带有RHEL 8.0标签的 ISO 镜像,引导装载程序配置应使用RHEL\x208.0。将
-o选项(-o ../NEWISO.iso)的值替换为新镜像的文件名。示例中的值在当前目录 上面的 目录中创建NEWISO.iso文件。有关这个命令的详情,请参考
genisoimage(1)手册页。
在镜像中省略 MD5 checksum。请注意,如果没有 MD5 检查和,镜像验证检查可能会失败(引导加载程序配置中的
rd.live.check选项),安装可能会挂起。#implantisomd5 ../NEWISO.iso在上例中, 使用文件名和您在上一步中创建的 ISO 镜像位置替换 ../NEWISO.iso。
现在,您可以将新 ISO 镜像写入到物理介质或网络服务器,来在物理硬件上启动它,或者您可以使用它来开始安装虚拟机。
其它资源
- 有关准备引导介质或网络服务器的说明,请参阅执行高级 RHEL 8 安装。
- 有关使用 ISO 镜像创建虚拟机的详情,请参考配置和管理虚拟化。