
Red Hat Training
A Red Hat training course is available for Red Hat Enterprise Linux
安装指南
为所有架构安装 Red Hat Enterprise Linux 5
摘要
部分 I. x86、AMD64、Intel® 64 和 Itanium - 安装和升级
第 1 章 Itanium 系统特定信息
1.1. Itanium 系统安装概述
- 引导进入可扩展固件接口(EFI) Shell。
- 如果您无法从 CD-ROM 引导,请从 Red Hat Enterprise Linux 提供的引导镜像文件创建一个 LS-120 磁盘空间。
- 使用 EFI Shell 和 ELILO 引导装载程序,加载并运行内核,并引导至 Red Hat Enterprise Linux 安装程序。
1.2. Itanium 系统 - EFI Shell
http://developer.intel.com/technology/efi/index.htm
1.2.1. Itanium 系统 - EFI 设备名称
- LS-120 驱动器(如果包含介质)
- 主 IDE 接口中的 IDE 硬盘驱动器
- 辅助 IDE 接口上的 IDE 硬盘驱动器
- SCSI 接口中的 SCSI 硬盘驱动器
- IDE 接口中的 CD-ROM 驱动器
- SCSI 接口中的 CD-ROM 驱动器
mapDevice mapping table fs0 : VenHw(Unknown Device:00)/HD(Part1,Sig00000000) fs1 : VenHw(Unknown Device:80)/HD(Part1,Sig00000000) fs2 : VenHw(Unknown Device:FF)/CDROM(Entry1)/HD(Part1,Sig00000000) blk0 : VenHw(Unknown Device:00) blk1 : VenHw(Unknown Device:00)/HD(Part1,Sig00000000) blk2 : VenHw(Unknown Device:80) blk3 : VenHw(Unknown Device:80)/HD(Part1,Sig00000000) blk4 : VenHw(Unknown Device:80)/HD(Part2,Sig00000000) blk5 : VenHw(Unknown Device:80)/HD(Part3,Sig00000000) blk6 : VenHw(Unknown Device:80)/HD(Part3,Sig00000000)/HD(Part1,Sig725F7772) blk7 : VenHw(Unknown Device:FF) blk8 : VenHw(Unknown Device:FF)/CDROM(Entry1) blk9 : VenHw(Unknown Device:FF)/CDROM(Entry1)/HD(Part1,Sig00000000)
fs 开头的列表都是 EFI 可以读取的 FAT16 文件系统。所有以 blk 开头的列表都是 EFI 识别的块设备。文件系统和块设备按照探测的顺序列出。因此,fs0 是 LS-120 上的系统分区,fs1 是硬盘驱动器上的系统分区,fs2 是 CD-ROM 上的系统分区。
1.2.2. Itanium 系统 - EFI 系统分区
/boot/efi/ 的挂载点。此分区包含已安装的 Linux 内核以及 ELILO 配置文件(elilo.conf)。elilo.conf 文件包含可从中引导系统的内核列表。
第 2 章 开始使用的步骤
2.1. 升级或安装?
2.2. 您的硬件是否兼容?
http://hardware.redhat.com/hcl/
2.3. 您是否具有强大的磁盘空间?
/ 和 swap)。对于 Itanium 系统,至少有三个分区(/、/boot/efi/ 和 swap)必须专用于 Red Hat Enterprise Linux。
- 有足够的 unpartitioned[1] 用于安装 Red Hat Enterprise Linux 的磁盘空间,或者
- 具有可以删除的一个或多个分区,从而释放足够磁盘空间来安装 Red Hat Enterprise Linux。
2.4. 您能使用 CD-ROM 或者 DVD 进行安装?
- 在计算机的 CD 或者 DVD 刻录中插入一个空白的可写入 CD。在一些计算机上,会在您插入磁盘时打开窗口并显示各种选项。如果您看到如下所示的窗口,可查找启动您选择的光盘刻录程序的选项。如果没有看到这样的选项,请关闭窗口并手动启动该程序。
- 启动您的磁盘刻录程序。在某些计算机上,您可以通过右键单击(或右键单击)镜像文件并选择带有复制映像 到 CD 的标签的菜单选项来完成此操作,或者复制 CD 或者 DVD 映像。其他计算机可能为您提供了一个菜单选项,用于直接启动您选择的光盘刻录程序,也可以选择 with 之类的选项。如果您的计算机上没有可用的这些选项,请从桌面图标启动该程序,在 Windows 操作系统上的" "菜单或"Mac
Applications"文件夹中。 - 在未刻录程序中,选择 选项从镜像文件中刻录 CD。例如,在 Nero Burning ROM 中,此选项名为 ,它位于 菜单中。请注意,您可以使用特定 CD 刻录软件时跳过此步骤;例如,Mac OS X 上的 磁盘实用程序 不需要它。
- 浏览到您之前下载的磁盘映像文件,再选择它进行刻录。
- 单击启动刻录过程的按钮。
2.4.1. 备选引导方法
- 引导 DVD/CD-ROM
- 如果使用 DVD/CD-ROM 驱动器引导,您可以创建自己的 CD-ROM 来引导安装程序。这很有用,例如,如果您要通过网络或从硬盘驱动器执行安装。更多说明,请参阅 第 2.4.2 节 “生成安装启动 CD-ROM”。
- USB pen drive
- 您的系统固件必须支持从 USB 设备引导才能使这个引导方法正常工作。有关指定系统引导设备的详情,请参考硬件厂商文档。USB 设备可能无法如预期命名安装过程中配置分区和文件系统时,请确定验证 USB 设备的大小、名称和类型。为 USB 附加存储设备分配名称的顺序可能会有所不同,因为某些设备可能需要比其他设备更长的时间。因此,设备可能会收到与您所期望不同的名称,如
sdc而不是sda。- 提供 Red Hat Enterprise Linux 5 安装文件的副本。任一:
- 插入 Red Hat Enterprise Linux 5 安装 DVD 或者 CD-ROM#1。
- 挂载 Red Hat Enterprise Linux 5 安装 DVD 或者 CD-ROM#1 的镜像。
- 确保安装文件位于您系统可访问的网络位置,例如,在它可访问的 NFS 共享中。
- 将 USB 闪存驱动器附加到您的系统。以下步骤假定运行 Red Hat Enterprise Linux 5 的系统。
- 运行 dmesg 来标识驱动器的设备名称。如果在附加驱动器后立即运行 dmesg,设备名称会出现在最新输出中。例如,以下 dmesg 输出显示了接收设备名称
/dev/sdb的闪存驱动器:Initializing USB Mass Storage driver... scsi2 : SCSI emulation for USB Mass Storage devices usb-storage: device found at 5 usb-storage: waiting for device to settle before scanning usbcore: registered new driver usb-storage USB Mass Storage support registered. Vendor: USB 2.0 Model: Flash Disk Rev: 5.00 Type: Direct-Access ANSI SCSI revision: 02 SCSI device sdb: 2043904 512-byte hdwr sectors (1046 MB) sdb: Write Protect is off sdb: Mode Sense: 0b 00 00 08 sdb: assuming drive cache: write through SCSI device sdb: 2043904 512-byte hdwr sectors (1046 MB) sdb: Write Protect is off sdb: Mode Sense: 0b 00 00 08 sdb: assuming drive cache: write through sdb: sdb1 sd 2:0:0:0: Attached scsi removable disk sdb sd 2:0:0:0: Attached scsi generic sg1 type 0 usb-storage: device scan complete
- 卸载当前挂载的闪存驱动器中的任何分区。在附加闪存驱动器时,您的系统可能会自动挂载任何可用的分区。
- 使用 mount 命令查找该闪存驱动器上挂载的分区。例如,以下输出显示了挂载
/dev/sdb上的单个分区,名为/dev/sdb1的分区:$ mount /dev/mapper/VolGroup00-LogVol00 on / type ext3 (rw) proc on /proc type proc (rw) sysfs on /sys type sysfs (rw) devpts on /dev/pts type devpts (rw,gid=5,mode=620) tmpfs on /dev/shm type tmpfs (rw,rootcontext="system_u:object_r:tmpfs_t:s0") /dev/sda1 on /boot type ext3 (rw) none on /proc/sys/fs/binfmt_misc type binfmt_misc (rw) sunrpc on /var/lib/nfs/rpc_pipefs type rpc_pipefs (rw) /dev/sdb1 on /media/BOOTUSB type vfat (rw,nosuid,nodev,uid=500,utf8,shortname=mixed,flush)
- 使用 umount 命令卸载分区。例如,要卸载
/dev/sdb1,请运行:umount /dev/sdb1针对要挂载的闪存驱动器中的每个分区运行 umount。
- 使用 fdisk 将闪存驱动器分区为仅包含单个分区,使用以下参数:
- 数字编号为
1。 - 分区类型设置为
b(W95 FAT32)。 - 标记为 bootable。
- 运行 mkdosfs 将上一步中创建的分区格式化为 FAT。例如:
mkdosfs /dev/sdb1 - 挂载分区。例如:
mount /dev/sdb1 /mnt - 将安装 DVD 或 CD-ROM#1 的
isolinux/目录的内容复制到闪存驱动器中。 - 将配置文件从
isolinux.cfg重命名为syslinux.cfg。例如,如果将闪存驱动器挂载到/mnt上,请运行:cd /mnt/; mv isolinux.cfg syslinux.cfg- 如有必要,为您的特定环境编辑
syslinux.cfg。例如,要将安装配置为使用通过 NFS 共享的 kickstart 文件,请指定:linux ks=nfs:://ks.cfg
- 将安装 DVD 或 CD-ROM#1 中的
images/pxeboot/initrd.img文件复制到闪存驱动器。 - 卸载该闪存驱动器。例如:
umount /dev/sdb1 - 使 USB 闪存驱动器可引导。例如:
syslinux /dev/sdb1 - 再次挂载闪存驱动器。例如:
mount /dev/sdb1 /mnt - 在 USB 闪存驱动器中安装 GRUB 引导装载程序。例如:
grub-install --root-directory=/mnt /dev/sdb - 验证 USB 闪存驱动器是否具有 /boot/grub 目录。如果没有,请手动创建目录,例如:
mkdir -p /mnt/boot/grub - 在闪存驱动器上创建
boot/grub/grub.conf文件,如下所示:default=0 timeout=5 root (hd1,0) title Red Hat Enterprise Linux installer kernel /vmlinuz initrd /initrd.img
- 卸载该闪存驱动器。例如:
umount /dev/sdb1 - 分离 USB 闪存驱动器。
- 将 USB 磁盘附加到您要安装 Red Hat Enterprise Linux 的系统。
- 从 USB 闪存驱动器引导目标系统。
2.4.2. 生成安装启动 CD-ROM
isolinux/ 目录复制到临时目录中(称为 < ;path-to-workspace> ):
cp -r <path-to-cd>/isolinux/ <path-to-workspace>;path-to-workspace > 目录:
cd <path-to-workspace>
chmod u+w isolinux/*mkisofs -o file.iso -b isolinux.bin -c boot.cat -no-emul-boot \ -boot-load-size 4 -boot-info-table -R -J -v -T isolinux/
file.iso,位于 <path-to-workspace> )中刻录到 CD-ROM。
2.5. 准备网络安装
boot: 提示下键入以下命令(使用 elilo for Itanium 系统进行准备):
linux mediacheck/location/of/disk/space。通过 FTP、NFS 或 HTTP 公开提供的目录将指定为 /publicly/available/directory。例如,/location/of/disk/space 可能是一个您创建名为 /var/isos 的目录。对于 HTTP 安装,/publicly/available/directory 可能为 /var/www/html/rhel5。
- 使用以下命令(对于 DVD)从安装磁盘创建 iso 镜像:dd if=/dev/dvd of=/location/of/disk/space/RHEL5.iso其中 dvd 是指您的 DVD 驱动器设备。
2.5.1. 准备 FTP 和 HTTP 安装
RELEASE-NOTES 文件以及所有操作系统的 ISO 镜像中的所有文件。- 插入 CD-ROM 或 DVD-ROM。
- 挂载 /media/cdrom
- 如果要安装服务器变体,请运行 cp -a /media/cdrom/Server < target-directory>如果要安装客户端变体,请运行 cp -a /media/cdrom/Client < target-directory>
- cp /media/cdrom/RELEASE-NOTES* < ;target-directory>(仅限安装 CD 1 或 DVD)
- cp /media/cdrom/images & lt;target-directory& gt;(仅安装 CD 1 或 DVD)
- umount /media/cdrom
/publicly/available/directory 目录通过 FTP 或 HTTP 共享,并验证客户端访问。您可以检查该目录是否可从服务器本身访问,然后从您要安装到的同一子网上的另一台计算机访问。
2.5.2. 准备 NFS 安装
- 对于 DVD:mv /location/of/disk/space/RHEL5.iso /publicly/available/directory/
- 对于 CDROM:mv /location/of/disk/space/disk*.iso /publicly/available/directory/
/publicly/available/directory 目录通过 /etc/exports 中的条目通过 NFS 导出。
2.6. 准备硬盘安装
- 使用一组 CD-ROM 或 DVD - 从每个安装 CD-ROM 或 DVD 创建 ISO 镜像文件。对于每个 CD-ROM(对于 DVD 而言),在 Linux 系统中执行以下命令:
dd if=/dev/cdrom of=/tmp/file-name.iso - 使用 ISO 映像 - 将这些映像传输到要安装的系统。在开始安装前验证 ISO 镜像是否完好,有助于避免问题。要在执行安装前验证 ISO 镜像是否完好,请使用 md5sum 程序(many md5sum 程序可用于各种操作系统)。md5sum 程序应该与 ISO 镜像位于同一个 Linux 计算机上。
boot: 提示下键入以下命令(使用 elilo for Itanium 系统进行准备):
linux mediacheckupdates.img 的文件,它将用于对 anaconda 的更新,即安装程序。有关安装 Red Hat Enterprise Linux 的各种方法以及如何应用安装程序更新的详情,请参考 anaconda RPM 软件包中的 install-methods.txt。
第 3 章 系统规格列表
- 硬盘驱动器 : type、标签、大小;例如 IDE hda=40 GB
- 分区 :分区映射和挂载点;例如
/dev/hda1=/home、/dev/hda2=/(在知道它们所在的位置后填充) - 内存: 在您的系统中安装的 RAM 量 ; 例如 512 MB、1 GB
- CD-ROM :接口类型;如 SCSI、IDE(ATAPI)
- SCSI 适配器 :如果存在、生成和型号号;例如,BusLogic SCSI Adapter、daptec 2940UW
- 网卡 :如果存在、生成和型号号,如 Tulip、3COM 3C590
- 鼠标鼠标:键入、协议以及按钮号;例如,通用 3 按钮 PS/2 mouse、MouseMan 2 按钮串行鼠标
- monitor: make、model 和 manufacturer 规格;例如,Optiquest Q53, ViewSonic G773
- 视频卡 :使用模型数和 VRAM 大小;例如,Creative Labs Graphics Blaster 3D, 8MB
- S3 SonicVibes、sound Blaster 32/64 AWE(S3 SonicVibes、S3 SonicVibes、sound Blaster 32/64 AWE)
- IP、DHCP 和 BOOTP 地址
- netmask
- 网关 IP 地址
- 一个或多个名称服务器 IP 地址(DNS)
- 域名 :提供给您的机构的名称;例如
example.com - hostname :计算机的名称;您的个人选择的名称;例如,
cookie、southpark
第 4 章 在 Intel® 和 AMD 系统上安装
- 熟悉安装程序的用户界面
- 启动安装程序
- 选择安装方法
- 在安装过程中的配置步骤(语言、键盘、鼠标、分区等)
- 完成安装
4.1. 图形安装程序用户界面
boot: 提示下使用以下命令:
linux text
elilo linux text4.1.1. 关于虚拟控制台的注意事项
表 4.1. 控制台、密钥和内容
| console | keystrokes | 内容 |
|---|---|---|
| 1 | ctrl+alt+f1 | 安装对话框 |
| 2 | ctrl+alt+f2 | shell 提示符 |
| 3 | ctrl+alt+f3 | 安装日志(来自安装程序的messages) |
| 4 | ctrl+alt+f4 | 与系统相关的信息 |
| 5 | ctrl+alt+f5 | 其他信息 |
| 6 | ctrl+alt+f6 | x 图形显示 |
4.2. 安装过程中的截屏
/root/anaconda-screenshots。
autostep --autoscreenshot 选项生成安装每个步骤的截图。有关配置 Kickstart 文件的详情,请参考 第 31.3 节 “创建 Kickstart 文件”。
4.3. 文本模式安装程序用户界面
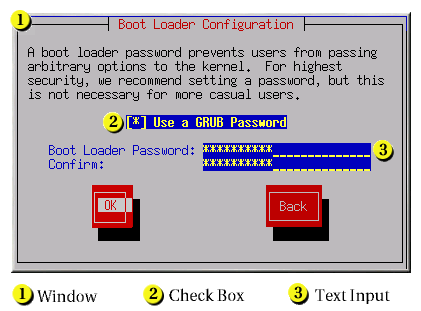
图 4.1. 安装程序 小部件配置
[D]
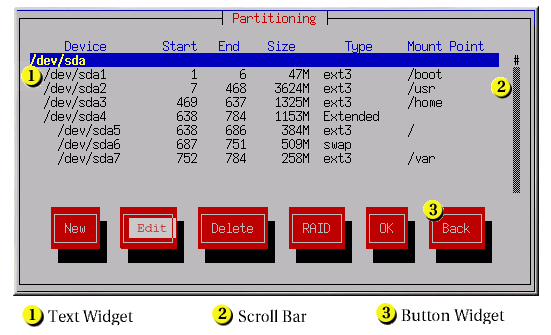
图 4.2. 安装程序小部件,如 Disk Druid所示
[D]
- 窗口 - Windows(通常在本手册中作为 对话框 )在安装过程中显示在您的屏幕上。有时候,一个窗口可能会相互覆盖;在这些情况下,您只能与顶部的窗口进行交互。在该窗口中完成后,它会消失,允许您在下面的窗口中继续工作。
- 复选框 - Checkboxes 允许您选择或取消选择某个功能。框显示一个星号(选择)或空格(未选择)。当光标处于复选框中时,按 空格来 选择或取消选择功能。
- 文本输入 - 文本输入行是您可以输入安装程序所需的信息的区域。当光标停留在文本输入行中时,您可以输入和/或编辑该行的信息。
- text Widget - 文本小部件是显示文本的屏幕区域。有时候,文本小部件也可以包含其他小部件,如复选框。如果文本小部件包含的信息比保留空间多,则会出现一个滚动条;如果您将光标定位到文本小部件中,您可以使用 Up 和 Down 箭头键滚动浏览所有可用信息。通过 # 字符在滚动栏中显示您的当前位置,该字符在滚动时向上和向下滚动条。
- 滚动条 - Scroll bars 显示在窗口侧或底部,以控制列表或文档的主机当前位于窗口的框中。通过滚动条,您可以轻松地移动到文件的任意部分。
- 按钮小部件 - Button widgets 是与安装程序交互的主要方法。您可以使用 Tab 和 Enter 键浏览安装程序的窗口,浏览这些按钮。在突出显示按钮时可以选择按钮。
- 光标 - 虽然不是小部件,但光标用于选择(并与之交互)特定小部件。由于光标从小部件移到小部件,可能会导致小部件更改颜色,或者光标本身可能仅出现在小部件或旁边。
4.3.1. 使用键盘来 Navigate
4.4. 启动安装程序
4.4.1. 在 x86、AMD64 和 Intel® 64 系统中引导安装程序
- Red Hat Enterprise Linux DVD/CD-ROM - 您的机器支持可引导 DVD/CD-ROM 驱动器,且您有 Red Hat Enterprise Linux CD-ROM 设置或 DVD。
- 引导 CD-ROM - 您的计算机支持可引导 CD-ROM 驱动器,而您希望执行网络或者硬盘安装。
- USB pen drive - 您的计算机支持从 USB 设备引导。
- 通过网络进行 PXE 引导 - 您的机器支持从网络启动。这是高级安装路径。有关这个方法的详情,请参考 第 34 章 。
boot: 提示符的屏幕。屏幕中包含各种引导选项的信息。每个引导选项也关联有一个或多个帮助屏幕。要访问帮助屏幕,请按屏幕底部所列的相应功能键。
- 出现
boot:提示符后,如果您首次没有操作,安装程序会自动启动。要禁用此功能,请按其中一个帮助屏幕功能键。 - 如果您按下 help screen 功能键,在帮助屏幕从引导介质读取时有一个小的延迟。
4.4.2. 在 Itanium 系统中引导安装程序
4.4.2.1. 从 DVD/CD-ROM 引导安装程序
- 删除除 Red Hat Enterprise Linux CD #1 之外的所有介质。
- 在 菜单中,选择 。
- 在
Shell>提示中,切换到 CD-ROM 的文件系统。例如,在上例 映射 输出中,CD-ROM 上的系统分区是fs1。要更改为fs1文件系统,请在提示符下键入 fs1:。 - 键入 elilo Linux 以引导至安装程序。
- 进入 第 4 章 在 Intel® 和 AMD 系统上安装 以开始安装。
4.4.2.2. 从 LS-120 Diskette 引导安装程序
images/boot.img 上的引导镜像文件创建 LS-120 引导镜像文件 diskette。要在 Linux 中创建此 diskette,插入一个空白的 LS-120 diskette,并在 shell 提示符下键入以下命令:
dd if=boot.img of=/dev/hda bs=180k/dev/hda
- 插入从引导镜像文件
boot.img中创建的 LS-120 diskette。如果您要执行本地 CD-ROM 安装,但从 LS-120 diskette 中引导,请插入 Red Hat Enterprise Linux CD #1。如果您要执行硬盘、NFS、FTP 或 HTTP 安装,则不需要 CD-ROM。 - 在 菜单中,选择 。
- 在
Shell>提示中,键入命令 fs0:,使用上面映射输出的示例 映射 输出,将设备更改为 LS-120 驱动器。 - 键入 elilo Linux 以引导至安装程序。
- 进入 第 4 章 在 Intel® 和 AMD 系统上安装 以开始安装。
4.4.3. 其他引导选项
elilo linux optionlinux textlinux mediacheck安装程序会提示您插入 CD 或选择要测试的 ISO 镜像,然后选择 来执行校验和操作。这个 checksum 操作可以在任何 Red Hat Enterprise Linux CD 上执行,且不需要按照特定顺序执行(例如,CD #1 不需要是您验证的第一个 CD)。强烈建议您在从下载的 ISO 镜像中创建的任何 Red Hat Enterprise Linux CD 上执行此操作。这个命令与 CD、DVD、硬盘 ISO 和 NFS ISO 安装方法一起工作。linux console=<device>对于文本模式安装,请使用:linux text console=<device>在以上命令中,& lt;device > 应该是您使用的设备(如 ttyS0 或 ttyS1)。例如,linux 文本 console=ttyS0。当终端支持 UTF-8 时,使用串行终端的文本模式安装效果最佳。在 UNIX 和 Linux 下,Kermit 支持 UTF-8。对于 Windows,Kermit '95 可以正常工作。非 UTF-8 功能的终端可以正常工作,只要在安装过程中使用英语。通过将 utf8 命令作为安装程序的引导时选项传递一个增强的串行显示,可以使用增强的串行显示。例如:linux console=ttyS0 utf8
4.4.3.1. 内核选项
linux updates
linux text updates4.5. 选择安装方法
- DVD/CD-ROM
- 如果您有一个 DVD/CD-ROM 驱动器以及 Red Hat Enterprise Linux CD-ROM 或者 DVD,您可以使用这个方法。有关 DVD/CD-ROM 安装说明,请参阅 第 4.6 节 “从 DVD/CD-ROM 安装”。
- 硬盘驱动器
- 如果您已将 Red Hat Enterprise Linux ISO 镜像复制到本地硬盘中,您可以使用这个方法。您需要一个引导 CD-ROM(使用 linux askmethod 引导选项)。有关硬盘安装说明,请参阅 第 4.7 节 “使用硬盘安装”。
- NFS
- 如果您使用 ISO 镜像或 Red Hat Enterprise Linux 的镜像从 NFS 服务器安装,您可以使用这个方法。您需要一个引导 CD-ROM(使用 linux askmethod 引导选项)。有关网络安装说明,请参阅 第 4.9 节 “通过 NFS 安装”。请注意,NFS 安装也可以在 GUI 模式中执行。
- FTP
- 如果您要直接从 FTP 服务器安装,请使用此方法。您需要一个引导 CD-ROM(使用 linux askmethod 引导选项)。有关 FTP 安装说明,请参阅 第 4.10 节 “通过 FTP 安装”。
- HTTP
- 如果您要直接从 HTTP(Web)服务器安装,请使用此方法。您需要一个引导 CD-ROM(使用 linux askmethod 引导选项)。有关 HTTP 安装说明,请参阅 第 4.11 节 “通过 HTTP 安装”。
4.6. 从 DVD/CD-ROM 安装
4.7. 使用硬盘安装
askmethod 引导选项并选择了 )。通过此对话框,您可以为安装 Red Hat Enterprise Linux 的磁盘分区和目录命名。如果您使用 repo=hd 引导选项,则代表您已指定了一个分区。
图 4.3. 为硬盘安装选择分区对话框

[D]
/。如果 ISO 镜像位于挂载分区的子目录中,输入该分区中包含 ISO 镜像的目录名称。例如,如果 ISO 镜像所在的分区通常挂载为 /home/,并且镜像位于 /home/new/ 中,您将输入 /new/。
4.8. 执行网络安装
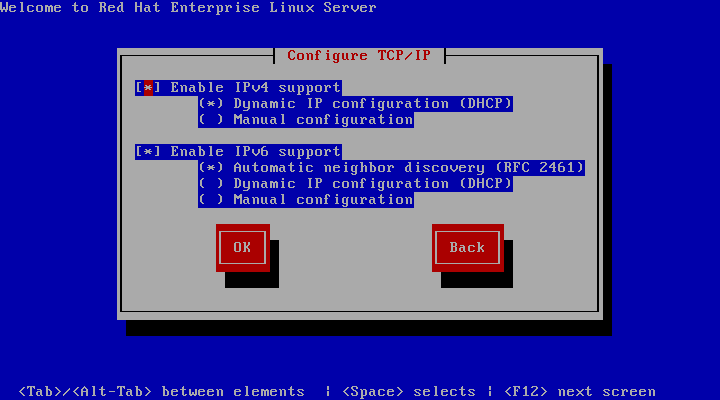
askmethod 引导选项引导,则会出现 Configure TCP/IP 对话框。此对话框询问您的 IP 和其他网络地址。您可以选择通过 DHCP 配置设备的 IP 地址和子网掩码,或者手动配置。如果手动,您可以选择输入 IPv4 和/或 IPv6 信息。输入安装过程中使用的 IP 地址,然后按 Enter 键。请注意,如果您需要执行 NFS 安装,则需要提供 IPv4 信息。
图 4.4. TCP/IP 配置
[D]
4.9. 通过 NFS 安装
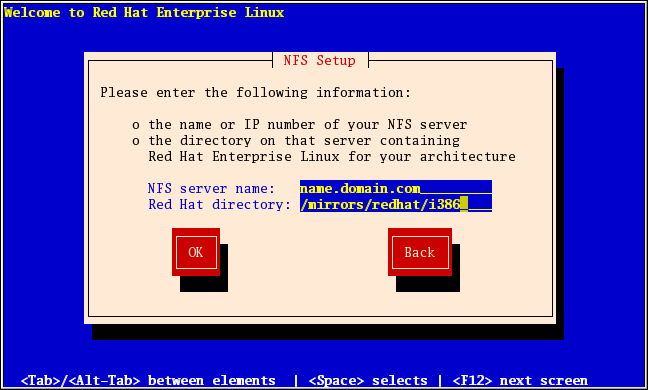
example.com 中的名为 eastcoast.com 的主机安装,请在 NFS 服务器 字段中输入 eastcoast.example.com。
/export/directory/。
图 4.5. NFS Setup 对话框
[D]
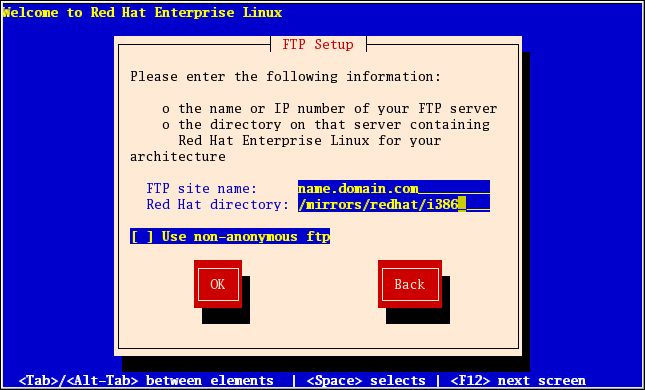
4.10. 通过 FTP 安装
askmethod 引导选项并选择了 )。通过此对话框,您可以识别要从中安装 Red Hat Enterprise Linux 的 FTP 服务器。如果您使用 repo=ftp 引导选项,则代表您已指定了一个服务器和路径。
图 4.6. FTP Setup Dialog
[D]
/ 目录的目录的名称。例如,如果 FTP 站点包含目录 /mirrors/redhat/arch/ variant ;/,输入 /mirrors/redhat/arch/ (其中 arch 替换为您系统的架构类型,如 i386、ia64、ppc 或 s390x,变体是您要安装的变量,如客户端、服务器、工作站等)。如果一切正确指定,则会出现一个消息框,指示正在从服务器检索文件。
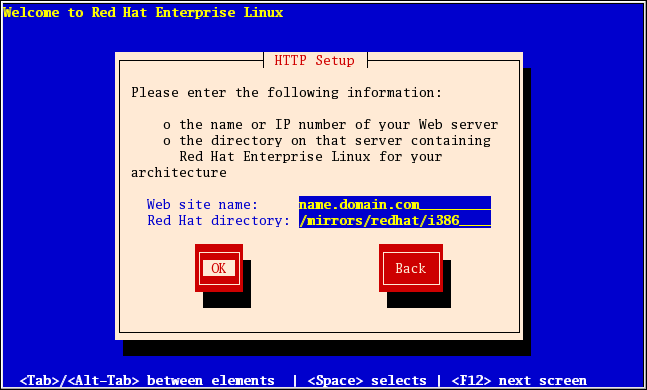
4.11. 通过 HTTP 安装
askmethod 引导选项并在 安装方法 对话框中选择了 )时,才会应用 HTTP 对话框。此对话框提示您输入从中安装 Red Hat Enterprise Linux 的 HTTP 服务器的信息。如果您使用 repo=http 引导选项,则代表您已指定了一个服务器和路径。
/ 目录的名称。例如,如果 HTTP 站点包含目录 /mirrors/redhat/arch/,请输入 /mirrors/redhat/arch/ (其中 arch 替换为系统的架构类型,如 i386、ia64、ppc 或 s390x,变体 是您要安装的变体,如客户端、服务器、工作站等)。如果一切正确指定,则会出现一个消息框,指示正在从服务器检索文件。
图 4.7. HTTP Setup Dialog
[D]
4.12. 欢迎使用 Red Hat Enterprise Linux

[D]
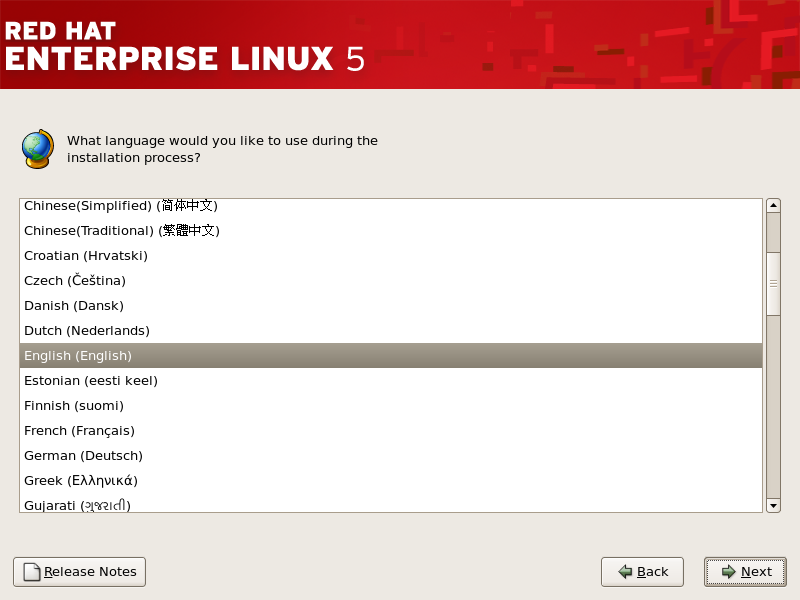
4.13. 语言选择
图 4.8. 语言选择
[D]
4.14. 键盘配置
图 4.9. 键盘配置

[D]
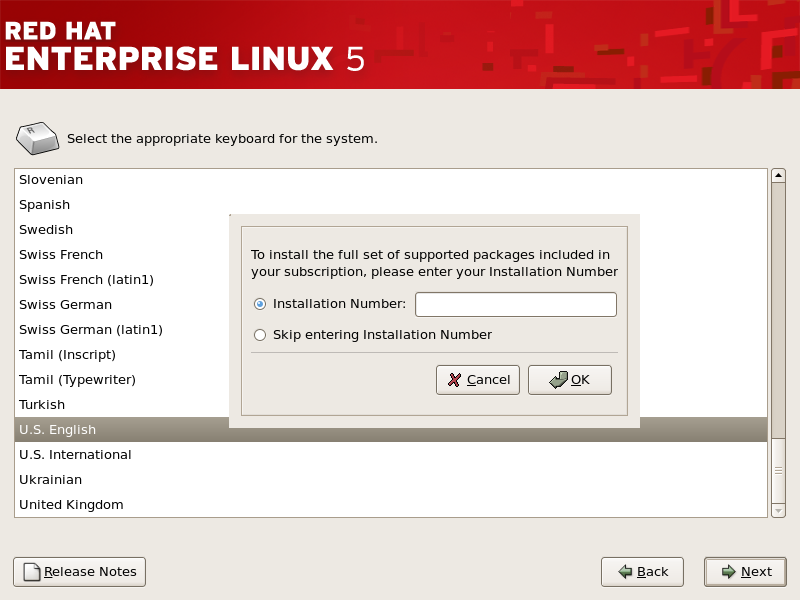
4.15. 输入安装号
图 4.10. 安装号
[D]
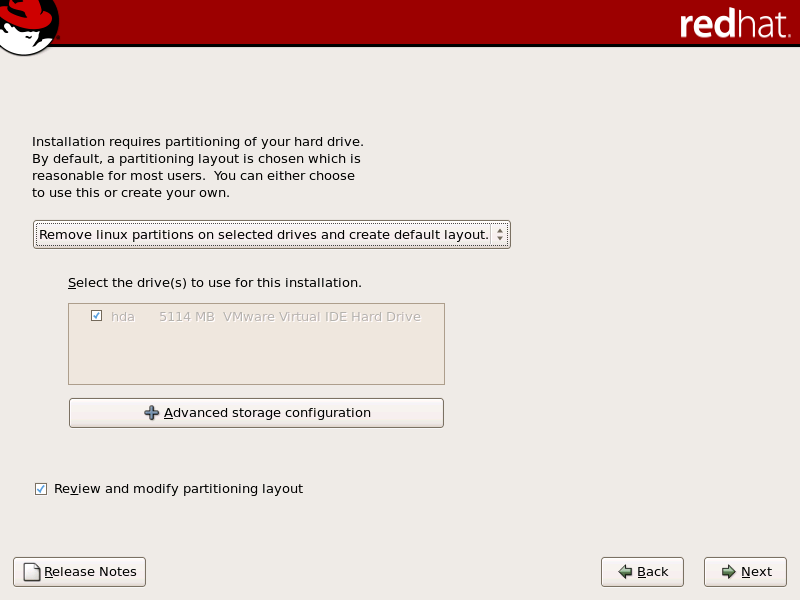
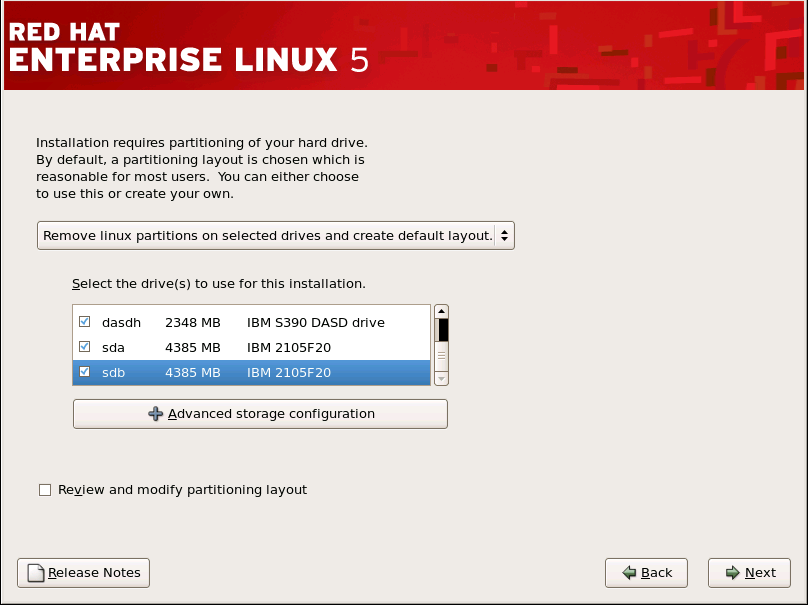
4.16. 磁盘分区设置
/var/cache/yum/。如果您手动为系统分区并创建独立 /var/ 分区,请务必创建足够大的分区(3.0 GB 或更多)来下载软件包更新。
图 4.11. 磁盘分区设置
[D]
mapper/mpath 的设备。
4.17. 高级存储选项
图 4.12. 高级存储选项
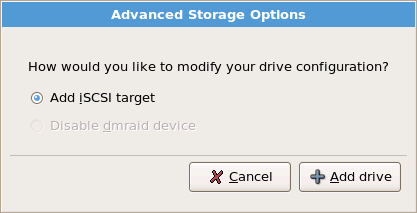
[D]
图 4.13. 启用网络接口
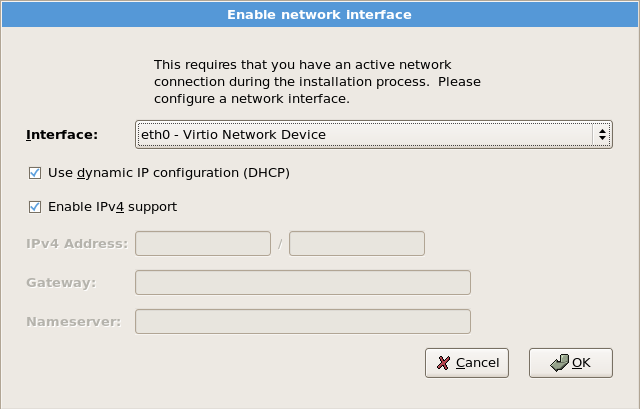
[D]
图 4.14. 配置 ISCSI 参数
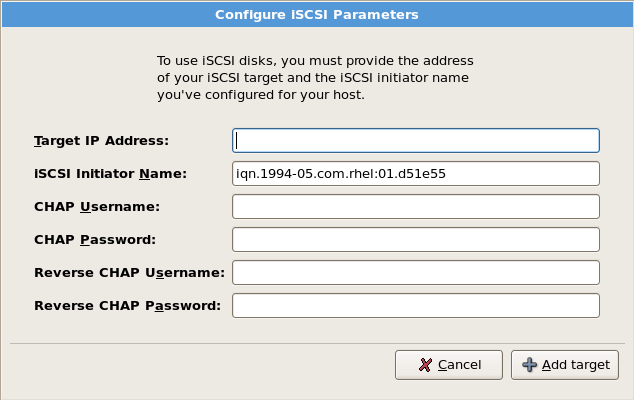
[D]
4.18. 创建默认布局
- 删除所选驱动器中的所有分区并创建默认布局 - 选择这个选项以删除硬盘中的所有分区(其中包括由其它操作系统创建的分区,如 Windows VFAT 或 NTFS 分区)。警告如果您选择这个选项,安装程序会删除所选硬盘中的所有数据。如果您有要保留在要安装 Red Hat Enterprise Linux 的硬盘上的信息,则不要选择这个选项。
- 在所选驱动器中删除 Linux 分区并创建默认布局 - 选择这个选项只删除 Linux 分区(从之前的 Linux 安装中创建的分区)。这不会删除您可能位于硬盘上的其他分区(如 VFAT 或 FAT32 分区)。
- 在所选驱动器上使用可用空间并创建默认布局 - 选择这个选项来保留您当前的数据和分区,假设您在硬盘上有足够的可用空间。
图 4.15. 创建默认布局

[D]
/boot/ 分区必须在 RAID 阵列之外被创建,比如在一个单独的硬盘驱动器上创建。对于有有问题的 RAID 卡的分区创建,需要使用内部硬盘驱动器。
/boot/ 分区。
/boot/ 分区。
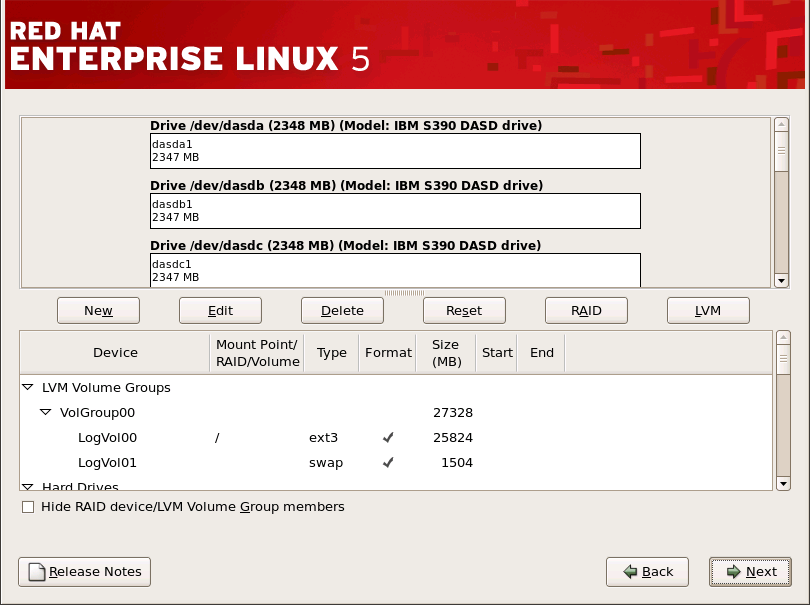
4.19. 对您的系统进行分区
/boot/efi/ 分区,以及类型为 FAT(VFAT)、至少 512 MB 的交换分区,以及适当化的根(/)分区。
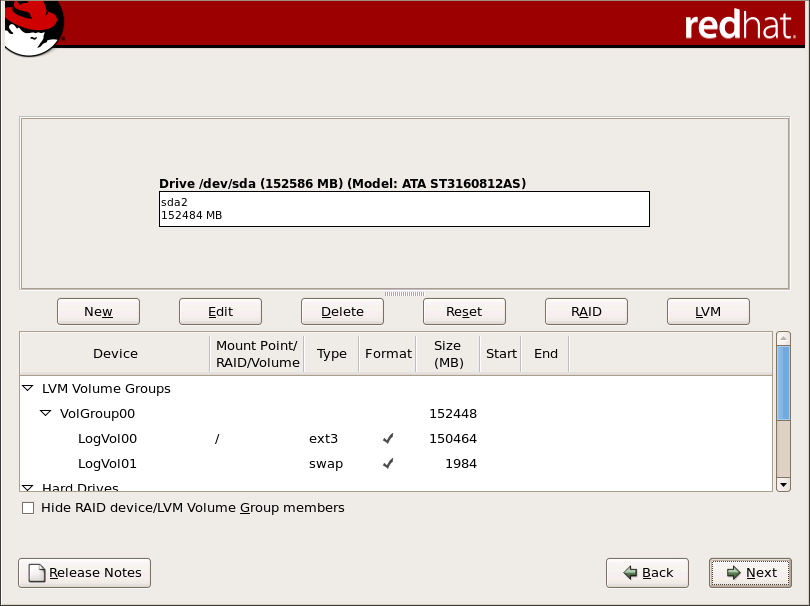
图 4.16. 在 x86、AMD64 和 Intel® 64 系统中使用 Disk Druid 进行分区
[D]
4.19.1. 图形显示硬盘.
4.19.2. disk Druid 's Buttons
- : 用于请求新分区。选择后,会出现一个对话框,其中包含必须填写的字段(如挂载点和大小字段)。
- :用来修改分区部分中当前选择 的分区 的属性。选择 将打开一个对话框。根据分区信息是否已写入磁盘,可以编辑某些或所有字段。您也可以按照图形显示中所示编辑可用空间,以便在该空间内创建新分区。突出显示可用空间,然后选择" "按钮,或者双击该可用空间进行编辑。
- 要制作 RAID 设备,您必须首先创建(或重复使用现有)软件 RAID 分区。创建两个或多个软件 RAID 分区后,选择 将软件 RAID 分区加入到 RAID 设备中。
- :用来删除当前突出显示的分区,在 Current Disk Partitions 部分中。系统将要求您确认删除任何分区。
- :用于将 Disk Druid 恢复到其原始状态。如果您 分区,则进行的所有更改都将丢失。
- :用来为任何或所有磁盘分区提供冗余。只有在您有使用 RAID 体验时才应使用。有关 RAID 的详情,请查看 Red Hat Enterprise Linux 部署指南。要制作 RAID 设备,您必须首先创建软件 RAID 分区。创建两个或多个软件 RAID 分区后,选择 将软件 RAID 分区加入到 RAID 设备中。
- :允许您创建 LVM 逻辑卷。LVM(逻辑卷管理器)的角色是显示底层物理存储空间的简单逻辑视图,如硬盘驱动器。LVM 管理单个物理磁盘 - 或者更精确,其中存在单个分区。只有在您有使用 LVM 体验时才应使用。有关 LVM 的详情,请查看 Red Hat Enterprise Linux 部署指南。请注意,LVM 只在图形安装程序中可用。要创建 LVM 逻辑卷,您必须首先创建类型为物理卷(LVM)的分区。创建一个或多个物理卷(LVM)分区后,选择 来创建 LVM 逻辑卷。
4.19.3. 分区字段
- 设备 :此字段显示分区的设备名称。
- 挂载点/RAID/Volume :挂载点是存在卷的目录层次结构中的位置;该卷在这个位置上"挂载"。此字段表示分区挂载位置。如果分区存在,但未设置,则需要定义其挂载点。双击 分区或 。
- 键入 :此字段显示分区的文件系统类型(例如:ext2、ext3 或 vfat)。
- 格式 :此字段显示创建的分区是否将被格式化。
- 大小(MB) :此字段显示分区的大小(以 MB 为单位)。
- 启动 :此字段显示在分区开始的硬盘上的柱面。
- 结束 :此字段显示在分区结束的硬盘上的柱面。
4.19.4. 推荐的分区方案
4.19.4.1. Itanium 系统
/boot/efi/partition(最小 100 MB)- 挂载在/boot/efi/中的分区,包含所有安装的内核、initrd 镜像和 ELILO 配置文件。警告您必须创建类型为 VFAT 的/boot/efi/分区,且大小至少为 100 MB,作为第一个主分区。- 交换分区(至少 256 MB)- 交换分区用于支持虚拟内存。换句话说,当内存不足以贮存系统正在处理的数据时,数据就会被写入 swap 分区。过去数年,推荐的 swap 空间会随系统中的 RAM 量增加而线性增大。但是,由于现代系统中的内存量已增加到成百 GB,因此现在意识到系统需要的交换空间量是该系统中运行的内存工作负载的功能。但是,由于交换空间通常在安装时指定,并且难以确定系统的内存工作负载,我们建议使用下表确定系统交换。
表 4.2. 推荐的系统交换空间
系统中 RAM 量 推荐的交换空间挂载 4GB RAM 或更少 至少 2GB 交换空间 4GB 到 16GB RAM 至少 4GB 交换空间 16GB 到 64GB RAM 至少 8GB 交换空间 64GB 到 256GB RAM 至少 16GB 交换空间 256GB 到 512GB RAM 至少 32GB 交换空间 请注意,您可以通过在多个存储设备间分布 swap 空间来获得更好的性能,特别是对于使用快速驱动器、控制器和接口的系统。 - root 分区(3.0 GB - 5.0 GB)- 这是"/"(根目录)所在的位置。
在这个设置中,所有文件(存储在/boot/efi中的 )均位于 root 分区中。3.0 GB 分区允许您最小安装,而 5.0 GB root 分区可让您执行完整安装,选择所有软件包组。
4.19.4.2. x86、AMD64 和 Intel® 64 系统
- 交换分区(至少 256 MB)- 交换分区用于支持虚拟内存。换句话说,当内存不足以贮存系统正在处理的数据时,数据就会被写入 swap 分区。过去数年,推荐的 swap 空间会随系统中的 RAM 量增加而线性增大。但是,由于现代系统中的内存量已增加到成百 GB,因此现在意识到系统需要的交换空间量是该系统中运行的内存工作负载的功能。但是,由于交换空间通常在安装时指定,并且难以确定系统的内存工作负载,我们建议使用下表确定系统交换。
表 4.3. 推荐的系统交换空间
系统中 RAM 量 推荐的交换空间挂载 4GB RAM 或更少 至少 2GB 交换空间 4GB 到 16GB RAM 至少 4GB 交换空间 16GB 到 64GB RAM 至少 8GB 交换空间 64GB 到 256GB RAM 至少 16GB 交换空间 256GB 到 512GB RAM 至少 32GB 交换空间 请注意,您可以通过在多个存储设备间分布 swap 空间来获得更好的性能,特别是对于使用快速驱动器、控制器和接口的系统。 - 一个
/boot/partition(250 MB)- 挂载在/boot/上的分区包含操作系统内核(允许您的系统引导 Red Hat Enterprise Linux),以及 bootstrap 过程中使用的文件。由于限制,需要创建一个原生 ext3 分区来容纳这些文件。对于大多数用户,一个 250 MB 的引导分区就足够了。备注如果您的硬盘驱动器超过 1024 个柱面(并且您的系统已经生成了两年以上),那么如果您希望/(root)分区使用您的硬盘中的所有剩余空间,则可能需要创建/boot/分区。备注如果您有一个 RAID 卡,请注意有些 BIOS 不支持从 RAID 卡引导。在这种情况下,/boot/分区必须在 RAID 阵列之外被创建,比如在一个单独的硬盘驱动器上创建。 root分区(3.0 GB - 5.0 GB)- 这是"/"(根目录)所在的位置。在此设置中,所有文件(存储在/boot中的除外)都位于 root 分区上。3.0 GB 分区允许您最小安装,而 5.0 GB root 分区可让您执行完整安装,选择所有软件包组。主目录(至少 100 MB) - 用于独立于系统数据存储用户数据。这将是卷组中/home目录的专用分区。这可让您在不删除用户数据文件的情况下升级或重新安装 Red Hat Enterprise Linux。
/var 放置到网络存储中 /var /var,/var 目录包含在建立网络服务前必须读取或写入的关键数据。
/var/spool、/var/www 或其他子目录,而不仅仅是完整的 /var 文件系统。
4.19.5. 添加分区
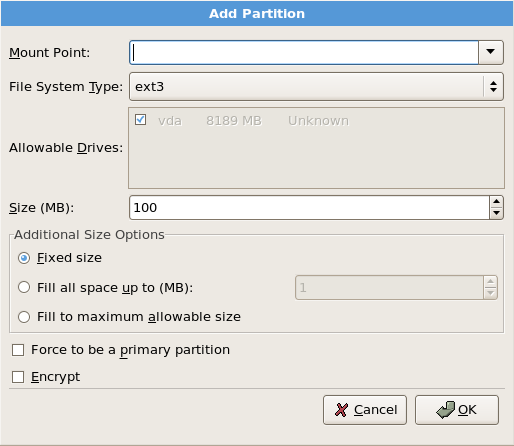
图 4.17. 创建新分区
[D]
- 挂载点 :输入分区的挂载点。例如:如果此分区应该是 root 分区,输入
/;在/boot分区中输入/boot,以此类推。您还可以使用下拉菜单为您的分区选择正确的挂载点。对于交换分区,不应设置挂载点 - 将文件系统类型设置为 swap 就足够了。 - 文件系统类型 : 使用下拉菜单为这个分区选择适当的文件系统类型。有关文件系统类型的详情,请参考 第 4.19.5.1 节 “文件系统类型”。
- 允许驱动器 :此字段包含系统上安装的硬盘的列表。如果突出显示了硬盘的框,则可以在该硬盘上创建所需的分区。如果没有 选中框,则 永远不会 在该硬盘上创建该分区。使用不同的复选框设置,您可以有需要它们的 磁盘 Druid 分区,或者让 Disk Druid 决定分区应前往的位置。
- 大小(MB) :输入分区的大小(以 MB 为单位)。请注意,此字段以 100 MB 开头;除非有更改,否则仅创建 100 MB 分区。
- 其它大小选项 :选择是否将该分区保持固定大小,以允许其"浏览"(填充可用硬盘驱动器空间)到某个点,还是允许它增加任何剩余硬盘可用。如果选择 Fill all space up(MB),则必须为此选项右侧的字段指定大小限制。这可让您在硬盘上保留特定数量的空间供以后使用。
- 强制成为主分区 :选择您所创建的分区应该是硬盘上的前四个分区之一。如果没有选中,则该分区被创建为逻辑分区。如需更多信息,请参阅 第 26.1.3 节 “分区内的分区 - 扩展分区概述”。
- 加密 :选择是否对分区进行加密,无需密语即可访问保存的数据,即使存储设备连接到另一个系统。有关存储设备加密的详情,请参考 第 29 章 磁盘加密指南。如果您选择这个选项,安装程序会提示您在将分区写入磁盘前提供密码短语。
- : 设置并想创建分区后,请选择"确定"。
- :如果您不想创建分区,请选择 。
4.19.5.1. 文件系统类型
- ext3 - ext3 文件系统基于 ext2 文件系统,它有一个主要优点 - 日志。使用日志记录文件系统可减少崩溃后恢复文件系统的时间,因为不需要 fsck [2] 文件系统。ext3 支持最多 16TB 的文件系统。ext3 文件系统会被默认选择,强烈建议使用。
- ext2 - ext2 文件系统支持标准 Unix 文件类型(普通文件、目录、符号链接等)。它允许分配长文件名,最多 255 个字符。
- 物理卷(LVM) - 创建一个或多个物理卷(LVM)分区允许您创建 LVM 逻辑卷。使用物理磁盘时 LVM 可以提高性能。有关 LVM 的详情,请查看 Red Hat Enterprise Linux 部署指南。
- 软件 RAID - 创建两个或多个软件 RAID 分区允许您创建 RAID 设备。有关 RAID 的详情,请参考 Red Hat Enterprise Linux 部署指南中的 RAID(独立 磁盘阵列)。
- swap - 交换分区用于支持虚拟内存。换句话说,当内存不足以贮存系统正在处理的数据时,数据就会被写入 swap 分区。如需更多信息,请参阅 Red Hat Enterprise Linux 部署指南。
- vfat - VFAT 文件系统是一个 Linux 文件系统,与 FAT 文件系统中的 Microsoft Windows 长文件名兼容。此文件系统必须用于 Itanium 系统上的
/boot/efi/分区。
4.19.6. 编辑分区
4.19.7. 删除分区
4.20. x86、AMD64 和 Intel® 64 Boot Loader 配置
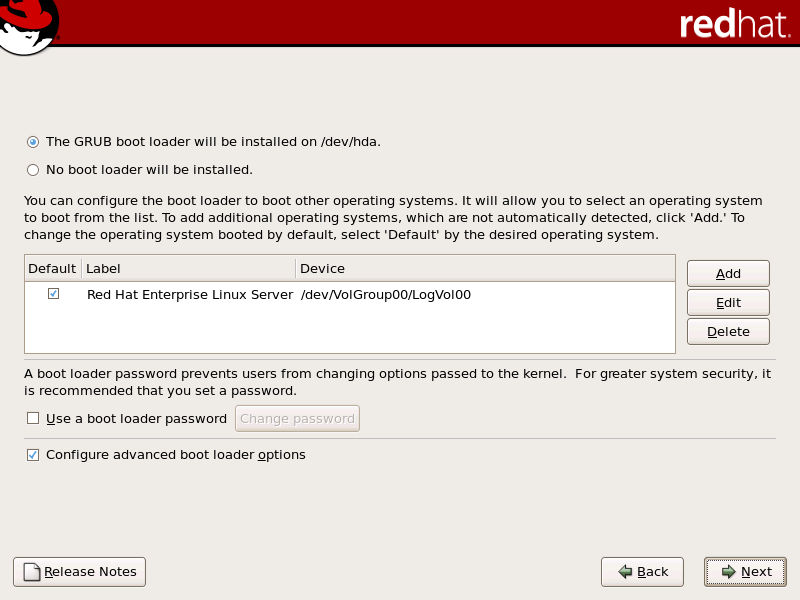
图 4.18. 引导装载程序配置
[D]
Red Hat Enterprise Linux (针对 GRUB)的标签。其他分区也可能具有引导标签。要为安装程序检测到的其他分区添加或更改引导标签,请在分区上点一次进行选择。选择后,您可以点击 按钮更改引导标签。
4.20.1. 高级 Boot Loader 配置
- 主引导记录(MBR)- 这是安装引导装载程序的推荐位置,除非 MBR 已经启动另一个操作系统加载程序,如 System Commander。MBR 是您计算机 BIOS 自动加载硬盘驱动器上的特殊区域,是引导装载程序可以控制启动过程的最早点。如果在 MBR 中进行安装,计算机引导时,GRUB 会显示启动提示符。然后您可以引导 Red Hat Enterprise Linux 或您将引导装载程序配置为引导的任何其他操作系统。
图 4.19. 引导装载程序安装

[D]
/boot/ 分区相同的驱动器的 MBR 中。
/boot/ 分区的 1024 个柱面限制。如果您有一个支持在 1024 cylinder 限制之上引导操作系统的 LBA32 扩展的系统,并且您想要将 /boot/ 分区放到cylinder 1024 以上,您应选择此选项。
/boot Linux 分区留出足够的空间以启动 Linux。其他 Linux 分区可以在柱面 1024 之后。
http://www.pcguide.com/ref/hdd/bios/sizeMB504-c.html
/dev/mapper/mpath0 的 MBR 中安装 GRUB。
4.20.2. 救援模式
- 使用 CD-ROM 引导 x86、AMD64 或者 Intel® 64 系统,在安装引导提示符下输入
linux rescue。Itanium 用户应该输入elilo linux rescue进入救援模式。
4.20.3. 备用 Boot Loaders
- LOADLIN
- 您可以从 MS-DOS 加载 Linux。不幸的是,这需要 Linux 内核(以及初始 RAM 磁盘)在 MS-DOS 分区中可用。达到此目的的唯一方式是使用某种其他方法(例如,从引导 CD-ROM)引导您的 Red Hat Enterprise Linux 系统,然后将内核复制到 MS-DOS 分区。LOADLIN 可通过及相关的镜像站点。
- SYSLINUX
- SYSLINUX 是 MS-DOS 程序与 LOADLIN 非常相似。它还可从及相关的镜像站点。
- 商业引导装载程序
- 您可以使用商业引导装载程序载入 Linux。例如,System Commander 和 partition Magic 可以引导 Linux(但仍然需要在 Linux root 分区中安装 GRUB)。
4.20.4. SMP Motherboards 和 GRUB
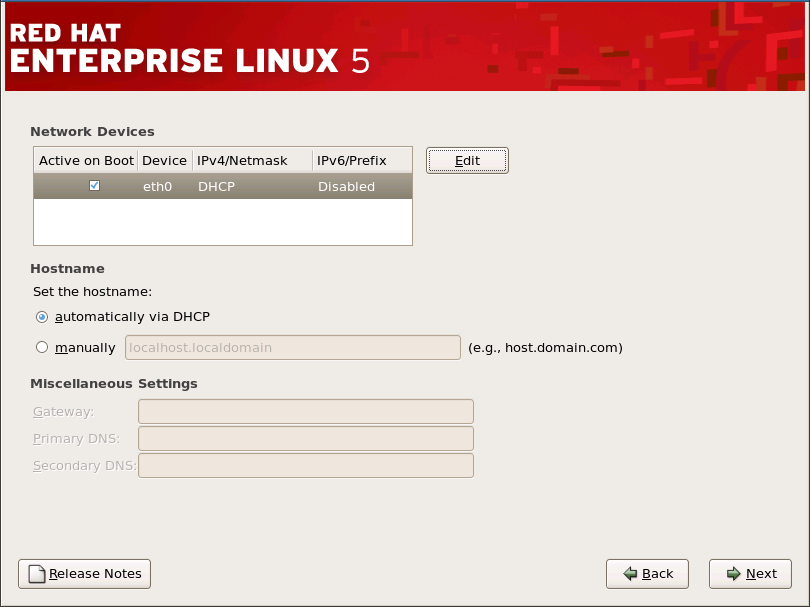
4.21. 网络配置
图 4.20. 网络配置

[D]
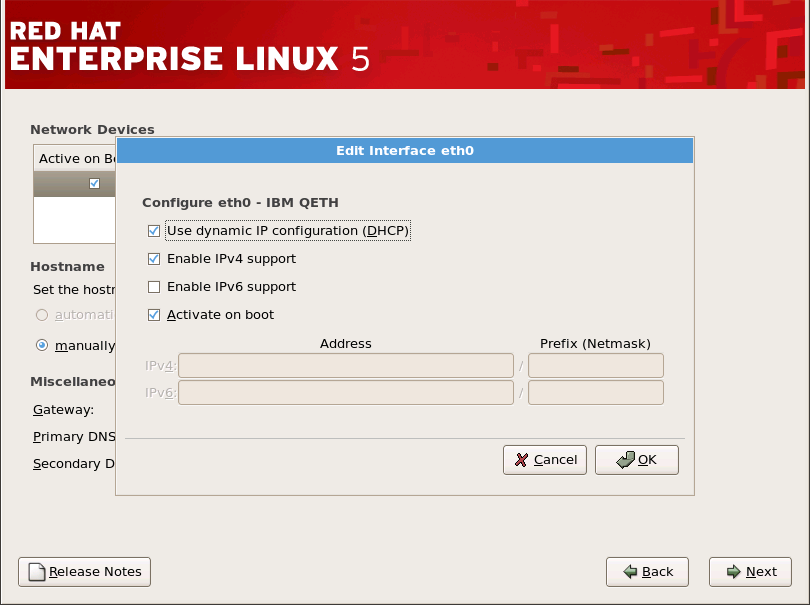
图 4.21. 编辑网络设备
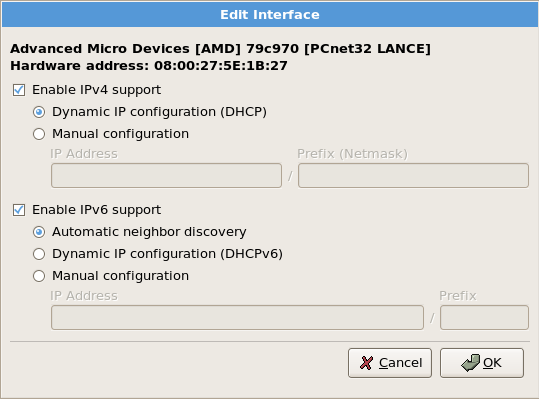
[D]
localhost。
4.22. 时区配置
- 使用您的鼠标,单击交互地图来选择特定的城市(以黄色点表示)。此时会出现一个红色 X 来代表您的选择。
- 您还可以滚动屏幕底部的列表来选择您的时区。使用鼠标,单击位置以突出显示您的选择。
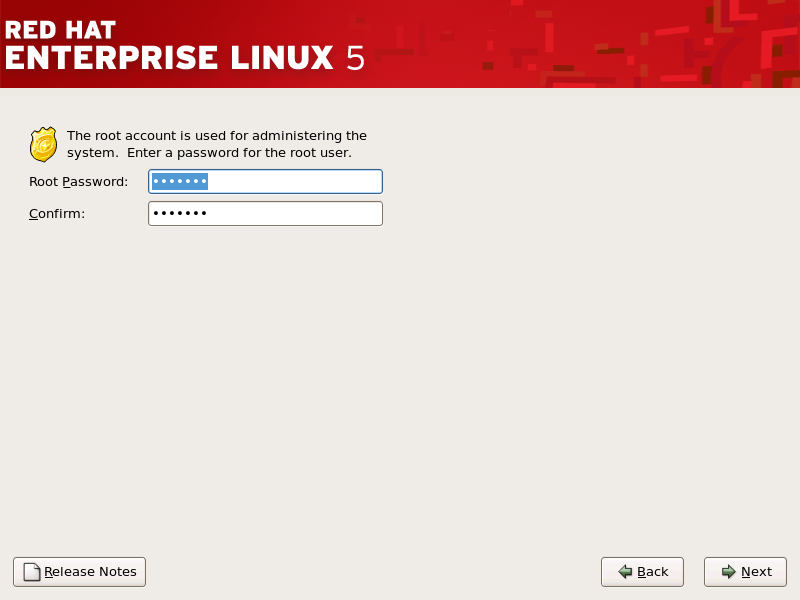
4.23. 设置 Root 密码
图 4.22. Root 密码
[D]
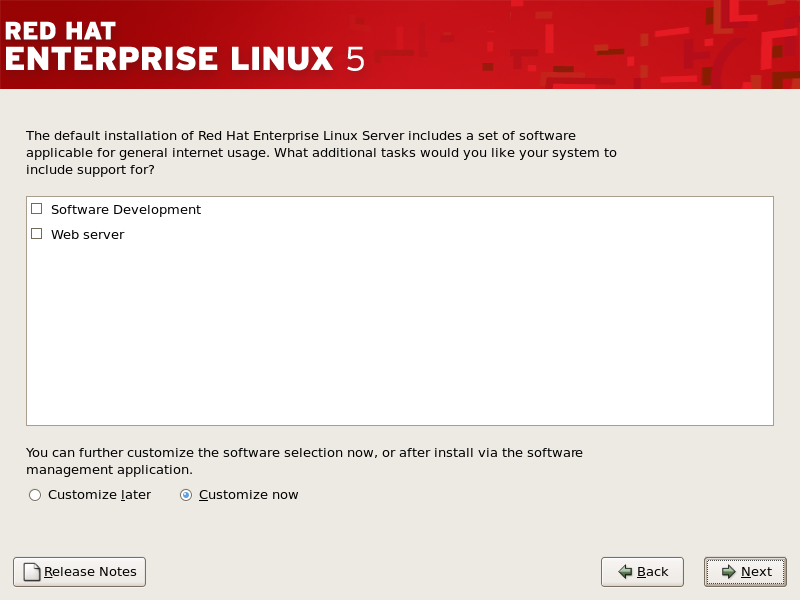
4.24. 软件包组选择
图 4.23. 软件包组选择
[D]
图 4.24. 软件包组详情
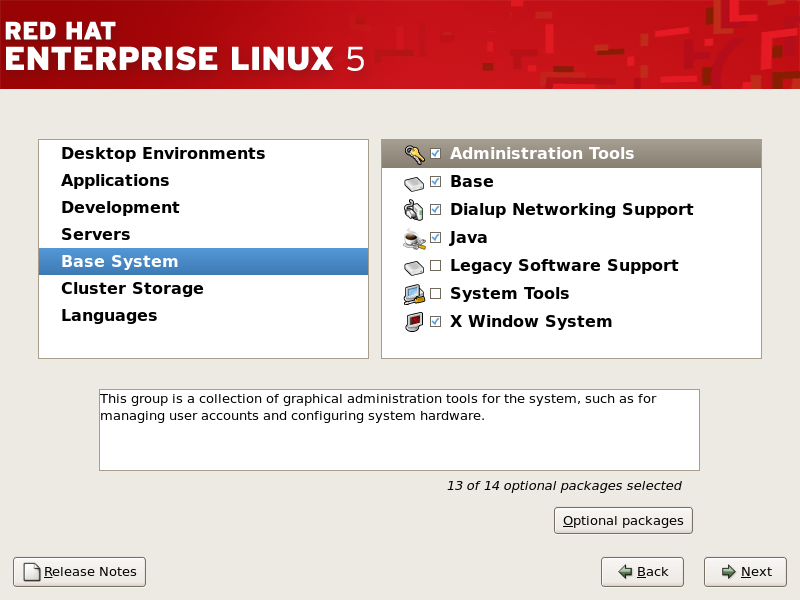
[D]
4.25. 准备安装
4.25.1. 准备安装
/root/install.log 中找到安装的完整日志。
4.26. 安装软件包
4.27. 安装完成
- 按 Enter - 会导致引导默认引导条目。
- 选择一个引导标签,后跟 Enter - 会导致引导装载程序引导与引导标签对应的操作系统。
- 不执行任何操作 - 在引导装载程序的超时时间(默认为 5 秒)后,引导装载程序会自动引导默认引导条目。
login: 提示或 GUI 登录屏幕(如果您安装了 X Window 系统并选择自动启动 X 窗口系统)。
4.28. Itanium 系统 - 引导您的机器和安装后设置
elilo/boot/efi/elilo.conf 配置文件中列出的默认内核。(在文件中列出的第一个内核是默认内核。)
/boot/efi/elilo.conf 中的内核标签名称。例如,要载入名为 linux 的内核,请输入:
elilo linux/boot/efi/elilo.conf 文件:
- 在
Shell>提示中,将设备改为系统分区(在 Linux 中挂载为/boot/efi)。例如:如果fs0是系统引导分区,在 EFI Shell 提示符中键入fs0:。 - 在
fs0:\>中键入 ls 以确保您在正确的分区中。 - 然后键入:
Shell>type elilo.conf此命令显示配置文件的内容。每个节均包含一个以标签开头的行,后跟该内核的标签名称。标签名称是您在 elilo 之后键入的内容,用于引导不同的内核。
4.28.1. 安装后的 Boot Loader 选项
single 或 mem=1024M 来强制 Red Hat Enterprise Linux 使用 1024 MB 内存。要将选项传递给引导装载程序,请在 EFI Shell 提示符中输入以下内容(将 linux 替换为您要引导的内核标签名,使用您要传递给内核的引导选项): option
elilo linux option4.28.2. 自动引导 Red Hat Enterprise Linux
elilo 以及所有引导选项。但是,如果要将 系统配置为自动启动 Red Hat Enterprise Linux,则需要配置 EFI 引导管理器。
- 引导 Itanium 系统,然后从 EFI 引导管理器菜单中选择 option maintenance 菜单。
- 从主 启动选项。
- 选择 Linux 中挂载为
/boot/efi/的系统分区。 - 选择
elilo.efi文件。 - 在
Enter New Description:提示中,键入Red Hat Enterprise Linux 5或者您要出现在 EFI Boot Manager 菜单中的任何名称。 - 在
Enter Boot Option Data Type:提示中,如果您不想将选项传递给 ELILO 引导装载程序,在 Options 中输入N。这个选项适用于大多数情况。如果要将选项传递给引导装载程序,您可以在/boot/efi/elilo.conf配置文件中进行配置。 - 在
Yes提示符后输入Save changes to NVRAM。这会返回到 EFI Boot Maintenance Manager 菜单。 - 接下来,您想要使 菜单项成为默认值。此时会出现引导选项列表。把 菜单项移到列表顶部,使用箭头键选择该组合键并按 u 键将其移至列表。您可以通过选择列表并按 d 键来移动项目。更改引导顺序后,选择 。选择 返回主菜单。
- 另外,您可以通过从主菜单选择 => 来更改引导超时值。
- 选择 以返回到 EFI 引导管理器。
4.28.2.1. 使用启动脚本
startup.nsh 的启动脚本。最后一个命令应当是 elilo 来引导到 Linux。
/boot/efi/ startup.nsh )中,并包含以下文本:
echo -off your set of commands eliloelilo 后添加它们。
Shell> 提示下,将设备改为系统分区(在 Linux 中挂载为 /boot/efi )。例如,如果 fs0 是系统引导分区,在 EFI Shell 提示下键入 fs0:。键入 ls 以确保处于正确的分区。然后键入 edit start.nsh。键入 文件的内容并保存它。
.nsh 文件并使用它来引导系统。要停止 EFI 加载该文件,请键入 Ctrl+c。这会中止进程,并将您返回到 EFI shell 提示符。
第 5 章 删除 Red Hat Enterprise Linux
fdisk /mbrlinux rescue。这会启动救援模式程序。
parted /dev/hda
rm 3
第 6 章 在 Intel® 或 AMD 系统上安装进行故障排除
6.1. 您无法引导 Red Hat Enterprise Linux
6.1.1. 使用 RAID 卡引导吗?
GRUB: )和闪存光标可以是所有出现的所有。如果是这种情况,您必须重新分区您的系统。
/boot 分区,比如在一个单独的硬盘驱动器中。对于有有问题的 RAID 卡的分区创建,需要使用内部硬盘驱动器。
/boot/ 分区的同一驱动器。
6.1.2. 您的系统显示信号 11 错误吗?
boot: 或 yaboot: 提示下键入以下命令(使用 elilo 为 Itanium 系统进行准备):
linux mediacheckhttp://www.bitwizard.nl/sig11/
6.2. 开始安装时出现问题
6.2.1. 引导到图形安装时出现问题
6.3. 安装过程中出现问题
6.3.1. 没有找到安装 Red Hat Enterprise Linux Error 信息的设备
Red Hat Enterprise Linux 的设备 的错误消息,则可能是安装程序无法识别的 SCSI 控制器。
6.3.2. 保存跟踪消息时没有磁盘驱动器
/tmp/anacdump.txt 的文件。出现对话框后,通过按 Ctrl+Alt+F2 键切换到新的 tty(虚拟控制台),scp 消息写入到 /tmp/anacdump.txt 到已知可正常工作的远程系统。
6.3.3. 分区表的问题
设备 hda 上的分区表是无法读取的。要创建必须初始化的新分区,请在此驱动器中丢失 ALL DATA。
6.3.4. 使用剩余空间
交换 并创建了 / (root)分区,并且您已选择了 root 分区以使用剩余空间,但它不会填充硬盘。
/ (root)分区使用硬盘上所有剩余空间,则必须创建一个 /boot 分区。
6.3.5. 其他分区问题
- 一个
/(root)分区 - 类型为 swap 的 <swap> 分区
6.3.6. Itanium 系统用户的其他分区问题
- VFAT 类型的
/boot/efi/分区 - 一个
/(root)分区 - 类型为 swap 的 <swap> 分区
6.3.7. 是否查看 Python 错误?
/tmp/目录时,可能会出现这个错误。错误可能类似如下:
Traceback (innermost last):
File "/var/tmp/anaconda-7.1//usr/lib/anaconda/iw/progress_gui.py", line 20, in run
rc = self.todo.doInstall ()
File "/var/tmp/anaconda-7.1//usr/lib/anaconda/todo.py", line 1468, in doInstall
self.fstab.savePartitions ()
File "fstab.py", line 221, in savePartitions
sys.exit(0)
SystemExit: 0
Local variables in innermost frame:
self: <fstab.GuiFstab instance at 8446fe0>
sys: <module 'sys' (built-in)>
ToDo object:  (itodo  ToDo  p1  (dp2  S'method'  p3  (iimage  CdromInstallMethod
p4  (dp5  S'progressWindow'  p6   <failed>
/tmp/ 的链接到其他位置或者创建之后已更改的系统。这些符号链接或已更改的链接会在安装过程中无效,因此安装程序无法写入信息并失败。
http://www.redhat.com/support/errata/
http://fedoraproject.org/wiki/Anaconda
http://bugzilla.redhat.com/bugzilla/
http://www.redhat.com/apps/activate/
6.4. 安装后的问题
6.4.1. 在基于 x86 的系统上使用图形 GRUB 屏幕上的问题?
/boot/grub/grub.conf 文件。
grub.conf 文件中,通过在行首插入 # 字符来注释掉以 splashimage 开头的行。
grub.conf 文件将重新读取,并且所做的任何更改生效。
grub.conf 文件)来重新启用图形引导屏幕。
6.4.2. 引导至图形环境
/etc/inittab 来编辑文件。完成后,重启计算机。下次登录时,您会看到图形登录提示。
/etc/inittab 将打开。在第一个屏幕中,会出现类似如下的文件部分:
# Default runlevel. The runlevels used by RHS are:
#   0 - halt (Do NOT set initdefault to this)
#   1 - Single user mode
#   2 - Multiuser, without NFS (The same as 3, if you do not have networking)
#   3 - Full multiuser mode
#   4 - unused
#   5 - X11
#   6 - reboot (Do NOT set initdefault to this)
#  id:3:initdefault:
3:initdefault: 中的数字从 3 改为 5。
3 更改为 5。
id:5:initdefault: 6.4.3. X Window 系统(GUI)的问题.
6.4.4. X Server Crashing 和 Non-Root 用户的问题
df -h
-h 选项),请通过在 shell 提示符下键入 man df 来参考 df man page。
/home/ 和 /tmp/ 分区有时可使用用户文件填满。您可以通过删除旧文件在该分区上创建一些空间。释放一些磁盘空间后,尝试以之前失败的用户运行 X。
6.4.5. 当您尝试登录时出现问题
kernel 开头的行并键入 e 以编辑此引导条目。
在内核行 的末尾添加:
single# 提示后,您必须键入 passwd root,这样您就可以为 root 输入新密码。此时,您可以键入 shutdown -r 来使用新的 root 密码重新引导系统。
http://hardware.redhat.com/hcl/
6.4.6. 您的 RAM 是否未经过认可?
/boot/grub/grub.conf 中:
mem=xxM/boot/grub/grub.conf 中,上面的示例类似如下:
# NOTICE: You have a /boot partition. This means that
#  all kernel paths are relative to /boot/
default=0
timeout=30
splashimage=(hd0,0)/grub/splash.xpm.gz
title Red Hat Enterprise Linux (2.6.9-5.EL)
root (hd0,0)
kernel /vmlinuz-2.6.9-5.EL ro root=/dev/hda3 mem=128M
grub.conf 所做的更改将反映在您的系统上。
kernel 开头的行并键入 e 以编辑此引导条目。
在内核行 的末尾添加
mem=xxM6.4.7. 您的打印机不工作
6.4.8. sound Configuration 的问题
6.4.9. 在启动时基于 Apache 的 httpd 服务/电子邮件 Hangs
/etc/hosts 文件中以下行:
127.0.0.1 localhost.localdomain localhost
第 7 章 在 Intel 和 AMD 系统上安装更新驱动程序
- 将镜像文件放在安装程序可访问的位置:
- 在本地 IDE 硬盘驱动器中
- USB 存储设备,比如 USB 闪存驱动器
- 在您的本地网络中的 FTP、HTTP 或者 NFS 服务器中(或者记录 Internet 上的位置,其他人已放置镜像文件)
- 通过将 镜像 文件解压缩到来创建驱动程序更新磁盘:
- 一个 CD(如果您的计算机有 IDE 光驱)
- 一个 DVD(如果您的计算机有 IDE 光驱)
- 软盘
- USB 存储设备,比如 USB 闪存驱动器
- 从 映像文件创建初始 ramdisk 更新,并将它存储在 PXE 服务器上。这是只有在您无法使用任何其他方法执行驱动程序更新时才应考虑的高级过程。
7.1. 安装过程中驱动程序更新的限制
- 已在使用中的设备
- 您不能使用驱动程序更新来替换安装程序已经载入的驱动程序。反之,您必须使用安装程序在安装后载入和更新新驱动程序完成安装的安装,或者需要安装流程的新驱动程序,请考虑执行初始 RAM 磁盘更新 - 请参考 第 7.2.3 节 “准备初始 RAM 磁盘更新”。
- 有等同设备可用设备的设备
- 因为所有相同类型的设备都被一起初始化,所以如果安装程序为类似的设备载入了驱动程序,则无法为设备更新驱动程序。例如,假设一个系统有两个不同的网络适配器,其中一个有驱动程序更新。安装程序将同时初始化两个适配器,因此您将无法使用这个驱动程序更新。再次使用安装程序载入的驱动程序完成安装,并在安装后更新至新驱动程序,或使用初始 RAM 磁盘更新。
7.2. 准备在安装过程中驱动程序更新
- 使用镜像文件本身的方法
- 本地硬盘驱动器(仅限IDE)
- USB 存储设备(例如,USB 闪存驱动器)
- 网络(HTTP、FTP、NFS)
- 使用从镜像文件生成的驱动程序更新磁盘的方法
- floppy 磁盘
- CD(仅限IDE)
- DVD(仅限IDE)
- USB 存储设备(例如,USB 闪存驱动器)
- 使用初始 RAM 磁盘更新的方法
- PXE
7.2.1. 准备使用驱动程序更新镜像文件
7.2.1.1. 准备使用本地存储上的镜像文件
.iso。在以下示例中,该文件名为 dd.iso :
图 7.1. 保存驱动程序更新镜像文件的 USB 闪存驱动器的内容
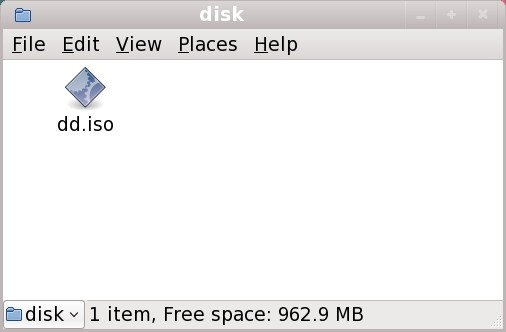
[D]
OEMDRV,安装程序会自动检查它是否有驱动程序更新,并载入它检测到的任何变化。这个行为由 dlabel=on 引导选项控制,该选项默认启用。请参阅 第 7.3.1 节 “让安装程序自动查找驱动程序更新磁盘”。
7.2.1.2. 准备使用通过网络提供的镜像文件
7.2.2. 准备驱动程序更新磁盘
7.2.2.1. 在 CD 或者 DVD 中创建驱动程序更新磁盘
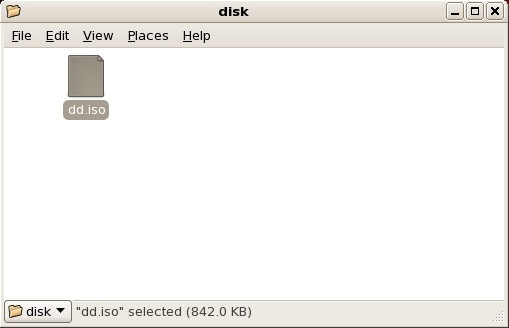
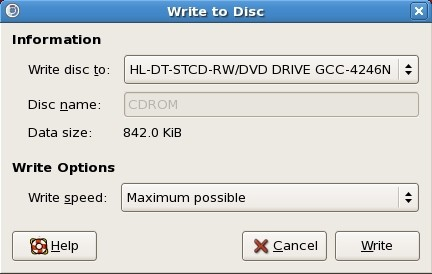
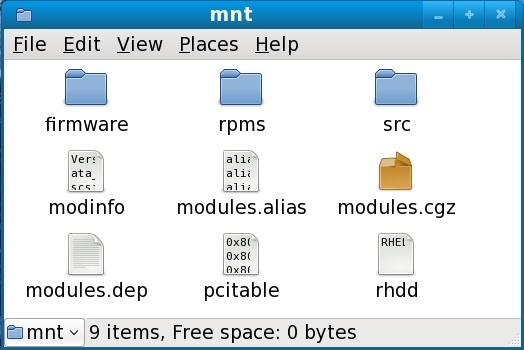
图 7.4. CD 或者 DVD 中典型的驱动程序更新磁盘
[D]
.iso 结尾的单个文件,则您尚未正确创建该磁盘,应重试。如果使用 GNOME 以外的 Linux 桌面,或者使用了其他操作系统,请确保选择类似于 从镜像刻录 的选项。
7.2.2.2. 在软盘或者 USB 存储设备中创建驱动程序更新磁盘
- 在可用驱动器中插入空白的、格式化的软盘,或者将空 USB 存储设备(如 USB 闪存驱动器)连接到您的计算机。请注意分配给此磁盘的设备名称,例如:系统上第一个软盘驱动器中的软盘的
/dev/fd0。如果您不知道设备名称,则变为 root 用户,在命令行中使用 fdisk -l 命令。您会看到系统中所有可用的存储设备的列表。当磁盘被删除或者存储设备断开连接时,比较 fdisk -l 插入磁盘或存储设备的存储设备将输出与这个命令的输出结果进行比较。 - 在命令行中,更改到包含镜像文件的目录。
- 在命令行中输入:
dd if=image of=device其中 image 是镜像文件,device 是设备名称。例如,要在软盘磁盘/dev/fd0上从驱动程序更新映像文件dd.iso创建驱动程序磁盘,您可以使用:dd if=dd.iso of=/dev/fd0
7.2.3. 准备初始 RAM 磁盘更新
- 将驱动程序更新镜像文件放在 PXE 服务器中。通常,您要通过从红帽或硬件供应商指定的位置下载到 PXE 服务器来完成此操作。驱动程序更新镜像文件的名称以
.iso结尾。 - 将驱动程序更新镜像文件复制到
/tmp/initrd_update目录中。 - 将驱动程序更新映像文件重命名为
dd.img。 - 在命令行中,切换到
/tmp/initrd_update目录,键入以下命令,然后按 Enter 键:find . | cpio --quiet -c -o | gzip -9 >/tmp/initrd_update.img
- 将文件
/tmp/initrd_update.img复制到包含您要用于安装的目标的目录中。该目录放置在/tftpboot/pxelinux/目录下。例如,/tftpboot/pxelinux/r5su3/可能会存放 Red Hat Enterprise Linux 5.3 服务器的 PXE 目标。 - 编辑
/tftpboot/pxelinux/pxelinux.cfg/default文件,使其包含您刚才创建的初始 RAM 磁盘更新的条目,格式为:label target-dd kernel target/vmlinuz append initrd=target/initrd.img,target/dd.img
其中 target 是您要用于安装的目标。
例 7.1. 从驱动程序更新镜像文件准备初始 RAM 磁盘更新
driver_update.iso 是一个驱动程序更新镜像文件,您从互联网下载到 PXE 服务器上的某一目录。您要通过 PXE 引导的目标位于 /tftpboot/pxelinux/r5su3中
$ cp driver_update.iso /tmp/initrd_update/dd.img
$ cd /tmp/initrd_update
$ find . | cpio --quiet -c -o | gzip -9 >/tmp/initrd_update.img
$ cp /tmp/initrd_update.img /tftpboot/pxelinux/r5su3/dd.img
/tftpboot/pxelinux/pxelinux.cfg/default 文件,并包含以下条目:
label r5su3-dd
kernel r5su3/vmlinuz
append initrd=r5su3/initrd.img,r5su3/dd.img
7.3. 在安装过程中执行驱动程序更新
- 让安装程序自动查找驱动程序更新磁盘。
- 安装程序会提示您输入驱动程序更新。
- 使用引导选项指定驱动程序更新磁盘。
- 使用引导选项指定网络中的驱动程序更新镜像文件。
- 选择一个包含驱动程序更新的 PXE 目标。
7.3.1. 让安装程序自动查找驱动程序更新磁盘
OEMDRV 的块设备。安装程序将自动检查该设备,并加载它检测到的任何驱动程序更新,且不会在此过程中提示。请参阅 第 7.2.1.1 节 “准备使用本地存储上的镜像文件” 来为安装程序准备存储设备。
7.3.2. 安装程序会提示您输入驱动程序更新
- 对于您选择的任何方法,正常启动安装。如果安装程序无法加载安装进程至关重要的硬件的驱动程序(例如,如果它无法检测到任何网络或存储控制器),它会提示您插入驱动程序更新磁盘:
图 7.5. 没有找到驱动程序的对话框
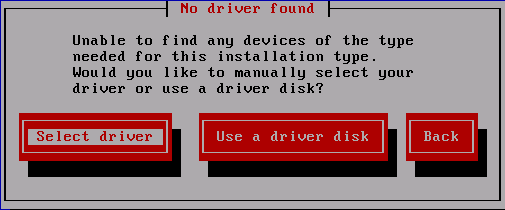
[D] - 选择 使用驱动程序磁盘 并引用 第 7.4 节 “指定驱动程序更新镜像文件或驱动程序更新磁盘的位置”。
7.3.3. 使用引导选项指定驱动程序更新磁盘
- 在安装过程开始时,键入 linux dd,然后按 Enter 键。安装程序会提示您确认有驱动程序磁盘:
图 7.6. 驱动程序磁盘提示符

[D] - 插入您在 CD、DVD、软盘或 USB 存储设备中创建的驱动程序更新磁盘,然后选择 。安装程序检查它可以检测到的存储设备。如果只有一个可以存放驱动程序磁盘的位置(例如,安装程序检测到软盘的存在,但没有其他存储设备),它将自动加载它在此位置找到的任何驱动程序更新。如果安装程序找到多个包含驱动程序更新的位置,它会提示您指定更新的位置。请参阅 第 7.4 节 “指定驱动程序更新镜像文件或驱动程序更新磁盘的位置”。
7.3.4. 使用引导选项指定网络中的驱动程序更新镜像文件
7.3.5. 选择一个包含驱动程序更新的 PXE 目标
- 在计算机的 BIOS 或引导菜单中选择网络启动。
指定这个选项的步骤因不同的计算机而异。有关您的计算机的具体信息,请参考您的硬件文档或硬件供应商。 - 在 preexecution 引导环境(PXE)中,选择您在 PXE 服务器上准备好的引导目标。例如,如果您标记此环境
r5su3-dd在 PXE 服务器上的/tftpboot/pxelinux/pxelinux.cfg/default文件中,请在提示符下键入r5su3-dd,然后按 Enter 键。
7.4. 指定驱动程序更新镜像文件或驱动程序更新磁盘的位置
图 7.7. 选择驱动程序磁盘源
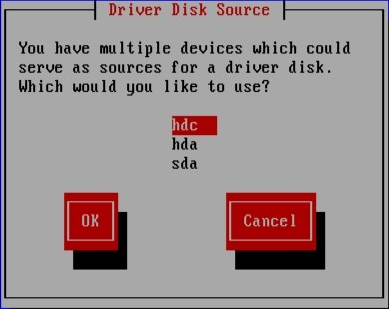
[D]
图 7.8. 选择驱动程序磁盘分区

[D]
图 7.9. 选择 ISO 镜像
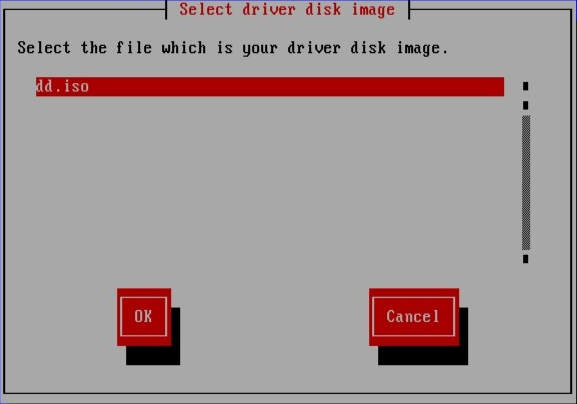
[D]
第 8 章 Intel® 和 AMD 系统的其他引导选项
boot: 提示时调用的命令。
引导时间命令参数
- askmethod
- 这个命令要求您选择要从 Red Hat Enterprise Linux CD-ROM 引导时使用的安装方法。
- apic
- 此 x86 引导命令大约在 Intel 440GX 芯片组 BIOS 中遇到的错误工作,而只有安装程序使用安装程序内核执行。
- dd
- 这个参数会导致安装程序提示您使用驱动程序 diskette。
- dd=url
- 这个参数会导致安装程序提示您使用指定 HTTP、FTP 或者 NFS 网络地址中的驱动程序镜像。
- display=ip:0
- 这个命令允许远程显示转发。在这个命令中,ip 应该替换为您希望显示的系统 IP 地址。在您要显示的系统中,您必须执行命令 xhost +remotehostname,其中 remotehostname 是您要运行原始显示的主机的名称。使用 xhost +remotehostname 命令限制对远程显示终端的访问,并且不允许来自任何未明确授权远程访问的任何人或任何系统的访问。
- driverdisk
- 该命令执行与 dd 命令相同的功能,并提示您在安装 Red Hat Enterprise Linux 时使用驱动程序 diskette。
- Linux upgradeany
- 此命令会放松您的
/etc/redhat-release文件中的一些检查。如果您的/etc/redhat-release文件已从默认更改,在尝试升级到 Red Hat Enterprise Linux 5 时,您的 Red Hat Enterprise Linux 安装可能无法找到。只有在还没有检测到现有 Red Hat Enterprise Linux 安装时才使用这个选项。 - mediacheck
- 这个命令为您提供了测试安装源的完整性的选项(如果基于 ISO 的方法)。该命令可用于 CD、DVD、硬盘 ISO 和 NFS ISO 安装方法。在您尝试安装前,先验证 ISO 镜像是否完整,有助于避免安装期间经常遇到的问题。
- mem=xxxm
- 这个命令允许您覆盖内核检测到机器的内存量。对于一些旧的系统,当只检测到 16 个 mb 个系统,且对于某些使用主内存共享视频内存的新机器,则可能需要这样做。执行此命令时,xxx 应替换为以 MB 为单位的内存量。
- mpath
- 启用多路径支持。重要 - 在多路径设备中安装必须如果在可通过多路径访问的网络存储设备中安装 Red Hat Enterprise Linux 5.11,则必须使用这个选项引导安装过程。如果您没有在引导时指定这个选项,安装将失败,或者系统在安装完成后无法引导。
- nmi_watchdog=1
- 这个命令启用内置内核死锁检测器。这个命令可以用来调试硬盘内核锁定。通过执行定期 NMI(Non Maskable Interrupt)中断,内核可以监控所有 CPU 是否根据需要被锁定并打印调试消息。
- noapic
- 这个 x86 boot 命令告知内核不使用 APIC 芯片。对于带有错误的 APIC 的一些主板(如 Abit BP6)或 buggy bios。基于 nvidia nforce3 芯片组(如 Asus SK8N)的系统可能已知在 IDE 检测期间挂起,或者显示其他中断发送问题。
- noeject
- 在安装后不要弹出光驱。这个选项在远程安装中非常有用。
- nomce
- 此 x86 boot 命令禁用在 CPU 上执行的自我诊断检查。内核默认在 CPU 上启用自我诊断检查(称为 机器检查异常)。早期 Compaq Pentium 系统可能需要这个选项,因为它们不支持正确处理器错误检查。其他一些笔记本电脑(特别是使用 Radeon IGP 芯片组)可能还需要此选项。
- nonet
- 此命令禁用网络硬件探测。
- nopass
- 这个命令禁用将键盘和鼠标信息传递给安装程序的 stage 2。在执行网络安装时,可用于在安装程序的第 2 阶段测试键盘和鼠标配置屏幕。
- nopcmcia
- 这个命令会忽略系统中的任何 PCMCIA 控制器。
- noprobe
- 这个命令禁用硬件检测,并提示用户获取硬件信息。
- noshell
- 这个命令禁用在安装过程中在虚拟控制台 2 上的 shell 访问。
- nostorage
- 这个命令禁用 SCSI 和 RAID 存储硬件的探测。
- nousb
- 这个命令禁用在安装过程中载入 USB 支持。如果安装程序在进程早期挂起,这个命令可能会有帮助。
- nousbstorage
- 该命令在安装程序的加载程序中禁用 usbstorage 模块。在 SCSI 系统中,设备排序可能会帮助。
- numa=off
- Red Hat Enterprise Linux 在 AMD64 架构上支持 NUMA(非统一内存访问)。而所有 cpus 都可以访问所有内存,而更新内核中存在的 numa 支持会导致内存分配使内存分配更有可能,从而尽可能减少 CPU 内存流量。这可在特定应用程序中提供显著的性能改进。要恢复到原始非 NUMA 行为,请指定这个引导选项。
- reboot=b
- 这个 x86、AMD64 和 Intel® EM64T boot 命令更改内核尝试重启机器的方式。如果在系统关闭时遇到内核挂起,这个命令可能会导致系统成功重启。
- rescue
- 这个命令运行救援模式。有关救援模式的详情,请参考 第 27 章 基本系统恢复。
- resolution=
- 告诉安装程序运行哪个视频模式。它接受任何标准解析,如
640x480、800x6001024x768等等。 - serial
- 这个命令会打开串口控制台支持。
- text
- 这个命令禁用图形安装程序,并强制安装程序在文本模式中运行。
- updates
- 这个命令会提示您为 anaconda 安装程序插入包含更新(错误修复)的软盘 diskette。如果您要执行网络安装,且已在服务器的
rhupdates/中放置了更新镜像内容,则不需要它。 - updates=
- 这个命令允许您指定一个 URL 来检索 anaconda 安装程序的更新(错误修复)。
- vnc
- 这个命令允许您从 VNC 服务器安装。
- vncpassword=
- 这个命令设定用于连接 VNC 服务器的密码。
第 9 章 GRUB Boot Loader
9.1. 引导装载程序和系统架构
表 9.1. 根据架构进行启动加载程序
| 架构 | 引导装载程序 |
|---|---|
| AMD® AMD64 | GRUB |
| IBM® eServer™ System i™ | OS/400® |
| IBM® eServer™ System p™ | YABOOT |
| IBM® System z® | z/IPL |
| IBM® System z® | z/IPL |
| Intel® Itanium™ | ELILO |
| x86 | GRUB |
9.2. GRUB
9.2.1. GRUB 和 x86 引导过程
- Stage 1 或主引导装载程序由 BIOS 从 MBR 读取到内存中[4].主引导装载程序存在于 MBR 中的磁盘空间小于 512 字节,并且能够加载 Stage 1.5 或 Stage 2 引导装载程序。
- 如果需要,Stage 1.5 引导装载程序由 Stage 1 引导装载程序读取在内存中。有些硬件需要中间步骤才能进入 Stage 2 引导装载程序。当
/boot/分区高于硬盘的 1024 cylinder 头或使用 LBA 模式时,这有时是 true。Stage 1.5 引导装载程序可在/boot/分区上找到,也可以在 MBR 和/boot/分区的小部分中找到。 - Stage 2 或 secondary 引导装载程序被读入内存。辅助引导装载程序显示 GRUB 菜单和命令环境。这个界面允许用户选择要引导的内核或操作系统,向内核传递参数,或者查看系统参数。
- 辅助引导装载程序将操作系统或内核以及
/boot/sysroot/的内容读取在内存中。GRUB 确定了要启动哪些操作系统或内核后,会将它加载到内存中并将机器传输到该操作系统。
9.2.2. GRUB 的特性
- GRUB 在 x86 机器上提供基于命令的、预操作系统环境。此功能为使用指定选项或收集系统信息加载操作系统方面具有最大的灵活性。多年来,许多非 x86 架构已使用预OS环境,允许从命令行引导系统。
- GRUB 支持 逻辑块寻址(LBA) 模式。LBA 放置用于查找硬盘固件中的文件的寻址转换,并在很多 IDE 和所有 SCSI 硬盘上使用。在 LBA 之前,启动加载器可能会遇到 1024-cylinder BIOS 限制,其中 BIOS 在磁盘 1024 cylinder 头后面找不到文件。LBA 支持允许从超出 1024 个柱面限制的分区引导操作系统,因此只要系统 BIOS 支持 LBA 模式,只要系统 BIOS 支持 LBA 模式。大多数现代 BIOS 修订支持 LBA 模式。
- GRUB 可以读取 ext2 分区。此功能允许 GRUB 在每次系统启动时都会访问其配置文件
/boot/grub/grub.conf,消除用户在进行配置更改时将第一个阶段引导装载程序的新版本写入 MBR。如果用户在 MBR 上重新安装 GRUB 的唯一时间是/boot/分区在磁盘中移动时。有关将 GRUB 安装到 MBR 的详情,请参考 第 9.3 节 “安装 GRUB”。
9.3. 安装 GRUB
/sbin/grub-install /dev/hda/boot 目录必须位于单个特定的磁盘分区。和在 0 个 RAID 中一样,/boot 目录不能在多个磁盘间分条。要在您的系统中使用级别 0 RAID,请将 /boot 放在 RAID 之外的独立分区中。
/boot 目录必须位于单个特定磁盘分区,因此如果保存该分区的磁盘失败或者从系统中删除,GRUB 无法引导系统。即使磁盘在级别 1 RAID 中进行镜像,也是如此。以下红帽知识库文章描述了如何从镜像集中的另一个磁盘启动系统: http://kbase.redhat.com/faq/docs/DOC-7095
9.4. GRUB 术语
9.4.1. 设备名称
- 如果系统硬盘是 IDE 或者 SCSI,所有硬盘驱动器都以字母 hd 开头,则无关紧要。字母 fd 用于指定 3.5 diskettes。
- 要指定整个设备而不考虑分区,请保留逗号和分区号。告知 GRUB 为特定磁盘配置 MBR 时很重要。例如,(hd0) 指定第一个设备的 MBR,而 (hd3) 指定第四个设备的 MBR。
- 如果系统有多个驱动器设备,了解在 BIOS 中如何设置驱动器引导顺序非常重要。当系统只有一个 IDE 或者 SCSI 驱动器时,这是一个简单的任务,但如果存在混合设备,则首先访问带有引导分区的驱动器类型非常重要。
9.4.2. 文件名和块列表
0+50,100+25,200+1
(hd0,0)+1
chainloader +19.4.3. Root 文件系统和 GRUB
/grub/ splash.xpm.gz 位于(hd0,0)分区 (hd0,0) 分区的 /grub/ 目录中)中(实际上是系统的 /boot/ 分区)。
9.5. GRUB 接口
- 菜单接口
- 这是安装程序配置 GRUB 时显示的默认接口。操作系统或预配置的内核菜单显示为列表,按名称排序。使用箭头键选择操作系统或内核版本,然后按 Enter 键引导它。如果您在此屏幕上执行任何操作,那么在 GRUB 超时期过期后,将加载默认选项。按 e 键,以进入条目编辑器界面或 c 键以加载命令行界面。有关配置此接口的详情,请参考 第 9.7 节 “GRUB 菜单配置文件”。
- 菜单 Entry Editor Interface
- 要访问菜单条目编辑器,请按引导装载程序菜单中的 e 键。该条目的 GRUB 命令在此显示,用户可以在引导操作系统前更改这些命令行(省略 可在当前行后面插入新行,而 O 在其前面插入新行)、编辑一(例如 )或删除操作系统(d)。完成所有更改后,b 键将执行命令并启动操作系统。Esc 键会丢弃任何更改并重新载入标准菜单接口。c 键加载命令行界面。备注有关使用 GRUB 菜单条目编辑器更改运行级别的详情,请参考 第 9.8 节 “在引导时更改运行级别”。
- 命令行界面
- 命令行界面是最基本的 GRUB 接口,但它也是授予最多控制的界面。通过命令行,可以键入任何相关的 GRUB 命令,后跟 Enter 键来执行它们。此界面具有一些类似于高级的 shell 功能,包括基于上下文的 Tab 键补全,以及键入命令时 Ctrl 组合键,例如Ctrla 移至行首,按 Ctrl+e 移动到行尾。此外,箭头、Home、End 和 Delete keys 在 bash shell 中可以正常工作。有关常用命令列表,请参阅 第 9.6 节 “GRUB 命令”。
9.5.1. 接口加载顺序
9.6. GRUB 命令
- boot - 引导最后一次载入的操作系统或链加载程序。
- chainloader </path/to/file > - 将指定的文件作为链加载程序。如果该文件位于指定分区的第一个扇区,请使用 blocklist 表示法 +1,而不是文件名。以下是 chainloader 命令示例:
chainloader +1 - displaymem - 根据 BIOS 中的信息显示当前使用内存。这可用于确定系统在引导前的 RAM 量。
- initrd </path/to/initrd > - 启用用户指定引导时要使用的初始 RAM 磁盘。当内核需要特定的模块才能正常启动时,则需要一个
initrd,比如使用 ext3 文件系统格式化 root 分区。以下是 initrd 命令示例:initrd /initrd-2.6.8-1.523.img - 安装 & lt;stage-1& gt; <install-disk > <stage-2 >
pconfig-file - 将 GRUB 安装到系统 MBR。- <stage -1> - 识别一个设备、分区和文件系统,从中可以找到第一个引导装载程序镜像,如 (hd0,0)/grub/stage1。
- <install-disk > - 指定应安装 stage 1 引导装载程序的磁盘,如 (hd0)。
- <stage-2 > - 将阶段 2 引导装载程序位置传递给阶段 1 引导装载程序,如 (hd0,0)/grub/stage2。
P<config-file > - 此选项告知 安装 命令查找由 < config-file > 指定的菜单配置文件,如 (hd0,0)/grub/grub.conf。
警告install 命令覆盖 MBR 上已存在的任何信息。 - kernel </path/to/kernel& gt; < option-1> <option-N > ... - 指定引导操作系统时要加载的 kernel 文件。将 </path/to/kernel > 替换为 root 命令指定的分区的绝对路径。将 <option -1> 替换为 Linux 内核的选项,如 root=/dev/VolGroup00/LogVol00 指定系统根分区所在的设备。可以在空格分隔列表中将多个选项传递给内核。以下是 内核 命令示例:
kernel /vmlinuz-2.6.8-1.523 ro root=/dev/VolGroup00/LogVol00上例中的 选项指定 Linux 的根文件系统位于 hda5 分区上。 - root(<device-type> <device-number >) - 配置 GRUB 的 root 分区,如 (hd0,0),并挂载分区。以下是 root 命令示例:
root (hd0,0) - rootnoverify(<device-type> <device-number > , <partition>) - 配置 GRUB 的 root 分区,就像 root 命令一样,但不会挂载分区。
9.7. GRUB 菜单配置文件
/boot/grub/grub.conf)用于创建要在 GRUB 的菜单界面中引导的操作系统列表,实质上允许用户选择要执行前一组命令。可以使用 第 9.6 节 “GRUB 命令” 中提供的命令,以及一些仅在配置文件中可用的特殊命令。
9.7.1. 配置文件结构
/boot/grub/grub.conf。为菜单接口设置全局首选项的命令将放置在文件顶部,后面是菜单中所列的每个操作系统或操作系统的小节。
default=0
timeout=10
splashimage=(hd0,0)/grub/splash.xpm.gz
hiddenmenu
title Red Hat Enterprise Linux Server (2.6.18-2.el5PAE)
root (hd0,0)
kernel /boot/vmlinuz-2.6.18-2.el5PAE ro root=LABEL=/1 rhgb quiet
initrd /boot/initrd-2.6.18-2.el5PAE.img

# section to load Windows
title Windows
rootnoverify (hd0,0)
chainloader +1
9.7.2. 配置文件指令
- chainloader </path/to/file > - 将指定的文件作为链加载程序。将 </path/to/file > 替换为链加载程序文件的绝对路径。如果该文件位于指定分区的第一个扇区,请使用 blocklist 表示法 +1。
- color <normal -color> <selected -color> - 允许菜单中使用特定的颜色,其中两个颜色配置为前台和后台。使用简单的颜色名称,如 红色/黑色。例如:
color red/black green/blue - default=<整数 > ; - 当 菜单接口超时时,将 <integer> 替换为默认条目标题号。
- fallback= <整数 > - 将 <整数 > 替换为条目标题号,以尝试尝试尝试是否失败。
- hiddenmenu - 显示 GRUB 菜单接口,在 超时 期到期时加载默认条目。用户可以按 Esc 键来查看标准 GRUB 菜单。
- initrd </path/to/initrd > - 启用用户指定引导时要使用的初始 RAM 磁盘。将 </path/to/initrd > 替换为到初始 RAM 磁盘的绝对路径。
- kernel </path/to/kernel& gt; < option-1> <option-N > - 指定引导操作系统时要加载的 kernel 文件。将 </path/to/kernel > 替换为 root 指令指定的分区的绝对路径。加载时可将多个选项传递给内核。
- password=<password> - 根据没有知道密码的用户编辑这个菜单选项的条目。(可选)可以在 password= <password > 指令后指定备用菜单配置文件。在这种情况下,GRUB 会重新启动第二阶段引导装载程序,并使用指定的备用配置文件构建菜单。如果命令省略了另一个菜单配置文件,那么可以了解该密码的用户来编辑当前配置文件。有关保护 GRUB 的更多信息,请参见《 Red Hat Enterprise Linux 部署指南》中标题为 Workstation Security 的章节。
- root(<device-type> <device-number >) - 配置 GRUB 的 root 分区,如 (hd0,0),并挂载分区。
- rootnoverify(<device-type> <device-number > , <partition>) - 配置 GRUB 的 root 分区,就像 root 命令一样,但不会挂载分区。
- timeout=<整数 > - 指定间隔,以秒为单位,GRUB 在载入 默认 命令中指定的条目前等待该间隔。
- splashimage= <path-to-image > - 指定在 GRUB 引导时要使用的启动画面镜像的位置。
- title group-title - 指定用于加载内核或操作系统的特定一组命令的标题。
9.8. 在引导时更改运行级别
- 当 GRUB 菜单在引导时绕过屏幕时,按任意键进入 GRUB 菜单(在前三秒内)。
- 按 一个键 附加到 kernel 命令。
- 在引导选项行的末尾添加 <space > <runlevel> 来引导到所需运行级别。例如,以下条目将启动引导过程到运行级别 3:
grub append> ro root=/dev/VolGroup00/LogVol00 rhgb quiet 3
9.9. 其它资源
9.9.1. 安装的文档
/usr/share/doc/grub-<version-number> /- 这个目录包含关于使用和配置 GRUB 的好信息,其中 < version-number > 与安装的 GRUB 软件包的版本对应。- info grub - GRUB info page 包含教程、用户参考手册、程序员参考手册以及有关 GRUB 及其用法的 FAQ 文档。
9.9.2. 有用的网站
- http://www.gnu.org/software/grub/ - GNU GRUB 项目的主页。此站点包含有关 GRUB 开发状态和常见问题的信息。
- http://kbase.redhat.com/faq/FAQ_43_4053.shtm - 详情引导 Linux 以外的操作系统。
- http://www.linuxgazette.com/issue64/kohli.html - 从头开始讨论 GRUB 配置的介绍,包括 GRUB 命令行选项概述。
第 10 章 关于 Itanium 和 Linux 的其他资源
- / - Itanium 处理器上的 Intel 网站
- http://developer.intel.com/technology/efi/index.htm?iid=sr+efi - Intel 网站可扩展固件接口(EFI)
- http://www.itanium.com/business/bss/products/server/itanium2/index.htm - Itanium 2 处理器上的 Intel 网站
部分 II. IBM POWER 架构 - 安装和引导
第 11 章 开始使用的步骤
11.1. 升级或安装?
11.2. 准备 IBM eServer System p 和 System i
11.3. 您是否具有强大的磁盘空间?
- 有足够的 unpartitioned[5] 用于安装 Red Hat Enterprise Linux 的磁盘空间,或者
- 具有可以删除的一个或多个分区,从而释放足够磁盘空间来安装 Red Hat Enterprise Linux。
11.4. 您能使用 CD-ROM 或者 DVD 进行安装?
11.5. 准备网络安装
yaboot: 提示下键入以下命令:
linux mediacheck/location/of/disk/space。通过 FTP、NFS 或 HTTP 公开提供的目录将指定为 /publicly/available/directory。例如,/location/of/disk/space 可能是一个您创建名为 /var/isos 的目录。对于 HTTP 安装,/publicly/available/directory 可能为 /var/www/html/rhel5。
- 使用以下命令(对于 DVD)从安装磁盘创建 iso 镜像:dd if=/dev/dvd of=/location/of/disk/space/RHEL5.iso其中 dvd 是指您的 DVD 驱动器设备。
11.5.1. 准备 FTP 和 HTTP 安装
RELEASE-NOTES 文件以及所有操作系统的 ISO 镜像中的所有文件。- 插入 CD-ROM 或 DVD-ROM。
- 挂载 /media/cdrom
- 如果要安装服务器变体,请运行 cp -a /media/cdrom/Server < target-directory>如果要安装客户端变体,请运行 cp -a /media/cdrom/Client < target-directory>
- cp /media/cdrom/RELEASE-NOTES* < ;target-directory>(仅限安装 CD 1 或 DVD)
- cp /media/cdrom/images & lt;target-directory& gt;(仅安装 CD 1 或 DVD)
- umount /media/cdrom
/publicly/available/directory 目录通过 FTP 或 HTTP 共享,并验证客户端访问。您可以检查该目录是否可从服务器本身访问,然后从您要安装到的同一子网上的另一台计算机访问。
11.5.2. 准备 NFS 安装
- 对于 DVD:mv /location/of/disk/space/RHEL5.iso /publicly/available/directory/
- 对于 CDROM:mv /location/of/disk/space/disk*.iso /publicly/available/directory/
/publicly/available/directory 目录通过 /etc/exports 中的条目通过 NFS 导出。
11.6. 准备硬盘安装
- 使用一组 CD-ROM 或 DVD - 从每个安装 CD-ROM 或 DVD 创建 ISO 镜像文件。对于每个 CD-ROM(对于 DVD 而言),在 Linux 系统中执行以下命令:
dd if=/dev/cdrom of=/tmp/file-name.iso - 使用 ISO 映像 - 将这些映像传输到要安装的系统。在开始安装前验证 ISO 镜像是否完好,有助于避免问题。要在执行安装前验证 ISO 镜像是否完好,请使用 md5sum 程序(many md5sum 程序可用于各种操作系统)。md5sum 程序应该与 ISO 镜像位于同一个 Linux 计算机上。
updates.img 的文件,它将用于对 anaconda 的更新,即安装程序。有关安装 Red Hat Enterprise Linux 的各种方法以及如何应用安装程序更新的详情,请参考 anaconda RPM 软件包中的 install-methods.txt。
第 12 章 在 IBM System i 和 IBM System p 系统上安装
- 熟悉安装程序的用户界面
- 启动安装程序
- 选择安装方法
- 在安装过程中的配置步骤(语言、键盘、鼠标、分区等)
- 完成安装
12.1. 图形安装程序用户界面
yaboot: 提示下使用以下命令:
linux text12.2. 引导 IBM System i 或 IBM System p 安装程序
图 12.1. SMS 控制台

[D]
boot: 提示符。按 Enter 或等待超时过期以开始安装。
images/netboot/ppc64.img 文件。
12.3. 关于 Linux 虚拟控制台的注释
表 12.1. 控制台、密钥和内容
| console | keystrokes | 内容 |
|---|---|---|
| 1 | ctrl+alt+f1 | 安装对话框 |
| 2 | ctrl+alt+f2 | shell 提示符 |
| 3 | ctrl+alt+f3 | 安装日志(来自安装程序的messages) |
| 4 | ctrl+alt+f4 | 与系统相关的信息 |
| 5 | ctrl+alt+f5 | 其他信息 |
| 6 | ctrl+alt+f6 | x 图形显示 |
12.4. 使用 HMC vterm
12.5. 文本模式安装程序用户界面
图 12.2. 安装程序 小部件配置
[D]
图 12.3. 安装程序小部件,如 Disk Druid所示
[D]
- 窗口 - Windows(通常在本手册中作为 对话框 )在安装过程中显示在您的屏幕上。有时候,一个窗口可能会相互覆盖;在这些情况下,您只能与顶部的窗口进行交互。在该窗口中完成后,它会消失,允许您在下面的窗口中继续工作。
- 复选框 - Checkboxes 允许您选择或取消选择某个功能。框显示一个星号(选择)或空格(未选择)。当光标处于复选框中时,按 空格来 选择或取消选择功能。
- 文本输入 - 文本输入行是您可以输入安装程序所需的信息的区域。当光标停留在文本输入行中时,您可以输入和/或编辑该行的信息。
- text Widget - 文本小部件是显示文本的屏幕区域。有时候,文本小部件也可以包含其他小部件,如复选框。如果文本小部件包含的信息比保留空间多,则会出现一个滚动条;如果您将光标定位到文本小部件中,您可以使用 Up 和 Down 箭头键滚动浏览所有可用信息。通过 # 字符在滚动栏中显示您的当前位置,该字符在滚动时向上和向下滚动条。
- 滚动条 - Scroll bars 显示在窗口侧或底部,以控制列表或文档的主机当前位于窗口的框中。通过滚动条,您可以轻松地移动到文件的任意部分。
- 按钮小部件 - Button widgets 是与安装程序交互的主要方法。您可以使用 Tab 和 Enter 键浏览安装程序的窗口,浏览这些按钮。在突出显示按钮时可以选择按钮。
- 光标 - 虽然不是小部件,但光标用于选择(并与之交互)特定小部件。由于光标从小部件移到小部件,可能会导致小部件更改颜色,或者光标本身可能仅出现在小部件或旁边。在 图 12.2 “安装程序 小部件配置” 中,光标位于 按钮。图 12.3 “安装程序小部件,如 Disk Druid所示”,在" "按钮上显示光标。
12.5.1. 使用键盘来 Navigate
12.6. 开始安装
12.6.1. 从 DVD/CD-ROM 安装
12.7. 使用硬盘安装
askmethod 引导选项并选择了 )。通过此对话框,您可以为安装 Red Hat Enterprise Linux 的磁盘分区和目录命名。如果您使用 repo=hd 引导选项,则代表您已指定了一个分区。
图 12.4. 为硬盘安装选择分区对话框
[D]
/。如果 ISO 镜像位于挂载分区的子目录中,输入该分区中包含 ISO 镜像的目录名称。例如,如果 ISO 镜像所在的分区通常挂载为 /home/,并且镜像位于 /home/new/ 中,您将输入 /new/。
12.8. 执行网络安装
askmethod 引导选项引导,则会出现 Configure TCP/IP 对话框。此对话框询问您的 IP 和其他网络地址。您可以选择通过 DHCP 配置设备的 IP 地址和子网掩码,或者手动配置。如果手动,您可以选择输入 IPv4 和/或 IPv6 信息。输入安装过程中使用的 IP 地址,然后按 Enter 键。请注意,如果您需要执行 NFS 安装,则需要提供 IPv4 信息。
图 12.5. TCP/IP 配置
[D]
12.9. 通过 NFS 安装
example.com 中的名为 eastcoast.com 的主机安装,请在 NFS 服务器 字段中输入 eastcoast.example.com。
变体 / 目录的目录 /export /directory/。
图 12.6. NFS Setup 对话框
[D]
12.10. 通过 FTP 安装
askmethod 引导选项并选择了 )。通过此对话框,您可以识别要从中安装 Red Hat Enterprise Linux 的 FTP 服务器。如果您使用 repo=ftp 引导选项,则代表您已指定了一个服务器和路径。
图 12.7. FTP Setup Dialog
[D]
/ 目录的目录的名称。例如,如果 FTP 站点包含目录 /mirrors/redhat/arch/ variant ;/,输入 /mirrors/redhat/arch/ (其中 arch 替换为您系统的架构类型,如 i386、ia64、ppc 或 s390x,变体是您要安装的变量,如客户端、服务器、工作站等)。如果一切正确指定,则会出现一个消息框,指示正在从服务器检索文件。
12.11. 通过 HTTP 安装
askmethod 引导选项并在 安装方法 对话框中选择了 )时,才会应用 HTTP 对话框。此对话框提示您输入从中安装 Red Hat Enterprise Linux 的 HTTP 服务器的信息。如果您使用 repo=http 引导选项,则代表您已指定了一个服务器和路径。
/ 目录的名称。例如,如果 HTTP 站点包含目录 /mirrors/redhat/arch/,请输入 /mirrors/redhat/arch/ (其中 arch 替换为系统的架构类型,如 i386、ia64、ppc 或 s390x,变体 是您要安装的变体,如客户端、服务器、工作站等)。如果一切正确指定,则会出现一个消息框,指示正在从服务器检索文件。
图 12.8. HTTP Setup Dialog
[D]
12.12. 欢迎使用 Red Hat Enterprise Linux
[D]
12.13. 语言选择
图 12.9. 语言选择
[D]
12.14. 键盘配置
图 12.10. 键盘配置
[D]
12.15. 输入安装号
图 12.11. 安装号
[D]
12.16. 磁盘分区设置
/var/cache/yum/。如果您手动为系统分区并创建独立 /var/ 分区,请务必创建足够大的分区(3.0 GB 或更多)来下载软件包更新。
图 12.12. 磁盘分区设置
[D]
mapper/mpath 的设备。
12.17. 高级存储选项
图 12.13. 高级存储选项
[D]
图 12.14. 启用网络接口
[D]
图 12.15. 配置 ISCSI 参数
[D]
12.18. 创建默认布局
- 删除所选驱动器中的所有分区并创建默认布局 - 选择这个选项以删除硬盘中的所有分区(其中包括由其它操作系统创建的分区,如 Windows VFAT 或 NTFS 分区)。警告如果您选择这个选项,安装程序会删除所选硬盘中的所有数据。如果您有要保留在要安装 Red Hat Enterprise Linux 的硬盘上的信息,则不要选择这个选项。
- 在所选驱动器中删除 Linux 分区并创建默认布局 - 选择这个选项只删除 Linux 分区(从之前的 Linux 安装中创建的分区)。这不会删除您可能位于硬盘上的其他分区(如 VFAT 或 FAT32 分区)。
- 在所选驱动器上使用可用空间并创建默认布局 - 选择这个选项来保留您当前的数据和分区,假设您在硬盘上有足够的可用空间。
图 12.16. 创建默认布局
[D]
/boot/ 分区必须在 RAID 阵列之外被创建,比如在一个单独的硬盘驱动器上创建。对于有有问题的 RAID 卡的分区创建,需要使用内部硬盘驱动器。
/boot/ 分区。
/boot/ 分区。
12.19. 对您的系统进行分区
/)分区、/boot/ 分区、PPC PReP 引导分区,以及 swap 分区与系统中有 RAM 量的两倍。
图 12.17. 在 IBM System p 和 System i 系统中使用 磁盘 Druid 进行分区

[D]
12.19.1. 图形显示硬盘.
12.19.2. disk Druid 's Buttons
- : 用于请求新分区。选择后,会出现一个对话框,其中包含必须填写的字段(如挂载点和大小字段)。
- :用来修改分区部分中当前选择 的分区 的属性。选择 将打开一个对话框。根据分区信息是否已写入磁盘,可以编辑某些或所有字段。您也可以按照图形显示中所示编辑可用空间,以便在该空间内创建新分区。突出显示可用空间,然后选择" "按钮,或者双击该可用空间进行编辑。
- 要制作 RAID 设备,您必须首先创建(或重复使用现有)软件 RAID 分区。创建两个或多个软件 RAID 分区后,选择 将软件 RAID 分区加入到 RAID 设备中。
- :用来删除当前突出显示的分区,在 Current Disk Partitions 部分中。系统将要求您确认删除任何分区。
- :用于将 Disk Druid 恢复到其原始状态。如果您 分区,则进行的所有更改都将丢失。
- :用来为任何或所有磁盘分区提供冗余。只有在您有使用 RAID 体验时才应使用。有关 RAID 的详情,请查看 Red Hat Enterprise Linux 部署指南。要制作 RAID 设备,您必须首先创建软件 RAID 分区。创建两个或多个软件 RAID 分区后,选择 将软件 RAID 分区加入到 RAID 设备中。
- :允许您创建 LVM 逻辑卷。LVM(逻辑卷管理器)的角色是显示底层物理存储空间的简单逻辑视图,如硬盘驱动器。LVM 管理单个物理磁盘 - 或者更精确,其中存在单个分区。只有在您有使用 LVM 体验时才应使用。有关 LVM 的详情,请查看 Red Hat Enterprise Linux 部署指南。请注意,LVM 只在图形安装程序中可用。要创建 LVM 逻辑卷,您必须首先创建类型为物理卷(LVM)的分区。创建一个或多个物理卷(LVM)分区后,选择 来创建 LVM 逻辑卷。
12.19.3. 分区字段
- 设备 :此字段显示分区的设备名称。
- 挂载点/RAID/Volume :挂载点是存在卷的目录层次结构中的位置;该卷在这个位置上"挂载"。此字段表示分区挂载位置。如果分区存在,但未设置,则需要定义其挂载点。双击 分区或 。
- 键入 :此字段显示分区的文件系统类型(例如:ext2、ext3 或 vfat)。
- 格式 :此字段显示创建的分区是否将被格式化。
- 大小(MB) :此字段显示分区的大小(以 MB 为单位)。
- 启动 :此字段显示在分区开始的硬盘上的柱面。
- 结束 :此字段显示在分区结束的硬盘上的柱面。
12.19.4. 推荐的分区方案
- 交换分区(至少 256 MB)- 交换分区用于支持虚拟内存。换句话说,当内存不足以贮存系统正在处理的数据时,数据就会被写入 swap 分区。过去数年,推荐的 swap 空间会随系统中的 RAM 量增加而线性增大。但是,由于现代系统中的内存量已增加到成百 GB,因此现在意识到系统需要的交换空间量是该系统中运行的内存工作负载的功能。但是,由于交换空间通常在安装时指定,并且难以确定系统的内存工作负载,我们建议使用下表确定系统交换。
表 12.2. 推荐的系统交换空间
系统中 RAM 量 推荐的交换空间挂载 4GB RAM 或更少 至少 2GB 交换空间 4GB 到 16GB RAM 至少 4GB 交换空间 16GB 到 64GB RAM 至少 8GB 交换空间 64GB 到 256GB RAM 至少 16GB 交换空间 256GB 到 512GB RAM 至少 32GB 交换空间 请注意,您可以通过在多个存储设备间分布 swap 空间来获得更好的性能,特别是对于使用快速驱动器、控制器和接口的系统。 - 硬盘的第一个分区上的 PPC PReP 引导分区 - PPC PReP 引导分区包含 YABOOT 引导装载程序(允许其它 POWER 系统引导 Red Hat Enterprise Linux)。 除非计划从软盘或网络源引导,否则您必须有一个 PPC PReP 引导分区才能引导 Red Hat Enterprise Linux。对于 IBM System i 和 IBM System p 用户: PPC PReP 引导分区应该介于 4-8 MB 之间,而不是超过 10 MB。
- 一个
/boot/partition(100 MB)- 挂载在/boot/上的分区包含操作系统内核(允许您的系统引导 Red Hat Enterprise Linux),以及 bootstrap 过程中使用的文件。由于大多数 PC 固件的限制,创建一个较小的分区来容纳这些是一个好主意。对于大多数用户,100 MB 引导分区就足够了。警告如果您有一个 RAID 卡,请注意,Red Hat Enterprise Linux 5.11 不支持在 IPR 卡中设置硬件 RAID。您可以在安装前引导独立的诊断 CD,以创建 RAID 阵列,然后安装到那个 RAID 阵列。 root分区(3.0 GB - 5.0 GB)- 这是"/"(根目录)所在的位置。在此设置中,所有文件(存储在/boot中的除外)都位于 root 分区上。3.0 GB 分区允许您最小安装,而 5.0 GB root 分区可让您执行完整安装,选择所有软件包组。
/var 放置到网络存储中 /var /var,/var 目录包含在建立网络服务前必须读取或写入的关键数据。
/var/spool、/var/www 或其他子目录,而不仅仅是完整的 /var 文件系统。
12.19.5. 添加分区
图 12.18. 创建新分区
[D]
- 挂载点 :输入分区的挂载点。例如:如果此分区应该是 root 分区,输入
/;在/boot分区中输入/boot,以此类推。您还可以使用下拉菜单为您的分区选择正确的挂载点。对于交换分区,不应设置挂载点 - 将文件系统类型设置为 swap 就足够了。 - 文件系统类型 : 使用下拉菜单为这个分区选择适当的文件系统类型。有关文件系统类型的详情,请参考 第 12.19.5.1 节 “文件系统类型”。
- 允许驱动器 :此字段包含系统上安装的硬盘的列表。如果突出显示了硬盘的框,则可以在该硬盘上创建所需的分区。如果没有 选中框,则 永远不会 在该硬盘上创建该分区。使用不同的复选框设置,您可以有需要它们的 磁盘 Druid 分区,或者让 Disk Druid 决定分区应前往的位置。
- 大小(MB) :输入分区的大小(以 MB 为单位)。请注意,此字段以 100 MB 开头;除非有更改,否则仅创建 100 MB 分区。
- 其它大小选项 :选择是否将该分区保持固定大小,以允许其"浏览"(填充可用硬盘驱动器空间)到某个点,还是允许它增加任何剩余硬盘可用。如果选择 Fill all space up(MB),则必须为此选项右侧的字段指定大小限制。这可让您在硬盘上保留特定数量的空间供以后使用。
- 强制成为主分区 :选择您所创建的分区应该是硬盘上的前四个分区之一。如果没有选中,则该分区被创建为逻辑分区。如需更多信息,请参阅 第 26.1.3 节 “分区内的分区 - 扩展分区概述”。
- 加密 :选择是否对分区进行加密,无需密语即可访问保存的数据,即使存储设备连接到另一个系统。有关存储设备加密的详情,请参考 第 29 章 磁盘加密指南。如果您选择这个选项,安装程序会提示您在将分区写入磁盘前提供密码短语。
- : 设置并想创建分区后,请选择"确定"。
- :如果您不想创建分区,请选择 。
12.19.5.1. 文件系统类型
- ext3 - ext3 文件系统基于 ext2 文件系统,它有一个主要优点 - 日志。使用日志记录文件系统可减少崩溃后恢复文件系统的时间,因为不需要 fsck [6] 文件系统。ext3 支持最多 16TB 的文件系统。ext3 文件系统会被默认选择,强烈建议使用。
- ext2 - ext2 文件系统支持标准 Unix 文件类型(普通文件、目录、符号链接等)。它允许分配长文件名,最多 255 个字符。
- 物理卷(LVM) - 创建一个或多个物理卷(LVM)分区允许您创建 LVM 逻辑卷。使用物理磁盘时 LVM 可以提高性能。有关 LVM 的详情,请查看 Red Hat Enterprise Linux 部署指南。
- 软件 RAID - 创建两个或多个软件 RAID 分区允许您创建 RAID 设备。有关 RAID 的详情,请参考 Red Hat Enterprise Linux 部署指南中的 RAID(独立 磁盘阵列)。
- swap - 交换分区用于支持虚拟内存。换句话说,当内存不足以贮存系统正在处理的数据时,数据就会被写入 swap 分区。如需更多信息,请参阅 Red Hat Enterprise Linux 部署指南。
12.19.6. 编辑分区
12.20. 网络配置
图 12.19. 网络配置
[D]
图 12.20. 编辑网络设备
[D]
12.21. 时区配置
- 使用您的鼠标,单击交互地图来选择特定的城市(以黄色点表示)。此时会出现一个红色 X 来代表您的选择。
- 您还可以滚动屏幕底部的列表来选择您的时区。使用鼠标,单击位置以突出显示您的选择。
12.22. 设置 Root 密码
图 12.21. Root 密码
[D]
12.23. 软件包组选择
图 12.22. 软件包组选择
[D]
图 12.23. 软件包组详情
[D]
12.24. 准备安装
12.24.1. 准备安装
/root/install.log 中找到安装的完整日志。
12.25. 安装软件包
12.26. 安装完成
- IBM eServer System p 和 System i - 完成安装
- 不要忘记删除任何引导介质。重启后,您必须将开放式固件引导设备设置为包含 Red Hat Enterprise Linux PReP 和 / 分区的磁盘。要完成此操作,请等待 LED 指示符或 HMC SRC 表示
E1F1,然后按 1 进入系统管理服务 GUI。。 "。选择 。选择包含 Red Hat Enterprise Linux 的磁盘。根据需要设置其他设备。然后,退出 SMS 菜单来引导新系统。备注SMS 菜单中的步骤可能根据机器模型的不同而有所不同。在您的计算机的正常开机序列完成后,会出现 YABOOT's 提示符,您可以执行以下操作:- 按 Enter - 导致 YABOOT 的默认引导条目引导。
- 选择引导标签,后跟 Enter - 可使 YABOOT 引导与引导标签对应的操作系统。(在
boot:提示时,非系统 i 系统的按 Tab 键,用于有效引导标签列表。) - do nothing - 在 YABOOT 的超时时间(默认为 5 秒)后自动引导默认引导条目。
引导 Red Hat Enterprise Linux 后,应滚动一个或多个信息屏幕。最后,会显示login:提示或 GUI 登录屏幕(如果您安装了 X Window 系统并选择自动启动 X 窗口系统)。
第 13 章 在 IBM POWER 系统中在安装过程中更新驱动程序
- 将镜像文件放在安装程序可访问的位置:
- 在本地 IDE 硬盘驱动器中
- USB 存储设备,比如 USB 闪存驱动器
- 在您的本地网络中的 FTP、HTTP 或者 NFS 服务器中(或者记录 Internet 上的位置,其他人已放置镜像文件)
- 通过将 镜像 文件解压缩到来创建驱动程序更新磁盘:
- 一个 CD(如果您的计算机有 IDE 光驱)
- 一个 DVD(如果您的计算机有 IDE 光驱)
- 软盘
- USB 存储设备,比如 USB 闪存驱动器
- 从 映像文件创建初始 ramdisk 更新,并将它存储在 PXE 服务器上。这是只有在您无法使用任何其他方法执行驱动程序更新时才应考虑的高级过程。
13.1. 安装过程中驱动程序更新的限制
- 已在使用中的设备
- 您不能使用驱动程序更新来替换安装程序已经载入的驱动程序。反之,您必须使用安装程序在安装后载入和更新新驱动程序完成安装的安装,或者需要安装流程的新驱动程序,请考虑执行初始 RAM 磁盘更新 - 请参考 第 13.2.3 节 “准备初始 RAM 磁盘更新”。
- 有等同设备可用设备的设备
- 因为所有相同类型的设备都被一起初始化,所以如果安装程序为类似的设备载入了驱动程序,则无法为设备更新驱动程序。例如,假设一个系统有两个不同的网络适配器,其中一个有驱动程序更新。安装程序将同时初始化两个适配器,因此您将无法使用这个驱动程序更新。再次使用安装程序载入的驱动程序完成安装,并在安装后更新至新驱动程序,或使用初始 RAM 磁盘更新。
13.2. 准备在安装过程中驱动程序更新
- 使用镜像文件本身的方法
- 本地硬盘驱动器(仅限IDE)
- USB 存储设备(例如,USB 闪存驱动器)
- 网络(HTTP、FTP、NFS)
- 使用从镜像文件生成的驱动程序更新磁盘的方法
- floppy 磁盘
- CD(仅限IDE)
- DVD(仅限IDE)
- USB 存储设备(例如,USB 闪存驱动器)
- 使用初始 RAM 磁盘更新的方法
- PXE
13.2.1. 准备使用驱动程序更新镜像文件
13.2.1.1. 准备使用本地存储上的镜像文件
.iso。在以下示例中,该文件名为 dd.iso :
图 13.1. 保存驱动程序更新镜像文件的 USB 闪存驱动器的内容
[D]
OEMDRV,安装程序会自动检查它是否有驱动程序更新,并载入它检测到的任何变化。这个行为由 dlabel=on 引导选项控制,该选项默认启用。请参阅 第 13.3.1 节 “让安装程序自动查找驱动程序更新磁盘”。
13.2.1.2. 准备使用通过网络提供的镜像文件
13.2.2. 准备驱动程序更新磁盘
13.2.2.1. 在 CD 或者 DVD 中创建驱动程序更新磁盘
图 13.4. CD 或者 DVD 中典型的驱动程序更新磁盘
[D]
.iso 结尾的单个文件,则您尚未正确创建该磁盘,应重试。如果使用 GNOME 以外的 Linux 桌面,或者使用了其他操作系统,请确保选择类似于 从镜像刻录 的选项。
13.2.2.2. 在软盘或者 USB 存储设备中创建驱动程序更新磁盘
- 在可用驱动器中插入空白的、格式化的软盘,或者将空 USB 存储设备(如 USB 闪存驱动器)连接到您的计算机。请注意分配给此磁盘的设备名称,例如:系统上第一个软盘驱动器中的软盘的
/dev/fd0。如果您不知道设备名称,则变为 root 用户,在命令行中使用 fdisk -l 命令。您会看到系统中所有可用的存储设备的列表。当磁盘被删除或者存储设备断开连接时,比较 fdisk -l 插入磁盘或存储设备的存储设备将输出与这个命令的输出结果进行比较。 - 在命令行中,更改到包含镜像文件的目录。
- 在命令行中输入:
dd if=image of=device其中 image 是镜像文件,device 是设备名称。例如,要在软盘磁盘/dev/fd0上从驱动程序更新映像文件dd.iso创建驱动程序磁盘,您可以使用:dd if=dd.iso of=/dev/fd0
13.2.3. 准备初始 RAM 磁盘更新
- 将驱动程序更新镜像文件放在 PXE 服务器中。通常,您要通过从红帽或硬件供应商指定的位置下载到 PXE 服务器来完成此操作。驱动程序更新镜像文件的名称以
.iso结尾。 - 将驱动程序更新镜像文件复制到
/tmp/initrd_update目录中。 - 将驱动程序更新映像文件重命名为
dd.img。 - 在命令行中,切换到
/tmp/initrd_update目录,键入以下命令,然后按 Enter 键:find . | cpio --quiet -c -o | gzip -9 >/tmp/initrd_update.img
- 将文件
/tmp/initrd_update.img复制到包含您要用于安装的目标的目录中。该目录放置在/tftpboot/pxelinux/目录下。例如,/tftpboot/pxelinux/r5su3/可能会存放 Red Hat Enterprise Linux 5.3 服务器的 PXE 目标。 - 编辑
/tftpboot/pxelinux/pxelinux.cfg/default文件,使其包含您刚才创建的初始 RAM 磁盘更新的条目,格式为:label target-dd kernel target/vmlinuz append initrd=target/initrd.img,target/dd.img
其中 target 是您要用于安装的目标。
例 13.1. 从驱动程序更新镜像文件准备初始 RAM 磁盘更新
driver_update.iso 是一个驱动程序更新镜像文件,您从互联网下载到 PXE 服务器上的某一目录。您要通过 PXE 引导的目标位于 /tftpboot/pxelinux/r5su3中
$ cp driver_update.iso /tmp/initrd_update/dd.img
$ cd /tmp/initrd_update
$ find . | cpio --quiet -c -o | gzip -9 >/tmp/initrd_update.img
$ cp /tmp/initrd_update.img /tftpboot/pxelinux/r5su3/dd.img
/tftpboot/pxelinux/pxelinux.cfg/default 文件,并包含以下条目:
label r5su3-dd
kernel r5su3/vmlinuz
append initrd=r5su3/initrd.img,r5su3/dd.img
13.3. 在安装过程中执行驱动程序更新
- 让安装程序自动查找驱动程序更新磁盘。
- 安装程序会提示您输入驱动程序更新。
- 使用引导选项指定驱动程序更新磁盘。
- 使用引导选项指定网络中的驱动程序更新镜像文件。
- 选择一个包含驱动程序更新的 PXE 目标。
13.3.1. 让安装程序自动查找驱动程序更新磁盘
OEMDRV 的块设备。安装程序将自动检查该设备,并加载它检测到的任何驱动程序更新,且不会在此过程中提示。请参阅 第 13.2.1.1 节 “准备使用本地存储上的镜像文件” 来为安装程序准备存储设备。
13.3.2. 安装程序会提示您输入驱动程序更新
- 对于您选择的任何方法,正常启动安装。如果安装程序无法加载安装进程至关重要的硬件的驱动程序(例如,如果它无法检测到任何网络或存储控制器),它会提示您插入驱动程序更新磁盘:
图 13.5. 没有找到驱动程序的对话框
[D] - 选择 使用驱动程序磁盘 并引用 第 13.4 节 “指定驱动程序更新镜像文件或驱动程序更新磁盘的位置”。
13.3.3. 使用引导选项指定驱动程序更新磁盘
- 在安装过程开始时,键入 linux dd,然后按 Enter 键。安装程序会提示您确认有驱动程序磁盘:
图 13.6. 驱动程序磁盘提示符
[D] - 插入您在 CD、DVD、软盘或 USB 存储设备中创建的驱动程序更新磁盘,然后选择 。安装程序检查它可以检测到的存储设备。如果只有一个可以存放驱动程序磁盘的位置(例如,安装程序检测到软盘的存在,但没有其他存储设备),它将自动加载它在此位置找到的任何驱动程序更新。如果安装程序找到多个包含驱动程序更新的位置,它会提示您指定更新的位置。请参阅 第 13.4 节 “指定驱动程序更新镜像文件或驱动程序更新磁盘的位置”。
13.3.4. 使用引导选项指定网络中的驱动程序更新镜像文件
13.3.5. 选择一个包含驱动程序更新的 PXE 目标
- 在计算机的 BIOS 或引导菜单中选择网络启动。
指定这个选项的步骤因不同的计算机而异。有关您的计算机的具体信息,请参考您的硬件文档或硬件供应商。 - 在 preexecution 引导环境(PXE)中,选择您在 PXE 服务器上准备好的引导目标。例如,如果您标记此环境
r5su3-dd在 PXE 服务器上的/tftpboot/pxelinux/pxelinux.cfg/default文件中,请在提示符下键入r5su3-dd,然后按 Enter 键。
13.4. 指定驱动程序更新镜像文件或驱动程序更新磁盘的位置
图 13.7. 选择驱动程序磁盘源
[D]
图 13.8. 选择驱动程序磁盘分区
[D]
图 13.9. 选择 ISO 镜像
[D]
第 14 章 在 IBM POWER 系统上安装故障排除
http://www14.software.ibm.com/webapp/set2/sas/f/lopdiags/info/LinuxAlerts.html
14.1. 您无法引导 Red Hat Enterprise Linux
14.1.1. 您的系统显示信号 11 错误吗?
boot: 或 yaboot: 提示下键入以下命令(使用 elilo 为 Itanium 系统进行准备):
linux mediacheckhttp://www.bitwizard.nl/sig11/
14.2. 开始安装时出现问题
14.2.1. 引导到图形安装时出现问题
14.3. 安装过程中出现问题
14.3.1. 没有找到安装 Red Hat Enterprise Linux Error 信息的设备
Red Hat Enterprise Linux 的设备 的错误消息,则可能是安装程序无法识别的 SCSI 控制器。
14.3.2. 保存跟踪消息时没有磁盘驱动器
/tmp/anacdump.txt 的文件。出现对话框后,通过按 Ctrl+Alt+F2 键切换到新的 tty(虚拟控制台),scp 消息写入到 /tmp/anacdump.txt 到已知可正常工作的远程系统。
14.3.3. 分区表的问题
设备 hda 上的分区表是无法读取的。要创建必须初始化的新分区,请在此驱动器中丢失 ALL DATA。
14.3.4. IBM™ POWER 系统用户的其他分区问题
- 一个
/(root)分区 - 类型为 swap 的 <swap> 分区
- PPC PReP Boot 分区。
- 一个 /boot/ 分区。
14.3.5. 是否查看 Python 错误?
/tmp/目录时,可能会出现这个错误。错误可能类似如下:
Traceback (innermost last):
File "/var/tmp/anaconda-7.1//usr/lib/anaconda/iw/progress_gui.py", line 20, in run
rc = self.todo.doInstall ()
File "/var/tmp/anaconda-7.1//usr/lib/anaconda/todo.py", line 1468, in doInstall
self.fstab.savePartitions ()
File "fstab.py", line 221, in savePartitions
sys.exit(0)
SystemExit: 0
Local variables in innermost frame:
self: <fstab.GuiFstab instance at 8446fe0>
sys: <module 'sys' (built-in)>
ToDo object:  (itodo  ToDo  p1  (dp2  S'method'  p3  (iimage  CdromInstallMethod
p4  (dp5  S'progressWindow'  p6   <failed>
/tmp/ 的链接到其他位置或者创建之后已更改的系统。这些符号链接或已更改的链接会在安装过程中无效,因此安装程序无法写入信息并失败。
http://www.redhat.com/support/errata/
http://fedoraproject.org/wiki/Anaconda
http://bugzilla.redhat.com/bugzilla/
http://www.redhat.com/apps/activate/
14.4. 安装后的问题
14.4.1. 无法从 *NWSSTG 的 IPL
14.4.2. 引导至图形环境
/etc/inittab 来编辑文件。完成后,重启计算机。下次登录时,您会看到图形登录提示。
/etc/inittab 将打开。在第一个屏幕中,会出现类似如下的文件部分:
# Default runlevel. The runlevels used by RHS are:
#   0 - halt (Do NOT set initdefault to this)
#   1 - Single user mode
#   2 - Multiuser, without NFS (The same as 3, if you do not have networking)
#   3 - Full multiuser mode
#   4 - unused
#   5 - X11
#   6 - reboot (Do NOT set initdefault to this)
#  id:3:initdefault:
3:initdefault: 中的数字从 3 改为 5。
3 更改为 5。
id:5:initdefault: 14.4.3. X Window 系统(GUI)的问题.
14.4.4. X Server Crashing 和 Non-Root 用户的问题
df -h
-h 选项),请通过在 shell 提示符下键入 man df 来参考 df man page。
/home/ 和 /tmp/ 分区有时可使用用户文件填满。您可以通过删除旧文件在该分区上创建一些空间。释放一些磁盘空间后,尝试以之前失败的用户运行 X。
14.4.5. 当您尝试登录时出现问题
# 提示后,您必须键入 passwd root,这样您就可以为 root 输入新密码。此时,您可以键入 shutdown -r 来使用新的 root 密码重新引导系统。
http://hardware.redhat.com/hcl/
14.4.6. 您的打印机不工作
14.4.7. 在启动时基于 Apache 的 httpd 服务/电子邮件 Hangs
/etc/hosts 文件中以下行:
127.0.0.1 localhost.localdomain localhost
第 15 章 IBM Power 系统的其他引导选项
boot: 提示时调用的命令。
引导时间命令参数
- askmethod
- 这个命令要求您选择要从 Red Hat Enterprise Linux CD-ROM 引导时使用的安装方法。
- dd
- 这个参数会导致安装程序提示您使用驱动程序 diskette。
- dd=url
- 这个参数会导致安装程序提示您使用指定 HTTP、FTP 或者 NFS 网络地址中的驱动程序镜像。
- display=ip:0
- 这个命令允许远程显示转发。在这个命令中,ip 应该替换为您希望显示的系统 IP 地址。在您要显示的系统中,您必须执行命令 xhost +remotehostname,其中 remotehostname 是您要运行原始显示的主机的名称。使用 xhost +remotehostname 命令限制对远程显示终端的访问,并且不允许来自任何未明确授权远程访问的任何人或任何系统的访问。
- driverdisk
- 该命令执行与 dd 命令相同的功能,并提示您在安装 Red Hat Enterprise Linux 时使用驱动程序 diskette。
- ide=nodma
- 这个命令禁用所有 IDE 设备上的 DMA,并在遇到 IDE 相关问题时非常有用。
- mediacheck
- 这个命令为您提供了测试安装源的完整性的选项(如果基于 ISO 的方法)。该命令可用于 CD、DVD、硬盘 ISO 和 NFS ISO 安装方法。在您尝试安装前,先验证 ISO 镜像是否完整,有助于避免安装期间经常遇到的问题。
- mem=xxxm
- 这个命令允许您覆盖内核检测到机器的内存量。对于一些旧的系统,当只检测到 16 个 mb 个系统,且对于某些使用主内存共享视频内存的新机器,则可能需要这样做。执行此命令时,xxx 应替换为以 MB 为单位的内存量。
- mpath
- 启用多路径支持。重要 - 在多路径设备中安装必须如果在可通过多路径访问的网络存储设备中安装 Red Hat Enterprise Linux 5.11,则必须使用这个选项引导安装过程。如果您没有在引导时指定这个选项,安装将失败,或者系统在安装完成后无法引导。
- noeject
- 在安装后不要弹出光驱。这个选项在远程安装中非常有用。
- nopass
- 这个命令禁用将键盘和鼠标信息传递给安装程序的 stage 2。在执行网络安装时,可用于在安装程序的第 2 阶段测试键盘和鼠标配置屏幕。
- nopcmcia
- 这个命令会忽略系统中的任何 PCMCIA 控制器。
- noprobe
- 这个命令禁用硬件检测,并提示用户获取硬件信息。
- noshell
- 这个命令禁用在安装过程中在虚拟控制台 2 上的 shell 访问。
- nostorage
- 这个命令禁用 SCSI 和 RAID 存储硬件的探测。
- nousb
- 这个命令禁用在安装过程中载入 USB 支持。如果安装程序在进程早期挂起,这个命令可能会有帮助。
- nousbstorage
- 该命令在安装程序的加载程序中禁用 usbstorage 模块。在 SCSI 系统中,设备排序可能会帮助。
- rescue
- 这个命令运行救援模式。有关救援模式的详情,请参考 第 27 章 基本系统恢复。
- resolution=
- 告诉安装程序运行哪个视频模式。它接受任何标准解析,如
640x480、800x6001024x768等等。 - serial
- 这个命令会打开串口控制台支持。
- text
- 这个命令禁用图形安装程序,并强制安装程序在文本模式中运行。
- updates
- 这个命令会提示您为 anaconda 安装程序插入包含更新(错误修复)的软盘 diskette。如果您要执行网络安装,且已在服务器的
rhupdates/中放置了更新镜像内容,则不需要它。 - vnc
- 这个命令允许您从 VNC 服务器安装。
- vncpassword=
- 这个命令设定用于连接 VNC 服务器的密码。
部分 III. IBM System z 架构 - 安装和引导
第 16 章 开始使用的步骤
16.1. 预安装
http://www.redbooks.ibm.com/
- 重要 - System z 中未格式化的 DASD在使用 kickstart 和 cmdline 用户界面安装时,Red Hat Enterprise Linux 5 无法使用未格式化的 DASD。有关确保在安装过程中格式化 DASD 的方法,请参考 第 31.4 节 “Kickstart 选项” 中的 clearpart 文档。
- 最少获取 512 MB RAM(强烈建议使用 1 GB)来指定 Linux 虚拟机。
- 确定您是否需要交换空间,以及是否如此。虽然可能(和建议)将足够的内存分配给 z/VM,并让 z/VM 进行必要的交换,但在有些情况下,所需 RAM 量不能预测。此类实例应逐一检查。
- 决定在运行操作系统的环境(在 LPAR 或作为客户机操作系统在一个或多个虚拟机上)。
- 最后,务必要查看第 3.3 到 3.8 节,以及 System z Red Hatbook 的 IBM Linux 第 5 和 6 章介绍了不同的配置,并在 zSeries 平台上提供安装场景,以及如何设置初始 LPAR 或 Linux 虚拟机(z/VM)。
16.2. System z 的额外硬件准备
16.3. 引导方法的基本概述
kernel.img)、ram 磁盘(initrd.img);如果使用 z/VM,可选的 CMS 配置文件(redhat.conf)和一个参数文件。提供了参数和 CMS 配置文件示例(redhat.parm 和 redhat.conf)。您应该编辑 CMS 配置文件并添加您的 DASD 信息。您可能还想添加有关网络配置的一些信息。在 IBM System z 上启动该操作后,将配置网络。然后,您可以在另一台计算机上使用 ssh 登录到您的安装镜像。现在,您可以启动一个安装脚本来安装 Red Hat Enterprise Linux。
16.4. 准备网络安装
/location/of/disk/space。通过 FTP、NFS 或 HTTP 公开提供的目录将指定为 /publicly/available/directory。例如,/location/of/disk/space 可能是一个您创建名为 /var/isos 的目录。对于 HTTP 安装,/publicly/available/directory 可能为 /var/www/html/rhel5。
- 使用以下命令(对于 DVD)从安装磁盘创建 iso 镜像:dd if=/dev/dvd of=/location/of/disk/space/RHEL5.iso其中 dvd 是指您的 DVD 驱动器设备。
16.4.1. 准备 FTP 和 HTTP 安装
RELEASE-NOTES 文件以及所有操作系统的 ISO 镜像中的所有文件。- 插入 CD-ROM 或 DVD-ROM。
- 挂载 /media/cdrom
- 如果要安装服务器变体,请运行 cp -a /media/cdrom/Server < target-directory>如果要安装客户端变体,请运行 cp -a /media/cdrom/Client < target-directory>
- cp /media/cdrom/RELEASE-NOTES* < ;target-directory>(仅限安装 CD 1 或 DVD)
- cp /media/cdrom/images & lt;target-directory& gt;(仅安装 CD 1 或 DVD)
- umount /media/cdrom
/publicly/available/directory 目录通过 FTP 或 HTTP 共享,并验证客户端访问。您可以检查该目录是否可从服务器本身访问,然后从您要安装到的同一子网上的另一台计算机访问。
16.4.2. 准备 NFS 安装
- 对于 DVD:mv /location/of/disk/space/RHEL5.iso /publicly/available/directory/
- 对于 CDROM:mv /location/of/disk/space/disk*.iso /publicly/available/directory/
/publicly/available/directory 目录通过 /etc/exports 中的条目通过 NFS 导出。
16.5. 准备硬盘安装
- 使用一组 CD-ROM 或 DVD - 从每个安装 CD-ROM 或 DVD 创建 ISO 镜像文件。对于每个 CD-ROM(对于 DVD 而言),在 Linux 系统中执行以下命令:
dd if=/dev/cdrom of=/tmp/file-name.iso当到达 CD-ROM 的末尾数据时,该命令将引发错误消息,这样可忽略它们。现在,创建的 ISO 镜像可以被用来安装,当复制到正确的 DASD 后。 - 使用 ISO 镜像 - 将这些传输给要安装的系统(或正确的 DASD 或者 SCSI 设备)。在开始安装前验证 ISO 镜像是否完好,有助于避免问题。要在执行安装前验证 ISO 镜像是否完好,请使用 md5sum 程序(many md5sum 程序可用于各种操作系统)。md5sum 程序应该与 ISO 镜像位于同一个 Linux 计算机上。使正确的 DASD 或 SCSI LUN 可以被新虚拟机或 LPAR 访问,然后继续安装。另外,如果安装的位置中存在名为
updates.img的文件,它将用于对anaconda的更新,即安装程序。有关安装 Red Hat Enterprise Linux 的各种方法以及如何应用安装程序更新的详情,请参考anacondaRPM 软件包中的install-methods.txt。
16.6. 在 z/VM 中安装
i cms
vmlink tcpmaint 592 592
set qioassist off
kernel.img 和 initrd.img)的机器,登录并执行以下命令。如果要覆盖现有的 kernel.img 、initrd.img、generic.prm 或者 redhat.exec 文件,使用 (repl 选项:
cd /location/of/boot/images//images/
locsite fix 80
bin
get kernel.img (repl
get initrd.img (repl
ascii
get generic.prm (repl
get redhat.exec (repl
quit
.parm 文件,如 root=/dev/ram0 ro ip=off ramdisk_size=40000,以及不分配给变量的单个参数,如 vnc。z/VM 安装中使用的两个参数都需要将安装程序添加到 .parm 文件中:
CMSDASD=191 CMSCONFFILE=redhat.conf
变量="value" 对的 bash 风格,每行一个。
redhat.parm 文件示例:
root=/dev/ram0 ro ip=off ramdisk_size=40000
CMSDASD=191 CMSCONFFILE=redhat.conf
vnc
redhat.exec 文件的内容为:
/* */
'cl rdr'
'purge rdr all'
'spool punch * rdr'
'PUNCH KERNEL IMG A (NOH'
'PUNCH REDHAT PARM A (NOH'
'PUNCH INITRD IMG A (NOH'
'ch rdr all keep nohold'
'i 00c'
redhat.conf 文件示例:
HOSTNAME="foobar.systemz.example.com"
DASD="200-203"
NETTYPE="qeth"
IPADDR="192.168.17.115"
SUBCHANNELS="0.0.0600,0.0.0601,0.0.0602"
PORTNAME="FOOBAR"
NETWORK="192.168.17.0"
NETMASK="255.255.255.0"
BROADCAST="192.168.17.255"
SEARCHDNS="example.com:systemz.example.com"
GATEWAY="192.168.17.254"
DNS="192.168.17.1"
MTU="4096"
- DASD=dasd-list其中 dasd-list 代表 Red Hat Enterprise Linux 要使用的 DASD 设备列表。虽然如果省略了这个参数,但最好将 DASD= 参数包含 DASD= 参数,但当将新 DASD 添加到 Red Hat Enterprise Linux 客户机时,这个设备名称可能会有所不同。这可能导致无法使用的系统。另外,在基于 SAN 的环境中,在基于 LPAR 的安装中自动观察到的副作用,因为 DASD 和 SCSI 卷的数量可能会意外大,并包括当前由其他用户使用的卷。特别是,强烈建议在 kickstart 安装过程中自动退出(可能启用了自动分区清除所有分区)。
- root=file-system其中 文件系统 代表可以找到 root 文件系统的设备。出于安装目的,应该将其设置为 /dev/ram0,这是包含 Red Hat Enterprise Linux 安装程序的 ramdisk。
- SUBCHANNELS=为各种网络接口提供所需的设备总线 ID。
qeth: SUBCHANNELS="read_device_bus_id,write_device_bus_id, data_device_bus_id"
lcs: SUBCHANNELS="read_device_bus_id,write_device_bus_id"
例如(一个 qeth SUBCHANNEL 声明示例):SUBCHANNELS=0.0.0600,0.0.0601,0.0.0602
- HOSTNAME=字符串其中 string 是新安装的 Linux guest 的主机名。
- NETTYPE=type其中 type 必须是以下之一: lcs 或 qeth。为以下选择
lcs:- OSA-2 Ethernet/Token Ring
- 在非QDIO 模式中的 OSA-Express Fast Ethernet
- 在非QDIO 模式中的 OSA-Express High Speed Token Ring
- 非QDIO 模式中的千兆位以太网
为以下选择qeth:- osa-Express Fast Ethernet
- 千兆位以太网(包括 1000Base-T)
- 高peed Token Ring
- HiperSockets
- ATM(运行以太网 LAN 模拟)
- IPADDR=IP其中 IP 是新 Linux 客户机的 IP 地址。
- NETWORK=network其中 network 是您的网络的地址。
- NETMASK=netmask其中 netmask 是子网掩码。
- BROADCAST=broadcast其中 broadcast 是广播地址。
- GATEWAY=gw其中 gw 是
eth设备的 gateway-IP。 - MTU=mtu其中 mtu 是此连接的最大传输单元(MTU)。
- DNS=server1:server2::serverN其中 server1:server2::serverN 是 DNS 服务器的列表,用冒号隔开。例如:DNS=10.0.0.1:10.0.0.2
- SEARCHDNS=domain1:domain2::domainN其中 domain1:domain2::domainN 是搜索域的列表,其用冒号隔开。例如:SEARCHDNS=example.com:example.org
- PORTNAME=osa_portname | lcs_portnumber此变量支持在 qdio 模式或非qdio 模式中操作的 OSA 设备。当使用 qdio 模式时: osa_portname 是 OSA 设备在 qeth 模式中运行时指定的 portname。PORTNAME 仅在没有 APARs VM63308 和 PQ73878 的情况下需要 z/VM 4.3 或更高版本。当使用非qdio 模式时: lcs_portnumber 将相对端口号作为整数,在 0 到 15 之间。
- FCP_n="device_number SCSI_ID WWPN SCSI_LUN FCP_LUN"这些变量可用于带有 FCP 设备的系统,以预配置 FCP 设置,然后在安装过程中可在 anaconda 中进行编辑。示例值可能类似如下:
FCP_1="0.0.5000 0x01 0x5105074308c212e9 0x0 4010"- N 是一个整数值(如 FCP_1、FCP_ 2、..)
- device_number 用于指定 FCP 设备的地址(例如,设备 5000 的 0.0.5000 )。
- SCSI_ID 在十六进制值中指定,通常连续值(如 0x01,0x02 ... )用于多个 FCP_ 变量。
- WWPN 是用于路由的全局端口名称(通常与多路径结合使用),它是 16 位十六进制值(如 0x5105074308c212e9)。
- SCSI_LUN 代表本地 SCSI 逻辑单元值,并指定为十六进制值,通常是连续的值(如 0x00, 0x01, ...)用于多个 FCP_ 变量。
- FCP_LUN 代表存储逻辑单元标识符,并指定为十六进制值(如 0x4010)。
备注FCP 参数(FCP_1、FCP_2、..)中使用的每个值都特定于站点,它们通常由 FCP 存储管理员提供。
- RUNKS=值如果您要在 3270 终端中以非互动(kickstart)模式运行安装程序,其中 值为 1,否则为 0。
- cmdline当指定 cmdline 时,3270 终端输出变得更易阅读,因为安装程序禁用适用于 unix 类似控制台但 3270 控制台不支持的大多数转义终端序列。
- 在使用 cmdline 选项之一 RUNKS 前,请确保您的 kickstart 文件包含所有必需的参数。
parm 文件中省略了使网络正常工作所需的网络参数,则会在安装过程中显示提示。
i cms
redhat.exec,其中包含 IPL 内核镜像并开始安装所需的命令。在 IPLed CMS 之后,在 3270 控制台中输入 redhat,然后按 Enter 键来执行此脚本。
parm 文件中指定所有必要信息。
16.7. 使用 Red Hat Enterprise Linux LPAR CD 在 LPAR 中安装
- 以足够特权的用户身份登录硬件主控制台(HMC)或 Support Element Workplace(SEW)。建议使用 SYSPROG 用户。
- 选择 ,然后选择要安装到的 LPAR。使用右侧框中的箭头进入 菜单。
- 双击 。
- 在随后的对话框中,选择 Local CD-ROM,然后单击 Continue。
- 在随后的对话框中,保留默认选择
generic.ins,然后单击 Continue。 - 跳过至 第 16.9 节 “在 LPAR 中安装(通用步骤)” 以继续。
16.8. 在没有 Red Hat Enterprise Linux for System z CD-ROM 的情况下在 LPAR 中安装
- 以足够权限的用户身份登录 Support Element Workplace,将新操作系统安装到 LPAR。
- 选择 ,然后选择您要安装到的 LPAR。
- 使用右侧框中的箭头进入 菜单。
- 双击 Load from CD-ROM 或 Server。
- 在随后的对话框中,选择 FTP Source,然后输入以下信息:
- 主机计算机:
- 您要从中安装的 FTP 服务器的主机名或 IP 地址(例如,
ftp.redhat.com) - 用户 ID:
- FTP 服务器上的用户名(或 匿名)
- 密码:
- 您的密码(如果您以匿名身份登录,请使用您的电子邮件地址)
- 帐户:
- 保留此字段为空
- 文件位置(可以留空):
- 为 System z 维护 Red Hat Enterprise Linux 的 FTP 服务器上的目录(例如:
/pub/redhat/linux/rawhide/s390x)
- 点
- 在随后的对话框中,保留默认选择
redhat.ins并单击 。 - 请参阅 第 16.9 节 “在 LPAR 中安装(通用步骤)” 以继续。
16.9. 在 LPAR 中安装(通用步骤)
16.10. 您是否具有强大的磁盘空间?
第 17 章 在 IBM System z 系统上安装
- 熟悉安装程序的用户界面
- 启动安装程序
- 选择安装方法
- 在安装过程中的配置步骤(语言、键盘、鼠标、分区等)
- 完成安装
17.1. 图形安装程序用户界面
17.2. 文本模式安装程序用户界面
图 17.1. 安装程序小部件,如 Disk Druid所示
[D]
- text Widget - 文本小部件是显示文本的屏幕区域。有时候,文本小部件也可以包含其他小部件,如复选框。如果文本小部件包含的信息比保留空间多,则会出现一个滚动条;如果您将光标定位到文本小部件中,您可以使用 Up 和 Down 箭头键滚动浏览所有可用信息。通过 # 字符在滚动栏中显示您的当前位置,该字符在滚动时向上和向下滚动条。
- 滚动条 - Scroll bars 显示在窗口侧或底部,以控制列表或文档的主机当前位于窗口的框中。通过滚动条,您可以轻松地移动到文件的任意部分。
- 按钮小部件 - Button widgets 是与安装程序交互的主要方法。您可以使用 Tab 和 Enter 键浏览安装程序的窗口,浏览这些按钮。在突出显示按钮时可以选择按钮。
- 光标 - 虽然不是小部件,但光标用于选择(并与之交互)特定小部件。由于光标从小部件移到小部件,可能会导致小部件更改颜色,或者光标本身可能仅出现在小部件或旁边。图 17.1 “安装程序小部件,如 Disk Druid所示”,在" "按钮上显示光标。
17.2.1. 使用键盘来 Navigate
17.3. 运行安装程序
parm 文件中设置 DISPLAY= 变量。基于文本的安装与图形安装类似,但图形安装提供了更多软件包选择详情,以及基于文本的安装中不可用的选项。强烈建议您尽可能使用图形安装。
17.3.1. 使用 X11 转发安装
ssh -X linuxvm.example.comX 选项启用 X11 转发。
DISPLAY= 变量来防止这一点。在参数文件中添加参数 DISPLAY=workstationname:0.0,将 workstationname 替换为连接到 Linux 镜像的客户端工作站的主机名。允许 Linux 镜像在本地工作站上使用命令 xhost +linuxvm 连接到 workstation。
parm 文件中的 DISPLAY= 变量设置。如果执行虚拟机安装,请再次运行安装,以在读取器中载入新的 parm 文件。此外,请确保在 workstation 计算机上执行 X11 转发显示时 X 服务器已启动。最后,确保选择了 NFS、FTP 或 HTTP 协议,因为所有 3 种方法都支持图形安装。
17.3.2. 使用 VNC 安装
17.4. 从硬盘(DASD)安装
askmethod 引导选项并选择了 )。通过此对话框,您可以为安装 Red Hat Enterprise Linux 的磁盘分区和目录命名。如果您使用 repo=hd 引导选项,则代表您已指定了一个分区。
/。如果 ISO 镜像位于挂载分区的子目录中,输入该分区中包含 ISO 镜像的目录名称。例如,如果 ISO 镜像所在的分区通常挂载为 /home/,并且镜像位于 /home/new/ 中,您将输入 /new/。
17.5. 通过 NFS 安装
example.com 中的名为 eastcoast.com 的主机安装,请在 NFS 服务器 字段中输入 eastcoast.example.com。
/export/directory/。
图 17.2. NFS Setup 对话框
[D]
17.6. 通过 FTP 安装
askmethod 引导选项并选择了 )。通过此对话框,您可以识别要从中安装 Red Hat Enterprise Linux 的 FTP 服务器。如果您使用 repo=ftp 引导选项,则代表您已指定了一个服务器和路径。
图 17.3. FTP Setup Dialog
[D]
/ 目录的目录的名称。例如,如果 FTP 站点包含目录 /mirrors/redhat/arch/ variant ;/,输入 /mirrors/redhat/arch/ (其中 arch 替换为您系统的架构类型,如 i386、ia64、ppc 或 s390x,变体是您要安装的变量,如客户端、服务器、工作站等)。如果一切正确指定,则会出现一个消息框,指示正在从服务器检索文件。
17.7. 通过 HTTP 安装
askmethod 引导选项并在 安装方法 对话框中选择了 )时,才会应用 HTTP 对话框。此对话框提示您输入从中安装 Red Hat Enterprise Linux 的 HTTP 服务器的信息。如果您使用 repo=http 引导选项,则代表您已指定了一个服务器和路径。
/ 目录的名称。例如,如果 HTTP 站点包含目录 /mirrors/redhat/arch/,请输入 /mirrors/redhat/arch/ (其中 arch 替换为系统的架构类型,如 i386、ia64、ppc 或 s390x,变体 是您要安装的变体,如客户端、服务器、工作站等)。如果一切正确指定,则会出现一个消息框,指示正在从服务器检索文件。
图 17.4. HTTP Setup Dialog
[D]
17.8. 欢迎使用 Red Hat Enterprise Linux
[D]
17.9. 语言选择
图 17.5. 语言选择
[D]
17.10. 输入安装号
图 17.6. 安装号
[D]
17.11. 磁盘分区设置
/var/cache/yum/。如果您手动为系统分区并创建独立 /var/ 分区,请务必创建足够大的分区(3.0 GB 或更多)来下载软件包更新。
图 17.7. 磁盘分区设置

[D]
mapper/mpath 的设备。
17.12. 高级存储选项
17.12.1. FCP 设备
图 17.8. 高级存储选项
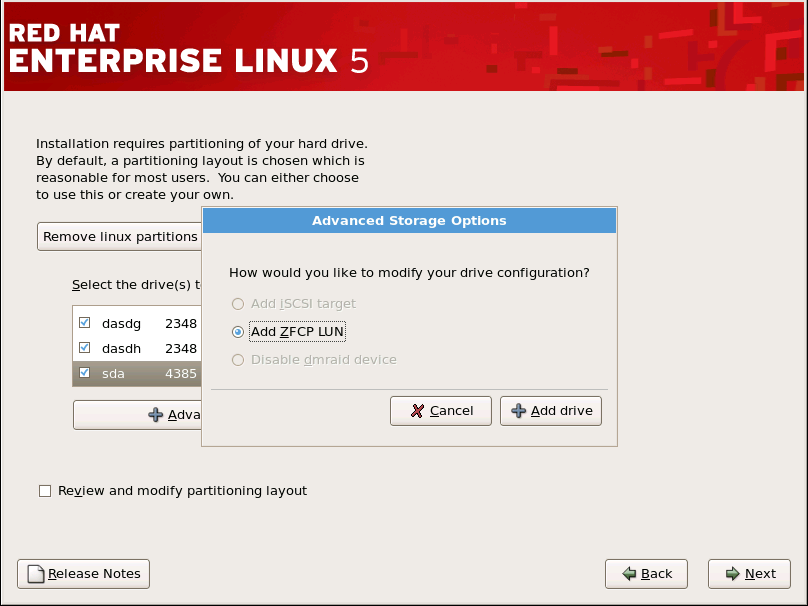
[D]
图 17.9. 配置 FCP 设备
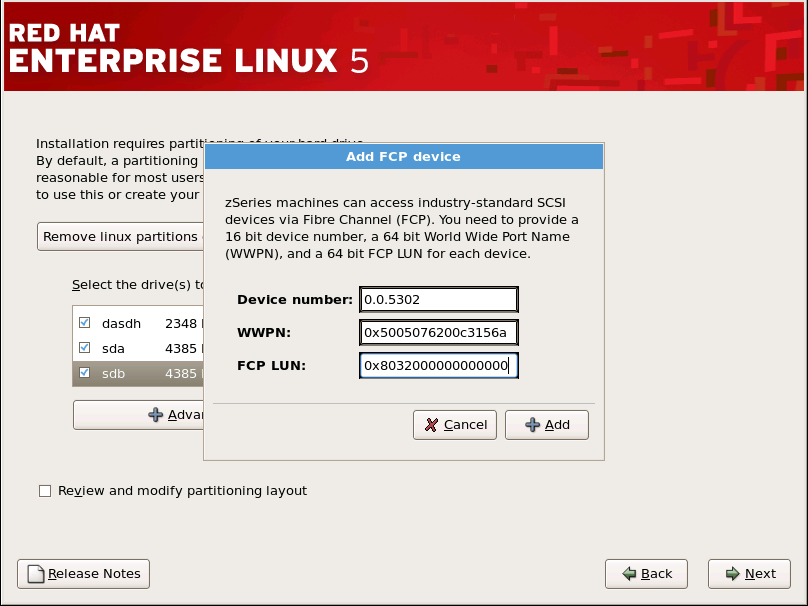
[D]
图 17.10. 配置 FCP 设备
[D]
17.13. 创建默认布局
- 删除所选驱动器中的所有分区并创建默认布局 - 选择这个选项以删除硬盘中的所有分区(其中包括由其它操作系统创建的分区,如 z/VM 或 z/OS)。警告如果您选择这个选项,安装程序会删除所选 DASD 和 SCSI 存储驱动器中的所有数据。如果您有要保留在要安装 Red Hat Enterprise Linux 的存储驱动器的信息,则不要选择这个选项。
- 在所选驱动器中删除 Linux 分区并创建默认布局 - 选择这个选项只删除 Linux 分区(从之前的 Linux 安装中创建的分区)。这不会删除您可能在存储驱动器中可能已有的其他分区(如 z/VM 或 z/OS 分区)。
- 在所选驱动器上使用可用空间并创建默认布局 - 选择这个选项来保留您当前的数据和分区,假设您在存储驱动器上有足够的可用空间。
图 17.11. 创建默认布局
[D]
17.14. 对您的系统进行分区
图 17.12. 使用 磁盘 Druid 进行分区
[D]
17.14.1. DASD 设备的图形显示
/boot 关联。内核文件和引导装载程序扇区将与此设备相关联。在大多数情况下,将使用第一个 DASD 或 SCSI LUN,但在一些不常的情况下,情况可能并非如此。重新安装后的系统将使用设备号。
17.14.2. disk Druid 's Buttons
- :用来修改分区部分中当前选择 的分区 的属性。选择 将打开一个对话框。根据分区信息是否已写入磁盘,可以编辑某些或所有字段。
- :用来为任何或所有磁盘分区提供冗余。只有在您有使用 RAID 体验时才应使用。有关 RAID 的详情,请查看 Red Hat Enterprise Linux 部署指南。要制作 RAID 设备,您必须首先创建软件 RAID 分区。创建两个或多个软件 RAID 分区后,选择 将软件 RAID 分区加入到 RAID 设备中。
17.14.3. 分区字段
- 设备 :此字段显示分区的设备名称。
- 挂载点/RAID/Volume :挂载点是存在卷的目录层次结构中的位置;该卷在这个位置上"挂载"。此字段表示分区挂载位置。如果分区存在,但未设置,则需要定义其挂载点。双击 分区或 。
- 键入 :此字段显示分区的文件系统类型(例如:ext2、ext3 或 vfat)。
- 格式 :此字段显示创建的分区是否将被格式化。
- 大小(MB) :此字段显示分区的大小(以 MB 为单位)。
- 启动 :此字段显示在分区开始的硬盘上的柱面。
- 结束 :此字段显示在分区结束的硬盘上的柱面。
17.14.4. 推荐的分区方案
- "章节 7.Linux swapping 在 IBM System z 上的 IBM Redbook Linux 中:性能测量和调整 [IBM Form Number SG24-6926-01],[ISBN 0738485586]可从 获取 http://www.redbooks.ibm.com/abstracts/sg246926.html
- IBM Systems Information Center 中的 Linux z 性能,网址为 http://publib.boulder.ibm.com/infocenter/systems/index.jsp?topic=/liaag/lcon_Linux_on_System_z_performance.htm
- 在虚拟机下运行时,可从以下位置获得 Linux 性能 : http://www.vm.ibm.com/perf/tips/linuxper.html
17.14.5. 编辑分区
17.15. 网络配置
图 17.13. 网络配置
[D]
图 17.14. 编辑网络设备
[D]
17.16. 时区配置
- 使用您的鼠标,单击交互地图来选择特定的城市(以黄色点表示)。此时会出现一个红色 X 来代表您的选择。
- 您还可以滚动屏幕底部的列表来选择您的时区。使用鼠标,单击位置以突出显示您的选择。
17.17. 设置 Root 密码
图 17.15. Root 密码
[D]
17.18. 软件包组选择
图 17.16. 软件包组选择
[D]
图 17.17. 软件包组详情
[D]
17.19. 准备安装
17.19.1. 准备安装
/root/install.log 中找到安装的完整日志。
17.20. 安装软件包
17.21. 安装完成
/etc/securetty 中列出的其他设备。
第 18 章 删除 Red Hat Enterprise Linux
第 19 章 参数文件示例
.parm 文件应包含真实内核参数,如 root=/dev/ram0 ro ip=off ramdisk_size=40000,以及不分配给变量的单个参数,如 vnc。将安装程序指向新配置文件的两个新参数需要添加到 .parm 文件中。它们是 CMSDASD 和 CMSCONF。
CMSDASD=cmsdasd_address- 其中 cmsdasd_address 代表 CMS DASD 设备的设备 ID 列表,其中包含配置文件。这通常是 CMS 用户的 'A' 磁盘。这个选项只适用于有 CMS 格式化的磁盘(z/VM)可用的用户。例如:
CMSDASD=191 CMSCONFFILE=configuration_file- 其中 configuration_file 代表配置文件的名称。这个值必须使用小写字符指定。它以 Linux 风格的文件名格式指定。CMS 文件
REDHAT CONF被指定为redhat.conf。这个选项只适用于有 CMS 格式化的磁盘(z/VM)可用的用户。例如:CMSCONFFILE=redhat.conf DASD=dasd-list- 其中 dasd-list 代表 Red Hat Enterprise Linux 要使用的 DASD 设备列表。虽然如果省略了这个参数,但最好使用 DASD= 参数自动探测到
DASD=参数,但当向客户端添加新 DASD 时,设备号(因此设备名称)可能会有所不同。这可能导致无法使用的系统。例如:DASD=0.0.0100,0.0201-0.0.0204
SUBCHANNELS=- 为各种网络接口提供所需的设备总线 ID。
qeth: SUBCHANNELS="read_device_bus_id,write_device_bus_id,
      data_device_bus_id"
lcs: SUBCHANNELS="read_device_bus_id,write_device_bus_id"
由于 qeth 命令行的长度,它已被分成两行。注意CTC 和 NETIUCV 驱动程序已弃用,在 Red Hat Enterprise Linux 中不再受支持。例如(一个 qeth SUBCHANNEL 声明示例):SUBCHANNELS=0.0.0600,0.0.0601,0.0.0602
HOSTNAME=字符串- 其中 string 是新安装的 Linux guest 的主机名。
NETTYPE=type- 其中 type 必须是以下之一: qeth 或 lcs。
IPADDR=IP- 其中 IP 是新 Linux 客户机的 IP 地址。
NETWORK=网络- 其中 network 是您的网络的地址。
NETMASK=netmask- 其中 netmask 是子网掩码。
BROADCAST=broadcast- 其中 broadcast 是广播地址。
GATEWAY=gw- 其中 gw 是 eth 设备的 gateway-IP。
MTU=mtu- 其中 mtu 是此连接的最大传输单元(MTU)。
DNS=server1:server2:additional_server_terms:serverN- 其中 server1:server2:additional_server_terms:serverN 是 DNS 服务器的列表,用冒号隔开。例如:
DNS=10.0.0.1:10.0.0.2
SEARCHDNS=domain1:domain2:additional_dns_terms:domainN- 其中 domain1:domain2:additional_dns_terms:domainN 是搜索域的列表,用冒号隔开。例如:
SEARCHDNS=example.com:example.org
PORTNAME=osa_portname | lcs_portnumber- 该变量支持在 qdio 模式或非 qdio 模式中操作的 OSA 设备。当使用 qdio 模式时: osa_portname 是 OSA 设备在 qeth 模式中运行时指定的 portname。PORTNAME 仅在没有 APARs VM63308 和 PQ73878 的情况下需要 z/VM 4.3 或更高版本。当使用非qdio 模式时: lcs_portnumber 将相对端口号作为整数,在 0 到 15 之间。
PORTNO=portnumber- 当在 z/VM 下安装时,您可以将
PORTNO=0(使用端口 0)或PORTNO=1(使用 port 1)添加到 CMS 配置文件,以避免提示输入该模式。PORTNO=设置也适用于 LPAR,但必须直接将其放置在 parmfile 中,而不是 CMS 配置文件。 LAYER2=- 将
LAYER2=0或LAYER2=1添加到 CMS 配置文件,以便在 System z 客户端上安装时使模式保持持久性。当 OSA 处于第 3 层模式时,使用LAYER2=0,当 OSA 处于第 2 层 VSWITCH=- 当指定
LAYER2=1时,您也可以在连接到 VSWITCH 时指定VSWITCH=1,或者在直接连接到 OSA 时指定VSWITCH=0。 MACADDR=MAC_address- 当指定
LAYER2=1和 VSWITCH 不在使用时,您可以使用此参数在 CMS 配置文件中指定 MAC 地址。 - FCP_* (FCP_1, FCP_2, ...)
- 这些变量可用于带有 FCP 设备的系统,以预配置 FCP 设置(可以在安装过程中修改它们)。
root=/dev/ram0 DASD=200
redhat.parm 文件示例:
root=/dev/ram0 ro ip=off ramdisk_size=40000
CMSDASD=191 CMSCONFFILE=redhat.conf
vnc
redhat.conf 文件示例(指向 redhat.parm中的 CMSCONFFILE)
DASD=200
HOSTNAME="foobar.systemz.example.com"
DASD="200-203"
NETTYPE="qeth"
IPADDR="192.168.17.115"
SUBCHANNELS="0.0.0600,0.0.0601,0.0.0602"
PORTNAME="FOOBAR"
NETWORK="192.168.17.0"
NETMASK="255.255.255.0"
BROADCAST="192.168.17.255"
SEARCHDNS="example.com:systemz.example.com"
GATEWAY="192.168.17.254"
DNS="192.168.17.1"
MTU="4096"
第 20 章 其他引导选项
boot: 提示时调用的命令。
zipl.conf 文件中为 z/IPL 引导装载程序存储内核引导选项,也可以手动编辑 文件或使用 zipl 工具。
zipl.conf 中的内核参数 parameters="vmhalt='LOGOFF'" 是正确的,而 parameters='vmhalt="LOGOFF"' 不正确,并可能导致意外行为。
引导时命令参数
- askmethod
- 这个命令要求您选择要从 Red Hat Enterprise Linux CD-ROM 引导时使用的安装方法。
- dd=url
- 这个参数会导致安装程序提示您使用指定 HTTP、FTP 或者 NFS 网络地址中的驱动程序镜像。
- display=ip:0
- 这个命令允许远程显示转发。在这个命令中,ip 应该替换为您希望显示的系统 IP 地址。在您要显示的系统中,您必须执行命令 xhost +remotehostname,其中 remotehostname 是您要运行原始显示的主机的名称。使用 xhost +remotehostname 命令限制对远程显示终端的访问,并且不允许来自任何未明确授权远程访问的任何人或任何系统的访问。
- mediacheck
- 这个命令为您提供了测试安装源的完整性的选项(如果基于 ISO 的方法)。该命令可用于 CD、DVD、硬盘 ISO 和 NFS ISO 安装方法。在您尝试安装前,先验证 ISO 镜像是否完整,有助于避免安装期间经常遇到的问题。
- mpath
- 启用多路径支持。重要 - 在多路径设备中安装必须如果在可通过多路径访问的网络存储设备中安装 Red Hat Enterprise Linux 5.11,则必须使用这个选项引导安装过程。如果您没有在引导时指定这个选项,安装将失败,或者系统在安装完成后无法引导。
- noeject
- 在安装后不要弹出光驱。这个选项在远程安装中非常有用。
- noprobe
- 这个命令禁用硬件检测,并提示用户获取硬件信息。
- rescue
- 这个命令运行救援模式。有关救援模式的详情,请参考 第 27 章 基本系统恢复。
- text
- 这个命令禁用图形安装程序,并强制安装程序在文本模式中运行。
- vnc
- 这个命令允许您从 VNC 服务器安装。
- vncpassword=
- 这个命令设定用于连接 VNC 服务器的密码。
- noipv6
- 该命令在安装程序 stage 1 处理中禁用 ipv6 选项的默认选择。如果指定了这个选项,则仍可手动进行 Ipv6 设置,但默认行为为 Ipv6 设置没有被启用。
- cmdline
- 3270 控制台(在 IBM System z 上安装时最常使用)无法识别与大多数 unix 风格的终端格式化条目通用的终端格式化条目。指定这个选项会在 kickstart 安装过程中更改 anaconda 的行为,以便 3270 上的控制台输出更好。这个选项不应该用于常规的交互式安装。
- RUNKS=1
- 这个选项用于为 IBM System z 指定(通常与 cmdline 选项一同使用)kickstart 安装。
第 21 章 对 IBM System z 系统中的安装进行故障排除
21.1. 您无法引导 Red Hat Enterprise Linux
21.1.1. 您的系统显示信号 11 错误吗?
21.2. 安装过程中出现问题
21.2.1. 没有找到安装 Red Hat Enterprise Linux Error 信息的设备
没有找到的设备安装 Red Hat Enterprise Linux,那么您的 DASD 设备可能会出现问题。如果您遇到这个错误,在 parm 文件中添加 DASD=<disks > 参数(其中 磁盘 是用于安装的 DASD 范围)并再次开始安装。
21.2.2. 分区表的问题
设备 hda 上的分区表是无法读取的。要创建必须初始化的新分区,请在此驱动器中丢失 ALL DATA。
21.2.3. 其他分区问题
- 一个
/(root)分区 - 类型为 swap 的 <swap> 分区
21.2.4. 是否查看 Python 错误?
/tmp/目录时,可能会出现这个错误。错误可能类似如下:
Traceback (innermost last):
File "/var/tmp/anaconda-7.1//usr/lib/anaconda/iw/progress_gui.py", line 20, in run
rc = self.todo.doInstall ()
File "/var/tmp/anaconda-7.1//usr/lib/anaconda/todo.py", line 1468, in doInstall
self.fstab.savePartitions ()
File "fstab.py", line 221, in savePartitions
sys.exit(0)
SystemExit: 0
Local variables in innermost frame:
self: <fstab.GuiFstab instance at 8446fe0>
sys: <module 'sys' (built-in)>
ToDo object:  (itodo  ToDo  p1  (dp2  S'method'  p3  (iimage  CdromInstallMethod
p4  (dp5  S'progressWindow'  p6   <failed>
/tmp/ 的链接到其他位置或者创建之后已更改的系统。这些符号链接或已更改的链接会在安装过程中无效,因此安装程序无法写入信息并失败。
http://www.redhat.com/support/errata/
http://fedoraproject.org/wiki/Anaconda
http://bugzilla.redhat.com/bugzilla/
http://www.redhat.com/apps/activate/
21.3. 安装后的问题
21.3.1. 远程图形控制台和 XDMCP
/etc/gdm/custom.conf 文件中编辑以下行:
Enable=true,保存文件,再退出文本编辑器。切换到运行级别 5 以启动 X 服务器:
/sbin/init 5
X :1 -query s390vm.example.com
:1 时显示远程图形登录屏幕(通常使用 Ctrl-Alt-F8 组合键访问)。
Xnest :1 -query s390vm.example.com
21.3.2. 当您尝试登录时出现问题
# 提示后,您必须键入 passwd root,这样您就可以为 root 输入新密码。此时,您可以键入 shutdown -r 来使用新的 root 密码重新引导系统。
http://hardware.redhat.com/hcl/
21.3.3. 您的打印机不工作
21.3.4. 在启动时基于 Apache 的 httpd 服务/电子邮件 Hangs
/etc/hosts 文件中以下行:
127.0.0.1 localhost.localdomain localhost
第 22 章 IBM System z 用户的额外信息
22.1. sysfs 文件系统
sysfs 文件系统。sysfs 文件系统被描述为 proc、devfs 和 devpty 文件系统。sysfs 文件系统将设备和总线枚举到可从用户空间访问的文件系统层次结构中。它旨在处理以前位于 /proc/ 中的设备和驱动程序特定选项,并且包含之前由 devfs 提供的动态设备添加。
sysfs 文件系统挂载于 /sys/,包含以几种不同方式组织附加到该系统的设备的目录。/sysfs/ 子目录包括:
/devices/目录该目录包含/css0/目录。其子目录代表 Linux 内核检测到的所有子频道。子通道目录采用0.0.nnnn格式命名,其中 nnnn 是 0000 和 ffff 之间的子频道号码。子目录中的子通道目录包含状态文件和代表实际设备的其他子目录。设备目录名为0.0.xxxx,其中 xxxx 是该设备的单元地址。/devices/目录还包含状态信息以及设备的配置选项。/bus/目录它包含/ccw/子目录和/ccwgroup/子目录。CCW 设备通过使用频道命令字词来访问。/ccw/目录中的设备仅使用大型机频道子系统上的一个子通道。CCW 组设备也通过频道命令词语访问,但它们每个设备使用多个子频道。例如: 3390-3 DASD 设备使用一个子通道,而 OSA 适配器的 QDIO 网络连接使用三个子频道。/ccw/和/ccwgroup/目录都包含名为设备和驱动程序的目录:/devices/目录包含到/sys/devices/css0/目录中的设备目录的符号链接。/drivers/目录包含目前系统中当前载入的每个设备驱动程序的目录。与dasd、console、qeth和zfcp等设备关联的驱动程序有目录条目。/driver/目录包含设备驱动程序的设置,以及指向它所使用的设备的符号链接(在/sys/devices/css0/目录中)。/class/目录其中包括将类似设备(如 ttys、SCSI 磁带驱动器、网络设备和其他其它设备)组合在一起的目录。/block/目录这个目录包含系统中每个块设备的目录。这些主要是磁盘类型设备,如真实 DASD、环回设备和软件 raid 块设备。旧的 Linux 系统与使用sysfs的旧 Linux 系统之间有明显的区别是需要根据sysfs名称引用设备。在 2.4 内核镜像中,zFCP驱动程序会作为其设备地址传递。在 2.6 内核镜像系统上,驱动程序作为0.0.1600传递。
22.2. 使用 zFCP 驱动程序
/etc/zfcp.conf 文件。它还向 /etc/modprobe.conf 添加行 别名 scsi_hostadapter zFCP。这会加载所需的 zFCP 模块。
# cat /etc/zfcp.conf
0.0.010a 0x01 0x5005076300c18154 0x00 0x5719000000000000

# cat /etc/modprobe.conf
alias eth0 qeth
options dasd_mod dasd=201,4b2e
alias scsi_hostadapter zfcp
# cd /lib/modules/2.6.7-1.451.2.3/kernel/drivers/s390/scsi
# modprobe zfcp

# lsmod
Module                  Size  Used by
zfcp                  221460  0 [permanent]
autofs4                39944  0
qeth                  166288  0
qdio                   60240  3 zfcp,qeth
ccwgroup               25344  1 qeth
ipt_REJECT             23552  1
ipt_state              18944  5
ip_conntrack           57904  1 ipt_state
iptable_filter         19712  1
ip_tables              37888  3 ipt_REJECT,ipt_state,iptable_filter
sd_mod                 39688  0
scsi_mod              182904  2 zfcp,sd_mod
dm_mod                 86408  0
ext3                  179056  2
jbd                    92720  1 ext3
dasd_fba_mod           25344  0
dasd_eckd_mod          77056  4
dasd_mod               85328  6 dasd_fba_mod,dasd_eckd_mod

# cd /sys/bus/ccw/drivers/zfcp/0.0.010a

# echo 1 > online
# cat online
1

# echo 0x5005076300c18154 > /sys/bus/ccw/drivers/zfcp/0.0.010a/port_add
# ls
0x5005076300c18154  failed            lic_version    s_id
availability        fc_link_speed     nameserver     status
card_version        fc_service_class  online         wwnn
cmb_enable          fc_topology       port_add       wwpn
cutype              hardware_version  port_remove
detach_state        host2             scsi_host_no
devtype             in_recovery       serial_number

# cd /sys/bus/ccw/drivers/zfcp/0.0.010a/0x5005076300c18154
# echo 0x5719000000000000 > unit_add
# ls
0x5719000000000000  d_id    in_recovery  status    unit_remove
detach_state        failed  scsi_id      unit_add  wwnn

# cat /sys/bus/ccw/drivers/zfcp/0.0.010a/scsi_host_no
0x0
# cat /sys/bus/ccw/drivers/zfcp/0.0.010a/0x5005076300c18154/scsi_id
0x1
# cat \
/sys/bus/ccw/drivers/zfcp/0.0.010a/0x5005076300c18154/0x5719000000000000/scsi_lun
0x0

# cat /sys/bus/scsi/devices/0\:0\:1\:0/hba_id
0.0.010a
# cat /sys/bus/scsi/devices/0\:0\:1\:0/wwpn
0x5005076300c18154
# cat /sys/bus/scsi/devices/0\:0\:1\:0/fcp_lun
0x5719000000000000

# cat /sys/bus/scsi/devices/0\:0\:1\:0/block/dev
8:0
# cat /sys/bus/scsi/devices/0\:0\:1\:0/block/sda1/dev
8:1

# cat /proc/scsi/scsi
Attached devices:
Host: scsi2 Channel: 00 Id: 01 Lun: 00
  Vendor: IBM      Model: 2105F20          Rev: .123
  Type:   Direct-Access                    ANSI SCSI revision: 03

# fdisk /dev/sda

# mke2fs -j /dev/sda1

# mount /dev/sda1 /mnt
# df
Filesystem           1K-blocks      Used Available Use% Mounted on
/dev/dasda1            2344224   1427948    797196  65% /
none                    511652         0    511652   0% /dev/shm
/dev/dasdb1            2365444     32828   2212456   2% /opt
/dev/sda1              3844088     32828   3615988   1% /mnt

# cd /boot
# mv initrd-2.6.7-1.451.2.3.img initrd-2.6.7-1.451.2.3.img.orig
# mkinitrd -v --with=scsi_mod --with=zfcp --with=sd_mod initrd-2.6.7-1.451.2.3.img 2.6.7-1.451.2.3
Looking for deps of module ide-disk
Looking for deps of module dasd_mod
Looking for deps of module dasd_eckd_mod         dasd_mod
Looking for deps of module dasd_mod
Looking for deps of module dasd_fba_mod  dasd_mod
Looking for deps of module dasd_mod
Looking for deps of module ext3  jbd
Looking for deps of module jbd
Looking for deps of module scsi_mod
Looking for deps of module zfcp  qdio scsi_mod
Looking for deps of module qdio
Looking for deps of module scsi_mod
Looking for deps of module sd_mod        scsi_mod
Looking for deps of module scsi_mod
Using modules:  ./kernel/drivers/s390/block/dasd_mod.ko
./kernel/drivers/s390/block/dasd_eckd_mod.ko
./kernel/drivers/s390/block/dasd_fba_mod.ko ./kernel/fs/jbd/jbd.ko
./kernel/fs/ext3/ext3.ko ./kernel/drivers/scsi/scsi_mod.ko
./kernel/drivers/s390/cio/qdio.ko ./kernel/drivers/s390/scsi/zfcp.ko
./kernel/drivers/scsi/sd_mod.ko
Using loopback device /dev/loop0
/sbin/nash -> /tmp/initrd.cT1534/bin/nash
/sbin/insmod.static -> /tmp/initrd.cT1534/bin/insmod
`/lib/modules/2.6.7-1.451.2.3/./kernel/drivers/s390/block/dasd_mod.ko'->
`/tmp/initrd.cT1534/lib/dasd_mod.ko'
`/lib/modules/2.6.7-1.451.2.3/./kernel/drivers/s390/block/dasd_eckd_mod.ko' ->
`/tmp/initrd.cT1534/lib/dasd_eckd_mod.ko'
`/lib/modules/2.6.7-1.451.2.3/./kernel/drivers/s390/block/dasd_fba_mod.ko' ->
`/tmp/initrd.cT1534/lib/dasd_fba_mod.ko'
`/lib/modules/2.6.7-1.451.2.3/./kernel/fs/jbd/jbd.ko' ->
`/tmp/initrd.cT1534/lib/jbd.ko'
`/lib/modules/2.6.7-1.451.2.3/./kernel/fs/ext3/ext3.ko' ->
`/tmp/initrd.cT1534/lib/ext3.ko'
`/lib/modules/2.6.7-1.451.2.3/./kernel/drivers/scsi/scsi_mod.ko' ->
`/tmp/initrd.cT1534/lib/scsi_mod.ko'
`/lib/modules/2.6.7-1.451.2.3/./kernel/drivers/s390/cio/qdio.ko' ->
`/tmp/initrd.cT1534/lib/qdio.ko'
`/lib/modules/2.6.7-1.451.2.3/./kernel/drivers/s390/scsi/zfcp.ko' ->
`/tmp/initrd.cT1534/lib/zfcp.ko'
`/lib/modules/2.6.7-1.451.2.3/./kernel/drivers/scsi/sd_mod.ko' ->
`/tmp/initrd.cT1534/lib/sd_mod.ko'
...
Loading module dasd_mod with options dasd=201,4b2e
Loading module dasd_eckd_mod
Loading module dasd_fba_mod
Loading module jbd
Loading module ext3
Loading module scsi_mod
Loading module qdio
Loading module zfcp
Loading module sd_mod

# zipl -V
Using config file '/etc/zipl.conf'
Target device information
  Device..........................: 5e:00
  Partition.......................: 5e:01
  Device name.....................: dasda
  DASD device number..............: 0201
  Type............................: disk partition
  Disk layout.....................: ECKD/compatible disk layout
  Geometry - heads................: 15
  Geometry - sectors..............: 12
  Geometry - cylinders............: 3308
  Geometry - start................: 24
  File system block size..........: 4096
  Physical block size.............: 4096
  Device size in physical blocks..: 595416
Building bootmap '/boot//bootmap'
Building menu 'rh-automatic-menu'
Adding #1: IPL section 'linux' (default)
  kernel image......: /boot/vmlinuz-2.6.7-1.451.2.3 at 0x10000
  kernel parmline...: 'root=LABEL=/' at 0x1000
  initial ramdisk...: /boot/initrd-2.6.7-1.451.2.3.img at 0x800000
Preparing boot device: dasda (0201).
Preparing boot menu
  Interactive prompt......: disabled
  Menu timeout............: disabled
  Default configuration...: 'linux'
Syncing disks...
Done.
22.3. 使用 mdadm 配置基于 RAID 和多路径存储
raidtools 软件包集的其他工具类似,mdadm 命令可以用来执行与管理多设备集合相关的所有必要功能。本节介绍如何使用 mdadm :
- 创建 RAID 设备
- 创建多路径设备
22.3.1. 使用 mdadm创建 RAID 设备
/etc/mdadm.conf 文件以定义适当的 DEVICE 和 ARRAY 值:
DEVICE /dev/sd[abcd]1
ARRAY /dev/md0 devices=/dev/sda1,/dev/sdb1,/dev/sdc1,/dev/sdd1
DEVICE 行使用传统文件名通配(请参阅 glob(7)手册页)来定义以下 SCSI 设备:
/dev/sda1/dev/sdb1/dev/sdc1/dev/sdd1
ARRAY 行定义了一个 RAID 设备(/dev/md0),它由 DEVICE 行定义的 SCSI 设备组成。
/proc/mdstat 文件不会显示活跃的 RAID 设备:
Personalities :
read_ahead not set
Event: 0
unused devices: none
mdadm -C /dev/md0 --level=raid0 --raid-devices=4 /dev/sda1 /dev/sdb1 /dev/sdc1 \
/dev/sdd1
Continue creating array? yes
mdadm: array /dev/md0 started.
/dev/md0:
Version : 00.90.00
Creation Time : Mon Mar  1 13:49:10 2004
Raid Level : raid0
Array Size : 15621632 (14.90 GiB 15.100 GB)
Raid Devices : 4
Total Devices : 4
Preferred Minor : 0
Persistence : Superblock is persistent

Update Time : Mon Mar  1 13:49:10 2004
State : dirty, no-errors
Active Devices : 4
Working Devices : 4
Failed Devices : 0
Spare Devices : 0

Chunk Size : 64K

      Number   Major   Minor   RaidDevice State
         0       8        1        0      active sync   /dev/sda1
         1       8       17        1      active sync   /dev/sdb1
         2       8       33        2      active sync   /dev/sdc1
         3       8       49        3      active sync   /dev/sdd1
           UUID : 25c0f2a1:e882dfc0:c0fe135e:6940d932
         Events : 0.1
22.3.2. 使用 mdadm创建多路径设备
/dev/sda 的 SCSI LUN(磁盘驱动器)也可以作为 /dev/sdb、/dev/sdc 等访问,具体取决于具体配置。
级别 选项的额外参数。在出现 I/O 路径失败时,这个参数 多路径 会将 Linux 内核中的 md 层从一个途径重新路由到另一个路径。
/etc/mdadm.conf 文件,以定义 DEVICE 和 ARRAY 行的值来反映您的硬件配置。
/etc/mdadm.conf 中指定的每个设备都必须代表不同的物理磁盘驱动器),此文件中的每个设备都引用相同的共享磁盘驱动器。
multipath 参数替换 RAID 级别参数:
mdadm -C /dev/md0 --level=multipath --raid-devices=4 /dev/sda1 /dev/sdb1
 /dev/sdc1 /dev/sdd1
Continue creating array? yes
mdadm: array /dev/md0 started.
/dev/md0 后,引用 /dev/md0 的所有 I/O 操作都定向到 /dev/sda1、/dev/sdb 1、/dev/sdc1 或 /dev/sdd1 (取决于哪个路径当前处于活动状态且正常运行)。
/dev/md0 来验证 /dev/md0 的配置实际上是一个多路径设备:
/dev/md0:
Version : 00.90.00
Creation Time : Tue Mar  2 10:56:37 2004
Raid Level : multipath
Array Size : 3905408 (3.72 GiB 3.100 GB)
Raid Devices : 1
Total Devices : 4
Preferred Minor : 0
Persistence : Superblock is persistent

Update Time : Tue Mar  2 10:56:37 2004
State : dirty, no-errors
Active Devices : 1
Working Devices : 4
Failed Devices : 0
Spare Devices : 3

    Number   Major   Minor   RaidDevice State
       0       8       49        0      active sync   /dev/sdd1
       1       8       17        1      spare   /dev/sdb1
       2       8       33        2      spare   /dev/sdc1
       3       8        1        3      spare   /dev/sda1
           UUID : 4b564608:fa01c716:550bd8ff:735d92dc
Events : 0.1/dev/sda1 将标记为故障,然后删除,最后将其重新添加到配置中。对于多路径配置,这些操作不会影响当时发生的任何 I/O 活动:
# mdadm /dev/md0 -f /dev/sda1
mdadm: set /dev/sda1 faulty in /dev/md0
# mdadm /dev/md0 -r /dev/sda1
mdadm: hot removed /dev/sda1
# mdadm /dev/md0 -a /dev/sda1
mdadm: hot added /dev/sda1
#
22.4. 从 SCSI 设备配置 IPL
22.4.1. IPL SCSI 磁盘
#cp set loaddev portname 50050763 00c18154 lun 57190000 00000000
Ready; T=0.01/0.01 15:47:53
q loaddev
PORTNAME 50050763 00C18154    LUN  57190000 00000000    BOOTPROG 0
BR_LBA   00000000 00000000
Ready; T=0.01/0.01 15:47:56
q fcp
00: FCP  010A ON FCP   010ACHPID C1 SUBCHANNEL = 0000
00:      010A QDIO-ELIGIBLE       QIOASSIST-ELIGIBLE
Ready; T=0.01/0.01 15:51:29

i 010a
00: I 010A
00: HCPLDI2816I Acquiring the machine loader from the processor
controller.
00: HCPLDI2817I Load completed from the processor controller.
00: HCPLDI2817I Now starting machine loader version 0001.
01: HCPGSP2630I The virtual machine is placed in CP mode due to a SIGP
stop and
store status from CPU 00.
00: MLOEVL012I: Machine loader up and running (version 0.13).
00: MLOPDM003I: Machine loader finished, moving data to final storage
location.
Linux version 2.6.7-1.451.2.3 (bhcompile@example.z900.redhat.com) (gcc
version 3.4
.1 20040702 (Red Hat Linux 3.4.1-2)) #1 SMP Wed Jul 14 17:52:22 EDT 2004
We are running under VM (64 bit mode)
22.5. 添加 DASD
CP LINK RHEL4X 4B2E 4B2E MR
DASD 4B2E LINKED R/W
过程 22.1. 在线启动磁盘
- 使用 cd 命令切换到代表那个卷的
/sys/目录:# cd /sys/bus/ccw/drivers/dasd-eckd/0.0.4b2e/ # ls -l total 0 -r--r--r-- 1 root root 4096 Aug 25 17:04 availability -rw-r--r-- 1 root root 4096 Aug 25 17:04 cmb_enable -r--r--r-- 1 root root 4096 Aug 25 17:04 cutype -rw-r--r-- 1 root root 4096 Aug 25 17:04 detach_state -r--r--r-- 1 root root 4096 Aug 25 17:04 devtype -r--r--r-- 1 root root 4096 Aug 25 17:04 discipline -rw-r--r-- 1 root root 4096 Aug 25 17:04 online -rw-r--r-- 1 root root 4096 Aug 25 17:04 readonly -rw-r--r-- 1 root root 4096 Aug 25 17:04 use_diag
- 接下来,检查它是否已经在线:
# cat online
0
- 如果没有在线,请运行以下命令使其在线:
# echo 1 > online
# cat online
1
- 请确认哪个块正在被访问:
# ls -l
total 0
-r--r--r--  1 root root 4096 Aug 25 17:04 availability
lrwxrwxrwx  1 root root    0 Aug 25 17:07 block -> ../../../../block/dasdb
-rw-r--r--  1 root root 4096 Aug 25 17:04 cmb_enable
-r--r--r--  1 root root 4096 Aug 25 17:04 cutype
-rw-r--r--  1 root root 4096 Aug 25 17:04 detach_state
-r--r--r--  1 root root 4096 Aug 25 17:04 devtype
-r--r--r--  1 root root 4096 Aug 25 17:04 discipline
-rw-r--r--  1 root root    0 Aug 25 17:04 online
-rw-r--r--  1 root root 4096 Aug 25 17:04 readonly
-rw-r--r--  1 root root 4096 Aug 25 17:04 use_diag
如本例中所示,设备 4B2E 正在作为/dev/dasdb进行访问。
# chccwdev -e 4b2e
/root 目录并格式化该设备:
# cd
# dasdfmt -b 4096 -d cdl -f /dev/dasdb -l LX4B2E -p -y

cyl    97 of  3338 |#----------------------------------------------|   2%
# fdasd -a /dev/dasdb
auto-creating one partition for the whole disk...
writing volume label...
writing VTOC...
checking !
wrote NATIVE!
rereading partition table...
# mke2fs -j /dev/dasdb1
mke2fs 1.35 (28-Feb-2004)
Filesystem label=
OS type: Linux
Block size=4096 (log=2)
Fragment size=4096 (log=2)
300960 inodes, 600816 blocks
30040 blocks (5.00%) reserved for the super user
First data block=0
19 block groups
32768 blocks per group, 32768 fragments per group
15840 inodes per group
Superblock backups stored on blocks:
        32768, 98304, 163840, 229376, 294912

Writing inode tables: done
Creating journal (8192 blocks): done
Writing superblocks and filesystem accounting information: done

This filesystem will be automatically checked every 39 mounts or
180 days, whichever comes first. Use tune2fs -c or -i to override.# mount /dev/dasdb1 /opt # mount /dev/dasda1 on / type ext3 (rw) none on /proc type proc (rw) none on /sys type sysfs (rw) none on /dev/pts type devpts (rw,gid=5,mode=620) none on /dev/shm type tmpfs (rw) /dev/dasdb1 on /opt type ext3 (rw)
/etc/fstab 添加条目,以便在 IPL 时挂载文件系统:
# vi /etc/fstab
# cat /etc/fstab
LABEL=/                 /                       ext3    defaults
1 1
none                    /dev/pts                devpts  gid=5,mode=620
0 0
none                    /dev/shm                tmpfs   defaults
0 0
none                    /proc                   proc    defaults
0 0
none                    /sys                    sysfs   defaults
0 0
/dev/dasdb1             /opt                    ext3    defaults
1 2
/etc/modprobe.conf 中 dasd_mod 的 选项行中,请务必在列表末尾添加新设备,否则它会更改 设备编号 : devnode 映射和文件系统不在其所在设备中。
# vi /etc/modprobe.conf
# cat /etc/modprobe.conf
alias eth0 qeth
options dasd_mod dasd=201,4B2E
modprobe.conf 的更改,以便该设备在下一个 IPL 后可以在线并挂载:
/tmp/initrd.AR1182/lib/dasd_mod.ko(elf64-s390)。
# cd /boot
# mv initrd-2.6.7-1.451.2.3.img initrd-2.6.7-1.451.2.3.img.old
# mkinitrd -v initrd-2.6.7-1.451.2.3.img 2.6.7-1.451.2.3
Looking for deps of module ide-disk
Looking for deps of module dasd_mod
Looking for deps of module dasd_eckd_mod         dasd_mod
Looking for deps of module dasd_mod
Looking for deps of module dasd_fba_mod  dasd_mod
Looking for deps of module dasd_mod
Looking for deps of module ext3  jbd
Looking for deps of module jbd
Using modules:  ./kernel/drivers/s390/block/dasd_mod.ko
./kernel/drivers/s390/block/dasd_eckd_mod.ko
./kernel/drivers/s390/block/dasd_fba_mod.ko ./kernel/fs/jbd/jbd.ko
./kernel/fs/ext3/ext3.ko
Using loopback device /dev/loop0
/sbin/nash -> /tmp/initrd.AR1182/bin/nash
/sbin/insmod.static -> /tmp/initrd.AR1182/bin/insmod
copy from
/lib/modules/2.6.7-1.451.2.3/./kernel/drivers/s390/block/dasd_mod.ko
(elf64-s390) to
/tmp/initrd.AR1182/lib/dasd_mod.ko(elf64-s390)
copy from
/lib/modules/2.6.7-1.451.2.3/./kernel/drivers/s390/block/dasd_eckd_mod.ko
(elf64-s390) to
/tmp/initrd.AR1182/lib/dasd_eckd_mod.ko
(elf64-s390)
copy from
/lib/modules/2.6.7-1.451.2.3/./kernel/drivers/s390/block/dasd_fba_mod.ko
(elf64-s390) to
/tmp/initrd.AR1182/lib/dasd_fba_mod.ko
(elf64-s390)
copy from
/lib/modules/2.6.7-1.451.2.3/./kernel/fs/jbd/jbd.ko(elf64-s390) to
/tmp/initrd.AR1182/lib/jbd.ko(elf64-s390)
copy from
/lib/modules/2.6.7-1.451.2.3/./kernel/fs/ext3/ext3.ko(elf64-s390) to
/tmp/initrd.AR1182/lib/ext3.ko(elf64-s390)
Loading module dasd_mod with options dasd=201,4B2E
Loading module dasd_eckd_mod
Loading module dasd_fba_mod
Loading module jbd
Loading module ext3
# zipl -V
Using config file '/etc/zipl.conf'
Target device information
  Device..........................: 5e:00
  Partition.......................: 5e:01
  Device name.....................: dasda
  DASD device number..............: 0201
  Type............................: disk partition
  Disk layout.....................: ECKD/compatible disk layout
  Geometry - heads................: 15
  Geometry - sectors..............: 12
  Geometry - cylinders............: 3308
  Geometry - start................: 24
  File system block size..........: 4096
  Physical block size.............: 4096
  Device size in physical blocks..: 595416
Building bootmap '/boot//bootmap'
Building menu 'rh-automatic-menu'
Adding #1: IPL section 'linux' (default)
  kernel image......: /boot/vmlinuz-2.6.7-1.451.2.3 at 0x10000
  kernel parmline...: 'root=LABEL=/' at 0x1000
  initial ramdisk...: /boot/initrd-2.6.7-1.451.2.3.img at 0x800000
Preparing boot device: dasda (0201).
Preparing boot menu
  Interactive prompt......: disabled
  Menu timeout............: disabled
  Default configuration...: 'linux'
Syncing disks...
Done.
22.6. 添加网络设备
proc文件系统不再用于控制或获取网络设备的状态。- 新的
sys文件系统现在为控制设备提供工具。 /sys/class/net/interface_name/device现在提供活跃设备的状态。interface_name是设备配置时由设备驱动程序为网络接口指定的名称,如eth0或eth2。/etc/chandev.conf不再存在。sys文件系统现在包含放入/etc/chandev.conf中的信息。/etc/modules.conf不再存在。现在,网络接口别名规格放在/etc/modprobe.conf中。
qeth 设备” 详细描述了如何将 qeth 设备添加到 Red Hat Enterprise Linux 的现有实例中。第 22.6.2 节 “添加网络设备的快速参考” 是安装其他 IBM System z 网络接口的快速参考。
22.6.1. 添加 qeth 设备
qeth 设备驱动程序模块是否被加载。
# lsmod | grep qeth
qeth                  135240  0
qdio                   45360  2 qeth
ipv6                  303984  13 qeth
ccwgroup               15104  1 qeth
# modprobe qeth
qeth 组设备。
# echo read_device_bus_id,write_device_bus_id,
data_device_bus_id > /sys/bus/ccwgroup/drivers/qeth/group
# echo 0.0.0600,0.0.0601,0.0.0602 > /sys/bus/ccwgroup/drivers/qeth/group
qeth 组设备是否已正确创建:
# ls /sys/bus/ccwgroup/drivers/qeth
0.0.0600  0.0.09a0  group  notifier_register
# cat /sys/bus/ccwgroup/drivers/qeth/0.0.0600/portname
no portname required
# echo portname > /sys/bus/ccwgroup/drivers/qeth/0.0.0600/portname
# echo 1 > /sys/bus/ccwgroup/drivers/qeth/0.0.0600/online
# cat /sys/bus/ccwgroup/drivers/qeth/0.0.0600/online
1
# cat /sys/bus/ccwgroup/drivers/qeth/0.0.0600/if_name
eth1
add_hhlenbroadcast_modebuffer_countcanonical_macaddrchecksummingdetach_statefake_broadcastfake_llipa_takeoverportnopriority_queueing恢复route4rxipungroupvipa
/etc/sysconfig/network-scripts/ 中。
if_name 文件中的值。在本例中,它是 eth1。
# cd /etc/sysconfig/network-scripts
# cp ifcfg-eth0 ifcfg-eth1
ifcfg-eth0 示例作为模板。
/etc/sysconfig/network-scripts/ifcfg-eth0
# IBM QETH
DEVICE=eth0
BOOTPROTO=static
HWADDR=00:06:29:FB:5F:F1
IPADDR=9.12.20.136
NETMASK=255.255.255.0
ONBOOT=yes
NETTYPE=qeth
SUBCHANNELS=0.0.09a0,0.0.09a1,0.0.09a2
TYPE=Ethernet
ifcfg-eth1 文件。
if_name 文件的内容。
yes。
qeth 设备的硬件地址匹配。
/etc/sysconfig/network-scripts/ifcfg-eth1
# IBM QETH
DEVICE=eth1
BOOTPROTO=static
IPADDR=192.168.70.87
NETMASK=255.255.255.0
ONBOOT=yes
NETTYPE=qeth
SUBCHANNELS=0.0.0600,0.0.0601,0.0.0602
TYPE=Ethernet
qeth 设备需要在 /etc/modprobe.conf 中定义一个别名定义。编辑此文件并为接口添加一个别名。
/etc/modprobe.conf
alias eth0 qeth
alias eth1 qeth
options dasd_mod dasd=0.0.0100,0.0.4b19
# ifup eth1
# ifconfig eth1
eth1      Link encap:Ethernet  HWaddr 02:00:00:00:00:01
          inet addr:192.168.70.87  Bcast:192.168.70.255  Mask:255.255.255.0
          inet6 addr: fe80::ff:fe00:1/64 Scope:Link
          UP BROADCAST RUNNING NOARP MULTICAST  MTU:1492  Metric:1
          RX packets:23 errors:0 dropped:0 overruns:0 frame:0
          TX packets:3 errors:0 dropped:0 overruns:0 carrier:0
          collisions:0 txqueuelen:1000
RX bytes:644 (644.0 b) TX bytes:264 (264.0 b)HWaddr 字段。必须添加到 ifcfg-eth1 文件后的值。在该文件中添加类似如下的行:
HWADDR=02:00:00:00:00:01
ifcfg-eth1 类似如下:
# IBM QETH
DEVICE=eth1
HWADDR=02:00:00:00:00:01
BOOTPROTO=static
IPADDR=192.168.70.69
NETMASK=255.255.255.0
ONBOOT=yes
NETTYPE=qeth
SUBCHANNELS=0.0.0600,0.0.0601,0.0.0602
TYPE=Ethernet
# route
Kernel IP routing table
Destination     Gateway         Genmask        Flags Metric Ref  Use Iface
192.168.70.0    *               255.255.255.0  U     0      0      0 eth1
9.12.20.0       *               255.255.255.0  U     0      0      0 eth0
169.254.0.0     *               255.255.0.0    U     0      0      0 eth1
default         pdlrouter-if5.p 0.0.0.0        UG    0      0      0 eth0
# ping -c 1 192.168.70.8
PING 192.168.70.8 (192.168.70.8) 56(84) bytes of data.
64 bytes from 192.168.70.8: icmp_seq=0 ttl=63 time=8.07 ms
/etc/sysconfig/network。
22.6.2. 添加网络设备的快速参考
- 加载设备驱动程序。
- 创建组设备。
- 配置设备。
- 设置设备在线。
- 定义别名(如果需要)。
- 创建配置脚本。
- 激活设备。
22.6.2.1. 使用 LCS 设备驱动程序
- 加载设备驱动程序:
# modprobe lcs
- 创建组设备:
# echo read_device_bus_id,write_device_bus_id >
		/sys/bus/ccwgroup/drivers/lcs/group
由于此命令的长度,它已被分为两行。 - 配置设备。OSA 卡可以为单个 CHPID 提供最多 16 个端口。默认情况下,LCS 组设备使用端口 0。要使用不同的端口,请发出类似如下的命令:
# echo portno > /sys/bus/ccwgroup/drivers/lcs/device_bus_id/portno
有关配置 LCS 驱动程序的详情,请参考以下内容:http://www-05.ibm.com/e-business/linkweb/publications/servlet/pbi.wss?CTY=US&FNC=SRX&PBL=SC33-8289-02 (Linux 用于 IBM System z 和 S/390 设备驱动程序、功能和命令) - 在线设定设备:
# echo 1 > /sys/bus/ccwgroup/drivers/lcs/read_device_bus_id/online
- 定义别名。根据添加的类型接口,向
/etc/modprobe.conf添加一行,类似于以下之一:ethn alias lcs trn alias lcs
- 创建配置脚本。在
/etc/sysconfig/network-scripts/中创建类似如下的文件:ifcfg-ethn ifcfg-trn
该文件应类似于如下:/etc/sysconfig/network-scripts/ifcfg-eth0# IBM LCS DEVICE=eth0 BOOTPROTO=static HWADDR=00:06:29:FB:5F:F1 IPADDR=9.12.20.136 NETMASK=255.255.255.0 ONBOOT=yes NETTYPE=lcs SUBCHANNELS=0.0.09a0,0.0.09a1 PORTNAME=0 TYPE=Ethernet根据添加的类型接口,DEVICE 参数应该是以下之一:DEVICE=ethn DEVICE=trn
- 激活设备。根据添加的类型接口,发出 ifup 命令:
# ifup ethn
# ifup trn
22.6.2.2. 使用 QETH 设备驱动程序
- hsin for HiperSocket 设备
- ethn 用于 OSA-Express Fast Ethernet 和 Gigabit Ethernet
- 用于令牌 Ring 的trn
- 加载设备驱动程序:
# modprobe qeth
- 创建组设备:
# echo read_device_bus_id,write_device_bus_id,data_device_bus_id >
/sys/bus/ccwgroup/drivers/qeth/group
由于此命令的长度,它已被分为两行。 - 配置设备。有关配置 QETH 驱动程序的详情,请参考以下内容:http://oss.software.ibm.com/developerworks/opensource/linux390/docu/lx26apr04dd01.pdf (Linux 用于 IBM System z 和 S/390 设备驱动程序、功能和命令)
- 在线设定设备:
# echo 1 > /sys/bus/ccwgroup/drivers/qeth/read_device_bus_id/online
- 定义别名。根据添加的类型接口,向
/etc/modprobe.conf中添加一行,如下所示:hsin alias qeth ethn alias qeth trn alias qeth
- 创建配置脚本。在
/etc/sysconfig/network-scripts/中创建类似如下的文件:ifcfg-hsin ifcfg-ethn ifcfg-trn
该文件应该类似如下:/etc/sysconfig/network-scripts/ifcfg-eth0# IBM QETH DEVICE=eth0 BOOTPROTO=static HWADDR=00:06:29:FB:5F:F1 IPADDR=9.12.20.136 NETMASK=255.255.255.0 ONBOOT=yes NETTYPE=qeth SUBCHANNELS=0.0.09a0,0.0.09a1,0.0.09a2 TYPE=Ethernet根据添加的类型接口,DEVICE 参数应该类似以下示例:DEVICE=hsin DEVICE=ethn DEVICE=trn
- 激活设备。根据添加的类型接口,发出 ifup 命令:
# ifup hsin
# ifup ethn
# ifup trn
22.7. 内核相关信息
/proc/ 文件系统完成。要禁用定期计时器中断,请使用以下命令:
echo 0 > /proc/sys/kernel/hz_timer
echo 1 > /proc/sys/kernel/hz_timer
/etc/sysctl.conf 中以禁用定期计时器中断:
kernel.hz_timer = 0
部分 IV. 常见任务
第 23 章 更新您的系统
23.1. 驱动程序更新 rpm 软件包
kmod- (注意最终 -)并点击 。
图 23.1. 列出已安装的驱动程序更新 RPM 软件包

[D]
$ rpm -qa | egrep ^kmod-请注意
- 在 kmod 的末尾。这将列出所有以 kmod- 开头的已安装软件包,它应包含当前安装在您的系统中的所有驱动程序更新。此输出中不会列出由第三方更新软件提供的其他驱动程序。有关详细信息,请联络第三方供应商。
- 从红帽或您的硬件供应商指定的位置下载驱动程序更新 rpm 软件包。软件包文件名将以
kmod开始( 内核模块的缩写),其格式与这个示例类似:kmod-ipw3945-1.2.04.17.el5.i686.rpm在这个示例中,驱动程序更新 rpm 软件包在 i686 系统中为 Red Hat Enterprise Linux 5 提供 Intel IPW3945 WiFi 驱动程序更新,其版本号为 1.2.0-4.17。此运行 Xen 内核的系统的这个驱动程序软件包的版本会相似,但在软件包名称中包含xen:kmod-ipw3945-xen-1.2.04.17.el5.i686.rpm驱动程序更新 rpm 软件包是签名的软件包,像所有其他软件包一样,它们在安装时会自动验证。要手动执行此步骤,请在命令行中输入以下内容:$ rpm --checksig -v filename.rpm
其中 filename.rpm 是驱动程序更新 rpm 软件包文件名。它使用标准 Red Hat GPG 软件包签名密钥验证软件包,这些密钥已在任何 Red Hat Enterprise Linux 5.11 系统上安装。如果需要这个密钥在另一个系统中进行验证,您可以通过以下方式获得: https://www.redhat.com/security/team/key/ - 找到并双击您下载的文件。系统可能会提示您输入 root 密码,之后它将出现以下"安装软件包"框:
图 23.2. 安装软件包框
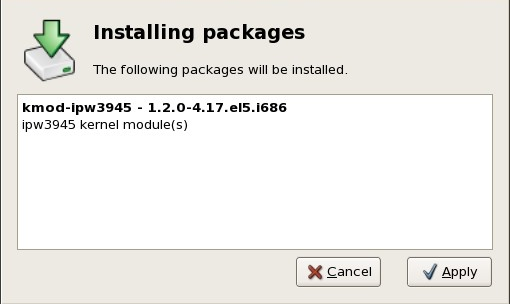
[D]单击 以完成软件包安装。另外,您可以在命令行中手动安装驱动程序更新:$ rpm -ivh kmod-ipw3945-1.2.04.17.el5.i686
- 无论您是使用图形安装还是命令行安装,重启您的系统以确保您的系统使用新驱动程序。
第 24 章 升级当前系统
24.1. 确定是否升级或再次安装
- 由于各种配置文件格式或布局的变化,单个软件包配置文件在执行升级后可能无法正常工作。
- 在升级之后,第三方或 ISV 应用程序可能无法正常工作。
- 如果您安装了 Red Hat 的层次产品(如集群套件)之一,可能需要在 Red Hat Enterprise Linux 升级完成后手动升级。
- 如果您从启用了红帽之外的供应商软件包仓库,请注意,在系统升级后,从这些软件仓库安装的软件可能无法正常工作。红帽不能保证此类存储库保持最新状态。
sendmail.cf .rpmsave )重命名,从而保留现有的配置文件。升级过程还在 /root/upgrade.log 中创建其操作日志。
24.2. 升级您的系统
/etc/redhat-release 文件的内容已从默认更改了,在尝试升级到 Red Hat Enterprise Linux 5.11 时,您的 Red Hat Enterprise Linux 安装可能无法找到。
linux upgradeany
第 25 章 注册您的系统并应用订阅
25.1. 注册系统
- 软件更新、勘误和维护
- 红帽技术支持资源和知识库文章
25.1.1. 在 Firstboot 中注册
- 客户门户订阅管理,红帽托管服务(默认)
- 订阅资产管理器,这是一个内部订阅服务器,代理内容发送到客户门户网站的服务
- CloudForms 系统引擎,即处理订阅服务和内容交付的内部服务
- 要识别要用于注册的订阅服务器,请输入该服务的主机名。默认服务是客户门户网站订阅管理,主机名为 subscription.rhn.redhat.com。要使用不同的订阅服务,如订阅资产管理器,请输入本地服务器的主机名。
- 点 。
- 输入给定订阅服务的用户凭证 以进行登录。重要使用的用户凭证取决于订阅服务。使用客户门户网站注册时,将红帽网络凭据用于管理员或公司帐户。但是,对于 Subscription Asset Manager 或 CloudForms System engine,要使用的用户帐户会在内部服务内创建,可能与客户门户网站用户帐户不同。如果您丢失了客户门户网站的登录名或密码,请从 https://www.redhat.com/wapps/sso/rhn/lostPassword.html 中恢复它们。如需丢失订阅资产管理器或 CloudForms 系统引擎的登录或密码信息,请联系您当地的管理员。
- 为主机设置系统名称。这是独一无二且明确识别订阅服务清单中的系统的任何内容。这通常是计算机的主机名或完全限定域名,但可以是任意字符串。
- 可选。设置在注册后是否应手动设置订阅。默认情况下,这个复选框会被取消选中,以便最匹配的订阅会自动应用到系统。选择此复选框意味着必须在第一次启动注册完成后手动将订阅添加到系统中。(即使订阅是自动附加,也可以在之后使用本地 Subscription Manager 工具将附加订阅添加到系统中。)
- 注册开始后,firstboot 扫描要注册系统的组织和环境(机构内的子域)。使用客户门户网站订阅管理的 IT 环境只有一个组织,因此不需要进一步的配置。使用本地订阅服务(如订阅资产管理器)的 IT 基础架构可能配置了多个组织,并且这些组织可在其中配置多个环境。如果检测到多个机构,Subscription Manager 会提示选择要加入的机构。
- 如果您决定让 Subscription Manager 自动将订阅附加到系统(默认),则系统会扫描订阅作为注册过程的一部分。注册完成后,订阅管理器会根据所选订阅中的信息以及附加到新系统的特定订阅报告系统中应用的服务级别。必须确认此订阅选择来完成注册过程。如果您选择在以后应用订阅,则将跳过该注册过程的一部分,firstboot 中的 Subscription Manager 屏幕会指示您稍后附加订阅。
- 点 移至 firstboot 的下一个配置区域,用户设置。
25.1.2. 在第一个引导后注册
--autosubscribe 选项的 register 命令,以便自动附加最符合的订阅。例如:
[root@server ~]# subscription-manager register --autosubscribe
Username: admin@example.com
Password:

The system has been registered with id: 30a3dc1b-db07-4ee7-bfb0-e09504b4033c
Installed Product Current Status:
Product Name:           Red Hat Enterprise Linux Server
Status:                 Subscribed
- 启动 Subscription Manager。例如:
[root@server ~]# subscription-manager-gui
- 在 Subscription Manager 窗口的 System 菜单中,选择 项。
- 输入要注册系统的订阅服务器的主机名。默认情况下,这个服务器是 Customer Portal Subscription Management(托管服务),地址为 subscription.rhn.redhat.com。要注册订阅资产管理器服务器或 CloudForms 系统引擎服务器,请输入相应的主机名。
- 在订阅服务中输入用户帐户的用户名和密码。重要使用的用户凭证取决于订阅服务。使用客户门户网站注册时,将红帽网络凭据用于管理员或公司帐户。但是,对于 Subscription Asset Manager 或 CloudForms System engine,要使用的用户帐户会在内部服务内创建,可能与客户门户网站用户帐户不同。
- (可选) 选择跳过自动订阅选择。默认情况下,注册过程会自动将系统订阅到最佳匹配订阅。这可以关闭,以便可以手动选择订阅。
25.1.3. 取消注册系统
[root@server1 ~]# subscription-manager unregister
- 启动 Subscription Manager。例如:
[root@server ~]# subscription-manager-gui
- 在 Subscription Manager 窗口的 System 菜单中,选择 项。
第 26 章 磁盘分区简介
26.1. 硬盘基本概念
图 26.1. Unused Disk Drive

[D]
26.1.1. 这不是您编写的内容,即如何编写它
图 26.2. 使用文件系统进行磁盘驱动器

[D]
- 使用一个小百分比的驱动器可用空间来存储与文件系统相关的数据,并被视为开销。
- 文件系统会将剩余空间分成较小的一致片段。对于 Linux,这些网段被称为 块。[11]
图 26.3. 使用不同的文件系统进行磁盘驱动器

[D]
图 26.4. 使用数据可写磁盘驱动器

[D]
26.1.2. 分区:为许多设备选择一 个驱动器
图 26.5. 使用分区表的磁盘驱动器

[D]
- 磁盘上分区启动和结束的地方
- 分区是否"活动"
- 分区的类型
图 26.6. 使用单一分区的磁盘驱动器

[D]
表 26.1. 分区类型
| 分区类型 | 值 | 分区类型 | 值 |
|---|---|---|---|
| 空 | 00 | Novell Netware 386 | 65 |
| DOS 12-bit FAT | 01 | PIC/IX | 75 |
| XENIX root | 02 | Old MINIX | 80 |
| XENIX usr | 03 | Linux/MINUX | 81 |
| DOS 16-bit <=32M | 04 | Linux swap | 82 |
| Extended | 05 | Linux native | 83 |
| DOS 16-bit >=32 | 06 | Linux extended | 85 |
| OS/2 HPFS | 07 | Amoeba | 93 |
| AIX | 08 | Amoeba BBT | 94 |
| AIX bootable | 09 | BSD/386 | a5 |
| OS/2 Boot Manager | 0a | OpenBSD | a6 |
| Win95 FAT32 | 0b | NEXTSTEP | a7 |
| Win95 FAT32(LBA) | 0c | BSDI fs | b7 |
| Win95 FAT16(LBA) | 0e | BSDI swap | b8 |
| Win95 Extended (LBA) | 0f | Syrinx | c7 |
| Venix 80286 | 40 | CP/M | db |
| Novell | 51 | DOS access | e1 |
| PPC PReP Boot | 41 | DOS R/O | e3 |
| GNU HURD | 63 | DOS secondary | f2 |
| Novell Netware 286 | 64 | BBT | ff |
26.1.3. 分区内的分区 - 扩展分区概述
图 26.7. 使用扩展分区的磁盘驱动器

[D]
26.1.4. 对 Red Hat Enterprise Linux 进行 Room
- 有可用的未分区的空闲空间
- 有可用的未使用过的分区
- 被活跃使用的分区内有可用的空闲空间
26.1.4.1. 使用未分区的空闲空间
图 26.8. 使用未分区的空闲空间的磁盘驱动器
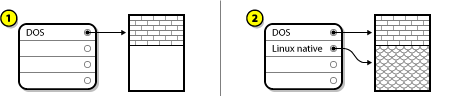
[D]
26.1.4.2. 使用未使用的分区中的空间
图 26.9. 使用未使用的分区进行磁盘驱动器
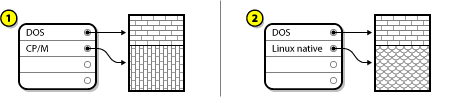
[D]
26.1.4.3. 使用 Active 分区中的空闲空间
- 破坏性重新分区
- 基本上,您可以删除单个大分区并创建几个较小的分区。正如您想象的,在原始分区中的数据都会被销毁。这意味着需要备份完整备份。对于您自己的 sake,请创建两个备份,使用验证(在您的备份软件中可用),并在删除分区 前 尝试从备份中读取数据。警告如果该分区中有某些类型的操作系统,也需要重新安装它。请注意,一些计算机用预安装的操作系统出售,可能没有包括 CD-ROM 介质来重新安装原始操作系统。在销毁原始分区及其操作系统安装 前,请注意这适用于您的系统的最佳时间。为现有操作系统创建较小的分区后,您可以重新安装任何软件,恢复您的数据并启动 Red Hat Enterprise Linux 安装。图 26.10 “以破坏性方式重新分区的磁盘驱动器” 显示正在完成的。
图 26.10. 以破坏性方式重新分区的磁盘驱动器
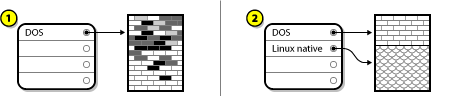
[D]在 图 26.10 “以破坏性方式重新分区的磁盘驱动器” 中,1 代表后代表,2 代表后代表。警告作为 图 26.10 “以破坏性方式重新分区的磁盘驱动器”,显示原始分区中存在的所有数据都会在没有正确备份的情况下丢失! - 非破坏性重新分区
- 在这里,您运行一个看似不可能的程序:它使大分区较小,而不会丢失该分区中存储的任何文件。许多人发现,这种方法是可靠且无问题。您应该使用什么软件来执行此联合?市场上有多个磁盘管理软件产品。进行一些调查,找到最适合您的情况的研究。虽然非破坏性重新分区的过程比较简单,但涉及多个步骤:
- 压缩和备份现存数据
- 重新划分现存分区的大小
- 创建新分区
26.1.4.3.1. 压缩现有数据
图 26.11. 压缩磁盘驱动器
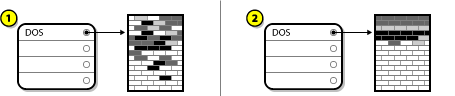
[D]
26.1.4.3.2. 重新划分现存分区的大小
图 26.12. 使用分区重新调整的磁盘驱动器
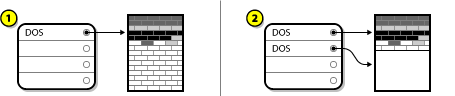
[D]
26.1.4.3.3. 创建新分区
图 26.13. 最后分区配置的磁盘驱动器
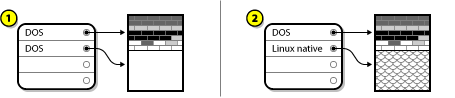
[D]
26.1.5. 分区命名方案
- 每个分区的类型会被检查,以确定 DOS/Windows 是否可以读取它。
- 如果该分区的类型兼容,则会为其分配一个"驱动器"符。 驱动器字母以"C"开头并移动到以下字母,具体取决于要标记的分区数量。
- 然后可以使用驱动器符来指代该分区以及该分区中包含的文件系统。
/dev/xxyN。
/dev/- 这是所有设备文件所在的目录名称。由于分区位于硬盘上,并且硬盘为设备,代表所有可能的分区都位于
/dev/中。 xx- 分区名的前两个字母代表分区所在的设备类型,通常是
hd(用于 IDE 磁盘)或sd(用于 SCSI 磁盘)。 y- 这个字母标明分区所在的设备。例如:
/dev/hda(第一个 IDE 硬盘)或/dev/sdb(第二个 SCSI 磁盘)。 N- 最后的数字表示分区。前四个分区(主分区或扩展分区)编号为
1到4。逻辑分区从5开始。例如,/dev/hda3是第一个 IDE 硬盘上的第三个主分区或扩展分区,/dev/sdb6是第二个 SCSI 硬盘上的第二个逻辑分区。
26.1.6. 磁盘分区和其它操作系统
26.1.7. 磁盘分区和挂载点
/dev/hda5 挂载到 /usr/ 上,这意味着 /usr/ 中的所有文件和目录都位于 /dev/hda5 上。因此,文件 /usr/share/doc/FAQ/Linux-FAQ 将存储在 /dev/hda5 中,而文件 /etc/gdm/custom.conf 则不行。
/usr/ 下面的一个或多个目录作为其他分区的挂载点。例如,分区(say、/dev/hda7)可以挂载到 /usr/local/,即 /usr/local/man/whatis 将驻留在 /dev/hda7 而不是 /dev/hda5 上。
26.1.8. 很多分区如何?
swap、/boot/ (或 Itanium 系统的 /boot/efi/ 分区)、Itanium 系统的 /var/ 分区和 / (root)。
部分 V. 基本系统恢复
第 27 章 基本系统恢复
27.1. 常见问题
- 您无法正常启动 Red Hat Enterprise Linux(运行级别 3 或 5)。
- 您遇到硬件或软件问题,并且您想要从系统的硬盘中获得更多重要文件。
- 您忘记了 root 密码。
27.1.1. 无法引导到 Red Hat Enterprise Linux
/ 分区的分区更改,引导装载程序可能无法找到它挂载分区。要解决这个问题,以救援模式引导并修改 /boot/grub/grub.conf 文件。
27.1.2. 硬件/软件问题
27.1.3. Root 密码
27.2. 引导至救援模式
- 通过从安装引导 CD-ROM 引导系统。
- 通过从其他安装介质引导系统,比如 USB 闪存设备。
- 通过从 Red Hat Enterprise Linux CD-ROM #1 引导系统。
rescue 添加为内核参数。例如,对于 x86 系统,在安装引导提示下键入以下命令:
linux rescue救援环境现在会尝试找到您的 Linux 安装,并将其挂载到 /mnt/sysimage 目录中。然后您可以进行系统所需的任何更改。如果要继续这个步骤,请选择"继续"。您可以选择以只读方式挂载文件系统,而不是读写,方法是选择"Read-only"。如果出于某种原因,可以选择"跳过",此步骤将跳过,您将直接进入命令 shell。
/mnt/sysimage/ 目录下挂载您的文件系统。如果挂载分区失败,它会通知您。如果您选择 ,它会尝试在 /mnt/sysimage/ 目录下挂载您的文件系统,但以只读模式挂载。如果您选择 ,则您的文件系统不会被挂载。如果您认为文件系统损坏,请选择 。
sh-3.00b#
chroot /mnt/sysimage/ 挂载 root 分区的命令,例如 rpm 等命令非常有用。要退出 chroot 环境,请键入 exit 来返回提示符。
/foo )在救援模式中手动挂载分区或 LVM2 逻辑卷,并输入以下命令:
mount -t ext3 /dev/mapper/VolGroup00-LogVol02 /foo/foo 是一个您创建的目录,/dev/mapper/VolGroup00-LogVol02 是您要挂载的 LVM2 逻辑卷。如果该分区类型为 ext2,请将 ext3 替换为 ext2。
fdisk -l
pvdisplay
vgdisplay
lvdisplay- SSH、scp 和 ping (如果网络启动)
- 使用磁带驱动器的用户 转储 和恢复
- parted 和 fdisk 用于管理分区
- RPM 用于安装或升级软件
- joe 用于编辑配置文件备注如果您尝试启动其他常用的编辑器,如 emacs、pico 或 vi,则 joe 编辑器将启动。
27.2.1. 重新安装 Boot Loader
- 从安装介质引导系统。
- 在安装提示下键入 linux rescue 以进入救援环境。
- 键入 chroot /mnt/sysimage 以挂载 root 分区。
- 键入 /usr/sbin/grub-install bootpart 以重新安装 GRUB 引导装载程序,其中 bootpart 是引导分区(通常为 /dev/sda)。
- 查看
/boot/grub/grub.conf文件,因为 GRUB 可能需要额外条目来控制其他操作系统。 - 重启系统:
27.3. 引导至单用户模式
- 在引导时,在 GRUB 启动画面上,按任意键进入 GRUB 互动菜单。
- 选择带有您要引导的内核版本的 Red Hat Enterprise Linux,并键入 a 来附加该行。
- 转至行的末尾并输入
single作为单独的单词(按 空格键,然后键入single)。按 Enter 退出编辑模式。
27.4. 引导至紧急模式
第 28 章 POWER 系统上的救援模式
"rescue"( 包括引号),或者 'dd rescue' (如果需要载入 SCSI 驱动程序)。在其它系统中,在 YABOOT 提示的默认内核名称后指定 rescue 或 dd rescue (没有引号)。
28.1. 从救援模式访问 SCSI 实用程序的特殊注意事项
- 使用 linux rescue askmethod 命令从 CD-ROM 引导。这可让您手动选择 NFS 作为救援介质的源,而不是默认选择 CD-ROM 驱动器。
- 将第一个安装复制到另一个 Linux 系统的文件系统。
- 通过 NFS 或 FTP 提供此安装磁盘副本。
- 因系统而异,或者关闭需要救援的系统。根据在救援模式引导安装磁盘的指示设置其 IPL 参数,但 IPL 源应指向 IFS 上的
boot.img(来自上面的步骤 1)。 - 确保安装磁盘不在 CD-ROM 驱动器中。
- Linux 系统 IPL。
- 按照 第 28 章 POWER 系统上的救援模式 所述的提示进行操作。此时会出现安装源的额外提示。选择 NFS 或 FTP(根据需要)并完成以下网络配置屏幕。
- 当 Linux 系统引导至救援模式时,可以使用 CD-ROM 驱动器,并且可以挂载驱动程序介质来访问 SCSI 工具。
部分 VI. 高级安装和部署
第 29 章 磁盘加密指南
29.1. 什么是块设备加密?
29.2. 使用 dm-crypt/LUKS 加密块设备
29.2.1. LUKS 概述
- LUKS 做什么:
- LUKS 加密整个块设备
- LUKS 因此非常适合保护移动设备的内容,例如:
- 可移动介质
- 笔记本电脑磁盘驱动器
- 加密块设备的基本内容是任意的。
- 这使加密 交换设备 很有用。
- 对于将特殊格式化块设备用于数据存储的某些数据库,这也很有用。
- LUKS 使用现有的设备映射器内核子系统。
- 这是 LVM 使用的相同子系统,因此经过测试良好。
- LUKS 提供密码短语增强。
- 这会防止字典攻击。
- LUKS 设备包含多个密钥插槽。
- 这允许用户添加备份密钥/密码短语。
- LUKS 做什么 :
- LUKS 不适用于需要对同一设备需要许多(超过 8 个)用户有不同的访问密钥的应用程序。
- LUKS 不适用于需要文件级加密的应用程序。
29.2.2. 如何在安装后访问加密设备?(系统启动)
29.2.3. 选择se Passphrase
29.3. 在 Anaconda 中创建加密块设备
29.3.1. 块设备可以加密什么原因?
29.4. 安装后在安装的系统中创建加密块设备
29.4.1. 创建块设备
29.4.2. 可选:使用随机数据填充设备
/dev/sda3)可大大增加加密的强度。不足之处在于可能需要很长时间。
- 提供高质量随机数据的最佳方法,但大多数系统上需要很长时间(以分钟为单位):
dd if=/dev/urandom of=<device>
- 最快的方法,提供较低质量的随机数据:
badblocks -c 10240 -s -w -t random -v <device>
29.4.3. 将设备格式化为 dm-crypt/LUKS 加密设备
cryptsetup luksFormat <device>
cryptsetup isLuks <device> && echo Success
cryptsetup luksDump <device>
29.4.4. 创建一个映射,以允许访问设备的解密内容
/dev/sda3)不同,只要 LUKS 标头保持不变,就能够保持稳定。要查找 LUKS 设备的 UUID,请运行以下命令:
cryptsetup luksUUID <device>
cryptsetup luksOpen <device> <name>
/dev/mapper/<name>,它代表解密的设备。可以从 读取和写入此块设备,就像其它未加密块设备一样。
dmsetup info <name>
29.4.5. 在映射的设备中创建文件系统,或者继续使用映射的设备构建复杂的存储结构
/dev/mapper/<name>)作为任何其他块设备。要在映射的设备中创建 ext2 文件系统,请使用以下命令:
mke2fs /dev/mapper/<name>
/mnt/test 上挂载这个文件系统,请使用以下命令:
/mnt/test 目录。
mount /dev/mapper/<name> /mnt/test
29.4.6. 将映射信息添加到 /etc/crypttab
/etc/crypttab 文件中显示条目。如果文件不存在,则创建该目录并将所有者和组更改为 root(root),并将模式更改为 0744。使用以下格式在文件中添加一行:
<name> <device> none
/dev/sda5)更改。
/etc/crypttab 文件格式的详细信息,请阅读 crypttab(5) 手册页。
29.4.7. 在 /etc/fstab中添加一个条目
/etc /fstab 文件中使用解密的设备 /dev/mapper/<name >。
/etc/fstab 中的设备。这的主要目的是在设备名称(例如: /dev/sda4)更改的情况下提供恒定标识符。LUKS 设备名称采用 /dev/mapper/luks-<luks_uuid > 形式仅基于设备的 LUKS UUID,因此可保证保持恒定性。这种事实使其适合在 /etc/fstab 中使用。
/etc/fstab 文件格式的详细信息,请阅读 fstab(5) man page。
29.5. 常见安装后任务
29.5.1. 将随机生成的密钥设置为访问加密块设备的额外方法
29.5.1.1. 生成密钥
$HOME/keyfile 中生成一个 256 位密钥。
		dd if=/dev/urandom of=$HOME/keyfile bs=32 count=1
		chmod 600 $HOME/keyfile
29.5.1.2. 将密钥添加到加密设备的可用键
cryptsetup luksAddKey <device> ~/keyfile
29.5.2. 在现有设备中添加新密码短语
cryptsetup luksAddKey <device>
29.5.3. 从设备中删除密码短语或密钥
cryptsetup luksRemoveKey <device>
第 30 章 通过 VNC 安装
- 可创建与图形模式中找到的类似用户界面的屏幕实际状态。
- 难以国际化支持。
- 想要维护一个交互式安装代码路径。
30.1. VNC Viewer
- 您的工作站
- 数据中心崩溃车上的笔记本电脑
- 通过安装 vnc 包在 Red Hat Enterprise Linux 中提供 vncviewer:
#
yum install vnc - TightVNC 可用于 Windows http://www.tightvnc.com/
- macOS X 包括内置的 VNC 支持,作为 10.5 版本。在" 查找器 "中,单击" Go "菜单并选择" 连接到服务器 "。在服务器地址字段中,您可以键入 vnc://SERVER:DISPLAY,其中 SERVER 是您要连接的 VNC 服务器的 IP 地址或 DNS 主机名,而 DISPLAY 是 VNC 显示号(通常为 1),然后单击 Connect。
30.2. Anaconda 中的 VNC 模式
30.2.1. 直接模式
- 将 vnc 指定为引导参数。
- 在用于安装的 kickstart 文件中指定 vnc 命令。
Running anaconda VERSION, the PRODUCT system installer - please wait...
- 需要对系统控制台的视觉访问,以查看 IP 地址和端口,才能将 VNC viewer 连接到。
- 需要交互式访问系统控制台才能完成安装程序的第一个阶段。
30.2.2. 连接模式
boot: linux vncconnect=HOST
30.3. 使用 VNC 安装
30.3.1. 安装示例
- 使用跨线线将笔记本电脑或其他工作站连接到目标系统。如果您使用常规跳接线,请确保使用小型 hub 或交换机连接这两个系统。最新的以太网接口会自动检测它们是否需要交叉,因此可以使用常规补丁电缆直接连接这两个系统。
- 将 VNC viewer 系统配置为使用没有网关的 RFC 1918 地址。此专用网络连接仅用于安装。将 VNC viewer 系统配置为 192.168.100.1/24。如果使用该地址,只需选择 RFC 1918 地址空间中可用的其他地址。
- 在目标系统中启动 RHEL 安装。
- 引导安装 DVD 或者 CD。如果引导安装介质(CD 或者 DVD),请确保将 vnc 作为引导参数传递。要添加 vnc 参数,您需要一个附加到目标系统的控制台,以便与引导过程交互。在提示符后输入以下内容:
boot:
linux vnc - 通过网络启动。如果目标系统配置了静态 IP 地址,请将 vnc 命令添加到 kickstart 文件中。如果目标系统使用 DHCP,请将 vncconnect=HOST 添加到目标系统的引导参数。HOST 是 VNC viewer 系统的 IP 地址或 DNS 主机名。在提示符后输入以下内容:
boot:
linux vncconnect=HOST
- 当目标系统中提示输入网络配置时,请分配您用于 VNC viewer 系统的同一网络中的可用 RFC 1918 地址。例如: 192.168.100.2/24。备注此 IP 地址只在安装过程中使用。您会有机会在安装程序稍后配置最终网络设置(如果有)。
- 安装程序表示启动 anaconda 后,系统将指示您将使用 VNC viewer 连接到系统。连接到查看器并按照产品文档中找到的图形安装模式说明操作。
30.3.2. Kickstart 注意事项
30.3.3. 防火墙注意事项
30.4. 参考信息
- Wikipedia :http://en.wikipedia.org/wiki/Vnc
- TightVNC: http://www.tightvnc.com/
- RFC 1918 - 专用网络的地址分配 :http://www.ietf.org/rfc/rfc1918.txt
- Anaconda 引导选项 :http://fedoraproject.org/wiki/Anaconda/Options
- Kickstart 文档 :http://fedoraproject.org/wiki/Anaconda/Kickstart
第 31 章 Kickstart 安装
31.1. Kickstart 安装是什么?
31.2. 如何执行 Kickstart 安装?
- 创建一个 kickstart 文件。
- 使用 kickstart 文件创建引导介质,或者使 kickstart 文件在网络中可用。
- 使安装树可用。
- 启动 kickstart 安装。
31.3. 创建 Kickstart 文件
/root/anaconda-ks.cfg 文件。您应能够使用任何文本编辑器或单词的处理器(可以将文件保存为 ASCII 文本)进行编辑。
- 必须按顺序指定部分 。除非另有指定,否则部分中的项目不必按特定顺序使用。部分顺序是:
- command 部分 - 有关 kickstart 选项列表,请参阅 第 31.4 节 “Kickstart 选项”。您必须包括所需选项。
- %packages 部分 - 详情请参阅 第 31.5 节 “软件包选择”。
- 不必需的项目可以被省略。
- 省略安装程序中任何必需项的结果,提示用户输入相关项目的回答,正如在典型的安装过程中提示您一样。给出答案后,安装将继续进行无人值守(除非它找到其他缺少的项)。
- 开头为 pound(也称为 hash)符号(#)的行被当作注释并被忽略。
- 对于 kickstart 升级,需要以下项目:
- 语言
- 安装方法
- 设备规格(如果需要设备执行安装)
- 键盘设置
- upgrade 关键字
- 引导装载程序配置
如果为升级指定任何其他项目,则忽略这些项目(请注意,其中包括软件包选择)。
31.4. Kickstart 选项
- autopart (可选)
- --encrypted - 在默认情况下,支持的所有设备都会被加密?这等同于在初始分区屏幕上选中" 加密 "复选框。
- --passphrase= - 为所有加密设备提供默认的系统范围密码短语。
- ignoredisk (可选)
- 如果您使用 autopartition 并希望忽略某些磁盘,则
ignoredisk很有用。例如,如果没有ignoredisk,请尝试在 SAN-cluster 上部署 kickstart 会失败,因为安装程序检测到 SAN 的被动路径没有分区表。--only-use选项指定只在安装过程中使用列出的磁盘。如果您有多个到磁盘的路径,则ignoredisk选项也很有用。语法为:ignoredisk --drives=drive1,drive2,...
其中 driveN 是sda、sdb、...、hda等之一。- --only-use - 指定安装程序使用的磁盘列表。其它磁盘将被忽略。例如:要在安装过程中使用磁盘
da并忽略所有其他磁盘:ignoredisk --only-use=sda
- autostep (可选)
- --autoscreenshot - 在安装的每一步获取一个截屏,并在安装完成后将镜像复制到 /root/anaconda-screenshots。这对文档来说最有用。
- auth 或 authconfig (必需)
- --enablemd5 - 对用户密码使用 md5 加密。
- --enablenis - NIS 支持。默认情况下,-- enablenis 使用它在网络上找到的任何域。使用 --nisdomain= 选项手动设置域应几乎始终设置。
- --nisdomain= - NIS 域名,用于 NIS 服务。
- --nisserver= - 用于 NIS 服务的服务器(默认广播)。
- --useshadow 或 --enableshadow - 使用影子密码。
- --enableldap - 在
/etc/nsswitch.conf中打开 LDAP 支持,允许您的系统从 LDAP 目录检索有关用户(UID、主目录、shell 等)的信息。要使用这个选项,您必须安装nss_ldap软件包。您还必须使用 --ldapserver= 和 --ldapbasedn= 指定服务器和基本 DN(区分名称)。 - --enableldapauth - 使用 LDAP 作为身份验证方法。这可让
pam_ldap模块使用 LDAP 目录进行身份验证和更改密码。要使用这个选项,必须安装nss_ldap软件包。您还必须使用 --ldapserver= 和 --ldapbasedn= 指定服务器和基本 DN。 - --ldapserver= - 如果您指定了 --enableldap 或 --enableldapauth,则使用这个选项指定要使用的 LDAP 服务器的名称。这个选项在
/etc/ldap.conf文件中设置。 - --ldapbasedn= - 如果您指定了 --enableldap 或 --enableldapauth,则使用此选项在存储用户信息的 LDAP 目录树中指定 DN。这个选项在
/etc/ldap.conf文件中设置。 - --enableldaptls - 使用 TLS(传输层安全)查找。此选项允许 LDAP 在身份验证前将加密用户名和密码发送到 LDAP 服务器。
- --enablekrb5 - 使用 Kerberos 5 来验证用户。Kerberos 本身不知道主目录、UID 或 shell。如果启用 Kerberos,则必须通过启用 LDAP、NIS 或 Hesiod 或者使用 /usr/sbin/useradd 命令使用户已知的帐户。如果使用这个选项,则必须安装
pam_krb5软件包。 - --krb5realm= - 您的工作站所属的 Kerberos 5 域。
- --krb5kdc= - 为域提供服务的 KDC(或 KDC)。如果您的域中有多个 KDC,请使用逗号(,,)分隔其名称。
- --krb5adminserver= - 您域中也运行 kadmind 的 KDC。此服务器处理密码更改和其他管理请求。如果您有多个 KDC,必须在主 KDC 上运行此服务器。
- --enablehesiod - 启用 Hesiod 支持以查找用户主目录、UID 和 shell。有关在您的网络上设置和使用 Hesiod 的更多信息,位于
/usr/share/doc/glibc-2.x.x/README.hesiod中,其中包括在glibc软件包中。Hesiod 是 DNS 的扩展,它使用 DNS 记录存储有关用户、组和各种项目的信息。 - --hesiodlhs - Hesiod LHS("左方")选项,在
/etc/hesiod.conf中设置。Hesiod 库使用这个选项来确定在查找信息时搜索 DNS 的名称,类似于 LDAP 使用基本 DN。 - --hesiodrhs - Hesiod RHS("right-hand")选项,在
/etc/hesiod.conf中设置。Hesiod 库使用这个选项来确定在查找信息时搜索 DNS 的名称,类似于 LDAP 使用基本 DN。备注要查找"jim"的用户信息,Hesiod 库查找 jim.passwd<LHS><RHS >,它应解析为类似其 passwd 条目的 TXT 记录(jim:*:501:501:Jungle Jim:/home/jim:/bin/bash)。对于组,这种情况相同,但使用 jim.group<LHS><RHS& gt; 除外。按编号查找用户和组通过使 "501.uid" 成为 "jim.passwd" 的 CNAME 和 "501.gid" 处理。请注意,在执行搜索时,程序库不会放置句点 。 在 LHS 和 RHS 值的前面。因此,LHS 和 RHS 值需要有一个句点,以便在它们需要此周期前放置它们。 - --enablesmbauth - 启用对 SMB 服务器(通常是 Samba 或 Windows 服务器)用户进行身份验证。SMB 身份验证支持不知道主目录、UID 或 shell。如果启用 SMB,则必须通过启用 LDAP、NIS 或 Hesiod 或通过使用 /usr/sbin/useradd 命令使其帐户成为工作站已知的帐户。若要使用此选项,必须安装
pam_smb软件包。 - --smbservers= - 用于 SMB 验证的服务器名称。要指定多个服务器,请使用逗号(,,)分隔名称。
- --smbworkgroup= - SMB 服务器的 workgroup 的名称。
- --enablecache - 启用 nscd 服务。nscd 服务缓存用户、组和各种其他类型的信息的信息。如果您选择通过 NIS、LDAP 或 hesiod 通过网络分发用户和组的信息,缓存尤其有用。
- --passalgo - 为密码短语启用 SHA256 或 SHA512 哈希。使用
--passalgo=sha256或--passalgo=sha512并删除--enablemd5(如果存在)。
- bootloader (必需)
- --append= - 指定内核参数。要指定多个参数,使用空格分隔它们。例如:
bootloader --location=mbr --append="hdd=ide-scsi ide=nodma"
- --driveorder - 指定在 BIOS 引导顺序中第一个驱动器。例如:
bootloader --driveorder=sda,hda
- --hvargs - 如果使用的是 GRUB,则指定 Xen 管理程序参数。要指定多个参数,使用空格分隔它们。例如:
bootloader --hvargs="dom0_mem=2G dom0_max_vcpus=4"
- --location= - 指定引导记录写入的位置。有效值为: mbr (默认)、分区 (在包含内核的第一个扇区安装引导装载程序)或 none (不安装引导装载程序)。
- --password= - 如果使用 GRUB,请将 GRUB 引导装载程序密码设置为此选项指定的密码。这应该用于限制对可传递任意内核选项的 GRUB shell 的访问。
- --md5pass= - 如果使用 GRUB,与 --password= 类似,但应已经加密该密码。
- --upgrade - 升级现有引导装载程序配置,保留旧的条目。这个选项仅适用于升级。
- clearpart (可选)
- 备注如果使用 clearpart 命令,则无法在逻辑分区中使用 --onpart 命令。重要 - System z 中未格式化的 DASD在使用 kickstart 和 cmdline 用户界面安装时,Red Hat Enterprise Linux 5 无法使用未格式化的 DASD。在 kickstart 文件中使用以下命令并明确列出您要使用 dasdfmt 格式化的所有 DASD,如果它们还没有低级格式化,则会自动列出它们:
clearpart --initlabel --drives=names_of_DASDs
例如:clearpart --initlabel --drives=dasda,dasdb,dasdc
- --all - 擦除系统中的所有分区。
- --drives= - 指定从中清除分区的驱动器。例如,下面的命令清除了主 IDE 控制器上前两个驱动器上所有分区:
clearpart --drives=hda,hdb --all
- --initlabel - 将磁盘标签初始化到您的架构的默认标签(例如,x86 和 gpt for Itanium)。它很有用,因此如果安装到新硬盘驱动器,安装程序不会询问是否应该初始化磁盘标签。
- --Linux - 删除所有 Linux 分区。
- --none (默认)- 不删除任何分区。
- cmdline (可选)
- device (可选)
- 在大多数 PCI 系统中,安装程序会正确地为以太网和 SCSI 卡自动探测。然而,在老的系统和一些 PCI 系统上,Kickstart 需要提示才能找到正确的设备。device 命令用来告诉安装程序安装额外的模块,采用以下格式:
device <type> <moduleName> --opts=<options>
- <type > - 替换为 scsi 或 eth。
- <MODULENAME> - 用应该安装的内核模块 的名称替换。
- --opts= - 用于挂载 NFS 导出的挂载选项。允许在
/etc/fstab中为 NFS 挂载指定任何选项。选项在 nfs(5) man page 中列出。用逗号分隔多个选项。
- driverdisk (可选)
- 驱动程序 diskettes 可在 kickstart 安装过程中使用。您必须将驱动程序 diskette 的内容复制到系统的硬盘分区的根目录中。然后,您必须使用 driverdisk 命令告知安装程序在哪里查找驱动程序磁盘。
driverdisk <partition> [--type=<fstype>]
或者,可以为驱动程序 diskette 指定网络位置:driverdisk --source=ftp://path/to/dd.img driverdisk --source=http://path/to/dd.img driverdisk --source=nfs:host:/path/to/img
- <partition > - 包含驱动程序磁盘的分区。
- --type= - 文件系统类型(例如,vfat 或 ext2)
- firewall (可选)
firewall --enabled|--disabled [--trust=] <device> [--port=]
- --enabled 或 --enable - 拒绝不是响应出站请求的传入连接,如 DNS 回复或 DHCP 请求。如果需要访问在这个机器中运行的服务,您可以选择允许指定的服务通过防火墙。
- --disabled 或 --disable - 不要配置任何 iptables 规则。
- --trust= - 在这里列出设备,如 eth0,允许所有来自该设备的流量通过防火墙。要列出多个设备,请使用 --trust eth0 --trust eth1。不要使用逗号分隔的格式,如 --trust eth0,eth1。
- <incoming > - 使用一个或多个替换,允许指定的服务通过防火墙。
- --ssh
- --telnet
- --smtp
- --http
- --ftp
- --port= - 您可以使用 port:protocol 格式指定通过防火墙允许的端口。例如,要允许 IMAP 通过您的防火墙,可指定 imap:tcp。数字端口也可以明确指定;例如,要允许 UDP 数据包在端口 1234 到,请指定 1234:udp。要指定多个端口,用逗号将它们隔开。
- firstboot (可选)
- --enable 或 --enabled - 设置代理 首次启动。
- --disable 或 --disabled - 设置代理 不会在系统第一次引导时启动。
- --reconfig - 在引导时启用 设置代理,以重新配置模式启动。此模式启用了语言、鼠标、键盘、root 密码、安全级别、时区以及默认网络配置之外的网络配置选项。
- halt (可选)
- halt 选项大致相当于 shutdown -h 命令。有关其他完成方法,请参考关闭、重新引导 和关闭 kickstart 选项。
- 图形 (可选)
- install (可选)
- 告诉系统安装一个全新的系统,而不是升级现有系统。这是默认的模式。对于安装,您必须通过 cdrom、harddrive、nfs 或 url (用于 FTP 或 HTTP 安装)指定安装类型。install 命令和安装方法命令必须位于单独的行中。
- CDROM - 从系统上的第一个 CD-ROM 驱动器安装。
- 硬盘驱动器 - 从 Red Hat 安装树安装在本地驱动器上,该驱动器必须是 vfat 或 ext2。
- --biospart=要从中安装的 BIOS 分区(如 82)
- --partition=要从(如 sdb2)中安装的分区。
- --dir=包含安装树
变体目录的目录。
例如:harddrive --partition=hdb2 --dir=/tmp/install-tree
- NFS - 从指定的 NFS 服务器安装。
- --server=要从中安装的服务器(主机名或 IP)。
- --dir=包含安装树
变体目录的目录。 - --opts=用于挂载 NFS 导出的挂载选项(可选)
例如:nfs --server=nfsserver.example.com --dir=/tmp/install-tree
- URL - 通过 FTP 或 HTTP 从远程服务器中的安装树安装。例如:
url --url http://<server>/<dir>
或:url --url ftp://<username>:<password>@<server>/<dir>
- interactive (可选)
- iSCSI (可选)
- 指定在安装过程中附加附加 iSCSI 存储。如果使用
iscsi参数,还必须使用iscsiname参数为 iSCSI 节点分配一个名称。在 kickstart 文件中iscsi参数之前,必须显示iscsiname参数。我们建议您尽可能在系统 BIOS 或固件中配置 iSCSI 存储(即 Intel 系统),而不是使用iscsi参数。Anaconda 会自动检测并使用在 BIOS 或固件中配置的磁盘,且在 kickstart 文件中不需要特殊配置。如果您必须使用iscsi参数,请确保在开始安装时激活联网,并在使用clearpart或ignoredisk等参数引用 iSCSI 磁盘前,在 kickstart 文件中出现iscsi参数。- --port= (必需)- 端口号(通常为 --port=3260)
- --user= - 与目标进行身份验证所需的用户名
- --password= - 与为目标指定的用户名对应的密码
- --reverse-user= - 从使用反向 CHAP 验证的目标与启动器进行身份验证所需的用户名
- --reverse-password= - 与为发起方指定的用户名对应的密码
- iscsiname (可选)
- key (可选)
- --skip - Skip 输入密钥。通常,如果密钥命令未给定,则 Anaconda 将在此步骤中暂停,以提示输入密钥。如果没有密钥或者不想提供密钥,这个选项允许自动安装继续。
- keyboard (必需)
be-latin1, bg, br-abnt2, cf, cz-lat2, cz-us-qwertz, de, de-latin1,
de-latin1-nodeadkeys, dk, dk-latin1, dvorak, es, et, fi, fi-latin1,
fr, fr-latin0, fr-latin1, fr-pc, fr_CH, fr_CH-latin1, gr, hu, hu101,
is-latin1, it, it-ibm, it2, jp106, la-latin1, mk-utf, no, no-latin1,
pl, pt-latin1, ro_win, ru, ru-cp1251, ru-ms, ru1, ru2,  ru_win,
se-latin1, sg, sg-latin1, sk-qwerty, slovene, speakup,  speakup-lt,
sv-latin1, sg, sg-latin1, sk-querty, slovene, trq, ua,  uk, us, us-acentos
文件/usr/lib/python2.2/site-packages/rhpl/keyboard_models.py还包含此列表,并且是rhpl包的一部分。- lang (必需)
- 设置在安装过程中使用的语言以及安装的系统上使用的默认语言。例如,要将语言设置为英语,Kickstart 文件应包含以下行:
lang en_US
文件/usr/share/system-config-language/locale-list提供了每行第一列中有效语言代码的列表,是system-config-language软件包的一部分。文本模式安装过程中不支持某些语言(中文、日语、韩文和印度的语言)。如果使用 lang 命令指定这些语言之一,安装将继续使用英语,但默认情况下运行的系统会具有指定的语言。 - langsupport (已弃用)
- langsupport 关键字已弃用,其使用将导致错误消息打印到屏幕上,然后安装停止。现在,您应该列出对 kickstart 文件的 %packages 部分中支持的所有语言的支持软件包组,而不是使用 langsupport 关键字。例如,添加对法语支持意味着您应该向 %packages 添加以下内容:
@french-support
- logvol (可选)
- 使用语法为逻辑卷管理(LVM)创建一个逻辑卷:
logvol <mntpoint> --vgname=<name> --size=<size> --name=<name> <options>
这些选项包括:- --noformat - 使用现有逻辑卷且不对其进行格式化。
- --useexisting - 使用现有逻辑卷并重新格式化它。
- --fstype= - 为逻辑卷设置文件系统类型。有效值为 xfs、ext2、ext3、ext 4、swap、vfat、和 hfs。
- --fsoptions= - 指定在挂载文件系统时要使用的选项的自由格式字符串。该字符串将复制到安装的系统的
/etc/fstab文件中,并且应用引号括起来。 - --bytes-per-inode= - 指定逻辑卷上要进行的文件系统中索引节点的大小。不是所有文件系统都支持此选项,因此这些情况下将被静默忽略。
- --size= - 逻辑卷最小值(以 MB 为单位)。在这里指定一个整数值,且不会将数字附加为 MB。如果逻辑卷被设置为增大,则必须提供最小大小。
- --grow= - 增大逻辑卷以填满可用空间(如果有),或最多设置最大值,同时符合其他限制。
- --maxsize= - 当逻辑卷设置为可增加时的最大大小(以 MB 为单位)。在这里指定一个整数值,且不会将数字附加为 MB。
- --recommended= - 自动确定逻辑卷的大小。
- --percent= - 将逻辑卷的大小指定为卷组中可用空间的百分比。
首先创建分区,然后创建逻辑卷组,然后创建逻辑卷。例如:part pv.01 --size 3000 volgroup myvg pv.01 logvol / --vgname=myvg --size=2000 --name=rootvol
- logging (可选)
- 此命令控制安装期间 anaconda 的错误日志。它对安装的系统没有影响。
- --host= - 向给定的远程主机发送日志信息,该主机必须运行配置为接受远程记录的 syslogd 进程。
- --port= - 如果远程 syslogd 进程使用默认端口以外的端口,则可以通过这个选项指定。
- --level= - 一个 debug、info、warning、error 或 critical。指定 tty3 上显示的最小消息级别。但是,无论此级别如何,所有消息仍会发送到日志文件。
- mediacheck (可选)
- 如果指定,这将强制 anaconda 在安装介质中运行 mediacheck。此命令要求安装 学习,因此默认禁用。
- monitor (可选)
- 如果未提供 monitor 命令,则 anaconda 将使用 X 来自动检测您的监控设置。请在手动配置监控器前尝试它。
- --hsync= - 指定监控器的水平同步频率。
- --monitor= - 使用指定的 monitor;监控器名称应该来自 hwdata 软件包中的 /usr/share/hwdata/MonitorsDB 的列表。监控器列表也可以在 Kickstart Configurator 的 X Configuration 屏幕中找到。如果提供了 --hsync 或 --vsync,则忽略它。如果没有提供 monitor 信息,安装程序会尝试自动探测到它。
- --noprobe= - 不要尝试探测 monitor。
- --vsync= - 指定监控器的垂直同步频率。
- mouse (已弃用)
- mouse 关键字已弃用。
- multipath (可选)
- 以格式指定多路径设备:
multipath --name=mpathX --device=device_name --rule=policy
例如:multipath --name=mpath0 --device=/dev/sdc --rule=failover
可用的选项有:- --name= - 多路径设备的名称,格式为
mpathX,其中 X 是整数。 - --device= - 连接到多路径设备的块设备。
- --rule= - 多路径 策略:
failover、multibus、group_by_serial、group_by_prio或group_by_node_name。有关这些策略的描述,请参考 multipath man page。
- 网络 (可选)
- 配置系统的网络信息。如果 kickstart 安装需要联网(通过
HTTP、FTP或NFS访问 Kickstart 文件时),将使用 命令指定的配置激活第一个网络命令中指定的设备。如果没有指定--device=选项且有多个网络设备可用,则会选择通过网络访问 Kickstart 文件的设备,或者要求用户选择该设备。请注意,如果没有在第一个 网络 命令中指定网络配置(例如,如果缺少--bootproto=选项),则设备将使用引导选项设置的配置激活。在安装的系统上,将使用默认值配置此设备,即--bootproto=dhcp。- --BOOTPROTO= - dhcp、bootp、静态 或 查询 之一。默认选项是 dhcp。BOOTP 和 dhcp 被视为相同。DHCP 方法使用 DHCP 服务器系统来获得它的网络配置。如您所见,BOOTP 方法类似,需要 BOOTP 服务器来提供网络配置。要指示系统使用 DHCP:
network --bootproto=dhcp
要指示机器使用 BOOTP 获取其网络配置,请在 kickstart 文件中使用以下行:network --bootproto=bootp
静态方法要求您在 kickstart 文件中输入所有必需的网络信息。顾名思义,这些信息是静态的,在安装过程中和安装后使用。静态网络的行更为复杂,因此您必须每行包含所有网络配置信息。您必须指定 IP 地址、子网掩码、网关和名称服务器。请注意,虽然此页面的演示中已破坏了该行,但实际 kickstart 文件中,您必须将所有这些信息包含在没有中断的一行中。network --bootproto=static --ip=10.0.2.15 --netmask=255.255.255.0 --gateway=10.0.2.254 --nameserver=10.0.2.1
如果使用静态方法,请注意以下两个限制:- 所有静态网络配置信息必须 在一行中 指定;例如,您无法使用反斜杠来换行行。
- 您也可以在此处配置多个名称服务器。为此,请在命令行中以逗号分隔列表的形式指定它们。请注意,虽然此页面的演示中已破坏了该行,但实际 kickstart 文件中,您必须将所有这些信息包含在没有中断的一行中。
network --bootproto=static --ip=10.0.2.15 --netmask=255.255.255.0
 --gateway=10.0.2.254 --nameserver 192.168.2.1,192.168.3.1
如果您将这个选项设置为查询,则会在实际安装过程中提示您手动配置网络选项。network --bootproto=query
- --device= - 用来指定所配置的网络设备。例如:
network --bootproto=dhcp --device=eth0
上例为 DHCP 配置设备eth0。 - --IP= - 要安装的计算机的 IP 地址。
- --gateway= - 默认网关作为 IP 地址。
- --nameserver= - 主名称服务器,作为 IP 地址。
- --No DNS - 不配置任何 DNS 服务器。
- --netmask= - 已安装系统的子网掩码。
- --hostname= - installed 系统的主机名。
- --ethtool= - 指定网络设备的额外低级别设置,它们将传递给 ethtool 程序。如果没有指定
autoneg,则自动插入autoneg off。 - --essid= - 无线网络的网络 ID。
- --wepkey= - 无线网络的加密密钥。
- --ONBOOT= - 是否在引导时启用设备。
- --dhcpclass= - DHCP 类。
- --MTU= - 设备的 MTU。
- --noipv4 - 在这个设备上禁用 IPv4。
- --noipv6 - 在这个设备上禁用 IPv6。
- part 或 partition (在安装时需要,忽略升级)
- 在系统上创建分区。如果不同分区的系统上存在多个 Red Hat Enterprise Linux 安装,安装程序会提示用户进行升级。警告除非使用 --noformat 和 --onpart,否则所有创建的分区都会格式化为安装过程的一部分。有关操作中详细示例,请参考 第 31.4.1 节 “高级分区示例”。
- <mntpoint & gt; - <mntpoint > 分区被挂载位置,且必须是以下形式之一:
/ <path>例如: /、/usr、/home- swap该分区被用作交换空间。要自动决定 swap 分区的大小,请使用 --recommended 选项:
swap --recommended
对于小于 2GB RAM 的机器,建议的最大 swap 大小是 RAM 量的两倍。对于有 2GB 或以上的机器,建议更改为 2GB 以及 RAM 量。 - raid.<id>该分区用于软件 RAID(请参考 raid)。
- pv.<id>该分区用于 LVM(请参考 logvol)。备注您可以为 < id> 字段分配任何值,但确保这些值在卷和卷组之间保持一致。第一个卷的默认值为 01。
- --size= - 以 MB 为单位的最小分区大小。此处指定一个整数值,如 500。不要使用 MB 添加该数字。
- --grow - 创建分区以增加以填满可用空间(如果有),或最多指定最大大小设置。备注如果您在 swap 分区中使用 --grow= 而不设置 --maxsize=,Anaconda 将限制 swap 分区的最大大小。对于物理内存小于 2GB 的系统,强制限制为物理内存的两倍。对于内存超过 2GB 的系统,强制限制为物理内存大小加上 2GB。
- --maxsize= - 当分区设置为增加时的最大分区大小(以 MB 为单位)。在这里指定一个整数值,且不会将数字附加为 MB。
- --noformat - 说明安装程序不格式化分区,以便与 --onpart 命令一起使用。
- --onpart= 或 --usepart= - 在 已有 设备中设置分区。例如:
partition /home --onpart=hda1
将/home置于/dev/hda1上,它必须已经存在。 - --ondisk= 或 --ondrive= - 强制在特定磁盘上创建分区。例如: --ondisk=sdb 将分区放在系统的第二个 SCSI 磁盘中。
- --asprimary - 强制将分区自动分配为主分区,或者分区失败。
- --type= (由 fstype替换)- 此选项不再可用。使用 fstype。
- --fstype= - 为分区设置文件系统类型。有效值为 xfs、ext2、ext3、ext 4、swap、vfat、和 hfs。
- --start= - 指定分区的起始柱面。它需要通过 --ondisk= 或 ondrive= 指定驱动器。它还要求以 --end= 指定终止柱面,或使用 --size= 指定分区大小。
- --end= - 指定分区的终止柱面。它需要通过 --start 来指定启动柱面。
- --bytes-per-inode= - 指定要在分区上创建的文件系统中索引节点的大小。不是所有文件系统都支持此选项,因此这些情况下将被静默忽略。
- --recommended - 确定分区大小。
- --onbiosdisk - 强制在特定磁盘上按 BIOS 发现的分区。
- --encrypted - 指定应加密此分区。
- --passphrase= - 指定在加密这个分区时要使用的密码短语。如果没有上述 -- 加密 选项,这个选项不会有任何作用。如果没有指定密码短语,则会使用默认的系统范围系统,否则当没有默认密码时,安装程序将停止和提示。
- --fsoptions= - 指定在挂载文件系统时要使用的选项的自由格式字符串。该字符串将复制到安装的系统的
/etc/fstab文件中,并且应用引号括起来。 - --label= - 为单个分区分配标签。
备注如果因为某种原因分区失败,虚拟控制台 3 中会显示诊断信息。 - poweroff (可选)
- 在成功完成安装后关闭并关闭系统。通常,在手动安装过程中,anaconda 会显示一条信息并等待用户按任意键来重新引导系统。在 kickstart 安装过程中,如果没有指定完成方法,则默认使用 halt 选项。poweroff 选项大致相当于 shutdown -p 命令。备注poweroff 选项高度依赖所使用的系统硬件。特别是,某些硬件部件如 BIOS、APM(高级电源管理)和 ACPI(高级配置和电源接口)必须能和系统内核交互。有关您系统的 APM/ACPI 功能的更多信息,请联系您的制造商。有关其他完成方法,请参考 停止、重新引导 和关闭 kickstart 选项。
- RAID (可选)
- 装配软件 RAID 设备。这个命令的格式如下:
raid <mntpoint> --level=<level> --device=<mddevice> <partitions*>
- <mntpoint > - 挂载 RAID 文件系统的位置。如果是
/,RAID 级别必须是 1,除非引导分区 (/boot) 存在。如果引导分区存在,/boot分区必须是级别 1,root (/) 分区可以是任意可用的类型。& lt;partitions *> (表示可以列出多个分区)列出了要添加到 RAID 阵列的 RAID 标识符。 - --level= - 要使用的 RAID 级别(0、1、4、5、6 或 10)。
- --device= - 要使用的 RAID 设备名称(如 md0 或 md1)。RAID 设备范围从 md0 到 md15,每个设备只能被使用一次。
- --bytes-per-inode= - 指定 RAID 设备中索引节点的大小。不是所有文件系统都支持此选项,因此这些情况下将被静默忽略。
- --spares= - 指定为 RAID 阵列分配的备用驱动器数目。可使用备用驱动器在驱动器失败时重建阵列。
- --fstype= - 为 RAID 阵列设置文件系统类型。有效值为 xfs、ext2、ext3、ext 4、swap、vfat、和 hfs。
- --fsoptions= - 指定在挂载文件系统时要使用的选项的自由格式字符串。此字符串将复制到已安装系统的 /etc/fstab 文件中,并使用引号括起来。
- --noformat - 使用现有的 RAID 设备,且不格式化 RAID 阵列。
- --useexisting - 使用现有 RAID 设备并重新格式化它。
- --encrypted - 指定应加密此 RAID 设备。
- --passphrase= - 指定在加密这个 RAID 设备时要使用的密码短语。如果没有上述 -- 加密 选项,这个选项不会有任何作用。如果没有指定密码短语,则会使用默认的系统范围系统,否则当没有默认密码时,安装程序将停止和提示。
以下示例演示了如何为 / 创建 RAID 1 分区以及/usrpart raid.01 --size=60 --ondisk=sda part raid.02 --size=60 --ondisk=sdb part raid.03 --size=60 --ondisk=sdc
part swap --size=128 --ondisk=sda
part swap --size=128 --ondisk=sdb
part swap --size=128 --ondisk=sdc
part raid.11 --size=1 --grow --ondisk=sda
part raid.12 --size=1 --grow --ondisk=sdb
part raid.13 --size=1 --grow --ondisk=sdc
raid / --level=1 --device=md0 raid.01 raid.02 raid.03
raid /usr --level=5 --device=md1 raid.11 raid.12 raid.13
有关 raid in action 的详细示例,请参考 第 31.4.1 节 “高级分区示例”。 - reboot (可选)
- 安装完成之后重启(无参数)。通常,Kickstart 会显示信息并等待用户按任意键来重新引导系统。reboot 选项大致相当于 shutdown -r 命令。当在 System z 的 cmdline 模式下安装时指定 reboot 来完全自动化安装。有关其他完成方法,请参考 停止、关闭 和关闭 kickstart 选项。如果在 kickstart 文件中未明确指定其他方法,则 halt 选项是默认的完成方法。注意根据安装介质和方法,使用 reboot 选项 可能会导致 无限期安装循环。
- repo (可选)
- 配置可用作软件包安装来源的其他 yum 存储库。可以指定多个存储库行。
repo --name=<repoid> [--baseurl=<url>| --mirrorlist=<url>]
- --name= - repo id。这个选项是必需的。
- --baseurl= - 存储库的 URL。这里不支持 yum repo 配置文件中可以使用的变量。您可以使用这个选项之一或 --mirrorlist,而不是两者。
- --mirrorlist= - 指向存储库镜像列表的 URL。这里不支持 yum repo 配置文件中可以使用的变量。您可以使用这个选项之一或 --baseurl,而不是两者。
- rootpw (必需)
rootpw [--iscrypted] <password>
- --iscrypted - 如果存在,则假设 password 参数已被加密。
- SELinux (可选)
selinux [--disabled|--enforcing|--permissive]
- --enforcing - 使用强制执行默认目标策略启用 SELinux。备注如果 kickstart 文件中不存在 selinux 选项,则 SELinux 会被启用并默认设置为 --enforcing。
- --permissive - 根据 SELinux 策略输出警告,但并不强制执行该策略。
- --disabled - 在系统中完全禁用 SELinux。
- services (可选)
- --disabled - 禁用以逗号分隔的列表中给出的服务。
- --enabled - 启用以逗号分开的列表中给出的服务。
不要在服务列表中包含空格如果您在用逗号分开的列表中包含空格,kickstart 将只启用或禁用最多第一个空间的服务。例如:services --disabled auditd、cups、smartd、nfslock将仅禁用 auditd 服务。要禁用所有四个服务,这个条目应该在服务间没有空格:services --disabled auditd,cups,smartd,nfslock- shutdown (可选)
- shutdown 选项大致相当于 shutdown 命令。有关其他完成方法,请参考 停止、关闭和 重启 kickstart 选项。
- skipx (可选)
- 文本 (可选)
- timezone (必需)
timezone [--utc] <timezone>
- -- UTC - 如果系统假定硬件时钟被设置为 UTC(Greenwich Mean)时间。
- upgrade (可选)
- 用户 (可选)
user --name=<username> [--groups=<list>] [--homedir=<homedir>] [--password=<password>] [--iscrypted] [--shell=<shell>] [--uid=<uid>]
- --name= - 提供用户名称。这个选项是必需的。
- --groups= - 除了 default 组外,还有以逗号分隔的用户名列表,该用户应属于这个用户名。组群必须在创建该用户帐户前就已经存在。
- --homedir= - 用户的主目录。如果没有提供,则默认为 /home/ <username>。
- --password= - 新用户的密码。如果没有提供,则默认锁定该帐户。
- --iscrypted= - --password 提供的密码是否已加密?
- --shell= - 用户的登录 shell。如果没有提供,则默认为系统默认。
- --UID= - 用户的 UID。如果没有提供,则默认使用下一个可用的非系统 UID。
- VNC (可选)
- 允许通过 VNC 远程查看图形安装。与文本模式相比,这个方法通常是首选使用模式,因为文本模式中有一些大小和语言限制。如果没有选项,这个命令将在没有密码的计算机上启动 VNC 服务器,并将打印出需要运行该命令来连接远程计算机。
vnc [--host=<hostname>] [--port=<port>] [--password=<password>]
- --host= - 在安装机器上启动 VNC 服务器的问题,连接到侦听指定主机名的 VNC viewer 进程。
- --port= - 提供远程 VNC viewer 进程侦听的端口。如果没有提供,anaconda 将使用 VNC 默认。
- --password= - 设定必须提供的密码以连接到 VNC 会话。这是可选的,但推荐使用。
- volgroup (可选)
volgroup <name> <partition> <options>
该分区以 pv. <id> 格式进行描述。任何值都可以为 < id > 字段分配,只要这些值在卷和卷组之间保持一致。默认值和最低值为 01。这些选项包括:- --noformat - 使用现有卷组,且不对其进行格式化。
- --useexisting - 使用现有卷组并重新格式化它。
- --pesize= - 设置物理扩展的大小。
首先创建分区,然后创建逻辑卷组,然后创建逻辑卷。例如:part pv.01 --size 3000 volgroup myvg pv.01 logvol / --vgname=myvg --size=2000 --name=rootvol
有关操作中 volgroup 的详细示例,请参阅 第 31.4.1 节 “高级分区示例”。- xconfig (可选)
- --driver - 指定要用于视频硬件的 X 驱动程序。
- --videoram= - 指定显卡拥有的视频 RAM 量。
- --defaultdesktop= - 指定 GNOME 或 KDE 来设置默认桌面(假设 GNOME 桌面环境和/或 KDE 桌面环境已通过 %packages安装)。
- --startxonboot - 在安装的系统中使用图形登录。
- --resolution= - 在安装的系统中为 X Window 系统指定默认分辨率。有效值为 640x480, 800x600, 1024x768, 1152x864, 1280x1024, 1400x1050, 1600x1200.确保指定与显卡和监控兼容的分辨率。
- --depth= - 在安装的系统中为 X Window 系统指定默认颜色深度。有效值为 8、16、24 和 32。请确定指定一个与显卡和监控兼容的颜色深度。
- zerombr (可选)
- 请注意,这个命令之前被指定为 zerombr 是。此表单现已弃用,您现在应该只在 kickstart 文件中指定 zerombr。
- zfcp (可选)
- zfcp [--devnum= <devnum>] [--fcplun= <fcplun>] [--scsiid= <scsiid>] [--scsilun= <scsilun>] [--wwpn= <wwpn>]
- %include (可选)
31.4.1. 高级分区示例
clearpart --drives=hda,hdc --initlabel
# Raid 1 IDE config
part raid.11    --size 1000     --asprimary     --ondrive=hda
part raid.12    --size 1000     --asprimary     --ondrive=hda
part raid.13    --size 2000     --asprimary     --ondrive=hda
part raid.14    --size 8000                     --ondrive=hda
part raid.15    --size 1 --grow                 --ondrive=hda
part raid.21    --size 1000     --asprimary     --ondrive=hdc
part raid.22    --size 1000     --asprimary     --ondrive=hdc
part raid.23    --size 2000     --asprimary     --ondrive=hdc
part raid.24    --size 8000                     --ondrive=hdc
part raid.25    --size 1 --grow                 --ondrive=hdc

# You can add --spares=x
raid /          --fstype ext3 --device md0 --level=RAID1 raid.11 raid.21
raid /safe      --fstype ext3 --device md1 --level=RAID1 raid.12 raid.22
raid swap       --fstype swap --device md2 --level=RAID1 raid.13 raid.23
raid /usr       --fstype ext3 --device md3 --level=RAID1 raid.14 raid.24
raid pv.01      --fstype ext3 --device md4 --level=RAID1 raid.15 raid.25

# LVM configuration so that we can resize /var and /usr/local later
volgroup sysvg pv.01
logvol /var             --vgname=sysvg  --size=8000     --name=var
logvol /var/freespace   --vgname=sysvg  --size=8000     --name=freespacetouse
logvol /usr/local       --vgname=sysvg  --size=1 --grow --name=usrlocal
31.5. 软件包选择
@Everything@Everything 或 simply * 来安装每个可用软件包。红帽不支持这种类型的安装。
@Conflicts 组。如果您在 kickstart 文件中指定 @Everything,请务必排除 @Conflicts,否则安装将失败:
@Everything
-@Conflicts
@Everything,即使您排除了 @Conflicts。
变体/repodata/comps-*.xml 文件。每个组都有一个 id、用户可见值、名称、描述和软件包列表。在软件包列表中,如果选择了组,则始终安装标记为 mandatory 的软件包,如果选择了组,则会选择标记 default 的软件包,并且必须专门选择标记可选的软件包,即使选择了该组,也必须进行选择。
- 管理工具
- 编写和发布
- 开发库
- 开发工具
- DNS 名称服务器
- eclipse
- Editors
- 工程和科学
- FTP 服务器
- GNOME 桌面环境
- GNOME 软件开发
- 游戏及 Entertainment
- 图形互联网
- 图形
- Java 开发
- KDE(K 桌面环境)
- KDE 软件开发
- 传统网络服务器
- 旧版软件开发
- 传统软件支持
- 邮件服务器
- Misc
- 多媒体
- MySQL 数据库
- 网络服务器
- news Server
- 办公室/产品
- OpenFabrics Enterprise Distribution
- PostgreSQL 数据库
- 打印支持
- 服务器配置工具
- 声音和视频
- 系统工具
- 基于文本的互联网
- Web 服务器
- Windows File Server
- Windows PV 驱动程序
- x 软件开发
- X 窗口系统
%packages
@ X Window System
@ GNOME Desktop Environment
@ Graphical Internet
@ Sound and Video dhcp
comps.xml 文件中给出的完整组名称。也可使用组的 id 指定组,如 gnome-desktop。指定单独的软件包时没有额外字符(上例中的 dhcp 行是单独的软件包)。
-autofs
- --nobase
- 不要安装 @Base 组。如果您要尝试创建一个非常小的系统,则使用这个选项。
- --resolvedeps
- --resolvedeps 选项已弃用。现在,每次都会自动解析依赖关系。
- --ignoredeps
- --ignoredeps 选项已弃用。现在,每次都会自动解析依赖关系。
- --ignoremissing
- 忽略缺少的软件包和组,而不是停止安装来询问应中止或继续安装。例如:
%packages --ignoremissing
31.6. 预安装脚本
ks.cfg 后立即添加要在系统上运行的命令。此部分必须位于 kickstart 文件的末尾(命令之后),且必须以 %pre 命令开头。您可以在 %pre 部分中访问网络;但是,此时尚未配置 名称服务,因此只有 IP 地址可以正常工作。
- --interpreter /usr/bin/python
- 允许指定不同的脚本语言,如 Python。使用您选择的脚本语言替换 /usr/bin/python。
31.6.1. 示例
%pre
#!/bin/sh
hds=""
mymedia=""
for file in /proc/ide/h* do
	mymedia=`cat $file/media`
	if [ $mymedia == "disk" ] ; then
		hds="$hds `basename $file`"
	fi
done
set $hds
numhd=`echo $#`
drive1=`echo $hds | cut -d' ' -f1`
drive2=`echo $hds | cut -d' ' -f2`
#Write out partition scheme based on whether there are 1 or 2 hard drives
if [ $numhd == "2" ] ; then
	#2 drives
	echo "#partitioning scheme generated in %pre for 2 drives" > /tmp/part-include
	echo "clearpart --all" >> /tmp/part-include
	echo "part /boot --fstype ext3 --size 75 --ondisk hda" >> /tmp/part-include
	echo "part / --fstype ext3 --size 1 --grow --ondisk hda" >> /tmp/part-include
	echo "part swap --recommended --ondisk $drive1" >> /tmp/part-include
	echo "part /home --fstype ext3 --size 1 --grow --ondisk hdb" >> /tmp/part-include
else
	#1 drive
	echo "#partitioning scheme generated in %pre for 1 drive" > /tmp/part-include
	echo "clearpart --all" >> /tmp/part-include
	echo "part /boot --fstype ext3 --size 75" >> /tmp/part-include
	echo "part swap --recommended" >> /tmp/part-include
	echo "part / --fstype ext3 --size 2048" >> /tmp/part-include
	echo "part /home --fstype ext3 --size 2048 --grow" >> /tmp/part-include
fi
%include /tmp/part-include
31.7. 安装后脚本
/etc/resolv.conf 文件没有完成。您可以访问网络,但不能解析 IP 地址。因此,如果您使用 DHCP,您必须在 %post 部分中指定 IP 地址。
- --nochroot
- 允许您指定在 chroot 环境之外运行的命令。以下示例将
/etc/resolv.conf文件复制到刚安装的文件系统中。%post --nochroot cp /etc/resolv.conf /mnt/sysimage/etc/resolv.conf
- --interpreter /usr/bin/python
- 允许指定不同的脚本语言,如 Python。使用您选择的脚本语言替换 /usr/bin/python。
- --log /path/to/logfile
- 记录安装后脚本的输出。请注意,无论您是否使用
--nochroot选项,日志文件的路径都必须考虑。例如,没有--nochroot:该命令可在 Red Hat Enterprise Linux 5.5 及更新的版本中使用。%post --log=/root/ks-post.log
使用--nochroot:%post --nochroot --log=/mnt/sysimage/root/ks-post.log
31.7.1. 例子
--log 选项将系统注册到订阅资产管理器服务器,以记录结果(在 Red Hat Enterprise Linux 5.5 及更高版本中):
%post --log=/root/ks-post.log
/usr/sbin/subscription-manager register --username=admin@example.com --password=secret --serverurl=sam-server.example.com --org="Admin Group" --environment="Dev" --servicelevel=standard
runme 的脚本:
mkdir /mnt/temp
mount -o nolock 10.10.0.2:/usr/new-machines /mnt/temp open -s -w --
/mnt/temp/runme
umount /mnt/temp
31.8. 使 Kickstart 文件可用
- 在引导磁盘中
- 在引导 CD-ROM 中
- 在网络中
31.8.1. 创建 Kickstart 引导介质
ks.cfg。
ks.cfg,且必须位于引导 CD-ROM 的顶层目录中。由于 CD-ROM 是只读的,所以该文件必须添加到用于创建写入 CD-ROM 的镜像的目录中。有关创建引导介质的说明,请参阅 第 2.4.1 节 “备选引导方法”,但在生成 file.iso 镜像文件前,将 ks.cfg kickstart 文件复制到 isolinux/ 目录中。
ks.cfg,且必须位于闪存内存的顶级目录中。先创建引导镜像,然后复制 ks.cfg 文件。
31.8.2. 在网络中使 Kickstart 文件可用
dhcpd.conf 文件中的一行示例:
filename "/usr/new-machine/kickstart/"; next-server blarg.redhat.com;文件名 后面的值替换为 kickstart 文件的名称(或 kickstart 文件所在的目录)以及 下一个服务器名称 后的值。
<ip-addr>-kickstart;ip-addr > 部分应替换为带点十进制表示法的客户端 IP 地址。例如,IP 地址为 10.10.0.1 的计算机的文件名是 10.10.0.1-kickstart。
/kickstart,并尝试使用上述相同的 < ip-addr> -kickstart 文件查找 kickstart 文件。
31.9. 使安装树可用
31.10. 启动 Kickstart 安装
- 使用驱动程序磁盘
- 如果您需要在 kickstart 中使用驱动程序磁盘,请指定
dd选项。例如:要引导引导 diskette 并使用驱动程序磁盘,在boot:提示下输入以下命令:linux ks=floppy dd
- 引导 CD-ROM
- 如果 kickstart 文件位于引导 CD-ROM 中,如 第 31.8.1 节 “创建 Kickstart 引导介质” 所述,将 CD-ROM 插入系统,在
boot:提示符下引导系统,然后在 提示符下输入以下命令(其中ks.cfg是 kickstart 文件的名称):linux ks=cdrom:/ks.cfg
- askmethod
- 如果我们在 CD-ROM 驱动器中检测到 Red Hat Enterprise Linux CD,则不会自动使用 CD-ROM 作为安装源。
- autostep
- 使 kickstart 非互动.用于调试和生成屏幕截图。在部署系统时不应该使用这个选项,因为它可能会破坏软件包安装。
- debug
- 立即启动 pdb。
- dd
- 使用驱动程序磁盘。
- dhcpclass=<class>
- 发送自定义 DHCP 供应商类标识符。ISC 的 dhcpcd 可以使用 "option vendor-class-identifier" 检查这个值。
- dns=<dns>
- 用于网络安装的以逗号分隔的名称服务器列表。
- driverdisk
- 与 'dd' 相同。
- 专家
- 打开特殊功能:
- 允许可移动介质分区
- 提示驱动程序磁盘
- gateway=<gw>
- 用于网络安装的网关。
- 图形化
- 强制图形安装。需要具有 ftp/http 使用 GUI。
- isa
- 提示用户输入 ISA 设备配置。
- ip=<ip>
- IP 用于网络安装,对 DHCP 使用 'dhcp'。
- keymap=<keymap>
- 要使用的键盘布局。有效值是可用于 'keyboard' kickstart 命令的那些值。
- ks=nfs: <server> : / <path>
- 安装程序在 NFS 服务器 <server> 中查找 kickstart 文件,该文件是文件 & lt; path >。安装程序使用 DHCP 来配置以太网卡。例如:如果您的 NFS 服务器是 server.example.com,且 kickstart 文件位于 NFS 共享
/mydir/ks.cfg中,正确的引导命令将是 ks=nfs:server.example.com:/mydir/ks.cfg。 - ks=http://<server>/<path>
- 安装程序在 HTTP 服务器 <server> 上查找 kickstart 文件,该文件是文件 & lt; path >。安装程序使用 DHCP 来配置以太网卡。例如:如果您的 HTTP 服务器是 server.example.com,且 kickstart 文件位于 HTTP 目录
/mydir/ks.cfg中,正确的引导命令将是 ks=http://server.example.com/mydir/ks.cfg。 - ks=floppy
- 安装程序在
/dev/fd0中的 diskette 中查找 vfat 或 ext2 文件系统上的文件ks.cfg。 - ks=floppy:/ <path>
- 安装程序在
/dev/fd0中的 diskette 中查找 kickstart 文件,作为文件 < path >。 - ks=hd: <device> : / <file>
- 安装程序在 < device >(必须是 vfat 或 ext2)上挂载文件系统,并在该文件系统中将 Kickstart 配置文件作为 < file& gt; 命名(例如 ks=hd:sda3:/mydir/ks.cfg)。
- ks=file:/<file>
- 安装程序尝试从文件系统中读取文件 < file >;不会执行挂载。如果 kickstart 文件已在
initrd镜像中,通常会使用此参数。 - ks=cdrom:/<path>
- 安装程序在 CD-ROM 上查找 kickstart 文件,作为文件 < path& gt;。
- ks
- 如果只使用 ks,安装程序会将以太网卡配置为使用 DHCP。kickstart 文件是从 DHCP 响应中的"bootServer"读取的,如同它是共享 kickstart 文件的 NFS 服务器一样。默认情况下,bootServer 与 DHCP 服务器相同。kickstart 文件的名称是以下之一:
- 如果指定了 DHCP,且引导文件以
/开头,则会在 NFS 服务器上查找 DHCP 提供的引导文件。 - 如果指定了 DHCP,且引导文件以
/之外的内容开头,那么在 NFS 服务器上的/kickstart目录中查找 DHCP 提供的引导文件。 - 如果 DHCP 没有指定引导文件,安装程序会尝试读取文件
/kickstart/1.2.3.4-kickstart,其中 1.2.3.4 是正在安装的计算机的数字 IP 地址。
- ksdevice=<device>
- 安装程序使用这个网络设备连接到网络。例如,考虑通过 eth1 设备连接到 NFS 服务器的系统。要在这个系统中使用 NFS 服务器的 kickstart 文件执行 kickstart 安装,您需要在
boot:提示时使用命令 ks=nfs: <server> : / <path > ksdevice=eth1。 - kssendmac
- 为 ks=http:// 请求添加 HTTP 标头,用于置备系统。包括表单的 CGI 环境变量中所有 nics 的 MAC 地址:"X-RHN-Provisioning-MAC-0: eth0 01:23:45:67:89:ab"。
- lang=<lang>
- 用于安装的语言。这应该是可与 'lang' kickstart 命令配合使用的语言。
- loglevel=<level>
- 设置记录消息所需的最低级别。<level> 的值有 debug、info、warning、error 和 critical。默认值为 info。
- lowres
- 强制 GUI 安装程序在 640x480 中运行。
- mediacheck
- 激活加载程序代码,让用户选择安装来源的测试完整性(如果采用基于 ISO 的方法)。
- method=cdrom://
- 执行基于 CDROM 的安装.
- method=ftp:// <path>
- 使用 <path> 进行 FTP 安装。
- method=hd: <dev> : <path>
- 在 <dev> 上使用 <path> 进行硬盘安装。
- method=http:// <path>
- 对于 HTTP 安装,使用 <path>。
- method=nfs: <path>
- 对于 NFS 安装,使用 <path>。
- netmask=<nm>
- 用于网络安装的子网掩码。
- nofallback
- 如果 GUI 退出。
- nofb
- 在某些语言中执行文本模式安装时,不要加载执行文本模式所需的 VGA16 框架缓冲。
- nofirewire
- 不要加载对 firewire 设备的支持。
- noipv6
- 在安装过程中禁用 IPv6 网络。在 PXE 安装过程中,这个选项不可用在从 PXE 服务器安装期间,IPv6 网络在 anaconda 处理 Kickstart 文件之前可能会变为活动状态。如果是这样,这个选项在安装过程中不会起作用。
- nomount
- 不要在救援模式中自动挂载任何已安装的 Linux 分区。
- nonet
- 不要自动探测网络设备。
- noparport
- 不要试图加载对并行端口的支持。
- nopass
- 不要将键盘/鼠标信息传递给 stage 2 安装程序,可用于在安装过程中在 stage2 安装程序中测试键盘和鼠标配置屏幕。
- nopcmcia
- 忽略系统中的 PCMCIA 控制器。
- noprobe
- 请勿尝试检测 hw,而是提示用户。
- noshell
- 不要在安装过程中在 tty2 上放置 shell。
- nostorage
- 不要自动探测存储设备(SCSI、IDE、RAID)。
- nousb
- 不要加载 USB 支持(有时安装会挂起)。
- nousbstorage
- 不要在加载 usbstorage 模块中加载 usbstorage 模块。可能会在 SCSI 系统中使用设备排序的帮助.
- rescue
- 运行救援环境。
- resolution=<mode>
- 以指定模式运行安装程序,例如"1024x768"。
- serial
- 打开串行控制台支持。
- skipddc
- 跳过监视器的 DDC 探测,如果系统挂起,可能帮助。
- syslog=<host>[:<port>]
- 安装启动并运行后,将日志信息发送到 < host > 上的 syslog 进程,以及可选的端口 <port& gt;。需要远程 syslog 进程接受连接( -r 选项)。
- text
- 强制文本模式安装。
- updates
- 提示是软盘,包含更新(错误修复)。
- updates=ftp:// <path>
- 包含通过 FTP 更新的镜像。
- updates=http:// <path>
- 包含通过 HTTP 更新的镜像。
- upgradeany
- 不要需要一个与升级预期语法匹配的 /etc/redhat-release。
- vnc
- 启用基于 vnc 的安装。您将需要使用 vnc 客户端应用程序连接计算机。
- vncconnect=<host>[:<port>]
- 安装启动后,连接到名为 < host > 的 vnc 客户端,并选择性地使用端口 <port& gt;。还需要指定 'vnc' 选项。
- vncpassword=<password>
- 为 vnc 连接启用密码。这样可防止有人意外地连接到基于 vnc 的安装。还需要指定 'vnc' 选项。
第 32 章 Kickstart Configurator
32.1. 基本配置
图 32.1. 基本配置
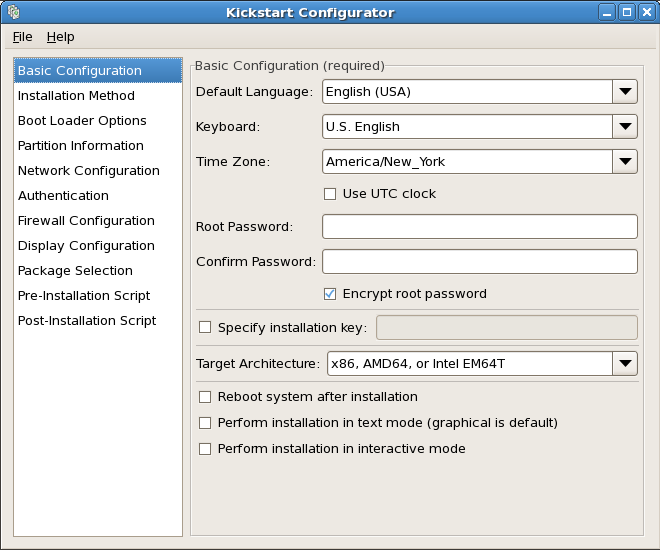
[D]
32.2. 安装方法
图 32.2. 安装方法
[D]
- CD-ROM - 选择从 Red Hat Enterprise Linux CD-ROM 安装或升级的选项。
- NFS - 选择这个选项从 NFS 共享目录中安装或升级。在 NFS 服务器的文本字段中,输入完全限定的域名或 IP 地址。对于 NFS 目录,输入包含安装树
变体目录的 NFS 目录的名称。例如,如果 NFS 服务器包含目录/mirrors/redhat/i386/Server/,请在 NFS 目录中输入/mirrors/redhat/i386/。 - FTP - 选择这个选项从 FTP 服务器安装或升级。在 FTP 服务器文本字段中,输入完全限定的域名或 IP 地址。对于 FTP 目录,输入包含
变体目录的 FTP 目录的名称。例如,如果 FTP 服务器包含目录/mirrors/redhat/i386/Server/,请为 FTP 目录输入/mirrors/redhat/i386/Server/。如果 FTP 服务器需要用户名和密码,同时指定它们。 - http - 选择这个选项从 HTTP 服务器安装或升级。在 HTTP 服务器的文本字段中,输入完全限定的域名或 IP 地址。对于 HTTP 目录,输入包含
变体目录的 HTTP 目录的名称。例如,如果 HTTP 服务器包含目录/mirrors/redhat/i386/Server/,请为 HTTP 目录输入/mirrors/redhat/i386/Server/。 - 硬盘驱动器 - 选择此选项从硬盘驱动器安装或升级。硬盘安装需要使用 ISO(或 CD-ROM)镜像。在开始安装前,请确保验证 ISO 镜像是否完好。要验证它们,请使用 md5sum 程序以及 Linux mediacheck 引导选项,如 Red Hat Enterprise Linux 安装指南 中所述。在"硬盘分区"文本框中输入包含 ISO 映像的硬盘驱动器分区(例如
/dev/hda1)。在" 硬盘目录"文本框中输入包含 ISO 镜像的目录。
32.3. 引导装载程序选项
图 32.3. 引导装载程序选项
[D]
/boot 分区的第一个扇区)。如果您计划将其用作引导装载程序,在 MBR 中安装引导装载程序。
hdd=ide-scsi 配置为内核参数(其中 hdd 是 CD-ROM 设备)来使用 SCSI 模拟驱动程序,必须在使用 cdrecord 之前加载该驱动程序。
32.4. 分区信息
图 32.4. 分区信息

[D]
32.4.1. 创建分区
图 32.5.

[D]
32.4.1.1.
图 32.6.

[D]
图 32.7.

[D]
32.5. 网络配置
图 32.8. 网络配置
[D]
32.6. 身份验证
图 32.9. 身份验证
[D]
- NIS
- LDAP
- Kerberos 5
- SMB
32.7.
图 32.10.
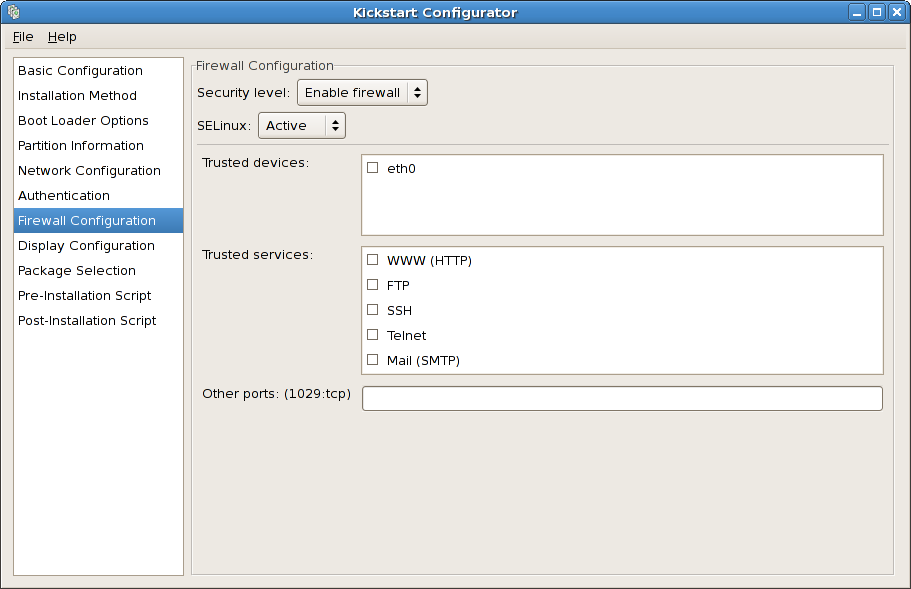
[D]
32.7.1. SELinux Configuration
32.8.
32.8.1. General
图 32.11.

[D]
32.8.2.
图 32.12.

[D]
32.8.3. Monitor
图 32.13.

[D]
32.9.
图 32.14.

[D]
32.10.
图 32.15.

[D]
32.11.
图 32.16.

[D]
echo "Hackers will be punished" > /etc/motd32.11.1.
echo "Hackers will be punished" > /mnt/sysimage/etc/motd32.11.2.
32.12.
图 32.17. 预览
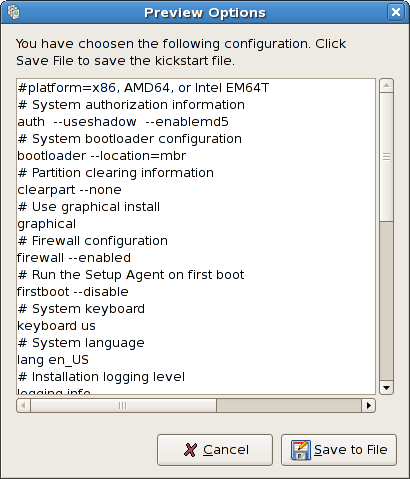
[D]
第 33 章
33.1.
33.2.
33.2.1.
33.2.2.
33.2.2.1.
33.2.3.
33.2.4.
K05innd -> ../init.d/innd
K05saslauthd -> ../init.d/saslauthd
K10dc_server -> ../init.d/dc_server
K10psacct -> ../init.d/psacct
K10radiusd -> ../init.d/radiusd
K12dc_client -> ../init.d/dc_client
K12FreeWnn -> ../init.d/FreeWnn
K12mailman -> ../init.d/mailman
K12mysqld -> ../init.d/mysqld
K15httpd -> ../init.d/httpd
K20netdump-server -> ../init.d/netdump-server
K20rstatd -> ../init.d/rstatd
K20rusersd -> ../init.d/rusersd
K20rwhod -> ../init.d/rwhod
K24irda -> ../init.d/irda
K25squid -> ../init.d/squid
K28amd -> ../init.d/amd
K30spamassassin -> ../init.d/spamassassin
K34dhcrelay -> ../init.d/dhcrelay
K34yppasswdd -> ../init.d/yppasswdd
K35dhcpd -> ../init.d/dhcpd
K35smb -> ../init.d/smb
K35vncserver -> ../init.d/vncserver
K36lisa -> ../init.d/lisa
K45arpwatch -> ../init.d/arpwatch
K45named -> ../init.d/named
K46radvd -> ../init.d/radvd
K50netdump -> ../init.d/netdump
K50snmpd -> ../init.d/snmpd
K50snmptrapd -> ../init.d/snmptrapd
K50tux -> ../init.d/tux
K50vsftpd -> ../init.d/vsftpd
K54dovecot -> ../init.d/dovecot
K61ldap -> ../init.d/ldap
K65kadmin -> ../init.d/kadmin
K65kprop -> ../init.d/kprop
K65krb524 -> ../init.d/krb524
K65krb5kdc -> ../init.d/krb5kdc
K70aep1000 -> ../init.d/aep1000
K70bcm5820 -> ../init.d/bcm5820
K74ypserv -> ../init.d/ypserv
K74ypxfrd -> ../init.d/ypxfrd
K85mdmpd -> ../init.d/mdmpd
K89netplugd -> ../init.d/netplugd
K99microcode_ctl -> ../init.d/microcode_ctl
S04readahead_early -> ../init.d/readahead_early
S05kudzu -> ../init.d/kudzu
S06cpuspeed -> ../init.d/cpuspeed
S08ip6tables -> ../init.d/ip6tables
S08iptables -> ../init.d/iptables
S09isdn -> ../init.d/isdn
S10network -> ../init.d/network
S12syslog -> ../init.d/syslog
S13irqbalance -> ../init.d/irqbalance
S13portmap -> ../init.d/portmap
S15mdmonitor -> ../init.d/mdmonitor
S15zebra -> ../init.d/zebra
S16bgpd -> ../init.d/bgpd
S16ospf6d -> ../init.d/ospf6d
S16ospfd -> ../init.d/ospfd
S16ripd -> ../init.d/ripd
S16ripngd -> ../init.d/ripngd
S20random -> ../init.d/random
S24pcmcia -> ../init.d/pcmcia
S25netfs -> ../init.d/netfs
S26apmd -> ../init.d/apmd
S27ypbind -> ../init.d/ypbind
S28autofs -> ../init.d/autofs
S40smartd -> ../init.d/smartd
S44acpid -> ../init.d/acpid
S54hpoj -> ../init.d/hpoj
S55cups -> ../init.d/cups
S55sshd -> ../init.d/sshd
S56rawdevices -> ../init.d/rawdevices
S56xinetd -> ../init.d/xinetd
S58ntpd -> ../init.d/ntpd
S75postgresql -> ../init.d/postgresql
S80sendmail -> ../init.d/sendmail
S85gpm -> ../init.d/gpm
S87iiim -> ../init.d/iiim
S90canna -> ../init.d/canna
S90crond -> ../init.d/crond
S90xfs -> ../init.d/xfs
S95atd -> ../init.d/atd
S96readahead -> ../init.d/readahead
S97messagebus -> ../init.d/messagebus
S97rhnsd -> ../init.d/rhnsd
S99local -> ../rc.local
33.3.
33.4.
init.d/ rc0.d/ rc1.d/ rc2.d/ rc3.d/ rc4.d/ rc5.d/ rc6.d/33.4.1.
id:5:initdefault:33.4.2.
33.5.
/sbin/shutdown -h now
/sbin/shutdown -r now第 34 章
- 在 PXE 引导所需的 tftp 服务器上配置文件。
- 配置允许从 PXE 配置引导的主机。
- 启动 tftp 服务。
- 配置 DHCP。
- 引导客户端并开始安装。
34.1. 设置网络服务器
34.2. PXE 引导配置
34.2.1. 命令行配置
system-config-netboot-cmd 软件包的一部分)可以用来配置 tftp 服务器文件,如 第 34.4 节 “TFTPD” 所述:
pxeos -a -i "<description>" -p <NFS|HTTP|FTP> -D 0 -s installer.example.com \
-L <location> -k <kernel> -K <kickstart> <os-identifer>
-a- 指定 OS 实例正在添加到 PXE 配置中。-I"<description> " - 将 " <description> " 替换为 OS 实例的描述。-p<NFS|HTTP|FTP> - 指定用于安装的 NFS、FTP 或 HTTP 协议。只能指定一个。-d<0|1> - 指定 "0",这表示它 不是 无磁盘配置,因为 pxeos 也可用于配置无盘环境。-sinstaller.example.com - 在-s选项后提供 NFS、FTP 或 HTTP 服务器的名称。-L<location> - 在-L选项后提供安装树的位置。例如,如果将安装树导出为 NFS 共享上的/install/rhel5,请指定-L /install/rhel5。-k<kernel > - 为引导提供特定内核。安装树可以包含多个内核。例如,如果安装树包含一个名为vmlinuz-du的补丁内核以及名为vmlinuz的标准内核,则使用-k vmlinuz-du指定补丁的内核。-k<kickstart > - 提供 kickstart 文件的位置(如果可用)。将此位置指定为包括协议在内的完整路径;例如:-K nfs:192.168.0.1:/install/rhel5/ks.cfg- <OS-identifer > - 指定 OS 标识符,该标识符用作
/tftpboot/linux-install/目录中的目录名称。
-A 0 -u <username> -p <password>
/tftpboot/linux-install/pxelinux.cfg/pxeos.xml 文件。
/tftpboot/linux-install/pxelinux.cfg/pxeos.xml 文件,并使用类似的选项来 pxeos。详情请参考 pxeboot man page。
34.3. 添加 PXE 主机
图 34.1. 添加主机
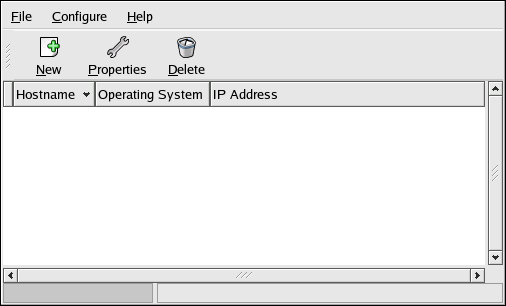
[D]
图 34.2. 添加主机
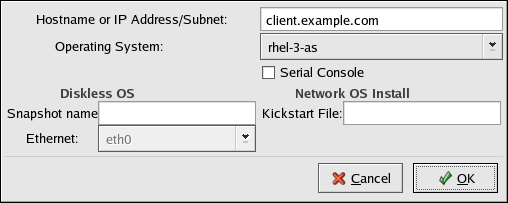
[D]
- 主机名或 IP 地址/子网掩码 - 应允许连接到 PXE 服务器以进行安装的 IP 地址、完全限定主机名或系统 子网。未接受多个 IP 地址只输入一个 IP 地址。Anaconda 不使用多个地址。
- Operating System - 要在这个客户端上安装的操作系统标识符。该列表从从网络安装对话框创建的网络安装实例 填充。
- 串行控制台 - 此选项允许使用串行控制台。
- Kickstart 文件 - 要使用的 kickstart 文件的位置,如
http://server.example.com/kickstart/ks.cfg。此文件可通过 Kickstart 配置 器创建。详情请查看 第 32 章 Kickstart Configurator。
34.3.1. 命令行配置
system-config-netboot 软件包的一部分)可用于添加允许连接到 PXE 服务器的主机:
pxeboot -a -K <kickstart> -O <os-identifier> -r <value> <host>
-a- 指定要添加的主机。-k<kickstart > - kickstart 文件的位置(如果可用)。-O<os-identifier > - 指定 第 34.2 节 “PXE 引导配置” 中定义的操作系统标识符。-R<value > - 指定ram 磁盘大小。- <host > - 指定要添加的主机的 IP 地址或主机名。
34.4. TFTPD
34.4.1. 启动 tftp 服务器
tftp-server 软件包已安装 rpm -q tftp-server。如果没有安装,请通过红帽网络或 Red Hat Enterprise Linux CD-ROM 安装它。
/sbin/chkconfig --level 345 xinetd on
/sbin/chkconfig --level 345 tftp on
34.5. 配置 DHCP 服务器
allow booting;
allow bootp;
class "pxeclients" {
    match if substring(option vendor-class-identifier, 0, 9) = "PXEClient";
    next-server <server-ip>;
    filename "linux-install/pxelinux.0"; }
34.6. 添加自定义引导消息
/tftpboot/linux-install/msgs/boot.msg 以使用自定义引导消息。
34.7. 执行 PXE 安装
附录 A. 修订历史记录
| 修订历史 | |||||||||||||
|---|---|---|---|---|---|---|---|---|---|---|---|---|---|
| 修订 3.1-46 | Thu Sep 11 2014 | ||||||||||||
| |||||||||||||
| 修订 3.1-45 | Mon Jun 30 2014 | ||||||||||||
| |||||||||||||
| 修订 3.1-44 | Mon Jun 30 2014 | ||||||||||||
| |||||||||||||
| 修订 3.1-43 | Thu Jul 11 2013 | ||||||||||||
| |||||||||||||
| 修订 3.1-42 | Thu Jul 11 2013 | ||||||||||||
| |||||||||||||
| 修订 3.1-39 | Tue Apr 23 2013 | ||||||||||||
| |||||||||||||
| 修订 3.1-38 | Tue Apr 23 2013 | ||||||||||||
| |||||||||||||
| 修订 3.1-37 | Mon Jan 7 2013 | ||||||||||||
| |||||||||||||
| 修订 3.1-36 | Mon Jan 7 2013 | ||||||||||||
| |||||||||||||
| 修订 3.1-35 | Wed Oct 31 2012 | ||||||||||||
| |||||||||||||
| 修订 3.1-34 | Wed Oct 31 2012 | ||||||||||||
| |||||||||||||
| 修订 3.1-33 | Wed Sep 12 2012 | ||||||||||||
| |||||||||||||
| 修订 3.1-32 | Thu Sep 06 2012 | ||||||||||||
| |||||||||||||
| 修订 3.1-30 | Tue Aug 14 2012 | ||||||||||||
| |||||||||||||
| 修订 3.1-26 | Fri Feb 02 2012 | ||||||||||||
| |||||||||||||
| 修订 3.1-24 | Fri Nov 18 2011 | ||||||||||||
| |||||||||||||
| 修订 3.1-22 | Wed Nov 9 2011 | ||||||||||||
| |||||||||||||
| 修订 3.1-21 | Fri Nov 4 2011 | ||||||||||||
| |||||||||||||
| 修订 3.1-20 | Thu Oct 13 2011 | ||||||||||||
| |||||||||||||
| 修订 3.1-19 | Thu Sep 29 2011 | ||||||||||||
| |||||||||||||
| 修订 3.1-18 | Fri Sep 23 2011 | ||||||||||||
| |||||||||||||
| 修订 3.1-17 | Mon Sep 19 2011 | ||||||||||||
| |||||||||||||
| 修订 3.1-16 | Thu Jul 21 2011 | ||||||||||||
| |||||||||||||
| 修订 3.1-15 | Fri Jun 10 2011 | ||||||||||||
| |||||||||||||
| 修订 3.1-14 | Mon Apr 11 2011 | ||||||||||||
| |||||||||||||
| 修订 3.1-13 | Thu Jan 6 2011 | ||||||||||||
| |||||||||||||
| 修订 3.1-12 | Wed Jan 5 2011 | ||||||||||||
| |||||||||||||
| 修订 3.1-11 | Wed Jan 5 2011 | ||||||||||||
| |||||||||||||
| 修订 3.1-10 | Wed Jan 5 2011 | ||||||||||||
| |||||||||||||
| 修订 3.1-9 | Tue Dec 21 2010 | ||||||||||||
| |||||||||||||
| 修订 3.1-5 | Thu Oct 7 2010 | ||||||||||||
| |||||||||||||
| 修订 3.1-2 | Mon Apr 19 2010 | ||||||||||||
| |||||||||||||
| 修订 3.1-1 | Mon Apr 19 2010 | ||||||||||||
| |||||||||||||
| 修订 3.1-0 | Tue Apr 6 2010 | ||||||||||||
| |||||||||||||
| 修订 3.0-23 | Tue Apr 6 2010 | ||||||||||||
| |||||||||||||
| 修订 3.0-22 | Wed Mar 31 2010 | ||||||||||||
| |||||||||||||
| 修订 3.0-21 | Tue Jan 12 2010 | ||||||||||||
| |||||||||||||
| 修订 3.0-20 | Tue Jan 12 2010 | ||||||||||||
| |||||||||||||
| 修订 3.0-19 | Mon Jan 11 2010 | ||||||||||||
| |||||||||||||
| 修订 3.0-18 | Mon Jan 11 2010 | ||||||||||||
| |||||||||||||
| 修订 3.0-17 | Mon Jan 11 2010 | ||||||||||||
| |||||||||||||
| 修订 3.0-16 | Mon Jan 11 2010 | ||||||||||||
| |||||||||||||
| 修订 3.0-15 | Fri Jan 8 2010 | ||||||||||||
| |||||||||||||
| 修订 3.0-14 | Tue Dec 22 2009 | ||||||||||||
| |||||||||||||
| 修订 3.0-13 | Mon Dec 21 2009 | ||||||||||||
| |||||||||||||
| 修订 3.0-12 | Thu Dec 17 2009 | ||||||||||||
| |||||||||||||
| 修订 3.0-11 | Wed Dec 16 2009 | ||||||||||||
| |||||||||||||
| 修订 3.0-10 | Fri Dec 11 2009 | ||||||||||||
| |||||||||||||
| 修订 3.0-9 | Fri Dec 11 2009 | ||||||||||||
| |||||||||||||
| 修订 3.0-8 | Fri Dec 11 2009 | ||||||||||||
| |||||||||||||
| 修订 3.0-1 | Tue Aug 04 2009 | , | |||||||||||
| |||||||||||||
| 修订 2.0-1 | Mon Jan 05 2009 | ||||||||||||
| |||||||||||||
| 修订 1.0-1 | Fri Oct 03 2008 | ||||||||||||
| |||||||||||||
索引
符号
- /boot/ 分区
- /boot/efi/ ,Itanium 系统
- /root/install.log
- /var/ 分区
- 主引导记录,无法引导到 Red Hat Enterprise Linux
- 重新安装,重新安装 Boot Loader
- 主机名配置,网络配置,网络配置,网络配置
- 内核
- 内核相关信息,内核相关信息
- 内核选项,内核选项
- 分区,对您的系统进行分区,对您的系统进行分区,对您的系统进行分区
- destructive,使用 Active 分区中的空闲空间
- Extended,分区内的分区 - 扩展分区概述
- non-destructive,使用 Active 分区中的空闲空间
- 为分区腾出空间,对 Red Hat Enterprise Linux 进行 Room
- 主分区,分区:为许多设备选择一 个驱动器
- 使用 in-use 分区,使用 Active 分区中的空闲空间
- 使用可用空间,使用未分区的空闲空间
- 使用未使用的分区,使用未使用的分区中的空间
- 其他操作系统,磁盘分区和其它操作系统
- 分区类型,分区:为许多设备选择一 个驱动器
- 创建新,添加分区,添加分区
- 删除,删除分区
- 号码分区,分区命名方案
- 命名分区,分区命名方案
- 基本概念,磁盘分区简介
- 扩展分区,分区内的分区 - 扩展分区概述
- 挂载点和,磁盘分区和挂载点
- 推荐的,推荐的分区方案,推荐的分区方案
- 有多少分区,分区:为许多设备选择一 个驱动器,很多分区如何?
- 简介,分区:为许多设备选择一 个驱动器
- 编辑,编辑分区,编辑分区,编辑分区
- 自动,创建默认布局,创建默认布局,创建默认布局
- 分区魔法,备用 Boot Loaders
- 删除
- Red Hat Enterprise Linux,删除 Red Hat Enterprise Linux
- 单用户模式,引导至单用户模式
- 卸载,删除 Red Hat Enterprise Linux,删除 Red Hat Enterprise Linux
- 参数文件
- 取消安装,从 DVD/CD-ROM 安装
- 启动
- 回溯信息
- 在没有软盘驱动器的情况下保存回溯消息,保存跟踪消息时没有磁盘驱动器,保存跟踪消息时没有磁盘驱动器
- 图形安装程序
- 从 NFS 运行,运行安装程序
- VNC,使用 VNC 安装
- x11 转发,使用 X11 转发安装
- 基于 RAID 和多路径存储配置,使用 mdadm 配置基于 RAID 和多路径存储
- 安装
- CD-ROM,从 DVD/CD-ROM 安装,从 DVD/CD-ROM 安装
- FTP,准备网络安装,通过 FTP 安装,准备网络安装,通过 FTP 安装,准备网络安装,通过 FTP 安装
- GUI
- HTTP,准备网络安装,通过 HTTP 安装,准备网络安装,通过 HTTP 安装,准备网络安装,通过 HTTP 安装
- Itanium 概述,Itanium 系统安装概述
- Kickstart (见 Kickstart 安装)
- mediacheck,其他引导选项
- method
- network,准备网络安装,准备网络安装,准备网络安装
- NFS,准备网络安装,通过 NFS 安装,准备网络安装,通过 NFS 安装,准备网络安装,通过 NFS 安装
- program
- 启动,启动安装程序
- 图形用户界面,图形安装程序用户界面,图形安装程序用户界面,图形安装程序用户界面
- 文本模式用户界面,文本模式安装程序用户界面,文本模式安装程序用户界面,文本模式安装程序用户界面
- 虚拟控制台,关于虚拟控制台的注意事项,关于 Linux 虚拟控制台的注释
- 中止,从 DVD/CD-ROM 安装
- 串行模式,其他引导选项
- UTF-8,其他引导选项
- 分区,对您的系统进行分区,对您的系统进行分区,对您的系统进行分区
- 启动,从 DVD/CD-ROM 安装,从 DVD/CD-ROM 安装
- 您可以使用 CD-ROM 或者 DVD 安装,您能使用 CD-ROM 或者 DVD 进行安装?,您能使用 CD-ROM 或者 DVD 进行安装?
- 文本模式,其他引导选项
- 没有 LPAR CD
- 没有用于 IBM System z CD-ROM 的 Red Hat Enterprise Linux,在没有 Red Hat Enterprise Linux for System z CD-ROM 的情况下在 LPAR 中安装
- 硬盘,准备硬盘安装,使用硬盘安装,准备硬盘安装,使用硬盘安装,准备硬盘安装
- 磁盘空间,您是否具有强大的磁盘空间?,您是否具有强大的磁盘空间?,您是否具有强大的磁盘空间?
- 键盘导航,使用键盘来 Navigate,使用键盘来 Navigate,使用键盘来 Navigate
- 安装介质
- 安装号 ,输入安装号,输入安装号,输入安装号
- 安装后设置,Itanium 系统 - 引导您的机器和安装后设置
- 安装日志文件
- 安装概述,Itanium 系统安装概述
- 安装程序
- Itanium
- Booting,在 Itanium 系统中引导安装程序
- x86、AMD64 和 Intel 64
- 启动,运行安装程序
- 安装软件包,软件包组选择,软件包组选择,软件包组选择
- 开始使用的步骤,预安装
- 引导 CD-ROM,备选引导方法
- 引导安装程序
- IBM System i 和 IBM System p ,引导 IBM System i 或 IBM System p 安装程序
- 引导方法
- 引导装载程序,x86、AMD64 和 Intel® 64 Boot Loader 配置,GRUB
- (参见 GRUB)
- GRUB,x86、AMD64 和 Intel® 64 Boot Loader 配置
- MBR,高级 Boot Loader 配置
- password,x86、AMD64 和 Intel® 64 Boot Loader 配置
- 在引导分区上安装,高级 Boot Loader 配置
- 的定义,GRUB Boot Loader
- 的替代方案,备用 Boot Loaders
- LOADLIN,备用 Boot Loaders
- SYSLINUX,备用 Boot Loaders
- 商业产品,备用 Boot Loaders
- 的类型
- ELILO,引导装载程序和系统架构
- GRUB,引导装载程序和系统架构
- OS/400,引导装载程序和系统架构
- YABOOT,引导装载程序和系统架构
- z/IPL,引导装载程序和系统架构
- 配置,x86、AMD64 和 Intel® 64 Boot Loader 配置
- 引导装载程序密码,x86、AMD64 和 Intel® 64 Boot Loader 配置
- 引导过程
- 直接载入,GRUB 和 x86 引导过程
- 链载入,GRUB 和 x86 引导过程
- 引导选项,其他引导选项
- boot.iso ,其他引导选项
- Linux mediacheck ,准备硬盘安装,准备硬盘安装
- mediacheck,其他引导选项
- 串行模式,其他引导选项
- UTF-8,其他引导选项
- 其他,Intel® 和 AMD 系统的其他引导选项,IBM Power 系统的其他引导选项,其他引导选项
- 文本模式,其他引导选项
- 截屏
- 在安装过程中,安装过程中的截屏
- 扩展分区,分区内的分区 - 扩展分区概述
- 挂载点
- 分区和,磁盘分区和挂载点
- 控制台、虚拟,关于虚拟控制台的注意事项,关于 Linux 虚拟控制台的注释
- 故障排除,在 Intel® 或 AMD 系统上安装进行故障排除,在 IBM POWER 系统上安装故障排除,对 IBM System z 系统中的安装进行故障排除
- Booting,您无法引导 Red Hat Enterprise Linux,您无法引导 Red Hat Enterprise Linux,您无法引导 Red Hat Enterprise Linux
- RAID 卡,使用 RAID 卡引导吗?
- 信号 11 错误,您的系统显示信号 11 错误吗?,您的系统显示信号 11 错误吗?,您的系统显示信号 11 错误吗?
- CD-ROM 失败
- 在安装过程中,安装过程中出现问题,安装过程中出现问题,安装过程中出现问题
- Python 错误,是否查看 Python 错误?,是否查看 Python 错误?,是否查看 Python 错误?
- 使用剩余的硬盘空间,使用剩余空间
- 分区表,分区表的问题,分区表的问题,分区表的问题
- 在没有 diskette 驱动器的情况下保存回溯信息,保存跟踪消息时没有磁盘驱动器,保存跟踪消息时没有磁盘驱动器
- 完成分区,其他分区问题,Itanium 系统用户的其他分区问题, IBM™ POWER 系统用户的其他分区问题 ,其他分区问题
- 没有找到安装 Red Hat Enterprise Linux 错误消息的设备,没有找到安装 Red Hat Enterprise Linux Error 信息的设备 ,没有找到安装 Red Hat Enterprise Linux Error 信息的设备 ,没有找到安装 Red Hat Enterprise Linux Error 信息的设备
- 安装后,安装后的问题,安装后的问题,安装后的问题
- Sendmail 在启动过程中挂起,在启动时基于 Apache 的 httpd 服务/电子邮件 Hangs,在启动时基于 Apache 的 httpd 服务/电子邮件 Hangs,在启动时基于 Apache 的 httpd 服务/电子邮件 Hangs
- x 服务器崩溃,X Server Crashing 和 Non-Root 用户的问题,X Server Crashing 和 Non-Root 用户的问题
- X(X 窗口系统),X Window 系统(GUI)的问题.,X Window 系统(GUI)的问题.
- 图形 GRUB 屏幕,在基于 x86 的系统上使用图形 GRUB 屏幕上的问题?
- 图形登录,远程图形控制台和 XDMCP
- 在启动时基于 Apache 的 httpd 服务挂起,在启动时基于 Apache 的 httpd 服务/电子邮件 Hangs,在启动时基于 Apache 的 httpd 服务/电子邮件 Hangs,在启动时基于 Apache 的 httpd 服务/电子邮件 Hangs
- 声配置,sound Configuration 的问题
- 引导至 GNOME 或 KDE,引导至图形环境,引导至图形环境
- 引导至 X 窗口系统,引导至图形环境,引导至图形环境
- 引导至图形环境,引导至图形环境,引导至图形环境
- 打印机,您的打印机不工作,您的打印机不工作,您的打印机不工作
- 未识别 RAM,您的 RAM 是否未经过认可?
- 登录,当您尝试登录时出现问题,当您尝试登录时出现问题,当您尝试登录时出现问题
- 开始安装,开始安装时出现问题,开始安装时出现问题
- GUI 安装方法不可用,引导到图形安装时出现问题,引导到图形安装时出现问题
- 帧缓冲,禁用,引导到图形安装时出现问题,引导到图形安装时出现问题
- 救援模式,救援模式
- 救援模式, POWER 系统,POWER 系统上的救援模式
- 访问 SCSI 工具,从救援模式访问 SCSI 实用程序的特殊注意事项
- 文件系统
- 格式,概述,这不是您编写的内容,即如何编写它
- 文件系统类型,文件系统类型,文件系统类型
- 无盘环境
- DHCP 配置,配置 DHCP 服务器
- 时区
- 来自 SCSI 设备的 IPL 配置,从 SCSI 设备配置 IPL
- 步骤
- eServer System i 硬件准备,准备 IBM eServer System p 和 System i
- eServer System p 硬件准备,准备 IBM eServer System p 和 System i
- 使用 CD-ROM 或者 DVD 安装,您能使用 CD-ROM 或者 DVD 进行安装?,您能使用 CD-ROM 或者 DVD 进行安装?
- 硬件兼容性,您的硬件是否兼容?
- 磁盘空间,您是否具有强大的磁盘空间?,您是否具有强大的磁盘空间?,您是否具有强大的磁盘空间?
- 注册您的订阅,注册系统
- 添加分区,添加分区,添加分区
- 激活您的订阅,注册系统
- 用户界面, 图形
- 用户界面、文本模式
- 硬件
- 兼容性,您的硬件是否兼容?
- 准备,System z 的额外硬件准备
- 配置,系统规格列表
- 硬件准备, eServer System i,准备 IBM eServer System p 和 System i
- 硬件准备, eServer System p,准备 IBM eServer System p 和 System i
- 硬盘
- 分区简介,分区:为许多设备选择一 个驱动器
- 分区类型,分区:为许多设备选择一 个驱动器
- 基本概念,硬盘基本概念
- 扩展分区,分区内的分区 - 扩展分区概述
- 文件系统格式,这不是您编写的内容,即如何编写它
- 的分区,磁盘分区简介
- 硬盘安装,使用硬盘安装,使用硬盘安装
- 磁盘分区,磁盘分区设置,磁盘分区设置,磁盘分区设置
- 磁盘空间,您是否具有强大的磁盘空间?,您是否具有强大的磁盘空间?,您是否具有强大的磁盘空间?
- 系统分区,Itanium 系统 - EFI 系统分区
- 系统命令,备用 Boot Loaders
- 系统恢复,基本系统恢复
- 常见问题,常见问题
- 忘记 root 密码,Root 密码
- 无法引导到 Red Hat Enterprise Linux,无法引导到 Red Hat Enterprise Linux
- 硬件/软件问题,硬件/软件问题
- 重新安装引导装载程序,重新安装 Boot Loader
- 紧急模式,引导至紧急模式
- 网络启动工具
- 网络安装
- 网络设备
- 添加、快速参考,添加网络设备的快速参考
- LCS 设备驱动程序,使用 LCS 设备驱动程序
- QETH 设备驱动程序,使用 QETH 设备驱动程序
- 网络设备(IBM System z)
- 添加,添加网络设备
- 自动分区,磁盘分区设置,创建默认布局,磁盘分区设置,创建默认布局,磁盘分区设置,创建默认布局
- 虚拟控制台,关于虚拟控制台的注意事项,关于 Linux 虚拟控制台的注释
- 表
- reference,系统规格列表
- 订阅服务,注册系统
- 订阅注册,注册系统
- 设置代理
- 通过 Kickstart,Kickstart 选项
- 语言
- 软件包
- 运行级别
- 使用 GRUB 更改,GRUB 接口
- 运行级别 1,引导至单用户模式
- 选择
- 配置
- 重新安装,确定是否升级或再次安装
- 驱动程序磁盘,启动安装程序
- ,,,,,, (见 ) (见 BIOS) (见 MBR)
- (参见 )
- (参见 services)
- ,网络配置,身份验证,,,,,,,,,,,,, (见 ) (见 BIOS) (见 MBR)
- %post 脚本,
- %pre 脚本,
- for x86,
- PXE (见 )
- SELinux configuration,SELinux Configuration
- 概述,
- 配置,
B
- BIOS
- boot.iso ,其他引导选项
- Booting
- 单用户模式,引导至单用户模式
- 安装程序
- Itanium,在 Itanium 系统中引导安装程序
- x86、AMD64 和 Intel 64,在 x86、AMD64 和 Intel® 64 系统中引导安装程序
- 从 CD-ROM 中,从 DVD/CD-ROM 引导安装程序
- 从 LS-120 diskette,从 LS-120 Diskette 引导安装程序
- 救援模式,引导至救援模式
- 紧急模式,引导至紧急模式
C
- CD-ROM
- ATAPI,从 DVD/CD-ROM 安装,从 DVD/CD-ROM 安装
- IDE,从 DVD/CD-ROM 安装,从 DVD/CD-ROM 安装
- SCSI,从 DVD/CD-ROM 安装,从 DVD/CD-ROM 安装
- 从安装,从 DVD/CD-ROM 安装,从 DVD/CD-ROM 安装
- 引导 CD-ROM,创建,生成安装启动 CD-ROM
- chkconfig ,
- (参见 services)
- clock,时区配置,时区配置,时区配置
D
- DASD
- 添加,添加 DASD
- DASD 安装,从硬盘(DASD)安装
- DHCP
- PXE 安装,配置 DHCP 服务器
- 无盘环境,配置 DHCP 服务器
- Disk Druid
- buttons,disk Druid 's Buttons,disk Druid 's Buttons,disk Druid 's Buttons
- 分区,对您的系统进行分区,对您的系统进行分区,对您的系统进行分区
- 删除分区,删除分区
- 添加分区
- 编辑分区,编辑分区,编辑分区,编辑分区
- dmraid
E
- EFI
- EFI Shell,Itanium 系统 - EFI Shell
- ELILO,引导装载程序和系统架构,
- (参见 引导装载程序)
- autoboot,自动引导 Red Hat Enterprise Linux
- 安装后引导设置,Itanium 系统 - 引导您的机器和安装后设置
G
- GRUB,x86、AMD64 和 Intel® 64 Boot Loader 配置,引导装载程序和系统架构,
- (参见 )
- (参见 引导装载程序)
- commands,GRUB 命令
- interfaces,GRUB 接口
- SMP 主板,SMP Motherboards 和 GRUB
- 使用 更改运行级别,GRUB 接口
- 其他资源,其它资源
- 功能,GRUB 的特性
- 在引导时更改运行级别,在引导时更改运行级别
- 安装,安装 GRUB
- 引导过程,GRUB 和 x86 引导过程
- 术语,GRUB 术语
- devices,设备名称
- files,文件名和块列表
- 根文件系统,Root 文件系统和 GRUB
- 的定义,GRUB
- 的替代方案,备用 Boot Loaders
- LOADLIN,备用 Boot Loaders
- SYSLINUX,备用 Boot Loaders
- 商业产品,备用 Boot Loaders
- 菜单配置文件,GRUB 菜单配置文件
- 指令,配置文件指令
- 配置,x86、AMD64 和 Intel® 64 Boot Loader 配置
- 配置文件
- grub.conf ,配置文件结构
- (参见 GRUB)
H
- halt,
- (参见 shutdown)
- HMC vterm,使用 HMC vterm
- HTTP
I
- ia64 (见 Itanium)
- IPL NWSSTG,无法从 *NWSSTG 的 IPL
- iscsi
K
- keyboard
- 使用导航安装程序,使用键盘来 Navigate,使用键盘来 Navigate,使用键盘来 Navigate
- 配置,键盘配置,键盘配置
- keymap
- Kickstart
- 如何找到文件,启动 Kickstart 安装
- Kickstart Configurator ,Kickstart Configurator
- Kickstart 安装,Kickstart 安装
- CD-ROM-based,创建 Kickstart 引导介质
- diskette-based,创建 Kickstart 引导介质
- LVM,Kickstart 选项
- 启动,启动 Kickstart 安装
- 从引导 CD-ROM 中,启动 Kickstart 安装
- 使用 diskette 从 CD-ROM #1,启动 Kickstart 安装
- 基于网络,在网络中使 Kickstart 文件可用,使安装树可用
- 基于闪存,创建 Kickstart 引导介质
- 安装树,使安装树可用
- 文件位置,使 Kickstart 文件可用
- 文件格式,创建 Kickstart 文件
- Kickstart 文件
- %include ,Kickstart 选项
- %post,安装后脚本
- %pre,预安装脚本
- auth ,Kickstart 选项
- authconfig ,Kickstart 选项
- autopart ,Kickstart 选项
- autostep ,Kickstart 选项
- bootloader ,Kickstart 选项
- CD-ROM-based,创建 Kickstart 引导介质
- clearpart ,Kickstart 选项
- cmdline ,Kickstart 选项
- device ,Kickstart 选项
- diskette-based,创建 Kickstart 引导介质
- driverdisk ,Kickstart 选项
- firewall ,Kickstart 选项
- firstboot ,Kickstart 选项
- halt ,Kickstart 选项
- ignoredisk ,Kickstart 选项
- install ,Kickstart 选项
- interactive ,Kickstart 选项
- iscsi ,Kickstart 选项
- iscsiname ,Kickstart 选项
- key ,Kickstart 选项
- keyboard ,Kickstart 选项
- lang ,Kickstart 选项
- langsupport ,Kickstart 选项
- logging ,Kickstart 选项
- logvol ,Kickstart 选项
- mediacheck ,Kickstart 选项
- mouse ,Kickstart 选项
- multipath ,Kickstart 选项
- network ,Kickstart 选项
- options,Kickstart 选项
- 分区示例,高级分区示例
- part ,Kickstart 选项
- poweroff ,Kickstart 选项
- raid ,Kickstart 选项
- reboot ,Kickstart 选项
- rootpw ,Kickstart 选项
- selinux ,Kickstart 选项
- services ,Kickstart 选项
- shutdown ,Kickstart 选项
- skipx ,Kickstart 选项
- text ,Kickstart 选项
- timezone ,Kickstart 选项
- user ,Kickstart 选项
- vnc ,Kickstart 选项
- volgroup ,Kickstart 选项
- xconfig ,Kickstart 选项
- zerombr ,Kickstart 选项
- zfcp ,Kickstart 选项
- 分区 ,Kickstart 选项
- 创建,Kickstart 选项
- 包含另一个文件的内容,Kickstart 选项
- 升级 ,Kickstart 选项
- 图形化 ,Kickstart 选项
- 基于网络,在网络中使 Kickstart 文件可用,使安装树可用
- 基于闪存,创建 Kickstart 引导介质
- 它是什么,创建 Kickstart 文件
- 安装后配置,安装后脚本
- 安装方法,Kickstart 选项
- 格式,创建 Kickstart 文件
- 软件包选择规格,软件包选择
- 预安装配置,预安装脚本
L
- LOADLIN,备用 Boot Loaders
- LPAR
- 安装
- 使用 LPAR CD,使用 Red Hat Enterprise Linux LPAR CD 在 LPAR 中安装
- 常见步骤,在 LPAR 中安装(通用步骤)
- 没有用于 IBM System z CD-ROM 的 Red Hat Enterprise Linux,在没有 Red Hat Enterprise Linux for System z CD-ROM 的情况下在 LPAR 中安装
- LS-120 boot.img ,从 LS-120 Diskette 引导安装程序
- LS-120 引导 diskette
- 从引导镜像文件创建,从 LS-120 Diskette 引导安装程序
- LVM
- 使用 kickstart,Kickstart 选项
M
- MBR
- (参见 )
- ,,
- (参见 )
- 在 上安装引导装载程序,高级 Boot Loader 配置
- mdadm
- 基于 RAID 和多路径存储配置,使用 mdadm 配置基于 RAID 和多路径存储
N
O
- OS/2 引导管理器,高级 Boot Loader 配置
- OS/400,引导装载程序和系统架构
- (参见 引导装载程序)
P
- parted partitioning 工具程序,创建新分区
- password
- 引导装载程序,x86、AMD64 和 Intel® 64 Boot Loader 配置
- 设置 root,设置 Root 密码,设置 Root 密码,设置 Root 密码
- POWER 系统救援模式,POWER 系统上的救援模式
- 访问 SCSI 工具,从救援模式访问 SCSI 实用程序的特殊注意事项
- programs
- PXE,
- PXE 安装
- pxeboot ,命令行配置
- pxeos ,命令行配置
R
- RAID
- Kickstart 安装,Kickstart 选项
- 磁盘失败后系统无法引导,安装 GRUB
- rc.local
- rc.serial ,
- (参见 )
- root / 分区
- root 密码,设置 Root 密码,设置 Root 密码,设置 Root 密码
S
- SCSI-over-fiber 驱动程序(zFCP),使用 zFCP 驱动程序
- services
- shutdown,
- (参见 halt)
- SMP 主板
- startup.nsh ,使用启动脚本
- swap 分区
- swap 文件
- upgrade,确定是否升级或再次安装
- sysfs 文件系统,sysfs 文件系统
- SYSLINUX,备用 Boot Loaders
- system-config-kickstart (见 Kickstart Configurator )
T
- TCP/IP 配置,执行网络安装,执行网络安装
- tftp ,,启动 tftp 服务器
U
- unregister,注册系统
- upgrade,确定是否升级或再次安装
- 添加 swap 文件,确定是否升级或再次安装
- USB pen drive
- 引导方法,备选引导方法
V
- VM (见 z/VM)
- VNC,使用 VNC 安装
X
- x11 转发,使用 X11 转发安装
- XDMCP,远程图形控制台和 XDMCP
Y
- YABOOT,引导装载程序和系统架构
- (参见 引导装载程序)
Z
- z/IPL,引导装载程序和系统架构
- (参见 引导装载程序)
- z/VM
- 安装,在 z/VM 中安装
- zfcp 驱动程序,使用 zFCP 驱动程序