
4.7. Ceph 对象网关的高可用性
作为存储管理员,您可以将多个 Ceph 对象网关实例分配到一个区域。这样,您可以随着负载的增加而横向扩展,即同一区组和区域。但是,您不需要联合架构来使用高可用性代理。由于每个 Ceph 对象网关守护进程都有自己的 IP 地址,因此您可以使用 ingress 服务在多个 Ceph 对象网关守护进程或节点间平衡负载。入口 服务为 Ceph 对象网关环境管理 HAProxy 和 keepalived 守护进程。您还可以终止 HAProxy 服务器上的 HTTPS 流量,并在 HAProxy 服务器和 Beast 前端 web 服务器实例之间使用 HTTP 作为 Ceph 对象网关。
4.7.1. 先决条件
- 在不同主机上运行至少两个 Ceph 对象网关守护进程。
-
在不同主机上运行至少两个
入口服务实例的容量。
4.7.2. 高可用性服务
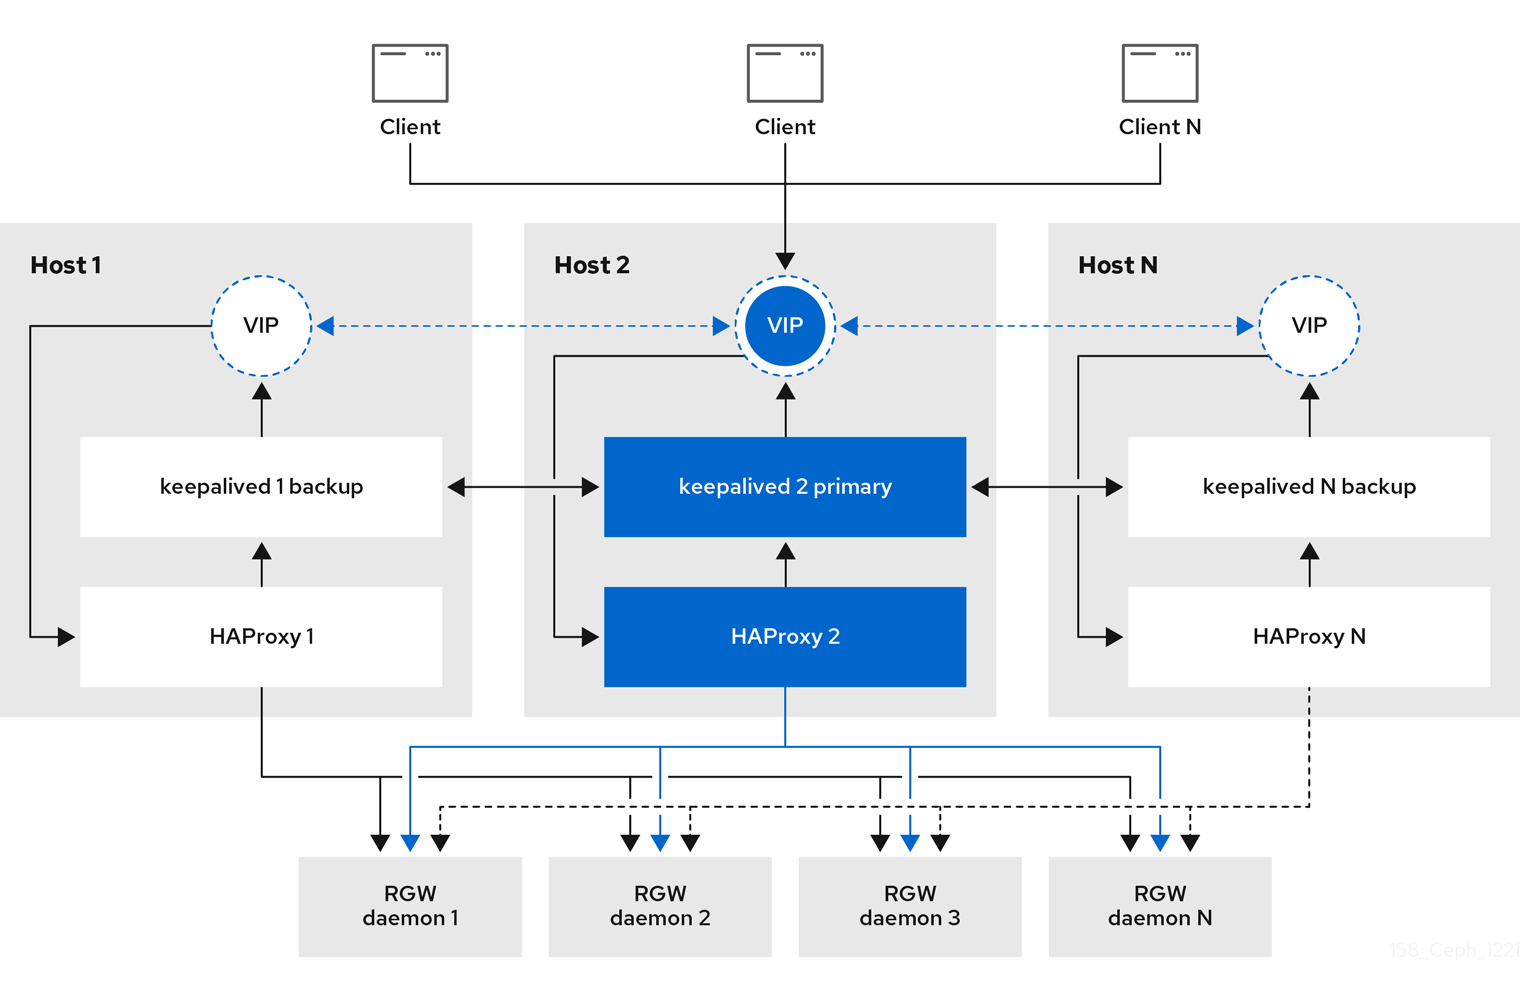
入口 服务为 Ceph 对象网关提供高度可用的端点。入口 服务可以根据需要部署到任意数量的主机。红帽建议至少有两个 Red Hat Enterprise Linux 8 服务器,每个服务器都配置了 入口 服务。您可以使用最小配置选项集合运行高可用性(HA)服务。Ceph 编排器通过提供使用浮动虚拟 IP 地址的负载平衡,部署 入口 服务来管理 haproxy 和 keepalived 守护进程。活跃的 haproxy 将所有 Ceph 对象网关请求分发到所有可用的 Ceph 对象网关守护进程。
一个虚拟 IP 地址一次会在其中一个 入口 主机上自动配置,称为主主机。Ceph 编排器基于配置为同一子网一部分的现有 IP 地址选择第一个网络接口。如果虚拟 IP 地址不属于同一个子网,则可以为 Ceph 编排器定义一个与现有 IP 地址匹配的子网列表。如果 keepalived 守护进程和活跃的 haproxy 在主主机上没有响应,则虚拟 IP 地址会移到备份主机上。此备份主机成为新的主主机。
目前,您不能在没有配置的 IP 地址的网络接口中配置虚拟 IP 地址。
要使用安全套接字层(SSL),SSL 必须由 ingress 服务终止,而不是在 Ceph 对象网关中终止。
4.7.3. 为 Ceph 对象网关配置高可用性
要为 Ceph 对象网关配置高可用性(HA),您可以编写 YAML 配置文件,Ceph 编排器负责安装、配置和管理 入口 服务。入口 服务使用 haproxy 和 keepalived 守护进程为 Ceph 对象网关提供高可用性。
先决条件
-
最少两个运行 Red Hat Enterprise Linux 8 或更高版本的主机,用于安装
入口服务。 - 正常运行的 Red Hat Ceph Storage 集群。
- 最少两个 Ceph 对象网关守护进程在不同的主机上运行。
-
对运行
入口服务的主机的根级别访问。 - 如果使用防火墙,则打开 HTTP 的端口 80,为 HTTPS 流量打开端口 443。
流程
创建一个新的
ingress.yaml文件:示例
[root@host01 ~] touch ingress.yaml
打开
ingress.yaml文件进行编辑。添加了以下选项,并添加适用于环境的值:语法
service_type: ingress 1
service_id: SERVICE_ID 2
placement: 3
  hosts:
    - HOST1
    - HOST2
    - HOST3
spec:
  backend_service: SERVICE_ID
  virtual_ip: IP_ADDRESS/CIDR 4
  frontend_port: INTEGER 5
  monitor_port: INTEGER 6
  virtual_interface_networks: 7
    - IP_ADDRESS/CIDR
  ssl_cert: | 8
示例
service_type: ingress
service_id: rgw.foo
placement:
  hosts:
    - host01.example.com
    - host02.example.com
    - host03.example.com
spec:
  backend_service: rgw.foo
  virtual_ip: 192.168.1.2/24
  frontend_port: 8080
  monitor_port: 1967
  virtual_interface_networks:
    - 10.10.0.0/16
  ssl_cert: |
    -----BEGIN CERTIFICATE-----
    MIIEpAIBAAKCAQEA+Cf4l9OagD6x67HhdCy4Asqw89Zz9ZuGbH50/7ltIMQpJJU0
    gu9ObNtIoC0zabJ7n1jujueYgIpOqGnhRSvsGJiEkgN81NLQ9rqAVaGpadjrNLcM
    bpgqJCZj0vzzmtFBCtenpb5l/EccMFcAydGtGeLP33SaWiZ4Rne56GBInk6SATI/
    JSKweGD1y5GiAWipBR4C74HiAW9q6hCOuSdp/2WQxWT3T1j2sjlqxkHdtInUtwOm
    j5Ism276IndeQ9hR3reFR8PJnKIPx73oTBQ7p9CMR1J4ucq9Ny0J12wQYT00fmJp
    -----END CERTIFICATE-----
    -----BEGIN PRIVATE KEY-----
    MIIEBTCCAu2gAwIBAgIUGfYFsj8HyA9Zv2l600hxzT8+gG4wDQYJKoZIhvcNAQEL
    BQAwgYkxCzAJBgNVBAYTAklOMQwwCgYDVQQIDANLQVIxDDAKBgNVBAcMA0JMUjEM
    MAoGA1UECgwDUkhUMQswCQYDVQQLDAJCVTEkMCIGA1UEAwwbY2VwaC1zc2wtcmhj
    czUtOGRjeHY2LW5vZGU1MR0wGwYJKoZIhvcNAQkBFg5hYmNAcmVkaGF0LmNvbTAe
    -----END PRIVATE KEY-----
启动 Cephadm shell:
示例
[root@host01 ~]# cephadm shell --mount ingress.yaml:/var/lib/ceph/radosgw/igress.yaml
配置最新的
haproxy和keepalived镜像:语法
ceph config set mgr mgr/cephadm/container_image_haproxy HAPROXY_IMAGE_ID
ceph config set mgr mgr/cephadm/container_image_keepalived KEEPALIVED_IMAGE_ID
示例
[ceph: root@host01 /]# ceph config set mgr mgr/cephadm/container_image_haproxy registry.redhat.io/rhceph/rhceph-haproxy-rhel8:latest
[ceph: root@host01 /]# ceph config set mgr mgr/cephadm/container_image_keepalived registry.redhat.io/rhceph/keepalived-rhel8:latest
使用 Ceph 编配器安装和配置新的
入口服务:[ceph: root@host01 /]# ceph orch apply -i ingress.yaml
在 Ceph 编排器完成后,验证 HA 配置。
在运行
ingress服务的主机上,检查是否显示虚拟 IP 地址:示例
[root@host01 ~]# ip addr show
尝试从 Ceph 客户端访问 Ceph 对象网关:
语法
wget HOST_NAME示例
[root@client ~]# wget host01.example.com
如果此操作返回带有类似内容的
index.html,则 Ceph 对象网关的 HA 配置可以正常工作。示例
<?xml version="1.0" encoding="UTF-8"?>
	<ListAllMyBucketsResult xmlns="http://s3.amazonaws.com/doc/2006-03-01/">
		<Owner>
			<ID>anonymous</ID>
			<DisplayName></DisplayName>
		</Owner>
		<Buckets>
		</Buckets>
	</ListAllMyBucketsResult>
其他资源
- 详情请查看 执行标准 RHEL 安装指南。
- 如需了解更多详细信息,请参阅 Red Hat Ceph Storage Object Gateway 指南中的 高可用性服务 部分。
4.7.4. HAProxy 和 keepalived
作为存储管理员,您可以将多个 Ceph 对象网关实例分配到一个区域。这允许您随着负载的增加(即相同的 zone group 和 zone)向外扩展,但您不需要联合架构来使用 HAProxy 和 keepalived。由于每个对象网关实例都有自己的 IP 地址,因此您可以使用 HAProxy 和 keepalived 在 Ceph 对象网关服务器之间平衡负载。
HAProxy 和 keepalived 的另一个用例是在 HAProxy 服务器上终止 HTTPS。您可以使用 HAProxy 服务器在 HAProxy 服务器上终止 HTTPS,并在 HAProxy 服务器和 Beast web 服务器实例之间使用 HTTP。
4.7.4.1. HAProxy/keepalived 先决条件
要使用 Ceph 对象网关设置 HAProxy,您必须有:
- 正在运行的 Red Hat Ceph Storage 集群
-
同一区域中至少有两个 Ceph 对象网关服务器配置为在端口
80上运行。如果您遵循简单的安装过程,网关实例默认位于同一 zone group 和 zone 中。如果您使用联合架构,请确保实例位于同一 zone group 和 zone 中。 -
至少两台 Red Hat Enterprise Linux 8 服务器用于 HAProxy 和
keepalived。
本节假定您在运行测试脚本时至少有两个 Ceph 对象网关服务器运行,并且您在通过端口 80 运行测试脚本时从各自获得有效的响应。
4.7.4.2. 准备 HAProxy 节点
以下设置假定两个名为 haproxy 和 haproxy2 的 HAProxy 节点,以及名为 rgw1 和 rgw2 的 Ceph 对象网关服务器。您可以使用您喜欢的任何命名规则。在至少两个 HAProxy 节点上执行以下步骤:
- 安装 Red Hat Enterprise Linux 8 或 9。
注册节点。
[root@haproxy]# subscription-manager register
启用 RHEL 服务器存储库。
Red Hat Enterprise Linux 9
[root@haproxy]# subscription-manager repos --enable=rhel-9-server-rpms
Red Hat Enterprise Linux 8
[root@haproxy]# subscription-manager repos --enable=rhel-8-server-rpms
更新服务器。
[root@haproxy]# dnf update -y
-
根据需要安装管理工具(如
wget、vim等)。 打开端口
80。[root@haproxy]# firewall-cmd --zone=public --add-port 80/tcp --permanent [root@haproxy]# firewall-cmd --reload
对于 HTTPS,打开端口
443。[root@haproxy]# firewall-cmd --zone=public --add-port 443/tcp --permanent [root@haproxy]# firewall-cmd --reload
4.7.4.3. 安装和配置 keepalived
在至少两个 HAProxy 节点上执行以下步骤:
先决条件
- 至少两个 HAProxy 节点。
- 至少两个对象网关节点。
流程
安装
keepalived:[root@haproxy]# yum install -y keepalived
配置
keepalived在两个 HAProxy 节点上:[root@haproxy]# vim /etc/keepalived/keepalived.conf
在配置文件中,有一个用于检查
haproxy进程脚本:vrrp_script chk_haproxy { script "killall -0 haproxy" # check the haproxy process interval 2 # every 2 seconds weight 2 # add 2 points if OK }接下来,主负载平衡器和备份负载平衡器中的实例使用
eno1作为网络接口。它还分配虚拟 IP 地址,即192.168.1.20。主负载均衡器节点
vrrp_instance RGW {
    state MASTER # might not be necessary. This is on the primary LB node.
    @main interface eno1
    priority 100
    advert_int 1
    interface eno1
    virtual_router_id 50
    @main unicast_src_ip 10.8.128.43 80
    unicast_peer {
           10.8.128.53
           }
    authentication {
        auth_type PASS
        auth_pass 1111
    }
    virtual_ipaddress {
        192.168.1.20
    }
    track_script {
      chk_haproxy
    }
}
virtual_server 192.168.1.20 80 eno1 { #populate correct interface
    delay_loop 6
    lb_algo wlc
    lb_kind dr
    persistence_timeout 600
    protocol TCP
    real_server 10.8.128.43 80 { # ip address of rgw2 on physical interface, haproxy listens here, rgw listens to localhost:8080 or similar
        weight 100
        TCP_CHECK { # perhaps change these to a HTTP/SSL GET?
            connect_timeout 3
        }
    }
    real_server 10.8.128.53 80 { # ip address of rgw3 on physical interface, haproxy listens here, rgw listens to localhost:8080 or similar
        weight 100
        TCP_CHECK { # perhaps change these to a HTTP/SSL GET?
            connect_timeout 3
        }
    }
}
备份负载均衡器节点
vrrp_instance RGW {
    state BACKUP # might not be necessary?
    priority 99
    advert_int 1
    interface eno1
    virtual_router_id 50
    unicast_src_ip 10.8.128.53 80
    unicast_peer {
           10.8.128.43
           }
    authentication {
        auth_type PASS
        auth_pass 1111
    }
    virtual_ipaddress {
        192.168.1.20
    }
    track_script {
      chk_haproxy
    }
}
virtual_server 192.168.1.20 80 eno1 { #populate correct interface
    delay_loop 6
    lb_algo wlc
    lb_kind dr
    persistence_timeout 600
    protocol TCP
    real_server 10.8.128.43 80 { # ip address of rgw2 on physical interface, haproxy listens here, rgw listens to localhost:8080 or similar
        weight 100
        TCP_CHECK { # perhaps change these to a HTTP/SSL GET?
            connect_timeout 3
        }
    }
    real_server 10.8.128.53 80 { # ip address of rgw3 on physical interface, haproxy listens here, rgw listens to localhost:8080 or similar
        weight 100
        TCP_CHECK { # perhaps change these to a HTTP/SSL GET?
            connect_timeout 3
        }
    }
}
启用并启动
keepalived服务:[root@haproxy]# systemctl enable keepalived [root@haproxy]# systemctl start keepalived
其它资源
-
有关使用
keepalived的详情,请参阅 使用 Keepalived 设置 Linux 集群:红帽客户门户上的基本配置 文章。
4.7.4.4. 安装和配置 HAProxy
在至少两个 HAProxy 节点上执行以下步骤:
安装
haproxy。[root@haproxy]# dnf install haproxy
为 SELinux 和 HTTP 配置
haproxy。[root@haproxy]# vim /etc/firewalld/services/haproxy-http.xml
添加以下行:
<?xml version="1.0" encoding="utf-8"?>
<service>
<short>HAProxy-HTTP</short>
<description>HAProxy load-balancer</description>
<port protocol="tcp" port="80"/>
</service>
以
root身份,为haproxy-http.xml文件分配正确的 SELinux 上下文和文件权限。[root@haproxy]# cd /etc/firewalld/services [root@haproxy]# restorecon haproxy-http.xml [root@haproxy]# chmod 640 haproxy-http.xml
如果要使用 HTTPS,请为 SELinux 和 HTTPS 配置
haproxy。[root@haproxy]# vim /etc/firewalld/services/haproxy-https.xml
添加以下行:
<?xml version="1.0" encoding="utf-8"?>
<service>
<short>HAProxy-HTTPS</short>
<description>HAProxy load-balancer</description>
<port protocol="tcp" port="443"/>
</service>
以
root身份,为haproxy-https.xml文件分配正确的 SELinux 上下文和文件权限。# cd /etc/firewalld/services # restorecon haproxy-https.xml # chmod 640 haproxy-https.xml
如果您打算使用 HTTPS,请为 SSL 生成密钥。如果您没有证书,您可以使用自签名证书。
最后,将证书和密钥放入 PEM 文件中。
[root@haproxy]# cat example.com.crt example.com.key > example.com.pem
[root@haproxy]# cp example.com.pem /etc/ssl/private/
配置
haproxy。[root@haproxy]# vim /etc/haproxy/haproxy.cfg
global和defaults可以保持不变。在defaults部分后,您需要配置frontend和backend部分。例如:frontend http_web bind *:80 mode http default_backend rgw frontend rgw-https bind *:443 ssl crt /etc/ssl/private/example.com.pem default_backend rgw backend rgw balance roundrobin mode http server rgw1 10.0.0.71:80 check server rgw2 10.0.0.80:80 check有关 HAProxy 配置的详情,请参考红帽更新基础架构系统管理员指南中的添加 HAProxy 负载平衡器章节。
Enable/start
haproxy[root@haproxy]# systemctl enable haproxy [root@haproxy]# systemctl start haproxy
4.7.4.5. 测试 HAProxy 配置
在 HAProxy 节点上,确保出现来自
keepalived配置的虚拟 IP 地址。[root@haproxy]# ip addr show
在托管 Red Hat Ceph Dashboard 容器的节点上,查看您是否能使用负载平衡器配置来访问 Ceph 对象网关节点。例如:
[root@haproxy]# wget haproxy
这应该返回相同的结果,如下:
[root@haproxy]# wget rgw1
如果返回包含以下内容的
index.html文件:<?xml version="1.0" encoding="UTF-8"?> <ListAllMyBucketsResult xmlns="http://s3.amazonaws.com/doc/2020-03-01/"> <Owner> <ID>anonymous</ID> <DisplayName></DisplayName> </Owner> <Buckets> </Buckets> </ListAllMyBucketsResult>
然后,您的配置可以正常工作。