
1.7. Troubleshooting
You can view the Migration Toolkit for Containers (MTC) custom resources and download logs to troubleshoot a failed migration.
If the application was stopped during the failed migration, you must roll it back manually in order to prevent data corruption.
Manual rollback is not required if the application was not stopped during migration because the original application is still running on the source cluster.
1.7.1. Viewing migration Custom Resources
The Migration Toolkit for Containers (MTC) creates the following custom resources (CRs):
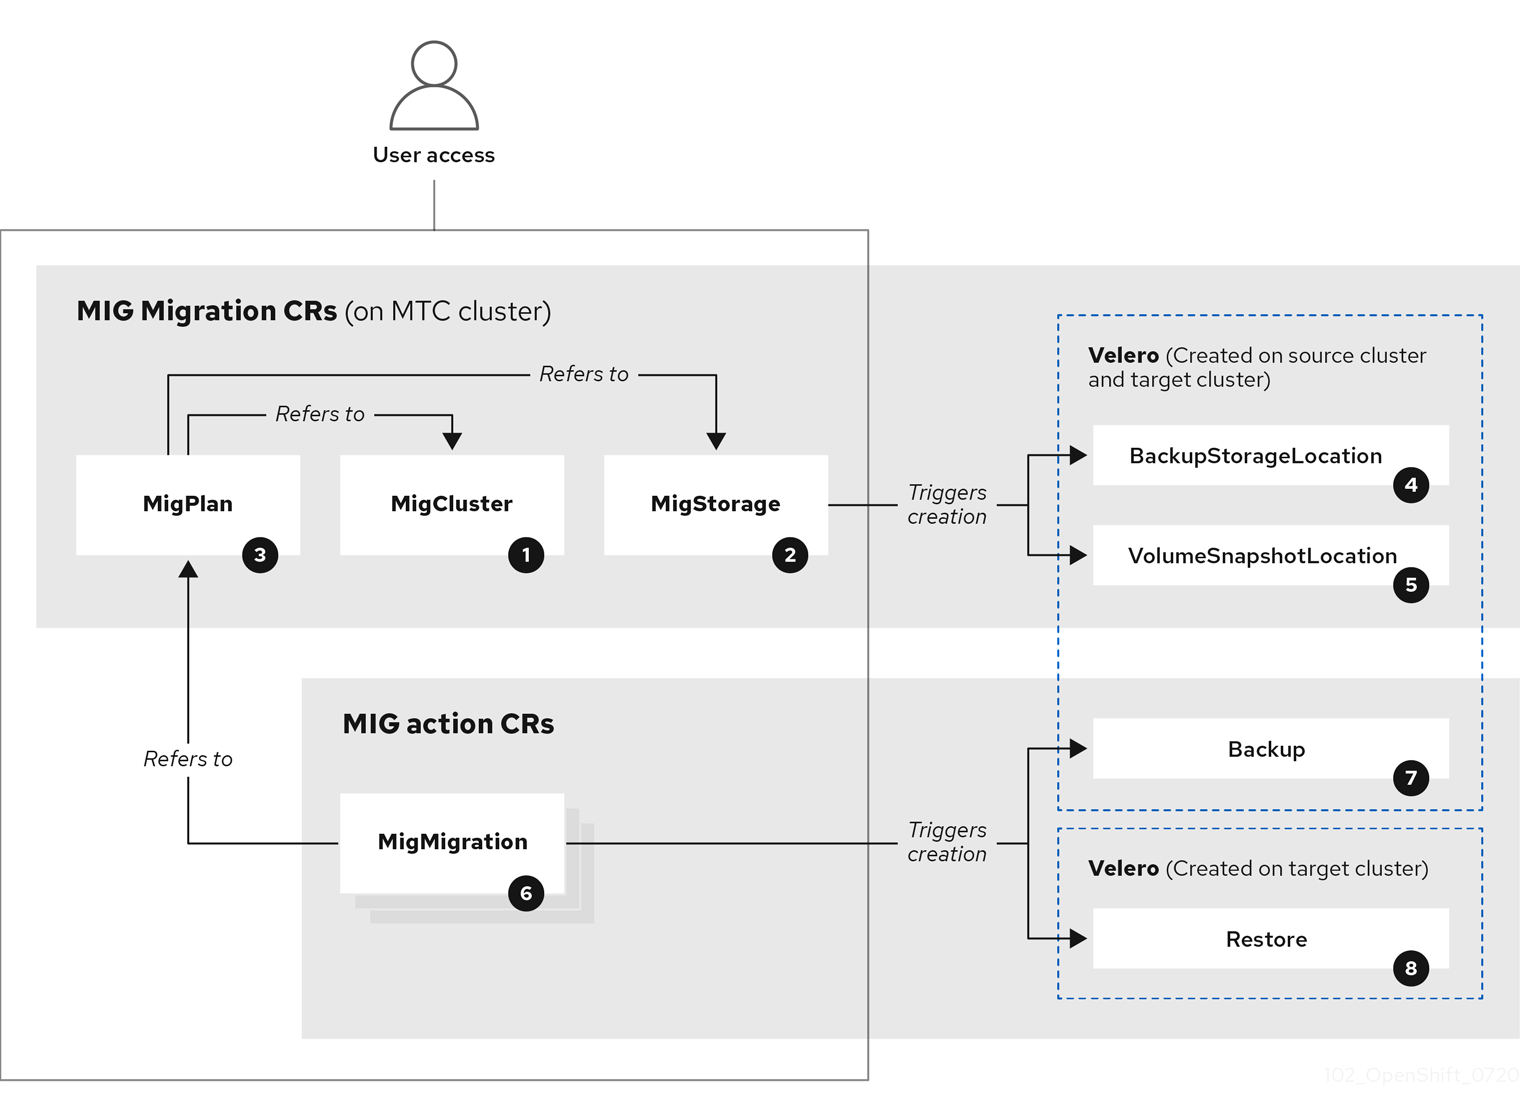
![]() MigCluster (configuration, MTC cluster): Cluster definition
MigCluster (configuration, MTC cluster): Cluster definition
![]() MigStorage (configuration, MTC cluster): Storage definition
MigStorage (configuration, MTC cluster): Storage definition
![]() MigPlan (configuration, MTC cluster): Migration plan
MigPlan (configuration, MTC cluster): Migration plan
The MigPlan CR describes the source and target clusters, replication repository, and namespaces being migrated. It is associated with 0, 1, or many MigMigration CRs.
Deleting a MigPlan CR deletes the associated MigMigration CRs.
![]() BackupStorageLocation (configuration, MTC cluster): Location of
BackupStorageLocation (configuration, MTC cluster): Location of Velero backup objects
![]() VolumeSnapshotLocation (configuration, MTC cluster): Location of
VolumeSnapshotLocation (configuration, MTC cluster): Location of Velero volume snapshots
![]() MigMigration (action, MTC cluster): Migration, created every time you stage or migrate data. Each
MigMigration (action, MTC cluster): Migration, created every time you stage or migrate data. Each MigMigration CR is associated with a MigPlan CR.
![]() Backup (action, source cluster): When you run a migration plan, the
Backup (action, source cluster): When you run a migration plan, the MigMigration CR creates two Velero backup CRs on each source cluster:
- Backup CR #1 for Kubernetes objects
- Backup CR #2 for PV data
![]() Restore (action, target cluster): When you run a migration plan, the
Restore (action, target cluster): When you run a migration plan, the MigMigration CR creates two Velero restore CRs on the target cluster:
- Restore CR #1 (using Backup CR #2) for PV data
- Restore CR #2 (using Backup CR #1) for Kubernetes objects
Procedure
List the
MigMigrationCRs in theopenshift-migrationnamespace:$ oc get migmigration -n openshift-migration
Example output
NAME                                   AGE
88435fe0-c9f8-11e9-85e6-5d593ce65e10   6m42s
Inspect the
MigMigrationCR:$ oc describe migmigration 88435fe0-c9f8-11e9-85e6-5d593ce65e10 -n openshift-migration
The output is similar to the following examples.
MigMigration example output
name:         88435fe0-c9f8-11e9-85e6-5d593ce65e10
namespace:    openshift-migration
labels:       <none>
annotations:  touch: 3b48b543-b53e-4e44-9d34-33563f0f8147
apiVersion:  migration.openshift.io/v1alpha1
kind:         MigMigration
metadata:
  creationTimestamp:  2019-08-29T01:01:29Z
  generation:          20
  resourceVersion:    88179
  selfLink:           /apis/migration.openshift.io/v1alpha1/namespaces/openshift-migration/migmigrations/88435fe0-c9f8-11e9-85e6-5d593ce65e10
  uid:                 8886de4c-c9f8-11e9-95ad-0205fe66cbb6
spec:
  migPlanRef:
    name:        socks-shop-mig-plan
    namespace:   openshift-migration
  quiescePods:  true
  stage:         false
status:
  conditions:
    category:              Advisory
    durable:               True
    lastTransitionTime:  2019-08-29T01:03:40Z
    message:               The migration has completed successfully.
    reason:                Completed
    status:                True
    type:                  Succeeded
  phase:                   Completed
  startTimestamp:         2019-08-29T01:01:29Z
events:                    <none>
Velero backup CR #2 example output that describes the PV data
apiVersion: velero.io/v1
kind: Backup
metadata:
  annotations:
    openshift.io/migrate-copy-phase: final
    openshift.io/migrate-quiesce-pods: "true"
    openshift.io/migration-registry: 172.30.105.179:5000
    openshift.io/migration-registry-dir: /socks-shop-mig-plan-registry-44dd3bd5-c9f8-11e9-95ad-0205fe66cbb6
  creationTimestamp: "2019-08-29T01:03:15Z"
  generateName: 88435fe0-c9f8-11e9-85e6-5d593ce65e10-
  generation: 1
  labels:
    app.kubernetes.io/part-of: migration
    migmigration: 8886de4c-c9f8-11e9-95ad-0205fe66cbb6
    migration-stage-backup: 8886de4c-c9f8-11e9-95ad-0205fe66cbb6
    velero.io/storage-location: myrepo-vpzq9
  name: 88435fe0-c9f8-11e9-85e6-5d593ce65e10-59gb7
  namespace: openshift-migration
  resourceVersion: "87313"
  selfLink: /apis/velero.io/v1/namespaces/openshift-migration/backups/88435fe0-c9f8-11e9-85e6-5d593ce65e10-59gb7
  uid: c80dbbc0-c9f8-11e9-95ad-0205fe66cbb6
spec:
  excludedNamespaces: []
  excludedResources: []
  hooks:
    resources: []
  includeClusterResources: null
  includedNamespaces:
  - sock-shop
  includedResources:
  - persistentvolumes
  - persistentvolumeclaims
  - namespaces
  - imagestreams
  - imagestreamtags
  - secrets
  - configmaps
  - pods
  labelSelector:
    matchLabels:
      migration-included-stage-backup: 8886de4c-c9f8-11e9-95ad-0205fe66cbb6
  storageLocation: myrepo-vpzq9
  ttl: 720h0m0s
  volumeSnapshotLocations:
  - myrepo-wv6fx
status:
  completionTimestamp: "2019-08-29T01:02:36Z"
  errors: 0
  expiration: "2019-09-28T01:02:35Z"
  phase: Completed
  startTimestamp: "2019-08-29T01:02:35Z"
  validationErrors: null
  version: 1
  volumeSnapshotsAttempted: 0
  volumeSnapshotsCompleted: 0
  warnings: 0
Velero restore CR #2 example output that describes the Kubernetes resources
apiVersion: velero.io/v1
kind: Restore
metadata:
  annotations:
    openshift.io/migrate-copy-phase: final
    openshift.io/migrate-quiesce-pods: "true"
    openshift.io/migration-registry: 172.30.90.187:5000
    openshift.io/migration-registry-dir: /socks-shop-mig-plan-registry-36f54ca7-c925-11e9-825a-06fa9fb68c88
  creationTimestamp: "2019-08-28T00:09:49Z"
  generateName: e13a1b60-c927-11e9-9555-d129df7f3b96-
  generation: 3
  labels:
    app.kubernetes.io/part-of: migration
    migmigration: e18252c9-c927-11e9-825a-06fa9fb68c88
    migration-final-restore: e18252c9-c927-11e9-825a-06fa9fb68c88
  name: e13a1b60-c927-11e9-9555-d129df7f3b96-gb8nx
  namespace: openshift-migration
  resourceVersion: "82329"
  selfLink: /apis/velero.io/v1/namespaces/openshift-migration/restores/e13a1b60-c927-11e9-9555-d129df7f3b96-gb8nx
  uid: 26983ec0-c928-11e9-825a-06fa9fb68c88
spec:
  backupName: e13a1b60-c927-11e9-9555-d129df7f3b96-sz24f
  excludedNamespaces: null
  excludedResources:
  - nodes
  - events
  - events.events.k8s.io
  - backups.velero.io
  - restores.velero.io
  - resticrepositories.velero.io
  includedNamespaces: null
  includedResources: null
  namespaceMapping: null
  restorePVs: true
status:
  errors: 0
  failureReason: ""
  phase: Completed
  validationErrors: null
  warnings: 15
1.7.2. Using the migration log reader
You can use the migration log reader to display a single filtered view of all the migration logs.
Procedure
Get the
mig-log-readerpod:$ oc -n openshift-migration get pods | grep log
Enter the following command to display a single migration log:
$ oc -n openshift-migration logs -f <mig-log-reader-pod> -c color 1- 1
- The
-c plainoption displays the log without colors.
1.7.3. Downloading migration logs
You can download the Velero, Restic, and MigrationController pod logs in the Migration Toolkit for Containers (MTC) web console to troubleshoot a failed migration.
Procedure
- In the MTC console, click Migration plans to view the list of migration plans.
-
Click the Options menu
 of a specific migration plan and select Logs.
Click Download Logs to download the logs of the
MigrationController,Velero, andResticpods for all clusters.You can download a single log by selecting the cluster, log source, and pod source, and then clicking Download Selected.
You can access a pod log from the CLI by using the
oc logscommand:$ oc logs <pod-name> -f -n openshift-migration 1- 1
- Specify the pod name.
1.7.4. Updating deprecated APIs
If your source cluster uses deprecated APIs, the following warning message is displayed when you create a migration plan in the Migration Toolkit for Containers (MTC) web console:
Some namespaces contain GVKs incompatible with destination cluster
You can click See details to view the namespace and the incompatible APIs. This warning message does not block the migration.
During migration with the Migration Toolkit for Containers (MTC), the deprecated APIs are saved in the Velero Backup #1 for Kubernetes objects. You can download the Velero Backup, extract the deprecated API yaml files, and update them with the oc convert command. Then you can create the updated APIs on the target cluster.
Procedure
- Run the migration plan.
View the
MigPlancustom resource (CR):$ oc describe migplan <migplan_name> -n openshift-migration 1- 1
- Specify the name of the
MigPlanCR.
The output is similar to the following:
metadata:
  ...
  uid: 79509e05-61d6-11e9-bc55-02ce4781844a 1
status:
  ...
  conditions:
  - category: Warn
    lastTransitionTime: 2020-04-30T17:16:23Z
    message: 'Some namespaces contain GVKs incompatible with destination cluster.
      See: `incompatibleNamespaces` for details'
    status: "True"
    type: GVKsIncompatible
  incompatibleNamespaces:
  - gvks: 2
    - group: batch
      kind: cronjobs
      version: v2alpha1
    - group: batch
      kind: scheduledjobs
      version: v2alpha1
Get the
MigMigrationname associated with theMigPlanUID:$ oc get migmigration -o json | jq -r '.items[] | select(.metadata.ownerReferences[].uid=="<migplan_uid>") | .metadata.name' 1- 1
- Specify the
MigPlanCR UID.
Get the
MigMigrationUID associated with theMigMigrationname:$ oc get migmigration <migmigration_name> -o jsonpath='{.metadata.uid}' 1- 1
- Specify the
MigMigrationname.
Get the
VeleroBackup name associated with theMigMigrationUID:$ oc get backup.velero.io --selector migration-initial-backup="<migmigration_uid>" -o jsonpath={.items[*].metadata.name} 1- 1
- Specify the
MigMigrationUID.
Download the contents of the
VeleroBackup to your local machine by running the command for your storage provider:AWS S3:
$ aws s3 cp s3://<bucket_name>/velero/backups/<backup_name> <backup_local_dir> --recursive 1- 1
- Specify the bucket, backup name, and your local backup directory name.
GCP:
$ gsutil cp gs://<bucket_name>/velero/backups/<backup_name> <backup_local_dir> --recursive 1- 1
- Specify the bucket, backup name, and your local backup directory name.
Azure:
$ azcopy copy 'https://velerobackups.blob.core.windows.net/velero/backups/<backup_name>' '<backup_local_dir>' --recursive 1- 1
- Specify the backup name and your local backup directory name.
Extract the
VeleroBackup archive file:$ tar -xfv <backup_local_dir>/<backup_name>.tar.gz -C <backup_local_dir>
Run
oc convertin offline mode on each deprecated API:$ oc convert -f <backup_local_dir>/resources/<gvk>.json
Create the converted API on the target cluster:
$ oc create -f <gvk>.json
1.7.5. Error messages and resolutions
This section describes common error messages you might encounter with the Migration Toolkit for Containers (MTC) and how to resolve their underlying causes.
1.7.5.1. Restic timeout error
If a CA certificate error message is displayed the first time you try to access the MTC console, the likely cause is the use of self-signed CA certificates in one of the clusters.
To resolve this issue, navigate to the oauth-authorization-server URL displayed in the error message and accept the certificate. To resolve this issue permanently, add the certificate to the trust store of your web browser.
If an Unauthorized message is displayed after you have accepted the certificate, navigate to the MTC console and refresh the web page.
1.7.5.2. OAuth timeout error in the MTC console
If a connection has timed out message is displayed in the MTC console after you have accepted a self-signed certificate, the causes are likely to be the following:
- Interrupted network access to the OAuth server
- Interrupted network access to the OpenShift Container Platform console
-
Proxy configuration that blocks access to the
oauth-authorization-serverURL. See MTC console inaccessible because of OAuth timeout error for details.
You can determine the cause of the timeout.
Procedure
- Navigate to the MTC console and inspect the elements with the browser web inspector.
Check the
MigrationUIpod log:$ oc logs <MigrationUI_Pod> -n openshift-migration
1.7.5.3. PodVolumeBackups timeout error in Velero pod log
If a migration fails because Restic times out, the following error is displayed in the Velero pod log.
Example output
level=error msg="Error backing up item" backup=velero/monitoring error="timed out waiting for all PodVolumeBackups to complete" error.file="/go/src/github.com/heptio/velero/pkg/restic/backupper.go:165" error.function="github.com/heptio/velero/pkg/restic.(*backupper).BackupPodVolumes" group=v1
The default value of restic_timeout is one hour. You can increase this parameter for large migrations, keeping in mind that a higher value may delay the return of error messages.
Procedure
- In the OpenShift Container Platform web console, navigate to Operators → Installed Operators.
- Click Migration Toolkit for Containers Operator.
- In the MigrationController tab, click migration-controller.
In the YAML tab, update the following parameter value:
spec: restic_timeout: 1h 1- 1
- Valid units are
h(hours),m(minutes), ands(seconds), for example,3h30m15s.
- Click Save.
1.7.5.4. ResticVerifyErrors in the MigMigration custom resource
If data verification fails when migrating a persistent volume with the file system data copy method, the following error is displayed in the MigMigration CR.
Example output
status:
  conditions:
  - category: Warn
    durable: true
    lastTransitionTime: 2020-04-16T20:35:16Z
    message: There were verify errors found in 1 Restic volume restores. See restore `<registry-example-migration-rvwcm>`
      for details 1
    status: "True"
    type: ResticVerifyErrors 2
A data verification error does not cause the migration process to fail.
You can check the Restore CR to identify the source of the data verification error.
Procedure
- Log in to the target cluster.
View the
RestoreCR:$ oc describe <registry-example-migration-rvwcm> -n openshift-migration
The output identifies the persistent volume with
PodVolumeRestoreerrors.Example output
status:
  phase: Completed
  podVolumeRestoreErrors:
  - kind: PodVolumeRestore
    name: <registry-example-migration-rvwcm-98t49>
    namespace: openshift-migration
  podVolumeRestoreResticErrors:
  - kind: PodVolumeRestore
    name: <registry-example-migration-rvwcm-98t49>
    namespace: openshift-migration
View the
PodVolumeRestoreCR:$ oc describe <migration-example-rvwcm-98t49>
The output identifies the
Resticpod that logged the errors.Example output
  completionTimestamp: 2020-05-01T20:49:12Z
  errors: 1
  resticErrors: 1
  ...
  resticPod: <restic-nr2v5>
View the
Resticpod log to locate the errors:$ oc logs -f <restic-nr2v5>
1.7.6. Direct volume migration does not complete
If direct volume migration does not complete, the target cluster might not have the same node-selector annotations as the source cluster.
Migration Toolkit for Containers (MTC) migrates namespaces with all annotations in order to preserve security context constraints and scheduling requirements. During direct volume migration, MTC creates Rsync transfer pods on the target cluster in the namespaces that were migrated from the source cluster. If a target cluster namespace does not have the same annotations as the source cluster namespace, the Rsync transfer pods cannot be scheduled. The Rsync pods remain in a Pending state.
You can identify and fix this issue by performing the following procedure.
Procedure
Check the status of the
MigMigrationCR:$ oc describe migmigration <pod_name> -n openshift-migration
The output includes the following status message:
Example output
...
Some or all transfer pods are not running for more than 10 mins on destination cluster
...
On the source cluster, obtain the details of a migrated namespace:
$ oc get namespace <namespace> -o yaml 1- 1
- Specify the migrated namespace.
On the target cluster, edit the migrated namespace:
$ oc edit namespace <namespace>
Add missing
openshift.io/node-selectorannotations to the migrated namespace as in the following example:apiVersion: v1 kind: Namespace metadata: annotations: openshift.io/node-selector: "region=east" ...- Run the migration plan again.
1.7.7. Using the Velero CLI to debug Backup and Restore CRs
You can debug the Backup and Restore custom resources (CRs) and partial migration failures with the Velero command line interface (CLI). The Velero CLI runs in the velero pod.
1.7.7.1. Velero command syntax
Velero CLI commands use the following syntax:
$ oc exec $(oc get pods -n openshift-migration -o name | grep velero) -- ./velero <resource> <command> <resource_id>
You can specify velero-<pod> -n openshift-migration in place of $(oc get pods -n openshift-migration -o name | grep velero).
1.7.7.2. Help command
The Velero help command lists all the Velero CLI commands:
$ oc exec $(oc get pods -n openshift-migration -o name | grep velero) -- ./velero --help
1.7.7.3. Describe command
The Velero describe command provides a summary of warnings and errors associated with a Velero resource:
$ oc exec $(oc get pods -n openshift-migration -o name | grep velero) -- ./velero <resource> describe <resource_id>
Example
$ oc exec $(oc get pods -n openshift-migration -o name | grep velero) -- ./velero backup describe 0e44ae00-5dc3-11eb-9ca8-df7e5254778b-2d8ql
1.7.7.4. Logs command
The Velero logs command provides the logs associated with a Velero resource:
velero <resource> logs <resource_id>
Example
$ oc exec $(oc get pods -n openshift-migration -o name | grep velero) -- ./velero restore logs ccc7c2d0-6017-11eb-afab-85d0007f5a19-x4lbf
1.7.7.5. Debugging a partial migration failure
You can debug a partial migration failure warning message by using the Velero CLI to examine the Restore custom resource (CR) logs.
A partial failure occurs when Velero encounters an issue that does not cause a migration to fail. For example, if a custom resource definition (CRD) is missing or if there is a discrepancy between CRD versions on the source and target clusters, the migration completes but the CR is not created on the target cluster.
Velero logs the issue as a partial failure and then processes the rest of the objects in the Backup CR.
Procedure
Check the status of a
MigMigrationCR:$ oc get migmigration <migmigration> -o yaml
status:
  conditions:
  - category: Warn
    durable: true
    lastTransitionTime: "2021-01-26T20:48:40Z"
    message: 'Final Restore openshift-migration/ccc7c2d0-6017-11eb-afab-85d0007f5a19-x4lbf: partially failed on destination cluster'
    status: "True"
    type: VeleroFinalRestorePartiallyFailed
  - category: Advisory
    durable: true
    lastTransitionTime: "2021-01-26T20:48:42Z"
    message: The migration has completed with warnings, please look at `Warn` conditions.
    reason: Completed
    status: "True"
    type: SucceededWithWarnings
Check the status of the
RestoreCR by using the Velerodescribecommand:$ oc exec $(oc get pods -n openshift-migration -o name | grep velero) -n openshift-migration -- ./velero restore describe <restore>
Phase:  PartiallyFailed (run 'velero restore logs ccc7c2d0-6017-11eb-afab-85d0007f5a19-x4lbf' for more information)

Errors:
  Velero:     <none>
  Cluster:    <none>
  Namespaces:
    migration-example:  error restoring example.com/migration-example/migration-example: the server could not find the requested resource
Check the
RestoreCR logs by using the Velerologscommand:$ oc exec $(oc get pods -n openshift-migration -o name | grep velero) -n openshift-migration -- ./velero restore logs <restore>
time="2021-01-26T20:48:37Z" level=info msg="Attempting to restore migration-example: migration-example" logSource="pkg/restore/restore.go:1107" restore=openshift-migration/ccc7c2d0-6017-11eb-afab-85d0007f5a19-x4lbf
time="2021-01-26T20:48:37Z" level=info msg="error restoring migration-example: the server could not find the requested resource" logSource="pkg/restore/restore.go:1170" restore=openshift-migration/ccc7c2d0-6017-11eb-afab-85d0007f5a19-x4lbf
The
RestoreCR log error message,the server could not find the requested resource, indicates the cause of the partially failed migration.
1.7.8. Using must-gather to collect data
You must run the must-gather tool if you open a customer support case on the Red Hat Customer Portal for the Migration Toolkit for Containers (MTC).
The openshift-migration-must-gather-rhel8 image for MTC collects migration-specific logs and data that are not collected by the default must-gather image.
Procedure
-
Navigate to the directory where you want to store the
must-gatherdata. Run the
must-gathercommand:$ oc adm must-gather --image=registry.redhat.io/rhmtc/openshift-migration-must-gather-rhel8:v1.4
- Remove authentication keys and other sensitive information.
Create an archive file containing the contents of the
must-gatherdata directory:$ tar cvaf must-gather.tar.gz must-gather.local.<uid>/
- Upload the compressed file as an attachment to your customer support case.
1.7.9. Rolling back a migration
You can roll back a migration by using the MTC web console or the CLI.
1.7.9.1. Rolling back a migration in the MTC web console
You can roll back a migration by using the Migration Toolkit for Containers (MTC) web console.
If your application was stopped during a failed migration, you must roll back the migration in order to prevent data corruption in the persistent volume.
Rollback is not required if the application was not stopped during migration because the original application is still running on the source cluster.
Procedure
- In the MTC web console, click Migration plans.
-
Click the Options menu
beside a migration plan and select Rollback.
Click Rollback and wait for rollback to complete.
In the migration plan details, Rollback succeeded is displayed.
Verify that rollback was successful in the OpenShift Container Platform web console of the source cluster:
- Click Home → Projects.
- Click the migrated project to view its status.
- In the Routes section, click Location to verify that the application is functioning, if applicable.
- Click Workloads → Pods to verify that the pods are running in the migrated namespace.
- Click Storage → Persistent volumes to verify that the migrated persistent volume is correctly provisioned.
1.7.9.1.1. Rolling back a migration from the CLI
You can roll back a migration by creating a MigMigration custom resource (CR) from the CLI.
If your application was stopped during a failed migration, you must roll back the migration in order to prevent data corruption in the persistent volume.
Rollback is not required if the application was not stopped during migration because the original application is still running on the source cluster.
Procedure
Create a
MigMigrationCR based on the following example:$ cat << EOF | oc apply -f - apiVersion: migration.openshift.io/v1alpha1 kind: MigMigration metadata: labels: controller-tools.k8s.io: "1.0" name: migration-rollback namespace: openshift-migration spec: ... rollback: true ... migPlanRef: name: <migplan_name> 1 namespace: openshift-migration EOF- 1
- Specify the name of the associated
MigPlanCR.
- In the MTC web console, verify that the migrated project resources have been removed from the target cluster.
- Verify that the migrated project resources are present in the source cluster and that the application is running.
1.7.10. Known issues
This release has the following known issues:
During migration, the Migration Toolkit for Containers (MTC) preserves the following namespace annotations:
-
openshift.io/sa.scc.mcs -
openshift.io/sa.scc.supplemental-groups openshift.io/sa.scc.uid-rangeThese annotations preserve the UID range, ensuring that the containers retain their file system permissions on the target cluster. There is a risk that the migrated UIDs could duplicate UIDs within an existing or future namespace on the target cluster. (BZ#1748440)
-
- Most cluster-scoped resources are not yet handled by MTC. If your applications require cluster-scoped resources, you might have to create them manually on the target cluster.
- If a migration fails, the migration plan does not retain custom PV settings for quiesced pods. You must manually roll back the migration, delete the migration plan, and create a new migration plan with your PV settings. (BZ#1784899)
-
If a large migration fails because Restic times out, you can increase the
restic_timeoutparameter value (default:1h) in theMigrationControllercustom resource (CR) manifest. - If you select the data verification option for PVs that are migrated with the file system copy method, performance is significantly slower.
If you are migrating data from NFS storage and
root_squashis enabled,Resticmaps tonfsnobody. The migration fails and a permission error is displayed in theResticpod log. (BZ#1873641)You can resolve this issue by adding supplemental groups for
Resticto theMigrationControllerCR manifest:spec: ... restic_supplemental_groups: - 5555 - 6666
- If you perform direct volume migration with nodes that are in different availability zones, the migration might fail because the migrated pods cannot access the PVC. (BZ#1947487)