
第 9 章 Installing on RHV
9.1. Installing a cluster quickly on RHV
Due to a known issue, this default installation procedure does not work with OpenShift Container Platform versions 4.4 and 4.5 on Red Hat Virtualization (RHV) 4.4.1. This defect is fixed in RHV 4.4.2.
Instead, follow the steps in Installing a cluster on RHV with customizations.
Installing OpenShift Container Platform version 4.6 on Red Hat Virtualization (RHV) requires RHV version 4.4. If you are running an earlier version of OpenShift Container Platform on RHV 4.3, do not update it to OpenShift Container Platform version 4.6. Red Hat has not tested running OpenShift Container Platform version 4.6 on RHV version 4.3 and does not support this combination. For more information, see OpenShift Container Platform 4.x Tested Integrations (for x86_x64).
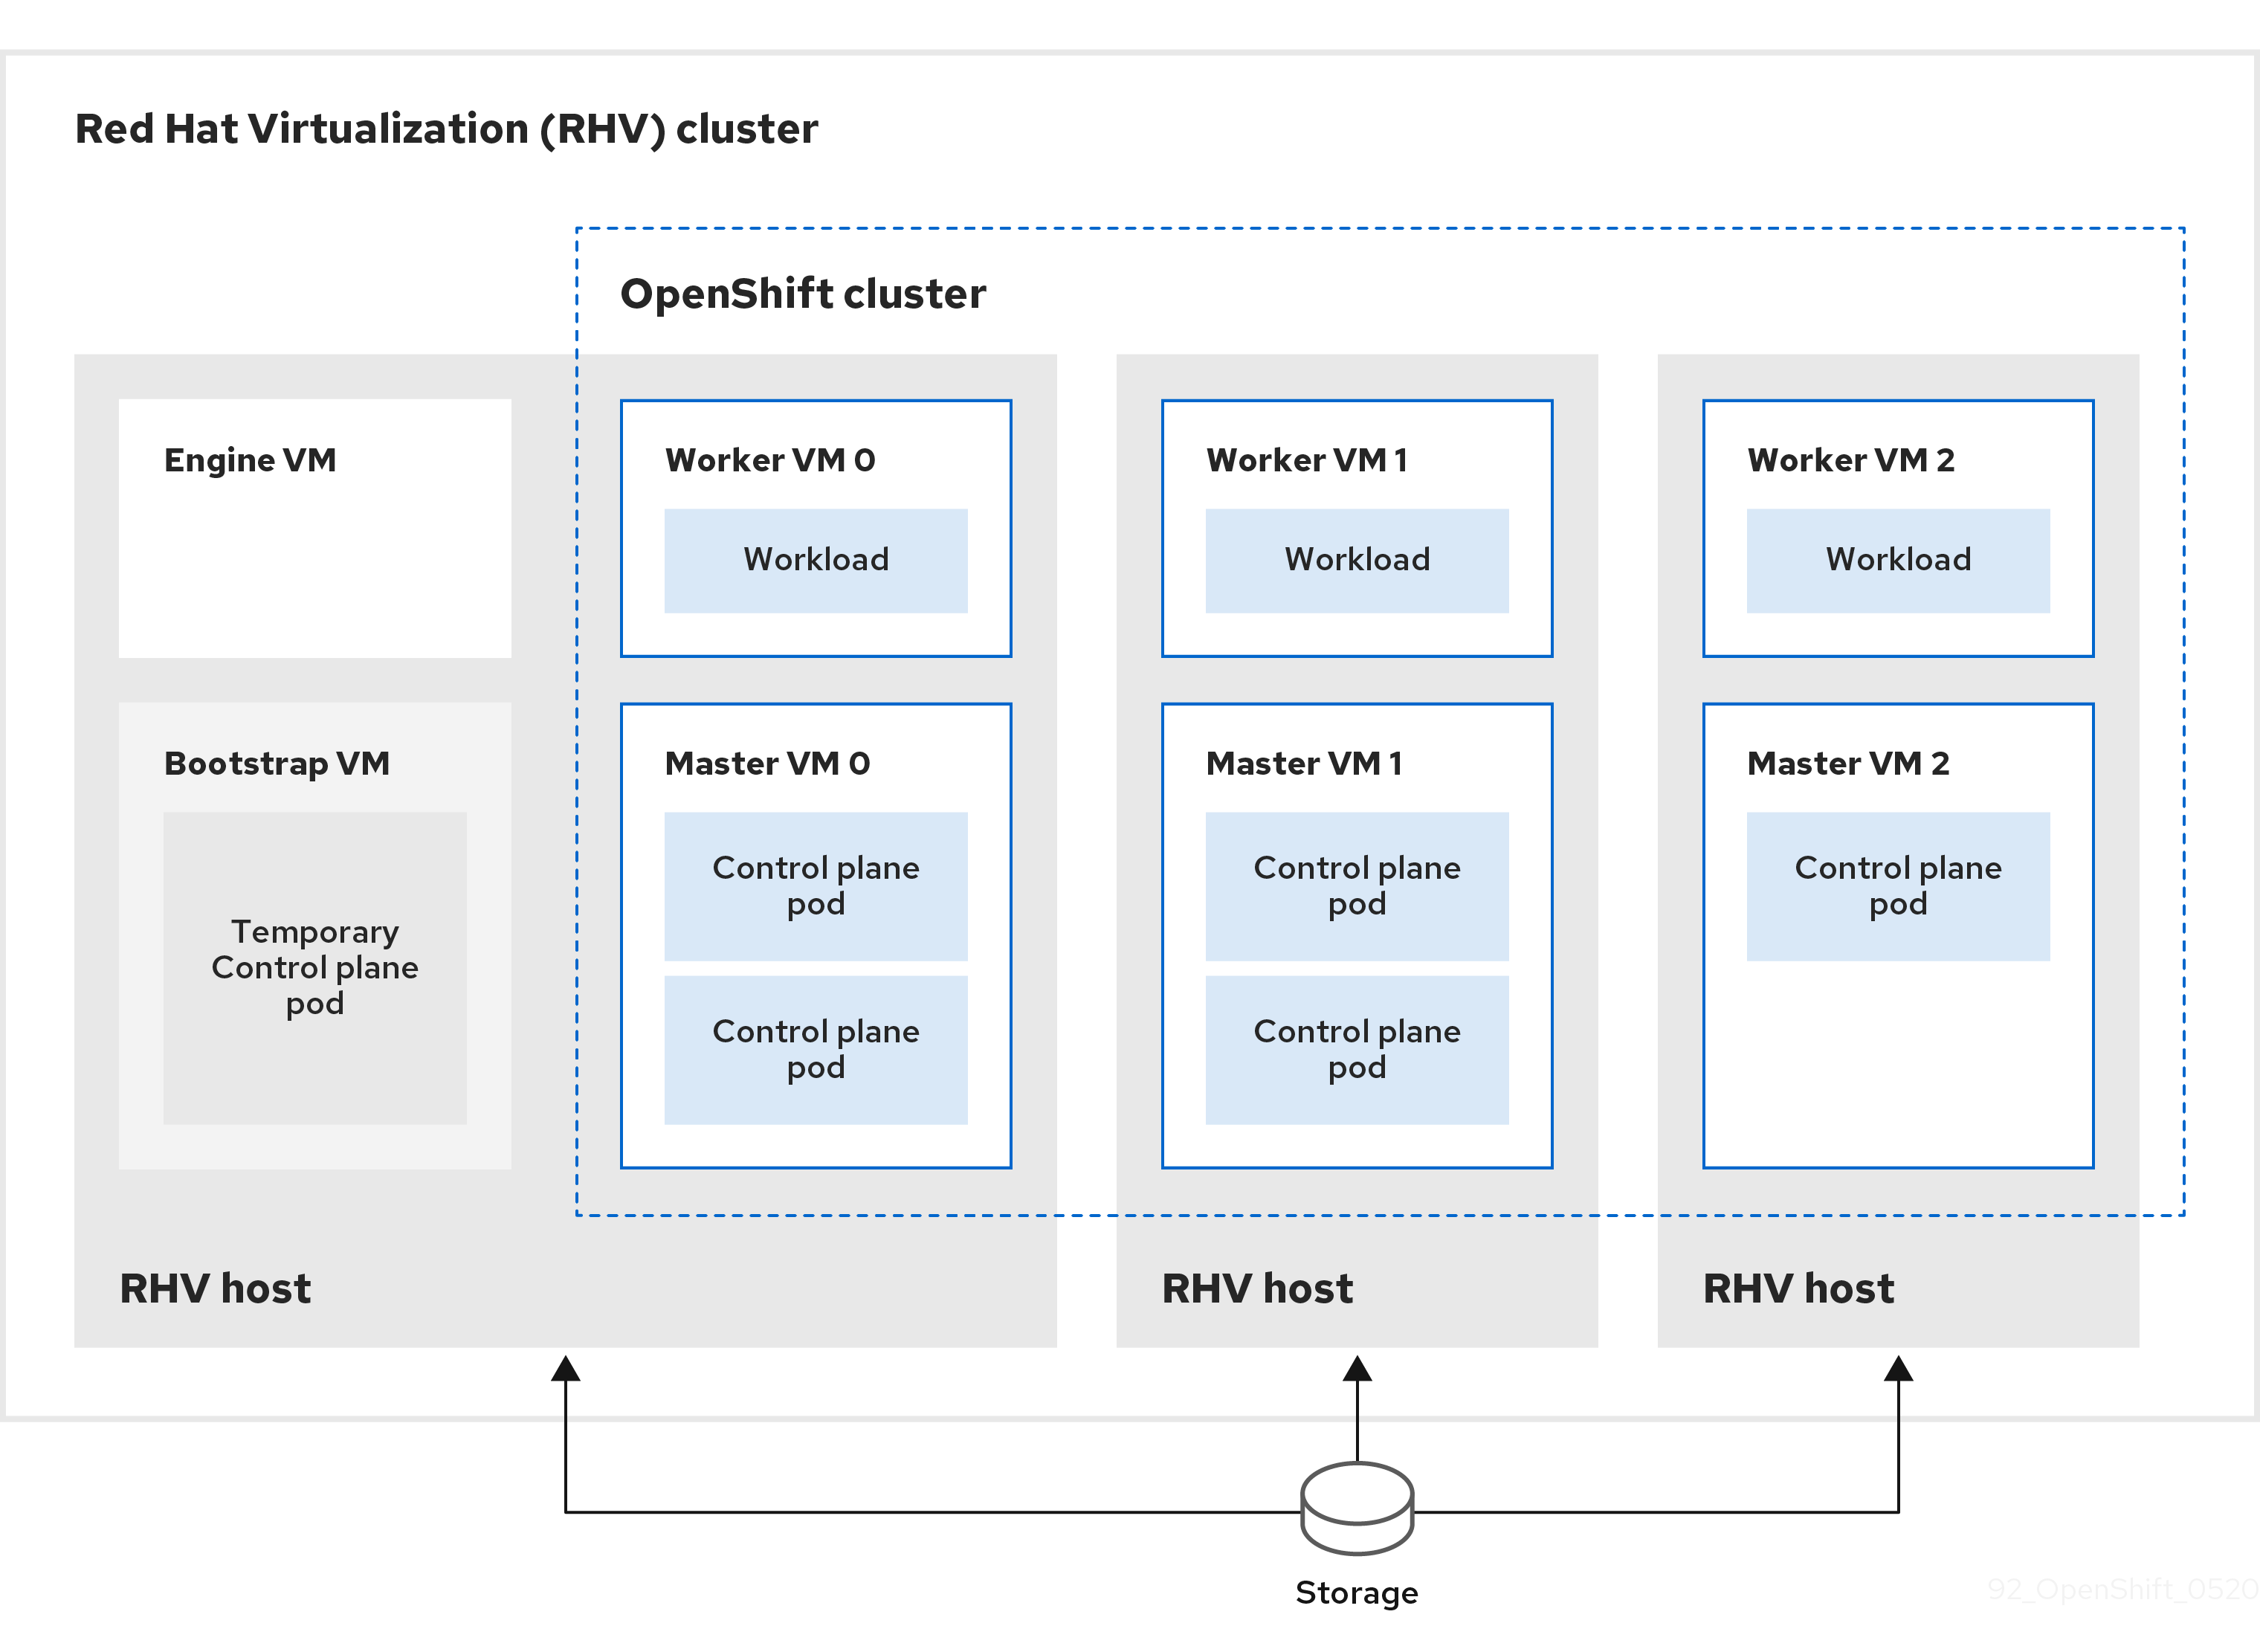
You can quickly install a default, non-customized, OpenShift Container Platform cluster on a Red Hat Virtualization (RHV) cluster, similar to the one shown in the following diagram.
The installation program uses installer-provisioned infrastructure to automate creating and deploying the cluster.
To install a default cluster, you prepare the environment, run the installation program and answer its prompts. Then, the installation program creates the OpenShift Container Platform cluster.
For an alternative to installing a default cluster, see Installing a cluster with customizations.
This installation program is available for Linux and macOS only.
9.1.1. Prerequisites
- Review details about the OpenShift Container Platform installation and update processes.
- If you use a firewall, configure it to allow the sites that your cluster requires access to.
9.1.2. Internet and Telemetry access for OpenShift Container Platform
In OpenShift Container Platform 4.5, you require access to the Internet to install your cluster. The Telemetry service, which runs by default to provide metrics about cluster health and the success of updates, also requires Internet access. If your cluster is connected to the Internet, Telemetry runs automatically, and your cluster is registered to the Red Hat OpenShift Cluster Manager (OCM).
Once you confirm that your Red Hat OpenShift Cluster Manager inventory is correct, either maintained automatically by Telemetry or manually using OCM, use subscription watch to track your OpenShift Container Platform subscriptions at the account or multi-cluster level.
You must have Internet access to:
- Access the Red Hat OpenShift Cluster Manager page to download the installation program and perform subscription management. If the cluster has Internet access and you do not disable Telemetry, that service automatically entitles your cluster.
- Access Quay.io to obtain the packages that are required to install your cluster.
- Obtain the packages that are required to perform cluster updates.
If your cluster cannot have direct Internet access, you can perform a restricted network installation on some types of infrastructure that you provision. During that process, you download the content that is required and use it to populate a mirror registry with the packages that you need to install a cluster and generate the installation program. With some installation types, the environment that you install your cluster in will not require Internet access. Before you update the cluster, you update the content of the mirror registry.
9.1.3. Requirements for the RHV environment
To install and run an OpenShift Container Platform cluster, the RHV environment must meet the following requirements. Not meeting these requirements can cause failures.
The following requirements for CPUs, memory, and storage are based on default values multiplied by the default number of virtual machines the installation program creates.
By default, the installation program creates seven machines during the installation process, which includes one bootstrap machine. When the installation program finishes, it deletes the bootstrap machine and frees up its resources. If you perform a custom installation, you can increase the number of virtual machines the installation program creates.
If you increase the number of virtual machines or resources in the install_config.yaml file, you must also increase these requirements.
Requirements
- The RHV version is 4.3.10 or later.
- The RHV environment has one data center whose state is Up.
- The RHV data center contains an RHV cluster.
The RHV cluster has the following resources exclusively for the OpenShift Container Platform cluster:
- Minimum 28 vCPUs, which is 4 vCPUs for each of the seven virtual machines created during installation.
112 GiB RAM or more, including:
- 16 GiB or more for the bootstrap machine, which provides the temporary control plane.
- 16 GiB or more for each of the three control plane machines which provide the control plane.
- 16 GiB or more for each of the three compute machines, which run the application workloads.
- The RHV storage domain must meet these etcd backend performance requirements.
- In production environments, each virtual machine must have 120 GiB or more, so the storage domain must have 840 GiB or more for the OpenShift Container Platform cluster. In resource-constrained or non-production environments, each virtual machine must have 32 GiB or more, so the storage domain must have 230 GiB or more for the OpenShift Container Platform cluster.
- The RHV cluster must have access to an Internet connection to download images from the Red Hat Ecosystem Catalog during installation and updates, and for the Telemetry service to simplify the subscription and entitlement process.
- The RHV cluster has a virtual network with access to the REST API on the RHV Manager. Ensure that DHCP is enabled on this network, because the VMs that the installer creates obtain their IP address by using DHCP.
- All together, the hosts must have the required memory and CPU resources in addition to and aside from what they use to operate or provide to non-OpenShift Container Platform operations.
- The release cycles of OpenShift Container Platform and RHV are different and versions tested might vary in the future depending on the release dates of both products.
- The bootstrap machine provides a temporary control plane while the installation program creates the OpenShift Container Platform cluster. After it creates the cluster, the installation program removes the bootstrap machine and releases its resources.
9.1.4. Verifying the requirements for the RHV environment
Verify that the RHV environment meets the requirements to install and run an OpenShift Container Platform cluster. Not meeting these requirements can cause failures.
These requirements are based on the default resources the installation program uses to create control plane and compute machines. These resources include vCPUs, memory, and storage. If you change these resources or increase the number of OpenShift Container Platform machines, adjust these requirements accordingly.
Procedure
Check the RHV version.
- In the RHV Administration Portal, click the ? help icon in the upper-right corner and select About.
- In the window that opens, confirm that the RHV Software Version is 4.3.10 or higher.
Inspect the data center, cluster, and storage.
- In the RHV Administration Portal, click Compute → Data Centers.
- Confirm the data center where you plan to install OpenShift Container Platform displays a green up arrow, meaning it is "Up".
- Click the name of that data center.
- In the data center details, on the Storage tab, confirm the storage domain where you plan to install OpenShift Container Platform is Active.
- Record the Domain Name for use later on.
- Confirm Free Space has at least 230 GiB.
- Confirm that the storage domain meets these etcd backend performance requirements, which can be measured using the fio performance benchmarking tool.
- In the data center details, click the Clusters tab.
- Find the RHV cluster where you plan to install OpenShift Container Platform. Record the cluster name for use later on.
Inspect the RHV host resources.
- In the RHV Administration Portal, click Compute > Clusters.
- Click the cluster where you plan to install OpenShift Container Platform.
- In the cluster details, click the Hosts tab.
- Inspect the hosts and confirm they have a combined total of at least 28 Logical CPU Cores available exclusively for the OpenShift Container Platform cluster.
- Record the number of available Logical CPU Cores for use later on.
- Confirm that these CPU cores are distributed so each of the seven virtual machines created during installation can have four cores.
Confirm that, all together, the hosts have 112 GiB of Max free Memory for scheduling new VMs distributed to meet the requirements for each of the following OpenShift Container Platform machines:
- 16 GiB required for the bootstrap machine
- 16 GiB required for each of the three control plane machines
- 16 GiB for each of the three compute machines
- Record the amount of Max free Memory for scheduling new VMs for use later on.
Verify that the virtual network for installing OpenShift Container Platform has access to the RHV Manager’s REST API. From a virtual machine on this network, use a curl command with the RHV Manager’s REST API. Use the following format:
$ curl -k -u <username>@<profile>:<password> \ 1
https://<engine-fqdn>/ovirt-engine/api 2
- 1
- For
<username>, specify the user name of an RHV administrator. For<profile>, specify the login profile, which you can get by going to the RHV Administration Portal login page and reviewing the Profile dropdown list. For<password>, specify the admin password. - 2
- For
<engine-fqdn>, specify the fully qualified domain name of the RHV environment.
For example:
$ curl -k -u rhvadmin@internal:pw123 \
https://rhv-env.virtlab.example.com/ovirt-engine/api
9.1.5. Preparing the network environment on RHV
Configure three static IP addresses for the OpenShift Container Platform cluster and create DNS entries using two of these addresses.
Procedure
Reserve three static IP addresses
- On the network where you plan to install OpenShift Container Platform, identify three static IP addresses that are outside the DHCP lease pool.
Connect to a host on this network and verify that each of the IP addresses is not in use. For example, use Address Resolution Protocol (ARP) to check that none of the IP addresses have entries:
$ arp 10.35.1.19
Example output
10.35.1.19 (10.35.1.19) -- no entry
- Reserve three static IP addresses following the standard practices for your network environment.
- Record these IP addresses for future reference.
Create DNS entries for the OpenShift Container Platform REST API and apps domain names using this format:
api.<cluster-name>.<base-domain>   <ip-address> 1
*.apps.<cluster-name>.<base-domain>   <ip-address> 2
For example:
api.my-cluster.virtlab.example.com	10.35.1.19
*.apps.my-cluster.virtlab.example.com	10.35.1.20
注意The third static IP address does not require a DNS entry. The OpenShift Container Platform cluster uses that address for its internal DNS service.
9.1.6. Setting up the CA certificate for RHV
Download the CA certificate from the Red Hat Virtualization (RHV) Manager and set it up on the installation machine.
You can download the certificate from a webpage on the RHV Manager or by using a curl command.
Later, you provide the certificate to the installation program.
Procedure
Use either of these two methods to download the CA certificate:
-
Go to the Manager’s webpage,
https://<engine-fqdn>/ovirt-engine/. Then, under Downloads, click the CA Certificate link. Run the following command:
$ curl -k 'https://<engine-fqdn>/ovirt-engine/services/pki-resource?resource=ca-certificate&format=X509-PEM-CA' -o /tmp/ca.pem 1- 1
- For
<engine-fqdn>, specify the fully qualified domain name of the RHV Manager, such asrhv-env.virtlab.example.com.
-
Go to the Manager’s webpage,
Configure the CA file to grant rootless user access to the Manager. Set the CA file permissions to have an octal value of
0644(symbolic value:-rw-r—r--):$ sudo chmod 0644 /tmp/ca.pem
For Linux, copy the CA certificate to the directory for server certificates. Use
-pto preserve the permissions:$ sudo cp -p /tmp/ca.pem /etc/pki/ca-trust/source/anchors/ca.pem
Add the certificate to the certificate manager for your operating system:
- For macOS, double-click the certificate file and use the Keychain Access utility to add the file to the System keychain.
For Linux, update the CA trust:
$ sudo update-ca-trust
注意If you use your own certificate authority, make sure the system trusts it.
Additional Resources
To learn more, see Authentication and Security in the RHV documentation.
9.1.7. Generating an SSH private key and adding it to the agent
If you want to perform installation debugging or disaster recovery on your cluster, you must provide an SSH key to both your ssh-agent and the installation program. You can use this key to access the bootstrap machine in a public cluster to troubleshoot installation issues.
In a production environment, you require disaster recovery and debugging.
You can use this key to SSH into the master nodes as the user core. When you deploy the cluster, the key is added to the core user’s ~/.ssh/authorized_keys list.
You must use a local key, not one that you configured with platform-specific approaches such as AWS key pairs.
Procedure
If you do not have an SSH key that is configured for password-less authentication on your computer, create one. For example, on a computer that uses a Linux operating system, run the following command:
$ ssh-keygen -t ed25519 -N '' \ -f <path>/<file_name> 1- 1
- Specify the path and file name, such as
~/.ssh/id_rsa, of the new SSH key. If you have an existing key pair, ensure your public key is in the your~/.sshdirectory.
Running this command generates an SSH key that does not require a password in the location that you specified.
注意If you plan to install an OpenShift Container Platform cluster that uses FIPS Validated / Modules in Process cryptographic libraries on the
x86_64architecture, do not create a key that uses theed25519algorithm. Instead, create a key that uses thersaorecdsaalgorithm.Start the
ssh-agentprocess as a background task:$ eval "$(ssh-agent -s)"
Example output
Agent pid 31874
Add your SSH private key to the
ssh-agent:$ ssh-add <path>/<file_name> 1Example output
Identity added: /home/<you>/<path>/<file_name> (<computer_name>)
- 1
- Specify the path and file name for your SSH private key, such as
~/.ssh/id_rsa
Set the
GOOGLE_APPLICATION_CREDENTIALSenvironment variable to the full path to your service account private key file.$ export GOOGLE_APPLICATION_CREDENTIALS="<your_service_account_file>"
Verify that the credentials were applied.
$ gcloud auth list
Next steps
- When you install OpenShift Container Platform, provide the SSH public key to the installation program.
9.1.8. Obtaining the installation program
Before you install OpenShift Container Platform, download the installation file on a local computer.
Prerequisites
- You must install the cluster from a computer that uses Linux or macOS.
- You need 500 MB of local disk space to download the installation program.
Procedure
- Access the Infrastructure Provider page on the Red Hat OpenShift Cluster Manager site. If you have a Red Hat account, log in with your credentials. If you do not, create an account.
Navigate to the page for your installation type, download the installation program for your operating system, and place the file in the directory where you will store the installation configuration files.
重要The installation program creates several files on the computer that you use to install your cluster. You must keep both the installation program and the files that the installation program creates after you finish installing the cluster.
重要Deleting the files created by the installation program does not remove your cluster, even if the cluster failed during installation. You must complete the OpenShift Container Platform uninstallation procedures outlined for your specific cloud provider to remove your cluster entirely.
Extract the installation program. For example, on a computer that uses a Linux operating system, run the following command:
$ tar xvf <installation_program>.tar.gz
-
From the Pull Secret page on the Red Hat OpenShift Cluster Manager site, download your installation pull secret as a
.txtfile. This pull secret allows you to authenticate with the services that are provided by the included authorities, including Quay.io, which serves the container images for OpenShift Container Platform components.
9.1.9. Deploying the cluster
You can install OpenShift Container Platform on a compatible cloud platform.
You can run the create cluster command of the installation program only once, during initial installation.
Prerequisites
- Configure an account with the cloud platform that hosts your cluster.
- Obtain the OpenShift Container Platform installation program and the pull secret for your cluster.
Procedure
Remove any existing GCP credentials that do not use the service account key for the GCP account that you configured for your cluster and that are stored in the following locations:
-
The
GOOGLE_CREDENTIALS,GOOGLE_CLOUD_KEYFILE_JSON, orGCLOUD_KEYFILE_JSONenvironment variables -
The
~/.gcp/osServiceAccount.jsonfile -
The
gcloud clidefault credentials
-
The
Run the installation program:
$ ./openshift-install create cluster --dir=<installation_directory> \ 1
    --log-level=info 2
重要Specify an empty directory. Some installation assets, like bootstrap X.509 certificates have short expiration intervals, so you must not reuse an installation directory. If you want to reuse individual files from another cluster installation, you can copy them into your directory. However, the file names for the installation assets might change between releases. Use caution when copying installation files from an earlier OpenShift Container Platform version.
Respond to the installation program prompts.
Optional: For
SSH Public Key, select a password-less public key, such as~/.ssh/id_rsa.pub. This key authenticates connections with the new OpenShift Container Platform cluster.注意For production OpenShift Container Platform clusters on which you want to perform installation debugging or disaster recovery, select an SSH key that your
ssh-agentprocess uses.-
For
Platform, selectovirt. For
Enter oVirt’s API endpoint URL, enter the URL of the RHV API using this format:https://<engine-fqdn>/ovirt-engine/api 1- 1
- For
<engine-fqdn>, specify the fully qualified domain name of the RHV environment.
For example:
$ curl -k -u ovirtadmin@internal:pw123 \
https://rhv-env.virtlab.example.com/ovirt-engine/api
-
For
Is the oVirt CA trusted locally?, enterYessince you have already set up a CA certificate. Otherwise, enterNo. -
For
oVirt’s CA bundle, if you enteredYesfor the preceding question, copy the certificate content from/etc/pki/ca-trust/source/anchors/ca.pemand paste it here. Then, pressEntertwice. Otherwise, if you enteredNofor the preceding question, this question does not appear. For
oVirt engine username, enter the user name and profile of the RHV administrator using this format:<username>@<profile> 1- 1
- For
<username>, specify the user name of an RHV administrator. For<profile>, specify the login profile, which you can get by going to the RHV Administration Portal login page and reviewing the Profile dropdown list. Together, the user name and profile should look similar to this example:
admin@internal
-
For
oVirt engine password, enter the RHV admin password. -
For
oVirt cluster, select the cluster for installing OpenShift Container Platform. -
For
oVirt storage domain, select the storage domain for installing OpenShift Container Platform. -
For
oVirt network, select a virtual network that has access to the RHV Manager REST API. -
For
Internal API Virtual IP, enter the static IP address you set aside for the cluster’s REST API. -
For
Internal DNS Virtual IP, enter the static IP address you set aside for the cluster’s internal DNS service. -
For
Ingress virtual IP, enter the static IP address you reserved for the wildcard apps domain. -
For
Base Domain, enter the base domain of the OpenShift Container Platform cluster. If this cluster is exposed to the outside world, this must be a valid domain recognized by DNS infrastructure. For example, enter:virtlab.example.com -
For
Cluster Name, enter the name of the cluster. For example,my-cluster. Use cluster name from the externally registered/resolvable DNS entries you created for the OpenShift Container Platform REST API and apps domain names. The installation program also gives this name to the cluster in the RHV environment. -
For
Pull Secret, copy the pull secret from thepull-secret.txtfile you downloaded earlier and paste it here. You can also get a copy of the same pull secret from the Pull Secret page on the Red Hat OpenShift Cluster Manager site.
注意If the cloud provider account that you configured on your host does not have sufficient permissions to deploy the cluster, the installation process stops, and the missing permissions are displayed.
When the cluster deployment completes, directions for accessing your cluster, including a link to its web console and credentials for the
kubeadminuser, display in your terminal.重要The Ignition config files that the installation program generates contain certificates that expire after 24 hours, which are then renewed at that time. If the cluster is shut down before renewing the certificates and the cluster is later restarted after the 24 hours have elapsed, the cluster automatically recovers the expired certificates. The exception is that you must manually approve the pending
node-bootstrappercertificate signing requests (CSRs) to recover kubelet certificates. See the documentation for Recovering from expired control plane certificates for more information.重要You must not delete the installation program or the files that the installation program creates. Both are required to delete the cluster.
Optional: You can reduce the number of permissions for the service account that you used to install the cluster.
-
If you assigned the
Ownerrole to your service account, you can remove that role and replace it with theViewerrole. -
If you included the
Service Account Key Adminrole, you can remove it.
-
If you assigned the
You have completed the steps required to install the cluster. The remaining steps show you how to verify the cluster and troubleshoot the installation.