
Red Hat Training
A Red Hat training course is available for Red Hat Enterprise Linux
Virtualization Getting Started Guide
Introduction to virtualization technologies available with RHEL
Abstract
Chapter 1. General Introduction to Virtualization
1.1. What is Virtualization?
- Full virtualization
- Full virtualization uses an unmodified version of the guest operating system. The guest addresses the host’s CPU via a channel created by the hypervisor. Because the guest communicates directly with the CPU, this is the fastest virtualization method.
- Paravirtualization
- Paravirtualization uses a modified guest operating system. The guest communicates with the hypervisor. The hypervisor passes the unmodified calls from the guest to the CPU and other interfaces, both real and virtual. Because the calls are routed through the hypervisor, this method is slower than full virtualization.
- Software virtualization (or emulation)
- Software virtualization uses binary translation and other emulation techniques to run unmodified operating systems. The hypervisor translates the guest calls to a format that can be used by the host system. Because all calls are translated, this method is slower than virtualization. Note that Red Hat does not support software virtualization on Red Hat Enterprise Linux.
- Containerization
- While KVM virtualization creates a separate instance of OS kernel, operating-system-level virtualization, also known as containerization, operates on top of an existing OS kernel and creates isolated instances of the host OS, known as containers. For more information on containers, see the Red Hat Customer Portal.Containers do not have the versatility of KVM virtualization, but are more lightweight and flexible to handle. For a more detailed comparison, see the Introduction to Linux Containers.To use containers on Red Hat Enterprise Linux, install the docker packages from the Extras channel. Note that Red Hat also offers optimized solutions for using containers, such as Red Hat Enterprise Linux Atomic Host and Red Hat OpenShift Container Platform. For details on container support, see the Red Hat KnowledgeBase.
1.2. Virtualization Solutions
- Red Hat Enterprise Linux
- The ability to create, run, and manage virtual machines, as well as a number of virtualization tools and features are included in Red Hat Enterprise Linux 7. This solution supports a limited number of running guests per host, as well as a limited range of guest types. As such, virtualization on Red Hat Enterprise Linux can be useful for example to developers who require testing in multiple environments, or to small businesses running several servers that do not have strict uptime requirements or service-level agreements (SLAs).
Important
This guide provides information about virtualization on Red Hat Enterprise Linux and does not go into detail about other virtualization solutions. - Red Hat Virtualization
- Red Hat Virtualization (RHV) is based on the Kernel-based Virtual Machine (KVM) technology like virtualization on Red Hat Enterprise Linux is, but offers an enhanced array of features. Designed for enterprise-class scalability and performance, it enables management of your entire virtual infrastructure, including hosts, virtual machines, networks, storage, and users from a centralized graphical interface.
Note
For more information about the differences between virtualization in Red Hat Enterprise Linux and Red Hat Virtualization, see the Red Hat Customer Portal.Red Hat Virtualization can be used by enterprises running larger deployments or mission-critical applications. Examples of large deployments suited to Red Hat Virtualization include databases, trading platforms, and messaging systems that must run continuously without any downtime.Note
For more information about Red Hat Virtualization, or to download a fully supported 60-day evaluation version, see http://www.redhat.com/en/technologies/virtualization/enterprise-virtualization. Alternatively, see the Red Hat Virtualization documentation suite. - Red Hat OpenStack Platform
- Red Hat OpenStack Platform offers an integrated foundation to create, deploy, and scale a secure and reliable public or private OpenStack cloud.
Note
For more information about Red Hat OpenStack Platform, or to download a 60-day evaluation version, see https://www.redhat.com/en/technologies/linux-platforms/openstack-platform. Alternatively, see the Red Hat OpenStack Platform documentation suite.
Chapter 2. Why Use Virtualization?
2.1. Virtualization Costs
- Less power
- Using virtualization negates much of the need for multiple physical platforms. This equates to less power being drawn for machine operation and cooling, resulting in reduced energy costs. The initial cost of purchasing multiple physical platforms, combined with the machines' power consumption and required cooling, is drastically cut by using virtualization.
- Less maintenance
- Provided that adequate planning is performed before migrating physical systems to virtualized ones, less time is needed to maintain them. This means less money needs to be spent on parts and labor.
- Extended life for installed software
- Older versions of software may not be able to run directly on more recent bare-metal machines. By running older software virtually on a larger, faster system, the life of the software may be extended while taking advantage of better performance from a newer system.
- Predictable costs
- A Red Hat Enterprise Linux subscription provides support for virtualization at a fixed rate, making it easy to predict costs.
- Less space
- Consolidating servers onto fewer machines means less physical space is required for computer systems.
2.2. Performance
- Red Hat Enterprise Linux 6.4 and KVM recorded an industry-leading TPC-C benchmark with an IBM DB2 database running in an entirely virtualized x86 environment and delivering 88% of bare-metal performance. Due to resource demands, databases have previously been reserved for bare-metal deployments only.
- The industry standard SAP Sales and Distribution (SD) Standard Application Benchmark found that Red Hat Enterprise Linux 6.2 and KVM performs at the virtualization efficiency of 85% when compared to a bare-metal system running on identical hardware.
- Red Hat Enterprise Linux 6.1 and KVM achieved record-setting virtualization performance in the SPECvirt_sc2010 benchmark recorded by the Standard Performance Evaluation Corporation (SPEC), setting the best virtual performance mark of any published SPECvirt result. The SPECvirt_sc2010 metric measures the end-to-end performance of system components in virtualized data center servers.
Note
2.3. Migration
Migration Types
- Offline migration
- An offline migration suspends the guest virtual machine, and then moves an image of the virtual machine's memory to the destination host. The virtual machine is then resumed on the destination host and the memory used by the virtual machine on the source host is freed.
- Live migration
- Live migration is the process of migrating an active virtual machine from one physical host to another. Note that this is not possible between all Red Hat Enterprise Linux releases. Consult the Virtualization Deployment and Administration Guide for details.
2.3.1. Benefits of Migrating Virtual Machines
- Load balancing
- When a host machine is overloaded, one or more of its virtual machines could be migrated to other hosts using live migration. Similarly, machines that are not running and tend to overload can be migrated using offline migration.
- Upgrading or making changes to the host
- When the need arises to upgrade, add, or remove hardware devices on a host, virtual machines can be safely relocated to other hosts. This means that guests do not experience any downtime due to changes that are made to hosts.
- Energy saving
- Virtual machines can be redistributed to other hosts and the unloaded host systems can be powered off to save energy and cut costs in low usage periods.
- Geographic migration
- Virtual machines can be moved to other physical locations for lower latency or for other reasons.
Note
2.3.2. Virtualized to Virtualized Migration (V2V)
virt-v2v tool converts and imports virtual machines from Xen, other versions of KVM, and VMware ESX.
Note
virt-p2v tool. For details, see the P2V Knowledgebase article.
2.4. Security
- SELinux
- Security-Enhanced Linux, or SELinux, provides Mandatory Access Control (MAC) for all Linux systems, and thus benefits also Linux guests. Under the control of SELinux, all processes and files are given a type, and their access on the system is limited by fine-grained controls of various types. SELinux limits the abilities of an attacker and works to prevent many common security exploits such as buffer overflow attacks and privilege escalation.
- sVirt
- sVirt is a technology included in Red Hat Enterprise Linux 7 that integrates SELinux and virtualization. It applies Mandatory Access Control (MAC) to improve security when using virtual machines, and hardens the system against hypervisor bugs that might be used to attack the host or another virtual machine.
Note
2.5. Disaster Recovery
Chapter 3. Introduction to Red Hat Virtualization Products and Features
3.1. KVM and Virtualization in Red Hat Enterprise Linux
virt-manager and virsh). Virtual machines are executed and run as multi-threaded Linux processes, controlled by these tools.
Warning
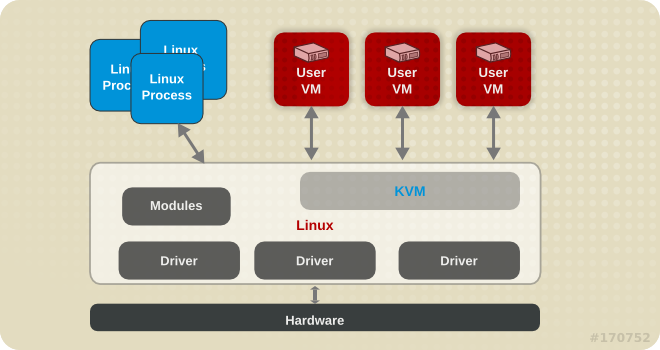
Figure 3.1. KVM architecture
- Overcommitting
- The KVM hypervisor supports overcommitting of system resources. Overcommitting means allocating more virtualized CPUs or memory than the available resources on the system, so the resources can be dynamically swapped when required by one guest and not used by another. This can improve how efficiently guests use the resources of the host, and can make it possible for the user to require fewer hosts.
Important
Overcommitting involves possible risks to system stability. For more information on overcommitting with KVM, and the precautions that should be taken, see the Red Hat Enterprise Linux 7 Virtualization Deployment and Administration Guide. - KSM
- Kernel Same-page Merging (KSM), used by the KVM hypervisor, enables KVM guests to share identical memory pages. These shared pages are usually common libraries or other identical, high-use data. KSM allows for greater guest density of identical or similar guest operating systems by avoiding memory duplication.
Note
For more information on KSM, see the Red Hat Enterprise Linux 7 Virtualization Tuning and Optimization Guide. - QEMU guest agent
- The QEMU guest agent runs on the guest operating system and makes it possible for the host machine to issue commands to the guest operating system.
Note
For more information on the QEMU guest agent, see the Red Hat Enterprise Linux 7 Virtualization Deployment and Administration Guide. - Disk I/O throttling
- When several virtual machines are running simultaneously, they can interfere with the overall system performance by using excessive disk I/O. Disk I/O throttling in KVM provides the ability to set a limit on disk I/O requests sent from individual virtual machines to the host machine. This can prevent a virtual machine from over-utilizing shared resources, and impacting the performance of other virtual machines.
Note
For instructions on using disk I/O throttling, see the Red Hat Enterprise Linux 7 Virtualization Tuning and Optimization Guide. - Automatic NUMA balancing
- Automatic non-uniform memory access (NUMA) balancing moves tasks, which can be threads or processes closer to the memory they are accessing. This improves the performance of applications running on non-uniform memory access (NUMA) hardware systems, without any manual tuning required for Red Hat Enterprise Linux 7 guests.
Note
For more information on automatic NUMA balancing, see the Red Hat Enterprise Linux 7 Virtualization Tuning and Optimization Guide. - Virtual CPU hot add
- Virtual CPU (vCPU) hot add capability provides the ability to increase processing power on running virtual machines as needed, without shutting down the guests. The vCPUs assigned to a virtual machine can be added to a running guest to either meet the workload's demands, or to maintain the Service Level Agreement (SLA) associated with the workload.
Note
For more information on virtual CPU hot add, see the Red Hat Enterprise Linux 7 Virtualization Deployment and Administration Guide. - Nested virtualization
- As a Technology Preview, Red Hat Enterprise Linux 7.2 and later offers hardware-assisted nested virtualization. This feature enables KVM guests to act as hypervisors and create their own guests.This can for example be used for debugging hypervisors on a virtual machine or testing larger virtual deployments on a limited amount of physical machines.
Note
For further information on setting up and using nested virtualization, see Red Hat Enterprise Linux 7 Virtualization Deployment and Administration Guide. - KVM guest virtual machine compatibility
- Red Hat Enterprise Linux 7 servers have certain support limits.The following URLs explain the processor and memory amount limitations for Red Hat Enterprise Linux:
- For the host system: https://access.redhat.com/site/articles/rhel-limits
- For the KVM hypervisor: https://access.redhat.com/site/articles/rhel-kvm-limits
For a complete chart of supported operating systems and host and guest combinations see Red Hat Customer PortalNote
To verify whether your processor supports virtualization extensions and for information on enabling virtualization extensions if they are disabled, see the Red Hat Enterprise Linux 7 Virtualization Deployment and Administration Guide.
3.2. libvirt and libvirt Tools
- A virtualization layer to securely manage virtual machines on a host.
- An interface for managing local and networked hosts.
- The APIs required to provision, create, modify, monitor, control, migrate, and stop virtual machines. Although multiple hosts may be accessed with libvirt simultaneously, the APIs are limited to single node operations.
Note
Only operations supported by the hypervisor can be performed using libvirt.
virsh and virt-manager.
3.3. Domain XML Configuration
virsh setmem, writes this change into the guest's XML configuration, which the hypervisor then reads when booting the guest and modifies the virtual machine accordingly.
virsh dumpxml guestname command.
- The
virshcommands - Persistent changes made to a guest virtual machine usingvirshcommands are recorded in the domain XML. - The
virt-xmlcommand - This command configures the domain XML file of a specified guest according to the provided options. - The Virtual Machine Manager - Changes made to a guest virtual machine in the Virtual Machine Manager are recorded in the domain XML.
Note
virsh edit guestname. This command opens the domain XML configuration of the specified guest in the text editor determined by root's bash configuration, by default vi.
virsh edit, set or modify the EDITOR variable in the .bashrc file of the intended user. For example, for the root user, this file is located in the /root/ directory.
virsh edit to take effect, save the edited XML configuration and restart the guest.
Warning
gedit /etc/libvirt/qemu/guestname.xml. Changes made this way do not take effect and are automatically overwritten.
3.4. Virtualized Hardware Devices
- Virtualized and emulated devices
- Paravirtualized devices
- Physically shared devices
3.4.1. Virtualized and Emulated Devices
- Virtual CPUs (vCPUs)
- On Red Hat Enterprise Linux 7.2 and above, the host system can have up to 240 virtual CPUs (vCPUs) that can be presented to guests for use, regardless of the number of host CPUs. This is up from 160 in Red Hat Enterprise Linux 7.0.
- Emulated system components
- The following core system components are emulated to provide basic system functions:
- Intel i440FX host PCI bridge
- PIIX3 PCI to ISA bridge
- PS/2 mouse and keyboard
- EvTouch USB graphics tablet
- PCI UHCI USB controller and a virtualized USB hub
- Emulated serial ports
- EHCI controller, virtualized USB storage and a USB mouse
- USB 3.0 xHCI host controller (Technology Preview in Red Hat Enterprise Linux 7.3)
- Emulated storage drivers
- Storage devices and storage pools can use emulated drivers to attach storage devices to virtual machines. The guest uses an emulated storage driver to access the storage pool.Note that like all virtual devices, the storage drivers are not storage devices. The drivers are used to attach a backing storage device, file or storage pool volume to a virtual machine. The backing storage device can be any supported type of storage device, file, or storage pool volume.
- The emulated IDE driver
- KVM provides two emulated PCI IDE interfaces. An emulated IDE driver can be used to attach any combination of up to four virtualized IDE hard disks or virtualized IDE CD-ROM drives to each virtual machine. The emulated IDE driver is also used for virtualized CD-ROM and DVD-ROM drives.
- The emulated floppy disk drive driver
- The emulated floppy disk drive driver is used for creating virtualized floppy drives.
- Emulated sound devices
- An emulated (Intel) HDA sound device,
intel-hda, is supported in the following guest operating systems:- Red Hat Enterprise Linux 7, for the AMD64 and Intel 64 architecture
- Red Hat Enterprise Linux 4, 5, and 6, for the 32-bit AMD and Intel architecture and the AMD64 and Intel 64 architecture
Note
The following emulated sound device is also available, but is not recommended due to compatibility issues with certain guest operating systems:ac97, an emulated Intel 82801AA AC97 Audio compatible sound card
- Emulated graphics cards
- The following emulated graphics cards are provided.
- A Cirrus CLGD 5446 PCI VGA card
- A standard VGA graphics card with Bochs VESA extensions (hardware level, including all non-standard modes)
Guests can connect to these devices with the Simple Protocol for Independent Computing Environments (SPICE) protocol or with the Virtual Network Computing (VNC) system. - Emulated network devices
- The following two emulated network devices are provided:
- The
e1000device emulates an Intel E1000 network adapter (Intel 82540EM, 82573L, 82544GC). - The
rtl8139device emulates a Realtek 8139 network adapter.
- Emulated watchdog devices
- A watchdog can be used to automatically reboot a virtual machine when the machine becomes overloaded or unresponsive.Red Hat Enterprise Linux 7 provides the following emulated watchdog devices:
i6300esb, an emulated Intel 6300 ESB PCI watchdog device. It is supported in guest operating system Red Hat Enterprise Linux versions 6.0 and above, and is the recommended device to use.ib700, an emulated iBase 700 ISA watchdog device. Theib700watchdog device is only supported in guests using Red Hat Enterprise Linux 6.2 and above.
Both watchdog devices are supported on 32-bit and 64-bit AMD and Intel architectures for guest operating systems Red Hat Enterprise Linux 6.2 and above.
3.4.2. Paravirtualized Devices
Note
- The paravirtualized network device (virtio-net)
- The paravirtualized network device is a virtual network device that provides network access to virtual machines with increased I/O performance and lower latency.
- The paravirtualized block device (virtio-blk)
- The paravirtualized block device is a high-performance virtual storage device that provides storage to virtual machines with increased I/O performance and lower latency. The paravirtualized block device is supported by the hypervisor and is attached to the virtual machine (except for floppy disk drives, which must be emulated).
- The paravirtualized controller device (virtio-scsi)
- The paravirtualized SCSI controller device provides a more flexible and scalable alternative to virtio-blk. A virtio-scsi guest is capable of inheriting the feature set of the target device, and can handle hundreds of devices compared to virtio-blk, which can only handle 28 devices.virtio-scsi is fully supported for the following guest operating systems:
- Red Hat Enterprise Linux 7
- Red Hat Enterprise Linux 6.4 and above
- The paravirtualized clock
- Guests using the Time Stamp Counter (TSC) as a clock source may suffer timing issues. KVM works around hosts that do not have a constant Time Stamp Counter by providing guests with a paravirtualized clock. Additionally, the paravirtualized clock assists with time adjustments needed after a guest runs the sleep (S3) or suspend to RAM operations.
- The paravirtualized serial device (virtio-serial)
- The paravirtualized serial device is a bytestream-oriented, character stream device, and provides a simple communication interface between the host's user space and the guest's user space.
- The balloon device (virtio-balloon)
- The balloon device can designate part of a virtual machine's RAM as not being used (a process known as inflating the balloon), so that the memory can be freed for the host (or for other virtual machines on that host) to use. When the virtual machine needs the memory again, the balloon can be deflated and the host can distribute the RAM back to the virtual machine.
- The paravirtualized random number generator (virtio-rng)
- The paravirtualized random number generator enables virtual machines to collect entropy, or randomness, directly from the host to use for encrypted data and security. Virtual machines can often be starved of entropy because typical inputs (such as hardware usage) are unavailable. Sourcing entropy can be time-consuming. virtio-rng makes this process faster by injecting entropy directly into guest virtual machines from the host.
- The paravirtualized graphics card (QXL)
- The paravirtualized graphics card works with the QXL driver to provide an efficient way to display a virtual machine's graphics from a remote host. The QXL driver is required to use SPICE.
3.4.3. Physical Host Devices
- VFIO device assignment
- Virtual Function I/O (VFIO) is a new kernel driver in Red Hat Enterprise Linux 7 that provides virtual machines with high performance access to physical hardware.VFIO attaches PCI devices on the host system directly to virtual machines, providing guests with exclusive access to PCI devices for a range of tasks. This enables PCI devices to appear and behave as if they were physically attached to the guest virtual machine.VFIO improves on previous PCI device assignment architecture by moving device assignment out of the KVM hypervisor, and enforcing device isolation at the kernel level. VFIO offers better security and is compatible with secure boot. It is the default device assignment mechanism in Red Hat Enterprise Linux 7.VFIO increases the number of assigned devices to 32 in Red Hat Enterprise Linux 7, up from a maximum 8 devices in Red Hat Enterprise Linux 6. VFIO also supports assignment of NVIDIA GPUs.
Note
For more information on VFIO device assignment, see the Red Hat Enterprise Linux 7 Virtualization Deployment and Administration Guide. - USB, PCI, and SCSI passthrough
- The KVM hypervisor supports attaching USB, PCI, and SCSI devices on the host system to virtual machines. USB, PCI, and SCSI device assignment makes it possible for the devices to appear and behave as if they were physically attached to the virtual machine. Thus, it provides guests with exclusive access to these devices for a variety of tasks.
Note
For more information on USB, PCI, and SCSI passthrough, see the Red Hat Enterprise Linux 7 Virtualization Deployment and Administration Guide. - SR-IOV
- SR-IOV (Single Root I/O Virtualization) is a PCI Express (PCI-e) standard that extends a single physical PCI function to share its PCI resources as separate virtual functions (VFs). Each function can be used by a different virtual machine via PCI device assignment.An SR-IOV-capable PCI-e device provides a Single Root function (for example, a single Ethernet port) and presents multiple, separate virtual devices as unique PCI device functions. Each virtual device may have its own unique PCI configuration space, memory-mapped registers, and individual MSI-based interrupts.
Note
For more information on SR-IOV, see the Red Hat Enterprise Linux 7 Virtualization Deployment and Administration Guide. - NPIV
- N_Port ID Virtualization (NPIV) is a functionality available with some Fibre Channel devices. NPIV shares a single physical N_Port as multiple N_Port IDs. NPIV provides similar functionality for Fibre Channel Host Bus Adapters (HBAs) that SR-IOV provides for PCIe interfaces. With NPIV, virtual machines can be provided with a virtual Fibre Channel initiator to Storage Area Networks (SANs).NPIV can provide high density virtualized environments with enterprise-level storage solutions.For more information on NPIV, see the vHBA-based storage pools using SCSI devices.
3.4.4. Guest CPU Models
Note
3.5. Storage
3.5.1. Storage Pools
- Local storage pools
- Local storage pools are attached directly to the host server. They include local directories, directly attached disks, physical partitions, and Logical Volume Management (LVM) volume groups on local devices. Local storage pools are useful for development, testing and small deployments that do not require migration or large numbers of virtual machines. Local storage pools may not be suitable for many production environment, because they do not support live migration.
- Networked (shared) storage pools
- Networked storage pools include storage devices shared over a network using standard protocols. Networked storage is required when migrating virtual machines between hosts with virt-manager, but is optional when migrating with
virsh. Networked storage pools are managed by libvirt.
3.5.2. Storage Volumes
3.5.3. Emulated Storage Devices
- virtio-scsi
- virtio-scsi is the recommended paravirtualized device for guests using large numbers of disks or advanced storage features such as TRIM. Guest driver installation may be necessary on guests using operating systems other than Red Hat Enterprise Linux 7.
- virtio-blk
- virtio-blk is a paravirtualized storage device suitable for exposing image files to guests. virtio-blk can provide the best disk I/O performance for virtual machines, but has fewer features than virtio-scsi.
- IDE
- IDE is recommended for legacy guests that do not support virtio drivers. IDE performance is lower than virtio-scsi or virtio-blk, but it is widely compatible with different systems.
- CD-ROM
- ATAPI CD-ROMs and virtio-scsi CD-ROMs are available and make it possible for guests to use ISO files or the host's CD-ROM drive. virtio-scsi CD-ROMs can be used with guests that have the virtio-scsi driver installed. ATAPI CD-ROMs offer wider compatibility but lower performance.
- USB mass storage devices and floppy disks
- Emulated USB mass storage devices and floppy disks are available when removable media are required. USB mass storage devices are preferable to floppy disks due to their larger capacity.
3.5.4. Host Storage
- Image files
- Image files can only be stored on a host file system. The image files can be stored on a local file system, such as ext4 or xfs, or a network file system, such as NFS.Tools such as libguestfs can manage, back up, and monitor files. Disk image formats on KVM include:
- raw
- Raw image files contain the contents of the disk with no additional metadata.Raw files can either be pre-allocated or sparse, if the host file system allows it. Sparse files allocate host disk space on demand, and are therefore a form of thin provisioning. Pre-allocated files are fully provisioned but have higher performance than sparse files.Raw files are desirable when disk I/O performance is critical and transferring the image file over a network is rarely necessary.
- qcow2
- qcow2 image files offer a number of advanced disk image features, including backing files, snapshots, compression, and encryption. They can be used to instantiate virtual machines from template images.qcow2 files are typically more efficient to transfer over a network, because only sectors written by the virtual machine are allocated in the image.Red Hat Enterprise Linux 7 supports the qcow2 version 3 image file format.
- LVM volumes
- Logical volumes (LVs) can be used for disk images and managed using the system's LVM tools. LVM offers higher performance than file systems because of its simpler block storage model.LVM thin provisioning offers snapshots and efficient space usage for LVM volumes, and can be used as an alternative to migrating to qcow2.
- Host devices
- Host devices such as physical CD-ROMs, raw disks, and logical unit numbers (LUNs) can be presented to the guest. This enables SAN or iSCSI LUNs as well as local CD-ROM media to be used by the guest with good performance.Host devices can be used when storage management is done on a SAN instead of on hosts.
- Distributed storage systems
- Gluster volumes can be used as disk images. This enables high-performance clustered storage over the network.Red Hat Enterprise Linux 7 includes native support for disk images on GlusterFS. This enables a KVM host to boot virtual machine images from GlusterFS volumes, and to use images from a GlusterFS volume as data disks for virtual machines. When compared to GlusterFS FUSE, the native support in KVM delivers higher performance.
3.6. Virtual Networking
libvirt's virtual network configuration. The host therefore acts as a virtual network switch, which can be configured in a number of different ways to fit the guest's networking needs.
default. Guests on this network can make the following connections:
- With each other and with the virtualization host
- Both inbound and outbound traffic is possible, but is affected by the firewalls in the guest operating system's network stack and by libvirt network filtering rules attached to the guest interface.
- With other hosts on the network beyond the virtualization host
- Only outbound traffic is possible, and is affected by Network Address Translation (NAT) rules, as well as the host system's firewall.
- Isolated mode
- The guests are connected to a network that does not allow any traffic beyond the virtualization host.
- Routed mode
- The guests are connected to a network that routes traffic between the guest and external hosts without performing any NAT. This enables incoming connections but requires extra routing-table entries for systems on the external network.
- Bridged mode
- The guests are connected to a bridge device that is also connected directly to a physical ethernet device connected to the local ethernet. This makes the guest directly visible on the physical network, and thus enables incoming connections, but does not require any extra routing-table entries.
default network is installed along with the libvirt package, and automatically started when the libvirtd service is started. If more advanced functionality is needed, additional networks can be created and configured using either virsh or virt-manager, and the guest XML configuration file can be edited to use one of these new networks.
Note
Chapter 4. Getting Started with Virtualization Command-line Interface
4.1. Primary Command-line Utilities for Virtualization
4.1.1. virsh
virsh is a CLI utility for managing hypervisors and guest virtual machines. It is the primary means of controlling virtualization on Red Hat Enterprise Linux 7. Its capabilities include:
- Creating, configuring, pausing, listing, and shutting down virtual machines
- Managing virtual networks
- Loading virtual machine disk images
virsh utility is ideal for creating virtualization administration scripts. Users without root privileges can use virsh as well, but in read-only mode.
Using virsh
virsh utility can be used in a standard command-line input, but also as an interactive shell. In shell mode, the virsh command prefix is not needed, and the user is always registered as root. The following example uses the virsh hostname command to display the hypervisor's host name - first in standard mode, then in interactive mode.
$virsh hostnamelocalhost.localdomain $virshWelcome to virsh, the virtualization interactive terminal. Type: 'help' for help with commands 'quit' to quit virsh #hostnamelocalhost.localdomain
Important
virsh as a non-root user, you enter an unprivileged libvirt session, which means you cannot see or interact with guests or any other virtualized elements created by the root.
virsh with the -c qemu:///system option.
Getting help with virsh
virsh by using the man virsh command or the --help option. In addition, the virsh help command can be used to view the help text of a specific virsh command, or, by using a keyword, to list all virsh commands that belong to a certain group.
virsh command groups and their respective keywords are as follows:
- Guest management - keyword
domain - Guest monitoring - keyword
monitor - Host and hypervisor monitoring and management- keyword
host - Host system network interface management - keyword
interface - Virtual network management - keyword
network - Network filter management - keyword
filter - Node device management - keyword
nodedev - Management of secrets, such as passphrases or encryption keys - keyword
secret - Snapshot management - keyword
snapshot - Storage pool management - keyword
pool - Storage volume management - keyword
volume - General
virshusage - keywordvirsh
virsh help, you first find the proper command to use and then learn its syntax. Finally, you use the command to rename a guest called Fontaine to Atlas.
Example 4.1. How to list help for all commands with a keyword
#virsh helpDomain Management (help keyword 'domain'): attach-device attach device from an XML file attach-disk attach disk device [...] domname convert a domain id or UUID to domain name domrename rename a domain [...] #domainvirsh helpNAME domrename - rename a domain SYNOPSIS domrename <domain> <new-name> DESCRIPTION Rename an inactive domain. OPTIONS [--domain] <string> domain name, id or uuid [--new-name] <string> new domain name #domrenamevirsh domrename --domain Fontaine --new-name AtlasDomain successfully renamed
Note
virsh, see the Red Hat Enterprise Linux 7 Virtualization Deployment and Administration Guide.
4.1.2. virt-install
virt-install is a CLI utility for creating new virtual machines. It supports both text-based and graphical installations, using serial console, SPICE, or VNC client-server pair graphics. Installation media can be local, or exist remotely on an NFS, HTTP, or FTP server. The tool can also be configured to run unattended and use the kickstart method to prepare the guest, allowing for easy automation of installation. This tool is included in the virt-install package.
Important
virt-install as a non-root user, you enter an unprivileged libvirt session. This means that the created guest will only be visible to you, and it will not have access to certain capabilities that guests created by the root have.
Note
virt-install, see the Red Hat Enterprise Linux 7 Virtualization Deployment and Administration Guide.
4.1.3. virt-xml
virt-xml is a command-line utility for editing domain XML files. For the XML configuration to be modified successfully, the name of the guest, the XML action, and the change to make must be included with the command.
example_domain guest:
#virt-xml boot=?--boot options: arch cdrom [...] menu network nvram nvram_template os_type smbios_mode uefi useserial #virt-xml example_domain --edit --boot menu=onDomain 'example_domain' defined successfully.
Note
virt-xml, see the virt-xml man pages.
4.1.4. guestfish
guestfish is a command-line utility for examining and modifying virtual machine disk images. It uses the libguestfs library and exposes all functionalities provided by the libguestfs API.
Using guestfish
guestfish utility can be used in a standard command-line input mode, but also as an interactive shell. In shell mode, the guestfish command prefix is not needed, and the user is always registered as root. The following example uses the guestfish to display the file systems on the testguest virtual machine - first in standard mode, then in interactive mode.
#guestfish domain testguest : run : list-filesystems/dev/sda1: xfs /dev/rhel/root: xfs /dev/rhel/swap: swap #guestfishWelcome to guestfish, the guest filesystem shell for editing virtual machine filesystems and disk images. Type: 'help' for help on commands 'man' to read the manual 'quit' to quit the shell ><fs>domain testguest><fs>run><fs>list-filesystems/dev/sda1: xfs /dev/rhel/root: xfs /dev/rhel/swap: swap
guestfish can be used in bash scripts for automation purposes.
Important
guestfish as a non-root user, you enter an unprivileged libvirt session. This means you cannot see or interact with disk images on guests created by the root.
guestfish with the -ro -c qemu:///system options. In addition, you must have read privileges for the disk image files.
Getting help with guestfish
guestfish by using the man guestfish command or the --help option. In addition, the guestfish help command can be used to view detailed information about a specific guestfish command. The following example displays information about the guestfish add command:
$ guestfish help add
NAME
    add-drive - add an image to examine or modify

SYNOPSIS
     add-drive filename [readonly:true|false] [format:..] [iface:..] [name:..] [label:..] [protocol:..] [server:..] [username:..] [secret:..] [cachemode:..] [discard:..] [copyonread:true|false]

DESCRIPTION
    This function adds a disk image called filename to the handle. filename
    may be a regular host file or a host device.
    [...]
Note
guestfish, see the Red Hat Enterprise Linux 7 Virtualization Deployment and Administration Guide.
4.2. Demonstration: Creating and Managing a Guest with Command-line Utilities
4.2.1. Installation
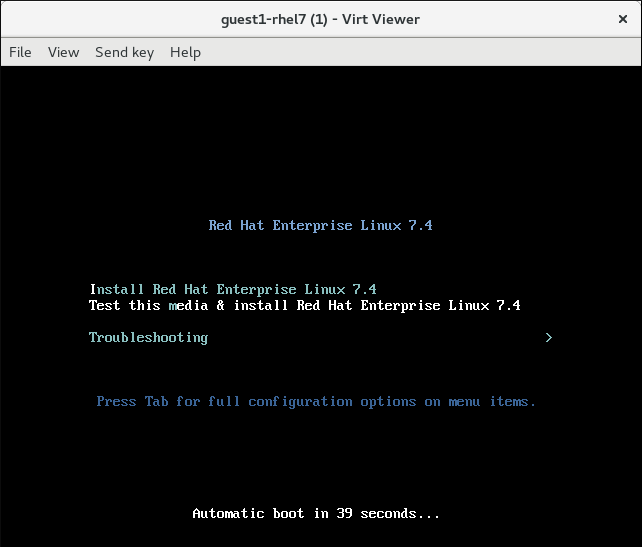
guest1-rhel7, and starts an OS installation from a Red Hat Enterprise Linux 7 Workstation ISO image. This image is obtainable on the Customer Portal and in this example, it is currently located in your ~/Downloads/ folder. The guest is allocated with two virtual CPUs, 2048 MB RAM, and 8 GB of disk space.
# virt-install --name guest1-rhel7 --memory 2048 --vcpus 2 --disk size=8 --cdrom /home/username/Downloads/rhel-workstation-7.4-x86_64-dvd.iso --os-variant rhel7

Starting install...
Allocating 'guest1-rhel7.qcow2'                                                   | 8.0 GB  00:00:00
Note
virt-install command similar to the following:
# virt-install -name rhel7anaconda-guest -r 1024 --location=/home/jherrman/Downloads/rhel-workstation-7.4-x86_64-dvd.iso --disk size=8 --nographics --extra-args="console=tty0 console=ttyS0,115200n8"Domain creation completed. Restarting guest.
# virsh shutdown guest1-rhel7
Domain guest1-rhel7 is being shutdown
4.2.2. Attaching a Device
lsusb command on the host to retrieve the device's IDs.
# lsusb

[...]
Bus 003 Device 007: ID 04e8:6860 Samsung Electronics Co., Ltd Galaxy (MTP)
samsung_USB_device.xml in this example, where you will input the vendor and product IDs.
# vim samsung_USB_device.xml
<hostdev mode='subsystem' type='usb' managed='yes'>
  <source>
    <vendor id='0x04e8'/>
    <product id='0x6860'/>
  </source>
</hostdev>
virsh attach-device command to attach the device to the guest.
# virsh attach-device guest1-rhel7 --file samsung_USB_device.xml --config
Device attached successfully
Note
--live option.
4.2.3. Interacting with the Guest
# virsh start guest1-rhel7
Domain guest1-rhel7 started
- On systems with a graphical display, use virt-viewer:
#
virt-viewer guest1-rhel7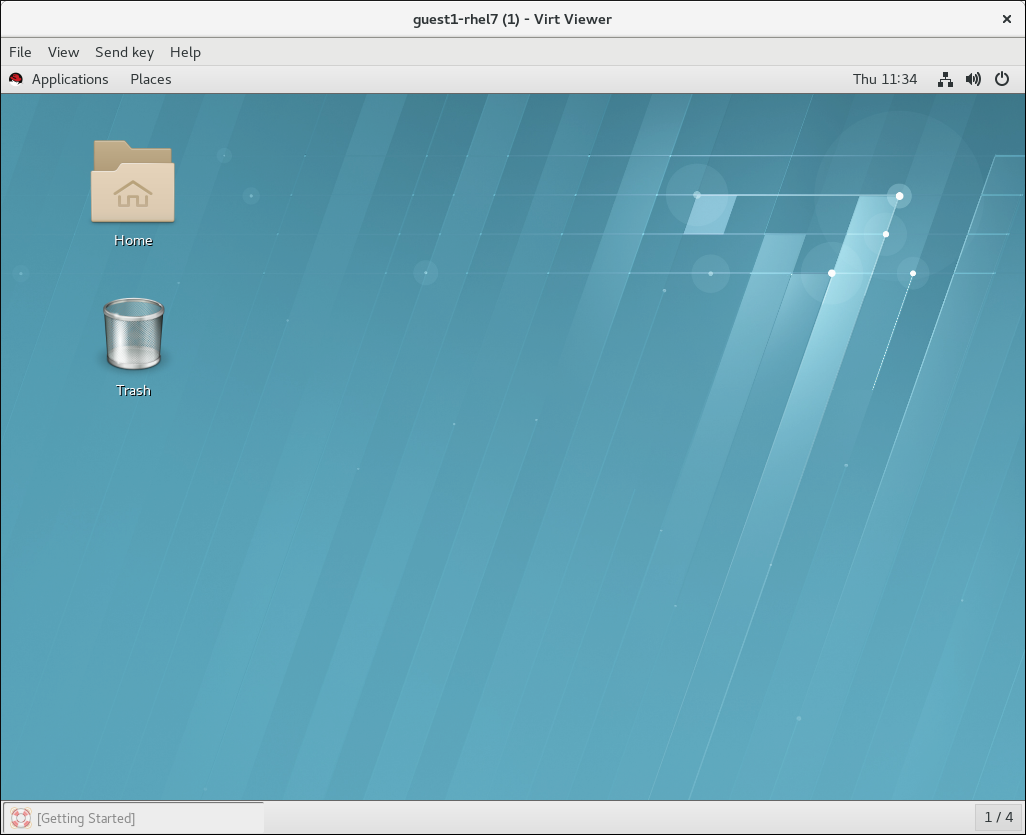 Afterwards, you can interact with the screen output in the virt-viewer window like with an OS GUI on a physical machine. For example, you can use the Subscription Manager application to register your Red Hat Enterprise Linux guest OS:
- If the host or guest has a text-only interface, use SSH. This requires knowing the IP address of the guest. If you do not know the IP address, it can be obtained using the
virsh domifaddrcommand.#
virsh domifaddr guest1-rhel7Name MAC address Protocol Address ------------------------------------------------------------------------------- vnet0 52:54:00:65:29:21 ipv4 10.34.3.125/24 #ssh root@10.34.3.125root@10.34.3.125's password: Last login: Wed Jul 19 18:27:10 2017 from 192.168.122.1 [root@localhost ~]#Note
Forvirsh domifaddrto work, the guest must be running, reachable on a network, and may require the QEMU guest agent to be activated.Afterwards, you can interact with the host terminal as if using a terminal on the guest machine. For example, you can use the subscription-manager utility to register your Red Hat Enterprise Linux guest OS:[root@localhost ~]#
subscription-manager registerRegistering to: subscription.rhsm.redhat.com:443/subscription Username: username@sample.com Password: The system has been registered with ID: 30b5e666-67f9-53bb-4b90-c2a88e5be789
4.2.4. Diagnostics
# virsh dominfo guest1-rhel7
Id:             1
Name:           guest1-rhel7
UUID:           ec0c0122-fb63-4a54-b602-5cf84f5e2dfd
OS Type:        hvm
State:          running
CPU(s):         2
CPU time:       33.4s
Max memory:     2097152 KiB
Used memory:    2097152 KiB
Persistent:     yes
Autostart:      disable
Managed save:   no
Security model: selinux
Security DOI:   0
Security label: unconfined_u:unconfined_r:svirt_t:s0:c102,c792 (enforcing)
4.2.5. Creating Snapshots
virsh snapshot-create command.
# virsh snapshot-create guest1-rhel7
Domain snapshot 1500563241 created
#virsh snapshot-list guest1-rhel7Name Creation Time State ------------------------------------------------------------ 1500563241 2017-07-20 17:07:21 +0200 shutoff #virsh snapshot-dumpxml guest1-rhel7 1500563241<domainsnapshot> <name>1500563241</name> <state>shutoff</state> <creationTime>1500563241</creationTime> <memory snapshot='no'/> <disks> <disk name='vda' snapshot='internal'/> [...]
# virsh snapshot-revert guest1-rhel7 --snapshotname 150056324Chapter 5. Getting Started with Virtual Machine Manager
virt-manager, is a graphical tool for creating and managing guest virtual machines. This chapter provides a description of the Virtual Machine Manager and how to run it.
Note
5.1. Running Virtual Machine Manager
# virt-manager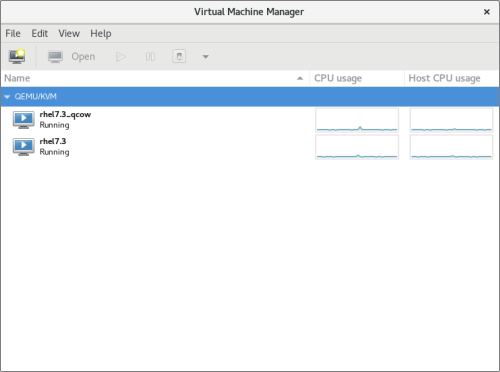
Figure 5.1. The Virtual Machine Manager
Note
virt-manager fails, ensure that the virt-manager package is installed. For information on installing the virt-manager package, see Installing the Virtualization Packages in the Red Hat Enterprise Linux Virtualization Deployment and Administration Guide.
5.2. The Virtual Machine Manager Interface
5.2.1. The Virtual Machine Manager Main Window

Figure 5.2. The Virtual Machine Manager window
5.2.1.2. The main window toolbar
Table 5.2. Virtual Machine Manager main window toolbar
| Icon | Description |
|---|---|
 | Opens the New VM wizard to create a new guest virtual machine. |
 | Opens the Virtual Machine window for the selected virtual machine. |
 | Starts the selected virtual machine. |
 | Pauses the selected virtual machine. |
 | Stops the selected virtual machine. |
 | Opens a menu to select one of the following actions to perform on the selected virtual machine:
|
5.2.1.3. The Virtual Machine list
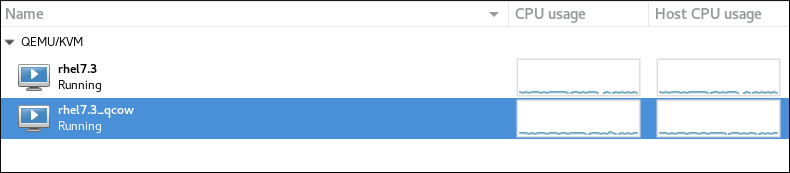
Figure 5.3. The Virtual Machine list
- CPU usage
- Host CPU usage
- Memory usage
- Disk I/O
- Network I/O
5.2.2. The Virtual Machine Window
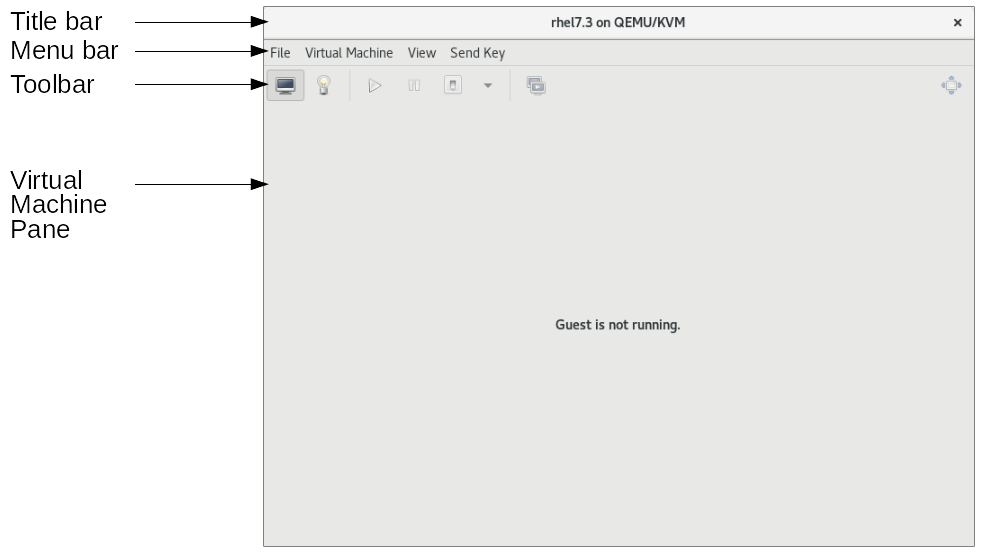
Figure 5.4. The Virtual Machine window
5.2.2.2. The Virtual Machine window toolbar
Table 5.4. Virtual Machine window toolbar
| Icon | Description |
|---|---|
 | Displays the graphical console for the virtual machine. |
 | Displays the details pane for the virtual machine. |
| | Starts the selected virtual machine. |
| | Pauses the selected virtual machine. |
| | Stops the selected virtual machine. |
| | Opens a menu to select one of the following actions to perform on the selected virtual machine:
|
 | Opens the Snapshots display in the Virtual Machine pane. |
 | Displays the virtual machine console in full screen mode. |
5.2.2.3. The Virtual Machine pane
The virtual machine console
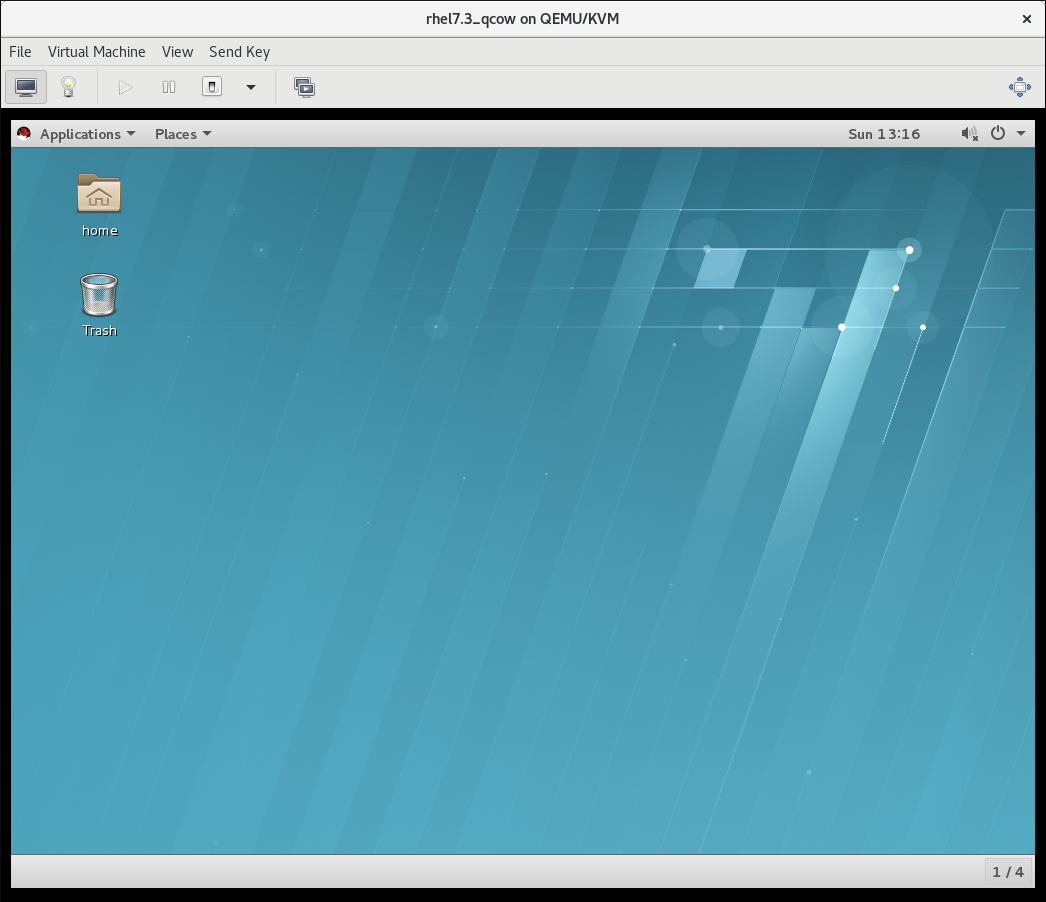
Figure 5.5. The Virtual Machine console
The virtual machine details window
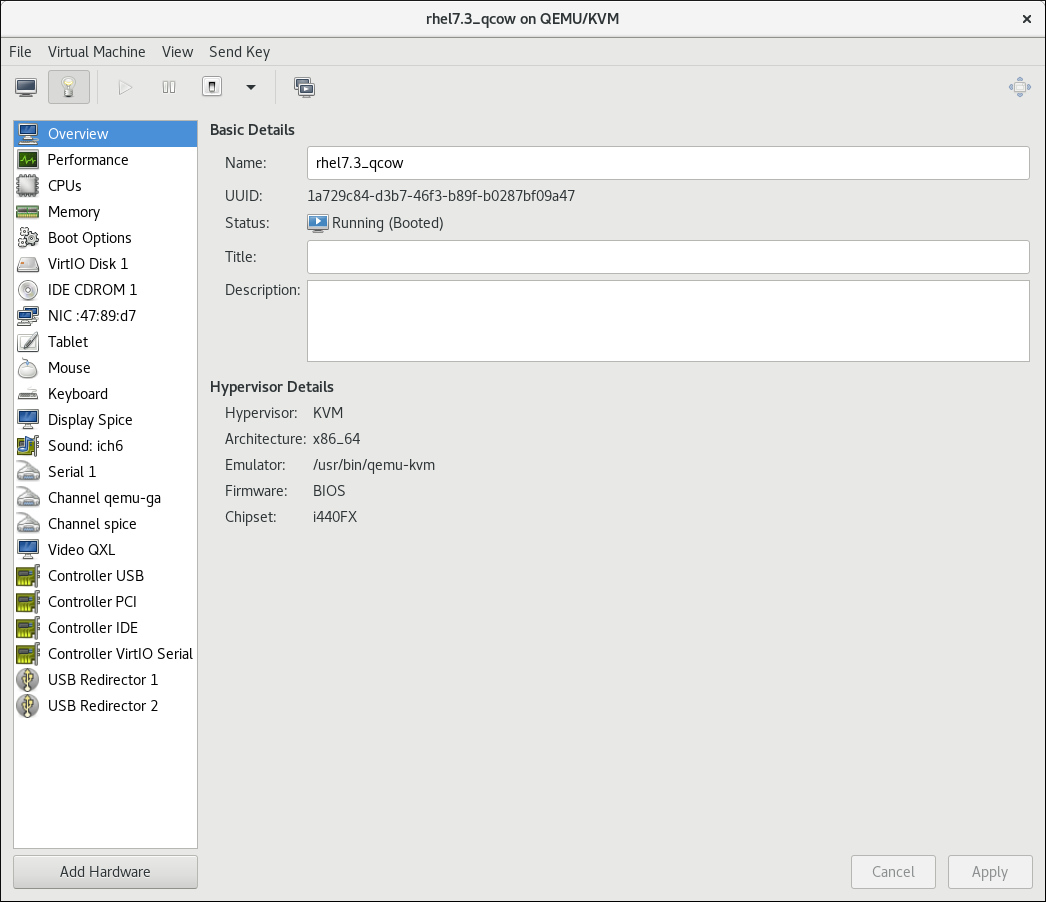
Figure 5.6. The Virtual Machine details window
The snapshots window
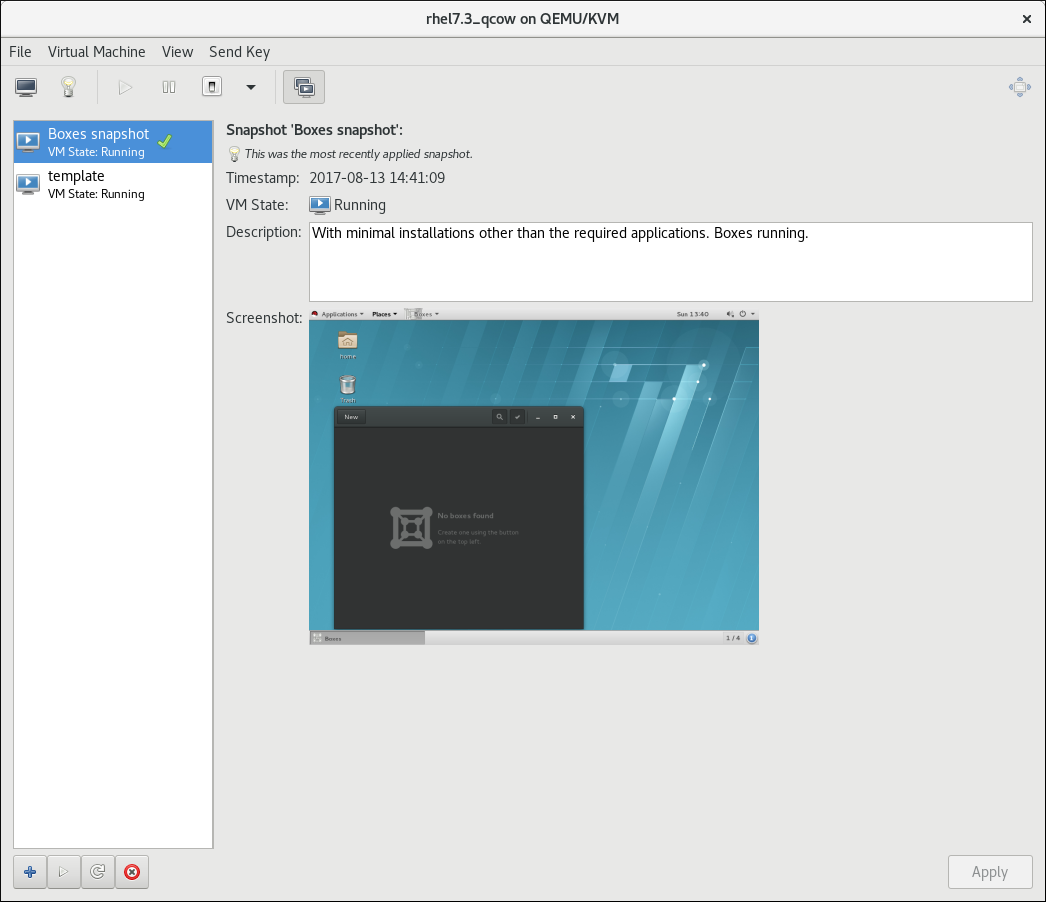
Figure 5.7. The Virtual Machine snapshots window
Appendix A. Revision History
| Revision History | |||
|---|---|---|---|
| Revision 1.0-56 | Thu May 23 2019 | ||
| |||
| Revision 1.0-55 | Thu Oct 25 2018 | ||
| |||
| Revision 1.0-53 | Thu Aug 5 2018 | ||
| |||
| Revision 1.0-52 | Thu Apr 5 2018 | ||
| |||
| Revision 1.0-49 | Thu Jul 27 2017 | ||
| |||
| Revision 1.0-46 | Mon Oct 17 2016 | ||
| |||
| Revision 1.0-44 | Mon Dec 21 2015 | ||
| |||
| Revision 1.0-43 | Thu Oct 08 2015 | ||
| |||
| Revision 1.0-42 | Sun Jun 28 2015 | ||
| |||