
Red Hat Training
A Red Hat training course is available for Red Hat Enterprise Linux
Virtualization
A reference guide for virsch, xm, vmm and xend.
엮음 2.0
초록
http://bugzilla.redhat.com/bugzilla/)에서 Red Hat Enterprise Linux 제품과 Virtualization_Guide에 대한 버그 리포트를 제출해 주시기 바랍니다.
1장. Red Hat Virtualization 시스템 구조
2장. 운영 체제 지원
- 완전 가상화와 반 가상화에 필요한 Intel VT-x 또는 AMD-V Pacifica와 Vanderpool 기술.
- i64의 Intel VT-i.
- NetBSD, FreeBSD, Solaris와 같은 Linux와 UNIX 운영 체제.
- Microsoft Windows as an unmodified guest operating system with Intel Vanderpool or AMD's Pacifica technology.
grep vmx /proc/cpuinfo
flags : fpu tsc msr pae mce cx8 apic mtrr mca cmov pat pse36 clflush dts acpi mmx fxsr sse sse2 ss ht tm syscall nx lm constant_tsc pni monitor ds_cpl vmx est tm2 cx16 xtpr lahf_lm
grep svm /proc/cpuinfo
cat /proc/cpuinfo | grep svm
flags : fpu tsc msr pae mce cx8 apic mtrr mca cmov pat pse36 clflush dt acpi mmx fxsr sse sse2 ss ht tm syscall nx mmtext fxsr_opt rdtscp lm 3dnowext pni cx16 lahf_lm cmp_legacy svm cr8_legacy
참고
3장. 하드웨어 지원
- Celeron
- Pentium II
- Pentium III
- Pentium IV
- Xeon
- AMD Athlon
- AMD Duron
mem=32G를 추가해야 합니다. 아래 예제는 grub.conf 파일에 어떻게 적절한 파라미터를 활성화하는지 보여줍니다.
title Red Hat Enterprise Linux Server  (2.6.18-4.elxen)
root  (hd0, 0)
kernel   /xen.gz-2.6.18-4-el5 mem=32G
module   /vmlinuz -2.6.18-4.el5xen ro root=LABEL=/
module   /initrd-2.6.18-4.el5xen.img
grep pae /proc/cpuinfo
flags : fpu tsc msr pae mce cx8 apic mtrr mca cmov pat pse36 mmx fxsr sse syscall mmtext 3dnowext 3dnow up ts
4장. Red Hat Virtualization 시스템 요구사항
- 사용 가능한 Red Hat RHEL 5 Linux 배포 버전
- 사용 가능한 GRUB 부트로더
- Root 사용 권한
- P6 클래스(또는 이전 클래스) 프로세서
- Linux bridge-utils
- Linux 핫플러그 시스템
- zlib 개발 설치
- Python 2.2 런타임
- initscript
참고
xen-ia64-guest-firmware package to run a fully virtualized guest. This package is provided in the Supplementary CD and is not installed by default.
5장. 시스템 시작
service xend start
xend를 활성화하려면, chkconfig xend 명령어를 사용하시기 바랍니다.
6장. GRUB 설정
/boot/grub/grub.conf) is used to create a list of operating systems to boot in GRUB's menu interface. When you install the kernel-xen RPM, a post script adds kernel-xen entries to the GRUB configuration file. You can edit the grub.conf file and enable the following GRUB parameter:
title Red Hat Enterprise Linux Server (2.6.18-3.el5xen)
root   (hd0; 0)
kernel  /xen.gz.-2.6.18-3.el5
module  /vmlinuz-2.6..18-3.el5xen ro root=/dev/VolGroup00/LogVol00  rhgb quiet
module  /initrd-2.6.18-3. el5xenxen.img
initrd 이미지)와 리눅스 커널을 불러들입니다. 이 커널 항목이 다른 항목보다 위에 있으므로 이 커널이 먼저 메모리에 상주하게 됩니다. 부트로더는 hypervisor와 Linux 커널로 또는 그것들로부터 명령행 인수를 보내거나 받습니다. 다음 예제 항목은 어떻게 domain0 리눅스 커널 메모리를 800MB로 제한하는지를 보여줍니다.
title Red Hat Enterprise Linux Server (2.6.18-3.el5xen)
root   (hd0; 0)
kernel  /xen.gz.-2.6.18-3.el5 dom0_mem=800M
module  /vmlinuz-2.6..18-3.el5xen ro root=/dev/VolGroup00/LogVol00  rhgb quiet
module  /initrd-2.6.18-3. el5xenxen.img
mem
com1=115200, 8n1
dom0_mem
dom0_max_vcpus
acpi
/*   ****  Linux config options: propagated to domain0  ****/
/*   "acpi=off":      Disables both ACPI table parsing and interpreter.   */
/*   "acpi=force":    Overrides the disable blacklist.                    */
/*   "acpi=strict":   Disables out-of-spec workarounds.                   */
/*   "acpi=ht":       Limits ACPI from boot-time to enable HT.            */
/*   "acpi=noirq":    Disables ACPI interrupt routing.                    */
noacpi
7장. 게스트 도메인 시작
xm 프로그램을 사용하여 게스트 도메인을 시작할 수 있습니다. 또한, virsh를 사용하여 Virtual Machine Manager가 게스트 도메인을 시작하도록 설정할 수 있습니다. 게스트 도메인을 시작하기 전에 게스트 호스트를 먼저 설치해야 합니다. 다음 예제는 xm create 하위 명령어를 사용합니다:
# xm create -c guestdomain1
guestdomain1은 사용자가 시작하는 도메인에 필요한 구성 파일입니다. -c 옵션을 사용하면 시작 후에 실제 콘솔로 연결합니다.
8장. 시스템 시작시 도메인 시작/종료
/etc/xen/ 디렉토리로 옮기셔야 합니다. 또한, 시스템 시작 시 시작하기를 원하는 모든 도메인은 반드시 /etc/xen/auto로 심볼릭 링크되어야 합니다.
chkconfig xendomains on
chkconfig xendomains on 명령어는 자동으로 도메인을 시작하지 않으며, 다음 시스템 시작 때 적용됩니다.
chkconfig xendomains off
chkconfig xendomains off 명령어는 실행 중인 모든 Red Hat Virtualization 도메인을 종료하며, 다음 시스템 시작 시에 적용됩니다.
9장. 구성 파일
/etc/xen directory.
표 9.1. Red Hat Virtualization 구성 파일
| 아이템 | 설명 |
|---|---|
|
pae
|
physical address extention 구성 데이터 지정.
|
|
apic
|
advanced programmable interrupt controller 구성 데이터 지정.
|
|
memory
|
메가바이트 단위로 메모리 크기 지정.
|
|
vcpus
|
가상 CPU 개수 지정.
|
|
console
|
도메인 콘솔로 익스포트하는 포트 번호 지정.
|
|
nic
|
가상 네트워크 인터페이스 번호 지정.
|
|
vif
|
Lists the randomly-assigned MAC addresses and bridges assigned to use for the domain's network addresses.
|
|
disk
|
도메인으로 익스포트할 블록 장치와 읽기 전용 권한을 사용하여 실제 장치를 도메인에 익스포트하는 불록 장치 목록.
|
|
dhcp
|
DHCP를 사용하여 네트워크 활성.
|
|
netmask
|
구성된 IP 넷마스크 지정.
|
|
gateway
|
구성된 IP 게이트웨이 지정.
|
|
acpi
|
advanced configuration power interface 구성 데이터 지정.
|
10장. CPU 관리
11장. 도메인 이전
xm migrate domain-id [destination domain]
xm migrate domain-id -l [destination domain]
12장. 네트워크 사용을 위한 구성
dom0 by a point to point link. These devices are vif <domid> and <vifid>. vif1.0 for the first interface in domain 1; vif3.1 for the second interface in domain 3.
network-bridge and vif-bridge. xend calls these scripts when certain events occur. Arguments can be passed to the scripts to provide additional contextual information. These scripts are located in the /etc/xen/scripts directory. You can change script properties by modifying the xend-config.sxp configuration file located in the /etc/xen directory.
network-bridge — xend가 시작되거나 종료될 때, 이 스크립트는 가상 네트워크를 시작하거나 종료합니다. 구성 시작 시 브리지 xen—br0를 생성하고 eth0를 브리지로 이동시키며, 이에 맞게 라우팅을 수정합니다. xend가 종료되면, 생성된 브리지를 삭제하고 eth0를 제거하여 기존 IP와 라우팅 구성을 복구합니다.
vif-bridge - 이 스크립트는 도메인의 모든 가상 인터페이스에 쓰이며, 방화벽 규칙을 설정하며 해당하는 브리지에 vif를 추가할 수 있습니다.
network-route, network-nat, vif-route,, vif-nat. 이러한 스크립트는 사용자 환경에 맞춘 형태로 대체될 수도 있습니다.
13장. domain0 보안
- 필요한 서비스를 최소화하여 실행하시기 바랍니다. domain0에 너무 많은 작업과 서비스가 있으면 안됩니다. domain0에 실행되는 서비스가 적을수록, 높은 수준의 보안이 제공됩니다.
- domain0을 보안하기 위해 SeLinux를 활성화하시기 바랍니다.
- 방화벽을 사용하여 domain0에 대한 의사소통을 제한하시기 바랍니다. default-reject 규칙을 사용하여 방화벽을 설정하면 domain0 공격에 대한 보안을 강화할 수 있습니다. 서비스에 직면한 네트워크를 제한하는 것 또한 중요합니다.
- domain0에 일반 사용자가 접속하지 못하도록 설정하시기 바랍니다. 일반 사용자가 domain0를 사용하도록 허용하면, domain0를 위험에 노출시키는 위험을 자초하는 것입니다. domain0는 권한을 가진 도메인이며, 비권한 계정 허용은 이러한 보안 수준을 위협할 수 있다는 것을 기억해 두시기 바랍니다.
14장. 저장 공간
15장. virsh를 사용한 가상 장치 관리
xend/qemu 명령어를 실행하려면, xend/qemu를 서비스로 작동하도록 활성화해야 합니다. 구성 파일을 수정한 후에 시스템을 재부팅하면 xend/qemu는 서비스로 작동할 것입니다. virsh를 사용하여 vm 작업을 스크립트할 수 있습니다. 또한, xm 도구와 같이 명령행에서 virsh를 실행할 수 있습니다.
15.1. hypervisor 접속
virsh connect <name>
<name> is the machine name of the hypervisor. If you want to initiate a read—only connection, append the above command with —readonly.
15.2. 가상 장치 생성
virsh create <path to XML configuration file>
15.3. XML 덤프 설정
virsh dumpxml [domain-id | domain-name | domain-uuid]
stdout . If you save the data to a file, you can use the create option to recreate the virtual machine.
15.4. 가상 장치 보류
virsh suspend [domain-id | domain-name |domain-uuid]
resume option.
15.5. 가상 장치 재시작
virsh resume [domain-id | domain-name | domain-uuid]
suspend와 resume 주기에서 유지됩니다.
15.6. 가상 장치 저장
virsh save [domain-name][domain-id | domain-uuid][filename]
restore option.
15.7. 가상 장치 복구
virsh save option:
virsh restore [filename]
15.8. 가상 장치 종료
virsh shutdown [domain-id | domain-name | domain-uuid]
xmdomain.cfg 파일에 on_shutdown 파라미터를 수정하여 가상 장치 종료에 대한 행동을 제어할 수 있습니다.
15.9. 가상 장치 재부팅
virsh reboot [domain-id | domain-name | domain-uuid]
xmdomain.cfg 파일에 on_reboot 파라미터를 수정하여 가상 장치 재부팅에 대한 행동을 제어할 수 있습니다.
15.10. 도메인 종료
virsh destroy [domain-name | domain-id | domain-uuid]
destroy option only when the virtual machine's operating system is non-responsive. For a paravirtualized virtual machine, you should use the shutdown option.
15.11. 도메인 이름을 도메인 ID로 변환
virsh domid [domain-name | domain-uuid]
15.12. 도메인 ID를 도메인 이름으로 변환
virsh domname [domain-name | domain-uuid]
15.13. 도메인 이름을 UUID로 변환
virsh domuuid [domain-id | domain-uuid]
15.14. 가상 장치 정보 표시
virsh dominfo [domain-id | domain-name | domain-uuid]
15.15. 노드 정보 표시
virsh nodeinfo
CPU model                    x86_64
CPU (s)                      8
CPU frequency                2895 Mhz
CPU socket(s)                2
Core(s) per socket           2
Threads per core:            2
Numa cell(s)                 1
Memory size:                 1046528 kb
15.16. 가상 장치 표시
virsh list domain-name [ ——inactive | —— -all]
——inactive 옵션은 활성화되지 않은 도메인(현재 활성화되지 않도록 정의된 도메인) 목록을 표시합니다. — -all 옵션은 활성화 상태와 관계없이 모든 도메인 목록을 표시합니다. 출력 내용은 다음과 비슷합니다:
ID                 Name                 State
————————————————
0                   Domain0             running
1                   Domain202           paused
2                   Domain010           inactive
3                   Domain9600          crashed
running  lists domains currently active on the CPU

blocked  lists domains that are blocked

paused   lists domains that are suspended

shutdown lists domains that are in process of shutting down

shutoff  lists domains that are completely down.

crashed  lists domains that are crashed
15.17. 가상 CPU 정보 표시
virsh vcpuinfo [domain-id | domain-name | domain-uuid]
15.18. 가상 CPU 동질성 설정
virsh vcpupin [domain-id | domain-name | domain-uuid] [vcpu] , [cpulist]
[vcpu]는 가상 VCPU 번호이며 [cpulist]는 CPU의 실제 번호를 표시합니다.
15.19. 가상 CPU 개수 설정
virsh setvcpus [domain-name | domain-id | domain-uuid] [count]
15.20. 메모리 할당량 설정
virsh setmem [domain-id | domain-name] [count]
[count] in kilobytes. Note that the new count cannot exceed the amount you specified when you created the Virtual Machine. Values lower than 64 MB probably won't work. You can adjust the Virtual Machine memory as necessary.
15.21. 최대 메모리 설정
virsh setmaxmem [domain-name | domain-id | domain-uuid] [count]
15.22. Managing Virtual Networks
virsh net-list
[root@domain ~]# virsh net-list
Name                 State      Autostart
-----------------------------------------
default              active     yes
vnet1	             active     yes
vnet2	             active     yes
virsh net-dumpxml [vnet name]
[root@domain ~]# virsh net-dumpxml vnet1
<network>
  <name>vnet1</name>
  <uuid>98361b46-1581-acb7-1643-85a412626e70</uuid>
  <forward dev='eth0'/>
  <bridge name='vnet0' stp='on' forwardDelay='0' />
  <ip address='192.168.100.1' netmask='255.255.255.0'>
    <dhcp>
      <range start='192.168.100.128' end='192.168.100.254' />
    </dhcp>
  </ip>
</network>
virsh net-autostart [network name]— Autostart a network specified as [network name]virsh net-create [XML file]— Generates and starts a new network using a preexisting XML filevirsh net-define [XML file]— Generates a new network from a preexisting XML file without starting itvirsh net-destroy [network name]— Destroy a network specified as [network name]virsh net-name [network UUID]— Convert a specified [network UUID] to a network namevirsh net-uuid [network name— Convert a specified [network name] to a network UUIDvirsh net-start [name of an inactive network]— Starts a previously undefined inactive networkvirsh net-undefine [name of an inactive network]— Undefine an inactive network
16장. xend를 이용한 가상 장치 관리
etc/xen 디렉토리에 있는 xend-config.sxp라는 xend 구성 파일을 편집하여 운영 파라미터를 지정해야 합니다. 다음은 xend-config.sxp 구성 파일에서 활성화 또는 비활성화할 수 있는 파라미터를 보여줍니다:
표 16.1. Red Hat Virtualization xend 구성 파라미터
| 아이템 | 설명 |
|---|---|
|
console-limit
|
Determines the console server's memory buffer limit and assigns values on a per-domain basis
|
|
min-mem
|
domain0에 사용되는 메가바이트의 최소 수를 결정 (0을 입력하면, 값은 변하지 않음).
|
|
dom0 cpus
|
domain0에서 사용되는 CPU 개수를 결정 (디폴트로 최소 1 CPU 할당).
|
|
enable-dump
|
충돌 발생 시 덤프 활성화 여부 결정 (디폴트: 0).
|
|
external-migration-tool
|
외부 장치 이전을 제어하는 스크립트와 프로그램을 결정 (
etc/xen/scripts/external-device-migrate에 스크립트 위치).
|
|
logfile
|
로그 파일의 위치 결정 (디폴트:
/var/log/xend.log).
|
|
loglevel
|
로그 모드 값 선별: DEBUG, INFO, WARNING, ERROR, CRITICAL (디폴트: DEBUG).
|
|
network-script
|
네트워크 환경을 활성화하는 스크립트 결정 (스크립트는 반드시
etc/xen/scripts 디렉토리에 위치).
|
|
xend-http-server
|
http 스트림 관리 서버 활성화 (디폴트: no).
|
|
xend-unix-server
|
유닉스 도메인 소켓 서버 활성화 (소켓 서버는 의사소통 종단점으로서 낮은 수준 네트워크 연결을 제어하고 들어오는 연결을 허용하거나 거절).
|
|
xend-relocation-server
|
장치 교체 이전을 위한 서버 재배치 활성화 (디폴트: no).
|
|
xend-unix-path
| xend-unix-server 명령어 출력 데이터가 있는 위치 결정 (디폴트: var/lib/xend/xend-socket).
|
|
xend-port
|
http 관리 서버가 사용하는 포트 결정 (디폴트: 8000).
|
|
xend-relocation-port
|
재배치 서버가 사용하는 포트 결정 (디폴트: 8002).
|
|
xend-relocation-address
|
시스템 이전에 사용되는 가상 장치 주소 결정.
|
|
xend-address
|
도메인 소켓 서버가 바인드하는 주소 결정.
|
service xend start
service xend stop
service xend restart
service xend status
17장. 가상 장치 관리자를 사용한 가상 장치 관리
17.1. 가상 장치 관리자 구조
17.2. 오픈 연결 창
test:///default in the URL field beneath. Once in test mode, you can connect to a libvirt dummy hypervisor. Note that although the Remote Xen host screen is visible, the functionality to connect to such a host is not implemented into Red Hat Enterprise Linux 5.1.
그림 17.1. Virtual Machine Manager Connection window
17.3. 가상 장치 관리자 창
그림 17.2. Virtual Machine Manager main window
17.4. 가상 장치 상세정보 창
그림 17.3. Virtual Machine Manager Details window
17.5. 가상 장치 그래픽형식 콘솔
그림 17.4. 그래픽형식 콘솔 창
17.6. Starting the Virtual Machine Manager
프로그램 메뉴에서 시스템 도구를 클릭하고 Virtual Machine Manager를 선택하시기 바랍니다.
그림 17.5. Starting the Virtual Machine Manager
17.7. 새로운 가상 장치 생성
- 새로운 도메인을 생성합니다.
- Configure or adjust a domain's resource allocation and virtual hardware.
- 실시간 성능과 자원 활용 통계를 이용해 실행 중인 도메인을 요약합니다.
- 매시간 성능과 자원 활용을 나타내는 그래프를 표시합니다.
- 게스트 도메인에 대한 완전 그래픽형식 콘솔을 보여주는 내장된 VNC 클라이언트 보기 프로그램을 사용합니다.
참고
절차 17.1. 게스트 운영 체제 생성
- 프로그램 메뉴에서 시스템 도구와 Virtual Machine Manager를 선택하시기 바랍니다.가상 장치 관리자 메인 창이 나타납니다.
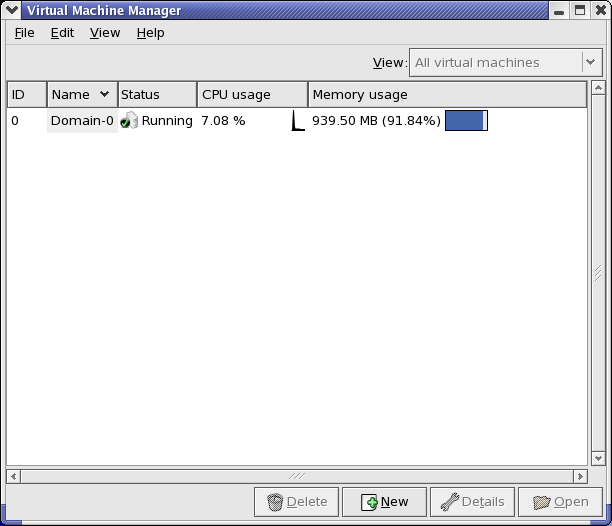
그림 17.6. Virtual Machine Manager window
- 파일 메뉴에서 새 장치를 선택하시기 바랍니다.
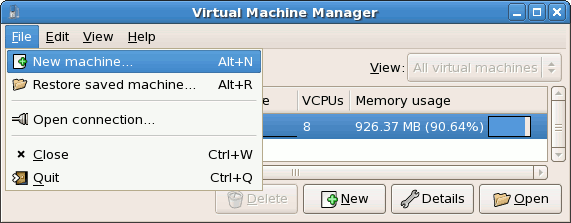
그림 17.7. 새 장치 선택
새 가상 장치 마법사가 나타납니다. - Click .

그림 17.8. 새 가상 시스템 마법사 생성
- Enter the name of the new virtual system and then click .

그림 17.9. 가상 시스템 이름 짓기
- 설치 개체의 위치를 입력하고 앞으로를 클릭합니다 (선택적으로 킥스타트 파일 위치를 입력할 수 있습니다).
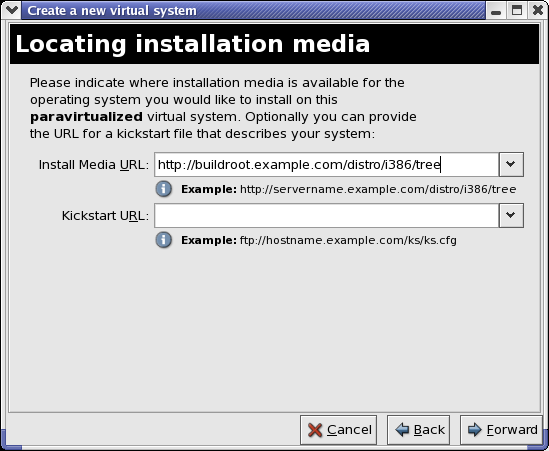
그림 17.10. 설치 매체 위치
- 물리 디스크 파티션 또는 파일을 사용하여 가상 파일 시스템으로 설치합니다.
참고
이 예제는 파일을 사용하여 가상 시스템을 설치합니다.SELinux policy only allows xen disk images to reside in/var/lib/xen/images.Open a terminal and create the /xen directory and set the SELinux policy with the commandrestorecon -v /xen. Specify your location and the size of the virtual disk, then click .
그림 17.11. 저장 공간 할당
- Select memory to allocate the guest and the number of virtual CPUs then click .

그림 17.12. 메모리 및 CPU 할당
- Select to open a console and the files start to install.
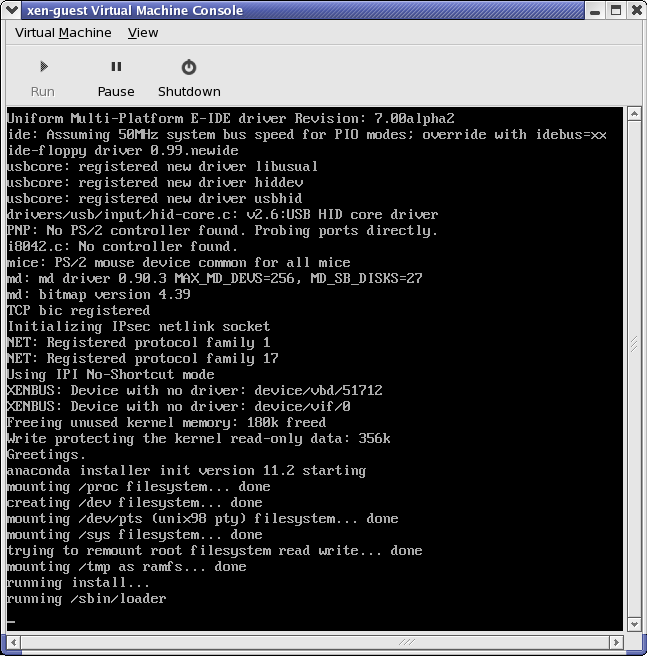
그림 17.13. 메모리 및 CPU 할당
- 화면에 제공되는 창에서 설치를 완료합니다.
그림 17.14. 설치 시작...
주의
When installing Red Hat Enterprise Linux 5.1 on a fully virtualized guest, do not use thekernel-xenkernel. Using this kernel on fully virtualized guests can cause your system to hang.If you are using an Installation Number when installing Red Hat Enterprise Linux 5.1 on a fully virtualized guest, be sure to deselect theVirtualizationpackage group during the installation. TheVirtualizationpackage group option installs thekernel-xenkernel.Note that paravirtualized guests are not affected by this issue. Paravirtualized guests always use thekernel-xenkernel. - Type
xm create -c xen-guestto start the Red Hat Enterprise Linux 5.1 guest. Right click on the guest in the Virtual Machine Manager and choose Open to open a virtual console.
그림 17.15. Red Hat Enterprise Linux 5.1 (guest)
- 사용자 이름과 패스워드를 넣고 가상 장치 관리자를 계속 사용합니다.
17.8. 저장된 장치 복구
- 파일 메뉴에서 저장된 장치 복구를 선택합니다.

그림 17.16. Restoring a Virtual Machine
- 가상 장치 복구 메인 창이 나타납니다.
그림 17.17. 저장된 가상 장치 세션 선택
- 적절한 디렉토리를 탐색하여 저장된 세션 파일을 선택합니다.
- 열기 클릭합니다.
그림 17.18. 복구된 가상 장치 관리자 세션
17.9. Displaying Virtual Machine Details
- 가상 장치 관리자 메인 창에 보기를 원하는 가상 장치를 하이라이트하시기 바랍니다.
그림 17.19. 표시하려는 가상 장치 선택
- 가상 장치 관리자의 편집 메뉴에서, 장치 정보를 선택합니다 (또는 가상 장치 관리자의 메인 창 아래에서 상세정보 버튼을 클릭합니다).
그림 17.20. 가상 장치 상세정보 메뉴 표시
가상 장치 상세정보 개요 창이 나타납니다. 이 창은 지정한 도메인에 사용되는 CPU와 메모리 사용량에 대한 정보를 요약하여 표시합니다.그림 17.21. 가상 장치 상세정보 개요 표시
- 가상 장치 상세정보 창에서 하드웨어 탭을 클릭해 보시기 바랍니다.가상 장치 상세정보 하드웨어 창이 나타납니다.

그림 17.22. 가상 장치 상세정보 하드웨어 표시
- 하드웨어 탭에서 Processor를 클릭하면 현재 프로세서 메모리 할당량을 보고 수정할 수 있습니다.

그림 17.23. 프로세서 할당량 표시
- 하드웨어 탭에서 Memory를 클릭하면 현재 RAM 메모리 할당량을 보고 수정할 수 있습니다.
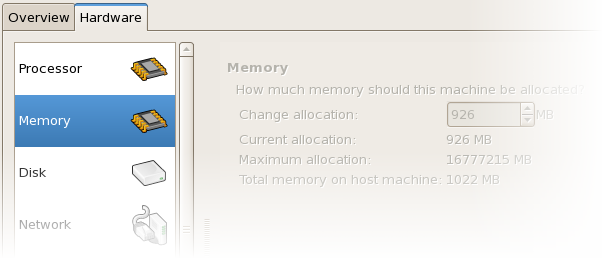
그림 17.24. 메모리 할당량 표시
- 하드웨어 탭에서 Disk를 클릭하면 현재 하드 디스크 구성을 보고 수정할 수 있습니다.
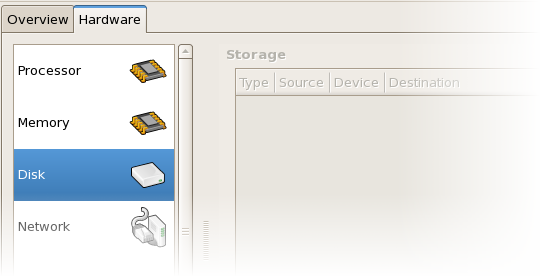
그림 17.25. 디스크 구성 표시
- 하드웨어 탭에서 Network를 클릭하면 현재 네트워크 구성을 보고 수정할 수 있습니다.

그림 17.26. 네트워크 구성 표시
17.10. Configuring Status Monitoring
- 편집 메뉴에서 기본 설정를 선택하시기 바랍니다.
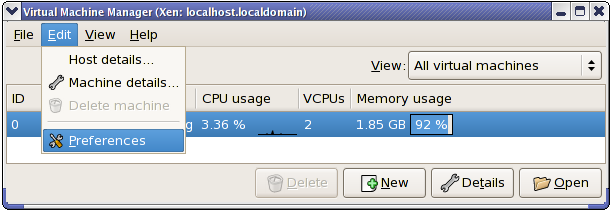
그림 17.27. 가상 장치 등록정보 수정
가상 장치 관리자 등록정보 창이 나타납니다. - 상태 감시 란의 선택 상자에서, 시스템을 업데이트할 시간(초 단위)을 지정합니다.
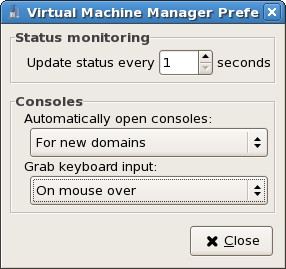
그림 17.28. Configuring Status Monitoring
- 콘솔 란에서, 어떻게 콘솔을 여는지 결정하고 입력 장치를 지정합니다.
17.11. 도메인 ID 표시
- 보기 메뉴에서, 도메인 ID 확인 상자를 선택하시기 바랍니다.

그림 17.29. 도메인 ID 표시
- The Virtual Machine Manager lists the Domain ID's for all domains on your system.
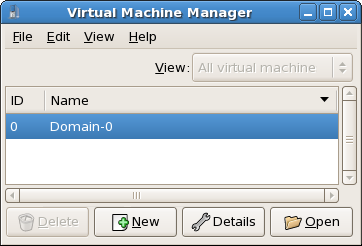
그림 17.30. 도메인 ID 표시
17.12. 가상 장치 상태 표시
- 보기 메뉴에서, 상태 확인 상자를 선택합니다.
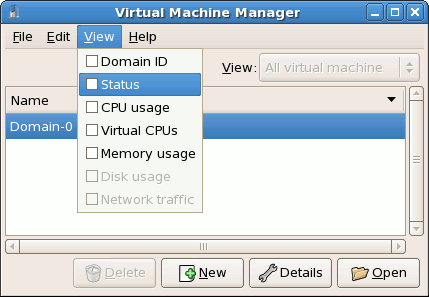
그림 17.31. 가상 장치 상태 표시
- 가상 장치 관리자는 시스템의 모든 가상 장치에 대한 상태 정보를 표시합니다.
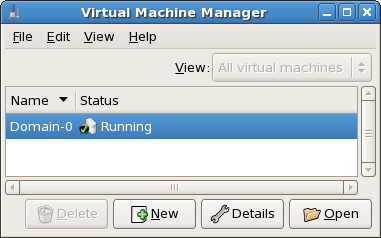
그림 17.32. 가상 장치 상태 표시
17.13. 가상 CPU 표시
- 보기 메뉴에서 가상 CPU 확인 상자를 선택하시기 바랍니다.
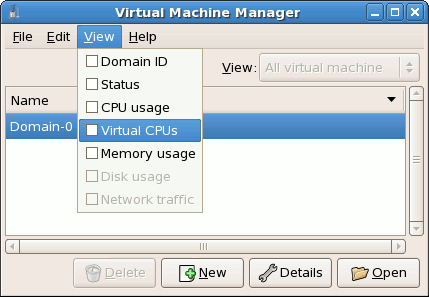
그림 17.33. 가상 CPU 표시
- 가상 장치 관리자는 시스템의 모든 가상 장치에 대한 가상 CPU를 표시합니다.

그림 17.34. 가상 CPU 표시
17.14. CPU 사용량 표시
- 보기 메뉴에서, CPU 사용량 확인 상자를 선택하시기 바랍니다.
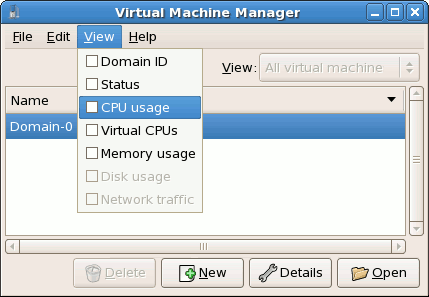
그림 17.35. CPU 사용량 표시
- 가상 장치 관리자는 시스템의 모든 가상 장치에 사용되는 CPU 사용량을 표시합니다.
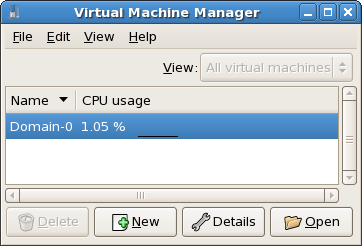
그림 17.36. CPU 사용량 표시
17.15. 메모리 사용량 표시
- 보기 메뉴에서, 메모리 사용량 확인 상자를 선택하시기 바랍니다.
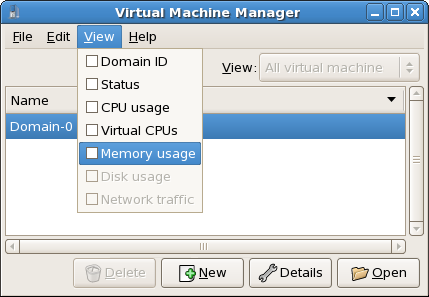
그림 17.37. 메모리 사용량 표시
- 는 데 장치 관리자는 시스템의 모든 가상 장치에 사용되는 메모리 사용량을 (메가바이트 단위로) 표시합니다.
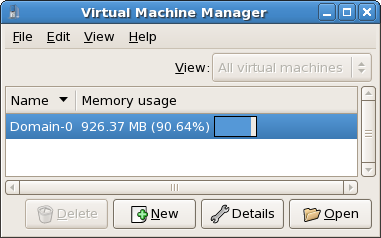
그림 17.38. 메모리 사용량 표시
17.16. Managing a Virtual Network
- From the Edit menu, select Host Details.

그림 17.39. Selecting Host Details
- This will open the menu. Click the Virtual Networks tab.
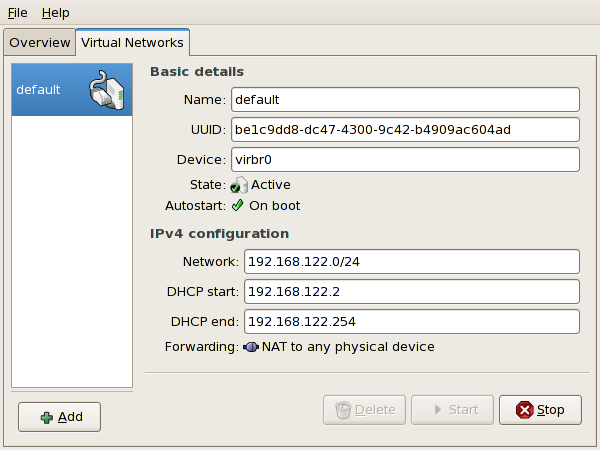
그림 17.40. Virtual Network Configuration
- All available virtual networks are listed on the left-hand box of the menu. You can edit the configuration of a virtual network by selecting it from this box and editing as you see fit.
17.17. Creating a Virtual Network
- Open the Host Details menu (refer to 17.16절. “Managing a Virtual Network”) and click the button.
그림 17.41. Virtual Network Configuration
This will open the menu. Click to continue.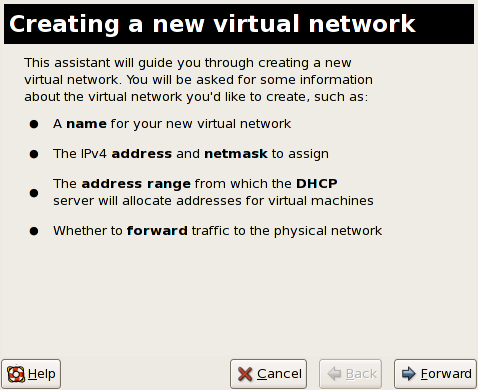
그림 17.42. Creating a new virtual network
- Enter an appropriate name for your virtual network and click .
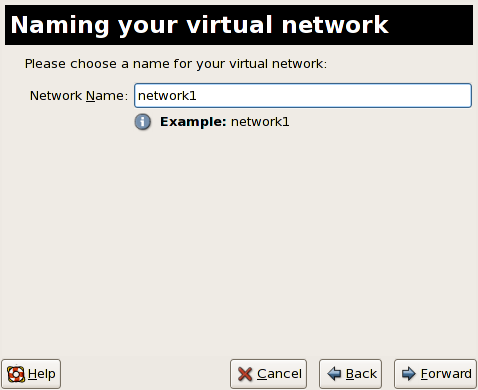
그림 17.43. Naming your virtual network
- Enter an IPv4 address space for your virtual network and click .
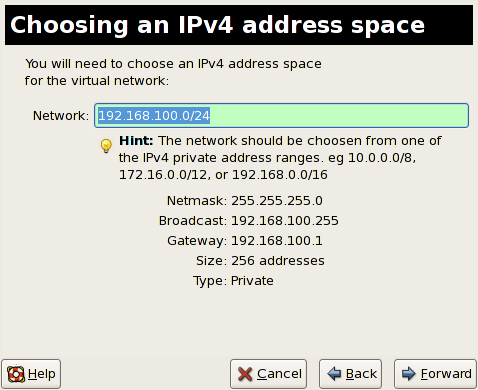
그림 17.44. Choosing an IPv4 address space
- Define the DHCP range for your virtual network by specifying a Start and End range of IP addresses. Click to continue.
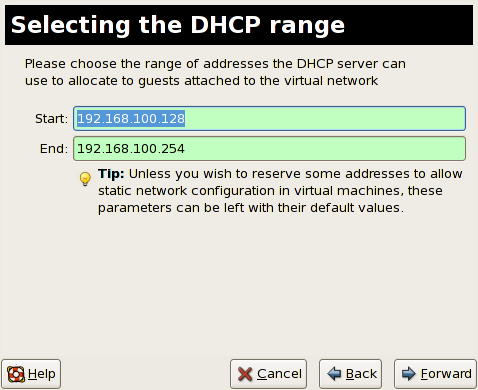
그림 17.45. Selecting the DHCP range
- Select how the virtual network should connect to the physical network.

그림 17.46. Connecting to physical network
If you select Forwarding to physical network, choose whether the Destination should be NAT to any physical device or NAT to physical device eth0.Click to continue. - You are now ready to create the network. Check the configuration of your network and click .

그림 17.47. Ready to create network
- The new virtual network is now available in the tab of the menu.

그림 17.48. New virtual network is now available
18장. Red Hat Virtualization 문제해결
18.1. 로그 파일 개요 및 위치
- Red Hat Virtualization의 주요 구성 디렉토리는
/etc/xen/입니다. 이 디렉토리에xend데몬과 다른 가상 장치 구성 파일이 포함되어 있으며, 네트워크 스크립트 파일 또한 이 디렉토리에 위치합니다 (/scripts하위 디렉토리 안). - 문제해결 목적으로 쓰여질 모든 실제 로그 파일은
/var/log/xen디렉토리에 위치합니다.
- 또한, 모든 가상 장치의 파일 기반 디스크 이미지에 사용되는 기본 디렉토리는
/var/lib/xen디렉토리안에 위치하는 것을 기억하시기 바랍니다. /proc파일 시스템에 대한 Red Hat Virtualization 정보는/proc/xen/디렉토리에 위치합니다.
18.2. 로그 파일 설명
xend 데몬과 qemu-dm 프로세스라는 두 가지의 주요 유틸리티가 있으며, 이를 사용하여 /var/log/xen/ 디렉토리에 다중 로그 파일을 작성합니다.
xend.log는 단순한 시스템 이벤트나 운영자에 의한 작업과 같은xend데몬에 의해 수집된 모든 데이터를 포함하는 로그 파일입니다. 모든 가상 장치 운영 작업(생성, 종료, 강제 종료 등)은 여기에서 볼 수 있습니다.xend.log는 주로 이벤트나 수행 문제를 조사할 때 가장 먼저 살펴보아야 할 파일입니다. 이 파일은 오류 메세지에 대한 자세한 내용과 상황을 다루고 있습니다.xend-debug.log는xend와 Virtualization 하위 시스템(프레임 버퍼, Python 스크립트 등)에서 이벤트 오류 기록을 다루는 로그 파일입니다.
xen-hotplug-log는 핫플러그 이벤트의 데이터를 포함하는 로그 파일입니다. 장치 또는 네트워크 스크립트가 온라인으로 연결되지 않으면, 이벤트는 여기에 나타납니다.qemu-dm.[PID].log는 모든 완전 가상 게스트를 위해qemu-dm에 의해 생성된 로그 파일입니다. 이 로그 파일을 사용할 때,ps명령어를 사용하여 가상 장치의qemu-dm프로세스를 분리하도록 프로세스 인수를 확인하여 반드시 주어진qemu-dm프로세스 PID를 검색해야 합니다. 반드시 [PID] 기호를 실제 PIDqemu-dm프로세스로 대체해야 하는 것에 주의하시기 바랍니다.
/.virt-manager 디렉토리에 있는 virt-manager.log 파일에 생성된 데이터를 살펴보셔야 합니다. 매번 가상 장치 관리자를 시작할 때, 로그 파일 내용은 항상 덮어 쓰여지는 것에 주의하시기 바랍니다. 따라서, 시스템 오류 발생 시 가상 장치 관리자를 재시작하기 전에 virt-manager.log 파일을 백업해 두시기 바랍니다.
18.3. 주요 디렉토리 위치
- 가상 장치 이미지는
/var/lib/xen/images디렉토리에 위치합니다.
xend데몬을 재시작하면,/var/lib/xen/xend-db디렉토리에 위치한xend-database를 업데이트합니다.
- 가상 장치 덤프(
xm dump-core명령어에 의해 수행)는/var/lib/xen/dumps디렉토리에 위치합니다.
/etc/xen디렉토리는 시스템 자원을 관리하는 데 사용되는 구성 파일을 포함하고 있습니다.xend데몬 구성 파일은xend-config.sxp라고 불리며, 이 파일을 사용하여 전체 시스템 변경을 수행하고 네트워크 콜아웃을 설정합니다.
proc명령어는 시스템 정보를 검색할 수 있는 또 다른 자원입니다. 이 proc 항목은/proc/xen디렉토리에 위치합니다:
/proc/xen/capabilities
/proc/xen/balloon
/proc/xen/xenbus/
18.4. 문제해결 도구
xentopxm dmesgxm logvmstatiostatlsof
XenOprofilesystemTapcrashsysrqsysrq tsysrq w
ifconfigtcpdumpbrctl
brctl은 Virtualization 리눅스 커널에서 이더넷 브리지 구성을 검사하고 설정하는 네트워크 도구입니다. 아래 예제 명령어를 실행하려면 반드시 루트 권한을 가지고 있어야 합니다:
# brctl show

bridge-name    bridge-id          STP  enabled  interfaces
-----------------------------------------------------------------------------
xenbr0             8000.feffffff       no        vif13.0
xenbr1             8000.ffffefff       yes       pddummy0
xenbr2             8000.ffffffef       no        vif0.0

# brctl showmacs xenbr0

port-no           mac-addr                  local?       ageing timer

1                 fe:ff:ff:ff:ff:           yes            0.00
2                 fe:ff:ff:fe:ff:           yes            0.00


# brctl showstp xenbr0

xenbr0

bridge-id              8000.fefffffffff

designated-root        8000.fefffffffff

root-port              0                   path-cost             0

max-age                20.00               bridge-max-age        20.00

hello-time             2.00                bridge-hello-time     2.00

forward-delay          0.00                bridge-forward-delay  0.00

ageing-time            300.01

hello-timer            1.43                tcn-timer             0.00

topology-change-timer  0.00                gc-timer              0.02
18.5. 로그를 사용한 문제해결
xend.log file contains the same basic information as when you run the xm log command. It resides in the /var/log/ directory. Here is an example log entry for when you create a domain running a kernel:
[2006-12-27 02:23:02 xend] ERROR (SrvBase: 163) op=create: Error creating domain: (0, 'Error')
Traceback (most recent call list)
File "/usr/lib/python2.4/site-packages/xen/xend/server/SrvBase.py" line 107 in_perform val = op_method (op,req)
File
"/usr/lib/python2.4/site-packages/xen/xend/server/SrvDomainDir.py line 71 in op_create
raise XendError ("Error creating domain: " + str(ex))
XendError: Error creating domain: (0, 'Error')
xend-debug.log는 xend.log 보다 더 자세한 정보를 포함하고 있기에 시스템 관리자에게 매우 유용하게 쓰입니다. 아래 예제는 같은 커널 도메인 생성 시 발생하는 문제에 대한 같은 오류 데이터를 보여줍니다:
ERROR: Will only load images built for Xen v3.0
ERROR: Actually saw: GUEST_OS=netbsd, GUEST_VER=2.0, XEN_VER=2.0; LOADER=generic, BSD_SYMTAB'
ERROR: Error constructing guest OS
18.6. 직렬 콘솔을 사용한 문제해결
grub.conf 파일안의 옵션을 수정해서 com1 /dev/ttyS0에서 38400-bps 직렬 콘솔을 활성화해야 합니다.
title Red Hat Enterprise Linix (2.6.18-8.2080_RHEL5xen0)
		root (hd0,2)
		kernel /xen.gz-2.6.18-8.el5 com1=38400,8n1
		module /vmlinuz-2.618-8.el5xen ro root=LABEL=/rhgb quiet console=xvc console=tty xencons=xvc
        	module /initrd-2.6.18-8.el5xen.img
sync_console can help determine a problem that causes hangs with asynchronous hypervisor console output, and the "pnpacpi=off" works around a problem that breaks input on the serial console. The parameters "console=ttyS0" and "console=tty" means that kernel errors get logged with on both the normal VGA console and on the serial console. Then you can install and set up ttywatch to capture the data on a remote host connected by a standard null-modem cable. For example, on the remote host you could type:
ttywatch --name myhost --port /dev/ttyS0
/dev/ttyS0의 출력을 /var/log/ttywatch/myhost.log 파일로 보냅니다.
18.7. 반 가상화 게스트 콘솔 사용
xm console [domain name or number]
domain100은 실행 중인 이름과 번호를 의미합니다. 또한, 가상 장치 관리자를 사용하여 가상 텍스트 콘솔을 표시할 수 있습니다. 가상 장치 상세정보 창의 보기 메뉴에서 직렬 콘솔을 선택하시기 바랍니다.
18.8. 완전 가상화 게스트 콘솔 사용
grub.conf file, and include the 'console =ttyS0 console=tty0' parameter. This ensures that the kernel messages are sent to the virtual serial console (and the normal graphical console). If you plan to use the virtual serial console in a full virtualized guest, you must edit the configuration file in the /etc/xen/ directory. On the host domain, you can then access the text console by typing:
xm console
18.9. lun 지속성 구현
udev를 사용하여 lun 지속성을 구현할 수 있습니다. 시스템에 lun 지속성을 구현하기 전에 적절한 UUID를 갖고 있는지 확인하시기 바랍니다. UUID를 갖고 있으면 /etc 디렉토리의 scsi_id 파일을 편집하여 lun 지속성을 구현할 수 있습니다. 편집 도구를 사용해 파일을 열어서 다음 줄의 주석처리를 해제해야 합니다.
# options=-b
# options=-g
# scsi_id -g -s /block/sdc
[root@devices] # scsi_id -g -s /block/sdc
*3600a0b80001327510000015427b625e*
/etc/udev/rules.d 디렉토리에 위치한 20-names.rules 파일을 편집합니다. 여기서 생성한 장치 이름 규칙은 다음 형식을 따릅니다.
# KERNEL="sd*", BUS="scsi", PROGRAM="sbin/scsi_id", RESULT="UUID", NAME="devicename"
 KERNEL="sd*",  BUS="scsi",  PROGRAM="sbin/scsi_id", RESULT="3600a0b80001327510000015427b625e
", NAME="mydevicename"
/dev/sd*와 일치하는 모든 장치를 활성화하도록 해줍니다. 일치된 장치를 검색했을 때, /dev/devicename이라는 장치 노드를 생성합니다. 이 예제에서 장치 노드는 /dev/mydevice입니다. 마지막으로, /etc 디렉토리에 위치한 rc.local 파일에 다음 경로를 추가해야 합니다:
/sbin/start_udev
/etc/ 디렉토리의 multipath.conf 파일을 편집하여 네 가지 장치를 정의합니다:
multipath  {
             wwid       3600a0b80001327510000015427b625e
             alias      oramp1
}
multipath  {
             wwid       3600a0b80001327510000015427b6
             alias      oramp2
}
multipath  {
             wwid       3600a0b80001327510000015427b625e
             alias      oramp3
}
multipath  {
             wwid       3600a0b80001327510000015427b625e
             alias      oramp4
}
/dev/mpath/oramp1, /dev/mpath/oramp2, /dev/mpath/oramp3, dev/mpath/oramp4. 이 장치들은 /dev/mpath 디렉토리에 위치하며 lun 이름은 lun의 wwid에서 생성된 별칭에 의해 재부팅과 관계없이 지속적으로 사용됩니다.
18.10. SELinux 고려사항
# semanage fcontext -a -t xen_image _t -f -b /dev/sda2
# restorecon /dev/sda2
xend_disable_trans는 데몬이 재시작한 후에 xend를 자유모드에 설정합니다. 전체 시스템보다 하나의 데몬에 대한 보호 기능을 비활성화하는 것이 좋습니다. 또한, 다른 목적으로 사용할 수 있는 xen_image_t로서 디렉토리를 다시 레이블하지 않기를 권장합니다.
18.11. 게스트 디스크 이미지에서 데이터 사용
yum install kpartx
kpartx -av /dev/xen/guest1
add map guest1p1 : 0 208782 linear /dev/xen/guest1 63
add map guest1p2: 0 16563015 linear /dev/xen/guest1 208845
# kpartx -a /dev/xen/guest1
#vgscan
Reading all physical volumes . This may take a while...
Found volume group "VolGroup00" using metadata type 1vm2
# vgchange -ay VolGroup00
2 logical volume(s) in volume group VolGroup00 now active.
# lvs
LV VG Attr Lsize Origin Snap% Move Log Copy%
LogVol00 VolGroup00 -wi-a- 5.06G
LogVol01 VolGroup00 -wi-a- 800.00M
# mount /dev/VolGroup00/LogVol00 /mnt/
....
#umount /mnt/
#vgchange -an VolGroup00
#kpartx -d /dev/xen/guest1
vgchange -an을 사용하여 논리 볼륨을 비활성화하고, kpartx-d를 사용하여 파티션을 제거하고, losetup -d 를 사용하여 루프 장치를 제거해야 하는 것을 반드시 기억하시기 바랍니다.
18.12. 일반 문제해결 상황
xend 서비스를 실행할 때 아무것도 발생하지 않습니다. xm list1을 입력하면 다음 내용이 출력될 것입니다:
Error: Error connecting to xend: Connection refused. Is xend running?
xend start를 수동으로 실행하면 다음과 같이 더 많은 오류가 뜰 것입니다:
Error: Could not obtain handle on privileged command interfaces (2 = No such file or directory)
Traceback (most recent call last:)

File "/usr/sbin/xend/", line 33 in ?

from xen.xend.server. import SrvDaemon

File "/usr/lib/python2.4/site-packages/xen/xend/server/SrvDaemon.py" , line 26 in ?

from xen.xend import XendDomain

File "/usr//lib/python2.4/site-packages/xen/xend/XendDomain.py" , line 33, in ?

from xen.xend import XendDomainInfo

File "/usr/lib/python2.4/site-packages/xen/xend/image.py" , line37, in ?

import images

File "/usr/lib/python2.4/site-packages/xen/xend/image.py" , line30, in ?

xc = xen.lowlevel.xc.xc ()

RuntimeError: (2, 'No such file or directory' )
xen-hypervisor가 아닌 커널로 호스트를 재부팅했을 때 발생할 수 있는 상황입니다. 이 문제를 해결하려면, 시작 시 반드시 xen-hypervisor 커널을 선택하거나 grub.conf 파일에 xen-hypervisor 커널을 디폴트로 설정해야 합니다.
18.13. 루프 장치 오류
/etc/modprobe.conf 파일을 수정하며, modprobe.conf 파일 안에 반드시 다음을 써넣어야 합니다.
options loop max_loop=64
phy: block device 또는 tap:aio 명령어를 사용하시기 바랍니다. 완전 가상 시스템에 대한 루프 장치 기반 게스트는 phy: device 또는 file: file 명령어를 사용합니다.
18.14. 게스트 생성 오류
"Invalid argument" error message. This usually means that the kernel image you are trying to boot is incompatible with the hypervisor. An example of this would be if you were attempting to run a non-PAE FC5 kernel on a PAE only FC6 hypervisor.
grub.conf에서 기본 커널로 Vritualization 커널 대신 완전한 커널로 전환합니다.
/etc/sysconfig/kernel/ 디렉토리에 있는 기본 커널 RPM을 수정해야 합니다. 또한, kernel-xen 파라미터가 gb.conf 파일에 기본 옵션으로 설정되어 있는지 확인하시기 바랍니다.
18.15. 직렬 콘솔 오류
grub.conf 파일을 수정하여 com 포트 파라미터를 다음과 같이 변경해야 합니다:
serial --unit=1 --speed=115200
title RHEL5 i386 Xen (2.6.18-1.2910.el5xen)
root (hd0, 8)
kernel /boot/xen.gz-2.6.18-1.2910.el5 com2=115200,8n1
module /boot/vmlinuz-2.6.18-1.2910.el5xen to root=LABEL=RHEL5_i386 console=tty console=ttyS1115200
module /boot/initrd-2.8.6.18-12910.el5xen.img

title RHEL5 i386 xen (2.6.18.-1.2910.el5xen
root (hd0, 8)
kernel /boot/xen.gz-2.6.18-1.2910.el5 com2=115200 console=com2l
module /boot/vmlinuz2.6.18-1.2910.el5xen to root=LABEL=RHEL5_i386 console=xvc xencons=xvc
module /boot/ititrd-2.6.18-1.2910.el5xen.img
grub.conf 파일을 위와 같이 변경하면 직렬 콘솔이 제대로 작동할 것입니다. ttyS에는 어떤 수도 사용할 수 있으며, ttyS0와 같이 작동되어야 합니다.
18.16. 네트워크 브리지 오류
/etc/sysconfig/network-scripts . You should use a process to setup multiple Xen bridges. This is an example config file for a second NIC called 'eth1' :
#/etc/sysconfig/network-scripts/fcfg-eth1
DEVICE=eth1
BOOTPROTO=static
ONBOOT=yes
USERCTL=no
IPV6INIT=no
PEERDNS=yes
TYPE=Ethernet
NETMASK=255.255.255.0
IPADDR=10.1.1.1
GATEWAY=10.1.1.254
ARP=yes
/etc/xen/scripts/network-bridge 파일을 /etc/xen/scripts/network-bridge.xen 파일로 복사하시기 바랍니다.
/etc/xen/xend-config.sxp and add a line to your new network bridge script (this example uses "network-virtualization-multi-bridge" ).
xend-config.sxp 파일에서 새로운 줄은 새 스크립트를 반영해야 합니다:
network-script network-xen-multi-bridge
network-script network-bridge
xenbr0와 xenbr1이라는 두 개의 Xen 브리지를 생성하고 eth1과 eth0에 각각 덧붙입니다:
# !/bin/sh
# network-xen-multi-bridge
# Exit if anything goes wrong
set -e
# First arg is operation.
OP=$1
shift
script=/etc/xen/scripts/network-bridge.xen
case ${OP} in
start)
$script start vifnum=1 bridge=xenbr1 netdev=eth1
$script start vifnum=0 bridge=xenbr0 netdev=eth0
;;
stop)
$script stop vifnum=1 bridge=xenbr1 netdev=eth1
$script stop vifnum=0 bridge=xenbr0 netdev=eth0
;;
status)
$script status vifnum=1 bridge=xenbr1 netdev=eth1
$script status vifnum=0 bridge=xenbr0 netdev=eth0
;;
*)
echo 'Unknown command: ' ${OP}
echo 'Valid commands are: start, stop, status'
exit 1
esac
18.17. 랩톱 구성
ifcfg-dummy0이며, /etc/sysconfig/network-scripts/ 디렉토리에 위치합니다:
DEVICE =dummy0
BOOTPROTO=none
ONBOOT=yes
USERCTL=no
IPV6INIT=no
PEERDNS=yes
TYPE=Ethernet
NETMASK=255.255.255.0
IPADDR=10.1.1.1
ARP=yes
xenbr0를 dummy0로 바인드하여 실제 네트워크로부터 차단될 때도 네트워크 연결을 허용해야 합니다.
xend-config.sxp file. You must locate the ( network-script 'network-bridge' bridge=xenbr0 ) section and add include this in the end of the line:
netdev=dummy0
/etc/sysconfig/ directory to reflect the example below:
NETWORKING=yes
HOSTNAME=localhost.localdomain
GATEWAY=10.1.1.1

IPADDR=10.1.1.10
NETMASK=255.255.255.0
/etc/rc3.d 디렉토리안의 S99XenLaptopNAT 파일을 아래와 같이 수정하시기 바랍니다:
#!/bin/bash
#
# XenLaptopNAT  Startup script for Xen on Laptops
#
# chkconfig: - 99 01
# description: Start NAT for Xen Laptops
#
# PATH=/usr/bin:/sbin:/bin:/usr/sbin
# export PATH
GATEWAYDEV=`ip route | grep default | awk {'print $5'}`
iptables -F
case "$1" in
start)
if test -z "$GATEWAYDEV"; then
echo "No gateway device found"
else
echo "Masquerading using $GATEWAYDEV"
/sbin/iptables -t nat -A POSTROUTING -o $GATEWAYDEV -j MASQUERADE
fi
echo "Enabling IP forwarding"
echo 1 > /proc/sys/net/ipv4/ip_forward
echo "IP forwarding set to `cat /proc/sys/net/ipv4/ip_forward`"
echo "done."
;;
*)
echo "Usage: $0 {start|restart|status}"
;;
esac
/etc/rc3.d/S99XenLaptopNAT에 대한 소프트 링크를 생성해야 합니다.
modprobe.conf 파일을 수정할 때 다음 줄을 써넣어야 합니다:
alias dummy0 dummy
options dummy numdummies=1
18.18. Starting Domains Automatically During System Boot
/etc/xen/auto에 있는 심볼릭 링크를 수정하여 이루어지며, 이 심볼릭 링크 파일은 자동으로 시작되는 게스트 구성 파일을 가리킵니다. 시작 과정은 게스트 번호가 높을수록 부트 과정은 더 길어지도록 나열됩니다. 아래 예제는 게스트 rhel5vm01에 대해 어떻게 심볼릭 링크를 사용하는지 보여줍니다:
[root@python xen]# cd /etc/xen
[root@python xen]# cd auto
[root@python auto]# ls
[root@python auto]# ln -s ../rhel5vm01 .
[root@python auto]# ls -l

lrwxrwxrwx 1 root root 14 Dec 14 10:02 rhel5vm01 -> ../rhel5vm01

[root@python auto]#
18.19. domain0 수정
grub.conf configuration file, that resides in the /etc directory. Because of the large number of domains to manage, many system administrators prefer to use the 'cut and paste' method when editing grub.conf . If you do this, make sure that you include all five lines in the Virtualization entry (or this will create system errors). If you require Xen hypervisor specific values, you must add them to the 'xen' line. This example represents a correct grub.conf Virtualization entry:
# boot=/dev/sda/
default=0
timeout=15
#splashimage=(hd0, 0)/grub/splash.xpm.gz
hiddenmenu
serial --unit=0 --speed=115200 --word=8 --parity=no --stop=1
terminal --timeout=10 serial console
title Red Hat Enterprise Linux Server (2.6.17-1.2519.4.21. el5xen)
        root (hd0, 0)
	kernel /xen.gz-2.6.17-1.2519.4.21.el5 com1=115200,8n1
	module /vmlinuz-2.6.17-1.2519.4.21el5xen ro root=/dev/VolGroup00/LogVol00
	module /initrd-2.6.17-1.2519.4.21.el5xen.img
'dom0_mem=256M' . This example represents the respective grub.conf xen entry:
# boot=/dev/sda
default=0
timeout=15
#splashimage=(hd0,0)/grubs/splash.xpm.gz
hiddenmenu
serial --unit=0 --speed =115200 --word=8 --parity=no --stop=1
terminal --timeout=10 serial console
title Red Hat Enterprise Linux Server (2.6.17-1.2519.4.21. el5xen)
        root (hd0,0)
	kernel /xen.gz-2.6.17-1.2519.4.21.el5 com1=115200,8n1 dom0_mem=256MB
	module /vmlinuz-2.6.17-1.2519.4.21.el5xen ro
	root=/dev/VolGroup00/LogVol00
	module /initrd-2.6.17-1.2519.4.21.el5xen.img
18.20. 게스트 구성 파일
name = "rhel5vm01"
memory = "2048"
disk = ['tap:aio:/xen/images/rhel5vm01.dsk,xvda,w',]
vif = ["type=ieomu, mac=00:16:3e:09:f0:12 bridge=xenbr0',
       "type=ieomu, mac=00:16:3e:09:f0:13 ]
vnc = 1
vncunused = 1
uuid = "302bd9ce-4f60-fc67-9e40-7a77d9b4e1ed"
bootloader = "/usr/bin/pygrub"
vcpus=2
on_reboot = "restart"
on_crash = "restart"
serial="pty" is the default for the configuration file. This configuration file example is for a fully-virtualized guest:
name = "rhel5u5-86_64"
builder = "hvm"
memory = 500
disk = ['file:/xen/images/rhel5u5-x86_64.dsk.hda,w']
vif = [ 'type=ioemu, mac=00:16:3e:09:f0:12, bridge=xenbr0', 'type=ieomu, mac=00:16:3e:09:f0:13, bridge=xenbr1']
uuid = "b10372f9-91d7-ao5f-12ff-372100c99af5'
device_model = "/usr/lib64/xen/bin/qemu-dm"
kernel = "/usr/lib/xen/boot/hvmloader/"
vnc = 1
vncunused = 1
apic = 1
acpi = 1
pae = 1
vcpus =1
serial ="pty" # enable serial console
on_boot = 'restart'
18.21. 게스트 구성 파일 클론
uuidgen(1) command). Then for the vif entries you must define a unique MAC address for each guest (if you are copying a guest configuration from an existing guest, you can create a script to handle it). For the xen bridge information, if you move an existing guest configuration file to a new host, you must update the xenbr entry to match your local networking configuration. For the Device entries, you must modify the entries in the 'disk=' section to point to the correct guest image.
/etc/sysconfig/network file to match the new guest's hostname.
/etc/sysconfig/network-scripts/ifcfg-eth0 파일에 있는 HWADDR 주소를 수정하여 ifconfig eth0 출력과 일치시키고, 수동 IP 주소를 사용하려면 IPADDR 항목을 수정해야 합니다.
18.22. MAC 주소를 생성하는 스크립트 구성
#! /usr/bin/python
# macgen.py script generates a MAC address for Xen guests
#
import random
mac = [ 0x00, 0x16, 0x3e,
random.randint(0x00, 0x7f),
random.randint(0x00, 0xff),
random.randint(0x00, 0xff) ]
print ':'.join(map(lambda x: "%02x" % x, mac))

Generates e.g.:
00:16:3e:66:f5:77
to stdout
18.23. 가상 장치 실시간 이전 설정
xm migrate command). Live migration can be done from the same command. However there are some additional modifications that you must do to the xend-config configuration file. This example identifies the entries that you must modify to ensure a successful migration:
(xend-relocation-server yes)- The default for this parameter is 'no', which keeps the relocation/migration server deactivated (unless on a trusted network) and the domain virtual memory is exchanged in raw form without encryption.
(xend-relocation-port 8002)- 이 파라미터는
xend가 이전에 사용할 포트를 설정합니다. 값을 정확히 입력하신 후 앞의 주석 처리를 해제하시기 바랍니다. (xend-relocation-address )- 이 파라미터는
xend-relocation-server를 활성화한 후에 소켓 연결 재배치를 위해 대기하는 주소를 가리킵니다. 대기 중에 특정 인터페이스에 대한 이전을 제한합니다. (xend-relocation-hosts-allow )- This parameter controls the host that communicates with the relocation port. If the value is empty, then all incoming connections are allowed. You must change this to a space-separated sequences of regular expressions (such as
xend-relocation-hosts-allow- '^localhost\\.localdomain$'). A host with a fully qualified domain name or IP address that matches these expressions are accepted.
18.24. 오류 메세지 해석
failed domain creation due to memory shortage, unable to balloon domain0
xend.log 파일을 확인해 보시기 바랍니다:
[2006-12-21] 20:33:31 xend 3198] DEBUG (balloon:133) Balloon: 558432 Kib free; 0 to scrub; need 1048576; retries: 20
[2006-12-21] 20:33:31 xend. XendDomainInfo 3198] ERROR (XendDomainInfo: 202
Domain construction failed
xm list Domain0 command. If domain0 is not ballooned down, you can use the command "xm mem-set Domain-0 NewMemSize" to check memory.
wrong kernel image: non-PAE kernel on a PAE
[root@smith]# xm create -c va base

Using config file "va-base"
Error: (22, 'invalid argument')
[2006-12-14 14:55:46 xend.XendDomainInfo 3874] ERRORs
(XendDomainInfo:202) Domain construction failed

Traceback (most recent call last)
File "/usr/lib/python2.4/site-packages/xen/xend/XendDomainInfo.py", line 195 in create vm.initDomain()
File " /usr/lib/python2.4/site-packages/xen/xend/XendDomainInfo.py", line 1363 in initDomain raise VmError(str(exn))
VmError: (22, 'Invalid argument')
[2006-12-14 14:55:46 xend.XendDomainInfo 3874] DEBUG (XenDomainInfo: 1449]
XendDlomainInfo.destroy: domin=1
[2006-12-14 14:55:46 xend.XendDomainInfo 3874] DEBUG (XenDomainInfo: 1457]
XendDlomainInfo.destroy:Domain(1)
Unable to open a connection to the Xen hypervisor or daemon
/etc/hosts 구성 파일에 localhost 항목이 없을 때 발생합니다. 파일을 확인하여 localhost 항목이 활성화되어 있는지 확인하시기 바랍니다. 아래 예제는 부정확한 localhost 항목을 보여줍니다:
# Do not remove the following line, or various programs
# that require network functionality will fail.
localhost.localdomain localhost
# Do not remove the following line, or various programs
# that require network functionality will fail.
127.0.0.1 localhost.localdomain localhost
localhost.localdomain. localhost
xen-xend.log file 파일에서 다음과 같은 오류를 볼 수 있습니다:
Bridge xenbr1 does not exist!
[root@trumble virt]# xm create r5b2-mySQL01

Using config file " r5b2-mySQL01"
Going to boot Red Hat Enterprise Linux Server (2.6.18.-1.2747 .el5xen)
kernel: /vmlinuz-2.6.18-12747.el5xen
initrd: /initrd-2.6.18-1.2747.el5xen.img
Error: Device 0 (vif) could not be connected. Hotplug scripts not working.
xend.log는 다음과 같은 오류를 표시합니다:
[2006-11-14 15:07:08 xend 3875] DEBUG (DevController:143) Waiting for devices vif
[2006-11-14 15:07:08 xend 3875] DEBUG (DevController:149) Waiting for 0
[2006-11-14 15:07:08 xend 3875] DEBUG (DevController:464) hotplugStatusCallback

/local/domain/0/backend/vif/2/0/hotplug-status

[2006-11-14 15:08:09 xend.XendDomainInfo 3875] DEBUG (XendDomainInfo:1449) XendDomainInfo.destroy: domid=2
[2006-11-14 15:08:09 xend.XendDomainInfo 3875] DEBUG (XendDomainInfo:1457) XendDomainInfo.destroyDomain(2)
[2006-11-14 15:07:08 xend 3875] DEBUG (DevController:464) hotplugStatusCallback

/local/domain/0/backend/vif/2/0/hotplug-status
vif 항목을 수정하여 편집해야 합니다. 디폴트 브리지로 xenbr0를 사용하고 있다고 가정하면, 구성 파일의 vif 항목은 다음과 비슷할 것입니다:
# vif = ['mac=00:16:3e:49:1d:11, bridge=xenbr0',]
[root@python xen]# xm shutdown win2k3xen12
[root@python xen]# xm create win2k3xen12

Using config file "win2k3xen12".

/usr/lib64/python2.4/site-packages/xenxm/opts.py:520: Deprecation Warning:
Non ASCII character '\xc0' in file win2k3xen12 on line 1, but no encoding
declared; see http://www.python.org/peps/pep-0263.html for details

execfile (defconfig, globs, locs,)
Error: invalid syntax 9win2k3xen12, line1)
18.25. 온라인 문제해결 자료
- Red Hat Virtualization 센터
http://www.openvirtualization.com
- Red Hat Enterprise Linux 5 Beta 2 문서자료
http://www.redhat.com/docs/manuals/enterprise/RHEL-5-manual/index.html
- Libvirt API
http://www.libvirt.org
- 가상 장치 관리자 프로젝트 홈 페이지
http://virt-manager.et.redhat.com
- Xen 커뮤니티 센터
http://www.xensource.com/xen/xen/
- 가상화 기술 개요
http://virt.kernelnewbies.org
- 통합 기술 프로젝트
http://et.redhat.com
19장. 추가 자료
19.1. 유용한 웹사이트
- http://www.cl.cam.ac.uk/research/srg/netos/xen/ — Red Hat Virtualization에 따른 Xen™ 반 가상화 장치 관리자의 프로젝트 웹사이트입니다. 이 사이트는 업스트림 Xen 프로젝트 바이너리와 소스 코드를 유지하며, Xen 관련 기술은 물론 Xen에 관한 정보, 구조 개요, 문서 자료, 관련 링크도 다루고 있습니다.
- http://www.libvirt.org/ — 호스트 OS의 가상화 프레임워크와 연동하는
libvirt가상화 API의 공식 웹사이트입니다. - http://virt-manager.et.redhat.com/ — 가상 장치를 관리하는 그래픽형식 프로그램인 가상 장치 관리자의 프로젝트 웹사이트입니다.
19.2. 설치된 문서 자료
/usr/share/doc/xen-<version-number>/—. This directory contains a wealth of information about the Xen para-virtualization hypervisor and associated management tools, including a look at various example configurations, hardware-specific information, and the current Xen upstream user documentation.man virshand/usr/share/doc/libvirt-<version-number>— Contains subcommands and options for thevirshvirtual machine management utility as well as comprehensive information about thelibvirtvirtualization library API./usr/share/doc/gnome-applet-vm-<version-number>— Documentation for the GNOME graphical panel applet that monitors and manages locally-running virtual machines./usr/share/doc/libvirt-python-<version-number>— Provides details on the Python bindings for thelibvirtlibrary. Thelibvirt-pythonpackage allows python developers to create programs that interface with thelibvirtvirtualization management library./usr/share/doc/python-virtinst-<version-number>— Provides documentation on thevirt-installcommand that helps in starting installations of Fedora and Red Hat Enterprise Linux related distributions inside of virtual machines./usr/share/doc/virt-manager-<version-number>— Provides documentation on the Virtual Machine Manager, which provides a graphical tool for administering virtual machines.
부록 A. 실습 1
- CPU가 PAE를 지원하는지 확인하려면 다음을 입력하시기 바랍니다:
grep pae /proc/cpuinfo - 다음 출력 결과는 CPU가 PAE를 지원하는지 보여줍니다. 명령어 입력 시 아무것도 출력되지 않으면, CPU는 PAE를 지원하지 않습니다. 모든 실습 과제를 수행하려면 PAE 확장을 갖춘 i386 CPU 또는 x86_64 / ia64 시스템이 필요합니다.
    flags :
    fpu vme de pse tsc msr pae mce cx8 apic mtrr pge mca cmov pat clflush dts acpi
    mmx fxsr sse sse2 ss tm pbe nx up est tm2
virt-install을 사용하여 RHEL5 Beta 2 Xen 반 가상 게스트를 설치합니다.
virt-install을 사용하여 Red Hat Enterprise Linux 5 Beta 2 Xen 게스트를 설치합니다.
- Red Hat Enterprise Linux 5 Beta 2 Xen 게스트를 설치하려면, 명령 프롬프트에 다음을 입력합니다:
virt-install - 완전 가상화 게스트를 설치하라는 프롬프트가 뜨면, 다음을 입력합니다:
no - 가상 장치 이름으로
rhel5b2-pv1을 입력합니다. - RAM 할당량으로 500을 입력합니다.
- 디스크(게스트 이미지)에
/xen/rhel5b2-pv1.img를 입력합니다. - 디스크(게스트 이미지) 크기에 6을 입력합니다.
yes를 입력하여 그래픽형식 지원을 활성화합니다.- 설치 위치에
nfs:server:/path/to/rhel5b2를 입력합니다. - 설치가 시작됩니다. 평소와 같이 설치하시기 바랍니다.
- 설치가 완료되면,
/etc/xen/rhel5b2-pv1에 다음을 수정하여 편집합니다: #vnc=1#vncunused=1sdl=1 - 텍스트 편집기를 사용하여
/etc/inittab에 다음을 추가하여 편집합니다:init 5.#id:3:initdefault:id:5:initdefault:
virt-manager를 사용하여 RHEL5 Beta 2 Xen 반 가상화 게스트를 설치합니다.
virt-manager를 사용하여 Red Hat Enterprise Linux 5 Beta 2 Xen 반 가상화 게스트를 설치합니다.
- Red Hat Enterprise Linux 5 Beta 2 Xen 게스트를 설치하려면, 명령 프롬프트에 다음을 입력합니다:
virt-manager - 오픈 연결 창에서 내부 Xen 호스트를 선택하고 연결을 클릭합니다.
- Start Red Hat's Virtual Machine Manager application, and from the File menu, click on New.
- 앞으로를 클릭합니다.
- 시스템 이름으로
rhel5b2-pv2를 입력하고 앞으로를 입력합니다. - 반 가상화를 선택하고 앞으로를 클릭합니다.
- 설치 매체 URL에
nfs:server:/path/to/rhel5b2를 입력하고 앞으로를 클릭합니다. Simple File을 선택하고, 파일 위치에/xen/rhel5b2-pv2.img를 입력합니다. 6000 MB를 선택하고 앞으로를 클릭합니다.- VM 시작과 최대 메모리로 500을 선택하고 앞으로를 클릭합니다.
- 완료를 클릭합니다.
- To determine if your CPU has Intel-VT or AMD-V support, type the following command:
egrep -e 'vmx|svm' /proc/cpuinfo - 다음 출력 결과는 CPU가 Intel-VT를 지원하는지 보여줍니다:
.flags :
    fpu tsc msr pae mce cx8 apic mtrr mca cmov pat clflush dts acpi mmx fxsr sse
    sse2 ss ht tm pbe constant_tsc pni monitor vmx est tm2 xtpr
명령어 입력 시 아무것도 출력되지 않으면, CPU는 Intel-VT 또는 AMD-V를 지원하지 않습니다. - CPU가 Intel-VT 또는 AMD-V를 지원하면, 다음을 입력하시기 바랍니다:
cat /sys/hypervisor/properties/capabilities
- The following output shows that Intel-VT support has been enabled in the BIOS. If the command returns nothing, then go into the BIOS Setup Utlility and look for a setting related to 'Virtualization', i.e. 'Intel(R) Virtualization Technology' under 'CPU' section on a IBM T60p. Enable and save the setting and do a power off to take effect.
xen-3.0-x86_32p hvm-3.0-x86_32 hvm-3.0-x86_32p
virt-install를 사용하여 Red Hat Enterprise Linux 5 Beta 2 Xen 완전 가상화 게스트를 설치합니다:
- Red Hat Enterprise Linux 5 Beta 2 Xen 게스트를 설치하려면, 명령 프롬프트에 다음을 입력합니다:
virt-install - 완전 가상화 게스트를 설치하라는 프롬프트가 뜨면,
yes를 입력합니다. - 가상 장치 이름으로
rhel5b2-pv2를 입력합니다. - 메모리 할당량에 500을 입력합니다.
- 디스트(게스트 이미지)로서
/xen/rhel5b2-fv1.img를 입력합니다. - 디스크(게스트 이미지) 크기에 6을 입력합니다.
yes를 입력하여 그래픽형식 지원을 활성화합니다.- 가상 CD 이미지에
/dev/cdrom을 입력합니다. - The VNC viewer appears within the installation window. If there is an error message that says “main: Unable to connect to host: Connection refused (111)”, then type the following command to proceed:
vncviewer localhost:5900. VNC port 5900 refers to the first Xen guest that is running on VNC. If it doesn't work, you might need to use 5901, 5902, etc.
virt-manager를 사용하여 Red Hat Enterprise Linux 5 Beta 2 Xen완전 가상화 게스트를 설치합니다:
- Red Hat Enterprise Linux 5 Beta 2 Xen 게스트를 설치하려면, 명령 프롬프트에 다음을 입력합니다:
virt-manager - 연결하기 창에서 내부 Xen 호스트를 선택하고 연결을 클릭합니다.
- Start Red Hat's Virtual Machine Monitor application, and from the File menu, click on New.
- 앞으로를 클릭합니다.
- 시스템 이름으로
rhel5b2-fv2를 입력하고 앞으로를 클릭합니다. - 완전 가상화를 선택하고 앞으로를 클릭합니다.
- CD-ROM 또는 DVD를 지정하고 설치 매체에 대한 경로를 입력합니다. ISO 이미지로부터 설치하려면 ISO 이미지 위치를 지정하고 앞으로를 클릭합니다.
- 간단한 파일을 선택하고, 파일 위치로서
/xen/rhel5b2-fv2.img을 입력합니다. 6000 MB를 지정하고 앞으로를 클릭합니다. - VM 시작과 최대 메모리로 500을 선택하고 앞으로를 클릭합니다.
- 완료를 클릭합니다.
- 가상 장치 콘솔 창이 나타납니다.
virt-manager를 사용하여 RHEL3 Xen 완전 가상 게스트를 설치합니다.
virt-manager를 사용하여 Red Hat Enterprise Linux 3 Xen 게스트를 설치합니다:
- 과제 6의 단계와 동일합니다.
virt-manager를 사용하여 RHEL4 Xen 완전 가상 게스트를 설치합니다.
virt-manager를 사용하여 Red Hat Enterprise Linux 4 Xen 게스트를 설치합니다:
- 과제 6의 단계와 동일합니다.
virt-manager를 사용하여 Windows XP Xen 완전 가상화 게스트를 설치합니다.
virt-manager를 사용하여 Windows XP Xen 완전 가상화 게스트를 설치합니다:
- Windows XP 호스트에 Red Hat Enterprise Linux 5를 설치하려면 명령 프롬프트에 다음을 입력하시기 바랍니다:
virt-manager - 연결하기 창에서 내부 Xen 호스트를 선택하고 연결을 클릭합니다.
- Start Red Hat's Virtual Machine Manager application, and from the File menu click on New.
- 앞으로를 클릭합니다.
- 시스템 이름으로
winxp를 입력하고 앞으로를 클릭합니다. - 완전 가상화를 선택하고 앞으로를 클릭합니다.
- CD-ROM 또는 DVD를 지정하고 설치 메체에 대한 경로를 입력합니다. ISO 이미지로부터 설치하려면 ISO 이미지 위치를 지정하고 앞으로를 클릭합니다.
- 간단한 파일을 선택하고 파일 위치에
/xen/winxp.img를 입력합니다. 6000 MB를 지정하고 앞으로를 클릭합니다. - VM 시작과 최대 메모리로 1024를 지정하고 VCPU에 2를 선택하고 앞으로를 클릭합니다.
- 완료를 클릭합니다.
- 가상 장치 콘솔 창이 나타납니다. 평소처럼 설치를 시작하고 완료하시기 바랍니다.
C:\파티션을 FAT 파일 시스템 형식으로 포맷하도록 선택합니다. Red Hat Enterprise Linux 5는 NTFS 커널 모듈을 지원하지 않습니다. NTFS 파일 시스템 형식으로 포맷한 파티션에는 파일을 Xen 게스트 이미지에 마운트하거나 작성할 수 없습니다.- 처음 시스템을 재부팅한 후
winxp게스트 이미지를 편집하시기 바랍니다:losetup /dev/loop0 /xen/winxp.imgkpartx -av /dev/loop0mount /dev/mapper/loop0p1 /mntcp -prv $WINDOWS/i386 /mnt/. 이것은 Windows 설치 시 발생할 수 있는 문제를 해결합니다. - 다음을 입력하여 Xen 게스트를 수동으로 재시작합니다:
xm create -c winxp/ - 가상 장치 관리자 창에서
winxpXen 게스트를 선택하고 열기를 클릭합니다. - 가상 장치 콘솔 창이 나타납니다. 평소처럼 설치를 완료하시기 바랍니다.
- Whenever a 'Files Needed' dialog box appears, change the path
GLOBALROOT\DEVICE\CDROM0\I386toC:\I386. Depending on your installation, you may or may not see this problem. You may be prompted for missing files during the installation. Changing the path toC:\I386should compensate for this problem. - Xen 게스트 콘솔이 정지되면
종료를 클릭하고 다음 사항을 수정합니다:/etc/xen/winxp:#vnc=1#vncunused=1sdl=1#vcpus=2 - 단계 14을 반복하고 평소처럼 설치하시기 바랍니다.
부록 B. 실습 2
host1과 host2로 부를 것입니다.
xm에 대한 UNIX 도메인 소켓 관리 서버를 시작하고 xend와 의사소통을 합니다. 장치 간 실시간 이전을 활성화하려면, 실시간 이전을 지원하도록 설정해야 합니다:
xend-config.sxp파일의 백업을 만듭니다:cp -pr /etc/xen/xend-config.sxp /etc/xen/xend-config.sxp.default/etc/xen/xend-config.sxp에 다음 사항을 수정하여 편집합니다:#(xend-unix-server yes)(xend-relocation-server yes)(xend-relocation-port 8002)(xend-relocation-address '')(xend-relocation-hosts-allow '')#(xend-relocation-hosts-allow '^localhost$ ^localhost\\.localdomain$')- xend를 재시작합니다: service xend restart
/etc/exports에 다음 줄을 추가하여 편집합니다:/xen *(rw,sync,no_root_squash)//etc/exports를 저장하고 NFS 서버를 재시작하고, NFS가 디폴트로 시작하는지 확인합니다:service nfs start, chkconfig nfs on.host1에서 NFS 서버를 시작하고host2:mount host1:/xen에 마운트합니다.- 이제
host1에서 Xen 게스트를 시작하고fc6-pv1(또는 실습1에서fc6-pv2)을 선택합니다:xm create -c fc6-pv1
http://www.gnump3d.org/에서gnump3d-2.9.9.9.tar.bz2파일을 다운로드합니다. 파일 압축을 풀고gnump3d-2.9.9.9/디렉토리에서 gnump3d 프로그램을 컴파일하고 설치합니다:tar xvjf gnump3d-2.9.9.9.tar.bz2cd gnump3d-2.9.9.9/make install- Create a
/home/mp3directory and copy TruthHappens.ogg from Red Hat's Truth Happens page tomkdir /home/mp3wget -c http://www.redhat.com/v/ogg/TruthHappens.ogg - 다음 명령어를 입력하여 스트리밍 서버를 시작합니다:
command:gnump3d
- 두 Xen 호스트 중 하나에 영화 플레이어를 실행합니다. 영화 플레이어를 실행하기 전에 totem과 iso-codecs rpm이 없으면 설치하시기 바랍니다. 프로그램 메뉴에서 사운드 & 비디오를 선택하고 영화 플레이어를 클릭합니다.
- 영화를 클릭하고 위치열기를 선택한 후 http://guest:8888/TruthHappens.ogg를 입력합니다.
- 두 Xen 호스트에서
TruthHappens.ogg파일을 실행합니다. host1로부터host2로 실시간 이전을 수행합니다:xm migrate –live fc6-pv1 host2
- 다음 명령어를 사용하여 두 Xen 호스트에서 다중 터미널 창을 열어보시기 바랍니다:
watch -n1 xm list
- 실시간 이전이 시작되는 것을 살펴보시기 바랍니다. 이전이 완료되는 데 얼마나 걸리는지 확인하시기 바랍니다.
gdm starts up. Run VNC viewer and connect to the Xen guest. Play with the Xen guest when the live migration occurs. Attempt to pause/resume, and save/restore the Xen guest and observe what happens to the VNC viewer. If you connect to the VNC viewer via localhost:590x, and do a live migration, you won't be able to connect to the VNC viewer again when it dies. This is a known bug.
부록 C. Revision History
| 고친 과정 | ||||
|---|---|---|---|---|
| 고침 2.0-11.400 | 2013-10-31 | |||
| ||||
| 고침 2.0-11 | 2012-07-18 | |||
| ||||
| 고침 5.1.0-10 | Fri Aug 3 2007 | |||
| ||||