
웹 콘솔
OpenShift Container Platform에서 웹 콘솔 시작하기
초록
1장. 웹 콘솔에 액세스
OpenShift Container Platform 웹 콘솔은 웹 브라우저에서 액세스할 수 있는 사용자 인터페이스입니다. 개발자는 웹 콘솔을 사용하여 프로젝트의 내용을 시각적으로 탐색 및 관리할 수 있습니다.
전제 조건
- 웹 콘솔을 사용하려면 JavaScript가 활성화되어 있어야합니다. WebSockets을 지원하는 웹 브라우저를 사용하는 것이 좋습니다.
- 클러스터에 대한 지원 인프라를 작성하기 전에 OpenShift Container Platform 4.x Tested Integrations 페이지를 확인합니다.
1.1. 웹 콘솔 이해 및 액세스
웹 콘솔은 마스터에서 Pod로 실행됩니다. Pod에서는 웹 콘솔을 실행하는 데 필요한 정적 환경을 제공합니다. OpenShift Container Platform이 성공적으로 설치되면 설치 프로그램의 CLI 출력에서 웹 콘솔 URL 및 설치된 클러스터의 로그인 인증 정보를 확인할 수 있습니다. 예를 들면 다음과 같습니다.
INFO Install complete!
INFO Run 'export KUBECONFIG=<your working directory>/auth/kubeconfig' to manage the cluster with 'oc', the OpenShift CLI.
INFO The cluster is ready when 'oc login -u kubeadmin -p <provided>' succeeds (wait a few minutes).
INFO Access the OpenShift web-console here: https://console-openshift-console.apps.demo1.openshift4-beta-abcorp.com
INFO Login to the console with user: kubeadmin, password: <provided>
이러한 세부 사항을 사용하여 로그인하고 웹 콘솔에 로그인하고 액세스하십시오.
2장. OpenShift Container Platform 대시 보드를 사용하여 클러스터 정보 검색
OpenShift Container Platform 대시 보드에는 클러스터에 대한 고급 정보가 포함되어 있으며 OpenShift Container Platform 웹 콘솔에서 Home → Dashboards → Overview를 통해 액세스합니다.
OpenShift Container Platform 대시 보드는 별도의 대시 보드 카드에 표시되는 다양한 클러스터 정보를 제공합니다.
2.1. OpenShift Container Platform 대시 보드 페이지 정보
OpenShift Container Platform 대시 보드는 다음 카드로 구성됩니다.
Details는 클러스터 정보에 대한 간략한 개요를 표시합니다.
상태에는 ok, error, warning, progress 및 unknown이 포함되어 있습니다. 리소스는 사용자 정의 상태 이름을 추가 할 수 있습니다.
- 클러스터 ID
- 공급자
- 버전
Cluster Inventory는 리소스 수 및 관련 상태를 정보를 표시합니다. 이러한 정보는 문제 해결에 개입이 필요한 경우 매우 유용하며 다음과 같은 관련 정보가 포함되어 있습니다.
- 노드 수
- Pod 수
- 영구 스토리지 볼륨 요청
- 상태에 따라 나열되는 클러스터의 베어 메탈 호스트 (metal3 환경에서만 사용 가능)
Cluster Capacity 차트는 관리자가 클러스터에 추가 리소스가 필요한 시기를 파악하는 데 도움이 됩니다. 이 차트에는 내부 링과 외부링이 포함되어 있으며 내부 링은 현재 소비를 표시하는 외부 링은 다음 정보를 포함하여 리소스에 설정된 임계 값을 표시합니다.
- CPU 시간
- 메모리 할당
- 소비된 스토리지
- 소비된 네트워크 리소스
- Cluster Utilization은 관리자가 리소스의 높은 소비 규모 및 빈도를 이해하는데 도움이 되도록 지정된 기간 동안 다양한 리소스의 용량을 표시합니다.
- Events는 Pod 생성 또는 다른 호스트로의 가상 머신 마이그레이션과 같은 클러스터의 최근 활동과 관련된 메시지를 표시합니다.
- Top Consumers 관리자가 클러스터 리소스가 소비되는 방식을 이해하는 데 도움이 됩니다. 리소스를 클릭하면 지정된 클러스터 리소스 (CPU, 메모리 또는 스토리지)를 가장 많이 소비하는 Pod 및 노드가 나열된 자세한 정보가 있는 페이지로 이동합니다.
3장. OpenShift Container Platform에서 웹 콘솔 구성
OpenShift Container Platform 웹 콘솔을 변경하여 로그 아웃 리디렉션 URL을 설정하거나 콘솔을 비활성화할 수 있습니다.
전제 조건
- OpenShift Container Platform 클러스터를 배포합니다.
3.1. 웹 콘솔 구성
console.config.openshift.io 리소스를 편집하여 웹 콘솔을 설정할 수 있습니다.
console.config.openshift.io리소스를 편집합니다.$ oc edit console.config.openshift.io cluster
다음 예제는 콘솔의 리소스 정의입니다.
apiVersion: config.openshift.io/v1
kind: Console
metadata:
  name: cluster
spec:
  authentication:
    logoutRedirect: "" 1
status:
  consoleURL: "" 2
4장. OpenShift Container Platform에서 웹 콘솔 사용자 정의
OpenShift Container Platform 웹 콘솔을 사용자 정의하여 사용자 정의 로고, 제품 이름, 링크, 알림 및 명령 줄 다운로드를 설정할 수 있습니다. 이는 웹 콘솔을 특정 기업 또는 정부의 요구 사항에 맞게 조정해야하는 경우 특히 유용합니다.
4.1. 사용자 정의 로고 및 제품 이름 추가
사용자 정의 로고 또는 사용자 정의 제품 이름을 추가하여 사용자 정의 브랜딩을 만들 수 있습니다. 이 설정은 서로 독립적이므로 모두 또는 하나씩 따로 설정할 수 있습니다.
전제 조건
- 클러스터 관리자 권한이 있어야합니다.
-
사용할 로고 파일을 만듭니다. 로고는 GIF, JPG, PNG 또는 SVG를 포함한 일반적인 이미지 형식의 파일 일 수 있으며
max-height60px로 제한됩니다.
프로세스
openshift-config네임 스페이스의 로고 파일을 ConfigMap으로 가져옵니다.$ oc create configmap console-custom-logo --from-file /path/to/console-custom-logo.png -n openshift-config
customLogoFile및customProductName을 포함하도록 웹 콘솔의 Operator 설정을 편집합니다.$ oc edit console.operator.openshift.io cluster
apiVersion: operator.openshift.io/v1
kind: Console
metadata:
  name: cluster
spec:
  customization:
    customLogoFile:
      key: console-custom-logo.png
      name: console-custom-logo
    customProductName: My Console
Operator 설정이 업데이트되면 사용자 정의 로고 ConfigMap을 콘솔 네임 스페이스에 동기화하고 이를 콘솔 Pod에 마운트한 후 다시 배포합니다.
성공적으로 실행되었는지 확인합니다. 문제가 있는 경우 콘솔 클러스터 Operator는
Degraded를 보고하고 콘솔 Operator 설정도CustomLogoDegraded를KeyOrFilenameInvalid또는NoImageProvided와 같은 이유와 함께 보고합니다.clusteroperator를 확인하려면 다음을 실행합니다.$ oc get clusteroperator console -o yaml
콘솔 Operator 설정을 확인하려면 다음을 실행합니다.
$ oc get console.operator.openshift.io -o yaml
4.2. 웹 콘솔에서 사용자 정의 링크 작성
전제 조건
- 클러스터 관리자 권한이 있어야합니다.
프로세스
- Administration → Custom Resource Definitions에서 ConsoleLink를 클릭합니다.
- Instances 탭을 선택합니다.
Create Console Link를 클릭하고 파일을 편집합니다.
apiVersion: console.openshift.io/v1 kind: ConsoleLink metadata: name: example spec: href: 'https://www.example.com' location: HelpMenu 1 text: Link 1- 1
- 유효한 위치 설정은
HelpMenu,UserMenu,ApplicationMenu및NamespaceDashboard입니다.
모든 네임 스페이스에 사용자 정의 링크를 표시하려면 다음 예제를 따르십시오.
apiVersion: console.openshift.io/v1
kind: ConsoleLink
metadata:
  name: namespaced-dashboard-link-for-all-namespaces
spec:
  href: 'https://www.example.com'
  location: NamespaceDashboard
  text: This appears in all namespaces
일부 네임 스페이스에만 사용자 정의 링크를 표시하려면 다음 예제를 따르십시오.
apiVersion: console.openshift.io/v1
kind: ConsoleLink
metadata:
  name: namespaced-dashboard-for-some-namespaces
spec:
  href: 'https://www.example.com'
  location: NamespaceDashboard
  # This text will appear in a box called "Launcher" under "namespace" or "project" in the web console
  text: Custom Link Text
  namespaceDashboard:
    namespaces:
    # for these specific namespaces
    - my-namespace
    - your-namespace
    - other-namespace
애플리케이션 메뉴에 사용자 정의 링크를 표시하려면 다음 예제를 따르십시오.
apiVersion: console.openshift.io/v1 kind: ConsoleLink metadata: name: application-menu-link-1 spec: href: 'https://www.example.com' location: ApplicationMenu text: Link 1 applicationMenu: section: My New Section # image that is 24x24 in size imageURL: https://via.placeholder.com/24- Save 버튼을 클릭하여 변경 사항을 적용합니다.
4.3. 로그인 페이지 사용자 정의
사용자 정의 로그인 페이지를 사용하여 서비스 약관 정보를 작성하십시오. 사용자 정의 로그인 페이지는 GitHub 또는 Google과 같은 타사 로그인 공급자를 사용하는 경우에도 사용자가 신뢰하는 브랜드 페이지를 표시하고 사용자를 인증 공급자로 리디렉션하는데 유용할 수 있습니다. 인증 프로세스 중에 사용자 정의 오류 페이지를 렌더링할 수도 있습니다.
전제 조건
- 클러스터 관리자 권한이 있어야합니다.
프로세스
다음 명령을 실행하여 수정할 수 있는 템플릿을 만듭니다.
$ oc adm create-login-template > login.html
$ oc adm create-provider-selection-template > providers.html
$ oc adm create-error-template > errors.html
시크릿을 사용하여 해당 정보를 만듭니다:
$ oc create secret generic login-template --from-file=login.html -n openshift-config
$ oc create secret generic providers-template --from-file=providers.html -n openshift-config
$ oc create secret generic error-template --from-file=errors.html -n openshift-config
다음을 실행합니다.
$ oc edit oauths cluster
사양을 업데이트합니다.
spec:
  templates:
    error:
        name: error-template
    login:
        name: login-template
    providerSelection:
        name: providers-template
oc explain oauths.spec.templates을 실행하여 옵션을 파악합니다.
4.4. 외부 로그 링크의 템플릿 정의
로그를 찾는 데 도움이되는 서비스에 연결되어 있지만 특정 방식으로 URL을 생성해야 하는 경우 링크의 템플릿을 정의할 수 있습니다.
전제 조건
- 클러스터 관리자 권한이 있어야합니다.
프로세스
- Administration → Custom Resource Definitions에서 ConsoleExternalLogLink를 클릭합니다.
- Instances 탭을 선택합니다.
Create Console External Log Link를 클릭하고 파일을 편집합니다.
apiVersion: console.openshift.io/v1
kind: ConsoleExternalLogLink
metadata:
  name: example
spec:
  hrefTemplate: >-
    https://example.com/logs?resourceName=${resourceName}&containerName=${containerName}&resourceNamespace=${resourceNamespace}&podLabels=${podLabels}
  text: Example Logs
4.5. 사용자 정의 알림 배너 만들기
전제 조건
- 클러스터 관리자 권한이 있어야합니다.
프로세스
- Administration → Custom Resource Definitions에서 ConsoleNotification을 클릭합니다.
- Instances 탭을 선택합니다.
Create Console Notification을 클릭하고 파일을 편집합니다.
apiVersion: console.openshift.io/v1 kind: ConsoleNotification metadata: name: example spec: text: This is an example notification message with an optional link. location: BannerTop 1 link: href: 'https://www.example.com' text: Optional link text color: '#fff' backgroundColor: '#0088ce'- 1
- 유효한 위치 설정은
BannerTop,BannerBottom및BannerTopBottom입니다.
- Create 버튼을 클릭하여 변경 사항을 적용합니다.
4.6. CLI 다운로드 사용자 정의
파일 패키지 또는 패키지를 제공하는 외부 페이지를 직접 지정할 수있는 사용자 정의 링크 텍스트 및 URL을 사용하여 CLI를 다운로드하기 위한 링크를 설정할 수 있습니다.
전제 조건
- 클러스터 관리자 권한이 있어야합니다.
프로세스
- Administration → Custom Resource Definitions로 이동합니다.
- CRD (Custom Resource Definitions) 목록에서 ConsoleCLIDownload를 선택합니다.
YAML 탭을 클릭한 후 편집합니다.
apiVersion: console.openshift.io/v1 kind: ConsoleCLIDownload metadata: name: example-cli-download-links-for-foo spec: description: | This is an example of download links for foo displayName: example-foo links: - href: 'https://www.example.com/public/foo.tar' text: foo for linux - href: 'https://www.example.com/public/foo.mac.zip' text: foo for mac - href: 'https://www.example.com/public/foo.win.zip' text: foo for windows- Save 버튼을 클릭합니다.
4.7. Kubernetes 리소스에 YAML 예제 추가
언제든지 Kubernetes 리소스에 YAML 예제를 동적으로 추가할 수 있습니다.
전제 조건
- 클러스터 관리자 권한이 있어야합니다.
프로세스
- Administration → Custom Resource Definitions에서 ConsoleYAMLSample을 클릭합니다.
YAML을 클릭하고 파일을 편집합니다.
apiVersion: console.openshift.io/v1 kind: ConsoleYAMLSample metadata: name: example spec: targetResource: apiVersion: batch/v1 kind: Job title: Example Job description: An example Job YAML sample yaml: | apiVersion: batch/v1 kind: Job metadata: name: countdown spec: template: metadata: name: countdown spec: containers: - name: counter image: centos:7 command: - "bin/bash" - "-c" - "for i in 9 8 7 6 5 4 3 2 1 ; do echo $i ; done" restartPolicy: Neverspec.snippet을 사용하여 YAML 샘플이 전체 YAML 리소스 정의가 아니라 사용자 커서에서 기존 YAML 문서에 삽입할 수 있는 조각을 보여줍니다.- Save를 클릭합니다.
5장. 웹 콘솔의 Developer 관점 정보
OpenShift Container Platform 웹 콘솔은 Administrator 관점 및 Developer 관점이라는 두 가지 관점을 제공합니다.
Developer 관점은 다음과 같은 개발자의 유스 케이스에 특정한 워크 플로우를 제공합니다.
- 기존 코드베이스, 이미지, dockerfile을 가져와서 OpenShift Container Platform에서 애플리케이션을 만들고 배포합니다.
- 프로젝트에서 관련 애플리케이션, 구성 요소 및 서비스와 시각적으로 상호 작용하고 배포 및 빌드 상태를 모니터링합니다.
- 애플리케이션에서 구성 요소를 그룹화하고 애플리케이션 내부 및 애플리케이션간에 구성 요소를 연결합니다.
- Serverless 기능 (기술 프리뷰)을 통합합니다.
- Eclipse Che를 사용하여 애플리케이션 코드를 편집할 수 있는 작업 공간을 만듭니다.
전제 조건
Developer 관점에 액세스하려면 웹 콘솔에 로그인해야 합니다.
5.1. Developer 관점 액세스
OpenShift Container Platform 웹 콘솔의 Developer 관점은 개발자의 유스 케이스에 특정한 워크 플로우를 제공합니다.
다음과 같이 웹 콘솔에서 Developer 관점에 액세스할 수 있습니다.
프로세스
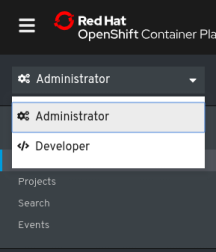
- 로그인 인증 정보를 사용하여 OpenShift Container Platform 웹 콘솔에 로그인합니다. OpenShift Container Platform 웹 콘솔의 기본 보기는 Administrator 관점입니다.
관점 전환 기능을 사용하여 Developer 관점으로 전환하십시오. 클러스터의 모든 프로젝트 목록과 함께 Topology 뷰가 표시됩니다.
그림 5.1. Developer 관점
- 목록에서 기존 프로젝트를 선택하거나 Project 드롭 다운 목록을 사용하여 새 프로젝트를 만듭니다.
프로젝트에 워크로드 또는 애플리케이션이없는 경우 Topology 뷰에는 애플리케이션을 작성하는 데 사용 가능한 옵션이 표시됩니다. 기존 워크로드가있는 경우 Topology 뷰는 워크로드 노드를 그래픽으로 표시합니다.
6장. OpenShift Container Platform에서 웹 콘솔 비활성화
OpenShift Container Platform 웹 콘솔을 비활성화할 수 있습니다.
전제 조건
- OpenShift Container Platform 클러스터를 배포합니다.
6.1. 웹 콘솔 비활성화
console.operator.openshift.io 리소스를 편집하여 웹 콘솔을 비활성화할 수 있습니다.
console.operator.openshift.io리소스를 편집합니다.$ oc edit console.operator.openshift.io cluster
다음 예제는 리소스에서 수정할 수 있는 매개 변수를 표시합니다.
apiVersion: config.openshift.io/v1 kind: Console metadata: name: cluster spec: managementState: Removed 1- 1
- 웹 콘솔을 비활성화하려면
managementState매개 변수 값을Removed로 설정합니다. 이 매개 변수의 다른 유효한 값은Managed(클러스터 제어 하에서 콘솔을 활성화) 및Unmanaged(사용자가 웹 콘솔 관리를 제어하고 있음)입니다.