
Red Hat Training
A Red Hat training course is available for Red Hat Enterprise Linux
8.14. Creating a Network Team Using a GUI
8.14.1. Establishing a Team Connection
You can use nm-connection-editor to direct NetworkManager to create a team from two or more Wired or InfiniBand connections. It is not necessary to create the connections to be teamed first. They can be configured as part of the process to configure the team. You must have the MAC addresses of the interfaces available in order to complete the configuration process.
Procedure 8.1. Adding a New Team Connection Using nm-connection-editor
Follow the below steps to add a new team connection.
- Enter nm-connection-editor in a terminal:
~]$ nm-connection-editor - Click the Add button. The Choose a Connection Type window appears. Select Team and click Create. The Editing Team connection 1 window appears.
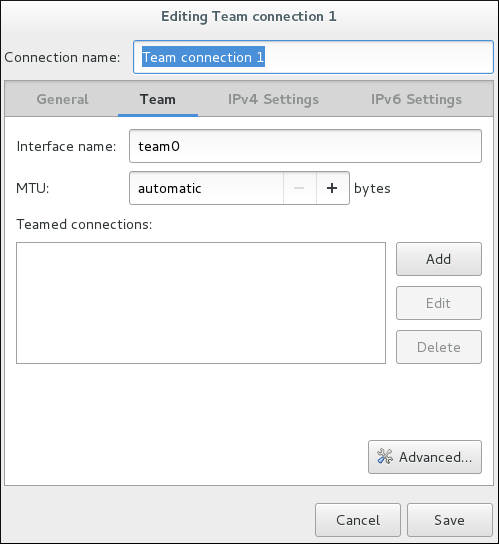
Figure 8.6. The NetworkManager Graphical User Interface Add a menu
- On the Team tab, click and select the type of interface you want to use with the team connection. Click the button. Note that the dialog to select the port type only comes up when you create the first port; after that, it will automatically use that same type for all further ports.
- The Editing team0 slave 1 window appears.

Figure 8.7. The NetworkManager Graphical User Interface Add a
SlaveConnection - If custom port settings are to be applied, click on the Team Port tab and enter a JSON configuration string or import it from a file.
- Click the button.
- The name of the teamed port appears in the Teamed connections window. Click the button to add further port connections.
- Review and confirm the settings and then click the Save button.
- Edit the team-specific settings by referring to Section 8.14.1.1, “Configuring the Team Tab” below.
Procedure 8.2. Editing an Existing Team Connection
Follow the below steps to edit an existing team connection.
- Enter nm-connection-editor in a terminal:
~]$ nm-connection-editor - Select the connection you want to edit and click the Edit button.
- Select the General tab.
- Five settings in the Editing dialog are common to the most connection types. See the General tab:
- Connection name — Enter a descriptive name for your network connection. This name is used to list this connection in the menu of the Network window.
- Connection priority for auto-activation — If the connection is set to autoconnect, the number is activated (
0by default). The higher number means higher priority. - Automatically connect to this network when it is available — Select this box if you want NetworkManager to auto-connect to this connection when it is available. See the section called “Editing an Existing Connection with control-center” for more information.
- All users may connect to this network — Select this box to create a connection available to all users on the system. Changing this setting may require root privileges. See Section 3.4.5, “Managing System-wide and Private Connection Profiles with a GUI” for details.
- Automatically connect to VPN when using this connection — Select this box if you want NetworkManager to auto-connect to a VPN connection when it is available. Select the VPN from the drop-down menu.
- Firewall Zone — Select the firewall zone from the drop-down menu. See the Red Hat Enterprise Linux 7 Security Guide for more information on firewall zones.
- Edit the team-specific settings by referring to Section 8.14.1.1, “Configuring the Team Tab” below.
Saving Your New (or Modified) Connection and Making Further Configurations
Once you have finished editing your team connection, click the button to save your customized configuration.
Then, to configure:
IPv4settings for the connection, click the IPv4 Settings tab and proceed to Section 5.4, “Configuring IPv4 Settings”orIPv6settings for the connection, click the IPv6 Settings tab and proceed to Section 5.5, “Configuring IPv6 Settings”.
8.14.1.1. Configuring the Team Tab
If you have already added a new team connection you can enter a custom JSON configuration string in the text box or import a configuration file. Click Save to apply the JSON configuration to the team interface.
For examples of JSON strings, see Section 8.13, “Configure teamd Runners”
See Procedure 8.1, “Adding a New Team Connection Using nm-connection-editor” for instructions on how to add a new team.