
ロードバランサーを使用した Capsule の設定
Capsule Server 間での負荷分散
概要
第1章 ロードバランシングソリューションのアーキテクチャー
Satellite Server がロードバランサーを使用して複数の Capsule Server 間でクライアント要求とネットワーク負荷を分散するように設定できます。このように設定すると、Capsule Server の全体的なパフォーマンスが向上します。
本書では、ロードバランシングを使用できるように Satellite Server と Capsule Server を準備する方法を概説し、負荷分散型の設定で、クライアントを登録する方法や、ロードバランサーを設定する方法についてガイドラインを提供します。
負荷分散の設定は、以下のコンポーネントで設定されます。
- Satellite Server
- Capsule Server 2 台以上
- ロードバランサー 1 つ
- クライアント複数台
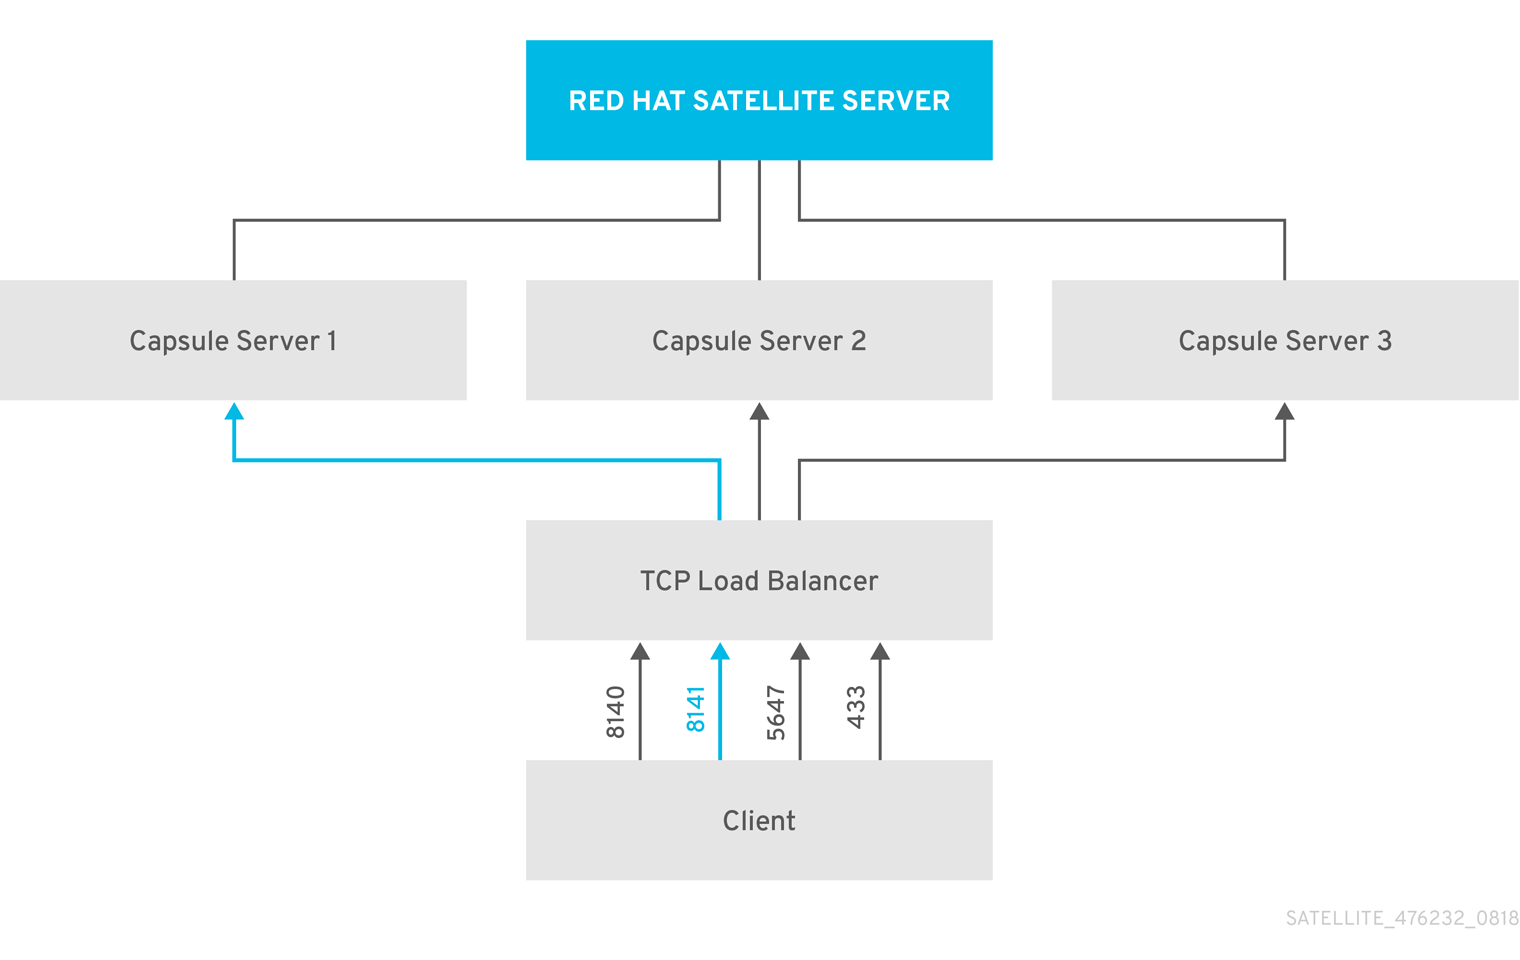
図1.1 Satellite ロードバランシングソリューションのアーキテクチャー
負荷分散型の設定では、予定メンテナーンスや、予定外のメンテナーンスで、Capsule Server が 1 台停止した場合に、ほぼすべての Capsule 機能は想定どおりに動作し続けます。ロードバランサーは、以下のサービスおよび機能と連携します。
-
subscription-managerでの登録 -
yumリポジトリーでのコンテンツ管理 - オプション: Puppet
負荷分散の設定では、ロードバランサーは上記のサービスと機能に対してのみ負荷を分散します。プロビジョニングや virt-who などの他のサービスが個別の Capsule で実行されている場合は、ロードバランサーではなく Capsule から直接アクセスする必要があります。
Puppet の制限の管理
Puppet 認証局 (CA) の管理では、負荷分散型の設定における証明書署名をサポートしていません。Puppet CA では、シリアル番号カウンターや CRL などの証明書情報がファイルシステムに保存されます。複数の書き込みプロセスで同一のデータを使用しようとすると、データが破損する可能性があります。
Puppet のこの制限を管理するには、次の手順を実行します。
- Capsule Server 1 台 (通常、ロードバランシング用に Capsule Server を設定する最初のシステム) に Puppet 証明書署名を設定します。
- ロードバランサー上のポート 8141 に CA 要求を送信するようにクライアントを設定します。
- Puppet 証明書に署名するために Capsule Server を設定したシステムで、ポート 8141 からポート 8140 に CA 要求をリダイレクトするようにロードバランサーを設定します。
第2章 負荷分散に関する考慮事項
複数の Capsule Server 間で負荷を分散すると、1 つの Capsule が単一障害点になることを防ぎます。ロードバランサーを使用するように Capsule を設定すると、予定および予定外のシステム停止に適応できるので、可用性および応答性が向上します。
ロードバランシングを設定する場合は、次のガイドラインを考慮します。
- Puppet を使用する場合は、Puppet 証明書署名は、設定する最初の Capsule に割り当てられます。最初の Capsule が停止していると、クライアントは Puppet コンテンツを取得できません。
- 本ガイドのソリューションでは、全 Capsule をある状態に維持するために Pacemaker などの同様の HA ツールは使用しません。問題のトラブルシュートするには、ロードバランサーを使用せずに Capsule ごとに問題を再現します。
ロードバランシングに必要な追加メンテナーンス
ロードバランサーを使用するように Capsule を設定すると、環境が複雑になり、新たなメンテナーンスが必要になります。
ロードバランシングには、次の追加手順が必要です。
- すべての Capsule に同じコンテンツビューがあることを確認し、すべての Capsule を同一のコンテンツビューバージョンに同期する必要があります。
- 各 Capsule を順にアップグレードする必要があります。
- 設定した Capsule ごとに定期的にバックアップする必要があります。
ロードバランシング設定の Capsule Server のアップグレード
Capsule Servers 6.8 から 6.9 へアップグレードするには、Red Hat Satellite のアップグレードおよび更新の Capsule Server のアップグレード の手順を実行します。ロードバランシング設定の Capsule Server では、他に必要な手順はありません。
第3章 Capsule Server のロードバランシング用の設定における要件
Capsule Server をロードバランシング用に設定するには、Capsule Server のインストールに記載の以下の手順を実行します。Satellite には、既存の Capsule Server をロードバランシング用に設定するサポートはありません。
第4章 Capsule Server のロードバランシング用の設定
この章では、ロードバランシング用に Capsule Server を設定する方法を概説します。お使いの Satellite Server の設定に合わせて、次のいずれかのセクションに進んでください。
作成する Katello 証明書には、Capsule Server ごとに異なるファイル名を使用します。たとえば、Capsule Server FQDN を使って証明書アーカイブファイルに名前を付けます。
4.1. デフォルト SSL 証明書を使用する Capsule Server のロードバランシング用の設定 (Puppet を使用しない)
次のセクションでは、Puppet を使用せず、デフォルト SSL 証明書を使用する Capsule Server をロードバランシング用に設定する方法を説明します。
この手順は、ロードバランシング用に設定する Capsule Server ごとに実行します。
手順
以下のように、Satellite Server で、Capsule Server の Katello 証明書を生成します。
# capsule-certs-generate \
--foreman-proxy-fqdn capsule.example.com \
--certs-tar "/root/capsule.example.com-certs.tar" \
--foreman-proxy-cname loadbalancer.example.com
capsule-certs-generateコマンドの出力であるsatellite-installerコマンド例をメモして、Capsule Server 証明書をインストールします。証明書アーカイブファイルを Satellite Server から Capsule Server にコピーします。
# scp /root/capsule.example.com-certs.tar \
root@capsule.example.com:capsule.example.com-certs.tar
capsule-certs-generateコマンドの出力から取得するsatellite-installerコマンドに次のオプションを追加します。コマンドの入力先の Capsule Server を参照するように、--puppet-ca-serverオプションを設定します。Puppet CA は、使用する予定があるかどうかに関係なく、Capsule Server にインストールする必要があります。Puppet は、デフォルトの単一ノード設定に設定されます。--certs-cname "loadbalancer.example.com" \ --puppet-dns-alt-names "loadbalancer.example.com" \ --puppet-ca-server "capsule.example.com" \ --foreman-proxy-puppetca "true" \ --puppet-server-ca "true" \ --enable-foreman-proxy-plugin-remote-execution-ssh
以下のように、Capsule Server で、
satellite-installerコマンドを実行します。# satellite-installer --scenario capsule \ --foreman-proxy-content-parent-fqdn "satellite.example.com" \ --foreman-proxy-register-in-foreman "true" \ --foreman-proxy-foreman-base-url "https://satellite.example.com" \ --foreman-proxy-trusted-hosts "satellite.example.com" \ --foreman-proxy-trusted-hosts "capsule.example.com" \ --foreman-proxy-oauth-consumer-key "oauth key" \ --foreman-proxy-oauth-consumer-secret "oauth secret" \ --certs-tar-file "capsule.example.com-certs.tar" \ --puppet-server-foreman-url "https://satellite.example.com" \ --certs-cname "loadbalancer.example.com" \ --puppet-dns-alt-names "loadbalancer.example.com" \ --puppet-ca-server "capsule.example.com" \ --foreman-proxy-puppetca "true" \ --puppet-server-ca "true" \ --enable-foreman-proxy-plugin-remote-execution-ssh
4.2. デフォルト SSL 証明書を使用する Capsule Server のロードバランシング用の設定 (Puppet を使用する)
次のセクションでは、Puppet を使用し、デフォルト SSL 証明書を使用する Capsule Server をロードバランシング用に設定する方法を説明します。
Satellite 設定で Puppet を使用する場合は、次の手順を実行する必要があります。
Puppet 証明書を生成して署名するための Capsule Server の設定
この手順は、ロードバランシング用に設定した他の Capsule Server すべてに、Puppet 証明書を生成して署名するように Capsule Server を設定するシステムにのみ、実行してください。この手順の例では、この Capsule Server の FQDN は capsule-ca.example.com です。
Satellite Server で、Puppet 証明書を生成し、署名するように Capsule Server を設定するシステムの Katello 証明書を生成します。
# capsule-certs-generate \
--foreman-proxy-fqdn capsule-ca.example.com \
--certs-tar "/root/capsule-ca.example.com-certs.tar" \
--foreman-proxy-cname loadbalancer.example.com
capsule-certs-generateコマンドの出力であるsatellite-installerコマンド例をメモして、Capsule Server 証明書をインストールします。証明書アーカイブファイルを Satellite Server から Capsule Server にコピーします。
# scp /root/capsule-ca.example.com-certs.tar \
root@capsule-ca.example.com:capsule-ca.example.com-certs.tar
capsule-certs-generateコマンドの出力から取得するsatellite-installerコマンドに次のオプションを追加します。--certs-cname "loadbalancer.example.com" \ --puppet-dns-alt-names "loadbalancer.example.com" \ --puppet-ca-server "capsule-ca.example.com" \ --foreman-proxy-puppetca "true" \ --puppet-server-ca "true" \ --enable-foreman-proxy-plugin-remote-execution-ssh
以下のように、Capsule Server で、
satellite-installerコマンドを実行します。# satellite-installer --scenario capsule \ --foreman-proxy-content-parent-fqdn "satellite.example.com" \ --foreman-proxy-register-in-foreman "true" \ --foreman-proxy-foreman-base-url "https://satellite.example.com" \ --foreman-proxy-trusted-hosts "satellite.example.com" \ --foreman-proxy-trusted-hosts "capsule-ca.example.com" \ --foreman-proxy-oauth-consumer-key "oauth key" \ --foreman-proxy-oauth-consumer-secret "oauth secret" \ --certs-tar-file "capsule-ca.example.com-certs.tar" \ --puppet-server-foreman-url "https://satellite.example.com" \ --certs-cname "loadbalancer.example.com" \ --puppet-dns-alt-names "loadbalancer.example.com" \ --puppet-ca-server "capsule-ca.example.com" \ --foreman-proxy-puppetca "true" \ --puppet-server-ca "true" \ --enable-foreman-proxy-plugin-remote-execution-ssh
Capsule Server で、Puppet サーバーを停止します。
# puppet resource service puppetserver ensure=stopped
ロードバランシングを設定する他のすべての Capsule Server に対して Puppet 証明書を生成します。ただし、Puppet 証明書署名を設定する最初のシステムを除きます。
# puppetserver ca generate --certname capsule.example.com \
--subject-alt-names loadbalancer.example.com --ca-client
このコマンドは、Capsule Server が Puppet 証明書に署名するように設定するシステムで、次のファイルを作成します。
-
/etc/puppetlabs/puppet/ssl/certs/ca.pem -
/etc/puppetlabs/puppet/ssl/certs/capsule.example.com.pem -
/etc/puppetlabs/puppet/ssl/private_keys/capsule.example.com.pem -
/etc/puppetlabs/puppet/ssl/public_keys/capsule.example.com.pem
-
Puppet サーバーを再開します。
# puppet resource service puppetserver ensure=running
残りの Capsule Server のロードバランシング用の設定
この手順は、Capsule Server が Puppet 証明書を署名するように設定するシステムを除き、各 Capsule Server で実行します。
Satellite Server で、Capsule Server の Katello 証明書を生成します。
# capsule-certs-generate \
--foreman-proxy-fqdn capsule.example.com \
--certs-tar "/root/capsule.example.com-certs.tar" \
--foreman-proxy-cname loadbalancer.example.com
capsule-certs-generateコマンドの出力であるsatellite-installerコマンド例をメモして、Capsule Server 証明書をインストールします。証明書アーカイブファイルを Satellite Server から Capsule Server にコピーします。
# scp /root/capsule.example.com-certs.tar \
root@capsule.example.com:capsule.example.com-certs.tar
Capsule Server で、
puppetserverパッケージをインストールします。# satellite-maintain packages install puppetserver
Capsule Server で、Puppet 証明書用のディレクトリーを作成します。
# mkdir -p /etc/puppetlabs/puppet/ssl/certs/ \
/etc/puppetlabs/puppet/ssl/private_keys/ \
/etc/puppetlabs/puppet/ssl/public_keys/
Capsule Server で、Capsule Server を設定するシステムから、対象の Capsule Server の Puppet 証明書をコピーして、Puppet 証明書を署名します。
# scp root@capsule-ca.example.com:/etc/puppetlabs/puppet/ssl/certs/ca.pem \
/etc/puppetlabs/puppet/ssl/certs/ca.pem
# scp root@capsule-ca.example.com:/etc/puppetlabs/puppet/ssl/certs/capsule.example.com.pem \
/etc/puppetlabs/puppet/ssl/certs/capsule.example.com.pem
# scp root@capsule-ca.example.com:/etc/puppetlabs/puppet/ssl/private_keys/capsule.example.com.pem \
/etc/puppetlabs/puppet/ssl/private_keys/capsule.example.com.pem
# scp root@capsule-ca.example.com:/etc/puppetlabs/puppet/ssl/public_keys/capsule.example.com.pem \
/etc/puppetlabs/puppet/ssl/public_keys/capsule.example.com.pem
Capsule Server で、ディレクトリーの所有権をユーザー
puppet、グループpuppetに変更し、SELinux コンテキストを設定します。# chown -R puppet:puppet /etc/puppetlabs/puppet/ssl/ # restorecon -Rv /etc/puppetlabs/puppet/ssl/
capsule-certs-generateコマンドの出力から取得するsatellite-installerコマンドに次のオプションを追加します。--certs-cname "loadbalancer.example.com" \ --puppet-dns-alt-names "loadbalancer.example.com" \ --puppet-ca-server "capsule-ca.example.com" \ --foreman-proxy-puppetca "false" \ --puppet-server-ca "false" \ --enable-foreman-proxy-plugin-remote-execution-ssh
以下のように、Capsule Server で、
satellite-installerコマンドを実行します。# satellite-installer --scenario capsule \ --foreman-proxy-content-parent-fqdn "satellite.example.com" \ --foreman-proxy-register-in-foreman "true" \ --foreman-proxy-foreman-base-url "https://satellite.example.com" \ --foreman-proxy-trusted-hosts "satellite.example.com" \ --foreman-proxy-trusted-hosts "capsule.example.com" \ --foreman-proxy-oauth-consumer-key "oauth key" \ --foreman-proxy-oauth-consumer-secret "oauth secret" \ --certs-tar-file "capsule.example.com-certs.tar" \ --puppet-server-foreman-url "https://satellite.example.com" \ --certs-cname "loadbalancer.example.com" \ --puppet-dns-alt-names "loadbalancer.example.com" \ --puppet-ca-server "capsule-ca.example.com" \ --foreman-proxy-puppetca "false" \ --puppet-server-ca :false" \ --enable-foreman-proxy-plugin-remote-execution-ssh
4.3. カスタム SSL 証明書を使用する Capsule Server のロードバランシング用の設定 (Puppet を使用しない)
次のセクションでは、Puppet を使用せず、カスタム SSL 証明書を使用する Capsule Server をロードバランシング用に設定する方法を説明します。
4.3.1. Capsule Server のカスタム SSL 証明書の作成
以下の手順は、証明書署名要求 (CSR) の設定ファイルを作成して、サブジェクトの別名としてロードバランサーと Capsule Server を追加する方法を説明します。この手順は、ロードバランシング用に設定する Capsule Server ごとに実行します。
手順
Capsule Server で、すべてのソース証明書ファイルを含むディレクトリーを作成し、
rootユーザーのみがアクセスできるようにします。# mkdir /root/capsule_cert # cd /root/capsule_cert
Certificate Signing Request (CSR) を署名する秘密鍵を作成します。
秘密鍵は暗号化する必要がないことに注意してください。パスワードで保護された秘密鍵を使用する場合は、秘密鍵のパスワードを削除します。
この Capsule Server の秘密鍵がすでにある場合は、この手順を省略します。
# openssl genrsa -out /root/capsule_cert/capsule_cert_key.pem 4096
証明書要求設定ファイルを作成して、次の内容を追加します。
[ req ]
default_bits       = 4096
distinguished_name = req_distinguished_name
req_extensions     = req_ext
prompt = no

[ req_distinguished_name ]
countryName=2 Letter Country Code
stateOrProvinceName=State or Province Full Name
localityName=Locality Name
0.organizationName=Organization Name
organizationalUnitName=Capsule Organization Unit Name
commonName=capsule.example.com  1
emailAddress=Email Address

[ req_ext ]
#authorityKeyIdentifier=keyid,issuer
#basicConstraints=CA:FALSE
keyUsage = digitalSignature, nonRepudiation, keyEncipherment, dataEncipherment
subjectAltName = @alt_names

[alt_names]                  2
DNS.1 = loadbalancer.example.com
DNS.2 = capsule.example.com
SAN 証明書の証明書署名要求 (CSR) を作成します。
# openssl req -new \
-key /root/capsule_cert/capsule_cert_key.pem \ 1
-config SAN_config.cfg \                   2
-out /root/capsule_cert/capsule_cert_csr.pem   3
証明書要求を認証局に送信します。
要求を送信する場合は、証明書の有効期限を指定してください。証明書要求を送信する方法は異なるため、推奨の方法について認証局にお問い合わせください。要求への応答で、認証局バンドルと署名済み証明書を別々のファイルで受け取ることになります。
- 認証局バンドル、認証局から受け取った Capsule Server の証明書ファイル、Capsule Server の秘密鍵を、Satellite Server にコピーします。
Satellite Server で、Capsule Server 証明書入力ファイルを検証します。
# katello-certs-check \
-c /root/capsule_cert/capsule_cert.pem \      1
-k /root/capsule_cert/capsule_cert_key.pem \  2
-b /root/capsule_cert/ca_cert_bundle.pem      3
commonName=をワイルドカードの値*に設定する場合には、-t capsuleオプションをkatello-certs-checkコマンドに追加する必要があります。katello-certs-checkコマンドの出力であるcapsule-certs-generateコマンドの例をメモして、この Capsule Server の認証アーカイブファイルを作成します。
4.3.2. カスタム SSL 証明書を使用する Capsule Server のロードバランシング用の設定 (Puppet を使用しない)
この手順は、ロードバランシング用に設定する Capsule Server ごとに実行します。
手順
katello-certs-checkコマンドの出力から取得するcapsule-certs-generateコマンドに次のオプションを追加します。--foreman-proxy-cname loadbalancer.example.comSatellite Server で、
capsule-certs-generateコマンドを入力して Capsule 証明書を生成します。以下に例を示します。# capsule-certs-generate \ --foreman-proxy-fqdn capsule.example.com \ --certs-tar /root/capsule_cert/capsule.tar \ --server-cert /root/capsule_cert/capsule.pem \ --server-key /root/capsule_cert/capsule.pem \ --server-ca-cert /root/capsule_cert/ca_cert_bundle.pem \ --foreman-proxy-cname loadbalancer.example.com
出力からの
satellite-installerコマンド例をメモし、Capsule Server 証明書をインストールします。証明書アーカイブファイルを Satellite Server から Capsule Server にコピーします。
# scp /root/capsule.example.com-certs.tar \
root@capsule.example.com:capsule.example.com-certs.tar
capsule-certs-generateコマンドの出力から取得するsatellite-installerコマンドに次のオプションを追加します。コマンドの入力先の Capsule Server を参照するように、--puppet-ca-serverオプションを設定します。Puppet CA は、使用する予定があるかどうかに関係なく、Capsule Server にインストールする必要があります。Puppet は、デフォルトの単一ノード設定に設定されます。--certs-cname "loadbalancer.example.com" \ --puppet-dns-alt-names "loadbalancer.example.com" \ --puppet-ca-server "capsule.example.com" \ --foreman-proxy-puppetca "true" \ --puppet-server-ca "true" \ --enable-foreman-proxy-plugin-remote-execution-ssh
以下のように、Capsule Server で、
satellite-installerコマンドを実行します。# satellite-installer --scenario capsule \ --foreman-proxy-content-parent-fqdn "satellite.example.com" \ --foreman-proxy-register-in-foreman "true" \ --foreman-proxy-foreman-base-url "https://satellite.example.com" \ --foreman-proxy-trusted-hosts "satellite.example.com" \ --foreman-proxy-trusted-hosts "capsule.example.com" \ --foreman-proxy-oauth-consumer-key "oauth key" \ --foreman-proxy-oauth-consumer-secret "oauth secret" \ --certs-tar-file "capsule.example.com-certs.tar" \ --puppet-server-foreman-url "https://satellite.example.com" \ --certs-cname "loadbalancer.example.com" \ --puppet-dns-alt-names "loadbalancer.example.com" \ --puppet-ca-server "capsule.example.com" \ --foreman-proxy-puppetca "true" \ --puppet-server-ca "true" \ --enable-foreman-proxy-plugin-remote-execution-ssh
4.4. カスタム SSL 証明書を使用する Capsule Server のロードバランシング用の設定 (Puppet を使用する)
次のセクションでは、Puppet を使用し、カスタム SSL 証明書を使用する Capsule Server をロードバランシング用に設定する方法を説明します。
4.4.1. Capsule Server のカスタム SSL 証明書の作成
以下の手順は、証明書署名要求 (CSR) の設定ファイルを作成して、サブジェクトの別名としてロードバランサーと Capsule Server を追加する方法を説明します。この手順は、ロードバランシング用に設定する Capsule Server ごとに実行します。
手順
Capsule Server で、すべてのソース証明書ファイルを含むディレクトリーを作成し、
rootユーザーのみがアクセスできるようにします。# mkdir /root/capsule_cert # cd /root/capsule_cert
Certificate Signing Request (CSR) を署名する秘密鍵を作成します。
秘密鍵は暗号化する必要がないことに注意してください。パスワードで保護された秘密鍵を使用する場合は、秘密鍵のパスワードを削除します。
この Capsule Server の秘密鍵がすでにある場合は、この手順を省略します。
# openssl genrsa -out /root/capsule_cert/capsule.pem 4096
証明書要求設定ファイルを作成して、次の内容を追加します。
[ req ]
default_bits       = 4096
distinguished_name = req_distinguished_name
req_extensions     = req_ext
prompt = no

[ req_distinguished_name ]
countryName=2 Letter Country Code
stateOrProvinceName=State or Province Full Name
localityName=Locality Name
0.organizationName=Organization Name
organizationalUnitName=Capsule Organization Unit Name
commonName=capsule.example.com  1
emailAddress=Email Address

[ req_ext ]
#authorityKeyIdentifier=keyid,issuer
#basicConstraints=CA:FALSE
keyUsage = digitalSignature, nonRepudiation, keyEncipherment, dataEncipherment
subjectAltName = @alt_names

[alt_names]                  2
DNS.1 = loadbalancer.example.com
DNS.2 = capsule.example.com
SAN 証明書の証明書署名要求 (CSR) を作成します。
# openssl req -new \
-key /root/capsule_cert/capsule.pem \ 1
-config SAN_config.cfg \          2
-out /root/capsule_cert/capsule.pem   3
証明書要求を認証局に送信します。
要求を送信する場合は、証明書の有効期限を指定してください。証明書要求を送信する方法は異なるため、推奨の方法について認証局にお問い合わせください。要求への応答で、認証局バンドルと署名済み証明書を別々のファイルで受け取ることになります。
- 認証局バンドル、認証局から受け取った Capsule Server の証明書ファイル、Capsule Server の秘密鍵を、Satellite Server にコピーし、検証します。
Satellite Server で、Capsule Server 証明書入力ファイルを検証します。
# katello-certs-check \
-c /root/capsule_cert/capsule.pem \      1
-k /root/capsule_cert/capsule.pem \      2
-b /root/capsule_cert/ca_cert_bundle.pem 3
4.4.2. カスタム SSL 証明書を使用する Capsule Server のロードバランシング用の設定 (Puppet を使用する)
Satellite 設定で Puppet を使用する場合は、次の手順を実行する必要があります。
Puppet 証明書を生成して署名するための Capsule Server の設定
この手順は、ロードバランシング用に設定した他の Capsule Server すべてに、Puppet 証明書を生成するように Capsule Server を設定するシステムにのみ、実行してください。この手順の例では、この Capsule Server の FQDN は capsule-ca.example.com です。
katello-certs-checkコマンドの出力から取得するcapsule-certs-generateコマンドに次のオプションを追加します。--foreman-proxy-cname loadbalancer.example.comSatellite Server で、
capsule-certs-generateコマンドを入力して Capsule 証明書を生成します。以下に例を示します。# capsule-certs-generate \ --foreman-proxy-fqdn capsule-ca.example.com \ --certs-tar /root/capsule_cert/capsule-ca.tar \ --server-cert /root/capsule_cert/capsule-ca.pem \ --server-key /root/capsule_cert/capsule-ca.pem \ --server-ca-cert /root/capsule_cert/ca_cert_bundle.pem \ --foreman-proxy-cname loadbalancer.example.com
出力からの
satellite-installerコマンド例をメモし、Capsule Server 証明書をインストールします。- 証明書アーカイブファイルを Satellite Server から Capsule Server にコピーします。
capsule-certs-generateコマンドの出力から取得するsatellite-installerコマンドに次のオプションを追加します。--puppet-dns-alt-names "loadbalancer.example.com" \ --puppet-ca-server "capsule-ca.example.com" \ --foreman-proxy-puppetca "true" \ --puppet-server-ca "true" \ --enable-foreman-proxy-plugin-remote-execution-ssh
以下のように、Capsule Server で、
satellite-installerコマンドを実行します。satellite-installer --scenario capsule \ --foreman-proxy-content-parent-fqdn "satellite.example.com" \ --foreman-proxy-register-in-foreman "true" \ --foreman-proxy-foreman-base-url "https://satellite.example.com" \ --foreman-proxy-trusted-hosts "satellite.example.com" \ --foreman-proxy-trusted-hosts "capsule-ca.example.com" \ --foreman-proxy-oauth-consumer-key "oauth key" \ --foreman-proxy-oauth-consumer-secret "oauth secret" \ --certs-tar-file "certs.tgz" \ --puppet-server-foreman-url "https://satellite.example.com" \ --certs-cname "loadbalancer.example.com" \ --puppet-dns-alt-names "loadbalancer.example.com" \ --puppet-ca-server "capsule-ca.example.com" \ --foreman-proxy-puppetca "true" \ --puppet-server-ca "true" \ --enable-foreman-proxy-plugin-remote-execution-ssh
Capsule Server で、ロードバランシングを設定する他のすべての Capsule に対して Puppet 証明書を生成します。ただし、Puppet 証明書署名を設定する最初のシステムを除きます。
# puppet cert generate capsule.example.com \
--dns_alt_names=loadbalancer.example.com
このコマンドは、Puppet 証明書署名を行う Capsule Server インスタンスに次のファイルを作成します。
-
/etc/puppetlabs/puppet/ssl/certs/ca.pem -
/etc/puppetlabs/puppet/ssl/certs/capsule.example.com.pem -
/etc/puppetlabs/puppet/ssl/private_keys/capsule.example.com.pem -
/etc/puppetlabs/puppet/ssl/public_keys/capsule.example.com.pem
-
残りの Capsule Server のロードバランシング用の設定
この手順は、Puppet 証明書に署名するために Capsule Server を設定するシステムを除き、各 Capsule Server で実行します。
katello-certs-checkコマンドの出力から取得するcapsule-certs-generateコマンドに次のオプションを追加します。--foreman-proxy-cname loadbalancer.example.comSatellite Server で、
capsule-certs-generateコマンドを入力して Capsule 証明書を生成します。以下に例を示します。# capsule-certs-generate \ --foreman-proxy-fqdn capsule.example.com \ --certs-tar /root/capsule_cert/capsule.tar \ --server-cert /root/capsule_cert/capsule.pem \ --server-key /root/capsule_cert/capsule.pem \ --server-ca-cert /root/capsule_cert/ca_cert_bundle.pem \ --foreman-proxy-cname loadbalancer.example.com
出力からの
satellite-installerコマンド例をメモし、Capsule Server 証明書をインストールします。証明書アーカイブファイルを Satellite Server から Capsule Server にコピーします。
# scp /root/capsule.example.com-certs.tar \
root@capsule.example.com:capsule.example.com-certs.tar
Capsule Server で、
puppetserverパッケージをインストールします。# satellite-maintain packages install puppetserver
Capsule Server で、Puppet 証明書用のディレクトリーを作成します。
# mkdir -p /etc/puppetlabs/puppet/ssl/certs/ \
/etc/puppetlabs/puppet/ssl/private_keys/ \
/etc/puppetlabs/puppet/ssl/public_keys/
Capsule Server で、Capsule Server を設定するシステムから、対象の Capsule Server の Puppet 証明書をコピーして、Puppet 証明書を署名します。
# scp root@capsule-ca.example.com:/etc/puppetlabs/puppet/ssl/certs/ca.pem \
/etc/puppetlabs/puppet/ssl/certs/ca.pem
# scp root@capsule-ca.example.com:/etc/puppetlabs/puppet/ssl/certs/capsule.example.com.pem \
/etc/puppetlabs/puppet/ssl/certs/capsule.example.com.pem
# scp root@capsule-ca.example.com:/etc/puppetlabs/puppet/ssl/private_keys/capsule.example.com.pem \
/etc/puppetlabs/puppet/ssl/private_keys/capsule.example.com.pem
# scp root@capsule-ca.example.com:/etc/puppetlabs/puppet/ssl/public_keys/capsule.example.com.pem \
/etc/puppetlabs/puppet/ssl/public_keys/capsule.example.com.pem
Capsule Server で、ディレクトリーの所有権をユーザー
puppet、グループpuppetに変更し、SELinux コンテキストを設定します。# chown -R puppet:puppet /etc/puppetlabs/puppet/ssl/ # restorecon -Rv /etc/puppetlabs/puppet/ssl/
capsule-certs-generateコマンドの出力から取得するsatellite-installerコマンドに次のオプションを追加します。--certs-cname "loadbalancer.example.com" \ --puppet-dns-alt-names "loadbalancer.example.com" \ --puppet-ca-server "capsule-ca.example.com" \ --foreman-proxy-puppetca "false" \ --puppet-server-ca "false" \ --enable-foreman-proxy-plugin-remote-execution-ssh
以下のように、Capsule Server で、
satellite-installerコマンドを実行します。# satellite-installer --scenario capsule \ --foreman-proxy-content-parent-fqdn "satellite.example.com" \ --foreman-proxy-register-in-foreman "true" \ --foreman-proxy-foreman-base-url "https://satellite.example.com" \ --foreman-proxy-trusted-hosts "satellite.example.com" \ --foreman-proxy-trusted-hosts "capsule.example.com" \ --foreman-proxy-oauth-consumer-key "oauth key" \ --foreman-proxy-oauth-consumer-secret "oauth secret" \ --certs-tar-file "capsule.example.com-certs.tar" \ --puppet-server-foreman-url "https://satellite.example.com" \ --certs-cname "loadbalancer.example.com" \ --puppet-dns-alt-names "loadbalancer.example.com" \ --puppet-ca-server "capsule-ca.example.com" \ --foreman-proxy-puppetca "false" \ --puppet-server-ca "false" \ --enable-foreman-proxy-plugin-remote-execution-ssh
第5章 ロードバランサーのインストール
以下の例は、HAProxy ロードバランサーの設定時の一般的な指針です。ただし、適切な負荷分散ソフトウェアソリューションをインストールして、TCP 転送とスティッキーセッションをサポートすることができます。
Red Hat Enterprise Linux 7 ホストで、HAProxy をインストールします。
# yum install haproxy
semanageツールが含まれる、次のパッケージをインストールします。# yum install policycoreutils-python
SELinux で HAProxy がどのポートでもバインドできるように設定します。
# semanage boolean --modify --on haproxy_connect_any
表5.1「ロードバランサー用のポート設定」 の説明に従って、ポートのネットワーク負荷を分散するようにロードバランサーを設定します。たとえば、HAProxy のポートを設定するには、
/etc/haproxy/haproxy.cfgファイルを表に合わせて編集します。TCP ポート 443 でスティッキーセッションを設定して、ロードバランシング用に設定する別の Capsule Server から RPM リポジトリーの yum メタデータを要求する必要があります。
表5.1 ロードバランサー用のポート設定
サービス ポート モード バランスモード 宛先 HTTP
80
TCP
roundrobin
全 Capsule Server のポート 80
HTTPS
443
TCP
source
全 Capsule Server のポート 443
RHSM
8443
TCP
roundrobin
全 Capsule Server のポート 8443
AMQP
5647
TCP
roundrobin
全 Capsule Server のポート 5647
Puppet (オプション)
8140
TCP
roundrobin
全 Capsule Server のポート 8140
PuppetCA (オプション)
8141
TCP
roundrobin
Puppet 証明書に署名するように Capsule Server を設定するシステムだけのポート 8140
SmartProxy (OpenScap のオプション)
9090
TCP
roundrobin
全 Capsule Server のポート 9090
Docker (オプション)
5000
TCP
roundrobin
全 Capsule Server のポート 5000
- SSL オフロードを無効にして、クライアント側の SSL 証明書がバックエンドサーバーにパススルーできるようにロードバランサーを設定します。クライアントから Capsule Server への通信はクライアント側の SSL 証明書に依存するので、この設定が必要です。
HAProxy サービスを起動し、有効にします。
# systemctl start haproxy
# systemctl enable haproxy
第6章 クライアントの登録
Red Hat Enterprise Linux バージョン 6、7、または 8 オペレーティングシステムを実行しているクライアントを、ロードバランシング用に設定する Capsule Server に登録できます。クライアントを登録して Puppet を使用するように設定する方法の詳細は、ホストの管理ガイドの ホストの登録 を参照してください。
クライアントを登録するには、次のいずれかの手順に進みます。
6.1. ブートストラップスクリプトを使ったクライアントの登録
クライアントを登録するには、クライアント上で次のコマンドを入力します。クライアントごとに登録の手順を実行する必要があります。
前提条件
クライアントにブートストラップスクリプトをインストールして、スクリプトのファイル権限を実行可能に変更していることを確認する。詳細は、ホストの管理ガイドの ブートストラップスクリプトを使ったホストの Red Hat Satellite への登録 を参照してください。
Red Hat Enterprise Linux 8 の場合は、以下のコマンドを入力します。
# /usr/libexec/platform-python bootstrap.py \
--login=admin \
--server loadbalancer.example.com \
--organization="Your_Organization" \
--location="Your_Location" \
--hostgroup="Your_Hostgroup" \
--activationkey=your_activation_key \
--enablerepos=rhel-7-server-satellite-tools-6.9-rpms \
--puppet-ca-port 8141 \    1
--force                    2
Red Hat Enterprise Linux 7、6、5 の場合は、以下のコマンドを入力します。
# python bootstrap.py --login=admin \
--server loadbalancer.example.com \
--organization="Your_Organization" \
--location="Your_Location" \
--hostgroup="Your_Hostgroup" \
--activationkey=your_activation_key \
--enablerepos=rhel-7-server-satellite-tools-6.9-rpms \
--puppet-ca-port 8141 \    1
--force                    2
このスクリプトでは、--login オプションで入力した Satellite ユーザー名に対応するパスワードの入力が求められます。
6.2. クライアントの手動登録
クライアントを手動で登録するには、登録するクライアントごとに、次の手順を実行します。
手順
katello-ca-consumerパッケージがインストールされている場合は削除します。# yum remove 'katello-ca-consumer*'
ロードバランサーから
katello-ca-consumerパッケージをインストールします。# rpm -Uvh \ http://loadbalancer.example.com/pub/katello-ca-consumer-latest.noarch.rpmクライアントを登録し、
--serverurlと--baseurlのオプションを追加します。# subscription-manager register --org=Your_Organization \ --activationkey=Your_Activation_Key \ --serverurl=https://loadbalancer.example.com:8443/rhsm \ --baseurl=https://loadbalancer.example.com/pulp/repos
第7章 SCAP コンテンツのクライアントへのプロモート
次のセクションでは、ロードバランシング用に設定する Capsule Server に登録されているクライアントにセキュリティー設定共通化手順 (SCAP) コンテンツをプロモートする方法について説明します。
前提条件
- SCAP コンテンツが設定されている。詳細は、Red Hat Satellite の管理の SCAP コンテンツの設定 を参照してください。
手順
-
Satellite Web UI で 設定 > クラス に移動して、
foreman_scap_clientをクリックします。 - スマートクラスパラメーター タブをクリックします。
-
スマートクラスパラメーター ウィンドウの左側のペインで、
ポートをクリックします。 - デフォルトの動作 エリアで、上書き チェックボックスを選択します。
-
キータイプ の一覧から
整数を選択します。 -
デフォルト値 フィールドに、
9090と入力します。 -
スマートクラスパラメーター ウィンドウの左側のペインで、
サーバーをクリックします。 - デフォルトの動作 エリアで、上書き チェックボックスを選択します。
-
キータイプ の一覧から
文字列を選択します。 -
デフォルト値 フィールドで、ロードバランサーの FQDN を入力します。たとえば、
loadbalancer.example.comと入力します。 - スマートクラスパラメーター ウィンドウの左下のペインで、送信 をクリックします。
-
foreman_scap_clientPuppet クラスが含まれる Puppet モジュールをコンテンツビューに追加します。このコンテンツビューを公開し、クライアントの環境にプロモートします。 設定を確認する場合は、クライアント上で Puppet エージェントを実行して、変更内容をプロモートします。Puppet エージェントは 30 分ごとにクライアント上で実行されるため、各クライアントで手動で Puppet エージェントを実行しないでください。
# puppet agent -t --noop
クライアント上で、
/etc/foreman_scap_client/config.yamlファイルに次の行が含まれていることを確認します。# Foreman proxy to which reports should be uploaded :server: 'loadbalancer.example.com' :port: 9090
関連情報
- Satellite Server に Puppet モジュールを追加する方法の詳細は、Puppet ガイドの Red Hat Satellite 6 への Puppet モジュールの追加 を参照してください。
- コンテンツビューの詳細は、コンテンツ管理ガイドの コンテンツビューの管理 を参照してください。
第8章 ロードバランシング設定の確認
設定する Capsule Server ごとに次の手順を実行して、ロードバランシング設定を確認します。
- Capsule Server のベースオペレーティングシステムをシャットダウンします。
-
この Capsule に登録されたクライアントで、コンテンツまたはサブスクリプション管理機能が利用可能であることを確認します。たとえば、クライアント上で
subscription-manager refreshコマンドを入力します。 - Capsule Server のベースオペレーティングシステムを再起動します。