
第7章 Creating an Application Life Cycle
This chapter outlines the application life cycle in Satellite and how to create and remove application life cycles for Satellite and Capsule.
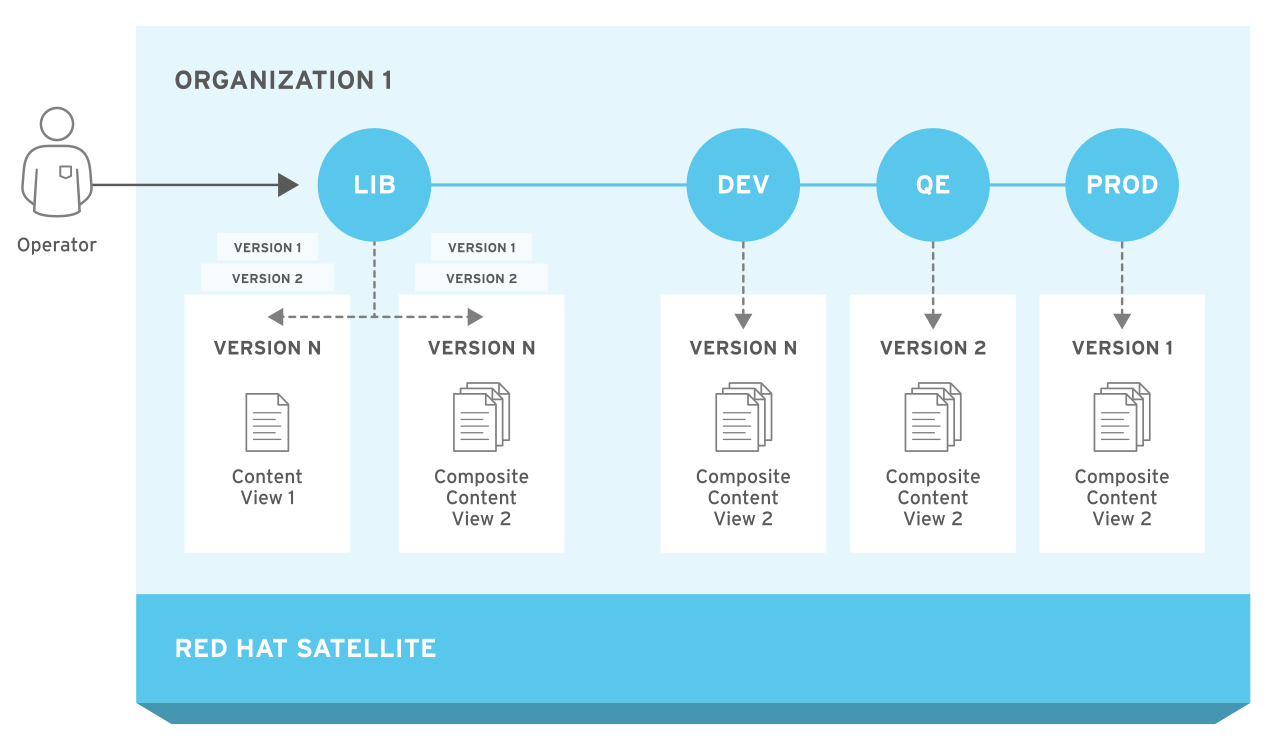
7.1. Application Life Cycle Overview
アプリケーションライフサイクル は、Red Hat Satellite 6 のコンテンツ管理機能の中心となる概念です。アプリケーションライフサイクルは、特定の段階で特定のシステムとソフトウェアがどのように見えるかを定義します。たとえば、アプリケーションライフサイクルが単純な場合には、開発段階と実稼働段階のみになります。このような場合に、アプリケーションライフサイクルは以下のようになります。
- Development
- Production
However, a more complex application life cycle might have further stages, such as a phase for testing or a beta release. This adds extra stages to the application life cycle:
- Development
- Testing
- Beta Release
- Production
Red Hat Satellite 6 provides methods to customize each application life cycle stage so that it suits your specifications.
Each stage in the application life cycle is called an environment in Red Hat Satellite 6. Each environment uses a specific collection of content. Red Hat Satellite 6 defines these content collections as a Content View. Each Content View acts as a filter where you can define what repositories, packages, and Puppet modules to include in a particular environment. This provides a method for you to define specific sets of content to designate to each environment.
たとえば、メールサーバーの場合は、実際に使用する実稼働レベルのサーバーと、最新のメールサーバーパッケージをテストするテストサーバーという、単純なアプリケーションライフサイクルのみを必要とします。テストサーバーが初期段階をパスすると、実稼働レベルのサーバーで新パッケージを使用するように設定できます。
別の例としては、ソフトウェア製品の開発ライフサイクルがあります。開発環境でソフトウェアの新しい部分を開発するには、品質保証環境でソフトウェアをテストしてベータ版としてプレリリースした後に、実稼働レベルのアプリケーションとしてソフトウェアをリリースします。
図7.1 The Red Hat Satellite 6 Application Life Cycle
7.2. Promoting Content across the Application Life Cycle
In the application life cycle chain, when content moves from one environment to the next, this is called promotion.
Example Content Promotion Across Satellite Life Cycle Environments
各環境には、Red Hat Satellite 6 に登録したシステムが含まれ、そのシステムがアクセスできるのは、各環境に関連するリポジトリーに限られます。別の環境にパッケージをプロモートすると、プロモート先の環境のリポジトリーはパッケージの新バージョンを受け取り、その結果、プロモート先の環境にある各システムはパッケージを新バージョンに更新できます。
| Development | Testing | Production |
|---|---|---|
|
example_software-1.1-0.noarch.rpm |
example_software-1.0-0.noarch.rpm |
example_software-1.0-0.noarch.rpm |
パッチ開発の完了後には、RPM をテスト環境にプロモートして、品質保証エンジニアチームがパッチをレビューできるようにします。この時点では、アプリケーションライフサイクルに以下のパッケージバージョンが各環境に含まれます。
| Development | Testing | Production |
|---|---|---|
|
example_software-1.1-0.noarch.rpm |
example_software-1.1-0.noarch.rpm |
example_software-1.0-0.noarch.rpm |
品質保証エンジニアチームがパッチのレビューを行う間、開発チームは example_software 2.0 の作業に着手します。このため、アプリケーションライフサイクルは以下のようになります。
| Development | Testing | Production |
|---|---|---|
|
exampleware-2.0-0.noarch.rpm |
exampleware-1.1-0.noarch.rpm |
exampleware-1.0-0.noarch.rpm |
品質保証エンジニアチームがパッチのレビューを完了します。これで、example_software 1.1 をリリースする準備が完了します。1.1 を実稼働環境にプロモートします。
| Development | Testing | Production |
|---|---|---|
|
example_software-2.0-0.noarch.rpm |
example_software-1.1-0.noarch.rpm |
example_software-1.1-0.noarch.rpm |
開発チームが example_software 2.0 の作業を完了し、テスト環境にプロモートします。
| Development | Testing | Production |
|---|---|---|
|
example_software-2.0-0.noarch.rpm |
example_software-2.0-0.noarch.rpm |
example_software-1.1-0.noarch.rpm |
Finally, the Quality Engineering team reviews the package. After a successful review, promote the package to the Production environment:
| Development | Testing | Production |
|---|---|---|
|
exampleware-2.0-0.noarch.rpm |
exampleware-2.0-0.noarch.rpm |
exampleware-2.0-0.noarch.rpm |
For more information, see 「Promoting a Content View」.
7.3. Creating an Application Life Cycle
ソフトウェアを開発してリリースする単純なアプリケーションライフサイクルを作成するには、初期環境として ライブラリー 環境を使用し、その後に 開発、テスト、および 実稼働 の順に、チェーンにこの 3 つの環境を追加します。
Procedure
To create an application life cycle, complete the following steps:
- In the Satellite web UI, navigate to Content > Lifecycle Environments.
- 新規環境パス をクリックして、新しいアプリケーションライフサイクルを開始します。
- 名前 フィールドに、環境の名前を入力します。
- In the Description field, enter a description for your environment.
- 保存をクリックします。
For CLI Users
Use the hammer lifecycle-environment create command to create each environment. Use the --prior option to specify the previous environment. For example:
# hammer lifecycle-environment create \
--name "Development" \
--description "Development Environment" \
--prior "Library" \
--organization "My_Organization"
# hammer lifecycle-environment create \
--name "Testing" \
--description "Testing Environment" \
--prior "Development" \
--organization "My_Organization"
# hammer lifecycle-environment create \
--name "Production" \
--description "Production Environment" \
--prior "Testing" \
--organization "My_Organization"
To view the chain of the life cycle environment, enter the hammer lifecycle-environment paths command:
# hammer lifecycle-environment paths --organization "_My_Organization_"
-----------------------------------------------
LIFECYCLE PATH
-----------------------------------------------
Library >> Development >> Testing >> Production
-----------------------------------------------
7.4. Removing Life Cycle Environments from Satellite Server
Use this procedure to remove a life cycle environment.
Procedure
ライフサイクル環境を削除するには、以下の手順を行います。
- Satellite Web UI で、コンテンツ > ライフサイクル環境 に移動します。
- 削除するライフサイクル環境の名前をクリックし、環境の削除をクリックします。
- 削除 をクリックして環境を削除します。
For CLI Users
List the life cycle environments for your organization and note the name of the life cycle environment you want to remove:
# hammer lifecycle-environment list --organization "My_Organization"Use the
hammer lifecycle-environment deletecommand to remove an environment:# hammer lifecycle-environment delete \ --name "your_environment" \ --organization "My_Organization"
7.5. Removing Life Cycle Environments from Capsule Server
When life cycle environments are no longer relevant to the host system or environments are added incorrectly to Capsule Server, you can remove the life cycle environments from Capsule Server.
Capsule からライフサイクル環境を削除するには、Satellite Web UI と Hammer の両方を使用できます。
Procedure
To remove a life cycle environment from Capsule Server, complete the following step:
- In the Satellite web UI, navigate to Infrastructure > Capsules, and select the Capsule that you want to remove a life cycle from.
- Edit をクリックしてから、Life Cycle Environments タブをクリックします。
- 右のメニューから、Capsule から削除するライフサイクル環境を選択し、送信 をクリックします。
- Capsule のコンテンツを同期するには、概要タブをクリックしてから同期ボタンをクリックします。
- 最適化された同期または 完全な同期を選択します。
For CLI Users
To remove a life cycle environment from Capsule Server, complete the following steps:
Select the Capsule Server that you want from the list and take note of its id:
# hammer capsule list
To verify the Capsule Server’s details, enter the following command:
# hammer capsule info --id capsule_idVerify the list of life cycle environments currently attached to the Capsule Server and take note of the environment id:
# hammer capsule content lifecycle-environments \
--id capsule_id
Remove the life cycle environment from Capsule Server:
# hammer capsule content remove-lifecycle-environment \
--id capsule_id \
--environment-id environment_id
Repeat this step for every life cycle environment that you want to remove from Capsule Server.
Synchronize the content from Satellite Server’s environment to Capsule Server:
# hammer capsule content synchronize \
--id capsule_id
7.6. Adding Life Cycle Environments to Capsule Servers
If your Capsule Server has the content functionality enabled, you must add an environment so that Capsule can synchronize content from Satellite Server and provide content to host systems.
リポジトリーが CDN から更新されるたびに自動で Capsule が同期されるようになるので、ライブラリーライフサイクル環境を Capsule Server に割り当てないでください。自動的に同期されると、Capsule 上の複数のシステムリソースや Satellite と Capsule 間のネットワーク帯域幅、および Capsule 上の利用可能なディスク領域が消費される可能性があります。
You can use Hammer CLI on Satellite Server or the Satellite web UI.
Procedure
To add a life cycle environment to Capsule Server, complete the following step:
- In the Satellite web UI, navigate to Infrastructure > Capsules, and select the Capsule that you want to add a life cycle to.
- Edit をクリックしてから、Life Cycle Environments タブをクリックします。
- From the left menu, select the life cycle environments that you want to add to Capsule, and then click Submit.
- Capsule のコンテンツを同期するには、概要タブをクリックしてから同期ボタンをクリックします。
- 最適化された同期または 完全な同期を選択します。
For CLI Users
Capsule Server の全一覧を表示するには、以下のコマンドを入力します。
# hammer capsule list
Note the ID that returns.
Using the ID, verify the details of your Capsule Server:
# hammer capsule info --id capsule_idVerify the life cycle environments available and note the environment ID:
# hammer capsule content available-lifecycle-environments \
--id capsule_id
To view the life cycle environments available for your Capsule Server, enter the following command and note the ID and the organization name:
# hammer capsule content available-lifecycle-environments --id capsule_idAdd the life cycle environment to your Capsule Server:
# hammer capsule content add-lifecycle-environment \
--id capsule_id --organization "My_Organization" \
--environment-id environment_id
Repeat for each life cycle environment you want to add to Capsule Server.
To synchronize all content from your Satellite Server environment to Capsule Server, enter the following command:
# hammer capsule content synchronize --id capsule_idTo synchronize a specific life cycle environment from your Satellite Server to Capsule Server, enter the following command:
# hammer capsule content synchronize --id external_capsule_id \
--environment-id environment_id