
Red Hat Process Automation Manager 使用ガイド
概要
前書き
ビジネス上の意思決定およびプロセスの作成者は、Red Hat Process Automation Manager で利用可能なさまざまなアセットを使用してデシジョンサービスおよびプロセスサービスを開発できます。Red Hat Business Optimizer を使用して、制限されたリソースのセットと特定の制約に基づいて問題の計画に最適なソリューションを見つけることもできます。
多様性を受け入れるオープンソースの強化
Red Hat では、コード、ドキュメント、Web プロパティーにおける配慮に欠ける用語の置き換えに取り組んでいます。まずは、マスター (master)、スレーブ (slave)、ブラックリスト (blacklist)、ホワイトリスト (whitelist) の 4 つの用語の置き換えから始めます。この取り組みにより、これらの変更は今後の複数のリリースに対して段階的に実施されます。詳細は、弊社の CTO である Chris Wright のメッセージ を参照してください。
パート I. Red Hat Process Automation Manager でのデシジョンサービスの使用
ビジネスルール開発者は、Red Hat Process Automation Manager の Business Central または VSCode の Red Hat Process Automation Manager DMN モデラーを使用して、さまざまなデシジョンサービスを設計できます。Red Hat Process Automation Manager は、参考用として、Business Central 内に直接、ビジネスアセットサンプルを含むサンプルプロジェクトを提供しています。本書は、Business Central に含まれる Traffic_Violation サンプルプロジェクトをもとに、交通違反例を作成してテストする方法を説明します。このサンプルプロジェクトは、Decision Model and Notation (DMN) モデルを使用して、交通違反のデシジョンサービスで運転手の罰則と免許停止のルールを定義します。本書の手順に従い、プロジェクトとプロジェクトに含まれるアセットを作成するか、既存の Traffic_Violation サンプルプロジェクトを開き、レビューします。
Red Hat Process Automation Manager における DMN コンポーネントおよび実装の情報は、DMN モデルを使用したデシジョンサービスの作成 を参照してください。
前提条件
- Red Hat JBoss Enterprise Application Platform 7.3 がインストールされている。詳細は、Red Hat JBoss EAP 7.3 インストールガイド を参照してください。
- Red Hat Process Automation Manager がインストールされ、KIE Server で設定されている。詳細は Red Hat JBoss EAP 7.3 への Red Hat Process Automation Manager のインストールおよび設定 を参照してください。
-
Red Hat Process Automation Manager が稼働し、
developerロールで Business Central にログインできる。詳細は、Red Hat Process Automation Manager インストールの計画 を参照してください。
第1章 Business Central のプロジェクトおよびビジネスアセットの例
Business Central には、プロジェクトサンプルがビジネスアセット例と合わせて同梱されており、ルール、プロセス、その他のアセットを、独自の Red Hat Process Automation Manager プロジェクトに作成するときの参考として使用できます。各プロジェクトは、Red Hat Process Automation Manager のプロセス自動化、意思決定管理、またはビジネス最適化アセットおよび論理を異なる方法で説明するように設計されています。
Red Hat は、Red Hat Process Automation Manager ディストリビューションに含まれるコードサンプルのサポートはしていません。
以下のプロジェクト例が、Business Central で利用できます。
- Course_Scheduling: (ビジネス最適化) コースのスケジュールとカリキュラム決定プロセス。講師を教室に割り当て、コースの競合や教室の収容能力といった要素を基にして学生のカリキュラムを決定します。
- Dinner_Party: (ビジネス最適化) ガイド付きデシジョンテーブルを使用したゲストの座席割り当ての最適化。各ゲストの職種、政治的信条、既知の関係を基にしてゲストに座席を割り当てます。
- Employee_Rostering (従業員勤務表) : (ビジネス最適化) デシジョンおよびソルバーアセットを使用した従業員勤務表の最適化。スキルに基づいて従業員をシフトに割り当てます。
- Evaluation_Process: (プロセス自動化) ビジネスプロセスアセットを使用したプロセス評価。実績に基づいて従業員を評価します。
- IT_Orders: (プロセス自動化およびケース管理) ビジネスプロセスとケース管理アセットを使用したケース注文。ニーズと承認に基づいて IT ハードウェアを注文します。
- Mortgages (住宅ローン): (ルールでのデシジョン管理) ルールベースのデシジョンアセットを使用した住宅ローン審査プロセス。申し込み者のデータと資格を基にローンの申し込み資格を判定します。
- Mortgage_Process (住宅ローン): (プロセス自動化) ビジネスプロセスとデシジョンアセットを使用した住宅ローン審査プロセス。申し込み者のデータと資格を基にローンの申し込み資格を判定します。
- OptaCloud: (ビジネス最適化) デシジョンおよびソルバーアセットを使用したリソース割り当ての最適化。リソースが制限されるなかでプロセスをコンピューターに割り当てます。
- Traffic_Violation (交通違反): (DMN でのデシジョン管理) Decision Model and Notation (DMN) モデルを使用した交通違反のデシジョンサービス。交通違反をもとに運転手の罰則および免許停止を判断します。
1.1. Business Central のプロジェクトおよびビジネスアセット例へのアクセス
Business Central のプロジェクト例を使用すると、独自の Red Hat Process Automation Manager プロジェクトにルールや他のアセットを作成するときに、参考としてビジネスアセットを確認できます。
前提条件
- Business Central をインストールし、実行している。インストールオプションは、Red Hat Process Automation Manager インストールの計画 を参照してください。
手順
- Business Central で、Menu → Design → Projects に移動します。既存のプロジェクトがある場合は、MySpace のデフォルトのスペースをクリックして、Add Project プルダウンメニューから Try Samples を選択して、サンプルにアクセスできます。既存のプロジェクトがない場合には、Try samples をクリックします。
- 各サンプルプロジェクトの説明を読んで、どのプロジェクトが最適か確認します。各プロジェクトは、Red Hat Process Automation Manager のプロセス自動化、意思決定管理、またはビジネス最適化アセットおよび論理を異なる方法で説明するように設計されています。
- サンプルプロジェクトを選択し、Ok をクリックして自分のスペースにプロジェクトを追加します。
- 自分のスペースの Projects ページで、サンプルプロジェクトの 1 つを選択して、そのプロジェクトのアセットを表示します。
各アセットを選択して、指定のゴールまたはワークフローに到達するためにプロジェクトがどのように設計されているのかを確認します。サンプルのプロジェクトには、アセットが複数ページ含まれているものもあります。右上隅の左向きまたは右向き矢印をクリックして、全アセット一覧を表示します。
図1.1 アセットページの選択

プロジェクトの Assets ページの右上隅にある Build をクリックしてサンプルプロジェクトをビルドするか、Deploy をクリックしてプロジェクトをビルドしてから、KIE Server にデプロイします。
注記Build & Install オプションを選択してプロジェクトをビルドし、KJAR ファイルを KIE Server にデプロイせずに設定済みの Maven リポジトリーに公開することもできます。開発環境では、Deploy をクリックすると、ビルドされた KJAR ファイルを KIE Server に、実行中のインスタンス (がある場合はそれ) を停止せずにデプロイできます。または Redeploy をクリックして、ビルドされた KJAR ファイルをデプロイしてすべてのインスタンスを置き換えることもできます。次回、ビルドされた KJAR ファイルをデプロイまたは再デプロイすると、以前のデプロイメントユニット (KIE コンテナー) が同じターゲット KIE Server で自動的に更新されます。実稼働環境では Redeploy オプションは無効になっており、Deploy をクリックして、ビルドされた KJAR ファイルを KIE Server 上の新規デプロイメントユニット (KIE コンテナー) にデプロイすることのみが可能です。
KIE Server の環境モードを設定するには、
org.kie.server.modeシステムプロパティーをorg.kie.server.mode=developmentまたはorg.kie.server.mode=productionに設定します。Business Central でそれぞれのプロジェクトのデプロイメント動作を設定するには、プロジェクトの Settings → General Settings → Version に移動し、Development Mode オプションを選択して、Save をクリックします。デフォルトでは、KIE Server および Business Central のすべての新規プロジェクトは開発モードになっています。Development Mode をオンにしたプロジェクトをデプロイしたり、実稼働モードになっている KIE Server に手動でSNAPSHOTバージョンの接尾辞を追加したプロジェクトをデプロイしたりすることはできません。プロジェクトのデプロイメントに関する詳細を確認するには、画面の上部にあるデプロイメントバナーの View deployment details か、Deploy のドロップダウンメニューをクリックします。このオプションを使用すると、Menu → Deploy → Execution Servers ページに移動します。
第2章 Red Hat Process Automation Manager の BPMN モデラ―および DMN モデラー
Red Hat Process Automation Manager は、グラフィカルモデラーを使用して Business Process Model and Notation (BPMN) プロセスモデルと、Decision Model and Notation (DMN) デシジョンモデルを設計するのに使用できる次の拡張機能またはアプリケーションを提供します。
Business Central: 関連する埋め込みデザイナーで、BPMN モデル、DMN モデル、およびテストシナリオファイルを表示および設計できます。
Business Central を使用するには、Business Central を含む開発環境を設定してビジネスルールおよびプロセスを作成し、KIE Server を作成して、作成したビジネスルールとプロセスを実行およびテストします。
Red Hat Process Automation Manager VSCode 拡張: Visual Studio Code (VSCode) で BPMN モデル、DMN モデル、およびテストシナリオファイルを表示して、作成できるようにします。VSCode 拡張機能には VSCode 1.46.0 以降が必要です。
Red Hat Process Automation Manager VSCode 拡張機能をインストールするには、VSCode で Extensions メニューオプションを選択して、Red Hat Business Automation Bundle 拡張を検索し、インストールします。
-
スタンドアロン BPMN および DMN エディター: Web アプリケーションに組み込まれた BPMN モデルおよび DMN モデルを表示して、作成できます。必要なファイルをダウンロードするには、NPM レジストリー から NPM アーティファクトを使用するか、
https://<YOUR_PAGE>/dmn/index.js(DMN スタンドアロンのエディターライブラリーの場合)、またはhttps://<YOUR_PAGE>/bpmn/index.js(BPMN スタンドアロンエディターライブラリーの場合) で JavaScript ファイルを直接ダウンロードします。
2.1. Red Hat Process Automation Manager VSCode 拡張機能バンドルのインストール
Red Hat Process Automation Manager は、Red Hat Business Automation Bundle VSCode 拡張機能を提供します。これにより、Decision Model and Notation (DMN) デシジョンモデル、Business Process Model and Notation (BPMN) 2.0 ビジネスプロセス、およびテストシナリオを VSCode で直接作成できます。VSCode は、新しいビジネスアプリケーションを開発するために推奨される統合開発環境 (IDE) です。Red Hat Process Automation Manager は、必要に応じて DMN サポートまたは BPMN サポートに VSCode 拡張機能である DMN Editor および BPMN Editor をそれぞれ提供します。
VSCode のエディターは、Business Central のエディターと部分的に互換性があり、VSCode では複数の Business Central 機能がサポートされていません。
前提条件
- VSCode の最新の安定版がインストールされている。
手順
VSCode IDE で Extensions メニューオプションを選択し、DMN、BPMN、およびテストシナリオファイルのサポートに対して Red Hat Business Automation Bundle を検索します。
DMN ファイルまたは BPMN ファイルだけをサポートする場合は、DMN Editor または BPMN Editor 拡張機能をそれぞれ検索することもできます。
- Red Hat Business Automation Bundle 拡張機能が VSCode に表示されたら、これを選択して Install をクリックします。
- VSCode エディターの動作を最適化するには、拡張機能のインストールが完了した後、VSCode のインスタンスを再度読み込み、または閉じてから再起動します。
VSCode 拡張バンドルをインストールした後、VSCode で開くか作成するすべての .dmn ファイル、.bpmn ファイル、または .bpmn2 ファイルがグラフィカルモデルとして自動的に表示されます。さらに、開くまたは作成する .scesim ファイルは、ビジネスデシジョンの機能をテストするテーブルテストシナリオモデルとして自動的に表示されます。
DMN、BPMN、またはテストシナリオモデラーが DMN、BPMN、またはテストシナリオファイルの XML ソースのみを開き、エラーメッセージが表示される場合は、報告されたエラーおよびモデルファイルを確認して、すべての要素が正しく定義されていることを確認します。
新しい DMN モデルまたは BPMN モデルの場合は、Web ブラウザーで dmn.new または bpmn.new を入力して、オンラインモデラーで DMN モデルまたは BPMN モデルを設計することもできます。モデルの作成が終了したら、オンラインモデラーページで Download をクリックして、DMN ファイルまたは BPMN ファイルを VSCode の Red Hat Process Automation Manager プロジェクトにインポートできます。
2.2. Red Hat Process Automation Manager スタンドアロンのエディターの設定
Red Hat Process Automation Manager は、自己完結型のライブラリーに分散されたスタンドアロンのエディターを提供し、エディターごとにオールインワンの JavaScript ファイルを提供します。JavaScript ファイルは、包括的な API を使用してエディターを設定および制御します。
スタンドアロンのエディターは、以下の 3 つの方法でインストールできます。
- 各 JavaScript ファイルを手動でダウンロード
- NPM パッケージの使用
手順
以下の方法のいずれかを使用して、スタンドアロンのエディターをインストールします。
各 JavaScript ファイルを手動でダウンロード: この方法の場合は、以下の手順に従います。
- JavaScript ファイルをダウンロードします。
- ダウンロードした Javascript ファイルをホスト型アプリケーションに追加します。
以下の
<script>タグを HTML ページに追加します。DMN エディターの HTML ページのスクリプトタグ
<script src="https://<YOUR_PAGE>/dmn/index.js"></script>
BPMN エディターの HTML ページのスクリプトタグ
<script src="https://<YOUR_PAGE>/bpmn/index.js"></script>
NPM パッケージの使用: この方法の場合は、以下の手順に従います。
NPM パッケージを
package.jsonファイルに追加します。NPM パッケージの追加
npm install @redhat/kogito-tooling-kie-editors-standalone
各エディターライブラリーを TypeScript ファイルにインポートします。
各エディターのインポート
import * as DmnEditor from "@redhat/kogito-tooling-kie-editors-standalone/dist/dmn"
import * as BpmnEditor from "@redhat/kogito-tooling-kie-editors-standalone/dist/bpmn"
スタンドアロンのエディターをインストールしたら、以下の例のように提供されたエディター API を使用して必要なエディターを開き、DMN エディターを開きます。API はエディターごとに同じです。
DMN スタンドアロンのエディターを開く
const editor = DmnEditor.open({
  container: document.getElementById("dmn-editor-container"),
  initialContent: Promise.resolve(""),
  readOnly: false,
  origin: "",
  resources: new Map([
    [
      "MyIncludedModel.dmn",
      {
        contentType: "text",
        content: Promise.resolve("")
      }
    ]
  ])
});
エディター API で以下のパラメーターを使用します。
表2.1 パラメーターの例
パラメーター 説明 containerエディターが追加される HTML 要素。
initialContentDMN モデルのコンテンツへの Pomise。以下の例のように、このパラメーターは空にすることができます。
-
Promise.resolve("") -
Promise.resolve("<DIAGRAM_CONTENT_DIRECTLY_HERE>") -
fetch("MyDmnModel.dmn").then(content ⇒ content.text())
readonly(任意)エディターでの変更を許可します。コンテンツの編集を許可する場合は
false(デフォルト)、エディターで読み取り専用モードの場合はtrueに設定します。注記現在、DMN エディターだけが読み取り専用モードをサポートしています。
origin(任意)リポジトリーの起点。デフォルト値は
window.location.originです。resources(任意)エディターのリソースのマッピング。たとえば、このパラメーターを使用して、BPMN エディターの DMN エディターまたは作業アイテム定義に含まれるモデルを提供します。マップの各エントリーには、リソース名と、
content-type(textまたはbinary) およびcontent(initialContentパラメーターと同様) で設定されるオブジェクトが含まれています。返されるオブジェクトには、エディターの操作に必要なメソッドが含まれます。
表2.2 返されたオブジェクトメソッド
メソッド 説明 getContent(): Promise<string>エディターのコンテンツを含む promise を返します。
setContent(content: string): voidエディターの内容を設定します。
getPreview(): Promise<string>現在のダイアグラムの SVG 文字列が含まれる promise を返します。
subscribeToContentChanges(callback: (isDirty: boolean) ⇒ void): (isDirty: boolean) ⇒ voidエディターでコンテンツを変更し、サブスクライブ解除に使用されるのと同じコールバックを返す際に呼び出されるコールバックを設定します。
unsubscribeToContentChanges(callback: (isDirty: boolean) ⇒ void): voidエディターでコンテンツが変更される際に渡されたコールバックのサブスクライブを解除します。
markAsSaved(): voidエディターの内容が保存されることを示すエディターの状態をリセットします。また、コンテンツの変更に関連するサブスクライブされたコールバックをアクティベートします。
undo(): voidエディターの最後の変更を元に戻します。また、コンテンツの変更に関連するサブスクライブされたコールバックをアクティベートします。
redo(): voidエディターで、最後に元に戻した変更をやり直します。また、コンテンツの変更に関連するサブスクライブされたコールバックをアクティベートします。
close(): voidエディターを終了します。
getElementPosition(selector: string): Promise<Rect>要素をキャンバスまたはビデオコンポーネント内に置いた場合に、標準のクエリーセレクターを拡張する方法を提供します。
selectorパラメーターは、Canvas:::MySquare、Video:::PresenterHandなどの<PROVIDER>:::<SELECT>形式に従う必要があります。このメソッドは、要素の位置を表すRectを返します。envelopeApi: MessageBusClientApi<KogitoEditorEnvelopeApi>これは高度なエディター API です。高度なエディター API の詳細は、MessageBusClientApi および KogitoEditorEnvelopeApi を参照してください。
-
第3章 Maven を使用した DMN モデルおよび BPMN モデルの作成および実行
Maven アーキタイプを使用して、Business Central ではなく Red Hat Process Automation Manager VSCode 拡張機能を使用して、VSCode で DMN モデルおよび BPMN モデルを開発できます。その後、必要に応じて、Business Central で、アーキタイプを Red Hat Process Automation Manager のデシジョンサービスおよびプロセスサービスに統合できます。DMN モデルおよび BPMN モデルを開発する方法は、Red Hat Process Automation Manager VSCode 拡張機能を使用して新規ビジネスアプリケーションを構築する場合に便利です。
手順
- コマンドターミナルで、新しい Red Hat Process Automation Manager プロジェクトを保存するローカルディレクトリーに移動します。
以下のコマンドを入力して、以下の Maven アーキタイプを使用して、定義したディレクトリーにプロジェクトを生成します。
Maven アーキタイプを使用したプロジェクトの生成
mvn archetype:generate \
    -DarchetypeGroupId=org.kie \
    -DarchetypeArtifactId=kie-kjar-archetype \
    -DarchetypeVersion=7.48.0.Final-redhat-00004
このコマンドにより、必要な依存関係で Maven プロジェクトが生成され、ビジネスアプリケーションを構築するのに必要なディレクトリーとファイルが生成されます。プロジェクト開発時に Git バージョン制御システム (推奨) を設定して使用できます。
同じディレクトリーに複数のプロジェクトを生成する場合は、直前のコマンドに
-DgroupId=<groupid> -DartifactId=<artifactId>を追加して、生成されたビジネスアプリケーションのartifactIdおよびgroupIdを指定できます。- VSCode IDE で File をクリックし、Open Folder を選択し、直前のコマンドを使用して生成されたディレクトリーに移動します。
最初のアセットを作成する前に、ビジネスアプリケーションのパッケージ (例:
org.kie.businessapp) を設定し、以下のパスにそれぞれのディレクトリーを作成します。-
PROJECT_HOME/src/main/java -
PROJECT_HOME/src/main/resources -
PROJECT_HOME/src/test/resources
たとえば、
org.kie.businessappパッケージのPROJECT_HOME/src/main/java/org/kie/businessappを作成できます。-
VSCode を使用して、ビジネスアプリケーションにアセットを作成します。以下の方法で、Red Hat Process Automation Manager VSCode 拡張機能がサポートするアセットを作成できます。
-
ビジネスプロセスを作成するには、
PROJECT_HOME/src/main/java/org/kie/businessappディレクトリーに、.bpmnまたは.bpmn2の新規ファイルを作成します (例:Process.bpmn)。 -
DMN モデルを作成するには、
PROJECT_HOME/src/main/java/org/kie/businessappディレクトリーに、.dmnの新規ファイルを作成します (例:AgeDecision.dmn)。 -
テストシナリオシミュレーションモデルを作成するには、
PROJECT_HOME/src/main/java/org/kie/businessappディレクトリーに、.scesimの新規ファイルを作成します (例:TestAgeScenario.scesim)。
-
ビジネスプロセスを作成するには、
Maven アーキタイプでアセットを作成したら、コマンドラインで (
pom.xmlがある) プロジェクトのルートディレクトリーに移動し、以下のコマンドを実行してプロジェクトのナレッジ JAR (KJAR) を構築します。mvn clean install
ビルドに失敗したら、コマンドラインのエラーメッセージに記載されている問題に対応し、ビルドに成功するまでプロジェクトの妥当性確認を行います。ただし、ビルドに成功すると、
PROJECT_HOME/targetディレクトリーでビジネスアプリケーションのアーティファクトを確認できます。注記mvn clean installコマンドを使用して、開発中の主要な変更ごとにプロジェクトを検証します。
REST API を使用して実行中の KIE Server に、ビジネスアプリケーションの生成されたナレッジ JAR (KJAR) をデプロイできます。プロセスの REST API の使用方法は、KIE API を使用した Red Hat Process Automation Manager との対話 を参照してください。
第4章 Business Central での交通違反プロジェクトの作成
この例では、traffic-violation という名前の新規プロジェクトを作成します。プロジェクトは、データオブジェクト、DMN アセット、およびテストシナリオなどのアセットのコンテナーです。作成中のプロジェクト例は、Business Central に含まれる既存の Traffic_Violation サンプルプロジェクトに似ています。
手順
Business Central で、Menu → Design → Projects に移動します。
Red Hat Process Automation Manager は以下のイメージのように MySpace と呼ばれるデフォルトスペースを提供します。このデフォルトスペースを使用してサンプルプロジェクトを作成およびテストできます。
図4.1 デフォルトのスペース

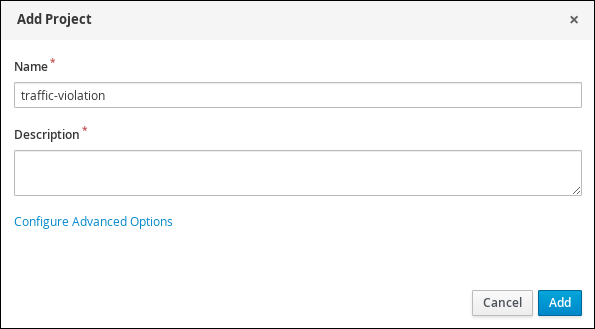
- Add Project をクリックします。
-
Name フィールドに
traffic-violationと入力します。 Add をクリックします。
図4.2 Add Project ウインドウ
プロジェクトの Assets ビューを開きます。
第5章 DMN (Decision Model and Notation)
DMN (Decision Model and Notation) は、業務的意思決定を説明してモデル化するために、OMG (Object Management Group) が確立している規格です。DMN は XML スキーマを定義して、DMN モデルを DMN 準拠のプラットフォーム間や組織間で共有し、ビジネスアナリストやビジネスルール開発者が DMN デシジョンサービスの設計と実装で協力できるようにするものです。DMN 規格は、ビジネスプロセスを開発してモデル化する BPMN (Business Process Model and Notation) 規格と類似しており、一緒に使用できます。
DMN の背景およびアプリケーションの詳細は、OMG の Decision Model and Notation specification を参照してください。
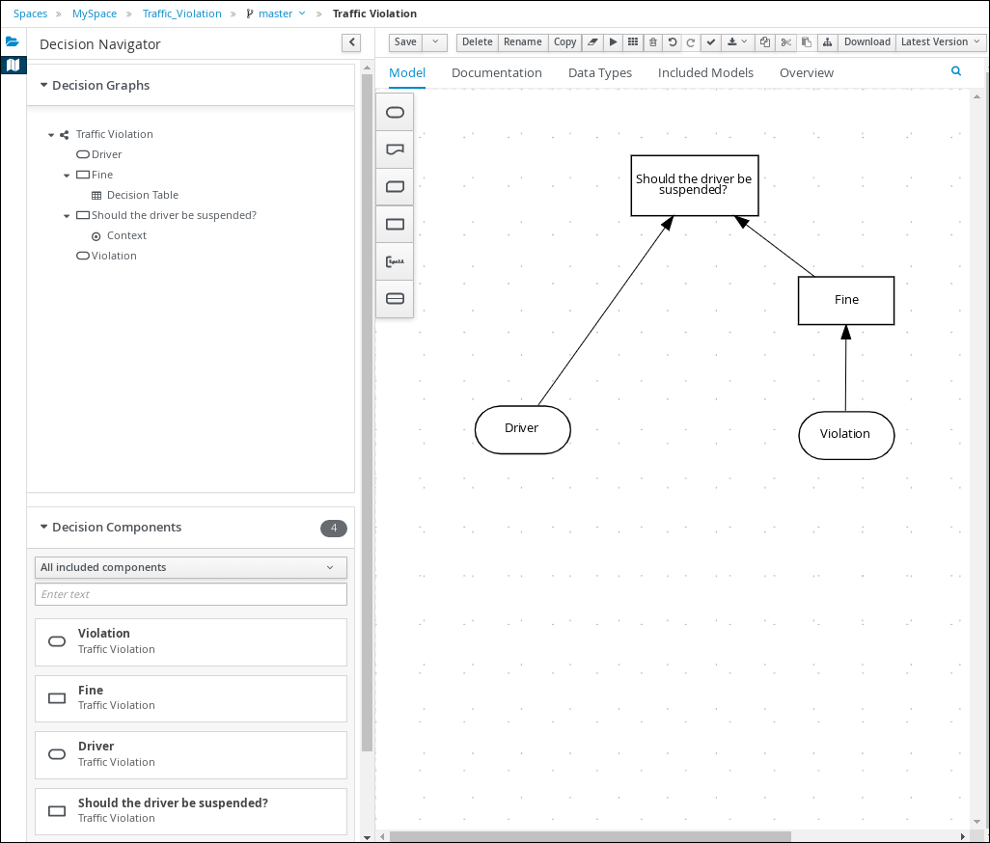
5.1. 交通違反 DMN デシジョン要件ダイアグラム (DRD) の作成
デシジョン要件ダイアグラム (DRD) は、DMN モデルを視覚的にしたものです。Business Central の DMN デザイナーを使用して交通違反プロジェクトの DRD を設計し、DRD コンポーネントのデシジョン論理を定義します。
図5.1 交通違反の例の DRD
前提条件
- Business Central に交通違反プロジェクトを作成している。
手順
- traffic-violation プロジェクトのホーム画面で Add Asset をクリックします。
Add Asset ページで DMN をクリックします。Create new DMN ウィンドウが開きます。
-
Create new DMN ウィンドウの DMN 名フィールドで
Traffic Violationを入力します。 -
Package リストから
com.myspace.traffic_violationを選択します。 - OK をクリックします。DMN デザイナーで DMN アセットが開きます。
-
Create new DMN ウィンドウの DMN 名フィールドで
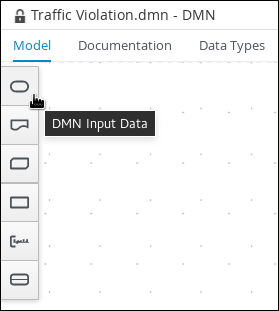
DMN デザイナーキャンバスで、DMN Input Data の入力ノード 2 つをキャンバスにドラッグします。
図5.2 DMN 入力データノード
-
右上隅の
 アイコンをクリックします。
-
入力ノードをダブルクリックして、名前の 1 つを
Driverに、もう 1 つをViolationに変更します。 - DMN Decision デシジョンノードをキャンバスにドラッグします。
-
デシジョンノードをダブルクリックして、
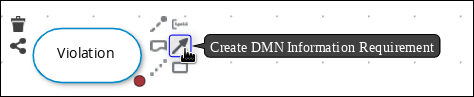
Fineに名前を変更します。 Violation 入力ノードをクリックして Create DMN Information Requirement アイコンを選択し、2 つのノードを接続する
Fineデシジョンノードをクリックします。図5.3 DMN 情報要件アイコンの作成
- DMN Decision デシジョンノードをキャンバスにドラッグします。
-
デシジョンノードをダブルクリックして、
Should the driver be suspended?に名前を変更します。 - Driver 入力ノードをクリックして Create DMN Information Requirement アイコンを選択し、2 つのノードを接続する Should the driver be suspended? デシジョンノードをクリックします。
- Fine デシジョンノードをクリックして Create DMN Information Requirement アイコンを選択し、Should the driver be suspended? デシジョンノードを選択します。
Save をクリックします。
注記DRD を定期的に保存すると、DMN デザイナーは DMN モデルを静的に検証し、モデルが完全に定義されるまでエラーメッセージを出力する可能性があります。DMN モデルをすべて定義し終えてもエラーが発生する場合は、特定の問題を随時トラブルシューティングしてください。
5.2. 交通違反 DMN カスタムデータタイプの作成
DMN データタイプは、デシジョン論理の定義向けの DMN ボックス式のテーブル、列、フィールドで使用するデータ構造を決定します。デフォルトの DMN データタイプ (文字列、数字、ブール値など) を使用するか、または独自のデータタイプを作成して、ボックス式の値に実装する新たなフィールドや制限を指定することもできます。Business Central の DMN デザイナーの Data Types タブを使用して交通違反プロジェクトのカスタムデータタイプを定義します。
図5.4 カスタムデータタイプのタブ
以下のテーブルでは、このプロジェクト用に作成する tDriver、tViolation、および tFine のカスタムデータタイプを一覧表示しています。
表5.1 tDriver カスタムデータタイプ
| 名前 | タイプ |
|---|---|
| tDriver | Structure |
| 名前 | string |
| Age | number |
| State | string |
| City | string |
| Points | number |
表5.2 tViolation カスタムデータタイプ
| 名前 | タイプ |
|---|---|
| tViolation | Structure |
| Code | string |
| Date | date |
| タイプ | string |
| Speed Limit | number |
| Actual Speed | number |
表5.3 tFine カスタムデータタイプ
| 名前 | タイプ |
|---|---|
| tFine | Structure |
| Amount | number |
| Points | number |
前提条件
- 交通違反 DMN デシジョン要件ダイアグラム (DRD) を Business Central で作成している。
手順
-
tDriverカスタムデータタイプを作成するには、Data Types タブの Add a custom Data Type をクリックし、Name フィールドにtDriverと入力して、Type リストからStructureを選択します。 新しいデータタイプの右側にあるチェックマークをクリックして、変更を保存します。
図5.5 tDriver のカスタムデータタイプ
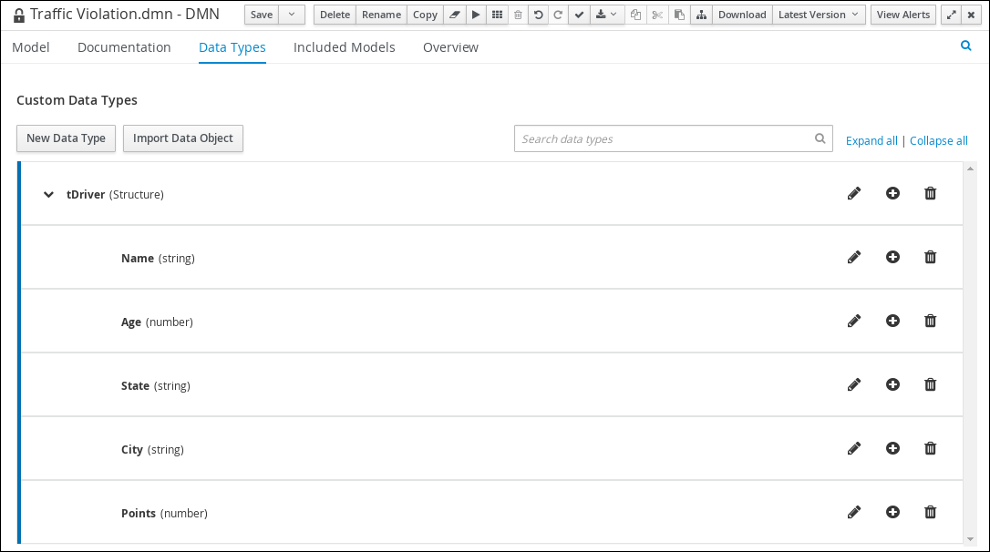
新しくネスト化されたデータタイプごとに、
tDriverの横にあるプラス記号をクリックして、tDriverの構造化データタイプに、以下のネスト化されたデータタイプを追加します。新規データタイプの右側にあるチェックマークをクリックして、変更を保存します。-
Name(文字列) -
Age(数字) -
State(文字列) -
City(文字列) -
Points(数字)
-
-
tViolationカスタムデータタイプを作成するには、New Data Types をクリックし、Name フィールドにtViolationと入力して、Type リストからStructureを選択します。 新しいデータタイプの右側にあるチェックマークをクリックして、変更を保存します。
図5.6 tViolation のカスタムデータタイプ
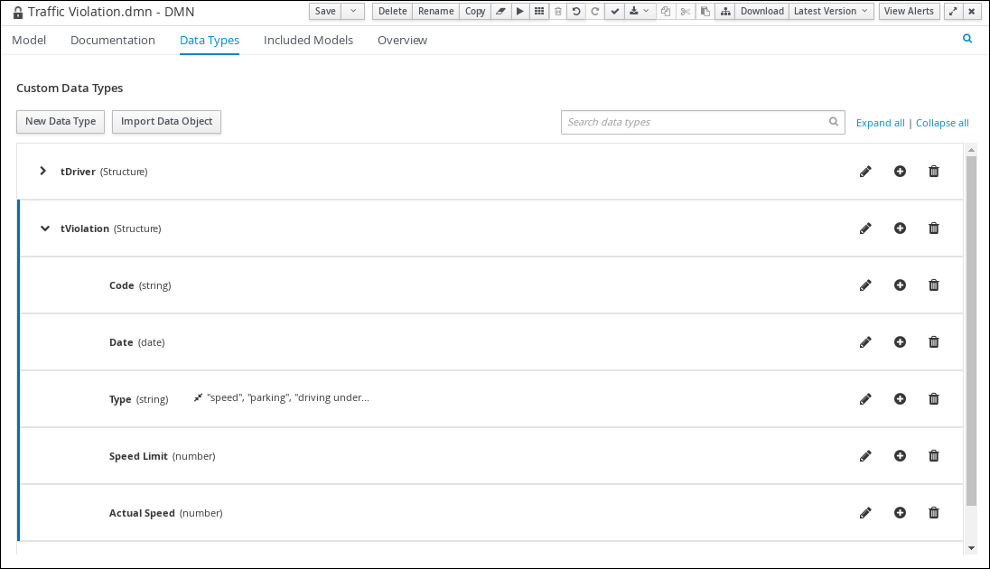
新しくネスト化されたデータタイプごとに、
tVoilationの横にあるプラス記号をクリックして、tVoilationの構造化データタイプに、以下のネスト化されたデータタイプを追加します。新規データタイプの右側にあるチェックマークをクリックして、変更を保存します。-
Code(文字列) -
Date(日付) -
Type(文字列) -
Speed Limit(数字) -
Actual Speed(数字)
-
以下の制約を
Typeのネスト化されたデータタイプに追加するには、編集アイコンをクリックして Add Constraints をクリックし、Select constraint type ドロップダウンメニューから Enumeration を選択します。-
speed -
parking -
driving under the influence
-
- OK をクリックしてから、type データタイプの右側にあるチェックマークをクリックし、変更を保存します。
tFineカスタムデータタイプを作成するには、New Data Types をクリックし、Name フィールドにtFineと入力して、Type リストからStructureを選択し、Save をクリックします。図5.7 tFine のカスタムデータタイプ
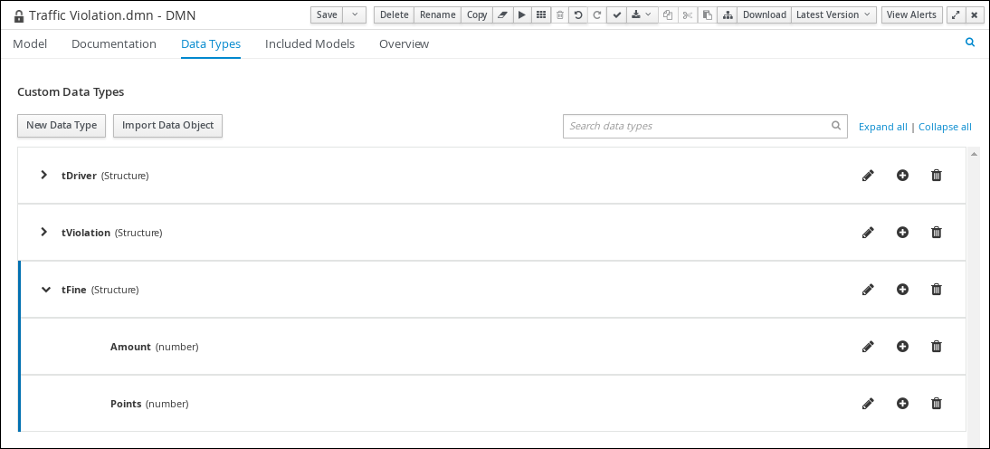
新しくネスト化されたデータタイプごとに、
tFineの横にあるプラス記号をクリックして、tFineの構造化データタイプに、以下のネスト化されたデータタイプを追加します。新規データタイプの右側にあるチェックマークをクリックして、変更を保存します。-
Amount(数字) -
Points(数字)
-
- Save をクリックします。
5.3. DRD 入力およびデシジョンノードへのカスタムデータタイプの割り当て
DMN カスタムデータタイプを作成したら、それらを交通違反 DRD 内で適切な DMN Input Data と DMN Decision のノードに割り当てます。
前提条件
- Business Central で交通違反 DMN カスタムデータタイプを作成している。
手順
-
DMN デザイナーの Model タブをクリックし、DMN デザイナーの右上隅にある Properties
アイコンをクリックして DRD プロパティーを公開します。
-
DRD で Driver 入力データノードを選択し、Properties パネルで Data type ドロップダウンメニューから
tDriverを選択します。 -
Violation 入力データノードを選択し、Data type ドロップダウンメニューから
tViolationを選択します。 -
Fine デシジョンノードを選択し、Data type ドロップダウンメニューから
tFineを選択します。 Should the driver be suspended? デシジョンノードを選択し、以下のプロパティーを設定します。
-
Data type:
string -
Question:
Should the driver be suspended due to points on his driver license? -
Allowed Answers:
Yes,No
-
Data type:
- Save をクリックします。
これでカスタムデータタイプが DRD の入力およびデシジョンノードに割り当てられました。
5.4. 交通違反 DMN デシジョン論理の定義
罰金を計算し、ドライバーが免許停止になるかどうかを判定するために、DMN デシジョンテーブルとコンテキストボックス式を使用した交通違反 DMN デシジョン論理を定義します。
図5.8 正規表現
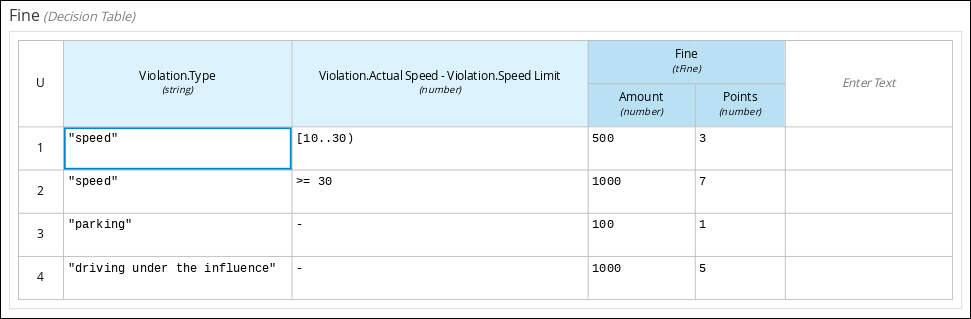
図5.9 ドライバーを免許停止にする式にする必要があります。

前提条件
- Business Central の交通違反 DRD で、DMN カスタムデータタイプが適切なデシジョンおよび入力ノードに割り当てられている。
手順
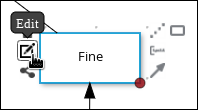
罰金を計算するには、DMN デザイナーキャンバスで Fine デシジョンノードを選択し、Edit をクリックして DMN ボックス式デザイナーを開きます。
図5.10 デシジョンノードの編集アイコン
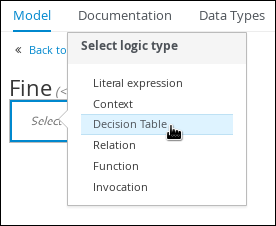
Select expression → Decision Table をクリックします。
図5.11 デシジョンテーブルロジックタイプの選択
- Violation.Date、Violation.Code、および Violation.Speed Limit の列で右クリックして、各フィールドで Delete を選択します。
-
Violation.Actual Speed 列ヘッダーをクリックし、Expression フィールドに
Violation.Actual Speed - Violation.Speed Limit式を入力します。 デシジョンテーブルの一行目に以下の値を入力します。
-
Violation.Type:
"speed" -
Violation.Actual Speed - Violation.Speed Limit:
[10..30) -
Amount:
500 Points:
31 行目を右クリックし、
Insert belowを選択して新たな行を追加します。
-
Violation.Type:
デシジョンテーブルの 2 行目に以下の値を入力します。
-
Violation.Type:
"speed" -
Violation.Actual Speed - Violation.Speed Limit:
>= 30 -
Amount:
1000 Points:
72 行目を右クリックし、
Insert belowを選択して新たな行を追加します。
-
Violation.Type:
デシジョンテーブルの 3 行目に以下の値を入力します。
-
Violation.Type:
"parking" -
Violation.Actual Speed - Violation.Speed Limit:
- -
Amount:
100 Points:
13 行目を右クリックし、
Insert belowを選択して新たな行を追加します。
-
Violation.Type:
デシジョンテーブルの 4 行目に以下の値を入力します。
-
Violation.Type:
"driving under the influence" -
Violation.Actual Speed - Violation.Speed Limit:
- -
Amount:
1000 -
Points:
5
-
Violation.Type:
- Save をクリックします。
- ドライバーの免許停止ルールを定義するには DMN デザイナーキャンバスに戻って Should the driver be suspended? デシジョンノードを選択し、Edit をクリックして DMN ボックス式デザイナーを開きます。
- Select expression → Context をクリックします。
-
ContextEntry-1 をクリックして Name に
Total Pointsと入力し、Data Type ドロップダウンメニューからnumberを選択します。 -
Total Points の横のセルをクリックしてコンテキストメニューから
Literal Expressionを選択し、Driver.Points + Fine.Points式を入力します。 -
Driver.Points + Fine.Points の下のセルのコンテキストメニューから
Literal Expressionを選択し、if Total Points >= 20 then "Yes" else "No"と入力します。 Save をクリックします。
これで罰金の計算方法とドライバーをいつ免許停止にするかを決定するコンテキストが定義されました。traffic-violation プロジェクトページに移動して Build をクリックすると、用例のプロジェクトがビルドされ、Alerts パネルのエラー (ある場合) が対処されます。
第6章 テストシナリオ
Red Hat Process Automation Manager のテストシナリオでは、ビジネスルールを実稼働環境にデプロイする前に、(ルールベースのテストシナリオの場合) ビジネスルールの機能とデータの妥当性、および (DMN ベースのテストシナリオの場合) DMN モデルを検証できます。このテストシナリオでは、プロジェクトのデータを使用して、指定した条件と、定義した 1 つ以上のビジネスルールで想定される結果を設定できます。シナリオを実行する際は、想定した結果と、ルールのインスタンスから実際に得られた結果を比較します。想定される結果が実際の結果と一致すると、テストは成功します。想定された結果が実際の結果と一致しないと、テストは失敗します。
Red Hat Process Automation Manager は現在、新規の テストシナリオ デザイナーと以前の テストシナリオ (レガシー) デザイナーの両方を含みます。デフォルトのデザイナー、新規のテストシナリオデザイナーで、ルールと DMN モデルのテストをサポートし、テストシナリオの全体的な使用感が改善されています。必要に応じて、レガシーのテストシナリオをそのまま使用することができますが、ルールベースのテストシナリオしかサポートされません。
レガシーのテストシナリオデザイナーは、Red Hat Process Automation Manager バージョン 7.3.0 で非推奨になりました。このツールは、今後の Red Hat Process Automation Manager リリースで削除予定です。代わりに、新しいテストシナリオデザイナーを使用してください。
プロジェクトレベルや、特定のシナリオアセット内で利用可能なテストシナリオを実行するなど、複数の方法で定義済みのテストシナリオを実行できます。テストシナリオは独立しており、他のテストシナリオに影響を与えたり、テストシナリオを変更したりできません。テストシナリオは、Business Central のプロジェクト開発時にいつでも実行できます。テストシナリオを実行するために、デシジョンサービスをコンパイルまたはデプロイする必要はありません。
別のパッケージからのデータオブジェクトは、テストシナリオと同じプロジェクトパッケージにインポートできます。同じパッケージに含まれるアセットはデフォルトでインポートされます。必要なデータオブジェクトとテストシナリオを作成したら、テストシナリオデザイナーの Data Objects タブを使用して、必要なデータオブジェクトがすべてリストされていることを検証するか、アイテムを追加 して既存のデータオブジェクトをインポートします。
テストシナリオのドキュメント全体で、テストシナリオ および テストシナリオデザイナー に関する言及はすべて、レガシーバージョンと明示的に記載がない限り、新規バージョンを対象としています。
6.1. テストシナリオを使用した交通違反のテスト
Business Central のテストシナリオデザイナーを使用して DMN 意思決定要件図 (DRD) をテストし、交通違反プロジェクトのデシジョン論理を定義します。
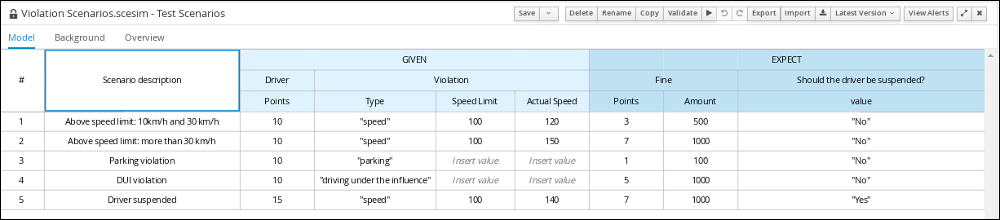
図6.1 交通違反の例のテストシナリオ
前提条件
- Business Central で交通違反プロジェクトを作成している。
手順
- traffic-violation プロジェクトのホーム画面で Add Asset をクリックして Add Asset 画面を開きます。
Test Scenario をクリックして Create new Test Scenario ダイアログを開きます。
-
Test Scenario フィールドに
Violation Scenariosと入力します。 -
Package リストから
com.myspace.traffic_violationを選択します。 -
Source type で
DMNを選択します。 - Choose DMN asset リストから DMN アセットへのパスを選択します。
- Ok をクリックして、Test Scenarios デザイナーで Violation Scenarios テストシナリオを開きます。
-
Test Scenario フィールドに
- Driver 列サブヘッダー下で、State、City、Age、および Name の値のセルを右クリックし、コンテキストメニューから Delete column を選択してそれらを削除します。
- Violation 列サブヘッダー下で Date と Code の値のセルを右クリックし、Delete column を選択してそれらを削除します。
以下の情報をテストシナリオの 1 行目に入力します。
-
Scenario description:
Above speed limit: 10km/h and 30 km/h -
Points (Given 列ヘッダー下):
10 -
Type:
"speed" -
Speed Limit:
100 -
Actual Speed:
120 -
Points:
3 -
Amount:
500 Should the driver be suspended?:
"No"1 行目を右クリックし、Insert row below を選択して新たな行を追加します。
-
Scenario description:
以下の情報をテストシナリオの 2 行目に入力します。
-
Scenario description:
Above speed limit: more than 30 km/h -
Points (Given 列ヘッダー下):
10 -
Type:
"speed" -
Speed Limit:
100 -
Actual Speed:
150 -
Points:
7 -
Amount:
1000 Should the driver be suspended?:
"No"2 行目を右クリックし、Insert row below を選択して新たな行を追加します。
-
Scenario description:
以下の情報をテストシナリオの 3 行目に入力します。
-
Scenario description:
Parking violation -
Points (Given 列ヘッダー下):
10 -
Type:
"parking" - Speed Limit: 空白のまま
- Actual Speed: 空白のまま
-
Points:
1 -
Amount:
100 Should the driver be suspended?:
"No"3 行目を右クリックし、Insert row below を選択して新たな行を追加します。
-
Scenario description:
以下の情報をテストシナリオの 4 行目に入力します。
-
Scenario description:
DUI violation -
Points (Given 列ヘッダー下):
10 -
Type:
"driving under the influence" - Speed Limit: 空白のまま
- Actual Speed: 空白のまま
-
Points:
5 -
Amount:
1000 Should the driver be suspended?:
"No"4 行目を右クリックし、Insert row below を選択して新たな行を追加します。
-
Scenario description:
以下の情報をテストシナリオの 5 行目に入力します。
-
Scenario description:
Driver suspended -
Points (Given 列ヘッダー下):
15 -
Type:
"speed" -
Speed Limit:
100 -
Actual Speed:
140 -
Points:
7 -
Amount:
1000 -
Should the driver be suspended?:
"Yes"
-
Scenario description:
- Save をクリックします。
Play アイコン
 をクリックして、テストシナリオがパスするか、失敗するかを確認します。
図6.2 交通違反の例のテストシナリオ実行結果
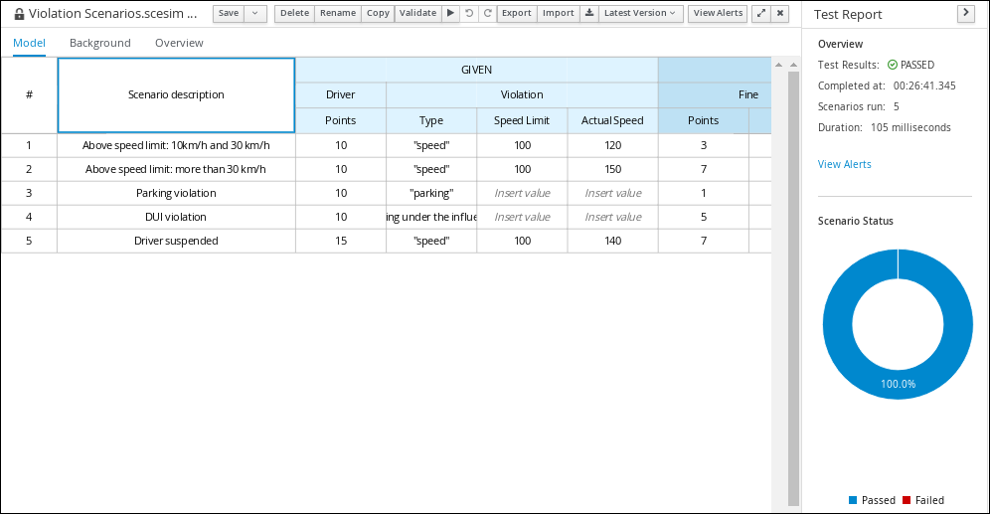
失敗した場合は、エラーを修正してサイドテストシナリオを実行します。
第7章 DMN モデルの実行
Business Central を使用して Red Hat Process Automation Manager のプロジェクトに DMN ファイルをインポートまたは作成するか、Business Central を使用しないプロジェクトのナレッジ JAR (KJAR) ファイルの一部として DMN ファイルをパッケージ化できます。Red Hat Decision Manager プロジェクトに DMN ファイルに実装した後、リモートアクセスの KIE Server にそれを含む KIE コンテナーをデプロイして、KIE Server REST API を使用するコンテナーと対話することで、DMN デシジョンサービスを実行できます。
プロジェクトのパッケージングおよびデプロイメントの方法に外部 DMN アセットを含める方法は、Red Hat Process Automation Manager プロジェクトのパッケージ化およびデプロイ を参照してください。
7.1. KIE Server REST API を使った DMN サービスの実行
KIE Server の REST エンドポイントで直接対話することで、呼び出しコードと、意思決定ロジックの定義の分離が最大になります。呼び出しコードに直接の依存関係がないため、Node.js、.NET など、完全に異なる開発プラットフォームに実装できます。このセクションの例では、Nix スタイルの curl コマンドを示しますが、REST クライアントに適用するための関連情報を提供します。
KIE Server の REST エンドポイントを使用する場合、標準の KIE Server マーシャリングアノテーションが付けられたドメインオブジェクト POJO Java クラスを定義することが推奨されます。たとえば、以下のコードは、適切にアノテーションが付けられたドメインオブジェクトの Person クラスを使用しています。
POJO Java クラスの例
@javax.xml.bind.annotation.XmlAccessorType(javax.xml.bind.annotation.XmlAccessType.FIELD)
public class Person implements java.io.Serializable {

    static final long serialVersionUID = 1L;

    private java.lang.String id;
    private java.lang.String name;
    @javax.xml.bind.annotation.adapters.XmlJavaTypeAdapter(org.kie.internal.jaxb.LocalDateXmlAdapter.class)
    private java.time.LocalDate dojoining;

    public Person() {
    }

    public java.lang.String getId() {
        return this.id;
    }

    public void setId(java.lang.String id) {
        this.id = id;
    }

    public java.lang.String getName() {
        return this.name;
    }

    public void setName(java.lang.String name) {
        this.name = name;
    }

    public java.time.LocalDate getDojoining() {
        return this.dojoining;
    }

    public void setDojoining(java.time.LocalDate dojoining) {
        this.dojoining = dojoining;
    }

    public Person(java.lang.String id, java.lang.String name,
            java.time.LocalDate dojoining) {
        this.id = id;
        this.name = name;
        this.dojoining = dojoining;
    }

}
KIE Server REST API の詳細は、KIE API を使用した Red Hat Process Automation Manager の操作 を参照してください。
前提条件
-
KIE Server がインストールされ、設定されている (
kie-serverロールが割り当てられているユーザーの既知のユーザー名と認証情報を含む)。インストールオプションは、Red Hat Process Automation Manager インストールの計画 を参照してください。 KJAR アーティファクトとして DMN プロジェクトをビルドして、KIE Server にデプロイしておく。理想的には、より効率的な実行ができるように、実行可能なモデルとして DMN プロジェクトをビルドしておいてください。
mvn clean install -DgenerateDMNModel=yes
プロジェクトのパッケージ化およびデプロイメント、および実行可能モデルに関する詳細は、Red Hat Process Automation Manager プロジェクトのパッケージ化およびデプロイ を参照してください。
- KIE コンテナーの ID に DMN モデルを含んでいる。1 つ以上のモデルが存在する場合は、そのモデルの名前空間およびモデル名が必要です。
手順
KIE Server REST API エンドポイントにアクセスするためのベース URL を決定します。これには、以下の値が必要です (例ではローカルデプロイメントのデフォルト値を使用しています)。
-
ホスト (
localhost) -
ポート (
8080) -
ルートコンテキスト (
kie-server) -
ベース REST パス (
services/rest/)
交通違反プロジェクトでのローカルデプロイメントにおけるベース URL の例:
http://localhost:8080/kie-server/services/rest/server/containers/traffic-violation_1.0.0-SNAPSHOT-
ホスト (
ユーザー認証要件を決定します。
ユーザーを KIE Server 設定に直接定義すると、ユーザー名およびパスワードを要求する HTTP Basic 認証が使用されます。要求を成功させるには、ユーザーに
kie-serverルールが必要です。以下の例は、curl 要求に認証情報を追加する方法を示します。
curl -u username:password <request>
Red Hat Single Sign-On を使用して KIE Server を設定している場合は、要求にベアラートークンが必要です。
curl -H "Authorization: bearer $TOKEN" <request>
要求と応答の形式を指定します。REST API エンドポイントには JSON と XML の両方の書式が利用でき、要求ヘッダーを使用して設定されます。
JSON
curl -H "accept: application/json" -H "content-type: application/json"
XML
curl -H "accept: application/xml" -H "content-type: application/xml"
必要に応じて、デプロイしたデシジョンモデルのリストに対するコンテナーのクエリーです。
[GET]
server/containers/{containerId}/dmncurl 要求例:
curl -u wbadmin:wbadmin -H "accept: application/xml" -X GET "http://localhost:8080/kie-server/services/rest/server/containers/traffic-violation_1.0.0-SNAPSHOT/dmn"
サンプルの XML 出力:
<?xml version="1.0" encoding="UTF-8" standalone="yes"?>
<response type="SUCCESS" msg="Ok models successfully retrieved from container 'traffic-violation_1.0.0-SNAPSHOT'">
    <dmn-model-info-list>
        <model>
            <model-namespace>https://github.com/kiegroup/drools/kie-dmn/_60b01f4d-e407-43f7-848e-258723b5fac8</model-namespace>
            <model-name>Traffic Violation</model-name>
            <model-id>_2CD7D1AA-BD84-4B43-AD21-B0342ADE655A</model-id>
            <decisions>
                <dmn-decision-info>
                    <decision-id>_23428EE8-DC8B-4067-8E67-9D7C53EC975F</decision-id>
                    <decision-name>Fine</decision-name>
                </dmn-decision-info>
                <dmn-decision-info>
                    <decision-id>_B5EEE2B1-915C-44DC-BE43-C244DC066FD8</decision-id>
                    <decision-name>Should the driver be suspended?</decision-name>
                </dmn-decision-info>
            </decisions>
            <inputs>
                <dmn-inputdata-info>
                    <inputdata-id>_CEB959CD-3638-4A87-93BA-03CD0FB63AE3</inputdata-id>
                    <inputdata-name>Violation</inputdata-name>
                    <inputdata-typeref>
                        <namespace-uri>https://github.com/kiegroup/drools/kie-dmn/_60B01F4D-E407-43F7-848E-258723B5FAC8</namespace-uri>
                        <local-part>tViolation</local-part>
                        <prefix></prefix>
                    </inputdata-typeref>
                </dmn-inputdata-info>
                <dmn-inputdata-info>
                    <inputdata-id>_B0E810E6-7596-430A-B5CF-67CE16863B6C</inputdata-id>
                    <inputdata-name>Driver</inputdata-name>
                    <inputdata-typeref>
                        <namespace-uri>https://github.com/kiegroup/drools/kie-dmn/_60B01F4D-E407-43F7-848E-258723B5FAC8</namespace-uri>
                        <local-part>tDriver</local-part>
                        <prefix></prefix>
                    </inputdata-typeref>
                </dmn-inputdata-info>
            </inputs>
            <itemdefinitions>
                <dmn-itemdefinition-info>
                    <itemdefinition-id>_9C758F4A-7D72-4D0F-B63F-2F5B8405980E</itemdefinition-id>
                    <itemdefinition-name>tViolation</itemdefinition-name>
                    <itemdefinition-itemcomponent>
                        <dmn-itemdefinition-info>
                            <itemdefinition-id>_0B6FF1E2-ACE9-4FB3-876B-5BB30B88009B</itemdefinition-id>
                            <itemdefinition-name>Code</itemdefinition-name>
                            <itemdefinition-typeref>
                                <namespace-uri>https://github.com/kiegroup/drools/kie-dmn/_60b01f4d-e407-43f7-848e-258723b5fac8</namespace-uri>
                                <local-part>string</local-part>
                                <prefix></prefix>
                            </itemdefinition-typeref>
                            <itemdefinition-itemcomponent/>
                            <itemdefinition-iscollection>false</itemdefinition-iscollection>
                        </dmn-itemdefinition-info>
                        <dmn-itemdefinition-info>
                            <itemdefinition-id>_27A5DA18-3CA7-4C06-81B7-CF7F2F050E29</itemdefinition-id>
                            <itemdefinition-name>date</itemdefinition-name>
                            <itemdefinition-typeref>
                                <namespace-uri>https://github.com/kiegroup/drools/kie-dmn/_60B01F4D-E407-43F7-848E-258723B5FAC8</namespace-uri>
                                <local-part>date</local-part>
                                <prefix></prefix>
                            </itemdefinition-typeref>
                            <itemdefinition-itemcomponent/>
                            <itemdefinition-iscollection>false</itemdefinition-iscollection>
                        </dmn-itemdefinition-info>
                        <dmn-itemdefinition-info>
                            <itemdefinition-id>_8961969A-8A80-4F12-B568-346920C0F038</itemdefinition-id>
                            <itemdefinition-name>type</itemdefinition-name>
                            <itemdefinition-typeref>
                                <namespace-uri>https://github.com/kiegroup/drools/kie-dmn/_60B01F4D-E407-43F7-848E-258723B5FAC8</namespace-uri>
                                <local-part>string</local-part>
                                <prefix></prefix>
                            </itemdefinition-typeref>
                            <itemdefinition-itemcomponent/>
                            <itemdefinition-iscollection>false</itemdefinition-iscollection>
                        </dmn-itemdefinition-info>
                        <dmn-itemdefinition-info>
                            <itemdefinition-id>_7450F12A-3E95-4D5E-8DCE-2CB1FAC2BDD4</itemdefinition-id>
                            <itemdefinition-name>speed limit</itemdefinition-name>
                            <itemdefinition-typeref>
                                <namespace-uri>https://github.com/kiegroup/drools/kie-dmn/_60b01f4d-e407-43f7-848e-258723b5fac8</namespace-uri>
                                <local-part>number</local-part>
                                <prefix></prefix>
                            </itemdefinition-typeref>
                            <itemdefinition-itemcomponent/>
                            <itemdefinition-iscollection>false</itemdefinition-iscollection>
                        </dmn-itemdefinition-info>
                        <dmn-itemdefinition-info>
                            <itemdefinition-id>_0A9A6F26-6C14-414D-A9BF-765E5850429A</itemdefinition-id>
                            <itemdefinition-name>Actual Speed</itemdefinition-name>
                            <itemdefinition-typeref>
                                <namespace-uri>https://github.com/kiegroup/drools/kie-dmn/_60B01F4D-E407-43F7-848E-258723B5FAC8</namespace-uri>
                                <local-part>number</local-part>
                                <prefix></prefix>
                            </itemdefinition-typeref>
                            <itemdefinition-itemcomponent/>
                            <itemdefinition-iscollection>false</itemdefinition-iscollection>
                        </dmn-itemdefinition-info>
                    </itemdefinition-itemcomponent>
                    <itemdefinition-iscollection>false</itemdefinition-iscollection>
                </dmn-itemdefinition-info>
                <dmn-itemdefinition-info>
                    <itemdefinition-id>_13C7EFD8-B85C-43BF-94D3-14FABE39A4A0</itemdefinition-id>
                    <itemdefinition-name>tDriver</itemdefinition-name>
                    <itemdefinition-itemcomponent>
                        <dmn-itemdefinition-info>
                            <itemdefinition-id>_EC11744C-4160-4549-9610-2C757F40DFE8</itemdefinition-id>
                            <itemdefinition-name>Name</itemdefinition-name>
                            <itemdefinition-typeref>
                                <namespace-uri>https://github.com/kiegroup/drools/kie-dmn/_60B01F4D-E407-43F7-848E-258723B5FAC8</namespace-uri>
                                <local-part>string</local-part>
                                <prefix></prefix>
                            </itemdefinition-typeref>
                            <itemdefinition-itemcomponent/>
                            <itemdefinition-iscollection>false</itemdefinition-iscollection>
                        </dmn-itemdefinition-info>
                        <dmn-itemdefinition-info>
                            <itemdefinition-id>_E95BE3DB-4A51-4658-A166-02493EAAC9D2</itemdefinition-id>
                            <itemdefinition-name>Age</itemdefinition-name>
                            <itemdefinition-typeref>
                                <namespace-uri>https://github.com/kiegroup/drools/kie-dmn/_60B01F4D-E407-43F7-848E-258723B5FAC8</namespace-uri>
                                <local-part>number</local-part>
                                <prefix></prefix>
                            </itemdefinition-typeref>
                            <itemdefinition-itemcomponent/>
                            <itemdefinition-iscollection>false</itemdefinition-iscollection>
                        </dmn-itemdefinition-info>
                        <dmn-itemdefinition-info>
                            <itemdefinition-id>_7B3023E2-BC44-4BF3-BF7E-773C240FB9AD</itemdefinition-id>
                            <itemdefinition-name>State</itemdefinition-name>
                            <itemdefinition-typeref>
                                <namespace-uri>https://github.com/kiegroup/drools/kie-dmn/_60B01F4D-E407-43F7-848E-258723B5FAC8</namespace-uri>
                                <local-part>string</local-part>
                                <prefix></prefix>
                            </itemdefinition-typeref>
                            <itemdefinition-itemcomponent/>
                            <itemdefinition-iscollection>false</itemdefinition-iscollection>
                        </dmn-itemdefinition-info>
                        <dmn-itemdefinition-info>
                            <itemdefinition-id>_3D4B49DD-700C-4925-99A7-3B2B873F7800</itemdefinition-id>
                            <itemdefinition-name>city</itemdefinition-name>
                            <itemdefinition-typeref>
                                <namespace-uri>https://github.com/kiegroup/drools/kie-dmn/_60B01F4D-E407-43F7-848E-258723B5FAC8</namespace-uri>
                                <local-part>string</local-part>
                                <prefix></prefix>
                            </itemdefinition-typeref>
                            <itemdefinition-itemcomponent/>
                            <itemdefinition-iscollection>false</itemdefinition-iscollection>
                        </dmn-itemdefinition-info>
                        <dmn-itemdefinition-info>
                            <itemdefinition-id>_B37C49E8-B0D9-4B20-9DC6-D655BB1CA7B1</itemdefinition-id>
                            <itemdefinition-name>Points</itemdefinition-name>
                            <itemdefinition-typeref>
                                <namespace-uri>https://github.com/kiegroup/drools/kie-dmn/_60B01F4D-E407-43F7-848E-258723B5FAC8</namespace-uri>
                                <local-part>number</local-part>
                                <prefix></prefix>
                            </itemdefinition-typeref>
                            <itemdefinition-itemcomponent/>
                            <itemdefinition-iscollection>false</itemdefinition-iscollection>
                        </dmn-itemdefinition-info>
                    </itemdefinition-itemcomponent>
                    <itemdefinition-iscollection>false</itemdefinition-iscollection>
                </dmn-itemdefinition-info>
                <dmn-itemdefinition-info>
                    <itemdefinition-id>_A4077C7E-B57A-4DEE-9C65-7769636316F3</itemdefinition-id>
                    <itemdefinition-name>tFine</itemdefinition-name>
                    <itemdefinition-itemcomponent>
                        <dmn-itemdefinition-info>
                            <itemdefinition-id>_79B152A8-DE83-4001-B88B-52DFF0D73B2D</itemdefinition-id>
                            <itemdefinition-name>Amount</itemdefinition-name>
                            <itemdefinition-typeref>
                                <namespace-uri>https://github.com/kiegroup/drools/kie-dmn/_60B01F4D-E407-43F7-848E-258723B5FAC8</namespace-uri>
                                <local-part>number</local-part>
                                <prefix></prefix>
                            </itemdefinition-typeref>
                            <itemdefinition-itemcomponent/>
                            <itemdefinition-iscollection>false</itemdefinition-iscollection>
                        </dmn-itemdefinition-info>
                        <dmn-itemdefinition-info>
                            <itemdefinition-id>_D7CB5F9C-9D55-48C2-83EE-D47045EC90D0</itemdefinition-id>
                            <itemdefinition-name>Points</itemdefinition-name>
                            <itemdefinition-typeref>
                                <namespace-uri>https://github.com/kiegroup/drools/kie-dmn/_60B01F4D-E407-43F7-848E-258723B5FAC8</namespace-uri>
                                <local-part>number</local-part>
                                <prefix></prefix>
                            </itemdefinition-typeref>
                            <itemdefinition-itemcomponent/>
                            <itemdefinition-iscollection>false</itemdefinition-iscollection>
                        </dmn-itemdefinition-info>
                    </itemdefinition-itemcomponent>
                    <itemdefinition-iscollection>false</itemdefinition-iscollection>
                </dmn-itemdefinition-info>
            </itemdefinitions>
            <decisionservices/>
        </model>
    </dmn-model-info-list>
</response>
サンプルの JSON 出力:
{
  "type" : "SUCCESS",
  "msg" : "OK models successfully retrieved from container 'Traffic-Violation_1.0.0-SNAPSHOT'",
  "result" : {
    "dmn-model-info-list" : {
      "models" : [ {
        "model-namespace" : "https://github.com/kiegroup/drools/kie-dmn/_60B01F4D-E407-43F7-848E-258723B5FAC8",
        "model-name" : "Traffic Violation",
        "model-id" : "_2CD7D1AA-BD84-4B43-AD21-B0342ADE655A",
        "decisions" : [ {
          "decision-id" : "_23428EE8-DC8B-4067-8E67-9D7C53EC975F",
          "decision-name" : "Fine"
        }, {
          "decision-id" : "_B5EEE2B1-915C-44DC-BE43-C244DC066FD8",
          "decision-name" : "Should the driver be suspended?"
        } ],
        "inputs" : [ {
          "inputdata-id" : "_CEB959CD-3638-4A87-93BA-03CD0FB63AE3",
          "inputdata-name" : "Violation",
          "inputdata-typeRef" : {
            "namespace-uri" : "https://github.com/kiegroup/drools/kie-dmn/_60B01F4D-E407-43F7-848E-258723B5FAC8",
            "local-part" : "tViolation",
            "prefix" : ""
          }
        }, {
          "inputdata-id" : "_B0E810E6-7596-430A-B5CF-67CE16863B6C",
          "inputdata-name" : "Driver",
          "inputdata-typeRef" : {
            "namespace-uri" : "https://github.com/kiegroup/drools/kie-dmn/_60B01F4D-E407-43F7-848E-258723B5FAC8",
            "local-part" : "tDriver",
            "prefix" : ""
          }
        } ],
        "itemDefinitions" : [ {
          "itemdefinition-id" : "_13C7EFD8-B85C-43BF-94D3-14FABE39A4A0",
          "itemdefinition-name" : "tDriver",
          "itemdefinition-typeRef" : null,
          "itemdefinition-itemComponent" : [ {
            "itemdefinition-id" : "_EC11744C-4160-4549-9610-2C757F40DFE8",
            "itemdefinition-name" : "Name",
            "itemdefinition-typeRef" : {
              "namespace-uri" : "https://github.com/kiegroup/drools/kie-dmn/_60B01F4D-E407-43F7-848E-258723B5FAC8",
              "local-part" : "string",
              "prefix" : ""
            },
            "itemdefinition-itemComponent" : [ ],
            "itemdefinition-isCollection" : false
          }, {
            "itemdefinition-id" : "_E95BE3DB-4A51-4658-A166-02493EAAC9D2",
            "itemdefinition-name" : "Age",
            "itemdefinition-typeRef" : {
              "namespace-uri" : "https://github.com/kiegroup/drools/kie-dmn/_60B01F4D-E407-43F7-848E-258723B5FAC8",
              "local-part" : "number",
              "prefix" : ""
            },
            "itemdefinition-itemComponent" : [ ],
            "itemdefinition-isCollection" : false
          }, {
            "itemdefinition-id" : "_7B3023E2-BC44-4BF3-BF7E-773C240FB9AD",
            "itemdefinition-name" : "State",
            "itemdefinition-typeRef" : {
              "namespace-uri" : "https://github.com/kiegroup/drools/kie-dmn/_60B01F4D-E407-43F7-848E-258723B5FAC8",
              "local-part" : "string",
              "prefix" : ""
            },
            "itemdefinition-itemComponent" : [ ],
            "itemdefinition-isCollection" : false
          }, {
            "itemdefinition-id" : "_3D4B49DD-700C-4925-99A7-3B2B873F7800",
            "itemdefinition-name" : "City",
            "itemdefinition-typeRef" : {
              "namespace-uri" : "https://github.com/kiegroup/drools/kie-dmn/_60B01F4D-E407-43F7-848E-258723B5FAC8",
              "local-part" : "string",
              "prefix" : ""
            },
            "itemdefinition-itemComponent" : [ ],
            "itemdefinition-isCollection" : false
          }, {
            "itemdefinition-id" : "_B37C49E8-B0D9-4B20-9DC6-D655BB1CA7B1",
            "itemdefinition-name" : "Points",
            "itemdefinition-typeRef" : {
              "namespace-uri" : "https://github.com/kiegroup/drools/kie-dmn/_60B01F4D-E407-43F7-848E-258723B5FAC8",
              "local-part" : "number",
              "prefix" : ""
            },
            "itemdefinition-itemComponent" : [ ],
            "itemdefinition-isCollection" : false
          } ],
          "itemdefinition-isCollection" : false
        }, {
          "itemdefinition-id" : "_A4077C7E-B57A-4DEE-9C65-7769636316F3",
          "itemdefinition-name" : "tFine",
          "itemdefinition-typeRef" : null,
          "itemdefinition-itemComponent" : [ {
            "itemdefinition-id" : "_79B152A8-DE83-4001-B88B-52DFF0D73B2D",
            "itemdefinition-name" : "Amount",
            "itemdefinition-typeRef" : {
              "namespace-uri" : "https://github.com/kiegroup/drools/kie-dmn/_60B01F4D-E407-43F7-848E-258723B5FAC8",
              "local-part" : "number",
              "prefix" : ""
            },
            "itemdefinition-itemComponent" : [ ],
            "itemdefinition-isCollection" : false
          }, {
            "itemdefinition-id" : "_D7CB5F9C-9D55-48C2-83EE-D47045EC90D0",
            "itemdefinition-name" : "Points",
            "itemdefinition-typeRef" : {
              "namespace-uri" : "https://github.com/kiegroup/drools/kie-dmn/_60B01F4D-E407-43F7-848E-258723B5FAC8",
              "local-part" : "number",
              "prefix" : ""
            },
            "itemdefinition-itemComponent" : [ ],
            "itemdefinition-isCollection" : false
          } ],
          "itemdefinition-isCollection" : false
        }, {
          "itemdefinition-id" : "_9C758F4A-7D72-4D0F-B63F-2F5B8405980E",
          "itemdefinition-name" : "tViolation",
          "itemdefinition-typeRef" : null,
          "itemdefinition-itemComponent" : [ {
            "itemdefinition-id" : "_0B6FF1E2-ACE9-4FB3-876B-5BB30B88009B",
            "itemdefinition-name" : "Code",
            "itemdefinition-typeRef" : {
              "namespace-uri" : "https://github.com/kiegroup/drools/kie-dmn/_60B01F4D-E407-43F7-848E-258723B5FAC8",
              "local-part" : "string",
              "prefix" : ""
            },
            "itemdefinition-itemComponent" : [ ],
            "itemdefinition-isCollection" : false
          }, {
            "itemdefinition-id" : "_27A5DA18-3CA7-4C06-81B7-CF7F2F050E29",
            "itemdefinition-name" : "Date",
            "itemdefinition-typeRef" : {
              "namespace-uri" : "https://github.com/kiegroup/drools/kie-dmn/_60B01F4D-E407-43F7-848E-258723B5FAC8",
              "local-part" : "date",
              "prefix" : ""
            },
            "itemdefinition-itemComponent" : [ ],
            "itemdefinition-isCollection" : false
          }, {
            "itemdefinition-id" : "_8961969A-8A80-4F12-B568-346920C0F038",
            "itemdefinition-name" : "Type",
            "itemdefinition-typeRef" : {
              "namespace-uri" : "https://github.com/kiegroup/drools/kie-dmn/_60B01F4D-E407-43F7-848E-258723B5FAC8",
              "local-part" : "string",
              "prefix" : ""
            },
            "itemdefinition-itemComponent" : [ ],
            "itemdefinition-isCollection" : false
          }, {
            "itemdefinition-id" : "_7450F12A-3E95-4D5E-8DCE-2CB1FAC2BDD4",
            "itemdefinition-name" : "Speed Limit",
            "itemdefinition-typeRef" : {
              "namespace-uri" : "https://github.com/kiegroup/drools/kie-dmn/_60B01F4D-E407-43F7-848E-258723B5FAC8",
              "local-part" : "number",
              "prefix" : ""
            },
            "itemdefinition-itemComponent" : [ ],
            "itemdefinition-isCollection" : false
          }, {
            "itemdefinition-id" : "_0A9A6F26-6C14-414D-A9BF-765E5850429A",
            "itemdefinition-name" : "Actual Speed",
            "itemdefinition-typeRef" : {
              "namespace-uri" : "https://github.com/kiegroup/drools/kie-dmn/_60B01F4D-E407-43F7-848E-258723B5FAC8",
              "local-part" : "number",
              "prefix" : ""
            },
            "itemdefinition-itemComponent" : [ ],
            "itemdefinition-isCollection" : false
          } ],
          "itemdefinition-isCollection" : false
        } ],
        "decisionServices" : [ ]
      } ]
    }
  }
}
モデルを実行します。
[POST]
server/containers/{containerId}/dmn注記model-namespaceの属性は自動生成され、各ユーザーで異なります。model-namespaceとmodel-nameの属性がデプロイされているモデルのものに合致することを確認してください。curl 要求例:
curl -u wbadmin:wbadmin -H "accept: application/json" -H "content-type: application/json" -X POST "http://localhost:8080/kie-server/services/rest/server/containers/traffic-violation_1.0.0-SNAPSHOT/dmn" -d "{ \"model-namespace\" : \"https://github.com/kiegroup/drools/kie-dmn/_60B01F4D-E407-43F7-848E-258723B5FAC8\", \"model-name\" : \"Traffic Violation\", \"dmn-context\" : {\"Driver\" : {\"Points\" : 15}, \"Violation\" : {\"Type\" : \"speed\", \"Actual Speed\" : 135, \"Speed Limit\" : 100}}}"JSON 要求例:
{
  "model-namespace" : "https://github.com/kiegroup/drools/kie-dmn/_60B01F4D-E407-43F7-848E-258723B5FAC8",
  "model-name" : "Traffic Violation",
  "dmn-context" :
  {
    "Driver" :
    {
  	   "Points" : 15
    },
  	"Violation" :
    {
  		"Type" : "speed",
  		"Actual Speed" : 135,
  		"Speed Limit" : 100
  	}
  }
}
XML 要求例 (JAXB 形式):
<?xml version="1.0" encoding="UTF-8" standalone="yes"?> <dmn-evaluation-context> <dmn-context xsi:type="jaxbListWrapper" xmlns:xsi="http://www.w3.org/2001/XMLSchema-instance"> <type>MAP</type> <element xsi:type="jaxbStringObjectPair" key="Violation"> <value xsi:type="jaxbListWrapper"> <type>MAP</type> <element xsi:type="jaxbStringObjectPair" key="Type"> <value xsi:type="xs:string" xmlns:xs="http://www.w3.org/2001/XMLSchema">speed</value> </element> <element xsi:type="jaxbStringObjectPair" key="Speed Limit"> <value xsi:type="xs:decimal" xmlns:xs="http://www.w3.org/2001/XMLSchema">100</value> </element> <element xsi:type="jaxbStringObjectPair" key="Actual Speed"> <value xsi:type="xs:decimal" xmlns:xs="http://www.w3.org/2001/XMLSchema">135</value> </element> </value> </element> <element xsi:type="jaxbStringObjectPair" key="Driver"> <value xsi:type="jaxbListWrapper"> <type>MAP</type> <element xsi:type="jaxbStringObjectPair" key="Points"> <value xsi:type="xs:decimal" xmlns:xs="http://www.w3.org/2001/XMLSchema">15</value> </element> </value> </element> </dmn-context> </dmn-evaluation-context>注記要求には、その形式にかかわらず、以下の要素が必要です。
- モデルの名前空間
- モデル名
- 入力値を含むコンテキストオブジェクト
JSON 応答例:
{
  "type": "SUCCESS",
  "msg": "OK from container 'Traffic-Violation_1.0.0-SNAPSHOT'",
  "result": {
      "dmn-evaluation-result": {
          "messages": [],
          "model-namespace": "https://github.com/kiegroup/drools/kie-dmn/_7D8116DE-ADF5-4560-A116-FE1A2EAFFF48",
          "model-name": "Traffic Violation",
          "decision-name": [],
          "dmn-context": {
              "Violation": {
                "Type": "speed",
                "Speed Limit": 100,
                "Actual Speed": 135
              },
              "Should Driver be Suspended?": "Yes",
                "Driver": {
                  "Points": 15
                },
                "Fine": {
                  "Points": 7,
                  "Amount": 1000
                }
            },
      "decision-results": {
          "_E1AF5AC2-E259-455C-96E4-596E30D3BC86": {
              "messages": [],
              "decision-id": "_E1AF5AC2-E259-455C-96E4-596E30D3BC86",
              "decision-name": "Should the Driver be Suspended?",
              "result": "Yes",
              "status": "SUCCEEDED"
            },
          "_D7F02CE0-AF50-4505-AB80-C7D6DE257920": {
              "messages": [],
              "decision-id": "_D7F02CE0-AF50-4505-AB80-C7D6DE257920",
              "decision-name": "Fine",
              "result": {
                "Points": 7,
                "Amount": 1000
              },
          "status": "SUCCEEDED"
        }
      }
    }
  }
}
XML (JAXB 形式) 応答例:
<?xml version="1.0" encoding="UTF-8" standalone="yes"?>
<response type="SUCCESS" msg="OK from container 'Traffic_1.0.0-SNAPSHOT'">
    <dmn-evaluation-result>
        <model-namespace>https://github.com/kiegroup/drools/kie-dmn/_A4BCA8B8-CF08-433F-93B2-A2598F19ECFF</model-namespace>
        <model-name>Traffic Violation</model-name>
        <dmn-context xsi:type="jaxbListWrapper" xmlns:xsi="http://www.w3.org/2001/XMLSchema-instance">
            <type>MAP</type>
            <element xsi:type="jaxbStringObjectPair" key="Violation">
                <value xsi:type="jaxbListWrapper">
                    <type>MAP</type>
                    <element xsi:type="jaxbStringObjectPair" key="Type">
                        <value xsi:type="xs:string" xmlns:xs="http://www.w3.org/2001/XMLSchema">speed</value>
                    </element>
                    <element xsi:type="jaxbStringObjectPair" key="Speed Limit">
                        <value xsi:type="xs:decimal" xmlns:xs="http://www.w3.org/2001/XMLSchema">100</value>
                    </element>
                    <element xsi:type="jaxbStringObjectPair" key="Actual Speed">
                        <value xsi:type="xs:decimal" xmlns:xs="http://www.w3.org/2001/XMLSchema">135</value>
                    </element>
                </value>
            </element>
            <element xsi:type="jaxbStringObjectPair" key="Driver">
                <value xsi:type="jaxbListWrapper">
                    <type>MAP</type>
                    <element xsi:type="jaxbStringObjectPair" key="Points">
                        <value xsi:type="xs:decimal" xmlns:xs="http://www.w3.org/2001/XMLSchema">15</value>
                    </element>
                </value>
            </element>
            <element xsi:type="jaxbStringObjectPair" key="Fine">
                <value xsi:type="jaxbListWrapper">
                    <type>MAP</type>
                    <element xsi:type="jaxbStringObjectPair" key="Points">
                        <value xsi:type="xs:decimal" xmlns:xs="http://www.w3.org/2001/XMLSchema">7</value>
                    </element>
                    <element xsi:type="jaxbStringObjectPair" key="Amount">
                        <value xsi:type="xs:decimal" xmlns:xs="http://www.w3.org/2001/XMLSchema">1000</value>
                    </element>
                </value>
            </element>
            <element xsi:type="jaxbStringObjectPair" key="Should the driver be suspended?">
                <value xsi:type="xs:string" xmlns:xs="http://www.w3.org/2001/XMLSchema">Yes</value>
            </element>
        </dmn-context>
        <messages/>
        <decisionResults>
            <entry>
                <key>_4055D956-1C47-479C-B3F4-BAEB61F1C929</key>
                <value>
                    <decision-id>_4055D956-1C47-479C-B3F4-BAEB61F1C929</decision-id>
                    <decision-name>Fine</decision-name>
                    <result xsi:type="jaxbListWrapper" xmlns:xsi="http://www.w3.org/2001/XMLSchema-instance">
                        <type>MAP</type>
                        <element xsi:type="jaxbStringObjectPair" key="Points">
                            <value xsi:type="xs:decimal" xmlns:xs="http://www.w3.org/2001/XMLSchema">7</value>
                        </element>
                        <element xsi:type="jaxbStringObjectPair" key="Amount">
                            <value xsi:type="xs:decimal" xmlns:xs="http://www.w3.org/2001/XMLSchema">1000</value>
                        </element>
                    </result>
                    <messages/>
                    <status>SUCCEEDED</status>
                </value>
            </entry>
            <entry>
                <key>_8A408366-D8E9-4626-ABF3-5F69AA01F880</key>
                <value>
                    <decision-id>_8A408366-D8E9-4626-ABF3-5F69AA01F880</decision-id>
                    <decision-name>Should the driver be suspended?</decision-name>
                    <result xsi:type="xs:string" xmlns:xs="http://www.w3.org/2001/XMLSchema" xmlns:xsi="http://www.w3.org/2001/XMLSchema-instance">Yes</result>
                    <messages/>
                    <status>SUCCEEDED</status>
                </value>
            </entry>
        </decisionResults>
    </dmn-evaluation-result>
</response>
第8章 関連情報
パート II. Red Hat Process Automation Manager でのプロセスサービスの使用
ビジネスルールおよびプロセス開発者は、Red Hat Process Automation Manager の Business Central または VSCode の Red Hat Process Automation Manager BPMN モデラーを使用して、ビジネス要件に合ったビジネスプロセスを作成できます。Red Hat Process Automation Manager は、参考用として、Business Central でビジネスアセットサンプルなど、サンプルプロジェクトを提供しています。本書では、Business Central やプロセスデザイナーに慣れていただけるように、新しい住宅ローンプロセスプロジェクト、データオブジェクト、およびビジネスプロセスを作成する方法を説明しています。
次に Business Central に含まれている Mortgage_Process のサンプルプロジェクトを参照して、サンプルプロジェクトのビジネスルール、デシジョンテーブル、およびフォームをレビューします。Mortgage_Process のサンプルプロジェクトをビルドしてデプロイし、定義したプロジェクトの機能を実行します。
前提条件
- Red Hat JBoss Enterprise Application Platform 7.3 がインストールされている。詳細情報は Red Hat JBoss EAP 7.3 インストールガイド を参照してください。
- Red Hat Process Automation Manager がインストールされ、KIE Server で設定されている。詳細は Red Hat JBoss EAP 7.3 への Red Hat Process Automation Manager のインストールおよび設定 を参照してください。
-
Red Hat Process Automation Manager が稼働し、
developerロールで Business Central にログインできる。詳細は、Red Hat Process Automation Manager インストールの計画 を参照してください。
第9章 概要
Business Central では、ビジネスプロセスの自動化ができます。ビジネスプロセスは、一連の手順の実行すべき順番を説明し、事前定義済みのノードや接続で設定される図のことです。各ノードは、プロセス内の手順 1 つを表し、接続はノード間の移動方法を指定します。
たとえば、銀行が住宅ローンサービスを提供します。住宅ローン部門が、Business Central を使用して、住宅ローンの全ビジネスプロセスを作成していきます。
顧客がローンを組んで新しい不動産物件を購入する場合に以下の手順が発生します。
- 顧客は、住宅ローンの申請記入を補助してくれる、銀行内のブローカーに問い合わせます。
- ブローカーは、顧客の給料、社会保障番号、不動産の販売価格、必要なローン金額など、不動産と顧客に関する情報を集めます。
- 次に、ブローカーは顧客の代わりに依頼を提出します。
顧客が申込書を提出するたびに、新しいプロセスインスタンスが作成されます。これにより、各要求の評価品質の一貫性が保たれ、要求ごとの状態を完全に視覚化し、プロセスを効率的かつ効果的に進めることができます。
第10章 Business Central のプロジェクトおよびビジネスアセットの例
Business Central には、プロジェクトサンプルがビジネスアセット例と合わせて同梱されており、ルール、プロセス、その他のアセットを、独自の Red Hat Process Automation Manager プロジェクトに作成するときの参考として使用できます。各プロジェクトは、Red Hat Process Automation Manager のプロセス自動化、意思決定管理、またはビジネス最適化アセットおよび論理を異なる方法で説明するように設計されています。
Red Hat は、Red Hat Process Automation Manager ディストリビューションに含まれるコードサンプルのサポートはしていません。
以下のプロジェクト例が、Business Central で利用できます。
- Course_Scheduling: (ビジネス最適化) コースのスケジュールとカリキュラム決定プロセス。講師を教室に割り当て、コースの競合や教室の収容能力といった要素を基にして学生のカリキュラムを決定します。
- Dinner_Party: (ビジネス最適化) ガイド付きデシジョンテーブルを使用したゲストの座席割り当ての最適化。各ゲストの職種、政治的信条、既知の関係を基にしてゲストに座席を割り当てます。
- Employee_Rostering (従業員勤務表) : (ビジネス最適化) デシジョンおよびソルバーアセットを使用した従業員勤務表の最適化。スキルに基づいて従業員をシフトに割り当てます。
- Evaluation_Process: (プロセス自動化) ビジネスプロセスアセットを使用したプロセス評価。実績に基づいて従業員を評価します。
- IT_Orders: (プロセス自動化およびケース管理) ビジネスプロセスとケース管理アセットを使用したケース注文。ニーズと承認に基づいて IT ハードウェアを注文します。
- Mortgages (住宅ローン): (ルールでのデシジョン管理) ルールベースのデシジョンアセットを使用した住宅ローン審査プロセス。申し込み者のデータと資格を基にローンの申し込み資格を判定します。
- Mortgage_Process (住宅ローン): (プロセス自動化) ビジネスプロセスとデシジョンアセットを使用した住宅ローン審査プロセス。申し込み者のデータと資格を基にローンの申し込み資格を判定します。
- OptaCloud: (ビジネス最適化) デシジョンおよびソルバーアセットを使用したリソース割り当ての最適化。リソースが制限されるなかでプロセスをコンピューターに割り当てます。
- Traffic_Violation (交通違反): (DMN でのデシジョン管理) Decision Model and Notation (DMN) モデルを使用した交通違反のデシジョンサービス。交通違反をもとに運転手の罰則および免許停止を判断します。
10.1. Business Central のプロジェクトおよびビジネスアセット例へのアクセス
Business Central のプロジェクト例を使用すると、独自の Red Hat Process Automation Manager プロジェクトにルールや他のアセットを作成するときに、参考としてビジネスアセットを確認できます。
前提条件
- Business Central をインストールし、実行している。インストールオプションは、Red Hat Process Automation Manager インストールの計画 を参照してください。
手順
- Business Central で、Menu → Design → Projects に移動します。既存のプロジェクトがある場合は、MySpace のデフォルトのスペースをクリックして、Add Project プルダウンメニューから Try Samples を選択して、サンプルにアクセスできます。既存のプロジェクトがない場合には、Try samples をクリックします。
- 各サンプルプロジェクトの説明を読んで、どのプロジェクトが最適か確認します。各プロジェクトは、Red Hat Process Automation Manager のプロセス自動化、意思決定管理、またはビジネス最適化アセットおよび論理を異なる方法で説明するように設計されています。
- サンプルプロジェクトを選択し、Ok をクリックして自分のスペースにプロジェクトを追加します。
- 自分のスペースの Projects ページで、サンプルプロジェクトの 1 つを選択して、そのプロジェクトのアセットを表示します。
各アセットを選択して、指定のゴールまたはワークフローに到達するためにプロジェクトがどのように設計されているのかを確認します。サンプルのプロジェクトには、アセットが複数ページ含まれているものもあります。右上隅の左向きまたは右向き矢印をクリックして、全アセット一覧を表示します。
図10.1 アセットページの選択
プロジェクトの Assets ページの右上隅にある Build をクリックしてサンプルプロジェクトをビルドするか、Deploy をクリックしてプロジェクトをビルドしてから、KIE Server にデプロイします。
注記Build & Install オプションを選択してプロジェクトをビルドし、KJAR ファイルを KIE Server にデプロイせずに設定済みの Maven リポジトリーに公開することもできます。開発環境では、Deploy をクリックすると、ビルドされた KJAR ファイルを KIE Server に、実行中のインスタンス (がある場合はそれ) を停止せずにデプロイできます。または Redeploy をクリックして、ビルドされた KJAR ファイルをデプロイしてすべてのインスタンスを置き換えることもできます。次回、ビルドされた KJAR ファイルをデプロイまたは再デプロイすると、以前のデプロイメントユニット (KIE コンテナー) が同じターゲット KIE Server で自動的に更新されます。実稼働環境では Redeploy オプションは無効になっており、Deploy をクリックして、ビルドされた KJAR ファイルを KIE Server 上の新規デプロイメントユニット (KIE コンテナー) にデプロイすることのみが可能です。
KIE Server の環境モードを設定するには、
org.kie.server.modeシステムプロパティーをorg.kie.server.mode=developmentまたはorg.kie.server.mode=productionに設定します。Business Central でそれぞれのプロジェクトのデプロイメント動作を設定するには、プロジェクトの Settings → General Settings → Version に移動し、Development Mode オプションを選択して、Save をクリックします。デフォルトでは、KIE Server および Business Central のすべての新規プロジェクトは開発モードになっています。Development Mode をオンにしたプロジェクトをデプロイしたり、実稼働モードになっている KIE Server に手動でSNAPSHOTバージョンの接尾辞を追加したプロジェクトをデプロイしたりすることはできません。プロジェクトのデプロイメントに関する詳細を確認するには、画面の上部にあるデプロイメントバナーの View deployment details か、Deploy のドロップダウンメニューをクリックします。このオプションを使用すると、Menu → Deploy → Execution Servers ページに移動します。
第11章 ユーザーの作成
必要な数だけ Business Central ユーザーを作成できます。ユーザーの権限および設定は、ユーザーに割り当てたロールと、ユーザーが属するグループで制御されます。この例では、新しいユーザーを 2 つ作成する必要があります。銀行の住宅ローンマネージャーおよび承認者の Katy と、住宅ローンを依頼するブローカーの Bill です。ユーザー作成に関する情報は、Red Hat JBoss EAP 7.3 への Red Hat Process Automation Manager のインストールおよび設定 のユーザーの作成の章を参照してください。
Business Central では、グループおよびロールを使用してユーザーをまとめて、パーミッションを制御できます。任意数のグループおよびロールを作成できますが、グループには最低でもユーザーを 1 つ所属させる必要があります。
この例では、以下のグループまたはロールの 1 つまたは複数に、タスクの作業を行うユーザーを割り当てる必要があります。
- approver グループ: Qualify タスクの場合
- broker グループ: Correct Data タスクおよび Increase Down Payment タスクの場合
- manager ロール: Final Approval タスクの場合
手順
-
右上隅のギアアイコン
 をクリックし、Users をクリックします。
-
 をクリックして
 Katyを入力し、Next をクリックして Create をクリックします。 -
Yes をクリックしてパスワードを設定し、両フィールドに
Katyと入力してから Change をクリックします。 -
Billと入力して、Next をクリックし、Create をクリックします。 -
Yes をクリックしてパスワードを設定し、両フィールドに
Billと入力してから Change をクリックします。 -
Groups タブをクリックし、
 をクリックし、appr を入力し
 てNextをクリックします。 -
ユーザー一覧から
Katyを選択して、Add selected users をクリックします。 -
をクリックし、
brokerを入力して Next をクリックします。 -
ユーザー一覧から
Billを選択して、Add selected users をクリックします。 -
Users をクリックして
Katyを選択し、Edit → Roles → Add roles の順にクリックします。 -
managerを選択し、Add to selected roles をクリックして Save をクリックします。 - Groups タブをクリックし、Edit → Groups → Add to groups をクリックします。
-
approverとkie-serverを選択して、Add to selected groups をクリックします。 - Save をクリックします。
-
ユーザー一覧から
Billを選択し、Edit → Roles → Add roles の順にクリックします。 -
userを選択して Add to selected roles をクリックします。 -
Groups タブをクリックし、
kie-serverを選択して Add to selected groups をクリックします。 - Save をクリックします。
第12章 Maven を使用した DMN モデルおよび BPMN モデルの作成および実行
Maven アーキタイプを使用して、Business Central ではなく Red Hat Process Automation Manager VSCode 拡張機能を使用して、VSCode で DMN モデルおよび BPMN モデルを開発できます。その後、必要に応じて、Business Central で、アーキタイプを Red Hat Process Automation Manager のデシジョンサービスおよびプロセスサービスに統合できます。DMN モデルおよび BPMN モデルを開発する方法は、Red Hat Process Automation Manager VSCode 拡張機能を使用して新規ビジネスアプリケーションを構築する場合に便利です。
手順
- コマンドターミナルで、新しい Red Hat Process Automation Manager プロジェクトを保存するローカルディレクトリーに移動します。
以下のコマンドを入力して、以下の Maven アーキタイプを使用して、定義したディレクトリーにプロジェクトを生成します。
Maven アーキタイプを使用したプロジェクトの生成
mvn archetype:generate \
    -DarchetypeGroupId=org.kie \
    -DarchetypeArtifactId=kie-kjar-archetype \
    -DarchetypeVersion=7.48.0.Final-redhat-00004
このコマンドにより、必要な依存関係で Maven プロジェクトが生成され、ビジネスアプリケーションを構築するのに必要なディレクトリーとファイルが生成されます。プロジェクト開発時に Git バージョン制御システム (推奨) を設定して使用できます。
同じディレクトリーに複数のプロジェクトを生成する場合は、直前のコマンドに
-DgroupId=<groupid> -DartifactId=<artifactId>を追加して、生成されたビジネスアプリケーションのartifactIdおよびgroupIdを指定できます。- VSCode IDE で File をクリックし、Open Folder を選択し、直前のコマンドを使用して生成されたディレクトリーに移動します。
最初のアセットを作成する前に、ビジネスアプリケーションのパッケージ (例:
org.kie.businessapp) を設定し、以下のパスにそれぞれのディレクトリーを作成します。-
PROJECT_HOME/src/main/java -
PROJECT_HOME/src/main/resources -
PROJECT_HOME/src/test/resources
たとえば、
org.kie.businessappパッケージのPROJECT_HOME/src/main/java/org/kie/businessappを作成できます。-
VSCode を使用して、ビジネスアプリケーションにアセットを作成します。以下の方法で、Red Hat Process Automation Manager VSCode 拡張機能がサポートするアセットを作成できます。
-
ビジネスプロセスを作成するには、
PROJECT_HOME/src/main/java/org/kie/businessappディレクトリーに、.bpmnまたは.bpmn2の新規ファイルを作成します (例:Process.bpmn)。 -
DMN モデルを作成するには、
PROJECT_HOME/src/main/java/org/kie/businessappディレクトリーに、.dmnの新規ファイルを作成します (例:AgeDecision.dmn)。 -
テストシナリオシミュレーションモデルを作成するには、
PROJECT_HOME/src/main/java/org/kie/businessappディレクトリーに、.scesimの新規ファイルを作成します (例:TestAgeScenario.scesim)。
-
ビジネスプロセスを作成するには、
Maven アーキタイプでアセットを作成したら、コマンドラインで (
pom.xmlがある) プロジェクトのルートディレクトリーに移動し、以下のコマンドを実行してプロジェクトのナレッジ JAR (KJAR) を構築します。mvn clean install
ビルドに失敗したら、コマンドラインのエラーメッセージに記載されている問題に対応し、ビルドに成功するまでプロジェクトの妥当性確認を行います。ただし、ビルドに成功すると、
PROJECT_HOME/targetディレクトリーでビジネスアプリケーションのアーティファクトを確認できます。注記mvn clean installコマンドを使用して、開発中の主要な変更ごとにプロジェクトを検証します。
REST API を使用して実行中の KIE Server に、ビジネスアプリケーションの生成されたナレッジ JAR (KJAR) をデプロイできます。プロセスの REST API の使用方法は、KIE API を使用した Red Hat Process Automation Manager との対話 を参照してください。
第13章 mortgage-process プロジェクトの作成
プロジェクトは、データオブジェクト、ビジネスプロセス、ガイド付きルール、デシジョンテーブル、フォームなど、アセットのコンテナーです。作成するプロジェクトは、Business Central に既存の Mortgage_Process サンプルプロジェクトによく似ています。
手順
Business Central で、Menu → Design → Projects に移動します。
Red Hat Process Automation Manager は以下のイメージのように MySpace と呼ばれるデフォルトスペースを提供します。このデフォルトスペースを使用してサンプルプロジェクトを作成およびテストできます。
図13.1 デフォルトのスペース
- Add Project をクリックします。
-
Name フィールドに
mortgage-processと入力します。 Configure Advanced Options をクリックして GAV フィールドを以下の値に変更します。
-
Group ID:
com.myspace -
Artifact ID:
mortgage-process -
Version:
1.0.0
-
Group ID:
- Add をクリックします。
プロジェクトの Assets ビューを開きます。
第14章 mortgage-process データオブジェクトの作成
データオブジェクトは、作成するルールアセットの設定要素です。データオブジェクトは、プロジェクトで指定したパッケージに Java クラスとして実装されているカスタムのデータ型です。このカスタムのデータ型は、アセットとデシジョンサービスがどのデータに基づいているかを指定します。
住宅ローンプロセスプロジェクトでは、以下のデータオブジェクトを使用します。
-
Applicant -
プロパティー -
ValidationErrorDO -
Application
14.1. 申請者データオブジェクトの作成
以下の手順に従い、申請者の情報を含む Applicant データオブジェクトを作成します。これは、本チュートリアルでローン申請に必要な基本情報です。
手順
- Business Central で MySpace のデフォルトスペースをクリックします。
- Menu → Design → Projects の順にクリックし、mortgage-process をクリックします。
- Add Asset をクリックして、Data Object を選択します。
-
Create new Data Object ウィンドウの Data Object フィールドに
Applicantと入力します。 -
Package ドロップダウンメニューから
com.myspace.mortgage_appを選択し、Ok をクリックします。 -
'Applicant'- general properties セクションの Label フィールドに
Applicantと入力します。 +add field をクリックして、以下の Applicant データオブジェクトの値を入力します。各項目を追加後に Create and continue をクリックします。最後の項目を追加したら、Create をクリックします。
図14.1 申請者データオブジェクトフィールドの値
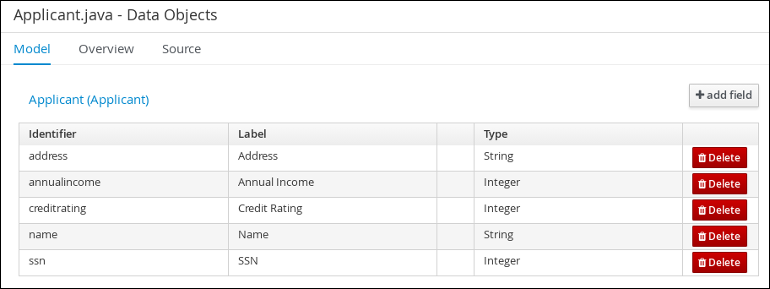
- Save をクリックします。
14.2. プロパティーデータプロジェクトの作成
以下の手順に従い、不動産の築年数や価格など、不動産の詳細情報が含まれる Property データオブジェクトを作成します。
手順
- Business Central で MySpace のデフォルトスペースをクリックします。
- Menu → Design → Projects の順にクリックし、mortgage-process をクリックします。
- Add Asset をクリックして、Data Object を選択します。
-
Create new Data Object ウィンドウの Data Object フィールドに
Propertyと入力します。 -
Package ドロップダウンメニューから
com.myspace.mortgage_appを選択し、Ok をクリックします。 -
'Property'- general properties セクションの Label フィールドに
Propertyと入力します。 +add field をクリックして、以下の Property データオブジェクトの値を入力します。各項目を追加後に Create and continue をクリックします。最後の項目を追加したら、Create をクリックします。
図14.2 プロパティーデータオブジェクトフィールドの値
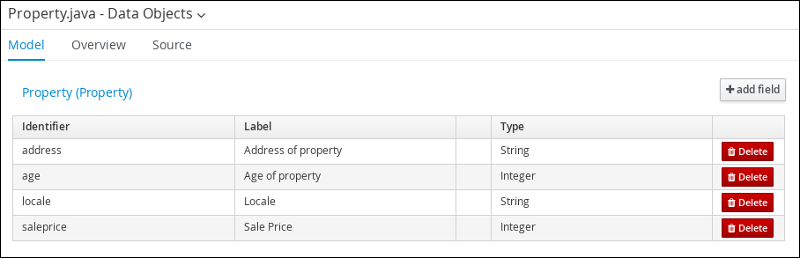
- Save をクリックします。
14.3. ValidationErrorDO データオブジェクトの作成
以下の手順に従い、申請エラーの原因を指定する ValidationErrorDO データプロジェクトを作成します。
手順
- Business Central で MySpace のデフォルトスペースをクリックします。
- Menu → Design → Projects の順にクリックし、mortgage-process をクリックします。
- Add Asset をクリックして、Data Object を選択します。
-
Create new Data Object ウィンドウの Data Object フィールドに
ValidationErrorDOと入力します。 -
Package ドロップダウンメニューから
com.myspace.mortgage_appを選択し、Ok をクリックします。 -
'ValidationErrorDO'- general properties セクションの Label フィールドに
ValidationErrorDOと入力します。 +add field をクリックして、以下の ValidationErrorDO データオブジェクトの値を入力します。各項目を追加後に Create and continue をクリックします。最後の項目を追加したら、Create をクリックします。
図14.3 ValidationErrorDO データオブジェクトフィールドの値
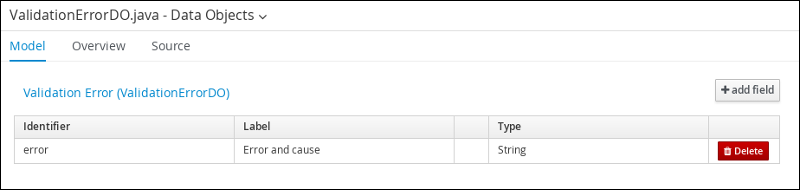
- Save をクリックします。
14.4. 申請データオブジェクトの作成
以下の手順に従い、頭金、住宅ローンの額など、住宅ローンの詳細情報が含めて Application データオブジェクトを作成します。
手順
- Business Central で MySpace のデフォルトスペースをクリックします。
- Menu → Design → Projects の順にクリックし、mortgage-process をクリックします。
- Add Asset をクリックして、Data Object を選択します。
-
Create new Data Object ウィンドウの Data Object フィールドに
Applicationと入力します。 -
Package ドロップダウンメニューから
com.myspace.mortgage_appを選択し、Ok をクリックします。 -
'Application'- general properties セクションの Label フィールドに
Applicationと入力します。 +add field をクリックして、以下の Applicantion データオブジェクトの値を入力します。各項目を追加後に Create and continue をクリックします。最後の項目を追加したら、Create をクリックします。
図14.4 申請データオブジェクトフィールドの値
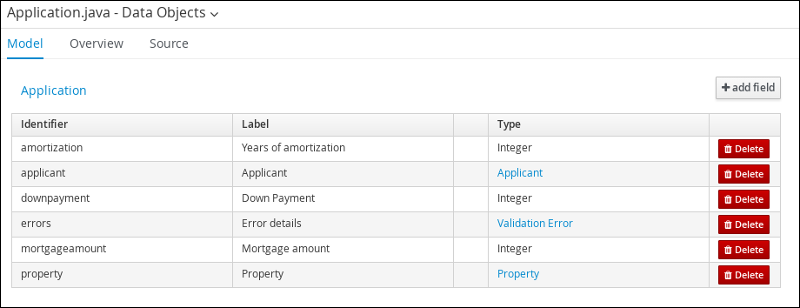
- Save をクリックします。
第15章 Business Central のビジネスプロセス
ビジネスプロセスは、フローチャートを使用して一連の手順を順番に説明する図です。ビジネスプロセスは、接続を使用して相互にリンクしているノードの集まりで設定されています。各ノードはプロセス全体のうちの 1 手順を表し、接続はノードが次のノードに移行する方法を指定します。
Mortgage_Process サンプルには、以下の事前定義済みの MortgageApprovalProcess ビジネスプロセスが含まれます。
15.1. ビジネスプロセスの作成
以下の手順では、MortgageApprovalProcess ビジネスプロセスを設定するタスク、接続、ゲートウェイの作成方法を詳しく説明します。住宅ローン検証のビジネスプロセスでは、新しい申請に必要なデータが含まれるかどうかを判断します。指定したデータ要件をすべて満たすと、申請のプロセスから住宅ローン計算のビジネスプロセスに進みます。
手順
- Business Central で、Menu → Design → Projects の順にクリックし、Mortgage-Process をクリックします。
- Add Asset → Business Process の順にクリックします。
以下の値を入力します。
-
Business Process:
MortgageApprovalProcess Package:
com.myspace.mortgage_appを選択します。Package は、既存のプロジェクト内で、アセットの作成先となる場所を指定します。この例では、
com/myspace/mortgage_appに作成します。
-
Business Process:
- OK をクリックします。ダイアグラムエディターが開きます。
-
右上隅の Properties
アイコンをクリックします。
-
下方向にスクロールして Process Data を展開し、Process Variables セクションの
 をクリックします。
以下の値を入力します。
-
名前:
application. -
データ型:
Application [com.myspace.mortgage_app]
-
名前:
15.1.1. 外向き接続と排他ゲートウェイの作成
本セクションでは、外向き接続、排他ゲートウェイ、ビジネスルールタスクの作成方法を説明します。排他ゲートウェイを使用して、意思決定を行い、利用可能なデータをもとにイベントに対応します。
Red Hat Process Automation Manager には、ビジネスプロセスの作成を簡略化する、事前定義済みのノードタイプが各種含まれます。事前定義済みのノードパネルは、ダイアグラムエディターの左側に置かれます。
手順
- 開始イベントノードをキャンバスにドラッグします。
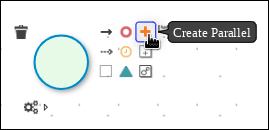
開始イベントから排他ゲートウェイへの外向き接続を作成します。
キャンバスで開始イベントノードをクリックし、Create Parallel アイコンをクリックします。
並列の
 アイコンにカーソルを合わせ、Convert into Exclusive アイコンをクリックします。

排他ゲートウェイからビジネスルールタスクへの外向き接続を作成します。
- キャンバスで排他ゲートウェイをクリックし、Create Parallel アイコンをクリックします。
タスクの
アイコンにカーソルを合わせ、Convert into Business Rule アイコンをクリックします。
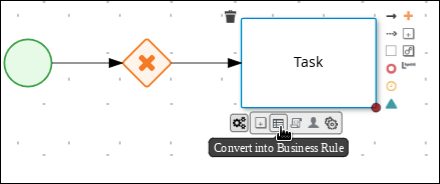
ビジネスルールタスクを設定します。
- ビジネスルールタスクをクリックします。
-
Properties パネルが表示されない場合は、右上隅の Properties
アイコンをクリックします。
-
Properties パネルで、Name フィールドに
Validationと入力します。 - Implementation/Execution を展開し、Rule Flow Group メニューから New を選択して、validation と入力します。
On Exit Action フィールドに、以下の Java 式を入力します。
System.out.println(application.getProperty());
-
Data Assignments を展開し、Assignments の横にある
 をクリックします。
Validation Data I/O ウィンドウで、Add をクリックして以下の割り当てを作成します。
データ入力と割り当て
- 名前: application
- Data Type: Application [com.myspace.mortgage_app]
- Source: application
データ出力と割り当て
- 名前: application
- Data Type: Application [com.myspace.mortgage_app]
Target: application
図15.1 Validation Data I/O 割り当て
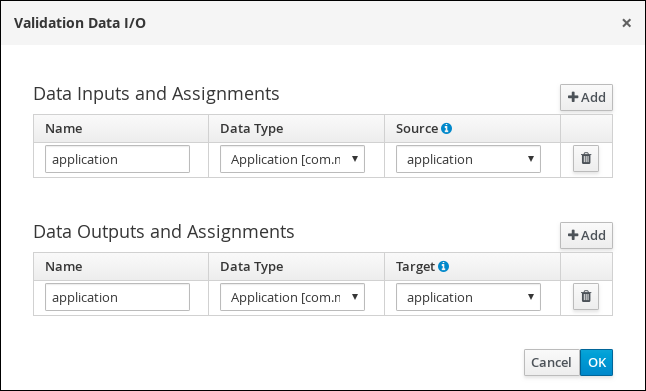
- Validation Data I/O ウィンドウで OK をクリックします。
- キャンバスの上にある Save をクリックして、変更を確定します。
15.1.2. 検証データの定義
このセクションは、申請データが正しいかどうか、またはエラーや情報の不足があるどうかを判断する検証データを定義する方法を説明します。
手順
Validation タスクから排他ゲートウェイに外向き接続を作成します。
- Validation タスクをクリックし、Create Parallel アイコンをクリックします。
並列の
アイコンにカーソルを合わせ、Convert into Exclusive アイコンをクリックします。
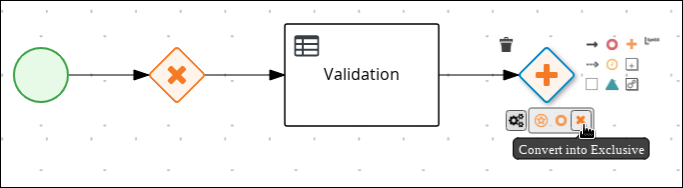
排他ゲートウェイから、新しいビジネスルールタスクへの外向き接続を作成します。
- 排他ゲートウェイをクリックし、Create Parallel アイコンをクリックします。
- 以下のように、新しいゲートウェイを排他ゲートウェイの下にドラッグします。
タスクの
アイコンにカーソルを合わせ、Convert into Business Rule アイコンをクリックします。
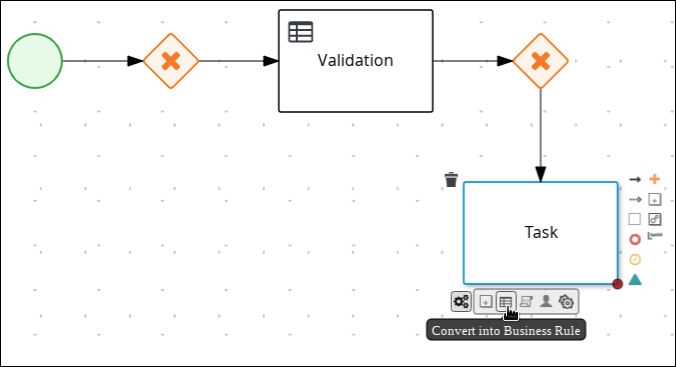
-
Properties パネルが表示されない場合は、右上隅の Properties
アイコンをクリックします。
-
Properties パネルで、Name フィールドに
Retract Validationと入力します。 -
Implementation/Execution を展開し、Rule Flow Group メニューから New を選択して、
errorと入力します。
排他ゲートウェイとビジネスルールタスクとの間の接続を設定します。
接続をクリックします。
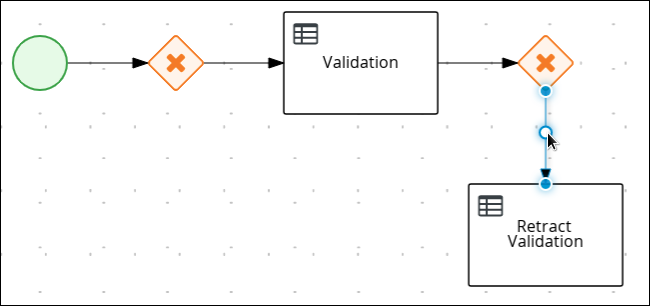
-
Properties パネルが表示されない場合は、右上隅の Properties
アイコンをクリックします。
-
Properties パネルで、Name フィールドに
Invalidを入力します。 - Implementation/Execution を展開し、Condition Expression セクションの Expression を選択します。
リストから、drools を選択して、Condition Expression フィールドに
ValidationErrorDO()を入力します。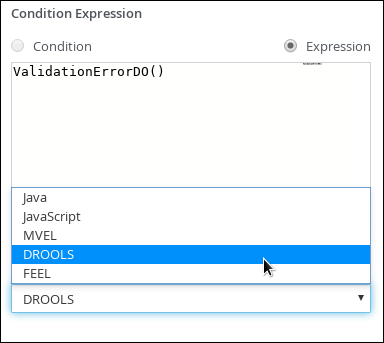
Retract Validation タスクから新規ユーザータスクに外向き接続を作成します。
- Retract Validation タスクをクリックし、Create Task アイコンをクリックします。
- 以下のように、新しいタスクを Validation タスクの下にドラッグします。
タスクの
アイコンにカーソルを合わせ、Convert into User アイコンをクリックします。
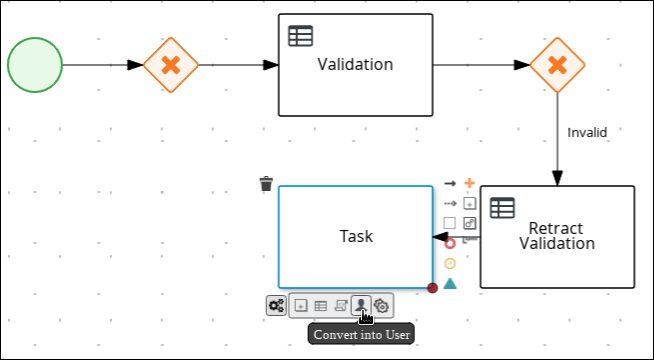
-
新規ユーザータスクをクリックし、Properties パネルの Name フィールドに
Correct Dataと入力します。 -
Implementation/Execution を展開し、Task Name フィールドに
CorrectDataと入力します。 -
Groups メニューから New を選択して
brokerと入力します。 -
Assignments の横にある
をクリックします。
Correct Data Data I/O ウィンドウで、Add をクリックして以下の割り当てを作成します。
- 名前: application
- Data Type: Application [com.myspace.mortgage_app]
Source: application
- データ出力と割り当て
- 名前: application
- Data Type: Application [com.myspace.mortgage_app]
Target: application
図15.2 Correct Data I/O 割り当て
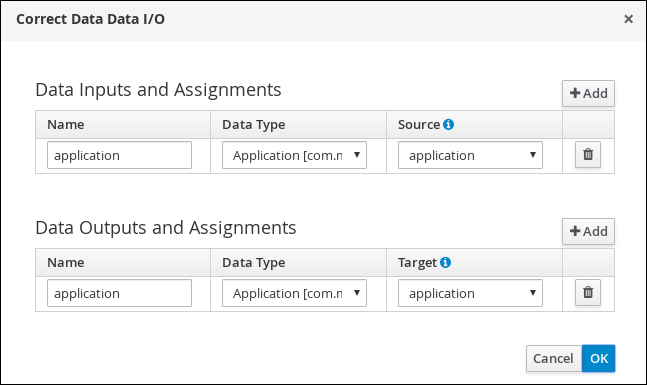
- Correct Data Data I/O ウィンドウで OK をクリックします。
- キャンバスの上にある Save をクリックして、変更を確定します。
Correct Data ユーザータスクをクリックしてから、Create sequence Flow アイコンをクリックし、最初の排他ゲートウェイにドラッグし直します。ワークフローは、以下のダイアグラムのようになります。

15.1.3. 住宅ローンの計算
住宅ローンの計算のビジネスプロセスは、申請者の住宅ローンの借入限度を決定します。
手順
- 2 つ目の排他ゲートウェイに戻り、新規ビジネスルールタスクへの外向き接続を作成します。
作成した接続をクリックし、Properties パネルの Name フィールドに
Validと入力します。- Implementation/Execution を展開し、Condition Expression セクションの Expression を選択します。
-
リストから、drools を選択して、Condition Expression フィールドに
not ValidationErrorDO()を入力します。
新しいビジネスルールタスクをクリックし、Properties パネルの Name フィールドに
Mortgage Calculationと入力します。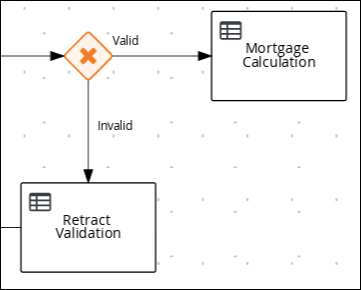
-
Implementation/Execution を展開し、Rule Flow Group メニューから New を選択して、
mortgagecalculationと入力します。
-
Implementation/Execution を展開し、Rule Flow Group メニューから New を選択して、
-
Data Assignments を展開し、Assignments の横にある
をクリックします。
Mortgage Calculation Data I/O ウィンドウで Add をクリックして以下の割当を作成し、Save をクリックします。
図15.3 Mortgage Calculation Data I/O 割り当て
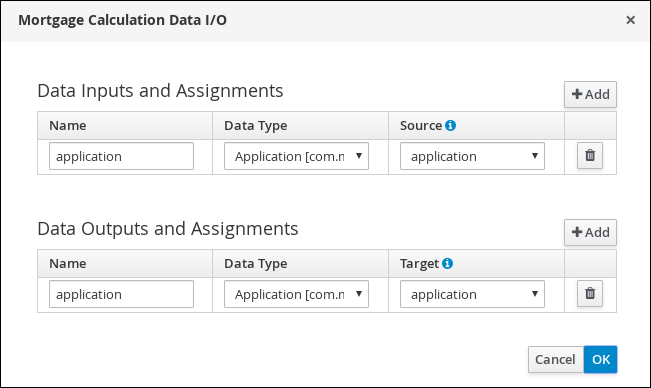
- Mortgage Calculation Data I/O ウィンドウで OK をクリックします。
キャンバスの空きスペースをクリックし、下方向にスクロールして Process Data を展開し、Process Variables の横にある
をクリックします。以下の値を入力します。
-
Name:
inlimit -
Data Type:
Boolean
-
Name:
- Mortgage Calculation タスクから新しいユーザータスクへの外向き接続を作成します。
-
ユーザータスクをクリックし、Name フィールドに
Qualifyと入力します。 -
Implementation/Execution を展開し、Task Name フィールドに
Qualifyと入力します。 -
Groups メニューから New を選択して
approverと入力します。 Assignments の横にある
をクリックします。Qualify Data I/O ウィンドウで、Add をクリックして、以下の割り当てを作成します。
図15.4 Qualify Data I/O 割り当て
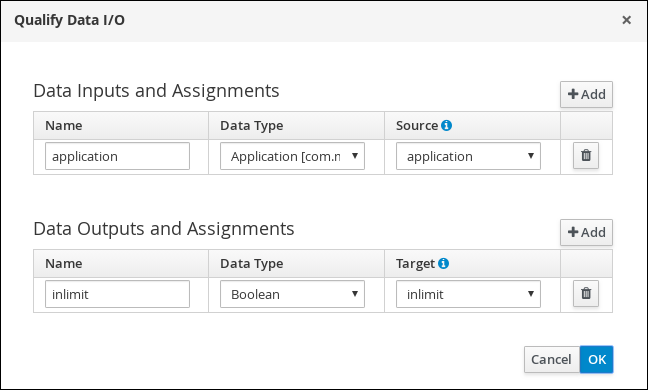
- Qualify Data I/O ウィンドウで OK をクリックします。
- キャンバスの上にある Save をクリックして、変更を確定します。
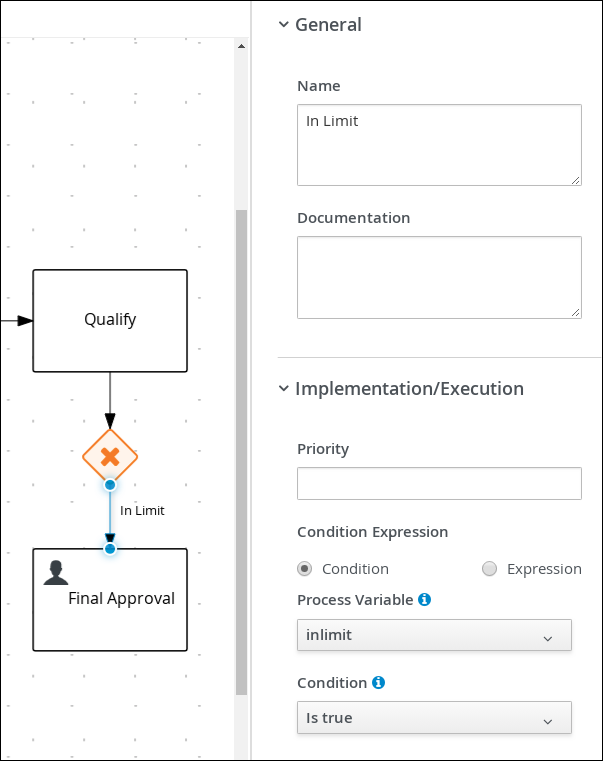
- Qualify ユーザータスク、Create parallel メニューアイコンの順にクリックし、排他ゲートウェイに変換します。
- Qualify ユーザータスクの下に、新しい排他ゲートウェイをドラッグします。
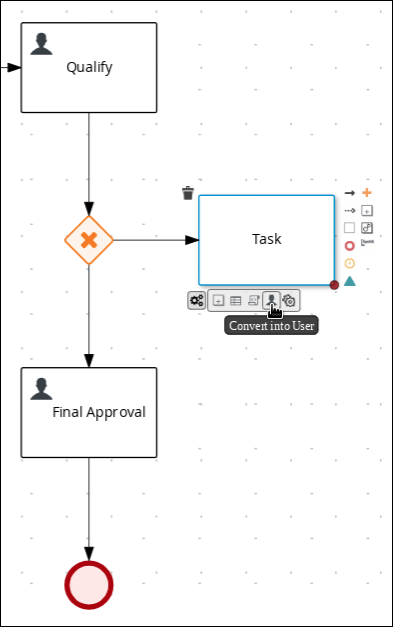
- 排他ゲートウェイからの外向き接続を作成し、新規ユーザータスクに連結します。
-
接続をクリックして、Properties パネルの Name フィールドに
In Limitと入力します。 - Implementation/Execution を展開し、Condition Expression セクションの Condition を選択します。
Process Variable ドロップダウンメニューから inlimit を選択し、Condition ドロップダウンメニューから Is true を選択します。
-
ユーザータスクをクリックし、Name フィールドに
Final Approvalと入力します。 -
Implementation/Execution を展開し、Task Name フィールドに
FinalApprovalと入力します。 -
Groups メニューから New を選択して
managerと入力します。 Assignments の横にある
をクリックします。Final Approval Data I/O ウィンドウで、Add をクリックして以下の割り当てを作成します。
図15.5 Final Approval Data I/O 割り当て
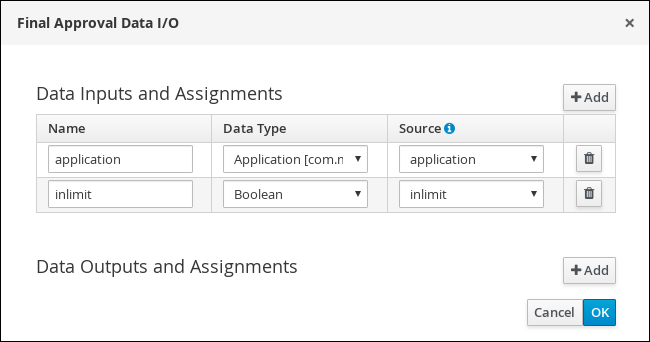
- Final Approval Data I/O ウィンドウで OK をクリックします。
- キャンバスの上にある Save をクリックして、変更を確定します。
15.1.4. 頭金の増額
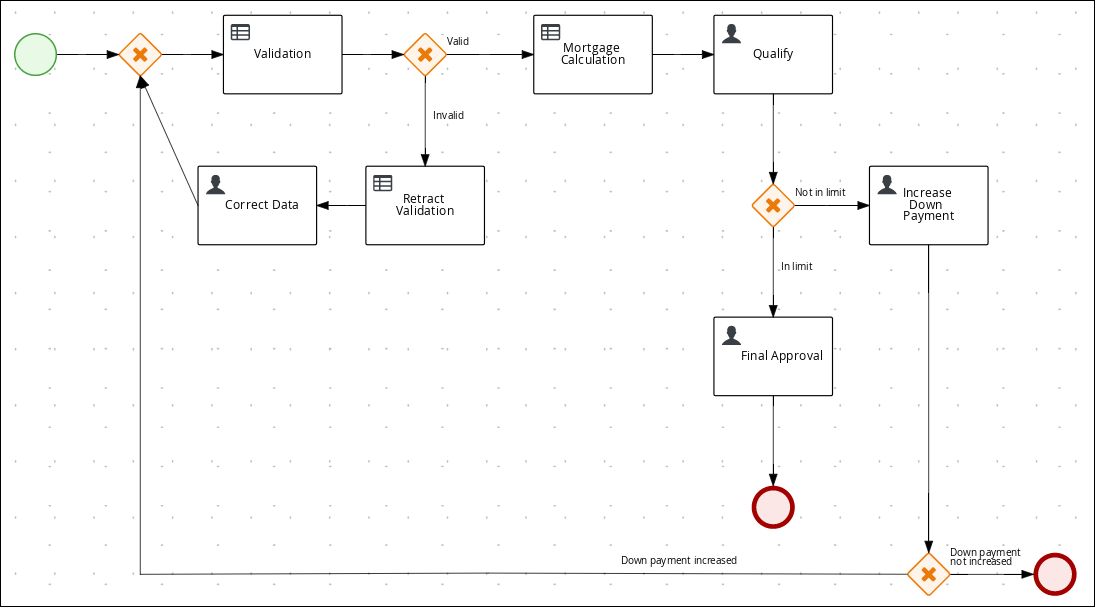
頭金の増額ビジネスプロセスは、頭金を増額することで、申請者がローンを組めるかどうかを確認します。最終結果は、申請者が頭金を増額できるかどうかに基づいて、ローンが最終的に承認または却下されます。
手順
- Final Approval ユーザータスクをクリックして、ユーザータスクのクイックメニューから Create End を選択します。
Final Approval ユーザータスクの下に、終了イベントを移動します。

Final Approval ユーザータスクに連結する排他ゲートウェイに戻ります。2 つ目の外向き接続を作成し、新しいユーザータスクに連結します。
-
接続をクリックして、Properties パネルの Name フィールドに
Not in Limitと入力します。 - Implementation/Execution を展開し、Condition Expression セクションの Condition を選択します。
- Process Variable ドロップダウンメニューから inlimit を選択し、Condition ドロップダウンメニューから Is false を選択します。
キャンバスの空きスペースをクリックし、下方向にスクロールして Process Data を展開し、Process Variables の横にある
をクリックします。以下の値を入力します。
-
Name:
incdownpayment Data Type:
Boolean
-
Name:
-
新規ユーザータスクをクリックして、Properties パネルの Name フィールドに
Increase Down Paymentを入力します。 -
Implementation/Execution を展開し、Task Name フィールドに
IncreaseDownPaymentと入力します。 -
Groups メニューから New を選択して
brokerと入力します。 Assignments の横にある
をクリックします。Increase Down Payment Data I/O ウィンドウで Add をクリックして、以下の割り当てを作成します。
図15.6 Increase Down Payment Data I/O 割り当て
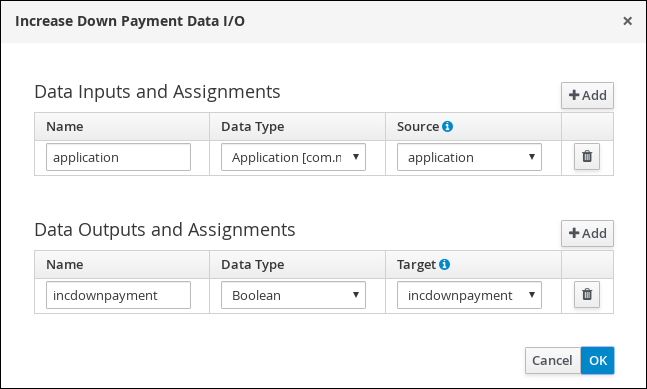
- Increase Down Payment Data I/O ウィンドウで OK をクリックします。
- キャンバスの上にある Save をクリックして、変更を確定します。
- Increase Down Payment ユーザータスク、Create parallel メニューアイコンの順にクリックし、排他ゲートウェイに変換します。
- Increase Down Payment ユーザータスクの下に新しい排他ゲートウェイをドラッグします。
- 排他ゲートウェイから終了イベントに外向き接続を作成します。
-
接続をクリックして、Properties パネルの Name フィールドに
Down payment not increasedと入力します。 - Implementation/Execution を展開し、Condition Expression セクションの Expresssion を選択します。
- return !incdownpayment; と入力し、ドロップダウンメニューから java を選択します。
- 排他ゲートウェイから外向き接続を作成し、それを最初の排他的ゲートウェイに接続します。
-
接続をクリックして、Properties パネルの Name フィールドに
Down payment increasedと入力します。 - Implementation/Execution を展開し、Condition Expression セクションの Expresssion を選択します。
- return incdownpayment; と入力し、ドロップダウンメニューから java を選択します。
- キャンバスの上にある Save をクリックして、変更を確定し、ビジネスプロセス全体を保存します。
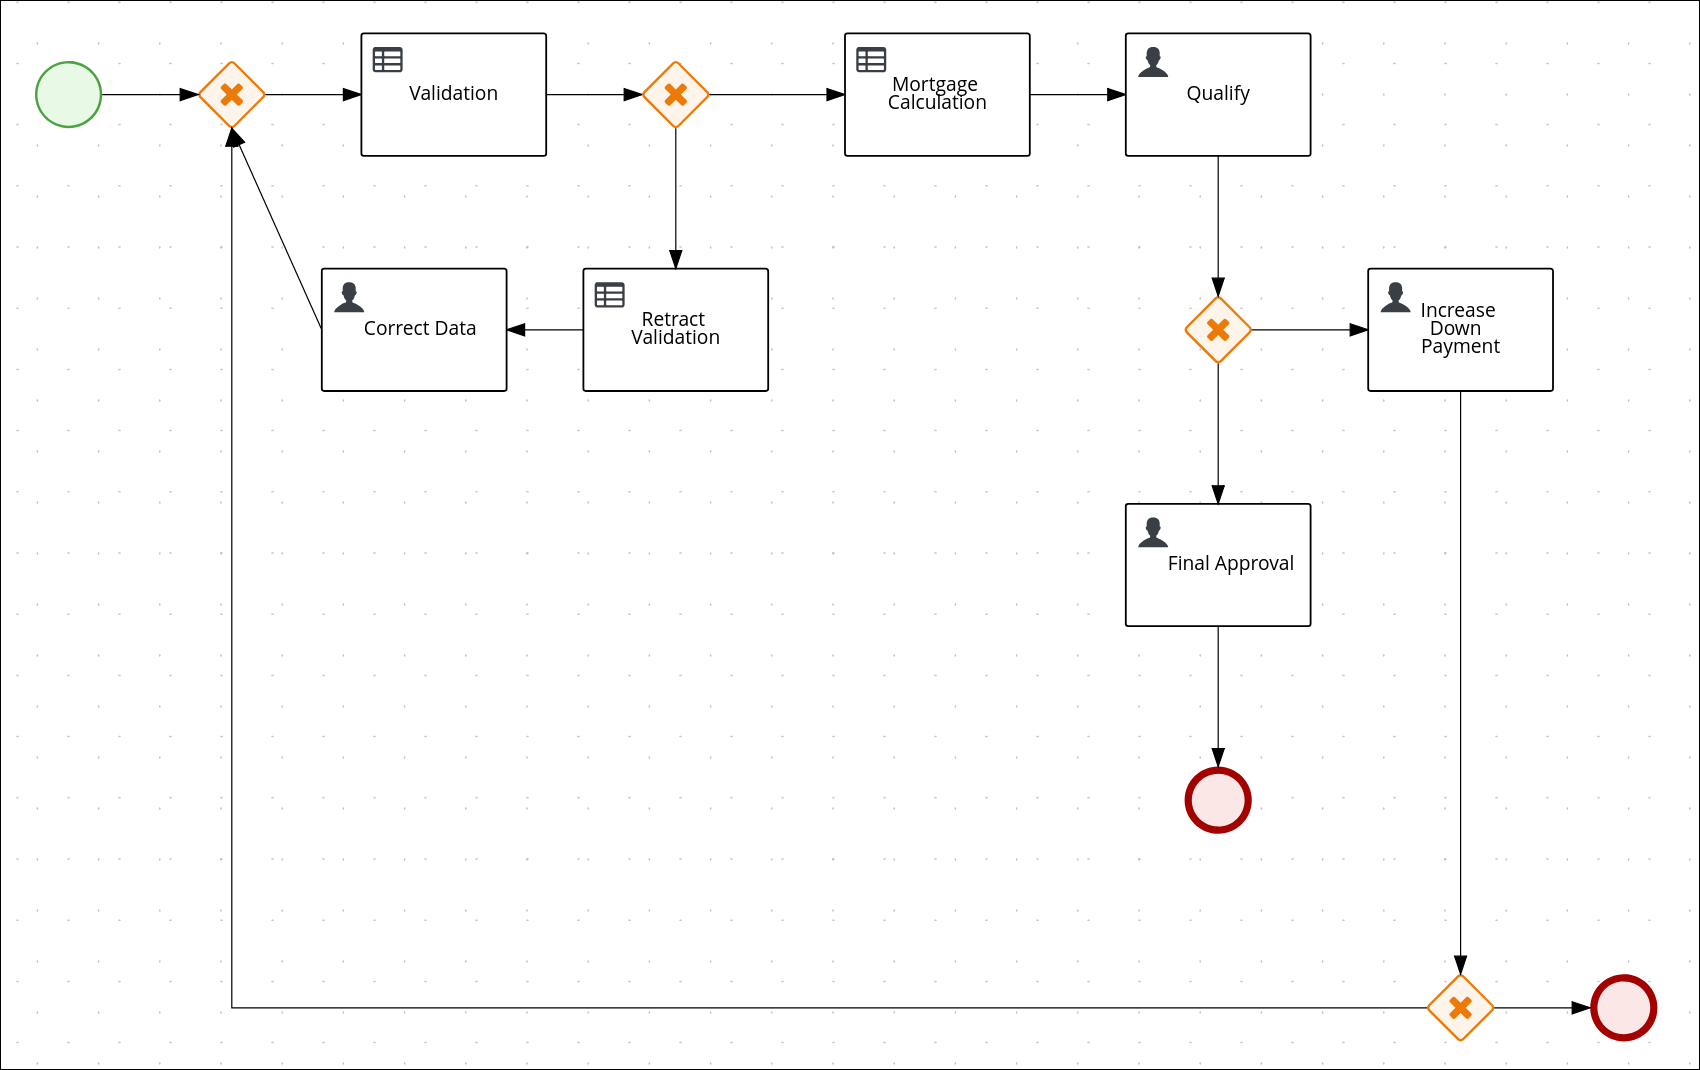
図15.7 ビジネスプロセスの最終バージョン
第16章 ガイド付きルール
ガイド付きルールは、ルール作成のプロセスを提供する、Business Central の UI ベースのガイド付きルールデザイナーで作成するビジネスルールです。ガイド付きルールデザイナーを使用すると、ルールを定義するデータオブジェクトに基づいて、可能なインプットにフィールドおよびオプションを提供します。定義したガイド付きルールは、その他のすべてのルールアセットとともに Drools Rule Language (DRL) ルールにコンパイルされます。
ガイド付きルールに関連するすべてのデータオブジェクトは、ガイド付きルールと同じプロジェクトパッケージに置く必要があります。同じパッケージに含まれるアセットはデフォルトでインポートされます。必要なデータオブジェクトとガイド付きルールを作成したら、ガイド付きルールデザイナーの Data Objects タブから、必要なデータオブジェクトがすべてリストされていることを検証したり、新規アイテム を追加してその他の既存データオブジェクトをインポートしたりできます。
16.1. Mortgage_Process ビジネスルールの表示
本章は、Mortgage_Process プロジェクトの事前定義済みのビジネスルールを紹介することが目的です。このチュートリアルでは、ビジネスルールの作成や定義は行いません。代わりに、Mortgage_Process サンプルプロジェクトの事前設定されたビジネスルールですでに定義されている WHEN ルールおよび THEN ルールを確認してください。ガイド付きビジネスルールの作成に関する情報は、ガイド付きルールを使用したデシジョンサービスの設計 を参照してください。
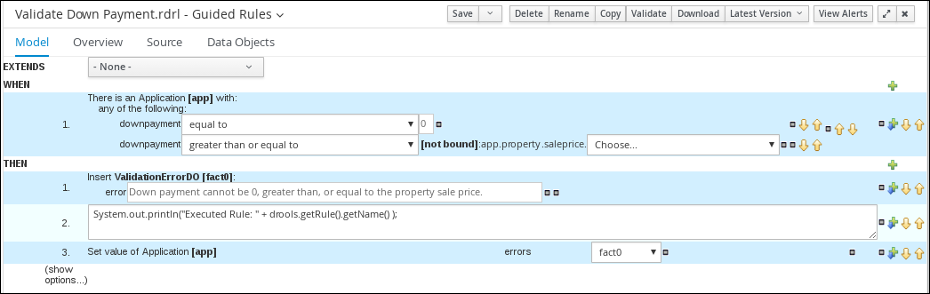
16.1.1. ガイド付きルール Validate Down Payment の表示
WHEN ルールおよび THEN ルールを確認して、条件の設定方法や、プロセスの実行時にどのように使用するかを理解してください。
手順
- Menu → Design → Projects の順にクリックし、Mortgage Process をクリックします。
- アセットリストの右矢印をクリックして、アセットリストの 2 ページ目を表示し、Validate Down Payment のガイド付きルールをクリックします。
ガイド付きルール Validate Down Payment の WHEN と THEN の条件と値を確認します。
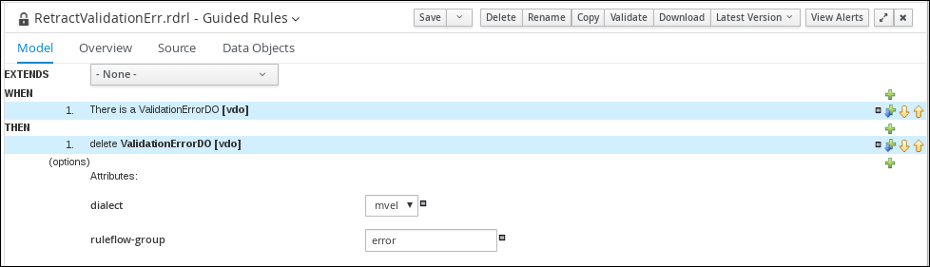
16.1.2. ガイド付きルール RetractValidationErr の表示
WHEN ルールおよび THEN ルールを確認して、条件の設定方法や、プロセスの実行時にどのように使用するかを理解してください。
手順
- Menu → Design → Projects の順にクリックし、Mortgage Process をクリックします。
- アセットリストの右矢印をクリックして、アセットリストの 2 ページ目を表示し、RetractValidationErr のガイド付きルールをクリックします。
ガイド付きルール RetractValidationErr の WHEN と THEN の条件と値を確認します。
第17章 ガイド付きデシジョンテーブル
ガイド付きデシジョンテーブルは、デシジョンテーブルのスプレッドシートに代わる方法で、ウィザードを用いて表形式でビジネスルールを定義します。ガイド付きデシジョンテーブルでは、プロジェクトで指定したデータオブジェクトをもとに、Business Central の UI ベースのウィザードに従ってルール属性、メタデータ、条件、およびアクションを定義します。ガイド付きデシジョンテーブルを作成すると、定義したルールは、その他のすべてのルールアセットとともに Drools Rule Language (DRL) ルールにコンパイルされます。
ガイド付きデシジョンテーブルに関連するすべてのデータオブジェクトは、ガイド付きデシジョンテーブルと同じプロジェクトパッケージに存在する必要があります。同じパッケージに含まれるアセットはデフォルトでインポートされます。必要なデータオブジェクトとガイド付きデシジョンテーブルの作成後、ガイド付きデシジョンテーブルデザイナーの Data Objects タブを使用して、必要なデータオブジェクトがすべてリストされていることを検証したり、新規アイテム を追加してその他の既存データオブジェクトをインポートしたりできます。
17.1. 住宅ローンデシジョンテーブルの表示
本章は、デシジョンテーブル MortgageDecisionTable を紹介することが目的です。このチュートリアルでは、デシジョンテーブル条件の作成および設定は行いません。代わりに、Mortgage_Process サンプルプロジェクトの MortgageDecisionTable ガイド付きデシジョンテーブルのアセットにすでに定義されている値と条件を確認します。デシジョンテーブルの作成方法は、ガイド付きデシジョンテーブルを使用したデシジョンサービスの作成 を参照してください。
前提条件
- ビジネスルールが作成されている。詳細は、「Mortgage_Process ビジネスルールの表示」 を参照してください。
手順
- Business Central で、Menu → Design → Projects の順にクリックし、Mortgage_Process をクリックします。
スクロールダウンして、ガイド付きデシジョンテーブルアセット MortgageDecisionTable をクリックします。

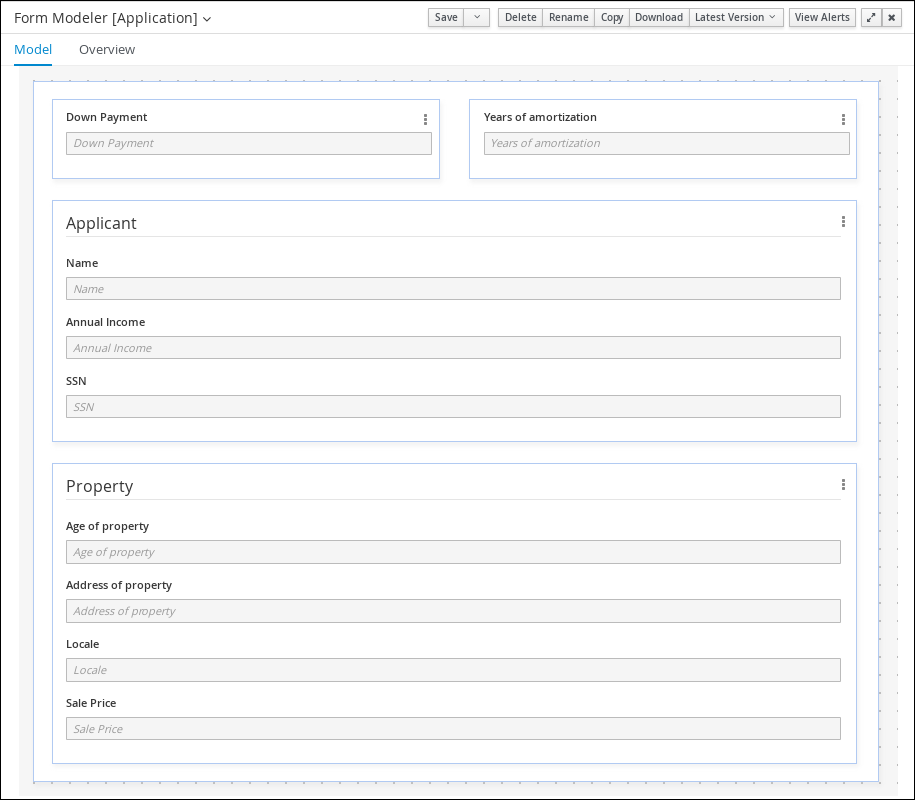
第18章 Business Central のフォーム
フォームは、HTML として定義されたページのレイアウト定義であり、プロセスおよびタスクのインスタンス化の間にユーザーにダイアログウィンドウとして表示されます。タスクフォームは、プロセスとタスクインスタンスの両方の実行のためにユーザーからデータを取得しますが、プロセスフォームはプロセス変数から入力と出力を受け取ります。
入力は、Data Input Assignment を使用してタスクにマッピングされ、タスク内で使用できます。タスクが完了すると、データは Data Output Assignment としてマッピングされ、データを親プロセスインスタンスに提供します。
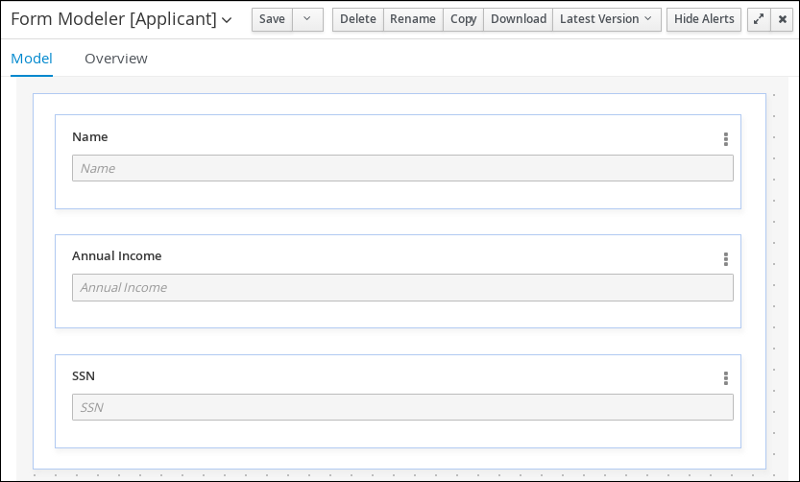
18.1. Mortgage_Process フォームの表示
本章は、Mortgage_Process サンプルプロジェクトの事前定義済みのフォームを紹介することが目的です。このフォームは、住宅ローン申請のビジネスプロセス向けにユーザーデータを収集するのに使用します。このチュートリアルでは、Mortgage_Process フォームの作成や変更は行いません。代わりに、事前定義済みのサンプルフォームを確認していきます。フォームの作成に関する詳細は、BPMN モデルを使用したビジネスプロセスの作成 を参照してください。
手順
- Business Central で、Menu → Design → Projects の順にクリックし、Mortgage_Process をクリックします。
アセットリストの右矢印をクリックして、アセットリストの 2 ページ目を表示し、Applicant フォームを選択します。
図18.1 Applicant サンプルフォーム
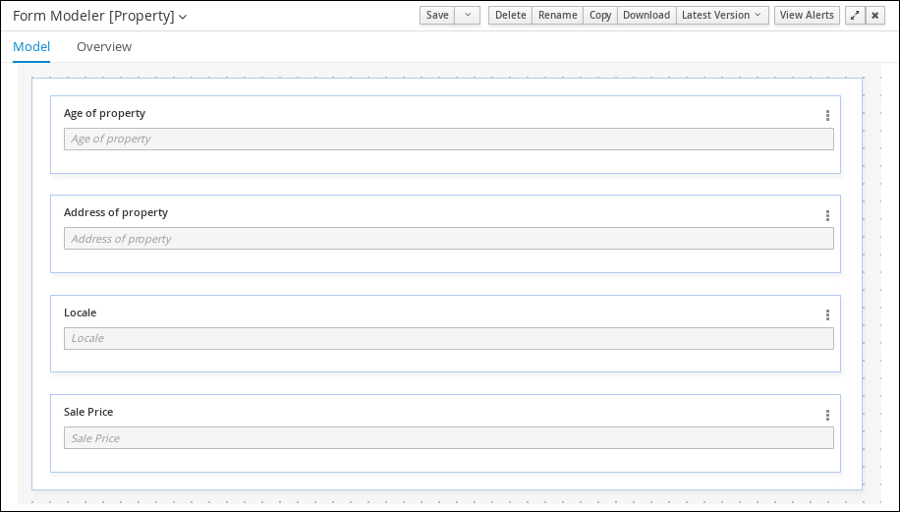
- Menu → Design → Projects → Mortgage Process の順にクリックします。
アセットリストから Property フォームを選択します。Property フォームは以下のようになります。
図18.2 Property サンプルフォーム
- Menu → Design → Projects → Mortgage Process の順にクリックします。
アセットリストから Application フォームを選択します。Application フォームは以下のようになります。
図18.3 Application サンプルフォーム
- 右上の X をクリックして、エディターを閉じます。
第19章 MortgageApprovalProcess プロセスアプリケーションのデプロイ
本章では、Red Hat Process Automation Manager に Mortgage_Process アプリケーションの新しいインスタンスをビルドしてデプロイする方法を説明します。
前提条件
- KIE Server がデプロイされて Business Central に接続されている。
手順
- Business Central で、Menu → Design → Projects の順にクリックし、Mortgage_Process をクリックします。
Deploy をクリックします。
- KIE コンテナー (デプロイメントユニット) がプロジェクト名に含まれていない場合は、デフォルト値でコンテナーが自動的に作成されます。
以前のバージョンのプロジェクトがすでにデプロイされている場合は、プロジェクト設定に移動して、プロジェクトバージョンを変更します。終了したら、変更を保存して Deploy をクリックします。これにより、最新の変更が適用された、同じプロジェクトの新しいバージョンが、古いバージョンとともにデプロイされます。
注記Build & Install オプションを選択してプロジェクトをビルドし、KJAR ファイルを KIE Server にデプロイせずに設定済みの Maven リポジトリーに公開することもできます。開発環境では、Deploy をクリックすると、ビルドされた KJAR ファイルを KIE Server に、実行中のインスタンス (がある場合はそれ) を停止せずにデプロイできます。または Redeploy をクリックして、ビルドされた KJAR ファイルをデプロイしてすべてのインスタンスを置き換えることもできます。次回、ビルドされた KJAR ファイルをデプロイまたは再デプロイすると、以前のデプロイメントユニット (KIE コンテナー) が同じターゲット KIE Server で自動的に更新されます。実稼働環境では Redeploy オプションは無効になっており、Deploy をクリックして、ビルドされた KJAR ファイルを KIE Server 上の新規デプロイメントユニット (KIE コンテナー) にデプロイすることのみが可能です。
KIE Server の環境モードを設定するには、
org.kie.server.modeシステムプロパティーをorg.kie.server.mode=developmentまたはorg.kie.server.mode=productionに設定します。Business Central の対応するプロジェクトでのデプロイメント動作を設定するには、プロジェクトの Settings → General Settings → Version に移動し、Development Mode オプションを選択します。デフォルトでは、KIE Server および Business Central のすべての新規プロジェクトは開発モードになっています。Development Mode をオンにしたプロジェクトをデプロイしたり、実稼働モードになっている KIE Server に手動でSNAPSHOTバージョンの接尾辞を追加したプロジェクトをデプロイしたりすることはできません。
- プロジェクトのデプロイメントに関する詳細を確認するには、画面の上部にあるデプロイメントバナーの View deployment details か、Deploy のドロップダウンメニューをクリックします。このオプションを使用すると、Menu → Deploy → Execution Servers ページに移動します。
第20章 MortgageApprovalProcess プロセスアプリケーションの実行
プロジェクトをデプロイしたため、プロジェクトで定義した機能を実行できます。本チュートリアルでは、住宅ローンブローカーとして、住宅ローン申請書にデータを入力します。MortgageApprovalProcess ビジネスプロセスが実行し、定義しておいたデシジョンルールに基づいて、申請者が条件に合った頭金を提示したかどうかを判断します。このビジネスプロセスは、ルールのテストを終了するか、続行するために頭金の増額を依頼します。アプリケーションが、ビジネスルールのテストを通過したら、銀行の承認者が申請書を見直し、ローンを承認または却下します。
前提条件
- KIE Server がデプロイされて Business Central に接続されている。
- Mortgage_Process アプリケーションがデプロイされている。
タスクを処理するユーザーが、以下のグループおよびロールのメンバーになっている。
- approver グループ: Qualify タスクの場合
- broker グループ: Correct Data タスクおよび Increase Down Payment タスクの場合
- manager ロール: Final Approval タスクの場合
手順
-
Red Hat Process Automation Manager に
Bill(broker) としてログインし、Menu → Manage → Process Definitions の順にクリックします。 Actions コラムの 3 つの縦の点をクリックして Start を選択し、Application フォームを表示して、フォームのフィールドに以下の値を入力します。
-
Down Payment:
30000 -
Years of amortization:
10 -
Name:
Ivo -
Annual Income:
60000 -
SSN:
123456789 -
Age of property:
8 -
Address of property:
Brno -
Locale:
Rural -
Property Sale Price:
50000
-
Down Payment:
- Submit をクリックして、新しいプロセスインスタンスを開始します。プロセスインスタンスを開始すると、Instance Details ビューが開きます。
Diagram タブをクリックして、プロセスダイアグラムのプロセスフローを表示します。各タスクを通過した時のプロセスの状態が強調表示されます。
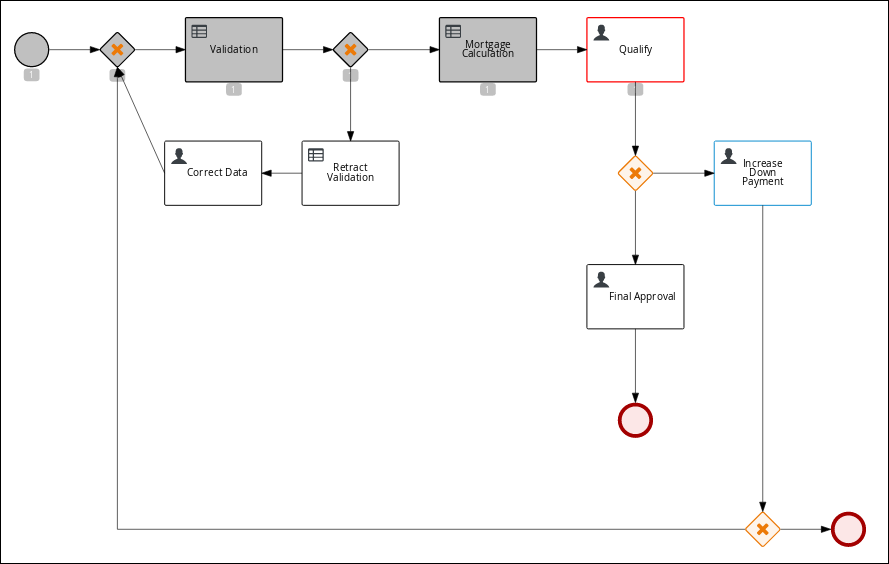
-
Business Central からログアウトし、
Katyとしてログインし直します。 - Menu → Track → Task Inbox の順にクリックします。これにより Qualify フォームに移動します。
-
Actions コラムの 3 つの縦の点をクリックして、Claim を選択してクリックします。Qualify タスクの Status が
Reservedに変わりました。 Qualify タスクの行をクリックして開き、タスク情報を確認します。Claim をクリックして、フォームの一番下の Start をクリックします。
申請書が承認/拒否できるようにアクティブになりました。
- 申請を承認するには、Is mortgage application in limit? を選択して Complete をクリックします。
- Task Inbox で、Final Approval 行の任意の場所をクリックし、Final Approval タスクを開きます。
- Final Approval の行にある Actions コラムの 3 つの縦の点をクリックして、Claim をクリックします。
- Final Approval の行の任意の場所をクリックして、Final Approval タスクを表示します。フォームの一番下にある Start をクリックします。
- アプリケーションで最終承認の準備ができていることを反映するために Inlimit のチェックボックスが選択されている点に着目してください。Complete をクリックします。
Save ボタンおよび Release ボタンは、承認プロセスを中断したり、(フィールド値を待っている場合は) インスタンスを保存したり、別のユーザーが修正するタスクを解除したりするために使用します。
第21章 MortgageApprovalProcess プロセスアプリケーションの監視
以下の章では、システム管理者や知識労働者など、職務が異なる銀行の従業員が、住宅ローンの承認プロセスのインスタンスを追跡するために、監視機能の一部をどのように使用していくかを説明します。
前提条件
- KIE Server がデプロイされて Business Central に接続されている。
手順
- Red Hat Process Automation Manager にログインし、Menu → Manage → Process Instances の順にクリックします。
- Manage Process Instances ウィンドウで、State、Errors、Id などのフィルターを設定します。
- State フィルターで Completed を選択し、完了した MortgageApprovalProcess インスタンスをすべて表示します。
- 完了したプロセスインスタンスをクリックします。
以下のいずれかのタブをクリックして、特定のプロセスインスタンスの監視に利用できる情報の種類を確認します。
- インスタンス詳細
- プロセス変数
- ドキュメント
- ログ
- ダイアグラム
- Menu → Track → Process Reports の順にクリックします。このビューにはさまざまなチャートが含まれているため、上級のプロセスマネージャーはこのようなチャートを使用して、タスクのレポートを行うために Type、Start Date、Running Time などに基づく全プロセスの概要を確認できます。
21.1. デフォルトおよび詳細フィルターを使用したプロセスインスタンスのフィルターリング
Business Central には、デフォルトおよび高度なフィルターが含まれており、実行中のプロセスインスタンスのフィルターリングや、検索に役立ちます。Advanced Filters オプションを使用してカスタムのフィルターを作成することも可能です。
21.1.1. デフォルトのフィルターを使用したプロセスインスタンスのフィルターリング
State、Errors、Filter By、Name、Start Date、Last update などの属性で、プロセスインスタンスをフィルターリングします。
手順
- Business Central で、Menu → Manage → Process Instances に移動します。
Manage Process Instances ページの左側にあるフィルターアイコンをクリックして、Filters ペインを展開します。
このペインは、以下のプロセス属性を表示し、プロセスインスタンスのフィルターリングに使用できます。
- State: 状態をもとにプロセスインスタンスをフィルターリングします (Active、Aborted、Completed、Pending、および Suspended)。
- Errors: エラー別でプロセスインスタンスをフィルターリングします。
Filter By: Id、Initiator、Correlation Key、または Description 属性をもとにプロセスインスタンスをフィルターリングします。
- 必要な属性を選択します。
- 下のテキストフィールドに検索クエリーを入力します。
- Apply をクリックします。
- Name: 定義名でプロセスインスタンスをフィルターリングします。
- Definition Id: プロセス定義 ID でプロセスインスタンスをフィルターリングします。
- Deployment Id: プロセスデプロイメント ID でプロセスインスタンスをフィルターリングします。
- Parent Process Instance Id: 親プロセスインスタンス ID でプロセスインスタンスをフィルターリングします。
- SLA Compliance: SLA コンプライアンス状態でプロセスインスタンスをフィルターリングします。
- Start Date: 作成日でプロセスインスタンスをフィルターリングします。
- Last update: 最後に変更した日付別にプロセスインスタンスをフィルターリングします。
21.1.2. 詳細フィルターを使用したプロセスインスタンスのフィルターリング
Advanced Filters オプションを使用して、カスタムのプロセスインスタンスフィルターを作成します。新規作成したカスタムフィルターは Saved Filters ペインに追加されます。このペインには、Manage Process Instances ページの左側にある星のアイコンをクリックしてアクセスできます。
手順
- Business Central で、Menu → Manage → Process Instances に移動します。
- Manage Process Instances ページの左側にある Advanced Filters アイコンをクリックします。
- Advanced Filters ペインで、フィルターの名前と説明を入力して、Add New をクリックします。
- Select column ドロップダウンリストから processName などの属性を選択します。ドロップダウンの内容が processName != value1 に変わります。
- もう一度ドロップダウンをクリックして、必要な論理クエリーを選択します。processName 属性については、equals to を選択してください。
フィルターリングするプロセス名の横にあるテキストフィールドの値を変更します。
注記名前は、プロジェクトのビジネスプロセスで定義した値と一致させる必要があります。
- Save をクリックして、フィルター定義に従い、プロセスをフィルターリングします。
星のアイコンをクリックして、Saved Filters ペインを開きます。
Saved Filters ペインで、保存した詳細フィルターをすべて表示できます。
第22章 関連資料
パート III. Red Hat Process Automation Manager でのケース管理の使用
ビジネスルールおよびプロセス開発者は、Business Central でケース管理アセットを使用し、予測不可能なアドホックケースプロセスを作成できます。ケースワーカーまたはプロセス管理者も、ケース管理および実行に Business Central を使用できます。Red Hat Process Automation Manager は、参考用として、Business Central 内に、ビジネスアセットサンプルを含むサンプルプロジェクトを提供しています。本書では、Business Central に同梱されている IT_Orders サンプルプロジェクトをもとに、IT 注文プロジェクトのサンプルを作成して、テストする方法を説明します。
前提条件
- Red Hat JBoss Enterprise Application Platform 7.3 がインストールされている。詳細は、Red Hat JBoss EAP 7.3 インストールガイド を参照してください。
- Red Hat Process Automation Manager がインストールされ、KIE Server で設定されている。詳細は Red Hat JBoss EAP 7.3 への Red Hat Process Automation Manager のインストールおよび設定 を参照してください。
-
Red Hat Process Automation Manager が実行し、
kie-serverロール、userロール、およびadminロールで Business Central にログインできる。 - ケース管理の設計および構築 の情報を確認済みである。
第23章 IT_Orders サンプルプロジェクトの確認
独自のケース管理プロジェクトを作成する前に、Business Central で既存の IT_Orders サンプルケース管理プロジェクトを確認してください。このサンプルプロジェクトには、独自のケースプロジェクトのリファレンスとして、事前定義されたケース管理アセットが含まれています。
ビジネスプロセスアプリケーションサンプルには、テクノロジープレビューとして提供されている機能が含まれます。テクノロジープレビュー機能は、Red Hat 製品のサービスレベルアグリーメント (SLA) ではサポートされておらず、機能的に完全ではない可能性があるため、実稼働環境での使用は推奨されません。これらの機能は、今後の製品機能への早期アクセスを提供することで、お客様が機能をテストし、開発プロセス中にフィードバックを提供できるようにしています。Red Hat テクノロジープレビュー機能の詳細は テクノロジープレビュー機能のサポート範囲 を参照してください。
手順
- Business Central で、Menu → Design → Projects に移動します。既存のプロジェクトがある場合は、MySpace のデフォルトのスペースをクリックして、Add Project ドロップダウンメニューから Try Samples を選択して、サンプルにアクセスできます。既存のプロジェクトがない場合には、Try samples をクリックします。
- IT_Orders を選択し、OK をクリックします。
プロジェクトの Assets ビューを開きます。各サンプルアセットを選択して、指定された目標またはワークフローを達成するためにプロジェクトがどのように設計されているかを調べます。
orderhardware ビジネスプロセスを確認します。これはビジネスプロセスフローを理解するのに役立ちます。
第24章 新しい IT_Orders ケースプロジェクトの作成
Business Central で新しい IT_Orders プロジェクトを作成して、必要なすべてのアセットとプロジェクトでの使用方法を理解します。
手順
Business Central にログインし、Menu → Design → Projects の順に移動します。
Business Central は以下のイメージのように MySpace と呼ばれるデフォルトスペースを提供します。このデフォルトスペースを使用してサンプルプロジェクトを作成およびテストできます。
図24.1 デフォルトスペース

Add Project ドロップダウン矢印をクリックし、Case project オプションを選択します。
図24.2 ケースプロジェクト
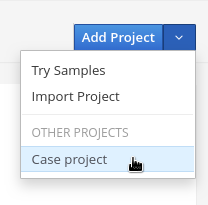
Add Project ウィンドウで、Name フィールドに
IT_Orders_Newと入力し、プロジェクトの Description を入力します。図24.3 Add Project ウインドウ
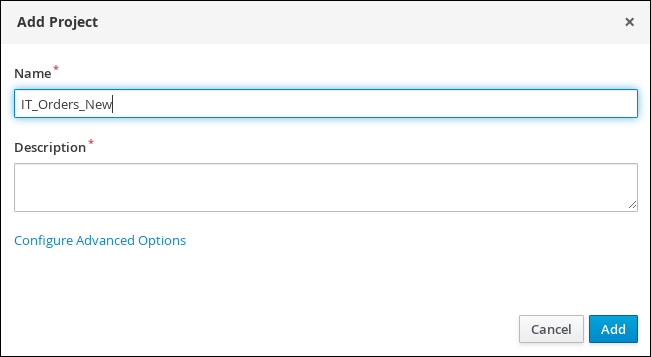
Add をクリックしてプロジェクトを追加します。
プロジェクトの Assets ビューを開きます。
第25章 データオブジェクト
データオブジェクトは、作成するルールアセットの設定要素です。データオブジェクトは、プロジェクトで指定したパッケージに Java オブジェクトとして実装されているカスタムのデータタイプです。たとえば、データフィールド Name、Address、および DateOfBirth を使用して Person オブジェクトを作成し、ローン申し込みルールに詳細な個人情報を指定できます。このカスタムのデータ型は、アセットとデシジョンサービスがどのデータに基づいているかを指定します。
25.1. ITOrderService データオブジェクトの作成
ITOrderService データオブジェクトは、IT Orders 変数の定義に使用されるデータタイプを指定します。
前提条件
- IT_Orders_New プロジェクトが作成されます。
手順
- Add Asset → Data Object をクリックします。
Create new Data Object ウィザードで、次の値を入力します。
-
データオブジェクト:
ITOrderService -
Package:
com.myspace.it_orders_new
-
データオブジェクト:
- OK をクリックします。
-
Package ドロップダウンメニューの横にある
 をクリックして、データオブジェクトの新しいパッケージを指定します。
-
org.jbpm.demo.it_orders.servicesと入力し、Add をクリックします。 - Save をクリックした後、Yes, Move をクリックして変更を確認します。
25.2. Survey データオブジェクトの作成
Survey データオブジェクトには、deliveredOnTime、missingEquipment などのデータフィールドが含まれています。ケースの設計時に、そのデータと値を使用します。
前提条件
- IT_Orders_New プロジェクトが作成されます。
手順
- Business Central にログインし、Menu → Design → Projects の順にクリックし、IT_Orders_New をクリックします。
- Add Asset → Data Object をクリックします。
Create new Data Object ウィザードで以下の値を入力します。
-
Data Object:
Survey -
Package:
com.myspace.it_orders_new
-
Data Object:
- OK をクリックします。
Survey データオブジェクトの制約を追加します。
- add field をクリックします。
以下の値を入力します。
-
Id:
comment - Label: 入力しない
-
Type:
String
-
Id:
Create and continue をクリックしてから、以下の値を入力します。
-
Id:
deliveredOnTime - Label: 入力しない
-
Type:
Boolean
-
Id:
Create and continue をクリックしてから、以下の値を入力します。
-
Id:
missingEquipment - Label: 入力しない
-
Type:
String
-
Id:
Create and continue をクリックしてから、以下の値を入力します。
-
Id:
satisfied - Label: 入力しない
-
Type:
Boolean
-
Id:
- Create をクリックします。
Save をクリックして、変更を確定します。
図25.1 Survey データオブジェクトの詳細
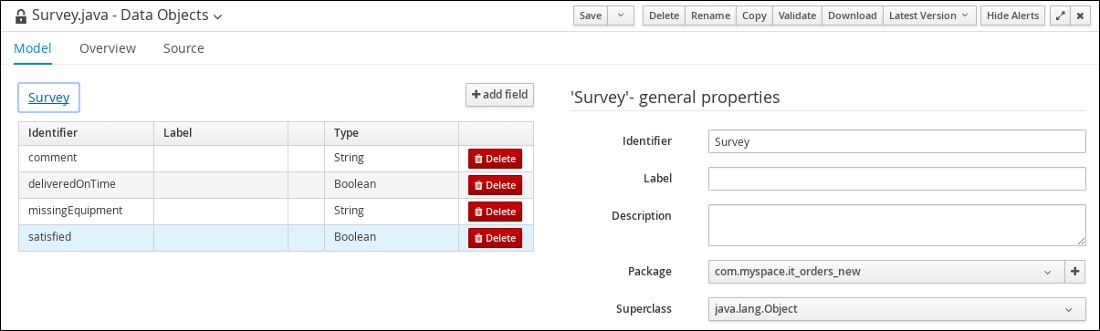
第26章 ケース定義の設計
Business Central のプロセスデザイナーを使用してケースを設計できます。ケース設計は、ケース管理に基づいて、各ケースに固有の目的およびタスクを設定します。ケースフローは、動的タスクまたはプロセスを追加して、実行時に動的に変更できます。この手順では、同じケース定義を作成して、ケース定義設計プロセスを学びます。
Business Central の IT_Orders サンプルプロジェクトには次の orderhardware ビジネスプロセスケース定義が含まれています。
図26.1 orderhardware ビジネスプロセスケース定義
前提条件
- Business Central で新しいケースを作成している。詳細は、24章新しい IT_Orders ケースプロジェクトの作成 を参照してください。
- データオブジェクトを作成している。詳細は、25章データオブジェクト を参照してください。
手順
- Business Central にログインし、Menu → Design → Projects の順にクリックし、IT_Orders_New をクリックします。
- Add Asset → Case Definition の順にクリックします。
Create new Case definition ウィンドウで、次の必要な情報を追加します。
-
Case definition:
orderhardwareを入力します。これは通常、ケース管理されているケースまたはプロジェクトの主題です。 - Package: com.myspace.it_orders_new を選択して、ケースファイルの作成場所を指定します。
-
Case definition:
- OK をクリックしてプロセスデザイナーを開きます。
ケース内で使用されるサブプロセス、サブケース、およびビジネスルールにアクセス可能なケースファイル変数に値を定義します。
-
右上隅の Properties
アイコンをクリックします。
下方向にスクロールして Case Management を展開し、Case File Variables セクションの
をクリックして、次の値を入力します。
図26.2 orderhardware ケースファイル変数
注記次のケースファイル変数は、カスタムのデータ型です。
- hwSpec: org.jbpm.document.Document (この値の型)
- survey: Survey [com.myspace.it_orders_new] (この値を選択)
-
右上隅の Properties
- Save をクリックします。
ケースに関係するロールを定義します。
-
右上隅の Properties
アイコンをクリックします。
下方向にスクロールして Case Management を展開し、Case Roles セクションの
をクリックして、次の値を入力します。
図26.3 orderhardware ケー出力ル

-
owner: ハードウェア注文リクエストを行う従業員。ロールの基数は1に設定されます。これは、このロールに割り当てられるユーザーまたはグループが 1 つであることを示しています。 -
manager: 従業員のマネージャー。要求されたハードウェアを承認または拒否する人。ロールの基数は1に設定されます。これは、このロールに割り当てられるユーザーまたはグループが 1 つであることを示しています。 -
supplier: システム内の IT ハードウェアの利用可能なサプライヤー。ロールの基数は2に設定します。つまり、このロールに複数のサプライヤーを割り当てることができます。
-
-
右上隅の Properties
- Save をクリックします。
26.1. Place order サブプロセスの作成
Place order サブプロセスを作成します。これは、別のビジネスプロセスで、サプライヤーが実行します。このサブプロセスは、26章ケース定義の設計 で説明されているように、ケースの実行中に発生する再利用可能なプロセスです。
前提条件
- Business Central で新しいケースを作成している。詳細は、24章新しい IT_Orders ケースプロジェクトの作成 を参照してください。
- データオブジェクトを作成している。詳細は、25章データオブジェクト を参照してください。
手順
- Business Central にログインし、Menu → Design → Projects → IT_Orders_New の順にクリックします。
- プロジェクトメニューから Add Asset → Business Process の順にクリックします。
Create new Business Process ウィザードで、以下の値を入力します。
-
Business Process:
place-order -
Package:
com.myspace.it_orders_newを選択します。
-
Business Process:
- OK をクリックします。ダイアグラムエディターが開きます。
-
キャンバスの空きスペースをクリックし、右上隅の Properties
アイコンをクリックします。
下方向にスクロールして Process Data を展開し、Process Variables セクションの
をクリックして、以下の値を入力します。
- Save をクリックします。
開始イベントをキャバスにドラッグして、開始イベントからタスクに外向き接続を作成し、新しいタスクをユーザータスクに変換します。
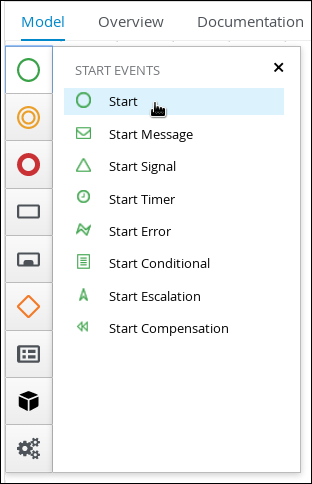

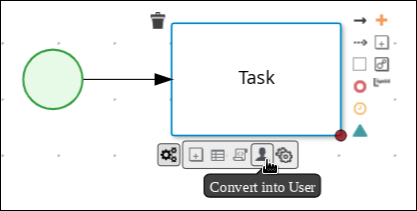
-
ユーザータスクをクリックし、Properties パネルの Name フィールドに
Place orderを入力します。 -
Implementation/Execution を展開し、Groups メニューで Add をクリックし、さらに Select → New をクリックして
supplierを入力します。 Assignments フィールドで
をクリックし、以下を追加します。
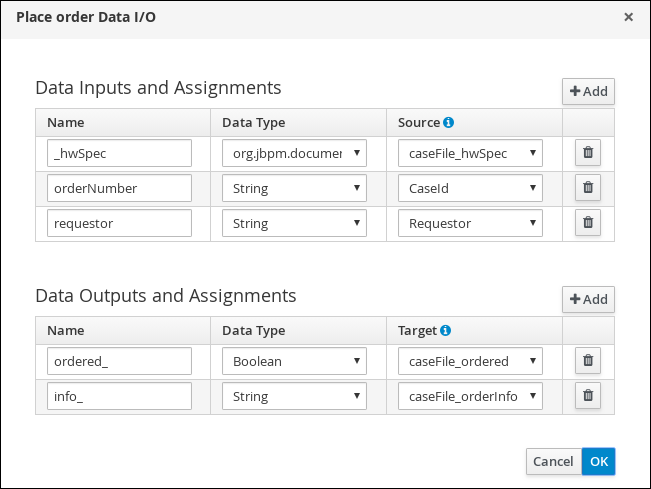
最初の入力割り当てについては、Data Type として Custom を選択し、
org.jbpm.document.Documentを入力します。- OK をクリックします。
Skippable チェックボックスを選択し、Description フィールドに次の文字を入力します。
Approved order #{CaseId} to be placed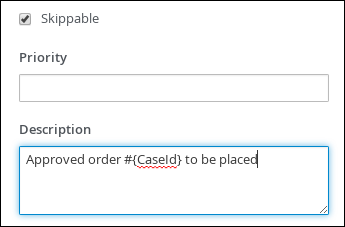
Place order ユーザータスクから外向き接続を作成し、終了イベントに接続します。
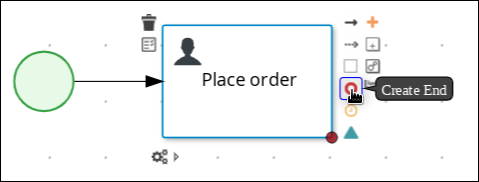
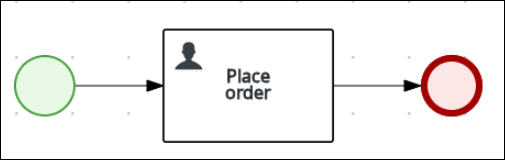
- Save をクリックして、変更を確定します。
26.2. マネージャー承認のビジネスプロセスの作成
マネージャーの承認プロセスは、注文を受ける否かを決定します。
手順
- Business Central で、Menu → Design → Projects → IT_Orders_New → orderhardware Business Process の順にクリックします。
Prepare hardware specユーザータスクを作成して設定します。- Object Library の Task を展開し、ユーザータスクをキャンバスに挿入し、新しいタスクをユーザータスクに変換します。
-
新規ユーザータスクをクリックして、画面の右上隅の Properties
アイコンをクリックします。
-
Name フィールドに
Prepare hardware specと入力します。 -
Implementation/Execution を展開し、Groups メニューで Add をクリックし、さらに Select → New をクリックして
supplierを入力します。 -
Task Name フィールドに
PrepareHardwareSpecと入力します。 Skippable チェックボックスを選択し、Description フィールドに次の文字を入力します。
Prepare hardware specification for #{initiator} (order number #{CaseId})Assignments フィールドで
をクリックし、以下を追加します。
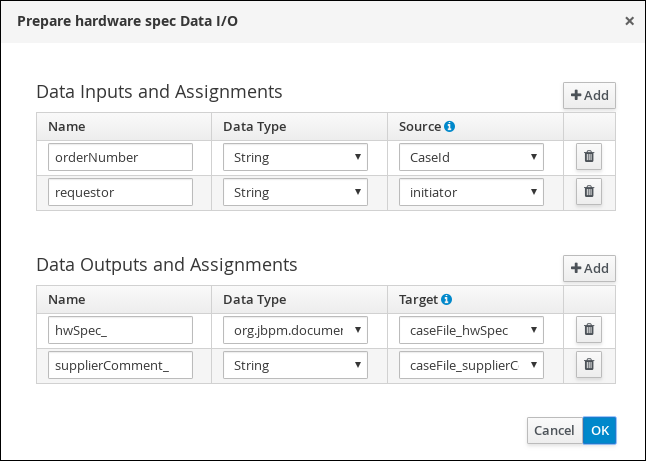
- OK をクリックします。
manager approval ユーザータスクを作成して設定します。
- Prepare hardware spec ユーザータスクをクリックして、新しいユーザータスクを作成します。
-
新規ユーザータスクをクリックして、画面の右上隅の Properties
アイコンをクリックします。
-
ユーザータスクをクリックし、Properties パネルの Name フィールドに
Manager approvalと入力します。 -
Implementation/Execution を展開し、Actors メニューで Add をクリックし、さらに Select → New をクリックして
managerと入力します。 -
Task Name フィールドに
ManagerApprovalと入力します。 Assignments フィールドで
をクリックし、以下を追加します。
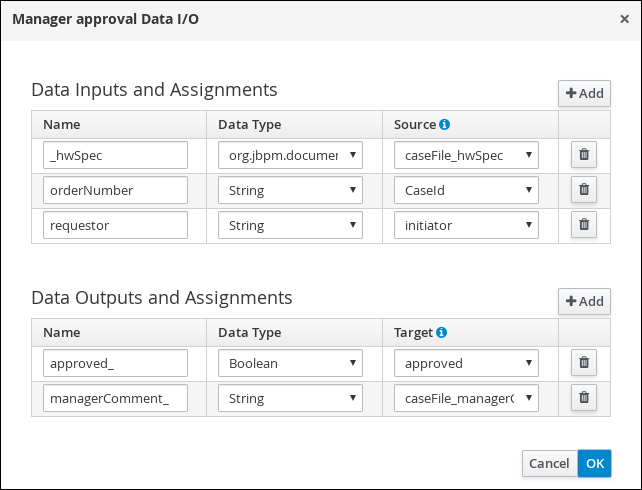
- OK をクリックします。
Skippable チェックボックスを選択し、Description フィールドに次の文字を入力します。
Approval request for new hardware for #{initiator} (order number #{CaseId})On Exit Action フィールドに、以下の Java 式を入力します。
kcontext.setVariable("caseFile_managerDecision", approved);- Save をクリックします。
Manager approval ユーザータスクをクリックして、データに基づく排他的論理和 (XOR) ゲートウェイを作成します。

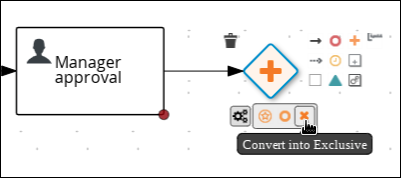
Place orderの再利用可能なサブプロセスを作成して設定します。Object Library から Subprocesses を展開して、Reusable をクリックします。データに基づく排他的論理和 (XOR) ゲートウェイの右側のキャンバスに新しい要素をドラッグします。
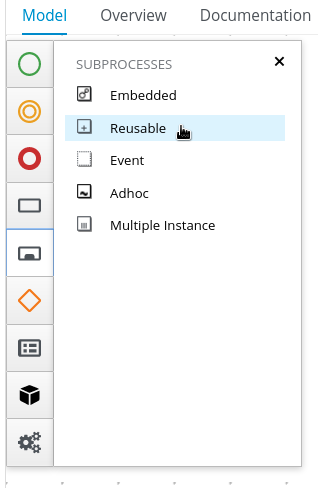
データに基づく排他的論理和 (XOR) ゲートウェイをサブプロセスに接続します。

-
新規サブタスクをクリックして、画面の右上隅の Properties
アイコンをクリックします。
-
Name フィールドに
Place orderと入力します。 Data Assignments を展開し、Assignments フィールドの
をクリックし、以下を追加します。
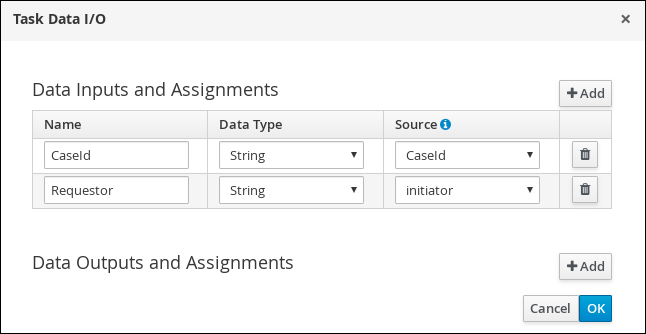
- OK をクリックします。
-
データに基づく排他的論理和(XOR)ゲートウェイからサブプロセスへの接続をクリックし、Properties
アイコンをクリックします。
Implementation/Execution を展開して Condition を選択し、以下の条件式を設定します。

- Place order ユーザータスクをクリックし、終了イベントを作成します。
order rejected ユーザータスクを作成して設定します。
- データに基づく排他的論理和 (XOR) ゲートウェイをクリックして、新規ユーザータスクを作成します。
新規タスクを Place order タスクの下に並ぶようにドラッグします。
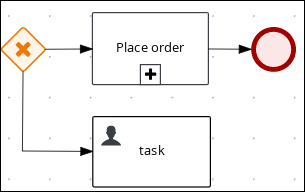
-
新規ユーザータスクをクリックして、画面の右上隅の Properties
アイコンをクリックします。
-
Name フィールドに
Order rejectedと入力します。 -
Implementation/Execution を展開し、Task Name フィールドに
OrderRejectedと入力します。 -
Actors メニューで Add をクリックし、さらに Select → New をクリックして
ownerと入力します。 Assignments フィールドで
をクリックし、以下を追加します。
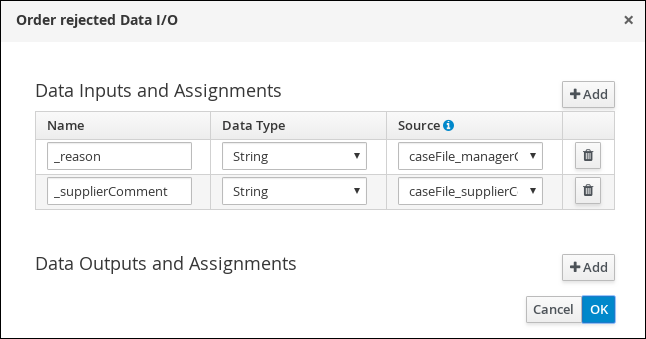
- OK をクリックします。
Skippable チェックボックスを選択し、Description フィールドに次の文字を入力します。
Order #{CaseId} has been rejected by manager- Order rejected ユーザータスクをクリックし、終了イベントを作成します。
- Save をクリックします。
-
データに基づく排他的論理和(XOR)ゲートウェイから Order rejected ユーザータスクへの接続をクリックし、Properties
アイコンをクリックします。
Implementation/Execution を展開して Condition を選択し、以下の条件式を設定します。
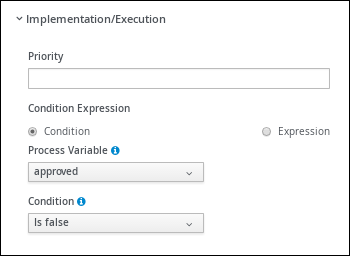
Save をクリックします。
図26.4 マネージャー承認のビジネスプロセス
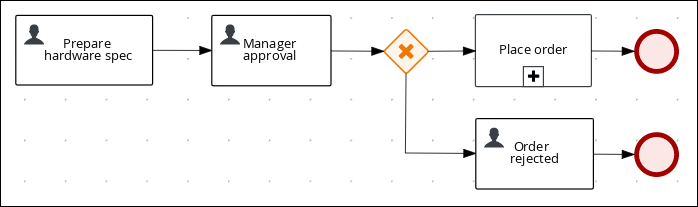
第27章 マイルストーン
マイルストーンとは、プロセスデザイナーパレットにマイルストーンノードを追加して、ケース定義デザイナーで設定できる、特別なサービスタスクのことです。新規ケース定義の作成時に、AdHoc Autostart として設定されたマイルストーンは、デフォルトでデザインパレットに含まれます。新規作成したマイルストーンはデフォルトで AdHoc Autostart には設定されません。
ケース管理のマイルストーンは、ステージの最後に発生するのが通常ですが、他のマイルストーンを達成した結果として発生する場合もあります。マイルストーンには、進捗を追跡するために、条件を定義する必要があります。マイルストーンは、ケースにデータを追加すると、ケースファイルのデータに反応します。また、マイルストーンは、ケースインスタンス内の達成地点を表します。これは、重要業績評価指標 (KPI) の追跡や、完了前のタスクの特定に有用な場合があります。
マイルストーンには、ケース実行中の以下のいずれのか状態を指定できます。
-
Active: 条件はマイルストーンで定義されているが、条件がまだ満たされていない。 -
Completed: マイルストーンの条件が満たされ、達成されたため、このケースは次のタスクに進むことができる。 -
Terminated: マイルストーンがケースプロセスから除外され、必要なくなっている。
マイルストーンが使用可能または完了している間は、シグナルによって手動でトリガーすることも、ケースインスタンスの開始時に AdHoc Autostart が設定されている場合は自動的にトリガーすることもできます。マイルストーンは何回でもトリガーできますが、条件が満たされている場合には、直接マイルストーンが達成されます。
27.1. Hardware spec ready マイルストーンの作成
必要なハードウェア仕様書の完成時に到達する HardwareSpecReady マイルストーンを作成します。
手順
- プロセスデザイナーで、Object Library の Milestone を展開し、キャンバスに新しいマイルストーンをドラッグして Place order 終了イベントの右側に配置します。
-
新規マイルストーンをクリックして、画面の右上隅の Properties
アイコンをクリックします。
-
Name フィールドに
Hardware spec readyと入力します。 - Implementation/Execution を展開して AdHoc Autostart を選択します。
Data Assignments を展開し、Assignments フィールドの
をクリックし、以下を追加します。
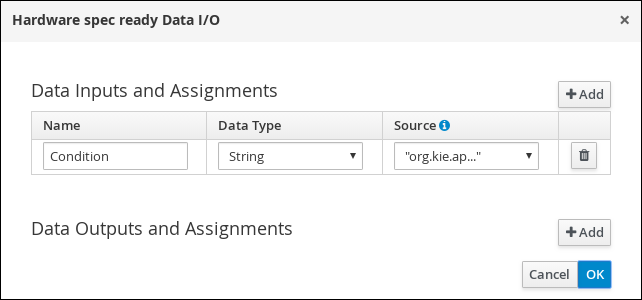
Source コラムのドロップダウンをクリックし、Constant を選択して
org.kie.api.runtime.process.CaseData(data.get("hwSpec") != null)と入力します。- OK をクリックします。
27.2. Manager decision マイルストーンの作成
managerDecision 変数に応答が渡されると、このマイルストーンに到達します。
手順
- プロセスデザイナーで、Object Library の Milestone を展開し、HardwareSpecReady マイルストーンの下のキャンバスに新しいマイルストーンをドラッグします。
-
新規マイルストーンをクリックして、画面の右上隅の Properties
アイコンをクリックします。
-
Name フィールドに
Manager decisionと入力します。 - Implementation/Execution を展開して AdHoc Autostart を選択します。
Data Assignments を展開し、Assignments フィールドの
をクリックし、以下を追加します。
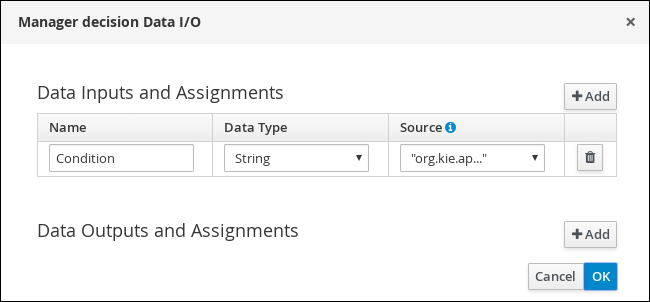
Source コラムのドロップダウンをクリックし、Constant を選択して
org.kie.api.runtime.process.CaseData(data.get("managerDecision") != null)と入力します。- OK をクリックします。
27.3. Order placed マイルストーンの作成
このマイルストーンには、Place order サブプロセスの一部である ordered 変数に応答が渡されると、到達します。
手順
- プロセスデザイナーで、Object Library の Milestone を展開し、Prepare hardware spec ユーザータスクの下のキャンバスに新しいマイルストーンをドラッグします。
-
新規マイルストーンをクリックして、画面の右上隅の Properties
アイコンをクリックします。
-
Name フィールドに
Milestone 1: Order placedと入力します。 - Implementation/Execution を展開して AdHoc Autostart を選択します。
Data Assignments を展開し、Assignments フィールドの
をクリックし、以下を追加します。
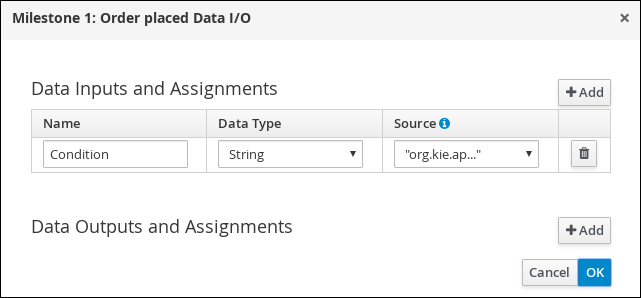
Source 列のドロップダウンをクリックし、Constant を選択し、
org.kie.api.runtime.process.CaseData(data.get("ordered") == true)を入力します。これは、orderedというケース変数が値trueを持つことを意味します。- OK をクリックします。
- Milestone 1: Order placed をクリックして、新しいスクリプトタスクを作成します。
-
新規スクリプトタスクをクリックして、画面の右上隅の Properties
アイコンをクリックします。
-
Name フィールドに
Notify requestorと入力します。 -
Implementation/Execution を展開して
System.out.println("Notification::Order placed");と入力します。 - Notify requestor スクリプトタスクをクリックして、シグナル終了イベントを作成します。
-
シグナルイベントをクリックして、画面の右上隅の Properties をクリックします。
アイコン。
- Implementation/Execution を展開して Signal フィールドの下向き矢印をクリックし、New を選択します。
-
Milestone 2: Order shippedと入力します。 - Signal Scope フィールドの下矢印をクリックし、Process Instance を選択します。
Save をクリックします。
図27.1 Order placed マイルストーン
27.4. Order shipped マイルストーンの作成
このマイルストーンの条件は、shipped というケースファイル変数が true であることです。AdHoc Autostart はこのマイルストーンに対して有効ではありません。代わりに、注文の送信準備が整ったときにシグナルイベントによってトリガーされます。
手順
- プロセスデザイナーで、Object Library の Milestone を展開し、Notify requestor スクリプトタスク下のキャンバスに新しいマイルストーンをドラッグします。
-
新規マイルストーンをクリックして、画面の右上隅の Properties
アイコンをクリックします。
-
Name フィールドに
Milestone 2: Order shippedと入力します。 - Implementation/Execution を展開して、AdHoc Autostart が選択されていないことを確認します。
Data Assignments を展開し、Assignments フィールドの
をクリックし、以下を追加します。

Source 列のドロップダウンをクリックし、Constant を選択して
org.kie.api.runtime.process.CaseData(data.get("shipped") == true)を入力します。これで、shippedというケース変数に値trueを指定しています。- OK をクリックします。
- Milestone 2: Order shipped をクリックして、新しいスクリプトタスクを作成します。
-
新規スクリプトタスクをクリックして、画面の右上隅の Properties
アイコンをクリックします。
-
Name フィールドに
Send to tracking systemと入力します。 -
Implementation/Execution を展開して、
System.out.println("Order added to tracking system");と入力します。 - Send to tracking system スクリプトタスクをクリックして、シグナル終了イベントを作成します。
-
シグナルイベントをクリックして、画面の右上隅の Properties をクリックします。
アイコン。
- Implementation/Execution を展開して Signal フィールドの下向き矢印をクリックし、New を選択します。
-
Milestone 3: Delivered to customerと入力します。 - Signal Scope フィールドの下矢印をクリックし、Process Instance を選択します。
Save をクリックします。
図27.2 Order shipped マイルストーン
27.5. Delivered to customer マイルストーンの作成
このマイルストーンの条件は、delivered というケースファイル変数が true であることです。AdHoc Autostart はこのマイルストーンに対して有効ではありません。代わりに、注文品が顧客に正常に配送された後にシグナルイベントによってトリガーされます。
手順
- プロセスデザイナーで、Object Library の Milestone を展開し、Send to tracking system スクリプトタスク下のキャンバスに新しいマイルストーンをドラッグします。
-
新規マイルストーンをクリックして、画面の右上隅の Properties
アイコンをクリックします。
-
Name フィールドに
Milestone 3: Delivered to customerと入力します。 - Implementation/Execution を展開して、AdHoc Autostart が選択されていないことを確認します。
Data Assignments を展開し、Assignments フィールドの
をクリックし、以下を追加します。
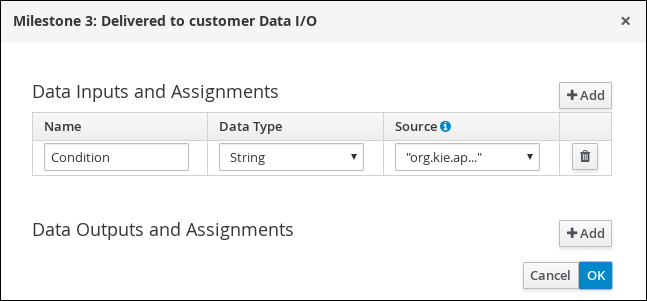
Source 列のドロップダウンをクリックし、Constant を選択して、
org.kie.api.runtime.process.CaseData(data.get("delivered") == true)を入力します。これは、deliveredというケース変数が値trueを持つことを意味します。- OK をクリックします。
Milestone 3: Delivered to customer をクリックして、新しいユーザータスクを作成します。
-
新規ユーザータスクをクリックして、画面の右上隅の Properties
アイコンをクリックします。
-
Name フィールドに
Customer satisfaction surveyを入力します。 -
Implementation/Execution を展開し、Actors メニューで Add をクリックし、さらに Select → New をクリックして
ownerと入力します。 -
Task Name フィールドに
CustomerSurveyを入力します。 Skippable チェックボックスを選択し、Description フィールドに次の文字を入力します。
Satisfaction survey for order #{CaseId}Assignments フィールドで
をクリックし、以下を追加します。
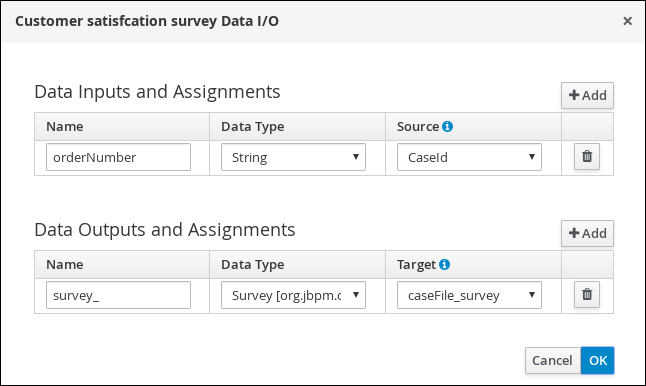
- OK をクリックします。
-
新規ユーザータスクをクリックして、画面の右上隅の Properties
- Customer satisfaction survey ユーザータスクをクリックし、終了イベントを作成します。
Save をクリックして、変更を確定します。
図27.3 Delivered to customer マイルストーン
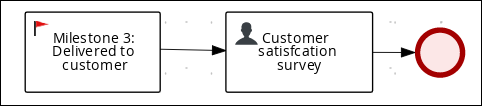
すべてのマイルストーンシーケンスが完了したら、IT 発注ケースを閉じることができます。ただし、ケースのアドホックの性質が原因で、顧客が注文を受け取らなかったり、アイテムに問題がある場合などにケースを再開できます。ランタイム時でも、タスクは必要に応じて再度トリガーしたり、ケース定義に追加できます。
第28章 IT order ケースプロジェクトのデプロイおよびテスト
新しい IT_Orders_New ケースプロジェクトのコンポーネントをすべて作成して定義したら、新規プロジェクトをデプロイしてテストします。
前提条件
- Business Central に接続されている実行中の KIE Server インスタンスがある。詳細は Red Hat JBoss EAP 7.3 への Red Hat Process Automation Manager のインストールおよび設定 を参照してください。
- Business Central で新しいケースを作成している。詳細は、24章新しい IT_Orders ケースプロジェクトの作成 を参照してください。
- データオブジェクトを作成している。詳細は、25章データオブジェクト を参照してください。
-
Place orderサブプロセスを作成している。詳細は、「Place order サブプロセスの作成」 を参照してください。 -
orderhardwareケース定義を設計している。詳細は、26章ケース定義の設計 を参照してください。
手順
- Business Central にログインし、Menu → Design → Projects の順にクリックし、IT_Orders_New をクリックします。
- Deploy をクリックします。
- Menu → Manage → Process Definitions → Manage Process Instances → New Process Instance の順にクリックします。
Menu → Deploy に移動し、Execution Servers をクリックし、新しいコンテナーがデプロイされ、起動されていることを確認します。
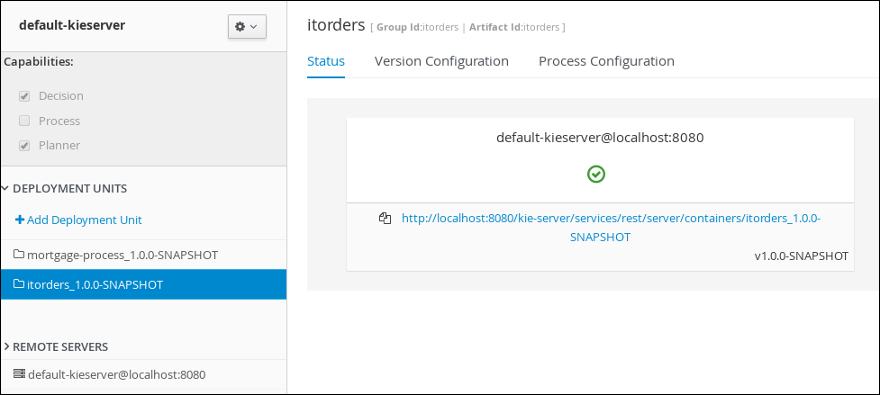
- Case Management Showcase アプリケーションを使用して新規ケースインスタンスを開始します。Showcase アプリケーションの使用方法は、ケース管理への Showcase アプリケーションの使用 を参照してください。
第29章 関連資料
パート IV. Red Hat Business Optimizer のスタートガイド
ビジネスルールの開発者は、Red Hat Business Optimizer を使用して、限られたリソースや個別の制約の中で計画問題に対する最適解を見つけ出すことができます。
本書を使用して、Red Hat Business Optimizer で Solver の開発を開始していきます。
第30章 Red Hat Business Optimizer の概要
Red Hat Business Optimizer は組み込み可能な軽量プランニングエンジンで、プランニングの問題を最適化します。最適化のためのヒューリスティック法およびメタヒューリスティック法を、非常に効率的なスコア計算と組み合わせ、一般的な Java プログラマーが計画問題を効率的に解決できるようにします。
Red Hat Business Optimizer は、さまざまなユースケースの解決に役立ちます。以下にその例を示します。
- 従業員勤務表/患者一覧: 看護師の勤務シフト作成を容易にし、病床管理を追跡します。
- 教育機関の時間割: 授業、コース、試験、および会議の計画を容易にします。
- 工場の計画: 自動車の組み立てライン、機械の操業計画、および作業員のタスク計画を追跡します。
- 在庫の削減: 紙や金属などの資源の消費を減らし、無駄を最小限に抑えます。
どの組織も、制約のある限定されたリソース (従業員、資産、時間、および資金) を使用して製品やサービスを提供するといった計画問題に直面しています。
Red Hat Business Optimizer は、Apache Software License 2.0 を使用するオープンソースソフトウェアです。100% Pure Java に認定されており、ほとんどの Java 仮想マシンで稼働します。
30.1. 計画問題
計画問題 では、限られたリソースや個別の制約の中で最適なゴールを見つけ出します。最適なゴールは、次のようなさまざまなものです。
- 最大の利益: 最適なゴールにより、可能な限り高い利益が得られます。
- 経済活動の最小フットプリント: 最適なゴールでは、環境負荷が最小となります。
- スタッフ/顧客の最大満足: 最適なゴールでは、スタッフ/顧客のニーズが優先されます。
これらのゴールに到達できるかどうかは、利用できるリソースの数に依存します。たとえば、以下のようなリソースには制限があります。
- 要員の人数
- 時間
- 予算
- 装置、車両、コンピューター、施設などの物理資産
これらのリソースに関連する個別の制約についても考慮する必要があります。たとえば、要員が働くことのできる時間数、特定の装置を使用することのできる技能、または機器同士の互換性などです。
Red Hat Business Optimizer は、Java プログラマーが制約の飽和性の問題を効率的に解決するのに役立ちます。最適化ヒューリスティックとメタヒューリスティックを効率的なスコア計算と組み合わせます。
30.2. 計画問題での NP 完全
例に挙げたユースケースは 通常 NP 完全または NP 困難 であり、以下のことが言えます。
- 問題に対する解を実用的な時間内に検証することが容易である。
- 問題に対する最適解を実用的な時間内に見つけ出す確実な方法がない。
この場合、一般的な 2 つの手法では不十分であるため、問題を解くのが予想より困難だと考えられます。
- 力まかせアルゴリズムでは (より高度な類似アルゴリズムであっても)、時間がかかり過ぎる。
- (ビンパッキング問題 において) 容量が一番大きいビンから順に詰めてゆく クイックアルゴリズムでは、最適解からは程遠い解しか得られない。
高度な最適化アルゴリズムを用いる Business Optimizer であれば、このような計画問題に対する適切な解を、妥当な時間内に見つけ出すことができます。
30.3. 計画問題に対する解
計画問題には、多数の解が存在します。
以下に示すように、解は複数のカテゴリーに分類されます。
- 可能解
- 可能解とは、制約に違反するかどうかは問わず、あらゆる解を指します。通常、計画問題には膨大な数の可能解が存在します。ただし、このような解の多くは、役に立ちません。
- 実行可能解
- 実行可能解とは、いずれの (負の) ハード制約にも違反しない解を指します。実行可能解の数は、可能解の数に比例します。実行可能解が存在しないケースもあります。実行可能解は、可能解の部分集合です。
- 最適解
- 最適解とは、最高のスコアを持つ解を指します。通常、計画問題には数個の最適解が存在します。実行可能解が存在せず、最適解が現実的ではない場合でも、計画問題には少なくとも 1 つの最適解が必ず存在します。
- 見つかった最善解
- 最善解とは、与えられた時間内に実施した検索で見つかった最高スコアの解を指します。通常、見つかった最善解は現実的で、十分な時間があれば最適解を見つけることができます。
直観には反していますが、小規模なデータセットの場合であっても、(正しく計算された場合は) 膨大な数の可能解が存在します。
planner-engine ディストリビューションディレクトリーのサンプルでも、ほとんどのインスタンスには多数の可能解が存在します。最適解を確実に見つけることができる方法は存在しないため、いかなる実行方法も、これらすべての可能解の部分集合を評価することしかできません。
膨大な数の可能解全体を効率的に網羅するために、Business Optimizer はさまざまな最適化アルゴリズムをサポートしています。
ユースケースによっては、ある最適化アルゴリズムが他のアルゴリズムより勝ることがありますが、それを事前に予測することは不可能です。Business Optimizer では、XML またはコード中の Solver 設定を数行変更するだけで、最適化アルゴリズムを切り替えることができます。
30.4. 計画問題に対する制約
通常、プランニングの問題には、少なくとも 2 つの制約レベルがあります。
(負の) ハード制約 は、絶対に違反してはならない。
例: 1 人の教師は同時に 2 つの講義を受け持つことはできない。
(負の) ソフト制約 は、避けることが可能であれば違反してはならない。
例: 教師 A は金曜日の午後に講義を受け持ちたくない。
正の制約を持つ問題もあります。
正のソフト制約 (ボーナス) は、可能であれば満たす必要がある。
例: 教師 B は月曜日の午前中に講義を受け持つことを希望している。
一部の基本的な問題にはハード制約のみがあります。問題によっては、3 つ以上の制約があります (例: ハード制約、中程度の制約、ソフト制約)。
これらの制約により、計画問題における スコア計算方法 (または 適合度関数) が定義されます。プランニングの問題の解は、それぞれスコアで等級付けすることができます。Business Optimizer のスコア制約は、Java などのオブジェクト指向言語または Drools ルールで記述されます。
このタイプのコードは柔軟で、スケーラビリティーに優れます。
第31章 Business Central での Solver のスタートガイド: 従業員勤務表の例
Business Central で employee-rostering のサンプルプロジェクトを構築して、デプロイできます。このプロジェクトは、シフト勤務の計画問題を解決するのに必要な Business Central の各アセットを作成し、Red Hat Business Optimizer を使用して実現可能な最適解を見つける方法を示します。
Business Central に事前設定された employee-rostering プロジェクトをデプロイすることができます。Business Central を使用してプロジェクトを独自に作成することができます。
Business Central の employee-rostering サンプルプロジェクトには、データセットが含まれていません。REST API 呼び出しを使用して XML 形式のデータセットを提供する必要があります。
31.1. Business Central への従業員勤務表サンプルプロジェクトのデプロイメント
Business Central には、製品と機能に慣れるために使用できるサンプルプロジェクトが多数あります。従業員の勤務表サンプルプロジェクトは、Red Hat Business Optimizer でシフト勤務のユースケースを示すために計画され作成されました。以下の手順に従って、従業員の勤務表サンプルを Business Central にデプロイして実行します。
前提条件
- Red Hat Process Automation Manager をダウンロードして、インストールしている。インストールオプションは、Red Hat Process Automation Manager インストールの計画 を参照してください。
-
インストールのドキュメントにあるように、Red Hat Decision Manager が起動し、
adminパーミッションを持つユーザーとして Business Central にログインしています。
手順
- Business Central で Menu → Design → Projects の順にクリックします。
-
事前に設定した
MySpaceスペースで Try Samples をクリックします。 - サンプルプロジェクトの一覧から employee-rostering を選択し、右上の OK をクリックして、プロジェクトをインポートします。
- アセットリストをコンパイルし、Build & Deploy をクリックして、従業員の勤務表サンプルをデプロイします。
本書は、各プロジェクトアセットとその設定について説明します。
31.2. 従業員の勤務表サンプルプロジェクトの再作成
従業員の勤務表サンプルプロジェクトは、Business Central で使用できる事前設定のプロジェクトです。このプロジェクトをデプロイする方法は、「Business Central への従業員勤務表サンプルプロジェクトのデプロイメント」 を参照してください。
ゼロから従業員勤務表を作成できます。この例では、ワークフローを使用して、Business Central で独自の類似プロジェクトを作成します。
31.2.1. 従業員の勤務表プロジェクトの設定
Business Central で Solver の開発を始めるには、プロジェクトを設定する必要があります。
前提条件
- Red Hat Process Automation Manager をダウンロードして、インストールしている。
-
Business Central をデプロイし、
adminロールを持つユーザーでログインしている。
手順
- Menu → Design → Projects → Add Project をクリックして、Business Central に新しいプロジェクトを作成します。
Add Project ウィンドウで、以下のフィールドに入力します。
-
Name:
employee-rostering - Description (任意): Business Optimizer を使用した従業員の勤務表問題の最適化。スキルに基づいて、従業員をシフトに割り当てます。
任意で、Configure Advanced Options をクリックして、
Group ID、Artifact ID、およびVersionに情報を追加します。-
Group ID:
employeerostering -
Artifact ID:
employeerostering -
Version:
1.0.0-SNAPSHOT
-
Name:
- Add をクリックして、Business Central プロジェクトリポジトリーにプロジェクトを追加します。
31.2.2. プロジェクトファクトおよびプランニングエンティティー
従業員勤務表の計画問題の各ドメインクラスは、以下のいずれかに分類されます。
- 関連性のないクラス: どのスコア制約にも使用されません。計画に関して言えば、このデータは使用されません。
-
問題ファクト クラス: スコア制約に使用されますが、 (問題が変わらない限り) 計画時には変化しません (例:
Shift、Employee)。問題ファクトクラスのプロパティーはすべて問題のプロパティーです。 プランニングエンティティークラス クラス: スコア制約に使用され、計画時に変化します (例:
ShiftAssignment)。計画時に変更するプロパティーは プランニング変数 です。その他のプロパティーは問題プロパティーです。以下の点についてお考え下さい。
- 計画時にどのクラスを変更しますか ?
Solverで変更する変数はどのクラスにありますか ?そのクラスが、プランニングエンティティーです。
プランニングエンティティークラスは、
@PlanningEntityアノテーションでアノテートする必要があります。または、ドメインデザイナーで Red Hat Business Optimizer ドックを使用して Business Central に定義する必要があります。各プランニングエンティティークラスには、1 つ以上の プランニング変数 があり、1 つ以上の定義プロパティーが必要です。
多くのユースケースには、プランニングエンティティークラスが 1 つだけあり、1 つのプランニングエンティティークラスに対してプランニング変数が 1 つだけ含まれます。
31.2.3. 従業員の勤務表プロジェクトへのデータモデルの作成
このセクションでは、Business Central で従業員の勤務表サンプルプロジェクトを実行するのに必要なデータオブジェクトを作成します。
前提条件
- 「従業員の勤務表プロジェクトの設定」 に従ってプロジェクト設定が完了している。
手順
- 新規プロジェクトで、プロジェクトパースペクティブの Data Object をクリックするか、Add Asset → Data Object をクリックして、新しいデータオブジェクトを作成します。
最初のデータオブジェクトの名前を
Timeslotとし、パッケージ でemployeerostering.employeerosteringを選択します。OK をクリックします。
-
Data Objects パースペクティブで +add field をクリックして、
Timeslotデータオブジェクトにフィールドを追加します。 -
id フィールドで
endTimeと入力します。 -
Type の横にあるドロップダウンメニューをクリックし、
LocalDateTimeを選択します。 - Create and continue を別のフィールドに追加します。
-
id
startTimeおよび TypeLocalDateTimeを使用して、フィールドを追加します。 - Create をクリックします。
-
右上の Save をクリックして、
Timeslotデータオブジェクトを保存します。 - 右上の x をクリックして、Data Objects パースペクティブを閉じ、Assets メニューに戻ります。
前述の手順で、以下のデータオブジェクトとその属性を作成します。
表31.1 Skill
id タイプ nameString表31.2 Employee
id タイプ nameStringskillsemployeerostering.employeerostering.Skill[List]表31.3 Shift
id タイプ requiredSkillemployeerostering.employeerostering.Skilltimeslotemployeerostering.employeerostering.Timeslot表31.4 DayOffRequest
id タイプ dateLocalDateemployeeemployeerostering.employeerostering.Employee表31.5 ShiftAssignment
id タイプ employeeemployeerostering.employeerostering.Employeeshiftemployeerostering.employeerostering.Shift
データオブジェクトの作成例は デシジョンサービスの使用ガイド を参照してください。
31.2.3.1. 従業員の勤務表プランニングエンティティーの作成
従業員勤務表の計画問題を解決するには、プランニングエンティティーと Solver を作成する必要があります。プランニングエンティティーは、Red Hat Business Optimizer ドックで利用可能な属性を使用して、ドメインデザイナーに定義します。
以下の手順に従って、従業員の勤務表サンプルに、ShiftAssignment データオブジェクトをプランニングエンティティーとして定義します。
前提条件
- 従業員の勤務表サンプルを実行するには、「従業員の勤務表プロジェクトへのデータモデルの作成」 の手順に従って、関連するデータオブジェクトとプランニングエンティティーを作成する必要があります。
手順
-
プロジェクトの Assets メニューから、
ShiftAssignmentデータオブジェクトを開きます。 -
Data Objects パースペクティブで、右側の
 をクリックして、Red Hat Business Optimizer のドックを開きます。
- Planning Entity を選択します。
-
ShiftAssignmentデータオブジェクトのフィールドリストでemployeeを選択します。 Red Hat Business Optimizer ドックで Planning Variable を選択します。
Value Range Id 入力フィールドに
employeeRangeを入力します。これにより、@ValueRangeProviderアノテーションがプランニングエンティティーに追加され、デザイナーのSourceタブをクリックすると表示されます。プランニング変数の値の範囲は
@ValueRangeProviderアノテーションで定義されます。@ValueRangeProviderアノテーションにはidプロパティーが常にあり、@PlanningVariableのvalueRangeProviderRefsプロパティーから参照されます。- ドックを閉じ、Save をクリックして、データオブジェクトを保存します。
31.2.3.2. 従業員の勤務表プランニングソリューションの作成
従業員勤務表の問題は、定義したプランニングソリューションに依存します。プランニングソリューションは、Red Hat Business Optimizer ドックで利用可能な属性を使用してドメインデザイナーで定義されます。
前提条件
- 「従業員の勤務表プロジェクトへのデータモデルの作成」 および 「従業員の勤務表プランニングエンティティーの作成」 の手順に従って、従業員の勤務表サンプルを実行するのに必要なデータオブジェクトおよびプランニングエンティティーを作成している。
手順
-
識別子
EmployeeRosterでデータオブジェクトを新規作成します。 以下のフィールドを作成します。
表31.6 EmployeeRoster
id タイプ dayOffRequestListemployeerostering.employeerostering.DayOffRequest[List]shiftAssignmentListemployeerostering.employeerostering.ShiftAssignment[List]shiftListemployeerostering.employeerostering.Shift[List]skillListemployeerostering.employeerostering.Skill[List]timeslotListemployeerostering.employeerostering.Timeslot[List]-
Data Objects パースペクティブで、右側の
をクリックして、Red Hat Business Optimizer のドックを開きます。
- Planning Solution を選択します。
-
Solution Score Type は、デフォルトの
Hard soft scoreのままにします。これにより、タイプがソリューションスコアとなるEmployeeRosterデータオブジェクトに、scoreフィールドが自動的に生成されます。 次の属性で新しいフィールドを追加します。
id タイプ employeeListemployeerostering.employeerostering.Employee[List]employeeListフィールドを選択した状態で、Red Hat Business Optimizer ドックを開いて、Planning Value Range Provider ボックスを選択します。id フィールドに
employeeRangeを入力します。ドックを閉じます。- 右上で Save をクリックし、アセットを保存します。
31.2.4. 従業員勤務表の制約
従業員の勤務表はプランニングソリューションです。すべての計画問題には、最適解を得るのに満たさなければならない制約が含まれます。
Business Central の従業員の勤務表サンプルプロジェクトには、以下のハード制約およびソフト制約が含まれます。
- ハード制約
- 従業員に割り当てられるシフトの数は、1 日 1 つまで。
- 特別な従業員スキルが必要なすべてのシフトは、そのスキルを持つ従業員に割り当てられる。
- ソフト制約
- すべての従業員がシフトに割り当てられている。
- 従業員が休暇を取った場合は、シフトが別の従業員に再割り当てされる。
ハード制約およびソフト制約は、Free form DRL デザイナー、またはガイド付きルールを使用して Business Central で定義します。
31.2.4.1. DRL (Drools Rule Language) ルール
DRL (Drools Rule Language) ルールは、.drl テキストファイルに直接定義するビジネスルールです。このような DRL ファイルは、Business Central の他のすべてのルールアセットが最終的にレンダリングされるソースとなります。Business Central インターフェイスで DRL ファイルを作成して管理するか、Red Hat CodeReady Studio や別の統合開発環境 (IDE) を使用して Maven または Java プロジェクトの一部として外部で作成することができます。DRL ファイルには、最低でもルールの条件 (when) およびアクション (then) を定義するルールを 1 つ以上追加できます。Business Central の DRL デザイナーでは、Java、DRL、および XML の構文が強調表示されます。
DRL ファイルは、以下のコンポーネントで設定されます。
DRL ファイル内のコンポーネント
package

import

function  // Optional

query  // Optional

declare   // Optional

global   // Optional

rule "rule name"
    // Attributes
    when
        // Conditions
    then
        // Actions
end

rule "rule2 name"

...
以下の DRL ルールの例では、ローン申し込みのデシジョンサービスで年齢制限を指定します。
申込者の年齢制限に関するルールの例
rule "Underage"
  salience 15
  agenda-group "applicationGroup"
  when
    $application : LoanApplication()
    Applicant( age < 21 )
  then
    $application.setApproved( false );
    $application.setExplanation( "Underage" );
end
DRL ファイルには、ルール、クエリー、関数が 1 つまたは複数含まれており、このファイルで、ルールやクエリーで割り当て、使用するインポート、グローバル、属性などのリソース宣言を定義できます。DRL パッケージは、DRL ファイルの一番上に表示され、ルールは通常最後に表示されます。他の DRL コンポーネントはどのような順番でも構いません。
ルールごとに、ルールパッケージ内で一意の名前を指定する必要があります。パッケージ内の DRL ファイルで、同じルール名を複数回使用すると、ルールのコンパイルに失敗します。特にルール名にスペースを使用する場合など、ルール名には必ず二重引用符 (rule "rule name") を使用して、コンパイルエラーが発生しないようにしてください。
DRL ルールに関連するデータオブジェクトはすべて、DRL ファイルと同じ Business Central プロジェクトパッケージに置く必要があります。同じパッケージに含まれるアセットはデフォルトでインポートされます。その他のパッケージの既存アセットは、DRL ルールを使用してインポートできます。
31.2.4.2. DRL デザイナーを使用した従業員の勤務表の制約定義
Business Central で Free form DRL デザイナーを使用して、従業員の勤務表サンプルに制約の定義を作成できます。
この手順を使用して、シフトが終わってから 10 時間以上経たないと従業員をシフトに割り当てられない ハード制約 を作成します。
手順
- Business Central で、Menu → Design → Projects に移動して、プロジェクト名をクリックします。
- Add Asset → DRL ファイル の順にクリックします。
-
DRL file 名前フィールドに、
ComplexScoreRulesと入力します。 -
employeerostering.employeerosteringパッケージを選択します。 - +OK をクリックして DRL ファイルを作成します。
DRL デザイナーの Model タブで、
Employee10HourShiftSpaceルールを DRL ファイルとして定義します。package employeerostering.employeerostering; rule "Employee10HourShiftSpace" when $shiftAssignment : ShiftAssignment( $employee : employee != null, $shiftEndDateTime : shift.timeslot.endTime) ShiftAssignment( this != $shiftAssignment, $employee == employee, $shiftEndDateTime <= shift.timeslot.endTime, $shiftEndDateTime.until(shift.timeslot.startTime, java.time.temporal.ChronoUnit.HOURS) <10) then scoreHolder.addHardConstraintMatch(kcontext, -1); end- Save をクリックして、DRL ファイルを保存します。
DRL ファイルの作成方法は、DRL ルールを使用したデシジョンサービスの作成 を参照してください。
31.2.5. ガイド付きルールを使用して従業員の勤務表にルールの作成
Business Central でガイド付きルールデザイナーを使用して、従業員の勤務表にハード制約およびソフト制約を定義するルールを作成できます。
31.2.5.1. ガイド付きルール
ガイド付きルールは、ルール作成のプロセスを提供する、Business Central の UI ベースのガイド付きルールデザイナーで作成するビジネスルールです。ガイド付きルールデザイナーを使用すると、ルールを定義するデータオブジェクトに基づいて、可能なインプットにフィールドおよびオプションを提供します。定義したガイド付きルールは、その他のすべてのルールアセットとともに Drools Rule Language (DRL) ルールにコンパイルされます。
ガイド付きルールに関連するすべてのデータオブジェクトは、ガイド付きルールと同じプロジェクトパッケージに置く必要があります。同じパッケージに含まれるアセットはデフォルトでインポートされます。必要なデータオブジェクトとガイド付きルールを作成したら、ガイド付きルールデザイナーの Data Objects タブから、必要なデータオブジェクトがすべてリストされていることを検証したり、新規アイテム を追加してその他の既存データオブジェクトをインポートしたりできます。
31.2.5.2. 従業員のシフト数のバランスを取るガイド付きルールの作成
ガイド付きルール BalanceEmployeesShiftNumber は、可能な限りバランスを取るように従業員にシフトを割り当てるソフト制約を作成します。これは、シフトの分配が平等でなくなると増えるスコアペナルティーを作成することで行います。ルールによって実装されたスコア式により、Solver がよりバランスの取れるようにシフトを分散させます。
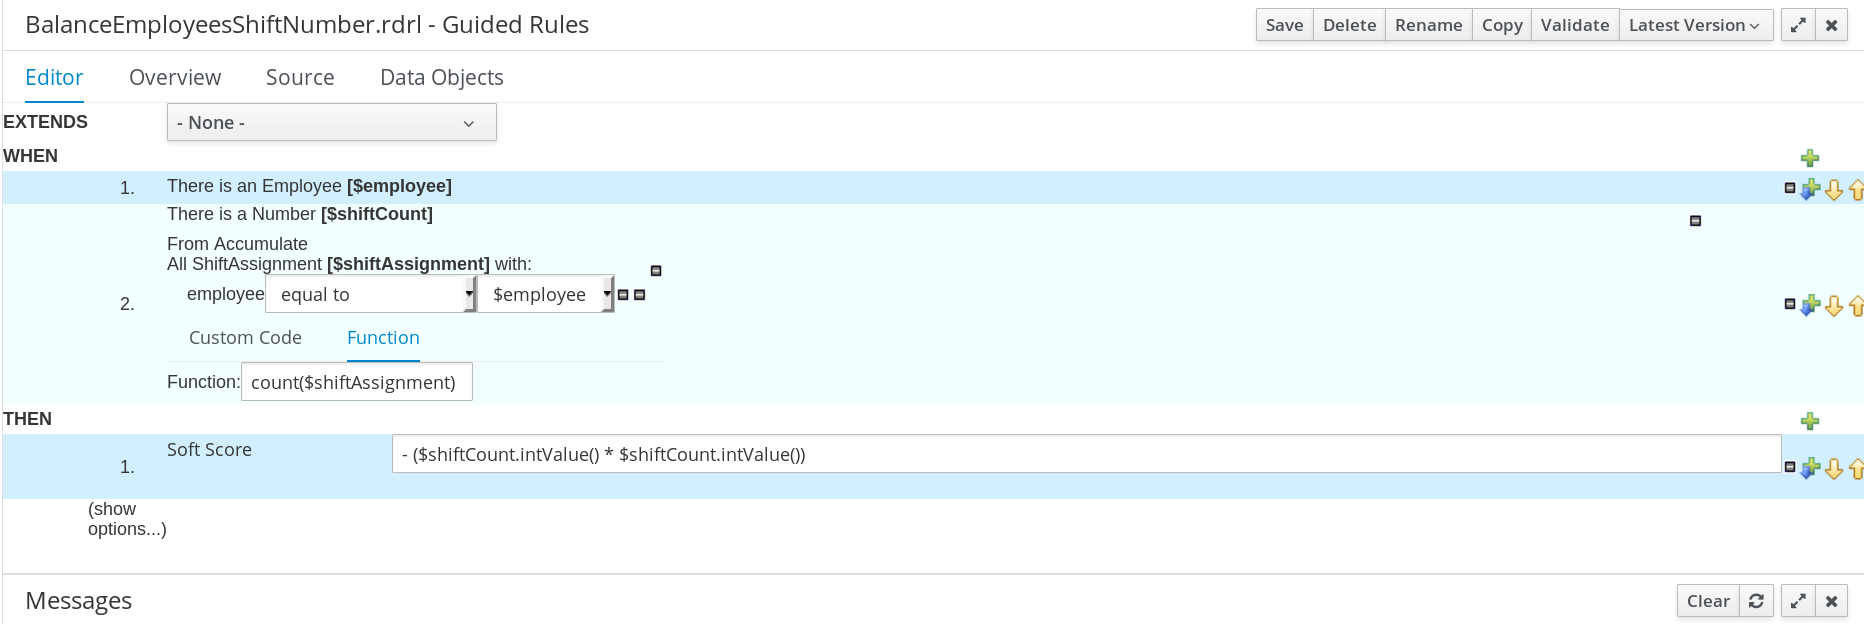
手順
- Business Central で、Menu → Design → Projects に移動して、プロジェクト名をクリックします。
- Add Asset → Guided Rule の順にクリックします。
-
Guided Rule 名 に
BalanceEmployeesShiftNumberと入力し、Package でemployeerostering.employeerosteringを選択します。 - OK をクリックして、ルールアセットを作成します。
-
WHEN フィールドで
 をクリックして、WHEN 条件を追加します。
-
Add a condition to the rule ウィンドウで
Employeeを選択します。+OK をクリックします。 -
Employee条件でクリックして制約を修正し、変数名$employeeを追加します。 WHEN 条件
From Accumulateを追加します。-
From Accumulate条件の上で click to add pattern をクリックし、ドロップダウンリストでファクトタイプNumberを選択します。 -
変数名
$shiftCountをNumber条件に追加します。 -
From Accumulate条件の下で click to add pattern をクリックして、ドロップダウンリストでShiftAssignmentファクトタイプを選択します。 -
変数名
$shiftAssignmentをShiftAssignmentファクトタイプに追加します。 -
ShiftAssignment条件を再度クリックし、Add a restriction on a field ドロップダウンリストでemployeeを選択します。 -
employee制約の横にあるドロップダウンリストでequal toを選択します。 -
ドロップダウンボタンの横の
 アイコンをクリックして変数を追加し、Field value ウィンドウで Bound variable をクリックします。
-
ドロップダウンリストで
$employeeを選択します。 -
Function ボックスに
count ($shiftAssignment)と入力します。
-
-
THEN フィールドで
をクリックして、THEN 条件を追加します。
Add a new actionウィンドウで Modify Soft Score を選択します。+OK をクリックします。-
ボックスに
- ($shiftCount.intValue()*$shiftCount.intValue())と入力します。
-
ボックスに
- 右上隅の Validate をクリックし、ルール条件がすべて有効であることを確認しますルールの妥当性確認に失敗したら、エラーメッセージに記載された問題に対応し、ルールの全コンポーネントを見直し、エラーが表示されなくなるまでルールの妥当性確認を行います。
- Save をクリックして、ルールを保存します。
ガイド付きルールの作成方法は、ガイド付きルールを使用したデシジョンサービスの作成 を参照してください。
31.2.5.3. 同じ日に複数のシフトを割り当てないようにするガイド付きルールの作成
ガイド付きルール OneEmployeeShiftPerDay は、同じ日の複数のシフトに従業員を割り当てないようにするハード制約を作成します。従業員の勤務表サンプルでは、この制約はガイド付きルールデザイナーを使用して作成されます。
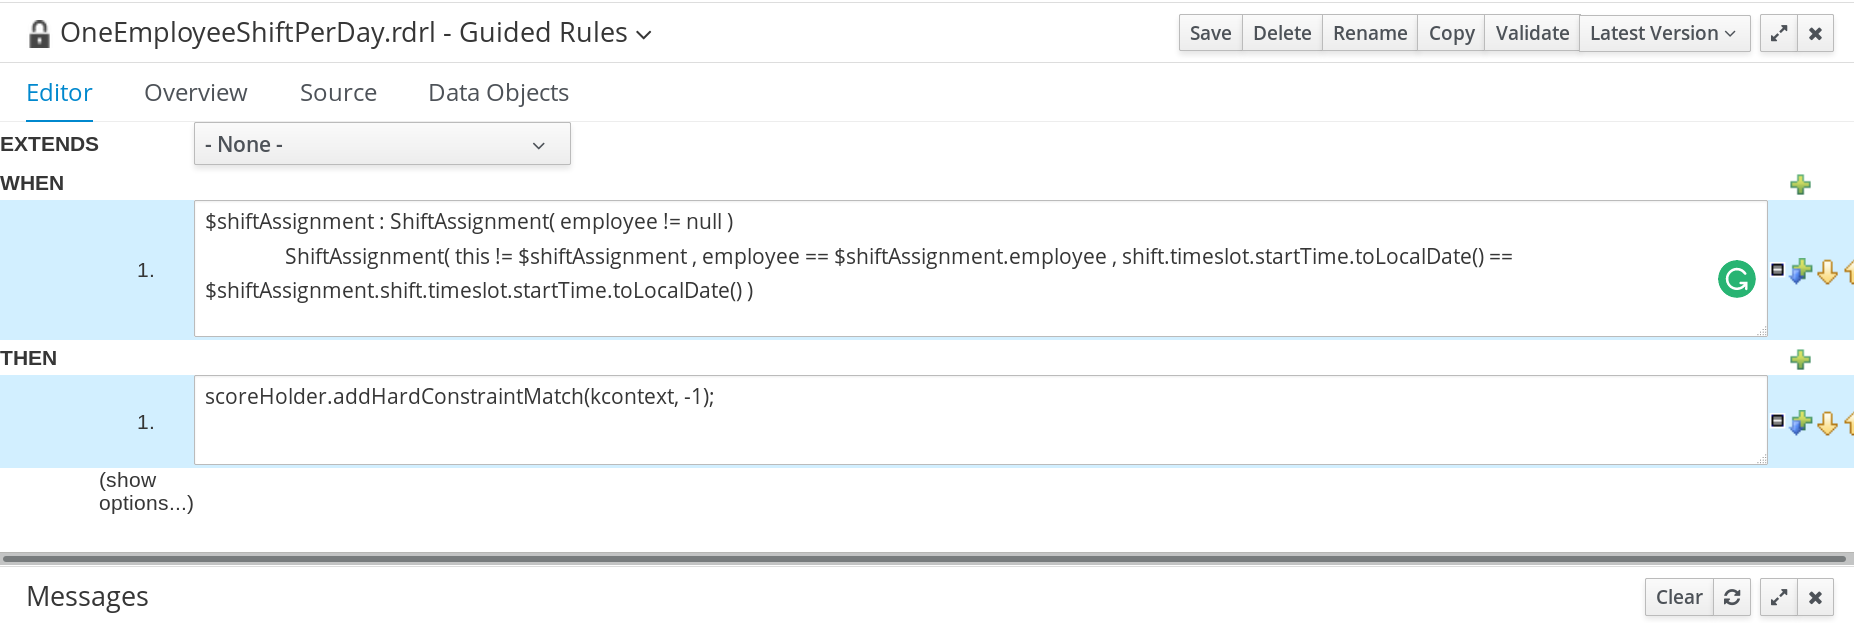
手順
- Business Central で、Menu → Design → Projects に移動して、プロジェクト名をクリックします。
- Add Asset → Guided Rule の順にクリックします。
-
Guided Rule 名に
OneEmployeeShiftPerDayと入力し、Package でemployeerostering.employeerosteringを選択します。 - OK をクリックして、ルールアセットを作成します。
-
WHEN フィールドで
をクリックして、WHEN 条件を追加します。
- Add a condition to the rule ウィンドウから Free form DRL を選択します。
Free form の DRL ボックスに、以下の条件を入力します。
$shiftAssignment : ShiftAssignment( employee != null )
		ShiftAssignment( this != $shiftAssignment , employee == $shiftAssignment.employee , shift.timeslot.startTime.toLocalDate() == $shiftAssignment.shift.timeslot.startTime.toLocalDate() )
この条件は、同じ日に別のシフトがすでに割り当てられている従業員にはシフトを割り当てることができないことを示しています。
-
THEN フィールドで
をクリックして、THEN 条件を追加します。
- Add a new action ウィンドウから Add Free form DRL を選択します。
Free form の DRL ボックスに、以下の条件を入力します。
scoreHolder.addHardConstraintMatch(kcontext, -1);
- 右上隅の Validate をクリックし、ルール条件がすべて有効であることを確認しますルールの妥当性確認に失敗したら、エラーメッセージに記載された問題に対応し、ルールの全コンポーネントを見直し、エラーが表示されなくなるまでルールの妥当性確認を行います。
- Save をクリックして、ルールを保存します。
ガイド付きルールの作成方法は、ガイド付きルールを使用したデシジョンサービスの作成 を参照してください。
31.2.5.4. シフト要件にスキルを一致させるガイド付きルールの作成
ガイド付きルール ShiftReqiredSkillsAreMet は、すべてのシフトが、適切なスキルセットを持つ従業員に割り当てられるのを確認するハード制約を作成します。従業員の勤務表サンプルでは、この制約はガイド付きルールデザイナーを使用して作成されます。
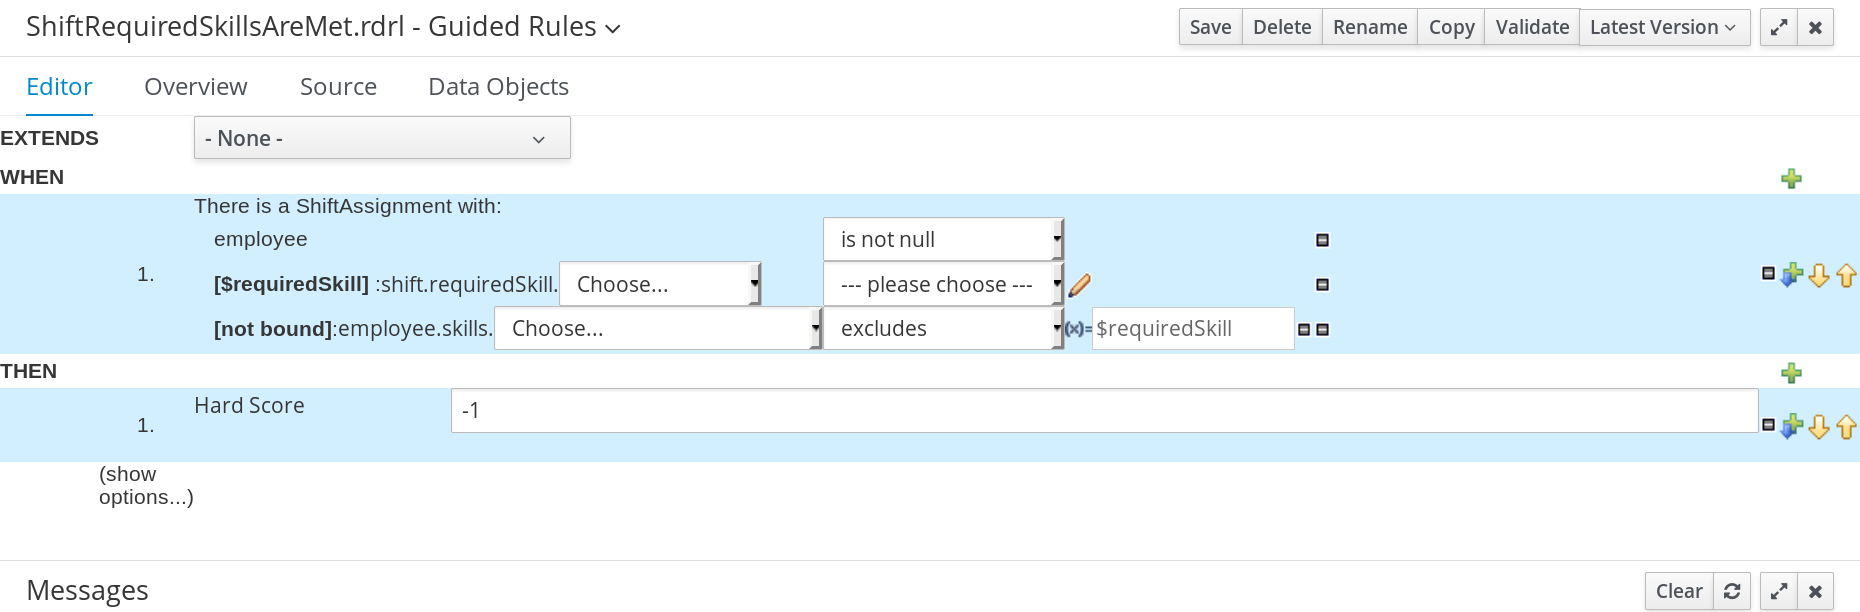
手順
- Business Central で、Menu → Design → Projects に移動して、プロジェクト名をクリックします。
- Add Asset → Guided Rule の順にクリックします。
-
Guided Rule 名に
ShiftReqiredSkillsAreMetと入力し、Package でemployeerostering.employeerosteringを選択します。 - OK をクリックして、ルールアセットを作成します。
-
WHEN フィールドで
をクリックして、WHEN 条件を追加します。
-
Add a condition to the rule ウィンドウで
ShiftAssignmentを選択します。+OK をクリックします。 -
ShiftAssignment条件をクリックし、Add a restriction on a field ドロップダウンリストでemployeeを選択します。 -
デザイナーで、
employeeの横のドロップダウンリストをクリックし、is not nullを選択します。 ShiftAssignment条件をクリックし、Expression editor をクリックします。-
デザイナーで、
[not bound]をクリックし、Expression editor を開き、式と変数$requiredSkillをバインドします。Set をクリックします。 -
デザイナーの
$requiredSkillの横にあるドロップダウンリストでshiftを選択し、その隣のドロップダウンリストでrequiredSkillを選択します。
-
デザイナーで、
ShiftAssignment条件をクリックし、Expression editor をクリックします。-
デザイナーで、
[not bound]の横にあるドロップダウンリストでemployeeを選択し、その隣のドロップダウンリストでskillsを選択します。 -
その隣のドロップダウンリストでは
Chooseを選択したままにします。 -
その隣のドロップダウンボックスで、
please chooseをexcludesに変更します。 -
excludesの横にある
アイコンをクリックし、Field value ウィンドウで New formula ボタンをクリックします。
-
式ボックスに
$requiredSkillを追加します。
-
デザイナーで、
-
THEN フィールドで
をクリックして、THEN 条件を追加します。
-
Add a new action ウィンドウで
Modify Hard Scoreを選択します。+OK をクリックします。 -
スコアアクションボックスに
-1を入力します。 - 右上隅の Validate をクリックし、ルール条件がすべて有効であることを確認しますルールの妥当性確認に失敗したら、エラーメッセージに記載された問題に対応し、ルールの全コンポーネントを見直し、エラーが表示されなくなるまでルールの妥当性確認を行います。
- Save をクリックして、ルールを保存します。
ガイド付きルールの作成方法は、ガイド付きルールを使用したデシジョンサービスの作成 を参照してください。
31.2.5.5. 休暇申請を管理するガイド付きルールの作成
ガイド付きルール DayOffRequest は、ソフト制約を作成します。この制約では、そのシフトに元々割り当てられていた従業員がその日に就業できなくなった場合に、別の従業員にシフトを再割り当てできるようにできます。従業員の勤務表サンプルでは、この制約はガイド付きルールデザイナーを使用して作成されます。
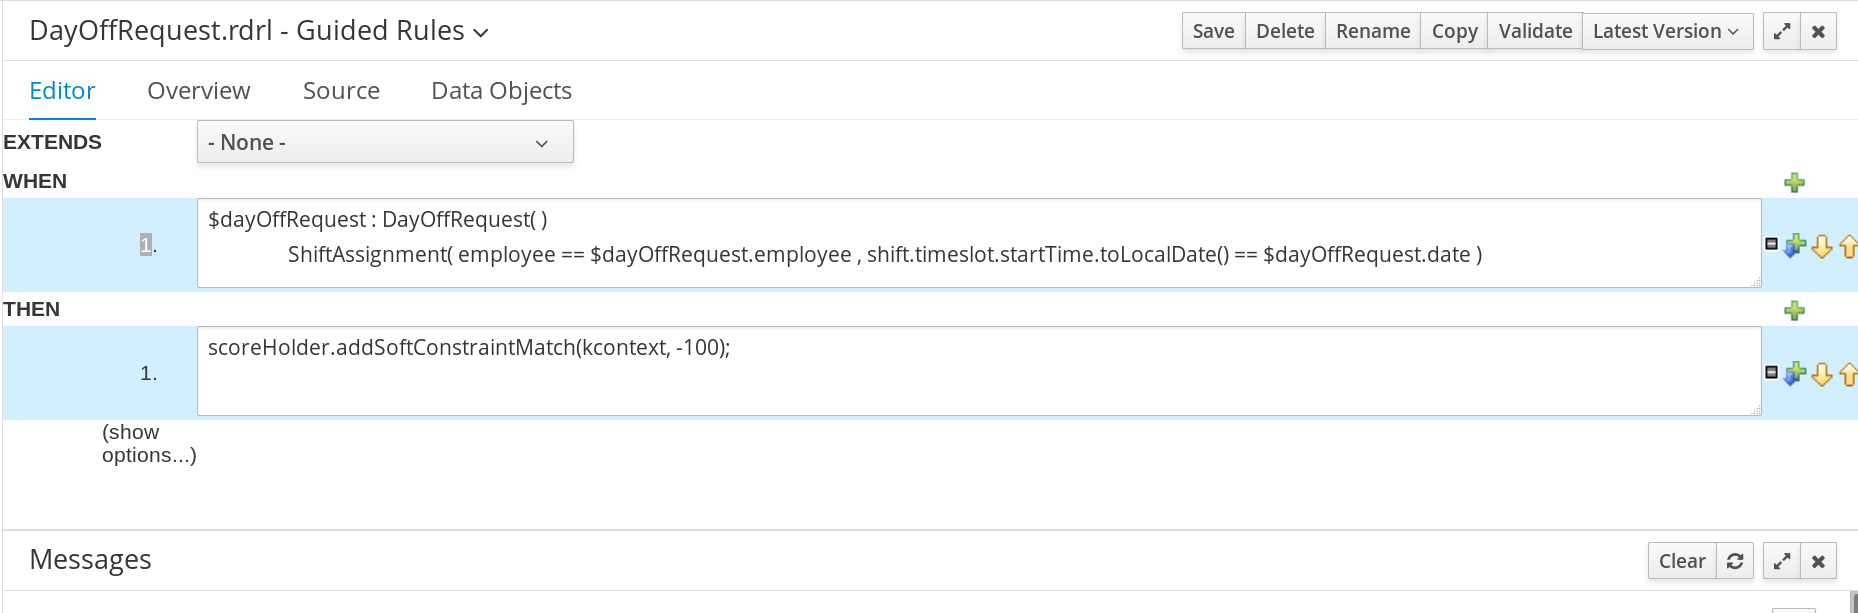
手順
- Business Central で、Menu → Design → Projects に移動して、プロジェクト名をクリックします。
- Add Asset → Guided Rule の順にクリックします。
-
Guided Rule 名に
DayOffRequestと入力し、Package でemployeerostering.employeerosteringを選択します。 - OK をクリックして、ルールアセットを作成します。
-
WHEN フィールドで
をクリックして、WHEN 条件を追加します。
- Add a condition to the rule ウィンドウから Free form DRL を選択します。
Free form の DRL ボックスに、以下の条件を入力します。
$dayOffRequest : DayOffRequest( )
		ShiftAssignment( employee == $dayOffRequest.employee , shift.timeslot.startTime.toLocalDate() == $dayOffRequest.date )
この条件は、休暇申請を行った従業員にシフトを割り当てている場合に、その従業員をその日のシフト割り当てから削除できることを示しています。
-
THEN フィールドで
をクリックして、THEN 条件を追加します。
- Add a new action ウィンドウから Add Free form DRL を選択します。
Free form の DRL ボックスに、以下の条件を入力します。
scoreHolder.addSoftConstraintMatch(kcontext, -100);
- 右上隅の Validate をクリックし、ルール条件がすべて有効であることを確認しますルールの妥当性確認に失敗したら、エラーメッセージに記載された問題に対応し、ルールの全コンポーネントを見直し、エラーが表示されなくなるまでルールの妥当性確認を行います。
- Save をクリックして、ルールを保存します。
ガイド付きルールの作成方法は、ガイド付きルールを使用したデシジョンサービスの作成 を参照してください。
31.2.6. 従業員の勤務表の Solver 設定の作成
Business Central に Solver 設定を作成して編集できます。Solver 設定デザイナーは、プロジェクトがデプロイされた後に実行できる Solver 設定を作成します。
前提条件
- Red Hat Process Automation Manager をダウンロードして、インストールしている。
- 従業員の勤務表サンプルに関連するアセットをすべて作成して設定している。
手順
- Business Central で Menu → Projects をクリックし、使用するプロジェクトをクリックして開きます。
- Assets パースペクティブで、Add Asset → Solver configuration をクリックします。
Create new Solver configuration ウィンドウで、Solver の名前
EmployeeRosteringSolverConfigと入力し、Ok をクリックします。これにより、Solver configuration デザイナーが開きます。
Score Director Factory 設定セクションで、スコアリングルール定義を含む KIE ベースを定義します。従業員の勤務表サンプルプロジェクトは
defaultKieBaseを使用します。-
KIE ベースに定義した KIE セッションの中から 1 つ選択します。従業員の勤務表サンプルプロジェクトは
defaultKieSessionを使用します。
-
KIE ベースに定義した KIE セッションの中から 1 つ選択します。従業員の勤務表サンプルプロジェクトは
- 右上の Validate をクリックし、Score Director Factory 設定が正しいことを確認します。妥当性確認に失敗したら、エラーメッセージに記載された問題に対応し、エラーが表示されなくなるまで妥当性確認を行います。
- Save をクリックして、Solver 設定を保存します。
31.2.7. 従業員の勤務表プロジェクトに対する Solver の終了設定
一定期間が過ぎたら Solver が終了できるように設定できます。デフォルトでは、プランニングエンジンには、時間制限なく問題を解決できるように指定されています。
従業員の勤務表サンプルプロジェクトは、30 秒間実行するように設定されています。
前提条件
-
従業員の勤務表プロジェクトに、関連するすべてのアセットを作成し、「従業員の勤務表の Solver 設定の作成」 の手順に従って、Business Central に Solver 設定
EmployeeRosteringSolverConfigを作成している。
手順
-
Assets パースペクティブで
EmployeeRosteringSolverConfigを開きます。これにより、Solver 設定 デザイナーが開きます。 - Termination セクションで Add をクリックして、選択した論理グループに新しい終了要素を作成します。
-
ドロップダウンリストから、終了タイプ
Time spentを選択します。これは、終了条件の入力フィールドとして追加されます。 - 時間要素の横の矢印を使用して、経過時間を 30 秒に設定します。
- 右上の Validate をクリックし、Score Director Factory 設定が正しいことを確認します。妥当性確認に失敗したら、エラーメッセージに記載された問題に対応し、エラーが表示されなくなるまで妥当性確認を行います。
- Save をクリックして、Solver 設定を保存します。
31.3. REST API を使用した Solver へのアクセス
サンプルの Solver をデプロイするか再作成したら、REST API を使用してアクセスできます。
REST API を使用して Solver インスタンスを登録する必要があります。その後に、データセットを指定して、最適解を取得できます。
前提条件
- 本書の以前のセクションに従い、従業員の勤務表プロジェクトを設定し、デプロイしてください。「従業員の勤務表サンプルプロジェクトの再作成」 に記載のとおり、同じプロジェクトをデプロイするか、「Business Central への従業員勤務表サンプルプロジェクトのデプロイメント」 に記載のとおり、プロジェクトを再作成できます。
31.3.1. REST API を使用した Solver の登録
Solver を使用するには、REST API を使用して Solver インスタンスを登録する必要があります。
各 Solver インスタンスで、一度に最適化できる計画問題の数は 1 つだけです。
手順
以下のヘッダーを使用して HTTP 要求を作成します。
authorization: admin:admin
X-KIE-ContentType: xstream
content-type: application/xml
以下の要求を使用して Solver を登録します。
- PUT
-
http://localhost:8080/kie-server/services/rest/server/containers/employeerostering_1.0.0-SNAPSHOT/solvers/EmployeeRosteringSolver - 要求ボディー
<solver-instance>
  <solver-config-file>employeerostering/employeerostering/EmployeeRosteringSolverConfig.solver.xml</solver-config-file>
</solver-instance>
31.3.2. REST API を使用した Solver の呼び出し
Solver インスタンスを登録した後に、REST API を使用して、データセットを Solver に送信して、最適解を取得できます。
手順
以下のヘッダーを使用して HTTP 要求を作成します。
authorization: admin:admin
X-KIE-ContentType: xstream
content-type: application/xml
以下の例のように、データセットを含む Solver に要求を送信します。
- POST
-
http://localhost:8080/kie-server/services/rest/server/containers/employeerostering_1.0.0-SNAPSHOT/solvers/EmployeeRosteringSolver/state/solving - 要求ボディー
<employeerostering.employeerostering.EmployeeRoster>
  <employeeList>
    <employeerostering.employeerostering.Employee>
      <name>John</name>
      <skills>
        <employeerostering.employeerostering.Skill>
          <name>reading</name>
        </employeerostering.employeerostering.Skill>
      </skills>
    </employeerostering.employeerostering.Employee>
    <employeerostering.employeerostering.Employee>
      <name>Mary</name>
      <skills>
        <employeerostering.employeerostering.Skill>
          <name>writing</name>
        </employeerostering.employeerostering.Skill>
      </skills>
    </employeerostering.employeerostering.Employee>
    <employeerostering.employeerostering.Employee>
      <name>Petr</name>
      <skills>
        <employeerostering.employeerostering.Skill>
          <name>speaking</name>
        </employeerostering.employeerostering.Skill>
      </skills>
    </employeerostering.employeerostering.Employee>
  </employeeList>
  <shiftList>
    <employeerostering.employeerostering.Shift>
      <timeslot>
        <startTime>2017-01-01T00:00:00</startTime>
        <endTime>2017-01-01T01:00:00</endTime>
      </timeslot>
      <requiredSkill reference="../../../employeeList/employeerostering.employeerostering.Employee/skills/employeerostering.employeerostering.Skill"/>
    </employeerostering.employeerostering.Shift>
    <employeerostering.employeerostering.Shift>
      <timeslot reference="../../employeerostering.employeerostering.Shift/timeslot"/>
      <requiredSkill reference="../../../employeeList/employeerostering.employeerostering.Employee[3]/skills/employeerostering.employeerostering.Skill"/>
    </employeerostering.employeerostering.Shift>
    <employeerostering.employeerostering.Shift>
      <timeslot reference="../../employeerostering.employeerostering.Shift/timeslot"/>
      <requiredSkill reference="../../../employeeList/employeerostering.employeerostering.Employee[2]/skills/employeerostering.employeerostering.Skill"/>
    </employeerostering.employeerostering.Shift>
  </shiftList>
  <skillList>
    <employeerostering.employeerostering.Skill reference="../../employeeList/employeerostering.employeerostering.Employee/skills/employeerostering.employeerostering.Skill"/>
    <employeerostering.employeerostering.Skill reference="../../employeeList/employeerostering.employeerostering.Employee[3]/skills/employeerostering.employeerostering.Skill"/>
    <employeerostering.employeerostering.Skill reference="../../employeeList/employeerostering.employeerostering.Employee[2]/skills/employeerostering.employeerostering.Skill"/>
  </skillList>
  <timeslotList>
    <employeerostering.employeerostering.Timeslot reference="../../shiftList/employeerostering.employeerostering.Shift/timeslot"/>
  </timeslotList>
  <dayOffRequestList/>
  <shiftAssignmentList>
    <employeerostering.employeerostering.ShiftAssignment>
      <shift reference="../../../shiftList/employeerostering.employeerostering.Shift"/>
    </employeerostering.employeerostering.ShiftAssignment>
    <employeerostering.employeerostering.ShiftAssignment>
      <shift reference="../../../shiftList/employeerostering.employeerostering.Shift[3]"/>
    </employeerostering.employeerostering.ShiftAssignment>
    <employeerostering.employeerostering.ShiftAssignment>
      <shift reference="../../../shiftList/employeerostering.employeerostering.Shift[2]"/>
    </employeerostering.employeerostering.ShiftAssignment>
  </shiftAssignmentList>
</employeerostering.employeerostering.EmployeeRoster>
計画問題に最適解をリクエストします。
- GET
http://localhost:8080/kie-server/services/rest/server/containers/employeerostering_1.0.0-SNAPSHOT/solvers/EmployeeRosteringSolver/bestsolution応答例
<solver-instance>
  <container-id>employee-rostering</container-id>
  <solver-id>solver1</solver-id>
  <solver-config-file>employeerostering/employeerostering/EmployeeRosteringSolverConfig.solver.xml</solver-config-file>
  <status>NOT_SOLVING</status>
  <score scoreClass="org.optaplanner.core.api.score.buildin.hardsoft.HardSoftScore">0hard/0soft</score>
  <best-solution class="employeerostering.employeerostering.EmployeeRoster">
    <employeeList>
      <employeerostering.employeerostering.Employee>
        <name>John</name>
        <skills>
          <employeerostering.employeerostering.Skill>
            <name>reading</name>
          </employeerostering.employeerostering.Skill>
        </skills>
      </employeerostering.employeerostering.Employee>
      <employeerostering.employeerostering.Employee>
        <name>Mary</name>
        <skills>
          <employeerostering.employeerostering.Skill>
            <name>writing</name>
          </employeerostering.employeerostering.Skill>
        </skills>
      </employeerostering.employeerostering.Employee>
      <employeerostering.employeerostering.Employee>
        <name>Petr</name>
        <skills>
          <employeerostering.employeerostering.Skill>
            <name>speaking</name>
          </employeerostering.employeerostering.Skill>
        </skills>
      </employeerostering.employeerostering.Employee>
    </employeeList>
    <shiftList>
      <employeerostering.employeerostering.Shift>
        <timeslot>
          <startTime>2017-01-01T00:00:00</startTime>
          <endTime>2017-01-01T01:00:00</endTime>
        </timeslot>
        <requiredSkill reference="../../../employeeList/employeerostering.employeerostering.Employee/skills/employeerostering.employeerostering.Skill"/>
      </employeerostering.employeerostering.Shift>
      <employeerostering.employeerostering.Shift>
        <timeslot reference="../../employeerostering.employeerostering.Shift/timeslot"/>
        <requiredSkill reference="../../../employeeList/employeerostering.employeerostering.Employee[3]/skills/employeerostering.employeerostering.Skill"/>
      </employeerostering.employeerostering.Shift>
      <employeerostering.employeerostering.Shift>
        <timeslot reference="../../employeerostering.employeerostering.Shift/timeslot"/>
        <requiredSkill reference="../../../employeeList/employeerostering.employeerostering.Employee[2]/skills/employeerostering.employeerostering.Skill"/>
      </employeerostering.employeerostering.Shift>
    </shiftList>
    <skillList>
      <employeerostering.employeerostering.Skill reference="../../employeeList/employeerostering.employeerostering.Employee/skills/employeerostering.employeerostering.Skill"/>
      <employeerostering.employeerostering.Skill reference="../../employeeList/employeerostering.employeerostering.Employee[3]/skills/employeerostering.employeerostering.Skill"/>
      <employeerostering.employeerostering.Skill reference="../../employeeList/employeerostering.employeerostering.Employee[2]/skills/employeerostering.employeerostering.Skill"/>
    </skillList>
    <timeslotList>
      <employeerostering.employeerostering.Timeslot reference="../../shiftList/employeerostering.employeerostering.Shift/timeslot"/>
    </timeslotList>
    <dayOffRequestList/>
    <shiftAssignmentList/>
    <score>0hard/0soft</score>
  </best-solution>
</solver-instance>
第32章 Java Solver のスタートガイド: クラウドバランシングの例
サンプルを使用して、Java コードを使用した基本的な Red Hat Business Optimizer Solver の開発を紹介します。
クラウドコンピューターを複数台所有し、そのクラウドコンピューターで複数のプロセスを実行する必要があると仮定します。コンピューターに各プロセスを割り当てる必要があります。
以下のハード制約を満たす必要があります。
すべてのコンピューターで、プロセスの合計容量を処理するのに必要なハードウェア最小要件を満たす必要があります。
- CPU 容量: コンピューターには、最低でも、そのコンピューターに割り当てられたプロセスで必要とされる合計の CPU 処理能力が必要です。
- メモリー容量: コンピューターには、最低でも、そのコンピューターに割り当てられたプロセスで必要とされる合計のメモリーが必要です。
- ネットワーク容量: コンピューターには、最低でも、そのコンピューターに割り当てられたプロセスで必要とされる合計のネットワーク帯域幅が必要です。
以下のソフト制約を最適化する必要があります。
1 つまたは複数のプロセスが割り当てられたコンピューターにはそれぞれ、保守コストが発生します (コンピューターごとに固定)。
- コスト: 合計保守コストを最小限に抑えます。
これは、ビンパッキング 問題にあたります。以下に、簡単なアルゴリズムを使用して、制約が 2 つ (CPU およびメモリー) あるコンピューター 2 台に、4 つのプロセスを割り当てるという簡単な例を紹介します。

ここで使用しているアルゴリズムは FFD (First Fit Decreasing) アルゴリズムです。このアルゴリズムでは、最初に大きいプロセスを割り当ててから、残りのスペースに小さいプロセスを割り当てていきます。図からも分かるように、これは黄色いプロセス D を割り当てる容量が残っていないため、最適ではありません。
Business Optimizer は、別の、より良いアルゴリズムを使用して、より適した解 (ソリューション) を見つけます。また、データ (プロセスやコンピューター) と制約 (ハードウェア要件などの制約) の両方を増やして評価します。
以下のまとめは、この例や、「マシンの再割当て (Google ROADEF 2012)」 で説明されている、より多くの制約を使用した高度な実装に該当します。
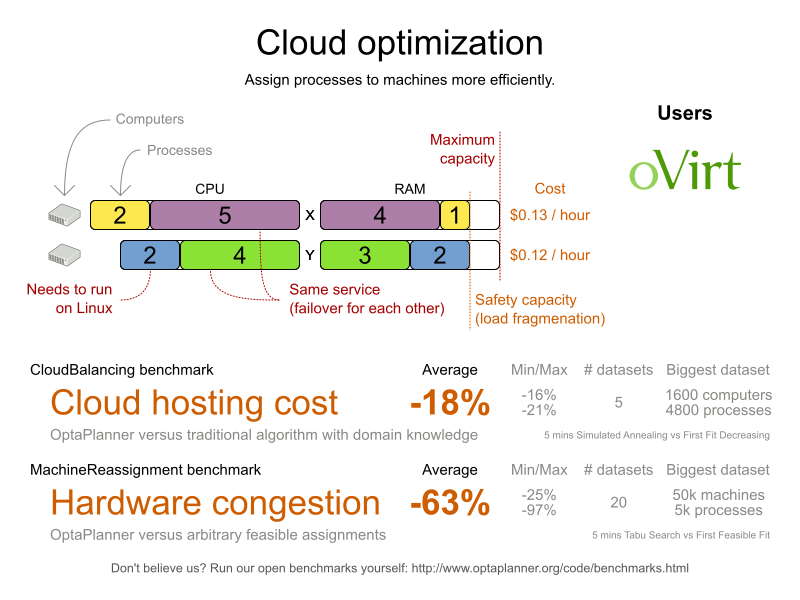
表32.1 クラウドのバランス問題の規模
| 問題の規模 | コンピューター | プロセス | 探索空間 |
|---|---|---|---|
| コンピューター 2 台、プロセス 6 件 | 2 | 6 | 64 |
| コンピューター 3 台、プロセス 9 件 | 3 | 9 | 10^4 |
| コンピューター 4 台、プロセス 012 件 | 4 | 12 | 10^7 |
| コンピューター 100 台、プロセス 300 件 | 100 | 300 | 10^600 |
| コンピューター 200 台、プロセス 600 件 | 200 | 600 | 10^1380 |
| コンピューター 400 台、プロセス 1200 件 | 400 | 1200 | 10^3122 |
| コンピューター 800 台、プロセス 2400 件 | 800 | 2400 | 10^6967 |
32.1. ドメインモデルの設計
ドメインモデル を使用すると、どのクラスがプランニングエンティティーで、どのプロパティーがプランニング変数かが分かります。また、制約の簡素化、パフォーマンスの向上、これからのニーズに対する柔軟性の向上もサポートします。
32.1.1. ドメインモデルの設計
ドメインモデルを作成するには、問題の入力データを表現するオブジェクトをすべて定義します。この例では、オブジェクトはプロセスとコンピューターです。
ドメインモデルの個別のオブジェクトは、ソリューションおよび入力データを含む、問題の完全なデータセットを表現する必要があります。以下の例では、このオブジェクトにコンピューターの一覧とプロセスの一覧を格納します。プロセスごとにコンピューターが 1 台割り当てられ、コンピューター間のプロセスの配分が解となります。
手順
- ドメインモデルのクラス図を作成します。
- 正規化して複製データを削除します。
クラスごとに サンプルインスタンス を記述します。サンプルインスタンスは、プランニングの目的に関連するエンティティープロパティーです。
Computer: 特定のハードウェアが搭載され、特定の保守コストが発生するコンピューターを表します。この例では、
cpuPower、memory、networkBandwidth、およびcostがComputerクラスのサンプルインスタンスです。Process: デマンドのあるプロセスを表します。このプロセスは、Planner によってComputerに割り当てられます。ProcessのサンプルインスタンスはrequiredCpuPower、requiredMemory、およびrequiredNetworkBandwidthです。CloudBalance: コンピューター間のプロセスの配分を表します。CloudBalance には、特定のデータセットのComputerおよびProcessがすべて含まれます。オブジェクトがすべてのデータセットおよび解を表す場合は、score を格納するサンプルインスタンスが必要です。Business Optimizer は異なる解のスコアを計算して、比較します。最高スコアの解が最適解となります。このため、
CloudBalanceのサンプルインスタンスはscoreになります。
プランニング中にどの関係 (またはフィールド) が変化するか判断します。
Planning entity (プランニングエンティティー): 解決中に Business Optimizer が変更可能なクラス。この例では、別のコンピューターにプロセスを移動できるため
Processクラスです。- Business Optimizer が変更できない入力データを表現するクラスは、問題ファクト として知られています。
-
Planning variable (プランニング変数): 解決時に変化するプランニングエンティティークラスのプロパティー。この例では、
Processクラスのcomputerプロパティーがそれにあたります。 -
Planning solution (プランニングの解): 問題への解を表現するクラス。このクラスは、プランニングエンティティーをすべて含むデータセットを表す必要があります。この例では、
CloudBalanceクラスがそれにあたります。
以下の UML クラスの図では、Business Optimizer のコンセプトにすでにアノテーションが付けてあります。
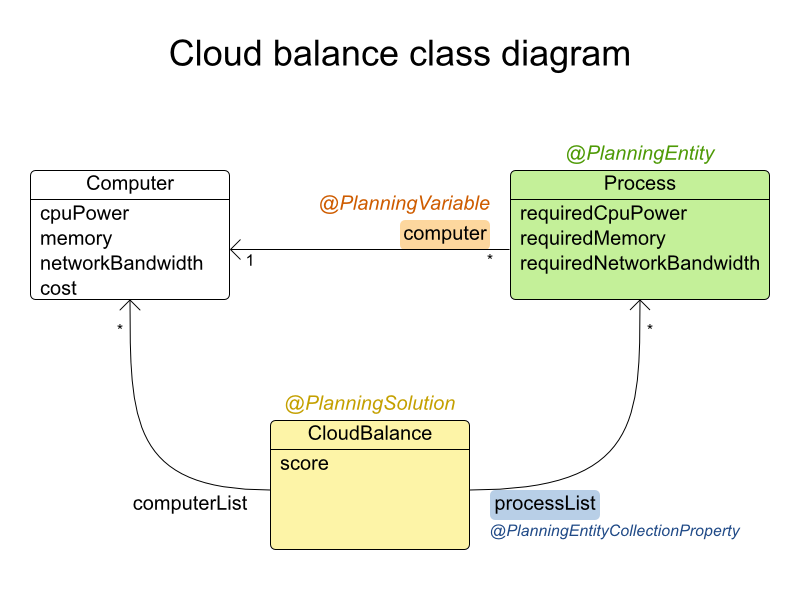
examples/sources/src/main/java/org/optaplanner/examples/cloudbalancing/domain ディレクトリーに、この例のクラス定義が含まれています。
32.1.2. Computer クラス
Computer クラスは、データを保存する Java オブジェクトで、POJO (Plain Old Java Object) として知られています。通常、入力データを持つこの種のクラスが多くなります。
例32.1 CloudComputer.java
public class CloudComputer ... {

    private int cpuPower;
    private int memory;
    private int networkBandwidth;
    private int cost;

    ... // getters
}
32.1.3. Process クラス
Process クラスは、解決中に変更されるクラスです。
Business Optimizer に、computer プロパティーを変更できることを指示する必要があります。これには、クラスに @PlanningEntity のアノテーションを付けて、getComputer() ゲッターに @PlanningVariable のアノテーションを付けます。
当然ながら、Business Optimizer が解決中にプロパティーを変更できるように、この computer プロパティーにはセッターも必要です。
例32.2 CloudProcess.java
@PlanningEntity(...)
public class CloudProcess ... {

    private int requiredCpuPower;
    private int requiredMemory;
    private int requiredNetworkBandwidth;

    private CloudComputer computer;

    ... // getters

    @PlanningVariable(valueRangeProviderRefs = {"computerRange"})
    public CloudComputer getComputer() {
        return computer;
    }

    public void setComputer(CloudComputer computer) {
        computer = computer;
    }

    // ************************************************************************
    // Complex methods
    // ************************************************************************

    ...

}
Business Optimizer は、computer プロパティーに割り当てるのに、どの値を選択できるのかを把握しておく必要があります。これらの値は、プランニングの解の CloudBalance.getComputerList() メソッドから取得し、現在のデータセットに含まれる全コンピューターのリストを返します。
CloudProcess.getComputer() 上にある @PlanningVariable の valueRangeProviderRefs パラメーターは、CloudBalance.getComputerList() 上にある @ValueRangeProvider の id に一致する必要があります。
ゲッターの代わりにフィールドにアノテーションも使用できます。
32.1.4. CloudBalance クラス
CloudBalance クラスには、@PlanningSolution アノテーションがあります。
このクラスは、すべてのコンピューターおよびプロセスの一覧を保持します。プランニングの問題と、 (初期化されている場合は) プランニングの解の両方を表します。
CloudBalance クラスには、以下の主要な属性が含まれます。
このクラスは、Business Optimizer が変更可能なプロセスコレクションを保持します。ゲッター
getProcessList()に@PlanningEntityCollectionPropertyアノテーションを付けて、Business Optimizer が変更できるプロセスを Business Optimizer で取得できるようにします。解を保存するには、Business Optimizer は、変更したプロセス一覧で、クラスの新規インスタンスを初期化します。-
これには
@PlanningScoreのアノテーションがついたscoreプロパティーも含まれており、このプロパティーは、現在の状態の解のScoreを指します。Business Optimizer は、解のインスタンス向けにScoreを計算すると自動的にこのプロパティーを更新するため、このプロパティーにはセッターが必要です。 -
特に、Drools でスコアの計算をする場合、
computerListのプロパティーは@ProblemFactCollectionPropertyのアノテーションを付けて、Business Optimizer がコンピューターのリスト (問題ファクト) を取得し、デシジョンエンジンに公開できるようにする必要があります。
-
これには
例32.3 CloudBalance.java
@PlanningSolution
public class CloudBalance ... {

    private List<CloudComputer> computerList;

    private List<CloudProcess> processList;

    private HardSoftScore score;

    @ValueRangeProvider(id = "computerRange")
    @ProblemFactCollectionProperty
    public List<CloudComputer> getComputerList() {
        return computerList;
    }

    @PlanningEntityCollectionProperty
    public List<CloudProcess> getProcessList() {
        return processList;
    }

    @PlanningScore
    public HardSoftScore getScore() {
        return score;
    }

    public void setScore(HardSoftScore score) {
        this.score = score;
    }

    ...
}
32.2. クラウドバランシングの Hello World の実行
hello world アプリケーションサンプルを実行して、Solver を例示します。
手順
- お好きな IDE にこの例をダウンロードして設定します。IDE へのサンプルのダウンロードおよび設定方法は、「IDE (IntelliJ、Eclipse、または Netbeans) での Red Hat Business Optimizer サンプルの実行」 を参照してください。
以下の主要クラス
org.optaplanner.examples.cloudbalancing.app.CloudBalancingHelloWorldで実行設定を作成します。デフォルトでは、クラウドバランシングの Hello World は 120 秒間実行するように設定されています。
結果
このアプリケーションは、以下のコードを実行します。
例32.4 CloudBalancingHelloWorld.java
public class CloudBalancingHelloWorld {

    public static void main(String[] args) {
        // Build the Solver
        SolverFactory<CloudBalance> solverFactory = SolverFactory.createFromXmlResource("org/optaplanner/examples/cloudbalancing/solver/cloudBalancingSolverConfig.xml");
        Solver<CloudBalance> solver = solverFactory.buildSolver();

        // Load a problem with 400 computers and 1200 processes
        CloudBalance unsolvedCloudBalance = new CloudBalancingGenerator().createCloudBalance(400, 1200);

        // Solve the problem
        CloudBalance solvedCloudBalance = solver.solve(unsolvedCloudBalance);

        // Display the result
        System.out.println("\nSolved cloudBalance with 400 computers and 1200 processes:\n" + toDisplayString(solvedCloudBalance));
    }

    ...
}
このコードサンプルにより、以下が行われます。
Solver の設定をもとに
Solverを構築します (ここでは、クラスパスの XML ファイルcloudBalancingSolverConfig.xmlを使用します)。Solverの構築がこの手順で最も複雑な部分です。詳細は、「Solver の設定」 を参照してください。SolverFactory<CloudBalance> solverFactory = SolverFactory.createFromXmlResource( "org/optaplanner/examples/cloudbalancing/solver/cloudBalancingSolverConfig.xml"); Solver solver<CloudBalance> = solverFactory.buildSolver();問題を読み込みます。
CloudBalancingGeneratorが無作為に問題を生成します。これは、たとえば、データベースなどから、実際の問題を読み込むクラスに置き換えてください。CloudBalance unsolvedCloudBalance = new CloudBalancingGenerator().createCloudBalance(400, 1200);
問題を解決します。
CloudBalance solvedCloudBalance = solver.solve(unsolvedCloudBalance);
結果を表示します。
        System.out.println("\nSolved cloudBalance with 400 computers and 1200 processes:\n"
                + toDisplayString(solvedCloudBalance));
32.3. Solver の設定
Solver の設定ファイルは、解決のプロセスがどのように機能するかを指定します。このファイルはコードの一部とみなされます。このファイルの名前は、examples/sources/src/main/resources/org/optaplanner/examples/cloudbalancing/solver/cloudBalancingSolverConfig.xml になります。
例32.5 cloudBalancingSolverConfig.xml
<?xml version="1.0" encoding="UTF-8"?>
<solver>
  <!-- Domain model configuration -->
  <scanAnnotatedClasses/>

  <!-- Score configuration -->
  <scoreDirectorFactory>
    <easyScoreCalculatorClass>org.optaplanner.examples.cloudbalancing.optional.score.CloudBalancingEasyScoreCalculator</easyScoreCalculatorClass>
    <!--<scoreDrl>org/optaplanner/examples/cloudbalancing/solver/cloudBalancingScoreRules.drl</scoreDrl>-->
  </scoreDirectorFactory>

  <!-- Optimization algorithms configuration -->
  <termination>
    <secondsSpentLimit>30</secondsSpentLimit>
  </termination>
</solver>
Solver の設定は、3 つの部分で設定されます。
ドメインモデル設定: Business Optimizer が変更可能なものは何ですか ?
Business Optimizer にドメインクラスを指定する必要があります。ここでは、(
@PlanningEntityまたは@PlanningSolutionアノテーションに対して) クラスパス内の全クラスを自動的にスキャンします。<scanAnnotatedClasses/>
スコアの設定: Business Optimizer はどのようにプランニング変数を最適化しますか? 目的は何ですか ?
ここでは、ハード制約とソフト制約を使用するため、
HardSoftScoreを使用します。ただし、Business Optimizer に、ビジネス要件に合ったスコアの計算方法を指定する必要があります。後ほど、スコアの計算方法を 2 種類 (基本的な Java 実装の使用、または Drools DRL の使用) 紹介します。<scoreDirectorFactory> <easyScoreCalculatorClass>org.optaplanner.examples.cloudbalancing.optional.score.CloudBalancingEasyScoreCalculator</easyScoreCalculatorClass> <!--<scoreDrl>org/optaplanner/examples/cloudbalancing/solver/cloudBalancingScoreRules.drl</scoreDrl>--> </scoreDirectorFactory>最適化アルゴリズムの設定: Business Optimizer をどのように最適化しますか? この例では、(最適化アルゴリズムが明示的に設定されていないため) 30 秒間、デフォルトの最適化アルゴリズムを使用します。
  <termination>
    <secondsSpentLimit>30</secondsSpentLimit>
  </termination>
Business Optimizer は、数秒でも (リアルタイム計画機能を使用する場合は 15 ミリ秒未満になる場合も) 良い結果は得られるはずですが、時間が長くなればなるほど、結果は良くなります。高度なユースケースでは、ハードな時間制限以外に、終了の条件を使用することが適しています。
デフォルトのアルゴリズムでも、人間の計画担当者やほとんどの社内実装を簡単に上回っています。高度なベンチマーク機能を使用して微調整を強化し、さらに良い結果を得ることができます。
32.4. スコアの設定
Business Oprtimizer は、スコア が最も高い ソリューション を探します。この例では、HardSoftScore を使用し、Business Oprtimizer がハード制約に違反していない (またはハードウェア要件を満たす) ソリューションと、ソフト制約に違反する数が最も少ない (メンテナーンスコストが最も低い) ソリューションを探します。
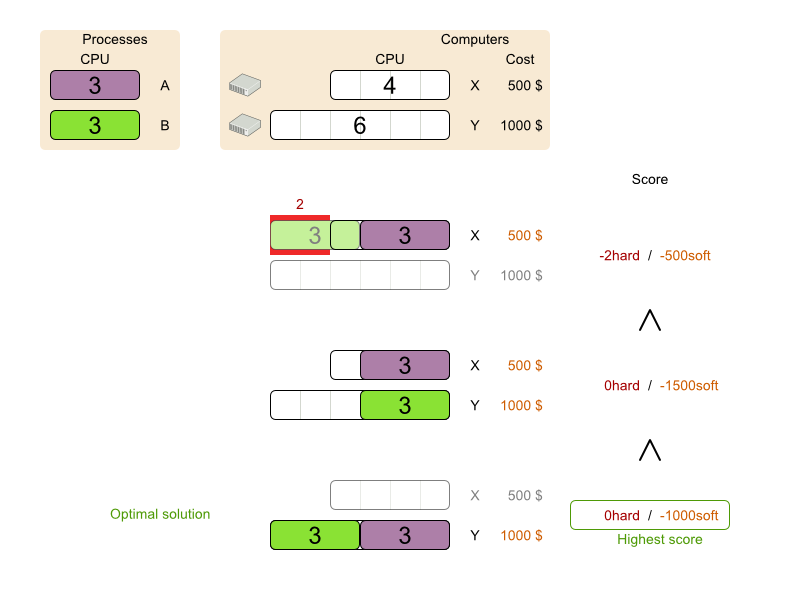
当然ながら、Business Optimizer には、これらのドメイン固有のスコア制約についても指定する必要があります。Java 言語または Drools 言語を使用して制約を定義できます。
32.4.1. Java を使用したスコア計算の設定
スコア関数を定義する方法の 1 つに、Plain Java での EasyScoreCalculator インターフェイス実装があります。
手順
cloudBalancingSolverConfig.xmlファイルで設定を追加するか、アンコメントします。<scoreDirectorFactory> <easyScoreCalculatorClass>org.optaplanner.examples.cloudbalancing.optional.score.CloudBalancingEasyScoreCalculator</easyScoreCalculatorClass> </scoreDirectorFactory>calculateScore (Solution)メソッドを実装してHardSoftScoreインスタンスを返します。例32.6 CloudBalancingEasyScoreCalculator.java
public class CloudBalancingEasyScoreCalculator implements EasyScoreCalculator<CloudBalance> {

    /**
     * A very simple implementation. The double loop can easily be removed by using Maps as shown in
     * {@link CloudBalancingMapBasedEasyScoreCalculator#calculateScore(CloudBalance)}.
     */
    public HardSoftScore calculateScore(CloudBalance cloudBalance) {
        int hardScore = 0;
        int softScore = 0;
        for (CloudComputer computer : cloudBalance.getComputerList()) {
            int cpuPowerUsage = 0;
            int memoryUsage = 0;
            int networkBandwidthUsage = 0;
            boolean used = false;

            // Calculate usage
            for (CloudProcess process : cloudBalance.getProcessList()) {
                if (computer.equals(process.getComputer())) {
                    cpuPowerUsage += process.getRequiredCpuPower();
                    memoryUsage += process.getRequiredMemory();
                    networkBandwidthUsage += process.getRequiredNetworkBandwidth();
                    used = true;
                }
            }

            // Hard constraints
            int cpuPowerAvailable = computer.getCpuPower() - cpuPowerUsage;
            if (cpuPowerAvailable < 0) {
                hardScore += cpuPowerAvailable;
            }
            int memoryAvailable = computer.getMemory() - memoryUsage;
            if (memoryAvailable < 0) {
                hardScore += memoryAvailable;
            }
            int networkBandwidthAvailable = computer.getNetworkBandwidth() - networkBandwidthUsage;
            if (networkBandwidthAvailable < 0) {
                hardScore += networkBandwidthAvailable;
            }

            // Soft constraints
            if (used) {
                softScore -= computer.getCost();
            }
        }
        return HardSoftScore.valueOf(hardScore, softScore);
    }

}
上記のコードを最適化し、Map を使用して processList を 1 回だけ反復した場合でも、インクリメンタルスコアの計算が行われないため、処理が遅いままです。
これを修正するには、インクリメント Java スコア計算か、Drools スコア計算を使用します。インクリメント Java スコア計算については、本書では触れません。
32.4.2. Drools を使用したスコア計算の設定
Drools ルール言語 (DRL) を使用して制約を定義できます。Drools スコア計算はインクリメント計算を使用します。この計算では、1 つまたは複数のスコアルールとしてすべてのスコア制約が記述されます。
スコア計算のデシジョンエンジンを使用すると、デシジョンテーブル (XLS または Web ベース)、Business Central をはじめとしたサポート対象の機能など、Drools の他の技術と統合できます。
手順
クラスパスに
scoreDrlリソースを追加してスコア機能としてデシジョンエンジンを使用します。cloudBalancingSolverConfig.xmlファイルで設定を追加するか、アンコメントします。<scoreDirectorFactory> <scoreDrl>org/optaplanner/examples/cloudbalancing/solver/cloudBalancingScoreRules.drl</scoreDrl> </scoreDirectorFactory>ハード制約を作成します。これらの制約で、すべてのコンピューターに、十分な CPU、メモリー、ネットワーク帯域幅が割り当てられ、全プロセスがサポートされるようになります。
例32.7 cloudBalancingScoreRules.drl - ハード制約
...

import org.optaplanner.examples.cloudbalancing.domain.CloudBalance;
import org.optaplanner.examples.cloudbalancing.domain.CloudComputer;
import org.optaplanner.examples.cloudbalancing.domain.CloudProcess;

global HardSoftScoreHolder scoreHolder;

// ############################################################################
// Hard constraints
// ############################################################################

rule "requiredCpuPowerTotal"
    when
        $computer : CloudComputer($cpuPower : cpuPower)
        accumulate(
            CloudProcess(
                computer == $computer,
                $requiredCpuPower : requiredCpuPower);
            $requiredCpuPowerTotal : sum($requiredCpuPower);
            $requiredCpuPowerTotal > $cpuPower
        )
    then
        scoreHolder.addHardConstraintMatch(kcontext, $cpuPower - $requiredCpuPowerTotal);
end

rule "requiredMemoryTotal"
    ...
end

rule "requiredNetworkBandwidthTotal"
    ...
end
ソフト制約を作成します。この制約は、保守コストを最小限に抑えます。ハード制約に該当する場合にのみ適用されます。
例32.8 cloudBalancingScoreRules.drl - ソフト制約
// ############################################################################
// Soft constraints
// ############################################################################

rule "computerCost"
    when
        $computer : CloudComputer($cost : cost)
        exists CloudProcess(computer == $computer)
    then
        scoreHolder.addSoftConstraintMatch(kcontext, - $cost);
end
32.5. Solver の他の開発
上記の例が機能するようになったので、さらに開発を進めてみてください。たとえば、ドメインモデルを改良して、以下のような制約を追加してみてください。
-
すべての
プロセスがサービスに属する。コンピューターはクラッシュする可能性があるため、同じサービスを実行するプロセスは、別のコンピューターに割り当てる必要がある (または割り当てなければならない)。 -
すべての
コンピューターがビルに設置されている。ビルが火災にあう可能性があるため、同じサービスのプロセスは、別のビルに設置されているコンピューターに割り当てる必要がある (割り当てなければならない)。
第33章 Red Hat Business Optimizer で提供される例
Red Hat Process Automation Manager には、Red Hat Business Optimizer のサンプルが複数同梱されています。たとえばコードなどを確認して、ニーズに合ったものに変更できます。
Red Hat は、Red Hat Process Automation Manager ディストリビューションに含まれるコードサンプルのサポートはしていません。
33.1. サンプルのダウンロードおよび実行
Red Hat Software Downloads の Web サイトから Red Hat Business Optimizer のサンプルをダウンロードして、実行できます。
33.1.1. Red Hat Business Optimizer のサンプルのダウンロード
Red Hat Process Automation Manager のアドオンパッケージの一部として例をダウンロードできます。
手順
-
Software Downloads ページから
rhpam-7.10.0-add-ons.zipファイルをダウンロードします。 - ファイルを展開します。
-
展開したディレクトリーから、
rhpam-7.10-planner-engine.zipファイルを展開します。
結果
展開した rhpam-7.10-planner-engine ディレクトリーの以下のサブディレクトリーに、サンプルのソースコードが含まれています。* examples/sources/src/main/java/org/optaplanner/examples * examples/sources/src/main/resources/org/optaplanner/examples * webexamples/sources/src/main/java/org/optaplanner/examples * webexamples/sources/src/main/resources/org/optaplanner/examples
「Business Optimizer サンプルの表」 では、各サンプルで使用するディレクトリーの名前を記載しています。
33.1.2. Business Optimizer サンプルの実行
Red Hat Business Optimizer には、さまざまなユースケースのデモとして多数のサンプルが含まれています。
前提条件
- 例をダウンロードして展開しました。ダウンロードおよび展開の方法は、「Red Hat Business Optimizer のサンプルのダウンロード」 を参照してください。
手順
rhpam-7.10.0-planner-engineディレクトリーで、examplesディレクトリーを開き、適切なスクリプトを使用してサンプルを実行します。Linux または Mac の場合:
$ cd examples
$ ./runExamples.sh
Windows:
$ cd examples
$ runExamples.bat
GUI アプリケーションウィンドウからサンプルを選択して実行します。
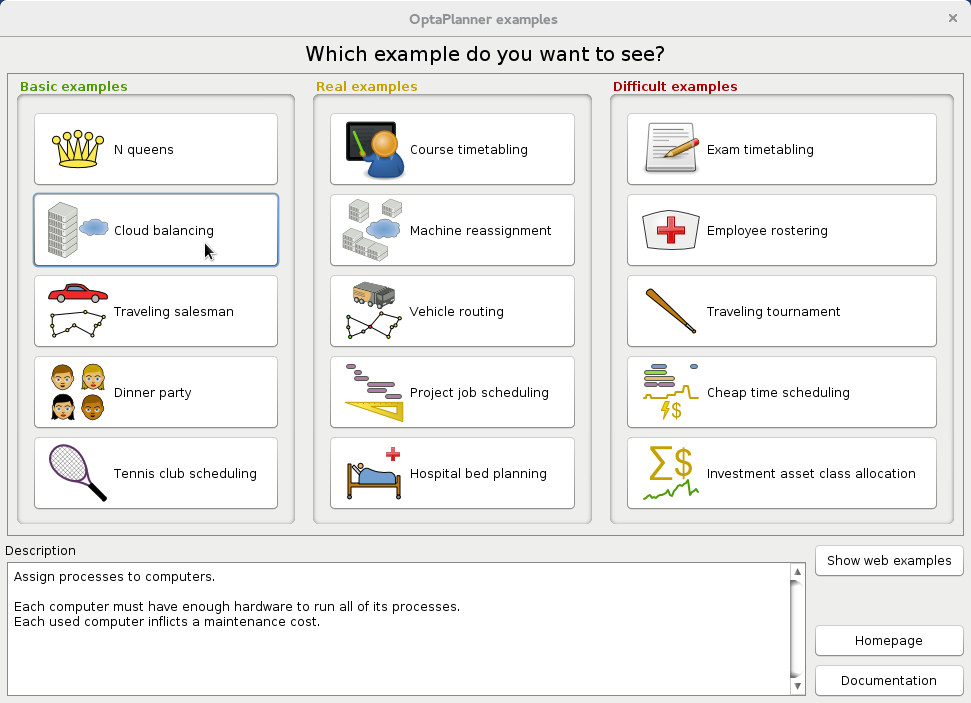
Red Hat Business Optimizer 自体は GUI に依存していません。デスクトップと同じように、サーバーまたはモバイル JVM 上でも実行できます。
33.1.3. IDE (IntelliJ、Eclipse、または Netbeans) での Red Hat Business Optimizer サンプルの実行
IntelliJ、Eclipse、Netbeans など統合開発環境 (IDE) を使用する場合は、お使いの開発環境にダウンロードした Red Hat Business Optimizer の例を実行できます。
前提条件
- 例をダウンロードして展開しました。ダウンロードおよび展開の方法は、「Red Hat Business Optimizer のサンプルのダウンロード」 を参照してください。
手順
新規プロジェクトとして Red Hat Business Optimizer サンプルを開きます。
-
IntelliJ または Netbeans の場合は、新規プロジェクトとして
examples/sources/pom.xmlを開きます。Maven 統合の指示に従い、インストールを進めてください。この手順では、残りのステップは省略します。 -
Eclipse の場合は、
examples/sourcesディレクトリーで新規プロジェクトを開きます。
-
IntelliJ または Netbeans の場合は、新規プロジェクトとして
-
binariesディレクトリーおよびexamples/binariesディレクトリーにあるすべての JAR を、クラスパスに追加します (examples/binaries/optaplanner-examples-*.jarファイルを除く)。 -
Java のソースディレクトリー
src/main/javaと Java のリソースディレクトリーsrc/main/resourcesを追加します。 実行設定を作成します。
-
メインクラス:
org.optaplanner.examples.app.OptaPlannerExamplesApp -
VM パラメーター (任意):
-Xmx512M -server -Dorg.optaplanner.examples.dataDir=examples/sources/data -
作業ディレクトリー:
examples/sources
-
メインクラス:
- 実行設定を実行します。
33.1.4. Web のサンプルの実行
GUI のサンプル以外に、Red Hat Process Automation Manager には、Red Hat Business Optimizer 用の一連の Web サンプルが含まれます。Web の例を以下に示します。
- 配送経路: Leaflet または Google Maps の視覚化機能どちらかを使用して、さまざまな顧客が必要とするアイテムをすべて回収する最短経路を計算します。
- クラウドバランシング: 異なる仕様およびコストのコンピューターにプロセスを割り当てます。
前提条件
- Red Hat Process Automation Manager アドオンパッケージから Red Hat Business Optimizer のサンプルをダウンロードして、展開しました。手順は、「Red Hat Business Optimizer のサンプルのダウンロード」を参照してください。
Web のサンプルは、以下の API など、複数の JEE API を実行する必要があります。
- Servlet
- JAX-RS
- CDI
これらの API は、Bussiness Optimizer 自体には必要ありません。
手順
- JBoss EAP、WildFly などの JEE アプリケーションサーバーをダウンロードして展開します。
展開した
rhpam-7.10.0-planner-engineディレクトリーで、webexamples/binariesサブディレクトリーを開き、JEE アプリケーションサーバーにoptaplanner-webexamples-*.warファイルをデプロイします。スタンドアロンモードで JBoss EAP を使用する場合は、
optaplanner-webexamples-*.warファイルをJBOSS_home/standalone/deploymentsディレクトリーに追加して実行できます。- Web ブラウザーで http://localhost:8080/optaplanner-webexamples/ のアドレスを開きます。
33.2. Business Optimizer サンプルの表
Business Optimizer サンプルには、教育関連のコンテストで出題された問題を解決するものもあります。以下の表の Contest 列には、このようなコンテストが掲載されています。また、コンテストの目的として、現実的 か、非現実的 かの識別をしています。現実的なコンテスト とは、独立した公式コンテストを指します。
現実的なコンテスト とは、以下の基準を満たす、独立した公式コンテストを指します。
- 明確に定義された実際のユースケースであること
- 実際に制約があること
- 実際のデータセットが複数あること
- 特定のハードウェアで特定の時間内に結果を再現できること
- 教育機関および/または企業の運用研究コミュニティーが真剣に参加していること
現実的なコンテストでは、競合のソフトウェアや教育研究と Business Optimizer を客観的に比較できます。
表33.1 サンプルの概要
| 例 | ドメイン | サイズ | コンテスト | ディレクトリー名 |
|---|---|---|---|---|
| エンティティークラス 1 つ (変数 1 つ) |
エンティティー ⇐
値 ⇐
探索空間 ⇐ | 無意味 (不正が可能) |
| |
| エンティティークラス 1 つ (変数 1 つ) |
エンティティー ⇐
値 ⇐
探索空間 ⇐ | いいえ (弊社が定義) |
| |
| エンティティークラス 1 つ (連鎖変数 1 つ) |
エンティティー ⇐
値 ⇐
探索空間 ⇐ | 現実的でない TSP Web |
| |
| エンティティークラス 1 つ (変数 1 つ) |
エンティティー ⇐
値 ⇐
探索空間 ⇐ | 現実的でない |
| |
| エンティティークラス 1 つ (変数 1 つ) |
エンティティー ⇐
値 ⇐
探索空間 ⇐ | いいえ (弊社が定義) |
| |
| エンティティークラス 1 つ (変数 2 つ) |
エンティティー ⇐
値 ⇐
探索空間 ⇐ | いいえ (弊社が定義) |
| |
| エンティティークラス 1 つ (変数 2 つ) |
エンティティー ⇐
値 ⇐
探索空間 ⇐ | 現実的 ITC 2007 track 3 |
| |
| エンティティークラス 1 つ (変数 1 つ) |
エンティティー ⇐
値 ⇐
探索空間 ⇐ | ほぼ現実的 ROADEF 2012 |
| |
| エンティティークラス 1 つ (連鎖変数 1 つ) シャドウエンティティークラス 1 つ (自動シャドウ変数 1 つ) |
エンティティー ⇐
値 ⇐
探索空間 ⇐ | 現実的でない VRP Web |
| |
| 時間枠がある中での 配送経路 | 配送経路すべて (シャドウ変数 1 つ) |
エンティティー ⇐
値 ⇐
探索空間 ⇐ | 現実的でない VRP Web |
|
| エンティティークラス 1 つ (変数 2 つ) (シャドウ変数 1 つ) |
エンティティー ⇐
値 ⇐
探索空間 ⇐ | ほぼ現実的 MISTA 2013 |
| |
| エンティティークラス 1 つ (連鎖変数 1 つ) (シャドウ変数 1 つ) シャドウエンティティークラス 1 つ (自動シャドウ変数 1 つ) |
エンティティー ⇐
値 ⇐
探索空間 ⇐ | いいえ (弊社が定義) |
| |
| エンティティークラス 2 つ (同じ階層) (変数 2 つ) |
エンティティー ⇐
値 ⇐
探索空間 ⇐ | 現実的 ITC 2007 track 1 |
| |
| エンティティークラス 1 つ (変数 1 つ) |
エンティティー ⇐
値 ⇐
探索空間 ⇐ | 現実的 INRC 2010 |
| |
| エンティティークラス 1 つ (変数 1 つ) |
エンティティー ⇐
値 ⇐
探索空間 ⇐ | 現実的でない TTP |
| |
| エンティティークラス 1 つ (変数 2 つ) |
エンティティー ⇐
値 ⇐
探索空間 ⇐ | ほぼ現実的 ICON Energy |
| |
| エンティティークラス 1 つ (変数 1 つ) |
エンティティー ⇐
値 =
探索空間 ⇐ | いいえ (弊社が定義) |
| |
| エンティティークラス 1 つ (変数 2 つ) |
エンティティー ⇐
値 ⇐
探索空間 ⇐ | いいえ (弊社が定義) |
| |
| エンティティークラス 1 つ (連鎖変数 1 つ) (シャドウ変数 4 つ) シャドウエンティティークラス 1 つ (自動シャドウ変数 1 つ) |
エンティティー ⇐
値 ⇐
探索空間 ⇐ | いいえ (弊社が定義) |
| |
| エンティティークラス 1 つ (変数 1 つ) シャドウエンティティークラス 1 つ (自動シャドウ変数 1 つ) |
エンティティー ⇐
値 ⇐
探索空間 ⇐ | いいえ (弊社が定義) |
|
33.3. N クィーン
n サイズのチェスボードで、他のクィーンに取られない場所に n 個のクィーンを置きます。最も一般的な n クィーンパズルは、n = 8 の 8 個のクィーンパズルです。
制約:
- n 列および n 行のチェスボードを使用します。
- チェスボードに n 個のクィーンを置きます。
- クィーンが他のクィーンに取られないように配置します。クィーンは、同じ水平線上、垂直線上、対角線上にある他のクィーンを取ることができます。
本書では、4 つのクイーンパズルを主な例として多用しています。
以下が提案された解です。
図33.1 クィーン 4 個のパズルの誤った解
上記の解は、A1 と B0 (および B0 と D0) のクィーンがお互いに駒を取れるので間違っています。B0 のクィーンをどかせば他のクィーンに取られないようにするという制約は順守できますが、n 個のクィーンを置くという制約に違反します。
以下は正しい解です。
図33.2 クィーン 4 個のパズルの正しい解
すべての制約が満たされているので、これが正解です。
n クィーンパズルでは、正解が複数存在する場合が多々あります。指定した n に対して考えられるすべての解を見つけるのではなく、指定の n に対する正しい解を 1 つ導き出すことに焦点をあてます。
問題の規模
4queens   has   4 queens with a search space of    256.
8queens   has   8 queens with a search space of   10^7.
16queens  has  16 queens with a search space of  10^19.
32queens  has  32 queens with a search space of  10^48.
64queens  has  64 queens with a search space of 10^115.
256queens has 256 queens with a search space of 10^616.
n クィーンは、初心者用のサンプルとして実装されているため、最適化はされていません。それにもかかわらず、クィーンが 64 個になっても簡単に処理できます。何点か変更を加えると、クィーンが 5000 個以上になっても簡単に対応できることが立証されています。
33.3.1. N クィーンのドメインモデル
この例では、4 つのクィーンの問題を解決するドメインモデルを使用します。
ドメインモデルの作成
適切なドメインモデルを使用すると、プランニングの問題をより簡単に理解し、解決することができます。
以下は、n クィーンの例のドメインモデルです。
public class Column {

    private int index;

    // ... getters and setters
}
public class Row { private int index; // ... getters and setters }public class Queen { private Column column; private Row row; public int getAscendingDiagonalIndex() {...} public int getDescendingDiagonalIndex() {...} // ... getters and setters }探索空間の計算
QueenインスタンスにはColumn(例: 0 は列 A、1 は列 B) およびRow(例: 0 は行 0、1 は行 1) が含まれます。列と行をもとに、昇順の対角線、および降順の対角線を計算することができます。
列と行のインデックスは、チェスボードの左上隅から数えています。
public class NQueens {

    private int n;
    private List<Column> columnList;
    private List<Row> rowList;

    private List<Queen> queenList;

    private SimpleScore score;

    // ... getters and setters
}
解の求め方
1 つの
NQueensインスタンスにはQueenインスタンスの一覧が含まれています。これがSolution実装として提供され、Solver が解決して読み出します。
たとえば、4 クイーンのサンプルでは、NQueens の getN() メソッドが常に 4 を返します。
図33.3 クィーン 4 個の解
表33.2 ドメインモデルの解の詳細
| columnIndex | rowIndex | ascendingDiagonalIndex (columnIndex + rowIndex) | descendingDiagonalIndex (columnIndex - rowIndex) | |
|---|---|---|---|---|
| A1 | 0 | 1 | 1 (**) | -1 |
| B0 | 1 | 0 (*) | 1 (**) | 1 |
| C2 | 2 | 2 | 4 | 0 |
| D0 | 3 | 0 (*) | 3 | 3 |
(*) や (**) のように、クィーン 2 つが同じ行、列、対角線を共有する場合は、2 つの駒が互いを取ることができます。
33.4. クラウドバランシング
このサンプルの詳細は、32章Java Solver のスタートガイド: クラウドバランシングの例 を参照してください。
33.5. 巡回セールスマン (TSP - 巡回セールスマン問題)
都市の一覧をもとに、セールスマンが最短距離で、各都市を 1 度だけ訪問するルートを探します。
この問題は ウィキペディア に定義されています。これは、計算数学で 最も熱心に研究された問題の 1 つ です。大概は、従業員のシフト勤務など、その他の制約と一緒に計画の問題の一部として使用されます。
問題の規模
dj38     has  38 cities with a search space of   10^43.
europe40 has  40 cities with a search space of   10^46.
st70     has  70 cities with a search space of   10^98.
pcb442   has 442 cities with a search space of  10^976.
lu980    has 980 cities with a search space of 10^2504.
問題の難易度
TSP の定義は単純ですが、問題の解決は驚くほど難しくなります。これは NP 困難問題と呼ばれ、多くの計画の問題と同様、特定の問題のデータセットに対する最適な解は、その問題のデータセットが少しでも変更すると、大幅に変化する可能性があります。
33.6. ディナーパーティー
マナーズさんがディナーパーティーを再度開催することにしました。
- 今回は、ゲスト 144 名を招待し、円卓を 12 個用意し、各テーブルに椅子を 12 席用意しました。
- 座席は、同じ性別の人が隣同士にならないようにします。
- また、隣の人とは必ず、同じ趣味を 1 つ持つようにします。
- 各テーブルには、政治家、医者、著名人、コーチ、教師、そしてプログラマーを 2 名ずつ配置します。
- 政治家、医者、コーチ、プログラマーは、それぞれ同じ業種の人が同じテーブルにならないようにします。
Drools Expert にも、(サイズがはるかに小さい) 一般的なミスマナーズのサンプルが含まれており、包括的なヒューリスティックを採用して解を導き出しています。Planner の実装は、ヒューリスティックを使用して最適解を見つけ、Drools Expert を使用して各解のスコアを計算するため、スケーラビリティーがはるかに高くなっています。
問題の規模
wedding01 has 18 jobs, 144 guests, 288 hobby practicians, 12 tables and 144 seats with a search space of 10^310.
33.7. テニスクラブのスケジュール
テニスクラブでは、毎週 4 チームが総あたりで試合をします。4 つの対戦枠を公平にチームに割り当てます。
ハード制約:
- 競合: チームは 1 日に 1 回だけ試合ができる。
- 参加不可: 日程によって参加できないチームがある。
中程度の制約:
- 公平な割り当て: 各チームが試合をする回数を (ほぼ) 同じにする。
ソフト制約:
- 均等に対戦: 各チームが、各対戦相手と対戦する回数を同じにする。
問題の規模
munich-7teams has 7 teams, 18 days, 12 unavailabilityPenalties and 72 teamAssignments with a search space of 10^60.
図33.4 ドメインモデル
33.8. 会議のスケジュール
各会議に、開始時間と会議室を割り当てます。会議の長さは異なります。
ハード制約:
- 部屋の制約: 2 つの会議が、同じ時間に同じ会議室を使用することはできない。
- 必須の出席者: 同じ時間に開催される必須の会議を 2 つ割り当てることはできない。
- 必要とされる部屋の収容人数: 会議の出席者全員を収容できない部屋では会議を行ってはいけない。
- 同日中に開始して終了: 会議は複数の日にわたってスケジュールされないようにする。
中程度の制約:
- 任意の出席者: 同じ時間に開催される任意の会議を 2 つ割り当てることはできない。また、任意の会議と必須の会議を同じ時間に割り当てることはできない。
ソフト制約:
- 早い段階でスケジュール: すべての会議をできるだけ早くスケジュールする。
- 会議と会議の間の休憩時間: 会議と会議の間には、最低でも時間枠 1 つ分、休憩を入れる必要がある。
- 会議の重複: 並行して行われる会議の数を最小限に抑えて、どちらかの会議を選択しなければならない状況をなくす。
- 先に大きい部屋から割り当てる: 参加者が登録していない場合でも、できるだけ多数の参加者を収容するために、大きい部屋が空いている場合にはその部屋から割り当てていく必要がある。
- 部屋の不変性: 会議が連続して行われ、休憩の時間枠が 2 つ分より少ない場合には、会議は同じ部屋で行う方が良い。
問題の規模
50meetings-160timegrains-5rooms  has  50 meetings, 160 timeGrains and 5 rooms with a search space of 10^145.
100meetings-320timegrains-5rooms has 100 meetings, 320 timeGrains and 5 rooms with a search space of 10^320.
200meetings-640timegrains-5rooms has 200 meetings, 640 timeGrains and 5 rooms with a search space of 10^701.
400meetings-1280timegrains-5rooms has 400 meetings, 1280 timeGrains and 5 rooms with a search space of 10^1522.
800meetings-2560timegrains-5rooms has 800 meetings, 2560 timeGrains and 5 rooms with a search space of 10^3285.
33.9. コースの時間割 (ITC 2007 Track 3 - カリキュラムのスケジュール)
各授業を、時間枠および講義室に割り当ててスケジュールを組みます。
ハード制約:
- 講師の制約: 各講師は、同じ時間に授業を 2 つ受け持つことはできない。
- カリキュラムの制約: カリキュラムには、2 つの授業を同じ時間に設定することはできない。
- 部屋の占有: 同じ時間の同じ講義室に、2 つの授業を割り当てることはできない。
- 利用不可の時間 (データセットごとに指定): 授業には割り当てられない時間がある。
ソフト制約:
- 講義室の収容人数: 講義室の収容人数は、その授業を受ける学生の数よりも多くなければならない。
- 最小限の就業日数: 同じコースの授業の開講期間は、最短になるようにする。
- カリキュラムの緊密さ: 同じカリキュラムに含まれる授業は、時間帯を近く (連続した時間に) 設定する。
- 講義室の不変性: 同じコースの授業は同じ講義室を割り当てる必要がある。
この問題は、International Timetabling Competition 2007 track 3 で定義されています。
問題の規模
comp01 has 24 teachers,  14 curricula,  30 courses, 160 lectures, 30 periods,  6 rooms and   53 unavailable period constraints with a search space of  10^360.
comp02 has 71 teachers,  70 curricula,  82 courses, 283 lectures, 25 periods, 16 rooms and  513 unavailable period constraints with a search space of  10^736.
comp03 has 61 teachers,  68 curricula,  72 courses, 251 lectures, 25 periods, 16 rooms and  382 unavailable period constraints with a search space of  10^653.
comp04 has 70 teachers,  57 curricula,  79 courses, 286 lectures, 25 periods, 18 rooms and  396 unavailable period constraints with a search space of  10^758.
comp05 has 47 teachers, 139 curricula,  54 courses, 152 lectures, 36 periods,  9 rooms and  771 unavailable period constraints with a search space of  10^381.
comp06 has 87 teachers,  70 curricula, 108 courses, 361 lectures, 25 periods, 18 rooms and  632 unavailable period constraints with a search space of  10^957.
comp07 has 99 teachers,  77 curricula, 131 courses, 434 lectures, 25 periods, 20 rooms and  667 unavailable period constraints with a search space of 10^1171.
comp08 has 76 teachers,  61 curricula,  86 courses, 324 lectures, 25 periods, 18 rooms and  478 unavailable period constraints with a search space of  10^859.
comp09 has 68 teachers,  75 curricula,  76 courses, 279 lectures, 25 periods, 18 rooms and  405 unavailable period constraints with a search space of  10^740.
comp10 has 88 teachers,  67 curricula, 115 courses, 370 lectures, 25 periods, 18 rooms and  694 unavailable period constraints with a search space of  10^981.
comp11 has 24 teachers,  13 curricula,  30 courses, 162 lectures, 45 periods,  5 rooms and   94 unavailable period constraints with a search space of  10^381.
comp12 has 74 teachers, 150 curricula,  88 courses, 218 lectures, 36 periods, 11 rooms and 1368 unavailable period constraints with a search space of  10^566.
comp13 has 77 teachers,  66 curricula,  82 courses, 308 lectures, 25 periods, 19 rooms and  468 unavailable period constraints with a search space of  10^824.
comp14 has 68 teachers,  60 curricula,  85 courses, 275 lectures, 25 periods, 17 rooms and  486 unavailable period constraints with a search space of  10^722.
図33.5 ドメインモデル

33.10. マシンの再割当て (Google ROADEF 2012)
各プロセスをマシンに割り当てます。全プロセスには、すでに元の (最適化されていない) 割り当てがあります。プロセスにはそれぞれ、各リソース (CPU、メモリーなど) が一定量必要です。これは、クラウドのバランスの例の応用です。
ハード制約:
- 最大容量: マシンに割り当てる各リソースはこの量を超えてはいけない。
- 競合: 同じサービスのプロセスは別のマシンで実行する必要がある。
- 分散: 同じサービスのプロセスは複数の場所に分散させる必要がある。
- 依存関係: 他のサービスに依存するサービスのプロセスは、そのサービスの近くで実行する必要がある。
- 一時的な使用: リソースによっては一時的なものがあり、元のマシンと、新たに割り当てられたマシンの両方の最大容量にカウントされる。
ソフト制約:
- 負荷: 各マシンの各リソースの安全容量を超えてはいけない。
- 負荷分散: 各マシンで利用可能なリソースを分散させて、今後の割り当てに対応できるように容量を空ける。
- プロセスの移動コスト: プロセスには移動コストが発生する。
- サービスの移動コスト: サービスには移動コストが発生する。
- 機械の移動コスト: マシン A からマシン B にプロセスを移動すると、A から B に固有の移動コストが別途発生する。
この問題は the Google ROADEF/EURO Challenge 2012 で定義されています。
図33.6 価値提案
問題の規模
model_a1_1 has  2 resources,  1 neighborhoods,   4 locations,    4 machines,    79 services,   100 processes and 1 balancePenalties with a search space of     10^60.
model_a1_2 has  4 resources,  2 neighborhoods,   4 locations,  100 machines,   980 services,  1000 processes and 0 balancePenalties with a search space of   10^2000.
model_a1_3 has  3 resources,  5 neighborhoods,  25 locations,  100 machines,   216 services,  1000 processes and 0 balancePenalties with a search space of   10^2000.
model_a1_4 has  3 resources, 50 neighborhoods,  50 locations,   50 machines,   142 services,  1000 processes and 1 balancePenalties with a search space of   10^1698.
model_a1_5 has  4 resources,  2 neighborhoods,   4 locations,   12 machines,   981 services,  1000 processes and 1 balancePenalties with a search space of   10^1079.
model_a2_1 has  3 resources,  1 neighborhoods,   1 locations,  100 machines,  1000 services,  1000 processes and 0 balancePenalties with a search space of   10^2000.
model_a2_2 has 12 resources,  5 neighborhoods,  25 locations,  100 machines,   170 services,  1000 processes and 0 balancePenalties with a search space of   10^2000.
model_a2_3 has 12 resources,  5 neighborhoods,  25 locations,  100 machines,   129 services,  1000 processes and 0 balancePenalties with a search space of   10^2000.
model_a2_4 has 12 resources,  5 neighborhoods,  25 locations,   50 machines,   180 services,  1000 processes and 1 balancePenalties with a search space of   10^1698.
model_a2_5 has 12 resources,  5 neighborhoods,  25 locations,   50 machines,   153 services,  1000 processes and 0 balancePenalties with a search space of   10^1698.
model_b_1  has 12 resources,  5 neighborhoods,  10 locations,  100 machines,  2512 services,  5000 processes and 0 balancePenalties with a search space of  10^10000.
model_b_2  has 12 resources,  5 neighborhoods,  10 locations,  100 machines,  2462 services,  5000 processes and 1 balancePenalties with a search space of  10^10000.
model_b_3  has  6 resources,  5 neighborhoods,  10 locations,  100 machines, 15025 services, 20000 processes and 0 balancePenalties with a search space of  10^40000.
model_b_4  has  6 resources,  5 neighborhoods,  50 locations,  500 machines,  1732 services, 20000 processes and 1 balancePenalties with a search space of  10^53979.
model_b_5  has  6 resources,  5 neighborhoods,  10 locations,  100 machines, 35082 services, 40000 processes and 0 balancePenalties with a search space of  10^80000.
model_b_6  has  6 resources,  5 neighborhoods,  50 locations,  200 machines, 14680 services, 40000 processes and 1 balancePenalties with a search space of  10^92041.
model_b_7  has  6 resources,  5 neighborhoods,  50 locations, 4000 machines, 15050 services, 40000 processes and 1 balancePenalties with a search space of 10^144082.
model_b_8  has  3 resources,  5 neighborhoods,  10 locations,  100 machines, 45030 services, 50000 processes and 0 balancePenalties with a search space of 10^100000.
model_b_9  has  3 resources,  5 neighborhoods, 100 locations, 1000 machines,  4609 services, 50000 processes and 1 balancePenalties with a search space of 10^150000.
model_b_10 has  3 resources,  5 neighborhoods, 100 locations, 5000 machines,  4896 services, 50000 processes and 1 balancePenalties with a search space of 10^184948.
図33.7 ドメインモデル
33.11. 配送経路
複数の車両を使用して、各顧客の品物を回収し、倉庫まで運びます。1 つの車両で複数の顧客から品物を回収することはできますが、収容できる容量には限りがあります。
基本例 (CVRP) のほかに、時間枠の設定が加わった例 (CVRPTW) もあります。
ハード制約:
- 車両の容量: 車両は、車載容量を超えて品物を運ぶことができない。
時間枠 (CVRPTW のみ):
- 移動時間: 別の場所に移動する場合には時間がかかる。
- 顧客対応の時間: 車両は顧客に対応している時間、顧客先にとどまる必要がある。
- 顧客の準備が整う時間: 顧客の準備が整う前に車両が到着する可能性があるが、準備ができるまで待機してから顧客に対応する必要がある。
- 顧客が設定した締め切り時間: 車両は、顧客が設定した締め切り時間までに到着する必要がある。
ソフト制約:
- 合計距離: 車両が移動する合計距離 (ガソリンの消費量) を最小限に抑える。
CVRP (Capacitated Vehicle Routing Problem) と CVRPTW (Capacitated Vehicle Routing Problem with Time Window) は、VRP Web で定義されています。
図33.8 価値提案
問題の規模
CVRP インスタンス (時間枠なし):
belgium-n50-k10             has  1 depots, 10 vehicles and   49 customers with a search space of   10^74.
belgium-n100-k10            has  1 depots, 10 vehicles and   99 customers with a search space of  10^170.
belgium-n500-k20            has  1 depots, 20 vehicles and  499 customers with a search space of 10^1168.
belgium-n1000-k20           has  1 depots, 20 vehicles and  999 customers with a search space of 10^2607.
belgium-n2750-k55           has  1 depots, 55 vehicles and 2749 customers with a search space of 10^8380.
belgium-road-km-n50-k10     has  1 depots, 10 vehicles and   49 customers with a search space of   10^74.
belgium-road-km-n100-k10    has  1 depots, 10 vehicles and   99 customers with a search space of  10^170.
belgium-road-km-n500-k20    has  1 depots, 20 vehicles and  499 customers with a search space of 10^1168.
belgium-road-km-n1000-k20   has  1 depots, 20 vehicles and  999 customers with a search space of 10^2607.
belgium-road-km-n2750-k55   has  1 depots, 55 vehicles and 2749 customers with a search space of 10^8380.
belgium-road-time-n50-k10   has  1 depots, 10 vehicles and   49 customers with a search space of   10^74.
belgium-road-time-n100-k10  has  1 depots, 10 vehicles and   99 customers with a search space of  10^170.
belgium-road-time-n500-k20  has  1 depots, 20 vehicles and  499 customers with a search space of 10^1168.
belgium-road-time-n1000-k20 has  1 depots, 20 vehicles and  999 customers with a search space of 10^2607.
belgium-road-time-n2750-k55 has  1 depots, 55 vehicles and 2749 customers with a search space of 10^8380.
belgium-d2-n50-k10          has  2 depots, 10 vehicles and   48 customers with a search space of   10^74.
belgium-d3-n100-k10         has  3 depots, 10 vehicles and   97 customers with a search space of  10^170.
belgium-d5-n500-k20         has  5 depots, 20 vehicles and  495 customers with a search space of 10^1168.
belgium-d8-n1000-k20        has  8 depots, 20 vehicles and  992 customers with a search space of 10^2607.
belgium-d10-n2750-k55       has 10 depots, 55 vehicles and 2740 customers with a search space of 10^8380.

A-n32-k5  has 1 depots,  5 vehicles and  31 customers with a search space of  10^40.
A-n33-k5  has 1 depots,  5 vehicles and  32 customers with a search space of  10^41.
A-n33-k6  has 1 depots,  6 vehicles and  32 customers with a search space of  10^42.
A-n34-k5  has 1 depots,  5 vehicles and  33 customers with a search space of  10^43.
A-n36-k5  has 1 depots,  5 vehicles and  35 customers with a search space of  10^46.
A-n37-k5  has 1 depots,  5 vehicles and  36 customers with a search space of  10^48.
A-n37-k6  has 1 depots,  6 vehicles and  36 customers with a search space of  10^49.
A-n38-k5  has 1 depots,  5 vehicles and  37 customers with a search space of  10^49.
A-n39-k5  has 1 depots,  5 vehicles and  38 customers with a search space of  10^51.
A-n39-k6  has 1 depots,  6 vehicles and  38 customers with a search space of  10^52.
A-n44-k7  has 1 depots,  7 vehicles and  43 customers with a search space of  10^61.
A-n45-k6  has 1 depots,  6 vehicles and  44 customers with a search space of  10^62.
A-n45-k7  has 1 depots,  7 vehicles and  44 customers with a search space of  10^63.
A-n46-k7  has 1 depots,  7 vehicles and  45 customers with a search space of  10^65.
A-n48-k7  has 1 depots,  7 vehicles and  47 customers with a search space of  10^68.
A-n53-k7  has 1 depots,  7 vehicles and  52 customers with a search space of  10^77.
A-n54-k7  has 1 depots,  7 vehicles and  53 customers with a search space of  10^79.
A-n55-k9  has 1 depots,  9 vehicles and  54 customers with a search space of  10^82.
A-n60-k9  has 1 depots,  9 vehicles and  59 customers with a search space of  10^91.
A-n61-k9  has 1 depots,  9 vehicles and  60 customers with a search space of  10^93.
A-n62-k8  has 1 depots,  8 vehicles and  61 customers with a search space of  10^94.
A-n63-k9  has 1 depots,  9 vehicles and  62 customers with a search space of  10^97.
A-n63-k10 has 1 depots, 10 vehicles and  62 customers with a search space of  10^98.
A-n64-k9  has 1 depots,  9 vehicles and  63 customers with a search space of  10^99.
A-n65-k9  has 1 depots,  9 vehicles and  64 customers with a search space of 10^101.
A-n69-k9  has 1 depots,  9 vehicles and  68 customers with a search space of 10^108.
A-n80-k10 has 1 depots, 10 vehicles and  79 customers with a search space of 10^130.
F-n45-k4  has 1 depots,  4 vehicles and  44 customers with a search space of  10^60.
F-n72-k4  has 1 depots,  4 vehicles and  71 customers with a search space of 10^108.
F-n135-k7 has 1 depots,  7 vehicles and 134 customers with a search space of 10^240.
CVRPTW インスタンス (時間枠あり):
belgium-tw-d2-n50-k10    has  2 depots, 10 vehicles and   48 customers with a search space of   10^74.
belgium-tw-d3-n100-k10   has  3 depots, 10 vehicles and   97 customers with a search space of  10^170.
belgium-tw-d5-n500-k20   has  5 depots, 20 vehicles and  495 customers with a search space of 10^1168.
belgium-tw-d8-n1000-k20  has  8 depots, 20 vehicles and  992 customers with a search space of 10^2607.
belgium-tw-d10-n2750-k55 has 10 depots, 55 vehicles and 2740 customers with a search space of 10^8380.
belgium-tw-n50-k10       has  1 depots, 10 vehicles and   49 customers with a search space of   10^74.
belgium-tw-n100-k10      has  1 depots, 10 vehicles and   99 customers with a search space of  10^170.
belgium-tw-n500-k20      has  1 depots, 20 vehicles and  499 customers with a search space of 10^1168.
belgium-tw-n1000-k20     has  1 depots, 20 vehicles and  999 customers with a search space of 10^2607.
belgium-tw-n2750-k55     has  1 depots, 55 vehicles and 2749 customers with a search space of 10^8380.

Solomon_025_C101       has 1 depots,  25 vehicles and   25 customers with a search space of   10^40.
Solomon_025_C201       has 1 depots,  25 vehicles and   25 customers with a search space of   10^40.
Solomon_025_R101       has 1 depots,  25 vehicles and   25 customers with a search space of   10^40.
Solomon_025_R201       has 1 depots,  25 vehicles and   25 customers with a search space of   10^40.
Solomon_025_RC101      has 1 depots,  25 vehicles and   25 customers with a search space of   10^40.
Solomon_025_RC201      has 1 depots,  25 vehicles and   25 customers with a search space of   10^40.
Solomon_100_C101       has 1 depots,  25 vehicles and  100 customers with a search space of  10^185.
Solomon_100_C201       has 1 depots,  25 vehicles and  100 customers with a search space of  10^185.
Solomon_100_R101       has 1 depots,  25 vehicles and  100 customers with a search space of  10^185.
Solomon_100_R201       has 1 depots,  25 vehicles and  100 customers with a search space of  10^185.
Solomon_100_RC101      has 1 depots,  25 vehicles and  100 customers with a search space of  10^185.
Solomon_100_RC201      has 1 depots,  25 vehicles and  100 customers with a search space of  10^185.
Homberger_0200_C1_2_1  has 1 depots,  50 vehicles and  200 customers with a search space of  10^429.
Homberger_0200_C2_2_1  has 1 depots,  50 vehicles and  200 customers with a search space of  10^429.
Homberger_0200_R1_2_1  has 1 depots,  50 vehicles and  200 customers with a search space of  10^429.
Homberger_0200_R2_2_1  has 1 depots,  50 vehicles and  200 customers with a search space of  10^429.
Homberger_0200_RC1_2_1 has 1 depots,  50 vehicles and  200 customers with a search space of  10^429.
Homberger_0200_RC2_2_1 has 1 depots,  50 vehicles and  200 customers with a search space of  10^429.
Homberger_0400_C1_4_1  has 1 depots, 100 vehicles and  400 customers with a search space of  10^978.
Homberger_0400_C2_4_1  has 1 depots, 100 vehicles and  400 customers with a search space of  10^978.
Homberger_0400_R1_4_1  has 1 depots, 100 vehicles and  400 customers with a search space of  10^978.
Homberger_0400_R2_4_1  has 1 depots, 100 vehicles and  400 customers with a search space of  10^978.
Homberger_0400_RC1_4_1 has 1 depots, 100 vehicles and  400 customers with a search space of  10^978.
Homberger_0400_RC2_4_1 has 1 depots, 100 vehicles and  400 customers with a search space of  10^978.
Homberger_0600_C1_6_1  has 1 depots, 150 vehicles and  600 customers with a search space of 10^1571.
Homberger_0600_C2_6_1  has 1 depots, 150 vehicles and  600 customers with a search space of 10^1571.
Homberger_0600_R1_6_1  has 1 depots, 150 vehicles and  600 customers with a search space of 10^1571.
Homberger_0600_R2_6_1  has 1 depots, 150 vehicles and  600 customers with a search space of 10^1571.
Homberger_0600_RC1_6_1 has 1 depots, 150 vehicles and  600 customers with a search space of 10^1571.
Homberger_0600_RC2_6_1 has 1 depots, 150 vehicles and  600 customers with a search space of 10^1571.
Homberger_0800_C1_8_1  has 1 depots, 200 vehicles and  800 customers with a search space of 10^2195.
Homberger_0800_C2_8_1  has 1 depots, 200 vehicles and  800 customers with a search space of 10^2195.
Homberger_0800_R1_8_1  has 1 depots, 200 vehicles and  800 customers with a search space of 10^2195.
Homberger_0800_R2_8_1  has 1 depots, 200 vehicles and  800 customers with a search space of 10^2195.
Homberger_0800_RC1_8_1 has 1 depots, 200 vehicles and  800 customers with a search space of 10^2195.
Homberger_0800_RC2_8_1 has 1 depots, 200 vehicles and  800 customers with a search space of 10^2195.
Homberger_1000_C110_1  has 1 depots, 250 vehicles and 1000 customers with a search space of 10^2840.
Homberger_1000_C210_1  has 1 depots, 250 vehicles and 1000 customers with a search space of 10^2840.
Homberger_1000_R110_1  has 1 depots, 250 vehicles and 1000 customers with a search space of 10^2840.
Homberger_1000_R210_1  has 1 depots, 250 vehicles and 1000 customers with a search space of 10^2840.
Homberger_1000_RC110_1 has 1 depots, 250 vehicles and 1000 customers with a search space of 10^2840.
Homberger_1000_RC210_1 has 1 depots, 250 vehicles and 1000 customers with a search space of 10^2840.
33.11.1. 配送経路のドメインモデル
時間枠ありの配送経路のドメインモデルでは、シャドウ変数の機能を多用します。こうすることで、arrivalTime や departureTime などのプロパティーがドメインモデルで直接利用できるため、制約をより自然に表現できます。
直線距離ではなく道路の距離
車は、直線距離を移動するのではなく、道路や高速道路を使用する必要があります。ビジネスの観点からすると、これは非常に重要です。
最適化アルゴリズムでは、2 点の距離を検索できている (できれば、事前に計算されている) 場合には、これは特に重要ではありません。移動のコストについては、距離の代わりに移動時間、ガソリン代、またはこれらの重み関数をベースにすることも可能です。GraphHopper (埋め込み可能なオフライン Java エンジン)、Open MapQuest (web サービス)、Google Maps Client API (web サービス) など、移動コストを事前に計算する技術があります。
また、Leaflet や Google Maps for developers など、移動コストをレンダリングする技術もあります。optaplanner-webexamples-*.war には、このようなレンダリングのデモ例が含まれています。
GraphHopper または Google Map Directions を使用して実際の経路をレンダリングすることも可能ですが、高速道路で経路が重なるため、停止する順番を確認するのが困難になります。
2 点間の移動コストは、Planner で使用したのと同じ最適化条件を使用する点に注意してください。たとえば、GraphHopper はデフォルトで、最短ではなく、最速の経路を返します。最速の GPS 経路の km (またはマイル) の距離を使用して、Planner で最短の移動を最適化しないようにしてください。以下のように、準最適な解が導き出される可能性があります。
一般的な考え方とは異なり、多くのユーザーは最短の経路ではなく、最速の経路を使用したいと考えます。通常の道路よりも高速道路の使用を好みます。舗装されていない道よりも舗装されている道路を好みます。実際には、最速の経路と、最短の経路が同じであることはほとんどありません。
33.12. プロジェクトジョブのスケジュール
プロジェクトの遅延を最小限に抑えるために、すべてのジョブを時間内に実行できるようにスケジュールを設定します。各ジョブは、プロジェクトに含まれます。ジョブは、異なる方法で実行できます。方法ごとに期間や使用するリソースが異なります。これは、柔軟な ジョブショップスケジューリング (JSP) の応用です。
ハード制約:
- ジョブの優先順位: ジョブは、先行のジョブがすべて完了するまで開始しない。
リソースの容量: 利用可能な量を超えるリソースを使用しない。
- リソースはローカル (同じプロジェクトのジョブ間で共有)、またはグローバル (全ジョブ間で共有) とする。
- リソースは更新可能 (1 日に利用可能な容量) または更新不可 (全日で利用可能な容量) とする。
中程度の制約:
- プロジェクトの合計遅延時間: 各プロジェクトの所要時間 (メイクスパン) を最短にする。
ソフト制約:
- メイクスパン合計: 複数のプロジェクトスケジュールの合計所要時間を最短にする。
この問題は、the MISTA 2013 challenge で定義されています。
問題の規模
Schedule A-1  has  2 projects,  24 jobs,   64 execution modes,  7 resources and  150 resource requirements.
Schedule A-2  has  2 projects,  44 jobs,  124 execution modes,  7 resources and  420 resource requirements.
Schedule A-3  has  2 projects,  64 jobs,  184 execution modes,  7 resources and  630 resource requirements.
Schedule A-4  has  5 projects,  60 jobs,  160 execution modes, 16 resources and  390 resource requirements.
Schedule A-5  has  5 projects, 110 jobs,  310 execution modes, 16 resources and  900 resource requirements.
Schedule A-6  has  5 projects, 160 jobs,  460 execution modes, 16 resources and 1440 resource requirements.
Schedule A-7  has 10 projects, 120 jobs,  320 execution modes, 22 resources and  900 resource requirements.
Schedule A-8  has 10 projects, 220 jobs,  620 execution modes, 22 resources and 1860 resource requirements.
Schedule A-9  has 10 projects, 320 jobs,  920 execution modes, 31 resources and 2880 resource requirements.
Schedule A-10 has 10 projects, 320 jobs,  920 execution modes, 31 resources and 2970 resource requirements.
Schedule B-1  has 10 projects, 120 jobs,  320 execution modes, 31 resources and  900 resource requirements.
Schedule B-2  has 10 projects, 220 jobs,  620 execution modes, 22 resources and 1740 resource requirements.
Schedule B-3  has 10 projects, 320 jobs,  920 execution modes, 31 resources and 3060 resource requirements.
Schedule B-4  has 15 projects, 180 jobs,  480 execution modes, 46 resources and 1530 resource requirements.
Schedule B-5  has 15 projects, 330 jobs,  930 execution modes, 46 resources and 2760 resource requirements.
Schedule B-6  has 15 projects, 480 jobs, 1380 execution modes, 46 resources and 4500 resource requirements.
Schedule B-7  has 20 projects, 240 jobs,  640 execution modes, 61 resources and 1710 resource requirements.
Schedule B-8  has 20 projects, 440 jobs, 1240 execution modes, 42 resources and 3180 resource requirements.
Schedule B-9  has 20 projects, 640 jobs, 1840 execution modes, 61 resources and 5940 resource requirements.
Schedule B-10 has 20 projects, 460 jobs, 1300 execution modes, 42 resources and 4260 resource requirements.
33.13. タスクの割り当て
従業員のキューのスポットに各タスクを割り当てます。タスクごとに、従業員のアフィニティーレベルから影響を受ける期間と、タスクの顧客が含まれます。
ハード制約:
- スキル: タスクごとに 1 つ以上のスキルが必要である。従業員には、このようなスキルがすべて必要です。
ソフトレベル 0 の制約:
- 極めて重要なタスク: 主要なタスクやマイナーなタスクの前に、極めて重要なタスクを完了する。
ソフトレベル 1 の制約:
メークスパンの最小化: 全タスクを完了するまでの時間を短縮する。
- 勤務歴の長い従業員から順番に進めていき、公平性やロードバランシングを作成する。
ソフトレベル 2 の制約:
- 主要なタスク: マイナーなタスクの前に、主要なタスクをできるだけ早く完了する。
ソフトレベル 3 の制約:
- マイナーなタスク: できるだけ早くマイナーなタスクを完了する。
図33.9 価値提案
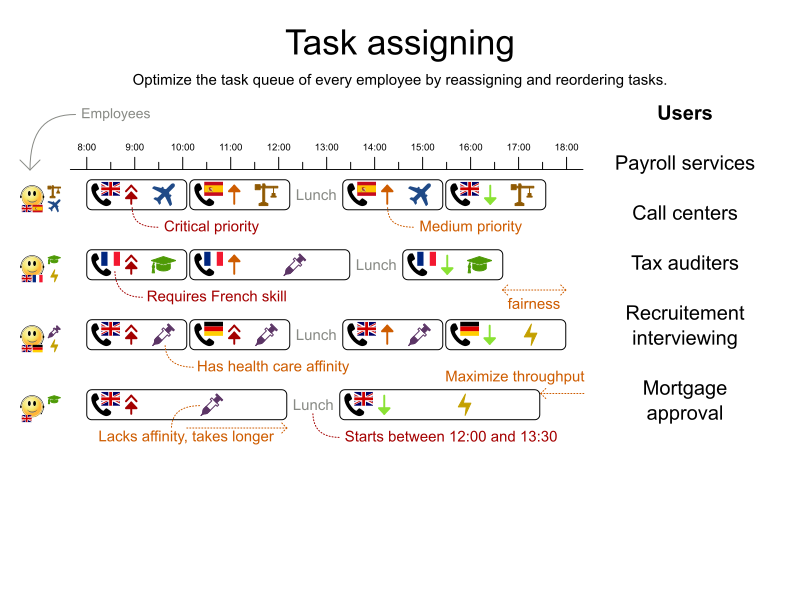
問題の規模
24tasks-8employees   has  24 tasks, 6 skills,  8 employees,   4 task types and  4 customers with a search space of   10^30.
50tasks-5employees   has  50 tasks, 5 skills,  5 employees,  10 task types and 10 customers with a search space of   10^69.
100tasks-5employees  has 100 tasks, 5 skills,  5 employees,  20 task types and 15 customers with a search space of  10^164.
500tasks-20employees has 500 tasks, 6 skills, 20 employees, 100 task types and 60 customers with a search space of 10^1168.
図33.10 ドメインモデル
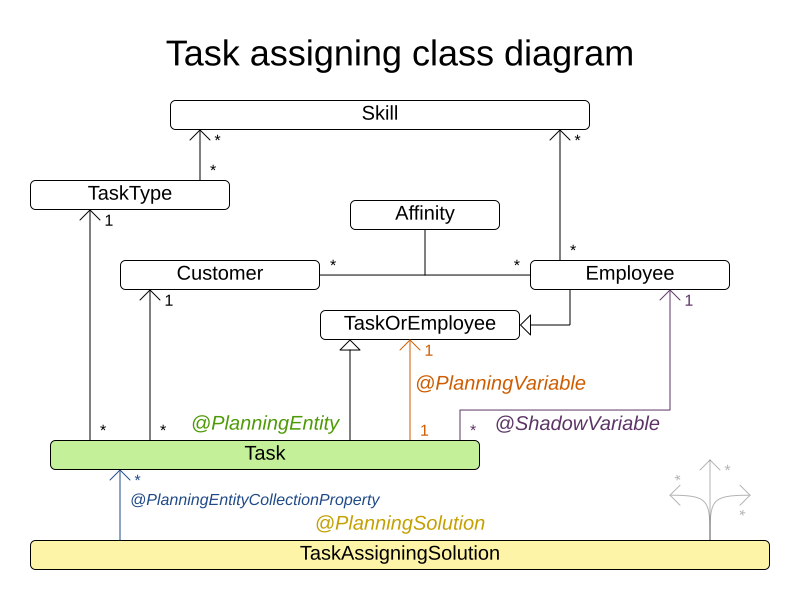
33.14. 試験の時間割 (ITC 2007 track 1 - 試験)
すべての試験に、時間と部屋を割り当てます。同じ時間帯に同じ部屋で、複数の試験を行うことができるものとします。
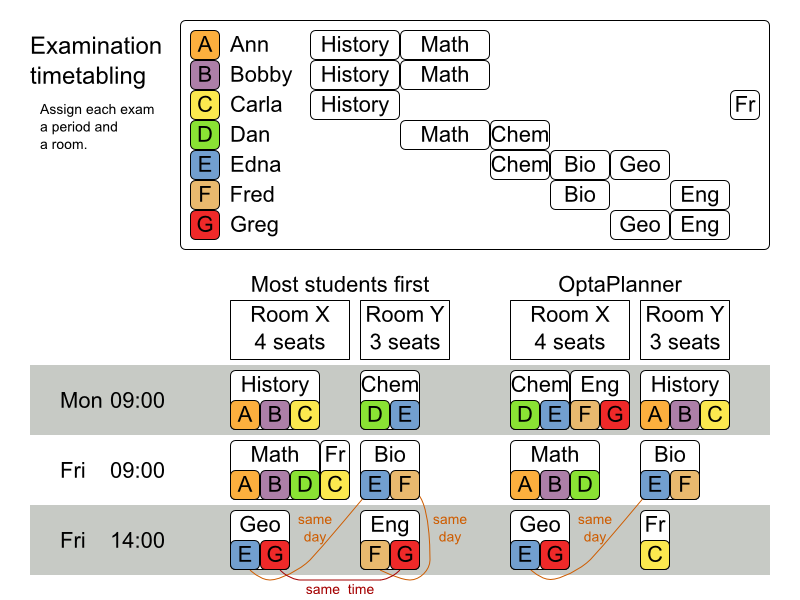
ハード制約:
- 試験の制約: 同じ学生が受ける 2 つの試験は、同じ時間帯に実施できないものとする。
- 教室の収容人数: 教室の座席数は、常に受験者数よりも多くなければならない。
- 期間: 期間は、すべての試験に対応できる長さでなければならない。
期間関連のハード制約 (データセットごとに指定):
- 一致: 特定の 2 つの試験を同じ時間帯に設定する必要がある (別の教室を使用することも可能)。
- 除外: 特定の 2 つの試験を同じ時間帯に設定できない。
- 以降: 特定の試験を、別の特定の試験の後に行う必要がある。
教室関連の制約 (データセットごとに指定):
- 排他的: 特定の試験を、他の試験と同じ教室で行うことはできない。
ソフト制約 (パラメーター化されたペナルティーがそれぞれ設定されている):
- 同じ学生が、続けて試験を 2 つ受けてはいけない。
- 同じ学生が、同じ日に試験を 2 つ受けてはいけない。
- 時間帯の分散: 同じ学生が受ける 2 つの試験は、時間をある程度あける。
- 異なる試験の長さ: 教室を共有する 2 つの試験の長さは、同じにする。
- 前倒し: 規模の大きい試験は、スケジュールを早めに決定する。
- 期間のペナルティー (データセットごとに指定): 期間によっては、使用されるとペナルティーが発生する。
- 部屋のペナルティー (データセットごとに指定): 部屋によっては、使用されるとペナルティーが発生する。
実際に大学から取得した大規模な試験データセットを使用します。
この問題は、International Timetabling Competition 2007 track 1 で定義されています。Geoffrey De Smet 氏は、ごく初期段階の Planner を使用して、このコンペティションで 4 位を獲得しました。このコンペティション以降、多くの改良点が加えられています。
問題の規模
exam_comp_set1 has  7883 students,  607 exams, 54 periods,  7 rooms,  12 period constraints and  0 room constraints with a search space of 10^1564.
exam_comp_set2 has 12484 students,  870 exams, 40 periods, 49 rooms,  12 period constraints and  2 room constraints with a search space of 10^2864.
exam_comp_set3 has 16365 students,  934 exams, 36 periods, 48 rooms, 168 period constraints and 15 room constraints with a search space of 10^3023.
exam_comp_set4 has  4421 students,  273 exams, 21 periods,  1 rooms,  40 period constraints and  0 room constraints with a search space of  10^360.
exam_comp_set5 has  8719 students, 1018 exams, 42 periods,  3 rooms,  27 period constraints and  0 room constraints with a search space of 10^2138.
exam_comp_set6 has  7909 students,  242 exams, 16 periods,  8 rooms,  22 period constraints and  0 room constraints with a search space of  10^509.
exam_comp_set7 has 13795 students, 1096 exams, 80 periods, 15 rooms,  28 period constraints and  0 room constraints with a search space of 10^3374.
exam_comp_set8 has  7718 students,  598 exams, 80 periods,  8 rooms,  20 period constraints and  1 room constraints with a search space of 10^1678.
33.14.1. 試験の時間割のドメインモデル
以下の図では、主な試験のドメインクラスを紹介しています。
図33.11 試験のドメインクラスの図
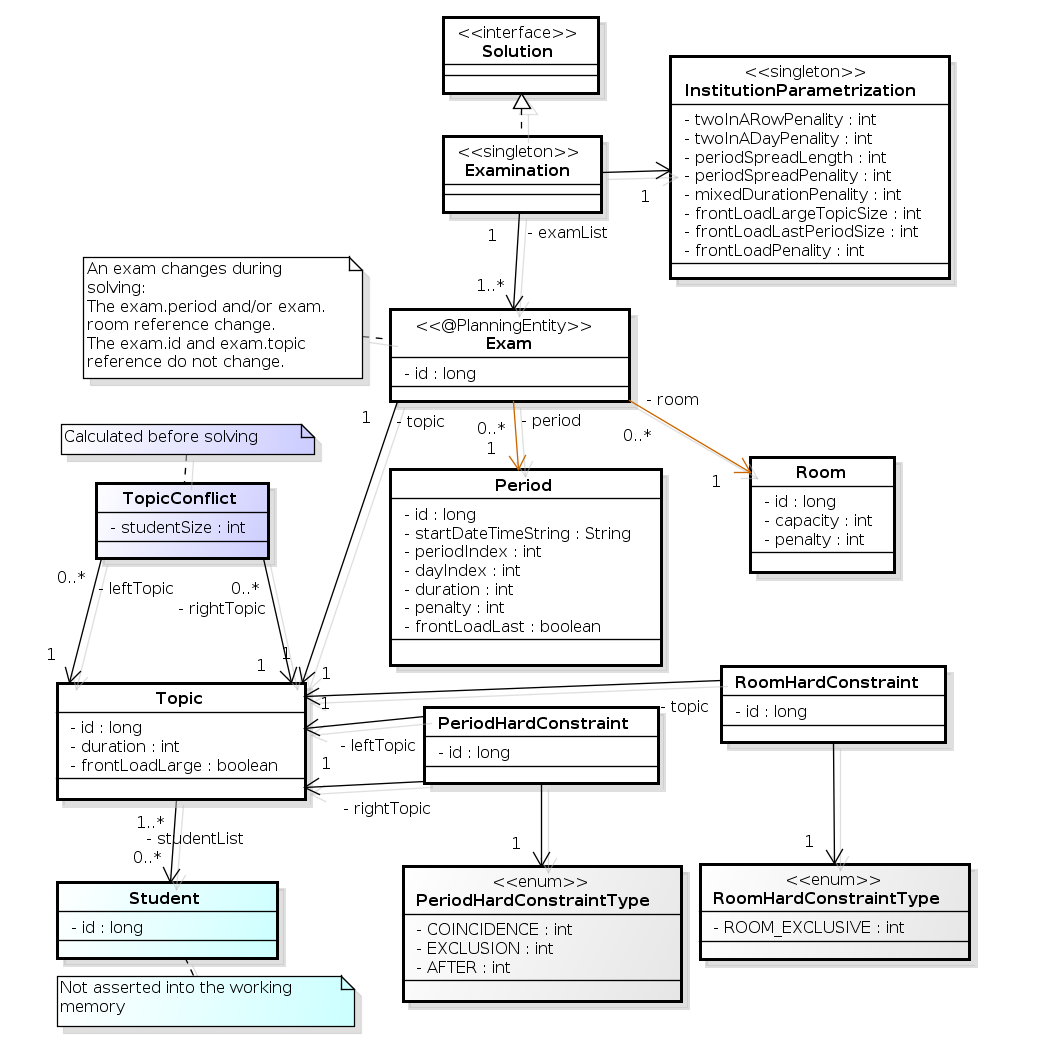
試験のコンセプトを、Exam クラスと Topic クラスに分けた点に注意してください。期間または教室のプロパティーを変更し、解 (プランニングエンティティークラス) を求めると、Exam インスタンスが変化します。このとき、Topic インスタンス、Period インスタンス、および Room インスタンスは変化しません (他のクラスと同様、これらも問題ファクトです)。
33.15. 看護師の勤務表 (INRC 2010)
各シフトに看護師を割り当てます。
ハード制約:
- 未割り当てのシフトなし (組み込み): すべてのシフトを従業員に割り当てる必要がある。
- シフトの制約: 従業員には 1 日に 1 シフトだけ割り当てることができる。
ソフト制約:
契約上の義務。この業界では、頻繁に契約上の義務に違反するため、ハード制約ではなく、ソフト制約として定義することに決定しました。
- 割り当ての下限および上限: 各従業員は、 (それぞれの契約に合わせて) x より多く、y よりも少ないシフト数を勤務する必要がある。
- 連続勤務日数の下限および上限: 各従業員は、 (それぞれの契約に合わせて) 連続で x 日から y 日間、勤務する必要がある。
- 連続公休日数の下限および上限: 各従業員は、 (それぞれの契約に合わせて) 連続で x 日から y 日間、休む必要がある。
- 週末に連続勤務する回数の下限および上限: 各従業員は、 (それぞれの契約に合わせて) 連続で x 回から y 回、週末勤務する必要がある。
- 週末の勤務有無を同じにする: 各従業員は、週末の両日を勤務する、または休む必要がある。
- 週末のシフトタイプを同じにする: 各従業員で、同じ週末のシフトタイプは、同じにする必要がある。
- 不要なパターン - 行に不要なシフトタイプの組み合わせ。例: 遅いシフト、早いシフト、遅いシフト。
従業員の希望:
- 勤務日のリクエスト: 従業員は、特定の勤務希望日を申請できる。
- 公休日のリクエスト: 従業員は、特定の公休希望日を申請できる。
- 勤務するシフトのリクエスト: 従業員は特定のシフトへの割り当てを希望できる。
- 勤務しないシフトのリクエスト: 従業員は特定のシフトに割り当てられないように希望できる。
- 他のスキル: スキルに割り当てられた従業員は、そのシフトで必要な全スキルに堪能である必要がある。
この問題は International Nurse Rostering Competition 2010 で定義されています。
図33.12 価値提案
問題の規模
以下のように、データセットの種類は 3 つあります。
- sprint: 数秒で問題を解決する必要があります。
- medium: 数分で問題を解決する必要があります。
- long: 数時間で問題を解決する必要があります。
toy1          has 1 skills, 3 shiftTypes, 2 patterns, 1 contracts,  6 employees,  7 shiftDates,  35 shiftAssignments and   0 requests with a search space of   10^27.
toy2          has 1 skills, 3 shiftTypes, 3 patterns, 2 contracts, 20 employees, 28 shiftDates, 180 shiftAssignments and 140 requests with a search space of  10^234.

sprint01      has 1 skills, 4 shiftTypes, 3 patterns, 4 contracts, 10 employees, 28 shiftDates, 152 shiftAssignments and 150 requests with a search space of  10^152.
sprint02      has 1 skills, 4 shiftTypes, 3 patterns, 4 contracts, 10 employees, 28 shiftDates, 152 shiftAssignments and 150 requests with a search space of  10^152.
sprint03      has 1 skills, 4 shiftTypes, 3 patterns, 4 contracts, 10 employees, 28 shiftDates, 152 shiftAssignments and 150 requests with a search space of  10^152.
sprint04      has 1 skills, 4 shiftTypes, 3 patterns, 4 contracts, 10 employees, 28 shiftDates, 152 shiftAssignments and 150 requests with a search space of  10^152.
sprint05      has 1 skills, 4 shiftTypes, 3 patterns, 4 contracts, 10 employees, 28 shiftDates, 152 shiftAssignments and 150 requests with a search space of  10^152.
sprint06      has 1 skills, 4 shiftTypes, 3 patterns, 4 contracts, 10 employees, 28 shiftDates, 152 shiftAssignments and 150 requests with a search space of  10^152.
sprint07      has 1 skills, 4 shiftTypes, 3 patterns, 4 contracts, 10 employees, 28 shiftDates, 152 shiftAssignments and 150 requests with a search space of  10^152.
sprint08      has 1 skills, 4 shiftTypes, 3 patterns, 4 contracts, 10 employees, 28 shiftDates, 152 shiftAssignments and 150 requests with a search space of  10^152.
sprint09      has 1 skills, 4 shiftTypes, 3 patterns, 4 contracts, 10 employees, 28 shiftDates, 152 shiftAssignments and 150 requests with a search space of  10^152.
sprint10      has 1 skills, 4 shiftTypes, 3 patterns, 4 contracts, 10 employees, 28 shiftDates, 152 shiftAssignments and 150 requests with a search space of  10^152.
sprint_hint01 has 1 skills, 4 shiftTypes, 8 patterns, 3 contracts, 10 employees, 28 shiftDates, 152 shiftAssignments and 150 requests with a search space of  10^152.
sprint_hint02 has 1 skills, 4 shiftTypes, 0 patterns, 3 contracts, 10 employees, 28 shiftDates, 152 shiftAssignments and 150 requests with a search space of  10^152.
sprint_hint03 has 1 skills, 4 shiftTypes, 8 patterns, 3 contracts, 10 employees, 28 shiftDates, 152 shiftAssignments and 150 requests with a search space of  10^152.
sprint_late01 has 1 skills, 4 shiftTypes, 8 patterns, 3 contracts, 10 employees, 28 shiftDates, 152 shiftAssignments and 150 requests with a search space of  10^152.
sprint_late02 has 1 skills, 3 shiftTypes, 4 patterns, 3 contracts, 10 employees, 28 shiftDates, 144 shiftAssignments and 139 requests with a search space of  10^144.
sprint_late03 has 1 skills, 4 shiftTypes, 8 patterns, 3 contracts, 10 employees, 28 shiftDates, 160 shiftAssignments and 150 requests with a search space of  10^160.
sprint_late04 has 1 skills, 4 shiftTypes, 8 patterns, 3 contracts, 10 employees, 28 shiftDates, 160 shiftAssignments and 150 requests with a search space of  10^160.
sprint_late05 has 1 skills, 4 shiftTypes, 8 patterns, 3 contracts, 10 employees, 28 shiftDates, 152 shiftAssignments and 150 requests with a search space of  10^152.
sprint_late06 has 1 skills, 4 shiftTypes, 0 patterns, 3 contracts, 10 employees, 28 shiftDates, 152 shiftAssignments and 150 requests with a search space of  10^152.
sprint_late07 has 1 skills, 4 shiftTypes, 0 patterns, 3 contracts, 10 employees, 28 shiftDates, 152 shiftAssignments and 150 requests with a search space of  10^152.
sprint_late08 has 1 skills, 4 shiftTypes, 0 patterns, 3 contracts, 10 employees, 28 shiftDates, 152 shiftAssignments and   0 requests with a search space of  10^152.
sprint_late09 has 1 skills, 4 shiftTypes, 0 patterns, 3 contracts, 10 employees, 28 shiftDates, 152 shiftAssignments and   0 requests with a search space of  10^152.
sprint_late10 has 1 skills, 4 shiftTypes, 0 patterns, 3 contracts, 10 employees, 28 shiftDates, 152 shiftAssignments and 150 requests with a search space of  10^152.

medium01      has 1 skills, 4 shiftTypes, 0 patterns, 4 contracts, 31 employees, 28 shiftDates, 608 shiftAssignments and 403 requests with a search space of  10^906.
medium02      has 1 skills, 4 shiftTypes, 0 patterns, 4 contracts, 31 employees, 28 shiftDates, 608 shiftAssignments and 403 requests with a search space of  10^906.
medium03      has 1 skills, 4 shiftTypes, 0 patterns, 4 contracts, 31 employees, 28 shiftDates, 608 shiftAssignments and 403 requests with a search space of  10^906.
medium04      has 1 skills, 4 shiftTypes, 0 patterns, 4 contracts, 31 employees, 28 shiftDates, 608 shiftAssignments and 403 requests with a search space of  10^906.
medium05      has 1 skills, 4 shiftTypes, 0 patterns, 4 contracts, 31 employees, 28 shiftDates, 608 shiftAssignments and 403 requests with a search space of  10^906.
medium_hint01 has 1 skills, 4 shiftTypes, 7 patterns, 4 contracts, 30 employees, 28 shiftDates, 428 shiftAssignments and 390 requests with a search space of  10^632.
medium_hint02 has 1 skills, 4 shiftTypes, 7 patterns, 3 contracts, 30 employees, 28 shiftDates, 428 shiftAssignments and 390 requests with a search space of  10^632.
medium_hint03 has 1 skills, 4 shiftTypes, 7 patterns, 4 contracts, 30 employees, 28 shiftDates, 428 shiftAssignments and 390 requests with a search space of  10^632.
medium_late01 has 1 skills, 4 shiftTypes, 7 patterns, 4 contracts, 30 employees, 28 shiftDates, 424 shiftAssignments and 390 requests with a search space of  10^626.
medium_late02 has 1 skills, 4 shiftTypes, 7 patterns, 3 contracts, 30 employees, 28 shiftDates, 428 shiftAssignments and 390 requests with a search space of  10^632.
medium_late03 has 1 skills, 4 shiftTypes, 0 patterns, 4 contracts, 30 employees, 28 shiftDates, 428 shiftAssignments and 390 requests with a search space of  10^632.
medium_late04 has 1 skills, 4 shiftTypes, 7 patterns, 3 contracts, 30 employees, 28 shiftDates, 416 shiftAssignments and 390 requests with a search space of  10^614.
medium_late05 has 2 skills, 5 shiftTypes, 7 patterns, 4 contracts, 30 employees, 28 shiftDates, 452 shiftAssignments and 390 requests with a search space of  10^667.

long01        has 2 skills, 5 shiftTypes, 3 patterns, 3 contracts, 49 employees, 28 shiftDates, 740 shiftAssignments and 735 requests with a search space of 10^1250.
long02        has 2 skills, 5 shiftTypes, 3 patterns, 3 contracts, 49 employees, 28 shiftDates, 740 shiftAssignments and 735 requests with a search space of 10^1250.
long03        has 2 skills, 5 shiftTypes, 3 patterns, 3 contracts, 49 employees, 28 shiftDates, 740 shiftAssignments and 735 requests with a search space of 10^1250.
long04        has 2 skills, 5 shiftTypes, 3 patterns, 3 contracts, 49 employees, 28 shiftDates, 740 shiftAssignments and 735 requests with a search space of 10^1250.
long05        has 2 skills, 5 shiftTypes, 3 patterns, 3 contracts, 49 employees, 28 shiftDates, 740 shiftAssignments and 735 requests with a search space of 10^1250.
long_hint01   has 2 skills, 5 shiftTypes, 9 patterns, 3 contracts, 50 employees, 28 shiftDates, 740 shiftAssignments and   0 requests with a search space of 10^1257.
long_hint02   has 2 skills, 5 shiftTypes, 7 patterns, 3 contracts, 50 employees, 28 shiftDates, 740 shiftAssignments and   0 requests with a search space of 10^1257.
long_hint03   has 2 skills, 5 shiftTypes, 7 patterns, 3 contracts, 50 employees, 28 shiftDates, 740 shiftAssignments and   0 requests with a search space of 10^1257.
long_late01   has 2 skills, 5 shiftTypes, 9 patterns, 3 contracts, 50 employees, 28 shiftDates, 752 shiftAssignments and   0 requests with a search space of 10^1277.
long_late02   has 2 skills, 5 shiftTypes, 9 patterns, 4 contracts, 50 employees, 28 shiftDates, 752 shiftAssignments and   0 requests with a search space of 10^1277.
long_late03   has 2 skills, 5 shiftTypes, 9 patterns, 3 contracts, 50 employees, 28 shiftDates, 752 shiftAssignments and   0 requests with a search space of 10^1277.
long_late04   has 2 skills, 5 shiftTypes, 9 patterns, 4 contracts, 50 employees, 28 shiftDates, 752 shiftAssignments and   0 requests with a search space of 10^1277.
long_late05   has 2 skills, 5 shiftTypes, 9 patterns, 3 contracts, 50 employees, 28 shiftDates, 740 shiftAssignments and   0 requests with a search space of 10^1257.
図33.13 ドメインモデル
33.16. 巡回トーナメント問題 (TTP)
n チーム間の試合をスケジュールします。
ハード制約:
- 各チームは、他のチームとそれぞれ 2 回 (ホームとアウェイ) 試合をする。
- 各チームは、各時間枠に 1 試合だけ行う。
- 3 回連続で、ホームまたはアウェイでの試合はできない。
- 繰り返しなし: 同じ対戦相手と 2 回連続で対戦できない。
ソフト制約:
- 全チームが移動する合計距離を最小限に抑える。
この問題は Michael Trick の Web サイト (世界記録が含まれます) で定義されています。
問題の規模
1-nl04     has  6 days,  4 teams and   12 matches with a search space of    10^5.
1-nl06     has 10 days,  6 teams and   30 matches with a search space of   10^19.
1-nl08     has 14 days,  8 teams and   56 matches with a search space of   10^43.
1-nl10     has 18 days, 10 teams and   90 matches with a search space of   10^79.
1-nl12     has 22 days, 12 teams and  132 matches with a search space of  10^126.
1-nl14     has 26 days, 14 teams and  182 matches with a search space of  10^186.
1-nl16     has 30 days, 16 teams and  240 matches with a search space of  10^259.
2-bra24    has 46 days, 24 teams and  552 matches with a search space of  10^692.
3-nfl16    has 30 days, 16 teams and  240 matches with a search space of  10^259.
3-nfl18    has 34 days, 18 teams and  306 matches with a search space of  10^346.
3-nfl20    has 38 days, 20 teams and  380 matches with a search space of  10^447.
3-nfl22    has 42 days, 22 teams and  462 matches with a search space of  10^562.
3-nfl24    has 46 days, 24 teams and  552 matches with a search space of  10^692.
3-nfl26    has 50 days, 26 teams and  650 matches with a search space of  10^838.
3-nfl28    has 54 days, 28 teams and  756 matches with a search space of  10^999.
3-nfl30    has 58 days, 30 teams and  870 matches with a search space of 10^1175.
3-nfl32    has 62 days, 32 teams and  992 matches with a search space of 10^1367.
4-super04  has  6 days,  4 teams and   12 matches with a search space of    10^5.
4-super06  has 10 days,  6 teams and   30 matches with a search space of   10^19.
4-super08  has 14 days,  8 teams and   56 matches with a search space of   10^43.
4-super10  has 18 days, 10 teams and   90 matches with a search space of   10^79.
4-super12  has 22 days, 12 teams and  132 matches with a search space of  10^126.
4-super14  has 26 days, 14 teams and  182 matches with a search space of  10^186.
5-galaxy04 has  6 days,  4 teams and   12 matches with a search space of    10^5.
5-galaxy06 has 10 days,  6 teams and   30 matches with a search space of   10^19.
5-galaxy08 has 14 days,  8 teams and   56 matches with a search space of   10^43.
5-galaxy10 has 18 days, 10 teams and   90 matches with a search space of   10^79.
5-galaxy12 has 22 days, 12 teams and  132 matches with a search space of  10^126.
5-galaxy14 has 26 days, 14 teams and  182 matches with a search space of  10^186.
5-galaxy16 has 30 days, 16 teams and  240 matches with a search space of  10^259.
5-galaxy18 has 34 days, 18 teams and  306 matches with a search space of  10^346.
5-galaxy20 has 38 days, 20 teams and  380 matches with a search space of  10^447.
5-galaxy22 has 42 days, 22 teams and  462 matches with a search space of  10^562.
5-galaxy24 has 46 days, 24 teams and  552 matches with a search space of  10^692.
5-galaxy26 has 50 days, 26 teams and  650 matches with a search space of  10^838.
5-galaxy28 has 54 days, 28 teams and  756 matches with a search space of  10^999.
5-galaxy30 has 58 days, 30 teams and  870 matches with a search space of 10^1175.
5-galaxy32 has 62 days, 32 teams and  992 matches with a search space of 10^1367.
5-galaxy34 has 66 days, 34 teams and 1122 matches with a search space of 10^1576.
5-galaxy36 has 70 days, 36 teams and 1260 matches with a search space of 10^1801.
5-galaxy38 has 74 days, 38 teams and 1406 matches with a search space of 10^2042.
5-galaxy40 has 78 days, 40 teams and 1560 matches with a search space of 10^2301.
33.17. コストを抑えるスケジュール
全タスクを時間内にスケジュールし、機械の電気代を最小限に抑えます。電気代は時間によって異なります。これは、ジョブショップスケジューリング の応用です。
ハード制約:
- 開始時間の制限: 各タスクは、最早と最遅の開始時間の制限内に、開始する必要がある。
- 最大容量: マシンに割り当てる各リソースはこの量を超えてはいけない。
- 開始および終了: 各機械は、タスクが割り当てられている間は稼働している必要がある。次のタスクまでの間、起動および終了コストを避けるため、機械をアイドルにすることができる。
中程度の制約:
電気代: 全スケジュールの合計電気代を最小限に抑える。
- 機械の電気代: 稼働中またはアイドル中の機械はそれぞれ、電気を消費し、電気代が発生する (金額は使用時の電気代によって異なる)。
- タスクの電気代: 各タスクも電気を消費し、電気代が発生する (金額は使用時の電気代によって異なる)。
- 機械の起動および終了コスト: 機械を起動または終了するたびに、追加のコストが発生する。
ソフト制約 (問題に元々設定されている定義に追加):
- 早く開始: なるべく早めにタスクを開始するようにする。
この問題は、ICON challenge で定義されています。
問題の規模
sample01   has 3 resources,   2 machines, 288 periods and   25 tasks with a search space of    10^53.
sample02   has 3 resources,   2 machines, 288 periods and   50 tasks with a search space of   10^114.
sample03   has 3 resources,   2 machines, 288 periods and  100 tasks with a search space of   10^226.
sample04   has 3 resources,   5 machines, 288 periods and  100 tasks with a search space of   10^266.
sample05   has 3 resources,   2 machines, 288 periods and  250 tasks with a search space of   10^584.
sample06   has 3 resources,   5 machines, 288 periods and  250 tasks with a search space of   10^673.
sample07   has 3 resources,   2 machines, 288 periods and 1000 tasks with a search space of  10^2388.
sample08   has 3 resources,   5 machines, 288 periods and 1000 tasks with a search space of  10^2748.
sample09   has 4 resources,  20 machines, 288 periods and 2000 tasks with a search space of  10^6668.
instance00 has 1 resources,  10 machines, 288 periods and  200 tasks with a search space of   10^595.
instance01 has 1 resources,  10 machines, 288 periods and  200 tasks with a search space of   10^599.
instance02 has 1 resources,  10 machines, 288 periods and  200 tasks with a search space of   10^599.
instance03 has 1 resources,  10 machines, 288 periods and  200 tasks with a search space of   10^591.
instance04 has 1 resources,  10 machines, 288 periods and  200 tasks with a search space of   10^590.
instance05 has 2 resources,  25 machines, 288 periods and  200 tasks with a search space of   10^667.
instance06 has 2 resources,  25 machines, 288 periods and  200 tasks with a search space of   10^660.
instance07 has 2 resources,  25 machines, 288 periods and  200 tasks with a search space of   10^662.
instance08 has 2 resources,  25 machines, 288 periods and  200 tasks with a search space of   10^651.
instance09 has 2 resources,  25 machines, 288 periods and  200 tasks with a search space of   10^659.
instance10 has 2 resources,  20 machines, 288 periods and  500 tasks with a search space of  10^1657.
instance11 has 2 resources,  20 machines, 288 periods and  500 tasks with a search space of  10^1644.
instance12 has 2 resources,  20 machines, 288 periods and  500 tasks with a search space of  10^1637.
instance13 has 2 resources,  20 machines, 288 periods and  500 tasks with a search space of  10^1659.
instance14 has 2 resources,  20 machines, 288 periods and  500 tasks with a search space of  10^1643.
instance15 has 3 resources,  40 machines, 288 periods and  500 tasks with a search space of  10^1782.
instance16 has 3 resources,  40 machines, 288 periods and  500 tasks with a search space of  10^1778.
instance17 has 3 resources,  40 machines, 288 periods and  500 tasks with a search space of  10^1764.
instance18 has 3 resources,  40 machines, 288 periods and  500 tasks with a search space of  10^1769.
instance19 has 3 resources,  40 machines, 288 periods and  500 tasks with a search space of  10^1778.
instance20 has 3 resources,  50 machines, 288 periods and 1000 tasks with a search space of  10^3689.
instance21 has 3 resources,  50 machines, 288 periods and 1000 tasks with a search space of  10^3678.
instance22 has 3 resources,  50 machines, 288 periods and 1000 tasks with a search space of  10^3706.
instance23 has 3 resources,  50 machines, 288 periods and 1000 tasks with a search space of  10^3676.
instance24 has 3 resources,  50 machines, 288 periods and 1000 tasks with a search space of  10^3681.
instance25 has 3 resources,  60 machines, 288 periods and 1000 tasks with a search space of  10^3774.
instance26 has 3 resources,  60 machines, 288 periods and 1000 tasks with a search space of  10^3737.
instance27 has 3 resources,  60 machines, 288 periods and 1000 tasks with a search space of  10^3744.
instance28 has 3 resources,  60 machines, 288 periods and 1000 tasks with a search space of  10^3731.
instance29 has 3 resources,  60 machines, 288 periods and 1000 tasks with a search space of  10^3746.
instance30 has 4 resources,  70 machines, 288 periods and 2000 tasks with a search space of  10^7718.
instance31 has 4 resources,  70 machines, 288 periods and 2000 tasks with a search space of  10^7740.
instance32 has 4 resources,  70 machines, 288 periods and 2000 tasks with a search space of  10^7686.
instance33 has 4 resources,  70 machines, 288 periods and 2000 tasks with a search space of  10^7672.
instance34 has 4 resources,  70 machines, 288 periods and 2000 tasks with a search space of  10^7695.
instance35 has 4 resources,  80 machines, 288 periods and 2000 tasks with a search space of  10^7807.
instance36 has 4 resources,  80 machines, 288 periods and 2000 tasks with a search space of  10^7814.
instance37 has 4 resources,  80 machines, 288 periods and 2000 tasks with a search space of  10^7764.
instance38 has 4 resources,  80 machines, 288 periods and 2000 tasks with a search space of  10^7736.
instance39 has 4 resources,  80 machines, 288 periods and 2000 tasks with a search space of  10^7783.
instance40 has 4 resources,  90 machines, 288 periods and 4000 tasks with a search space of 10^15976.
instance41 has 4 resources,  90 machines, 288 periods and 4000 tasks with a search space of 10^15935.
instance42 has 4 resources,  90 machines, 288 periods and 4000 tasks with a search space of 10^15887.
instance43 has 4 resources,  90 machines, 288 periods and 4000 tasks with a search space of 10^15896.
instance44 has 4 resources,  90 machines, 288 periods and 4000 tasks with a search space of 10^15885.
instance45 has 4 resources, 100 machines, 288 periods and 5000 tasks with a search space of 10^20173.
instance46 has 4 resources, 100 machines, 288 periods and 5000 tasks with a search space of 10^20132.
instance47 has 4 resources, 100 machines, 288 periods and 5000 tasks with a search space of 10^20126.
instance48 has 4 resources, 100 machines, 288 periods and 5000 tasks with a search space of 10^20110.
instance49 has 4 resources, 100 machines, 288 periods and 5000 tasks with a search space of 10^20078.
33.18. 投資資産クラスの割り当て (ポートフォリオの最適化)
各資産クラスに投資する相対数を決定します。
ハード制約:
リスクの最大値: 標準偏差合計は、標準偏差の最大値を超えてはならない。
- 標準偏差合計の計算は、Markowitz Portfolio Theory を適用した、資産クラスの相対関係を考慮する必要がある。
- 地域の最大値: 地域ごとに数量の最大値がある。
- セクターの最大値: 各セクターに数量の最大値がある。
ソフト制約:
- 期待収益を最大化する。
問題の規模
de_smet_1 has 1 regions, 3 sectors and 11 asset classes with a search space of 10^4.
irrinki_1 has 2 regions, 3 sectors and 6 asset classes with a search space of 10^3.
サイズが大きいデータセットは作成/検証されていませんが、問題はないはずです。データに関する適切な情報源として、このアセット相関の Web サイト を参照してください。
33.19. 会議スケジュール
各会議を時間帯と部屋に割り当てていきます。時間帯は重複させることができます。*.xlsx ファイルに対する読み取りや書き込みが可能で、このファイルは LibreOffice または Microsof Excel で編集できます。
ハード制約:
- 時間帯の会議タイプ: 会議のタイプは、時間帯の会議タイプと一致する必要がある。
- 部屋が使用中の時間帯: その会議の時間帯に、会議用の部屋が利用できなければならない。
- 部屋の競合: 2 つの会議が、同じ時間に同じ会議室を使用することはできない。
- 講演者が空いていない時間帯: 講演者は必ず、会議の時間帯に空いていなければならない。
- 講演者の競合: 同じ時間帯の 2 つの会議に同じ講演者を割り当てることができない。
汎用の時間帯および部屋のタグ
- 講演者が要求する時間帯タグ: 講演者に、必須時間帯タグが付けられている場合、講演者の会議はそのタグが付いている時間に割り当てる必要がある。
- 講演者の禁止時間帯タグ: 公演者に、禁止時間帯タグが割り当てられている場合は、そのタグの付いた時間帯に講演者の会議をどれも割り当てることができない。
- 会議を設定する必要のある時間帯タグ: 会議に必須時間帯タグが付いている場合は、そのタグの付いた時間帯に割り当てる必要がある。
- 会議の禁止時間帯タグ: 会議に、禁止時間帯タグが割り当てられている場合は、そのタグの付いた時間帯にその会議を割り当てることができない。
- 講演者が要求する部屋のタグ: 講演者に、必須の部屋タグが付けられている場合、講演者の会議はそのタグが付いている部屋に割り当てる必要がある。
- 講演者が禁止する部屋のタグ: 講演者に、禁止部屋のタグが付けられている場合、講演者の会議はそのタグが付いている部屋に割り当てことができない。
- 会議を設定する必要のある部屋タグ: 会議に必須部屋タグが付いている場合は、そのタグの付いた部屋に割り当てる必要がある。
- 会議の禁止部屋タグ: 会議に、禁止部屋タグが割り当てられている場合は、そのタグの付いた部屋にその会議を割り当てることができない。
- 他の会議と同じ時間帯に設定しないタグ: このタグが付いている会議は、同じ時間帯に重複してスケジュールしてはいけない。
- 受講条件が付いた会議: 受講条件が付いた会議をすべて完了してからでないと対象の会議をスケジュールしてはいけない。
ソフト制約:
- テーマの追跡競合: 同じ時間帯で、同じテーマのタグが付いた会議の数を最小限に抑える。
- セクターの競合: 同じ時間帯で同じセクタータグの付いた会議の数を最小限に抑える。
- コンテンツの受講者レベルのフロー違反: すべてのコンテンツタグに対して、上級者用の会議の前に入門レベルの会議をスケジュールする。
- 受講者レベルの多様性: すべての時間帯において、異なる受講者レベルの会議数を最大限に増やす。
- 言語の多様性: すべての時間帯において、異なる言語の会議数を最大限を増やす。
汎用の時間帯および部屋のタグ
- 講演者が希望する時間帯タグ: 講演者に、希望の時間帯タグが付けられている場合、講演者の会議はそのタグが付いている時間に割り当てるようにする。
- 講演者が希望しない時間帯タグ: 講演者に、希望しない時間帯タグが付けられている場合、その講演者の会議はそのタグが付いている時間に割り当てないようにする。
- 会議の希望の時間帯タグ: 会議に希望の時間帯タグが付いている場合は、そのタグの付いた時間帯に割り当てるようにする。
- 会議の設定を希望しない時間帯タグ: 会議に、希望しない時間帯タグが付いている場合は、そのタグの付いた時間帯に割り当てないようにする。
- 講演者が希望する部屋のタグ: 講演者に、希望の部屋タグが付けられている場合、講演者の会議はそのタグが付いている部屋に割り当てるようにする。
- 講演者が希望しない部屋のタグ: 講演者に、希望しない部屋タグが付けられている場合、講演者の会議はそのタグが付いている部屋に割り当てないようにする。
- 会議を希望の部屋タグ: 会議に希望の部屋タグが付いている場合は、そのタグの付いた部屋に割り当てるようにする。
- 会議での使用を希望しない部屋タグ: 会議に、希望しない部屋タグが付いている場合、そのタグの付いた部屋に割り当てないようにする。
- 同じ日の会議: 同じテーマタグまたはコンテンツタグが付いた会議は必ず、必要最小限に日数 (理想としては同じ日) にスケジュールするようにする。
図33.14 価値提案
問題の規模
18talks-6timeslots-5rooms    has  18 talks,  6 timeslots and  5 rooms with a search space of  10^26.
36talks-12timeslots-5rooms   has  36 talks, 12 timeslots and  5 rooms with a search space of  10^64.
72talks-12timeslots-10rooms  has  72 talks, 12 timeslots and 10 rooms with a search space of 10^149.
108talks-18timeslots-10rooms has 108 talks, 18 timeslots and 10 rooms with a search space of 10^243.
216talks-18timeslots-20rooms has 216 talks, 18 timeslots and 20 rooms with a search space of 10^552.
33.20. ロックツアー
次のショーへの移動はロックバスを使用し、空いている日のみショーをスケジュールする。
ハード制約:
- 必要とされるショーをすべてスケジュールする。
- できるだけ多くのショーをスケジュールする。
中程度の制約:
- 収益の機会を最大化する。
- 運転時間を最小限に抑える。
- できるだけ早く到着する。
ソフト制約:
- 長時間の運転は避ける。
問題の規模
47shows has 47 shows with a search space of 10^59.
33.21. 航空機乗組員のスケジューリング
パイロットと客室乗務員にフライトを割り当てます。
ハード制約:
- 必須スキル: フライトの割り当てにはそれぞれ、必要とされるスキルがあります。たとえば、フライト AB0001 ではパイロット 2 名と、客室乗務員 3 名が必要です。
- フライトの競合: 各従業員は同じ時間に出勤できるフライトは 1 つだけにする。
- 2 つのフライト間での移動: 2 つのフライトの間で、従業員は到着先の空港と、出発元の空港に移動できる必要がある。たとえば、アンは 10 時にブリュッセルに到着し、15 時にアムステルダムを出発するなどです。
- 従業員の勤務できない日: 従業員はフライトの当日は空いていなければならない。たとえば、アンは 2 月 1 日に休暇を取っているなど。
ソフト制約:
- 最初の仕事が自宅から出発する。
- 最後の仕事が自宅に到着する。
- 総フライト時間を従業員別に平均的に分散する。
問題の規模
175flights-7days-Europe  has 2 skills, 50 airports, 150 employees, 175 flights and  875 flight assignments with a search space of  10^1904.
700flights-28days-Europe has 2 skills, 50 airports, 150 employees, 700 flights and 3500 flight assignments with a search space of  10^7616.
875flights-7days-Europe  has 2 skills, 50 airports, 750 employees, 875 flights and 4375 flight assignments with a search space of 10^12578.
175flights-7days-US      has 2 skills, 48 airports, 150 employees, 175 flights and  875 flight assignments with a search space of  10^1904.
付録A バージョン情報
本書の最終更新日: 2022 年 3 月 8 日 (火)
付録B お問い合わせ先
Red Hat Process Automation Manager のドキュメントチーム: brms-docs@redhat.com