
Red Hat Training
A Red Hat training course is available for Red Hat JBoss Operations Network
カスタムプラグインの作成
カスタムサーバーおよびエージェントリソースプラグインを作成するためのガイドライン
概要
第1章 JBoss ON プラグインの概要
1.1. JBoss ON の拡張: プラグインの定義
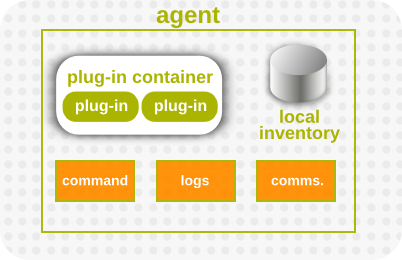
図1.1 JBoss ON のアーキテクチャー
- すべてのプラグインは JAR ファイルとしてパッケージ化されます。
- すべてのプラグインには必要な XML ファイル( プラグイン記述子 )があり、すべてのプラグイン機能を定義します。
- すべてのプラグインにはコンパイルされた Java ファイルが含まれます。このファイルには、記述子に定義されたすべてのアクションを実行するのに必要なコードが含まれます。
- プラグインは、プラグインと直接対話し、すべてのプラグインを起動および停止するエンティティーであるプラグインコンテナー 内で実行されます。
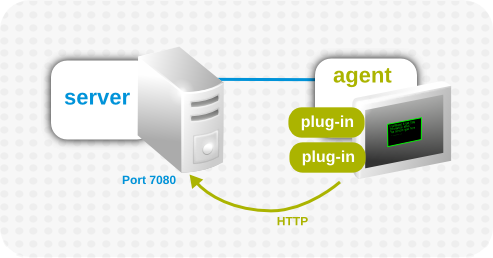
- すべてのカスタムプラグインが JBoss ON サーバーにデプロイされます。サーバー側のプラグインは他のサーバーすべてに高可用性クラウド全体に伝播されますが、エージェントをダウンロードするためにエージェントプラグインがサーバーを介して利用可能になります。
1.2. JBoss ON のプラグインの基本コンポーネント
1.2.1. プラグインコンテナー
1.2.2. プラグイン記述子
META-INF/ ディレクトリーにプラグイン記述子を配置する必要があります。サーバー側のプラグインの場合は、このファイルの名前は rhq-serverplugin.xmlおよびエージェントプラグイン用に指定する必要があり rhq-plugin.xmlます。
1.2.3. プラグインスキーマの定義
rhq-configuration.xsdます。サーバー側のプラグインは、追加のスキーマ定義ファイルと共にそのスキーマを拡張してから rhq-serverplugin.xsd、サーバー側の各プラグインタイプのカスタムスキーマ定義を拡張します。
1.2.4. Java ファイル
- エージェントプラグインは、同じプラグインで親要素と子要素(プラットフォーム、サーバー、およびサービス)の両方を定義でき、各リソースタイプは独自のプラグインコードを使用します。
- エージェントプラグインには、2 つの別個の機能があります。ほぼすべてのエージェントプラグインには、プラグインで定義されたリソースタイプを特定してインベントリーする方法を決定する検出コンポーネント(検出 Java ファイル)が必要です。さらに、エージェントプラグインはリソースのイベント収集を有効にすることもできます。これには、個別のコンポーネント(イベントポーリング Java ファイル)がリソースログを追跡する必要があります。最後に、プラグイン機能を実装するコンポーネント(Java ファイル)が必要です。
- エージェントプラグインは依存関係を許可します。親プラグインは、子とクラスを共有できます。エージェントプラグインは、そのプラグインクラスを読み込むことができる他のエージェントプラグインに依存関係を設定できます。プラグインのパフォーマンスが向上し、関連するプラグインコードへのアクセスを容易にするために、エージェントプラグインが頻繁に小さな Java ファイルに侵入され、プラグインコードを再利用できます。
1.2.5. 外部ライブラリー
lib/ ディレクトリーにあるライブラリーにアクセスできます。
1.3. プラグインファイルのダウンロード
git clone http://git.fedorahosted.org/git/rhq/rhq.git
/etc/samples/ ディレクトリーに あります。これには、完全に開発されたサンプルとプラグインテンプレートの両方が含まれます。これらのテンプレートを使用して、新しいプラグインを作成できます。ソースコード全体をチェックアウトするのではなく、この URL でサンプルファイルを手動でダウンロードできます。
http://git.fedorahosted.org/git/?p=rhq/rhq.git;a=tree;f=etc/samples;hb=master
第2章 サーバー側のプラグインの作成: 背景
2.1. サーバー側のプラグインの概要
- リソースのアラート通知を送信するメソッドのアラート送信プラグイン。
- ファイルおよびアプリケーションをデプロイするためのバンドルプラグイン
- リソースまたはファイルシステムの設定およびファイルを監視するドリフトプラグイン
- リソース設定を管理するためのコンテンツプラグイン
- その他のすべての汎用プラグイン
- サーバー側のプラグインがビルドおよびデプロイされると、プラグインは
rhq-serverplugin.xmlプラグイン記述子が含まれるMETA-INF/ディレクトリーを持つ JAR ファイルです。 - 各プラグインは他のすべてのプラグインから独立しています。エージェントプラグインとは異なり、サーバー側のプラグインは相互に対話しません。サーバー側のプラグインにはプラグインの依存関係がありません。
図2.1 サーバー側のプラグインコンテナー
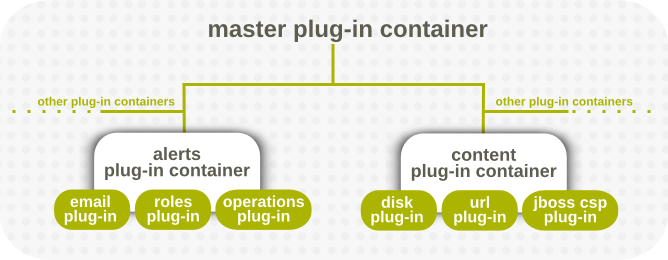
表2.1 利用可能なプラグインコンテナー
| プラグインの種類 | description | コンテナー名 |
|---|---|---|
| generic | すべてのカスタムプラグインの catch-all タイプ。このタイプのプラグインは、プラグインを開始および停止し、プラグインライブラリーを初期化およびシャットダウンするためにコンテナーのプラグインコンテナーとのみ対話します。 | 汎用プラグイン |
| アラートメソッド | アラート通知メソッドまたはアラートの送信方法を定義します。 | AlertHandler |
| bundle | バンドルのタイプを定義し、処理します。このタイプのプラグインは、コアサーバーが Ant レシピやファイルベースのバンドルなどの特定のバンドルタイプのバンドルを処理および管理するために必要なタスクを実行します。各バンドルサーバープラグインは単一のバンドルタイプを認識し、処理できます。 | バンドルプラグイン |
| drift | ドリフト操作および設定を処理します。このファイルは、ドリフト検出および修復のために管理されるコンテンツ(ファイル)を保存し、取得します。 | drift JPA プラグイン |
| コンテンツ | リポジトリーまたはリポジトリーグループのメタデータが含まれます。 | PackageSource |
| リポジトリー(パッケージ) | コンテンツリポジトリーを定義します。プラグインは単一のリポジトリーを定義できます。リポジトリーは、JBoss の ON 管理リソースのプロビジョニング、エンタイトルメント、および更新に使用されます。 | ChannelSource |
2.2. サーバー側のプラグイン設定の内訳
.jar ファイルです。これらの .jar ファイルによって使用されるディレクトリー構造、ライブラリー、およびクラスは、プラグインライターの判断と要件により完全に最大で、すべてのプラグインファイルにはプラグイン記述子 .jar ファイルが必要です META-INF/rhq-serverplugin.xml。
org.rhq.enterprise.server.plugin.pc.ServerPluginComponent クラス。これは、コンテナー内のプラグインのライフサイクルを制御します。
- プラグインの記述子として機能する XML ファイル
- 記述子情報をプルし、プラグインのクラスを実装する Java ファイル。
- オプションのライブラリー依存関係。サードパーティーライブラリーは、プラグイン JAR ファイルの
lib/ディレクトリーに保存する必要があります。
2.2.1. 記述子および設定
rhq-serverplugin.xml ファイルの META-INF/ ディレクトリーのファイルで定義されます。(デフォルトのサーバー側のプラグインは同じ設定に従います。) このファイルは必須です。
MANIFEST.MF ファイルから自動的に取得されます。
- 定期的に、または cron スケジュールを使用したアクションのスケジュール設定
- 特定のプラグインタイプの全インスタンスに対するグローバルパラメーターの設定
- プラグインタイプでのローカルまたはインスタンス固有の設定の許可
2.2.1.1. 定義およびクラス
例2.1 プラグイン記述子: 定義
<alert-plugin
         name="alert-email"
         displayName="Alert:Email"
         xmlns="urn:xmlns:rhq-serverplugin.alert"
         xmlns:c="urn:xmlns:rhq-configuration"
         xmlns:serverplugin="urn:xmlns:rhq-serverplugin"
         package="org.rhq.enterprise.server.plugins.alertEmail"
         description="Alert sender plugin that sends alert notifications via email"
         version="1.0"
>org.rhq.enterprise.server.plugin.pc.ServerPluginComponent class: プラグインの簡単なライフサイクル管理を提供します。このコンポーネントは、プラグインを初期化、開始、停止、およびシャットダウンするコンテナーのフックを提供します。プラグインが初期化されると、プラグインのランタイム環境に関する情報を提供するサーバープラグインコンテキストが付与されます。
- <plugin-component> タグを使用したクラスの指定(すべてのプラグインで利用可能)
- ユーザー定義タグを使用したクラスの特定(プラグインコンテナーで利用可能なスキーマに応じてサーバー側のプラグインの一部で利用可能)
例2.2 プラグイン記述子: クラス情報
<serverplugin:plugin-component class="MyLifecycleListener" />
<plugin-class>RolesSender</plugin-class>
2.2.1.2. コントロール操作
ServerPluginComponent クラスはオプションで ControlFacet インターフェースを実装できます。これらの制御操作は、プラグイン設定領域にある JBoss ON Web インターフェースで直接呼び出すことができます。
例2.3 制御操作の設定
<serverplugin:plugin-component class="MyLifecycleListener">
   <serverplugin:control name="testControl" description="A test control operation">
      <serverplugin:parameters>
         <c:simple-property name="paramProp" required="true" description="Set to 'fail' to simulate an error"/>
      </serverplugin:parameters>
      <serverplugin:results>
         <c:simple-property name="resultProp" required="false"/>
      </serverplugin:results>
   </serverplugin:control>
</serverplugin:plugin-component>2.2.1.3. ジョブのスケジュール設定
ScheduledJobInvocationContext コンポーネント
- ジョブクラスはステートレス(各ジョブクラスが呼び出されるたびにインスタンス化される)か、プラグインコンポーネントインスタンスを呼び出すことでステートフルにすることができます。注記サーバー側のプラグインは、プラグインのライフサイクルリスナーとして機能するプラグインコンポーネントを定義できます。プラグインコンポーネントを使用することは非常に便利です。実際には、汎用サーバー側のプラグインがコアサーバーに接続する唯一のメカニズムです。
- ジョブは同時に実行できます。つまり、(同じサーバー上を含む)任意の数のサーバーで一度に複数の呼び出しを実行できます。ジョブが同時実行されない場合、1 つのジョブ呼び出しはいつでも 1 つのジョブ呼び出しのみを実行できます。(ジョブが同時ではなく、クラスター化されていない場合 は、JBoss ON サーバークラウドのどこにでも 1 つのジョブ呼び出しのみを実行できます)。
- ジョブはクラスター化できます。つまり、ジョブは JBoss ON サーバークラウドの任意のサーバーから実行できます。ジョブがクラスター化されていない場合、ジョブは常にジョブがスケジュールされたマシンで実行されます。これは、concurrent 設定と併用して動作します。
- スケジュールは周期的(毎時実行など)か、パターン(たとえば、月曜日の 5pm 時など)で繰り返し発生します。
- 同じプラグインに複数のジョブをスケジュールし、それぞれはプラグインの <scheduled-jobs> エントリー <map-property> 下に置かれます。
例2.4 プラグイン記述子: スケジュールされたジョブ
<serverplugin:scheduled-jobs>
         <!-- notice that we use the map name as the methodName -->
         <c:map-property name="myScheduledJobMethod1">
             <c:simple-property name="enabled" type="boolean" required="true" default="true" summary="true" description="Whether or not the job should be scheduled"/>
             <c:simple-property name="scheduleType" type="string" required="true" default="cron" summary="true" description="Indicates when the schedule triggers">
                 <c:property-options>
                     <c:option value="periodic"/>
                     <c:option value="cron" default="true"/>
                 </c:property-options>
             </c:simple-property>
             <c:simple-property name="scheduleTrigger" type="string" required="true" default="0 0/5 * * * ?" summary="true" description="Based on the schedule type, this is either the period, in milliseconds, or the cron expression"/>
             <c:simple-property name="concurrent" type="boolean" required="false" default="false" summary="true" description="Whether or not the job can be run multiple times concurrently"/>
             <c:simple-property name="clustered" type="boolean" required="false" default="true" summary="true" description="Whether or not the job can be run anywhere in the JBoss ON server cluster, or if it must be run on the server where the job was schedule."/>
         </c:map-property>
</serverplugin:scheduled-jobs>2.2.1.3.1. ジョブの状態
例2.5 ステートレスジョブ設定
<c:map-property name="statelessJob1" description="invokes a stateless job class but given a job context">
      <c:simple-property name="class" type="string" required="true" readOnly="true" default="MyScheduledJob" summary="true" />
      <c:simple-property name="methodName" type="string" required="true" readOnly="true" default="executeWithContext" summary="true" />
</c:map-property>- 呼び出すジョブのメソッド名。ステートフルジョブの場合、ターゲットメソッドはプラグインコンポーネントにあります。ステートレスジョブの場合、これは class プロパティーで指定されたクラスにあります。いずれの方法でも、メソッド名はサーバーに対して呼び出しを指示します。default メソッドはすでにプラグインコンポーネントで定義されており、特定のメソッド名プロパティーを使用せずにステートフルジョブで呼び出すことができます。
<c:simple-property
name="methodName"type="string" required="true" readOnly="true" default="executeWithContext" summary="true" />メソッドに引数がない場合、または型の引数が 1 つ必要です。ScheduledJobInvocationContext. - ジョブが有効であるかどうかを示す設定。
<simple-property name="enabled" type="boolean" ... />
- Periodic または cron ジョブであるかどうかを示すスケジュールタイプ。ジョブのタイプは、true に設定されるオプションで識別されます。例:
<simple-property name="scheduleType" ... default="periodic" ... > <c:property-options> <c:option value="periodic" default="true"/> <c:option value="cron" /> </c:property-options> </c:simple-property> - ジョブを実行するタイミング(「トリガー」)の実際のスケジュール。これは期間または cron スケジュールのいずれかです。定期的なジョブの場合、これは時間間隔(ミリ秒単位)を指定します。
<simple-property name="scheduleTrigger" type="string" required="true" default="60000" ... />
cron ジョブでは、デフォルトの引数に完全な cron 式が含まれます。<simple-property name="scheduleTrigger" type="string" required="true" default="0 0/5 * * * ?" ... />
(cron スケジュール形式の完全な説明は http://www.quartz-scheduler.org/documentation/quartz-2.1.x/tutorials/tutorial-lesson-06.html にあり ます )。 - ジョブが同時実行であるかどうかの設定(つまり、このジョブを複数のサーバーで複数回実行できるか、または同時に実行できるか)。false の場合、ジョブの 1 つのインスタンスのみを一度に実行できるようにし、複数のサーバーがジョブの実行をスケジュールされていても、それらの 1 つのインスタンスでのみ実行されます。
<simple-property name="concurrent" type="boolean" ... />
- ジョブは、JBoss ON サーバークラウドのどこにでも実行するか、またはジョブがスケジュールされたマシンで実行する必要があるかの設定を許可します。クラスターの値を true に設定すると、ジョブがクラスター化されるよう JBoss ON クラウドのサーバーからジョブを呼び出すことができます。この値は、ジョブをスケジュールされているすべてのマシンで実行する必要がある場合は false である必要があります。すべてのプラグインはすべてのサーバーに自動的に登録されるため、クラスター化されていないジョブは独立して各サーバー上で実行されます。
<simple-property name="clustered" type="boolean" default="true" ... />
- ジョブには、任意でコールバックデータを受け入れるカスタム文字列を含めることができます。
<simple-property name="custom1" type="boolean" required="true" default="true" summary="true" description="A custom boolean for callback data"/>
コールバックデータは、ブール値、文字列、long など、実行されるジョブに適するタイプです。 - ステートレスジョブには、クラスのメソッド名を渡するプロパティーがあります。メソッド名はプラグインコンポーネントで呼び出されるクラスを識別するか、またはジョブが呼び出されるタイミングをインスタンス化するためにクラスを呼び出すこともできます。メソッドとクラスキーの両方が表示され 例2.5「ステートレスジョブ設定」 ます。ターゲットとして使用されるクラスには、メソッド名 simple プロパティーでメソッドが定義されている必要があります。通常、ジョブはステートフルプラグインコンポーネントをターゲットとするため、クラスは指定されません。class プロパティーでは、ステートレスジョブの作成オプションが許可されます。
2.2.1.3.2. 同時およびクラスター化されたジョブ
scheduleTrigger 設定)ジョブの実行場所と 実行 方法 は、concurrent と clustered の 2 つの設定で決定されます。
表2.2 同時およびクラスター化された動作の比較
| 同時実行 | clustered | スケジュールがトリガーされると、 |
|---|---|---|
| true | true | ...ジョブは常に呼び出されます。JBoss ON サーバークラウドの任意のサーバーで呼び出されることがあります。 |
| true | false | ... ジョブは常に呼び出され、ジョブがスケジュールされているサーバー上で実行されます。 |
| false | true | JBoss ON サーバーは、このジョブが JBoss ON サーバークラウドの他の場所で実行されているかをチェックします。その場合、新しいジョブは、開始するまで古いジョブが終了するまで待機する必要があります。JBoss ON サーバークラウドのどこでも、このジョブのインスタンスは 1 つしか実行できません。 |
| false | false | ... スケジューラーは、ジョブを呼び出す前にローカルでジョブが実行されているかどうかを確認します。ジョブ呼び出しは一度に 1 つのみサーバー上で実行することができますが、クラウドの複数のサーバーはジョブを同時に実行している可能性があります。 |
2.2.1.4. プラグイン設定(グローバルおよびローカルの両方)
例2.6 プラグイン記述子: グローバル設定
<serverplugin:plugin-configuration>
         <c:simple-property name="user" type="string" required="false"/>
         <c:simple-property name="password" type="password" required="false"/>
</serverplugin:plugin-configuration>
例2.7 プラグイン記述子: インスタンス固有の設定(Alert)
<alert-configuration>
         <c:simple-property name="emailAddress" displayName="Receiver Email Address(es)" type="longString"
                 description="Email addresses (separated by comma) used for notifications."/>

h5. </alert-configuration>
例2.8 プラグイン記述子: インスタンス固有の設定(Perspectives)
<perspectivePlugin
   description="The Core Perspective defining Core UI Elements"
   displayName="Core Perspective"
   name="CorePerspective"
   package="org.rhq.perspective.core"
   xmlns="urn:xmlns:rhq-serverplugin.perspective"
   xmlns:serverplugin="urn:xmlns:rhq-serverplugin"
   xmlns:xsi="http://www.w3.org/2001/XMLSchema-instance">


<!-- Menu -->
<menuItem name="logo" displayName="" url="/" iconUrl="/images/JBossLogo_small.png">
   <position placement="firstChild" />
</menuItem>
/modules/enterprise/server/xml-schemas/src/main/resources のプラグインコンテナースキーマをチェックして、特定のタイプのプラグインで利用可能な要素を確認します。すべてのプラグインタイプがローカル設定を許可する訳ではありません。たとえば、一般的なプラグインはグローバルプラグインの設定のみを許可します。
git clone http://git.fedorahosted.org/git/rhq/rhq.git
/etc/samples/custom-serverplugin/ ディレクトリー で、新規プラグインを作成するためのテンプレートとして使用できます。ソースコード全体をチェックアウトするのではなく、この URL で custom-serverplugin ファイルを手動でダウンロードできます。
http://git.fedorahosted.org/git/?p=rhq/rhq.git;a=tree;f=etc/samples/custom-serverplugin;hb=master
2.2.2. スキーマファイル
rhq-configuration.xsd ファイルを使用します。このファイルは、プラグインで利用可能な基本的な設定オプションを定義します。
rhq-configuration.xsd ファイルのスキーマはにより拡張され rhq-serverplugin.xsdます。このファイルは、サーバー側のプラグインの機能に固有の追加の XML 要素を提供します。このファイルは、すべてのサーバー側のプラグインによって参照されます。
/modules/enterprise/server/xml-schemas/src/main/resources ディレクトリーに あります。
2.2.2.1. プラグインコンテナースキーマファイルの解析
- 要素
- attributes
<xs:element name="alert-plugin">
<alert-plugin>
Stuff
</alert-plugin>
<xs:attribute name="name">
<alert-plugin name="myAlertPlugin">
Stuff
</alert-plugin>
/modules/enterprise/server/xml-schemas/src/main/resources のプラグインコンテナースキーマを確認し <xs:element name="">、<xs:attribute name=""> エントリーを検索することです。
git clone http://git.fedorahosted.org/git/rhq/rhq.git
2.2.2.2. rhq-configuration.xsd ファイル
rhq-configuration.xsd ファイルは、すべての JBoss ON プラグインで使用できるスキーマを提供します。これは、エージェントとサーバー側のプラグインにより使用されます。
rhq-configuration.xsd ファイルは ソースにあり/modules/core/client-api/src/main/resourcesます。
git clone http://git.fedorahosted.org/git/rhq/rhq.git
/etc/samples/custom-serverplugin/ ディレクトリー で、新規プラグインを作成するためのテンプレートとして使用できます。ソースコード全体をチェックアウトするのではなく、この URL で custom-serverplugin ファイルを手動でダウンロードできます。
http://git.fedorahosted.org/git/?p=rhq/rhq.git;a=tree;f=etc/samples/custom-serverplugin;hb=master
rhq-configuration スキーマで定義される最も一般的な要素は、やのようなプラグインの設定値の設定に関連 <simple-property> し <map-property>ます。
表2.3 rhq-configuration.xsd スキーマ要素
| 要素 | description |
|---|---|
| configuration-property | ユーザー定義の設定のプラグインに設定属性を追加する場合。 |
| simple-property | デフォルト設定値を設定する場合。 |
| オプション | プロパティーの値が列挙された一覧(false)から取得されるか、またはユーザーが定義する値(true)であるかを設定します。 |
rhq-configuration.xsd file また、必須属性や name オプション displayName 属性など、プラグイン記述子に使用できる最も一般的なフラグも定義します。
表2.4 rhq-configuration.xsd スキーマ要素属性
| attribute | description |
|---|---|
| Name | 必須。プラグインの一意の名前を指定します。 |
| displayName | GUI のプラグインに使用する名前を指定します。これを指定しない場合には、name の値が使用されます。 |
| description | プラグインの簡単な説明を提供します。 |
rhq-configuration.xsd ファイルに多くの要素および属性が設定されます。それぞれの項目の説明は、項目の <xs:annotation> タグのテキストで説明されています。
2.2.2.3. rhq-serverplugin.xsd ファイル
rhq-serverplugin.xsd は中央のサーバー側のプラグインスキーマファイルです。
rhq-serverplugin.xsd ファイルは、サーバー側のプラグインごとに重要なスキーマ要素を提供します。おそらく、最も重要な要素は <server-plugin> (プラグインのルート要素用)と <scheduled-jobs> (リソースまたはサーバーでジョブを実行する場合)です。
rhq-serverplugin.xsd ファイルは ソースにあり/modules/enterprise/server/xml-schemas/src/main/resourcesます。
rhq-serverplugin.xsd ファイルの最も一般的な要素はに記載されてい 表2.5「rhq-serverplugin.xsd スキーマ要素」 ます。
表2.5 rhq-serverplugin.xsd スキーマ要素
| 要素 | description |
|---|---|
| server-plugin | プラグイン記述子のルート要素が含まれます。 |
| help | には、プラグインを他のアプリケーションと統合するのに役立つ追加の使用情報またはその他のヒントが含まれます。 |
| plugin-component | プラグインが停止したり、開始したときに通知されるクラスを特定します。これはステートフルオブジェクトで、スケジュールされたステートフルジョブのターゲットです。 |
| scheduled-jobs | 指定されたタスクを実行するプラグインのスケジュールを定義します。 |
rhq-serverplugin.xsd れている属性のほとんどは、プラグイン記述子のルート要素で使用される include フラグです。これらは、サーバー側のプラグインのリリースおよび更新を制御する管理属性を追加します。
表2.6 rhq-serverplugin.xsd スキーマ要素属性
| attribute | description |
|---|---|
| パッケージ | プラグインパッケージ名を設定する場合。 |
| version | プラグインのバージョンを設定する場合。バージョンが記述子に設定されていない場合、プラグイン JAR ファイルは Implementation-Version 設定でバージョン番号を定義 META-INF/MANIFEST.MFする必要があります。 |
| apiVersion | プラグインの作成に使用する API のバージョンを設定する場合。 |
rhq-serverplugin.xsd ファイルに多くの要素および属性が設定されます。それぞれの項目の説明は、項目の <xs:annotation> タグのテキストで説明されています。
2.2.3. Java クラスファイル
2.3. Alert Sender Server-Side Plug-ins のAtomy
2.3.1. デフォルトのアラート送信者
表2.7 デフォルトのアラート送信者
| Alert メソッド | description | プラグイン名 |
|---|---|---|
| アラート情報を使用して、ユーザーまたはユーザー一覧に電子メールを送信します。 | alert-email | |
| roles | 内部メッセージを JBoss ON ユーザーロールに送信します。 | alert-roles |
| SNMP | SNMP トラップに通知を送信します。 | alert-snmp |
| operations | ターゲットリソースで JBoss ON がサポートするタスクを開始しました。 | alert-operations |
| subject | JBoss ON のユーザーに通知を送信します。 | alert-subject |
2.3.2. 実際のアラート送信プラグインの内訳
- 所定の XML スキーマファイル(XSD)に準拠する XML プラグイン記述子
- Java ファイル
2.3.2.1. 記述子
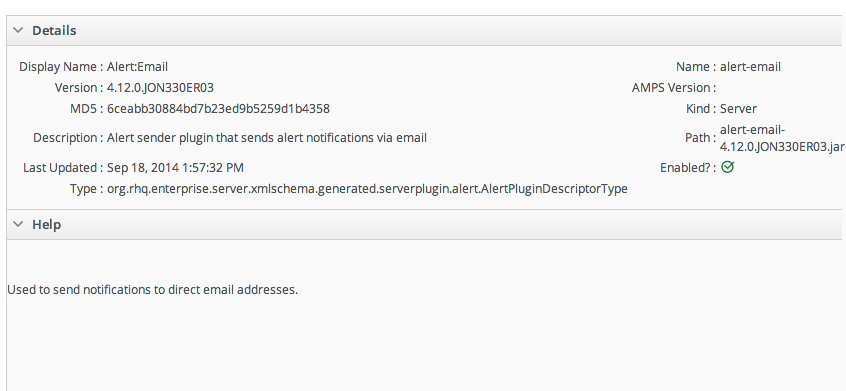
src/main/resources/META-INF/ ファイル rhq-serverplugin.xml で呼び出されるファイルです。
<alert-plugin
     name="alert-email"
     displayName="Alert:Email"
     xmlns="urn:xmlns:rhq-serverplugin.alert"
     xmlns:c="urn:xmlns:rhq-configuration"
     xmlns:serverplugin="urn:xmlns:rhq-serverplugin"
     package="org.rhq.enterprise.server.plugins.alertEmail"
     description="Alert sender plug-in that sends alert notifications via email"
>
<serverplugin:help>
     Used to send notifications to direct email addresses.
</serverplugin:help>
図2.2 アラートヘルプテキスト
<!-- startup & tear down listener, + scheduled jobs
<serverplugin:plugin-component />
-->
<!-- Global preferences for all email alerts -->

<serverplugin:plugin-configuration>
     <c:simple-property name="mailserver" displayName="Mail server address" type="longString"
          description="Address of the mail server to use (if not the default JBoss ON one )"
          required="false"/>
     <c:simple-property name="senderEmail" displayName="Email of sender" type="string"
          description="Email of the account from which alert emails should come from"
          required="false"/>
     <c:simple-property name="needsLogin" displayName="Needs credentials?"
          description="Mark this field if the server needs credentials to send email and give them below" type="boolean"
          default="false"/>
     <c:simple-property name="user" type="string" required="false"/>
     <c:simple-property name="password" type="password" required="false"/>
</serverplugin:plugin-configuration>
<!-- How does this sender show up in drop downs etc -->

<short-name>Email</short-name>
org.rhq.enterprise.server.plugins.pluginName。記述子の package 要素の <plugin> 要素から取得されます。alert-email プラグインの場合、完全なパッケージ名はです。 org.rhq.enterprise.server.plugins.alertEmail。 EmailSender.java クラス。
 <!-- Class that does the actual sending -->

<plugin-class>EmailSender</plugin-class>
 <!-- What can a user configure when defining an alert -->

<alert-configuration>
     <c:simple-property name="emailAddress" displayName="Receiver Email Address(es)" type="longString"
          description="Email addresses (separated by comma) used for notifications."/>
     </alert-configuration>
2.3.2.2. Java リソース
package org.rhq.enterprise.server.plugins.alertEmail;

import java.util.ArrayList;
import java.util.Collection;
import java.util.HashSet;
import java.util.List;
import java.util.Set;

import org.rhq.core.domain.alert.Alert;
import org.rhq.core.domain.alert.notification.SenderResult;
import org.rhq.enterprise.server.plugin.pc.alert.AlertSender;
import org.rhq.enterprise.server.util.LookupUtil;
public class EmailSender extends AlertSender {

    @Override
    public SenderResult send(Alert alert) {
        String emailAddressString = alertParameters.getSimpleValue("emailAddress", null);
        if (emailAddressString == null) {
            return SenderResult.getSimpleFailure("No email address given");
} List<String> emails = AlertSender.unfence(emailAddressString, String.class, ",");
try {
Set<String> uniqueEmails = new HashSet<String>(emails);
Collection<String> badEmails = LookupUtil.getAlertManager()
.sendAlertNotificationEmails(alert, uniqueEmails);
List<String> goodEmails = new ArrayList<String>(uniqueEmails);
goodEmails.removeAll(badEmails);
SenderResult result = new SenderResult();
result.setSummary("Target addresses were: " + uniqueEmails);
if (goodEmails.size() > 0) {
result.addSuccessMessage("Successfully sent to: " + goodEmails);
}
if (badEmails.size() > 0) {
result.addFailureMessage("Failed to send to: " + badEmails);
}
return result;
} catch (Throwable t) {
return SenderResult.getSimpleFailure("Error sending email notifications to " + emails + ", cause: "
+ t.getMessage());
}
}
@Override
public String previewConfiguration() {
String emailAddressString = alertParameters.getSimpleValue("emailAddress", null);
if (emailAddressString == null || emailAddressString.trim().length() == 0) {
return "<empty>";
}
return emailAddressString;
}
} catch (Exception e) {
log.warn("Sending of email failed: " + e);
return SenderResult.getSimpleFailure("Sending failed :" + e.getMessage());
}
return SenderResult.getSimpleSuccess("Send notification to " + txt + ", msg-id: " + status.getId());
}
}
2.3.2.3. スキーマ要素
rhq-configuration.xsdすべての JBoss ON プラグインによって使用されるrhq-serverplugin.xsdサーバー側のすべてのプラグインによって使用されるrhq-serverplugin-alert.xsd: アラートプラグインによって使用されます。
rhq-serverplugin-alert.xsd ファイルは、アラート送信元プラグインに必要です。追加のスキーマファイルを追加して他の要素を含めることができますが、アラートスキーマには、アラートセンダープラグインに非常に有用なスキーマ要素が複数含まれています。
表2.8 便利なアラートスキーマ要素
| スキーマ要素 | description | 親タグ |
|---|---|---|
| alert-plugin | 単一アラートプラグイン定義のルート要素。 | なし。 |
| short-name | UI で使用されるプラグインの表示名。 | alert-plugin |
| plugin-class | プラグインの機能を実装するクラス。 | alert-plugin |
| alert-configuration | アラートインスタンスの設定時に UI に表示する(デフォルト)設定要素。これには、ユーザー名、パスワード、URL、サーバー名、またはポートなどの一般的なデータが含まれます。 | alert-plugin |
第3章 サーバー側のプラグインの作成: 手順
3.1. ヒント: XSD アノテーションの確認
rhq-configuration.xsd rhq-serverplugin.xsd、のようなタイプ固有のファイルが多数あります rhq-serverplugin-alert.xsd。
	<xs:element name="control" type="serverplugin:ControlType" minOccurs="0" maxOccurs="unbounded">
                <xs:annotation>
                    <xs:documentation>
                        Defines operations a user can invoke on the plugin component.
                        Typically, a user interface will allow a user to invoke these operations to
                        control the server plugin component during runtime.
                    </xs:documentation>
                </xs:annotation>
</xs:element>3.2. サーバー側のプラグインの作成
- プラグインのタイプを特定します。各サーバー側のプラグインは、プラグインのタイプまたは機能に関連付ける高レベルのプラグインコンテナーによって管理されます。
- オプション。プラグイン設定にカスタムスキーマを作成します。
- sourceRoot ディレクトリーにカスタムプラグイン用のディレクトリーを作成 し
/modules/enterprise/server/pluginsます。例:mkdir myPlugin cd myPlugin/ mkdir -p src/main/java/org/rhq/enterprise/server/plugins/myPlugin mkdir -p src/main/resources/META-INF
- Maven ビルドに使用する同様の既存プラグインから
pom.xmlファイルをコピーし、新しいプラグインをパッケージ化します。例:cp ../alert-email/pom.xml .
- プロパティーが新しいプラグインを反映するように、
pom.xmlファイルを編集します。注記サーバー側のプラグインが使用する親リポジトリーの場所を必ず含めてくださいhttps://repository.jboss.org/nexus/content/groups/public/org/rhq/rhq-enterprise-server-plugins-parent/。例:<repositories> <repository> <snapshots> <enabled>true</enabled> </snapshots> <id>jboss</id> <name>JBoss Repository</name> <url>https://repository.jboss.org/nexus/content/groups/public/org/rhq/rhq-enterprise-server-plugins-parent/</url> </repository> ... </repositories> - 特定のプラグインインスタンスを定義するプラグイン記述子を作成します。プラグイン記述子は、プラグインクラスからスケジュールされたジョブまですべて定義します。プラグイン記述子要素については、で説明されてい 「プラグイン設定(グローバルおよびローカルの両方)」 ます。
- プラグインの Java クラスを実装します。
- プラグインを構築します。Maven ビルドプロセス中に、プラグインファイルを検証できます。
mvn install
- にあるように、プラグインをデプロイし 「サーバーサイドプラグインのデプロイ」 ます。サーバー側のプラグインが 1 台のサーバーにデプロイされると、クラウドの他のすべての JBoss ON サーバーに自動的に伝播されます。
3.3. Server-Side プラグインの検証
- XML は適切に作成され、設定されたサーバープラグイン XML スキーマを使用して検証されます。
- プラグインコンポーネントが指定されている場合、そのクラスはプラグイン JAR で見つかり、インスタンス化できます。
- スケジュールされたジョブがすべて適切に設定されている。
- プラグインには有効なバージョンがあります。
- プラグイン設定が正しく宣言されている。
pom.xml 設定ファイルに追加する必要があります。
- sourceRoot ディレクトリー
/modules/enterprise/server/plugins/validate-all-serverplugins/でpom.xmlファイルを開きます。 - カスタムサーバー側の JAR ファイルを参照するファイルに <pathelement> 行を追加します。例:
<pathelement location="../myPlugin/target/myPlugin.jar" />
- プラグインを構築します。
mvn install
org.rhq.enterprise.server.plugin.pc.ServerPluginValidatorUtil クラス。
3.4. サーバーサイドプラグインのデプロイ
- プラグイン JAR ファイルをサーバーのルートディレクトリー(ローカル)の sourceRoot フォルダー
/plugins/にコピーします。 - Web インターフェース(リモート)でプラグイン JAR ファイルをアップロードします。
図3.1 サーバー側のプラグイン伝搬
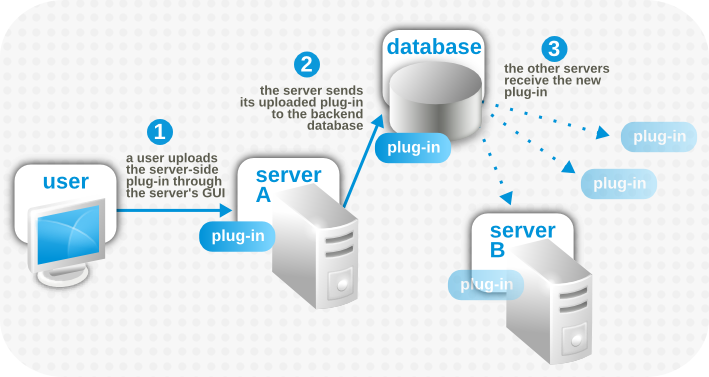
- デプロイ済みおよび有効化
- デプロイ済みおよび無効
3.4.1. サーバー側のプラグインをリモートでデプロイ
- トップメニューで、Administration タブをクリックします。

- 左側のナビゲーションバーの Configuration ボックスで、Server Plugins リンクをクリックします。

- ページの下部にある Upload Plugin セクションまでスクロールします。
- Browse... ボタンをクリックして、プラグイン JAR ファイルの場所を参照します。
- プラグインをデプロイするには、Upload ボタンをクリックします。

3.4.2. サーバー側のプラグインをローカルでデプロイ
/plugins/ ディレクトリーにコピーでき 、サーバーによってデプロイされます。
3.5. Server-Side プラグインの更新
META-INF/MANIFEST.MF ファイルにある Implementation-Version 設定)を使用して、プラグインの後続のバージョンを特定し、クラウドの JBoss ON サーバーのプラグインを更新します。
3.6. サーバー側のプラグインの無効化
- トップメニューで、Administration タブをクリックします。
- 左側のナビゲーションバーの Configuration ボックスで、Server Plugins リンクをクリックします。
- 無効にするサーバー側のプラグインを選択します。
- DISABLE ボタンをクリックします。

3.7. サーバー側のプラグインコンテナーの再起動
- トップメニューで、Administration タブをクリックします。
- 左側のナビゲーションバーの Configuration ボックスで、Server Plugins リンクをクリックします。
- テーブルの下部までスクロールし、RESTART MASTER PLUGIN CONTAINER ボタンをクリックします。

- 再起動プロセスが実行されると(問題が発生しないことを前提として)、右上隅に成功メッセージが表示されます。

3.8. プラグイン設定プロパティーの設定
rhq-plugin.xml ファイルで定義され、値は JBoss ON UI に指定されます。
- トップメニューで、Administration タブをクリックします。
- 左側のナビゲーションバーの Configuration ボックスで、Server Plugins リンクをクリックします。
- テーブルでサーバー側のプラグインの名前をクリックします。
- プラグインの詳細ページの間に Plugin Configuration セクションを展開し、設定プロパティーにアクセスします。注記必要に応じて、チェックボックスの選択を Unset 解除して、編集するフィールドをアクティベートします。

- 設定セクション上部の SAVE ボタンをクリックします。
3.9. サーバー側のプラグインの削除
- トップメニューで、Administration タブをクリックします。
- 左側のナビゲーションバーの Configuration ボックスで、Server Plugins リンクをクリックします。
- 削除するプラグインを選択します。
- Delete ボタンをクリックします。

第4章 エージェントプラグインの作成: 背景
4.1. エージェントプラグインの Advanced Management Plug-in System(AMPS)について
- エージェントのプラグインコンテナー。プラグインには JBoss ON エージェント内で実行され、デプロイされたすべてのリソースプラグインのマネージャーが提供されます。プラグインコンテナーは、実際にリソースプラグインのライフサイクルを管理するものです。エージェントはプラグインコンテナーを開始し、プラグインコンテナーはリソースプラグインを起動します。プラグインコンテナーは、リソースプラグインに対してすべてのクラスロード、スレッド、および実行も処理します。プラグイン開発者は、プラグインコンテナーと対話する必要がありません。プラグインが適切なコンポーネントおよび有効なプラグイン記述子で記述されている限り、エージェントはこのリソースを管理できます。
- ドメインオブジェクト。これは、プラグインの個別のオブジェクト(特にリソース、リソースタイプ、および設定)を定義します。AMPS の他のすべての要素は、ドメインオブジェクトを使用してリソース要素を定義します。ドメインオブジェクト内で最大規模の API セットの 1 つが configuration です。設定 API は、プラグイン設定からリソースへの接続から操作引数への接続まで、設定プロパティーのセットが必要な場所に使用されます。
- プラグインコンポーネント。これらのコンポーネントは、エージェントプラグインによって使用される実際のコンポーネントインターフェースと、プラグインがサポートする ファセット を定義します。プラグインコンポーネントはパブリック API です。AMPS 内のこの要素は、プラグインライターが使用する部分です。これには、プラグイン作成者がリソースプラグインに実装するインターフェースが含まれます。
- ネイティブシステムオペレーティングシステムの情報からリソースを監視または管理するのに必要な情報が多くあります。ネイティブシステムは、オペレーティングシステム情報への JNI またはネイティブアクセスを提供し、プロセステーブルから情報をプルしたり、外部プログラムを実行したり、システムメトリックを収集することもできます。
- リソースプラグイン。JBoss ON には、すでにリソースプラグインのセットが定義されています。各リソースプラグインは、特定の製品(アプリケーションとサーバー、サービス、またはプラットフォーム)を管理します。これらのプラグインはエージェントのプラグインコンテナーにロードされ、API で定義されるプラグインコンポーネントを実装します。
4.2. エージェントプラグイン設定の内訳
META-INF/ ディレクトリーrhq-plugin.xml 内)で構成されます。
- プラグイン機能のすべてのコードを含むプラグインコンポーネントファイル
- プラグインで定義されたリソースの検出プロセスを設定する
*Discovery.javaファイル - リソースで収集できるイベントを
*EventPoller.java定義する
rhq-plugin.xml 記述子のプラグインの設定を密に追跡します。
4.2.1. スキーマファイル
rhq-configuration.xsd ファイルを使用して利用可能な基本的な設定オプションを定義します。
rhq-plugin.xsd ファイルは rhq-configuration.xsd スキーマを拡張し、リソース関連のプラグイン専用の追加要素を追加します。
rhq-configuration.xsd ファイルは、すべての JBoss ON プラグインで使用できるスキーマを提供します。 rhq-configuration.xsd ファイルは ソースにあり/modules/core/client-api/src/main/resourcesます。
rhq-configuration スキーマで定義される最も一般的な要素は、やのようなプラグインの設定値の設定に関連 <simple-property> し <map-property>ます。
表4.1 rhq-configuration.xsd スキーマ要素
| 要素 | description |
|---|---|
| configuration-property | ユーザー定義の設定のプラグインに設定属性を追加する場合。 |
| simple-property | デフォルト設定値を設定する場合。 |
| オプション | プロパティーの値が列挙された一覧(false)から取得されるか、またはユーザーが定義する値(true)であるかを設定します。 |
rhq-configuration.xsd file また、必須属性や name オプション displayName 属性など、プラグイン記述子に使用できる最も一般的なフラグも定義します。
表4.2 rhq-configuration.xsd スキーマ属性
| attribute | description |
|---|---|
| Name | 必須。プラグインの一意の名前を指定します。 |
| displayName | GUI のプラグインに使用する名前を指定します。これを指定しない場合には、name の値が使用されます。 |
| description | プラグインの簡単な説明を提供します。 |
rhq-plugin.xsd、エージェントプラグイン専用のすべてのスキーマ要素を提供します。 rhq-plugin.xsd ファイルは ソース/modules/core/client-api/src/main/resources ディレクトリーにあります。
rhq-plugin.xsd ファイルの最も一般的な要素はに記載されてい 表4.3「rhq-plugin.xsd スキーマ要素」 ます。
表4.3 rhq-plugin.xsd スキーマ要素
| 要素 | description |
|---|---|
| plugin | プラグイン記述子のルート要素が含まれます。 |
| Dependencies | このプラグインが必要または拡張する他のプラグインを特定します。 |
| プラットフォーム、サーバー、サービス | エージェントプラグイン内で定義されるリソースのタイプを特定します。<platforms> はトップレベルの要素ですが、プラットフォームやその他のサーバー <servers> およびサービスリソースの子として <services> 追加されます。 |
| メトリクス |
そのリソースタイプに対して収集できるメトリクスを定義するプラットフォーム、サーバー、またはサービス内の要素。
このリソース要素の子要素および属性は
rhq-plugin.xsd ファイルにリストされます。
値の配列など、大きなデータ構造の一部を形成する値は、監視の前に個別の値にデコンストラクトする必要があります。
|
| イベント | リソースがイベントをサポートするかどうかを定義するプラットフォーム、サーバー、またはサービス内の要素。イベントが含まれる他の設定プロパティーはありません。イベント自体はリソースのログファイルから累積されます。 |
| bundle-target |
リソースにバンドルをデプロイするかどうかおよび設定します。
このリソース要素の子要素および属性は
rhq-plugin.xsd ファイルにリストされます。
|
| drift-definition |
リソースに対してドリフトの監視を実行するかどうかおよび方法を設定します。
このリソース要素の子要素および属性は
rhq-plugin.xsd ファイルにリストされます。
|
| resource-configuration |
リソースタイプの設定プロパティーを定義します。
このリソース要素の子要素および属性は
rhq-plugin.xsd ファイルにリストされます。
|
| operation |
そのリソースタイプで実行できる操作を定義します。
このリソース要素の子要素および属性は
rhq-plugin.xsd ファイルにリストされます。
|
| コンテンツ |
リソースタイプにアップロードまたはデプロイできるパッケージのタイプを設定します。
このリソース要素の子要素および属性は
rhq-plugin.xsd ファイルにリストされます。
|
rhq-plugin.xsd れている属性のほとんどは、プラグイン記述子のルート要素で使用される include フラグです。これらは、エージェントプラグインのリリースや更新を制御する管理属性を追加します。
表4.4 rhq-plugin.xsd スキーマ属性
| attribute | description |
|---|---|
| パッケージ | プラグインパッケージ名を設定する場合。 |
| version | プラグインのバージョンを設定する場合。これは、OSGi と互換性のある形式である必要があります。 |
| ampsVersion | このプラグインが必要とするエージェントプラグインシステムバージョンの場合。これは、OSGi と互換性のある形式である必要があります。 |
| pluginLifecycleListener | プラグインを初期化およびシャットダウンするリスナー。 |
| 検出 | 検出スキャンでリソースタイプを検出するかどうかを設定します。このフラグは、親リソースで検出される子リソースには不要です。 |
rhq-plugin.xsd ファイルに多くの要素および属性が設定されます。それぞれの項目の説明は、項目の <xs:annotation> タグのテキストで説明されています。
4.2.2. 記述子および設定
- プラグインがサポートするリソースタイプ(サーバーおよびサービス)の名前
- エージェントのプラグインコンポーネントがリソースへの接続に使用するすべての設定
- リソースの監視に使用するメトリクス(セキュリティー定義)は、リソース自体が発行するデータの種類によって異なります。
- リソースで起動できる操作のセット。これは通常、開始および停止操作ですが、スクリプトの実行などのアプリケーション固有の操作や他のアクションを含めることができます。
- リソースの実際の設定で編集できるリソース設定値。プラグイン設定は、コンポーネントに対し、リソースへの接続方法を指示します。一方、リソース設定は、外部で編集できるリソース自体の設定です。
- リソース階層の一部である子リソース。たとえば、JBoss サーバーにはデータソースサービスが実行されているため、データソースサービスは JBoss サーバーの子リソースプラグインで定義されます。
4.2.2.1. リソースの種類、メタデータ、およびプラグインの設定
<plugin name="JMX"
        displayName="Generic JMX"
        package="org.rhq.plugins.jmx"
        description="Supports management of JMX MBean Servers via various remoting systems."
        ampsVersion="2.0"
        xmlns:xsi="http://www.w3.org/2001/XMLSchema-instance"
        xmlns="urn:xmlns:rhq-plugin"
xmlns:c="urn:xmlns:rhq-configuration">nameまた、プラグインの内部および GUI 名displayNameを付与します。ampsVersionプラグインのバージョン番号を指定します。packageプラグインのコンポーネントによって使用されるクラスの名前を指定します。
   <server name="JMX Server" discovery="JMXDiscoveryComponent" class="JMXServerComponent"
           description="Generic JMX Server"
supportsManualAdd="true" createDeletePolicy="neither">discoveryリソースタイプの特定に使用される検出コンポーネントを特定します。classプラグインの実際のコードが含まれるプラグインコンポーネントを特定します。
supportsManualAdd管理者は、リソースをインベントリーに追加できます。createDeletePolicyインベントリーから子を手作業で追加または削除できるかどうかを設定します。
<plugin-configuration>
  <c:list-property name="Servers">
     <c:map-property name="OneServer">
        <c:simple-property name="host"/>
        <c:simple-property name="port">
           <c:integer-constraint
              minimum="0"
              maximum="65535"/>
        </c:simple-property>
        <c:simple-property name="protocol">
           <c:property-options>
              <c:option value="http" default="true"/>
              <c:option value="https"/>
           </c:property-options>
        </c:simple-property>
     </c:map-property>
  </c:list-property>
</plugin-configuration>- <simple-property>1 つのキーと値のペアを定義する
- <map-property>。以下に示すように、単一のエンティティーに関連する複数のキーと値のペアを定義します。
java.util.Map概念 - <list-property>プロパティーのリストが含まれる
         <c:template name="JDK 5" description="Connect to JDK 5">
            <c:simple-property name="type" default="org.mc4j.ems.connection.support.metadata.J2SE5ConnectionTypeDescriptor"/>
            <c:simple-property name="connectorAddress" default="service:jmx:rmi:///jndi/rmi://localhost:8999/jmxrmi"/>
</c:template>4.2.2.2. 検出およびプロセススキャン
discovery 属性があります。(プラグインに複数のリソースが定義されている場合は、複数の検出コンポーネントがあります。)
/**
 * Discovery class
 */
public class testDiscovery implements ResourceDiscoveryComponent
,ManualAddFacet
{

    private final Log log = LogFactory.getLog(this.getClass());

      /**
       * Do the manual add of this one resource
       */
      public DiscoveredResourceDetails discoverResource(Configuration pluginConfiguration, ResourceDiscoveryContext context) throws InvalidPluginConfigurationException {

            // TODO implement this
            DiscoveredResourceDetails detail = null; // new DiscoveredResourceDetails(
//                context.getResourceType(), // ResourceType
//            );

            return detail;
      }
} public DiscoveredResourceDetails discoverResource(Configuration pluginConfig,
ResourceDiscoveryContext discoveryContext)
throws InvalidPluginConfigurationException {
// TODO: Connect to the remote JVM to verify the user-specified conn props are valid, and if connecting
// fails, throw an exception.
String resourceKey = pluginConfig.getSimpleValue(CONNECTOR_ADDRESS_CONFIG_PROPERTY, null);
String connectionType = pluginConfig.getSimpleValue(CONNECTION_TYPE, null);
// TODO (ips, 09/04/09): We should connect to the remote JVM in order to obtain its version.
String version = null;
DiscoveredResourceDetails resourceDetails = new DiscoveredResourceDetails(discoveryContext.getResourceType(),
resourceKey, "Java VM", version, connectionType + " [" + resourceKey + "]", pluginConfig, null);
return resourceDetails;
}name、. は特定 query name のスキャンメソッドを特定します query。は何かを行う属性です。query は、PIQL(Process Info Query Language)で記述された文字列です。この値は、プロセスの検索に使用されます。
process|attribute|match=value,arg|attribute|match=value
jsmith 2035 0.0 -1.5 724712 30616 p7 S+ 9:49PM 0:01.61java-Dprogram.name=run.sh -Xms128m -Xmx512m -Dsun.rmi.dgc.client.gcInterval=3600000 -Dsun.rmi.dgc.server.gcInterval=3600000 -Djboss.platform.mbeanserver -Djava.endorsed.dirs=/devel/jboss-4.0.5.GA/lib/endorsed -classpath /devel/jboss-4.0.5.GA/bin/run.jar:/lib/tools.jarorg.jboss.Main-c minimal
process|attribute|match=value,arg|attribute|match=value
   |       |       |____      |_    |____     |______
   |       |            |       |        |           |
   |       |            |       |        |           |
   |       |            |       |        |           |
   |       |            |       |        |           |
process|basename|match=^java.*,arg|org.jboss.Main|match=.*
process|attribute|match=value
process|pidfile|match=/etc/product/lock.pid
rhq-plugin.xml 記述子ファイルにスキャンクエリーを定義したら、スキャンおよびプロセス結果を実装するために検出コンポーネントを記述する必要があります。
例4.1 検出コンポーネントのプロセススキャンメソッド
   List<ProcessScanResult< autoDiscoveryResults =
      context.getAutoDiscoveredProcesses();
   for (ProcessScanResult result : autoDiscoveryResults) {
       ProcessInfo procInfo = result.getProcessInfo();
       ....
       // as before
       DiscoveredResourceDetails detail =
          new DiscoveredResourceDetails(
              resourceType, key, name, null,
              description, childConfig, procInfo
          );
       result.add(detail);
} <metric displayName="Bytes Sent"
description="Shows the rate that data bytes are sent by the Web service."
property="Bytes Sent/sec"
defaultOn="true"
displayType="summary"
measurementType="trendsup"
units="bytes"/>propertyリソースモニタリングプロパティーを特定します。measurementType収集されるデータタイプを設定します。unitsモニタリングする単位を設定します。
public class testComponent implements ResourceComponent
, MeasurementFacet
, OperationFacet
    public void getValues(MeasurementReport report, Set<MeasurementScheduleRequest> metrics) throws Exception {

        String propertyBase = "\\Web Service(_Total)\\";
        Pdh pdh = new Pdh();

        for (MeasurementScheduleRequest request : metrics) {
            double value = pdh.getRawValue(propertyBase + request.getName());
            report.addData(new MeasurementDataNumeric(request, value));
        }
}4.2.2.3. イベント
<event name="errorLogEntry" description="an entry in the error log file"/>
EventPoller コンポーネントこれは大きなプラグイン Java コンポーネントにすることができますが、通常は別の *EventPoller.java コンポーネントに分割されます。イベントポーリングの実装方法は、リソースとロギングの性質によって異なります。最も簡単な方法の 1 つは、 EventPoller()次に、イベントタイプを定義し、イベントのポーリング方法を設定します。
    public PerfTestEventPoller(ResourceContext resourceContext) {
        this.resourceContext = resourceContext;
    }

    public String getEventType() {
        return PERFTEST_EVENT_TYPE;
    }

    public Set<Event> poll() {
        int count = Integer.parseInt(System.getProperty(SYSPROP_EVENTS_COUNT, "1"));
        String severityString = System.getProperty(SYSPROP_EVENTS_SEVERITY, EventSeverity.INFO.name());
        EventSeverity severity = EventSeverity.valueOf(severityString);
        Set<Event> events = new HashSet<Event>(count);
        for (int i = 0; i < count; i++) {
            Event event = new Event(PERFTEST_EVENT_TYPE, "source.loc", System.currentTimeMillis(), severity, "event #"
                + i);
            events.add(event);
        }
        return events;
}4.2.2.4. リソース設定
         <resource-configuration>
            <c:group name="Attributes">
               <c:simple-property
                  name="appBase"
                  required="true"
                  readOnly="true"
                  description="The Application Base directory for this virtual host." />
               <c:simple-property
                  name="autoDeploy"
                  type="boolean"
                  description="Does this host deploy new applications dropped in appBase at runtime?" />
               <c:simple-property
                  name="deployOnStartup"
                  type="boolean"
                  description="Does this host deploy applications in appBase at startup?" />
               <c:simple-property
                  name="deployXML"
                  displayName="Deploy XML"
                  type="boolean"
                  description="deploy Context XML config files?" />
               <c:simple-property
                  name="unpackWARs"
                  displayName="Unpack WARs"
                  type="boolean"
                  description="Does this Host automatically unpack deployed WAR files?" />
               <c:simple-property
                  name="aliases"
                  required="false"
                  type="longString"
                  description="Aliases assigned to the Host. When editing, each alias must be on a new line. Aliases are automatically lowercased." />
            </c:group>
</resource-configuration> public Configuration loadResourceConfiguration() {
Configuration configuration = super.loadResourceConfiguration();
try {
resetConfig(CONFIG_ALIASES, configuration);
} catch (Exception e) {
log.error("Failed to reset role property value", e);
}
return configuration;
} public void updateResourceConfiguration(ConfigurationUpdateReport report) {
Configuration reportConfiguration = report.getConfiguration();
// reserve the new alias settings
PropertySimple newAliases = reportConfiguration.getSimple(CONFIG_ALIASES);
// get the current alias settings
resetConfig(CONFIG_ALIASES, reportConfiguration);
PropertySimple currentAliases = reportConfiguration.getSimple(CONFIG_ALIASES);
// remove the aliases config from the report so they are ignored by the mbean config processing
reportConfiguration.remove(CONFIG_ALIASES);
// perform standard processing on remaining config
super.updateResourceConfiguration(report);
// add back the aliases config so the report is complete
reportConfiguration.put(newAliases);
// if the mbean update failed, return now
if (ConfigurationUpdateStatus.SUCCESS != report.getStatus()) {
return;
}
// try updating the alias settings
try {
consolidateSettings(newAliases, currentAliases, "addAlias", "removeAlias", "alias");
} catch (Exception e) {
newAliases.setErrorMessage(ThrowableUtil.getStackAsString(e));
report.setErrorMessage("Failed setting resource configuration - see property error messages for details");
log.info("Failure setting Tomcat VHost aliases configuration value", e);
}
// If all went well, persist the changes to the Tomcat server.xml
try {
storeConfig();
} catch (Exception e) {
report
.setErrorMessage("Failed to persist configuration change. Changes will not survive Tomcat restart unless a successful Store Configuration operation is performed.");
}
}4.2.3. ライフサイクルリスナー
org.rhq.core.pluginapi.plugin.PluginLifecycleListener クラスはプラグインコンポーネントで必要なグローバルリソースを割り当て、これらのリソースをクリーンアップします。
pluginLifecycleListener 属性を指定して 1 つのライフサイクルリスナーをオプションで定義できます。
<plugin name="Apache"
		displayName="Apache HTTP Server"
		description="Management of Apache web servers"
		package="org.rhq.plugins.apache"
		pluginLifecycleListener="ApachePluginLifecycleListener"
		...
4.2.4. プラグイン依存関係: プラグイン間の関係の定義
- 必要な依存関係は <depends> 要素を使用して設定されます。使用するだけで必要なプラグインが読み込まれないと、他のプラグインが読み込まれないことを <depends> 意味します。
useClasses属性を追加すると、親プラグインのクラスおよび JAR ファイルを子プラグインで使用できるようになります。 - インジェクションプラグインの依存関係は、ルートレベルのリソースが別のリソースタイプ内で実行され、親リソースが親プラグインとして定義されることを意味します。これにより、既存のリソースタイプに新しい子が追加されます。
- 埋め込みプラグインの依存関係は、既存の子に新しい親リソースタイプを追加することを意味します。これにより、(両方のプラグインの設定に応じて)新たな親のクラスローダーを共有するか、単に検出を拡張するだけです。
4.2.4.1. 必要なプラグイン依存関係
useClasses 属性を指定して、親プラグインから JAR でプルできます。この useClasses オプションは、1 つのプラグイン記述子で必要な依存関係の 1 つに対してのみ設定できます。<depends> 要素に useClasses 属性がない場合、デフォルトでプラグイン記述子に指定された最後の <depends> 要素は useClasses 属性を true に設定しています。
4.2.4.2. 埋め込みプラグインの依存関係
sourcePlugin および sourceType 属性を設定してプラグイン記述子に定義されます。プラグインソースを指定すると、サーバーまたはサービスはソースリソースタイプからコピーされます。これは、埋め込みサーバーまたはサービスが検出とリソースクラスを上書きできる例外で、ソースと同じメタデータを持ちます。
4.2.4.3. インジェクションプラグインの依存関係
<runs-inside>
   <parent-resource-type name="JMX Server" plugin="JMX" />
   <parent-resource-type name="JBoss Server" plugin="JBoss AS" />
</runs-inside>
4.2.5. プラグイン間のクラス共有
図4.1 エージェントコンポーネント、使用方法
classLoader="instance" し、リソースタイプの検出コンポーネントが実装されていることを確認します。 ClassLoaderFacet したがって、管理されている特定バージョンの特定のバージョンの接続クラスを追加で検索できる場合は、プラグインコンテナーに指示します。
classLoader オプションが shared に設定されます。つまり、Z1.server リソースは親リソースとクラスローダーを共有し、そのクラスローダーはリソースクラスローダーまたはプラグインクラスローダーになります。すべての Z1.server リソースは同じクラスローダーを使用します。
例4.2 プラグイン Z のクラスローダー
<plug-in name="Z">

<depends plugin="A" />

<server name="Z1.server" classLoader="shared">
   <runs-inside>
      <parent-resource-type name="B1.server" plugin="B"/>
      <parent-resource-type name="C1.server" plugin="C"/>
   </runs-inside>
</server>

<server name="Z2.server" sourcePlugin="D" sourceType="D1" classLoader="instance">
</server>

<server name="Z3.server" classLoader="instance">
</server>

</plugin>classLoader オプションを instance に設定すると、各リソースが独自のリソースプラグインを使用することを意味します。ただし、Z2.server の場合は、Z2.server プラグインはプラグイン D の値を組み込むことで拡張されるため、Z2.server リソースはクラスローダーを親プラグインと共有します。
classLoader オプションが instance に設定され、インジェクトまたは埋め込み依存関係のないため、単に独自のリソースクラスローダーを使用します。classLoader オプションが instance に設定されている場合、 ResourceDiscoveryComponent 実装は任意で、 ClassLoaderFacet リソースのクラスローダーに配置する必要のある追加の JAR を List<URL> 参照するメソッド(getAdditionalClasspathUrls)を使用します。プラグインコンテナーがリソースのクラスローダーを作成する必要がある場合は、リソースの検出コンポーネントがこのファセットを実装しているかどうかを確認します。そうであれば、追加のクラスパス URL を取得し、リソースの作成時にこれをリソースクラスローダーに追加します。
classLoader 属性値とその親の属性値の両方に依存し classLoader ます。
| リソースクラスローダー | 親クラスローダー | classloader Description |
|---|---|---|
| shared | shared | リソースがクラスと親クラスの両方にアクセスできるように、useClasses 値を true に設定する必要があります。 |
| インスタンス | shared | リソースには主に独自のクラスが必要ですが、親クラスを使用できるように useclasses するため、リソースを true に設定することは有益です。 |
| shared | インスタンス | リソースは独自のクラスローダーのみを使用します。 |
| インスタンス | インスタンス | リソースは独自のクラスローダーのみを使用します。 |
4.3. 拡張例: リソースのコンテンツタイプ
      <content name="InstalledSoftware" displayName="Installed Software" category="deployable" description="Installed Windows Software">
           <configuration>
               <c:simple-property name="Publisher"/>
               <c:simple-property name="Comments"/>
               <c:simple-property name="Contact"/>
               <c:simple-property name="HelpLink"/>
               <c:simple-property name="HelpTelephone"/>
               <c:simple-property name="InstallLocation"/>
               <c:simple-property name="InstallSource"/>
               <c:simple-property name="EstimatedSize" units="kilobytes"/>
          </configuration>
</content>パッケージの属性
- 表示名(オプション)
- ユーザーインターフェースのパッケージタイプの名前。
- 説明(オプション)
- は、このタイプのパッケージに含まれるコンテンツの種類を説明します。
- カテゴリー(必須)
- 4 つの列挙オプションの 1 つ。
- 実行可能なスクリプト(編集可能な可能性があります)
- 実行可能なバイナリー
- 設定ファイル(リソースの設定ファイル)
- deployable
- 検出間隔(オプション)
- このタイプのパッケージ検出スキャンの間隔を定義します。異なるパッケージタイプを間隔で設定して、パッケージインベントリーの変更の可能性を表すことができます。
- 作成タイプのフラグ(オプション)
- true に設定すると、エンクロージングリソースタイプのリソースを作成する際にこのタイプのパッケージが使用されます。この状況の例は、Java EAR ファイルです。JBoss ON のエンタープライズアプリケーションを表す EAR リソースタイプがあります。そのリソースタイプの下には、EAR ファイル自体を表すために定義されたパッケージタイプがあります。このパッケージタイプには、作成タイプとしてフラグが付けられます。新規の EAR リソースを作成する場合は、EAR ファイルを同時に作成する必要があります。パッケージは通常新しいリソースの作成を表していないため、この属性のデフォルトは false です。
- 設定(オプション)
- configuration 要素を使用すると、プラグインはパッケージタイプに関するオープンな属性のセットを定義できます。これらの値はパッケージの検出中に設定され、読み取り専用としてマークされていない場合は、アーティファクトの作成時にユーザーに指定できます。この設定要素のプロパティーの例として、EAR ファイルが展開形式または zipped としてデプロイされるかどうかを記述するブール値があります。EAR ファイルが検出されると、このフラグにデータが設定され、パッケージタイプに指定された情報が伝送されます。さらに、JBoss ON で新しい EAR ファイルをデプロイする場合、このフラグを設定して、パッケージを AS インスタンスにデプロイする方法を指定できます。
4.4. 拡張例: HTTP メトリクス
- GET または HEAD リクエストを指定のサーバーのベース URL に発行します。
- HTTP の戻りコードと応答時間をリソース特性として収集します。
図4.2 基本的なエージェントプラグインシナリオ
rhq-plugin.xml ファイルをプラグイン記述子として持ちます。これは、JBoss ON がプラグイン設定を認識するために必要なものです。プラグインは Maven プロジェクトとして構築されるため、適切に設定された JAR pom.xml ファイルをエージェントプラグインとしてデプロイできるため、必須ではありませんが、ファイルには必須ではありません。
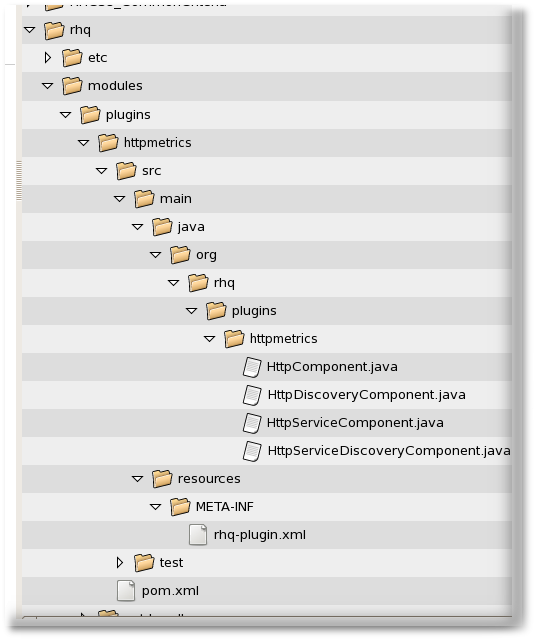
図4.3 エージェントプラグインプロジェクトのディレクトリーレイアウト
4.4.1. プラグイン記述子(rhq-plugin.xml)の確認
例4.3 基本的なプラグイン情報
<?xml version="1.0" encoding="UTF-8" ?>
<plugin name="HttpTest"
        displayName="HttpTest plugin"
        package="org.rhq.plugins.httptest"
        version="2.0"
        description="Monitoring of http servers"
        xmlns:xsi="http://www.w3.org/2001/XMLSchema-instance"
        xmlns="urn:xmlns:rhq-plugin"
xmlns:c="urn:xmlns:rhq-configuration">package 属性は、記述子のプラグイン設定で参照される Java クラス名の Java パッケージを特定します。
例4.4 サーバー定義
<server name="HttpCheck"
   description="Httpserver pinging"
   discovery="HttpDiscoveryComponent"
   class="HttpComponent">
.java ファイルとクラスを指します。この supportsManualAdd オプションは、UI を使用して HTTP サービスを手動で追加できることを JBoss ON に指定します。これは管理に重要になります。
例4.5 サービス定義
<service name="HttpServiceCheck"
         discovery="HttpServiceDiscoveryComponent"
         class="HttpServiceComponent"
         description="One remote Http Server"
supportsManualAdd="true"例4.6 簡易設定プロパティー
<plugin-configuration>
   <c:simple-property name="url"
     type="string"
     required="true" />
</plugin-configuration>例4.7 複雑な設定プロパティー
<plugin-configuration>
  <c:list-property name="Servers">
     <c:map-property name="OneServer">
        <c:simple-property name="host"/>
        <c:simple-property name="port">
           <c:integer-constraint
              minimum="0"
              maximum="65535"/>
        </c:simple-property>
        <c:simple-property name="protocol">
           <c:property-options>
              <c:option value="http" default="true"/>
              <c:option value="https"/>
           </c:property-options>
        </c:simple-property>
     </c:map-property>
  </c:list-property>
</plugin-configuration>例4.8 定義されたメトリクス
     <metric property="responseTime"
             displayName="Response Time"
             measurementType="dynamic"
             units="milliseconds"
             displayType="summary"/>

     <metric property="status"
             displayName="Status Code"
             data type="trait"
             displayType="summary"/>
      </service>
   </server>
</plugin>表4.5 メトリクスの属性
| attribute | description |
|---|---|
| property | このメトリクスの一意の名前を指定します。を使ってコードで名前を取得することもできます。 getName() コール。 |
| description | メトリックの人間が判読できる説明を提供します。 |
| displayName | JBoss ON UI に表示される名前を指定します。 |
| データタイプ | 数値や特性などのメトリックのタイプを設定します。 |
| units | 数値データタイプに使用する測定単位。 |
| displayType | 値がに設定されていると summary、メトリクスはインジケータチャートに表示され、デフォルトで収集されます。 |
| defaultOn | デフォルトで収集されるメトリクスを設定します。 |
| measurementType |
数値の値の特性を設定します。オプションは、傾向、傾向、または動的です。両方の傾向のメトリックの場合、システムは毎分のメトリックを自動で作成します。
値の配列など、大きなデータ構造の一部を形成する値は、監視の前に個別の値にデコンストラクトする必要があります。
|
4.4.2. Discovery コンポーネント(HttpDiscoveryComponent.java および HttpServiceDiscoveryComponent.java)の確認
HttpDiscoveryComponent.java、HTTP メトリクスサーバーを検出します。検出コンポーネントは、リソースを検出するためにエージェントの InventoryManager によって呼び出されます。これは、プロセステーブルのスキャン、MBeanServer のクエリー、またはその他の方法で実行できます。いずれの方法でも最も重要なことは、検出コンポーネントが同じリソースに対して同じ一意の鍵を返すことです。DiscoveryComponent を実装する必要があり org.rhq.core.pluginapi.inventory.ResourceDiscoveryComponent、実装する必要があり discoverResources()ます。
例4.9 HttpDiscoveryComponent.java
public class HttpDiscoveryComponent implements
    ResourceDiscoveryComponent
{
    public Set discoverResources(ResourceDiscoveryContext context)
        throws InvalidPluginConfigurationException, Exception
    {
        Set<DiscoveredResourceDetails> result =
            new HashSet<DiscoveredResourceDetails>();

        String key = "http://localhost:7080/"; // Jon server
        String name = key;
        String description = "Http server at " + key;
        Configuration configuration = null;
        ResourceType resourceType = context.getResourceType();
        DiscoveredResourceDetails detail =
            new DiscoveredResourceDetails(resourceType,
                key, name, null, description,
                configuration, null
            );

        result.add(detail);

        return result;
}HttpServiceDiscoveryComponent.java)は、検出スキャンではなく、GUI で渡される情報に依存し、そのリソースを設定します。Java ファイルの最初の定義はサーバー検出の場合と似ていますが、この定義には追加の定義があります。 list<Configuration> childConfigs UI 経由で渡される情報を処理する。これにより、ユーザーが提供する必要な url 情報に関する情報を取得します。
例4.10 サービスディスカバリー
public class HttpServiceDiscoveryComponent
    implements ResourceDiscoveryComponent<HttpServiceComponent>;
{
    public Set<DiscoveredResourceDetails> discoverResources
        (ResourceDiscoveryContext<HttpServiceComponent> context)
        throws InvalidPluginConfigurationException, Exception
    {
        Set<DiscoveredResourceDetails> result =
            new HashSet<DiscoveredResourceDetails>();
        ResourceType resourceType = context.getResourceType();

        List<Configuration> childConfigs =
            context.getPluginConfigurations();
        for (Configuration childConfig : childConfigs) {
            String key = childConfig.getSimpleValue("url", null);
            if (key == null)
                throw new InvalidPluginConfigurationException(
"No URL provided");例4.11 HTTP URL リソースの一覧表示
            String name = key;
            String description = "Http server at " + key;
            DiscoveredResourceDetails detail =
                new DiscoveredResourceDetails(
                    resourceType, key, name, null,
                    description, childConfig, null
                );
            result.add(detail);
        }
        return result;
}4.4.3. プラグインコンポーネント(HttpComponent.java および HttpServiceComponent.java)の確認
HttpComponent.java)では、プラグインは非常にシンプルです。コンポーネントは ResourceComponent インターフェースからプレースホルダーメソッドのみを実装し、サーバーの可用性を設定します。可用性を UP に設定すると、リソースコンポーネントが自動的に起動できるようになります。
例4.12 検出後のサーバーの可用性
    public AvailabilityType getAvailability() {
        return AvailabilityType.UP;
}HttpServiceComponent.java)は、プラグイン記述子に定義された操作を実行する必要があるため、より複雑です。
MeasurementFacet.
MeasurementFacet 以下のメソッドを実装します。
getValues(MeasurementReport report, Set metrics)
MeasurementReport 渡されるのは、監視結果が追加される場所です。The metrics value は、データを収集する必要のあるメトリクスの一覧です。この情報はすべて、<metrics> 要素または UI 設定で定義できます。
public class HttpComponent implements ResourceComponent,
    MeasurementFacet
{
    URL url;       // remote server url
    long time;     // response time from last collection
String status; // Status code from last collectiongetValues() メソッド MeasurementFacet 実装は必須ですが、これを実行する最初のステップではありません。リソースがダウンしている場合はリソースを検出できないので、最初のステップでは、開始元となる起動値を設定します。 ResourceContext UP の可用性を付与します。
例4.13 サービスリソースの可用性
    public void start(ResourceContext context)
        throws InvalidPluginConfigurationException, Exception
    {
        url = new URL(context.getResourceKey());
        // Provide an initial status, so
        // getAvailability() returns up
        status = "200";
}getValues() 実装が可能です。これは、指定の URL から実際に監視データを収集します。
例4.14 getValues()の実装
public void getValues(MeasurementReport report,
          Set<MeasurementScheduleRequest> metrics)
        throws Exception
    {
        getData();
        // Loop over the incoming requests and
        // fill in the requested data
        for (MeasurementScheduleRequest request : metrics)
        {
            if (request.getName().equals("responseTime")) {
                report.addData(new MeasurementDataNumeric(
                    request, new Double(time)));
            } else if (request.getName().equals("status")) {
                report.addData(new MeasurementDataTrait
                    (request, status));
            }
        }
}getData() のメソッド MeasurementFacet 受信リクエストをループして、希望するメトリックを確認し、収集した値を指定します。データのタイプによっては、データは正しいデータにラップされる可能性があります。 MeasurementData* クラス。
例4.15 getData()の実装
private void getData()
    {
        HttpURLConnection con = null;
        int code = 0;
        try {
            con = (HttpURLConnection) url.openConnection();
            con.setConnectTimeout(1000);
            long now = System.currentTimeMillis();
            con.connect();
            code = con.getResponseCode();
            long t2 = System.currentTimeMillis();
            time = t2 - now;
        } catch (Exception e) {
            e.printStackTrace();
        }
        if (con != null)
            con.disconnect();

        status = String.valueOf(code);
}4.5. 例: 組み込みおよび挿入されたプラグイン依存関係
4.5.1. 簡単な依存関係: JBoss AS および JMX プラグイン
例4.16 JMX プラグイン記述子
<plugin name="JMX">
   <server name="JMX Server" discovery="JMXDiscoveryComponent" class="JMXServerComponent">
   ...
   </server>
</plugin>
useClasses 引数がに設定されたため true)JBoss AS プラグインクラスローダーがすべての JMX プラグインクラスを使用できるようにしますが、JBoss AS プラグイン記述子は JMX プラグインに関連するソースタイプを実際に定義または使用するわけではありません。
例4.17 JBoss AS プラグイン記述子
<plugin name="JBossAS">
   <depends plugin="JMX" useClasses="true"/>
   <server name="JBossAS Server" discovery="JBossASDiscoveryComponent" class="JBossASServerComponent">
   ...
   </server>
</plugin>
4.5.2. Embedded Dependency: JVM MBeanServer および JBoss AS
例4.18 JMX プラグイン記述子
<plugin name="JMX">
   <server name="JMX Server" discovery="JMXDiscoveryComponent" class="JMXServerComponent">
      <service name="VM Memory System"
               discovery="MBeanResourceDiscoveryComponent"
               class="MBeanResourceComponent"
               description="The memory system of the Java virtual machine">
      ...
      </service>
   ...
   </server>
</plugin>sourcePlugin および sourceType 属性でプルされます。これは、2 番目の JMX 検出スキャンを実行するためです。これは、を使用します。 org.rhq.plugins.jmx.EmbeddedJMXServerDiscoveryComponent 特別な検出スキャンを実行するクラス。JBoss AS インスタンスに組み込まれた JVM を検索します。次に sourcePlugin および sourceType 属性はリソースタイプをコピーし、これを一意の名前にして、埋め込み JVM がスタンドアロン JVM とは異なるリソースタイプとして処理されるようにします。
例4.19 JBoss AS プラグイン記述子
<plugin name="JBossAS">
   <depends plugin="JMX" useClasses="true"/>
   <server name="JBossAS Server" discovery="JBossASDiscoveryComponent" class="JBossASServerComponent">
      <server name="JBoss AS JVM"
              description="JVM of the JBossAS"
              sourcePlugin="JMX"
              sourceType="JMX Server"
              discovery="org.rhq.plugins.jmx.EmbeddedJMXServerDiscoveryComponent"
              class="org.rhq.plugins.jmx.JMXServerComponent">
      ...
      </server>
   ...
   </server>
</plugin>4.5.3. injected Dependency: Hibernate with JVM and JBoss AS
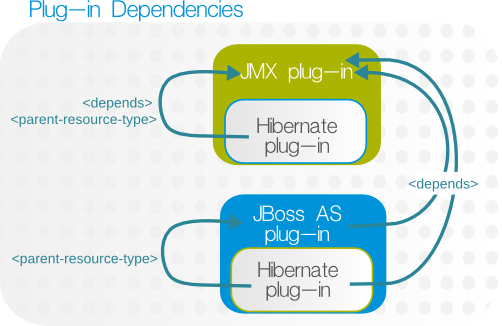
図4.4 Hibernate、JMX、および JBoss AS 依存関係
例4.20 JMX プラグイン記述子
<plugin name="JMX">
   <server name="JMX Server" discovery="JMXDiscoveryComponent" class="JMXServerComponent">
   ...
   </server>
</plugin>
例4.21 JBoss AS プラグイン記述子
<plugin name="JBoss AS">
   <depends plugin="JMX" useClasses="true"/>
   <server name="JBossAS Server" discovery="JBossASDiscoveryComponent" class="JBossASServerComponent">
   ...
   </server>
</plugin>
例4.22 Hibernate プラグイン記述子
   <depends plugin="JMX" useClasses="true"/>
   <service name="Hibernate Statistics"
            discovery="org.rhq.plugins.jmx.MBeanResourceDiscoveryComponent" class="StatisticsComponent">
     <runs-inside>
         <parent-resource-type name="JMX Server" plugin="JMX"/>
         <parent-resource-type name="JBossAS Server" plugin="JBossAS"/>
      </runs-inside>
   ...
   </service>
</plugin>4.6. 拡張例: 誤差の監視
- Filesystem - リソースにローカルとなるマシンの任意のディレクトリー
- pluginConfiguration: ホームディレクトリーなどのリソースプラグインでプロパティーを定義します。
- resourceConfiguration、リソース設定プロパティー
- measurementTrayt(リソースについての収集される特性)
/etc/、drift 定義の要素は以下のようになります。
Value name: fileSystem
Value context: /etc
例4.23 ベースディレクトリーのみ
     <drift-definition name="Template-File System"
                       description="Monitor the file system for drift. Definitions should set a more specific base directory as the file system root is not recommended.">
         <basedir>
             <value-context>fileSystem</value-context>
             <value-name>/</value-name>
         </basedir>
</drift-definition>例4.24 含まれるパスおよびパターン
<drift-definition name="Template-Base Files"
                  description="Monitor base application server files for drift. It defines monitoring for some standard sub-directories of the HOME directory.  Note, it is not recommeded to monitor all files for an application server. There are many files, and many temp files.">
    <basedir>
         <value-context>pluginConfiguration</value-context>
         <value-name>homeDir</value-name>
    </basedir>
    <includes>
	<include path="bin" pattern="*/*.sh" />
        <include path="lib" />
        <include path="client" />
    </includes>
</drift-definition>4.7. 拡張例: プロビジョニングおよびコンテンツデプロイメント(バンドル)
- Filesystem - リソースにローカルとなるマシンの任意のディレクトリー
- pluginConfiguration: ホームディレクトリーなどのリソースプラグインでプロパティーを定義します。
- resourceConfiguration、リソース設定プロパティー
- measurementTrayt(リソースについての収集される特性)
例4.25 単一バンドルベースディレクトリー
     <bundle-target>
         <destination-base-dir name="Root File System" description="The top root directory on the platform (/)" >
           <value-context>fileSystem</value-context>
           <value-name>/</value-name>
        </destination-base-dir>
</bundle-target>例4.26 複数のバンドルベースディレクトリー
<bundle-target>
    <destination-base-dir name="Install Directory" description="The top directory where the JBossAS Server is installed. ">
      <value-context>pluginConfiguration</value-context>
      <value-name>homeDir</value-name>
   </destination-base-dir>
   <destination-base-dir name="Profile Directory" description="The profile configuration directory.">
      <value-context>pluginConfiguration</value-context>
      <value-name>serverHomeDir</value-name>
   </destination-base-dir>
</bundle-target>4.8. 拡張例: 非同期可用性チェック
getAvailability().
AvailabilityCollectorRunnable クラス。
例4.27 パート 1: コレクター
public class YourResourceComponent implements ResourceComponent {

    // your component needs this data member - it is your availability collector
private AvailabilityCollectorRunnable availCollector;例4.28 パート 2: アベイラビリティーコレクターの開始
    public void start(ResourceContext context) {
        availCollector = resourceContext.createAvailabilityCollectorRunnable(new AvailabilityFacet() {
            public AvailabilityType getAvailability() {
                // Perform the actual check to see if the managed resource is up or not
                // This method is not on a timer and can return the availability in any amount of time
                // that it needs to take.
                return ...AvailabilityType...;
            }
        }, 60000L); // 1 minute - the minimum interval allowed

        // Now that you've created your availability collector, start it to assign it a thread in the pool.
        availCollector.start();

        // ... and the rest of your component's start method goes here ...
	}


    public void stop() {
        // Stop your availability collector to cancel the collector and kill its thread.
        availCollector.stop();

        // ... and the rest of your component's stop method goes here ...
}getAvailability() メソッド。Async アベイラビリティーコレクターが作成されると、 getAvailability() メソッドは、新しい可用性スキャンの実行を試行するのではなく、コレクターに保存されている最後の既知の結果を返す必要があります。
getAvailability() メソッド。
例4.29 パート 2: 最後の既知の利用可能な状態に戻します。
    public AvailabilityType getAvailability() {
	// This method quickly returns the last known availability that was recorded
	// by the availability collector.
        return availCollector.getLastKnownAvailability();
    }
}第5章 エージェントプラグインの作成: 手順
5.1. ヒント: XSD アノテーションの確認
rhq-configuration.xsd およびに要素を提供する XSD ファイルがいくつかあります rhq-plugin.xsd。
      <xs:attribute name="subCategory" use="optional">
         <xs:annotation>
            <xs:documentation>
               Resource types can be grouped into subcategories. A subcategory
               defines "like" resource types so they can, for example, be shown together
               in a UI group tab. You can, therefore, define multiple resource types
               and group them together by making their subCategory attributes the same.
            </xs:documentation>
         </xs:annotation>
      </xs:attribute>
5.2. エージェントプラグインの検証
mvn org.rhq:rhq-plugin-validator:rhq-plugin-validate
<build>
   <plugins>
      <plugin>
         <groupId>org.rhq</groupId>
         <artifactId>rhq-core-plugin-validator</artifactId>
         <version>1.0.1-SNAPSHOT</version>
      </plugin>
   </plugins>
</build>
...

...
<pluginRepositories>
   <pluginRepository>
      <id>jboss</id>
      <name>JBoss Plugin Repository</name>
      <url>http://repository.jboss.org/maven2/</url>
      <snapshots>
         <enabled>false</enabled>
      </snapshots>
   </pluginRepository>
</pluginRepositories>
...
5.3. エージェントプラグインの編集に関する注意事項
rhq-plugin.xml ファイルを編集し、プラグインを再ビルドします。
5.4. エージェントプラグインのデプロイ
/rhq-agent/plugins/ ディレクトリーに保存さ れます。エージェントプラグインは JBoss ON サーバー にアップロードしてデプロイされ、JBoss ON サーバーはエージェントに配布します。サーバー側のプラグインと同様に、エージェントプラグインをローカルの JBoss ON サーバーまたは JBoss ON UI でデプロイできます。
5.4.1. リモートでエージェントプラグインをデプロイ
- トップメニューで、Administration タブをクリックします。
- 左側のナビゲーションバーの Configuration ボックスで、Agent Plugins リンクをクリックします。

- ページの下部にある Upload Plugin セクションまでスクロールします。
- Browse... ボタンをクリックして、プラグイン JAR ファイルの場所を参照します。
- デプロイするプラグインがボックスに一覧表示されている場合は、Upload ボタンをクリックします。

- エージェントプラグインのアップロードが完了したら、Scan For Updates ボタンを使用します。追加されたプラグインで定義されるリソースタイプのサイズと数によって、更新プロセスに数分かかる場合があります。
- システム内のエージェントにプラグインの更新をデプロイするには、Update Plugins On Agents ボタンを使用します。注記プラグインは、各 RHQ Agent を再起動するか、各 RHQ Agent リソースの Update All Plugins リソース操作を呼び出してデプロイすることもできます。
- メイン Inventory タブを選択します。
- 左側の Resources メニューから All Resources オプションを選択します。
- 関連するエージェントの名前を選択します。
- Operations タブの下にスケジュールを作成します。
5.4.2. エージェントプラグインのデプロイ
plugins/ ディレクトリーがあります。サーバーは定期的にこのディレクトリーをポーリングします。新規または更新された JAR ファイルはすべてサーバー設定の適切なディレクトリーにコピーされ、元の JAR ファイルが plugins/ ディレクトリーから削除されます。
/plugins/ ディレクトリーにコピーでき 、サーバーによってデプロイされます。
5.5. エージェントプラグインの更新
META-INF/MANIFEST.MF ファイルにある Implementation-Version 設定)を使用して、プラグインの後続のバージョンを特定し、クラウドの JBoss ON サーバーのプラグインを更新します。
5.6. エージェントプラグインの無効化
- トップメニューで、Administration タブをクリックします。
- 左側のナビゲーションバーの Configuration ボックスで、Agent Plugins リンクをクリックします。
- 無効にするエージェントプラグインを選択します。
- DISABLE ボタンをクリックします。

5.7. エージェントプラグインの削除
- トップメニューで、Administration タブをクリックします。
- 左側のナビゲーションバーの Configuration ボックスで、Agent Plugins リンクをクリックします。
- 削除するプラグインを選択します。
- Delete ボタンをクリックします。

第6章 エージェント Advanced Management Plug-in System(AMPS)リファレンス
6.1. Domain オブジェクト
6.1.1. リソースおよびリソースタイプ
6.2. プラグインの Facets
6.2.1. AvailabilityFacet
6.2.2. ConfigurationFacet
6.2.3. ContentFacet
6.2.4. ManualAddFacet
6.2.5. MeasurementFacet
6.2.6. OperationFacet
6.2.7. ResourceFactoryFacet
6.2.8. SupportFacet
6.3. プラグインコンポーネント
6.3.1. ResourceDiscoveryComponent
ResourceDiscoveryContext オブジェクトで検出コンポーネントに送信されます。このコンテキストには、コンポーネントが新規リソースを見つけ、作成するために必要なすべての情報が含まれます。Discovery コンテキストは、検出コンポーネントの代わりにプラグインコンテナーが新しいリソースを検出できる場合に、検出コンポーネントにリソースを注入するために使用されます。プラグインコンテナーは、プラグインの記述子を介して適切なメタデータが提供される場合にのみ、自動的に検出できます。
6.3.2. ResourceComponent
6.4. ネイティブシステム情報アクセス
6.4.1. SystemInfoFactory および SystemInfo
ResourceDiscoveryContext またはのいずれか ResourceContext)から SystemInfo オブジェクトを取得したら、ネイティブライブラリーに呼び出しを行い、オペレーティングシステムから要求されたデータを取得するオブジェクトに呼び出しを行うことができます。ネイティブライブラリーが利用できない場合、SystemInfo は、SystemInfo インターフェースで定義されたメソッドの一部の純粋な Java 実装でサポートされます(このインターフェースの JavaSystemInfo 実装を参照してください)。純粋な Java 実装でサポートされていないメソッドはをスローし UnsupportedOperationExceptionます。
6.4.2. ProcessInfoQuery
第7章 ドキュメント情報
7.1. フィードバック提供
- JBoss products グループを選択します。
- 一覧 Red Hat JBoss Operations Network から選択します。
- コンポーネントをに設定し Documentationます。
- バージョン番号を 3.3 に設定します。
- エラーの場合は、ページ番号(PDF ファイル用)または URL(HTML の場合)を付け、問題(正しくない手順や typo など)の説明を付与します。機能強化のために、追加する必要のある情報と理由を示します。
- バグの明確なタイトルを指定します。たとえば、"Incorrect command example for setup script options" はよりも優れてい "Bad example"ます。
付録A ドキュメント履歴
| 改訂履歴 | |||
|---|---|---|---|
| 改訂 3.3.2-7 | Thu Jun 25 2015 | ||
| |||
| 改訂 3.3.1-1 | Wed Feb 18 2015 | ||
| |||
| 改訂 3.3-10 | Mon Nov 17 2014 | ||
| |||