
第9章 Integrating Red Hat JBoss BRMS with Red Hat Single Sign-On
Red Hat Single Sign-On (RH-SSO) is a Single Sign-On solution that you can use for securing your browser applications and your REST web services. This chapter describes how you can integrate RH-SSO with Red Hat JBoss BRMS and leverage its features.
Integrating with RH-SSO brings an integrated SSO and IDM (Identity Management) environment for Red Hat JBoss BRMS. The session management feature of RH-SSO allows you to use different Red Hat JBoss BRMS environments on the web by authenticating only once.
For more information on RH-SSO, see the RH-SSO documentation.
Red Hat Single Sign On Integration Points
You can integrate RH-SSO with Realtime Decision Servers using the following integration points:
Business Central authentication through an RH-SSO server
Authenticating Red Hat JBoss BRMS Business Central through RH-SSO involves securing both the Business Central web client and remote services through RH-SSO. This integration enables you to connect to Business Central using either web interface or a remote service consumer through RH-SSO.
Realtime Decision Server authentication through an RH-SSO server
Authenticating Red Hat JBoss BRMS Realtime Decision Server through RH-SSO involves securing the remote services provided by the Realtime Decision Server as it does not provide a web interface for server authentication. This enables any remote Red Hat JBoss BRMS service consumer (user or a service) to authenticate through RH-SSO.
Third-party client authentication through an RH-SSO server
Authenticating a third-party client through an RH-SSO server involves third-party clients to authenticate themselves using RH-SSO to consume the remote service endpoints provided by Business Central and Realtime Decision Server, such as the REST API or remote file system services.
The following sections describe how to achieve RH-SSO integration through these integration points:
9.1. Business Central Authentication through RH-SSO
To authenticate Business Central through RH-SSO:
- Set up and run an RH-SSO server with a realm client for Business Central.
- Install and set up the RH-SSO client adapter for EAP.
- Secure Business Central Remote Service using RH-SSO.
9.1.1. Setting Up RH-SSO with Realm Client for Business Central
Security realms are used to restrict access for the different applications resources. It is advised to create a new realm whether your RH-SSO instance is private or shared amongst other products. You can keep the master realm as a place for super administrators to create and manage the realms in your system. If you are integrating with an RH-SSO instance that is shared with other product installations to achieve Single Sign-On with those applications, all those applications must use the same realm.
Here is how you can install an RH-SSO server and create a security realm for Business Central:
Procedure: Setting Up RH-SSO with Realm Client
- Download RH-SSO from the DOWNLOADS section of the Red Hat Customer Portal.
Install and configure a basic RH-SSO standalone server. To do this, follow the instructions in chapter Install and Boot of the Red Hat Single Sign On Getting Started Guide. For production environment settings, consult the Red Hat Single Sign On Server Administration Guide.
注記If you want to run both RH-SSO and Red Hat JBoss BRMS servers on the same machine, ensure that you avoid port conflicts. To do so, do one of the following:
Update the
RHSSO_HOME/standalone/configuration/standalone.xmlfile and set a port offset to 100. For example:<socket-binding-group name="standard-sockets" default-interface="public" port-offset="${jboss.socket.binding.port-offset:100}">Use an environment variable to run the server:
bin/standalone.sh -Djboss.socket.binding.port-offset=100
Start the RH-SSO server using the following command from
RHSSO_HOME/bin:./standalone.sh
Once the RH-SSO server starts, open http://localhost:8180/auth/admin in a web browser and log in using your admin credentials that you created while installing RH-SSO. When you login for the first time, you can set up the initial user using the new user registration form.
- In the RH-SSO Admin Console, click the Realm Settings left menu item.
On the Realm Settings page, click Add Realm.
The Add realm page opens.
- On the Add realm page, provide a name for the realm and click Create.
Click the Clients left menu item and click Create.
The Add Client page opens.
On the Add Client page, provide the required information to create a new client for your realm. For example:
- Client ID: kie
- Client protocol: openid-connect
- Root URL: http://localhost:8080/business-central
Click Save to save your changes.
Once you create a new client, its Access Type is set to
publicby default. Change it toconfidential.At this point, the RH-SSO server is configured with a realm with a client for Red Hat JBoss BRMS applications (Business Central, in this example) and running and listening for HTTP connections at
localhost:8180. This realm provides different users, roles, and sessions for the Red Hat JBoss BRMS applications.
9.1.2. Setting Up RH-SSO Client Adapter for EAP
To set up the RH-SSO client adapter for EAP:
- Install the RH-SSO adapter for EAP.
- Configure the Red Hat JBoss BRMS application and the RH-SSO client adapter.
Procedure: Installing the RH-SSO Adapter for Red Hat JBoss EAP 6 and 7
Install Red Hat JBoss EAP 6.4.X or 7.0.
For version 6, see chapter Installation Instructions from the Red Hat JBoss Enterprise Application Platform Installation Guide.
For version 7, see chapter Installing JBoss EAP from the Red Hat JBoss Enterprise Application Platform Installation Guide.
Install Red Hat JBoss BRMS in the freshly installed JBoss EAP.
If you configure RH-SSO adapter by making changes in
standalone.xml, and then unzip Red Hat JBoss BRMS, you may overwrite and lose the RH-SSO adapter configuration.- Download the EAP adapter from the Red Hat Customer Portal.
- Unzip and install the adapter. For installation instructions, see section JBoss EAP Adapter from the Red Hat Single Sign On Securing Applications and Services Guide.
For version 7, go to
EAP_HOME/standalone/configurationand open thestandalone.xmlandstandalone-full.xmlfiles. Delete the<single-sign-on/>element from both of them.You do not need to perform this step for Red Hat JBoss EAP 6.
Procedure: Configuring the RH-SSO Adapter
Navigate to
EAP_HOME/standalone/configurationin your EAP installation and editstandalone.xmlto add the RH-SSO subsystem configuration. For example:<subsystem xmlns="urn:jboss:domain:keycloak:1.1"> <secure-deployment name="business-central.war"> <realm>demo</realm> <realm-public-key>MIGfMA0GCSqGSIb3DQEBAQUAA4GNADCBiQKBgQCrVrCuTtArbgaZzL1hvh0xtL5mc7o0NqPVnYXkLvgcwiC3BjLGw1tGEGoJaXDuSaRllobm53JBhjx33UNv+5z/UMG4kytBWxheNVKnL6GgqlNabMaFfPLPCF8kAgKnsi79NMo+n6KnSY8YeUmec/p2vjO2NjsSAVcWEQMVhJ31LwIDAQAB</realm-public-key> <auth-server-url>http://localhost:8180/auth</auth-server-url> <ssl-required>external</ssl-required> <enable-basic-auth>true</enable-basic-auth> <resource>kie</resource> <credential name="secret">759514d0-dbb1-46ba-b7e7-ff76e63c6891</credential> <principal-attribute>preferred_username</principal-attribute> </secure-deployment> </subsystem>
Here,
-
secure-deployment name: Name of your application’s WAR file. -
realm: Name of the realm that you created for the applications to use. -
realm-public-key: The public key of the realm you created. You can find the key in the Keys tab in the Realm settings page of the realm you created in the RH-SSO Admin Console. If you do not provide a value forrealm-public-key, the server retrieves it automatically. -
auth-server-url: The URL for the RH-SSO authentication server. -
enable-basic-auth: The setting to enable basic authentication mechanism, so that the clients can use both token-based and basic authentication approaches to perform the requests. -
resource: The name for the client that you created. -
credential name: The secret key for the client you created. You can find the key in the Credentials tab on the Clients page of the RH-SSO Admin Console. principal-attribute: The login name of the user. If you do not provide this value, your User Id is displayed in the application instead of your user name.注記The RH-SSO server converts the user names to lowercase. Therefore, after integration with RH-SSO, your user name will appear in lowercase in Business Central. If you have user names in upper-case letters hard coded in business processes, the application may not be able to identify the upper-case user.
-
Navigate to
EAP_HOME/bin/and start the EAP server using the following command:./standalone.sh
You can also configure RH-SSO adapter for EAP by updating your applications WAR file to use the RH-SSO security subsystem. However, the recommended approach is configuring the adapter through the RH-SSO subsystem. This means that you are updating EAP configuration instead of applying the configuration on each WAR file.
9.1.3. Adding a New User
To add new users and assign them a role to access Business Central:
- Log in to the RH-SSO Admin Console and open the realm to which you wish to add a user.
Click the Users left menu item under the Manage section.
An empty user list page called Users opens.
Click the Add User button on the empty user list to start creating your new user.
An Add user page opens.
- Provide user information on the Add user page and click Save.
- Set a new password under the Credentials tab.
Assign the new user one of the roles that allow access to Business Central. For example, the
adminoranalystrole.Define the roles as realm roles in the Realm Roles tab under the Roles section.
- Click Role Mappings tab on the Users page to assign roles.
You can now log in to your Red Hat JBoss BRMS application (in this example, Business Central) once the server is running using the user credentials you just created.
9.1.4. Securing Business Central Remote Service Using RH-SSO
Business Central provides different remote service endpoints that can be consumed by third-party clients using remote API. To authenticate those services through RH-SSO, you must disable a security filter called BasicAuthSecurityFilter. To do this, follow these steps:
Procedure: Disabling BasicAuthSecurityFilter
Open your application deployment descriptor file (
WEB-INF/web.xml) and apply the following changes to it:Remove the following lines to remove the servlet filter and its mapping for class
org.uberfire.ext.security.server.BasicAuthSecurityFilter:<filter> <filter-name>HTTP Basic Auth Filter</filter-name> <filter-class>org.uberfire.ext.security.server.BasicAuthSecurityFilter</filter-class> <init-param> <param-name>realmName</param-name> <param-value>KIE Workbench Realm</param-value> </init-param> </filter> <filter-mapping> <filter-name>HTTP Basic Auth Filter</filter-name> <url-pattern>/rest/*</url-pattern> <url-pattern>/maven2/*</url-pattern> <url-pattern>/ws/*</url-pattern> </filter-mapping>Add the following lines to add the
security-constraintfor the url-patterns that you have removed from the filter mapping:<security-constraint> <web-resource-collection> <web-resource-name>remote-services</web-resource-name> <url-pattern>/rest/*</url-pattern> <url-pattern>/maven2/*</url-pattern> <url-pattern>/ws/*</url-pattern> </web-resource-collection> <auth-constraint> <role-name>rest-all</role-name> <role-name>rest-project</role-name> <role-name>rest-deployment</role-name> <role-name>rest-process</role-name> <role-name>rest-process-read-only</role-name> <role-name>rest-task</role-name> <role-name>rest-task-read-only</role-name> <role-name>rest-query</role-name> <role-name>rest-client</role-name> </auth-constraint> </security-constraint>
- Save your changes.
9.1.5. Securing Business Central File System Services Using RH-SSO
To consume other remote services, such as file systems (for example, a remote GIT service), you need to specify a correct RH-SSO login module. First, generate a JSON configuration file:
- Navigate to the RH-SSO Admin Console located at http://localhost:8080/auth/admin.
- Click the Clients left menu item.
Create a new client with the following settings:
-
Set Client ID as
kie-git. -
Set Access Type as
confidential. - Disable the Standard Flow Enabled option.
- Enable the Direct Access Grants Enabled option.
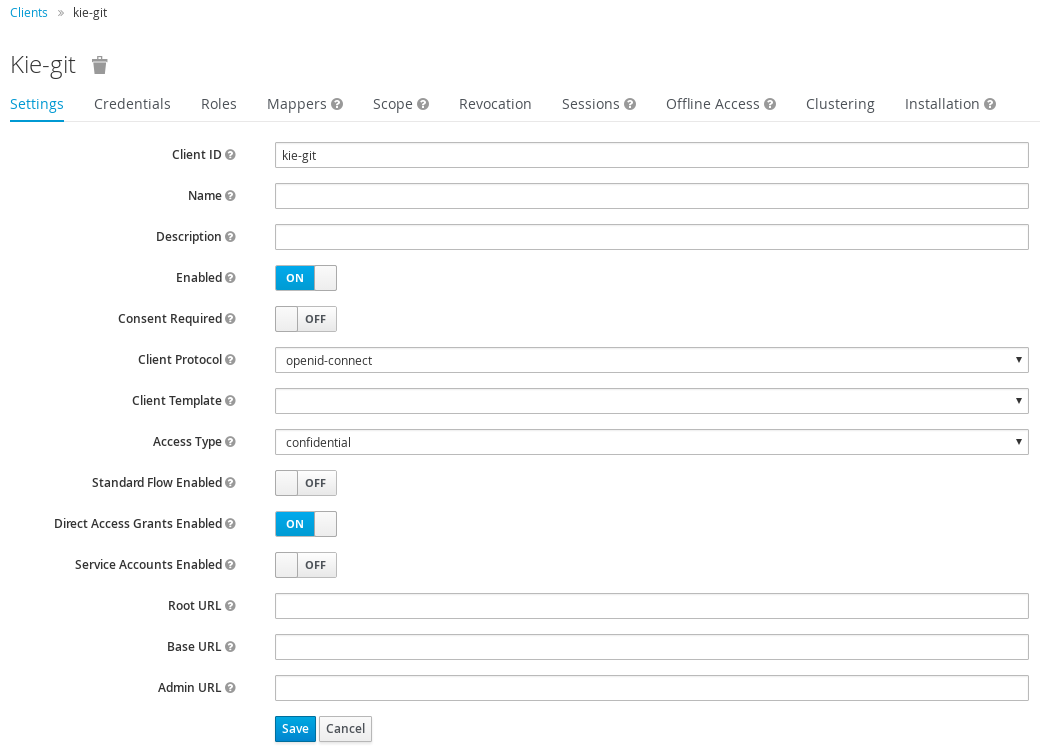
-
Set Client ID as
- Click Save.
- Click the Installation tab at the top of the client configuration screen and choose Keycloak OIDC JSON as a Format Option.
- Click Download.
Move the downloaded JSON file to an accessible directory in the server’s file system or add it to the application class path.
For more information, see chapter JAAS plugin of the Keycloak Securing Applications and Services Guide.
After you successfuly generate and download the JSON configuration file, specify the correct RH-SSO login module in the EAP_HOME/standalone/configuration/standalone.xml file. By default, the security domain in Business Central is set to other. Replace the default values of the login-module in this security domain with the ones presented in the example below:
<security-domain name="other" cache-type="default">
  <authentication>
    <login-module code="org.keycloak.adapters.jaas.DirectAccessGrantsLoginModule" flag="required">
      <module-option name="keycloak-config-file" value="$EAP_HOME/kie-git.json"/>
    </login-module>
  </authentication>
</security-domain>
The JSON file specified in the module-option element contains a client used for securing the remote services. Replace the $EAP_HOME/kie-git.json value of the module-option element with the absolute path or the class path (classpath:/EXAMPLE_PATH/kie-git.json) to this JSON configuration file.
At this point, all users authenticated through the RH-SSO server can clone internal GIT repositories. In the following command, change USER_NAME to a RH-SSO user, for example admin:
git clone ssh://USER_NAME@localhost:8001/system
9.2. Realtime Decision Server Authentication through RH-SSO
The Red Hat JBoss BRMS Realtime Decision Server provides a REST API for third-party clients. You can integrate the Realtime Decision Server with RH-SSO to delegate the third-party clients identity management to the RH-SSO server.
Once you have created a realm client for Business Central and set up the RH-SSO client adapter for EAP, you can repeat the same steps to integrate the Realtime Decision Server with RH-SSO.
9.2.1. Creating Client for Realtime Decision Server on RH-SSO
To create a new client on your already created realm on RH-SSO Admin Console:
Procedure: Creating a Client for the Realtime Decision Server
- In the RH-SSO Admin Console, open the security realm that you created.
Click the Clients left menu item and click Create.
The Add Client page opens.
On the Add Client page, provide the required information to create a new client for your realm. For example:
- Client ID: kie-execution-server
- Root URL: http://localhost:8080/kie-server
- Client protocol: openid-connect
Click Save to save your changes.
Once you create a new client, its Access Type is set to
publicby default. Change it toconfidentialand click Save again.- Navigate to the Credentials tab and copy the secret key. The secret key is necessary to configure the kie-execution-server client in the next section.
9.2.2. Installing and Setting Up Realtime Decision Server with Client Adapter
To consume the Realtime Decision Server remote service endpoints, you must first create and assign the kie-server role in the RH-SSO Admin Console.
If you deployed the Realtime Decision Server to a different application server than Business Central, install and configure RH-SSO on your second server as well.
Procedure: Setting Up the Realtime Decision Server
Navigate to
EAP_HOME/standalone/configurationin your EAP installation and editstandalone.xmlto add the RH-SSO subsystem configuration. For example:<subsystem xmlns="urn:jboss:domain:keycloak:1.1"> <secure-deployment name="kie-server.war"> <realm>demo</realm> <realm-public-key>MIGfMA0GCSqGSIb3DQEBAQUAA4GNADCBiQKBgQCrVrCuTtArbgaZzL1hvh0xtL5mc7o0NqPVnYXkLvgcwiC3BjLGw1tGEGoJaXDuSaRllobm53JBhjx33UNv+5z/UMG4kytBWxheNVKnL6GgqlNabMaFfPLPCF8kAgKnsi79NMo+n6KnSY8YeUmec/p2vjO2NjsSAVcWEQMVhJ31LwIDAQAB</realm-public-key> <auth-server-url>http://localhost:8180/auth</auth-server-url> <ssl-required>external</ssl-required> <resource>kie-execution-server</resource> <enable-basic-auth>true</enable-basic-auth> <credential name="secret">03c2b267-7f64-4647-8566-572be673f5fa</credential> <principal-attribute>preferred_username</principal-attribute> </secure-deployment> </subsystem> <system-properties> <property name="org.kie.server.sync.deploy" value="false"/> </system-properties>Here,
-
secure-deployment name: Name of your application WAR file. -
realm: Name of the realm that you created for the applications to use. -
realm-public-key: The public key of the realm you created. You can find the key in the Keys tab in the Realm settings page of the realm you created in the RH-SSO Admin Console. If you do not provide a value for this public key, the server retrieves it automatically. -
auth-server-url: The URL for the RH-SSO authentication server. -
resource: The name for the server client that you created. -
enable-basic-auth: The setting to enable basic authentication mechanism, so that the clients can use both token-based and basic authentication approaches to perform the requests. -
credential name: The secret key of the server client you created. You can find the key in the Credentials tab on the Clients page of the RH-SSO Admin Console. -
principal-attribute: The login name of the user. If you do not provide this value, your User Id is displayed in the application instead of your user name.
-
-
Save your configuration changes in
standalone.xml. Use the following command to restart the EAP server and run the Realtime Decision Server.
EXEC_SERVER_HOME/bin/standalone.sh -Dorg.kie.server.id=<ID> -Dorg.kie.server.user=<USER> -Dorg.kie.server.pwd=<PWD> -Dorg.kie.server.location=<LOCATION_URL> -Dorg.kie.server.controller=<CONTROLLER_URL> -Dorg.kie.server.controller.user=<CONTROLLER_USER> -Dorg.kie.server.controller.pwd=<CONTOLLER_PASSWORD>
Here is an example:
EXEC_SERVER_HOME/bin/standalone.sh -Dorg.kie.server.id=kieserver1 -Dorg.kie.server.user=kieserver -Dorg.kie.server.pwd=password -Dorg.kie.server.location=http://localhost:8080/kie-server/services/rest/server -Dorg.kie.server.controller=http://localhost:8080/business-central/rest/controller -Dorg.kie.server.controller.user=kiecontroller -Dorg.kie.server.controller.pwd=password
Once the Realtime Decision Server is running, you can check the server status. In the following command,
kieserveris a user name with thekie-serverrole and passwordpassword:curl http://kieserver:password@localhost:8080/kie-server/services/rest/server/
Token-based authorization is also supported for communication between Business Central and the Realtime Decision Server. You can use the complete token as a system property of your application server, instead of the user name and password, for your applications. However, you must ensure that the token does not expire for the period of interaction between the applications, as it is not automatically refreshed. To get the token, see 「Token-Based Authentication」.
For the Business Central to manage the Realtime Decision Server using the tokens:
Set the
org.kie.server.tokenproperty.In such case, do not set the
org.kie.server.userandorg.kie.server.pwdproperties. The Business Central will then use theAuthorization: Bearer $TOKENauthentication method.
If you want to use the REST API using the token-based authentication:
Set the
org.kie.server.controller.tokenproperty.In such case, do not set the
org.kie.server.controller.userandorg.kie.server.controller.pwdproperties.
As the Realtime Decision Server is unable to refresh the token, use a high-lifespan token. A token’s lifespan must not exceed January 19 2038. Check with your security best practices to see whether this is a suitable solution for your environment.
9.3. Third-Party Client Authentication through RH-SSO
To use the different remote services provided by Business Central or by the Realtime Decision Server, your client, such as curl, wget, web browser, or a custom REST client, must authenticate through the RH-SSO server and have a valid token to perform the requests. To use the remote services, the authenticated user must have assigned the following roles:
-
rest-all: For using the Business Central remote services. -
kie-server: For using the Realtime Decision Server remote services.
Use the RH-SSO Admin Console to create these roles and assign them to the users that will consume the remote services.
Your client can authenticate through RH-SSO using one of these options:
- Basic authentication, if it is supported by the client.
- Token-based authentication.
9.3.1. Basic Authentication
If you have enabled the basic authentication in the RH-SSO client adapter configuration for both Business Central and Realtime Decision Server, you can avoid the token grant/refresh calls and call the services as shown in the examples below:
For web based remote repositories endpoint:
curl http://admin:password@localhost:8080/business-central/rest/repositories
For the Realtime Decision Server:
curl http://admin:password@localhost:8080/kie-server/services/rest/server/
9.3.2. Token-Based Authentication
If you want to opt for a more secure option of authentication, you can consume the remote services from both Business Central and Realtime Decision Server using a granted token provided by RH-SSO.
Procedure: Obtaining and Using Token for Authorizing Remote Calls
In the RH-SSO Admin Console, click the Clients left menu item and click Create to create a new client.
The Add Client page opens.
On the Add Client page, provide the required information to create a new client for your realm. For example:
- Client ID: kie-remote
- Client protocol: openid-connect
- Click Save to save your changes.
Change the token settings in Realm Settings:
- In the RH-SSO Admin Console, click the Realm Settings left menu item.
- Click the Tokens tab.
Change the value for Access Token Lifespan to
15minutes.This gives you enough time to get a token and invoke the service before it expires.
- Click Save to save your changes.
Once a public client for your remote clients is created, you can now obtain the token by making an HTTP request to the RH-SSO server’s token endpoint using:
RESULT=`curl --data "grant_type=password&client_id=kie-remote&username=admin&password=password" http://localhost:8180/auth/realms/demo/protocol/openid-connect/token`
The user used in the command above is an RH-SSO user. For further information, see 「Adding a New User」.
To view the token obtained from the RH-SSO server, use the following command:
TOKEN=`echo $RESULT | sed 's/.*access_token":"//g' | sed 's/".*//g'`
You can now use this token to authorize the remote calls. For example, if you want to check the internal Red Hat JBoss BRMS repositories, use the token as shown below:
curl -H "Authorization: bearer $TOKEN" http://localhost:8080/business-central/rest/repositories