
Red Hat Training
A Red Hat training course is available for Red Hat Gluster Storage
Configuring Red Hat OpenStack with Red Hat Storage
Red Hat Gluster Storage 3
Getting Started with Red Hat OpenStack and Red Hat Storage
Abstract
This document is a step-by-step guide for users to install and configure a basic Red Hat Openstack environment and enable Red Hat Storage for storage.
Chapter 1. Introduction to Red Hat Storage and Red Hat OpenStack
Red Hat Storage is a software-based, distributed technology that is scalable and highly available as software only. Red Hat Storage can be deployed in the cloud or data centers using Red Hat Storage Server.
Red Hat OpenStack provides the foundation for building a private or public Infrastructure-as-a-Service (IaaS) cloud on top of Red Hat Enterprise Linux. It offers a massively scalable, fault-tolerant platform for the development of cloud-enabled workloads.
Integration of Red Hat Storage with Red Hat OpenStack is hardened and validated by Red Hat, and is best suited to serve as the storage platform for Red Hat OpenStack.
1.1. Advantages of Integration
The following are some of the advantages of using an integrated solution:
- It offers users a storage and compute solution, a platform for innovation, and a support experience during the journey to open hybrid cloud.
- Makes it easier to deploy and manage enterprise and public clouds with unified storage services for OpenStack, supporting block storage (Cinder), image services (Glance), and object storage (Swift) from the same storage pool.
1.2. Architecture Overview
Red Hat OpenStack and Red Hat Storage integration consists of:
- Red Hat Enterprise OpenStack environment.See Red Hat OpenStack Architecture in Product Introduction in the Red Hat OpenStack Getting Started Guide.
- Red Hat Storage environment.A Red Hat Storage environment consists of bricks that are used to build volumes. Different types of optimized storage volumes can be used as storage for Red Hat OpenStack.
The following diagram illustrates Red Hat Enterprise OpenStack integration with Red Hat Storage 3.0:
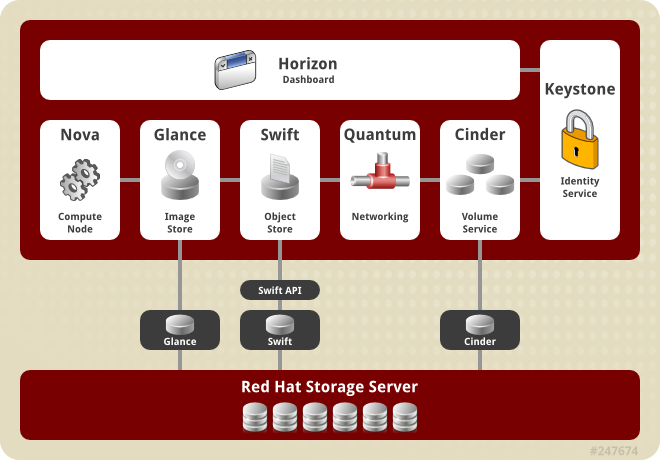
Figure 1.1. Integration Architecture
Chapter 2. Prerequisites
Ensure that the listed prerequisites are met to install and integrate Red Hat Storage with Red Hat OpenStack.
2.1. Supported Versions
The following version of Red Hat OpenStack and Red Hat Storage can be successfully integrated.
- Red Hat Storage 3.0 with Red Hat OpenStack 4.0
2.2. Software and Hardware Requirements
To ensure successful integration between Red Hat OpenStack and Red Hat Storage, see:
- the hardware and software requirements to install and configure the Red Hat OpenStack environment in the Prerequisites chapter of Red Hat Enterprise Linux OpenStack Platform 4's Installation and Configuration Guide.
- the hardware compatibility matrix and system requirements in the Planning Red Hat Storage Installation chapter of Red Hat Storage Installation Guide.
2.3. Subscribing to Red Hat Channels
Red Hat Enterprise Linux hosts need to be registered and subscribed to a number of entitlements using either Subscription Manager or Red Hat Network Classic. For more information, see section Configuring Software Repositories in the chapter Red Hat Enterprise Linux OpenStack Platform Getting Started Guide.
Ensure that the clients are registered with the following Red Hat channels:
- rhel-x86_64-server-6
- rhel-x86_64-server-6-ost-4
Ensure that servers are registered to Red Hat Storage channels.
2.4. Setting SELinux Booleans
Set the following SELinux booleans:
# setsebool -P sanlock_use_fusefs on
# setsebool -P virt_use_sanlock on
# setsebool -P virt_use_fusefs on
Chapter 3. Installing and Configuring Red Hat Storage
Red Hat OpenStack uses Red Hat Storage (volumes) as a storage platform. To use Red Hat Storage volumes in a Red Hat OpenStack environment, install and configure Red Hat Storage on all the servers that will be included in the Red Hat Storage trusted storage pool.
3.1. Installing Red Hat Storage Server
Download and install Red Hat Storage 3.0 on the all the servers. Red Hat Storage installation instructions are available in the Installing Red Hat Storage chapter of the Red Hat Storage Installation Guide.
3.2. Setting up Red Hat Storage Trusted Storage Pool
Set up a Red Hat Storage trusted storage pool to create volumes. For trusted storage pools setup instructions, see the Setting up Trusted Storage Pools chapter in the Red Hat Storage Administration Guide.
3.2.1. Creating Volumes
Create Red Hat Storage volumes for both the Block Storage and Image service. This example uses a distributed-replicated volume to demonstrate using Red Hat Storage as the storage back-end for Red Hat OpenStack.
- To create a distributed-replicate Red Hat Storage volume for Block Storage:
# gluster volume create [new_volname] [replica [count]] [transport tcp | rdma | tcp,rdma] [new-brick]...
As an example, the following command creates a four node distributed-replicated volume with a two-way mirror:# gluster volume create cinder-volume replica 2 transport tcp 10.1.1.11:/rhs/brick1/cinder-vol 10.1.1.12:/rhs/brick1/cinder-vol 10.1.1.13:/rhs/brick2/cinder-vol 10.1.1.14:/rhs/brick2/cinder-vol Creation of cinder-volume has been successful Please start the volume to access data.
- To create a distributed-replicated Red Hat Storage volume for the Image service:
# gluster volume create [new-volname] [replica [count]] [transport tcp | rdma | tcp,rdma] [count]...
As an example, the following command creates a four node distributed-replicated volume with a two-way mirror:# gluster volume create glance-volume replica 2 transport tcp 10.1.1.11:/rhs/brick1/glance-vol 10.1.1.12:/rhs/brick1/glance-vol 10.1.1.13:/rhs/brick2/glance-vol 10.1.1.14:/rhs/brick2/glance-vol Creation of cinder-volume has been successful Please start the volume to access data.
3.2.2. Tuning Red Hat Storage Volumes for Red Hat OpenStack
Before starting the volume, tune the volumes used for Block Storage as follows:
# gluster volume set [volname] group virt
# gluster vol set [volname] storage.owner-uid [uid]
# gluster vol set [volname] storage.owner-gid [gid]
As an example, set these volume options for
cinder-vol volume as follows:
# gluster vol set cinder-vol group virt
Set volume successful

# gluster vol set cinder-vol storage.owner-uid 165
Set volume successful

# gluster vol set cinder-vol storage.owner-gid 165
Set volume successful
Important
When a volume is tagged (using the
group virt command), it is reserved as a storage back-end for Red Hat OpenStack and cannot be used for any other storage purpose. The tagged volume is only accessible using the gluster native client.
The tuning command sets the options on the listed volume as key value pairs in the
/var/lib/glusterd/groups/virt file.
The default (and recommended) key value pairs (volume set options) of the group name file in the
/var/lib/glusterd/groups/virt file are as follows:
quick-read=off
read-ahead=off
io-cache=off
stat-prefetch=off
eager-lock=enable
remote-dio=on
quorum-type=auto
server-quorum-type=server
For details about volume set options that can be tuned, see the Managing Red Hat Storage Volumes chapter in the Red Hat Storage Administration Guide.
3.2.3. Verifying Red Hat Storage Volume Configuration
Use the following command to verify the volume configuration before starting the volumes:
# gluster vol info [volname]
The following are examples of this command and its output:
# gluster vol info cinder-vol
Volume Name: cinder-vol
Type: Distributed-Replicate
Volume ID: 2f4edaef-678b-492a-b972-bd95c1c490a3
Status: Created
Number of Bricks: 2 x 2 = 4
Transport-type: tcp
Bricks:
Brick1: 10.1.1.11:/rhs/brick1/cinder-vol
Brick2: 10.1.1.12:/rhs/brick1/cinder-vol
Brick3: 10.1.1.13:/rhs/brick2/cinder-vol
Brick4: 10.1.1.14:/rhs/brick2/cinder-vol
Options Reconfigured:
storage.owner-gid: 165
storage.owner-uid: 165
network.remote-dio: enable
cluster.eager-lock: enable
performance.stat-prefetch: off
performance.io-cache: off
performance.read-ahead: off
performance.quick-read: off
# gluster vol info glance-vol
Volume Name: glance-vol
Type: Distributed-Replicate
Volume ID: eedd5254-e0ca-4173-98eb-45eaef738010
Status: Started
Number of Bricks: 2 x 2 = 4
Transport-type: tcp
Bricks:
Brick1: 10.1.1.11:/rhs/brick3/glance-vol
Brick2: 10.1.1.12:/rhs/brick3/glance-vol
Brick3: 10.1.1.13:/rhs/brick4/glance-vol
Brick4: 10.1.1.14:/rhs/brick4/glance-vol
Options Reconfigured:
storage.owner-gid: 161
storage.owner-uid: 161
network.remote-dio: enable
cluster.eager-lock: enable
performance.stat-prefetch: off
performance.io-cache: off
performance.read-ahead: off
performance.quick-read: off
3.2.4. Starting Red Hat Storage Volumes
Start the Block Storage and Image service volumes using the following command:
# gluster volume start [volname]
An example of this command and its output is as follows:
# gluster volume start cinder-vol
Starting cinder-vol has been successful
# gluster volume start glance-vol
Starting glance-vol has been successful
3.3. Installing the Native Client Packages
The Native Client is a FUSE-based client that runs in the user space. Use the Native Client to access Red Hat Storage volumes. Install the Native Client RPMs on the Red Hat OpenStack nodes as follows:
# yum install --assume yes glusterfs glusterfs-fuse
Chapter 4. Installing and Configuring Red Hat OpenStack
Red Hat OpenStack uses Red Hat Storage (volumes) as a storage platform. After installing and configuring Red Hat Storage volumes, perform the following:
- Install OpenStack using Foreman Installer or PackStack
- Configure the OpenStack Cinder service to use Red Hat Storage volume
- Configure the OpenStack Glance service to use Red Hat Storage volume
- Configure the OpenStack Compute service to use Red Hat Storage volume
- Verify the integrated setup
4.1. Installing OpenStack
- Install OpenStack using Foreman OpenStack Manager on all the OpenStack nodes. For more information on installing using Foreman installer, see Chapter 3. Foreman Overview and Installation of Red Hat Enterprise Linux OpenStack Platform 4 Installation and Configuration Guide.
- Install OpenStack using PackStack utility on all the OpenStack nodes. For information on installing using PackStack, see Part II. Deploying OpenStack using PackStack of Red Hat Enterprise Linux OpenStack Platform 4 Getting Started Guide.
4.2. Configuring Openstack Block Storage to Use Red Hat Storage Volume
Procedure 4.1. Configure Openstack Block Storage to Use Red Hat Storage Volume
Update the cinder.conf File
Set the glusterFS default configuration parameters in thecinder.conffile as follows:# openstack-config --set /etc/cinder/cinder.conf DEFAULT volume_driver cinder.volume.drivers.glusterfs.GlusterfsDriver # openstack-config --set /etc/cinder/cinder.conf DEFAULT glusterfs_shares_config /etc/cinder/shares.conf # openstack-config --set /etc/cinder/cinder.conf DEFAULT glusterfs_mount_point_base /var/lib/cinder/volumes
Create the shares.conf File
Create the/etc/cinder/shares.conffile. Add a list of Red Hat Storage Volumes from different trusted storage pools with the client mount point for each. Each storage volume and mount point must be on a new line, as follows:STORAGEHOST:VOLUME STORAGEHOST1:NEXTVOLUME STORAGEHOSTHOST2:ANOTHERVOLUME
An example of this configuration is as follows:10.1.1.11:/cinder-vol 10.1.2.12:/nextcinder-vol 10.1.3.13:/anothercinder-vol
When listing the storage volume and mount point, Red Hat recommends that you use thebackup-volfile-servers=volfile_server2:volfile_server3:...:volfile_serverNoption to list the backup volfile servers to mount the client. If this option is specified while mounting the FUSE client, and if the first volfile server fails, the servers specified in thebackup-volfile-serversoption are used as volfile servers to mount the client until the mount operation is successful. Add this option to the storage volume and mount point list in/etc/cinder/shares.conffile as shown below:10.1.1.11:/cinder-vol -o backup-volfile-servers=volfile_server2:volfile_server3
Restart Services
Restart the cinder services as follows:# service openstack-cinder-api restart # service openstack-cinder-volume restart # service openstack-cinder-scheduler restart
4.3. Configure the OpenStack Image Service to Use Red Hat Storage Volumes
Procedure 4.2. Configure the OpenStack Image Service to Use Red Hat Storage Volumes
- Specify the location for
filesystem_store_datadiras follows:# ============ Filesystem Store Options=================== # Directory that the Filesystem backend store # writes image data to filesystem_store_datadir = /mnt/gluster/glance/images/
- Create a directory named
imagesas follows:# mkdir -p /mnt/gluster/glance/images
- Change the ownership of the the Red Hat Storage volume as follows:
chown -R glance:glance/mnt/gluster/glance/
- Mount the Red Hat Storage volume on
filesystem_store_datadiras follows:mount -t glusterfs 10.1.1.11:/glance-vol /mnt/gluster
When mounting the volume, Red Hat recommends you to usebackup-volfile-servers=volfile_server2:volfile_server3:...:volfile_serverNoption to list the backup volfile servers to mount the client. If this option is specified while mounting the fuse client, when the first volfile server fails, the servers specified in backup-volfile-servers option are used as volfile servers to mount the client until the mount is successful. - To persistently mount the glance volume, add the following line to the
/etc/fstabfile:10.1.1.11:/glance-vol images glusterfs defaults,_netdev 0 0
- Restart the OpenStack glance service as follows:
# service openstack-glance-api restart
4.4. Configure the OpenStack Compute Service to Use Red Hat Storage Volumes
This section provides steps to configure common Red Hat Storage volume to host both Image and Compute services.
Procedure 4.3. Configure the OpenStack Compute Service to Use Red Hat Storage Volumes
- Configure the Compute service to the use Red Hat Storage volume by editing the
instances_pathin the/etc/nova/nova.conffile:#instances_path = /mnt/gluster/instance
- Create a directory named
instanceas follows:# mkdir -p /mnt/gluster/instance
If you are using a different volume other than the glance volume for compute service, then you must mount the volume usingmount -t glusterfs 10.1.1.11:/nova-vol /mnt/novacommand.When mounting the volume, Red Hat recommends you to use thebackup-volfile-servers=volfile_server2:volfile_server3:...:volfile_serverNoption to list the backup volfile servers to mount the client. If this option is specified while mounting the FUSE client, when the first volfile server fails, the servers specified in backup-volfile-servers option are used as volfile servers to mount the client until the mount operation is successful. - Change the ownership of the Red Hat Storage volume as follows:
chown -R nova:nova /mnt/gluster/instance
- Restart the OpenStack Compute service as follows:
# service openstack-nova-compute restart
4.5. Verifying the Integrated Setup
Procedure 4.4. Verify the Integrated Setup
- Verify that the Red Hat Storage Volumes are successfully mounted as follows:
# mount | grep gluster
10.1.1.11:/glance-vol on /mnt/gluster/glance/images type fuse.glusterfs (rw,default_permissions,allow_other,max_read=131072)
10.1.1.11:cinder-vol on /var/lib/cinder/volumes/586c24173ac3ab5d1d43aed1f113d9f6 type fuse.glusterfs (rw,default_permissions,allow_other,max_read=131072)
- Verify that the Cinder volume is mounted on the Red Hat Storage volumes as follows:
# getfattr -d -etext -m. -n trusted.glusterfs.pathinfo /var/lib/cinder/volumes/586c24173ac3ab5d1d43aed1f113d9f6

# file: var/lib/cinder/volumes/586c24173ac3ab5d1d43aed1f113d9f6
trusted.glusterfs.pathinfo="((<DISTRIBUTE:cinder-vol-dht> (<REPLICATE:cinder-vol-replicate-0> <POSIX(/rhs/brick1/cinder-vol):dhcpzz-183.example.com:/rhs/brick1/cinder-vol/> <POSIX(/rhs/brick1/cinder-
vol):dhcpzz-223.example.com:/rhs/brick1/cinder-vol/>) (<REPLICATE:cinder-vol-replicate-1> <POSIX(/rhs/brick2/cinder-vol):dhcpzz-223.example.com:/rhs/brick2/cinder-vol/> <POSIX(/rhs/brick2/
cinder-vol):dhcpzz-183.example.com:/rhs/brick2/cinder-vol/>)) (cinder-vol-dht-layout (cinder-vol-replicate-0 0 2147483646) (cinder-vol-replicate-1 2147483647 4294967295)))"
- Verify that the glance image was created on the Red Hat Storage volumes as follows:
# glance image-create --name="test" --is-public=true --container-format=ovf --disk-format=qcow2 < f17-x86_64-openstack-sda.qcow2 +------------------+--------------------------------------+ | Property | Value | +------------------+--------------------------------------+ | checksum | 1f104b5667768964d5df8c4ad1d7cd27 | | container_format | ovf | | created_at | 2013-07-30T12:56:05 | | deleted | False | | deleted_at | None | | disk_format | qcow2 | | id | a66213ee-1a76-4d4a-959d-5df3f8f320ac | | is_public | True | | min_disk | 0 | | min_ram | 0 | | name | test | | owner | 84e2f0fac93d402287a8eb97b6ba9711 | | protected | False | | size | 251985920 | | status | active | | updated_at | 2013-07-30T12:56:49 | +------------------+--------------------------------------+ # ls -l /mnt/gluster/glance/images/ total 246080 -rw-r-----. 1 glance glance 251985920 Jul 30 18:26 a66213ee-1a76-4d4a-959d-5df3f8f320ac ~(keystone_admin)]# getfattr -d -etext -m. -n trusted.glusterfs.pathinfo /mnt/gluster/glance/images/a66213ee-1a76-4d4a-959d-5df3f8f320ac getfattr: Removing leading '/' from absolute path names # file: var/lib/glance/images/a66213ee-1a76-4d4a-959d-5df3f8f320ac trusted.glusterfs.pathinfo="(<DISTRIBUTE:glance-vol-dht> (<REPLICATE:glance-vol-replicate-1> <POSIX(/rhs/brick4/glance-vol):dhcpzz-223.example.com:/rhs/brick4/glance-vol/a66213ee-1a76-4d4a-959d-5df3f 8f320ac> <POSIX(/rhs/brick4/glance-vol):dhcpzz-183.example.com:/rhs/brick4/glance-vol/a66213ee-1a76-4d4a-959d-5df3f8f320ac>))" - Verify that the nova instance was created on the Red Hat Storage volumes as follows:
# nova list
+--------------------------------------+-----------+--------+------------+-------------+---------------------+
| ID                                   | Name      | Status | Task State | Power State | Networks            |
+--------------------------------------+-----------+--------+------------+-------------+---------------------+
| 9b8f4140-665b-4959-abcd-5970c979e9df | instance1 | ACTIVE | None       | Running     | public=172.24.4.227 |
+--------------------------------------+-----------+--------+------------+-------------+---------------------+


# getfattr -d -etext -m. -n trusted.glusterfs.pathinfo /mnt/gluster/instance/9b8f4140-665b-4959-abcd-5970c979e9df/disk
getfattr: Removing leading '/' from absolute path names

# file: mnt/gluster/instance/9b8f4140-665b-4959-abcd-5970c979e9df
trusted.glusterfs.pathinfo="(<DISTRIBUTE:glance-vol-dht> (<REPLICATE:glance-vol-replicate-5> <POSIX(/rhs/brick4/glance-vol):rhs-vm4:/rhs/brick4/glance-vol/glance/images/ 9b8f4140-665b-4959-abcd-5970c979e9df> <POSIX(/rhs/brick4/glance-vol):rhs-vm3:/rhs/brick4/glance-vol/glance/images/9b8f4140-665b-4959-abcd-5970c979e9df>))"
Use these steps to ensure that Red Hat OpenStack uses Red Hat Storage as the storage platform. For further operations, such as deploying Virtual Machines and managing OpenStack, see the Red Hat Enterprise Linux OpenStack Platform documentation.
Appendix A. Revision History
| Revision History | |||
|---|---|---|---|
| Revision 3-10 | Mon Sep 22 2014 | ||
| |||
Legal Notice
Copyright © 2013-2014 Red Hat, Inc.
This document is licensed by Red Hat under the Creative Commons Attribution-ShareAlike 3.0 Unported License. If you distribute this document, or a modified version of it, you must provide attribution to Red Hat, Inc. and provide a link to the original. If the document is modified, all Red Hat trademarks must be removed.
Red Hat, as the licensor of this document, waives the right to enforce, and agrees not to assert, Section 4d of CC-BY-SA to the fullest extent permitted by applicable law.
Red Hat, Red Hat Enterprise Linux, the Shadowman logo, JBoss, OpenShift, Fedora, the Infinity logo, and RHCE are trademarks of Red Hat, Inc., registered in the United States and other countries.
Linux® is the registered trademark of Linus Torvalds in the United States and other countries.
Java® is a registered trademark of Oracle and/or its affiliates.
XFS® is a trademark of Silicon Graphics International Corp. or its subsidiaries in the United States and/or other countries.
MySQL® is a registered trademark of MySQL AB in the United States, the European Union and other countries.
Node.js® is an official trademark of Joyent. Red Hat Software Collections is not formally related to or endorsed by the official Joyent Node.js open source or commercial project.
The OpenStack® Word Mark and OpenStack logo are either registered trademarks/service marks or trademarks/service marks of the OpenStack Foundation, in the United States and other countries and are used with the OpenStack Foundation's permission. We are not affiliated with, endorsed or sponsored by the OpenStack Foundation, or the OpenStack community.
All other trademarks are the property of their respective owners.