
テクニカルサポート用の sos レポートの生成
sos ユーティリティーを使用した RHEL サーバーからのトラブルシューティング情報の収集
概要
多様性を受け入れるオープンソースの強化
Red Hat では、コード、ドキュメント、Web プロパティーにおける配慮に欠ける用語の置き換えに取り組んでいます。まずは、マスター (master)、スレーブ (slave)、ブラックリスト (blacklist)、ホワイトリスト (whitelist) の 4 つの用語の置き換えから始めます。この取り組みは膨大な作業を要するため、今後の複数のリリースで段階的に用語の置き換えを実施して参ります。詳細は、Red Hat CTO である Chris Wright のメッセージ をご覧ください。
Red Hat ドキュメントへのフィードバック (英語のみ)
Red Hat ドキュメントに関するご意見やご感想をお寄せください。また、改善点があればお知らせください。
Jira からのフィードバック送信 (アカウントが必要)
- Jira の Web サイトにログインします。
- 上部のナビゲーションバーで Create をクリックします。
- Summary フィールドにわかりやすいタイトルを入力します。
- Description フィールドに、ドキュメントの改善に関するご意見を記入してください。ドキュメントの該当部分へのリンクも追加してください。
- ダイアログの下部にある Create をクリックします。
第1章 テクニカルサポート用の sos レポートの生成
sos ユーティリティーを使用して設定、診断、およびトラブルシューティングのデータを収集し、それらのファイルを Red Hat テクニカルサポートに提供できます。
1.1. sos ユーティリティーの機能
sos レポートは一般的に、Red Hat テクニカルサポートエンジニアが RHEL システムのサービス要求を分析する際の開始点として使用されます。sos ユーティリティー (sosreport とも呼ばれます) は、診断情報を収集するための標準化された方法を提供します。Red Hat サポートエンジニアは、この診断情報を、サポートケースで報告された問題の調査全体を通じて参照できます。sos ユーティリティーを使用すると、データ出力を繰り返し求められることを回避できます。
sos ユーティリティーを使用すると、1 つ以上のシステムからさまざまなデバッグ情報を収集し、必要に応じて機密データをクリーンアップしてから、Red Hat にレポート形式でアップロードできます。より具体的には、3 つの sos コンポーネントは次のことを行います。
sos reportは、1 つ のシステムからデバッグ情報を収集します。注記このプログラムは元々
sosreportという名前でした。sosreportを実行しても、同じ引数を使用して代わりにsos reportが呼び出されるため、機能します。-
sos collectを使用すると、指定したノードのセットから個別のsosレポートを実行および収集できます。 -
sos cleanは、ユーザー名、ホスト名、IP アドレス、MAC アドレス、またはその他のユーザー指定のデータなどの機密性の高い情報を難読化します。
レポートで収集される情報には、RHEL システムからの設定詳細、システム情報、診断情報が含まれます。以下に例を示します。
- 実行中のカーネルバージョン
- 読み込み済みカーネルモジュール
- システムおよびサービスの設定ファイル
- 診断コマンドの出力
- インストールされているパッケージのリスト
sos ユーティリティーは、sosreport-<host_name>-<support_case_number>-<YYYY-MM-DD>-<unique_random_characters>.tar.xz という名前のアーカイブに収集データを書き込みます。
このユーティリティーは、アーカイブと MD5 チェックサムを /var/tmp/ ディレクトリーに保存します。
[root@server1 ~]# ll /var/tmp/sosreport*
total 18704
-rw-------. 1 root root 19136596 Jan 25 07:42 sosreport-server1-12345678-2022-01-25-tgictvu.tar.xz
-rw-r--r--. 1 root root       33 Jan 25 07:42 sosreport-server1-12345678-2022-01-25-tgictvu.tar.xz.md5
関連情報
-
sosreport(1)man ページ
1.2. コマンドラインからの sos のインストール
sos ユーティリティーを使用するには、sos パッケージをインストールします。
前提条件
-
root権限がある。
手順
sosパッケージをインストールします。[root@server ~]# yum install sos
検証手順
rpmユーティリティーを使用して、sosパッケージがインストールされていることを確認します。[root@server ~]# rpm -q sos sos-4.2-15.el8.noarch
1.3. コマンドラインからの sos レポートの生成
sos report コマンドを使用して、RHEL サーバーから sos レポートを収集します。
前提条件
-
sosパッケージをインストールしている。 -
root権限がある。
手順
sos reportコマンドを実行し、画面の指示に従います。--uploadオプションを追加すると、sosレポートの生成直後にレポートを Red Hat に転送できます。[user@server1 ~]$ sudo sos report [sudo] password for user: sos report (version 4.2) This command will collect diagnostic and configuration information from this Red Hat Enterprise Linux system and installed applications. An archive containing the collected information will be generated in /var/tmp/sos.qkn_b7by and may be provided to a Red Hat support representative. ... Press ENTER to continue, or CTRL-C to quit.
(オプション) Red Hat でテクニカルサポートケースをすでに作成している場合には、ケース番号を入力して
sosレポートファイルの名前に追加します。--uploadオプションを指定している場合は、対象のケースにアップロードされます。ケース番号がない場合は、このフィールドを空白にしておきます。ケース番号の入力は任意であるため、sosユーティリティーの動作には影響はありません。Please enter the case id that you are generating this report for []: <8-digit_case_number>コンソール出力の末尾に表示されている
sosレポートファイルの名前を書き留めておきます。... Finished running plugins Creating compressed archive... Your sos report has been generated and saved in: /var/tmp/sosreport-server1-12345678-2022-04-17-qmtnqng.tar.xz Size 16.51MiB Owner root md5 bba955bbd9a434954e18da0c6778ba9a Please send this file to your support representative.
-
--batchオプションを使用すると、対話形式で入力を求められることなく、sosレポートを生成できます。
[user@server1 ~]$ sudo sos report --batch --case-id <8-digit_case_number>
-
--cleanオプションを使用して、収集したばかりのsosレポートを難読化することもできます。
[user@server1 ~]$ sudo sos report --clean検証手順
sosユーティリティーが、/var/tmp/に、コマンド出力の説明と一致するアーカイブを作成したことを確認します。[user@server1 ~]$ sudo ls -l /var/tmp/sosreport* [sudo] password for user: -rw-------. 1 root root 17310544 Sep 17 19:11 /var/tmp/sosreport-server1-12345678-2022-04-17-qmtnqng.tar.xz
1.4. 複数のシステムで同時に sos レポートを生成および収集する
sos ユーティリティーを使用して、複数のシステムで sos report コマンドをトリガーできます。レポートが終了するまで待機し、生成されたすべてのレポートを収集します。
前提条件
- 実行対象の クラスター タイプまたは ノード のリストを把握している。
-
すべてのシステムに
sosパッケージをインストールしている。 -
すべてのシステムに
rootアカウントのssh鍵がある。または、--passwordオプションを使用して root パスワードを指定することもできます。
手順
sosreportコマンドを実行し、画面の指示に従います。注記デフォルトでは、
sos collectは、レポートを収集する ノード を自動的に識別するために、実行対象の クラスター のタイプを特定しようとします。-
--clusterまたは--nodesオプションを使用して、クラスター または ノード の種類を手動で設定できます。 -
--masterオプションを使用して、sosユーティリティーにリモートノードを指定し、クラスター タイプと ノード のリストを決定することもできます。したがって、sosレポートを収集するために クラスター ノード のいずれかにログインする必要はなく、ワークステーションから実行できます。 -
--uploadオプションを追加すると、sos reportの生成直後にレポートを Red Hat に転送できます。 -
有効な
sos reportオプションをさらに指定できます。指定したオプションは、--batchや--cleanオプションなど、すべてのsosレポートの実行に渡されます。
[root@primary-rhel8 ~]# sos collect --nodes=sos-node1,sos-node2 -o process,apache --log-size=50

sos-collector (version 4.2)

This utility is used to collect sosreports from multiple nodes simultaneously.
It uses OpenSSH's ControlPersist feature to connect to nodes and run commands remotely. If your system installation of OpenSSH is older than 5.6, please upgrade.

An archive of sosreport tarballs collected from the nodes will be generated in /var/tmp/sos.o4l55n1s and may be provided to an appropriate support representative.

The generated archive may contain data considered sensitive and its content should be reviewed by the originating organization before being passed to any third party.

No configuration changes will be made to the system running this utility or remote systems that it connects to.


Press ENTER to continue, or CTRL-C to quit


Please enter the case id you are collecting reports for: <8-digit_case_number>

sos-collector ASSUMES that SSH keys are installed on all nodes unless the
--password option is provided.

The following is a list of nodes to collect from:
    primary-rhel8
    sos-node1
    sos-node2


Press ENTER to continue with these nodes, or press CTRL-C to quit


Connecting to nodes...

Beginning collection of sosreports from 3 nodes, collecting a maximum of 4 concurrently

primary-rhel8 : Generating sosreport...
sos-node1  : Generating sosreport...
sos-node2 : Generating sosreport...
primary-rhel8 : Retrieving sosreport...
sos-node1  : Retrieving sosreport...
primary-rhel8  : Successfully collected sosreport
sos-node1 : Successfully collected sosreport
sos-node2 : Retrieving sosreport...
sos-node2 : Successfully collected sosreport

The following archive has been created. Please provide it to your support team.
    /var/tmp/sos-collector-2022-04-15-pafsr.tar.xz

[root@primary-rhel8 ~]#
-
検証手順
sos collectコマンドが、/var/tmp/ディレクトリーに、コマンド出力の説明に一致するアーカイブを作成したことを確認します。[root@primary-rhel8 ~]# ls -l /var/tmp/sos-collector* -rw-------. 1 root root 160492 May 15 13:35 /var/tmp/sos-collector-2022-05-15-pafsr.tar.xz
関連情報
-
--batchおよび--cleanオプションの使用例は、コマンドラインからのsosレポートの生成 を参照してください。
1.5. sos レポートのクリーニング
sos ユーティリティーは、ユーザー名、ホスト名、IP アドレス、MAC アドレス、または他のユーザー指定のキーワードなど、機密性の高いデータを難読化するルーチンを提供します。元の sos report または sos collect は変更されず、新しい *-obfuscated.tar.xz ファイルが生成されます。このファイルは、サードパーティーと共有することを想定したものです。
sos report または sos collect コマンドに --clean オプションを使用して、クリーナー機能を追加できます。
[user@server1 ~]$ sudo sos report --clean
前提条件
-
sos reportまたはsos collecttarball を生成している。 - (オプション) 難読化するユーザー名、ホスト名、およびその他のデータ以外の特定のキーワードのリストがある。
手順
sos reportまたはsos collectの tarball のどちらかに対してsos cleanコマンドを実行し、画面の指示に従います。-
--keywordsオプションを追加して、特定のキーワードリストをさらにクリーンアップできます。 --usernamesオプションを追加して、さらに機密性の高いユーザー名を難読化できます。自動ユーザー名クリーニングは、UID が 1000 以上のユーザーの
lastlogファイルを通じて報告されたユーザーに対して、自動的に実行されます。このオプションは、実際のログインとしては表示されないものの、特定のログファイルに記録される可能性がある LDAP ユーザーに対して使用されます。[user@server1 ~]$ sudo sos clean /var/tmp/sos-collector-2022-05-15-pafsr.tar.xz [sudo] password for user: sos clean (version 4.2) This command will attempt to obfuscate information that is generally considered to be potentially sensitive. Such information includes IP addresses, MAC addresses, domain names, and any user-provided keywords. Note that this utility provides a best-effort approach to data obfuscation, but it does not guarantee that such obfuscation provides complete coverage of all such data in the archive, or that any obfuscation is provided to data that does not fit the description above. Users should review any resulting data and/or archives generated or processed by this utility for remaining sensitive content before being passed to a third party. Press ENTER to continue, or CTRL-C to quit. Found 4 total reports to obfuscate, processing up to 4 concurrently sosreport-primary-rhel8-2022-05-15-nchbdmd : Extracting... sosreport-sos-node1-2022-05-15-wmlomgu : Extracting... sosreport-sos-node2-2022-05-15-obsudzc : Extracting... sos-collector-2022-05-15-pafsr : Beginning obfuscation... sosreport-sos-node1-2022-05-15-wmlomgu : Beginning obfuscation... sos-collector-2022-05-15-pafsr : Obfuscation completed sosreport-primary-rhel8-2022-05-15-nchbdmd : Beginning obfuscation... sosreport-sos-node2-2022-05-15-obsudzc : Beginning obfuscation... sosreport-primary-rhel8-2022-05-15-nchbdmd : Re-compressing... sosreport-sos-node2-2022-05-15-obsudzc : Re-compressing... sosreport-sos-node1-2022-05-15-wmlomgu : Re-compressing... sosreport-primary-rhel8-2022-05-15-nchbdmd : Obfuscation completed sosreport-sos-node2-2022-05-15-obsudzc : Obfuscation completed sosreport-sos-node1-2022-05-15-wmlomgu : Obfuscation completed Successfully obfuscated 4 report(s) A mapping of obfuscated elements is available at /var/tmp/sos-collector-2022-05-15-pafsr-private_map The obfuscated archive is available at /var/tmp/sos-collector-2022-05-15-pafsr-obfuscated.tar.xz Size 157.10KiB Owner root Please send the obfuscated archive to your support representative and keep the mapping file private
-
検証手順
sos cleanコマンドが、/var/tmp/ディレクトリーに、コマンド出力の説明に一致する難読化されたアーカイブと難読化マッピングを作成したことを確認します。[user@server1 ~]$ sudo ls -l /var/tmp/sos-collector-2022-05-15-pafsr-private_map /var/tmp/sos-collector-2022-05-15-pafsr-obfuscated.tar.xz [sudo] password for user: -rw-------. 1 root root 160868 May 15 16:10 /var/tmp/sos-collector-2022-05-15-pafsr-obfuscated.tar.xz -rw-------. 1 root root 96622 May 15 16:10 /var/tmp/sos-collector-2022-05-15-pafsr-private_map*-private_mapファイルで難読化マッピングを確認します。[user@server1 ~]$ sudo cat /var/tmp/sos-collector-2022-05-15-pafsr-private_map [sudo] password for user: { "hostname_map": { "pmoravec-rhel8": "host0" }, "ip_map": { "10.44.128.0/22": "100.0.0.0/22", .. "username_map": { "foobaruser": "obfuscateduser0", "jsmith": "obfuscateduser1", "johndoe": "obfuscateduser2" } }
元の難読化されていないアーカイブと *private_map ファイルの両方をローカルに保存しておいてください。Red Hat サポートから難読化された用語について問い合わせがあった場合に、用語を元の値に変換する必要があるためです。
1.6. sos レポートの生成と、GPG パスフレーズ暗号化によるセキュリティーの保護
この手順では、sos レポートを生成して、パスフレーズをベースにした GPG2 対称暗号化を使用してセキュリティーを確保する方法を説明します。sos レポートは、公共ネットワーク経由で第三者に転送する必要がある場合などに、レポートの内容をパスワードで保護することが推奨されます。
暗号化した sos レポートを作成する場合には、ディスク領域の倍の容量を一時的に使用するため、十分な領域を確保してください。
-
sosユーティリティーは、暗号化されていないsosレポートを作成します。 -
このユーティリティーは、
sosレポートを新しいファイルとして暗号化します。 - 次に、ユーティリティーは暗号化されていないアーカイブを削除します。
前提条件
-
sosパッケージをインストールしている。 -
root権限がある。
手順
sos reportコマンドを実行し、--encrypt-passオプションでパスフレーズを指定します。--uploadオプションを追加すると、sosレポートの生成直後にレポートを Red Hat に転送できます。[user@server1 ~]$ sudo sos report --encrypt-pass my-passphrase [sudo] password for user: sosreport (version 4.2) This command will collect diagnostic and configuration information from this Red Hat Enterprise Linux system and installed applications. An archive containing the collected information will be generated in /var/tmp/sos.6lck0myd and may be provided to a Red Hat support representative. ... Press ENTER to continue, or CTRL-C to quit.
(オプション) Red Hat でテクニカルサポートケースをすでに作成している場合には、ケース番号を入力して
sosレポートファイルの名前に追加します。--uploadオプションを指定している場合は、対象のケースにアップロードされます。ケース番号がない場合は、このフィールドを空白にしておきます。ケース番号の入力は任意であるため、sosユーティリティーの動作には影響はありません。Please enter the case id that you are generating this report for []: <8-digit_case_number>コンソール出力の末尾に表示されている
sosレポートファイルの名前を書き留めておきます。Finished running plugins Creating compressed archive... Your sosreport has been generated and saved in: /var/tmp/secured-sosreport-server1-12345678-2022-01-24-ueqijfm.tar.xz.gpg Size 17.53MiB Owner root md5 32e2bdb23a9ce3d35d59e1fc4c91fe54 Please send this file to your support representative.
検証手順
sosユーティリティーで、以下の要件を満たすアーカイブが作成されたことを確認します。-
ファイル名が
securedで始まる。 -
ファイル名が
.gpg拡張子で終わる。 /var/tmp/ディレクトリーにある。[user@server1 ~]$ sudo ls -l /var/tmp/sosreport* [sudo] password for user: -rw-------. 1 root root 18381537 Jan 24 17:55 /var/tmp/secured-sosreport-server1-12345678-2022-01-24-ueqijfm.tar.xz.gpg
-
ファイル名が
アーカイブの暗号化に使用したパスフレーズと同じものを使用して、アーカイブを復号できることを確認します。
gpgコマンドを使用して、アーカイブを復号します。[user@server1 ~]$ sudo gpg --output decrypted-sosreport.tar.gz --decrypt /var/tmp/secured-sosreport-server1-12345678-2022-01-24-ueqijfm.tar.xz.gpgプロンプトが表示されたら、アーカイブの暗号化に使用したパスフレーズを入力します。
┌──────────────────────────────────────────────────────┐ │ Enter passphrase │ │ │ │ │ │ Passphrase: <passphrase> │ │ │ │ <OK> <Cancel> │ └──────────────────────────────────────────────────────┘gpgユーティリティーが、暗号化されていない、ファイル拡張子が.tar.gzのアーカイブを生成したことを確認します。[user@server1 ~]$ sudo ls -l decrypted-sosreport.tar.gz [sudo] password for user: -rw-r--r--. 1 root root 18381537 Jan 24 17:59 decrypted-sosreport.tar.gz
1.7. sos レポートの生成と、キーペアをベースにした GPG 暗号化によるセキュリティー保護
この手順では、sos レポートを生成し、GPG キーリングからのキーペアをベースにした GPG2 暗号化を使用してセキュリティーを確保する方法を説明します。サーバーに保存されている sos レポートを保護する場合などに、この種類の暗号化を使用して sos レポートの内容を保護することが推奨されます。
暗号化した sos レポートを作成する場合には、ディスク領域の倍の容量を一時的に使用するため、十分な領域を確保してください。
-
sosユーティリティーは、暗号化されていないsosレポートを作成します。 -
このユーティリティーは、
sosレポートを新しいファイルとして暗号化します。 - 次に、ユーティリティーは暗号化されていないアーカイブを削除します。
前提条件
-
sosパッケージをインストールしている。 -
root権限がある。 - GPG2 キーを作成している。
手順
sos reportコマンドを実行し、--encrypt-keyオプションで GPG キーリングを所有するユーザー名を指定します。--uploadオプションを追加すると、sosレポートの生成直後にレポートを Red Hat に転送できます。注記sos reportコマンドを実行するユーザーは、sosレポートの暗号化および復号に使用する GPG キーリングの所有者と同じユーザーで なければなりません。ユーザーがsudoを使用してsos reportコマンドを実行する場合は、sudoでキーリングを設定するか、ユーザーがそのアカウントに直接シェルアクセスできる必要があります。[user@server1 ~]$ sudo sos report --encrypt-key root [sudo] password for user: sosreport (version 4.2) This command will collect diagnostic and configuration information from this Red Hat Enterprise Linux system and installed applications. An archive containing the collected information will be generated in /var/tmp/sos.6ucjclgf and may be provided to a Red Hat support representative. ... Press ENTER to continue, or CTRL-C to quit.
(オプション) Red Hat でテクニカルサポートケースをすでに作成している場合には、ケース番号を入力して
sosレポートファイルの名前に追加します。--uploadオプションを指定している場合は、対象のケースにアップロードされます。ケース番号がない場合は、このフィールドを空白にしておきます。ケース番号の入力は任意であるため、sosユーティリティーの動作には影響はありません。Please enter the case id that you are generating this report for []: <8-digit_case_number>コンソール出力の末尾に表示されている
sosレポートファイルの名前を書き留めておきます。... Finished running plugins Creating compressed archive... Your sosreport has been generated and saved in: /var/tmp/secured-sosreport-server1-23456789-2022-02-27-zhdqhdi.tar.xz.gpg Size 15.44MiB Owner root md5 ac62697e33f3271dbda92290583d1242 Please send this file to your support representative.
検証手順
sosユーティリティーで、以下の要件を満たすアーカイブが作成されたことを確認します。-
ファイル名が
securedで始まる。 -
ファイル名が
.gpg拡張子で終わる。 /var/tmp/ディレクトリーにある。[user@server1 ~]$ sudo ls -l /var/tmp/sosreport* [sudo] password for user: -rw-------. 1 root root 16190013 Jan 24 17:55 /var/tmp/secured-sosreport-server1-23456789-2022-01-27-zhdqhdi.tar.xz.gpg
-
ファイル名が
暗号化に使用したキーと同じキーでアーカイブを復号できることを確認します。
gpgコマンドを使用して、アーカイブを復号します。[user@server1 ~]$ sudo gpg --output decrypted-sosreport.tar.gz --decrypt /var/tmp/secured-sosreport-server1-23456789-2022-01-27-zhdqhdi.tar.xz.gpgプロンプトが表示されたら、GPG キーの作成に使用したパスフレーズを入力します。
┌────────────────────────────────────────────────────────────────┐ │ Please enter the passphrase to unlock the OpenPGP secret key: │ │ "GPG User (first key) <root@example.com>" │ │ 2048-bit RSA key, ID BF28FFA302EF4557, │ │ created 2020-01-13. │ │ │ │ │ │ Passphrase: <passphrase> │ │ │ │ <OK> <Cancel> │ └────────────────────────────────────────────────────────────────┘gpgユーティリティーが、暗号化されていない、ファイル拡張子が.tar.gzのアーカイブを生成したことを確認します。[user@server1 ~]$ sudo ll decrypted-sosreport.tar.gz [sudo] password for user: -rw-r--r--. 1 root root 16190013 Jan 27 17:47 decrypted-sosreport.tar.gz
1.8. GPG2 キーの作成
以下の手順では、暗号化ユーティリティーで使用する GPG2 キーを生成する方法を説明します。
前提条件
-
root権限がある。
手順
pinentryユーティリティーをインストールして設定します。[root@server ~]# yum install pinentry [root@server ~]# mkdir ~/.gnupg -m 700 [root@server ~]# echo "pinentry-program /usr/bin/pinentry-curses" >> ~/.gnupg/gpg-agent.conf
希望する内容で、GPG キーペアの生成に使用する
key-inputファイルを作成します。以下に例を示します。[root@server ~]# cat >key-input <<EOF %echo Generating a standard key Key-Type: RSA Key-Length: 2048 Name-Real: GPG User Name-Comment: first key Name-Email: root@example.com Expire-Date: 0 %commit %echo Finished creating standard key EOF
(オプション) デフォルトでは、GPG2 はキーリングを
~/.gnupgファイルに保存します。カスタムのキーリングの場所を使用するには、GNUPGHOME環境変数を、root のみがアクセスできるディレクトリーに設定します。[root@server ~]# export GNUPGHOME=/root/backup [root@server ~]# mkdir -p $GNUPGHOME -m 700
key-inputファイルの内容に基づいて、新しい GPG2 キーを生成します。[root@server ~]# gpg2 --batch --gen-key key-inputGPG2 キーを保護するパスフレーズを入力します。このパスフレーズは、秘密鍵へのアクセスと復号に使用します。
┌──────────────────────────────────────────────────────┐
│ Please enter the passphrase to                       │
│ protect your new key                                 │
│                                                      │
│ Passphrase: <passphrase>                             │
│                                                      │
│	 <OK>                             <Cancel>         │
└──────────────────────────────────────────────────────┘
パスフレーズを再度入力して、正しいパスフレーズを確認します。
┌──────────────────────────────────────────────────────┐
│ Please re-enter this passphrase                      │
│                                                      │
│ Passphrase: <passphrase>                             │
│                                                      │
│	 <OK>                             <Cancel>         │
└──────────────────────────────────────────────────────┘
新しい GPG2 キーが正常に作成されたことを確認します。
gpg: keybox '/root/backup/pubring.kbx' created
gpg: Generating a standard key
gpg: /root/backup/trustdb.gpg: trustdb created
gpg: key BF28FFA302EF4557 marked as ultimately trusted
gpg: directory '/root/backup/openpgp-revocs.d' created
gpg: revocation certificate stored as '/root/backup/openpgp-revocs.d/8F6FCF10C80359D5A05AED67BF28FFA302EF4557.rev'
gpg: Finished creating standard key
検証手順
サーバーの GPG キーのリストを表示します。
[root@server ~]# gpg2 --list-secret-keys
gpg: checking the trustdb
gpg: marginals needed: 3  completes needed: 1  trust model: pgp
gpg: depth: 0  valid:   1  signed:   0  trust: 0-, 0q, 0n, 0m, 0f, 1u
/root/backup/pubring.kbx
------------------------
sec   rsa2048 2020-01-13 [SCEA]
      8F6FCF10C80359D5A05AED67BF28FFA302EF4557
uid           [ultimate] GPG User (first key) <root@example.com>
関連情報
1.9. レスキュー環境からの sos レポートの生成
Red Hat Enterprise Linux (RHEL) ホストが適切に起動しない場合は、sos レポートを収集するために、ホストを起動して レスキュー環境 を作成してください。
レスキュー環境を使用すると、/mnt/sysimage にターゲットシステムをマウントし、そのコンテンツにアクセスして、sos report コマンドを実行できます。
前提条件
- ホストがベアメタルサーバーの場合は、マシンに物理的にアクセスできる。
- ホストが仮想マシンの場合は、ハイパーバイザーにある仮想マシンの設定にアクセス権できる。
- RHEL インストールを行うための ISO イメージファイル、インストール DVD、netboot CD、PXE (Preboot Execution Environment) 設定などの RHEL インストールソース。
手順
- インストールソースからホストを起動します。
インストールメディアのブートメニューで、
Troubleshootingを選択します。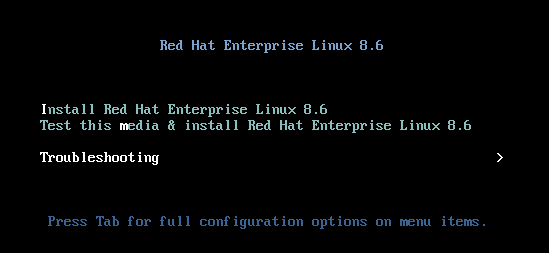
Troubleshooting メニューで
Rescue a Red Hat Enterprise Linux systemオプションを選択します。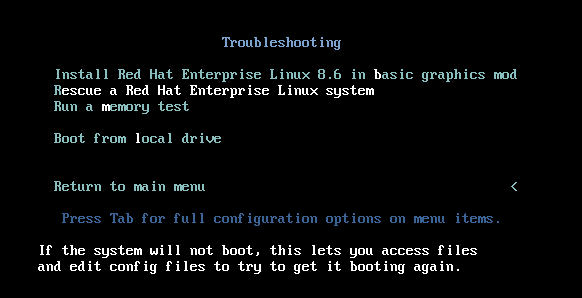
レスキューメニューで
1を選択し、Enter キーを押して続行し、/mnt/sysimageディレクトリーにシステムをマウントします。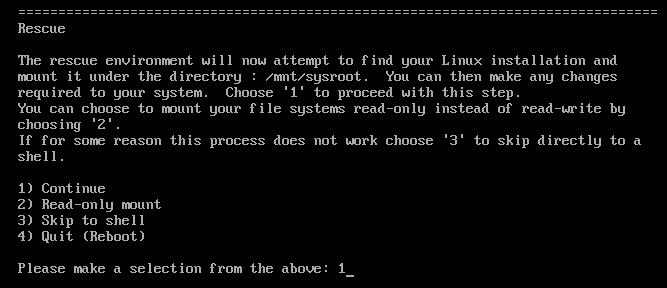
プロンプトが表示されたら、Enter キーを押してシェルを取得します。

chrootコマンドを使用して、レスキューセッションの root ディレクトリーに見せかけたディレクトリーを/mnt/sysimageディレクトリーに変更します。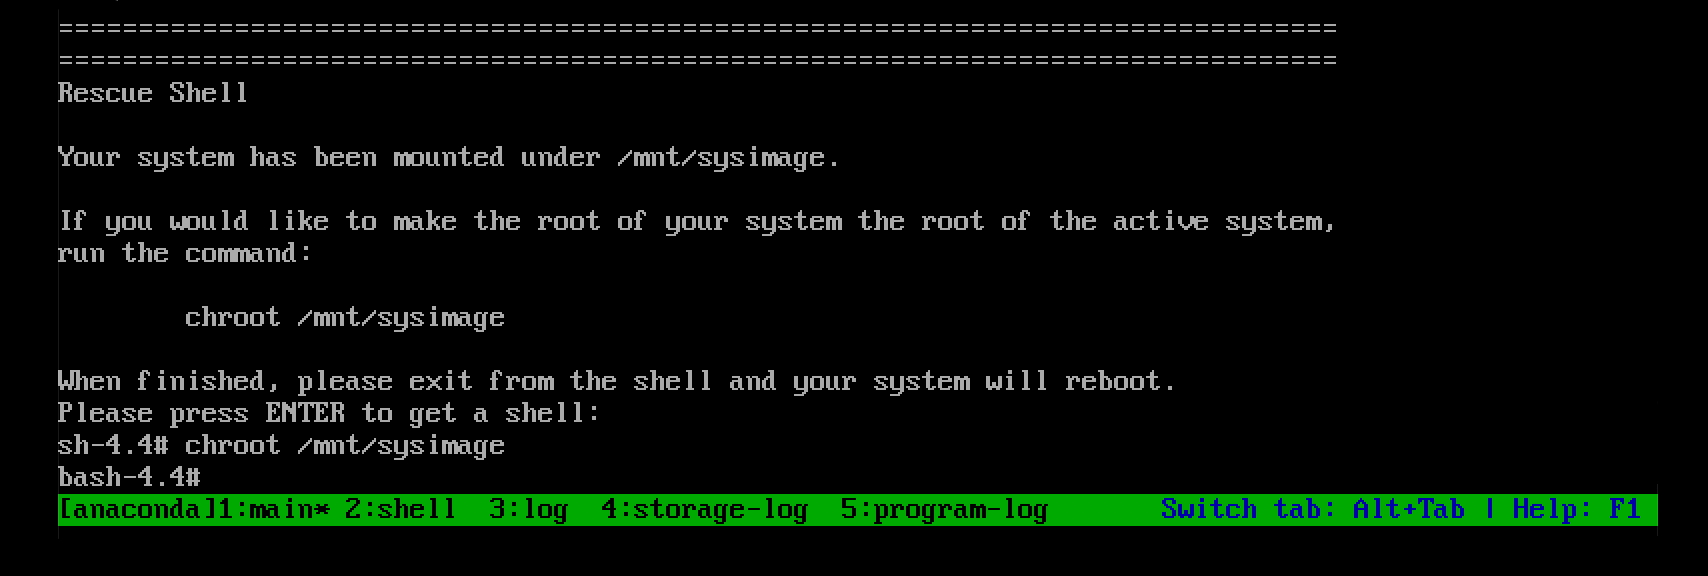
オプション: 最初の Rescue 環境ではネットワークが起動していない可能性があるため、必ず最初にネットワークをセットアップしてください。たとえば、ネットワークに静的 IP アドレスが必要で、ネットワーク経由で
sosレポートを転送したい場合は、以下のようにネットワークを設定します。使用するイーサネットデバイスを特定します。
# ip link show … 2: enp1s0: <BROADCAST,MULTICAST,UP,LOWER_UP> mtu 1500 qdisc fq_codel state UP mode DEFAULT group default qlen 1000 link/ether 52:54:00:74:79:56 brd ff:ff:ff:ff:ff:ffネットワークインターフェイスに IP アドレスを割り当て、デフォルトゲートウェイを設定します。たとえば、サブネット 255.255.255.0 (CIDR 24) を持つ IP アドレス 192.168.0.1 をデバイス enp1s0 に追加する場合は、次のように入力します。
# ip address add <192.168.0.1/24> dev <enp1s0>
# ip route add default via <192.168.0.254>
/etc/resolv.confファイルにnameserverエントリーを追加します。次に例を示します。# nameserver <192.168.0.5>
sos reportコマンドを実行し、画面の指示に従います。--uploadオプションを追加すると、sosレポートの生成直後にレポートを Red Hat に転送できます。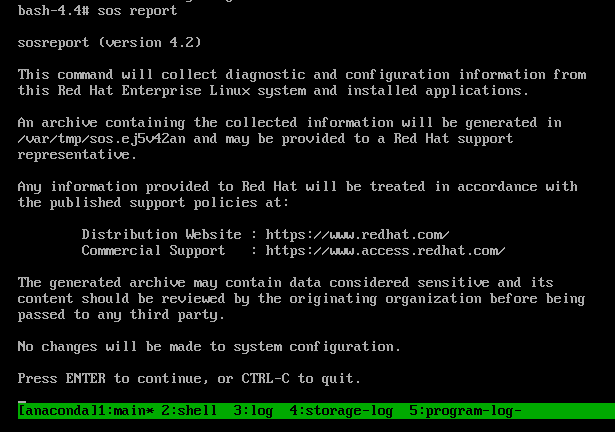
(オプション) Red Hat でテクニカルサポートケースをすでに作成している場合には、ケース番号を入力して
sosレポートファイルの名前に追加します。--uploadを指定しており、ホストがインターネットに接続されている場合は対象のケースにアップロードされます。ケース番号がない場合は、このフィールドを空白にしておきます。ケース番号の入力は任意であるため、sosユーティリティーの動作には影響はありません。
コンソール出力の末尾に表示されている
sosレポートファイルの名前を書き留めておきます。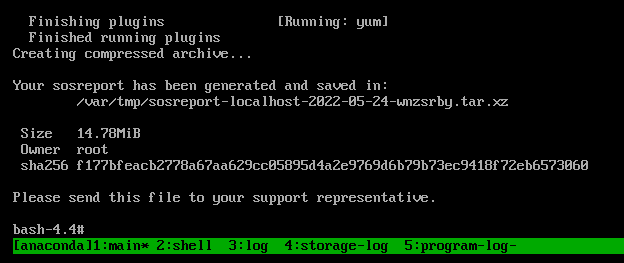
-
ホストがインターネットに接続されていない場合は、
scpなどのファイル転送ユーティリティーを使用して、ネットワーク上の別のホストにsosレポートを転送して Red Hat テクニカルサポートケースにアップロードします。
検証手順
sosユーティリティーが、/var/tmp/ディレクトリーにアーカイブを作成したことを確認します。
関連情報
- How to generate sosreport from the rescue environment.
- Enabling networking in rescue environment without chrooting.
- RHEL インストール DVD の ISO をダウンロードするには、Red Hat カスタマーポータルのダウンロードセクションに移動してください。製品のダウンロード を参照してください。
-
Red Hat テクニカルサポートへの
sosレポートの提出方法
1.10. Red Hat テクニカルサポートへの sos レポートの提供方法
以下の方法を使用して、sos レポートを Red Hat テクニカルサポートにアップロードできます。
sos reportコマンドでのアップロード--uploadオプションを使用して、sosレポートの生成直後にレポートを Red Hat に転送できます。-
プロンプトが表示されたときにケース番号を指定するか、
--case-idまたは--ticket-numberのオプションを使用すると、sosユーティリティーは、Red Hat カスタマーポータルアカウントの認証後に、sosレポートをケースにアップロードします。 ケース番号を指定しない場合、または認証を行わない場合には、sos ユーティリティーにより、
sosレポートが Red Hat 公開 SFTP サイトにアップロードされます。Red Hat テクニカルサポートエンジニアに、sosレポートのアーカイブ名を提示し、エンジニアがアーカイブにアクセスできるようにします。[user@server1 ~]$ sudo sos report --upload [sudo] password for user: sosreport (version 4.2) This command will collect diagnostic and configuration information from this Red Hat Enterprise Linux system and installed applications. ... Please enter the case id that you are generating this report for []: <8-digit_case_number> Enter your Red Hat Customer Portal username (empty to use public dropbox): <Red_Hat_Customer_Portal_ID> Please provide the upload password for <user@domain.com>: ... Attempting upload to Red Hat Customer Portal Uploaded archive successfully
-
プロンプトが表示されたときにケース番号を指定するか、
- Red Hat カスタマーポータルからのファイルのアップロード
Red Hat ユーザーアカウントを使用して、Red Hat カスタマーポータル Web サイトの
Support Casesセクションにログインし、テクニカルサポートケースにsosレポートをアップロードできます。ログインするには、サポートケース にアクセスします。
- Red Hat Support Tool を使用したファイルのアップロード
Red Hat Support Tool を使用すると、コマンドラインから Red Hat テクニカルサポートケースにファイルを直接アップロードできます。ケース番号が必要です。
[user@server1 ~]$ redhat-support-tool addattachment -c <8-digit_case_number> </var/tmp/sosreport_filename>
関連情報
-
SFTP、
curlなど、Red Hat テクニカルサポートにsosレポートを提出する他の方法については、Red Hat ナレッジベースの記事 How to provide files to Red Hat Support (vmcore, rhev logcollector, sosreports, heap dumps, log files, and so on) を参照してください。
第2章 RHEL Web コンソールを使用した診断レポートの生成と維持
RHEL Web コンソールで診断レポートを生成、ダウンロード、および削除します。
2.1. RHEL Web コンソールを使用した診断レポートの生成
前提条件
- RHEL Web コンソールがインストールされている。詳細は、Web コンソールのインストール を参照してください。
-
cockpit-storagedパッケージがシステムにインストールされている。 - 管理者権限がある。
手順
- RHEL Web コンソールにログインします。詳細は、Web コンソールへのログイン を参照してください。
- 左側のメニューで、Tools >> Diagnostic reports を選択します。
新しい診断レポートを生成するには、 ボタンをクリックします。
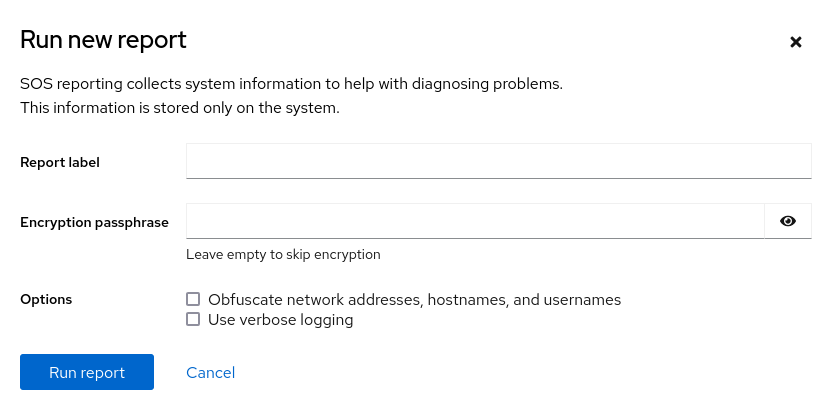
- 作成するレポートのラベルを入力します。
(オプション) レポートをカスタマイズします。
- レポートを暗号化するための暗号化パスフレーズを入力します。レポートの暗号化をスキップする場合は、フィールドを空のままにします。
- 特定のデータを難読化するには Obfuscate network addresses, hostnames, and usernames チェックボックスをオンにします。
- Use verbose logging チェックボックスをオンにし、ログの詳細度を上げます。
- ボタンをクリックしてレポートを生成し、プロセスが完了するまで待ちます。 ボタンを使用して、レポートの生成を停止できます。
2.2. RHEL Web コンソールを使用した診断レポートのダウンロード
前提条件
- RHEL Web コンソールがインストールされている。詳細は、Web コンソールのインストール を参照してください。
- 管理者権限がある。
- 1 つ以上の診断レポートが生成されている。
手順
- RHEL Web コンソールにログインします。詳細は、Web コンソールへのログイン を参照してください。
- 左側のメニューで、Tools >> Diagnostic reports を選択します。
- ダウンロードするレポートの横にある ボタンをクリックします。ダウンロードが自動的に開始されます。
次のステップ
Red Hat テクニカルサポートチームに診断レポートを提供する方法については、Red Hat テクニカルサポートに sos レポートを提供する方法 を参照してください。
2.3. RHEL Web コンソールを使用した診断レポートの削除
前提条件
- RHEL Web コンソールがインストールされている。詳細は、Web コンソールのインストール を参照してください。
- 管理者権限がある。
- 1 つ以上の診断レポートが生成されている。
手順
- RHEL Web コンソールにログインします。詳細は、Web コンソールへのログイン を参照してください。
- 左側のメニューで、Tools >> Diagnostic reports を選択します。
- 削除するレポートの横にある ボタンの横にある縦の省略記号をクリックし、 ボタンをクリックします。
- Delete report permanently? ウィンドウで、 ボタンをクリックしてレポートを削除します。