
6.2. データのエクスポート
LDAP データ交換形式 (LDIF) ファイルは、Directory Server データベースからデータベースエントリーをエクスポートするために使用されます。LDIF は RFC 2849 で説明されている標準形式です。
注記
エクスポート操作は、設定情報 (cn=config)、スキーマ情報 (cn=schema)、または監視情報 (cn=monitor) をエクスポートしません。
データのエクスポートは、以下の場合に役に立ちます。
- データベースのデータのバックアップを作成します。
- 別の Directory Server にデータをコピーします。
- 別のアプリケーションへのデータのエクスポート。
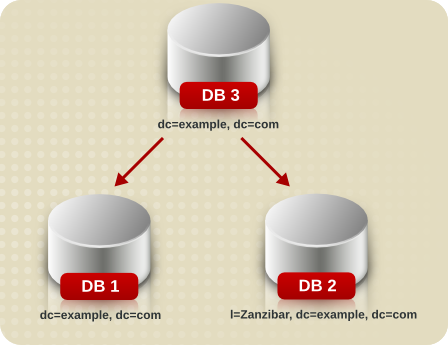
- ディレクトリートポロジーの変更後にデータベースを再作成します。たとえば、ディレクトリーに 1 つのデータベースが含まれ、その内容を 2 つのデータベースに分割する必要がある場合は、図6.1「データベースコンテンツの 2 つのデータベースへの分割」で説明されるように、2 つの新しいデータベースのコンテンツをエクスポートし、それを 2 つの新しいデータベースにインポートます。
図6.1 データベースコンテンツの 2 つのデータベースへの分割
警告
エクスポート操作中はサーバーを停止しないでください。
Directory Server は、エクスポート操作を
dirsrv ユーザーとして実行します。したがって、移行先ディレクトリーのパーミッションでは、このユーザーがこのファイルを作成できるようにする必要があります。
6.2.1. コマンドラインを使用した LDIF ファイルへのデータのエクスポート
Directory Server は、インスタンスの実行中またはオフライン時にデータのエクスポートをサポートします。
- インスタンスが実行している場合には、以下のいずれかの方法を使用します。
- dsconf backend export コマンドを使用します。「dsconf backend export コマンドを使用したデータベースのエクスポート」を参照してください。
- cn=tasks エントリーを作成します。「cn=tasks エントリーを使用したデータベースのエクスポート」を参照してください。
- インスタンスがオフラインの場合は、dsctl db2ldif コマンドを使用します。「サーバーがオフライン時のデータベースのエクスポート」を参照してください。
重要
LDIF ファイルを
/tmp または /var/tmp/ ディレクトリーにエクスポートしないでください。理由は以下のとおりです。
- Directory Server は、デフォルトで
systemdのPrivateTmp機能を使用します。LDIF ファイルを/tmpまたは/var/tmp/システムディレクトリーに配置すると、Directory Server はインポート中にこれらの LDIF ファイルを認識しません。PrivateTmpの詳細は、systemd.exec(5)の man ページを参照してください。 - LDIF ファイルには、しばしばユーザーパスワードなどの機密データが含まれます。したがって、これらのファイルを保存するために一時システムディレクトリーを使用しないでください。
6.2.1.1. サーバーの実行中にデータベースのエクスポート
6.2.1.1.1. dsconf backend export コマンドを使用したデータベースのエクスポート
dsconf backend export コマンドを使用して、LDIF ファイルにデータをエクスポートするタスクを自動的に作成します。
たとえば、
userRoot データベースをエクスポートするには、以下のコマンドを実行します。
# dsconf -D "cn=Directory Manager" ldap://server.example.com backend export userRoot
The export task has finished successfully
デフォルトでは、
dsconf は、エクスポートを /var/lib/dirsrv/slapd-instance_name/export/ ディレクトリーの instance_name_database_name-time_stamp.ldif という名前のファイルに保存します。または、コマンドに -l file_name オプションを追加して、別の場所を指定します。
dsconf backend export コマンドは、特定の接尾辞を除外するなど、追加オプションに対応します。利用可能なオプションをすべて表示するには、以下を入力します。
# dsconf ldap://server.example.com backend export --help
6.2.1.1.2. cn=tasks エントリーを使用したデータベースのエクスポート
Directory Server 設定の cn=tasks,cn=config エントリーは、サーバーがタスクの管理に使用する一時的なエントリー用のコンテナーエントリーです。エクスポート操作を開始するには、cn=export,cn=tasks,cn=config エントリーにタスクを作成します。
タスクエントリーを使用すると、サーバーの実行中にデータをエクスポートできます。
エクスポートタスクエントリーには以下の属性が必要です。
cn: タスクの一意の名前を設定します。nsInstance: エクスポートするデータベースの名前を設定します。nsFilename: エクスポートを保存するファイルの名前を設定します。
エクスポートタスクは、接尾辞を除外するなどの追加のパラメーターをサポートします。完全なリストは、『Red Hat Directory Server の設定、コマンド、およびファイルリファレンス』 の 『cn=export』 セクションを参照してください。
たとえば、
userRoot データベースのコンテンツを /var/lib/dirsrv/slapd-instance_name/ldif/example.ldif ファイルにエクスポートするタスクを追加するには、次のようにします。
# ldapadd -D "cn=Directory Manager" -W -H ldap://server.example.com -x

dn: cn=example_export,cn=export,cn=tasks,cn=config
changetype: add
objectclass: extensibleObject
cn: example_export
nsInstance: userRoot
nsFilename: /var/lib/dirsrv/slapd-instance_name/ldif/example.ldif
タスクが完了すると、エントリーはディレクトリー設定から削除されます。
6.2.1.2. サーバーがオフライン時のデータベースのエクスポート
データのエクスポート時にサーバーがオフラインの場合は、dsctl db2ldif コマンドを使用します。
- インスタンスを停止します。
# dsctl instance_name stop
- データベースを LDIF ファイルにエクスポートします。たとえば、
userRootデータベースを/var/lib/dirsrv/slapd-instance_name/ldif/example.ldifファイルにエクスポートするには:# dsctl instance_name db2ldif userroot /var/lib/dirsrv/slapd-instance_name/ldif/example.ldif OK group dirsrv exists OK user dirsrv exists ldiffile: /var/lib/dirsrv/slapd-instance_name/ldif/example.ldif [18/Jul/2018:10:46:03.353656777 +0200] - INFO - ldbm_instance_config_cachememsize_set - force a minimal value 512000 [18/Jul/2018:10:46:03.383101305 +0200] - INFO - ldbm_back_ldbm2ldif - export userroot: Processed 160 entries (100%). [18/Jul/2018:10:46:03.391553963 +0200] - INFO - dblayer_pre_close - All database threads now stopped db2ldif successful - インスタンスを起動します。
# dsctl instance_name start
6.2.2. Web コンソールを使用した LDIF ファイルへの接尾辞のエクスポート
Web コンソールを使用して接尾辞をエクスポートするには、以下を実行します。
- Web コンソールで Directory Server ユーザーインターフェイスを開きます。「Web コンソールを使用した Directory Server へのログイン」を参照してください。
- インスタンスを選択します。
- メニューを開きます。
- 接尾辞エントリーを選択します。
- をクリックし、Export Suffix を選択します。
- エクスポートを保存する LDIF ファイルの名前を入力します。Directory Server は、指定したファイル名を使用して、ファイルを
/var/lib/dirsrv/slapd-instance_name/ldif/ディレクトリーに保存します。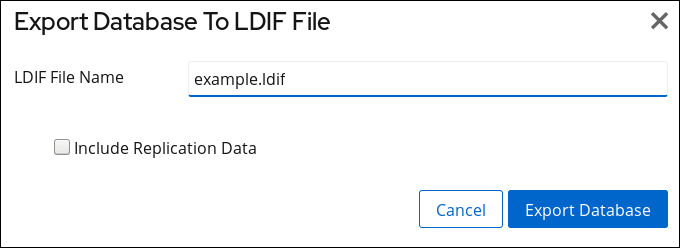
- をクリックします。
6.2.3. グループのメンバーがデータをエクスポートすることの許可、およびグループメンバーの 1 つとしてのエクスポートの実行
グループのメンバーに、データをエクスポートするパーミッションを設定できます。スクリプトに
cn=Directory Manager の認証情報を設定する必要がなくなるため、セキュリティーが向上します。また、グループを変更して、エクスポートのパーミッションを簡単に許可し、取り消しすことができます。
6.2.3.1. グループがデータをエクスポートすることの許可
この手順を使用して、
cn=export_users,ou=groups,dc=example,dc=com グループを追加し、このグループのメンバーがエクスポートタスクを作成することを許可します。
手順
cn=export_users,ou=groups,dc=example,dc=comグループを作成します。# dsidm -D "cn=Directory Manager" ldap://server.example.com -b "dc=example,dc=com" group create --cn export_users
cn=export_users,ou=groups,dc=example,dc=comグループのメンバーがエクスポートタスクを作成するのを許可するアクセス制御手順 (ACI) を追加します。# ldapadd -D "cn=Directory Manager" -W -H ldap://server.example.com dn: cn=config changetype: modify add: aci aci: (target = "ldap:///cn=export,cn=tasks,cn=config")(targetattr="*") (version 3.0 ; acl "permission: Allow export_users group to export data" ; allow (add, read, search) groupdn = "ldap:///cn=export_users,ou=groups,dc=example,dc=com";) - add: aci aci: (target = "ldap:///cn=config")(targetattr = "objectclass || cn || nsslapd-suffix || nsslapd-ldifdir") (version 3.0 ; acl "permission: Allow export_users group to access ldifdir attribute" ; allow (read,search) groupdn = "ldap:///cn=export_users,ou=groups,dc=example,dc=com";)
- ユーザーを作成します。
- ユーザーアカウントを作成します。
# dsidm -D "cn=Directory Manager" ldap://server.example.com -b "dc=example,dc=com" user create --uid="example" --cn="example" --uidNumber="1000" --gidNumber="1000" --homeDirectory="/home/example/" --displayName="Example User"
- ユーザーアカウントのパスワードを設定します。
# dsidm -D "cn=Directory Manager" ldap://server.example.com -b "dc=example,dc=com" account reset_password "uid=example,ou=People,dc=example,dc=com" "password"
uid=example,ou=People,dc=example,dc=comユーザーをcn=export_users,ou=groups,dc=example,dc=comグループに追加します。# dsidm -D "cn=Directory Manager" ldap://server.example.com -b "dc=example,dc=com" group add_member export_users uid=example,ou=People,dc=example,dc=com
検証
- cn=config に設定した ACI を表示します。
# ldapsearch -o ldif-wrap=no -LLLx -D "cn=Directory Manager" -W -H ldap://server.example.com -b cn=config aci=* aci -s base
dn: cn=config
aci: (target = "ldap:///cn=export,cn=tasks,cn=config")(targetattr="*")(version 3.0 ; acl "permission: Allow export_users group to export data" ; allow (add, read, search) groupdn = "ldap:///cn=export_users,ou=groups,dc=example,dc=com";)
aci: (target = "ldap:///cn=config")(targetattr = "objectclass || cn || nsslapd-suffix || nsslapd-ldifdir")(version 3.0 ; acl "permission: Allow export_users group to access ldifdir attribute" ; allow (read,search) groupdn = "ldap:///cn=export_users,ou=groups,dc=example,dc=com";)
...
6.2.3.2. 通常のユーザーとしてのエクスポートの実行
cn=Directory Manager ではなく、通常のユーザーとしてエクスポートを実行できます。
前提条件
cn=export_users,ou=groups,dc=example,dc=comグループのメンバーがデータをエクスポートすることを許可している。「グループがデータをエクスポートすることの許可」を参照してください。- エクスポートの実行に使用するユーザーが
cn=export_users,ou=groups,dc=example,dc=comグループのメンバーである。
手順
- 以下の方法のいずれかを使用してエクスポートタスクを作成します。
- dsconf backend export コマンドの使用:
# dsconf -D "uid=example,ou=People,dc=example,dc=com" ldap://server.example.com backend export userRoot
- タスクの手動での作成:
# ldapadd -D "uid=example,ou=People,dc=example,dc=com" -W -H ldap://server.example.com

dn: cn=userRoot-2021_07_23_12:55_00,cn=export,cn=tasks,cn=config
changetype: add
objectClass: extensibleObject
nsFilename: /var/lib/dirsrv/slapd-instance_name/ldif/None-userroot-2021_07_23_12:55_00.ldif
nsInstance: userRoot
cn: export-2021_07_23_12:55_00
検証
- バックアップが作成されたことを確認します。
# ls -l /var/lib/dirsrv/slapd-instance_name/ldif/*.ldif
total 0
-rw-------. 1 dirsrv dirsrv 10306 Jul 23 12:55 None-userroot-2021_07_23_12_55_00.ldif
...