
第4章 Creating guided rules
Guided rules enable you to define business rules in a structured format, based on the data objects associated with the rules. You can create and define guided rules individually for your project.
Procedure
- In Business Central, go to Menu → Design → Projects and click the project name.
- Click Add Asset → Guided Rule.
Enter an informative Guided Rule name and select the appropriate Package. The package that you specify must be the same package where the required data objects have been assigned or will be assigned.
You can also select Show declared DSL sentences if any domain specific language (DSL) assets have been defined in your project. These DSL assets will then become usable objects for conditions and actions that you define in the guided rules designer.
Click Ok to create the rule asset.
The new guided rule is now listed in the Guided Rules panel of the Project Explorer, or in the Guided Rules (with DSL) panel if you selected the Show declared DSL sentences option.
- Click the Data Objects tab and confirm that all data objects required for your rules are listed. If not, click New item to import data objects from other packages, or create data objects within your package.
After all data objects are in place, return to the Model tab of the guided rules designer and use the buttons on the right side of the window to add and define the WHEN (condition) and THEN (action) sections of the rule, based on the available data objects.
図4.1 The guided rules designer
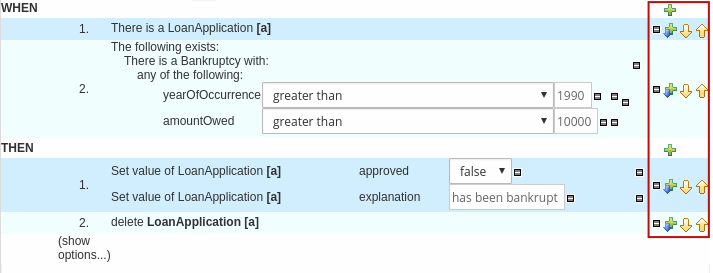
The WHEN part of the rule contains the conditions that must be met to execute an action. For example, if a bank requires loan applicants to have over 21 years of age, then the WHEN condition of an
Underagerule would beAge | less than | 21.The THEN part of the rule contains the actions to be performed when the conditional part of the rule has been met. For example, when the loan applicant is under 21 years old, the THEN action would set
approvedtofalse, declining the loan because the applicant is under age.You can also specify exceptions for more complex rules, such as if a bank may approve of an under-aged applicant when a guarantor is involved. In that case, you would create or import a guarantor data object and then add the field to the guided rule.
- After you define all components of the rule, click Validate in the upper-right toolbar of the guided rules designer to validate the guided rule. If the rule validation fails, address any problems described in the error message, review all components in the rule, and try again to validate the rule until the rule passes.
- Click Save in the guided rules designer to save your work.
4.1. Adding WHEN conditions in guided rules
The WHEN part of the rule contains the conditions that must be met to execute an action. For example, if a bank requires loan applicants to have over 21 years of age, then the WHEN condition of an Underage rule would be Age | less than | 21. You can set simple or complex conditions to determine how and when your rules are applied.
Prerequisites
- All data objects required for your rules have been created or imported and are listed in the Data Objects tab of the guided rules designer.
Procedure
In the guided rules designer, click the plus icon (
 ) on the right side of the
 WHENsection.The Add a condition to the rule window with the available condition elements opens.
図4.2 Add a condition to the rule
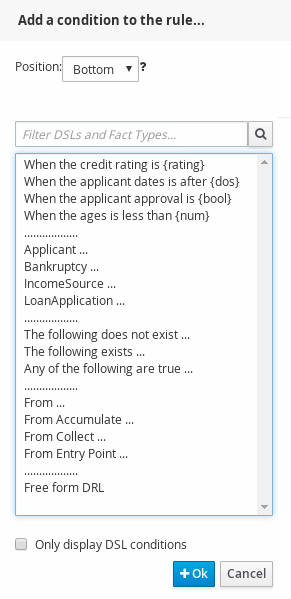
The list includes the data objects from the Data Objects tab of the guided rules designer, any DSL objects defined for the package (if you selected Show declared DSL sentences when you created this guided rule), and the following standard options:
- The following does not exist: Use this to specify facts and constraints that must not exist.
- The following exists: Use this to specify facts and constraints that must exist. This option is triggered on only the first match, not subsequent matches.
- Any of the following are true: Use this to list any facts or constraints that must be true.
-
From: Use this to define a
Fromconditional element for the rule. -
From Accumulate: Use this to define an
Accumulateconditional element for the rule. -
From Collect: Use this to define a
Collectconditional element for the rule. -
From Entry Point: Use this to define an
Entry Pointfor the pattern. - Free form DRL: Use this to insert a free-form DRL field where you can define condition elements freely, without the guided rules designer.
- Choose a condition element (for example, LoanApplication) and click Ok.
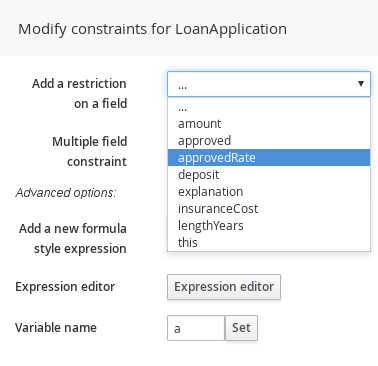
Click the condition element in the guided rules designer and use the Modify constraints for LoanApplication window to add a restriction on a field, apply multiple field constraints, add a new formula style expression, apply an expression editor, or set a variable name.
図4.3 Modify a condition
 注記
注記A variable name enables you to identify a fact or field in other constructs within the guided rule. For example, you could set the variable of
LoanApplicationtoaand then referenceain a separateBankruptcyconstraint that specifies which application the bankruptcy is based on.a : LoanApplication() Bankruptcy( application == a ).
After you select a constraint, the window closes automatically.
-
Choose an operator for the restriction (for example,
greater than) from the drop-down menu next to the added restriction. -
Click the edit icon (
 ) to define the field value. The field value can be a literal value, a formula, or a full MVEL expression.
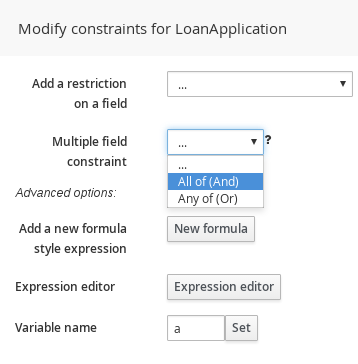
To apply multiple field constraints, click the condition and in the Modify constraints for LoanApplication window, select All of(And) or Any of(Or) from the Multiple field constraint drop-down menu.
図4.4 Add multiple field constraints
- Click the constraint in the guided rules designer and further define the field value.
- After you define all condition components of the rule, click Validate in the upper-right toolbar of the guided rules designer to validate the guided rule conditions. If the rule validation fails, address any problems described in the error message, review all components in the rule, and try again to validate the rule until the rule passes.
- Click Save in the guided rules designer to save your work.