
Designing a decision service using guided rule templates
Guide
概要
Preface
As a business analyst or business rules developer, you can define business rule templates using the guided rule templates designer in Business Central. These guided rule templates provide a reusable rule structure for multiple rules that are compiled into Drools Rule Language (DRL) and form the core of the decision service for your project.
You can also design your decision service using Decision Model and Notation (DMN) models instead of rule-based or table-based assets. For information about DMN support in Red Hat Decision Manager 7.8, see the following resources:
- Getting started with decision services (step-by-step tutorial with a DMN decision service example)
- Designing a decision service using DMN models (overview of DMN support and capabilities in Red Hat Decision Manager)
Prerequisites
- The space and project for the guided rule templates have been created in Business Central. Each asset is associated with a project assigned to a space. For details, see Getting started with decision services.
第1章 Decision-authoring assets in Red Hat Decision Manager
Red Hat Decision Manager supports several assets that you can use to define business decisions for your decision service. Each decision-authoring asset has different advantages, and you might prefer to use one or a combination of multiple assets depending on your goals and needs.
The following table highlights the main decision-authoring assets supported in Red Hat Decision Manager projects to help you decide or confirm the best method for defining decisions in your decision service.
表1.1 Decision-authoring assets supported in Red Hat Decision Manager
| Asset | Highlights | Authoring tools | Documentation |
|---|---|---|---|
| Decision Model and Notation (DMN) models |
| Business Central or other DMN-compliant editor | |
| Guided decision tables |
| Business Central | |
| Spreadsheet decision tables |
| Spreadsheet editor | Designing a decision service using spreadsheet decision tables |
| Guided rules |
| Business Central | |
| Guided rule templates |
| Business Central | |
| DRL rules |
| Business Central or integrated development environment (IDE) | |
| Predictive Model Markup Language (PMML) models |
| PMML or XML editor |
第2章 Guided rule templates
Guided rule templates are business rule structures with placeholder values (template keys) that are interchanged with actual values defined in separate data tables. Each row of values defined in the corresponding data table for that template results in a rule. Guided rule templates are ideal when many rules have the same conditions, actions, and other attributes but differ in values of facts or constraints. In such cases, instead of creating many similar guided rules and defining values in each rule, you can create a guided rule template with the rule structure that applies to each rule and then define only the differing values in the data table.
The guided rule templates designer provides fields and options for acceptable template input based on the data objects for the rule template being defined, and a corresponding data table where you add template key values. After you create your guided rule template and add values in the corresponding data table, the rules you defined are compiled into Drools Rule Language (DRL) rules as with all other rule assets.
All data objects related to a guided rule template must be in the same project package as the guided rule template. Assets in the same package are imported by default. After you create the necessary data objects and the guided rule template, you can use the Data Objects tab of the guided rule templates designer to verify that all required data objects are listed or to import other existing data objects by adding a New item.
第3章 Data objects
Data objects are the building blocks for the rule assets that you create. Data objects are custom data types implemented as Java objects in specified packages of your project. For example, you might create a Person object with data fields Name, Address, and DateOfBirth to specify personal details for loan application rules. These custom data types determine what data your assets and your decision services are based on.
3.1. Creating data objects
The following procedure is a generic overview of creating data objects. It is not specific to a particular business asset.
Procedure
- In Business Central, go to Menu → Design → Projects and click the project name.
- Click Add Asset → Data Object.
Enter a unique Data Object name and select the Package where you want the data object to be available for other rule assets. Data objects with the same name cannot exist in the same package. In the specified DRL file, you can import a data object from any package.
Importing data objects from other packagesYou can import an existing data object from another package directly into the asset designers like guided rules or guided decision table designers. Select the relevant rule asset within the project and in the asset designer, go to Data Objects → New item to select the object to be imported.
- To make your data object persistable, select the Persistable checkbox. Persistable data objects are able to be stored in a database according to the JPA specification. The default JPA is Hibernate.
- Click Ok.
In the data object designer, click add field to add a field to the object with the attributes Id, Label, and Type. Required attributes are marked with an asterisk (*).
- Id: Enter the unique ID of the field.
- Label: (Optional) Enter a label for the field.
- Type: Enter the data type of the field.
List: (Optional) Select this check box to enable the field to hold multiple items for the specified type.
図3.1 Add data fields to a data object
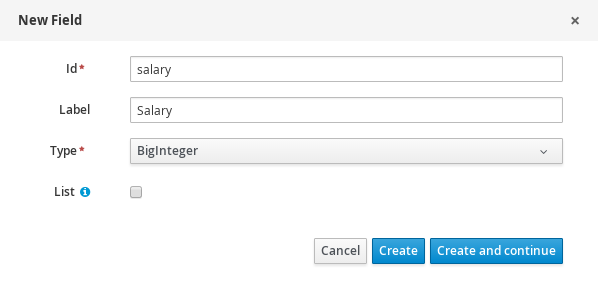
Click Create to add the new field, or click Create and continue to add the new field and continue adding other fields.
注記To edit a field, select the field row and use the general properties on the right side of the screen.
第4章 Creating guided rule templates
You can use guided rule templates to define rule structures with placeholder values (template keys) that correspond to actual values defined in a data table. Guided rule templates are an efficient alternative to defining sets of many guided rules individually that use the same structure.
Procedure
- In Business Central, go to Menu → Design → Projects and click the project name.
- Click Add Asset → Guided Rule Template.
- Enter an informative Guided Rule Template name and select the appropriate Package. The package that you specify must be the same package where the required data objects have been assigned or will be assigned.
Click Ok to create the rule template.
The new guided rule template is now listed in the Guided Rule Templates panel of the Project Explorer.
- Click the Data Objects tab and confirm that all data objects required for your rules are listed. If not, click New item to import data objects from other packages, or create data objects within your package.
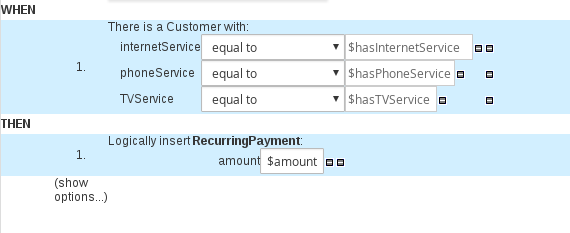
After all data objects are in place, return to the Model tab and use the buttons on the right side of the window to add and define the WHEN (condition) and THEN (action) sections of the rule template, based on the available data objects. For the field values that vary per rule, use template keys in the format
$keyin the rule designer or in the format@{key}in free form DRL (if used).図4.1 Sample guided rule template
 Note on template keys
Template keys are fundamental in guided rule templates. Template keys are what enable field values in the templates to be interchanged with actual values that you define in the corresponding data table to generate different rules from the same template. You can use other value types, such as Literal or Formula, for values that are part of the rule structure of all rules based on that template. However, for any values that differ among the rules, use the Template key field type with a specified key. Without template keys in a guided rule template, the corresponding data table is not generated in the template designer and the template essentially functions as an individual guided rule.
The WHEN part of the rule template is the condition that must be met to execute an action. For example, if a telecommunications company charges customers based on the services they subscribe to (Internet, phone, and TV), then one of the WHEN conditions would be
internetService | equal to | $hasInternetService. The template key$hasInternetServiceis interchanged with an actual Boolean value (trueorfalse) defined in the data table for the template.The THEN part of the rule template is the action to be performed when the conditional part of the rule has been met. For example, if a customer subscribes to only Internet service, a THEN action for
RecurringPaymentwith a template key$amountwould set the actual monthly amount to the integer value defined for Internet service charges in the data table.- After you define all components of the rule, click Save in the guided rule templates designer to save your work.
4.1. Adding WHEN conditions in guided rule templates
The WHEN part of the rule contains the conditions that must be met to execute an action. For example, if a telecommunications company charges customers based on the services they subscribe to (Internet, phone, and TV), then one of the WHEN conditions would be internetService | equal to | $hasInternetService. The template key $hasInternetService is interchanged with an actual Boolean value (true or false) defined in the data table for the template.
Prerequisites
- All data objects required for your rules have been created or imported and are listed in the Data Objects tab of the guided rule templates designer.
Procedure
In the guided rule templates designer, click the plus icon (
 ) on the right side of the
 WHENsection.The Add a condition to the rule window with the available condition elements opens.
図4.2 Add a condition to the rule
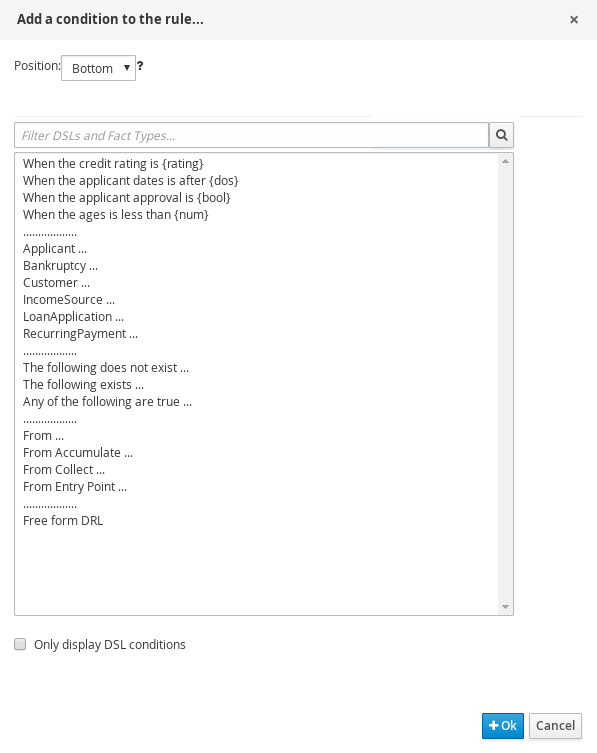
The list includes the data objects from the Data Objects tab of the guided rule templates designer, any DSL objects defined for the package, and the following standard options:
- The following does not exist: Use this to specify facts and constraints that must not exist.
- The following exists: Use this to specify facts and constraints that must exist. This option is triggered on only the first match, not subsequent matches.
- Any of the following are true: Use this to list any facts or constraints that must be true.
-
From: Use this to define a
Fromconditional element for the rule. -
From Accumulate: Use this to define an
Accumulateconditional element for the rule. -
From Collect: Use this to define a
Collectconditional element for the rule. -
From Entry Point: Use this to define an
Entry Pointfor the pattern. -
Free form DRL: Use this to insert a free-form DRL field where you can define condition elements freely, without the guided rules designer. For template keys in free form DRL, use the format
@{key}.
- Choose a condition element (for example, Customer) and click Ok.
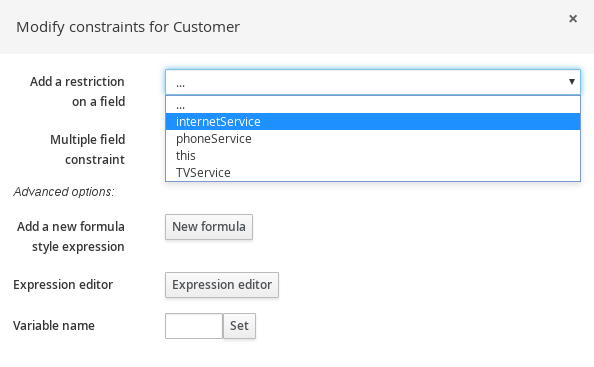
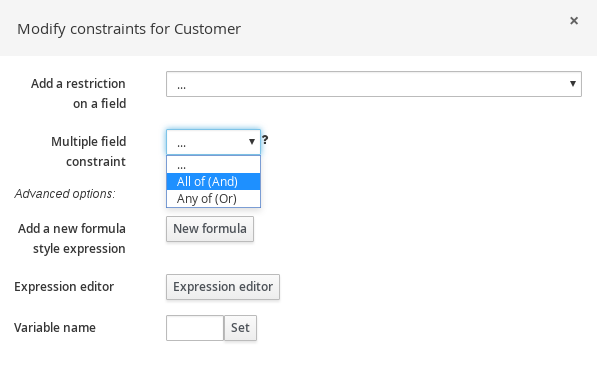
Click the condition element in the guided rule templates designer and use the Modify constraints for Customer window to add a restriction on a field, apply multiple field constraints, add a new formula style expression, apply an expression editor, or set a variable name.
図4.3 Modify a condition
 注記
注記A variable name enables you to identify a fact or field in other constructs within the guided rule. For example, you could set the variable of
Customertocand then referencecin a separateApplicantconstraint that specifies that theCustomeris theApplicant.c : Customer() Applicant( this == c )
After you select a constraint, the window closes automatically.
-
Choose an operator for the restriction (for example,
equal to) from the drop-down menu next to the added restriction. -
Click the edit icon (
 ) to define the field value.
-
Select Template key and add a template key in the format
$keyif this value varies among the rules that are based on this template. This allows the field value to be interchanged with actual values that you define in the corresponding data table to generate different rules from the same template. For field values that do not vary among the rules and are part of the rule template, you can use any other value type. To apply multiple field constraints, click the condition and in the Modify constraints for Customer window, select All of(And) or Any of(Or) from the Multiple field constraint drop-down menu.
図4.4 Add multiple field constraints
- Click the constraint in the guided rule templates designer and further define the field values.
- After you define all condition elements, click Save in the guided rule templates designer to save your work.
4.2. Adding THEN actions in guided rule templates
The THEN part of the rule template is the action to be performed when the conditional part of the rule has been met. For example, if a customer subscribes to only Internet service, a THEN action for RecurringPayment with a template key $amount would set the actual monthly amount to the integer value defined for Internet service charges in the data table.
Prerequisites
- All data objects required for your rules have been created or imported and are listed in the Data Objects tab of the guided rule templates designer.
Procedure
In the guided rule templates designer, click the plus icon (
) on the right side of the THENsection.The Add a new action window with the available action elements opens.
図4.5 Add a new action to the rule
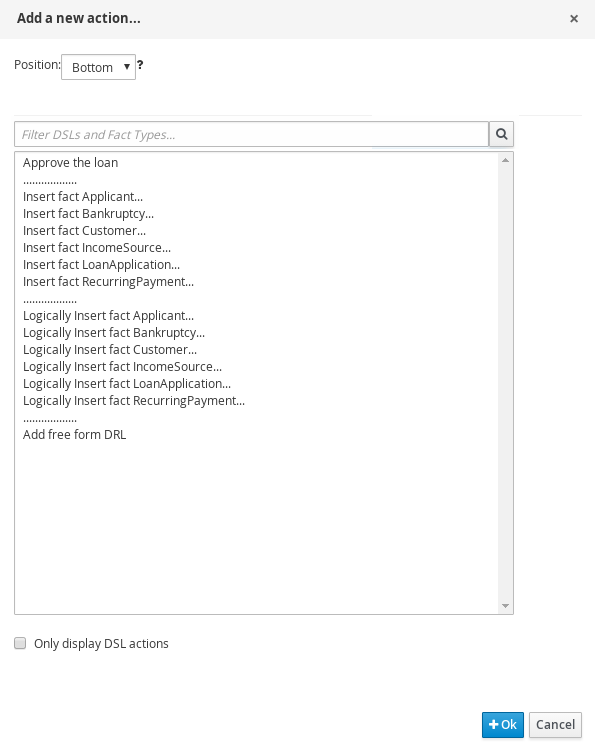
The list includes insertion and modification options based on the data objects in the Data Objects tab of the guided rule templates designer, and on any DSL objects defined for the package:
- Insert fact: Use this to insert a fact and define resulting fields and values for the fact.
- Logically Insert fact: Use this to insert a fact logically into the decision engine and define resulting fields and values for the fact. The decision engine is responsible for logical decisions on insertions and retractions of facts. After regular or stated insertions, facts have to be retracted explicitly. After logical insertions, facts are automatically retracted when the conditions that originally asserted the facts are no longer true.
-
Add free form DRL: Use this to insert a free-form DRL field where you can define condition elements freely, without the guided rules designer. For template keys in free form DRL, use the format
@{key}.
- Choose an action element (for example, Logically Insert fact RecurringPayment) and click Ok.
Click the action element in the guided rule templates designer and use the Add a field window to select a field.
図4.6 Add a field
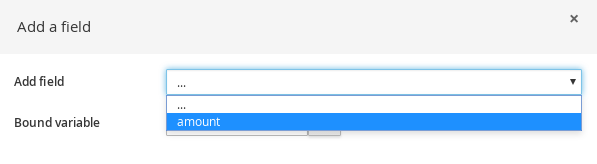
After you select a field, the window closes automatically.
-
Click the edit icon (
) to define the field value.
-
Select Template key and add a template key in the format
$keyif this value varies among the rules that are based on this template. This allows the field value to be interchanged with actual values that you define in the corresponding data table to generate different rules from the same template. For field values that do not vary among the rules and are part of the rule template, you can use any other value type. - After you define all action elements, click Save in the guided rule templates designer to save your work.
4.3. Defining enumerations for drop-down lists in rule assets
Enumeration definitions in Business Central determine the possible values of fields for conditions or actions in guided rules, guided rule templates, and guided decision tables. An enumeration definition contains a fact.field mapping to a list of supported values that are displayed as a drop-down list in the relevant field of a rule asset. When a user selects a field that is based on the same fact and field as the enumeration definition, the drop-down list of defined values is displayed.
You can define enumerations in Business Central or in the DRL source for your Red Hat Decision Manager project.
Procedure
- In Business Central, go to Menu → Design → Projects and click the project name.
- Click Add Asset → Enumeration.
- Enter an informative Enumeration name and select the appropriate Package. The package that you specify must be the same package where the required data objects and relevant rule assets have been assigned or will be assigned.
Click Ok to create the enumeration.
The new enumeration is now listed in the Enumeration Definitions panel of the Project Explorer.
In the Model tab of the enumerations designer, click Add enum and define the following values for the enumeration:
- Fact: Specify an existing data object within the same package of your project with which you want to associate this enumeration. Open the Data Objects panel in the Project Explorer to view the available data objects, or create the relevant data object as a new asset if needed.
- Field: Specify an existing field identifier that you defined as part of the data object that you selected for the Fact. Open the Data Objects panel in the Project Explorer to select the relevant data object and view the list of available Identifier options. You can create the relevant identifier for the data object if needed.
-
Context: Specify a list of values in the format
['string1','string2','string3']or[integer1,integer2,integer3]that you want to map to the Fact and Field definitions. These values will be displayed as a drop-down list for the relevant field of the rule asset.
For example, the following enumeration defines the drop-down values for applicant credit rating in a loan application decision service:
図4.7 Example enumeration for applicant credit rating in Business Central

Example enumeration for applicant credit rating in the DRL source
'Applicant.creditRating' : ['AA', 'OK', 'Sub prime']
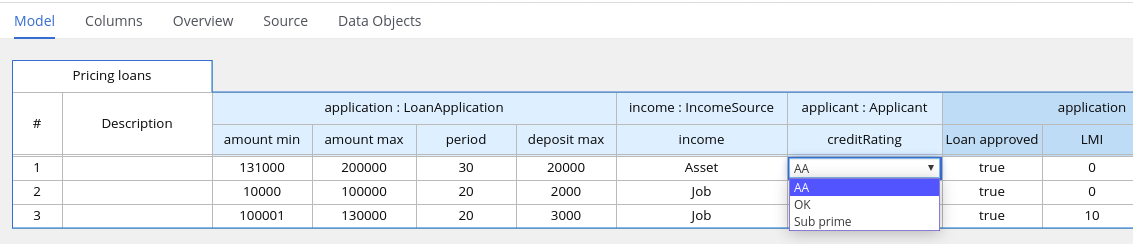
In this example, for any guided rule, guided rule template, or guided decision table that is in the same package of the project and that uses the
Applicantdata object and thecreditRatingfield, the configured values are available as drop-down options:図4.8 Example enumeration drop-down options in a guided rule or guided rule template
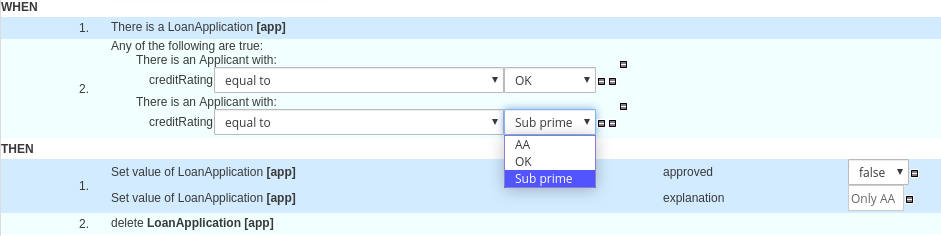
図4.9 Example enumeration drop-down options in a guided decision table
4.3.1. Advanced enumeration options for rule assets
For advanced use cases with enumeration definitions in your Red Hat Decision Manager project, consider the following extended options for defining enumerations:
- Mapping between DRL values and values in Business Central
If you want the enumeration values to appear differently or more completely in the Business Central interface than they appear in the DRL source, use a mapping in the format
'fact.field' : ['sourceValue1=UIValue1','sourceValue2=UIValue2', … ]for your enumeration definition values.For example, in the following enumeration definition for loan status, the options
AorDare used in the DRL file but the optionsApprovedorDeclinedare displayed in Business Central:'Loan.status' : ['A=Approved','D=Declined']
- Enumeration value dependencies
If you want the selected value in one drop-down list to determine the available options in a subsequent drop-down list, use the format
'fact.fieldB[fieldA=value1]' : ['value2', 'value3', … ]for your enumeration definition.For example, in the following enumeration definition for insurance policies, the
policyTypefield accepts the valuesHomeorCar. The type of policy that the user selects determines the policycoveragefield options that are then available:'Insurance.policyType' : ['Home', 'Car'] 'Insurance.coverage[policyType=Home]' : ['property', 'liability'] 'Insurance.coverage[policyType=Car]' : ['collision', 'fullCoverage']
注記Enumeration dependencies are not applied across rule conditions and actions. For example, in this insurance policy use case, the selected policy in the rule condition does not determine the available coverage options in the rule actions, if applicable.
- External data sources in enumerations
If you want to retrieve a list of enumeration values from an external data source instead of defining the values directly in the enumeration definition, on the class path of your project, add a helper class that returns a
java.util.Listlist of strings. In the enumeration definition, instead of specifying a list of values, identify the helper class that you configured to retrieve the values externally.For example, in the following enumeration definition for loan applicant region, instead of defining applicant regions explicitly in the format
'Applicant.region' : ['country1', 'country2', … ], the enumeration uses a helper class that returns the list of values defined externally:'Applicant.region' : (new com.mycompany.DataHelper()).getListOfRegions()
In this example, a
DataHelperclass contains agetListOfRegions()method that returns a list of strings. The enumerations are loaded in the drop-down list for the relevant field in the rule asset.You can also load dependent enumeration definitions dynamically from a helper class by identifying the dependent field as usual and enclosing the call to the helper class within quotation marks:
'Applicant.region[countryCode]' : '(new com.mycompany.DataHelper()).getListOfRegions("@{countryCode}")'If you want to load all enumeration data entirely from an external data source, such as a relational database, you can implement a Java class that returns a
Map<String, List<String>>map. The key of the map is thefact.fieldmapping and the value is ajava.util.List<String>list of values.For example, the following Java class defines loan applicant regions for the related enumeration:
public class SampleDataSource {

  public Map<String, List<String>> loadData() {
    Map data = new HashMap();

    List d = new ArrayList();
    d.add("AU");
    d.add("DE");
    d.add("ES");
    d.add("UK");
    d.add("US");
    ...
    data.put("Applicant.region", d);

    return data;
  }

}
The following enumeration definition correlates to this example Java class. The enumeration contains no references to fact or field names because they are defined in the Java class:
=(new SampleDataSource()).loadData()
The
=operator enables Business Central to load all enumeration data from the helper class. The helper methods are statically evaluated when the enumeration definition is requested for use in an editor.注記Defining an enumeration without a fact and field definition is currently not supported in Business Central. To define the enumeration for the associated Java class in this way, use the DRL source in your Red Hat Decision Manager project.
4.4. Adding other rule options
You can also use the rule designer to add metadata within a rule, define additional rule attributes (such as salience and no-loop), and freeze areas of the rule to restrict modifications to conditions or actions.
Procedure
- In the rule designer, click (show options…) under the THEN section.
-
Click the plus icon (
) on the right side of the window to add options.
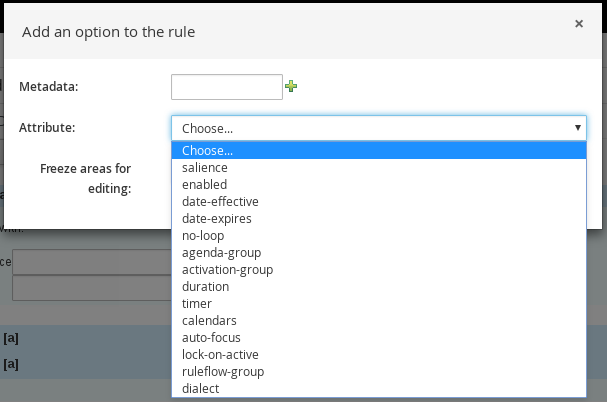
Select an option to be added to the rule:
-
Metadata: Enter a metadata label and click the plus icon (
). Then enter any needed data in the field provided in the rule designer.
- Attribute: Select from the list of rule attributes. Then further define the value in the field or option displayed in the rule designer.
Freeze areas for editing: Select Conditions or Actions to restrict the area from being modified in the rule designer.
図4.10 Rule options
-
Metadata: Enter a metadata label and click the plus icon (
- Click Save in the rule designer to save your work.
4.4.1. Rule attributes
Rule attributes are additional specifications that you can add to business rules to modify rule behavior.
The following table lists the names and supported values of the attributes that you can assign to rules:
表4.1 Rule attributes
| Attribute | Value |
|---|---|
|
| An integer defining the priority of the rule. Rules with a higher salience value are given higher priority when ordered in the activation queue.
Example: |
|
| A Boolean value. When the option is selected, the rule is enabled. When the option is not selected, the rule is disabled.
Example: |
|
|
A string containing a date and time definition. The rule can be activated only if the current date and time is after a
Example: |
|
|
A string containing a date and time definition. The rule cannot be activated if the current date and time is after the
Example: |
|
| A Boolean value. When the option is selected, the rule cannot be reactivated (looped) if a consequence of the rule re-triggers a previously met condition. When the condition is not selected, the rule can be looped in these circumstances.
Example: |
|
| A string identifying an agenda group to which you want to assign the rule. Agenda groups allow you to partition the agenda to provide more execution control over groups of rules. Only rules in an agenda group that has acquired a focus are able to be activated.
Example: |
|
| A string identifying an activation (or XOR) group to which you want to assign the rule. In activation groups, only one rule can be activated. The first rule to fire will cancel all pending activations of all rules in the activation group.
Example: |
|
| A long integer value defining the duration of time in milliseconds after which the rule can be activated, if the rule conditions are still met.
Example: |
|
|
A string identifying either
Example: |
|
| A Quartz calendar definition for scheduling the rule.
Example: |
|
| A Boolean value, applicable only to rules within agenda groups. When the option is selected, the next time the rule is activated, a focus is automatically given to the agenda group to which the rule is assigned.
Example: |
|
|
A Boolean value, applicable only to rules within rule flow groups or agenda groups. When the option is selected, the next time the ruleflow group for the rule becomes active or the agenda group for the rule receives a focus, the rule cannot be activated again until the ruleflow group is no longer active or the agenda group loses the focus. This is a stronger version of the
Example: |
|
| A string identifying a rule flow group. In rule flow groups, rules can fire only when the group is activated by the associated rule flow.
Example: |
|
|
A string identifying either
Example: 注記
When you use Red Hat Decision Manager without the executable model, the |
第5章 Defining data tables for guided rule templates
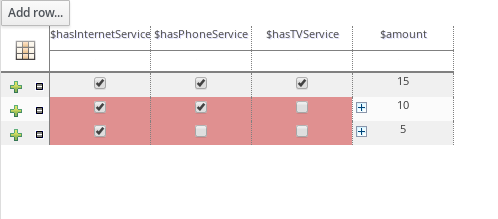
After you create a guided rule template and add template keys for field values, a data table is displayed in the Data table of the guided rule templates designer. Each column in the data table corresponds to a template key that you added in the guided rule template. Use this table to define values for each template key row by row. Each row of values that you define in the data table for that template results in a rule.
Procedure
In the guided rule templates designer, click the Data tab to view the data table. Each column in the data table corresponds to a template key that you added in the guided rule template.
注記If you did not add any template keys to the rule template, then this data table does not appear and the template does not function as a genuine template but essentially as an individual guided rule. For this reason, template keys are fundamental in creating guided rule templates.
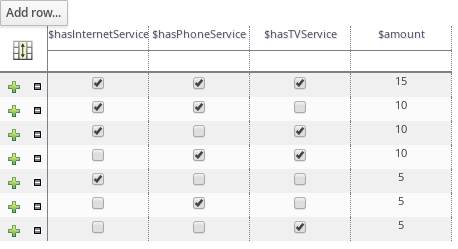
- Click Add row and define the data values for each template key column to generate that rule (row).
Continue adding rows and defining data values for each rule that will be generated. You can click Add row for each new row, or click the plus icon (
) or minus icon to add or remove rows.
図5.1 Sample data table for a guided rule template
To view the DRL code, click the Source tab in the guided rule templates designer.
Example:
rule "PaymentRules_6"
	when
		Customer( internetService == false ,
			phoneService == false ,
			TVService == true )
	then
		RecurringPayment fact0 = new RecurringPayment();
		fact0.setAmount( 5 );
		insertLogical( fact0 );
end

rule "PaymentRules_5"
	when
		Customer( internetService == false ,
			phoneService == true ,
			TVService == false )
	then
		RecurringPayment fact0 = new RecurringPayment();
		fact0.setAmount( 5 );
		insertLogical( fact0 );
end
...
//Other rules omitted for brevity.
As a visual aid, click the grid icon in the upper-left corner of the data table to toggle cell merging on and off, if needed. Cells in the same column with identical values are merged into a single cell.
図5.2 Merge cells in a data table
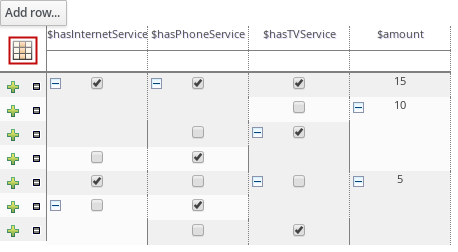
You can then use the expand/collapse icon [+/-] in the upper-left corner of each newly merged cell to collapse the rows corresponding to the merged cell, or to re-expand the collapsed rows.
図5.3 Collapse merged cells
- After you define the template key data for all rules and adjust the table display as needed, click Validate in the upper-right toolbar of the guided rule templates designer to validate the guided rule template. If the rule template validation fails, address any problems described in the error message, review all components in the rule template and data defined in the data table, and try again to validate the rule template until the rule template passes.
- Click Save in the guided rule templates designer to save your work.
第6章 Executing rules
After you identify example rules or create your own rules in Business Central, you can build and deploy the associated project and execute rules locally or on KIE Server to test the rules.
Prerequisites
- Business Central and KIE Server are installed and running. For installation options, see Planning a Red Hat Decision Manager installation.
Procedure
- In Business Central, go to Menu → Design → Projects and click the project name.
In the upper-right corner of the project Assets page, click Deploy to build the project and deploy it to KIE Server. If the build fails, address any problems described in the Alerts panel at the bottom of the screen.
For more information about project deployment options, see Packaging and deploying a Red Hat Decision Manager project.
注記If the rule assets in your project are not built from an executable rule model by default, verify that the following dependency is in the
pom.xmlfile of your project and rebuild the project:<dependency> <groupId>org.drools</groupId> <artifactId>drools-model-compiler</artifactId> <version>${rhdm.version}</version> </dependency>This dependency is required for rule assets in Red Hat Decision Manager to be built from executable rule models by default. This dependency is included as part of the Red Hat Decision Manager core packaging, but depending on your Red Hat Decision Manager upgrade history, you may need to manually add this dependency to enable the executable rule model behavior.
For more information about executable rule models, see Packaging and deploying a Red Hat Decision Manager project.
Create a Maven or Java project outside of Business Central, if not created already, that you can use for executing rules locally or that you can use as a client application for executing rules on KIE Server. The project must contain a
pom.xmlfile and any other required components for executing the project resources.For example test projects, see "Other methods for creating and executing DRL rules".
Open the
pom.xmlfile of your test project or client application and add the following dependencies, if not added already:-
kie-ci: Enables your client application to load Business Central project data locally usingReleaseId -
kie-server-client: Enables your client application to interact remotely with assets on KIE Server -
slf4j: (Optional) Enables your client application to use Simple Logging Facade for Java (SLF4J) to return debug logging information after you interact with KIE Server
Example dependencies for Red Hat Decision Manager 7.8 in a client application
pom.xmlfile:<!-- For local execution --> <dependency> <groupId>org.kie</groupId> <artifactId>kie-ci</artifactId> <version>7.39.0.Final-redhat-00005</version> </dependency> <!-- For remote execution on KIE Server --> <dependency> <groupId>org.kie.server</groupId> <artifactId>kie-server-client</artifactId> <version>7.39.0.Final-redhat-00005</version> </dependency> <!-- For debug logging (optional) --> <dependency> <groupId>org.slf4j</groupId> <artifactId>slf4j-simple</artifactId> <version>1.7.25</version> </dependency>
For available versions of these artifacts, search the group ID and artifact ID in the Nexus Repository Manager online.
注記Instead of specifying a Red Hat Decision Manager
<version>for individual dependencies, consider adding the Red Hat Business Automation bill of materials (BOM) dependency to your projectpom.xmlfile. The Red Hat Business Automation BOM applies to both Red Hat Decision Manager and Red Hat Process Automation Manager. When you add the BOM files, the correct versions of transitive dependencies from the provided Maven repositories are included in the project.Example BOM dependency:
<dependency>
  <groupId>com.redhat.ba</groupId>
  <artifactId>ba-platform-bom</artifactId>
  <version>7.8.0.redhat-00005</version>
  <scope>import</scope>
  <type>pom</type>
</dependency>
For more information about the Red Hat Business Automation BOM, see What is the mapping between Red Hat Decision Manager and the Maven library version?.
-
Ensure that the dependencies for artifacts containing model classes are defined in the client application
pom.xmlfile exactly as they appear in thepom.xmlfile of the deployed project. If dependencies for model classes differ between the client application and your projects, execution errors can occur.To access the project
pom.xmlfile in Business Central, select any existing asset in the project and then in the Project Explorer menu on the left side of the screen, click the Customize View gear icon and select Repository View → pom.xml.For example, the following
Personclass dependency appears in both the client and deployed projectpom.xmlfiles:<dependency> <groupId>com.sample</groupId> <artifactId>Person</artifactId> <version>1.0.0</version> </dependency>
If you added the
slf4jdependency to the client applicationpom.xmlfile for debug logging, create asimplelogger.propertiesfile on the relevant classpath (for example, insrc/main/resources/META-INFin Maven) with the following content:org.slf4j.simpleLogger.defaultLogLevel=debug
In your client application, create a
.javamain class containing the necessary imports and amain()method to load the KIE base, insert facts, and execute the rules.For example, a
Personobject in a project contains getter and setter methods to set and retrieve the first name, last name, hourly rate, and the wage of a person. The followingWagerule in a project calculates the wage and hourly rate values and displays a message based on the result:package com.sample; import com.sample.Person; dialect "java" rule "Wage" when Person(hourlyRate * wage > 100) Person(name : firstName, surname : lastName) then System.out.println("Hello" + " " + name + " " + surname + "!"); System.out.println("You are rich!"); endTo test this rule locally outside of KIE Server (if needed), configure the
.javaclass to import KIE services, a KIE container, and a KIE session, and then use themain()method to fire all rules against a defined fact model:Executing rules locally
import org.kie.api.KieServices;
import org.kie.api.builder.ReleaseId;
import org.kie.api.runtime.KieContainer;
import org.kie.api.runtime.KieSession;
import org.drools.compiler.kproject.ReleaseIdImpl;

public class RulesTest {

  public static final void main(String[] args) {
    try {
      // Identify the project in the local repository:
      ReleaseId rid = new ReleaseIdImpl("com.myspace", "MyProject", "1.0.0");

      // Load the KIE base:
      KieServices ks = KieServices.Factory.get();
      KieContainer kContainer = ks.newKieContainer(rid);
      KieSession kSession = kContainer.newKieSession();

      // Set up the fact model:
      Person p = new Person();
      p.setWage(12);
      p.setFirstName("Tom");
      p.setLastName("Summers");
      p.setHourlyRate(10);

      // Insert the person into the session:
      kSession.insert(p);

      // Fire all rules:
      kSession.fireAllRules();
      kSession.dispose();
    }

    catch (Throwable t) {
      t.printStackTrace();
    }
  }
}
To test this rule on KIE Server, configure the
.javaclass with the imports and rule execution information similarly to the local example, and additionally specify KIE services configuration and KIE services client details:Executing rules on KIE Server
package com.sample;

import java.util.ArrayList;
import java.util.HashSet;
import java.util.List;
import java.util.Set;

import org.kie.api.command.BatchExecutionCommand;
import org.kie.api.command.Command;
import org.kie.api.KieServices;
import org.kie.api.runtime.ExecutionResults;
import org.kie.api.runtime.KieContainer;
import org.kie.api.runtime.KieSession;
import org.kie.server.api.marshalling.MarshallingFormat;
import org.kie.server.api.model.ServiceResponse;
import org.kie.server.client.KieServicesClient;
import org.kie.server.client.KieServicesConfiguration;
import org.kie.server.client.KieServicesFactory;
import org.kie.server.client.RuleServicesClient;

import com.sample.Person;

public class RulesTest {

  private static final String containerName = "testProject";
  private static final String sessionName = "myStatelessSession";

  public static final void main(String[] args) {
    try {
      // Define KIE services configuration and client:
      Set<Class<?>> allClasses = new HashSet<Class<?>>();
      allClasses.add(Person.class);
      String serverUrl = "http://$HOST:$PORT/kie-server/services/rest/server";
      String username = "$USERNAME";
      String password = "$PASSWORD";
      KieServicesConfiguration config =
        KieServicesFactory.newRestConfiguration(serverUrl,
                                                username,
                                                password);
      config.setMarshallingFormat(MarshallingFormat.JAXB);
      config.addExtraClasses(allClasses);
      KieServicesClient kieServicesClient =
        KieServicesFactory.newKieServicesClient(config);

      // Set up the fact model:
      Person p = new Person();
      p.setWage(12);
      p.setFirstName("Tom");
      p.setLastName("Summers");
      p.setHourlyRate(10);

      // Insert Person into the session:
      KieCommands kieCommands = KieServices.Factory.get().getCommands();
      List<Command> commandList = new ArrayList<Command>();
      commandList.add(kieCommands.newInsert(p, "personReturnId"));

      // Fire all rules:
      commandList.add(kieCommands.newFireAllRules("numberOfFiredRules"));
      BatchExecutionCommand batch = kieCommands.newBatchExecution(commandList, sessionName);

      // Use rule services client to send request:
      RuleServicesClient ruleClient = kieServicesClient.getServicesClient(RuleServicesClient.class);
      ServiceResponse<ExecutionResults> executeResponse = ruleClient.executeCommandsWithResults(containerName, batch);
      System.out.println("number of fired rules:" + executeResponse.getResult().getValue("numberOfFiredRules"));
    }

    catch (Throwable t) {
      t.printStackTrace();
    }
  }
}
Run the configured
.javaclass from your project directory. You can run the file in your development platform (such as Red Hat CodeReady Studio) or in the command line.Example Maven execution (within project directory):
mvn clean install exec:java -Dexec.mainClass="com.sample.app.RulesTest"
Example Java execution (within project directory)
javac -classpath "./$DEPENDENCIES/*:." RulesTest.java
java -classpath "./$DEPENDENCIES/*:." RulesTest
- Review the rule execution status in the command line and in the server log. If any rules do not execute as expected, review the configured rules in the project and the main class configuration to validate the data provided.
第7章 Next steps
付録A Versioning information
Documentation last updated on Tuedday, March 8, 2022.