
第43章 Defining spreadsheet decision tables
Spreadsheet decision tables (XLS or XLSX) require two key areas that define rule data: a RuleSet area and a RuleTable area. The RuleSet area of the spreadsheet defines elements that you want to apply globally to all rules in the same package (not only the spreadsheet), such as a rule set name or universal rule attributes. The RuleTable area defines the actual rules (rows) and the conditions, actions, and other rule attributes (columns) that constitute that rule table within the specified rule set. A spreadsheet of decision tables can contain multiple RuleTable areas, but only one RuleSet area.
You should typically upload only one spreadsheet of decision tables, containing all necessary RuleTable definitions, per rule package in Business Central. You can upload separate decision table spreadsheets for separate packages, but uploading multiple spreadsheets in the same package can cause compilation errors from conflicting RuleSet or RuleTable attributes and is therefore not recommended.
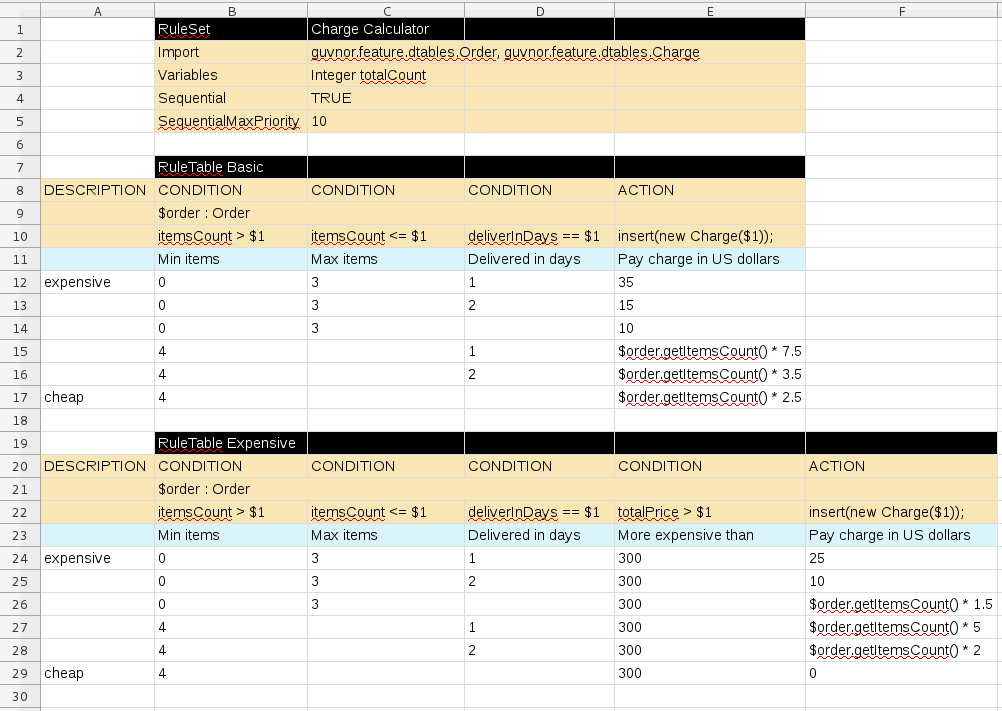
Refer to the following sample spreadsheet as you define your decision table:
図43.1 Sample spreadsheet decision table for shipping charges
Procedure
-
In a new XLS or XLSX spreadsheet, go to the second or third column and label a cell
RuleSet(row 1 in example). Reserve the column or columns to the left for descriptive metadata (optional). -
In the next cell to the right, enter a name for the
RuleSet. This named rule set will contain allRuleTablerules defined in the rule package. -
Under the
RuleSetcell, define any rule attributes (one per cell) that you want to apply globally to all rule tables in the package. Specify attribute values in the cells to the right. For example, you can enter anImportlabel and in the cell to the right, specify relevant data objects from other packages that you want to import into the package for the decision table (in the formatpackage.name.object.name). For supported cell labels and values, see 「RuleSet definitions」. -
Below the
RuleSetarea and in the same column as theRuleSetcell, skip a row and label a new cellRuleTable(row 7 in example) and enter a table name in the same cell. The name is used as the initial part of the name for all rules derived from this rule table, with the row number appended for distinction. You can override this automatic naming by inserting aNAMEattribute column. Use the next four rows to define the following elements as needed (rows 8-11 in example):
- Rule attributes: Conditions, actions, or other attributes. For supported cell labels and values, see 「RuleTable definitions」.
- Object types: The data objects to which the rule attributes apply. If the same object type applies to multiple columns, merge the object cells into one cell across multiple columns (as shown in the sample decision table), instead of repeating the object type in multiple cells. When an object type is merged, all columns below the merged range will be combined into one set of constraints within a single pattern for matching a single fact at a time. When an object is repeated in separate columns, the separate columns can create different patterns, potentially matching different or identical facts.
- Constraints: Constraints on the object types.
Column label: (Optional) Any descriptive label for the column, as a visual aid. Leave blank if unused.
注記As an alternative to populating both the object type and constraint cells, you can leave the object type cell or cells empty and enter the full expression in the corresponding constraint cell or cells. For example, instead of
Orderas the object type anditemsCount > $1as a constraint (separate cells), you can leave the object type cell empty and enterOrder( itemsCount > $1 )in the constraint cell, and then do the same for other constraint cells.
After you have defined all necessary rule attributes (columns), enter values for each column as needed, row by row, to generate rules (rows 12-17 in example). Cells with no data are ignored (such as when a condition or action does not apply).
If you need to add more rule tables to this decision table spreadsheet, skip a row after the last rule in the previous table, label another
RuleTablecell in the same column as the previousRuleTableandRuleSetcells, and create the new table following the same steps in this section (rows 19-29 in example).- Save your XLS or XLSX spreadsheet to finish.
By default, only the first worksheet in a spreadsheet workbook is processed as a decision table when you upload the spreadsheet in Business Central. Each RuleSet name combined with the RuleTable name must be unique across all decision table files in the same package.
If you want to process multiple worksheet decision tables, then create a .properties file with the same name as the spreadsheet workbook. The .properties file must contain a property sheet with comma-separated values (CSV) for the names of the worksheets, for example:
sheets=Sheet1,Sheet2
After you upload the decision table in Business Central, the rules are rendered as DRL rules like the following example, from the sample spreadsheet:
//row 12
rule "Basic_12"
salience 10
  when
    $order : Order( itemsCount > 0, itemsCount <= 3, deliverInDays == 1 )
  then
    insert( new Charge( 35 ) );
end
By default, any white space before or after values in decision table cells is removed before the decision table is processed by the decision engine. To retain white space that you use intentionally before or after values in cells, set the drools.trimCellsInDTable system property to false in your Red Hat Decision Manager distribution.
For example, if you use Red Hat Decision Manager with Red Hat JBoss EAP, add the following system property to your $EAP_HOME/standalone/configuration/standalone-full.xml file:
<property name="drools.trimCellsInDTable" value="false"/>
If you use the decision engine embedded in your Java application, add the system property with the following command:
java -jar yourApplication.jar -Ddrools.trimCellsInDTable=false
43.1. RuleSet definitions
Entries in the RuleSet area of a decision table define DRL constructs and rule attributes that you want to apply to all rules in a package (not only in the spreadsheet). Entries must be in a vertically stacked sequence of cell pairs, where the first cell contains a label and the cell to the right contains the value. A decision table spreadsheet can have only one RuleSet area.
The following table lists the supported labels and values for RuleSet definitions:
表43.1 Supported RuleSet definitions
| Label | Value | Usage |
|---|---|---|
|
|
The package name for the generated DRL file. Optional, the default is | Must be the first entry. |
|
|
| Optional, at most once. If omitted, no firing order is imposed. |
|
| Integer numeric value | Optional, at most once. In sequential mode, this option is used to set the start value of the salience. If omitted, the default value is 65535. |
|
| Integer numeric value | Optional, at most once. In sequential mode, this option is used to check if this minimum salience value is not violated. If omitted, the default value is 0. |
|
|
| Optional, at most once. If omitted, quotation marks are escaped. |
|
| A comma-separated list of Java classes to import from another package. | Optional, may be used repeatedly. |
|
| Declarations of DRL globals (a type followed by a variable name). Multiple global definitions must be separated by commas. | Optional, may be used repeatedly. |
|
| One or more function definitions, according to DRL syntax. | Optional, may be used repeatedly. |
|
| One or more query definitions, according to DRL syntax. | Optional, may be used repeatedly. |
|
| One or more declarative types, according to DRL syntax. | Optional, may be used repeatedly. |
|
| The rule units that the rules generated from this decision table belong to. | Optional, at most once. If omitted, the rules do not belong to any unit. |
|
|
|
Optional, at most once. If omitted, |
In some cases, Microsoft Office, LibreOffice, and OpenOffice might encode a double quotation mark differently, causing a compilation error. For example, 「A」 will fail, but "A" will pass.