
Chapter 6. APIcast Policies
APIcast policies are units of functionality that modify how APIcast operates. Policies can be enabled, disabled, and configured to control how they modify APIcast. Use policies to add functionality that is not available in a default APIcast deployment. You can create your own policies, or use standard policies provided by Red Hat 3scale.
Control policies for a service with a policy chain. Policy chains do the following:
- specify what policies APIcast uses
- provide configuration information for policies 3scale uses
- specify the order in which 3scale loads policies
Red Hat 3scale provides a method for adding custom policies, but does not support custom policies.
In order to modify APIcast behavior with custom policies, you must do the following:
- Add custom policies to APIcast
- Define a policy chain that configures APIcast policies
- Add the policy chain to APIcast
6.1. APIcast Standard Policies
Red Hat 3scale provides the following standard policies:
- Section 6.1.1, “3scale Auth Caching policy”
- Section 6.1.2, “3scale Batcher Policy”
- Section 6.1.3, “Anonymous Access Policy”
- Section 6.1.4, “APIcast CORS Request Handling Policy”
- Section 6.1.5, “Echo Policy”
- Section 6.1.6, “Edge Limiting Policy”
- Section 6.1.7, “Header Modification Policy”
- Section 6.1.8, “Liquid Context Debug Policy”
- Section 6.1.9, “Logging Policy”
- Section 6.1.13, “Prometheus Metrics”
- Section 6.1.10, “OAuth 2.0 Token Introspection Policy”
- Section 6.1.11, “Referrer Policy”
- Section 6.1.12, “RH-SSO/Keycloak Role Check Policy”
- Section 6.1.14, “SOAP Policy”
- Section 6.1.15, “Upstream Policy”
- Section 6.1.16, “URL Rewriting Policy”
- Section 6.1.17, “URL Rewriting with Captures Policy”
You can enable and configure standard policies in the 3scale API Management.
6.1.1. 3scale Auth Caching policy
The 3scale Auth Caching policy caches authentication calls made to APIcast. You can select an operating mode to configure the cache operations.
3scale Auth Caching is available in the following modes:
1. Strict - Cache only authorized calls.
"Strict" mode only caches authorized calls. If a policy is running under the "strict" mode and if a call fails or is denied, the policy invalidates the cache entry. If the backend becomes unreachable, all cached calls are rejected, regardless of their cached status.
2. Resilient – Authorize according to last request when backend is down.
The "Resilient" mode caches both authorized and denied calls. If the policy is running under the "resilient" mode, failed calls do not invalidate an existing cache entry. If the backend becomes unreachable, calls hitting the cache continue to be authorized or denied based on their cached status.
3. Allow - When backend is down, allow everything unless seen before and denied.
The "Allow" mode caches both authorized and denied calls. If the policy is running under the "allow" mode, cached calls continue to be denied or allowed based on the cached status. However, any new calls are cached as authorized.
Operating in the "allow" mode has security implications. Consider these implications and exercise caution when using the "allow" mode.
4. None - Disable caching.
The "None" mode disables caching. This mode is useful if you want the policy to remain active, but do not want to use caching.
Configuration properties
| property | description | values | required? |
|---|---|---|---|
| caching_type |
The | data type: enumerated string [resilient, strict, allow, none] | yes |
Policy object example
{
  "name": "caching",
  "version": "builtin",
  "configuration": {
    "caching_type": "allow"
  }
}
For information on how to configure policies, see the Creating a policy chain section of the documentation.
6.1.2. 3scale Batcher Policy
The 3scale Batcher policy provides an alternative to the standard APIcast authorization mechanism, in which one call to the 3scale backend (Service Management API) is made for each API request APIcast receives.
The 3scale Batcher policy reduces latency and increases throughput by significantly reducing the number of requests to the 3scale backend. In order to achieve this, this policy caches authorization statuses and batches usage reports.
When the 3scale Batcher policy is enabled, APIcast uses the following authorization flow:
On each request, the policy checks whether the credentials are cached:
- If the credentials are cached, the policy uses the cached authorization status instead of calling the 3scale backend.
- If the credentials are not cached, the policy calls the backend and caches the authorization status with a configurable Time to Live (TTL).
- Instead of reporting the usage corresponding to the request to the 3scale backend immediately, the policy accumulates their usage counters to report them to the backend in batches. A separate thread reports the accumulated usage counters to the 3scale backend in a single call, with a configurable frequency.
The 3scale Batcher policy improves the throughput, but with reduced accuracy. The usage limits and the current utilization are stored in 3scale, and APIcast can only get the correct authorization status when making calls to the 3scale backend. When the 3scale Batcher policy is enabled, there is a period of time APIcast is not sending calls to 3scale. During this window, applications making calls might go over the defined limits.
Use this policy for high-load APIs if the throughput is more important than the accuracy of the rate limiting. The 3scale Batcher policy gives better results in terms of accuracy when the reporting frequency and authorization TTL are much less than the rate limiting period. For example, if the limits are per day and the reporting frequency and authorization TTL are configured to be several minutes.
The 3scale Batcher policy supports the following configuration settings:
auths_ttl: Sets the TTL in seconds when the authorization cache expires.When the authorization for the current call is cached, APIcast uses the cached value. After the time set in the
auths_ttlparameter, APIcast removes the cache and calls the 3scale backend to retrieve the authorization status.-
batch_report_seconds: Sets the frequency of batch reports APIcast sends to the 3scale backend. The default value is10seconds.
To use this policy, enable both the 3scale APIcast and 3scale Batcher policy in the policy chain.
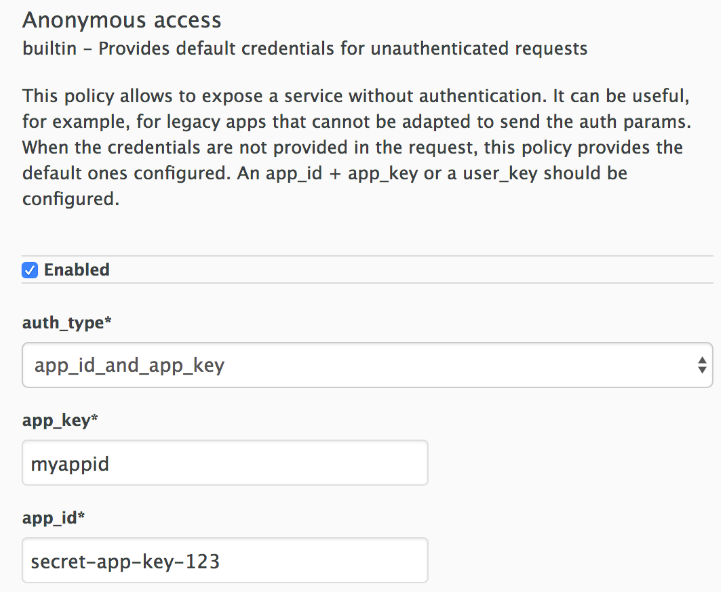
6.1.3. Anonymous Access Policy
The Anonymous access policy exposes a service without authentication. It can be useful, for example, for legacy applications that cannot be adapted to send the authentication parameters. The Anonymous policy only supports services with API Key and App Id / App Key authentication options. When the policy is enabled for API requests that do not have any credentials provided, APIcast will authorize the calls using the default credentials configured in the policy. For the API calls to be authorized, the application with the configured credentials must exist and be active.
Using the Application Plans, you can configure the rate limits on the application used for the default credentials.
Following are the required configuration properties for the policy:
auth_type: You can select from the following options and the property must correspond to the authentication option configured for the API:
- app_id_and_app_key: For App ID / App Key authentication option.
- user_key: For API key authentication option.
- app_id (only for app_id_and_app_key auth type): The App Id of the application that will be used for authorization if no credentials are provided with the API call.
- app_key (only for app_id_and_app_key auth type): The App Key of the application that will be used for authorization if no credentials are provided with the API call.
- user_key (only for the user_key auth_type): The API Key of the application that will be used for authorization if no credentials are provided with the API call.
Figure 6.1. Anonymous Access Policy
6.1.4. APIcast CORS Request Handling Policy
The Cross Origin Resource Sharing (CORS) request handling policy allows you to control CORS behavior by allowing you to specify:
- Allowed headers
- Allowed methods
- Allow credentials
- Allowed origin headers
The CORS request handling policy will block all unspecified CORS requests.
Configuration properties
| property | description | values | required? |
|---|---|---|---|
| allow_headers |
The | data type: array of strings, must be a CORS header | no |
| allow_methods |
The | data type: array of enumerated strings [GET, HEAD, POST, PUT, DELETE, PATCH, OPTIONS, TRACE, CONNECT] | no |
| allow_origin |
The | data type: string | no |
| allow_credentials |
The | data type: boolean | no |
Policy object example
{
  "name": "cors",
  "version": "builtin",
  "configuration": {
    "allow_headers": [
      "App-Id", "App-Key",
      "Content-Type", "Accept"
    ],
    "allow_credentials": true,
    "allow_methods": [
      "GET", "POST"
    ],
    "allow_origin": "https://example.com"
  }
}
For information on how to configure policies, refer to the Creating a policy chain section of the documentation.
6.1.5. Echo Policy
The echo policy prints an incoming request back to the client, along with an optional HTTP status code.
Configuration properties
| property | description | values | required? |
|---|---|---|---|
| status | The HTTP status code the echo policy will return to the client | data type: integer | no |
| exit |
Specifies which exit mode the echo policy will use. The | data type: enumerated string [request, set] | yes |
Policy object example
{
  "name": "echo",
  "version": "builtin",
  "configuration": {
    "status": 404,
    "exit": "request"
  }
}
For information on how to configure policies, refer to the Creating a policy chain section of the documentation.
6.1.6. Edge Limiting Policy
The Edge Limiting policy aims to provide flexible rate limiting for the traffic sent to the backend API and can be used with the default 3scale authorization. Some examples of the use cases supported by the policy include:
-
End-user rate limiting: Rate limit by the value of the "sub" (subject) claim of a JWT token passed in the Authorization header of the request (configured as
{{ jwt.sub }}). - Requests Per Second (RPS) rate limiting.
- Global rate limits per service: Apply limits per service rather than per application.
- Concurrent connection limit: Set the number of concurrent connections allowed.
6.1.6.1. Types of limits
The policy supports the following types of limits that are provided by the lua-resty-limit-traffic library:
-
leaky_bucket_limiters: Based on the "leaky_bucket" algorithm that is based on the average number of requests plus a maximum burst size. -
fixed_window_limiters: Based on a fixed window of time (last X seconds). -
connection_limiters: Based on the concurrent number of connections.
You can scope any limit by service or globally.
6.1.6.2. Limit definition
The limits have a key that encodes the entities that are used to define the limit (an IP, a service, an endpoint, an ID, the value for a specific header, etc.). The Key is specified in the key parameter of the limiter.
key is an object that is defined by the following properties:
-
name: It is the name of the key. It must be unique in the scope. scope: It defines the scope of the key. The supported scopes are:-
Per service scope that affects one service (
service). -
Global scope that affects all the services (
global).
-
Per service scope that affects one service (
name_type: It defines how the "name" value will be evaluated:-
As plain text (
plain) -
As Liquid (
liquid)
-
As plain text (
Each limit also has some parameters that vary depending on their types:
leaky_bucket_limiters:rate,burst.-
rate: It defines how many requests can be made per second without a delay. -
burst: It defines the amount of requests per second that can exceed the allowed rate. An artificial delay is introduced for requests above the allowed rate (specified byrate). After exceeding the rate by more requests per second than defined inburst, the requests get rejected.
-
-
fixed_window_limiters:count,window.countdefines how many requests can be made per number of seconds defined inwindow. connection_limiters:conn,burst,delay.-
conn: Defines the maximum number of the concurrent connections allowed. It allows exceeding that number byburstconnections per second. -
delay: It is the number of seconds to delay the connections that exceed the limit.
-
Examples
Allow 10 requests per minute to service_A:
{
  "key": { "name": "service_A" },
  "count": 10,
  "window": 60
}
Allow 100 connections with bursts of 10 with a delay of 1s:
{
  "key": { "name": "service_A" },
  "conn": 100,
  "burst": 10,
  "delay": 1
}
You can define several limits for each service. In case multiple limits are defined, the request can be rejected or delayed if at least one limit is reached.
6.1.6.3. Liquid templating
The Edge Limiting policy allows specifying the limits for the dynamic keys by supporting Liquid variables in the keys. For this, the name_type parameter of the key must be set to "liquid" and the name parameter can then use Liquid variables. Example: {{ remote_addr }} for the client IP address or {{ jwt.sub }} for the "sub" claim of the JWT token.
Example:
{
  "key": { "name": "{{ jwt.sub }}", "name_type": "liquid" },
  "count": 10,
  "window": 60
}
For more information about Liquid support, see Section 6.7, “Using variables and filters in policies”.
6.1.6.4. Applying conditions
Each limiter can have an optional condition that defines when the limiter must be applied. The condition is specified in the condition property of the limiter.
condition is defined by the following properties:
-
combine_op. It is the boolean operator applied to the list of operations. The following two values are supported:orandand. operations. It is a list of conditions that need to be evaluated. Each operation is represented by an object with the following properties:-
left: The left part of the operation. -
left_type: How theleftproperty is evaluated (plain or liquid). -
right: The right part of the operation. -
right_type: How therightproperty is evaluated (plain or liquid). -
op: Operator applied between the left and the right parts. The following two values are supported:==(equals) and!=(not equals).
-
Example:
"condition": {
  "combine_op": "and",
  "operations": [
    {
      "op": "==",
      "right": "GET",
      "left_type": "liquid",
      "left": "{{ http_method }}",
      "right_type": "plain"
    }
  ]
}
6.1.6.5. Configuring the store
By default, Edge Limiting policy uses OpenResty shared dictionary for the rate limiting counters. However, an external Redis server can be used instead of the shared dictionary. This can be useful when multiple APIcast instances are used. Redis server can be configured using the redis_url parameter.
6.1.6.6. Error handling
The limiters support the following parameters to configure how the errors are handled:
limits_exceeded_errorallows to configure the error status code and message that will be returned to the client when the configured limits are exceeded. The following parameters should be configured:-
status_code: The status code of the request when the limits are exceeded. Default:429. error_handling: How to handle the error.-
exit: "Respond with an error". -
log: "Let the request go through and only output logs"
-
-
configuration_errorallows to configure the error status code and message that will be returned to the client in case of incorrect configuration. The following parameters should be configured:-
status_code: The status code when there is a configuration issue. Default: 500. error_handling: How to handle the error.-
exit: "Respond with an error". -
log: "Let the request go through and only output logs".
-
-
6.1.7. Header Modification Policy
The Header modification policy allows you to modify the existing headers or define additional headers to add to or remove from an incoming request or response. You can modify both response and request headers.
The Header modification policy supports the following configuration parameters:
-
request: List of operations to apply to the request headers -
response: List of operations to apply to the response headers
Each operation consists of the following parameters:
-
op: Specifies the operation to be applied. Theaddoperation adds a value to an existing header. Thesetoperation creates a header and value, and will overwrite an existing header’s value if one already exists. Thepushoperation creates a header and value, but will not overwrite an existing header’s value if one already exists. Instead,pushwill add the value to the existing header. -
header: Specifies the header to be created or modified and can be any string that can be used as a header name (e.g.Custom-Header). -
value_type: Defines how the header value will be evaluated and can either beplainfor plain text orliquidfor evaluation as a Liquid template. For more information, see Section 6.7, “Using variables and filters in policies”. -
value: Specifies the value that will be used for the header. For value type "liquid" the value should be in the format{{ variable_from_context }}
Policy object example
{
  "name": "headers",
  "version": "builtin",
  "configuration": {
    "response": [
      {
        "op": "add",
        "header": "Custom-Header",
        "value_type": "plain",
        "value": "any-value"
      }
    ],
    "request": [
      {
        "op": "set",
        "header": "Authorization",
        "value_type": "plain",
        "value": "Basic dXNlcm5hbWU6cGFzc3dvcmQ="
      },
      {
        "op": "set",
        "header": "Service-ID",
        "value_type": "liquid",
        "value": "{{service.id}}"
      }
    ]
  }
}
For information on how to configure policies, see the Creating a policy chain section of the documentation.
6.1.8. Liquid Context Debug Policy
The Liquid Context Debug policy is meant only for debugging purposes in the development environment and not in production.
This policy responds to the API request with a JSON, containing the objects and values that are available in the context and can be used for evaluating Liquid templates. When combined with the 3scale APIcast or Upstream policy, Liquid Context Debug must be placed before them in the policy chain in order to work correctly. To avoid circular references, the policy only includes duplicated objects once and replaces them with a stub value.
An example of the value returned by APIcast when the policy is enabled:
{
  "jwt": {
    "azp": "972f7b4f",
    "iat": 1537538097,
    ...
    "exp": 1537574096,
    "typ": "Bearer"
  },
  "credentials": {
    "app_id": "972f7b4f"
  },
  "usage": {
    "deltas": {
      "hits": 1
    },
    "metrics": [
      "hits"
    ]
  },
  "service": {
    "id": "2",
    ...
  }
  ...
}
6.1.9. Logging Policy
The logging policy allows enabling or disabling APIcast (NGINX) access logs for each API service individually. By default, this policy is not enabled in policy chains.
This policy only supports the enable_access_logs configuration parameter. To disable access logging for a service, enable the policy, unselect the enable_access_logs parameter and click the Submit button. To enable the access logs, select the enable_access_logs parameter or disable the Logging policy.
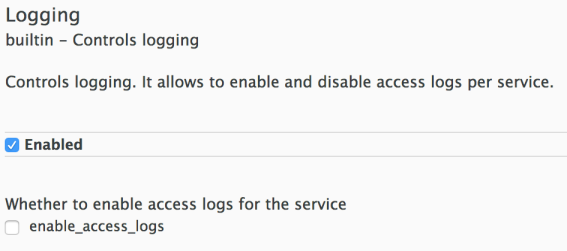
You can combine the Logging policy with the global setting for the location of access logs. Set the APICAST_ACCESS_LOG_FILE environment variable to configure the location of APIcast access logs. By default, this variable is set to /dev/stdout, which is the standard output device. For further details about global APIcast parameters, see Chapter 7, APIcast Environment Variables.
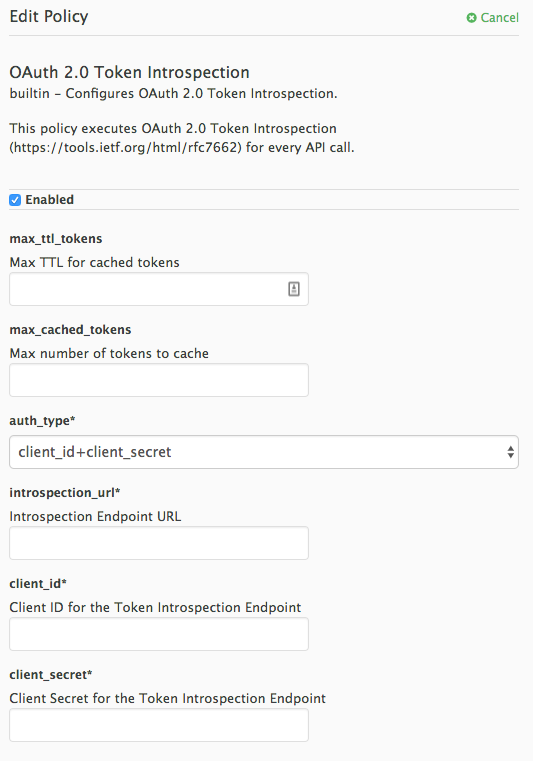
6.1.10. OAuth 2.0 Token Introspection Policy
The OAuth 2.0 Token Introspection policy allows validating the JSON Web Token (JWT) token used for services with the OpenID Connect authentication option using the Token Introspection Endpoint of the token issuer (Red Hat Single Sign-On).
APIcast supports the following authentication types in the auth_type field to determine the Token Introspection Endpoint and the credentials APIcast uses when calling this endpoint:
use_3scale_oidc_issuer_endpointWith this setting, APIcast uses the client credentials (Client ID and Client Secret) and the Token Introspection Endpoint from the OpenID Connect Issuer setting configured on the Service Integration page.
APIcast discovers the Token Introspection endpoint from the
token_introspection_endpointfield the.well-known/openid-configurationendpoint of the OpenID Connect issuer returns.Example 6.1. Authentication type set to
use_3scale_oidc_issuer_endpointThe following is a configuration example if the authentication type is set to
use_3scale_oidc_issuer_endpoint:"policy_chain": [ … { "name": "apicast.policy.token_introspection", "configuration": { "auth_type": "use_3scale_oidc_issuer_endpoint" } } … ],client_id+client_secretThis option enables you to specify a different Token Introspection Endpoint, as well as the Client ID and Client Secret APIcast uses to request token information.
When using this option, set the following configuration parameters:
-
client_id: Sets the Client ID for the Token Introspection Endpoint. -
client_secret: Sets the Client Secret for the Token Introspection Endpoint. introspection_url: Sets the Introspection Endpoint URL.Example 6.2. Authentication type set to
client_id+client_secretThe following is a configuration example if the authentication type is set to
client_id+client_secret:"policy_chain": [ … { "name": "apicast.policy.token_introspection", "configuration": { "auth_type": "client_id+client_secret", "client_id": "myclient", "client_secret": "mysecret", "introspection_url": "http://red_hat_single_sign-on/token/introspection" } } … ],
-
Regardless of the setting in the auth_type field, APIcast uses Basic Authentication to authorize the Token Introspection call (Authorization: Basic <token> header, where <token> is Base64-encoded <client_id>:<client_secret> setting).
The response of the Token Introspection Endpoint contains the active attribute. APIcast checks the value of this attribute. Depending on the value of the attribute, APIcast authorizes or rejects the call:
-
true: The call is authorized -
false: The call is rejected with theAuthentication Failederror
The policy allows enabling caching of the tokens to avoid calling the Token Introspection Endpoint on every call for the same JWT token. To enable token caching for the Token Introspection Policy, set the max_cached_tokens field to a value from 0, which disables the feature, and 10000. Additionally, you can set a Time to Live (TTL) value from 1 to 3600 seconds for tokens in the max_ttl_tokens field.
6.1.11. Referrer Policy
The 3scale Referrer policy enables the Referrer Filtering feature. When the policy is enabled in the service policy chain, APIcast sends the value of the Referer policy of the upcoming request to the Service Management API (AuthRep call) in the referrer parameter. For more information on how Referrer Filtering works, see the Referrer Filtering section in Authentication Patterns.
6.1.12. RH-SSO/Keycloak Role Check Policy
This policy adds role check when used with the OpenID Connect authentication option. This policy verifies realm roles and client roles in the access token issued by Red Hat Single Sign-On. The realm roles are specified when you want to add role check to every client’s resources or 3Scale.
Following are the two types of role checks that the type property specifies in the policy configuration:
- whitelist (default): When whitelist is used, APIcast will check if the specified scopes are present in the JWT token and will reject the call if the JWT doesn’t have the scopes.
- blacklist: When blacklist is used, APIcast will reject the calls if the JWT token contains the blacklisted scopes.
It is not possible to configure both checks – blacklist and whitelist in the same policy, but you can add more than one instances of the RH-SSO/Keycloak role check policy to the APIcast policy chain.
You can configure a list of scopes via the scopes property of the policy configuration.
Each scope object has the following properties:
- resource: Resource (endpoint) controlled by the role. This is the same format as Mapping Rules. The pattern matches from the beginning of the string and to make an exact match you must append $ at the end.
resource_type: This defines how the resource value is evaluated.
- As plain text (plain): Evaluates the resource value as plain text. Example: /api/v1/products$.
- As Liquid text (liquid): Allows using Liquid in the resource value. Example: /resource_{{ jwt.aud }} manages access to the resource including the Client ID (contained in the JWT aud claim).
realm_roles: Use it to check the realm role (see the Realm Roles in Red Hat Single Sign-On documentation).
The realm roles are present in the JWT issued by Red Hat Single Sign-On.
  "realm_access": {
    "roles": [
      "<realm_role_A>", "<realm_role_B>"
    ]
  }
The real roles must be specified in the policy.
"realm_roles": [
  { "name": "<realm_role_A>" }, { "name": "<realm_role_B>" }
]
Following are the available properties of each object in the realm_roles array:
- name: Specifies the name of the role.
- name_type: Defines how the name must be evaluated; it can be plain or liquid (works the same way as for the resource_type).
client_roles: Use client_roles to check for the particular access roles in the client namespace (see the Client Roles in Red Hat Single Sign-On documentation).
The client roles are present in the JWT under the resource_access claim.
  "resource_access": {
    "<client_A>": {
      "roles": [
        "<client_role_A>", "<client_role_B>"
      ]
    },
    "<client_B>": {
      "roles": [
        "<client_role_A>", "<client_role_B>"
      ]
    }
  }
Specify the client roles in the policy.
"client_roles": [
  { "name": "<client_role_A>", "client": "<client_A>" },
  { "name": "<client_role_B>", "client": "<client_A>" },
  { "name": "<client_role_A>", "client": "<client_B>" },
  { "name": "<client_role_B>", "client": "<client_B>" }
]
Following are the available properties of each object in the client_roles array:
- name: Specifies the name of the role.
- name_type: Defines how the name value must be evaluated; it can be plain or liquid (works the same way as for the resource_type).
- client: Specifies the client of the role. When it is not defined, this policy uses the aud claim as the client.
- client_type: Defines how the client value must be evaluated; it can be plain or liquid (works the same way as for the resource_type).
6.1.13. Prometheus Metrics
Prometheus is a stand-alone, open source systems monitoring and alerting toolkit.
For this release of Red Hat 3scale, Prometheus installation and configuration are not supported. Optionally, you can use the community version of Prometheus to visualize metrics and alerts for APIcast-managed API services.
Prometheus metrics availability
APIcast integration with Prometheus is available for the following deployment options:
- Self-managed APIcast (both with hosted or on-premises API manager)
- Built-in APIcast on-premise
APIcast integration with Prometheus is not available in hosted API manager and hosted APIcast.
Prometheus metrics list
The following metrics are always available:
| Metric | Description | Type | Labels |
|---|---|---|---|
| nginx_http_connections | Number of HTTP connections | gauge | state(accepted,active,handled,reading,total,waiting,writing) |
| nginx_error_log | APIcast errors | counter | level(debug,info,notice,warn,error,crit,alert,emerg) |
| openresty_shdict_capacity | Capacity of the dictionaries shared between workers | gauge | dict(one for every dictionary) |
| openresty_shdict_free_space | Free space of the dictionaries shared between workers | gauge | dict(one for every dictionary) |
| nginx_metric_errors_total | Number of errors of the Lua library that manages the metrics | counter | - |
| backend_response | Response status codes from 3scale’s backend | counter | status(2xx,4xx,5xx) |
Metrics with no value
If a metric has no value, the metric is hidden. For example, if nginx_error_log has no errors to report, the nginx_error_log metric is not displayed. It will only be visible once it has a value.
6.1.14. SOAP Policy
The SOAP policy matches SOAP action URIs provided in the SOAPAction or Content-Type header of an HTTP request with mapping rules specified in the policy.
Configuration properties
| property | description | values | required? |
|---|---|---|---|
| pattern |
The | data type: string | yes |
| metric_system_name |
The | data type: string, must be a valid metric | yes |
Policy object example
{
  "name": "soap",
  "version": "builtin",
  "configuration": {
    "mapping_rules": [
      {
        "pattern": "http://example.com/soap#request",
        "metric_system_name": "soap",
        "delta": 1
      }
    ]
  }
}
For information on how to configure policies, refer to the Creating a policy chain section of the documentation.
6.1.15. Upstream Policy
The Upstream policy allows you to parse the Host request header using regular expressions and replace the upstream URL defined in the Private Base URL with a different URL.
For Example:
A policy with a regex /foo, and URL field newexample.com would replace the URL https://www.example.com/foo/123/ with newexample.com
Policy chain reference:
| property | description | values | required? |
|---|---|---|---|
| regex |
The | data type: string, Must be a valid regular expression syntax | yes |
| url |
Using the | data type: string, ensure this is a valid URL | yes |
Policy object example
{
  "name": "upstream",
  "version": "builtin",
  "configuration": {
    "rules": [
      {
        "regex": "^/v1/.*",
        "url": "https://api-v1.example.com",

      }
    ]
  }
}
For information on how to configure policies, refer to the Creating a policy chain section of the documentation.
6.1.16. URL Rewriting Policy
The URL rewriting policy allows you to modify the path of a request and the query string.
When combined with the 3scale APIcast policy, if the URL rewriting policy is placed before the 3scale APIcast policy in the policy chain, the APIcast mapping rules will apply to the modified path. If the URL rewriting policy is placed after APIcast in the policy chain, then the mapping rules will apply to the original path.
The policy supports the following two sets of operations:
-
commands: List of commands to be applied to rewrite the path of the request. -
query_args_commands: List of commands to be applied to rewrite the query string of the request.
6.1.16.1. Commands for rewriting the path
Following are the configuration parameters that each command in the commands list consists of:
-
op: Operation to be applied. The options available are:subandgsub. Thesuboperation replaces only the first occurrence of a match with your specified regular expression. Thegsuboperation replaces all occurrences of a match with your specified regular expression. See the documentation for the sub and gsub operations. -
regex: Perl-compatible regular expression to be matched. -
replace: Replacement string that is used in the event of a match. -
options(optional): Options that define how the regex matching is performed. For information on available options, see the ngx.re.match section of the OpenResty Lua module project documentation. -
break(optional): When set to true (checkbox enabled), if the command rewrote the URL, it will be the last one applied (all posterior commands in the list will be discarded).
6.1.16.2. Commands for rewriting the query string
Following are configuration parameters that each command in the query_args_commands list consists of:
op: Operation to be applied to the query arguments. The following options are available:-
add: Add a value to an existing argument. -
set: Create the arg when not set and replace its value when set. -
push: Create the arg when not set and add the value when set. -
delete: Delete an arg.
-
-
arg: The query argument name that the operation is applied on. -
value: Specifies the value that is used for the query argument. For value type "liquid" the value should be in the format{{ variable_from_context }}. For thedeleteoperation the value is not taken into account. -
value_type(optional): Defines how the query argument value is evaluated and can either beplainfor plain text orliquidfor evaluation as a Liquid template. For more information, see Section 6.7, “Using variables and filters in policies”. If not specified, the type "plain" is used by default.
Example
The URL Rewriting policy is configured as follows:
{
  "name": "url_rewriting",
  "version": "builtin",
  "configuration": {
    "query_args_commands": [
      {
        "op": "add",
        "arg": "addarg",
        "value_type": "plain",
        "value": "addvalue"
      },
      {
        "op": "delete",
        "arg": "user_key",
        "value_type": "plain",
        "value": "any"
      },
      {
        "op": "push",
        "arg": "pusharg",
        "value_type": "plain",
        "value": "pushvalue"
      },
      {
        "op": "set",
        "arg": "setarg",
        "value_type": "plain",
        "value": "setvalue"
      }
    ],
    "commands": [
      {
        "op": "sub",
        "regex": "^/api/v\\d+/",
        "replace": "/internal/",
        "options": "i"
      }
    ]
  }
The original request URI that is sent to the APIcast:
https://api.example.com/api/v1/products/123/details?user_key=abc123secret&pusharg=first&setarg=original
The URI that APIcast sends to the API backend after applying the URL rewriting:
https://api-backend.example.com/internal/products/123/details?pusharg=first&pusharg=pushvalue&setarg=setvalue
The following transformations are applied:
-
The substring
/api/v1/matches the only path rewriting command and it is replaced by/internal/. -
user_keyquery argument is deleted. -
The value
pushvalueis added as an additional value to thepushargquery argument. -
The value
originalof the query argumentsetargis replaced with the configured valuesetvalue. -
The command
addwas not applied because the query argumentaddargis not present in the original URL.
For information on how to configure policies, see the Creating a policy chain section of the documentation.
6.1.17. URL Rewriting with Captures Policy
The URL Rewriting with Captures policy is an alternative to the Section 6.1.16, “URL Rewriting Policy” policy and allows rewriting the URL of the API request before passing it to the API backend.
The URL Rewriting with Captures policy captures arguments in the URL and uses their values in the rewritten URL.
The policy supports the transformations configuration parameter. It is a list of objects that describe which transformations are applied to the request URL. Each tranformation object consist of two properties:
-
match_rule: This rule is matched to the incoming request URL. It can contain named arguments in the{nameOfArgument}format; these arguments can be used in the rewritten URL. The URL is compared tomatch_ruleas a regular expression. The value that matches named arguments must contain only the following characters (in PCRE regex notation):[\w-.~%!$&'()*,;=@:]. Other regex tokens can be used in thematch_ruleexpression, such as^for the beginning of the string and$for the end of the string. -
template: The template for the URL that the original URL is rewritten with; it can use named arguments from thematch_rule.
The query parameters of the original URL are merged with the query parameters specified in the template.
Example
The URL Rewriting with Captures is configured as follows:
{
  "name": "rewrite_url_captures",
  "version": "builtin",
  "configuration": {
    "transformations": [
      {
        "match_rule": "/api/v1/products/{productId}/details",
        "template": "/internal/products/details?id={productId}&extraparam=anyvalue"
      }
    ]
  }
}
The original request URI that is sent to the APIcast:
https://api.example.com/api/v1/products/123/details?user_key=abc123secret
The URI that APIcast sends to the API backend after applying the URL rewriting:
https://api-backend.example.com/internal/products/details?user_key=abc123secret&extraparam=anyvalue&id=123
6.2. Enabling a standard Policy
Perform the following procedure to enable policies in the admin portal UI:
- Log in to your AMP
- Navigate to the API page and select the desired API
-
From the Integration page, select
edit APIcast configuration
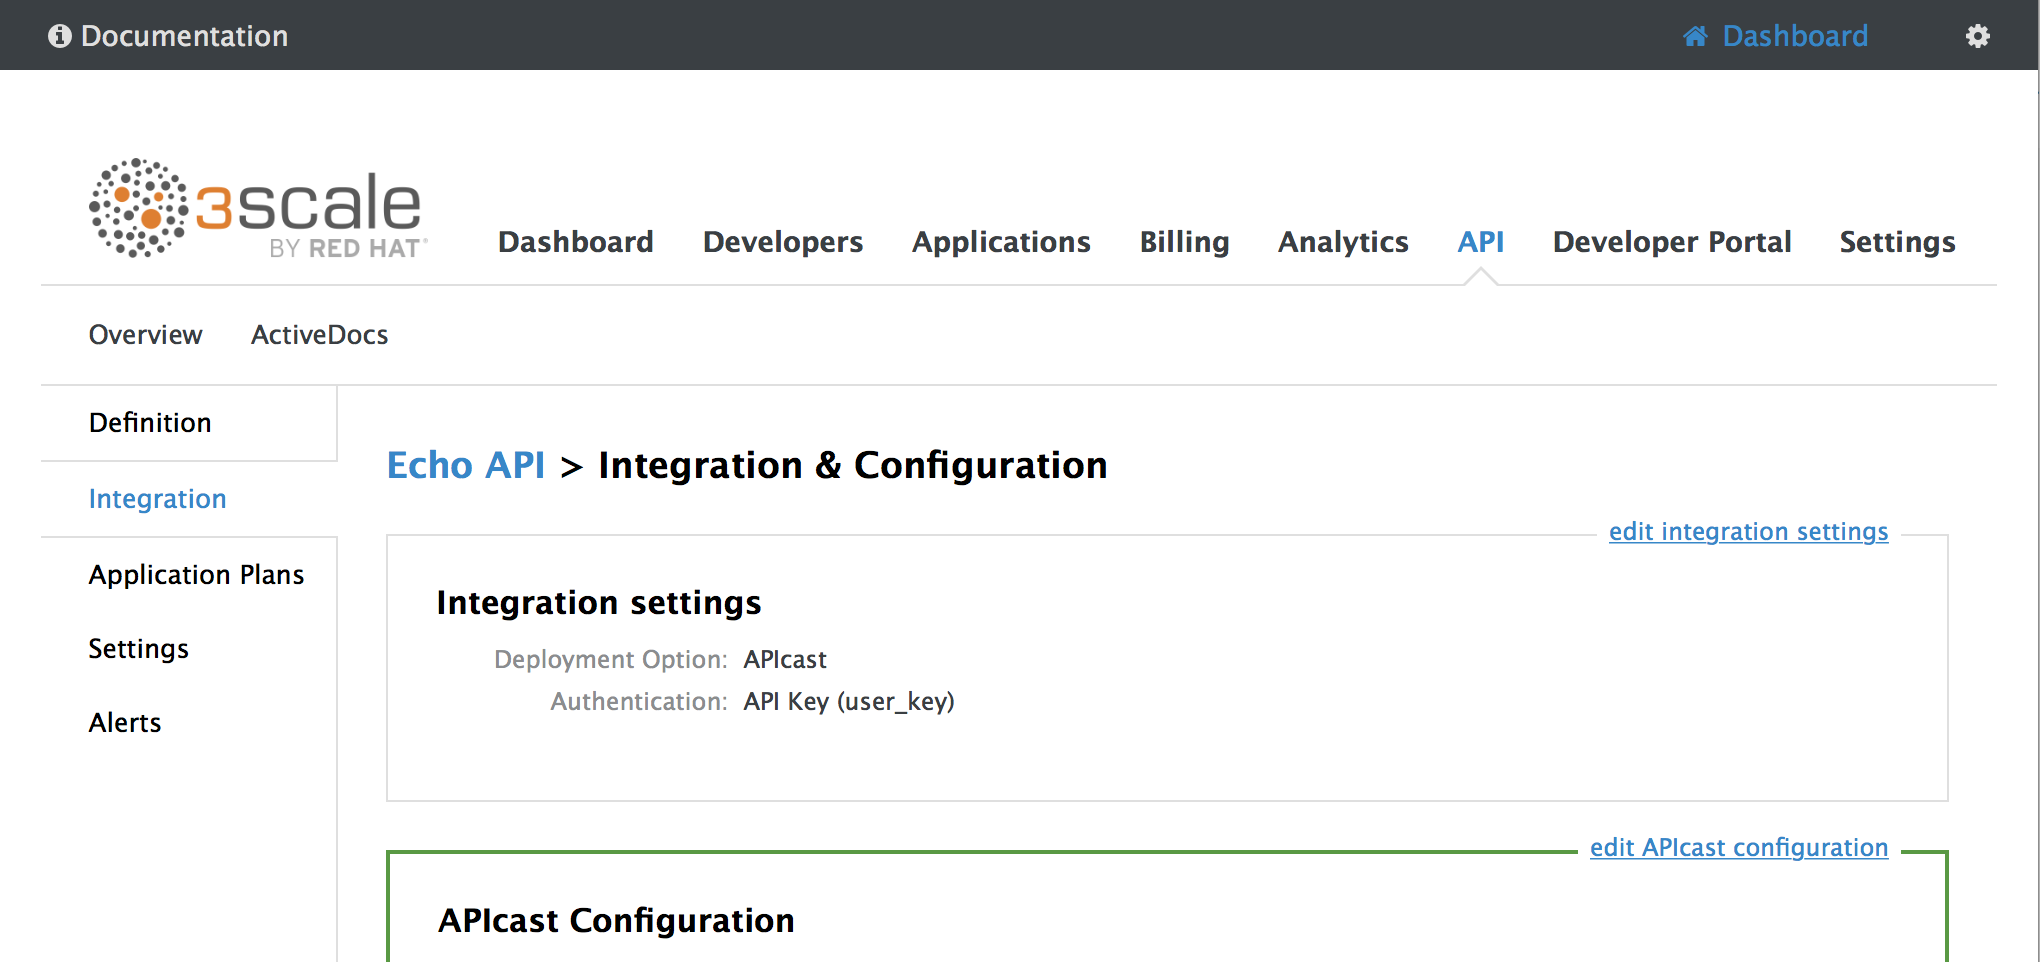
-
Under the POLICIES section, click
add policy
- Select the policy you want to add and fill out the required fields
- Click the Update and test in Staging Environment button to save the policy chain
6.3. Creating custom APIcast policies
You can create custom APIcast policies entirely or modify the standard policies.
In order to create custom policies, you must understand the following:
- Policies are written in Lua.
- Policies must adhere to and be placed in the proper file directory.
- Policy behavior is affected by how they are placed in a policy chain.
- The interface to add custom policies is fully supported, but not the custom policies themselves.
6.4. Adding custom policies to APIcast
If you have created custom policies, you must add them to APIcast. How you do this depends on where APIcast is deployed.
You can add custom policies to the following APIcast self-managed deployments:
- APIcast built-in gateways as part of a 3scale on-premises deployment on OpenShift
- APIcast on OpenShift and the Docker containerized environment
You cannot add custom policies to APIcast hosted.
Never make policy changes directly onto a production gateway. Always test your changes.
6.4.1. Adding custom policies to APIcast built-in
To add custom APIcast policies to an On-Premises deployment, you must build an OpenShift image containing your custom policies and add it to your deployment. Red Hat 3scale provides a sample repository you can use as a framework to create and add custom policies to an on-premises deployment.
This sample repository contains the correct directory structure for a custom policy, as well as a template which creates an image stream and BuildConfigs for building a new APIcast OpenShift image containing any custom policies you create.
When you build apicast-custom-policies, the build process "pushes" a new image to the amp-apicast:latest tag. When there is an image change on this image stream tag (:latest), both the apicast-staging and the apicast-production tags, by default, are configured to automatically start new deployment. To avoid any disruptions to your production service (or staging, if you prefer) it is recommended to disable automatic deployment ("Automatically start a new deployment when the image changes" checkbox), or configure a different image stream tag for production (e.g. amp-apicast:production).
Follow these steps to add a custom policy to an on-premises deployment:
- Fork the https://github.com/3scale/apicast-example-policy [public repository with the policy example] or create a private repository with its content. You need to have the code of your custom policy available in a Git repository for OpenShift to build the image. Note that in order to use a private Git repository, you must set up the secrets in OpenShift.
- Clone the repository locally, add the implementation for your policy, and push the changes to your Git repository.
Update the
openshift.ymltemplate. Specifically, change the following parameters:-
spec.source.git.uri: https://github.com/3scale/apicast-example-policy.gitin the policy BuildConfig – change it to your Git repository location. -
spec.source.images[0].paths.sourcePath: /opt/app-root/policies/examplein the custom policies BuildConfig - changeexampleto the name of the custom policy that you have added under thepoliciesdirectory in the repository. -
Optionally, update the OpenShift object names and image tags. However, you must ensure that the changes are coherent (example:
apicast-example-policyBuildConfig builds and pushes theapicast-policy:exampleimage that is then used as a source by theapicast-custom-policiesBuildConfig. So, the tag should be the same).
-
Create the OpenShift objects by running the command:
oc new-app -f openshift.yml --param AMP_RELEASE=2.3.0
In case the builds do not start automatically, run the following two commands. In case you changed it, replace
apicast-example-policywith your own BuildConfig name (e.g.apicast-<name>-policy). Wait for the first command to complete before you execute the second one.oc start-build apicast-example-policy oc start-build apicast-custom-policies
If the build-in APIcast images have a trigger on them tracking the changes in the amp-apicast:latest image stream, the new deployment for APIcast will start. After apicast-staging has restarted, go to the Integration page on the admin portal, and click the Add Policy button to see your custom policy listed. After selecting and configuring it, click Update & test in Staging Environment to make your custom policy work in the staging APIcast.
6.4.2. Adding custom policies to APIcast on another OpenShift Container Platform
You can add custom policies to APIcast on OpenShift Container Platform (OCP) by fetching APIcast images containing your custom policies from the the Integrated OpenShift Container Registry.
Add custom policies to APIcast on another OpenShift Container Platform
- Add policies to APIcast built-in
- If you are not deploying your APIcast gateway on your primary OpenShift cluster, establish access to the internal registry on your primary OpenShift cluster.
- Download the 3scale 2.3 APIcast OpenShift template.
To modify the template, replace the default
imagedirectory with the full image name in your internal registry.image: <registry>/<project>/amp-apicast:latest
Deploy APIcast using the OpenShift template, specifying your customized image:
oc new-app -f customizedApicast.yml
6.5. Creating a policy chain in the AMP
Create a policy chain in the AMP as part of your APIcast gateway configuration. Follow these steps to modify the policy chain in the UI:
- Log in to your AMP
Navigate to the API page and select the desired API
From the Integration page, select
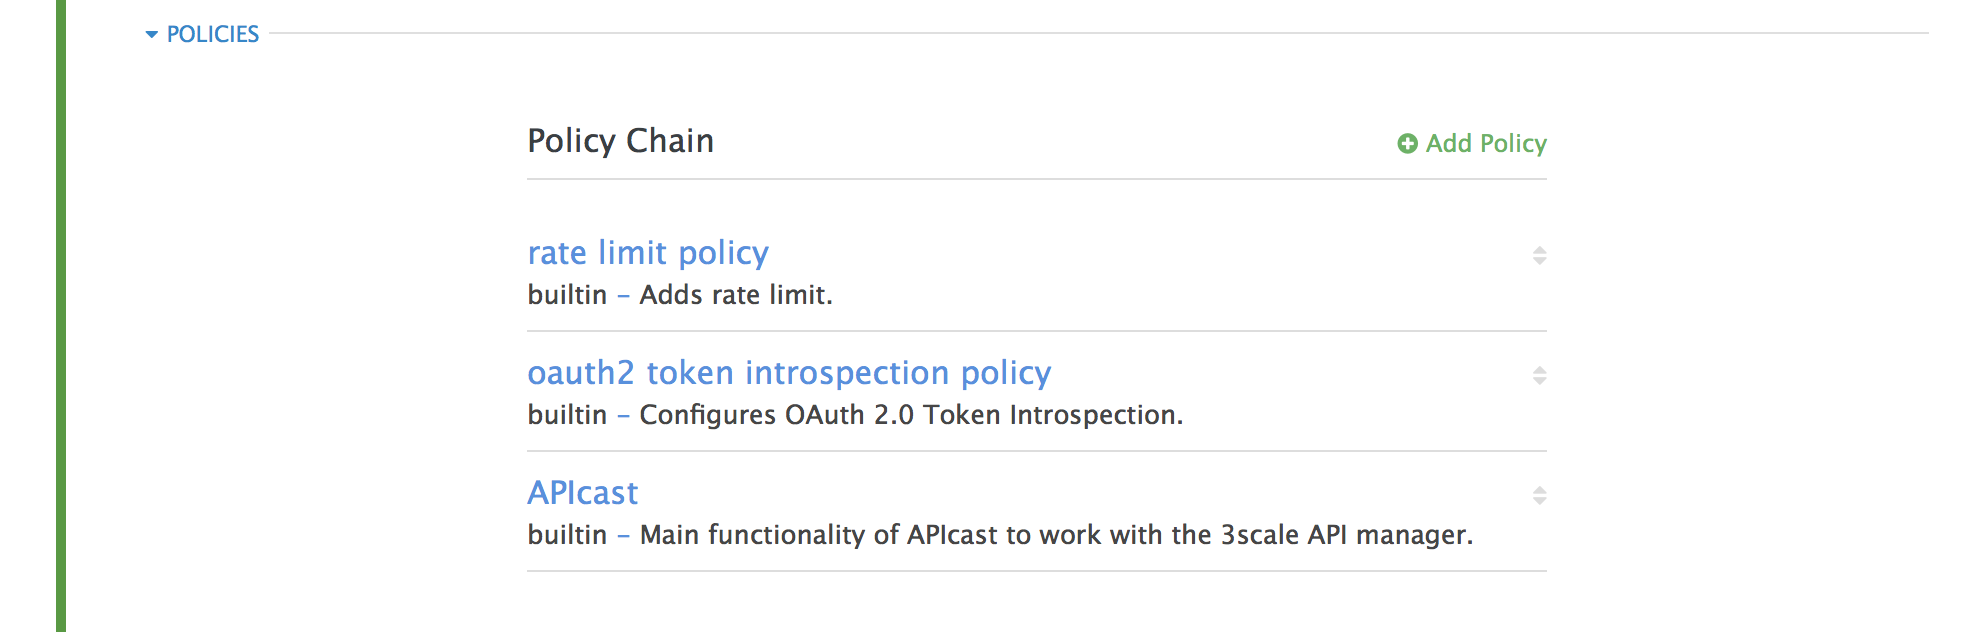
edit APIcast configurationUnder the POLICIES section, use the arrow icons to reorder policies in the policy chain. Always place the APIcast policy last in the policy chain.
- Click the Update and test in Staging Environment button to save the policy chain
6.6. Creating a policy chain JSON configuration file
If you are using a native deployment of APIcast, you can create a JSON configuration file to control your policy chain outside of the AMP.
A JSON configuration file policy chain contains a JSON array composed of the following information:
-
the
servicesobject with anidvalue that specifies which service the policy chain applies to by number -
the
proxyobject, which contains the policy_chain and subsequent objects -
the
policy_chainobject, which contains the values that define the policy chain -
individual
policyobjects which specify bothnameandconfigurationdata necessary to identify the policy and configure policy behavior
The following is an example policy chain for a custom policy sample_policy_1 and the API introspection standard policy token_introspection:
{
  "services":[
    {
      "id":1,
      "proxy":{
        "policy_chain":[
          {
            "name":"sample_policy_1", "version": "1.0",
            "configuration":{
              "sample_config_param_1":["value_1"],
              "sample_config_param_2":["value_2"]
            }
          },
          {
            "name": "token_introspection", "version": "builtin",
            "configuration": {
              introspection_url:["https://tokenauthorityexample.com"],
              client_id:["exampleName"],
              client_secret:["secretexamplekey123"]
          },
          {
             "name": "apicast", "version": "builtin",
          }
        ]
      }
    }
  ]
}
All policy chains must include the built-in policy apicast. Where you place APIcast in the policy chain will affect policy behavior.
6.7. Using variables and filters in policies
Some Section 6.1, “APIcast Standard Policies” support Liquid templating that allows using not only plain string values, but also variables that are present in the context of the request.
To use a context variable, wrap its name in {{ and }}, example: {{ uri }}. If the variable is an object, you can also access its attributes, for example: {{ somevar.attr }}.
Following are the standard variables that are available in all the policies:
-
uri: The path of the request without query parameters (the value of the embedded NGINX variable$uri). -
host: The host of the request (the value of the embedded NGINX variable$host). -
remote_addr: The IP address of the client (the value of the embedded NGINX variable$remote_addr). -
headers: The object containing the request headers. Use{{headers['Some-Header']}}to get a specific header value. -
http_method: The request method: GET, POST, etc.
The variables are available in the context of the request. Policies can add extra variables to the context. These variables can be used by the same or other policies in the policy chain, provided that the phase where they are used is executed after the phase where the variable was added. It can also be the same phase if the variable is used in the policy that appears after the policy in which the variable was added.
Following are some examples of variables that the standard 3scale APIcast policy adds to the context:
-
jwt: A parsed JSON payload of the JWT token (for OpenID Connect authentication). -
credentials: An object that holds the application credentials. Example:"app_id": "972f7b4f","user_key": "13b668c4d1e10eaebaa5144b4749713f". -
service: An object that holds the configuration for the service that the current request is handled by. Example: the service ID would be available as {{ service.id }}.
For a full list of objects and values available in the context, see the Section 6.1.8, “Liquid Context Debug Policy”).
The variables are used with the help of Liquid templates. Example: {{ remote_addr }}, {{ headers['Some-Header'] }}, {{ jwt.aud }}. The policies that support variables for the values have a special parameter, usually with the _type suffix (example: value_type, name_type, etc.) that accepts two values: "plain" for plain text and "liquid" for liquid template.
APIcast also supports Liquid filters that can be applied to the variables' values. The filters apply NGINX functions to the value of the Liquid variable.
The filters are placed within the variable output tag {{ }}, following the name of the variable or the literal value by a pipe character | and the name of the filter. Examples: {{ 'username:password' | encode_base64 }}, {{ uri | escape_uri }}.
Some filters do not require parameters, so you can use an empty string instead of the variable. Example: {{ '' | utctime }} will return the current time in UTC time zone.
Filters can be chained as follows: {{ variable | function1 | function2 }}. Example: {{ '' | utctime | escape_uri }}.
Following is the list of the available functions: