
Chapter 3. Core Concepts
3.1. Overview
The following topics provide high-level, architectural information on core concepts and objects you will encounter when using OpenShift Enterprise. Many of these objects come from Kubernetes, which is extended by OpenShift Enterprise to provide a more feature-rich development lifecycle platform.
- Containers and images are the building blocks for deploying your applications.
- Pods and services allow for containers to communicate with each other and proxy connections.
- Projects and users provide the space and means for communities to organize and manage their content together.
- Builds and image streams allow you to build working images and react to new images.
- Deployments add expanded support for the software development and deployment lifecycle.
- Routes announce your service to the world.
- Templates allow for many objects to be created at once based on customized parameters.
3.2. Containers and Images
3.2.1. Containers
The basic units of OpenShift Enterprise applications are called containers. Linux container technologies are lightweight mechanisms for isolating running processes so that they are limited to interacting with only their designated resources.
Many application instances can be running in containers on a single host without visibility into each others' processes, files, network, and so on. Typically, each container provides a single service (often called a "micro-service"), such as a web server or a database, though containers can be used for arbitrary workloads.
The Linux kernel has been incorporating capabilities for container technologies for years. More recently the Docker project has developed a convenient management interface for Linux containers on a host. OpenShift Enterprise and Kubernetes add the ability to orchestrate Docker-formatted containers across multi-host installations.
Though you do not directly interact with the Docker CLI or service when using OpenShift Enterprise, understanding their capabilities and terminology is important for understanding their role in OpenShift Enterprise and how your applications function inside of containers. The docker RPM is available as part of RHEL 7, as well as CentOS and Fedora, so you can experiment with it separately from OpenShift Enterprise. Refer to the article Get Started with Docker Formatted Container Images on Red Hat Systems for a guided introduction.
3.2.2. Images
Containers in OpenShift Enterprise are based on Docker-formatted container images. An image is a binary that includes all of the requirements for running a single container, as well as metadata describing its needs and capabilities.
You can think of it as a packaging technology. Containers only have access to resources defined in the image unless you give the container additional access when creating it. By deploying the same image in multiple containers across multiple hosts and load balancing between them, OpenShift Enterprise can provide redundancy and horizontal scaling for a service packaged into an image.
You can use the Docker CLI directly to build images, but OpenShift Enterprise also supplies builder images that assist with creating new images by adding your code or configuration to existing images.
Because applications develop over time, a single image name can actually refer to many different versions of the "same" image. Each different image is referred to uniquely by its hash (a long hexadecimal number e.g. fd44297e2ddb050ec4f…) which is usually shortened to 12 characters (e.g. fd44297e2ddb).
Rather than version numbers, the Docker service allows applying tags (such as v1, v2.1, GA, or the default latest) in addition to the image name to further specify the image desired, so you may see the same image referred to as centos (implying the latest tag), centos:centos7, or fd44297e2ddb.
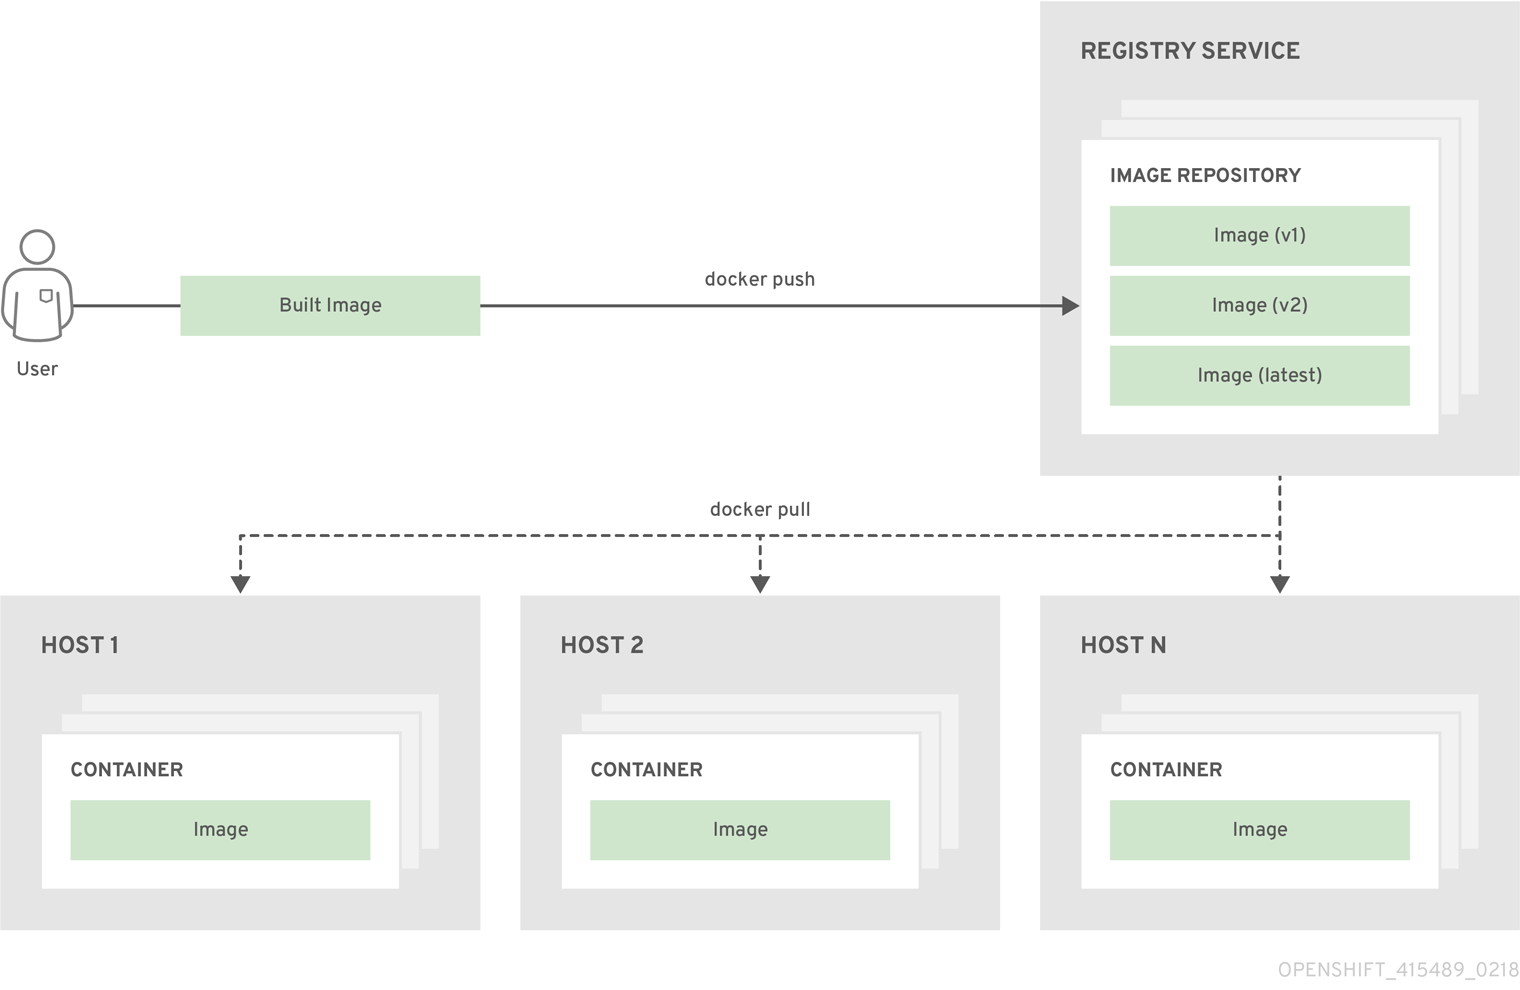
3.2.3. Container Registries
A container registry is a service for storing and retrieving Docker-formatted container images. A registry contains a collection of one or more image repositories. Each image repository contains one or more tagged images. Docker provides its own registry, the Docker Hub, and you can also use private or third-party registries. Red Hat provides a registry at registry.access.redhat.com for subscribers. OpenShift Enterprise can also supply its own internal registry for managing custom container images.
The relationship between containers, images, and registries is depicted in the following diagram:
3.3. Pods and Services
3.3.1. Pods
OpenShift Enterprise leverages the Kubernetes concept of a pod, which is one or more containers deployed together on one host, and the smallest compute unit that can be defined, deployed, and managed.
Pods are the rough equivalent of OpenShift Enterprise v2 gears, with containers the rough equivalent of v2 cartridge instances. Each pod is allocated its own internal IP address, therefore owning its entire port space, and containers within pods can share their local storage and networking.
Pods have a lifecycle; they are defined, then they are assigned to run on a node, then they run until their container(s) exit or they are removed for some other reason. Pods, depending on policy and exit code, may be removed after exiting, or may be retained to enable access to the logs of their containers.
OpenShift Enterprise treats pods as largely immutable; changes cannot be made to a pod definition while it is running. OpenShift Enterprise implements changes by terminating an existing pod and recreating it with modified configuration, base image(s), or both. Pods are also treated as expendable, and do not maintain state when recreated. Therefore manage pods with higher-level controllers, rather than directly by users.
The following example definition of a pod provides a long-running service, which is actually a part of the OpenShift Enterprise infrastructure: the private Docker registry. It demonstrates many features of pods, most of which are discussed in other topics and thus only briefly mentioned here.
Pod object definition example
apiVersion: v1
kind: Pod
metadata:
  annotations: { ... }
  labels:                                1
    deployment: docker-registry-1
    deploymentconfig: docker-registry
    docker-registry: default
  generateName: docker-registry-1-       2
spec:
  containers:                            3
  - env:                                 4
    - name: OPENSHIFT_CA_DATA
      value: ...
    - name: OPENSHIFT_CERT_DATA
      value: ...
    - name: OPENSHIFT_INSECURE
      value: "false"
    - name: OPENSHIFT_KEY_DATA
      value: ...
    - name: OPENSHIFT_MASTER
      value: https://master.example.com:8443
    image: openshift/origin-docker-registry:v0.6.2 5
    imagePullPolicy: IfNotPresent
    name: registry
    ports:                              6
    - containerPort: 5000
      protocol: TCP
    resources: {}
    securityContext: { ... }            7
    volumeMounts:                       8
    - mountPath: /registry
      name: registry-storage
    - mountPath: /var/run/secrets/kubernetes.io/serviceaccount
      name: default-token-br6yz
      readOnly: true
  dnsPolicy: ClusterFirst
  imagePullSecrets:
  - name: default-dockercfg-at06w
  restartPolicy: Always
  serviceAccount: default               9
  volumes:                              10
  - emptyDir: {}
    name: registry-storage
  - name: default-token-br6yz
    secret:
      secretName: default-token-br6yz
- 1
- Pods can be "tagged" with one or more labels, which can then be used to select and manage groups of pods in a single operation. The labels are stored in key-value format in the
metadatahash. One label in this example is docker-registry=default. - 2
- Pods must have a unique name within their namespace. A pod definition may specify the basis of a name with the
generateNameattribute and random characters will be added automatically to generate a unique name. - 3
containersspecifies an array of container definitions; in this case (as with most), just one.- 4
- Environment variables can be specified to pass necessary values to each container.
- 5
- Each container in the pod is instantiated from its own Docker-formatted container image.
- 6
- The container can bind to ports which will be made available on the pod’s IP.
- 7
- OpenShift Enterprise defines a security context for containers which specifies whether they are allowed to run as privileged containers, run as a user of their choice, and more. The default context is very restrictive but administrators can modify this as needed.
- 8
- The container specifies where external storage volumes should be mounted within the container. In this case, there is a volume for storing the registry’s data, and one for access to credentials the registry needs for making requests against the OpenShift Enterprise API.
- 9
- Pods making requests against the OpenShift Enterprise API is a common enough pattern that there is a
serviceAccountfield for specifying which service account user the pod should authenticate as when making the requests. This enables fine-grained access control for custom infrastructure components. - 10
- The pod defines storage volumes that are available to its container(s) to use. In this case, it provides an ephemeral volume for the registry storage and a
secretvolume containing the service account credentials.
This pod definition does not include attributes that are filled by OpenShift Enterprise automatically after the pod is created and its lifecycle begins. The Kubernetes API documentation has complete details of the pod REST API object attributes, and the Kubernetes pod documentation has details about the functionality and purpose of pods.
3.3.2. Services
A Kubernetes service serves as an internal load balancer. It identifies a set of replicated pods in order to proxy the connections it receives to them. Backing pods can be added to or removed from a service arbitrarily while the service remains consistently available, enabling anything that depends on the service to refer to it at a consistent internal address.
Services are assigned an IP address and port pair that, when accessed, proxy to an appropriate backing pod. A service uses a label selector to find all the containers running that provide a certain network service on a certain port.
Like pods, services are REST objects. The following example shows the definition of a service for the pod defined above:
Service object definition example
apiVersion: v1
kind: Service
metadata:
  name: docker-registry      1
spec:
  selector:                  2
    docker-registry: default
  portalIP: 172.30.136.123   3
  ports:
  - nodePort: 0
    port: 5000               4
    protocol: TCP
    targetPort: 5000         5
- 1
- The service name docker-registry is also used to construct an environment variable with the service IP that is inserted into other pods in the same namespace. The maximum name length is 63 characters.
- 2
- The label selector identifies all pods with the docker-registry=default label attached as its backing pods.
- 3
- Virtual IP of the service, allocated automatically at creation from a pool of internal IPs.
- 4
- Port the service listens on.
- 5
- Port on the backing pods to which the service forwards connections.
The Kubernetes documentation has more information on services.
3.3.2.1. Service externalIPs
In addition to the cluster’s internal IP addresses, the user can configure IP addresses that are external to the cluster. The administrator is responsible for ensuring that traffic arrives at a node with this IP.
The externalIPs must be selected by the admin from the ExternalIPNetworkCIDRs range configured in master-config.yaml file. When master-config.yaml is changed, the master service must be restarted.
Example 3.1. Sample ExternalIPNetworkCIDR /etc/origin/master/master-config.yaml
networkConfig:
  ExternalIPNetworkCIDR: 172.47.0.0/24
Example 3.2. Service externalIPs Definition (JSON)
{
    "kind": "Service",
    "apiVersion": "v1",
    "metadata": {
        "name": "my-service"
    },
    "spec": {
        "selector": {
            "app": "MyApp"
        },
        "ports": [
            {
                "name": "http",
                "protocol": "TCP",
                "port": 80,
                "targetPort": 9376
            }
        ],
        "externalIPs" : [
            "80.11.12.10"         1
        ]
    }
}- 1
- List of External IP addresses on which the port is exposed. In addition to the internal IP addresses)
3.3.2.2. Service ingressIPs
In non-cloud clusters, externalIP addresses can be automatically assigned from a pool of addresses. This eliminates the need for the administrator manually assigning them.
The pool is configured in /etc/origin/master/master-config.yaml file. After changing this file, restart the master service.
The ingressIPNetworkCIDR is set to 172.29.0.0/16 by default. If the cluster environment is not already using this private range, use the default range or set a custom range.
If you are using high availibility, then this range must be less than 256 addresses.
Example 3.3. Sample ingressIPNetworkCIDR /etc/origin/master/master-config.yaml
networkConfig:
  ingressIPNetworkCIDR: 172.29.0.0/16
3.3.2.3. Service NodePort
Setting the service type=NodePort will allocate a port from a flag-configured range (default: 30000-32767), and each node will proxy that port (the same port number on every node) into your service.
The selected port will be reported in the service configuration, under spec.ports[*].nodePort.
To specify a custom port just place the port number in the nodePort field. The custom port number must be in the configured range for nodePorts. When 'master-config.yaml' is changed the master service must be restarted.
Example 3.4. Sample servicesNodePortRange /etc/origin/master/master-config.yaml
kubernetesMasterConfig:
  servicesNodePortRange: ""
The service will be visible as both the <NodeIP>:spec.ports[].nodePort and spec.clusterIp:spec.ports[].port
Setting a nodePort is a privileged operation.
3.3.2.4. Service Proxy Mode
OpenShift Enterprise has two different implementations of the service-routing infrastructure. The default implementation is entirely iptables-based, and uses probabilistic iptables rewriting rules to distribute incoming service connections between the endpoint pods. The older implementation uses a user space process to accept incoming connections and then proxy traffic between the client and one of the endpoint pods.
The iptables-based implementation is much more efficient, but it requires that all endpoints are always able to accept connections; the user space implementation is slower, but can try multiple endpoints in turn until it finds one that works. If you have good readiness checks (or generally reliable nodes and pods), then the iptables-based service proxy is the best choice. Otherwise, you can enable the user space-based proxy when installing, or after deploying the cluster by editing the node configuration file.
3.3.3. Labels
Labels are used to organize, group, or select API objects. For example, pods are "tagged" with labels, and then services use label selectors to identify the pods they proxy to. This makes it possible for services to reference groups of pods, even treating pods with potentially different containers as related entities.
Most objects can include labels in their metadata. Labels can be used to group arbitrarily-related objects; for example, all of the pods, services, replication controllers, and deployment configurations of a particular application can be grouped.
Labels are simple key-value pairs, as in the following example:
Key-value pairs example
labels:
  key1: value1
  key2: value2
Consider:
- A pod consisting of an nginx container, with the label role=webserver.
- A pod consisting of an Apache httpd container, with the same label role=webserver.
A service or replication controller that is defined to use pods with the role=webserver label treats both of these pods as part of the same group.
The Kubernetes labels documentation has more information about labels.
3.4. Projects and Users
3.4.1. Users
Interaction with OpenShift Enterprise is associated with a user. An OpenShift Enterprise user object represents an actor which may be granted permissions in the system by adding roles to them or to their groups.
Several types of users can exist:
| Regular users |
This is the way most interactive OpenShift Enterprise users will be represented. Regular users are created automatically in the system upon first login, or can be created via the API. Regular users are represented with the |
| System users |
Many of these are created automatically when the infrastructure is defined, mainly for the purpose of enabling the infrastructure to interact with the API securely. They include a cluster administrator (with access to everything), a per-node user, users for use by routers and registries, and various others. Finally, there is an |
| Service accounts |
These are special system users associated with projects; some are created automatically when the project is first created, while project administrators can create more for the purpose of defining access to the contents of each project. Service accounts are represented with the |
Every user must authenticate in some way in order to access OpenShift Enterprise. API requests with no authentication or invalid authentication are authenticated as requests by the anonymous system user. Once authenticated, policy determines what the user is authorized to do.
3.4.2. Namespaces
A Kubernetes namespace provides a mechanism to scope resources in a cluster. In OpenShift Enterprise, a project is a Kubernetes namespace with additional annotations.
Namespaces provide a unique scope for:
- Named resources to avoid basic naming collisions.
- Delegated management authority to trusted users.
- The ability to limit community resource consumption.
Most objects in the system are scoped by namespace, but some are excepted and have no namespace, including nodes and users.
The Kubernetes documentation has more information on namespaces.
3.4.3. Projects
A project is a Kubernetes namespace with additional annotations, and is the central vehicle by which access to resources for regular users is managed. A project allows a community of users to organize and manage their content in isolation from other communities. Users must be given access to projects by administrators, or if allowed to create projects, automatically have access to their own projects.
Projects can have a separate name, displayName, and description.
-
The mandatory
nameis a unique identifier for the project and is most visible when using the CLI tools or API. The maximum name length is 63 characters. -
The optional
displayNameis how the project is displayed in the web console (defaults toname). -
The optional
descriptioncan be a more detailed description of the project and is also visible in the web console.
Each project scopes its own set of:
| Objects | Pods, services, replication controllers, etc. |
| Policies | Rules for which users can or cannot perform actions on objects. |
| Constraints | Quotas for each kind of object that can be limited. |
| Service accounts | Service accounts act automatically with designated access to objects in the project. |
Cluster administrators can create projects and delegate administrative rights for the project to any member of the user community. Cluster administrators can also allow developers to create their own projects.
Developers and administrators can interact with projects using the CLI or the web console.
3.5. Builds and Image Streams
3.5.1. Builds
A build is the process of transforming input parameters into a resulting object. Most often, the process is used to transform input parameters or source code into a runnable image. A BuildConfig object is the definition of the entire build process.
OpenShift Enterprise leverages Kubernetes by creating Docker-formatted containers from build images and pushing them to a container registry.
Build objects share common characteristics: inputs for a build, the need to complete a build process, logging the build process, publishing resources from successful builds, and publishing the final status of the build. Builds take advantage of resource restrictions, specifying limitations on resources such as CPU usage, memory usage, and build or pod execution time.
The OpenShift Enterprise build system provides extensible support for build strategies that are based on selectable types specified in the build API. There are three build strategies available:
By default, Docker builds and S2I builds are supported.
The resulting object of a build depends on the builder used to create it. For Docker and S2I builds, the resulting objects are runnable images. For Custom builds, the resulting objects are whatever the builder image author has specified.
For a list of build commands, see the Developer’s Guide.
For more information on how OpenShift Enterprise leverages Docker for builds, see the upstream documentation.
3.5.1.1. Docker Build
The Docker build strategy invokes the docker build command, and it therefore expects a repository with a Dockerfile and all required artifacts in it to produce a runnable image.
3.5.1.2. Source-to-Image (S2I) Build
Source-to-Image (S2I) is a tool for building reproducible, Docker-formatted container images. It produces ready-to-run images by injecting application source into a container image and assembling a new image. The new image incorporates the base image (the builder) and built source and is ready to use with the docker run command. S2I supports incremental builds, which re-use previously downloaded dependencies, previously built artifacts, etc.
The advantages of S2I include the following:
| Image flexibility |
S2I scripts can be written to inject application code into almost any existing Docker-formatted container image, taking advantage of the existing ecosystem. Note that, currently, S2I relies on |
| Speed | With S2I, the assemble process can perform a large number of complex operations without creating a new layer at each step, resulting in a fast process. In addition, S2I scripts can be written to re-use artifacts stored in a previous version of the application image, rather than having to download or build them each time the build is run. |
| Patchability | S2I allows you to rebuild the application consistently if an underlying image needs a patch due to a security issue. |
| Operational efficiency | By restricting build operations instead of allowing arbitrary actions, as a Dockerfile would allow, the PaaS operator can avoid accidental or intentional abuses of the build system. |
| Operational security | Building an arbitrary Dockerfile exposes the host system to root privilege escalation. This can be exploited by a malicious user because the entire Docker build process is run as a user with Docker privileges. S2I restricts the operations performed as a root user and can run the scripts as a non-root user. |
| User efficiency |
S2I prevents developers from performing arbitrary |
| Ecosystem | S2I encourages a shared ecosystem of images where you can leverage best practices for your applications. |
| Reproducibility | Produced images can include all inputs including specific versions of build tools and dependencies. This ensures that the image can be reproduced precisely. |
3.5.1.3. Custom Build
The Custom build strategy allows developers to define a specific builder image responsible for the entire build process. Using your own builder image allows you to customize your build process.
A Custom builder image is a plain Docker-formatted container image embedded with build process logic, for example for building RPMs or base images. The openshift/origin-custom-docker-builder image is available on the Docker Hub registry as an example implementation of a Custom builder image.
3.5.2. Image Streams
An image stream comprises any number of Docker-formatted container images identified by tags. It presents a single virtual view of related images, similar to an image repository, and may contain images from any of the following:
- Its own image repository in OpenShift Enterprise’s integrated registry
- Other image streams
- Image repositories from external registries
Image streams can be used to automatically perform an action when new images are created. Builds and deployments can watch an image stream to receive notifications when new images are added and react by performing a build or deployment, respectively.
For example, if a deployment is using a certain image and a new version of that image is created, a deployment could be automatically performed.
See the Developer Guide for details on managing images and image streams.
Example 3.5. Image Stream Object Definition
apiVersion: v1
kind: ImageStream
metadata:
  annotations:
    openshift.io/generated-by: OpenShiftNewApp
  creationTimestamp: 2016-01-29T13:33:49Z
  generation: 1
  labels:
    app: ruby-sample-build
    template: application-template-stibuild
  name: origin-ruby-sample
  namespace: test
  resourceVersion: "633"
  selflink: /oapi/v1/namespaces/test/imagestreams/origin-ruby-sample
  uid: ee2b9405-c68c-11e5-8a99-525400f25e34
spec: {}
status:
  dockerImageRepository: 172.30.56.218:5000/test/origin-ruby-sample
  tags:
  - items:
    - created: 2016-01-29T13:40:11Z
      dockerImageReference: 172.30.56.218:5000/test/origin-ruby-sample@sha256:47463d94eb5c049b2d23b03a9530bf944f8f967a0fe79147dd6b9135bf7dd13d
      generation: 1
      image: sha256:47463d94eb5c049b2d23b03a9530bf944f8f967a0fe79147dd6b9135bf7dd13d
    tag: latest
3.5.2.1. Image Stream Mappings
When the integrated registry receives a new image, it creates and sends an ImageStreamMapping to OpenShift Enterprise, providing the image’s namespace (i.e., its project), name, tag, and image metadata.
This information is used to create a new image (if it does not already exist) and to tag the image into the image stream. OpenShift Enterprise stores complete metadata about each image, such as commands, entrypoint, and environment variables. Images in OpenShift Enterprise are immutable and the maximum name length is 63 characters.
See the Developer Guide for details on manually tagging images.
The following ImageStreamMapping example results in an image being tagged as test/origin-ruby-sample:latest:
Example 3.6. Image Stream Mapping Object Definition
apiVersion: v1
kind: ImageStreamMapping
metadata:
  creationTimestamp: null
  name: origin-ruby-sample
  namespace: test
tag: latest
image:
  dockerImageLayers:
  - name: sha256:5f70bf18a086007016e948b04aed3b82103a36bea41755b6cddfaf10ace3c6ef
    size: 0
  - name: sha256:ee1dd2cb6df21971f4af6de0f1d7782b81fb63156801cfde2bb47b4247c23c29
    size: 196634330
  - name: sha256:5f70bf18a086007016e948b04aed3b82103a36bea41755b6cddfaf10ace3c6ef
    size: 0
  - name: sha256:5f70bf18a086007016e948b04aed3b82103a36bea41755b6cddfaf10ace3c6ef
    size: 0
  - name: sha256:ca062656bff07f18bff46be00f40cfbb069687ec124ac0aa038fd676cfaea092
    size: 177723024
  - name: sha256:63d529c59c92843c395befd065de516ee9ed4995549f8218eac6ff088bfa6b6e
    size: 55679776
  - name: sha256:92114219a04977b5563d7dff71ec4caa3a37a15b266ce42ee8f43dba9798c966
    size: 11939149
  dockerImageMetadata:
    Architecture: amd64
    Config:
      Cmd:
      - /usr/libexec/s2i/run
      Entrypoint:
      - container-entrypoint
      Env:
      - RACK_ENV=production
      - OPENSHIFT_BUILD_NAMESPACE=test
      - OPENSHIFT_BUILD_SOURCE=https://github.com/openshift/ruby-hello-world.git
      - EXAMPLE=sample-app
      - OPENSHIFT_BUILD_NAME=ruby-sample-build-1
      - PATH=/opt/app-root/src/bin:/opt/app-root/bin:/usr/local/sbin:/usr/local/bin:/usr/sbin:/usr/bin:/sbin:/bin
      - STI_SCRIPTS_URL=image:///usr/libexec/s2i
      - STI_SCRIPTS_PATH=/usr/libexec/s2i
      - HOME=/opt/app-root/src
      - BASH_ENV=/opt/app-root/etc/scl_enable
      - ENV=/opt/app-root/etc/scl_enable
      - PROMPT_COMMAND=. /opt/app-root/etc/scl_enable
      - RUBY_VERSION=2.2
      ExposedPorts:
        8080/tcp: {}
      Labels:
        build-date: 2015-12-23
        io.k8s.description: Platform for building and running Ruby 2.2 applications
        io.k8s.display-name: 172.30.56.218:5000/test/origin-ruby-sample:latest
        io.openshift.build.commit.author: Ben Parees <bparees@users.noreply.github.com>
        io.openshift.build.commit.date: Wed Jan 20 10:14:27 2016 -0500
        io.openshift.build.commit.id: 00cadc392d39d5ef9117cbc8a31db0889eedd442
        io.openshift.build.commit.message: 'Merge pull request #51 from php-coder/fix_url_and_sti'
        io.openshift.build.commit.ref: master
        io.openshift.build.image: centos/ruby-22-centos7@sha256:3a335d7d8a452970c5b4054ad7118ff134b3a6b50a2bb6d0c07c746e8986b28e
        io.openshift.build.source-location: https://github.com/openshift/ruby-hello-world.git
        io.openshift.builder-base-version: 8d95148
        io.openshift.builder-version: 8847438ba06307f86ac877465eadc835201241df
        io.openshift.expose-services: 8080:http
        io.openshift.s2i.scripts-url: image:///usr/libexec/s2i
        io.openshift.tags: builder,ruby,ruby22
        io.s2i.scripts-url: image:///usr/libexec/s2i
        license: GPLv2
        name: CentOS Base Image
        vendor: CentOS
      User: "1001"
      WorkingDir: /opt/app-root/src
    Container: 86e9a4a3c760271671ab913616c51c9f3cea846ca524bf07c04a6f6c9e103a76
    ContainerConfig:
      AttachStdout: true
      Cmd:
      - /bin/sh
      - -c
      - tar -C /tmp -xf - && /usr/libexec/s2i/assemble
      Entrypoint:
      - container-entrypoint
      Env:
      - RACK_ENV=production
      - OPENSHIFT_BUILD_NAME=ruby-sample-build-1
      - OPENSHIFT_BUILD_NAMESPACE=test
      - OPENSHIFT_BUILD_SOURCE=https://github.com/openshift/ruby-hello-world.git
      - EXAMPLE=sample-app
      - PATH=/opt/app-root/src/bin:/opt/app-root/bin:/usr/local/sbin:/usr/local/bin:/usr/sbin:/usr/bin:/sbin:/bin
      - STI_SCRIPTS_URL=image:///usr/libexec/s2i
      - STI_SCRIPTS_PATH=/usr/libexec/s2i
      - HOME=/opt/app-root/src
      - BASH_ENV=/opt/app-root/etc/scl_enable
      - ENV=/opt/app-root/etc/scl_enable
      - PROMPT_COMMAND=. /opt/app-root/etc/scl_enable
      - RUBY_VERSION=2.2
      ExposedPorts:
        8080/tcp: {}
      Hostname: ruby-sample-build-1-build
      Image: centos/ruby-22-centos7@sha256:3a335d7d8a452970c5b4054ad7118ff134b3a6b50a2bb6d0c07c746e8986b28e
      OpenStdin: true
      StdinOnce: true
      User: "1001"
      WorkingDir: /opt/app-root/src
    Created: 2016-01-29T13:40:00Z
    DockerVersion: 1.8.2.fc21
    Id: 9d7fd5e2d15495802028c569d544329f4286dcd1c9c085ff5699218dbaa69b43
    Parent: 57b08d979c86f4500dc8cad639c9518744c8dd39447c055a3517dc9c18d6fccd
    Size: 441976279
    apiVersion: "1.0"
    kind: DockerImage
  dockerImageMetadataVersion: "1.0"
  dockerImageReference: 172.30.56.218:5000/test/origin-ruby-sample@sha256:47463d94eb5c049b2d23b03a9530bf944f8f967a0fe79147dd6b9135bf7dd13d
3.6. Deployments
3.6.1. Replication Controllers
A replication controller ensures that a specified number of replicas of a pod are running at all times. If pods exit or are deleted, the replication controller acts to instantiate more up to the defined number. Likewise, if there are more running than desired, it deletes as many as necessary to match the defined amount.
A replication controller configuration consists of:
- The number of replicas desired (which can be adjusted at runtime).
- A pod definition to use when creating a replicated pod.
- A selector for identifying managed pods.
A selector is a set of labels assigned to the pods that are managed by the replication controller. These labels are included in the pod definition that the replication controller instantiates. The replication controller uses the selector to determine how many instances of the pod are already running in order to adjust as needed.
The replication controller does not perform auto-scaling based on load or traffic, as it does not track either. Rather, this would require its replica count to be adjusted by an external auto-scaler.
A replication controller is a core Kubernetes object called ReplicationController.
The following is an example ReplicationController definition:
apiVersion: v1
kind: ReplicationController
metadata:
  name: frontend-1
spec:
  replicas: 1  1
  selector:    2
    name: frontend
  template:    3
    metadata:
      labels:  4
        name: frontend 5
    spec:
      containers:
      - image: openshift/hello-openshift
        name: helloworld
        ports:
        - containerPort: 8080
          protocol: TCP
      restartPolicy: Always
- The number of copies of the pod to run.
- The label selector of the pod to run.
- A template for the pod the controller creates.
- Labels on the pod should include those from the label selector.
- The maximum name length after expanding any parameters is 63 characters.
3.6.2. Jobs
A job is similar to a replication controller, in that its purpose is to create pods for specified reasons. The difference is that replication controllers are designed for pods that will be continuously running, whereas jobs are for one-time pods. A job tracks any successful completions and when the specified amount of completions have been reached, the job itself is completed.
The following example computes π to 2000 places, prints it out, then completes:
apiVersion: extensions/v1
kind: Job
metadata:
  name: pi
spec:
  selector:
    matchLabels:
      app: pi
  template:
    metadata:
      name: pi
      labels:
        app: pi
    spec:
      containers:
      - name: pi
        image: perl
        command: ["perl",  "-Mbignum=bpi", "-wle", "print bpi(2000)"]
      restartPolicy: Never
See the Jobs topic for more information on how to use jobs.
3.6.3. Deployments and Deployment Configurations
Building on replication controllers, OpenShift Enterprise adds expanded support for the software development and deployment lifecycle with the concept of deployments. In the simplest case, a deployment just creates a new replication controller and lets it start up pods. However, OpenShift Enterprise deployments also provide the ability to transition from an existing deployment of an image to a new one and also define hooks to be run before or after creating the replication controller.
The OpenShift Enterprise DeploymentConfiguration object defines the following details of a deployment:
-
The elements of a
ReplicationControllerdefinition. - Triggers for creating a new deployment automatically.
- The strategy for transitioning between deployments.
- Life cycle hooks.
Each time a deployment is triggered, whether manually or automatically, a deployer pod manages the deployment (including scaling down the old replication controller, scaling up the new one, and running hooks). The deployment pod remains for an indefinite amount of time after it completes the deployment in order to retain its logs of the deployment. When a deployment is superseded by another, the previous replication controller is retained to enable easy rollback if needed.
For detailed instructions on how to create and interact with deployments, refer to Deployments.
Here is an example DeploymentConfiguration definition with some omissions and callouts:
apiVersion: v1
kind: DeploymentConfig
metadata:
  name: frontend
spec:
  replicas: 5
  selector:
    name: frontend
  template: { ... }
  triggers:
  - type: ConfigChange 1
  - imageChangeParams:
      automatic: true
      containerNames:
      - helloworld
      from:
        kind: ImageStreamTag
        name: hello-openshift:latest
    type: ImageChange  2
  strategy:
type: Rolling 3-
A
ConfigChangetrigger causes a new deployment to be created any time the replication controller template changes. -
An
ImageChangetrigger causes a new deployment to be created each time a new version of the backing image is available in the named image stream. -
The default
Rollingstrategy makes a downtime-free transition between deployments.
3.7. Routes
3.7.1. Overview
An OpenShift Enterprise route exposes a service at a host name, like www.example.com, so that external clients can reach it by name.
DNS resolution for a host name is handled separately from routing. Your administrator may have configured a DNS wildcard entry that will resolve to the OpenShift Enterprise node that is running the OpenShift Enterprise router. If you are using a different host name you may need to modify its DNS records independently to resolve to the node that is running the router.
Each route consists of a name (limited to 63 characters), a service selector, and an optional security configuration.
3.7.2. Routers
An OpenShift Enterprise administrator can deploy routers to nodes in an OpenShift Enterprise cluster, which enable routes created by developers to be used by external clients. The routing layer in OpenShift Enterprise is pluggable, and two available router plug-ins are provided and supported by default.
See the Installation and Configuration guide for information on deploying a router.
A router uses the service selector to find the service and the endpoints backing the service. When both router and service provide load balancing, OpenShift Enterprise uses the router load balancing. A routers detects relevant changes in the IP addresses of its services, and adapts its configuration accordingly. This is useful for custom routers to communicate modifications of API objects to an external routing solution.
The path of a request starts with the DNS resolution of a host name to one or more routers. The suggested method is to define a cloud domain with a wildcard DNS entry pointing to one or more virtual IP (VIP) addresses backed by multiple router instances. Routes using names and addresses outside the cloud domain require configuration of individual DNS entries.
When there are fewer VIP addresses than routers, the routers corresponding to the number of addresses are active and the rest are passive. A passive router is also known as a hot-standby router. For example, with two VIP addresses and three routers, you have an "active-active-passive" configuration. See High Availability for more information on router VIP configuration.
Routes can be sharded among the set of routers. Administrators can set up sharding on a cluster-wide basis and users can set up sharding for the namespace in their project. Sharding allows the operator to define multiple router groups. Each router in the group serves only a subset of traffic.
OpenShift Enterprise routers provide external host name mapping and load balancing of service end points over protocols that pass distinguishing information directly to the router; the host name must be present in the protocol in order for the router to determine where to send it.
Router plug-ins assume they can bind to host ports 80 (HTTP) and 443 (HTTPS), by default. This means that routers must be placed on nodes where those ports are not otherwise in use. Alternatively, a router can be configured to listen on other ports by setting the ROUTER_SERVICE_HTTP_PORT and ROUTER_SERVICE_HTTPS_PORT environment variables.
Because a router binds to ports on the host node, only one router listening on those ports can be on each node if the router uses host networking (the default). Cluster networking is configured such that all routers can access all pods in the cluster.
Routers support the following protocols:
- HTTP
- HTTPS (with SNI)
- WebSockets
- TLS with SNI
WebSocket traffic uses the same route conventions and supports the same TLS termination types as other traffic.
3.7.2.1. Template Routers
A template router is a type of router that provides certain infrastructure information to the underlying router implementation, such as:
- A wrapper that watches endpoints and routes.
- Endpoint and route data, which is saved into a consumable form.
- Passing the internal state to a configurable template and executing the template.
- Calling a reload script.
3.7.3. Available Router Plug-ins
The following router plug-ins are provided and supported in OpenShift Enterprise. Instructions on deploying these routers are available in Deploying a Router.
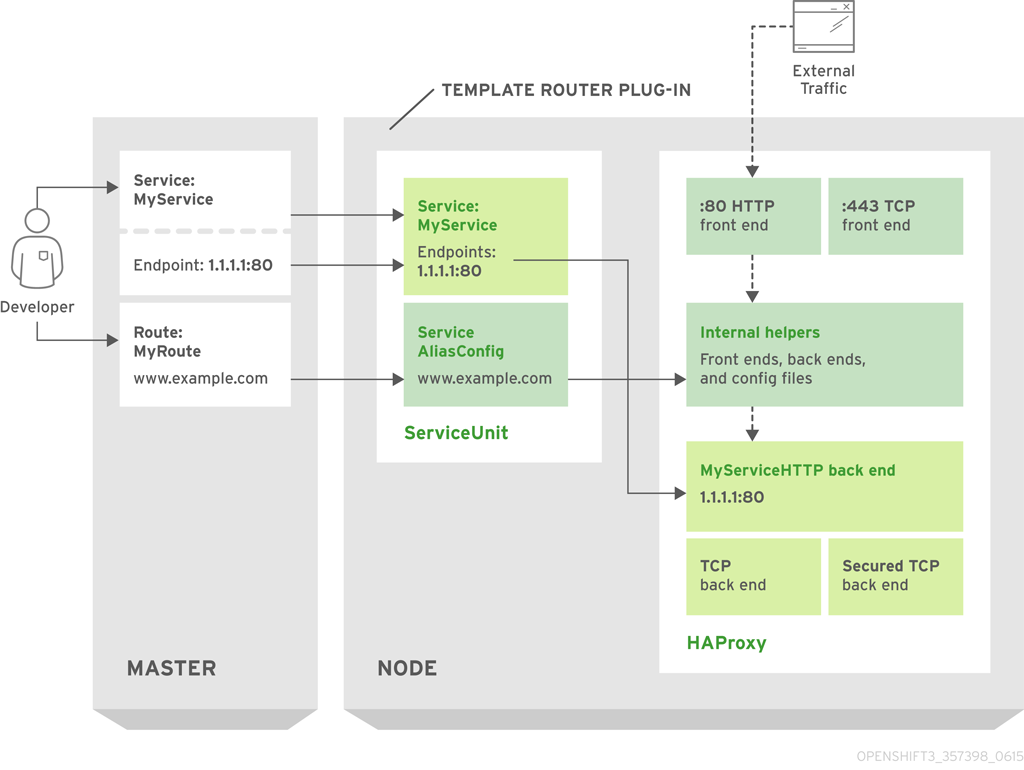
3.7.3.1. HAProxy Template Router
The HAProxy template router implementation is the reference implementation for a template router plug-in. It uses the openshift3/ose-haproxy-router repository to run an HAProxy instance alongside the template router plug-in.
The following diagram illustrates how data flows from the master through the plug-in and finally into an HAProxy configuration:
Figure 3.1. HAProxy Router Data Flow
Sticky Sessions
Implementing sticky sessions is up to the underlying router configuration. The default HAProxy template implements sticky sessions using the balance source directive which balances based on the source IP. In addition, the template router plug-in provides the service name and namespace to the underlying implementation. This can be used for more advanced configuration such as implementing stick-tables that synchronize between a set of peers.
Specific configuration for this router implementation is stored in the haproxy-config.template file located in the /var/lib/haproxy/conf directory of the router container.
The balance source directive does not distinguish between external client IP addresses; because of the NAT configuration, the originating IP address (HAProxy remote) is the same. Unless the HAProxy router is running with hostNetwork: true, all external clients will be routed to a single pod.
3.7.3.2. F5 Router
The F5 router plug-in is available starting in OpenShift Enterprise 3.0.2.
The F5 router plug-in integrates with an existing F5 BIG-IP® system in your environment. F5 BIG-IP® version 11.4 or newer is required in order to have the F5 iControl REST API. The F5 router supports unsecured, edge terminated, re-encryption terminated, and passthrough terminated routes matching on HTTP vhost and request path.
The F5 router has feature parity with the HAProxy template router, and has additional features over the F5 BIG-IP® support in OpenShift Enterprise 2. Compared with the routing-daemon used in earlier versions, the F5 router additionally supports:
- path-based routing (using policy rules),
- re-encryption (implemented using client and server SSL profiles), and
- passthrough of encrypted connections (implemented using an iRule that parses the SNI protocol and uses a data group that is maintained by the F5 router for the servername lookup).
Passthrough routes are a special case: path-based routing is technically impossible with passthrough routes because F5 BIG-IP® itself does not see the HTTP request, so it cannot examine the path. The same restriction applies to the template router; it is a technical limitation of passthrough encryption, not a technical limitation of OpenShift Enterprise.
Routing Traffic to Pods Through the SDN
Because F5 BIG-IP® is external to the OpenShift Enterprise SDN, a cluster administrator must create a peer-to-peer tunnel between F5 BIG-IP® and a host that is on the SDN, typically an OpenShift Enterprise node host. This ramp node can be configured as unschedulable for pods so that it will not be doing anything except act as a gateway for the F5 BIG-IP® host. It is also possible to configure multiple such hosts and use the OpenShift Enterprise ipfailover feature for redundancy; the F5 BIG-IP® host would then need to be configured to use the ipfailover VIP for its tunnel’s remote endpoint.
F5 Integration Details
The operation of the F5 router is similar to that of the OpenShift Enterprise routing-daemon used in earlier versions. Both use REST API calls to:
- create and delete pools,
- add endpoints to and delete them from those pools, and
- configure policy rules to route to pools based on vhost.
Both also use scp and ssh commands to upload custom TLS/SSL certificates to F5 BIG-IP®.
The F5 router configures pools and policy rules on virtual servers as follows:
When a user creates or deletes a route on OpenShift Enterprise, the router creates a pool to F5 BIG-IP® for the route (if no pool already exists) and adds a rule to, or deletes a rule from, the policy of the appropriate vserver: the HTTP vserver for non-TLS routes, or the HTTPS vserver for edge or re-encrypt routes. In the case of edge and re-encrypt routes, the router also uploads and configures the TLS certificate and key. The router supports host- and path-based routes.
NotePassthrough routes are a special case: to support those, it is necessary to write an iRule that parses the SNI ClientHello handshake record and looks up the servername in an F5 data-group. The router creates this iRule, associates the iRule with the vserver, and updates the F5 data-group as passthrough routes are created and deleted. Other than this implementation detail, passthrough routes work the same way as other routes.
- When a user creates a service on OpenShift Enterprise, the router adds a pool to F5 BIG-IP® (if no pool already exists). As endpoints on that service are created and deleted, the router adds and removes corresponding pool members.
- When a user deletes the route and all endpoints associated with a particular pool, the router deletes that pool.
3.7.4. Route Host Names
In order for services to be exposed externally, an OpenShift Enterprise route allows you to associate a service with an externally-reachable host name. This edge host name is then used to route traffic to the service.
When two routes claim the same host, the oldest route wins. If additional routes with different path fields are defined in the same namespace, those paths will be added. If multiple routes with the same path are used, the oldest takes priority.
Example 3.7. A Route with a Specified Host:
Example 3.8. A Route Without a Host:
apiVersion: v1
kind: Route
metadata:
  name: no-route-hostname
spec:
  to:
    kind: Service
    name: service-name
If a host name is not provided as part of the route definition, then OpenShift Enterprise automatically generates one for you. The generated host name is of the form:
<route-name>[-<namespace>].<suffix>
The following example shows the OpenShift Enterprise-generated host name for the above configuration of a route without a host added to a namespace mynamespace:
Example 3.9. Generated Host Name
no-route-hostname-mynamespace.router.default.svc.cluster.local 1- 1
- The generated host name suffix is the default routing subdomain router.default.svc.cluster.local.
A cluster administrator can also customize the suffix used as the default routing subdomain for their environment.
3.7.5. Route Types
Routes can be either secured or unsecured. Secure routes provide the ability to use several types of TLS termination to serve certificates to the client. Routers support edge, passthrough, and re-encryption termination.
Example 3.10. Unsecured Route Object YAML Definition
apiVersion: v1
kind: Route
metadata:
  name: route-unsecured
spec:
  host: www.example.com
  to:
    kind: Service
    name: service-name
Unsecured routes are simplest to configure, as they require no key or certificates, but secured routes offer security for connections to remain private.
A secured route is one that specifies the TLS termination of the route. The available types of termination are described below.
3.7.6. Path Based Routes
Path based routes specify a path component that can be compared against a URL (which requires that the traffic for the route be HTTP based) such that multiple routes can be served using the same hostname, each with a different path. Routers should match routes based on the most specific path to the least; however, this depends on the router implementation. The following table shows example routes and their accessibility:
Table 3.1. Route Availability
| Route | When Compared to | Accessible |
|---|---|---|
| www.example.com/test | www.example.com/test | Yes |
| www.example.com | No | |
| www.example.com/test and www.example.com | www.example.com/test | Yes |
| www.example.com | Yes | |
| www.example.com | www.example.com/test | Yes (Matched by the host, not the route) |
| www.example.com | Yes |
Example 3.11. An Unsecured Route with a Path:
apiVersion: v1
kind: Route
metadata:
  name: route-unsecured
spec:
  host: www.example.com
  path: "/test"   1
  to:
    kind: Service
name: service-name- 1
- The path is the only added attribute for a path-based route.
Path-based routing is not available when using passthrough TLS, as the router does not terminate TLS in that case and cannot read the contents of the request.
3.7.7. Secured Routes
Secured routes specify the TLS termination of the route and, optionally, provide a key and certificate(s).
TLS termination in OpenShift Enterprise relies on SNI for serving custom certificates. Any non-SNI traffic received on port 443 is handled with TLS termination and a default certificate (which may not match the requested hostname, resulting in validation errors).
Secured routes can use any of the following three types of secure TLS termination.
Edge Termination
With edge termination, TLS termination occurs at the router, prior to proxying traffic to its destination. TLS certificates are served by the front end of the router, so they must be configured into the route, otherwise the router’s default certificate will be used for TLS termination.
Example 3.12. A Secured Route Using Edge Termination
apiVersion: v1
kind: Route
metadata:
  name: route-edge-secured 1
spec:
  host: www.example.com
  to:
    kind: Service
    name: service-name 2
  tls:
    termination: edge            3
    key: |-                      4
      -----BEGIN PRIVATE KEY-----
      [...]
      -----END PRIVATE KEY-----
    certificate: |-              5
      -----BEGIN CERTIFICATE-----
      [...]
      -----END CERTIFICATE-----
    caCertificate: |-            6
      -----BEGIN CERTIFICATE-----
      [...]
      -----END CERTIFICATE-----
- 1 2
- The name of the object, which is limited to 63 characters.
- 3
- The
terminationfield isedgefor edge termination. - 4
- The
keyfield is the contents of the PEM format key file. - 5
- The
certificatefield is the contents of the PEM format certificate file. - 6
- An optional CA certificate may be required to establish a certificate chain for validation.
Because TLS is terminated at the router, connections from the router to the endpoints over the internal network are not encrypted.
Edge-terminated routes can specify an insecureEdgeTerminationPolicy that enables traffic on insecure schemes (HTTP) to be disabled, allowed or redirected. The allowed values for insecureEdgeTerminationPolicy are: None or empty (for disabled), Allow or Redirect. The default insecureEdgeTerminationPolicy is to disable traffic on the insecure scheme. A common use case is to allow content to be served via a secure scheme but serve the assets (example images, stylesheets and javascript) via the insecure scheme.
Example 3.13. A Secured Route Using Edge Termination Allowing HTTP Traffic
apiVersion: v1
kind: Route
metadata:
  name: route-edge-secured-allow-insecure 1
spec:
  host: www.example.com
  to:
    kind: Service
    name: service-name 2
  tls:
    termination:                   edge   3
    insecureEdgeTerminationPolicy: Allow  4
    [ ... ]
Example 3.14. A Secured Route Using Edge Termination Redirecting HTTP Traffic to HTTPS
apiVersion: v1
kind: Route
metadata:
  name: route-edge-secured-redirect-insecure 1
spec:
  host: www.example.com
  to:
    kind: Service
    name: service-name 2
  tls:
    termination:                   edge      3
    insecureEdgeTerminationPolicy: Redirect  4
    [ ... ]
Passthrough Termination
With passthrough termination, encrypted traffic is sent straight to the destination without the router providing TLS termination. Therefore no key or certificate is required.
Example 3.15. A Secured Route Using Passthrough Termination
apiVersion: v1
kind: Route
metadata:
  name: route-passthrough-secured 1
spec:
  host: www.example.com
  to:
    kind: Service
    name: service-name 2
  tls:
    termination: passthrough     3
The destination pod is responsible for serving certificates for the traffic at the endpoint. This is currently the only method that can support requiring client certificates (also known as two-way authentication).
Re-encryption Termination
Re-encryption is a variation on edge termination where the router terminates TLS with a certificate, then re-encrypts its connection to the endpoint which may have a different certificate. Therefore the full path of the connection is encrypted, even over the internal network. The router uses health checks to determine the authenticity of the host.
Example 3.16. A Secured Route Using Re-Encrypt Termination
apiVersion: v1
kind: Route
metadata:
  name: route-pt-secured 1
spec:
  host: www.example.com
  to:
    kind: Service
    name: service-name 2
  tls:
    termination: reencrypt        3
    key: [as in edge termination]
    certificate: [as in edge termination]
    caCertificate: [as in edge termination]
    destinationCACertificate: |-  4
      -----BEGIN CERTIFICATE-----
      [...]
      -----END CERTIFICATE-----
- 1 2
- The name of the object, which is limited to 63 characters.
- 3
- The
terminationfield is set toreencrypt. Other fields are as in edge termination. - 4
- The
destinationCACertificatefield specifies a CA certificate to validate the endpoint certificate, securing the connection from the router to the destination. This field is required, but only for re-encryption.
3.7.8. Router Sharding
In OpenShift Enterprise, each route can have any number of labels in its metadata field. A router uses selectors (also known as a selection expression) to select a subset of routes from the entire pool of routes to serve. A selection expression can also involve labels on the route’s namespace. The selected routes form a router shard. You can create and modify router shards independently from the routes, themselves.
This design supports traditional sharding as well as overlapped sharding. In traditional sharding, the selection results in no overlapping sets and a route belongs to exactly one shard. In overlapped sharding, the selection results in overlapping sets and a route can belong to many different shards. For example, a single route may belong to a SLA=high shard (but not SLA=medium or SLA=low shards), as well as a geo=west shard (but not a geo=east shard).
Another example of overlapped sharding is a set of routers that select based on namespace of the route:
| Router | Selection | Namespaces |
|---|---|---|
| router-1 |
|
|
| router-2 |
|
|
| router-3 |
|
|
Both router-2 and router-3 serve routes that are in the namespaces Q*, R*, S*, T*. To change this example from overlapped to traditional sharding, we could change the selection of router-2 to K* — P*, which would eliminate the overlap.
When routers are sharded, a given route is bound to zero or more routers in the group. The route binding ensures uniqueness of the route across the shard. Uniqueness allows secure and non-secure versions of the same route to exist within a single shard. This implies that routes now have a visible life cycle that moves from created to bound to active.
In the sharded environment the first route to hit the shard reserves the right to exist there indefinitely, even across restarts.
During a green/blue deployment a route may be be selected in multiple routers. An OpenShift Enterprise application administrator may wish to bleed traffic from one version of the application to another and then turn off the old version.
Sharding can be done by the administrator at a cluster level and by the user at a project/namespace level. When namespace labels are used, the service account for the router must have cluster-reader permission to permit the router to access the labels in the namespace.
For two or more routes that claim the same host name, the resolution order is based on the age of the route and the oldest route would win the claim to that host. In the case of sharded routers, routes are selected based on their labels matching the router’s selection criteria. There is no consistent way to determine when labels are added to a route. So if an older route claiming an existing host name is "re-labelled" to match the router’s selection criteria, it will replace the existing route based on the above mentioned resolution order (oldest route wins).
3.8. Templates
3.8.1. Overview
A template describes a set of objects that can be parameterized and processed to produce a list of objects for creation by OpenShift Enterprise. The objects to create can include anything that users have permission to create within a project, for example services, build configurations, and deployment configurations. A template may also define a set of labels to apply to every object defined in the template.
Example 3.17. A Simple Template Object Definition (YAML)
apiVersion: v1
kind: Template
metadata:
  name: redis-template 1
  annotations:
    description: "Description" 2
    iconClass: "icon-redis" 3
    tags: "database,nosql" 4
objects:   5
- apiVersion: v1
  kind: Pod
  metadata:
    name: redis-master
  spec:
    containers:
    - env:
      - name: REDIS_PASSWORD
        value: ${REDIS_PASSWORD} 6
      image: dockerfile/redis
      name: master
      ports:
      - containerPort: 6379
        protocol: TCP
parameters:  7
- description: Password used for Redis authentication
  from: '[A-Z0-9]{8}'   8
  generate: expression
  name: REDIS_PASSWORD
labels:      9
  redis: master
- 1
- The name of the template
- 2
- Optional description for the template
- 3
- The icon that will be shown in the UI for this template; the name of a CSS class defined in the web console source (search content for "openshift-logos-icon").
- 4
- A list of arbitrary tags that this template will have in the UI
- 5
- A list of objects the template will create (in this case, a single pod)
- 6
- Parameter value that will be substituted during processing
- 7
- A list of parameters for the template
- 8
- An expression used to generate a random password if not specified
- 9
- A list of labels to apply to all objects on create
A template describes a set of related object definitions to be created together, as well as a set of parameters for those objects. For example, an application might consist of a frontend web application backed by a database; each consists of a service object and deployment configuration object, and they share a set of credentials (parameters) for the frontend to authenticate to the backend. The template can be processed, either specifying parameters or allowing them to be automatically generated (for example, a unique DB password), in order to instantiate the list of objects in the template as a cohesive application.
Templates can be processed from a definition in a file or from an existing OpenShift Enterprise API object. Cluster administrators can define standard templates in the API that are available for all users to process, while users can define their own templates within their own projects.
Administrators and developers can interact with templates using the CLI and web console.
3.8.2. Parameters
Templates allow you to define parameters which take on a value. That value is then substituted wherever the parameter is referenced. References can be defined in any text field in the objects list field.
Each parameter describes a variable and the variable value which can be referenced in any text field in the objects list field. During processing, the value can be set explicitly or it can be generated by OpenShift Enterprise.
An explicit value can be set as the parameter default using the value field:
parameters:
  - name: USERNAME
    description: "The user name for Joe"
    value: joe
The generate field can be set to 'expression' to specify generated values. The from field should specify the pattern for generating the value using a pseudo regular expression syntax:
parameters:
  - name: PASSWORD
    description: "The random user password"
    generate: expression
    from: "[a-zA-Z0-9]{12}"
In the example above, processing will generate a random password 12 characters long consisting of all upper and lowercase alphabet letters and numbers.
The syntax available is not a full regular expression syntax. However, you can use \w, \d, and \a modifiers:
-
[\w]{10}produces 10 alphabet characters, numbers, and underscores. This follows the PCRE standard and is equal to[a-zA-Z0-9_]{10}. -
[\d]{10}produces 10 numbers. This is equal to[0-9]{10}. -
[\a]{10}produces 10 alphabetical characters. This is equal to[a-zA-Z]{10}.