
Red Hat Training
A Red Hat training course is available for OpenShift Container Platform
18.3. VMware NSX-T のインストール
前提条件
ESXi ホストの要件:
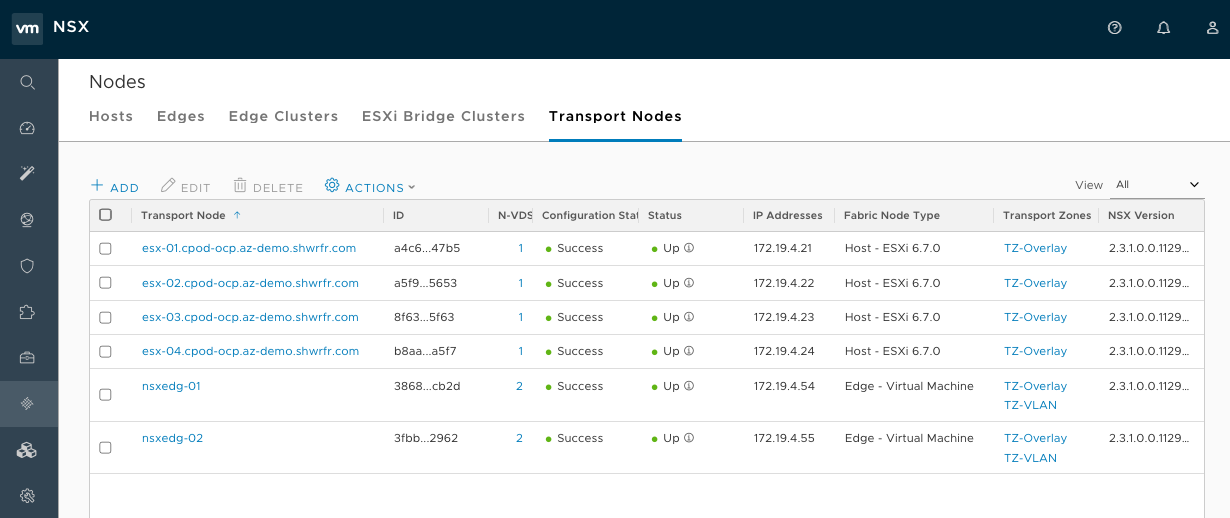
OpenShift Container Platform ノード仮想マシンをホストする ESXi サーバーは NSX-T トランスポートノードである必要があります。
図18.1 NSX UI での通常の高可用性環境のトランスポートノード表示
DNS の要件:
-
ワイルドカードのある DNS サーバーの新規エントリーをインフラストラクチャーノードに追加する必要があります。これにより、NSX-T または他のサードパーティー LoadBalancer による負荷分散が許可されます。以下の
hostsファイルで、エントリーはopenshift_master_default_subdomain変数によって定義されます。 -
DNS サーバーは、
openshift_master_cluster_hostnameおよびopenshift_master_cluster_public_hostname変数で更新する必要があります。
-
ワイルドカードのある DNS サーバーの新規エントリーをインフラストラクチャーノードに追加する必要があります。これにより、NSX-T または他のサードパーティー LoadBalancer による負荷分散が許可されます。以下の
仮想マシンの要件:
- OpenShift Container Platform ノード仮想マシンには 2 つの vNIC が必要です。
- Management vNIC が管理 T1 ルーターのアップリンクに使用される論理スイッチに接続されている必要があります。
すべての仮想マシンの 2 つ目の vNIC は NSX-T でタグ付けし、 NSX Container Plug-in (NCP) が特定の OpenShift Container Platform ノードで実行されているすべてのポートの親 VIF として使用する必要のあるポートを識別できるようにする必要があります。タグは以下のようになります。
{'ncp/node_name': 'node_name'}
{'ncp/cluster': 'cluster_name'}
以下の図では、NSX UI でのすべてのノードについてのタグを示しています。大規模なクラスターの場合、API 呼び出しを使用するか、または Ansible を使用してタグ付けを自動化することができます。
図18.2 NSX UI でのノードタグの表示
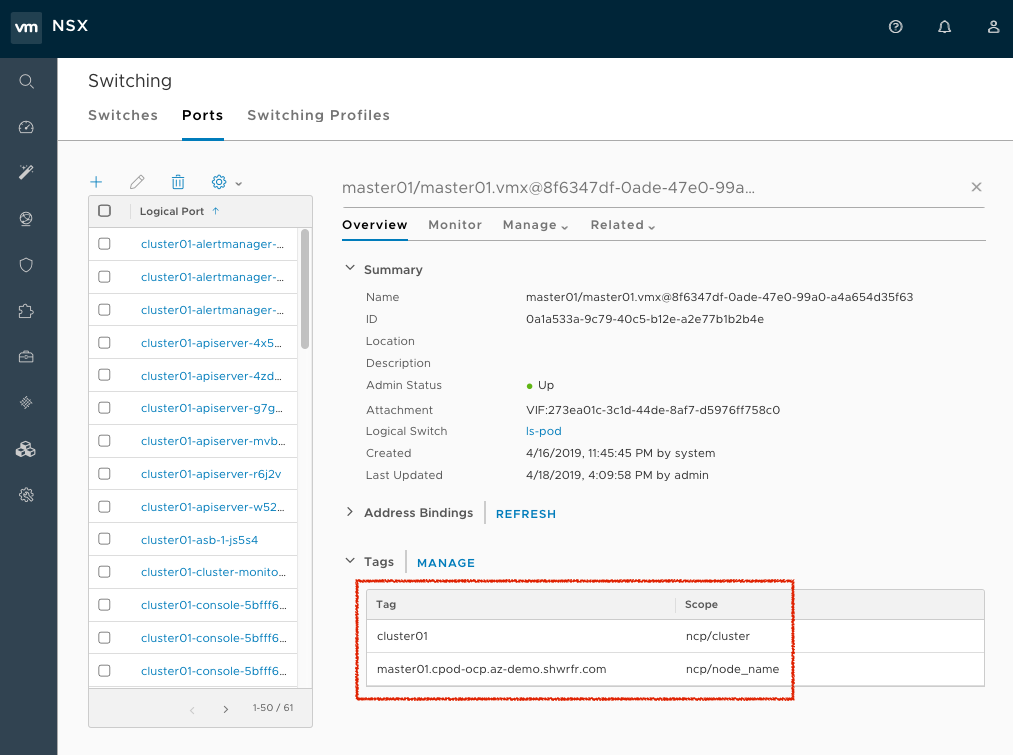
NSX UI でのタグの順序は API とは反対になります。ノード名は kubelet が予想するものと完全に一致する必要があり、クラスター名は以下に示すように Ansible ホストファイルの
nsx_openshift_cluster_nameと同じである必要があります。適切なタグがすべてのノードの 2 つ目の vNIC に適用されていることを確認してください。
NSX-T の要件:
以下の前提条件を NSX で満たしている必要があります。
- Tier-0 ルーター。
- オーバーレイトランポートゾーン。
- POD ネットワークの IP ブロック。
- (オプション) ルート指定された (NoNAT) POD ネットワークの IP ブロック
- SNAT の IP プール。デフォルトで Pod ネットワークの IP ブロックからプロジェクトごとに指定されるサブネットは NSX-T 内でのみルーティング可能です。NCP はこの IP プールを使用して外部への接続を提供します。
- (オプション) dFW (分散ファイアウォール) の Top および Bottom ファイアウォールセクション。NCP は 2 つのセクション間に Kubernetes ネットワークポリシールールを配置します。
-
Open vSwitch および CNI プラグイン RPM は OpenShift Container Platform ノード仮想マシンから到達可能な HTTP サーバーでホストされる必要があります (この例では
http://websrv.example.com)。それらのファイルは、Download NSX Container Plug-in 2.4.0 からダウンロードできる NCP Tar ファイルに含まれています。
OpenShift Container Platform の要件:
以下のコマンドを実行して、OpenShift Container Platform の必要なソフトウェアパッケージをインストールします (ある場合)。
$ ansible-playbook -i hosts openshift-ansible/playbooks/prerequisites.yml
- NCP コンテナーイメージがすべてのノードにローカルにダウンロードされていることを確認します。
prerequisites.ymlPlaybook が正常に実行された後に、xxxを NCP ビルドバージョンに置き換えて、以下のコマンドをすべてのノードで実行します。$ docker load -i nsx-ncp-rhel-xxx.tar
以下に例を示します。
$ docker load -i nsx-ncp-rhel-2.4.0.12511604.tar
イメージ名を取得して、これに再度タグを付けます。
$ docker images $ docker image tag registry.local/xxxxx/nsx-ncp-rhel nsx-ncp 1- 1
xxxを NCP ビルドバージョンに置き換えます。以下に例を示します。
docker image tag registry.local/2.4.0.12511604/nsx-ncp-rhel nsx-ncp
OpenShift Container Platform Ansible ホストファイルで、以下のパラメーターを指定し、ネットワークプラグインとして NSX-T をセットアップします。
[OSEv3:children]
masters
nodes
etcd

[OSEv3:vars]
ansible_ssh_user=root
openshift_deployment_type=origin
openshift_master_identity_providers=[{'name': 'htpasswd_auth', 'login': 'true', 'challenge': 'true', 'kind': 'HTPasswdPasswordIdentityProvider'}]
openshift_master_htpasswd_users={"admin" : "$apr1$H0QeP6oX$HHdscz5gqMdtTcT5eoCJ20"}
openshift_master_default_subdomain=demo.example.com
openshift_use_nsx=true
os_sdn_network_plugin_name=cni
openshift_use_openshift_sdn=false
openshift_node_sdn_mtu=1500
openshift_master_cluster_method=native
openshift_master_cluster_hostname=master01.example.com
openshift_master_cluster_public_hostname=master01.example.com
openshift_hosted_manage_registry=true
openshift_hosted_manage_router=true
openshift_enable_service_catalog=true
openshift_cluster_monitoring_operator_install=true
openshift_web_console_install=true
openshift_console_install=true

# NSX-T specific configuration
#nsx_use_loadbalancer=false
nsx_openshift_cluster_name='cluster01'
nsx_api_managers='nsxmgr.example.com'
nsx_api_user='nsx_admin'
nsx_api_password='nsx_api_password_example'
nsx_tier0_router='LR-Tier-0'
nsx_overlay_transport_zone='TZ-Overlay'
nsx_container_ip_block='pod-networking'
nsx_no_snat_ip_block='pod-nonat'
nsx_external_ip_pool='pod-external'
nsx_top_fw_section='containers-top'
nsx_bottom_fw_section='containers-bottom'
nsx_ovs_uplink_port='ens224'
nsx_cni_url='http://websrv.example.com/nsx-cni-buildversion.x86_64.rpm'
nsx_ovs_url='http://websrv.example.com/openvswitch-buildversion.rhel75-1.x86_64.rpm'
nsx_kmod_ovs_url='http://websrv.example.com/kmod-openvswitch-buildversion.rhel75-1.el7.x86_64.rpm'
nsx_insecure_ssl=true
# vSphere Cloud Provider
#openshift_cloudprovider_kind=vsphere
#openshift_cloudprovider_vsphere_username='administrator@example.com'
#openshift_cloudprovider_vsphere_password='viadmin_password'
#openshift_cloudprovider_vsphere_host='vcsa.example.com'
#openshift_cloudprovider_vsphere_datacenter='Example-Datacenter'
#openshift_cloudprovider_vsphere_cluster='example-Cluster'
#openshift_cloudprovider_vsphere_resource_pool='ocp'
#openshift_cloudprovider_vsphere_datastore='example-Datastore-name'
#openshift_cloudprovider_vsphere_folder='ocp'

[masters]
master01.example.com
master02.example.com
master03.example.com

[etcd]
master01.example.com
master02.example.com
master03.example.com

[nodes]
master01.example.com ansible_ssh_host=192.168.220.2 openshift_node_group_name='node-config-master'
master02.example.com ansible_ssh_host=192.168.220.3 openshift_node_group_name='node-config-master'
master03.example.com ansible_ssh_host=192.168.220.4 openshift_node_group_name='node-config-master'
node01.example.com ansible_ssh_host=192.168.220.5 openshift_node_group_name='node-config-infra'
node02.example.com ansible_ssh_host=192.168.220.6 openshift_node_group_name='node-config-infra'
node03.example.com ansible_ssh_host=192.168.220.7 openshift_node_group_name='node-config-compute'
node04.example.com ansible_ssh_host=192.168.220.8 openshift_node_group_name='node-config-compute'
OpenShift Container Platform インストールパラメーターについての詳細は、インベントリーファイルの設定 を参照してください。
手順
すべての要件を満たしている場合、NSX Data Center および OpenShift Container Platform をデプロイできます。
OpenShift Container Platform クラスターをデプロイします。
$ ansible-playbook -i hosts openshift-ansible/playbooks/deploy_cluster.yml
OpenShift Container Platform インストールについての詳細は、OpenShift Container Platform のインストール を参照してください。
インストールが完了したら、NCP および nsx-node-agent Pod が実行されていることを確認します。
$ oc get pods -o wide -n nsx-system
NAME                   READY     STATUS    RESTARTS   AGE       IP              NODE                                   NOMINATED NODE
nsx-ncp-5sggt          1/1       Running   0          1h        192.168.220.8   node04.example.com     <none>
nsx-node-agent-b8nkm   2/2       Running   0          1h        192.168.220.5   node01.example.com     <none>
nsx-node-agent-cldks   2/2       Running   0          2h        192.168.220.8   node04.example.com     <none>
nsx-node-agent-m2p5l   2/2       Running   28         3h        192.168.220.4   master03.example.com   <none>
nsx-node-agent-pcfd5   2/2       Running   0          1h        192.168.220.7   node03.example.com     <none>
nsx-node-agent-ptwnq   2/2       Running   26         3h        192.168.220.2   master01.example.com   <none>
nsx-node-agent-xgh5q   2/2       Running   26         3h        192.168.220.3   master02.example.com   <none>