
Deduplicating and compressing logical volumes on RHEL
Using VDO to increase LVM storage capacity
Résumé
Rendre l'open source plus inclusif
Red Hat s'engage à remplacer les termes problématiques dans son code, sa documentation et ses propriétés Web. Nous commençons par ces quatre termes : master, slave, blacklist et whitelist. En raison de l'ampleur de cette entreprise, ces changements seront mis en œuvre progressivement au cours de plusieurs versions à venir. Pour plus de détails, voir le message de notre directeur technique Chris Wright.
Fournir un retour d'information sur la documentation de Red Hat
Nous apprécions vos commentaires sur notre documentation. Faites-nous savoir comment nous pouvons l'améliorer.
Soumettre des commentaires sur des passages spécifiques
- Consultez la documentation au format Multi-page HTML et assurez-vous que le bouton Feedback apparaît dans le coin supérieur droit après le chargement complet de la page.
- Utilisez votre curseur pour mettre en évidence la partie du texte que vous souhaitez commenter.
- Cliquez sur le bouton Add Feedback qui apparaît près du texte en surbrillance.
- Ajoutez vos commentaires et cliquez sur Submit.
Soumettre des commentaires via Bugzilla (compte requis)
- Connectez-vous au site Web de Bugzilla.
- Sélectionnez la version correcte dans le menu Version.
- Saisissez un titre descriptif dans le champ Summary.
- Saisissez votre suggestion d'amélioration dans le champ Description. Incluez des liens vers les parties pertinentes de la documentation.
- Cliquez sur Submit Bug.
Chapitre 1. Introduction to VDO on LVM
The Virtual Data Optimizer (VDO) feature provides inline block-level deduplication, compression, and thin provisioning for storage. You can manage VDO as a type of Logical Volume Manager (LVM) Logical Volumes (LVs), similar to LVM thin-provisioned volumes.
VDO volumes on LVM (LVM-VDO) contain the following components:
- VDO pool LV
- This is the backing physical device that stores, deduplicates, and compresses data for the VDO LV. The VDO pool LV sets the physical size of the VDO volume, which is the amount of data that VDO can store on the disk.
- Currently, each VDO pool LV can hold only one VDO LV. As a result, VDO deduplicates and compresses each VDO LV separately. Duplicate data that is stored on separate LVs do not benefit from data optimization of the same VDO volume.
- VDO LV
- This is the virtual, provisioned device on top of the VDO pool LV. The VDO LV sets the provisioned, logical size of the VDO volume, which is the amount of data that applications can write to the volume before deduplication and compression occurs.
- kvdo
- A kernel module that loads into the Linux Device Mapper layer provides a deduplicated, compressed, and thin provisioned block storage volume.
-
The
kvdomodule exposes a block device that the VDO pool LV uses to create a VDO LV. The VDO LV is then used by the system. -
When
kvdoreceives a request to read a logical block of data from a VDO volume, it maps the requested logical block to the underlying physical block and then reads and returns the requested data. -
When
kvdoreceives a request to write a block of data to a VDO volume, it first checks whether the request is a DISCARD or TRIM request or whether the data is uniformly zero. If either of these conditions is met,kvdoupdates its block map and acknowledges the request. Otherwise, VDO processes and optimizes the data. - The kvdo module utilizes the Universal Deduplication Service (UDS) index on the volume internally and analyzes data, as it is received for duplicates. For each new piece of data, UDS determines if that piece is identical to any previously stored piece of data. If the index finds a match, the storage system can then verify the accuracy of that match and then update internal references to avoid storing the same information more than once.
If you are already familiar with the structure of an LVM thin-provisioned implementation, you can refer to Table 1.1 to understand how the different aspects of VDO are presented to the system.
Tableau 1.1. A comparison of components in VDO on LVM and LVM thin provisioning
| Physical device | Provisioned device | |
|---|---|---|
| VDO on LVM | VDO pool LV | VDO LV |
| LVM thin provisioning | Thin pool | Thin volume |
Since the VDO is thin-provisioned, the file system and applications only see the logical space in use and not the actual available physical space. Use scripting to monitor the available physical space and generate an alert if use exceeds a threshold. For information about monitoring the available VDO space see the Monitoring VDO section.
Chapitre 2. LVM-VDO requirements
VDO on LVM has certain requirements on its placement and your system resources.
2.1. VDO memory requirements
Each VDO volume has two distinct memory requirements:
- The VDO module
VDO requires a fixed 38 MB of RAM and several variable amounts:
- 1.15 MB of RAM for each 1 MB of configured block map cache size. The block map cache requires a minimum of 150MB RAM.
- 1.6 MB of RAM for each 1 TB of logical space.
- 268 MB of RAM for each 1 TB of physical storage managed by the volume.
- The UDS index
The Universal Deduplication Service (UDS) requires a minimum of 250 MB of RAM, which is also the default amount that deduplication uses. You can configure the value when formatting a VDO volume, because the value also affects the amount of storage that the index needs.
The memory required for the UDS index is determined by the index type and the required size of the deduplication window:
Index type Deduplication window Note Dense
1 TB per 1 GB of RAM
A 1 GB dense index is generally sufficient for up to 4 TB of physical storage.
Sparse
10 TB per 1 GB of RAM
A 1 GB sparse index is generally sufficient for up to 40 TB of physical storage.
NoteThe minimal disk usage for a VDO volume using default settings of 2 GB slab size and 0.25 dense index, requires approx 4.7 GB. This provides slightly less than 2 GB of physical data to write at 0% deduplication or compression.
Here, the minimal disk usage is the sum of the default slab size and dense index.
The UDS Sparse Indexing feature is the recommended mode for VDO. It relies on the temporal locality of data and attempts to retain only the most relevant index entries in memory. With the sparse index, UDS can maintain a deduplication window that is ten times larger than with dense, while using the same amount of memory.
Although the sparse index provides the greatest coverage, the dense index provides more deduplication advice. For most workloads, given the same amount of memory, the difference in deduplication rates between dense and sparse indexes is negligible.
Ressources supplémentaires
2.2. VDO storage space requirements
You can configure a VDO volume to use up to 256 TB of physical storage. Only a certain part of the physical storage is usable to store data. This section provides the calculations to determine the usable size of a VDO-managed volume.
VDO requires storage for two types of VDO metadata and for the UDS index:
- The first type of VDO metadata uses approximately 1 MB for each 4 GB of physical storage plus an additional 1 MB per slab.
- The second type of VDO metadata consumes approximately 1.25 MB for each 1 GB of logical storage, rounded up to the nearest slab.
- The amount of storage required for the UDS index depends on the type of index and the amount of RAM allocated to the index. For each 1 GB of RAM, a dense UDS index uses 17 GB of storage, and a sparse UDS index will use 170 GB of storage.
Ressources supplémentaires
2.3. Examples of VDO requirements by physical size
The following tables provide approximate system requirements of VDO based on the physical size of the underlying volume. Each table lists requirements appropriate to the intended deployment, such as primary storage or backup storage.
The exact numbers depend on your configuration of the VDO volume.
- Primary storage deployment
In the primary storage case, the UDS index is between 0.01% to 25% the size of the physical size.
Tableau 2.1. Storage and memory requirements for primary storage
Physical size RAM usage: UDS RAM usage: VDO Utilisation du disque Index type 10GB–1TB
250MB
472MB
2.5GB
Dense
2–10TB
1GB
3GB
10GB
Dense
250MB
22GB
Sparse
11–50TB
2GB
14GB
170GB
Sparse
51–100TB
3GB
27GB
255GB
Sparse
101–256TB
12GB
69GB
1020GB
Sparse
- Backup storage deployment
In the backup storage case, the UDS index covers the size of the backup set but is not bigger than the physical size. If you expect the backup set or the physical size to grow in the future, factor this into the index size.
Tableau 2.2. Storage and memory requirements for backup storage
Physical size RAM usage: UDS RAM usage: VDO Utilisation du disque Index type 10GB–1TB
250MB
472MB
2.5 GB
Dense
2–10TB
2GB
3GB
170GB
Sparse
11–50TB
10GB
14GB
850GB
Sparse
51–100TB
20GB
27GB
1700GB
Sparse
101–256TB
26GB
69GB
3400GB
Sparse
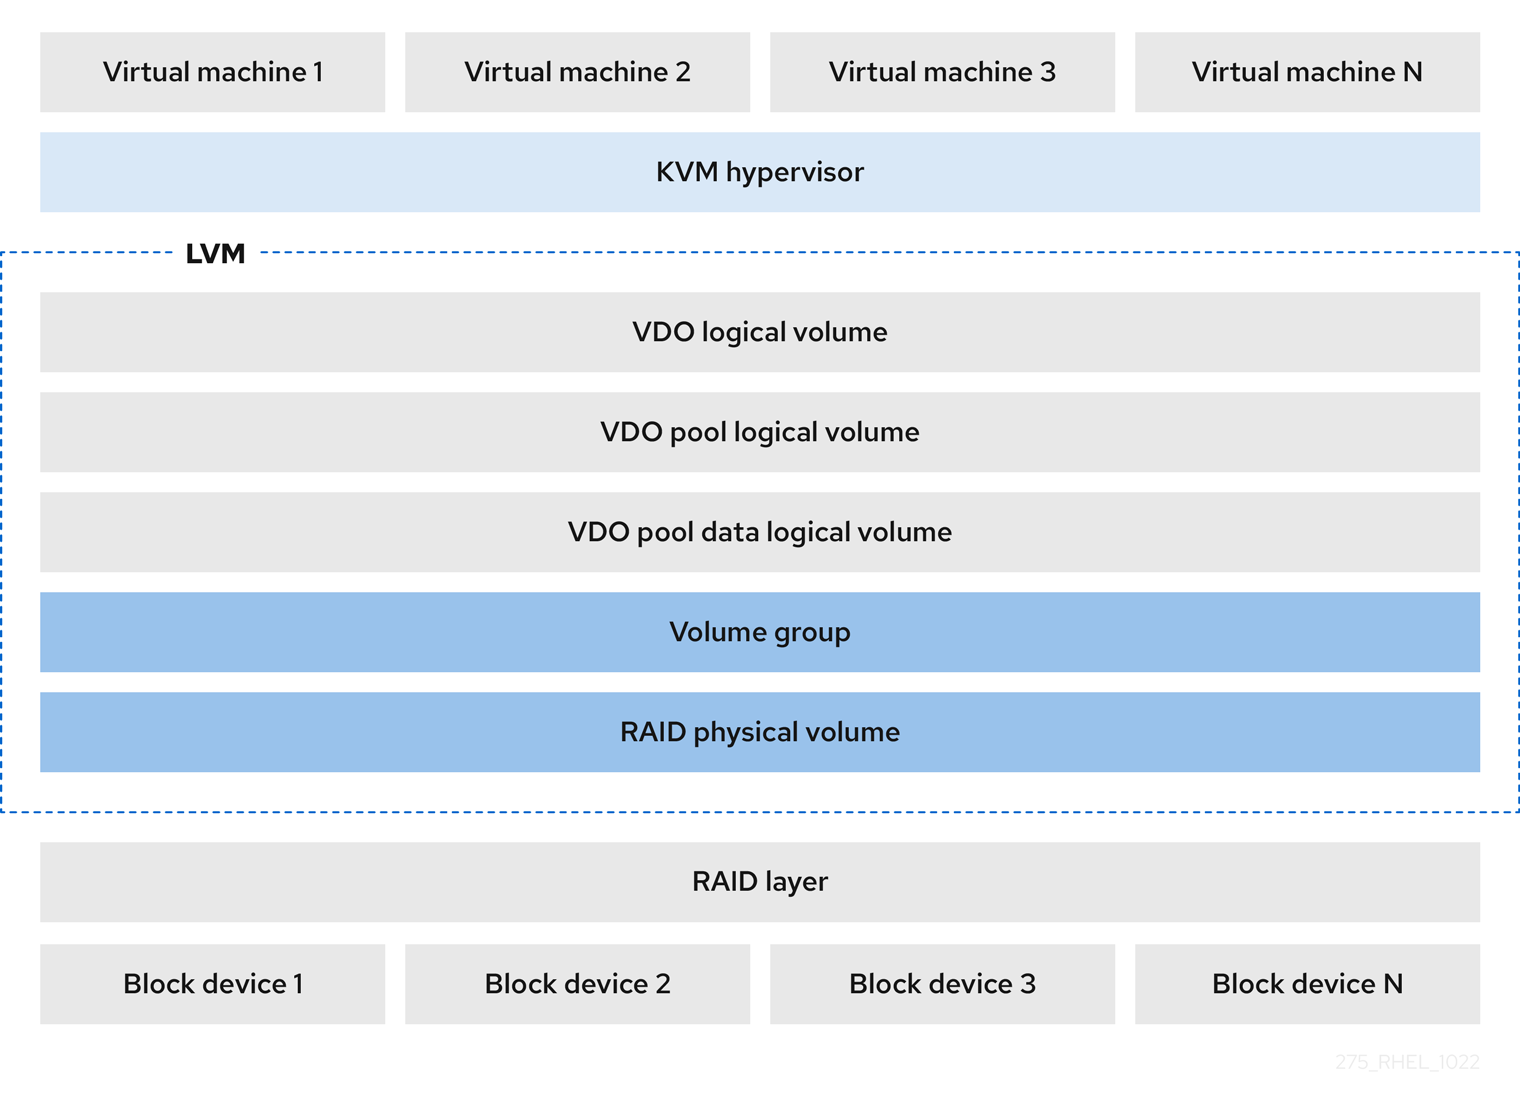
2.4. Placement of LVM-VDO in the storage stack
You must place certain storage layers under a VDO logical volume and others above it.
You can place thick-provisioned layers on top of VDO, but you cannot rely on the guarantees of thick provisioning in that case. Because the VDO layer is thin-provisioned, the effects of thin provisioning apply to all layers above it. If you do not monitor the VDO volume, you might run out of physical space on thick-provisioned volumes above VDO.
The supported placement of the following layers is under VDO. Do not place them above VDO:
- DM Multipath
- DM Crypt
- Software RAID (LVM or MD RAID)
The following configurations are not supported:
- VDO on top of a loopback device
- Encrypted volumes on top of VDO
- Partitions on a VDO volume
- RAID, such as LVM RAID, MD RAID, or any other type, on top of a VDO volume
- Deploying Ceph Storage on LVM-VDO
Ressources supplémentaires
Chapitre 3. Creating a deduplicated and compressed logical volume
You can create an LVM logical volume that uses the VDO feature to deduplicate and compress data.
3.1. LVM-VDO deployment scenarios
You can deploy VDO on LVM (LVM-VDO) in a variety of ways to provide deduplicated storage for:
- block access
- file access
- local storage
- remote storage
Because LVM-VDO exposes its deduplicated storage as a regular logical volume (LV), you can use it with standard file systems, iSCSI and FC target drivers, or as unified storage.
Deploying Ceph Storage on LVM-VDO is currently not supported.
- KVM
You can deploy LVM-VDO on a KVM server configured with Direct Attached Storage.
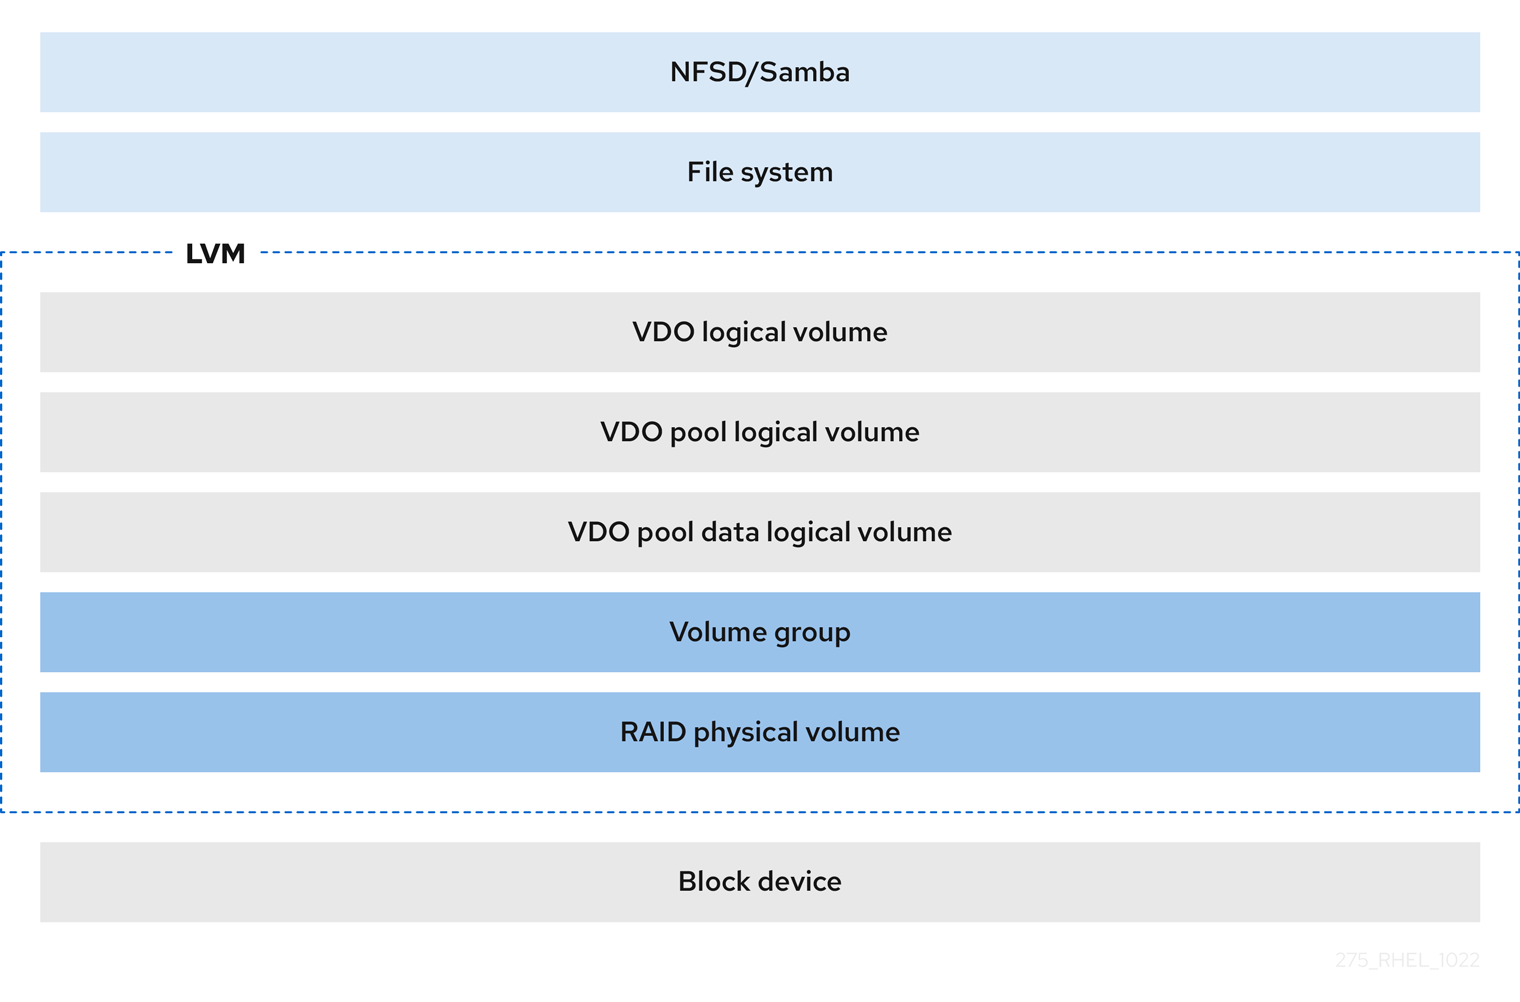
- Systèmes de fichiers
You can create file systems on top of a VDO LV and expose them to NFS or CIFS users with the NFS server or Samba.
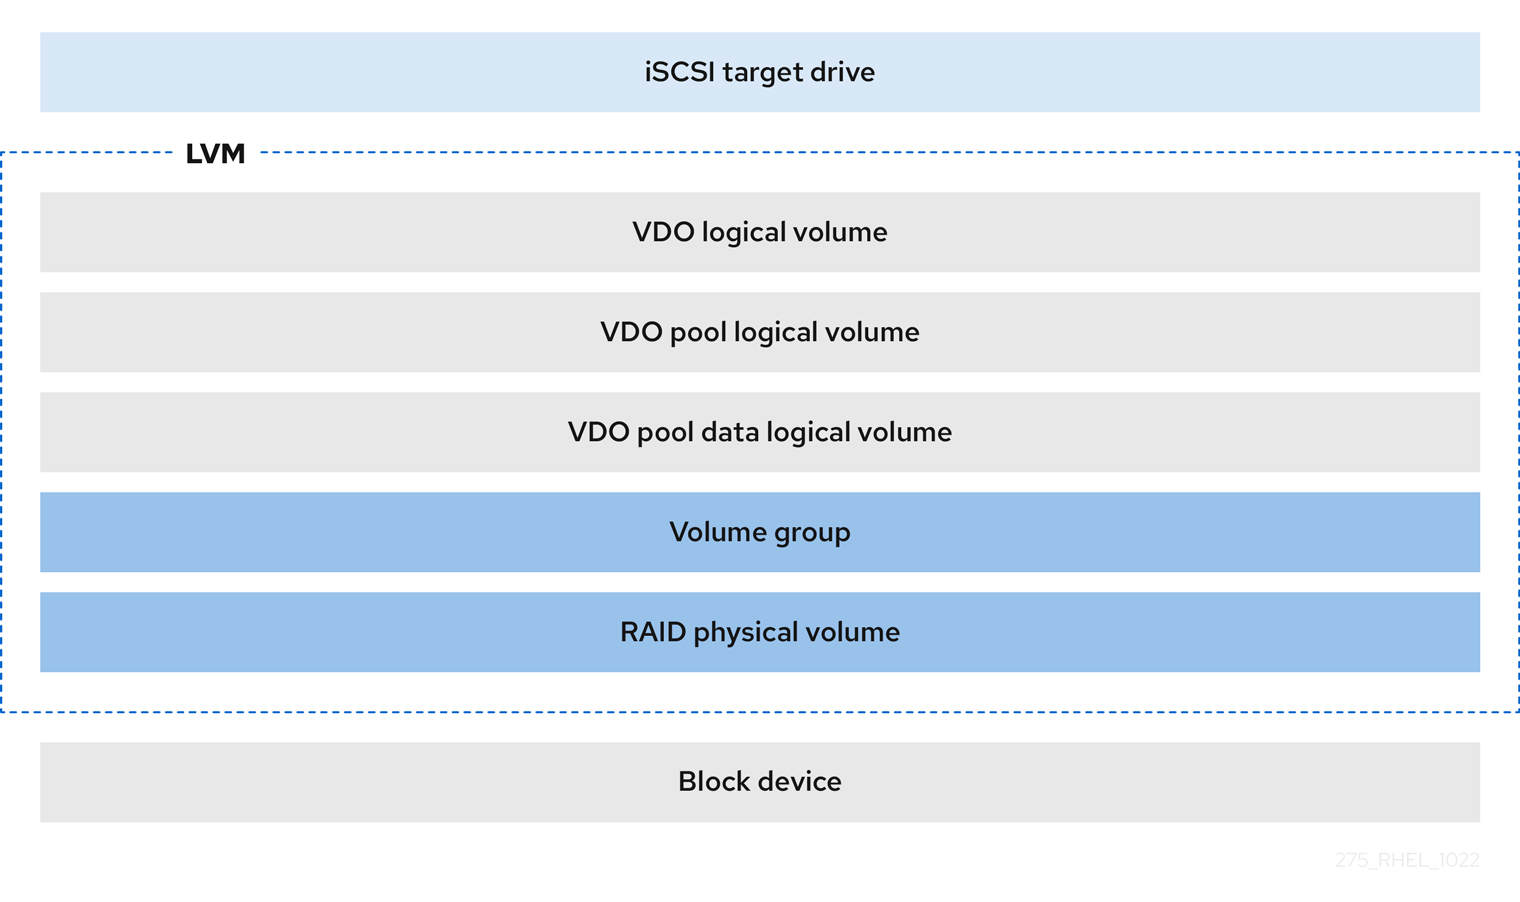
- iSCSI target
You can export the entirety of the VDO LV as an iSCSI target to remote iSCSI initiators.
- Encryption
Device Mapper (DM) mechanisms such as DM Crypt are compatible with VDO. Encrypting a VDO LV volumes helps ensure data security, and any file systems above the VDO LV are still deduplicated.
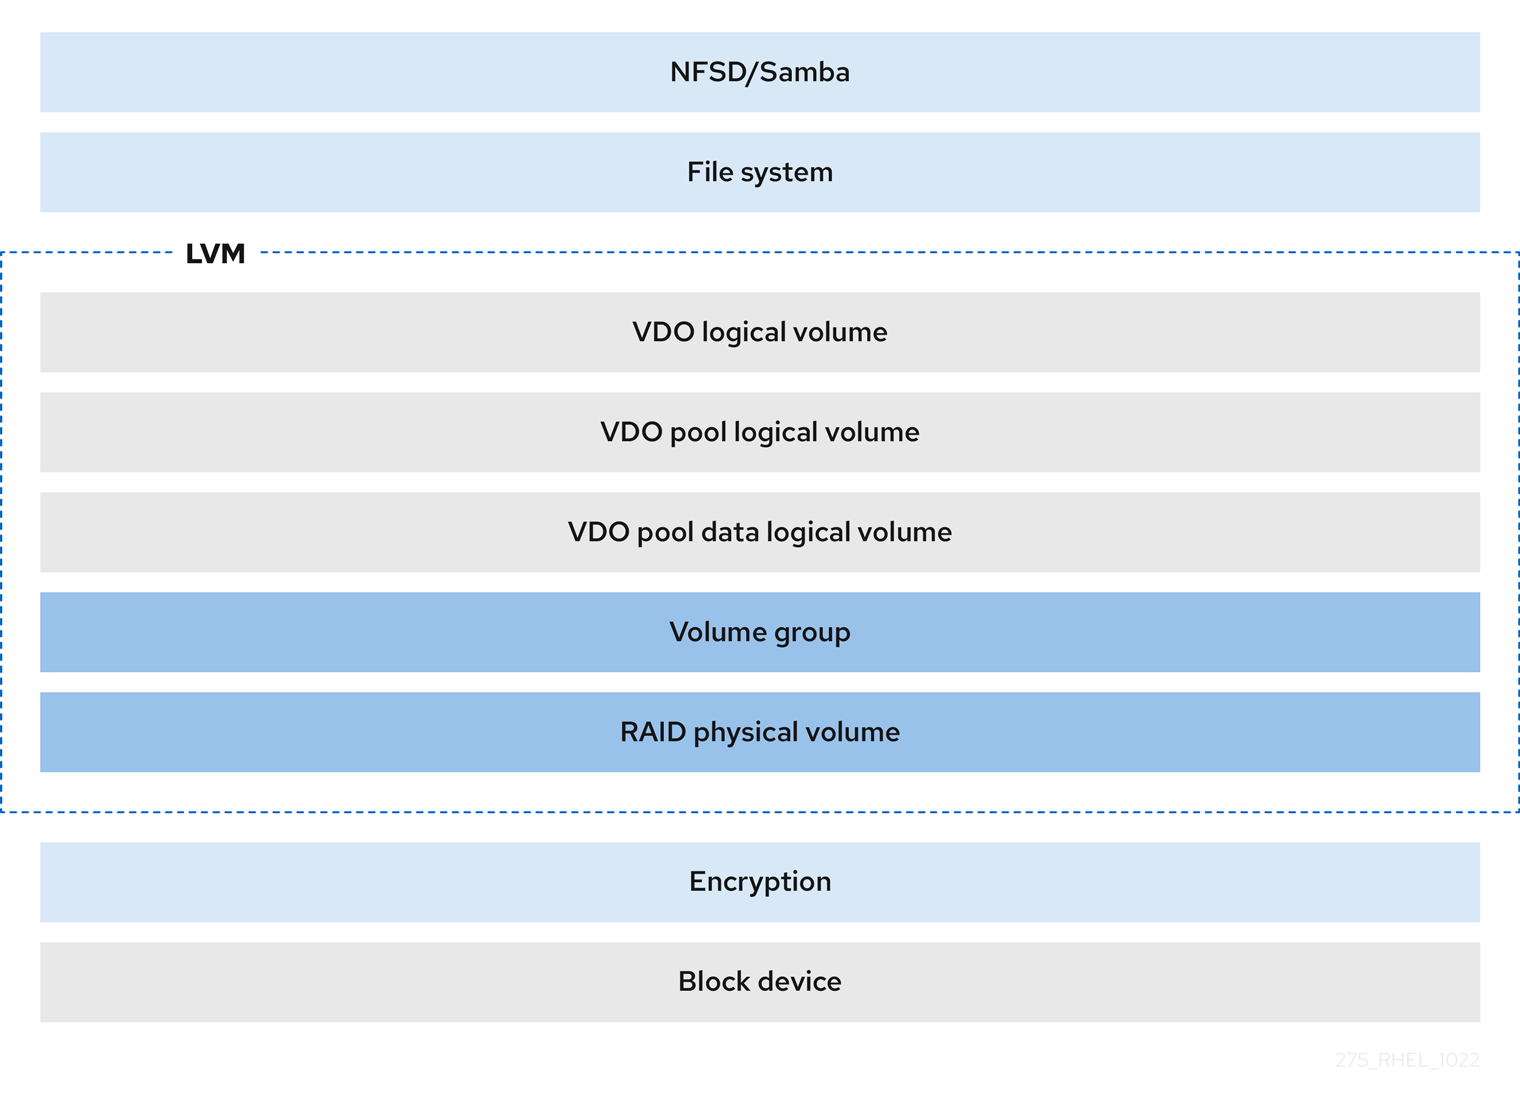 Important
Applying the encryption layer above the VDO LV results in little if any data deduplication. Encryption makes duplicate blocks different before VDO can deduplicate them.
Always place the encryption layer below the VDO LV.
3.2. The physical and logical size of an LVM-VDO volume
This section describes the physical size, available physical size, and logical size that VDO can utilize.
- Physical size
This is the same size as the physical extents allocated to the VDO pool LV. VDO uses this storage for:
- User data, which might be deduplicated and compressed
- VDO metadata, such as the UDS index
- Available physical size
This is the portion of the physical size that VDO is able to use for user data.
It is equivalent to the physical size minus the size of the metadata, rounded down to a multiple of the slab size.
- Logical Size
This is the provisioned size that the VDO LV presents to applications. It is usually larger than the available physical size. VDO currently supports any logical size up to 254 times the size of the physical volume with an absolute maximum logical size of 4 PB.
When you set up a VDO logical volume (LV), you specify the amount of logical storage that the VDO LV presents. When hosting active VMs or containers, Red Hat recommends provisioning storage at a 10:1 logical to physical ratio, that is, if you are utilizing 1 TB of physical storage, you would present it as 10 TB of logical storage.
If you do not specify the
--virtualsizeoption, VDO provisions the volume to a1:1ratio. For example, if you put a VDO LV on top of a 20 GB VDO pool LV, VDO reserves 2.5 GB for the UDS index, if the default index size is used. The remaining 17.5 GB is provided for the VDO metadata and user data. As a result, the available storage to consume is not more than 17.5 GB, and can be less due to metadata that makes up the actual VDO volume.
Ressources supplémentaires
3.3. Slab size in VDO
The physical storage of the VDO volume is divided into a number of slabs. Each slab is a contiguous region of the physical space. All of the slabs for a given volume have the same size, which can be any power of 2 multiple of 128 MB up to 32 GB.
The default slab size is 2 GB to facilitate evaluating VDO on smaller test systems. A single VDO volume can have up to 8192 slabs. Therefore, in the default configuration with 2 GB slabs, the maximum allowed physical storage is 16 TB. When using 32 GB slabs, the maximum allowed physical storage is 256 TB. VDO always reserves at least one entire slab for metadata, and therefore, the reserved slab cannot be used for storing user data.
Slab size has no effect on the performance of the VDO volume.
Tableau 3.1. Recommended VDO slab sizes by physical volume size
| Physical volume size | Recommended slab size |
|---|---|
| 10–99 GB | 1 GB |
| 100 GB – 1 TB | 2 GB |
| 2–256 TB | 32 GB |
The minimal disk usage for a VDO volume using default settings of 2 GB slab size and 0.25 dense index, requires approx 4.7 GB. This provides slightly less than 2 GB of physical data to write at 0% deduplication or compression.
Here, the minimal disk usage is the sum of the default slab size and dense index.
You can control the slab size by providing the --config 'allocation/vdo_slab_size_mb=size-in-megabytes' option to the lvcreate command.
3.4. Installing VDO
This procedure installs software necessary to create, mount, and manage VDO volumes.
Procédure
Install the VDO software:
# dnf install lvm2 kmod-kvdo vdo
3.5. Creating an LVM-VDO volume
This procedure creates an VDO logical volume (LV) on a VDO pool LV.
Conditions préalables
- Install the VDO software. For more information, see Installing VDO.
- An LVM volume group with free storage capacity exists on your system.
Procédure
Pick a name for your VDO LV, such as
vdo1. You must use a different name and device for each VDO LV on the system.In all the following steps, replace vdo-name with the name.
Create the VDO LV:
# lvcreate --type vdo \ --name vdo-name --size physical-size --virtualsize logical-size \ vg-name- Replace vg-name with the name of an existing LVM volume group where you want to place the VDO LV.
- Replace logical-size with the amount of logical storage that the VDO LV will present.
If the physical size is larger than 16TiB, add the following option to increase the slab size on the volume to 32GiB:
--config 'allocation/vdo_slab_size_mb=32768'
If you use the default slab size of 2GiB on a physical size larger than 16TiB, the
lvcreatecommand fails with the following error:ERROR - vdoformat: formatVDO failed on '/dev/device': VDO Status: Exceeds maximum number of slabs supportedExemple 3.1. Creating a VDO LV for container storage
For example, to create a VDO LV for container storage on a 1TB VDO pool LV, you can use:
# lvcreate --type vdo \ --name vdo1 --size 1T --virtualsize 10T \ vg-nameImportantIf a failure occurs when creating the VDO volume, remove the volume to clean up.
Create a file system on the VDO LV:
For the XFS file system:
# mkfs.xfs -K /dev/vg-name/vdo-name
For the ext4 file system:
# mkfs.ext4 -E nodiscard /dev/vg-name/vdo-name
Ressources supplémentaires
-
lvmvdo(7)man page
3.6. Mounting an LVM-VDO volume
This procedure mounts a file system on an LVM-VDO volume, either manually or persistently.
Conditions préalables
- An LVM-VDO volume exists on your system. For more information, see Creating an LVM-VDO volume.
Procédure
To mount the file system on the LVM-VDO volume manually, use:
# mount /dev/vg-name/vdo-name mount-point
To configure the file system to mount automatically at boot, add a line to the
/etc/fstabfile:For the XFS file system:
/dev/vg-name/vdo-name mount-point xfs defaults 0 0
For the ext4 file system:
/dev/vg-name/vdo-name mount-point ext4 defaults 0 0
If the LVM-VDO volume is located on a block device that requires network, such as iSCSI, add the
_netdevmount option. For iSCSI and other block devices requiring network, see thesystemd.mount(5)man page for information on the_netdevmount option.
Ressources supplémentaires
-
systemd.mount(5)man page
3.7. Changing the compression and deduplication settings on an LVM-VDO volume
This procedure enables or disables the compression and deduplication of a VDO pool logical volume (LV).
Compression and deduplication are enabled by default.
Conditions préalables
- An LVM-VDO volume exists on your system.
Procédure
To find out if the compression and deduplication is enabled or disabled on your logical volumes:
# lvs -o+vdo_compression,vdo_deduplication
Find out status of the compression and status of the deduplication index of your running active VDOPoolLV:
# lvs -o+vdo_compression_state,vdo_index_state
The
vdo_index_statecan show aserror,close,opening,closing,online, andoffline.To enable or disable the compression for VDOPoolLV:
# lvchange --compression y|n vg-name/vdopoolname
To enable or disable the deduplication for VDOPoolLV:
# lvchange --deduplication y|n vg-name/vdopoolname
Ressources supplémentaires
-
lvmvdo(7)man page
3.8. Managing thin provisioning with Virtual Data Optimizer
It is possible to configure a thin-provisioned VDO volume to prepare for future expansion of the physical space, in order to address a condition where the physical space usage of the VDO volume is approaching 100%. Instead of using -l 100%FREE in the lvcreate operation, for example, use '95%FREE' to ensure that there is some reserved space for recovery later on if needed. This procedure describes how to resolve the following issues:
- The volume runs out of space
- The file system enters read-only mode
- ENOSPC reported by the volume
The best way to address high physical space usage on a VDO volume is to delete unused files, and discard the blocks used by these unused files either by using online discard or the fstrim program. The physical space of a VDO volume can only be grown to 8192 slabs that is 16 TB for a VDO volume with the default slab size of 2 GB, or 256 TB for a VDO volume with the maximal slab size of 32 GB.
In all of the following steps, replace myvg and myvdo with the volume group and VDO name respectively.
Conditions préalables
- Install the VDO software. For more information, see Installing VDO.
- An LVM volume group with free storage capacity exists on your system.
-
A thin-provisioned VDO volume using the
lvcreate --type vdo --name myvdo myvg -L logical-size-of-pool --virtualsize virtual-size-of-vdocommand. For more information, see Creating an LVM-VDO volume.
Procédure
Determine the optimal logical size for a thin-provisioned VDO volume
# vdostats myvg-vpool0-vpool

Device               1K-blocks Used     Available  Use% Space saving%
myvg-vpool0-vpool   104856576  29664088 75192488   28%   69%
To calculate the space savings ratio, use the following formula:
Savings ratio = 1 / (1 - Space saving%)
In this example,
-
there is approximately a
3.22:1space savings ratio on a data set of about 80 GB. - Multiplying the data set size by the ratio would yield a potential logical size of 256 GB if more data with the same space savings were written to the VDO volume.
- Adjusting this number downward to 200 GB yields a logical size with a safe margin of free physical space, given the same space savings ratio.
-
there is approximately a
Monitor the free physical space in a VDO volume:
# vdostats myvg-vpool0-vpoolThis command can be executed periodically to provide monitoring of the used and free physical space of the VDO volume.
Optional: View the warnings on physical space usage on a VDO volume by using the available
/usr/share/doc/vdo/examples/monitor/monitor_check_vdostats_physicalSpace.plscript:# /usr/share/doc/vdo/examples/monitor/monitor_check_vdostats_physicalSpace.pl myvg-vpool0-vpoolWhen creating a VDO volume, the
dmeventdmonitoring service monitors the usage of physical space in a VDO volume. This is enabled by default when a VDO volume is created or started.Use the
journalctlcommand to view the output ofdmeventdin the logs while monitoring a VDO volume:lvm[8331]: Monitoring VDO pool myvg-vpool0-vpool. ... lvm[8331]: WARNING: VDO pool myvg-vpool0-vpool is now 84.63% full. lvm[8331]: WARNING: VDO pool myvg-vpool0-vpool is now 91.01% full. lvm[8331]: WARNING: VDO pool myvg-vpool0-vpool is now 97.34% full.
Remediate VDO volumes that are almost out of available physical space. When it is possible to add a physical space to a VDO volume, but the volume space is full before it can be grown, it may be necessary to temporarily stop I/O to the volume.
To temporarily stop I/O to the volume, execute the following steps, where VDO volume myvdo contains a file system mounted on the /users/homeDir path:
Freeze the filesystem:
# xfs_freeze -f /users/homeDir

# vgextend myvg /dev/vdc2

# lvextend -l new_size myvg/vpool0-name

# xfs_freeze -u /users/homeDir
Unmount the filesystem:
# umount /users/homeDir

# vgextend myvg /dev/vdc2

# lvextend -l new_size myvg/vpool0-name

# mount -o discard /dev/myvg/myvdo /users/homeDir
NoteUnmounting or freezing a filesystem with cached data will incur a write of the cached data, which may fill the physical space of the VDO volume. Consider the maximum amount of cached filesystem data when setting a monitoring threshold for free physical space on a VDO volume.
Blocks that are no longer used by a file system can be cleaned up by using the
fstrimutility. Executingfstrimagainst a mounted file system on top of a VDO volume may result in increased free physical space for that volume. Thefstrimutility will send discards to the VDO volume, which are then used to remove references to the previously used blocks. If any of those blocks are single-referenced, the physical space will be available to use.Check VDO stats to see what the current amount of free space is:
# vdostats --human-readable myvg-vpool0-vpool

 Device             Size  Used  Available Use%  Space saving%
myvg-vpool0-vpool  100.0G 95.0G 5.0G      95%   73%
Discard unused blocks:
# fstrim /users/homeDirView the free physical space of the VDO volume:
# vdostats --human-readable myvg-vpool0-vpool


 Device             Size    Used   Available Use%  Space saving%
myvg-vpool0-vpool  100.0G   30.0G  70.0G     30%    43%
In this example, after executing
fstrimon the file system, the discards were able to return 65G of physical space to use in the VDO volume.NoteDiscarding volumes with lower levels of deduplication and compression will have a possibility of reclaiming physical space than discarding volumes with higher levels of deduplication and compression. A volume that has high levels of deduplication and compression may potentially require a more extensive cleanup to reclaim physical space than just simply discarding already unused blocks.
Chapitre 4. Importing existing VDO volumes to LVM
You can import a VDO volume that was created by the VDO manager into LVM. As a result, you can manage the volume as a logical volume using the LVM tools.
The import operation is not reversible. After converting an existing VDO volume to LVM, accessing the VDO data is only possible using the LVM commands and the VDO manager no longer controls the volume.
Conditions préalables
- Install the VDO software. For more information, see Installing VDO.
Procédure
Convert an existing VDO volume created by the VDO manager into a logical volume. In the following command, replace vg-name with the volume group name, lv-name with the logical volume name, and /dev/sdg1 with the VDO device:
# lvm_import_vdo --name vg-name/lv-name /dev/sdg1


Convert VDO device "/dev/sdg1" to VDO LV "vg-name/lv-name"? [y|N]: Yes
Stopping VDO vdo-name
Converting VDO vdo-name
     Opening /dev/disk/by-id/scsi-36d094660575ece002291bd67517f677a-part1 exclusively
     Loading the VDO superblock and volume geometry
     Checking the VDO state
     Converting the UDS index
     Converting the VDO
     Conversion completed for '/dev/disk/by-id/scsi-36d094660575ece002291bd67517f677a-part1': VDO is now offset by 2097152 bytes
 Physical volume "/dev/sdg1" successfully created.
 Volume group "vg-name" successfully created
 WARNING: Logical volume vg-name/lv-name_vpool not zeroed.
 Logical volume "lv-name_vpool" created.
 WARNING: Converting logical volume vg-name/lv-name_vpool to VDO pool volume WITHOUT formating.
 WARNING: Using invalid VDO pool data MAY DESTROY YOUR DATA!
 Logical volume "lv-name" created.
 Converted vg-name/lv-name_vpool to VDO pool volume and created virtual vg-name/lv-name VDO volume.
- Optional: Create a file system on the VDO LV.
- Optional: Mount the LVM-VDO volume. For more information, see Mounting an LVM-VDO volume.
Vérification
List your LVM devices to verify that importing the VDO volumes to LVM succeeded:
# lvs -a -o +devices
  LV                    VG      Attr       LSize  Pool          Origin Data%  Meta%  Move Log Cpy%Sync Convert Devices
  lv-name               vg-name vwi-a-v--- 25.00g lv-name_vpool        0.00                                    lv-name_vpool(0)
  lv-name_vpool         vg-name dwi------- <1.82t                      0.31                                    lv-name_vpool_vdata(0)
  [lv-name_vpool_vdata] vg-name Dwi-ao---- <1.82t                                                              /dev/sdg1(0)
Ressources supplémentaires
-
lvm_import_vdo(8),lvmvdo(7), andsystemd.mount(5)man pages
Chapitre 5. Trim options on an LVM-VDO volume
You can mount your file system with the discard option, which informs the VDO volume of the unused space. Another option is to use the fstrim application, which is an on-demand discarding, or mount -o discard command for immediate discarding.
When using the fstrim application, the admin needs to schedule and monitor an additional process, while using mount -o discard command allows for immediate recovery of space when possible.
Note that it is currently recommended to use fstrim application to discard unused blocks rather than the discard mount option because the performance impact of this option can be quite severe. For this reason, nodiscard is the default.
5.1. Enabling discard mount option on VDO
This procedure enables the discard option on your VDO volume.
Conditions préalables
- An LVM-VDO volume exists on your system.
Procédure
Enable the
discardon your volume:# mount -o discard /dev/vg-name/vdo-name mount-point
Ressources supplémentaires
-
xfs(5),mount(8), andlvmvdo(7)man pages
5.2. Setting up periodic TRIM operation
This procedure enables a scheduled TRIM operation on your system.
Conditions préalables
- An LVM-VDO volume exists on your system.
Procédure
Enable and start the timer:
# systemctl enable --now fstrim.timer
Vérification
Verify that the timer is enabled:
# systemctl list-timers fstrim.timer
Exemple 5.1. Possible output of the verification procedure
# systemctl list-timers fstrim.timer
NEXT                         LEFT         LAST  PASSED  UNIT         ACTIVATES
Mon 2021-05-10 00:00:00 EDT  5 days left  n/a   n/a     fstrim.timer fstrim.service
You will not see any reference to a VDO volume, because the fstrim.timer runs across all mounted filesystems.
Ressources supplémentaires
-
fstrim(8)man page