
Red Hat Training
A Red Hat training course is available for Red Hat Enterprise Linux
3.3. Creating Guests with virt-manager
virt-manager, is a graphical tool for creating and managing guest virtual machines.
3.3.1. virt-manager installation overview
- Choosing the hypervisor and installation type
- Locating and configuring the installation media
- Configuring memory and CPU options
- Configuring the virtual machine's storage
- Configuring virtual machine name, networking, architecture, and other hardware settings
virt-manager can access the installation media (whether locally or over the network) before you continue.
3.3.2. Creating a Red Hat Enterprise Linux 7 Guest with virt-manager
Note
Procedure 3.1. Creating a Red Hat Enterprise Linux 7 guest virtual machine with virt-manager using local installation media
Optional: Preparation
Prepare the storage environment for the virtual machine. For more information on preparing storage, see Chapter 13, Managing Storage for Virtual Machines.Important
Various storage types may be used for storing guest virtual machines. However, for a virtual machine to be able to use migration features, the virtual machine must be created on networked storage.Red Hat Enterprise Linux 7 requires at least 1 GB of storage space. However, Red Hat recommends at least 5 GB of storage space for a Red Hat Enterprise Linux 7 installation and for the procedures in this guide.Open virt-manager and start the wizard
Open virt-manager by executing thevirt-managercommand as root or opening Applications → System Tools → Virtual Machine Manager.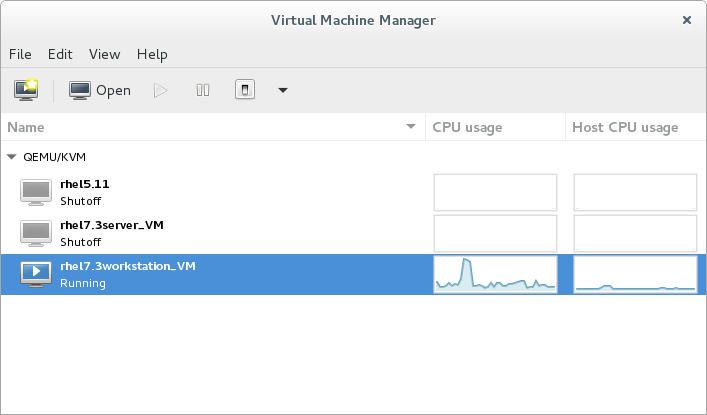
Figure 3.1. The Virtual Machine Manager window
Optionally, open a remote hypervisor by selecting the hypervisor and clicking the button.Click to start the new virtualized guest wizard.
The New VM window opens.
to start the new virtualized guest wizard.
The New VM window opens.Specify installation type
Select the installation type:- Local install media (ISO image or CDROM)
- This method uses an image of an installation disk (for example,
.iso). However, using a host CD-ROM or a DVD-ROM device is not possible. - Network Install (HTTP, FTP, or NFS)
- This method involves the use of a mirrored Red Hat Enterprise Linux or Fedora installation tree to install a guest. The installation tree must be accessible through either HTTP, FTP, or NFS.If you select Network Install, provide the installation URL and also Kernel options, if required.
- Network Boot (PXE)
- This method uses a Preboot eXecution Environment (PXE) server to install the guest virtual machine. Setting up a PXE server is covered in the Red Hat Enterprise Linux 7 Installation Guide. To install using network boot, the guest must have a routable IP address or shared network device.If you select Network Boot, continue to STEP 5. After all steps are completed, a DHCP request is sent and if a valid PXE server is found the guest virtual machine's installation processes will start.
- Import existing disk image
- This method allows you to create a new guest virtual machine and import a disk image (containing a pre-installed, bootable operating system) to it.
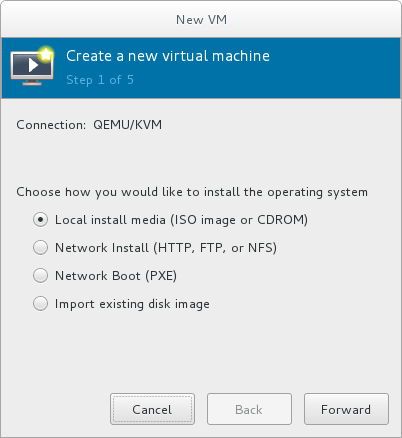
Figure 3.2. Virtual machine installation method
Click to continue.Select the installation source
- If you selected Local install media (ISO image or CDROM), specify your intended local installation media.

Figure 3.3. Local ISO image installation
Warning
Even though the option is currently present in the GUI, installing from a physical CD-ROM or DVD device on the host is not possible. Therefore, selecting the Use CDROM or DVD option will cause the VM installation to fail. For details, see the Red Hat Knowledge Base.To install from an ISO image, select Use ISO image and click the button to open the Locate media volume window.Select the installation image you wish to use, and click .If no images are displayed in the Locate media volume window, click the button to browse the host machine for the installation image or DVD drive containing the installation disk. Select the installation image or DVD drive containing the installation disk and click ; the volume is selected for use and you are returned to the Create a new virtual machine wizard.Important
For ISO image files and guest storage images, the recommended location to use is/var/lib/libvirt/images/. Any other location may require additional configuration by SELinux. See the Red Hat Enterprise Linux Virtualization Security Guide or the Red Hat Enterprise Linux SELinux User's and Administrator's Guide for more details on configuring SELinux. - If you selected
Network Install, input the URL of the installation source and also the required Kernel options, if any. The URL must point to the root directory of an installation tree, which must be accessible through either HTTP, FTP, or NFS.To perform a kickstart installation, specify the URL of a kickstart file in Kernel options, starting withks=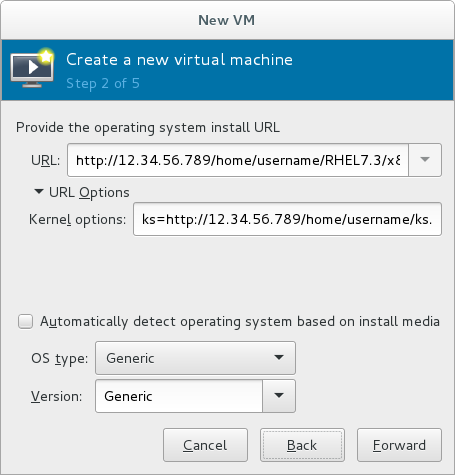
Figure 3.4. Network kickstart installation
Note
For a complete list of kernel options, see the Red Hat Enterprise Linux 7 Installation Guide.
Next, configure the and of the installation. Ensure that you select the appropriate operating system type for your virtual machine. This can be specified manually or by selecting the Automatically detect operating system based on install media check box.Click to continue.Configure memory (RAM) and virtual CPUs
Specify the number of CPUs and amount of memory (RAM) to allocate to the virtual machine. The wizard shows the number of CPUs and amount of memory you can allocate; these values affect the host's and guest's performance.Virtual machines require sufficient physical memory (RAM) to run efficiently and effectively. Red Hat supports a minimum of 512MB of RAM for a virtual machine. Red Hat recommends at least 1024MB of RAM for each logical core.Assign sufficient virtual CPUs for the virtual machine. If the virtual machine runs a multi-threaded application, assign the number of virtual CPUs the guest virtual machine will require to run efficiently.You cannot assign more virtual CPUs than there are physical processors (or hyper-threads) available on the host system. The number of virtual CPUs available is noted in the Up to X available field.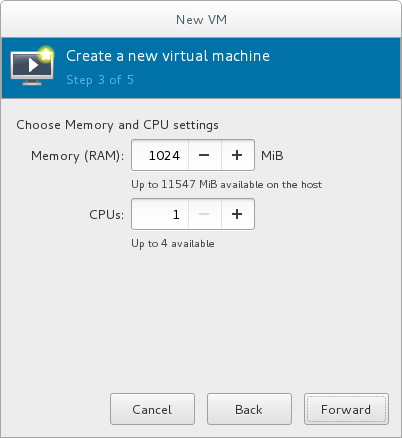
Figure 3.5. Configuring Memory and CPU
After you have configured the memory and CPU settings, click to continue.Note
Memory and virtual CPUs can be overcommitted. For more information on overcommitting, see Chapter 7, Overcommitting with KVM.Configure storage
Enable and assign sufficient space for your virtual machine and any applications it requires. Assign at least 5 GB for a desktop installation or at least 1 GB for a minimal installation.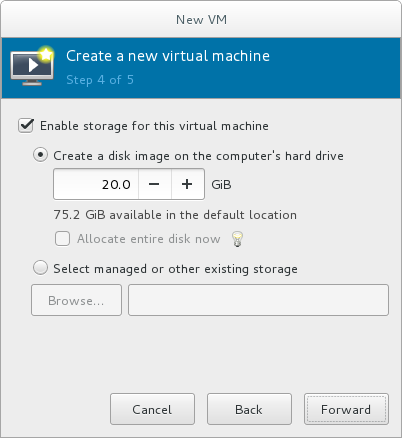
Figure 3.6. Configuring virtual storage
Note
Live and offline migrations require virtual machines to be installed on shared network storage. For information on setting up shared storage for virtual machines, see Section 15.4, “Shared Storage Example: NFS for a Simple Migration”.With the default local storage
Select the Create a disk image on the computer's hard drive radio button to create a file-based image in the default storage pool, the/var/lib/libvirt/images/directory. Enter the size of the disk image to be created. If the Allocate entire disk now check box is selected, a disk image of the size specified will be created immediately. If not, the disk image will grow as it becomes filled.Note
Although the storage pool is a virtual container it is limited by two factors: maximum size allowed to it by qemu-kvm and the size of the disk on the host physical machine. Storage pools may not exceed the size of the disk on the host physical machine. The maximum sizes are as follows:- virtio-blk = 2^63 bytes or 8 Exabytes(using raw files or disk)
- Ext4 = ~ 16 TB (using 4 KB block size)
- XFS = ~8 Exabytes
- qcow2 and host file systems keep their own metadata and scalability should be evaluated/tuned when trying very large image sizes. Using raw disks means fewer layers that could affect scalability or max size.
Click to create a disk image on the local hard drive. Alternatively, select Select managed or other existing storage, then select Browse to configure managed storage.With a storage pool
If you select Select managed or other existing storage to use a storage pool, click Browse to open the Locate or create storage volume window.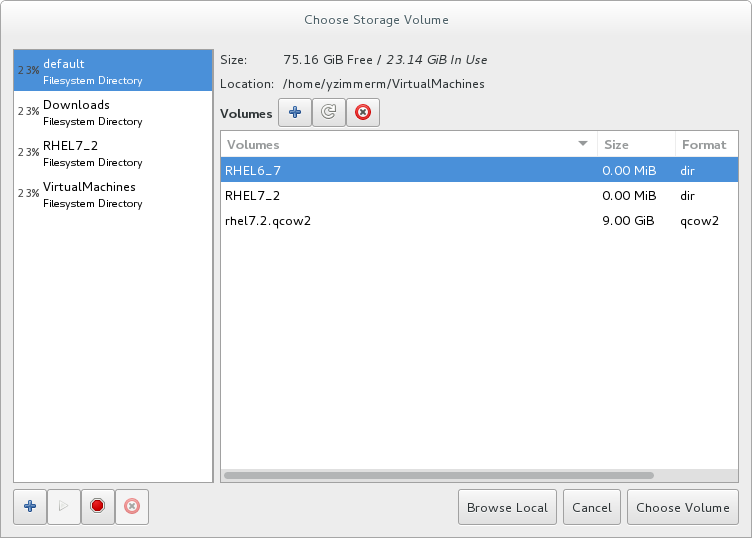
Figure 3.7. The Choose Storage Volume window
- Select a storage pool from the Storage Pools list.
- Optional: Click
 to create a new storage volume. The Add a Storage Volume screen will appear. Enter the name of the new storage volume.
Choose a format option from the Format drop-down menu. Format options include raw, qcow2, and qed. Adjust other fields as needed. Note that the qcow2 version used here is version 3. To change the qcow version see Section 23.19.2, “Setting Target Elements”
to create a new storage volume. The Add a Storage Volume screen will appear. Enter the name of the new storage volume.
Choose a format option from the Format drop-down menu. Format options include raw, qcow2, and qed. Adjust other fields as needed. Note that the qcow2 version used here is version 3. To change the qcow version see Section 23.19.2, “Setting Target Elements”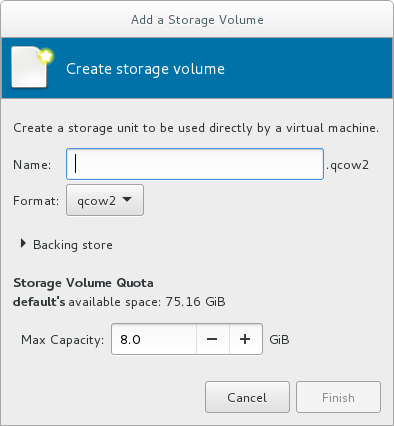
Figure 3.8. The Add a Storage Volume window
Select the new volume and click . Next, click to return to the New VM wizard. Click to continue.Name and final configuration
Name the virtual machine. Virtual machine names can contain letters, numbers and the following characters: underscores (_), periods (.), and hyphens (-). Virtual machine names must be unique for migration and cannot consist only of numbers.By default, the virtual machine will be created with network address translation (NAT) for a network called 'default' . To change the network selection, clickNetwork selectionand select a host device and source mode.Verify the settings of the virtual machine and click when you are satisfied; this will create the virtual machine with specified networking settings, virtualization type, and architecture.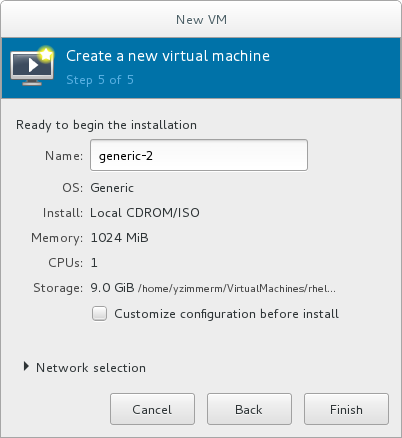
Figure 3.9. Verifying the configuration
Or, to further configure the virtual machine's hardware, check the check box to change the guest's storage or network devices, to use the paravirtualized (virtio) drivers or to add additional devices. This opens another wizard that will allow you to add, remove, and configure the virtual machine's hardware settings.Note
Red Hat Enterprise Linux 4 or Red Hat Enterprise Linux 5 guest virtual machines cannot be installed using graphical mode. As such, you must select "Cirrus" instead of "QXL" as a video card.After configuring the virtual machine's hardware, click .virt-managerwill then create the virtual machine with your specified hardware settings.Warning
When installing a Red Hat Enterprise Linux 7 guest virtual machine from a remote medium but without a configured TCP/IP connection, the installation fails. However, when installing a guest virtual machine of Red Hat Enterprise Linux 5 or 6 in such circumstances, the installer opens a "Configure TCP/IP" interface.For further information about this difference, see the related knowledgebase article.Click to continue into the Red Hat Enterprise Linux installation sequence. For more information on installing Red Hat Enterprise Linux 7, see the Red Hat Enterprise Linux 7 Installation Guide.